Central Motor Installation Manual
20
Central Motor Installation Manual Models LM-1600, LM-2000, LM-2800, LM-3600, LM-1600HV, LM-2000HV, LM-2800HV, LM-3600HV LiftMaster 845 Larch Avenue Elmhurst, Illinois 60126-1196 LiftMaster.com
Transcript of Central Motor Installation Manual

Central MotorInstallation ManualModels LM-1600, LM-2000, LM-2800, LM-3600, LM-1600HV, LM-2000HV,
LM-2800HV, LM-3600HV
LiftMaster845 Larch AvenueElmhurst, Illinois 60126-1196LiftMaster.com

2
Table of Contents
Warnings ...................................................... 2
Application .................................................... 3
Motor Selection .............................................. 3
Specifi cations ................................................ 4
Tools ........................................................... 4
Overview ...................................................... 5
Installation ..................................................6-8
Adjustment/Operation ....................................... 9
Maintenance .................................................. 9
Warranty ...................................................... 9
Repair Parts .................................................10
Contact Us ...................................................10
Warnings
To reduce the risk of SEVERE INJURY or DEATH:
IMPORTANT INSTALLATION INSTRUCTIONS
1. READ AND FOLLOW ALL INSTALLATION WARNINGS AND INSTRUCTIONS.
2. Disconnect electric power BEFORE installing or servicing the motor. A disconnecting device MUST be provided in the permanently-wired installation to guarantee all-pole disconnection by means of a switch (at least 3 mm contact gap) or by a separate fused line of adequate capacity. Operator MUST be properly grounded and connected in accordance with national and local electrical codes.
3. NEVER connect door operator to power source until instructed to do so.
4. NEVER let children operate or play with door controls.
5. Personnel should keep away from a door in motion and keep the moving door in sight until it is completely closed or opened. NO ONE SHOULD CROSS THE PATH OF A MOVING DOOR.
6. For products having a manual release, if possible use the manual release only when the door is closed. Use caution when using this release when the door is open. Weak or broken springs may cause the door to fall rapidly, causing SEVERE INJURY or DEATH.
7. Not to be used by persons (including children) with reduced physical, sensory, or mental capabilities or lack of experience and knowledge unless they have been given supervision or instruction.
8. Not to be used on door with a wicket/pedestrian door.
9. KEEP DOORS PROPERLY OPERATING AND BALANCED. See Door Manufacturer’s Owners Manual. An improperly operating or balanced door could cause SEVERE INJURY or DEATH. Have a trained door systems technician make repairs to cables, spring assemblies, and other hardware.
10. SAVE THESE INSTRUCTIONS.
WARNING
WARNING
WARNING WARNING
To avoid possible SERIOUS INJURY from a falling operator:
• Fasten the operator SECURELY to structural supports of the building.
• Concrete anchors MUST be used if installing ANY brackets into masonry.
3
Motor SelectionWhen choosing the correct Central Motor it is important to understand the application, as well as the size, weight and condition of the door. First, identify the type of rolling door you will be working with. For example is it a Slat Door, Grid Door, Glass Door, Wood door, etc. Common applications for these doors include small store fronts, garage doors, mall store fronts, hotels/motels, etc. Each door type has specifi c requirements.
Regardless of the motor being specifi ed, you MUST know the diameter of the motor crown, weight of the door, and the overall height and width of the door. Use the following chart to select the appropriate motor for your application.
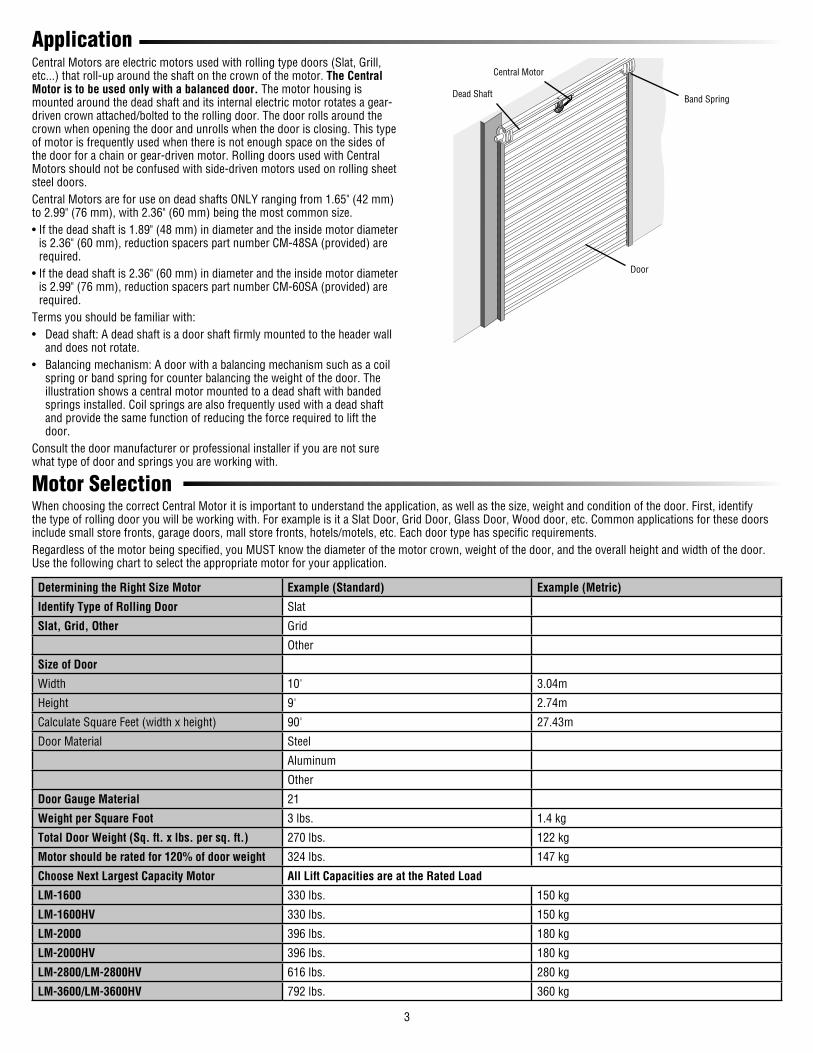
ApplicationCentral Motors are electric motors used with rolling type doors (Slat, Grill, etc...) that roll-up around the shaft on the crown of the motor. The Central Motor is to be used only with a balanced door. The motor housing is mounted around the dead shaft and its internal electric motor rotates a gear-driven crown attached/bolted to the rolling door. The door rolls around the crown when opening the door and unrolls when the door is closing. This type of motor is frequently used when there is not enough space on the sides of the door for a chain or gear-driven motor. Rolling doors used with Central Motors should not be confused with side-driven motors used on rolling sheet steel doors.
Central Motors are for use on dead shafts ONLY ranging from 1.65" (42 mm) to 2.99" (76 mm), with 2.36" (60 mm) being the most common size.
• If the dead shaft is 1.89" (48 mm) in diameter and the inside motor diameter is 2.36" (60 mm), reduction spacers part number CM-48SA (provided) are required.
• If the dead shaft is 2.36" (60 mm) in diameter and the inside motor diameter is 2.99" (76 mm), reduction spacers part number CM-60SA (provided) are required.
Terms you should be familiar with:
• Dead shaft: A dead shaft is a door shaft fi rmly mounted to the header wall and does not rotate.
• Balancing mechanism: A door with a balancing mechanism such as a coil spring or band spring for counter balancing the weight of the door. The illustration shows a central motor mounted to a dead shaft with banded springs installed. Coil springs are also frequently used with a dead shaft and provide the same function of reducing the force required to lift the door.
Consult the door manufacturer or professional installer if you are not sure what type of door and springs you are working with.
Central Motor
Dead ShaftBand Spring
Door
Determining the Right Size Motor Example (Standard) Example (Metric)
Identify Type of Rolling Door Slat
Slat, Grid, Other Grid
Other
Size of Door
Width 10' 3.04m
Height 9' 2.74m
Calculate Square Feet (width x height) 90' 27.43m
Door Material Steel
Aluminum
Other
Door Gauge Material 21
Weight per Square Foot 3 lbs. 1.4 kg
Total Door Weight (Sq. ft. x lbs. per sq. ft.) 270 lbs. 122 kg
Motor should be rated for 120% of door weight 324 lbs. 147 kg
Choose Next Largest Capacity Motor All Lift Capacities are at the Rated Load
LM-1600 330 lbs. 150 kg
LM-1600HV 330 lbs. 150 kg
LM-2000 396 lbs. 180 kg
LM-2000HV 396 lbs. 180 kg
LM-2800/LM-2800HV 616 lbs. 280 kg
LM-3600/LM-3600HV 792 lbs. 360 kg

4
Tools
Specifi cations
Model Number LM-1600/LM-1600HV LM-2000/LM-2000HV LM-2800/LM-2800HV LM-3600/LM-3600HV
Power Supply Voltage/Hz
120 Vac - 50/60Hz (LM-1600)230 Vac - 50/60Hz (LM-1600HV)
120 Vac - 50/60Hz (LM-2000)230 Vac - 50/60Hz (LM-2000HV)
120 Vac - 50/60Hz (LM-2800)230 Vac - 50/60Hz (LM-2800HV)
120 Vac - 50/60Hz (LM-3600)230 Vac - 50/60Hz (LM-3600HV)
Amp Watts 5.0 A 590 W (LM-1600)2.3 A 520 W (LM-1600HV)
5.5 A 635 W (LM-2000)2.6 A 580 W (LM-2000HV)
8.5 A 1000W (LM-2800)3.9 A 880 W (LM-2800HV)
9.6 A 1140W (LM-3600)4.5 A 1000 (LM-3600HV)
Motor Single Single Dual Dual
Drive Torque (Range) 150Nm 180Nm 380Nm 420Nm
Lifting Capacity (Range)
150 kg (LM-1600)150 kg (LM-1600HV)
180 kg (LM-2000)180 kg (LM-2000HV)
280 kg 360 kg
Winding Flange Speed
12 RPM (120 Vac) (LM-1600)10 RPM (230 Vac) (LM-1600HV)
12 RPM (120 Vac) (LM-2000) 10 RPM (230 Vac) (LM-2000HV)
12 RPM (120 Vac) (LM-2800)10 RPM (230 Vac) (LM-2800HV)
12 RPM (120 Vac) (LM-3600)10 RPM (230 Vac) (LM-3600HV)
Maximum Door Height
3.5 m 3.5 m 3.5 m 3.5 m
Cycles per day (Max) 10 10 10 10
Shutter Shaft Diameter (Insert)
60mm (48mm) 60mm (48mm) 76mm (60mm) 76mm (60mm)
Flange/Drum Diameter
200mm/220mm 200mm/220mm 220mm/240mm 220mm/240mm
Max Shutter Size 16m2 20m2 26m2 30m2
Operator Weight 9.0 kg/19.9 lbs. 10.5 kg/23.2 lbs. 14.5 kg/32 lbs. 15.0 kg/33 lbs
Limit Switches Electro-Mechanical Electro-Mechanical Electro-Mechanical Electro-Mechanical
Brake Type Electric Electric Electric Electric
Door Release Manual Manual Manual Manual
Overload Protection 4 Minutes w/Reset 4 Minutes w/Reset 4 Minutes w/Reset 4 Minutes w/Reset
Thermal Protection (Degrees)
155°C 155°C 155°C 155°C
Insulation Class F F F F
Normal Operating Temperature Range
-5°C - +35°C (23°F - +95°F) -5°C - +35°C (23°F - +95°F) -5°C - +35°C (23°F - +95°F) -5°C - +35°C (23°F - +95°F)
Regulatory Requirements
IEC UL325 (model LM-1600 only)
IECUL325 (model LM-2000 only)
IEC IEC
Phillips and slotted screwdrivers
Ratchet and sockets(standard and metric)
Drill with 1/4" (6.35mm)and 1/2" (12.7mm)
high speed steel bits
Ladder(non metallic)
Allen wrenches, long handle
(standard and metric)
Extension cord (if applicable)
Fish tape
Electrical tape
Open end wrenches (standard and metric)
Electricians gloves
Cutting knife
NOT SHOWNScrews, washers, nuts,
and wire nuts
Wire strippers

5
Overview
The Central Motor consists of an electric motor secured to the dead shaft of the door with a clamping mechanism. The motor has a gear attached to the front of the armature. The gear drives the inside teeth of a circular crown and that rotates around the front of the motor and the dead shaft.
The motor stays fi xed to the shaft and only the crown rotates. Once the door is bolted to the crown using the required hardware, the door will wrap around the crown. The ends of the door are supported with drums that are the same diameter as the motor crown.
When the door reaches the open and close limit switch, the brake is engaged stopping the motor.
Electric Motor
Collar
Through Bolt
Lubricated Belt
Motor Housing Collar(clamps the motor to the dead shaft)
Front Motor Crown (rotates around dead shaft on lubricated belt)
Limit Switch box (used to set upper and lower limits of door travel)
Electric brake with manual cable release
Power Cable
Hold Down or Pinch Bolt
Door Mounting Bolt

6
Installation
Install the Motor
1
2
3
Vertical Centerline
Dead Shaft
Dead Shaft
Crown
Pinch Bolt or Hold Down BoltThrough
Bolt
Door Mounting Bolt
Mounting Hole
Washer
Collar
Motor
To prevent possible SERIOUS INJURY or DEATH:
• DO NOT connect electric power until instructed to do so.
• Disable ALL locks and remove ALL ropes connected to door BEFORE installing and operating door operator to avoid entanglement.
1. Close the door and disconnect power at the circuit prior to installation. Locate and mark the vertical centerline of the dead shaft. NOTE: Once the door is in the fully closed position, the upper slats may hinder the installation of the motor and it may be necessary to close the door
further to expose the dead shaft. Use a pry bar or similar device to force the top slats of the door down, past the fully closed position, then use clamps to temporarily secure the door. This procedure should be done in a secure and safe manner.
2. Remove the two piece crown and upper portion of collar from the motor. Position the motor onto the dead shaft near the vertical centerline and secure to the dead shaft using the collar and previously removed hex bolts (4). Make sure that the lubricated belt is correctly installed onto the collar during assembly. DO NOT tighten the bolts at this time. Position the motor with assembled collar as close to the vertical centerline of the dead shaft as possible by sliding the motor along the shaft. If possible, align the door hold-down bolt with the mounting hole in the top of the door if one exists.
3. Mark and drill a 1/2" (12.7mm) hole completely through both sides of the hollow dead shaft using the front Through-Bolt hole in the collar as a guide for the holes. Insert the through-bolt through the collar and dead shaft. Tighten all bolts (4) on the collar. Tighten the through-bolt and pinch bolt/hold down bolt. Position both halves of the crown over the collar and secure with previously removed bolts. Make sure limit switch box is facing you for upcoming adjustment. Measure 3" (7.6cm) to 4" (10.16cm) behind the brake casting and drill a 1/2" (12.7mm) hole through the facing side of the shaft. This hole is for feeding the brake and power cables. If a mounting hole does not already exist near the top of the door, mark and drill a hole in the door that aligns with the mounting hole in the crown. Fasten the door to the crown with the door mounting bolt.

7
1. Determine the mounting location for the control station. Remove the brake handle from the brake release cable. Locate the end of the dead shaft where the brake and power cables will be pulled through. If there is a solid mounting plate or obstruction at the end of the shaft, drill a 1/2" (12.7 mm) or larger hole through the end plate, making sure the hole being drilled makes it through the center of the shaft. Feed a fi sh tape through the end of the shaft to the hole drilled just past the rear of the motor. Connect the brake and power cables to the fi sh tape.
2. Pull the brake cable and power cable wires through the 1/2" (12.7 mm) hole that was drilled in the dead shaft behind the motor and down to the desired location of the lock box.
3. Run the brake cable and door control wires to the lock box location. Insert the brake cable through the rear knock out and secure to the brake release arm with the hex socket plug and aluminum drum. Check that the brake line is installed correctly by pulling the brake lever to release the internal brake clutch. The door should open manually. If the brake did not release, tighten brake cable. Release the hex socket plug, pull the brake line to create more tension. Reset the hex socket plug.
4. Fasten the entrapment warning placard next to the lock box.
Installation
1 2
3
4
Brake Cable and Door Control Wires
Door Control Wires
Brake CableBrake Cable
Brake ReleaseHandle
Control Station(Key Lock Box)
Brake Cable
To prevent possible SERIOUS INJURY or DEATH from a closing door:
• The constant-pressure-to-close switch MUST be installed within sight of the door, out of reach of children, at a minimum height of 4.92' (1.5 m) and away from ALL moving parts of the door.
• The constant-pressure-to-close switch MUST NOT be accessible to the public.
• Install the entrapment warning placard on wall next to the control station in a prominent location that is visible from the door.
WARNING
WARNING
WARNING WARNING Attach Brake to the Control Station (Key Lock Box)

8
Attach Wire Connectors to Wires1. Remove the screws (4) securing the switch plate to the lock box housing.
2. Slide the plastic boot on to the wire.
3. Strip 1/2" (12.7 mm) of insulation from the end of the wire.
4. Insert exposed wire into the wire connector and crimp the tangs down to secure the wire.
5. Slide the plastic boot over the connector.
6. Tug on the wire to ensure it is secure in the connector.
7. Insert the wires into the lock box through the top grommets.
See Install the Control Station and Wiring below.
Install the Control Station and Wiring (230 Vac)
1. Disconnect ALL power before proceeding.
2. Connect wires to the control station as shown and reattach the switch plate.
3. Mount the control station to the wall using appropriate hardware.
4. Run power wires and connect power.
1
3
2
Blue
Red To Power
Source
(120V/60Hz)
Red
White
Black
From
MotorBack of
Control
Station
N/O
Control Station
Terminals
N/O
COM
L
N
1/2"
(12.7 mm)
Plastic BootWire
Wire
Connector
1
2
3 BlueL
N
To Power Source
(230V/50Hz)
Red
Blue
Brown
Black
From
MotorBack of
Control
Station
N/O
Control Station
Terminals
N/O
COM
Installation
Install the Control Station and Wiring (120 Vac)1. Disconnect ALL power before proceeding.
2. Connect wires to the control station as shown and reattach the switch plate.
3. Mount the control station to the wall using appropriate hardware.
4. Run power wires and connect power.

9
Warranty
Maintenance
EVERY MONTH:Check to be sure door opens and closes fully. Adjust limits if necessary.
Examine door for signs of wear or damage to cables and check that the door is balanced.
Check to ensure the brake release is working correctly. Follow instructions if any adjustments are necessary.
LiftMaster Central Motors have a maintenance free lubrication belt, if installed correctly and subject to normal operating conditions.
LiftMaster offers a two year Limited Warranty on all Central Motors and Accessories.
LiftMaster warrants these products to be free from defects in material and workmanship for a period of two (2) years beginning with the placement of the order. In the event that you should have a problem with a LiftMaster Central Motor or Accessory, contact [email protected].
If the problem cannot be resolved working with our technical staff, LiftMaster will provide a replacement product free of charge once the product is confi rmed to be defective by either a LiftMaster Technical Staff member or a LiftMaster Field Specialist. Depending on the type of failure, LiftMaster may require that the defective part be returned to LiftMaster for evaluation to help ensure our continuous product quality standards are being met.
If the product is not required to be returned for evaluation, LiftMaster requires the Dealer/Installer to remove the Limit Switch Assembly from the Central Motor and arrange to return to LiftMaster or your designated LiftMaster Field Specialist.
Adjustment/Operation
Limit Switch Adjustment1. Carefully release any clamps or devices used to hold the door in the down
position. Make sure the door is in the normal closed position without any excess slack.
2. Remove the limit switch cover.
3. Adjust the close limit cam until the cam contacts the close limit switch. Lock the limit cam in place using the locking spacer. Cycle the motor to ensure the door closes properly. Adjust as necessary.
4. With the door completely closed, adjust the open limit cam until the cam contacts the open limit switch. Lock the limit cam in place using the locking spacer.
5. Activate the motor using the control station to ensure the door opens and closes to the desired position. Adjust if necessary.
Brake Release OperationWith the door in the closed position:
1. Unlock the lock box and open the lock box cover.
2. Locate the brake lever. Pull the brake lever to a 90 degree position to release the brake. The door can now be opened manually.
NOTE: If brake lever does not release brake completely refer to page 7 to readjust the cable.
Limit Switch Cover
Limit Switch
Limit Cam
Close Limit Cam
Open Limit Cam

10
Repair Parts
Contact Us
For support contact:
Number Part Number Description
1 CA200-60 Crown Assembly for Models LM1600 and LM2000
CA200-76 Crown Assembly for Models LM2800 and LM3600
2 LM-LSA Limit Switch Assembly
3 EM16-120 Motor for Model LM1600 120 Vac
EM16-230 Motor for Model LM1600 230 Vac
EM20-120 Motor for Model LM2000 120 Vac
EM20-230 Motor for Model LM2000 230 Vac
EM28-120 Motor for Model LM2800 120 Vac
EM28-230 Motor for Model LM2800 230 Vac
EM36-120 Motor for Model LM3600 120 Vac
EM36-230 Motor for Model LM3600 230 Vac
1
3
2

Motor CentralManual de instalaciónModelos LM-1600, LM-2000, LM-2800, LM-3600, LM-1600HV, LM-2000HV,
LM-2800HV, LM-3600HV
LiftMaster845 Larch AvenueElmhurst, Illinois 60126-1196LiftMaster.com

12
Índice
Advertencias
Para reducir el riesgo de LESIONES GRAVES o la MUERTE:
INSTRUCCIONES IMPORTANTES DE INSTALACIÓN
1. LEA Y RESPETE TODAS LAS ADVERTENCIAS Y LAS INSTRUCCIONES.
2. Desconectar la alimentación eléctrica ANTES de proceder con la instalación o el mantenimiento del motor. DEBE instalarse un aparato de desconexión en el circuito permanentemente bajo tensión a fin de asegurar la desconexión de todas las fases (polos), ya sea con un interruptor (al menos 3 mm de separación entre contactos) o con una caja de fusibles de la capacidad correspondiente. El operador DEBE tener una puesta a tierra adecuada y debe estar conectado de acuerdo con los códigos eléctricos locales.
3. NO conecte el operador de la puerta a una línea con voltaje hasta que se le indique.
4. NO permita que los niños usen ni jueguen con los controles de la puerta.
5. Mantenerse alejado de la puerta en movimiento y no perderla de vista hasta que esté totalmente cerrada o abierta. NADIE DEBE ATRAVESAR EL RECORRIDO DE LA PUERTA CUANDO ESTÁ EN MOVIMIENTO.
6. En productos con desenganche manual de la puerta, siempre que sea posible usar el desenganche sólo cuando la puerta esté cerrada. Tenga precaución cuando utilice este desenganche con la puerta abierta. Los resortes rotos o debilitados pueden hacer que la puerta caiga rápidamente y cause LESIONES GRAVES o incluso la MUERTE.
7. No debe ser usado por personas (ni niños) con capacidad física, sensorial o mental disminuida, ni personas con falta de conocimiento o experiencia en el uso de la unidad, a menos que reciban instrucciones o estén bajo supervisión.
8. No apto para uso en puertas con una portezuela secundaria o puerta para peatones.
9. MANTENER LAS PUERTAS EN BUENAS CONDICIONES DE USO Y BALANCEADAS. Consulte el manual de instrucciones del fabricante. El funcionamiento defectuoso o el desbalance de la puerta puede causar LESIONES GRAVES o incluso la MUERTE. Realizar las reparaciones de cables, resortes y otros componentes con un técnico especializado.
10. CONSERVAR ESTAS INSTRUCCIONES.
ADVERTENCIA
Para evitar posibles LESIONES GRAVES causadas por la caída del operador:
• Fijar el operador FIRMEMENTE a soportes estructurales del edificio.
• DEBE usarse anclajes para concreto si alguno de los soportes se va a instalar en mampostería.
PRECAUCIÓN
Advertencias .................................................12
Aplicación ....................................................13
Elección del motor ..........................................13
Especifi caciones técnicas .................................14
Herramientas necesarias ..................................14
Descripción general ........................................15
Instalación ...............................................16-18
Regulación/Operación .....................................19
Mantenimiento ..............................................19
Garantía ......................................................19
Repuestos ....................................................20
Comuníquese con nosotros ...............................20

13
Elección del motorPara seleccionar el motor central apropiado hay que considerar el uso, la capacidad, el peso y el tipo de puerta. En primer lugar debe determinar el tipo de puerta arrolladiza. Por ejemplo, es una puerta tipo persiana, de rejas, con vidrio, de madera, etc. Las aplicaciones comunes de estas puertas abarcan frentes de comercios, puertas de garaje, entrada a centros comerciales, hoteles, etc. Cada tipo de puerta tiene sus propios requisitos.
Además del tipo de motor, usted DEBE saber el diámetro de la corona del motor, y el peso, la altura y el ancho de la puerta. Utilice la siguiente tabla para elegir el motor apropiado.
AplicaciónLos motores centrales son motores eléctricos utilizados para puertas arrolladizas (tipo persiana, de rejas, etc.) que se enrollan en la corona conducida por el motor. El motor central se utiliza únicamente en una puerta balanceada. El alojamiento del motor está montado sobre el eje fi jo y el motor eléctrico interno conduce una corona de transmisión acoplada a la puerta arrolladiza. La puerta se enrolla en la corona al abrirse y se desenrolla al cerrarse. Este tipo de motor es generalmente utilizado cuando hay poco espacio a los lados de la puerta para instalar un mecanismo de transmisión de cadena o engranajes. Las puertas arrolladizas utilizadas con motores centrales no deben confundirse con las puertas de chapa de acero conducidas lateralmente con el motor de la unidad.
Los motores centrales se utilizan ÚNICAMENTE con ejes fi jos entre 42 mm (1.65 pulg.) y 76 mm (2.99 pulg.) o de mayor diámetro. La medida más común es 60 mm (2.36 pulg.).
• Si el eje fi jo es de 48 mm (1.89 pulg.) de diámetro y el diámetro del eje del motor interno es de 60 mm (2.36 pulg.) será necesario usar separadores CM-48SA (suministrados con la unidad).
• Si el eje fi jo es de 60 mm (2.36 pulg.) de diámetro y el diámetro del eje del motor interno es de 76 mm (2.99 pulg.) será necesario usar separadores CM-60SA (suministrados con la unidad).
Terminología útil:
• Eje fi jo: Es un eje de la puerta montado en la pared, que no gira.
• Mecanismo de balanceo: Una puerta con un mecanismo de balanceo tal como un resorte helicoidal o una correa para contrarrestar el peso de la puerta. En la ilustración de muestra un motor central montado sobre un eje fi jo con resortes de correa. Los resortes helicoidales se usan también con ejes fi jos y cumplen la misma función de reducir la fuerza necesaria para levantar la puerta.
Consultar al fabricante de la puerta o a un técnico profesional si no estuviera seguro del tipo de puerta o de resortes que tiene en su instalación.
Motor central
Eje fi jo Resorte de correa
Puerta
Determinación de la capacidad del motor Ejemplo (estándar) Ejemplo (métrico)
Defi na el tipo de puerta arrolladiza Persiana
Persiana, de rejas, otro De rejas
Otro
Tamaño de la puerta
Ancho 10 pies 3.04m
Altura 9 pies 2.74m
Calcular la superfi cie (ancho por alto) 90 pies 27.43m
Material de la puerta Acero
Aluminio
Otro
Espesor del material de la puerta 21
Peso por pie cuadrado 3 lbs. 1.4 kg
Peso total de la puerta (pies cuadrados x libras por pie cuadrado) 270 lbs. 122 kg
El motor debe tener una capacidad del 120% del peso de la puerta 324 lbs. 147 kg
Elegir la potencia inmediatamente superior Todas las capacidades de elevación se encuentran en la carga nominal
LM-1600 330 lbs. 150 kg
LM-1600HV 330 lbs. 150 kg
LM-2000 396 lbs. 180 kg
LM-2000HV 396 lbs. 180 kg
LM-2800/LM-2800HV 616 lbs. 280 kg
LM-3600/LM-3600HV 792 lbs. 360 kg

14
Herramientas necesarias
Especifi caciones técnicas
Destornilladores Phillips y de punta plana
Llave de trinquetey llaves tubo
(SAE y métricas)Taladro y brocas de acero rápido
de ¼" (6.35 mm) y 1/2" (12.7mm)
Escalera(no metálica)
Llaves Allencon mango largo(SAE y métricas)
Cordón prolongador (si fuera necesario)
Cinta pasacables
Cinta aisladora
Llaves de boca(SAE y métricas)
Guantes para electricista
Cuchilla
NO MOSTRADOTornillos, arandelas,
tuercas y capuchones de empalme
Pelacables
Número de modelo LM-1600/LM-1600HV LM-2000/LM-2000HV LM-2800/LM-2800HV LM-3600/LM-3600HV
Voltaje y frecuencia de alimentación
120 Vac - 50/60Hz (LM-1600)230 Vac - 50/60Hz (LM-1600HV)
120 Vac - 50/60Hz (LM-2000)230 Vac - 50/60Hz (LM-2000HV)
120 Vac - 50/60Hz (LM-2800)230 Vac - 50/60Hz (LM-2800HV)
120 Vac - 50/60Hz (LM-3600)230 Vac - 50/60Hz (LM-3600HV)
Vatios de ampere 5.0 A 590 W (LM-1600)2.3 A 520 W (LM-1600HV)
5.5 A 635 W (LM-2000)2.6 A 580 W (LM-2000HV)
8.5 A 1000W (LM-2800)3.9 A 880 W (LM-2800HV)
9.6 A 1140W (LM-3600)4.5 A 1000 (LM-3600HV)
Motor Simple Simple Simple Simple
Torque de salida (rango)
150Nm 180Nm 380Nm 420Nm
Capacidad de levantamiento (rango)
150 kg (LM-1600)150 kg (LM-1600HV)
180 kg (LM-2000)180 kg (LM-2000HV)
280 kg 360 kg
Velocidad de brida de enrollamiento
12 RPM (120 Vac) (LM-1600)10 RPM (230 Vac) (LM-1600HV)
12 RPM (120 Vac) (LM-2000) 10 RPM (230 Vac) (LM-2000HV)
12 RPM (120 Vac) (LM-2800)10 RPM (230 Vac) (LM-2800HV)
12 RPM (120 Vac) (LM-3600)10 RPM (230 Vac) (LM-3600HV)
Altura máxima de la puerta
3.5 m 3.5 m 3.5 m 3.5 m
Ciclos por día (máx.) 10 10 10 10
Diámetro del eje de persiana (inserto)
60mm (48mm) 60mm (48mm) 76mm (60mm) 76mm (60mm)
Diámetro de brida/cilindro
200mm/220mm 200mm/220mm 220mm/240mm 220mm/240mm
Medida máxima de persiana
16m2 20m2 26m2 30m2
Peso del operador 9.0 kg/19.9 lbs. 10.5 kg/23.2 lbs. 14.5 kg/32 lbs. 15.0 kg/33 lbs.
Límites de carrera Electromecánica Electromecánica Electromecánica Electromecánica
Tipo de freno Eléctrico Eléctrico Eléctrico Electric
Seguro de la puerta Manual Manual Manual Eléctrico
Protección contra sobrecarga
4 minutos con reposición 4 minutos con reposición 4 minutos con reposición 4 minutos con reposición
Protección térmica (grados)
155°C 155°C 155°C 155°C
Tipo de aislamiento F F F F
Rango de temperatura de servicio normal
-5°C - +35°C (23°F - +95°F) -5°C - +35°C (23°F - +95°F) -5°C - +35°C (23°F - +95°F) -5°C - +35°C (23°F - +95°F)
Normativas IEC UL325 (modelo LM-1600 únicamente)
IECUL325 (modelo LM-2000 únicamente)
IEC IEC

15
Descripción general
El motor central es un motor eléctrico acoplado al eje fi jo de la puerta. El motor tiene un engranaje acoplado al frente de la armadura. El engranaje conduce los dientes interiores de una corona circular que gira sobre el eje fi jo.
El motor permanece fi jo y sólo se mueve la corona. La puerta se fi ja con pernos a la corona y se enrolla a su alrededor. Los extremos de la puerta quedan sostenidos con cilindros del mismo diámetro que la corona del motor.
Cuando la puerta activa el límite de carrera de apertura, actuará el freno para detener el motor.
Motor eléctrico
Collar
Perno pasante
Correa lubricada
Collar del alojamiento del motor(acopla el motor al eje fi jo)
Corona frontal del motor(gira sobre el eje fi jo con correa lubricada)
Caja de límites de carrera(para regular el recorrido de apertura y cierre de la puerta)
Freno eléctrico con desenganche manual
Cable de alimentación
Perno de retención
Perno de montaje de la puerta

16
Instalación
Instalación del motor
1
2
3
Centro vertical
Eje fi jo
Eje fi jo
Corona
Perno de retención
Perno pasante
Perno de montaje de la puerta
Orifi cio de montaje
Arandela
Collar
Motor
Para evitar una LESIÓN GRAVE O INCLUSO LA MUERTE:
• NO conecte la energía eléctrica hasta que se le indique.
• Quitar TODOS los seguros y retirar TODAS las cuerdas conectadas a la puerta ANTES de instalar y hacer funcionar el operador, para evitar que se enreden.
ADVERTENCIA
1. Antes de la instalación, cerrar la puerta y cortar la alimentación eléctrica al circuito. Determinar y marcar el centro vertical del eje fi jo. NOTA: Con la puerta cerrada, la parte superior de la misma podría difi cultar la instalación del motor. Podría ser necesario cerrar la puerta un poco más para
dejar totalmente expuesto el eje fi jo. Con una palanca o herramienta similar forzar los listones superiores de la puerta hacia abajo, más allá de la posición cerrada, y fi jarla temporalmente con abrazaderas. Llevar a cabo esto tomando precauciones y cuidadosamente.
2. Quitar del motor la corona y la parte superior del collar. Colocar el motor en el eje fi jo, cerca de la línea de centro vertical y fi jarlo al eje con el collar y los pernos hexagonales extraídos anteriormente (4). Verifi car que la correa lubricada quede bien colocada en el collar durante el montaje. NO ajustar los pernos en este momento. Colocar el motor con el collar tan cerca como sea posible de la línea del centro vertical del eje fi jo, moviendo el motor a lo largo del eje. Si fuera posible, alinea el perno de sujeción de la puerta con el orifi cio de montaje que hubiera en la parte superior de la puerta.
3. Hacer un orifi cio pasante de 12.7 mm (1/2 de pulg.) que atraviese ambos lados del eje fi jo hueco, usando como guía el orifi cio del perno pasante frontal del collar. Pasar el perno por el collar y el eje fi jo. Ajustar todos los pernos (4) del collar. Ajustar el perno pasante y el perno de retención. Colocar ambas mitades de la corona en el collar y fi jarlas con los pernos extraídos anteriormente. Verifi car que la caja de límites de carrera quede orientada hacia usted para realizar las regulaciones. A una distancia de 7.6 cm (3 pulg.) a 10.16 cm (4 pulg.) detrás del freno hacer un orifi cio de 12.7 mm (1/2 de pulg.) en el eje. Este orifi cio es pasar los cables del freno y de alimentación eléctrica. Si no hubiera un orifi cio de montaje cerca de la parte superior de la puerta, hacer uno alineado con el orifi cio de montaje de la corona. Ajustar la puerta a la corona con el perno de montaje de la puerta.

17
1. Determine la ubicación para montar la estación de control. Quitar la manija del cable de desenganche del freno. Buscar el extremo del eje por el cual pasan los cables del freno y de alimentación eléctrica. Si hubiera una placa sólida o una obstrucción en el extremo del eje, hacer un orifi cio de 12.7 mm (1/2 de pulg.) o mayor hasta el centro del eje. Pasar una cinta pasacables por el extremo del eje hasta el orifi cio detrás de la parte posterior del motor. Unir los cables del freno y alimentación eléctrica a la cinta pasacables.
2. Pasar los cables por el orifi cio de 12.7 mm (1/2 de pulg.) en el eje fi jo detrás del motor, hasta el lugar de instalación de la caja con cerradura.
3. Pasar el cable del freno y los cables de control de la puerta hasta el lugar de instalación de la caja con cerradura. Pasar el cable del freno por el orifi cio trasero y ajustar la manija de desenganche manual con el tornillo para llave Allen y el cilindro de aluminio. Verifi car la instalación de la línea del freno tirando de la palanca de freno para desenganchar el embrague interno. La puerta debería abrirse manualmente. Si el freno no se desenganchara, ajustar el cable del freno. Soltar el tornillo para llave Allen y tirar de la línea del freno para hacerla más tensa. Ajustar el perno para llave Allen.
4. Fije el cartel de advertencia de atrapamientos junto a la caja con cerradura.
Instalación
1 2
3
4
Cable del freno y cables de control de la puerta
Cables de control de la puerta
Cable del freno
Cable del freno
Manija de desenganche del freno
Estación de control (caja con cerradura)
Cable del freno
Para evitar la posibilidad de una LESIÓN GRAVE O INCLUSO LA MUERTE cuando la puerta del garaje se esté cerrando:
• El relé de presión constante de cierre DEBE instalarse a la vista desde la puerta, fuera del alcance de los niños, a una altura mínima de 1,5 metros y alejado de TODAS las partes móviles de la puerta.
• El relé de presión constante de cierre NO DEBE quedar al alcance del público.
ADVERTENCIA
Conectar el freno a la estación de control (caja con cerradura)

18
1
3
2
Azul
RojoA la entrada de
alimentación
(120 V/60 Hz)
RojoBlanco
Negro
Del
motor
Parte trasera
de la estación
de control
N/O
Terminales
de la estación
de control
N/O
COM
L
N
1
2
3 AzulL
N
A la entrada de
alimentación
(120 V/60 Hz)
Rojo
Azul
Marrón
NegroDel motor
Parte trasera
de la estación
de control
N/O
Terminales
de la estación
de control
N/O
COM
InstalaciónConectar los conectores a los conductores1. Quitar los cuatro tornillos que fi jan la tapa de la llave al alojamiento.
2. Deslizar el manguito plástico en el conductor.
3. Quitar 12.7 mm (1/2 de pulg.) de aislamiento del extremo del conductor.
4. Introducir el cable pelado en el conector e indentar las pestañas hacia abajo para fi jarlo.
5. Deslizar el manguito plástico sobre el conector.
6. Tirar del conductor para verifi car que esté fi rmemente fi jado en el conector.
7. Introducir los conductores en el alojamiento a través de las arandelas superiores.
Véase a continuación Instalar la estación de control y el cableado.
1/2"
(12.7 mm)
Plastic BootWire
Wire
Connector
Instalar la estación de control y el cableado (120 VCA)1. Desconectar la alimentación eléctrica antes de continuar.
2. Conectar los conductores al panel de control tal como se muestra y volver a.
3. Fijar la estación de control a la pared.
4. Pasar los cables de alimentación y conectar la energía eléctrica.
Instalar la estación de control y el cableado (230 VCA)1. Desconectar la alimentación eléctrica antes de continuar.
2. Conectar los conductores al panel de control tal como se muestra y volver a.
3. Fijar la estación de control a la pared.
4. Pasar los cables de alimentación y conectar la energía eléctrica.
Perno de montaje de la puerta
Manguito plástico12.7 mm
(1/2 de pulg.)Cable

19
Garantía
Mantenimiento
MENSUALMENTE:Verifi car que la puerta se abra y se cierre totalmente. Volver a hacer la regulaciones que fueran necesarias.
Inspeccionar la puerta para detectar desgaste o averías de cables y verifi car que esté balanceada.
Comprobar el funcionamiento del desenganche del freno. Seguir las instrucciones si fuera necesario reajustarlo.
La correa de los motores centrales de LiftMaster no necesita mantenimiento si fue instalada correctamente y usada normalmente.
LiftMaster ofrece una garantía limitada por dos años para todos los motores centrales y accesorios.
LiftMaster garantiza que estos productos están libres de defectos de material y fabricación por un período de dos (2) años a partir de la fecha de la orden de compra. En el caso de que tuviera un problema con el motor central o los accesorios LiftMaster comuníquese con el número de apoyo técnico indicado más abajo en este manual.
Si el problema no pudiera resolverse con nuestro personal técnico, LiftMaster entregará sin costo alguno un producto de repuesto cuando el personal de LiftMaster confi rme que existe un defecto. Según el tipo de defecto, LiftMaster podría solicitar el envío de la parte defectuosa para evaluarlo a fi n de evitar problemas de calidad en el futuro.
Si el producto no tiene de enviarse para evaluación, LiftMaster exigirá que el Distribuidor o Instalador desmonte el límite de carrera y se lo entregue a LiftMaster o al especialista que LiftMaster designe.
Regulación/Operación
Regulación de límites de carrera1. Retirar toda abrazadera o perno que retenga la puerta en posición cerrada.
Verifi car que la puerta esté en posición cerrada normal, sin pandeo.
2. Quitar la tapa de la caja de límites de carrera.
3. Regular la posición de la leva de cierre hasta que haga contacto con el límite de carrera de cierre. Fijar la leva en esa posición con el separador de retención. Mover el motor un ciclo para verifi car que la puerta cierra correctamente. Cambiar la posición si fuera necesario.
4. Con la puerta totalmente cerrada, regular la leva de apertura hasta que haga contacto con el límite de carrera. Fijar la leva en esa posición con el separador de retención.
5. Activar el motor desde la estación de control para verifi car que la puerta se abra y se cierre correctamente. Volver a hacer la regulaciones que fueran necesarias.
Desenganche del frenoCon la puerta cerrada hacer lo siguiente:
1. Abrir la tapa de la caja con cerradura.
2. Ubicar la manija de freno. Tirar la manija para llevarla a 90 grados a fi n de desenganchar el freno. La puerta ahora puede abrirse manualmente.
NOTA: Si la manija no desenganchara el freno, leer las instrucciones en la página 7 para reajustar el cable.
Tapa de límites de carrera
Límite de carrera
Leva de límite
Leva de límite de cierre
Leva de límite de apertura

® LiftMaster All Rights Reserved01-37396 Reservados todos los derechos de ley.
Repuestos
Comuníquese con nosotros
Apoyo técnico:
Número Número de parte Descripción
1 CA200-60 Mecanismo de corona para los Modelos LM1600 y LM2000
CA200-76 Mecanismo de corona para los Modelos LM2800 and LM3600
2 LM-LSA Conjunto de límites de carrera
3 EM16-120 Motor para el Modelo LM1600 120 VCA
EM16-230 Motor para el Modelo LM1600 230 VCA
EM20-120 Motor para el Modelo LM2000 120 VCA
EM20-230 Motor para el Modelo LM2000 230 VCA
EM28-120 Motor para el Modelo LM2800 120 VCA
EM28-230 Motor para el Modelo LM2800 230 VCA
EM36-120 Motor para el Modelo LM3600 120 VCA
EM36-230 Motor para el Modelo LM3600 230 VCA
1
3
2