C:Documents and SettingsmsaleeDesktopPDF guidesmgs3 Eater_PS2.pdf · Survival Knife The knife is...
37
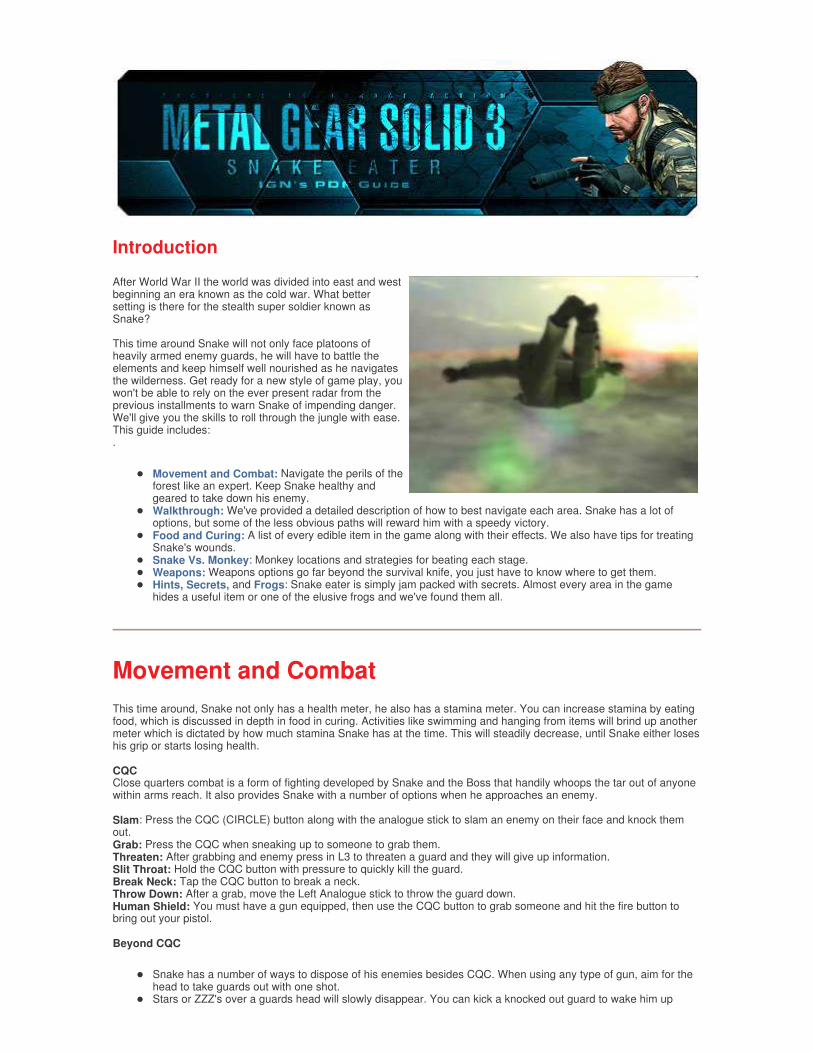
Introduction After World War II the world was divided into east and west beginning an era known as the cold war. What better setting is there for the stealth super soldier known as Snake? This time around Snake will not only face platoons of heavily armed enemy guards, he will have to battle the elements and keep himself well nourished as he navigates the wilderness. Get ready for a new style of game play, you won't be able to rely on the ever present radar from the previous installments to warn Snake of impending danger. We'll give you the skills to roll through the jungle with ease. This guide includes: . Movement and Combat: Navigate the perils of the forest like an expert. Keep Snake healthy and geared to take down his enemy. Walkthrough: We've provided a detailed description of how to best navigate each area. Snake has a lot of options, but some of the less obvious paths will reward him with a speedy victory. Food and Curing: A list of every edible item in the game along with their effects. We also have tips for treating Snake's wounds. Snake Vs. Monkey: Monkey locations and strategies for beating each stage. Weapons: Weapons options go far beyond the survival knife, you just have to know where to get them. Hints, Secrets, and Frogs: Snake eater is simply jam packed with secrets. Almost every area in the game hides a useful item or one of the elusive frogs and we've found them all. Movement and Combat This time around, Snake not only has a health meter, he also has a stamina meter. You can increase stamina by eating food, which is discussed in depth in food in curing. Activities like swimming and hanging from items will brind up another meter which is dictated by how much stamina Snake has at the time. This will steadily decrease, until Snake either loses his grip or starts losing health. CQC Close quarters combat is a form of fighting developed by Snake and the Boss that handily whoops the tar out of anyone within arms reach. It also provides Snake with a number of options when he approaches an enemy. Slam: Press the CQC (CIRCLE) button along with the analogue stick to slam an enemy on their face and knock them out. Grab: Press the CQC when sneaking up to someone to grab them. Threaten: After grabbing and enemy press in L3 to threaten a guard and they will give up information. Slit Throat: Hold the CQC button with pressure to quickly kill the guard. Break Neck: Tap the CQC button to break a neck. Throw Down: After a grab, move the Left Analogue stick to throw the guard down. Human Shield: You must have a gun equipped, then use the CQC button to grab someone and hit the fire button to bring out your pistol. Beyond CQC Snake has a number of ways to dispose of his enemies besides CQC. When using any type of gun, aim for the head to take guards out with one shot. Stars or ZZZ's over a guards head will slowly disappear. You can kick a knocked out guard to wake him up
Transcript of C:Documents and SettingsmsaleeDesktopPDF guidesmgs3 Eater_PS2.pdf · Survival Knife The knife is...
Introduction
After World War II the world was divided into east and west beginning an era known as the cold war. What better setting is there for the stealth super soldier known as Snake? This time around Snake will not only face platoons of heavily armed enemy guards, he will have to battle the elements and keep himself well nourished as he navigates the wilderness. Get ready for a new style of game play, you won't be able to rely on the ever present radar from the previous installments to warn Snake of impending danger. We'll give you the skills to roll through the jungle with ease. This guide includes: .
� Movement and Combat: Navigate the perils of the forest like an expert. Keep Snake healthy and geared to take down his enemy.
� Walkthrough: We've provided a detailed description of how to best navigate each area. Snake has a lot of options, but some of the less obvious paths will reward him with a speedy victory.
� Food and Curing: A list of every edible item in the game along with their effects. We also have tips for treating Snake's wounds.
� Snake Vs. Monkey: Monkey locations and strategies for beating each stage. � Weapons: Weapons options go far beyond the survival knife, you just have to know where to get them. � Hints, Secrets, and Frogs: Snake eater is simply jam packed with secrets. Almost every area in the game
hides a useful item or one of the elusive frogs and we've found them all.
Movement and Combat This time around, Snake not only has a health meter, he also has a stamina meter. You can increase stamina by eating food, which is discussed in depth in food in curing. Activities like swimming and hanging from items will brind up another meter which is dictated by how much stamina Snake has at the time. This will steadily decrease, until Snake either loses his grip or starts losing health. CQC Close quarters combat is a form of fighting developed by Snake and the Boss that handily whoops the tar out of anyone within arms reach. It also provides Snake with a number of options when he approaches an enemy. Slam: Press the CQC (CIRCLE) button along with the analogue stick to slam an enemy on their face and knock them out. Grab: Press the CQC when sneaking up to someone to grab them. Threaten: After grabbing and enemy press in L3 to threaten a guard and they will give up information. Slit Throat: Hold the CQC button with pressure to quickly kill the guard. Break Neck: Tap the CQC button to break a neck. Throw Down: After a grab, move the Left Analogue stick to throw the guard down. Human Shield: You must have a gun equipped, then use the CQC button to grab someone and hit the fire button to bring out your pistol. Beyond CQC
� Snake has a number of ways to dispose of his enemies besides CQC. When using any type of gun, aim for the head to take guards out with one shot.
� Stars or ZZZ's over a guards head will slowly disappear. You can kick a knocked out guard to wake him up
purposely. � Guards can also have their weapons and radios shot from their grip. Shooting a radio will allow Snake to make
sure that HQ is not notified of his presence. � After a guard has been knocked out or killed, pick him up and put him down to receive items. Do the same to
scientists to receive healing items. � Snake can blow up the various store rooms in the game with TNT. After doing this, the guard's in the area will
have very low stamina and will complain about how hungry they are. At this point if you throw food to the guard they will run after it. It would be a shame if that food were not in the best shape...
� There are two ways to go about every boss battle. You can either take them out lethally or non lethally. There are rewards for the non-lethal method.
� Use your radio for game hints and saving. Many of the conversations are funny and worth listening to.
Alerts Alert Phase - When Snake is seen by a guard the game will go into Alert Phase. This means that they have seen Snake and are currently trying to kill him. The counter will now go down from 99.99 seconds. It will count down faster if Snake kills the guards in the surrounding area or if he stays completely out of sight. Evasion Phase - The guards do not see Snake, but they know he is in the area. They will leave their scripted routes and look in strange places for signs of an intruder. Caution Phase - The guards do not see Snake but they see evidence of an intruder. They stick to their routes but are more alert. It remains in caution phase if you leave evidence of passing through an area.
Food and Curing
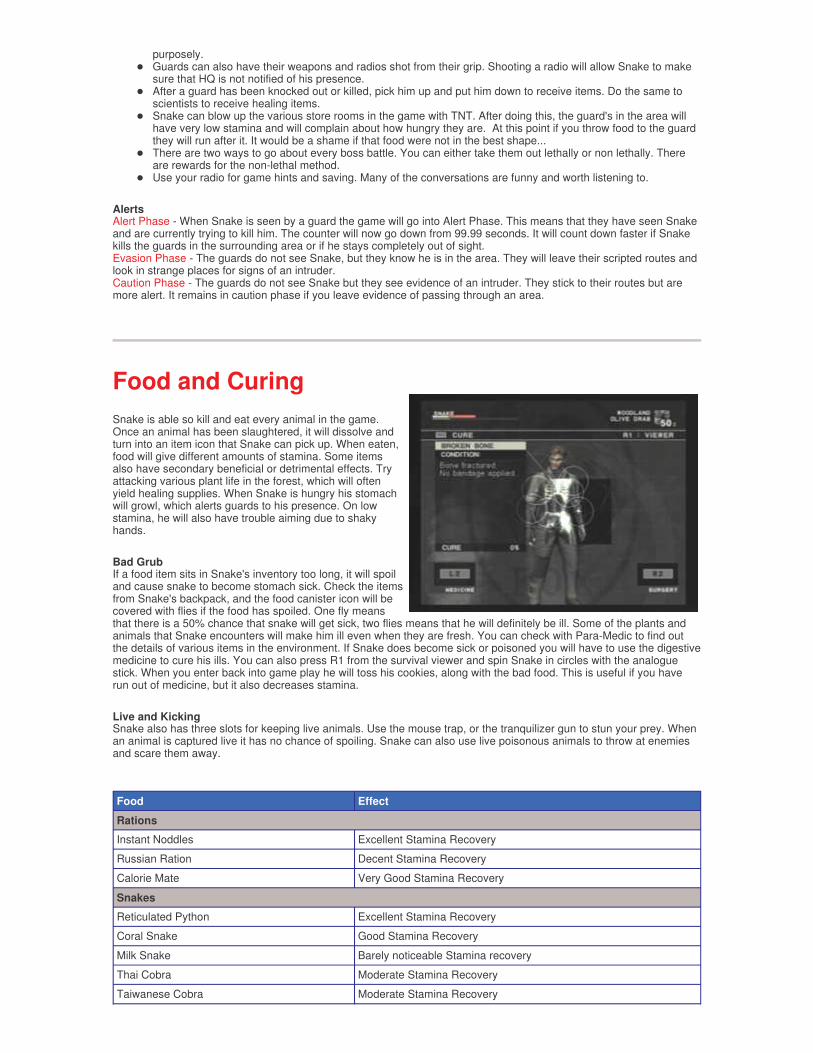
Snake is able so kill and eat every animal in the game. Once an animal has been slaughtered, it will dissolve and turn into an item icon that Snake can pick up. When eaten, food will give different amounts of stamina. Some items also have secondary beneficial or detrimental effects. Try attacking various plant life in the forest, which will often yield healing supplies. When Snake is hungry his stomach will growl, which alerts guards to his presence. On low stamina, he will also have trouble aiming due to shaky hands.
Bad Grub If a food item sits in Snake's inventory too long, it will spoil and cause snake to become stomach sick. Check the items from Snake's backpack, and the food canister icon will be covered with flies if the food has spoiled. One fly means that there is a 50% chance that snake will get sick, two flies means that he will definitely be ill. Some of the plants and animals that Snake encounters will make him ill even when they are fresh. You can check with Para-Medic to find out the details of various items in the environment. If Snake does become sick or poisoned you will have to use the digestive medicine to cure his ills. You can also press R1 from the survival viewer and spin Snake in circles with the analogue stick. When you enter back into game play he will toss his cookies, along with the bad food. This is useful if you have run out of medicine, but it also decreases stamina.
Live and Kicking Snake also has three slots for keeping live animals. Use the mouse trap, or the tranquilizer gun to stun your prey. When an animal is captured live it has no chance of spoiling. Snake can also use live poisonous animals to throw at enemies and scare them away.
Food Effect
Rations
Instant Noddles Excellent Stamina Recovery
Russian Ration Decent Stamina Recovery
Calorie Mate Very Good Stamina Recovery
Snakes
Reticulated Python Excellent Stamina Recovery
Coral Snake Good Stamina Recovery
Milk Snake Barely noticeable Stamina recovery
Thai Cobra Moderate Stamina Recovery
Taiwanese Cobra Moderate Stamina Recovery
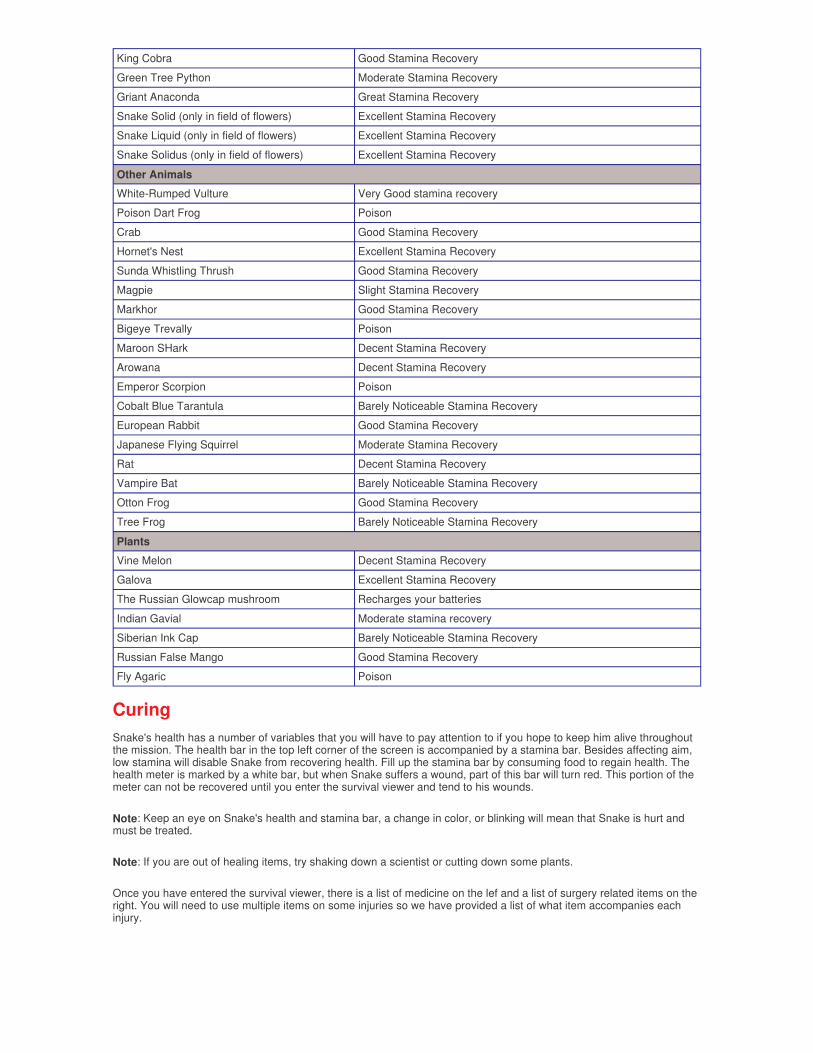
Curing Snake's health has a number of variables that you will have to pay attention to if you hope to keep him alive throughout the mission. The health bar in the top left corner of the screen is accompanied by a stamina bar. Besides affecting aim, low stamina will disable Snake from recovering health. Fill up the stamina bar by consuming food to regain health. The health meter is marked by a white bar, but when Snake suffers a wound, part of this bar will turn red. This portion of the meter can not be recovered until you enter the survival viewer and tend to his wounds.
Note: Keep an eye on Snake's health and stamina bar, a change in color, or blinking will mean that Snake is hurt and must be treated.
Note: If you are out of healing items, try shaking down a scientist or cutting down some plants.
Once you have entered the survival viewer, there is a list of medicine on the lef and a list of surgery related items on the right. You will need to use multiple items on some injuries so we have provided a list of what item accompanies each injury.
King Cobra Good Stamina Recovery
Green Tree Python Moderate Stamina Recovery
Griant Anaconda Great Stamina Recovery
Snake Solid (only in field of flowers) Excellent Stamina Recovery
Snake Liquid (only in field of flowers) Excellent Stamina Recovery
Snake Solidus (only in field of flowers) Excellent Stamina Recovery
Other Animals
White-Rumped Vulture Very Good stamina recovery
Poison Dart Frog Poison
Crab Good Stamina Recovery
Hornet's Nest Excellent Stamina Recovery
Sunda Whistling Thrush Good Stamina Recovery
Magpie Slight Stamina Recovery
Markhor Good Stamina Recovery
Bigeye Trevally Poison
Maroon SHark Decent Stamina Recovery
Arowana Decent Stamina Recovery
Emperor Scorpion Poison
Cobalt Blue Tarantula Barely Noticeable Stamina Recovery
European Rabbit Good Stamina Recovery
Japanese Flying Squirrel Moderate Stamina Recovery
Rat Decent Stamina Recovery
Vampire Bat Barely Noticeable Stamina Recovery
Otton Frog Good Stamina Recovery
Tree Frog Barely Noticeable Stamina Recovery
Plants
Vine Melon Decent Stamina Recovery
Galova Excellent Stamina Recovery
The Russian Glowcap mushroom Recharges your batteries
Indian Gavial Moderate stamina recovery
Siberian Ink Cap Barely Noticeable Stamina Recovery
Russian False Mango Good Stamina Recovery
Fly Agaric Poison
Weapons and Items
Snake Eater is packed with deadly weapons. While some weapons may look the same, each one has its own qualities that make it useful for a specific task. When a weapon is equiped to Snake's inventory, you can access it by pressing the shoulder buttons and scrolling through different items. Hint: To quickly equip your last weapon, simply tap R2. Double tap R2 to perform a very fast reload. Here is a list of the weapons and their attributes.
A few weapons in the game can have a suppressor attached to make them silent. Select the weapon in the menu and press CIRCLE to put on a suppressor. Be warned that these will deteriorate over time, so use them sparingly.
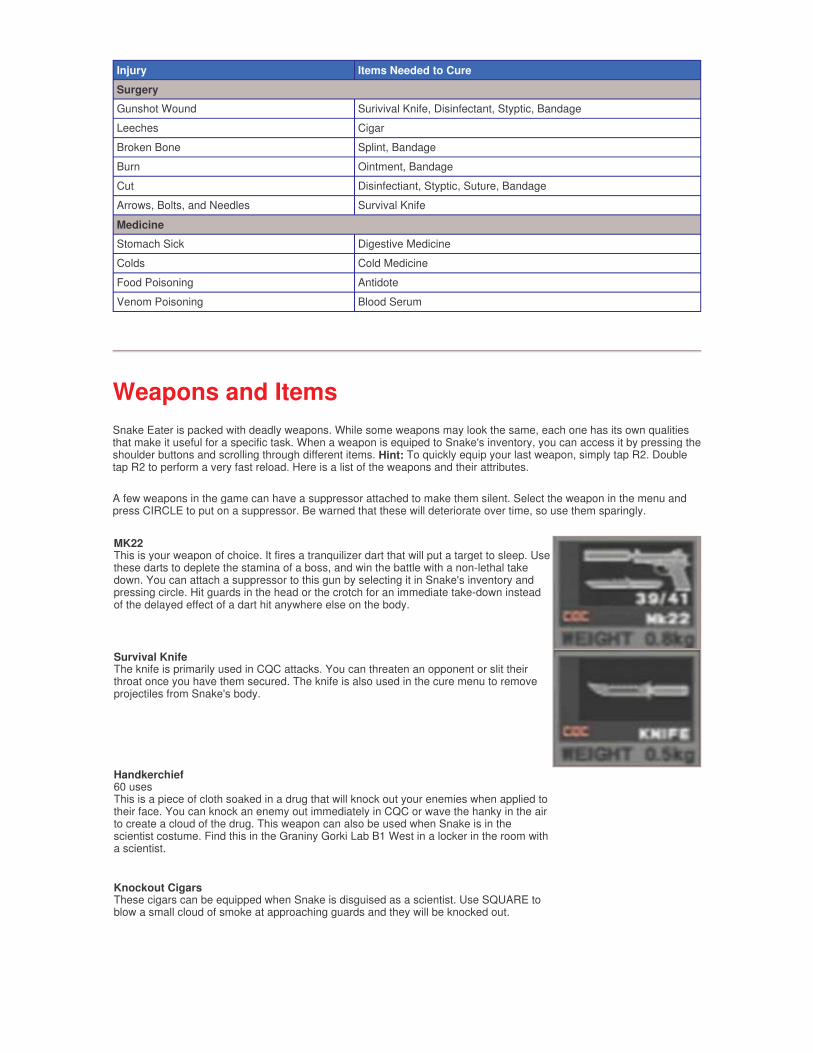
Injury Items Needed to Cure
Surgery
Gunshot Wound Surivival Knife, Disinfectant, Styptic, Bandage
Leeches Cigar
Broken Bone Splint, Bandage
Burn Ointment, Bandage
Cut Disinfectiant, Styptic, Suture, Bandage
Arrows, Bolts, and Needles Survival Knife
Medicine
Stomach Sick Digestive Medicine
Colds Cold Medicine
Food Poisoning Antidote
Venom Poisoning Blood Serum
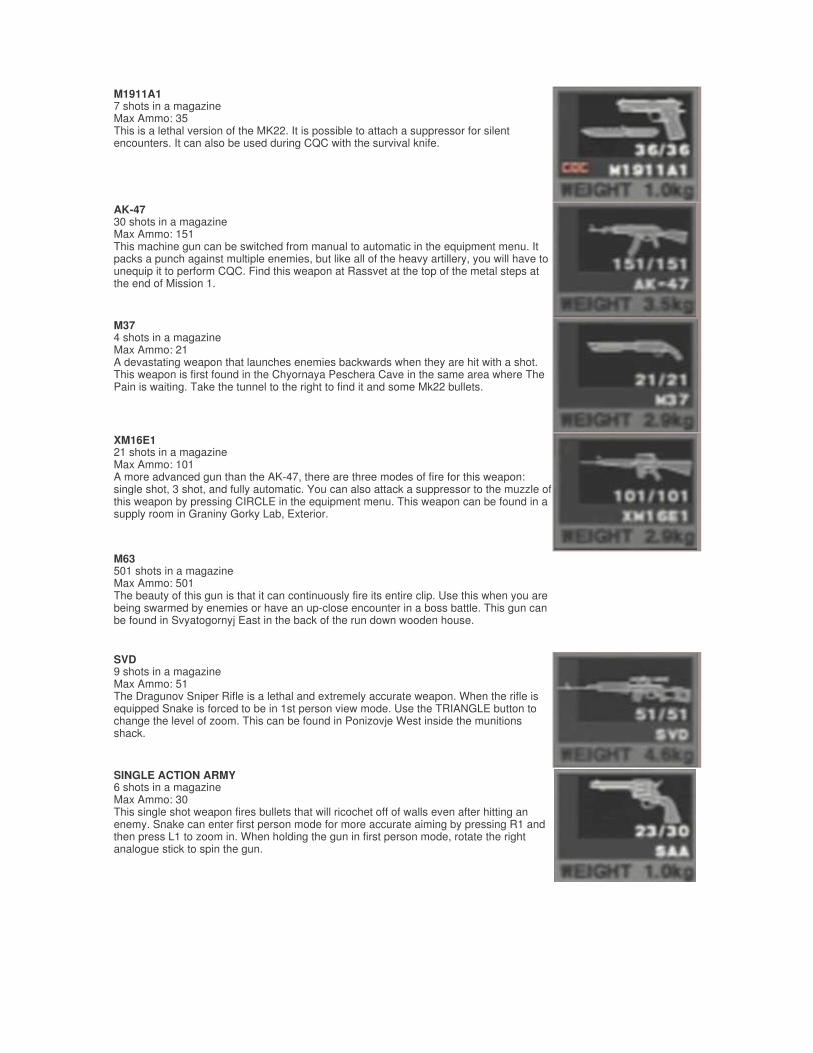
MK22 This is your weapon of choice. It fires a tranquilizer dart that will put a target to sleep. Use these darts to deplete the stamina of a boss, and win the battle with a non-lethal take down. You can attach a suppressor to this gun by selecting it in Snake's inventory and pressing circle. Hit guards in the head or the crotch for an immediate take-down instead of the delayed effect of a dart hit anywhere else on the body.
Survival Knife The knife is primarily used in CQC attacks. You can threaten an opponent or slit their throat once you have them secured. The knife is also used in the cure menu to remove projectiles from Snake's body.
Handkerchief 60 uses This is a piece of cloth soaked in a drug that will knock out your enemies when applied to their face. You can knock an enemy out immediately in CQC or wave the hanky in the air to create a cloud of the drug. This weapon can also be used when Snake is in the scientist costume. Find this in the Graniny Gorki Lab B1 West in a locker in the room with a scientist.
Knockout Cigars These cigars can be equipped when Snake is disguised as a scientist. Use SQUARE to blow a small cloud of smoke at approaching guards and they will be knocked out.
M1911A1 7 shots in a magazine Max Ammo: 35 This is a lethal version of the MK22. It is possible to attach a suppressor for silent encounters. It can also be used during CQC with the survival knife.
AK-47 30 shots in a magazine Max Ammo: 151 This machine gun can be switched from manual to automatic in the equipment menu. It packs a punch against multiple enemies, but like all of the heavy artillery, you will have to unequip it to perform CQC. Find this weapon at Rassvet at the top of the metal steps at the end of Mission 1.
M37 4 shots in a magazine Max Ammo: 21 A devastating weapon that launches enemies backwards when they are hit with a shot. This weapon is first found in the Chyornaya Peschera Cave in the same area where The Pain is waiting. Take the tunnel to the right to find it and some Mk22 bullets.
XM16E1 21 shots in a magazine Max Ammo: 101 A more advanced gun than the AK-47, there are three modes of fire for this weapon: single shot, 3 shot, and fully automatic. You can also attack a suppressor to the muzzle of this weapon by pressing CIRCLE in the equipment menu. This weapon can be found in a supply room in Graniny Gorky Lab, Exterior.
M63 501 shots in a magazine Max Ammo: 501 The beauty of this gun is that it can continuously fire its entire clip. Use this when you are being swarmed by enemies or have an up-close encounter in a boss battle. This gun can be found in Svyatogornyj East in the back of the run down wooden house.
SVD 9 shots in a magazine Max Ammo: 51 The Dragunov Sniper Rifle is a lethal and extremely accurate weapon. When the rifle is equipped Snake is forced to be in 1st person view mode. Use the TRIANGLE button to change the level of zoom. This can be found in Ponizovje West inside the munitions shack.
SINGLE ACTION ARMY 6 shots in a magazine Max Ammo: 30 This single shot weapon fires bullets that will ricochet off of walls even after hitting an enemy. Snake can enter first person mode for more accurate aiming by pressing R1 and then press L1 to zoom in. When holding the gun in first person mode, rotate the right analogue stick to spin the gun.
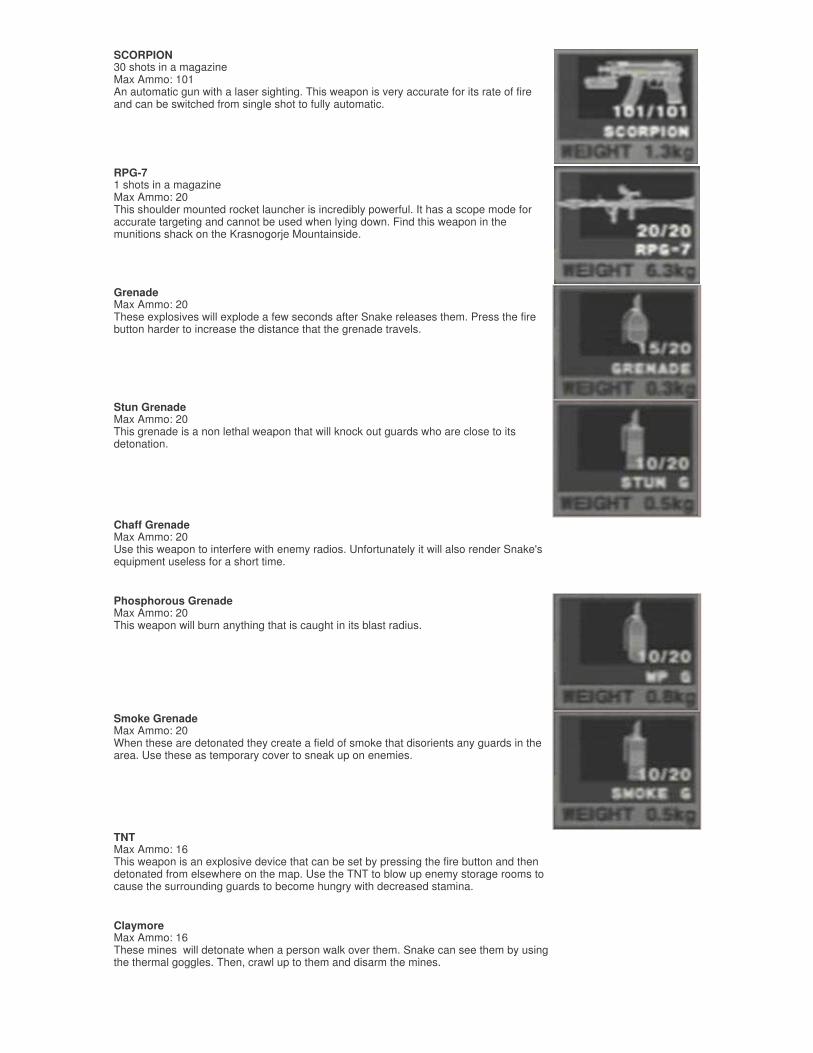
SCORPION 30 shots in a magazine Max Ammo: 101 An automatic gun with a laser sighting. This weapon is very accurate for its rate of fire and can be switched from single shot to fully automatic.
RPG-7 1 shots in a magazine Max Ammo: 20 This shoulder mounted rocket launcher is incredibly powerful. It has a scope mode for accurate targeting and cannot be used when lying down. Find this weapon in the munitions shack on the Krasnogorje Mountainside.
Grenade Max Ammo: 20 These explosives will explode a few seconds after Snake releases them. Press the fire button harder to increase the distance that the grenade travels.
Stun Grenade Max Ammo: 20 This grenade is a non lethal weapon that will knock out guards who are close to its detonation.
Chaff Grenade Max Ammo: 20 Use this weapon to interfere with enemy radios. Unfortunately it will also render Snake's equipment useless for a short time.
Phosphorous Grenade Max Ammo: 20 This weapon will burn anything that is caught in its blast radius.
Smoke Grenade Max Ammo: 20 When these are detonated they create a field of smoke that disorients any guards in the area. Use these as temporary cover to sneak up on enemies.
TNT Max Ammo: 16 This weapon is an explosive device that can be set by pressing the fire button and then detonated from elsewhere on the map. Use the TNT to blow up enemy storage rooms to cause the surrounding guards to become hungry with decreased stamina.
Claymore Max Ammo: 16 These mines will detonate when a person walk over them. Snake can see them by using the thermal goggles. Then, crawl up to them and disarm the mines.
Items Life Medicine Max Amount: 10 Refills one bar of Snake's health meter. Fake Death Pill Max Amount: 5 Snake enters a "dead" state that fools enemies. Use the revival pill to wake back up. Bug Juice Max Amount: 25 Use this to avoid hornets and leeches. Anti-Personel Sensor Depletes Battery Power Vibrates the controller when equipped and life forms approach. Book Max Amount: 10 This is an adult magazine that can be used to distract guards from their duty. Magazine Max Amount: 100 An empty magazine that can be thrown to distract enemy. Mousetrap Max Amount: 16 Use the mousetrap to catch live animals and keep them in Snake's inventory. Live animals will not rot and can be thrown at enemies. Active Sonar Depletes Battery Power The active sonar reveals the location of all animals on the map screen. This includes snakes and birds as well as guards so don't rely completely on this item for an enemy location. The ping noise it emits is also audible to enemies. Directional Microphone Use this to locate enemies at almost any distance. Its handy for weeding out snipers. Motion Detector Depletes Battery Power A sensor that detects moving objects within a certain radius. It runs continuously, so watch your battery power. Night Vision Goggles Depletes Battery Power These goggles allow Snake to see in the dark but are useless in areas with even dim light sources. Thermal Goggles Depletes Battery Power This gear will illuminate any object that emits heat. They are extremely useful and can be found in Rassvet, in a locker in the room Snake begins in when the guards storm the area. Camera You can use the camera to take pictures and save them onto a memory card. The camera can be obtained by beating the game or found in the office outside of the Groznyj Grad Torture Room. Don't worry, you'll know when you've reached the torture room. Cardboard Box Use this around other boxes to hide from guards. Box A (to weapons lab east wing) is found in Dolinovodno on top of the lockers to the left of the room the professor was in. Box B can be found at the end of the hall behind the waterfall after the Tikhogornyj area. Box C is found in Groznyj Grad South East in an alleyway on the eastern side of the area. Torch This can be found in the Chernoya Peschera Cave Branch. When lit, this can lead Snake through dark areas, it can also be used as a weapon. Mine Detector Use it to find mines. Look for it in Rassvet in the room outside of where the scientist was being held after the Virtuous Mission.
Camouflage Snake will not effectively be able to blend into his environment unless he is wearing the appropriate camouflage. There are many suits and different face paint styles hidden in the game, so keep your eyes open.
Mosin Nagant Max Ammo: 26 A sniper rifle that shoots tranq darts. This can only be obtained by beating The End non-lethally.
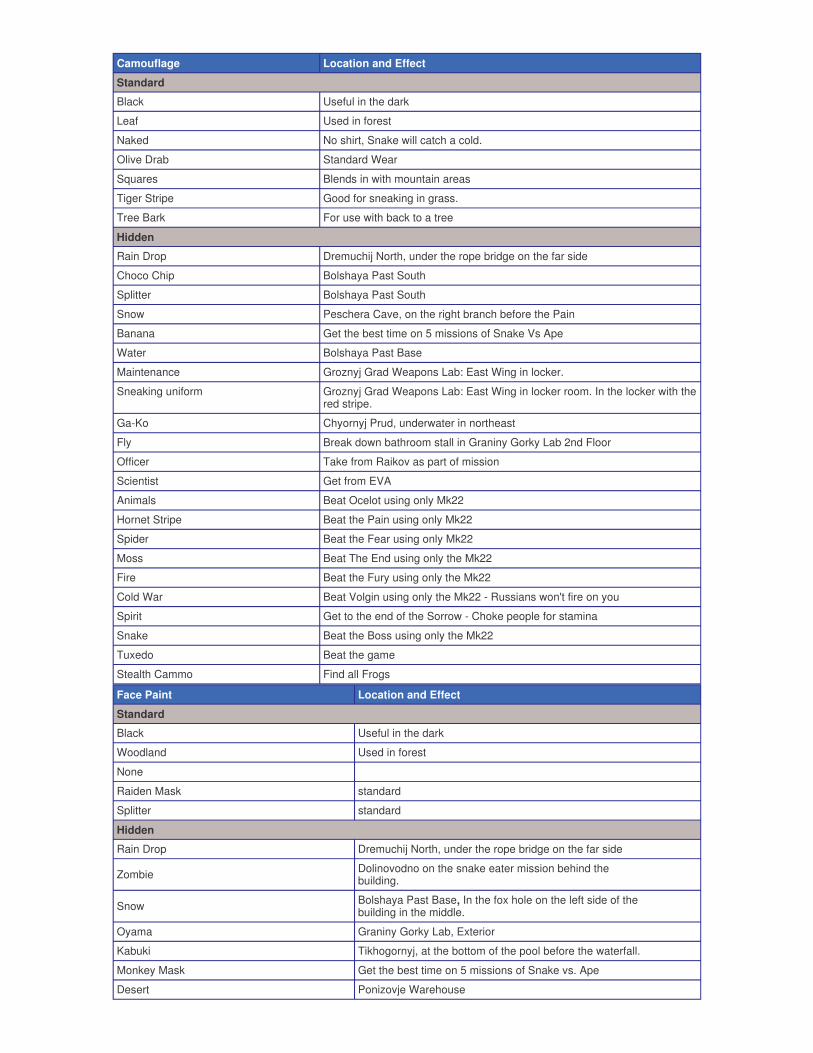
Camouflage Location and Effect
Standard
Black Useful in the dark
Leaf Used in forest
Naked No shirt, Snake will catch a cold.
Olive Drab Standard Wear
Squares Blends in with mountain areas
Tiger Stripe Good for sneaking in grass.
Tree Bark For use with back to a tree
Hidden
Rain Drop Dremuchij North, under the rope bridge on the far side
Choco Chip Bolshaya Past South
Splitter Bolshaya Past South
Snow Peschera Cave, on the right branch before the Pain
Banana Get the best time on 5 missions of Snake Vs Ape
Water Bolshaya Past Base
Maintenance Groznyj Grad Weapons Lab: East Wing in locker.
Sneaking uniform Groznyj Grad Weapons Lab: East Wing in locker room. In the locker with the red stripe.
Ga-Ko Chyornyj Prud, underwater in northeast
Fly Break down bathroom stall in Graniny Gorky Lab 2nd Floor
Officer Take from Raikov as part of mission
Scientist Get from EVA
Animals Beat Ocelot using only Mk22
Hornet Stripe Beat the Pain using only Mk22
Spider Beat the Fear using only Mk22
Moss Beat The End using only the Mk22
Fire Beat the Fury using only the Mk22
Cold War Beat Volgin using only the Mk22 - Russians won't fire on you
Spirit Get to the end of the Sorrow - Choke people for stamina
Snake Beat the Boss using only the Mk22
Tuxedo Beat the game
Stealth Cammo Find all Frogs
Face Paint Location and Effect
Standard
Black Useful in the dark
Woodland Used in forest
None
Raiden Mask standard
Splitter standard
Hidden
Rain Drop Dremuchij North, under the rope bridge on the far side
Zombie Dolinovodno on the snake eater mission behind the building.
Snow Bolshaya Past Base, In the fox hole on the left side of the building in the middle.
Oyama Graniny Gorky Lab, Exterior
Kabuki Tikhogornyj, at the bottom of the pool before the waterfall.
Monkey Mask Get the best time on 5 missions of Snake vs. Ape
Desert Ponizovje Warehouse
Walkthrough Part 1 Play Along All of the cut scenes in the game are interactive. Be sure to hit everything but the face buttons (X, CIRCLE, SQUARE, TRIANGLE) during the cut scenes and Snake will receive extra information as well as influence changes in the GUI. On the title screen the L3 button changes the pattern in the background. R1 speeds up action and R2 slows it down. L1 switches the black silhouette from the foreground to the background and L2 changes the color of the silhouette. L3 changes the color of the pattern in the background. Falling to Earth As snake makes his halo jump there will be two instances where the R1 button will appear in the upper right hand corner of the screen. Press it to view the jump from snake's eyes.
Snake lands and gets instructions from the major to retrieve his backpack. Trees that are lined with ivy can be climbed by using the action button. Snake can crawl under the fallen tree across from the ledge that looks out onto the jungle. He can also walk down a path to the right of the fallen tree that leads to the same area and hides life medicine. Straight ahead is a large tree with a cross hatched patter on it. This indicates that snake can climb the tree by pressing TRIANGLE.
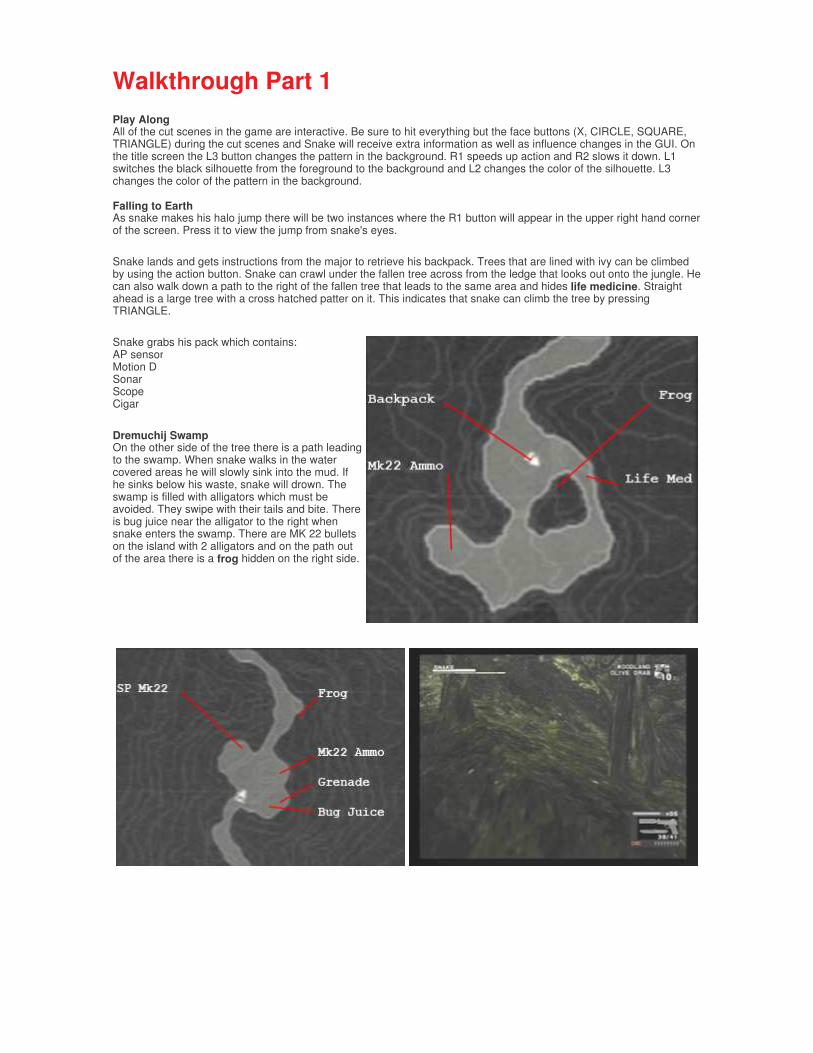
Snake grabs his pack which contains: AP sensor Motion D Sonar Scope Cigar
Dremuchij Swamp On the other side of the tree there is a path leading to the swamp. When snake walks in the water covered areas he will slowly sink into the mud. If he sinks below his waste, snake will drown. The swamp is filled with alligators which must be avoided. They swipe with their tails and bite. There is bug juice near the alligator to the right when snake enters the swamp. There are MK 22 bullets on the island with 2 alligators and on the path out of the area there is a frog hidden on the right side.
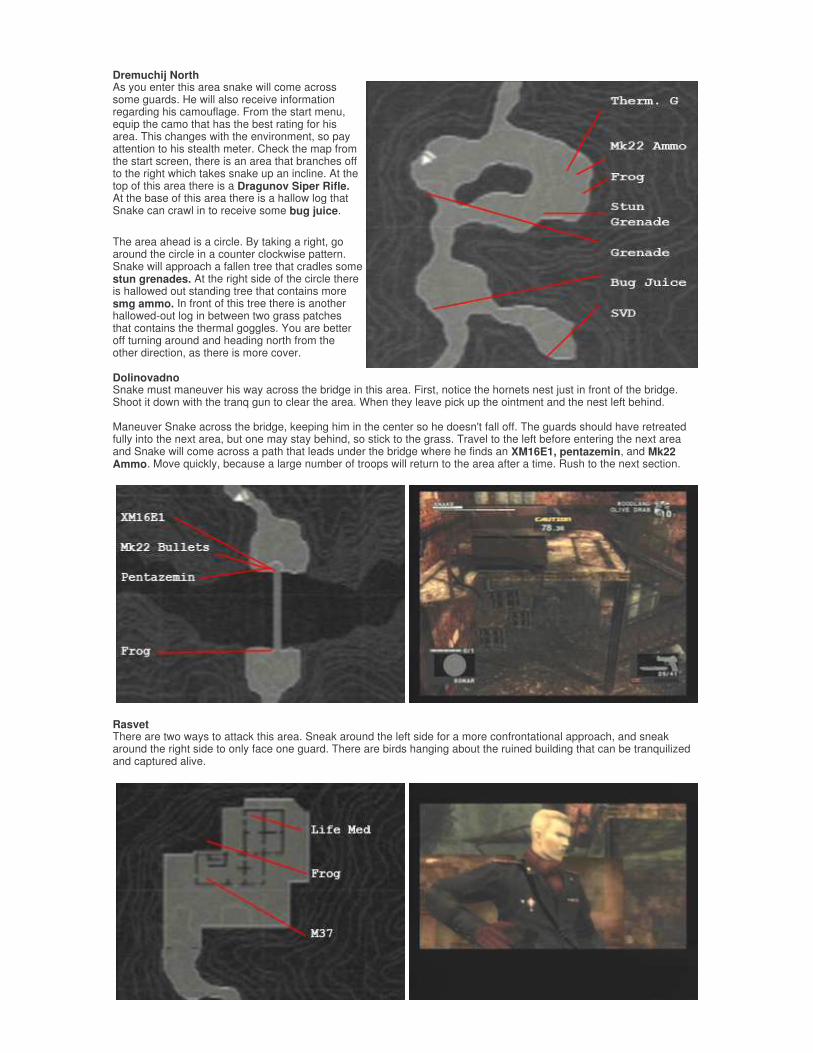
Dremuchij North As you enter this area snake will come across some guards. He will also receive information regarding his camouflage. From the start menu, equip the camo that has the best rating for his area. This changes with the environment, so pay attention to his stealth meter. Check the map from the start screen, there is an area that branches off to the right which takes snake up an incline. At the top of this area there is a Dragunov Siper Rifle. At the base of this area there is a hallow log that Snake can crawl in to receive some bug juice.
The area ahead is a circle. By taking a right, go around the circle in a counter clockwise pattern. Snake will approach a fallen tree that cradles some stun grenades. At the right side of the circle there is hallowed out standing tree that contains more smg ammo. In front of this tree there is another hallowed-out log in between two grass patches that contains the thermal goggles. You are better off turning around and heading north from the other direction, as there is more cover. Dolinovadno Snake must maneuver his way across the bridge in this area. First, notice the hornets nest just in front of the bridge. Shoot it down with the tranq gun to clear the area. When they leave pick up the ointment and the nest left behind. Maneuver Snake across the bridge, keeping him in the center so he doesn't fall off. The guards should have retreated fully into the next area, but one may stay behind, so stick to the grass. Travel to the left before entering the next area and Snake will come across a path that leads under the bridge where he finds an XM16E1, pentazemin, and Mk22 Ammo. Move quickly, because a large number of troops will return to the area after a time. Rush to the next section.
Rasvet There are two ways to attack this area. Sneak around the left side for a more confrontational approach, and sneak around the right side to only face one guard. There are birds hanging about the ruined building that can be tranquilized and captured alive.
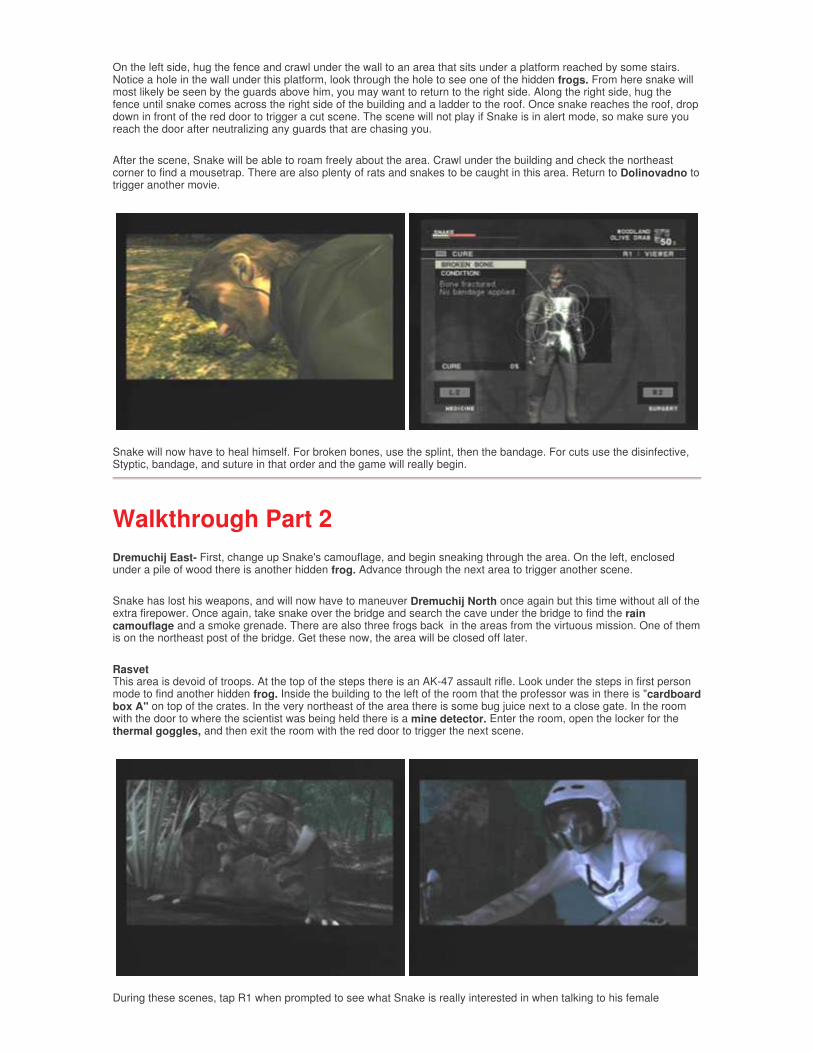
On the left side, hug the fence and crawl under the wall to an area that sits under a platform reached by some stairs. Notice a hole in the wall under this platform, look through the hole to see one of the hidden frogs. From here snake will most likely be seen by the guards above him, you may want to return to the right side. Along the right side, hug the fence until snake comes across the right side of the building and a ladder to the roof. Once snake reaches the roof, drop down in front of the red door to trigger a cut scene. The scene will not play if Snake is in alert mode, so make sure you reach the door after neutralizing any guards that are chasing you.
After the scene, Snake will be able to roam freely about the area. Crawl under the building and check the northeast corner to find a mousetrap. There are also plenty of rats and snakes to be caught in this area. Return to Dolinovadno to trigger another movie.
Snake will now have to heal himself. For broken bones, use the splint, then the bandage. For cuts use the disinfective, Styptic, bandage, and suture in that order and the game will really begin.
Walkthrough Part 2 Dremuchij East- First, change up Snake's camouflage, and begin sneaking through the area. On the left, enclosed under a pile of wood there is another hidden frog. Advance through the next area to trigger another scene.
Snake has lost his weapons, and will now have to maneuver Dremuchij North once again but this time without all of the extra firepower. Once again, take snake over the bridge and search the cave under the bridge to find the rain camouflage and a smoke grenade. There are also three frogs back in the areas from the virtuous mission. One of them is on the northeast post of the bridge. Get these now, the area will be closed off later.
Rasvet This area is devoid of troops. At the top of the steps there is an AK-47 assault rifle. Look under the steps in first person mode to find another hidden frog. Inside the building to the left of the room that the professor was in there is "cardboard box A" on top of the crates. In the very northeast of the area there is some bug juice next to a close gate. In the room with the door to where the scientist was being held there is a mine detector. Enter the room, open the locker for the thermal goggles, and then exit the room with the red door to trigger the next scene.
During these scenes, tap R1 when prompted to see what Snake is really interested in when talking to his female
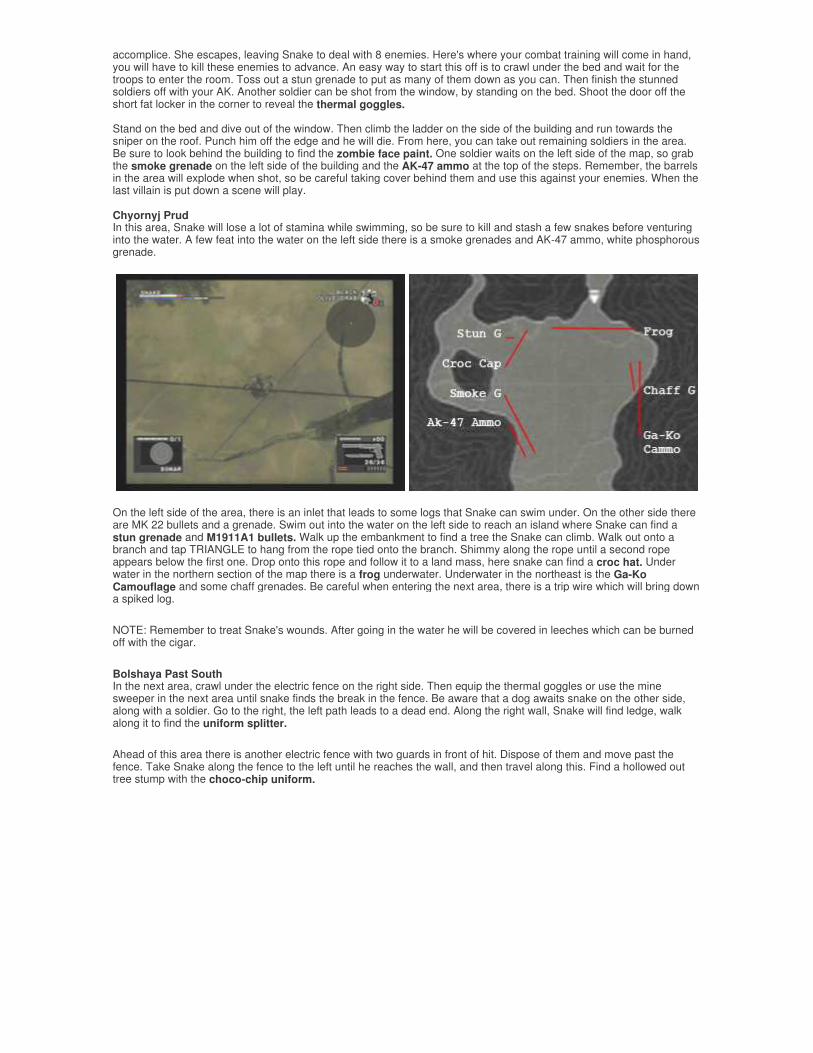
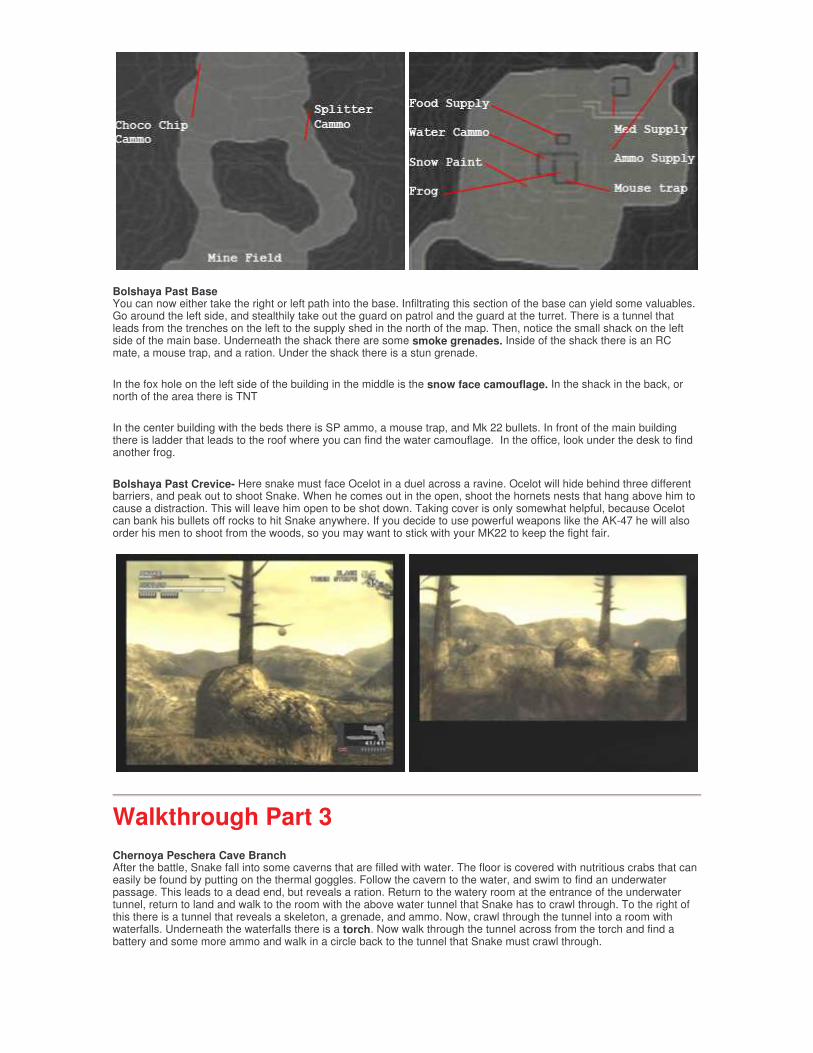
accomplice. She escapes, leaving Snake to deal with 8 enemies. Here's where your combat training will come in hand, you will have to kill these enemies to advance. An easy way to start this off is to crawl under the bed and wait for the troops to enter the room. Toss out a stun grenade to put as many of them down as you can. Then finish the stunned soldiers off with your AK. Another soldier can be shot from the window, by standing on the bed. Shoot the door off the short fat locker in the corner to reveal the thermal goggles. Stand on the bed and dive out of the window. Then climb the ladder on the side of the building and run towards the sniper on the roof. Punch him off the edge and he will die. From here, you can take out remaining soldiers in the area. Be sure to look behind the building to find the zombie face paint. One soldier waits on the left side of the map, so grab the smoke grenade on the left side of the building and the AK-47 ammo at the top of the steps. Remember, the barrels in the area will explode when shot, so be careful taking cover behind them and use this against your enemies. When the last villain is put down a scene will play. Chyornyj Prud In this area, Snake will lose a lot of stamina while swimming, so be sure to kill and stash a few snakes before venturing into the water. A few feat into the water on the left side there is a smoke grenades and AK-47 ammo, white phosphorous grenade.
On the left side of the area, there is an inlet that leads to some logs that Snake can swim under. On the other side there are MK 22 bullets and a grenade. Swim out into the water on the left side to reach an island where Snake can find a stun grenade and M1911A1 bullets. Walk up the embankment to find a tree the Snake can climb. Walk out onto a branch and tap TRIANGLE to hang from the rope tied onto the branch. Shimmy along the rope until a second rope appears below the first one. Drop onto this rope and follow it to a land mass, here snake can find a croc hat. Under water in the northern section of the map there is a frog underwater. Underwater in the northeast is the Ga-Ko Camouflage and some chaff grenades. Be careful when entering the next area, there is a trip wire which will bring down a spiked log.
NOTE: Remember to treat Snake's wounds. After going in the water he will be covered in leeches which can be burned off with the cigar.
Bolshaya Past South In the next area, crawl under the electric fence on the right side. Then equip the thermal goggles or use the mine sweeper in the next area until snake finds the break in the fence. Be aware that a dog awaits snake on the other side, along with a soldier. Go to the right, the left path leads to a dead end. Along the right wall, Snake will find ledge, walk along it to find the uniform splitter.
Ahead of this area there is another electric fence with two guards in front of hit. Dispose of them and move past the fence. Take Snake along the fence to the left until he reaches the wall, and then travel along this. Find a hollowed out tree stump with the choco-chip uniform.
Bolshaya Past Base You can now either take the right or left path into the base. Infiltrating this section of the base can yield some valuables. Go around the left side, and stealthily take out the guard on patrol and the guard at the turret. There is a tunnel that leads from the trenches on the left to the supply shed in the north of the map. Then, notice the small shack on the left side of the main base. Underneath the shack there are some smoke grenades. Inside of the shack there is an RC mate, a mouse trap, and a ration. Under the shack there is a stun grenade.
In the fox hole on the left side of the building in the middle is the snow face camouflage. In the shack in the back, or north of the area there is TNT
In the center building with the beds there is SP ammo, a mouse trap, and Mk 22 bullets. In front of the main building there is ladder that leads to the roof where you can find the water camouflage. In the office, look under the desk to find another frog.
Bolshaya Past Crevice- Here snake must face Ocelot in a duel across a ravine. Ocelot will hide behind three different barriers, and peak out to shoot Snake. When he comes out in the open, shoot the hornets nests that hang above him to cause a distraction. This will leave him open to be shot down. Taking cover is only somewhat helpful, because Ocelot can bank his bullets off rocks to hit Snake anywhere. If you decide to use powerful weapons like the AK-47 he will also order his men to shoot from the woods, so you may want to stick with your MK22 to keep the fight fair.
Walkthrough Part 3
Chernoya Peschera Cave Branch After the battle, Snake fall into some caverns that are filled with water. The floor is covered with nutritious crabs that can easily be found by putting on the thermal goggles. Follow the cavern to the water, and swim to find an underwater passage. This leads to a dead end, but reveals a ration. Return to the watery room at the entrance of the underwater tunnel, return to land and walk to the room with the above water tunnel that Snake has to crawl through. To the right of this there is a tunnel that reveals a skeleton, a grenade, and ammo. Now, crawl through the tunnel into a room with waterfalls. Underneath the waterfalls there is a torch. Now walk through the tunnel across from the torch and find a battery and some more ammo and walk in a circle back to the tunnel that Snake must crawl through.
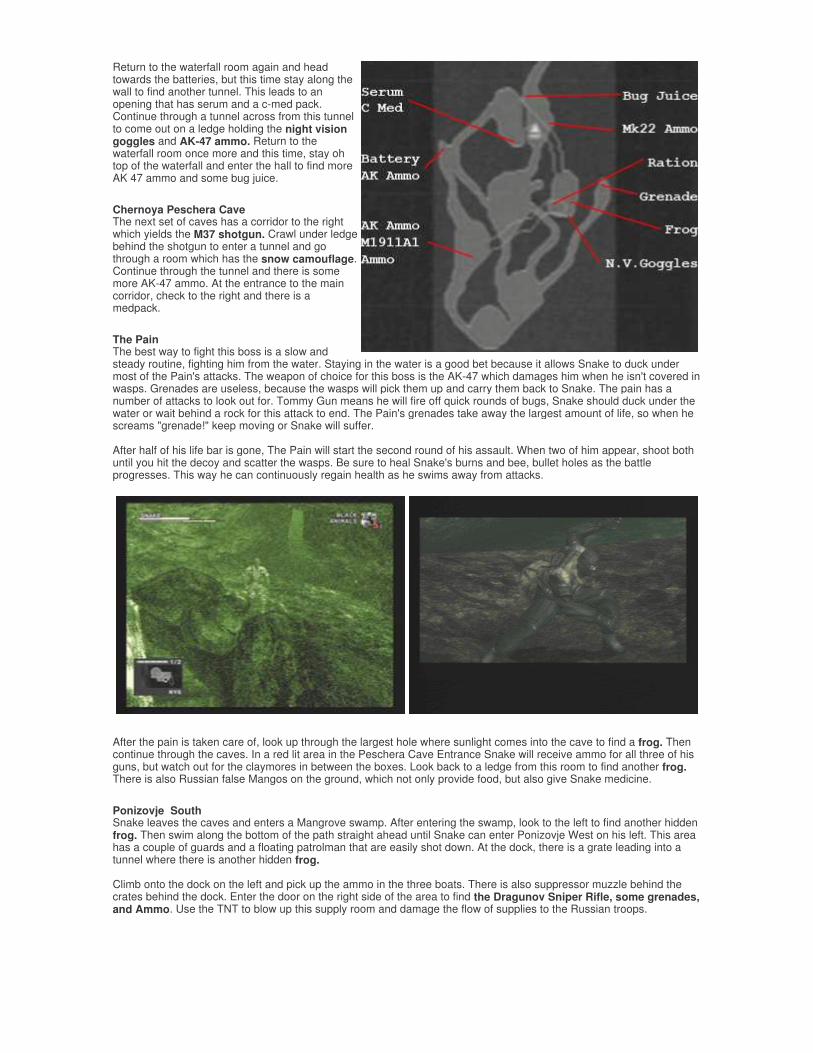
Return to the waterfall room again and head towards the batteries, but this time stay along the wall to find another tunnel. This leads to an opening that has serum and a c-med pack. Continue through a tunnel across from this tunnel to come out on a ledge holding the night vision goggles and AK-47 ammo. Return to the waterfall room once more and this time, stay oh top of the waterfall and enter the hall to find more AK 47 ammo and some bug juice.
Chernoya Peschera Cave The next set of caves has a corridor to the right which yields the M37 shotgun. Crawl under ledge behind the shotgun to enter a tunnel and go through a room which has the snow camouflage. Continue through the tunnel and there is some more AK-47 ammo. At the entrance to the main corridor, check to the right and there is a medpack.
The Pain The best way to fight this boss is a slow and steady routine, fighting him from the water. Staying in the water is a good bet because it allows Snake to duck under most of the Pain's attacks. The weapon of choice for this boss is the AK-47 which damages him when he isn't covered in wasps. Grenades are useless, because the wasps will pick them up and carry them back to Snake. The pain has a number of attacks to look out for. Tommy Gun means he will fire off quick rounds of bugs, Snake should duck under the water or wait behind a rock for this attack to end. The Pain's grenades take away the largest amount of life, so when he screams "grenade!" keep moving or Snake will suffer. After half of his life bar is gone, The Pain will start the second round of his assault. When two of him appear, shoot both until you hit the decoy and scatter the wasps. Be sure to heal Snake's burns and bee, bullet holes as the battle progresses. This way he can continuously regain health as he swims away from attacks.
After the pain is taken care of, look up through the largest hole where sunlight comes into the cave to find a frog. Then continue through the caves. In a red lit area in the Peschera Cave Entrance Snake will receive ammo for all three of his guns, but watch out for the claymores in between the boxes. Look back to a ledge from this room to find another frog. There is also Russian false Mangos on the ground, which not only provide food, but also give Snake medicine.
Ponizovje South Snake leaves the caves and enters a Mangrove swamp. After entering the swamp, look to the left to find another hidden frog. Then swim along the bottom of the path straight ahead until Snake can enter Ponizovje West on his left. This area has a couple of guards and a floating patrolman that are easily shot down. At the dock, there is a grate leading into a tunnel where there is another hidden frog. Climb onto the dock on the left and pick up the ammo in the three boats. There is also suppressor muzzle behind the crates behind the dock. Enter the door on the right side of the area to find the Dragunov Sniper Rifle, some grenades, and Ammo. Use the TNT to blow up this supply room and damage the flow of supplies to the Russian troops.
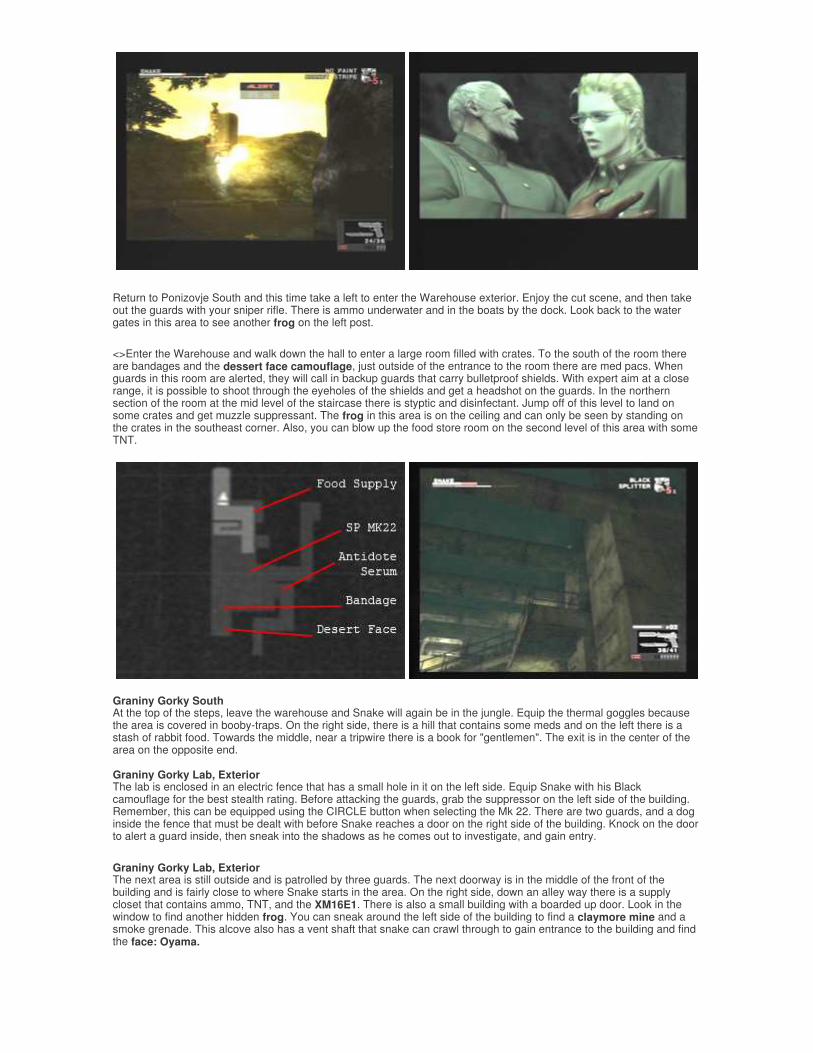
Return to Ponizovje South and this time take a left to enter the Warehouse exterior. Enjoy the cut scene, and then take out the guards with your sniper rifle. There is ammo underwater and in the boats by the dock. Look back to the water gates in this area to see another frog on the left post.
<>Enter the Warehouse and walk down the hall to enter a large room filled with crates. To the south of the room there are bandages and the dessert face camouflage, just outside of the entrance to the room there are med pacs. When guards in this room are alerted, they will call in backup guards that carry bulletproof shields. With expert aim at a close range, it is possible to shoot through the eyeholes of the shields and get a headshot on the guards. In the northern section of the room at the mid level of the staircase there is styptic and disinfectant. Jump off of this level to land on some crates and get muzzle suppressant. The frog in this area is on the ceiling and can only be seen by standing on the crates in the southeast corner. Also, you can blow up the food store room on the second level of this area with some TNT.
Graniny Gorky South At the top of the steps, leave the warehouse and Snake will again be in the jungle. Equip the thermal goggles because the area is covered in booby-traps. On the right side, there is a hill that contains some meds and on the left there is a stash of rabbit food. Towards the middle, near a tripwire there is a book for "gentlemen". The exit is in the center of the area on the opposite end. Graniny Gorky Lab, Exterior The lab is enclosed in an electric fence that has a small hole in it on the left side. Equip Snake with his Black camouflage for the best stealth rating. Before attacking the guards, grab the suppressor on the left side of the building. Remember, this can be equipped using the CIRCLE button when selecting the Mk 22. There are two guards, and a dog inside the fence that must be dealt with before Snake reaches a door on the right side of the building. Knock on the door to alert a guard inside, then sneak into the shadows as he comes out to investigate, and gain entry.
Graniny Gorky Lab, Exterior The next area is still outside and is patrolled by three guards. The next doorway is in the middle of the front of the building and is fairly close to where Snake starts in the area. On the right side, down an alley way there is a supply closet that contains ammo, TNT, and the XM16E1. There is also a small building with a boarded up door. Look in the window to find another hidden frog. You can sneak around the left side of the building to find a claymore mine and a smoke grenade. This alcove also has a vent shaft that snake can crawl through to gain entrance to the building and find the face: Oyama.
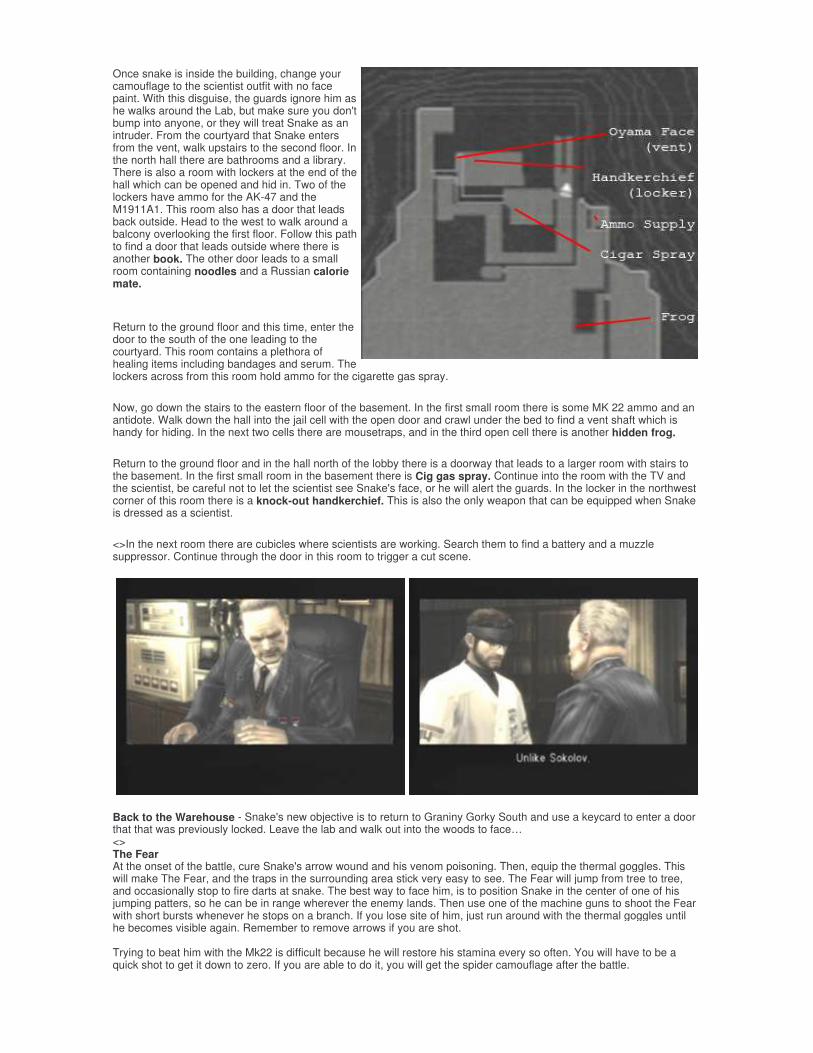
Once snake is inside the building, change your camouflage to the scientist outfit with no face paint. With this disguise, the guards ignore him as he walks around the Lab, but make sure you don't bump into anyone, or they will treat Snake as an intruder. From the courtyard that Snake enters from the vent, walk upstairs to the second floor. In the north hall there are bathrooms and a library. There is also a room with lockers at the end of the hall which can be opened and hid in. Two of the lockers have ammo for the AK-47 and the M1911A1. This room also has a door that leads back outside. Head to the west to walk around a balcony overlooking the first floor. Follow this path to find a door that leads outside where there is another book. The other door leads to a small room containing noodles and a Russian calorie mate.
Return to the ground floor and this time, enter the door to the south of the one leading to the courtyard. This room contains a plethora of healing items including bandages and serum. The lockers across from this room hold ammo for the cigarette gas spray.
Now, go down the stairs to the eastern floor of the basement. In the first small room there is some MK 22 ammo and an antidote. Walk down the hall into the jail cell with the open door and crawl under the bed to find a vent shaft which is handy for hiding. In the next two cells there are mousetraps, and in the third open cell there is another hidden frog.
Return to the ground floor and in the hall north of the lobby there is a doorway that leads to a larger room with stairs to the basement. In the first small room in the basement there is Cig gas spray. Continue into the room with the TV and the scientist, be careful not to let the scientist see Snake's face, or he will alert the guards. In the locker in the northwest corner of this room there is a knock-out handkerchief. This is also the only weapon that can be equipped when Snake is dressed as a scientist.
<>In the next room there are cubicles where scientists are working. Search them to find a battery and a muzzle suppressor. Continue through the door in this room to trigger a cut scene.
Back to the Warehouse - Snake's new objective is to return to Graniny Gorky South and use a keycard to enter a door that that was previously locked. Leave the lab and walk out into the woods to face… <> The Fear At the onset of the battle, cure Snake's arrow wound and his venom poisoning. Then, equip the thermal goggles. This will make The Fear, and the traps in the surrounding area stick very easy to see. The Fear will jump from tree to tree, and occasionally stop to fire darts at snake. The best way to face him, is to position Snake in the center of one of his jumping patters, so he can be in range wherever the enemy lands. Then use one of the machine guns to shoot the Fear with short bursts whenever he stops on a branch. If you lose site of him, just run around with the thermal goggles until he becomes visible again. Remember to remove arrows if you are shot. Trying to beat him with the Mk22 is difficult because he will restore his stamina every so often. You will have to be a quick shot to get it down to zero. If you are able to do it, you will get the spider camouflage after the battle.
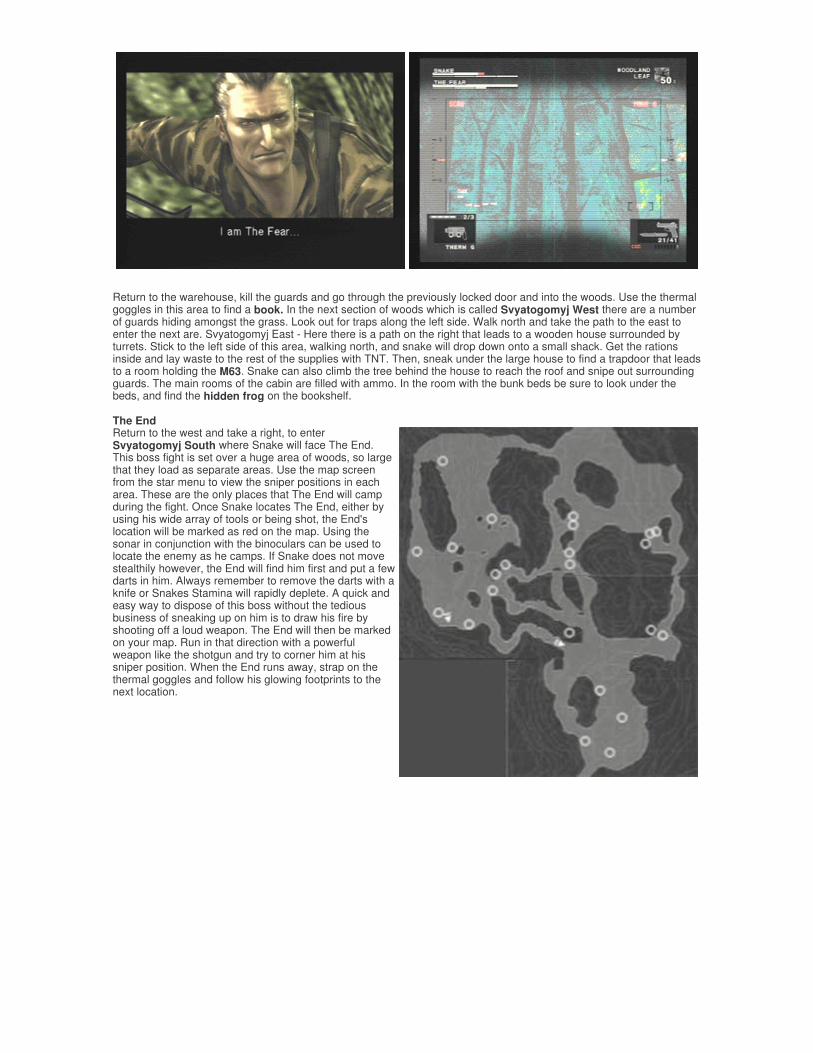
Return to the warehouse, kill the guards and go through the previously locked door and into the woods. Use the thermal goggles in this area to find a book. In the next section of woods which is called Svyatogomyj West there are a number of guards hiding amongst the grass. Look out for traps along the left side. Walk north and take the path to the east to enter the next are. Svyatogomyj East - Here there is a path on the right that leads to a wooden house surrounded by turrets. Stick to the left side of this area, walking north, and snake will drop down onto a small shack. Get the rations inside and lay waste to the rest of the supplies with TNT. Then, sneak under the large house to find a trapdoor that leads to a room holding the M63. Snake can also climb the tree behind the house to reach the roof and snipe out surrounding guards. The main rooms of the cabin are filled with ammo. In the room with the bunk beds be sure to look under the beds, and find the hidden frog on the bookshelf. The End Return to the west and take a right, to enter Svyatogomyj South where Snake will face The End. This boss fight is set over a huge area of woods, so large that they load as separate areas. Use the map screen from the star menu to view the sniper positions in each area. These are the only places that The End will camp during the fight. Once Snake locates The End, either by using his wide array of tools or being shot, the End's location will be marked as red on the map. Using the sonar in conjunction with the binoculars can be used to locate the enemy as he camps. If Snake does not move stealthily however, the End will find him first and put a few darts in him. Always remember to remove the darts with a knife or Snakes Stamina will rapidly deplete. A quick and easy way to dispose of this boss without the tedious business of sneaking up on him is to draw his fire by shooting off a loud weapon. The End will then be marked on your map. Run in that direction with a powerful weapon like the shotgun and try to corner him at his sniper position. When the End runs away, strap on the thermal goggles and follow his glowing footprints to the next location.
Notes: You can hear The End snoring with the directional microphone. Simply point it the direction of any sonar blips that come up to check if he's in the area. Also, the End's sniper positions are not always reachable by foot in every area. You may have find a path from another area that climbs up to his level. If you are able to beat The End without killing him you will be rewarded with the Mosin Nagant, a tranq sniper rifle.
Walkthrough Part 4
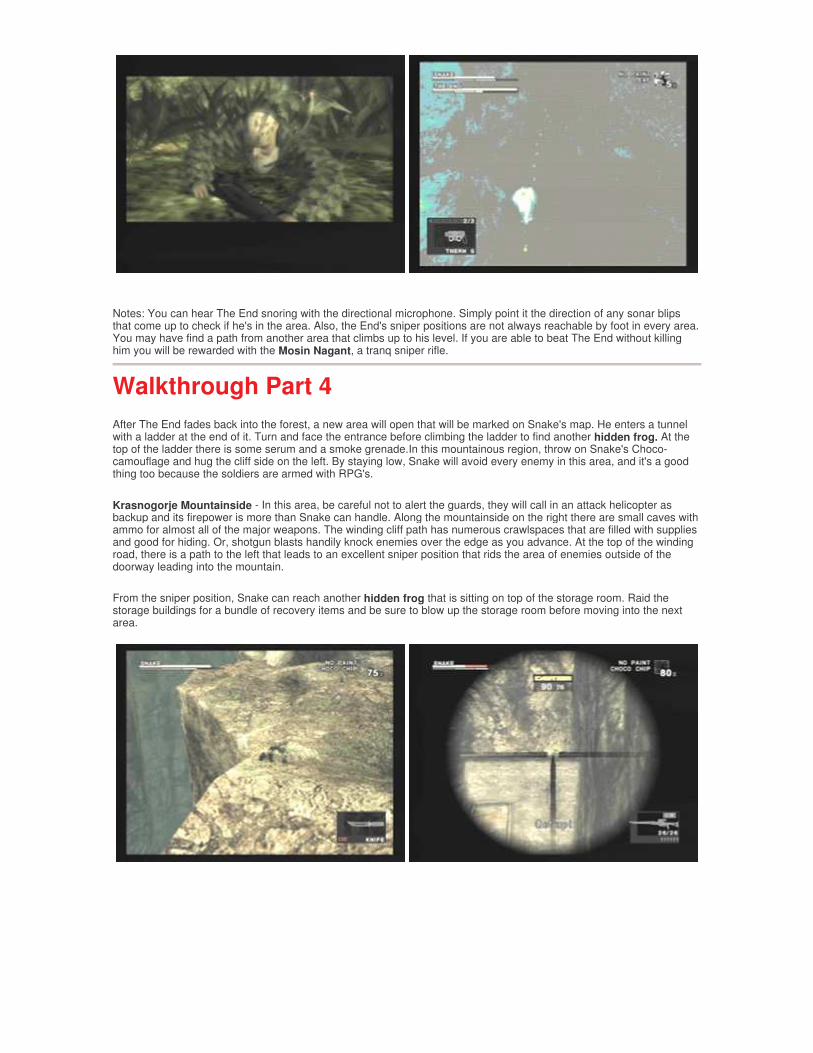
After The End fades back into the forest, a new area will open that will be marked on Snake's map. He enters a tunnel with a ladder at the end of it. Turn and face the entrance before climbing the ladder to find another hidden frog. At the top of the ladder there is some serum and a smoke grenade.In this mountainous region, throw on Snake's Choco- camouflage and hug the cliff side on the left. By staying low, Snake will avoid every enemy in this area, and it's a good thing too because the soldiers are armed with RPG's.
Krasnogorje Mountainside - In this area, be careful not to alert the guards, they will call in an attack helicopter as backup and its firepower is more than Snake can handle. Along the mountainside on the right there are small caves with ammo for almost all of the major weapons. The winding cliff path has numerous crawlspaces that are filled with supplies and good for hiding. Or, shotgun blasts handily knock enemies over the edge as you advance. At the top of the winding road, there is a path to the left that leads to an excellent sniper position that rids the area of enemies outside of the doorway leading into the mountain.
From the sniper position, Snake can reach another hidden frog that is sitting on top of the storage room. Raid the storage buildings for a bundle of recovery items and be sure to blow up the storage room before moving into the next area.
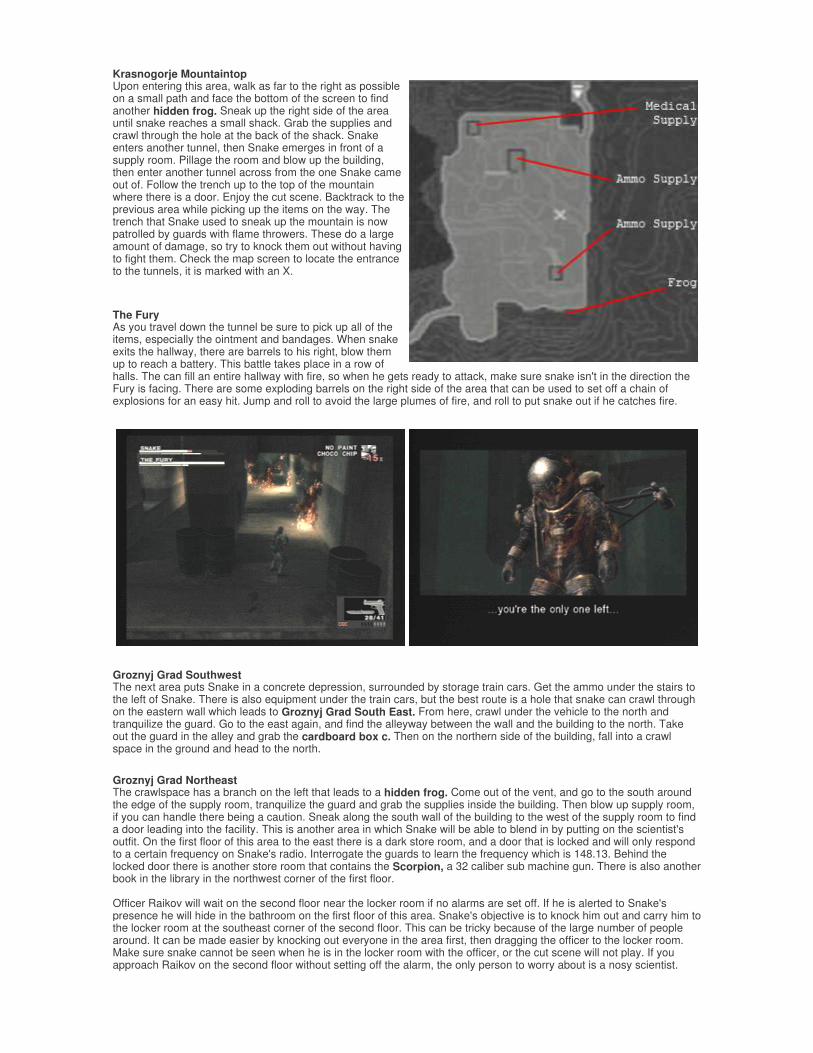
Krasnogorje Mountaintop Upon entering this area, walk as far to the right as possible on a small path and face the bottom of the screen to find another hidden frog. Sneak up the right side of the area until snake reaches a small shack. Grab the supplies and crawl through the hole at the back of the shack. Snake enters another tunnel, then Snake emerges in front of a supply room. Pillage the room and blow up the building, then enter another tunnel across from the one Snake came out of. Follow the trench up to the top of the mountain where there is a door. Enjoy the cut scene. Backtrack to the previous area while picking up the items on the way. The trench that Snake used to sneak up the mountain is now patrolled by guards with flame throwers. These do a large amount of damage, so try to knock them out without having to fight them. Check the map screen to locate the entrance to the tunnels, it is marked with an X.
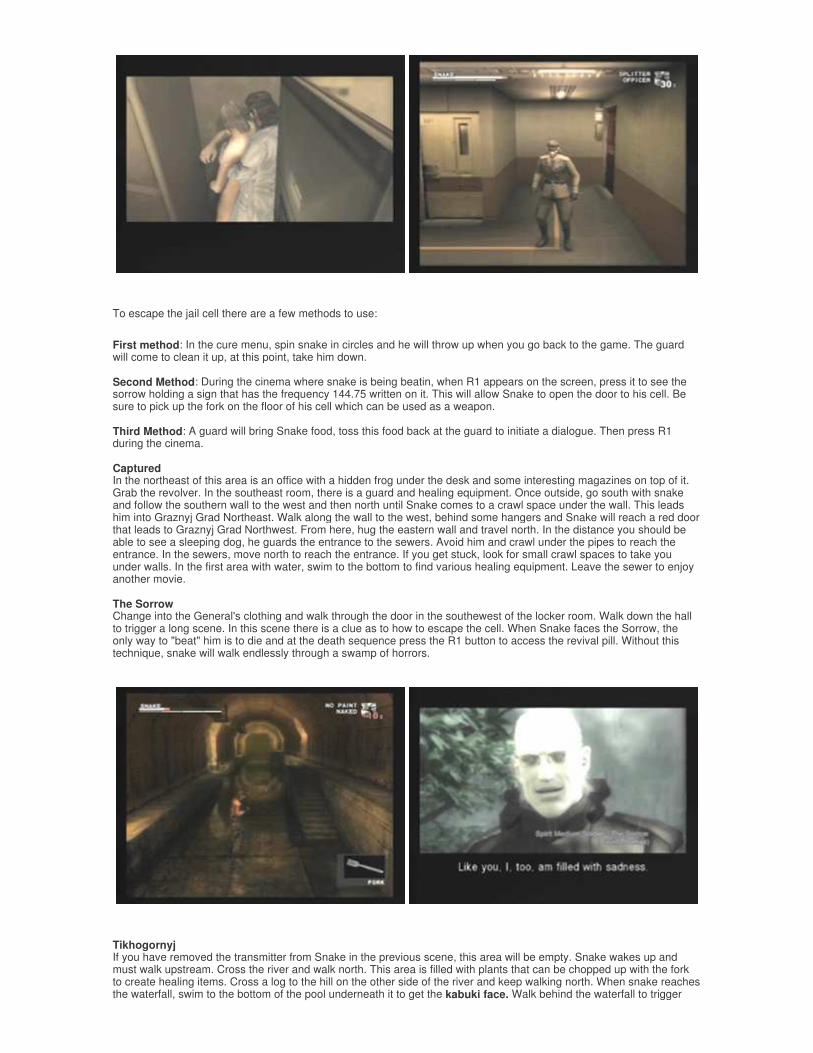
The Fury As you travel down the tunnel be sure to pick up all of the items, especially the ointment and bandages. When snake exits the hallway, there are barrels to his right, blow them up to reach a battery. This battle takes place in a row of halls. The can fill an entire hallway with fire, so when he gets ready to attack, make sure snake isn't in the direction the Fury is facing. There are some exploding barrels on the right side of the area that can be used to set off a chain of explosions for an easy hit. Jump and roll to avoid the large plumes of fire, and roll to put snake out if he catches fire.
Groznyj Grad Southwest The next area puts Snake in a concrete depression, surrounded by storage train cars. Get the ammo under the stairs to the left of Snake. There is also equipment under the train cars, but the best route is a hole that snake can crawl through on the eastern wall which leads to Groznyj Grad South East. From here, crawl under the vehicle to the north and tranquilize the guard. Go to the east again, and find the alleyway between the wall and the building to the north. Take out the guard in the alley and grab the cardboard box c. Then on the northern side of the building, fall into a crawl space in the ground and head to the north.
Groznyj Grad Northeast The crawlspace has a branch on the left that leads to a hidden frog. Come out of the vent, and go to the south around the edge of the supply room, tranquilize the guard and grab the supplies inside the building. Then blow up supply room, if you can handle there being a caution. Sneak along the south wall of the building to the west of the supply room to find a door leading into the facility. This is another area in which Snake will be able to blend in by putting on the scientist's outfit. On the first floor of this area to the east there is a dark store room, and a door that is locked and will only respond to a certain frequency on Snake's radio. Interrogate the guards to learn the frequency which is 148.13. Behind the locked door there is another store room that contains the Scorpion, a 32 caliber sub machine gun. There is also another book in the library in the northwest corner of the first floor. Officer Raikov will wait on the second floor near the locker room if no alarms are set off. If he is alerted to Snake's presence he will hide in the bathroom on the first floor of this area. Snake's objective is to knock him out and carry him to the locker room at the southeast corner of the second floor. This can be tricky because of the large number of people around. It can be made easier by knocking out everyone in the area first, then dragging the officer to the locker room. Make sure snake cannot be seen when he is in the locker room with the officer, or the cut scene will not play. If you approach Raikov on the second floor without setting off the alarm, the only person to worry about is a nosy scientist.
To escape the jail cell there are a few methods to use:
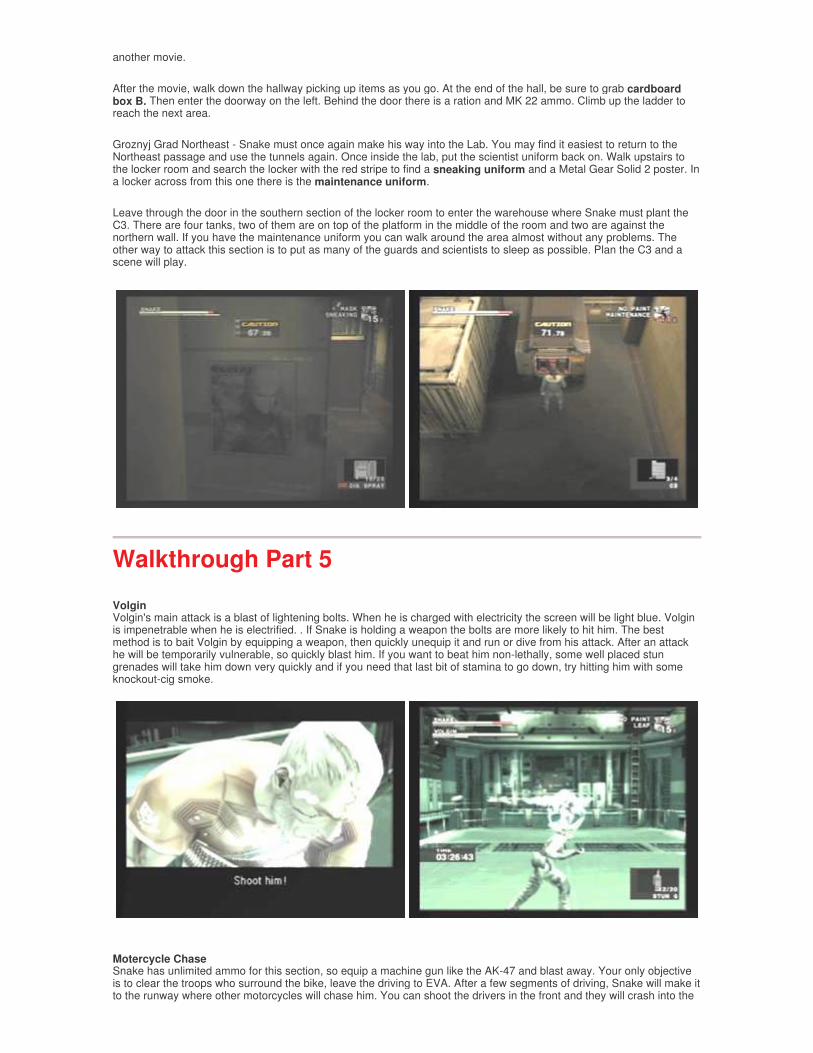
First method: In the cure menu, spin snake in circles and he will throw up when you go back to the game. The guard will come to clean it up, at this point, take him down. Second Method: During the cinema where snake is being beatin, when R1 appears on the screen, press it to see the sorrow holding a sign that has the frequency 144.75 written on it. This will allow Snake to open the door to his cell. Be sure to pick up the fork on the floor of his cell which can be used as a weapon. Third Method: A guard will bring Snake food, toss this food back at the guard to initiate a dialogue. Then press R1 during the cinema. Captured In the northeast of this area is an office with a hidden frog under the desk and some interesting magazines on top of it. Grab the revolver. In the southeast room, there is a guard and healing equipment. Once outside, go south with snake and follow the southern wall to the west and then north until Snake comes to a crawl space under the wall. This leads him into Graznyj Grad Northeast. Walk along the wall to the west, behind some hangers and Snake will reach a red door that leads to Graznyj Grad Northwest. From here, hug the eastern wall and travel north. In the distance you should be able to see a sleeping dog, he guards the entrance to the sewers. Avoid him and crawl under the pipes to reach the entrance. In the sewers, move north to reach the entrance. If you get stuck, look for small crawl spaces to take you under walls. In the first area with water, swim to the bottom to find various healing equipment. Leave the sewer to enjoy another movie. The Sorrow Change into the General's clothing and walk through the door in the southewest of the locker room. Walk down the hall to trigger a long scene. In this scene there is a clue as to how to escape the cell. When Snake faces the Sorrow, the only way to "beat" him is to die and at the death sequence press the R1 button to access the revival pill. Without this technique, snake will walk endlessly through a swamp of horrors.
Tikhogornyj If you have removed the transmitter from Snake in the previous scene, this area will be empty. Snake wakes up and must walk upstream. Cross the river and walk north. This area is filled with plants that can be chopped up with the fork to create healing items. Cross a log to the hill on the other side of the river and keep walking north. When snake reaches the waterfall, swim to the bottom of the pool underneath it to get the kabuki face. Walk behind the waterfall to trigger
another movie.
After the movie, walk down the hallway picking up items as you go. At the end of the hall, be sure to grab cardboard box B. Then enter the doorway on the left. Behind the door there is a ration and MK 22 ammo. Climb up the ladder to reach the next area.
Groznyj Grad Northeast - Snake must once again make his way into the Lab. You may find it easiest to return to the Northeast passage and use the tunnels again. Once inside the lab, put the scientist uniform back on. Walk upstairs to the locker room and search the locker with the red stripe to find a sneaking uniform and a Metal Gear Solid 2 poster. In a locker across from this one there is the maintenance uniform.
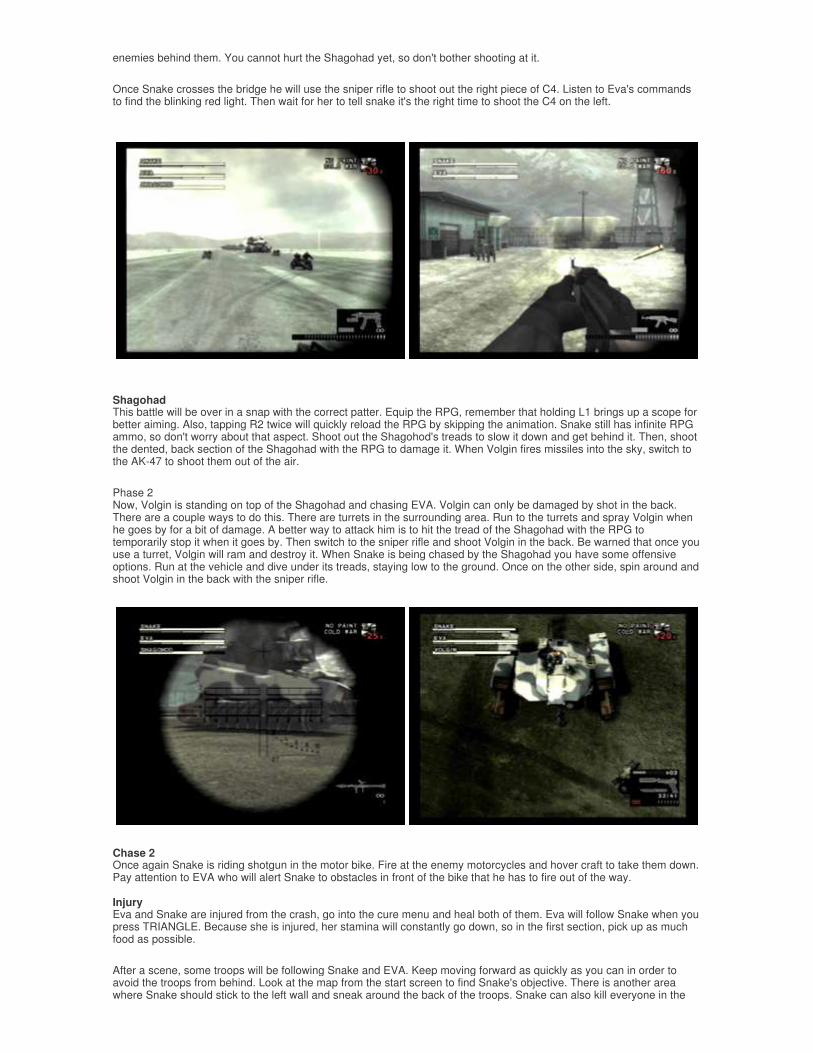
Leave through the door in the southern section of the locker room to enter the warehouse where Snake must plant the C3. There are four tanks, two of them are on top of the platform in the middle of the room and two are against the northern wall. If you have the maintenance uniform you can walk around the area almost without any problems. The other way to attack this section is to put as many of the guards and scientists to sleep as possible. Plan the C3 and a scene will play.
Walkthrough Part 5 Volgin Volgin's main attack is a blast of lightening bolts. When he is charged with electricity the screen will be light blue. Volgin is impenetrable when he is electrified. . If Snake is holding a weapon the bolts are more likely to hit him. The best method is to bait Volgin by equipping a weapon, then quickly unequip it and run or dive from his attack. After an attack he will be temporarily vulnerable, so quickly blast him. If you want to beat him non-lethally, some well placed stun grenades will take him down very quickly and if you need that last bit of stamina to go down, try hitting him with some knockout-cig smoke.
Motercycle Chase Snake has unlimited ammo for this section, so equip a machine gun like the AK-47 and blast away. Your only objective is to clear the troops who surround the bike, leave the driving to EVA. After a few segments of driving, Snake will make it to the runway where other motorcycles will chase him. You can shoot the drivers in the front and they will crash into the
enemies behind them. You cannot hurt the Shagohad yet, so don't bother shooting at it.
Once Snake crosses the bridge he will use the sniper rifle to shoot out the right piece of C4. Listen to Eva's commands to find the blinking red light. Then wait for her to tell snake it's the right time to shoot the C4 on the left.
Shagohad This battle will be over in a snap with the correct patter. Equip the RPG, remember that holding L1 brings up a scope for better aiming. Also, tapping R2 twice will quickly reload the RPG by skipping the animation. Snake still has infinite RPG ammo, so don't worry about that aspect. Shoot out the Shagohod's treads to slow it down and get behind it. Then, shoot the dented, back section of the Shagohad with the RPG to damage it. When Volgin fires missiles into the sky, switch to the AK-47 to shoot them out of the air.
Phase 2 Now, Volgin is standing on top of the Shagohad and chasing EVA. Volgin can only be damaged by shot in the back. There are a couple ways to do this. There are turrets in the surrounding area. Run to the turrets and spray Volgin when he goes by for a bit of damage. A better way to attack him is to hit the tread of the Shagohad with the RPG to temporarily stop it when it goes by. Then switch to the sniper rifle and shoot Volgin in the back. Be warned that once you use a turret, Volgin will ram and destroy it. When Snake is being chased by the Shagohad you have some offensive options. Run at the vehicle and dive under its treads, staying low to the ground. Once on the other side, spin around and shoot Volgin in the back with the sniper rifle.
Chase 2 Once again Snake is riding shotgun in the motor bike. Fire at the enemy motorcycles and hover craft to take them down. Pay attention to EVA who will alert Snake to obstacles in front of the bike that he has to fire out of the way. Injury Eva and Snake are injured from the crash, go into the cure menu and heal both of them. Eva will follow Snake when you press TRIANGLE. Because she is injured, her stamina will constantly go down, so in the first section, pick up as much food as possible.
After a scene, some troops will be following Snake and EVA. Keep moving forward as quickly as you can in order to avoid the troops from behind. Look at the map from the start screen to find Snake's objective. There is another area where Snake should stick to the left wall and sneak around the back of the troops. Snake can also kill everyone in the
area in order to advance to the lake.
The Boss The boss is a dangerous foe. If she gets in close range of Snake she will perform some CQC moves that will damage him, disarm him, and take away a good amount of ammo. Snake can win the CQC battles, if you continuously tap attack. Also, to make sure you don't lose items in your inventory, equip snake with his knife if she gets in close. Mastering CQC will allow you to avoid damage from the Boss at close range and keep her at bay.
At long range, the Boss will hide behind trees and take shots at Snake. A good way to pick the boss out of the flowers is to use the thermal goggles. Then when you see her hiding behind a tree, pick her off with the sniper rifle. It will take two shots to bring her to the ground. The Boss will move close to snake as she hides behind the trees, then will say something like "I'm coming" and move in for some CQC. Switch to the knife.
Note: There are three special snakes in this area which will restore all of Snake's stamina. Also, beat the Boss using only the Mk22 in order to recieve the ultimate camouflage.
After the Boss is killed, and Snake is on the plane, there will be one final sequence where Ocelot plays a game of Russian Roulette. Hold R1 to get a better view of the juggling and make your decision. Congratulations! You have completed the mission. The origin of the Metal Gear series has been revealed. For beating the game you will be rewarded with items that are listed in the secrets section. Wait through the credits for some audio at the title screen. There are two sections of audio, so wait a bit after the first one.
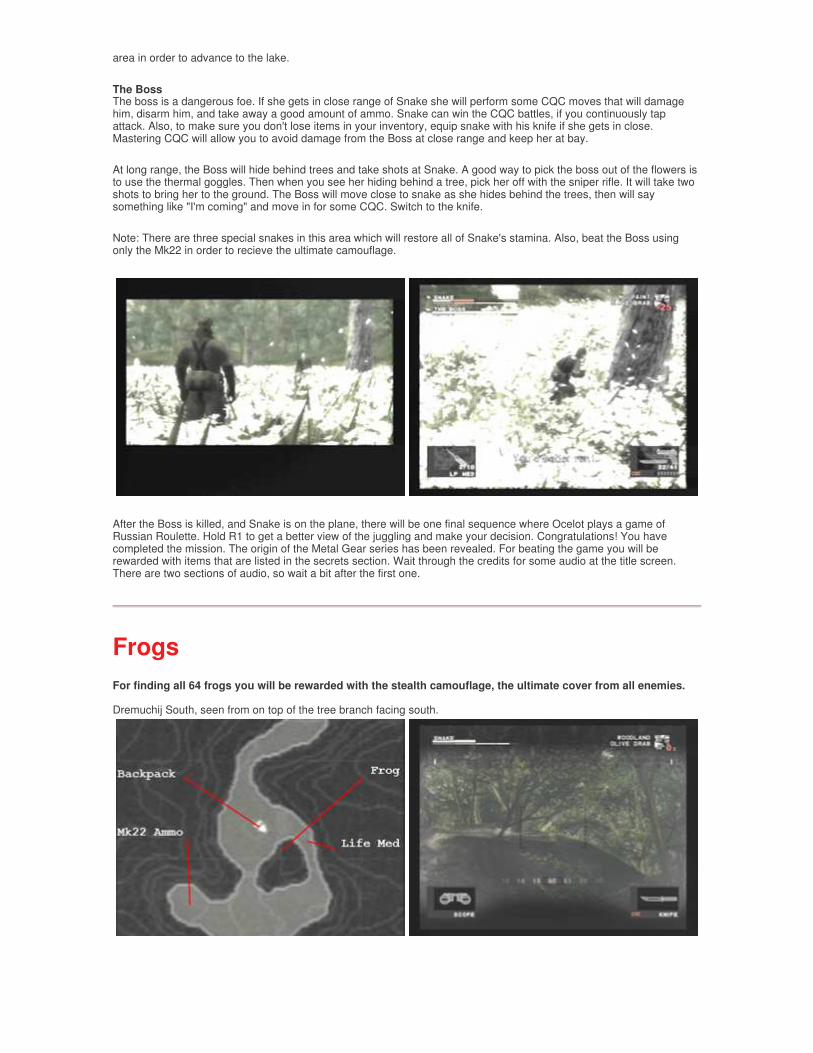
Frogs For finding all 64 frogs you will be rewarded with the stealth camouflage, the ultimate cover from all enemies. Dremuchij South, seen from on top of the tree branch facing south.
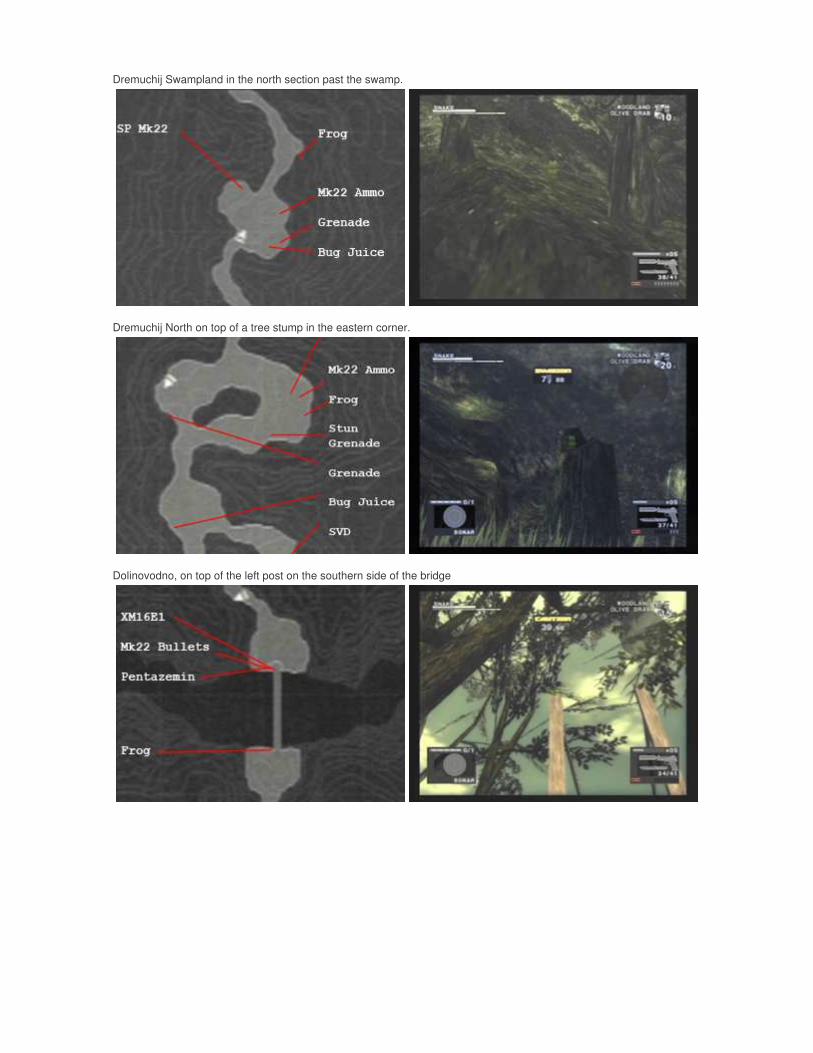
Dremuchij Swampland in the north section past the swamp.
Dremuchij North on top of a tree stump in the eastern corner.
Dolinovodno, on top of the left post on the southern side of the bridge
� Rasvet - Under the metal stairs where the AK47 was. � Dolinovodno - On the northeast post of the bridge � Dremuchij North - On the hill in the middle of the northern section. View it from the tree in the northwest. � Dremuchij Swamp - On the ground next to a tree. Cross the quicksand to the area on the north west side of the
swamp. � Dremuchij South - In the very south wester area. Look west on top of the hill.
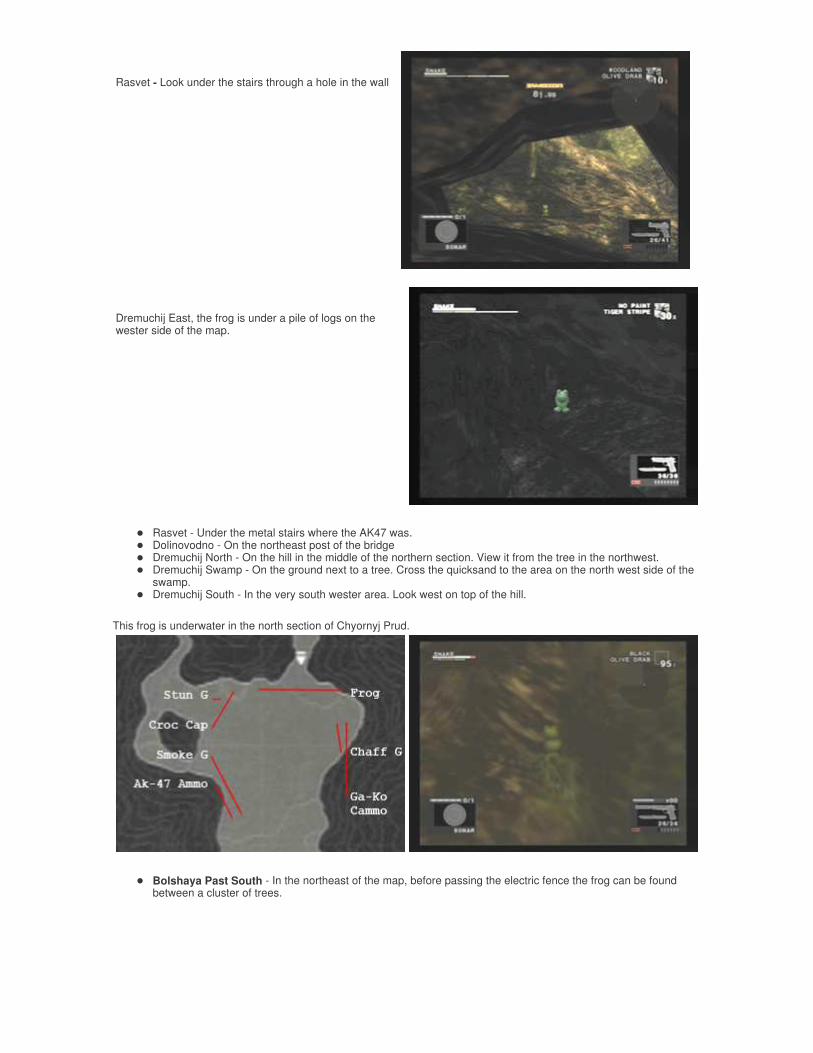
This frog is underwater in the north section of Chyornyj Prud.
� Bolshaya Past South - In the northeast of the map, before passing the electric fence the frog can be found between a cluster of trees.
Rasvet - Look under the stairs through a hole in the wall
Dremuchij East, the frog is under a pile of logs on the wester side of the map.
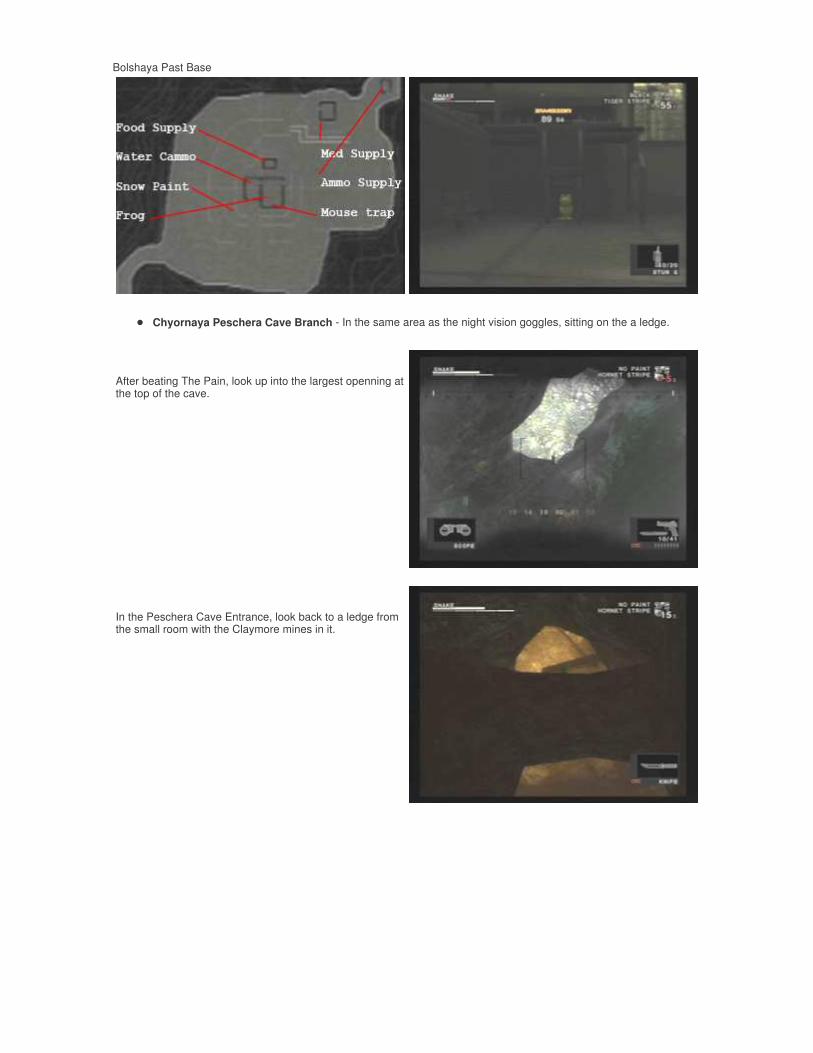
Bolshaya Past Base
� Chyornaya Peschera Cave Branch - In the same area as the night vision goggles, sitting on the a ledge.
After beating The Pain, look up into the largest openning at the top of the cave.
In the Peschera Cave Entrance, look back to a ledge from the small room with the Claymore mines in it.
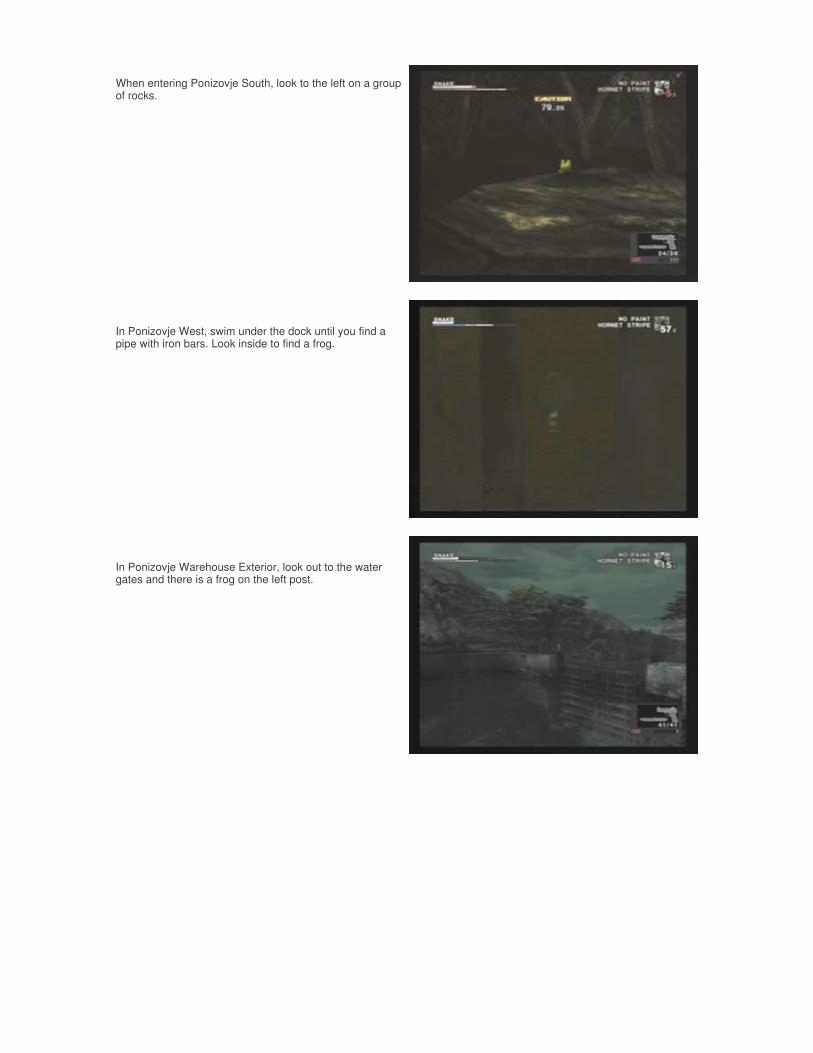
When entering Ponizovje South, look to the left on a group of rocks.
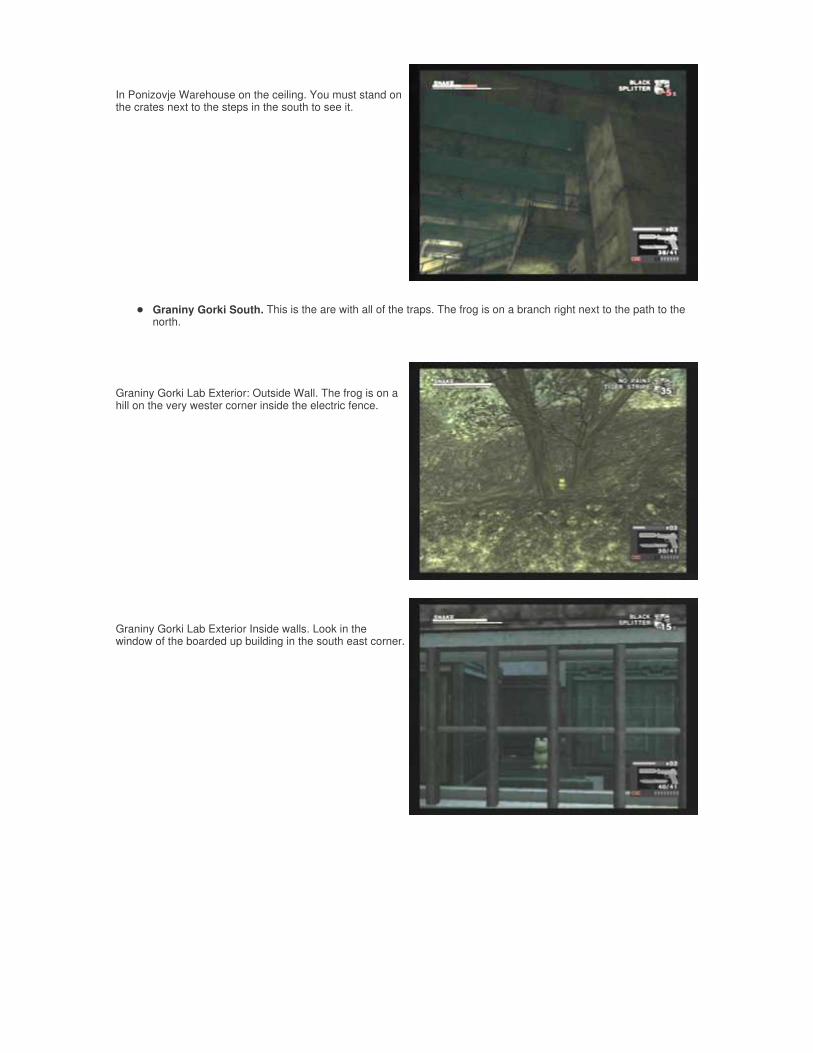
In Ponizovje West, swim under the dock until you find a pipe with iron bars. Look inside to find a frog.
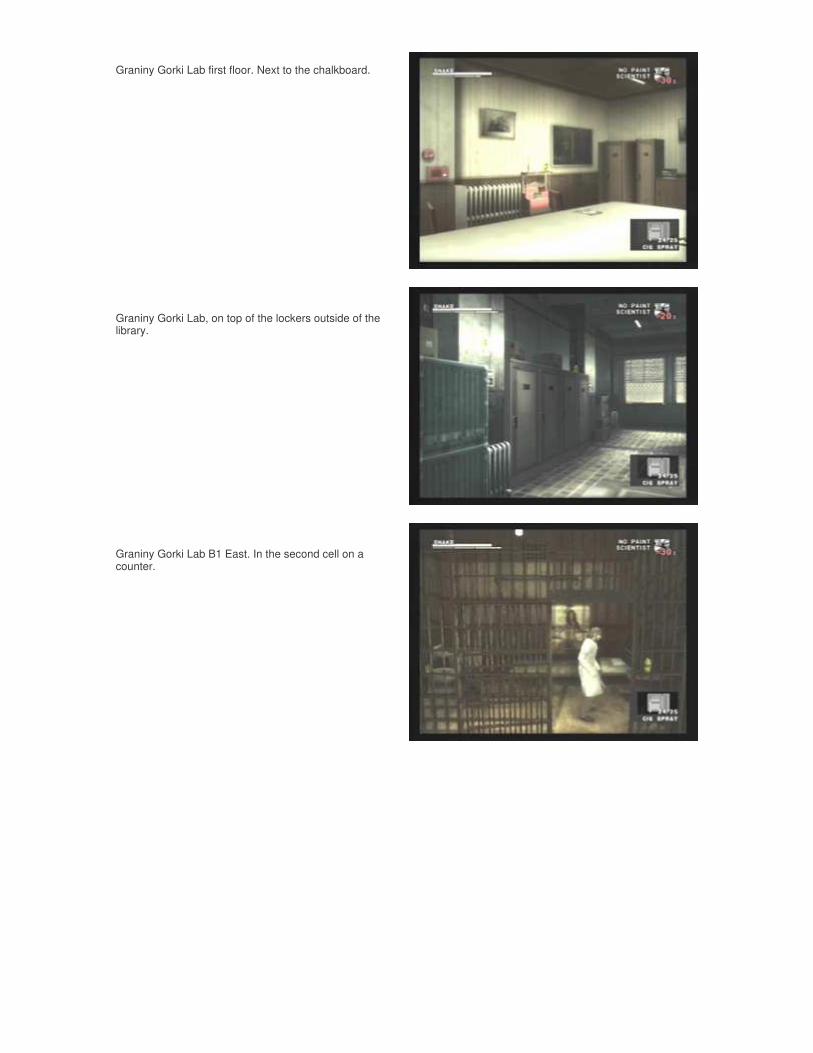
In Ponizovje Warehouse Exterior, look out to the water gates and there is a frog on the left post.
� Graniny Gorki South. This is the are with all of the traps. The frog is on a branch right next to the path to the north.
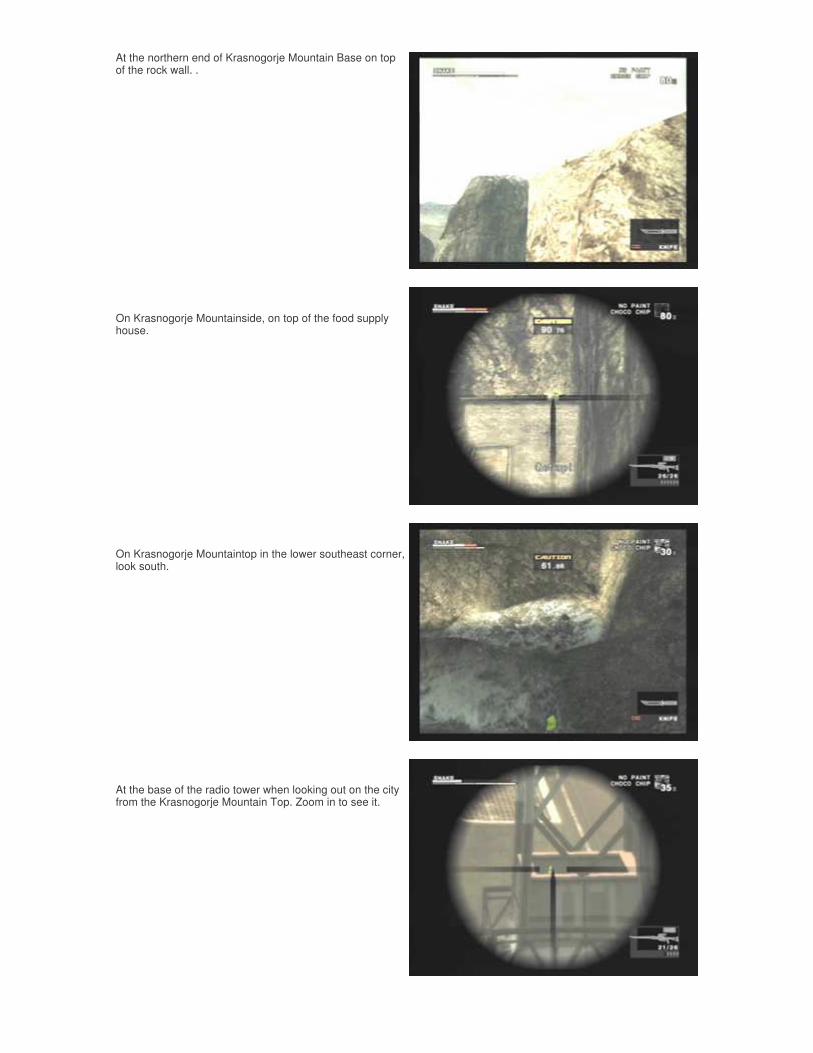
In Ponizovje Warehouse on the ceiling. You must stand on the crates next to the steps in the south to see it.
Graniny Gorki Lab Exterior: Outside Wall. The frog is on a hill on the very wester corner inside the electric fence.
Graniny Gorki Lab Exterior Inside walls. Look in the window of the boarded up building in the south east corner.
Graniny Gorki Lab first floor. Next to the chalkboard.
Graniny Gorki Lab, on top of the lockers outside of the library.
Graniny Gorki Lab B1 East. In the second cell on a counter.

� Svyatogornyj West - In the southwestern section of the map next to the hollow log and the climbable tree. � Svyatogornyj East - Enter the large building from the western side. There is a bookshelf in the small room that
contains a frog.
� Sokreovenno North- Look for the hollow lock in the southern section of the map. To the west of the log on the hill at the base of a tree there is a frog.
In Svyatogornyj South, turn around and face the entrance. Look on top of the ledge in the corner.
Frogs shown are in Sokreovenno South and West.
At the base of the long ladder after The End battle. Turn around and towards the entrance.
At the northern end of Krasnogorje Mountain Base on top of the rock wall. .
On Krasnogorje Mountainside, on top of the food supply house.
On Krasnogorje Mountaintop in the lower southeast corner, look south.
At the base of the radio tower when looking out on the city from the Krasnogorje Mountain Top. Zoom in to see it.
� Groznyj Grad Underground Tunnel - When fighting The Fury, run to the northern side of the map and look up on top of the pipes to find another frog.
The frogs of Groznyj Grad
� Tikhogornyj - At the very south of the area a frog sits on a branch over the stream. � Tikhogornyj - Behind the waterfall in the room with the ladder leading to the next area, look on top of a pipe. � Groznyj Grad Weapons Lab: On the left side of the Shagohod, look down between the machine and the railing
to find a frog. � Groznyj Grad Runway: At the beginning of the chase when there is a group of soldiers, look on the seat of the
forklift to the left of the motorcycle. � Groznyj Grad Runway: While you are flying down the runway, there is a frog on top of a sign on the right side
facing backwards. � Groznyj Grad Rail Bridge Explosion: The frog can be found on one of the arches under the bridge. � First Shagohod Boss Fight: Look for a frog on the bottom of the radio tower in the southwest corner of the
map. � Groznyj Grad Rail Bridge North: EVA will stop in front of red and white road barriers. There is a frog on the
ground inbetween two of the barriers. � Motorcycle Chase: When the sixth section of the chase scene starts there is a frog to your right (facing foward)
on a rock. � Motorcycle Chase: When the seventh section of the chase scene starts there is a frog to your left (facing
foward) on top of a rock. � Zaozyorje South: On the western side of the map there is a tree bridge. Look below the bridge to the right to
find a frog. � Zaozyorje North: Where the path splits in this area there is a frog at the base of a tree against the hill. � Rokovoj Bereg: The frog is sitting on top of a tree near the center of the map.
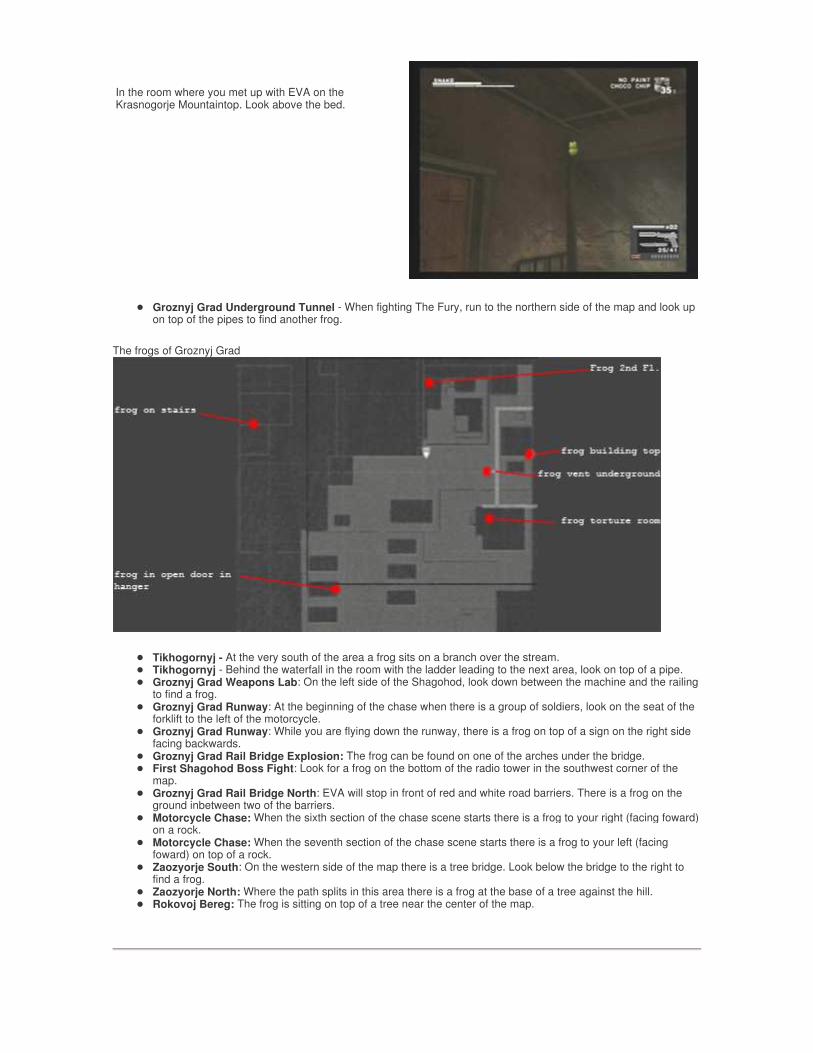
In the room where you met up with EVA on the Krasnogorje Mountaintop. Look above the bed.

Snake Vs. Monkey Snake's inventory for this game is: EZ Gun Stun Grenades Directional Microphone Active Sonar Thermal Goggles Scope Escape From the Jungle The two most difficult monkeys to find in this section are sitting on the tree where Snake finds his backpack at the beginning of the story mode. You should first get the monkey sitting on the cliff, the two closest to the starting position. One of these is up on the embankment. Get the one in the dead end to the west, then run back across the map to the east and tag the two monkeys up the hill. Shoot the two monkeys hiding in the tree from the top of the eastern area then slide down and pick them up. The last monkey is just to the west of the tree.
Dragnet of the Apes In this mission, Snake's stun grenades will come in handy. Use a grenade on the three monkeys just around the corner to the right. Other monkeys can be shot from a distance. The hard to find buggers are sitting on the tree and the island in the middle of the map. The far eastern corner is a good place to snipe these monkeys, because they always fall off to the right. Be sure to pick up the sonar at the beginning of the stage.
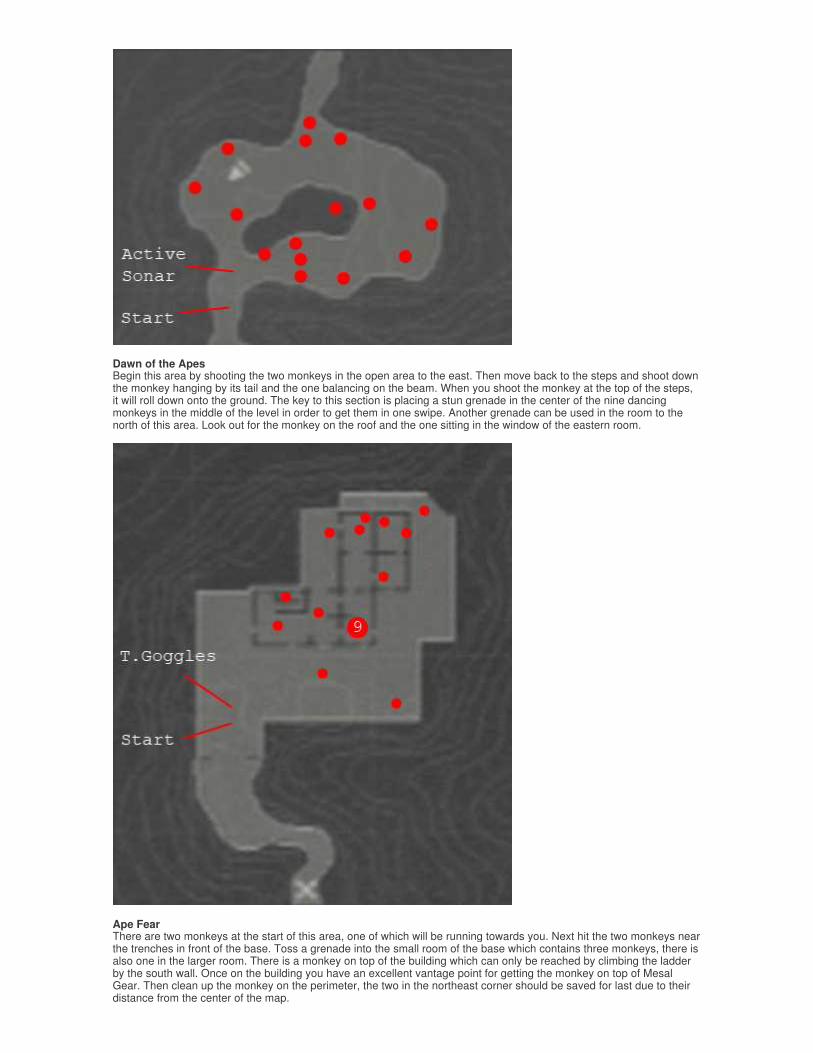
Dawn of the Apes Begin this area by shooting the two monkeys in the open area to the east. Then move back to the steps and shoot down the monkey hanging by its tail and the one balancing on the beam. When you shoot the monkey at the top of the steps, it will roll down onto the ground. The key to this section is placing a stun grenade in the center of the nine dancing monkeys in the middle of the level in order to get them in one swipe. Another grenade can be used in the room to the north of this area. Look out for the monkey on the roof and the one sitting in the window of the eastern room.
Ape Fear There are two monkeys at the start of this area, one of which will be running towards you. Next hit the two monkeys near the trenches in front of the base. Toss a grenade into the small room of the base which contains three monkeys, there is also one in the larger room. There is a monkey on top of the building which can only be reached by climbing the ladder by the south wall. Once on the building you have an excellent vantage point for getting the monkey on top of Mesal Gear. Then clean up the monkey on the perimeter, the two in the northeast corner should be saved for last due to their distance from the center of the map.
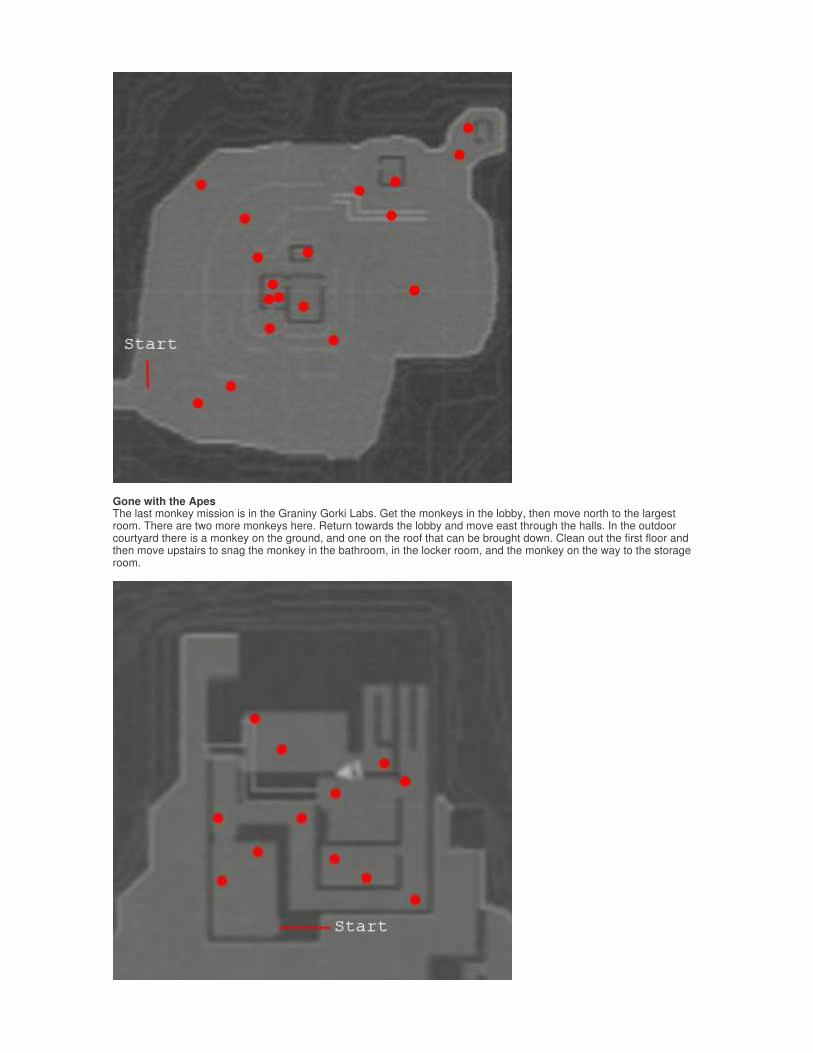
Gone with the Apes The last monkey mission is in the Graniny Gorki Labs. Get the monkeys in the lobby, then move north to the largest room. There are two more monkeys here. Return towards the lobby and move east through the halls. In the outdoor courtyard there is a monkey on the ground, and one on the roof that can be brought down. Clean out the first floor and then move upstairs to snag the monkey in the bathroom, in the locker room, and the monkey on the way to the storage room.
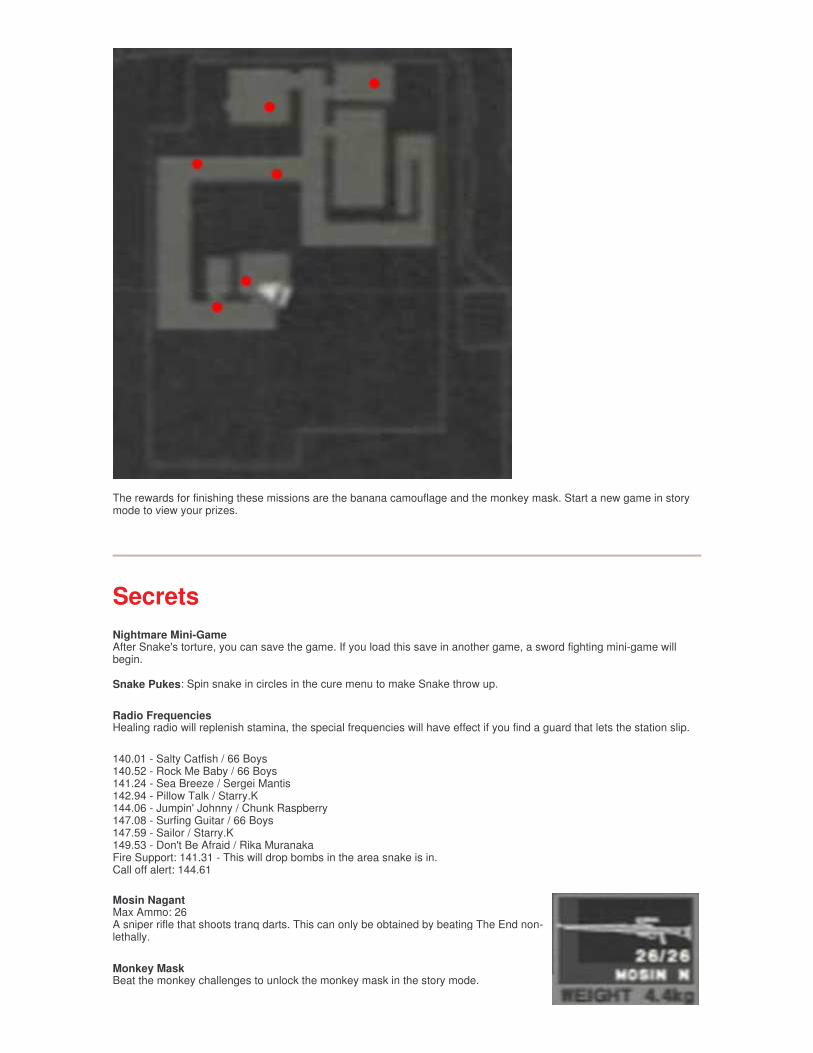
The rewards for finishing these missions are the banana camouflage and the monkey mask. Start a new game in story mode to view your prizes.
Secrets Nightmare Mini-Game After Snake's torture, you can save the game. If you load this save in another game, a sword fighting mini-game will begin. Snake Pukes: Spin snake in circles in the cure menu to make Snake throw up.
Radio Frequencies Healing radio will replenish stamina, the special frequencies will have effect if you find a guard that lets the station slip.
140.01 - Salty Catfish / 66 Boys 140.52 - Rock Me Baby / 66 Boys 141.24 - Sea Breeze / Sergei Mantis 142.94 - Pillow Talk / Starry.K 144.06 - Jumpin' Johnny / Chunk Raspberry 147.08 - Surfing Guitar / 66 Boys 147.59 - Sailor / Starry.K 149.53 - Don't Be Afraid / Rika Muranaka Fire Support: 141.31 - This will drop bombs in the area snake is in. Call off alert: 144.61 Mosin Nagant Max Ammo: 26 A sniper rifle that shoots tranq darts. This can only be obtained by beating The End non-lethally.
Monkey Mask Beat the monkey challenges to unlock the monkey mask in the story mode.
Game Rankings:
Unlockable: Moss Camouflage When fighting The End, if you sneak up behind him when he is asleep and hold him up, he shakes down and will eventually give you the camouflage moss. Hint: Hidden R1 Scenes
� Secret 1: When there's the animation with Volgin beating Tatyana, Boss sending The Fear to kill you, The End is there in a wheel chair, etc. When the Boss says: "The Sorrow, is that you?". It gives you a R1 notice, but you're zooming on The Boss. Move the camera to the right to see The Sorrow.
� Secret 2: When you kill Volgin on the Shagohad and Eva is about to kiss you, hold R1. You won't get any notice, but it works. You're going to see The Sorrow standing in the background.
� Secret 3: After you killing The Boss, once the horse is there, hold R1. You won't get any notice, but it works. You're going to see The Boss spirit with The Sorrow.
� Secret 4: When you're shaking hands with the President, hold R1. You won't get any notice, but it works anyway. Move the camera to the left to see Ocelot doing his trademark taunt from the window.
� Secret 5: When Big Boss is standing in front of The Boss's grave, hold R1. You won't get any notice, but it works anyway. You're going to see the complete Graveyard.
� Secret 6: When Ocelot is leaving the Torture Room, Press R1. You won't get any notice, but it works anyway. You're going to see The Boss doing Ocelot's taunt.
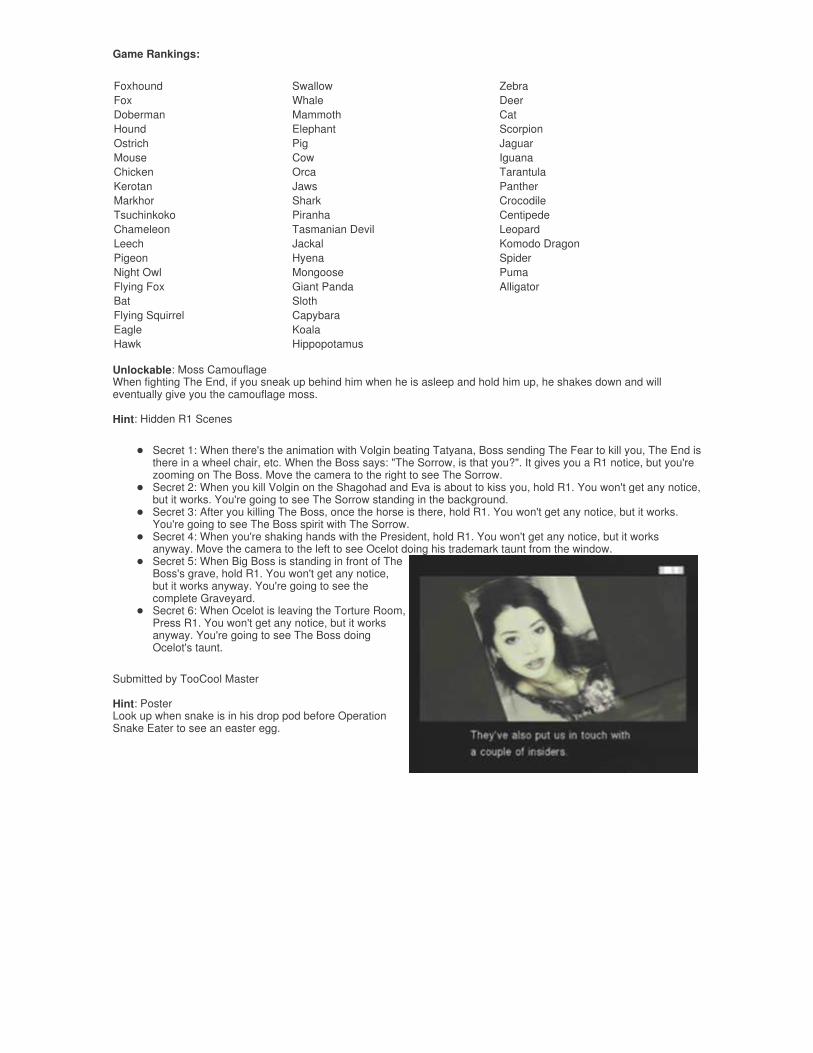
Submitted by TooCool Master Hint: Poster Look up when snake is in his drop pod before Operation Snake Eater to see an easter egg.
Foxhound Swallow Zebra Fox Whale Deer Doberman Mammoth Cat Hound Elephant Scorpion Ostrich Pig Jaguar Mouse Cow Iguana Chicken Orca Tarantula Kerotan Jaws Panther Markhor Shark Crocodile Tsuchinkoko Piranha Centipede Chameleon Tasmanian Devil Leopard Leech Jackal Komodo Dragon Pigeon Hyena Spider Night Owl Mongoose Puma Flying Fox Giant Panda Alligator Bat Sloth Flying Squirrel Capybara Eagle Koala Hawk Hippopotamus