CC Lab: The Basic Stamp Microcontroller. We won’t have time today to go in depth into the BASIC...
93
CC Lab: The Basic Stamp Microcontroller
-
Upload
julie-marshall -
Category
Documents
-
view
218 -
download
1
Transcript of CC Lab: The Basic Stamp Microcontroller. We won’t have time today to go in depth into the BASIC...

CC Lab:
The Basic Stamp Microcontroller

We won’t have time today to go in depth into the
BASIC Stamp. Refer back to this PowerPoint and to the docs on the CC Lab
site ffor more info.
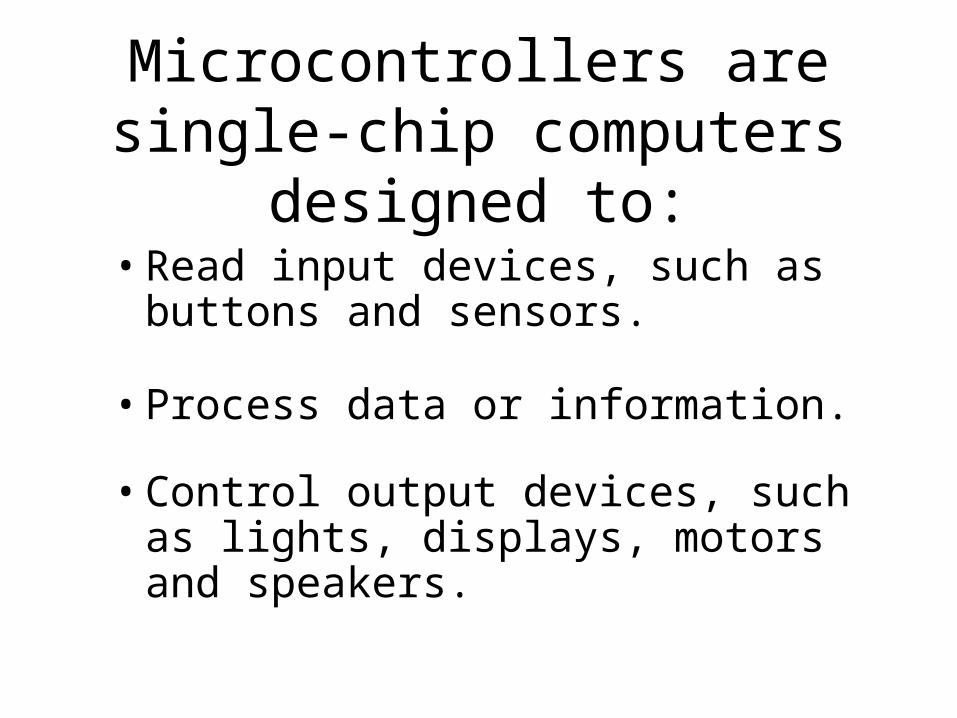
Microcontrollers are single-chip computers designed to:
• Read input devices, such as buttons and sensors.
• Process data or information.
• Control output devices, such as lights, displays, motors and speakers.
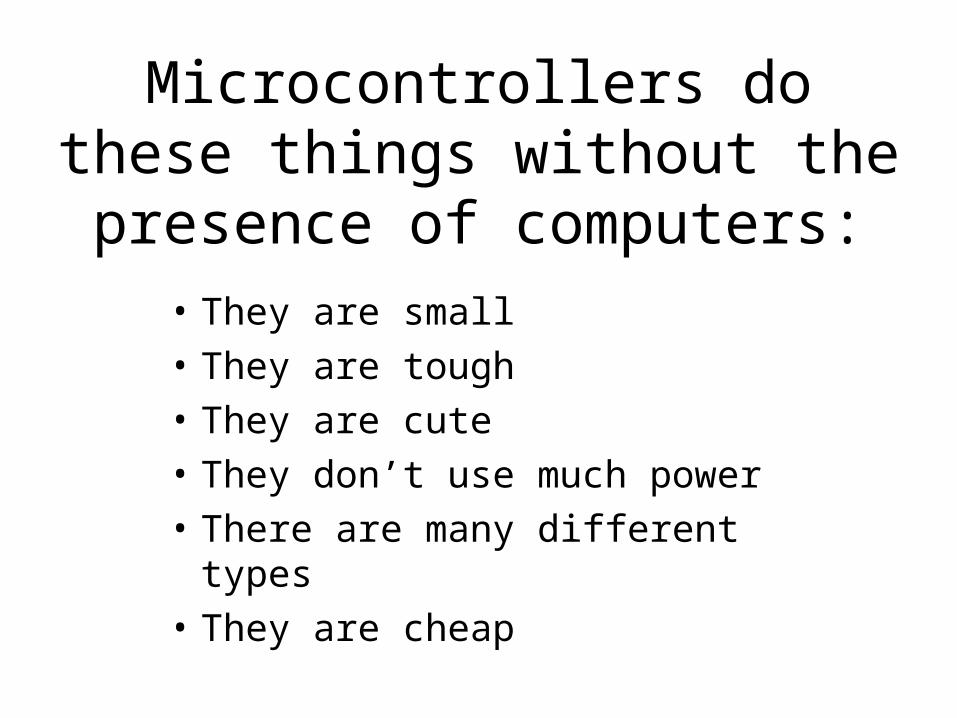
Microcontrollers do these things without the presence
of computers:• They are small• They are tough• They are cute• They don’t use much power• There are many different types• They are cheap

Artists and designers use microcontrollers when they create:
• Installations• Performances• Robots• Wearable technology• Games• Other products

Wearable technology
(Alison Lewis)

Robots
(Honda)

Games
(Jonah Warren)

Weird physical violence
(Kaho Abe)

Installation
(Listening Post)

Performance
(Zach and Golan: Messa di Voce)

Androids
(Fake Arnold)

More examples: the BASIC Stamp in Use
BASIC Stamps have been used in multitudes of projects and systems:
• Educational Robotics
The ParallaxBoe-Bot
First Competitions

• Research Robots
Autonomous FlyingRobot at UC, Irvine
Millipede Projectat Nanyang University

• Helpful Robots
Robotic Lawn MowerPrototype by the Robot Shop
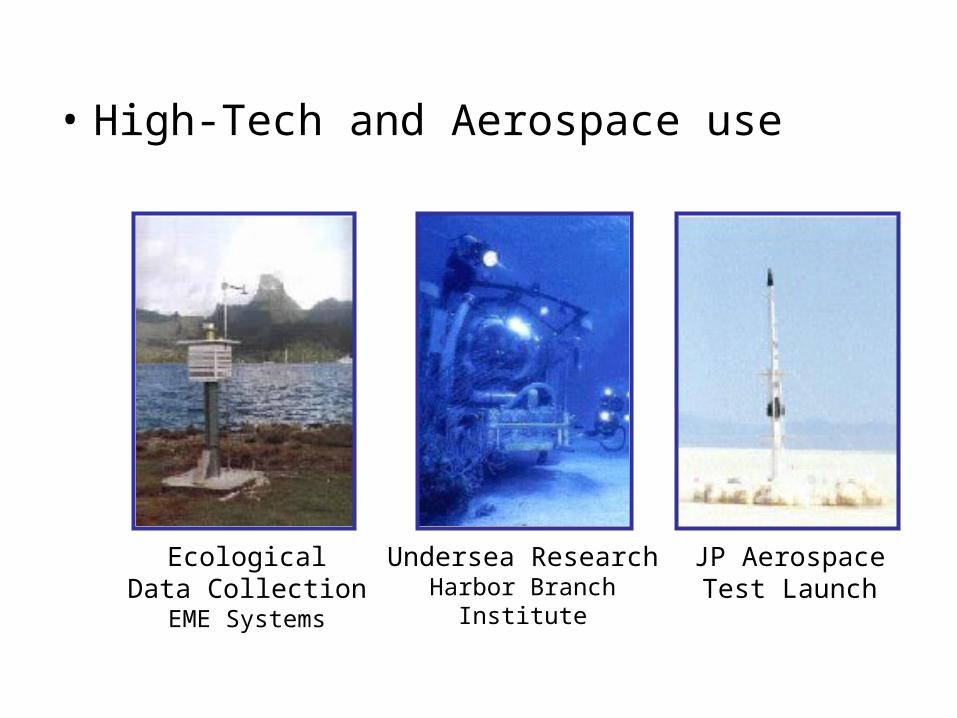
• High-Tech and Aerospace use
EcologicalData Collection
EME Systems
Undersea ResearchHarbor Branch
Institute
JP AerospaceTest Launch

• Process Control & Technical Education
Oil Flow ControlSouthern Illinois University
Electronic Systems Technologies

The main thing you should know is that the BASIC Stamp
is easy to use, and it is a great way to get simple things done (switches,
sensors, circuits).
Don’t be afraid to use it, or to asked someone who knows
more to help you make something.

Today, we will introduce:
•The Basic Stamp (the microcontroller we will use in the CC Lab)
•PBasic (a programming language we will use to program the Basic Stamp

First, a bit about logic gate. We aren’t going to spend a lot of time on boolean logic, binary math or electronics in general, but you should know that electricity and
electrical circuits are based on simple logic.
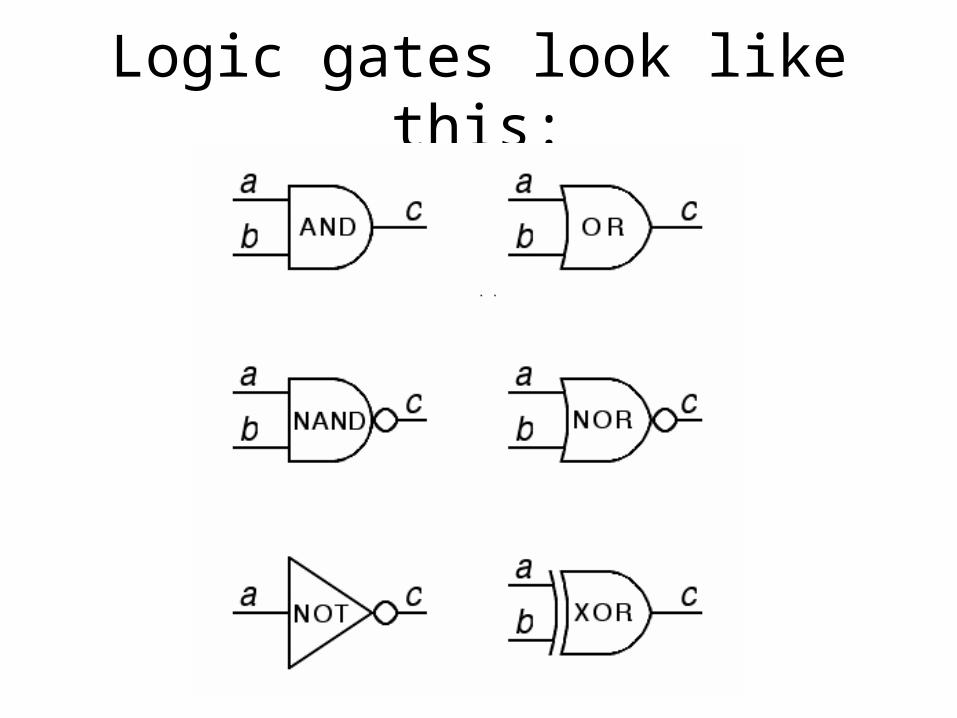
Logic gates look like this:

Logic gates work like this:

This is an integrated circuit (it contains electronic logic
gates):

Using logic gates the same circuit can be described like this (5 examples):
(What type of gates are on these circuits?)

When we work with the Basic Stamp 2, we will build our own
circuits:
(Well, maybe not this complicated)

In order to build circuits, we need to understand basic electrical terms, symbols,
and devices and to understand how to read simple circuit diagrams
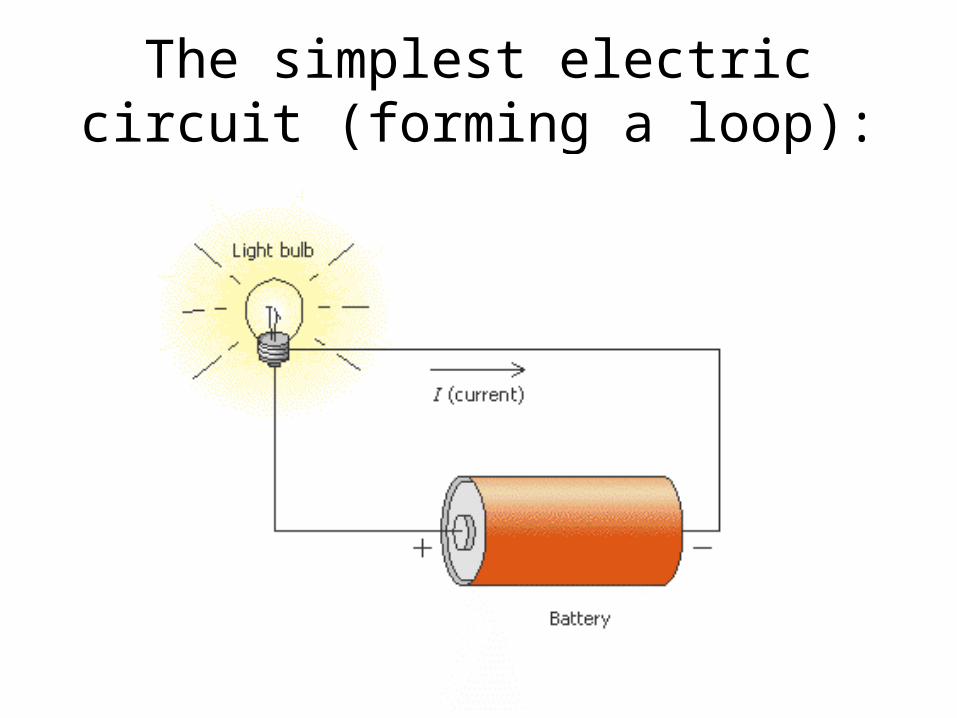
The simplest electric circuit (forming a loop):

Circuits usually contain many other components such as resistors,
capacitors, switches, and transistors:

Electronic devices and symbols used in the creation of circuits:

All of these things (binary math, logic, electrical
components) are used to build circuits. If you want
more info, refer to the various PDFs on the server.

This is the Basic Stamp 2 integrated circuit

The Basic Stamp 2 is a programmable
microcontroller that we can add circuits to.
It is made by Parallax Inc., and there is a huge library
of code and parts for it:www.parallax.com

In this CC Lab module we will learn to control the Stamp, and make a few small projects with it.
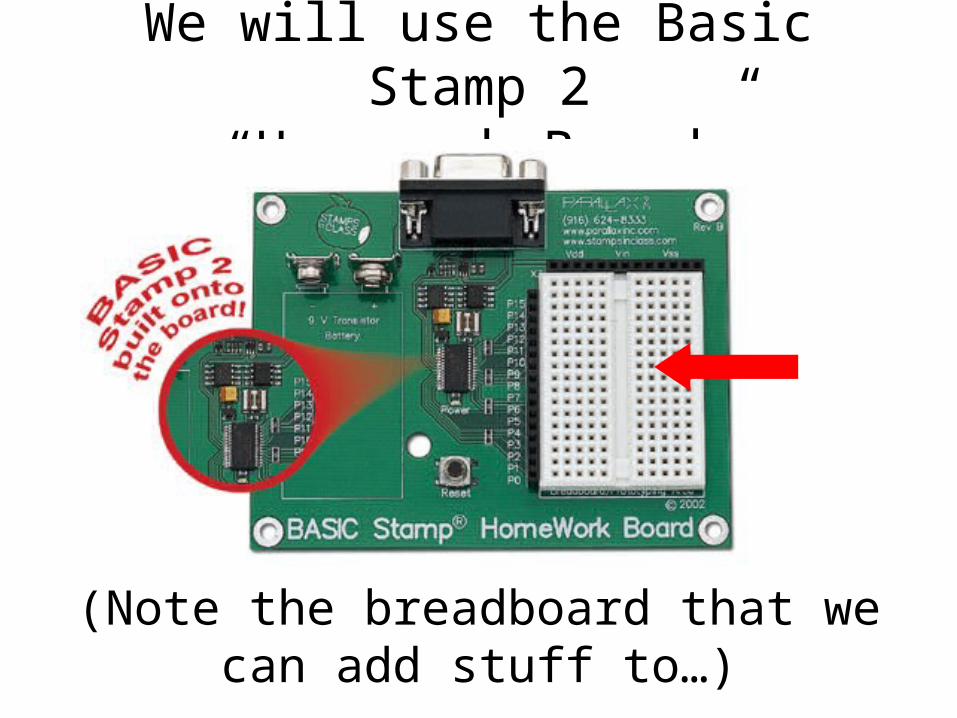
We will use the Basic Stamp 2“Homework Board”
(Note the breadboard that we can add stuff to…)

We will add lights, switches, sensors, motors and other stuff and program the Basic Stamp 2 to control and react to them.

About the Parallax “Homework Board”:
9V batteryconnectors
Input-output
Serial connector (for program download)

We program the Basic Stamp 2 using a language
called “BASIC”

BASIC was invented at Dartmouth. Originally
devised as an easy-to-use programming language, it
became widespread on home microcomputers in
the 1980s.

The most common implementation of BASIC today is Microsoft “Visual Basic”, for the Windows
OS.

If you are new to programming, BASIC has a lot
going for it: • Easy to learn for beginners • Adds powerful additional features for
the advanced user • Is designed for interactive use rather
than batch work • Lends itself to learning by hands-on
practical use

Significant features of BASIC:• Loops • Arrays, sorting, and searches• User-Defined Functions• Structured Programming • Subroutines • Built-In Functions • Input from the keyboard• Menu Driven Applications• System Commands

We’ll learn about a few of these things in this CC Lab
module– we won’t have time to learn everything.
Your reading assignment for this week will discuss some
of these features.
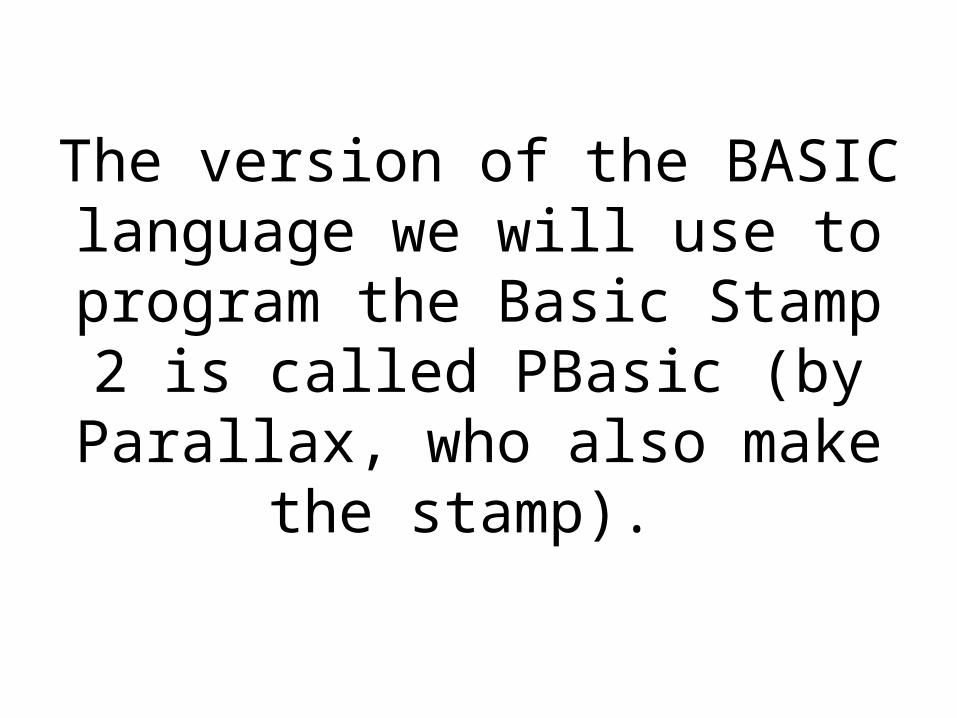
The version of the BASIC language we will use to
program the Basic Stamp 2 is called PBasic (by Parallax, who also make the stamp).

The PBasic Editor 2.0 runs on windows, and is free to
download at http://www.parallax.com

The PBasic Editor looks like this:
There is a way to program the Stamp using the
terminal OS X too, we’ll talk about that next week.

Your assignments this week:
• Complete the worksheets on binary math, logic gates, and circuits
• Read the document “stampGuide.pdf” (on the server)
• Get together with your group, make sure your “Homework Board” is working, mess around with the PBasic Editor (on all the PCs in the 10FL Lab) and do the blinking LED project

Now, let’s form groups and distribute the Basic Stamp
kits; we will form four groups. There is one kit for each
group, so the board will be checked out to one person
(who will hand it back to the faculty at the end of the
module)
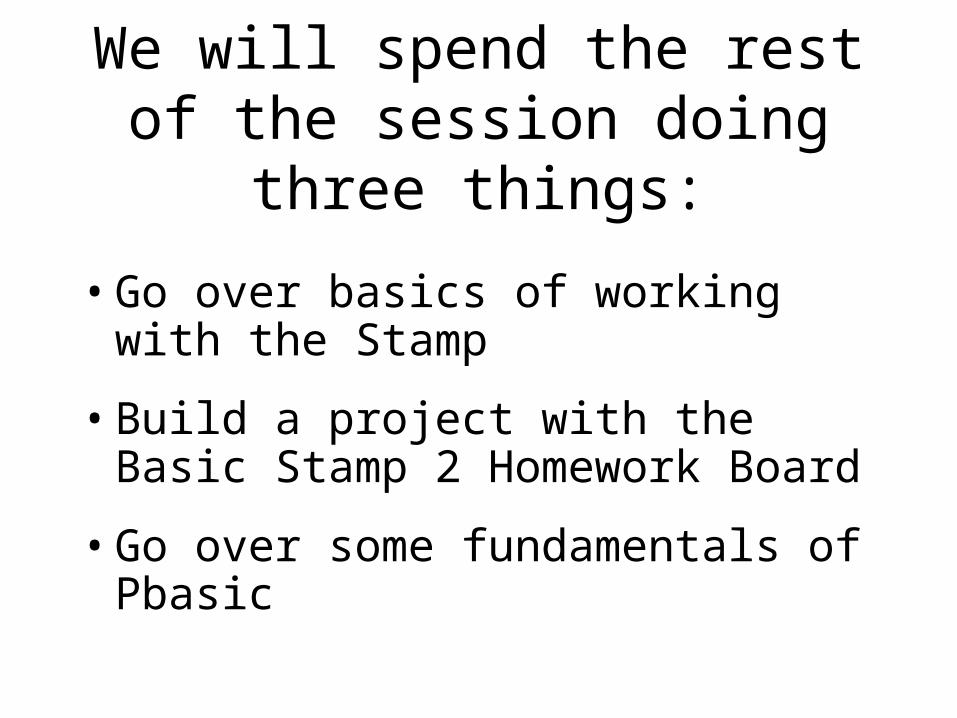
We will spend the rest of the session doing three
things:
• Go over basics of working with the Stamp
• Build a project with the Basic Stamp 2 Homework Board
• Go over some fundamentals of Pbasic

First let’s look a bit closer at the notion of
microcontrollers. We will use parts of a powerpoint from the Parallax book:
What’s a Microcontroller?

Getting Started with the BS2
Presentation based on:
"What's a Microcontroller ?"By Andy LindsayParallax, Inc
Presentation developed by:
Martin A. HebelSouthern Illinois University CarbondaleCollege of Applied Sciences and ArtsElectronic Systems Technologies9/02/03

Use and CopyrightThis presentation supplements "What's a Microcontroller" by Andy Lindsay. (Link to text) • This presentation is not a replacement for the text.• Important concepts of the text are highlighted.• In some cases, additional material has been added to augment the text.• Full program listings are generally not provided in the presentation.
Distribution:This presentation may be freely distributed without modifications. Modifications are permitted by schools and organizations
for internal use only. Credits, use and copyright slides must remain.
COPYRIGHTS AND TRADEMARKSThis documentation is Copyright 2003 by Parallax, Inc. By downloading or obtaining a printed copy of this documentation or
software you agree that it is to be used exclusively with Parallax products. Any other uses are not permitted and may represent a violation of Parallax copyrights, legally punishable according to Federal copyright or intellectual property laws. Any duplication of this documentation for commercial uses is expressly prohibited by Parallax, Inc. Check with Parallax for approval prior to duplicating any of our documentation in part or whole for any use.
BASIC Stamp is a registered trademark of Parallax, Inc. If you decide to use the name BASIC Stamp on your web page or in printed material, you must state that "BASIC Stamp is a registered trademark of Parallax, Inc." Other brand and product names are trademarks or registered trademarks of their respective holders.
DISCLAIMER OF LIABILITYParallax, Inc. and Southern Illinois University are not responsible for special, incidental, or consequential damages resulting
from any breach of warranty, or under any legal theory, including lost profits, downtime, goodwill, damage to or replacement of equipment or property, or any costs of recovering, reprogramming, or reproducing any data stored in or used with Parallax products. Parallax is also not responsible for any personal damage, including that to life and health, resulting from use of any of our products. You take full responsibility for your BASIC Stamp application, no matter how life threatening it may be.

In general, developing with micro-controllers require:
• Specialized hardware for programming.• Knowledge of complex languages (sometimes very
expensive) and configuration settings.• External components for timing and communications.

The BASIC Stamp 2
The BASIC Stamp 2 embeds a micro-controller, the PIC16C57, on a module to make programming and use very simple, yet very powerful.
Additional components on the module provide everything needed to start developing your own control systems.

Module Components
5V RegulatorRegulates voltageto 5V with a supply of 5.5VDC to 15VDC
ResonatorSets the speed at whichinstructions are processed.
EEPROMStores the tokenized PBASIC program.
Interpreter ChipReads the BASIC program from the EEPROM and executes the instructions.
Serial SignalConditioningConditions voltagesignals between PC serialconnection (+/- 12V) and BASIC Stamp (5V) forProgramming.
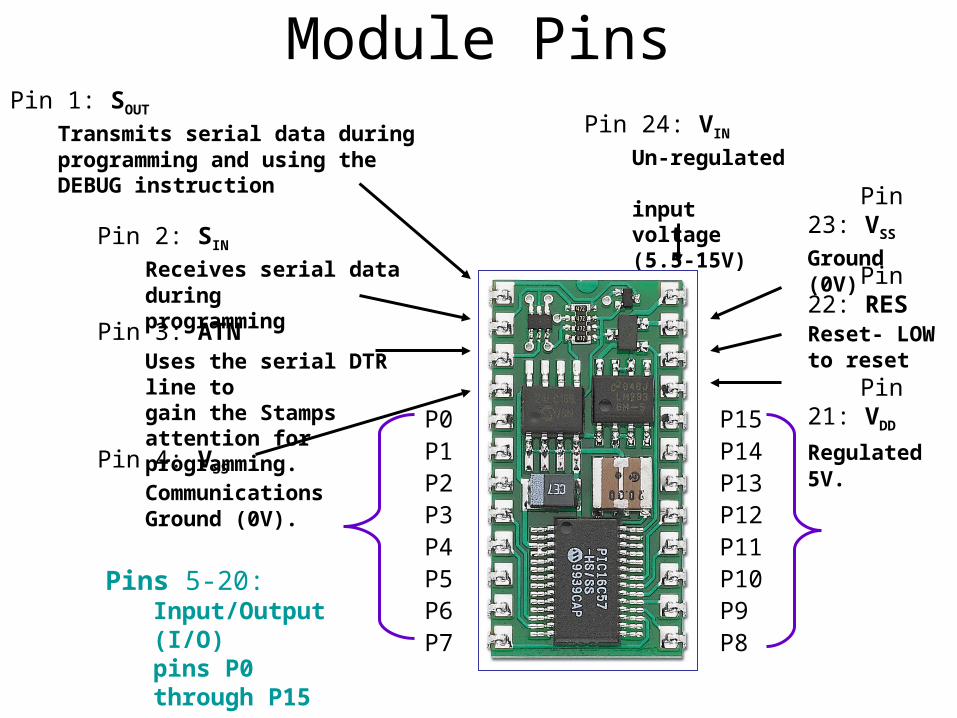
Module PinsPin 1: SOUT
Transmits serial data during programming and using theDEBUG instruction
Pin 2: SIN
Receives serial data during programming
Pin 3: ATNUses the serial DTR line togain the Stamps attention for programming.
Pin 4: VSS
CommunicationsGround (0V).
P0P1P2P3P4P5P6P7 P8
P9P10P11P12P13P14P15
Pins 5-20:Input/Output (I/O)pins P0 through P15
Pin 21: VDD
Regulated 5V.
Pin 22: RESReset- LOWto reset
Pin 23: VSS
Ground (0V)
Pin 24: VIN
Un-regulated input voltage(5.5-15V)

BASIC Stamp Editor
Embedded systems are a combination of:• Hardware - The components which the controller
monitors and controls.• Software - The program to tell the controller
what to monitor and how to control.
The software used to write programs for the BASIC Stamp is the BASIC Stamp Editor, which uses the PBASIC programming language

Getting the Software• The BASIC Stamp is programmed in PBASIC, a version of
the popular BASIC programming language. Code is written in the editor and downloaded to the BASIC Stamp.
• The BASIC Stamp Editor is installed on all of the PCs in the 10FL Lab.
• If you want to set up on your own machine, the BASIC Stamp Editor may be downloaded from Parallax's website and installed.
• Also on the CC Lab site are references to PBASIC programming on OS X (Mac)

System Setup and Testing
• Once the software is installed, the next step is to setup and test the hardware.
• The BASIC Stamp can be used on a variety of carrier boards, from Parallax, other vendors, or designed yourself. A carrier board is used for programming and testing.
• The board we will use is the HomeWork Board (HWB)

The HomeWork BoardThe HomeWork Board has a BASIC Stamp 2
integrated on the board and not as many frills to make it more affordable for students. It does not have servos on board to control robots.
IntegratedBASIC Stamp
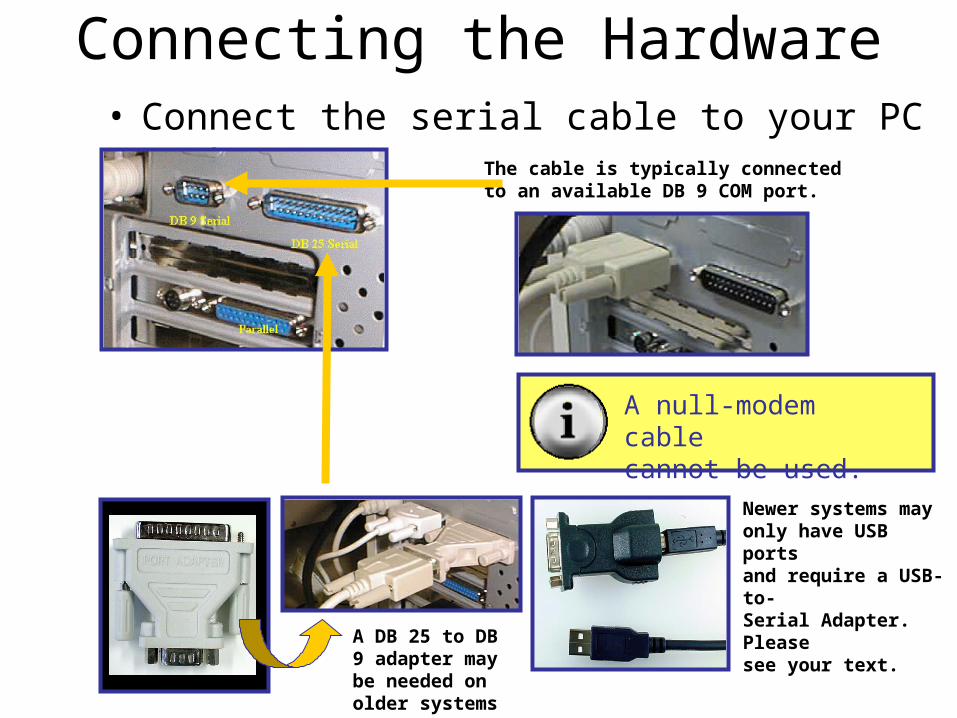
Connecting the Hardware• Connect the serial cable to your PC or
Laptop. The cable is typically connectedto an available DB 9 COM port.
A DB 25 to DB 9 adapter may be needed on older systems
Newer systems mayonly have USB portsand require a USB-to-Serial Adapter. Pleasesee your text.
A null-modem cablecannot be used.
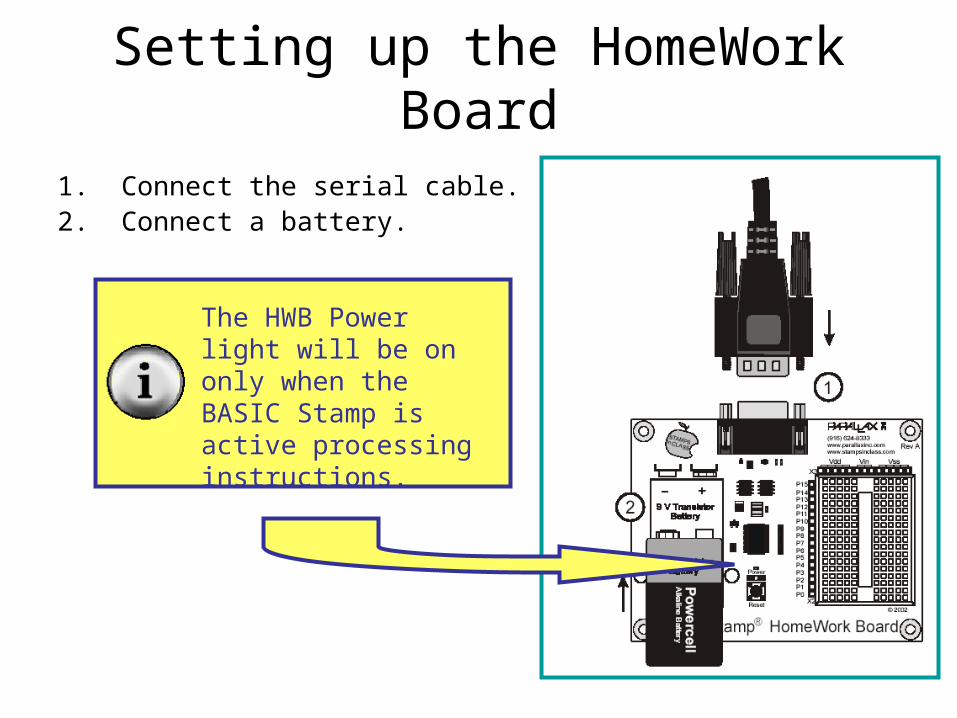
Setting up the HomeWork Board
1. Connect the serial cable.2. Connect a battery.
The HWB Power light will be on only when the BASIC Stamp is active processing instructions.
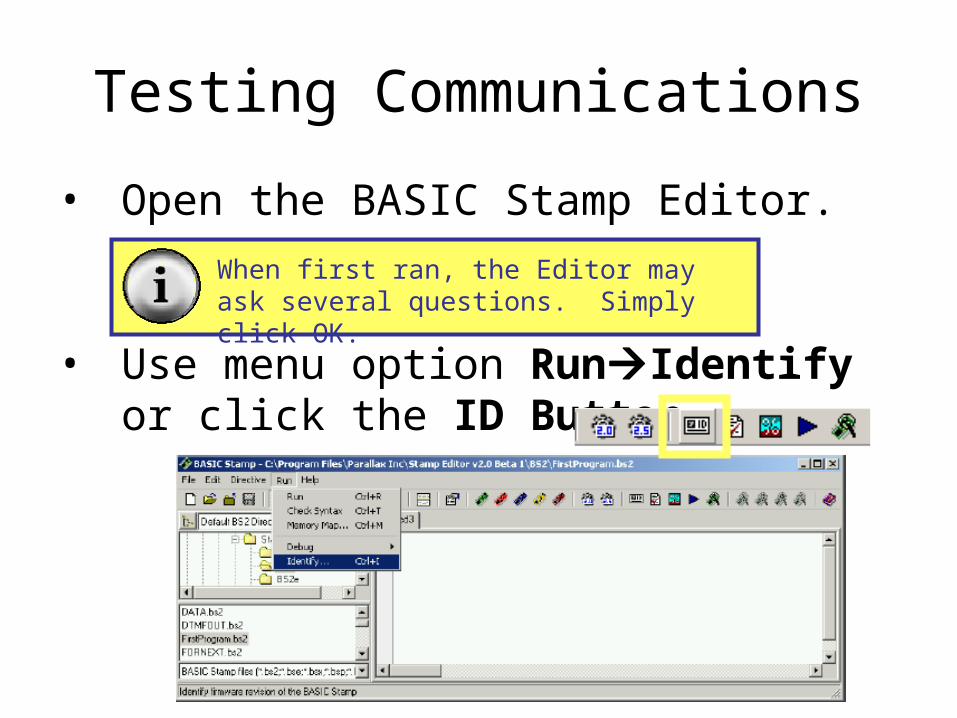
Testing Communications
• Open the BASIC Stamp Editor.
• Use menu option RunIdentify or click the ID Button.
When first ran, the Editor may ask several questions. Simply click OK.

• The Identification box should show similar to the following for the COM port you are connected to:

Your First Program
• Type your first program into the BASIC Stamp Editor:
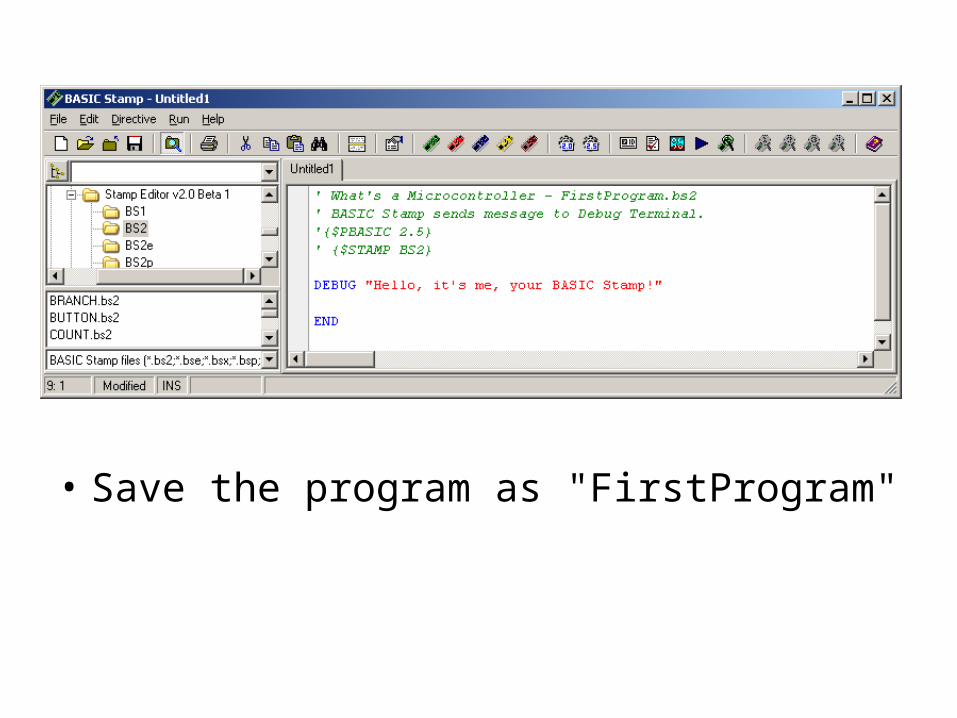
• Save the program as "FirstProgram"

'Running' Your Program• Download, or Run your program by
clicking the Run button.• The DEBUG Window should appear
showing your message.

How a Program is Placed on the Module
A program is writtenin the BASIC Stamp Editor.
The Interpreter Chip reads the program from EEPROM and executes the instructions.
The program is tokenized,or converted into symbolic format. Tokenizer
The tokenized program is transmitted through the serial cable and stored in EEPROM memory.

Understanding the Code
It's important to understand the code so that:
• When you make mistakes entering a program, you can find the problem faster.
• You can start writing your own programs.
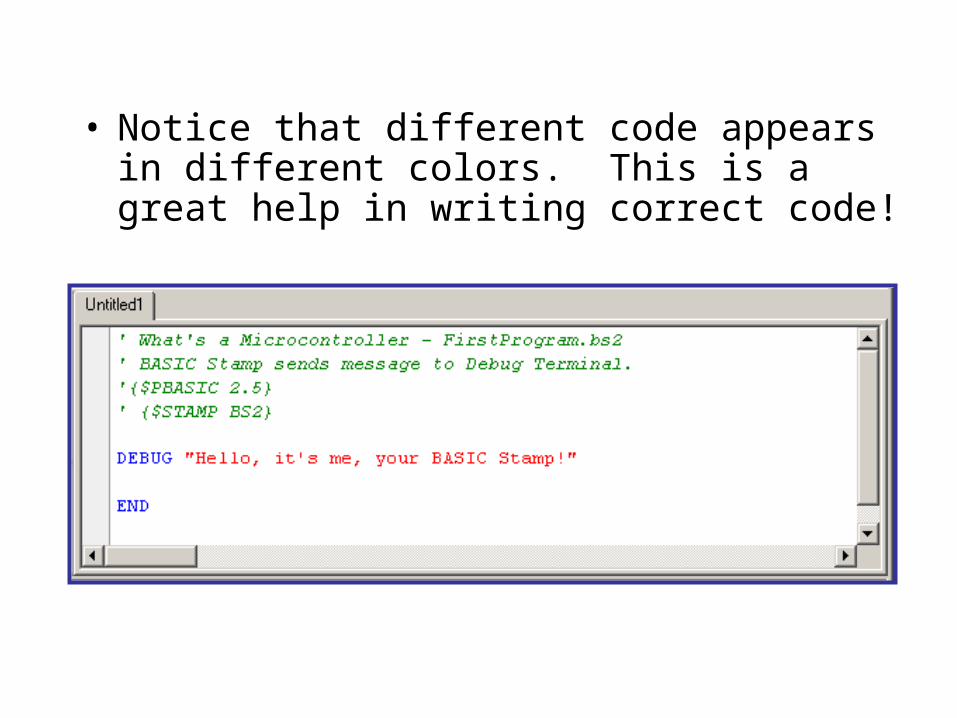
• Notice that different code appears in different colors. This is a great help in writing correct code!
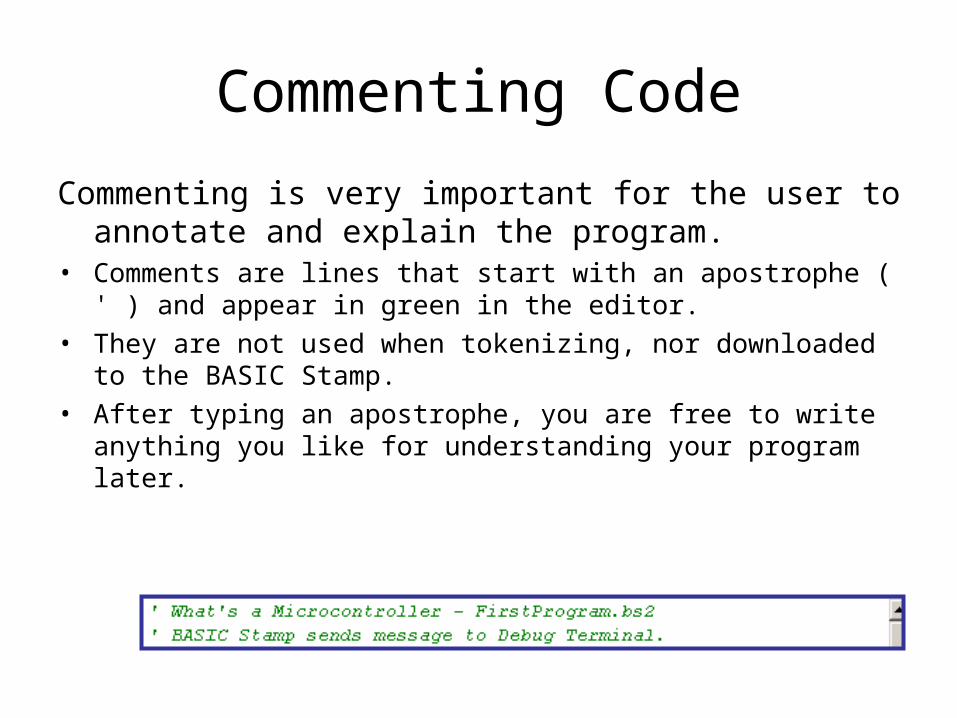
Commenting Code
Commenting is very important for the user to annotate and explain the program.
• Comments are lines that start with an apostrophe ( ' ) and appear in green in the editor.
• They are not used when tokenizing, nor downloaded to the BASIC Stamp.
• After typing an apostrophe, you are free to write anything you like for understanding your program later.

Directives
Directives are special instructions to the Editor ensuring the the code is tokenized for the correct PBASIC version and for the correct BASIC Stamp.
• When starting a new program, be sure to click the buttons to add these directives to your program.
Key Commands - DEBUG & END
Controllers are a little like dogs. • Dogs only understand special commands
such as sit, lay, shake, and so on.• In programming only commands
understood by the controller can be used.• The two commands used in this program
were DEBUG and END.• While not required, by convention
instructions are in upper-case.
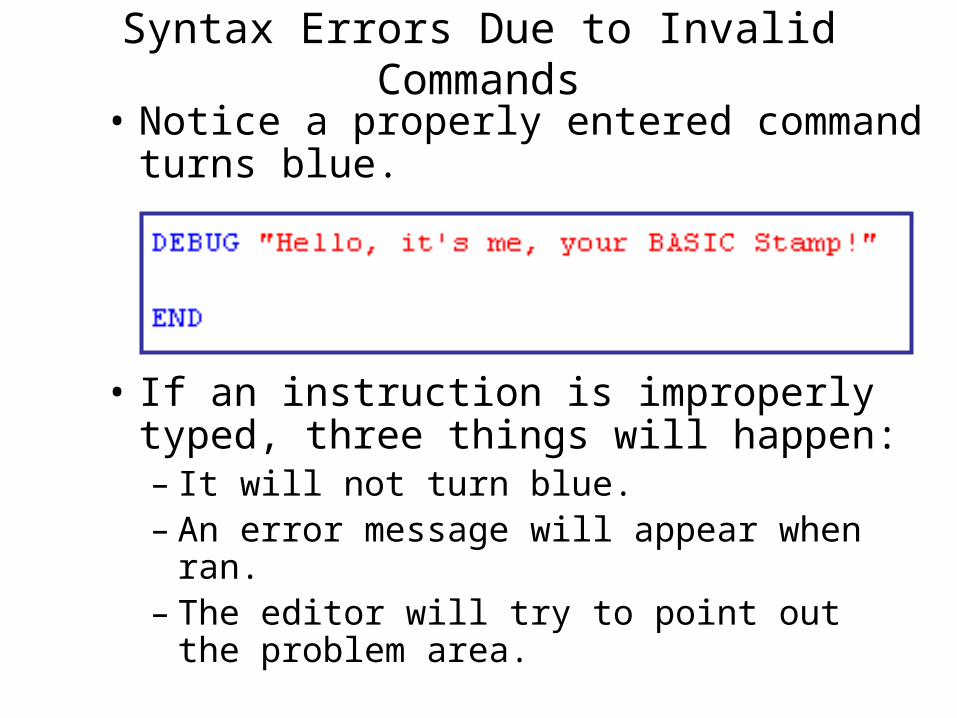
Syntax Errors Due to Invalid Commands
• Notice a properly entered command turns blue.
• If an instruction is improperly typed, three things will happen:– It will not turn blue.– An error message will appear when ran.– The editor will try to point out the
problem area.
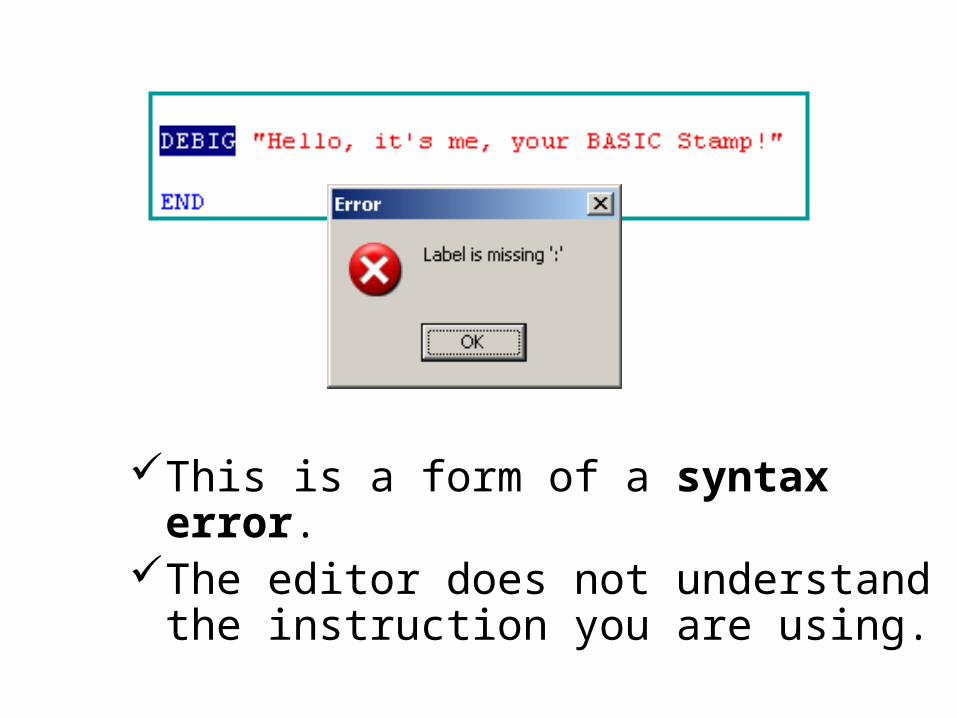
This is a form of a syntax error.
The editor does not understand the instruction you are using.

Syntax Errors Due to Incorrect Parameters
Most commands need to be told what to do.
• If you were told to "ADD 1 and 2" you would understand.
• If you were told to "ADD Tree and Fish" you would be a little confused!
• BASIC Stamp commands are similar, you need to be very specific in telling it what to do and giving it the correct parameters or arguments.

Error messages will vary:• Verify the command is correct.• Verify using Help (discussed soon) that the
correct parameters are being used.
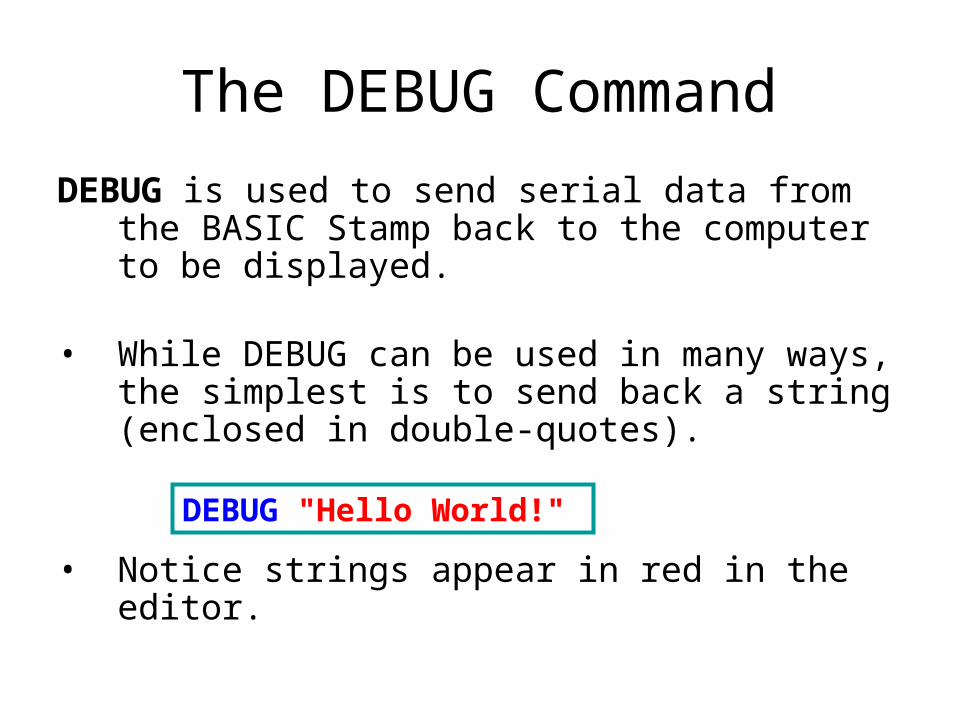
The DEBUG Command
DEBUG is used to send serial data from the BASIC Stamp back to the computer to be displayed.
• While DEBUG can be used in many ways, the simplest is to send back a string (enclosed in double-quotes).
• Notice strings appear in red in the editor.
DEBUG "Hello World!"

DEBUG Window When a program contains a DEBUG command, the Editor opens the DEBUG Window.
Data is sent back through the serial cable as characters to be viewed. This data is sent very quickly!
Hello, it's me, your BASIC Stamp!
The RESET button on board will start the program on your Stamp again.
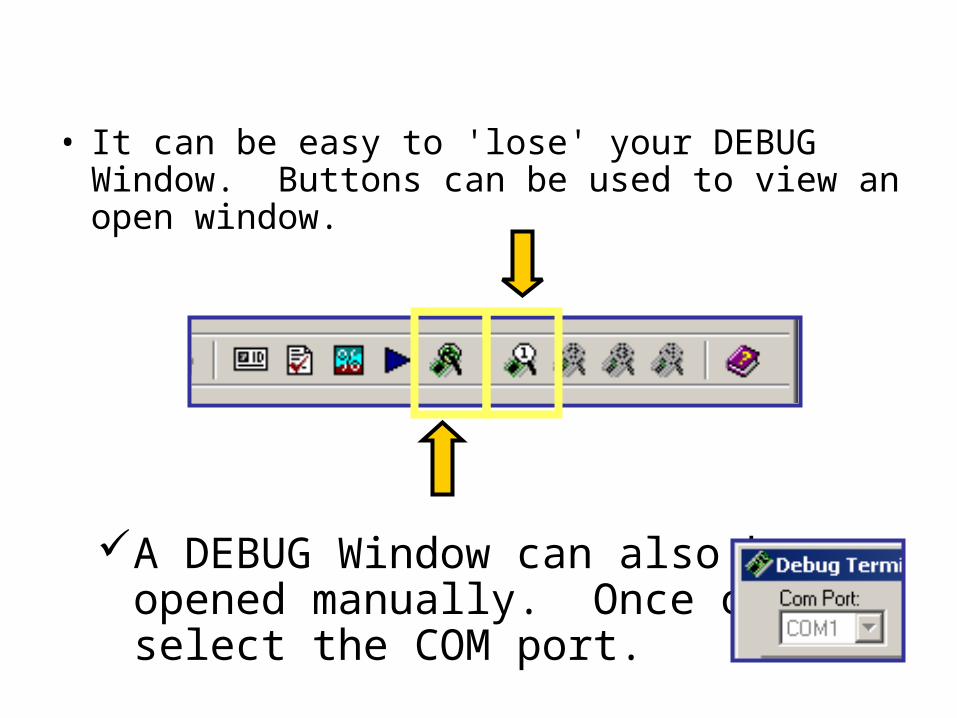
• It can be easy to 'lose' your DEBUG Window. Buttons can be used to view an open window.
A DEBUG Window can also be opened manually. Once open,select the COM port.

DEBUG FormattersFormatters are used to display data in a defined manner.• One DEBUG Formatter is DEC which displays the decimal value.
DEBUG DEC 7 * 11
Debug Window: 77
What occurs if DEC is left out?
DEBUG 7 * 11
Debug Window: M
77 is the numeric code representing the letter M (ASCII Code).

DEBUG Control Characters
• Control codes may be used with DEBUG to help format your text on the screen.
• CR inserts a carriage return (starts on the next line)
• HOME starts text back at the top.• CLS clears the Debug Window text.• Note that each parameter in DEBUG must
be separated by a comma.
DEBUG CLS, "Hello World!", CRDEBUG DEC 7*11, CR

The END Command
END is used to inform the BASIC Stamp the program is complete.
• END will also place your BASIC Stamp in a low-power mode to save energy and make your battery last much longer!
• The BASIC Stamp will stay in low-power mode until reset or a new program is downloaded.

Logical Errors
Logical Errors are those which cause your program to act improperly, but the BASIC Stamp is perfectly happy doing it!
• What's wrong with this program and what will it do?

Getting Help!!!
There are numerous commands and numerous ways to use many commands which makes the BASIC Stamp Editor's HELP invaluable.
• Each command is provided with help for:– Syntax for the command.– Explanation of use.– Example code.


• Example code is ready to copy, paste, and test though your hardware would need to match in some cases.
• Use Help to look up the END command.

BASIC Stamp Manual
• The BASIC Stamp Manual is a bound text with full command listing, examples, explanations, and discussion on use.
• It, along with a bunch of other docs, is on the CC Lab site in pdf form
• You can also purchase the manual from Parallax
• Many other (non Parallax) books are available from Amazon, B&N, etc.

Need More Help?• BASIC Stamps users share and help each other
at: http://groups.yahoo.com/group/basicstamps/

When you are done
• When you are done programming, or leave your equipment for any length of time, it's a good idea to disconnect power (meaning remove the battery).
• This will conserve your batteries and ensures your BASIC Stamp doesn't gain intelligence and try to take over the world!

Your assignment (finish this class) is to complete the “Blinking LED” project:
• Do it with one LED first• Do it with 3+ LEDs next, and figure
out something fun to do with the multiple lights
• Every group members should go through the process of downloading a program (don’t just sit there looking)

Now, let’s go work in the lab!
Each group should get a serial cable to use with their
Basic Stamp 2 Homework Board.
Your homework for the week after Thanksgiving:
• Read (review) the document on PBASIC programming (on the CC Lab site)
• Choose a next project from the StampWorks collection. Identify the parts you will need, and get them. We have some stuff in the CC Lab parts box in the 10FL lab. Check there first
• Remember, you can’t do stuff with servos (motors) yet.
• With your group, execute the project and be ready to demo in class next week.