Cayman Islands Automatic Exchange of Information (AEOI) Portal V3.2.1 User · PDF...
110
Department for International Tax Cooperation CAYMAN ISLANDS ______________________________________________________________________________ Cayman Islands Automatic Exchange of Information (AEOI) Portal V4.0 User Guide (15 March 2018) The AEOI Portal can be accessed here: https://caymanaeoiportal.gov.ky This User Guide v4.0 replaces all earlier versions and explains how Cayman Financial Institutions must use the AEOI Portal to perform their Notification (registration) and Reporting obligations in respect of US FATCA and the OECD Common Reporting Standard (CRS). Please refer to the DITC website AEOI News & Updates page for confirmation of the accessibility date for the Cayman AEOI Portal. Updates to CRS reporting will be posted on this website page whenever possible.
-
Upload
truonglien -
Category
Documents
-
view
216 -
download
2
Transcript of Cayman Islands Automatic Exchange of Information (AEOI) Portal V3.2.1 User · PDF...
Department for International Tax Cooperation
CAYMAN ISLANDS
______________________________________________________________________________
Cayman Islands Automatic
Exchange of Information
(AEOI) Portal
V4.0 User Guide
(15 March 2018)
The AEOI Portal can be accessed here: https://caymanaeoiportal.gov.ky
This User Guide v4.0 replaces all earlier versions and explains how Cayman Financial Institutions must use the AEOI Portal to perform their Notification (registration) and Reporting obligations in respect of US FATCA and the OECD Common Reporting Standard (CRS).
Please refer to the DITC website AEOI News & Updates page for confirmation of the accessibility date for the Cayman AEOI Portal. Updates to CRS reporting will be posted on this website page whenever possible.
i
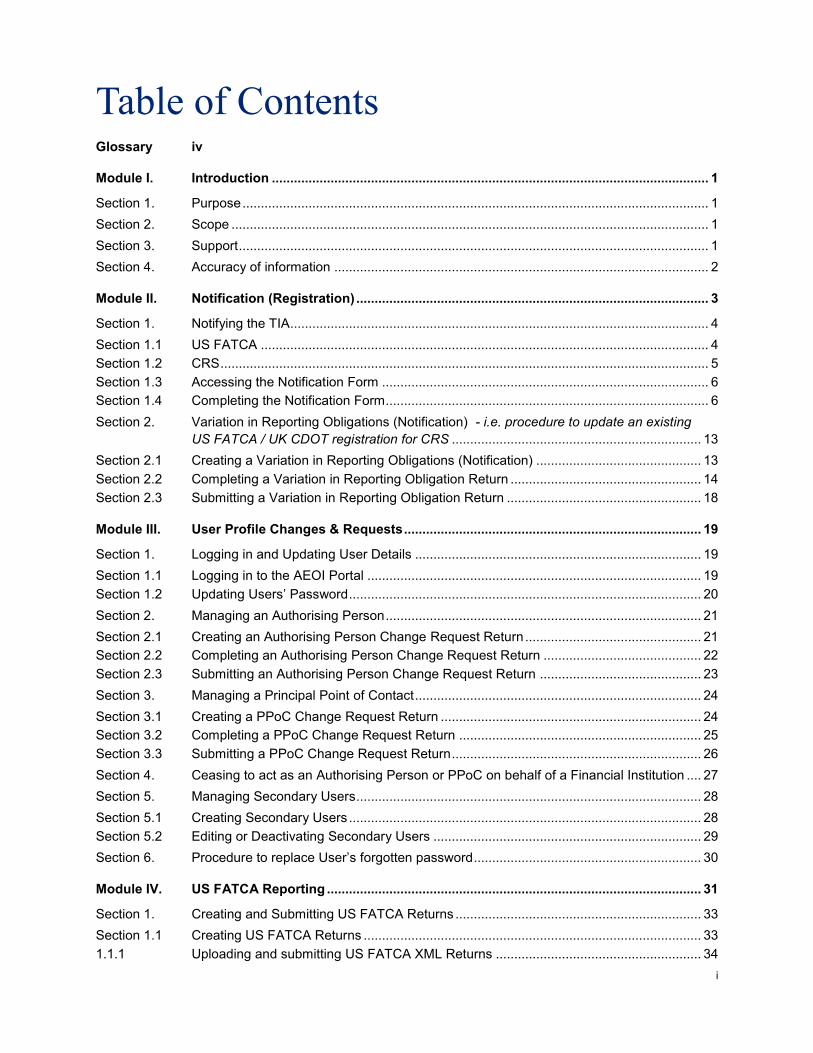
Table of Contents Glossary iv
Module I. Introduction ....................................................................................................................... 1
Section 1. Purpose ............................................................................................................................... 1
Section 2. Scope .................................................................................................................................. 1
Section 3. Support ................................................................................................................................ 1
Section 4. Accuracy of information ...................................................................................................... 2
Module II. Notification (Registration) ................................................................................................ 3
Section 1. Notifying the TIA .................................................................................................................. 4
Section 1.1 US FATCA .......................................................................................................................... 4
Section 1.2 CRS ..................................................................................................................................... 5
Section 1.3 Accessing the Notification Form ......................................................................................... 6
Section 1.4 Completing the Notification Form ........................................................................................ 6
Section 2. Variation in Reporting Obligations (Notification) - i.e. procedure to update an existing
US FATCA / UK CDOT registration for CRS .................................................................... 13
Section 2.1 Creating a Variation in Reporting Obligations (Notification) ............................................. 13
Section 2.2 Completing a Variation in Reporting Obligation Return .................................................... 14
Section 2.3 Submitting a Variation in Reporting Obligation Return ..................................................... 18
Module III. User Profile Changes & Requests ................................................................................. 19
Section 1. Logging in and Updating User Details .............................................................................. 19
Section 1.1 Logging in to the AEOI Portal ........................................................................................... 19
Section 1.2 Updating Users’ Password ................................................................................................ 20
Section 2. Managing an Authorising Person ...................................................................................... 21
Section 2.1 Creating an Authorising Person Change Request Return ................................................ 21
Section 2.2 Completing an Authorising Person Change Request Return ........................................... 22
Section 2.3 Submitting an Authorising Person Change Request Return ............................................ 23
Section 3. Managing a Principal Point of Contact .............................................................................. 24
Section 3.1 Creating a PPoC Change Request Return ....................................................................... 24
Section 3.2 Completing a PPoC Change Request Return .................................................................. 25
Section 3.3 Submitting a PPoC Change Request Return .................................................................... 26
Section 4. Ceasing to act as an Authorising Person or PPoC on behalf of a Financial Institution .... 27
Section 5. Managing Secondary Users .............................................................................................. 28
Section 5.1 Creating Secondary Users ................................................................................................ 28
Section 5.2 Editing or Deactivating Secondary Users ......................................................................... 29
Section 6. Procedure to replace User’s forgotten password .............................................................. 30
Module IV. US FATCA Reporting ...................................................................................................... 31
Section 1. Creating and Submitting US FATCA Returns ................................................................... 33
Section 1.1 Creating US FATCA Returns ............................................................................................ 33
1.1.1 Uploading and submitting US FATCA XML Returns ........................................................ 34

ii
Section 1.2 Completing a US FATCA Manual Entry Return ................................................................ 35
1.2.1 Submitting US FATCA Manual Entry Returns .................................................................. 45
Section 1.3 Reviewing and correcting validation issues ...................................................................... 46
Section 2. Deleting Returns ............................................................................................................... 47
Section 3. Viewing Submitted Returns ............................................................................................... 48
Sections 4 to 7 Amended, Void and Corrected records............................................................................. 49
Section 4. Creating an Amended Return ........................................................................................... 50
Section 4.1 Creating a Manual Entry Amended Return ....................................................................... 50
Section 4.2 Creating an XML Amended Return ................................................................................... 52
Section 5. IRS notifications ................................................................................................................ 53
Section 5.1 Downloading an IRS notification ....................................................................................... 54
Section 5.2 Understanding an IRS notification Code ........................................................................... 58
Section 6. Creating Corrected Returns in Response to an IRS notification ...................................... 61
Section 6.1 Creating Corrected Manual Entry Returns ........................................................................ 61
Section 6.2 Creating Corrected XML Returns ...................................................................................... 65
Section 7. Creating Void Returns in Response to an IRS notification ............................................... 67
Section 7.1 Creating a Manual Entry Void Return ............................................................................... 67
Section 7.2 Creating an XML Void Return ........................................................................................... 67
Module V. CRS Reporting ................................................................................................................. 68
Section 1. Creating and Submitting CRS Returns ............................................................................. 68
Section 1.1 Introduction ....................................................................................................................... 68
1.1.1 CRS Reporting – Annex 3 of the Standard ....................................................................... 68
1.1.2 CRS Business Rules ......................................................................................................... 68
1.1.3 CRS Receiving Country Returns ...................................................................................... 68
1.1.4 CRS Filing Declaration ...................................................................................................... 69
Section 1.2 CRS Business Rules ......................................................................................................... 69
Section 1.3 Creating CRS Returns ...................................................................................................... 76
1.3.1 Uploading and submitting CRS XML Returns ................................................................... 77
Section 1.4 Completing a CRS Manual Entry Return .......................................................................... 79
1.4.1 CRS Manual Entry Return - filing dependencies .............................................................. 79
1.4.2 Completing a CRS Manual Entry Return .......................................................................... 80
1.4.3 Submitting CRS Manual Entry Returns............................................................................. 87
1.4.4 Reviewing and correcting validation issues ...................................................................... 89
Section 1.5 CRS Filing Declaration ...................................................................................................... 90
1.5.1 CRS Filing Declaration - validation summary ................................................................... 90
1.5.2 Creating the CRS Filing Declaration ................................................................................. 91
1.5.3 Submitting the CRS Filing Declaration.............................................................................. 92
Section 2. Deleting Returns ............................................................................................................... 95
Section 3. Viewing Submitted Returns ............................................................................................... 96
Section 4. Correction Process for CRS Returns ................................................................................ 97
Section 5. CRS Status Messages ...................................................................................................... 97
Section 5.1 File errors .......................................................................................................................... 97
Section 5.2 Record errors .................................................................................................................... 98
Section 5.3 Submitting CRS Corrected Return (including deletions)................................................... 98
iii
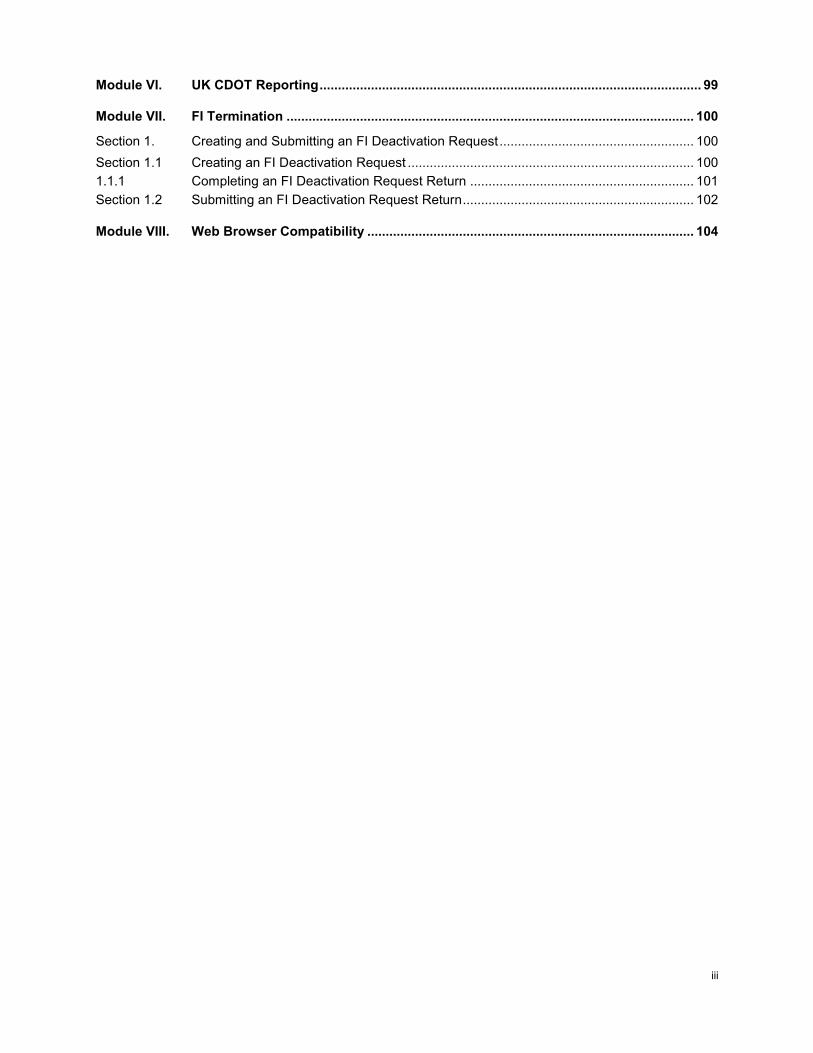
Module VI. UK CDOT Reporting ........................................................................................................ 99
Module VII. FI Termination ............................................................................................................... 100
Section 1. Creating and Submitting an FI Deactivation Request ..................................................... 100
Section 1.1 Creating an FI Deactivation Request .............................................................................. 100
1.1.1 Completing an FI Deactivation Request Return ............................................................. 101
Section 1.2 Submitting an FI Deactivation Request Return ............................................................... 102
Module VIII. Web Browser Compatibility ......................................................................................... 104
iv
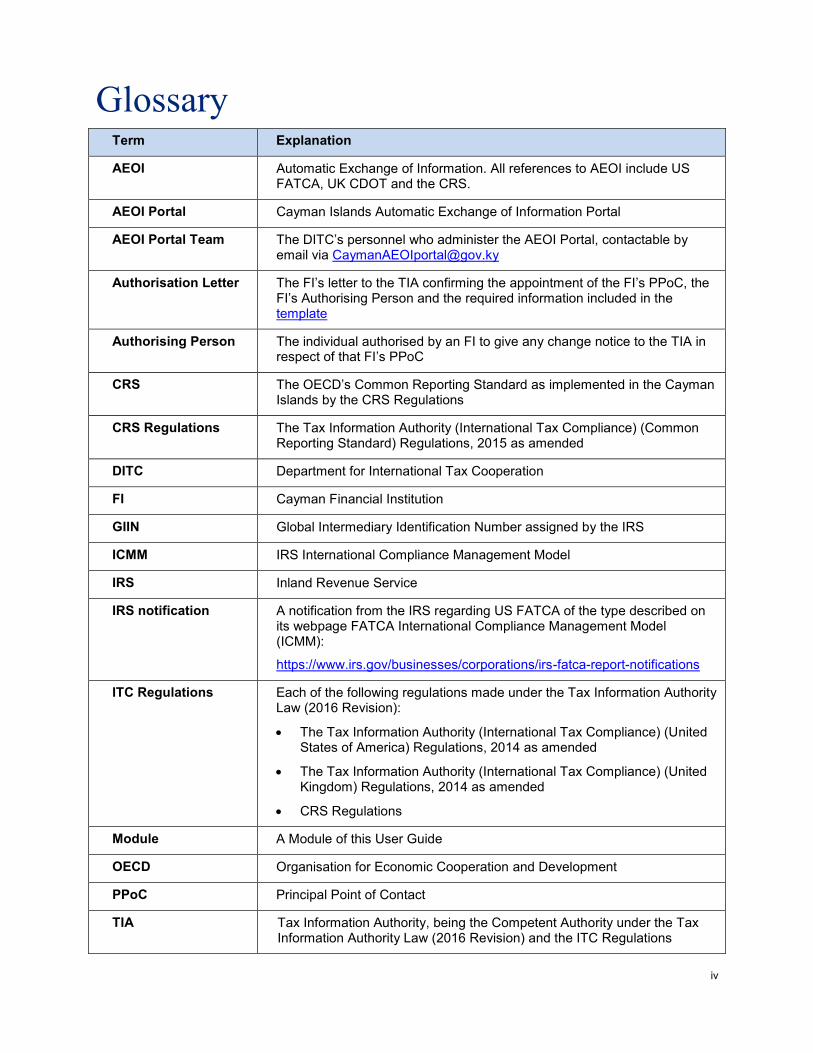
Glossary Term Explanation
AEOI Automatic Exchange of Information. All references to AEOI include US FATCA, UK CDOT and the CRS.
AEOI Portal Cayman Islands Automatic Exchange of Information Portal
AEOI Portal Team The DITC’s personnel who administer the AEOI Portal, contactable by email via [email protected]
Authorisation Letter The FI’s letter to the TIA confirming the appointment of the FI’s PPoC, the FI’s Authorising Person and the required information included in the template
Authorising Person The individual authorised by an FI to give any change notice to the TIA in respect of that FI’s PPoC
CRS The OECD’s Common Reporting Standard as implemented in the Cayman Islands by the CRS Regulations
CRS Regulations The Tax Information Authority (International Tax Compliance) (Common Reporting Standard) Regulations, 2015 as amended
DITC Department for International Tax Cooperation
FI Cayman Financial Institution
GIIN Global Intermediary Identification Number assigned by the IRS
ICMM IRS International Compliance Management Model
IRS Inland Revenue Service
IRS notification A notification from the IRS regarding US FATCA of the type described on its webpage FATCA International Compliance Management Model (ICMM):
https://www.irs.gov/businesses/corporations/irs-fatca-report-notifications
ITC Regulations Each of the following regulations made under the Tax Information Authority Law (2016 Revision):
The Tax Information Authority (International Tax Compliance) (United States of America) Regulations, 2014 as amended
The Tax Information Authority (International Tax Compliance) (United Kingdom) Regulations, 2014 as amended
CRS Regulations
Module A Module of this User Guide
OECD Organisation for Economic Cooperation and Development
PPoC Principal Point of Contact
TIA Tax Information Authority, being the Competent Authority under the Tax Information Authority Law (2016 Revision) and the ITC Regulations
v
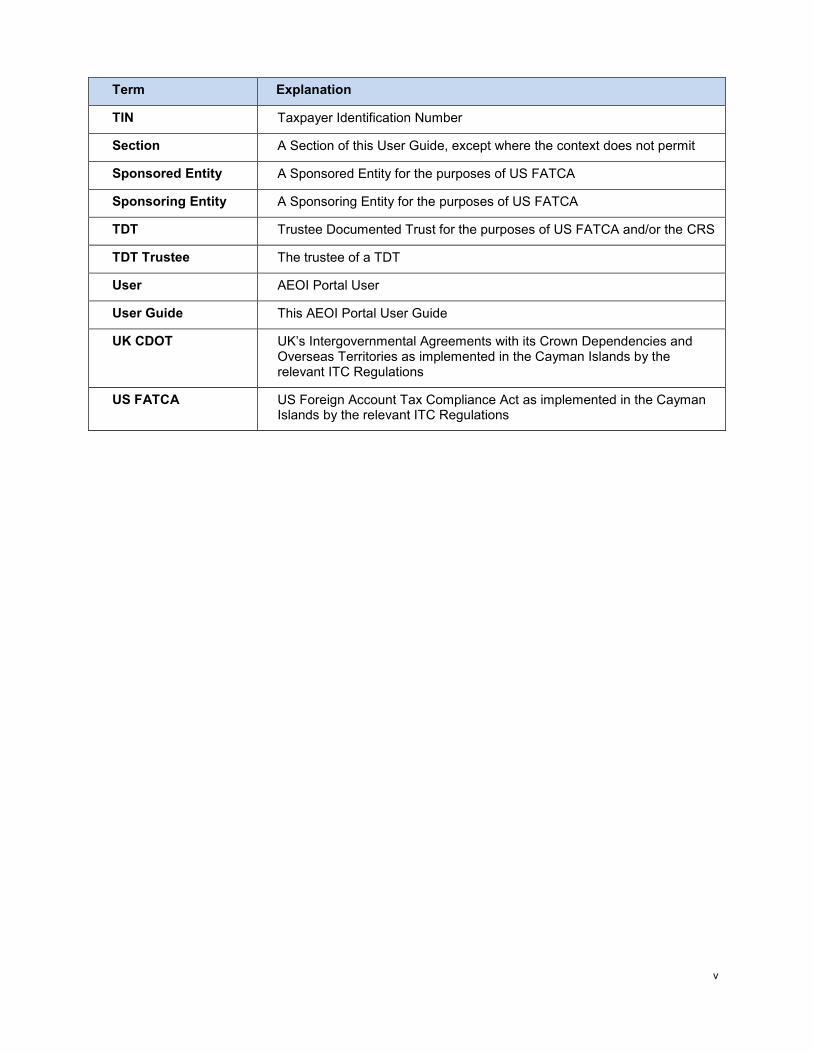
Term Explanation
TIN Taxpayer Identification Number
Section A Section of this User Guide, except where the context does not permit
Sponsored Entity A Sponsored Entity for the purposes of US FATCA
Sponsoring Entity A Sponsoring Entity for the purposes of US FATCA
TDT Trustee Documented Trust for the purposes of US FATCA and/or the CRS
TDT Trustee The trustee of a TDT
User AEOI Portal User
User Guide This AEOI Portal User Guide
UK CDOT UK’s Intergovernmental Agreements with its Crown Dependencies and Overseas Territories as implemented in the Cayman Islands by the relevant ITC Regulations
US FATCA US Foreign Account Tax Compliance Act as implemented in the Cayman Islands by the relevant ITC Regulations
1
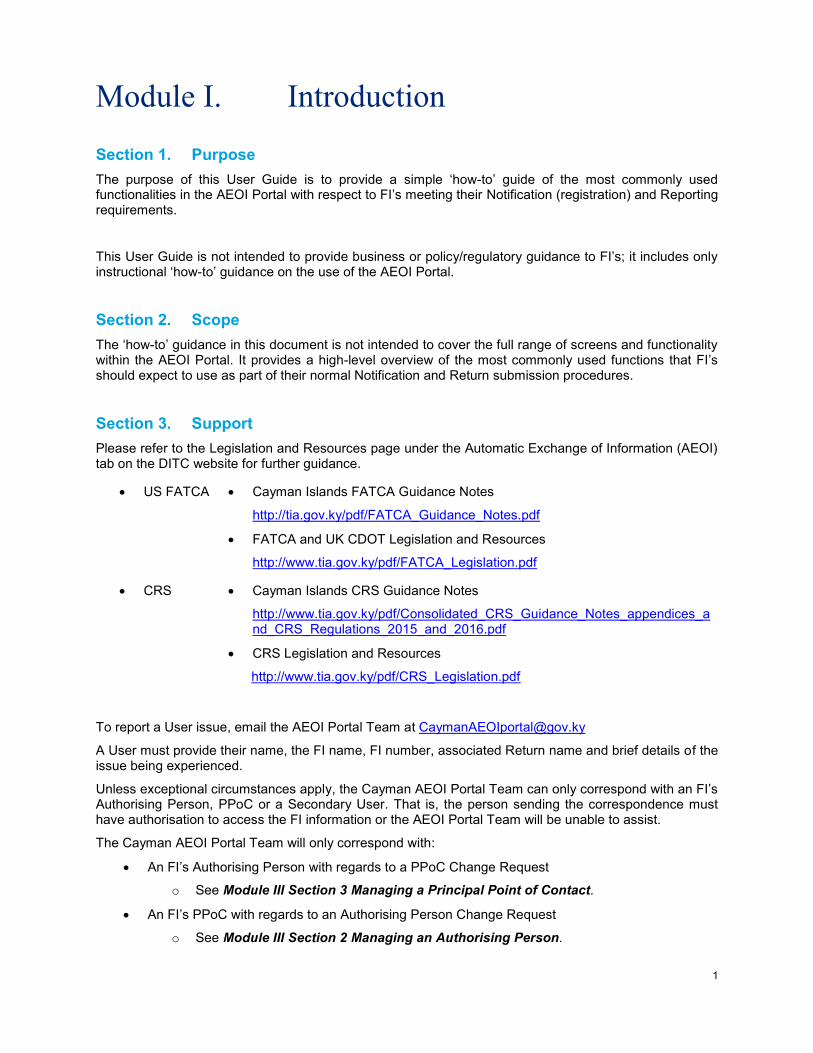
Module I. Introduction
Section 1. Purpose
The purpose of this User Guide is to provide a simple ‘how-to’ guide of the most commonly used functionalities in the AEOI Portal with respect to FI’s meeting their Notification (registration) and Reporting requirements.
This User Guide is not intended to provide business or policy/regulatory guidance to FI’s; it includes only instructional ‘how-to’ guidance on the use of the AEOI Portal.
Section 2. Scope
The ‘how-to’ guidance in this document is not intended to cover the full range of screens and functionality within the AEOI Portal. It provides a high-level overview of the most commonly used functions that FI’s should expect to use as part of their normal Notification and Return submission procedures.
Section 3. Support
Please refer to the Legislation and Resources page under the Automatic Exchange of Information (AEOI) tab on the DITC website for further guidance.
US FATCA Cayman Islands FATCA Guidance Notes
http://tia.gov.ky/pdf/FATCA_Guidance_Notes.pdf
FATCA and UK CDOT Legislation and Resources
http://www.tia.gov.ky/pdf/FATCA_Legislation.pdf
CRS Cayman Islands CRS Guidance Notes
http://www.tia.gov.ky/pdf/Consolidated_CRS_Guidance_Notes_appendices_and_CRS_Regulations_2015_and_2016.pdf
CRS Legislation and Resources
http://www.tia.gov.ky/pdf/CRS_Legislation.pdf
To report a User issue, email the AEOI Portal Team at [email protected]
A User must provide their name, the FI name, FI number, associated Return name and brief details of the issue being experienced.
Unless exceptional circumstances apply, the Cayman AEOI Portal Team can only correspond with an FI’s Authorising Person, PPoC or a Secondary User. That is, the person sending the correspondence must have authorisation to access the FI information or the AEOI Portal Team will be unable to assist.
The Cayman AEOI Portal Team will only correspond with:
An FI’s Authorising Person with regards to a PPoC Change Request
o See Module III Section 3 Managing a Principal Point of Contact.
An FI’s PPoC with regards to an Authorising Person Change Request
o See Module III Section 2 Managing an Authorising Person.
2
Response times are expected to be within ten business days. Response times will be longer at peak access times.
Section 4. Accuracy of information
Each FI will give information to the TIA in the course of complying with its obligations under the ITC Regulations. In order for the TIA to perform its functions it is important that all information given to the TIA is accurate, i.e. complete, correct and reliable. The ITC Regulations establish certain offences regarding inaccurate information.
The DITC may contact FIs with regards to the accuracy of information submitted to the AEOI Portal. These emails will be sent from a dedicated email address [email protected]. AEOI Portal Users must ensure that their contact email accounts are able to receive emails from this email address e.g. by adding the email address to a ‘safe list’. Other general email communications may be sent by the AEOI Portal Team from the address [email protected] and users should also ensure that email communications can be received from this address.
3
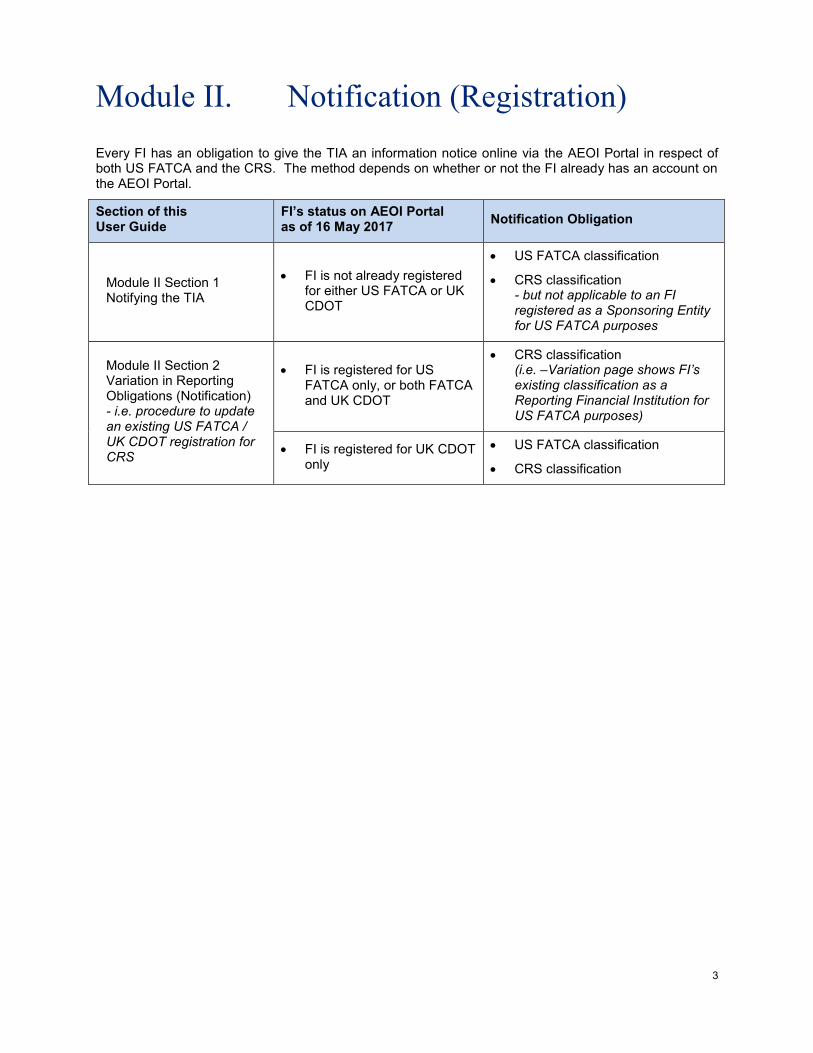
Module II. Notification (Registration)
Every FI has an obligation to give the TIA an information notice online via the AEOI Portal in respect of both US FATCA and the CRS. The method depends on whether or not the FI already has an account on the AEOI Portal.
Section of this User Guide
FI’s status on AEOI Portal as of 16 May 2017
Notification Obligation
Module II Section 1 Notifying the TIA
FI is not already registered for either US FATCA or UK CDOT
US FATCA classification
CRS classification - but not applicable to an FI registered as a Sponsoring Entity for US FATCA purposes
Module II Section 2 Variation in Reporting Obligations (Notification) - i.e. procedure to update an existing US FATCA / UK CDOT registration for CRS
FI is registered for US FATCA only, or both FATCA and UK CDOT
CRS classification (i.e. –Variation page shows FI’s existing classification as a Reporting Financial Institution for US FATCA purposes)
FI is registered for UK CDOT only
US FATCA classification
CRS classification

4
Section 1. Notifying the TIA
Use this Section to create a new Notification (Registration) for US FATCA and/or the CRS.
DO NOT use this section to update an existing Notification (Registration) made pursuant to US FATCA and/or UK CDOT in order to comply with the CRS.
GO TO Module II Section 2 Variation in Reporting Obligations (Notification) - i.e. procedure to update an existing US FATCA / UK CDOT registration for CRS.
Section 1.1 US FATCA
To notify the TIA of a reporting obligation under US FATCA, an FI or a Sponsoring Entity, authorised to act on behalf of their Sponsored Entities, is required to complete a Notification Form using the AEOI Portal.
Sponsoring Entities and Trustees of Trustee Documented Trusts (TDT Trustees)
Unlike the CRS, US FATCA provides for Sponsoring Entities and Sponsored Entities. The implications of this are set out below.
US FATCA also requires the trustee of a Trustee Documented Trust (TDT Trustee) to comply with Notification (registration) and Reporting obligations as a Sponsoring Entity by treating its Trustee Documented Trusts (TDTs) as Sponsored Entities. In contrast, the CRS Regulations impose Notification (registration) and Reporting obligations directly on a TDT, although the TDT Trustee performs the same in the name of the TDT.
Sponsoring Entities and TDT Trustees
A Sponsoring Entity must satisfy the applicable conditions of Section VI. B or C of Annex II to the USA-Cayman Model 1B Intergovernmental Agreement.
The TDT Trustee must satisfy the conditions of Section VI. A of Annex II to the USA-Cayman Model 1B Intergovernmental Agreement.
A Sponsoring Entity or a TDT Trustee must be registered as a ‘Sponsoring Entity’ with the IRS on the IRS FATCA registration website in order to obtain a GIIN with ‘SP’ as the category code:
https://www.irs.gov/businesses/corporations/fatca-online-registration-system-and-ffi-list-giin-composition-information
A Sponsoring Entity / TDT Trustee is required to complete only one Notification Form on the AEOI Portal – using its GIIN with ‘SP’ as the category code - in order to submit US FATCA Returns on behalf of Sponsored Entities and/or TDTs, as applicable.
An FI which has used its GIIN with ‘SP’ as the category code when registering on the AEOI Portal for US FATCA purposes will not be able to complete the CRS Section B or Section C of the Notification Form or the Variation in Reporting Obligations (Notification) Form, as the case may be.
A Sponsoring Entity / TDT Trustee does not have the obligation to notify the TIA with the details of an Authorising Person (the individual authorised by an FI to give any change notice to the TIA in respect of that FI’s PPoC) but may do so if desired. If a Sponsoring Entity / TDT Trustee does not assign an Authorising Person they will be unable to change their PPoC using the Change of PPoC process described in Module III Section 3 Managing a Principal Point of Contact and should instead email the AEOI Portal Team to request a change to their PPoC
5
Sponsored Entities and Trustee Documented Trusts (TDTs)
An FI that is a Sponsored Entity or TDT for US FATCA purposes is not required to complete the Cayman Islands Notification procedure in respect of US FATCA but must do so in respect of the CRS.
A Sponsoring Entity must obtain a GIIN in respect of any Sponsored Entity with a US Reportable Account and include that GIIN when reporting in respect of the Sponsored Entity as specified by the IRS FATCA XML Schema v2.0 User Guide.
o Exceptions:
A Sponsoring Entity is not required to obtain a GIIN in respect of a Sponsored FFI that is a sponsored, closely held investment entity
A TDT Trustee is not required to obtain a GIIN in respect of its TDT even if the TDT has US Reportable Accounts.
Consequently, a Sponsoring Entity / TDT Trustee must use its own ‘SP’ GIIN as the GIIN of the Sponsored FFI or TDT, as the case may be, when creating a US FATCA Return for that Sponsored FFI or TDT. Details are provided in the Sections on FATCA XML Returns and FATCA Manual Entry Returns below.
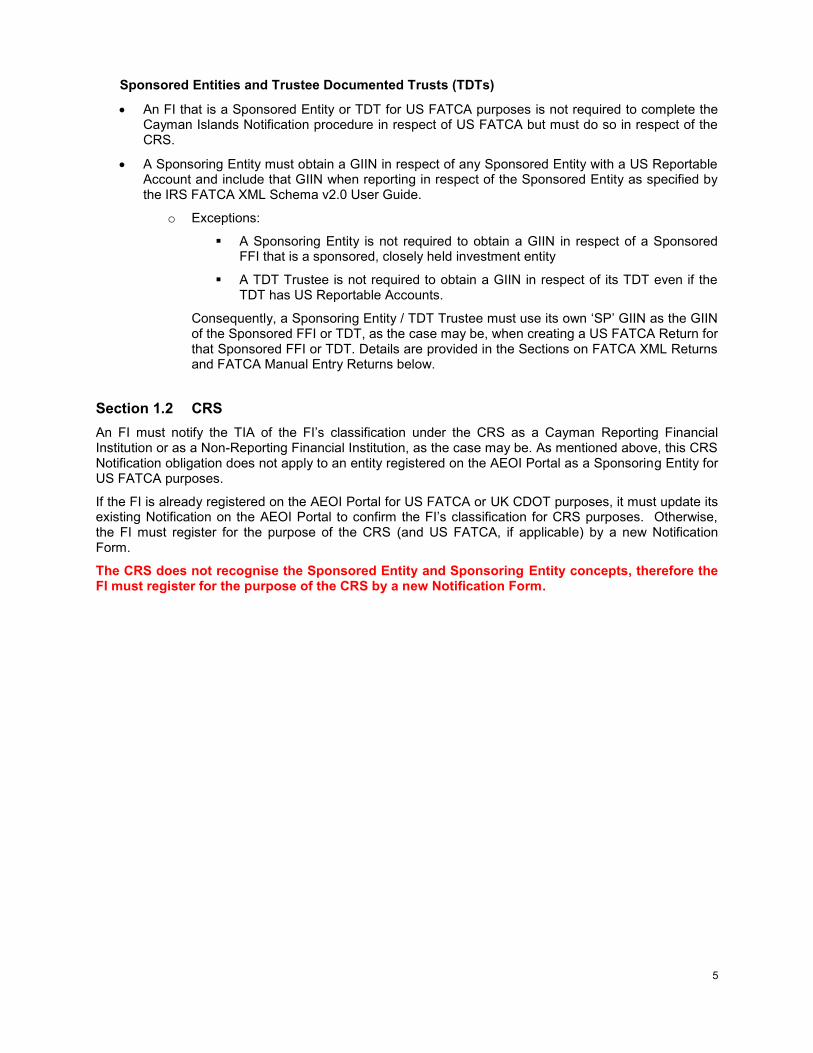
Section 1.2 CRS
An FI must notify the TIA of the FI’s classification under the CRS as a Cayman Reporting Financial Institution or as a Non-Reporting Financial Institution, as the case may be. As mentioned above, this CRS Notification obligation does not apply to an entity registered on the AEOI Portal as a Sponsoring Entity for US FATCA purposes.
If the FI is already registered on the AEOI Portal for US FATCA or UK CDOT purposes, it must update its existing Notification on the AEOI Portal to confirm the FI’s classification for CRS purposes. Otherwise, the FI must register for the purpose of the CRS (and US FATCA, if applicable) by a new Notification Form.
The CRS does not recognise the Sponsored Entity and Sponsoring Entity concepts, therefore the FI must register for the purpose of the CRS by a new Notification Form.
6
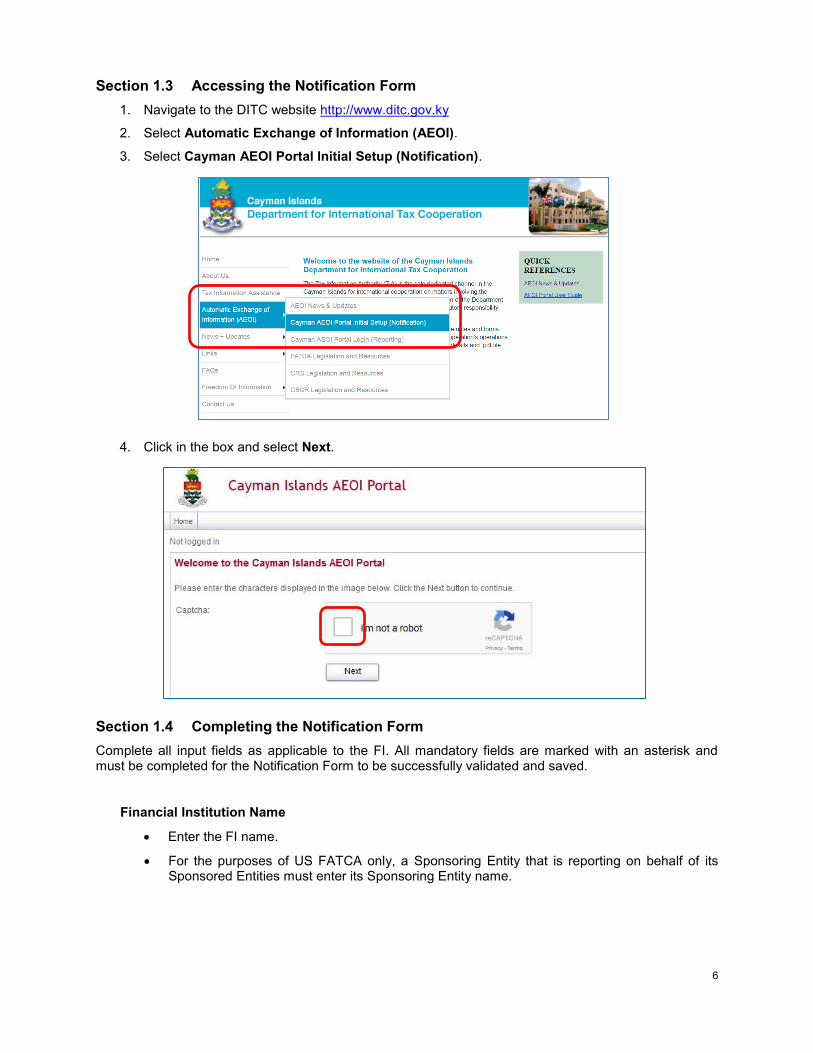
Section 1.3 Accessing the Notification Form
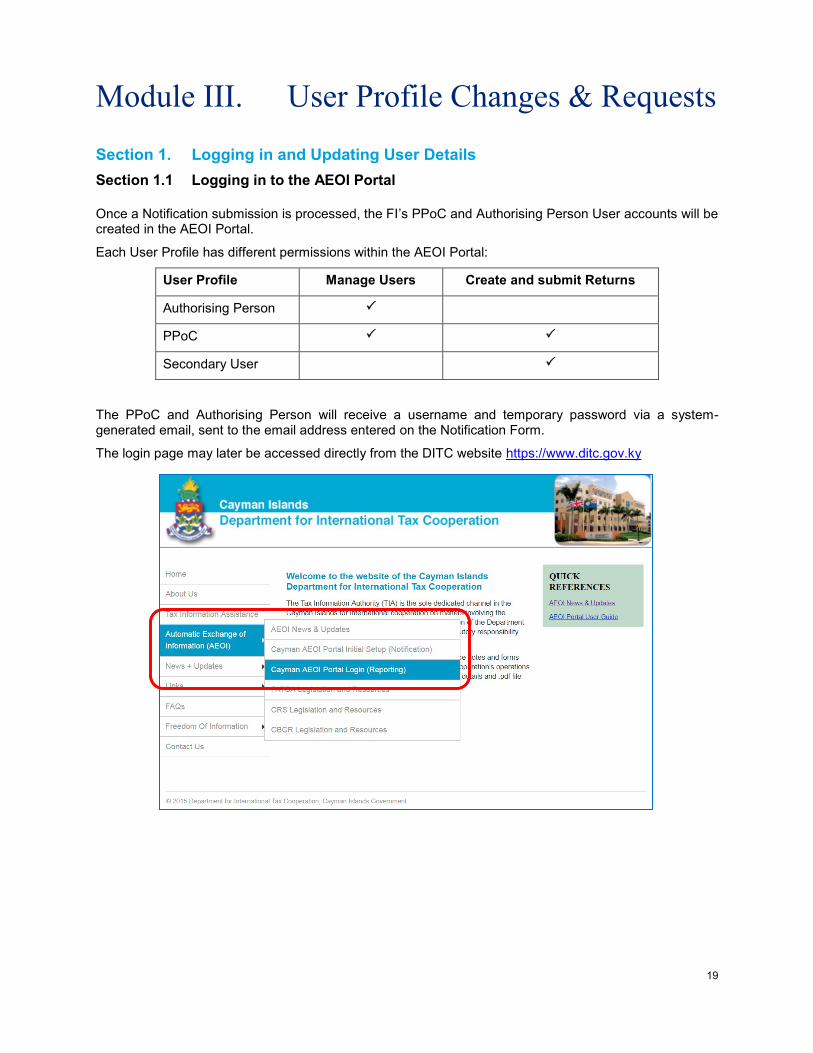
1. Navigate to the DITC website http://www.ditc.gov.ky
2. Select Automatic Exchange of Information (AEOI).
3. Select Cayman AEOI Portal Initial Setup (Notification).
4. Click in the box and select Next.
Section 1.4 Completing the Notification Form
Complete all input fields as applicable to the FI. All mandatory fields are marked with an asterisk and must be completed for the Notification Form to be successfully validated and saved.
Financial Institution Name
Enter the FI name.
For the purposes of US FATCA only, a Sponsoring Entity that is reporting on behalf of its Sponsored Entities must enter its Sponsoring Entity name.
7
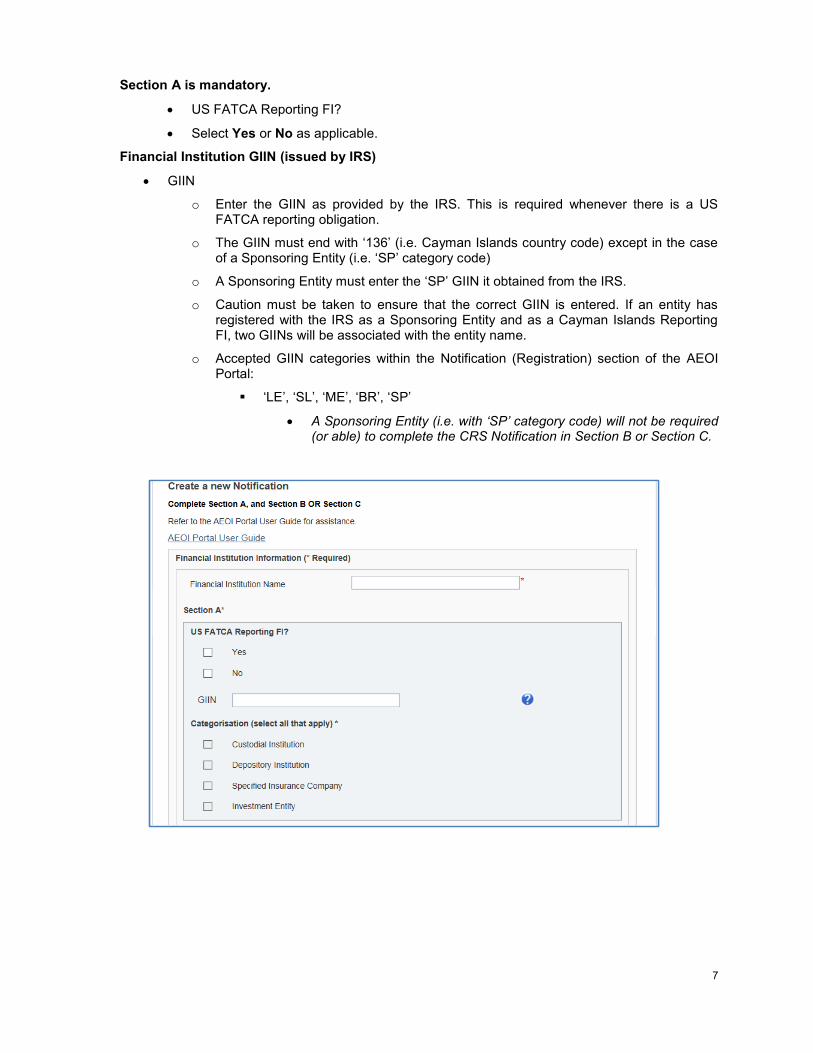
Section A is mandatory.
US FATCA Reporting FI?
Select Yes or No as applicable.
Financial Institution GIIN (issued by IRS)
GIIN
o Enter the GIIN as provided by the IRS. This is required whenever there is a US FATCA reporting obligation.
o The GIIN must end with ‘136’ (i.e. Cayman Islands country code) except in the case of a Sponsoring Entity (i.e. ‘SP’ category code)
o A Sponsoring Entity must enter the ‘SP’ GIIN it obtained from the IRS.
o Caution must be taken to ensure that the correct GIIN is entered. If an entity has registered with the IRS as a Sponsoring Entity and as a Cayman Islands Reporting FI, two GIINs will be associated with the entity name.
o Accepted GIIN categories within the Notification (Registration) section of the AEOI Portal:
‘LE’, ‘SL’, ‘ME’, ‘BR’, ‘SP’
A Sponsoring Entity (i.e. with ‘SP’ category code) will not be required (or able) to complete the CRS Notification in Section B or Section C.

8
Section B – CRS Reporting FI
Section B is mandatory unless Section C applies and is completed.
CRS Reporting FI?
o Check the box if the FI is a CRS Reporting FI.
Categorisation (select all that apply)
o The available categorisations are:
Custodial Institution
Depository Institution
Specified Insurance Company
Investment Entity
If the FI is an Investment Entity it may also check the last box to confirm that it has no financial accounts by virtue of Schedule 1 to the CRS Regulations, Section VIII.C.1.a).
o Checking this box will prevent the FI from being able to submit CRS returns and /or CRS Filing Declarations within the AEOI Portal.
9
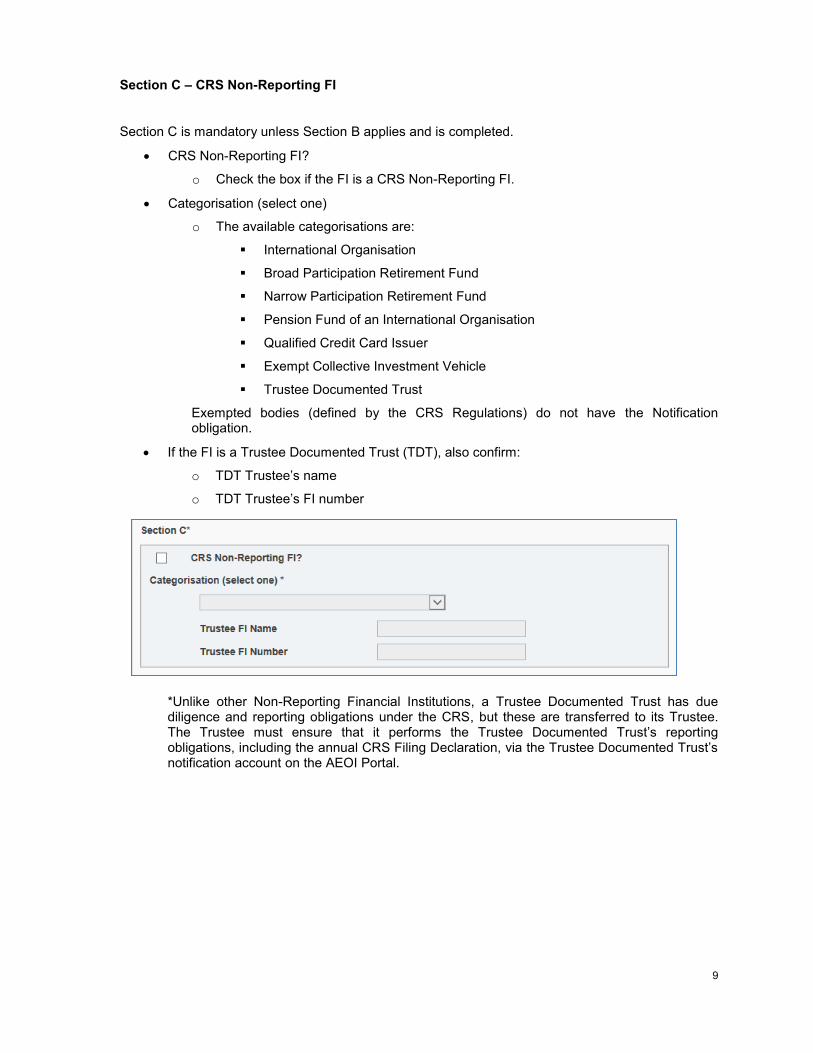
Section C – CRS Non-Reporting FI
Section C is mandatory unless Section B applies and is completed.
CRS Non-Reporting FI?
o Check the box if the FI is a CRS Non-Reporting FI.
Categorisation (select one)
o The available categorisations are:
International Organisation
Broad Participation Retirement Fund
Narrow Participation Retirement Fund
Pension Fund of an International Organisation
Qualified Credit Card Issuer
Exempt Collective Investment Vehicle
Trustee Documented Trust
Exempted bodies (defined by the CRS Regulations) do not have the Notification obligation.
If the FI is a Trustee Documented Trust (TDT), also confirm:
o TDT Trustee’s name
o TDT Trustee’s FI number
*Unlike other Non-Reporting Financial Institutions, a Trustee Documented Trust has due diligence and reporting obligations under the CRS, but these are transferred to its Trustee. The Trustee must ensure that it performs the Trustee Documented Trust’s reporting obligations, including the annual CRS Filing Declaration, via the Trustee Documented Trust’s notification account on the AEOI Portal.
10
Authorising Person Information (must be a different individual than the PPoC)
The Authorising Person is the individual the FI has authorised to give any change notice regarding the PPoC. That procedure is described in Module III Section 3 Managing a Principal Point of Contact.
The contact email address entered for the Authorising Person must be specific to that individual. For security reasons, the Authorising Person MUST NOT give access to this email address or share it with any other person.
(e.g. The FI’s Authorising Person must never enter a contact email address in the AEOI Portal that is shared with another individual who is the PPoC of that FI.)
On submission of the notification and the first creation of the individual’s profile as Authoring Person, the Authorising Person will receive a system-generated email, which includes their username and temporary password, which they will use to log onto the AEOI Portal. They will be asked to select a new password upon their first login to the AEOI Portal. The Authorising Person MUST NOT share their AEOI Portal login and password with any other individual. Portal users must be aware that is an offence under Cayman law to access confidential information without appropriate authorisation or to allow the unauthorised access of another.
If an Authorising Person has multiple FIs and wishes to gain access from a single login point then the same email address must be entered into the Authorising Person Contact information section on each FI Notification.
Principal Point of Contact (PPoC) Information
The email address entered for the PPoC must be specific to that user.
For security reasons, the PPOC MUST NOT give access to the email address used for communication via the AEOI Portal or share it with any other person.
On submission of the notification and first creation of the individual’s User profile, the PPoC will receive a system-generated email including their username and a temporary password which they will use to log onto the AEOI Portal. They will be asked to select a new password upon their first login to the AEOI Portal (see Module III Section 1 Logging in and Updating User Details). The PPoC MUST NOT share their AEOI Portal log in details and password with any other individual. Portal users must be aware that is an offence under Cayman law to access confidential information without appropriate authorisation or to allow the unauthorised access of another.
If a PPoC has multiple FIs and wishes to gain access from a single login point then the same email address must be entered into the PPoC Contact Information section on each FI Notification.
11
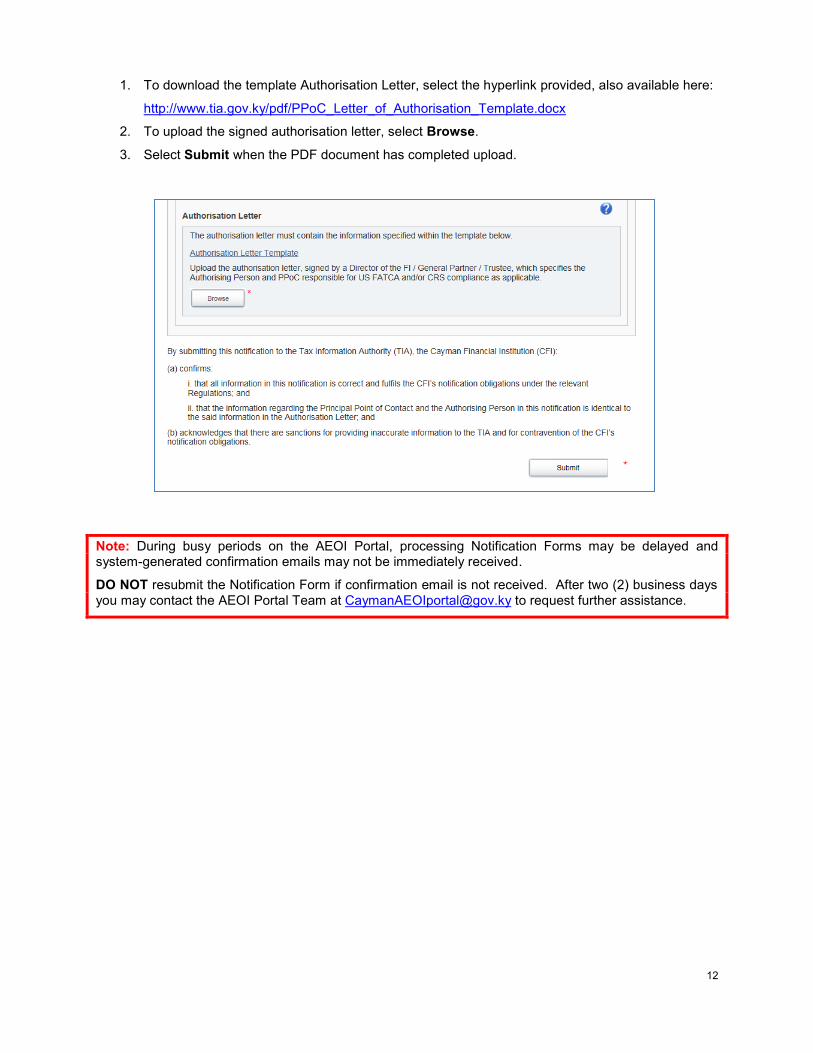
Authorisation Letter - PDF document to be attached (only one document may be uploaded).
The Authorisation Letter (and any supporting documentation) must be in one PDF document.
The Authorisation Letter must contain the information specified within the template provided: http://www.tia.gov.ky/pdf/PPoC_Letter_of_Authorisation_Template.docx
The Authorisation Letter must be from the Financial Institution (“FI”) and in a customary business format such as a letterhead and must include the following information:
The letter is dated within the last three months
The FI name
FI number if available
GIIN
The contact details of the elected Principal Point of Contact (i.e. required to identify the natural person authorised to be the PPoC):
Full name
Position
Email address
Telephone number
Business entity name
Physical address
The PPoC may be either a named employee/fiduciary of the FI or an employee/fiduciary of a third-party service provider
The contact details of the Authorising Person (the natural person authorised to submit a change request regarding the PPoC):
Full name
Position
Email address
Telephone number
Business entity name
Physical address
The Authorising Person may be either a named employee/fiduciary of the FI or an employee/fiduciary of a third-party service provider.
The Authorisation Letter must be signed by a director of the FI or of its trustee or general partner as applicable, and the signatory’s position and name must be stated.
The TIA may, depending on the circumstances, require an FI to produce additional documents (e.g. the register of directors and a board of directors resolution or a court order appointing official liquidators and a liquidators resolution) as evidence in support of the appointment of the Authorising Person and the PPoC but it is not mandatory to attach such supporting documents to the Authorisation Letter when it is first uploaded to the AEOI Portal.
Multiple FIs may use the same Authorisation Letter which lists all such FIs if they each have the same PPoC, Authorising Person and signatory of the Authorisation Letter. In this case, the PPoC must upload the same Authorisation Letter for each separate FI Notification on the AEOI Portal.
12
1. To download the template Authorisation Letter, select the hyperlink provided, also available here:
http://www.tia.gov.ky/pdf/PPoC_Letter_of_Authorisation_Template.docx
2. To upload the signed authorisation letter, select Browse.
3. Select Submit when the PDF document has completed upload.
Note: During busy periods on the AEOI Portal, processing Notification Forms may be delayed and system-generated confirmation emails may not be immediately received.
DO NOT resubmit the Notification Form if confirmation email is not received. After two (2) business days
you may contact the AEOI Portal Team at [email protected] to request further assistance.
13
Section 2. Variation in Reporting Obligations (Notification) - i.e. procedure to update an existing US FATCA / UK CDOT registration for CRS
Use this Section to update an existing Notification (Registration) made pursuant to US FATCA and/or UK CDOT in order to comply with the CRS to create a new Notification (Registration).
DO NOT use this Section to create a new Notification (Registration) for CRS purposes.
GO TO Module II Section 1 Notifying the TIA.
When Users have already completed the Notification process in the AEOI Portal and have received log-in credentials, they must Notify the TIA of any changes in reporting obligations using the Variation in Reporting Obligations (Notification) form.
An FI that is already registered on the AEOI Portal for US FATCA and/or UK CDOT purposes must use this procedure to perform its Notification obligation for CRS purposes.
Section 2.1 Creating a Variation in Reporting Obligations (Notification)
In order to Notify the TIA of a change in reporting obligations, a Variation in Reporting Obligations (Notification) Return must be created.
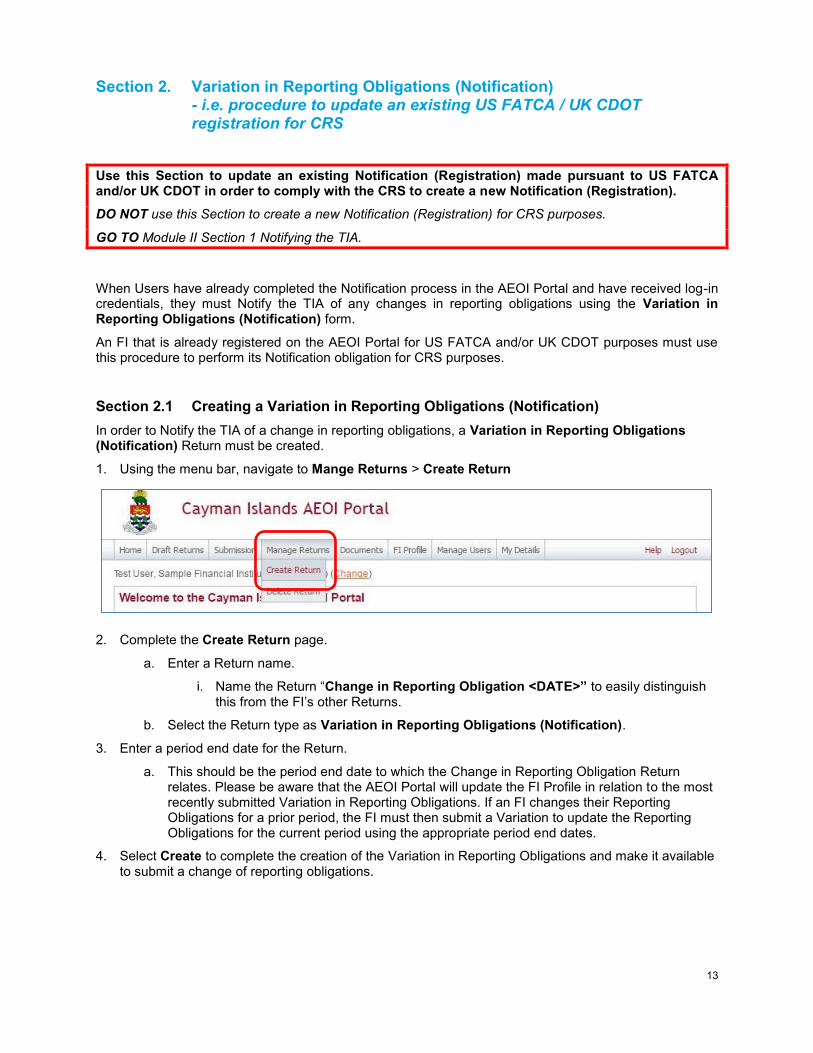
1. Using the menu bar, navigate to Mange Returns > Create Return
2. Complete the Create Return page.
a. Enter a Return name.
i. Name the Return “Change in Reporting Obligation <DATE>” to easily distinguish this from the FI’s other Returns.
b. Select the Return type as Variation in Reporting Obligations (Notification).
3. Enter a period end date for the Return.
a. This should be the period end date to which the Change in Reporting Obligation Return relates. Please be aware that the AEOI Portal will update the FI Profile in relation to the most recently submitted Variation in Reporting Obligations. If an FI changes their Reporting Obligations for a prior period, the FI must then submit a Variation to update the Reporting Obligations for the current period using the appropriate period end dates.
4. Select Create to complete the creation of the Variation in Reporting Obligations and make it available to submit a change of reporting obligations.
14
Section 2.2 Completing a Variation in Reporting Obligation Return
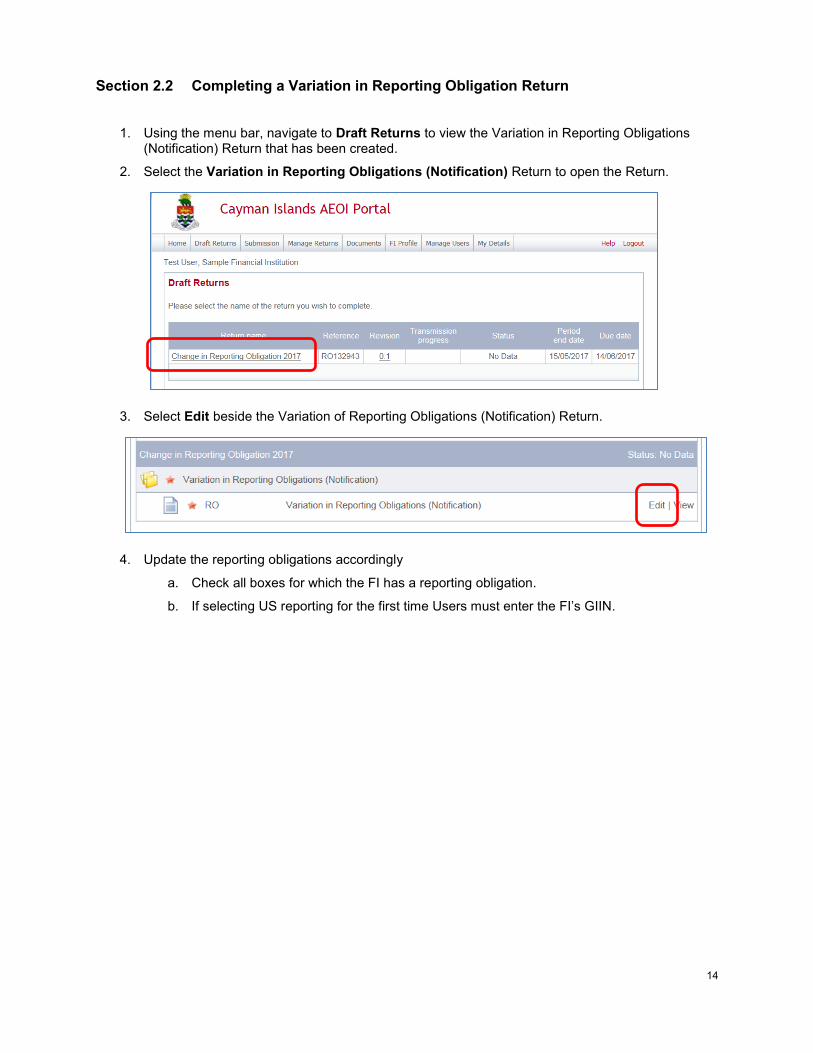
1. Using the menu bar, navigate to Draft Returns to view the Variation in Reporting Obligations (Notification) Return that has been created.
2. Select the Variation in Reporting Obligations (Notification) Return to open the Return.
3. Select Edit beside the Variation of Reporting Obligations (Notification) Return.
4. Update the reporting obligations accordingly
a. Check all boxes for which the FI has a reporting obligation.
b. If selecting US reporting for the first time Users must enter the FI’s GIIN.
15
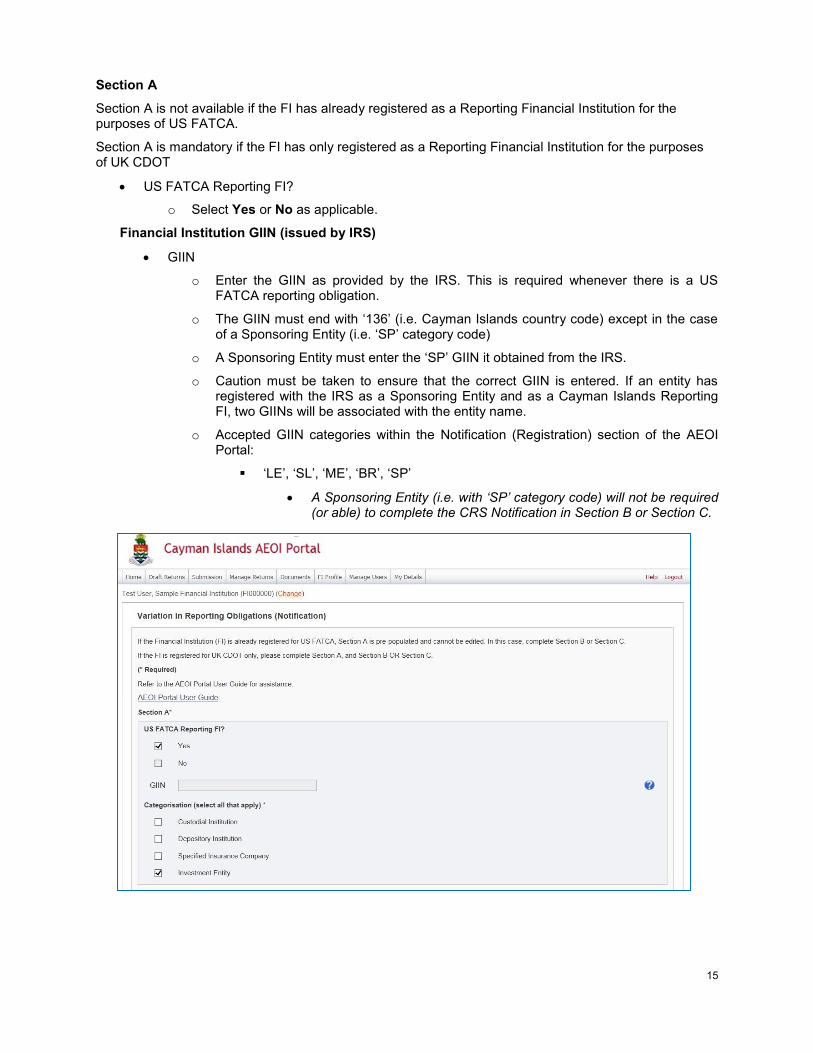
Section A
Section A is not available if the FI has already registered as a Reporting Financial Institution for the purposes of US FATCA.
Section A is mandatory if the FI has only registered as a Reporting Financial Institution for the purposes of UK CDOT
US FATCA Reporting FI?
o Select Yes or No as applicable.
Financial Institution GIIN (issued by IRS)
GIIN
o Enter the GIIN as provided by the IRS. This is required whenever there is a US FATCA reporting obligation.
o The GIIN must end with ‘136’ (i.e. Cayman Islands country code) except in the case of a Sponsoring Entity (i.e. ‘SP’ category code)
o A Sponsoring Entity must enter the ‘SP’ GIIN it obtained from the IRS.
o Caution must be taken to ensure that the correct GIIN is entered. If an entity has registered with the IRS as a Sponsoring Entity and as a Cayman Islands Reporting FI, two GIINs will be associated with the entity name.
o Accepted GIIN categories within the Notification (Registration) section of the AEOI Portal:
‘LE’, ‘SL’, ‘ME’, ‘BR’, ‘SP’
A Sponsoring Entity (i.e. with ‘SP’ category code) will not be required (or able) to complete the CRS Notification in Section B or Section C.

16
Section B – CRS Reporting FI
Section B is mandatory unless Section C applies and is completed.
CRS Reporting FI?
o Check the box if the FI is a CRS Reporting FI.
Categorisation (select all that apply)
o The available categorisations are:
Custodial Institution
Depository Institution
Specified Insurance Company
Investment Entity
o If the FI is an Investment Entity it may also check the last box to confirm that it has no financial accounts by virtue of Schedule 1 to the CRS Regulations, Section VIII.C.1.a) so that it is not necessary to submit an annual nil return if, by virtue of that provision, the FI has no Reportable Accounts for CRS purposes. Checking this box will prevent the FI from being able to submit CRS returns and/or a CRS filing Declaration within the AEOI Portal.

17
Section C – CRS Non-Reporting FI
Section C is mandatory unless Section B applies and is completed.
CRS Non-Reporting FI?
o Check the box if the FI is a CRS Non-Reporting FI.
Categorisation (select one). The available categorisations are:
o International Organisation
o Broad Participation Retirement Fund
o Narrow Participation Retirement Fund
o Pension Fund of an International Organisation
o Qualified Credit Card Issuer
o Exempt Collective Investment Vehicle
o Trustee Documented Trust
Exempted bodies (defined by the CRS Regulations) do not have the Notification obligation.
If the FI is a Trustee Documented Trust (TDT), also confirm:
o TDT Trustee’s name
o TDT Trustee’s FI number
It is no longer possible to change the Authorising Person via the Variation in Reporting Obligation Return. The procedure to change Portal Users is described in Module III.
18
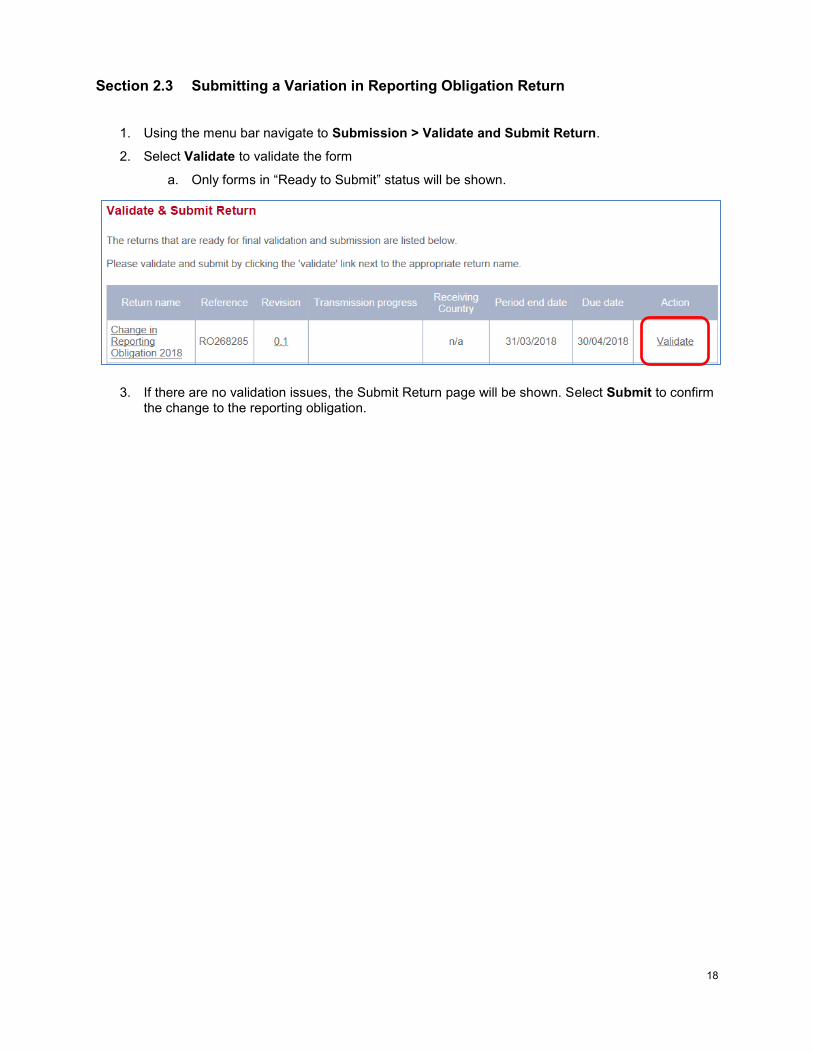
Section 2.3 Submitting a Variation in Reporting Obligation Return
1. Using the menu bar navigate to Submission > Validate and Submit Return.
2. Select Validate to validate the form
a. Only forms in “Ready to Submit” status will be shown.
3. If there are no validation issues, the Submit Return page will be shown. Select Submit to confirm the change to the reporting obligation.
19
Module III. User Profile Changes & Requests
Section 1. Logging in and Updating User Details
Section 1.1 Logging in to the AEOI Portal
Once a Notification submission is processed, the FI’s PPoC and Authorising Person User accounts will be created in the AEOI Portal.
Each User Profile has different permissions within the AEOI Portal:
User Profile Manage Users Create and submit Returns
Authorising Person
PPoC
Secondary User
The PPoC and Authorising Person will receive a username and temporary password via a system-generated email, sent to the email address entered on the Notification Form.
The login page may later be accessed directly from the DITC website https://www.ditc.gov.ky
20
1. Once prompted, enter the User email address and password and select Login.
2. Upon first login to the AEOI Portal, the User will be asked to change their password, the following rules are enforced for the password:
It must contain one capital letter, one small letter, one number and one special character
(e.g. #*!$).
It must be at least eight characters and no more than 30 characters.
It must not contain any spaces.
Users cannot reuse an existing password. Users MUST NOT share their AEOI Portal log in details and password with any other individual. Portal users must be aware that is an offence under Cayman law to access confidential information without appropriate authorisation or to allow the unauthorised access of another.
Section 1.2 Updating Users’ Password
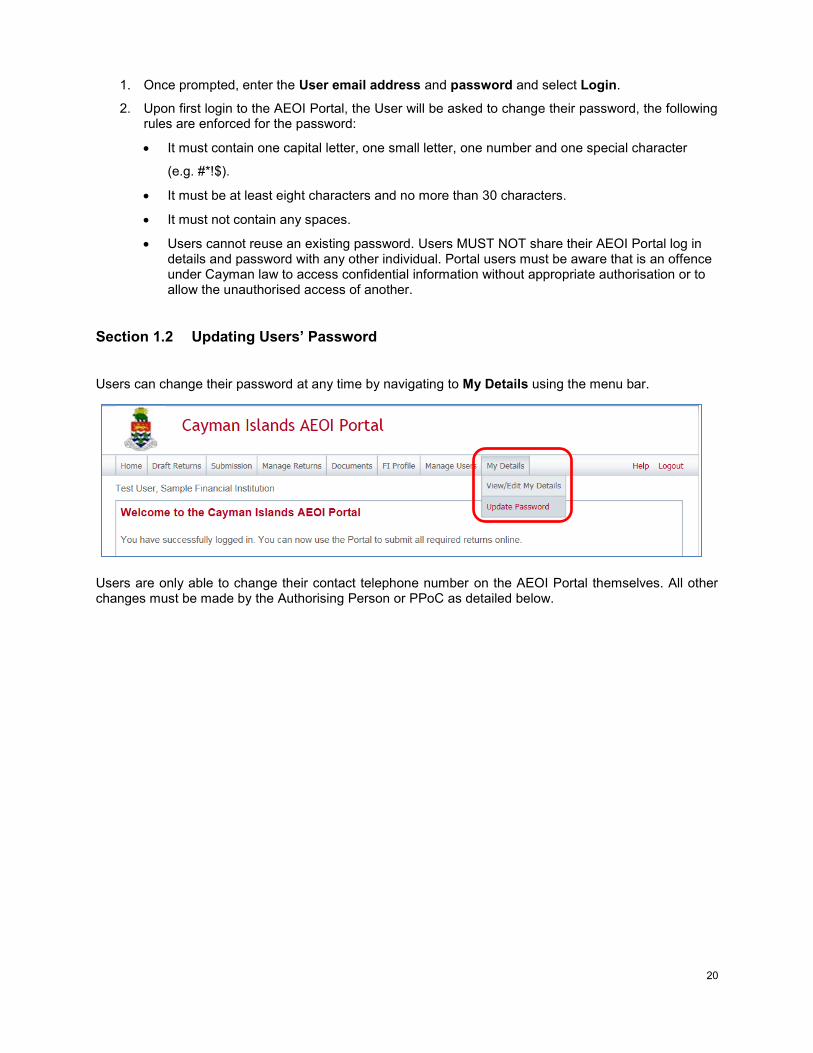
Users can change their password at any time by navigating to My Details using the menu bar.
Users are only able to change their contact telephone number on the AEOI Portal themselves. All other changes must be made by the Authorising Person or PPoC as detailed below.

21
Section 2. Managing an Authorising Person
Each FI registered on the AEOI Portal must have an Authorising Person assigned. Only a PPoC has the ability to assign an Authorising Person and must have the appropriate authorisation from the FI before submitting the request.
Section 2.1 Creating an Authorising Person Change Request Return
1. Using the menu bar, navigate to Manage Returns > Create Return.
2. Complete the Create Return page.
a. Enter a Return name, for example <FI Name> AP Change Request
b. Select Authorising Person Change Request.
c. Enter a Period end date for the Return. This should be the date of the request
3. Select Create to complete the creation of the Authorising Person Change Request and make it available within Draft Returns.
22
Section 2.2 Completing an Authorising Person Change Request Return
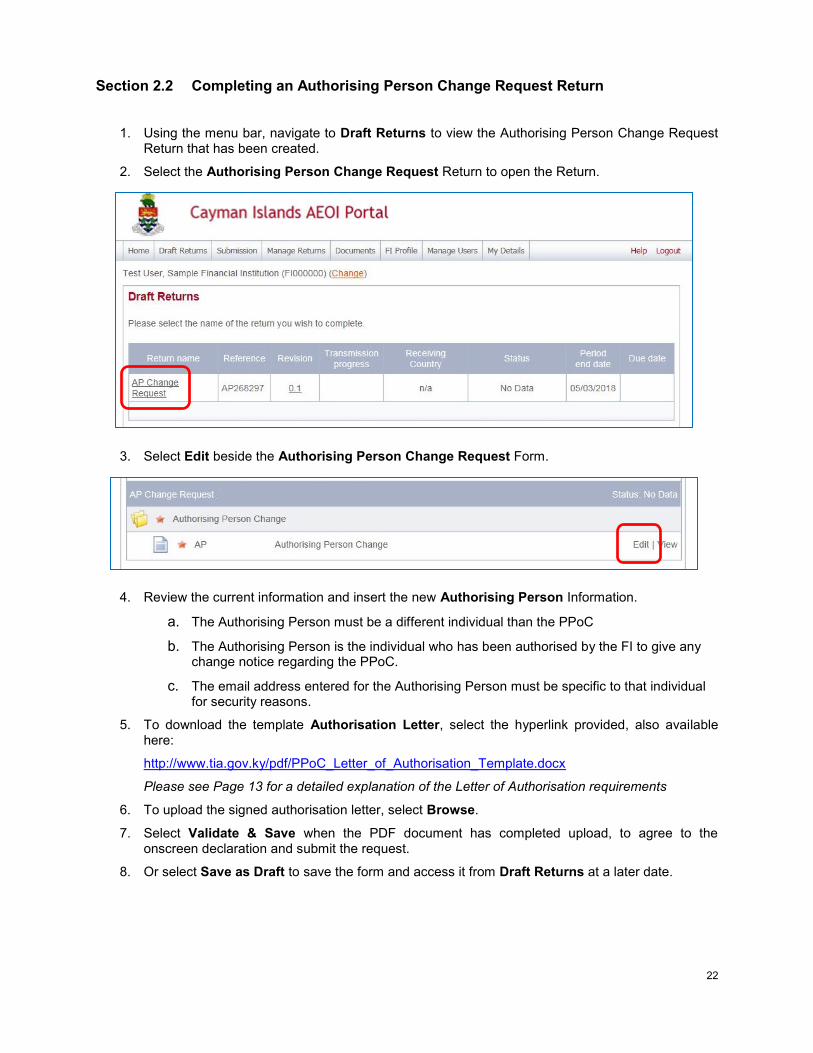
1. Using the menu bar, navigate to Draft Returns to view the Authorising Person Change Request Return that has been created.
2. Select the Authorising Person Change Request Return to open the Return.
3. Select Edit beside the Authorising Person Change Request Form.
4. Review the current information and insert the new Authorising Person Information.
a. The Authorising Person must be a different individual than the PPoC
b. The Authorising Person is the individual who has been authorised by the FI to give any change notice regarding the PPoC.
c. The email address entered for the Authorising Person must be specific to that individual for security reasons.
5. To download the template Authorisation Letter, select the hyperlink provided, also available here:
http://www.tia.gov.ky/pdf/PPoC_Letter_of_Authorisation_Template.docx
Please see Page 13 for a detailed explanation of the Letter of Authorisation requirements
6. To upload the signed authorisation letter, select Browse.
7. Select Validate & Save when the PDF document has completed upload, to agree to the onscreen declaration and submit the request.
8. Or select Save as Draft to save the form and access it from Draft Returns at a later date.

23
Section 2.3 Submitting an Authorising Person Change Request Return
1. Using the menu bar navigate to Submission > Validate and Submit Return.
2. Select Validate to validate the form
a. Only forms in a ‘Ready to Submit status will be shown.
3. If there are no validation issues, the Submit Return page will be shown. Select Submit to confirm the change to the Authorising Person.
Upon approval and the first creation of the individual’s User profile, the Authorising Person will receive a system-generated email, which includes their username and temporary password. They will be asked to select a new password upon their first login to the AEOI Portal (see Module III Section 1 Logging in and Updating User Details).
Note: Once submitted, the user change request will be reviewed by DITC for approval.
On approval, confirmation of the change will be emailed to both the existing and new Authorising Persons and the PPoC. Until the request is approved the Authorising Persons details will remain unchanged.
The Authorisation Letter uploaded to the form must contain all of the information specified within the template provided and agree to the information inserted into the form. Any discrepancies may cause the request to be rejected.
DO NOT resubmit the request if a confirmation email is not received. After ten (10) business days the
PPoC may contact the AEOI Portal Team at [email protected] to request further assistance.
24
Section 3. Managing a Principal Point of Contact
PPoC Change Requests are now* submitted via a form on the AEOI Portal by an FI’s Authorising Person. Only an Authorising Person has the ability to assign a PPoC and must have the appropriate authorisation from the FI before submitting the request.
*This does not apply to changing the PPoC of a Sponsoring Entity unless it has an Authorising Person. See: “Sponsoring Entities and TDT Trustees” under Module II Section 1.1 US FATCA.
Note: If an Authorising Person has not yet been assigned to an FI, the PPoC registered on the AEOI Portal must ensure this has been completed.
If this PPoC no longer has access to the AEOI Portal please contact the AEOI Portal Team at [email protected] to request further assistance.
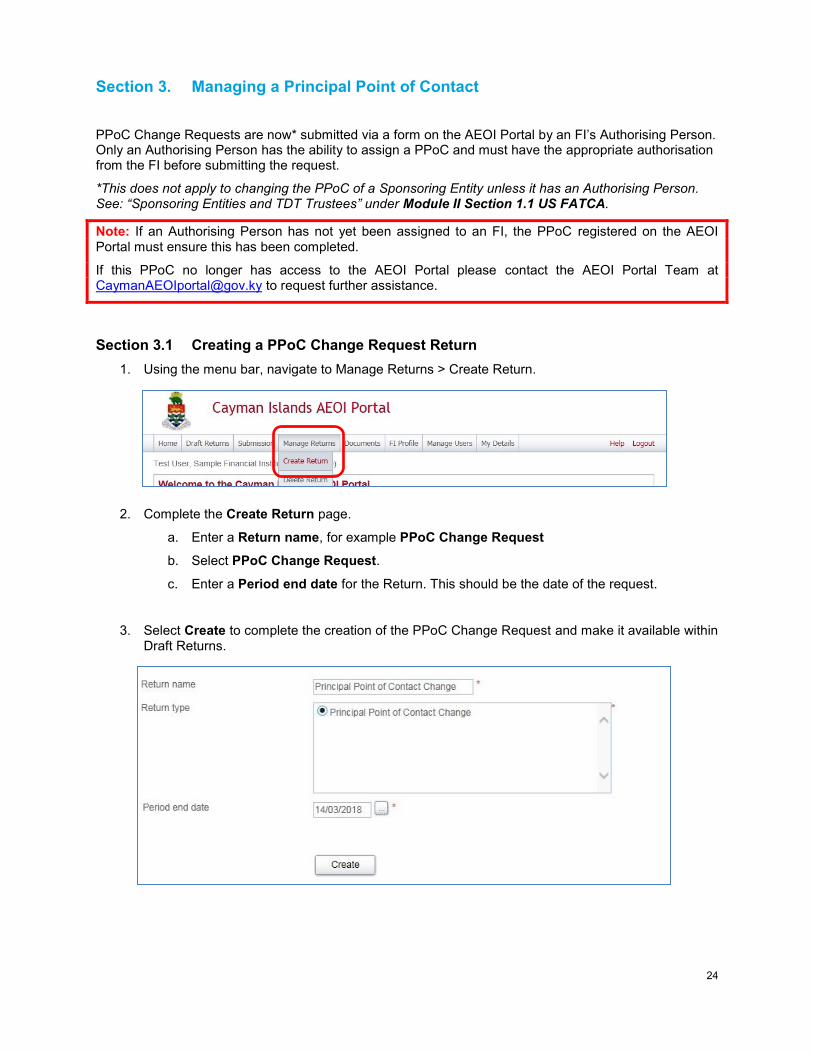
Section 3.1 Creating a PPoC Change Request Return
1. Using the menu bar, navigate to Manage Returns > Create Return.
2. Complete the Create Return page.
a. Enter a Return name, for example PPoC Change Request
b. Select PPoC Change Request.
c. Enter a Period end date for the Return. This should be the date of the request.
3. Select Create to complete the creation of the PPoC Change Request and make it available within Draft Returns.
25
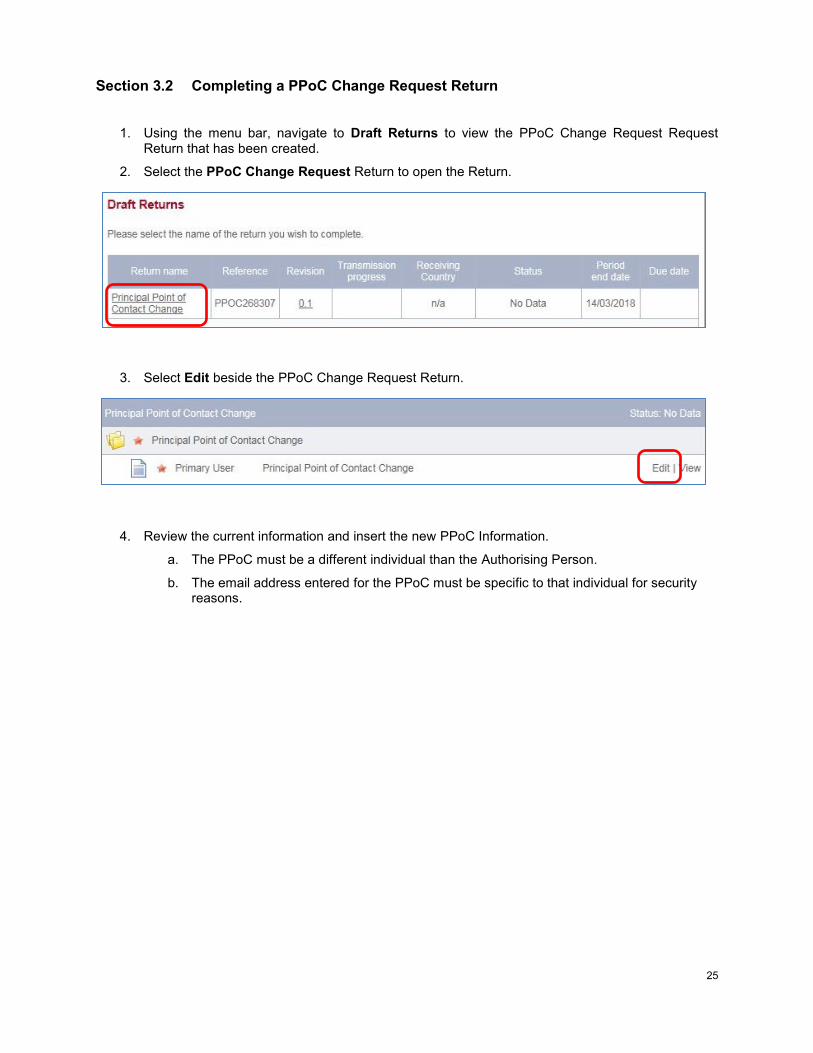
Section 3.2 Completing a PPoC Change Request Return
1. Using the menu bar, navigate to Draft Returns to view the PPoC Change Request Request Return that has been created.
2. Select the PPoC Change Request Return to open the Return.
3. Select Edit beside the PPoC Change Request Return.
4. Review the current information and insert the new PPoC Information.
a. The PPoC must be a different individual than the Authorising Person.
b. The email address entered for the PPoC must be specific to that individual for security reasons.
26
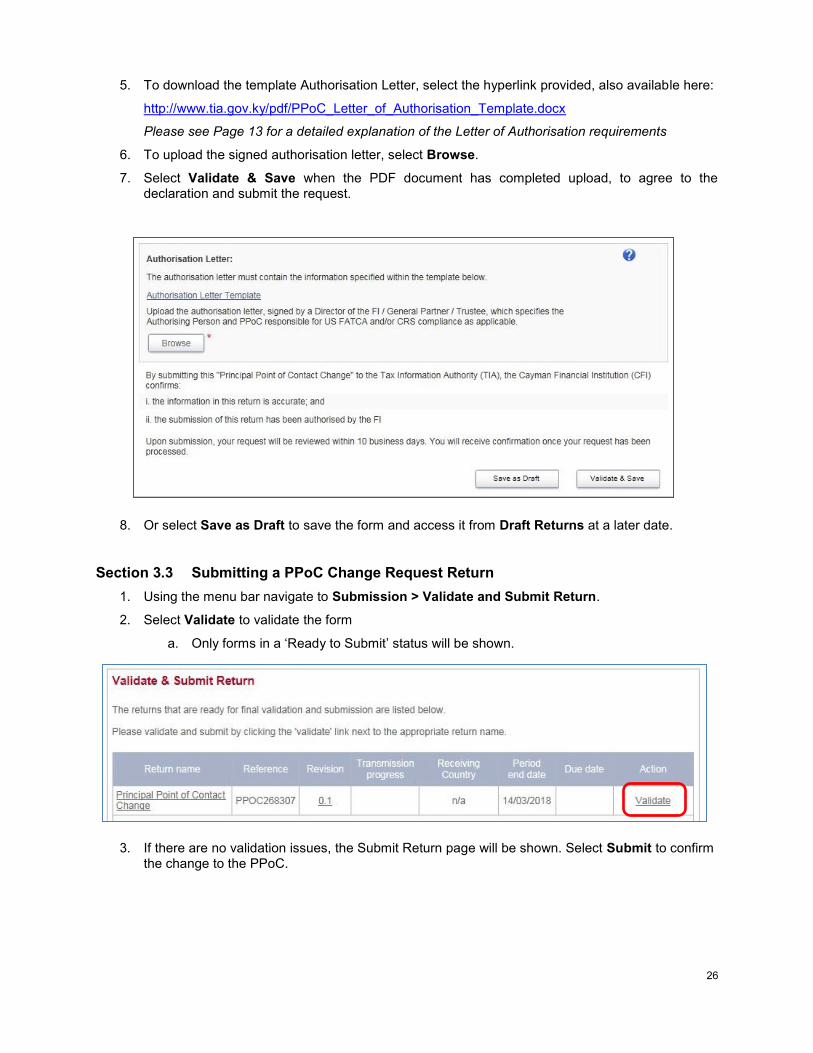
5. To download the template Authorisation Letter, select the hyperlink provided, also available here:
http://www.tia.gov.ky/pdf/PPoC_Letter_of_Authorisation_Template.docx
Please see Page 13 for a detailed explanation of the Letter of Authorisation requirements
6. To upload the signed authorisation letter, select Browse.
7. Select Validate & Save when the PDF document has completed upload, to agree to the declaration and submit the request.
8. Or select Save as Draft to save the form and access it from Draft Returns at a later date.
Section 3.3 Submitting a PPoC Change Request Return
1. Using the menu bar navigate to Submission > Validate and Submit Return.
2. Select Validate to validate the form
a. Only forms in a ‘Ready to Submit’ status will be shown.
3. If there are no validation issues, the Submit Return page will be shown. Select Submit to confirm the change to the PPoC.

27
Upon approval and first creation of an individual’s User profile, the PPoC will receive a system-generated email, which includes their username and temporary password. They will be asked to select a new password upon their first login to the AEOI Portal (see Module III Section 1 Logging in and Updating User Details).
Note: Once submitted, the user change request will be reviewed by DITC for approval.
On approval, confirmation of the change will be emailed to both the existing and new PPoCs and the Authorising Person. Until the request is approved the PPoCs details will remain unchanged.
The Authorisation Letter uploaded to the form must contain all of the information specified within the template provided and agree to the information inserted into the form. Any discrepancies may cause the request to be rejected.
DO NOT resubmit the request if a confirmation email is not received. After ten (10) business days the Authorising Person may contact the AEOI Portal Team at [email protected] to request further assistance.
Section 4. Ceasing to act as an Authorising Person or PPoC on behalf of a Financial Institution
When an individual will cease to act as the Authorising Person or PPoC of an FI they should ensure that another individual is assigned the responsibility for the role. When the role is reassigned on the Portal through a Change Request they will receive an automatic email confirmation. If they do not receive email confirmation that the role has been assigned to another individual they should contact the AEOI Portal Team to confirm when they will cease to act in this role on behalf of the FI and provide details of the individual who will take over the role. If they do not have contact details for the individual that will be taking over the role, they should provide the AEOI Portal Team with additional information, such as the contact details of the directors of the FI.
28
Section 5. Managing Secondary Users
PPoCs can create, edit and deactivate Secondary Users for their FI(s).
Note: A PPoC must receive authorisation from an FI before adding a Secondary User.
The PPoC is responsible for the administration and monitoring of any such Secondary User(s) (e.g. safeguard of passwords and access to the AEOI Portal).
Section 5.1 Creating Secondary Users
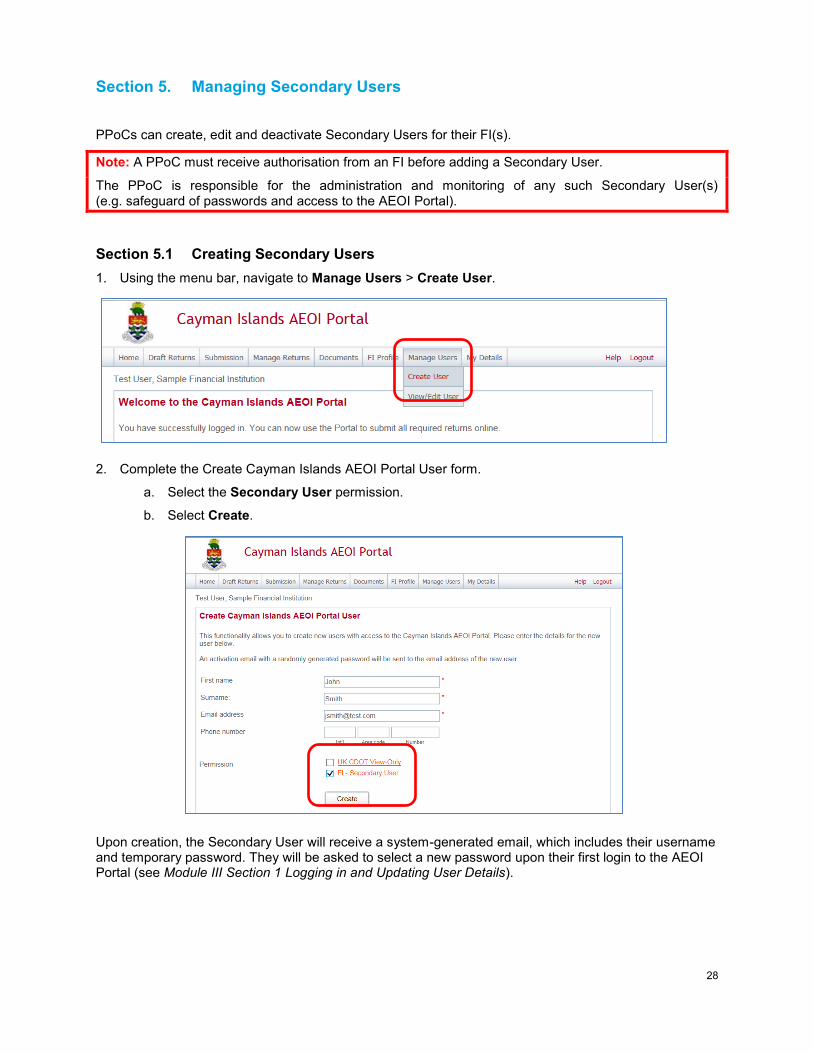
1. Using the menu bar, navigate to Manage Users > Create User.
2. Complete the Create Cayman Islands AEOI Portal User form.
a. Select the Secondary User permission.
b. Select Create.
Upon creation, the Secondary User will receive a system-generated email, which includes their username and temporary password. They will be asked to select a new password upon their first login to the AEOI Portal (see Module III Section 1 Logging in and Updating User Details).

29
Section 5.2 Editing or Deactivating Secondary Users
1. Using the menu bar, navigate to Manage Users > View/Edit User.
The View/edit Cayman Islands AEOI Portal Users page displays the list of Secondary Users for the FI.
2. Select the View/edit link for the User whose details or status requires updating.
The Edit Cayman Islands AEOI Portal User page allows a User to edit details, remove permission to access, or set the status to deactivated.
3. Select Save once all the required changes have been made.
Note: Once an email address has been changed, a User must enter the new email address to log into the AEOI Portal. System-generated emails will be sent to the new email address.
Removing a User’s permission, or setting their status to deactivated will prevent that User from being able to view or edit an FI’s data in the AEOI Portal.

30
Section 6. Procedure to replace User’s forgotten password
A User must follow the following steps in order to replace the forgotten password:
1. User clicks the forgotten password link on the log in page.
2. User enters the screen capture.
3. User enters their email address.
4. User receives an email on the email address which was inserted (if registered on the Portal).
5. Users should check their SPAM folder after 10 minutes if no email is received.
6. User must click on the hyperlink within the email, within 20 minutes of the time received.
7. If the hyperlink is not clicked on within 20 minutes, User will see a timed-out message and will need to go back to step 1.
8. User is taken to the AEOI Portal and asked to insert a new password, and then confirm that new password.
9. User will receive an email confirming the change of password.
10. User must then go to the log in page to insert the new password.
31
Module IV. US FATCA Reporting DO NOT proceed with creating a US FATCA XML Return before reading important resources:
• IRS FATCA XML Schema v2.0
• IRS Publication 5124 XML Schema 2.0 User Guide
These resources are available here:
https://www.irs.gov/businesses/corporations/fatca-xml-schemas-and-business-rules-for-form-8966
TIA’s important exceptions to the IRS Publication 5124 IRS FATCA XML Schema v2.0 User Guide:
Topic TIA instructions to FIs (i.e. notwithstanding IRS FATCA XML Schema v2.0
User Guide)
Explanation
5 Reporting FI - TIN Value for either
(a) Trustee Documented Trust
(b) Sponsored FFI that is a sponsored, closely held investment vehicle
Insert the Sponsoring Entity’s ‘SP’ GIIN or, if the TDT or Sponsored FFI has its own GIIN, use that GIIN
TDTs and those types of Sponsored FFIs are not required to obtain a GIIN from the IRS. Users cannot leave the field blank due to the TIA’s validation rules which are required to prevent IRS record level error notifications
5 Reporting FI - DocRefId for either:
(a) Trustee Documented Trust (b) Sponsored FFI that is a sponsored, closely held investment vehicle
Insert the same GIIN used in the TIN field and a unique value (i.e. not used for any other US FATCA return made using the same GIIN at any other time), separated by a full stop, in this format:
[GIIN].[unique value]
The TIA’s validation rules will reject any US FATCA Return where TIN component of the Reporting FI’s DocRefId does not match its GIIN which, in the case of TDTs and those types of Sponsored FFIs that have not obtained their own GIIN from the IRS, is the Sponsoring Entity’s ‘SP’ GIIN
SendingCompanyIN
You must populate the SendingCompanyIN field of the US FATCA XML Return with these characters and no others: 000000.00000.TA.136
This follows from the instruction in section 3.1 of the IRS FATCA XML Schema v2.0 User Guide because, for the purpose of the US FATCA XML Return, the sender of the message would be the Cayman Islands Tax Information Authority (TIA) as an HCTA (i.e. Host Country Tax Authority).
Users are not required to input the SendingCompanyIN in a US FATCA Manual Entry Return because this is added in the background by the TIA.
Account Holder / Controlling Person that does not provide documentation
US FATCA due diligence rules permit FIs to rely on AML due diligence procedures in respect of certain Pre-existing Accounts without obtaining a self-certification. In those cases, it will not be necessary to report on the relevant Financial Account if there is no indicia that the Account Holder / Controlling Person is a Specified US Person.
When an FI is required to obtain a self-certification and is unable to obtain it, the FI must not open the Financial Account or must close the Financial Account if it was already opened. If there is indicia that the Account Holder / Controlling Person is a Specified US Person, a report must be made in respect of that Financial Account.

32
Account Reports: Tax Identification Numbers (TIN) of Account Holders and Substantial US Owners
If the Account Holder Type is a Specified U.S. Person (Individual), the TIN MUST be provided in one of the following formats (or left blank):
Part II: Account Holder or Payee Information
a. 123456789 (nine consecutive digits without hyphens or other separators)
b. 123-45-6789 (nine digits with a hyphen after the third and the fifth digit)
c. 12-3456789 (nine digits with a hyphen after the second digit)
d. AAAAAAAAA (nine uppercase As) in the case of Pre-Existing Individual Account Holders may be used for calendar years 2017, 2018, and 2019, to confirm that the Reporting Financial Institution:
1. Is reporting the date of birth of the account holder whose U.S. TIN is not reported (that field is mandatory in order for 9As to be accepted in the TIN field;
2. requests annually from each account holder any missing required U.S. TIN;
3. and has searched its electronically searchable data and been unable to find the missing U.S. TIN
e. Leave the TIN field blank to indicate that it has not been obtained or is considered unreliable. The IRS will generate an error notification requiring the TIN to be provided. The TIA will consider the Account Holder as recalcitrant and may take regulatory action
Part III: Identifying Information of U.S. Owners that are specified U.S. Persons
Organisation TIN:
The Organisation TIN for a Passive Non-Financial Foreign Entity is optional and may be left blank
Individual TIN
The TIN MUST be provided in one of the following formats (or left blank):
a. 123456789 (nine consecutive digits without hyphens or other separators)
b. 123-45-6789 (nine digits with a hyphen after the third and the fifth digit)
c. 12-3456789 (nine digits with a hyphen after the second digit)
d. Leave the TIN field blank to indicate that it has not been obtained from the Individual or Specified U.S. Person. The IRS will generate an error notification requiring the TIN to be provided. The TIA will consider the Account Holder as recalcitrant and may take regulatory action
Where a TIN is provided and sent to the IRS it will be validated.
The FI should expect to receive an IRS notification if the TIN is incorrect.

33
Section 1. Creating and Submitting US FATCA Returns
Section 1.1 Creating US FATCA Returns
1. Using the menu bar, navigate to Manage Returns > Create Return.
2. Complete the Create Return page.
a. Enter a Return name.
b. Select the Return type.
i. To submit an XML Return, US FATCA XML Upload.
ii. To submit a Manual Entry Return, US FATCA Manual Entry.
c. Enter a Period end date for the Return.
i. The period end date is the last day of the reporting period (the calendar year).
ii. This date must always* be December for any given reporting period e.g. 31/12/2017.
*This applies even in the case of an Entity that is making a final return because it is closed or in liquidation.
d. Select Create to complete the creation of the Return and make it available to enter or upload data.
34
1.1.1 Uploading and submitting US FATCA XML Returns
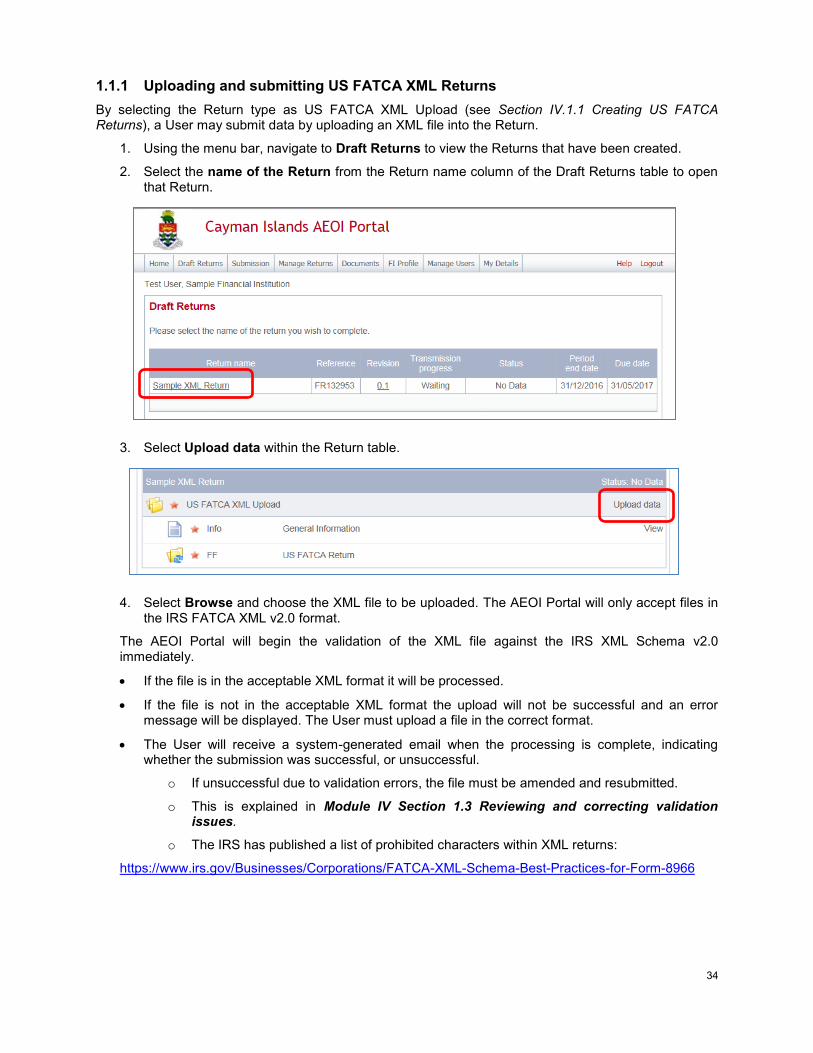
By selecting the Return type as US FATCA XML Upload (see Section IV.1.1 Creating US FATCA Returns), a User may submit data by uploading an XML file into the Return.
1. Using the menu bar, navigate to Draft Returns to view the Returns that have been created.
2. Select the name of the Return from the Return name column of the Draft Returns table to open that Return.
3. Select Upload data within the Return table.
4. Select Browse and choose the XML file to be uploaded. The AEOI Portal will only accept files in the IRS FATCA XML v2.0 format.
The AEOI Portal will begin the validation of the XML file against the IRS XML Schema v2.0 immediately.
If the file is in the acceptable XML format it will be processed.
If the file is not in the acceptable XML format the upload will not be successful and an error message will be displayed. The User must upload a file in the correct format.
The User will receive a system-generated email when the processing is complete, indicating whether the submission was successful, or unsuccessful.
o If unsuccessful due to validation errors, the file must be amended and resubmitted.
o This is explained in Module IV Section 1.3 Reviewing and correcting validation issues.
o The IRS has published a list of prohibited characters within XML returns:
https://www.irs.gov/Businesses/Corporations/FATCA-XML-Schema-Best-Practices-for-Form-8966
35
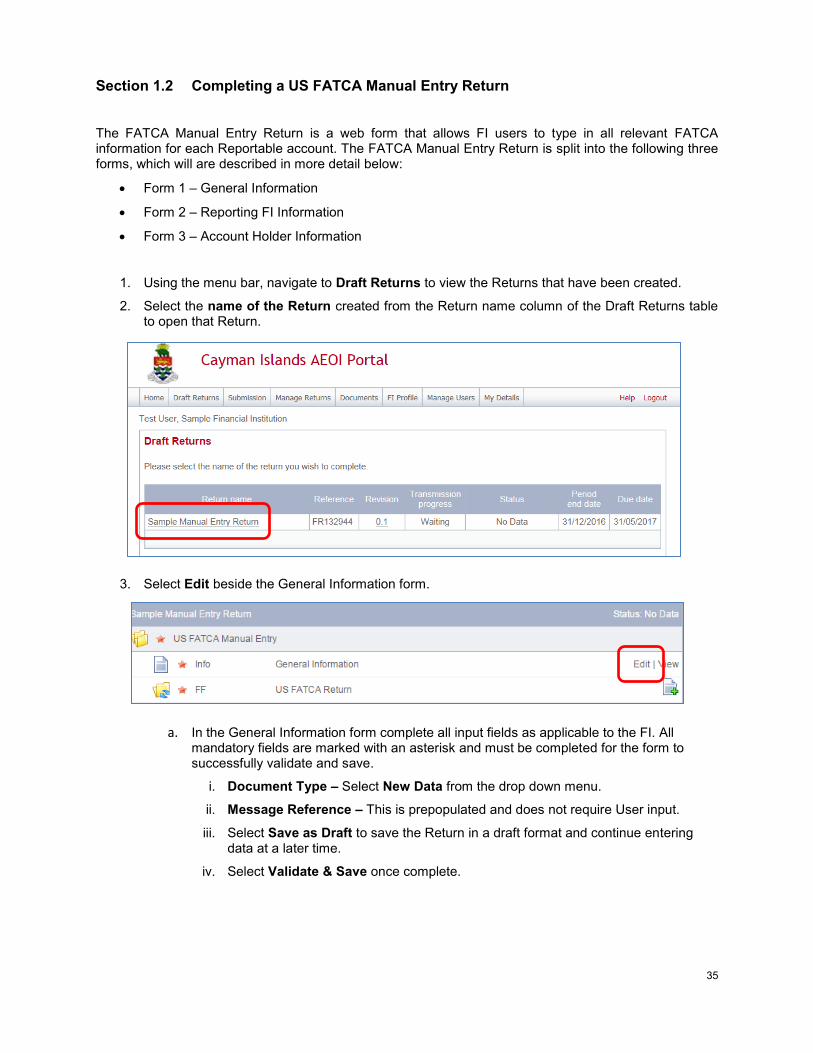
Section 1.2 Completing a US FATCA Manual Entry Return
The FATCA Manual Entry Return is a web form that allows FI users to type in all relevant FATCA information for each Reportable account. The FATCA Manual Entry Return is split into the following three forms, which will are described in more detail below:
Form 1 – General Information
Form 2 – Reporting FI Information
Form 3 – Account Holder Information
1. Using the menu bar, navigate to Draft Returns to view the Returns that have been created.
2. Select the name of the Return created from the Return name column of the Draft Returns table to open that Return.
3. Select Edit beside the General Information form.
a. In the General Information form complete all input fields as applicable to the FI. All mandatory fields are marked with an asterisk and must be completed for the form to successfully validate and save.
i. Document Type – Select New Data from the drop down menu.
ii. Message Reference – This is prepopulated and does not require User input.
iii. Select Save as Draft to save the Return in a draft format and continue entering data at a later time.
iv. Select Validate & Save once complete.
36
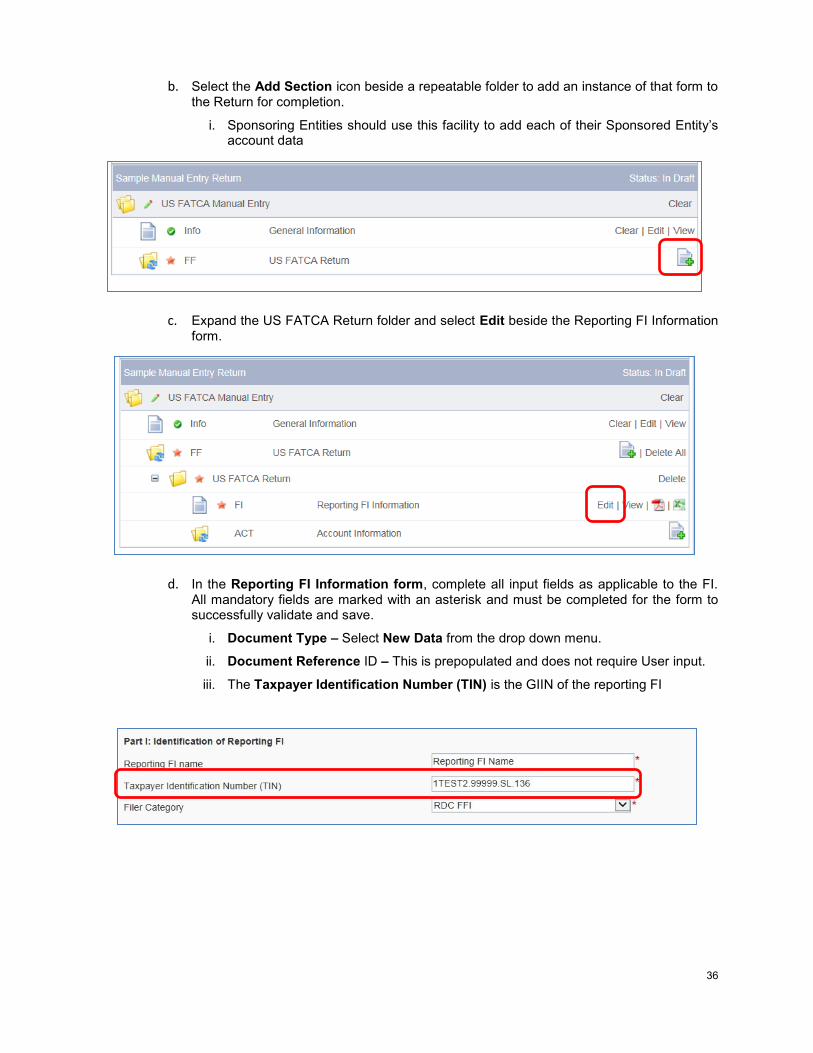
b. Select the Add Section icon beside a repeatable folder to add an instance of that form to the Return for completion.
i. Sponsoring Entities should use this facility to add each of their Sponsored Entity’s account data
c. Expand the US FATCA Return folder and select Edit beside the Reporting FI Information form.
d. In the Reporting FI Information form, complete all input fields as applicable to the FI. All mandatory fields are marked with an asterisk and must be completed for the form to successfully validate and save.
i. Document Type – Select New Data from the drop down menu.
ii. Document Reference ID – This is prepopulated and does not require User input.
iii. The Taxpayer Identification Number (TIN) is the GIIN of the reporting FI

37
The following table shows the TIN requirements* for the purpose of US FATCA reporting:
FI type FI’s TIN Sponsoring Entity’s TIN
Reporting FI FI’s GIIN Not applicable
Sponsored Entity (other than the type in the next row)
Sponsored Entity’s GIIN (i.e. category code ‘SF’, ‘SD’, ‘SS’, or ‘SB’, as the case may be)**
Sponsoring Entity’s GIIN (i.e. category code ‘SP’)
Sponsored FFI that is a sponsored, closely held investment entity
Sponsoring Entity’s ‘SP’ GIIN (i.e. because this type of Sponsored FFI is not required to have its own GIIN)
Sponsoring Entity’s GIIN (i.e. category code ‘SP’)
TDT Sponsoring Entity’s ‘SP’ GIIN (i.e. because a TDT is not required to have its own GIIN)
TDT Trustee’s GIIN (i.e. category code ‘SP’)
*Refer to Sections 5 and 6 of the IRS FATCA XML Schema v2.0 User Guide:
https://www.irs.gov/pub/irs-pdf/p5124.pdf
**Refer to the IRS FATCA Online Registration System and FFI List GIIN Composition Information:
https://www.irs.gov/businesses/corporations/fatca-online-registration-system-and-ffi-list-giin-composition-information
Reporting FI with its own GIIN
38
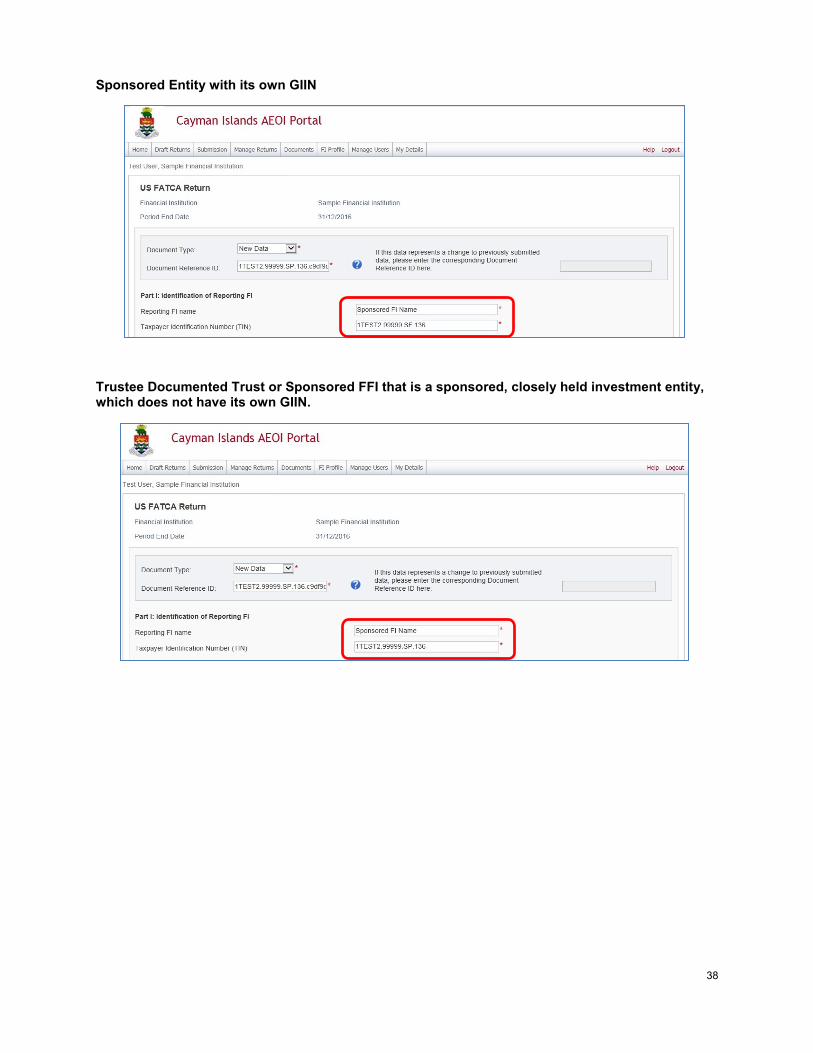
Sponsored Entity with its own GIIN
Trustee Documented Trust or Sponsored FFI that is a sponsored, closely held investment entity, which does not have its own GIIN.

39
e. Select one of the following Filer Category Types:
i. RDC FFI*
ii. Limited Branch or Limited FFI
iii. Qualified Intermediary (QI), Withholding Foreign Partnership (WP), or Withholding Foreign Trust (WT)
The others are not applicable in the Cayman Islands and must not be selected although they are available under the US Treasury’s FATCA Regulations.
*The term “RDC FFI” includes all Cayman Islands Reporting Financial Institutions but, where one of the categories listed as 2 or 3 above applies, that category should be selected instead of RDC FFI. The term RDC FFI is used in the Manual Entry Form (i.e. instead of Reporting Financial Institution which is used in the the USA-Cayman Model 1B IGA) simply for consistency with terminology used in the US FATCA XML Schema v2.0.
f. Nil Return Explanation
i. Whenever a Cayman FI is reporting financial accounts under a US FATCA Return it should answer No in the following screen.
ii. Alternatively, if the Cayman FI is making a Nil Return – which is optional under US FATCA - it should answer Yes to that screen:
iii. Document Type – Select New Data from the drop down menu.
iv. Insert a Document Reference ID
- The DocRefID must be unique, DO NOT use a DocRefID that the FI has used in a previous year’s Return
- The FI’s GIIN must be used to avoid duplicating a DocRefID that has been used in another Return. Example: XXXXXX.99999.SL.136.001
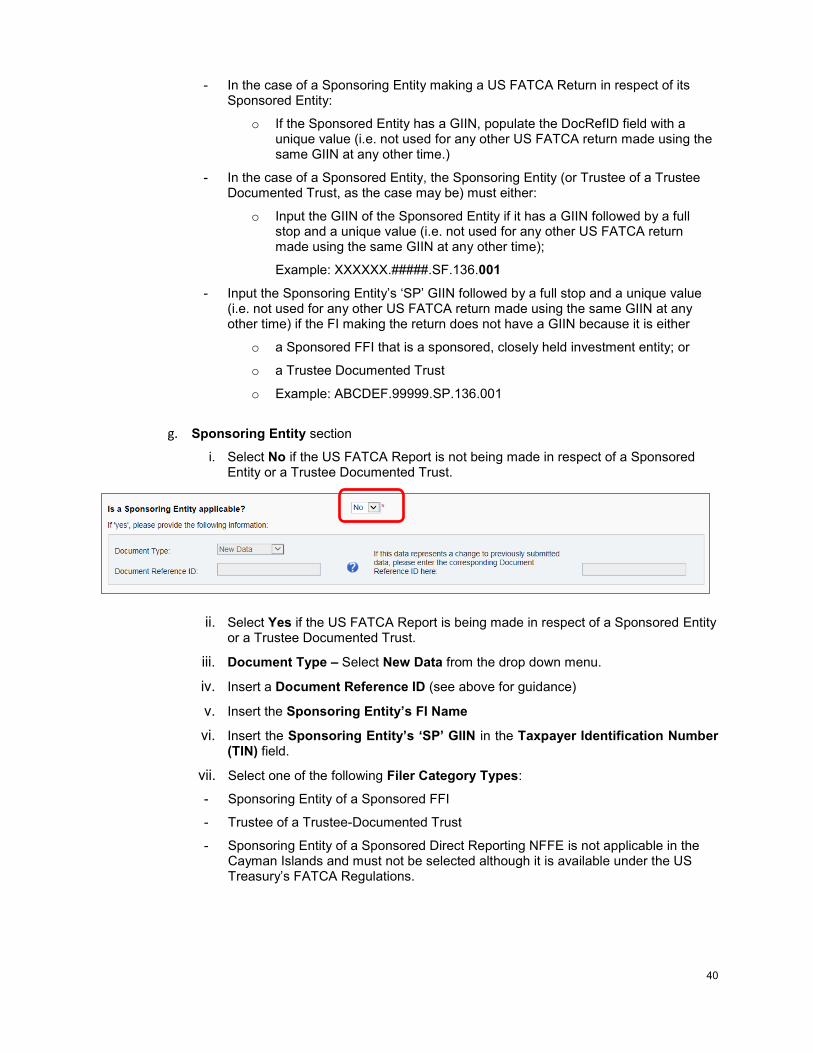
40
- In the case of a Sponsoring Entity making a US FATCA Return in respect of its Sponsored Entity:
o If the Sponsored Entity has a GIIN, populate the DocRefID field with a unique value (i.e. not used for any other US FATCA return made using the same GIIN at any other time.)
- In the case of a Sponsored Entity, the Sponsoring Entity (or Trustee of a Trustee Documented Trust, as the case may be) must either:
o Input the GIIN of the Sponsored Entity if it has a GIIN followed by a full stop and a unique value (i.e. not used for any other US FATCA return made using the same GIIN at any other time);
Example: XXXXXX.#####.SF.136.001
- Input the Sponsoring Entity’s ‘SP’ GIIN followed by a full stop and a unique value (i.e. not used for any other US FATCA return made using the same GIIN at any other time) if the FI making the return does not have a GIIN because it is either
o a Sponsored FFI that is a sponsored, closely held investment entity; or
o a Trustee Documented Trust
o Example: ABCDEF.99999.SP.136.001
g. Sponsoring Entity section
i. Select No if the US FATCA Report is not being made in respect of a Sponsored Entity or a Trustee Documented Trust.
ii. Select Yes if the US FATCA Report is being made in respect of a Sponsored Entity or a Trustee Documented Trust.
iii. Document Type – Select New Data from the drop down menu.
iv. Insert a Document Reference ID (see above for guidance)
v. Insert the Sponsoring Entity’s FI Name
vi. Insert the Sponsoring Entity’s ‘SP’ GIIN in the Taxpayer Identification Number (TIN) field.
vii. Select one of the following Filer Category Types:
- Sponsoring Entity of a Sponsored FFI
- Trustee of a Trustee-Documented Trust
- Sponsoring Entity of a Sponsored Direct Reporting NFFE is not applicable in the Cayman Islands and must not be selected although it is available under the US Treasury’s FATCA Regulations.
41
h. Intermediary Section
i. This section is not relevant in the Cayman Islands except where section 6.2 of the IRS FATCA XML Schema v2.0 User Guide applies, in which case please follow the guidance there regarding the TIN Value for Intermediary.
i. Select Validate & Save once complete.
j. Select the Add Section icon next to the Account Information folder to add to an Account Information form.
i. Up to fifty (50) Account Information forms may be added to each Account Information folder.
ii. Multiple US FATCA Return folders may be added to accommodate more forms.
42
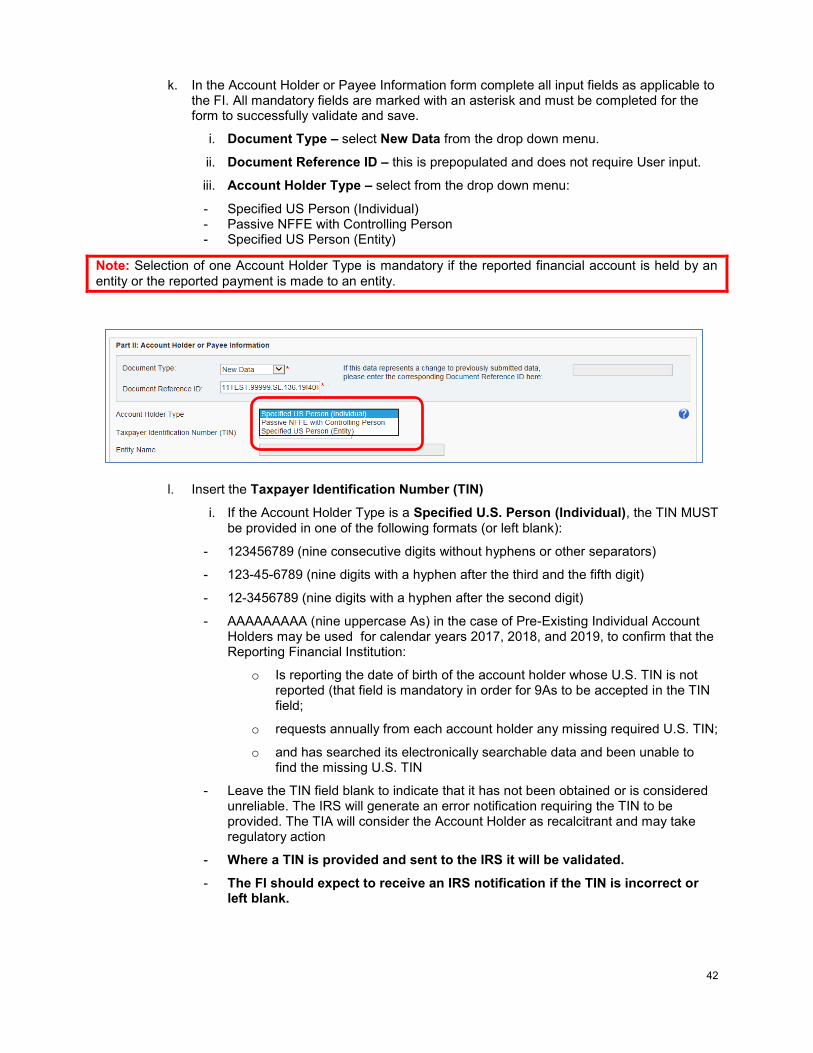
k. In the Account Holder or Payee Information form complete all input fields as applicable to the FI. All mandatory fields are marked with an asterisk and must be completed for the form to successfully validate and save.
i. Document Type – select New Data from the drop down menu.
ii. Document Reference ID – this is prepopulated and does not require User input.
iii. Account Holder Type – select from the drop down menu:
- Specified US Person (Individual) - Passive NFFE with Controlling Person - Specified US Person (Entity)
Note: Selection of one Account Holder Type is mandatory if the reported financial account is held by an
entity or the reported payment is made to an entity.
l. Insert the Taxpayer Identification Number (TIN)
i. If the Account Holder Type is a Specified U.S. Person (Individual), the TIN MUST be provided in one of the following formats (or left blank):
- 123456789 (nine consecutive digits without hyphens or other separators)
- 123-45-6789 (nine digits with a hyphen after the third and the fifth digit)
- 12-3456789 (nine digits with a hyphen after the second digit)
- AAAAAAAAA (nine uppercase As) in the case of Pre-Existing Individual Account Holders may be used for calendar years 2017, 2018, and 2019, to confirm that the Reporting Financial Institution:
o Is reporting the date of birth of the account holder whose U.S. TIN is not reported (that field is mandatory in order for 9As to be accepted in the TIN field;
o requests annually from each account holder any missing required U.S. TIN;
o and has searched its electronically searchable data and been unable to find the missing U.S. TIN
- Leave the TIN field blank to indicate that it has not been obtained or is considered unreliable. The IRS will generate an error notification requiring the TIN to be provided. The TIA will consider the Account Holder as recalcitrant and may take regulatory action
- Where a TIN is provided and sent to the IRS it will be validated.
- The FI should expect to receive an IRS notification if the TIN is incorrect or left blank.
43
Account Holder / Controlling Person that does not provide documentation
US FATCA due diligence rules permit Financial Institutions to rely on AML due diligence procedures in respect of certain Pre-existing Accounts without obtaining a self-certification. In those cases, it will not be necessary to report on the relevant Financial Account if there is no indicia that the Account Holder / Controlling Person is a Specified US Person.
When an FI is required to obtain a self-certification and is unable to obtain it, the FI must not open the Financial Account or must close the Financial Account if it was already opened. If there is indicia that the Account Holder / Controlling Person is a Specified US Person, a report must be made in respect of that Financial Account.
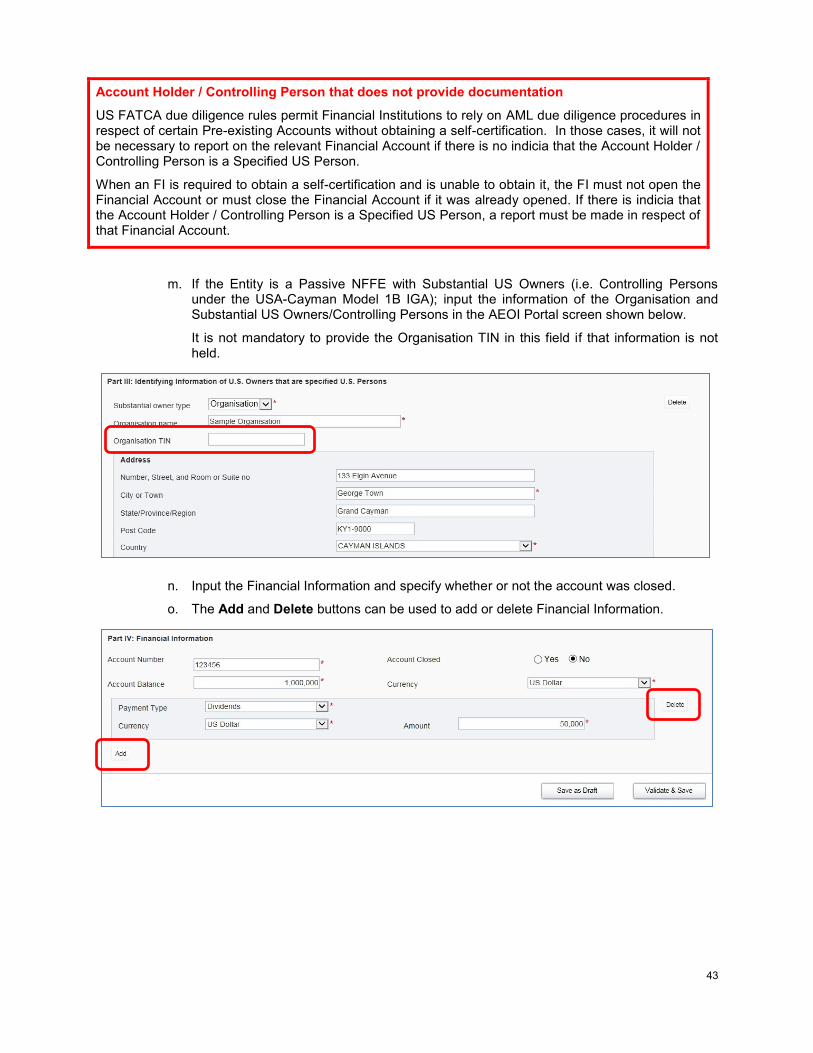
m. If the Entity is a Passive NFFE with Substantial US Owners (i.e. Controlling Persons under the USA-Cayman Model 1B IGA); input the information of the Organisation and Substantial US Owners/Controlling Persons in the AEOI Portal screen shown below.
It is not mandatory to provide the Organisation TIN in this field if that information is not held.
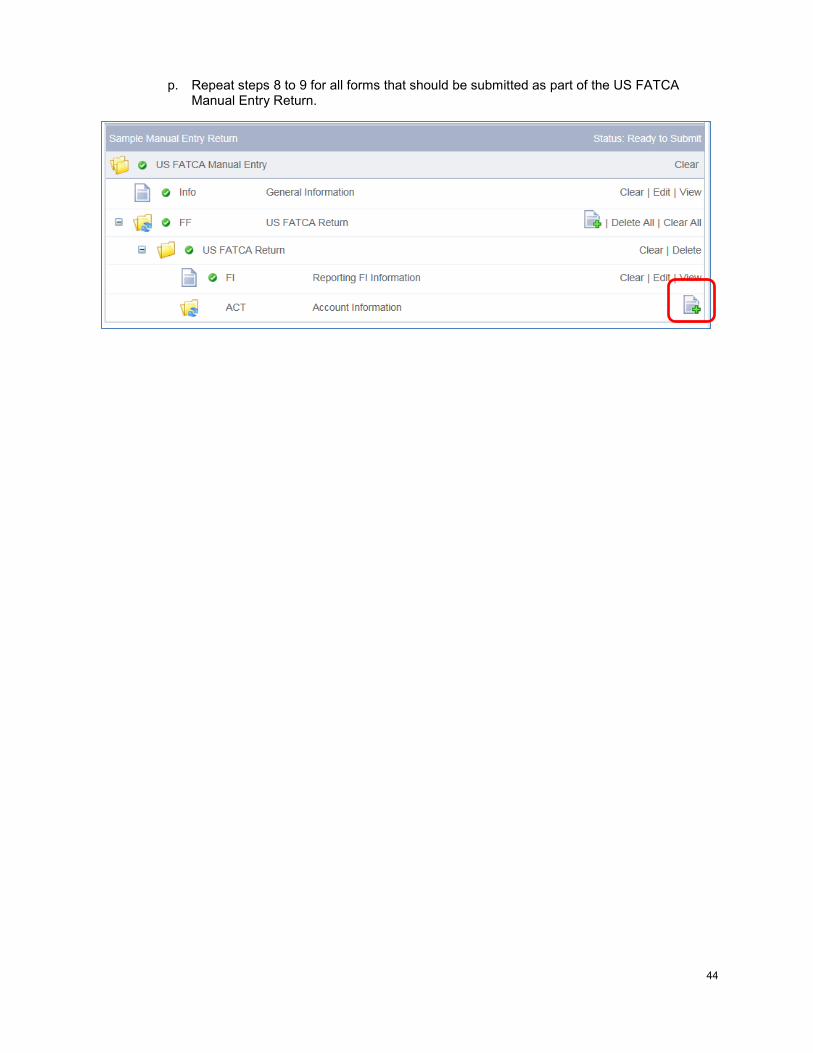
n. Input the Financial Information and specify whether or not the account was closed.
o. The Add and Delete buttons can be used to add or delete Financial Information.
44
p. Repeat steps 8 to 9 for all forms that should be submitted as part of the US FATCA Manual Entry Return.
45
1.2.1 Submitting US FATCA Manual Entry Returns
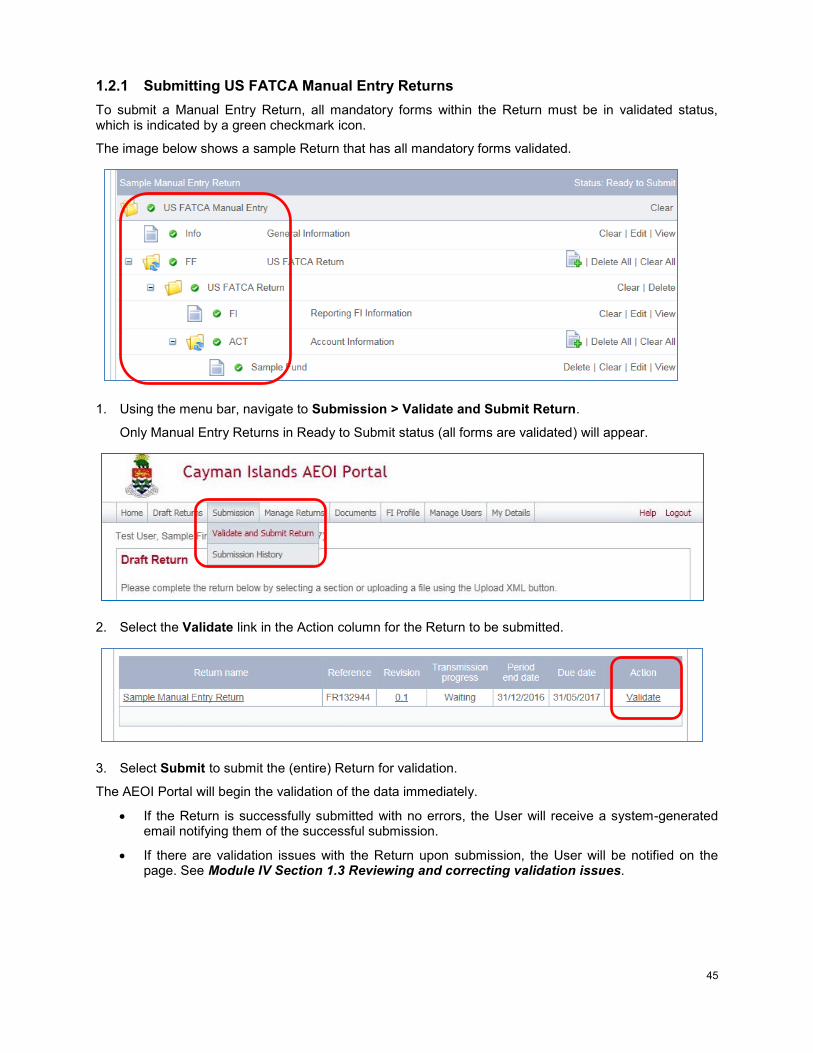
To submit a Manual Entry Return, all mandatory forms within the Return must be in validated status, which is indicated by a green checkmark icon.
The image below shows a sample Return that has all mandatory forms validated.
1. Using the menu bar, navigate to Submission > Validate and Submit Return.
Only Manual Entry Returns in Ready to Submit status (all forms are validated) will appear.
2. Select the Validate link in the Action column for the Return to be submitted.
3. Select Submit to submit the (entire) Return for validation.
The AEOI Portal will begin the validation of the data immediately.
If the Return is successfully submitted with no errors, the User will receive a system-generated email notifying them of the successful submission.
If there are validation issues with the Return upon submission, the User will be notified on the page. See Module IV Section 1.3 Reviewing and correcting validation issues.

46
Section 1.3 Reviewing and correcting validation issues
If there are validation issues with the Return, a User must review the errors in order to determine corrective actions that need to be made.
1. Using the menu bar, navigate to Draft Returns.
a. If there are errors on a Return that a User has attempted to submit, the error icon (red exclamation point) will be displayed beside the Return status.
2. Select the error icon to display the validation errors.
3. The Validation Page will open. This provides details of the errors that need to be corrected.
4. To correct the errors and resubmit the Return, select Back.
5. Select the Return name from the Return name column of the table.
a. Manual Entry Return.
i. Select Edit next to the form(s) that need to be corrected.
ii. Correct the data and once complete select Validate & Save.
iii. Follow the steps to submit the Return, as per Module IV 1.2.1 Submitting US FATCA Manual Entry Returns.
b. XML Upload Return.
i. Select the Upload data link and select the updated XML file to upload.
ii. The system will begin validation of the new file immediately.
47
Section 2. Deleting Returns
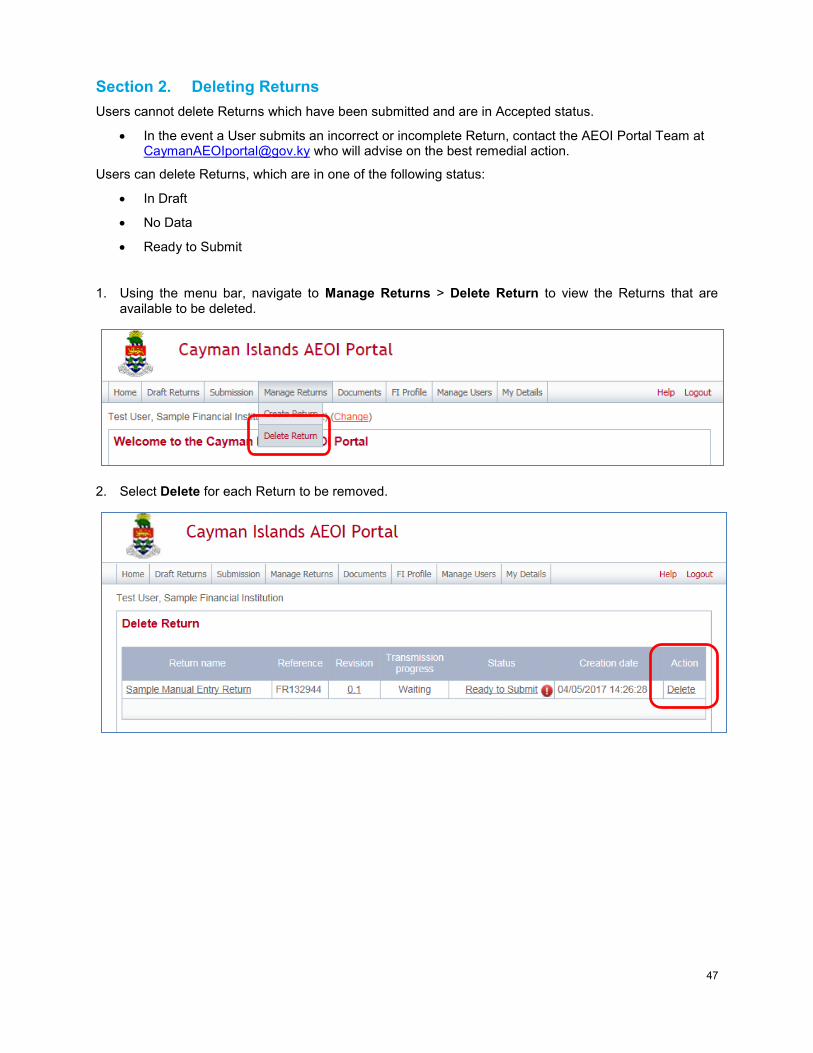
Users cannot delete Returns which have been submitted and are in Accepted status.
In the event a User submits an incorrect or incomplete Return, contact the AEOI Portal Team at [email protected] who will advise on the best remedial action.
Users can delete Returns, which are in one of the following status:
In Draft
No Data
Ready to Submit
1. Using the menu bar, navigate to Manage Returns > Delete Return to view the Returns that are available to be deleted.
2. Select Delete for each Return to be removed.
48
Section 3. Viewing Submitted Returns
Once a Return has been successfully submitted, it can no longer be edited or deleted. It will show an “Accepted” Status in Submission History.
A Manual Return can be viewed in a read-only web form.
A submitted XML Upload Return can be downloaded and saved.
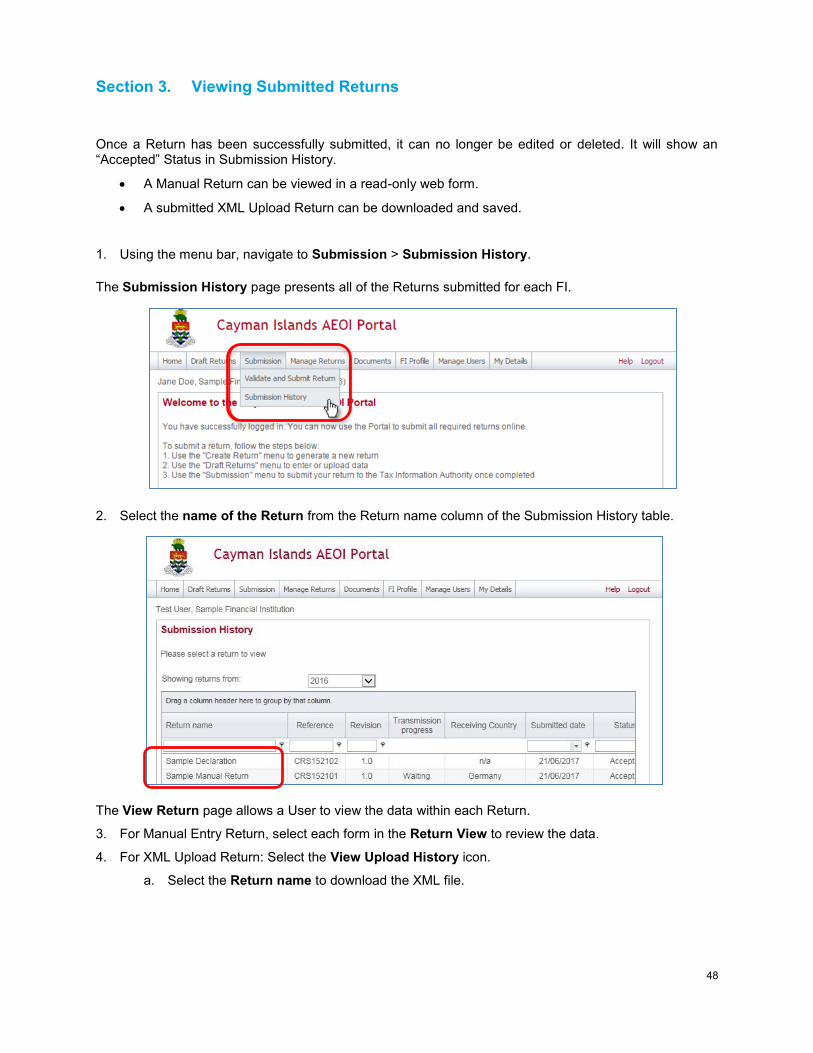
1. Using the menu bar, navigate to Submission > Submission History.
The Submission History page presents all of the Returns submitted for each FI.
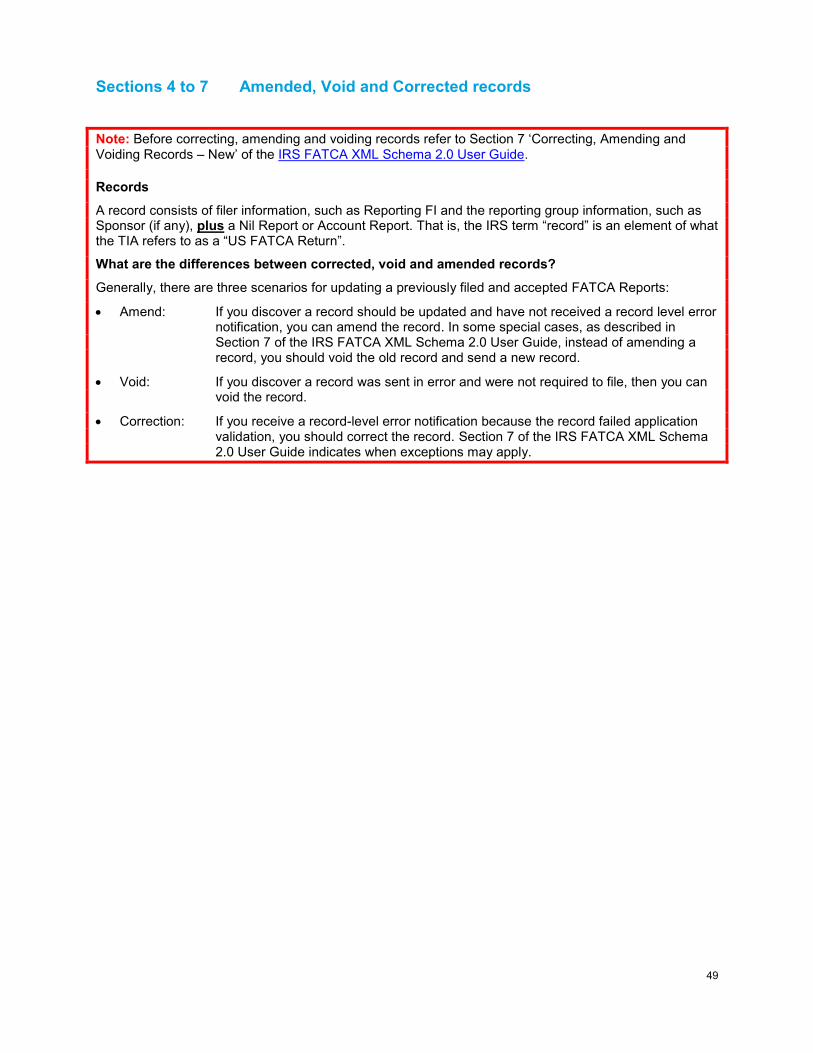
2. Select the name of the Return from the Return name column of the Submission History table.
The View Return page allows a User to view the data within each Return.
3. For Manual Entry Return, select each form in the Return View to review the data.
4. For XML Upload Return: Select the View Upload History icon.
a. Select the Return name to download the XML file.
49
Sections 4 to 7 Amended, Void and Corrected records
Note: Before correcting, amending and voiding records refer to Section 7 ‘Correcting, Amending and Voiding Records – New’ of the IRS FATCA XML Schema 2.0 User Guide.
Records
A record consists of filer information, such as Reporting FI and the reporting group information, such as Sponsor (if any), plus a Nil Report or Account Report. That is, the IRS term “record” is an element of what the TIA refers to as a “US FATCA Return”.
What are the differences between corrected, void and amended records?
Generally, there are three scenarios for updating a previously filed and accepted FATCA Reports:
Amend: If you discover a record should be updated and have not received a record level error notification, you can amend the record. In some special cases, as described in Section 7 of the IRS FATCA XML Schema 2.0 User Guide, instead of amending a record, you should void the old record and send a new record.
Void: If you discover a record was sent in error and were not required to file, then you can void the record.
Correction: If you receive a record-level error notification because the record failed application validation, you should correct the record. Section 7 of the IRS FATCA XML Schema 2.0 User Guide indicates when exceptions may apply.
50
Section 4. Creating an Amended Return
Note: Refer to Section 7 of the IRS FATCA XML Schema 2.0 User Guide before creating an amended
return.
An Amended Return is used to edit a previously submitted and accepted Return in a “Received” status.
Section 4.1 Creating a Manual Entry Amended Return
1. Before a User creates the Amended Data Return it is recommended they first view the original Return to take note of some required information.
2. Follow Module IV Section 3 Viewing Submitted Returns and navigate to the original Return.
3. Take note of the following information from the General Information form.
a. Message Reference ID.
4. Select Back then select the Reporting FI Information form.
a. Take note of the Document Reference ID.
5. Select Back then select the Account Information form(s).
a. Take note of the Document Reference ID.
b. This must be completed for each Account Information form within the Return.
6. Follow Module IV Section 7
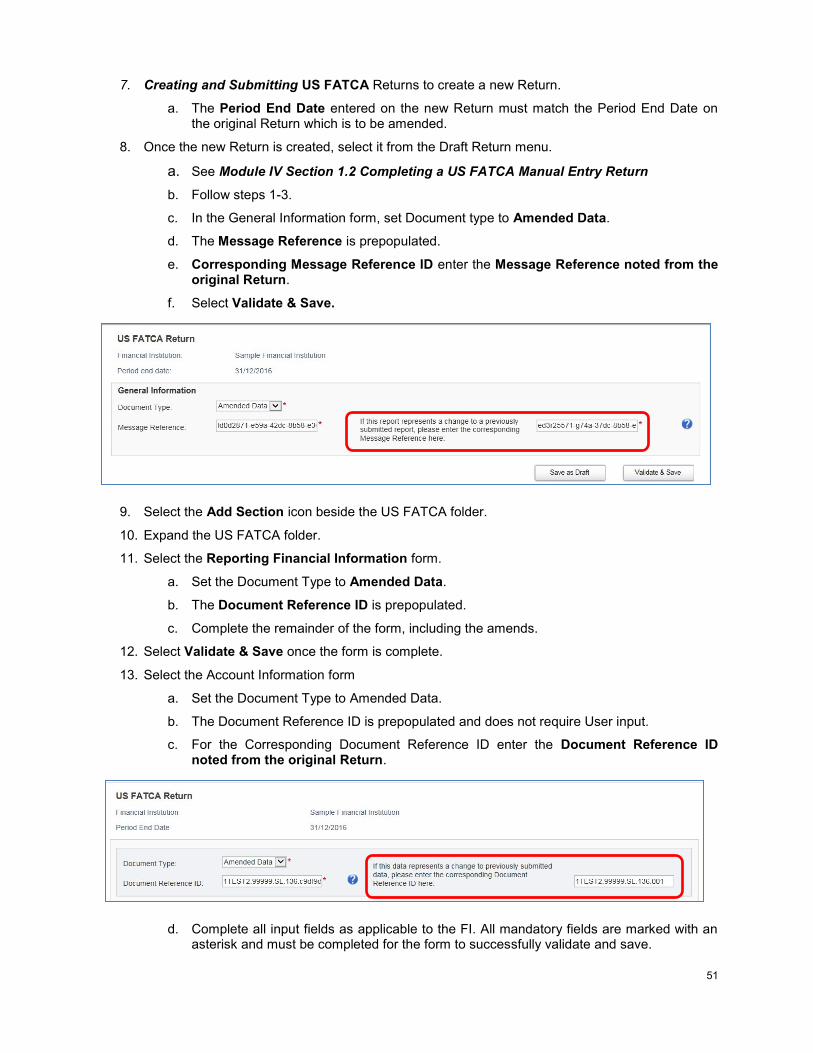
51
7. Creating and Submitting US FATCA Returns to create a new Return.
a. The Period End Date entered on the new Return must match the Period End Date on the original Return which is to be amended.
8. Once the new Return is created, select it from the Draft Return menu.
a. See Module IV Section 1.2 Completing a US FATCA Manual Entry Return
b. Follow steps 1-3.
c. In the General Information form, set Document type to Amended Data.
d. The Message Reference is prepopulated.
e. Corresponding Message Reference ID enter the Message Reference noted from the original Return.
f. Select Validate & Save.
9. Select the Add Section icon beside the US FATCA folder.
10. Expand the US FATCA folder.
11. Select the Reporting Financial Information form.
a. Set the Document Type to Amended Data.
b. The Document Reference ID is prepopulated.
c. Complete the remainder of the form, including the amends.
12. Select Validate & Save once the form is complete.
13. Select the Account Information form
a. Set the Document Type to Amended Data.
b. The Document Reference ID is prepopulated and does not require User input.
c. For the Corresponding Document Reference ID enter the Document Reference ID noted from the original Return.
d. Complete all input fields as applicable to the FI. All mandatory fields are marked with an asterisk and must be completed for the form to successfully validate and save.
52
14. Repeat the above steps for each created Account Information form which you wish to amend.
15. Select Validate & Save once all updates are complete.
16. Once all updates are complete, submit the Return following Module IV 1.2.1 Submitting US FATCA Manual Entry Returns.
Section 4.2 Creating an XML Amended Return
1. Follow Module IV Section 3 Viewing Submitted Returns.
a. Download and save the XML file so it can be edited.
2. Follow Module IV Section 1.1 Creating US FATCA Returns to create a new Return
a. Please note that submitting an Amended Data Return is different than submitting a New Data Return.
b. The Period End Date entered on the new Return must match the Period End Date on the original Return which is to be amended.
3. To submit an Amended Return, changes must be made within the DocSpec element of the XML file.
a. DocTypeIndic element must be FATCA4 to denote an Amended record.
b. CorrMessageRefID element must be set equal to the MessageRefID for the original file in which the record being amended was contained.
c. CorrDocRefID element must be set equal to the DocRefID for the original record being amended.
Please refer to Section 7 – “Correcting, Amending and Voiding Records – New” of the IRS FATCA XML v2.0 User Guide
https://www.irs.gov/pub/irs-pdf/p5124.pdf
4. Complete the XML file Return submission as per Module IV 1.1.1 Uploading and submitting US FATCA XML Returns.
53
Section 5. IRS notifications
Note:
Refer to Section 7 of the IRS FATCA XML Schema 2.0 User Guide before attempting to correct a Return.
Read the ICMM Notifications User Guide* in conjunction with this User Guide.
*IRS International Compliance Management Model (ICMM) Notifications User Guide:
https://www.irs.gov/pub/fatca/icmmnotificationxmlschemauserguidefinal.pdf
The ICMM Notifications User Guide includes detailed explanations about the potential error notifications Users will receive in response to FATCA Returns submitted and the required steps to address them. Also refer to the IRS FATCA ICMM Report Notifications webpage for current FAQs on error notifications:
https://www.irs.gov/Businesses/Corporations/FATCA-Error-Notifications .
An FI MUST submit all FATCA Returns via the AEOI Portal notwithstanding anything to the contrary in the ICMM Notifications User Guide regarding submissions via the IRS IDES or by a paper submission of Form 8966.
An FI MUST address IRS error notifications promptly by submitting the appropriate Return to the TIA via the AEOI Portal so that the TIA, in turn, is able to transmit that Return to the IRS via the IDES within the prescribed 120 day period.
All required remedial action must be successfully completed via the Cayman AEOI Portal by the reporting year specific deadline shown on the DITC website AEOI News & Updates page.
US FATCA submissions that were transmitted by the TIA via IDES may generate IRS notifications. These are attached by the AEOI Portal Team to the associated FI Return in the AEOI Portal. An IRS notification may require further action (e.g. the submission of a Corrected Return or Void Return via the AEOI Portal).
Note that some notifications state within the XML file that no further action is required; multiple errors may however be highlighted within the XML file so care must be taken when reviewing.
Once an IRS notification is available for a User to download from the AEOI Portal, the PPoC and associated Secondary User(s) will receive a system-generated email from the AEOI Portal or an advisory email from [email protected].
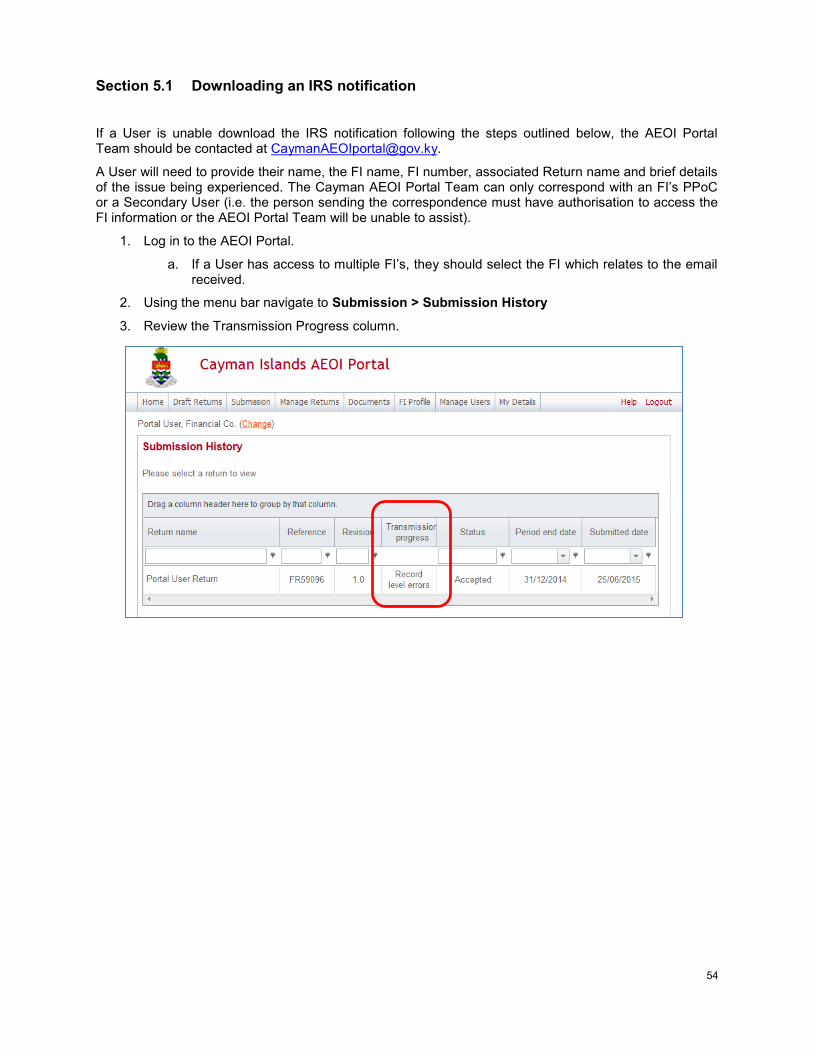
54
Section 5.1 Downloading an IRS notification
If a User is unable download the IRS notification following the steps outlined below, the AEOI Portal Team should be contacted at [email protected].
A User will need to provide their name, the FI name, FI number, associated Return name and brief details of the issue being experienced. The Cayman AEOI Portal Team can only correspond with an FI’s PPoC or a Secondary User (i.e. the person sending the correspondence must have authorisation to access the FI information or the AEOI Portal Team will be unable to assist).
1. Log in to the AEOI Portal.
a. If a User has access to multiple FI’s, they should select the FI which relates to the email received.
2. Using the menu bar navigate to Submission > Submission History
3. Review the Transmission Progress column.
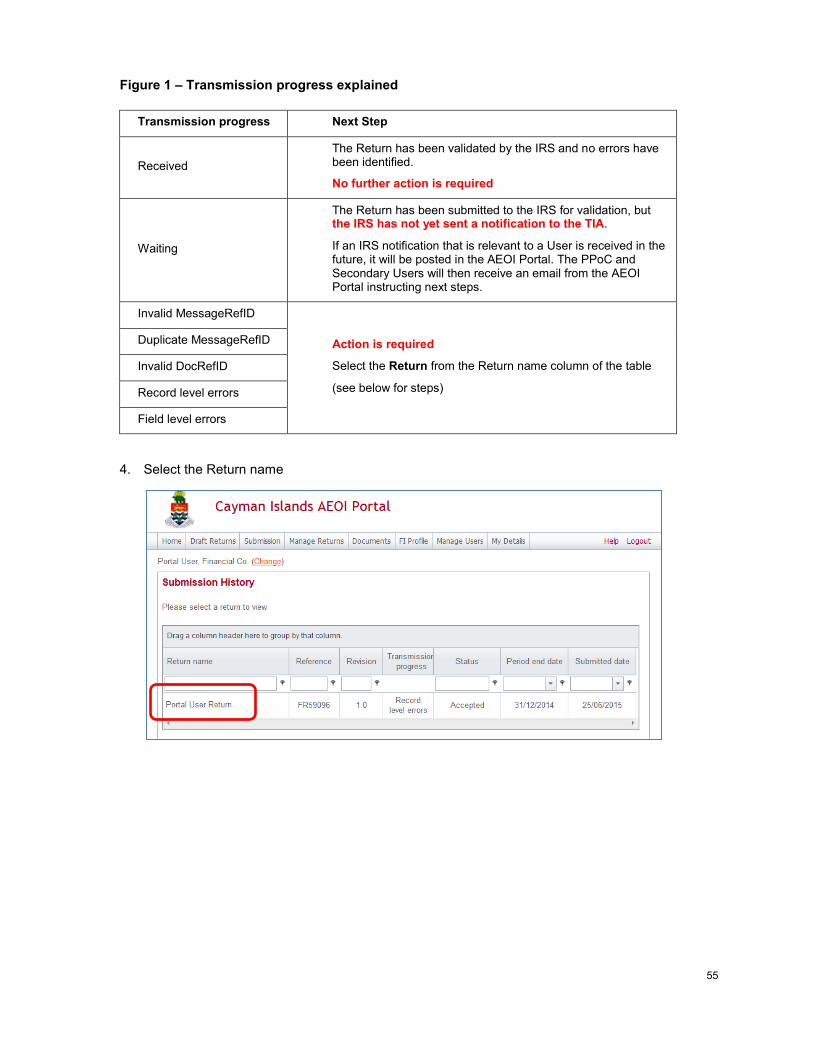
55
Figure 1 – Transmission progress explained
Transmission progress Next Step
Received
The Return has been validated by the IRS and no errors have been identified.
No further action is required
Waiting
The Return has been submitted to the IRS for validation, but the IRS has not yet sent a notification to the TIA.
If an IRS notification that is relevant to a User is received in the future, it will be posted in the AEOI Portal. The PPoC and Secondary Users will then receive an email from the AEOI Portal instructing next steps.
Invalid MessageRefID
Action is required
Select the Return from the Return name column of the table
(see below for steps)
Duplicate MessageRefID
Invalid DocRefID
Record level errors
Field level errors
4. Select the Return name
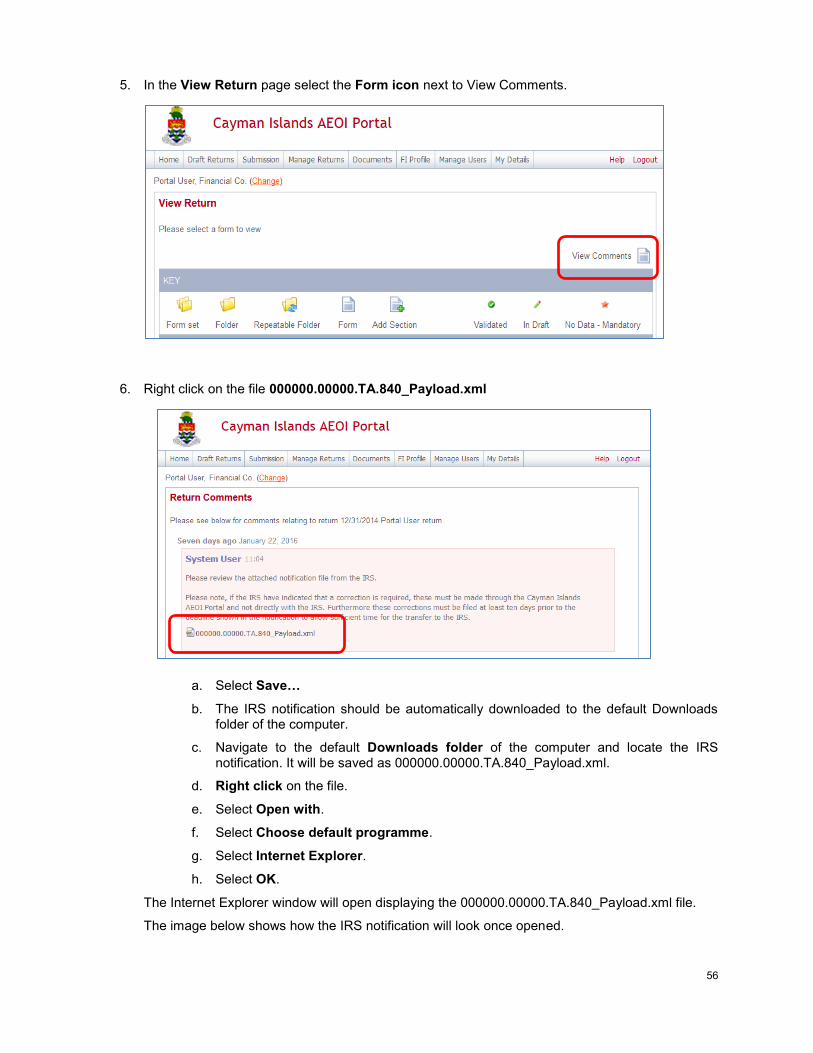
56
5. In the View Return page select the Form icon next to View Comments.
6. Right click on the file 000000.00000.TA.840_Payload.xml
a. Select Save…
b. The IRS notification should be automatically downloaded to the default Downloads folder of the computer.
c. Navigate to the default Downloads folder of the computer and locate the IRS notification. It will be saved as 000000.00000.TA.840_Payload.xml.
d. Right click on the file.
e. Select Open with.
f. Select Choose default programme.
g. Select Internet Explorer.
h. Select OK.
The Internet Explorer window will open displaying the 000000.00000.TA.840_Payload.xml file.
The image below shows how the IRS notification will look once opened.
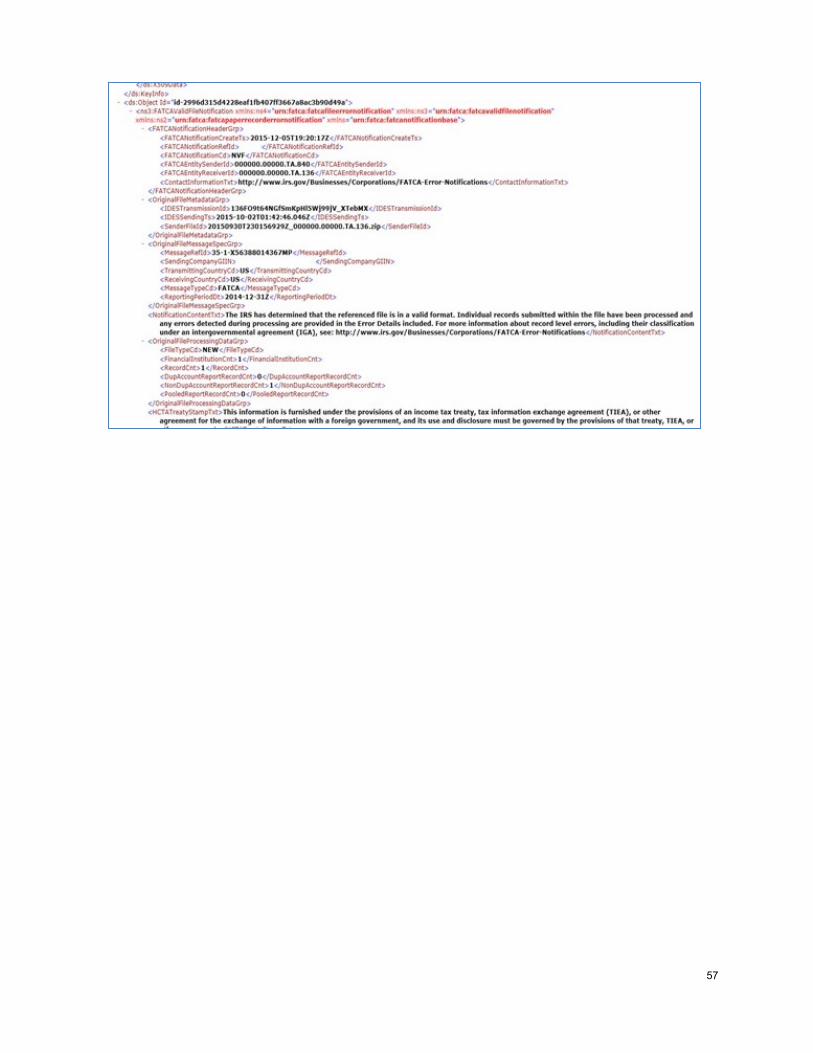
57
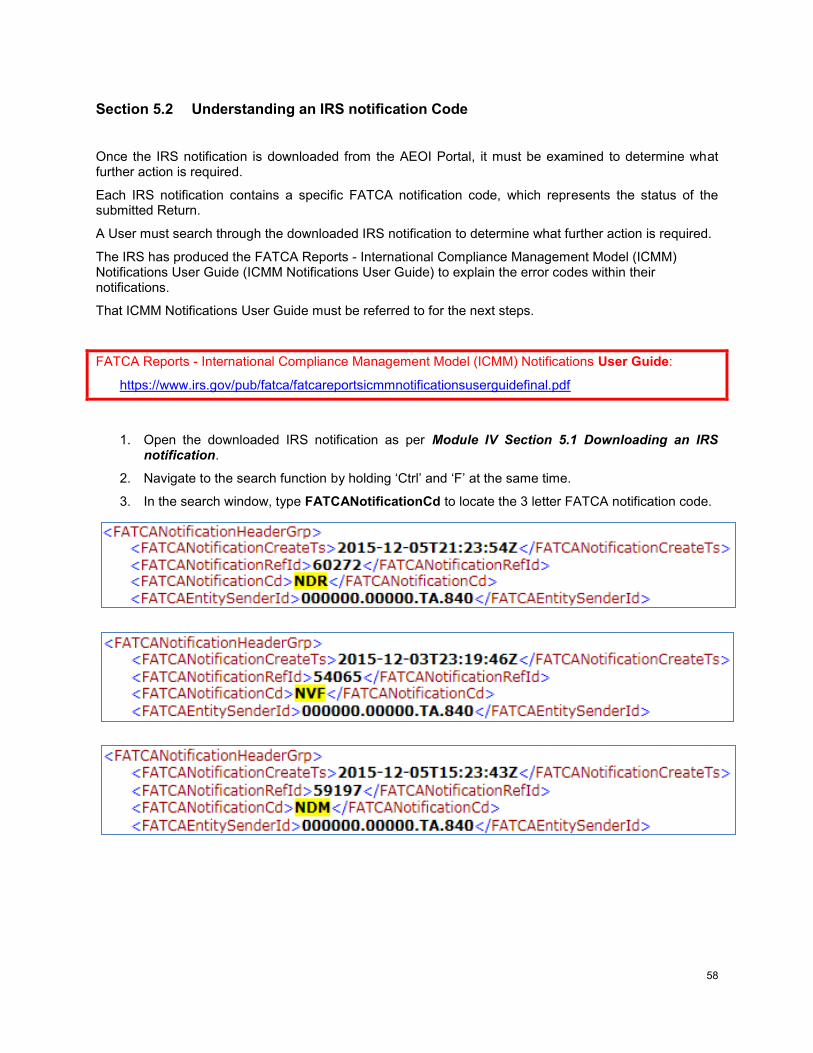
58
Section 5.2 Understanding an IRS notification Code
Once the IRS notification is downloaded from the AEOI Portal, it must be examined to determine what further action is required.
Each IRS notification contains a specific FATCA notification code, which represents the status of the submitted Return.
A User must search through the downloaded IRS notification to determine what further action is required.
The IRS has produced the FATCA Reports - International Compliance Management Model (ICMM) Notifications User Guide (ICMM Notifications User Guide) to explain the error codes within their notifications.
That ICMM Notifications User Guide must be referred to for the next steps.
FATCA Reports - International Compliance Management Model (ICMM) Notifications User Guide:
https://www.irs.gov/pub/fatca/fatcareportsicmmnotificationsuserguidefinal.pdf
1. Open the downloaded IRS notification as per Module IV Section 5.1 Downloading an IRS notification.
2. Navigate to the search function by holding ‘Ctrl’ and ‘F’ at the same time.
3. In the search window, type FATCANotificationCd to locate the 3 letter FATCA notification code.
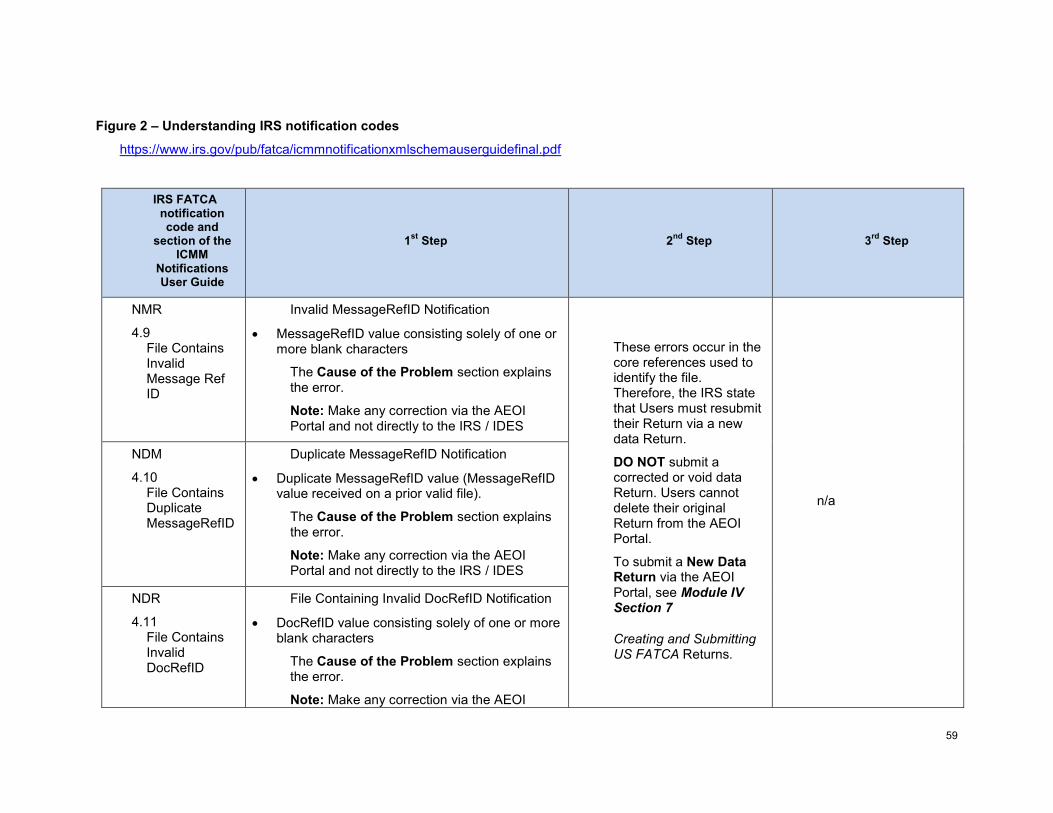
59
Figure 2 – Understanding IRS notification codes
https://www.irs.gov/pub/fatca/icmmnotificationxmlschemauserguidefinal.pdf
IRS FATCA notification code and
section of the ICMM
Notifications User Guide
1st
Step 2nd
Step 3rd
Step
NMR
4.9 File Contains Invalid Message Ref ID
Invalid MessageRefID Notification
MessageRefID value consisting solely of one or more blank characters
The Cause of the Problem section explains the error.
Note: Make any correction via the AEOI Portal and not directly to the IRS / IDES
These errors occur in the core references used to identify the file. Therefore, the IRS state that Users must resubmit their Return via a new data Return.
DO NOT submit a corrected or void data Return. Users cannot delete their original Return from the AEOI Portal.
To submit a New Data Return via the AEOI Portal, see Module IV Section 7
Creating and Submitting US FATCA Returns.
n/a
NDM
4.10 File Contains Duplicate MessageRefID
Duplicate MessageRefID Notification
Duplicate MessageRefID value (MessageRefID value received on a prior valid file).
The Cause of the Problem section explains the error.
Note: Make any correction via the AEOI Portal and not directly to the IRS / IDES
NDR
4.11 File Contains Invalid DocRefID
File Containing Invalid DocRefID Notification
DocRefID value consisting solely of one or more blank characters
The Cause of the Problem section explains the error.
Note: Make any correction via the AEOI
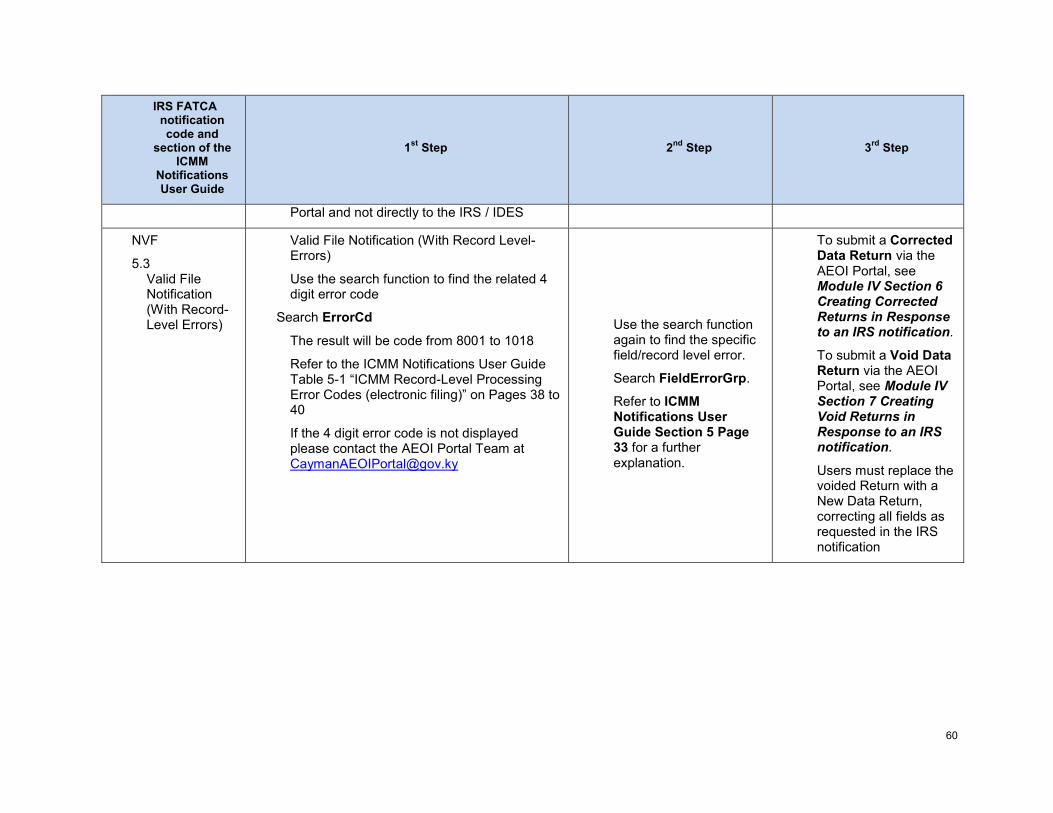
60
IRS FATCA notification code and
section of the ICMM
Notifications User Guide
1st
Step 2nd
Step 3rd
Step
Portal and not directly to the IRS / IDES
NVF
5.3 Valid File Notification (With Record-Level Errors)
Valid File Notification (With Record Level-Errors)
Use the search function to find the related 4 digit error code
Search ErrorCd
The result will be code from 8001 to 1018
Refer to the ICMM Notifications User Guide Table 5-1 “ICMM Record-Level Processing Error Codes (electronic filing)” on Pages 38 to 40
If the 4 digit error code is not displayed please contact the AEOI Portal Team at [email protected]
Use the search function again to find the specific field/record level error.
Search FieldErrorGrp.
Refer to ICMM Notifications User Guide Section 5 Page 33 for a further explanation.
To submit a Corrected Data Return via the AEOI Portal, see Module IV Section 6 Creating Corrected Returns in Response to an IRS notification.
To submit a Void Data Return via the AEOI Portal, see Module IV Section 7 Creating Void Returns in Response to an IRS notification.
Users must replace the voided Return with a New Data Return, correcting all fields as requested in the IRS notification

61
Section 6. Creating Corrected Returns in Response to an IRS notification
Section 6.1 Creating Corrected Manual Entry Returns
Before a User creates the Corrected Data Return it is recommended they first view the original Return to take note of some required information.
1. Follow Module IV Section 3 Viewing Submitted Returns and navigate to the original Return.
2. Take note of the following information from the General Information form.
a. Message Reference ID.
3. Select Back then select the Reporting FI Information form.
a. Take note of the Document Reference ID.
4. Select Back then select the Account Information form(s).
a. Take note of the Document Reference ID.
b. This must be completed for each Account Information form within the Return, which the IRS notification references.
5. Follow Module IV Section 7
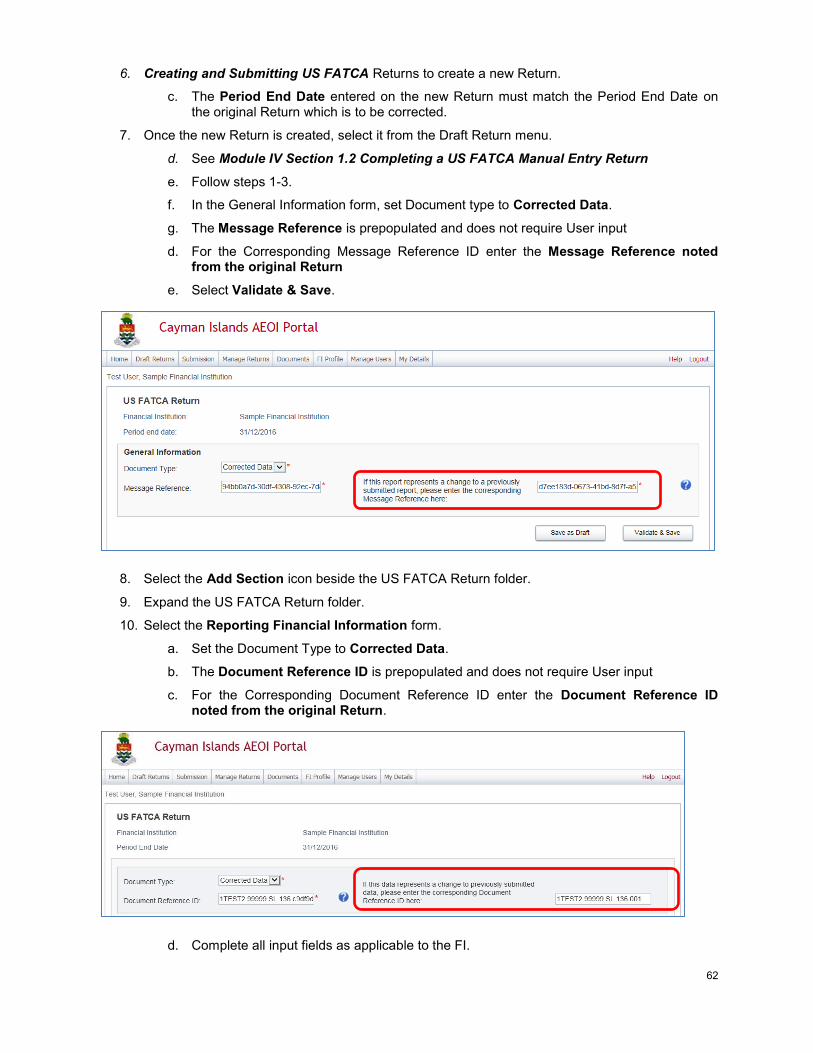
62
6. Creating and Submitting US FATCA Returns to create a new Return.
c. The Period End Date entered on the new Return must match the Period End Date on the original Return which is to be corrected.
7. Once the new Return is created, select it from the Draft Return menu.
d. See Module IV Section 1.2 Completing a US FATCA Manual Entry Return
e. Follow steps 1-3.
f. In the General Information form, set Document type to Corrected Data.
g. The Message Reference is prepopulated and does not require User input
d. For the Corresponding Message Reference ID enter the Message Reference noted from the original Return
e. Select Validate & Save.
8. Select the Add Section icon beside the US FATCA Return folder.
9. Expand the US FATCA Return folder.
10. Select the Reporting Financial Information form.
a. Set the Document Type to Corrected Data.
b. The Document Reference ID is prepopulated and does not require User input
c. For the Corresponding Document Reference ID enter the Document Reference ID noted from the original Return.
d. Complete all input fields as applicable to the FI.
63
i. All fields identified in the IRS notification must be corrected.
ii. All mandatory fields are marked with an asterisk and must be completed for the form to successfully validate and save.
Note: If you are creating a “Void Data” Return, the information MUST precisely match the information
included in the original data Return.

64
11. Select Validate & Save once the form is complete.
12. Select the Account Information form.
a. Set the Document Type to Corrected Data.
b. The Document Reference ID is prepopulated and does not require User input.
c. For the Corresponding Document Reference ID enter the Document Reference ID noted from the original Return.
d. Complete all input fields as applicable to the FI.
i. All fields identified in the IRS notification must be corrected.
ii. All mandatory fields are marked with an asterisk and must be completed for the form to successfully validate and save.
Note: If you create a Void Data Return, the information in that Void Data Return MUST precisely match
the information included in the original data Return.
13. Repeat step 11 for each Account Information form(s) within the Return, which the IRS notification references.
14. Select Validate & Save once all updates are complete.
15. Once all updates are complete, submit the Return following Section 1.2.1 Submitting US FATCA Manual Entry Returns.

65
Section 6.2 Creating Corrected XML Returns
1. Follow Module IV Section 3 Viewing Submitted Returns and navigate to the original Return.
a. Download and save the XML file so it can be edited.
2. Follow Module IV Section 7
66
3. Creating and Submitting US FATCA Returns to create a new Return.
a. Please note that submitting a Corrected Data Return is different than submitting a New Data Return.
b. The Period End Date entered on the new Return must match the Period End Date on the original Return which is to be corrected.
4. To submit a Corrected Return in response to an IRS notification, changes must be made within the DocSpec element of the XML file.
a. DocTypeIndic element must be FATCA2 to denote a corrected record.
b. CorrMessageRefID element must be set equal to the MessageRefID for the original file in which the record being corrected was contained.
c. CorrDocRefID element must be set equal to the DocRefID for the original record being corrected.
d. All fields identified in the IRS notification must be corrected.
Note: If you create a Void Data Return, the information in that Void Data Return MUST precisely match
the information included in the original data Return.
Please refer to Section 6.4 Account Report of the IRS FATCA XML Schema v2.0 User Guide:
https://www.irs.gov/pub/irs-pdf/p5124.pdf
Please see the ICMM Notifications User Guide Section 5.5 Page 41 for details on how to correct XML files.
The ICMM Notifications User Guide can be found here:
https://www.irs.gov/pub/fatca/fatcareportsicmmnotificationsuserguidefinal.pdf
5. Complete the XML file Return submission as per Module IV 1.1.1 Uploading and submitting US FATCA XML Returns.
* ICMM Notifications User Guide Page numbers correct as at March 2017.
67
Section 7. Creating Void Returns in Response to an IRS notification
Note: Refer to Section 7 of the IRS FATCA XML Schema 2.0 User Guide before creating a void return.
A Void Return should be created at the request of the IRS notification. e.g. “If the record has an error in the Reporting FI GIIN, the original record must be voided and a new record submitted to correct the GIIN.”
Users MUST replace the voided Return with a New Data Return, correcting all fields as requested in the IRS notification.
Section 7.1 Creating a Manual Entry Void Return
1. To create a Void Return follow steps 1 through 12 in Module IV Section 6.1 Creating Corrected Manual Entry Returns.
i. Ensure the Document Type (where required) is set to Void Data.
ii. Ensure that the information included in the Void Data Return matches the original data Return.
2. Once all fields are complete, submit the Return following Module IV 1.2.1 Submitting US FATCA Manual Entry Returns.
Section 7.2 Creating an XML Void Return
1. Follow Module IV Section 3 Viewing Submitted Returns and navigate to the original Return.
a. Download and save the XML file.
2. Follow Module IV Section 1.1 Creating US FATCA Returns to create a new Return.
a. Please note that submitting a Void Data Return is different than submitting a New Data Return.
b. The Period End Date entered on the new Return must match the Period End Date on the original Return which is to be void.
3. To submit a Void Return, changes must be made within the DocSpec element of the XML file.
a. DocTypeIndic element must be FATCA3 to denote Void Data.
b. CorrMessageRefID element must be set equal to the MessageRefID for the original file in which the record to be void was contained.
c. CorrDocRefID element must be set equal to the DocRefID for the original record to be void.
Please refer to Section 7 “Correcting, Amending and Voiding Records – New” of the IRS FATCA XML v2.0 User Guide https://www.irs.gov/pub/irs-pdf/p5124.pdf
4. Complete the XML file Return submission as per Module IV 1.1.1 Uploading and submitting US FATCA XML Returns.
Once you submit your Void Return, remember to create your New Data Return.
68
Module V. CRS Reporting
Section 1. Creating and Submitting CRS Returns
Section 1.1 Introduction
1.1.1 CRS Reporting – Annex 3 of the Standard
CRS reporting is based on the requirements of the Common Reporting Standard User Guide in Annex 3 to the Standard for Automatic Exchange of Financial Account Information in Tax Matters. Annex 3 is available here:
http://www.keepeek.com/Digital-Asset-Management/oecd/taxation/standard-for-automatic-exchange-of-financial-account-information-for-tax-matters_9789264216525-en#page232]
The TIA has modified these requirements in certain respects as noted in the CRS Business Rules referred to below and also by requiring every FI with CRS reporting obligations to complete its reporting obligations by submitting the CRS Filing Declaration described below.
1.1.2 CRS Business Rules
An FI’s CRS Receiving Country Returns, whether XML or Manual Entry, MUST ALWAYS comply with the business rules listed in Module V Section 1.1 CRS Business Rules. These business rules are validations implemented within the CRS component of the AEOI Portal. They are designed to ensure adherence with the CRS XSD and are sourced from the business rules set out in the OECD’s CRS XML user guide and the OECD’s CRS Status Message user guide, with appropriate modifications for the way in which the Cayman Islands is implementing the CRS.
1.1.3 CRS Receiving Country Returns
An FI MUST make a separate CRS XML or CRS Manual Entry Return (“Receiving Country Return”) in respect of each Receiving Country in respect of which it has Reportable Accounts.
The term “Receiving Country” means a Reportable Jurisdiction in respect of which an FI has Reportable Accounts.
The Cayman Islands has published a list of 2017 and 2018 Reportable Jurisdictions. The list is included in Appendix 4 to the CRS Guidance Notes which is available here: http://www.ditc.gov.ky/pdf/CRS_Legislation.pdf
Refer to the CRS Guidance Notes as necessary for the meaning of Reportable Accounts.
An FI must satisfy its CRS reporting obligations via the AEOI Portal in accordance with either:
Module V Section 1.3 Creating CRS Returns; or
Module V Section 1.4 Completing a CRS Manual Entry Return
69
1.1.4 CRS Filing Declaration
Every Cayman Reporting Financial Institution and every Trustee Documented Trust (by its Trustee) MUST submit a CRS Filing Declaration Form – described in Module V Section 1.5 CRS Filing Declaration - in order to complete its CRS reporting obligations.
When a CFI submits a CRS Filing Declaration, it confirms that, for the relevant calendar year it has submitted a Receiving Country Return for each Receiving Country in respect of which the CFI has Reportable Accounts and makes a nil return in respect of each Reportable Jurisdiction not specified as a Receiving Country in a Receiving Country Return. The CFI also confirms in the CRS Filing Declaration that all information submitted in each Receiving Country Return and in the CRS Filing Declaration is accurate and fulfils the CFI’s reporting obligations under the CRS Regulations. Finally, the CFI acknowledges that there are sanctions for providing inaccurate information to the TIA and for contravention of the CFI’s reporting obligations.
Section 1.2 CRS Business Rules
An FI’s CRS Receiving Country Returns MUST ALWAYS comply with the business rules listed in the following table. Understanding the business rules will help you avoid validation errors when submitting CRS XML Returns and CRS Manual Entry Returns.
You MUST review these CRS business rules before preparing and submitting CRS XML Returns.
The TIA recommends that you review these business rules before attempting to prepare the CRS Manual Entry Returns.
Rule Source
Rule
Rule Logic
TIA requirements / recommendations noted in red italics.
Location on Filing
Location on XML
CRS Message Reference format
For non-domestic reporting, the message reference must be more than eight characters.
General Information form – Message Reference
CRS_OECD\MessageSpec\MessageRefId
CRS Unique Message Reference
The message reference must be unique. Upon submission of a Filing this rule will search all previously submitted filings to ensure the message reference has not already been used.
The TIA recommends the unique value start with the FI number and include two or more other unique numbers to ensure that the FI itself and no other FI has or will file a return with the same MessageRefID.
General Information form – Message Reference
CRS_OECD\MessageSpec\MessageRefId
CRS Corresponding message reference present
Corresponding Message Ref ID is prohibited within the Message Spec group for CRS reporting
General Information form – Corresponding Message Reference
CRS_OECD\MessageSpec\CorrMessageRefId
CRS Sending Company IN check
If a CRS filing is being used to report domestically then the filer must include a Sending Company IN.
For all CRS XML Returns and for CRS Manual Entry Returns in respect of Undocumented Accounts with Cayman Islands as the Receiving Country, populate this field with the FI number issued to the FI by the TIA. This field is prepopulated in the case of other types of CRS Manual Entry Returns.
The SendingCompanyIN is NOT required for
General Information form – Sending Company IN
CRS_OECD\MessageSpec\SendingCompanyIN
70
Rule Source
Rule
Rule Logic
TIA requirements / recommendations noted in red italics.
Location on Filing
Location on XML
non-domestic CRS XML Returns.
CRS Domestic Nil reporting check
The message type “The message advises there is no data to report” can only be used for domestic reporting.
Do not make nil returns using the CRS XML Returns. It is not possible to make nil returns using CRS Manual Entry Returns. Nil returns (if any) must be made by means of the CRS Filing Declaration described below.
General Information form – Message Type
CRS_OECD\MessageSpec\MessageTypeIndic
CRS Reporting FI Document Reference ID format
For non-domestic reporting, the document reference id field must be in the following format. The first two characters must correspond to the sending jurisdiction country code, the next set of characters must be a unique reference.
The OECD will not accept CRS Returns which contain Document Reference IDs that are not unique in space and time. Therefore, the TIA strongly recommends that the DocRefID be formatted shown in the following example but in a single line without spaces:
Country code of sending jurisdiction
KY
Year to which the data relates
2016
Country code of Receiving Country
GB
Unique value, including the FI number plus additional letters / numbers
FI043230001
Reporting FI Information – Document Reference Id
CRS_OECD\CRSBody\ReportingFI\DocSpec\DocRefId
CRS Reporting FI Unique Document Reference ID
The document reference id must be unique. Upon submission of a Filing this rule will search all previously submitted filings to ensure the document reference id has not already been used.
The recommendation in the row above should help ensure that the Document Reference ID is unique.
Reporting FI Information – Document Reference Id
CRS_OECD\CRSBody\ReportingFI\DocSpec\DocRefId
CRS Reporting FI Document type check
The only document type values allowed for CRS reporting are OECD1 - New Data, OECD2 - Corrected Data or OECD3 - Deletion of Data.
Reporting FI Information – Document Type
CRS_OECD\CRSBody\ReportingFI\DocSpec\DocTypeIndic
CRS Reporting FI Corresponding document reference id present
If a document type of corrected data or deletion of data is selected on the Reporting FI information form, then a corresponding document reference ID must be included in the filing.
Reporting FI Information – Corresponding Document Reference Id
CRS_OECD\CRSBody\ReportingFI\DocSpec\CorrDocRefId
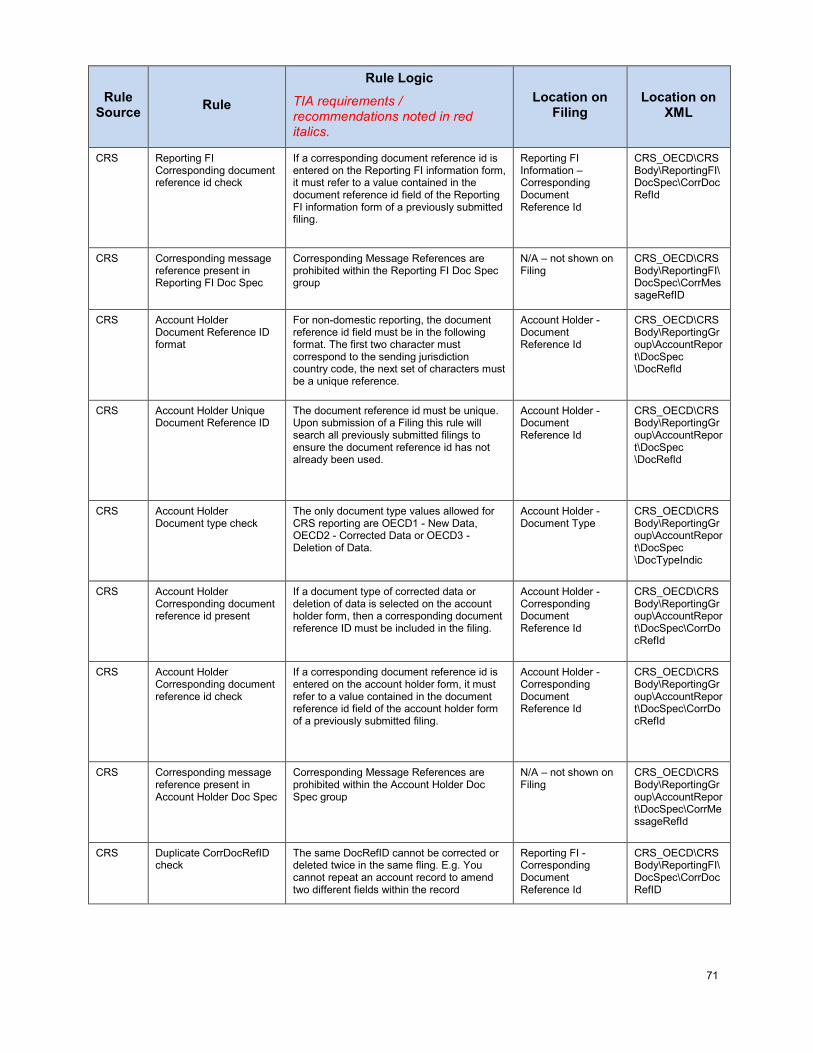
71
Rule Source
Rule
Rule Logic
TIA requirements / recommendations noted in red italics.
Location on Filing
Location on XML
CRS Reporting FI Corresponding document reference id check
If a corresponding document reference id is entered on the Reporting FI information form, it must refer to a value contained in the document reference id field of the Reporting FI information form of a previously submitted filing.
Reporting FI Information – Corresponding Document Reference Id
CRS_OECD\CRSBody\ReportingFI\DocSpec\CorrDocRefId
CRS Corresponding message reference present in Reporting FI Doc Spec
Corresponding Message References are prohibited within the Reporting FI Doc Spec group
N/A – not shown on Filing
CRS_OECD\CRSBody\ReportingFI\DocSpec\CorrMessageRefID
CRS Account Holder Document Reference ID format
For non-domestic reporting, the document reference id field must be in the following format. The first two character must correspond to the sending jurisdiction country code, the next set of characters must be a unique reference.
Account Holder - Document Reference Id
CRS_OECD\CRSBody\ReportingGroup\AccountReport\DocSpec \DocRefId
CRS Account Holder Unique Document Reference ID
The document reference id must be unique. Upon submission of a Filing this rule will search all previously submitted filings to ensure the document reference id has not already been used.
Account Holder - Document Reference Id
CRS_OECD\CRSBody\ReportingGroup\AccountReport\DocSpec \DocRefId
CRS Account Holder Document type check
The only document type values allowed for CRS reporting are OECD1 - New Data, OECD2 - Corrected Data or OECD3 - Deletion of Data.
Account Holder - Document Type
CRS_OECD\CRSBody\ReportingGroup\AccountReport\DocSpec \DocTypeIndic
CRS Account Holder Corresponding document reference id present
If a document type of corrected data or deletion of data is selected on the account holder form, then a corresponding document reference ID must be included in the filing.
Account Holder - Corresponding Document Reference Id
CRS_OECD\CRSBody\ReportingGroup\AccountReport\DocSpec\CorrDocRefId
CRS Account Holder Corresponding document reference id check
If a corresponding document reference id is entered on the account holder form, it must refer to a value contained in the document reference id field of the account holder form of a previously submitted filing.
Account Holder - Corresponding Document Reference Id
CRS_OECD\CRSBody\ReportingGroup\AccountReport\DocSpec\CorrDocRefId
CRS Corresponding message reference present in Account Holder Doc Spec
Corresponding Message References are prohibited within the Account Holder Doc Spec group
N/A – not shown on Filing
CRS_OECD\CRSBody\ReportingGroup\AccountReport\DocSpec\CorrMessageRefId
CRS Duplicate CorrDocRefID check
The same DocRefID cannot be corrected or deleted twice in the same fling. E.g. You cannot repeat an account record to amend two different fields within the record
Reporting FI - Corresponding Document Reference Id
CRS_OECD\CRSBody\ReportingFI\DocSpec\CorrDocRefID

72
Rule Source
Rule
Rule Logic
TIA requirements / recommendations noted in red italics.
Location on Filing
Location on XML
Account Holder - Corresponding Document Reference Id
CRS_OECD\CRSBody\ReportingGroup\AccountReport\DocSpec\CorrDocRefId
CRS All Document types must correspond to Message type
A) Where a Message Type of “New information” is selected then all Document types contained within the Reporting FI information form and the Account holder forms must have a type of “New Data”
General information form – Message type
CRS_OECD\MessageSpec\MessageTypeIndic
Reporting FI – Document Type
CRS_OECD\CRSBody\ReportingFI\DocSpec\DocTypeIndic
B) Where a message type of “Corrections for previously sent information” is selected then all Document types contained within the Reporting FI information form and the Account holder forms must have a type of “Corrected Data” or “Deletion of Data”
Account Holder – Document type
CRS_OECD\CRSBody\ReportingGroup\AccountReport\DocSpec\DocTypeIndic
CRS All Document types must be the same
Document types cannot differ between the Reporting FI information form and the Account Holder form within the same filing
Reporting FI – Document Type
CRS_OECD\CRSBody\ReportingFI\DocSpec\DocTypeIndic
Account Holder – Document type
CRS_OECD\CRSBody\ReportingGroup\AccountReport\DocSpec\DocTypeIndic
CRS Controlling person check (a)
If account holder type “Passive Non-Financial Entity with one or more controlling person that is a Reportable Person” is selected, then at least one controlling person record must be present
Account holder – Account holder type
CRS_OECD\CRSBody\ReportingGroup\AccountReport\Controlling person
CRS Controlling person check (b)
If an account holder type other than “Passive Non-Financial Entity with one or more controlling person that is a Reportable Person” is selected, then no controlling person records can be present
Account holder – Account holder type
CRS_OECD\CRSBody\ReportingGroup\AccountReport\Controlling person
CRS Closed account nil balance check
Where the account being reported upon has been marked as a closed account, the account balance should be zero
Account holder – Account balance
CRS_OECD\CRSBody\ReportingGroup\AccountReport\Account Balance
CRS Account balance check The account balance cannot be less than zero.
Account holder – Account balance
CRS_OECD\CRSBody\ReportingGroup\AccountReport\Account Balance
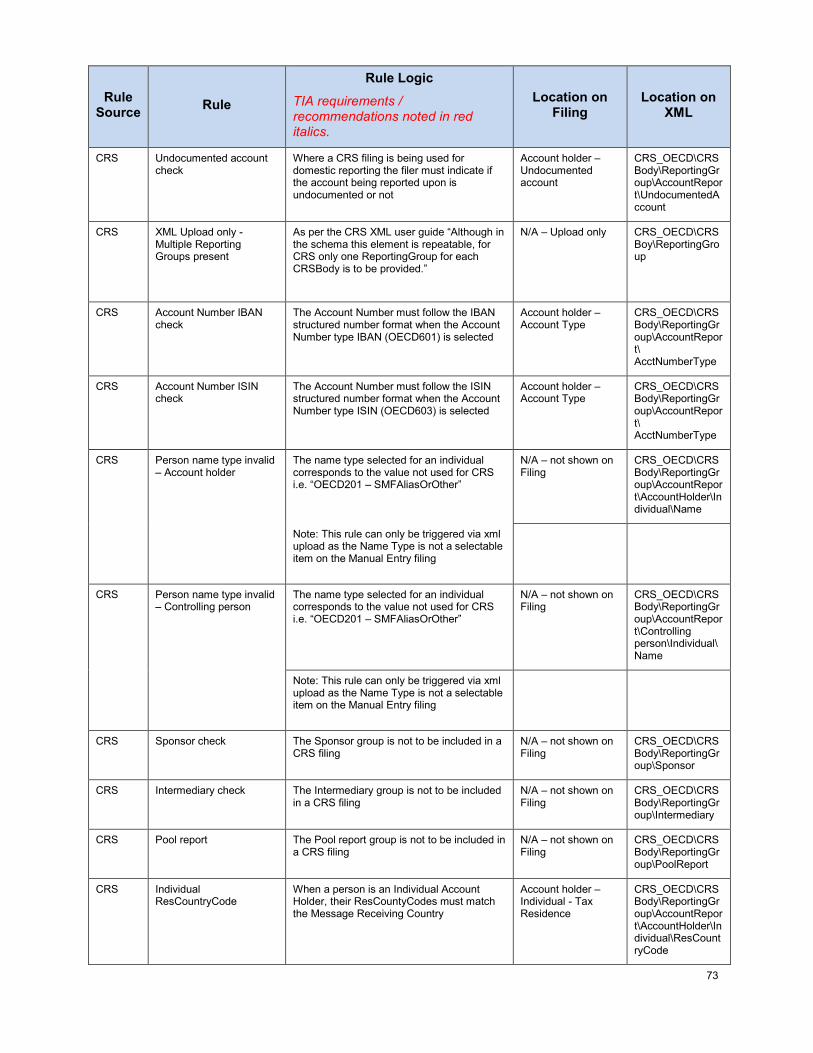
73
Rule Source
Rule
Rule Logic
TIA requirements / recommendations noted in red italics.
Location on Filing
Location on XML
CRS Undocumented account check
Where a CRS filing is being used for domestic reporting the filer must indicate if the account being reported upon is undocumented or not
Account holder – Undocumented account
CRS_OECD\CRSBody\ReportingGroup\AccountReport\UndocumentedAccount
CRS XML Upload only - Multiple Reporting Groups present
As per the CRS XML user guide “Although in the schema this element is repeatable, for CRS only one ReportingGroup for each CRSBody is to be provided.”
N/A – Upload only CRS_OECD\CRSBoy\ReportingGroup
CRS Account Number IBAN check
The Account Number must follow the IBAN structured number format when the Account Number type IBAN (OECD601) is selected
Account holder – Account Type
CRS_OECD\CRSBody\ReportingGroup\AccountReport\ AcctNumberType
CRS Account Number ISIN check
The Account Number must follow the ISIN structured number format when the Account Number type ISIN (OECD603) is selected
Account holder – Account Type
CRS_OECD\CRSBody\ReportingGroup\AccountReport\ AcctNumberType
CRS Person name type invalid – Account holder
The name type selected for an individual corresponds to the value not used for CRS i.e. “OECD201 – SMFAliasOrOther”
N/A – not shown on Filing
CRS_OECD\CRSBody\ReportingGroup\AccountReport\AccountHolder\Individual\Name
Note: This rule can only be triggered via xml upload as the Name Type is not a selectable item on the Manual Entry filing
CRS Person name type invalid – Controlling person
The name type selected for an individual corresponds to the value not used for CRS i.e. “OECD201 – SMFAliasOrOther”
N/A – not shown on Filing
CRS_OECD\CRSBody\ReportingGroup\AccountReport\Controlling person\Individual\Name
Note: This rule can only be triggered via xml upload as the Name Type is not a selectable item on the Manual Entry filing
CRS Sponsor check The Sponsor group is not to be included in a CRS filing
N/A – not shown on Filing
CRS_OECD\CRSBody\ReportingGroup\Sponsor
CRS Intermediary check The Intermediary group is not to be included in a CRS filing
N/A – not shown on Filing
CRS_OECD\CRSBody\ReportingGroup\Intermediary
CRS Pool report The Pool report group is not to be included in a CRS filing
N/A – not shown on Filing
CRS_OECD\CRSBody\ReportingGroup\PoolReport
CRS Individual ResCountryCode
When a person is an Individual Account Holder, their ResCountyCodes must match the Message Receiving Country
Account holder – Individual - Tax Residence
CRS_OECD\CRSBody\ReportingGroup\AccountReport\AccountHolder\Individual\ResCountryCode
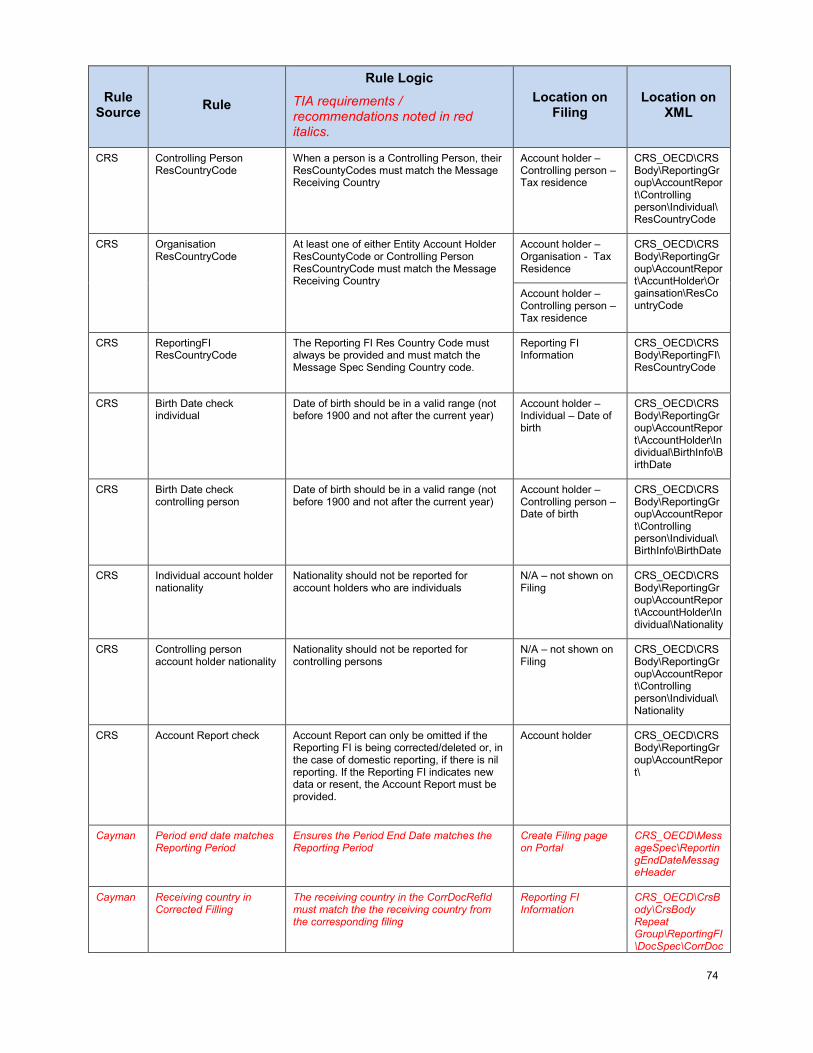
74
Rule Source
Rule
Rule Logic
TIA requirements / recommendations noted in red italics.
Location on Filing
Location on XML
CRS Controlling Person ResCountryCode
When a person is a Controlling Person, their ResCountyCodes must match the Message Receiving Country
Account holder – Controlling person – Tax residence
CRS_OECD\CRSBody\ReportingGroup\AccountReport\Controlling person\Individual\ResCountryCode
CRS Organisation ResCountryCode
At least one of either Entity Account Holder ResCountyCode or Controlling Person ResCountryCode must match the Message Receiving Country
Account holder – Organisation - Tax Residence
CRS_OECD\CRSBody\ReportingGroup\AccountReport\AccuntHolder\Orgainsation\ResCountryCode
Account holder – Controlling person – Tax residence
CRS ReportingFI ResCountryCode
The Reporting FI Res Country Code must always be provided and must match the Message Spec Sending Country code.
Reporting FI Information
CRS_OECD\CRSBody\ReportingFI\ResCountryCode
CRS Birth Date check individual
Date of birth should be in a valid range (not before 1900 and not after the current year)
Account holder – Individual – Date of birth
CRS_OECD\CRSBody\ReportingGroup\AccountReport\AccountHolder\Individual\BirthInfo\BirthDate
CRS Birth Date check controlling person
Date of birth should be in a valid range (not before 1900 and not after the current year)
Account holder – Controlling person – Date of birth
CRS_OECD\CRSBody\ReportingGroup\AccountReport\Controlling person\Individual\BirthInfo\BirthDate
CRS Individual account holder nationality
Nationality should not be reported for account holders who are individuals
N/A – not shown on Filing
CRS_OECD\CRSBody\ReportingGroup\AccountReport\AccountHolder\Individual\Nationality
CRS Controlling person account holder nationality
Nationality should not be reported for controlling persons
N/A – not shown on Filing
CRS_OECD\CRSBody\ReportingGroup\AccountReport\Controlling person\Individual\Nationality
CRS Account Report check Account Report can only be omitted if the Reporting FI is being corrected/deleted or, in the case of domestic reporting, if there is nil reporting. If the Reporting FI indicates new data or resent, the Account Report must be provided.
Account holder CRS_OECD\CRSBody\ReportingGroup\AccountReport\
Cayman Period end date matches Reporting Period
Ensures the Period End Date matches the Reporting Period
Create Filing page on Portal
CRS_OECD\MessageSpec\ReportingEndDateMessageHeader
Cayman Receiving country in Corrected Filling
The receiving country in the CorrDocRefId must match the the receiving country from the corresponding filing
Reporting FI Information
CRS_OECD\CrsBody\CrsBody Repeat Group\ReportingFI\DocSpec\CorrDoc
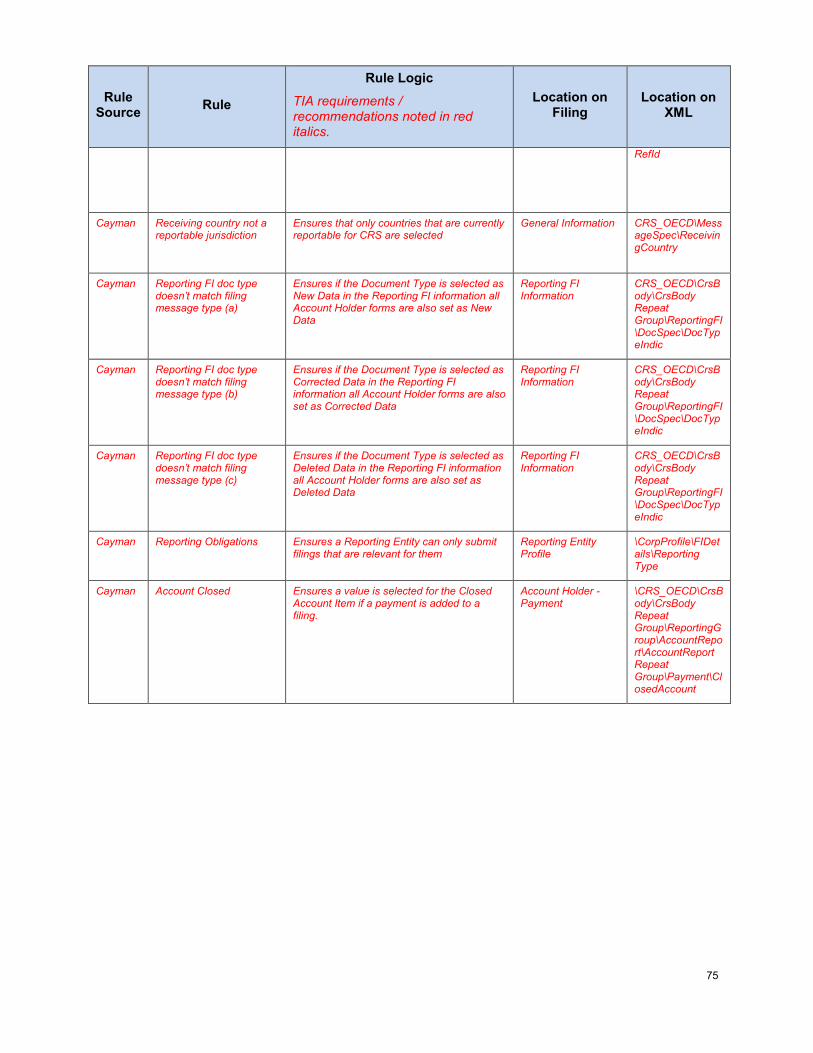
75
Rule Source
Rule
Rule Logic
TIA requirements / recommendations noted in red italics.
Location on Filing
Location on XML
RefId
Cayman Receiving country not a reportable jurisdiction
Ensures that only countries that are currently reportable for CRS are selected
General Information CRS_OECD\MessageSpec\ReceivingCountry
Cayman Reporting FI doc type doesn’t match filing message type (a)
Ensures if the Document Type is selected as New Data in the Reporting FI information all Account Holder forms are also set as New Data
Reporting FI Information
CRS_OECD\CrsBody\CrsBody Repeat Group\ReportingFI\DocSpec\DocTypeIndic
Cayman Reporting FI doc type doesn’t match filing message type (b)
Ensures if the Document Type is selected as Corrected Data in the Reporting FI information all Account Holder forms are also set as Corrected Data
Reporting FI Information
CRS_OECD\CrsBody\CrsBody Repeat Group\ReportingFI\DocSpec\DocTypeIndic
Cayman Reporting FI doc type doesn’t match filing message type (c)
Ensures if the Document Type is selected as Deleted Data in the Reporting FI information all Account Holder forms are also set as Deleted Data
Reporting FI Information
CRS_OECD\CrsBody\CrsBody Repeat Group\ReportingFI\DocSpec\DocTypeIndic
Cayman Reporting Obligations Ensures a Reporting Entity can only submit filings that are relevant for them
Reporting Entity Profile
\CorpProfile\FIDetails\Reporting Type
Cayman Account Closed Ensures a value is selected for the Closed Account Item if a payment is added to a filing.
Account Holder - Payment
\CRS_OECD\CrsBody\CrsBody Repeat Group\ReportingGroup\AccountReport\AccountReport Repeat Group\Payment\ClosedAccount
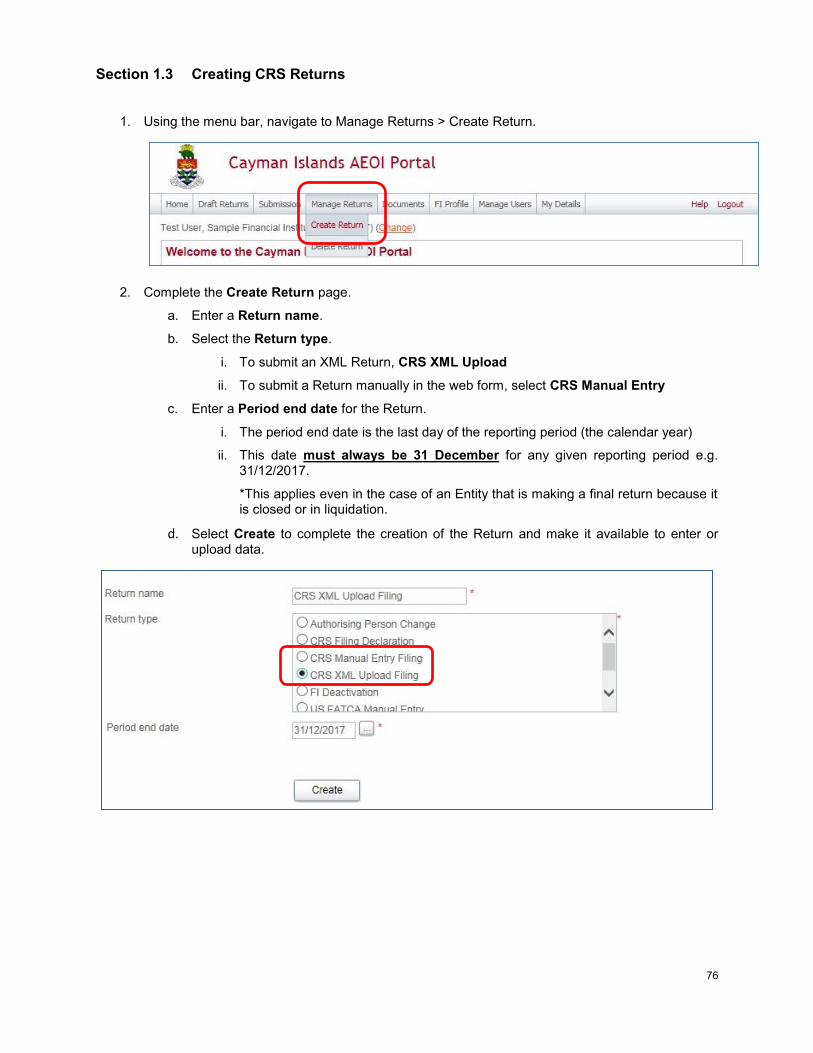
76
Section 1.3 Creating CRS Returns
1. Using the menu bar, navigate to Manage Returns > Create Return.
2. Complete the Create Return page.
a. Enter a Return name.
b. Select the Return type.
i. To submit an XML Return, CRS XML Upload
ii. To submit a Return manually in the web form, select CRS Manual Entry
c. Enter a Period end date for the Return.
i. The period end date is the last day of the reporting period (the calendar year)
ii. This date must always be 31 December for any given reporting period e.g. 31/12/2017.
*This applies even in the case of an Entity that is making a final return because it is closed or in liquidation.
d. Select Create to complete the creation of the Return and make it available to enter or upload data.
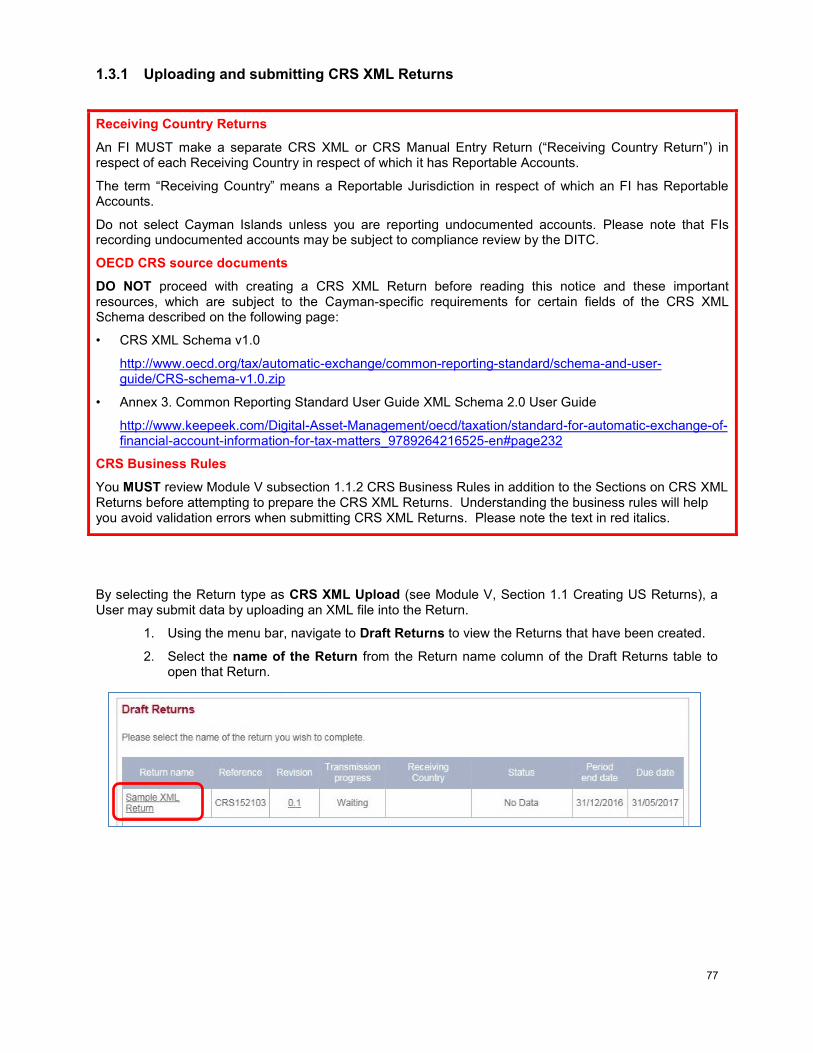
77
1.3.1 Uploading and submitting CRS XML Returns
By selecting the Return type as CRS XML Upload (see Module V, Section 1.1 Creating US Returns), a User may submit data by uploading an XML file into the Return.
1. Using the menu bar, navigate to Draft Returns to view the Returns that have been created.
2. Select the name of the Return from the Return name column of the Draft Returns table to open that Return.
Receiving Country Returns
An FI MUST make a separate CRS XML or CRS Manual Entry Return (“Receiving Country Return”) in respect of each Receiving Country in respect of which it has Reportable Accounts.
The term “Receiving Country” means a Reportable Jurisdiction in respect of which an FI has Reportable Accounts.
Do not select Cayman Islands unless you are reporting undocumented accounts. Please note that FIs recording undocumented accounts may be subject to compliance review by the DITC.
OECD CRS source documents
DO NOT proceed with creating a CRS XML Return before reading this notice and these important resources, which are subject to the Cayman-specific requirements for certain fields of the CRS XML Schema described on the following page:
• CRS XML Schema v1.0
http://www.oecd.org/tax/automatic-exchange/common-reporting-standard/schema-and-user-guide/CRS-schema-v1.0.zip
• Annex 3. Common Reporting Standard User Guide XML Schema 2.0 User Guide
http://www.keepeek.com/Digital-Asset-Management/oecd/taxation/standard-for-automatic-exchange-of-financial-account-information-for-tax-matters_9789264216525-en#page232
CRS Business Rules
You MUST review Module V subsection 1.1.2 CRS Business Rules in addition to the Sections on CRS XML Returns before attempting to prepare the CRS XML Returns. Understanding the business rules will help you avoid validation errors when submitting CRS XML Returns. Please note the text in red italics.
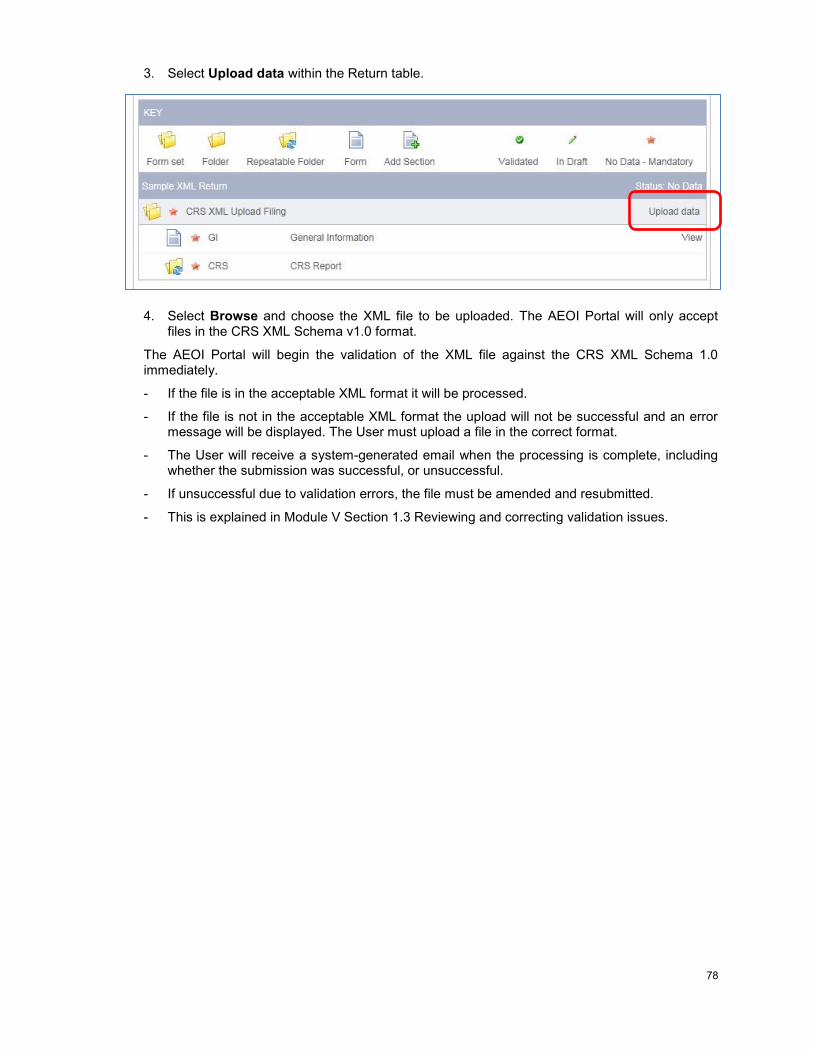
78
3. Select Upload data within the Return table.
4. Select Browse and choose the XML file to be uploaded. The AEOI Portal will only accept files in the CRS XML Schema v1.0 format.
The AEOI Portal will begin the validation of the XML file against the CRS XML Schema 1.0 immediately.
- If the file is in the acceptable XML format it will be processed.
- If the file is not in the acceptable XML format the upload will not be successful and an error message will be displayed. The User must upload a file in the correct format.
- The User will receive a system-generated email when the processing is complete, including whether the submission was successful, or unsuccessful.
- If unsuccessful due to validation errors, the file must be amended and resubmitted.
- This is explained in Module V Section 1.3 Reviewing and correcting validation issues.
79
Section 1.4 Completing a CRS Manual Entry Return
Receiving Country Returns
An FI MUST make a separate CRS XML or CRS Manual Entry Return (“Receiving Country Return”) in respect of each Receiving Country in respect of which it has Reportable Accounts.
The term “Receiving Country” means a Reportable Jurisdiction in respect of which an FI has Reportable Accounts.
Do not select Cayman Islands unless you are reporting undocumented accounts. Please note that FIs recording undocumented accounts may be subject to compliance review by the DITC.
CRS Business Rules
The TIA recommends that you review Module V1.1.2 CRS Business Rules in addition to the Sections on CRS Manual Entry Returns before attempting to prepare the CRS Manual Entry Returns. Understanding the business rules will help you avoid validation errors when submitting CRS Manual Entry Returns. Please note the text in red italics.
1.4.1 CRS Manual Entry Return - filing dependencies
Certain fields in the CRS Manual Entry Returns are enabled or disabled based on data entered on the forms as described in the following table. This ensures adherence with the OECD published CRS XSD.
Form Dependency
General Information
The Sending Company IN field is disabled by default unless the Receiving country is set to the Tax Authority’s jurisdiction to indicate the filing is being used for domestic reporting.
Account Holder
The corresponding document reference id field is disabled by default unless a document type of “Corrected data” or “Deletion of data” is selected.
Account Holder
The Account Holder form is disabled if a Message Type of “The message advises there is no data to report” is selected in the General Information form.
Account Holder
The corresponding document reference id field is disabled by default unless a document type of “Corrected data” or “Deletion of data” is selected.
Account Holder
The field “Domestic Only: Undocumented account” is disabled unless the Receiving country is set to the Tax Authority’s jurisdiction to indicate the filing is being used for domestic reporting.
Account Holder
The fields pertaining to account holders who are individuals are enabled by default based on the fact that the account holder type field is blank. These fields become disabled once a selection is made in the account holder type selection box. This is due to the fact that within the XSD there is a choice of “Individual” or “Organisation and Account holder type”. According to the XSD the group which houses individual details cannot co-exist with the account holder type item in a single account holder record.
Account Holder
The fields pertaining to account holders who are organisations are disabled by default based on the fact that the account holder type field is blank. These fields become enabled once a selection is made in the account holder type selection box. This is due to the fact that within the XSD there is a choice of “Individual” or “Organisation and Account holder type”. According to the XSD if the group which houses organisation details is present then account holder type must also exist in a single account holder record.
Account Holder
The field pertaining to controlling persons are disabled by default. These fields become enabled once an account holder type of “Passive Non-Financial Entity with one or more controlling person that is a Reportable Person” is selected.
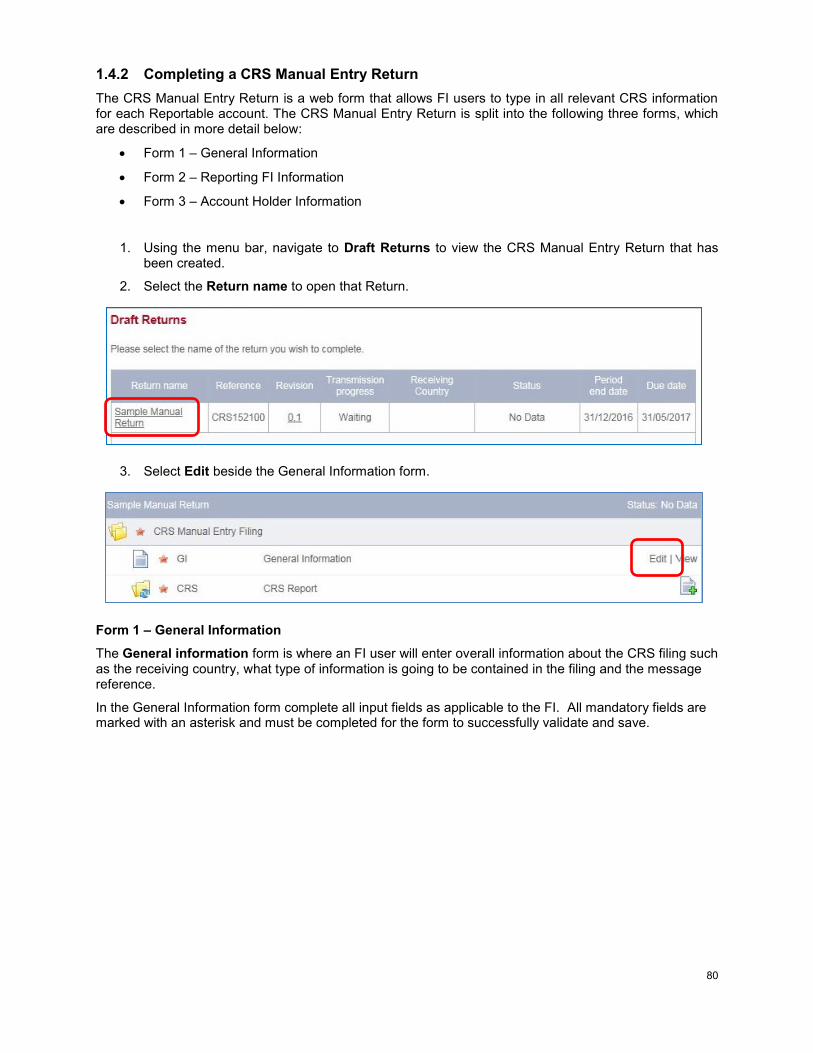
80
1.4.2 Completing a CRS Manual Entry Return
The CRS Manual Entry Return is a web form that allows FI users to type in all relevant CRS information for each Reportable account. The CRS Manual Entry Return is split into the following three forms, which are described in more detail below:
Form 1 – General Information
Form 2 – Reporting FI Information
Form 3 – Account Holder Information
1. Using the menu bar, navigate to Draft Returns to view the CRS Manual Entry Return that has been created.
2. Select the Return name to open that Return.
3. Select Edit beside the General Information form.
Form 1 – General Information
The General information form is where an FI user will enter overall information about the CRS filing such as the receiving country, what type of information is going to be contained in the filing and the message reference.
In the General Information form complete all input fields as applicable to the FI. All mandatory fields are marked with an asterisk and must be completed for the form to successfully validate and save.
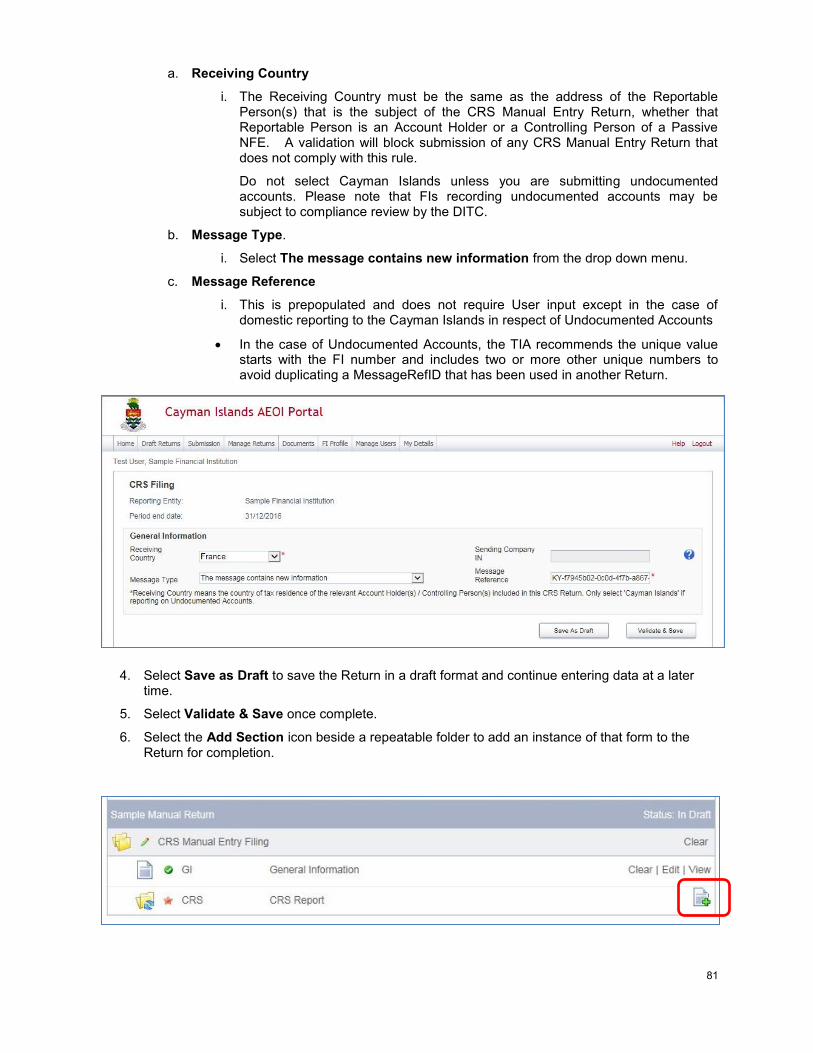
81
a. Receiving Country
i. The Receiving Country must be the same as the address of the Reportable Person(s) that is the subject of the CRS Manual Entry Return, whether that Reportable Person is an Account Holder or a Controlling Person of a Passive NFE. A validation will block submission of any CRS Manual Entry Return that does not comply with this rule.
Do not select Cayman Islands unless you are submitting undocumented accounts. Please note that FIs recording undocumented accounts may be subject to compliance review by the DITC.
b. Message Type.
i. Select The message contains new information from the drop down menu.
c. Message Reference
i. This is prepopulated and does not require User input except in the case of domestic reporting to the Cayman Islands in respect of Undocumented Accounts
In the case of Undocumented Accounts, the TIA recommends the unique value starts with the FI number and includes two or more other unique numbers to avoid duplicating a MessageRefID that has been used in another Return.
4. Select Save as Draft to save the Return in a draft format and continue entering data at a later time.
5. Select Validate & Save once complete.
6. Select the Add Section icon beside a repeatable folder to add an instance of that form to the Return for completion.
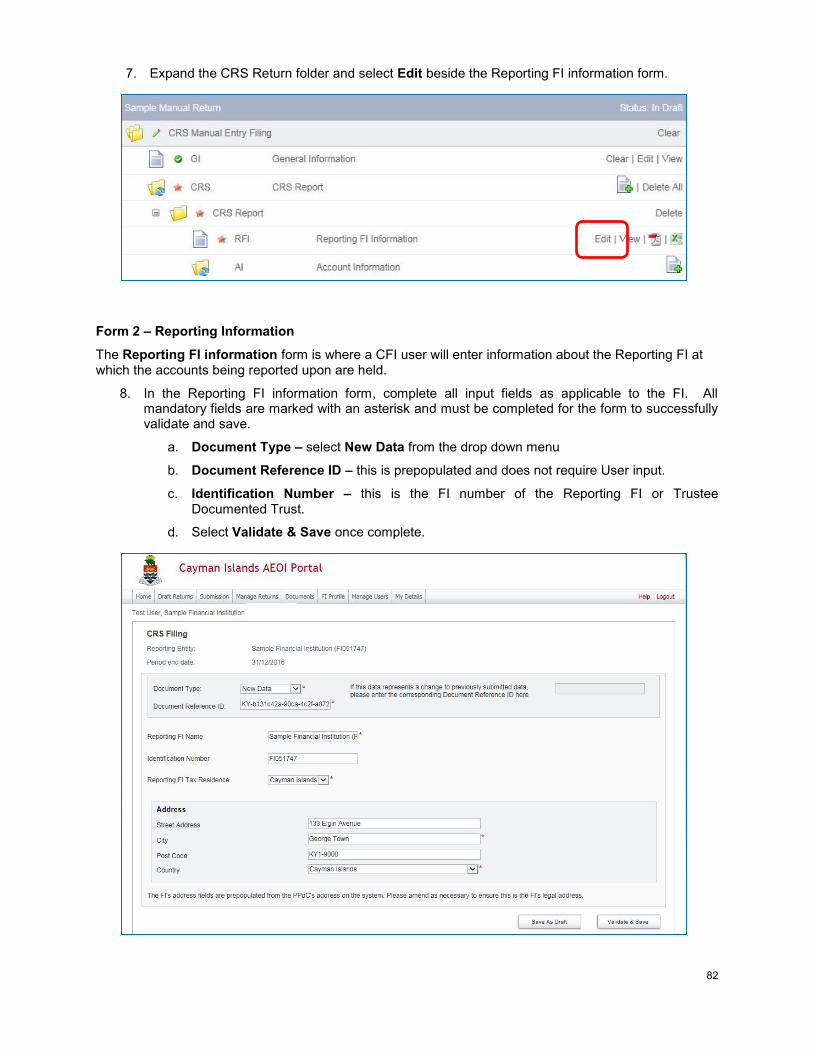
82
7. Expand the CRS Return folder and select Edit beside the Reporting FI information form.
Form 2 – Reporting Information
The Reporting FI information form is where a CFI user will enter information about the Reporting FI at which the accounts being reported upon are held.
8. In the Reporting FI information form, complete all input fields as applicable to the FI. All mandatory fields are marked with an asterisk and must be completed for the form to successfully validate and save.
a. Document Type – select New Data from the drop down menu
b. Document Reference ID – this is prepopulated and does not require User input.
c. Identification Number – this is the FI number of the Reporting FI or Trustee Documented Trust.
d. Select Validate & Save once complete.

83
Form 3 – Account Holder Information
The Account holder information form is where details of the accounts being reported upon are captured. Depending on whether or not the account is an individual, certain fields are dynamically enabled or disabled as shown in the two examples below. This form is also where payment information and details regarding controlling persons are captured as required.
9. Select the Add Section icon next to the Account Information folder to add an Account Information form.
Up to fifty (50) Account Information forms may be added to each Account Information folder. Multiple CRS Return folders may be added to accommodate more forms.
10. In the Account Holder form complete all input fields as applicable to the FI. All mandatory fields are marked with an asterisk and must be completed to successfully validate and save.
a. Document Type – select New Data from the drop down menu.
b. Document Reference ID – this is prepopulated and does not require User input.
c. If the Account Holder is an Individual:
i. You MUST ensure that the Taxpayer Identification Number (TIN) or functional equivalent conforms with the Receiving Country’s rules, if any, on the issuance, structure, use and validity of TINs or their functional equivalents. The OECD has published an overview of these rules here:
https://www.oecd.org/tax/automatic-exchange/crs-implementation-and-assistance/tax-identification-numbers/
ii. The Individual’s country of residence in the Tax Residence MUST be the same as the Receiving Country specified in the General Information form.

84
iii. Input the Financial Information and specify whether or not the account was closed.
The Add Payment Record and Delete buttons can be used to add or delete Financial Information.
iv. Select either the Save as Draft button or the Validate & Save button shown above, as appropriate.
e. If the Account Holder is an Entity
i. You MUST select one of the following as the Account Holder Type:
Passive Non-Financial Entity with one or more Controlling Persons that is a Reportable Person.
CRS Reportable Person.
Passive Non-Financial Entity that is a CRS Reportable Person
Examples for each of these cases A, B and C appear in the screen shots below paragraph ii.
f. The field Domestic only: Undocumented account is only available where the Receiving Country is the Cayman Islands; select ‘Yes’ to report on an Undocumented Account.
g. Input the Entity’s information in the relevant fields.
You MUST ensure that the Taxpayer Identification Number (TIN) or functional equivalent conforms with the Receiving Country’s rules, if any, on the issuance, structure, use and validity of TINs or their functional equivalents. The OECD has published an overview of these rules here:
https://www.oecd.org/tax/automatic-exchange/crs-implementation-and-assistance/tax-identification-numbers/
i. The Receiving Country specified in the General Information form MUST be the same as either:
- The Controlling Person’s country of residence in the Country field if the Account Holder Type is a Passive Non-Financial Entity with one or more Controlling Persons that is a Reportable Person.
- The Entity’s country of residence in the Country field if the Account Holder Type is either
o a CRS Reportable Person, or
o a Passive NFE that is a CRS Reportable Person
ii. Input the Financial Information and specify whether or not the account was closed.
- The Add and Delete buttons can be used to add or delete Financial Information.
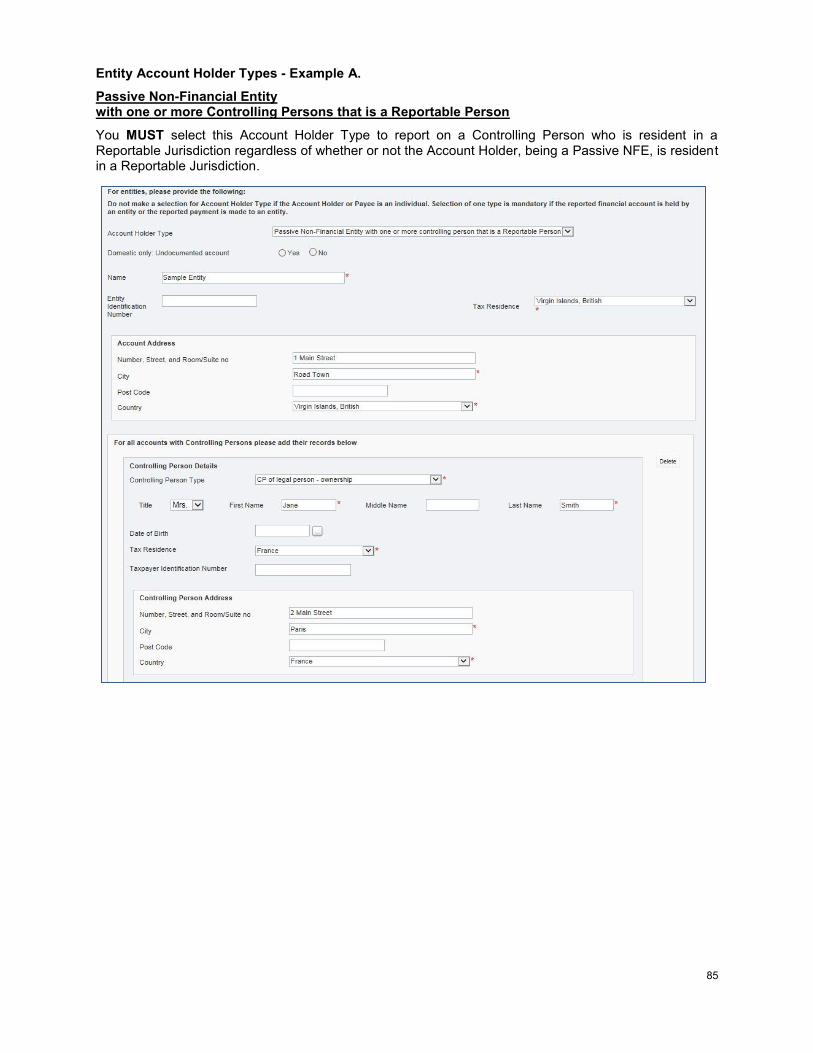
85
Entity Account Holder Types - Example A.
Passive Non-Financial Entity with one or more Controlling Persons that is a Reportable Person
You MUST select this Account Holder Type to report on a Controlling Person who is resident in a Reportable Jurisdiction regardless of whether or not the Account Holder, being a Passive NFE, is resident in a Reportable Jurisdiction.
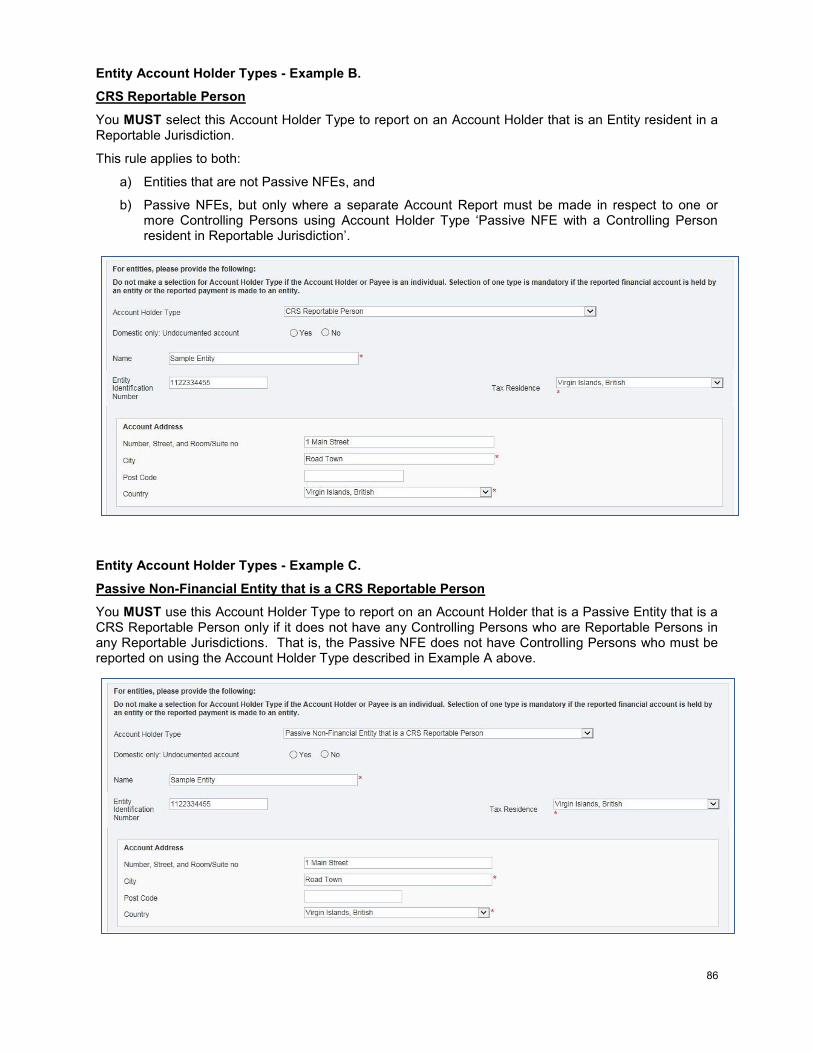
86
Entity Account Holder Types - Example B.
CRS Reportable Person
You MUST select this Account Holder Type to report on an Account Holder that is an Entity resident in a Reportable Jurisdiction.
This rule applies to both:
a) Entities that are not Passive NFEs, and
b) Passive NFEs, but only where a separate Account Report must be made in respect to one or more Controlling Persons using Account Holder Type ‘Passive NFE with a Controlling Person resident in Reportable Jurisdiction’.
Entity Account Holder Types - Example C.
Passive Non-Financial Entity that is a CRS Reportable Person
You MUST use this Account Holder Type to report on an Account Holder that is a Passive Entity that is a CRS Reportable Person only if it does not have any Controlling Persons who are Reportable Persons in any Reportable Jurisdictions. That is, the Passive NFE does not have Controlling Persons who must be reported on using the Account Holder Type described in Example A above.
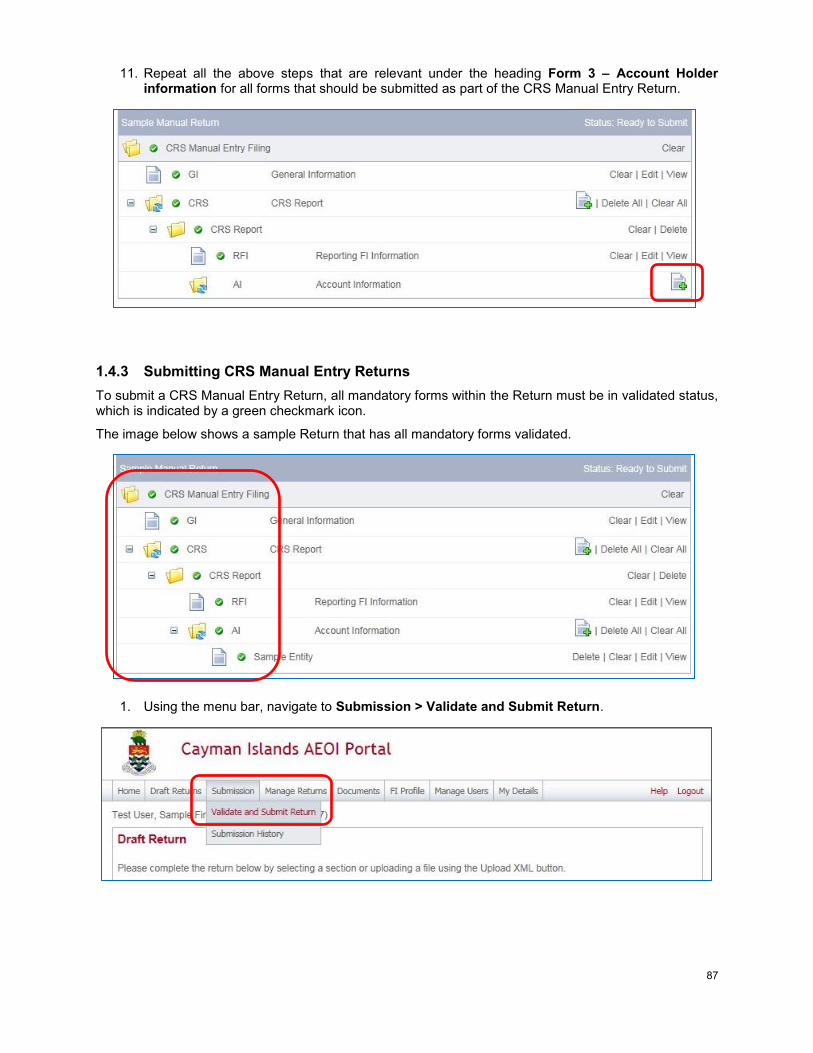
87
11. Repeat all the above steps that are relevant under the heading Form 3 – Account Holder information for all forms that should be submitted as part of the CRS Manual Entry Return.
1.4.3 Submitting CRS Manual Entry Returns
To submit a CRS Manual Entry Return, all mandatory forms within the Return must be in validated status, which is indicated by a green checkmark icon.
The image below shows a sample Return that has all mandatory forms validated.
1. Using the menu bar, navigate to Submission > Validate and Submit Return.
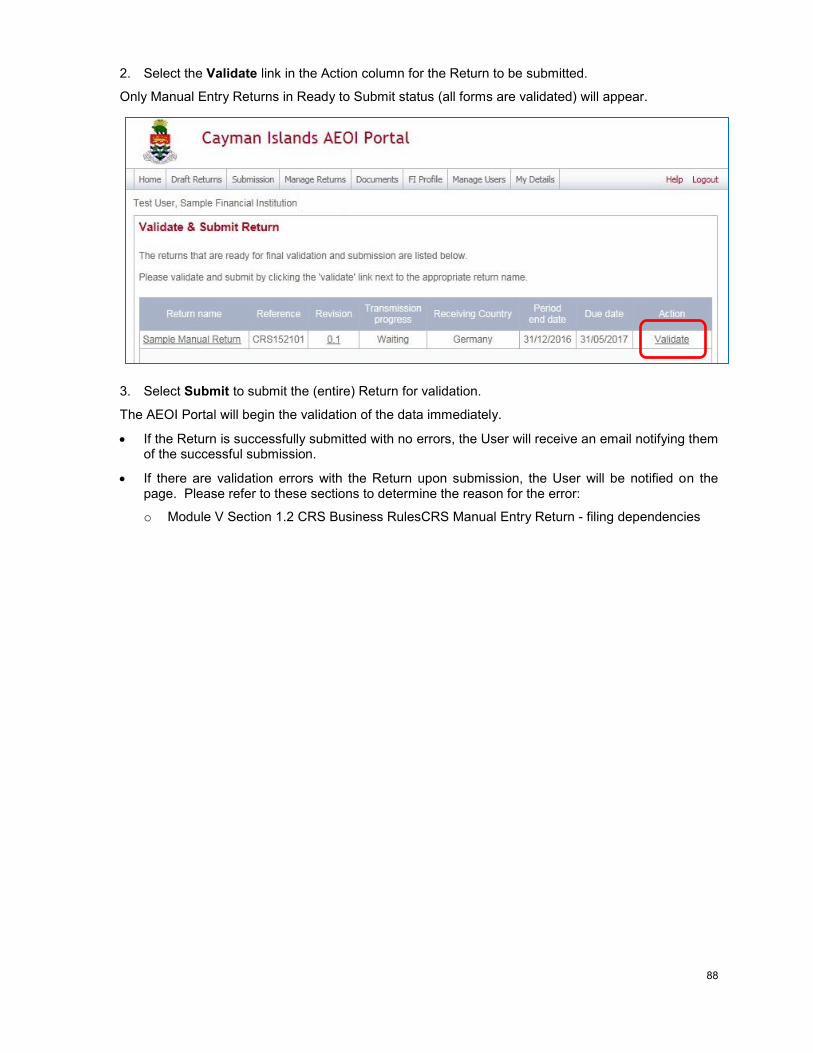
88
2. Select the Validate link in the Action column for the Return to be submitted.
Only Manual Entry Returns in Ready to Submit status (all forms are validated) will appear.
3. Select Submit to submit the (entire) Return for validation.
The AEOI Portal will begin the validation of the data immediately.
If the Return is successfully submitted with no errors, the User will receive an email notifying them of the successful submission.
If there are validation errors with the Return upon submission, the User will be notified on the page. Please refer to these sections to determine the reason for the error:
o Module V Section 1.2 CRS Business RulesCRS Manual Entry Return - filing dependencies
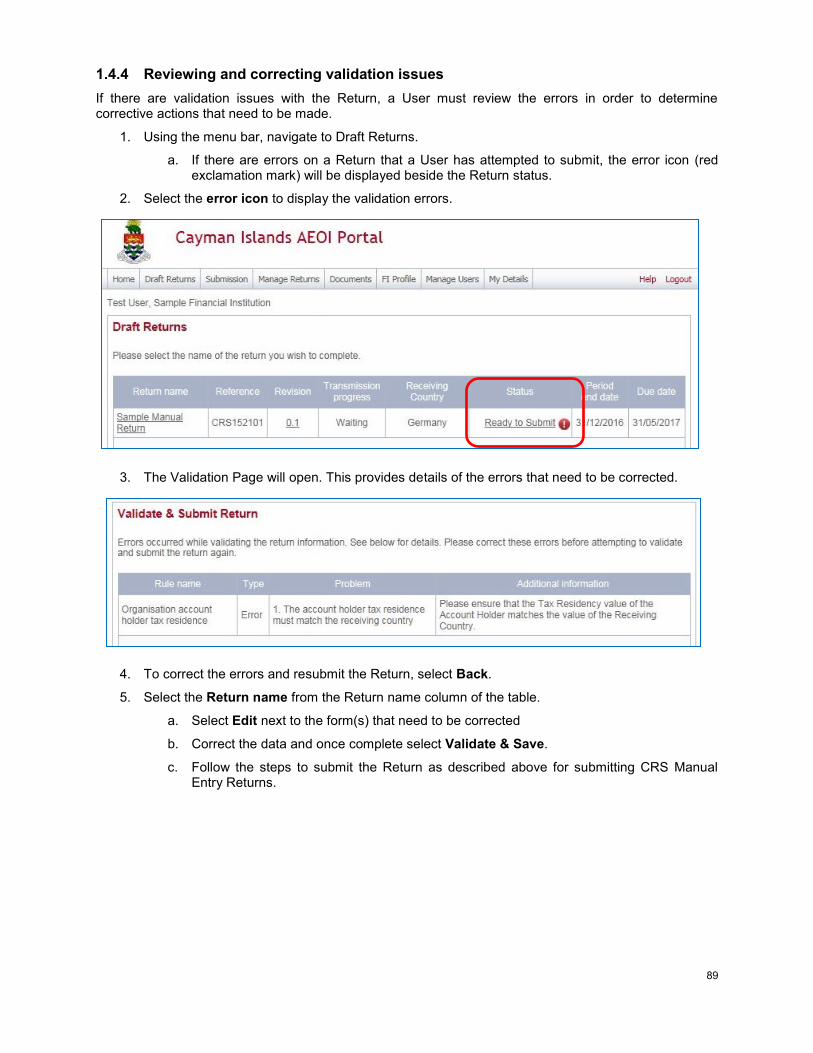
89
1.4.4 Reviewing and correcting validation issues
If there are validation issues with the Return, a User must review the errors in order to determine corrective actions that need to be made.
1. Using the menu bar, navigate to Draft Returns.
a. If there are errors on a Return that a User has attempted to submit, the error icon (red exclamation mark) will be displayed beside the Return status.
2. Select the error icon to display the validation errors.
3. The Validation Page will open. This provides details of the errors that need to be corrected.
4. To correct the errors and resubmit the Return, select Back.
5. Select the Return name from the Return name column of the table.
a. Select Edit next to the form(s) that need to be corrected
b. Correct the data and once complete select Validate & Save.
c. Follow the steps to submit the Return as described above for submitting CRS Manual Entry Returns.
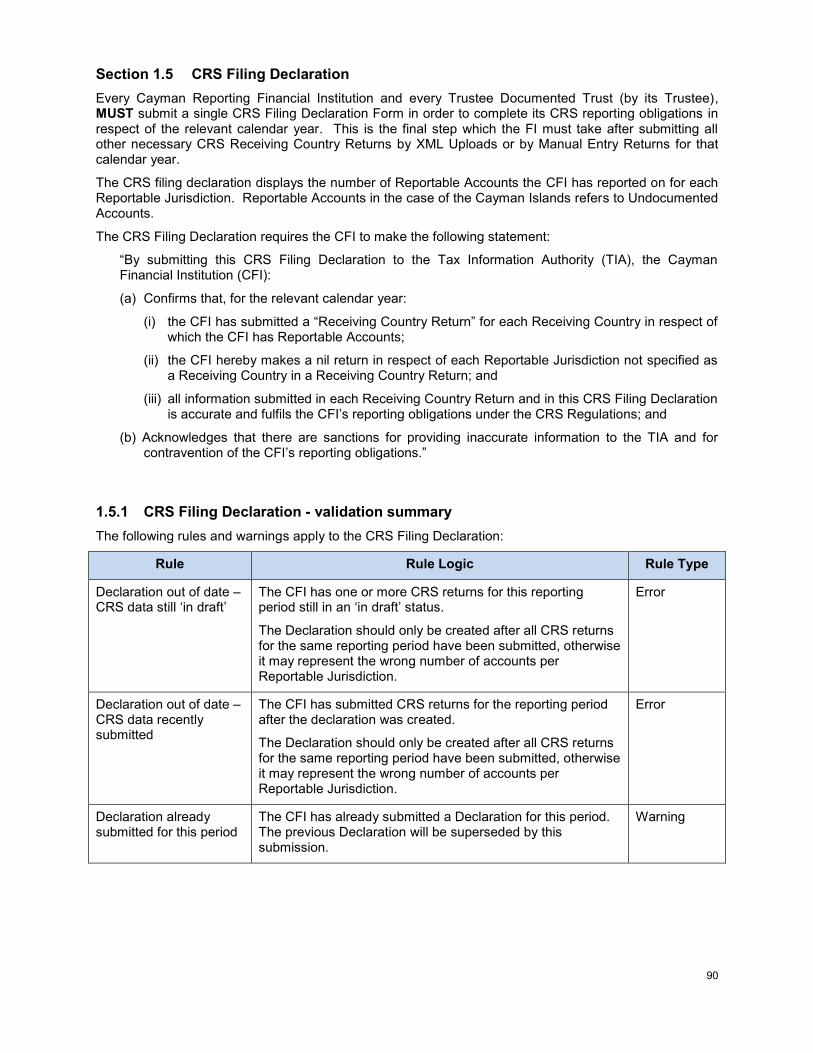
90
Section 1.5 CRS Filing Declaration
Every Cayman Reporting Financial Institution and every Trustee Documented Trust (by its Trustee), MUST submit a single CRS Filing Declaration Form in order to complete its CRS reporting obligations in respect of the relevant calendar year. This is the final step which the FI must take after submitting all other necessary CRS Receiving Country Returns by XML Uploads or by Manual Entry Returns for that calendar year.
The CRS filing declaration displays the number of Reportable Accounts the CFI has reported on for each Reportable Jurisdiction. Reportable Accounts in the case of the Cayman Islands refers to Undocumented Accounts.
The CRS Filing Declaration requires the CFI to make the following statement:
“By submitting this CRS Filing Declaration to the Tax Information Authority (TIA), the Cayman Financial Institution (CFI):
(a) Confirms that, for the relevant calendar year:
(i) the CFI has submitted a “Receiving Country Return” for each Receiving Country in respect of which the CFI has Reportable Accounts;
(ii) the CFI hereby makes a nil return in respect of each Reportable Jurisdiction not specified as a Receiving Country in a Receiving Country Return; and
(iii) all information submitted in each Receiving Country Return and in this CRS Filing Declaration is accurate and fulfils the CFI’s reporting obligations under the CRS Regulations; and
(b) Acknowledges that there are sanctions for providing inaccurate information to the TIA and for contravention of the CFI’s reporting obligations.”
1.5.1 CRS Filing Declaration - validation summary
The following rules and warnings apply to the CRS Filing Declaration:
Rule Rule Logic Rule Type
Declaration out of date – CRS data still ‘in draft’
The CFI has one or more CRS returns for this reporting period still in an ‘in draft’ status.
The Declaration should only be created after all CRS returns for the same reporting period have been submitted, otherwise it may represent the wrong number of accounts per Reportable Jurisdiction.
Error
Declaration out of date – CRS data recently submitted
The CFI has submitted CRS returns for the reporting period after the declaration was created.
The Declaration should only be created after all CRS returns for the same reporting period have been submitted, otherwise it may represent the wrong number of accounts per Reportable Jurisdiction.
Error
Declaration already submitted for this period
The CFI has already submitted a Declaration for this period. The previous Declaration will be superseded by this submission.
Warning
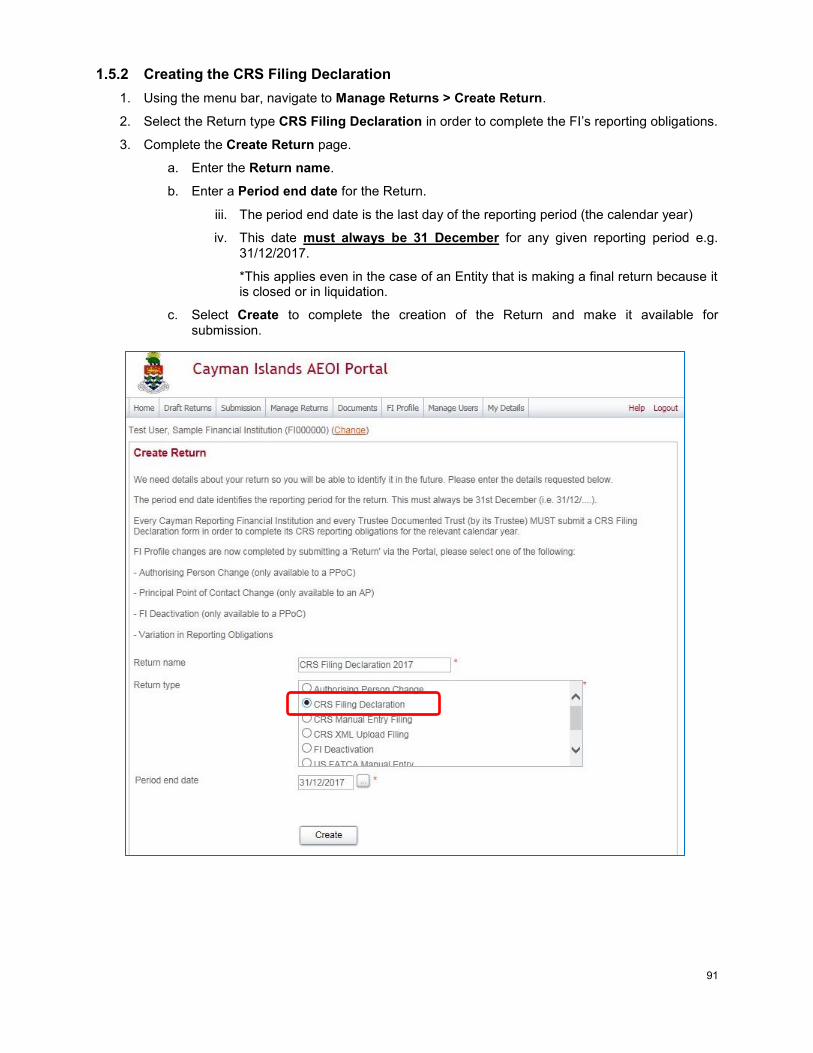
91
1.5.2 Creating the CRS Filing Declaration
1. Using the menu bar, navigate to Manage Returns > Create Return.
2. Select the Return type CRS Filing Declaration in order to complete the FI’s reporting obligations.
3. Complete the Create Return page.
a. Enter the Return name.
b. Enter a Period end date for the Return.
iii. The period end date is the last day of the reporting period (the calendar year)
iv. This date must always be 31 December for any given reporting period e.g. 31/12/2017.
*This applies even in the case of an Entity that is making a final return because it is closed or in liquidation.
c. Select Create to complete the creation of the Return and make it available for submission.
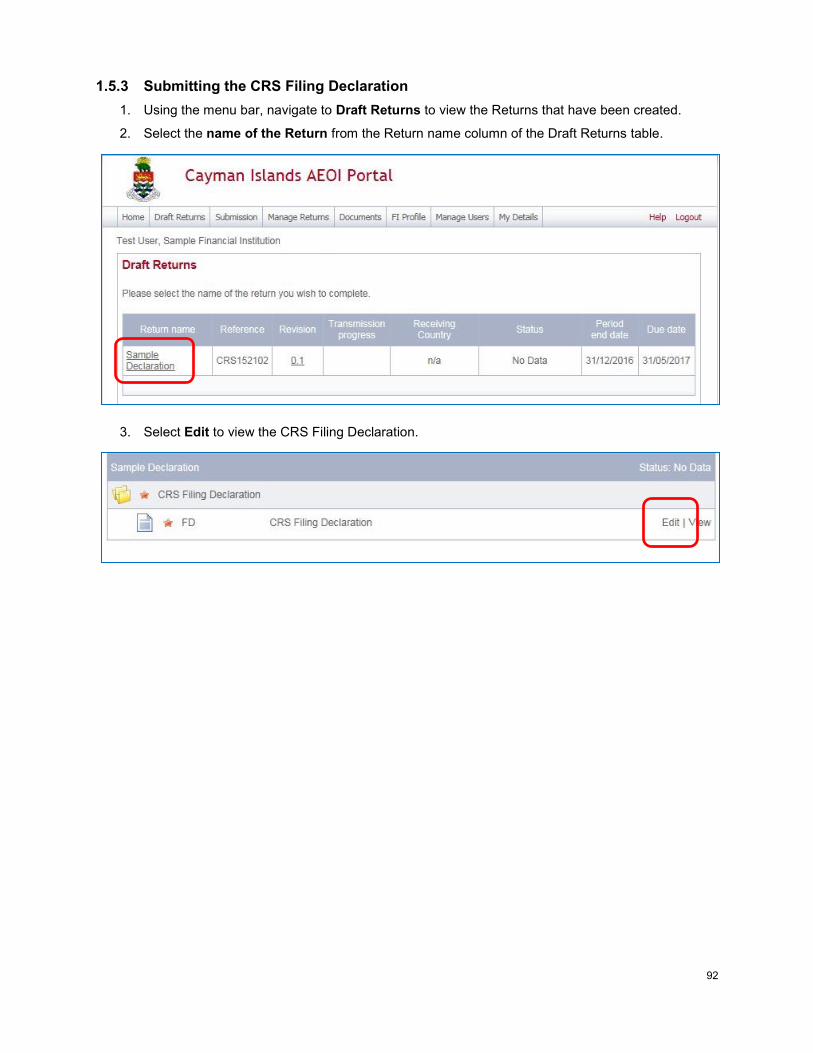
92
1.5.3 Submitting the CRS Filing Declaration
1. Using the menu bar, navigate to Draft Returns to view the Returns that have been created.
2. Select the name of the Return from the Return name column of the Draft Returns table.
3. Select Edit to view the CRS Filing Declaration.
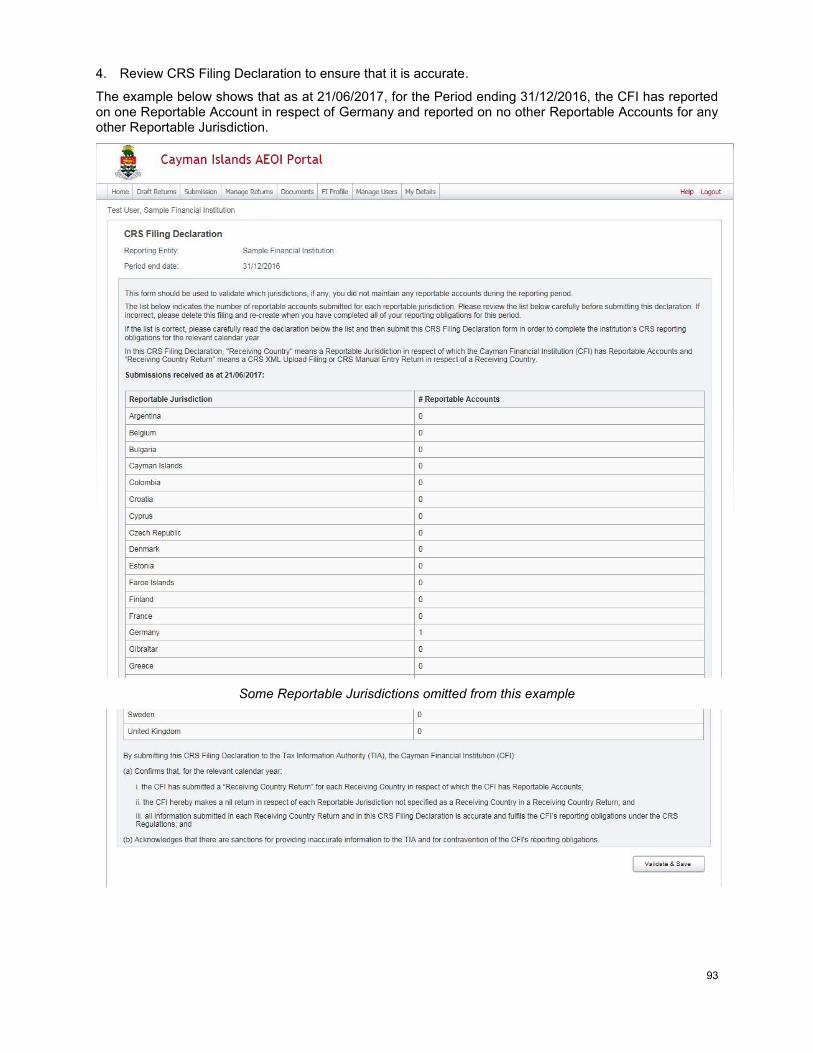
93
4. Review CRS Filing Declaration to ensure that it is accurate.
The example below shows that as at 21/06/2017, for the Period ending 31/12/2016, the CFI has reported on one Reportable Account in respect of Germany and reported on no other Reportable Accounts for any other Reportable Jurisdiction.
Some Reportable Jurisdictions omitted from this example
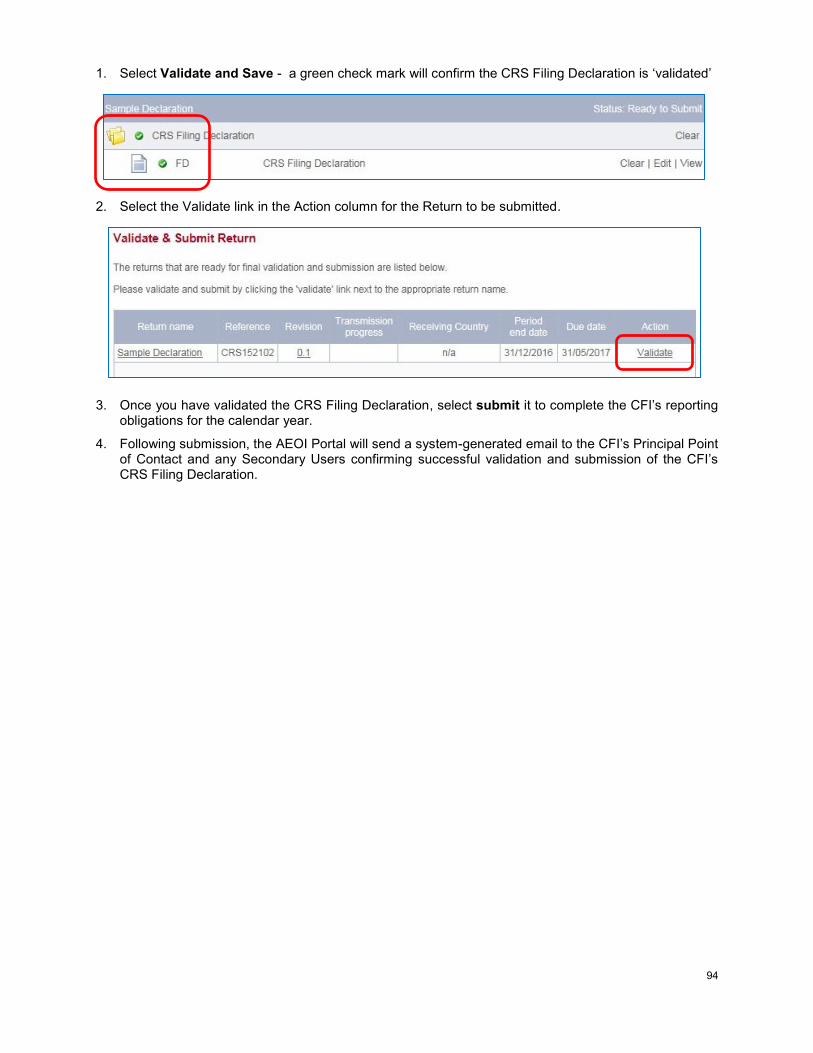
94
1. Select Validate and Save - a green check mark will confirm the CRS Filing Declaration is ‘validated’
2. Select the Validate link in the Action column for the Return to be submitted.
3. Once you have validated the CRS Filing Declaration, select submit it to complete the CFI’s reporting obligations for the calendar year.
4. Following submission, the AEOI Portal will send a system-generated email to the CFI’s Principal Point of Contact and any Secondary Users confirming successful validation and submission of the CFI’s CRS Filing Declaration.
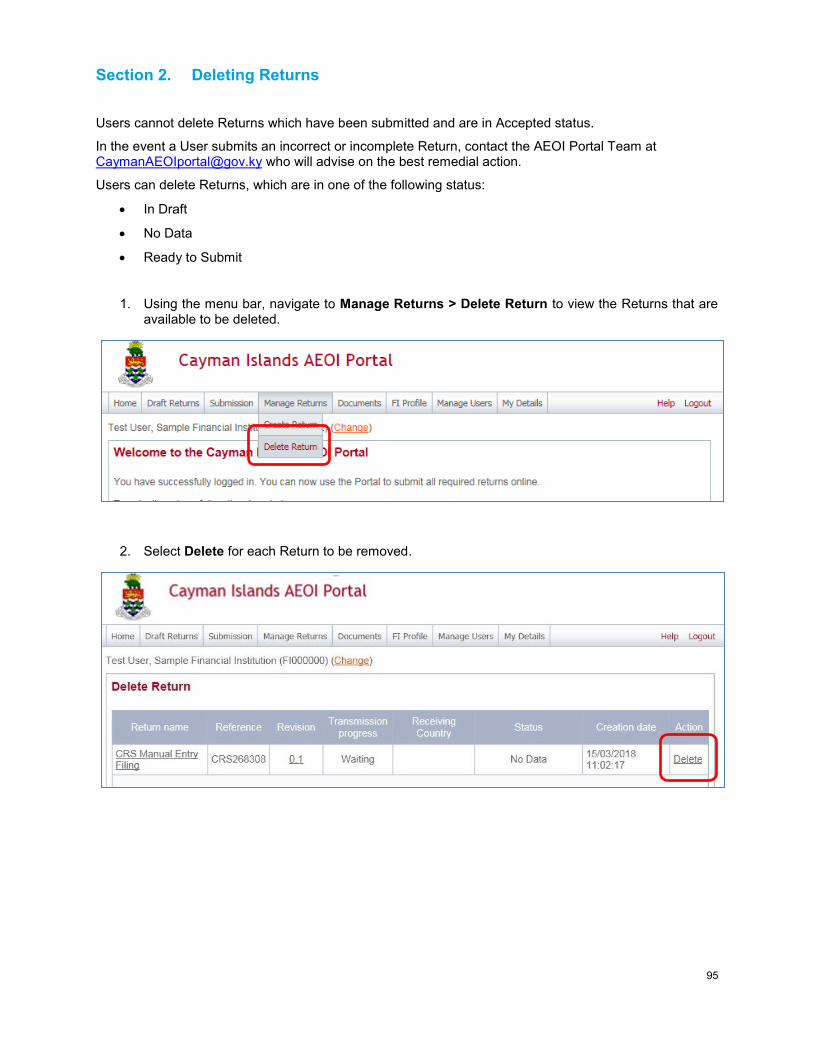
95
Section 2. Deleting Returns
Users cannot delete Returns which have been submitted and are in Accepted status.
In the event a User submits an incorrect or incomplete Return, contact the AEOI Portal Team at [email protected] who will advise on the best remedial action.
Users can delete Returns, which are in one of the following status:
In Draft
No Data
Ready to Submit
1. Using the menu bar, navigate to Manage Returns > Delete Return to view the Returns that are available to be deleted.
2. Select Delete for each Return to be removed.
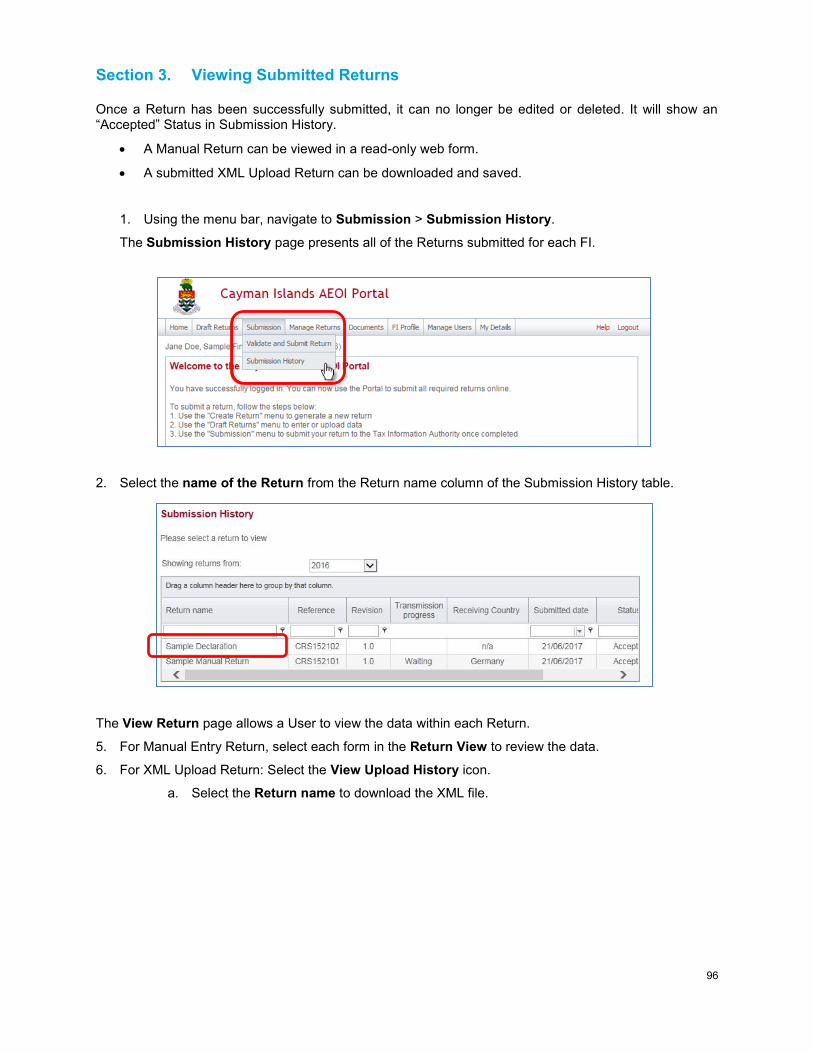
96
Section 3. Viewing Submitted Returns
Once a Return has been successfully submitted, it can no longer be edited or deleted. It will show an “Accepted” Status in Submission History.
A Manual Return can be viewed in a read-only web form.
A submitted XML Upload Return can be downloaded and saved.
1. Using the menu bar, navigate to Submission > Submission History.
The Submission History page presents all of the Returns submitted for each FI.
2. Select the name of the Return from the Return name column of the Submission History table.
The View Return page allows a User to view the data within each Return.
5. For Manual Entry Return, select each form in the Return View to review the data.
6. For XML Upload Return: Select the View Upload History icon.
a. Select the Return name to download the XML file.

97
Section 4. Correction Process for CRS Returns
DO NOT attempt to correct a CRS Return that has been validated and submitted on the AEOI Portal until you have received a CRS Status Message (described below) indicating whether or not the relevant CRS Return is valid. This rule applies even where you believe that there may be a record level error rather than a field level error (as described in the following Section on CRS Status Messages).
The TIA’s initial transmission of CRS Returns to Receiving Countries via the OECD’s Common Transmission System will only include CRS Returns that have specified ‘New Data’ as the DocSpecType. The TIA initial transmission of CRS Returns to the CTS cannot include CRS Returns where the DocSpecType is ‘Corrected Data’.
The TIA may update this Section on the Correction Process for CRS Returns when it updates the following Section on CRS Status Messages.
Section 5. CRS Status Messages
Note
A Receiving Country will use a CRS Status Message to notify the Tax Information Authority (TIA) when a correction is recorded to a CRS Return made by a Cayman FI.
The AEOI Portal Team will contact the PPoCs of Cayman FIs on an individual basis to confirm where it is necessary to correct a CRS Return made in 2017 in response to a Receiving Country’s CRS Status Message.
This AEOI Portal User Guide may be revised in future to describe the processes for creating corrected or void returns in response to a CRS Status Message and downloading and creating an XML from a system generated file.
You MUST carefully follow the file preparation instructions in the OECD CRS Status Message XML Schema: User Guide for Tax Administrations before addressing any CRS Status Messages.
http://www.oecd.org/tax/exchange-of-tax-information/common-reporting-standard-status-message-xml-schema-user-guide-for-tax-administrations.pdf
Competent Authorities of Receiving Countries use the CRS Status Message XML Schema to provide the TIA with structured information on any file and/or record errors in CRS Returns submitted by Cayman FIs. Competent Authorities of Receiving Countries will rely on the usual bilateral communication methods with the TIA, rather than CRS Status Messages, for substantive follow-up requests or qualitative feedback on such CRS Returns.
Section 5.1 File errors
File errors in a CRS Return are of a fundamental nature which prevent the Receiving Country from opening and using the CRS Return.
If an FI submits a CRS Return to a Receiving Country and the CRS Return contains one or more file errors, the Competent Authority of the Receiving Country will send a CRS Status Message to the TIA with a view to timely receiving the new file without the file error with the CRS information contained in the initial erroneous file sent.
An FI which is the subject of a CRS Status Message regarding a file error MUST resubmit the relevant CRS Return including the information contained in the initial erroneous file sent but without the file error.
98
Section 5.2 Record errors
Record errors address key issues of data quality of the CRS information received, but do not impede the Competent Authority of the Receiving Country from opening and using the file. The record errors in the CRS Status Message XML Schema reflect additional validations that were agreed.
If an FI submits a CRS Return to a Receiving Country and the CRS Return contains one or more record errors, the Competent Authority of the Receiving Country may send a CRS Status Message to the TIA with a view to timely receiving the new file without the record error with the CRS information contained in the initial erroneous file sent.
An FI which is the subject of a CRS Status Message with a record error MUST resubmit the CRS Return including the information contained in the initial erroneous file sent but without record file error.
Section 5.3 Submitting CRS Corrected Return (including deletions)
To proactively correct or delete data submitted to the Portal you must submit a “Corrected” Return that references the original (corresponding) Return to correct the errors indicated.
The New Data Return will be transmitted to the relevant jurisdiction first, once processed, the Corrected Return will be sent.
Corrected Returns are created and submitted via XML Upload or Manual Entry, using the same processes outlined at the beginning of this section.
When submitting a Corrected Return, you must ensure the following:
The Message Type Indicator must be set to:
o “The message contains corrections for previously sent information” (CRS702).
The Document Type Indicator for the Reporting FI section must be set to either:
o “Resent Data” (OECD0) – only used when there are no corrections/deletions for this section
If the Reporting FI section is being resent without modification (using OECD0 - Resent Data), the same Document Reference ID should be used as was used in the previous corresponding submission.
o “Corrected Data” (OECD2) – only used when correcting data in this section
o “Deletion of Data” (OECD3) – only used in this section when deleting the entire Return
The Document Type Indicator for the Account Report section must be set to either:
o “Corrected Data” (OECD2) or
o “Deletion of Data” (OECD3)
The Corresponding Document Reference ID for each section being corrected or deleted should reference the Document Reference ID from the corresponding section of the previous Return
A Corrected Return can contain either corrections (OECD2) or deletions (OECD3) or both, as well as a resent Reporting FI element (OECD0), but may not contain new data (OECD1)
99
Module VI. UK CDOT Reporting
For reporting in 2018 onwards:
(a) an FI which has reporting obligations under the CRS must make a CRS Return for the UK as the Reportable Jurisdiction in respect of all Reportable Accounts with an Account Holder or a Controlling Person who is a Reportable Jurisdiction Person resident in the UK; and
(b) an FI which had a reporting obligation under UK CDOT will not be required (or able) to make reports pursuant to UK CDOT in respect of Specified UK Persons via the AEOI Portal.
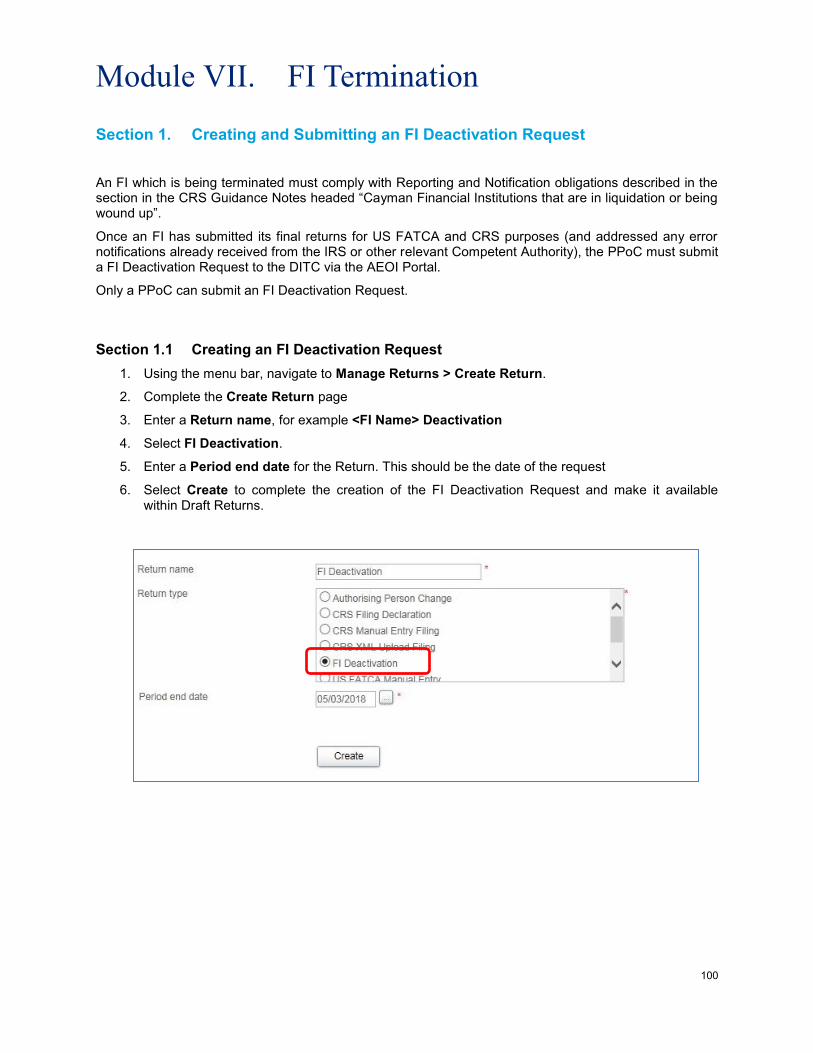
100
Module VII. FI Termination
Section 1. Creating and Submitting an FI Deactivation Request
An FI which is being terminated must comply with Reporting and Notification obligations described in the section in the CRS Guidance Notes headed “Cayman Financial Institutions that are in liquidation or being wound up”.
Once an FI has submitted its final returns for US FATCA and CRS purposes (and addressed any error notifications already received from the IRS or other relevant Competent Authority), the PPoC must submit a FI Deactivation Request to the DITC via the AEOI Portal.
Only a PPoC can submit an FI Deactivation Request.
Section 1.1 Creating an FI Deactivation Request
1. Using the menu bar, navigate to Manage Returns > Create Return.
2. Complete the Create Return page
3. Enter a Return name, for example <FI Name> Deactivation
4. Select FI Deactivation.
5. Enter a Period end date for the Return. This should be the date of the request
6. Select Create to complete the creation of the FI Deactivation Request and make it available within Draft Returns.
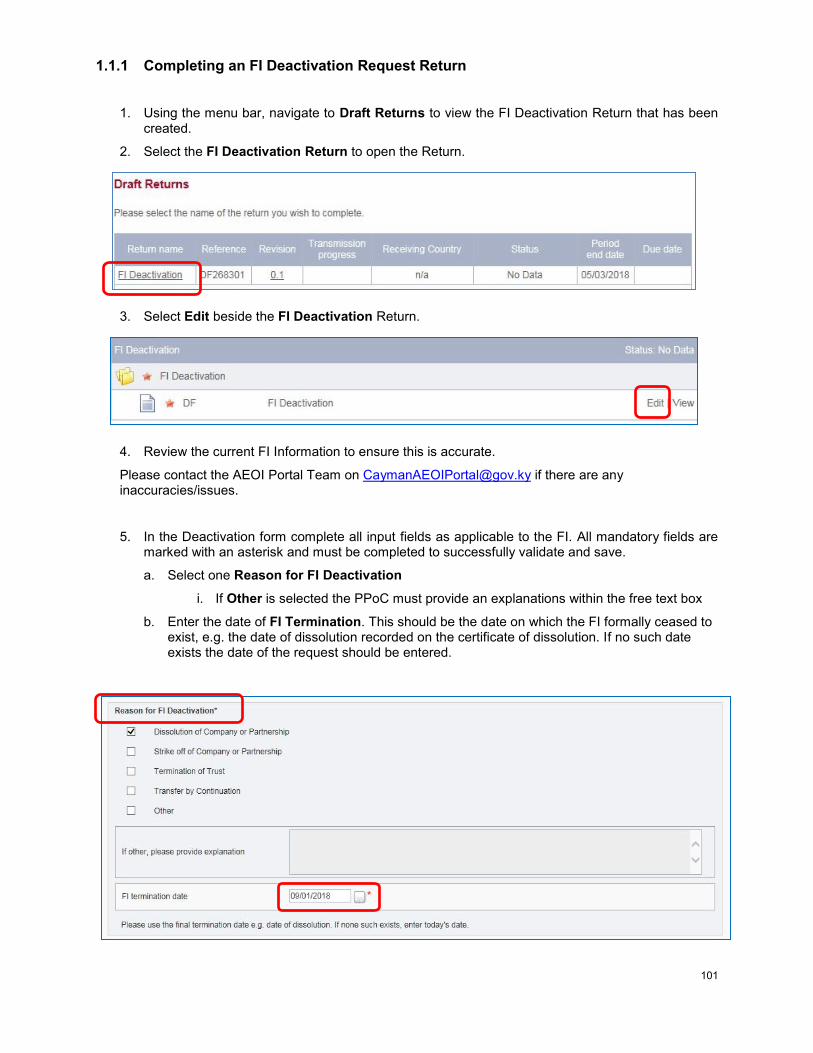
101
1.1.1 Completing an FI Deactivation Request Return
1. Using the menu bar, navigate to Draft Returns to view the FI Deactivation Return that has been created.
2. Select the FI Deactivation Return to open the Return.
3. Select Edit beside the FI Deactivation Return.
4. Review the current FI Information to ensure this is accurate.
Please contact the AEOI Portal Team on [email protected] if there are any inaccuracies/issues.
5. In the Deactivation form complete all input fields as applicable to the FI. All mandatory fields are marked with an asterisk and must be completed to successfully validate and save.
a. Select one Reason for FI Deactivation
i. If Other is selected the PPoC must provide an explanations within the free text box
b. Enter the date of FI Termination. This should be the date on which the FI formally ceased to exist, e.g. the date of dissolution recorded on the certificate of dissolution. If no such date exists the date of the request should be entered.
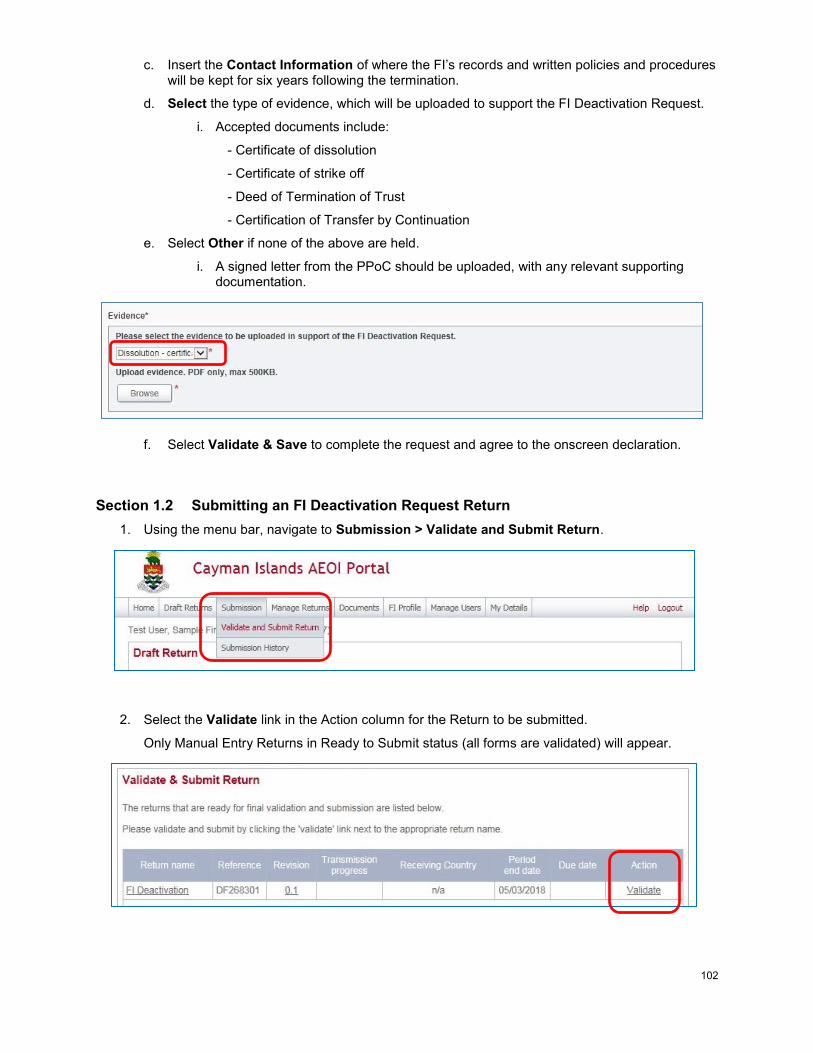
102
c. Insert the Contact Information of where the FI’s records and written policies and procedures will be kept for six years following the termination.
d. Select the type of evidence, which will be uploaded to support the FI Deactivation Request.
i. Accepted documents include:
- Certificate of dissolution
- Certificate of strike off
- Deed of Termination of Trust
- Certification of Transfer by Continuation
e. Select Other if none of the above are held.
i. A signed letter from the PPoC should be uploaded, with any relevant supporting documentation.
f. Select Validate & Save to complete the request and agree to the onscreen declaration.
Section 1.2 Submitting an FI Deactivation Request Return
1. Using the menu bar, navigate to Submission > Validate and Submit Return.
2. Select the Validate link in the Action column for the Return to be submitted.
Only Manual Entry Returns in Ready to Submit status (all forms are validated) will appear.
103
3. Select Submit to submit the Return for validation.
The AEOI Portal will begin the validation of the data immediately.
If the Return is successfully submitted with no errors, the PPoC will receive a system-generated email notifying them of the successful submission.
If there are any validation issues with the Return upon submission, details of the validation issues will be shown on the submission page. All errors must be corrected before the Return is accepted.
Upon submission the request will be reviewed by DITC within 30 business days. If no response is received after 30 business days the PPoC should forward the confirmation email to [email protected] requesting assistance. The AEOI Portal Team can only assist PPoCs with this process.
Submitting inaccurate, incomplete information or uploading irrelevant supporting evidence may cause the request to be rejected.
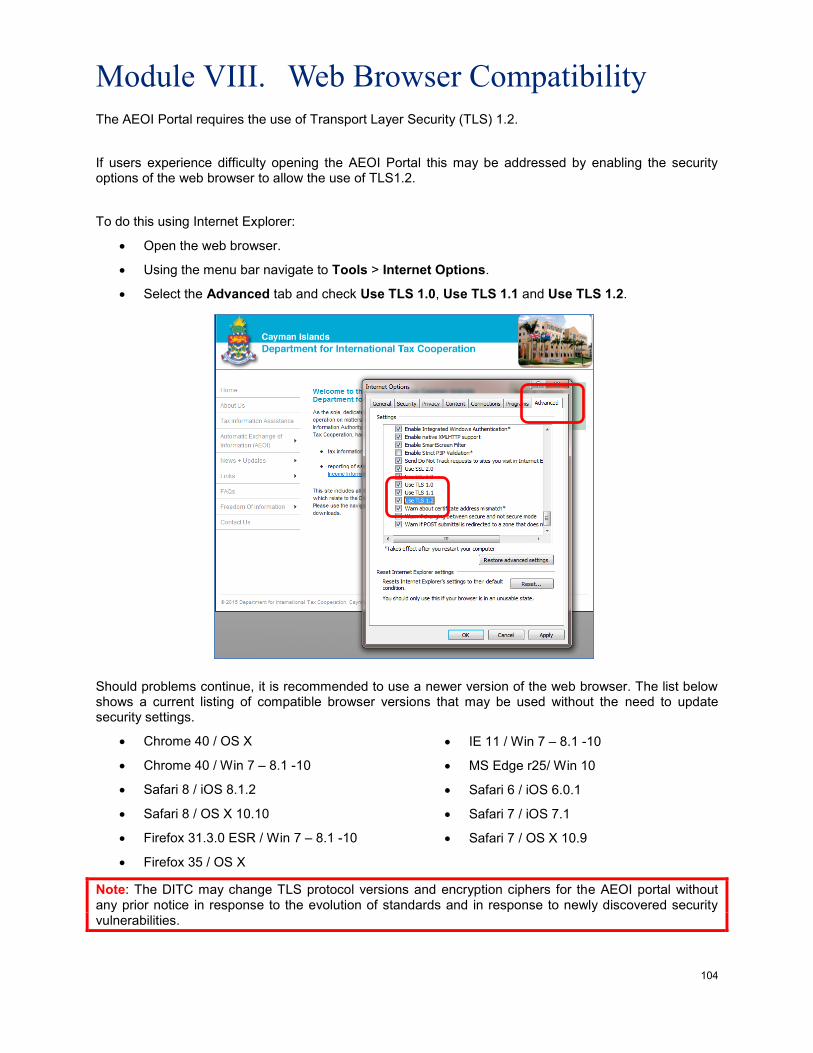
104
Module VIII. Web Browser Compatibility
The AEOI Portal requires the use of Transport Layer Security (TLS) 1.2.
If users experience difficulty opening the AEOI Portal this may be addressed by enabling the security options of the web browser to allow the use of TLS1.2.
To do this using Internet Explorer:
Open the web browser.
Using the menu bar navigate to Tools > Internet Options.
Select the Advanced tab and check Use TLS 1.0, Use TLS 1.1 and Use TLS 1.2.
Should problems continue, it is recommended to use a newer version of the web browser. The list below shows a current listing of compatible browser versions that may be used without the need to update security settings.
Chrome 40 / OS X
Chrome 40 / Win 7 – 8.1 -10
Safari 8 / iOS 8.1.2
Safari 8 / OS X 10.10
Firefox 31.3.0 ESR / Win 7 – 8.1 -10
Firefox 35 / OS X
Note: The DITC may change TLS protocol versions and encryption ciphers for the AEOI portal without any prior notice in response to the evolution of standards and in response to newly discovered security vulnerabilities.
IE 11 / Win 7 – 8.1 -10
MS Edge r25/ Win 10
Safari 6 / iOS 6.0.1
Safari 7 / iOS 7.1
Safari 7 / OS X 10.9