CASPER Reporting Provider User Guide · 08/2010 Certification And Survey Provider Enhanced Reports...
31
08/2010 C ertification A nd S urvey P rovider E nhanced R eports FUNCTIONALITY 2-1 CASPER Reporting HHA Provider User’s Guide 2 FUNCTIONALITY ACCESSING THE CASPER REPORTING APPLICATION....................................... 2 LOGIN .................................................................................................................. 3 TOOLBAR ............................................................................................................. 4 NAVIGATING THE CASPER REPORTING APPLICATION............................................. 5 REQUESTING REPORTS ........................................................................................ 6 SAVING REPORT CRITERIA ................................................................................... 9 RUNNING AND MAINTAINING SAVED CRITERIA TEMPLATES ...........................11 VIEWING AND MODIFYING SAVED CRITERIA TEMPLATES .........................................11 RUNNING REPORTS FROM SAVED CRITERIA TEMPLATES .......................................13 MOVING SAVED CRITERIA TEMPLATES ..................................................................13 DELETING SAVED CRITERIA TEMPLATES ...............................................................14 PACKAGE REPORTS .............................................................................................15 SHARED FOLDERS ................................................................................................17 VIEWING, PRINTING, AND SAVING INDIVICUAL REPORTS................................18 ZIPPING, PRINTING, AND SAVING MULTIPLE REPORTS ...................................21 CUSTOMIZING THE CASPER REPORTING TOOL ...............................................24 MAINTAINING FOLDERS ........................................................................................ 24 MOVING REPORTS ...............................................................................................25 DELETING REPORTS ............................................................................................26 OTHER CUSTOMIZATIONS .....................................................................................27 CASPER TOPICS....................................................................................................28 VIEWING REPORTS OFFLINE ...............................................................................29 REPORT SEARCH FEATURE ................................................................................30
-
Upload
truongtruc -
Category
Documents
-
view
217 -
download
0
Transcript of CASPER Reporting Provider User Guide · 08/2010 Certification And Survey Provider Enhanced Reports...

08/2010 Certification And Survey Provider Enhanced Reports FUNCTIONALITY 2-1 CASPER Reporting HHA Provider User’s Guide
2 FUNCTIONALITY
ACCESSING THE CASPER REPORTING APPLICATION ....................................... 2 LOGIN .................................................................................................................. 3 TOOLBAR ............................................................................................................. 4 NAVIGATING THE CASPER REPORTING APPLICATION............................................. 5
REQUESTING REPORTS ........................................................................................ 6 SAVING REPORT CRITERIA ................................................................................... 9 RUNNING AND MAINTAINING SAVED CRITERIA TEMPLATES ...........................11
VIEWING AND MODIFYING SAVED CRITERIA TEMPLATES .........................................11 RUNNING REPORTS FROM SAVED CRITERIA TEMPLATES .......................................13 MOVING SAVED CRITERIA TEMPLATES ..................................................................13 DELETING SAVED CRITERIA TEMPLATES ...............................................................14
PACKAGE REPORTS .............................................................................................15 SHARED FOLDERS ................................................................................................17 VIEWING, PRINTING, AND SAVING INDIVICUAL REPORTS ................................18 ZIPPING, PRINTING, AND SAVING MULTIPLE REPORTS ...................................21 CUSTOMIZING THE CASPER REPORTING TOOL ...............................................24
MAINTAINING FOLDERS ........................................................................................24 MOVING REPORTS ...............................................................................................25 DELETING REPORTS ............................................................................................26 OTHER CUSTOMIZATIONS .....................................................................................27
CASPER TOPICS....................................................................................................28 VIEWING REPORTS OFFLINE ...............................................................................29 REPORT SEARCH FEATURE ................................................................................30

08/2010 Certification And Survey Provider Enhanced Reports FUNCTIONALITY 2-2 CASPER Reporting HHA Provider User’s Guide
ACCESSING THE CASPER REPORTING APPLICATION Home Health Agency (HHA) providers access the CASPER Reporting application via their CMS OASIS System Welcome page (Figure 2-1) by selecting the CASPER Reporting link.
Figure 2-1. CMS OASIS System Welcome Page

08/2010 Certification And Survey Provider Enhanced Reports FUNCTIONALITY 2-3 CASPER Reporting HHA Provider User’s Guide
Login Selecting the Online Reports link from the preceding website connects you to the CASPER Login page (Figure 2-2).
Figure 2-2. CASPER Login Page
Enter your login information in the appropriate fields and select the Login button. The CASPER Topics (Home) page displays (Figure 2-3).
Figure 2-3. CASPER Topics Page – Home Page Pane
The CASPER Topics/Home page includes a list of related topic links in the left navigation pane. Refer to the CASPER Topics section of this guide for more information.

08/2010 Certification And Survey Provider Enhanced Reports FUNCTIONALITY 2-4 CASPER Reporting HHA Provider User’s Guide
The main body of the CASPER Topics page is the Home page pane. The Home page includes a “Welcome to CASPER” greeting and links to the functionality available in the CASPER Reporting application. The links and descriptions of the functionality they provide are included in the Home page pane:
• Logout – End current session and exit the CASPER Application
• Folders – View your output report folders and the documents in them
• Reports – Select report categories and request reports
• Queue – List the reports that have been requested but not yet completed
• Options – Customize the report format, number of links displayed per page and report display size
• Maint – Perform maintenance such as creating, renaming and/or deleting folders
• Home – Return to this page The functionality provided by these links is also available on the CASPER Reporting application toolbar that is described below.
Toolbar Across the top of each page of the CASPER Reporting application is a toolbar (Figure 2-4) with which you may access the CASPER Reporting application functionality.
Figure 2-4. CASPER Reporting Application Toolbar
The CASPER Reporting toolbar includes the following buttons:
• Logout • Folders • MyLibrary • Reports • Queue • Options • Maint • Home You can select the buttons of the CASPER Reporting toolbar in two ways:
• With the mouse, you may click on a button to access the functionality associated with that button.

08/2010 Certification And Survey Provider Enhanced Reports FUNCTIONALITY 2-5 CASPER Reporting HHA Provider User’s Guide
• Keyboard users may use the following shortcut keys bring focus to items on the toolbar:
Shortcut Keys To Access Alt + l Logout Alt + s Folders Alt + y MyLibrary Alt + r Reports Alt + q Queue Alt + o Options Alt + m Maint Alt + g Home
With focus on a button, press the Enter key to access the function associated with that button.
Navigating the CASPER Reporting Application To begin using the CASPER Reporting application, select one of the buttons on the CASPER toolbar across the top of the CASPER Topics page (Figure 2-3, above) or a descriptive link in the Home Page pane. If you select the Reports button [Alt + r] from the toolbar or the Reports link from the Home Page pane, you proceed to the CASPER Reports page where you may request reports. If you select the Folders button [Alt + s] or the Folders link, you proceed to the CASPER Folders page where you may view previously requested report output.
08/2010 Certification And Survey Provider Enhanced Reports FUNCTIONALITY 2-6 CASPER Reporting HHA Provider User’s Guide
REQUESTING REPORTS 1. Select the Reports button [Alt + r] from the CASPER toolbar to access the
CASPER Reports page (Figure 2-5).
Figure 2-5. CASPER Reports Page
The Report Categories pane on the left lists the various report categories that are available to you. Some reports are restricted to specific users/user groups. The pane on the right lists the reports contained in the selected report category. This list may span multiple pages. Use the page number links at the bottom of the pane to navigate from one page to another.
2. To request a specific report, click the abbreviated report name displayed as a black underlined link in the right pane of the page. The CASPER Reports Submit page (Figure 2-6) is presented for the selected report.
Figure 2-6. CASPER Reports Submit Page
08/2010 Certification And Survey Provider Enhanced Reports FUNCTIONALITY 2-7 CASPER Reporting HHA Provider User’s Guide
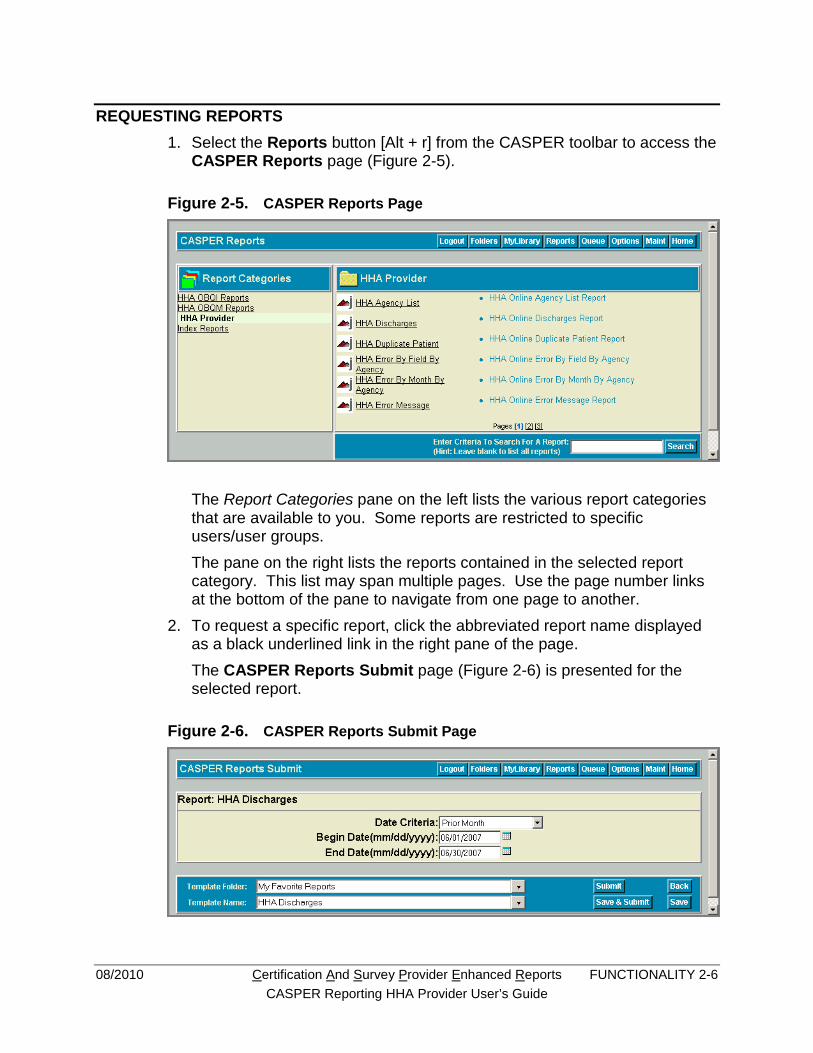
3. Select the desired report criteria. If another page of criteria selections exists, select the Next button to proceed to it. The Back button returns you to the previous page. When you are finished specifying all of the desired report criteria, select the Submit button.
NOTE: The criteria choices presented on the CASPER Reports Submit pages vary depending upon the specific report requested and the level of access assigned to you.
Refer to the individual report descriptions in subsequent sections of the CASPER Reporting HHA Provider User’s Guide for report-specific criteria.
Following a report submission request, you receive verification that it was placed into the queue for processing (Figure 2-7).
Figure 2-7. CASPER Reports Submit Verification Page
4. If desired, select the Queue button [Alt + q] from the CASPER toolbar to view the status of a requested report. The CASPER Report Queue page (Figure 2-8) is presented.
Figure 2-8. CASPER Reports Queue Page
The CASPER Report Queue page provides detailed information including the report’s position in the queue, the corresponding Queue Id, the name of the requested report, the processing status, and the duration (or time) the report has spent processing. Processing # of # Reports tells you how many reports are currently being processed for all users in the nation. Position tells you where the report you submitted is in the queue. For example, if the Position is 2 of 3, this

08/2010 Certification And Survey Provider Enhanced Reports FUNCTIONALITY 2-8 CASPER Reporting HHA Provider User’s Guide
indicates that your report is next to be processed out of the 3 requests submitted nationwide. The CASPER Queue page is refreshed every 7 seconds so that you can monitor the progress of your reports. When all of your reports are done processing, the CASPER Folders page is presented so that you can view the reports in the My Inbox folder.
NOTE: The length of time it takes to generate a report varies. You may consider logging off after requesting reports, and returning to the reporting system at a later time to retrieve them. However, some reports may process so quickly that they are delivered to your inbox before you can view them on the CASPER Queue page.
The completed report is delivered to the default folder, My Inbox, and is accessed by selecting the Folders button [Alt + s]. Refer to the Viewing, Printing, Saving And Exporting Reports section of this document for more information. To request another report, select the Reports button [Alt + r] to return to the listing of reports. The Back button [Alt + b] on the CASPER Report Queue page returns you to the previous page you were viewing.

08/2010 Certification And Survey Provider Enhanced Reports FUNCTIONALITY 2-9 CASPER Reporting HHA Provider User’s Guide
SAVING REPORT CRITERIA The CASPER Reporting application includes functionality that allows you to save the criteria you selected for a report so that you may run it at a later time without selecting all of the criteria again. The last CASPER Reports Submit criteria page (Figure 2-9) for each report provides Template Folder and Template Name fields as well as Save and Save & Submit buttons for the purpose of saving the report criteria you selected.
Figure 2-9. CASPER Reports Submit Page
1. To save report criteria, select the desired criteria options, advancing as necessary through all of the CASPER Reports Submit criteria pages. On the last CASPER Reports Submit criteria page, the generic name of the report you selected is defaulted into the Template Name field. You may save your template with this name, select another template name from the drop-down list or create a new template name by typing in the Template Name field.
NOTE: If you select an existing template name from the drop-down list, the criteria previously saved in that template are replaced with the current criteria selections.
In the Template Folder field, My Favorite Reports is the defaulted folder name. You may save your template into this folder or create a new folder by typing the new folder name in the Template Folder field.
NOTE: The My Favorite Reports folder does not actually exist until you save a template to it. If you choose to save a template to the My Favorite Reports folder, it is created for you when you save the template.
2. Select or enter a name for your report criteria template in the Template Name field and a folder in which to save the template in the Template Folder field.
08/2010 Certification And Survey Provider Enhanced Reports FUNCTIONALITY 2-10 CASPER Reporting HHA Provider User’s Guide
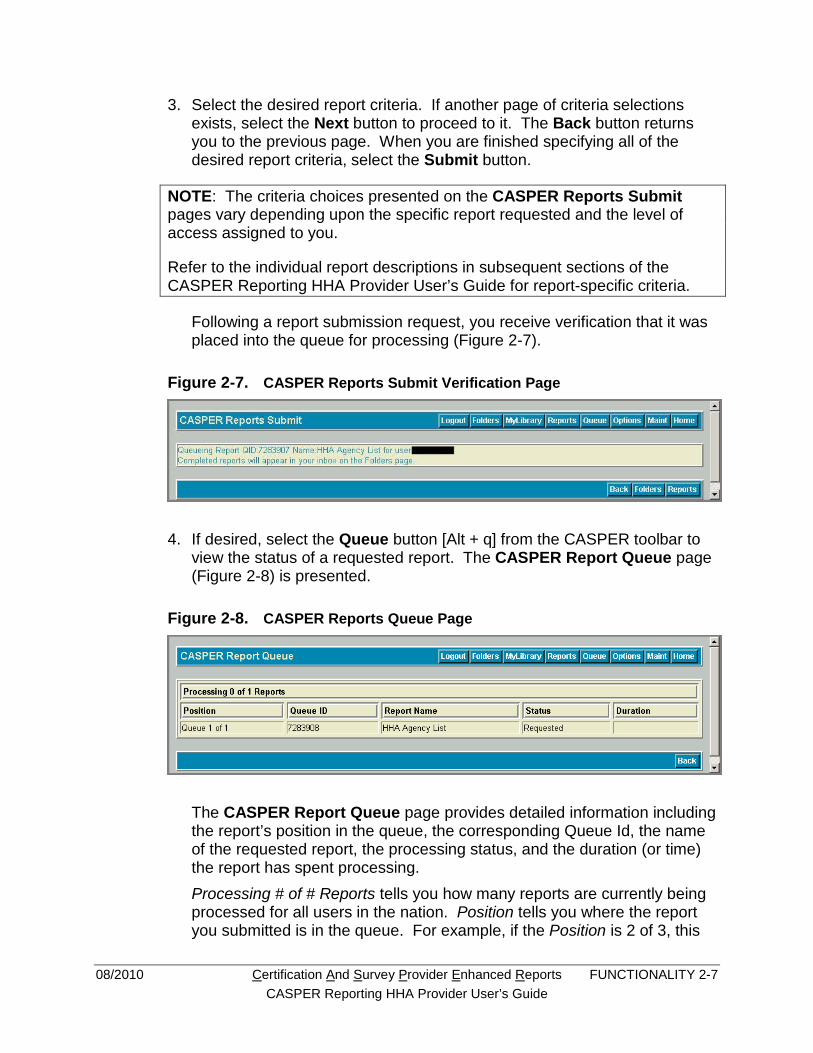
3. To run the report AND save the criteria for future use, select the Save & Submit button. The system responds with verification that the report was placed into the queue for processing (Figure 2-10). The template is saved into the folder you specified.
Figure 2-10. CASPER Reports Submit Verification Page
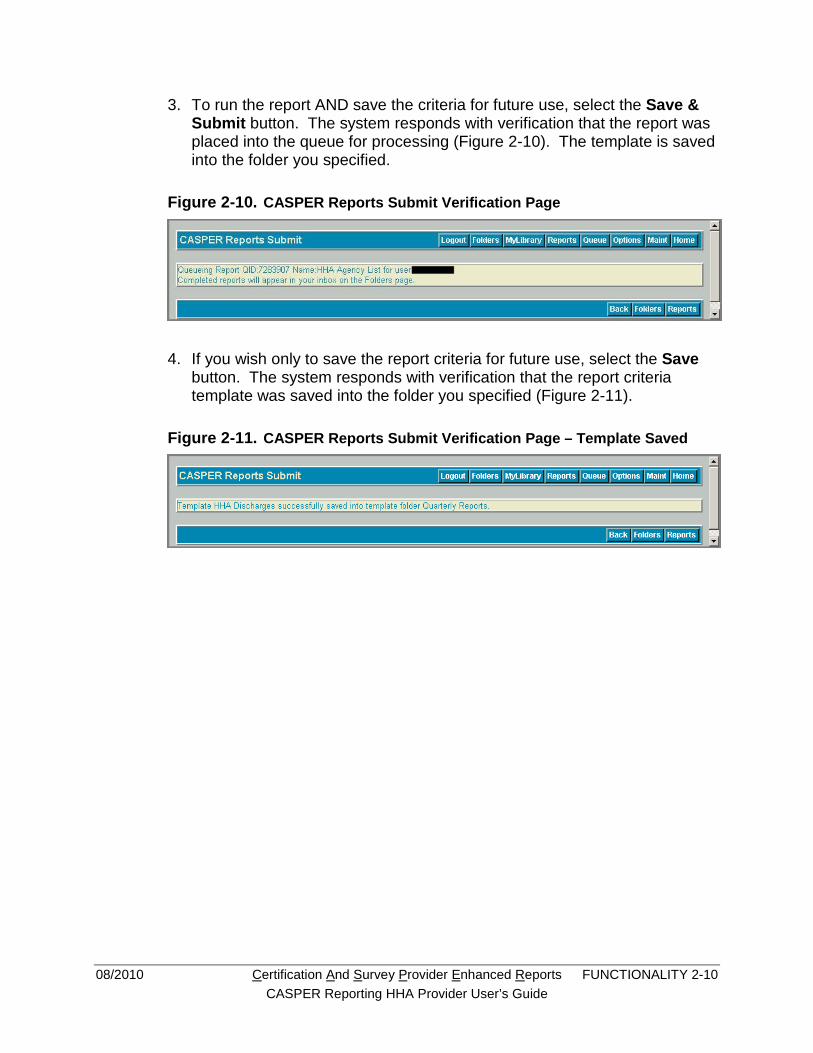
4. If you wish only to save the report criteria for future use, select the Save button. The system responds with verification that the report criteria template was saved into the folder you specified (Figure 2-11). 0.
Figure 2-11. CASPER Reports Submit Verification Page – Template Saved
08/2010 Certification And Survey Provider Enhanced Reports FUNCTIONALITY 2-11 CASPER Reporting HHA Provider User’s Guide
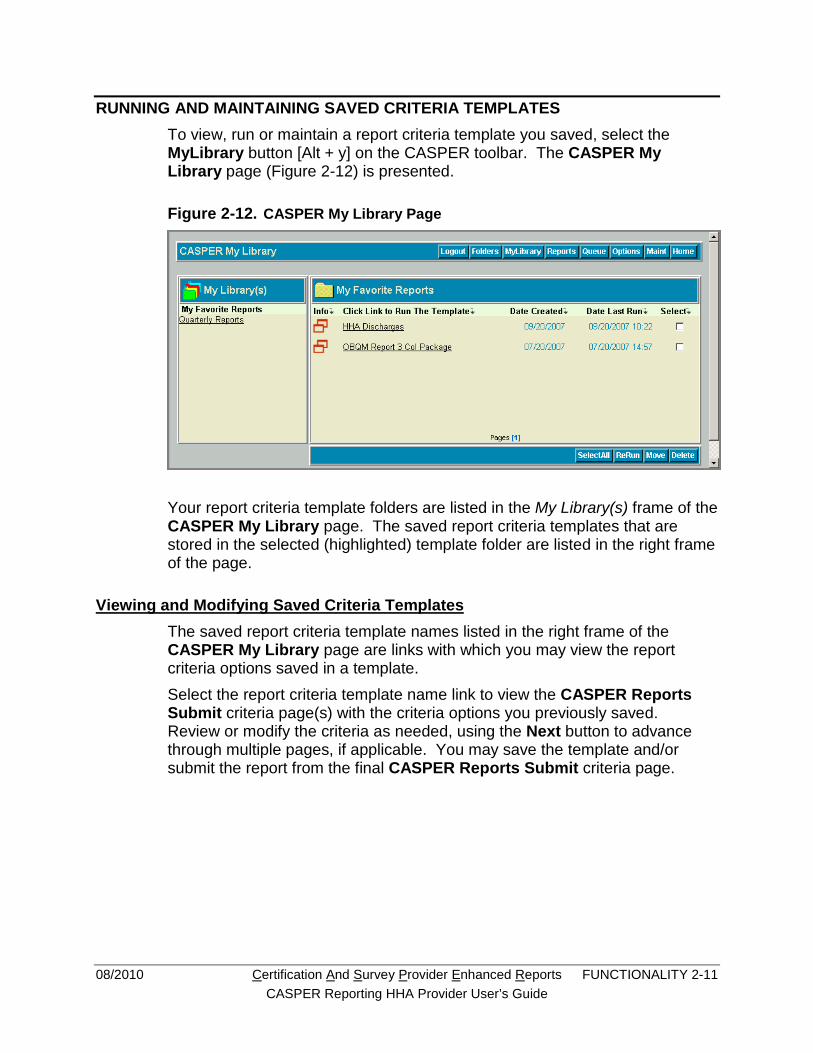
RUNNING AND MAINTAINING SAVED CRITERIA TEMPLATES To view, run or maintain a report criteria template you saved, select the MyLibrary button [Alt + y] on the CASPER toolbar. The CASPER My Library page (Figure 2-12) is presented.
Figure 2-12. CASPER My Library Page
Your report criteria template folders are listed in the My Library(s) frame of the CASPER My Library page. The saved report criteria templates that are stored in the selected (highlighted) template folder are listed in the right frame of the page.
Viewing and Modifying Saved Criteria Templates The saved report criteria template names listed in the right frame of the CASPER My Library page are links with which you may view the report criteria options saved in a template. Select the report criteria template name link to view the CASPER Reports Submit criteria page(s) with the criteria options you previously saved. Review or modify the criteria as needed, using the Next button to advance through multiple pages, if applicable. You may save the template and/or submit the report from the final CASPER Reports Submit criteria page.

08/2010 Certification And Survey Provider Enhanced Reports FUNCTIONALITY 2-12 CASPER Reporting HHA Provider User’s Guide
To view a synopsis of the saved criteria, with your mouse, point to and hover over the report icon in the Info column to the left of the template name. A Report Arguments pop-up box (Figure 2-13) containing the details of the saved criteria is presented.
Figure 2-13. Template Info – Report Arguments
When you click the Info icon, the CASPER Document Info page (Figure 2-14) is presented for the associated template. This page displays the saved criteria selections in addition to the date the template was created and the date it was last run. If needed, use your browser’s print function to print this page.
Figure 2-14. CASPER Document Info Page
08/2010 Certification And Survey Provider Enhanced Reports FUNCTIONALITY 2-13 CASPER Reporting HHA Provider User’s Guide
Running Reports From Saved Criteria Templates To run one or more reports without first viewing or modifying the saved criteria, check the Select box(es) to the far right of the desired template(s) and select the Rerun button on the CASPER My Library page (Figure 2-12). All selected reports are placed into the queue for processing.
NOTE: Use the SelectAll button to place checks in the Select boxes for all of the report criteria templates in the selected folder. The SelectAll button then changes to an UnSelectAll button with which you may remove all checks in the Select boxes.
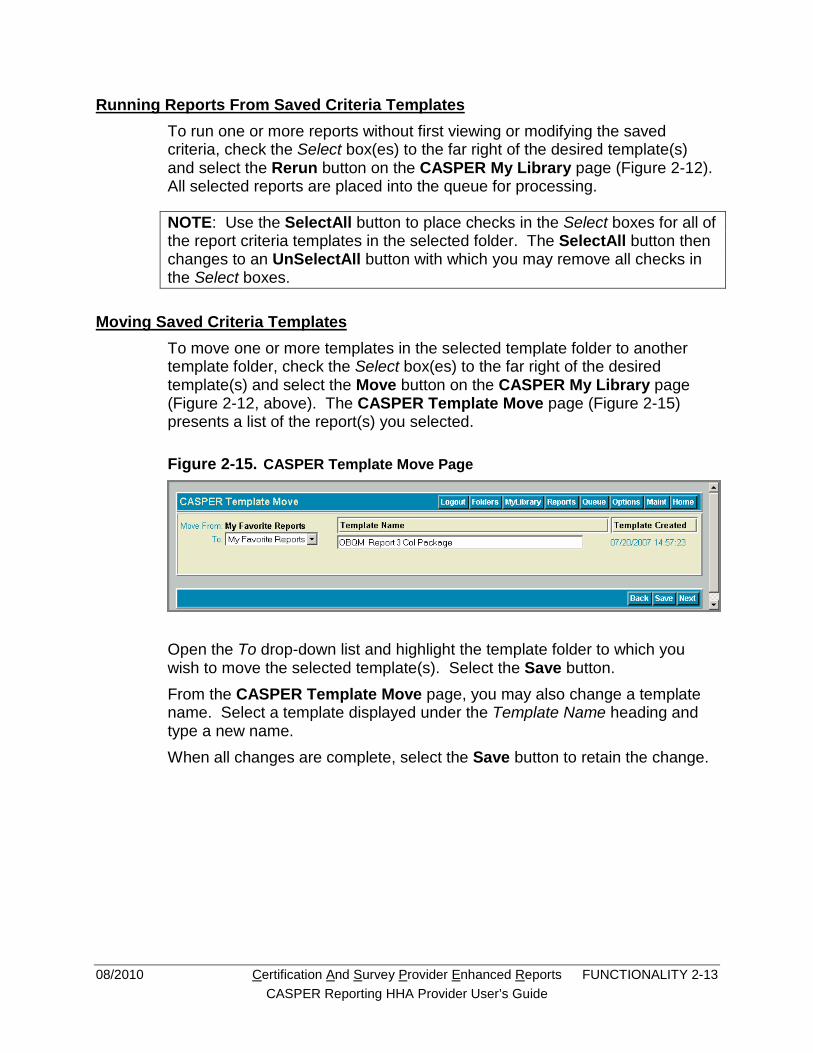
Moving Saved Criteria Templates To move one or more templates in the selected template folder to another template folder, check the Select box(es) to the far right of the desired template(s) and select the Move button on the CASPER My Library page (Figure 2-12, above). The CASPER Template Move page (Figure 2-15) presents a list of the report(s) you selected.
Figure 2-15. CASPER Template Move Page
Open the To drop-down list and highlight the template folder to which you wish to move the selected template(s). Select the Save button. From the CASPER Template Move page, you may also change a template name. Select a template displayed under the Template Name heading and type a new name. When all changes are complete, select the Save button to retain the change.

08/2010 Certification And Survey Provider Enhanced Reports FUNCTIONALITY 2-14 CASPER Reporting HHA Provider User’s Guide
Deleting Saved Criteria Templates To delete one or more report criteria templates, check the Select box(es) to the far right of the desired template(s) and select the Delete button on the CASPER My Library page (Figure 2-12, above). A delete confirmation dialog box (Figure 2-16) is presented.
Figure 2-16. Delete Confirmation
Select the OK button to confirm the delete request. The CASPER DeleteCriteria page (Figure 2-17) is presented indicating the template(s) you successfully deleted.
Figure 2-17. CASPER DeleteCriteria Page
NOTE: Upon deletion of all saved report criteria templates from a template folder, the system automatically deletes the template folder.

08/2010 Certification And Survey Provider Enhanced Reports FUNCTIONALITY 2-15 CASPER Reporting HHA Provider User’s Guide
PACKAGE REPORTS Several report categories include “Package” listings (Figure 2-18) that allow you to request multiple reports with a single submission.
Figure 2-18. CASPER Reports Page – Package Report
NOTE: When submitting requests containing multiple reports and/or facilities, expect the total processing time to increase. Please limit the number of reports you submit to a reasonable number.

08/2010 Certification And Survey Provider Enhanced Reports FUNCTIONALITY 2-16 CASPER Reporting HHA Provider User’s Guide
When a package is selected, the name of each report included in the package is presented (Figure 2-19) with checkboxes checked by default. If only specific reports in the group are desired, uncheck those that you do not need.
Figure 2-19. CASPER Reports Package
Specify the desired date criteria and select the Submit button. Each report is then individually sent to the queue, processed and delivered to your Inbox.
08/2010 Certification And Survey Provider Enhanced Reports FUNCTIONALITY 2-17 CASPER Reporting HHA Provider User’s Guide
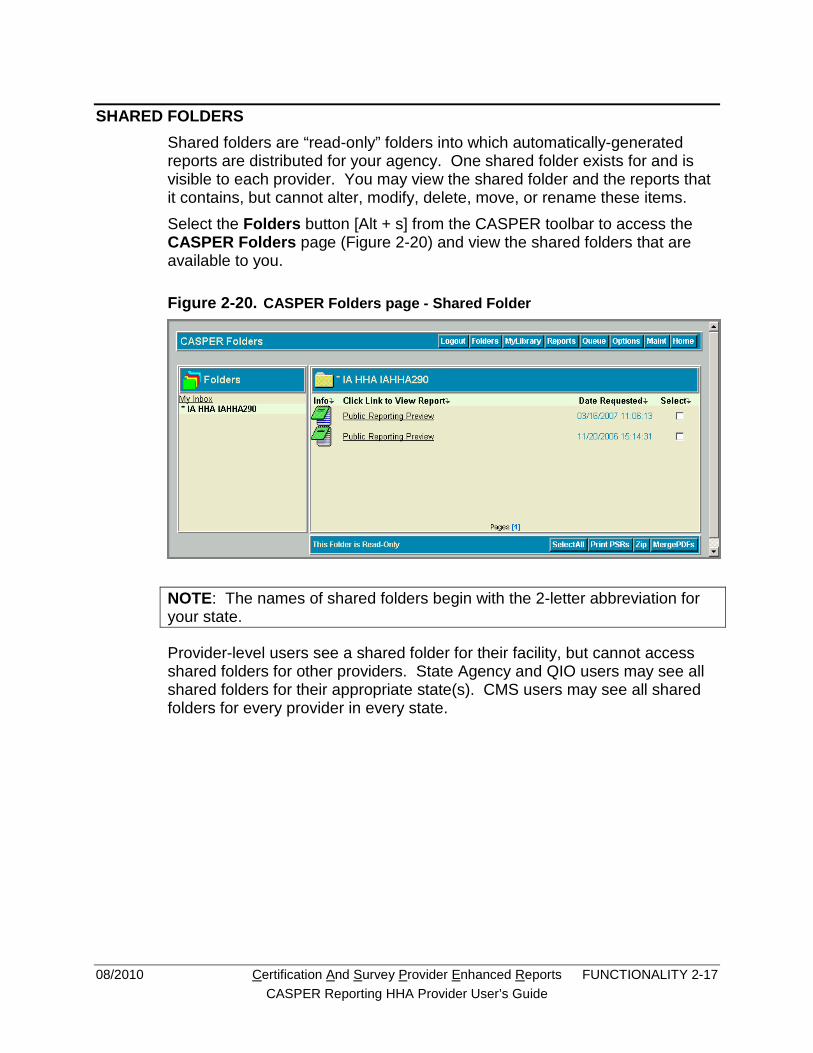
SHARED FOLDERS Shared folders are “read-only” folders into which automatically-generated reports are distributed for your agency. One shared folder exists for and is visible to each provider. You may view the shared folder and the reports that it contains, but cannot alter, modify, delete, move, or rename these items. Select the Folders button [Alt + s] from the CASPER toolbar to access the CASPER Folders page (Figure 2-20) and view the shared folders that are available to you.
Figure 2-20. CASPER Folders page - Shared Folder
NOTE: The names of shared folders begin with the 2-letter abbreviation for your state.
Provider-level users see a shared folder for their facility, but cannot access shared folders for other providers. State Agency and QIO users may see all shared folders for their appropriate state(s). CMS users may see all shared folders for every provider in every state.

08/2010 Certification And Survey Provider Enhanced Reports FUNCTIONALITY 2-18 CASPER Reporting HHA Provider User’s Guide
VIEWING, PRINTING, AND SAVING INDIVICUAL REPORTS 1. To view a completed report, select the Folders button [Alt + s] on the
CASPER toolbar. The CASPER Folders page (Figure 2-21) s presented. By default, the My Inbox folder is selected. Reports that you request are placed in your My Inbox folder. Select another folder if necessary. Links to the reports stored in the selected folder are listed in the right-hand pane of the page.
Figure 2-21. CASPER Folders Page – My Inbox
When you hover the mouse pointer over a report icon in the Info column in the right-hand pane of the page, details of the criteria selected to generate the report appear briefly (Figure 2-22).
Figure 2-22. CASPER Folders Page – Report Criteria Summary

08/2010 Certification And Survey Provider Enhanced Reports FUNCTIONALITY 2-19 CASPER Reporting HHA Provider User’s Guide
NOTE: Use the report criteria information to identify the specific report you wish to view from a list of similar reports.
When you select a report Info icon, the CASPER Document Info page (Figure 2-23) is presented for the associated report. This page displays the criteria selections used to generate the report in addition to other characteristics of the report document.
Figure 2-23. CASPER Document Info Page
2. To view the report, click the underlined report name link from the My Inbox folder (Figure 2-21, above). A report generated in the PDF format (Figure 2-24) displays in your browser with the Adobe Reader plug-in.
Figure 2-24. PDF Report Display
NOTE: Other report formatting options include comma-separated values (CSV) and XLS for use with Microsoft Excel.

08/2010 Certification And Survey Provider Enhanced Reports FUNCTIONALITY 2-20 CASPER Reporting HHA Provider User’s Guide
3. To locate specific text of interest in the displayed report, perform a Find function. The Find function [Ctrl + f] is available on the Edit menu for all report formats.
4. To print a displayed report, select the Print tool from the toolbar directly above the report.
5. To save a displayed PDF-formatted report to your workstation or local network, select the Save A Copy tool from the Adobe toolbar directly above the report. Specify the name and destination location of your file.
08/2010 Certification And Survey Provider Enhanced Reports FUNCTIONALITY 2-21 CASPER Reporting HHA Provider User’s Guide
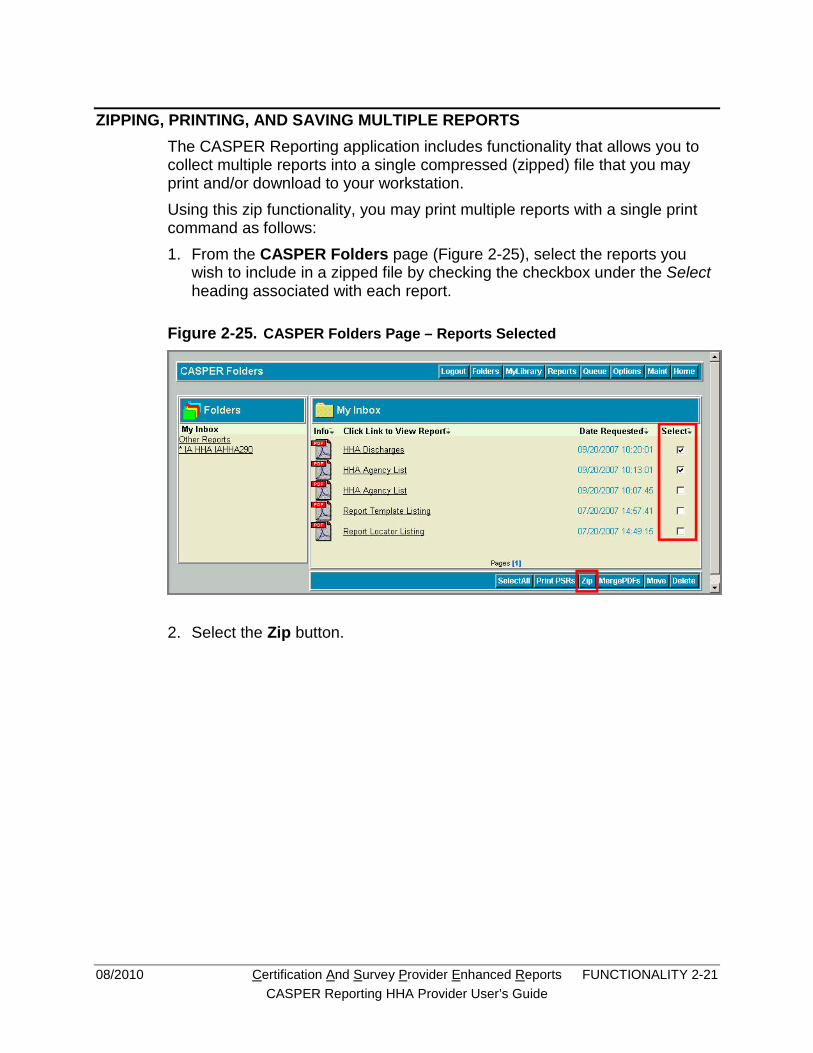
ZIPPING, PRINTING, AND SAVING MULTIPLE REPORTS The CASPER Reporting application includes functionality that allows you to collect multiple reports into a single compressed (zipped) file that you may print and/or download to your workstation. Using this zip functionality, you may print multiple reports with a single print command as follows: 1. From the CASPER Folders page (Figure 2-25), select the reports you
wish to include in a zipped file by checking the checkbox under the Select heading associated with each report.
Figure 2-25. CASPER Folders Page – Reports Selected
2. Select the Zip button.

08/2010 Certification And Survey Provider Enhanced Reports FUNCTIONALITY 2-22 CASPER Reporting HHA Provider User’s Guide
A Windows File Download dialog box (Figure 2-26) opens.
Figure 2-26. Windows File Download Dialog Box
3. If you wish to print the one or more reports in their entirety immediately, select the Open button.
NOTE: If you prefer to save the zip file to your workstation so that you may readily view and/or print the reports it in the future, select the Save button.
A WinZip window (Figure 2-27) displays the contents of the zipped file.
Figure 2-27. WinZip Window
4. Select (highlight) each report you wish to print.
NOTE: To highlight two or more reports, press and hold the Ctrl key as you select the reports.

08/2010 Certification And Survey Provider Enhanced Reports FUNCTIONALITY 2-23 CASPER Reporting HHA Provider User’s Guide
5. From the File menu select the Print option (Figure 2-28) or right-click and select the Print option. All pages of each report are sent to your default printer.
Figure 2-28. WinZip File Menu
NOTE: To print select pages from the zipped reports you must open each report individually.
08/2010 Certification And Survey Provider Enhanced Reports FUNCTIONALITY 2-24 CASPER Reporting HHA Provider User’s Guide
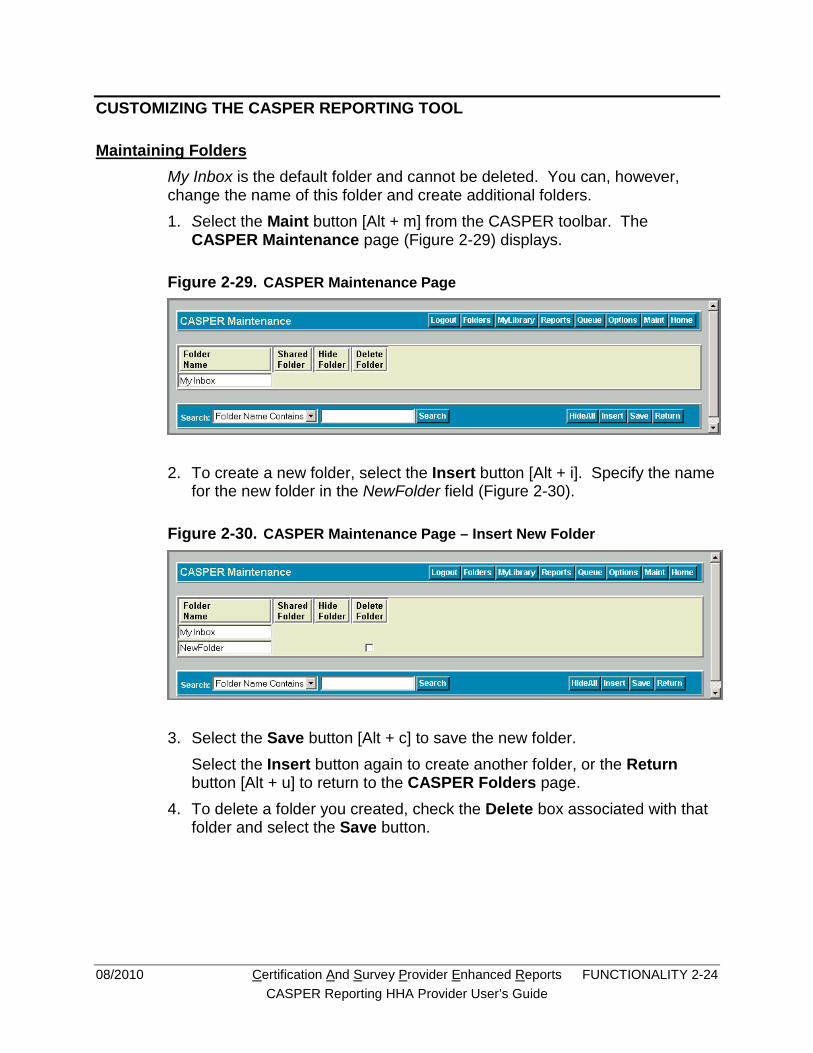
CUSTOMIZING THE CASPER REPORTING TOOL
Maintaining Folders My Inbox is the default folder and cannot be deleted. You can, however, change the name of this folder and create additional folders. 1. Select the Maint button [Alt + m] from the CASPER toolbar. The
CASPER Maintenance page (Figure 2-29) displays.
Figure 2-29. CASPER Maintenance Page
2. To create a new folder, select the Insert button [Alt + i]. Specify the name for the new folder in the NewFolder field (Figure 2-30).
Figure 2-30. CASPER Maintenance Page – Insert New Folder
3. Select the Save button [Alt + c] to save the new folder. Select the Insert button again to create another folder, or the Return button [Alt + u] to return to the CASPER Folders page.
4. To delete a folder you created, check the Delete box associated with that folder and select the Save button.

08/2010 Certification And Survey Provider Enhanced Reports FUNCTIONALITY 2-25 CASPER Reporting HHA Provider User’s Guide
Moving Reports The CASPER Folders page provides you with functionality to move reports from one folder to another. 1. To move one or more reports, check the Select box to the far right of each
report and select the Move button [Alt + n] (Figure 2-31).
Figure 2-31. CASPER Folders Page - Moving Reports
2. The CASPER Move page (Figure 2-32) lists the report(s) you selected.
Figure 2-32. CASPER Move Page
3. Open the drop-down list and highlight the folder to move the report(s) to. Select the Save button. 0. From the CASPER Move page, you may also change a report title. Select a report displayed under the Document Name heading and type a name for the report that is more meaningful to you. When all changes are complete, select the Save button to retain the change.

08/2010 Certification And Survey Provider Enhanced Reports FUNCTIONALITY 2-26 CASPER Reporting HHA Provider User’s Guide
Deleting Reports The CASPER Folders page also provides you with functionality to delete reports. 1. Place a check in the Select box to the far right of each report to delete on
the CASPER Folders page (Figure 2-31, above) and select the Delete button [Alt + x]. A delete confirmation dialog box (Figure 2-33) is presented.
Figure 2-33. Delete Confirmation
2. Select the OK button to confirm the delete request. The CASPER Delete page (Figure 2-34) is presented indicating the report(s) you successfully deleted.
Figure 2-34. CASPER Delete Page

08/2010 Certification And Survey Provider Enhanced Reports FUNCTIONALITY 2-27 CASPER Reporting HHA Provider User’s Guide
Other Customizations As reports are requested and delivered to the default folder, the list of reports in the default folder on the CASPER Folders page may expand to multiple pages. You can access specific pages of the list via the page number links at the bottom of the frame. To alter the number of reports per page that are displayed in a folder, and further customize the CASPER Reporting application, select the Options button [Alt + o] from the CASPER toolbar. The CASPER Options page (Figure 2-35) is presented.
Figure 2-35. CASPER Options Page
The following items are currently available on the CASPER Options page:
• Rows: alters the number of reports available on each page and, therefore, the size of the report-viewing window. This setting must be between 5 and 50.
• Allow Share: displays when you have access to Shared Folders, but it cannot be modified. Only a CASPER Reporting Administrator can add or remove Shared Folder access.
• OutputFormat: allows report requests to be processed in one of the following formats: PDF, CSV, EXCEL, or Jasper. The standard default is PDF.
• ColorScheme: allows color customization of the application colors. Select from: CMS, Footprints, Original, Lavender, Forest, Wood, and Winter.
• ViewStyle: allows customization of the layout of your CASPER Reporting application workspace. Select from: Classic and DDLB. The screen shots included in this manual depict the Classic ViewStyle.
After selecting the desired options, select the Save button [Alt + c]. The Return button [Alt + u] on the CASPER Options page returns you to the previous page you were viewing.

08/2010 Certification And Survey Provider Enhanced Reports FUNCTIONALITY 2-28 CASPER Reporting HHA Provider User’s Guide
CASPER TOPICS The Topics frame of the CASPER Topics page (Figure 2-36) provides instructions, notices and bulletins, helpful information, and downloadable files pertaining to the CASPER Reporting application.
Figure 2-36. CASPER Topics Page
The CASPER Topics page is presented with each successful login to the CASPER Reporting application. To access the CASPER Topics page anytime thereafter, select the Home button [Alt + g] on the CASPER toolbar.

08/2010 Certification And Survey Provider Enhanced Reports FUNCTIONALITY 2-29 CASPER Reporting HHA Provider User’s Guide
VIEWING REPORTS OFFLINE You can save PDF-formatted reports to a local drive and then view them with Adobe Reader at any time. Likewise, you can save and then view XLS- and CSV-formatted reports with Microsoft Excel. It is not necessary to be logged in to the CASPER Reporting application to view these types of reports offline.
NOTE: In order to be viewed offline, a report must first be saved to a local drive, workstation or other storage medium. Refer to the Viewing, Printing, And Saving Reports section for instructions.
08/2010 Certification And Survey Provider Enhanced Reports FUNCTIONALITY 2-30 CASPER Reporting HHA Provider User’s Guide
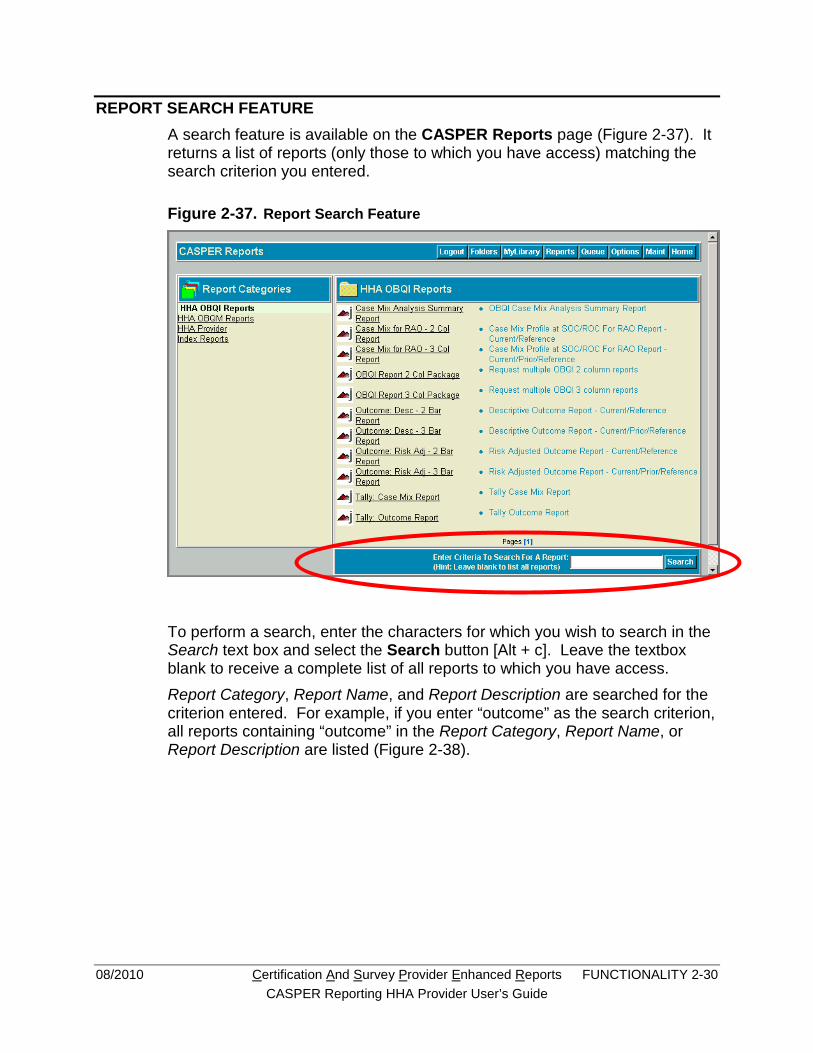
REPORT SEARCH FEATURE A search feature is available on the CASPER Reports page (Figure 2-37). It returns a list of reports (only those to which you have access) matching the search criterion you entered.
Figure 2-37. Report Search Feature
To perform a search, enter the characters for which you wish to search in the Search text box and select the Search button [Alt + c]. Leave the textbox blank to receive a complete list of all reports to which you have access. Report Category, Report Name, and Report Description are searched for the criterion entered. For example, if you enter “outcome” as the search criterion, all reports containing “outcome” in the Report Category, Report Name, or Report Description are listed (Figure 2-38).

08/2010 Certification And Survey Provider Enhanced Reports FUNCTIONALITY 2-31 CASPER Reporting HHA Provider User’s Guide
Figure 2-38. Report Search Results
You may then click the underlined report name link to go to the criteria selection and submission page for a particular report.