CargoWiz User's Guide (PDF Version of the CargoWiz Help … User's Guide.pdf · CargoWiz User's...
62
Copyright © by softtruck. All Rights Reserved. CargoWiz User's Guide (PDF Version of the CargoWiz Help File)
-
Upload
truongcong -
Category
Documents
-
view
220 -
download
1
Transcript of CargoWiz User's Guide (PDF Version of the CargoWiz Help … User's Guide.pdf · CargoWiz User's...

Copyright © by softtruck. All Rights Reserved.
CargoWiz User's Guide(PDF Version of theCargoWiz Help File)

CargoWiz User's Guide (PDF Version of the CargoWiz Help File)
2 / 62
Table of contents
Help ................................................................................................................. 3Getting Started .............................................................................................. 3Tab 1. Truck/Container Data ........................................................................... 5Tab 2. Entering Cargo Data ............................................................................. 6Tab 3. Create a Load Plan ............................................................................. 11
About Statistics ........................................................................................ 12Improving the Load Plan ........................................................................... 12Identifying Cargo ..................................................................................... 13Controlling the Loading Order ................................................................... 14
System Requirements ................................................................................... 19Passing and Sharing of Data Files ............................................................... 19
Tour, Tips, and FAQ's ................................................................................... 20How Do I... ..................................................................................................... 21
Tab 1. Manage Truck, Container or Pallet ........................................................ 21Set Weight Limit ....................................................................................... 22Add Truck, Container or Pallet to Truck Grid ............................................... 23
Tab 2. Manage Cargo ................................................................................... 23Import From Excel ................................................................................... 24Avoid Typing in all My Cargo Info .............................................................. 24Avoid Chopped-Off Part Numbers or Descriptions ........................................ 25Control Turning and Tipping of Cargo ........................................................ 25Control Taboo On Top .............................................................................. 26Set Stacking Limits ................................................................................... 27Import/Export with Company System (ERP) ................................................ 28
Tab 3. Load Container, Truck or Pallet ............................................................ 29Load For Stops or Deliveries ...................................................................... 29Control the Loading Sequence ................................................................... 29Force a Cargo Item to be Loaded First ........................................................ 29See Part Number Labels on Cargo .............................................................. 30Learn How Many Will Fit ............................................................................ 31Container Advisor .................................................................................... 32Load a 40 foot, then the rest into a 20 foot truck or container ....................... 34Drag and Drop Cargo ............................................................................... 34Spread the Cargo ..................................................................................... 51Load by ratio (Sets) .................................................................................. 52
Work With the CargoWiz Results .................................................................... 53Reports - Load Plan Report and Quick Shipment Summary ........................... 53Send Results to Excel or Email ................................................................... 56Print Cargo Grid ....................................................................................... 57Axle Weights ........................................................................................... 58Allocate Freight Costs to Each Cargo Item ................................................... 59Email Images and Results ......................................................................... 61Send Results to Others - the Free Viewer .................................................... 61
Contact Support ........................................................................................... 62Show CargoWiz Support My Result ............................................................. 62

CargoWiz User's Guide (PDF Version of the CargoWiz Help File)
3 / 62
Help
Getting Started
Before getting started, you may be interested in viewing a brief demonstration video that providesan overview of CargoWiz. Locate the demonstration video by searching the web for "YouTubeCargoWiz Load Planning."
You have probably taken the Tour, which runs automatically the first time you start CargoWiz,and gives an overview of CargoWiz.
If not, or if it has been awhile, you can tour again. Look for Quick Tour on the Main Menu underHelp.
Setting Your Preferences
Choose your preference for either Metric or English measurement. To do so, click "Options" inthe main CargoWiz toolbar. Choose the "Metric or English" button, click Metric or English, andclick the "Done" button.
Choose your language preference under "Options." Click the "Language" button, choose yourpreferred language, and click "Done." Using this procedure, you can change languages at anytime. When changing between Chinese and other languages, click the "About viewing Chinese"button for additional information.
CargoWiz User's Guide (PDF Version of the CargoWiz Help File)
4 / 62
Getting started with your data
Once generally familiar with CargoWiz the procedure for most customers, such asmanufacturers is:1. Choose or enter truck/container data. You will find CargoWiz contains many popular
truck and container sizes and you need only click on one. You may also add trucks andcontainers with other dimensions if needed.
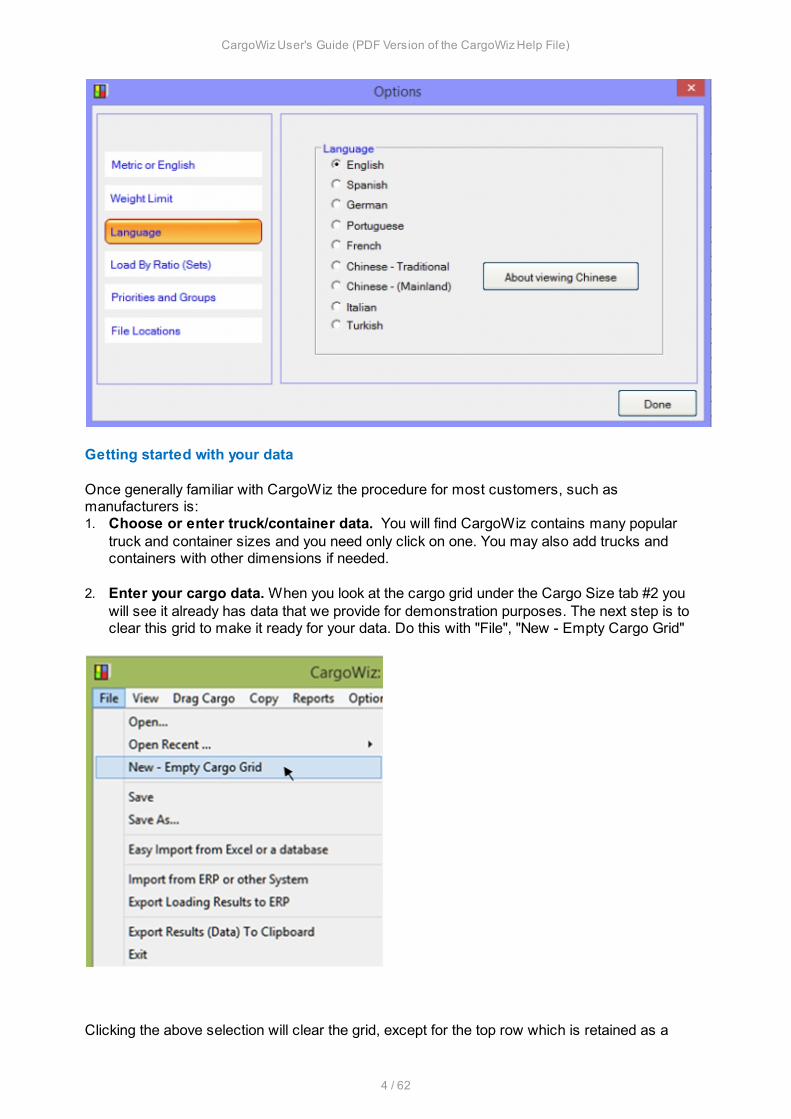
2. Enter your cargo data. When you look at the cargo grid under the Cargo Size tab #2 youwill see it already has data that we provide for demonstration purposes. The next step is toclear this grid to make it ready for your data. Do this with "File", "New - Empty Cargo Grid"
Clicking the above selection will clear the grid, except for the top row which is retained as a
CargoWiz User's Guide (PDF Version of the CargoWiz Help File)
5 / 62
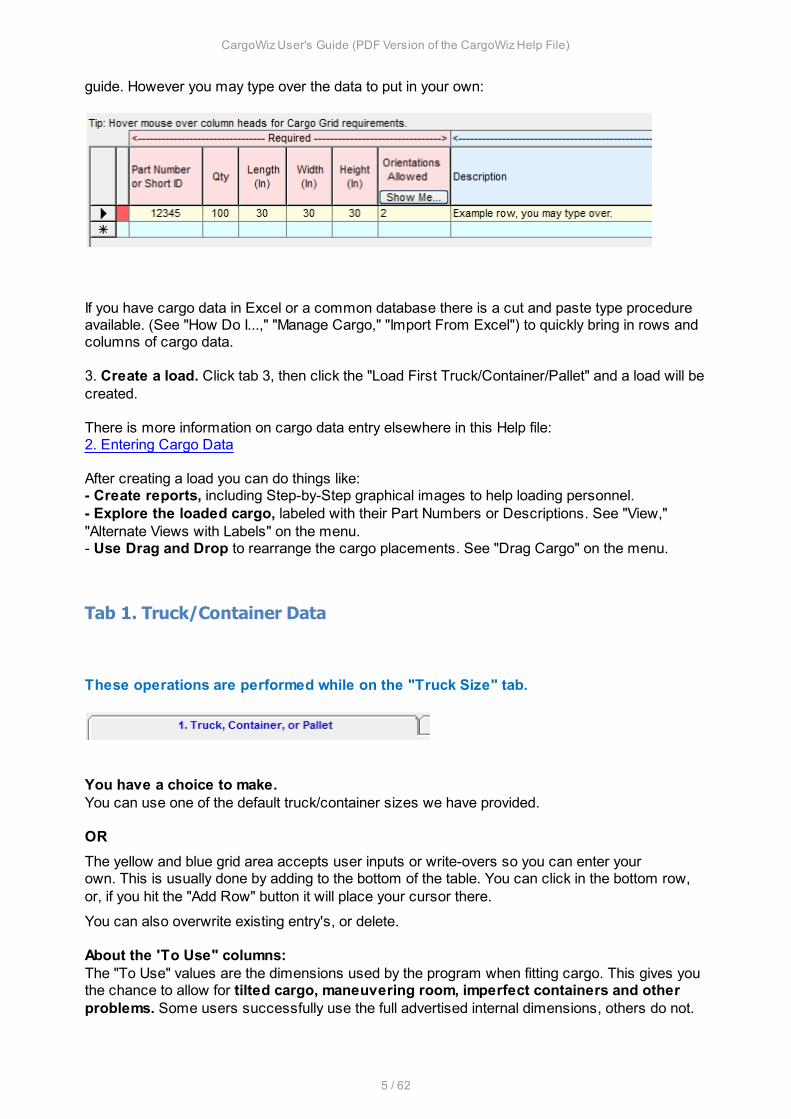
guide. However you may type over the data to put in your own:
If you have cargo data in Excel or a common database there is a cut and paste type procedureavailable. (See "How Do I...," "Manage Cargo," "Import From Excel") to quickly bring in rows andcolumns of cargo data. 3. Create a load. Click tab 3, then click the "Load First Truck/Container/Pallet" and a load will becreated. There is more information on cargo data entry elsewhere in this Help file:2. Entering Cargo Data After creating a load you can do things like:- Create reports, including Step-by-Step graphical images to help loading personnel.- Explore the loaded cargo, labeled with their Part Numbers or Descriptions. See "View,""Alternate Views with Labels" on the menu.- Use Drag and Drop to rearrange the cargo placements. See "Drag Cargo" on the menu.
Tab 1. Truck/Container Data
These operations are performed while on the "Truck Size" tab.
You have a choice to make.You can use one of the default truck/container sizes we have provided.
OR
The yellow and blue grid area accepts user inputs or write-overs so you can enter yourown. This is usually done by adding to the bottom of the table. You can click in the bottom row,or, if you hit the "Add Row" button it will place your cursor there.
You can also overwrite existing entry's, or delete.
About the 'To Use" columns:The "To Use" values are the dimensions used by the program when fitting cargo. This gives youthe chance to allow for tilted cargo, maneuvering room, imperfect containers and otherproblems. Some users successfully use the full advertised internal dimensions, others do not.
CargoWiz User's Guide (PDF Version of the CargoWiz Help File)
6 / 62
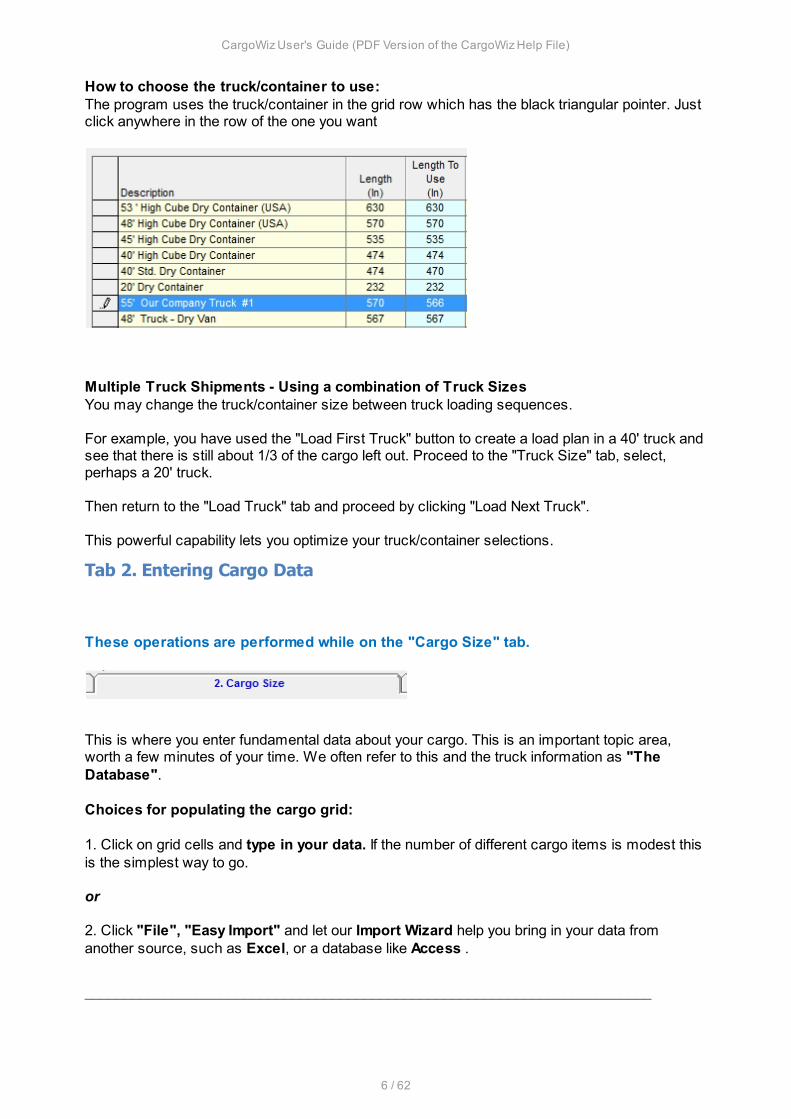
How to choose the truck/container to use:The program uses the truck/container in the grid row which has the black triangular pointer. Justclick anywhere in the row of the one you want
Multiple Truck Shipments - Using a combination of Truck SizesYou may change the truck/container size between truck loading sequences.
For example, you have used the "Load First Truck" button to create a load plan in a 40' truck andsee that there is still about 1/3 of the cargo left out. Proceed to the "Truck Size" tab, select,perhaps a 20' truck.
Then return to the "Load Truck" tab and proceed by clicking "Load Next Truck".
This powerful capability lets you optimize your truck/container selections.
Tab 2. Entering Cargo Data
These operations are performed while on the "Cargo Size" tab.
This is where you enter fundamental data about your cargo. This is an important topic area,worth a few minutes of your time. We often refer to this and the truck information as "TheDatabase".
Choices for populating the cargo grid:
1. Click on grid cells and type in your data. If the number of different cargo items is modest thisis the simplest way to go.
or
2. Click "File", "Easy Import" and let our Import Wizard help you bring in your data fromanother source, such as Excel, or a database like Access .
_______________________________________________________________________

CargoWiz User's Guide (PDF Version of the CargoWiz Help File)
7 / 62
How to Type in your data
There are details about what is permissible or advisable for each column that you should review.These details are also available by hovering the mouse over the column head in the grid.
Part Number or Short ID
Required. Numbers and/or letters permitted.
Qty
Not required when creating the database of cargo, as the program will set it to zero for now andyou can set later as needed for actual shipments.
Length, Width, Height
Required. Usually even numbers, but decimals are permitted, like 27.375.
Length is in the truck-length direction.
Width corresponds with the cross-truck direction.
Height is toward the roof.
The value you assign to which direction has no effect if you select the option for "Allow AllTurnings" but has effect in the "Allow Horizontal Turnings" or "Allow No Turnings" options.
Cargo Orientations Allowed
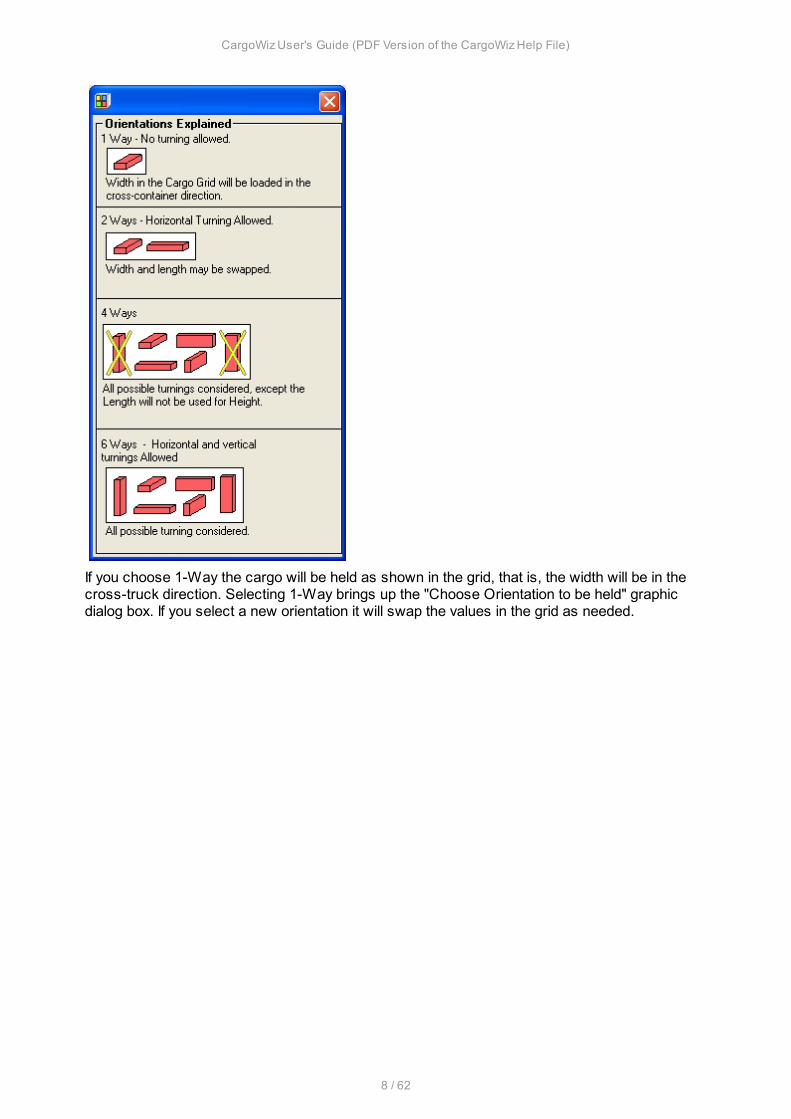
Required. For each Cargo type you may set the allowed orientations. For instance, a furnituremanufacturer might want tables to be kept legs down, while permitting small chairs to be anyorientation. The entry may be either the number 1, 2, 4 or 6. A click on the "Show Me..." button atthe column head reveals the following image in order to explain what these orientations mean.
CargoWiz User's Guide (PDF Version of the CargoWiz Help File)
8 / 62
If you choose 1-Way the cargo will be held as shown in the grid, that is, the width will be in thecross-truck direction. Selecting 1-Way brings up the "Choose Orientation to be held" graphicdialog box. If you select a new orientation it will swap the values in the grid as needed.

CargoWiz User's Guide (PDF Version of the CargoWiz Help File)
9 / 62
Description
Not Required, but usually filled in.
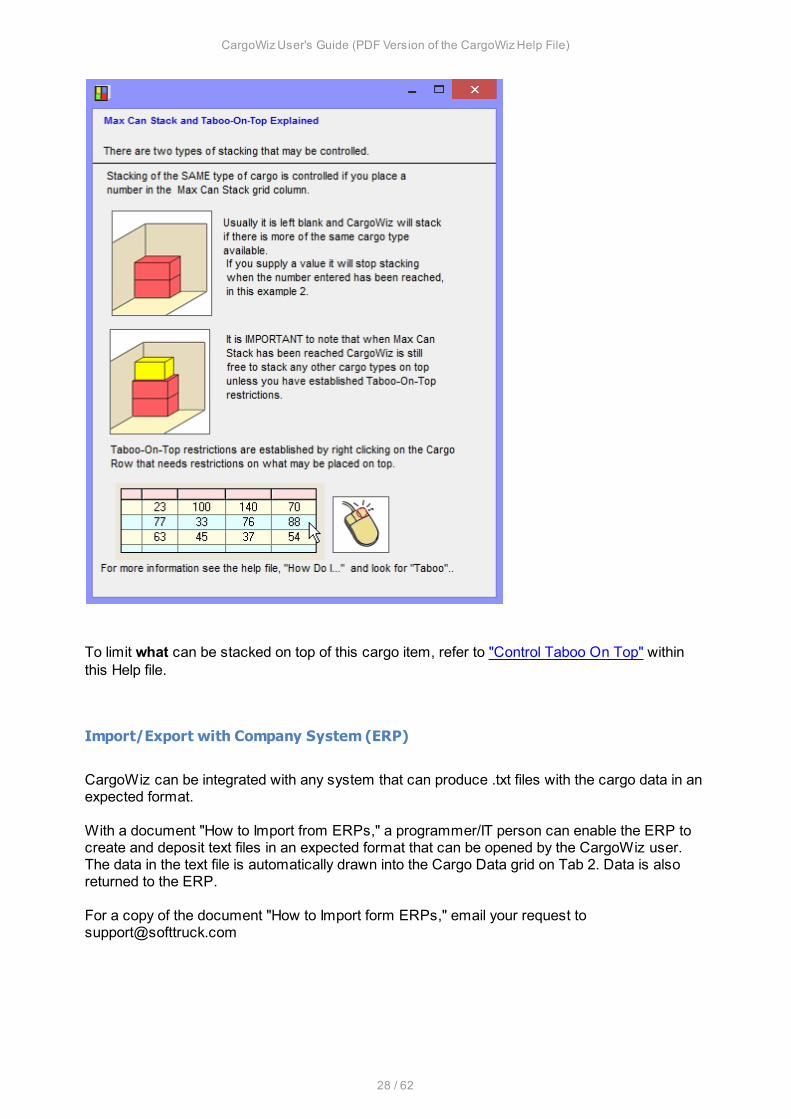
Max Can Stack
Not Required. Most users let the program figure out how many will fit without going through theroof. But there are also many situations where there are compression loading weight concerns.
Max Can Stack refers to the number of identical cargo items that can be stacked, including thebase cargo item. So a Max Can Stack of 3 means there will be a total of 3 items in the stack.
Click on the "Show Me" button in the Max Can Stack column heading to access a full description.
Note that if a Max Can Stack value is set, and that value is accomplished in the load plangenerated, other types of cargo may be placed on top unless specifically prohibited by setting"Taboo-On-Top" for this cargo. Use this link for more about Taboo-On-Top.
Bottom Only
CargoWiz User's Guide (PDF Version of the CargoWiz Help File)
10 / 62
Not Required. Usually left unchecked. If checked the cargo will only be loaded on the floor(bottom) of the truck/container. Note that other cargo items may be stacked on top of it unlesslimited using Taboo-On-Top" for this cargo. About Taboo-On-Top
Loading Priority or Group
Not Required. This permits control of the loading order, as might be useful for a distributor withmultiple stops. More than one row may be given the same priority number to create groups withthe same loading priority.
Weight
Not Required. If used, usually even numbers are entered, but decimals are accepted.
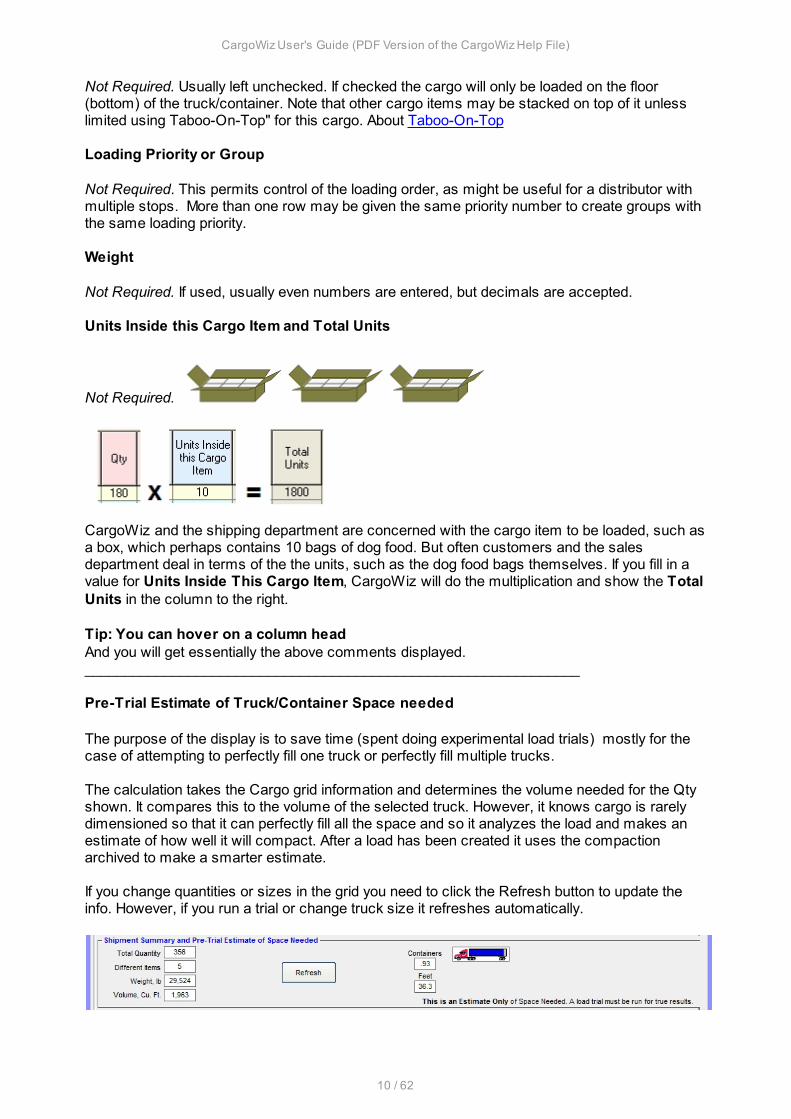
Units Inside this Cargo Item and Total Units
Not Required.
CargoWiz and the shipping department are concerned with the cargo item to be loaded, such asa box, which perhaps contains 10 bags of dog food. But often customers and the salesdepartment deal in terms of the the units, such as the dog food bags themselves. If you fill in avalue for Units Inside This Cargo Item, CargoWiz will do the multiplication and show the TotalUnits in the column to the right.
Tip: You can hover on a column headAnd you will get essentially the above comments displayed.______________________________________________________________
Pre-Trial Estimate of Truck/Container Space needed
The purpose of the display is to save time (spent doing experimental load trials) mostly for thecase of attempting to perfectly fill one truck or perfectly fill multiple trucks.
The calculation takes the Cargo grid information and determines the volume needed for the Qtyshown. It compares this to the volume of the selected truck. However, it knows cargo is rarelydimensioned so that it can perfectly fill all the space and so it analyzes the load and makes anestimate of how well it will compact. After a load has been created it uses the compactionarchived to make a smarter estimate.
If you change quantities or sizes in the grid you need to click the Refresh button to update theinfo. However, if you run a trial or change truck size it refreshes automatically.

CargoWiz User's Guide (PDF Version of the CargoWiz Help File)
11 / 62
Tab 3. Create a Load Plan
These operations are performed on the "Load Container " (or "Load Truck" or "LoadPallet") tab.
For simplicity, the examples here are for a container. Loading a Truck or Pallet works the sameway unless noted.
Generally, the container and cargo information having been established, you just click the "Loador Reload First Container" button.
What to Do Next
Users have different goals:
A. Fill one container as tightly as possible, with the freedom to vary the cargo.
In this case, make quantity adjustments by returning to the cargo tab, then try again.
B. Use multiple containers as needed. In this case, if there is left out cargo from theprevious load plan, the "Load Next Container " button becomes available. Clicking it continueswith another container. It may be of different size if you change it before loading.
When the load is complete you may print a report. (Menu bar - "Reports")
For more information on reports available from CargoWiz, follow this link to the "Reports" sectionof the Help File.
How to See More:
CargoWiz User's Guide (PDF Version of the CargoWiz Help File)
12 / 62
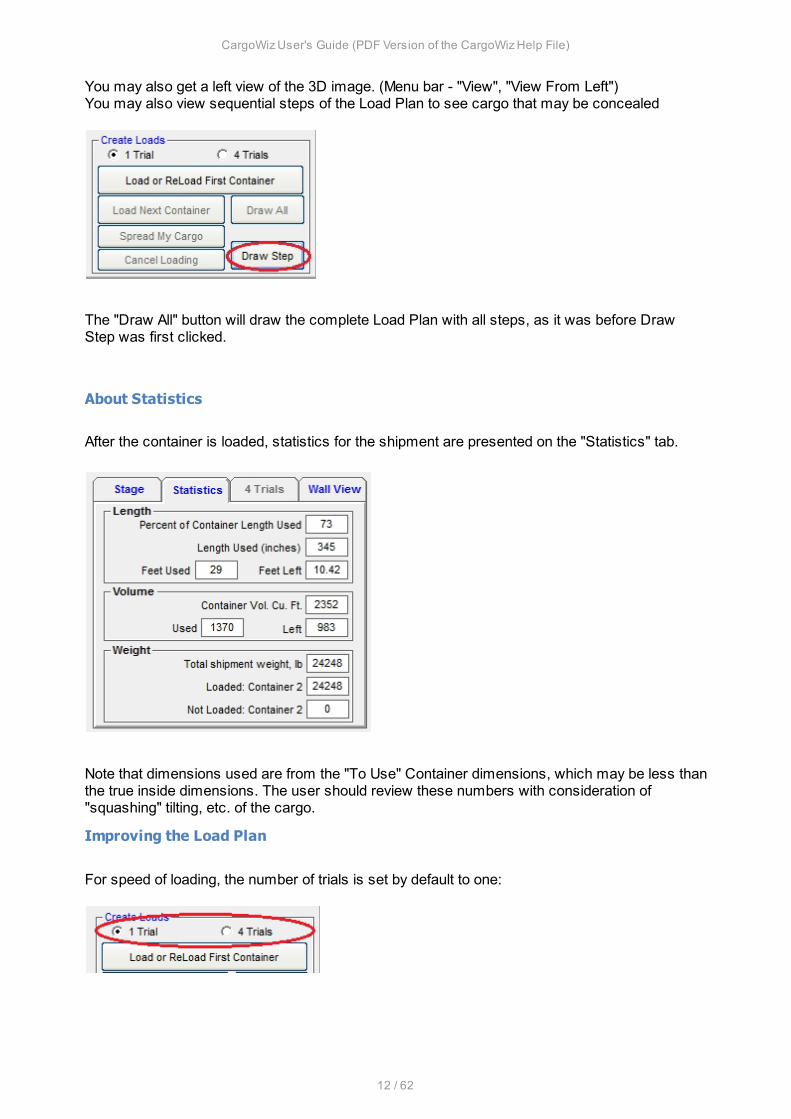
You may also get a left view of the 3D image. (Menu bar - "View", "View From Left")You may also view sequential steps of the Load Plan to see cargo that may be concealed
The "Draw All" button will draw the complete Load Plan with all steps, as it was before DrawStep was first clicked.
About Statistics
After the container is loaded, statistics for the shipment are presented on the "Statistics" tab.
Note that dimensions used are from the "To Use" Container dimensions, which may be less thanthe true inside dimensions. The user should review these numbers with consideration of"squashing" tilting, etc. of the cargo.
Improving the Load Plan
For speed of loading, the number of trials is set by default to one:
CargoWiz User's Guide (PDF Version of the CargoWiz Help File)
13 / 62
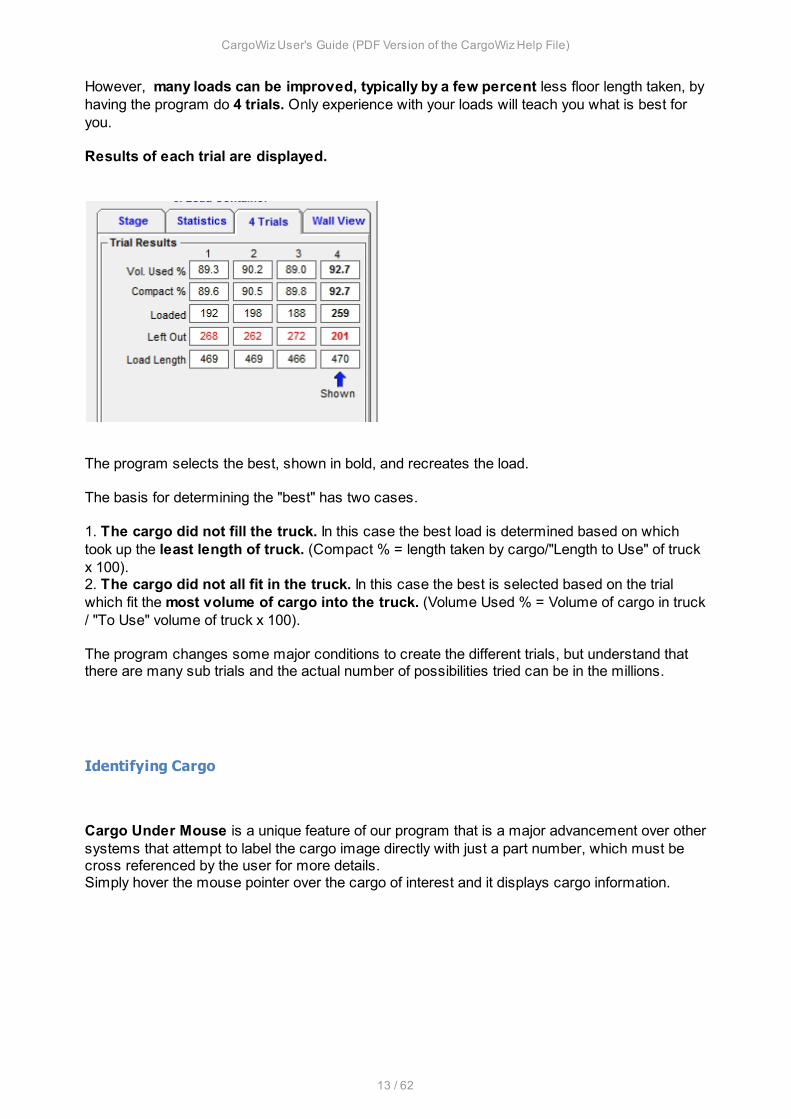
However, many loads can be improved, typically by a few percent less floor length taken, byhaving the program do 4 trials. Only experience with your loads will teach you what is best foryou. Results of each trial are displayed.
The program selects the best, shown in bold, and recreates the load.
The basis for determining the "best" has two cases.
1. The cargo did not fill the truck. In this case the best load is determined based on whichtook up the least length of truck. (Compact % = length taken by cargo/"Length to Use" of truckx 100).2. The cargo did not all fit in the truck. In this case the best is selected based on the trialwhich fit the most volume of cargo into the truck. (Volume Used % = Volume of cargo in truck/ "To Use" volume of truck x 100).
The program changes some major conditions to create the different trials, but understand thatthere are many sub trials and the actual number of possibilities tried can be in the millions.
Identifying Cargo
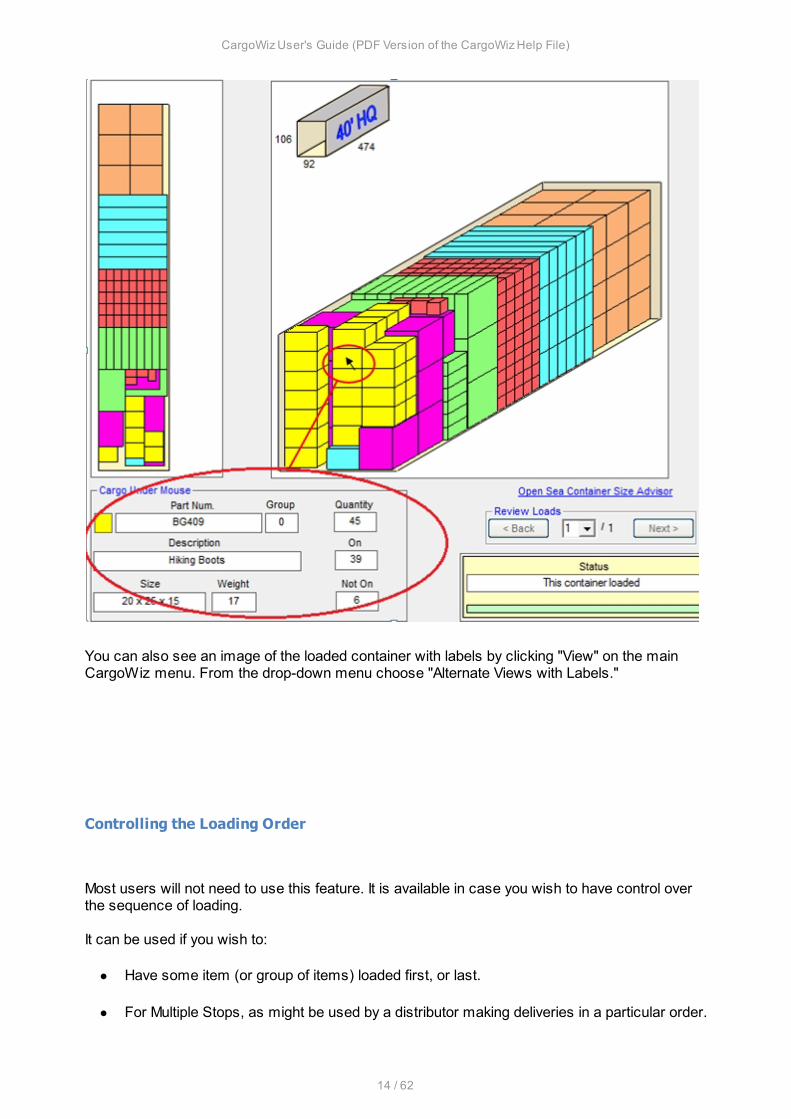
Cargo Under Mouse is a unique feature of our program that is a major advancement over othersystems that attempt to label the cargo image directly with just a part number, which must becross referenced by the user for more details.Simply hover the mouse pointer over the cargo of interest and it displays cargo information.
CargoWiz User's Guide (PDF Version of the CargoWiz Help File)
14 / 62
You can also see an image of the loaded container with labels by clicking "View" on the mainCargoWiz menu. From the drop-down menu choose "Alternate Views with Labels."
Controlling the Loading Order
Most users will not need to use this feature. It is available in case you wish to have control overthe sequence of loading.
It can be used if you wish to:
· Have some item (or group of items) loaded first, or last.
· For Multiple Stops, as might be used by a distributor making deliveries in a particular order.
CargoWiz User's Guide (PDF Version of the CargoWiz Help File)
15 / 62
· To Prioritize, thus making sure some items are not left out of the load if space isinsufficient for all items.
· To create "fillers" to take up any available space. By having the last group contain anabundance of small items, and by setting "Mix" (with previously loaded items, the smallitems will take up any available space.
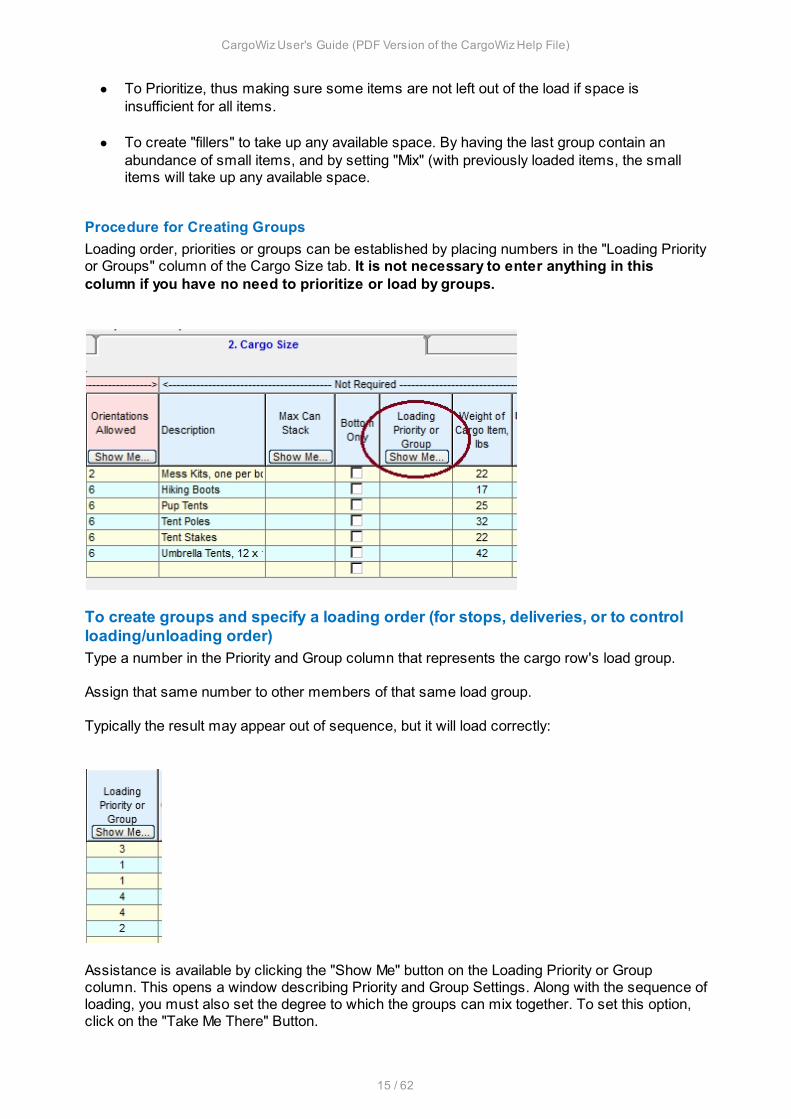
Procedure for Creating Groups
Loading order, priorities or groups can be established by placing numbers in the "Loading Priorityor Groups" column of the Cargo Size tab. It is not necessary to enter anything in thiscolumn if you have no need to prioritize or load by groups.
To create groups and specify a loading order (for stops, deliveries, or to controlloading/unloading order)Type a number in the Priority and Group column that represents the cargo row's load group.
Assign that same number to other members of that same load group.
Typically the result may appear out of sequence, but it will load correctly:
Assistance is available by clicking the "Show Me" button on the Loading Priority or Groupcolumn. This opens a window describing Priority and Group Settings. Along with the sequence ofloading, you must also set the degree to which the groups can mix together. To set this option,click on the "Take Me There" Button.

CargoWiz User's Guide (PDF Version of the CargoWiz Help File)
16 / 62
The "Take Me There" button will open the Options window for controlling how groups may mix.
Controlling How Groups May Mix
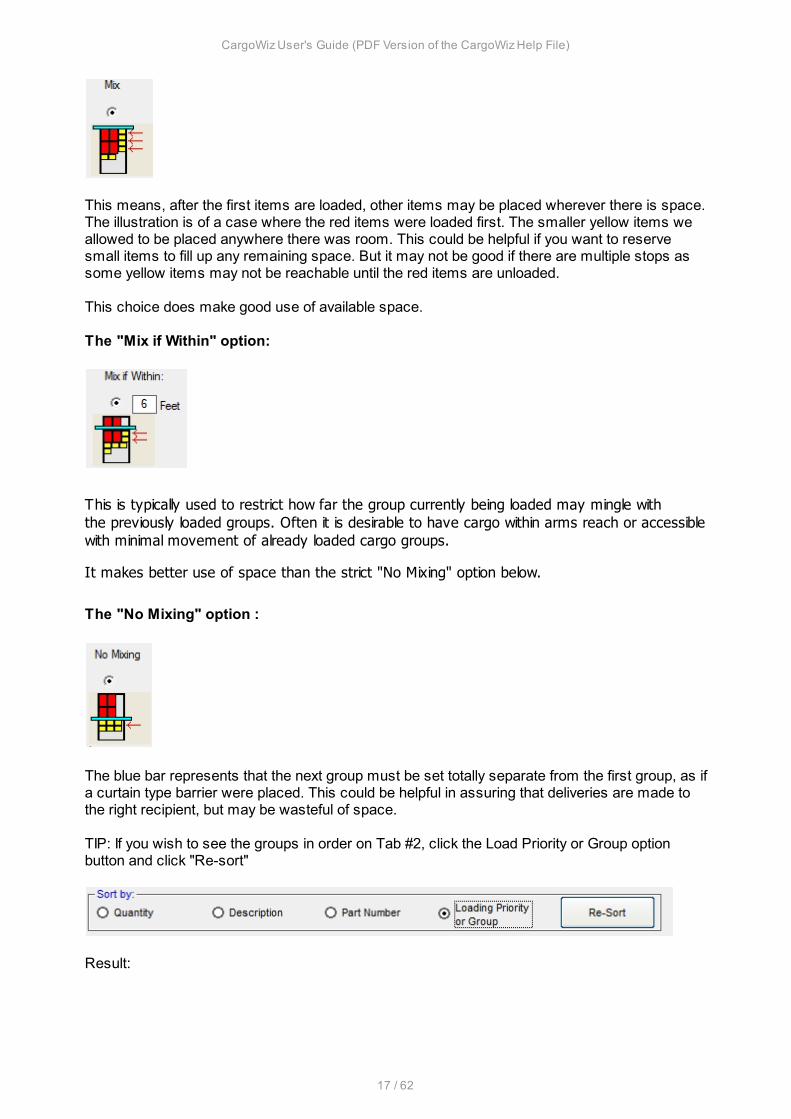
The "Mix" option:
CargoWiz User's Guide (PDF Version of the CargoWiz Help File)
17 / 62
This means, after the first items are loaded, other items may be placed wherever there is space.The illustration is of a case where the red items were loaded first. The smaller yellow items weallowed to be placed anywhere there was room. This could be helpful if you want to reservesmall items to fill up any remaining space. But it may not be good if there are multiple stops assome yellow items may not be reachable until the red items are unloaded.
This choice does make good use of available space. The "Mix if Within" option:
This is typically used to restrict how far the group currently being loaded may mingle withthe previously loaded groups. Often it is desirable to have cargo within arms reach or accessiblewith minimal movement of already loaded cargo groups.
It makes better use of space than the strict "No Mixing" option below.
The "No Mixing" option :
The blue bar represents that the next group must be set totally separate from the first group, as ifa curtain type barrier were placed. This could be helpful in assuring that deliveries are made tothe right recipient, but may be wasteful of space.
TIP: If you wish to see the groups in order on Tab #2, click the Load Priority or Group optionbutton and click "Re-sort"
Result:
CargoWiz User's Guide (PDF Version of the CargoWiz Help File)
18 / 62
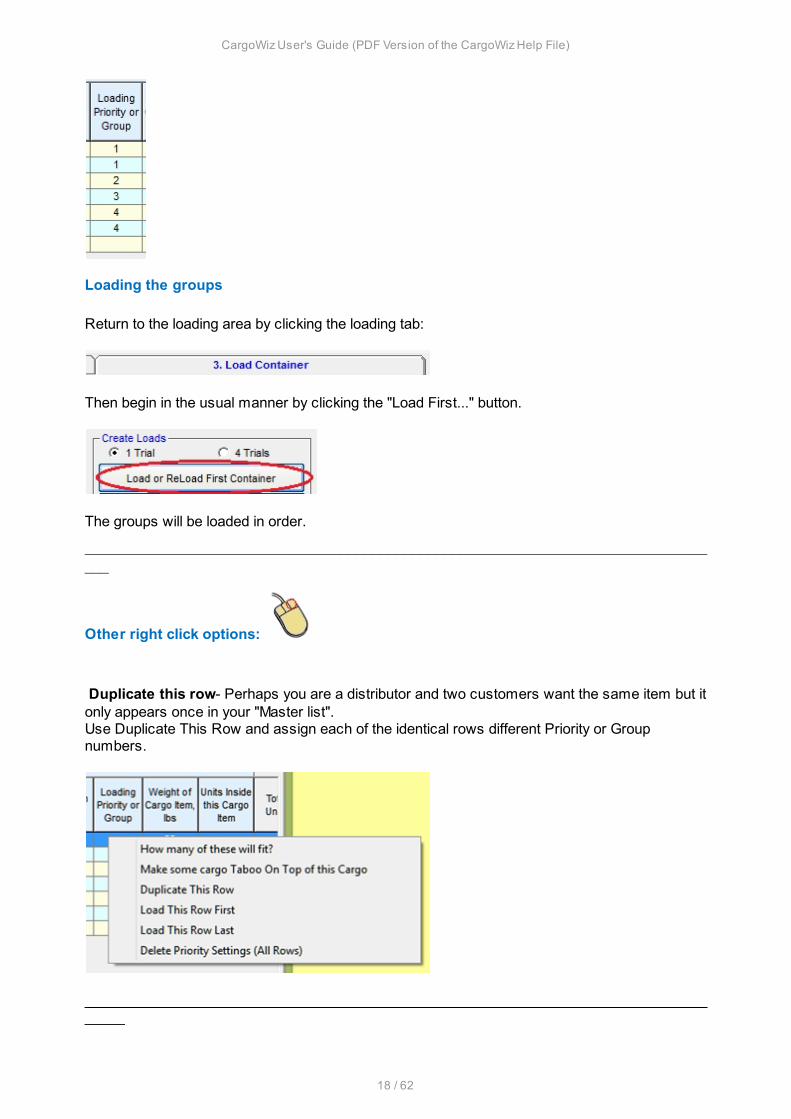
Loading the groups
Return to the loading area by clicking the loading tab:
Then begin in the usual manner by clicking the "Load First..." button.
The groups will be loaded in order.
_________________________________________________________________________________
Other right click options:
Duplicate this row- Perhaps you are a distributor and two customers want the same item but itonly appears once in your "Master list".Use Duplicate This Row and assign each of the identical rows different Priority or Groupnumbers.
___________________________________________________________________________________
CargoWiz User's Guide (PDF Version of the CargoWiz Help File)
19 / 62
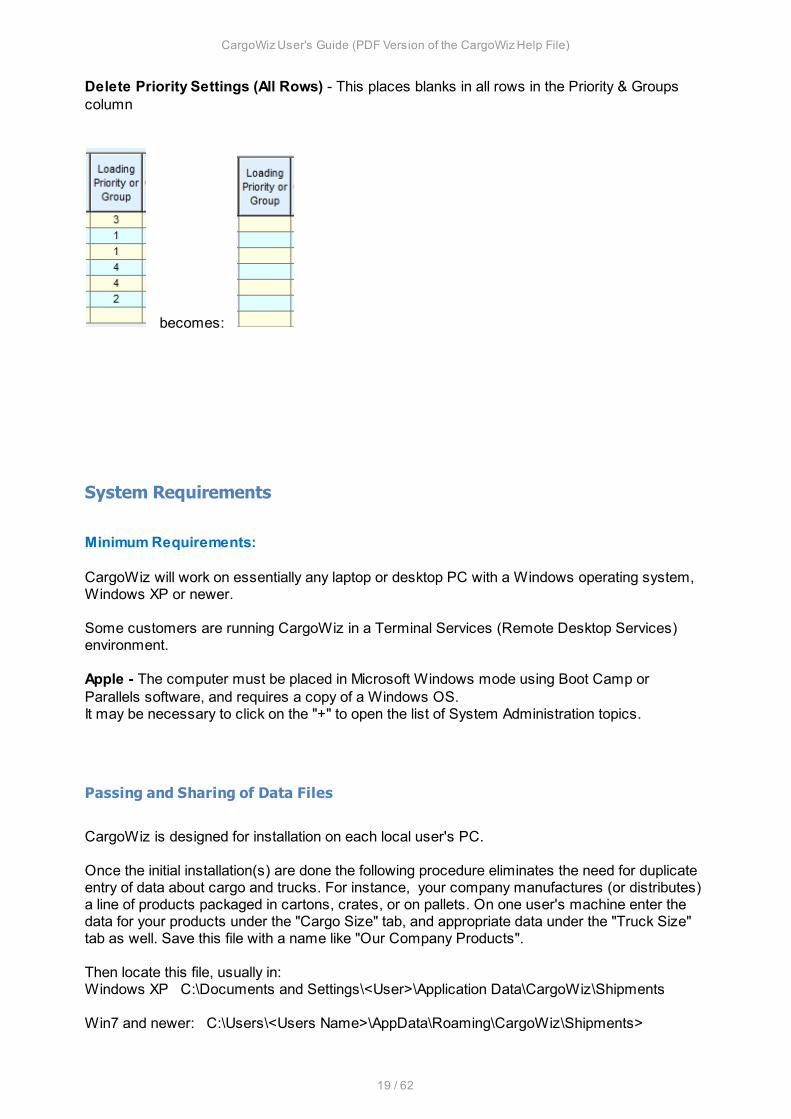
Delete Priority Settings (All Rows) - This places blanks in all rows in the Priority & Groupscolumn
becomes:
System Requirements
Minimum Requirements:
CargoWiz will work on essentially any laptop or desktop PC with a Windows operating system,Windows XP or newer.
Some customers are running CargoWiz in a Terminal Services (Remote Desktop Services)environment.
Apple - The computer must be placed in Microsoft Windows mode using Boot Camp orParallels software, and requires a copy of a Windows OS.It may be necessary to click on the "+" to open the list of System Administration topics.
Passing and Sharing of Data Files
CargoWiz is designed for installation on each local user's PC.
Once the initial installation(s) are done the following procedure eliminates the need for duplicateentry of data about cargo and trucks. For instance, your company manufactures (or distributes) a line of products packaged in cartons, crates, or on pallets. On one user's machine enter thedata for your products under the "Cargo Size" tab, and appropriate data under the "Truck Size"tab as well. Save this file with a name like "Our Company Products".
Then locate this file, usually in:Windows XP C:\Documents and Settings\<User>\Application Data\CargoWiz\Shipments
Win7 and newer: C:\Users\<Users Name>\AppData\Roaming\CargoWiz\Shipments>

CargoWiz User's Guide (PDF Version of the CargoWiz Help File)
20 / 62
and transfer it to the Shipments folder of the other users, which they can then open. Transfercan be by copy and paste on a network, an email attachment, memory stick or other means.
Should your company add, change, or delete products this same procedure can be repeated.
Save to Shared Folder or LocationAn alternative is to save the cargo data in a shared folder or on a shared drive. Then each usercan change the default location where shipment files will be accessed and saved.
To change the default location click "Options" on the main CargoWiz toolbar.
Choose "File Locations." Browse to the desired location and click the "Apply" button. Choose"Done."
Once the file location is set on the individual user's desktop, they will access the database andtheir shipment files will be saved to that location.
Tour, Tips, and FAQ's
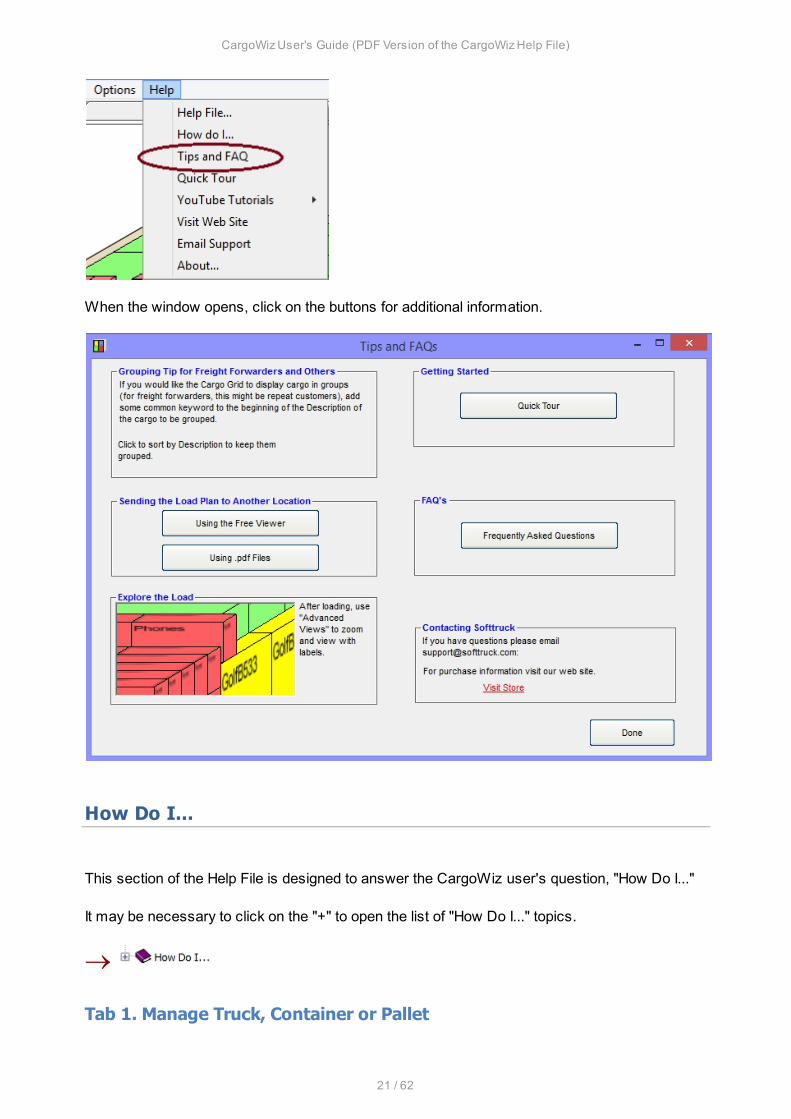
These topics are accessed from the Help drop-down on the main toolbar.
CargoWiz User's Guide (PDF Version of the CargoWiz Help File)
21 / 62
When the window opens, click on the buttons for additional information.
How Do I...
This section of the Help File is designed to answer the CargoWiz user's question, "How Do I..."
It may be necessary to click on the "+" to open the list of "How Do I..." topics.
®
Tab 1. Manage Truck, Container or Pallet

CargoWiz User's Guide (PDF Version of the CargoWiz Help File)
22 / 62
This section of the Help File is designed to answer the CargoWiz user's questions regardinghow to manage the truck, container or pallet.
It may be necessary to click on the "+" to open the list of Tab 1. Manage Truck, Container orPallet topics.
®Set Weight Limit
You can set a maximum weight limit per container, truck or pallet for your load. Here are thesteps.
In CargoWiz, click on Options in the top toolbar and the Options window will open. In that windowchoose Weight Limit.
On the center panel of the window, click the button for USE maximum cargo weight limits. Clickthe "Done" button. Now the "Maximum Cargo Weights" column will be shown on Tab 1.
You can set or change the desired weight in the Maximum Cargo Weight column on Tab 1. Once set, the weight limit will be saved for that truck or container.

CargoWiz User's Guide (PDF Version of the CargoWiz Help File)
23 / 62
Note: If you choose the button "DO NOT USE maximum cargo weight limits," the MaximumCargo Weight column will not appear on the Tab 1 Truck and Container grid.
Add Truck, Container or Pallet to Truck Grid
You can use the truck sizes built into CargoWiz or add your own. This is explained in the HelpSection. To see how, follow the link provided below.
1. Truck/Container Data
Adding Alternative Truck Styles
Flat RackCargoWiz can be used to load flat racks, although it was not designed with that use in mind.
The primary method, would be to create a truck with an expanded width to accommodate thesize of the cargo to fit on the flat rack. Example: for over-width cargo, the process is:· Create a Flat Rack on tab #1 by adding it in the last, vacant, row. You can use standard flat
rack dimensions to begin with.· If the case is over-width cargo, then increase the width so the over-width cargo will fit.
· Proceed to load, probably best done using “Drag Cargo” on the menu in order to open theDrag and Drop editor.
Of course the image will not look like a flat rack with overhang, but it does help in determiningwhat will fit on the flat rack.
Multiple Level Trucks (Drop Deck Trailer)Although drop deck trailers are not built into CargoWiz, it can be done with an extra step on thepart of the user. You can make separate “trucks” for each level by putting your own dimensionsin the grid on tab #1. When one has loaded, go to tab #1 and select the next one, then back totab #3 to load.
If there is just one high, short area up front you might try creating a dummy cargo that goes infirst, just fits and leaves the right head room. You can give the dummy piece a Priority 1 on theTab 2 Cargo Grid. That will insure that it is loaded first. For this approach you would have torecognize that the “dummy” piece is not actual cargo.
Tab 2. Manage Cargo
This section of the Help File is designed to answer the CargoWiz user's questions regardinghow to manage cargo.
CargoWiz User's Guide (PDF Version of the CargoWiz Help File)
24 / 62
It may be necessary to click on the "+" to open the list of "Tab 2. Manage Cargo" topics.
®Import From Excel
This is discussed in this topic:
Avoid Typing in all My Cargo Info
Avoid Typing in all My Cargo Info
Many users, like manufacturers, need only put their data into CargoWiz once, then change thequantity of an item to non-zero if it is on a particular shipment. The initial entry of data can be a big job and so we have built-in assistance for a "Copy andPaste" type of procedure to quickly bring in data from another source such as an Excelspreadsheet.
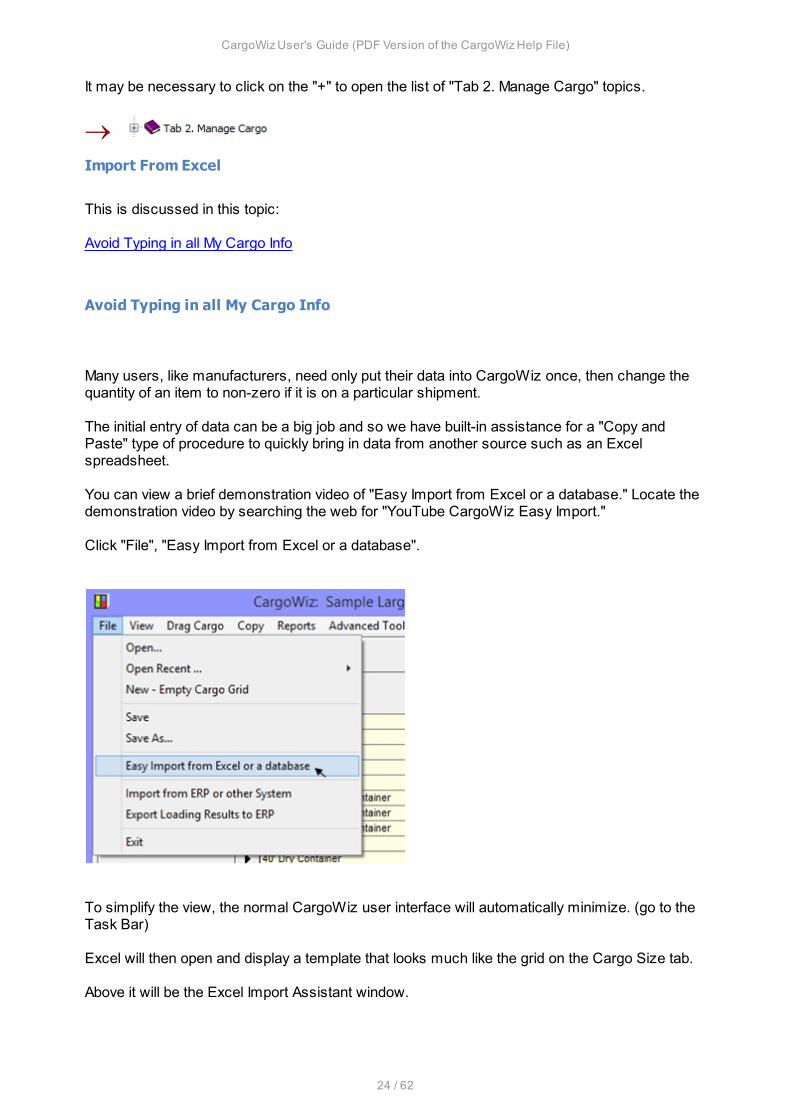
You can view a brief demonstration video of "Easy Import from Excel or a database." Locate thedemonstration video by searching the web for "YouTube CargoWiz Easy Import." Click "File", "Easy Import from Excel or a database".
To simplify the view, the normal CargoWiz user interface will automatically minimize. (go to theTask Bar)
Excel will then open and display a template that looks much like the grid on the Cargo Size tab.
Above it will be the Excel Import Assistant window.

CargoWiz User's Guide (PDF Version of the CargoWiz Help File)
25 / 62
Only the first 3 columns, Length, Width, and Height, are required in order to make it quick andeasy for those like freight forwarders who may be unconcerned about the other data.
Tip: To choose "Bottom Only" in the Excel Import Assistant, type the word TRUE in the Excelcell.
Avoid Chopped-Off Part Numbers or Descriptions
Make Cargo Columns Wider
If your Part Number or Description is partially cut off you may widen the column by moving themouse pointer to the column divider in the header. It will turn into a double headed arrow. Withthe left mouse button pressed you can move the divider by dragging.
This may cause columns on the right to move out of view but they can be brought back by usingthe horizontal scroll bar that automatically appears.
Control Turning and Tipping of Cargo
This is controlled by a grid setting:
For more information, follow this link to "Cargo Orientations Allowed."

CargoWiz User's Guide (PDF Version of the CargoWiz Help File)
26 / 62
Control Taboo On Top
Taboo On Top
You may easily prevent the loading of, perhaps heavy, cargo on cargo that may not support it, byestablishing taboo relationships.Right click the row containing the lower cargo:
Choose "Make some cargo Taboo On Top of this Cargo. The Taboo On Top window will open:
Check boxes as needed to prevent the the checked cargo from being loaded on top of the lowercargo.
CargoWiz User's Guide (PDF Version of the CargoWiz Help File)
27 / 62
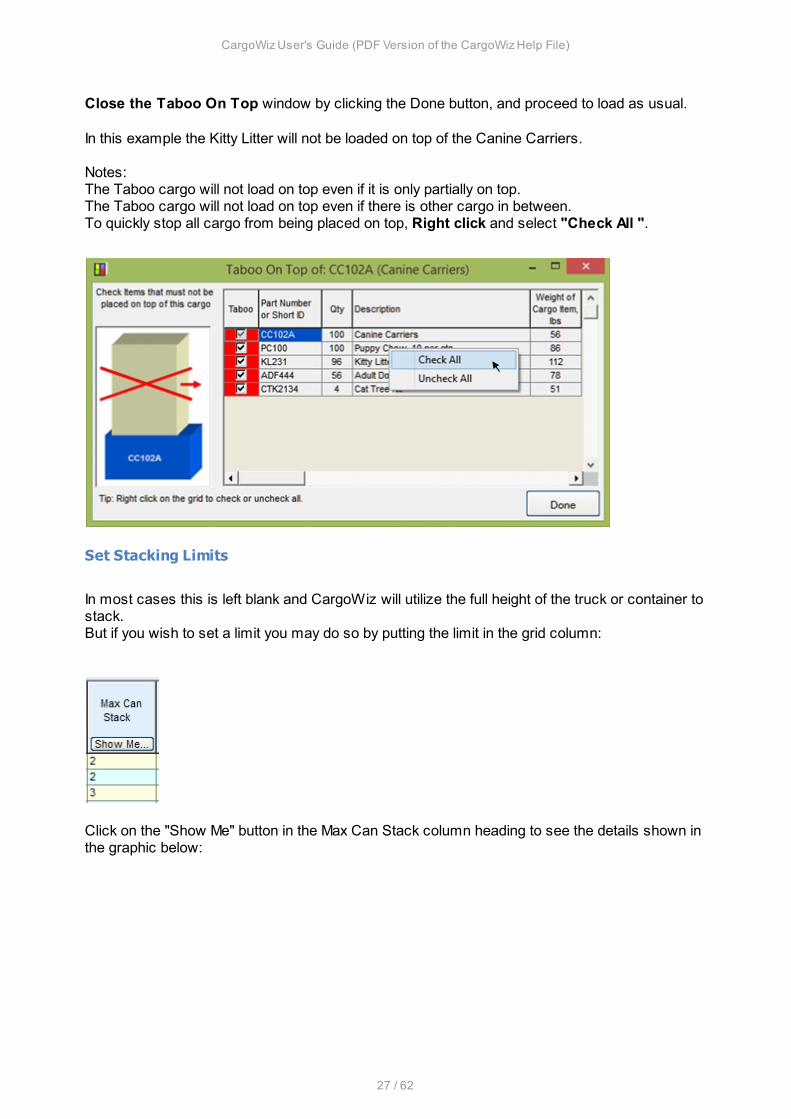
Close the Taboo On Top window by clicking the Done button, and proceed to load as usual.
In this example the Kitty Litter will not be loaded on top of the Canine Carriers.
Notes:The Taboo cargo will not load on top even if it is only partially on top.The Taboo cargo will not load on top even if there is other cargo in between.To quickly stop all cargo from being placed on top, Right click and select "Check All ".
Set Stacking Limits
In most cases this is left blank and CargoWiz will utilize the full height of the truck or container tostack.But if you wish to set a limit you may do so by putting the limit in the grid column:
Click on the "Show Me" button in the Max Can Stack column heading to see the details shown inthe graphic below:
CargoWiz User's Guide (PDF Version of the CargoWiz Help File)
28 / 62
To limit what can be stacked on top of this cargo item, refer to "Control Taboo On Top" withinthis Help file.
Import/Export with Company System (ERP)
CargoWiz can be integrated with any system that can produce .txt files with the cargo data in anexpected format.
With a document "How to Import from ERPs," a programmer/IT person can enable the ERP tocreate and deposit text files in an expected format that can be opened by the CargoWiz user.The data in the text file is automatically drawn into the Cargo Data grid on Tab 2. Data is alsoreturned to the ERP.
For a copy of the document "How to Import form ERPs," email your request [email protected]

CargoWiz User's Guide (PDF Version of the CargoWiz Help File)
29 / 62
Tab 3. Load Container, Truck or Pallet
This section of the Help File is designed to answer the CargoWiz user's questions regardinghow to load the container, truck or pallet.
It may be necessary to click on the "+" to open the list of Tab 3. Load Container, Truck or Pallettopics.
®Load For Stops or Deliveries
Information on loading for Stops or Deliveries can be found using the link below:
"Controlling the Loading Order"
Control the Loading Sequence
Information on Controlling the Loading Sequence can be found using the link below:
"Controlling the Loading Order"
Force a Cargo Item to be Loaded First
To Specify some Cargo to be loaded first or last:

CargoWiz User's Guide (PDF Version of the CargoWiz Help File)
30 / 62
Click the right mouse button anywhere in the row and select from the drop-down listwith a left button click.
To set more complex loading sequence rules, such as loading for multiple stops or settingloading priorities, see:
"Controlling the Loading Order"
See Part Number Labels on Cargo
You may explore the load once it is created by going to "Alternate Views with Labels."
This will open the Advanced Views Window shown below. Here you can zoom in and out, rotateand translate the view. You can also choose the label to be Part Number or Description.

CargoWiz User's Guide (PDF Version of the CargoWiz Help File)
31 / 62
Learn How Many Will Fit
Method #1:
One method is to try to create a load with somewhat more than you think will fit. (The "miniTrucks" in the Cargo Size tab give you a prediction).
After loading, look at this information on Tab 3:

CargoWiz User's Guide (PDF Version of the CargoWiz Help File)
32 / 62
The amount loaded is the amount that will fit. If you like you can then go to the Cargo Grid andput in the exact fit quantity.
Method #2: How many of a specific cargo row will it take to fill the container?
Right click on the cargo row. From the drop-down box, choose "How many of these will fit." Thistells you how many of that cargo item it would take to fill the chosen container.
Container Advisor
Using the Open Sea Container Size Advisor
For assistance in determining which combination of containers to use, access the Open SeaContainer Size Advisor.
CargoWiz User's Guide (PDF Version of the CargoWiz Help File)
33 / 62
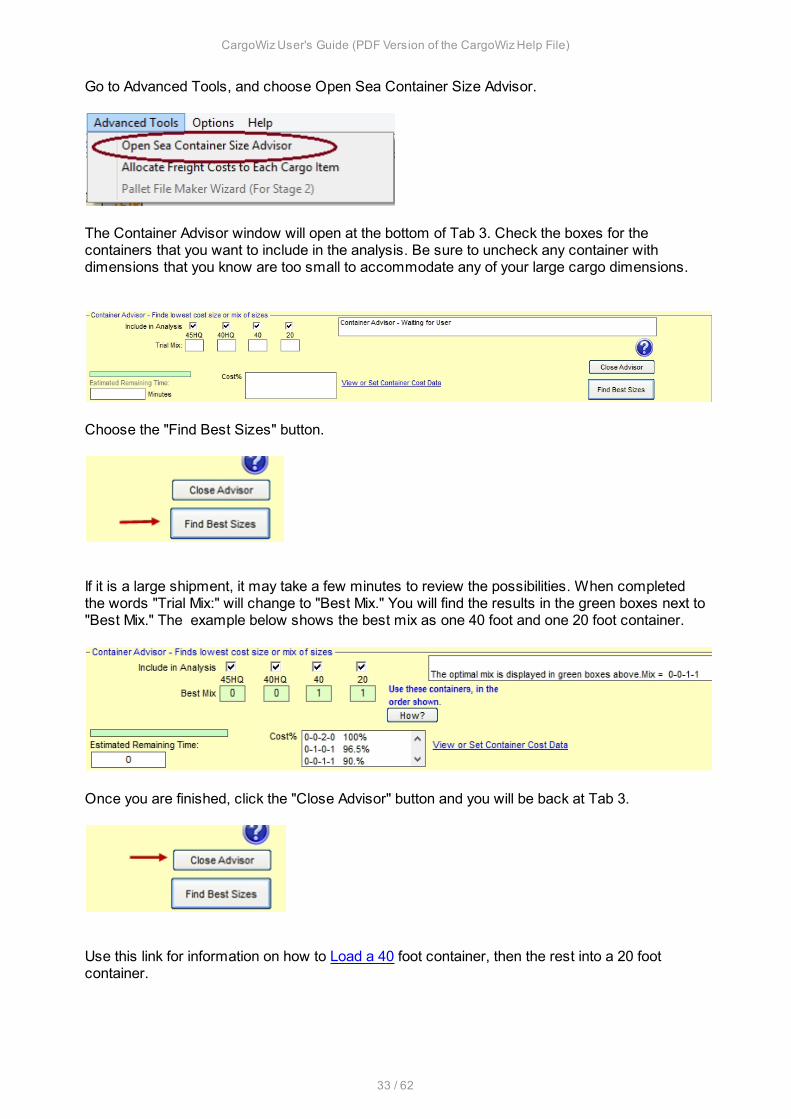
Go to Advanced Tools, and choose Open Sea Container Size Advisor.
The Container Advisor window will open at the bottom of Tab 3. Check the boxes for thecontainers that you want to include in the analysis. Be sure to uncheck any container withdimensions that you know are too small to accommodate any of your large cargo dimensions.
Choose the "Find Best Sizes" button.
If it is a large shipment, it may take a few minutes to review the possibilities. When completedthe words "Trial Mix:" will change to "Best Mix." You will find the results in the green boxes next to"Best Mix." The example below shows the best mix as one 40 foot and one 20 foot container.
Once you are finished, click the "Close Advisor" button and you will be back at Tab 3.
Use this link for information on how to Load a 40 foot container, then the rest into a 20 footcontainer.

CargoWiz User's Guide (PDF Version of the CargoWiz Help File)
34 / 62
Load a 40 foot, then the rest into a 20 foot truck or container
You may switch truck or container sizes when the load operation for one is complete.
For example, with a 40 foot container selected, click "Load First Container".
When that load plan has finished, if you wish the remainder to go in some other size, such as a20 foot container, go to tab #1 and click the size you want.
Then return to tab #3 and click "Load Next Container."
Drag and Drop Cargo
See the Drag and Drop feature in action. View a demonstration video by searching theweb for "YouTube CargoWiz Drag and Drop Demo."
Here's how it works.
1. Either have CargoWiz create a load layout (Load First Truck/Container Button) which you willmodify, or create the load entirely on your own. (Do not click the Load First Truck/ContainerButton)
Here it is loaded:

CargoWiz User's Guide (PDF Version of the CargoWiz Help File)
35 / 62
Next:
The current Window will close and the Editing Window will open.
Note: If your load has many cargo items this can be slow, so please be patient.

CargoWiz User's Guide (PDF Version of the CargoWiz Help File)
36 / 62
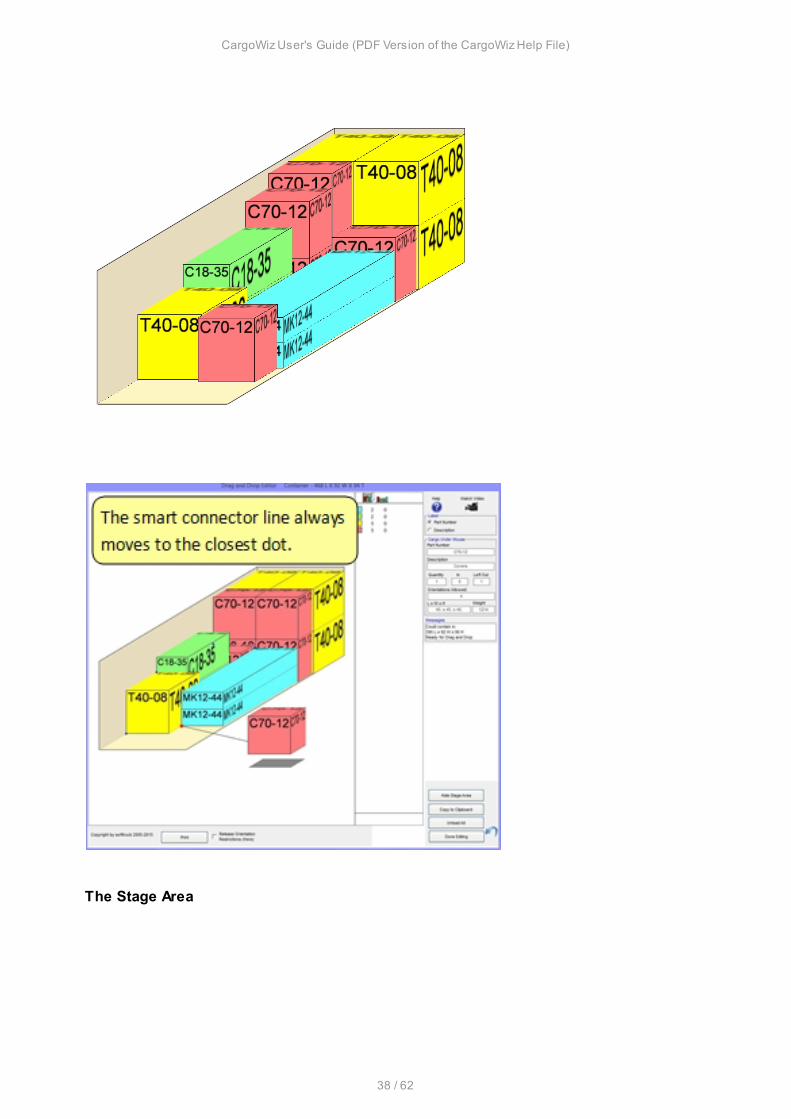
Click on Cargo to drag and move them:

CargoWiz User's Guide (PDF Version of the CargoWiz Help File)
37 / 62
CargoWiz User's Guide (PDF Version of the CargoWiz Help File)
38 / 62
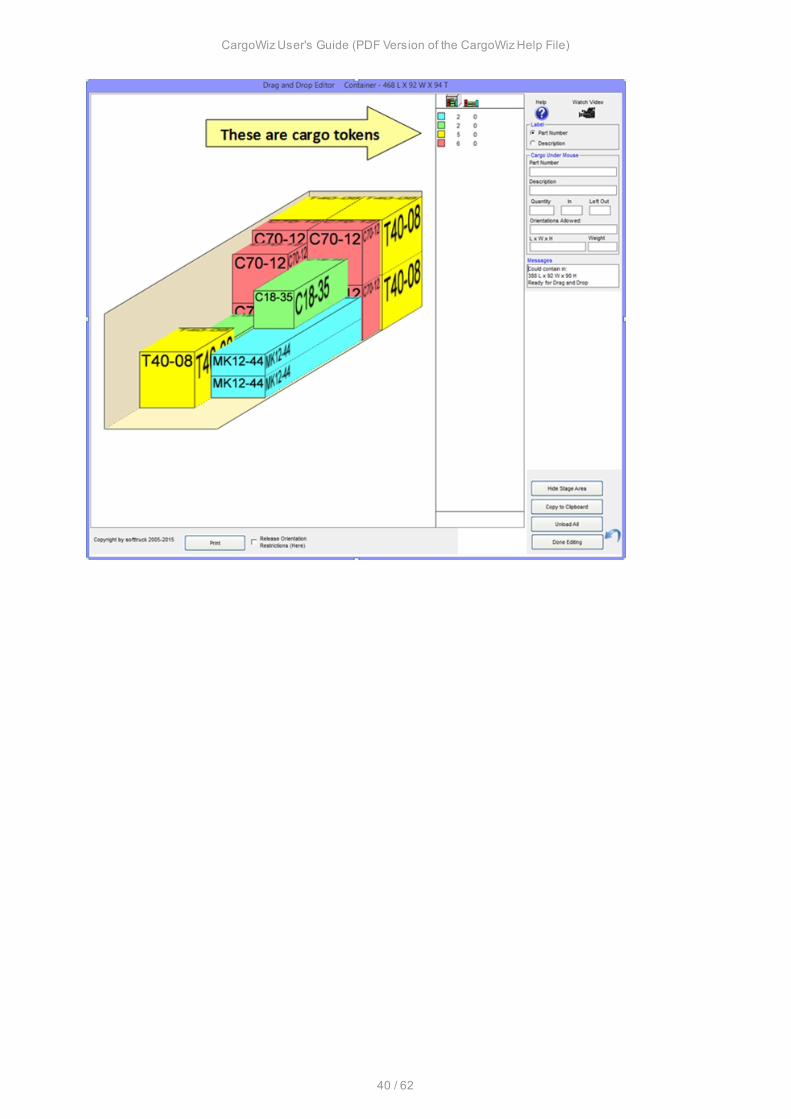
The Stage Area

CargoWiz User's Guide (PDF Version of the CargoWiz Help File)
39 / 62
CargoWiz User's Guide (PDF Version of the CargoWiz Help File)
40 / 62

CargoWiz User's Guide (PDF Version of the CargoWiz Help File)
41 / 62

CargoWiz User's Guide (PDF Version of the CargoWiz Help File)
42 / 62

CargoWiz User's Guide (PDF Version of the CargoWiz Help File)
43 / 62

CargoWiz User's Guide (PDF Version of the CargoWiz Help File)
44 / 62

CargoWiz User's Guide (PDF Version of the CargoWiz Help File)
45 / 62

CargoWiz User's Guide (PDF Version of the CargoWiz Help File)
46 / 62
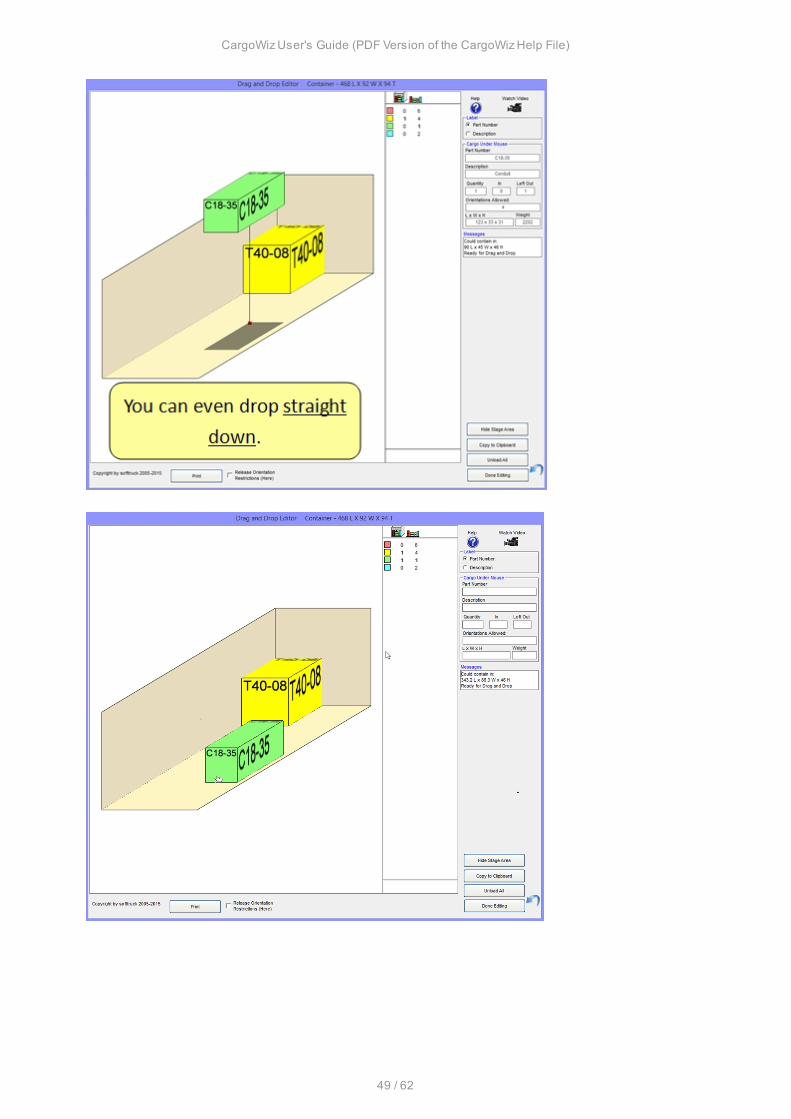
You can also drag from the truck back to the stage and the cargo will be a token again. Turning Cargo:

CargoWiz User's Guide (PDF Version of the CargoWiz Help File)
47 / 62
Let's turn the first item horizontally...

CargoWiz User's Guide (PDF Version of the CargoWiz Help File)
48 / 62
Here is the list of cargo placement options:
CargoWiz User's Guide (PDF Version of the CargoWiz Help File)
49 / 62

CargoWiz User's Guide (PDF Version of the CargoWiz Help File)
50 / 62
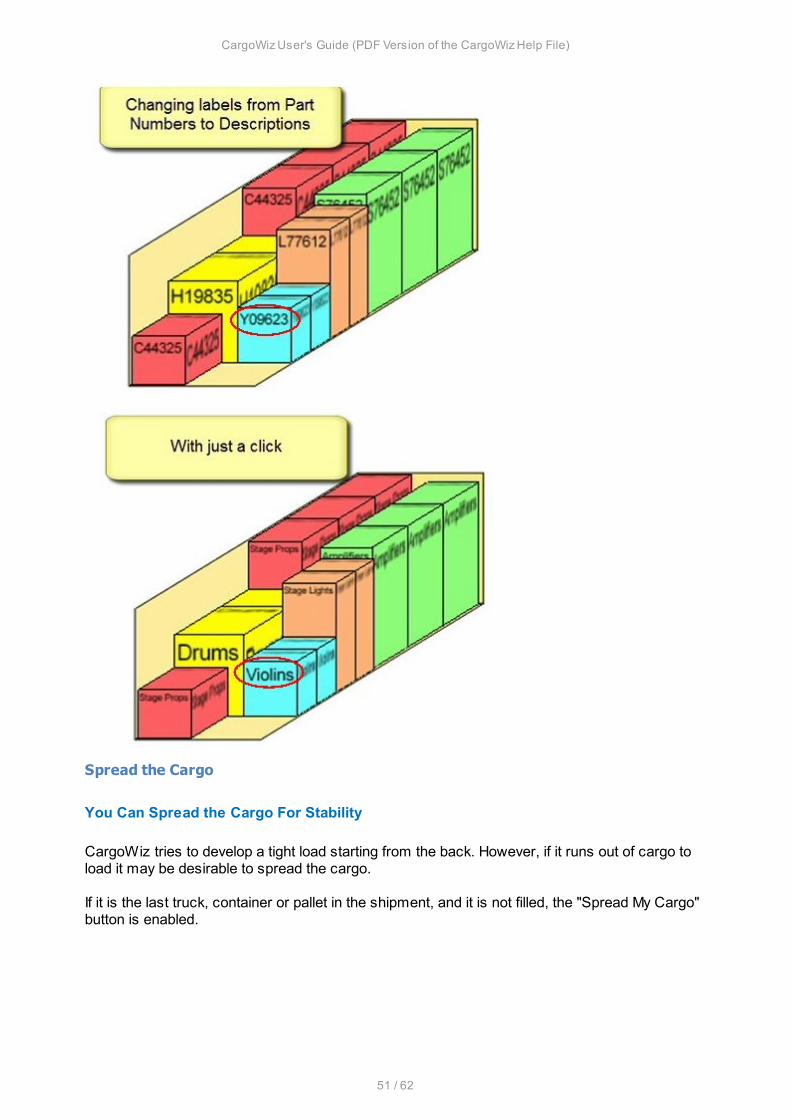
You may also chose between labeling with Part Numbers or Descriptions.
CargoWiz User's Guide (PDF Version of the CargoWiz Help File)
51 / 62
Spread the Cargo
You Can Spread the Cargo For Stability
CargoWiz tries to develop a tight load starting from the back. However, if it runs out of cargo toload it may be desirable to spread the cargo.
If it is the last truck, container or pallet in the shipment, and it is not filled, the "Spread My Cargo"button is enabled.

CargoWiz User's Guide (PDF Version of the CargoWiz Help File)
52 / 62
Load by ratio (Sets)
Perhaps you ship in sets and wish to send full containers or trucks that maintain the ratio ofitems that form a set, like each table has 4 chairs.
You would like to determine how many will fit, and how to load them.
Under Options, look for:
Select the Ratio option.
Then, in the Cargo Grid, enter the ratio of items in the set:

CargoWiz User's Guide (PDF Version of the CargoWiz Help File)
53 / 62
Click "Load First Truck/Container". CargoWiz will try to load a large number of sets, then tryfewer and fewer sets until it finds a solution with none left over.
Work With the CargoWiz Results
This section of the Help File is designed to answer questions regarding how to work with theCargoWiz results.
It may be necessary to click on the "+" to open the list of Work With the Cargo Results topics.
®Reports - Load Plan Report and Quick Shipment Summary
Load Plan - Details and Step-by-Step Report
After loading a container, Reports will be available on the CargoWiz main tool bar.
From the drop-down list, choose Print Load Plan - Details and Step-by-Step.
Choose to print just one load or the entire shipment (All Loads).
CargoWiz User's Guide (PDF Version of the CargoWiz Help File)
54 / 62
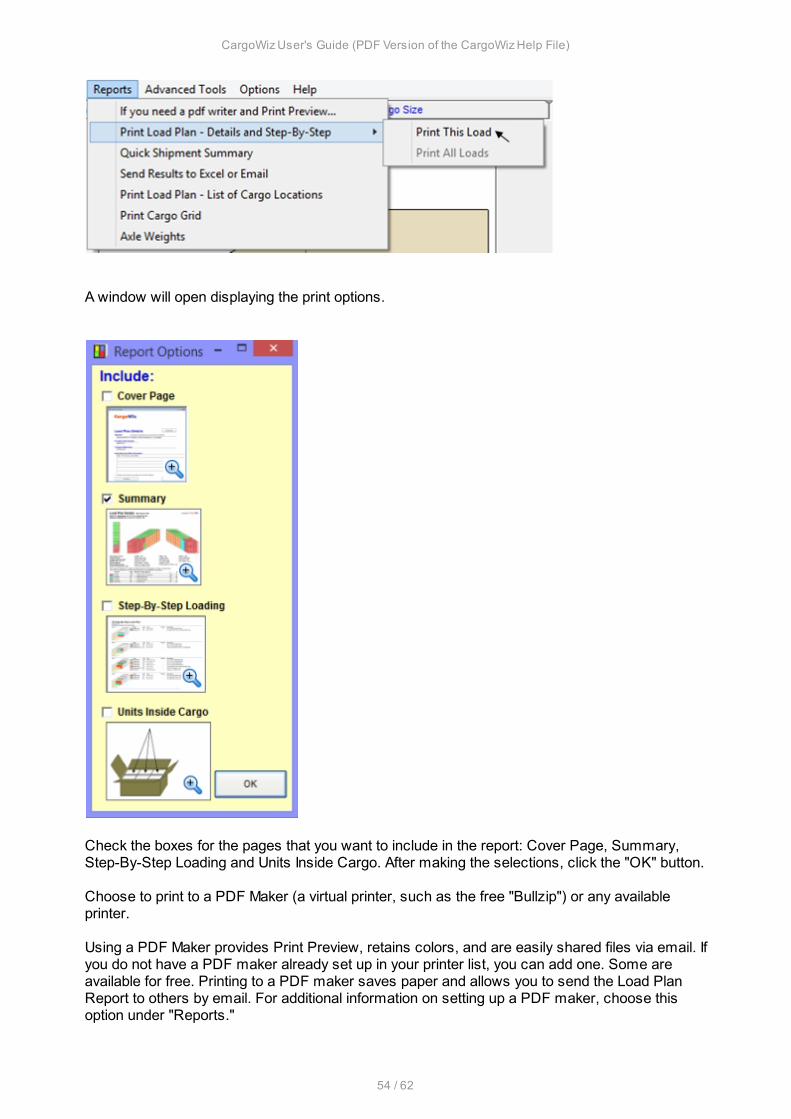
A window will open displaying the print options.
Check the boxes for the pages that you want to include in the report: Cover Page, Summary,Step-By-Step Loading and Units Inside Cargo. After making the selections, click the "OK" button.
Choose to print to a PDF Maker (a virtual printer, such as the free "Bullzip") or any availableprinter.
Using a PDF Maker provides Print Preview, retains colors, and are easily shared files via email. Ifyou do not have a PDF maker already set up in your printer list, you can add one. Some areavailable for free. Printing to a PDF maker saves paper and allows you to send the Load PlanReport to others by email. For additional information on setting up a PDF maker, choose thisoption under "Reports."

CargoWiz User's Guide (PDF Version of the CargoWiz Help File)
55 / 62
The customizable Cover Page allows you to add your own logo to the Cover Page.
The Summary page of the Load Plan - Details and Step-By-Step report provides statistics of theload. Subsequent pages provide images showing each step in the loading process.
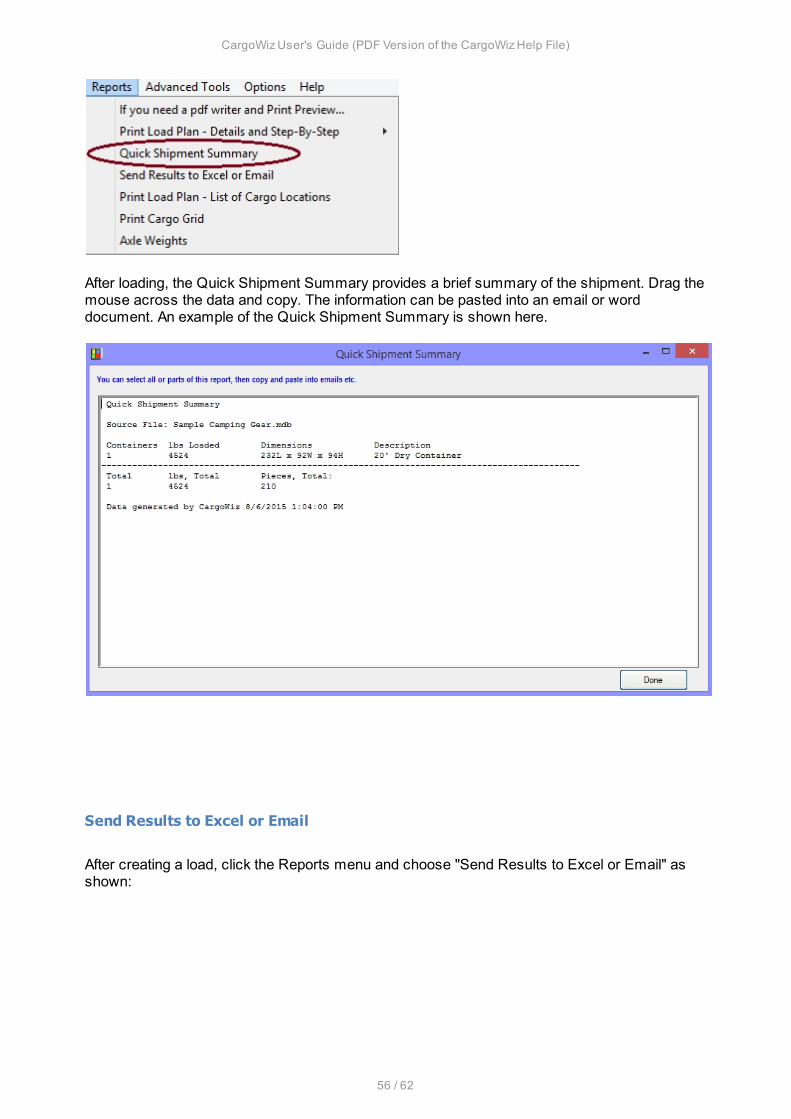
Quick Shipment Summary
CargoWiz User's Guide (PDF Version of the CargoWiz Help File)
56 / 62
After loading, the Quick Shipment Summary provides a brief summary of the shipment. Drag themouse across the data and copy. The information can be pasted into an email or worddocument. An example of the Quick Shipment Summary is shown here.
Send Results to Excel or Email
After creating a load, click the Reports menu and choose "Send Results to Excel or Email" asshown:

CargoWiz User's Guide (PDF Version of the CargoWiz Help File)
57 / 62
In the window that opens with grids, drag the mouse to select the data you want:
Then click this button:
In Excel, an email or other program, click where you want the data and then paste:
Print Cargo Grid
The Tab 2 Cargo Grid can be printed for use such as creating a picking ticket.
Go to Reports and choose "Print Cargo Grid."

CargoWiz User's Guide (PDF Version of the CargoWiz Help File)
58 / 62
A window will open with your Cargo Grid. Choose "File," then "Print."
Axle Weights
After creating a load plan the weight distribution may be examined. If there is room to shift theload, it can be adjusted here. Click "Axle Weights" on the Reports drop-down menu.
Note that the program algorithms do not consider the weight of a cargo item as they create theload plan, they are only concerned with a space-saving, compact plan. The information under theAxle Loads tab is a report of the result.

CargoWiz User's Guide (PDF Version of the CargoWiz Help File)
59 / 62
The load plan is built from the front of the trailer/container backwards. If there is room left, it ispossible to shift the load by left clicking in the yellow cargo area and dragging to the right. (It isnot possible to shift individual items, just the entire load.) The image below shows a resultingredistribution of the load.
The red arrow indicates the Center of Gravity of the load. It is the single point where the loaditself (without the trailer) could be picked up and be in balance. (This is slightly different than thecenter of gravity for the whole assembly that includes the empty trailer or container weight. Thisvalue is unreported.)
The calculated axle weights use default assumptions about the tare (trailer empty) weights of thetractor and of the trailer. If your case is significantly different you may wish to overwrite thevalues shown. The same is true for truck geometry items, like axle spacing and kingpin location.Changes are saved for future sessions.
The program creates a load plan without regard to safety considerations. It is the user'sresponsibility to make safety and suitability decisions.
Allocate Freight Costs to Each Cargo Item
When loading is complete, you can determine the freight cost for each cargo type and each
CargoWiz User's Guide (PDF Version of the CargoWiz Help File)
60 / 62
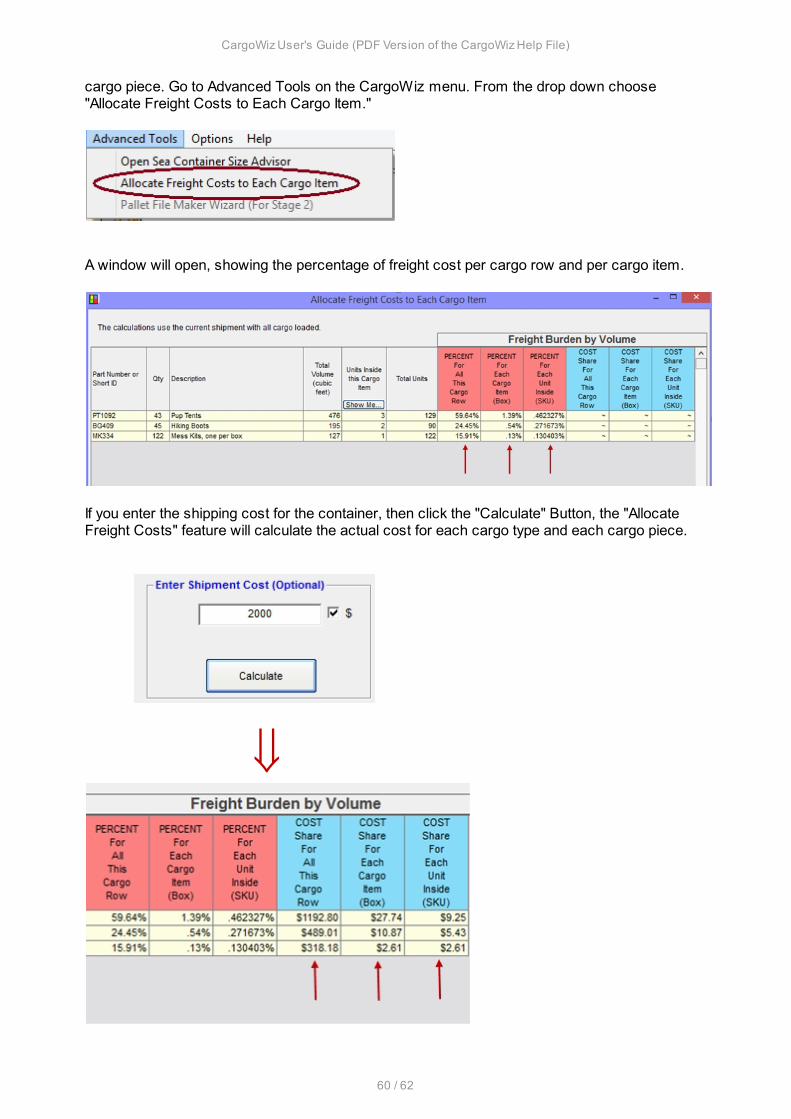
cargo piece. Go to Advanced Tools on the CargoWiz menu. From the drop down choose"Allocate Freight Costs to Each Cargo Item."
A window will open, showing the percentage of freight cost per cargo row and per cargo item.
If you enter the shipping cost for the container, then click the "Calculate" Button, the "AllocateFreight Costs" feature will calculate the actual cost for each cargo type and each cargo piece.
ß
CargoWiz User's Guide (PDF Version of the CargoWiz Help File)
61 / 62
You can share this information with others by swiping the mouse across the relevantinformation, click "Copy to Clipboard," and paste the results into Excel or an email.
Email Images and Results
Within an email body:
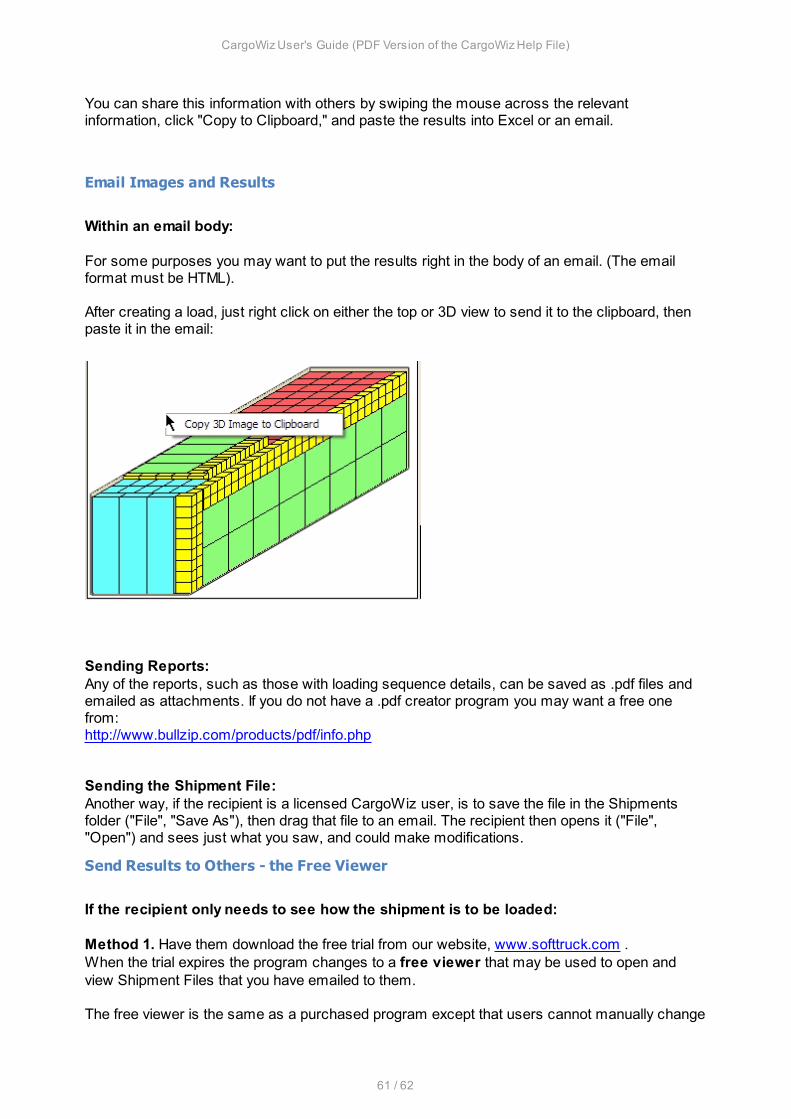
For some purposes you may want to put the results right in the body of an email. (The emailformat must be HTML).
After creating a load, just right click on either the top or 3D view to send it to the clipboard, thenpaste it in the email:
Sending Reports:Any of the reports, such as those with loading sequence details, can be saved as .pdf files andemailed as attachments. If you do not have a .pdf creator program you may want a free onefrom:http://www.bullzip.com/products/pdf/info.php
Sending the Shipment File:Another way, if the recipient is a licensed CargoWiz user, is to save the file in the Shipmentsfolder ("File", "Save As"), then drag that file to an email. The recipient then opens it ("File","Open") and sees just what you saw, and could make modifications.
Send Results to Others - the Free Viewer
If the recipient only needs to see how the shipment is to be loaded:
Method 1. Have them download the free trial from our website, www.softtruck.com .When the trial expires the program changes to a free viewer that may be used to open andview Shipment Files that you have emailed to them.
The free viewer is the same as a purchased program except that users cannot manually change
CargoWiz User's Guide (PDF Version of the CargoWiz Help File)
62 / 62
any of the data in the cargo data grid. All of the reports can be generated.
(Note: Shipment Files have a .mdb suffix and most systems will remove them unless you putthem in a zip file. You may also need to change ".mdb" to a different suffix, such as ".doc" Let therecipient know they will need to change it back.)
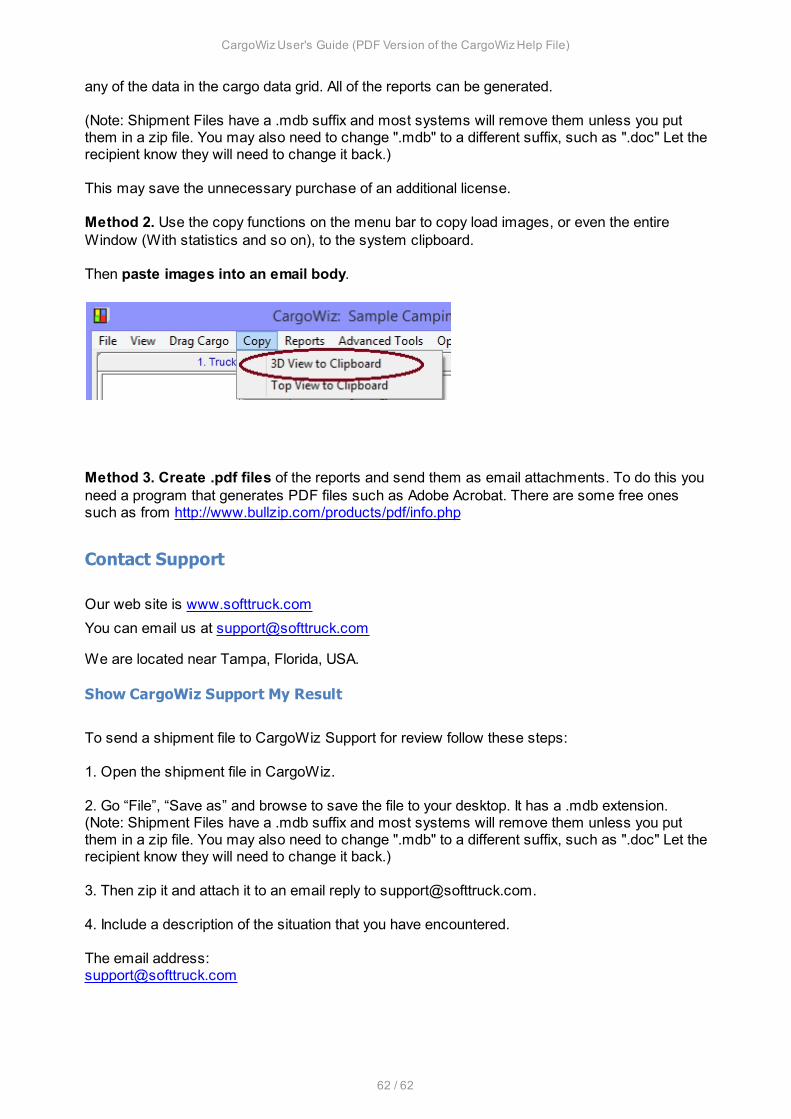
This may save the unnecessary purchase of an additional license. Method 2. Use the copy functions on the menu bar to copy load images, or even the entireWindow (With statistics and so on), to the system clipboard.
Then paste images into an email body.
Method 3. Create .pdf files of the reports and send them as email attachments. To do this youneed a program that generates PDF files such as Adobe Acrobat. There are some free onessuch as from http://www.bullzip.com/products/pdf/info.php
Contact Support
Our web site is www.softtruck.com
You can email us at [email protected]
We are located near Tampa, Florida, USA.
Show CargoWiz Support My Result
To send a shipment file to CargoWiz Support for review follow these steps:
1. Open the shipment file in CargoWiz.
2. Go “File”, “Save as” and browse to save the file to your desktop. It has a .mdb extension.(Note: Shipment Files have a .mdb suffix and most systems will remove them unless you putthem in a zip file. You may also need to change ".mdb" to a different suffix, such as ".doc" Let therecipient know they will need to change it back.)
3. Then zip it and attach it to an email reply to [email protected].
4. Include a description of the situation that you have encountered.
The email address:[email protected]