Canon CR-50 User Guide - shelbyinc.com CR-50 User Guide Set up Canon CR-50 Scanner in Shelby v.5...
14
User Guide Canon CR-50 Check Scanner Updated: 8/18/2014 ©2014 Shelby Systems, Inc. All Rights Reserved Other brand and product names are trademarks or registered trademarks of the respective holders.
Transcript of Canon CR-50 User Guide - shelbyinc.com CR-50 User Guide Set up Canon CR-50 Scanner in Shelby v.5...
User Guide
Canon CR-50 Check Scanner
Updated: 8/18/2014 ©2014 Shelby Systems, Inc. All Rights Reserved
Other brand and product names are trademarks or registered trademarks of the respective holders.

Canon CR-50 User Guide
Introduction The Canon CR-50 Check Scanner is one of the newest scanners sold by Shelby Systems. With its combination of functionality, size, and speed, the Canon CR-50 check scanner is ideal for improving check processing efficiency at your organization. All of our new scanners offer unmatched image quality and reliability for check capture at the first point of presentment. This document introduces some of the features of the Canon CR-50 unit and provides an overview of installation and use of the interface with Shelby v.5.
Features Double-Sided Image Scanning
When the CR-50 check scanner detects a check MICR (Magnetic Ink Character Recognition) number, the scanner will automatically scan both sides of the check. The endorsement side can easily be viewed in the Shelby v.5 interface simply by clicking the image and then clicking the Next button.
Electronic Check Processing using Shelby Teller
The Canon CR-50 check scanner integrates fully with Shelby Teller. Shelby Teller is a complete, Check 21- compatible, electronic, check processing software that fully integrates with your Shelby v.5 data. This unique system scans and captures images of both the front and back of checks, tithing envelopes, or other financial documents and allows you to remotely deposit those scanned monies in the bank. For more information or to purchase Shelby Teller, contact Shelby Systems at (800) 877-0222.
Precise MICR Read
The CR-50 check transport is equipped with a patented magnetic head for high precision MICR reading. It takes MICR accuracy further by combining MICR reading with OCR processing (MOCR) for a higher level of accuracy. These capabilities ensure high read rates that mitigate risks associated with digitizing checks.
Electronic Endorsements when using Shelby Teller
A digital endorsement message is added horizontally across the back of check images. The message is completely customizable; you can choose any endorsement information or instructions. Using this functionality leaves no risk of questions from the bank regarding smudged or illegible endorsements.
Page 2

Canon CR-50 User Guide
Inherited Cross Check Features
In addition to electronic processing using Shelby Teller, the Canon CR-50 check scanner employs a single check-by-check feed mode which enables the unit to function similarly to the Cross Check and Cross Check Plus systems. As with these other models, the CR-50 is used to process donations in the Contributions and Donors & Gifts applications, process checks in the Accounts Receivable application, reconcile your bank statement in the Bank Reconciliation application, and process apportionments in the Remittances application.
Installation
Included with the Canon CR-50 Unit
• Ranger Driver and Software CD • USB Cable • Power cord • Power supply • One ink cartridge • One-year maintenance agreement
Before You Begin
Before you begin using the Canon CR-50 interface, you must first load the Activation Key for the CR-50 unit into your Shelby v.5 database. The activation key is sent to each customer via email upon purchasing the product, or is included with the Shelby Systems software CD for new customers. Loading instructions also accompany the activation key.
If you need assistance obtaining your activation key or help loading the key, have your official Shelby Systems Contact (the individual in your organization authorized to interact with Shelby Systems) call Shelby Systems Support toll-free at (888) 697-4352.
Page 3

Canon CR-50 User Guide
Load Software
1. Insert the Ranger driver and software CD into your computer’s CD-ROM drive. 2. Browse to your CD-ROM drive within My Computer or Windows Explorer. 3. Double-click on the Ranger folder. 4. Double-click on the Setup executable. 5. Follow on-screen instructions and complete the installation wizard.
Connect Scanner
1. Connect power cord to scanner. 2. Connect USB cable to scanner and computer. 3. The LED on the front of the scanner should be lit and the scanner should now be operational. If the LED
is not lit, flip the power switch on the back of the unit by the AC adapter.
Page 4

Canon CR-50 User Guide
Set up Canon CR-50 Scanner in Shelby v.5 Before using the Canon CR-50 check scanner, you must configure the scanner software to accept supplemental documents (such as giving envelopes) as well as configure the CR-50 Shelby v.5 interface. The Shelby v.5 configuration utility can be accessed through Contributions, Donors & Gifts, Bank Reconciliation, Remittances, or Accounts Receivable. The configuration utility is the same in each application, but the methods of getting to it differ. We will first go over how to get to the utility in each application, and then go over the configuration process one time.
Configure the Scanner Software
1. Click Start>Programs>Silver Bullet Technology. 2. Click RangerFlex for CR-50_CR-80.
3. Click the Options menu and then Settings.
4. Click on the MICR tab and remove the check from Infrared Double Feed Detection and click OK.
Page 5
Canon CR-50 User Guide
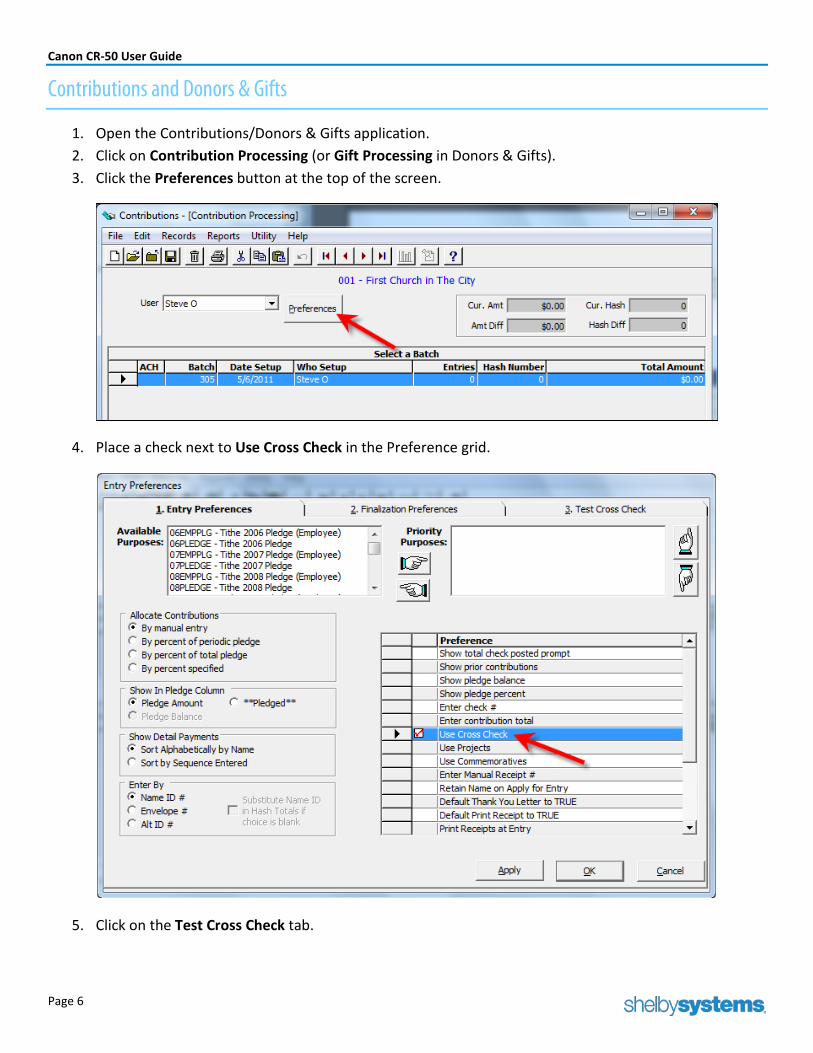
Contributions and Donors & Gifts
1. Open the Contributions/Donors & Gifts application. 2. Click on Contribution Processing (or Gift Processing in Donors & Gifts). 3. Click the Preferences button at the top of the screen.
4. Place a check next to Use Cross Check in the Preference grid.
5. Click on the Test Cross Check tab.
Page 6

Canon CR-50 User Guide
6. Click on the Configure button by the Cross Check field… see “Configuring the Canon CR-50 Check Scanner” on page 10.
Bank Reconciliation
1. Open the Bank Reconciliation application. 2. Click on the Utility menu and select Preferences. 3. Select Reconcile using Cross Check. 4. Click on the Configure button by the Cross Check field... see “Configuring the Canon CR-50 Check
Scanner” on page 10.
Page 7

Canon CR-50 User Guide
Remittances
1. Open the Remittances application. 2. Click on Remittance Processing. 3. Click the Preferences button at the top of the screen. 4. Place a check next to Use Cross Check in the preference grid. 5. Click on the Configure button by the Cross Check field… see “Configuring the Canon CR-50 Check
Scanner” on page 10.
Page 8

Canon CR-50 User Guide
Accounts Receivable
1. Open the Accounts Receivable application. 2. Click on the Utility menu, then Set Up Information and select Preferences. 3. Place a check next to the Use Cross Check option. 4. Click on the Configure button.
Page 9

Canon CR-50 User Guide
Configuring the Canon CR-50 Check Scanner 1. Click on the Ranger image to select your Canon CR-50 Check Scanner. If you have a check loaded in the
scanner, it will scan automatically and the check information and image will be displayed. 2. Click the Use This Unit button at the upper right. This will return you to the previous screen, and also
pull another item through your scanner. 3. At this point, the scanner is ready for use in the module in which it was configured. Click OK, if
applicable.
Page 10

Canon CR-50 User Guide
Scanning Checks in Shelby v.5 The way you will use your Canon CR-50 check scanner in Shelby v.5 depends on the application. We will go through the basics of how the scanner is used (once configured using the steps above) for each application or grouping of applications. Options that are common to all interfaces are bolded in the first set of steps below. Keep in mind that you can put up to 50 checks in the feeding tray at one time.
Contributions, Donors & Gifts, and Remittances
1. Click on the Processing button on the Home Base of the application (e.g., Contributions Processing in Contributions).
2. Create your new batch as you would normally. 3. Create a new entry and the check (or supplemental document) should feed through automatically.
4. Finish the Contribution batch. Upon saving, when you double-click the individual’s entry in Inquiries, the scanned items will appear. The scanned check images also appear in the image edit (the report generated while saving a batch) and the Contribution List Images report.
Page 11

Canon CR-50 User Guide
Page 12

Canon CR-50 User Guide
5. To close out, click the Display button. This will take you to another screen showing the images. You can then click Close to exit.
Bank Reconciliation
1. Go into Reconcile on the Bank Reconciliation Home Base screen. 2. Pull up the month you want to reconcile (or create a new Reconciliation Date) as you normally would,
input the Statement Ending Balance, and click OK. 3. Click in the Cross Check field and it will automatically scan the first check. 4. After confirming the amount (if necessary) you can click in the field again to scan the next check.
Page 13

Canon CR-50 User Guide
Accounts Receivable
1. Go into Payment Processing on the Accounts Receivable Home Base screen. 2. Click the New button to bring up the Payment Entry screen. The CR-50 Check Scanner will scan a check
automatically.
Page 14


![perTormance curves an CR 10 CR 10 [kPa] [m] d tech nical ... 10.pdf · perTormance curves an CR 10 CR 10 [kPa] [m] d tech nical data 1.5 CR, CRI, CRN CR 10 50 Hz ISO 9906:1999 Annex](https://static.fdocuments.us/doc/165x107/5e3d2191ebefda7c2e01de5e/pertormance-curves-an-cr-10-cr-10-kpa-m-d-tech-nical-10pdf-pertormance.jpg)