Camtasia Part 2 - Colorado State University · Tracks A track is the sequence of clips and elements...
16
How to add items to the Clip Bin From a new or existing “project”, open the saved video by selecting the Import Media link from the Add options group in the Task List on the left side of the screen, or from the Import media button on the top of the screen. Navigate to the folder storing the file(s) and select them. The selected file should now be placed in the Clip Bin, which is to the right of the Task List Pane in the Camtasia window. TIP: The Clip Bin houses audio, images and video files. TIP: Music files can be added to Camtasia, but they cannot be taken from iTunes or any other download site. They must be your music files. Add the File to the Timeline The Timeline is located at the base of the Camtasia window. The Timeline is where the images, audio and video get blended together in order to complete the video. When importing a file, you will need to Add the file to the Timeline in order to make further edits. To add an item to the Timeline, right click on the item and select “Add to timeline”, or select the file and drag and drop the file on the timeline. Selecting Editing Dimensions When you add photos to the timeline for a new project, Camtasia will ask what you want the editing dimensions to be. As you cycle through the options, Camtasia will show how each of the photos will fit into the Video by showing white dashed lines in the preview window. The way the pictures display is based on the pixel dimension of the pictures that are on the timeline.
Transcript of Camtasia Part 2 - Colorado State University · Tracks A track is the sequence of clips and elements...

HowtoadditemstotheClipBinFrom a new or existing “project”, open the saved video by selecting
the Import Media link from the Add options group in the Task List on
the left side of the screen, or from the Import media button on the top
of the screen.
Navigate to the folder storing the file(s) and select them.
The selected file should now be placed in the Clip Bin, which is to the
right of the Task List Pane in the Camtasia window.
TIP: The Clip Bin houses audio, images and video files.
TIP: Music files can be added to Camtasia, but they cannot be taken
from iTunes or any other download site. They must be your music
files.
AddtheFiletotheTimelineThe Timeline is located at the base of the Camtasia window. The Timeline is
where the images, audio and video get blended together in order to
complete the video. When importing a file, you will need to Add the file to
the Timeline in order to make further edits. To add an item to the Timeline,
right click on the item and select “Add to timeline”, or select the file and drag
and drop the file on the timeline.
SelectingEditingDimensionsWhen you add photos to the timeline for a new
project, Camtasia will ask what you want the editing
dimensions to be. As you cycle through the options,
Camtasia will show how each of the photos will fit into
the Video by showing white dashed lines in the
preview window.
The way the pictures display is based on the pixel
dimension of the pictures that are on the timeline.
TracksA track is the sequence of clips and elements (callouts, cursor, zoom) that
are included in a video.
To add a new track, click on the Tracks button on the timeline toolbar and
select the track that you would like to include on your timeline.
Tip: If you recorded voice with your video, audio and the video will be
placed in the same track. If you want to play music in the background, you
may add a new Track.
Tracks work like transparencies. If a file is placed on a higher track, that
file will lay over the files below it.
Remember, if your pixel dimensions are very large, Camtasia will shrink the picture, without losing
quality, to fit into the video.
You can use this to display two files at the same time within your video by dragging the files on top of
each other in different tracks on the timeline.
If you do have files that you want to have appear on the timeline at the same
time, you may want to group these files so you don’t have to select each one
individually to drag them if you ever need to do that. To Group the files, select
each file by clicking on each one seperatly while holding down the Ctrl key, then
right click on a selected file and choose Group.
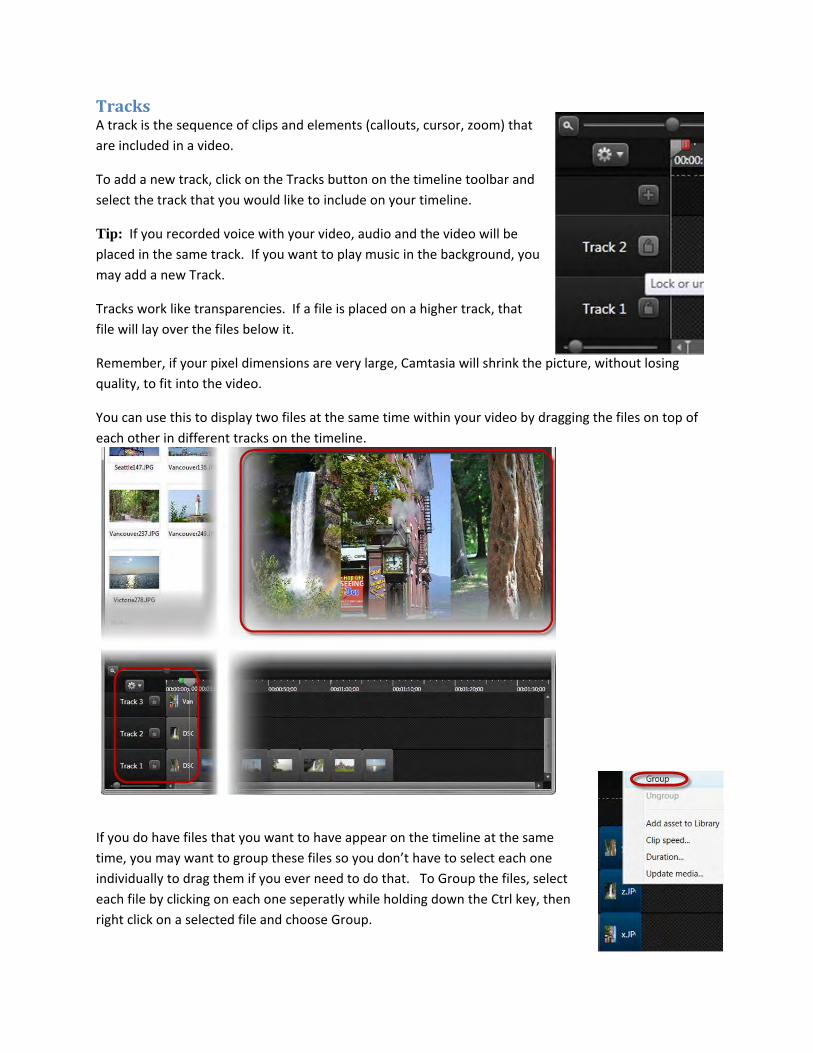
Once the images have been added to the timeline, you can
adjust the time that the images appear on the video selecting
the right or left edge and dragging the image to adjust the
duration.
You can also rearrange the files by selecting and clicking and
dragging to a new location. The selected file is highlighted in
blue.
To select multiple files, click on the files while holding down the
Ctrl key.
When adding images to your timeline, make sure the images are at least the same size or larger than
your editing dimensions so they fit on the screen. So the pixel dimensions should be at least 640 x 480 if
you are editing in 640 x 480. You resolution should be at least 72dpi to be able to see the picture on a
computer screen. You can go higher on your resolution, but if you are around
When you have images on your timeline, you are able to resize and rotate them as well. To do this,
move the playhead in the timeline over the image you want to adjust. Click on the image in the preview
window and you will see circles along the edges and a couple in the center of the image. Click, hold and
drag on these circles to adjust your image.
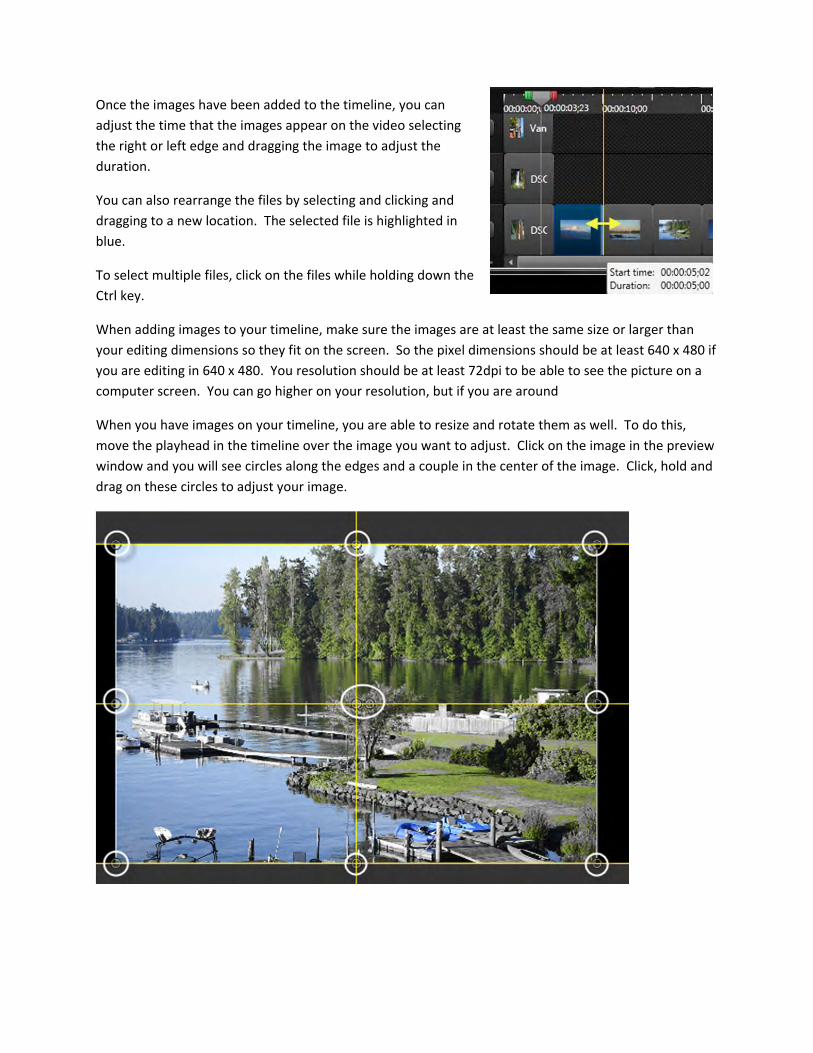
AddingTransitionsTransitions will add a visual effect
between different items on your Video
section of the timeline. To access this
option, select the Transitions tab from the
Task Tab. If you double click on any of
the Transitions icons, a preview will show
in the preview window. When you have
found the transition that you want to use,
left click and hold that transition and drag
it to the track where you want the
transition to go. Transitions can go onto
the front or back end of any yellow area
on the track.
If you want to use the same transition on multiple files, select
the files that you want to add the transition to by holding down
the Ctrl key, then right click on the transition you would like to
use and select, Add to selected media. This will add the
transition to the beginning and the end of the file
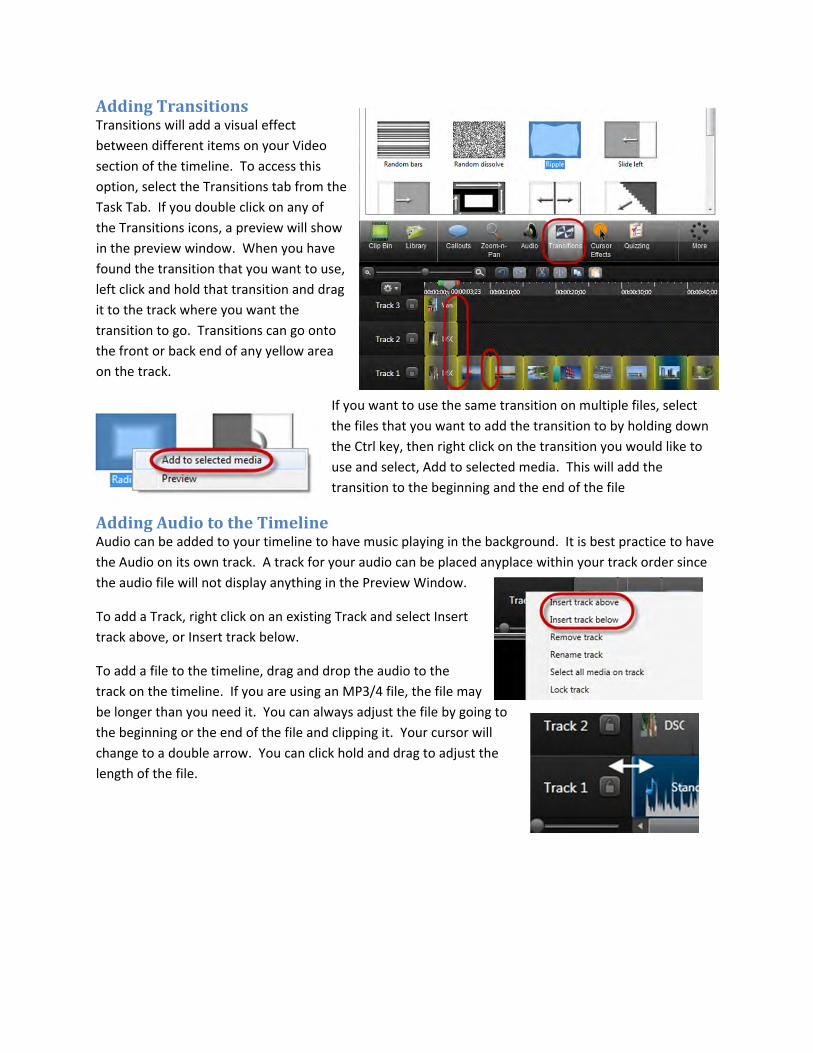
AddingAudiototheTimelineAudio can be added to your timeline to have music playing in the background. It is best practice to have
the Audio on its own track. A track for your audio can be placed anyplace within your track order since
the audio file will not display anything in the Preview Window.
To add a Track, right click on an existing Track and select Insert
track above, or Insert track below.
To add a file to the timeline, drag and drop the audio to the
track on the timeline. If you are using an MP3/4 file, the file may
be longer than you need it. You can always adjust the file by going to
the beginning or the end of the file and clipping it. Your cursor will
change to a double arrow. You can click hold and drag to adjust the
length of the file.

AudioPropertiesIf you have an audio clip selected, you can click on the Audio tab to make some adjustments to that
audio file.
If you preview your video and your audio is a loud, you can use the Volume down button to dampen the
volume of the file. You can also do this if you have multiple files. Just make sure you select both filed
and click on the Volume down button.
If you are using two files that you clipped
so they aren’t starting at the beginning or
ending at the end of the song, you are
able to make a nice transition between
the two files by using the Fade in or Fade
out button. To use these features, select
the file you want to fade, then click on
either Fade in or Fade out.
By default, when you Fade out, the sound will go completely silent. You can change this by dragging the
bottom circle up so the volume doesn’t quit completely.
LiningupfilesontheTimelineTo make sure your files like up accurately on the timeline, you can go to the end of your video and click,
hold and drag a file in relationship to another file. Camtasia will show a yellow line when the files are
lined up. This works really well if you are using an audio file so the audio stops when the video is done.
TIP: If you are using an audio file, remember to add a Fade out to
the end of the file.
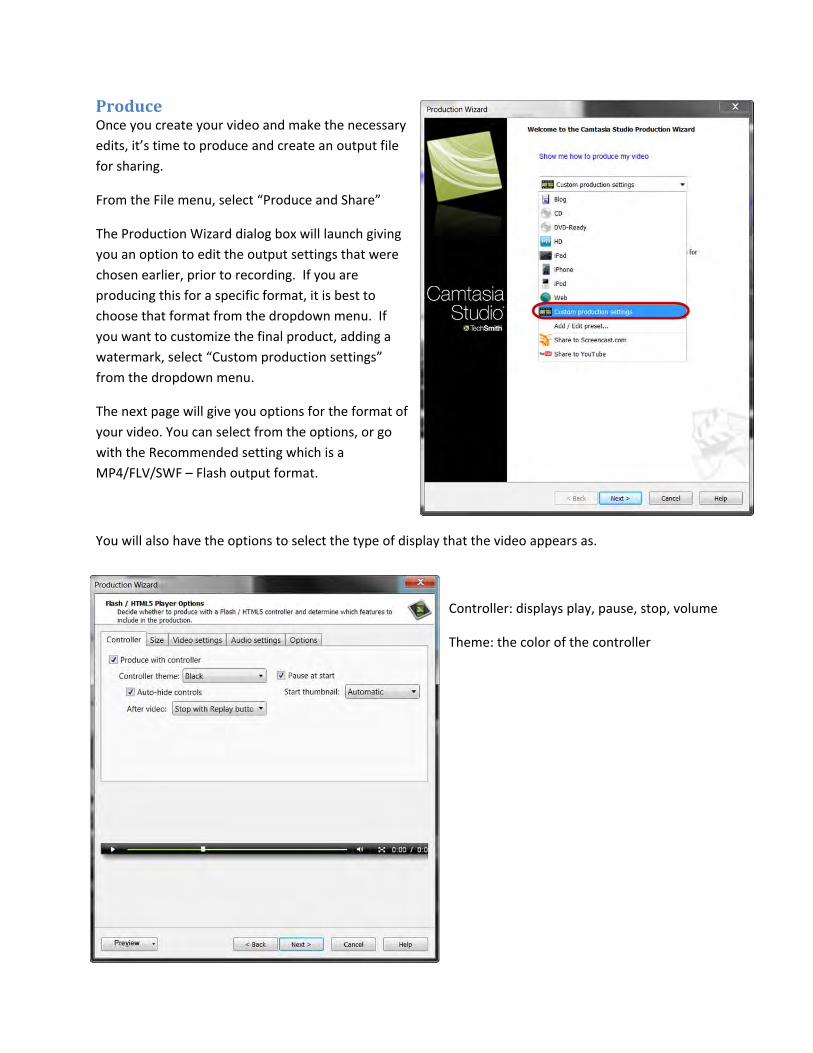
ProduceOnce you create your video and make the necessary
edits, it’s time to produce and create an output file
for sharing.
From the File menu, select “Produce and Share”
The Production Wizard dialog box will launch giving
you an option to edit the output settings that were
chosen earlier, prior to recording. If you are
producing this for a specific format, it is best to
choose that format from the dropdown menu. If
you want to customize the final product, adding a
watermark, select “Custom production settings”
from the dropdown menu.
The next page will give you options for the format of
your video. You can select from the options, or go
with the Recommended setting which is a
MP4/FLV/SWF – Flash output format.
You will also have the options to select the type of display that the video appears as.
Controller: displays play, pause, stop, volume
Theme: the color of the controller

Tip: It is Best Practice is to leave the output settings as they were originally set up prior to recording. If
you change the output settings after the fact, you run the risk of losing quality and/or stretching the
video for the new dimensions.
Click next when you have finished with your selections.
The next page will give you a couple more options, one
which we are going to look at, being the Watermark. You
are able to add a watermark that will display throughout
the entire video if you would like. To add a watermark,
click on the options button under the Watermark heading.
The next window will allow you to browse to the location of the file that you want to use. There are also
options on the location of the watermark, effects of the image, and scaling. A preview will also appear
so you can see what the watermark will look like on your video.
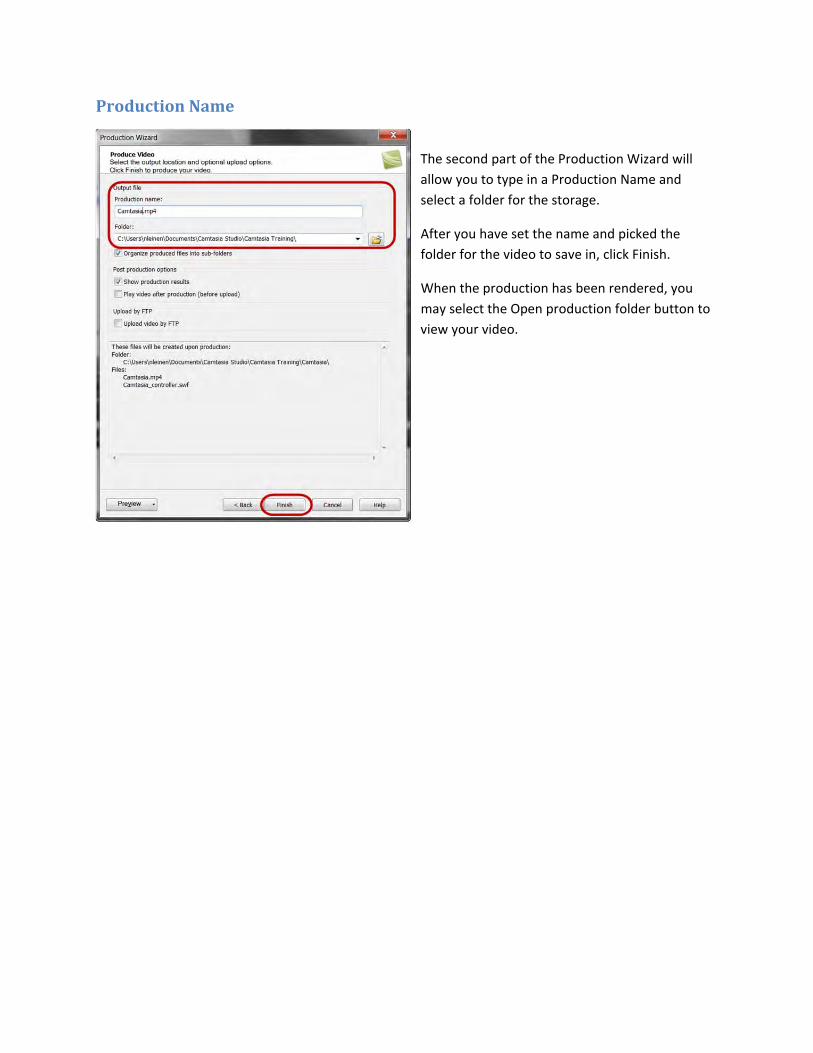
ProductionName
The second part of the Production Wizard will
allow you to type in a Production Name and
select a folder for the storage.
After you have set the name and picked the
folder for the video to save in, click Finish.
When the production has been rendered, you
may select the Open production folder button to
view your video.

QuizzingCamtasia now includes the feature of quizzing that can be a part of your video. Quizzes can be used to
survey your views or to see what your viewers have learned. These quizzes have to option to be scored
as well.
Quizzing can be added to any Camtasia project, and is best to add after all of your editing is done. One
big requirement that is needed for a video with quizzing is the video has to be edited with a minimum
dimension of 640 x 480. If you edit your video smaller than these dimensions, quizzing will not be
available.
Other items to consider when adding quizzing
Editing dimensions must be at least 640 x 480
The quiz must be live on a web hosting site to work
After you have finished editing your video, click on the Quizzing tab to add a quiz question to your video.
Remember, if you do not see the Quizzing tab, it may be located under the More Tab.
To add a quiz, click on the Add quiz button on the top
of the quizzing tab.
When you click Add quiz, Camtasia will show the Quiz
View, which will be on top of your timeline and will
place a Quiz placeholder at the location of your
playhead. If you want the quiz located in a different location, you are able
to click and drag the quiz bubble to a new location.
Another way to add a quiz is to make sure the Quiz view is shown and by
moving your mouse over a piece of media on your timeline. You will see a
purple diamond that will appear on top of the media. When you click your
mouse, you will create a quiz that is tied to that media.

You are able to Show and Hide the Quiz View by
clicking on the Show hide gear next to the Timeline,
or by using the shortcut Ctrl‐Q.
Once you have added
a quiz, you will see all
of the options for the
quiz.
You are able to;
Name the quiz
Add multiple questions
Allow for scoring
Allow users to see their answers
Choice of 4 different questions types.

QuizNameThis is the name of the quiz. Each quiz may have a single question, or multiple questions.
ScoringaquizYou are able to allow your quiz to be scored. All of the scoring can be emailed to you in excel format if
you decide to score the quiz. We will cover this when we produce the video.
AllowuserstoViewtheiranswersIf this option is selected, the user will be able to see how they answered the questions after taking the
quiz. They will not be able to answer the questions again.
QuestionTypesCamtasia has the option for 4 different question types; Multiple Choice, Fill in the blank, Short Answer,
True/False.
MultipleChoiceWith Multiple Choice, you are
giving the user different options for
the correct answer to the Quiz
Question. You are able to enter up
to 30 options for the correct
answer, but there may be only 1
correct answer.
Remember to check the checkbox
with the correct answer.
You will enter the Question in the Question text box, and then enter in the Answer’s in the Answers text
box.
Once you have enter in your question and answers, you may click on Add question to add another
question, preview the question by clicking on the Preview button, or navigate to another location on
your timeline to enter in another quiz.

FillintheBlankFill in the blank questions will allow for the
user to enter in their own answer to the
question. You as the quiz designer must
enter in a list of acceptable answers to the
question so the scoring is correct when
you get the results from Camtasia.
You will enter the Question in the
Question text box, and then enter in the
Answer’s in the Answers text box. Make sure to allow for different variations in your acceptable
answers.
For example, if you answer is supposed to be Fort Collins, make sure you allow for Ft Collins, Ft. Collins,
Fort Collins, etc.
True/FalseTrue/False questions have 1 answer, it is
either True or it is False.
You will enter the Question in the Question
text box, and then select either True or
False.
ShortAnswerShort Answer questions allow the
user to enter in anything they want
and as much information as they
want. If you are scoring your quiz,
Camtasia will accept any answer as
correct for Short Answer questions. These questions will have to be looked at by the grader to make
sure the answers are acceptable. The only way a user would not get any points is if they were to leave
this question blank.

ProducingyourVideowithQuizzingRemember, your editing dimensions must be at least 640 x 480 for quizzing to work appropriately.
When you have finished adding quizzing to your video, you are ready to produce your video. To do this,
click on the Produce and Share button on the top of your Screen.
There are a couple of options here that will not
work with quizzing. You must selection an
option with MP4 AND a video player. If you do
select Custom Productions, you will get an MP4
with video player as well.
You may also Share your video to
screencast.com. Screencast will host your video
for you, but you must create an account with
Screencast to do this.
Tip: By going through Custom production
settings you are able to choose the look of your
video player, as well as add a watermark if you
would like.
We will show the Custom production settings in
this example.
Select Custom production settings, and
then click the Next button.
IMPORTANT: Your file format MUST BE
the recommended setting of MP4‐Flash /
HTML 5 player for quizzing to work. If
you select any of the other options, your
quiz will not display.
Keep the recommended setting for the
file format, and then click Next.

On the next window, click on the
Options tab to make sure Quizzing is
checked. If it is not checked, make
sure you check it.
You are able to change the look of the
Controller by clicking on the
Controller tab.
The next window will allow you to include a watermark if you would like. Click Next when you have
added your watermark if you are going to do so.
The Production Wizard window is where
we have options for our quiz results.
If you are scoring the quiz, click on the
Report quiz results through email. Enter
in the email address where you would
like the results to be sent. The results
are sent once a day if anyone has taken a
quiz.
You will have an option to require the
users to input their name and email
address or to allow users to take the quiz
anonymously.
On the last window, give your video a
name, and make sure the Show
production results checkbox is
checked. These will be the files that
are needed in order to display our
video with quizzing.
Your video will not be produced and
the folder containing the results will
open.
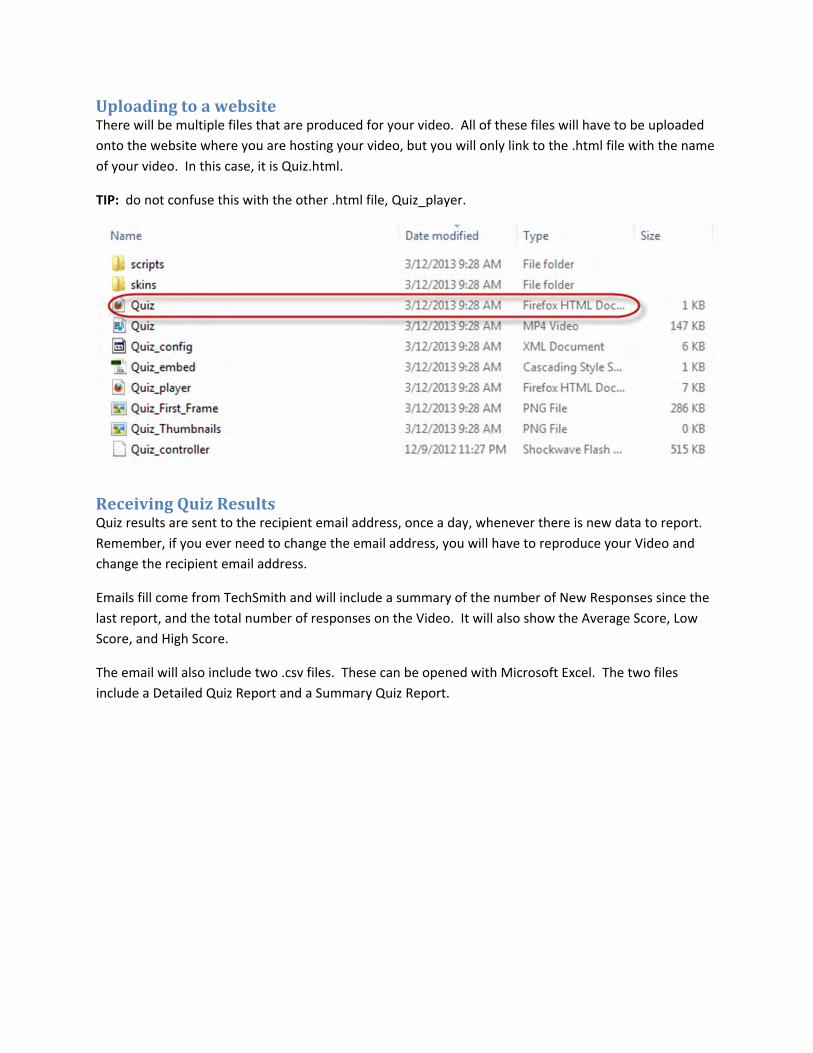
UploadingtoawebsiteThere will be multiple files that are produced for your video. All of these files will have to be uploaded
onto the website where you are hosting your video, but you will only link to the .html file with the name
of your video. In this case, it is Quiz.html.
TIP: do not confuse this with the other .html file, Quiz_player.
ReceivingQuizResultsQuiz results are sent to the recipient email address, once a day, whenever there is new data to report.
Remember, if you ever need to change the email address, you will have to reproduce your Video and
change the recipient email address.
Emails fill come from TechSmith and will include a summary of the number of New Responses since the
last report, and the total number of responses on the Video. It will also show the Average Score, Low
Score, and High Score.
The email will also include two .csv files. These can be opened with Microsoft Excel. The two files
include a Detailed Quiz Report and a Summary Quiz Report.

DetailedQuizReportThe Detailed Quiz Report will include the Name and email address of the people taking the quiz, if you
selected that option when producing your video. It will also show the Question Text, The Viewer
Answer, and the correct Answer for each question on the Quiz. The report will also show the
percentage of the video viewed by the user, and tie time it took them to complete the quiz.
SummaryQuizReportThe Summary Quiz Report included the Name and Email address of the people taking the quiz, as well as
the percentage correct of the quiz questions that were answered, followed by the Number Correct and
the Number of Scored Questions answered. Short Answer questions are not graded, but the answers
are provided in the Detailed Quiz Report.
Viewers are only given a score for attempted questions. If they do not attempt a question, they are not
graded on that question.