C&R Racing Supercharger Coolant Expansion Tank Reservoir ...
5
C&R Racing Supercharger Coolant Expansion Tank Reservoir - Black (07-12 GT500) Required Tools: 3-4 feet of rubber hose or siphon kit Drain Bucket/Pan Funnel Hand/Shop Towels Open ended 8MM Wrench Paper Cup Pliers Ratchet and 8MM Socket Razor Blade or Utility Knife Installation Time: 1-2 hours 1. Make sure the car is turned off and is cool down before proceeding with the removal and installation of Expansion Tank 2. Set Emergency Brake and block the rear wheels. 3. Remove the cap off of the stock coolant tank. 4. Start to remove the coolant from the tank, which can be done in two ways a) Using a 3-4 feet of hose (or siphon kit) to siphon the coolant out of the tank into a bucket. Siphoning the coolant makes it the cleanest and easiest way to remove the fluid.
Transcript of C&R Racing Supercharger Coolant Expansion Tank Reservoir ...

C&R Racing Supercharger Coolant Expansion Tank Reservoir - Black (07-12 GT500)
Required Tools:
3-4 feet of rubber hose or siphon kit Drain Bucket/Pan Funnel Hand/Shop Towels Open ended 8MM Wrench Paper Cup Pliers Ratchet and 8MM Socket Razor Blade or Utility Knife
Installation Time: 1-2 hours
1. Make sure the car is turned off and is cool down before proceeding with the removal and installation of Expansion Tank
2. Set Emergency Brake and block the rear wheels. 3. Remove the cap off of the stock coolant tank. 4. Start to remove the coolant from the tank, which can be done in two ways
a) Using a 3-4 feet of hose (or siphon kit) to siphon the coolant out of the tank into a bucket. Siphoning the coolant makes it the cleanest and easiest way to remove the fluid.

b) Use a set of pliers and loosen the clamp, remove line from tank and allow the fluid to go in a drain bucket or pan.
5. Use a Ratchet and an 8MM Socket to remove the bolt from the front of the tank which holds the tank to the fan shroud.
6. Use a set of pliers to loosen the hose clamps that attach the coolant lines to the tank, remove each hose from the tank and remove stock tank from vehicle

TOP – LEFT SIDE
BOTTOM – RIGHT SIDE
a. May have excess coolant at the bottom of the tank, place a cup underneath the hose to
catch excess fluid. 7. Grab the C&R Expansion Tank Reservoir and connect the lower hose on the right side of the tank

a) Use pliers to loosen the hose clamp and slide it over the line to clamp it in place. i. To get a hand down to move factory clamp back into place may be harder, you
can use another clamp if you choose to. 8. Once the lower line is connected, use an open 8MM wrench and re-install the 8MM bolt which
mounts the tank to the fan shroud
a) Make sure you do not over tighten the bolt, if you do, you may break the tab that the
bolt mounts to. 9. Line up the upper coolant line to the tank connection, you will need to cut a small amount of
hose off for the line to fit properly back on the tank
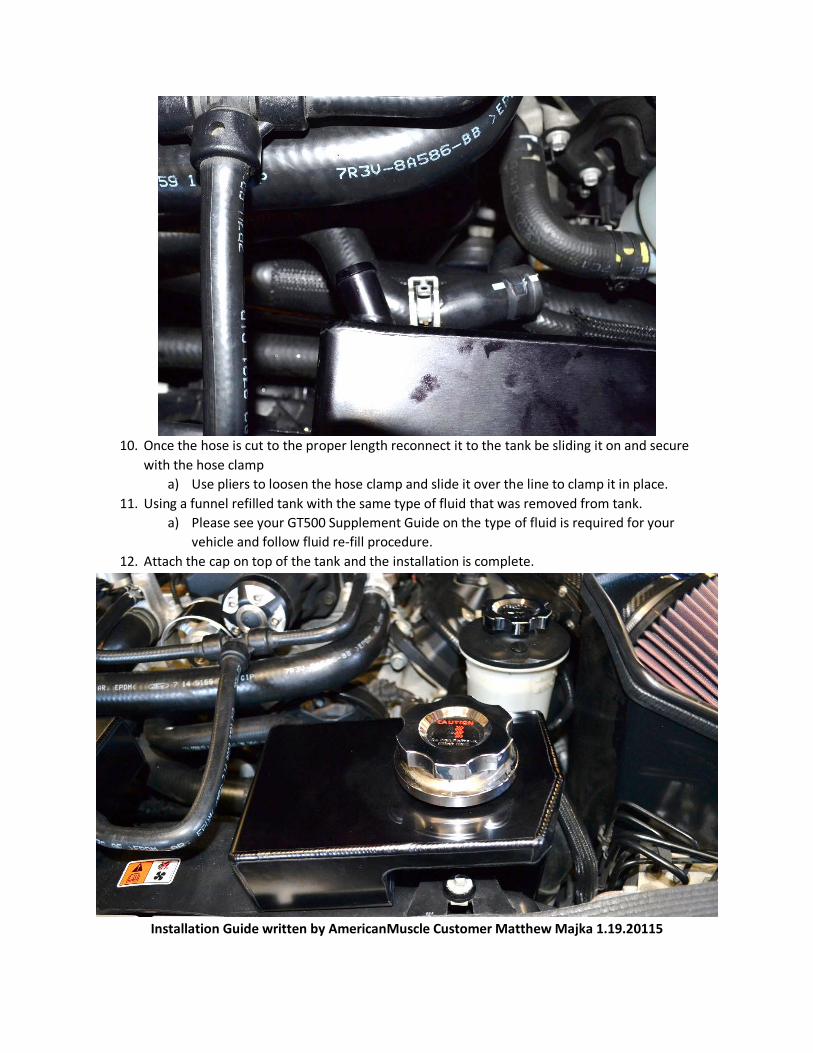
10. Once the hose is cut to the proper length reconnect it to the tank be sliding it on and secure with the hose clamp
a) Use pliers to loosen the hose clamp and slide it over the line to clamp it in place. 11. Using a funnel refilled tank with the same type of fluid that was removed from tank.
a) Please see your GT500 Supplement Guide on the type of fluid is required for your vehicle and follow fluid re-fill procedure.
12. Attach the cap on top of the tank and the installation is complete.
Installation Guide written by AmericanMuscle Customer Matthew Majka 1.19.20115