Call-in Agent Configuration 9 - Viking...
33
© 2002 Johnson Controls, Inc. www.johnsoncontrols.com Code No. LIT-1201418 Software Release 5.1 Call-in Agent Configuration 9 9.1 Overview of the Call-in Agent The Call-in Agent enables users to access OPC data over the phone. The Call-in Agent configuration sets up the voice and key entries and menu options based on information supplied from the Multimedia configuration database, the current state of OPC data, and the security level of the user calling into the system. Note: The following Configurator features do NOT apply to the Call-in Agent: the Multimedia Configuration Wizard, media templates, action sets, and schedules. 9.1.1 Call-in Agent Quick Start Configuring and using the M-Alarm Multimedia Call-in Agent require the following steps: 1. Install the Dialogic® hardware. (See Appendix B: Advanced Telephony Settings (LIT-1201407) for information about installing and configuring Intel® Dialogic boards. For additional information about purchasing and installing Intel Dialogic boards, please visit the Intel Web site at www.intel.com/network/csp/products/index_vp.htm. 2. Install the Dialogic drivers. (At the time of this writing, these drivers must be Dialogic version 5.1 with Service Pack 1.) 3. Install the M-Alarm Multimedia software. (Refer to Introduction (LIT-1201169) or the readme.htm file on the M-Alarm Multimedia CD for installation instructions.) 4. Configure the Dialogic card. During initial setup, it is recommended that the Dialogic Configuration Manager (DCM) be used for configuring and running the Dialogic drivers. (See the "Installing and Configuring Telephony Cards" section of Appendix B.) Open the DCM and select the Action menu. If you are familiar with the card, use the Add Device option, or have the DCM detect the card using the Auto Detect Devices option. 5. Start the Dialogic drivers. Highlight the configured Dialogic card from the graphical tree menu. Start the drivers by clicking the green start button. If the drivers fail to initialize the card, check the card type and settings. If problem persists, contact Dialogic for technical support.
Transcript of Call-in Agent Configuration 9 - Viking...

© 2002 Johnson Controls, Inc. www.johnsoncontrols.comCode No. LIT-1201418 Software Release 5.1
Call-in Agent Configuration 9
9.1 Overview of the Call-in AgentThe Call-in Agent enables users to access OPC data over the phone. The Call-inAgent configuration sets up the voice and key entries and menu options based oninformation supplied from the Multimedia configuration database, the current state ofOPC data, and the security level of the user calling into the system.
Note: The following Configurator features do NOT apply to the Call-in Agent: theMultimedia Configuration Wizard, media templates, action sets, and schedules.
9.1.1 Call-in Agent Quick StartConfiguring and using the M-Alarm Multimedia Call-in Agent require the followingsteps:
1. Install the Dialogic® hardware. (See Appendix B: Advanced TelephonySettings (LIT-1201407) for information about installing and configuring Intel®Dialogic boards. For additional information about purchasing and installing IntelDialogic boards, please visit the Intel Web site atwww.intel.com/network/csp/products/index_vp.htm.
2. Install the Dialogic drivers. (At the time of this writing, these drivers must beDialogic version 5.1 with Service Pack 1.)
3. Install the M-Alarm Multimedia software. (Refer to Introduction (LIT-1201169) orthe readme.htm file on the M-Alarm Multimedia CD for installation instructions.)
4. Configure the Dialogic card. During initial setup, it is recommended that theDialogic Configuration Manager (DCM) be used for configuring and runningthe Dialogic drivers. (See the "Installing and Configuring Telephony Cards"section of Appendix B.) Open the DCM and select the Action menu. If you arefamiliar with the card, use the Add Device option, or have the DCM detect thecard using the Auto Detect Devices option.
5. Start the Dialogic drivers. Highlight the configured Dialogic card from thegraphical tree menu. Start the drivers by clicking the green start button. If thedrivers fail to initialize the card, check the card type and settings. If problempersists, contact Dialogic for technical support.
2 M-Alarm Multimedia User’s Guide
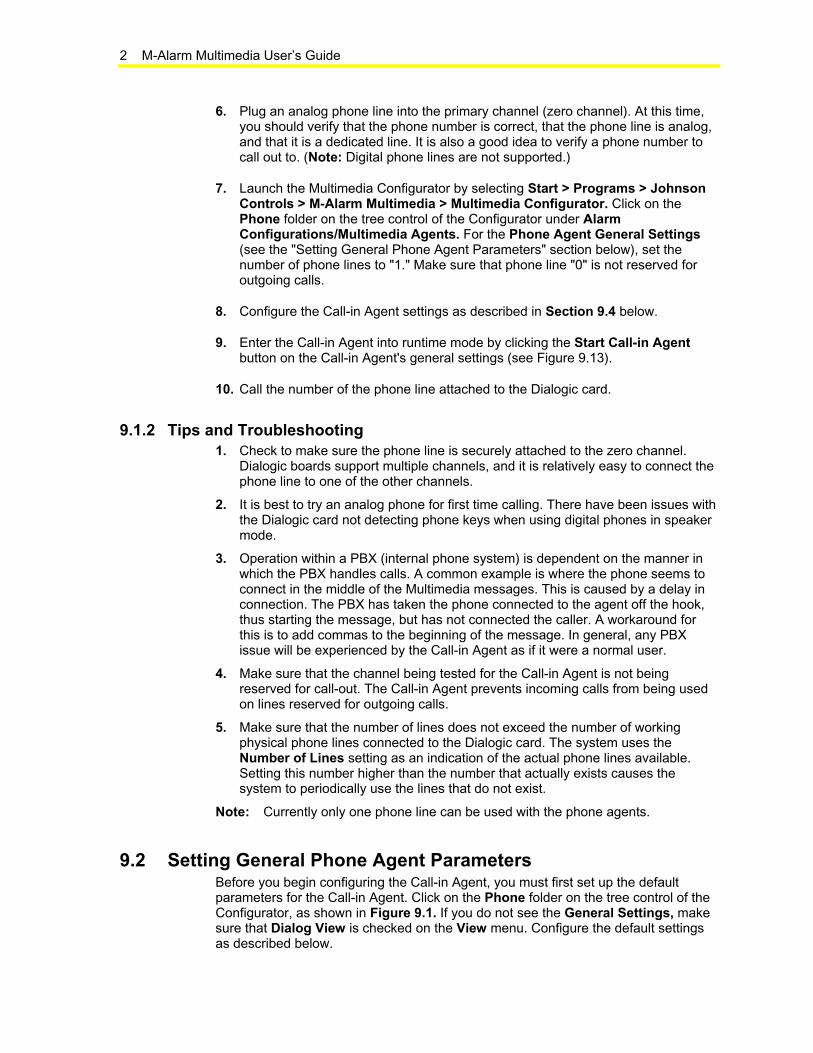
6. Plug an analog phone line into the primary channel (zero channel). At this time,you should verify that the phone number is correct, that the phone line is analog,and that it is a dedicated line. It is also a good idea to verify a phone number tocall out to. (Note: Digital phone lines are not supported.)
7. Launch the Multimedia Configurator by selecting Start > Programs > JohnsonControls > M-Alarm Multimedia > Multimedia Configurator. Click on thePhone folder on the tree control of the Configurator under AlarmConfigurations/Multimedia Agents. For the Phone Agent General Settings(see the "Setting General Phone Agent Parameters" section below), set thenumber of phone lines to "1." Make sure that phone line "0" is not reserved foroutgoing calls.
8. Configure the Call-in Agent settings as described in Section 9.4 below.
9. Enter the Call-in Agent into runtime mode by clicking the Start Call-in Agentbutton on the Call-in Agent's general settings (see Figure 9.13).
10. Call the number of the phone line attached to the Dialogic card.
9.1.2 Tips and Troubleshooting1. Check to make sure the phone line is securely attached to the zero channel.
Dialogic boards support multiple channels, and it is relatively easy to connect thephone line to one of the other channels.
2. It is best to try an analog phone for first time calling. There have been issues withthe Dialogic card not detecting phone keys when using digital phones in speakermode.
3. Operation within a PBX (internal phone system) is dependent on the manner inwhich the PBX handles calls. A common example is where the phone seems toconnect in the middle of the Multimedia messages. This is caused by a delay inconnection. The PBX has taken the phone connected to the agent off the hook,thus starting the message, but has not connected the caller. A workaround forthis is to add commas to the beginning of the message. In general, any PBXissue will be experienced by the Call-in Agent as if it were a normal user.
4. Make sure that the channel being tested for the Call-in Agent is not beingreserved for call-out. The Call-in Agent prevents incoming calls from being usedon lines reserved for outgoing calls.
5. Make sure that the number of lines does not exceed the number of workingphysical phone lines connected to the Dialogic card. The system uses theNumber of Lines setting as an indication of the actual phone lines available.Setting this number higher than the number that actually exists causes thesystem to periodically use the lines that do not exist.
Note: Currently only one phone line can be used with the phone agents.
9.2 Setting General Phone Agent ParametersBefore you begin configuring the Call-in Agent, you must first set up the defaultparameters for the Call-in Agent. Click on the Phone folder on the tree control of theConfigurator, as shown in Figure 9.1. If you do not see the General Settings, makesure that Dialog View is checked on the View menu. Configure the default settingsas described below.

Call-in Agent Configuration 3
Figure 9.1. Phone Agents: General Settings
9.2.1 Phone LinesConfigure the following parameters for the phone lines you will be using for theCall-in Agent:
• Number of Lines: Sets the total number of phone lines that will be used.
Note: The number of lines specified must be less than or equal to the actualnumber of phone lines that will be used. If the number of lines specified in theConfigurator is greater than the actual number of lines in use, the Call-in Serverworks under the assumption that additional phone lines are available eventhough the lines do not actually exist. Up to 20 lines are supported, but thenumber of lines that can be used may be limited by the type of Dialogic board.See Appendix B: Advanced Telephony Settings (LIT-1201407) for details.
Note: Currently only one phone line can be used with the phone agents.
• Incoming Calls: Specifies which phone lines are reserved for incoming calls.
• Outgoing Calls: Specifies which phone lines are reserved for outgoing calls.
Note: When specifying which phone lines are reserved for incoming andoutgoing calls, the first line is always line "0". For example, suppose you areusing a total of three lines, as shown in Figure 9.1. The first line is "0", thesecond line is "1", and the third line is "2". Since the first and second lines areused for incoming calls, enter "0" and "1" in the Incoming Calls field, as shownin Figure 9.1. The third line is used for outgoing calls, so enter "2" in theOutgoing Calls field, as shown in Figure 9.1.
Note: Any phone lines that are not reserved are used as general purpose lines(i.e. for either incoming or outgoing calls).

4 M-Alarm Multimedia User’s Guide
9.2.2 Menus Security and TimeoutsConfigure the following security and timeout parameters for the Call-in menus.
• Call-in PIN Protect: Specify a numeric password or PIN that users mustenter prior to each menu in order to progress through the phone menus inthe Call-in Agent.
Note: This is different from the general security settings used for logging intothe phone system. (The login settings are configured in the Call-in Agent treecontrol.)
• Restrict same menu visits to: Limits the number of times a user canaccess the same menu through the Call-in Agent. This limits the overall timeusers can remain in the phone system to prevent users from tying up thephone lines.
• Password Retries: Sets the number of times a user is allowed to enter anincorrect password on the phone keypad.
• Initial Key Timeout: Sets the number of seconds the phone waits for a keypress before retry.
• Inter-Key Timeout: Sets the number of seconds allowed between keypresses on the phone keypad before ending caller input.
• Total Time: Sets the total consecutive time (in seconds) that a caller mayspend in the same menu before timeout. This includes the time the systemuses to process and deliver the text-to-speech messages to the caller.
9.2.3 Dialogic ConfigurationYou must have a telephony card installed on the computer on which you are runningthe Call-in Agent. M-Alarm Multimedia supports Intel Dialogic boards. You also needto have an analog phone line connected to the board. Dialogic boards do not workfor Windows® 98 operating system, so the Call-in Agent will not work onWindows 98 operating system. (Note: Digital lines are also not supported.) OnlyDialogic boards are supported for the current version of M-Alarm Multimedia. Pleasesee Appendix B: Advanced Telephony Settings (LIT-1201407) for informationabout installing and configuring Intel Dialogic boards. For more information aboutpurchasing and installing Intel Dialogic boards, please go towww.intel.com/network/csp/products/index_vp.htm.
9.3 Organization of Call-in Agent Groups and MenusClick on the Call-in Agent folder under the Phone tree control of the Configurator, asshown in Figure 9.2. This folder contains the configuration user interface for all call-inmenus, which enable you to configure the options, key entries, and actions for theCall-in Agent.

Call-in Agent Configuration 5
Figure 9.2. Call-in Agent Tree Control
The Call-in Menus branch of the tree control contains both menu groups andindividual menus, as shown in Figure 9.3. For information about various menu types,please see Section 9.6.
Figure 9.3. Hierarchy of Call-in Agent Tree Control

6 M-Alarm Multimedia User’s Guide
Two menu groups, shown in Figure 9.4, are provided by default to help you getstarted with your configuration. The Prebuilt Samples group contains preconfiguredmenus that you can use as templates for starting your Call-in Agent configuration.The TenantCallin group is an example group that contains several fully configuredexample menus and submenus that you can use as a guide in creating your Call-inAgent configurations for tenant call-in applications for office rooms.
Configurator assigns an ID number for each group in the Base Menu ID field. Eachof the menus that you create for the group is also assigned an ID number based onthe Base ID for the group. Menu IDs can be used as key-in actions for key-in menus(described in Section 9.6).
Figure 9.4. Default Call-in Menu Groups
Each group may contain several Call-in menus and submenus, as shown inFigure 9.5. The menus are organized hierarchically, similar to the way directoriesand files are organized on your computer's hard drive. For information about variousmenu types, please see Section 9.6.
Figure 9.5. Default Call-in Menus

Call-in Agent Configuration 7
9.3.1 Modifying and Copying Groups and MenusTo save time, you can modify the default groups and menus and tailor them to yourconfiguration. If you do not want to change the default groups and menus, you canalso make a copy of them:
1. Right-click on a group or menu and select Copy from the pop-up menu, asshown in Figure 9.6.
Figure 9.6. Copying a Group or Menu
2. Right-click the target folder and select Paste from the pop-up menu, as shown inFigure 9.7.
Figure 9.7. Pasting a Group or Menu
3. Rename the group or menu as desired in the copy of the group or menu whichappears under the target folder. See Figure 9.8.

8 M-Alarm Multimedia User’s Guide
Figure 9.8. Copy of Group or Menu
9.3.2 Creating New Menu GroupsTo create a new Call-in menu group:
1. Right-click the Call-in Menus folder on the tree control of the Configurator andselect New > Call-in Menu Group, as shown in Figure 9.9. The propertiesdialog box for the new group appears in the right-hand pane of the Configurator(Figure 9.10).
Figure 9.9. Creating a New Call-in Menu Group
2. In the Menu Group Name field, type a name for the new group. TheConfigurator assigns an ID number for the group in the Base Menu ID field. Eachof the menus that you create for the group is also assigned an ID number basedon the Base ID for the group. Menu IDs can be used as key-in actions for key-inmenus (described in Section 9.6).
Call-in Agent Configuration 9
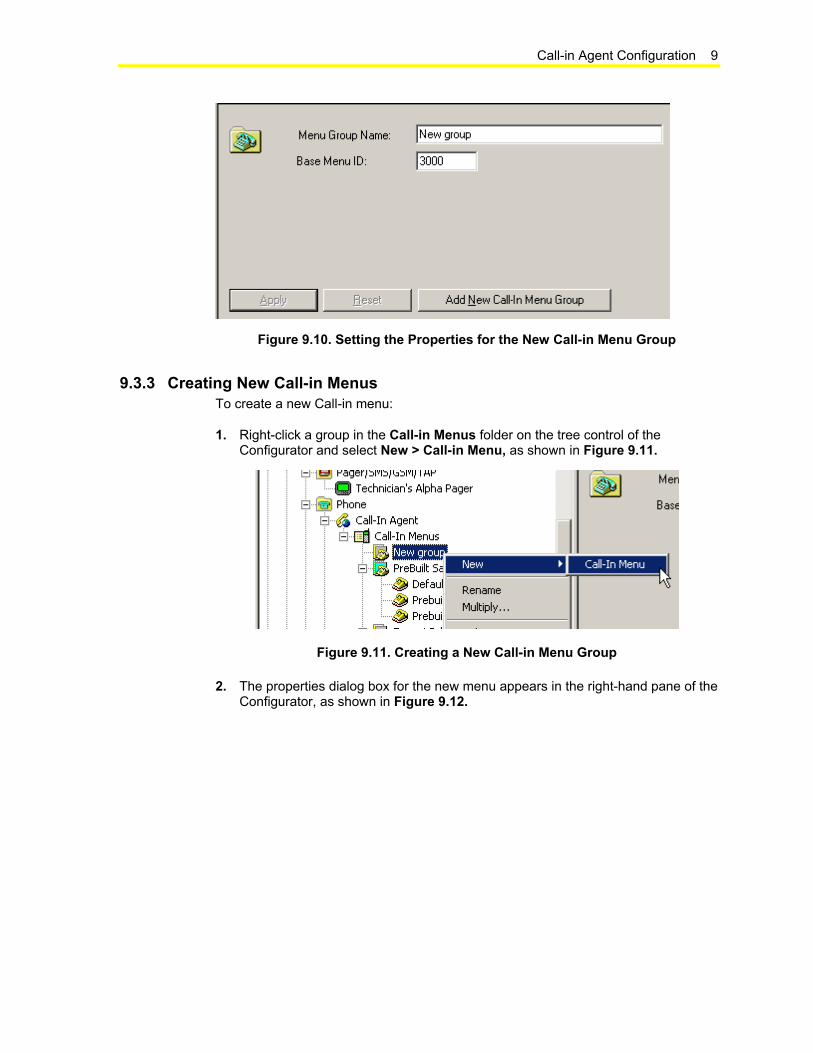
Figure 9.10. Setting the Properties for the New Call-in Menu Group
9.3.3 Creating New Call-in MenusTo create a new Call-in menu:
1. Right-click a group in the Call-in Menus folder on the tree control of theConfigurator and select New > Call-in Menu, as shown in Figure 9.11.
Figure 9.11. Creating a New Call-in Menu Group
2. The properties dialog box for the new menu appears in the right-hand pane of theConfigurator, as shown in Figure 9.12.

10 M-Alarm Multimedia User’s Guide
Figure 9.12. Setting the Properties for the New Call-in Menu
3. In the Menu Name field, type a name for the new menu. The Configuratorassigns an ID number for the menu in the Menu ID field based on the Base IDnumber of the group in which the menu was created.
4. Configure the menu settings as described in the sections below.
9.4 Configuring General Call-in Agent SettingsOnce you have set the default parameters for the Phone Agents, you are ready tobegin configuring the Call-in Agent settings. Click on the Call-in Agent folder underthe Phone tree control of the Configurator, as shown in Figure 9.13.

Call-in Agent Configuration 11
Figure 9.13. Call-in Agent General Settings
This folder contains the main configuration settings for the Call-in Agent.
1. Under Main Menu, select a menu from the drop-down list that you want to use asthe main menu for your Call-in Agent. This is the menu to which callers arereturned by default.
2. Under Default Start-up Menu, select a menu from the drop-down list that youwant to use as the start menu for your Call-in Agent. The default start-up menuwill most likely be the same as your main menu.
Note: The drop-down lists under Main Menu and Default Start-up Menu containonly the top-level menus for each menu group.
3. Under Menu Timeout Action, specify what happens after a system timeoutoccurs. From the drop-down list, select an action (e.g. "repeat," "return to mainmenu," or "hang up") or a menu that immediately follows a timeout. For example,if a caller does not respond within the initial key timeout period, the system timesout and then redirects the caller to the menu or action that you specified.
4. The report Diagnostic information to GenEvent check box is checked bydefault. All diagnostic information is reported to the GenEvent Server.
5. If you want to log diagnostic information to a text file, check the Write DiagnosticInformation to MMXCall_in.log file check box. The MMXCall_in.log file is astandalone file used for debugging purposes only.
Note: The Alarm & Event OPC Subscription parameter is not implemented in thecurrent version.
9.4.1 Server OptionsClicking the Server Options button in the Call-in Agent general settings(Figure 9.13) opens the Call-in Agent Options dialog box, shown in Figure 9.14.This dialog box sets the parameters for the Call-in Server.

12 M-Alarm Multimedia User’s Guide
9.4.1.1 Server Strings Tab
The Server Strings tab allows you to customize predefined messages that the callerhears in certain situations. Use the Call-In Agent’s Message Type drop-down list toselect a particular message type, and then edit the text associated with that messagetype in the Message Text field. Figure 9.14, for example, contains a message that acaller hears when the caller is denied access to a menu: "Insufficient security toaccess this menu."
Figure 9.14. Server Strings
9.4.1.2 Flash Settings Tab
The Flash Settings tab sets the parameters for the Flash Warning function in directaction menus, where you can optionally specify a reset value. The reset value iswritten to the same OPC tag after the specified time interval, resetting the OPC valuewritten by the menu action. When the Flash Warning check box is checked in adirect action menu, the system switches, or "flashes", the OPC tag between the tag'scurrent (write) value and its reset value before finally resetting the tag value.
The Flash Settings tab, shown in Figure 9.15, sets the following parameters for theFlash Warning function in direct action menus:
Lead Time: Sets the amount of time the system switches (flashes) between the tag'swrite value and reset value before resetting the value.
Time on: Sets the time period for each warning flash for the write value.
Time off: Sets the time period for each warning flash for the reset value.
Number of Flashes: Specifies how many times the system switches (flashes)between the tag's write value and reset value before resetting the value.

Call-in Agent Configuration 13
For each setting, you can specify how many minutes, seconds, and milliseconds.
Note: For information about configuring direct action menus, please see the MenuTypes section of this document.
Figure 9.15. Flash Settings for Direct Action Menus
9.4.2 AliasesThe Call-in Agent uses an alias key for each user (caller). Each caller must beassigned a numeric alias key in the configuration, which is a unique ID number thatthe Call-in Agent uses to recognize the caller. Each alias key can be associated withnumerous aliases, enabling you to customize settings for each user by associatingthe caller's alias key with certain parameters, such as which locations in the buildingthe caller can access (e.g. room, floor). When a caller dials into the system, the calleris asked to enter his or her alias key.
To configure aliases, click the Alias Table button in the Call-in Agent general settings(Figure 9.13). The Call-in Alias Table appears, as shown in Figure 9.16. The tablecontains several columns. The Alias Key column lists each numeric alias key. TheUserName column lists the name of the caller associated with each alias key. TheAlias Key column and UserName column are fixed; neither can be deleted, andeach alias key must be associated with a user name. (You can change the keys anduser names in the columns, but the columns themselves cannot be deleted.) Theremaining columns contain aliases (e.g. Bldg, Floor, and Room) that can bemodified or removed as needed.

14 M-Alarm Multimedia User’s Guide
Figure 9.16. Alias Table
9.4.2.1 Alias Key-in Actions
A Key-in menu, such as the Get ID menu shown in Figure 9.17, is an example ofwhen a caller would be asked to enter an alias key. The Enter Alias Key to ResolveAliases option must be selected from the drop-down list under Key-in Action, asshown in Figure 9.17. For example, in the GetID key-in menu, the IntroductionPhrase states "please enter your 8 digit ID." Thus, when a caller dials into thesystem, the caller is prompted to enter his or her alias key. If the system recognizesthe caller's alias key, it resolves the user name and all other aliases associated withthe alias key. For more information about configuring key-in menus, please seeSection 9.6.
Note: The Call-in Agent supports both alias login and the standard security login.The alias login uses the UserName alias column to log a caller into the agent. Thisonly takes place if the alias key entry is specified in the key-in menu. When the calleraccesses this menu and enters an alias key, the system uses the name associatedwith the UserName alias column for login purposes. The standard security login usesthe security server password and the alias login UserName. The caller first enters analias key, and then enters a security password. The name associated with theUserName alias column is sent to the security server as the login name. The securitypassword entered is used as the login password. The security server will resolve thiscombination for security login.

Call-in Agent Configuration 15
Figure 9.17. Alias Key-in Action
9.4.2.2 Creating Alias Keys
To add a new alias key to the table:
1. Right-click a column and select Insert New Alias Key from the pop-up menu, asshown in Figure 9.18.
Figure 9.18. Creating an Alias Key
2. The new key appears under the Alias Key column, as shown in Figure 9.19.Type a number for the key (can be any number of digits) in the table row.

16 M-Alarm Multimedia User’s Guide
Figure 9.19. New Alias Key Added to Column
9.4.2.3 Creating New Aliases
To add a new alias to the alias table:
1. To add a new alias to the alias table, right-click inside a column and select InsertNew Alias from the pop-up menu, as shown in Figure 9.20.
Figure 9.20. Creating a New Alias
2. The New Call-in Alias dialog box appears, as shown in Figure 9.21. Enter aname for the new alias, and then click the OK button.
Figure 9.21. Naming the New Alias
3. The new alias column appears in the table, as shown in Figure 9.22.

Call-in Agent Configuration 17
Figure 9.22. New Alias Added to Table
9.4.2.4 Deleting Alias Keys
To delete an alias key, right-click the key and select Delete Alias Key from the pop-up menu, as shown in Figure 9.23.
Figure 9.23. Deleting an Alias Key
9.4.2.5 Renaming Aliases
To rename an alias:
1. Right-click an alias and select Rename Alias from the pop-up menu, as shown inFigure 9.24.

18 M-Alarm Multimedia User’s Guide
Figure 9.24. Renaming an Alias
2. The Rename Call-in Alias dialog box appears, as shown in Figure 9.25. Enter anew name for the alias, and then click the OK button.
Figure 9.25. Typing a New Name for the Alias
9.4.2.6 Deleting Aliases
To remove an alias from the configuration, right-click an alias in the table and selectDelete Alias from the pop-up menu, as shown in Figure 9.26.
Note: The User Name alias cannot be deleted.
Figure 9.26. Deleting an Alias
9.5 Configuring Call-in Agent MenusEach menu group may contain one or more Call-in Agent menus or submenus. Allmenus contain the following general configuration settings at the top of theconfiguration dialog box, as shown in Figure 9.27.

Call-in Agent Configuration 19
Figure 9.27. Basic Menu Configuration Settings
• Menu Name: Type a name for the menu in this field (maximum of 256characters).
• Menu Type: Each menu contains an extensive configuration interface, which isdivided into different menu types. Select from one of the following menu types:
∗ Option Menu
∗ Key-In Menu
∗ Direct Action
∗ Decision Menu
For more information about configuring each kind of menu, please see theSection 9.6.
• Preliminary Action: This parameter is not implemented in the current version.
• Menu ID: The Configurator assigns a unique ID number for each menu based onthe Base ID number of the group in which the menu was created. Menu IDs canbe used as key-in actions for key-in menus (described in Section 9.6).
• Introduction Phrase: Enter the message (maximum of 256 characters) that thecaller hears upon reaching the menu. The text is automatically converted tospeech by the Call-in Agent. If you do not want to use a text message, you caninstead select a sound file (.wav). You can also insert an alias name in this text(the alias name appears inside double angle brackets: e.g. <<Floor>>). The Call-in Agent tries to resolve this alias according to the alias key that caller enteredearlier in the call-in session.
Note: You can use text-to-speech messages, sound files, and text messages withaliases. For information about selecting a sound file or an alias, see the "InsertingSound Files" and "Inserting Aliases" sections below.
9.5.1 Menu Progression and SequenceWhen configuring Call-in menus, it is important to keep in mind how you want thecallers to progress through the menus so that callers can efficiently communicatewith the Call-in Agent. In the Call-in Agent menu configuration, you can specify thesequence of the menus by defining actions or menus that immediately follow eachevent.

20 M-Alarm Multimedia User’s Guide
The configuration for each menu type includes a Next Action/Menu field, shown inFigure 9.28, specifies the action or menu that results from each of the caller's actionsor responses (i.e. key presses). From the drop-down list, you can select any availablemenu as well as the following actions:
• Go back: Returns the caller to the previous menu.
• Repeat: Repeats the current menu.
• Hang up: Ends the current call-in session.
• Go to start menu: Returns the caller to the start-up menu.
• Go to main menu: Returns the caller to the main menu.
If you select a menu from the drop-down list, the arrow to the right of the field isenabled, as shown in Figure 9.28. Clicking this arrow takes you to the menu youselected.
Figure 9.28. Next Action/Menu Field
9.5.2 Inserting Sound FilesIf you do not want to use a text-to-speech phrase or message, you can instead selecta sound file (.wav). To insert a sound file:
1. Click the ... button next to an appropriate field (the Introduction Phrase field isused here as an example) and select From Sound Library from the pop-upmenu, as shown in Figure 9.29.
Figure 9.29. Adding a Sound File to the Menu Configuration

Call-in Agent Configuration 21
2. This opens the Sound Library dialog box, shown in Figure 9.30. Click the AddSound File button to browse for .wav files. Click Open to add the selected file tothe Sound Library. To listen to a file, highlight the file and click the Play button.To select an existing sound file from the Sound Library, highlight the entire rowfor that file, and then click the Select button. The selected sound file appears inthe configuration field you selected.
Figure 9.30. Selecting Sound Files From the Sound Library
3. The selected sound file is added to the Introduction Phrase field, as shown inFigure 9.31.
Figure 9.31. Sound File Added to Configuration
9.5.3 Inserting AliasesTo insert an alias into a text message:
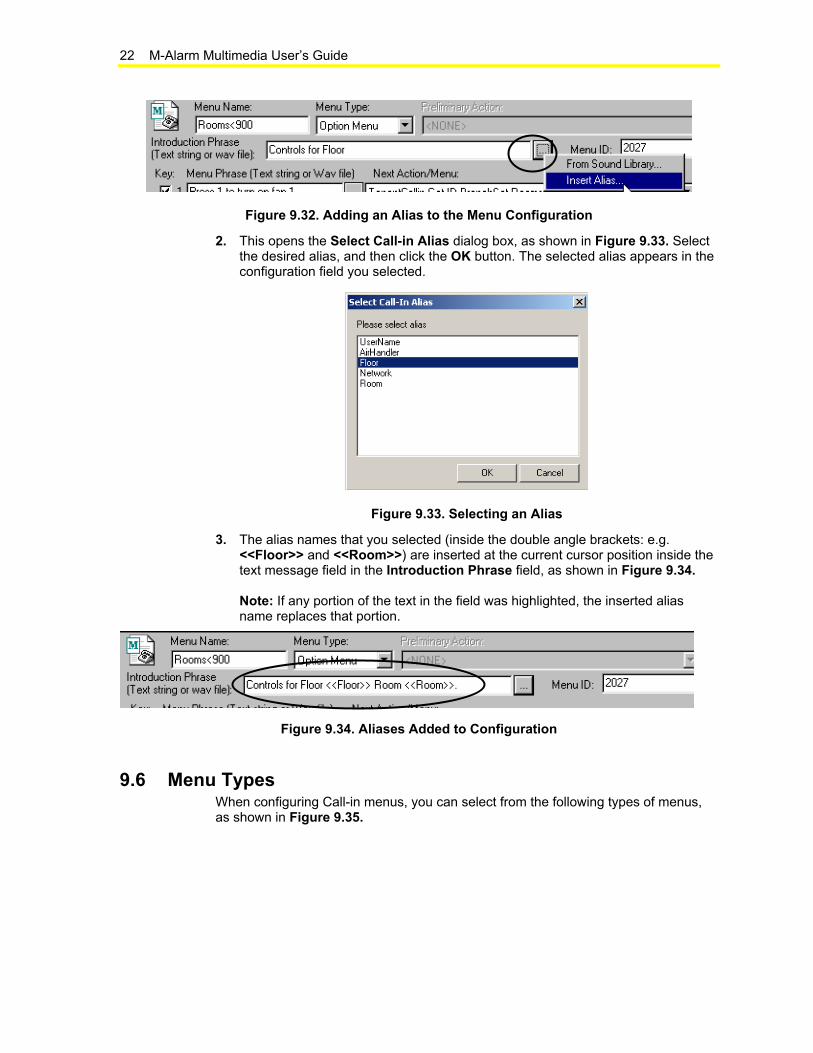
1. Click the ... button next to the appropriate field (the Introduction Phrase field isused here as an example) and select Insert Alias from the pop-up menu, asshown in Figure 9.32.
22 M-Alarm Multimedia User’s Guide
Figure 9.32. Adding an Alias to the Menu Configuration
2. This opens the Select Call-in Alias dialog box, as shown in Figure 9.33. Selectthe desired alias, and then click the OK button. The selected alias appears in theconfiguration field you selected.
Figure 9.33. Selecting an Alias
3. The alias names that you selected (inside the double angle brackets: e.g.<<Floor>> and <<Room>>) are inserted at the current cursor position inside thetext message field in the Introduction Phrase field, as shown in Figure 9.34.
Note: If any portion of the text in the field was highlighted, the inserted aliasname replaces that portion.
Figure 9.34. Aliases Added to Configuration
9.6 Menu TypesWhen configuring Call-in menus, you can select from the following types of menus,as shown in Figure 9.35.

Call-in Agent Configuration 23
• Key-in Menu: Contains a user-input menu with a string of digits followed by thepound key.
• Decision Menu: Gets rerouted to another menu based on value of an OPC tagor expression.
• Option Menu: Contains a list of user-configured menu choices.
• Direct Action: Specifies a direct, predefined action to take place upon enteringthe menu.
Figure 9.35. Selecting Menu Types
In describing these menu types, we will walk through various example menus fromthe Tenant Callin menu group, as shown in Figure 9.36.
Figure 9.36. Menu Types in Group
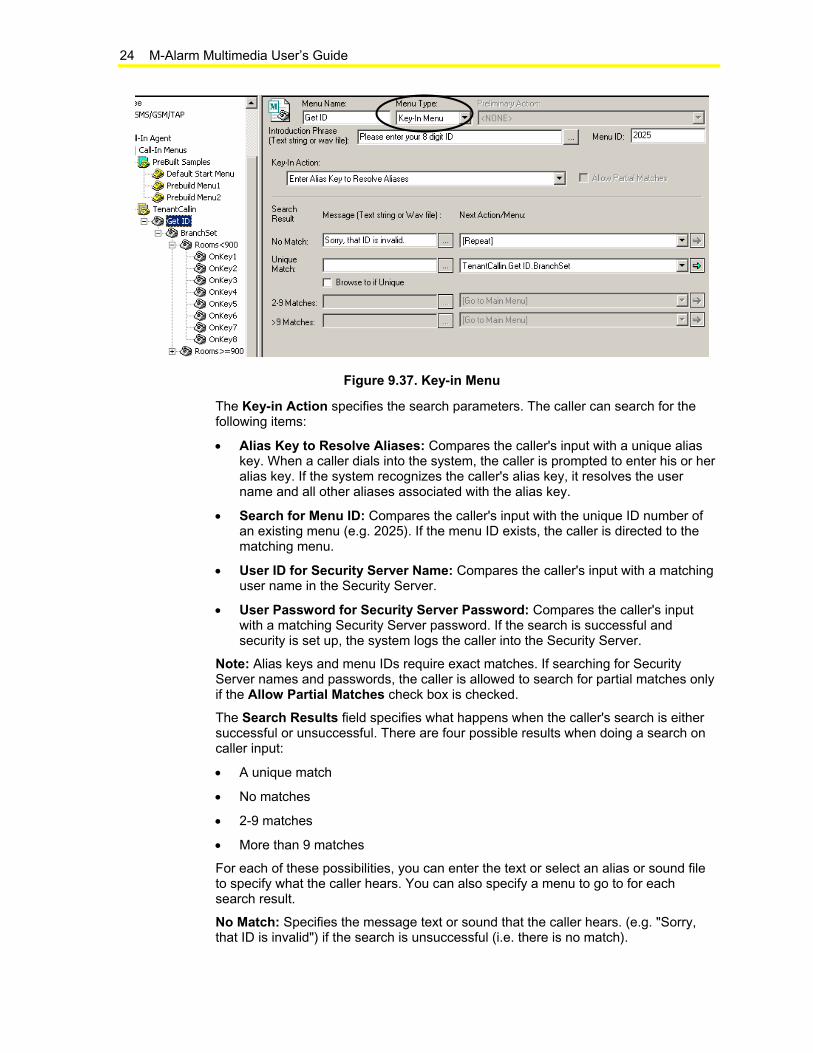
9.6.1 Key-in MenusA Key-in menu, such as the Get ID example menu shown in Figure 9.37, is a menuthat expects the caller to enter in a series of digits, followed by the pound (#) key.The keys entered serve as a search parameter for finding OPC tags, aliases, menuIDs, security names, or security passwords.
24 M-Alarm Multimedia User’s Guide
Figure 9.37. Key-in Menu
The Key-in Action specifies the search parameters. The caller can search for thefollowing items:
• Alias Key to Resolve Aliases: Compares the caller's input with a unique aliaskey. When a caller dials into the system, the caller is prompted to enter his or heralias key. If the system recognizes the caller's alias key, it resolves the username and all other aliases associated with the alias key.
• Search for Menu ID: Compares the caller's input with the unique ID number ofan existing menu (e.g. 2025). If the menu ID exists, the caller is directed to thematching menu.
• User ID for Security Server Name: Compares the caller's input with a matchinguser name in the Security Server.
• User Password for Security Server Password: Compares the caller's inputwith a matching Security Server password. If the search is successful andsecurity is set up, the system logs the caller into the Security Server.
Note: Alias keys and menu IDs require exact matches. If searching for SecurityServer names and passwords, the caller is allowed to search for partial matches onlyif the Allow Partial Matches check box is checked.
The Search Results field specifies what happens when the caller's search is eithersuccessful or unsuccessful. There are four possible results when doing a search oncaller input:
• A unique match
• No matches
• 2-9 matches
• More than 9 matches
For each of these possibilities, you can enter the text or select an alias or sound fileto specify what the caller hears. You can also specify a menu to go to for eachsearch result.
No Match: Specifies the message text or sound that the caller hears. (e.g. "Sorry,that ID is invalid") if the search is unsuccessful (i.e. there is no match).

Call-in Agent Configuration 25
Unique Match: Specifies the message text or sound that the caller hears if thesearch is an exact match.
2-9 Matches: Specifies the message text or sound that the caller hears if the searchyields 2-9 matches.
>9 Matches: Specifies the message text or sound that the caller hears. (e.g. "Presszero to hear more options") if the search yields more than nine matches.
Note: When searching for a menu ID or an alias key, searching for partial matches isdisabled and there is no option to specify what happens with two or more matches. Ifthe Browse to if Unique check box is checked, the caller can browse for a match inthe event that a match occurs in multiple subgroups.
The Next Action/Menu field specifies the action or menu that immediately followseach search result. From each drop-down list, you can select any available menu aswell as the following actions:
• Go back: Returns the caller to the previous menu.
• Repeat: Repeats the current menu.
• Hang up: Ends the current call-in session.
• Go to start menu: Returns the caller to the start-up menu.
• Go to main menu: Returns the caller to the main menu.
Note: For information about how to select sound files and aliases, please refer tothe "Inserting Sound Files" and "Inserting Aliases" sections.
9.6.2 Decision MenusA decision menu, such as the BranchSet example menu shown in Figure 9.38,transports a caller to another menu based on the true/false condition of an OPC tagor the result of an expression.
Figure 9.38. Decision Menu

26 M-Alarm Multimedia User’s Guide
The Next Action field specifies the action or menu that immediately follows theresolution of each OPC tag or expression that the caller accesses through the Call-inAgent. If the OPC tag or expression specified resolves to a nonzero value, or TRUE,the flow of execution goes to the menu specified in the Next Action drop-down listnext to True. If the value is zero, or FALSE (or undefined), flow of execution goes tothe menu specified in the Next Action drop-down list next to False.
From each drop-down list under Next Action, you can select any available menu aswell as the following actions:
• Go back: Returns the caller to the previous menu.
• Repeat: Repeats the current menu.
• Hang up: Ends the current call-in session.
• Go to start menu: Returns the caller to the start-up menu.
• Go to main menu: Returns the caller to the main menu.
To specify an OPC tag or expression, click the Edit Expression button. This opensthe Edit Expression dialog box, shown in Figure 9.39. The following options areavailable for editing OPC expressions:
• Arithmetic
• Relational
• Logical
• Bitwise
• Functions
• Tags
Note: For complete information about using the Expression Editor, please refer toCreating Alarm Configurations (LIT-1201170).
Figure 9.39. Expression Editor
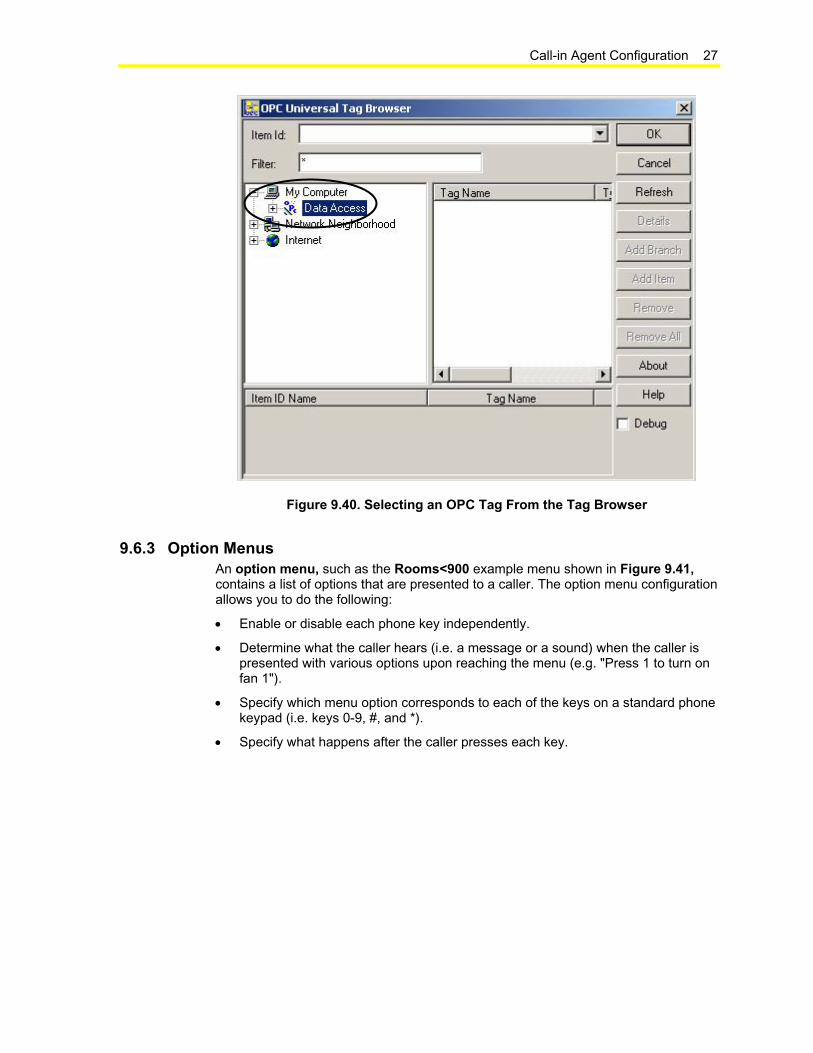
To select an OPC tag, click the Tags button. This opens the OPC Tag Browser, asshown in Figure 9.40. Select an OPC tag from the Data Access tree control andthen click OK.
Call-in Agent Configuration 27
Figure 9.40. Selecting an OPC Tag From the Tag Browser
9.6.3 Option MenusAn option menu, such as the Rooms<900 example menu shown in Figure 9.41,contains a list of options that are presented to a caller. The option menu configurationallows you to do the following:
• Enable or disable each phone key independently.
• Determine what the caller hears (i.e. a message or a sound) when the caller ispresented with various options upon reaching the menu (e.g. "Press 1 to turn onfan 1").
• Specify which menu option corresponds to each of the keys on a standard phonekeypad (i.e. keys 0-9, #, and *).
• Specify what happens after the caller presses each key.

28 M-Alarm Multimedia User’s Guide
Figure 9.41. Option Menu
To enable keys for the menu:
1. Check the check box next to each key you want to use for the menu. The field underMenu Phrase now becomes available.
2. Under the Menu Phrase field for each enabled key, specify some text to be spokenor a sound file to be played. To select a sound file, click the ... button next to eachkey. The caller hears each of the items in the order in which they appear in theConfigurator.
In the example menu in the figure above, when a caller reaches the menu, the callerhears the following:
"Press 1 to turn on fan 1."
"Press 2 to turn off fan 1."
"Press 3 to turn on light 1."
"Press 4 to turn off light 1."
"Press 5 to turn on fan 2."
"Press 6 to turn off fan 2."
"Press 7 to turn on light 2."
"Press 8 to turn off light 2."
"Press Pound to Hang Up."
3. For each enabled key, you must specify an action or a menu to which the caller isdirected upon pressing the key on the phone pad. The Next Action/Menu fieldspecifies the action or menu that results when the caller presses the key. From eachdrop-down list, you can select any available menu as well as the following actions:
• Go back: Returns the caller to the previous menu.
• Repeat: Repeats the current menu.

Call-in Agent Configuration 29
• Hang up: Ends the current call-in session.
• Go to start menu: Returns the caller to the start-up menu.
• Go to main menu: Returns the caller to the main menu.
In the Invalid Key Stroke field, specify the message or sound a caller hears (e.g."Invalid Key.") when the caller presses the wrong key.
9.6.4 Direct Action MenusA direct action menu, such as the On Key 1 example menu shown in Figure 9.42,supplies quick updates and writes to and reads from OPC tags. In this example, thecaller is directed to this direct action menu after pressing the "1" key on the pone pad(as defined by the Rooms<900 example option menu in the section above). Directaction menus allows for quick browsing to a specific OPC tag group (or server). Themenu specifies that the caller is going to request a specific action (instead ofbrowsing and searching through groups/tags). In this example, the caller pressed "1to turn on fan 1." The direct action menu enables you to tell the Call-in Agent how toturn on fan 1 by specifying OPC values.
Figure 9.42. Direct Action Menu

30 M-Alarm Multimedia User’s Guide
1. Choose one of the following actions from the drop-down list under the Actionfield:
• Write to an OPC tag: Writes a value to the OPC tag specified in the ActionDestination Path field. Data to write can come from either the caller or apredefined constant.
• Read the value of OPC tag: Gives the value of the OPC tag specified in theAction Destination Path.
If the Confirm User Action check box is checked, the Call-in Agent askswhether the caller wants to proceed with the selected action before writing orreading the OPC value.
Note: The Use last browsed-to or keyed-in point check box is notimplemented in the current version.
2. Under Action Destination Path, click the Browse button either to launch theOPC Tag Browser, which allows you to select an OPC Data Access tag, or toselect an alias. For example, for an N30 object (in this case, an N2 AO):
JC.BNOPC.2\@BRENGEL:FL02:FL02-AHU-1-AO-1.Present Value
Or, for an N1 Object (in this case, an AO):
JC.N1OPC.1.0\NAV_01\NC-1-V01\V01-AO01.SEND_COMMAND
3. Select from the following Write Parameters for OPC tags:
• Write Constant Value: When this option is selected, the Call-in Agentautomatically writes an OPC tag value (i.e. no action is required from thecaller). An example for an N30 Object (again, an N2AO) would be 72. For anN1 object (an AO) the value could be SET_AOS 72.
• Prompt Caller for Value: When this option is selected, the caller must enteran OPC value using the phone keypad. [Note: The Star (*) key on the phonekeypad can be used as a decimal point.] Enter the message text or select asound file by clicking the ... button to specify the Call-in Agent’s prompt forentering the OPC value.
Note: The Confirm Value Changed check box is not implemented in thecurrent version.
• Reset Value: You can optionally specify a reset value, which is written tothe same OPC tag after the specified time interval, resetting the OPC valuewritten by this menu action. When Flash Warning is checked, the systemswitches the OPC tag between the tag's current (write) value and its resetvalue before finally resetting the tag value. The lead time, time off, time on,and number flashes are specified in the flash warning parameters set in thegeneral Call-in settings. (Refer to the "Configuring General Call-in AgentSettings" section above.)
For an N30 object (an N2AO) this value could be 65. An example for an N1object (an AO) this value could be RELEASE 2 or SET_AOS 65.
4. Under the Action Status field, you must specify what the caller hears (messageor sound) when the OPC read/write is a success or a failure. In this example,the action is successfully completed when fan 1 is turned on.
You must specify an action or a menu to which the caller is directed uponsuccess or failure. The field allows you to specify the action or menu that resultswhen the caller presses the key. From each drop-down list under NextAction/Menu, select an available menu or one of the following actions:

Call-in Agent Configuration 31
• Go back: Returns the caller to the previous menu.
• Repeat: Repeats the current menu.
• Hang up: Ends the current call-in session.
• Go to start menu: Returns the caller to the start-up menu.
• Go to main menu: Returns the caller to the main menu.
9.7 Starting and Stopping the Call-in AgentWhen the Call-in Agent is in configuration mode, the Call-in Agent branch on the treecontrol appears as shown in Figure 9.43. Notice that the phone icon has a red markon it, indicating that the Call-in Agent server is turned off.
Figure 9.43. Call-in Agent in Configuration Mode
9.7.1 Starting the Call-in AgentWhen your Call-in Agent configuration is complete, you must start the Call-in Agentserver in order for callers to call in to the system.
1. Click the Start Call-in Agent button on the general settings dialog, as shown inFigure 9.44.
Figure 9.44. Starting the Call-in Agent
2. As the Call-in Agent loads, a progress window appears, as shown in Figure 9.45.

32 M-Alarm Multimedia User’s Guide
Figure 9.45. Call-in Agent Loading
3. Once the Call-in Agent is running, you can call the number of the phone lineattached to the Dialogic card to dial in to the system. The red mark over thephone icon in the tree control is now removed to indicate that the Call-in Agent isrunning, as shown in Figure 9.46.
Figure 9.46. Call-in Agent Running
9.7.2 Stopping the Call-in AgentAfter you start the Call in agent, the Start Call-in Agent button changes to say StopCall-in Agent.
1. Click the Stop Call-in Agent button on the general settings dialog.
2. As the Call-in Agent shuts down, a progress window appears, as shown inFigure 9.47.
Figure 9.47. Call-in Agent Shutting Down

Call-in Agent Configuration 33
Controls Group507 E. Michigan StreetP.O. Box 423 www.johnsoncontrols.comMilwaukee, WI 53201 Printed in U.S.A.