Calculator Notes for the Texas Instruments TI-Nspire...
101
Calculator Notes for the Texas Instruments TI-Nspire and TI-Nspire CAS SECOND EDITION
-
Upload
phunghuong -
Category
Documents
-
view
228 -
download
4
Transcript of Calculator Notes for the Texas Instruments TI-Nspire...

Calculator Notes for the Texas Instruments TI-Nspire and TI-Nspire CAS
SECOND EDITION
DAA2CNTNS_014_fm.indd iDAA2CNTNS_014_fm.indd i 3/16/09 11:23:47 AM3/16/09 11:23:47 AM

Editors: Elizabeth DeCarli, Heather Dever, Jocelyn Van Vliet
Project Administrator: Tamar Wolins
Writer: David Lambright
Editorial Consultant: Carrie Gongaware
Production Editor: Christa Edwards
Editorial Production Supervisor: Kristin Ferraioli
Production Director: Christine Osborne
Senior Production Coordinator: Ann Rothenbuhler
Text Designer: ICC Macmillan Inc.
Composition, Technical Art: ICC Macmillan Inc.
Textbook Product Manager: Tim Pope
Executive Editor: Josephine Noah
Publisher: Steven Rasmussen
©2010 by Key Curriculum Press. All rights reserved.
Limited Reproduction Permission
The publisher grants the teacher whose school has adopted Discovering Advanced Algebra, and who has received Discovering Advanced Algebra: An Investigative Approach, Calculator Notes for the Texas Instruments TI-Nspire and TI-Nspire CAS as part of the Teaching Resources package for the book, the right to reproduce material for use in his or her own classroom. Unauthorized copying of Discovering Advanced Algebra: An Investigative Approach, Calculator Notes for the Texas Instruments TI-Nspire and TI-Nspire CAS constitutes copyright infringement and is a violation of federal law.
®Key Curriculum Press is a registered trademark of Key Curriculum Press. ™The Discovering Mathematics logo is a trademark of Key Curriculum Press. All registered trademarks and trademarks in this book are the property of their respective holders.
Key Curriculum Press1150 65th StreetEmeryville, CA 94608(510) [email protected]
Printed in the United States of America
10 9 8 7 6 5 4 3 2 1 13 12 11 10 09 ISBN 978-1-60440-014-4
DAA2CNTNS_014_fm.indd iiDAA2CNTNS_014_fm.indd ii 3/16/09 11:23:48 AM3/16/09 11:23:48 AM

iii
Introduction . . . . . . . . . . . . . . . . . . . . . . . . . . . . . . . . . . . . . . . . . . . . . . . . . . . . . . . . . . . . . . . . . . . . . . . . . . . . . . . . . . . . . . . . . . . . . vii
Getting Started: Navigating Screens and Menus. . . . . . . . . . . . . . . . . . . . . . . . . . . . . . . . . . . . . 1
Chapter 0
Note 0A: Fractions and Decimals. . . . . . . . . . . . . . . . . . . . . . . . . . . . . . . . . . . . . . . . . . . . . . . . . . . . . . . . . . . 7
Note 0B: Order of Operations. . . . . . . . . . . . . . . . . . . . . . . . . . . . . . . . . . . . . . . . . . . . . . . . . . . . . . . . . . . . . . . . 8
Chapter 1
Note 1A: Reentry . . . . . . . . . . . . . . . . . . . . . . . . . . . . . . . . . . . . . . . . . . . . . . . . . . . . . . . . . . . . . . . . . . . . . . . . . . . . . . . . 10
Note 1B: Recursion . . . . . . . . . . . . . . . . . . . . . . . . . . . . . . . . . . . . . . . . . . . . . . . . . . . . . . . . . . . . . . . . . . . . . . . . . . . . . 10
Note 1C: Making Spreadsheets . . . . . . . . . . . . . . . . . . . . . . . . . . . . . . . . . . . . . . . . . . . . . . . . . . . . . . . . . . 12
Note 1D: Looking for the Rebound. . . . . . . . . . . . . . . . . . . . . . . . . . . . . . . . . . . . . . . . . . . . . . . . . . . . . . 13
Note 1E: Entering Data. . . . . . . . . . . . . . . . . . . . . . . . . . . . . . . . . . . . . . . . . . . . . . . . . . . . . . . . . . . . . . . . . . . . . . . . 14
Note 1F: Plotting Data . . . . . . . . . . . . . . . . . . . . . . . . . . . . . . . . . . . . . . . . . . . . . . . . . . . . . . . . . . . . . . . . . . . . . . . . 15
Note 1G: Tracing Data Plots . . . . . . . . . . . . . . . . . . . . . . . . . . . . . . . . . . . . . . . . . . . . . . . . . . . . . . . . . . . . . . . . 17
Note 1H: Sharing Data . . . . . . . . . . . . . . . . . . . . . . . . . . . . . . . . . . . . . . . . . . . . . . . . . . . . . . . . . . . . . . . . . . . . . . . . 17
Note 1I: Creating Sequences . . . . . . . . . . . . . . . . . . . . . . . . . . . . . . . . . . . . . . . . . . . . . . . . . . . . . . . . . . . . . . . 18
Note 1J: Graphing Sequences . . . . . . . . . . . . . . . . . . . . . . . . . . . . . . . . . . . . . . . . . . . . . . . . . . . . . . . . . . . . . 19
Note 1K: Finding Specific Terms . . . . . . . . . . . . . . . . . . . . . . . . . . . . . . . . . . . . . . . . . . . . . . . . . . . . . . . . . . 19
Note 1L: Random Numbers . . . . . . . . . . . . . . . . . . . . . . . . . . . . . . . . . . . . . . . . . . . . . . . . . . . . . . . . . . . . . . . . . 19
Note 1M: Finance Solver . . . . . . . . . . . . . . . . . . . . . . . . . . . . . . . . . . . . . . . . . . . . . . . . . . . . . . . . . . . . . . . . . . . . . 21
Chapter 2
Note 2A: Basic Statistics . . . . . . . . . . . . . . . . . . . . . . . . . . . . . . . . . . . . . . . . . . . . . . . . . . . . . . . . . . . . . . . . . . . . . . 22
Note 2B: Box Plots . . . . . . . . . . . . . . . . . . . . . . . . . . . . . . . . . . . . . . . . . . . . . . . . . . . . . . . . . . . . . . . . . . . . . . . . . . . . . . 23
Note 2C: Histograms. . . . . . . . . . . . . . . . . . . . . . . . . . . . . . . . . . . . . . . . . . . . . . . . . . . . . . . . . . . . . . . . . . . . . . . . . . . 23
Chapter 3
Note 3A: Entering and Graphing Equations . . . . . . . . . . . . . . . . . . . . . . . . . . . . . . . . . . . . . . . . . 25
Note 3B: Function Tables . . . . . . . . . . . . . . . . . . . . . . . . . . . . . . . . . . . . . . . . . . . . . . . . . . . . . . . . . . . . . . . . . . . . 33
Note 3C: Balloon Blastoff . . . . . . . . . . . . . . . . . . . . . . . . . . . . . . . . . . . . . . . . . . . . . . . . . . . . . . . . . . . . . . . . . . . . 34
Note 3D: Median-Median Line. . . . . . . . . . . . . . . . . . . . . . . . . . . . . . . . . . . . . . . . . . . . . . . . . . . . . . . . . . . . . 34
Note 3E: Residuals and the Root Mean Square Error . . . . . . . . . . . . . . . . . . . . . . . . . . . . 35
Note 3F: Greatest Integer Function . . . . . . . . . . . . . . . . . . . . . . . . . . . . . . . . . . . . . . . . . . . . . . . . . . . . . 37
Note 3G: Movable Line. . . . . . . . . . . . . . . . . . . . . . . . . . . . . . . . . . . . . . . . . . . . . . . . . . . . . . . . . . . . . . . . . . . . . . . . 37
Chapter 4
Note 4A: Function Notation . . . . . . . . . . . . . . . . . . . . . . . . . . . . . . . . . . . . . . . . . . . . . . . . . . . . . . . . . . . . . . . . 39
Note 4B: Entering Programs. . . . . . . . . . . . . . . . . . . . . . . . . . . . . . . . . . . . . . . . . . . . . . . . . . . . . . . . . . . . . . . . 39
Note 4C: Movin’ Around . . . . . . . . . . . . . . . . . . . . . . . . . . . . . . . . . . . . . . . . . . . . . . . . . . . . . . . . . . . . . . . . . . . . . 41
Note 4D: Setting Windows . . . . . . . . . . . . . . . . . . . . . . . . . . . . . . . . . . . . . . . . . . . . . . . . . . . . . . . . . . . . . . . . . . 42
Contents
DAA2CNTNS_014_fm.indd iiiDAA2CNTNS_014_fm.indd iii 3/16/09 10:34:48 PM3/16/09 10:34:48 PM
iv
Note 4E: Graphing Piecewise Functions. . . . . . . . . . . . . . . . . . . . . . . . . . . . . . . . . . . . . . . . . . . . . . . 43
Note 4F: Graphing Absolute-Value Functions . . . . . . . . . . . . . . . . . . . . . . . . . . . . . . . . . . . . . . 44
Note 4G: Graphing Transformations. . . . . . . . . . . . . . . . . . . . . . . . . . . . . . . . . . . . . . . . . . . . . . . . . . . . 45
Note 4H: Transformations and Compositions . . . . . . . . . . . . . . . . . . . . . . . . . . . . . . . . . . . . . . 45
Note 4I: Drawing Segments . . . . . . . . . . . . . . . . . . . . . . . . . . . . . . . . . . . . . . . . . . . . . . . . . . . . . . . . . . . . . . . . 46
Note 4J: Web Graphs . . . . . . . . . . . . . . . . . . . . . . . . . . . . . . . . . . . . . . . . . . . . . . . . . . . . . . . . . . . . . . . . . . . . . . . . . . 48
Chapter 5
Note 5A: Powers and Roots . . . . . . . . . . . . . . . . . . . . . . . . . . . . . . . . . . . . . . . . . . . . . . . . . . . . . . . . . . . . . . . . . 50
Note 5B: Drawing the Inverse of a Function. . . . . . . . . . . . . . . . . . . . . . . . . . . . . . . . . . . . . . . . . 50
Note 5C: Logarithms and Antilogs. . . . . . . . . . . . . . . . . . . . . . . . . . . . . . . . . . . . . . . . . . . . . . . . . . . . . . . 52
Note 5D: Gathering Temperature Data. . . . . . . . . . . . . . . . . . . . . . . . . . . . . . . . . . . . . . . . . . . . . . . . 52
Chapter 6
Note 6A: Entering and Editing Matrices . . . . . . . . . . . . . . . . . . . . . . . . . . . . . . . . . . . . . . . . . . . . . . . 54
Note 6B: Matrix Operations. . . . . . . . . . . . . . . . . . . . . . . . . . . . . . . . . . . . . . . . . . . . . . . . . . . . . . . . . . . . . . . . . 54
Note 6C: Plotting a Polygon . . . . . . . . . . . . . . . . . . . . . . . . . . . . . . . . . . . . . . . . . . . . . . . . . . . . . . . . . . . . . . . . 56
Note 6D: Inverse Matrices . . . . . . . . . . . . . . . . . . . . . . . . . . . . . . . . . . . . . . . . . . . . . . . . . . . . . . . . . . . . . . . . . . . 58
Note 6E: Matrix Row Operations . . . . . . . . . . . . . . . . . . . . . . . . . . . . . . . . . . . . . . . . . . . . . . . . . . . . . . . . . 58
Note 6F: Reduced Row-Echelon Form. . . . . . . . . . . . . . . . . . . . . . . . . . . . . . . . . . . . . . . . . . . . . . . . . . 59
Note 6G: Graphing Inequalities . . . . . . . . . . . . . . . . . . . . . . . . . . . . . . . . . . . . . . . . . . . . . . . . . . . . . . . . . . . 60
Chapter 7
Note 7A: Free Fall . . . . . . . . . . . . . . . . . . . . . . . . . . . . . . . . . . . . . . . . . . . . . . . . . . . . . . . . . . . . . . . . . . . . . . . . . . . . . . . 61
Note 7B: Finite Differences. . . . . . . . . . . . . . . . . . . . . . . . . . . . . . . . . . . . . . . . . . . . . . . . . . . . . . . . . . . . . . . . . . 61
Note 7C: Rolling Along. . . . . . . . . . . . . . . . . . . . . . . . . . . . . . . . . . . . . . . . . . . . . . . . . . . . . . . . . . . . . . . . . . . . . . . . 63
Note 7D: QUAD Program . . . . . . . . . . . . . . . . . . . . . . . . . . . . . . . . . . . . . . . . . . . . . . . . . . . . . . . . . . . . . . . . . . . . 64
Note 7E: Complex Numbers . . . . . . . . . . . . . . . . . . . . . . . . . . . . . . . . . . . . . . . . . . . . . . . . . . . . . . . . . . . . . . . . 64
Note 7F: MANDELBR Program . . . . . . . . . . . . . . . . . . . . . . . . . . . . . . . . . . . . . . . . . . . . . . . . . . . . . . . . . . . . . 65
Note 7G: SYNDIV Program . . . . . . . . . . . . . . . . . . . . . . . . . . . . . . . . . . . . . . . . . . . . . . . . . . . . . . . . . . . . . . . . . . 66
Note 7H: Zero Finding. . . . . . . . . . . . . . . . . . . . . . . . . . . . . . . . . . . . . . . . . . . . . . . . . . . . . . . . . . . . . . . . . . . . . . . . . 66
Chapter 8
Note 8A: Intersections, Maximums, and Minimums . . . . . . . . . . . . . . . . . . . . . . . . . . . . . 68
Note 8B: Asymptotes, Holes, and Drag Lines . . . . . . . . . . . . . . . . . . . . . . . . . . . . . . . . . . . . . . . 69
Chapter 9
Note 9A: Partial Sums of Series . . . . . . . . . . . . . . . . . . . . . . . . . . . . . . . . . . . . . . . . . . . . . . . . . . . . . . . . . . . 71
Chapter 10
Note 10A: Dice Simulation . . . . . . . . . . . . . . . . . . . . . . . . . . . . . . . . . . . . . . . . . . . . . . . . . . . . . . . . . . . . . . . . . . 72
Note 10B: Permutations. . . . . . . . . . . . . . . . . . . . . . . . . . . . . . . . . . . . . . . . . . . . . . . . . . . . . . . . . . . . . . . . . . . . . . 72
Note 10C: Factorials. . . . . . . . . . . . . . . . . . . . . . . . . . . . . . . . . . . . . . . . . . . . . . . . . . . . . . . . . . . . . . . . . . . . . . . . . . . . 72
Note 10D: Combinations. . . . . . . . . . . . . . . . . . . . . . . . . . . . . . . . . . . . . . . . . . . . . . . . . . . . . . . . . . . . . . . . . . . . . 72
Note 10E: Binomial Probability . . . . . . . . . . . . . . . . . . . . . . . . . . . . . . . . . . . . . . . . . . . . . . . . . . . . . . . . . . . 73
DAA2CNTNS_014_fm.indd ivDAA2CNTNS_014_fm.indd iv 3/16/09 11:23:49 AM3/16/09 11:23:49 AM

Chapter 11
Note 11A: Entering e. . . . . . . . . . . . . . . . . . . . . . . . . . . . . . . . . . . . . . . . . . . . . . . . . . . . . . . . . . . . . . . . . . . . . . . . . . . 75
Note 11B: Normal Graphs . . . . . . . . . . . . . . . . . . . . . . . . . . . . . . . . . . . . . . . . . . . . . . . . . . . . . . . . . . . . . . . . . . . 75
Note 11C: Probabilities of Normal Distributions . . . . . . . . . . . . . . . . . . . . . . . . . . . . . . . . . . 76
Note 11D: Creating Random Probability Distributions . . . . . . . . . . . . . . . . . . . . . . . . . 79
Note 11E: Correlation Coefficient . . . . . . . . . . . . . . . . . . . . . . . . . . . . . . . . . . . . . . . . . . . . . . . . . . . . . . . . 80
Note 11F: Least Squares Line . . . . . . . . . . . . . . . . . . . . . . . . . . . . . . . . . . . . . . . . . . . . . . . . . . . . . . . . . . . . . . 82
Chapter 12
Note 12A: Changing Settings . . . . . . . . . . . . . . . . . . . . . . . . . . . . . . . . . . . . . . . . . . . . . . . . . . . . . . . . . . . . . . 84
Note 12B: Trigonometric and Inverse Trigonometric Functions. . . . . . . . . . . . 84
Note 12C: Graphing Parametric Equations . . . . . . . . . . . . . . . . . . . . . . . . . . . . . . . . . . . . . . . . . . 84
Note 12D: Tracing Parametric Equations . . . . . . . . . . . . . . . . . . . . . . . . . . . . . . . . . . . . . . . . . . . . . 85
Note 12E: Parametric Walk. . . . . . . . . . . . . . . . . . . . . . . . . . . . . . . . . . . . . . . . . . . . . . . . . . . . . . . . . . . . . . . . . . 86
Note 12F: Graphing Functions with Parametric Equations . . . . . . . . . . . . . . . . . . . 86
Chapter 13
Note 13A: Unit Circle . . . . . . . . . . . . . . . . . . . . . . . . . . . . . . . . . . . . . . . . . . . . . . . . . . . . . . . . . . . . . . . . . . . . . . . . . . 87
Note 13B: Radians . . . . . . . . . . . . . . . . . . . . . . . . . . . . . . . . . . . . . . . . . . . . . . . . . . . . . . . . . . . . . . . . . . . . . . . . . . . . . . 88
Note 13C: Secant, Cosecant, and Cotangent . . . . . . . . . . . . . . . . . . . . . . . . . . . . . . . . . . . . . . . . 89
Note 13D: Collecting Sound Frequency Data . . . . . . . . . . . . . . . . . . . . . . . . . . . . . . . . . . . . . . . 90
Note 13E: Polar Coordinates . . . . . . . . . . . . . . . . . . . . . . . . . . . . . . . . . . . . . . . . . . . . . . . . . . . . . . . . . . . . . . . 90
Note 13F: Sliders. . . . . . . . . . . . . . . . . . . . . . . . . . . . . . . . . . . . . . . . . . . . . . . . . . . . . . . . . . . . . . . . . . . . . . . . . . . . . . . . . 91
v
DAA2CNTNS_014_fm.indd vDAA2CNTNS_014_fm.indd v 3/16/09 11:23:49 AM3/16/09 11:23:49 AM

DAA2CNTNS_014_fm.indd viDAA2CNTNS_014_fm.indd vi 3/16/09 11:23:49 AM3/16/09 11:23:49 AM

ContentsThe Same Yet Smaller
To accommodate students with different and ever-changing types of graphing calculators, Discovering Advanced Algebra refers to calculators generically in the student book and provides detailed notes for various calculator models in separate books. As secondary mathematics classrooms integrate new calculator technologies, Key Curriculum Press will continue to create calculator notes to aid students.
These calculator notes, written for use with the Texas Instruments TI-Nspire and TI-Nspire CAS handhelds, familiarize students with handhelds and provide specific keystroke instructions. Some notes help students use motion sensors, such as the Texas Instruments Calculator-Based Ranger (CBR2™), to collect data with their handhelds. Other notes contain programs for specific investigations or exercises. The keystrokes are the same for both calculators, but students may discover functionality on their TI-Nspire CAS handhelds that is not used in Discovering Advanced Algebra.
Your students will find references to the calculator notes throughout the student book. For example, on page 191, you will find the following reference [� See Calculator Note 4A to learn about defining and evaluating functions. �]. This reference indicates that in Calculator Note 4A there are instructions on how to use the handheld to define and evaluate functions. All pertinent calculator notes for each lesson are also mentioned in the materials list of the Discovering Advanced Algebra Teacher’s Edition. How much your students need these notes will depend on their experience with graphing calculators and with the particular graphing calculator methods used to explore concepts in Discovering Advanced Algebra. The notes will be particularly useful if your students use several different types of calculators.
You may copy and distribute the notes as they are needed, or you may copy and distribute all of the notes for each chapter as you begin work on that chapter. Choose your strategy based on student needs, copy machine access, and your duplicating budget. If your students have limited experience with graphing calculators, an ideal strategy is to distribute a copy of the notes to each student and encourage students to keep the notes in their notebooks. Another strategy is to store enough copies in three-hole report covers or hanging files so that each group of students has access to the notes. If your students have sufficient experience with graphing calculators, however, you may need only one or two copies of the notes for classroom reference. Place the copies in binders and make them available to students. If your students use different calculator models, you’ll need to make copies of the notes for each type of calculator. If students need to access a note from home, they will find all the notes on the Discovering Advanced Algebra student website, www.keymath.com/DAA.
Even if you do not usually copy a complete set of calculator notes for each student, you may find it helpful to distribute copies to all students for particular sections of material. For example, some sections in the student book contain special programs for the handhelds. If students manually input these programs rather than transferring them between handhelds, they may need access to a hard copy of the programs. For shorter programs, you can display the program commands using an overhead projector, but if students are using a variety of
Introduction
vii
DAA2CNTNS_014_fm.indd viiDAA2CNTNS_014_fm.indd vii 3/16/09 11:23:49 AM3/16/09 11:23:49 AM

calculators, you will probably want to provide each student with calculator-specific notes.
If you have TI-Nspire Computer Link software, TI-Nspire Connect-To-Class, or TI-Nspire Navigator, and access to a computer, you can take advantage of the programs and data stored on the Teaching Resources on CD available with the Teaching Resources package. These programs and data can also be found at www.keymath.com/DAA (for students) or www.keypress.com/keyonline (for teachers). You can download documents containing programs or data from the CD or Key’s websites to a computer, and then students can link their handhelds to the computer or to other handhelds to transfer the documents. By downloading documents in this way, you and your students can avoid the hassles of debugging programs and checking the accuracy of data input.
You will also find it useful to make available to students a copy of the TI-Nspire Handheld Guidebook. See http://education.ti.com to learn about further resources Texas Instruments provides for teachers.
Handheld Software Updates
Texas Instruments periodically updates TI-Nspire’s operating system (OS). Visit http://education.ti.com to determine if an updated OS is available for the handheld. With changes to the handheld’s OS, screen appearance or keystrokes may differ slightly from those displayed in these calculator notes. These notes are current as of December 2008.
viii
DAA2CNTNS_014_fm.indd viiiDAA2CNTNS_014_fm.indd viii 3/16/09 11:23:50 AM3/16/09 11:23:50 AM

Discovering Advanced Algebra Calculator Notes for the Texas Instruments TI-Nspire and TI-Nspire CAS INTRODUCTION 1©2010 Key Curriculum Press
INTRODUCTION Calculator Notes for the TI-Nspire and TI-Nspire CAS
Getting Started: Navigating Screens and Menus
Your handheld is like a small computer. You will always work in a document with one or more problems and one or more pages. Each page can contain one or more applications. Applications and pages in the same problem can share information, but applications and pages in different problems cannot. You can save your documents in folders on the handheld and open them again to continue working.
Creating a New Document
When you turn the handheld on, a document will already be displayed. To open a new document, press c and choose New Document or press /N. You can have only one document open at any time. If a document was already open, you will be asked if you want to save it. Tab between the choices and press · or a. Then press ¤ or £ to choose an application.
Calculator Application
Use the Calculator application to evaluate expressions and define variables and functions. Once you have defined a variable or function, you can use it in any other application in the same problem.
Graphs & Geometry Application
Use the Graphs & Geometry application to graph and explore functions, parametric equations, polar equations, and scatter plots. You can also construct and explore dynamic geometric figures. Information from the Graphs & Geometry application can be shared by other applications in the same problem.
(continued)
DAA2CNTNS_014_intro.indd 1DAA2CNTNS_014_intro.indd 1 3/16/09 11:25:01 AM3/16/09 11:25:01 AM

2 INTRODUCTION Discovering Advanced Algebra Calculator Notes for the Texas Instruments TI-Nspire and TI-Nspire CAS
©2010 Key Curriculum Press
Press b, and choose Window⎮ Window Settings to set the window of values that you want to graph. For more information about entering and graphing equations in the Graphs & Geometry application, see Note 3A.
Lists & Spreadsheet Application
Use the Lists & Spreadsheet application to enter and perform calculations on data in lists and tables and create sequences. The data stored in the Lists & Spreadsheet application can be shared by other applications in the same problem.
Notes Application
Use the Notes application as a word processor, a question-and-answer template, and a two-column proof template. You can use the Format menu to format your text.
Getting Started: Navigating Screens and Menus (continued) TI-Nspire and TI-Nspire CAS
(continued)
DAA2CNTNS_014_intro.indd 2DAA2CNTNS_014_intro.indd 2 3/16/09 11:25:02 AM3/16/09 11:25:02 AM

Discovering Advanced Algebra Calculator Notes for the Texas Instruments TI-Nspire and TI-Nspire CAS INTRODUCTION 3©2010 Key Curriculum Press
Data & Statistics Application
Use the Data & Statistics application to graph and analyze data using a variety of plots and tools.
Document and System Settings
Press c and choose System Info⎮Document Settings or System Settings to change the number of decimal places displayed, whether the handheld automatically converts fractions to decimals, and other settings as necessary. Document settings affect only the document you are currently working in. System settings control the default settings on all new documents that are created. Press ¢ or ¡ to move among the various settings. Then press ¤ to see your choices. Press £ or ¤ to highlight the desired option, and press a. Highlight OK and press · to apply the settings to the current document. Most of the time, your handheld should use these settings.
Inserting Pages and Problems
To insert a new page, press c or /I and choose the application you would like to insert.
(continued)
Getting Started: Navigating Screens and Menus (continued) TI-Nspire and TI-Nspire CAS
DAA2CNTNS_014_intro.indd 3DAA2CNTNS_014_intro.indd 3 3/16/09 11:25:03 AM3/16/09 11:25:03 AM

4 INTRODUCTION Discovering Advanced Algebra Calculator Notes for the Texas Instruments TI-Nspire and TI-Nspire CAS
©2010 Key Curriculum Press
Different problems within a document do not share variables, lists, or functions. To insert a new problem, press /c and choose Insert⎮ Problem. Note that the page numbering changes between problems.
Navigating Through a Document
When a document contains more than one page, you can advance to the next page by pressing /¢. To go to the previous page, press /¡ .
To view all the pages in the document, press /£. Up to nine pages of the document appear as thumbnails. Highlight the thumbnail of the desired page, and press · to go to that page.
Saving a Document
To save a document, press /S. If the document is not named, choose the folder in which to store the document, and enter a name. You can change the name or location of a document by pressing /c and choosing File⎮Save As. After saving a document, you can continue to work with it or press /N to open a new document.
Getting Started: Navigating Screens and Menus (continued) TI-Nspire and TI-Nspire CAS
(continued)
DAA2CNTNS_014_intro.indd 4DAA2CNTNS_014_intro.indd 4 3/16/09 11:25:04 AM3/16/09 11:25:04 AM

Discovering Advanced Algebra Calculator Notes for the Texas Instruments TI-Nspire and TI-Nspire CAS INTRODUCTION 5©2010 Key Curriculum Press
Opening a Document
To open a document saved on your handheld, press c and choose My Documents. To expand or compress folders, press £ or ¤ to select the folder, and press a. To open a document, select it and press a.
Commands
There are keys for the most common commands you will use. You can also type commands or access them from menus or the catalog. Each application has different menus and commands. To use menu commands, press b. Press the number of the command you want or navigate to the command and press · or a.
For example, you can find the least common multiple of 18 and 24 using menus and submenus in a Calculator page. Press b and choose Number⎮Least Common Multiple, type 18, 24, and press ·. Alternatively, type lcm(18, 24) and press ·.
Finding Commands in the Catalog
To find a command in the catalog, press k. The catalog has five tabs.
Press 1 to see the commands listed in alphabetical order.
Press 2 to see the commands grouped by category.
Getting Started: Navigating Screens and Menus (continued) TI-Nspire and TI-Nspire CAS
(continued)
DAA2CNTNS_014_intro.indd 5DAA2CNTNS_014_intro.indd 5 3/16/09 11:25:05 AM3/16/09 11:25:05 AM

6 INTRODUCTION Discovering Advanced Algebra Calculator Notes for the Texas Instruments TI-Nspire and TI-Nspire CAS
©2010 Key Curriculum Press
Press 3 to insert a symbol.
Press 4 to insert an expression template.
Press 5 to see the programs and library objects available. (To learn more about programs, see Note 4B. To learn about library objects, see Note 4C.)
Navigate to the desired command, symbol, expression, or category, and press a to choose it. Pressing a letter will take you to the first catalog entry that begins with that letter.
Undoing an Action
In any application, press /Z to undo your previous action. This is especially helpful in the Graphs & Geometry and Data & Statistics applications.
Getting Started: Navigating Screens and Menus (continued) TI-Nspire and TI-Nspire CAS
DAA2CNTNS_014_intro.indd 6DAA2CNTNS_014_intro.indd 6 3/16/09 11:25:06 AM3/16/09 11:25:06 AM

Discovering Advanced Algebra Calculator Notes for the Texas Instruments TI-Nspire and TI-Nspire CAS CHAPTER 0 7©2010 Key Curriculum Press
CHAPTER 0 Calculator Notes for the TI-Nspire and TI-Nspire CAS
Note 0A: Fractions and Decimals
You can use the handheld to perform operations with both fractions and decimals. If your handheld or document is set to Auto, it will automatically display division calculations as fractions in lowest terms. If it is set to Approximate, it will display them as decimal approximations. To learn how to change settings, see the Getting Started note.
Using Fractions in the Calculator Application
Press c and choose Calculator. There are two ways to enter a fraction.
1. Type the numerator, press p, then type the denominator. Press ·. In Auto setting, the calculation is displayed as a fraction in lowest terms. Press /· to display the decimal equivalent.
2. Press /p. A fraction template will appear. Type the numerator, press ¤, and type the denominator. Press ¢ to exit the fraction template. In Auto setting, press · to display the number as a fraction in lowest terms or /· to display the decimal equivalent.
The second method might seem complicated for a simple fraction, but it is useful when the fraction is complex or the numerator and denominator contain expressions.
(continued)
DAA2CNTNS_014_00.indd 7DAA2CNTNS_014_00.indd 7 3/16/09 11:02:29 AM3/16/09 11:02:29 AM

8 CHAPTER 0 Discovering Advanced Algebra Calculator Notes for the Texas Instruments TI-Nspire and TI-Nspire CAS
©2010 Key Curriculum Press
If your handheld or document is set to Approximate, it will always convert a fraction to a decimal.
Using Fractions in the Lists & Spreadsheet Application
Press c and choose Lists & Spreadsheet. To input a fraction in the Lists & Spreadsheet application, type the numerator, press p, type the denominator, and press ·. If you are in Auto setting, the calculation is displayed as a fraction. You cannot approximate the fraction by pressing
/·. If you are in Approximate setting, the calculation is displayed as a decimal approximation.
Note 0B: Order of Operations
To evaluate expressions, the handheld uses the standard order of operations, PEMDAS, which is parentheses, exponents, multiplication and division, and addition and subtraction. For example, when you enter the expression 1 + 12 / 4 � 3:
a. The handheld reads no parentheses or exponents.
b. The handheld multiplies and divides from left to right, so it evaluates 12 / 4 as 3 to get 1 + 3 � 3, and it evaluates 3 � 3 as 9 to get 1 � 9.
c. The handheld adds and subtracts from left to right, so it evaluates 1 � 9 as 10.
Note 0A: Fractions and Decimals (continued) TI-Nspire and TI-Nspire CAS
(continued)
DAA2CNTNS_014_00.indd 8DAA2CNTNS_014_00.indd 8 3/16/09 11:02:30 AM3/16/09 11:02:30 AM

Discovering Advanced Algebra Calculator Notes for the Texas Instruments TI-Nspire and TI-Nspire CAS CHAPTER 0 9©2010 Key Curriculum Press
Negation is on the same level as multiplication, so powers are calculated before negation. So the handheld evaluates �42 as �16, but evaluates (�4)2 as 16.
Although there are keys for the brackets and braces you may use for grouping when you work on paper, the handheld uses them for other things. To group on the handheld, you use only parentheses, but you can also enter expressions as they appear in your book. Here are two equivalent ways to
evaluate the expression 5 � 3 ____ 2 � 4 � �
_____ 8 � 1 � 4 ________
[ 2(7 � 2) ] 2 .
1. Press /p, type 5 + 3, press ¤, type 2 � 4, press ¢ +,
press /p/q, type 8+1, press ¢, type – 4, press ¤,
type (2(7 – 2)), and press q·.
2. Type (5 + 3) / (2 � 4) + (, press /q, type 8 + 1, press ¢,
type – 4) / (2(7 – 2)), and press q·.
Note 0B: Order of Operations (continued) TI-Nspire and TI-Nspire CAS
DAA2CNTNS_014_00.indd 9DAA2CNTNS_014_00.indd 9 3/16/09 11:02:30 AM3/16/09 11:02:30 AM

10 CHAPTER 1 Discovering Advanced Algebra Calculator Notes for the Texas Instruments TI-Nspire and TI-Nspire CAS
©2010 Key Curriculum Press
CHAPTER 1 Calculator Notes for the TI-Nspire and TI-Nspire CAS
Note 1A: Reentry
If you are not currently in the Calculator application, press c and choose Calculator. Evaluate an expression. To perform an operation on the result of the expression you just evaluated, press any mathematical operation key and type an expression. The result of the previously evaluated expression will appear as “Ans” until you press ·.
You can enter the previous line into an expression by pressing /-. For example, evaluate an expression, press /q/-, and type –1 before pressing ·.
You can also recall and edit a previous expression. Press £ to highlight the entry you want to recall and press ·. Use the NavPad to move across the expression and enter new characters. To delete characters, press .. When you are finished, press · to recalculate the revised expression.
Note 1B: Recursion
The command /- allows you to use the result of your last calculation in your next calculation. Also, if you press · without pressing another key, the handheld will recompute the last expression. Using these two commands together gives you a recursion machine.
(continued)
DAA2CNTNS_014_01.indd 10DAA2CNTNS_014_01.indd 10 3/16/09 11:03:40 AM3/16/09 11:03:40 AM

Discovering Advanced Algebra Calculator Notes for the Texas Instruments TI-Nspire and TI-Nspire CAS CHAPTER 1 11©2010 Key Curriculum Press
If you are not currently in the Calculator application, press c and choose Calculator. First, type the starting value of a sequence and press ·. This value represents u1. Then type the rule, pressing /- for “Ans” in place
of un � 1. Press · repeatedly to generate the sequence. These screens show the sequence.
u1 � 47
un � 2un �1 � 8 where n � 2
You can generate several sequences at once. This is useful when you want to keep track of the term numbers of a sequence, or when you want to keep track of several related sequences. Use braces, { and }, to enclose the sequences, and separate the value for each sequence with a comma. Use Ans[1], Ans[2], and so on, to refer to the previous values. This example shows the starting values 1, 2000, and 470. Each time · is pressed, the first sequence is increased by 1, the second sequence is decreased by 50, and the third sequence is increased by 40. You can think of the first sequence as n. The other two sequences can be described by the formulas:
u1 � 2000 and u1 � 470
un � un�1 � 50 where n � 2 un � un�1 � 40 where n � 2
Note 1B: Recursion (continued) TI-Nspire and TI-Nspire CAS
DAA2CNTNS_014_01.indd 11DAA2CNTNS_014_01.indd 11 3/16/09 11:03:41 AM3/16/09 11:03:41 AM

12 CHAPTER 1 Discovering Advanced Algebra Calculator Notes for the Texas Instruments TI-Nspire and TI-Nspire CAS
©2010 Key Curriculum Press
Note 1C: Making Spreadsheets
Use the Lists & Spreadsheet application to organize data. Press c and choose Lists & Spreadsheet.
Use the NavPad to move from cell to cell in the spreadsheet. Input or edit values in a list by typing numbers, expressions, fractions, or functions. Press · or ¤ after each value. Here the values {1, 2, 3, 4}
were input by typing 1 · 2 · 3 · 4.
You can fill spreadsheet cells with an arithmetic sequence. If the consecutive terms of a list have a common difference, highlight the first two terms of the sequence by starting in the first cell and pressing g¤. To fill cells below the highlighted cells, press b and choose Data⎮ Fill Down. Press ¤ repeatedly to highlight the cells that will contain the sequence. Press · to display the sequence.
You can also enter a formula in a cell or for an entire column. To enter a formula in a cell, press = and type the formula. For example, to generate the second term of the sequence, type b1 + 4 to add 4 to cell B1. To continue the sequence, press b and choose Data⎮ Fill Down. Then press ¤ to highlight the cells you want to fill. The handheld will automatically adjust the cell reference(s) in the formula for the cells to be filled.
(continued)
TI-Nspire and TI-Nspire CAS
DAA2CNTNS_014_01.indd 12DAA2CNTNS_014_01.indd 12 3/16/09 11:03:41 AM3/16/09 11:03:41 AM

Discovering Advanced Algebra Calculator Notes for the Texas Instruments TI-Nspire and TI-Nspire CAS CHAPTER 1 13©2010 Key Curriculum Press
To enter a formula for an entire column, move the cursor to the gray box in the column. This box is known as the formula cell. When you begin typing the formula, an “�” symbol will appear automatically. Press · to apply the formula. In this example, column C contains values that are twice the values in column B. The handheld adds the brackets after b in the formula to indicate that b is a column reference.
Note 1D: Looking for the Rebound
You will need a CBR2 motion sensor. Press c and choose New Document. Connect the CBR2 to the handheld. The handheld will automatically open the Auto Launch dialog box. Choose Lists & Spreadsheet, and press ¢a. Your handheld will show an active sensor.
Because the CBR2 will measure the distance from itself to the ball, you need to manipulate the data the CBR2 will collect.
a. Put the ball on the floor and hold the CBR2 at the height over the ball where you intend to hold the CBR2 when you collect the data.
b. Press b and choose Sensors⎮ Zero. This will set the ball’s position on the floor as zero units. As the ball moves closer to the sensor, the distance will be measured as negative distance.
c. Press b and choose Sensors⎮ Reverse. This will collect the distance as positive distance.
(continued)
Note 1C: Making Spreadsheets (continued) TI-Nspire and TI-Nspire CAS
DAA2CNTNS_014_01.indd 13DAA2CNTNS_014_01.indd 13 3/16/09 11:03:42 AM3/16/09 11:03:42 AM

14 CHAPTER 1 Discovering Advanced Algebra Calculator Notes for the Texas Instruments TI-Nspire and TI-Nspire CAS
©2010 Key Curriculum Press
d. To collect data, hold the ball under the sensor and press a as the ball is released. The CBR2 will collect data for five seconds. If you are not satisfied with the data, press b and choose Experiment⎮ Start Collection to repeat the experiment. A new experiment will begin immediately after you store or discard your previous data.
e. Once you are satisfied with your experiment, press ¢ to highlight the Close button in the upper-right corner of the data collection console. Press a to close the data collection console. To get the data collection console back after closing it, press /D.
For the first set of data collected, the time is in column dc01.time and the heights of the bounces are in column dc01.dist1. The velocity and acceleration of the bouncing ball are also recorded in the spreadsheet as dc01.vel1 and dc01.acc1. You might change these variable names to time and distance to make your graph labels more descriptive. See Note 1F for help plotting the data.
To share your data with someone else, see Note 1H.
Note 1E: Entering Data
Use the Lists & Spreadsheet application to organize data in lists.
Naming the Data / Storing the Data as a Variable
You can label a list with a descriptive name. This stores the list as a variable and allows you to use the data in other applications. To label a list, move the cursor to the top of the column. Type a descriptive name in this box. The first character of the list name must be a letter, and the name must not contain any spaces.
(continued)
Note 1D: Looking for the Rebound (continued) TI-Nspire and TI-Nspire CAS
DAA2CNTNS_014_01.indd 14DAA2CNTNS_014_01.indd 14 3/16/09 11:03:42 AM3/16/09 11:03:42 AM

Discovering Advanced Algebra Calculator Notes for the Texas Instruments TI-Nspire and TI-Nspire CAS CHAPTER 1 15©2010 Key Curriculum Press
Changing Column Width
You can change the column width to display all the information. To do this, move the cursor to any location in the column to be resized. Then press b and choose Actions⎮Resize⎮Resize Column Width. Press ¢ or ¡ to change the column width. Press a when you are done.
Note 1F: Plotting Data
You can plot data in the Data & Statistics application. If you want to graph one-variable data, you can create a dot plot, box plot, or histogram. To compare two lists, you can create a scatter plot.
Press c and choose Data & Statistics. Move the cursor to the horizontal label “Click to add variable” and press a. All of the lists you have stored and named in the current problem will be displayed. Choose the list to be plotted. The handheld will display a dot plot. To learn how to store data in lists, see Note 1E.
To see these data displayed as a box plot, press b and choose
Plot Type⎮Box Plot. To see these data displayed as a histogram, press b and choose Plot Type⎮Histogram. For more information about box plots and histograms, see Notes 2B and 2C.
(continued)
Note 1E: Entering Data (continued) TI-Nspire and TI-Nspire CAS
DAA2CNTNS_014_01.indd 15DAA2CNTNS_014_01.indd 15 3/16/09 11:03:43 AM3/16/09 11:03:43 AM

16 CHAPTER 1 Discovering Advanced Algebra Calculator Notes for the Texas Instruments TI-Nspire and TI-Nspire CAS
©2010 Key Curriculum Press
To graph a scatter plot, move the cursor to the left of the vertical axis and press a or choose Plot Properties⎮Add Y Variable, and choose the appropriate list. Then press a to display the scatter plot.
The Data & Statistics application automatically selects a window that will display all of the data in your lists. If you want to change the graphing window, press b, choose Window/Zoom⎮ Window Settings, and adjust the window settings.
Graphing a Scatter Plot in the Graphs & Geometry Application
Press c and choose Graphs & Geometry. To graph a scatter plot, press b and choose Graph Type⎮ Scatter Plot. Two boxes now appear on the bottom of the screen that represent the x- and y-variables. You can choose any list that has been stored and named. Press a, choose the x-variable, and press a. Press ¢ to choose the y-variable box. Press a, choose the y-variable, and press a.
The data are now graphed with the standard window settings. You might need to change the window settings to see the entire data set or to better see the shape of the data. For help choosing the window settings, see Note 3A.
To add another scatter plot, go to the entry line and press ¤. Repeat the process described above. To hide the entry line, press /G.
Note 1F: Plotting Data (continued) TI-Nspire and TI-Nspire CAS
DAA2CNTNS_014_01.indd 16DAA2CNTNS_014_01.indd 16 3/16/09 11:03:44 AM3/16/09 11:03:44 AM

Discovering Advanced Algebra Calculator Notes for the Texas Instruments TI-Nspire and TI-Nspire CAS CHAPTER 1 17©2010 Key Curriculum Press
Note 1G: Tracing Data Plots
Selecting Data in the Data & Statistics Application
When a scatter plot or a dot plot is displayed in the Data & Statistics application, move the cursor to a point and press a to display the coordinates of the point. If the hand grasps the point, press d to release the point. To deselect the point, move to a blank area of the screen and press a. If you move a point accidentally, press /Z to undo.
To select data points in a box plot, see Note 2B. To select data points in a histogram, see Note 2C.
Tracing Data Points in the Graphs & Geometry Application
To trace a scatter plot, press b and choose Trace⎮Graph Trace. One point in the scatter plot will blink and the handheld will display its coordinates. Press ¢ or ¡ to move from point to point. Press a to display the coordinates permanently. In scatter plots, the data are traced in the order they appear in the list, so pressing ¡ may not move the cursor to a point to the left. Pressing £ or ¤ will move the trace from one scatter plot to another. If a vertical dashed line appears, the intersection(s) of all functions and scatter plots with the vertical line display as points and coordinates.
Note 1H: Sharing Data
You can transfer documents from one handheld to another. This is useful for sharing large data sets. You will need a link cable and two compatible handhelds. Push the plugs of the link cable firmly into the port at the top of each handheld.
(continued)
TI-Nspire and TI-Nspire CAS
DAA2CNTNS_014_01.indd 17DAA2CNTNS_014_01.indd 17 3/16/09 11:03:44 AM3/16/09 11:03:44 AM

18 CHAPTER 1 Discovering Advanced Algebra Calculator Notes for the Texas Instruments TI-Nspire and TI-Nspire CAS
©2010 Key Curriculum Press
If you want to send the document you are currently working on, press /c and choose File⎮Send. The document and its folder will be transferred to the linked handheld. You will get a message indicating whether the document has been transferred successfully.
To select a document to transfer, press c and select My Documents. Folders and documents saved on the handheld appear in My Documents. To open or close the folders, press £ or ¤ to outline the folder and press a. To transfer a document, press £ or ¤
to outline the document, press /c, and choose File⎮Send.
Note 1I: Creating Sequences
Press c and choose Lists & Spreadsheet. Move the cursor to the gray box in the column for which you wish to generate the sequence. This box is known as a formula cell. Press b and choose Data⎮Generate Sequence.
Formula: u(n) � a formula for u(n). Use n � 1 to represent the previous value.
Initial Terms � the first term in the sequence. To input more than the first term of the sequence, enter the terms separated by commas.
Max No. Terms � the maximum number of terms in the sequence.
Ceiling Value � the maximum value for the sequence.
You must have a value in either the Max No. Terms box or the Ceiling Value box.
Note 1H: Sharing Data (continued) TI-Nspire and TI-Nspire CAS
DAA2CNTNS_014_01.indd 18DAA2CNTNS_014_01.indd 18 3/16/09 11:03:45 AM3/16/09 11:03:45 AM

Discovering Advanced Algebra Calculator Notes for the Texas Instruments TI-Nspire and TI-Nspire CAS CHAPTER 1 19©2010 Key Curriculum Press
Note 1J: Graphing Sequences
To graph a sequence, you will create two lists in the Lists & Spreadsheet application: one containing the values of n, and one containing the terms of the sequence. For help creating a sequence, see Note 1I. Set the Max No. Terms to be the same for both sequences. In column A, create the sequence 1, 2, 3, . . . , and name it num. For help naming the data, see Note 1E. In column B, create the sequence you want to graph and name it seqa. Then create a scatter plot using num and seqa. For help creating a scatter plot, see Note 1F. You can graph sequences in either Graphs & Geometry or Data & Statistics. However, if you want to graph a sequence in the same window as another scatter plot, you will need to use Graphs & Geometry.
Note 1K: Finding Specific Terms
For information on creating a sequence, see Note 1I. If you begin a sequence in the first row of the spreadsheet, the n th term will appear in row n.
To go to a specific cell in a spreadsheet, press /G, type in the name of
the cell, and press ·. Alternatively, you can press b, choose Actions⎮Go To, type in the name of the cell, and press ·.
Note 1L: Random Numbers
You will generate random numbers most often in the Lists & Spreadsheet and Calculator applications.
Random Integer
To generate a random integer in the Calculator application, press b, choose Probability⎮Random⎮Integer, type in a minimum, a maximum, the number of random integers you want to generate, and press ·.
(continued)
TI-Nspire and TI-Nspire CAS
DAA2CNTNS_014_01.indd 19DAA2CNTNS_014_01.indd 19 3/16/09 11:03:45 AM3/16/09 11:03:45 AM

20 CHAPTER 1 Discovering Advanced Algebra Calculator Notes for the Texas Instruments TI-Nspire and TI-Nspire CAS
©2010 Key Curriculum Press
Alternatively, you can type randint( to access the random-integer generator and input the minimum, maximum, and number of random integers to generate. If you create a list in the Calculator application that is too long to display on one line of the screen, you can press £ to highlight the list and scroll through it by pressing ¢ or ¡.
Random Decimal Number
To compute a random number between 0 and 1 in the Calculator application, press b, choose Probability⎮Random⎮Number, and press ·. The handheld will randomly generate a number between 0 and 1. Alternatively, you can type rand(). Optionally, you can type a number in the parentheses to tell the handheld how many random numbers to generate. To choose a random number between 0 and 8, type 8rand() and press ·. You can also use these commands in the Lists & Spreadsheet application.
Random Seed
If you are getting exactly the same random numbers as someone else, try changing the seed value. Press b, choose Probability⎮Random⎮Seed, and type a number.
Note 1L: Random Numbers (continued) TI-Nspire and TI-Nspire CAS
DAA2CNTNS_014_01.indd 20DAA2CNTNS_014_01.indd 20 3/16/09 11:03:46 AM3/16/09 11:03:46 AM

Discovering Advanced Algebra Calculator Notes for the Texas Instruments TI-Nspire and TI-Nspire CAS CHAPTER 1 21©2010 Key Curriculum Press
Note 1M: Finance Solver
The Finance Solver will solve problems about simple loans, mortgages, and investments. From the Calculator application, press b and choose Finance⎮Finance Solver. Enter values into all but one of the areas of the Finance Solver dialog box. In general, negative money amounts indicate money you give to the bank and positive amounts indicate money you receive from the bank.
N � the total number of payments.
I(%) � the annual interest rate as a percent.
PV � the present value, which is negative for investments.
Pmt � the payment or regular deposit, which is negative for investments.
FV � the future value.
PpY � the payments per year.
CpY � the interest calculations period per year.
PmtAt � payments made at the end or beginning of each period. To toggle between END and BEGIN, press ¤ to highlight the appropriate selection and press ·.
After entering values for all except the unknown quantity, move the cursor to the value you want to find and press ·.
This screen shows the calculation of a monthly payment to completely repay a 5-year (60-month) $12,000 loan at 5.25% interest, with payments made at the end of each month. The answer, PMT, is negative because it is a payment made to a bank.
TI-Nspire and TI-Nspire CAS
DAA2CNTNS_014_01.indd 21DAA2CNTNS_014_01.indd 21 3/16/09 11:03:46 AM3/16/09 11:03:46 AM

22 CHAPTER 2 Discovering Advanced Algebra Calculator Notes for the Texas Instruments TI-Nspire and TI-Nspire CAS
©2010 Key Curriculum Press
CHAPTER 2 Calculator Notes for the TI-Nspire and TI-Nspire CAS
Note 2A: Basic Statistics
You can calculate several standard statistics for a data set in the Calculator application or the Lists & Spreadsheet application. To use the Calculator application to find statistics for data in the Lists & Spreadsheet application, you must name the data in the Lists & Spreadsheet application.
In either application, press b, choose Statistics⎮Stat Calculations⎮One-Variable
Statistics, and press ·. A One-Variable Statistics dialog box will appear. For “X1 List,” press ¤ to choose the appropriate list, then press ·. To use a list to describe the frequency of the “X1 List,” press e¤ to choose the
appropriate frequency list and press ·. Finally, press · and the one-variable statistics will be displayed.
_ x � the mean.
∑
x � the sum of the x-values.
∑
x 2 � the sum of the squares of the x-values.
sx : sn – l x � the sample standard deviation.
�x : �n x � the population standard deviation.
n � the number of data values.
MinX � the minimum data value.
Q1X � the first quartile.
MedianX � the median.
Q3X � the third quartile.
MaxX � the maximum data value.
SSX :� ∑
(x � __
x ) 2 � the sum of the square of the difference of the x-values and the mean of x.
You can display some statistics individually in the Calculator application. Press b, choose Statistics⎮List Math, and choose the statistic you wish to find. Press ·, type the name of the list, and press ·.
DAA2CNTNS_014_02.indd 22DAA2CNTNS_014_02.indd 22 3/16/09 11:05:11 AM3/16/09 11:05:11 AM

Discovering Advanced Algebra Calculator Notes for the Texas Instruments TI-Nspire and TI-Nspire CAS CHAPTER 2 23©2010 Key Curriculum Press
Note 2B: Box Plots
You can display two types of box plots in the Data & Statistics application: a regular box plot and a modified box plot. You will need a named list of data.For help plotting data, see Note 1F. The modified box plot marks outliers as points, but a regular box plot does not identify outliers.
The handheld uses the standard rule for defining an outlier: Values greater than Q 3 + 1.5 IQR or less than Q 1 – 1.5 IQR are outliers. Move the cursor over the various parts of the box plot to identify the minimum, first quartile, median, third quartile, and maximum. Press a on the box plot to display
select data points. To move these points, press /a and use ¡ and ¢. This changes the values in the list.
To undo the move, press /Z. To deselect the points, press d, move the cursor to a blank area of the screen, and press a.
To change the type of box plot, press b, then choose Plot Properties. If the modified box plot is currently displayed, choose Extend Box Plot
Whiskers to hide any outliers. If the outliers are currently hidden, choose Show Box Plot Outliers to change the box plot into a modified box plot.
When you create a box plot, the handheld selects an appropriate window. To change the window, move the cursor to the displayed axis. When the cursor is near the center of the axis, press /a and ¢ or ¡ to translate the axis. When the cursor is near the end of the axis, press /a and ¢ or ¡ to horizontally compress and expand the axis. You can also press b and choose Window/Zoom⎮Window Settings to give exact values for the minimum and maximum x-values.
Note 2C: Histograms
You can create histograms in the Data & Statistics application. You will need a named list of data. You can display a histogram with three different scales: count, percent, and density. For help setting up a histogram, see Note 1F.
Move the cursor over a bin of the histogram. Press and hold a to display the bin interval and the number of data points in the bin. The hand will grasp the data in the bin. Press ¡ or ¢ to move the points in a selected bin. Moving points will change the values in the list. To undo the move, press /Z. To deselect the points in the bin, press a once. (continued)
TI-Nspire and TI-Nspire CAS
DAA2CNTNS_014_02.indd 23DAA2CNTNS_014_02.indd 23 3/16/09 11:05:11 AM3/16/09 11:05:11 AM
24 CHAPTER 2 Discovering Advanced Algebra Calculator Notes for the Texas Instruments TI-Nspire and TI-Nspire CAS
©2010 Key Curriculum Press
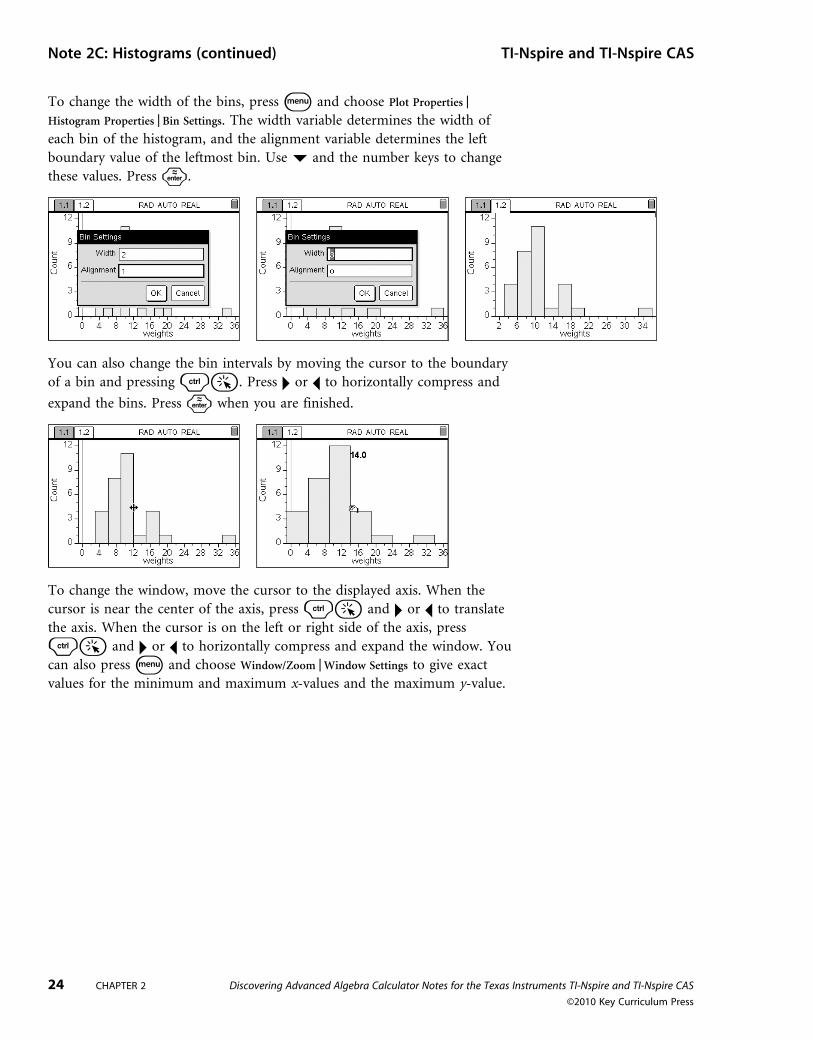
To change the width of the bins, press b and choose Plot Properties⎮Histogram Properties⎮Bin Settings. The width variable determines the width of each bin of the histogram, and the alignment variable determines the left boundary value of the leftmost bin. Use ¤ and the number keys to change these values. Press ·.
You can also change the bin intervals by moving the cursor to the boundary of a bin and pressing /a. Press ¢ or ¡ to horizontally compress and
expand the bins. Press · when you are finished.
To change the window, move the cursor to the displayed axis. When the cursor is near the center of the axis, press /a and ¢ or ¡ to translate the axis. When the cursor is on the left or right side of the axis, press
/a and ¢ or ¡ to horizontally compress and expand the window. You can also press b and choose Window/Zoom⎮Window Settings to give exact values for the minimum and maximum x-values and the maximum y-value.
Note 2C: Histograms (continued) TI-Nspire and TI-Nspire CAS
DAA2CNTNS_014_02.indd 24DAA2CNTNS_014_02.indd 24 3/16/09 11:05:12 AM3/16/09 11:05:12 AM
Discovering Advanced Algebra Calculator Notes for the Texas Instruments TI-Nspire and TI-Nspire CAS CHAPTER 3 25©2010 Key Curriculum Press
CHAPTER 3 Calculator Notes for the TI-Nspire and TI-Nspire CAS
Note 3A: Entering and Graphing Equations
You will usually graph equations in the Graphs & Geometry application. See Note 1F for information about graphing in the Data & Statistics application.
Graphing Equations
Press c and choose Graphs & Geometry. To show the end values of each axis, press b and choose View⎮Show Axes End Values. There are two ways to graph an equation.
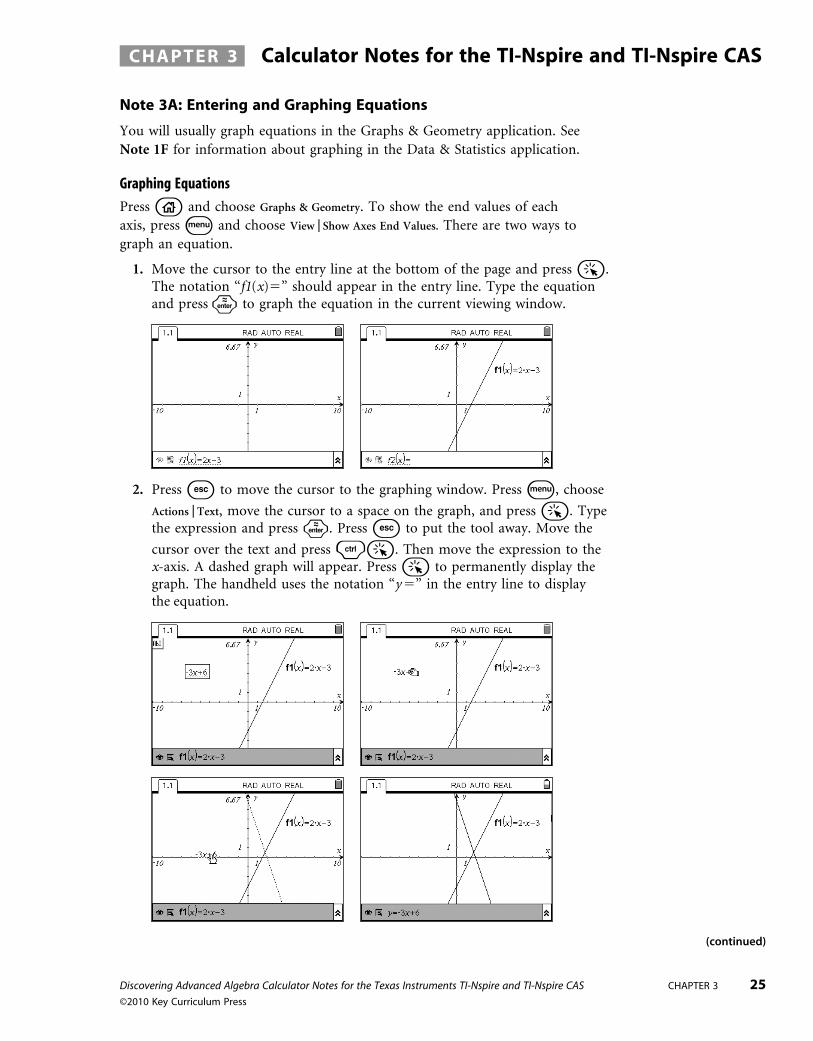
1. Move the cursor to the entry line at the bottom of the page and press a. The notation “f1(x)�” should appear in the entry line. Type the equation and press · to graph the equation in the current viewing window.
2. Press d to move the cursor to the graphing window. Press b, choose
Actions⎮Text, move the cursor to a space on the graph, and press a. Type the expression and press ·. Press d to put the tool away. Move the
cursor over the text and press /a. Then move the expression to the x-axis. A dashed graph will appear. Press a to permanently display the graph. The handheld uses the notation “y �” in the entry line to display the equation.
(continued)
DAA2CNTNS_014_03.indd 25DAA2CNTNS_014_03.indd 25 3/16/09 11:06:54 AM3/16/09 11:06:54 AM
26 CHAPTER 3 Discovering Advanced Algebra Calculator Notes for the Texas Instruments TI-Nspire and TI-Nspire CAS
©2010 Key Curriculum Press
Editing Equations
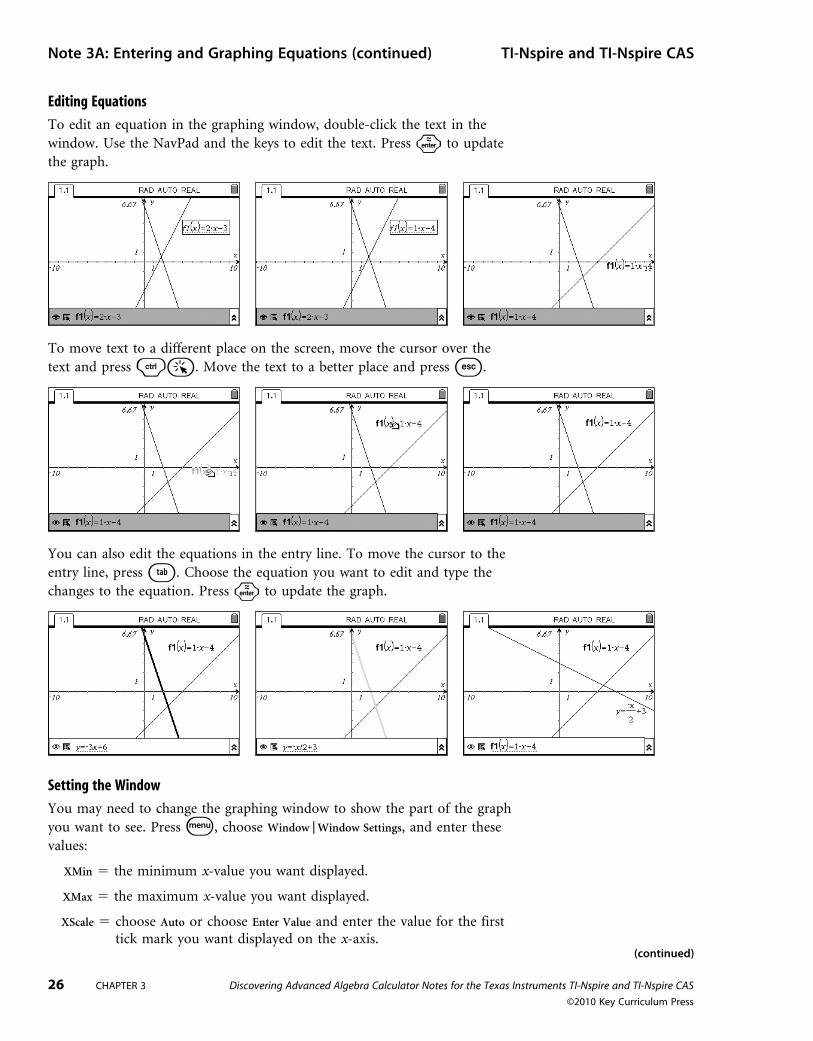
To edit an equation in the graphing window, double-click the text in the window. Use the NavPad and the keys to edit the text. Press · to update the graph.
To move text to a different place on the screen, move the cursor over the text and press /a. Move the text to a better place and press d.
You can also edit the equations in the entry line. To move the cursor to the entry line, press e. Choose the equation you want to edit and type the changes to the equation. Press · to update the graph.
Setting the Window
You may need to change the graphing window to show the part of the graph you want to see. Press b, choose Window⎮Window Settings, and enter these values:
XMin � the minimum x-value you want displayed.
XMax � the maximum x-value you want displayed.
XScale � choose Auto or choose Enter Value and enter the value for the first tick mark you want displayed on the x-axis.
(continued)
Note 3A: Entering and Graphing Equations (continued) TI-Nspire and TI-Nspire CAS
DAA2CNTNS_014_03.indd 26DAA2CNTNS_014_03.indd 26 3/16/09 11:06:54 AM3/16/09 11:06:54 AM

Discovering Advanced Algebra Calculator Notes for the Texas Instruments TI-Nspire and TI-Nspire CAS CHAPTER 3 27©2010 Key Curriculum Press
YMin � the minimum y-value you want displayed.
YMax � the maximum y-value you want displayed.
YScale � choose Auto or choose Enter Value and enter the value for the first tick mark you want displayed on the y-axis.
Adjusting the Window
There are three other ways to adjust the graphing window.
1. Move the cursor to the labels where an axis intercepts the edge of the screen. Double-click the number, type in a new value, and press ·.
2. Move the cursor to a tick mark on an axis. Press /a to change the cursor from an open hand to a grasping hand. Then use the NavPad to expand or compress the graph in both the horizontal and vertical directions. Press d to release the tick mark.
(continued)
Note 3A: Entering and Graphing Equations (continued) TI-Nspire and TI-Nspire CAS
DAA2CNTNS_014_03.indd 27DAA2CNTNS_014_03.indd 27 3/16/09 11:06:55 AM3/16/09 11:06:55 AM

28 CHAPTER 3 Discovering Advanced Algebra Calculator Notes for the Texas Instruments TI-Nspire and TI-Nspire CAS
©2010 Key Curriculum Press
3. Translate the window by moving the cursor to a blank area of the screen. Press /a to grasp the screen and use the NavPad to translate the window. Press d to release the window.
Setting the Graph Attributes
You can use the Attributes menu to change the appearance of your graph. Attributes you can change include
1. Lineweight: thin, medium, or thick
2. Line style: continuous, dotted, or dashed
3. Label style: f, f (), f ()�, y �f (), y � . . .
4. Graph: continuous or discrete
There are three ways to access the Attributes menu.
1. In the entry line, press ¡ to move the cursor to the left of the equation and highlight the Attributes button. Press a to open an Attributes menu that allows you to change the characteristics of the graph. Press £ or ¤ to choose which attribute you want to change. Then press ¡ or ¢ to choose
the setting you wish to use. When you are finished, press · to exit the Attributes menu.
2. In the graphing window, click on the graph, press /b, and choose Attributes. Follow the steps described above to change the attributes.
(continued)
Note 3A: Entering and Graphing Equations (continued) TI-Nspire and TI-Nspire CAS
DAA2CNTNS_014_03.indd 28DAA2CNTNS_014_03.indd 28 3/16/09 11:06:56 AM3/16/09 11:06:56 AM

Discovering Advanced Algebra Calculator Notes for the Texas Instruments TI-Nspire and TI-Nspire CAS CHAPTER 3 29©2010 Key Curriculum Press
3. Press b, choose Actions⎮Attributes, and click on the graph. Change the attributes as described above, and press d to put the tool away.
Similarly, you can change the attributes of the axes. Move the cursor to one of the axes, press /b, and choose Attributes.
Hiding the Entry Line
To hide the entry line, press /G. To show a hidden entry line, press /G.
Zooming
There are several ways to enlarge part of the graph. Press b and choose
Window⎮Zoom – Box to select a portion of the current screen to view. Move the cursor to one corner of the part of the graph where you want to zoom in and press a. Then move to the opposite corner of the part of the graph where you want to zoom in and press a.
(continued)
Note 3A: Entering and Graphing Equations (continued) TI-Nspire and TI-Nspire CAS
DAA2CNTNS_014_03.indd 29DAA2CNTNS_014_03.indd 29 3/16/09 11:06:56 AM3/16/09 11:06:56 AM
30 CHAPTER 3 Discovering Advanced Algebra Calculator Notes for the Texas Instruments TI-Nspire and TI-Nspire CAS
©2010 Key Curriculum Press
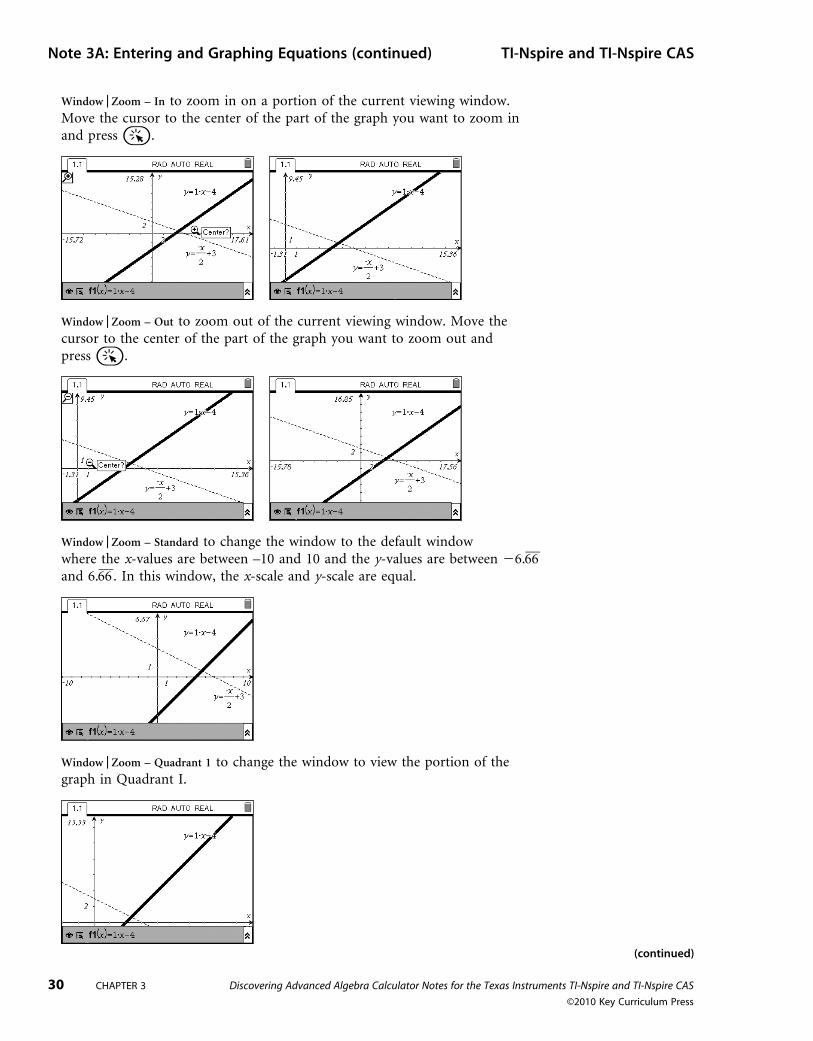
Window⎮Zoom – In to zoom in on a portion of the current viewing window. Move the cursor to the center of the part of the graph you want to zoom in and press a.
Window⎮Zoom – Out to zoom out of the current viewing window. Move the cursor to the center of the part of the graph you want to zoom out and press a.
Window⎮Zoom – Standard to change the window to the default window where the x-values are between –10 and 10 and the y-values are between �6.
___ 66
and 6. ___
66 . In this window, the x-scale and y-scale are equal.
Window⎮Zoom – Quadrant 1 to change the window to view the portion of the graph in Quadrant I.
(continued)
Note 3A: Entering and Graphing Equations (continued) TI-Nspire and TI-Nspire CAS
DAA2CNTNS_014_03.indd 30DAA2CNTNS_014_03.indd 30 3/16/09 11:06:57 AM3/16/09 11:06:57 AM

Discovering Advanced Algebra Calculator Notes for the Texas Instruments TI-Nspire and TI-Nspire CAS CHAPTER 3 31©2010 Key Curriculum Press
Window⎮Zoom – Fit to have the handheld choose the y-values that will best display the function(s) for the window’s current x-values. This command is useful when it is hard to determine the best window in which to view the graph of a function.
Window⎮Zoom – Data to have the handheld choose a viewing window that will display all of the points in a scatter plot.
Point On
To create a point on the graph, press b and choose Points & Lines⎮Point On. As you move the point along the graph of the function, you will see gray coordinates and a blinking point. Press a to make the point and its coordinates permanent. Press d to put away the point tool.
To delete the point, move the cursor over the point, and press a..
There are two ways to move a point.
1. Move the cursor over the point. Press /a to grasp it and move the point to another place along the graph of the function. Press d to release the point.
(continued)
Note 3A: Entering and Graphing Equations (continued) TI-Nspire and TI-Nspire CAS
DAA2CNTNS_014_03.indd 31DAA2CNTNS_014_03.indd 31 3/16/09 11:06:57 AM3/16/09 11:06:57 AM
32 CHAPTER 3 Discovering Advanced Algebra Calculator Notes for the Texas Instruments TI-Nspire and TI-Nspire CAS
©2010 Key Curriculum Press
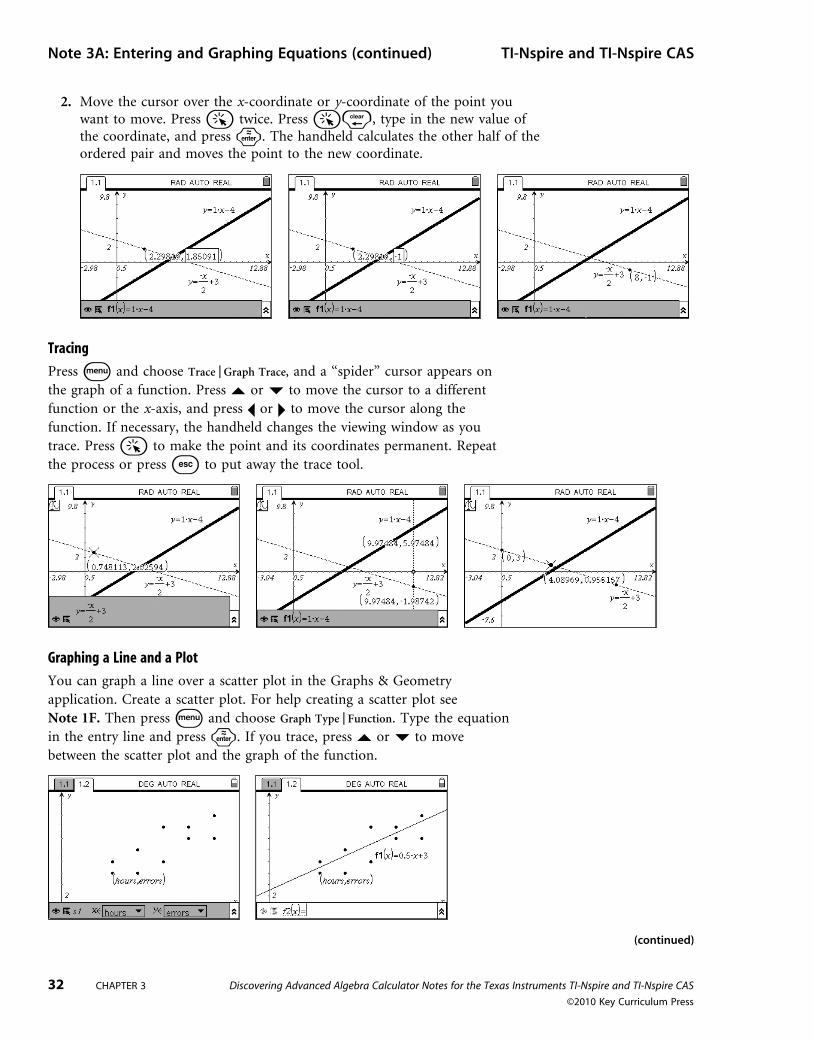
2. Move the cursor over the x-coordinate or y-coordinate of the point you want to move. Press a twice. Press a., type in the new value of the coordinate, and press ·. The handheld calculates the other half of the ordered pair and moves the point to the new coordinate.
Tracing
Press b and choose Trace⎮Graph Trace, and a “spider” cursor appears on the graph of a function. Press £ or ¤ to move the cursor to a different function or the x-axis, and press ¡ or ¢ to move the cursor along the function. If necessary, the handheld changes the viewing window as you trace. Press a to make the point and its coordinates permanent. Repeat the process or press d to put away the trace tool.
Graphing a Line and a Plot
You can graph a line over a scatter plot in the Graphs & Geometry application. Create a scatter plot. For help creating a scatter plot see Note 1F. Then press b and choose Graph Type⎮Function. Type the equation in the entry line and press ·. If you trace, press £ or ¤ to move between the scatter plot and the graph of the function.
(continued)
Note 3A: Entering and Graphing Equations (continued) TI-Nspire and TI-Nspire CAS
DAA2CNTNS_014_03.indd 32DAA2CNTNS_014_03.indd 32 3/16/09 11:06:58 AM3/16/09 11:06:58 AM

Discovering Advanced Algebra Calculator Notes for the Texas Instruments TI-Nspire and TI-Nspire CAS CHAPTER 3 33©2010 Key Curriculum Press
(continued)
You can also graph a line over a scatter plot in the Data & Statistics application. See Note 1F for help creating a scatter plot. To graph a line (or any function), press b and choose Analyze⎮Plot Function. Enter the equation in the entry box that appears, and press ·.
Note 3B: Function Tables
You can use a function table to build a list of values for one or more previously defined functions.
a. In the Lists & Spreadsheet application, press b and choose
Function Table⎮Switch to Function. You can also press /T.
b. Press £ or ¤ to highlight the function for which you would like to create a table, and press ·.
c. Press £ or ¤ to view the values of the function for the corresponding values of x.
To build a function table for a different function, move to another column and select the function you would like to create a table for, or press b and choose Function Table⎮Select Function.
To change the way the function table displays the independent x-values and the dependent y-values, press b and choose Function Table⎮Edit Function
Table Settings. Press e to move between settings, and press · when you are finished.
Table Start � the first x-value you wish to see in the table when first viewed.
Table Step � the difference between the x-values in the table.
Independent: Auto means the table will automatically start with the x-values created by the Table Start value and the Table Step value. If Independent is set to Ask, the table will be blank until you provide the x-value.
Dependent: Auto means the table will automatically evaluate each cell in the function columns for each x-value. If Dependent is set to Ask, then you must move to each cell and press · to evaluate each cell in the function column.
Note 3A: Entering and Graphing Equations (continued) TI-Nspire and TI-Nspire CAS
DAA2CNTNS_014_03.indd 33DAA2CNTNS_014_03.indd 33 3/16/09 11:06:59 AM3/16/09 11:06:59 AM

34 CHAPTER 3 Discovering Advanced Algebra Calculator Notes for the Texas Instruments TI-Nspire and TI-Nspire CAS
©2010 Key Curriculum Press
To edit the function you are evaluating, press b and choose Function Table⎮Edit Function Expression. Type any changes you need to make to the function and press ·.
To delete a function in the function table, move to any cell in the column you want to delete, press b, and choose Function Table⎮Delete Column.
Note 3C: Balloon Blastoff
You will need a CBR2 motion sensor for this investigation. Press c and choose New Document. Connect the CBR2 to the handheld. The handheld will automatically open the Auto Launch dialog box. Choose Lists &
Spreadsheet, and press ¢a.
Aim the CBR2 motion sensor at the rocket as explained in the investigation. To collect the data, press a as the rocket is released. The CBR2 will collect data for five seconds and then stop automatically. You can stop the data collection sooner by pressing a.
If you are not satisfied with the data, see Note 1D for information on re-collecting data. Complete the investigation in your book. See Note 1D for additional information on using a CBR2.
Note 3D: Median-Median Line
Creating a Median-Median Line in the Data & Statistics Application
Create a scatter plot in the Data & Statistics application. For help creating a scatter plot, see Note 1F. To graph and find the equation of a median-median line, press b and choose Analyze⎮Regression⎮Show Median-Median.
(continued)
Note 3B: Function Tables (continued) TI-Nspire and TI-Nspire CAS
DAA2CNTNS_014_03.indd 34DAA2CNTNS_014_03.indd 34 3/16/09 11:06:59 AM3/16/09 11:06:59 AM

Discovering Advanced Algebra Calculator Notes for the Texas Instruments TI-Nspire and TI-Nspire CAS CHAPTER 3 35©2010 Key Curriculum Press
Creating a Median-Median Line in the Calculator and Lists & Spreadsheet Applications
You can find the equation of median-median line in the Calculator application or the Lists & Spreadsheet application. Press b and choose Statistics⎮Stat
Calculations⎮Median-Median Line to open a Median-Median Line dialog box.
a. In the “X List” box, type the name of the list that contains the x-values, or press ¤ to highlight the desired list and press a. Press e.
b. In the “Y List” box, use the same procedure to specify the list that contains the y-values. Press e.
c. In the “SaveRegEqn to” box, press ¤ to highlight the name you want to give the regression equation and press a. Press · to calculate the prediction equation.
To graph the scatter plot and regression equation, press c and choose Graphs & Geometry. See Note 1F and Note 3A for help on graphing functions and scatter plots.
Note 3E: Residuals and the Root Mean Square Error
Once you find a model for paired data, you can calculate the residuals and the root mean square error. For this example, assume that your data are stored in two lists named xvalues and yvalues, and your equation is stored in f1(x).
Residuals
a. Return to the Lists & Spreadsheet page where your data are stored.
b. Move to an empty column. In the formula box type yvalues – f1(xvalues) and press ·. This creates a dynamic list that changes if you change the data in your lists or the equation stored in f1(x).
c. Name the list containing the residuals.
(continued)
Note 3D: Median-Median Line (continued) TI-Nspire and TI-Nspire CAS
DAA2CNTNS_014_03.indd 35DAA2CNTNS_014_03.indd 35 3/16/09 11:07:00 AM3/16/09 11:07:00 AM

36 CHAPTER 3 Discovering Advanced Algebra Calculator Notes for the Texas Instruments TI-Nspire and TI-Nspire CAS
©2010 Key Curriculum Press
Root Mean Square Error
The root mean square error is defined as s � � __________
∑ i�1
n
� yi � yi � 2
_________ n � 2 . The numerator of the fraction is the sum of the squares of the residuals. The denominator is two less than the number of elements in your data sets. Use the following procedure to compute the root mean square error in either the Calculator application or the Lists & Spreadsheet application.
a. Calculate the residuals using the procedure described above.
b. Press b and choose Statistics⎮Stat Calculations⎮One-Variable Statistics.
c. Press · to choose 1 list, press ¤, and highlight the name of your list of
residuals.
d. Press · twice and several calculations will be made. In particular, you are
interested in “n” and “SSX :� ∑
(x � _
x )2.”
e. Take the square root of the quotient of SSX and n � 2. Press h and choose the values from the list. They will be named stat.ssx and stat.n (the names may vary if you have done other statistics calculations in the same problem).
For large values of n, you can divide by n � 1 instead of n � 2. This is the sample standard deviation represented by “sx : sn – 1x” when the handheld calculates One-Variable Statistics. (continued)
Note 3E: Residuals and the Root Mean Square Error (continued) TI-Nspire and TI-Nspire CAS
DAA2CNTNS_014_03.indd 36DAA2CNTNS_014_03.indd 36 3/16/09 11:07:00 AM3/16/09 11:07:00 AM

Discovering Advanced Algebra Calculator Notes for the Texas Instruments TI-Nspire and TI-Nspire CAS CHAPTER 3 37©2010 Key Curriculum Press
You can create a visual representation of the squares of the residuals in the Data & Statistics application. Create a scatter plot and graph the median-median line (see Note 3D for help graphing the median-median line). Press b and choose Analyze⎮Residuals⎮Show Residual Squares.
Note 3F: Greatest Integer Function
To find the greatest integer less than or equal to a value, type int(, enter the value, and then close the parentheses. Use this command in the Graphs & Geometry application to graph a step function.
Alternatively, in the Calculator application, you can press b, choose Number⎮Number Tools⎮Floor, enter the value, and press ·.
Note 3G: Movable Line
To create a movable line when a scatter plot is displayed in a Data & Statistics page, press b and choose Analyze⎮Add Movable Line. Move the cursor over the movable line.
a. Near the center of the movable line, the cursor will appear as a four-directional icon. Press /a to grasp the movable line. Translate
the line by using the NavPad and press d to release the line.
Note 3E: Residuals and the Root Mean Square Error (continued) TI-Nspire and TI-Nspire CAS
(continued)
DAA2CNTNS_014_03.indd 37DAA2CNTNS_014_03.indd 37 3/16/09 11:07:01 AM3/16/09 11:07:01 AM

38 CHAPTER 3 Discovering Advanced Algebra Calculator Notes for the Texas Instruments TI-Nspire and TI-Nspire CAS
©2010 Key Curriculum Press
b. Away from the center of the movable line, the cursor appears as two arrows in a circular arrangement. Press /a to grasp the movable line. Rotate
the line using the NavPad and press d to release the line.
Minimizing the sum of the squares of the residuals is a good way to find a line that fits the data. Press b and choose Analyze⎮Residuals⎮Show Residual
Squares. Use the above transformations to minimize the sum of the squares of the residuals.
Note 3G: Movable Line (continued) TI-Nspire and TI-Nspire CAS
DAA2CNTNS_014_03.indd 38DAA2CNTNS_014_03.indd 38 3/16/09 11:07:01 AM3/16/09 11:07:01 AM

Discovering Advanced Algebra Calculator Notes for the Texas Instruments TI-Nspire and TI-Nspire CAS CHAPTER 4 39©2010 Key Curriculum Press
CHAPTER 4 Calculator Notes for the TI-Nspire and TI-Nspire CAS
Note 4A: Function Notation
The handheld uses function notation automatically. You can define a function in the Calculator, Graphs & Geometry, and Data & Statistics applications. See Note 3A to learn how to define a function. You can have up to 99 functions defined in any problem, f1(x) to f99(x). To calculate the value of the function for a given x-value, replace the x in the function with that x-value. For example, suppose you have defined f1(x) � x 2 � 3 and f2(x) � 3x � 1. To evaluate each of the functions when x is 4, type f1(4) and press ·, then type f 2(4) and press ·. Notice that a defined function turns bold when you type it.
Note 4B: Entering Programs
The handheld can be programmed like a computer. In the Calculator application, you can instruct the handheld to perform a series of calculations. This series of calculations can be stored as a program that can be used temporarily or on a regular basis. Programming is a process that takes much time to master. These instructions show you how to enter prewritten programs into the handheld.
Manually Entering a Program
Go to a Calculator page or add a new Calculator page by pressing c and choosing Calculator. To enter the program, press b and choose Functions
& Programs ⎜Program Editor ⎜New. Type the name of the program, for example, hello. If you want to be able to use this program in any document, see Running Programs Anytime Using the Public Library in this note. Press ·. Next, type the program exactly as it appears in the source you are copying. Press · to add a new line to the program, and press _ to add a space. You can type commands or choose them from the catalog. (Press k and scroll through the list. Press a letter to jump to that part of the list.)
When you are finished typing the program, press b and choose Check Syntax & Store ⎜Check Syntax & Store. The handheld checks the program for certain types of mistakes and then stores the program. If the handheld finds an error, it notifies you of the error and (after you press ·) takes the cursor to it. Not all errors are found by this process, so make sure you type the program exactly as it appears in your source.
(continued)
DAA2CNTNS_014_04.indd 39DAA2CNTNS_014_04.indd 39 3/16/09 11:12:46 AM3/16/09 11:12:46 AM

40 CHAPTER 4 Discovering Advanced Algebra Calculator Notes for the Texas Instruments TI-Nspire and TI-Nspire CAS
©2010 Key Curriculum Press
To run the program, press /e to go to the left side of the screen. Type the program name and press ·. Using the example program, you can type hello(3) to display “hello” three times. This program will run in any Calculator page in the current document.
Running Programs Anytime Using the Public Library
To enter a program that can be run in any document, press c and choose New Document. Add a Calculator page. To enter the program, press
b and choose Functions & Programs ⎜Program Editor ⎜New. Type the name of the program, for example, hi. Then press e twice, press a, and choose LibPub (Show in Catalog) from the menu that appears. Press · twice.
Notice that this program looks nearly identical to the hello program, but the word “LibPub” appears in the first line. This allows this program to be accessed at any time. After you have entered the program, press /S, give the document a name, such as math, and save it in the folder MyLib. To update all the programs the handheld can use, press /c and choose Refresh Libraries. To run the hi program in a different document, open a new or saved document and go to a Calculator page. Press k5 and choose math⏐hi. Type the number of times you want the program to display “hi” and press ·.
(continued)
Note 4B: Entering Programs (continued) TI-Nspire and TI-Nspire CAS
DAA2CNTNS_014_04.indd 40DAA2CNTNS_014_04.indd 40 3/16/09 11:12:47 AM3/16/09 11:12:47 AM

Discovering Advanced Algebra Calculator Notes for the Texas Instruments TI-Nspire and TI-Nspire CAS CHAPTER 4 41©2010 Key Curriculum Press
If you plan on having many programs on your handheld, consider keeping several of them in one document. Type each program on a separate page of the same document. Here the hi program and the quad
program are both saved in the math document.
Transferring a Program Between Handhelds
To transfer a program between handhelds, see Note 1H.
Note 4C: Movin’ Around
You will need two CBR2s.
With bits of tape, label the CBR2s A and B. Label two handhelds A and B. On each handheld, open a new document by pressing c and choosing New Document. Connect each handheld to its corresponding CBR2 (A to A, B to B). The data collection console should launch automatically. Choose Lists & Spreadsheet and click OK.
You will see a Lists & Spreadsheet page, with a Dist meter. The meter will be reading the current value of the CBR2. Press b and choose Experiment ⎜Set Up
Collection ⎜Time Graph. Enter these values.
Follow the directions in the investigation to collect the data. To start collecting data, press a to press the Play button on the meter. Data collection will stop automatically after 10 seconds. The handheld collects four lists: time is stored in dc01.time, distance is stored in dc01.dist1, velocity is stored in dc01.vel1, and acceleration is stored in dc01.acc1. Check your data by making a scatter plot of the (dc01.time, dc01.dist1) data. See Note 1F if you need help making a scatter plot. You can close the data collection console by pressing ¢ until you highlight the Close button and then pressing a.
Note 4B: Entering Programs (continued) TI-Nspire and TI-Nspire CAS
(continued)
DAA2CNTNS_014_04.indd 41DAA2CNTNS_014_04.indd 41 3/16/09 11:12:47 AM3/16/09 11:12:47 AM

42 CHAPTER 4 Discovering Advanced Algebra Calculator Notes for the Texas Instruments TI-Nspire and TI-Nspire CAS
©2010 Key Curriculum Press
If your team didn’t get good data, redo the experiment: Get the data collection console back by pressing /D. Press the Play button, and choose Discard to overwrite the previous data.
When you are satisfied with the data, you need to save your time and distance lists so that someone else can access them. Do that by saving them to the library. Add a Calculator application. Type Define LibPub (or press
k and choose it from the list). Enter a name for the list, such as timea for handheld A’s time data. The name should have no spaces or periods. Press
= , then press h and choose dc01.time. Press ·. Repeat to save the distance list (dista) in the library.
Save the document in the MyLib folder: Press /c and choose File | Save As. Give the document a name, such as MovinA, make sure you are saving in the MyLib folder, and click OK. The document’s name should have no spaces. Then press /c and choose Refresh Libraries.
Each group member should link to handheld A and copy the document MovinA, then link to handheld B and copy the document MovinB. See Note 1H if you need help transferring a document. Again, press /c and choose Refresh Libraries.
To get all the lists in the same document, open one of the documents, for example, MovinB. Go to the Lists & Spreadsheet page, and arrow up to the top of a blank list. Press k5 to see a list of the library documents. Arrow down to MovinA, press a and choose one of the lists. Press ·, then · again to fill the list with the data. You may want to rename the list. Repeat to add the other list. You should have four lists: timea, dista, timeb, and distb. Continue with the investigation.
Note 4D: Setting Windows
A “square” window is scaled so that the units on the y-axis are the same as the units on the x-axis. On a square window, there is no distortion of the graph. Many of the zoom options in the Window menu of the Graphs & Geometry application give you a square window: Zoom – Standard, Zoom –
Quadrant 1, and Zoom – Trig are all square windows. If you have changed the window settings using some other method, you can make the window square
Note 4C: Movin’ Around (continued) TI-Nspire and TI-Nspire CAS
(continued)
DAA2CNTNS_014_04.indd 42DAA2CNTNS_014_04.indd 42 3/16/09 11:12:48 AM3/16/09 11:12:48 AM

Discovering Advanced Algebra Calculator Notes for the Texas Instruments TI-Nspire and TI-Nspire CAS CHAPTER 4 43©2010 Key Curriculum Press
by pressing b and choosing Window | Zoom – Square. The handheld will find the nearest square window. To verify that a window is square, look at the scale factors on the x- and y-axes. They should be the same.
Sometimes when you trace a graph you would like only “nice” decimal values to be displayed. You can control how far the trace jumps on the x-axis to display nice decimals for the x-values. The y-values of a function may or may not be nice decimal values. To do this, press b and choose Trace | Trace Settings. Press a and choose Enter Value. Type the value you want to jump by, such as 0.1, and press ·. Now when you trace, you will see “nice” decimal values.
Note 4E: Graphing Piecewise Functions
You can graph piecewise functions in the Graphs & Geometry application. If a Graphs & Geometry page is not open, press c and choose Graphs &
Geometry. In the entry line, press /r. The piecewise icon that shows two pieces opens a template that always creates a two-piece piecewise function. The piecewise icon that shows three pieces allows you to choose how many pieces you want in the piecewise function. Use the NavPad to select the three-piece icon and press a. Enter the number of pieces you want in the function and press ·. In each line of the piecewise function template, type the expression of the function, press ¢, and then type the domain of the function using the inequality keys. Note that there are gray buttons for the greater than and less than signs. Press /> to enter the � sign or /< to enter the � sign. To advance to the next line of the piecewise function, press ¤.
Note 4D: Setting Windows (continued) TI-Nspire and TI-Nspire CAS
(continued)
DAA2CNTNS_014_04.indd 43DAA2CNTNS_014_04.indd 43 3/16/09 11:12:48 AM3/16/09 11:12:48 AM
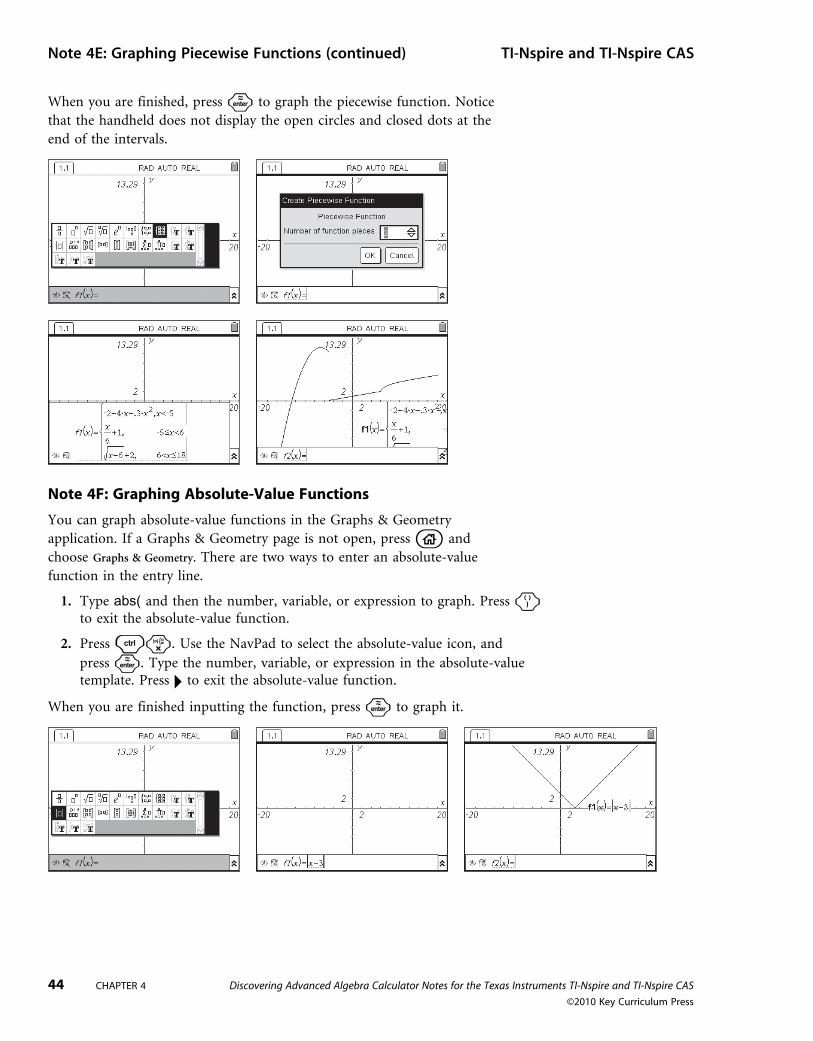
44 CHAPTER 4 Discovering Advanced Algebra Calculator Notes for the Texas Instruments TI-Nspire and TI-Nspire CAS
©2010 Key Curriculum Press
When you are finished, press · to graph the piecewise function. Notice that the handheld does not display the open circles and closed dots at the end of the intervals.
Note 4F: Graphing Absolute-Value Functions
You can graph absolute-value functions in the Graphs & Geometry application. If a Graphs & Geometry page is not open, press c and choose Graphs & Geometry. There are two ways to enter an absolute-value function in the entry line.
1. Type abs( and then the number, variable, or expression to graph. Press ) to exit the absolute-value function.
2. Press /r. Use the NavPad to select the absolute-value icon, and press ·. Type the number, variable, or expression in the absolute-value template. Press ¢ to exit the absolute-value function.
When you are finished inputting the function, press · to graph it.
Note 4E: Graphing Piecewise Functions (continued) TI-Nspire and TI-Nspire CAS
DAA2CNTNS_014_04.indd 44DAA2CNTNS_014_04.indd 44 3/16/09 11:12:49 AM3/16/09 11:12:49 AM
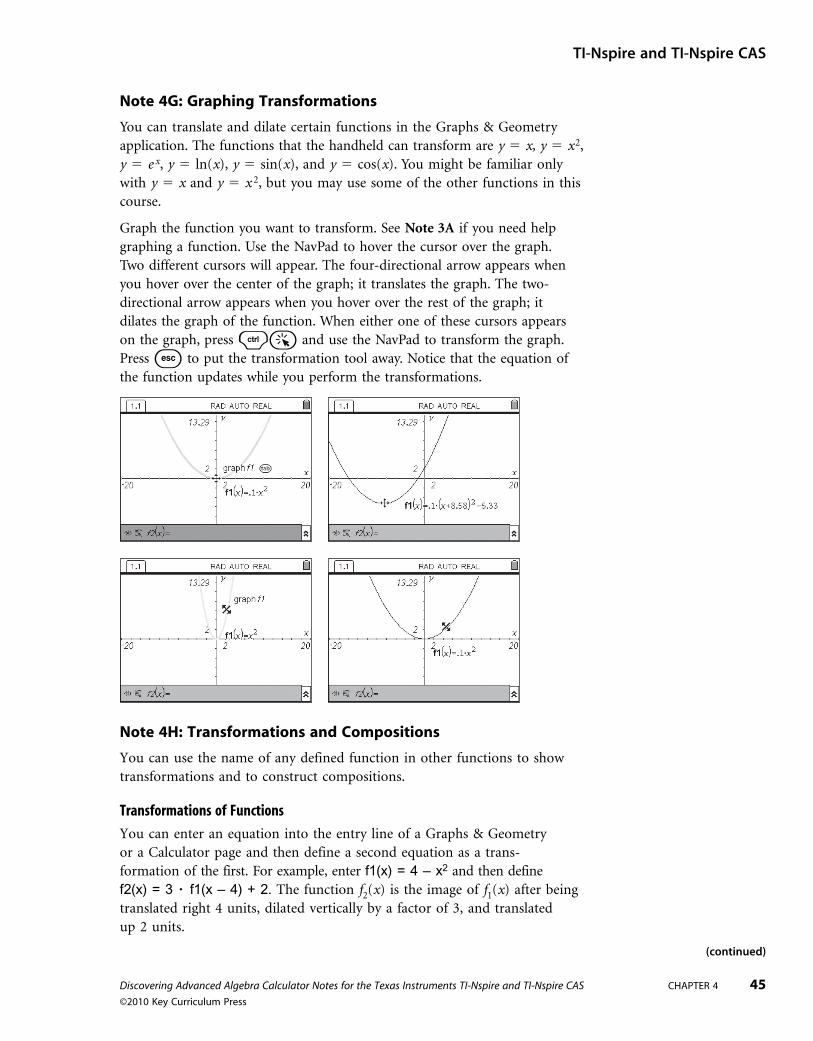
Discovering Advanced Algebra Calculator Notes for the Texas Instruments TI-Nspire and TI-Nspire CAS CHAPTER 4 45©2010 Key Curriculum Press
Note 4G: Graphing Transformations
You can translate and dilate certain functions in the Graphs & Geometry application. The functions that the handheld can transform are y � x, y � x 2, y � e x, y � ln(x), y � sin(x), and y � cos(x). You might be familiar only with y � x and y � x 2, but you may use some of the other functions in this course.
Graph the function you want to transform. See Note 3A if you need help graphing a function. Use the NavPad to hover the cursor over the graph. Two different cursors will appear. The four-directional arrow appears when you hover over the center of the graph; it translates the graph. The two-directional arrow appears when you hover over the rest of the graph; it dilates the graph of the function. When either one of these cursors appears on the graph, press /a and use the NavPad to transform the graph. Press d to put the transformation tool away. Notice that the equation of the function updates while you perform the transformations.
Note 4H: Transformations and Compositions
You can use the name of any defined function in other functions to show transformations and to construct compositions.
Transformations of Functions
You can enter an equation into the entry line of a Graphs & Geometry or a Calculator page and then define a second equation as a trans-formation of the first. For example, enter f1(x) = 4 – x2 and then define f 2(x) = 3 � f1(x – 4) + 2. The function f2(x) is the image of f1(x) after being translated right 4 units, dilated vertically by a factor of 3, and translated up 2 units.
TI-Nspire and TI-Nspire CAS
(continued)
DAA2CNTNS_014_04.indd 45DAA2CNTNS_014_04.indd 45 3/16/09 11:12:49 AM3/16/09 11:12:49 AM

46 CHAPTER 4 Discovering Advanced Algebra Calculator Notes for the Texas Instruments TI-Nspire and TI-Nspire CAS
©2010 Key Curriculum Press
Compositions of Functions
If you define two or more equations in a Graphs & Geometry or Calculator page, you can define another equation as the composition of the equations you have entered. For example, define f1(x) = 4 – x2 and f3(x) = x + 5. You can then define f4(x) = f1(f3(x)).
You can perform a recursive composition in the Calculator application to evaluate the repeated composition of a function with itself. Perform the first iteration by typing the initial value in the parentheses of the function. Then enter “Ans” for the x-value by pressing /v. For example, to perform a recursive composition with f3(x) � x � 5 and initial value �4, type f3(– 4), and press ·. Type f3( and press /v. Then press · to find each successive term.
Note 4I: Drawing Segments
If you are not currently in a Graphs & Geometry page, press c and choose Graphs & Geometry. To draw a segment, press b and choose Points &
Lines | Segment. Use the NavPad to move to one endpoint and press a. At this point, you can optionally type in a label using the green keys. Use the
(continued)
Note 4H: Transformations and Compositions (continued) TI-Nspire and TI-Nspire CAS
DAA2CNTNS_014_04.indd 46DAA2CNTNS_014_04.indd 46 3/16/09 11:12:50 AM3/16/09 11:12:50 AM

Discovering Advanced Algebra Calculator Notes for the Texas Instruments TI-Nspire and TI-Nspire CAS CHAPTER 4 47©2010 Key Curriculum Press
NavPad to move to the other endpoint and press a. At this point, you can optionally type in a label using the green keys. Repeat the process to draw another segment. When you are done, press d to put away the segment tool.
To label the endpoints with coordinates, press b and choose Actions | Coordinates and Equations. Use the NavPad to point at the endpoint of the segment, press a to choose the endpoint, and press a again to fix the coordinates on the screen. Press d to put away the tool. To change the number of digits shown for the coordinates, use the NavPad to move over the coordinate and press + to increase the number of digits and - to decrease the number of digits.
To move a point, press /a to grab the point, and use the NavPad.
When you are done, press d to release the point. You can also press a twice on a coordinate, type the new value, and press ·.
If you would like to hide the Cartesian coordinate plane and entry line, press
b and choose View | Plane Geometry View.
Note 4I: Drawing Segments (continued) TI-Nspire and TI-Nspire CAS
DAA2CNTNS_014_04.indd 47DAA2CNTNS_014_04.indd 47 3/16/09 11:12:50 AM3/16/09 11:12:50 AM

48 CHAPTER 4 Discovering Advanced Algebra Calculator Notes for the Texas Instruments TI-Nspire and TI-Nspire CAS
©2010 Key Curriculum Press
Note 4J: Web Graphs
To create a web graph, you first need to create a sequence for the function in a Lists & Spreadsheet page. Enter the function rule as the sequence using un�1 in place of x. See Note 1I for more information on creating sequences. Enter the program from the next page in the program editor. See Note 4B if you need help entering the program. To run the program, in the Calculator application type web( and the name of the sequence list you created. The program creates two lists, wx and wy, which represent the x- and y-coordinates of the web graph. The examples show creating a web graph for the function f (x) � 4x (1 � x).
Open a Graphs & Geometry page, and create a scatter plot using lists wx and wy. Press b and choose Window | Zoom – Data. To connect the dots, press b and choose Actions | Attributes. Move the NavPad over the points, and press a ¤ ¢ a. Graph the function you created the web graph for as well as f (x) � x . Press /G to hide the entry line. Finally, move along the scatter plot by pressing b and choosing Trace | Graph Trace. If the cursor is not on a point of the scatter plot, press £ or ¤ until it is. Press ¡ until you are sure you are at the initial point. Press ¢ to move from point to point.
TI-Nspire and TI-Nspire CAS
(continued)
DAA2CNTNS_014_04.indd 48DAA2CNTNS_014_04.indd 48 3/16/09 11:12:51 AM3/16/09 11:12:51 AM
Discovering Advanced Algebra Calculator Notes for the Texas Instruments TI-Nspire and TI-Nspire CAS CHAPTER 4 49©2010 Key Curriculum Press
Program Define web(seqlist)=Prgm mid(seqlist,1,1)→wx {0}→wy For k,1,dim(seqlist)-1augment(wx,mid(seqlist,k,1))→wx augment(wy,mid(seqlist,k+1,1))→wy augment(wx,mid(seqlist,k+1,1))→wx augment(wy,mid(seqlist,k+1,1))→wy EndFor EndPrgm
Note 4J: Web Graphs (continued) TI-Nspire and TI-Nspire CAS
DAA2CNTNS_014_04.indd 49DAA2CNTNS_014_04.indd 49 3/16/09 11:12:52 AM3/16/09 11:12:52 AM

50 CHAPTER 5 Discovering Advanced Algebra Calculator Notes for the Texas Instruments TI-Nspire and TI-Nspire CAS
©2010 Key Curriculum Press
CHAPTER 5 Calculator Notes for the TI-Nspire and TI-Nspire CAS
Note 5A: Powers and Roots
Powers
Press q to square a number, variable, or expression in parentheses. To raise a number, variable, or expression in parentheses to a power, press l and type the exponent. Press ¢ to exit the exponent template.
Roots
Press /q to find the square root of a number, variable, or expression. Press ¢ to exit the square root template.
To find the n th root of any number, variable, or expression, press /l. Type the value for n, press ¢, type in the number, variable, or expression, and press ¢ to exit the n th root template.
Note 5B: Drawing the Inverse of a Function
You can use construction tools in Graphs & Geometry to draw the graph of the inverse of a function. You will use the property that the graph of an inverse is the reflection of the original graph over the line y � x, and you will use the idea of a locus of points, which you may recall from geometry.
Enter a function as f1(x) and graph it. You must use a constructed line (rather than a line graphed as a function) as the reflection line. Press b and choose View⎮Show Grid. Then press b and choose Points & Lines⎮Line. To construct the line y � x, you will need to click on two points to define the line. Choose two points with equal x- and y-coordinates, and use the grid as your guide. Click on the grid point for the first point, then move the
(continued)
DAA2CNTNS_014_05.indd 50DAA2CNTNS_014_05.indd 50 3/16/09 11:13:55 AM3/16/09 11:13:55 AM
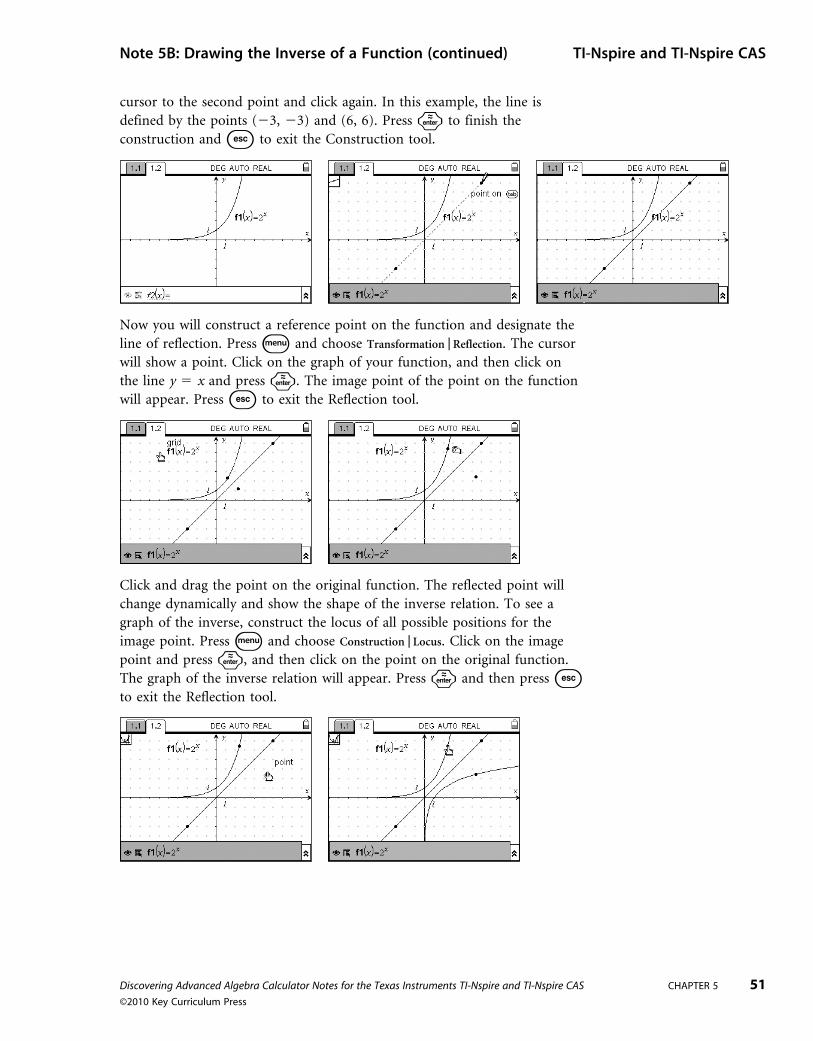
Discovering Advanced Algebra Calculator Notes for the Texas Instruments TI-Nspire and TI-Nspire CAS CHAPTER 5 51©2010 Key Curriculum Press
cursor to the second point and click again. In this example, the line is defined by the points (�3, �3) and (6, 6). Press · to finish the construction and d to exit the Construction tool.
Now you will construct a reference point on the function and designate the line of reflection. Press b and choose Transformation⎮Reflection. The cursor will show a point. Click on the graph of your function, and then click on the line y � x and press ·. The image point of the point on the function will appear. Press d to exit the Reflection tool.
Click and drag the point on the original function. The reflected point will change dynamically and show the shape of the inverse relation. To see a graph of the inverse, construct the locus of all possible positions for the image point. Press b and choose Construction⎮Locus. Click on the image point and press ·, and then click on the point on the original function. The graph of the inverse relation will appear. Press · and then press d to exit the Reflection tool.
Note 5B: Drawing the Inverse of a Function (continued) TI-Nspire and TI-Nspire CAS
DAA2CNTNS_014_05.indd 51DAA2CNTNS_014_05.indd 51 3/16/09 11:13:56 AM3/16/09 11:13:56 AM

52 CHAPTER 5 Discovering Advanced Algebra Calculator Notes for the Texas Instruments TI-Nspire and TI-Nspire CAS
©2010 Key Curriculum Press
Note 5C: Logarithms and Antilogs
Logarithms
To find the common, or base 10, logarithm of a number, press /s¢ and type a positive number. The handheld can also find logarithms that are not base 10. For example, to find log 5125, press /s 5 ¢ 125.
Antilogs
Press s to find the common antilog of the number. Pressing 10 l has the same result as pressing s.
Note 5D: Gathering Temperature Data
You will need an EasyTemp probe.
Press c and choose New Document. Connect the EasyTemp probe to the handheld. The handheld will automatically open the Auto Launch dialog box. Choose Lists & Spreadsheet from the Auto Launch dialog box, and press ¢a. The handheld will show an active sensor.
Press b and choose Experiment⎮Set Up Collection⎮Time Graph. Type 10 in the Time Between Samples box and type 180 in the Experiment Length box. Press ·.
Follow the instructions in your textbook to determine what data to collect. Press a to begin collecting data. The handheld stops automatically.
If you are not satisfied with the data, press b and choose Experiment⎮Start Collection to repeat the experiment. A new experiment will begin immediately after you decide to store or discard your previous data.
(continued)
TI-Nspire and TI-Nspire CAS
DAA2CNTNS_014_05.indd 52DAA2CNTNS_014_05.indd 52 3/16/09 11:13:57 AM3/16/09 11:13:57 AM

Discovering Advanced Algebra Calculator Notes for the Texas Instruments TI-Nspire and TI-Nspire CAS CHAPTER 5 53©2010 Key Curriculum Press
Once you are satisfied with your experiment, press ¢ to highlight the Close button in the upper-right corner of the data collection console. Press a to close the data collection console. To get the data collection console back after closing it, press /D.
For the first set of data collected, the time lapsed is in column dc01.time and the corresponding temperature is in column dc01.temp1. Rename these columns t and p.
The data from the EasyTemp probe is stored in lists, which can be accessed in the Calculator application by pressing h. To share this data with someone else, see Note 1H.
Note 5D: Gathering Temperature Data (continued) TI-Nspire and TI-Nspire CAS
DAA2CNTNS_014_05.indd 53DAA2CNTNS_014_05.indd 53 3/16/09 11:13:57 AM3/16/09 11:13:57 AM

54 CHAPTER 6 Discovering Advanced Algebra Calculator Notes for the Texas Instruments TI-Nspire and TI-Nspire CAS
©2010 Key Curriculum Press
CHAPTER 6 Calculator Notes for the TI-Nspire and TI-Nspire CAS
Note 6A: Entering and Editing Matrices
You will use the Calculator application to enter and edit matrices.
Entering a Matrix
Press c and choose Calculator. To access the (m � n) matrix template,
press /r. Highlight the small block, which pictures a 3 � 3 matrix, and press a. Enter the number of rows and columns and press ·. The handheld displays an empty matrix. Move to each element in the matrix and type the appropriate value in each cell.
To store the matrix as a variable, press ¢ until you exit the matrix, press
/h, type the name of the matrix, and press ·.
Editing a Matrix
To edit a matrix, highlight it and press ·. The matrix will appear in the entry line. Move to the elements you would like to edit and type new values. Then press ·.
Note 6B: Matrix Operations
You can perform operations on matrices just as with numbers. You can add or subtract matrices if they have the same dimensions.
(continued)
DAA2CNTNS_014_06.indd 54DAA2CNTNS_014_06.indd 54 3/16/09 5:38:41 PM3/16/09 5:38:41 PM

Discovering Advanced Algebra Calculator Notes for the Texas Instruments TI-Nspire and TI-Nspire CAS CHAPTER 6 55©2010 Key Curriculum Press
You can multiply two matrices if the number of columns in the first matrix matches the number of rows in the second matrix.
You can multiply any matrix by a constant.
You can raise a square matrix to a power.
The result of a matrix operation can be stored in a matrix with a variable name or used in the next calculation. This allows you to work recursively with matrices.
Note 6B: Matrix Operations (continued) TI-Nspire and TI-Nspire CAS
(continued)
DAA2CNTNS_014_06.indd 55DAA2CNTNS_014_06.indd 55 3/16/09 5:38:43 PM3/16/09 5:38:43 PM

56 CHAPTER 6 Discovering Advanced Algebra Calculator Notes for the Texas Instruments TI-Nspire and TI-Nspire CAS
©2010 Key Curriculum Press
(continued)
Note 6B: Matrix Operations (continued) TI-Nspire and TI-Nspire CAS
Errors
If you get an Error: Dimension error message, then the dimensions of the matrices do not satisfy the operation’s criteria.
An Error: Variable is not defined message probably indicates that you have named a matrix that has not been defined.
Note 6C: Plotting a Polygon
To plot a polygon stored as a matrix, you need to convert the matrix into two lists, one representing the x-coordinates and the other representing the y-coordinates. To graph a closed figure, you must repeat the first point as
the last point. For example, the matrix � 1 2
�2 1
�3
�1
2 �2
1 2
� represents
the quadrilateral with vertices (1, 2), (�2, 1), (�3, �1), and (2, �2).
First, you will create two submatrices that each contain just one row of the original polygon matrix. Then you will convert each submatrix into a list. So, to plot the polygon represented by a matrix, follow these steps:
a. Enter the matrix and store it as matrix poly.
b. Save each row of the matrix in a submatrix. To create a submatrix, press b and choose Matrix & Vector⎮Create⎮Submatrix. Input the name of the original matrix, the starting row number of the submatrix, the starting column number, the ending row number, and the ending column number of the submatrix.
Type poly, 1, 1, 1, 5) to represent row 1, column 1, to row 1, column 5, and press ·.
c. Store the resulting matrix as a list by pressing b and choosing
Statistics⎮List Operations⎮Convert Matrix to List. Press £· to copy the
matrix from above to the current line. Press ¢/h and type
the name of the list, xcoord, and press ·.
DAA2CNTNS_014_06.indd 56DAA2CNTNS_014_06.indd 56 3/16/09 5:38:43 PM3/16/09 5:38:43 PM

Discovering Advanced Algebra Calculator Notes for the Texas Instruments TI-Nspire and TI-Nspire CAS CHAPTER 6 57©2010 Key Curriculum Press
d. Repeat the process for the y-coordinates, but change the row and column references to 2, 1, 2, 5. Store this matrix as the list ycoord.
Make a scatter plot of (xcoord, ycoord ) in a Graphs & Geometry page. Move to the attribute icon in the entry line and press a. Press ¤ ¢a to connect the vertices of the polygon.
Set an appropriate window and display the graph. Press /G to hide the entry line.
You can also use matrices to transform polygons. You can nest commands and copy and edit commands and expressions to make the process easier.
Note 6C: Plotting a Polygon (continued) TI-Nspire and TI-Nspire CAS
DAA2CNTNS_014_06.indd 57DAA2CNTNS_014_06.indd 57 3/16/09 5:38:44 PM3/16/09 5:38:44 PM

58 CHAPTER 6 Discovering Advanced Algebra Calculator Notes for the Texas Instruments TI-Nspire and TI-Nspire CAS
©2010 Key Curriculum Press
Note 6D: Inverse Matrices
To find the inverse of a square matrix, type in the matrix or its variable name and press lv, type 1, and press ·.
If you get an Error: Dimension error message, the matrix is not square; if you get an Error: Singular matrix message, one row of the matrix is a multiple of another row. In either case, the matrix has no inverse.
Note 6E: Matrix Row Operations
The handheld can perform four operations on the rows of a matrix. To continue working with a matrix, store the matrix as a variable, or work with it recursively by pressing /v.
To exchange two rows of a matrix, press b and choose Matrix &
Vector⎮Row Operations⎮Swap Rows. Then type the matrix or its name and the two row numbers you would like to exchange.
To add the entries of one row to those of another row, press b and choose Matrix & Vector⎮Row Operations⎮Row Add. For example, you add the entries of row 1 to those of row 2 and store them in row 2 with the command rowAdd(matrixa, 1, 2).
(continued)
TI-Nspire and TI-Nspire CAS
DAA2CNTNS_014_06.indd 58DAA2CNTNS_014_06.indd 58 3/16/09 5:38:45 PM3/16/09 5:38:45 PM

Discovering Advanced Algebra Calculator Notes for the Texas Instruments TI-Nspire and TI-Nspire CAS CHAPTER 6 59©2010 Key Curriculum Press
To multiply the entries in a row by a value, press b and choose Matrix &
Vector⎮Row Operations⎮Multiply Row. For example, you multiply the entries of row 1 by 5 and store the products in row 1 with the command mRow(5, matrixa, 1).
To multiply the entries of one row by a value and add the products to another row, press b and choose Matrix & Vector⎮Row Operations⎮Multiply
Row & Add. For example, you multiply the entries of row 1 by 5, add the products to row 2, and store them in row 2 with the command mRowAdd(5, matrixa, 1, 2).
These commands don’t change the original matrix, they create a new matrix. You’ll probably want to end each command by storing the new matrix with a new name. If you don’t need to keep the original matrix, you can store the new matrix with the original name, as was done in each of the examples.
Note 6F: Reduced Row-Echelon Form
To convert an augmented matrix to reduced row-echelon form, type rref( or press b and choose Matrix & Vector⎮Reduced Row-Echelon Form. Type the matrix or its name, and press ·. For example, the following system of equations could be solved by using reduced row-echelon form to get x � 2, y � 3, and z � 4.
x � y � 2z � 7
x � 2y � 3z � �4
2x � 2y � z � 6
Note 6E: Matrix Row Operations (continued) TI-Nspire and TI-Nspire CAS
DAA2CNTNS_014_06.indd 59DAA2CNTNS_014_06.indd 59 3/16/09 5:38:45 PM3/16/09 5:38:45 PM

60 CHAPTER 6 Discovering Advanced Algebra Calculator Notes for the Texas Instruments TI-Nspire and TI-Nspire CAS
©2010 Key Curriculum Press
Note 6G: Graphing Inequalities
Press c and choose Graphs & Geometry. Move to the entry line and
press . to delete the “�” symbol. Next, type the inequality symbol.
To create “�” or “�” press /< or />. As soon as the inequality sign is typed, f 1(x) changes to y. Type the rest of the expression and press · to graph the inequality.
TI-Nspire and TI-Nspire CAS
DAA2CNTNS_014_06.indd 60DAA2CNTNS_014_06.indd 60 3/16/09 5:38:46 PM3/16/09 5:38:46 PM

Discovering Advanced Algebra Calculator Notes for the Texas Instruments TI-Nspire and TI-Nspire CAS CHAPTER 7 61©2010 Key Curriculum Press
CHAPTER 7 Calculator Notes for the TI-Nspire and TI-Nspire CAS
Note 7A: Free Fall
You will need a CBR2 motion sensor. Press c and choose New Document. Connect the CBR2 to the handheld. Choose Lists & Spreadsheet, and press ¢a.
a. Press b and choose Experiment⎮ Set Up Collection⎮ Time Graph. In the Configure Time Based Data Collection dialog box, change the settings to collect data every 0.05 second for five seconds.
b. Position the CBR2 facing up on the floor as described in the investigation instructions. When you are ready to collect the data, press a. If you are not satisfied with the data, press b and choose Experiment⎮ Start Collection to repeat the experiment. A new experiment will begin immediately after you decide to store or discard your previous data.
c. Once you are satisfied with your experiment, press ¢ to highlight the Close button in the upper-right corner of the data collection console. Press a to close the data collection console. To get the data collection console back after closing it, press /D.
d. Create a scatter plot of (dc01.time, dc01.distance) in Data & Statistics.
e. Identify a short segment of the graph that describes the drop, and record the lowest x-coordinate of this segment. Press /£ and choose Lists &
Spreadsheet. Move to the time value you noted, press and hold g, and use the NavPad to select the time and distance values for at least ten data points. Press /C to copy these data points. Press cand choose
Lists & Spreadsheet. Move the cursor to cell A1 and press /V to paste the data points from the previous page.
f. Label the first column time and the second column distance.
To change column width, see Note 1C. See the Getting Started note for help changing the Document Settings.
Note 7B: Finite Differences
To create a difference list in a Calculator page, press b and choose Statistics⎮ List Operations⎮ Difference List. Type the list and press ·. You can use this command recursively to calculate the values of the first, second, and third differences of a sequence.
(continued)
DAA2CNTNS_014_07.indd 61DAA2CNTNS_014_07.indd 61 3/16/09 11:16:55 AM3/16/09 11:16:55 AM

62 CHAPTER 7 Discovering Advanced Algebra Calculator Notes for the Texas Instruments TI-Nspire and TI-Nspire CAS
©2010 Key Curriculum Press
Data Analysis Using Finite Differences
You can also use the Lists & Spreadsheet application to create lists of differences that can then be graphed.
a. Enter two spreadsheet lists. The list you use for the x-values must be an arithmetic sequence. In this example, the lists are time and distance.
b. Press c and choose Data & Statistics. Display a scatter plot of (time, distance).
The plot does not show a horizontal linear pattern or even a linear pattern, so proceed to look at a graph of the first differences.
c. Go to the Lists & Spreadsheet page that contains your data.
d. Label the column in which you want to store your difference list df1. Move to the formula box below df1. Press k2. Then choose List⎮ Operations⎮ Difference List. Press h, highlight distance, and press a or ·.
e. Display a scatter plot of (time, df1).
The plot shows a linear but nonhorizontal pattern using the first differences, so you must proceed to the next set of differences.
f. Repeat the two previous steps to find and plot the second differences. This time you will use df1 as the argument for the Difference List command.
Note 7B: Finite Differences (continued) TI-Nspire and TI-Nspire CAS
(continued)
DAA2CNTNS_014_07.indd 62DAA2CNTNS_014_07.indd 62 3/16/09 11:16:56 AM3/16/09 11:16:56 AM

Discovering Advanced Algebra Calculator Notes for the Texas Instruments TI-Nspire and TI-Nspire CAS CHAPTER 7 63©2010 Key Curriculum Press
g. When you create scatter plots in the Data & Statistics application, the window adjusts automatically to the data being graphed. However, this may exaggerate minor differences between values. Adjust your window settings to show a larger range of y-values.
This graph of second differences has a horizontal linear trend, so the original data can be modeled with a 2nd-degree polynomial.
Note 7C: Rolling Along
You will need a CBR2 motion sensor. Press c and choose New Document. Connect the CBR2 to the handheld. Choose Lists &
Spreadsheet, and press ¢a.
Press b and choose Experiment⎮ Set Up Collection⎮ Time Graph. In the Configure Time Based Data Collection dialog box, change the settings to collect data every 0.05 second for six seconds.
Position the CBR2 at the low end of the table as described in the investigation instructions. When you are ready to collect the data, press a. You can graph the data in either Graphs & Geometry or Data & Statistics to see if they look like a parabola. If not, modify your procedure and repeat the data collection. See Note 7A for additional information on collecting and re-collecting data.
Once you are satisfied with your experiment, press ¢ to highlight the Close button in the upper-right corner of the data collection console. Press a to close the data collection console. To get the data collection console back after closing it, press /D.
Continue with the investigation. As mentioned in the instructions, make sure to subtract 0.5 meter from the distance measurements.
Note 7B: Finite Differences (continued) TI-Nspire and TI-Nspire CAS
DAA2CNTNS_014_07.indd 63DAA2CNTNS_014_07.indd 63 3/16/09 11:16:57 AM3/16/09 11:16:57 AM

64 CHAPTER 7 Discovering Advanced Algebra Calculator Notes for the Texas Instruments TI-Nspire and TI-Nspire CAS
©2010 Key Curriculum Press
Note 7D: QUAD Program
The program quad allows you to use the quadratic formula to find the solutions of ax 2 � bx � c � 0 by inputting the values of a, b, and c. For example, to evaluate x 2 – x � 6 � 0, type quad(1, �1, 6). Note 4B explains how to enter programs into the handheld. Save this program in the common public library that allows anyone to use this program at any time. See Note 4B to learn how to save and use a program in the public library.
Type the program as follows. Note that the first line might contain LibPub if it is stored as a program that can be used at any time.
Define quad(a,b,c)Prgm
Disp �b � � __________
b 2 � 4 � a � c _________________ 2 � a
Disp �b � � __________
b 2 � 4 � a � c _________________ 2 � a
EndPrgm
When you are finished typing the program, press b and choose
Check Syntax & Store⎮ Check Syntax & Store. After you save the document, press /c and choose Refresh Libraries. This program can now be used in any Calculator page of any document. Press /N to open a new document. Choose Add Calculator, press k5, and choose math⎮ quad. Input values for a, b, and c in parentheses and press ·.
Note 7E: Complex Numbers
The handheld has three different settings to display and evaluate complex numbers. To learn more about changing settings on the handheld, see the Getting Started note. The Real setting displays only real values unless you enter a complex number using i. If the answer is not real, an error message will appear. The Rectangular setting displays both real and nonreal values in the form a � bi. Use this setting when you work with complex numbers.
TI-Nspire and TI-Nspire CAS
(continued)
DAA2CNTNS_014_07.indd 64DAA2CNTNS_014_07.indd 64 3/16/09 11:16:57 AM3/16/09 11:16:57 AM

Discovering Advanced Algebra Calculator Notes for the Texas Instruments TI-Nspire and TI-Nspire CAS CHAPTER 7 65©2010 Key Curriculum Press
When you enter the square root of negative 1 as i, make sure you press the gray i key, j, not the green letter I key, I.
Note 7F: MANDELBR Program
The mandelbr program graphs an area of the Mandelbrot set. When you use the program, specify the viewing window by typing the minimum x-value, maximum x-value, minimum y-value, and maximum y-value after the program name.
For example, if you would like to view the Mandelbrot set in the window [�2, 1, �1, 1], you would type mandelbr(–2, 1, –1, 1). This program might take over an hour to run on the handheld or a fraction of that time using computer software.
Note 7E: Complex Numbers (continued) TI-Nspire and TI-Nspire CAS
Define madelbr(xmin,xmax,Ymin,Ymax)=Prgm{} xc{} YcFor a,xmin,xmax,((xmax-xmin)/(75))For b,Ymin,Ymax,((Ymax-Ymin)/(50))0 n0 zWhile n 50 and abs(z) 2n+1 nz^(2)+a+bi zEndWhile
If abs(z) 2 Thenaugment(xc,{a}) xcaugment( c,{b}) YcEndIfEndForEndForEndPrgm
After you run the program, press c and choose Graphs & Geometry. Create a scatter plot. Plot xc on the x-axis and yc on the y-axis. See Note 1F for information on creating a scatter plot.
DAA2CNTNS_014_07.indd 65DAA2CNTNS_014_07.indd 65 3/16/09 11:16:58 AM3/16/09 11:16:58 AM

66 CHAPTER 7 Discovering Advanced Algebra Calculator Notes for the Texas Instruments TI-Nspire and TI-Nspire CAS
©2010 Key Curriculum Press
Note 7G: SYNDIV Program
The program syndiv performs the synthetic division of a polynomial divided by (x � c). To run the program, create a list of the coefficients of the polynomial in descending exponent order, including a zero for any missing terms, and state the value of c. For example, to divide x 3 � 13x � 12 by (x � 4), type syndiv({1, 0, �13, 12}, 4). The program will output an answer similar to the one you would produce if you worked out the division by hand.
Press /_ to type “_________”. For help entering a program and making it available in any document, see Note 4B.
TI-Nspire and TI-Nspire CAS
Define sYndiv(list,c)Prgm0 ddim(list)-1 d{0} r:{ } list2:list2 list3For j,1,dr:=mid(list, j,1)+c.raugment(list2,c.r) list2augment(list3,r) list3EndFor
mid(list, j,1)+c.r rDisp c, “⎮”,listDisp “⎮”,list2Disp“ ”Disp list3Disp “ remainder ”,rEndPrgm
(continued)
Note 7H: Zero Finding
There are two ways to find the zeros of a function using the Graphs & Geometry application.
1. Press b and choose Points & Lines⎮ Intersection Point(s). Move the cursor to the x-axis and press a. Then move the cursor to the function and press a. To find the coordinates of the zeros, press b, choose Actions⎮ Coordinates & Equations, move the cursor to the points, and double-click each point.
DAA2CNTNS_014_07.indd 66DAA2CNTNS_014_07.indd 66 3/16/09 11:16:58 AM3/16/09 11:16:58 AM

Discovering Advanced Algebra Calculator Notes for the Texas Instruments TI-Nspire and TI-Nspire CAS CHAPTER 7 67©2010 Key Curriculum Press
2. Press b and choose Trace⎮ Graph Trace. Move the cursor along the graph. When the handheld displays “zero” with the coordinates, that x-coordinate is a zero. Press a to display the point permanently.
Note 7H: Zero Finding (continued) TI-Nspire and TI-Nspire CAS
DAA2CNTNS_014_07.indd 67DAA2CNTNS_014_07.indd 67 3/16/09 11:16:59 AM3/16/09 11:16:59 AM
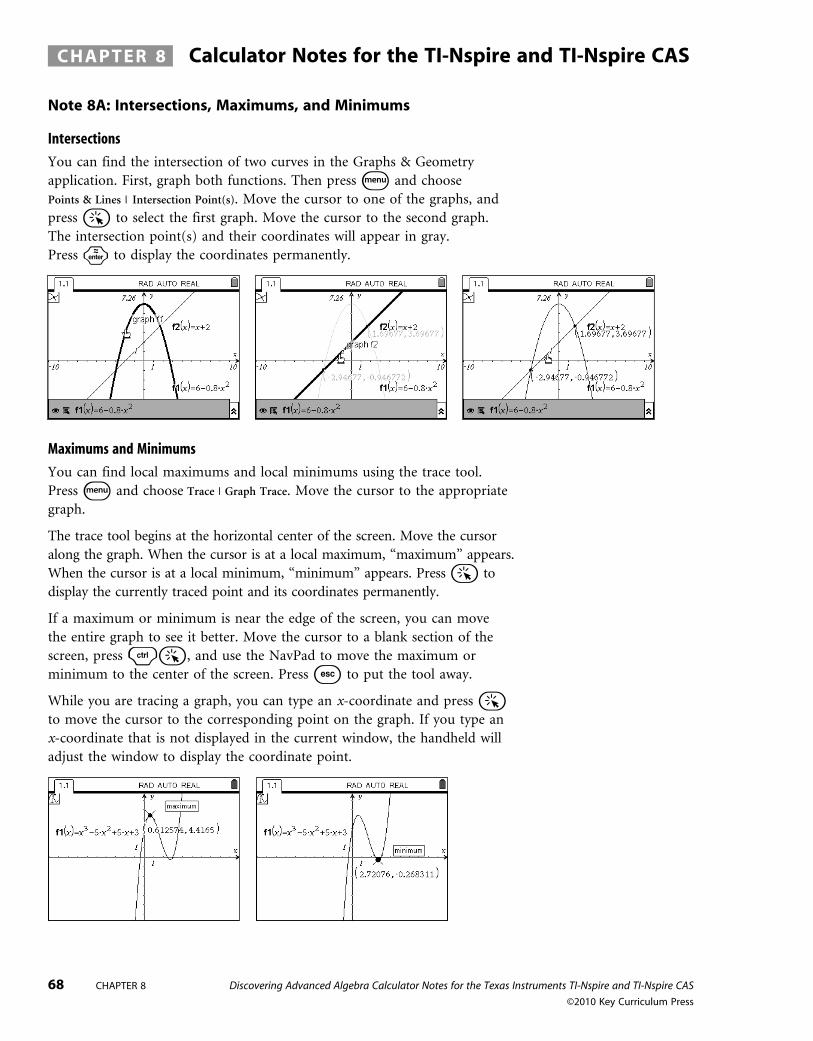
68 CHAPTER 8 Discovering Advanced Algebra Calculator Notes for the Texas Instruments TI-Nspire and TI-Nspire CAS
©2010 Key Curriculum Press
CHAPTER 8 Calculator Notes for the TI-Nspire and TI-Nspire CAS
Note 8A: Intersections, Maximums, and Minimums
Intersections
You can find the intersection of two curves in the Graphs & Geometry application. First, graph both functions. Then press b and choose Points & Lines | Intersection Point(s). Move the cursor to one of the graphs, and press a to select the first graph. Move the cursor to the second graph. The intersection point(s) and their coordinates will appear in gray. Press · to display the coordinates permanently.
Maximums and Minimums
You can find local maximums and local minimums using the trace tool. Press b and choose Trace | Graph Trace. Move the cursor to the appropriate graph.
The trace tool begins at the horizontal center of the screen. Move the cursor along the graph. When the cursor is at a local maximum, “maximum” appears. When the cursor is at a local minimum, “minimum” appears. Press a to display the currently traced point and its coordinates permanently.
If a maximum or minimum is near the edge of the screen, you can move the entire graph to see it better. Move the cursor to a blank section of the screen, press /a, and use the NavPad to move the maximum or minimum to the center of the screen. Press d to put the tool away.
While you are tracing a graph, you can type an x-coordinate and press a to move the cursor to the corresponding point on the graph. If you type an x-coordinate that is not displayed in the current window, the handheld will adjust the window to display the coordinate point.
DAA2CNTNS_014_08.indd 68DAA2CNTNS_014_08.indd 68 3/16/09 11:18:10 AM3/16/09 11:18:10 AM

Discovering Advanced Algebra Calculator Notes for the Texas Instruments TI-Nspire and TI-Nspire CAS CHAPTER 8 69©2010 Key Curriculum Press
Note 8B: Asymptotes, Holes, and Drag Lines
Verifying the Location of an Asymptote or a Hole
The handheld graphs functions without showing asymptotes or holes. Use the domain of a function to determine the location of an asymptote or a hole.
You can verify the existence of a vertical asymptote or hole by using the trace tool. Press b and choose Trace⎮Graph Trace. Press £ or ¤ to move the cursor to the appropriate graph. Type the x-coordinate of the hole or asymptote, and press ·. An error message will verify that the function is not defined for this value of x.
Graphing a Vertical Asymptote
You can represent a vertical asymptote by drawing a dashed line in the graphing window.
To draw the vertical asymptote, press b and choose Construction⎮
Perpendicular. Move the cursor to the approximate place the asymptote intersects the x-axis. While the x-axis is blinking, press a twice. A vertical
line and a point on the x-axis will appear. Press /a and move the asymptote to the appropriate location.
To be more precise, press b and choose Actions⎮Coordinates and Equations. Move the cursor over a point on the vertical line and press a twice to make the coordinates appear. Press d and move the cursor to the x-coordinate of the point. Press a twice and change the x-coordinate to the value of the x-coordinate of the asymptote, and press ·.
When you are satisfied with the location of the asymptote, press b, choose Actions⎮Attributes, and move to the vertical line. Change the line to a dashed line by pressing a¤¢¢·.
TI-Nspire and TI-Nspire CAS
(continued)
DAA2CNTNS_014_08.indd 69DAA2CNTNS_014_08.indd 69 3/16/09 11:18:11 AM3/16/09 11:18:11 AM

70 CHAPTER 8 Discovering Advanced Algebra Calculator Notes for the Texas Instruments TI-Nspire and TI-Nspire CAS
©2010 Key Curriculum Press
Graphing a Hole
You can draw a point to represent a hole in the graph of a function. Press b, choose Points & Lines⎮Point On, move the cursor to the function, and press a. The point and coordinate will be displayed. Press d to put away the tool, and double-click the x-coordinate. Change the x-coordinate to a number very close to the actual number, and press ·. For example, if the hole is at x � 4, type 3.999999. When you are satisfied with the location of the point, press b, choose Actions⎮Attributes, move the cursor to the point that will represent the hole, and press a. To change the point to an open circle, press ¢·. Press d to put away the tool.
Note 8B: Asymptotes, Holes, and Drag Lines (continued) TI-Nspire and TI-Nspire CAS
DAA2CNTNS_014_08.indd 70DAA2CNTNS_014_08.indd 70 3/16/09 11:18:11 AM3/16/09 11:18:11 AM

Discovering Advanced Algebra Calculator Notes for the Texas Instruments TI-Nspire and TI-Nspire CAS CHAPTER 9 71©2010 Key Curriculum Press
CHAPTER 9 Calculator Notes for the TI-Nspire and TI-Nspire CAS
Note 9A: Partial Sums of Series
To find and graph the partial sums of a recursively defined series, you will create three lists in the Lists & Spreadsheet application: one containing the values of n, a second containing the terms of the sequence, and a third containing the partial sums. For help creating a sequence, see Note 1I.
In column A, create the sequence 1, 2, 3, . . . , and name it n. In column B, create the sequence that you are going to sum and name it seqa. In cell C1, type the initial term of seqa. In C2, type = c1 + b2, press b, choose
Data⎮ Fill Down, select the cells you want to fill, and press ·. Name the third list partialsum. To graph the partial sums, create a scatter plot of (n, partialsum) in either Graphs & Geometry or Data & Statistics. You may need to adjust the window settings to view larger terms.
DAA2CNTNS_014_09.indd 71DAA2CNTNS_014_09.indd 71 3/16/09 11:18:56 AM3/16/09 11:18:56 AM

72 CHAPTER 10 Discovering Advanced Algebra Calculator Notes for the Texas Instruments TI-Nspire and TI-Nspire CAS
©2010 Key Curriculum Press
CHAPTER 10 Calculator Notes for the TI-Nspire and TI-Nspire CAS
Note 10A: Dice Simulation
You can simulate the throw of a die using the random integer command in the Lists & Spreadsheet application. Label columns A, B, and C as die1, die2, and sumdice, respectively. To simulate 300 throws of a pair of dice, type randint(1, 6, 300) in the formula cells for die1 and die2. In the formula cell for sumdice, type die1 + die2 and press ·.
You can use a histogram to display the distribution of sumdice. Press c and choose Data & Statistics. Add sumdice to the x-axis, press b, and choose Plot Type⎮ Histogram. See Note 2C for help graphing a histogram.
Note 10B: Permutations
You can use the Calculator application to find the number of permutations of n objects chosen r at a time. Press b and choose Probability⎮Permutations. Type the number of objects (n) to choose from, the number of objects (r) chosen at a time, and press ·. For example, to find the number of permutations of five objects chosen three at a time, press b, choose Probability⎮Permutations, type 5, 3, and press ·.
Alternatively, type the command npr(5, 3).
Note 10C: Factorials
You can use the Calculator application to evaluate factorials. To use the factorial command, press b and choose Probability⎮Factorial. For example, to find 5!, type 5, press b, choose Probability⎮Factorial, and press ·.
In the order of operations, factorial has higher precedence than negation, so �3! Is equivalent to �(3!).
Note 10D: Combinations
You can use the Calculator application to find the number of combinations of n objects chosen r at a time. Press b and choose Probability⎮Combinations. Type the number of objects (n) to choose from, the number of objects (r) chosen at a time, and press ·. For example, to find the number of combinations of five objects chosen three at a time, press b, choose Probability⎮Combinations, type 5, 3 and press ·.
Alternatively, type the command ncr(5, 3).
DAA2CNTNS_014_10.indd 72DAA2CNTNS_014_10.indd 72 3/16/09 11:19:46 AM3/16/09 11:19:46 AM

Discovering Advanced Algebra Calculator Notes for the Texas Instruments TI-Nspire and TI-Nspire CAS CHAPTER 10 73©2010 Key Curriculum Press
Note 10E: Binomial Probability
Single Probability
In the Calculator application, you can use the binomial probability distribution function command, binomPdf(, to calculate the probability of any number of successes in a probability experiment. Press b and choose Probability⎮Distributions⎮Binomial Pdf.
Num Trials, n � the total number of trials.
Prob Success, p � the probability that each trial is a success.
X Value � the number of desired successes.
For example, to find the probability of eight successes out of ten trials with a probability of success for each trial of 0.75, type 10, press e, type 0.75, press e, type 8, and press ·.
The binomPdf( command is a shortcut for calculating the value of one term of a binomial expansion. That is, binomPdf(10,0.75,8) is the same as
10C8 � (0.75)8 � (0.25)2. You can type the command directly instead of using the menu.
To find more than one probability at the same time, do not enter any information in the x-value entry box. For example, to find the probability of three or fewer successes out of three trials with a probability of success of each trial of 0.6, type 3, press e, type 0.6, and press ·. Alternatively, type the command binompdf(3, 0.6).
(continued)
TI-Nspire and TI-Nspire CAS
DAA2CNTNS_014_10.indd 73DAA2CNTNS_014_10.indd 73 3/16/09 11:19:47 AM3/16/09 11:19:47 AM

74 CHAPTER 10 Discovering Advanced Algebra Calculator Notes for the Texas Instruments TI-Nspire and TI-Nspire CAS
©2010 Key Curriculum Press
Cumulative Probability
The binomial cumulative distribution function command, binomCdf(, is similar to the binomPdf( command, but it sums the binomial probabilities from zero successes to the desired number of successes. Press b and choose Probability⎮Distributions⎮Binomial Cdf.
Num Trials, n � the total number of trials.
Prob Success, p � the probability that each trial is a success.
Lower Bound � 0.
Upper Bound � the highest number of successes.
For example, to find the probability of six or fewer successes out of ten trials with a probability of success for each trial of 0.75, type 10, press e, type 0.75, press ee, type 6, and press ·. To find the probability of more than six successes, subtract the previous answer from 1. Alternatively, type the command binomcdf(10, 0.75, 0, 6).
Note 10E: Binomial Probability (continued) TI-Nspire and TI-Nspire CAS
DAA2CNTNS_014_10.indd 74DAA2CNTNS_014_10.indd 74 3/16/09 11:19:47 AM3/16/09 11:19:47 AM

Discovering Advanced Algebra Calculator Notes for the Texas Instruments TI-Nspire and TI-Nspire CAS CHAPTER 11 75©2010 Key Curriculum Press
CHAPTER 11 Calculator Notes for the TI-Nspire and TI-Nspire CAS
Note 11A: Entering e
In any application, press u to display the value e . Press . after you press u to display the value of e without an exponent.
Note 11B: Normal Graphs
You can graph normal curves in the Data & Statistics application and the Graphs & Geometry application.
1. To graph a normal curve in the Data & Statistics application, first open a Lists & Spreadsheet page. Give columns A and B variable names such as value, and density. You do not need any data in the columns. Press b and choose Data & Statistics. Plot value on the x-axis and density on the y-axis. Press b and choose Analyze⎮ Plot Function. Type normpdf ( x, �, �)
and press ·. Set an appropriate viewing window. It is helpful to choose values for x-minimum and x-maximum that are about four standard deviations below and above the mean.
(continued)
DAA2CNTNS_014_11.indd 75DAA2CNTNS_014_11.indd 75 3/16/09 11:20:41 AM3/16/09 11:20:41 AM

76 CHAPTER 11 Discovering Advanced Algebra Calculator Notes for the Texas Instruments TI-Nspire and TI-Nspire CAS
©2010 Key Curriculum Press
2. In the Graphs & Geometry application, you can graph a normal curve with the normal probability function, normPdf(. To graph a normal distribution with mean, �, and standard deviation, �, type normpdf(x, �, �) in the function line. For example, to graph the normal distribution with mean 3.1 and standard deviation 0.28, type normpdf(x, 3.1, 0.28) in the entry line. Set an appropriate window.
To graph the standard normal distribution, that is, a normal curve with mean 0 and standard deviation 1, type normpdf(x).
Note 11C: Probabilities of Normal Distributions
Calculating Ranges
You can calculate the area under the normal curve between two endpoints in the Calculator application using the normal cumulative distribution function, normCdf(. To access this command, press b and choose Statistics⎮ Distributions⎮ Normal Cdf, and input values into the Normal Cdf dialog box, or type normcdf(lower, upper), and press ·. For any normal distribution, with mean � and standard deviation �, enter the command in the form normcdf(lower, upper, �, �).
(continued)
Note 11B: Normal Graphs (continued) TI-Nspire and TI-Nspire CAS
DAA2CNTNS_014_11.indd 76DAA2CNTNS_014_11.indd 76 3/16/09 11:20:42 AM3/16/09 11:20:42 AM

Discovering Advanced Algebra Calculator Notes for the Texas Instruments TI-Nspire and TI-Nspire CAS CHAPTER 11 77©2010 Key Curriculum Press
Graphing Ranges
Use the Data & Statistics application or the Graphs & Geometry application to calculate the probability associated with an area under the normal curve.
To calculate the area under the normal curve in the Data & Statistics application:
a. Graph the normal curve. See Note 11B for help graphing the normal curve using the Data & Statistics application.
b. Press d and choose Analyze⎮Plot Value. At the prompt, type the lower
bound for the area you want to find and then press ·.
c. Repeat the previous step to add the upper bound.
d. Press b and choose Analyze⎮Shade Under Function. Move the cursor over the lower bound until a pointing finger appears and press a. Then move the cursor to the upper bound until a pointing finger appears and press a.
This will calculate the area between the values and under the curve. To clear the displayed values, move the cursor to a blank area of the screen and press a. To display the area value again, move the cursor over the shaded area and press a.
You can also use the Shade Under tool to calculate the area under the normal curve, but the area calculated will be less precise.
a. Press b and choose Analyze⎮Shade Under Function. Move the dashed line to the lower bound of the area you want the handheld to find and press a.
(continued)
Note 11C: Probabilities of Normal Distributions (continued) TI-Nspire and TI-Nspire CAS
DAA2CNTNS_014_11.indd 77DAA2CNTNS_014_11.indd 77 3/16/09 11:20:42 AM3/16/09 11:20:42 AM

78 CHAPTER 11 Discovering Advanced Algebra Calculator Notes for the Texas Instruments TI-Nspire and TI-Nspire CAS
©2010 Key Curriculum Press
b. Move the dashed line to the upper bound and press a.
To change the area boundaries, move the cursor over a boundary line, press
/a, and move the line to a new location. The area calculation changes as the line moves. Press a when the boundary is where you want to leave it.
To calculate the area under the normal curve in the Graphs & Geometry application:
a. Graph the normal distribution. For help graphing the standard normal curve, see Note 11B. Hide the entry line by pressing /G.
b. Create two points on the graph by pressing b and choosing Points &
Lines⎮Point On. Then click on two different locations on the graph. Press d to put away the Point On tool.
c. Double-click the x-value of the left point, type in the initial value from which you want to find the area under the normal curve, and press ·.
(continued)
Note 11C: Probabilities of Normal Distributions (continued) TI-Nspire and TI-Nspire CAS
DAA2CNTNS_014_11.indd 78DAA2CNTNS_014_11.indd 78 3/16/09 11:20:43 AM3/16/09 11:20:43 AM

Discovering Advanced Algebra Calculator Notes for the Texas Instruments TI-Nspire and TI-Nspire CAS CHAPTER 11 79©2010 Key Curriculum Press
d. Press b, choose Construction⎮Measurement Transfer, and click on the x-coordinate of the left point. Move the cursor to the x-axis, and press a. Press d to put away the Measurement tool.
e. To change the value of the right point to the appropriate value, repeat the previous two steps.
f. Press b, choose Measurement⎮Integral, move to and click on each of the following: the normal distribution graph, the initial value on the x-axis, and the final value on the x-axis.
The area under the curve will be shaded and a numerical value representing the area will be displayed. Press d to put away the tool.
Note 11D: Creating Random Probability Distributions
You can simulate a random probability distribution in the Calculator application or the Lists & Spreadsheet application. You can view the distribution as a histogram in the Data & Statistics application.
a. To create a uniform distribution, use the rand( command. This example creates a list of 500 values uniformly distributed between 20 and 50.
(continued)
Note 11C: Probabilities of Normal Distributions (continued) TI-Nspire and TI-Nspire CAS
DAA2CNTNS_014_11.indd 79DAA2CNTNS_014_11.indd 79 3/16/09 11:20:43 AM3/16/09 11:20:43 AM

80 CHAPTER 11 Discovering Advanced Algebra Calculator Notes for the Texas Instruments TI-Nspire and TI-Nspire CAS
©2010 Key Curriculum Press
b. To create a normal distribution, use the randNorm( command. This example creates a list of 500 values with mean 35 and standard deviation 5. Almost all of the values will be between 20 and 50.
c. To create a left-skewed distribution, use the cube root of rand(. This example creates a left-skewed population of 200 values between 20 and 50.
d. To create a right-skewed distribution, use the cube of rand(. This example creates a right-skewed population of 200 values between 20 and 50.
Note 11E: Correlation Coefficient
There are several ways to find a correlation coefficient, r, using the handheld. You can manually enter the calculations yourself, or you can have the handheld do the work for you.
Computing r Using Two-Variable Statistics
You can manually calculate r using the formula r � ∑
(x � _ x )(y �
_ y ) ____________
sxsy (n � 1) .
To calculate r using a Two-Variable Statistics dialog box:
a. Use the Lists & Spreadsheet application to enter and store the bivariate data in two named lists.
Note 11D: Creating Random Probability TI-Nspire and TI-Nspire CASDistributions (continued)
(continued)
DAA2CNTNS_014_11.indd 80DAA2CNTNS_014_11.indd 80 3/16/09 11:20:44 AM3/16/09 11:20:44 AM

Discovering Advanced Algebra Calculator Notes for the Texas Instruments TI-Nspire and TI-Nspire CAS CHAPTER 11 81©2010 Key Curriculum Press
b. Press b and choose Statistics⎮Stat Calculations⎮Two-Variable Statistics.
c. Choose the appropriate variables for “X List” and “Y List.” Make sure the “1st Result Column” box is “c[ ].” Then press ·.
d. A list of two-variable statistics will appear in column C. Their corresponding values are in column D. The correlation coefficient, r, is displayed in cell D14.
You can use the Calculator application to find the correlation coefficient by following the previous steps in a Calculator page. The two-variable statistics will appear on the screen.
Note 11E: Correlation Coefficient (continued) TI-Nspire and TI-Nspire CAS
(continued)
DAA2CNTNS_014_11.indd 81DAA2CNTNS_014_11.indd 81 3/16/09 11:20:44 AM3/16/09 11:20:44 AM

82 CHAPTER 11 Discovering Advanced Algebra Calculator Notes for the Texas Instruments TI-Nspire and TI-Nspire CAS
©2010 Key Curriculum Press
Computing r Using Linear Regression
In the Calculator application or the Lists & Spreadsheet application, you can calculate the correlation coefficient, r, using linear regression.
In the Calculator application, enter and store two lists of the same length. Then press b and choose Statistics⎮Stat Calculations⎮Linear Regression (a+bx). Select the appropriate variables for “X List” and “Y List,” and press ·. The correlation value, r, will be displayed with other information.
In the Lists & Spreadsheet application, enter lists of equal length into two columns. Press b and choose Statistics⎮Stat Calculations⎮Linear Regression (a+bx). Select the appropriate variables for “X List,” “Y List,” and the column where you want to store the results, and press ·. The correlation value, r, will be displayed with the other information.
Note 11F: Least Squares Line
You can find the equation of the least squares line in either the form y � mx � b or the form y � a � bx. If you have two lists defined, you can find the equation of the least squares line in several ways.
Least Squares Line in the Data & Statistics Application
When you create a scatter plot in the Data & Statistics application, you can graph a least squares regression line. Press b and choose Analyze⎮Regression⎮Show Linear (mx+b) or Show Linear (a+bx).
Note 11E: Correlation Coefficient (continued) TI-Nspire and TI-Nspire CAS
(continued)
DAA2CNTNS_014_11.indd 82DAA2CNTNS_014_11.indd 82 3/16/09 11:20:45 AM3/16/09 11:20:45 AM

Discovering Advanced Algebra Calculator Notes for the Texas Instruments TI-Nspire and TI-Nspire CAS CHAPTER 11 83©2010 Key Curriculum Press
Least Squares Line in the Calculator and List & Spreadsheet Applications
An equation of the least squares regression line can be computed in the Calculator application or the Lists & Spreadsheet application.
In either application, press b, choose Statistics⎮Stat Calculations⎮Linear
Regression (mx+b) or Linear Regression (a+bx), and choose the appropriate variables for “X List” and “Y List.” In “Save RegEqn to:” choose the name you want to give the equation of the regression line. The a and b values are stored as variables, and the equation is stored in the function you selected.
Note 11F: Least Squares Line (continued) TI-Nspire and TI-Nspire CAS
DAA2CNTNS_014_11.indd 83DAA2CNTNS_014_11.indd 83 3/16/09 11:20:45 AM3/16/09 11:20:45 AM

84 CHAPTER 12 Discovering Advanced Algebra Calculator Notes for the Texas Instruments TI-Nspire and TI-Nspire CAS
©2010 Key Curriculum Press
CHAPTER 12 Calculator Notes for the TI-Nspire and TI-Nspire CAS
Note 12A: Changing Settings
Angles can be measured in radians and degrees. The handheld’s default setting is radians. To change to degree mode, press c and choose System Info⎮ Document Settings. Move to the Angle setting and choose Degree. Press · to return to the document. If you get “funny” values when using trigonometric functions, check to see whether you are in Degree mode. For more information on changing document and system settings, see the Getting Started note.
Note 12B: Trigonometric and Inverse Trigonometric Functions
Before using trigonometric functions, make sure you are in Degree mode.
Press m, n, or o to find the sine, cosine, or tangent, respectively, of any angle measure. Alternatively, you can type sin(, cos(, or tan(.
Press /m, /n, or /o to find the angle that has the given ratio.
Note 12C: Graphing Parametric Equations
In the Graphs & Geometry application, press b and choose Graph Type⎮ Parametric. In the entry line, type an equation that represents the x-coordinates in terms of the variable t. Press e and type an equation that represents the y-coordinates in terms of the variable t. Press e.
The inequality shows the range of t-values the handheld will use to evaluate the x- and y-function values. The tstep is the increment by which t increases between each evaluation. Choose an appropriate range of t-values for your graph.
(continued)
DAA2CNTNS_014_12.indd 84DAA2CNTNS_014_12.indd 84 3/16/09 11:21:43 AM3/16/09 11:21:43 AM

Discovering Advanced Algebra Calculator Notes for the Texas Instruments TI-Nspire and TI-Nspire CAS CHAPTER 12 85©2010 Key Curriculum Press
Press /G to toggle between hiding and displaying the entry line.
Setting the Graph Attributes
Parametric graph attributes are similar to the attributes of other function graphs. See Note 3A for help with changing the graph attributes.
Note 12D: Tracing Parametric Equations
To trace on a parametric graph, press b and choose Trace⎮ Graph Trace. Press ¢ or ¡ to trace the graph in increments of t as defined by tstep in the entry line. Note that the right arrow key may not necessarily move the cursor to the right on the graph, but it will always increase the value of t. Alternatively, you can type a value of t and press ·. To change the trace step, press b, choose Trace⎮Trace Settings, and enter a new trace step.
The displayed x- and y-coordinates are determined by evaluating x(t) and y(t) for the current value of t. Press a to create a point at the location of the cursor. This point will be labeled with rectangular coordinates and no t-value.
To move to a different graph, press £ or ¤. Press d to put away the trace tool.
Note 12C: Graphing Parametric Equations (continued) TI-Nspire and TI-Nspire CAS
DAA2CNTNS_014_12.indd 85DAA2CNTNS_014_12.indd 85 3/16/09 11:21:43 AM3/16/09 11:21:43 AM

86 CHAPTER 12 Discovering Advanced Algebra Calculator Notes for the Texas Instruments TI-Nspire and TI-Nspire CAS
©2010 Key Curriculum Press
Note 12E: Parametric Walk
The TI-Nspire currently has the ability to collect data only when a sensor is attached to the handheld. Therefore, you will need to use two handhelds, each with a CBR2 attached, to collect the data. See Note 4C for instructions on collecting data with two handhelds and sharing the data electronically.
You can also collect data with two handhelds and then type the list from one handheld into the other handheld.
a. Press c and choose New Document. Connect the CBR2 to the handheld. Choose Lists & Spreadsheet and press ¢a.
b. When you are ready to collect data, press a. The CBR2 will collect data for five seconds and stop automatically. Because your data will need to match up with data that another member of your group is collecting, the time you start collecting needs to be synchronized with the other data collector in your group and the walker.
c. If you are not satisfied with the data, press b and choose Experiment⎮ Start
Collection to repeat the experiment. A new experiment will begin immediately after you decide to store or discard your previous data.
d. Once you are satisfied with your experiment, press ¢ to highlight the Close button in the upper-right corner of the data collection console. Press a to close the data collection console. To get the data collection console back after closing it, press /D.
Alternatively, you can use the TI-84 Plus faceplate on the handheld. (This method is not possible with the TI-Nspire CAS.) Change the TI-Nspire faceplate to the TI-84 Plus faceplate, and follow the procedure in Note 12E of Calculator Notes for the Texas Instruments TI-83 Plus and TI-84 Plus.
Note 12F: Graphing Functions with Parametric Equations
Functions and parametric equations can be graphed in the same Graphs & Geometry page. After graphing a parametric equation, press b, choose Graph Type⎮ Function, and graph the function.
TI-Nspire and TI-Nspire CAS
DAA2CNTNS_014_12.indd 86DAA2CNTNS_014_12.indd 86 3/16/09 11:21:44 AM3/16/09 11:21:44 AM

Discovering Advanced Algebra Calculator Notes for the Texas Instruments TI-Nspire and TI-Nspire CAS CHAPTER 13 87©2010 Key Curriculum Press
CHAPTER 13 Calculator Notes for the TI-Nspire and TI-Nspire CAS
Note 13A: Unit Circle
Complete the following steps to graph the unit circle using parametric equations.
a. Make sure your handheld is in Degree mode. If you need help with Degree mode, see Note 12A.
b. In the Graphs & Geometry application, press b and choose Graph Type⎮ Parametric.
c. In the entry line, type cos(t) for x (t). Press e and type sin(t) for y (t). Move to the final line and change the numerical values to 0 � t � 900 and tstep � 15.
d. Press · to display the graph. Press /G to hide the entry line.
e. Move the cursor to a tick mark on an axis, press /a, use the
NavPad to change the scale of the axes and zoom in on the unit circle.
Press d to let go of the tick mark.
f. To find the coordinates of points on the unit circle, press b and choose Trace⎮ Graph Trace.
DAA2CNTNS_014_13.indd 87DAA2CNTNS_014_13.indd 87 3/16/09 11:22:34 AM3/16/09 11:22:34 AM
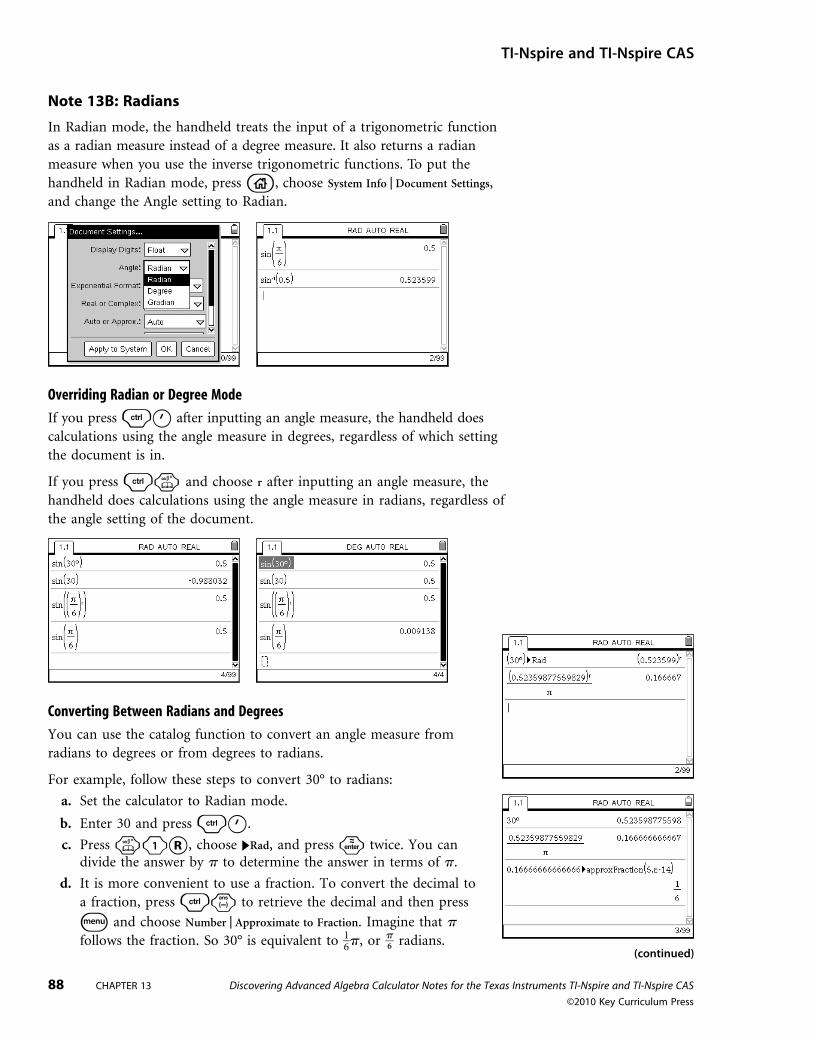
88 CHAPTER 13 Discovering Advanced Algebra Calculator Notes for the Texas Instruments TI-Nspire and TI-Nspire CAS
©2010 Key Curriculum Press
TI-Nspire and TI-Nspire CAS
Note 13B: Radians
In Radian mode, the handheld treats the input of a trigonometric function as a radian measure instead of a degree measure. It also returns a radian measure when you use the inverse trigonometric functions. To put the handheld in Radian mode, press c, choose System Info⎮ Document Settings, and change the Angle setting to Radian.
Overriding Radian or Degree Mode
If you press /' after inputting an angle measure, the handheld does calculations using the angle measure in degrees, regardless of which setting the document is in.
If you press /k and choose r after inputting an angle measure, the handheld does calculations using the angle measure in radians, regardless of the angle setting of the document.
Converting Between Radians and Degrees
You can use the catalog function to convert an angle measure from radians to degrees or from degrees to radians.
For example, follow these steps to convert 30° to radians:
a. Set the calculator to Radian mode.
b. Enter 30 and press /'.
c. Press k1R, choose ¢Rad, and press · twice. You can divide the answer by � to determine the answer in terms of �.
d. It is more convenient to use a fraction. To convert the decimal to a fraction, press /v to retrieve the decimal and then press
b and choose Number⎮ Approximate to Fraction. Imagine that � follows the fraction. So 30° is equivalent to 1 _ 6 �, or � __ 6 radians.
(continued)
DAA2CNTNS_014_13.indd 88DAA2CNTNS_014_13.indd 88 3/16/09 11:22:34 AM3/16/09 11:22:34 AM

Discovering Advanced Algebra Calculator Notes for the Texas Instruments TI-Nspire and TI-Nspire CAS CHAPTER 13 89©2010 Key Curriculum Press
For another example, follow these steps to convert 7� __ 12 radians to degrees:
a. Set the calculator to Degree mode.
b. Enter 7� __ 12 and press /k and choose r. Then press k1D,
choose ¢DD, and press · twice.
c. So 7� __ 12 radians is equivalent to 105°.
Note 13C: Secant, Cosecant, and Cotangent
All of the trigonometric functions and the inverse trigonometric functions can be found in the trigonometry section of the catalog. To access these functions, press k2, choose Trigonometry, and then choose the appropriate trigonometric or inverse trigonometric function.
Alternatively, you can type in the trigonometric function. For example, to find the cosecant of 30 degrees, type csc(30 and press /'··.
You cannot type in the inverse trigonometric functions, but you can find the inverse cosecant, inverse secant, and inverse cotangent by using the inverse of a reciprocal trigonometric function with the reciprocal of the input. For example, to find the sec�1 (3.1), press /n, type 1 / 3.1, and press ·.
Note 13B: Radians (continued) TI-Nspire and TI-Nspire CAS
DAA2CNTNS_014_13.indd 89DAA2CNTNS_014_13.indd 89 3/16/09 11:22:35 AM3/16/09 11:22:35 AM

90 CHAPTER 13 Discovering Advanced Algebra Calculator Notes for the Texas Instruments TI-Nspire and TI-Nspire CAS
©2010 Key Curriculum Press
Note 13D: Collecting Sound Frequency Data
The microphone sensor is not currently compatible with the TI-Nspire. Change the TI-Nspire faceplate to the TI-84 Plus faceplate.
You need a CBL2 and the EasyData application to collect sound frequency data. Plug the microphone probe into channel CH 1 of the CBL2, and connect the calculator to the CBL2. Press APPS and select EasyData. If the program does not recognize the microphone, follow these steps:
a. Press Setup ( WINDOW ) and select Other Sensors.
b. Select CH1 and press Next ( ZOOM ). Then choose Microphone and press Next.
Ring the tuning fork and press Start ( ZOOM ) to begin collecting data. The CBL2 collects data for only 0.02 second, so it will stop again almost immediately. The calculator will display a graph. If the graph does not look like a sinusoidal curve, press Main ( TRACE ) and then Start ( ZOOM ) to try again. Press OK ( GRAPH ) to overwrite the data. If you continue to have trouble collecting good data, adjust the microphone’s position.
When you have good data, press Main ( TRACE ) and then Quit ( GRAPH ). The calculator will tell you that time data are stored in list L1 and sound frequency data are stored in list L2. Press OK ( GRAPH ).
The microphone sensor cannot be used with the TI-Nspire CAS at this time. Go to http://education.ti.com for more information.
Note 13E: Polar Coordinates
Graphing Polar Coordinates
Polar equations can be graphed using radians or degrees. To learn how to change to Degree mode, see Note 12A. You can graph a polar equation using these steps:
a. In the Graphs & Geometry application, press b and choose Graph Type⎮ Polar.
b. In the entry line, type an equation in the form r � f (�).
c. Move to the final line and change the numerical values of the inequality to the appropriate values.
Press /G to toggle between hiding and displaying the entry line. Change the viewing window if necessary. See Note 4D for help on setting windows.
TI-Nspire and TI-Nspire CAS
(continued)
DAA2CNTNS_014_13.indd 90DAA2CNTNS_014_13.indd 90 3/16/09 11:22:36 AM3/16/09 11:22:36 AM

Discovering Advanced Algebra Calculator Notes for the Texas Instruments TI-Nspire and TI-Nspire CAS CHAPTER 13 91©2010 Key Curriculum Press
Tracing Polar Coordinates
To trace on a polar graph, press b and choose Trace⎮ Graph Trace. Press ¢ or ¡ to increase or decrease the angle measure, �. Alternatively, you can type the angle measure and press ·. The coordinates are displayed in the form (r, �). Press a to create a point at the current coordinates. This point will be labeled with rectangular coordinates instead of polar coordinates. Press b and choose Trace⎮ Trace Settings to adjust the trace step.
To move to a different graph, press £ or ¤. Press d to put away the trace tool.
Note 13F: Sliders
Sliders allow you to control the values of coefficients in equations. Note that in Graphs & Geometry, you can grab the graph of a function, dynamically alter it, and observe the changes that occur in its equation. Sliders allow you to dynamically change the values of coefficients in an equation and observe the resulting changes in the graph of the equation. You can insert sliders into Graphs & Geometry pages and Data & Statistics pages.
Inserting and Using a Slider
Follow these steps to insert a slider:
a. Press c and choose Graphs & Geometry or Data & Statistics.
b. Press b and choose Actions⎮ Insert Slider. A slider appears on the graphing screen. Type a name for the slider and press ·.
c. If the slider is not in a convenient location, move the cursor to the upper-right corner of the slider and press /a. Move the slider to the desired location and press d.
(continued)
Note 13E: Polar Coordinates (continued) TI-Nspire and TI-Nspire CAS
DAA2CNTNS_014_13.indd 91DAA2CNTNS_014_13.indd 91 3/16/09 11:22:36 AM3/16/09 11:22:36 AM

92 CHAPTER 13 Discovering Advanced Algebra Calculator Notes for the Texas Instruments TI-Nspire and TI-Nspire CAS
©2010 Key Curriculum Press
d. Move the cursor to the entry line and press a. Type a function, typing the name of the slider in place of the coefficient you want to vary. It is important to enter operation symbols in the function. For example, if b is the slider, do not type 4 + bx. Type 4 + b � x.
e. Press · to graph the function.
f. Press d and move the cursor to the sliding tab on the slider.
Press /a and move the tab to the desired value. Alternatively, move the cursor to the value of the slider. Press a, type the desired value for the slider, and press ·. The graph will adjust automatically.
Changing Slider Settings
The slider is preset to values between zero and ten. To change these values, move the cursor over the slider and press a. Then press /b and choose Settings.
In the Slider Settings dialog box, change the values to the appropriate minimum and maximum. The value you enter in the “Step Size” box will determine the steps the handheld will you use if you animate the slider. Press ·.
(continued)
Note 13F: Sliders (continued) TI-Nspire and TI-Nspire CAS
DAA2CNTNS_014_13.indd 92DAA2CNTNS_014_13.indd 92 3/16/09 11:22:37 AM3/16/09 11:22:37 AM

Discovering Advanced Algebra Calculator Notes for the Texas Instruments TI-Nspire and TI-Nspire CAS CHAPTER 13 93©2010 Key Curriculum Press
Animating a Slider
To animate the slider, move the cursor over the slider and press a. Then press /b and choose Animate. The slider immediately animates and the graph changes as the slider value changes. To stop the animation, press /b and choose Stop Animate.
Minimizing a Slider
To minimize the slider, move the cursor over the slider and press a. Press /b and choose Minimize. The slider can be controlled by the up and down arrows next to the slider value. Move the cursor to these arrows to change the value of the slider in step increments. To return the slider to its original size, press /b and choose Maximize.
Note 13F: Sliders (continued) TI-Nspire and TI-Nspire CAS
DAA2CNTNS_014_13.indd 93DAA2CNTNS_014_13.indd 93 3/16/09 11:22:38 AM3/16/09 11:22:38 AM