Caffe Bellissimo - Sunbeam Australia · Pastikan bahwa tindakan-tindakan keselamatan seperti ......
52
ffmbetriz Caffe Bellissimo Automatic Espresso Machine with One Touch Milk Instruction Booklet EM9300 Please read these instructions carefully and retain for future reference.
Transcript of Caffe Bellissimo - Sunbeam Australia · Pastikan bahwa tindakan-tindakan keselamatan seperti ......

ffmbetriz
Caffe BellissimoAutomatic Espresso Machinewith One Touch Milk
Instruction BookletEM9300
Please read these instructions carefullyand retain for future reference.

Sunbeam's Safety Precautions 2
About espresso coffee 3
Features of your Sunbeam Caffe Bellissimo 4
Symbols 7
LCD menu overview 8
Preparing your Sunbeam Caffe Bellissimo 9
Fitting the bean hopper 9
Connecting the milk system 10
Setting the water hardness 14
Preparing coffee 15
Espresso with beans 15
Espresso with pre-ground coffee 16
Milk-based coffee 18
Hot water function 20
Programming 21
Espresso pour volume 21
Settings for milk-based coffee 22
Grind settings 24
Menu settings 25
Setting and storing the coffee temperature 25
Switching on the additional heating 26
Setting and sorting the shut-off time 27
Resetting the factory default settings 28
Display number of dispensed coffees 29
Cleaning and maintenance 30
Cleaning the coffee brewing unit 33
Milk system cleaning program 35
Running the cleaning program 36
Running the descaling program 38
Trouble shooting guide 41

Important instructions - retain forfuture use.
e.,,,S1.11 L.)t-J1 QL.1.14,... I Ail ,su
MI-P.OTS±Llt5r9kfIl3B#M o
Assurez-vous que les precautions ci-dessus relatives a lasecurite sont bien comprises
Versichem Sie sich,dass die obenstehendenSicherheitsmaBnahmen verstanden werden
Bat:moven mac 01 napartavw npocpuKdatc aoxpakciaqyivovTat Kamm*
Pastikan bahwa tindakan-tindakan keselamatan sepertidi atas dimengerti anda
Accertatevi the le suddette norme di sicurezza sianocomprese a dovere
±1EVIIIIIIC:k<81V).1:4t),
Yeepe-re ce neKa norope cnomeHarvire tnepitm Hanperna3ninsoc-r ce go6po pa3bpaHin
Asegurese de que las precauciones de seguridadprecedentes sean bien comprendidas
dt.,J vt, (51...1.14,... I AS 1.4-c.. a jig
iTseTrarrAeleriutlaseriinriaittilat Silt) ring
Yukarda belirtilen gitvenlik onlemlerinin anlasildigindanemin olunuz
Xin kigm chec rang nhCing bien phap lam an toankg tren Micro higu rO

Sunbeam's Safety Precautions
SAFETY PRECAUTIONS FOR YOUR SUNBEAMESPRESSO MACHINE.
Always place the unit on a flat level surface.
Do not operate without water in reservoir. Observethe maximum filling volume is 1.4 litres.
Do not fill the water reservoir with any liquid otherthan clean, cold water or cleaning and descalingsolutions specified in this instruction manual.
Do not operate without the drip tray and cup restplate in position.
The steam nozzle becomes very hot when preparingmilk. This may cause burns in case of contact,therefore avoid any direct contact with the steamnozzle.
Hot coffee, water or milk ejected by the appliancecan cause scalding. Only activate the appliancewhen a container is underneath the coffee spouts.
Always unplug the appliance from the power if thereis any problem during the coffee making process orprior to cleaning and maintenance.
Never put any part of this appliance into thedishwasher. Never immerse the appliance in water.
Allow the appliance to cool down before cleaning.
Sunbeam is very safety conscious when designing andmanufacturing consumer products, but it is essentialthat the product user also exercise care when usingan electrical appliance. Listed below are precautionswhich are essential for the safe use of an electricalappliance:
Read carefully and save all the instructions providedwith an appliance.
Always turn the power off at the power outlet beforeyou insert or remove a plug. Remove by grasping theplug - do not pull on the cord.
Turn the power off and remove the plug when theappliance is not in use and before cleaning.
Do not use your appliance with an extension cordunless this cord has been checked and tested by aqualified technician or service person.
Always use your appliance from a power outlet of thevoltage (A.C. only) marked on the appliance.
This appliance is not intended for use by persons(including children) with reduced physical, sensoryor mental capabilities, or lack of experience andknowledge, unless they have been given supervisionor instruction concerning use of the appliance by aperson responsible for their safety.
Children should be supervised to ensure that they donot play with the appliance.
The temperature of accessible surfaces may be highwhen the appliance is operating.
Never leave an appliance unattended while in use.
2
Do not use an appliance for any purpose other thanits intended use.
Do not place an appliance on or near a hot gasflame, electric element or on a heated oven.
Do not place on top of any other appliance.
Do not let the power cord of an appliance hang overthe edge of a table or bench top or touch any hotsurface.
Do not operate any electrical appliance with adamaged cord or after the appliance has beendamaged in any manner. If damage is suspected,return the appliance to the nearest SunbeamAppointed Service Centre for examination, repairor adjustment.
For additional protection, Sunbeam recommendthe use of a residual current device (RCD) with atripping current not exceeding 30mA in the electricalcircuit supplying power to your appliances.
Do not immerse the appliance in water or any otherliquid unless recommended.
Appliances are not intended to be operated bymeans of an external timer or separate remotecontrol system.
This appliance is intended to be used in householdand similar applications such as: staff kitchen areasin shops, offices and other working environments;farm houses; by clients in hotels, motels and otherresidential type environments; bed and breakfasttype environments.
If you have any concerns regarding the performance and use of your appliance,please visit www.sunbeam.com.au or contact the Sunbeam Consumer Service Line.
Ensure the above safety precautions are understood.

About espresso coffee
Sunbeam's extensive experience in designingquality, long-lasting appliances has enabledus to develop a range of espresso machinesthat are as beautiful as they are functional.As well as incorporating the learningsfrom commercial machines to ensure caféquality coffee, ease-of-use was an importantdynamic in the design of the Sunbeam CaffeBellissimo.
The Sunbeam Caffe Bellissimo. is fullyautomatic, removing all the guesswork frommaking espresso coffee. At the push of abutton the machine will grind the coffeebeans, place the correct dose of coffee grindsinto the filter, tamp it and pump the preciseamount of water needed to produce a shot ofespresso. As a result, each time you make anespresso with the Sunbeam Caffe Bellissimoyou are assured a consistent taste everytime. With the added feature of an automaticmilk frother milk can be textured perfectlyeverytime with ease.
As coffee continues to be an integral elementof Australian culture, the demand for theperfect cup is ever increasing. A growingfavourite for coffee lovers in Australia, atany time of the day is the Caffe Latte. Toaccommodate these style of drinks, theheight of the espresso pour spouts areadjustable. Ideal for all styles of cups - bringthe spouts down for espresso cups and forthose that prefer a Caffe Latte or a LongBlack raise the pour spouts for taller cups.
Drinking authentic café quality coffee athome is guaranteed with a sunbeam espressomachine. The simple to use design of themachine allows you to enjoy the sweet aromaand taste of the perfect shot of espresso withits signature golden crema every time.
What makes a good coffee?
Sunbeam have consulted with experiencedcoffee makers and appreciators of coffeethrough every stage of design, to ensure themachine delivers a great espresso coffeeevery time. There are many factors thatcontribute to the perfect coffee. The words'`taste' and 'aroma' are consistently usedwhen describing the perfect cup.
The sweet aroma and taste of the espressocoffee is largely due to the correct combinationof temperature and pressure during the brewingprocess. The 'thermoblock' heating systemsensure the water is at the correct temperature,so the full coffee flavour is extracted. Secondly,the italian made 15 pump ensures the correctpressure at which the liquid espresso isreleased from the pour spouts. The pour shouldbe steady and consist of both liquid and cream.This cream is commonly known as the 'crema'.The perfect 'crema' should be a golden colourand thick and stable, preserving the coffeeflavour, aroma and temperature.
We hope you have many enjoyable coffeeexperiences with your Sunbeam CaffeBellissimo.
3

Features of your SunbeamCaffe BellissimoOne touch operationPrepares your favourite coffee at the touchof a button - with automatic milk.
Milk BoxWith two cold packs, the milk box keeps milkcold for up to 3 hours.
15 Bar PumpItalian designed and manufactured, themachine is fitted with a 15 BAR pumpdelivering the pressure required for a completeextraction of oils, coffee solidsand aroma.
Thermoblock Heating SystemThe thermoblock heating system heats thewater ensuring the precise temperature isachieved for each function. Additionally, thethermoblock is coated with non-stick materialto slow scale build up and reducethe frequency of cleaning required.
On/Off button
LCD display
Easy-to-use control display allows you to selectyour desired coffee type and menu options.
Waste containerUsed coffee grinds are ejected into the wastecontainer, which is removed easily for emptyingand cleaning.
Coffee spoutsDelivers the espresso and milk into your glass.
Rest for tall glassesAllows you to place even the tallest glasses toprepare a grande latte.
4

SaaPosing
.
Quick-start guide
Adjustable coffee beans containerThe coffee beans container can be increasedto 450g.
Height adjustable dispenser unitAllows you to place the smallest glass for anespresso, or the largest glass for a grandelatte by simply sliding up and down, avoidingmessy splashes.
- Water tankRemovable for easy filling, the water tank hasa large capacity of 1.4 litres.
- Retractable and removable drip trayThe drip tray can be pushed back into themachine and released with a simple push toallow for tidy and convenient storage. It isalso removable for easy cleaning.
Test strip fordetermining thewater hardness
Measuring spoon withcleaning brush
Cleaning tablets
OO
Descaling tablet
0 DessalIng tablets

Features of your Sunbeam Caffe Bellissimo continued.
TOP VIEW
Pre-ground coffee shaftAllows you to use pre-ground coffee insteadof coffee beans.
Grind fineness leverAdjust the fineness or the grind using thegrind fineness lever.
LCD DISPLAY
000114,
OK button
Menu/return button
A buttonSelect your coffee strength
e EP
do003 D
B buttonSelect your dispensing function: espresso,milk-based coffees, hot water or coffee usingpre-ground coffee.
C button
Select your cup size: espresso cup, coffeecup or coffee mug.
6

Symbols
The below table shows the different LCDsymbols and what they stand for.
El Dispensing coffee
>. El Hot waterCO
0- 01 Pre-ground coffeev,5
...,5- Milk basedCO El.1- coffees
VI
Cup size
Selection
Cup mug
OP Coffee cup
Espresso cup
WI° Cappuccino
Café Latte
Grande Latte
PO Ground coffee quantity
Y75 Milk quick cleaning (Display: upper left of the display)
Cup filling quantityCappucino
el settings
SettingsMilk-basedCofffees
Cleaning program
Coffee-Milkproportion
OPP. Froth quantity
gb Cup filling quantity
Café Latte Coffee-MilkSettings proportion
gb Froth quantity
Cup filling quantityGrandeLatte - Coffee-Milk
proportionSettings
Froth quantity
Descaling program
Coffee temperaWater hardness
tureDevice
0Ecomode O Infoparameters Heating system
O Shut-off time RESETDefault-settings
7

LCD Menu Overview
Multifunction display
In this section, you will find an overview ofthe menus and the symbols used to operatethe coffee machine.The ®selection buttons A-B-C each havedifferent functions depending on the menuselected.
Start display
This menu appears when the coffee machineis switched on. You can select a function ormake settings for preparing coffee here.
GP
999A
Pre-ground coffee quantity setting:"extra light" to "extra strong".
Selection of the dispensingfunction:Espresso, milk based coffee, hotwater or pre-ground coffee.
Cup size setting: espresso cup,coffee cup or coffee mug.
Menu button
To display the menu, press the ()menubutton. You can make changes to theparameters of the coffee machine, start theservice program and retrieve informationhere.
X "5,I- OK
000A Scroll (left)
B Confirm
A B C C Scroll (right)
8
To display a service program, repeatedly pressthe buttons (A) and (C) until the desiredservice program appears in the selectionframe and confirm by pressing the button (B)or the 8 button.
You can select from the following serviceprograms:
Desca lingprogramme
Cleaning' programme
Device parameters
Quick cleaning formilk
Milk-basedcoffee setting
This service program runs the descalingprocess. Refer to page 38 for Runningthe descaling program
This service program runs the cleaningprocess. Refer to page 36 for Runningthe cleaning program
In the "Device parameters" serviceprogram, you can select from thefollowing:
1111
0RESET Factory settings
You can run this service programafter dispensing a coffee with milk.Refer to page 35 for Milk SystemCleaning Program
You can make the settings in this serviceprogram for Toffee quantity;Toffee-Milk proportion" and "Foamquantity for each individual coffeetype.
Coffee temperature
Energy-save mode
Shut-off time
Water hardness
Info
Note: The display automatically returns to theselection menu after 30 seconds if no actionis performed in the service menu.

Preparing your SunbeamCaffe BellissimoFitting the tray for tall glassesThe tray enables the use of taller glasses.
To fit:
Push the drip tray with the cup grate intothe coffee machine until it snaps intoplace.
Lift the front of the coffee machineslightly, centre and push the tray from thefront under the coffee machine. Lower thecoffe machine and allow the tray to snapin. Refer to Figure 1.
Fitting the coffee bean containerIt is possible to increase the capacity of thecoffee bean container to 450g.
To increase the coffee bean container size:
Remove the lid (a) of the coffee beancontainer by opening it to an uprightposition and pulling it out of its holder.
Remove the lid (b) of the pre-ground coffeeshaft by opening it to an upright positionand turning to the right or left to pull it outof its holder. Refer to Figure 2.
a
Figure 2
Place the larger coffee bean container ontop of the smaller bean container.See Figure 3.
Figure 3
Note: Make sure that the grinder finenesslevers are on top of each other.
Fit the lid (b) of the coffee powder shaft byinserting it into the holder and turning itinto position.
9

Preparing your Sunbeam Caffe Bellissimo continued
Fit the lid (a) of the coffee holder byinserting the hinge into the holder fromabove. Refer to Figure 3.
Filling the coffee bean containerCaution:
Make sure that no foreign objects such asstones get into the coffee bean container.This will damage your espresso machine.
Fill the coffee bean container only withcoffee beans without sugar coatings oraromatised constituents.
To fill the coffee bean container:Fold back the lid of the bean hopper.Fill the container with fresh coffee beans.
Then close the container again.
10
Connecting the milk systemThe milk system must be connected in orderto dispense milk-based coffees.
Press the left side of the door with thecoffee dispensing unit to open it.See Figure 4.
Figure 4
nsert the cut end of the milk tube intothe opening on the upper left of the milkcontainer. See Figure 5.
Put the tapered end through the openingon the side towards the outside and placethe milk tube into the guide.See Figure 6.

Preparing your Sunbeam Caffe Bellissimo continued
Close the door with the coffee dispensingunit.Place a carton of cold milk (5 - 8°C) intothe milk box to the left of the coffeemachine.Insert the milk tube into the open milkcontainer.
Note: The slanted tube end must reach thebottom of the milk container.
Using the milk box
Preparing the cold packs:Remove the screw plug and rubberstoppers of the cold pack.Fill the cold pack with water.
Note: Do not fill the cold pack to the brim toavoid bursting during freezing
Put the cold pack into the freezer.
Installing the milk box:
Place the milk box to the left of the coffeemachine. Open the lid and put previouslycooled cold packs into the holder.Insert a milk carton.Insert the milk tube into the open milkcarton. See Figure 7.The slanted tube end must reach thebottom of the milk container.Put the tube into the recess on the upperedge and close the lid.
Note: The milk box is supplied with two coldpacks. These can both be used to keep themilk cold for up to 3 hours. For optimumresults, return milk to the fridge immediatelyafter use. This will result in the best frothquality.
Filling with water
Caution: Milk, mineral water or other liquidscan damage the water tank or the coffeemachine.
Only fill the water tank with fresh, coldwater.
Observe the maximum filling level of 1.4litres.
To ensure a quality coffee, change the waterin the water reservoir daily and wash thereservoir at least once a week in hot soapywater and rinse thoroughly.
11

Preparing your Sunbeam Caffe Bellissimo continued
Push the coffee dispensing unit upwards toits highest position.
Press the water tank and pull it out of thecoffee machine. See Figure 8.
Figure 8
Fill the water tank with fresh water up toits maximum marking shown on the righthand side of the tank. See Figure 9.
Replace the water tank. Push it until itclicks in. See Figure 10.
Figure 10
12
If the following warning appears on thedisplay, the water tank must be refilledbefore the next coffee is dispensed.
Prior to switching on each time, make surethere is water in the water reservoir andreplenish if necessary. As the machinerequires water for the automatic rinsing cycleevery time the machine is switched on andoff.
Important: Only operate the machine when thewaste container and drip tray are fitted.
Switching on the coffee machine
Before switching on, always check that thewater tank and the coffee bean containerare full. If necessary, top up with water orcoffee beans. Every time the coffee machineis switched on or off, it requires water for theautomatic rinsing cycle.A cup can be placed under the coffeedispensing unit during the rinsing process toavoid the drip tray filling too quickly.
Press the ON/OFF button Tto switch onthe coffee machine. During the heating upprocess (approximately 45 seconds), thefollowing appears on the display:

Preparing your Sunbeam Caffe Bellissimo continued
When the operating temperature has beenreached, the coffee machine automaticallyperforms a rinsing cycle. The water flowsinto the drip tray. The rinsing cycle isshown on the display:
I
Note: Your machine is set to prepare a cafelatte by default.
When the rinsing cycle is completed, thecoffee machine is ready for operation. Theselection menu appears on the display:
Switching off the coffee machine
Press the ®l ON/OFF button to switch offthe coffee machine. It will then perform arinsing cycle. The following appears on thedisplay:
Note: If the water tank is empty or therequired milk system cleaning was notperformed, the switch-off process will bedelayed for 15 minutes.
The coffee machine subsequently promptsyou to empty the waste container. Thefollowing appears on the display:
Important: Empty the waste container afterevery use to prevent mould from building up.The coffee machine automatically switchesitself off after 60 seconds.Note: If you have prepared a coffee with milk/milk froth, the coffee machine will promptyou to clean the milk system after rinsing.Details for this can be found on page 35'Milk System Cleaning Program'.
Switching off the coffee machine in anemergency
In the event of an emergency, you can switchoff the coffee machine by pressing ® ON/OFF button 2 times. The only time youcannot turn the machine off is during therinsing procedure.
13

Preparing your Sunbeam Caffe Bellissimo continued
Setting the water hardness
Before using the coffee machine for the firsttime, it should be set to the appropriatewater hardness for your region. You candetermine the water hardness with the helpof the test strip supplied with the coffeemachine. Proceed as follows:
Dip the test strip into cold water for 1second and shake off the excess water.After approximately 1 minute, the waterhardness can read from the pink-colouredareas.
Water hardness I Oft
Test strip
2
3
medium-hard hard very hard
Setting and storing the water hardness
To set the previously determined waterhardness, proceed as follows:
Press the ()menu button. The followingappears on the display:
14
I "56 66 6
OK mill
Press the (C) button until the "Deviceparameters" menu appears for selection.The following appears on the display:
4 64 6
+ OK -Po
Press the ()button to select the "Deviceparameters" menu.
Press the (A) or (C) buttons repeatedlyuntil the "Water hardness" menu appearson the display. The following appears onthe display:
0411- OK -Po
Press thesbutton to display the "Waterhardness" menu. The following appears onthe display:
091411- OK -Po
Press the (C) button 1 time for hardnesslevel 1, 2 times for hardness level 2 etc.until you have set the determined waterhardness. Store the input by pressing the"OK" button (B). The stored water hardnessbriefly appears on the display.
Press thee button twice to return to themain screen.

Preparing coffee
Preparing espresso with beans
To prepare espresso with whole coffee beans,proceed as follows:
Place one or two cups under the coffeedispensing spout.
In order to reduce heat loss and splashing,adjust the dispensing spout height to suityour cup size by moving it up or down.
See Figure 11.
Note: If the height adjuster is difficult tomove, clean it following instructions onpage 31, Cleaning the height adjustabledispenser unit.
Select the desired cup size by pressing the(C) button. The following selections arepossible:
Coffee mug
INP Coffee cup
Espresso cup
approx. 190ml
approx. 120ml
approx. 40ml
The set cup filling level remains stored evenwhen the coffee machine is switched off.
The coffee machine is set for standardquantities for each cup size by default. Ifyou wish to change any of the cup fillingquantities, instructions can be found on page21, Espresso pour volume.
Select the desired ground coffee quantityby pressing the (A) button. The followingselections are possible:
0 0 0 dt. dt.0 0 dt. dt. dt.0 dt. dt. dt. dt.dt. dt. dt. dt. dt.
"extra "light" "normal" "strong" "extralight" strong"
The most recent ground coffee quantityremains set for each cup size.
The set ground coffee quantity remainsstored even when the coffee machine isswitched off.
15

Preparing coffee continued
For 1 cup or 2 cups
Press the button once to prepare onecup. The following appears on the display:
Press thesbutton a second time toprepare two cups. The following appears onthe display:
You can switch between one cup or two cupsduring the grinding process by pressing the8 button.Important: Two brewing processes areperformed in sequence in two-cup operation.Only remove the cups when the both brewingprocesses are completed.
During coffee preparation, the coffee powderis moistened with a small amount of waterfirst for pre-brewing. The actual brewingprocess takes place after a short pause.
You can stop coffee dispensing early bybriefly pressing the e menu button.
16
Making an espresso with pre-ground coffee
Caution: Ensure that you only use themeasuring spoon supplied and never fill thecontainer with more than one level measuringspoon (max. 8 g) of pre-ground coffee.
Do not fill the container with water-soluble,freeze-dried instant products or other drinkpowders.
Pre-ground coffee that is too fine can becomeclogged and damage your machine.
To prepare coffee with pre-ground coffee:
Select the "Pre-ground coffee" function bypressing the (B) button.The following appears on display:
During preparation of coffee with pre-groundcoffee, the "ground coffee quantity" functionis deactivated. Therefore no information onthe ground coffee quantity appears on thedisplay.
Only one cup can be prepared withpre-ground coffee.
Select the desired cup size by pressing the(C) button. The following selections arepossible:
Coffee mug
Coffee cup
Espresso cup
approx. 190ml
approx. 120ml
approx. 40ml

Preparing coffee continued
Note: The standard filling quantities for eachcup size apply to bean, pre-ground coffeeand hot water mode. If you wish to changethe cup filling volume for pre-ground coffee,instructions can be found on page 21,Programming the espresso pour volume inpre-ground mode.
The following appears on the display:
Li Li)
Open the lid of the coffee bean containerand the pre-ground coffee shaft.
Add a maximum of one level measuringspoon (max.8g) of pre-ground coffee.
Then close both lids again.Ensure that pre-ground coffee does not clogthe container and that no foreign matter getsinto the container.
Never fill the container with more than onelevel measuring spoon of pre-ground coffee.
Place a cup under the coffee spouts.
In order to reduce heat loss and splashing,adjust the height of the dispenser to suityour cup size by moving it up or down.
See Figure 12.
Note: If the height adjuster is difficult tomove, clean it. Follow instructions on page31, Cleaning the height adjustable dispenserunit.
Press the 8 button to dispense coffee.Note: You can stop coffee dispensinprematurely by briefly pressing the M menubutton.
17

Preparing coffee continued
Milk-based coffee
The milk system must be connected in orderto dispense milk-based coffees. Refer to page10, Connecting the milk system.
When the espresso machine is turned on youcan select latte at one touch.Always use milk from the refrigerator(5-8 °C) as it produces the best frothingresult for milk-based coffees.
Note: Soy and rice milk do not produce asgood frothing results as regular milk.
Select the "milk-base coffee" function bypressing the (B) button go.The following appears on the display:
ee
1E1 'It .5-
Select the desired milk-based coffee bypressing the (C) button.The following selections are possible:
Grande Latte
Caffe Latte
1.6 Cappuccino
approx.270mL
approx.180mLapprox.200mL
Place one or two cups under the coffeedispensing spout.
When preparing Latte Grande, push thedrip tray and the cup grate into the coffeemachine completely and place two glassesonto the rest for tall glasses.
18
The coffee machine has default factorysettings. If you wish to change these settings,refer to the instructions on page 22, Settingsfor milk-based coffee.The settings for milk-based coffee (coffee-milk proportion, coffee filling quantity andfroth quantity) remain stored even when thecoffee machine is switched off.
In order to reduce heat loss and splashing,adjust the dispensing spout height to suityour cup/glass size by moving it up ordown. See Figure 13.
Note: If the height adjuster is difficult tomove, clean it. Proceed as described on page31 Cleaning the height adjustor.
Select the desired ground coffee quantityby pressing the (A) button. The followingselections are possible:
0 0 0 0 0 eitt.0 0 0 00 0
elt, eg,
only "extra "light" "normal" "strong" "extramilk" light" strong"
If you select the coffee ground quantity "0",you can prepare hot milk.The last-selected ground coffee quantityremains set for each drink.The set ground coffee quantity remainsstored even when the coffee machine isswitched off.

Preparing coffee continued
Press the8 button to dispense yourselected milk-based coffee.Press the® button once to prepare onecup. The following appears on the display:
Press the8button a second time toprepare two cups. The following appears onthe display:
You can still switch between one cup or twocups during the grinding process by pressingthe® button.Important: A short steam dump will occurbefore the milk is dispensed. This is normaland your cups can be left under the spoutswhile this occurs.Be aware that two brewing processes areperformed in sequence in two-cup operation.Only remove the cups when the both brewingprocesses are completed.
During coffee preparation, the coffee powderis moistened with a small amount of waterfirst for pre-brewing. The actual brewingprocess takes place after a short pause.
Note: You can stop coffee dispensingprematurely by briefly pressing thee menubutton.
Quick cleaning after dispensing a milk-basedcoffee
The symbol '77 appears on the above leftof the display after dispensing a milk-basedcoffee. This is to remind you to performquick cleaning. The following appears on thedisplay:
Press the® menu button.The following appears on the display:
I LS4- OK -OP
Press the ® button to perform quickcleaning. The symbol on on the upper left
of the display disappears.
Notes: If no quick cleaning is performed, thecoffee machine rinses automatically afterabout 5 minutes.
19

Hot water function
Important: There is a risk of scalding from hotsplashing water. Avoid direct contact withskin.
To prepare hot water:
Select the "hot water" function by pressingthe (B) button El. The following appearson the display:
1=1)
Place a glass/cup under the coffeedispensing spout.
Select the desired cup size by pressing the(C) button. The following selections arepossible:
IN) Coffee mug
Coffee cup
Espresso cup
a pprox. 190ml
a pprox. 120ml
approx. 40ml
In order to reduce heat loss and splashing,adjust the height of the dispenser to suityour cup size by moving it up or down.
See Figure 14.
Note: If the height adjuster is difficult tomove, clean it. Follow the instructions onpage 31, Cleaning the dispensing unit.
Press thesbutton to dispense hot water.
Note: You can stop hot water dispensingprematurely by briefly pressing the ()menubutton.

Programming
Programming the espresso pour volume in beanmode
The coffee machine is set for standardquantities by default. However, you can setthe cup filling level individually for each cupsize.
Press the (A) button repeatedly until therequired cup symbol for the desired groundcoffee quantity is displayed.
Note: The cup filling level for one cup isstored during this process.
Place an appropriate cup under the coffeedelivery spout.
Press the (A) button repeatedly until thesymbol for the ground coffee quantity youdesire is displayed.
Press the oK button and hold it presseduntil the desired cup filling level isreached.
Release the button. The new cup fillinglevel is now stored.
Repeat the procedure if you also wish tochange the filling level for the other cupsizes.
All values remain stored even when thecoffee machine is switched off. Should youchange your cup size, you can adapt the cupfilling level individually at any time or resetthe filling level with a "Reset". The settingsaffected are described on page 28, Restoringthe factory default settingsThe stored cup filling levels for eachindividual cup symbol only applies in beanmode.
Programming the espresso pour volume inpre-ground mode
The coffee machine is set for standardquantities by default. However, you can setthe cup filling level individually for each cupsize. Proceed as follows:
Select the "Coffee powder" function bypressing the (B) button 1;:l.Press the (C) button repeatedly until therequired cup symbol for the desired groundcoffee quantity is displayed.
Place an appropriate cup under the coffeedelivery spout.
Add a maximum of one level measuringspoon (max.8g) of pre-ground coffee.
Then press the oK button and hold itpressed until the desired cup filling levelis reached.
Release the button. The desired cup fillinglevel is now stored.
Repeat the procedure if you also wish tochange the filling level for the other cupsizes.
All values remain stored even when thecoffee machine is switched off. Should youchange your cup size, you can adapt the cupfilling level individually at any time or resetthe filling level with a "Reset". Follow thesteps described on page 28, Restoring thefactory default setting.
The stored cup filling levels for eachindividual cup symbol only applies in powdermode.
21

Programming continued
Programming the espresso pour volume in hotwater mode
The coffee machine is set for standardquantities by default. You can set the cupfilling level individually for each cup size.
Select the "hot water" function by pressingthe (B) button El.Press the (C) button repeatedly until therequired cup symbol for the desired groundcoffee quantity is displayed.
Place an appropriate cup under the coffeedelivery spout.
Then press thee button and hold itpressed until the desired cup filling level isreached. Button (A), (B) and (C) will flashon rotation to indicate you are in programmode.
Release the button. The desired cup fillinglevel is now stored.
Repeat the procedure if you also wish tochange the filling level for the other cupsizes.
All values remain stored even when thecoffee machine is switched off. Should youchange your cup size, you can adapt the cupfilling level individually at any time or resetthe filling level with a "Reset". Follow thesteps described on page 28, Restoring thefactory default settings.
22
Programming settings for milk-based coffee
The standard cup filling quantity, coffee-milkproportion and coffee froth quantity is set bydefault. These settings can be individuallychanged and stored for each milk-basedcoffee:.
Press the Q menu button. The followingappears on the display:
I LS4 44 4
411- OK IIP1
Press (C) button to move the selection intothe "Settings for milk-based coffee" menu.The following appears on the display:
111114 4444 444
411- OK 411
Press thee button to display the"Settings for milk-based coffee".The following appears on the display:
411- OK -10
Press the (C) button until the desiredmilk-based coffee settings to be changedappears in the selection menu and thenconfirm selection by pressing theebutton.
The same setting options are available for allmilk-based coffees. The following illustratesthe possibilities using a cappuccino as anexample.

Programming continued
The first setting affects the cup fillingquantity.
The filling quantity can be set from 50% to150%.
Press the (A) or (C) button until the desiredcoffee filling quantity is displayed.Press the8 button to store the settings.The stored filling quantity briefly appearson the display.
The next setting affects the coffee-milkproportion.
50% e 50%
411- OK -Po
The coffee-milk proportion can be set from80/20 to 20/80.
Press the (A) or (C) button until the desiredcoffee filling quantity is displayed.Press the® button to store the settings.The stored coffee-milk proportion brieflyappears on the display.
The last setting affects the froth quantity.
sb411- OK -10
The settings for the froth quantity are: none,low, medium and high.
Press the (A) or (C) button until the desiredfroth quantity is displayed.Press the8 button to store the settings.The stored froth quantity briefly appears onthe display.
Press thee button twice to return to themain screen.
Repeat the procedure if you also wish tochange settings for other milk-based coffeesto your personal preference.
You can make individual changes to thesettings at any time or reset them. Follow thesteps described on page 28, Restoring thefactory default settings.
23

Programming continued
Programming the grind settings
You can set the grinding fineness with thehelp of the lever located in the bottom righthand corner of the coffee beans container.
Caution: Only set the grinding fineness whenthe grinder is running. Setting the grindingfineness when the grinder is not running candamage your espresso machine.
To set the grinding fineness:
Place a cup under the coffee spouts andselect espresso.
Press the® button to prepare the coffee.Adjust the grinding fineness with thegrinding fineness lever while the grinderis running. The coffee is prepared and thegrinding fineness is set.
The following lever positions are possible:
fine ground for "intense taste"
medium ground for "normal taste"
coarse ground for "mild taste"
For light roasted coffeegrinding mechanism toFor dark roasted coffeegrinding mechanism to
24
beans, set the"fine".
beans, set the"coarse".
Changing and storing the ground coffee quantity
You can store a different ground coffeequantity for each cup symbol. However, thisis only possible when using coffee beans.Proceed as follows:
Press the (C) button until the desiredcup symbol for the desired ground coffeequantity is displayed.
Then press the (A) button until the desiredground coffee quantity is displayed. Thevalue for the ground coffee quantity isstored.
Repeat the procedure if you also wish tochange the ground coffee quantity for othercups sizes.
All values remain stored even when thecoffee machine is switched off.

Menu settings
Setting and storing the coffee temperature
You can select from 5 temperature levels:
. 1] II
D o
di
To set the coffee temperature:
Press the Q menu button. The followingappears on the display:
moderatelywarm
warm
normal
hot
Iextra hot
4 44 4
411- OKPress the (C) button until the "Deviceparameters" menu appears for selection.The following appears on the display:
Press the 8 button to select the "Deviceparameters" menu.
Press the (C) button until the"Temperature" menu appears for selection.The following appears on the display:
RESET
Press the 8 button to select the"Temperature" menu.The following appears on the display:
Press the (A) button until the desiredcoffee temperature is set. Store the inputby pressing the 8 button. The storedtemperature level briefly appears on thedisplay.
After programming, the display automaticallyreturns to the "Temperature" menu item.
To return to coffee mode, press the menubutton twice or wait approx. 30 seconds untilthe coffee machine switches back to coffeemode.
25

Menu settings continued
Switching on additional heating
Additional heating of the coffee machineis preset to energy saving mode. Additionalheating can be switched on as required.During a brief warming up phase, thefollowing appears on the display:
You can switch on additional heatingpermanently to prepare all coffee productsand hot water without a waiting period.You can choose from the following settings:
1111
Heating system for short preparation times.(eco-mode)
Heating system with additional heating for short-timepreparation.
To set the heating system:
Press the Q menu button. The followingappears on the display:
26
Lir56 66 6
411- OK -Po
Press the (C) button until the "Deviceparameters" menu appears for selection.The following appears on the display:
Press the ® button to select the "Deviceparameters".
Press the (C) button until the "Heating"menu appears for selection. The followingappears on the display:
p
0 11
411- OK -Po
Press the® button to select the"Temperature" menu. The following appearson the display:
411- OK -Po
Press the (A) button until the desiredheating setting is set. Store the input bypressing the® button.The stored heating setting briefly appearson the display.
After programming, the display automaticallyreturns to the "Heating" menu item.
To return to coffee mode, press the Q menubutton twice or wait approx. 30 seconds untilthe coffee machine switches back to coffeemode.

ta354 4
K
I
411- K -Po
Menu settings continued
Setting and storing the shut-off time
You can select from 5 shut-off times:
1 hour
2 hours
3 hours
4 hours
5 hours
To set the shut-off time:
Press the Q menu button. The followingappears on the display:
Press the (C) button until the "Deviceparameters" menu appears for selection.The following appears on the display:
Press the s button to select the "Deviceparameters".
Press the (C) button until the "Shut-offtime menu appears for selection. Thefollowing appears on the display:
+ O K -110
Press the oK button to select the "Shut-off time". The following appears on thedisplay:
Press the (C) button until you have set thedesired shut-off time. Store the input bypressing the "OK" button. The stored shut-off time briefly appears on the display.
After programming, the display automaticallyreturns to the "Shut-off time menu item.To return to coffee mode, press the
menu button twice or wait approx. 30seconds until the coffee machine switchesback to coffee mode.
27
Menu settings continued
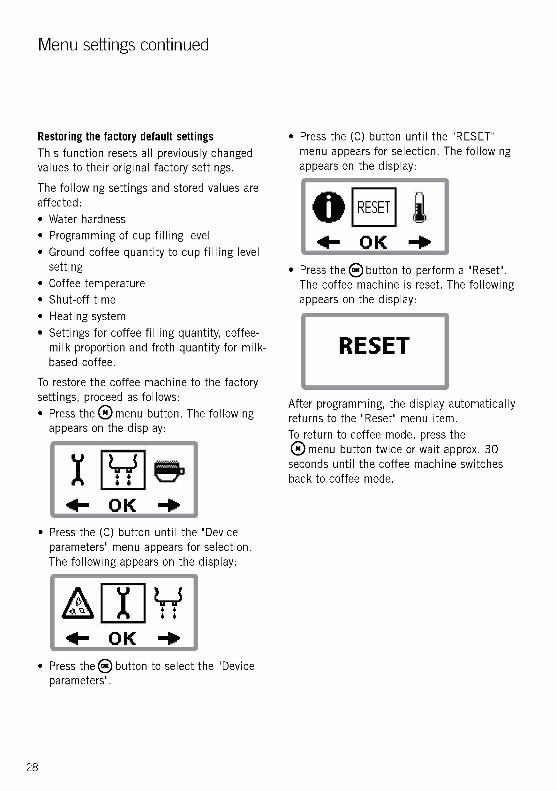
Restoring the factory default settings
This function resets all previously changedvalues to their original factory settings.
The following settings and stored values areaffected:
Water hardness
Programming of cup filling level
Ground coffee quantity to cup filling levelsetting
Coffee temperature
Shut-off timeHeating system
Settings for coffee filling quantity, coffee-milk proportion and froth quantity for milk -based coffee.
To restore the coffee machine to the factorysettings, proceed as follows:
Press the e menu button. The followingappears on the display:
Lir56 66 6
+ OKPress the (C) button until the "Deviceparameters" menu appears for selection.The following appears on the display:
4 64 6
OK -Po
Press the® button to select the "Deviceparameters".
28
Press the (C) button until the "RESET"menu appears for selection. The followingappears on the display:
RESET
411- OK -110
Press the ()button to perform a "Reset".The coffee machine is reset. The followingappears on the display:
RESET
After programming, the display automaticallyreturns to the "Reset" menu item.To return to coffee mode, press the8 menu button twice or wait approx. 30seconds until the coffee machine switchesback to coffee mode.

Menu settings continued
Display number of dispensed coffees(Info menu)
To display the number of dispensed coffeesto date, proceed as follows:
Press the 0 menu button. The followingappears on the display:
Lir56 66 6
411- K -Po
Press the (C) button until the "Deviceparameters" menu appears for selection.The following appears on the display:
+ +
11- OKPress the ()button to select the "Deviceparameters" menu.
Press the (C) button until the "INFO"menu appears for selection. The followingappears on the display:
RESET
11- OK -110
Press the ® button to select the "Info"menu. The following appears on thedisplay:
The software version is displayed in the upperhalf and the number of dispensed coffees inthe lower half of the display.
29

Cleaning and maintenance
Cleaning and maintenance
This section contains important informationon cleaning and maintenance of the coffeemachine. Keep your coffee machine clean atall times to ensure consistent, high coffeequality and long life in your appliance.
Safety precautions
Before cleaning your espresso machine:
Switch off the coffee machine and pullthe plug out of the mains socket beforestarting cleaning.
Before cleaning, allow the coffee machinecool down.
Do not use any scratching, abrasive orcorrosive agents. Simply wipe the insideand outside of the housing with a dampcloth.
Never immerse the coffee machine itself,the mains cable or the mains plug intowater or other liquids.
Do not clean the coffee machine or itsparts in a dish washer.
Never pour water into the coffee beancontainer or grinding mechanism as thiswill cause damage.
Observe the cleaning and descalinginstructions.
30
Regular cleaning
Clean the external surfaces of the coffeemachine with a damp cloth.Remove the waste container and the watertank and clean both with warm water anda mild washing-up liquid. Wipe both with adamp cloth.
Empty the drip tray at regular intervals, butat least when the red filling level indicatorbecomes visible through the opening in thecup grate.
Clean the drip tray and the rest for tallglasses with warm water and a mildwashing-up liquid.
Wipe the coffee bean container with a drylint-free cloth.
Emptying the waste container
After dispensing 16 coffees, the wastecontainer must be emptied and cleaned. Thefollowing appears on the display:
As soon as you are prompted to empty thewaste container, no more coffee can bedispensed.
Push the coffee dispensing unit into theuppermost position.
Press the upper left edge of the wastecontainer, remove, empty and clean it.Insert the cleaned waste container backinto the machine and push it until itstops. The coffee machine is now ready todispense coffee again.

Cleaning and maintenance continued
Only empty the waste container when thecoffee machine is switched on. The coffeemachine can only detect emptying whenit is switched on. If you empty the wastecontainer with the coffee machine switchedoff, this will not be detected.This may result in prompting to empty afterdispensing the first coffee when the coffeemachine is switched on again the next time.The waste container should be cleaned dailyif the coffee machine is used every day. Youwill be reminded of this each time by thefollowing display symbol:
Cleaning the dispenser unit
To clean the dispensing unit:
Press the left side of the door with thedispensing unit to open it. See Figure 15.
11111a11110
Figure 15
Pull the dispensing unit upwards gentlyuntil it dislodges from its holding rails.Loosen the connecting tube from theholder in the door.See Figure 16.
Clean the gaps between the two parts ofthe height adjuster with warm water toremove any coffee residue.
Place the connecting tube back into itsoriginal position and align the dispensingunit on the holding rails. Gently movedownwards back into position.See Figure 17.

Cleaning and maintenance continued
Cleaning the nozzle of the milk frother
To clean the nozzle of the milk frother:Press the left side of the door with thedispensing unit to open it. See Figure 18.
Figure 18
Remove the milk tube from the milkfrother. See Figure 19.
Figure 19
Fold the lever on the milk frother upwardsand pull the milk frother out towards you.See Figure 20.
Figure 20
32
Remove the milk tube from the milkfrother.
Remove the milk frother nozzle from themilk frother by inserting the rounded endof the measuring spoon into the slot ofthe milk frother nozzle and turning 45° topull it out. The nozzle is lifted up slightlyduring turning so that it can removed moreeasily. See Figure 21.
Clean the milk frother nozzle with a toothpick. See Figure 22.
Leave all parts of the milk frother in warm,soapy water for 5 hours or over night.
Rinse all parts thoroughly under warmrunning water afterwards.

Cleaning and maintenance continued
Replace the frother nozzle in the milkfrother and lock the nozzle by turning it45° with the rounded end of the measuringspoon. See Figure 23.
Figure 23
Replace the cover.
Replace the milk frother in the coffeemachine and push the lever downwards tolock. See Figure 24.
Figure 24
Fit the milk tube again to the upper left ofthe milk frother. See Figure 25.
Cleaning the brewing unit
The brewing unit must cleaned every week.If used intensively, more regular cleaning willbe necessary. If you do not intend to use yourcoffee machine for a longer period of time,it is necessary to empty the waste containerand the water tank and to clean the brewingunit thoroughly.
Caution: The dispensing unit may still be hotif you have recently prepared coffee. Alwaysallow the brewing unit to cool down beforecleaning.
To clean the brewing unit, proceed as follows:
Press the left side of the door with thecoffee dispensing unit to open it.See Figure 26.
Figure 26
Remove the wastethe container andcoffee machine.
See Figure 27.
container by pressingpulling it out of the
Figure 27
33

Remove the brewing unit by gripping thefront from underneath and pulling it outtowards yourself. Use your other hand tostop it from falling out. See Figure 28.
Turn the brewing unit round. The brewingunit is open and the ejector folded down.The two stainless steel screens are nowfreely accessible.
If the brewing unit is closed, you can loosenit on the back with the help of the toolfunction on the measuring spoon. Push thetoothed opening on the measuring spoon ontothe pin and loosen it by turning completely atleast 3 times.
Clean the brewing unit under hot runningwater. In particular, the stainless steelscreens must be rinsed out well to removeany coffee residue Use the cleaning brushattached to the back of the measuringspoon. See Figure 29.
Dry the brewing unit.
Replace the brewing unit by turning it intothe right position (the outlet tube facingdownwards and to the front), insert thebrewing unit into the guide grooves andpush it completely into the coffee machine.See Figure 31.
Push the waste container into the coffeemachine and close the door.
Note: You can only switch on the coffeemachine when the brewing unit is fittedand the door with coffee dispensing unit isclosed. After switching on, the brewing unitis adjusted and the normal heating processstarts. During preparation of the first coffeeafter cleaning, an increased amount of waterwill run into the waste container.

Milk system cleaning program
Switch off the coffee machine with theON/OFF button. After dispensing a milk-based coffee, the coffee machine performs arinsing cycle and then prompts you to cleanthe milk system.If the coffee machine automatically switchesitself off after dispensing a milk-basedcoffee, you are prompted to clean the milksystem after 5 minutes.
If the milk system cleaning is not performed,the coffee machine will prompt you againthe next time it is switched on. You can onlydispense coffee again when cleaning hasbeen performed.
The following symbols appear on the display:
Fill a container with 250m1 of warm waterand half a capful of Sunbeam liquiddescaler. Alternatively, dissolve 1 teaspoonof bi-carbonate soda into 250mL of warmwater.
Insert the milk tube into the container.Note: The slanted end of the tube must reachthe bottom of the container.
Press the s button to run the cleaningprogram for the milk system.
The solution is fed out of the container viathe milk tube and drained into the drip tray.The following appears on the display:
The cleaning process is completedautomatically.
The following appears on the display:
After completion, empty the container andfill it again with 250m1 of warm water.
Insert the milk tube into the container.Note: The slanted end of the tube must reachthe bottom of the container.
Press the ()button to continue with thecleaning program.
The water is fed out of the container via themilk tube and drained into the drip tray. Thefollowing appears on the display:
4 4
The cleaning process is completedautomatically. It will then performs a rinsingcycle.
The coffee machine subsequently promptsyou to empty the waste container. Thefollowing appears on the display:
Empty the waste container after every use toprevent mould from building up.The coffee machine automatically switchesitself off after 60 seconds.
35

Cleaning and maintenance continued
Running the cleaning program
The cleaning program enables intensivecleaning of otherwise inaccessible areas.The cleaning program must be started whenthe following symbol appears on the display:
Important: The cleaning process takes approx.8 minutes and should not be interrupted.Before running the cleaning program, themetal sieves in the brewing unit must beclean and wiped dry. Follow steps providedon page 30 'Cleaning the brewing unit'.If the water level drops too low duringthe cleaning program, the coffee machineswitches off.
To run the cleaning program, follow theinstructions on the display and these steps:
Press the e menu button. The followingappears on the display:
Lir56 66 6
+ OKPress the (C) button until the "Cleaningprogram" menu appears for selection. Thefollowing appears on the display:
36
Press the® button to select the cleaningprogram. The following then appears on thedisplay:
Remove the water tank, fill it with 1 litre ofwater and push it back in.
The following appears on the display:
Open the lid of the coffee bean containerand the coffee powder shaft.
Put a cleaning tablet into the coffeepowder shaft.
Then press the 8 button.The following appears on the display:
4M7/-166'

Cleaning and maintenance continued
The brewing unit is positioned. The followingthen appears on the display:
fr- 11 fr-41- - NI +
Remove the drip tray and empty it.
Push the drip tray into the coffee machineas far as indicated on the display.
The drip tray serves the purpose of acollecting the cleaning water.
Note: Push the drip tray into the coffeemachine to the first stop. If the position ofthe drip tray is not correct, the followingappears on the display:
IChange the position until the displaydisappears.
Press the s button to continue with thecleaning process.
The program performs several cycles. Thefollowing appears alternately on the displayduring the cleaning process:
4444111--'
I I
The brewing unit is positioned. The followingthen appears on the display:
fr- 11 fr-41- - NI +
Remove the drip tray and empty it.Push the drip tray into the coffee machineas far as indicated on the display.Press thesbutton to continue with thecleaning process.
The machine starts rinsing and the followingappears on the display:
44-I III iii6 6 & 6
At the end of the cleaning process, thefollowing appears on the display:
fr- 11 II-41- - NI +
Remove the drip tray and empty it.Push the drip tray into the coffee machineas indicated on the display.
Press the ()button to complete thecleaning process. The following appears onthe display:
(MT)6 6 6
The cleaning process is completed. Thecoffee machine is now ready for operationagain and returns to the last selected coffeemode.
Note: We recommend disposing the first cupof dispensed coffee after cleaning.
37

Cleaning and maintenance continued
Running the descaling program
The descaling program enables simple andeffective descaling of your coffee machine.You should descale the coffee machineat regular intervals, but at least when thefollowing symbol appears on the display:
The descaling process runs in 2 phases,takes approx. 10 minutes and should not beinterrupted.
The frequency of descaling depends onthe hardness of the water in your region.Therefore do not forget to determine thewater hardness and to set the correspondinghardness for the coffee machine. Refer topage 14 Determining the water hardnessand page 14 Setting and storing the waterhardness for instructions on this.
Caution: Avoid skin and eye contact withdescaling solution. Rinse off descalingsolution with clean water. Obtain medicaladvice after eye contact. Remove anysplashes immediately of descaling solutionon the appliance as it can damage delicatesurfaces.
38
To run the descaling program, follow theinstructions on the display and proceed asfollows:
Press the Q menu button. The followingappears on the display:
I "56 66 6
OK -.Press the (C) button until the "Descalingprogram" menu appears for selection. Thefollowing appears on the display:
Press thesbutton to start running thedescaling program.
L OK

Cleaning and maintenance continued
Phase 1: Descaling
The following appears alternately on thedisplay:
Remove the water tank.
Add 1 descaling tablet to the water tankand 250m1 of tap water.Press thes button to continue with thedescaling program.
The following appears on the display:
000000I m I10000j
Pull the waste container out and empty it.Push the waste container back into thecoffee machine.
The following then appears on the display:
fr-.4- - N I
D fr-+
Remove the drip tray and empty it.Push the drip tray into the coffee machineas far as indicated on the display.
Note: Push the drip tray into the coffeemachine to the first stop. If the position ofthe drip tray is not correct, the followingappears on the display:
Change the position until the displaydisappears.
Press the 8 button to continue thedescaling program.
The brewing unit is positioned. The followingthen appears alternately on the display:
`r. r4 4
The program performs several cycles.Intermittent pausing allows descaling to takeeffect. The status is shown on the display.Note: Part of the descaling solution is fedinto the waste container and the rest viathe coffee spout into the drip tray. You canplace a container under the spout. Empty thecontainer when the coffee machine indicatesthat the drip try must be emptied.
The following then appears on the display:
.4- - NI +
Remove the drip tray and empty it.Push the drip tray into the coffee machineas far as indicated on the display.
Note: Push the drip tray into the coffeemachine to the first stop. If the position ofthe drip tray is not correct, the followingappears on the display:
IChange the position until the displaydisappears.
Press the 8 button to continue thedescal ing program.
The following appears on the display:Remove the water tank and rinse itthoroughly.
Ct--CI
39
Cleaning and maintenance continued
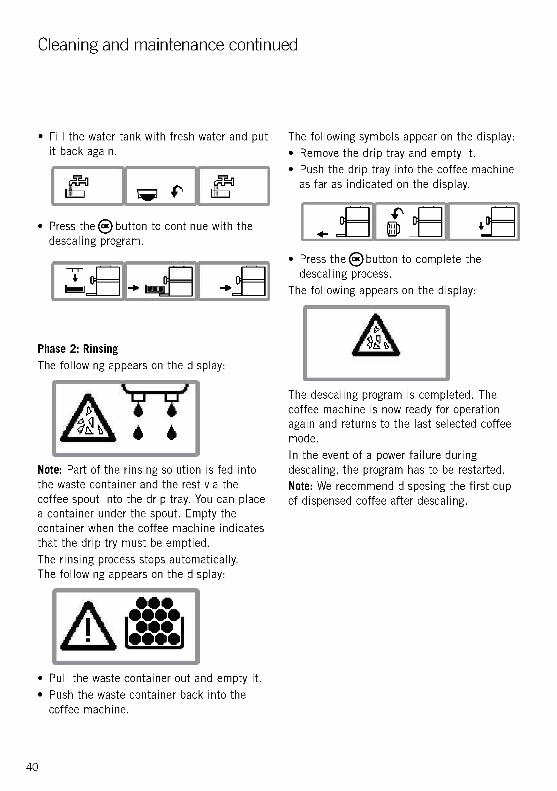
Fill the water tank with fresh water and putit back again.
Press theObutton to continue with thedescaling program.
11 -P -10=I
Phase 2: Rinsing
The following appears on the display:
Note: Part of the rinsing solution is fed intothe waste container and the rest via thecoffee spout into the drip tray. You can placea container under the spout. Empty thecontainer when the coffee machine indicatesthat the drip try must be emptied.The rinsing process stops automatically.The following appears on the display:
Pull the waste container out and empty it.Push the waste container back into thecoffee machine.
40
The following symbols appear on the display:
Remove the drip tray and empty it.Push the drip tray into the coffee machineas far as indicated on the display.
V- 11 Cr-41- - liill i
Press thesbutton to complete thedescaling process.
The following appears on the display:
The descaling program is completed. Thecoffee machine is now ready for operationagain and returns to the last selected coffeemode.
In the event of a power failure duringdescaling, the program has to be restarted.Note: We recommend disposing the first cupof dispensed coffee after descaling.

Troubleshooting
This section contains important information on possible troubleshooting.
Please observe this information to prevent damage to your espresso machine.
Coffee machine messages, possible causes and solutions
Display
STOP
Cause
Water tank is empty
Water container is full
Solution
Fill water tank: see pg 11Filling with water
Empty and clean thewaste container: see pg30 Emptying the wastecontainer
Waste container is Replace waste containermissing
Number of dispensedcoffees prompts cleaning
Number of dispensedcoffee prompts descaling
Process aborted due tomalfunction or incorrectoperation
Run the cleaning program:see pg 36 Running thecleaning program
Run the descalingprogram: see pg 38Running the descalingprogram
Machine goes to normalstandby function
41

Troubleshooting continued
Display Cause Solution
Brewing unit is blocked(technical reason)
Pull out the brewingunit and loosen it on therear side using the toolfunction of the measuringspoon). Push the toothedopening on the measuringspoon onto the pin andloosen it by turningcompletely at least 3times. Then thoroughlyrinse out the brewing unit
Coffee temperature error
Steam temperature error
Error in motor valve 1
If this message appearson the display, turn off thecoffee machine
Switch on the machineagain after a cooling-downperiod of approx.30 minutes.
If the message is displayedagain, an error has occurredthat requires technicalassistance
Contact us via our CustomerService Hotline:
1300 881 861
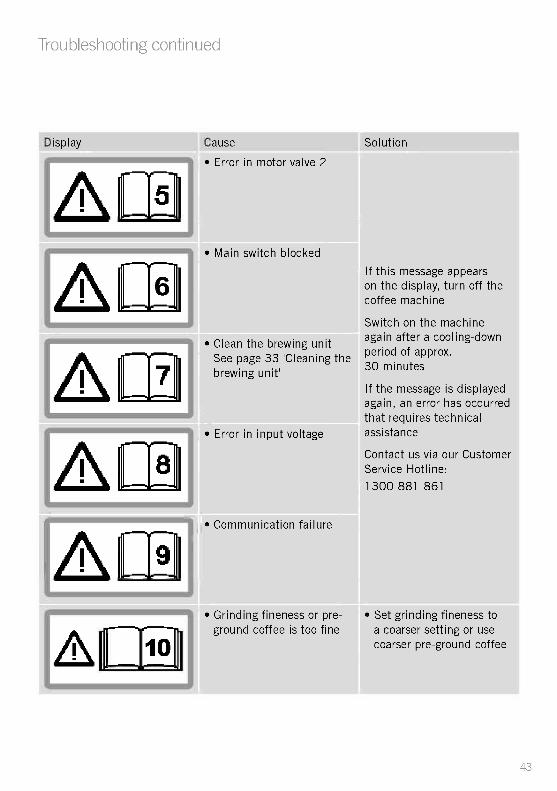
Troubleshooting continued
Display
El01
Cause Solution
Error in motor valve 2
Main switch blocked
Clean the brewing unitSee page 33 'Cleaning thebrewing unit'
Error in input voltage
Communication failure
Grinding fineness or pre-ground coffee is too fine
If this message appearson the display, turn off thecoffee machine
Switch on the machineagain after a cooling-downperiod of approx.30 minutes
If the message is displayedagain, an error has occurredthat requires technicalassistance
Contact us via our CustomerService Hotline:
1300 881 861
Set grinding fineness toa coarser setting or usecoarser pre-ground coffee
43

Troubleshooting continued
Display Cause
Espresso/coffee Cups too coldnot hot enough
Espresso/coffee too weak. Not enough pre-groundcoffee used
No milk froth or milk notdispensed
Low quality froth.
Very loud noise duringgrinding
Solution
Warm up cups with hotwater
Increase the coffeetemperature: see pg 25Setting and storing thecoffee temperature
Measure coffee properly:top up with 1 levelmeasuring spoon (max.8g)of pre-ground coffeeSet ground coffee quantityhigher
Vary grinding fineness
Try a different coffee sort.
Milk system not correctly Check milk systemconnected. connection: see section
pg 10 Connecting themilk system
Milk tube bent Straighten milk tube
Milk container is empty Fill milk container
Milk too warm or old Use fresh, cold milk.
Froth nozzle is clogged. Clean froth nozzle: see pg32 Cleaning the nozzle ofthe milk frother
Milk system is not clean. Clean milk system: see pg35 Milk system cleaningprogram.
Grinding mechanism Contact our Customerclogged by foreign matter Service Hotline to locate
your nearest service agentrepresentative on1800 881 861
44

Troubleshooting continued
Display
Display shows "Water tankempty" even though the tankis full
"Empty waste container"message is displayed afterless than 16 dispensedcoffees.
I
00000000000000
Water in the waste container
Coffee dispensing too slowly
Cause
Air in system
Brewing unit clogged
Water system clogged
Waste container wasemptied while the coffeemachine was switched off
Small amounts of waterget into the wastecontainer during eachrinsing process, this is notan error
Grinding mechanismclogged by foreign matter
Solution
Dispense a little hot water:see pg 20 Hot waterpreparation
Clean the brewing unitthoroughly: see pg 30Cleaning the brewing unit
As a precautionarymeasure, run the cleaningor descaling program:see pg 38 Running thecleaning program andRunning the descalingprogram
Empty the waste containeronly when the coffeemachine is switched on
None (technical reason)
Contact our CustomerService Hotline to locateyour nearest service agentrepresentative on1800 881 861
Grinding quantity set too Set ground coffee quantityhigh lower
45

Troubleshooting continued
Display
Water runs into the wastecontainer instead of throughthe coffee spout duringrinsing when switching thecoffee machine on and off
Cause
Brewing unit blocked.
I
Remedy
Adjust the brewing unit.Push the toothed openingon the measuring spoononto the pin turn itclockwise 3 times
Coffee machine switches off Pressure in brewing unitafter rinsing or dispensing too high.coffee
Coffee machine cannot be Not plugged inswitched on
Remove and clean thebrewing unit. If thebrewing unit is closed,open before cleaning.Unscrew the brewing unitat the black tooth pin.An opened brewing unitis illustrated in page 30Cleaning the brewing unit
Insert the mains plug
Coffee dispensing unit not Install coffee dispensinginstalled
Brewing unit not fitted
Brewing unit was notpushed in completely
unit
Install brewing unit
Push the brewing unit inuntil it stops
Note: If you cannot resolve the problem with the steps described above,please contact customer service on 1300 881 861
46

12 Month Repair GuaranteeIn the unlikely event that this appliance develops any malfunctionwithin 12 months of purchase due to faulty materials ormanufacture, we will REPAIR it for you free of charge.
Should you experience any difficulties withyour appliance, please contact our customerservice line for advice on 1300 881 861 inAustralia, or 0800 786 232 in New Zealand.Alternatively, you can send a written claim toSunbeam at the address listed below. Uponreceipt of your claim, Sunbeam will seek toresolve your difficulties or, if the appliance isdefective, advise you on how to arrange for itto be repaired.
Your Sunbeam 12 Month REPAIR Guaranteenaturally does not cover misuse or improperhandling, and normal wear and tear. Similarly,your 12 Month REPAIR Guarantee does notcover freight or any other costs incurred inmaking a claim.
It will be at the discretion of Sunbeam whetherto repair or replace any appliance that developsa malfunction during the REPAIR Guaranteeperiod. Sunbeam is by no means obliged toreplace any appliance if it can be repaired.If the appliance is irreparable due to anyclaimed defect caused by faulty workmanshipor material, then Sunbeam will replace theappliance.
Prior to any repairs being undertaken, apurchase receipt must be provided as proof ofpurchase. Sunbeam will not be responsible forthe cost of transport to and from any Sunbeamauthorized service centre, or any insurancecosts associated with this transport. SimilarlySunbeam will not be responsible for anydamage or loss that occurs during transit to orfrom any Sunbeam authorized service centrefor reasons not related to the malfunction.
The benefits given to you by this guarantee arein addition to your other rights and remediesunder any laws which relate to the appliance.
Our goods come with guarantees that cannotbe excluded under the Australian ConsumerLaw and under the New Zealand ConsumerGuarantees Act.
In Australia you are entitled to a replacementor refund for a major failure and forcompensation for any other reasonablyforeseeable loss or damage. You are alsoentitled to have the goods repaired or replacedif the goods fail to be of acceptable qualityand the failure does amountto a major failure.
Should your appliance require repair or serviceafter the guarantee period, contact yournearest Sunbeam service centre.
For a complete list of Sunbeam's authorisedservice centres visit our website or call:
Australia
www.sunbeam.com.au
1300 881 861Units 5 & 6, 13 Lord Street
Botany NSW 2019 Australia
New Zealand
www.sunbeam.co.nz
0800 786 23226 Vestey Drive, Mt WellingtonAuckland, New Zealand

Need help with your appliance?Contact our customer service team or visitour website for information and tips ongetting the most from your appliance.
In Australia
Visit www.sunbeam.com.au
Or call 1300 881 861
In New Zealand
Visit www.sunbeam.co.nz
Or call 0800 786 232
crrti-6etin'l is a registered trademark.
Made in China.
Due to minor changes in design or otherwise,
the product may differ from the one shown in this leaflet.
© Copyright. Sunbeam Corporation Limited 2011.ABN 45 000 006 771
Units 5 & 6, 13 Lord StreetBotany NSW 2019 Australia
Unit 3, Building D26 Vestey Drive
Mt Wellington AucklandNew Zealand
Sunbeam Corporation is a division of GUD Holdings Ltd. 8/11