
CAD LAB 5B - University of Nebraska–Lincolnkcbrown/F17_LABFIVE.pdf · Mech 130 CAD LAB 5 . ......
15
F17_LABFIVE.doc Page 1 of 15 Mech 130 CAD LAB 5 FALL 2017 originally due Friday, December 1, 2017 at 3:30 PM EXTENDED TO MONDAY DEC 4, 2017 at 3:30 PM Please note: if you get turned in by Friday, you will most likely get the graded work back to you on Tuesday Dec. 5 th in time to review prior to the lab practical. Some students were asking for an extension for working over the weekend, hence the extended time. All of LAB 5’s hardcopies will be working drawing layouts. Do not print out from the part file. We will be using the ME130DRAW drawing sheet layout for our drawings generated from the SolidWorks part we will be building. Lab 5A and 5B will require you to download 1 part (the receiver) from the class webpage to use in conjunction with the three parts you built for Lab 4. You will make an Assembly and then create a drawing layout for 5A and 5B. Lab 5C requires you to build a part from scratch and then create a specified working drawing layout. Lab 5D was originally part of Lab 4 but reassigned here, you will include a hardcopy of the drawing layout and a separate discussion sheet. All drawings are printed at SCALE 100%. THERE IS A TOTAL OF 4 HARDCOPIES (5A, 5B, 5C, and 5D) for this entire lab in addition to one discussion sheet. Assembly Receiver/Hitch/Ball/Pin to use for CAD LAB 5A and 5B: Download the Receiver part (called GBR_RECEIVER.SLDPRT) from the class web page. You will be using this part file in addition to your Hitch/Ball/and Pin Parts created for Lab 4. It is a good practice to have all of the files in a single folder. UTILIZE THE ASSEMBLY TEMPLATE FOR OUR CLASS: ME130ASSEM.asmdot found on the class webpage – DOWNLOAD like you did for parts and drawing document templates. Insert the Receiver first. Remember to click the OK button which is the GREEN CHECKMARK (in order to have it fixed.) Insert the components (hitch/ball/pin) each separately into the assembly. You will need to mate the parts in a logical fashion.
Transcript of CAD LAB 5B - University of Nebraska–Lincolnkcbrown/F17_LABFIVE.pdf · Mech 130 CAD LAB 5 . ......

F17_LABFIVE.doc Page 1 of 15
Mech 130 CAD LAB 5 FALL 2017 originally due Friday, December 1, 2017 at 3:30 PM
EXTENDED TO MONDAY DEC 4, 2017 at 3:30 PM Please note: if you get turned in by Friday, you will most likely get the graded work back to you on Tuesday Dec. 5th in time to review prior to the lab practical. Some students were asking for an extension for working over the weekend, hence the extended time. All of LAB 5’s hardcopies will be working drawing layouts. Do not print out from the part file. We will be using the ME130DRAW drawing sheet layout for our drawings generated from the SolidWorks part we will be building. Lab 5A and 5B will require you to download 1 part (the receiver) from the class webpage to use in conjunction with the three parts you built for Lab 4. You will make an Assembly and then create a drawing layout for 5A and 5B. Lab 5C requires you to build a part from scratch and then create a specified working drawing layout. Lab 5D was originally part of Lab 4 but reassigned here, you will include a hardcopy of the drawing layout and a separate discussion sheet. All drawings are printed at SCALE 100%. THERE IS A TOTAL OF 4 HARDCOPIES (5A, 5B, 5C, and 5D) for this entire lab in addition to one discussion sheet.
Assembly Receiver/Hitch/Ball/Pin to use for CAD LAB 5A and 5B:
Download the Receiver part (called GBR_RECEIVER.SLDPRT) from the class web page. You will be using this part file in addition to your Hitch/Ball/and Pin Parts created for Lab 4. It is a good practice to have all of the files in a single folder.
UTILIZE THE ASSEMBLY TEMPLATE FOR OUR CLASS: ME130ASSEM.asmdot found on the class webpage – DOWNLOAD like you did for parts and drawing document templates. Insert the Receiver first. Remember to click the OK button which is the GREEN CHECKMARK (in order to have it fixed.) Insert the components (hitch/ball/pin) each separately into the assembly. You will need to mate the parts in a logical fashion.

F17_LABFIVE.doc Page 2 of 15
VERY IMPORTANT TO NOTE: some of these illustrations do NOT show exactly what your parts/sizes or what the parts going into the assembly are named. Illustrations just give the GENERAL look of the assembly. Always look at YOUR given drawing layout assigned to determine YOUR lab’s resultant assembly. Receiver and Hitch Mates (THREE of them) (1) Coincident Principal Planes (2) Parallel Principal Planes (3) Coincident Axes.
Mate #3) View temporary axis and make the Axis of the two holes (one in receiver and one in hitch) to be coincident.
2
1

F17_LABFIVE.doc Page 3 of 15
Hitch and Ball Mates (Need two of them so hexagon of ball does not spin) (1) Coincident Edges (2) Coincident Principal Planes
Hitch and Pin Mates (3 of them) (1) Coincident Axis (2) Distance Mate (3) Parallel principal planes
View temporary axis as needed Mate #1) the Axis of the hitch and the axis of pin should be coincident
Mate #2) Face of receiver and face of pin set to be a specific distance (1.00”) apart.
Mate #3) Principal plane of pin and plane of Hitch made Parallel so that the pin doesn’t “spin” in the hole. Note the orientation of the pin from the given orthographics in your resultant drawing layout,
This may need to be checked on.
1.000”
Mate #1) Edge of hitch’s hole will be coincident with edge of ball’s projection
Mate #2) Principal planes are coincident or parallel – depending on how you built the ball. Notice the orientation of the hexagon on the hitch needs to follow what is shown in the final hardcopy (it may not be shown in the proper orientation here)
Started like this

F17_LABFIVE.doc Page 4 of 15
IMPORTANT to note: UPON ASSEMBLY YOU WILL NOTICE THAT THE PIN IS TOO SMALL OF DIAMETER – AND other issues with curvature. EDIT THE PART AND
• Change the original circle sketch (FOR SWEEP) to a DIAMETER OF .875” • Change the original path sketch (see illustration below)
o 1) distance of 5.50 to 5.8000” o 2) distance of 5.25 to 5.5000” o 3)angle from 150.000° to 160.000°
YOU WILL ALSO NEED EDIT THE HITCH PART AND CHANGE the HOLE the pin enters – it should also have a DIAMETER OF .8750
Once everything is assembled, you’ll need to create an “Exploded View”. IMPORTANT: You must explode the assembly in the assembly file in order to have the option of including the exploded view in the drawing file. The exploded view is used for one of the hard copies so you can look at the picture there to see the general ideas/directions Step1: The pin is moved 6.500” out along its main axis. Step 2: The hitch and ball are both selected and then moved out of the receiver 5.000”.
(They should move together – have both selected before pulling them away) Step 3: Ball is then moved up 3.000”. Once the exploded assembly has been completed, save the Assembly. Then start a new drawing for each of specific drawing layouts which involve assembled views.
Open Part
Pin is highlighted in tree then right click will bring up pop-up menu, top folder icon will open part.
Revised Profile Sketch for Pin

F17_LABFIVE.doc Page 5 of 15
CAD LAB 5A: Assembly Orthographics with Detail & Section Views.
Specifics: Orthographics of ASSEMBLY are at Scale 1:5 and
the automatic scale found in the titleblock should reflect that.
Hidden Lines are visible in all views except the sectioning.
Tangent Edges are Removed in all views. Section A-A is at middle of ball. Don’t exclude
anything from the section view. Do not show hidden lines. You will also need to Break Alignment once it has been placed. Right Click on the View get the options shown.
Modify the hatching (uncheck the Material crosshatch option) for the Ball, the Pin and the Hitch. See the settings shown at right. Accept the default hatching of the receiver.
Detail of Pin is a SCALE of 1:2 it should look like what is shown, the detail circle size can vary but it should have same style (connected) & be approximately as shown.
Include dimensions and annotations as shown (including text/arrows inside or outside) and to precision shown – document is set to .001” and 2 are set individually to 6-decimals
Scale 1:5
Ball Pin Hitch

F17_LABFIVE.doc Page 6 of 15
CAD LAB 5B: Revised PIN Orthographics /Exploded PICTORIAL View
Specifics: Orthographics of Pin are at Scale 1:1
and the automatic scale found in the titleblock should reflect that. • Only include the two views as shown. • Tangent edges are Removed. • Hidden Lines are Removed • Inserted a centerline using an
Annotation tool. Exploded View is only possible if the
assembly had an Exploded View done (see earlier page of this document) • Scale (User Defined) of 1:4 for
exploded DImetric view • Shaded with edges • Tangent Edges with Font
Insert Model Items to get dimensions of the PIN. Source should be Entire Model.
You can use the pull-down of VIEW>HIDE/SHOW>ANNOTATIONS to manipulate their display. You can also Hide unwanted dimensions by highlighting the dimension and then doing a right-click to get the pop-up menu needed.
Adjust precision (using document global setting to 4-decimal) and placement of dimensions to be as shown. Add centerlines (not viewing temporary axis) Include all additional annotations.
Scale 1:1
This button is what it means by select the type of Model Item you want… Dimensions>Marked for drawing
The dimension is highlighted and then will want to select Hide from the pop-up menu.

F17_LABFIVE.doc Page 7 of 15
The instructions for 5C have not change from the previous handout. CAD LAB 5C: Build Radially Symmetric Object and create drawing layout. Create the part You will need to assign a Copper material TO THE PART and then start a new SolidWorks drawing… you will print out the drawing layout at 100%. SOME OF THE ILLUSTRATIONS SHOWN WILL NOT MATCH THE ICONS FOR Solidworks 2016 Specifics:
Orthographics are at a Scale of 1:2 and the automatic scale found in the titleblock should reflect that. Delete the right side view and then create a Sectioned View (remains aligned as shown) using a cutting
line through the middle of the object. o Sectioned View should not have hidden lines displayed. o Leave the Material crosshatch setting CHECKED ON Tangent edges are removed in all views except for the rotated saved view – that has them displayed as
font (phantom). Use an auxiliary view to show the projection at the 30°angle, true size. MAINTAIN ALIGNMENT Under Options and the Document Properties tab change the precision of dimensions to .01” o Dimensions should also be placed as shown, including whether arrows inside/outside of extension lines. o Add a centermark on the auxiliary view, its tool is found in the annotation tab. Include all notes as shown. The rotated view (DONE AS a FRONT VIEW rotated 45° down) will need to be
saved in the part file before it can be placed in the drawing. It is placed with a SCALE 1:3 and is displayed without hidden lines but with tangent edges shown as font.
In order to build the part, please refer to the drawing above for some of the sizes and specifications. ALSO there are additional SKETCHES/SIZES SHOWN ON THE FOLLOWING PAGES!

F17_LABFIVE.doc Page 8 of 15
SHOWN NOT TO SCALE

F17_LABFIVE.doc Page 9 of 15
Here’s are the various sketches and methods to use for the part. Assume sizes are in inches. Be sure that Merge Results is always CHECKED ON.
A circle of Ø 2.000 inches with its centerpoint at the origin. Extrude 2.0000” MIDPLANE
Here are the sketches when complete (the next page shows each specific sketch.
Shown is the resulting cylinder in isometric. Insert three additional reference geometry planes. Each are parallel to the Front principal plane. They are spaced as .50”, 1.5”, and 3.0” inches from the Front Principal plane
F17_LABFIVE.doc Page 10 of 15
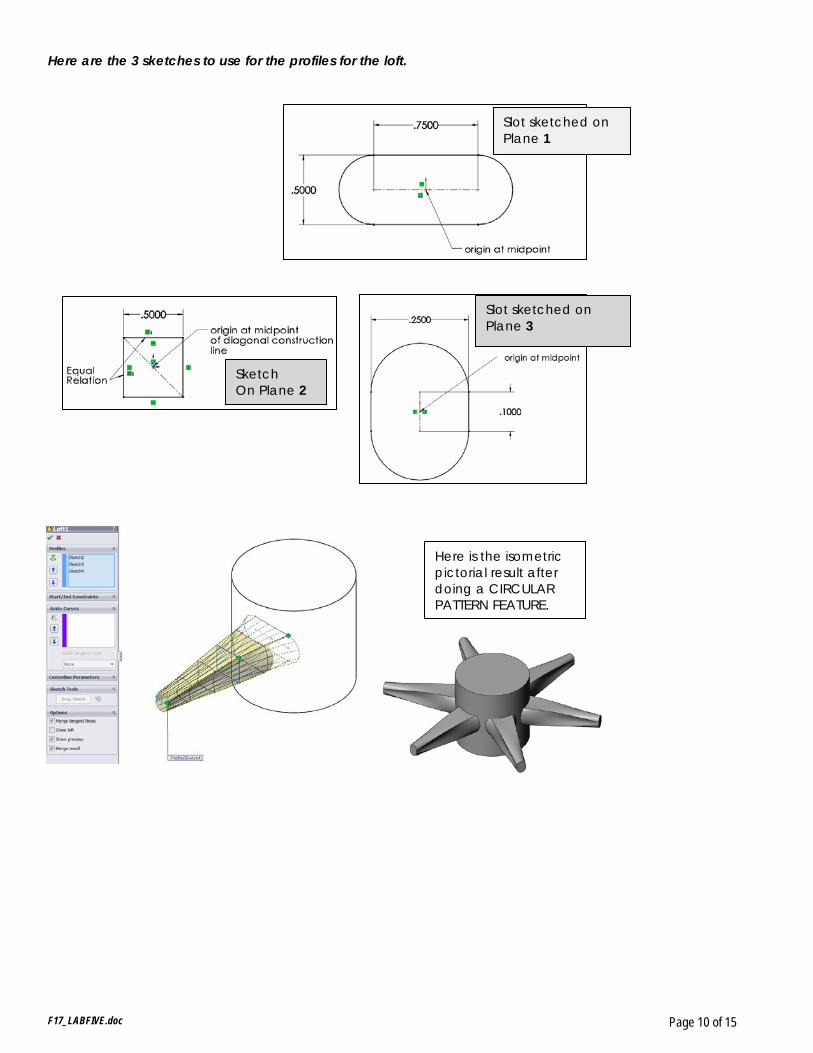
Here are the 3 sketches to use for the profiles for the loft.
Here is the isometric pictorial result after doing a CIRCULAR PATTERN FEATURE.
Slot sketched on Plane 1
Slot sketched on Plane 3
Sketch On Plane 2

F17_LABFIVE.doc Page 11 of 15
Continuation of sketches and methods.
Sketch on the Top Principal Plane. Circle to use for Extrude with a THIN FEATURE option. Depth of 1.00 inches MIDPLANE Thickness of .30 inches
Create a sketch on the bottom face and use CONVERT ENTITIES to get a single circle to use for Extrude (THIN feature) Sizes (Blind distance of .2500 inches and Thickness as .4000 inches) as indicated below.
Use a SINGLE fillet feature Radius of .1000 inch to round and fillet the appropriate face needed (refer to sheet layout detail).

F17_LABFIVE.doc Page 12 of 15
Completion of part – INSERTING A 30° REFERENCE plane TO DRAW ON
Sketch on the plane, this type of sketch will work (piece will come in with a “hole” in it) There are 3 lines, 1 arc tangent to both horizontal lines, and an 8-sided polygon centered with the arc. EXTRUDE IT MIDPLANE a thickness of .40”
Save a rotated view of the object to use in the sheet layout! It is the front view, rotated down 3 “clicks” (45 degrees) Don’t forget to assign a material to the part before doing the drawing. It is COPPER.
Viewing Temporary Axis is important so that you can select the Axis of the cylinder for the second reference.
TOP VIEW

F17_LABFIVE.doc Page 13 of 15
CAD LAB 5D (formerly 4D) Create part, make drawing layout and include discussion sheet. FIRST Construct a part of the table support shown here on the right. Sizes are in inches. The sizes shown are not necessarily the driving dimensions to use in solidworks – instead use some common sense design intent to create your model. However the resultant sizes should be as shown. Orientation of your model should be that its orthographics are consistent with what is shown THEN generate a drawing of the part. • Print at 1:1 a layout of the DRAWING sheet as shown. The
page layout print is Scale 100%. • Orthographics are 1:1 This scale should automatically be reflected in the titleblock area. See NOTE.
o Tangent edges removed. o Hidden Lines displayed
• ISOMETRIC View is as shown with hidden lines displayed and at 1:2 Custom Scale. • Include all the annotations as shown. Precision set to 2-decimal places using document global setting. I
IN ADDITION TO THIS HARDCOPY – FOR LAB 5D ONLY – Include on a separate full size sheet, a clear brief description (handwritten is fine but MUST BE LEGIBLE) listing 3 DIFFERENT unique design intents that you used for your part model HOW you did it and WHY. You may include sketches to help describe the design intent you used. Sketches can be rough but again MUST BE LEGIBLE!
NOTE: this should automatically read SCALE 1:1

F17_LABFIVE.doc Page 14 of 15
This page left intentionally blank.

F17_LABFIVE.doc Page 15 of 15


