CA Spectrum® Spectrum 9 3 0-ENU/Bookshelf... · CA Technologies Product References This document...
152
Installation Guide Release 9.3 CA Spectrum®
Transcript of CA Spectrum® Spectrum 9 3 0-ENU/Bookshelf... · CA Technologies Product References This document...

Installation Guide Release 9.3
CA Spectrum®

This Documentation, which includes embedded help systems and electronically distributed materials, (hereinafter referred to as the “Documentation”) is for your informational purposes only and is subject to change or withdrawal by CA at any time.
This Documentation may not be copied, transferred, reproduced, disclosed, modified or duplicated, in whole or in part, without the prior written consent of CA. This Documentation is confidential and proprietary information of CA and may not be disclosed by you or used for any purpose other than as may be permitted in (i) a separate agreement between you and CA governing your use of the CA software to which the Documentation relates; or (ii) a separate confidentiality agreement between you and CA.
Notwithstanding the foregoing, if you are a licensed user of the software product(s) addressed in the Documentation, you may print or otherwise make available a reasonable number of copies of the Documentation for internal use by you and your employees in connection with that software, provided that all CA copyright notices and legends are affixed to each reproduced copy.
The right to print or otherwise make available copies of the Documentation is limited to the period during which the applicable license for such software remains in full force and effect. Should the license terminate for any reason, it is your responsibility to certify in writing to CA that all copies and partial copies of the Documentation have been returned to CA or destroyed.
TO THE EXTENT PERMITTED BY APPLICABLE LAW, CA PROVIDES THIS DOCUMENTATION “AS IS” WITHOUT WARRANTY OF ANY KIND, INCLUDING WITHOUT LIMITATION, ANY IMPLIED WARRANTIES OF MERCHANTABILITY, FITNESS FOR A PARTICULAR PURPOSE, OR NONINFRINGEMENT. IN NO EVENT WILL CA BE LIABLE TO YOU OR ANY THIRD PARTY FOR ANY LOSS OR DAMAGE, DIRECT OR INDIRECT, FROM THE USE OF THIS DOCUMENTATION, INCLUDING WITHOUT LIMITATION, LOST PROFITS, LOST INVESTMENT, BUSINESS INTERRUPTION, GOODWILL, OR LOST DATA, EVEN IF CA IS EXPRESSLY ADVISED IN ADVANCE OF THE POSSIBILITY OF SUCH LOSS OR DAMAGE.
The use of any software product referenced in the Documentation is governed by the applicable license agreement and such license agreement is not modified in any way by the terms of this notice.
The manufacturer of this Documentation is CA.
Provided with “Restricted Rights.” Use, duplication or disclosure by the United States Government is subject to the restrictions set forth in FAR Sections 12.212, 52.227-14, and 52.227-19(c)(1) - (2) and DFARS Section 252.227-7014(b)(3), as applicable, or their successors.
Copyright © 2013 CA. All rights reserved. All trademarks, trade names, service marks, and logos referenced herein belong to their respective companies.
CA Technologies Product References
This document references the following CA Technologies products:
■ CA Spectrum® (CA Spectrum)
■ CA Spectrum® Report Manager
■ CA Spectrum® Network Configuration Manager (NCM)
Contact CA Technologies
Contact CA Support
For your convenience, CA Technologies provides one site where you can access the information that you need for your Home Office, Small Business, and Enterprise CA Technologies products. At http://ca.com/support, you can access the following resources:
■ Online and telephone contact information for technical assistance and customer services
■ Information about user communities and forums
■ Product and documentation downloads
■ CA Support policies and guidelines
■ Other helpful resources appropriate for your product
Providing Feedback About Product Documentation
If you have comments or questions about CA Technologies product documentation, you can send a message to [email protected].
To provide feedback about CA Technologies product documentation, complete our short customer survey which is available on the CA Support website at http://ca.com/docs.
FIPS 140-2 Compatibility
For the latest updates regarding FIPS 140-2 compatibility, access the following web address:
http://ca.com/support

Contents 5
Contents
Chapter 1: System Requirements 11
Windows System Requirements ................................................................................................................................ 11
Windows Support ................................................................................................................................................ 11
SpectroSERVER and OneClick Server Requirements for Windows ..................................................................... 12
OneClick Client Requirements for Windows ....................................................................................................... 13
Linux System Requirements ....................................................................................................................................... 14
Linux Support ...................................................................................................................................................... 14
SpectroSERVER and OneClick Server Requirements for Linux ............................................................................ 14
OneClick Client Requirements for Linux .............................................................................................................. 16
Solaris System Requirements ..................................................................................................................................... 17
Solaris Support .................................................................................................................................................... 17
SpectroSERVER and OneClick Server Requirements for Solaris .......................................................................... 18
OneClick Client Requirements for Solaris ........................................................................................................... 20
System Configurations ............................................................................................................................................... 21
SpectroSERVER and OneClick .............................................................................................................................. 22
OneClick with Report Manager ........................................................................................................................... 22
System Support and Setup Considerations ................................................................................................................ 23
Virtualization Environments ................................................................................................................................ 23
Rule of Localization Homogeneity....................................................................................................................... 23
Disk Striping and RAID ......................................................................................................................................... 24
Symantec pcAnywhere ........................................................................................................................................ 24
Antivirus Software and Data Backup ................................................................................................................... 24
OneClick Considerations ............................................................................................................................................ 25
OneClick and Report Manager Considerations ................................................................................................... 25
OneClick and Service Manager Considerations ................................................................................................... 26
Chapter 2: Prerequisites 27
Prerequisites for Windows ......................................................................................................................................... 27
Administrator Privileges ...................................................................................................................................... 27
User Account Control (UAC) ................................................................................................................................ 28
Fixed IP Address on Windows ............................................................................................................................. 29
Emergency Repair Disks ...................................................................................................................................... 29
Network and Security Settings ............................................................................................................................ 30
User Audit ........................................................................................................................................................... 30
Convert the File System to NTFS ......................................................................................................................... 30
Prerequisites for Linux and Solaris ............................................................................................................................. 30

6 Installation Guide
Root Privileges..................................................................................................................................................... 31
Fixed IP Address .................................................................................................................................................. 31
Hosts File ............................................................................................................................................................. 31
NFS-Mounted File Systems ................................................................................................................................. 32
Set Up CDE Style Manager (Solaris 10 Only) ....................................................................................................... 32
Solaris ZFS Snapshots .......................................................................................................................................... 33
Chapter 3: Upgrading CA Spectrum 35
Upgrading from Earlier Versions ................................................................................................................................ 35
Upgrade to a Supported Version First ................................................................................................................. 35
Upgrade Scenarios that Require a One-Time Database Conversion ................................................................... 40
Schema Changes in MySQL Databases for CA Spectrum 9.3 .............................................................................. 41
Required Times for Upgrade Options ................................................................................................................. 43
Pre-Upgrade and Post-Upgrade Tasks........................................................................................................................ 43
Preserve Customized Support Files ............................................................................................................................ 45
How to Perform In-Place Upgrades ............................................................................................................................ 47
Preserve the Existing SpectroSERVER Database ................................................................................................. 48
Preserve the CA Spectrum Events and Statistics Database ................................................................................. 49
Upgrade Best Practices: Fault-Tolerant Deployments ............................................................................................... 50
Upgrade Fault-Tolerant SpectroSERVERs and OneClick Web Servers................................................................. 51
Upgrade Fault-Tolerant Secondary SpectroSERVERs .......................................................................................... 54
Perform One-Time Database Conversion (Fault-Tolerant Environments) .......................................................... 55
Upgrade Best Practices: DSS Deployments without Fault Tolerance ......................................................................... 57
Upgrade SpectroSERVERs and OneClick Web Servers in a Non-Fault Tolerant Deployment ............................. 58
Migrate and Upgrade on Windows ............................................................................................................................ 60
Migrate and Upgrade on Linux and Solaris ................................................................................................................ 63
OneClick Web Server Upgrades ................................................................................................................................. 65
New OneClick Privileges ............................................................................................................................................. 65
Chapter 4: Installing CA Spectrum 67
Install CA Spectrum Remotely .................................................................................................................................... 67
OneClick Web Server and SpectroSERVER on Separate Systems ............................................................................... 67
Mount the Installation Media on Solaris and Linux ................................................................................................... 68
Start the Installation on Windows .............................................................................................................................. 68
Start the Installation on Linux and Solaris .................................................................................................................. 69
Install CA Spectrum .................................................................................................................................................... 71
Files Created During Installation ................................................................................................................................ 76
Services for Windows .......................................................................................................................................... 76
CA Spectrum Process Daemon Files for Linux ..................................................................................................... 77
CA Spectrum Process Daemon Files for Solaris ................................................................................................... 77
CA Spectrum Remote Administration Daemon Files for Linux ........................................................................... 78

Contents 7
CA Spectrum Remote Administration Daemon Files for Solaris ......................................................................... 78
Installation Database Savefiles ........................................................................................................................... 79
Chapter 5: Other Installation Scenarios 81
How to Install New Components................................................................................................................................ 81
Patch Installations ...................................................................................................................................................... 82
Distributed SpectroSERVER and Fault-Tolerant Configurations ................................................................................. 82
Reinstall CA Spectrum ................................................................................................................................................ 82
Chapter 6: Upgrading Models 85
Database Compatibility After Upgrade ...................................................................................................................... 85
Preserved Model Attributes and Elements ......................................................................................................... 86
Model Type Editor and the Customized SpectroSERVER Database .................................................................... 86
Using the Multicast Manager or VPN Manager After Installing a Patch or Upgrade .......................................... 87
Convert Existing Models to Newly-Supported Model Types ...................................................................................... 87
Change the Model Type for a Single Device Type ...................................................................................................... 89
Troubleshoot the Post-Upgrade Installation Script .................................................................................................... 90
Chapter 7: Installing CA Spectrum in a Distributed Environment 91
Distributed Installation Requirements ....................................................................................................................... 91
Types of Distributed Installations ............................................................................................................................... 92
How to Perform a Distributed Installation ................................................................................................................. 93
SRAdmin Installation Methods ................................................................................................................................... 94
Install SRAdmin Daemon ..................................................................................................................................... 95
Manually Install SRAdmin Daemon on Windows ................................................................................................ 96
Manually Install SRAdmin Daemon on Linux ...................................................................................................... 97
Manually Install SRAdmin Daemon on Solaris .................................................................................................... 98
Install SRAdmin Daemon in Silent Mode on Windows ....................................................................................... 99
Install SRAdmin Daemon in Silent Mode on Linux ............................................................................................ 100
Install SRAdmin Daemon in Silent Mode on Solaris .......................................................................................... 101
Create the Host Installation Information File ........................................................................................................... 101
HII File Parameters ................................................................................................................................................... 102
Creating the Password File ....................................................................................................................................... 105
Create a Password File ...................................................................................................................................... 105
Grant Limited Root Permissions (Linux and Solaris) ......................................................................................... 106
Change the Sudoers File Owner (Linux and Solaris) .......................................................................................... 107
Run the Distributed Installation Client on Windows ................................................................................................ 108
Run the Distributed Installation Client on Linux and Solaris .................................................................................... 110
Distributed Installations Without the Root Password ...................................................................................... 113
Log Files ............................................................................................................................................................. 113

8 Installation Guide
Installation Duplication ............................................................................................................................................ 113
Chapter 8: Starting CA Spectrum and OneClick Web Server 115
Prepare the SpectroSERVER to Communicate With the OneClick Web Server ....................................................... 115
Start CA Spectrum on Windows ............................................................................................................................... 117
Start CA Spectrum on Linux and Solaris ................................................................................................................... 117
Initiate a Remote Display of CA Spectrum ............................................................................................................... 118
Terminate a Remote Display of CA Spectrum .......................................................................................................... 119
Chapter 9: How to Start the OneClick Client 121
Install the JRE and Java Components ....................................................................................................................... 121
Install the JRE and Java Web Start on Windows ............................................................................................... 122
Install the JRE and Java Web Start on Linux ...................................................................................................... 124
Install the JRE, Java Web Start and the Java Plug-in on Solaris ......................................................................... 125
Launch the OneClick Console ................................................................................................................................... 126
Start OneClick from a Browser .......................................................................................................................... 127
Start OneClick from the Command Line on Solaris ........................................................................................... 127
Chapter 10: Post-Installation Configurations 129
Set OneClick Client Restrictions ............................................................................................................................... 129
Set Up Client Access to CA Spectrum in a Distributed Environment ................................................................ 130
Change the OneClick Web Server Port ..................................................................................................................... 130
Configure the Windows Server Scheduled Tasks Service ......................................................................................... 131
Landscape Polling Interval Configuration in Fault-Tolerant Environments .............................................................. 132
Chapter 11: Uninstalling CA Spectrum 133
Uninstall CA Spectrum on Windows......................................................................................................................... 133
Uninstall CA Spectrum on Linux and Solaris ............................................................................................................. 134
Appendix A: Troubleshooting Installation Problems 135
Installation Media Does Not Contain Installation Information ................................................................................ 135
Incorrect Text Displays on the Screen ...................................................................................................................... 136
<index file name> Cannot Be Found ........................................................................................................................ 136
Received a Landscape Handle Error ......................................................................................................................... 136
Received an InvocationTargetException Error ......................................................................................................... 137
Received a Database Initialization Error .................................................................................................................. 137
Received a Database Saving Error ............................................................................................................................ 138
Received a VNMRC File Processing Error ................................................................................................................. 138
Server Configuration Problems ................................................................................................................................ 138

Contents 9
Installation Owner User Problems ........................................................................................................................... 139
OneClick Web Server Error Message ........................................................................................................................ 139
OneClick Web Server Shuts Down ............................................................................................................................ 140
Appendix B: Troubleshooting OneClick Client Problems 141
Odd OneClick Behavior ............................................................................................................................................. 141
OneClick Client Fails to Launch................................................................................................................................. 142
OneClick Console Does Not Open (Windows) .......................................................................................................... 142
Firefox Download Error Dialog (Linux) ..................................................................................................................... 144
OneClick.jnlp File Download Dialog Opens (Solaris) ................................................................................................ 145
OneClick Fails to Start, Access Denied (Windows) ................................................................................................... 145
OneClick Console Does Not Open (Solaris) .............................................................................................................. 146
Cannot Log In to OneClick Client .............................................................................................................................. 146
Index 149

Chapter 1: System Requirements 11
Chapter 1: System Requirements
This section contains the following topics:
Windows System Requirements (see page 11) Linux System Requirements (see page 14) Solaris System Requirements (see page 17) System Configurations (see page 21) System Support and Setup Considerations (see page 23) OneClick Considerations (see page 25)
Windows System Requirements
Windows Support
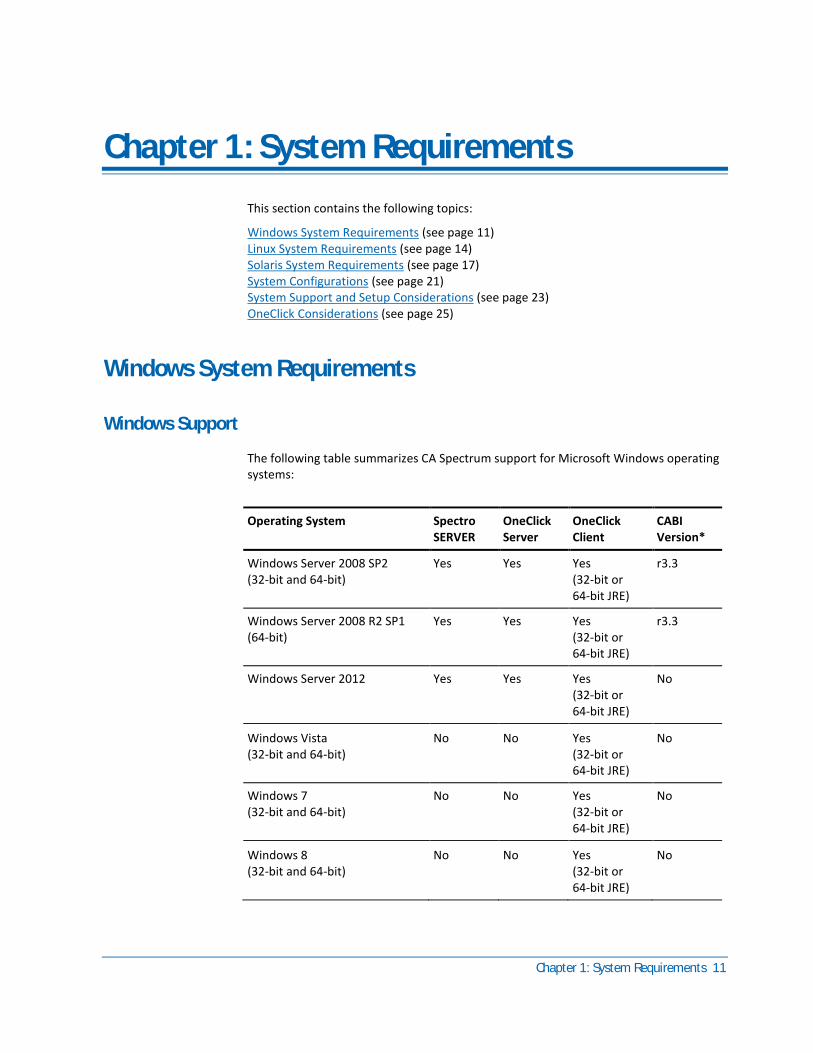
The following table summarizes CA Spectrum support for Microsoft Windows operating systems:
Operating System Spectro SERVER
OneClick Server
OneClick Client
CABI Version*
Windows Server 2008 SP2 (32-bit and 64-bit)
Yes Yes Yes (32-bit or 64-bit JRE)
r3.3
Windows Server 2008 R2 SP1 (64-bit)
Yes Yes Yes (32-bit or 64-bit JRE)
r3.3
Windows Server 2012 Yes Yes Yes (32-bit or 64-bit JRE)
No
Windows Vista (32-bit and 64-bit)
No
No
Yes (32-bit or 64-bit JRE)
No
Windows 7 (32-bit and 64-bit)
No No Yes (32-bit or 64-bit JRE)
No
Windows 8 (32-bit and 64-bit)
No
No
Yes (32-bit or 64-bit JRE)
No
Windows System Requirements
12 Installation Guide
* Report Manager uses CABI r3.3 as the report delivery engine.
Note: For information on the platforms that CABI r3.3 supports, see the Supported Platforms document that is delivered with the CABI r3.3 installation media.
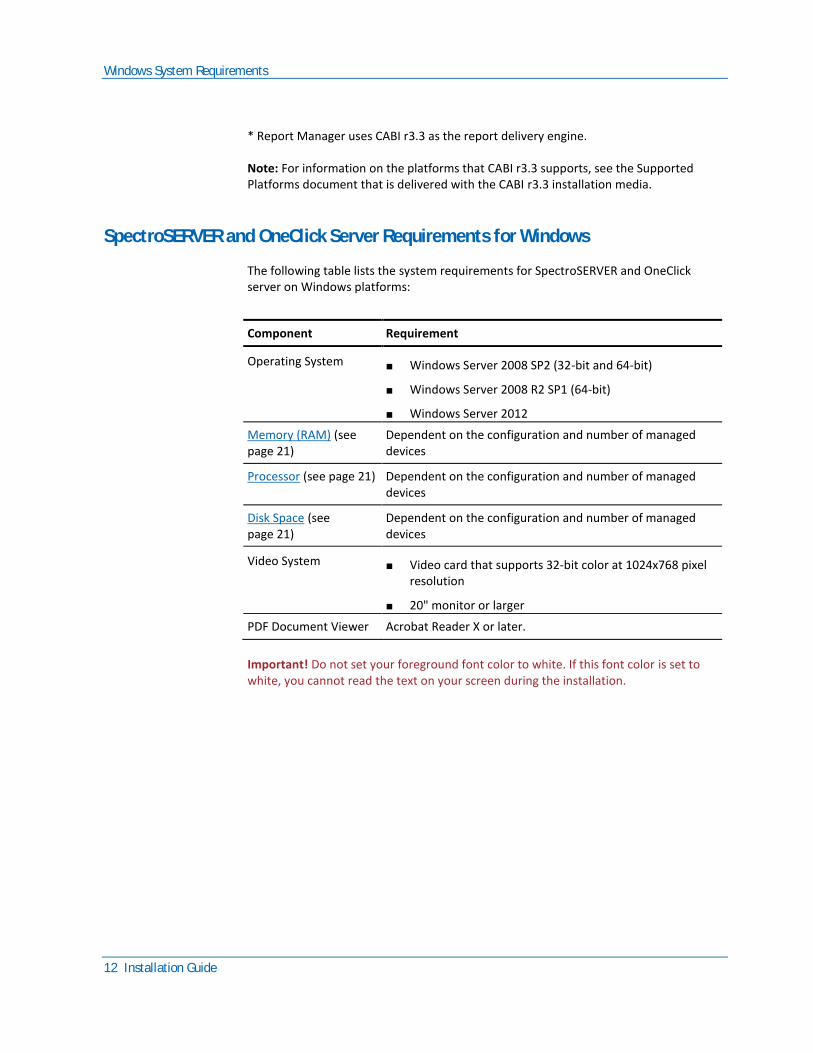
SpectroSERVER and OneClick Server Requirements for Windows
The following table lists the system requirements for SpectroSERVER and OneClick server on Windows platforms:
Component Requirement
Operating System
■ Windows Server 2008 SP2 (32-bit and 64-bit)
■ Windows Server 2008 R2 SP1 (64-bit)
■ Windows Server 2012
Memory (RAM) (see page 21)
Dependent on the configuration and number of managed devices
Processor (see page 21) Dependent on the configuration and number of managed devices
Disk Space (see page 21)
Dependent on the configuration and number of managed devices
Video System
■ Video card that supports 32-bit color at 1024x768 pixel resolution
■ 20" monitor or larger
PDF Document Viewer Acrobat Reader X or later.
Important! Do not set your foreground font color to white. If this font color is set to white, you cannot read the text on your screen during the installation.

Windows System Requirements
Chapter 1: System Requirements 13
OneClick Client Requirements for Windows
The following table lists the OneClick client requirements for Windows platforms:
Component Requirement
Operating System
■ Windows Server 2008 SP2
■ Windows Server 2008 R2 SP1
■ Windows Server 2012
■ Windows Vista
■ Windows 7
■ Windows 8
Memory (RAM) (see page 21)
Dependent on the configuration and number of managed devices
Processor (see page 21) Dependent on the configuration and number of managed devices
Disk Space (see page 21)
Dependent on the configuration and number of managed devices
Java Components
Java 2 Runtime Environment (JRE) version 1.7.0_21 (32-bit or 64-bit), or later. (JRE 1.7.0_21 is available for download from OneClick.)
Web Browser ■ Firefox 10.0 or later
■ Internet Explorer 8.0 or later
Note: Internet Explorer 10 entails some special requirements. For more information, see OneClick Considerations (see page 25).

Linux System Requirements
14 Installation Guide
Linux System Requirements
Linux Support
The following table summarizes CA Spectrum support for Linux operating systems:
Operating System SpectroSERVER
OneClick Server
OneClick Client
CABI Version*
Red Hat® Enterprise Linux® 5.x (32-bit and 64-bit)
Yes
Yes
Yes (32-bit or 64-bit JRE)
r3.3
Red Hat Enterprise Linux 6.x (32-bit and 64-bit)
Yes Yes Yes (32-bit or 64-bit JRE)
r3.3
* Report Manager uses CABI r3.3 as the report delivery engine.
Note: For information on the platforms that CABI r3.3 supports, see the Supported Platforms document that is delivered with the CABI r3.3 installation media.
SpectroSERVER and OneClick Server Requirements for Linux
The following table lists the system requirements for SpectroSERVER and OneClick server on Linux platforms:
Component Requirement
Operating System
■ Red Hat Enterprise Linux 5.x (32-bit and 64-bit)
■ Red Hat Enterprise Linux 6.x (32-bit and 64-bit)
■ X-based desktop environment (such as KDE or GNOME)
Memory (RAM) (see page 21)
Dependent on the configuration and number of managed devices
Processor (see page 21) Dependent on the configuration and number of managed devices
Disk Space (see page 21)
Dependent on the configuration and number of managed devices
Graphical User Interface
Motif (32-bit).
Note: Motif is not required for a distributed installation.

Linux System Requirements
Chapter 1: System Requirements 15
Component Requirement
Video System ■ Video card that supports 32-bit color at 1024x768 pixel resolution
■ 20" monitor or larger
PDF Document Viewer
Acrobat Reader X or later
Packages See "Required Packages," below.
Important! Do not set your foreground font color to white. If this font color is set to white, you cannot read the text on your screen during the installation.
Required Packages
Note: For purposes of identification, 32-bit RPMs for Red Hat Enterprise Linux contain "i386" or "i686". The 64-bit RPMs contain "x86_64".
For Red Hat Enterprise Linux 5.x and 6.x servers (32-bit or 64-bit), install the following RPMs and any dependencies:
■ openmotif
■ elfutils-libelf
■ libaio (required for MySQL v5.5, the MySQL version for the database).
For Red Hat Enterprise Linux 5.x or 6.x (32-bit or 64-bit), other dependent RPM packages may be required:
■ glibc
■ nss-softokn-freebl
■ libICE
■ libSM
■ libX11
■ libXext
■ libXft
■ libXmu
Linux System Requirements
16 Installation Guide
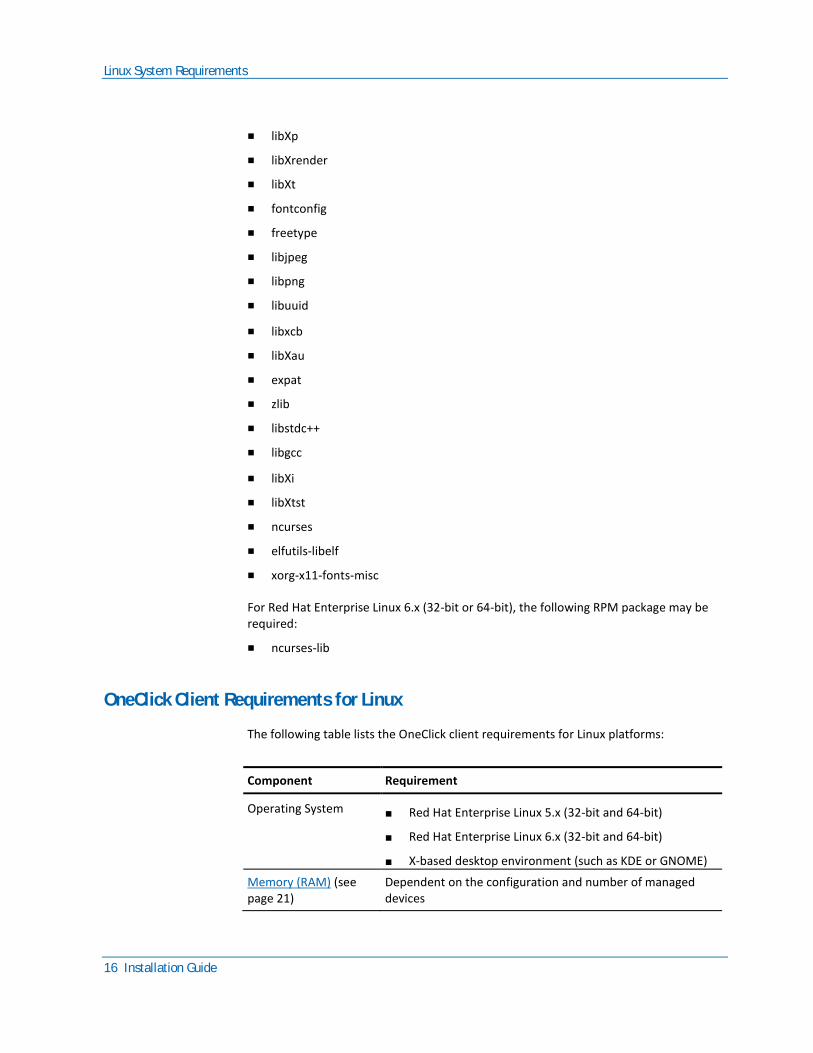
■ libXp
■ libXrender
■ libXt
■ fontconfig
■ freetype
■ libjpeg
■ libpng
■ libuuid
■ libxcb
■ libXau
■ expat
■ zlib
■ libstdc++
■ libgcc
■ libXi
■ libXtst
■ ncurses
■ elfutils-libelf
■ xorg-x11-fonts-misc
For Red Hat Enterprise Linux 6.x (32-bit or 64-bit), the following RPM package may be required:
■ ncurses-lib
OneClick Client Requirements for Linux
The following table lists the OneClick client requirements for Linux platforms:
Component Requirement
Operating System
■ Red Hat Enterprise Linux 5.x (32-bit and 64-bit)
■ Red Hat Enterprise Linux 6.x (32-bit and 64-bit)
■ X-based desktop environment (such as KDE or GNOME)
Memory (RAM) (see page 21)
Dependent on the configuration and number of managed devices
Solaris System Requirements
Chapter 1: System Requirements 17
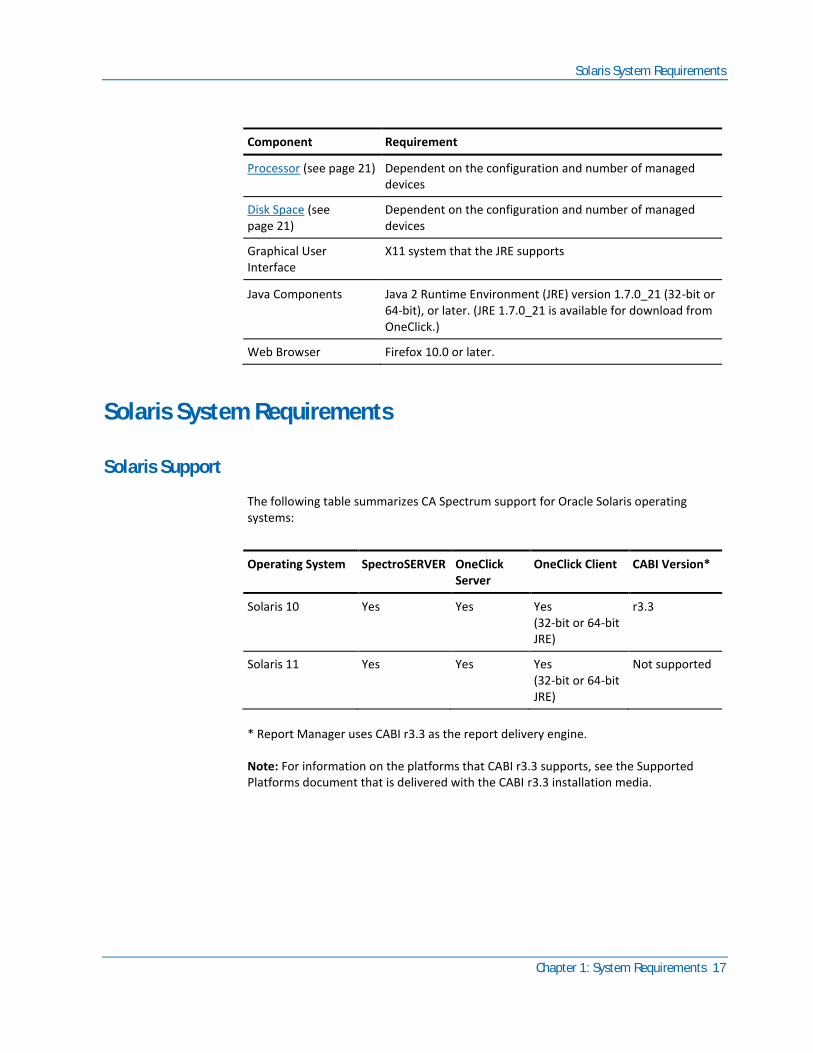
Component Requirement
Processor (see page 21) Dependent on the configuration and number of managed devices
Disk Space (see page 21)
Dependent on the configuration and number of managed devices
Graphical User Interface
X11 system that the JRE supports
Java Components
Java 2 Runtime Environment (JRE) version 1.7.0_21 (32-bit or 64-bit), or later. (JRE 1.7.0_21 is available for download from OneClick.)
Web Browser Firefox 10.0 or later.
Solaris System Requirements
Solaris Support
The following table summarizes CA Spectrum support for Oracle Solaris operating systems:
Operating System SpectroSERVER OneClick Server
OneClick Client CABI Version*
Solaris 10 Yes Yes Yes (32-bit or 64-bit JRE)
r3.3
Solaris 11 Yes Yes Yes (32-bit or 64-bit JRE)
Not supported
* Report Manager uses CABI r3.3 as the report delivery engine.
Note: For information on the platforms that CABI r3.3 supports, see the Supported Platforms document that is delivered with the CABI r3.3 installation media.
Solaris System Requirements
18 Installation Guide
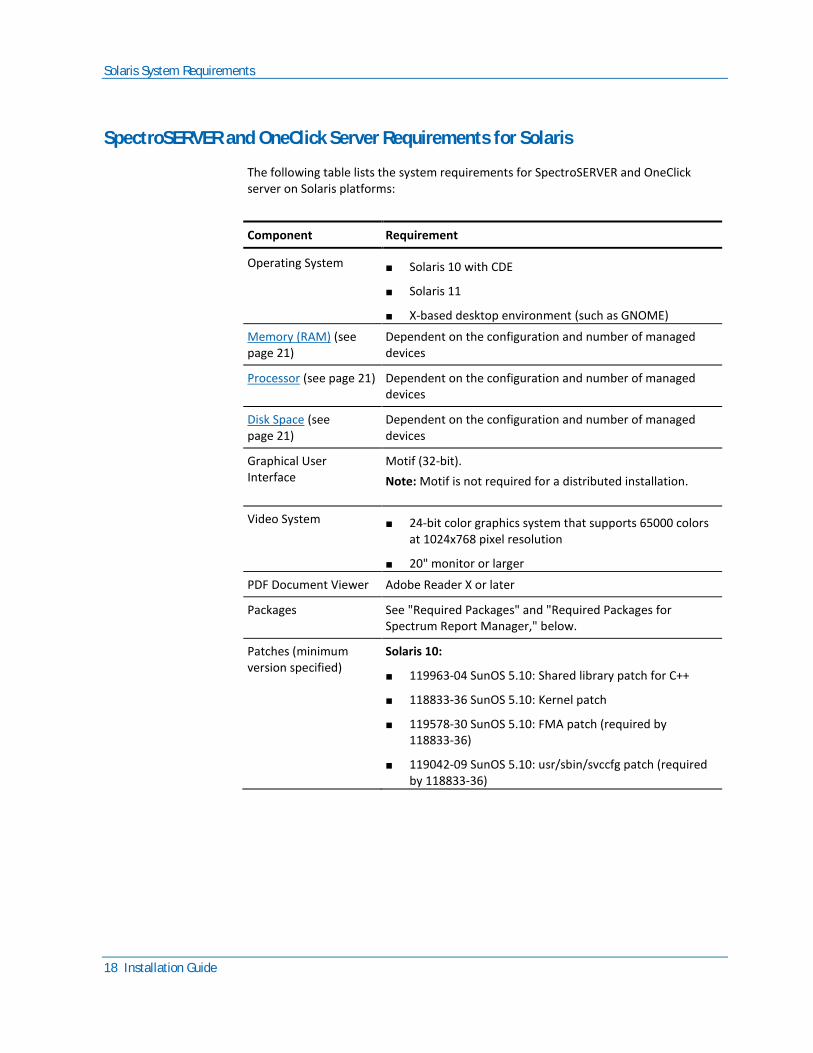
SpectroSERVER and OneClick Server Requirements for Solaris
The following table lists the system requirements for SpectroSERVER and OneClick server on Solaris platforms:
Component Requirement
Operating System
■ Solaris 10 with CDE
■ Solaris 11
■ X-based desktop environment (such as GNOME)
Memory (RAM) (see page 21)
Dependent on the configuration and number of managed devices
Processor (see page 21) Dependent on the configuration and number of managed devices
Disk Space (see page 21)
Dependent on the configuration and number of managed devices
Graphical User Interface
Motif (32-bit).
Note: Motif is not required for a distributed installation.
Video System ■ 24-bit color graphics system that supports 65000 colors at 1024x768 pixel resolution
■ 20" monitor or larger
PDF Document Viewer Adobe Reader X or later
Packages See "Required Packages" and "Required Packages for Spectrum Report Manager," below.
Patches (minimum version specified)
Solaris 10:
■ 119963-04 SunOS 5.10: Shared library patch for C++
■ 118833-36 SunOS 5.10: Kernel patch
■ 119578-30 SunOS 5.10: FMA patch (required by 118833-36)
■ 119042-09 SunOS 5.10: usr/sbin/svccfg patch (required by 118833-36)
Solaris System Requirements
Chapter 1: System Requirements 19
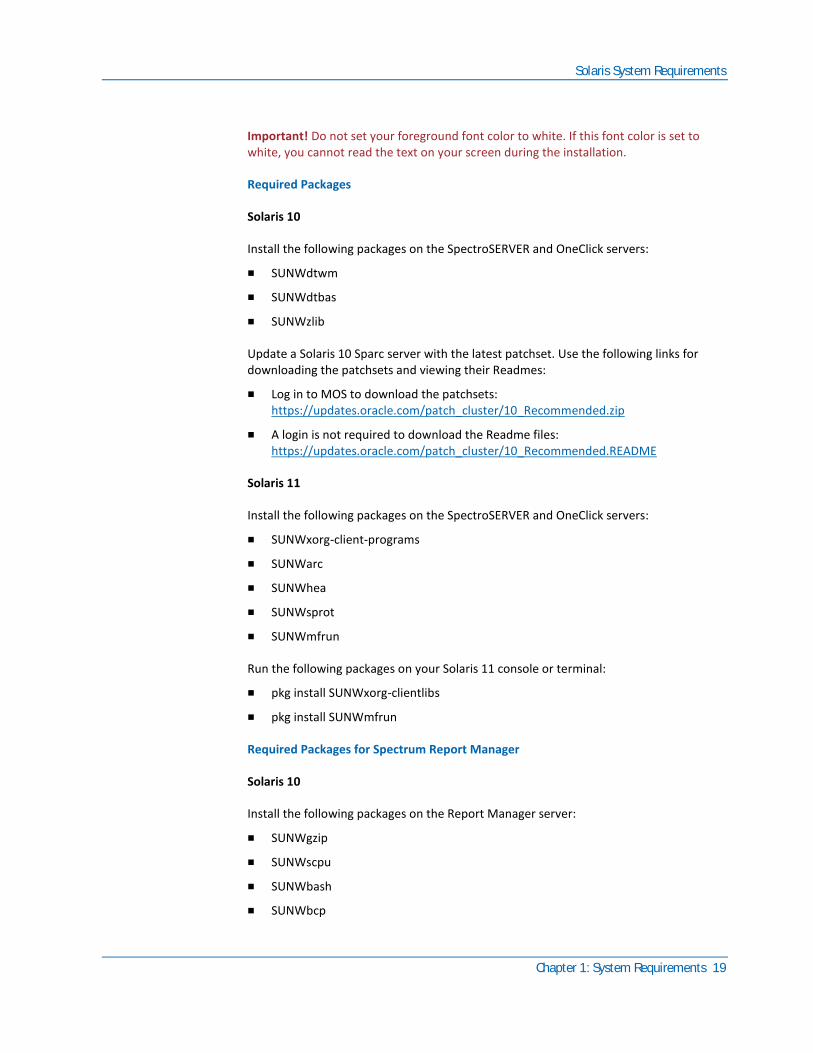
Important! Do not set your foreground font color to white. If this font color is set to white, you cannot read the text on your screen during the installation.
Required Packages
Solaris 10
Install the following packages on the SpectroSERVER and OneClick servers:
■ SUNWdtwm
■ SUNWdtbas
■ SUNWzlib
Update a Solaris 10 Sparc server with the latest patchset. Use the following links for downloading the patchsets and viewing their Readmes:
■ Log in to MOS to download the patchsets: https://updates.oracle.com/patch_cluster/10_Recommended.zip
■ A login is not required to download the Readme files: https://updates.oracle.com/patch_cluster/10_Recommended.README
Solaris 11
Install the following packages on the SpectroSERVER and OneClick servers:
■ SUNWxorg-client-programs
■ SUNWarc
■ SUNWhea
■ SUNWsprot
■ SUNWmfrun
Run the following packages on your Solaris 11 console or terminal:
■ pkg install SUNWxorg-clientlibs
■ pkg install SUNWmfrun
Required Packages for Spectrum Report Manager
Solaris 10
Install the following packages on the Report Manager server:
■ SUNWgzip
■ SUNWscpu
■ SUNWbash
■ SUNWbcp

Solaris System Requirements
20 Installation Guide
■ SUNWxcu4
■ SUNWxwfnt
■ SUNWxwplt
■ SUNWlibC
■ SUNWeu8os
■ SUNWeuluf
■ SUNWuiu8
■ SUNWulcf
■ SUNWmfrun
■ SUNWxwice
Solaris 11
Install the following packages on the Report Manager server:
■ SUNWgzip
■ SUNWbash
■ SUNWxwplt
■ SUNWlibC
■ SUNWuiu8
■ SUNWmfrun
■ SUNWxwice
OneClick Client Requirements for Solaris
The following table lists the OneClick client requirements for Solaris platforms:
Component Requirement
Operating System
■ Solaris 10 with CDE
■ Solaris 11
■ X-based desktop environment (such as GNOME)
Memory (RAM) (see page 21)
Dependent on the configuration and number of managed devices
Processor (see page 21) Dependent on the configuration and number of managed devices

System Configurations
Chapter 1: System Requirements 21
Component Requirement
Disk Space (see page 21)
Dependent on the configuration and number of managed devices
Graphical User Interface
X11 system that the JRE supports
Java Components
Java 2 Runtime Environment (JRE) version 1.7.0_21 (32-bit or 64-bit), or later. (JRE 1.7.0_21 is available for download from OneClick.)
Web Browser Firefox 10.0 or later
System Configurations
The configuration tables in this section provide guidelines for running CA Spectrum at peak efficiency. You can achieve optimal system performance when all system resources are robust enough that a single resource does not limit the others. System resources include memory, processor speeds, and disk space.
Note: Consult your support or sales representative for more help in determining the best configuration for your network.
You cannot define all configurations and system requirements for all users because of the following complexities and variables:
■ Polling frequency
■ Device types
■ Number of devices in a network
Important! Installing OneClick on a single-CPU SpectroSERVER host system can degrade the performance of both SpectroSERVER and OneClick. To maximize the performance of both, we recommend that you install OneClick on a separate, dedicated computer. If you upgrade SpectroSERVER components, you might also need to upgrade OneClick.
More information:
Windows System Requirements (see page 11) Linux System Requirements (see page 14) Solaris System Requirements (see page 17)
System Configurations
22 Installation Guide
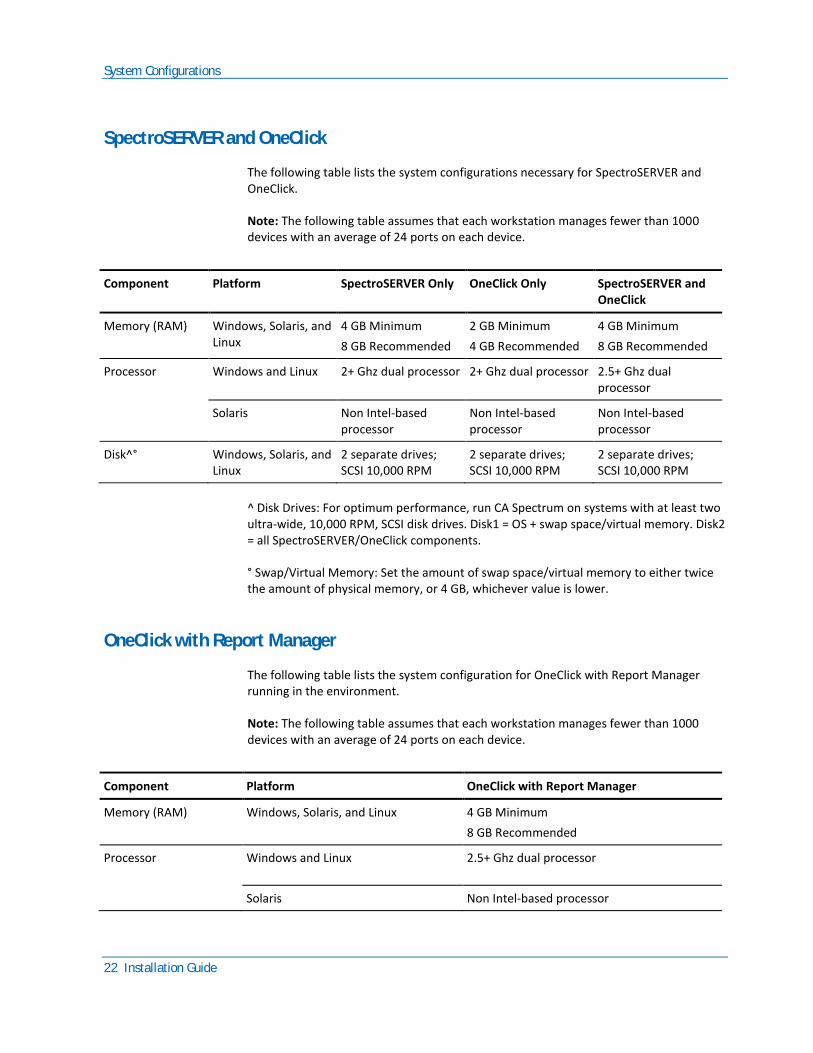
SpectroSERVER and OneClick
The following table lists the system configurations necessary for SpectroSERVER and OneClick.
Note: The following table assumes that each workstation manages fewer than 1000 devices with an average of 24 ports on each device.
Component Platform SpectroSERVER Only OneClick Only SpectroSERVER and OneClick
Memory (RAM) Windows, Solaris, and Linux
4 GB Minimum
8 GB Recommended
2 GB Minimum
4 GB Recommended
4 GB Minimum
8 GB Recommended
Processor Windows and Linux 2+ Ghz dual processor 2+ Ghz dual processor 2.5+ Ghz dual processor
Solaris Non Intel-based processor
Non Intel-based processor
Non Intel-based processor
Disk^° Windows, Solaris, and Linux
2 separate drives; SCSI 10,000 RPM
2 separate drives; SCSI 10,000 RPM
2 separate drives; SCSI 10,000 RPM
^ Disk Drives: For optimum performance, run CA Spectrum on systems with at least two ultra-wide, 10,000 RPM, SCSI disk drives. Disk1 = OS + swap space/virtual memory. Disk2 = all SpectroSERVER/OneClick components.
° Swap/Virtual Memory: Set the amount of swap space/virtual memory to either twice the amount of physical memory, or 4 GB, whichever value is lower.
OneClick with Report Manager
The following table lists the system configuration for OneClick with Report Manager running in the environment.
Note: The following table assumes that each workstation manages fewer than 1000 devices with an average of 24 ports on each device.
Component Platform OneClick with Report Manager
Memory (RAM) Windows, Solaris, and Linux 4 GB Minimum
8 GB Recommended
Processor Windows and Linux 2.5+ Ghz dual processor
Solaris Non Intel-based processor
System Support and Setup Considerations
Chapter 1: System Requirements 23
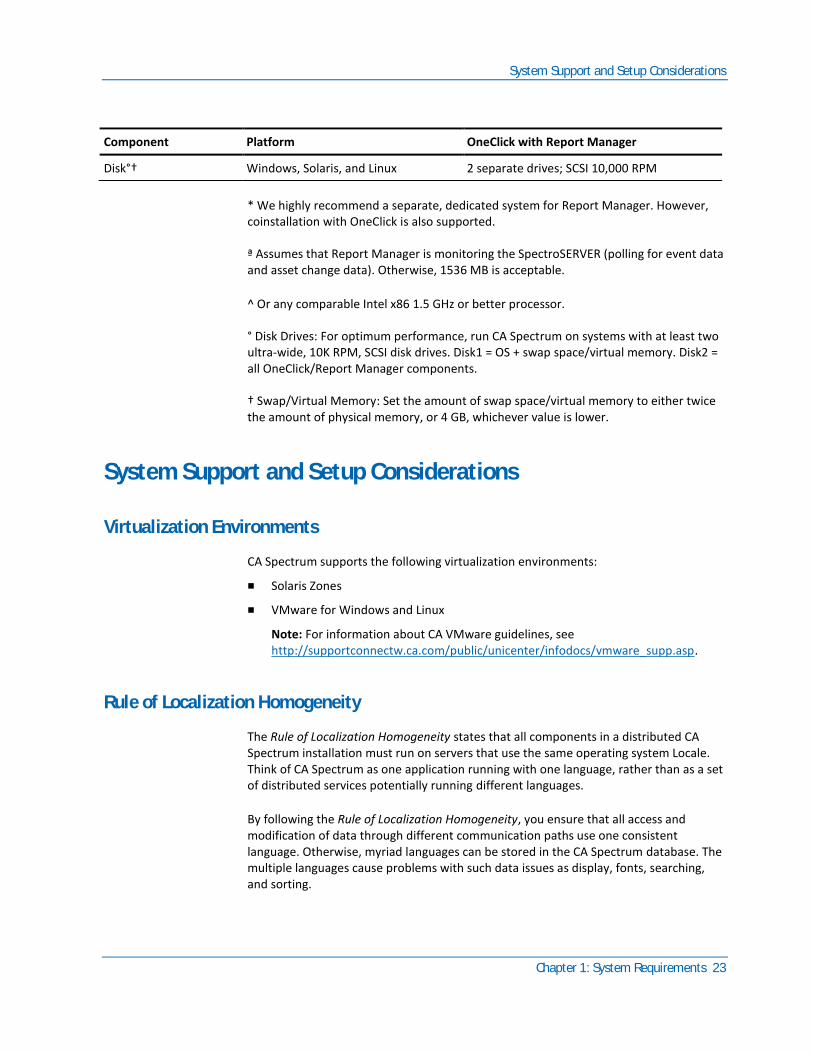
Component Platform OneClick with Report Manager
Disk°† Windows, Solaris, and Linux 2 separate drives; SCSI 10,000 RPM
* We highly recommend a separate, dedicated system for Report Manager. However, coinstallation with OneClick is also supported.
ª Assumes that Report Manager is monitoring the SpectroSERVER (polling for event data and asset change data). Otherwise, 1536 MB is acceptable.
^ Or any comparable Intel x86 1.5 GHz or better processor.
° Disk Drives: For optimum performance, run CA Spectrum on systems with at least two ultra-wide, 10K RPM, SCSI disk drives. Disk1 = OS + swap space/virtual memory. Disk2 = all OneClick/Report Manager components.
† Swap/Virtual Memory: Set the amount of swap space/virtual memory to either twice the amount of physical memory, or 4 GB, whichever value is lower.
System Support and Setup Considerations
Virtualization Environments
CA Spectrum supports the following virtualization environments:
■ Solaris Zones
■ VMware for Windows and Linux
Note: For information about CA VMware guidelines, see http://supportconnectw.ca.com/public/unicenter/infodocs/vmware_supp.asp.
Rule of Localization Homogeneity
The Rule of Localization Homogeneity states that all components in a distributed CA Spectrum installation must run on servers that use the same operating system Locale. Think of CA Spectrum as one application running with one language, rather than as a set of distributed services potentially running different languages.
By following the Rule of Localization Homogeneity, you ensure that all access and modification of data through different communication paths use one consistent language. Otherwise, myriad languages can be stored in the CA Spectrum database. The multiple languages cause problems with such data issues as display, fonts, searching, and sorting.

System Support and Setup Considerations
24 Installation Guide
We recommend that you set the Locale on the servers that run CA Spectrum processes before you install CA Spectrum. Such servers include the Location server, Processd, SpectroSERVERs, OneClick servers, clients, and the Secure Domain Manager.
Disk Striping and RAID
For optimum performance, you can run CA Spectrum on systems with multiple, ultrawide, 10k rpm, SCSI disk drives that use disk striping or RAID (redundant array of independent disks) technologies.
Disk striping is a technique of spreading data over multiple disk drives. RAID is a disk drive system that uses two or more drives in combination for fault tolerance and performance improvement.
Symantec pcAnywhere
Symantec pcAnywhere™ can cause Java to lock and prevent Java applications from launching. Java applications include OneClick Console, CA Spectrum Control Panel, Model Type Editor, and Performance View. The processes start, but the GUIs do not launch. If you stop pcAnywhere, the Java-based applications launch and the GUIs display correctly.
To resolve this issue, install or upgrade to DirectX version 9.0 B, which is available at http://support.microsoft.com.
Alternatively, you can stop the pcAnywhere Host Service before installation. After you install CA Spectrum and OneClick, you can enable the pcAnywhere Host Service again.
Antivirus Software and Data Backup
CA Spectrum does not include antivirus software. We recommend installing your preferred antivirus software to protect your networking environment.
Important! To avoid database corruption, exclude CA Spectrum installation areas and CA Spectrum files from scans by any local or remote instances of antivirus software. CA Spectrum installation areas include OneClick and Report Manager installation areas.
Exclude all CA Spectrum installation areas, including OneClick and Report Manager installation areas, from scans by data backup programs.
OneClick Considerations
Chapter 1: System Requirements 25
OneClick Considerations
OneClick consists of a web server-based component and a client-based component, each of which requires different software. The OneClick web server includes the following items:
■ Apache Tomcat servlet engine
■ MySQL database management system
■ Java 2 Software Development Kit (SDK)
Note: CA Spectrum supports only the version of the JDK that ships with OneClick.
The OneClick client includes the following items:
■ Java Runtime Environment (JRE) with Java Web Start
If Microsoft Internet Explorer version 10 is installed on the OneClick clients, set the browser security level to medium-low to avoid security-related issues. Or, if the Internet Explorer 10 security level is high, be sure to add the OneClick website to the list of Trusted Sites.
By default, the OneClick website is automatically run in Compatibility Mode if the OneClick web server is installed within an intranet. In Internet Explorer 10, intranet sites run in Compatibility Mode by default. Run Internet Explorer 10 in Compatibility Mode to support the CA Spectrum - CA Service Desk Manager integration and Spectrum Report Manager. For more information, consult the Microsoft website.
OneClick and Report Manager Considerations
If you are installing OneClick with Report Manager, see the Report Manager Installation and Administration Guide for installation information.
OneClick Considerations
26 Installation Guide
OneClick and Service Manager Considerations
If you are installing OneClick with Service Manager, the following considerations apply:
■ Service Manager must be installed on the computer where the SpectroSERVER is installed and on the computer where OneClick is installed. The modeling catalog and all modeling intelligence exist within the SpectroSERVER database. The historical database and event handling code exist on the OneClick web server, which is installed with OneClick.
■ We recommend that you also install Service Manager when you install Report Manager with OneClick. Installing these components together ensures that the Service and SLA Reporting tables are populated.
Note: For more information about Service Manager, see the Service Manager User Guide.

Chapter 2: Prerequisites 27
Chapter 2: Prerequisites
This section contains the following topics:
Prerequisites for Windows (see page 27) Prerequisites for Linux and Solaris (see page 30)
Prerequisites for Windows
Ensure that you meet the following prerequisites before you install CA Spectrum on a Windows system.
More information:
Install SRAdmin Daemon in Silent Mode on Windows (see page 99) Install SRAdmin Daemon (see page 95) Start the Installation on Windows (see page 68) Manually Install SRAdmin Daemon on Windows (see page 96)
Administrator Privileges
To install CA Spectrum, log in as Administrator or as a user with administrator privileges.
Note: If you plan to install CA Spectrum as a user other than Administrator, turn off User Account Control (UAC) (see page 28).
CA Spectrum installation software requires administrator privileges to evaluate available resources and to run custom installation scripts. An initial installation generates residual files with administrator ownership. Subsequent upgrade installations also require administrator privileges.

Prerequisites for Windows
28 Installation Guide
User Account Control (UAC)
To install CA Spectrum as a user other than Administrator, User Account Control (UAC) must be turned off. UAC is a Windows security component that prompts you for permission when a task requires administrator privileges.
During CA Spectrum installation, the installation user is elevated to an administrator in CA Spectrum Remote Administration (SRAdmin). UAC would then need to prompt the user for permission, which is not possible because SRAdmin is a noninteractive service. Disablement of UAC allows the installation to run continuously.
Note: Disabling UAC is required for CA Spectrum installation as a user other than Administrator only. After installation and during normal CA Spectrum operation, UAC can be enabled.
More information:
How to Disable UAC on Windows Server 2008 (see page 28) How to Disable UAC on Windows Server 2008 R2 and Windows Server 2012 (see page 29) How to Disable UAC in Local Security Policy on Windows Server (see page 29)
How to Disable UAC on Windows Server 2008
To install CA Spectrum as a user other than Administrator, UAC must be turned off. The following procedure describes how to disable UAC on Windows Server 2008.
Follow these steps:
1. From the Start menu, select Control Panel, User Accounts.
2. Click "Turn User Account Control on or off".
3. Uncheck "Use User Account Control (UAC) to help protect your computer", and click OK.
4. Disable UAC in Local Security Policy (see page 29).
UAC is now disabled.

Prerequisites for Windows
Chapter 2: Prerequisites 29
How to Disable UAC on Windows Server 2008 R2 and Windows Server 2012
To install CA Spectrum as a user other than Administrator, UAC must be turned off. The following procedure describes how to disable UAC on Windows Server 2008 R2 and Windows Server 2012.
Follow these steps:
1. From the Start menu, select Control Panel, User Accounts.
2. Click "Change User Account Control settings".
3. Move the slider down to the bottom line, Never notify, and click OK.
4. Disable UAC in Local Security Policy (see page 29).
UAC is now disabled.
How to Disable UAC in Local Security Policy on Windows Server
In addition to the UAC setting, a Local Security Policy option for UAC must also be disabled, as described in the following procedure.
Follow these steps:
1. In a Run dialog, enter secpol.msc and click OK.
2. In the Local Security Policy window, select the Security Settings, Local Policies, Security Options folder.
3. Right click the "User Account Control: Run all administrators in Admin Approval Mode" policy, and select Properties.
4. Select Disabled, and click OK.
The necessary Local Security Policy option for turning off UAC has been disabled.
Fixed IP Address on Windows
Ensure that the system on which you want to install CA Spectrum has a fixed IP address. You can enable DHCP on the system when the DHCP server issues a static address that never changes.
Emergency Repair Disks
We recommend that you create an emergency repair disk (ERD) before installing CA Spectrum, because the installation can corrupt files. You can use the ERD to restore Windows configuration files. We recommend that you also create an ERD after successfully installing CA Spectrum.
Note: Windows Help files contain detailed instructions on creating an ERD.

Prerequisites for Linux and Solaris
30 Installation Guide
Network and Security Settings
To use email for applications (such as CA Spectrum Enterprise Alarm Manager), configure the user profile that is logged in and running CA Spectrum to send email using the supported service provider.
Set security as required for the directory where you install CA Spectrum. If you set the security before installation, CA Spectrum preserves the changes to the directory hierarchy security.
Note: Restart your system after you make changes.
User Audit
If the user auditing feature is enabled on Windows, every action is audited, resulting in many entries in the Windows Event Log. We recommend that you disable the Windows user auditing feature because it slows CA Spectrum system performance.
Convert the File System to NTFS
We recommend that you install CA Spectrum in an NTFS file system partition. If your disk drive is formatted as a FAT partition, convert the Windows file system to NTFS.
Follow these steps:
1. Execute cd Windows\system32 from the command line.
2. Run the CONVERT utility as follows:
CONVERT C: /FS:NTFS
Note: You can run the conversion utility without damaging or deleting existing data. If the hard drive is already converted, a message appears.
3. Restart your system.
The reformatting takes effect, and the file system is converted.
Prerequisites for Linux and Solaris
Ensure that you meet the following prerequisites before you install CA Spectrum on a Linux system or a Solaris system.

Prerequisites for Linux and Solaris
Chapter 2: Prerequisites 31
More information:
Manually Install SRAdmin Daemon on Solaris (see page 98) Manually Install SRAdmin Daemon on Linux (see page 97) Install SRAdmin Daemon in Silent Mode on Linux (see page 100) Install SRAdmin Daemon in Silent Mode on Solaris (see page 101) Install SRAdmin Daemon (see page 95) Start the Installation on Linux and Solaris (see page 69)
Root Privileges
CA Spectrum and CA Spectrum Remote Administration (SRAdmin) Daemon installations require root privileges to evaluate available resources and run custom installation scripts. Installing under the root ensures root privileges for the setuid executable, which lets the SpectroSERVER connect to SNMP ports. Because an initial installation generates residual files with root ownership, subsequent upgrade installations also require root privileges.
Fixed IP Address
Ensure that the system on which you plan to install CA Spectrum has a fixed IP address. You can enable DHCP on the system when the DHCP server issues a static address that never changes.
Hosts File
Ensure that the /etc/hosts file has the following format:
127.0.0.1 localhost localhost.localdomain <external IP> <external names>
external IP
Is the static DNS IP of the host.
external names
Are the DNS short names.
Make sure that the first line has the local host after the loop-back address. The loop-back line must have localhost as the official host name.
You can add nicknames after the local host. For example:
127.0.0.1 localhost localhost.localdomain

Prerequisites for Linux and Solaris
32 Installation Guide
The following example is incorrect and would cause host resolution and security problems with CA Spectrum:
127.0.0.1 <external name> localhost localhost.localdomain
NFS-Mounted File Systems
For CA Spectrum install directories that are an NFS-mounted file system, we recommend that you set the NFS mount options to ‘hard’ and ‘nointr’. These settings help ensure database consistency.
However, as there are many possible problems with such a setup, including severe performance impacts, we recommend that you avoid NFS mounts, if possible.
If you do use the 'hard' and 'nointr' NFS mount options, take extra care to obtain good database backups.
We do not recommend the 'soft' option at any time.
Set Up CDE Style Manager (Solaris 10 Only)
Before you install CA Spectrum, set up the CDE Style Manager to ensure proper behavior of OneClick views.
Follow these steps:
1. From CDE, select the Desktop Control button.
2. In the Application Manager - Desktop Controls window, select Window Style Manager.
3. Select Allow Primary Windows On Top.
This option allows pop-up windows to appear on top of OneClick views.
4. Within the Application Manager - Desktop Controls window, select Color Style Manager.
5. Select Raise Window When Made Active to allow a partially blocked window to appear on top when active.
The CDE style manager is set up.

Prerequisites for Linux and Solaris
Chapter 2: Prerequisites 33
Solaris ZFS Snapshots
One of the final steps of the CA Spectrum installation on Solaris platforms is the execution of the chown -R command. This command gives ownership of the CA Spectrum installation to the installation owner.
If you have taken a ZFS snapshot of your CA Spectrum installation, ZFS creates a .zfs directory in the <$SPECROOT> directory. This directory can cause massive delays during the installation process when the chown -R command is run.
To prevent massive delays during the installation process, the Administrator must hide the zpool snap directory before installing CA Spectrum. To hide this directory, enter the following command:
zfs set snapdir=hidden prod/data
This command does not affect the data that is stored; it makes the data invisible to the CA Spectrum installation. The Administrator can reveal the zpool snap directory after the installation completes.


Chapter 3: Upgrading CA Spectrum 35
Chapter 3: Upgrading CA Spectrum
This section contains the following topics:
Upgrading from Earlier Versions (see page 35) Pre-Upgrade and Post-Upgrade Tasks (see page 43) Preserve Customized Support Files (see page 45) How to Perform In-Place Upgrades (see page 47) Upgrade Best Practices: Fault-Tolerant Deployments (see page 50) Upgrade Best Practices: DSS Deployments without Fault Tolerance (see page 57) Migrate and Upgrade on Windows (see page 60) Migrate and Upgrade on Linux and Solaris (see page 63) OneClick Web Server Upgrades (see page 65) New OneClick Privileges (see page 65)
Upgrading from Earlier Versions
This release of CA Spectrum only supports new installations and upgrades from CA Spectrum starting with Release 9.2 H04.
Note: To upgrade from CA Spectrum 9.1 or an earlier version, you must be at CA Spectrum 9.2.0 or later before starting the upgrade to Release 9.2 H04. And then you can upgrade again, to Release 9.3.
For any CA Spectrum versions earlier than Release 9.2 H04, follow the steps that are provided in Upgrade to a Supported Version First (see page 35).
Important! During the upgrade, you must specify the character set encoding that your system is currently using. The installer prompts you for this information so that it can automatically convert your SpectroSERVER, DDM, and Spectrum Report Manager databases. For more information, see Upgrade Scenarios that Require a One-Time Database Conversion (see page 40).
Upgrade to a Supported Version First
As explained in Upgrading from Earlier Versions (see page 35), upgrades from some older versions of CA Spectrum first require an upgrade to a more recent version of the software. This release of CA Spectrum only supports new installations and upgrades from CA Spectrum starting with Release 9.2 H04.

Upgrading from Earlier Versions
36 Installation Guide
The following procedure describes an upgrade from a backlevel version in a fault-tolerant environment. First, upgrade the Primary SpectroSERVERs and Primary OneClick Web Server to Release 9.2 H04 or later. Then upgrade the Secondary servers. And then install CA Spectrum Release 9.3.
Important! Make sure all CA Spectrum servers, Primary and Secondary, are at the same version of CA Spectrum before starting them up.
Follow these steps:
1. Disable automatic online backups on the Primary SpectroSERVERs by taking the following steps:
a. Highlight the VNM model in the Universe Topology view.
b. In the Component Detail panel, select the Information tab.
c. Locate and expand the Online Database Backup subview.
d. Set Automatic Backups to “Disabled”.
2. Perform a manual online backup on every Primary SpectroSERVER to preserve the current database. Take the following steps:
a. In the Online Database Backup subview, click Begin Backup Now.
b. Verify that the online backup has succeeded.
Note: We recommend differentiating the databases by version number. Set the “Prefix for Backup File Name” parameter from the default of “db_” to something like “db_version_” or another value that identifies the version.
3. Edit the .vnmrc file to increase the 'maximum event records' parameter on all Secondary SpectroSERVERs. For example, change the following parameter:
max_event_records=20000
to the following value:
max_event_records=200000
The new value ensures that no events are lost during the upgrade.
4. Restart all Secondary SpectroSERVERs so that the change takes effect:
a. Launch a Spectrum Control Panel.
b. Click Stop SpectroSERVER.
c. Once the Status changes to “INACTIVE,” click Start SpectroSERVER.
d. Verify that the Status changes to “RUNNING”.
5. Instruct all OneClick users who are logged into the Primary OneClick Web Server to close their clients and log in to the Secondary OneClick Web Server.

Upgrading from Earlier Versions
Chapter 3: Upgrading CA Spectrum 37
6. Stop each of the Primary SpectroSERVERs:
a. Launch a Spectrum Control Panel
b. Click Stop SpectroSERVER.
c. You are prompted to verify the action to stop the SpectroSERVER and Archive Manger.
d. Verify that the Status changes to “INACTIVE”.
e. Exit the Spectrum Control Panel.
7. On the OneClick clients, verify that the SpectroSERVERs have failed over to the Secondary SpectroSERVERs.
The landscape icons in the Explorer hierarchy panel change from green to yellow
Yellow borders appear around the Contents and Component Detail panels.
8. (Optional) If you are upgrading a CA Spectrum version earlier than Release 9.2 H04, perform an upgrade to the interim version of CA Spectrum on the Primary OneClick Web Server, and wait for the installation to complete.
Note: To upgrade from CA Spectrum 9.1 or an earlier version, you must be at CA Spectrum 9.2.0 or later before starting the upgrade to Release 9.2 H04. And then you can upgrade again, to Release 9.3.
9. When the installation has completed, stop the Tomcat web server by executing the following command:
$SPECROOT/tomcat/bin/stopTomcat.sh
10. (Optional) Perform an upgrade to the interim version of CA Spectrum on all of the Primary SpectroSERVERs, and verify that the installations complete successfully.
Note: Wait for every installation to complete before continuing to the next step. Make sure all servers are at the same version of CA Spectrum.

Upgrading from Earlier Versions
38 Installation Guide
11. Install CA Spectrum Release 9.3 or Release 9.2.3. Use the same order that you followed for the upgrade.
Important! If you are upgrading to CA Spectrum Release 9.3, the installation includes a dialog to initiate a one-time database conversion. When you are prompted to select the appropriate character set encoding, select the option that applies to your environment. Select the Default option for deployments configured with the default character set encoding and default locale (US English). For more information, see Upgrade Scenarios that Require a One-Time Database Conversion (see page 40).
12. Manually start the Archive Manager on every Primary SpectroSERVER:
a. Launch a Spectrum Control Panel.
b. Select Control, and click Start Archive Manager.
Note: Starting the Archive Manager ensures that the events that are being stored locally on the Secondary SpectroSERVER are sent over to the Primary Archive Manager.
13. Wait for all events on the Secondary SpectroSERVERs to be sent over to the Primary Archive Manager. To verify their status, take the following steps:
a. In the OneClick client, highlight the VNM model for each SpectroSERVER in the Universe Topology view.
b. In the Component Detail panel, select the Information tab.
c. Locate and expand the SpectroSERVER Control subview.
d. Locate and expand the Event Log Information subview.
e. Wait for the total of Locally Stored Events to reach zero (0).
14. Start the SpectroSERVER on the Primary SpectroSERVER:
a. Launch a Spectrum Control Panel on the Primary SpectroSERVER.
b. Click Start SpectroSERVER.
c. Verify that the Status changes to “RUNNING”.
15. Start the remaining Primary SpectroSERVERs.
16. Start the Tomcat web service on the Primary OneClick Web Server by executing the following command:
$SPECROOT/tomcat/bin/startTomcat.sh
Note: The OneClick clients that are connected to the Secondary Web Server may or may not see the landscapes go red at this point.
17. Instruct all OneClick users who are logged in to the Secondary OneClick Web Server to close their client and log in to the Primary OneClick Web Server.

Upgrading from Earlier Versions
Chapter 3: Upgrading CA Spectrum 39
18. Verify that all clients can see the Primary SpectroSERVERs and that all landscape icons are green in the Explorer hierarchy panel.
Secondary Server Upgrade
Now upgrade the Secondary SpectroSERVERs to version Release 9.2 H04 or later.
Follow these steps:
1. Perform the upgrade of the Secondary OneClick Web Server and wait for the installation to complete. When the installation has completed, stop the Tomcat web server by executing the following command:
$SPECROOT/tomcat/bin/stopTomcat.sh
2. Perform the upgrades to the interim version of CA Spectrum on all of the Secondary SpectroSERVERs and verify that the installations complete successfully.
Note: Wait for every installation to complete before continuing to the next step.
3. Install CA Spectrum Release 9.3 or Release 9.2.3. (The version must match the version that you installed on the Primary SpectroSERVERs).
Important! If you are upgrading to CA Spectrum Release 9.3, the installation includes a dialog to initiate a one-time database conversion. When you are prompted to select the appropriate character set encoding, select the option that applies to your environment. Select the Default option for deployments configured with the default character set encoding and default locale (US English). For more information, see Upgrade Scenarios that Require a One-Time Database Conversion (see page 40).
4. Start the SpectroSERVER on every Secondary SpectroSERVER:
a. Launch a Spectrum Control Panel on the SpectroSERVER.
b. lick Start SpectroSERVER.
c. Verify that the Status changes to “RUNNING”.
5. Start the Tomcat web service on the Secondary OneClick Web Server by executing the following command:
$SPECROOT/tomcat/bin/startTomcat.sh
6. Instruct some OneClick users to launch a OneClick client to the Secondary OneClick Web Server.

Upgrading from Earlier Versions
40 Installation Guide
7. Verify that the clients open successfully and that all of the Secondary SpectroSERVERs are green.
8. If you have disabled automatic online backups on the Primary SpectroSERVERs, re-enable them:
a. Highlight the VNM model in the Universe Topology view.
b. In the Component Detail panel, select the Information tab.
c. Locate and expand the Online Database Backup subview.
d. Set Automatic Backups to “Enabled”.
9. Perform a manual online backup on every Primary SpectroSERVER to preserve the current database. Resynchronize the Primary SpectroSERVER database to the Secondary SpectroSERVER. Take the following steps:
a. In the Online Database Backup subview, click Begin Backup Now.
b. Verify that the online backup has succeeded.
Note: We recommend differentiating the databases by version number. Set the “Prefix for Backup File Name” parameter from the default of “db_” to something like “db_version_” or another value that identifies the version.
10. In fault-tolerant deployments, some final steps may be required. For more information, see Perform One-Time Database Conversion (Fault-Tolerant Environments) (see page 55).
Upgrade Scenarios that Require a One-Time Database Conversion
Some upgrade scenarios require extra steps to convert data in the SpectroSERVER, DDM, and Spectrum Report Manager databases. In most cases, however, no extra steps are required. To determine whether additional conversion steps are required for your situation, verify whether a non-default character set or locale was configured in your CA Spectrum deployment.
First, identify the character set encoding that your system uses to store CA Spectrum attribute data. If you think that the encoding setting may have been modified at some point, you can verify the encoding on the Character Set Encoding page in OneClick Administration. Or check the $SPECROOT/custom/common/config/tomcat-server-config.xml file. By default, the OneClick server uses the character set that is defined by the system language setting. Finally, consider whether CA Spectrum users have ever used a non-English character set when entering data, such as model names or annotations.

Upgrading from Earlier Versions
Chapter 3: Upgrading CA Spectrum 41
Most of the character set conversion for supported encodings is performed automatically during the upgrade. However, you must be careful to select the correct encoding in the Pre-Upgrade Character Set Encoding dialog during the installation.
If neither the default character set encoding nor the default locale (US English) has been changed, select the Default Encoding when you are prompted during the installation.
For fault-tolerant deployments, if a non-default character set encoding or a non-default locale setting was used before the upgrade, or if non-English characters were entered into the database, you must also run a script (see page 55) after the upgrade completes.
Not all character set encodings can be converted. Only the following encodings are supported for an upgrade:
■ ISO-8859-1 -- Americas, Western Europe, Australia (English, German, Italian, and others)
■ ISO-8859-2 -- Eastern European (Czech, Polish, Slovak, Hungarian, and others)
■ ISO-8859-7 Greek
■ ISO-8859-8 Hebrew
■ ISO-8859-9 Turkish
Notes: The only Japanese encoding that is supported is a database conversion from CA Spectrum r9.1J. The Windows-1255 character set can also be converted with the ISO-8859-8 option.
If you are using an unsupported encoding, perform a fresh installation instead of an upgrade.
For more information, see Perform One-Time Database Conversion (Fault-Tolerant Environments) (see page 55).
Schema Changes in MySQL Databases for CA Spectrum 9.3
UTF-8 encoding is mandatory for the internationalization of CA Spectrum Release 9.3. As a result, during the upgrade the CA Spectrum MySQL databases (ddmdb, mibtools, eh_integ, and netqos_integ) are converted to UTF-8 in the background. This conversion takes some time and depends on the size of these databases, actual hardware, and software environment parameters, such as the RAM, processor, the operating system.
Important! To improve the overall efficiency of the character encoding conversion of databases during the upgrade, run the db_optimize.pl script, and then the db_maintenance.pl script to clean your DDM database. For more information about database maintenance and optimization, see the Database Management Guide. Refer to Required Times for Upgrade Options (see page 43) for detailed information about expected upgrade times in different environments.

Upgrading from Earlier Versions
42 Installation Guide
If you have installed the Spectrum Report Manager, the schema of the reporting database is changed after the upgrade once the Tomcat web server restarts. The CA Spectrum installer prompts you to choose one of the following methods to convert the reporting database before you start the upgrade:
Preserve Report Manager data
Select this option if you want to preserve the Report Manager data. In this method, the schema of the reporting database is changed. All of the existing reporting database is converted to UTF-8 and stored using InnoDB. The Report Manager database conversion time depends on the size of the existing reporting database, hardware, and software parameters. Spectrum Report Manager is unavailable until the conversion finishes. After the conversion, all new reporting data is stored using InnoDB and in the UTF-8 encoding.
Remove all Report Manager data
Select this option if you want to delete all of your existing Report Manager data for a faster conversion. In this method, only the schema of the reporting database is changed. In this case, the conversion is faster as there is no existing data to be converted to the new schema. Spectrum Report Manager is unavailable until the conversion finishes. After the conversion, reporting data is stored using InnoDB and UTF-8.
Remove only Report Manager event data
Select this option if you want to delete only the Report Manager event data for a time efficient conversion. In this method, apart from the schema change, all of the existing reporting database except the event data, is converted to UTF-8 and stored using the InnoDB. The event data is large. By deleting this data, you can reduce the overall size of the Report Manager data. Spectrum Report Manager is unavailable until the conversion finishes. After the conversion, all new reporting data is stored using InnoDB and UTF-8.
Note: After you upgrade by clearing only the Report Manager event data, you may find some events that occurred before the time of upgrade. This situation occurs if the last event synchronization time from Archive Manager to Report Manager was a time before the upgrade. As a result, although the event data was cleared before the upgrade, the event synchronization after the upgrade causes the events to flow through to the reporting database starting from the last event synchronization time instead of the upgrade time.

Pre-Upgrade and Post-Upgrade Tasks
Chapter 3: Upgrading CA Spectrum 43
Required Times for Upgrade Options
We performed tests on specific databases to derive approximate upgrade times for various scenarios. We performed all tests on a server with 4 GB of RAM and two CPUs (2.26 GHZ) on the Windows 2008 Server platform. If an encoding conversion is required, the process can take more time than indicated here. The following table provides example results to help you determine the preferable upgrade option for your environment.
The results are for your information only. They are environment-specific and might not apply to all databases of the same size. In addition to the one-time database character set conversion, other factors, such as system specifications, platform, the number of database entries, and the degree of database fragmentation, can also affect the timings.
SRM DB Size Event Table Size
Event Table Rows
Time Required for Specified Option:
Preserve All Data
Remove Event Data
Remove All Data
75 GB 39 GB 35,683,681 5 hours (h) 36 minutes (mins)
< 1 min
115 GB 104 GB 50,198,426 7 h 48 mins 3 mins
215 GB 200 GB 64,575,242 9 h 1h 30 mins
8 mins
260 GB 153 GB 372,768,550 96 h 7h 28 mins
30 mins
Pre-Upgrade and Post-Upgrade Tasks
Before you upgrade CA Spectrum, complete these tasks:
■ Stop all running applications other than CA Spectrum.
■ Stop the following CA Spectrum applications:
■ Shut down all OneClick clients by logging off all users from OneClick in the Client Details web page in the OneClick home page.
Note: For more information about shutting down OneClick clients, see the Administrator Guide.
Pre-Upgrade and Post-Upgrade Tasks
44 Installation Guide
■ Stop the SpectroSERVER and the Archive Manager by clicking Stop SpectroSERVER in the CA Spectrum Control Panel and then close the CA Spectrum Control Panel.
■ Stop all VnmSh connections.
Note: For more information about stopping VnmSh connections, see the Command Line Interface User Guide.
■ Close all Bash shells.
■ Remove any existing versions of MySQL from the SpectroSERVER.
■ Schema changes in some MySQL databases occur during the upgrade. For more information about these schema changes, see Schema Changes in MySQL Databases for Spectrum 9.3 (see page 41).
■ The installer prompts you for your character set encoding so that it can convert the data in the DDM and Spectrum Report Manager databases to a supported encoding. For more information, see Upgrade Scenarios that Require a One-Time Database Conversion (see page 40).
■ If you have installed Spectrum Report Manager, verify that free disk space on the system is at least twice the size of the largest MYD file under $SPECROOT/mysql/data/reporting.
■ Do not install third-party software that uses MySQL because the results can be unpredictable.
After you upgrade from a previous version of CA Spectrum, complete these tasks:
■ If required for your environment, run the conversion script to convert the data in your fault-tolerant DDM database to a supported encoding. For more information, see Upgrade Scenarios that Require a One-Time Database Conversion (see page 40). The syntax is documented in Perform One-Time Database Conversion (Fault-Tolerant Environments) (see page 55).
■ To know the status of the conversion of the Report Manager database, see the tomcat log file at $SPECROOT\tomcat\logs.
■ If you configured OneClick to launch from Report Manager using SSL, configure this modification again.
Note: For more information about this modification, see the Administrator Guide.
More information:
How to Perform In-Place Upgrades (see page 47)

Preserve Customized Support Files
Chapter 3: Upgrading CA Spectrum 45
Preserve Customized Support Files
Some custom CA Spectrum support files can be overwritten when installing a new version of CA Spectrum. These support files include AlertMap, EventDisp, Event Format, Probable Cause, or GIB files.
For example, you can have customized event files that exist in the <$SPECROOT>/SG-Support/CsEvFormat directory. Before you upgrade the OneClick web server, move these files to <$SPECROOT>/custom/Events/CsEvFormat.
To preserve the customized files, the CA Spectrum installation creates a backup copy of each file. After you complete a CA Spectrum installation, you can review your customized files and can add them to the upgraded CA Spectrum version.
Follow these steps:
1. Navigate to the <$SPECROOT>/Install-Tools/LOGS/<version_date>/SavedFiles directory after you complete a CA Spectrum installation.
This directory contains subdirectories with backups of customized files. The original versions of these customized files are overwritten during an upgrade. The two backup file formats are:
■ .sv - files that were replaced during an upgrade by new files with the same name.
■ .obs - files that are obsolete and no longer exist with the upgraded version of CA Spectrum.
The original path to a given backup file is preserved within the SavedFiles directory. This directory structure tells you where the customized file originally came from.
For example, if you customized the Rtr_Cisco AlertMap file and then you installed a new version of CA Spectrum, the following file is available:
<$SPECROOT>/Install-Tools/LOGS/<version_date/SavedFiles/SS/CsVendor/Cisco_Rou
ter/Rtr_Cisco/Alertmap.sv
2. Review the .sv and .obs files to determine which customizations you want to implement again.

Preserve Customized Support Files
46 Installation Guide
3. Using any overwritten files, reapply your customization changes to the newly installed files.
For example, to reimplement the customizations in the Rtr_Cisco AlertMap file:
a. Open the following file in a text editor:
<$SPECROOT>/Install-Tools/LOGS/<version_date>/SavedFiles/SS/CsVendor/Cisc
o_Ro uter/Rtr_Cisco/AlertMap.sv
b. Compare this file to the new Rtr_Cisco AlertMap file at:
<$SPECROOT>/SS/CsVendor/Cisco_Router/Rtr_Cisco/AlertMap
c. Copy and paste any needed customizations from the backed-up AlertMap file (AlertMap.sv) to the new AlertMap file.
4. For any obsolete files, recreate a file to reimplement customizations.
If you want to apply your customizations across model types, you can recreate customizations at the global level. You can also recreate your customizations for only the specific model type for which they were originally implemented.
For example, the CA Spectrum upgrade obsoletes your event processing information in the EventDisp file at <$SPECROOT>/SS/CsVendor/Ctron_MMAC_Pls/9G426_02/EventDisp. To reimplement your customization, follow these steps:
a. To recreate the customizations at a model type level, create a blank text file that is called EventDisp. Save it to the <$SPECROOT>/SS/CsVendor/Ctron_MMAC_Pls/9G426_02 directory.
b. To recreate the customizations at a global level, create a blank text file that is called EventDisp. Save it to the <$SPECROOT>/SS/CsVendor/Ctron_MMAC_Pls directory.
c. Open the backup copy of the EventDisp file that the CA Spectrum installation created during the installation process. This file is located in the <$SPECROOT>/Install-Tools/LOGS/<version_date>/SavedFiles/SS/CsVendor/Ctron_MM AC_Pls/9G426_02 directory.
d. Locate each line of the EventDisp file that you customized.

How to Perform In-Place Upgrades
Chapter 3: Upgrading CA Spectrum 47
e. Copy each of these lines to the new, blank EventDisp file that you created.
Important! Copy only the lines in the EventDisp file that you customized. Do not copy the entire backed-up EventDisp file and paste it into the new EventDisp file. If the CA Spectrum version that you are installing has updated processing for some of the events previously in the Cabletron MMACPlus EventDisp file but are now in a global EventDisp file, you override this new event processing.
f. Save and close the new EventDisp file.
5. Restart the SpectroSERVER.
Your changes to the CA Spectrum support files are applied, and your customized support files are preserved.
Note: For more information about global or model type EventDisp and AlertMap files, see the Modeling and Managing Your IT Infrastructure Administrator Guide and the Event Configuration User Guide.
How to Perform In-Place Upgrades
If you have CA Spectrum data that you want to preserve, perform an in-place upgrade. An in-place upgrade installs a new version of CA Spectrum on an earlier version in the same system and directory. In-place upgrades do not require a database migration. For an upgrade that changes the server platform and requires data migration, see Migrate and Upgrade on Windows (see page 60) or Migrate and Upgrade on Linux and Solaris (see page 63).
To perform an in-place upgrade:
1. Complete all preupgrade tasks (see page 43).
2. Preserve your existing SpectroSERVER database (see page 48).
3. Preserve the CA Spectrum events and statistics database (see page 49).
4. Install CA Spectrum on top of an earlier version of CA Spectrum.
5. This guide provides procedures to upgrade from a backlevel version (see page 35), to upgrade in a fault-tolerant environment (see page 50), and to upgrade in an environment that lacks fault tolerance (see page 57).
Note: Additional steps are required for preserving the CA Spectrum databases and upgradeable components that are part of the older version.
More information:
Database Compatibility After Upgrade (see page 85)
How to Perform In-Place Upgrades
48 Installation Guide
Preserve the Existing SpectroSERVER Database
You can preserve an existing SpectroSERVER database before performing an in-place upgrade.
Follow these steps:
1. Verify that the SpectroSERVER is running, and open the CA Spectrum Control Panel.
2. Make a copy of your current SpectroSERVER database by clicking Save Database in the CA Spectrum Control Panel.
The Online Database Backup dialog opens.
3. Verify that the option to Use Backup Compression is selected.
4. Accept the default or enter a directory path in the Backup Directory field.
The default directory path is as follows:
■ Windows—C:/win32app/SPECTRUM/SS-DB-Backup
■ Solaris, Linux—/usr/SPECTRUM/SS-DB-Backup
Note: If you change the default, select a directory other than the CA Spectrum installation directory.
5. Accept the default of 20 for the Minimum Required Disk Space or enter an appropriate value.
6. Select Save to save all changes.
7. Click Begin Backup Now.
The Status displays the progress of the backup.
CA Spectrum automatically assigns a name for the backup with a .SSdb extension in the format db_YYYYMMDD_HHMM. The YYYYMMDD represents the year, month, and day, and HHMM represents the hour and minute when the backup started. For example, a backup that started at 10:42 on 10/06/06 is named db_20061006_1042.SSdb.
Note: Because compression was enabled, this file is compressed into a file with a .gz extension.
8. Click Save and Close.
The database is backed up.
9. Move the database to an area outside the CA Spectrum installation directory.
The existing SpectroSERVER database is preserved.

How to Perform In-Place Upgrades
Chapter 3: Upgrading CA Spectrum 49
More information:
Migrate and Upgrade on Windows (see page 60) Migrate and Upgrade on Linux and Solaris (see page 63) How to Perform In-Place Upgrades (see page 47) Install CA Spectrum (see page 71)
Preserve the CA Spectrum Events and Statistics Database
You can preserve the CA Spectrum events and statistics database before upgrading CA Spectrum.
Follow these steps:
1. Stop the SpectroSERVER and the Archive Manager by clicking Stop SpectroSERVER in the CA Spectrum Control Panel.
2. Execute cd <$SPECROOT>\SS\DDM in the command prompt, where <$SPECROOT> is the directory where CA Spectrum was installed.
3. Enter the following command:
ddm_save dbsavefile
The file dbsavefile.tgz is created.
4. Move the dbsavefile.tgz to an area other than the CA Spectrum installation directory.
5. Stop the following CA Spectrum applications:
■ Shut down all OneClick clients by logging off all users from OneClick in the Client Details web page in the OneClick home page.
Note: For more information about shutting down OneClick clients, see the Administrator Guide.
■ Stop all VnmSh connections.
Note: For more information about stopping VnmSh connections, see the Command Line Interface User Guide.
■ Close all Bash shells.
6. Install CA Spectrum (see page 71).
Note: We recommend that you back up the new, upgraded SpectroSERVER database using the SSdbsave utility with the -cm option before starting the SpectroSERVER. This utility is located in the SS-Tools directory. Backing up the new SpectroSERVER database ensures the integrity of the database, in case the new SpectroSERVER fails before you access the Online Database Backup.
The existing CA Spectrum events and statistics database is preserved.

Upgrade Best Practices: Fault-Tolerant Deployments
50 Installation Guide
More information:
How to Perform In-Place Upgrades (see page 47)
Upgrade Best Practices: Fault-Tolerant Deployments
Upgrades in a fault-tolerant environment are supported. However, take care to follow the recommendations in this topic and in the related procedure (see page 51). All of your Primary and Secondary SpectroSERVERs must be upgraded within a small window of a few hours.
Not all upgrade paths are supported. Refer to Upgrading from an Earlier Version (see page 35) for more information.
Before conducting any upgrades, verify that all CA Spectrum components are up-to-date with current service packs. Also consult the list of the communication ports and protocols that CA Spectrum uses. Your security parameters may require you to temporarily disable these ports and protocols during the upgrade. For more information about firewall ports and protocols, see the Distributed SpectroSERVER Administrator Guide.
Upgrade the Primary SpectroSERVER and Primary OneClick server first, followed by the remaining Primary SpectroSERVERs. Upgrade the Secondary servers last.
Important! The one-time database conversion is slightly different in some fault-tolerant deployments to avoid having both the Primary and Secondary SpectroSERVERs down at the same time.
The following steps describe a fault-tolerant database conversion:
1. Upgrade all Primary servers (see page 51) first. The encoding conversion occurs automatically.
2. Upgrade all Secondary servers (see page 54). The encoding conversion occurs automatically.
3. If required, run Ssdbload –UpgradeFrom source encoding on all Primary servers.
This script converts any alarm data that is synchronized from the Secondary servers to UTF-8 character encoding. For more information, see Perform One-Time Database Conversion (Fault-Tolerant Environments) (see page 55).
Upgrade Best Practices: Fault-Tolerant Deployments
Chapter 3: Upgrading CA Spectrum 51
Upgrade Fault-Tolerant SpectroSERVERs and OneClick Web Servers
The following procedure describes an upgrade in a fault-tolerant environment. Use the same procedure for a single-server or DSS upgrade: upgrade Primary servers before upgrading Secondary servers (see page 54). Upgrade the OneClick Web Server before upgrading the SpectroSERVERs.
Typical upgrades occur between contiguous releases. The following steps include optional instructions for a noncontiguous upgrade (that is, an upgrade in which intervening versions of the software are not installed).
Note: Alarms may display incorrectly in OneClick until the upgrade process is complete, including any post-upgrade steps that may be required. Avoid using CA Spectrum for management until you have completed all steps.
Follow these steps:
1. Disable automatic online backups on the Primary SpectroSERVERs by taking the following steps:
a. Highlight the VNM model in the Universe Topology view.
b. In the Component Detail panel, select the Information tab.
c. Locate and expand the Online Database Backup subview.
d. Set Automatic Backups to “Disabled”.
2. Perform a manual online backup on every Primary SpectroSERVER to preserve the current database. Take the following steps:
a. In the Online Database Backup subview, click Begin Backup Now.
b. Verify that the online backup has succeeded.
Note: We recommend differentiating the databases by version number. Set the “Prefix for Backup File Name” parameter from the default of “db_” to something like “db_version_” or another value that identifies the version.
3. Edit the .vnmrc file to increase the 'maximum event records' parameter on all Secondary SpectroSERVERs. For example, change the following parameter:
max_event_records=20000
to the following value:
max_event_records=200000
The new value prevents event loss during the upgrade.
Upgrade Best Practices: Fault-Tolerant Deployments
52 Installation Guide
4. Restart all Secondary SpectroSERVERs so that the change takes effect:
a. Launch a Spectrum Control Panel.
b. Click Stop SpectroSERVER.
c. Once the Status changes to “INACTIVE,” click Start SpectroSERVER.
d. Verify that the Status changes to “RUNNING”.
5. Instruct all OneClick users who are logged into the Primary OneClick Web Server to close their clients and log in to the Secondary OneClick Web Server.
6. Stop each of the Primary SpectroSERVERs:
a. Launch a Spectrum Control Panel
b. Click Stop SpectroSERVER.
c. You are prompted to verify the action to stop the SpectroSERVER and Archive Manger.
d. Verify that the Status changes to “INACTIVE”.
e. Exit the Spectrum Control Panel.
7. On the OneClick clients, verify that the SpectroSERVERs have failed over to the Secondary SpectroSERVERs.
The landscape icons in the Explorer hierarchy panel change from green to yellow
Yellow borders appear around the Contents and Component Detail panels.
8. (Optional) If you are upgrading a CA Spectrum version earlier than Release 9.2 H04, follow the steps in the topic titled Upgrade to a Supported Version First (see page 35).
9. Install CA Spectrum Release 9.3 or Release 9.2.3.
Important! If you are upgrading to CA Spectrum Release 9.3, the installation includes a dialog to initiate a one-time database conversion. When you are prompted to select the appropriate character set encoding, select the option that applies to your environment. Select the Default option for deployments configured with the default character set encoding and default locale (US English). For more information, see Upgrade Scenarios that Require a One-Time Database Conversion (see page 40).
10. When the installation has completed, stop the Tomcat web server by executing the following command:
$SPECROOT/tomcat/bin/stopTomcat.sh
11. (Optional) Perform the upgrade to the interim version of CA Spectrum on all of the Primary SpectroSERVERs, and verify that the installations complete successfully.
Note: Wait for every installation to complete before continuing to the next step.

Upgrade Best Practices: Fault-Tolerant Deployments
Chapter 3: Upgrading CA Spectrum 53
12. Perform the upgrade to the most recent version of CA Spectrum on the Primary OneClick Web Server, and wait for the installation to complete.
13. When the installation has completed, stop the Tomcat web server by executing the following command:
$SPECROOT/tomcat/bin/stopTomcat.sh
14. Perform the upgrade to the most recent version of CA Spectrum on all of the Primary SpectroSERVERs, and verify that the installations complete successfully.
Note: Wait for every installation to complete before continuing to the next step.
15. Manually start the Archive Manager on every Primary SpectroSERVER:
a. Launch a Spectrum Control Panel.
b. Select Control, and click Start Archive Manager.
Note: Starting the Archive Manager ensures that the events that are being stored locally on the Secondary SpectroSERVER are sent over to the Primary Archive Manager.
16. Wait for all events on the Secondary SpectroSERVERs to be sent over to the Primary Archive Manager. To verify their status, take the following steps:
a. In the OneClick client, highlight the VNM model for each SpectroSERVER in the Universe Topology view.
b. In the Component Detail panel, select the Information tab.
c. Locate and expand the SpectroSERVER Control subview.
d. Locate and expand the Event Log Information subview.
e. Wait for the total of Locally Stored Events to reach zero (0).
17. Start the SpectroSERVER on the Primary MLS:
a. Launch a Spectrum Control Panel on the Primary MLS.
b. Click Start SpectroSERVER.
c. Verify that the Status changes to “RUNNING”.
18. Start the remaining Primary SpectroSERVERs.
19. Start the Tomcat web service on the Primary OneClick Web Server by executing the following command:
$SPECROOT/tomcat/bin/startTomcat.sh
Note: The OneClick clients that are connected to the Secondary Web Server may or may not see the landscapes go red at this point.
20. Instruct all OneClick users who are logged in to the Secondary OneClick Web Server to close their client and log in to the Primary OneClick Web Server.
21. Verify that all clients can see the Primary SpectroSERVERs and that all landscape icons are green in the Explorer hierarchy panel.

Upgrade Best Practices: Fault-Tolerant Deployments
54 Installation Guide
Upgrade Fault-Tolerant Secondary SpectroSERVERs
The following procedure describes an upgrade in a fault-tolerant environment. These steps assume that you have already upgraded Primary servers. In this procedure, you upgrade all Secondary SpectroSERVERs and the Secondary OneClick Web Server.
Note: Alarms may display incorrectly in OneClick until the upgrade process is complete, including any post-upgrade steps that may be required. Avoid using CA Spectrum for management until you have completed all steps.
Follow these steps:
1. Perform the upgrade of the Secondary OneClick Web Server and wait for the installation to complete.
2. When the installation has completed, stop the Tomcat web server by executing the following command:
$SPECROOT/tomcat/bin/stopTomcat.sh
3. Perform the upgrades to the most recent version of CA Spectrum on all of the Secondary SpectroSERVERs, and verify that the installations complete successfully.
Important! If you are upgrading to CA Spectrum Release 9.3, the installation includes a dialog to initiate a one-time database conversion. When you are prompted to select the appropriate character set encoding, select the option that applies to your environment. Select the Default option for deployments configured with the default character set encoding and default locale (US English). For more information, see Upgrade Scenarios that Require a One-Time Database Conversion (see page 40).
Note: Wait for every installation to complete before continuing to the next step.
4. Start the SpectroSERVER on every Secondary SpectroSERVER:
a. Launch a Spectrum Control Panel on the SpectroSERVER.
b. Click Start SpectroSERVER.
c. Verify that the Status changes to “RUNNING”.
5. Start the tomcat web service on the Secondary OneClick Web Server by executing the following command:
$SPECROOT/tomcat/bin/startTomcat.sh
6. Instruct a few OneClick users to launch a OneClick client to the Secondary OneClick Web Server.
Upgrade Best Practices: Fault-Tolerant Deployments
Chapter 3: Upgrading CA Spectrum 55
7. Verify that the clients open successfully and that all of the Primary SpectroSERVERs are green.
8. Perform a manual online backup on every Primary SpectroSERVER to preserve the current database. Take the following steps:
a. In the Online Database Backup subview, click Begin Backup Now.
b. Verify that the online backup has succeeded.
c. Resynchronize the Primary SpectroSERVER database with the Secondary SpectroSERVER.
Note: We recommend differentiating the databases by version number. Set the “Prefix for Backup File Name” parameter from the default of “db_” to something like “db_version_” or another value that identifies the version.
9. When both servers have been upgraded, perform the final steps that are described in Perform One-Time Database Conversion (Fault-Tolerant Environments) (see page 55).
Perform One-Time Database Conversion (Fault-Tolerant Environments)
After upgrading multiple servers to CA Spectrum Release 9.3 in a fault-tolerant deployment, you must take some final steps to convert existing alarms to use UTF-8 encoding. This encoding is required to support localization. The upgrade procedure automatically converts your databases to use UTF-8; however, the steps in this one-time procedure are required to convert existing alarms in a fault-tolerant deployment to UTF-8.
The additional conversion steps are only required if any one of the following applies:
■ A non-default character set was configured in your CA Spectrum deployment.
■ The system locale has been changed from the default (English) locale.
■ User input to CA Spectrum may contain non-English characters—characters outside of the standard NVT ASCII character set.
For more information, see Upgrade Scenarios that Require a One-Time Database Conversion (see page 40).

Upgrade Best Practices: Fault-Tolerant Deployments
56 Installation Guide
Note: Alarms may display incorrectly in OneClick until the upgrade process is complete, including any post-upgrade steps that may be required. Avoid using CA Spectrum for management until you have completed all steps.
Follow these steps:
1. Disable the option to Automatically Start/Stop Archive Manager on the Primary SpectroSERVER by taking the following steps:
a. Launch a Spectrum Control Panel.
b. From the Control menu, clear the option to 'Auto Start/Stop Archive Manager'.
2. Stop the Primary SpectroSERVER by taking the following steps:
a. Launch a Spectrum Control Panel.
b. Click Stop SpectroSERVER.
You are prompted to verify the action to stop the SpectroSERVER.
c. Verify that the Status changes to “INACTIVE”.
d. Exit the Spectrum Control Panel.
3. Disable Fault-Tolerant Alarm Synchronization on the Primary SpectroSERVER by taking the following steps:
a. Open the $SPECROOT/SS/.vnmrc file.
b. Add the following option at the end of the file:
ftasv_enabled=false
4. Save a copy of the database on the Primary SpectroSERVER.
From the $SPECROOT/SS directory, run the following command:
../SS-Tools/SSdbsave –m dbsavefile
dbsavefile
The filename of the database copy that you are creating.
5. Run the conversion script on the Primary SpectroSERVER.
The conversion utility is included with SSdbload and uses the following syntax:
SSdbload –UpgradeFrom encoding SAVE_FILE
encoding
The encoding that you used with the previous version of CA Spectrum and want to convert. The supported encodings are listed in the Software Release Notice.
SAVE_FILE
The filename of the database copy that you created in Step 4.

Upgrade Best Practices: DSS Deployments without Fault Tolerance
Chapter 3: Upgrading CA Spectrum 57
6. Start the Primary SpectroSERVER by taking the following steps:
a. Launch a Spectrum Control Panel on the Primary SpectroSERVER.
b. Click Start SpectroSERVER.
c. Verify that the Status changes to “RUNNING”.
7. Run an Online Database Backup by taking the following steps:
a. Open a OneClick client.
b. Navigate to the Online Database Backup subview on the VNM model.
c. Wait for the Model Activation on the Primary SpectroSERVER to complete.
d. Click Begin Backup Now.
8. Enable the Fault Tolerant Alarm Synchronization on the Primary SpectroSERVER by taking the following steps:
a. Open the $SPECROOT/SS/.vnmrc file.
b. Remove the following option from the end of the file:
ftasv_enabled=false
9. Enable the option to Automatically Start/Stop Archive Manager on the Primary SpectroSERVER by taking the following steps:
a. Launch a Spectrum Control Panel.
b. From the Control menu, select the option to 'Auto Start/Stop Archive Manager'.
10. Restart the OneClick web server and any connected OneClick clients.
Important! Alarms that are generated on the Secondary SpectroSERVER during this process are not preserved, but are regenerated on the Primary SpectroSERVER when the conditions are detected.
Upgrade Best Practices: DSS Deployments without Fault Tolerance
The topic titled Upgrade Fault-Tolerant SpectroSERVERs and OneClick Web Servers (see page 51) provides the steps to upgrade CA Spectrum in a fault-tolerant environment. With no fault-tolerant SpectroSERVERs configured in your deployment, a temporary fault-tolerant system is used during the upgrade. Once the temporary system is configured, the primary SpectroSERVER is disabled for an in-place upgrade. Meanwhile, the temporary, secondary SpectroSERVER system takes over core network management duties.

Upgrade Best Practices: DSS Deployments without Fault Tolerance
58 Installation Guide
Some CA Spectrum applications do not support automatic failover and are disabled during the upgrade. For example, TL1, Southbound Gateway, Modeling Gateway, Alarm Notifier, and Event Notifier are temporarily disabled during the upgrade.
Upgrade SpectroSERVERs and OneClick Web Servers in a Non-Fault Tolerant Deployment
When you upgrade a CA Spectrum DSS environment that lacks a fault-tolerant configuration, deploy a temporary server to preserve network monitoring activities. This server is systematically configured as the Secondary, fault-tolerant server for each SpectroSERVER that is upgraded. Start the upgrade with the MLS, the main SpectroSERVER.
The procedure to perform an in-place upgrade with no network management loss is described below.
Follow these steps:
1. Designate a server to serve as the temporary Secondary SpectroSERVER.
2. Install a copy of your currently installed (that is, backlevel) CA Spectrum software on the temporary SpectroSERVER. Be sure to install all required patches.
Important! Do not start the SpectroSERVER yet.
3. Edit the Host Security configuration on the temporary SpectroSERVER. The list of hostnames must be identical to that of the MLS in your current deployment.
4. Perform an online backup of the SpectroSERVER database on the MLS.
Important! Be sure to disable file compression and automatic backup features until the entire upgrade process has completed.
5. Copy the backup database to the $SPECROOT/SS directory on the temporary SpectroSERVER.
6. On the temporary SpectroSERVER host, navigate to the SS directory.
7. Load the database backup file by issuing the following command:
../SS-Tools/SSdbload -il -add precedence savefile
precedence
A numeric value that is greater than the Primary SpectroSERVER (the MLS) default value.
Default: 10 (20 is recommended).
savefile
The name of the database backup file that you created previously.

Upgrade Best Practices: DSS Deployments without Fault Tolerance
Chapter 3: Upgrading CA Spectrum 59
8. Edit the .vnmrc file to increase the 'maximum event records' parameter on the temporary SpectroSERVER. For example, change the following parameter:
max_event_records=20000
to the following value:
max_event_records=200000
The new value ensures that no events are lost during the upgrade.
9. Disable the Archive Manager on the Secondary SpectroSERVER from starting automatically to avoid losing event and statistical data.
Taking this step ensures that all data is cached and returned to the Primary SpectroSERVER once the upgrade has completed and the Primary SpectroSERVER has been restarted.
a. On the temporary Secondary SpectroSERVER, launch a Spectrum Control Panel.
b. Click Control, and clear the box next to “Auto Start/Stop Archive Manager.”
Note: As a best practice, ensure that no events are lost during the upgrade. You can increase the maximum locally stored event record size. The default maximum locally stored log sizes for events and statistics are 20,000 and 5,000. In most cases, these default settings are sufficient.
10. Start the SpectroSERVER on the temporary SpectroSERVER host. The temporary SpectroSERVER is now the Secondary, fault-tolerant SpectroSERVER for the MLS.
An orange alarm on the VNM indicates that the Archive Manager is not running. You can ignore it.
11. Verify the setup of the Secondary fault tolerant SpectroSERVER by checking the Landscape Configuration view on the MLS:
a. In OneClick, double-click the VNM icon in the Universe Topology view. The landscape container is displayed.
b. In the Contents panel highlight the “LocalLscpe” model.
c. In the Component Detail panel, select the Information tab.
d. Locate and expand the “Loaded Landscapes” subview.
e. Verify that the list contains both the Primary MLS, with a precedence of 10, and the temporary Secondary SpectroSERVER, with a precedence of 20 (or the precedence value that was specified with the “SSdbload” command).
12. Shut down the Primary SpectroSERVER (the MLS).
The Secondary SpectroSERVER resumes management tasks while the MLS is upgraded.

Migrate and Upgrade on Windows
60 Installation Guide
13. Follow the steps that are listed in How to Perform In-Place Upgrades (see page 47) to upgrade the MLS.
14. Once the MLS has been successfully upgraded, manually start the Archive Manager on the Primary SpectroSERVER:
a. Launch a Spectrum Control Panel.
b. Select Control, and click Start Archive Manager.
Note: Starting the Archive Manager ensures that the events that are being stored locally on the Secondary SpectroSERVER are sent over to the Primary Archive Manager.
15. Start the SpectroSERVER.
Primary management functions switch back to the MLS.
16. Follow the steps that are provided in Perform One-Time Database Conversion (Fault-Tolerant Environments) (see page 55).
Note: Do not perform the step that instructs you to initiate an Online Backup.
This upgrade configuration ensures that alarms that are synchronized from the secondary SpectroSERVER and that were generated before the primary SpectroSERVER was upgraded do not contain non-UTF-8 data.
17. Configure the temporary SpectroSERVER host as a Secondary SpectroSERVER for the next SpectroSERVER that you plan to upgrade.
18. Repeat the above steps to back up, shut down, and upgrade each SpectroSERVER in turn.
19. Upgrade the OneClick Web Server last.
20. Review the post-installation steps in Post-Installation Configurations (see page 129).
Migrate and Upgrade on Windows
You can migrate the existing SpectroSERVER database and Archive Manager database and other upgradeable components to a different directory or system, and then upgrade CA Spectrum. This way, you can continue to manage your network with the existing CA Spectrum version during the installation process.
Note: You cannot move a CA Spectrum installation from one system to another or from one directory to another. Instead, first copy or move the CA Spectrum databases and then run the installation program to reinstall CA Spectrum over the relocated database.
Migrate and Upgrade on Windows
Chapter 3: Upgrading CA Spectrum 61
Important! The C:\Program Files\CA directory is automatically created during a first-time installation of CA Spectrum. CA Spectrum components that are also common to other CA products are intentionally installed into this directory. This directory is automatically updated as needed during a CA Spectrum upgrade. Do not remove files from this directory.
Follow these steps:
1. Delete all remote landscapes, if any exist, from the existing database.
2. Create a user model from the OneClick Users tab. Name it the same name as the owner of the directory where you are installing the new CA Spectrum version.
3. Preserve the existing SpectroSERVER database (see page 48).
Important! When backing up the SpectroSERVER database for migration, include both the modeling catalog and the models. A catalog-only or models-only migration is not supported.
4. Preserve the CA Spectrum Events and Statistics database (see page 49).
5. Extract the dbsavefile.SSdb file from the dbsavefile.SSdb.gz file in the SS-DB-Backup directory.
6. Copy the saved SSdb file to the dbsavefile.SSdb file. If the SSdb file had backup compression enabled, uncompress the SSdb file by running gzip -d <database_file.gz> and then perform the copy. For example, cp db_20080105_1153.SSdb dbsavefile.SSdb.
Important! The dbsavefile.SSdb file must not be compressed. If dbsavefile.SSdb is compressed, the database is not migrated during installation.
7. Create an installation directory, <$SPECROOT>, for the new version of CA Spectrum.
Important! You cannot install CA Spectrum into a directory that contains a space anywhere in the path. Spaces within the directory path cause the installation to fail.
8. Create an SS subdirectory in $SPECROOT.
9. Copy the custom directory from the earlier CA Spectrum installation directory to the $SPECROOT directory of the upgraded CA Spectrum installation.
10. Copy or FTP (in binary mode) the dbsavefile.SSdb file to the $SPECROOT\SS subdirectory.
Note: Migrating an existing SpectroSERVER database migrates all of the existing models into the new SpectroSERVER database when you install a new version of CA Spectrum. This migration includes the models containing topology views including icon placement, groupings, and annotations.
11. Create a DDM subdirectory in the SS subdirectory.

Migrate and Upgrade on Windows
62 Installation Guide
12. Copy or FTP (in binary mode) dbsavefile.tgz to the new $SPECROOT\SS\DDM directory.
The directory structure now resembles the following structure:
13. (Optional) To migrate the OneClick web server, copy the contents of the <$SPECROOT>\custom directories from the computer with the old OneClick web server installation. Paste these contents into the <$SPECROOT>\custom directories on the computer with the new OneClick web server installation.
Important! Do not copy the <$SPECROOT>/custom/common/config/custom-jnlp-config.xml file to another computer when you migrate and upgrade CA Spectrum. This file can contain memory settings that are not compatible with the computer where you are copying the custom directories.
Note: The mapping of custom background images (<$SPECROOT>\custom\images\background) to topology views is maintained in the SpectroSERVER database. For more information about the <$SPECROOT>\custom directories, see the OneClick Customization Guide.
14. Install CA Spectrum (see page 71).
CA Spectrum is migrated and upgraded.

Migrate and Upgrade on Linux and Solaris
Chapter 3: Upgrading CA Spectrum 63
Migrate and Upgrade on Linux and Solaris
You can migrate existing CA Spectrum databases and other upgradeable components to a different directory or system, and then upgrade CA Spectrum. This way, you can continue to manage your network with the existing CA Spectrum version during the installation process.
Note: Do not move a CA Spectrum installation from one system to another or from one directory to another. Instead, first copy or move the CA Spectrum database and then run the installation program to reinstall CA Spectrum over the relocated database.
Important! The /opt/CA directory is automatically created during a first-time installation of CA Spectrum. CA Spectrum components that are also common to other CA products are intentionally installed into this directory. This directory is automatically updated as needed during a CA Spectrum upgrade. Do not remove files from this directory.
Follow these steps:
1. Delete all remote landscapes, if any exist, from the existing database.
2. Create a user model from the OneClick Users tab. Name it the same name as the owner of the directory where you are installing the new CA Spectrum version.
3. Preserve the existing SpectroSERVER database (see page 48).
Important! When backing up the SpectroSERVER database for migration, include both the modeling catalog and the models. A catalog-only or models-only migration is not supported.
4. Preserve the CA Spectrum Events and Statistics database (see page 49).
5. Extract the dbsavefile.SSdb file from the dbsavefile.SSdb.gz file in the SS-DB-Backup directory.
6. Copy the saved SSdb file to the dbsavefile.SSdb file. If SSdb had backup compression enabled, first uncompress the SSdb by running gzip -d <database_file.gz> and then perform the copy. For example, cp db_20080105_1153.SSdb dbsavefile.SSdb.
Important! The dbsavefile.SSdb file must not be compressed. If dbsavefile.SSdb is compressed, the database is not migrated during installation.
7. Create an installation directory, <$SPECROOT>, for the new version of CA Spectrum, along with subdirectories for the two database files as follows:
mkdir -p <$SPECROOT>/SS/DDM
Important! Do not use /opt/SPECTRUM as the installation directory name. This location is reserved for a directory that is automatically created during installation. Also, ensure that the directory owner name is the same name as the owner of the directory where you are installing the new CA Spectrum version.
Important! You cannot install CA Spectrum into a directory that contains a space anywhere in the path. Spaces within the directory path cause the installation to fail.

Migrate and Upgrade on Linux and Solaris
64 Installation Guide
8. Copy or FTP (in binary mode) the dbsavefile.SSdb file to the <$SPECROOT>/SS directory.
Note: Migrating an existing SpectroSERVER database migrates all the existing models into the new SpectroSERVER database when you install a new version of CA Spectrum. This migration includes the models containing topology views including icon placement, groupings, and annotations.
9. Copy or FTP (in binary mode) the dbsavefile.tgz file to the <$SPECROOT>/SS/DDM directory.
The directory structure now resembles the following structure:
10. (Optional) To migrate the OneClick web server, copy the contents of the <$SPECROOT>/custom directories from the computer with the old OneClick web server installation. Paste these contents into the <$SPECROOT>/custom directories on the computer with the new OneClick web server installation.
Important! Do not copy the <$SPECROOT>/custom/common/config/custom-jnlp-config.xml file to another computer when you migrate and upgrade CA Spectrum. This file can contain memory settings that are not compatible with the computer where you are copying the custom directories.
Note: The mapping of custom background images (<$SPECROOT>/custom/images/background) to topology views is maintained in the SpectroSERVER database. For more information about the <$SPECROOT>/custom directories, see the OneClick Customization Guide.
11. Install CA Spectrum (see page 71).
CA Spectrum is migrated and upgraded.

OneClick Web Server Upgrades
Chapter 3: Upgrading CA Spectrum 65
OneClick Web Server Upgrades
All OneClick clients must be shut down before upgrading the OneClick web server because Java Web Start applications cache application jar files on the client. These jar files are automatically updated when you restart the application. You can shut down all OneClick clients by selecting Client Details and clicking Log Off Clients.
For OneClick web server installations on a dedicated system (such as, <OC install dir>/WebApps), the OneClick web server is installed in the <$SPECROOT> directory. However, OneClick web server installation on the same system as CA Spectrum are installed in a different directory. In this case, the OneClick web server is installed in the directory you specified during the CA Spectrum upgrade (such as, <OC install dir>/WebApps).
Note: For more examples about how to use the <$SPECROOT>/custom directory, see the OneClick Customization Guide.
When you install the OneClick web server on a dedicated system, install it in the <OC install dir>/WebApps directory. Install CA Spectrum in the existing CA Spectrum directory when the system includes a current version of a SpectroSERVER and the OneClick web server. Do not install CA Spectrum in the OneClick directory. The existing CA Spectrum directory appears in the Destination Location dialog.
Note: Upgrading the OneClick web server typically archives the existing Apache Tomcat directory to <$SPECROOT>/Install-Tools/LOGS/<version_date>/SavedFiles/tomcat-<time>. Once you have successfully upgraded the OneClick web server and verified any OneClick customizations, we recommend that an administrator remove this directory. The directory uses available disk space unnecessarily.
New OneClick Privileges
A new version of CA Spectrum sometimes includes new privileges that are assigned, by default, to one or more of the default CA Spectrum roles. For example, CA Spectrum assigns these privileges to a default CA Spectrum role such as OperatorRW. Remember, users who are not assigned these default roles are not automatically granted these new privileges. To grant these new privileges, either explicitly assign them to the users, or assign the default roles to the users.
Additionally, consider assigning the new privileges to one or more custom roles that you have created. Therefore, users that are assigned to only those custom roles are also granted the new privileges.
Note: For more information on working with users, roles, and privileges, see the Administrator Guide.


Chapter 4: Installing CA Spectrum 67
Chapter 4: Installing CA Spectrum
This section contains the following topics:
Install CA Spectrum Remotely (see page 67) OneClick Web Server and SpectroSERVER on Separate Systems (see page 67) Mount the Installation Media on Solaris and Linux (see page 68) Start the Installation on Windows (see page 68) Start the Installation on Linux and Solaris (see page 69) Install CA Spectrum (see page 71) Files Created During Installation (see page 76)
Install CA Spectrum Remotely
You can use Telnet to install CA Spectrum remotely over your network. You can also use the GUI or distributed installation to install CA Spectrum remotely. For example, you can use the Windows GUI installer to install CA Spectrum to a Solaris or Linux system using the installation DVD for that platform.
You can only perform one system installation at a time. You need the host name of the remote system and the administrator ID and password.
Follow these steps:
1. If CA Spectrum is not already installed on the remote system, insert the installation DVD into the appropriate drive of the computer where you want to install CA Spectrum remotely.
2. Install the CA Spectrum Remote Administration Daemon (SRAdmin) on the computer where you want to install CA Spectrum remotely.
3. Insert the installation DVD for the computer where you want to install CA Spectrum remotely into the appropriate drive of the local computer.
4. Install CA Spectrum (see page 71).
CA Spectrum is installed remotely.
OneClick Web Server and SpectroSERVER on Separate Systems
To install the OneClick web server and a SpectroSERVER on separate systems, repeat the installation process (see page 71) for each system installation. Be sure to select the appropriate components on the Select Options dialog during installation. You can also use the distributed installation to install different components to separate systems at the same time.
Mount the Installation Media on Solaris and Linux
68 Installation Guide
Mount the Installation Media on Solaris and Linux
If Volume Management is disabled, set up an installation media mount-point directory. Then, run a mount command to access the installation software on the installation media. This procedure varies depending on whether the installation is local (the target system is the host for the drive) or remote (a system other than the target hosts the drive).
Note: If a Solaris or Linux system has Volume Management enabled, the installation media mounts automatically.
Follow these steps:
1. Insert the installation media into the appropriate drive.
2. Mount the <installation_media> file system by running the following command, where <installation_media> is the directory you created:
■ On Solaris:
mount -r -F hsfs /dev/sr0 /<installation_media>
■ On Linux:
mount -t iso9660 /dev/dvd /mnt/<installation_media>
The installation media is mounted.
Start the Installation on Windows
You can start the CA Spectrum installation on Windows platforms.
Important! You cannot install a released version of CA Spectrum on top of a beta or evaluation version of the product. Instead, uninstall the beta or evaluation version first.
Follow these steps:
1. Stop all non-CA Spectrum running applications.
2. Stop the following CA Spectrum applications:
■ Shut down all OneClick clients by logging off all users from OneClick in the Client Details web page in the OneClick home page.
Note: For more information about shutting down OneClick clients, see the Administrator Guide.
■ Stop the SpectroSERVER and the Archive Manager by clicking Stop SpectroSERVER in the CA Spectrum Control Panel and then close the CA Spectrum Control Panel.
Note: For more information about the CA Spectrum Control Panel, see the Administrator Guide.
Start the Installation on Linux and Solaris
Chapter 4: Installing CA Spectrum 69
■ Stop all VnmSh connections.
Note: For more information about stopping VnmSh connections, see the Command Line Interface User Guide.
■ Close all Bash shells.
3. Ensure that you have met the system requirements (see page 11) and prerequisites (see page 27).
Important! Disable your antivirus software's real-time protection before installing CA Spectrum. Disabling helps avoid potential problems with files that could be in use by the real-time protection software.
4. Log in as a user with administrator rights.
5. Insert the installation media into the appropriate drive. If autorun is disabled, you can double-click setupnt.exe from the Explorer view to start the installation.
The installation starts.
6. Install CA Spectrum (see page 71).
More information:
SRAdmin Installation Methods (see page 94)
Start the Installation on Linux and Solaris
You can install CA Spectrum on Linux and Solaris platforms.
Important! You cannot install a released version of CA Spectrum on top of a beta or evaluation version of the product. Instead, uninstall the beta or evaluation version first.
Follow these steps:
1. Stop all non-CA Spectrum running applications.
2. Stop the following CA Spectrum applications:
■ Shut down all OneClick clients by logging off all users from OneClick in the Client Details web page in the OneClick home page.
Note: For more information about shutting down OneClick clients, see the Administrator Guide.
■ Stop the SpectroSERVER and the Archive Manager by clicking Stop SpectroSERVER in the CA Spectrum Control Panel and then close the CA Spectrum Control Panel.
Note: For more information about the CA Spectrum Control Panel, see the Administrator Guide.

Start the Installation on Linux and Solaris
70 Installation Guide
■ Stop all VnmSh connections.
Note: For more information about stopping VnmSh connections, see the Command Line Interface User Guide.
■ Close all Bash shells.
3. Ensure that you have met the system requirements for Linux (see page 14) and Solaris (see page 17).
4. Ensure that you have met the prerequisites (see page 30).
5. Insert the CA Spectrum installation media into the appropriate drive.
6. If necessary, set your DISPLAY variable to the host name of the target system:
■ From a C shell, enter:
setenv DISPLAY <hostname>:0
■ From Bourne or Korn shells, enter:
DISPLAY=<hostname>:0 ; export DISPLAY
Note: Run echo $DISPLAY to confirm this setting is in effect.
7. To display the CA Spectrum installation GUI on a remote system, run the following command from the target system:
/usr/openwin/bin/xhost +<hostname>
hostname
Is the name of the target system.
8. Perform one of the following steps:
■ If you are installing from a local drive, use File Manager to navigate to the mounted installation media.
■ If you are installing from a remote drive, right-click to access the Workspace Menu. Then, select Files, File Manager. Use File Manager to navigate to the remote mount-point directory (/<installation_media>).
9. Double-click the Installer icon.
10. Install CA Spectrum (see page 71).
More information:
SRAdmin Installation Methods (see page 94)

Install CA Spectrum
Chapter 4: Installing CA Spectrum 71
Install CA Spectrum
You can install CA Spectrum on Windows, Linux, or Solaris platforms.
Important! The C:\Program Files\CA directory on Windows platforms and the /opt/CA directory on Linux and Solaris platforms are automatically created during a first-time installation of CA Spectrum. CA Spectrum components that are also common to other CA products are intentionally installed into this directory. This directory is automatically updated as needed during a CA Spectrum upgrade. Do not remove files from this directory.
Follow these steps:
1. Start the installation on Windows (see page 68), Linux (see page 69), or Solaris (see page 69).
The Install dialog opens.
2. Select the Install CA Spectrum option.
Note: On Linux platforms, the following warning could appear before the installer launches, if you launch the installer from a shell. This warning does not cause any problems with your installation and can be disregarded:
awk: cmd. line:6: warning: escape sequence `\.' treated as plain `.'
The Introduction dialog opens.
3. Click Next to proceed.
The License Agreement dialog opens.
4. Scroll through and read the license agreement, accept the agreement, and click Next.
The Destination Host dialog opens.
5. Enter the name of the host system where you are installing CA Spectrum and click Next.
Note: If you are installing CA Spectrum and OneClick on remote platforms on your network, follow the steps in Install CA Spectrum Remotely (see page 67).
The SRAdmin Authentication dialog opens.
Note: If the 'Unable to connect to CA Spectrum Remote Administration Daemon (SRAdmin)' dialog appears, install SRAdmin before continuing with the installation. To install SRAdmin, click Install on this dialog.

Install CA Spectrum
72 Installation Guide
6. Enter a username and password as follows, and click Next:
■ For a Solaris or Linux installation, enter a username with root access. Or, you can use a sudoers file for root permissions.
Note: If you have root access when starting this installation, you are not prompted for a user name and password.
■ For a Windows installation, enter a username that has Administrator rights, and verify the domain name (if applicable).
The Destination Location dialog opens.
7. Click Next to install CA Spectrum in the default directory. The default directory is C:\win32app\SPECTRUM on Windows and /usr/SPECTRUM on Solaris and Linux.
If you are performing an in-place upgrade, the installation program detects the previous installation directory.
Important! When performing an in-place upgrade, do not change the default destination to a location other than the directory containing the CA Spectrum database you are upgrading. On Solaris and Linux, do not use /opt/SPECTRUM as an installation directory. This location and name are reserved for a directory that is created automatically during the installation.
To install CA Spectrum in a location other than the default directory, click Choose, select a location, and click Next. This option only appears for a local installation (not for a remote installation).
Important! You cannot install CA Spectrum into a directory that contains a space anywhere in the path. Spaces within the directory path cause the installation to fail.
The installer reports that it is extracting installation information.
8. If you are performing an upgrade, you are prompted to select the appropriate character set encoding. Select the option that applies to your environment.
This dialog enables a one-time database conversion for CA Spectrum Release 9.3. The conversion is only required for deployments with non-default character set encodings or non-default locales. For more information, see Upgrade Paths for One-Time Database Conversion.
The Select Destination Language dialog opens.
9. Select one of the supported languages to install in addition to English, and click Next.
Localized CsEvFormat, CsPCause and EventTables will be installed for the selected language.
The Select Options dialog opens.
Install CA Spectrum
Chapter 4: Installing CA Spectrum 73
10. Select the Installation Type:
Standard
Allows the installation of the SpectroSERVER, the OneClick server, and all other CA Spectrum components.
Remote Operations Server
Allows the installation of minimal components to run the SpectroSERVER and OneClick server.
Components are displayed based on the type of installation you entered.
Note: If you are performing an upgrade, add-on components that exist in your current implementation appear for the Remote Operations Server option.
11. Select the items that you want to install from the Components list and click Next.
Important! Installing OneClick on a single-CPU SpectroSERVER host system can degrade the performance of both SpectroSERVER and OneClick. We recommend installing OneClick on a separate dedicated system.
The Host Evaluation dialog opens.
12. Scroll down to verify that no warnings appear, and click Next to proceed.
The CA Spectrum Installation Owner dialog opens.
13. Enter the username and password as follows, and click Next. This username is used to create the initial CA Spectrum user (if installing SpectroSERVER) and becomes the installation owner. For a OneClick installation, the username also determines the SpectroSERVERs to which the OneClick web server connects:
■ For a Solaris or Linux installation, enter the username for the host system. The installation owner must be a non-root user.
■ For a Windows installation, enter either the domain user username and password, or the local user username and password.
Important! When installing CA Spectrum on a computer in a domain, the username for the CA Spectrum installation owner cannot be the same as the computer hostname.
The username and password are also used to configure the CA Spectrum Process Daemon service. The username and password are not used or stored in CA Spectrum.
Note: If the installation owner is a non-administrator, you cannot restart the process service as the installation owner. However, because you typically do not need to restart the service on a normal daily basis, we recommend that the installation owner is a nonadministrator. Using a nonadministrator helps increase security and simplify password maintenance.

Install CA Spectrum
74 Installation Guide
Note: For first-time installations, the default CA Spectrum password for the installation owner is spectrum.
Important! When installing OneClick, be sure to specify a CA Spectrum username to which the administrative license is associated. This user needs access to all models in CA Spectrum (ADMIN access). We recommend that you specify the installation owner that you specified during the SpectroSERVER installations. This user must also exist on the installation host and does not need to be a Windows administrative user.
The Main Location Server dialog opens.
When you install CA Spectrum components, you also automatically install a location server. However, if you install OneClick only, you do not automatically install a location server.
Note: In a distributed environment, CA Spectrum uses location servers to maintain the VNM landscape map and provide connection services to client applications. For more information about location servers and the main location server, see the Distributed SpectroSERVER Administrator Guide.
14. Enter a hostname for the main location server and click Next.
Note: CA Spectrum must be able to resolve the hostname, regardless of whether you provide a fully qualified hostname.
The Web Server Port Number dialog shows the default value.
15. (Optional) Enter a port number other than the default, and click Next.
Note: The default port is 80 for Windows and 8080 for Solaris and Linux.
If you previously selected Report Manager from the Components list, the Report Manager Servers dialog opens.
16. If the Report Manager Servers dialog opens, select each SpectroSERVER that you want Report Manager to report about and click Next.
The CA Spectrum Report Data Migration Panel dialog opens.
Install CA Spectrum
Chapter 4: Installing CA Spectrum 75
17. If you are performing a Spectrum Report Manager migration, enter the source hostname and root password for the report database and then click Next. Otherwise, leave the fields blank.
18. If you are performing a Spectrum Report Manager upgrade, you are prompted to select the appropriate character set encoding. Select the option that applies to your environment.
This dialog enables a one-time database conversion for CA Spectrum Release 9.3. The conversion is only required for deployments with non-default character set encodings or non-default locales. For more information, see Upgrade Paths for One-Time Database Conversion.
19. If you are performing an upgrade or migration, you are prompted to preserve or discard existing Spectrum Report Manager data because a database conversion is required.
For more information, see Schema Changes in MySQL Databases for CA Spectrum 9.3 (see page 41).
The Landscape Handle dialog opens.
Note: This dialog appears only when you are installing a SpectroSERVER. The dialog does not appear during an upgrade.
A landscape is a network domain that a single SpectroSERVER manages. A landscape includes all the models, associations, attribute values, alarms, events, and statistics of a SpectroSERVER. Each landscape in a network is unique, and a unique landscape handle (ID) identifies each.
Enter a value as instructed on the dialog for the landscape handle.
Note: On Solaris, you can convert a decimal value to the proper format for a CA Spectrum hexadecimal landscape handle by running the following three commands:
bc
obase=16
<decimal value> * 262144<CTRL>D
The bc utility displays a hexadecimal value that you enter in the Landscape Handle box, prefixed by 0x. For example, a decimal value of 24 multiplied by 262144 yields a hexadecimal value of 600000. You would enter 0x600000 in the Landscape Handle field. Unique landscape handles are crucial if you are configuring a distributed SpectroSERVER environment.
20. Click Next.
The Review Settings dialog opens.
21. Scroll down to ensure all the settings are what you selected and click Next.
The Installing CA Spectrum dialog appears. After CA Spectrum is installed, the status changes to Installation successful and the Next button is enabled.

Files Created During Installation
76 Installation Guide
22. Click Next.
The Installation Complete dialog opens.
23. Click Done.
The configuration dialog appears for a brief moment and closes.
CA Spectrum is configured for your system.
24. Click Close on the initial Install dialog. Log out, and log back in.
CA Spectrum is installed.
More information:
Preserve the Existing SpectroSERVER Database (see page 48) Preserve the CA Spectrum Events and Statistics Database (see page 49) SRAdmin Installation Methods (see page 94) How to Perform In-Place Upgrades (see page 47)
Files Created During Installation
The CA Spectrum installation adds the following file types:
■ CA Spectrum Services (Windows)
■ CA Spectrum Process Daemon (processd) Files (Linux and Solaris)
■ CA Spectrum Remote Administration Daemon Files (Linux and Solaris)
■ Installation Database Savefiles
Services for Windows
The CA Spectrum installation adds the following services to Windows Services:
■ CA Spectrum Process Daemon
■ CA Spectrum Remote Admin
■ CA Spectrum MYSQL Database Server
■ SpectrumTomcat

Files Created During Installation
Chapter 4: Installing CA Spectrum 77
CA Spectrum Process Daemon Files for Linux
The CA Spectrum installation adds a process daemon (processd) file to the following startup areas on Linux:
■ /etc/rc.d/init.d/processd
■ /etc/rc.d/rc0.d/K*processd
■ /etc/rc.d/rc1.d/K*processd
■ /etc/rc.d/rc2.d/K*processd
■ /etc/rc.d/rc3.d/S*processd
■ /etc/rc.d/rc4.d/K*processd
■ /etc/rc.d/rc5.d/S*processd
■ /etc/rc.d/rc6.d/K*processd
Note: Your operating system determines the number that is indicated by the symbol, *. For more information about processd, see the Distributed SpectroSERVER Administrator Guide.
Important! Do not remove these files because they are required for CA Spectrum operation.
CA Spectrum Process Daemon Files for Solaris
The CA Spectrum installation adds a process daemon (processd) file to the following startup areas on Solaris:
■ /etc/init.d/processd
■ /etc/init.d/processd.pl
■ /etc/rc0.d/K*processd
■ /etc/rc2.d/S*processd
Your operating system determines the number that is indicated by *.
Important! Do not remove these files because they are required for CA Spectrum operation.
Note: For more information about processd, see the Distributed SpectroSERVER Administrator Guide.

Files Created During Installation
78 Installation Guide
CA Spectrum Remote Administration Daemon Files for Linux
The CA Spectrum installation adds the following CA Spectrum Remote Administration Daemon (sradmin) files that CA Spectrum requires for user authentication and distributed administration:
■ /etc/init.d/sradmin
■ /etc/rc0.d/K*sradmin
■ /etc/rc1.d/K*sradmin
■ /etc/rc2.d/K*sradmin
■ /etc/rc3.d/S*sradmin
■ /etc/rc4.d/K*sradmin
■ /etc/rc5.d/S*sradmin
■ /etc/rc6.d/K*sradmin
Note: Your operating system determines the number that is indicated by *.
These files are added to /sw/SPECTRUM/SRAdmin/sradmin.exe or another path if SRAdmin was installed manually.
Important! Do not remove these files because they are required for CA Spectrum operation.
CA Spectrum Remote Administration Daemon Files for Solaris
The CA Spectrum installation adds the following CA Spectrum Remote Administration Daemon (sradmin) files that CA Spectrum requires for user authentication and distributed administration:
■ /etc/init.d/sradmin
■ /etc/rc2.d/S*sradmin
Note: Your operating system determines the number that is indicated by *.
These files are added to /sw/SPECTRUM/SRAdmin/sradmin.exe or another directory path if you installed SRAdmin manually.
Important! Do not remove these files because they are required for CA Spectrum operation.

Files Created During Installation
Chapter 4: Installing CA Spectrum 79
Installation Database Savefiles
The installation automatically creates two savefiles in the <$SPECROOT>/SS directory. Each file contains a copy of the database modeling catalog that was installed. The first file is date-stamped, with the extension .after. A copy of the .after file is created and named legacy.SSdb (overwriting any previous legacy.SSdb file).
The legacy.SSdb file is used with the SSdbload utility to reinitialize the database with the most recently installed modeling catalog. Whereas, the .after files let you restore the catalog that is associated with any particular installation. A sequential counter following the date portion of the file name lets you distinguish between multiple .after files generated on the same day. For example, if three of these files were generated on May 4, 2006, they would be labeled as follows:
■ db_20060504,1.after.SSdb
■ db_20060504,2.after.SSdb
■ db_20060504,3.after.SSdb

Chapter 5: Other Installation Scenarios 81
Chapter 5: Other Installation Scenarios
This section contains the following topics:
How to Install New Components (see page 81) Patch Installations (see page 82) Distributed SpectroSERVER and Fault-Tolerant Configurations (see page 82) Reinstall CA Spectrum (see page 82)
How to Install New Components
If any components were not installed initially, you can add them using the following procedure.
Follow these steps:
1. Stop SpectroSERVER and all CA Spectrum applications.
2. Run the installation for the version of CA Spectrum you currently have installed. Note the following guidelines:
■ Retain the default directory on the Destination Location dialog because all components must be installed in the same directory. You cannot install OneClick and SpectroSERVER in different directories.
■ If the component you are adding is listed on the Select Options dialog, select it. Components from the same version that are already installed appear selected and disabled; these components are not reinstalled. If the component you are adding does not appear, verify that the component is installed in the Review Settings dialog. The Review Settings dialog displays all components that are installed.
Note: You cannot change the Installation Type when adding components. This option is available on the initial installation only.
The CA Spectrum installation installs the new components only.
3. After all of the components are installed, reinstall the latest CA Spectrum maintenance, if any (see page 82).

Patch Installations
82 Installation Guide
Patch Installations
Updates or patches for existing versions of CA Spectrum are available for downloading at http://ca.com/support. Contact a technical support representative for available maintenance patches. Each patch includes a software release notice that provides step-by-step installation instructions.
Distributed SpectroSERVER and Fault-Tolerant Configurations
To install more than one SpectroSERVER to manage different portions of your network, see the Distributed SpectroSERVER Administrator Guide before starting the installation.
CA Spectrum also supports a fault-tolerant configuration so that one or more than one SpectroSERVER can function as standbys for a primary SpectroSERVER. In this scenario, a secondary SpectroSERVER is ready to take over management functions when the primary SpectroSERVER becomes unavailable. The special requirements for this configuration are explained in the Distributed SpectroSERVER Administrator Guide.
Upgrades with fault-tolerance are supported. For more information, see Upgrade Best Practices: Fault-Tolerant Deployments (see page 50).
Note: For information about OneClick Web server fault tolerance, see the Administrator Guide.
Reinstall CA Spectrum
If problems occur during installation, you can reinstall CA Spectrum. You cannot install new components and reinstall at the same time. Reinstall CA Spectrum first and then install the new components.
If you want to change the installation owner for an existing installation, run the following program from a Windows bash shell before reinstalling CA Spectrum. This program removes the processd service so that the service is recreated during the reinstallation with the new installation owner:
<install dir>/lib/SDPM/processd.exe --remove
To reinstall CA Spectrum to change the installation owner, you must be reinstalling a full, major release; it cannot be a service pack or maintenance. For example, CA Spectrum 9.3.x users must reinstall CA Spectrum 9.3.0 first, then install CA Spectrum 9.3.x again.

Reinstall CA Spectrum
Chapter 5: Other Installation Scenarios 83
Note: The following procedure is for the GUI-based installation. If you are using the distributed installation, set same=yes in the host installation information file before reinstalling CA Spectrum.
Follow these steps:
1. Stop SpectroSERVER and all CA Spectrum applications.
2. Run the installation for the version of CA Spectrum you currently have installed. Note the following guidelines:
■ Retain the default path on the Destination Location dialog because all components must be installed in the same directory.
■ In the Select Options dialog, no new selections can be made. Components that can be reinstalled are selected and disabled.
■ In the Host Evaluation dialog, a message indicates that nothing was selected for installation.
3. Click Next on the Host Evaluation dialog.
4. Click Reinstall on the Reinstall Option dialog.
5. Click Preserve on the Preserve Files dialog.
The existing user-modified files are preserved, and the Host Evaluation runs again to evaluate the new settings.
6. Click Next and modify the installation dialogs, as needed.
7. View the Review Settings dialog and ensure that all components are reinstalled. Click Next to proceed with the reinstallation.
The reinstallation completes.
More information:
How to Install New Components (see page 81)


Chapter 6: Upgrading Models 85
Chapter 6: Upgrading Models
This section contains the following topics:
Database Compatibility After Upgrade (see page 85) Convert Existing Models to Newly-Supported Model Types (see page 87) Change the Model Type for a Single Device Type (see page 89) Troubleshoot the Post-Upgrade Installation Script (see page 90)
Database Compatibility After Upgrade
To ensure compatibility between the SpectroSERVER database and a new version of CA Spectrum after upgrading, complete these tasks:
■ Convert existing models that are based on defunct model types to new models (see page 87).
■ Convert existing models to model types that are more appropriate (see page 87).
These procedures are not required for first-time installations.
Important! If you do not run appropriate upgrade scripts after a CA Spectrum upgrade, system problems can occur.
In some cases, a model type can change, depending on vendor requirements or added functionality in CA Spectrum. In other cases, CA Spectrum no longer supports a device with a unique model type; therefore, convert these models to an alternative model type.
Contact a support representative if you have questions about the model conversion process or any errors you encounter during conversion.
Note: If you plan to set up a distributed SpectroSERVER configuration, convert all models before partitioning the database.
More information:
How to Perform In-Place Upgrades (see page 47)

Database Compatibility After Upgrade
86 Installation Guide
Preserved Model Attributes and Elements
The following model attributes are preserved when you use the listed scripts to upgrade the SpectroSERVER database:
■ 0x1006e Model_Name
■ 0x12d7f Network_Address
■ 0x10024 Community_Name
■ 0x10009 Security_String
■ 0x11564 Notes (Notes are preserved for the device, interface, application, module, and port models.)
■ 0x10071 Polling_Interval
■ 0x10072 Poll_Log_Ratio
■ 0x1154f Polling Status
■ 0x110c4 Time Out
■ 0x110c5 Try Count
■ 0x1000c Value_When_Yellow
■ 0x1000d Value_When_Orange
■ 0x1000e Value_When_Red
The following details are also preserved:
■ Inter-model relations, including device connectivity
■ Connections to both physical and logical interfaces on all devices
■ Model type-specific and model-specific NCM configurations
During remodeling, interfaces and applications are rediscovered and modeled. This remodeling results in new model handles for these child models.
Note: Watches are not preserved during the model and model type conversion and must be rebuilt on the new model type.
Model Type Editor and the Customized SpectroSERVER Database
If you customized your SpectroSERVER database using the Model Type Editor (MTE), make a record of all changes. Certain changes that are made with the MTE are not preserved when the SpectroSERVER database is upgraded to a later version of CA Spectrum.
Convert Existing Models to Newly-Supported Model Types
Chapter 6: Upgrading Models 87
If you changed relations, meta-rules, or attributes of CA Spectrum-supplied or other developer-supplied model types, those changes could be unrecognized during the database upgrade. Reapply the changes manually after you upgrade CA Spectrum.
Model types can be changed and improved in the upgraded version of CA Spectrum. For the new release of CA Spectrum to operate correctly, these changes might need to overwrite customized values.
Note: For more information about preserving database changes and the type of changes that can be preserved, see the Model Type Editor User Guide.
Using the Multicast Manager or VPN Manager After Installing a Patch or Upgrade
The NewMM.pl post-installation script affects the following model types:
■ Rtr_Cisco
■ Cisco_12000
■ SwCat6xxx, SwCat35xx, and SwCat4xxx
Rerun Multicast and/or VPN discovery and reapply customizations after you run the post-installation scripts. This process helps ensure the correct modeling and management of the newly created device models within your environment.
Convert Existing Models to Newly-Supported Model Types
Use the NewMM.pl post-installation script to convert the existing models of various model types to the newly supported model types. This script preserves many key attributes, relationships, and other elements.
For example, you previously modeled Cisco Catalyst 4500 devices as GnSNMPDev in CA Spectrum. These models can be converted to use the Catalyst 4500 Certification functionality.
Convert Existing Models to Newly-Supported Model Types
88 Installation Guide
In addition, you can use the NewMM.pl script to convert various Cisco-specific model types to the appropriate supported model type. As Cisco introduces new devices, CA Spectrum adds support for these new devices using the appropriate model type available.
Note: If you update model types using the NewMM.pl script, a set of models is created in the Reporting Database with a new model type. Models with the previous model type are marked as destroyed. In addition, data is not migrated from the old model type to the new type.
Follow these steps:
1. Verify that the SpectroSERVER is running.
2. Run the following command from the $SPECROOT/Install-Tools/PostInstall/ directory:
NewMM.pl
Note: On Windows, all necessary scripts must be run from a bash shell. They do not run as expected from a DOS command prompt.
3. Enter the host name or IP address of the VNM and press Enter.
4. Enter the SpectroSERVER landscape handle when prompted, and press Enter.
The script analyzes the database to determine which models are eligible for conversion, if any. The script provides a complete list of models that correspond to each new model type before prompted for conversion.
Note: Models that are in maintenance or hibernation mode or that cannot be contacted are not candidates for conversion.
5. When prompted to convert eligible models of a specific model type, enter Yes. If you do not want to convert specific model types, enter No. The following log file is created in the $SPECROOT/Install-Tools/PostInstall/ directory:
NewMM_Log_DATE
6. To confirm the model conversion, verify the following log file:
NewMM_Log_DATE
Existing models are converted to the newly supported model types.
More information:
Database Compatibility After Upgrade (see page 85)

Change the Model Type for a Single Device Type
Chapter 6: Upgrading Models 89
Change the Model Type for a Single Device Type
You can use the NewMM.pl post-installation script to change the model type for a single device type automatically. This script preserves many key attributes, relationships, and other elements.
This procedure changes the model type for all models that have the same specified system Object ID and the same specified starting model type.
Important! Do not perform this procedure until you modify the model type mapping for the device type in the Device Certification utility. If you do not perform this procedure with the Device Certification utility, your changes cannot be communicated to the SpectroSERVER database, causing unexpected alarms. For information about using the Device Certification utility, see the Certification User Guide.
Follow these steps:
1. Verify that the SpectroSERVER is running.
2. Run the following command from the $SPECROOT/Install-Tools/PostInstall/ directory:
NewMM.pl -m
Note: On Windows, all necessary scripts must be run from a bash shell. They do not run as expected from a DOS command prompt.
3. Enter the host name or IP of the VNM and press Enter.
4. Enter the SpectroSERVER landscape handle when prompted, and press Enter.
5. Enter the system Object ID of the model when prompted, and press Enter.
6. Enter the current model type of the model when prompted, and press Enter.
7. Enter the model type that you want to change to when prompted, and press Enter.
The model type is changed.
The log file, NewMM_Log_DATE, is created in the $SPECROOT/Install-Tools/PostInstall/ directory.
8. To confirm the model type conversion, verify the following log file:
NewMM_Log_DATE
Model type for a single device type is modified.

Troubleshoot the Post-Upgrade Installation Script
90 Installation Guide
Troubleshoot the Post-Upgrade Installation Script
You can troubleshoot the post-upgrade installation script.
Note: Log files are in the <$SPECROOT>/Install-Tools/PostInstall/ directory. On Windows, run all scripts from a bash shell.
Follow these steps:
1. Start the SpectroSERVER, if it is not already running:
■ On Windows, click Start, Programs, CA, CA Spectrum Control Panel. The CA Spectrum Control Panel displays. Click the Start SpectroSERVER button.
■ On Solaris, select the CA Spectrum Control Panel option from the list of items on the CA Spectrum menu. The CA Spectrum Control Panel displays. Click the Start SpectroSERVER button.
■ On Linux, run the SCP command, which is located in <$SPECROOT>/bin/. The CA Spectrum Control Panel displays. Click the Start SpectroSERVER button.
The SpectroSERVER begins to run.
2. Open the OneClick home page in your web browser, using the URL that your administrator provided. The URL has the following format: http://<hostname>:<portnumber>/.
3. Enter your OneClick login credentials when prompted.
The OneClick home page opens.
4. Click Start Console.
The OneClick Console opens.
5. Expand the SpectroSERVER that has been named the main location server and click Universe in the Navigation panel.
A list of alarms, if any, appear in the Alarms tab of the Contents panel for the Universe topology. If any models display Minor (yellow) alarms with a probable cause of DIFFERENT TYPE MODEL, clear the alarms. To verify that the script converted all eligible models that it discovered, rerun the NewMM.pl script.
The log file, NewMM_Log_<DATE>, is created in the <$SPECROOT>/Install-Tools/PostInstall/ directory.
6. To verify that all models converted successfully, check the log file, NewMM_Log_<DATE>.
Note: If DIFFERENT TYPE MODEL alarms recur, contact Technical Support.
The troubleshooting is complete.

Chapter 7: Installing CA Spectrum in a Distributed Environment 91
Chapter 7: Installing CA Spectrum in a Distributed Environment
This section contains the following topics:
Distributed Installation Requirements (see page 91) Types of Distributed Installations (see page 92) How to Perform a Distributed Installation (see page 93) SRAdmin Installation Methods (see page 94) Create the Host Installation Information File (see page 101) HII File Parameters (see page 102) Creating the Password File (see page 105) Run the Distributed Installation Client on Windows (see page 108) Run the Distributed Installation Client on Linux and Solaris (see page 110) Installation Duplication (see page 113)
Distributed Installation Requirements
Ensure that you meet the following requirements before you start a distributed installation:
■ Check the Software Release Notice for information about any new parameters that are required for the Host Installation Information file (see page 102).
■ Establish a TCP/IP connection from the target system to remote systems.
Note: In firewall environments, ensure that port 46517 is opened during a distributed installation.
■ Verify that the time setting on the installer host is synchronized to within 2 minutes of the time setting on the remote hosts. This setting is required for secure authentication with the CA Spectrum Remote Administration Daemon.
■ Verify that the remote hosts have sufficient disk space. The CA Spectrum distributed installation copies temporary files to temporary directories on the target system. Therefore, it requires at least 100 MB of disk space in the temp or tmp directories. For Windows, you can edit the default TEMP location as a user Environment Variable.

Types of Distributed Installations
92 Installation Guide
Types of Distributed Installations
CA Spectrum lets you select the type of distributed installation that meets your requirements.
The following table shows the available types of distributed installations and their corresponding procedures found in this guide:
Type of Distributed Installation Procedures
CA Spectrum installation on Solaris or Linux
■ Install SRAdmin Daemon (see page 95).
■ Create a Root/Administrator Password File (see page 105) and create the Host Installation Information File (see page 101).
■ Run the Distributed Installation Client on Linux and Solaris (see page 110).
Upgrading CA Spectrum from 9.0 or later on Linux or Solaris
■ Install SRAdmin Daemon (see page 95).
■ Create a Root/Administrator Password File (see page 105) and create the Host Installation Information File (see page 101).
■ Run the Distributed Installation Client on Linux and Solaris (see page 110).
CA Spectrum installation on Windows Server 2008 or Windows Server 2012
■ Install SRAdmin Daemon (see page 95).
■ Create a Root/Administrator Password File (see page 105) and create the Host Installation Information File (see page 101).
■ Run the Distributed Installation Client on Windows (see page 108).
Upgrading CA Spectrum from 9.0 or later on supported Windows platforms
■ Install SRAdmin Daemon (see page 95).
■ Create a Root/Administrator Password File (see page 105) and create the Host Installation Information File (see page 101).
■ Run the Distributed Installation Client on Windows (see page 108).

How to Perform a Distributed Installation
Chapter 7: Installing CA Spectrum in a Distributed Environment 93
How to Perform a Distributed Installation
The CA Spectrum distributed installation is a command line interface that lets you install CA Spectrum and the OneClick web server (locally and remotely). Different types of installations can be performed on each system. For example, you can install the following items in a single distributed installation:
■ SpectroSERVER only
■ OneClick web server only
■ SpectroSERVER and OneClick web server
A CA Spectrum distributed installation has the following components:
CA Spectrum Remote Administration (SRAdmin) Daemon
Allows for secure, remote installations without requiring that you manually set up the NFS mounts or Microsoft Network File shares. A time-critical Triple-DES encryption is used to ensure that the root/Administrator account/password information is safe when it is passed between daemons. Install SRAdmin on each remote system where you install CA Spectrum.
CA Spectrum Distributed Installation Client (sdicsol.exe for Solaris, sdiclinux.exe for Linux, and sdicnt.exe for Windows)
Launches multiple installations across multiple machines and collects the results of these installations. The distributed installation client requires the following files:
Password file
Contains accounts and passwords for remote computers.
Host installation file
Contains installation information. The topic HII File Parameters (see page 102) contains important information about the required contents of this file.
To perform a distributed installation, complete these steps:
1. Install SRAdmin Daemon (see page 95).
2. Create the password file (see page 105).
3. Create the HII file (see page 101).
SRAdmin Installation Methods
94 Installation Guide
SRAdmin Installation Methods
You can install SRAdmin through the following methods:
■ CA Spectrum GUI (see page 71)
If you install CA Spectrum on a local computer from the CA Spectrum GUI, SRAdmin can be installed during the installation process. You cannot install SRAdmin from the CA Spectrum GUI when you install remotely. If you are using the CA Spectrum GUI locally to upgrade from a release earlier than CA Spectrum 9.0, SRAdmin cannot be automatically upgraded on the local machine. Instead, you have the option to install it.
■ SRAdmin GUI (see page 95)
Install SRAdmin from the SRAdmin GUI when you want to perform a remote installation or a distributed installation of CA Spectrum. You can also install SRAdmin from the SRAdmin GUI as an alternative to using the CA Spectrum GUI installation to perform a local CA Spectrum installation.
■ Manually install SRAdmin on Linux (see page 97), Solaris (see page 98), and Windows (see page 96)platforms
Note: As an alternative to the GUI install options, install SRAdmin manually.
■ Install SRAdmin in silent mode on Linux (see page 100), Solaris (see page 101), and Windows (see page 99) platforms
Note: As an alternative to the GUI and manual install options, install SRAdmin in silent mode.
More information:
Start the Installation on Windows (see page 68) Start the Installation on Linux and Solaris (see page 69)

SRAdmin Installation Methods
Chapter 7: Installing CA Spectrum in a Distributed Environment 95
Install SRAdmin Daemon
Install SRAdmin from the SRAdmin GUI when you want to perform a remote installation or a local distributed installation of CA Spectrum. You can also install SRAdmin from the SRAdmin GUI as an alternative to using the CA Spectrum GUI installation to perform a local CA Spectrum installation.
Note: If you are upgrading CA Spectrum from a post 9.0 release, you do not need to install SRAdmin. SRAdmin is automatically upgraded.
Follow these steps:
1. Ensure that you have met the installation prerequisites for Linux (see page 30), Solaris (see page 30), or Windows (see page 27).
2. Ensure that you are logged in as root when installing on Solaris or Linux (unless you are using a sudoers file for root permissions). Ensure that you are logged in as a user with Administrator rights if you are installing on Windows.
3. Insert the installation media into the appropriate drive.
The Install dialog appears.
4. Click Install CA Spectrum Remote Administration.
The License Agreement dialog appears.
5. Scroll through and read the license agreement, accept the agreement, and click Next.
The Destination Location dialog appears with the default directory.
6. Click Next if you want to install in the default location or click Choose and select a different directory and then click Next.
Note: The default directory for Windows is C:/Program Files/SRAdmin. The default directory for Solaris and Linux is /sw/SPECTRUM/SRAdmin.
A dialog appears with a progress bar.
Note: On Linux platforms, the following warning could appear before the installer launches, if you launch the installer from a shell. This warning does not cause any problems with your installation and can be disregarded:
awk: cmd. line:6: warning: escape sequence `\.' treated as plain `.'
The Installation Complete dialog appears once the installation is complete.
7. Click Done to exit.
SRAdmin Daemon is installed.
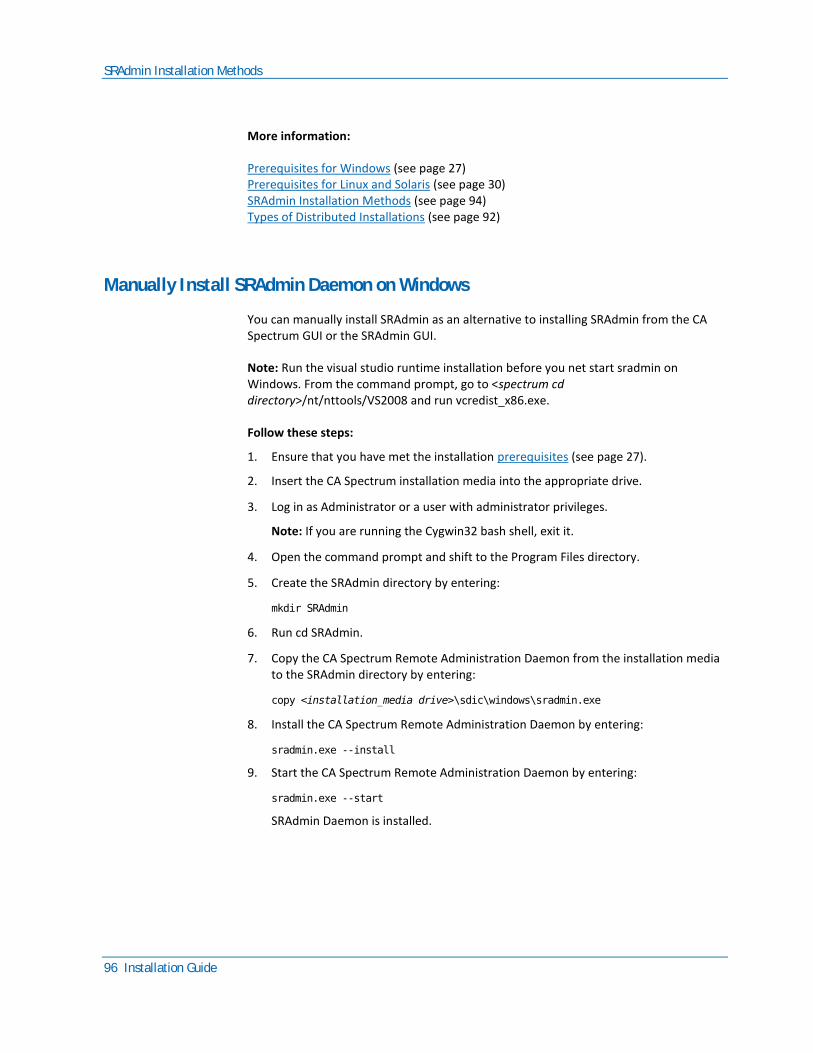
SRAdmin Installation Methods
96 Installation Guide
More information:
Prerequisites for Windows (see page 27) Prerequisites for Linux and Solaris (see page 30) SRAdmin Installation Methods (see page 94) Types of Distributed Installations (see page 92)
Manually Install SRAdmin Daemon on Windows
You can manually install SRAdmin as an alternative to installing SRAdmin from the CA Spectrum GUI or the SRAdmin GUI.
Note: Run the visual studio runtime installation before you net start sradmin on Windows. From the command prompt, go to <spectrum cd directory>/nt/nttools/VS2008 and run vcredist_x86.exe.
Follow these steps:
1. Ensure that you have met the installation prerequisites (see page 27).
2. Insert the CA Spectrum installation media into the appropriate drive.
3. Log in as Administrator or a user with administrator privileges.
Note: If you are running the Cygwin32 bash shell, exit it.
4. Open the command prompt and shift to the Program Files directory.
5. Create the SRAdmin directory by entering:
mkdir SRAdmin
6. Run cd SRAdmin.
7. Copy the CA Spectrum Remote Administration Daemon from the installation media to the SRAdmin directory by entering:
copy <installation_media drive>\sdic\windows\sradmin.exe
8. Install the CA Spectrum Remote Administration Daemon by entering:
sradmin.exe --install
9. Start the CA Spectrum Remote Administration Daemon by entering:
sradmin.exe --start
SRAdmin Daemon is installed.

SRAdmin Installation Methods
Chapter 7: Installing CA Spectrum in a Distributed Environment 97
More information:
Install SRAdmin Daemon (see page 95) SRAdmin Installation Methods (see page 94) Install CA Spectrum (see page 71)
Manually Install SRAdmin Daemon on Linux
You can manually install SRAdmin as an alternative to installing SRAdmin from the CA Spectrum GUI or the SRAdmin GUI.
Follow these steps:
1. Ensure that you have met the installation prerequisites (see page 30).
2. Insert the installation media into the appropriate drive.
3. Log in as root and create the SRAdmin directory path by entering:
mkdir -p /sw/SPECTRUM/SRAdmin
This directory path is stored in the S99sradmin file in the /etc/rc2.d/ directory.
4. Copy the SRAdmin Daemon to the SRAdmin directory by entering:
cp <installation_media drive>/sdic/linux/sradmin.exe /sw/SPECTRUM/SRAdmin
5. Copy sradmin.rc2 to the init.d directory by entering:
cp <installation_media drive>/sdic/linux/sradmin rc2 /etc/init.d/sradmin
6. Change the file permissions by entering:
chmod 500 /etc/init.d/sradmin
7. Run the following command:
/sbin/chkconfig --add sradmin
8. Start the CA Spectrum Remote Administration Daemon by entering:
/etc/init.d/sradmin start
SRAdmin Daemon is installed.
More information:
Install SRAdmin Daemon (see page 95) SRAdmin Installation Methods (see page 94) Install CA Spectrum (see page 71)

SRAdmin Installation Methods
98 Installation Guide
Manually Install SRAdmin Daemon on Solaris
You can manually install SRAdmin as an alternative to installing SRAdmin from the CA Spectrum GUI or the SRAdmin GUI.
Follow these steps:
1. Ensure that you have met the installation prerequisites (see page 30).
2. Insert the installation media into the appropriate drive.
3. Log in as root and create the SRAdmin directory path as follows:
mkdir -p /sw/SPECTRUM/SRAdmin
This path is stored in the S99sradmin file in the /etc/rc2.d/ directory.
4. Copy SRAdmin Daemon to the SRAdmin directory as follows:
cp <installation_media drive>/sdic/sunos5/sradmin.exe /sw/SPECTRUM/SRAdmin
5. Copy the sradmin.rc2 file to the init.d directory as follows:
cp <installation_media drive>/sdic/sunos5/sradmin.rc2 /etc/init.d/sradmin
6. Change the file permissions as follows:
chmod 500 /etc/init.d/sradmin
7. Change the directory to rc2.d as follows:
cd /etc/rc2.d
8. Run the following command:
ln -s ../init.d/sradmin S99sradmin
9. Start the CA Spectrum Remote Administration Daemon as follows:
/etc/init.d/sradmin start
SRAdmin Daemon is installed.
More information:
Install SRAdmin Daemon (see page 95) SRAdmin Installation Methods (see page 94) Install CA Spectrum (see page 71)

SRAdmin Installation Methods
Chapter 7: Installing CA Spectrum in a Distributed Environment 99
Install SRAdmin Daemon in Silent Mode on Windows
As an alternative, you can install SRAdmin Daemon on Windows using silent mode.
Note: By default, a silent installation of SRAdmin Daemon is installed into the /sw/SPECTRUM/SRAdmin/directory. To install SRAdmin Daemon into another directory, run the following command before completing the silent installation procedure:
srainstall.bin -f <properties file>
The properties file now contains the following text:
INSTALLER_UI=silent
USER_INSTALL_DIR=/sradmin
Follow these steps:
1. Ensure that you have met the installation prerequisites (see page 27).
2. Insert the installation media into the appropriate drive.
3. Log in as Administrator or as a user with administrator privileges.
4. Open the command prompt and go to the appropriate drive.
5. Run the following command:
sdic\nt\ srainstall.exe -i silent
SRAdmin Daemon is silently installed.
More information:
Install SRAdmin Daemon (see page 95) SRAdmin Installation Methods (see page 94) Install CA Spectrum (see page 71)
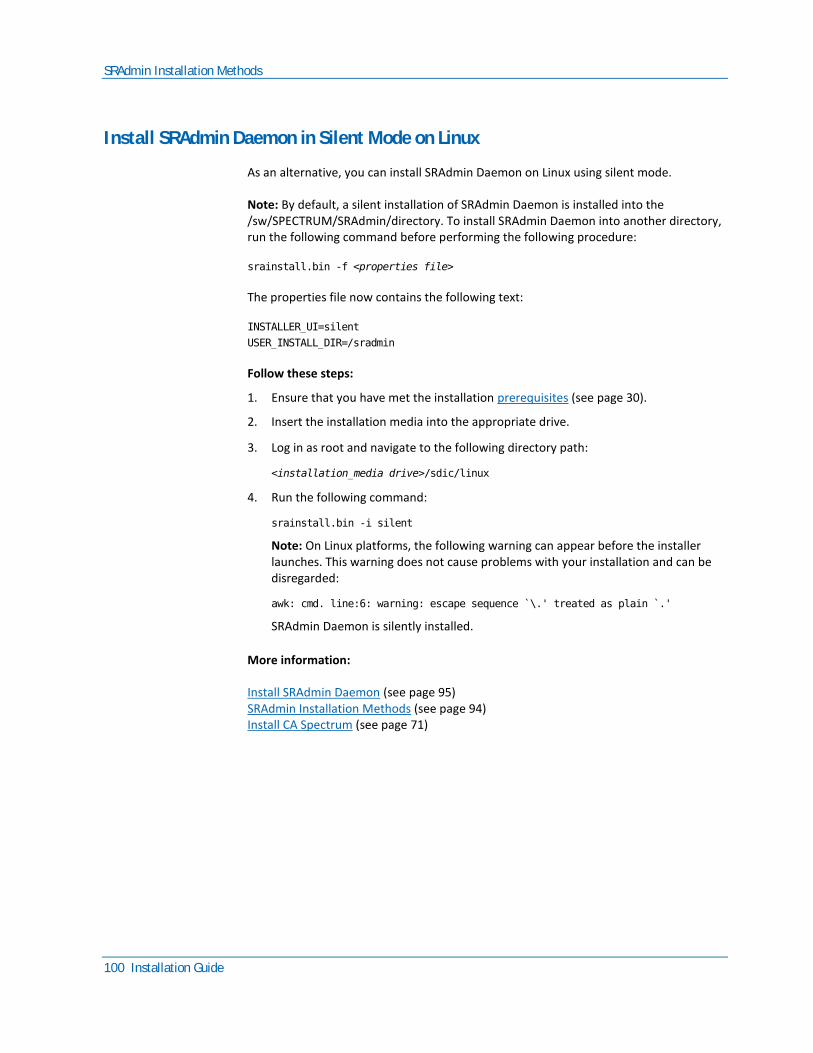
SRAdmin Installation Methods
100 Installation Guide
Install SRAdmin Daemon in Silent Mode on Linux
As an alternative, you can install SRAdmin Daemon on Linux using silent mode.
Note: By default, a silent installation of SRAdmin Daemon is installed into the /sw/SPECTRUM/SRAdmin/directory. To install SRAdmin Daemon into another directory, run the following command before performing the following procedure:
srainstall.bin -f <properties file>
The properties file now contains the following text:
INSTALLER_UI=silent
USER_INSTALL_DIR=/sradmin
Follow these steps:
1. Ensure that you have met the installation prerequisites (see page 30).
2. Insert the installation media into the appropriate drive.
3. Log in as root and navigate to the following directory path:
<installation_media drive>/sdic/linux
4. Run the following command:
srainstall.bin -i silent
Note: On Linux platforms, the following warning can appear before the installer launches. This warning does not cause problems with your installation and can be disregarded:
awk: cmd. line:6: warning: escape sequence `\.' treated as plain `.'
SRAdmin Daemon is silently installed.
More information:
Install SRAdmin Daemon (see page 95) SRAdmin Installation Methods (see page 94) Install CA Spectrum (see page 71)
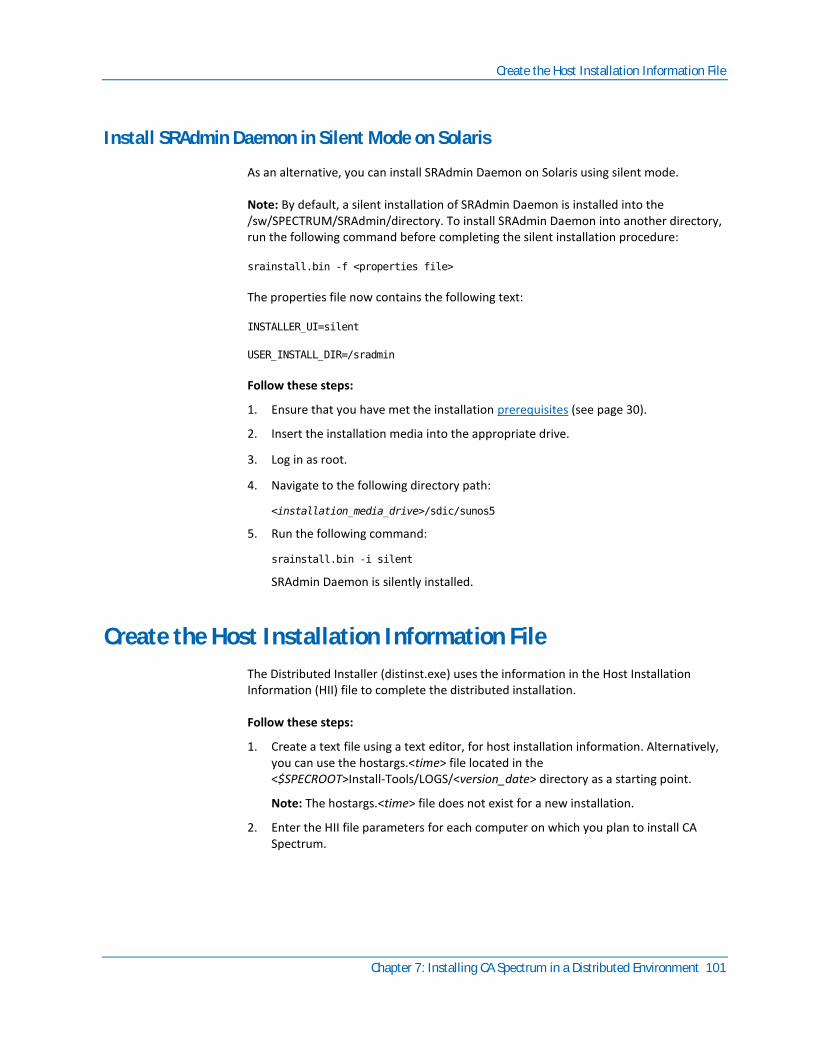
Create the Host Installation Information File
Chapter 7: Installing CA Spectrum in a Distributed Environment 101
Install SRAdmin Daemon in Silent Mode on Solaris
As an alternative, you can install SRAdmin Daemon on Solaris using silent mode.
Note: By default, a silent installation of SRAdmin Daemon is installed into the /sw/SPECTRUM/SRAdmin/directory. To install SRAdmin Daemon into another directory, run the following command before completing the silent installation procedure:
srainstall.bin -f <properties file>
The properties file now contains the following text:
INSTALLER_UI=silent
USER_INSTALL_DIR=/sradmin
Follow these steps:
1. Ensure that you have met the installation prerequisites (see page 30).
2. Insert the installation media into the appropriate drive.
3. Log in as root.
4. Navigate to the following directory path:
<installation_media_drive>/sdic/sunos5
5. Run the following command:
srainstall.bin -i silent
SRAdmin Daemon is silently installed.
Create the Host Installation Information File
The Distributed Installer (distinst.exe) uses the information in the Host Installation Information (HII) file to complete the distributed installation.
Follow these steps:
1. Create a text file using a text editor, for host installation information. Alternatively, you can use the hostargs.<time> file located in the <$SPECROOT>Install-Tools/LOGS/<version_date> directory as a starting point.
Note: The hostargs.<time> file does not exist for a new installation.
2. Enter the HII file parameters for each computer on which you plan to install CA Spectrum.
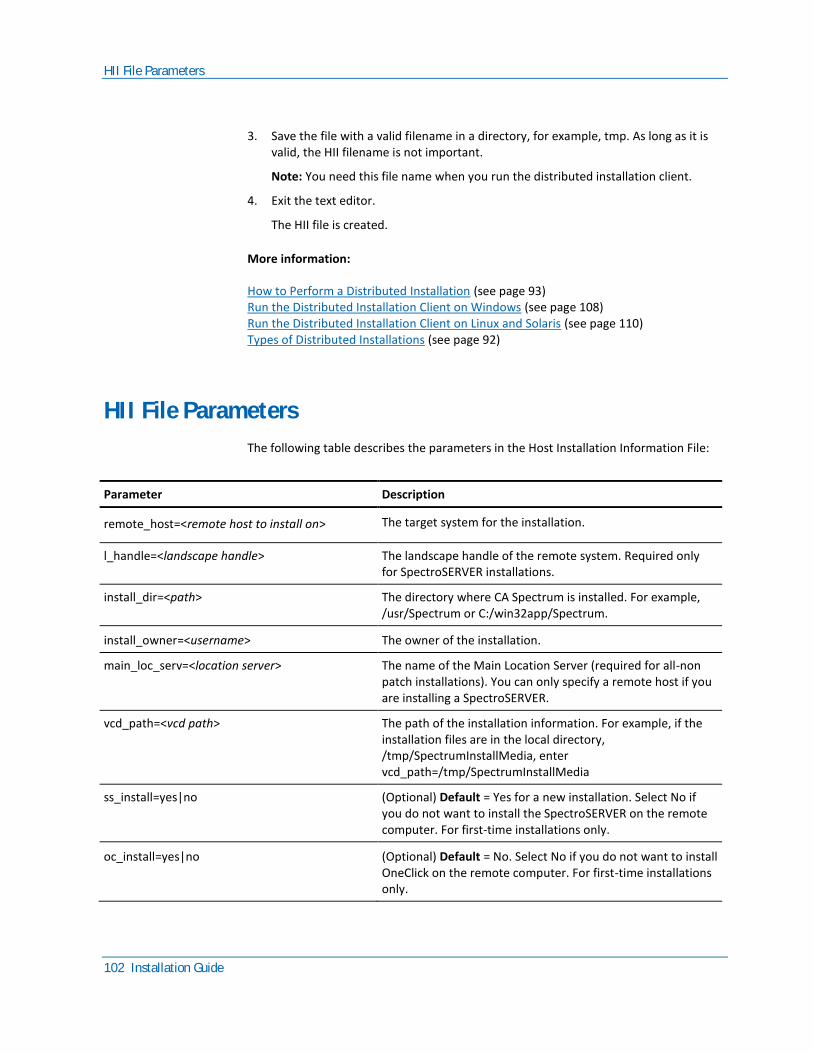
HII File Parameters
102 Installation Guide
3. Save the file with a valid filename in a directory, for example, tmp. As long as it is valid, the HII filename is not important.
Note: You need this file name when you run the distributed installation client.
4. Exit the text editor.
The HII file is created.
More information:
How to Perform a Distributed Installation (see page 93) Run the Distributed Installation Client on Windows (see page 108) Run the Distributed Installation Client on Linux and Solaris (see page 110) Types of Distributed Installations (see page 92)
HII File Parameters
The following table describes the parameters in the Host Installation Information File:
Parameter Description
remote_host=<remote host to install on>
The target system for the installation.
l_handle=<landscape handle> The landscape handle of the remote system. Required only for SpectroSERVER installations.
install_dir=<path> The directory where CA Spectrum is installed. For example, /usr/Spectrum or C:/win32app/Spectrum.
install_owner=<username>
The owner of the installation.
main_loc_serv=<location server> The name of the Main Location Server (required for all-non patch installations). You can only specify a remote host if you are installing a SpectroSERVER.
vcd_path=<vcd path> The path of the installation information. For example, if the installation files are in the local directory, /tmp/SpectrumInstallMedia, enter vcd_path=/tmp/SpectrumInstallMedia
ss_install=yes|no (Optional) Default = Yes for a new installation. Select No if you do not want to install the SpectroSERVER on the remote computer. For first-time installations only.
oc_install=yes|no
(Optional) Default = No. Select No if you do not want to install OneClick on the remote computer. For first-time installations only.
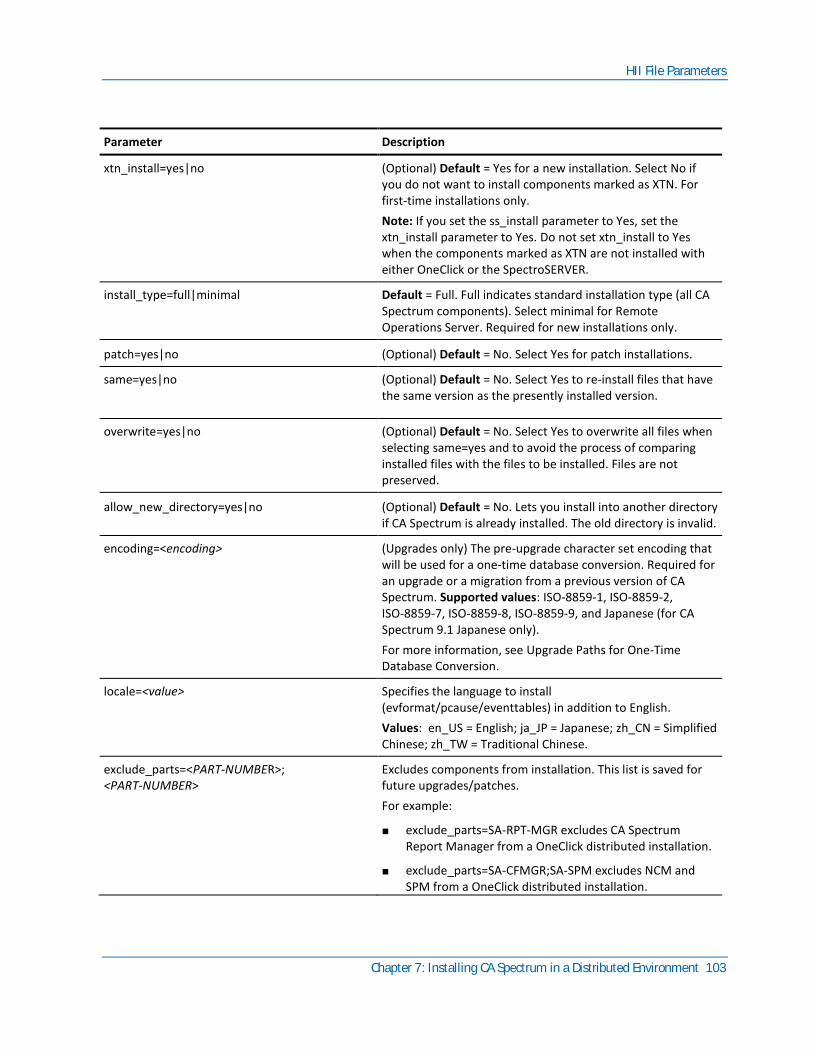
HII File Parameters
Chapter 7: Installing CA Spectrum in a Distributed Environment 103
Parameter Description
xtn_install=yes|no (Optional) Default = Yes for a new installation. Select No if you do not want to install components marked as XTN. For first-time installations only.
Note: If you set the ss_install parameter to Yes, set the xtn_install parameter to Yes. Do not set xtn_install to Yes when the components marked as XTN are not installed with either OneClick or the SpectroSERVER.
install_type=full|minimal Default = Full. Full indicates standard installation type (all CA Spectrum components). Select minimal for Remote Operations Server. Required for new installations only.
patch=yes|no
(Optional) Default = No. Select Yes for patch installations.
same=yes|no (Optional) Default = No. Select Yes to re-install files that have the same version as the presently installed version.
overwrite=yes|no (Optional) Default = No. Select Yes to overwrite all files when selecting same=yes and to avoid the process of comparing installed files with the files to be installed. Files are not preserved.
allow_new_directory=yes|no
(Optional) Default = No. Lets you install into another directory if CA Spectrum is already installed. The old directory is invalid.
encoding=<encoding> (Upgrades only) The pre-upgrade character set encoding that will be used for a one-time database conversion. Required for an upgrade or a migration from a previous version of CA Spectrum. Supported values: ISO-8859-1, ISO-8859-2, ISO-8859-7, ISO-8859-8, ISO-8859-9, and Japanese (for CA Spectrum 9.1 Japanese only).
For more information, see Upgrade Paths for One-Time Database Conversion.
locale=<value> Specifies the language to install (evformat/pcause/eventtables) in addition to English.
Values: en_US = English; ja_JP = Japanese; zh_CN = Simplified Chinese; zh_TW = Traditional Chinese.
exclude_parts=<PART-NUMBER>; <PART-NUMBER>
Excludes components from installation. This list is saved for future upgrades/patches.
For example:
■ exclude_parts=SA-RPT-MGR excludes CA Spectrum Report Manager from a OneClick distributed installation.
■ exclude_parts=SA-CFMGR;SA-SPM excludes NCM and SPM from a OneClick distributed installation.

HII File Parameters
104 Installation Guide
Parameter Description
ignore_disk_space=yes|no
(Optional) Default = No. Select Yes if you want to install, regardless of the disk space warnings.
remove_vnmdb_lock=yes|no Default = No. Removes the vnmdb lock file if one exists. Enter Yes only if SpectroSERVER is not running.
srm_source_host=<hostname> (Optional) Report Manager option (default = no migration). The MySQL hostname needed to obtain the CA Spectrum Report Manager database.
srm_source_password=<password> (Optional) Report Manager option (default = no migration). The MySQL password is required for the CA Spectrum Report Manager database.
srm_ss_servers=<server lists> (separated by ";")
(Optional) Report Manager option (default = Main Location Server). The SpectroSERVERs from which Report Manager gathers information.
rptdb_preserve=<value> During an upgrade, specifies how Spectrum Report Manager data is handled. Some options can reduce the amount of time required for the upgrade.
Values: preserve = Preserves Report Manager data; removealldata = Removes all Report Manager data; removeeventdata = Removes Report Manager event data only.
Default: preserve.
tomcat_port=xxxxxx The port number for Apache Tomcat. Default: 80 for Windows; 8080 for Solaris/Linux.
tomcat_root=<tomcat root directory> An existing Apache Tomcat directory. The default is the OneClick install directory.
server_username=<user name>
(Optional) Used by the Process Daemon (processd) server on Windows only. For a Windows domain, the syntax is <domain>\<username>. Default = SRAdmin username.
server_password=<password> (Optional) Used by the processd server on Windows only. Default = SRAdmin password.

Creating the Password File
Chapter 7: Installing CA Spectrum in a Distributed Environment 105
Creating the Password File
A password file contains accounts and passwords for remote computers. You can create a password file on Solaris, Linux, and Windows. You add one entry per host to this file. Each line contains:
■ host name
■ root/administrator account name
■ root/administrator account password
You can use a pound (#) or a backslash (\) in the password file. Insert a backslash before the characters of the password or CA Spectrum interprets them as a comment line.
For example, if your password is test#computer, enter it in the password file as test\#computer. If your password is test\computer, enter it in the password file as test\\computer.
Note: You can use a sudoers file to provide users with limited root permissions for remote clients. Root permissions apply only to the commands required to install CA Spectrum. This option is available for Solaris and Linux operating systems.
Create a Password File
You can omit a root/administrator password in the password file and only enter a host name and user name. In this case, the CA Spectrum distributed installation client prompts you to enter a password at the command line.
After you enter a password, the installer asks if you want to use this same password for all entries. If you answer “No," you are prompted for a password each time a host in the password file does not have a password entry.
Follow these steps:
1. Create a password file using a text editor.
2. For each system in which you plan to install CA Spectrum, add an entry with the host name, account name, and password. Enter this information in the following order:
■ On Solaris/Linux:
<host name> <root account name> <root password>
■ On Windows:
<host name> <administrator account name> <administrator password>
Note: The <root password> and the <administrator password> are optional.
Creating the Password File
106 Installation Guide
3. Save the file with a valid file name in a directory. If the password file name is valid, it is not important.
Note: Use this file name for running the distributed installation client.
4. Exit the text editor.
The password file is created.
More information:
Installation Duplication (see page 113) How to Perform a Distributed Installation (see page 93) Run the Distributed Installation Client on Windows (see page 108) Run the Distributed Installation Client on Linux and Solaris (see page 110) Types of Distributed Installations (see page 92)
Grant Limited Root Permissions (Linux and Solaris)
Sudo (super user do) is a third-party application. Using this application, a system administrator can let users run certain commands as root or as another user. CA Spectrum is compatible with the sudoers file (which the Sudo application uses). Specifically, you can use the sudoers files to grant users root permissions that are needed for running the CA Spectrum installation on remote systems. This file eliminates the need for the installation program to have full root permissions on all of the remote systems where CA Spectrum is installed.
Note: CA Spectrum does not use the actual Sudo application to change user permissions. Instead, it parses the applicable information in the sudoers file to provide installation permissions to the specified user. For information about the Sudo application, see http://www.courtesan.com/sudo/.
SRAdmin Daemon must be installed on all the computers where you plan to install CA Spectrum. You also need a sudoers file on all the computers where you plan to install CA Spectrum.

Creating the Password File
Chapter 7: Installing CA Spectrum in a Distributed Environment 107
Execute the following steps on each remote computer where you are installing CA Spectrum.
Follow these steps:
1. Add the following entry to the sudoers file. This entry provides the specified user permission to run the sradmin.exe program as root:
<username> <client_host> = <path_to_sraadmin>/sradmin.exe
username
Specifies the user with root permissions for running the installation. You can set this parameter to ALL to indicate that all users can have root permissions.
client_host
Specifies the name of the local host system (that is, the system where you plan to run the distributed installation). You can set this parameter to ALL to indicate all host computers that exist in the NIS/DNS namespace.
path_to_sradmin
Specifies the path to the sradmin.exe application. The default path is /sw/SPECTRUM/SRAdmin/. You can also use ALL in place of <path_to_sraadmin>/sradmin.exe, which indicates that the user has root access to all programs on the specified server.
Note: The entry must be on a single line. Do not use line continuation characters.
2. Create a symbolic link file named sudoers in the directory where the sradmin.exe application exists. By default, this directory is /sw/SPECTRUM/SRAdmin. You can use the following command to create the symbolic link file:
ln -s <full path to sudoers file from step 1> sudoers
3. Verify that the following conditions are met:
■ Root(0) owns both of these files.
■ The group is set to root(0).
■ The permissions for the files are 0440.
Limited root permissions are granted.
Change the Sudoers File Owner (Linux and Solaris)
By default, root owns the sudoers file. However, to limit the number of users who can access the sudoers file, you can change its owner. Then, modify the sradmin.exe startup parameters so that the sradmin.exe application honors only the configuration found in the sudoers file that the specified user owns. Sudoers files that other users own are ignored.

Run the Distributed Installation Client on Windows
108 Installation Guide
To change the sudoers file owner, add the --sudoowners parameter to the command line in the S99sradmin file that is used for starting sradmin.exe.
Follow these steps:
1. Open the following file:
■ On Solaris: /etc/rc2.d/S99aradmin
■ On Linux: /etc/rc2.d/K09sradmin
2. Locate the following line:
$SRADHOME/sradmin.exe --start
3. Add the following parameter to this line:
--sudoowners=<username>
username
Specifies the user who owns the sudoers file. For example, you can enter:
$SRADHOME/sradmin.exe --start --sudoowners=bsmith
4. Save and close the file.
The sudoers file owner is changed.
Run the Distributed Installation Client on Windows
The prerequisites for running the distributed installation client on a Windows system are as follows:
■ Verify that the time settings for the following systems are synchronized within 2 minutes of each other:
– The Windows system running the installation
– The remote hosts receiving the installation.
If the time setting is not synchronized, the distributed installation fails to authenticate with the SRAdmin Daemon on the remote systems.
■ Verify that all CA Spectrum processes in the distributed environment (including the SpectroSERVER and the OneClick clients) are shut down.
Follow these steps:
1. Log on to the Windows system.
2. Install SRAdmin Daemon (see page 95).
3. Create the password file (see page 105).
4. Create the Host Installation Information file (see page 101).

Run the Distributed Installation Client on Windows
Chapter 7: Installing CA Spectrum in a Distributed Environment 109
5. Locate the distributed installation client (sdicnt.exe):
■ If you are installing from the installation media, the executable is located in <installation_media drive>:\sdic directory.
■ If you are installing from a downloaded patch, the executable is located in the <$SPECROOT>/Install-Tools/sdic directory.
6. (Optional) Run a verification test before running the CA Spectrum Distributed Installation Client. This test verifies user names and passwords in the password file, checks SRAdmin versions on remote computers, and validates VCD paths. To run this test, enter the following command:
<pathtoexecutable>\sdicnt.exe -h <host file> -p <password file> -test
pathtoexecutable
Specifies the location of the distributed installation client.
host file
Specifies a file containing the remote host installation information. Include this path when the host file is not located in the same directory as the distributed installation client. Example: -h C:/tmp/hostinfo
password file
Specifies the file containing account and password information. Include this path when the password file is not located in the same directory as the distributed installation client.
Note: Results of the test appear on the screen and in the LOGS_YYYYMMDD subdirectory (YYYY=year, MM=month, DD=day). This subdirectory is located in the same directory as the CA Spectrum Distributed Installation Client.
7. Run the CA Spectrum Distributed Installation Client as follows:
<pathtoexecutable>\sdicnt.exe -h <host file> -p <password file>
[-accept]
pathtoexecutable
Specifies the location of the CA Spectrum Distributed Installation Client (sdicnt.exe).
host file
Specifies a file containing the remote host installation information. Include this path when the host file is not located in the same directory as the distributed installation client. Example: -h C:/tmp/hostinfo
password file
Specifies the file containing account and password information. Include this path when the password file is not located in the same directory as the distributed installation client.

Run the Distributed Installation Client on Linux and Solaris
110 Installation Guide
-accept
(Optional) Acknowledges the license agreement and accepts its terms without the agreement appearing on your screen. This option allows for a silent installation.
The license agreement is located in the following places:
■ In the installation directory, <install dir>/Install-Tools/license/license.txt.
■ On the installation media, <installation_media>/<plat>/license/license.txt, where plat is either nt, sunos5, or linux.
Note: You do not need to perform the following two steps when you use the -accept command.
You can exit the installation at any time by pressing Ctrl + C; however, the remote installations continue.
Note: Results of the installation appear on the screen and in the LOGS_YYYYMMDD subdirectory. This subdirectory is located in the directory where you ran the distributed installation client.
8. Review the license agreement. When complete, accept the terms of the agreement and continue the installation by entering Y (yes), and pressing Enter.
Note: Pressing Enter scrolls line-by-line, and pressing the space bar scrolls page-by-page.
After the installation is complete, the message Installation Complete appears. Running the distributed installation client on Windows is complete.
Run the Distributed Installation Client on Linux and Solaris
The prerequisites for running the distributed installation client on a Linux or Solaris system are as follows:
■ Verify that the time settings for the following systems are synchronized within 2 minutes of each other:
– The Linux or Solaris system running the installation
– The remote hosts receiving the installation
If the time setting is not synchronized, the distributed installation fails to authenticate with the SRAdmin Daemon on the remote systems.
■ Verify that all CA Spectrum processes in the distributed environment (including the SpectroSERVER and the OneClick clients) are shut down.
Follow these steps:
1. Log on to the Linux or Solaris system.
2. Install SRAdmin Daemon (see page 95).

Run the Distributed Installation Client on Linux and Solaris
Chapter 7: Installing CA Spectrum in a Distributed Environment 111
3. Create the Host Installation Information file (see page 101).
4. Create the password file (see page 105).
5. Locate the distributed installation client (sdiclinux.exe for Linux or sdicsol.exe for Solaris):
■ If you are installing from the installation media, the executable is located in the <installation_media mount>/sdic directory.
■ If you are installing from a downloaded patch, the executable is located in the <$SPECROOT>/Install-Tools/sdic directory.
6. (Optional) Run a verification test before running the distributed installation client. This test verifies user names and passwords in the password file, checks SRAadmin versions on remote computers, and validates VCD paths. To run this test, enter the following command:
■ For Linux:
<pathtoexecutable>/sdiclinux.exe -h <host file> -p <password file> -test
■ For Solaris:
<pathtoexecutable>/sdicsol.exe -h <host file> -p <password file> -test
pathtoexecutable
Specifies the location of the distributed installation client.
host file
Specifies a file containing the remote host installation information. Include this path when the host file is not located in the same directory as the distributed installation client.
Example: -h /tmp/hostinstall
password file
Specifies the file containing account and password information. Include this path when the password file is not located in the same directory as the distributed installation client.
Note: Results of the test appear on the screen and in the LOGS_YYYYMMDD subdirectory (YYYY=year, MM=month, DD=day). This subdirectory is located in the same directory as the distributed installation client.
7. Run the distributed installation client as follows:
■ For Linux:
<pathtoexecutable>/sdiclinux.exe -h <host file> -p <password file>
[-accept]
■ For Solaris:
<pathtoexecutable>/sdicsol.exe -h <host file> -p <password file>
[-accept]

Run the Distributed Installation Client on Linux and Solaris
112 Installation Guide
pathtoexecutable
Specifies the location of the CA Spectrum Distributed Installation Client.
host file
Specifies a file containing the remote host installation information. Include this path when the host file is not located in the same directory as the distributed installation client.
Example: -h /tmp/hostinstall
password file
Specifies the file containing account and password information. Include this path when the password file is not located in the same directory as the distributed installation client.
-accept
(Optional) Acknowledges the license agreement and accepts its terms without the agreement appearing on your screen. This option allows for a silent installation.
The license agreement is located in the following places:
■ In the installation directory, <install dir>/Install-Tools/license/license.txt.
■ On the installation media, <installation_media>/<plat>/license/license.txt, where plat is either nt, sunos5, or linux.
Note: You do not need to perform the following two steps when you use the -accept command.
You can exit the installation at any time by pressing Ctrl + C; however, the remote installations continue.
Note: Results of the installation appear on the screen and in the LOGS_YYYYMMDD subdirectory. This subdirectory is located in the same directory as the distributed installation client.
8. Review the license agreement. When complete, accept the terms of the agreement and continue the installation by entering Y (yes), and pressing Enter.
Note: Pressing Enter scrolls line-by-line, and pressing the space bar scrolls page-by-page.
After the installation is complete, the message Installation Complete appears. Running the distributed installation client on Solaris or Linux is complete.
More information:
Types of Distributed Installations (see page 92)

Installation Duplication
Chapter 7: Installing CA Spectrum in a Distributed Environment 113
Distributed Installations Without the Root Password
Under certain conditions, you can run a distributed installation in a Solaris or Linux environment without being prompted for a user name and password.
For this scenario to work properly, run the distributed installation from the local machine as root. The installation program automatically executes without asking for a user name or password.
Note: This process does not automate the acceptance of the CA Spectrum license agreement. You must manually agree to the terms of the license agreement before the installation can proceed.
Log Files
The CA Spectrum Distributed Installation Client creates a subdirectory named LOGS_YYYYMMDD (YYYY=year, MM=month, and DD=day when the installation was started). This subdirectory contains a file for each system where you install CA Spectrum. To view these files, you need write permissions to the directory where you started the distributed installation client.
These files use the following naming convention:
<host_name>.HH.MM
host_name
Specifies the remote host name.
HH
Specifies the hour when the installation started.
MM
Specifies the minute when the installation started.
Note: Results of a distributed installation appear in the LOGS_YYYYMMDD subdirectory.
Installation Duplication
After you complete a CA Spectrum GUI installation, you can use the hostargs.<time> file located in the <$SPECROOT>Install-Tools/LOGS/<version_date> directory of the new installation as a baseline for more installations. The only potential change that is needed is the remote_host parameter in the hostargs<time> file.

Installation Duplication
114 Installation Guide
Also, add values to the server_user name and server_password parameters for either of these scenarios:
■ You are installing on Windows in a domain
■ You do not want the existing user name and password used in the <password file>.
If you are installing CA Spectrum on Windows in a domain, create a password file (see page 105).

Chapter 8: Starting CA Spectrum and OneClick Web Server 115
Chapter 8: Starting CA Spectrum and OneClick Web Server
This section contains the following topics:
Prepare the SpectroSERVER to Communicate With the OneClick Web Server (see page 115) Start CA Spectrum on Windows (see page 117) Start CA Spectrum on Linux and Solaris (see page 117) Initiate a Remote Display of CA Spectrum (see page 118) Terminate a Remote Display of CA Spectrum (see page 119)
Prepare the SpectroSERVER to Communicate With the OneClick Web Server
Make sure that the SpectroSERVER and OneClick can communicate with one another.
Note: Some service packs require updates to the SpectroSERVER and the OneClick web server. See the CA Spectrum Software Release Notice for more information.
Follow these steps:
1. Verify if the CA Spectrum version installed on the SpectroSERVER host is the same as the CA Spectrum version you are installing on the OneClick web server.
To verify, navigate to <$SPECROOT>/Install-Tools and view the .history file using a text editor. If the version is different, install the same version of CA Spectrum.
Important! For each SpectroSERVER, there must be an entry in the .hostrc file for the computer hosting the OneClick web server. For more information, see the Administrator Guide.
2. Ensure that all associated SpectroSERVERs are running.

Prepare the SpectroSERVER to Communicate With the OneClick Web Server
116 Installation Guide
3. Ensure that the computer on which you are installing the OneClick web server has host access to all associated SpectroSERVER computers. On each SpectroSERVER host:
a. Launch the CA Spectrum Control Panel.
b. Select Configure, Host Security.
c. Ensure that the Server List contains either:
■ The host name of the designated OneClick host (OneClick Web Server)
■ A plus (+) sign (meaning unrestricted access)
Note: See the Administrator Guide for more information.
4. Verify that you are connected by pinging the designated CA Spectrum host using its host name.
5. Designate an existing user as the OneClick administrator or create a OneClick administrator. Verify that this user is a valid administrator, as follows:
a. Launch the CA Spectrum Control Panel.
b. Select Control, Users.
c. Verify that the user model designated as the OneClick administrator exists.
d. If the user does not exist, select Create.
e. Enter the user name in the User Name field, enter a password in the New Password and Confirm New Password fields, and click OK.
The user is created as a super user and has access to all models and privileges.
f. Click Close to exit the Users window.
Note: In a distributed environment, this administrative user must exist in all landscapes. For more information, see the Distributed SpectroSERVER Administrator Guide.
6. Ensure that the computer on which you are installing the OneClick web server has access to the SpectroSERVER.
7. For all Windows platforms, ensure that you can resolve the SpectroSERVER host name from the OneClick web server by editing the local hosts file:
a. Navigate to the C:\Windows\system32\drivers\etc directory.
b. Open the hosts file with a text editor.
c. Add entries per the comments in the hosts file.
d. Save the file.

Start CA Spectrum on Windows
Chapter 8: Starting CA Spectrum and OneClick Web Server 117
8. On Solaris and Linux, ensure that you have host name resolution to the SpectroSERVER from the OneClick web server by editing the local hosts file. If you are not using a name service, edit your local hosts file as follows:
a. To test host name resolution, ping the CA Spectrum host using only the host part of its fully qualified domain name.
For example, to ping host.company.com, enter shell> ping host. If the ping fails, edit the file /etc/hosts to reflect the IP and name of the CA Spectrum host.
b. Add a host name to the Solaris hosts file as follows:
■ Log in as root.
■ Edit the /etc/hosts file.
■ Add an entry as follows (host in this example):
#
# Internet host table
#
127.0.0.1 localhost
192.168.200.1 host loghost
The SpectroSERVER is prepared to communicate with OneClick.
Start CA Spectrum on Windows
After you install CA Spectrum, you can start CA Spectrum on Windows.
Click Start, Programs, CA, SPECTRUM, Administrator, Control Panel.
CA Spectrum starts and the CA Spectrum Control Panel appears.
Start CA Spectrum on Linux and Solaris
After you install CA Spectrum, you can start CA Spectrum on Linux and Solaris.
Follow these steps:
1. Navigate to the directory path where you installed CA Spectrum (for example, /usr/SPECTRUM/).
2. Set up your remote display, if needed.
3. Navigate to the bin directory and run the following command:
./SCP
CA Spectrum starts and the CA Spectrum Control Panel appears.
Initiate a Remote Display of CA Spectrum
118 Installation Guide
Initiate a Remote Display of CA Spectrum
You can set up a Windows system to display CA Spectrum remotely when CA Spectrum is running on a Solaris or Linux system. The Solaris or Linux system must be installed with the applications that you want to display remotely on Windows. Also, the Solaris or Linux system must be configured to support Telnet services. The Windows system must be configured to support a Telnet client.
Note: CA Spectrum supports one remote display session open at a time on a client system.
Follow these steps:
1. Ensure that the CA Spectrum Control Panel and any applications that you want to display remotely are installed on the Solaris or Linux system. Also, ensure that they are configured to support remote display.
Note: On Solaris, you can initiate remote display when OneClick is not running.
2. Click Run from the Windows Start menu.
The Run window appears.
3. Run the following command:
Telnet <Solaris host name>
The Solaris or Linux login dialog appears.
4. Log in to the Solaris or Linux system using your CA Spectrum user name and password.
The system reports your last login, host name, and operating system version. The Solaris prompt follows.
5. To set the remote display environment, run the following commands:
■ In the K (default) shell, enter:
export DISPLAY=<remote display hostname>:0.0
■ In the C shell, enter:
setenv DISPLAY <remote display hostname>:0.0
■ In the Bourne shell, enter:
DISPLAY=<remote display hostname>:0.0 export display
Note: For frequent use of remote display, you can avoid repeating this task at each login by adding the DISPLAY environment to your profile.
Terminate a Remote Display of CA Spectrum
Chapter 8: Starting CA Spectrum and OneClick Web Server 119
6. Navigate to the <$SPECROOT>/bin directory.
7. Enter the following command:
./SCP
The CA Spectrum Control Panel appears, providing you with access to all CA Spectrum Control Panel functions, including access to client CA Spectrum applications.
Terminate a Remote Display of CA Spectrum
You can terminate a remote display of CA Spectrum.
Follow these steps:
1. Exit all remotely displayed CA Spectrum applications properly.
2. Enter exit at the prompt in the Telnet terminal window.
The Telnet session is ended.


Chapter 9: How to Start the OneClick Client 121
Chapter 9: How to Start the OneClick Client
The following procedure describes how to set up and start the OneClick client.
Follow these steps:
1. Verify that your workstation meets the minimum OneClick client requirements for Windows (see page 13), Linux (see page 16), or Solaris (see page 20).
2. Install the JRE and necessary Java components. (see page 121)
3. If necessary, associate the JNLP files with Java Web Start.
4. Launch the OneClick Console. (see page 125)
More information:
Troubleshooting OneClick Client Problems (see page 141)
Install the JRE and Java Components
The OneClick Console and OneClick add-on applications require the Java Runtime Environment (JRE). The JRE includes the Java Web Start client, which is required to run Java Network Launching Protocol (JNLP) applications like OneClick. After you install the JRE, you can start the OneClick Console.
Important! The OneClick Console requires a specific version of the JRE. If that version is not present on your system, the OneClick Console fails to run. Some users have experienced problems running other Java applications that are not compatible with the same version of the JRE that OneClick requires.
Note the following points regarding Java updates:
■ By default, the JRE automatically checks for Java updates and notifies you if an update is available for downloading. Before downloading and updating Java using this method, shut down the OneClick web server and any connected OneClick clients. Automatic Java updates can be disabled in the Java Control Panel.
■ If you upgrade the version of Java running on any OneClick client computer, update the Java version entered on the JNLP Configuration page.
Note: For more information about JNLP configuration, see the Administrator Guide.

Install the JRE and Java Components
122 Installation Guide
More information:
Install the JRE, Java Web Start and the Java Plug-in on Solaris (see page 125) Install the JRE and Java Web Start on Windows (see page 122) Install the JRE and Java Web Start on Linux (see page 124)
Install the JRE and Java Web Start on Windows
To run the OneClick Console on your Windows system, install the JRE and Java Web Start.
Confirm the following prerequisites before proceeding:
■ You have the correct URL for the OneClick web server system.
■ You can access the OneClick web server system using HTTP on a web browser.
■ Your account allows you to log in to the OneClick web server.
Important! Uninstall any 64-bit version of JRE. Perform this procedure, then reinstall the 64-bit version of JRE.
Follow these steps:
1. Log in to your Windows system.
2. Open the OneClick home page in a browser using the URL that your administrator provided. The URL has the following format:
http://<hostname>:<portnumber>/
Note: <hostname> is the name of the OneClick web server. Use :<portnumber> only if the OneClick web server does not use the default of port 80. If you cannot access the OneClick web server, notify your administrator.
3. Enter your OneClick login credentials, if prompted.
The OneClick home page opens.
4. Click Install JRE.
The Installing the Java Runtime Environment page opens.
5. Click Java Runtime Environment.
The File Download dialog opens.
6. Click Run or Open (not Save) in the File Download dialog.
The download begins. After the file download completes, the Internet Explorer Security Warning dialog opens.
Install the JRE and Java Components
Chapter 9: How to Start the OneClick Client 123
7. Click Run in the Internet Explorer Security Warning dialog.
The JRE installation program runs.
8. Click Select Typical setup, and then click Accept to accept the License Agreement.
Note: To download and install the JRE, accept the license agreement. You cannot run the OneClick Console without the JRE.
9. Click Finish when the installation completes.
The JRE and Java Web Start are installed.
More information:
Start OneClick from a Browser (see page 127)
Associate .jnlp Files with Java Web Start
The file that launches OneClick is a JNLP file. Verify that the .jnlp file extension is mapped to the javaws.exe application.
Follow these steps:
1. Open Windows Explorer.
2. Click Tools, Folder Options.
The Folder Options dialog opens.
3. Click the File Types tab.
A list of registered file types is displayed.
4. Scroll down and select JNLP.
The bottom portion of the dialog displays Details for the ‘JNLP’ extension.
5. Verify that the details for the ‘JNLP’ extension box indicate the following information:
■ For Windows 2000/2003: The file opens with javaws.
■ For Windows XP: The file opens with Java Web Start Launcher.
If JNLP files are not set as described, you can manually map the .jnlp extension to the javaws.exe application.
6. Click Change in the Details for ‘JNLP’ extension box.
The Open With dialog opens.
7. Scroll down and select ‘javaws’ or ‘JavaTM Web Start Launcher’ and click OK.

Install the JRE and Java Components
124 Installation Guide
8. Click OK in Folder Options.
9. Exit Windows Explorer.
The .jnlp file extension is now mapped to the Java Web Start application and can launch the OneClick Console.
Install the JRE and Java Web Start on Linux
To run the OneClick Console on your Linux system, install the JRE and Java Web Start.
Confirm the following prerequisites before proceeding:
■ You have the correct URL for the OneClick web server system.
■ You can access the OneClick web server system using HTTP on a web browser.
■ Your account allows you to log in to the OneClick web server.
Important! Uninstall any 64-bit version of JRE. Perform this procedure, then reinstall the 64-bit version of JRE.
Follow these steps:
1. Log in to your Linux system.
2. Open the OneClick home page in a Web browser, using the URL that your administrator provided. The URL has the following format:
http://<hostname>:<portnumber>/
Note: <hostname> is the name of the OneClick web server. Use :<portnumber> only if the OneClick web server does not use the default of port 8080. If you cannot access the OneClick web server, notify your administrator.
3. Enter your OneClick login credentials, if prompted.
The OneClick home page opens.
4. Click Install JRE.
The Installing the Java Runtime Environment page opens.
5. Click Java Runtime Environment.
The File Download dialog opens.
6. Save the JRE file to your system when prompted.
7. Install the JRE and the Java Web Start application by running the file that you just downloaded. If necessary, change permissions on the file to run it.
The JRE and Java Web Start are installed.

Install the JRE and Java Components
Chapter 9: How to Start the OneClick Client 125
8. Associate the .jnlp file type with the Java Web Start application for the OneClick Console to launch:
a. Click Start Console in Firefox.
b. Click Open with and select javaws, in the JRE directory (<JRE>/bin/javaws).
c. Click OK.
The .jnlp file type is now associated with Java Web Start.
More information:
Start OneClick from a Browser (see page 127)
Install the JRE, Java Web Start and the Java Plug-in on Solaris
To run the OneClick Console on your Solaris system, install the JRE, Java Web Start, and Java plug-ins.
Note: The installation program informs you if you require more operating system patches to support the JRE.
Confirm the following prerequisites before proceeding:
■ You have the correct URL for the OneClick web server system.
■ You can access the OneClick web server system using HTTP on a web browser.
■ Your account allows you to log in to the OneClick web server.
Important! Uninstall any 64-bit version of JRE. Perform this procedure, then reinstall the 64-bit version of JRE.
Follow these steps:
1. Log in to your Solaris system.
2. Open the OneClick home page in a Web browser using the URL that your administrator provided. The URL has the following format:
http://<hostname>:<portnumber>/
Note: <hostname> is the name of the OneClick web server. Use :<portnumber> only if the OneClick web server does not use the default of port 8080. If you cannot access the OneClick web server, notify your administrator.
3. Enter your OneClick login credentials, if prompted.
The OneClick home page opens.
4. Click Install JRE.
The Installing the Java Runtime Environment page opens.

Launch the OneClick Console
126 Installation Guide
5. Click Java Runtime Environment.
The File Download dialog opens.
6. Save the JRE file to your system when prompted.
7. Install the JRE and the Java Web Start application by running the file that you just downloaded. If necessary, change permissions on the file to run it.
The JRE, Java Web Start, and the Java plug-ins are installed.
8. Install the Java plug-in on your Solaris OneClick Console system.
Note: To see the instructions to install the Java plug-in for J2SE, access the Oracle website.
9. Associate the .jnlp file type with the Java Web Start application for the OneClick Console to launch:
a. Click Start Console in Firefox.
b. Click Open with and select javaws, in the JRE directory (<JRE>/bin/javaws).
c. Click OK.
The .jnlp file type is now associated with Java Web Start.
More information:
Start OneClick from the Command Line on Solaris (see page 127) Start OneClick from a Browser (see page 127)
Launch the OneClick Console
After the JRE and required Java components are installed, you can launch the OneClick Console. You can launch the OneClick Console from a browser (see page 127) or from the command line (see page 127) (for Solaris only).

Launch the OneClick Console
Chapter 9: How to Start the OneClick Client 127
Start OneClick from a Browser
You can start OneClick from a browser on your computer where the OneClick Console is installed.
Follow these steps:
1. Open the OneClick home page in a browser using the URL that your administrator provided. The URL has the following format:
http://<hostname>:<portnumber>/
Note: <hostname> is the name of the OneClick web server. Use :<portnumber> only if the OneClick web server does not use the default of port 80 on Windows or 8080 on Solaris/Linux. If you cannot access the OneClick web server, notify your administrator.
2. Enter your OneClick login credentials, if prompted.
The OneClick home page opens.
Note: Any date and time information that is shown in OneClick is localized to reflect the time zone where the OneClick client is installed and running.
3. Install JRE and Java Web Start if you have not done so already on Windows (see page 122), Linux (see page 124), or Solaris (see page 125).
4. Click Start Console.
5. Enter your OneClick user name and password again, if prompted.
OneClick starts and the OneClick Console opens.
Start OneClick from the Command Line on Solaris
You can start OneClick on Solaris from the command line.
Follow these steps:
1. Enter the following command from the directory in which you installed the Java Web Start application (javaws):
./javaws http://<hostname>:<portnumber>/spectrum/oneclick.jnlp
Note: <hostname> is the name of the OneClick web server. For HTTP communications, use :<portnumber> only when the OneClick web server does not use the default port 80 on Windows or 8080 on Solaris/Linux.
The OneClick Console application starts.
2. Enter your OneClick user name and password when prompted.
OneClick is started from the command line.

Launch the OneClick Console
128 Installation Guide
More information:
Install the JRE, Java Web Start and the Java Plug-in on Solaris (see page 125)

Chapter 10: Post-Installation Configurations 129
Chapter 10: Post-Installation Configurations
This section contains the following topics:
Set OneClick Client Restrictions (see page 129) Change the OneClick Web Server Port (see page 130) Configure the Windows Server Scheduled Tasks Service (see page 131) Landscape Polling Interval Configuration in Fault-Tolerant Environments (see page 132)
Set OneClick Client Restrictions
Client access to CA Spectrum includes access to OneClick web server installations. When the OneClick clients use the OneClick web server for connections, adding them to Host Security is not necessary.
Note: You can configure host security for the OneClick web server using Remote Address Filter and Remote Host Filter in Apache Tomcat. See http://tomcat.apache.org for details.
Follow these steps:
1. Navigate to <$SPECROOT>/tomcat/webapps/spectrum/META-INF.
2. Open the context.xml file in this directory, using an XML editor.
3. Locate the following line:
<Context path="/spectrum" docBase="spectrum">
Enter the following lines under this line:
<Valve className="org.apache.catalina.valves.RemoteAddrValve"
allow=""
deny=""/>
4. Enter IP addresses as values for the deny parameter to specify users in which you want to restrict OneClick access. For example, you can allow all users for a given IP address range, but you can exclude one or more specific users.
5. Optionally, enter IP addresses as values for the allow parameter to specify specific IP addresses in which you want to give OneClick access. For example, you can enter 10.254.*.* to include all IP addresses in your network that are in the “10.254” IP address range.
6. Save and exit the file.
OneClick client restrictions are set.

Change the OneClick Web Server Port
130 Installation Guide
Set Up Client Access to CA Spectrum in a Distributed Environment
If you selected a Main Location Server other than the host system during installation, enter the name of the host system in the .hostrc file of the Main Location Server.
Note: The installation automatically enters the name of the Main Location Server in the .hostrc file of the host system.
Follow these steps:
1. Start the SPECTRUM Control Panel on the system that is designated as the Main Location Server.
2. Select Configure, Host Security.
3. Add the name of the host system to the Server List and click OK.
The client access to CA Spectrum is set up.
Change the OneClick Web Server Port
Change the default server shutdown port for the OneClick web server when:
■ Your OneClick web server contains multiple instances of Apache Tomcat.
■ Those instances of Apache Tomcat are using the default server shutdown port (8005).
Apache Tomcat cannot start on a system with another instance running on it.
Follow these steps:
1. Navigate to the following directory:
<$SPECROOT>/tomcat/conf
2. Open the server.xml file, using a text editor.
3. Navigate to the following line:
- <Server port="8005" shutdown="SHUTDOWN" debug="0">
4. Change the server port value to the new server shutdown port number. For example, port="8099"
5. Restart Apache Tomcat, as follows:
■ On Windows:
– Select All Programs, Administrative Tools, Services from the Start menu.
– Select SpectrumTomcat from the list.
– Click Restart the service in the left pane.

Configure the Windows Server Scheduled Tasks Service
Chapter 10: Post-Installation Configurations 131
■ On Solaris and Linux:
– Navigate to the following path:
<$SPECROOT>/tomcat/webapps/spectrum
– Enter the following command:
restart.sh
The web server port is changed.
More information:
OneClick Web Server Shuts Down (see page 140)
Configure the Windows Server Scheduled Tasks Service
You can configure the Windows Server 2008 or Windows Server 2012 Scheduled Tasks service to work with the CA Spectrum Scheduler.
Follow these steps:
1. Click Start, Administrative Tools.
2. Select Task Scheduler.
3. Select Action, AT Service Account Configuration.
4. Select the option Another user account and select Change user.
5. Enter a user name (including the domain, if applicable) of a valid CA Spectrum user (for example, WORKGROUP\jsmith).
Note: By default, this dialog contains the current user. If the default is the CA Spectrum user, no change is necessary. Scheduled tasks are run on behalf of the designated user.
6. Enter the user password in the Password and Confirm Password fields and click OK.
7. Click OK in the AT Service Configuration dialog.
The Windows Scheduled Tasks service is configured.

Landscape Polling Interval Configuration in Fault-Tolerant Environments
132 Installation Guide
Landscape Polling Interval Configuration in Fault-Tolerant Environments
In fault-tolerant CA Spectrum environments, OneClick checks the status of the SpectroSERVER by polling each landscape at 10-second intervals by default. Frequent polling shortens the failover time to the secondary SpectroSERVER when the primary SpectroSERVER goes down. This polling also avoids missing any SpectroSERVER restarts.
You can increase the landscape polling interval for better performance. You can configure the interval by editing the value of domainPollingInterval in the context.xml file on the OneClick web server. The value of domainPollingInterval is the seconds between polls to the SpectroSERVER to determine its status.
To increase the polling interval, edit the domainPollingInterval value in the context.xml file (located in the <$SPECROOT>/tomcat/webapps/spectrum/META-INF directory). For example, to change the landscape polling interval to 60 seconds, change the value of domainPollingInterval from 10 to 60.
Note: For the changes to take effect, stop and restart the OneClick web server.
Chapter 11: Uninstalling CA Spectrum 133
Chapter 11: Uninstalling CA Spectrum
This section contains the following topics:
Uninstall CA Spectrum on Windows (see page 133) Uninstall CA Spectrum on Linux and Solaris (see page 134)
Uninstall CA Spectrum on Windows
The uninstallation program removes all of CA Spectrum from your hard drive. The files that are removed include everything that was originally installed, plus your customizations, if any. The uninstallation program automatically stops all CA Spectrum processes (for example, the CA Spectrum Control Panel, the OneClick web server, processd, and the Location Server).
Close any bash shells that you have open before uninstalling. The uninstallation program does not close bash shells, because you could be running bash shells for programs other than CA Spectrum.
Important! Do not uninstall CA Spectrum if you plan to perform an upgrade installation. Doing so permanently removes the customizations that you have applied, if any.
Follow these steps:
1. Stop CA Spectrum.
2. Log in as Administrator or a user with administrator privileges.
3. Go to Start, Control Panel, Programs and Features.
4. Highlight SPECTRUM and select Uninstall/Change.
Note: If you highlight SPECTRUM OneClick Console and select Change/Remove, only the Java Web Start application is removed.
The Uninstallation dialog appears.
5. Select Uninstall.
6. Click OK on the Warning window.
The uninstallation program continues.
7. When the uninstallation program completes, click OK on the Uninstall Status window.
CA Spectrum is uninstalled.

Uninstall CA Spectrum on Linux and Solaris
134 Installation Guide
Uninstall CA Spectrum on Linux and Solaris
The uninstallation program removes all of CA Spectrum from your hard drive. The files that are removed include everything that was originally installed, plus your customizations, if any. The uninstallation program automatically stops all CA Spectrum processes (for example, the CA Spectrum Control Panel, the OneClick web server, processd, and the Location Server).
Important! Do not uninstall CA Spectrum if you plan to perform an upgrade installation. Doing so permanently removes the customizations that you have applied, if any.
Follow these steps:
1. Stop CA Spectrum.
2. Log in as root and navigate to the <$SPECROOT>/Install-Tools/Uninstaller directory.
3. Enter ./UninstallSpectrum and then click Uninstall.
4. Select OK on the Warning window.
The uninstallation program continues.
5. When the uninstallation program completes, click OK on the Uninstall Status window.
CA Spectrum is uninstalled.
Appendix A: Troubleshooting Installation Problems 135
Appendix A: Troubleshooting Installation Problems
This section contains the following topics:
Installation Media Does Not Contain Installation Information (see page 135) Incorrect Text Displays on the Screen (see page 136) <index file name> Cannot Be Found (see page 136) Received a Landscape Handle Error (see page 136) Received an InvocationTargetException Error (see page 137) Received a Database Initialization Error (see page 137) Received a Database Saving Error (see page 138) Received a VNMRC File Processing Error (see page 138) Server Configuration Problems (see page 138) Installation Owner User Problems (see page 139) OneClick Web Server Error Message (see page 139) OneClick Web Server Shuts Down (see page 140)
Installation Media Does Not Contain Installation Information
Symptom:
The following message appears:
The CA Spectrum installation media does not contain the installation information for
this platform.
Solution:
This message appears when you do not have the correct installation media for the host platform. Use the CA Spectrum installation media of the platform on which you are installing.

Incorrect Text Displays on the Screen
136 Installation Guide
Incorrect Text Displays on the Screen
Valid on Solaris
Symptom:
The screen displays inverted text, partially missing text, or other improper text.
Solution:
Ensure that you are using the latest drivers for your video card.
<index file name> Cannot Be Found
Symptom:
I received the following error:
Error: <index file name> not found!
Solution:
One of the following conditions caused this error:
■ Extraction of the Installation record from the distribution medium was incomplete.
■ The Installation record files were improperly removed or modified before the installation.
Retry the installation. If the failure persists, contact Technical Support.
Received a Landscape Handle Error
Symptom:
The following message appears:
** Error during Set Landscape Handle
Solution:
The installation is unable to set the SpectroSERVER landscape handle value, which is a serious problem. Contact Technical Support.
Received an InvocationTargetException Error
Appendix A: Troubleshooting Installation Problems 137
Received an InvocationTargetException Error
Symptom:
The following message appears:
Invocation of this Java Application has caused an InvocationTargetException. This
application will now exit. (LAX)
Stack Trace:
java.awt.HeadlessException:
No X11 DISPLAY variable was set, but this program performed an operation which
requires it.
at java.awt.GraphicsEnvironment.checkHeadless
(GraphicsEnvironment.java:159)
at java.awt.Window.<init>(Window.java:317)
at java.awt.Frame.<init>(Frame.java:419)
at java.awt.Frame.<init>(Frame.java:384)
at javax.swing.JFrame.<init>(JFrame.java:150)
at com.zerog.ia.installer.LifeCycleManager.f(DashoA8113)
at com.zerog.ia.installer.LifeCycleManager.g(DashoA8113)
at com.zerog.ia.installer.LifeCycleManager.a(DashoA8113)
at com.zerog.ia.installer.Main.main(DashoA8113)
at sun.reflect.NativeMethodAccessorImpl.invoke0(Native Method)
at sun.reflect.NativeMethodAccessorImpl.invoke
(NativeMethodAccessorImpl.java:39)
at sun.reflect.DelegatingMethodAccessorImpl.invoke
(DelegatingMethodAccessorImpl.java:25)
at java.lang.reflect.Method.invoke(Method.java:585)
at com.zerog.lax.LAX.launch(DashoA8113)
at com.zerog.lax.LAX.main(DashoA8113)
This Application has Unexpectedly Quit: Invocation of this Java Application has caused
an InvocationTargetException. This application will now exit. (LAX)
Solution:
Your DISPLAY environment variable is not set to the host name of the system on which you are running the installation software. Set the environment variable correctly.
Received a Database Initialization Error
Symptom:
I received the following message:
** Error during Database Initialization
Received a Database Saving Error
138 Installation Guide
Solution:
The installation is unable to create the SpectroSERVER database, which is a serious problem. Contact Technical Support.
Received a Database Saving Error
Symptom:
The following message appears:
** Error during Database save as db_<extension>
Solution:
The installation is unable to save the existing SpectroSERVER database. The most likely cause is that the SpectroSERVER database is write-protected or does not exist (for example, the database was deleted).
To make the SpectroSERVER database writable, use the chmod utility. Then, reinstall CA Spectrum. If this procedure does not work, contact Technical Support.
Received a VNMRC File Processing Error
Symptom:
The following message appears:
** Error during Processing of vnmrc file
Solution:
The installation is unable to set values properly in the SpectroSERVER defaults file, SS/.vnmrc. This problem cannot be resolved at the installation site. Contact Technical Support.
Server Configuration Problems
Valid on Solaris and Linux
Symptom:
The following message appears:
Unable to Connect to Location Server
Installation Owner User Problems
Appendix A: Troubleshooting Installation Problems 139
Solution:
Follow these steps:
1. Verify connectivity by pinging the <CA Spectrum host>.
2. Verify name resolution.
3. Verify that the installation host is in the .hostrc file on <CA Spectrum host>.
4. Verify that the main location server is running on <CA Spectrum host>.
5. Verify that the location server ports are correct.
Installation Owner User Problems
Valid on Linux and Solaris
Symptom:
I have installation owner user problems.
Solution:
Follow these steps:
1. Verify the name resolution (without the domain name) to the <CA Spectrum host>.
2. Select Users from the Control menu in the CA Spectrum Control Panel and verify that the installation owner appears in the Users dialog.
3. Verify that the same version of CA Spectrum is installed on the computers where OneClick and the SpectroSERVER are installed.
OneClick Web Server Error Message
Symptom:
The resource at http://<server>/spectrum/index.jsp was not found. Authorization could not be completed.
Solution:
You could have another Web services application running on the same port Apache Tomcat is attempting to use. Stop (and disable, if necessary) the other application and associated services and restart the Apache Tomcat service.

OneClick Web Server Shuts Down
140 Installation Guide
OneClick Web Server Shuts Down
Symptom:
I upgraded to VMware 2.0 and it runs an Apache Tomcat server of its own. After I install the OneClick web server, the OneClick web server shuts down when it attempts to bind to port 8005. Then, I receive the following error message:
- StandardServer.await: create[8005]:
java.net.BindException: Address already in use: JVM_Bind
Solution:
By default, Apache Tomcat uses port 80 on Windows platforms and port 8080 on Linux and Solaris platforms. If SSL is configured, Apache Tomcat uses port 443. Apache Tomcat also uses the default server shutdown port 8005. When installing the OneClick web server, be sure that other applications on the same computer do not use these ports. Or, you can change the ports on the instance of Apache Tomcat that CA Spectrum uses.
Note: We recommend that you do not install the OneClick web server on a computer where an instance of Apache Tomcat is already running.
More information:
Change the OneClick Web Server Port (see page 130)

Appendix B: Troubleshooting OneClick Client Problems 141
Appendix B: Troubleshooting OneClick Client Problems
This section contains the following topics:
Odd OneClick Behavior (see page 141) OneClick Client Fails to Launch (see page 142) OneClick Console Does Not Open (Windows) (see page 142) Firefox Download Error Dialog (Linux) (see page 144) OneClick.jnlp File Download Dialog Opens (Solaris) (see page 145) OneClick Fails to Start, Access Denied (Windows) (see page 145) OneClick Console Does Not Open (Solaris) (see page 146) Cannot Log In to OneClick Client (see page 146)
Odd OneClick Behavior
Symptom:
After I upgrade CA Spectrum, I notice that the OneClick client is behaving oddly on one of my computers.
Solution:
Try to reproduce the problem on another computer where OneClick has not been used. If you cannot reproduce the problem on this computer, the Java cache most likely did not update during the CA Spectrum upgrade.
On the computer where the OneClick client exhibits this problem, clear the java cache:
1. Access the Java Control Panel:
■ On Windows platforms, click Start, Control Panel, and then double-click Java.
■ On Solaris and Linux platforms, launch <JRE install directory>/bin/jcontrol.
2. Click the View button under Temporary Internet Files on the General tab.
3. Select the CA Spectrum OneClick Console Application and click the X button in the toolbar.
The selected item is removed.

OneClick Client Fails to Launch
142 Installation Guide
OneClick Client Fails to Launch
Symptom:
I tried to launch OneClick, but it failed to start.
Solution:
When installing the JRE, which includes Java Web Start, on Windows, the default cache directory is the installing home directory of the user. However, if any part of the full path of the home directory, including the username, includes the exclamation character (!), OneClick fails to launch properly.
Follow these steps:
1. Click Start, Control Panel, and then double-click Java.
2. Select the General tab and then click Settings.
3. Click Change to change the location where temporary files are located. Select a path that does not include the exclamation character.
Solution:
Your server already had a Java version installed when you tried to launch OneClick for the first time after installation. Each time OneClick is launched, a check for a minimum version of Java is performed. Typically, you see a prompt asking you to update the JRE when required. But sometimes, this update fails.
If your inability to launch the OneClick client is related to a failed update of the JRE, install the software by clicking Install JRE on the OneClick home page. This link calls up a page with a link to the required version of the JRE.
OneClick Console Does Not Open (Windows)
Valid on Windows
Symptom:
I tried to launch the OneClick Console. The Java splash screen appeared but vanished, and the OneClick Console did not open.
Solution:
The JRE is not installed correctly. The OneClick client server must have the correct JRE version. If you are upgrading from a previous release, an older version of Java is already installed in the default Windows location, C:\Program Files\Jave\jre6. That version is causing the problem.
OneClick Console Does Not Open (Windows)
Appendix B: Troubleshooting OneClick Client Problems 143
Follow these steps:
1. Repeat the procedure that is outlined in Install JRE and Java Web Start on Windows (see page 122). However, when installing the JRE, select a location other than the default or the existing location.
2. After installation is complete, shut down any existing OneClick clients.
3. Clear the cache of old jar files to run the OneClick Console using the new version of Java:
a. In the Windows Start, Run dialog, type javaws -viewer and click OK.
The Java Control Panel and the Java Cache Viewer dialogs open.
b. Review the applications in the cache on the Java Cache Viewer dialog, delete any existing OneClick applications in this view, and click Close.
c. On the Java Control Panel dialog on the General tab, click Settings in the Temporary Internet Files section.
The Temporary Files Settings dialog opens.
d. Take one of the following steps:
■ If the option to 'Keep temporary files on my computer' is selected, click Delete Files. Verify that the Applications and Applets option on the Delete Temporary Files dialog is selected, and click OK.
■ If the option is cleared, manually delete the temporary files. Navigate to your <Windows home directory>\Local Settings\Temp folder and delete all 'jar_temp<number>' files.
4. Start a new OneClick Console.
More information:
OneClick Client Requirements for Solaris (see page 20) OneClick Client Requirements for Linux (see page 16) OneClick Client Requirements for Windows (see page 13)

Firefox Download Error Dialog (Linux)
144 Installation Guide
Firefox Download Error Dialog (Linux)
Valid on Linux
Symptom:
I get the Firefox Download Error dialog when I attempt to start the OneClick Console.
Solution:
The Firefox Download Error dialog opens when you attempt to start the OneClick Console due to one of the following conditions:
■ The correct JRE version is not installed on the Linux system.
■ The correct JRE version is not configured properly.
■ The .jnlp file type is not associated with the JavaWS application.
Follow these steps:
1. Verify that the correct JRE version is installed on the Linux OneClick Console system. If the JRE is installed, go to the next step. If it is not installed, follow the instructions in Install JRE and Java Web Start on Linux (see page 124) to install the JRE.
2. Configure the Firefox browser to associate .jnlp file types with the JavaWS application:
a. In a Firefox browser window, click Edit, and Preferences.
The Preferences dialog opens.
b. Click Downloads.
c. Click View, and Edit in the Download Actions section.
The Download Actions dialog opens.
d. Locate the entry for the JNLP extension. Verify that the action associated with the file type is Open with JavaTM Web Start Launcher. This association is made when installing the JRE. If a different association is listed, click Change Action.
The Change Action dialog opens.
e. Select 'Open them with this application', and click Browse, if necessary.
The Select Helper Application dialog opens.
f. Select javaws from the location where you installed it, and click OK.
g. Click Close.
3. Click OK.
OneClick.jnlp File Download Dialog Opens (Solaris)
Appendix B: Troubleshooting OneClick Client Problems 145
More information:
OneClick Client Requirements for Solaris (see page 20) OneClick Client Requirements for Linux (see page 16) OneClick Client Requirements for Windows (see page 13)
OneClick.jnlp File Download Dialog Opens (Solaris)
Valid on Solaris
Symptom:
I tried to start OneClick but all I see is a OneClick.jnlp file download dialog.
Solution:
The JRE is not installed or failed to install correctly on your computer. To resolve this problem, the OneClick client server must have the correct JRE version.
Follow these steps:
1. Verify that a supported JRE version is installed on the system.
2. If the JRE file is not installed, install the file from the OneClick home page. For more information, see Install JRE, Java Web Start, and the Java Plug-in on Solaris (see page 125).
If the issue still persists even after installing JRE, continue to the next step.
3. Verify that the Java plug-in is installed correctly. For more information, see Install JRE, Java Web Start, and the Java Plug-in on Solaris (see page 125).
OneClick Fails to Start, Access Denied (Windows)
Valid on Windows
Symptom:
I tried to launch OneClick, but OneClick failed to start. I received the following error:
opening oneclick.jnlp...
Access to the specified device, path, or file is denied.
Solution:
The .jnlp file type is not associated with the javaws.application. Verify that the .jnlp file extension is mapped to the javaws.exe application.

OneClick Console Does Not Open (Solaris)
146 Installation Guide
More information:
Associate .jnlp Files with Java Web Start (see page 123)
OneClick Console Does Not Open (Solaris)
Valid on Solaris
Symptom:
The Opening OneClick.jnlp dialog opens but the ‘Open with’ option is not available.
Solution:
The .jnlp file type is not associated with the javaws application on the system. Verify that .jnlp file types are associated with JWS.
If the issue persists, verify the settings in the javaws console.
Follow these steps:
1. Open the javaws console.
2. Select Edit, Preferences, Advanced, JNLP File/Mime Association.
3. Select Prompt user.
4. Click Apply.
5. Click OK.
6. Start the OneClick Console.
If the condition persists after completing the previous steps, see your CA Spectrum administrator.
Cannot Log In to OneClick Client
Symptom:
I am unable to log in either at the OneClick home page (that is, http://<hostname>/spectrum or http://<hostname>:<portnumber>/spectrum), or when launching the OneClick client.
Solution:
Check for these common problems:
1. Does the user name that is entered at login represent a valid user?
2. Does the user exist at the main location server?

Cannot Log In to OneClick Client
Appendix B: Troubleshooting OneClick Client Problems 147
3. Is the SpectroSERVER, or the secondary SpectroSERVER, running properly?
4. On the primary SpectroSERVER, does the user have either the administrator or operator role? To verify the user role, select the Users tab in the OneClick Console.
5. Is the password correct? To verify the user password, select the Users tab in the OneClick Console.


Index 149
Index
A
administrator privileges • 27 after.SSdb files • 79 antivirus software • 24 Apache Tomcat
restarting • 130 server port • 130
B
backslash characters • 105
C
CA Spectrum distributed installation clients • 93 installing in a distributed environment • 91 patches • 82 starting • 117 system object ID • 89 uninstalling • 134 upgrading • 35, 85 Windows Services • 76
CA Spectrum system requirements Linux • 14 Windows • 11
CDE Style Manager • 32 client access
in a distributed environment • 130 client restrictions • 129 converting existing models • 87, 89 customized support files • 45
D
data, backing up • 24 database compatibility • 85 databases
backing up • 48 events and statistics • 49 installation savefiles • 79 migration • 60, 63 saving • 48
directory structure migrating on Linux • 63 migrating on Solaris • 63 migrating on Windows • 60
upgrading on Linux • 63 upgrading on Solaris • 63 upgrading on Windows • 60
disk striping • 24 distributed installation
components • 93 defined • 93 requirements • 91 sradmin • 93
distributed installation client • 93 creating installation files • 93 running on Linux • 110 running on Solaris • 110 running on Windows • 108
E
emergency repair disk • 29
F
fault tolerance • 82 file system
converting to NTFS • 30 file types • 76 FIPS 140-2 compatibility • 3 fixed IP addresses • 29, 31
H
host installation information file creating • 101 parameters • 102
hosts file • 31
I
InnoDB • 41 installation
and root privileges • 31 duplicating • 113 Linux prerequisites • 30 new components • 81 Solaris prerequisites • 30 tasks • 11 using host_args.txt file • 113 Windows prerequisites • 27 without the root password • 113

150 Installation Guide
installation types CA Spectrum patches • 82 distributed and fault tolerant CA Spectrum
configurations • 82 installing additional components • 81 migration and upgrade and Solaris • 63 migration and upgrade and Windows • 60 upgrades • 35
installing CA Spectrum in a distributed environment • 91 OneClick • 21, 67 patches • 82 SpectroSERVER • 67
J
Java 2 Runtime Environment installing on Linux • 124 installing on Solaris • 125 installing on Windows • 122 required version • 25
java cache • See odd OneClick behavior Java updates • 122, 124, 125
L
landscape polling interval • 132 language, selecting • 71, 102 legacy.SSdb • 79 Linux
hosts file • 31 installing sradmin on • 97 Linux, .jnlp file • 124 log files • 113 migration • 63 mounting a CD • 68 processd files • 77 running sdiclinux • 110 starting CA Spectrum on • 117 system requirements • 14 uninstalling CA Spectrum on • 134 upgrading on • 63 web administrator problems on • 139
locale • 71 location server error • 138 log files
Linux • 113 Solaris • 113 Windows • 113
M
management modules • 87 migration • 60, 63 minimum system configurations • 21 model type editor • 86 model types
Cisco • 87 mounting
CA Spectrum CD • 68 procedures • 68
N
new components • 81 NewMM.pl • 87, 89 NTFS • 30
O
OneClick and Report Manager • 25 and Service Manager • 26 client login problems • 146 failure to launch • 142 launching through a web browser • 127 launching with command line • 127 OneClick, fault tolerance and • 82 privileges • 65 recommendations • 25 client restrictions • 129 web server • 140 web server error message • 139
OneClick web server requirements Linux • 14 Solaris • 17 Windows • 11
P
parameters for host installation information file • 101
password file • 93, 105 patches • 82 pcAnywhere • 24 polling interval
polling interval, landscape • 132 post installation scripts
log files • 90 troubleshooting • 90
pound characters • 105

Index 151
preserved model attributes and elements • 86 preserving database customizations • 45 processd files • 77
R
RAID • 24 remote administration daemon files • 78 remote display
initiating • 118 of CA Spectrum • 118 setting up • 118 terminating a session • 119
remote installations • 67 Report Manager Database • 41 restart.sh • 130 restarting Apache Tomcat • 130 restrictions • 129 root privileges • 31 root/administrator password file • 105
S
saved files directory • 45 saving login information • 122, 124, 125 scripts
log files • 87, 89 New MM.pl • 87, 89
sdiclinux running on Linux • 110
sdicnt distributed installation • 93 running on Windows • 108
sdicsol distributed installation • 93 running on Solaris • 110
security checking network settings • 30
silent mode • 99, 100, 101 Solaris
.jnlp file • 125 directory structure • 63 hosts file • 31 installing sradmin on • 98 log files • 113 migration • 63 mounting a CD • 68 processd files • 77 running sdicsol • 110 starting CA Spectrum on • 117
system requirements • 17 uninstalling CA Spectrum on • 134 upgrading on • 63 web administrator problems on • 139
SpectroSERVER database compatibility • 85 multiple installations • 82 running • 67 saving the database • 48
SRAdmin installing • 94, 97, 98 installing in silent mode • 94, 99, 100, 101 installing manually • 94, 97, 98 installing on remote systems • 94, 95 location of files • 76 uppgrading on remote systems • 95
SRAdmin Daemon • 31 sradmin files • 78 SSdbload utility • 79 starting CA Spectrum • 117 sudo account • 106 sudoers • 105, 106, 107 support files • 45 swap space
recommended setting • 21 system configurations • 21 system requirements • 11, 17
T
Tomcat • 25 troubleshooting
<index file name> • 136 improperly displayed text • 136 installation media • 135 inverted text • 136 InvocationTargetException • 137 landscape handle value • 136 odd OneClick behavior • 141 OneClick client login • 146 OneClick fails to launch • 142 OneClick web server error • 139 OneClick web server shut down • 140 server configurations • 138 SpectroSERVER database • 137, 138 vnmrc file • 138 web administrator user • 139

152 Installation Guide
U
uninstalling • 133, 134 upgrading
CA Spectrum • 35 OneClick web server • 65
user auditing • 30
V
viewing log files • 113 virtual memory • 21 virtualization environments • 23
W
web administrator problems • 139 Windows
database backup • 48 directory structure • 49 log files • 113 migration • 60 NTFS file system • 30 remote display • 118 services • 76 starting CA Spectrum on • 117 system requirements • 11 upgrading on • 60
Z
ZFS snapshots • 33