

C H IP - Forgotten Books
52
Transcript of C H IP - Forgotten Books


CH IP CA RV IN G
HARRIS W. MOORE
Supervisor of M anual Training
Watertown , M assachusetts
THE MANUAL ARTS PRESS
PEORIA , ILLINOIS

Copyright, 1922
HARRIS W. M OORE
Printed in Unaa i sum of America

CONTENTS
INTRODUCTIONTOOLS AND GENERALDIRECTIONSEASELS, TWO, PHOTOGRAPH OR POSTCARDTOOTHPICK HOLDER, THREE PATT ERNSGLOVE BoxCHECKER BOARDPIN TRA)STAM P Box .
CARD CASE .
BLOTTERPEG M ORREL )GAM E BOARD)F ox AND GEESE )GAM E BOARD)THERM OM ETER M OUNTS , TWO PATT ERN SPIPE RACKHANDKERCHIEP Box .
WHISKBROOM HOLDERPICTURE FRAM E .
PHOTOGRAPH FRAM E .
WHISKBROOM HOLDERWASTE BASKETPAPER KNIVES, THREE

EXAMPLES OF PRIMITIVE CARVING.
The photographs on the two follow ing pages show specimens of chip carving now located in the Peabody Museum ,
Harvard University.
NO. 1 is a ceremonial ad z from Mangaia Island in theHervey Group in the South Pacific. It is about a yard long.
The lower pa rt of the handle is ho llow and perfora ted , theremainder deeply incised .
No. 2 is a ceremonial or tribute paddle from Vavitao Islandin the Australian Group . A lens will help to bring out thebeauty of its ca rving. Notice that bands emphasize thecenter and outline of the paddle and that the )unction of theshaft and blade is seemingly strengthened by horizonta l rowsof incisions as tho bound with cords. The blade is not flatbut curved both transversely and longitudinally .
In NO . 3 notice the beauty of the marvelous repetition , yethere also are the bands denoting structure.
NO. 6 is from Mangaia Island and shows beautiful workmanship thruout. The )ade head is bound to the handlewith braided cord in an elaborate and skillful manner. Thishandle, like several others not shown, stands as erect as acolumn, whether from design or not, is not known. Thishandle suggested the pattern used in Plate XVI.
No. 7 from New ) ealand is a storage box for feathers andother personal ornaments, used on special occasions. It is ofrich brown wood with dull red pa int in the incisions betweenthe bands. What beautiful flowing curves they make ) Andthere is the semblance of a chain to hold the treasures.

Photo by M arshall Stud io Cumbn dge Mm Peabody M useum.Harvard Unwemlty

Photo bv M arshallStudio Cu m .M al l Peabody Harvard Umvamt)

INTRODUCTION
HIP-CARVING , characterized as it is by angular incisions in thesurface °decorated , occupies a very limited field in the realm of woodcarving. But with its limitations frankly recognized, it may appro
priately be employed to enrich an otherwiseplain surface. Because ofits angularity , caremust be exercised in applying it to curved surfaces
or to surfaces having curved outlines , lest it become as degenerate as so manyof our designs in cut glass have. Deco ration by means of incisions has
been utilized by many prim itive peoples , because it is applied to an other
F ig. 1 . Full-siz e units of primitive designs
wise finished surface. While handling his weapons and implements in times
of leisure , the primitive man would na turally turn to scra tches and incisionsas a method of embellishment. To appreciate what chip-ca rving may beat its best , one should see some of the ceremonial adz handles and paddlesproduced by the primitive men of the South Pacific islands. The decoration of these articles is characterized by an all-over pattern Of small units
,
for the most pa rt deeply cut. Often these units are as small a s V8”or
The chief element in their beauty is repetition , and to a chieve such beauty
one must exercise great patience . As these articles were decorated forceremonial occasion and not for daily use , no adaptations for conveniencewere necessary ; some of the adz handles , for example, were ho llow squaretubes even as large as six inches on a side. Sharp comers and deep incisionswere freely used . When we remember that these primitive craftsmen useda bit of shell
.
or a shark’s tooth as a cutting tool , we can appreciate bettertheir devotion to their art. And let us always remember that without thatdevotion no beau tiful th ing is ever crea ted .

6 CHIP CARVING
Fig. 1 shows some full-size units of primitive design. Whatever motifwas chosen it was used consistently, so that the whole decoration displayedunity. Lines of division were sometimes scratched and sometimes indicatedby rows of very fine chips.The photographs shown in the book should be studied Closely by the
beginner before undertaking to carve any of the articles drawn In this book.
Close Observation of these photographs will give a fair idea of how to executea pattern which may seem obscure in the ink d rawing.

TOOLS AND GENERAL DIRECTIONS
THOa ll the designs suggested In this book can be cut with the ch ip
-carvingknife shown In F ig. 2, the following additional tools will be found con
venient : a wood-carver’s veining too l , F ig. 3 ; a parting-too l towide , Fig. 4 ; and a 1
” skew chisel . Fig. 5 , for the larger chips. Inflower form rosettes , as in Plate XVII, a ca rver
’s gouge Of proper curveshown in Fig. 6 is helpful for stabbing. These cutting tools should behoned to a keen, perfect edge on a fine sharpening stone, stropped onleather, and then protected from all in)ury by sticking them into corkswhen not in use. Results can be attained with perfect cutting toolswhich are simply unattainable with dull ones . For the single purposeof veining )cutting narrow grooves), the veining tool should be sharpenedso that the cutting edges Of the V slant forward somewhat so that
F ig. 3 . Veining-tool
F ig. 4 . Parting-too l
F ig. 5 . Skew chisel
F ig. 6 . Carver’s gouge
they cut the wood )ust ahead of the po int of,
the V as shown in Fig. 3.
On ly in this shape will this tool cut smoothly a cross the grain.
Since the designs in this book are all full size, it is expected that they willbe traced and transferred to the model by ca rbon paper. Should
/
they notbe traced, the following drawing tools will be needed : T-square, 45
° tri
angle, 30° x 60° triangle, 22V3
° x triangle, compass, d ivider, scroll ,and ruler. Angles of 15 ° and 75 ° Can be obta ined by adding the 30 ° angle
to the 45 ° triangle .

8 CHIP CARVING
After one has acquired considerable skill in carving, not all the linesshown in the design need be drawn, for some of them will result from stabbingand some from cutting the chips . In general the important point to lay out
is the point where the kn ife is set to sta b the design.
The first cutting operation is to stab the design ,making a vertical cut, the point of the knifebeing at the deepest part of the incision to bemade, Fig. 7 . Care must be taken ) to holdkn ife vertical andmake the stab CO
inc ide w i th thelines ofthepattern .
To r emo v e t h echip , the knife isheld as in Fig. 8
w i th the thumbheld firmly on the wo rk to serve as a so rt Ofpivot on which to swing the hand while forcing the blade of the knife under the chip. Indo ing this the po int of the kn ife must bekept from go ing into the vertical wall madeby the stab , or into an ad)oining chip . Small F ig) 8 ° RemOVing Chips
chips in straight grain wood should be removed at one cut ; large ones , curvedones , or those in crooked grain may require two or more cuts to removethe chip smoothly . A smoo th , crisp , clear-cut chip is the only one whichshould give satisfaction ; but one should not give up if this is not obta inedwith the first trial , for sometimes unsuccessful cuts can be improved byrecutting deeper .In these plates dimensions are always given in the followmg order
The sign for inches is omitted because no modelurement by feet.
)about represent a groove.
F ig. 7 . Stabbing
Grooves g tool , or veiner. In the attempt toindicate the valleys s), by shading, the light is supposedto come from the u the page. Befo re stabbing any pa ttern , one must have to be cut ou t.Spa rklets )little a chip as shown in plate
0 stab it

TOOLS AN D GENERAL DIRECTION S 9
In the selection of wood for the various articles illustrated in this book,
the fo llowing considerations are pertinent. The soft, close-grain woods cuteasier than the hard woods , but if sub)ected to hard usage they do not
wear as well . F or an article which is used rather intimately and viewedclose by, a choice wood isappropriate. Some Of the soft woods are pine
,
basswood, poplar or whitewood , and red-gun ; those of medium hardness,
mahogany and black walnut ; the hard woods, cherry , oak , birch and hardmaple. Of course, some trees of any Of these kinds vary one way or theother from the average of its kind. Tho carved wood may be stained ordyed it is generally better to select wood of natural beauty, and to finishit without stain. Color, however, is such an important element of beautyand harmony that one should not hesitate to use the excellent commercialwood sta ins and dyes which are now available, if thereby the article is mademore harmonious with its surroundings.Befo re wood is finished it should be smooth and clean. No attempt
should be made to sandpaper the actual cuts of a piece of chip carving. Thetools should be sharp enough and used with such precision as to leave thesurface smooth . If a surface needs sandpapering after it has been ca rved,
the sandpapering should be done carefully with fine sandpaper wrappedsnugly about a smoo th flat block ; and this should be moved in the directionof the grain. Great care is needed not to fla tten the sharp ridges of thecarving.
For articles which are not to be handled much, a wax or linseed oilfinish is suitable. Dull rather than glossy finish should be used . An articlethat is apt to become soiled with handling and hence need cleaning at timesis better finished with shellac or varnish. Thin white shellac laid Onquickly with a soft camel’s hair brush makes a good, hard finish. Shellacis not waterproof but turns white in a few hours under water.A wax finish is easily obtained with the commercial prepared waxes
or with beeswax cut with turpentine till a soft paste results. These waxesmay be brushed on and then polished after a little time with a brush asshoes are polished. A good durable finish may be obta ined in the course ofseveral weeks by the use of linseed Oil alone if successive applications ofOil are rubbed well with a cloth and allowed to dry thoroly between applications . Sometimes a week is not too long a time to allow the oil to harden.

lO CHIP CARVING
EASEL PLATE I.
F OR HOLDING PHOTOGRAPH OR POST CARD
A . The grain Of the wood in this ea sel should run vertica lly as thedrawing is shown in this plate. One should not attempt to carve anypattern until one has succeeded in carving the design on a practice piece ofwood . The model may ormay not be planed thin at the wide end.
B . The heavy line indicating the valley and the miter lines at thecorners are the important lines in the lay-out Of th is design. The ca rvingof this pattern should sta rt at the inner end of the fret , ca re being takennot to cut across any ridge. The sectional drawing shows ridges andvalleys.

PLATE I

12 CHIP CARVING
TOOTHPICK HOLDER. PLATE II
A . This pattern is a primitive design from the South Pacific Islands .
B. Particular care should be taken to cut the grooves of uniform width.
The crosses in the background a re merely lines stabbed four times with thepoint of the knife at the intersection of the cro ss . In making any ca rvinghaving radiating chips as in this pattern , which is an adapta tion of theGreek honeysuckle, ca re must be taken to make the center of radiation a s
perfect as possible.0 . Sparklets may be added to the shallow ch ips to suggest a plant fo rm .
GLOVE BO) . PLATE III
The ca rving on this box represents an interesting variation Of grooving.
The outer line of the pattern represents a vertica l wall about 3 32 deep,
and should be cut first with the knife held vertica lly. The chip is cutslanting from the line next the outer line to this vertical wall. Only onehalf of the front and top patterns is shown. The front and end shown
in the drawing are the parts below the cover. If a lock is added to thisbox the front pattern should be modified to recognize the keyhole. A
box like this should be glued and bradded together completely and then
the cover sawed apart along the line of separation ; is allowed for
this.
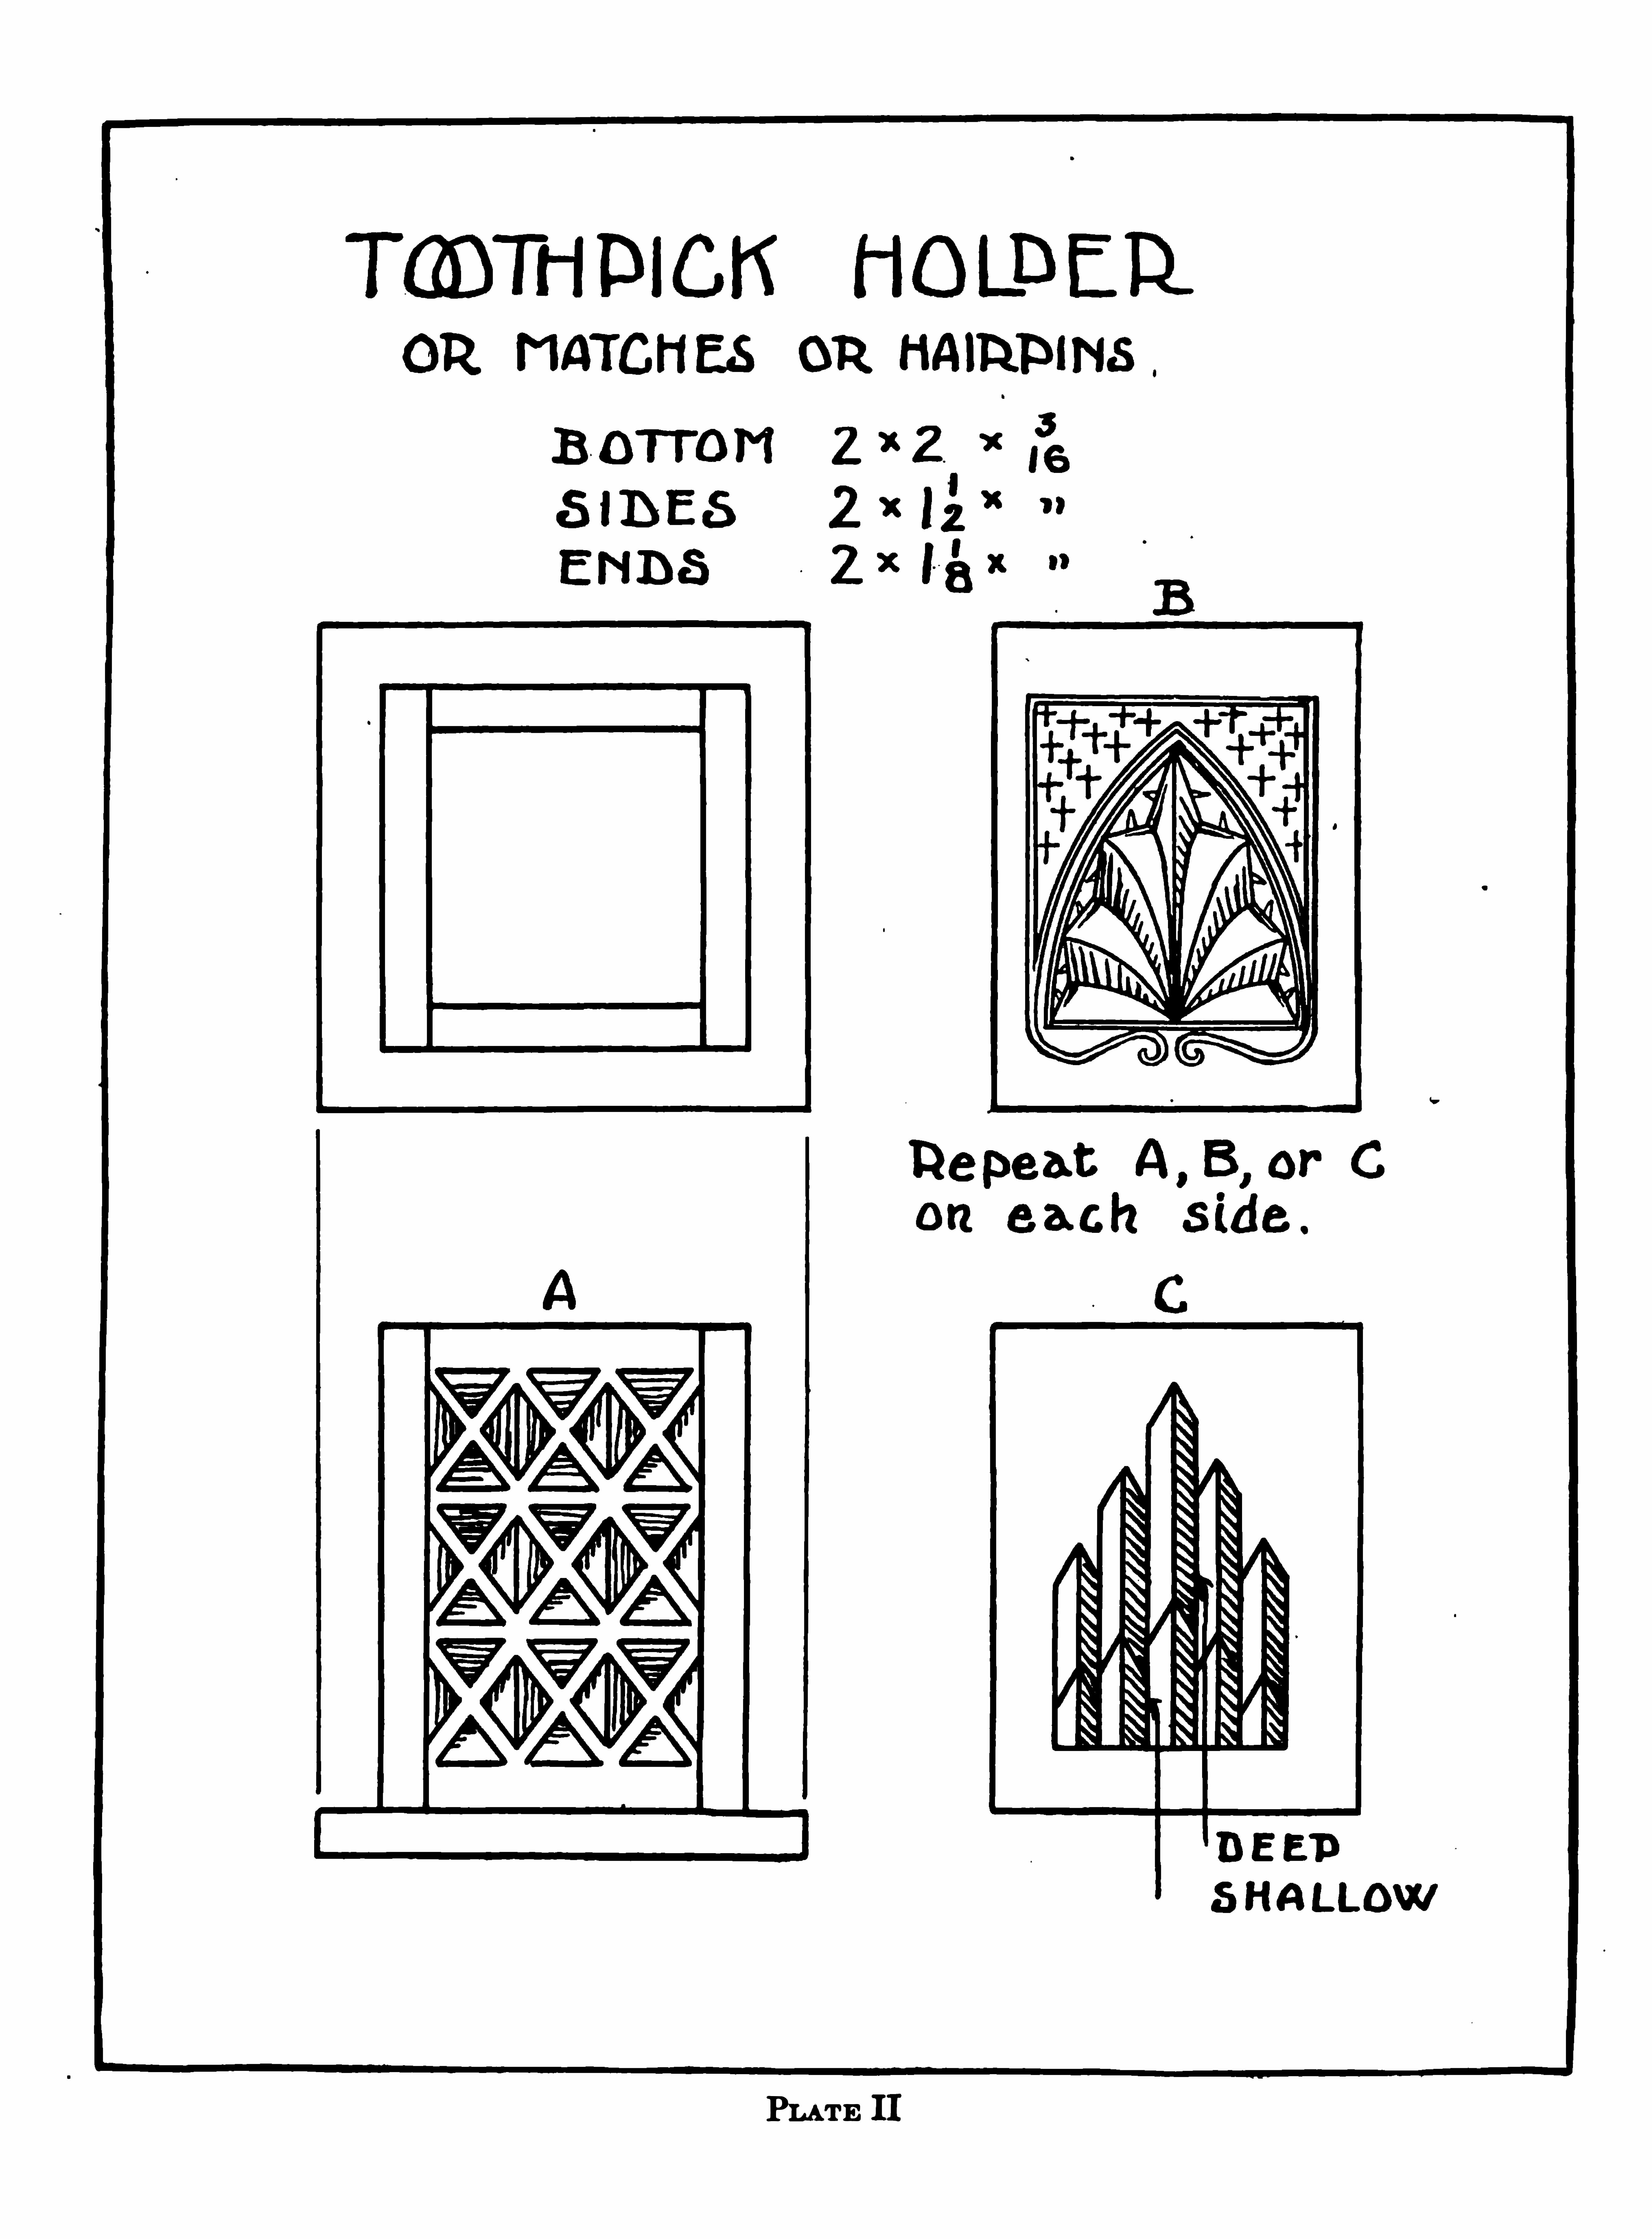
PLATE II

PLATE III

16 CHIP CARVIN G
CHECKERBOARD . PLATE IV
This form of carving, sometimes called ribbon ca rving, permits the easysliding of the checkers . It differs from that in Plate III in that the chipslants from the outer line to the next outer as shown in Section A. Whenselecting the wood for this checkboard , avoid any wood tha t is liable towarp. Well-seasoned mahogany is recommended.

PLATE IV

18 CHIP CARVING
PIN TRA) . PLATE V
The diamond rosette should be cut rather shallow. Tho it may notlook so , the all-over pattern is in this design laid out on the equilateraltriangle , one side being 14 , and vertical. There are many other interestingmodes of cutting on such a lay-out. This form was chosen to keep the sur
face a s level as p ossible.


20 CHIP CARVING
STAMP BO) . PLATE VI
The two blocks are to be fastened to the under side of the cover nea rthe ends to keep the cover in position in ca se hinges are not used .

The puff box and the paper knives shown above were carved by M rs Eda mW. F oster of Brooklyn, N . ) .
The box is ma de of pea r R 0 0d It vsa s turned by a blind student in a school for the blind in Gothenberg, Swed en,and then ca rved by M rs. F oster The paper knives a re made of apple “ 0 0 d . The blanks were made in Swed enbut the ca rving wa s done in th is co untry
These ca rved Ob)ects represent a )ne ada pta tion of the ch ip-ca rving forms tha t have been vet) common inthe Northern countries of Europe.


22 CHIP CARVING
CARD CASE . PLATE VII
Of course, this case should be planned to fit the pack of ca rds used.
The dimensions suggested fit some of the standard sizes . The catch dependsupon springing the front and the back apart as the cover is pressed down .
If carefully made, it holds the cover well.

PLATE VII
TO P Jfg t li xl
‘
zF RONT 3 ; A x n
S IDE x g5“ R ooms6
A ;C ATCH 3
cc 4
)Section a t Ato Show catch .

24 CHIP CARVING
BLOTTER. PLATE VIII
It is desirable to use a V3 chisel to stab the valley between the rows ofdiamonds . A brad awl might be sharpened for this purpose, or the knifewill stab it in two operations.

PLATE VIII
26 CHIP CARVING
PEG MORREL. PLATE IX
Peg morrel )ninemen’s morris , shepherd’s mill) is a fine game for twoplayers . The moves are interesting, and victory or defeat may come quickly .
The holes in this board are so placed that the game of fox and geese maybe made on the reverse side of the board. The pegs shou ld have ends soshaped and well sandpapered that they can readily be inserted into orremoved from the holes. A skillful carver would carve the two innerborders on a layout consisting only of the rows of flat )uncut) trianglesalong their edges. Careful sta bbing would finish the design.
DIRECTIONS FOR PLA) ING“
First one player then the other places a peg in a hole, each striving to get a. “mill)three pegs in a row but not cornerwise) and a lso to prevent his opponent from getting amill. A mill entitles its owner to remove one opponent’s peg, but not from any mill hemay have. After all pegs have been placed , they are moved , without )umping, a long thelines, one hole at a move. When a player has only three pegs left, he can )ump anywhere ;when he has only two , he has lost the game.
)M anual Training M agaz ine, Dec. 1918 , page 134 .

PLATE IX

28 CHIP CARVING
FOX AND GEESE . PLATE X
It Often adds interest to a piece of decoration if its corresponding members are not exactly the same. This idea is carried out in Plate X and inPlate XV in the long ch ips along the sides of the board , the valley at thetop of the plate being straight and the one at the left curved. Sparkletsmight be introduced in some of the diamonds .
DIRECTIONS FOR FOX AND GEESE
The fox is placed at the center hole. He can )ump and so take up a goose next to himif the hole )ust beyond is empty. If conditions are righ t, he can sometimes )ump more thanone goose at a move . The ) fteen geese occupy one arm )say the upper) of the cross solidly,and then extend to either side, occupying holes in the outer row .
F or the geese to win , they must so block the fox that he cannot move.
DIRECTIONS F OR SOLITAIRE
The problems of solita ire are various : one, for example, being to sta rt with a ll holes) lled except the center one, then to )u p )and take up) all pegs except the last one, which isto land in the center hole. One or severa l holes in other parts of the board may be leftempty, and so other problems crea ted.

30 CHIP CARVIN G
THERMOMETER MOUNTS . PLATE XI
These mounts are designed for thermometers measuring 4 1 . Theyshould, of course, be changed to fit other siz es which may be used. Beca useof the direction of the grain , care must be taken not to break the slenderpoints of the flat surface in the border design of the shorter mount.In the longer mount, other methods of cutting chips on this lay-out can
be discovered. The inventive faculty thus employed is worth cultivating.


32 CHIP CARVING
PIPE RACK. PLATE XII
The holes in the shelf should be of suitable size to accommodate the pipesused. The upper edges of these holes should be well rounded and smooth.
The long sweeping valleys in the back can be sta bbed by drawing the knifepoint several times along these lines . T0 remove the chips smoothly willrequire several operations . The three small diamond-shaped surfaces atthe left and right ends of the back piece are even with the main surface ofthe board and are simply stabbed on all four sides to receive the valleys .
HANDKERCHIEF BO) . PLATE XIII
The under top board should be screwed as well as glued to the cover,with the grain running cross-wise. The deta il drawings show one-half Ofone side and one-half of the pattern for the cover.

PLATE XII

PLATE XII-A

PLATE XIII

36 CHIP CARVING
WHISKBROOM HOLDER. PLATE XIV
The front and the back of this model had better be carved theparts are glued together. Because the design on the sides extends to itsedges, the outside rows of chips are better out after the parts are glued.
The chips between the vertical rows Of flat diamonds are somewhat peculiarin that their deepest po ints are not together, but are at opposite ends ofthe valley.

38 CHIP CARVIN G
PICTURE FRAME . PLATE XV
The recess for the picture sho uld be cut with chisel and router planebefo re the carving is executed . The circular opening ca n be cut w ith alarge expansive bit or with a scro ll saw. If the frame is to hang on the walla sma ll brass screw-eye may be used.


40 CHIP CARVING
PHOTOGRAPH FRAME . PLATE XVI
The play of light and shade on this design when carved is much more
interesting than the drawing suggests . The carving should be kept delica te,hence the flat radiating and elliptical bands must be made narrow. Thenarrower they are, however, the more liable to split are those which runacross the grain . A pocket into which the photograph slips is built on theback. The brace presupposes the use of the frame as an ea sel.

PLATE XVI

42 CHIP CARVING
WHISKBROOM HOLDER. PLATE XVII
To stab these rosettes a gouge )Fig . 6) of suita ble sweep is desirable, thothe curves can be cut by drawing the knife several times a long them .
Attention is called to the leaf pattern border on the edge and ends of theshelf. This border may , of course, be omitted . Accurate cutting of thesparklets will add much to the appearance of this article. The upper edgesof the elliptical opening should be well rounded with sandpaper.
WASTE BASKET. PLATE ) VIII
The octagonal bo ttom should be made as accurate as possible. Theblocks between the eight vertical sides are best made in one long piece.
They should be glued and nailed in place before the sides are screwed to thebottom . Only one screw should be put in each side until the tops are tiedtogether. Two rosettes may give place to large brass ring handles. Pi
nally, the sides should be laced together with raw-hide shoe or belt lacings .

PLATE XVII

PLATE XVIII

46 CHIP CARVING
PAPER KNIVES . PLATE XIX
These kn ives should be shaped completely before the carving is added .
They should be made of firm , close-grain wood. The design of B wasadapted from a paddle from the South Pacific islands ; the design Of C
’from aknife by Jenny Andreen in her book, Chip-CarvingPatterns.

PLATE XIX