
BZ 5503 - Brüel & Kjær · BZ 5503 It is used in noise profile measurement (to measure industrial,...
56
BZ 5503
Transcript of BZ 5503 - Brüel & Kjær · BZ 5503 It is used in noise profile measurement (to measure industrial,...

BZ 5503

Table Of Contents Introduction .................................................................................................................................................... 1
What can you do with Utility Software for Hand-held Analyzers BZ 5503? ............................................... 1
About the BZ 5503 Software ...................................................................................................................... 2
Help for Utility Software for Hand-held Analyzers BZ 5503 ....................................................................... 3
How to... ......................................................................................................................................................... 4
How to... ..................................................................................................................................................... 4
How to Install a New Version of Type 2250 Software ................................................................................ 5
How to Install a License for a Type 2250 Software Module....................................................................... 6
How to Get Data from your Type 2250....................................................................................................... 7
How to Export Type 2250 Data to Type 7810/12/15/16/20/25 or Excel..................................................... 9
How to Export Type 2250 Data to Excel .................................................................................................. 10
How to Create New Users on your Type 2250......................................................................................... 14
How to Configure your Type 2250............................................................................................................ 16
How to Backup Archives .......................................................................................................................... 17
Instrument .................................................................................................................................................... 18
Instrument View........................................................................................................................................ 18
Transfer Data from the Instrument to the Archive .................................................................................... 20
Create Users on Instrument ..................................................................................................................... 21
On-line Display ......................................................................................................................................... 22
Dial-up ...................................................................................................................................................... 23
Archive ......................................................................................................................................................... 25
Archive View............................................................................................................................................. 25
Transfer Data from the Archive to the Instrument .................................................................................... 27
Create Users in Archives.......................................................................................................................... 28
Export ....................................................................................................................................................... 29
New Archive ............................................................................................................................................. 30
Removable Disks, SD- and CF-cards ...................................................................................................... 31
2250 Viewer.............................................................................................................................................. 32
2250 Editor ............................................................................................................................................... 33
Add Note................................................................................................................................................... 34
Maintenance................................................................................................................................................. 35
Installing Software Modules on Type 2250 .............................................................................................. 35
Installing Software Modules on Type 2250 Using a CF-card................................................................... 38
Installing Licenses for Type 2250 Software ............................................................................................. 39
Enhancements Log................................................................................................................................... 41
Menus .......................................................................................................................................................... 42
ii

Table Of Contents
Menus....................................................................................................................................................... 42
Tools Menu............................................................................................................................................... 45
iii


BZ 5503
Introduction
What can you do with Utility Software for Hand-held Analyzers BZ 5503?
Utility Software for Hand-held Analyzers BZ 5503 functions as the link between Type 2250 and reporting software on a PC, such as Noise Explorer Type 7815, Evaluator Type 7820/21 or Protector Type 7825. It enables you to do the following:
• setup or control Type 2250 from a PC
• retrieve data from Type 2250
• manage and archive data from Type 2250
• export data to – Type 7810
Predictor Type 7810, Environmental Noise Prediction and Control Software, is a multi-purpose Windows®-based software package for calculating environmental noise. It allows you to calculate and analyze noise from various noise sources such as industry or traffic. With its state-of-the-art calculation power, it can be used for all applications ranging from small-scale impact assessments to mapping of large agglomerations.
For further information see Product Data for Predictor Type 7810.
– Type 7812
Lima Type 7812, Environmental Noise Calculation and Mapping Software, is the most powerful noise calculation system available. It includes advanced automated data manipulation, geometric handling and allows you to efficiently perform large, accurate noise calculations from existing data sets, without the need to use other software, such as GIS (Geographical Information Systems) and Auto-CAD. With fast algorithms and a huge capacity, Lima can make rapid, yet accurate, calculations. It is highly flexible, allowing in-depth analyses, and its openness eases integration with external data sets, calculation components and software.
For further information see Product Data for Lima Type 7812.
– Type 7815
Noise Explorer Type 7815 is a Windows®-based software package for the downloading and reporting of noise and vibration data measured with Brüel & Kjær Sound Level Meters and analyzers.
This software allows you to:
• format your data for export to spreadsheets, noise mapping software or the Windows® clipboard
• display/print measurement results in graphical or tabular form
For further information see Product Data for Noise Explorer Type 7815.
– Type 7816
Acoustic Determinator Type 7816 is a Windows®-based software tool for acoustic engineers who want to find out the sound power level of industrial sources by measuring sound pressure levels in the field. Using data from field measurements, Acoustic Determinator can guide you in the determination of sound power levels of various sources in accordance with a wide range of leading national and international standards, such as ISO 8297 and ISO 3744.
For further information see Product Data for Acoustic Determinator Type 7816.
– Type 7820
Evaluator™ Type 7820 is a Windows®-based software package for environmental noise evaluation. It provides versatile tools for analysing measured data from the family of Brüel & Kjær Sound Level Meters, and is a complete solution for the determination of Rating Levels according to various national standards.
1
BZ 5503
It is used in noise profile measurement (to measure industrial, residential and road/rail traffic noise) and in environmental noise evaluation against noise limits according to national and international standards.
For further information see Product Data for Evaluator Type 7820.
– Type 7825
Protector™ is a Windows®-based software package for post-processing, simulating and archiving noise exposure data. Designed to work with the family
of Brüel & Kjær sound level meters, noise dose meters and sound level analyzers, Protector™ allows you to quickly download sample noise profiles for specific locations or persons. Protector™ can use this data to calculate noise exposure for people or positions under investigation. It calculates noise exposure according to ISO9612.2.
For situations where only work point noise measurements are available, and workers move about, Protector™ can combine workpoint measurements with a profile of a persons movements, to simulate their personal noise exposure.
This software allows you to:
• make comparisons between measured, calculated, and permitted noise exposure values
• create a corporate database for all occupational health matters related to noise exposure
• identify high-exposure areas and jobs for planning noise-reduction measures
For further information see Product Data for Protector Type 7825.
or Microsoft® Excel
• upgrade and update software on Type 2250 or install licenses for Type 2250 software
About the BZ 5503 Software
BZ 5503 Utility Software comprises two views:
• Archive View
• Instrument View
Archive View
To show the Archive view, click on the Archive button at the top of the window or use the shortcut CTRL + 1.
The Archive View contains all the tasks commonly associated with the archives. The purpose of the archives is to keep the data in a secure and effective way, stored in the same structure as that used on the instrument. Data is kept in projects organised in job folders, per user.
The following suggestions are considered good practice when using the archives:
• Keep all data related to the same case in the same archive
• Make new archives for major new cases
• Keep data in the archive, even if you export data for post-processing, then you always have the raw data in a secure way
• Create the archive on a network drive, then your colleagues will also have access to the data
• Create users and templates in the archive for easy setup of Type 2250 to a specific case
Use the archive as the basis for the following activities with your Type 2250:
• Setup of Type 2250
• Storage of Type 2250 data
• Export of data for post-processing
2

BZ 5503
Note: It is strongly recommended that you never change an existing archive file structure with Windows® Explorer.
Instrument View
To show the Instrument view, click on the Instrument button at the top of the window or use the shortcut CTRL + 2.
The Instrument View contains all the tasks commonly performed on the instrument. The purpose of these tasks is to transfer data from the instrument to the archives and to organise data and users on the instrument. In addition, you can control the instrument 'on-line' for demonstration purposes, or if you need a very large display.
The following suggestions are considered good practice when organising data on the instrument:
• Create a User for each user of the instrument, all data and setups for each user are then effectively secure from being altered by other users
• Create job folders to distinguish between different jobs
• To organise larger jobs, or cases, consider creating a User as a "case", this will ease working on several cases at the same time
To distinguish between tasks in the Instrument View and those in the Archive View, the background colour of the Instrument Explorer and pop-up dialogs is Brüel & Kjær green, while the rest are grey.
Help for Utility Software for Hand-held Analyzers BZ 5503
Context-sensitive help is provided with Utility Software for Hand-held Analyzers BZ 5503, press F1 at any time during use of this program to get detailed help on the current task. If required, a printer friendly 'pdf' version is also available on the Environmental Software CD-ROM (BZ 5298).
3

BZ 5503
How to...
How to...
Install a New Version of 2250 Software
Install a License for a 2250 Software Module
Get Data from 2250
Export Data to Type 7810/12/15/16//20/25 or Excel
Export 2250 Data to Excel
Configure Type 2250
Create New Users in 2250
Backup Archives
4

BZ 5503
How to Install a New Version of Type 2250 Software
Type 2250 software modules are collected together in a 2250 Software Package. The software packages (available at the time) were copied to your PC when you installed BZ 5503. Later versions of these software packages may now be available on the 2250 Maintenance site at www.bksv.com. All software modules are installed when you install a package – you cannot pick out a single module from a package and install it separately.
To Install a 2250 Software Package:
1. Open your BZ 5503 application and click on the Instrument button at the top of the window to show the Instrument view.
2. Switch on your Type 2250 and wait a few seconds for the instrument to go through its initialisation and start-up routine.
3. Connect your Type 2250 to the PC via the USB cable and wait for the instrument to be recognised automatically – this can confirmed by checking that the instrument serial number appears next to Selected Instrument: (top of the left pane).
4. Press the Install button on the toolbar (or select Tools, Maintenance, Install 2250 Software) to see the table showing the installed versions of the software modules.
5. Select the 2250 Software Package to install and press the Next button.
6. Select "Install and reuse settings" and press the Install button, the installation starts.
7. The installation will take several minutes. Type 2250 will automatically reboot and start again, when the installation is finished
5

BZ 5503
How to Install a License for a Type 2250 Software Module
A valid license is required to run a software module on Type 2250. If you have purchased your Type 2250 together with the software module(s), then the relevant license(s) will come pre-installed on the instrument. If you purchased a separate software application for your Type 2250, then you have to install the license on the instrument.
To Install a License for a Type 2250 Software Module:
1. Open your BZ 5503 application and click on the Instrument button at the top of the window to show the Instrument view.
2. Switch on your Type 2250 and wait a few seconds for the instrument to go through its initialisation and start-up routine. .
3. Connect your Type 2250 to the PC via the USB cable and wait for the instrument to be recognised automatically – this can be confirmed by checking that the instrument serial number appears next to Selected Instrument: (at the top of the left pane).
4. Press the License button in the toolbar (or select Tools, Maintenance, Install 2250 SW License) to see the table showing the installed versions of the software modules and the licenses already available.
5. Press the Next button to enter the Install License wizard.
6. You will have received a License Certificate from Brüel & Kjær together with the software module. Enter the 16 character license code (from the certificate) into the Install License for 2250 SW control panel.
7. Press Install and the license will be installed. You can now use the software module.
6

BZ 5503
How to Get Data from your Type 2250
Measurement data created by Type 2250 is saved on the internal disk of the instrument, or on an SD-card or a CF-card plugged into your Type 2250. Use BZ 5503 Utility Software for Hand-held Analyzers to transfer data to an archive on the PC.
Data in an archive on the PC can be exported to the post-processing and reporting software Type 7810 Predictor, Type 7812 Lima, Type 7815 Noise Explorer, Type 7816 Acoustic Determinator, Type 7820 Evaluator, Type 7825 Protector or to Microsoft® Excel. The export is controlled by the BZ 5503 software (you cannot open Type 2250 data directly from the previously mentioned software, or Excel).
You can transfer data from Type 2250 in two ways:
a. Transfer data directly from Type 2250 over the USB cable (or via a modem) to an archive.
b. Plug an SD-card (or a CF-card) containing 2250 data into a card reader on the PC and transfer the data directly to an archive.
The two methods are described below.
Transferring Data from Type 2250 Over the USB Cable to an Archive:
1. Open your BZ 5503 application and click on the Instrument button at the top of the window to show the Instrument view.
2. Switch on your Type 2250 and wait a few seconds for the instrument to go through its initialisation and start-up routine.
3. Connect Type 2250 to the PC via the USB cable and wait for the instrument to be recognised automatically and appear in the Instrument Explorer.
The easy way of selecting data:
4. Press the To Archive button on the toolbar (or use the Tools, To Archive menu). Select an archive for data storage in the Send Data to Archive control panel.
5. Select "Automatic deletion of data from the instrument" (then you don't have to bother with cleaning up the data on your Type 2250 afterwards).
6. Select "Transfer new data" (then you will get all data saved since your last transfer of data).
7. Press the Start Transfer button and the data will be transferred into the selected archive. The transferred data will be stored in the archive using the same user and job folder structure as on the instrument.
The advanced way of selecting data:
8. Select the data you want to transfer in the Instrument Explorer. You can select multiple job folders and/or projects in the list view.
9. Right click on the selected data and select To Archive (or press the To Archive button on the toolbar, or use the Tools, To Archive menu). Select an archive for data storage in the Send Data to Archive wizard.
10. Select "Transfer selected data".
11. Press the Start Transfer button and the data (including the data in subfolders) will be transferred into the selected archive, using the same user and job folder structure as on the instrument.
12. Repeat steps 8-10 until you have transferred all the data required.
13. Delete the projects no longer required on the Type 2250 by right clicking on the project(s) and selecting Delete from the context menu that appears.
Finally, press the Archive button to find your data again in the Archive Explorer.
7

BZ 5503
Transferring Data from an SD-card (or a CF-card) on a PC Card Reader, to an Archive
1. Open the BZ 5503 application and press the Archive button at the top of the window to show the Archive view.
2. Plug the SD/CF-card into the card reader on the PC.
3. A 'Removable Disk' will appear in the Archive Explorer with the data from your Type 2250.
4. Be sure the filters you have set above the tree view show the Archive and User you want to transfer the data to (or select All Archives and All Users).
5. Select the job folders and/or projects on the removable disk and drag them with the mouse to the archive at the position, where you want to drop them - or right click with the mouse and select Cut or Copy, then right click at the position in the archive where you want the data, right click and select Paste.
6. Delete the projects no longer required on the removable disk.
8

BZ 5503
How to Export Type 2250 Data to Type 7810/12/15/16/20/25 or Excel
Type 2250 Data can be processed by Type 7810 Predictor, Type 7812 Lima, Type 7815 Noise Explorer, Type 7816 Acoustic Determinator, Type 7820 Evaluator, Type 7825 Protector or Microsoft® Excel.
First, using your BZ 5503 software, you have to transfer the Type 2250 data to an archive on the PC. Then you can export data from the archive to any of the types mentioned above, or to Excel. The export is controlled by your BZ 5503 software (you cannot open Type 2250 data directly from the post-processing and reporting software, or Excel).
To Export Data from an Archive to Post-processing Software:
1. Open your BZ 5503 application and click on the Archive button at the top of the window to show the Archive view.
2. Select the data you want to export in the Archive Explorer (you can select multiple projects and/or Job folders in the list view).
3. Right click on the selected data and select Export from the drop-down (or press the Export button on the toolbar, or select the File, Export menu). Select whether you want to export to Type 7810/12/15/16/20/25, or Excel, in the Export control panel.
4. If you want to export to Excel then press Next and specify what to export and an Excel master file for the Excel output – see details in How to Export Type 2250 Data to Excel
5. Press Finish to export the data - the post-processing software will automatically be started and display the result
9
BZ 5503
How to Export Type 2250 Data to Excel
You can export data from your Type 2250 to Excel using the following procedures. They will enable you to:
• View all the data for each Sound Level Meter or Frequency Analysis Project in one Microsoft® Excel row
• View all the data for each logging interval in Logging Projects in one Excel row
• View all the data for each Report interval in Periodic Reports in one Excel row
• Export as much data as you want in one go – within the scope of a single User's data and the limitations of Excel
• Make your own filter to extract data for export
• Make your own Excel report format including charts and tables
How it Works
Firstly, you have to transfer data from your Type 2250 to an archive - see How to Get Data from your Type 2250. Then you can export data from an archive to Excel using the Export Wizard (see below). Right click on the selected data and select Export from the drop-down (or press the Export button on the toolbar, or select the File, Export menu).
Using the Export Wizard, you can select which parts of the data you want to export and with an "Excel Master File" you can format the exported file. Then you can choose to launch Microsoft® Excel immediately or save the output to your chosen Excel file.
The default Master File supplied with BZ 5503 is called 'EmptyMaster.xls' – it is used to export the complete data from your Type 2250 and should not be modified.
Creating your own Master Files
You create your own Master Files for filtering and reporting by:
• selecting the data for export (1st screen in the Wizard below)
• exporting the selected data and creating an Excel output file (2nd screen in the Wizard below)
• using that file to create your own Master Files for filtering or reporting by deleting the data you want to filter away and/or adding the report features (graphs, tables etc.,) you want (3rd screen in the Wizard below)
Three Master files (referred to as such only in the wizard) are supplied with the BZ 5503 software:
• EmptyMaster.xls – mentioned above and used in the Step by Step Guide below
• FilterExample.xls – similar to 'MyFilter' used in the Step by Step Guide below
• ReportExample.xls – used in the Step by Step Guide below
The Wizard
The Wizard consists of three screens, as follows:
10
BZ 5503
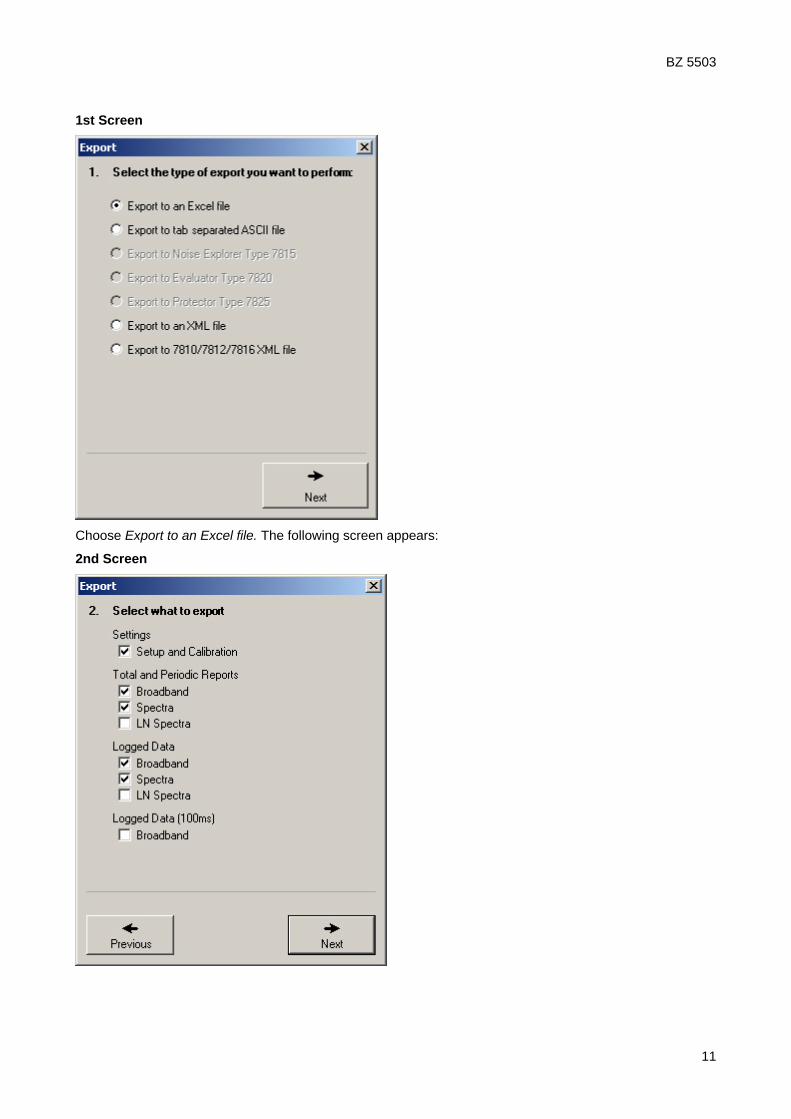
1st Screen
Choose Export to an Excel file. The following screen appears:
2nd Screen
11

BZ 5503
Settings:
• Setup and Calibration parameters will be output to one sheet.
Total and Periodic Reports:
• Broadband will output Broadband data to a single sheet. Total data will be output to one row. Periodic Reports will be output with one Report interval per Excel row.
• Spectra will output Spectral data to a single sheet. Total data will be output to one row. Periodic Reports will be output with one Report interval per Excel row.
• LN Spectra will be output to a single sheet. Total spectra will be output to one row. Periodic Reports will be output with one Report interval per Excel row.
Logged Data:
• Broadband will output Broadband data to a single sheet. The Logged data will be output with one logging interval per Excel row.
• Spectra will output Spectral data to a single sheet. The Logged data will be output with one logging interval per Excel row.
• LN Spectra will be output to a single sheet. The LN spectra will be output with one logging interval per Excel row.
Logged Data (100 ms):
• Broadband will output LAeq and/or LAF to a single sheet. The data will be output with one 100 ms interval per Excel row.
Each selection will output data to a separate sheet. Select the data you want to export and the final screen appears:
3rd Screen
The panel has one section which allows you to:
12
BZ 5503
• save the output in an Excel file (either by typing the name into the entry field or browsing to it using
the browse button
• select an Excel Master File (either by typing the name into the entry field or browsing to it using the
browse button
Note: The parameters in the header row will be in the language selected in Tools, Options, Export Language.
• launch Excel immediately after exporting the data
Step by Step Guide
The following steps guide you through the whole process of exporting data to an Excel spreadsheet and/or creating reports.
Exporting Complete Set of Data
1. Use the wizard (shown above) to select the data for export and the EmptyMaster.xls as the Master File. This is the file used when you want export the complete set of data. It consists of an empty Excel file.
Filtering Data for Export
1. Still in the Wizard, select Launch Excel and export the complete set of data.
2. After Excel has opened, delete the unwanted data columns (parameters).
3. Delete all data rows (except row 1, the header row).
4. Save the Excel sheets as MyFilter.xls with the other Master Files.
5. Export your data using MyFilter.xls as the Master File – the resulting Excel file will contain only the required sheets and parameters.
Note 1: The filter must match the measured data. If for example, LAeq and LCeq appear in the list of filtered information and you use the filter on data measured with Broadband Frequency Weighting set to AZ instead of AC, then you will only get LAeq. LCeq will not be present in the data and LZeq has not been set in the filter. If you want LZeq to be present together with LAeq, then make a new filter.
Note 2: The filter must match the selected Export Language in Tools, Options.
Reporting
1. Export complete data or filtered data as shown above, naming the Excel file (as an example) MyReport.xls.
2. Add one or more sheets containing calculated data, tables and graphs.
3. Create links between the report sheets and the data sheets (if you want to delete the data rows in the data sheets afterwards, use the Clear Contents option from the Edit menu, then Excel will preserve the links to the empty cells).
4. Save MyReport.xls with the other Master Files.
5. Export your data using MyReport.xls as the Master File – the resulting Excel file will contain the required data and reports:
Note: Again, it is essential that the filter matches the measured data.
13

BZ 5503
How to Create New Users on your Type 2250
Type 2250 can handle more than one user of the instrument. Each user has their own set of preferences, templates and jobs/projects – completely invisible to other users. This can also be very useful in organising large jobs, or cases, you can separate the cases completely from each other by handling each case as a user.
The transducers, the calibration setup and the calibration histories of the transducers are common to all users/cases.
To Create a User/Case on the Instrument:
1. Open your BZ 5503 application and click on the Instrument button at the top of the window to show the Instrument view.
2. Connect your Type 2250 to the PC via the USB cable.
3. Switch on your Type 2250 and wait a few seconds for the instrument to be recognized automatically in the Instrument Explorer.
4. Select the instrument in the tree view and right click on it to select Create User from the drop-down (or press the Users button on the toolbar, or select the File, New, User menu). Type the name of the new user/case in the Manage users on Instrument control panel.
5. Select whether the settings (preferences and templates) for the new user shall be the default settings or the same as the settings of a user already defined on the instrument.
6. Press the Create button and the user is created.
Note: New users can also be created in the archive (using the Users task) and then transferred to Type 2250 using the To Instrument task .
To Enable the New User/Case:
1. Set the Multi-user parameter to Enabled on the instrument (under Users in the Preferences menu):
14

BZ 5503
To Switch Between Users/Cases:
1. Select Log Off <user name> from the Main Menu on Type 2250:
2. Select the new user name in the login screen and tap Login
15

BZ 5503
How to Configure your Type 2250
Type 2250 is configured directly on the instrument by changing the setup and saving the changes in the Template. However, you can configure the templates on the PC in advance and then transfer them to Type 2250.
To Configure Type 2250:
1. Open your BZ 5503 application and click on the Archive button at the top of the window to show the Archive view.
2. Select an archive in the tree view and right click on it to create the users you require (if they don't already exist).
3. Select the user required (or set to All Users) and set Data Type to Settings instead of Measurement Data (top left pane).
4. You can copy templates from other users to this user – and delete the templates you do not want
5. Right click on a template to Edit it. This will open an editor similar to the one on the instrument. Make the changes required to the setup and close the editor to save the changes.
6. Switch on your Type 2250 and wait a few seconds for the instrument to go through its initialisation and start-up routine.
7. Connect Type 2250 to the PC via the USB cable and wait for the instrument to be recognised automatically.
8. Select the To Instrument task, and select either a specific template, all templates or the user, and click Start Transfer to transfer the selected settings to the instrument.
16

BZ 5503
How to Backup Archives
The archives containing Type 2250 data have typically been created on the local disk of your PC, or on a disk drive on your company network.
If you want to backup an archive, use Windows® Explorer as follows:
1. Locate the path to the archive you want to backup (the default path on your local disk is "C:\Documents and Settings\All Users\Application Data\Bruel and Kjaer\Env\Archives"). The folders in this path contain the archives, each of the folder names represents an archive name. Note: Do not make any changes to the content of the archive using the Windows® Explorer - this might make the archive unreadable to the BZ 5503 Utility Software for Hand-held Analyzers
2. Copy the folder with the name of your archive (and the content of the folder and all sub-folders) to the location where you want your backup.
3. You can zip your backup if required.
4. You can create a CD or DVD with your backup.
If you want to use your backup again:
5. Copy your backup to a folder of your choice, or connect directly to it (if not zipped).
6. Unzip the backup – if zipped (remember to set "Use folder names", when unzipping).
7. Open your BZ 5503 application and click on the Archive button at the top of the window to show the Archive view.
8. Press the Archives button on the toolbar.
9. Select the path to the folder with the backup of the archive.
10. Type the name of the archive in the name field above the path.
11. Press the OK button, the archive will be discovered and connected instead of being created.
12. The archive appears in the Archive Explorer.
If the backup is on a CD or a DVD (and Not Zipped), you can connect to it directly:
13. Select the path to the folder where the backup of the archive is stored (e.g., "D:\", if the CD drive is recognised as D).
14. Type the name of the archive in the name field above the path.
15. Press the OK button, the archive will be discovered and connected instead of being created.
16. The archive appears in the Archive Explorer – however, you will only be able to read, export or copy data from this archive, you cannot add or edit any data or settings to this archive.
17

BZ 5503
Instrument
Instrument View
The Instrument View allows you to view or select jobs/projects on the instrument, for further action. It consists of a tree and a list view:
Tree View
The tree view in Instrument View allows you to quickly navigate to the job folder and project you need.
List View
The list view (to the right of the tree view) allows you to sort the data and see more detail.
An example Instrument View is shown below:
The pane at the top allows you to select which Instrument, User and Data Type you would like:
Instrument
When you connect your instrument to the PC via the USB cable, the instrument is automatically detected, and the serial number is displayed here. If you connect more than one instrument, then select here which instrument you wish to connect to.
User
If you have defined more than one user on the instrument, then select which user to view here. It is possible to view all users at the same time by selecting All Users.
18

BZ 5503
Data Type
Select whether you want to display Measurement Data (job folders and projects) or Settings (templates and preferences).
Context Menus
To help you manage your data in this view, various context menus have been provided. These pop-up when you right-click on the selected item. For instance, menus have been provided for each of the tree nodes, each of your job folders and each of your projects. Each of these menus has various options, some of which may, or may not be available, depending on which part of the tree you are in and what you have selected in the Data Type drop down list. Most tasks and functionality in Instrument View can be activated from the context menus.
While some of the options on these context menus are specific to this BZ 5503 software and need explanation (see below), some are common options found in most software packages, such as Expand, Collapse, Explore, Cut, Copy, Paste, Delete and Rename, which are self-explanatory.
Context Menus Specific to BZ 5503 Software
On-line Display: Use this option to start the on-line display, which allows you to view the instruments display remotely on your PC and use the simulated keyboard to control measurements and data.
Create User: Use this option to create a new user on the instrument by typing the new name into the entry field provided. Select which method you want to use to create the new user, you can choose either the 'default' user, or clone an existing one by selecting it from the user drop-down list. Once you have selected what you want, click the Create button.
To Archive: Use this option to transfer the currently selected data from your instrument to the archive. Select an archive from the drop down list that appears in the pop-up window, or click the New button to create a new archive. Tick the tick box if you want to delete the data from the instrument once it has been transferred to the archive. Click the Start Transfer button to start the process.
Create Job Folder: Use this option to create a new job folder in the archive. Type the new name into the entry field of the window that pops up, then click the Create button to add your new folder to the archive.
View Annotations: Use this option to view the list of text notes or recorded comments that have been attached to the project as annotations.
Disconnect Instrument: Use this option to disconnect the USB connection between the PC and the instrument, before unplugging the USB cable. To connect to the instrument again, simply plug the USB cable into the socket.
19
BZ 5503
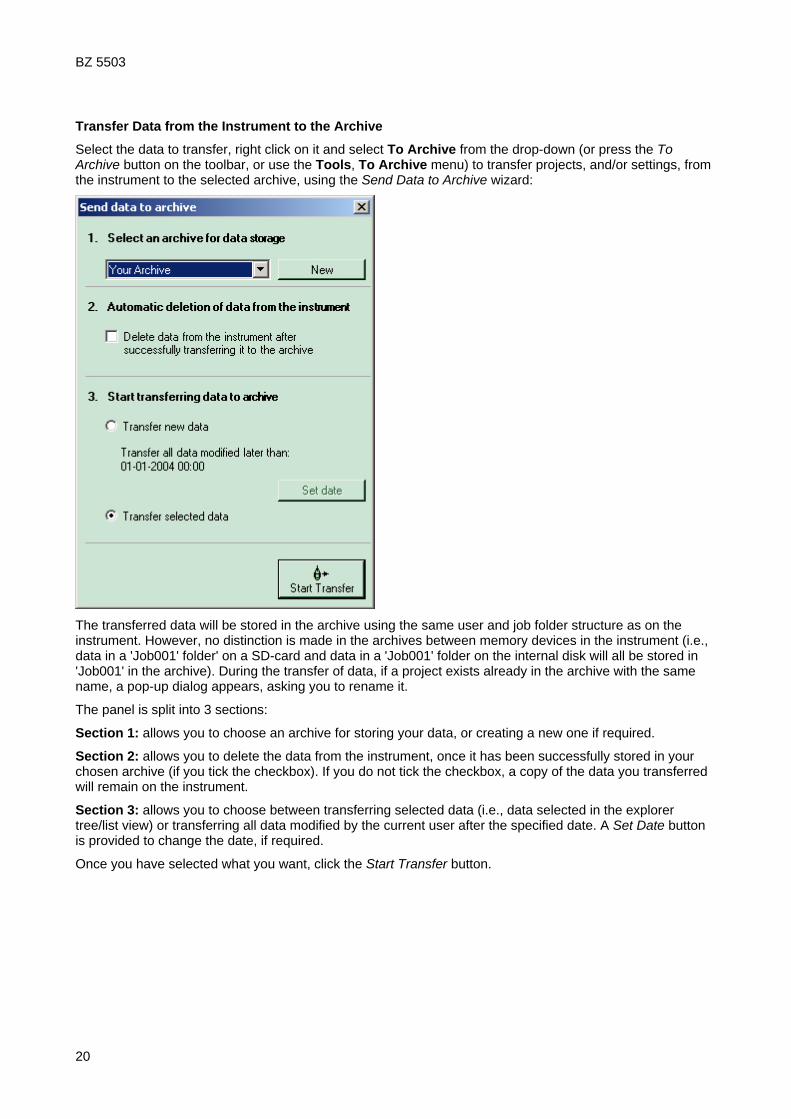
Transfer Data from the Instrument to the Archive
Select the data to transfer, right click on it and select To Archive from the drop-down (or press the To Archive button on the toolbar, or use the Tools, To Archive menu) to transfer projects, and/or settings, from the instrument to the selected archive, using the Send Data to Archive wizard:
The transferred data will be stored in the archive using the same user and job folder structure as on the instrument. However, no distinction is made in the archives between memory devices in the instrument (i.e., data in a 'Job001' folder' on a SD-card and data in a 'Job001' folder on the internal disk will all be stored in 'Job001' in the archive). During the transfer of data, if a project exists already in the archive with the same name, a pop-up dialog appears, asking you to rename it.
The panel is split into 3 sections:
Section 1: allows you to choose an archive for storing your data, or creating a new one if required.
Section 2: allows you to delete the data from the instrument, once it has been successfully stored in your chosen archive (if you tick the checkbox). If you do not tick the checkbox, a copy of the data you transferred will remain on the instrument.
Section 3: allows you to choose between transferring selected data (i.e., data selected in the explorer tree/list view) or transferring all data modified by the current user after the specified date. A Set Date button is provided to change the date, if required.
Once you have selected what you want, click the Start Transfer button.
20
BZ 5503
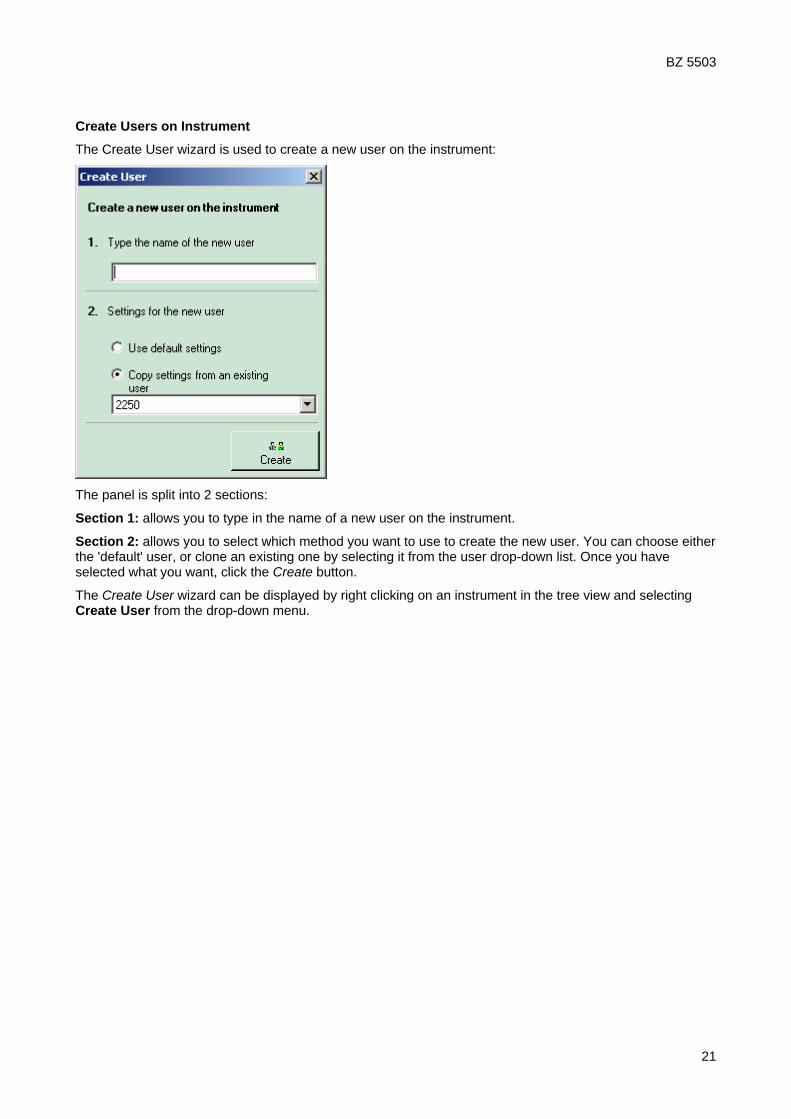
Create Users on Instrument
The Create User wizard is used to create a new user on the instrument:
The panel is split into 2 sections:
Section 1: allows you to type in the name of a new user on the instrument.
Section 2: allows you to select which method you want to use to create the new user. You can choose either the 'default' user, or clone an existing one by selecting it from the user drop-down list. Once you have selected what you want, click the Create button.
The Create User wizard can be displayed by right clicking on an instrument in the tree view and selecting Create User from the drop-down menu.
21

BZ 5503
On-line Display
The on-line display and keyboard connect to the instrument you have selected in explorer. They allow you to control and monitor your measurements remotely from your PC.
Note: The on-line display can be active while transferring data to the archive or to the instrument. More than one on-line display can be active at the same time, this means that different instruments can have their own on-line display.
22

BZ 5503
Dial-up
The Dial-up wizard allows you to connect to the instrument via a telephone connection – wired or wireless – using suitable modems. When you connect via modem you will see the contents of Type 2250 in the Instrument Task, as if you had made the connection via USB. You then have the same possibilities for transferring data to the Archive and organising data on Type 2250, as if you were connected via the USB connector. You can also use the On-line Display and keyboard to monitor and control the instrument.
Press the Dial Up button on the toolbar (or use the Tools, Dial-up menu) to use the Dial Up Connections wizard for connecting an instrument using a modem:
Ensure your PC is connected to a modem and Type 2250 is connected to a modem - see details in the Type 2250 User Manual.
Select a site and press the Dial Up button for connecting to the instrument.
You can define more than one site. A site is described by the Name of site, the Name of network connection and the Phone number. These settings can be set by pressing the Add button:
The settings can be edited by pressing the Properties button or deleted by pressing the Remove button.
23

BZ 5503
You can select Automatic in the Name of network connection drop-down, if you want BZ 5503 to automatically set up your modem, or define your network connection and modem using the functionality in Windows®:
• Open 'Phone and modem options' to add a new modem in Windows®
• Under 'Network (and Dial-up) Connections' you use the 'Create (Make) a new connection' wizard to create a dial-up connection using the modem
• Select the created network in Name of network connection drop-down
Please refer to the Windows built-in help for details.
Use the Disconnect button in the Dial-up Connections wizard to disconnect the instrument.
24

BZ 5503
Archive
Archive View
The Archive View allows you to view or select jobs/projects in the archive for further action. It consists of an archive tree and a list view:
Archive Tree View
The archive tree view allows you to quickly navigate to the job folder and project you need in the archive.
List View
The list view (to the right of the tree view) allows you to sort the data.
An example Archive View is shown below:
The pane at the top allows you to select which Archive, User and Data Type you would like:
Archive
If you have created more than one archive, then select which archive here. It is possible to view all archives at the same time by selecting All Archives.
User
If you have defined more than one user in the archive, then select which user to view here. It is possible to view all users at the same time by selecting All Users.
25

BZ 5503
Data Type
Select whether you want to display Measurement Data (job folders and projects) or Settings (templates and setups).
Context Menus
To help you manage your data in this view, various context menus have been provided. These pop-up when you right-click on the selected item. For instance, menus have been provided for each of the tree nodes, each of your job folders and each of your projects. Each of these menus has various options, some of which may, or may not be available, depending on which part of the tree you are in and what you have selected in the Data Type drop-down list. Most tasks and functionality in the Archive View can be activated from the context menus.
While some of the options on these context menus are specific to this BZ 5503 software and need explanation (see below), some are common options found in most software packages, such as Expand, Collapse, Explore, Cut, Copy, Paste, Delete and Rename, which are self-explanatory.
Context Menus Specific to BZ 5503 Software
New Archive: Use this option to add a new archive. Type the new name into the entry field of the Add New Archive window that pops up, then select the path where to create the new archive by navigating to it using the browse button. Then click the OK button to accept or the Cancel button to abort.
Note: If you specify an archive that already exists, then the instrument will connect to that archive and no new archive will be created.
Create User: Use this option to create a new user in the currently highlighted archive. Type the new name into the entry field and then select which settings you want to use for the new archive. Use either the default settings or copy the settings from an existing user in the archive, selecting the user from the drop-down list that appears when you select the radio button. When you have finished, click the Create button to create the new user.
Properties: Use this option if you want to check the path of the currently highlighted archive.
Create Job Folder: Use this option to create a new job folder for the current user in the archive. Type the new name into the entry field of the window that pops up, then click the Create button to add your new folder to the archive.
To Instrument: Use this option to transfer data from the selected archive to the instrument. First select the instrument from the drop-down list. Then select the memory device in the instrument to which you want to download the data. Finally, select the data that you want to transfer (in the explorer tree view) and click the Start Transfer button.
Add Note: Use this option to add a text note to either the job folder or a project within the folder.
Export: Use this option to export the selected jobs or projects.
View: Use this option to view the measurement data stored in the currently highlighted project, using the 2250 viewer.
Edit: Use this option to edit the text note attached to the project, or to edit a template.
Play: Use this option to play the recorded comment or sound recording attached to the selected project.
View Annotations: Use this option to view the list of text notes or recorded comments that have been attached to the project file as annotations.
Disconnect Archive: Use this option to disconnect an archive from the Archive Explorer. Once disconnected, the archive will no longer be available or displayed. Use New Archive to reconnect the archive again.
Hide: Use this option to hide a removable disk that is not relevant to your Type 2250.
Show: Use this option to display a removable disk that was previously hidden.
26

BZ 5503
Transfer Data from the Archive to the Instrument
Select the data to transfer, right click on it and select To Instrument (or press the To Instrument button on the toolbar, or use the Tools, To Instrument menu) to transfer projects, and/or settings, from a selected archive to the selected instrument, using the Send Data to 2250 wizard:
The transferred data will be stored in the instrument on the selected memory device in the same job folder structure as in the archive and under the same user.
The panel is split into 2 sections:
Section 1: allows you to choose an instrument for storing your data.
Section 2: allows you to select the memory device on the instrument (whether it be internal disk, SD-card or CF-card).
Once you have selected what you want, click the Start Transfer button.
27

BZ 5503
Create Users in Archives
The Create User wizard is used to create a new user in the archives:
The panel is split into 2 sections:
Section 1: allows you to type in the name of a new user to be created in archives.
Section 2: allows you to select which method you want to use to create the new user. You can choose either the 'default' user, or clone an existing one by selecting it from the user drop-down list. Once you have selected what you want, click the Create button.
The Create User wizard can be displayed by right clicking on an archive node in the tree view and selecting Create User from the drop-down menu (or press the Users button on the toolbar).
28
BZ 5503
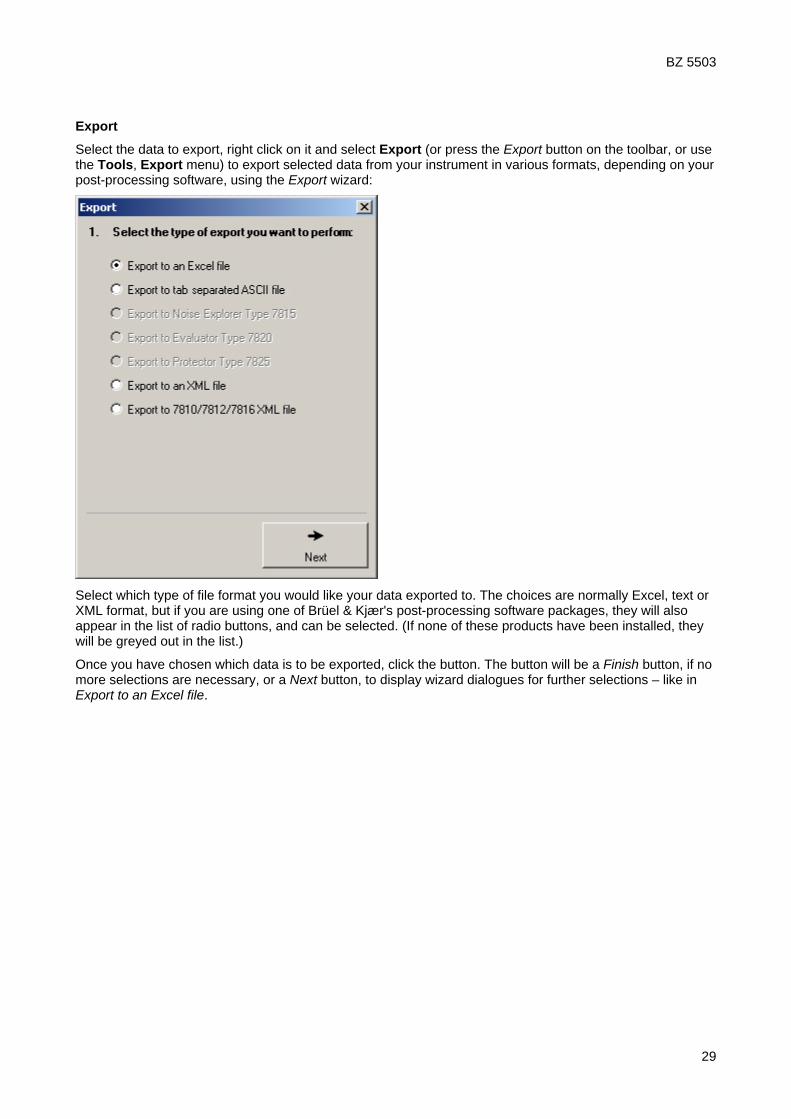
Export
Select the data to export, right click on it and select Export (or press the Export button on the toolbar, or use the Tools, Export menu) to export selected data from your instrument in various formats, depending on your post-processing software, using the Export wizard:
Select which type of file format you would like your data exported to. The choices are normally Excel, text or XML format, but if you are using one of Brüel & Kjær's post-processing software packages, they will also appear in the list of radio buttons, and can be selected. (If none of these products have been installed, they will be greyed out in the list.)
Once you have chosen which data is to be exported, click the button. The button will be a Finish button, if no more selections are necessary, or a Next button, to display wizard dialogues for further selections – like in Export to an Excel file.
29

BZ 5503
New Archive
Right click on the top most level in the Archive tree and select New Archive from the drop-down (or use the File, New, Archive menu) to create a new archive, using the New Archive wizard:
Enter the name of the new archive and select the path for creating the new archive. (Use the browse button
if required.)
Finally, click the OK button to insert the new archive, click Cancel to abort.
30

BZ 5503
Removable Disks, SD- and CF-cards
In the Archive View you can get access to removable disks like SD-Cards or CF-Cards (this requires that your PC has slots for these cards - or you connect an SD-Card or a CF-Card reader to the USB port of the PC).
If you have stored 2250 data on an SD-Card or a CF-Card, and the card is in the SD/CF slot on your Type 2250, then you can transfer the data from the card to an archive using the To Archive task (through the USB connection), or you can remove the card from the 2250 and insert it in the slot or card reader on your PC. The card will then be available in the Archive View as a 'Removable Disk':
You can copy or move data (projects, jobs or even users) to an archive. Use the mouse to right click on the data you want to copy (select Copy from the context menu) or move (select Cut from the context menu) and then right click at the position in the archive, where you want the data and select Paste. The data will then be transferred from the card to the archive.
You can also use the mouse to drag and drop the data. Left click on the data you want to transfer, keep the button pressed down and move the mouse to the position in the archive, where you want the data. If you release the button, the data will be moved. If you press the <Ctrl> button while you release the mouse button, then the data will be copied. You can move or copy data from an archive to the card in the same way.
Note: All removable disks on your PC will be displayed in the Archive View. If a disk is not relevant as storage media for the Type 2250, then you can hide it by right clicking on it and selecting Hide from the context menu.
You can reveal hidden removable disks by right clicking at the top most level in the Archive View and selecting Show.
31

BZ 5503
2250 Viewer
The 2250 Viewer allows you to view the data in your previously saved projects. Select View from the context menu that appears when you right click on a project in the archive list. A viewer window, similar to that shown below, will appear:
Use this window to view your data and scroll backwards and forwards through any other projects in this job folder.
32

BZ 5503
2250 Editor
The 2250 Editor allows you to edit the data in your previously saved templates. Select Edit from the context menu that appears when you right click on a template in the archive list. The editor window (showing the template name in brackets in the title banner) will appear, see example below:
Use this window to edit any of your templates. When finished, close the window to save the changes.
33

BZ 5503
Add Note
Right click on a job folder or a project in the Archive View and select Add Note from the list of options. Type your notes into the window that appears, see example below:
When you left click on a job folder in the tree view, all notes attached to each project in the job folder appear as paperclip symbols in the list view. Similarly, when you left click on the individual project in the tree view, all notes attached to that project (if there are any) are visible in the list view (numbered 'Note 1' up to 'Note N').
If you need to edit the note later, simply right click on the note in the list view, select Edit from the list of options and edit as required.
34
BZ 5503
Maintenance
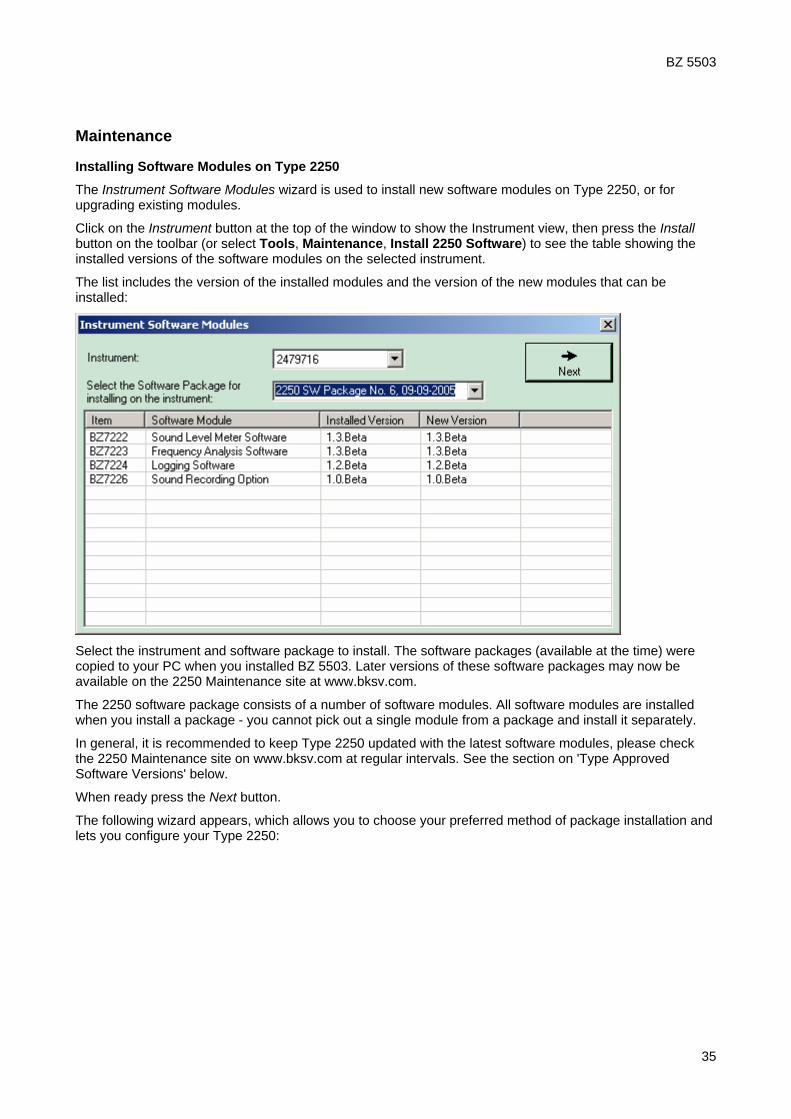
Installing Software Modules on Type 2250
The Instrument Software Modules wizard is used to install new software modules on Type 2250, or for upgrading existing modules.
Click on the Instrument button at the top of the window to show the Instrument view, then press the Install button on the toolbar (or select Tools, Maintenance, Install 2250 Software) to see the table showing the installed versions of the software modules on the selected instrument.
The list includes the version of the installed modules and the version of the new modules that can be installed:
Select the instrument and software package to install. The software packages (available at the time) were copied to your PC when you installed BZ 5503. Later versions of these software packages may now be available on the 2250 Maintenance site at www.bksv.com.
The 2250 software package consists of a number of software modules. All software modules are installed when you install a package - you cannot pick out a single module from a package and install it separately.
In general, it is recommended to keep Type 2250 updated with the latest software modules, please check the 2250 Maintenance site on www.bksv.com at regular intervals. See the section on 'Type Approved Software Versions' below.
When ready press the Next button.
The following wizard appears, which allows you to choose your preferred method of package installation and lets you configure your Type 2250:
35

BZ 5503
Select one of three methods of installation and configuration:
• Install and reuse preferences (recommended) - this will install the software modules and copy new templates to Type 2250 and to the user "2250".
• Install and reset settings to default. Templates will be reset and "Used Transducer" set to Unknown - this will install the software modules and copy new templates to the user "2250", existing templates will be cleared and updated. Preferences will be cleared and updated and the "Used Transducer" parameter will be set to Unknown. Any unsaved annotations or data will be deleted. Saved data will be unaffected. Use this setting if you downgrade the software modules to older versions. After the installation you have to adjust the touch screen in Preferences, Display Settings, and select your preferred language and Time Zone, etc., in Preferences, Regional Settings. Then select your transducer again in the "Transd. used" line in the Transducers display.
• Install, clear internal disk and reset settings to default. Warning: All data and settings will be lost! - this will install the software modules, delete all data, settings, transducer descriptions and calibration histories on the internal disk, copy new templates to Type 2250 and reset to defaults. You should only use this setting if you have experienced serious problems in starting and using the software, and you have tried the Reset Options described in the Troubleshooting section of the Type 2250 User Manual and you have tried the "Install and reset settings to default" procedure (above) without any success. After the installation you have to adjust the touch screen in Preferences, Display Settings, and to select your preferred language and Time Zone, etc., in Preferences, Regional Settings. Then you have to define the supplied Type 4189 Microphone in the transducer database, select it as the "Used Transducer" and calibrate it.
Once you have selected what you want, click the Install button. The installation will then proceed and a pop-up will appear showing the installation progress. This will take several minutes:
36

BZ 5503
Warning: Do not interrupt the installation process.
Type 2250 will automatically reboot and start again, when the installation is finished.
Note 1: The templates for user "2250" will be updated when installing/upgrading 2250 software. You have to manually update the templates for the other users afterwards. This is done by copying templates from user "2250" to the other users - see How to Configure your Type 2250.
Note 2: If you have experienced serious problems in starting and using the software, you have tried the Reset Options described in the Troubleshooting section of the Type 2250 User Manual and you are not able to install software using the USB, then you can install 2250 software using a CF-card.
Type Approved Software Versions
National bodies that type approve sound level meters generally approve specific versions of the sound level meter software. Whenever Brüel & Kjær revises software an extension of the approval is applied for. However, new versions can be published on the 2250 Maintenance site at www.bksv.com before the new approvals are finalised. If use of your Type 2250 relies on the use of an approved version you should check with your type approving authority, or with your local Brüel & Kjær representative, before installing a new version.
If you need to install a previous version of a software module, then select the 2250 Software Package containing the version of the software module required and install it as described above.
37

BZ 5503
Installing Software Modules on Type 2250 Using a CF-card
If you are not able to install software using the USB, then you can install 2250 software using a CF-card.
Procedure:
• Locate the required 2250 Software Package in the folder where you have installed BZ 5503. The default path is:
C:\Program Files\Bruel and Kjaer\ENV\BZ5503\SWP
• Copy the content of the required 2250 Software Package to the root of an empty CF-Card (size between 64 and 512 MB and formatted with FAT 16). You should now have the following layout:
• Power off Type 2250 and insert the CF-card in the CF slot on the instrument
• Press and hold down the Commentary and Save pushbuttons, while switching on the instrument. The Maintenance Mode initial screen will be displayed
• Press the Accept pushbutton to "Update 2250 Software”. This takes a few minutes
• Then press the Accept pushbutton to Reset to Default Settings. This will install the rest of the applications and reset Type 2250 to the SLM template, with no transducer selected. This takes a few minutes
• When done, the instrument initialises in SLM mode. Please adjust the touch screen in Preferences, Display Settings.
• Select your transducer again in the topmost line of the Transducers display
• Remove the CF-Card
38

BZ 5503
Installing Licenses for Type 2250 Software
The Instrument Software Licenses wizard is used to install licenses for 2250 software modules on Type 2250.
Click on the Instrument button at the top of the window to show the Instrument view, then press the License button on the toolbar (or select Tools, Maintenance, Install 2250 SW Licenses) to see a list of software modules that are installed on the selected instrument.
The list includes the version of the installed modules and a description of the license for the modules listed:
Select the license you want to install, then press the Next button.
The following wizard appears, which allows you to enter the 16 character license code, taken from the License Certificate. (You received the License Certificate from Brüel & Kjær, together with the software module):
Once you have entered the license code, click the Install button. The license is then installed on your Type 2250, and the list of installed software modules with the description of the licenses is refreshed.
Delete Licenses
You can limit the range of functionality of your Type 2250 (for example, when lending the instrument out to other users) by deleting the licenses of certain 2250 software modules. Delete a license by right clicking the software module in question in the list and select Delete.
39

BZ 5503
You install the license again as described above using the 16 character license code from the License Certificate. (You received the License Certificate from Brüel & Kjær, together with the software module)
Note: The license for Sound Level Meter software module BZ 7222 cannot be deleted.
40

BZ 5503
Enhancements Log
The enhancements log provides information on what new features have been included in the latest version of the software.
Version 1.1
• Supports installation of new software on Type 2250 using the USB connection
• Supports installation of software licenses for Type 2250 applications
• Supports export of logging data to Type 7815/20/25 and Excel
• Supports export of data to tab delimited text files
• Supports transfer of data from SD-/CF-cards to the archives
• Use of mouse to drag and drop jobs and projects when copying/moving data between archives or locally on Type 2250
• Creation of users as an Instrument task
• Copying, moving and deletion of templates
• Copying preferences
Version 1.2
• Supports Excel master files where cells can be deleted or cleared
• Minor improvements in Excel output
Version 2.0
• User Interface changed from using tasks in a task bar to two Views: Archive and Instrument
• Supports dial-up connection to a Type 2250 using a modem
• New faster and more reliable USB driver for connecting to Type 2250 using the USB interface
• Disconnect button for safe removal of a Type 2250 connected via a USB cable
• Compatibility mode for support of Type 2250 with older software versions using the previous USB interface
• PULSE not required for running BZ 5503
Version 2.1
• Supports user interface in a variety of languages
• Supports selection of data for export to Excel, Text-files and XML-files
• Supports export in Invariant English (will not change over time) and in the local language supported on Type 2250
• Disconnect button removed – in most cases it is not necessary to use the disconnect facility before removing the USB cable between Type 2250 and the PC
• Dial-up supports automatic setup of modem
41

BZ 5503
Menus
Menus
File Menu
The File menu allows you to choose from the following options:
Open Allows you to open and view projects in the selected archive. This option is not available in the Instrument View.
Note: an error pop-up will appear if you don't select a project before selecting Open from the menu.
New Allows access to the following options on the sub-menu:
Archive - creates a new archive (same as right clicking on top most level in the Archive View and selecting New Archive from the drop-down menu, or using the Tools, Archives, Connect Archive menu).
User - creates a new user on the selected instrument (same as right clicking on an instrument in the tree view and selecting Create User from the drop-down menu).
Job Folder - creates a new job folder on the selected instrument or in a selected archive. Simply type in the name for the new folder in the pop-up that appears and then press the Create button.
Note - adds a note to the job folder or project selected in the Archive View (same as right clicking on a job folder or project in the Archive view and selecting Add Note from the drop-down menu).
Delete Allows you to delete the selected job folder or project in either the Instrument or Archive View.
Note: a warning pop-up asks you to confirm the deletion of the selected item, or cancel the action.
Rename Allows you to rename any item in the Instrument or Archive View.
Export Allows you to export selected data from your instrument in various formats, depending on your post-processing software. (Same as pressing the Export button on the toolbar).
Properties Allows you to view the properties of the selected archive in the Archive View (same as right clicking on an archive in the Archive view and selecting Properties from the drop-down menu).
Exit Allows you to exit the program.
Edit Menu
The Edit menu allows you to choose from the following options:
42

BZ 5503
Copy Allows you to copy notes from one project to another, via the clipboard??
Short cut: <Ctrl + C>
Cut Allows you to cut notes from projects, and temporarily store them on the clipboard??
Short cut: <Ctrl + X>
Paste Allows you to paste the contents of the clipboard into the project??
Short cut: <Ctrl + V>
View Menu
The View menu allows you to select one of the defined views:
Archive Use this to display the Archive View, equivalent to clicking on the Archive button at the top of the window.
Short cut: <Ctrl + 1>
Instrument Use this to display the Instrument View, equivalent to clicking on the Instrument button at the top of the window.
Short cut: <Ctrl + 2>
Tools Menu
The Tools menu allows you to choose from the following options:
To Instrument Allows you to transfer projects, and/or settings, from a selected archive to the selected instrument.
Export Allows you to export data to post-processing software.
To Archive Allows you to transfer projects, and/or settings, from the instrument to the selected archive.
Disconnect Instrument Allows you to disconnect the USB connection between the PC and the instrument, before unplugging the USB cable.
On-line Display Allows you to control and monitor your measurements remotely from your PC.
Dial-up Allows you to connect to the instrument via a telephone connection – wired or wireless – using suitable modems.
Archives Choose this option if you want to connect/disconnect an archive, or
43

BZ 5503
show/hide a removable device.
Maintenance, Install 2250 Software
Allows you to install new software modules on Type 2250, or upgrade existing modules.
Maintenance, Install 2250 SW License
Allows you to install new software modules on Type 2250, or upgrade existing modules.
Maintenance, 2250 Service Info
Displays information for the connected Type 2250 - useful if contacting Brüel & Kjær for service enquiries.
Options Displays the Options window, where you can select a language, change the Excel export options and enable/disable the compatibility mode.
Help Menu
The Help menu allows you to display the contents window for BZ 5503 Help and show the About Dialog.
Help Topics Displays the Help and its Contents window.
About BZ5503 Displays the About BZ 5503 Dialog box containing version information and detailed information on the software modules.
44

BZ 5503
Tools Menu
Options (Tools Menu)
Selecting Options from the Tools menu displays the Options wizard (which opens on the Language tab):
Use this tab page to select the language to be used on the User Interface and the language to be used for export. You can use the export language to get parameters in your local language, e.g., when exporting to Excel.
Note: If a program (or macro) is going to interpret the parameters, then you are recommended to select “Invariant English” from the drop-down list of export languages. This setting will output parameters in English and the names of the parameters will be kept over time from version to version of the program. This is not guaranteed for other languages, where the parameter names might change over time.
Once selected, click the OK button to save the changes or click Cancel to exit.
Compatibility
The other tab on the Options wizard is the Compatibility tab:
45

BZ 5503
Use this tab page if you want to make sure that your USB connection is compatible with older versions of Type 2250 software (BZ 7222 version 1.2 or older). Tick the checkbox if you want to enable the compatibility mode, leave the checkbox blank if you want the mode disabled.
Note: If you enable the compatibility mode, this can reduce the performance of the BZ 5503 application.
46

BZ 5503
2250 Service Information
Should you encounter any problems with your Type 2250, the Service Information window provides you with all the information you will need to enable you to contact Brüel & Kjær:
This includes:
• the serial number of your Type 2250
• hardware information for your Type 2250
• software information for your Type 2250
The window can be accessed from the Tools menu, by selecting Maintenance, 2250 Service Info.
The window can be copied to your clipboard, then pasted into an email and sent to your local Brüel & Kjær representative.
47

Index
2
2250 Editor .........................................................36
2250 Maintenance Site.......................................38
2250 Software Package .....................................41
2250 Viewer........................................................35
A
About BZ 5503 Software ................................1, 45
Accept pushbutton ..............................................41
Add Note.......................................................26, 37
Add Note 'n' ........................................................37
Add Text Annotations .........................................26
Archive..........................................................17, 26
Archive Tree View...............................................26
Archive View .............................................1, 26, 45
Archives
Backing Up......................................................17
Archives ..............................................................17
B
Backing Up Archives...........................................17
Browse Button ....................................................32
C
Cancel.................................................................32
Cancel button................................................26, 32
CF-card.........................................................29, 41
CF-card Reader ..................................................33
CF-cards .............................................................33
Commentary pushbutton ....................................41
Compatibility .......................................................48
Context Menus..............................................18, 26
Context Menus Specific to BZ 5503 Software
Add Note .........................................................26
Collapse ....................................................18, 26
Create Job Folder .....................................18, 26
Create User.....................................................26
Disconnect Archive .........................................26
Disconnect Instrument ....................................18
Edit ........................................................... 26, 36
Expand ..................................................... 18, 26
Explore ..................................................... 18, 26
Export ............................................................. 26
Hide ................................................................ 26
New Archive ................................................... 26
On-line Display ............................................... 18
Play ................................................................ 26
Properties ....................................................... 26
Show .............................................................. 26
To Archive ...................................................... 18
To Instrument ................................................. 26
View.......................................................... 26, 35
View Annotations............................................ 26
Context Menus Specific to BZ 5503 Software ... 18
Copy............................................................. 18, 26
Create button ......................................... 21, 26, 32
Create Job Folder ........................................ 18, 26
Create User........................................................ 26
Create Users in Archives ................................... 30
Cut................................................................ 18, 26
D
Data Type .............................................. 18, 26, 36
Delete........................................................... 18, 26
Delete button................................................ 21, 32
Deleting Licenses............................................... 42
Dial Up button .................................................... 24
Dial-up................................................................ 24
Disconnect (instrument) button.......................... 18
Disconnect (modem) button............................... 24
Disconnecting the Instrument ............................ 18
Download Data from the Instrument .................. 45
E
Edit ..................................................................... 26
Empty Master..................................................... 10
Enhancements Log............................................ 44
49

BZ 5503
Evaluator Type 7820.............................................1
Excel ...................................................................48
Explore..........................................................18, 26
Explorer Pane .......................................................1
Export .............................................. 26, 31, 45, 48
Export control panel............................................31
Export Options ....................................................48
Export Options window.......................................48
Export Progress Window ....................................31
Export Task...................................................26, 31
Export Wizard .....................................................10
Exporting Complete Set of Data .........................10
Exporting Data - Step by Step Guide .................10
F
Filtering Data for Export......................................10
Finish button .......................................................31
H
Help Topics (BZ5503).........................................45
How to
Backup Archives .............................................17
Configure your Type 2250 ..............................16
Create a User/Case on the Instrument ...........14
Create New Users on your Type 2250............14
Create your own Master Files .........................10
Enable a New User/Case................................14
Export Data from an Archive to Post-processing Software ........................................................9
Export Type 2250 Data to Excel .....................10
Export Type 2250 Data to Type 7815/20/25 or Excel..............................................................9
Get Data from your Type 2250 .........................7
Install a 2250 Software Package ......................5
Install a License for a Type 2250 Software Module...........................................................6
Install a New Version of Type 2250 Software...5
Select Data - the Advanced Way......................7
Select Data - the Easy Way ..............................7
Switch Between Users/Cases.........................14
Transfer Data from an SD-card (or CF-card) on a PC Card Reader, to an Archive..................7
Transfer Data from your Type 2250 Over the USB Cable to an Archive.............................. 7
Use Your Backup Again ................................. 17
I
Info Note ............................................................ 45
Install 2250 SW Modules Control Panel ............ 38
Install and Reset Settings to Default.................. 38
Install and Reuse Settings ................................. 38
Install button....................................................... 38
Install License for 2250 SW Control Panel ........ 42
Install, Clear Internal Disk and Reset Settings to Default ............................................................ 38
Installation Task ................................................. 38
Installing
Licenses for Type 2250 Software................... 42
Software Modules on Type 2250 ................... 38
Software Modules on Type 2250 Using a CF-card............................................................. 41
Instrument .......................................................... 18
Instrument View ....................................... 1, 18, 45
Internal Disk ....................................................... 20
Introduction .......................................................... 1
L
Language ..................................................... 45, 48
Licences
Deleting .......................................................... 42
Licences............................................................. 42
License Code ..................................................... 42
License Task...................................................... 42
List
in Archive Explorer ......................................... 45
in Instrument Explorer ................................ 1, 45
List...................................................................... 45
List View....................................................... 18, 26
M
Manage
Archives.................................................... 32, 45
Archives Control Panel................................... 32
Users in Archives ........................................... 45
50

Index
Users on Instrument........................................21
Users on Instrument Control Panel.................21
Manage...............................................................32
Master File
for Filtering ......................................................10
for Reporting ...................................................10
Master File ..........................................................10
Master File Procedures - Summary....................10
Measurement Data .............................................26
Menus .................................................................45
N
New Archive........................................................26
Next button .........................................................31
Noise Explorer Type 7815 ....................................1
Notes Window.....................................................37
O
OK button................................................26, 32, 48
On-line Display .......................................18, 22, 45
On-line Display Control Panel ............................22
Options ...............................................................45
Options (Tools Menu) .........................................48
Organize
Archive Data....................................................45
Instrument Data...............................................45
P
Paste.............................................................18, 26
Play.....................................................................26
Previous button...................................................31
Proceed button ...................................................38
Properties ...........................................................26
Protector Type 7825 .............................................1
PULSE Multi-analyzer platform ............................1
R
Removable Disk..................................................33
Removable Disks, SD- and CF-cards.................33
Rename ........................................................18, 26
Reporting ............................................................10
S
Save pushbutton ................................................ 41
SD- and CF-cards .............................................. 33
SD- cards ........................................................... 33
SD-card........................................................ 20, 29
Set Date button .................................................. 20
Settings ........................................................ 26, 36
Software Modules ........................................ 38, 42
Start Transfer button.............................. 20, 26, 29
Step by Step Guide to Exporting Data............... 10
Stop button......................................................... 20
Summary of Master File Procedures ................. 10
T
The Export Wizard ............................................. 10
To Archive task ............................................ 18, 20
To Instrument..................................................... 26
To Instrument task ............................................. 29
Toolbar............................. 6, 14, 18, 22, 24, 26, 38
Tools Menu ........................................................ 45
Transfer Data
from the Archive to the Instrument ................. 29
from the Instrument to the Archive................. 20
to the Archive ................................................. 45
to the Instrument ............................................ 45
Transfer Data ..................................................... 29
Tree view ........................................................... 18
Type Approved Software Versions .................... 38
U
USB.............................................................. 38, 41
USB Connection ................................................ 33
User ............................................................. 18, 26
Using Your Backup Again.................................. 17
Utility Software for Hand-held Analyzers BZ 55031
V
View ................................................................... 26
View Annotations ............................................... 26
View Data........................................................... 45
View Menu ......................................................... 45
51

BZ 5503
W What can you do with Utility Software for Hand-held Analyzers BZ 5503? ................................. 1
52