By Alessio Cavatore - Mantic Games (Low-Res).pdf · By Alessio Cavatore Design & Production: River...
18
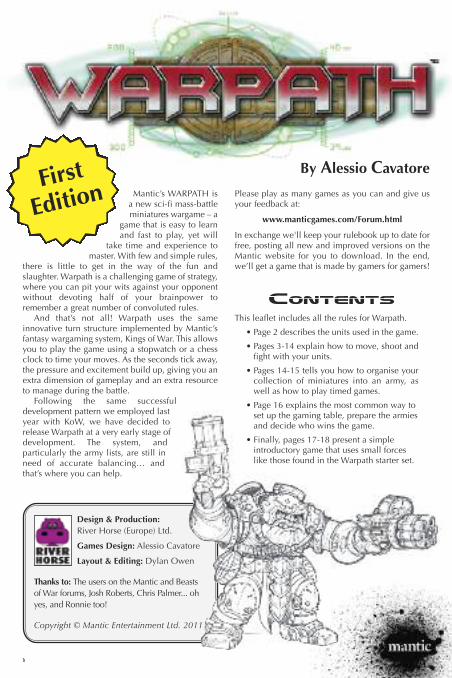
By Alessio Cavatore Design & Production: River Horse (Europe) Ltd. Games Design: Alessio Cavatore Layout & Editing: Dylan Owen Thanks to: The users on the Mantic and Beasts of War forums, Josh Roberts, Chris Palmer... oh yes, and Ronnie too! Copyright © Mantic Entertainment Ltd. 2011 Mantic’s WARPATH is a new sci-fi mass-battle miniatures wargame – a game that is easy to learn and fast to play, yet will take time and experience to master. With few and simple rules, there is little to get in the way of the fun and slaughter. Warpath is a challenging game of strategy, where you can pit your wits against your opponent without devoting half of your brainpower to remember a great number of convoluted rules. And that’s not all! Warpath uses the same innovative turn structure implemented by Mantic’s fantasy wargaming system, Kings of War. This allows you to play the game using a stopwatch or a chess clock to time your moves. As the seconds tick away, the pressure and excitement build up, giving you an extra dimension of gameplay and an extra resource to manage during the battle. Following the same successful development pattern we employed last year with KoW, we have decided to release Warpath at a very early stage of development. The system, and particularly the army lists, are still in need of accurate balancing… and that’s where you can help. First Edition Please play as many games as you can and give us your feedback at: www.manticgames.com/Forum.html In exchange we'll keep your rulebook up to date for free, posting all new and improved versions on the Mantic website for you to download. In the end, we’ll get a game that is made by gamers for gamers! Contents This leaflet includes all the rules for Warpath. • Page 2 describes the units used in the game. • Pages 3-14 explain how to move, shoot and fight with your units. • Pages 14-15 tells you how to organise your collection of miniatures into an army, as well as how to play timed games. • Page 16 explains the most common way to set up the gaming table, prepare the armies and decide who wins the game. • Finally, pages 17-18 present a simple introductory game that uses small forces like those found in the Warpath starter set.
Transcript of By Alessio Cavatore - Mantic Games (Low-Res).pdf · By Alessio Cavatore Design & Production: River...
By Alessio Cavatore
Design & Production:
River Horse (Europe) Ltd.
Games Design: Alessio Cavatore
Layout & Editing: Dylan Owen
Thanks to: The users on the Mantic and Beasts
of War forums, Josh Roberts, Chris Palmer... oh
yes, and Ronnie too!
Copyright © Mantic Entertainment Ltd. 2011
Mantic’s WARPATH isa new sci-fi mass-battleminiatures wargame – a
game that is easy to learnand fast to play, yet will
take time and experience tomaster. With few and simple rules,
there is little to get in the way of the fun andslaughter. Warpath is a challenging game of strategy,where you can pit your wits against your opponentwithout devoting half of your brainpower toremember a great number of convoluted rules.
And that’s not all! Warpath uses the sameinnovative turn structure implemented by Mantic’sfantasy wargaming system, Kings of War. This allowsyou to play the game using a stopwatch or a chessclock to time your moves. As the seconds tick away,the pressure and excitement build up, giving you anextra dimension of gameplay and an extra resourceto manage during the battle.
Following the same successfuldevelopment pattern we employed lastyear with KoW, we have decided torelease Warpath at a very early stage ofdevelopment. The system, andparticularly the army lists, are still inneed of accurate balancing… andthat’s where you can help.
First
Edition Please play as many games as you can and give usyour feedback at:
www.manticgames.com/Forum.html
In exchange we'll keep your rulebook up to date forfree, posting all new and improved versions on theMantic website for you to download. In the end,we’ll get a game that is made by gamers for gamers!
Contents
This leaflet includes all the rules for Warpath.
• Page 2 describes the units used in the game.
• Pages 3-14 explain how to move, shoot andfight with your units.
• Pages 14-15 tells you how to organise yourcollection of miniatures into an army, aswell as how to play timed games.
• Page 16 explains the most common way toset up the gaming table, prepare the armiesand decide who wins the game.
• Finally, pages 17-18 present a simpleintroductory game that uses small forceslike those found in the Warpath starter set.
units
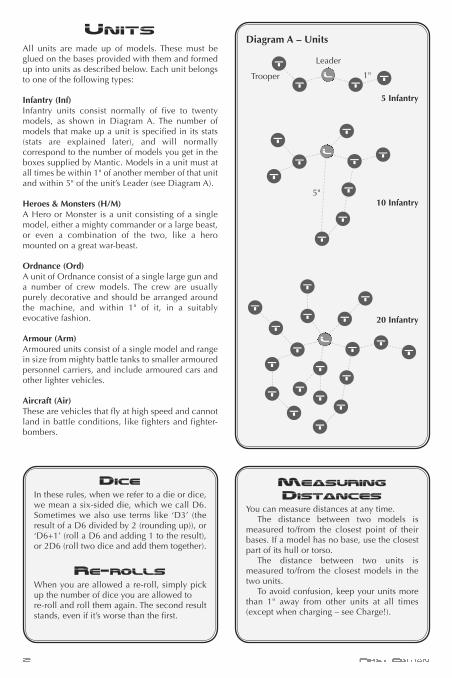
All units are made up of models. These must beglued on the bases provided with them and formedup into units as described below. Each unit belongsto one of the following types:
Infantry (Inf)Infantry units consist normally of five to twentymodels, as shown in Diagram A. The number ofmodels that make up a unit is specified in its stats(stats are explained later), and will normallycorrespond to the number of models you get in theboxes supplied by Mantic. Models in a unit must atall times be within 1" of another member of that unitand within 5" of the unit’s Leader (see Diagram A).
Heroes & Monsters (H/M)A Hero or Monster is a unit consisting of a singlemodel, either a mighty commander or a large beast,or even a combination of the two, like a heromounted on a great war-beast.
Ordnance (Ord)A unit of Ordnance consist of a single large gun anda number of crew models. The crew are usuallypurely decorative and should be arranged aroundthe machine, and within 1" of it, in a suitablyevocative fashion.
Armour (Arm)Armoured units consist of a single model and rangein size from mighty battle tanks to smaller armouredpersonnel carriers, and include armoured cars andother lighter vehicles.
Aircraft (Air)These are vehicles that fly at high speed and cannotland in battle conditions, like fighters and fighter-bombers.
Diagram A – Units
5 Infantry
Leader
Trooper
5"10 Infantry
20 Infantry
l
t
t t
t
t
t
t
t
t
t
t
t
t
t
t
t
t
t
t
t
t
t
t
t
t
t
t
t
t
t
t
t
l
l
diCe
In these rules, when we refer to a die or dice,we mean a six-sided die, which we call D6.Sometimes we also use terms like ‘D3’ (theresult of a D6 divided by 2 (rounding up)), or‘D6+1’ (roll a D6 and adding 1 to the result),or 2D6 (roll two dice and add them together).
re-rolls
When you are allowed a re-roll, simply pickup the number of dice you are allowed to re-roll and roll them again. The second resultstands, even if it’s worse than the first.
1"
Measuring
distanCes
You can measure distances at any time. The distance between two models is
measured to/from the closest point of theirbases. If a model has no base, use the closestpart of its hull or torso.
The distance between two units ismeasured to/from the closest models in thetwo units.
To avoid confusion, keep your units morethan 1" away from other units at all times(except when charging – see Charge!).

unit leaders
A unit’s Leader is very important, and should berepresented by a suitably imposing model so that heclearly stands out from the rest of the unit. TheLeader is the commander of the unit, the one makingthe decisions and issuing orders to his subordinates,and is used as an important point of reference duringsome stages of the game. If a unit consists of a singlemodel (such as an Armoured unit, a Hero orMonster), that model obviously counts as a ‘Leader’.
line oF sight
During the game, you will at times need todetermine whether one of your units can see anotherone, normally an enemy unit that your unit intendsto charge or shoot.
Unless stated otherwise, models can see allaround regardless of the direction they are actuallyfacing.
Of course, terrain and other units can still get inthe way and hide targets from sight. To determinewhether your unit can see a target, simply lean downon the table and peek from behind the head of theunit’s Leader. If the Leader can ‘see’ the torso of anymodel in the target unit (ignore weapons, banners orother decorations, heads, limbs, tails, wings, etc.),then his entire unit can see it. In reality somemembers of the unit might not see any enemiesdirectly, but they will direct their fire in the samegeneral area as the members of their unit that cansee the enemy. When checking the Leader’s line ofsight, ignore his own unit’s models, and move themtemporarily out of the way if you need to (in realitythe Leader would order them down anyway).
If you’re not sure whether a unit’s Leader can seea target or not, roll a die. On a 4+ he can see, on 3or less he cannot.
the turn
Much like chess, Warpath is played in turns. Just rolla die to decide who is going to have the first turn –the player winning the die roll decides who goes first.That player moves, shoots and strikes blows in meleewith his units – this concludes Turn 1 of the game.After that, his opponent takes a turn (Turn 2 of thegame), and the players keep alternating this way untilan agreed time limit or turn limit is reached.
In his turn a player goes through the followingthree phases:
1) Move phase
2) Shoot phase
3) Melee phase
Let’s examine each of these phases in detail.
stats
Each unit in Warpath has a name and a series ofstatistics (for short, we call them ‘stats’), whichdefine how powerful it is in the game. These are:
• Type. The unit’s type and how many modelsit comprises. Single models have no number.
• Speed (Spd). How fast the unit moves, in inches.
• To Hit (Hit). The score needed by the unit tohit, both with ranged attacks and in melee.
• Firepower (Fire). The number of dice the unitrolls when using ranged attacks.
• Range (Ran). The effective range in inches ofthe unit’s ranged attacks.
• Attacks (Att). The number of dice the unitrolls when attacking in melee.
• Defence (Def). The score the enemy requiresto damage the unit.
• Nerve (Ner). A combination of the unit’s sizeand its training and discipline, this stat showshow resistant it is to damage suffered.
• Special. A unit’s entry will also list any unusualequipment and special rules the unit has.
ExAMPLES:
Forgefathers Steel Warriors Team
Type Spd Hit Fire Ran Att Def Ner
Inf (5) 4 4+ 8 24 5 5+ 11/13
Special: Headstrong.
Forgefathers Steel Warriors Section
Type Spd Hit Fire Ran Att Def Ner
Inf (10) 4 4+ 16 24 10 5+ 14/16
Special: Headstrong.
Forgefathers Steel Warriors Platoon
Type Spd Hit Fire Ran Att Def Ner
Inf (20) 4 4+ 32 24 20 5+ 21/23
Special: Headstrong.
MoveMent
During the Move phase of your turn, pick each ofyour units in turn, and choose one of the followingorders for the unit’s Leader to give them:
Halt!The unit does not move at all.
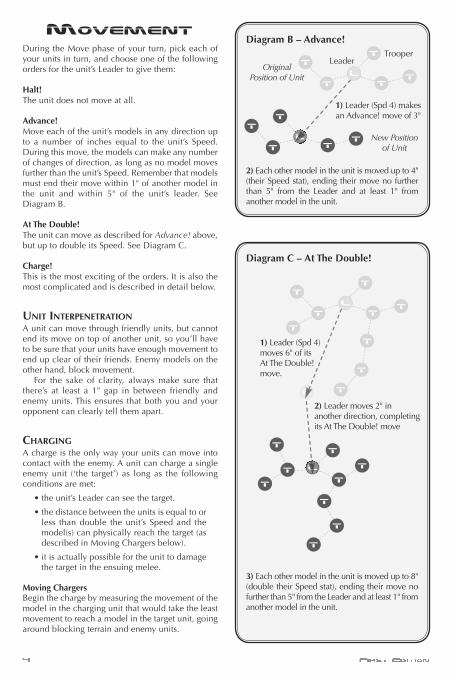
Advance!Move each of the unit’s models in any direction upto a number of inches equal to the unit’s Speed.During this move, the models can make any numberof changes of direction, as long as no model movesfurther than the unit’s Speed. Remember that modelsmust end their move within 1" of another model inthe unit and within 5" of the unit’s leader. SeeDiagram B.
At The Double!The unit can move as described for Advance! above,but up to double its Speed. See Diagram C.
Charge! This is the most exciting of the orders. It is also themost complicated and is described in detail below.
UNIT INTERPENETRATION
A unit can move through friendly units, but cannotend its move on top of another unit, so you’ll haveto be sure that your units have enough movement toend up clear of their friends. Enemy models on theother hand, block movement.
For the sake of clarity, always make sure thatthere’s at least a 1" gap in between friendly andenemy units. This ensures that both you and youropponent can clearly tell them apart.
CHARGING
A charge is the only way your units can move intocontact with the enemy. A unit can charge a singleenemy unit (‘the target’) as long as the followingconditions are met:
• the unit’s Leader can see the target.
• the distance between the units is equal to orless than double the unit’s Speed and themodel(s) can physically reach the target (asdescribed in Moving Chargers below).
• it is actually possible for the unit to damagethe target in the ensuing melee.
Moving Chargers Begin the charge by measuring the movement of themodel in the charging unit that would take the leastmovement to reach a model in the target unit, goingaround blocking terrain and enemy units.
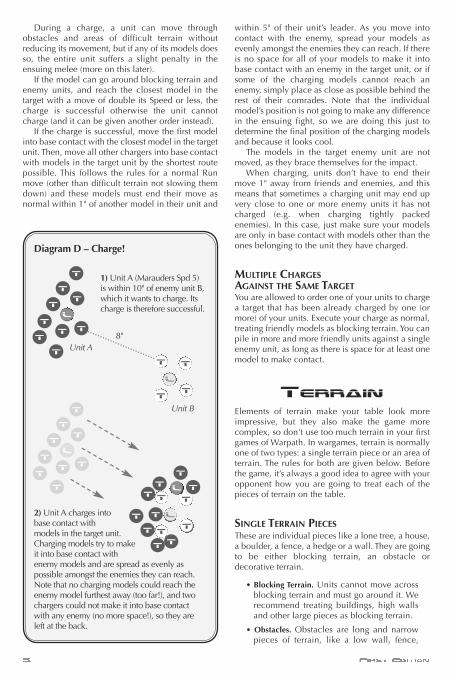
Diagram C – At The Double!
1) Leader (Spd 4)moves 6" of its At The Double!move.
2) Leader moves 2" inanother direction, completingits At The Double! move
3) Each other model in the unit is moved up to 8"(double their Speed stat), ending their move nofurther than 5" from the Leader and at least 1" fromanother model in the unit.
t
t
t
t
t
t
t
t
l
l
t
l
Diagram B – Advance!
t
t t
t
t
t
t
t
t
t
l
LeaderTrooper
l
1) Leader (Spd 4) makesan Advance! move of 3"
l
2) Each other model in the unit is moved up to 4"(their Speed stat), ending their move no furtherthan 5" from the Leader and at least 1" fromanother model in the unit.
OriginalPosition of Unit
New Positionof Unit
t
t
t
t
t
t
t
t
t
t
tt
t
l
During a charge, a unit can move throughobstacles and areas of difficult terrain withoutreducing its movement, but if any of its models doesso, the entire unit suffers a slight penalty in theensuing melee (more on this later).
If the model can go around blocking terrain andenemy units, and reach the closest model in thetarget with a move of double its Speed or less, thecharge is successful otherwise the unit cannotcharge (and it can be given another order instead).
If the charge is successful, move the first modelinto base contact with the closest model in the targetunit. Then, move all other chargers into base contactwith models in the target unit by the shortest routepossible. This follows the rules for a normal Runmove (other than difficult terrain not slowing themdown) and these models must end their move asnormal within 1" of another model in their unit and
Diagram D – Charge!
t
t
t
t
t
l
l
t
t
t
t
t
tt
t
t
1) Unit A (Marauders Spd 5)is within 10" of enemy unit B,which it wants to charge. Itscharge is therefore successful.
Unit B
Unit A
8"
t
t
t
t
t
tt
t
t
l
t
tt
t
l
t
t
tt
within 5" of their unit’s leader. As you move intocontact with the enemy, spread your models asevenly amongst the enemies they can reach. If thereis no space for all of your models to make it intobase contact with an enemy in the target unit, or ifsome of the charging models cannot reach anenemy, simply place as close as possible behind therest of their comrades. Note that the individualmodel’s position is not going to make any differencein the ensuing fight, so we are doing this just todetermine the final position of the charging modelsand because it looks cool.
The models in the target enemy unit are notmoved, as they brace themselves for the impact.
When charging, units don’t have to end theirmove 1" away from friends and enemies, and thismeans that sometimes a charging unit may end upvery close to one or more enemy units it has notcharged (e.g. when charging tightly packedenemies). In this case, just make sure your modelsare only in base contact with models other than theones belonging to the unit they have charged.
MULTIPLE CHARGESAGAINST THE SAME TARGETYou are allowed to order one of your units to chargea target that has been already charged by one (ormore) of your units. Execute your charge as normal,treating friendly models as blocking terrain. You canpile in more and more friendly units against a singleenemy unit, as long as there is space for at least onemodel to make contact.
terrain
Elements of terrain make your table look moreimpressive, but they also make the game morecomplex, so don't use too much terrain in your firstgames of Warpath. In wargames, terrain is normallyone of two types: a single terrain piece or an area ofterrain. The rules for both are given below. Beforethe game, it’s always a good idea to agree with youropponent how you are going to treat each of thepieces of terrain on the table.
SINGLE TERRAIN PIECES
These are individual pieces like a lone tree, a house,a boulder, a fence, a hedge or a wall. They are goingto be either blocking terrain, an obstacle ordecorative terrain.
• Blocking Terrain. Units cannot move acrossblocking terrain and must go around it. Werecommend treating buildings, high wallsand other large pieces as blocking terrain.
• Obstacles. Obstacles are long and narrowpieces of terrain, like a low wall, fence,
2) Unit A charges into base contact with models in the target unit. Charging models try to make it into base contact with enemy models and are spread as evenly aspossible amongst the enemies they can reach.Note that no charging models could reach theenemy model furthest away (too far!), and twochargers could not make it into base contactwith any enemy (no more space!), so they areleft at the back.

FIRING AND HITTING THE TARGETOnce the target has been picked, roll a number ofdice equal to the firing unit’s Firepower (Fire) value.
Your unit’s dice rolls, with any modifiers thatapply, must score a number equal to or higher thanits To Hit (Hit) value in order to hit its target. Discardany dice that score less than that.
Modifiers A number of factors can make a hit less likely tohappen. The most common are:
• -1 extreme range. The target is over half ofthe unit’s range away.
• -1 soft cover. The target is in soft cover.
• -2 hard cover. The target is in hard cover.
• -1 moving. The firing unit received anAdvance! order that turn.
• -1 fragged. The firing unit has an amount ofdamage equal to or higher than its Nerve.
For each of these factors, deduct one from the scorerolled by the dice. For example, if your unit normallyneeds a 4+ to hit, but it’s shooting at a target in softcover, you will need to score 5 or more to hit instead.If the target was in hard cover, you’d need 6s.
hedge, a stream, etc. – something that aman-sized creature could see over andclamber across easily. Units can move overobstacles normally (even ending halfwayover them), but cannot cross them whilemoving ‘At the Double’.
• Decorative Terrain. A unit can move overdecorative terrain pieces as it pleases,ignoring them altogether. However, it is bestif you still make sure your models don’t endup on top of them. This is best for smallterrain pieces like individual bushes or trees.
AREAS OF DIFFICULT TERRAIN
This type of terrain consists of things like ruinedbuildings, alien jungles, scattered mining or colonialinfrastructures, cratered areas or broken, rockyterrain, scree, and so on. These are normally madeby gluing a number of pieces of terrain onto a largebase. This conveniently demarcates the area of theterrain – the entire area of the base counts as difficultterrain. Units can move through these areas, butevery inch they cross counts as two inches.
shoot
When you’re done moving all of your units, it’s timeto shoot with any that can do so. Pick one of yourunits at a time, choose a target for them, and fire!
MOvING AND SHOOTING
Units that have received an ‘At the Double!’ orderthat turn are too busy moving to shoot.
Some cumbersome weapons can fire only if theyreceived a Halt! order that turn, and this will bespecified in their rules.
MELEE AND SHOOTING
Units that have any models in base contact withenemies cannot shoot, and cannot be shot at.
PICkING A TARGET
A unit can pick a single enemy unit as a target for itsranged attacks as long as the following conditionsare met:
• the unit’s Leader can see the target.
• the distance between the units is equal to orless than your unit’s Range (Ran).
RANGE
The stats of each unit show the Range of its weapons.
Cover
To decide whether the target unit is in cover, take alook at it from behind the heads of the firing unit’smodels. Ignore models in the firing unit (they’retrained to get down) and models in the target unit(you cannot use your team mates as cover!).
• If at least half of the models in the targetunit have no cover whatsoever from thepoint of view of at least half of the firingmodels, the target is not in cover.
• If at least half of the models in the target unitare completely or partially obscured byintervening terrain or other units (friend orfoe), from the point of view of at least half ofthe firing unit, the target is in cover.
• If the majority of the target unit’s models areon, or in base contact with, an area ofdifficult terrain, the target is in cover.
• If the majority of the firing unit’s shots haveto go through 3" or more of an area ofdifficult terrain, the target is in cover.
• If the majority of the cover is made of thingsthat in reality would hide the unit but notstop any bullets or shrapnel, use the softcover modifier. Otherwise, use hard cover.Agree before the game what is going tocount as hard and soft cover.
• If you’re not sure the target is in cover, rolla die. On a 4+ it is not, on 3 or less it is.

Any dice that rolls a 1 is always a miss, regardlessof modifiers. However, if modifiers to the roll meanthat the unit would need more than 6 to hit, it canstill shoot and will need 6 to hit, but it only rolls diceequal to half of its Firepower, rounding down (notethat this means that weapons with a Firepower of 1cannot hit in these conditions).
DAMAGING THE TARGET
After discarding any dice that missed, pick up thedice and roll them again, to try and damage theenemy unit. The number your unit needs to damagethe target is equal to the target’s Defence value.
This roll can sometime be modified by specialrules. For example, some units (normally, Armouredunits), have a Defence value of 7 or more, so theycannot be damaged unless the firer has somepositive modifiers to this roll.
Any dice that rolls a 1 always fails to damage,regardless of modifiers.
Recording Damage For each hit that scores damage, place a damagemarker next to the unit. This represents physicaldamage and casualties as well as a decline in theunit’s morale, cohesion and will to fight on.
As the unit accumulates damage markers, it mightbe more convenient to record this by writing itdown, or placing a die (possibly an unusual one, ofa different size or colour, to avoid rolling it bymistake) next to a single damage marker behind theunit, or using some other suitable tokens.
TESTING NERvE
At the end of the Shoot phase, you can test the Nerveof any unit you inflicted damage on in that phase.This test is described on page 8, but basically it willdetermine whether the damaged units will stand, besuppressed or destroyed.
BFGS
Sometimes, units can be upgraded by giving one ormore of their models a Ballistic FirepowerGuarantor, or BFG for short. These are especiallypowerful man-portable weapons, which varyenormously in nature depending on the race utilisingthem. In general, they either increase the firepowerof the unit, or are used to take on enemy tanks andlarge alien creatures.
Each BFG has its own profile, specifying itsFirepower, Range and any other special rules itmight have. For example:
Fire Ran Special
Laser Cannon 1 60 Piercing (6)
Independent Fire
BFGs are always fired independently from their unitand can be fired either at the same target as their unitor at another target. Resolve their fire in any orderyou like, but you must resolve all of the fire comingfrom a unit before moving to another one.
For example, let’s say you have a unit with twoBFGs. You first fire one BFG at target A, rolling to hitand to damage. Then pick unit B as target for yourunit’s normal weapons. Finally, you decide that yoursecond BFG is going to fire at unit A again andresolve that.
Note that the fact that one or more models arefiring BFGs does not reduce the Firepower of the unit– their comrades compensate for that.
Line of Sight When firing a BFG, always determine line of sightand cover by looking along its barrel or from theviewpoint of the model carrying it, ignoring modelsfrom the BFG’s own unit (basically, imagine that therest of the unit does not exist).
Melee
When you’re done shooting with all of your units,it’s time for your warriors to strike against theenemies that they have charged. In reality the enemywarriors would also be striking against yours, but forthe sake of playability, we imagine that the impetusof the charge means your men are doing most of theattacking. If the enemy is not destroyed, your menwill fall back and brace themselves, because theenemy will charge back in during their turn toavenge their fallen comrades.
STRIkING
To attack the unit you charged, roll a number of diceequal to the charging unit’s Attacks value.
HITTING
Same as hitting with ranged attacks, but uses themodifiers below instead.
Modifiers A number of factors can make a hit less likely tohappen. The most common are:
• -1 defensive positions/disrupted charge. The target is behind an obstacle and/or thechargers’ move has gone through any part ofone or more areas of difficult terrain orobstacles.
• -1 fragged. The attacking unit has an amountof damage markers equal to or higher thanits Nerve value.

DAMAGING THE TARGET
Same as rolling for damage with ranged attacks.
Recording Damage Same as recording damage from ranged attacks.
TESTING NERvE
At the end of each combat, you must test the Nerveof the enemy unit that your unit(s) inflicted damageon. This test (described below) will determinewhether the enemy will stand or be destroyed, seeFollow-on Combat below. Note that in melee, resultsof ‘Suppressed’ count as ‘Steady’ instead.
REGROUPING AND FOLLOW-ON COMBATRegroupingAt the end of each combat, if your unit(s) managedto destroy the enemy it was fighting, it can either staywhere it is or move up to D6" in any direction,following all of the rules for a normal move.
If, on the other hand, your unit did not manageto destroy its enemies and is therefore still in contactwith them, you must pull back, executing a D6"move as described above. The enemy models are leftin place.
Follow-on Combat If a unit is not destroyed by a charging enemy, in itsnext turn it can only be ordered to move At TheDouble! or Charge! one of the units that charged itin the previous turn. This represents the unit eitherdisengaging from the combat or deciding to stay andfight back.
testing nerve
As a unit accumulates damage, it will become moreand more likely to lose cohesion, until eventually itwill turn tail and run from the field, never to return.
WHEN TO TEST
At the end of both your Move and Shoot phase, testthe Nerve of any enemy unit you managed to inflictdamage upon during that phase. In the Melee phase,however, this test is taken at the end of each combat.
HOW TO TEST
Each unit has two numbers under its Nerve value.The first number is the unit’s Suppression limit, thesecond number is its Destruction limit.
To test the Nerve of an enemy unit, roll 2D6 andadd to the result the points of damage currently on theunit, plus any other modifiers that apply (such as aspecial rule). This is the total you’re using to ‘attack’ theenemy unit’s Nerve. This total is then compared with
speCial results
Double Six – We Are Doomed!
If you roll double six when testing Nerve andthe unit is not Destroyed, it will still suffer froma result of Suppressed... it’s the noise!
Double One – Hold Your Ground!
If you roll snake eyes (double one) whentesting Nerve, the enemy is filled withimplacable resolve and will always be Steadyand fight on, regardless of any modifier.
the Nerve value of the enemy unit.
• If the total is equal to or higher than theunits’s Destruction limit, the unit suffers aDestroyed! result (see below).
• If the total is lower than the Destructionlimit, but equal to or higher than theSuppression limit, the unit suffers from aSuppressed result (see below).
• If the total is lower than the unit’sSuppression limit, then the unit is Steady,which means it is completely unaffected andcontinues to fight on as normal.
For example, let’s say you are testing the Nerve of anenemy unit that has a Nerve of 11/13 and hassuffered 3 points of damage. If you roll a seven orless, your total will be 10 or less and the enemy willbe Steady. If you roll an eight or nine, your total willbe 11 or 12 and the enemy will be Suppressed. Ifyou roll a ten or more, your total will be 13 or moreand the enemy is Destroyed!
SuppressedThe unit continues to fight, but drops to the ground andtakes cover for a while. In its next Move phase, it canonly be ordered to Halt! In addition, the unit is sodisrupted that it will not be able to shoot in its nextShoot phase. It is normally a good idea to markSuppressed units with a token of some kind.
If the Nerve test is caused by melee attacks, treatSuppressed results as Steady instead (laying flat on theground is not a great defence against bayonet thrusts...).
DestroyedThe unit is scattered, surrenders or is utterlydestroyed, remove it.
arMour
Armoured units follow the rules as given previously,but they consist of a single model and use theexceptions listed here below.
ARMOUR MOvEMENTArmoured units move in a very different way fromother units. So when ordering an Armoured unit, youcan give it the following orders:
Halt! This is just the same as any other unit – theArmoured unit remains stationary.
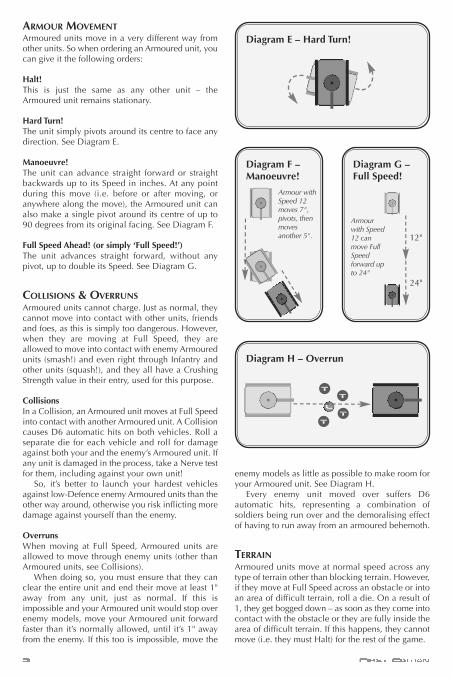
Hard Turn! The unit simply pivots around its centre to face anydirection. See Diagram E.
Manoeuvre!The unit can advance straight forward or straightbackwards up to its Speed in inches. At any pointduring this move (i.e. before or after moving, oranywhere along the move), the Armoured unit canalso make a single pivot around its centre of up to90 degrees from its original facing. See Diagram F.
Full Speed Ahead! (or simply ‘Full Speed!’)The unit advances straight forward, without anypivot, up to double its Speed. See Diagram G.
COLLISIONS & OvERRUNS
Armoured units cannot charge. Just as normal, theycannot move into contact with other units, friendsand foes, as this is simply too dangerous. However,when they are moving at Full Speed, they areallowed to move into contact with enemy Armouredunits (smash!) and even right through Infantry andother units (squash!), and they all have a CrushingStrength value in their entry, used for this purpose.
CollisionsIn a Collision, an Armoured unit moves at Full Speedinto contact with another Armoured unit. A Collisioncauses D6 automatic hits on both vehicles. Roll aseparate die for each vehicle and roll for damageagainst both your and the enemy’s Armoured unit. Ifany unit is damaged in the process, take a Nerve testfor them, including against your own unit!
So, it’s better to launch your hardest vehiclesagainst low-Defence enemy Armoured units than theother way around, otherwise you risk inflicting moredamage against yourself than the enemy.
OverrunsWhen moving at Full Speed, Armoured units areallowed to move through enemy units (other thanArmoured units, see Collisions).
When doing so, you must ensure that they canclear the entire unit and end their move at least 1"away from any unit, just as normal. If this isimpossible and your Armoured unit would stop overenemy models, move your Armoured unit forwardfaster than it’s normally allowed, until it’s 1" awayfrom the enemy. If this too is impossible, move the
enemy models as little as possible to make room foryour Armoured unit. See Diagram H.
Every enemy unit moved over suffers D6automatic hits, representing a combination ofsoldiers being run over and the demoralising effectof having to run away from an armoured behemoth.
TERRAIN
Armoured units move at normal speed across anytype of terrain other than blocking terrain. However,if they move at Full Speed across an obstacle or intoan area of difficult terrain, roll a die. On a result of1, they get bogged down – as soon as they come intocontact with the obstacle or they are fully inside thearea of difficult terrain. If this happens, they cannotmove (i.e. they must Halt) for the rest of the game.
Diagram H – Overrun
Diagram F –Manoeuvre!
Diagram G –Full Speed!
24"
12"
Armourwith Speed12 canmove FullSpeedforward upto 24"
l
t
t
t
t
Diagram E – Hard Turn!
Armour withSpeed 12moves 7",pivots, thenmovesanother 5".
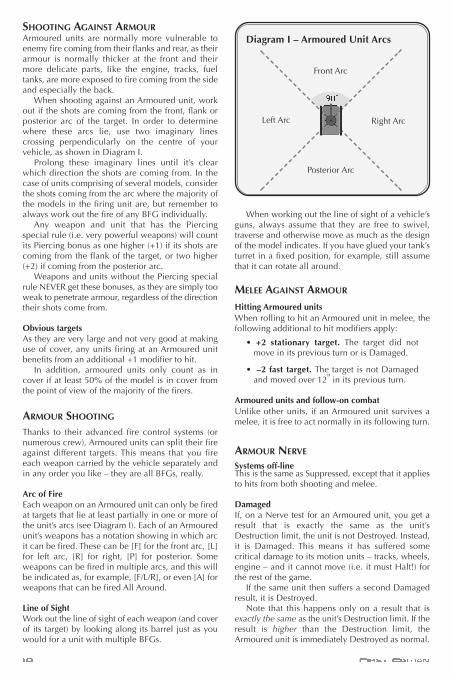
Diagram I – Armoured Unit Arcs
Front Arc
90°
Right ArcLeft Arc
Posterior Arc
SHOOTING AGAINST ARMOURArmoured units are normally more vulnerable toenemy fire coming from their flanks and rear, as theirarmour is normally thicker at the front and theirmore delicate parts, like the engine, tracks, fueltanks, are more exposed to fire coming from the sideand especially the back.
When shooting against an Armoured unit, workout if the shots are coming from the front, flank orposterior arc of the target. In order to determinewhere these arcs lie, use two imaginary linescrossing perpendicularly on the centre of yourvehicle, as shown in Diagram I.
Prolong these imaginary lines until it’s clearwhich direction the shots are coming from. In thecase of units comprising of several models, considerthe shots coming from the arc where the majority ofthe models in the firing unit are, but remember toalways work out the fire of any BFG individually.
Any weapon and unit that has the Piercingspecial rule (i.e. very powerful weapons) will countits Piercing bonus as one higher (+1) if its shots arecoming from the flank of the target, or two higher(+2) if coming from the posterior arc.
Weapons and units without the Piercing specialrule NEVER get these bonuses, as they are simply tooweak to penetrate armour, regardless of the directiontheir shots come from.
Obvious targets As they are very large and not very good at makinguse of cover, any units firing at an Armoured unitbenefits from an additional +1 modifier to hit.
In addition, armoured units only count as incover if at least 50% of the model is in cover fromthe point of view of the majority of the firers.
ARMOUR SHOOTING
Thanks to their advanced fire control systems (ornumerous crew), Armoured units can split their fireagainst different targets. This means that you fireeach weapon carried by the vehicle separately andin any order you like – they are all BFGs, really.
Arc of Fire Each weapon on an Armoured unit can only be firedat targets that lie at least partially in one or more ofthe unit’s arcs (see Diagram I). Each of an Armouredunit’s weapons has a notation showing in which arcit can be fired. These can be [F] for the front arc, [L]for left arc, [R] for right, [P] for posterior. Someweapons can be fired in multiple arcs, and this willbe indicated as, for example, [F/L/R], or even [A] forweapons that can be fired All Around.
Line of Sight Work out the line of sight of each weapon (and coverof its target) by looking along its barrel just as youwould for a unit with multiple BFGs.
When working out the line of sight of a vehicle’sguns, always assume that they are free to swivel,traverse and otherwise move as much as the designof the model indicates. If you have glued your tank’sturret in a fixed position, for example, still assumethat it can rotate all around.
MELEE AGAINST ARMOUR
Hitting Armoured unitsWhen rolling to hit an Armoured unit in melee, thefollowing additional to hit modifiers apply:
• +2 stationary target. The target did notmove in its previous turn or is Damaged.
• –2 fast target. The target is not Damagedand moved over 12" in its previous turn.
Armoured units and follow-on combatUnlike other units, if an Armoured unit survives amelee, it is free to act normally in its following turn.
ARMOUR NERvE
Systems off-lineThis is the same as Suppressed, except that it appliesto hits from both shooting and melee.
DamagedIf, on a Nerve test for an Armoured unit, you get aresult that is exactly the same as the unit’sDestruction limit, the unit is not Destroyed. Instead,it is Damaged. This means it has suffered somecritical damage to its motion units – tracks, wheels,engine – and it cannot move (i.e. it must Halt!) forthe rest of the game.
If the same unit then suffers a second Damagedresult, it is Destroyed.
Note that this happens only on a result that isexactly the same as the unit’s Destruction limit. If theresult is higher than the Destruction limit, theArmoured unit is immediately Destroyed as normal.

airCraFt
Aircraft follow the rules as given earlier, except thatthese units consist of a single model rather than agroup of models and have quite a list of exceptionsdue to their very different nature.
MOvEMENT
An Aircraft unit is never deployed at the start of thegame.
At the beginning of your second turn, the unit issimply placed anywhere on the battlefield (thiscounts as ordering it to Manoeuvre!), except on topof other units or any type of terrain.
At the beginning of its next turn, the unit isremoved from the table, as it needs a full turn to pullaway from the ground, bank around and prepare foranother pass.
During the Move phase of any of your followingturns, you can then place it anywhere on the table,exactly as above. You’ll then have to remove it againthe next turn, and so on.
The unit cannot Overrun or Collide.
SHOOTING AGAINST AIRCRAFT
When shooting against Aircraft, always add 18" tothe measured range in order to compensate for theheight at which they move.
Also, to simulate the fact they are so high up,intervening terrain and models never block the lineof sight of units firing against aircraft and never offerany cover to them, simply measure the range to thetarget aircraft.
AIRCRAFT SHOOTING
Weapons mounted on Aircraft are BFGs exactly likethe ones mounted on Armoured units, and willtherefore have the same kind of notation.
All Aircraft have the Stabilised special rule, andso suffer no -1 to hit penalty for moving and firing.
All weapons fired by Aircraft count as hittingarmoured units from the left/right arc, as they alwayshit the thinner top armour.
MELEE
Aircraft can neither charge nor be charged (andcannot take part in collisions either!).
NERvE
Aircraft cannot be Suppressed, and so they don’thave a Suppression limit – we assume that theaircraft simply decides to disengage, rocked by theenemy anti-aircraft fire.
If they suffer any Destroyed result, they areDestroyed as normal.
ordnanCe
Ordnance units follow the rules as given earlier, buthave a few exceptions. We thought it convenient tosum up all such unique rules in a separate section,so that they are easier to find.
MOvEMENT
All Ordnance units have the Lumbering special rule,and therefore cannot move At the Double! Inaddition, they are not allowed to Charge!
Ordnance units treat all type of terrain asblocking terrain. They can be deployed in areas ofdifficult terrain, but in that case they can only beordered to Halt! for the rest of the game.
SHOOTING
As they are so bulky, Ordnance units can shoot onlyif they received a Halt! order that turn.
When firing an Ordnance unit, first pivot itaround its centre to face its intended target (this doesnot count as moving), and then check its line of sightalong the barrel of the gun.
MELEE
Ordnance units are really useless in melee, so anyunits attacking them always treble their Attacks.
When charging an Ordnance unit, it looks betterif your models charge the crew as well. This does notmake any difference (the crew normally getbutchered anyway), but certainly appears morepleasing to the eye.
As they cannot move At The Double! or Charge!,Ordnance units must be ordered to Advance! in theturn following the one when they have beenattacked in melee – they are attempting to redeployunder cover from friendly units.
Note that Ordnance units, not being very good atgetting out of the way of Overrunning armouredunits, and suffer 3D6 hits instead of D6 – crunch!
heroes and
Monsters
Heroes and Monsters follow the rules as given in theprevious pages, except that these units consist of asingle model rather than a group of models.
In addition, these models are Obvious Targets asdescribed for Armoured units.
speCial rules
Units, or entire armies, sometimes possess what wecall ‘special rules’. Each of these special rules is anexception to the normal rules. The most common ofthem are listed here, but we will undoubtedly addmore to this list at a later date.
Ack-AckThis weapon is designed to track fast-moving targetslike aircraft and engage them.
If the unit is ordered to Halt!, in that turn it willnot suffer from the additional 18” of range for firingagainst Aircraft.
Blast (n)Booooooommmmm!!!
Roll to hit and to damage normally. Then, anypoint of damage caused is multiplied by the numberindicated in the bracket.
BulkySize matters.
The unit cannot be transported.
CravenNot everyone is cut out to be a warrior...
If the unit is ordered to Charge!, roll a die. On aresult 2+ the Charge proceeds as normal. On a 1, theunits ‘misunderstands’ the order and Halts instead.
Crushing Strength (n)This rule is used to represent the devastating effectsof melee hits from creatures of terrible strength, orequipped with specialised close combat weaponry.
All melee hits inflicted by the unit have a +(n)modifier when rolling to damage.
EliteElite creatures are true masters of the art of war.
Whenever the unit rolls to hit or to damage, it canre-roll one of the dice that failed to hit/damage.
FastZooooooooooommmmm!!!
When ordered At The Double! or Full SpeedAhead!, this unit trebles its speed rather than
doubling it. All Fast Armoured units alsohave the Nimble special rule.
Flamer (n)This rule is used for flame throwers and
other attacks where a great gout ofincendiary liquid or toxic gas fills an area.The unit has a ranged attack for which you
roll (n) dice rather than use the unit’s Firepowervalue. This attack has a range of 12" and always hitson 4+, regardless of any modifier.
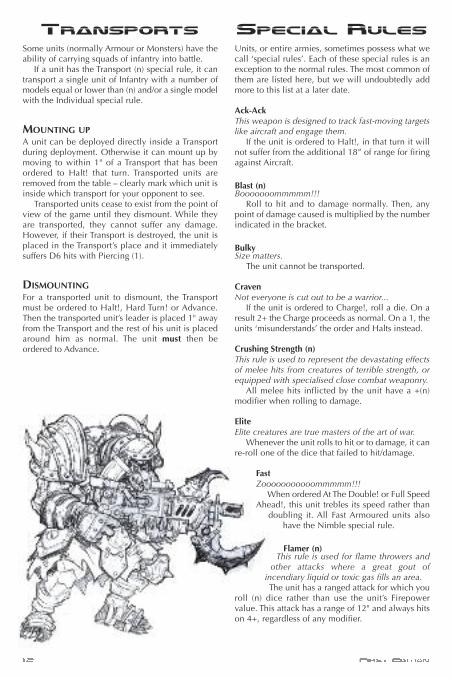
transports
Some units (normally Armour or Monsters) have theability of carrying squads of infantry into battle.
If a unit has the Transport (n) special rule, it cantransport a single unit of Infantry with a number ofmodels equal or lower than (n) and/or a single modelwith the Individual special rule.
MOUNTING UP
A unit can be deployed directly inside a Transportduring deployment. Otherwise it can mount up bymoving to within 1" of a Transport that has beenordered to Halt! that turn. Transported units areremoved from the table – clearly mark which unit isinside which transport for your opponent to see.
Transported units cease to exist from the point ofview of the game until they dismount. While theyare transported, they cannot suffer any damage.However, if their Transport is destroyed, the unit isplaced in the Transport’s place and it immediatelysuffers D6 hits with Piercing (1).
DISMOUNTING
For a transported unit to dismount, the Transportmust be ordered to Halt!, Hard Turn! or Advance.Then the transported unit’s leader is placed 1" awayfrom the Transport and the rest of his unit is placedaround him as normal. The unit must then beordered to Advance.

Headstrong“I’ve got no time to bleed.”
When this unit begins a turn Suppressed, it rollsa die. On a 4+, it shrugs off the effects of beingSuppressed and can act normally that turn.
HowitzerSome flexible weapons can either be fired directly atthe enemy or used to bombard very distant targets.
The unit may either fire normally or by using theIndirect Fire special rule. Declare before you fire.
Indirect fireThe unit fires its shots in high arcing trajectories.Receiving coordinates from observers in orbit, theunit can engage targets it cannot see. However, theunit cannot fire at enemy who get too close.
The unit never suffers any to hit modifiers forrange or cover. However, it can never shoot targetswithin 12".
In addition, the unit may fire at targets that it cannotsee, but if it does so, it will suffer a -1 to hit modifier.
IndividualA single enemy running around the battlefield isdifficult to pinpoint in the confusion of battle.
Not only this model is not an Obvious Target, butwhen shooting against it, enemies suffer anadditional -1 penalty on their rolls to hit.
However, if the model suffers any point ofdamage from a weapon/unit with a Piercing orCrushing Strength of (4) or higher, it is killed outrightand removed from the table without testing forNerve – all that remains is a pair of smoking boots.
InspiringThe bravery of a heroic individual, the presence of afeared superior officer or indeed the mind-link ofsome controlling alien creature, are all factors thatcontribute to make troops fight that much harder.
If the unit or any friendly units within 6" of it areDestroyed, the opponent must re-roll that Nerve test.The second result stands. This rule does not work onArmoured units.
Jump TroopsSome troops use anti-grav personal systems, jumpjets, short-range teleporters and other more exoticgear allowing them to cross the battlefield at speed,bounding over friends, enemy and terrain alike.
The unit can move normally on the ground usingits Speed value, or can activate its jump jets. If itdoes so, its Speed increases to 10 (so, 20” at thedouble), and it can move over anything withoutpenalties (blocking terrain, difficult terrain, enemyunits, etc.), but still cannot land on top of them. If itdoes so as it charges, in the ensuing melee it neversuffers the -1 to hit penalty for charging a defensiveposition or for a disrupted charge.
LumberingSome machineries of war are not build for speed, butmore than compensate for it with firepower.
The unit cannot be ordered ‘At The Double!’ or‘Full Speed Ahead!’. Its Charge! range is also halved,being the same as a normal move rather than adouble move.
Piercing (n)This rule is given to high-poweredranged attacks that have a betterchance of penetrating the armour of enemy units.
All ranged hits inflicted by the unit have a +(n)modifier when rolling to damage.
SniperA weapon designed to hunt and kill enemy leaders.
If the unit is ordered to Halt!, in that turn itsshooting will ignore any cover modifiers and the -1modifier for firing against Individuals.
StabilisedThis weapon is designed to fire on the move.
Even if ordered to Advance!, Manoeuvre! or HardTurn!, the unit counts as having received a Halt!order when firing its weapons in that turn.
SteadfastNo retreat! No surrender!
The unit treats Suppressed results on the Nervetest table as Steady instead.
StealthyThe unit is extremely adept at infiltrating and hiding,or benefits from thermo-optical screening.
During your set-up, you can set this unit upanywhere on the table outside of the enemy’s set-uparea and more than 12" from an enemy unit.
In addition, enemies shooting against the unitsuffer an additional -1 to hit modifier.
ReconThis unit is trained to range ahead of the main force,scouting the terrain and gathering information.
The unit can make a single At the Double!/FullSpeed move after set-up is finished, but before theplayers roll to decide who goes first.
If both armies have units with this rule, roll a die.The highest scorer decides who begins to move oneof his Recon units first, then the players alternateuntil all Recon units have been moved.
Zap! (n)This represents all sort of assorted alien mind-burning powers and other exoteric modes of attack.
The unit has a ranged attack. You roll (n) dice forthis ranged attack rather than using the Firepowervalue of the unit. This attack has a range of 24",always hits on 4+ (regardless of modifiers) and isPiercing (1).
At the beginning of your first turn, before issuing anyorders, roll a die for each unit you left behind asReinforcements (see page 16). If you roll a 1, the unitarrives onto the battlefield. At the beginning of yoursecond turn, roll again for all units that have notentered the battle yet. This time they will arrive on aresult of 1 or 2. On your third turn, Reinforcementswill arrive on 1, 2 or 3. Continue like this every turnuntil all of your Reinforcements have entered thebattle, or until you reach your sixth turn, when allremaining Reinforcements arrive automatically.
When a reinforcing unit arrives, immediatelychoose an entry point for the unit. This can beanywhere on your long table edge, or on either shorttable edge, a number of feet equal to your currentturn number away from your long edge. Imagine thatthe unit is running forward every turn, just outsidethe table and along the short table edges.
For example, on your third turn, the entry pointcan be on your long table edge or on either shorttable edge within three feet of your edge. If the unitarrives on your fifth turn, it can also enter from theenemy long edge, but within a foot of either corner,or within two feet of the corners if it arrives on yoursixth turn (the unit has obviously encircled theenemy position).
Place the unit’s Leader in contact with the entrypoint and position the remaining models around himas normal. Then you must immediately order the unitto Advance! (or Manoeuvre! if it is an Armoured unit).
piCking a ForCe
You can play Warpath with just a few units per side,without worrying about the two sides being equallymatched. This is great for learning the game, but afteryou’ve become familiar with the rules and amassed alarge collection of models, you might want to try agame where the forces are balanced, so that bothplayers have an equal chance of winning the game.
To achieve this, you and your opponent must pickan army before the game. First agree a maximum totalof points, say 2,000 points. Then start picking unitsfrom the army lists provided by Mantic – each unitcosts a certain amount of points, as listed in its entryin the appropriate army list (including any options likeBFGs). For example, a squad might cost around 100points. As you pick units and include them in yourarmy, keep adding their cost until you have reachedthe total you agreed. You can of course spend less thanthe agreed total.
The only limit we set to stop ruthless gamers fromconcocting absurd armies is that for every ‘solid unit’in your army (i.e. units of at least 10 infantry), youcan include 1 Ordnance unit, 1 Aircraft, 1 Armouredunit and 1 Hero or Monster.
ARMOUR SPECIAL RULESThe following special rules are normally given toarmoured units.
HovererUsed for vehicles that can fly at low altitude, hoverin stationary flight and land vertically at will, muchlike a helicopter or anti-grav gunship.
The unit can move over anything withoutpenalties (blocking terrain, difficult terrain, enemyunits, etc.), but cannot land on top of them. As aconsequence, it cannot Overrun enemy units, and itcan only initiate a Collision against another unit withthis rule. The unit cannot be charged unless it isDamaged. The unit also has the Nimble special rule.
NimbleUsed for vehicles with little or no armour, this rulemakes the unit much more manoeuvrable.
If ordered to Manoeuvre! or Full Speed Ahead!,the unit can make a single extra ‘Hard Turn!’ moveat any point during its movement.
Open TopUsed for vehicles that have soft skin and/or have nocover at all, so that the crew and passengers areexposed to enemy fire.
Transported troops can fire – place the Leaderand any BFGs on the transporting model in order towork out their line of sight and range. If the Transportis given a Manoeuvre! order, the transported troopscount as Advancing, and if it moves at Full Speed!,they count as moving At The Double!
In addition, these units can be ordered toAdvance!, Charge! or move At The Double! afterdismounting.
The drawback for all these bonuses is that OpenTop vehicles have a considerably lower Def value,as the enemy shooting can cut down the crew andhit other vital components from the inside.
reinForCeMents
So, for example, including 3 solid units gives youaccess to up to 3 Ordnance units, 3 Aircraft, 3Armoured units and up to 3 Heroes or Monsters.
In addition, if a unit has [1] after its name in thelist, only one such unit can be included in the army.
ALLIED ARMIES
You are free to mix units from different races in yourarmy, as long as you always keep in mind that youneed a solid unit of a specific race to include eachOrdnance unit, Armoured unit and Hero or Monsterof that race.
You can also join forces with your friends andplay with several allied armies on either or bothsides, as long as the points values are balanced.
However, alliances between races that are hatedenemies in the Warpath background are not very‘realistic’, so we have given a specific list of PossibleAllies to each army.
So please try to follow these guidelines and don’t include units of an army that is not a PossibleAlly in your army, unless your opponent agrees, of course.
tiMed gaMes
We really enjoy playing Warpath in a relaxedatmosphere, with the accompaniment of epic music,beer, pizza and the unavoidable truculent banter.However, the game is designed so that you can alsodecide to introduce another dimension to the fight:time. This way you’ll be able to experience some ofthe pressure of real battle, when snap decisionsmake the difference between victory or defeat, lifeor death!
CHESS CLOCkS
The best tool for timed games is a chess clock, aclever device that ensures time is equally dividedamongst the players, thus creating the ultimate fairand balanced wargame.
Simply agree a number of turns for the game andan amount of time per player, and set the chess clockaccordingly. For a 2,000 points game, we suggest sixturns and one hour per player, but it's up you to findthe pace you prefer for your games. Then, afterdeciding which player begins to deploy, start thatplayer’s clock. Once he’s finished deploying the firstunit, he stops his clock and activates the opponent’sclock, and so on.
Once deployment is finished, stop both clocksand roll to see who has the first turn.
Once the winner of the roll has made his choice,re-start that player’s clock. That player plays a turnand then stops his clock and activates the opponent’sclock, and so on.
The game ends at the agreed number of turns andvictory conditions are worked out as normal.However, if a player runs out of time during one ofhis turns, the game ends instantly and his entire armyrouts – immediately remove all of his remainingunits, as if they suffered a Destroyed result, and workout the victory conditions as normal.
OTHER TIMERS
If you don’t have a chess clock at hand, don’t worry– the stopwatch in your phone or watch, or even anhourglass or egg timer will do fine.
If you use one of these, then each player gets anagreed amount of time per turn (agree first howmany turns the game is going to last for). We suggestthat each turn should take around two to threeminutes per 500 points in your game (say, tenminutes in a 2,000 points game).
If a player runs out of time during his turn, hismove ends and any melee that has not been foughtyet is cancelled – move the chargers back 1".
Make sure that you also set a time limit fordeployment (30 seconds per unit works fine).
BE NICE!Of course, it’s only fair to stop the chess clock ortimer if one of the players is distracted from the game(by a phone call or the like), or if the players need tocheck a rule, an unclear line of sight, etc.
It is also best if any unit you destroy during yourturn is removed by your opponent, together with allof its damage markers, at the beginning of his turn.
By all means, you and your opponent can varythe amount of time you have for your game or yourturns according to your own taste, but if you’re likeus, you are going to love the pressure created bytimed games – after all, in real war one rarely hasthe luxury of time...
gaMe sCenario
1) PREPARE yOUR FORCES
First of all you and your opponent need to pickarmies to an agreed total of points, using the processdescribed in ‘Picking a Force’.
2) CHOOSE A GAMING AREA
We assume that games of Warpath will be played ona 6x4 foot area, either on a table or another flatsurface, like the floor.
3) TERRAIN – ALIEN WORLDS
Before the game, you should place some terrain onthe battlefield. Try to recreate an evocativelandscape of the futuristic/alien world your armiesare battling on, and always keep in mind thatWarpath plays better if the is quite a lot of terrain onthe table. Ideally, you need a few large pieces ofterrain completely blocking the models’ line of sight,so that units have to move around to engage targets.
Also, you need a fair amount of smaller terrain thatgives your units some cover from enemy fire. Withoutenough terrain on the table, units might just sit on theedge blasting away at each other, which is not muchfun, especially on the receiving side. A good solutionis to find a third (and neutral!) person to lay out theterrain for you. During this stage it’s vital that you agreewhat each piece of terrain is going to count as duringthe game – is it blocking terrain, an obstacle, a pieceof decorative terrain, or an area of difficult terrain?
4) SET TIME
Decide whether the game is going to continue for aset number of turns (we suggest twelve turns – sixper player), or a set amount of time (we suggest twohours), after which the game continues until eachplayer has had the same number of turns.Alternatively, you could also play a Timed Game, asexplained in the Timed Games section.
5) ENGAGEMENT BRIEF
So, when the game ends, who is going to be thewinner? In order to determine that, roll a dice:
D6 Type of Game 1-2 Meat Grinder 3-4 Scorched Earth5-6 Total Global Domination
Meat GrinderAt the end of the game, add up the cost of all of enemyunits you Wasted/Destroyed. That is your score. Youropponent does the same and you compare scores. Ifthe difference between the scores in favour of a player
is at least 20% of the total cost of the armies, thatplayer wins, otherwise the game is a draw (e.g. in agame where armies are 2,000 points, you need at least400 points more than the opponent to win).
Scorched EarthPlace D6+1 objectives on the battlefield. These caneither be tokens, like a coin, or pieces of terrainalready on the board. Both players roll a die. Whoeverscores highest either places a token or designates apiece of terrain as an objective. Objectives must beoutside of the players’ deployment zones and morethan 12" apart from one another. Players then taketurns to place/designate objectives.
If, at the end of the game you have a unit within 1"of an objective and no enemies within 1" of it, youcontrol that objective. A unit can only control a singleobjective. If you control two more objectives than youropponent, you win, otherwise the game is a draw.
Total Global DominationProceed as for Scorched Earth above, but at the endof the game count the points just like in a MeatGrinder game. In addition to points for killing units,any objective you control at the end of the game (asdescribed above) is worth an extra 250 points.
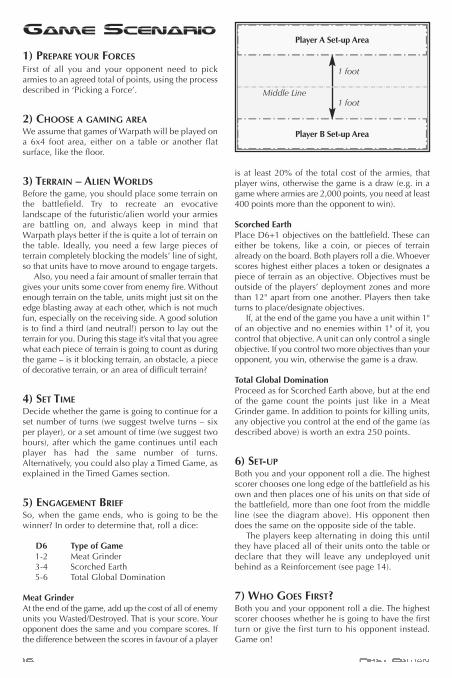
6) SET-UP
Both you and your opponent roll a die. The highestscorer chooses one long edge of the battlefield as hisown and then places one of his units on that side ofthe battlefield, more than one foot from the middleline (see the diagram above). His opponent thendoes the same on the opposite side of the table.
The players keep alternating in doing this untilthey have placed all of their units onto the table ordeclare that they will leave any undeployed unitbehind as a Reinforcement (see page 14).
7) WHO GOES FIRST?Both you and your opponent roll a die. The highestscorer chooses whether he is going to have the firstturn or give the first turn to his opponent instead.Game on!
Player B Set-up Area
1 foot
1 foot
Middle Line
Player A Set-up Area

deMo
sCenario:
First ContaCt
The following is a scenario describing how to goabout playing your first battle of Warpath, ideallyusing the contents of the Fate of the Forgestarbattleset. This scenario is a perfect way to learn therules of the game, because it uses a limited numberof units that belong to three unit types – Infantry,Ordnance and Armour.
This scenario is also useful to run very quick andeasy demo games, whether in a store, club or event. The only extra elements you are going to need otherthan the contents of the battleset are a tape measure,ruler, or other measuring tool, and a 2’ x 2’ gamingarea, but we recommend placing some terrain onthe table to both break up the lines of sight and makeyour demo more attractive.
If you don’t have Fate of the Starforge, you can stilluse this scenario for your introductory games – justemploy two small forces of roughly 700 points each.
ASSEMBLE THE UNITS
Fate of the Starforge includes a Marauders and aForgefathers force. Before you start, you’ll need toassemble and glue the models together, and groupthem up into units as shown in the picture opposite. The rules and statistics for the units used in thisscenario are summarised opposite for yourconvenience, to save you from having to find themduring your first game.
SET UP THE GAME
Each player stands behind one side of the table sothat they are facing each other. The Forgefathersplayer sets up his force first, placing all of his units
within 3” of his own table edge. Then the Maraudersplayer does the same with his force on the oppositeside of the table.
GAME ON!The Marauders player has the first turn. He moves,shoots and resolves any melee (not that you’re goingto have any in Turn 1...). Then the Forgefathers playerhas his turn and the game continues as normal untilone player completely wipes out the enemy forceand (quite obviously) wins the game.
Swap Sides!The easiest way to find out if you’re better than youropponent is to play the game again after swappingsides. This way you can show him the way thingsshould be done!
Time It!Another fun way to add a new element to the gameis to time each player’s moves. You each have threeminutes to finish your move. When time runs out,you finish the action you were performing and thenthe enemy turns starts.
Other OptionsIt’s easy to add variety and complexity to the gameby using the contents of the battleset. If you find thatthe Marauders are losing too often, you can replacetheir machine guns with anti-tank guns. If it is theForgefathers that seem to suffer, you can give theSteel Warriors a BFG.
Then, when you feel ready to move on and learnmore about Warpath, you could for example addterrain to the battlefield (and/or play on a largersurface), but the best thing to do is to purchase aHero model to bolster each of the forces, and thenmaybe other units of Infantry, Ordnance, Armour, oreven Aircrafts! And you can continue to expand yourinitial force, until you will be able to field a vastarmy of your favourite race. Have fun!
1 STEEL WARRIORS SECTION
Type Spd Hit Fire Ran Att Def Ner
Inf (10) 4 4+ 16 24 10 5+ 14/16
Special: One heat hammer (see below).
4 GRUNT SECTIONS
Type Spd Hit Fire Ran Att Def Ner
Inf (10) 5 4+ 8 12 20 4+ 13/15
Special: One machine gun (see below).
One Ripper Talons (see below).
1 RAPTOR
Type Spd Hit Fire Ran Att Def Ner
Arm 12 4+ * * – 6+ 9/11
Special: Fast, Open Top, Crushing Strength (1). One anti-tank gun (see below).
1 STORMRAGE vETERANS TEAM
Type Spd Hit Fire Ran Att Def Ner
Inf (5) 4 3+ 4 24 5 5+ 11/13
Special: Two heat-cannons – BFG (see below).
Two hailstorm autocannons – BFG (see below).
One heat hammer (see below).
1 JOTUNN HEAvy HAILSTORM CANNON
Type Spd Hit Fire Ran Att Def Ner
Ord 4 4+ 16 60 – 6+ 10/12
Special: Piercing (2).
WEAPONRy
Hailstorm autocannon
Fire Ran Special
Hailstormautocannon 4 36 Piercing (2)
Heat-cannon
Fire Ran Special
Heat cannon 1 24 Blast (D3), Piercing (7)
Heat HammerRoll separately an extra die in melee for the unit. If this
Attack hits, it is resolved at Crushing Strength (6).
WEAPONRy
Machine gun
Fire Ran Special
Machine gun 5 36 Piercing (1)
Ripper talonsRoll separately two extra dice in melee for the unit. If these
Attacks hit, they are resolved at Crushing Strength (5).
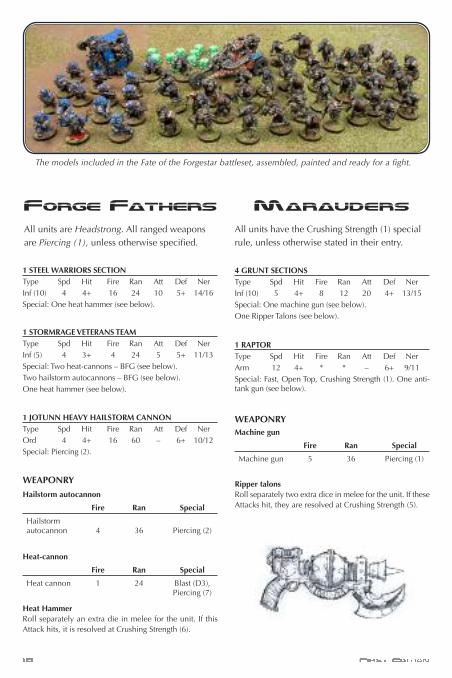
The models included in the Fate of the Forgestar battleset, assembled, painted and ready for a fight.
Forge Fathers
All units are Headstrong. All ranged weapons
are Piercing (1), unless otherwise specified.
Marauders
All units have the Crushing Strength (1) special
rule, unless otherwise stated in their entry.