BVCMS Hands-On Training: Tasks, Contacts, Email and · PDF fileBVCMS Hands-On Training: Tasks,...
16
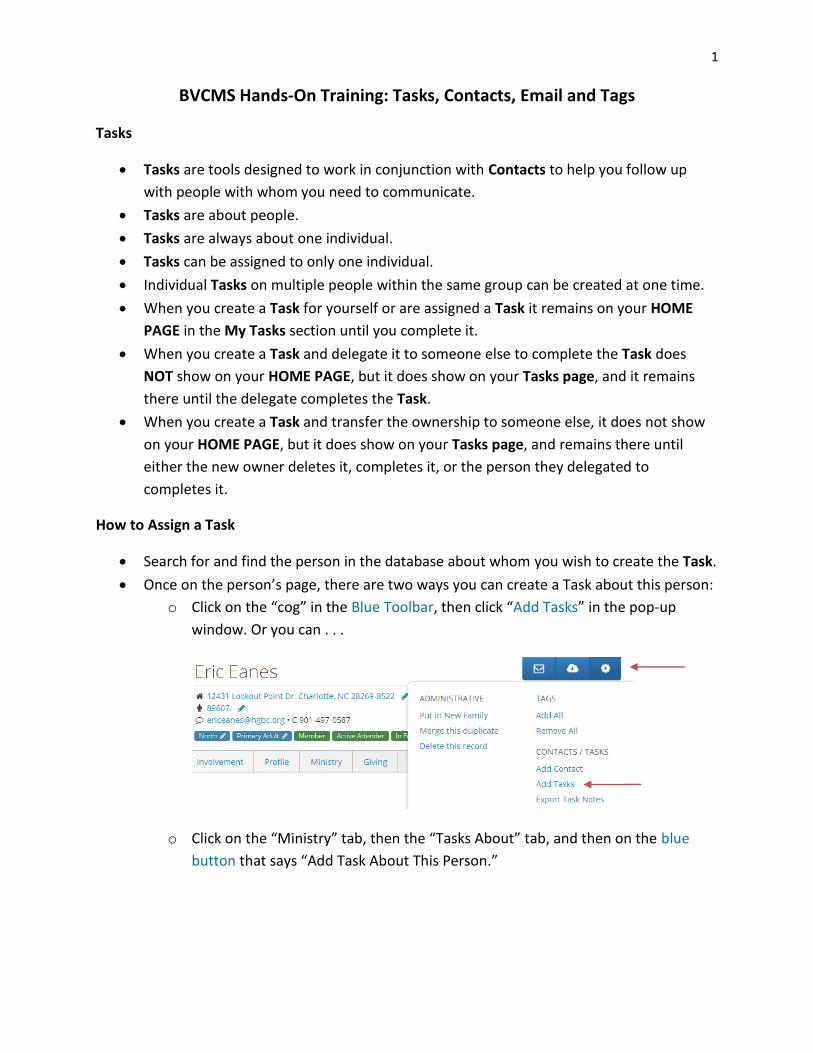
1 BVCMS Hands-On Training: Tasks, Contacts, Email and Tags Tasks Tasks are tools designed to work in conjunction with Contacts to help you follow up with people with whom you need to communicate. Tasks are about people. Tasks are always about one individual. Tasks can be assigned to only one individual. Individual Tasks on multiple people within the same group can be created at one time. When you create a Task for yourself or are assigned a Task it remains on your HOME PAGE in the My Tasks section until you complete it. When you create a Task and delegate it to someone else to complete the Task does NOT show on your HOME PAGE, but it does show on your Tasks page, and it remains there until the delegate completes the Task. When you create a Task and transfer the ownership to someone else, it does not show on your HOME PAGE, but it does show on your Tasks page, and remains there until either the new owner deletes it, completes it, or the person they delegated to completes it. How to Assign a Task Search for and find the person in the database about whom you wish to create the Task. Once on the person’s page, there are two ways you can create a Task about this person: o Click on the “cog” in the Blue Toolbar, then click “Add Tasks” in the pop-up window. Or you can . . . o Click on the “Ministry” tab, then the “Tasks About” tab, and then on the blue button that says “Add Task About This Person.”
Transcript of BVCMS Hands-On Training: Tasks, Contacts, Email and · PDF fileBVCMS Hands-On Training: Tasks,...
1
BVCMS Hands-On Training: Tasks, Contacts, Email and Tags
Tasks
Tasks are tools designed to work in conjunction with Contacts to help you follow up
with people with whom you need to communicate.
Tasks are about people.
Tasks are always about one individual.
Tasks can be assigned to only one individual.
Individual Tasks on multiple people within the same group can be created at one time.
When you create a Task for yourself or are assigned a Task it remains on your HOME
PAGE in the My Tasks section until you complete it.
When you create a Task and delegate it to someone else to complete the Task does
NOT show on your HOME PAGE, but it does show on your Tasks page, and it remains
there until the delegate completes the Task.
When you create a Task and transfer the ownership to someone else, it does not show
on your HOME PAGE, but it does show on your Tasks page, and remains there until
either the new owner deletes it, completes it, or the person they delegated to
completes it.
How to Assign a Task
Search for and find the person in the database about whom you wish to create the Task.
Once on the person’s page, there are two ways you can create a Task about this person:
o Click on the “cog” in the Blue Toolbar, then click “Add Tasks” in the pop-up
window. Or you can . . .
o Click on the “Ministry” tab, then the “Tasks About” tab, and then on the blue
button that says “Add Task About This Person.”

2
o Either way, you will be asked to confirm that you want to add a new Task for this
person. Click “OK.”
Once you confirm that you want to create a Task, the Task box will open on your Tasks
page.
You will notice several items are already populated in the Task (see the image above):
o The type of Task always defaults to “Please Contact” because the system
assumes you are creating the Task because you want to contact that individual in
some way.
o It shows you the date and time that you created the task. (Note: The time is
Central Standard Time because the developers of BVCMS are in Central Time.
This cannot be changed.)

3
o The “Owner” of the Task is you since you created it.
o You can transfer the ownership to another person by clicking on “(transfer).”
o “Delegated To:” will be the person to whom you are assigning the Task.
If you need to EDIT your Task you should do so BEFORE you delegate it.
Otherwise, you will be sending multiple emails to the Delegate every time
you edit the Task.
If you are creating the Task as a reminder for yourself you do NOT need
to delegate it. It will remain on your HOME PAGE until you complete it.
REMEMBER: DELEGATING IS THE LAST THING YOU DO
o “Due” allows you to set a due date while you are in EDIT mode.
o “Status” tells you the current condition of the Task:
“Active” means the Task is just that, active. Once you delegate the Task
the Status automatically changes to “Pending Acceptance.”
“Pending Acceptance” means that the Delegate has received your Task
but has not yet accepted it. When the Delegate accepts your task the
Status changes from “Pending Acceptance” to “Active.”
When a person completes a Task the status is changed to “Complete”
and the task is removed from the Creator’s Task page, the Owner’s Task
page, and the Delegate’s HOME PAGE and Task page.
o “Regarding Person:” is information available to you about the person on whom
the task has been created.
Notice that several of the pieces of information in this box are
hyperlinked.
Clicking on the person’s name takes you to their personal page in BVCMS.
Clicking on “(change)” allows you to change the person about whom the
Task has been created.
Clicking on Prospect Report generates a PDF file on the person which
contains their contact information, member status, family demographics,
attendance history, previous contacts, and enrollments.
Clicking on the address opens Google maps and will map the location of
their home for you.
Clicking on “driving directions” opens Google maps and will give you
driving directions from our Harris Blvd. location to the person’s home.
Clicking on the email address opens Outlook (if this is your email server)
and create a blank email to the person. (If you do not use Outlook for
your email this feature may not work.)
If we have a home phone number on the person it will show to the right
of the email address. If all we have is a cell phone or work phone number
you will have to go to their personal page or generate a Prospect Report
to get it.
4
o “Completed Contact:” Once the Task has been completed, the person
completing the Task clicks on “(complete),” which opens a Contact page for
them to enter the results of the contact.
o “Notes:” When in EDIT mode, additional comments can be added to the Task
here.
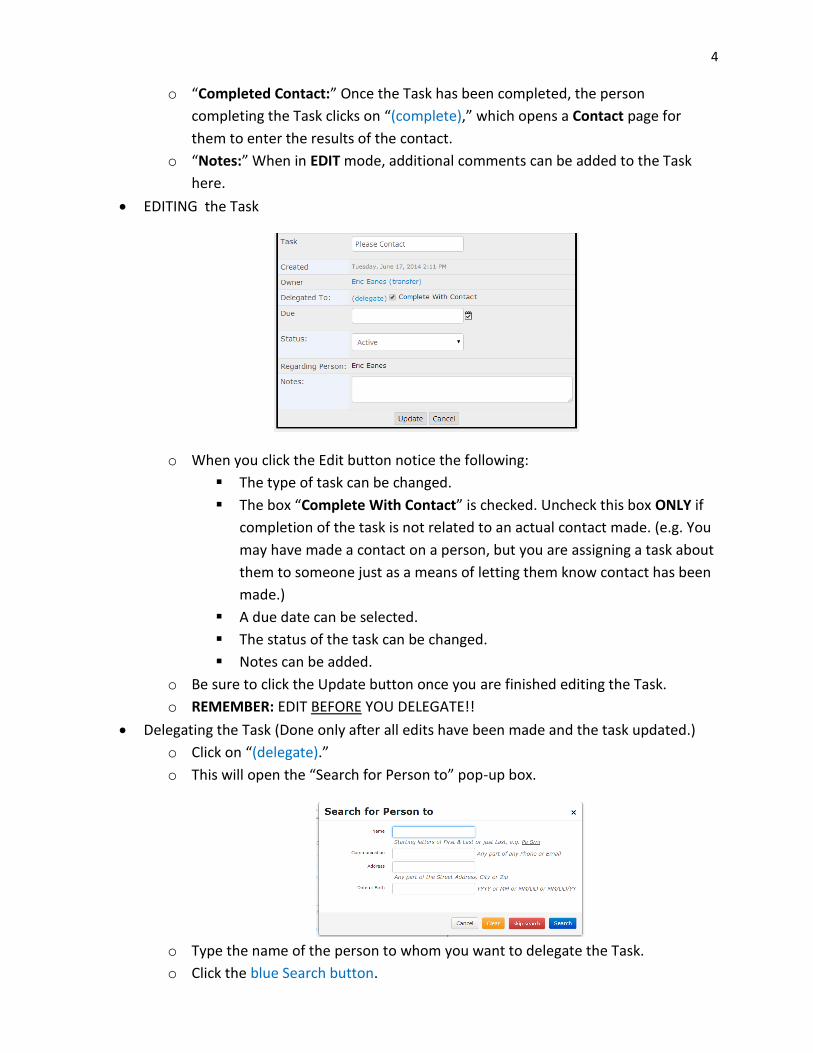
EDITING the Task
o When you click the Edit button notice the following:
The type of task can be changed.
The box “Complete With Contact” is checked. Uncheck this box ONLY if
completion of the task is not related to an actual contact made. (e.g. You
may have made a contact on a person, but you are assigning a task about
them to someone just as a means of letting them know contact has been
made.)
A due date can be selected.
The status of the task can be changed.
Notes can be added.
o Be sure to click the Update button once you are finished editing the Task.
o REMEMBER: EDIT BEFORE YOU DELEGATE!!
Delegating the Task (Done only after all edits have been made and the task updated.)
o Click on “(delegate).”
o This will open the “Search for Person to” pop-up box.
o Type the name of the person to whom you want to delegate the Task.
o Click the blue Search button.

5
o NOTE: You can only search for persons who are members of the organization(s)
in which you serve as a Leader.
o Once you find the right person, click on their name (which is hyperlinked) and
this will add that person’s name to the Task.
o When you delegate a Task two things happen automatically:
An e-mail is sent to the Delegate letting him or her know he or she has
been assigned a Task.
The status of the Task changes from Active to Pending Acceptance.
o NOTE: You can delegate a Task to anyone in your organization. However, unless
that person is also a Leader in the organization AND they have access to BVCMS,
they cannot access nor do anything with the Task.
o A task can be re-delegated to another person, but only by the person who owns
the task.
o A person who is assigned a task cannot re-delegate it.
Deleting a Task You Created
o Check the box that is to the left of the Task you wish to delete on your Task page.
o Click on the dropdown list that says “Actions.”
o Click on “..Delete Task”
o NOTE: You cannot delete a Task that you created if you have transferred the
ownership to someone else.
o NOTE: You cannot delete a Task that has been assigned to you by someone else.
Task-related E-mail Communication
o E-mails pertaining to the task are automatically generated and sent every time a
task is:
Delegated
Edited after being delegated (which is why you want to edit, then
delegate)
Accepted
Re-delegated
Completed
o The senders and recipients of the e-mails are the owner and delegate related to
the task.

6
o These e-mails are automatically generated and sent by BVCMS.
o The only exception is if a person is assigned a task and cannot complete it. In this
scenario, the delegate needs to call or e-mail the owner of the task to let them
know that he or she will not be able to complete the task and that it needs to be
re-delegated to another person.
Contacts
Contacts are how we record ministry that happens to members and guests.
There are several different ways to enter contacts.
This document will look specifically at:
o Entering contacts having completed a task.
o Entering a contact that is not task related.
o Entering the same contact on multiple people (e.g. sending a group a letter or
e-mail and you want to document that contact).
Entering a Task-Related Contact
When you have completed an assigned task and you are ready to document your
contact in BVCMS:
o Go to your HOME PAGE and in the “My Tasks” box, click (Please Contact) beside
the name of the person you contacted.
o This opens the task box on your Task Page.
o Click on the (complete) that appears below the person’s contact information.
o This opens the Contact Report Page which is where you will document the
results of your contact.

7
o First, click the blue Edit button. This enables you to do the following:
Select the Contact Date
Select the Ministry under which you made the contact
Select the Contact Type
Select the Contract Reason
Check the appropriate checkboxes on the right side of the report.
Enter comments related to your contact.
o NOTE: A contact report is NOT COMPLETE until you have followed ALL of the
editing steps above.
o NOTE: Comments should be informative enough to help the next person doing
ministry know what follow-up needs to occur.
o NOTE: Comments have the potential to be viewed by people other than yourself
including the person you contacted. Please do not record any information of a
deeply personal nature.
o Once you have finished editing the contact, click the blue Update button.
o Notice that the name of the person who completed the task appears under
“Ministry Team,” and the name of the person contacted appears under “Those
Contacted.”
o If another person made the contact with you, and if that person is a member of
the organization in which you are a leader, you can add their name by clicking on
the blue plus sign beside “Ministry Team” and then searching for their name,
clicking on the hyperlinked name, and then clicking the blue Commit and Add
button.

8
o If you need to add another contact for the Ministry Team, you can click on the
green button “Add New Contact for Team.”
NOTE: If you add a new contact this way you will still need to edit the
contact and enter comments. However, you will also need to add the
name or names of the person or persons whom you contacted. If they are
not in your organization you may not be able to add them. If this is the
case, contact the Administrative Assistant of the ministry under which
you made the contact, and they will assist you.

9
o If for some reason you need to delete the contact report, click on the red Delete
button.
o Once you have edited and updated your contact report, the report is saved
automatically. Click on “Hickory Grove Baptist Church” in the upper left corner
to go back to your HOME PAGE.
Entering a Non-Task Related Contact (this will only apply if you have access to that person’s record)
If you make a ministry contact that is not connected to a task you have been assigned
and you want to document the contact, the easiest way to do so is from the person’s
record.
Search for the person in BVCMS.
Once the person’s record appears:
o Click on the Ministry tab
o Click on the Contacts Received tab
o Click on the green button: “Add Contact Received By This Person”
This opens the Contact page.
NOTE: The Contact page will already be in edit mode.
Simply select the correct date of the contact, Ministry, Contact Type and Contact
Reason.
Check the appropriate boxes to the right.
Type any comments that will be helpful for further follow-up and ministry.
You will notice that by entering a contact through the person’s record, your name
automatically appears as the “Ministry Team” and the name of the person you
contacted automatically appears under “Those Contacted.”
If you need to add additional persons either to the Ministry Team or Those Contacted,
follow the steps above.
If you need to add another contact regarding a separate ministry contact, click the green
button “Add New Contact for Team” as noted above.
Entering a Single Contact on Multiple Records at Once
In the event that you contact multiple people via e-mail or letter, and you want to
document the contacts, here’s an easy way to do so without having to document each
contact individually.
10
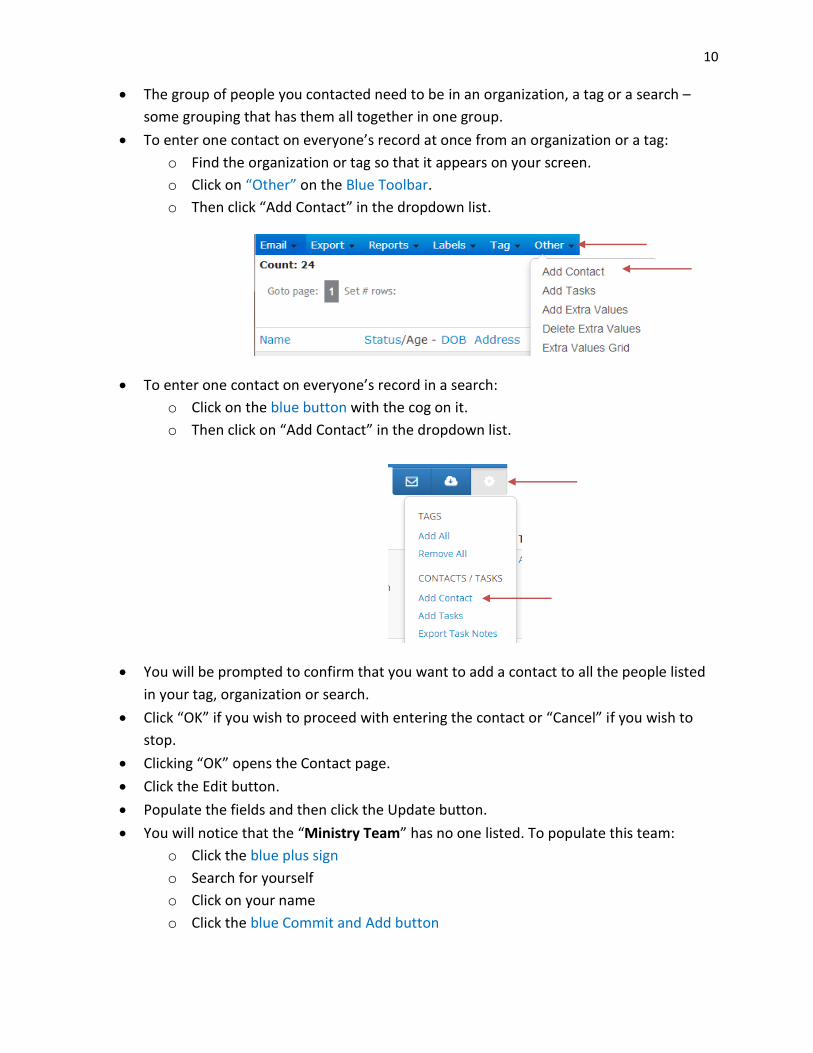
The group of people you contacted need to be in an organization, a tag or a search –
some grouping that has them all together in one group.
To enter one contact on everyone’s record at once from an organization or a tag:
o Find the organization or tag so that it appears on your screen.
o Click on “Other” on the Blue Toolbar.
o Then click “Add Contact” in the dropdown list.
To enter one contact on everyone’s record in a search:
o Click on the blue button with the cog on it.
o Then click on “Add Contact” in the dropdown list.
You will be prompted to confirm that you want to add a contact to all the people listed
in your tag, organization or search.
Click “OK” if you wish to proceed with entering the contact or “Cancel” if you wish to
stop.
Clicking “OK” opens the Contact page.
Click the Edit button.
Populate the fields and then click the Update button.
You will notice that the “Ministry Team” has no one listed. To populate this team:
o Click the blue plus sign
o Search for yourself
o Click on your name
o Click the blue Commit and Add button

11
You will notice that the names of everyone in your tag, organization or search appear
under “Those Contacted.” This means that the contact you entered appears on their
record.
If you wish to remove one or more individuals from the list of those contacted, click on
the “Remove” to the right of the name.
E-mailing through BVCMS
You can send e-mails to multiple people at once, and you don’t have to create a
distribution list first.
To e-mail more than one person, the people need to be grouped together in a tag,
organization or search.
To e-mail from a tag or organization, click on “Email” on the Blue Toolbar, and then click
on “Individuals” in the dropdown list.
To e-mail from a search, click on the envelope symbol in the small Blue Toolbar, and
then click “Individuals.”
Clicking “Individuals” directs you to the Email page where you can select an email
option.
It is highly recommended that you select the Empty Template under “Use Blank” as the
other templates are designed for official use by specific ministries of the church.

12
Click on Empty Template to open the email template.
When this opens you will notice several features:
o The top line tells you how many people will be receiving your e-mail. If we do not
have an e-mail address in the database for a person in your group then this
number will be less than the number of people in your tag, organization or
search.
o “From:” – your name appears here.
o “Subject:” – you will need to type in a subject for the e-mail you are sending.
o Text Box – click on the text box to type the body of your e-mail.
NOTE: You need to remove “Text goes here.” Otherwise it will appear in
your e-mail.
o “Test (Send to Yourself)” – allows you to send the e-mail to yourself before
sending it out to the group.
This is highly recommended because the e-mail may not appear the way
it looks in the text box.
o “Save As Draft” – allows you to save your e-mail as a draft if you are not ready
to send it.
NOTE: If you back out of the e-mail template and do not save as a draft,
you will lose your work!
o “Send” – this sends the e-mail.
13
For more detailed information on the e-mail features and functions see the help
documentation at http://www.bvcms.com/doc/_Email_Index.
Tags
Tags allow you to create a list of people that you need to communicate with but who
are not in a specific organization or search.
Tags are created by “tagging” people, which adds them to your active tag.
The active tag is the tag that is open behind the scenes.
o Anytime you are logged into BVCMS, there is always an active tag open behind
the scenes.
o The default active tag is labeled “Unnamed” and will remain as the active tag
until you create a new tag or select a tag that you have previously created.
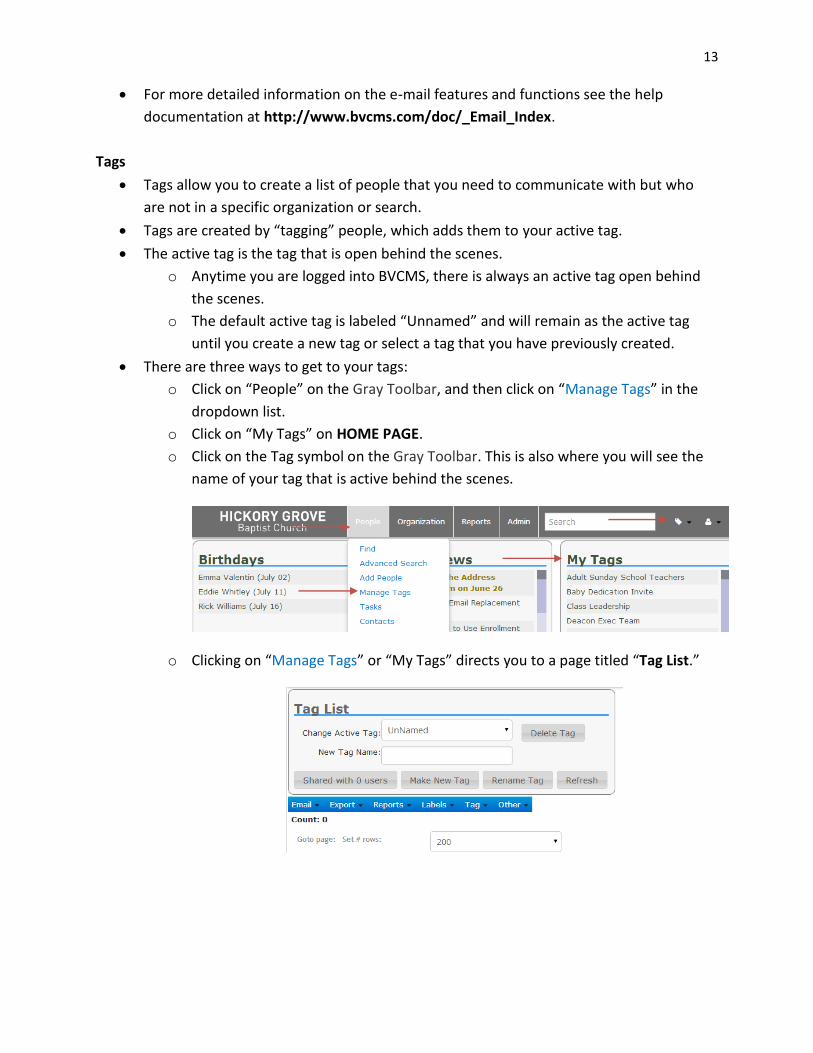
There are three ways to get to your tags:
o Click on “People” on the Gray Toolbar, and then click on “Manage Tags” in the
dropdown list.
o Click on “My Tags” on HOME PAGE.
o Click on the Tag symbol on the Gray Toolbar. This is also where you will see the
name of your tag that is active behind the scenes.
o Clicking on “Manage Tags” or “My Tags” directs you to a page titled “Tag List.”

14
o Clicking on the Tag symbol creates a pop-up window listing all the tags you have
created.
To create a Tag:
o Go to the Tag List Page as noted above.
o Type in the name of your tag in the “New Tag Name:” box and click on “Rename
Tag.”
This will make your newly created tag the active tag.
To add People to a Tag
o Create or select the Tag to which you want to add people.
o Find the first person you want to add.
o Click on “Add” under “Tag” which will be to the far right of the person’s name.
This adds the person directly to your active Tag.
You can add a person or persons from an organization or search this
same way.
To add People to a Tag from their Personal Page:
o Click on the Cog symbol on the small Blue Toolbar, and then click on “Add All”
under “Tags.”
o Clicking “Add All” generates a pop-up box to confirm that you wish to add the
person to the active Tag.
Click “OK” to add.
Click “Close” if you do not want to add.

15
Click “Clear Tag First” if you want to empty the active Tag before adding
the person you wish to add.
If you realize that the active Tag is not the correct Tag to which you wish
to add the person, you can type in the name of the correct Tag in the
“TagName” box and hit “Enter” on your keyboard and this will add that
person to the Tag.
To Add Every Person in an Organization to a Tag:
o Open the organization.
o Click on “Tag” in the Blue Toolbar, and then click “Add All.”
To Add Every Person in Search to a Tag:
o Run your search.
o Click on the Cog symbol, and then click “Add All” under “Tags.”
To Remove People from a Tag
o Open the Tag.
o Click “Remove” under “Tag” to the far right of the person’s name.
o Click the “Refresh” button to finish the removal process.
To Remove All Persons from a Tag:
o Click on “Tag” on the blue tool bar, and then click on “Remove All.”
o You can also click on the Tag symbol on the Gray Toolbar and then click on
“Empty Active Tag” in the Tag pop-up box.

16
To Delete a Tag:
o Go to the Tag List page as noted above.
o Select the Tag you want to delete using the dropdown list in the “Change Active
Tag:” box.
o Click the “Delete Tag” button.
This will generate a pop-up box to confirm you wish to delete the Tag.
Click “OK” if you want to delete it.
Click “Cancel” if you do not want to delete it.