Building Up, Breaking Down
16
MAY 00 Publication of this issue of Smithsonian in Your Classroom is made possible through the generous support of the Rocks Build America Foundation of the National Stone Association. BUILDING UP, Breaking Down SUBJECT ■ Science GRADES 3-8 C lassr oo m SMITHSONIAN IN YOUR
Transcript of Building Up, Breaking Down

MAY 00
Publication of this issue of
Smithsonian in Your Classroom is
made possible through the generous
support of the Rocks Build America
Foundation of the National Stone
Association.
BUILDING UP,Breaking
Down
SUBJECT■ Science
GRADES 3-8
ClassroomSMITHSONIAN IN YO
UR
2
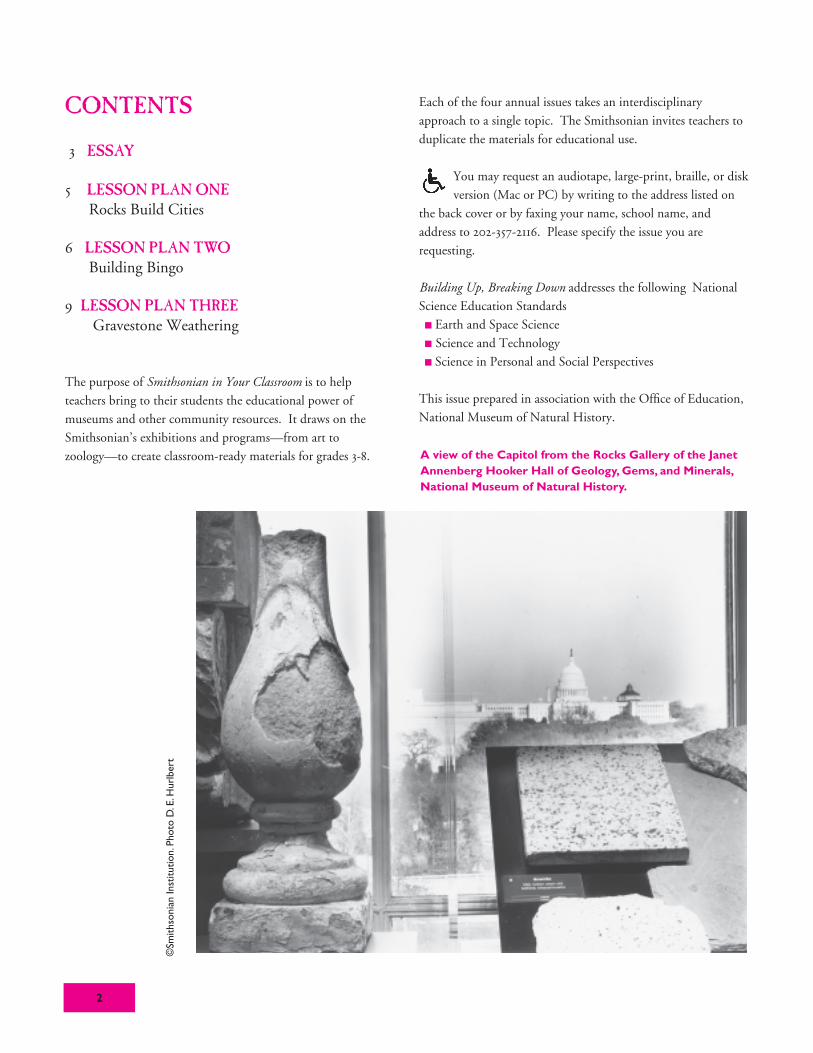
A view of the Capitol from the Rocks Gallery of the JanetAnnenberg Hooker Hall of Geology, Gems, and Minerals,National Museum of Natural History.
©Sm
ithso
nian
Inst
itutio
n.Ph
oto
D.E
.Hur
lber
t
CONTENTS
3 ESSAY
5 LESSON PLAN ONE
Rocks Build Cities
6 LESSON PLAN TWO
Building Bingo
9 LESSON PLAN THREE
Gravestone Weathering
The purpose of Smithsonian in Your Classroom is to help
teachers bring to their students the educational power of
museums and other community resources. It draws on the
Smithsonian’s exhibitions and programs—from art to
zoology—to create classroom-ready materials for grades 3-8.
Each of the four annual issues takes an interdisciplinary
approach to a single topic. The Smithsonian invites teachers to
duplicate the materials for educational use.
You may request an audiotape, large-print, braille, or disk
version (Mac or PC) by writing to the address listed on
the back cover or by faxing your name, school name, and
address to 202-357-2116. Please specify the issue you are
requesting.
Building Up, Breaking Down addresses the following National
Science Education Standards
� Earth and Space Science
� Science and Technology
� Science in Personal and Social Perspectives
This issue prepared in association with the Office of Education,
National Museum of Natural History.

3
THE PHOTOGRAPH ON THE COVER SHOWS THE SMITHSONIANNATIONAL MUSEUM OF NATURAL HISTORY in 1909, the year of itscompletion. The building itself, like all buildings, has a natural history. Its exterioris made up of pink granite mined from Massachusetts and white granite fromVermont. The steps of the front entrance are of unekite granite from a quarry inNew Jersey that’s still in operation.
Most construction materials come directly or indirectly from the earth, andtherefore are subject to natural processes of breakdown. The baluster on theopposite page is a display in the museum’s Rocks Gallery. It is from the oldestsection of the U.S. Capitol, which, like the White House, is built of light tanAquia Creek sandstone from Virginia. Over time, the outer surface of this stoneweathers to a much darker shade of brown. The White House and this part of theCapitol are white only because they are coated with paint, which helps toweatherproof the stone. But, as this picture shows, the coating delays rather thanprevents deterioration.
BUILDING MATERIALS
Aggregate is crushed stone, sand, and gravel
(small, naturally loose pieces of rock).
Asphalt is a mixture of sand and a liquid product
refined from crude oil, combined with
aggregate.
Brick is a baked mixture of sand, clay, and water.
Cement is a fine, gray powder that is made by
firing clay and limestone in a kiln.
Ceramic tiles are made by firing a mixture of
clay, chemicals, and water.
Concrete is a mixture of cement, aggregate,
sand, and water.
Dimension stones, either chunky blocks or thin
slab-like panels, are quarried rock such as
marble, granite, sandstone, and limestone.
Glass is made by melting a mixture of quartz
sand (silica), soda (sodium carbonate), lime
(baked limestone), and chemicals.
Manufactured stone is made of sturdy pieces of
natural or artificial material (or both) glued
or pressed together and cut into pieces of the
desired shape.
Metals like steel, copper, and aluminum are
manufactured from ore minerals.
Mortar is a coarse paste, often made of water,
sand, and either lime or cement.
Plaster is a smooth paste, often made of water,
sand, and either lime or gypsum.

In this issue’s lesson plans,
your students can explore their
school building to learn how
rocks are modified (either by na-
ture or manufacture) into con-
struction materials, and how
these materials deteriorate over
time. The culminating activity is
an off-site visit to a cemetery to
view the effects of weathering on
a variety of monument stones.
We hope they will see that the
natural environment includes
buildings, and that the preserva-
tion of the environment can ap-
ply to cities and towns as well as
wilderness.
WHAT HAPPENS TO
BUILDING MATERIALS
WHEN THEY WEATHER?Buildings begin to break down
the minute they are assembled.
Weathering occurs as decomposition (chemical break-
down) or disintegration (physical breakdown) or both.
One type of weathering can lead to another. For exam-
ple, a physical breakdown such as rock fracture makes
chemical breakdown more likely by exposing addi-
tional surface areas to damaging solutions. Chemical
weathering, in turn, weakens the material, increasing
the likelihood of further fracturing.
Some chemical weathering is a consequence of acids
produced by living things growing on the rock. The
deterioration of structures such as bridges and statues
has increased dramatically in the last few decades, how-
ever, because of chemical changes that produce acid
rain. Pollution from automobiles and industrial plants
adds sulfur dioxide, carbon dioxide, and other gasses to
the natural carbon dioxide in the air.
4
Sand is used in glass, concrete,asphalt, bricks, and the mortarthat holds bricks together. sand here
sand heresand here
sand here
sand here

� LESSON PLAN ONE
ROCKS BUILD CITIES
In this guided-imagery lesson, students make drawings
of urban and rural environments. They use creative
thinking skills together with personal knowledge and
experiences to identify and interpret similarities and
differences in the drawings.
STUDENT PRODUCT
Student-made summary poster that includes:
� a pair of personal drawings taped to poster board
� names of objects common to both rural and ur-
ban environments written on poster board
around mounted drawings
� a written summary statement outlining how peo-
ple modify natural materials
MATERIALS AND RESOURCES
� poster board
� drawing paper
� colored markers
� tape
ACTIVITY
1. Explain to the students that they will be drawing
images and writing responses to the guided-imagery
text you will be reading aloud. Assure them that you
will pause and allow enough time for them to follow
the specific directions as they are presented.
2. After the activity, ask students to share their
paired drawings with the class. Have them mount the
drawings on poster board and collectively identify
which scenes are rural and which are urban. As a class-
room project, compare and contrast several mounted
drawings, writing student comments on the board.
Have each student annotate his or her own poster in a
similar fashion by naming features that appear, in one
form or another, in both of the drawings.
3. After students have written these comments on
their posters, ask them to discuss how they depicted
natural materials adapted for use in the urban environ-
ment. Students should write a summary statement on
their own posters. Statements should be simple and
straightforward. For example, “rocks cemented together
make buildings,” “sand melts to form glass,” and “river
gravel is mixed with cement to form concrete.”
5
The woolly coat on the lamb adorning this infant’s gravemarker is disappearing bit by bit because of chemicalweathering.
Lean
ne W
iber
g

READING GUIDED IMAGERY ALOUD
Encourage students to develop a mental picture
incrementally. They will build up the picture in their
minds as you read aloud. They will then illustrate
their impressions.
Allow plenty of time for them to draw and think.
Don’t rush. Encourage thoughts about the colors,
smells, textures, and sounds inspired by your reading.
Read slowly with lots of pauses. The first time
through, read the text printed in bold. The second
time, read the bracketed text printed in italics.
� � LESSON PLAN TWO
BUILDING BINGO
This “in-school field trip” gives students hands-on ex-
perience in identifying building materials. By playing
Building Bingo, they might see their school building
and school grounds in a new light. The game requires
them to identify the structural materials found on
campus, as well as the substances used to make each
material. To accomplish this task, teams of students lo-
cate interior or exterior building materials on their
school grounds that they’d like to identify. They will
take with them photocopies of page seven. Referring to
the Natural Materials chart, they will complete the
Building Materials Facts label. They will attach a label
to each material they have identified.
The labels state the name of the building material
and describe the source materials from which it is
made. Students use the information from each of their
Building Materials Facts labels to play Building Bingo
by crossing off appropriate boxes on their Bingo cards.
Before the team receives a “bingo,” the teacher or a
student mentor must verify each identification as well
as check the accuracy of the information on the labels.
STUDENT PRODUCT
� at least one completed Bingo Building card
� properly identified (labeled) building materials
(approximately three to five sites)
MATERIALS AND RESOURCES
� Building Material Facts labels
� Building Bingo cards
� Natural Materials charts
ACTIVITY
Review the idea that people adapt natural materials
for use in the built environment. To do this, guide
the students using copies of the Natural Materials
GUIDED IMAGERY
Close your eyes and listen carefully as I read to you. Keep your
eyes closed until I ask you to open them. If you want to say
something, raise your hand. I’ll call on you. Speak to the class,
and to me, with your eyes closed.
Now . . . imagine yourself on a summer’s day outside
[in a large city.][in a large city.] Don’t worry
about how you got there . . . you’re just THERE. Now, try to
see yourself sitting quietly [on some steps at the[on some steps at the
entrance to a tall building in the city.]entrance to a tall building in the city.] What [do[do
the steps]the steps] look like? Open your eyes and draw what you’ve
imagined on your paper. Draw [the steps to the[the steps to the
building.]building.] Close your eyes again when you’ve drawn
[the steps.][the steps.] Your [steps are][steps are] in the shade. It is hot outside.
You’re hungry. . . it is noon. It’s lunchtime; your stomach
growls.
Focus on what is around you. What objects do you see from
[the steps?][the steps?] Open your eyes and draw at least three of
them. Draw the things you see from [the steps.][the steps.] Focus
on what you hear . . . write down the sounds you hear. You can
write things like “leaves rustle in the wind.” You may write
anywhere on your drawing.
Close your eyes again. Now imagine it begins to rain; the rain
comes harder and harder. . . the wind picks up strength. Do you
want to stay on [the steps?][the steps?] Why or why not? Where
do you want to go? Open your eyes. On your paper, draw an
arrow pointing to a nearby location that is not on your paper.
Write a word under the arrow. The word is to. Draw a blank
after the word to. Now, fill in the blank so it says “to the cave,”
or whatever you decide to say.

NATURAL MATERIALS
WATER AGGREGATE SAND CLAY LIME
Ceramic Tile
Glass
Brick
Asphalt
Plaster
Concrete
Mortar
REFINEDCRUDE OIL
(silica sand)
7
BBUILDING MAUILDING MATERIAL FTERIAL FAACTSCTS
This material is
___________________________
Shows weathering Yes No(circle one)
Made with natural materials Yes No
(circle one)
Contains or once contained:(check box)
❑❑ sand ❑❑ refined crude oil
❑❑ clay ❑❑ quarried rock
❑❑ lime ❑❑ ore minerals
❑ ❑ water ❑❑ aggregate
�
�
�
�
�
�
�
�
�
�
�
�
�
�
�
�
�
�
�
� �
�(optional)
(or gypsum)
+ chemicals
+ chemicals

8
asphalt transparent ceramic tilesholds bricks
togethermetal
water+
clay+
chemicals
baked mixtureof water,clay and
sand
dimensionstone
plastermanufacturedstone
melted silica
sand +chemicals
solid rockfrom aquarry
FREE brickconcrete
clay-richsquareplates
containscementpowder
manufacturedstone
containsrefined
crude oil
spreadon
walls
brick
madefromminedore
minerals
mortar concreteglass

chart. Column headings on the chart list earth materi-
als; row headings list building materials.
Review vocabulary, considering the students’ knowl-
edge level and the words that are presently familiar to
them.
TO PLAY BUILDING BINGO:� Students get into pairs or small groups
� One team may play several identical cards at one
time; several students can mark off squares this way
� Scoring is the conventional “all in a row” (vertical,
horizontal, or diagonal)
� Students may mark off more than one square at
each stop
� If games finish too early, require students to mark
only one square at each labeled site or adopt a bingo
pattern that uses additional mark-offs
Allow students to spread out through the building
to avoid the marking of an architectural component al-
ready claimed by another team. You may wish to as-
sign a specific school section to each group to ensure
that all students have a chance to identify building ma-
terials independently. You might award a suitable prize
for each team’s completed Building Bingo game.
9
��� LESSON PLAN THREE
GRAVESTONE WEATHERING
In this lesson, a cemetery field trip allows students to
examine the distinguishing characteristics of rock
weathering. You might supplement the activities by
logging on to GraveNet,
which has classroom activities related to the subject.
While playing Building Bingo, students undoubt-
edly noticed the breakdown and deterioration of mate-
rials on the playground and on the buildings’ exteriors.
The focus of this lesson is on specific mechanisms of
chemical weathering (decomposition) and physical
weathering (disintegration).
The field trip is not required for the lesson, but it
is highly recommended. You may find that it offers
elements of discovery that static lecture plans and
computer and library research cannot provide.
STUDENT PRODUCT
� completed Physical Disintegration Data chart
� completed Chemical Decomposition Data chart
MATERIALS AND RESOURCES
� copies of all graphics and charts
ACTIVITY
Just as an inscription on a grave marker records a per-
son’s placement in history, the physical condition of
the marker bearing that inscription records geological
history. The gravestone’s residence time (time since in-
stallation) and composition, together with local climate
and even its positioning in the cemetery, determine
how well it survives to accomplish the social purpose
for which it was intended.
Cultural anthropologists, folklorists, and genealo-
gists regularly visit cemeteries to gather information.
Nevertheless, visiting a grave site can be upsetting for
some students. A teacher’s common sense, sensitivity,
and gut feelings play a major part in making this trip
successful. Discuss etiquette with both chaperones and
students. Visiting a person’s grave site is no different
from visiting someone’s home.

This close-up view of the base of a marker shows flakingand chipping caused by physical weathering.
10
This sandstone tablet is disappearing because of chemicalweathering.The mineral calcite, which holds the quartzsand grains together, dissolves away. The loosened sandaccumulates at the marker’s base. If acidic precipitationcontinues to damage the stone, only a pile of loose redsand will remain.
Leanne Wiberg Leanne Wiberg

SETTING THE SCENEDiscuss the significance of monuments and stat-
ues. Ask the students why we have graves and grave
markers. Review the building materials they lo-
cated during the Building Bingo game in Lesson
Two. Ask them to predict which of these materials
they’d expect to see in a cemetery, and have them
support their suggestions.
Explain that a new vocabulary will be intro-
duced to help them understand how materials—in
this case, rocks used for grave markers—change
over time. Guide the students in examining the il-
lustrations that outline the processes involved in
weathering. Simple words like flaking and chip-
ping generally indicate simple concepts, but words
like oxidation and hydrolysis will need reviewing.
SELECTING THE SITE
Keep in mind that the trip should provide ample
opportunity to view a variety of stone markers of
different materials and different ages. Abandoned
and unkempt cemeteries should be avoided. Visits
to newly established memorial parks and cemeter-
ies, or to military and county cemeteries with uni-
form markers, cannot provide the information
needed. Obtain permission before you visit the se-
lected site.
Chemical weathering of this white marble markerincreases the readability of its inscription. Lichens—smallplants made up of two life forms—thrive in the shadedrecesses where lettering and decorations have beeninscribed.The gray lichens, and the organic acids theyproduce, darken and discolor the marble.
WHAT IF . . .
11
Leanne Wiberg

STUDENT READINGS AND RESEARCH
(TWO CLASS DAYS)The class should examine references and background
information on stone weathering and acid rain by us-
ing the library or the Internet or both. The research
can be split between out-of-class assignments and
in-class group work spanning two class periods. It
might help to assign specific topics or research tools to
individual students. Each reading might provide data
on one aspect of the trip.
For out-of-class work, students should prepare to
present and discuss their findings in class during the
second research-and-reading session. They might also
assess the exterior of their home, school, or place of
worship for evidence of local weathering models or
patterns.
12
FAMILY NAME
DATES
Dissolution
Oxidation
Hydrolysis
BiologicalEffects
TEATEACHER TIPCHER TIP
Bring samples of freshly exposed unweathered rock
to the cemetery for comparison. A good place to
find this rock, of course, is a quarry. The National
Stone Association can help arrange a class visit to a
quarry by putting teachers in contact with regional
operators. Call 1-800-342-1415 or visit the Web site
at
CHEMICAL DECOMPOSITION DATA

CEMETERY VISIT
(2-3 HOURS, INCLUDING TRAVEL)Using the Vintage Gravestones information on page
fourteen, guide students in recognizing stones that be-
long to the same time period by their distinctive shapes
and rock types. Referring to the photographic images
on Gravenet will be helpful here.
Using vintage shape as a criterion, find an old stone
in a central part of the cemetery that shows pro-
nounced chemical weathering. Marble, you will find,
will show it best. Locate on the stone the chemical de-
composition processes illustrated on the previous page.
“Adopt” this stone as the class’s chemical weathering
model. Students with questions about identifying signs
of decomposition can compare this stone to others
they study in the cemetery.
In a similar fashion, adopt a nearby older stone as a
model for the physical disintegration illustrated on this
page. You might need to select both stones ahead of
time. Explain to the students that they will go off on
their own and use what they know about stone shapes
to locate from afar a group of especially old stones. Ask
13
FFAMILAMILY NAMEY NAME
DDAATESTES
Fracturing/Fracturing/CrackingCracking
PartingParting
SheetingSheeting
Chipping/Chipping/FlakingFlaking
PHYSICAL DISINTEGRATION DATA

them to approach these stones and look closely for
signs of weathering. They should write headstone in-
formation on the Chemical Decomposition Data chart
or the Physical Distintegration Data chart, and record
the weathering processes in operation by checking ap-
propriate boxes. Every effort should be made to docu-
ment each type of weathering seen in the gravestone il-
lustrations on pages twelve and thirteen. This may
require visiting many markers.
POST-TRIP ANALYSIS
Discuss with students the fact that they have used in-
dependent study, cooperative learning, and creative
presentation to understand that weathering is a natural
process.
Design activities that individual students or
groups can do on their own to follow up on the study.
Perhaps they can conduct interviews with family mem-
bers, religious leaders, or other respected adults to ex-
amine the role of preservation and citizenship in main-
taining historic graveyards. They might also interview
the manager of a cemetery to learn how gravestones are
renovated and maintained.
Suggest specific topics for further study and enrich-
ment, such as the geographical patterns of acid precipi-
tation, or the exact role of water or biological processes
in weathering.
Submit class results to GraveNet if Internet access is
available.
14
OBELISK
� came into use over 100 years ago� usually marble� many positioned on fairly-thick base� lettering may be on all sides� carving may be elaborate (urn or
ball can top the obelisk)
SLENDER TABLET
� came into use over two hundred years ago� limestone, marble, slate, sandstone� some have no base; set directly in ground� primitive carving on oldest stones
SLAB OR BLOCK
� came into use about 50 years ago� minimum thickness is 6”-8”� most are granite; some are marble� front face is polished� hardness of granite limits detailed carving
VINTAGE GRAVESTONES

RESOURCES
BOOK
Cvancara, Alan M. A Field Manual for the Amateur Geologist:
Tools and Activities for Exploring Our Planet. Wiley and Sons,
1995.
CURRICULUM PACKETVermont Old Cemetery Association. Stones & Bones: Using
Tombstones as Textbooks. An order form is on the Web at
ELECTRONIC RESOURCES
Again, the GraveNet project is at
The Newton’s Apple teacher’s guide has material on acid rain at
Try additional Internet searches using the key words gravestone
and weathering. Some kid-friendly search engines are
and
ACKNOWLEDGEMENTS
Laura McKie
Director of Education
National Museum of Natural History
Dr. James Luhr
Chairman, Department of Mineral
Sciences
National Museum of Natural History
ALSO
Pearl Bailis
Capitol Hill Day School
Washington, D.C.
Harold Banks
National Museum of Natural History
Ella Wilcox
Neil Armstrong Elementary School
Reston, Virginia
Writer
Leanne Wiberg
Editor
Stephen Binns
Publications Director
Michelle Smith
Designer
Kathleen Sims
Illustrator
Ann Feild
15
In Loving Memory of
Dr. James O’Connor
City Geologist of Washington, D.C.
Subscribe to Smithsonian in Your Classroom
N A M E
S C H O O L / O R G A N I Z AT I O N
A D D R E S S
C I T Y, S TAT E , Z I P
M AY W E H AV E YO U R S C H O O L T E L E P H O N E N U M B E R ?
Prefer home delivery? Fill out below:
A D D R E S S
C I T Y, S TAT E , Z I P
M AY W E H AV E YO U R H O M E T E L E P H O N E N U M B E R ?
For a free subscription to Smithsonian in Your Classroom, make a copy of this
form and send it to: Smithsonian Center for Education and Museum
Studies/Smithsonian in Your Classroom, Arts and Industries Building 1163,
Washington, D.C. 20560-0402. Please print clearly.
Please check one box under each category:
J O B T I T L E G R A D E L E V E L
❑ Teacher (T) ❑ Elementary (E)
❑ School Administrator (A) ❑ Middle / Junior High (M)
❑ Library / Media Specialist (L) ❑ Senior High (S)
❑ Home School Educator (H) ❑ –12 (K)
❑ Museum Educator (M) ❑ College (C)
❑ Community Educator (C) ❑ Other
❑ Other
MAY WE HAVE YOUR E-MAIL ADDRESS?
Smithsonian Center for Education and Museum Studies
Washington DC 20560-0402
Official BusinessPenalty for Private Use $300
Bulk Rate
Postage and Fees Paid
Smithsonian Institution
G-94
Visit us on the Web http: / /educate.s i .edu