Building an Access Grid Station
19
Building an Access Grid Station
Transcript of Building an Access Grid Station

Building an Access Grid Station
Building an Access Grid Station
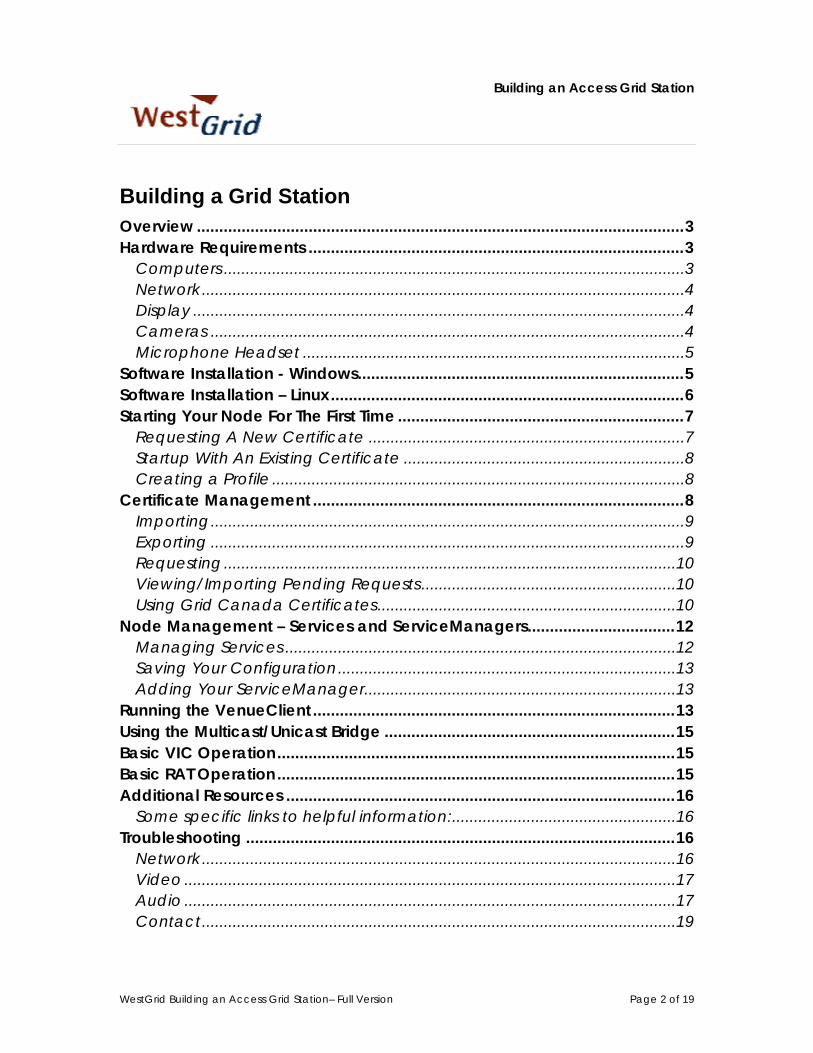
Building a Grid StationOverview .............................................................................................................3 Hardware Requirements ....................................................................................3
Computers .........................................................................................................3 Network ..............................................................................................................4 Display ................................................................................................................4 Cameras ............................................................................................................4 Microphone Headset .......................................................................................5
Software Installation - Windows.........................................................................5 Software Installation – Linux...............................................................................6 Starting Your Node For The First Time ................................................................7
Requesting A New Certificate ........................................................................7 Startup With An Existing Certificate ................................................................8 Creating a Profile ..............................................................................................8
Certificate Management ...................................................................................8 Importing............................................................................................................9 Exporting ............................................................................................................9 Requesting.......................................................................................................10 Viewing/Importing Pending Requests..........................................................10 Using Grid Canada Certificates....................................................................10
Node Management – Services and ServiceManagers.................................12 Managing Services .........................................................................................12 Saving Your Configuration.............................................................................13 Adding Your ServiceManager.......................................................................13
Running the VenueClient .................................................................................13 Using the Multicast/Unicast Bridge .................................................................15 Basic VIC Operation.........................................................................................15 Basic RAT Operation.........................................................................................15 Additional Resources .......................................................................................16
Some specific links to helpful information:...................................................16 Troubleshooting ................................................................................................16
Network ............................................................................................................16 Video ................................................................................................................17 Audio ................................................................................................................17 Contact............................................................................................................19
WestGrid Building an Access Grid Station– Full Version Page 2 of 19

Building an Access Grid Station
Overview The Access Grid (AG) is a collaboration technology which offers a unique and high-quality experience for users and participants of collaborations. It is described on the Access Grid website (www.accessgrid.org) as “an ensemble of resources including multimedia large-format displays, presentation and interactive environments, and interfaces to Grid middleware and to visualization environments.” AG technology is now used at over 150 institutions around the world for activities such as very large distributed meeting, lectures, seminars, and other interactive collaborative tasks. Typically, an AG ‘node’ consists of anywhere from two to four computers, a high-end echo cancellation unit, multiple large displays, and multiple camera and microphone inputs – all housed within a large conference style room. An 'Access Grid Station’ (more commonly referred to as a 'Personal Interface to the Access Grid' or PIG node), by contrast, is a single computer with the ability to access and make use of the AG and its related services. This document will guide you through the download, install and basic troubleshooting of setting up a personal AG node using the 2.1.2 version of the Access Grid software.
Hardware Requirements Due to the nature of collaboration using AG (multiple video feeds from many sites), it is important to have a fairly powerful computer with a good network connection to fully utilize the AG. This document is primarily targeted at those users wishing to determine if their current computer is adequate for participating in AG meetings. Thus it is not a hardware specification but a recommendation of system capabilities that are required. We provide suggestions below that will guide new users of the AG in determining if their current technology is adequate and if not what hardware upgrades they might require to make practical use of the AG. For those AG users that are building a new system a baseline hardware specification is provided in the 'Access Grid Station Hardware Recommendations' documents.
Computers In general, any modern (P3 or greater, preferably P4) computer system should be adequate for an Access Grid Station. Due to the amount of video encoding/decoding that takes place during collaboration, the amount of memory should be maximized. We recommend at least 512 MB of memory, although for smaller meetings with a relatively small number of video feeds less memory may be adequate. Although not necessary, it is useful to invest in slightly higher quality video and audio cards than generic or ‘on-board’ devices. By using the widely used nVidia, ATI or Matrox video cards and standard SoundBlaster audio cards, hardware related issues can usually be avoided.
WestGrid Building an Access Grid Station– Full Version Page 3 of 19
Building an Access Grid Station
Reference the 'Access Grid Station Hardware Recommendations' document for further information.
Network Due to the amount of data (video, audio, application data) that is distributed during a typical AG collaboration, the quality of the network connection is very important. Both bandwidth and latency are important factors. Users communicating via AG over the University research network (the WestGrid network, the regional research networks, and the national research network) should not have any issues with performance. If communicating over the generic Internet, quality and performance of the audio and video will vary depending on the quality of network connection. Small meetings (two or three sites with a small number of video feeds) can be effectively held with users using high-speed home networks (ADSL, cable) if the home network connection is not loaded with other traffic. Quality and performance can vary drastically in these instances. In addition to raw performance of the network connectivity, the AG technology uses IP Multicast to facilitate the multi-site nature of collaboration. Multicast provides network efficiency by allowing the network infrastructure to optimize the traffic for many sites without requiring complex Multipoint Control Units (MCUs). Depending on your location and service provider, multicast may or may not be enabled. While some universities and research facilities offer full multicast enabled network access, most typical commercial Internet Service Providers (ISP’s) do NOT support multicast traffic. The WestGrid and Canarie backbone networks are multicast enabled, but many University routers are not. Check with your network administrator to confirm whether your network is multicast enabled. If multicast is not available on your local network, WestGrid is supplying multicast to unicast bridging capabilities for WestGrid users. For operation using a multicast bridge see the “Using The Multicast/Unicast Bridge” section below.
Display As noted, collaborations typically involve many sites – each with multiple video feeds. In addition, shared applications or visualizations are often the topic of the collaboration. This can raise ‘screen real-estate’ problems if you are using a small display. By investing in a large display – or a multi-headed display adapter with multiple monitors, this problem can be minimized. See the 'Access Grid Station Hardware Recommendations' document for further information.
Cameras For a typical Access Grid Station setup, any usb will be sufficient. Again, as above, the more you invest, the higher the quality output. This is especially true of webcam. If you would like to have higher quality video capture, you can invest in a 'video capture card' (such as a Hauppauge) and use any DV camera as input.
WestGrid Building an Access Grid Station– Full Version Page 4 of 19

Building an Access Grid Station
Microphone Headset
It is strongly recommended that a good quality headphone/microphone headset be purchased to maximize the quality of the collaboration. If a standard microphone and desktop speakers are used, the audio from the speakers will be picked up by the microphone and be sent back to the other sites as echo. You will not be able to hear this echo; however, it is very distracting for the other sites and can destroy the quality of the collaboration. For single person Grid Stations, it is recommended that each user use a headset and microphone rather than desktop speakers. Also, it is useful to have both a volume control and a mute button on the headset or the audio cable.
Software Installation - Windows Installation of the Access Grid software on Windows is fairly simple. However there is some prerequisite software that is required to make the AG software operate. These prerequisites are Python 2.2 and wxPythonWIN32. Here are the steps to installing AG2.x on Windows. 1. Download and install Python 2.2 from the ActiveState Python site.
Note: The Access Grid installer specifically requires Python 2.2! It won't accept Python 2.3!! Python 2.2 can be found on the ActiveState Python Download page located at http://www.activestate.com/ or can be downloaded directly by clicking here.
2. Download and install wxPython. WxPython can be found by navigating to http://prdownloads.sourceforge.net/wxpython – odirectly by clicking
r can be downloaded here.
During the installation, you should choose to install all of the components for wxPython. Further, on the final window, choose to 'Compile Python .py files to .pyc' and to 'Create batch files for tool scripts' as shown.
3. (If Required) Download and run aguninstall.py If you are installing the software over an existing AG v2.x installation, it is recommended that you first run the aguninstall.py script available at http://www-unix.mcs.anl.gov/fl/research/accessgrid/software/releases/2.1.2/windows/aguninstall.py to avoid losing your settings and certificates! Further, it is recommended that you back up any existing certificates you may have.
WestGrid Building an Access Grid Station– Full Version Page 5 of 19

Building an Access Grid Station
4. Download and Install AG2.1.2 Access Grid v2.1.2 can be downloaded from http://www-unix.mcs.anl.gov/fl/research/accessgrid/software/releases/2.1.2/windows.html - or you can download it directly by clicking here.
5. Although it may not be required – we have found that rebooting your computer may prevent some issues after installation. Once the software is installed – please see the section called 'Starting Your Node For The First Time' below.
Software Installation – Linux The AG software was initially built for use only with RedHat Linux. The installation binaries available on the site are 'rpm's' made specifically for RedHat 7.3; however, these binaries will work with RH v8.0 seamlessly. For use with RH 9.0, one additional prerequisite is required to make the installation work properly – see step 2 below. For other Linux distributions, click here to see the CVS installation instructions – or go to http://www-unix.mcs.anl.gov/fl/research/accessgrid/software/cvs/index.html Installation Procedure: 1. Download and install wxPythonGTK from prdownloads.sourceforge.net .
2. RH9.0 ONLY
For the AG installation to be successful, pyOpenSSL must be patched. Here is a solution that was posted to the AG-Tech mailing list:
cd /tmp wget
ftp://ftp.rpmfind.net/linux/rawhide/1.0/SRPMS/SRPMS/pyOpe
nSSL-0.5.1-7.src.rpm
wget http://www-
unix.mcs.anl.gov/fl/research/accessgrid/software/required
/SRPMS/pyOpenSSL_AG-0.5.1-1.src.rpm
rpm -ivh pyOpenSSL-0.5.1-7.src.rpm
rpm -ivh pyOpenSSL_AG-0.5.1-1.src.rpm
cd /usr/src/redhat/SOURCES
tar zxvf pyOpenSSL_AG-0.5.1.tar.gz
cd pyOpenSSL_AG-0.5.1
patch -p1 < ../pyOpenSSL-0.5.1-openssl097.patch
rpmbuild -ba pyOpenSSL.spec
(wait...wait...)
rpm -ivh /usr/src/redhat/RPMS/i386/pyOpenSSL_AG-0.5.1-
1.i386.rpm
WestGrid Building an Access Grid Station– Full Version Page 6 of 19

Building an Access Grid Station
3. Download the AG Toolkit Bundle from http://www-unix.mcs.anl.gov/fl/research/accessgrid/software/releases/2.1.2/redhat.html or by clicking here.
4. Install the downloaded tarball by running the install.sh script as follows: tar -xzvf AccessGrid-2.1.2-13.tar.gz cd AccessGrid-2.1.2-13 ./install.sh
This will start the install script that will automatically install all of the Access Grid rpm's. During the install script – follow the instructions as required. If there were no errors – see the 'Starting Your Node For The First Time' section below. If there were errors during the installation – visit the Troubleshooting section at the end of this document.
Starting Your Node For The First Time The Access Grid software requires a valid user certificate to operate and to allow connections to external VenueServers. The first time you launch the VenueClient, the software will ask that you request a new certificate. For more information on Certificates and their use, see the ‘Certificate Management’ section below. If you already have a valid certificate from Globus or Argonne, skip to the 'Startup With An Existing Certificate' section below. To start the VenueClient: 1. Click on the VenueClient shortcut created during installation
OR 2. From the command line – run: “VenueClient.py --personalNode”
Requesting A New Certificate If you don't yet have a certificate, you will have to rone.
equest
1. Click 'Next' to continue with the Certificate Request process,
2. Fill out the appropriate information and press Next 3. Press Finish to complete the request.
A Certificate Request will automatically be sent to Argonne National Labs to be approved. You will have to wait until ANL responds to your certificate request before connecting to any other sites or configuring your VenueClient. See the Certificate Management section below for information on viewing pending requests and importing certificates
WestGrid Building an Access Grid Station– Full Version Page 7 of 19
Building an Access Grid Station
Startup With An Existing Certificate If you already have an existing certificate from Argonne or Globus, you can click 'cancel' to start up the VenueClient without a certificate. You will be able to import your certificates once the VenueClient has started. See the Certificate Management section for information on importing your certificates.
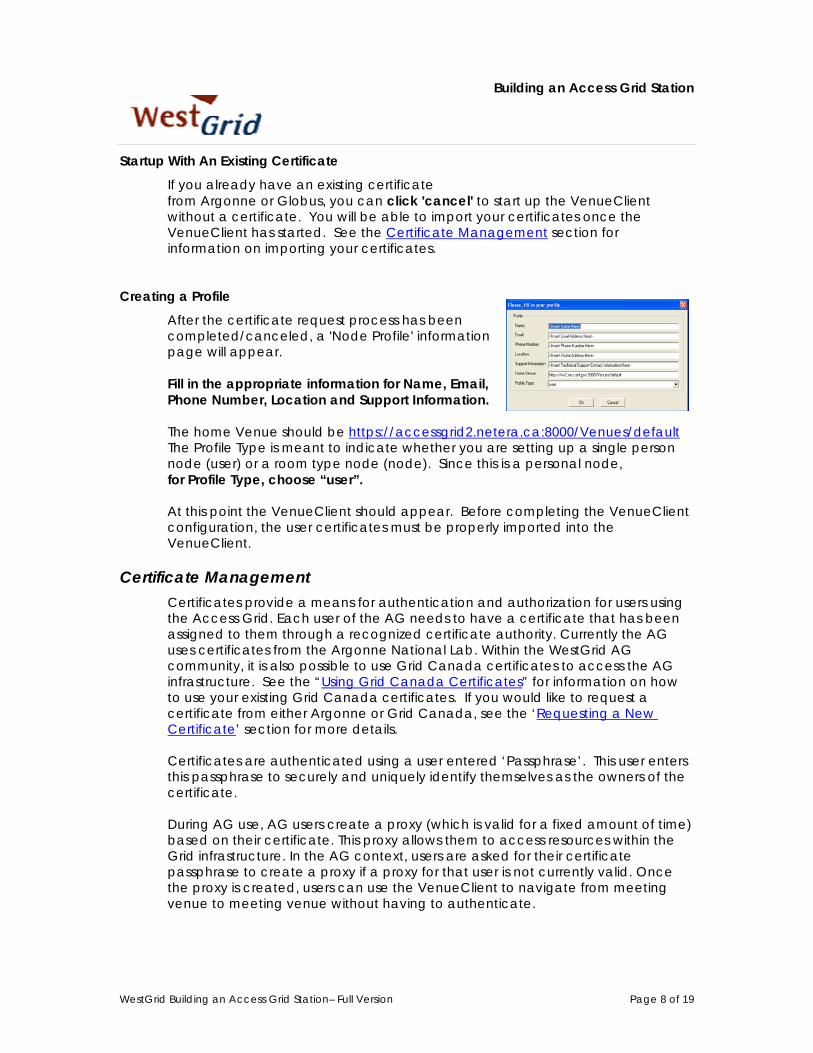
Creating a Profile After the certificate request process has been completed/canceled, a 'Node Profile' information page will appear. Fill in the appropriate information for Name, Email, Phone Number, Location and Support Information. The home Venue should be https://accessgrid2.netera.ca:8000/Venues/default The Profile Type is meant to indicate whether you are setting up a single person node (user) or a room type node (node). Since this is a personal node, for Profile Type, choose “user”. At this point the VenueClient should appear. Before completing the VenueClient configuration, the user certificates must be properly imported into the VenueClient.
Certificate Management Certificates provide a means for authentication and authorization for users using the Access Grid. Each user of the AG needs to have a certificate that has been assigned to them through a recognized certificate authority. Currently the AG uses certificates from the Argonne National Lab. Within the WestGrid AG community, it is also possible to use Grid Canada certificates to access the AG infrastructure. See the “Using Grid Canada Certificates” for information on how to use your existing Grid Canada certificates. If you would like to request a certificate from either Argonne or Grid Canada, see the ‘Requesting a New Certificate’ section for more details. Certificates are authenticated using a user entered ‘Passphrase’. This user enters this passphrase to securely and uniquely identify themselves as the owners of the certificate. During AG use, AG users create a proxy (which is valid for a fixed amount of time) based on their certificate. This proxy allows them to access resources within the Grid infrastructure. In the AG context, users are asked for their certificate passphrase to create a proxy if a proxy for that user is not currently valid. Once the proxy is created, users can use the VenueClient to navigate from meeting venue to meeting venue without having to authenticate.
WestGrid Building an Access Grid Station– Full Version Page 8 of 19
Building an Access Grid Station
1. To manage certificates for the VenueClient: Click on Preferences -> Manage Certificates.
2. Choose your Certificate Management activity. Some of the activities include - Importing or Viewing your Identity Certificates, Importing or Viewing your Trusted CA Certificates, Importing the Default Globus Certificates, Requesting a Certificate or Viewing Pending Requests.
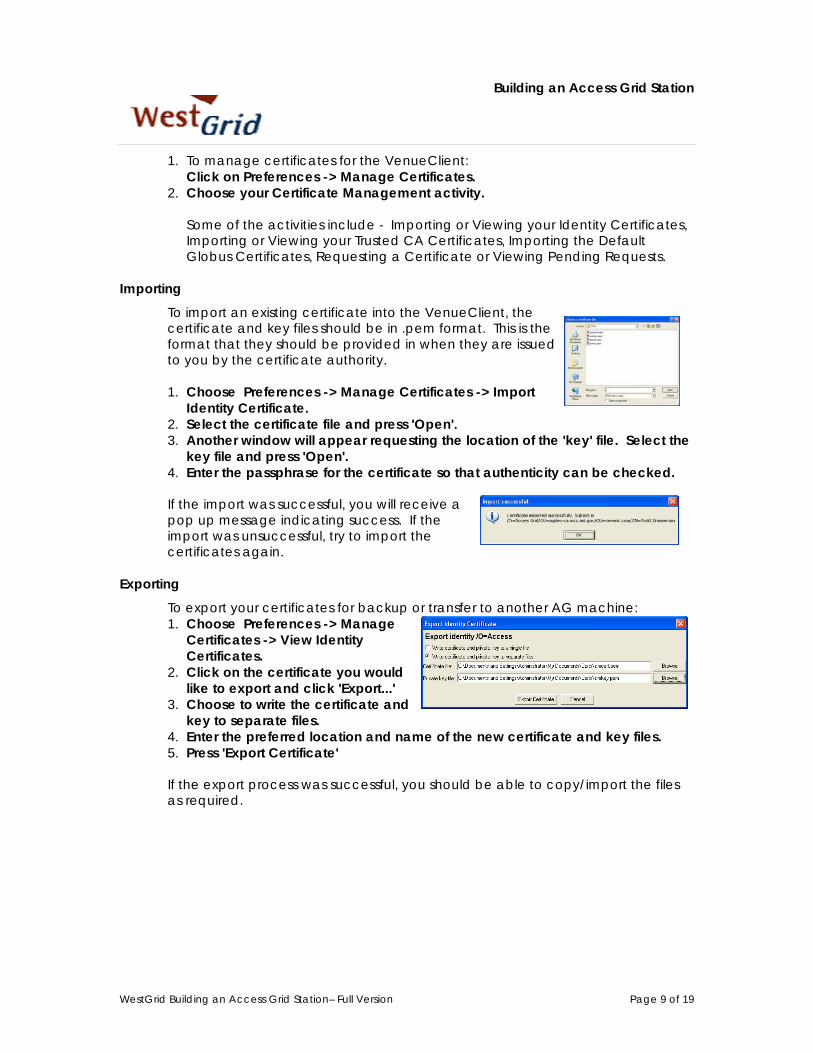
Importing To import an existing certificate into the VenueClient, the certificate and key files should be in .pem format. This is the format that they should be provided in when they are issued to you by the certificate authority. 1. Choose Preferences -> Manage Certificates -> Import
Identity Certificate. 2. Select the certificate file and press 'Open'. 3. Another window will appear requesting the location of the 'key' file. Select the
key file and press 'Open'. 4. Enter the passphrase for the certificate so that authenticity can be checked. If the import was successful, you will receive a pop up message indicating success. If the import was unsuccessful, try to import the certificates again.
Exporting To export your certificates for backup o1. Choose Preferences -> Manage
r transfer to another AG machine:
2. you would
3. d
Certificates -> View Identity Certificates. Click on the certificatelike to export and click 'Export...' Choose to write the certificate ankey to separate files.
4. Enter the preferred location and name of the new certificate and key files. 5. Press 'Export Certificate' If the export process was successful, you should be able to copy/import the files as required.
WestGrid Building an Access Grid Station– Full Version Page 9 of 19
Building an Access Grid Station
Requesting To request a new certificate from Argonne National Labs: 1. Choose Preferences -> Manage Certificates -> Request a Certificates 2. Click 'Next' to continue with the Certificate Request process 3. Fill in the appropriate information and click Next 4. Click Finish to send the Certificate Request to Argonne National Labs You will have to wait until ANL responds to your certificate – see Viewing/Importing Pending Requests below.
Viewing/Importing Pending Requests You can monitor whether your certificate has been approved and sent by: 1. Clicking on Preferences -> Manage Certificates -> View Pending Requests 2. Locate you request and check the 'Status' field. 3. If your certificate is ready, you can then select the certificate – and choose
“Import” to integrate your certificate into the VenueClient.
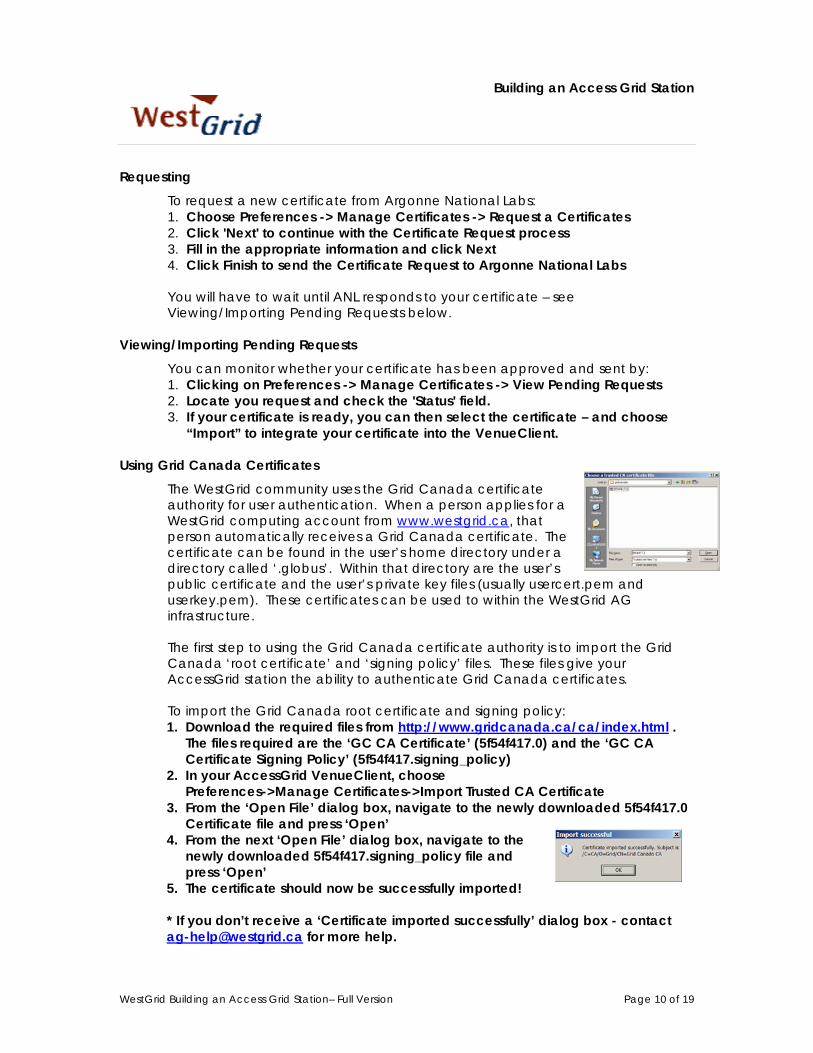
Using Grid Canada Certificates The WestGrid community uses the Grid Canada certificate authority for user authentication. When a person applies for a WestGrid computing account from www.westgrid.ca, that person automatically receives a Grid Canada certificate. The certificate can be found in the user’s home directory under a directory called ‘.globus’. Within that directory are the user’s public certificate and the user’s private key files (usually usercert.pem and userkey.pem). These certificates can be used to within the WestGrid AG infrastructure. The first step to using the Grid Canada certificate authority is to import the Grid Canada ‘root certificate’ and ‘signing policy’ files. These files give your AccessGrid station the ability to authenticate Grid Canada certificates. To import the Grid Canada root certificate and signing policy: 1. Download the required files from http://www.gridcanada.ca/ca/index.html .
The files required are the ‘GC CA Certificate’ (5f54f417.0) and the ‘GC CA Certificate Signing Policy’ (5f54f417.signing_policy)
2. In your AccessGrid VenueClient, choose Preferences->Manage Certificates->Import Trusted CA Certificate
3. From the ‘Open File’ dialog box, navigate to the newly downloaded 5f54f417.0 Certificate file and press ‘Open’
4. From the next ‘Open File’ dialog box, navigate to the newly downloaded 5f54f417.signing_policy file and press ‘Open’
5. The certificate should now be successfully imported!
* If you don’t receive a ‘Certificate imported successfully’ dialog box - contact [email protected] for more help.
WestGrid Building an Access Grid Station– Full Version Page 10 of 19
Building an Access Grid Station
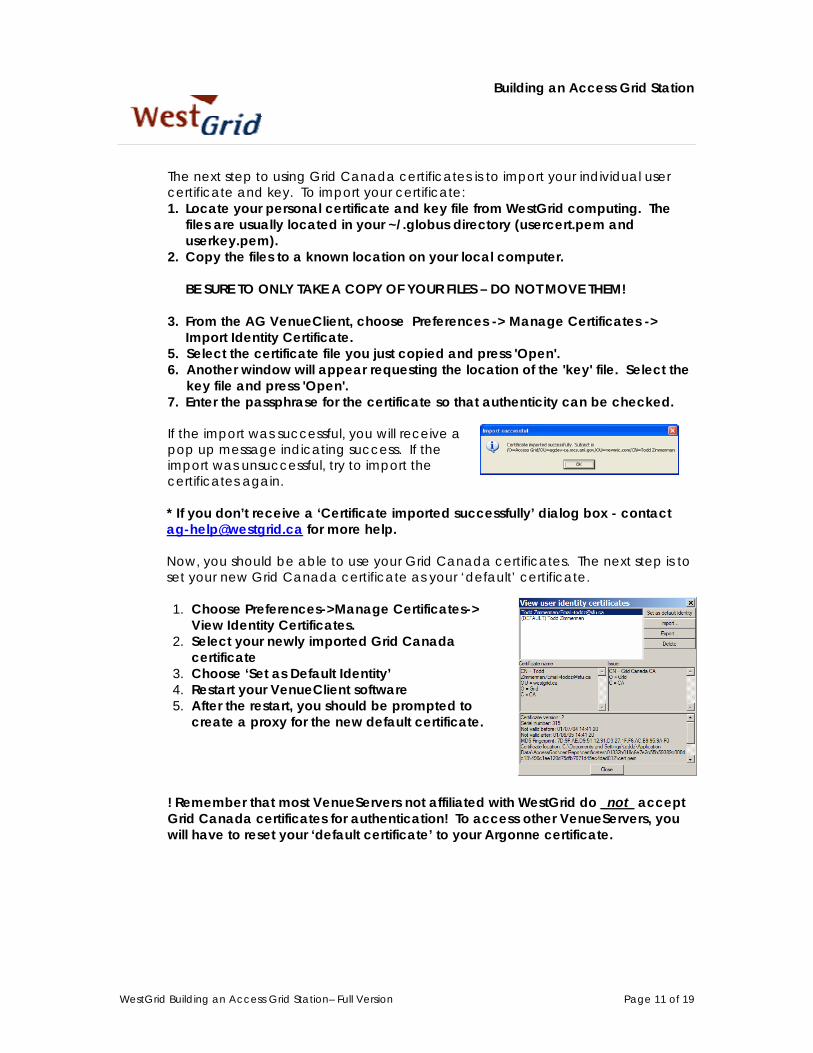
The next step to using Grid Canada certificates is to import your individual user certificate and key. To import your certificate: 1. Locate your personal certificate and key file from WestGrid computing. The
files are usually located in your ~/.globus directory (usercert.pem and userkey.pem).
2. Copy the files to a known location on your local computer. BE SURE TO ONLY TAKE A COPY OF YOUR FILES – DO NOT MOVE THEM!
3. From the AG VenueClient, choose Preferences -> Manage Certificates -> Import Identity Certificate.
5. Select the certificate file you just copied and press 'Open'. 6. Another window will appear requesting the location of the 'key' file. Select the
key file and press 'Open'. 7. Enter the passphrase for the certificate so that authenticity can be checked. If the import was successful, you will receive a pop up message indicating success. If the import was unsuccessful, try to import the certificates again. * If you don’t receive a ‘Certificate imported successfully’ dialog box - contact [email protected] for more help. Now, you should be able to use your Grid Canada certificates. The next step is to set your new Grid Canada certificate as your ‘default’ certificate. 1. Choose Preferences->Manage Certificates->
View Identity Certificates. 2. Select your newly imported Grid Canada
certificate 3. Choose ‘Set as Default Identity’ 4. Restart your VenueClient software 5. After the restart, you should be prompted to
create a proxy for the new default certificate. ! Remember that most VenueServers not affiliated with WestGrid do _not_ accept Grid Canada certificates for authentication! To access other VenueServers, you will have to reset your ‘default certificate’ to your Argonne certificate.
WestGrid Building an Access Grid Station– Full Version Page 11 of 19

Building an Access Grid Station
Node Management – Services and ServiceManagers VenueClients use ServiceManagers to provide services when connecting to venues. In fact, a single VenueClient can control multiple computers – each running a ServiceManager to create a room based node. This functionality, however, is beyond the scope of this document – you can find more information on building a room node on the WestGrid website - http://www.westgrid.ca/usersAccess/users_access.html For an Access Grid Station, the VenueClient only connects with its own ServiceManager – usually named 'localhost'. While the ServiceManager is actually a completely different process from the VenueClient, the ServiceManager is started automatically when the VenueClient is launched from the desktop shortcut that was created during installation, or when it is launched from the command line with the '--personalNode ' option added.
Managing Services Services provide a specific aspect of collaboration – such as audio conferencing, video display, or video capture. These services are called the AudioConsumer, VideoConsumer and VideoProducer respectively. Services are managed by ServiceManagers. As mentioned above, for a personal node the only ServiceManager that will be connected is already running on the node itself – called localhost. To manage the services running on your node: 1. Click on Preferences -> Manage My Node 2. The 'localhost:12000' ServiceManager should be
listed in the left hand window. If it is not, see the 'Adding Your ServiceManager' section. Select t'localhost:12000' ServiceManager by clickit.
hing on
e
3. All of the associated services that are managed by that ServiceManager should appear in the right hand window.
4. To change the settings of a particular service – or to delete a service, right click that service and select the appropriate function.
To add video capture capability, you must add a 'VideoProducer' service. To add a VideoProducer service: 1. Select Service -> Add from the menubar 2. Select VideoProducerService from the list and press OK 3. You can properly configure your new service by right
clicking the 'VideoProducer' service from the main Node Management window.
WestGrid Building an Access Grid Station– Full Version Page 12 of 19
Building an Access Grid Station
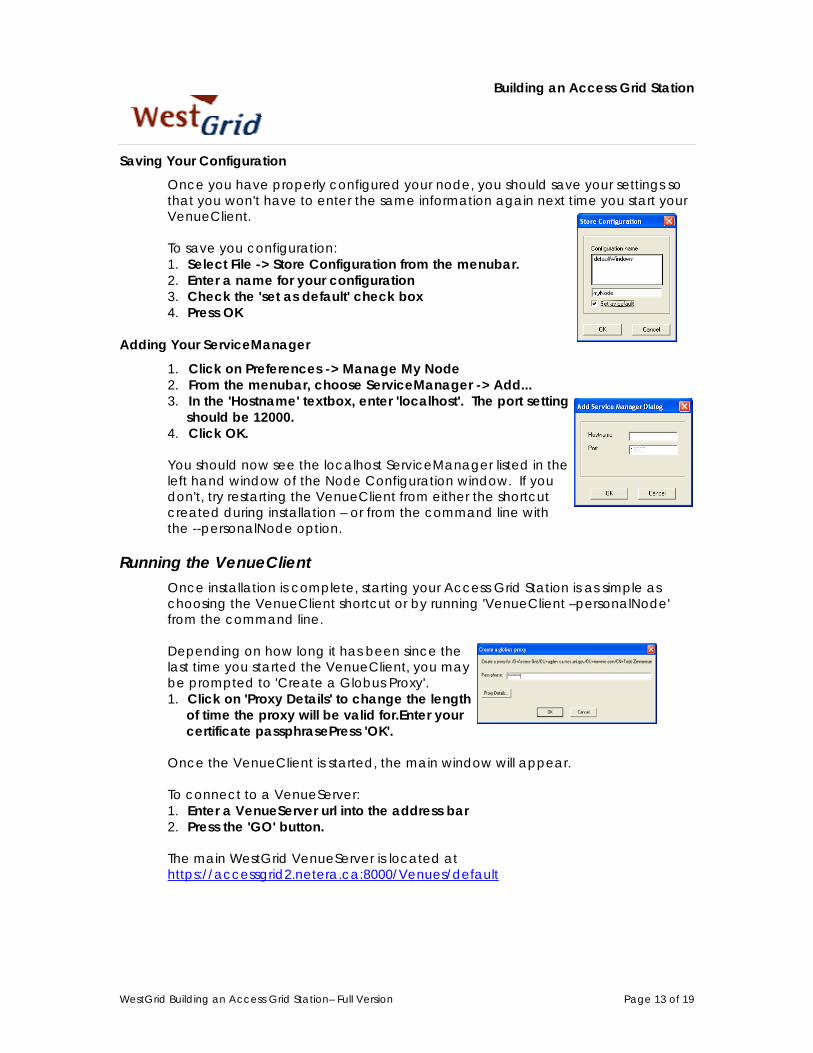
Saving Your Configuration Once you have properly configured your node, you should save your settings so that you won't have to enter the same information again next time you start your VenueClient. To save you configuration: 1. Select File -> Store Configuration from the menubar. 2. Enter a name for your configuration 3. Check the 'set as default' check box 4. Press OK
Adding Your ServiceManager
1. Click on Preferences -> Manage My Node 2. From the menubar, choose ServiceManager -> Add... 3. In the 'Hostname' textbox, enter 'localhost'. The port setting
should be 12000. 4. Click OK. You should now see the localhost ServiceManager listed in the left hand window of the Node Configuration window. If you don't, try restarting the VenueClient from either the shortcut created during installation – or from the command line with the --personalNode option.
Running the VenueClient Once installation is complete, starting your Access Grid Station is as simple as choosing the VenueClient shortcut or by running 'VenueClient –personalNode' from the command line. Depending on how long it has been since the last time you started the VenueClient, you may be prompted to 'Create a Globus Proxy'. 1. Click on 'Proxy Details' to change the length
of time the proxy will be valid for.Enter your certificate passphrasePress 'OK'.
Once the VenueClient is started, the main window will appear. To connect to a VenueServer: 1. Enter a VenueServer url into the address bar 2. Press the 'GO' button. The main WestGrid VenueServer is located at https://accessgrid2.netera.ca:8000/Venues/default
WestGrid Building an Access Grid Station– Full Version Page 13 of 19
Building an Access Grid Station
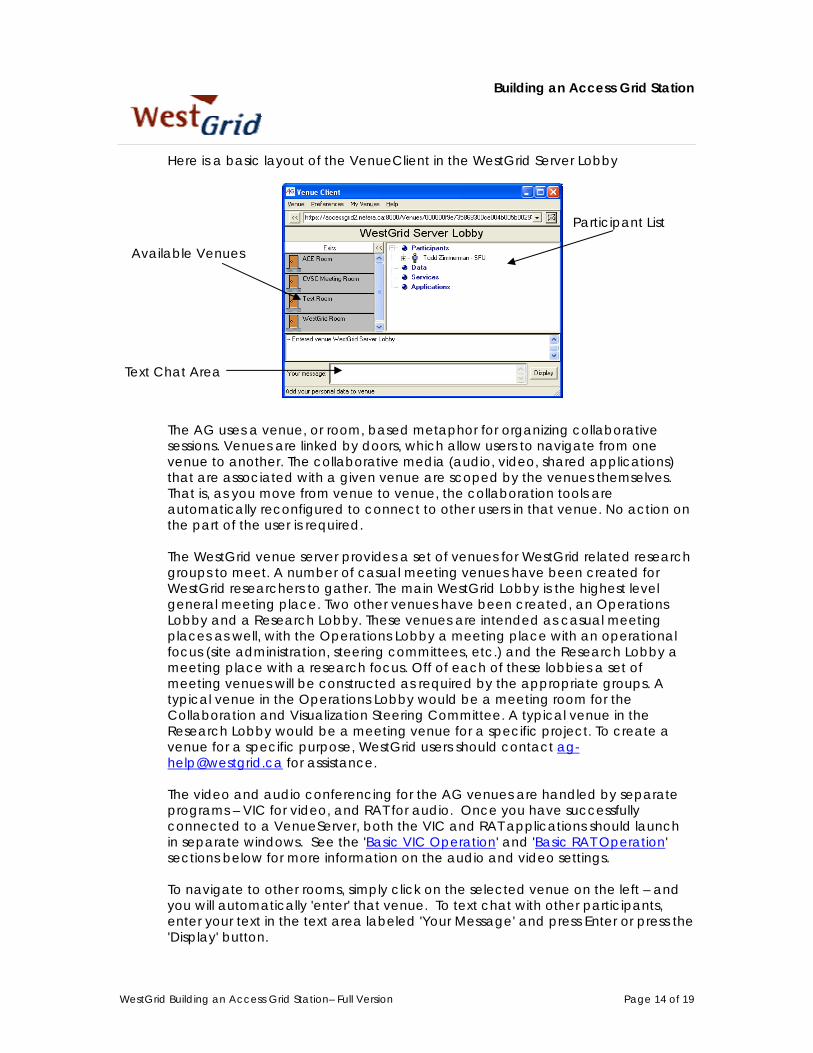
Here is a basic layout of the VenueClient in the WestGrid Server Lobby
Text Chat Area
Participant List
Available Venues
The AG uses a venue, or room, based metaphor for organizing collaborative sessions. Venues are linked by doors, which allow users to navigate from one venue to another. The collaborative media (audio, video, shared applications) that are associated with a given venue are scoped by the venues themselves. That is, as you move from venue to venue, the collaboration tools are automatically reconfigured to connect to other users in that venue. No action on the part of the user is required. The WestGrid venue server provides a set of venues for WestGrid related research groups to meet. A number of casual meeting venues have been created for WestGrid researchers to gather. The main WestGrid Lobby is the highest level general meeting place. Two other venues have been created, an Operations Lobby and a Research Lobby. These venues are intended as casual meeting places as well, with the Operations Lobby a meeting place with an operational focus (site administration, steering committees, etc.) and the Research Lobby a meeting place with a research focus. Off of each of these lobbies a set of meeting venues will be constructed as required by the appropriate groups. A typical venue in the Operations Lobby would be a meeting room for the Collaboration and Visualization Steering Committee. A typical venue in the Research Lobby would be a meeting venue for a specific project. To create a venue for a specific purpose, WestGrid users should contact [email protected] for assistance. The video and audio conferencing for the AG venues are handled by separate programs – VIC for video, and RAT for audio. Once you have successfully connected to a VenueServer, both the VIC and RAT applications should launch in separate windows. See the 'Basic VIC Operation' and 'Basic RAT Operation' sections below for more information on the audio and video settings. To navigate to other rooms, simply click on the selected venue on the left – and you will automatically 'enter' that venue. To text chat with other participants, enter your text in the text area labeled 'Your Message' and press Enter or press the 'Display' button.
WestGrid Building an Access Grid Station– Full Version Page 14 of 19

Building an Access Grid Station
Using the Multicast/Unicast Bridge If your network does not support multicast traffic, you will have to use a Multicast to Unicast bridge to communicate with other AG participants. To access the bridge: 1. Select Preferences -> Use Unicast from the VenueClient. 2. A 'Bridge Dialog' should appear listing the available bridges
that you can connect to. 3. Select a bridge that is geographically near your location and
press 'OK'. If there are no bridges listed in the dialog box, you will have to notify the meeting organizer so that they can set one up.
Basic VIC Operation Vic’s main window shows all of the available video feeds as thumbnails. The number of columns of thumbnails that are displayed can be changed by pressing the number key (1,2,3, or 4) associated with the desired number of columns. The image to the right shows the main page with a column width of two wide.
By clicking the mouse on the thumbnails, the individual video feed will enlarge to become its own window – available to be placed and sized independently, as shown to the left. The size of the individual video feed window can be changed by pressing s, m or l (small, medium or large). For feeds with a “frame” the frame can be cut using shift-s, shift-m and shift-l.
By selecting the “menu” button on Vic’s main page, the capture device can be selected by choosing the “Device” button – and the “Transmit” checkbox can be (de)selected depending on whether you would like to transmit video. Also, the quality of the video transmission can be adjusted based on current network conditions or personal preferences.
Basic RAT Operation The rat interface offers the ability to control all reception and transmission options for the audio component of the collaboration. To transmit audio, make sure the “Talk” checkbox is checked – and the appropriate input (microphone or line-in) is selected below the talk button (Line-In is chosen in the image). You can scroll through available inputs by clicking on the arrow keys beside the selected input – below the talk button. The slider under the level meter will adjust the input level. To change any personal information or settings, press the “Options” button.
WestGrid Building an Access Grid Station– Full Version Page 15 of 19

Building an Access Grid Station
Beside each participants name is a slider which can be used to adjust individual volumes for specific participants. For more information on operating VIC, visit the UCL Multimedia website located at http://www-mice.cs.ucl.ac.uk/multimedia/software/vic/index.html Also, you can find a helpful user's guide located at http://www.vrvs.org/Documentation/Applications/vic-userguide.pdf
Additional Resources The main WestGrid Access Grid webpage has many helpful documents that may be of assistance to you. Also, many additional resources and help files can be found on the Internet by searching Access Grid, or by visiting the main Access Grid site at http://www.accessgrid.org
Some specific links to helpful information: WestGrid Access Grid Documentation http://www.westgrid.ca/usersAccess/users_access.html Access Grid Documentation http://www.accessgrid.org/documentation/index.html The Access Grid Documentation Project http://www.accessgrid.org/agdp/ Access Grid Training Project Tutorials http://foxtrot.ncsa.uiuc.edu:8900/public/AGIB/ Vic User Guidehttp://www.vrvs.org/Documentation/Applications/vic-userguide.pdf Also, some great information can be found in the various AG mailing lists – most are archived and searchable at http://agmailarchivers.ncsa.uiuc.edu/cgi-bin/agmailarchivers/viewlist.pl and
ttp://www.accessgrid.org/%7Ekomatsu/search/h
Troubleshooting
Network Most network issues are a result of a failure of multicast. These issues can be hard to diagnose and even harder to fix due to the fact that many times, the problem doesn’t exist on your network segment. You can help troubleshoot the network problems by installing Internet2 detective (http://detective.internet2.edu/) You can also check general multicast connectivity by visiting the “Multicast Beacon” site at http://beaconserver.accessgrid.org:9999/index.html .
WestGrid Building an Access Grid Station– Full Version Page 16 of 19

Building an Access Grid Station
To fully utilize the beacon, the beacon software would also need to be installed. Visit http://dast.nlanr.net/Projects/Beacon/ for more information.
Video Video tends to be one of the easier aspects of the AG to set up; however, there are a couple of 'gotchas' to be aware of. Reception Greyed Out If you are receiving video feeds, but all of them are 'greyed out', you have set up a 'Video Producer' instead of a 'Video Consumer'. If you would like to view video feeds from other sites – add a Video Consumer service to your node. No Feeds Received If you are not receiving any feeds - but are sure that there are feeds being sent from other sites, make sure that your multicast is working correctly. Try using the unicast bridge to see if the problem is resolved. Vic Crashes If the video transmit options are incorrectly set – VIC can unexpectedly crash. To solve VIC crashes on startup/transmit, click on the “menu” button on Vic’s main page, and choose Options->Configure on Transmit. Then, click on the transmit button to begin video capture. A transmit configuration box should appear. On this configuration screen – be sure to select a resolution that AG Vic can handle – no higher than CIF (352x288). Selecting a Video Source Depending on what kind of capture card / webcam device you are using, the 'Device...' selection may show up in different ways. If your specific device shows up in the 'Device Selection' dialog, that is the preferable selection. If your specific device is not listed, the default capture device that can be used for webcams in Windows is 'Microsoft WDM Image Capture (Win32)'.
Audio So much of the quality of a video conference can be attributed to audio quality that a lot of time is spent making sure that the audio subsystem is working adequately. When audio issues arise, they can often be fatal to a meeting or collaboration – so having a backup plan (such as a telephone) is always a good idea. These audio issues can sometimes be hard to diagnose; however, by logically following the path of the sound, the problem can usually be found. As with any computer problem, rule number one with all audio issues is to check (and double check) the wiring/cabling. Many issues can be solved by checking to make sure everything is plugged in properly. Reception
WestGrid Building an Access Grid Station– Full Version Page 17 of 19

Building an Access Grid Station
If you are having a problem with reception, first try to diagnose if it is a single site or all sites that you are having issues with. If it is a single site – it may not be your issue at all. Ask some other participating sites if they are also experiencing the problem and try to diagnose it. If the issue is consistent over all of the sites, then you will need to try to narrow down the possible causes. If you aren’t receiving any audio, try some of the following:
• Make sure the “Listen” checkbox is selected on the main RAT window • Double click the “Volume” icon in the system tray and be sure the
“Volume Control” is at an appropriate level and “Mute All” isn’t selected. • Double click the “Volume” icon in the system tray and be sure the “Wave”
level is also appropriately set – and not muted. • If you are using an “onboard” Intel sound card, a number of users have
experienced conflicts with the RAT software. If you are receiving audio, but the quality is low, try playing a CD or other media file to see if the problem is RAT specific. Transmission If you are having a problem with transmitting audio, try the following:
• Make sure the “Talk” checkbox is checked in Rat • Make sure the microphone cable is plugged into the Microphone input of
your computer/sound card (usually it is RED). If your computer doesn’t have a Microphone input – you can use the “Line In” input (usually BLUE).
• Make sure that the appropriate input source is selected below the “Talk”
checkbox in Rat (Usually “Line In” or “Microphone”)
• Double click the “Volume” icon in the system tray, select Options then Properties. In the window that pops up, select Adjust Volume For: “Recording” and be sure the input that your microphone is plugged into is checked in the “Show the following volume controls” list below. Then select OK. A new window will appear
containing the “Recording” levels and controls. On this window, be sure that the “Select” checkbox for whichever input you are using is selected – and be sure that the level is around 70 – 75%.
WestGrid Building an Access Grid Station– Full Version Page 18 of 19

Building an Access Grid Station
• If you can hear yourself in your headphones, double click the “Volume” icon in the system tray, and be sure that the Mute checkbox for the input source (usually Microphone) is checked. If you do not see a slider for your input source – you can click on Options, choose Properties and select which volume controls to view from the checklist.
Contact For more information about the Access Grid and WestGrid – or if you have any questions about this document, please contact WestGrid AG Help at [email protected]
WestGrid Building an Access Grid Station– Full Version Page 19 of 19


![Power Transmission Solutions Grid · PDF filePower Transmission Solutions Grid Access ... Station 132 kV Cables. ... _Greater Gabbard Grid Access_V 1a.ppt [Schreibgeschützt]](https://static.fdocuments.us/doc/165x107/5aaf1b2d7f8b9a3a038cf7dd/power-transmission-solutions-grid-transmission-solutions-grid-access-station.jpg)