Build Geodatabase from input datasets - Research Data...
20
Mantra ArcGIS Data Management Practical – Exercise 1. Build Geodatabase from input datasets. 1 of 20 Contents of Exercise 1: Build Geodatabase from input datasets. In this first exercise we spend time in ArcGIS setting up a work environment and a Geodatabase in which all work within ArcGIS will be carried out. Attention is paid to choice of name for file and variables/fields within geospatial datasets. Part 1: Explore project datasets. Part 2: Create new Geodatabase. Part 3: Load data into Geodatabase. Part 4: Add data from Geodatabase to ArcMap project
Transcript of Build Geodatabase from input datasets - Research Data...

Mantra ArcGIS Data Management Practical – Exercise 1.
Build Geodatabase from input datasets.
1 of 20
Contents of Exercise 1: Build Geodatabase from input datasets.
In this first exercise we spend time in ArcGIS setting up a work environment and a
Geodatabase in which all work within ArcGIS will be carried out. Attention is paid to
choice of name for file and variables/fields within geospatial datasets.
Part 1: Explore project datasets.
Part 2: Create new Geodatabase.
Part 3: Load data into Geodatabase.
Part 4: Add data from Geodatabase to ArcMap project
Mantra ArcGIS Data Management Practical – Exercise 1.
Build Geodatabase from input datasets.
2 of 20
Part 1: Explore project datasets.
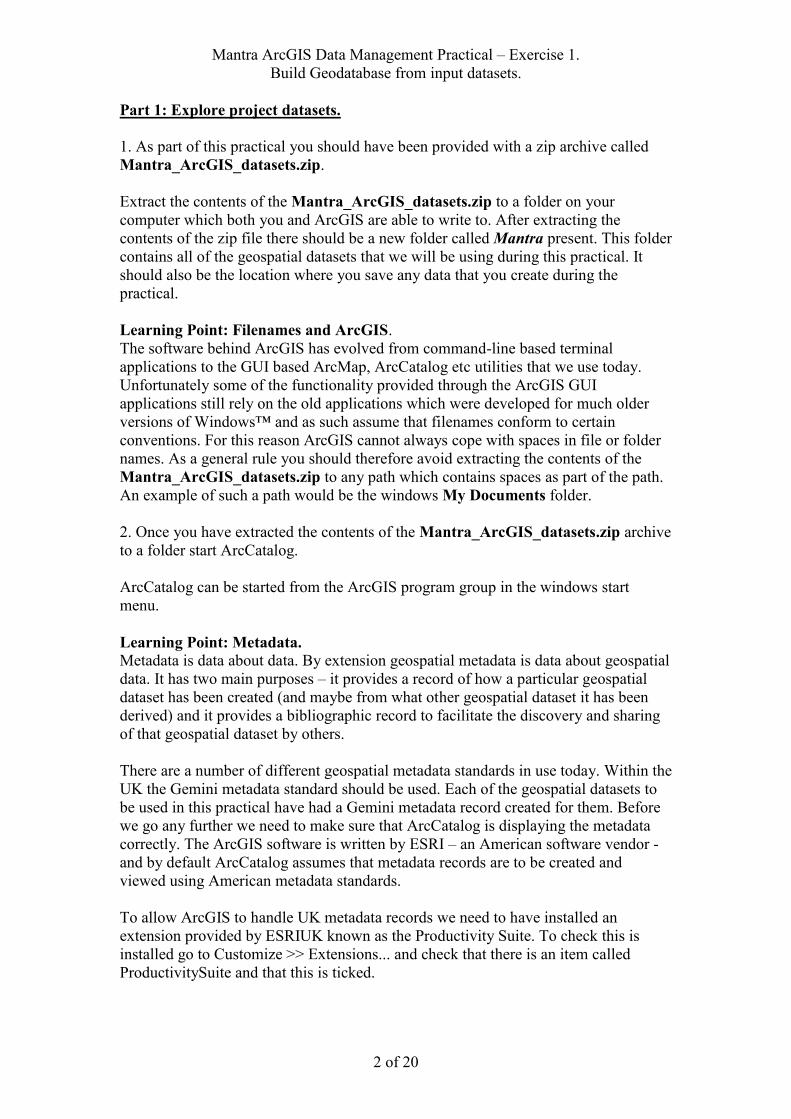
1. As part of this practical you should have been provided with a zip archive called
Mantra_ArcGIS_datasets.zip.
Extract the contents of the Mantra_ArcGIS_datasets.zip to a folder on your
computer which both you and ArcGIS are able to write to. After extracting the
contents of the zip file there should be a new folder called Mantra present. This folder
contains all of the geospatial datasets that we will be using during this practical. It
should also be the location where you save any data that you create during the
practical.
Learning Point: Filenames and ArcGIS.
The software behind ArcGIS has evolved from command-line based terminal
applications to the GUI based ArcMap, ArcCatalog etc utilities that we use today.
Unfortunately some of the functionality provided through the ArcGIS GUI
applications still rely on the old applications which were developed for much older
versions of Windows™ and as such assume that filenames conform to certain
conventions. For this reason ArcGIS cannot always cope with spaces in file or folder
names. As a general rule you should therefore avoid extracting the contents of the
Mantra_ArcGIS_datasets.zip to any path which contains spaces as part of the path.
An example of such a path would be the windows My Documents folder.
2. Once you have extracted the contents of the Mantra_ArcGIS_datasets.zip archive
to a folder start ArcCatalog.
ArcCatalog can be started from the ArcGIS program group in the windows start
menu.
Learning Point: Metadata.
Metadata is data about data. By extension geospatial metadata is data about geospatial
data. It has two main purposes – it provides a record of how a particular geospatial
dataset has been created (and maybe from what other geospatial dataset it has been
derived) and it provides a bibliographic record to facilitate the discovery and sharing
of that geospatial dataset by others.
There are a number of different geospatial metadata standards in use today. Within the
UK the Gemini metadata standard should be used. Each of the geospatial datasets to
be used in this practical have had a Gemini metadata record created for them. Before
we go any further we need to make sure that ArcCatalog is displaying the metadata
correctly. The ArcGIS software is written by ESRI – an American software vendor -
and by default ArcCatalog assumes that metadata records are to be created and
viewed using American metadata standards.
To allow ArcGIS to handle UK metadata records we need to have installed an
extension provided by ESRIUK known as the Productivity Suite. To check this is
installed go to Customize >> Extensions... and check that there is an item called
ProductivitySuite and that this is ticked.
Mantra ArcGIS Data Management Practical – Exercise 1.
Build Geodatabase from input datasets.
3 of 20
If the ProductivitySuite item is not listed then you will need to install the
Productivity Suite Extension before going any further.
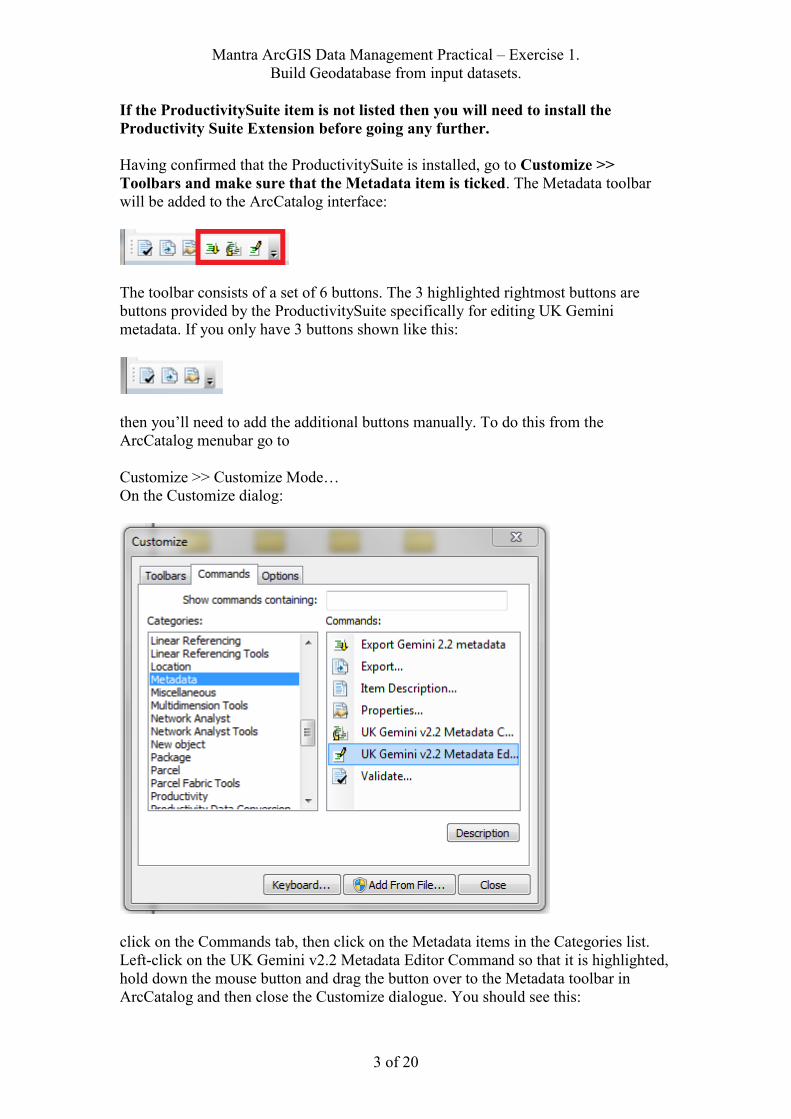
Having confirmed that the ProductivitySuite is installed, go to Customize >>
Toolbars and make sure that the Metadata item is ticked. The Metadata toolbar
will be added to the ArcCatalog interface:
The toolbar consists of a set of 6 buttons. The 3 highlighted rightmost buttons are
buttons provided by the ProductivitySuite specifically for editing UK Gemini
metadata. If you only have 3 buttons shown like this:
then you’ll need to add the additional buttons manually. To do this from the
ArcCatalog menubar go to
Customize >> Customize Mode…
On the Customize dialog:
click on the Commands tab, then click on the Metadata items in the Categories list.
Left-click on the UK Gemini v2.2 Metadata Editor Command so that it is highlighted,
hold down the mouse button and drag the button over to the Metadata toolbar in
ArcCatalog and then close the Customize dialogue. You should see this:
Mantra ArcGIS Data Management Practical – Exercise 1.
Build Geodatabase from input datasets.
4 of 20
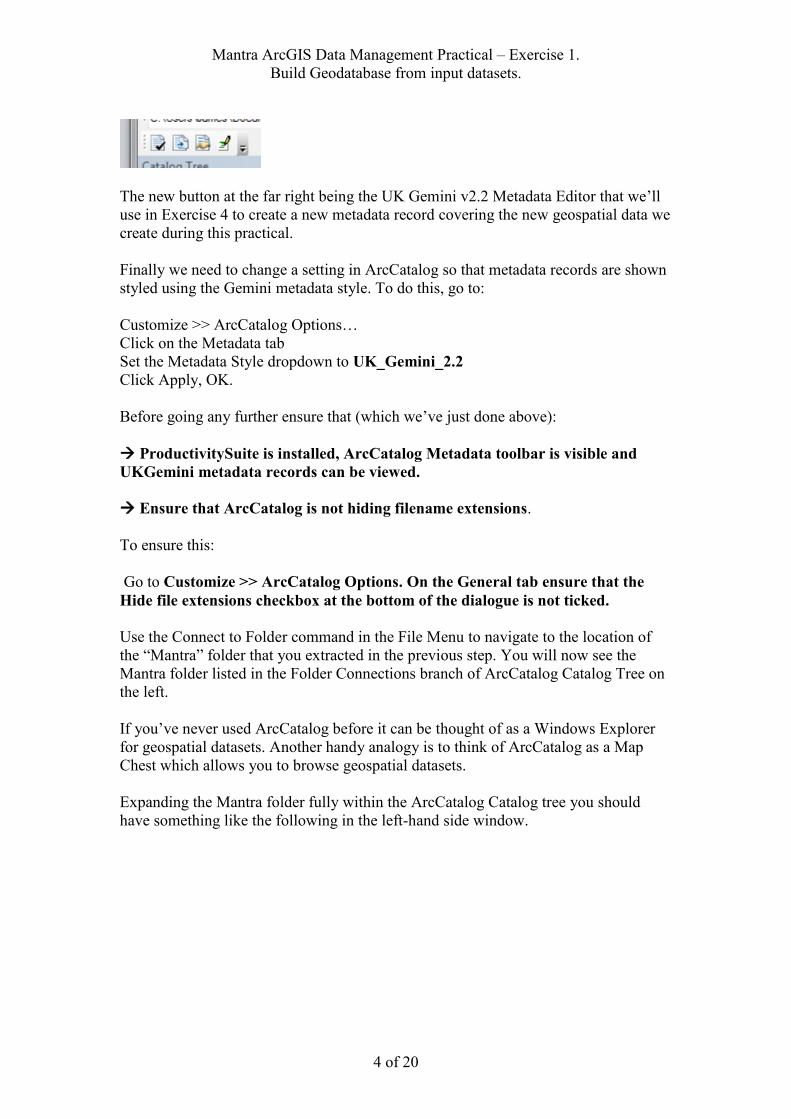
The new button at the far right being the UK Gemini v2.2 Metadata Editor that we’ll
use in Exercise 4 to create a new metadata record covering the new geospatial data we
create during this practical.
Finally we need to change a setting in ArcCatalog so that metadata records are shown
styled using the Gemini metadata style. To do this, go to:
Customize >> ArcCatalog Options…
Click on the Metadata tab
Set the Metadata Style dropdown to UK_Gemini_2.2
Click Apply, OK.
Before going any further ensure that (which we’ve just done above):
ProductivitySuite is installed, ArcCatalog Metadata toolbar is visible and
UKGemini metadata records can be viewed.
Ensure that ArcCatalog is not hiding filename extensions.
To ensure this:
Go to Customize >> ArcCatalog Options. On the General tab ensure that the
Hide file extensions checkbox at the bottom of the dialogue is not ticked.
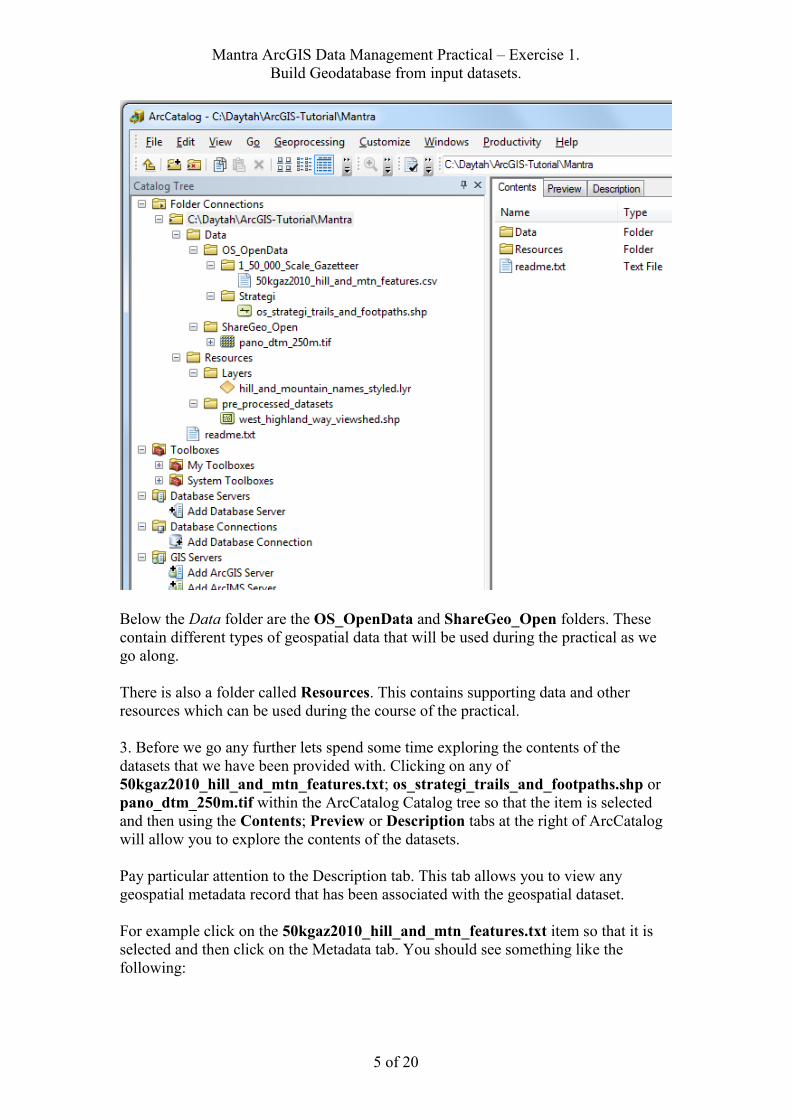
Use the Connect to Folder command in the File Menu to navigate to the location of
the “Mantra” folder that you extracted in the previous step. You will now see the
Mantra folder listed in the Folder Connections branch of ArcCatalog Catalog Tree on
the left.
If you’ve never used ArcCatalog before it can be thought of as a Windows Explorer
for geospatial datasets. Another handy analogy is to think of ArcCatalog as a Map
Chest which allows you to browse geospatial datasets.
Expanding the Mantra folder fully within the ArcCatalog Catalog tree you should
have something like the following in the left-hand side window.
Mantra ArcGIS Data Management Practical – Exercise 1.
Build Geodatabase from input datasets.
5 of 20
Below the Data folder are the OS_OpenData and ShareGeo_Open folders. These
contain different types of geospatial data that will be used during the practical as we
go along.
There is also a folder called Resources. This contains supporting data and other
resources which can be used during the course of the practical.
3. Before we go any further lets spend some time exploring the contents of the
datasets that we have been provided with. Clicking on any of
50kgaz2010_hill_and_mtn_features.txt; os_strategi_trails_and_footpaths.shp or
pano_dtm_250m.tif within the ArcCatalog Catalog tree so that the item is selected
and then using the Contents; Preview or Description tabs at the right of ArcCatalog
will allow you to explore the contents of the datasets.
Pay particular attention to the Description tab. This tab allows you to view any
geospatial metadata record that has been associated with the geospatial dataset.
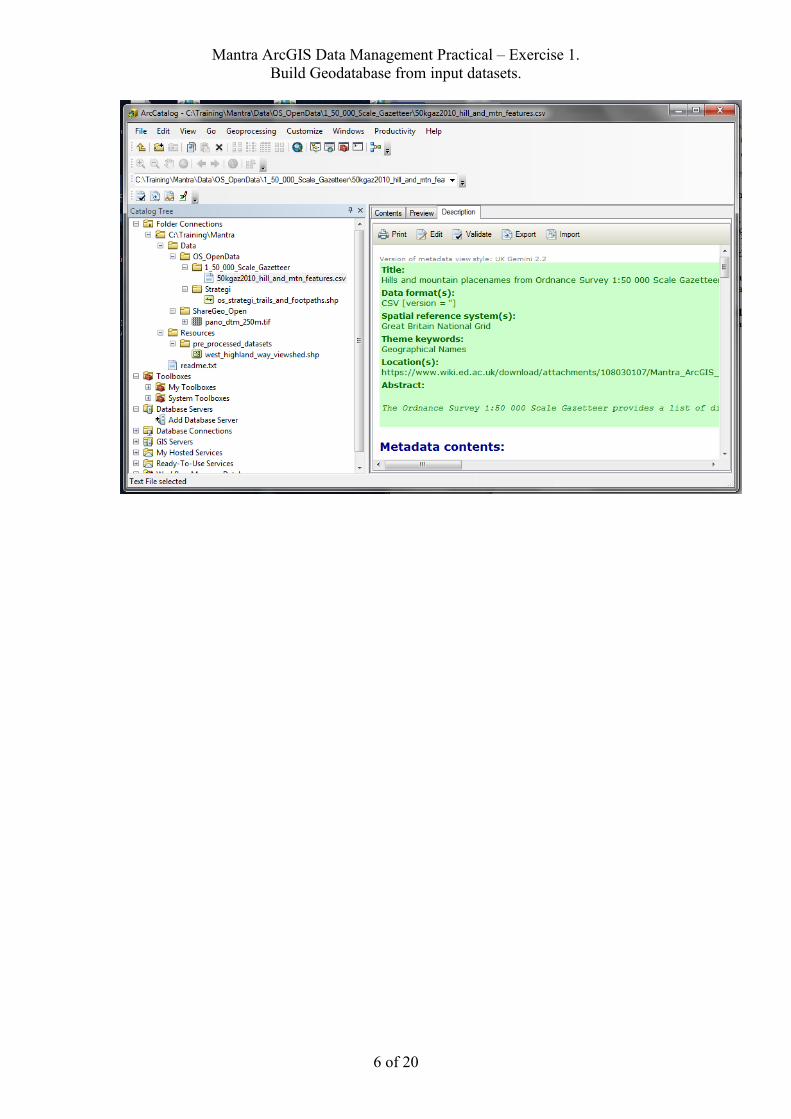
For example click on the 50kgaz2010_hill_and_mtn_features.txt item so that it is
selected and then click on the Metadata tab. You should see something like the
following:
Mantra ArcGIS Data Management Practical – Exercise 1.
Build Geodatabase from input datasets.
6 of 20
Mantra ArcGIS Data Management Practical – Exercise 1.
Build Geodatabase from input datasets.
7 of 20
Part 2: Create new Geodatabase.
Let’s create a new file geodatabase and then load our geospatial datasets into this.
Learning Point: The Geodatabase.
ArcGIS can use different type of Geodatabases. A Personal Geodatabase stores all
data in a Microsoft Access database whereas a File Geodatabase stores all data in a
local file structure. There is one important difference between the Personal
Geodatabase and the File Geodatabase. A Personal Geodatabase may contain up to
2GB of data whereas a File Geodatabase can contain up to 1TB of data. When using
geographical information data volumes often become large quickly and it is
recommended that you always create a File Geodatabase.
Within the ArcCatalog Catalog Tree click the Data folder in the top level of the
Mantra dataset so that it is highlighted, right-click and from the pop-up menu select
New > Folder.
Give the folder the name Workspace. Click the Workspace folder so that it is
selected and from the ArcCatalog menu bar select File > New > File Geodatabase
and give the File Geodatabase the name Mantra.gdb.
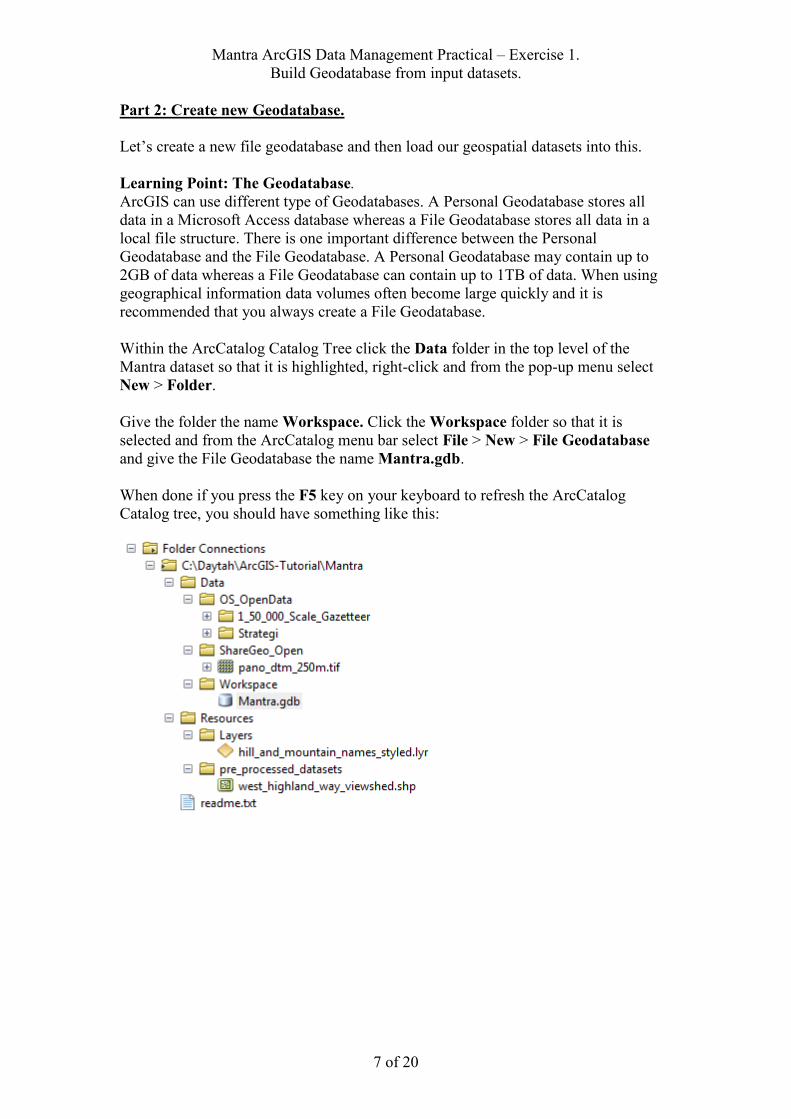
When done if you press the F5 key on your keyboard to refresh the ArcCatalog
Catalog tree, you should have something like this:
Mantra ArcGIS Data Management Practical – Exercise 1.
Build Geodatabase from input datasets.
8 of 20
Part 3: Load data into Geodatabase.
Now that the Geodatabase is in place let’s populate it with our datasets. First we’ll
create a new point featureclass based on the records held in the
50kgaz2010_hill_and_mtn_features.csv file. After which we’ll add in the other 2
datasets. We will not load the pano_dtm_250m.tif dataset into the Geodatabase.
Let’s create a hill_and_mountain_names point featureclass within Mantra.gdb
geodatabase from 50kgaz2010_hill_and_mtn_features.csv delimited text file. To do
this:
In the ArcCatalog Catalog Tree click on the 50kgaz2010_hill_and_mtn_features.csv
item so that it is selected, right-click, and then from the pop-up menu select Create
Feature Class > From XY Table…
Doing so will bring up the Create Feature Class From XY Table dialogue.
The 50kgaz2010_hill_and_mtn_features.csv contains a set of records. Each record
contains a placename, various information about the placename plus the location of
that placename as a British national grid Easting and Northing.
Set the X Field: to EAST
Set the Y Field: to NORTH
When we create a new featureclass within the geodatabase we need to specify the
coordinate system applied to this. Click the Coordinate System of Input
Coordinates... button. The Spatial Reference Properties dialogue will be shown.
Double-click:
Projected Coordinate Systems > National Grids > Europe
Click on the British National Grid items so it is selected and click OK.
This will take you back to the Create Feature Class from XY Table dialogue, on
which under Output, click the yellow folder button. This will open up the Saving
Data dialogue. Ensure that Save as type is set to File and Personal Geodatabase
feature classes and then navigate to the location of the geodatabase that we just
created in our workspace. Double-click the Mantra.gdb Geodatabase icon and then
enter hill_and_mountain_names for the name of the file to be created. Then click
Save
ArcGIS will return you to the Create Feature Class From XY Table, on which you
should click the OK button. When done if you press the F5 key on your keyboard to
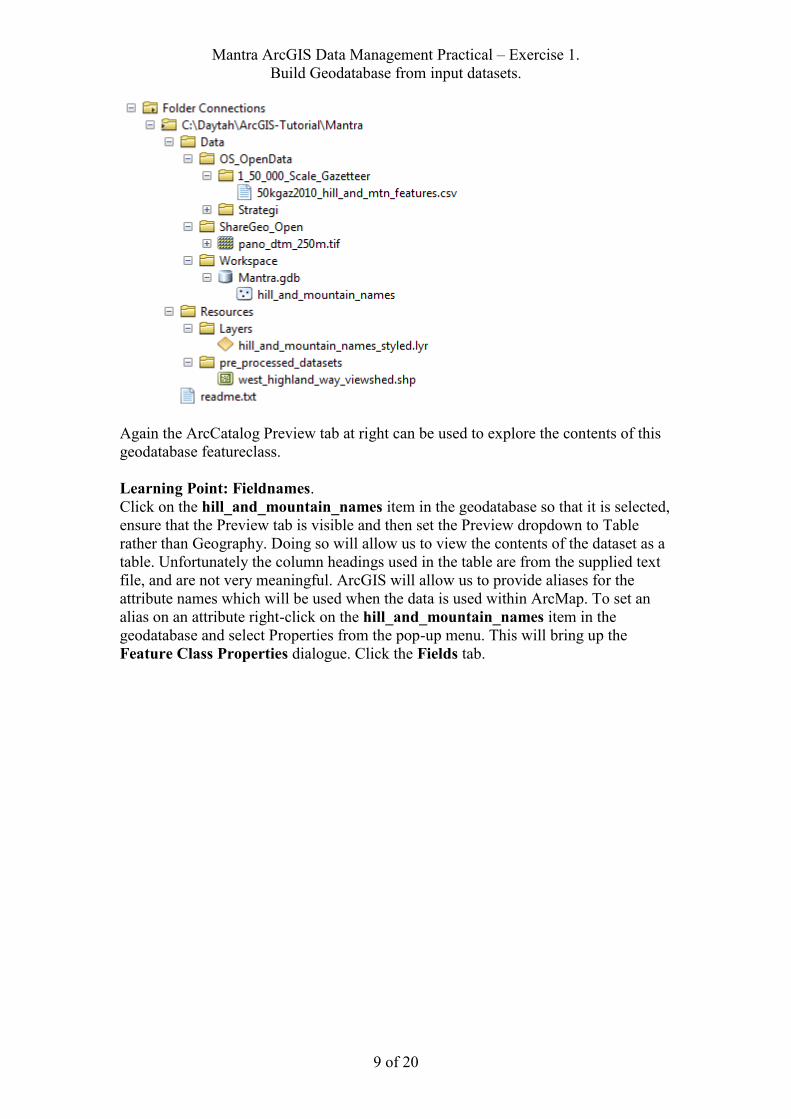
refresh the ArcCatalog Catalog tree, and then expand the contents of the Geodatabase
our new featureclass will be listed within the geodatabase like so:
Mantra ArcGIS Data Management Practical – Exercise 1.
Build Geodatabase from input datasets.
9 of 20
Again the ArcCatalog Preview tab at right can be used to explore the contents of this
geodatabase featureclass.
Learning Point: Fieldnames.
Click on the hill_and_mountain_names item in the geodatabase so that it is selected,
ensure that the Preview tab is visible and then set the Preview dropdown to Table
rather than Geography. Doing so will allow us to view the contents of the dataset as a
table. Unfortunately the column headings used in the table are from the supplied text
file, and are not very meaningful. ArcGIS will allow us to provide aliases for the
attribute names which will be used when the data is used within ArcMap. To set an
alias on an attribute right-click on the hill_and_mountain_names item in the
geodatabase and select Properties from the pop-up menu. This will bring up the
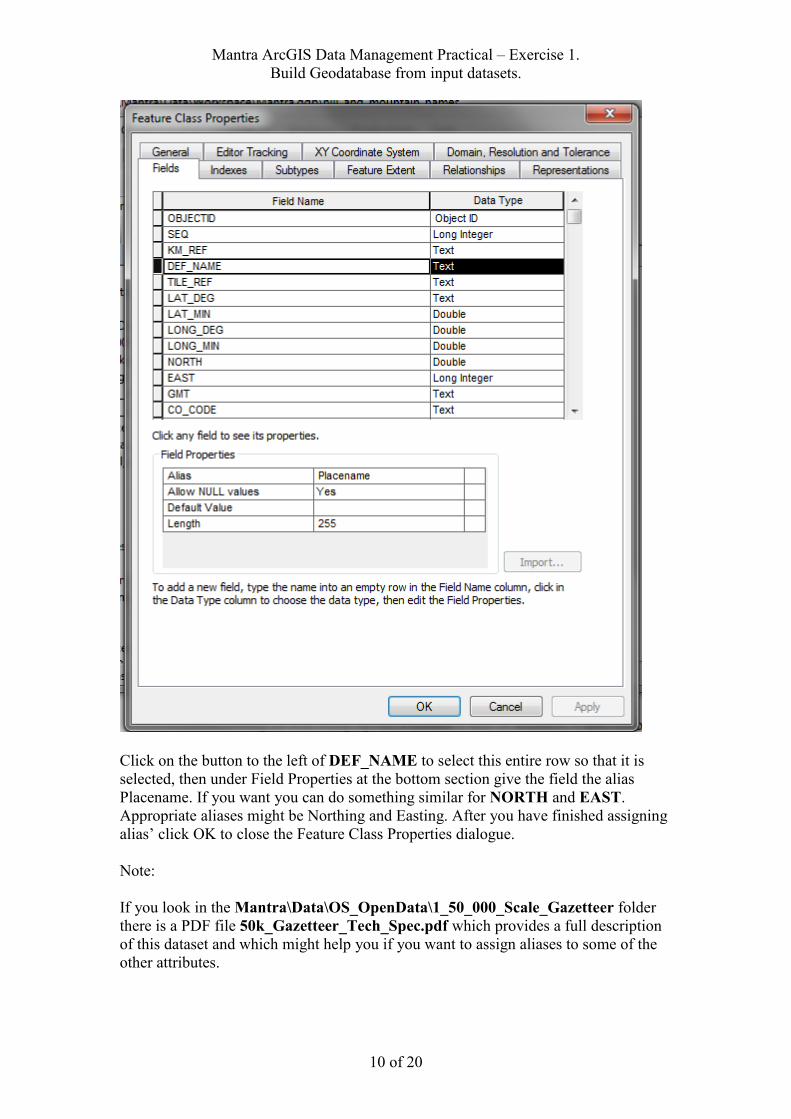
Feature Class Properties dialogue. Click the Fields tab.
Mantra ArcGIS Data Management Practical – Exercise 1.
Build Geodatabase from input datasets.
10 of 20
Click on the button to the left of DEF_NAME to select this entire row so that it is
selected, then under Field Properties at the bottom section give the field the alias
Placename. If you want you can do something similar for NORTH and EAST.
Appropriate aliases might be Northing and Easting. After you have finished assigning
alias’ click OK to close the Feature Class Properties dialogue.
Note:
If you look in the Mantra\Data\OS_OpenData\1_50_000_Scale_Gazetteer folder
there is a PDF file 50k_Gazetteer_Tech_Spec.pdf which provides a full description
of this dataset and which might help you if you want to assign aliases to some of the
other attributes.
Mantra ArcGIS Data Management Practical – Exercise 1.
Build Geodatabase from input datasets.
11 of 20
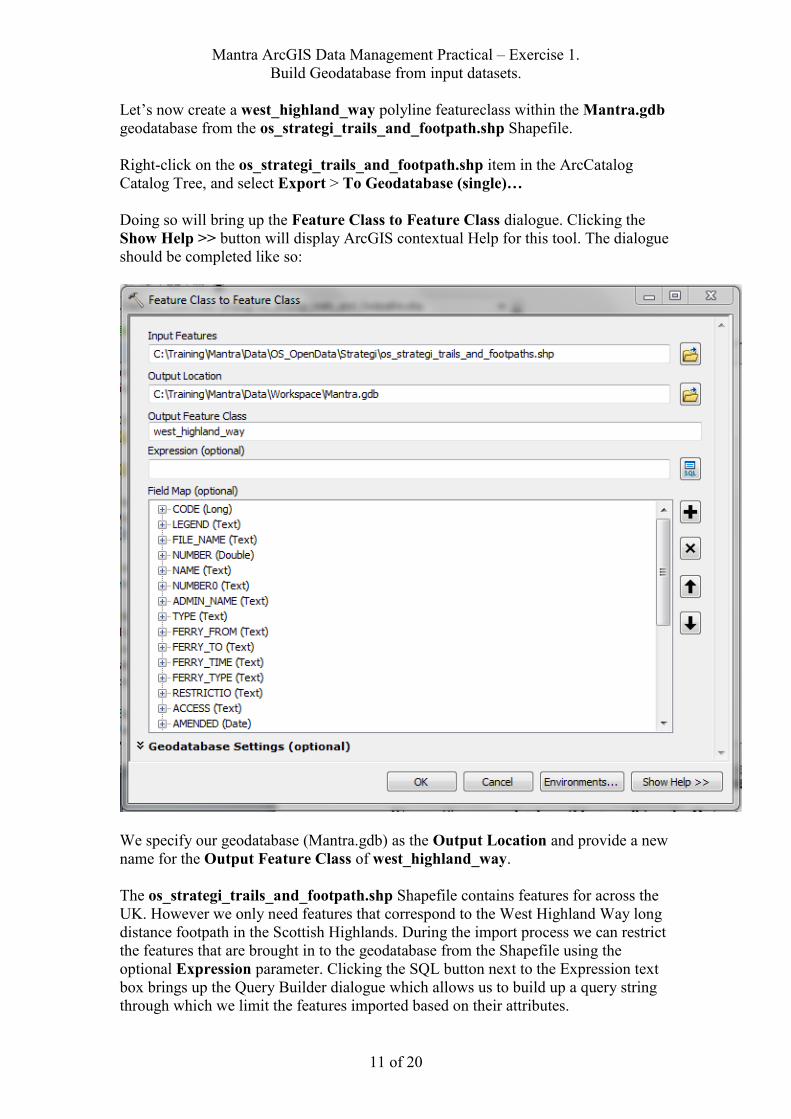
Let’s now create a west_highland_way polyline featureclass within the Mantra.gdb
geodatabase from the os_strategi_trails_and_footpath.shp Shapefile.
Right-click on the os_strategi_trails_and_footpath.shp item in the ArcCatalog
Catalog Tree, and select Export > To Geodatabase (single)…
Doing so will bring up the Feature Class to Feature Class dialogue. Clicking the
Show Help >> button will display ArcGIS contextual Help for this tool. The dialogue
should be completed like so:
We specify our geodatabase (Mantra.gdb) as the Output Location and provide a new
name for the Output Feature Class of west_highland_way.
The os_strategi_trails_and_footpath.shp Shapefile contains features for across the
UK. However we only need features that correspond to the West Highland Way long
distance footpath in the Scottish Highlands. During the import process we can restrict
the features that are brought in to the geodatabase from the Shapefile using the
optional Expression parameter. Clicking the SQL button next to the Expression text
box brings up the Query Builder dialogue which allows us to build up a query string
through which we limit the features imported based on their attributes.

Mantra ArcGIS Data Management Practical – Exercise 1.
Build Geodatabase from input datasets.
12 of 20
The Scrollable window at the top of the dialogue lists all of the fields available in the
dataset that we want to make selections from. Clicking on the name of a field so that it
is selected and then clicking the Get Unique Values button will list all of the unique
values that appear within a specific field.
In the Query Builder dialogue we specify that we want to import only those features
that have a NAME attribute with value of West Highland Way. So we enter the
following query:
“NAME” = ‘West Highland Way’
Note: choice of quote mark is significant. Double-quotes should be used for field
names, single-quotes for textual values to search for within that field.
Clicking OK having entered this in the Query Builder dialogue followed by OK on
the Feature Class to Feature Class dialogue will load the data. When done if you
press the F5 key on your keyboard to refresh the ArcCatalog Catalog tree, the
geodatabase should now contain both a hill_and_mountain_names item and a
west_highland_way item.
Mantra ArcGIS Data Management Practical – Exercise 1.
Build Geodatabase from input datasets.
13 of 20
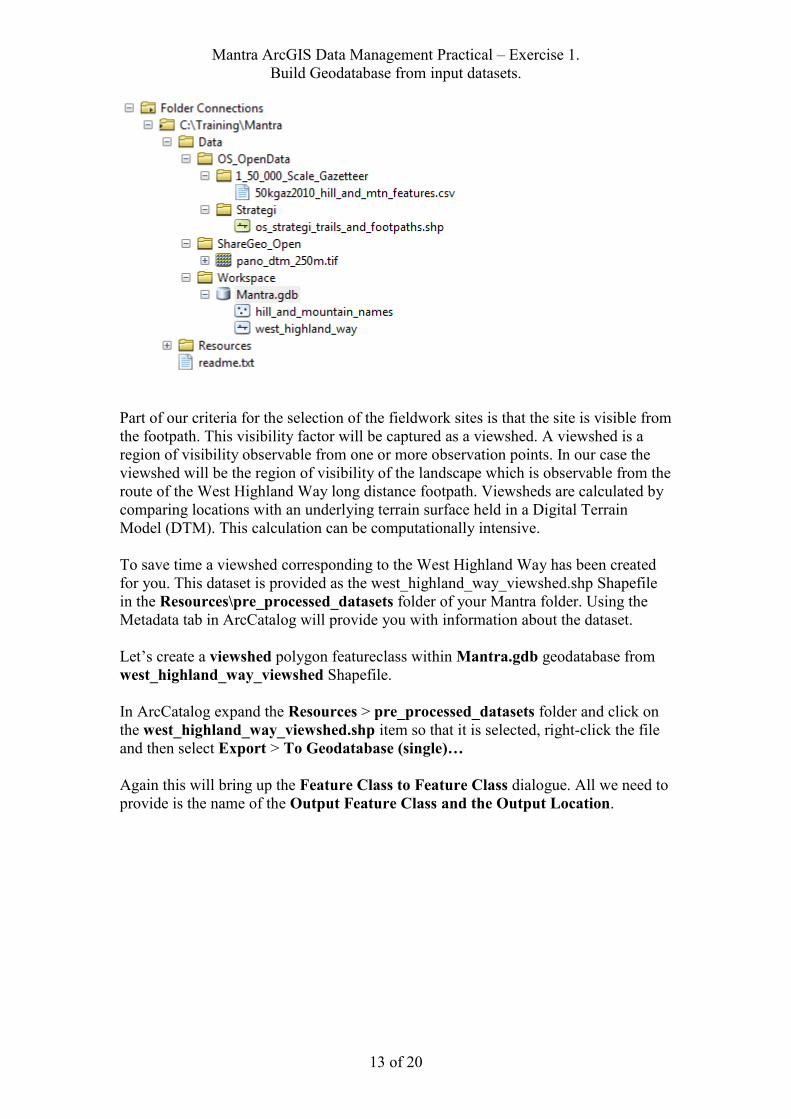
Part of our criteria for the selection of the fieldwork sites is that the site is visible from
the footpath. This visibility factor will be captured as a viewshed. A viewshed is a
region of visibility observable from one or more observation points. In our case the
viewshed will be the region of visibility of the landscape which is observable from the
route of the West Highland Way long distance footpath. Viewsheds are calculated by
comparing locations with an underlying terrain surface held in a Digital Terrain
Model (DTM). This calculation can be computationally intensive.
To save time a viewshed corresponding to the West Highland Way has been created
for you. This dataset is provided as the west_highland_way_viewshed.shp Shapefile
in the Resources\pre_processed_datasets folder of your Mantra folder. Using the
Metadata tab in ArcCatalog will provide you with information about the dataset.
Let’s create a viewshed polygon featureclass within Mantra.gdb geodatabase from
west_highland_way_viewshed Shapefile.
In ArcCatalog expand the Resources > pre_processed_datasets folder and click on
the west_highland_way_viewshed.shp item so that it is selected, right-click the file
and then select Export > To Geodatabase (single)…
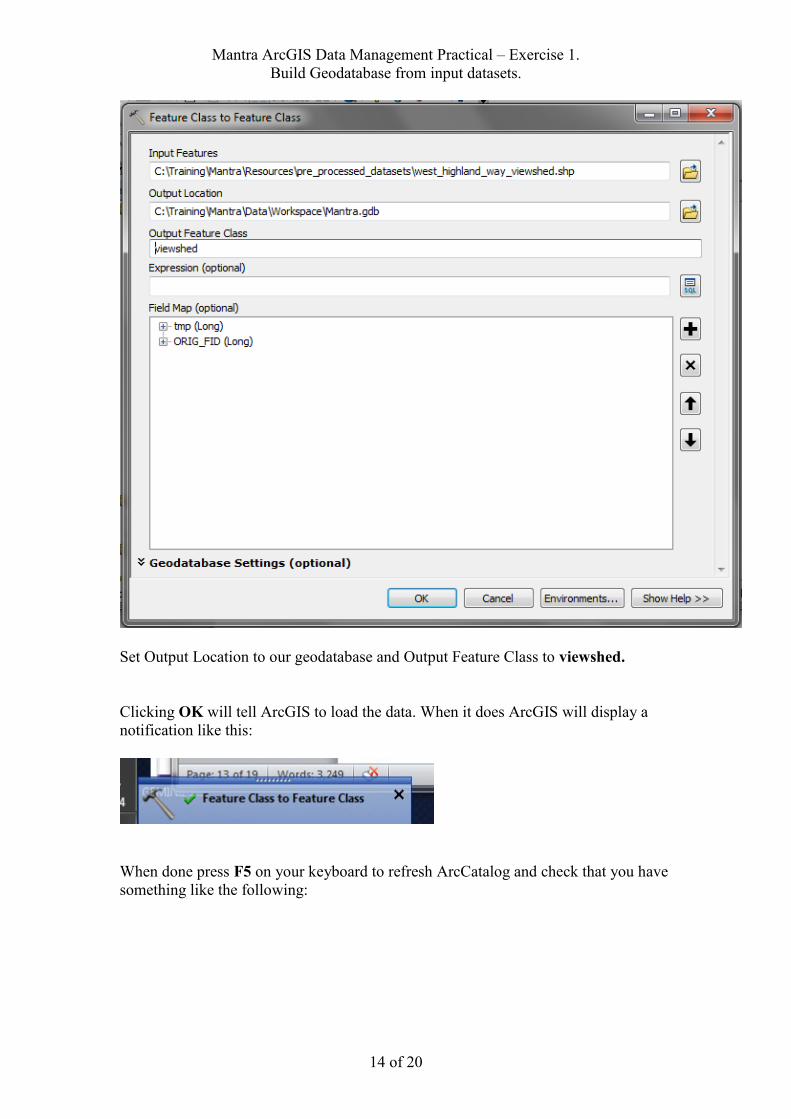
Again this will bring up the Feature Class to Feature Class dialogue. All we need to
provide is the name of the Output Feature Class and the Output Location.
Mantra ArcGIS Data Management Practical – Exercise 1.
Build Geodatabase from input datasets.
14 of 20
Set Output Location to our geodatabase and Output Feature Class to viewshed.
Clicking OK will tell ArcGIS to load the data. When it does ArcGIS will display a
notification like this:
When done press F5 on your keyboard to refresh ArcCatalog and check that you have
something like the following:
Mantra ArcGIS Data Management Practical – Exercise 1.
Build Geodatabase from input datasets.
15 of 20
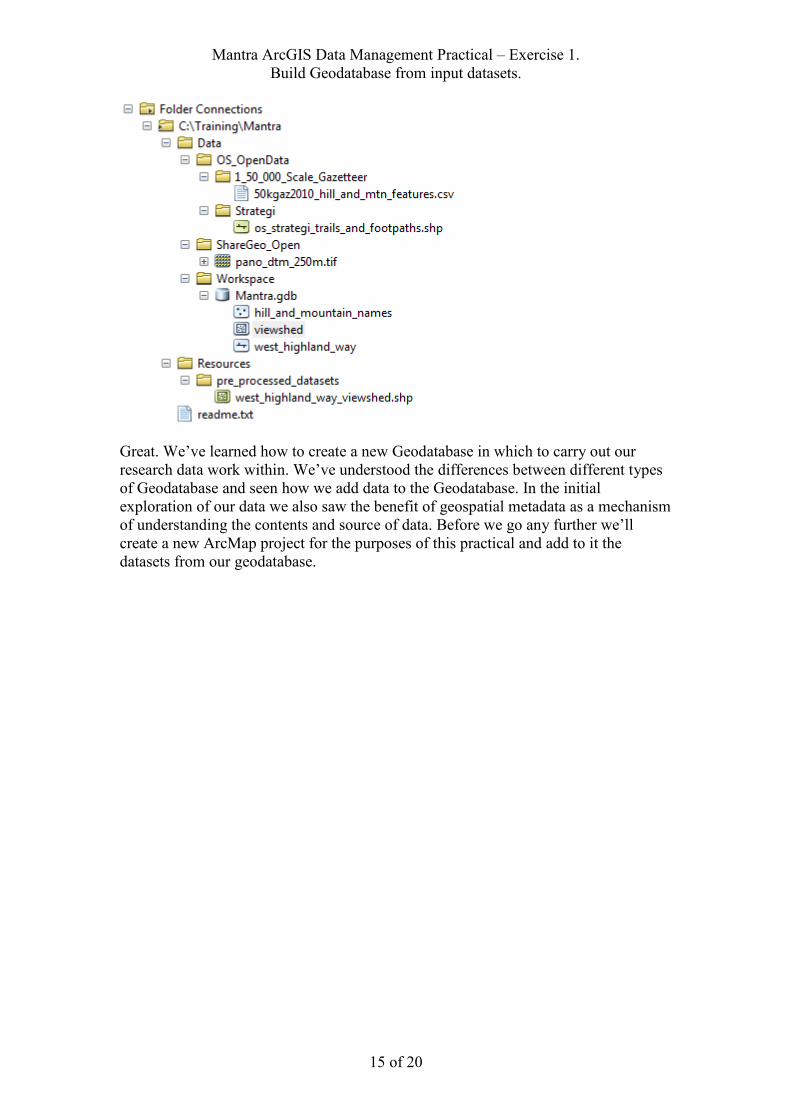
Great. We’ve learned how to create a new Geodatabase in which to carry out our
research data work within. We’ve understood the differences between different types
of Geodatabase and seen how we add data to the Geodatabase. In the initial
exploration of our data we also saw the benefit of geospatial metadata as a mechanism
of understanding the contents and source of data. Before we go any further we’ll
create a new ArcMap project for the purposes of this practical and add to it the
datasets from our geodatabase.
Mantra ArcGIS Data Management Practical – Exercise 1.
Build Geodatabase from input datasets.
16 of 20
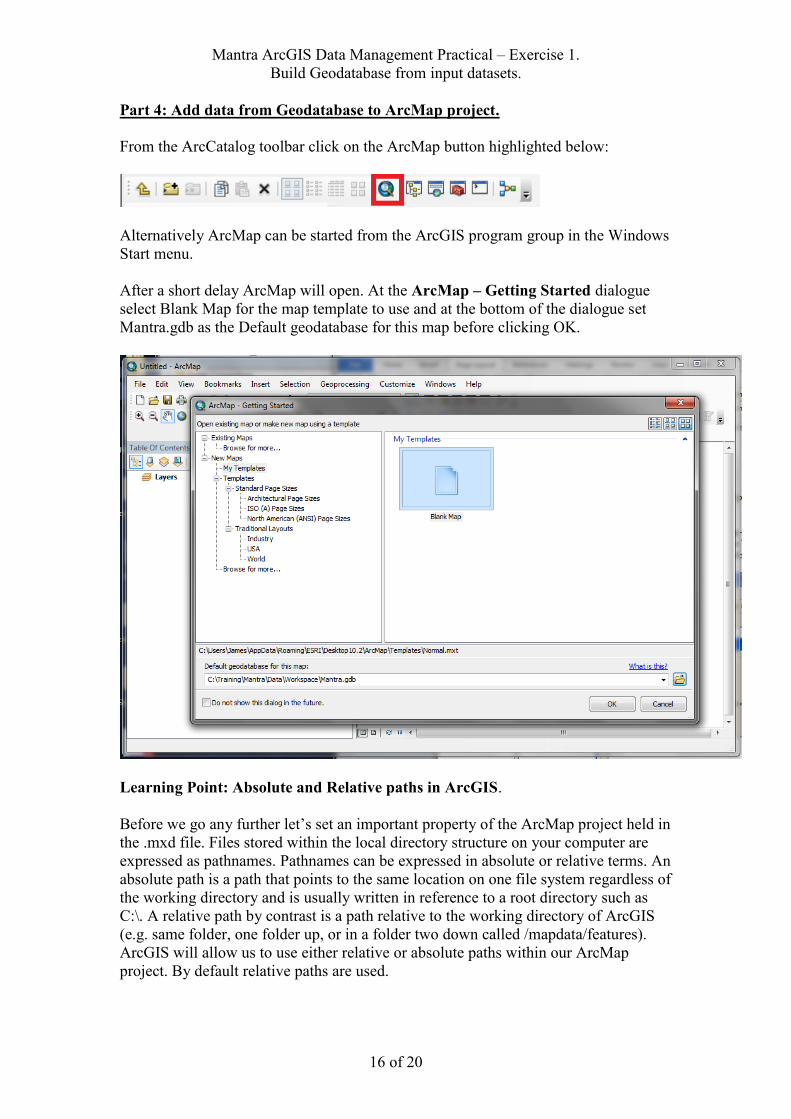
Part 4: Add data from Geodatabase to ArcMap project.
From the ArcCatalog toolbar click on the ArcMap button highlighted below:
Alternatively ArcMap can be started from the ArcGIS program group in the Windows
Start menu.
After a short delay ArcMap will open. At the ArcMap – Getting Started dialogue
select Blank Map for the map template to use and at the bottom of the dialogue set
Mantra.gdb as the Default geodatabase for this map before clicking OK.
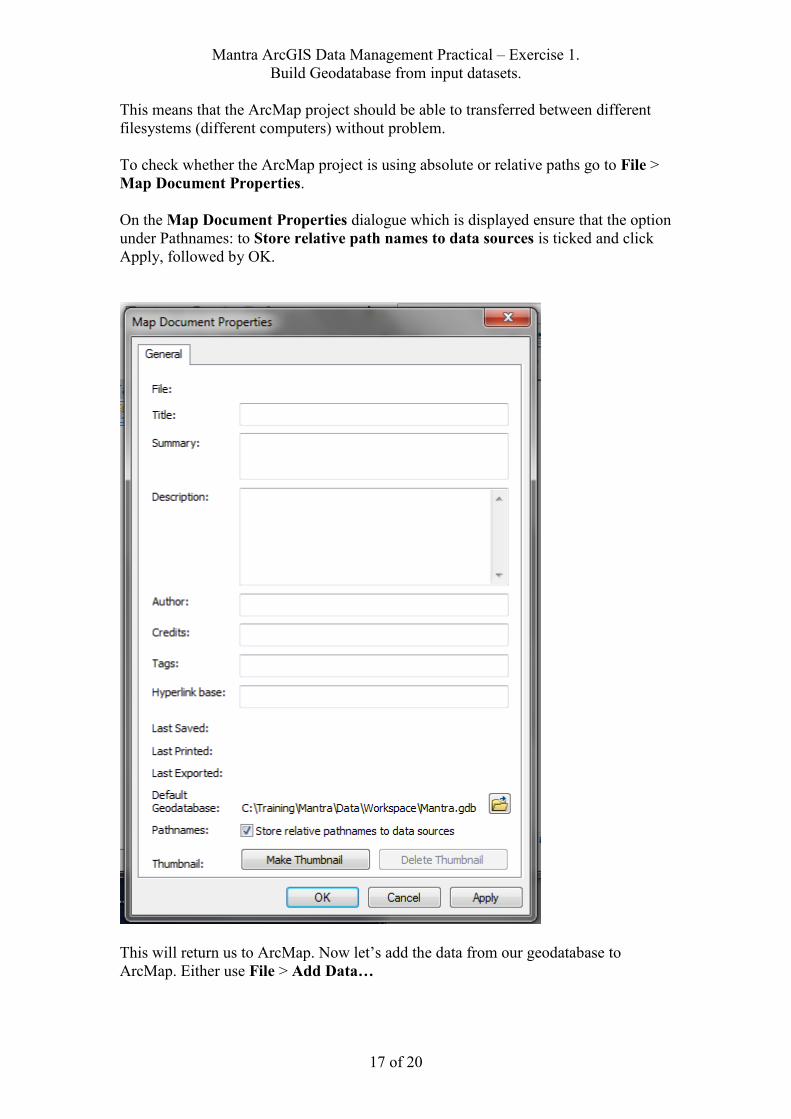
Learning Point: Absolute and Relative paths in ArcGIS.
Before we go any further let’s set an important property of the ArcMap project held in
the .mxd file. Files stored within the local directory structure on your computer are
expressed as pathnames. Pathnames can be expressed in absolute or relative terms. An
absolute path is a path that points to the same location on one file system regardless of
the working directory and is usually written in reference to a root directory such as
C:\. A relative path by contrast is a path relative to the working directory of ArcGIS
(e.g. same folder, one folder up, or in a folder two down called /mapdata/features).
ArcGIS will allow us to use either relative or absolute paths within our ArcMap
project. By default relative paths are used.
Mantra ArcGIS Data Management Practical – Exercise 1.
Build Geodatabase from input datasets.
17 of 20
This means that the ArcMap project should be able to transferred between different
filesystems (different computers) without problem.
To check whether the ArcMap project is using absolute or relative paths go to File >
Map Document Properties.
On the Map Document Properties dialogue which is displayed ensure that the option
under Pathnames: to Store relative path names to data sources is ticked and click
Apply, followed by OK.
This will return us to ArcMap. Now let’s add the data from our geodatabase to
ArcMap. Either use File > Add Data…
Mantra ArcGIS Data Management Practical – Exercise 1.
Build Geodatabase from input datasets.
18 of 20
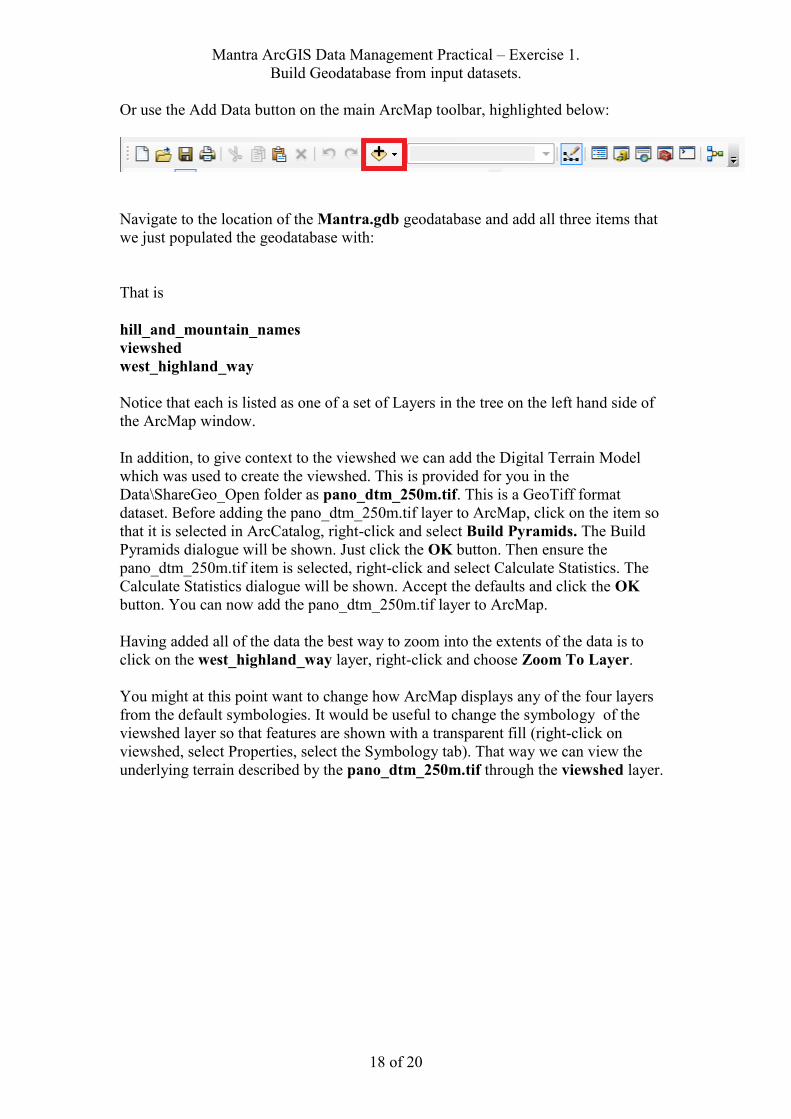
Or use the Add Data button on the main ArcMap toolbar, highlighted below:
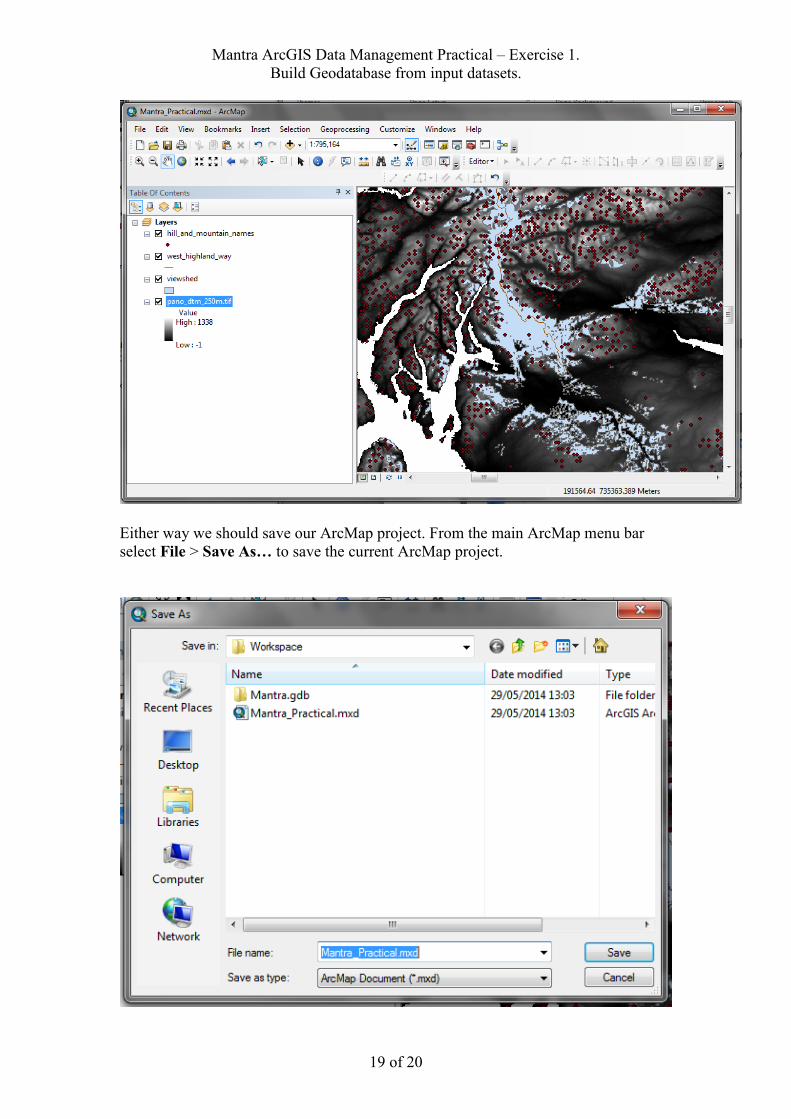
Navigate to the location of the Mantra.gdb geodatabase and add all three items that
we just populated the geodatabase with:
That is
hill_and_mountain_names
viewshed
west_highland_way
Notice that each is listed as one of a set of Layers in the tree on the left hand side of
the ArcMap window.
In addition, to give context to the viewshed we can add the Digital Terrain Model
which was used to create the viewshed. This is provided for you in the
Data\ShareGeo_Open folder as pano_dtm_250m.tif. This is a GeoTiff format
dataset. Before adding the pano_dtm_250m.tif layer to ArcMap, click on the item so
that it is selected in ArcCatalog, right-click and select Build Pyramids. The Build
Pyramids dialogue will be shown. Just click the OK button. Then ensure the
pano_dtm_250m.tif item is selected, right-click and select Calculate Statistics. The
Calculate Statistics dialogue will be shown. Accept the defaults and click the OK
button. You can now add the pano_dtm_250m.tif layer to ArcMap.
Having added all of the data the best way to zoom into the extents of the data is to
click on the west_highland_way layer, right-click and choose Zoom To Layer.
You might at this point want to change how ArcMap displays any of the four layers
from the default symbologies. It would be useful to change the symbology of the
viewshed layer so that features are shown with a transparent fill (right-click on
viewshed, select Properties, select the Symbology tab). That way we can view the
underlying terrain described by the pano_dtm_250m.tif through the viewshed layer.
Mantra ArcGIS Data Management Practical – Exercise 1.
Build Geodatabase from input datasets.
19 of 20
Either way we should save our ArcMap project. From the main ArcMap menu bar
select File > Save As… to save the current ArcMap project.

Mantra ArcGIS Data Management Practical – Exercise 1.
Build Geodatabase from input datasets.
20 of 20
Give the project the filename Mantra_Practical.mxd, ensure that Save as type is set
to ArcMap Document (*.mxd) and that you save the file to the
Mantra/Data/Workspace folder.