
Build and Test a Model Solar House - Concord … Test #1: Keep the house warm What is the power...
27
1 Copyright © 2012 The Concord Consortium Introduction The goal of this engineering project is to construct and test the energy efficiency and solar heat gain of a model house. You will be working with a model rather than a full-sized house, but the principles are the same. This experiment uses a pre-designed standard house, but you could also build a house of your own design. You could then modify it to improve its energy efficiency and solar heat gain, and test again to see if your modifications were successful. This project uses a standard procedure for measuring the thermal perfor- mance of a house. For the house to lose heat, there must be a tempera- ture difference. The interior must be warmer than the outside. Since you can’t cool down your classroom to 0 °C, you will warm up your house to 10 °C above room temperature. This is done with a heater light bulb inside the house. As with a real house, what matters is how long the furnace must be on to keep the house warm. The more it’s on, the more energy is used per day and the greater your heating bill. To imitate this situation, you will record what percentage of time the heater light bulb must be on to keep the house at 10° C above room temperature. Finally, you will perform the same test, but with a bright light shining on the house, imitating sunshine. You can then tell how much your energy bill is reduced by “solar heating.” Note: This is the first chapter of a longer engineering project in which students design, construct, and test their own houses (with different shapes, roofs, windows, etc.), using the same simple materials. They also explore the various mechanisms of heat transfer—conduction, convec- tion, radiation, and heat capacity—with hands-on or model-based ex- periments. See: http://concord.org/engineering Build a model house and measure how much energy is needed to keep it warm. Build and Test a Model Solar House
Transcript of Build and Test a Model Solar House - Concord … Test #1: Keep the house warm What is the power...

1Copyright © 2012 The Concord Consortium
IntroductionThe goal of this engineering project is to construct and test the energy efficiency and solar heat gain of a model house. You will be working with a model rather than a full-sized house, but the principles are the same.
This experiment uses a pre-designed standard house, but you could also build a house of your own design. You could then modify it to improve its energy efficiency and solar heat gain, and test again to see if your modifications were successful.
This project uses a standard procedure for measuring the thermal perfor-mance of a house. For the house to lose heat, there must be a tempera-ture difference. The interior must be warmer than the outside. Since you can’t cool down your classroom to 0 °C, you will warm up your house to 10 °C above room temperature. This is done with a heater light bulb inside the house.
As with a real house, what matters is how long the furnace must be on to keep the house warm. The more it’s on, the more energy is used per day and the greater your heating bill. To imitate this situation, you will record what percentage of time the heater light bulb must be on to keep the house at 10° C above room temperature.
Finally, you will perform the same test, but with a bright light shining on the house, imitating sunshine. You can then tell how much your energy bill is reduced by “solar heating.”
Note: This is the first chapter of a longer engineering project in which students design, construct, and test their own houses (with different shapes, roofs, windows, etc.), using the same simple materials. They also explore the various mechanisms of heat transfer—conduction, convec-tion, radiation, and heat capacity—with hands-on or model-based ex-periments. See: http://concord.org/engineering
Build a model house and measure how much energy is needed to keep it warm.
Build and Test aModel Solar House

Building Instructions
Tools & materials
• One fast-response tempera-ture sensor (for example, the Vernier surface temperature sensor STS-BTA)
• Computer or other graphing interface for temperature sensor
• Cardstock sheet, 56 x 71 cm (22 x 28 in)
• Acetate sheets for windows
• Cardboard base, about 25 x 35 cm
• Clear tape
• Metal ruler (metric)
• Scissors
• Safety utility cutter
• Pencils
• Cardboard surface to cut on
• One 40 W heater light bulb in a socket with an inline switch, covered with alumi-num foil (see pages 23-24)
• One 150-300 W light bulb in a gooseneck fixture (note: this will exceed the fixture’s wattage rating, but it’s on for a short time.)
• Sun angle template (see page 25)
Standard House Description
The standard house has a floor area of 400 cm2 (16 x 24 cm). It has •a window on the south side that faces the sun, and its area is 120 cm2.
The house sits on a base, larger than the house. The base is labeled •with the directions north, south, east, and west for testing purpos-es, so that you can picture the house with a real orientation with respect to the sun*.
There is enough room inside for the light bulb (15 cm high) and •its base. There is a 12 cm diameter hole in the floor for the heater light bulb.
* Note that this project is written for a climate at about 40° north latitude that has warm summers and cold winters. Other climates may have quite different design issues, and the sun’s path changes in other latitudes.
2 Copyright © 2012 The Concord Consortium

Draw out the two pieces of the standard house on a piece of card-1. stock (see pages 26-27 for the exact dimensions). Note how they must be arranged to fit on one sheet. Be sure to mark the location for the sensor - 10 cm from the bottom and in the center of one of the end walls.
Cut out the two pieces, using scissors. 2.
Use a sharp pencil to make a hole for inserting a temperature 3. sensor. The hole is 10 cm above the floor.
Cut out the window and tape a piece of acetate over it on the side 4. of the cardstock that will be inside the house.
Cut a circle out of the bottom of the house, as in the template, so 5. that the heater light bulb can fit in. (The circle happens to be the same size as a CD.)
Fold the cardboard along the dashed lines. Use the edge of a table 6. to make straight folds.
3Copyright © 2012 The Concord Consortium

7. Tape the edges together.
8. Label the base with directions: North, South, East, West.
9. Place the heater bulb on the base.
10. Feed the power cord of the bulb through one corner of the house, as in the picture below. Then tape the joints closed around it.
4 Copyright © 2012 The Concord Consortium

5
Note the power cord coming out of one corner of the house.
11. Place your house and bulb on the base so that the window faces south and the bulb fits through the hole in the base of the house.
12. Your house will look similar to the house pictured below.
Copyright © 2012 The Concord Consortium
6
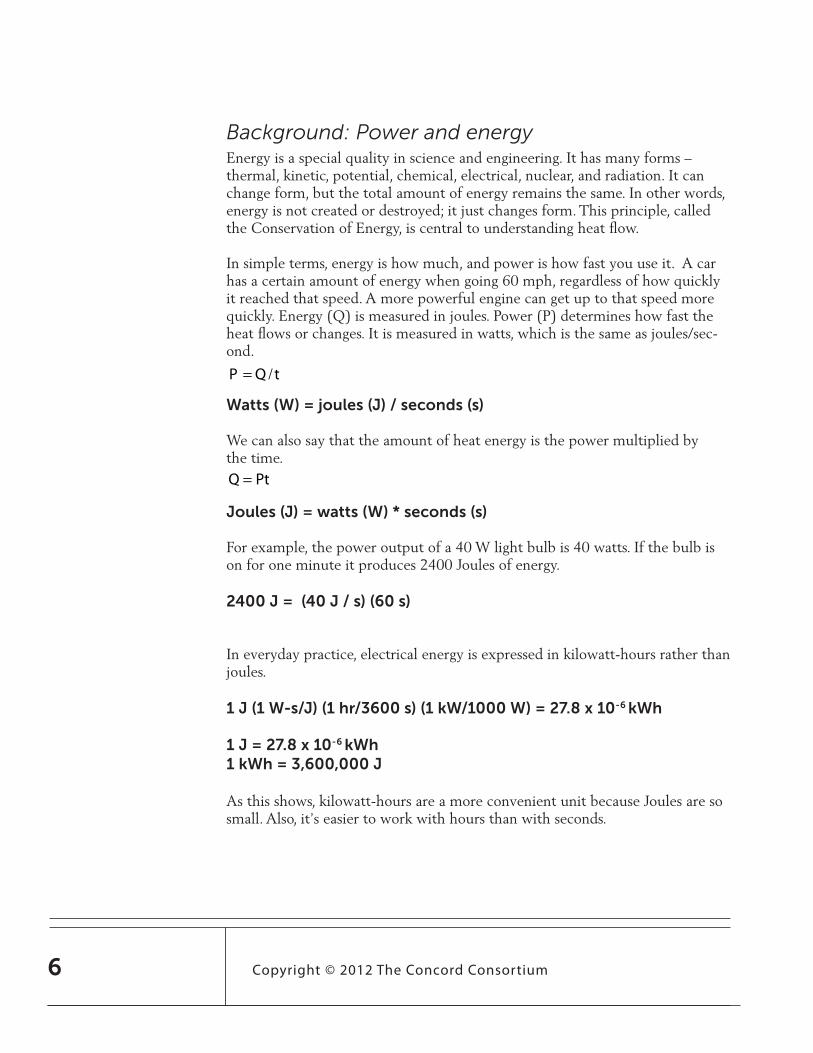
Background: Power and energyEnergy is a special quality in science and engineering. It has many forms – thermal, kinetic, potential, chemical, electrical, nuclear, and radiation. It can change form, but the total amount of energy remains the same. In other words, energy is not created or destroyed; it just changes form. This principle, called the Conservation of Energy, is central to understanding heat flow.
In simple terms, energy is how much, and power is how fast you use it. A carhas a certain amount of energy when going 60 mph, regardless of how quickly it reached that speed. A more powerful engine can get up to that speed more quickly. Energy (Q) is measured in joules. Power (P) determines how fast the heat flows or changes. It is measured in watts, which is the same as joules/sec-ond.
Watts (W) = joules (J) / seconds (s)
We can also say that the amount of heat energy is the power multiplied bythe time.
Joules (J) = watts (W) * seconds (s)
For example, the power output of a 40 W light bulb is 40 watts. If the bulb is on for one minute it produces 2400 Joules of energy.
2400 J = (40 J / s) (60 s)
In everyday practice, electrical energy is expressed in kilowatt-hours rather than joules.
1 J (1 W-s/J) (1 hr/3600 s) (1 kW/1000 W) = 27.8 x 10⁻⁶ kWh
1 J = 27.8 x 10⁻⁶ kWh1 kWh = 3,600,000 J
As this shows, kilowatt-hours are a more convenient unit because Joules are so small. Also, it’s easier to work with hours than with seconds.
€
P = Q /t
€
Q = Pt
Copyright © 2012 The Concord Consortium

7
What is the power output of a 100 W incandescent bulb?
How much energy does a 100 W bulb use in 24 hr?
How much energy (in kilowatt-hours = 1000 watt-hours) would the bulb use if left on for a year?
How much energy would you save if you replaced the bulb with a 20 W fluorescent, which has about the same light output but uses less energy? (Fluorescent bulbs are more efficient. For the same power input, they produce more light and less heat than incandescent bulbs.)
How much money would you save if electricity costs $0.15/kWh?
Copyright © 2012 The Concord Consortium

8
For example, suppose the room temperature is 20 °C. The target tem-perature for the warmed-up house will be 10 °C higher. What will these temperatures be as measured on the Fahrenheit scale? Fill in Table 2.
The last calculation is to show that our experimental conditions have the same temperature difference as a house kept at 20 °C when the outdoor temperature is 10 °C (50 °F). It’s a cold day, but not freezing.
Celsius vs. Fahrenheit
Temperature in °C Temperature in °F
Water freezes
Water boils
Room temperature 20
A hot day 100
Experimental conditions
Temperature in °C Temperature in °F
Room temperature 20
Target house temperature 20 + 10 = 30
Outdoor temperature if it were 10 °C below room temperature
20 – 10 = 10
Background: Celsius vs. FahrenheitNote to American students: You will use the Celsius scale for these measurements, so here’s a quick exercise to remind you about Celsius vs. Fahrenheit. Fill in Table 1.
or
€
C = 5 /9(F − 32)
€
F = (9 /5)C + 32
Copyright © 2012 The Concord Consortium

9
Test #1: Keep the house warmWhat is the power requirement to keep a house warm on a cold day?
IntroductionYour goal is to warm up your house to 10 °C greater than the air around it. To do this, you will raise the house to the target temperature using the heater light bulb.
As you perform the following steps you will look at the graph generated by a temperature sensor, which will record the time and temperature automatically and represent them graphically.
This project uses a standard procedure for measuring the thermal performance of a house. For the house to lose heat, there must be a temperature difference. The interior of the house must be warmer than the outside. Since you can’t cool down your classroom to 0 °C, you will warm up your house to 10 °C above room temperature. This is done with a heater light bulb inside the standard house.
As with a real house, what matters is how long the furnace must be on to keep the house warm. The more it’s on, the more energy is used per day and the greater your heating bill. To imitate this situation, you will record what percentage of time the heater light bulb is on.
Your goal is to measure how much power it takes to keep your house 10 °C warmer than the air around it. To do this, you will:
Turn the heater on and off so that the temperature stays within • 0.2 °C of the target temperature.
Record the times when the heater is turned on and off.•
Calculate what percentage of time the heater has to be on to keep • the house warm.
Multiply that percentage by the heater power (40) to get the average • power supplied to the house.
Copyright © 2012 The Concord Consortium

Procedure
Cut a 3x3 cm square of cardstock and tape the sensor to the cen-1. ter of it 3 cm from its tip. Fold the sensor 90° so that it is perpen-dicular to the card and is 3 cm long.
Insert the temperature sensor in the hole you made in the middle 2. of the wall of the standard house. The sensor must be pushed through the wall so that it is perpendicular to the wall. Make sure it is not touching the wall. Tape the card to the outside of the house to keep the sensor in place.
10 Copyright © 2012 The Concord Consortium
11
Collect data
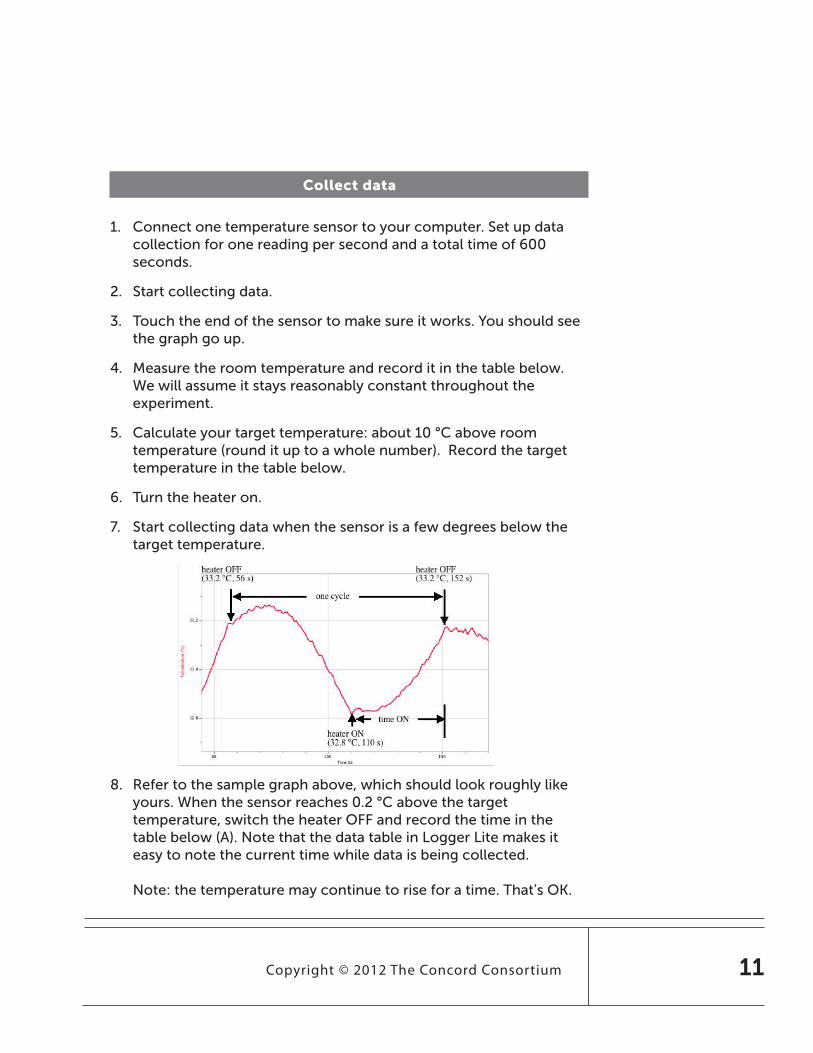
Connect one temperature sensor to your computer. Set up data 1. collection for one reading per second and a total time of 600 seconds.
Start collecting data.2.
Touch the end of the sensor to make sure it works. You should see 3. the graph go up.
Measure the room temperature and record it in the table below. 4. We will assume it stays reasonably constant throughout the experiment.
Calculate your target temperature: about 10 °C above room 5. temperature (round it up to a whole number). Record the target temperature in the table below.
Turn the heater on. 6.
Start collecting data when the sensor is a few degrees below the 7. target temperature.
Refer to the sample graph above, which should look roughly like 8. yours. When the sensor reaches 0.2 °C above the target temperature, switch the heater OFF and record the time in the table below (A). Note that the data table in Logger Lite makes it easy to note the current time while data is being collected. Note: the temperature may continue to rise for a time. That’s OK.
Copyright © 2012 The Concord Consortium

12
When the sensor drops to 0.2 °C below the target temperature, 9. switch the heater ON and record the time in the table below (B). Note: the temperature may continue to fall for a time. That’s OK.
When the sensor again reaches 0.2 °C above the target 10. temperature, switch the heater OFF and record the time in the table below (C).
Stop collecting data.11.
Click the “scale” icon to fit the graph to your data.12.
Save the data file.13.
Calculate the average power requirement to keep the house warm 14. by filling out the rest of the table below.
House heating test
Room temperature: _____°C
Target temperature: _____°C
Upper limit (target temperature + 0.2): _____°C
Lower limit (target temperature - 0.2): _____°C
Event Time (from data table)
A. Turn heater OFF at upper limit (point A)
B. Turn heater ON at lower limit (point B)
C. Turn heater OFF at upper limit (point C)
D. Total cycle time (C - A)
E. Total time ON (C - B)
F. proportion of time the heater is on(C - B) / (C - A)
G. Average power requirement (40 W * proportion of time heater is on) _______ W
Copyright © 2012 The Concord Consortium

13
How to calculate the power requirement (Row G)
You used the energy provided by the heater to heat up your house and maintain it at your target temperature. The bulb you used as a heater has a power of 40 W. This means that it releases 40 joules of energy per second. But since it wasn’t on all the time, the house used less than 40 W to stay warm. The average power requirement of your house is:
Power requirement = 40 W * time on / total time
Note that the total time should be a full cycle, from OFF to ON to OFF again.
The steps of the calculation are set out in the table above.
Copyright © 2012 The Concord Consortium

Analysis
In your own words, explain the difference between energy and power.
Which did you measure in this experiment, power or energy?
What are the units for energy? What are the units for power?
The light bulb in this test house is supposed to model the furnace or boiler in your house. Describe how turning the light bulb on and off is similar to a thermostat in your house.
How do you think you could reduce the power needed to maintain the house temperature in this model? Explain what you would do and how it would help.
14 Copyright © 2012 The Concord Consortium

15
Connection to buildings
The light bulb in the standard house is like the furnace or boiler in your house. It has a fixed output and is on part of the time. Heating units are sized so that they would be on all of the time only on the coldest days, when there would be the greatest temperature differences between inside and outside, and hence the greatest rate of heat loss. If you improved the energy efficiency of your house, the heater would be on less time and use less total energy over the year.
Your house has a thermostat, which does exactly what you did by hand in the experiment: it turns the heater on when the house temperature is below the set temperature, and off when the temperature rises above the set temperature. If you graphed the temperature in your house, it would be a wavy line like the graph in this experiment.
In a real house, the yearly energy requirement would be calculated by looking at the energy bill (for example, 400 gallons of oil multiplied by 130,000 BTU/gallon = 52 million BTU = 15,200 kWh).
Note: in the USA, both kilowatt-hours (kWh) and British Thermal Units (BTU) are in common use as heating energy units. If you want to inter-pret your energy bill and compare electrical energy to oil or gas energy, you will need to convert from one to the other.
1 kWh = 3412 BTU
Copyright © 2012 The Concord Consortium

16
Look up your actual heating energy use, following the steps below.
Figure out the amount of energy you use for heating. You probably use electricity, oil, or natural gas.
yearly oil (gal)
yearly gas (therms)
yearly electric (kWh)
Make use of the following approximate conversion factors:
1 kWh = 3400 BTU
For oil, 1 gallon = 120,000 BTU (allowing for a boiler effiency of 85%)
For natural gas, 1 Therm = 100,000 BTU
Your annual heating energy use in kWh:
If your boiler heats domestic hot water as well as the house, subtract the average monthly summer use from each winter month (about six months in all) to obtain just the heating energy. If heating and hot water are separate, you can skip this step.
Your average monthly hot water energy use in kWh:
Your hot water energy use for 12 months in kWh:
Your heating energy use (annual heating energy minus annual hot water energy) in kWh:
Copyright © 2012 The Concord Consortium

17
IntroductionDuring the last session you built your house and heated it using a heater light bulb. That situation mirrors the nighttime when there is no sunlight.
Now you will add a very bright light bulb (300 W) outside as the “sun.” Its position will be roughly that of the sun at noon in winter in the northern United States (40° N). You will use a single temperature sensor to measure the house temperature.
You will turn the heater on and off, but leave the sun on all the time. This will simulate a sunny day with light from the 300 W bulb providing “solar energy.”
Test #2: Solar Heating TestHow does energy provided by the sun reduce the house heating require-ment?
Copyright © 2012 The Concord Consortium

18
Set up the sensor
Insert the temperature sensor in the hole at the middle of your 1. house.
Connect the temperature sensor to your computer. 2.
Set up data collection for one reading per second and a total time 3. of 600 seconds.
Use the room temperature from the previous experiment. It will be 4. approximately the same.
Calculate the target temperature (room temperature + 10) and 5. enter it in the table below.
Set up the gooseneck lamp with a sun light bulb in it, due south of 6. the building.
Cut out the sun angle template (see page 25). Place the sun angle 7. template so the corner is in the center of the window.
Aim the tip of the light bulb along the “winter test angle” line on 8. the template (see figure below).
Copyright © 2012 The Concord Consortium

19
Procedure - Collect data
Switch on the heater light bulb AND the sun light bulb. 1. NOTE: The 300 W bulb is very hot. Be careful not to touch it, and wait until it cools down to move or store it. Turn it off except while doing the experiment.
Start collecting data when the sensor is a few degrees below the 2. target temperature.
When the sensor reaches 0.2 °C above the target temperature, 3. switch the heater OFF and record the time in the table below (A). Leave the sun on throughout the test.
When the sensor reaches 0.2 °C below the target temperature, turn 4. the heater ON. Record the time in the table below (B).
When the sensor again reaches 0.2 °C above the target 5. temperature, switch the heater OFF and record the time in the table below (C).
Stop collecting data.6.
Click the “scale” icon to fit the graph to your data.7.
Save the data file.8.
Calculate the power requirement to keep the house warm by filling 9. out the rest of the table below.
Copyright © 2012 The Concord Consortium

20
Solar heating test
Note: Sun is ON for the whole experiment.
Room temperature: _____°C
Target temperature: _____°C
Upper limit (target temperature + 0.2): _____°C
Lower limit (target temperature – 0.2): _____°C
Event Time in seconds (from data table)
A. Turn heater OFF at upper limit
B. Turn heater ON at lower limit
C. Turn heater OFF at upper limit
D. Total cycle time (C - A)
E. Total time ON (C - B)
F. proportion of time the heater is on(C - B) / (C - A)
G. Power requirement (40 W * proportion of time heater is on) _______W
H. Average power requirement without the sun (from previous experiment) _______W
I. Power supplied by the sun_______W
Copyright © 2012 The Concord Consortium
21
Analysis
What is the solar contribution to house heating, in watts and as a percentage of the total power
requirement?
In a real situation, there might be strong sunshine for six hours a day, on average, out of twenty-four. On the other hand, the light would be much more intense than a 300 W light bulb. What might the solar contribution be in that case?
How might you deal with the problem that larger windows can trap more of the sun’s energy when it’s shining but also lose more heat when the sun is not shining?
Copyright © 2012 The Concord Consortium

22
Connection to buildings
Think about your own house and the possibility of using sunshine for heating it.
a. How many south-facing windows does your house have? Measure the area of each and add them up.
south-facing glass m2
b. How good is your south-facing exposure? Are there trees or other buildings that cast shade for part of the day?
c. Could you add more south-facing windows?
d. What would you do to increase heat gain during sunny periods, but minimize heat loss at night?
Copyright © 2012 The Concord Consortium

Procedure
1. Cut off the outlet end of the extension cord. Strip the wires.
2. Install the inline switch in the extension cord. Note that the common (ground) wire has ribs and the live (hot) wire is smooth. Make sure the switch interrupts the hot wire.
3. Drill a 5/16” (8 mm) hole through the side of the pancake box and insert the cord.
Fabricating a light bulb heater
Tools & materials
The required parts, available at any hardware store, are:
• keyless socket (plastic or ceramic)
• 6’ extension cord
• in-line switch
• metal pancake box
• 40 W light bulb
• aluminum foil
Copyright © 2012 The Concord Consortium 23

4. Attach the wires to the keyless socket. The ribbed (ground) wire is attached to a silver screw and the smooth (hot) wire is attached to a brass-colored screw.
5. Screw the socket to the pancake box. Cover the bulb with a layer of foil to cut down on radiation.
Copyright © 2012 The Concord Consortium 24

25

26 Copyright © 2012 The Concord Consortium

27Copyright © 2012 The Concord Consortium