Buffalo Wireless Internet Start Up Guide - BWIG
19
Buffalo Wireless Internet Start Up Guide Website: www.bwig.net Email: [email protected] Help Desk: 763-684-5423 Hours: 8am-5pm Monday-Friday Emergency: 763-682-1001
Transcript of Buffalo Wireless Internet Start Up Guide - BWIG

Buffalo Wireless Internet
Start Up Guide
Website: www.bwig.net Email: [email protected] Help Desk: 763-684-5423
Hours: 8am-5pm Monday-Friday Emergency: 763-682-1001

Page 2

Page 3
Table of Contents Chapter 1 Hardware Installation……………………... 4 Chapter 2 Basic Computer Configuration…………... 8 Chapter 3 Static IP Addressing………………………11 Chapter 4 Basic Email Services……………………..12 Chapter 5 Troubleshooting………………………….. 14 Antenna Alignment Tool…………………. 16 Chapter 6 Technical Settings…………………………17 Technical Support…………………………19
Page 4
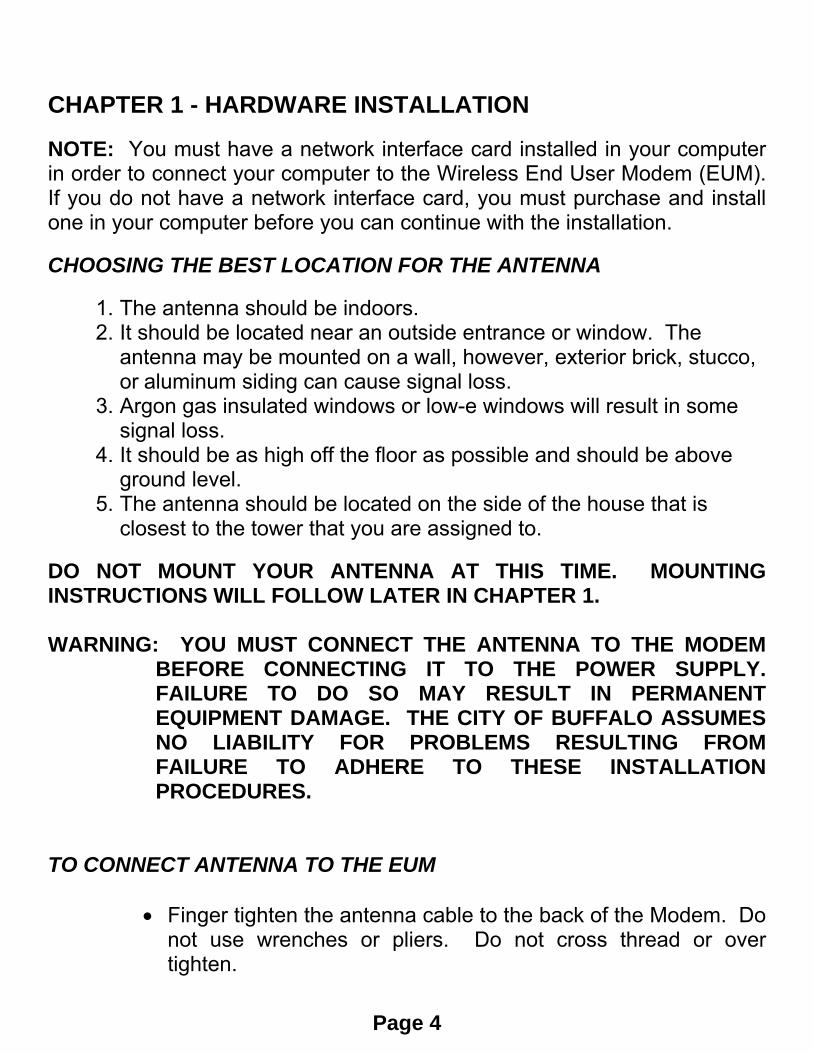
CHAPTER 1 - HARDWARE INSTALLATION NOTE: You must have a network interface card installed in your computer in order to connect your computer to the Wireless End User Modem (EUM). If you do not have a network interface card, you must purchase and install one in your computer before you can continue with the installation. CHOOSING THE BEST LOCATION FOR THE ANTENNA
1. The antenna should be indoors. 2. It should be located near an outside entrance or window. The
antenna may be mounted on a wall, however, exterior brick, stucco, or aluminum siding can cause signal loss.
3. Argon gas insulated windows or low-e windows will result in some signal loss.
4. It should be as high off the floor as possible and should be above ground level.
5. The antenna should be located on the side of the house that is closest to the tower that you are assigned to.
DO NOT MOUNT YOUR ANTENNA AT THIS TIME. MOUNTING INSTRUCTIONS WILL FOLLOW LATER IN CHAPTER 1. WARNING: YOU MUST CONNECT THE ANTENNA TO THE MODEM
BEFORE CONNECTING IT TO THE POWER SUPPLY. FAILURE TO DO SO MAY RESULT IN PERMANENT EQUIPMENT DAMAGE. THE CITY OF BUFFALO ASSUMES NO LIABILITY FOR PROBLEMS RESULTING FROM FAILURE TO ADHERE TO THESE INSTALLATION PROCEDURES.
TO CONNECT ANTENNA TO THE EUM
• Finger tighten the antenna cable to the back of the Modem. Do not use wrenches or pliers. Do not cross thread or over tighten.

Page 5
TO CONNECT THE EUM TO YOUR COMPUTER
• Attach the crossover Ethernet cable that is included to the Ethernet port on your computer and on your Modem.
APPLYING POWER TO THE EUM
REMEMBER: NEVER APPLY POWER TO THE EUM UNLESS AN APPROVED ANTENNA HAS BEEN PROPERLY ATTACHED TO THE EUM FIRST. 1. Connect the AC/DC power adapter to the EUM. To do this,
press firmly at the base of the DC connector on the power cord, and attach to the corresponding DC connector on the EUM.
2. Connect the AC-power cord between the AC/DC adapter and
an AC outlet. Your Modem will power-up; there is no ON/OFF switch.
VERIFYING PROPER EUM FUNCTION
Once power is applied to the EUM, all three front lights will come on during the start up process. After a few seconds the power light will continue to stay on.

Page 6
The middle light (RSSI LED) is a rough indicator of signal strength. (the modem type can be found on the side of the modem as “Product: EUM300_”)
The top light indicates traffic passing between your Modem and our transmission towers.
EUM3000/3003/3004 EUM3005 OFF No signal is detected. The
antenna is disconnected or is not aligned properly with your wireless internet service provider’s antenna.
No adequate signal detected. Move or turn the antenna until it begins flashing.
FLASHING The EUM has adequate signal to support the radio link. As the signal level increases, the flash rate increases. Move or turn the antenna slowly until the Signal Level LED flashes as fast as possible.
SLOW FLASH
The signal strength is poor.
FAST FLASH
The signal strength is good.
SOLID ON The signal strength is very good.
EUM3000/3003/3004 EUM3005 OFF The link is currently not
active, no data is being transferred over the link.
The Ethernet physical connection is not working properly.
ON The link is transferring data.
The Ethernet physical connection connected.
FLASHING The link is transferring data.
The link is transferring data.

Page 7
MOUNTING YOUR ANTENNA (May need to be moved to find optimal signal, see troubleshooting - Step 3 on page 15.)
(Kit includes suction cups, drywall anchors, and screws.)
1. Antennas can be mounted horizontally (wire coming out of either side) or vertically (wire coming out of top or bottom) depending on your polarization. Refer to Page 17 for your antenna polarization.
2. Either way the dish portion (concave) should face the tower that you are assigned.
3. Thread the pre-attached antenna cable through the guides in the back of the antenna bracket (if required).
WARNING: Bending the antenna cable too sharply can degrade EUM
performance. If a quarter (25 cent piece) fits into the curve, the bend is acceptable.
Insert the suction cups or screws into the base of the antenna bracket, and then mount the bracket onto the desired surface. If you mount the antenna bracket on a vertical surface, orient the bracket so that the spring clip is closest to the ceiling.
Horizontal Polarization Vertical Polarization
Page 8
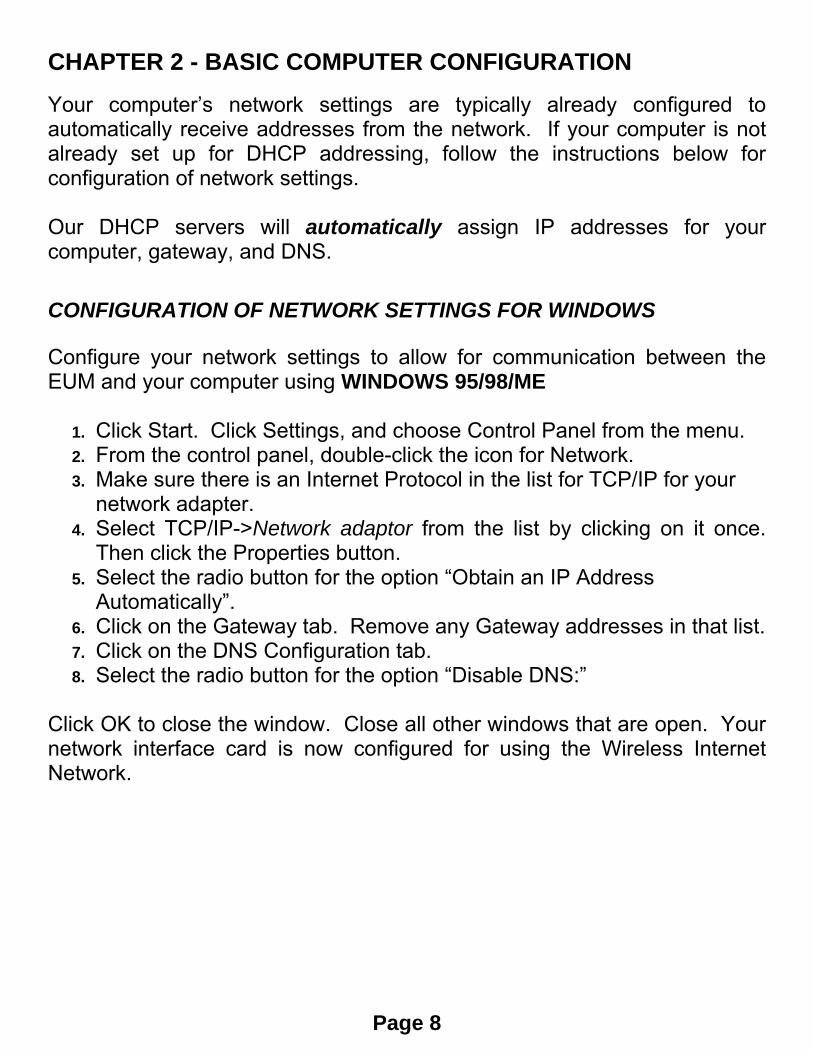
CHAPTER 2 - BASIC COMPUTER CONFIGURATION Your computer’s network settings are typically already configured to automatically receive addresses from the network. If your computer is not already set up for DHCP addressing, follow the instructions below for configuration of network settings. Our DHCP servers will automatically assign IP addresses for your computer, gateway, and DNS.
CONFIGURATION OF NETWORK SETTINGS FOR WINDOWS Configure your network settings to allow for communication between the EUM and your computer using WINDOWS 95/98/ME
1. Click Start. Click Settings, and choose Control Panel from the menu. 2. From the control panel, double-click the icon for Network. 3. Make sure there is an Internet Protocol in the list for TCP/IP for your
network adapter. 4. Select TCP/IP->Network adaptor from the list by clicking on it once.
Then click the Properties button. 5. Select the radio button for the option “Obtain an IP Address
Automatically”. 6. Click on the Gateway tab. Remove any Gateway addresses in that list. 7. Click on the DNS Configuration tab. 8. Select the radio button for the option “Disable DNS:”
Click OK to close the window. Close all other windows that are open. Your network interface card is now configured for using the Wireless Internet Network.

Page 9
Configure your network settings to allow for communication between the EUM and your computer using WINDOWS 2000/WINDOWS XP*
1. Click Start. Click Settings, and choose Control Panel from the menu. 2. From the control panel, double-click the icon for Network and Dial-up
Connections. 3. Right-click the Local Area Connections icon, and left click the
properties menu option. 4. Make sure there is an Internet Protocol in the list for TCP/IP and the
box is checked next to it. 5. Select Internet Protocol (TCP/IP) from the list by clicking it once.
Then click the Properties button. 6. Select the radio button for the option “Obtain an IP Address
automatically.” 7. Select the radio button for the option “Obtain DNS server address
automatically.” 8. Click OK to close the window. Close all other windows that are open.
Your network interface card is now configured for using the Wireless Internet Network.
*NOTE: These steps may vary slightly with Windows XP. Configure your INTERNET EXPLORER browser settings to connect through the Local Area Network (LAN).
1. Click Start. Click Settings, and choose Control Panel from the menu. 2. Double-click Internet Options. 3. Click on the Connection tab. 4. Choose the option for Dial whenever a network connection is not
present or never dial a connection. 5. Click the LAN Settings button. 6. On the LAN Settings page, check the box next to Automatically Detect
Settings. Click OK, then close the Internet Options dialog box.

Page 10
CONFIGURATION OF NETWORK SETTINGS FOR MACINTOSH
Configuring DHCP in Mac OS 8 / OS 9
1. Click on the Apple Menu in the left top corner and choose Control Panels.
2. From Control Panels choose TCP/IP. 3. On the top of the TCP/IP screen select Connect Via Ethernet. 4. In the Setup section select Using DHCP Server from the Configure
dropdown. 5. All other boxes should be left blank. 6. IP Address, Subnet mask, and Router address should default to “will
be supplied by server”. 7. Choose Close from the File Menu and click Save when prompted.
Configuring DHCP in Mac OS X
1. Click on the Apple Menu in the left top corner and choose Control Panels.
2. Choose System Preferences. 3. Click on the Network button. 4. Choose the Built-in Ethernet option from the Configure menu. 5. On the TCP/IP tab choose Using DHCP in the Configure menu. 6. Click Save.

Page 11
CHAPTER 3 – STATIC IP ADDRESSING PRIVATE STATIC IP ADDRESSING Private static IP addressing may be useful to people that have inbound network traffic or maybe required for some firewalls, routers, or VPN connections. For instructions about how to configure your computer to use a static IP addressing, view articles “TCP/IP Settings for Windows” or “TCP/IP Settings for Macintosh” found on our website at http://www.bwig.net/support.htm If you requested a private static IP address, it can be found on page 17. To request a private static IP address, contact the BWIG help desk for more information. PUBLIC STATIC IP ADDRESSING If you require a public static IP address for inbound traffic, you will be assigned both a public and private IP address. You will need to put the private static IP address in to your computer using the instructions earlier in this chapter. The public IP address will then be linked with your private IP address through Network Address Translocation (NAT). There is an additional monthly charge for a Public Static IP Address. Contact our help desk for more information about costs for this service.

Page 12
CHAPTER 4 - BWIG EMAIL SERVICES With your account, you get 10 email addresses (100 for business service). You must request what you want these addresses to be. The addresses must be setup by the BWIG help desk. The email addresses that have been set up for you are found on page 17. Each mailbox is 5 MB in size. If you need a larger mailbox, contact the BWIG help desk to discuss available options. ACCESS EMAIL USING YOUR WEB BROWSER 1. Using your web browser: enter the address of http://mail.bwig.net to get to the website setup for you to send & receive email. 2. Enter Your User ID: Your user ID is your email address. 3. Enter Your Password: Your password will be on your new service sheet. 4. Changing Your Password: To Change your password once you’re logged in, click on preferences. Then on the right pane under change password, you can type your new password twice, then click on save above. Once your password is changed, you will return to the inbox. ADVANCED EMAIL FUNCTIONS Our website contains many articles about how to setup POP3 clients to download email to your computer, how to configure POP3 clients for multiple users, and how to setup and take advantage of our Anti-spam filters. To view these and other articles, log on to http://www.bwig.net/support.htm.

Page 13
REGISTERED DOMAINS If you have a registered domain and would like us to host your email, please contact our help desk to have this service set up. There is a one time set up charge. Other fees related to domain name registration are the responsibility of the applicant. We will not relay mail for mail accounts hosted by other ISP’s.
Page 14
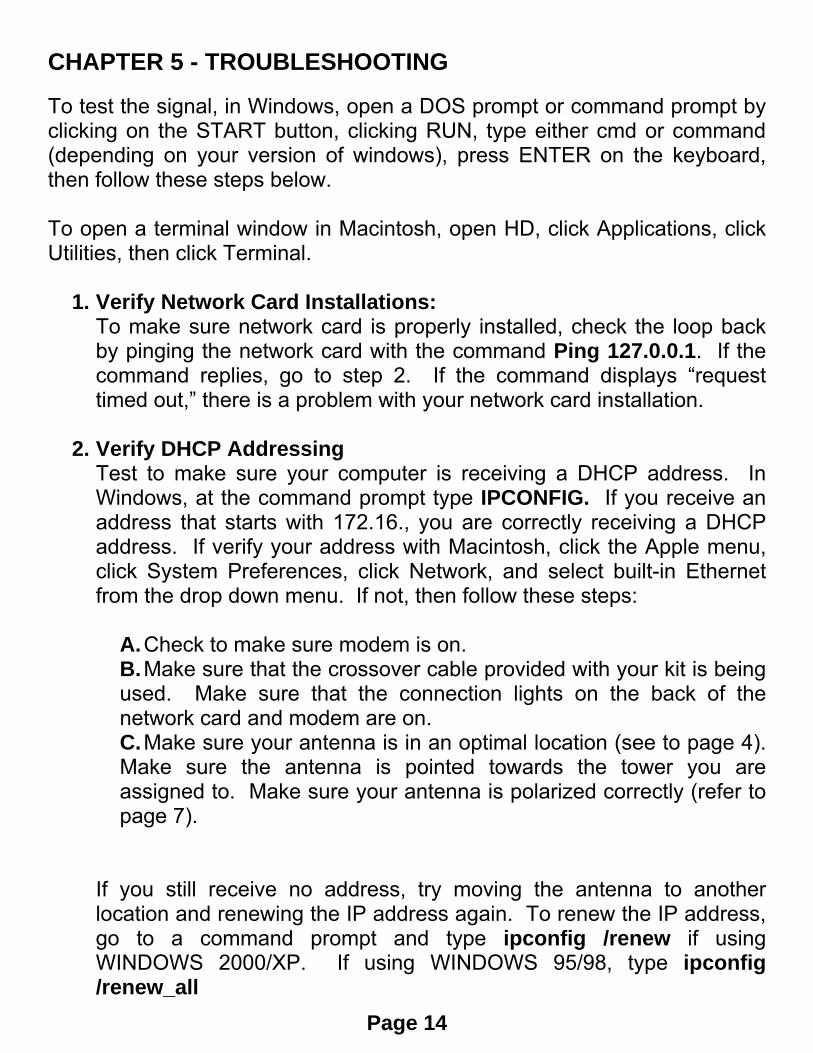
CHAPTER 5 - TROUBLESHOOTING To test the signal, in Windows, open a DOS prompt or command prompt by clicking on the START button, clicking RUN, type either cmd or command (depending on your version of windows), press ENTER on the keyboard, then follow these steps below. To open a terminal window in Macintosh, open HD, click Applications, click Utilities, then click Terminal.
1. Verify Network Card Installations: To make sure network card is properly installed, check the loop back by pinging the network card with the command Ping 127.0.0.1. If the command replies, go to step 2. If the command displays “request timed out,” there is a problem with your network card installation.
2. Verify DHCP Addressing Test to make sure your computer is receiving a DHCP address. In Windows, at the command prompt type IPCONFIG. If you receive an address that starts with 172.16., you are correctly receiving a DHCP address. If verify your address with Macintosh, click the Apple menu, click System Preferences, click Network, and select built-in Ethernet from the drop down menu. If not, then follow these steps:
A. Check to make sure modem is on. B. Make sure that the crossover cable provided with your kit is being used. Make sure that the connection lights on the back of the network card and modem are on. C. Make sure your antenna is in an optimal location (see to page 4). Make sure the antenna is pointed towards the tower you are assigned to. Make sure your antenna is polarized correctly (refer to page 7).
If you still receive no address, try moving the antenna to another location and renewing the IP address again. To renew the IP address, go to a command prompt and type ipconfig /renew if using WINDOWS 2000/XP. If using WINDOWS 95/98, type ipconfig /renew_all

Page 15
3. Signal Optimization
Ping the Gateway IP address found on page 17. Ping by typing in ping followed by the gateway IP address at the command prompt.
For example: ping 127.0.0.1 (Substitute the gateway IP address for 127.0.0.1 in the above
example.) Note: You can perform a continuous ping simulating normal Internet usage using the following example:
Windows example: Ping 127.0.0.1 –t –l 1472 (Use the gateway IP address. Note: l is the lowercase L)
Macintosh example: ping –s 1400 127.0.0.1
If you are receiving consistent replies with response times in the range of 100ms, your antenna has been properly oriented.

Page 16
OBTAINING THE OPTIMAL SIGNAL USING BWIG’S ANTENNA ALIGNMENT TOOL (Note: The antenna alignment tool will only work with the EUM3000, EUM3003, and EUM3004. It does not work with the EUM3005.) The Antenna Alignment tool can be downloaded from http://www.bwig.net/support.htm. Please follow these steps to install the Tool and align your Antenna: 1) On the CD, double click on the Antenna Alignment Tool. 2) Click run. 3) Follow the prompts to install the software. 4) After installed, the following icon will appear on your desktop.
EUM Antenna Alignment Tool.lnk
5) Double click the icon to start the program. 6) You will then be prompted to enter your Antenna Activation Key
(See page 17). The key MUST be entered exactly as shown. 7) Click OK to accept the key and begin using the tool. At this point you should have at least one colored bar on your bar graph. This tool will allow you to watch your signal strength as you move your antenna to find your optimal signal. Three or more bars on the graph indicate adequate radio signal for your equipment.

Page 17
CHAPTER 6 – TECHNICAL SETTINGS ANTENNA Polarization: □ Vertical (Cable comes out top or bottom of antenna.) □ Horizontal (Cable comes out either side of antenna.) Private Static Address: _____________________ Subnet Mask: 255.255.252.0 GATEWAY IP Address: _____________________ DNS Server IP Address: 205.171.2.65 205.171.3.65 Public Static IP Address: _____________________ Tower Location: ________________________________ Antenna Alignment Tool
Activation Key: ________________________________
YOUR EMAIL ADDRESSES
@bwig.net
@bwig.net
@bwig.net
@bwig.net
@bwig.net
@bwig.net
@bwig.net
@bwig.net
@bwig.net
@bwig.net

Page 18

Page 19
Technical Support Contact Information Website: www.bwig.net Email: [email protected] Help Desk: 763-684-5423 Hours: Monday – Friday, 8 am – 5 pm After Hours Emergency Support: 763-682-1001