Broad Stripes,Bright Star - robertkaufman.com · Companion Angle triangles to make Flying Goose...
5
Finished quilt measures 76” x 76” Broad Stripes,Bright Star Designed By Darlene Zimmerman Featuring Classic Mini’s by Darlene Zimmerman Supplies Needed: 3 yds Blue Toile (#14432- blue) 1 1/4 yd Red Stripe (#14438-3) 3/4 yd Background Lg. and Sm. Stars (#14436-14) 5/8 yd each Blue Prints (#14433-4, 14433-68, 14439-4, 14437-4) 3/8 yd each Light Prints (#14436-3, 14436-14,14435-4, 14434-2) 3/4 yd Dark Blue (Large Star Centers and Binding #14433-4) 4 2/3 yd Backing Batting: Queen size Easy Angle (EZ Quilting #8823759A) Companion Angle (EZ Quilting #882670139A) For individual use only - Not for resale Copyright 2013, Robert Kaufman Blue Toile 2—6-1/2” x 42” strips 12—6-1/2” squares Each Blue Print 1—3-1/2” x 42” strip 2—2” x 42” strips 4—3-1/2” squares 32 Easy Angle triangles Background (#14436-14) 7—2” x 42” strips 64—2” squares 64 Companion Angle triangles Cutting Directions For Notes Before You Begin • Seam allowances are 1/4” unless otherwise noted. • Please through instructions before beginning. • Remember to measure twice, cut once! From Cut To Yield Page 1
Transcript of Broad Stripes,Bright Star - robertkaufman.com · Companion Angle triangles to make Flying Goose...

Finished quilt measures 76” x 76”
Broad Stripes,Bright Star Designed By Darlene Zimmerman
Featuring Classic Mini’s
by Darlene Zimmerman
Supplies Needed:
3 yds Blue Toile (#14432- blue)
1 1/4 yd Red Stripe (#14438-3)
3/4 yd Background Lg. and Sm. Stars
(#14436-14)
5/8 yd each Blue Prints (#14433-4,
14433-68, 14439-4, 14437-4)
3/8 yd each Light Prints (#14436-3,
14436-14,14435-4, 14434-2)
3/4 yd Dark Blue (Large Star Centers
and Binding #14433-4)
4 2/3 yd Backing
Batting: Queen size
Easy Angle (EZ Quilting #8823759A)
Companion Angle (EZ Quilting
#882670139A)
For individual use only - Not for resale
Copyright 2013, Robert Kaufman
Blue Toile 2—6-1/2” x 42” strips 12—6-1/2” squares
Each Blue Print 1—3-1/2” x 42” strip
2—2” x 42” strips
4—3-1/2” squares
32 Easy Angle triangles
Background (#14436-14) 7—2” x 42” strips 64—2” squares
64 Companion Angle triangles
Cutting Directions For
Notes Before You Begin
• Seam allowances are 1/4” unless otherwise noted.
• Please through instructions before beginning.
• Remember to measure twice, cut once!
From Cut To Yield
Page 1
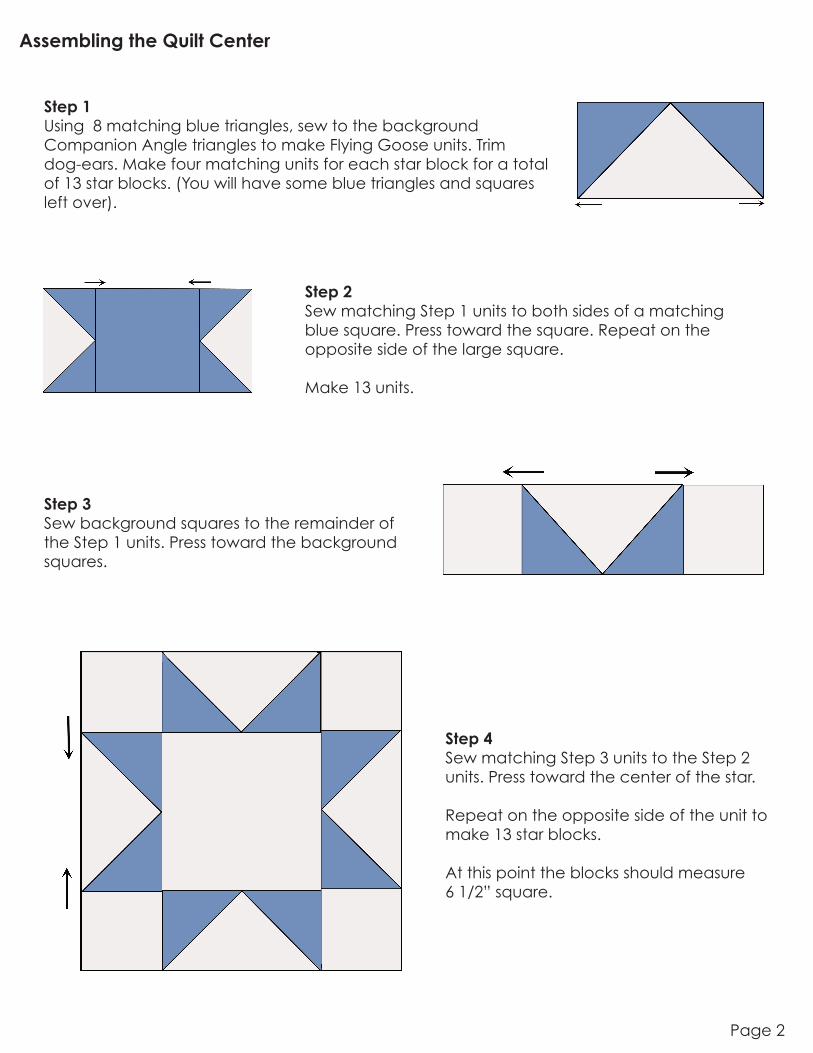
Assembling the Quilt Center
Step 1
Using 8 matching blue triangles, sew to the background
Companion Angle triangles to make Flying Goose units. Trim
dog-ears. Make four matching units for each star block for a total
of 13 star blocks. (You will have some blue triangles and squares
left over).
Step 2
Sew matching Step 1 units to both sides of a matching
blue square. Press toward the square. Repeat on the
opposite side of the large square.
Make 13 units.
Step 3
Sew background squares to the remainder of
the Step 1 units. Press toward the background
squares.
Step 4
Sew matching Step 3 units to the Step 2
units. Press toward the center of the star.
Repeat on the opposite side of the unit to
make 13 star blocks.
At this point the blocks should measure
6 1/2” square.
Page 2

Step 5
Sew three rows with three star blocks and two toile squares. Press toward the
toile squares.
Step 6
Sew two rows of three toile squares with two star blocks. Press toward the toile
squares.
Step 7
Assemble the center square by alternating the Step 5 and 6 rows as shown in
the quilt photo. Press the row seams all one direction.
Cutting Directions for Large Star
Red stripe 2— 15 7/8” x 42” strips 4— 15 7/8” squares, place
2 RST and cut once on the
diagonal to make 8
triangles
Each Blue print 2— 5 1/2” x 42” strips 9— 5 1/2” squares
2 Easy Angle triangles
Each Light print 2— 5 1/2” x 42” strips 6— 5 1/2” squares
4 Easy Angle triangles
From Cut To Yield
Page 3

Assembling the Large Star
Step 1
Sew 5 blue squares and four light squares together into a
nine-patch block as shown. Press. Make 4 blocks.
At this point the blocks should measure 15 1/2” square.
Step 2
Sew 4 blue squares, 2 blue triangles, 2 light squares
and 4 light triangles together to make a large trian-
gle unit. Press.
Make four triangle units.
Step 3
Arrange the striped triangles around the
center so the stripes are aligned correctly.
Sew the striped triangles to both sides of the
Step 2 pieced triangles.
Make 4 units.
At this point the units should measure
15 1/2” x 30 1/2”.
Step 4
Sew the star units together the same way as the small stars were assembled.
Page 4

Cutting Directions for Borders & Binding
From Cut To Yield
Blue Toile 3—8 1/2” x 42” strips
2—8 1/2” x 62” lengthwise
Top and bottom borders
borders for the sides
Dark Blue 1—4 1/2” x 42” strip
8—2 1/4” x 42” strips
4—4 1/2” squares
Binding
Red Stripe 3—2 1/2” x 42” strips 32 Easy Angle triangles
Background (#14436-14) 3—2 1/2” x 42” strips 16—2 1/2” squares
16 Companion Angle triangles
Assembling the Quilt
Step 1
Assemble the large stars in the same manner as the small stars for the center. Make 4. At this
point the star blocks should measure 8 1/2”.
Step 2
Join the three 8 1/2” x 42” horizontal borders with straight (not diagonal) seams. Trim two borders
the width of the quilt center (60 1/2”). Sew to the top and bottom of the quilt. Press toward the
borders.
Step 3
Trim the lengthwise side borders to the measurement of the quilt center (without borders). Sew
the large star blocks to both ends of the side borders. Press toward the borders. Sew to the sides
of the quilt.
Finishing the Quilt
Step 1
Layer, baste and quilt as desired. Before binding, hand or machine baste (using a walking foot) a
scant ¼” around the edge of the quilt to hold the layers together and prevent shifting.
Step 2
Prepare the binding by joining the ends with diagonal seams pressed open. Fold the binding
in half, wrong sides together and press to make a double binding. Sew to the quilt with a 1/4”
seam, mitering the corners.
Step 3
Trim excess batting and backing, turn the binding to the back side of the quilt and stitch down
by hand with matching thread.
Enjoy your quilt!
Page 5