
British V8 Newsletter (aka MG V8 Newsletter) - Sports · Watkins Glen in the rain. The Cornett...
62
MGA headlamp and vintage leather bonnet strap (owner: Jonathan Lamson) The British V8 Newsletter - Current Issue - Table of Contents British V8 Newsletter October - December 2007 (Volume 15, Issue 3) 306 pages, 706 photos Main Editorial Section (including this table of contents) 65 pages, 156 photos In the Driver's Seat by Curtis Jacobson Canadian Corner by Martyn Harvey Machine Shop 101: An Introduction to the Basic Processes by Greg Myer Take a Guided Tour of the "Awesome Engines" Machine Shop by Greg Myer Classic Conversions' New MGB 4-link Rear Suspension by Curtis Jacobson Install Sebring Style (Fiberglass) MGB Fender Flares by Simon Austin MGB Roadmaster - the Story of "Project BADASS" by Jim Blackwood Visit the MG Owners Club Facilities in Cambridge England by Rob Ficalora Rob Ficalora's MGB V8 Project - Progress Report by Rob Ficalora Like a Phoenix - the Story of Steven Ward's MGB V8 Project by Steven Ward Enter the Second Annual British V8 Photo Contest by Curtis Jacobson Please Support Our Sponsors! by Curtis Jacobson Special Reference Section: The History of MG's "MGB GT V8" Model, part 1 78 pages, 138 photos Press Release: MGB GT V8 - Preface (British Leyland) Press Release: MGB GT V8 - Description (British Leyland) Press Release: MGB GT V8 - Development (British Leyland) Press Release: MGB GT V8 - Background (British Leyland) Press Release: MGB GT V8 - Technical Specifications (British Leyland) Magazine Ad: "This Will Ruin Your Day" (British Leyland) The Thames Valley Police MGB GT V8s by David Willcox MG B GT V8 (Police Review magazine) Auto Test: MGB GT V8 (Autocar weekly magazine) Road Test: MGB GT V8 (Motor weekly magazine) New Targets for the Old Firm (Motor weekly magazine) M.G.-B GT V8 Road Test (Motor Sport magazine) MGB V8 Goes Like A Shot From A Gun (Midweek Observer) Whatever Happened to the MGB V8? (Old Motor magazine) Photo Reference: Nigel Ricardo's 1975 MGB GT V8 Photo Reference: Kevin Richards' 1974 MGB GT V8 Photo Reference: Dave Wellings' 1974 MGB GT V8 Special Reference Section: Rover's Aluminum V8 Engine, and Cars They Put It In 41 pages, 84 photos History of Rover's Aluminum V8 (Autocar weekly magazine) Press Release: The Leyland Eight GE (Leyland Motor Corp. N.A.) Press Release: Rover 3500S Sedan (and lightweight V8) (Leyland Motor Corp. N.A.) Press Release: Rover 3500S - Specs and Pricing (Leyland Motor Corp. N.A.) Rover P6 Design Innovations by Bill Wardlow Photo Reference: Lance LaCerte's 1970 Rover 3500S
Transcript of British V8 Newsletter (aka MG V8 Newsletter) - Sports · Watkins Glen in the rain. The Cornett...

MGA headlamp and vintage leather bonnet strap (owner: Jonathan Lamson)
The British V8 Newsletter - Current Issue - Table of Contents
British V8 Newsletter October - December 2007 (Volume 15, Issue 3) 306 pages, 706 photos
Main Editorial Section (including this table of contents) 65 pages, 156 photos
In the Driver's Seat by Curtis Jacobson
Canadian Corner by Martyn Harvey
Machine Shop 101: An Introduction to the Basic Processes by Greg Myer
Take a Guided Tour of the "Awesome Engines" Machine Shop by Greg Myer
Classic Conversions' New MGB 4-link Rear Suspension by Curtis Jacobson
Install Sebring Style (Fiberglass) MGB Fender Flares by Simon Austin
MGB Roadmaster - the Story of "Project BADASS" by Jim Blackwood
Visit the MG Owners Club Facilities in Cambridge England by Rob Ficalora
Rob Ficalora's MGB V8 Project - Progress Report by Rob Ficalora
Like a Phoenix - the Story of Steven Ward's MGB V8 Project by Steven Ward
Enter the Second Annual British V8 Photo Contest by Curtis Jacobson
Please Support Our Sponsors! by Curtis Jacobson
Special Reference Section: The History of MG's "MGB GT V8" Model, part 1 78 pages, 138 photos
Press Release: MGB GT V8 - Preface (British Leyland)
Press Release: MGB GT V8 - Description (British Leyland)
Press Release: MGB GT V8 - Development (British Leyland)
Press Release: MGB GT V8 - Background (British Leyland)
Press Release: MGB GT V8 - Technical Specifications (British Leyland)
Magazine Ad: "This Will Ruin Your Day" (British Leyland)
The Thames Valley Police MGB GT V8s by David Willcox
MG B GT V8 (Police Review magazine)
Auto Test: MGB GT V8 (Autocar weekly magazine)
Road Test: MGB GT V8 (Motor weekly magazine)
New Targets for the Old Firm (Motor weekly magazine)
M.G.-B GT V8 Road Test (Motor Sport magazine)
MGB V8 Goes Like A Shot From A Gun (Midweek Observer)
Whatever Happened to the MGB V8? (Old Motor magazine)
Photo Reference: Nigel Ricardo's 1975 MGB GT V8
Photo Reference: Kevin Richards' 1974 MGB GT V8
Photo Reference: Dave Wellings' 1974 MGB GT V8
Special Reference Section: Rover's Aluminum V8 Engine, and Cars They Put It In 41 pages, 84 photos
History of Rover's Aluminum V8 (Autocar weekly magazine)
Press Release: The Leyland Eight GE (Leyland Motor Corp. N.A.)
Press Release: Rover 3500S Sedan (and lightweight V8) (Leyland Motor Corp. N.A.)
Press Release: Rover 3500S - Specs and Pricing (Leyland Motor Corp. N.A.)
Rover P6 Design Innovations by Bill Wardlow
Photo Reference: Lance LaCerte's 1970 Rover 3500S

"How It Was Done" Articles: 122 pages, 328 photos
#165 LeRoy Barton (Lakewood CO, 72 MG MGB, Ford SHO V6 EFI, Mazda M5OD 5-speed)
#166 Earl Brotherton (Asheville NC, 77 MG MGB, Chevy 4.3 V6, T56 6-speed)
#167 John Butruce (San Jose CA, 72 Triumph TR6, Ford 302, C4 auto)
#168 Chris Falla (Poole Dorset UK, 68 MG MGB, Ford 2.0 I4 turbo, T5 5-speed)
#169 Jay Fowler (Amery WI, 73 Jenson-Healey, Buick 215, T5 5-speed)
#170 David Graham (Sherrills Ford NC, 72 Triumph Stag, Ford 5.0 EFI, T5 5-speed)
#171 Art Hart (Ottsville PA, 63 Triumph TR4, Ford 302, T5 5-speed)
#172 Gregg Haskell (Montrose CO, 77 MG MGB, Buick 215, T5 5-speed)
#173 Lorenz Hassenstein (Ridgefield CT, 68 MG MGB/GT, Rover 5.0, T5 5-speed)
#174 Jerry Johnson (Port Townsend WA, 55 Healey 100-4, Chevy 350, T10 4-speed)
#175 Glenn Merrell (Lafayette CO, 73 Triumph Stag, Rover 3.5 EFI, LT77 5-speed)
#176 Richard Moor (Angola IN, 69 Fiberfab Avenger, Buick 3.8 V6 turbo, VW 4-speed)
#177 Ed Olson (St.Paul MN, 69 Triumph TR6, Pontiac 487, T400 auto)
#178 David Park (Centerburg OH, 60 Alpine, Ford 410, T10 4-speed)
#179 Jack Pease (Champaign IL, 80 MGB 302, Tremec 5-speed)
#180 Fred Schade Jr. (Buffalo NY, 55 Healey 100-4, Chevy 305, T10 4-speed)
#181 George Snively (Sacramento CA, 65 MG MGB, Ford 289, Toploader 4-speed)
#182 Rick Vandenberg (Arvada CO, 72 Triumph TR6, Chevy 350, 700R4 auto)
#183 Steve Ward (Dallas TX, 80 MG MGB, Chevy LT1 5.7L V8 EFI, 4L60-E auto)
#184 Don Watson (Wheeling WV, 74 Triumph TR6, Ford 5.0, Ford AOD auto)
#185 David Winne (Liverpool NY, 79 MG MGB, Rover 3.5, GM 700R4 auto)
Prefer to DOWNLOAD or PRINT the whole newsletter? This newsletter is available in printer-optimized Adobe "PDF" format - but only for our financial contributors. To contribute the funds so badly needed for our continued growth... Click Here to Support The British V8 Newsletter!
What's YOUR story? We're working on the next issue right now. Please consider submitting info, photos, or an article!
British V8: Newsletter Photo Gallery Web Forum Meetings Contact Info Web-Rings Site Map

the editor's car
In The Driver's Seat (Volume XV Issue 3, December 2007)
by: Curtis Jacobson
Welcome Readers!
If this is your first introduction to The British V8 Newsletter, you're in for a treat! You've found the one and only magazine that's allabout serious performance modifications for classic British sports cars. We also feature the British sports cars that originally camewith V8 engines. Our mission is to provide a very diverse range of quality content: entertaining, educational, technical, andinspirational articles and photographs. Something for nearly every car enthusiast!
Our niche of the British car hobby isn't the largest, but it's the most vibrant and the fastest growing. The popularity of radicalperformance modifications is both out-pacing and complementing traditional restoration work. The term "restomod" captures thepoint: many of today's enthusiasts want to combine classic styling with modern performance, and they demand modern reliability.We're seeing bigger-budget projects and we're seeing lots more of them. If you're skeptical of these trends, consider this websiteitself. We reliably serve over 2000 visitors every day! That's up about 300 percent from last year. On October 22, we quietly launcheda new online message board. By the time you read this, it'll have passed the 1000-messages-posted milestone.
So What's New In This Issue?
Special Historical Section on the "Factory" MGB GT V8
Last summer I was looking over back-issues and something really struck me: somehow we'd managed to go fifteen years withoutever including an article on the "factory" MGB GT V8 model. How did that happen? What can we do to correct it? Sometimes thingsfall into place like magic. The very next day, I was talking on the telephone with my friend Kelvin Dodd of Moss Motors, and someonewalked into his office. "Oh, here's someone you need to meet."
Talk about an informal introduction, eh? Kelvin handed the phone to Ken Smith. At the time, I didn't realize who I was talking to, butI've since learned that Ken Smith is a veteran MG journalist, a passionate MG enthusiast, a dedicated historian, and a very generousman. If you've read any MG-specific magazine, you've probably seen his work. He's contributed to "Safety Fast", "MG Enthusiast",and "Abingdon Classics". He was the founding editor of "MGB Driver", he's the Editor of "Classic MG", and he's the Executive Editorof Moss's "British Motoring". He also authored the outstanding book: "Aspects of Abingdon".
Ken has been enamored with MGB GT V8's for years. Over that time, he's collected a treasure trove of articles, photos,remembrances, and correspondence about these special cars - all for a book project that never quite came together. In this issue ofThe Newsletter we're publishing "Part One" of Ken's collection! We'll have another big installment in our Spring issue, and perhapsone next Autumn. I haven't gotten anywhere near the bottom of the box yet!
This special section also includes three "Photo Reference" articles on factory cars. I'm very grateful to their respective owners forsharing detailed photos and information. (Readers, we're on the look-out for more - send us leads!)
Special Section on the Rover V8 (and cars Rover put it in)
As I researched the MGB GT V8, I became interested in knowing more about the Rover connection. This section is the result so far.I'm particularly indebted to Bill Wardlow of The Motorway Ltd. (a full service shop in Fort Collins CO), who gave me a detailed

personal tour of a Rover P6 ("3500S"). I know you'll appreciate his insights too. David Gable contributed the original Rover pressmaterials for this section.
To fully understand the genesis of the MGB GT V8 - in England and at BLMC - one also needs to know about the role of KenCostello. It's not in this issue, but don't worry! We're planning a section specifically on Ken and his "Costello V8" cars for our Springedition. (Readers: please send me anything you can share on these subjects!)
How-It-Was-Done Articles
It just wouldn't be a "British V8 Newsletter" without our extremely popular How-It-Was-Done articles! The new crop of twenty-onearticles certainly demonstrates the remarkable diversity of our community.
While all of these cars are wonderful, from my perspective one of them stands out as a must-read: Dr. George Snively's 1965 MGBwas professionally converted to V8 power in 1966. That makes it the earliest-completed MG engine swap we've documented in thisformat so far. Of course we all know that MG V8 engine swaps date right back to at least the early fifties, and one MG-TC inparticular actively raced with a Buick 215 V8 engine throughout the 1962 season. We're continuing a loooong tradition here.
Congratulations!
To John Targett for Winning MGVR's "Denver Cornett Jr. Trophy"
Folks who attended British V8 2007 will recognize John as the man who brought both an Aston Martin and a Jensen - as well as atrailer full of MGB racecar parts to sell. (He couldn't bring his MGB GT V8 because it's back home in England.) As the proprietor ofTargett Motorsports, John is also an enthusiastic sponsor of The British V8 Newsletter... but outside of our circle he's better knownas a keen driver. This year John raced his red MGB to strong finishes in eight race weekends - including a dominant performance atWatkins Glen in the rain. The Cornett Trophy was awarded at SVRA's "Zippo US Vintage Grand Prix" this September to John forbeing the top-placing MG driver.
To Bill Guzman, whose 1967 MGB-GT is featured in Classic Motorsports' 2007 calender
Run down to the news stand and buy the January issue of Classic Motorsports. The free bonus wall calendar is a keeper... becauseBill's V6-powered GT is drop-dead gorgeous! (It's on the February page. The calendar also includes a nifty race-prepped SunbeamTiger.) Bill is the proprietor of Classic Conversions Engineering, another of the vendor sponsors that keep "British V8" growing andthriving. Incidentally Bill has now sold over 300 MGB-V6 conversion kits!
To Larry Shimp, whose 1968 MGB-GT is featured in the late-winter issue of British Motoring magazine
Good job Larry! Moss Motors' "British Motoring" magazine has recognized a point I made earlier in this article by prominentlyfeaturing Larry's immaculate, incredibly-refined Ford-powered MGB GT in a feature article entitled "MGB V8 Restomod". The articleshows that the essential character of our cars can be developed and improved - not abandoned or destroyed - by installation of abetter engine. Larry is a frequent contributor to The British V8 Newsletter, and he's active in our meets too.
This magazine relies on the generous support of readers like you!To contribute to our operating budget, please click here and follow the
instructions.(Suggested contribution is twenty bucks per year. Feel free to give
more!)

British V8 2008 (July 13-16, 2008 in Port Washington WI)
Our annual British V8 meet is the best place to enjoy a large number of performance-modified and V8-powered British sports cars intheir element, and you're invited! Please feel welcome no matter what kind of car you're currently driving. Please note that the name"V8" wasn't selected to exclude anyone. V6 and other engine types are totally welcome too. Also, please consider that many peoplehave attended our meets to collect ideas, information, contacts, and inspiration before starting their own projects. We stronglyrecommend that.
This year's meet is being coordinated by Paul & Mary Schils and they're planning a diverse range of exciting activities. The fullschedule will be published here on the British V8 website later in January. Keep an eye on the "Pub" section of the message boardfor the latest-breaking event news. As I get more concrete information, I'll also update the "Meeting Overview" page which is alwayseasily accessed by clicking on the big "Meetings" button at the top of every single page of this website.
If you haven't booked a room, you'd be wise to act quickly. We have a good discount on a block of rooms, but it's filling up quickly.Here's the contact information for the host hotel. (Remember to mention "British V8 Meet" when placing your reservation to get thegroup-discount price of $87.)
Country Inn and Suites 350 E Seven Hills Rd Port Washington, WI 53074 (262) 284-2100
Nearby Elkhart Lake is the home of the Road America race track. We'll visit the track during our meet, and also some of us will bestaying over in Wisconson a few extra days to enjoy the Kohler International Challenge (with Brian Redman). It's a full weekend ofSVRA sanctioned vintage racing, plus associated activities such as a concours d'elegance. Our group discount for the race events is20% off, and Road America will allow us to buy tickets at this discount when we visit the track.
This Newsletter is a Volunteer Effort
The British V8 Newsletter and website represent the work of many people. I want to take a moment to recognize and thank all thefolks who've contributed articles, photos, and information. Returning readers will probably recognize some familiar names includingMartyn Harvey, Greg Myer, and Jim Blackwood. I also want to thank brand-new writers Simon Austin, Rob Ficalora, Steve Ward, BillWardlow, and David Willcox plus all the folks who've contributed "How It Was Done" write-ups and photographs, and Peter Mittler forphotographs from his recent trip to England.
I continue to be encouraged by the generosity of readers. Since the last issue, we've been blessed with financial support from thefollowing individuals: Tony Bates, Jeb Blanchard, Richard Bunch, Brian Clough, Graham Creswick, Lamar Crowell, Steve DeGroat,Michael Devenis, Gerrit Diepering, David Dillon, Barrie Egerton, Don Faber, Rob Ficalora, David Germain, Calvin Grannis, BruceHarland, Martyn Harvey, Erik Henrichsen, Ken Hiebert, Rod Holderbaum, Jerry Jackman, Bill Jacobson, Jerry Johnson, Chris Jones,Larry Kelly, Bob Kilpatrick, Dale Knapke, Wayne Kube, Robert Lockwood, Mike Maloney, David Maples, Dan Masters, JacquesMathieu, Bruce Mills, Robert & Susan Milner, Colin Ostergard, Donald Paye, Bernie Posey, Jack Renaud, Nigel Ricardo, Paul & MarySchils, Terry Schulte, Les Shockey, Jim Stuart, Mark Trosper, Paul Waters, Nicolas Wiederhold, and Bill Young. You guys arewonderful! Your contributions will be put to good use expanding the depth and breadth of our coverage.
Please Support Our Sponsors!
Here's a great performance tip: pick up your telephone and work through the list of companies in our Vendor Directory!It really pays to get to know these guys. I've been discovering that most of them offer more different performance parts and servicesthan are advertised on their websites. I can honestly say that every one of our sponsors is friendly, knowledgeable, and will be happyto help you with anything they can. Keep in mind that our sponsors/advertisers are mostly small businesses with very limitedadvertising budgets. Please thank them for sponsoring "The British V8 Newsletter", and let them know that their $40/year ads arereaching the right people.
We welcome sponsors that are new with this issue:
BMC British Automobile LLC MGB V6 conversions and the parts so you can do them yourself.
Custom Rod Works Conversions and suspensions / fabrications and design / mild to wild!
Motorcar Garage British Automobiles are our passion... Let us share the passion with you!
The Wedge Shop Specializing in TR7 and TR8 performance modifications, and Rover V8 engines.
Wire Wheel Classic Sports Cars A dealer in quality classic British sports and race cars.
And familiar companies that have renewed and increased their sponsorship:
Advance Auto-Wire Advance Auto-Wire: Electrical reliability in a British car? Believe it!
Advanced Distributors, LLC Distributor rebuilding and re-curving for all vehicles.
All British Car Repair MGA and MGB V8 conversions. Quality restorations and repairs.

Brit-Tek Ltd. The MGB specialists where people are more important than parts!
Brooklands Car Components Custom built sportscars with a British heritage.
Classic Conversions Engineering MGB V6 specialists, including kits, plus MGB chassis upgrades.
Fast Cars Inc. British sports car chassis and handling. Conversions, modifications and brakes.
Mantell Motorsport Ford V8 engine conversions for MGB, plus powder coating.
The Motorway Ltd., Fort Collins CO Restoration, customization, race preparation and performance.
Pieces of Eight! Struts to hold open the bonnet and the boot lid or GT hatch of your MGB.
Roadtronics Automotive Technologies (aka: "RATCO") Triumph frames & performance chassis upgrades.
Reborn Company LLC Rover engine specialists. MGB V8 conversions and big brake kits.
The Sports Car Shop Sales service and restoration of fine British automobiles.
Targett MotorSport Performance & racing: engine, tranny, wheels, brakes, handling & more.
Are you in the British sports car performance trade? You should be listed here too! (Here's info about advertising.)
British V8: Newsletter Photo Gallery Web Forum Meetings Contact Info Web-Rings Site Map
Canadian Corner (Volume XV Issue 3, December 2007)
by: Martyn Harvey
25 Years? - 40 Years? - Worth the Wait!
In the late 60s and early 70s I was a teenager living in the UK. I loved cars then and I still love them today. Starting with an AustinMini, a Morris Minor pick-up, and a Ford Cortina, I learned to drive at a very young age... and I couldn't wait to get my license and acar of my own. This is the story of how it took twenty-five years to get from there to the car I always needed, and why it was worth thewait.
I've also included a summary of Key Events in the History of the MGB V8 Hobby in Canada.
You have to start somewhere I guess, and I started with a VW Beetle. I loved it. It was a grey 1962 model that I wanted to convert toa dune buggy. (Youthful ambition!) In those early years, I also briefly owned a black 1957 Beetle.
When I moved to Canada in 1973, the first car I got was a turquoise blue, oil guzzling, rust-bucket. A 1964 Mercury Comet certainlywasn't my first choice! I really wanted an MGB GT and I actually went to look at a used 1967 GT. But my very protective uncle withwhom I was living was also my guardian, and he had already decided that a used British sports car would be a bad idea. In his roleas guardian it was his duty to make sure I didn't get ripped off buying something silly (or British.) Ironically, he brought home theturquoise rust-bucket and tried to convince me it was a good deal for $100.
However, it wasn't a good deal and I quickly moved on to my second Canadian car: a 1965 Beetle. It was on this car that I learnedsome basic auto mechanics. I tried to tune the engine one day and set the car on fire. My next car was a 1971 Renault "12". Ienjoyed the front wheel drive, the comfortable seats and the excellent fuel consumption... but I still wanted an MGB GT.
When my parents arrived in Canada they needed transportation and they decided to buy the cheapest new car available: a 1974AMC Gremlin for $2680. I inherited this car a couple of years later and drove it while rust consumed it. It wasn't a fun car to drive: itdidn't really go and it certainly wouldn't stop!

When I became fully employed I managed to move back into the world of imported cars and bought a used 1976 Audi 100LS. It wasa posh-looking car but also a money pit and I learned that it was impossible for me to tune up an early style Bosch fuel injectionsystem. That was definitely a good thing, actually, since it prevented me setting the car on fire like the old VW.
In 1978 my dad helped me to buy a brand new Ford Fiesta. It was truly a fun car to drive and it was also a sensible car. However, itwas small - very small - and not fast either. It was probably the need for speed that led me to the purchase a brand new 1983"T-roofed" Mercury Capri 302 5-speed. This car was a monumental diversion from family practicality and it got me hooked on V8power plants. It was a lot of fun, and it was fast, but it just didn't handle the way a sports car should. That point was driven home tome when I drove a friend's 1980 Triumph TR8. My life was changed forever. I finally knew that I didn't just want a British sports car - Ineeded one - and I decided to take action.
Enjoying this article? Our newsletter is funded through the generoussupport of readers like you!
To contribute to our operating budget, please click here and follow the instructions.
(Suggested contribution is twenty bucks per year. Feel free to givemore!)
That decision led me to the purchase of an MGB. My top three reasons for choosing the MGB were: (1) It seemed to be the quintessential British sports car, (in other words, it looked good), (2) It was cheap to buy (affordable), (3) It would be cheap and easy to maintain (durable, and with low operating costs).
There was a fourth reason too: I wanted to learn how to maintain my own car and the B seemed simple enough to be a good start.This "fourth reason" turned out to be very true. The first driving trip in my 1972 MGB resulted in a broken U-joint and a very slow limphome! The first tune-up I attempted on my 77 MGB resulted in a cross-threaded spark plug and some expensive machining on thecylinder head. For some reason these problems didn't turn me off MG cars in the slightest. Strangely enough, they created thatspecial bond MGB owners have with their cars. The bond kept growing stronger and by 1995 it had grown into a bit of an obsessionthat led me to complete a V8 conversion.
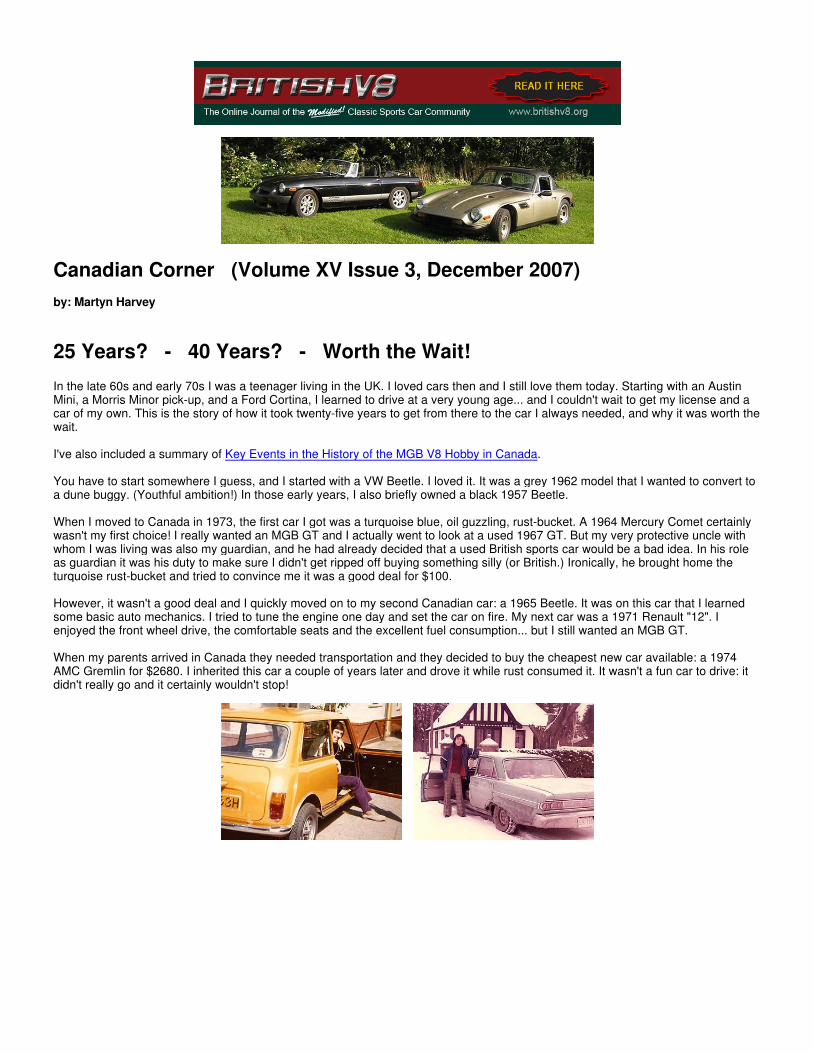
I had already owned and enjoyed my red four-cylinder MGB Roadster for about eight years when I first laid eyes on a black MGB thatleft an indelible mark in my mind. I was smitten and I decided I just had to have a shiny black "B" with alloy rims, chunky tires and anoverdrive gearbox.
A few months later I was driving home my new possession: a sixteen-year old 1979 MGB LE. The car was in good original condition,still sporting the factory paint, biscuit interior, and single Stromberg carb. The factory dash plaque recorded her as car number 54 of
100 imported into Canada. The odometer showed just 86,000 original kilometers and the Ministry of Transportation records indicatedthree previous owners. The last owner had parked her in a barn beside a Healey 100 for some time, although he did drive heroccasionally. He had oil sprayed the chassis every year and this had kept the rust away. She was solid but in need of some TLC.She was also in need of more horsepower!
During the eight years I owned my red '72 B, I had learned to fix minor mechanical problems and to enjoy making minor performanceenhancing mods. I added adjustable shocks, thicker sway bars, alloy rims, wider tires and exhaust headers. That car was a lot of funto drive around the country roads of South-Western Ontario. In comparison, the LE was a slug and I was determined to dosomething about it.
(At right: BritishV8 autocross hot-shoe Graeme Harvey in the driver's seat. His brother Andrew waits for a turn.)
The black MGB that had "caught my eye" the previous year was quite a special car. It was a Rover V8-powered machine. I wasdetermined to own one too. Of course this meant building my own BV8 since at that time it was almost impossible to find such a carfor sale in Canada. I wasn't sure if I was up to the challenge since I had only been tinkering and playing with my '72 B - basicallychanging oil and performing routine maintenance tasks. As I researched the project, I discovered to my surprise a couple of otherMGB V8s in South-Western Ontario. Don Smith of Cambridge and Keith Childs of Hamilton had independently built Rover-poweredMGBs. (Both of these cars still reside in Ontario and they're both show-cased in the British V8 website's MG Photo Gallery.) I alsodiscovered a factory MGB GT V8 in Toronto, owned by Dave Plummer. This car was brought over to Canada by Dave when heemigrated from England. I was thrilled to purchase a brand new factory V8 tachometer from him that continues to operate in mycurrent car: "HARV8".
In 1997 then, twenty-five years after purchasing my first car back in the UK, and twenty-five years after Ken Costello produced hisfirst MGB V8, I started driving my first MGB V8 roadster. I wasn't disappointed with my efforts or with the money it took to build thecar. I'm just as smitten today with the whole MGB V8 hobby as ever!
In fact, the MGB V8 hobby in Canada just keeps getting better and better. I've recently started a construction of another MGB V8 toenjoy in my retirement, but this one will be an MGB GT - the car I wanted in the beginning except better!
Martyn's MGB LE V8 (aka "HARV8") and his '74.5 MGB GT V8 project car.
Key Events Related to the History of MGB V8's in Canada
Year Activity
1962 First MGB ("G-HN3 101") was produced at Abingdon, England.
1968 Earliest known MGB V8 conversion within Canada is offered for sale.A 1967 MGB GT with Ford 289 was offered by Gulliver Motors in Hamilton ON for $3500.If you have additional info about this or any other early conversions please contact us!
1967 - 1969 Abingdon produced the MGC (4,542 roadsters and 4,457 GTs).
1971 Ken Costello introduced his MGB GT V8 in the UK press.
1972 Costello shipped a left-hand drive MGB GT V8 (w/ automatic) to a Canadian customer.
1973 - 1976 Abingdon produced 2,591 "factory" MGB GT V8s in the UK.(Note: actually 2,600 if you count the pre-production engineering & marketing builds.)
1976 MG ceased production of the MGB GT V8 in the UK.
1980 MG produced their final MGB at the Abingdon factory.
1992 - 1994 Rover produced approximately 2,000 MG RV8s in the UK.

1993 MG V-8 Newsletter launched by Kurt Schley in Ohio.
1997 - 2003 Canadian MGBV8 Register website launched by Martyn Harvey in Ontario.In 2003 there were 39 Canadian members listed.
1997 First MG V-8 Annual Meeting held (in St.Louis MO)
1998 Brooklands Car Company of (Kitchener ON) Canada produced their first "350S".(The Brooklands 350S was an MGB-based special powered by a Rover V8 engine.Brooklands has developed a succession of MGB-based V8 sports cars since 1998.)
1997 - 2007 Growing #'s of Canadian V8-conversions attended British V8 Meets:
1997 (St.Louis MO) - no Canadian cars in attendance
1998 (Annapolis MD) - 1 Canadian car (Martyn Harvey)
1999 (Champagne IL) - no Canadian cars in attendance
2000 (Westlake OH) - no Canadian car in attendance
2001 (Sebring FL) - 1 Canadian car (Martyn Harvey)
2002 (Grand Rapids MI) - 2 Canadian cars (Pete Smith & Martyn Harvey)
2003 (Townsend TN) - 1 Canadian car (Martyn Harvey)
2004 (Grand Rapids, MI) - 2 Canadian cars (Chris Trace & Martyn Harvey)
2005 (Terra Haute IN) - 2 Canadian cars (Pete Smith & Graham Creswick)
2006 (Townsend TN) - 6 Canadian cars in attendance!
2007 (Willoughby OH) - 10 Canadian cars in attendance!!!
2000 - 2007 ~1/2 dozen Canadian V8s gathered annually at the Bronte British Car Day, Burlington ON.
2001 Dan Masters began uploading British V8 Newsletters to the internet (in PDF format).
2006 Curtis Jacobson moved the British V8 Newsletter entirely online and made it free.
2007 Now that 15 years have passed, it's feasible to import and register an MG RV8 in Canada.
2010 ? Proposed Canadian-Hosted British V8 Meet.
Disclaimer: This page was researched and written by Martyn Harvey. Views expressed are those of the author, and areprovided without warrantee or guarantee. Apply at your own risk.
British V8: Newsletter Photo Gallery Web Forum Meetings Contact Info Web-Rings Site Map

Greg Myer takes us along for an inside look at a few local machine shops!
Machine Shop 101: an introduction to the basic processes
as published in British V8 Newsletter, Volume XV Issue 3, December 2007
by: Greg Myer
What happens at a machine shop? What do we need to know before we take our parts to the machine shop? Does it even matter?Maybe we just want our block bored and to get on with the build. Well it depends very much on what your goals are, what theintended use of the engine in question is, how much horsepower you intend on producing and how long it's designed to last.
The more knowledgeable one is going in, the more intelligent questions you can ask and then the result should be a better buildwhen you get all your parts back. We will look at a number of areas starting with some very basic information so you can see howthese things work together. They do work together. Never forget that there are relationships, many and varied, between all thefunctioning and nonfunctioning parts of your motor.
Relationships
No, I'm not going Dr. Phil here. First there are mechanical relationships. Piston to bore clearance for example measured inthousandths of an inch. Many different dimensions need to be considered. Some will be built into the new parts and need to bechecked and others will need to be machined to specifications. Other relationships are when things happen. In engines these areusually measured in degrees of a circle, which has 360º. Spark timing, for example, might be expressed: in degrees "Before TopDead Center" (BTDC). Some of these relationships are affected by the machine work. A third relationship is ratios. An "over-square"bore to stroke ratio for example. These mostly fall under the design stage of planning the build rather than the machining process.Also included in ratios are volumes. Intake port volume and combustion chamber volume come quickly to mind. These are affectedby various machining jobs performed on the head. Theory and planning will determine the direction of your build. The machine workwill make it possible.
Lets start with the block. We'll use a V8 block for reference. (This is British V8 after all!) Buick, Rover, Chevy or Ford; doesn't matterto the machinist. We'll talk generic here as it makes little difference. The block has eight cylinders, composed of two banks of four ina 90º "V" pattern, as viewed from the front. The crankshaft rides in the journals at the bottom of the block and the heads are bolted tothe "decks" above the two cylinder banks.
First, you disassemble your engine. If there's little wear on the cylinder walls, and little or no ridge at the top, pulling the pistonsshould be easy. If there is a bit of a ridge, use your ridge reamer to remove it so the piston rings won't get caught. If it's not wornmuch, you can use a glaze breaker and just put new rings in it, using the same pistons. You should thoroughly clean everything anduse new bearings, etc. Look at the lifter bores too. If they're glazed from high mileage you can use a brake cylinder hone to make afinish that the new lifters will work with better. You are using new lifters, aren't you? Here's a law: always use new lifters on a newcam. Even if you have what appears to be a good used cam, you will be miles ahead if you install new lifters on it. (Besides, liftersare relatively cheap.)
When the bores are worn and new pistons are needed, the bores need to be enlarged. Pistons come in "oversizes" and the blockneeds to be bored to match. If the new pistons are 0.030" inches larger in diameter, then the bore size needs to be increased by alike amount. The new pistons will come as a matched set. The machinist needs them in hand to bore your block. He will also needthe old ones to press the old pistons off and the new ones on. This calls for knowledge as the pistons may have different valve reliefnotches to match the pattern in the head. Some piston sets also have the pin bore offset to the thrust side of the engine. Yourmachinist will know how all that needs to be put together. The rods should be marked by number and need to go back together on

the crankshaft in the same sequence and same direction.
At the shop the block will be inspected and the cam bearings removed, as well as the freeze plugs and galley plugs. Then it's into thecleaning solution. These vary. Hot tank with strong chemicals or a high pressure cleaning using a strong soap that's bio-friendly aretwo of the most common. (Aluminum can't be hot-tanked!) The cleaning is for more than aesthetics. There will be a build up of crudthat needs to be removed from the oil galleys as well as water passages. Since the freeze plugs and pipe plugs will be removedbefore this process begins, you'll need new ones.
Boring bars vary in design. A small local shop may have what's know as a portable boring bar, this type is less expensive and itmounts off the block's deck. This is acceptable if the deck is square and parallel to the crankshaft bore. If, however, the deck iscloser to the crank at the front of the block than the rear, the new bore will start right but end up angling towards the rear of the block.Bad news! If assembled this way, there may be excessive loading on the top front of the piston and lower rear skirt as well as therods riding on the crank pins. This type of bar is fine as long as the operator does all the checking he needs to first.
A boring bar that mounts off the crankshaft bore prevents this problem. That's the second type. It's also known as a portable boringbar. It may not look portable, but the one in Bill Cannon's Garage was recently taken on board a work boat and used to bore a largediesel engine. Not an easy task, but less complicated than pulling that motor. There are many of these types in use around thecountry. They can provide a good, consistent job. Again, the operator needs to be familiar with his equipment and make all thechecks, but the boring bit is always at a 90º angle to the crankshaft. That's a good thing!

The third type is a boring machine. It's not portable, no matter how large you are. The Rottler unit at the local NAPA Machine Shop isa good example. These are large units that are designed for a long life of heavy use. With periodic maintenance and sharp cuttingbits they can do a fine job for many years. These mount the block off the crank bores too and are quite accurate. This is what most ofus can hope to find in the local machine shop. If that's what you see, you're in good hands.
The fourth type of machine used for boring is a CNC Machine (CNC stands for: "Computer Numeric Control") and they arestate-of-the-art! This is the one that all the fuss is about. The example in the photo is at Bill Cannon's Awesome Engines. It's afour-axis, computer-controlled machining center. It can perform a multitude of tasks, not just bore a block. While it's doing thesecomplex jobs it holds tighter tolerances than is possible with the other types of equipment. That's great! It's also a very expensivepiece of machinery. It requires software and/or someone very astute with both computers and machinery to program it. You willunderstand if the charges for this type of machine work are above and beyond other, more common shops. You get what you payfor.
Do you need this amount of accuracy? Well, there's no such thing as being too accurate! On the other hand, if you're building anaverage, daily-driver type motor, your local plain-Jane machine shop will probably work just fine for you, at an affordable cost. Goingracing? Planning to use nitrous or a turbo? You'll need higher dollar parts to begin with, and top-quality machine work could veryeasily be exactly what's needed for all those pieces to live together and retain their performance edge longer.
Whichever machine does the boring, it won't open the cylinder all the way up to the specified diameter. Rather, it stops short and ahoning machine is then used to take the cylinder to the correct size and crosshatch finish. This is for seating the rings. There areseveral types of machines to do this task. There are several approaches to the job too. The honing machine at my local NAPA is agood example of what is used in many shops. High performance machine shops carry this operation one step farther by using a deckplate bolted to the deck to simulate the stresses the head will exert on the block after assembly.

One point we need to understand is that whatever equipment is used, the machinist needs to be familiar with it and know its properset-up. My local machine shop is Bailey's, in Pittsville, MD. The owner, Kevin Bailey, has been a friend of mine for years. He's done alot of my machine work and I've done some porting for him. It's a one man operation, and he gets friends he knows well to help outwhen needed. The shop doesn't look like the ones you'd see in the magazines like "Engine Masters" or "Hot Rod". It might evenscare newcomers, if they didn't know what they were looking at. Don't be put off. It's organized in Kevin's own way... and it works! Heknows what he's doing. In fact he built the engine for the 2006 NHRA Summit Pro Bracket World Champion, Phillip Truitt ofParsonburg, MD. Things like that don't happen by accident!
Let's watch him as he performs some routine jobs. First the block is hot-tanked in a 180º chemical solution. After removing andflushing the chemicals off, the machine work can start. Kevin sets the block on a work stand and checks it. The deck is important asthe boring machine squares off of it.
The machine anchors to the main bearings so nothing changes position once the boring starts. He begins by using a micrometer toset the diamond dressing tool for the correct diameter. In this case, an Olds 425 that has a stock bore of 4.125" is being opened up0.030", so the tool is set for 4.155". In reality it's slightly less as Kevin will finish the final dimension by power honing.
Often, we read about certain skirt clearances for racing pistons, etc. that sound like a trick set up. Don't ask for your machinist to giveyour pistons skirts that clearance. He can't. The piston skirt clearance is built into the piston. The bore is for the top of the piston andthe rings should match.
Honing
This can vary. In Kevin's shop almost everyone is using Moly rings so he finishes the bore with a 300-400 grit stone in his Sunnen 4blade hone. The hone has 2 stones and 2 wipers to maintain it square at all times. Honing oil is used for this process.
Your machine shop will need to know what type of rings you are going to use so they can properly finish the bore surface to make itso the rings seat. This is important. Many racing engines using the latest technology in the ring package need little or no time to seat.They are ready when assembled. For example, the crew at Bill Cannon's Awesome Engines Machine Shop run new engines on thedyno to check how everything functions together for the first time and to run them through a heat cycle to temper the metals. Theonly problem he's run into recently is with roller lifters. They need oil with zinc in it, and without it they can have problems, which iseasy to understand considering the high valve spring pressures that racing profiles need to run.
Another phase of the machine work that involves boring and honing is sleeving. If a block has damage to a cylinder wall, it may beable to be saved by boring the cylinder in question oversize so a sleeve can be pressed in. Usually a step or lip is left at the bottomof the bore for the sleeve to butt up against so it can't move. This may differ if the block is aluminum and had sleeves in the firstplace. Once in, the sleeve needs to be finished to the size of the piston and rings.
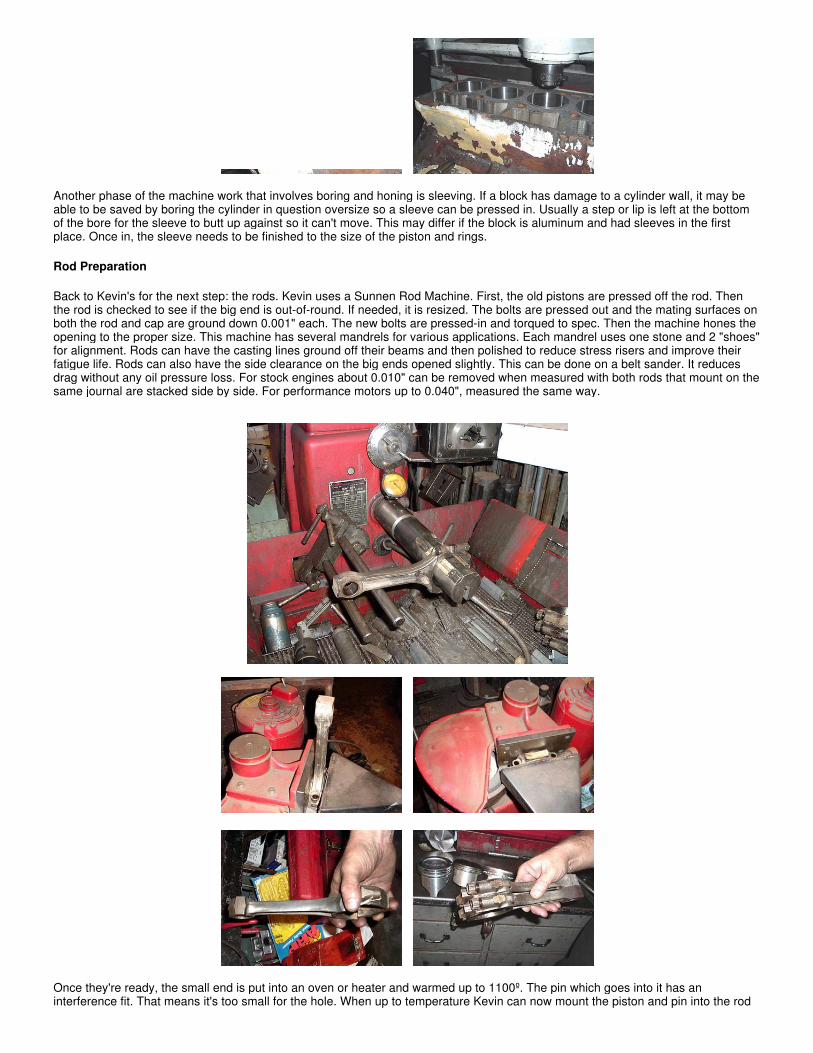
Rod Preparation
Back to Kevin's for the next step: the rods. Kevin uses a Sunnen Rod Machine. First, the old pistons are pressed off the rod. Thenthe rod is checked to see if the big end is out-of-round. If needed, it is resized. The bolts are pressed out and the mating surfaces onboth the rod and cap are ground down 0.001" each. The new bolts are pressed-in and torqued to spec. Then the machine hones theopening to the proper size. This machine has several mandrels for various applications. Each mandrel uses one stone and 2 "shoes"for alignment. Rods can have the casting lines ground off their beams and then polished to reduce stress risers and improve theirfatigue life. Rods can also have the side clearance on the big ends opened slightly. This can be done on a belt sander. It reducesdrag without any oil pressure loss. For stock engines about 0.010" can be removed when measured with both rods that mount on thesame journal are stacked side by side. For performance motors up to 0.040", measured the same way.
Once they're ready, the small end is put into an oven or heater and warmed up to 1100º. The pin which goes into it has aninterference fit. That means it's too small for the hole. When up to temperature Kevin can now mount the piston and pin into the rod

by hand. Yes! The pin slides in that easily, and when it is cool, seconds later, it is locked in place.
Depending on your piston choice, you may want full floating rods. That's where the pin slides in the rod and uses C-clips, rings, orcirclips in grooves in the piston to keep it in place. To do this with press fit rods, the small end needs to be bored to the proper sizeand bronze bushings with an oil hole are pressed in. After this you could assemble the pistons and rods at home. However, if youdecide to try that, please make sure you know what you're doing! The rods have different faces on the sides of the big end. One tomate to another rod and one that's beveled to fit the fillet of the crank throw. Also to be considered is the orientation of the piston.The valve notches, if there are any need to match where the valves are and even if you are using dished pistons, the pin will beoffset as the pistons have major and minor thrust sides. Your machinist will mount them correctly. Just make sure you fit them in thecorrect position when reassembling the engine. (I once bought a set of 'almost new' TRW pistons inexpensively because a young

man had put then in the block wrong and bent most of the brand new intake valves in his 302 Chevrolet.)
One more important note about the rods: use new bolts! Many times these are overlooked. They can cause very rapid destruction ofthe crank if they fail. One long time drag racer I knew said he never saw a rod bolt break. Well, they do break, but mostly they fatigueand stretch. Then what? The clearance on that rod bearing opens up. More oil rushes past and oil pressure drops. That's the firstsign of trouble. It won't last long as the rod bearing will soon spin because there isn't enough crush to hold it in place. The crank androd will be destroyed very swiftly thereafter. If the rod breaks, it can hole the block. Stock replacement bolts are better than oldfatigued ones, and aren't too pricey. There are many others to choose from too, and no matter what the cost, it's cheap insurance inthe long run.
Other Machining Processes
There are other things to consider while the block is undergoing its surgery. How about grooves for o-rings in the deck? Dependingon the compression you plan to run, or if a turbo or nitrous is to be used, it may be a very important step. Turbos and nitrous oxideuse create extreme cylinder pressures and can overpower the head gasket if everything isn't exactly right. O-Ringing the block (orhead in some cases) and using the proper gasket, and following the manufacturer's recommended torque specs and sequence cango a long way to keeping the motor together.
While we are discussing the deck, there a few points to note. If, for example, the block needs one or more sleeves, or there waswarping or for some other reason the deck was in question, it will need resurfacing. (This is also the case when you want to "ZeroDeck" your motor during the build.)
Usually, with most cast iron blocks, the machine shop is all set to "shave" the deck. They've done it often and know what's needed.However, with some aluminum blocks, using either iron or aluminum heads, and many late motors, there are special considerations.Check the instructions on the headgasket! You may find that a certain roughness average (Ra) in microinches is specified. The old"iron block, iron head" combination with a composition soft-face gasket needs 60 - 120 microinches Ra, while an aluminum head oniron block with the same type of gasket calls for 20 - 50 microinches Ra. Some newer OEM engines with multilayer steel headgaskets require even smoother finishes (perhaps 20 - 30 microinches Ra) and there are even a few that recomend 7 - 15microinches Ra. Check with the manufacturer before scheduling the work. Do not assume the shop knows what type of gasket youare going to use.
New cam bearings will be driven into their respective positions. If you've seen a cam bearing driver and are tempted to try it yourself,remember; the bearings get smaller as they go from front to the back of the block. The size difference isn't great so you need to payattention or you could damage one. Also, I like to 'clock' the bearings. That is rotate them in reference to the bottom of the block.Looking at the cam from the front of the block, I like the oil holes at about 4 o'clock. That way the oil is heaviest where the pressure isthe greatest on the bearing.

Balancing is something that needs to be done here too. New pistons weigh a bit different than the old ones. That calls for changessomewhere. Resizing the rods changes their weight too. All of the pieces need to be weighed individually, and matched to thelightest in the set by removing material. The crank is then spun with bob weights on the rod journals that equal the combined weightof the rods and pistons to determine how much needs to be added or removed from the crank throws. Removing weight is done bydrilling. Adding weight requires putting a heavy metal ("Malory metal" is denser than steel) in the throws. This is a critical step forhigh-revving engines, whereas components that are similar-to-stock put into a stock motor may not always need balancing. Ask yourmachinist if you have any questions.
Align boring is when the main caps are treated in a similar fashion as the rod caps were. Material is removed from the matingsurfaces and then the caps are torqued in place and bored the length of the engine, assuring a straight seat for your crankshaft. Thishas to be done if you bought a new set of 4-bolt main caps for your 2-bolt block. The other 2 bolt holes will need to be bored andtapped on each cap at this time too.
Crankshafts are part of this shortblock package that we've been discussing. The machine shop can check yours for straightness, andstraighten it if necessary. The main and/or rod journals may have wear and need to be turned undersize. When that is done mostshops supply the properly sized bearings when the crank is returned. Polishing the journals will help it move smoothly on the oil filmlayer between the crank and bearing. Getting the crank "indexed" can be helpful with some factory cranks. That's where all thethrows are checked and offset ground as needed to be 90º or 180º from the others. I know, that's the way they should come from thefactory, but it ain't necessarily so. If the throws are off by a few degrees, well, there all sorts of relationships will be messed up too!Where will the piston be when the intake valve opens or the plug fires at what's supposed to be 36º BTC at 5500 RPM? What effectwill it have on exhaust scavenging if the piston is several degrees late getting to TDC compared to camshaft events? Go ahead Dr.Phil, just try to answer that one.
That about wraps up the machine work on the short block. Oh, there are other things that can be done, but this is just to cover thebasics. If you want to get even deeper into machine work and engine building, you might like to check out some of the books ormagazines out there that specialize in just that.
Editor's note: We would like to thank Bailey's Machine Shop, on Main Street in Pittsville Maryland (phone 410-835-2241) fortheir help with this article.
Disclaimer: This page was researched and written by Greg Myer. Views expressed are those of the author, and are providedwithout warrantee or guarantee. Apply at your own risk.
Photos by Greg Myer for The British V8 Newsletter. All rights reserved.
British V8: Newsletter Photo Gallery Web Forum Meetings Contact Info Web-Rings Site Map

Visiting the "Awesome Engines" Machine Shop
as published in British V8 Newsletter, Volume XV Issue 3, December 2007
by: Greg Myer
While visiting the machine shop of Awesome Engines recently, I happened to spy quite a few aluminum engine parts. They wereobviously newer and a good bit bigger than the Buick 215 parts laying around my shop...
I asked a few questions, and decided to pass along the answers here. A "Big Block" Chevy will fit in an MGB, as we've seen... (referto Tom DiCenzo's "How It Was Done" article from the April 2007 issue of The British V8 Newsletter.)
A lot of work, it's true, but it can happen. Well, how about an all-aluminum Big Block Chevy!?!
This is an aluminum "BBC" engine block sitting on the corner of a cardboard box.Why isn't the box crushed? The aluminum block only weighes 120 pounds.
It can be bored-out to 4.600 inches. With a 4.250 inch crank, that's 565 cubic inches.Even with a very mild hydraulic cam... well just imagine!

Two different types of BBC aluminum cylinder heads. The "Big Chief" aluminum heads for aBig Block Chevy (top picture) feature eleven degree valve angles for better flow and combustion.
They're about $10,000 a set though, so start saving.
Here is a closer look at the combustion chamber and intake port...

Intake port, viewed from the manifold end. Humomgous!
The exhaust port is a thing of beauty! Looking at it from the header side,you can actually see most of the back side of the valve.
Awesome Engines makes sure all their engines produce whatever they're supposed to before shipping.Here's a Big Block Chevy on the dynomometer. Take a look at the dyno print-out below.
Awesome EnginesCustom Built Race Engines36389 DuPont BoulevardSelbyville, DE 19975Phone: 302-436-4200www.awesomeengines.biz

Test Information
Customer Name & Date & Phone
Address, City, State, Zip
Engine Make & Model 565 PRO BULLET BBC
Bore / Stroke / Crank / Rods 4.6 X 4.25 = 565" AERC CRANK & MANLEY 6.535" RODS W/ARP 2000
Engine Testing Conditions SOME OF THE WORST
Car Marque, Model & Use
1/4 mile / 1/8 mile Bracket or Heads Up
Special Notes INTIAL BREAK IN AND RUN IN OF ENGINE
Engine Specifications
Nitrous Oxide Usage UP TO 300 W/PROPER FUEL & TIMING RETARD
Intake Manifold and Spacer PROFILER SNIPER MATCH PORTED
Cylinder Head and Valve Size 350 BMP 2.3X1.88
Compression W/CC's 14/1
Carb & Jetting 1150 QFT OTBOX
Fuel & Pressure C12 VP RACING FUEL 7LBS
Camshaft Specifications TOP SECRET
Distributor & Ignition Timing 38 DEGREES TOTAL TIMING
Spark Plug & Gap AR3934 .035
Oil Type 10W30 MOBIL 1
Vacuum Pump MOROSO 3 VANE SEE SHEET
Header & Collector Size 2-1/4 X 2-3/8 STEP WITH 5" LEMONS HEADER MUFFLERS
Peaks
Peak Power (6/21/2007 Sweep ********) 878
Peak CorrHP (6/21/2007 Sweep ********) 961
Peak Torque (6/21/2007 Sweep ********) 733
Peak CorrTorq (6/21/2007 Sweep ********) 802
First Valve Position Press 4 (6/21/2007 Sweep ********) 13.68%
Peak Power (6/21/2007 Sweep ********) 867
Peak CorrHP (6/21/2007 Sweep ********) 964
Peak Torque (6/21/2007 Sweep ********) 765
Peak CorrTorq (6/21/2007 Sweep ********) 851
First Valve Position Press 4 (6/21/2007 Sweep ********) 13.68%
Disclaimer: This page was researched and written by Greg Myer. Views expressed are those of the author, and are providedwithout warrantee or guarantee. Apply at your own risk.
Photos by Greg Myer for The British V8 Newsletter. All rights reserved.
British V8: Newsletter Photo Gallery Web Forum Meetings Contact Info Web-Rings Site Map
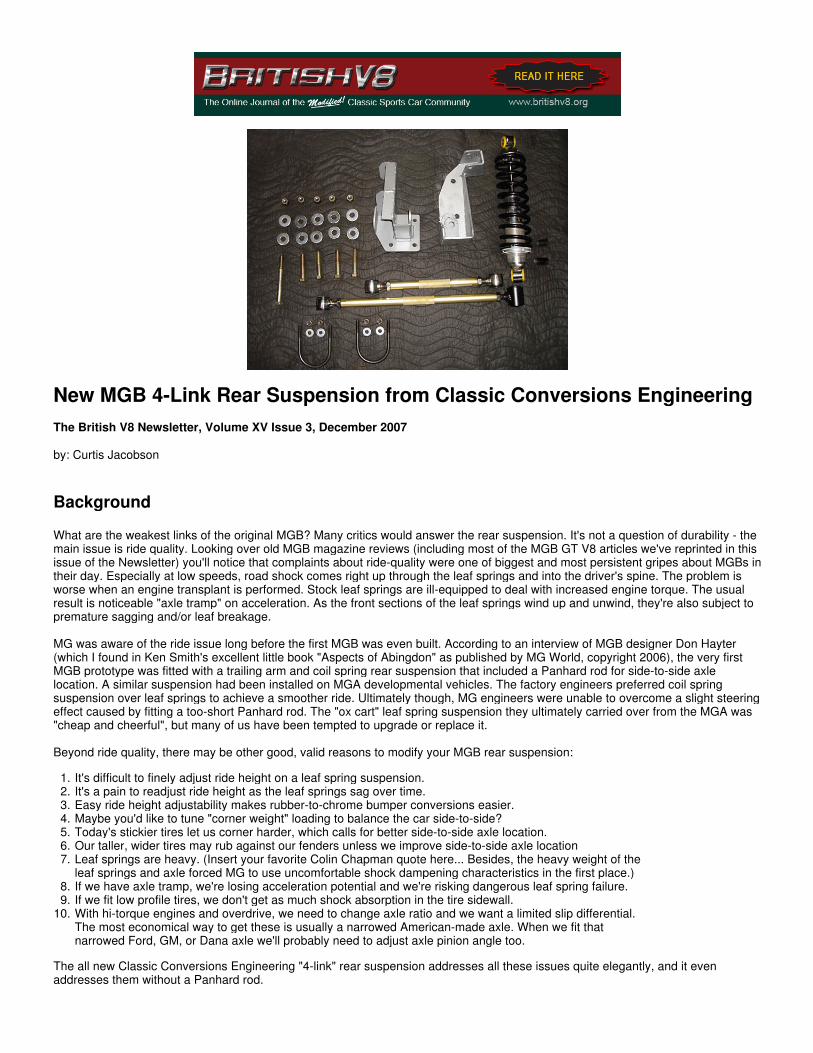
New MGB 4-Link Rear Suspension from Classic Conversions Engineering
The British V8 Newsletter, Volume XV Issue 3, December 2007
by: Curtis Jacobson
Background
What are the weakest links of the original MGB? Many critics would answer the rear suspension. It's not a question of durability - themain issue is ride quality. Looking over old MGB magazine reviews (including most of the MGB GT V8 articles we've reprinted in thisissue of the Newsletter) you'll notice that complaints about ride-quality were one of biggest and most persistent gripes about MGBs intheir day. Especially at low speeds, road shock comes right up through the leaf springs and into the driver's spine. The problem isworse when an engine transplant is performed. Stock leaf springs are ill-equipped to deal with increased engine torque. The usualresult is noticeable "axle tramp" on acceleration. As the front sections of the leaf springs wind up and unwind, they're also subject topremature sagging and/or leaf breakage.
MG was aware of the ride issue long before the first MGB was even built. According to an interview of MGB designer Don Hayter(which I found in Ken Smith's excellent little book "Aspects of Abingdon" as published by MG World, copyright 2006), the very firstMGB prototype was fitted with a trailing arm and coil spring rear suspension that included a Panhard rod for side-to-side axlelocation. A similar suspension had been installed on MGA developmental vehicles. The factory engineers preferred coil springsuspension over leaf springs to achieve a smoother ride. Ultimately though, MG engineers were unable to overcome a slight steeringeffect caused by fitting a too-short Panhard rod. The "ox cart" leaf spring suspension they ultimately carried over from the MGA was"cheap and cheerful", but many of us have been tempted to upgrade or replace it.
Beyond ride quality, there may be other good, valid reasons to modify your MGB rear suspension:
It's difficult to finely adjust ride height on a leaf spring suspension.1.It's a pain to readjust ride height as the leaf springs sag over time.2.Easy ride height adjustability makes rubber-to-chrome bumper conversions easier.3.Maybe you'd like to tune "corner weight" loading to balance the car side-to-side?4.Today's stickier tires let us corner harder, which calls for better side-to-side axle location.5.Our taller, wider tires may rub against our fenders unless we improve side-to-side axle location6.Leaf springs are heavy. (Insert your favorite Colin Chapman quote here... Besides, the heavy weight of theleaf springs and axle forced MG to use uncomfortable shock dampening characteristics in the first place.)
7.
If we have axle tramp, we're losing acceleration potential and we're risking dangerous leaf spring failure.8.If we fit low profile tires, we don't get as much shock absorption in the tire sidewall.9.With hi-torque engines and overdrive, we need to change axle ratio and we want a limited slip differential.The most economical way to get these is usually a narrowed American-made axle. When we fit thatnarrowed Ford, GM, or Dana axle we'll probably need to adjust axle pinion angle too.
10.
The all new Classic Conversions Engineering "4-link" rear suspension addresses all these issues quite elegantly, and it evenaddresses them without a Panhard rod.
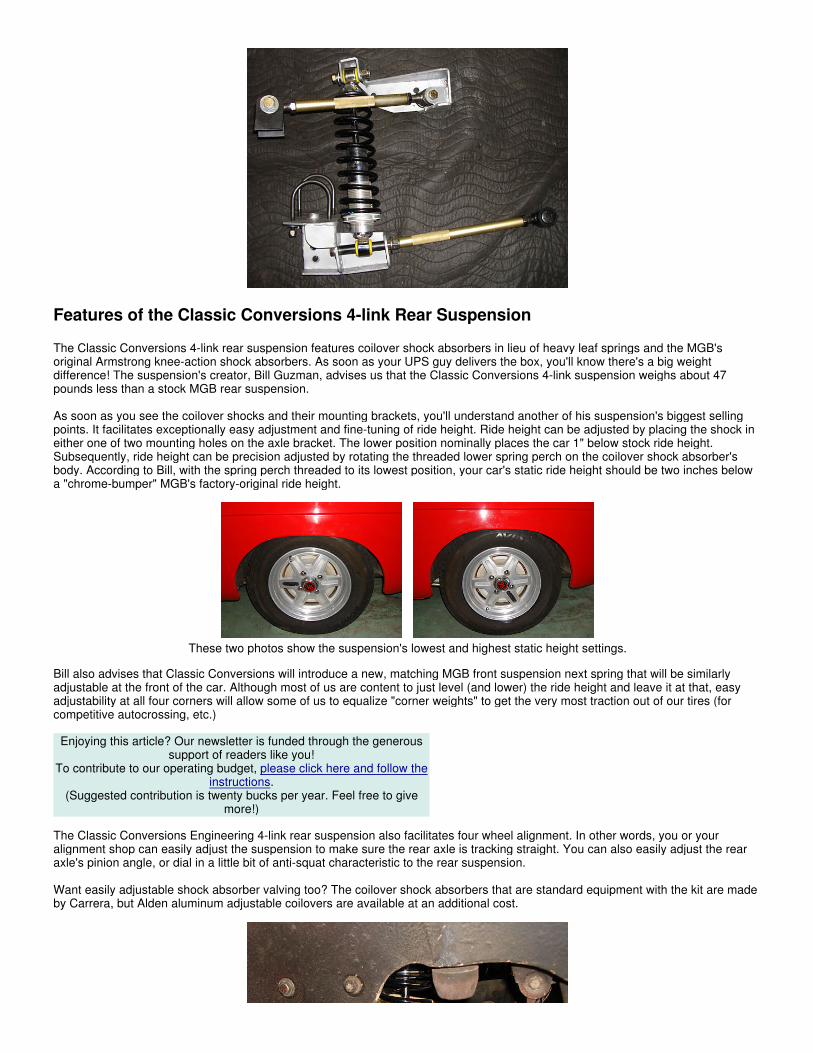
Features of the Classic Conversions 4-link Rear Suspension
The Classic Conversions 4-link rear suspension features coilover shock absorbers in lieu of heavy leaf springs and the MGB'soriginal Armstrong knee-action shock absorbers. As soon as your UPS guy delivers the box, you'll know there's a big weightdifference! The suspension's creator, Bill Guzman, advises us that the Classic Conversions 4-link suspension weighs about 47pounds less than a stock MGB rear suspension.
As soon as you see the coilover shocks and their mounting brackets, you'll understand another of his suspension's biggest sellingpoints. It facilitates exceptionally easy adjustment and fine-tuning of ride height. Ride height can be adjusted by placing the shock ineither one of two mounting holes on the axle bracket. The lower position nominally places the car 1" below stock ride height.Subsequently, ride height can be precision adjusted by rotating the threaded lower spring perch on the coilover shock absorber'sbody. According to Bill, with the spring perch threaded to its lowest position, your car's static ride height should be two inches belowa "chrome-bumper" MGB's factory-original ride height.
These two photos show the suspension's lowest and highest static height settings.
Bill also advises that Classic Conversions will introduce a new, matching MGB front suspension next spring that will be similarlyadjustable at the front of the car. Although most of us are content to just level (and lower) the ride height and leave it at that, easyadjustability at all four corners will allow some of us to equalize "corner weights" to get the very most traction out of our tires (forcompetitive autocrossing, etc.)
Enjoying this article? Our newsletter is funded through the generoussupport of readers like you!
To contribute to our operating budget, please click here and follow the instructions.
(Suggested contribution is twenty bucks per year. Feel free to givemore!)
The Classic Conversions Engineering 4-link rear suspension also facilitates four wheel alignment. In other words, you or youralignment shop can easily adjust the suspension to make sure the rear axle is tracking straight. You can also easily adjust the rearaxle's pinion angle, or dial in a little bit of anti-squat characteristic to the rear suspension.
Want easily adjustable shock absorber valving too? The coilover shock absorbers that are standard equipment with the kit are madeby Carrera, but Alden aluminum adjustable coilovers are available at an additional cost.

The Classic Conversions 4-link is designed to be simple to install. Only a minimal amount of weldingis required, and the welds in question (shown here) are of heavy gauge brackets to the top of the axle
tubes. If you're not comfortable welding, this job wouldn't be very expensive to farm-out locally.
Easy Installation - Suits a Broad Range of Applications
The Classic Conversions 4-link rear suspension is designed to be installable in one afternoon. (Whether this is really possible willdepend on what's in the way. You may have to alter your exhaust system, etc.) The design utilizes the MGB's front leaf springmounting holes, and the bolt holes for the old knee-action shocks. Just to set the record straight for purists: this installation iscompletely "reversible".
This design should also work equally nicely with all the popular stock and aftermarket axles: either MGB's "banjo" or Salisbury axles,and with either lugged or splined hubs, plus also narrowed Ford, GM, or Dana axles.
Designed for serviceability...
Although the system is durable and intended to last for years without modification, it's also designed to be easily serviceable. Springchanges, for example, are just a matter of unbolting the bottom bolt of the shock, unscrewing the spring-perch nut, and replacing thespring.
The coil spring for the GT has a nominal rating of 160 lbs per inch, and the coil spring for the roadster has a nominal rating of 140 lbsper inch. Both GT and roadster kits utilize the same shock absorber valving.

Top links are angled inward...
All four of the suspension links are custom made out of gold anodized 6061-T6 aluminum. The links feature 5/8" threadedstainless-steel rod-ends with urethane bushings, and they have right-hand threads at one end and left-hand threads at the other foreasy adjustability. So long as the rod-ends don't bind up, the rods can only be loaded along their axis, in tension or compression.The rods are sufficiently strong to eliminate axle tramp (assuming that the rear axle itself is rigid).
How Does It Function?
Notice in the photos that the top pair of links are angled-in toward the center of the axle. This design was chosen to make a Panhardrod unnecessary. Working together, the two links should positively locate the axle from side-to-side. Of course there will be someside-to-side motion due to compliance in the rubber bushes, but compared to the original MGB suspension the car should feel moresecure on turns, tire scuffing on the wheel wells or fender-lips should be avoided, and you may be able to fit wider tires.
Let's digress and review for a moment what a Panhard rod is and how it functions. A Panhard rod is a single link mounted parallel tothe rear axle with one end mounted to the axle and the other end mounted to the frame or body of the car, usually for the solepurpose of keeping the axle centered. Panhard rods can be made to work great, and they're both simple and cost-effective - but theycan also cause problems! Think for a moment of the axle end of the Panhard rod as being positively fixed in space, with the rest ofthe rod free to pivot around it. When the car goes over a bump, the body end of the Panhard rod must move up and down relative tothe axle. Since the rod is rigid and has a fixed length, the body also gets shoved a little bit side-to-side as the rod-end swings throughan arc. A longer Panhard rod induces less side-to-side motion for a given amount of up-and-down motion. (Take a ruler andcompass to some paper if you need to prove this to yourself.) Thus, Panhard rods should always be as long as feasible!
By not using a Panhard rod, the Classic Conversions 4-link has avoided the induced steering effect on bumps that MG engineersreportedly had with their coil-sprung rear suspension prototypes.
Another inherent feature of the new Classic Conversions suspension is "anti-squat". Bill tells us that the suspension links have beendeliberately angled to counteract compressive force at the rear springs as the weight of car shifts rearward. The result will be addedtraction and improved acceleration when exiting corners.
Speaking of cornering, how does the suspension react to body roll in turns? Does the geometry of the suspension cause the rearaxle to cock slightly to one side, thus causing "roll steer"? When just one rear wheel hits a bump, will the driver need to make asteering correction due to "bump steer"? If there is indeed a roll steer effect, how strong is it? Does the effect tend toward "understeer" or "over steer"?
Bill advises that the Classic Conversions 4-link has a slight roll steer characteristic which is in the direction of over steer. In otherwords, as the body pitches in a turn it will tend to cause the car to steer a tighter line.
Later model MGB axles were equipped with a rear anti-sway bar. It was mounted just above and parallel-to the axle and its two armsextended forward to mounts on the body. (Click here to see what these anti-sway bars looked like.) If your car is equipped with this style anti-sway bar, it will need to be removed before the top links of the suspension can even be installed. The new 4-link rearsuspension was designed to be used without a rear anti-sway bar.
Bill has rigged up a static roll-test and been unable to induce binding in any suspension pivot through the full travel of thesuspension. All of the bolted joints in the suspension are in double-shear. The suspension is provided with all the SAE Grade-8hardware required for installation.
The Classic Conversions four-link rear suspension kit is priced at $1,228, plus shipping. Through March 31, Classic Conversions isoffering a special introductory discount price of just $1103, plus shipping. With optional Alden shocks instead of the standardCarrera, add $180.

The upper chassis mount uses the old shock absorber mounting holes.
Stock bump stops and rebound straps can be left unchanged.(For added safety, when you weld the mounting tabs onto your axle you may want to weld a simplereinforcement strap or two between them to reduce the likelihood of fatigue cracking in the welds.)
The Classic Conversions 4-link provides a full range of suspension travel without binding.(The lower end of the shock absorber has been disconnected for this demonstration photo.)
Disclaimer: This page was written by Curtis Jacobson based on information provided by Bill Guzman. Views expressed arethose of the author, and are provided without warrantee or guarantee. The author has not tested the suspension inquestion. All suspension and chassis modifications are made at the reader's own risk.
Photos by Bill Guzman. All rights reserved.
British V8: Newsletter Photo Gallery Web Forum Meetings Contact Info Web-Rings Site Map

Classic Conversions is a proud sponsor of the British V8 newsletter :
© 2007 British V8 Newsletter - All Rights Reserved.Website code and graphic design by Curtis Jacobson
at www.Boulder-Web-Design.com
Bill Guzman, proprietor of Classic Conversions,presented a complete line of specially engineered
MGB performance products at the 2006 British V8/V6meeting, including V6 Engine Installation Kits.
Learn more about Bill's own MGB-V6 here:www.britishv8.org/MG/BillGuzman.htm
Learn more about Classic Conversions' New4-Link Rear Suspension Kit
Classic Conversions
• GM V6 Engine Installation Kits • Transmission Adapters • Hydraulic Throw-Out Bearings • CNC Billet Intake Manifolds for GM V6s • Front Coil Over Suspension Kits • Rear 4-Link Suspension Kits • Wilwood Disc Brake Kits (Front & Rear) • Sebring Headlight Covers • Pneumatic Hood and Trunk Lift Kits
Classic Conversions EngineeringBill Guzman, proprietor1744 N. Lyndhurst AvenueCamarillo, CA 93010
telephone: (805) 484-1428e-Mail: [email protected]
Visit us on the web at:www.classicconversionseng.com
British V8 Conversions Newsletter Meetings Photo Gallery Contact Info Web-Rings Site Map

How To Install Fiberglass Fender Flares
(specifically: how to install the MG Owners' Club "Sebring" flares)
The British V8 Newsletter, Volume XV Issue 3, December 2007
by: Simon Austin
This article provides detailed description of the work involved to install ready-made fiberglass fenders on a sports car. Theinstallation steps and techniques shown in this article apply to other styles of fiberglass fenders and flares, to products from othervendors, and even to installation of flares on other car models.
I purchased my "Sebring style" fender flare kit from the MG Owners' Club ("MGOC") in the UK. For just over $1200 (Canadian)including shipping, the kit included two complete front fenders and two rear quarter-panels from the top of the fender down. TheSebring kit is offered in roadster or GT versions, and obviously I chose the roadster version, but the installation process is similar.(The fenders differ near the windshield "A-pillar".)
The styling of these particular flares was clearly inspired by the fenders on the two famous MGC GTs that successfully raced in the1968 "12 Hours of Sebring" race. These original MGC race cars were actually built with riveted-on aluminum fender flares fabricatedby a "panel beater" at MG's Abingdon works (not by Pressed Steel, the company that provided MG with stamped steel body panels.)The MGB GT that MG raced in a smaller-engine class at Sebring in 1968 wasn't fitted with flared fenders.
Let's start with the rear quarter-panels, as their installation is somewhat easier than the front fenders. Each quarter-panel was laid upagainst the car for sizing and to get an idea how much fiberglass would need to be removed.
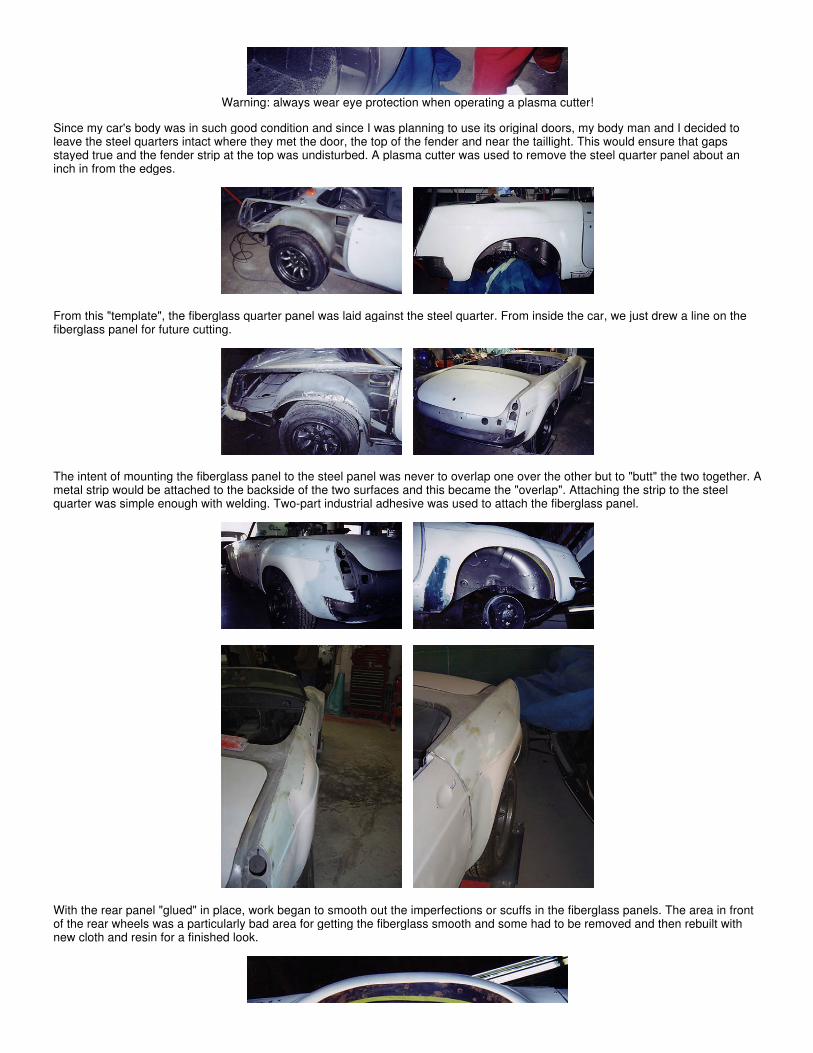
Warning: always wear eye protection when operating a plasma cutter!
Since my car's body was in such good condition and since I was planning to use its original doors, my body man and I decided toleave the steel quarters intact where they met the door, the top of the fender and near the taillight. This would ensure that gapsstayed true and the fender strip at the top was undisturbed. A plasma cutter was used to remove the steel quarter panel about aninch in from the edges.
From this "template", the fiberglass quarter panel was laid against the steel quarter. From inside the car, we just drew a line on thefiberglass panel for future cutting.
The intent of mounting the fiberglass panel to the steel panel was never to overlap one over the other but to "butt" the two together. Ametal strip would be attached to the backside of the two surfaces and this became the "overlap". Attaching the strip to the steelquarter was simple enough with welding. Two-part industrial adhesive was used to attach the fiberglass panel.
With the rear panel "glued" in place, work began to smooth out the imperfections or scuffs in the fiberglass panels. The area in frontof the rear wheels was a particularly bad area for getting the fiberglass smooth and some had to be removed and then rebuilt withnew cloth and resin for a finished look.

That pretty much takes care of getting the rear quarters to a "primer stage".
There was only one area that needed a little bit of further modification: because of the addition of about 3" of flared fender, there wasa large gap inside the inner wheel arch. Here we added strips of metal, bonded to the fiberglass panel and welded to the metal arch.With a test drive, I discovered that the rear wheels rubbed (rather loudly!) on the metal inside the arch. I took the car back to mybody-man and he removed a section of metal about 8" long inside the arch and replaced it with fiberglass, suitably rounded off toaccommodate the tire. With about 5000 miles on the car since this modification, no rubbing issues have been detected.
Now let's talk about the front fenders. These presented a much more challenging project, in that they are not the finest mouldedfiberglass fenders made. Sure they look like MGB fenders in these photos - but looks are deceiving! Once the steel fenders wereremoved (and sold, because I thought I wouldn't need them anymore), the fiberglass ones were placed on the car.
As can be seen in the pictures, I've added the ST spoiler so this had to be blended in with the fenders. Also, my car started out as a"rubber bumper" (post 1974) model, but I planned a "chrome bumper" conversion - so those changes need to come together too.
The most difficult area to fit properly on these fenders was at the rear top where the fender meets the windshield frame. When youorder this kit, you specify whether you want the GT or roadster. After much cutting and rebuilding in the windshield-to-fender area, Idon't think it would really matter if you got the wrong fenders for your project. The problem here is poor fit quality. The curve of thefender had to be cut out, fiberglass added in to reshape and then the curve added back in to follow the car. The overall fit of thefender is good in that it sits in the correct position, but it does take a lot of reshaping in small areas to make it look like it came withthe car. The turn signal light area is shaped and easy enough to cut out for your lights. Remember to add a ground wire from the lighthousing to a good ground on the car as the original housing just grounded itself by being attached to the steel fender. The headlighthousing is mounted the same way. Cut out the fiberglass, mark your mounting holes for the bucket and all the associated lightfittings and you're set.

As many MG owners will already know, the rear of the original steel fenders mount to the car by use of a steel vertical panels that arewelded to the fender and then bolted to the car. The fiberglass fenders have their own versions of these panels, but they're totallyuseless. They're not in the correct position, so I removed them. In the picture above, you can see how an inner brace was made toreplicate this panel. This bracket was bonded to the fiberglass fender. Then I used the original holes on the car to mount the fender.
This area is hidden behind the stock MGB splash panel that installs in the factory location with the only addition being some metaladded at the bottom to fill the gap created by the flare. The outer edge of the splash panel has a rubber weather-strip and it sealsagainst the fiberglass fender nicely.
Inside the engine compartment, holes are drilled through the fiberglass fender to install the bolts to hold it to the car. Mounting thefenders at the front involved adding small panels to replace the vertical ones on either side of the grille that were attached to thesteel fenders.
You can just see the original panel mounts for the fenders. The easiest way to attach the fiberglass fenders is to source some oldsteel fenders, cut off the small panel that attaches the fender to the car and attach these to the fiberglass ones. Then sculpt thefiberglass around the grille opening to the proper shape. Having a grille to use makes this step much easier.

The last step before the final bodywork, primer and paint is to reinforce the wheel arch lip of the fenders. As shown above (here andalso three photos up where the inner brace was shown) the arch lip is literally a sharp edge. Some may elect to leave it like this, butadding strength here will prevent someone from leaning on the fender and cracking it. My body-man came up with some foam stripsthat he attached to the lip, built it up with resin and then fibre-glassed under the arch to give the lip a "horizontal" edge. To givefurther strength to the fender (and to prevent rocks and debris off the tires damaging the underside of each fender), we chose toapply spray-on truck bed-liner material under each fender. This product was used on the rear fenders as well. Now that the car isdone, it's hard to tell that the fenders are actually fiberglass.
Looking back on this project, the only thing I'd do differently is to not use the complete fiberglass front fenders. Installing thefiberglass front fenders certainly isn't as simple as just bolting them on (as you may have gathered.) If you have or can procure areasonably staight set of steel fenders, I'd recommend bonding the flared sections of the fiberglass fenders to them (much like thefiberglass rear quarters are attached.) Installing complete fiberglass fenders seems appropriate for repairing a car with extensivecollision or rust damage, but if available I think it'd save considerable work and avoid hassles to use steel fenders as a foundation.

Genuine Minilite wheels (Made in Britain!) complete the authentic vintage-performance "look".
For more information and photos, please see Simon Austin's "How It Was Done" article.
Disclaimer: This page was researched and written by Simon Austin. Views expressed are those of the author, and areprovided without warrantee or guarantee. Apply at your own risk.
Photos by Simon Austin for the British V8 Newsletter. All rights reserved.
British V8: Newsletter Photo Gallery Web Forum Meetings Contact Info Web-Rings Site Map
MGB Roadmaster (aka "Project BADASS")
as published in British V8 Newsletter, Volume XV Issue 3, December 2007
by: Jim Blackwood
Project Overview
This is the first of a series of progress reports on the Roadmaster project, so a little background is in order. As a group project bylong-term British V8 participants and others, the Roadmaster project was conceived as a means of "educating the public about thesynergies between American and British technology, particularly as they related to sports cars..."
Well, not exactly! What really happened is that I was on the "V8Buick" internet message board, participating in a discussion abouthow small and light the big block Buick engine is and was tongue-in-cheek trying to persuade some guy to put one in his friend'sMGB. The more we talked about it, the more it began to look like it really could be done, and end up with a perfectly streetable car.
From that small beginning last spring, the project just snowballed. Almost immediately we had embarked on a group project andpeople began donating components to make it happen. Pretty soon I could see that this was developing into an organization and thecar should rightfully belong to the people involved, and the only way to do that was through incorporation, but it struck me thatmaking individual donations deductible as charitable contributions might help us finance the project, so the BADASS, NLC(Non-profit Limited liability Company) was formed.
There is one possible misconception that I'd like to clear up here. Because it is a non-profit, all assets of the company belong to thepublic, including the car. This means that if at some future date the company is dissolved, we need to provide for how the public is tohave the benefit of the car and other assets, such as perhaps by donation to a car museum for example. In the meantime, our plansfor use and display of the car do not change. It's a pleasant little place in automotive history that we're carving out for ourselves withthis project, and the first time that a non-profit has sponsored a group project for the development of a special automobile.
With so many MGB V8s having been built using the smallest V8 engine ever produced by Buick, we decided to go full circle andbuild one using the largest Buick V8, the 455. This was anything but a whim. The Buick 455 is perhaps the lightest and mostcompact big block engine, and has the same general layout as the 215 or Rover V8.
Measurements and test fitting showed that the engine will indeed fit, and weighing indicates that the change in vehicle weight withthe conversion should be in the range of -10 to +200 lbs at the front of the car, depending on optional lightweight components used.That's well within a safe margin for the MGB chassis. Naturally we would prefer to stay toward the lighter end of the range. Evengreater weight reductions would be possible in the near future but were not deemed necessary for this car.

Steve DeGroat reviews a trial installation of the big block Buick engine.
The GT body was chosen to give an added safety margin for body rigidity since this is the first swap of this type. Contributorsdonated major components and work began in the summer of 2007, as well as incorporation of a non-profit entity to take ownershipof the project. At this point the stripped down body shell is mounted on a rotisserie and has the engine and transmission mountingbrackets in place, the steering modifications largely completed, much of the rusted panels removed as well as the undercoating, andis close to being ready for replacement sills and other panels.
We have two engines, one of which is on a stand and used for test fitting and the other in the process of being transported forteardown and rebuild. A Jaguar IRS has been donated and fitting it to the body has begun.
The timeline calls for completion of a rolling chassis for display at the 2008 British V8 meet in Michigan, and completion of the car forthe 2009 meet. Upon completion, a rotation schedule will be set up among the contributors who wish to participate and the car willpass from one member to the next for a stated time period, during which the member will take custody, drive the car, take it to local,regional and national shows and in general display it to the public, thereby fulfilling the goals of the organization. But mostimportantly, we'll bring it to the British V8 meets and give everyone a chance to see how it feels to ride in it and if possible to drive itas well.
Carl Floyd begins disassembly of the MGB GT
We are just now at the cusp of asking sponsors to step up to the plate. And we think we have an almost irresistible package for themwhich we are doing everything we can think of to make even more attractive. A vendor presentation package is in the works whichdemonstrates the power of this program to bring enthusiasts together with vendors, and to entice new enthusiasts.
There can be no doubt that there is a fairly large group of guys out there who always have been and ever will be Big Blockenthusiasts. Very few in that group have ever considered the MGB to be a suitable vehicle for one of these massive engines, eventhough they have gone to great trouble to reduce the weight. Even as we speak, TA Performance is developing an aluminum blockfor the 455 Buick and already has heads and intake available.
The Roadmaster is scheduled for completion before the new block will be available however so we'll have to be satisfied with about a420 lb engine. Still the point is, that these big block enthusiasts will see how well that engine nestles into the MGB engine bay andhow well mannered the car is and they will want one. They'll lust for it the way we all lusted for a Hemi-Cuda, or a 427 SS Camaro, ora Shelby GT-500. The difference is, they can have one. This is certain to swell the ranks of our sport, bringing with it increasedgrowth, more parts and accessories, and greater prosperity for all of our vendors. In turn we will see better products at morefavorable prices than ever before. I've been in this sport for three decades and we are better off now than at any time in the history ofthe MG that I know of.

The MGB GT bodyshell - in the early stages of preparation.
The other thing this will do is to renew interest in the Buick engine line when considering a conversion. It's no secret that Ford 302and GM "sixty-degree" V6 engines have made considerable inroads into what was once strictly Buick and Rover territory - and forgood reasons. The Ford conversion makes an excellent high-powered machine and the narrow V6 (in displacements from 2.8 to 3.4liters) provides bang-for-the-buck and a no-cutting, no-welding installation.
There's room for other excellent Buick engines in this paradigm. We have Small Block Buicks (SBB) and Big Block Buicks (BBB) andeven a special case of SBB, the ninety-degree Buick V6. (Think "Buick Grand National"!) All of these engines have excellentperformance histories. In the SBB line, starting with the 215/3.5L we have the basic conversion choice, a lightweight alloy enginewith excellent power output and the mainstay of the conversion industry.
The next step up is the 1964 Buick 300, with its cast-iron block and aluminum heads. This engine is in many respects similar to the215, but it does have a 5/8" taller deck and weighs an extra 80 pounds. It has been used in several MGB engine conversions. Withsome machine work, the 1964 Buick 300 heads and crank can even be fitted to a 215 block (to produce a lightweight mid-sizeoption.) This has also been used in several MGB conversions. The Buick 300 block and all later SBB's use a "BOP" bellhousingbolt-pattern rather than the BOP/R 215 bolt pattern, making transmission choices simpler.
Enjoying this article? Our newsletter is funded through the generoussupport of readers like you!
To contribute to our operating budget, please click here and follow the instructions.
(Suggested contribution is twenty bucks per year. Feel free to givemore!)
The post-1964 Buick 300 with iron heads and intake manifold adds yet another 80 pounds, but the heads flow better. To myknowledge, nobody has swapped one into an MG. Next is the Buick 340. This somewhat odd engine, built for only one year, is thesame as the cast iron 300 but has a still taller deck and longer stroke. There is only one person planning to use this engine (me) andthat one will be supercharged and fitted with 1964 aluminum heads. The only real advantage this engine has, other thandisplacement, is that the same headers that fit the 215 will fit the 340.
At this point we transition to the most popular and well known SBB of them all, the 350. Cranked out in incredible numbers over along production run, the 350 was the mainstay of the Buick line for well over a decade. Dimensionally it was identical to the 340, butit had a 0.050" larger diameter bore. It also had redesigned heads. It can't use Buick 215 (or Rover) headers, plus it uses a differentcam. A couple of years from now TA Performance is planning to offer aluminum heads and intake for the 350, bringing it down toabout 80 lbs heavier than the 215. Consider that the 215 is 30 lbs lighter than the stock MG B-Series engine. That means a 350swap with only a 50 lb weight penalty, and the availability of many desirable performance parts.
I believe that could give it a technical edge over the Ford swap, although the Ford swap is unlikely to diminish much in popularity. Ithas earned a place, and there will always be Ford fans who would like to have one.
Trial installation of a big block Buick engine and newly fabricated motor mounts.
That brings us to the BBB. The amazing thing about this engine is that it weighs only some 40 lbs more than a Buick 350. Not onlythat, but the stroke is only 0.050" longer as well. Where the 350 is a relatively long stroke small block, the BBB is a short stroke bigblock and gets its displacement increase from a half inch larger bore. Naturally the engine is wider and longer, but it's not reallymuch taller. In fact, we have considered one configuration where we could close a stock hood on it, and that could still happen.Aluminum heads and intake are available from several sources. The TA aluminum block is in the works and there may be anotheraluminum block already on the market. When you consider that the Fast Cars front suspension is 80 lbs lighter than the stock frontsuspension, it is pretty plain that a car that weighs 80-120 lbs less than stock in the front is a very real possibility. Couple that with alightweight 8" rear axle and you're suddenly down in the realm of a sub 2000 lb car with excessive power! Now, take yourHemi-Cuda, SS Camaro or Shelby 500 and shed 1200 lbs from it and that's about what you've got. Except that it handles like anMGB. What's not to like?

But we aren't going to build that car; we're just here to point the way. What we need to do, and do well, is to build a car that ispleasant to drive as well as having outrageous power. The car is destined to be an icon. The first of it's kind! All that come afterwardscan point back in their lineage and say that they are descended from the BADASS MGB "Roadmaster".
Progress Report
As of December 2007, the drivetrain had been fitted to the car, motor and transmission mounts fabricated, steering relocated, headeropenings cut and the Jag IRS fit into position and prepped for narrowing. The GT body had been mounted on a rotisserie, pressureblasted, and stripped down for bodywork and paint. The 1970 Buick 455 engine was broken down and sent out for machine work andsome primary sponsors had been approached for help on the big ticket items.
Our immediate goal is to have a rolling chassis to display at the annual 2008 British V8 meet on July 13th in Port Washington,Wisconsin. That will leave us one year to finish paint, interior trim, and tuning prior to the 2009 meet. From that point the car will goon tour on a rotational basis between the contributors who choose to participate. Those participants will in turn take custody of thecar, attend shows and meets within their region, display the car and promote the objectives of BADASS, NLC. In this way, passingfrom on participant to the next the car will make its way around the country, returning each summer to the annual V8 meet where itscondition and need for maintenance will be assessed.
Officers
PresidentJim Blackwood: Prototype developer, patent attorney, machinist and fabricator, business owner and founding member of Idea Soup.The driving force behind the project, Jim is a long time MGB owner and converter, creating one of the earliest US conversions andcertainly the most instantly recognizable car of them all. Never resting, Jim's roadster is slated for an upgrade to a supercharged 340Buick with alloy 300 heads, a 2004r transmission and a custom built IRS conversion in the near future.
Vice-PresidentCarl Floyd: The quintessential fighter pilot of the back roads, Carl is renowned for his skills behind the wheel, be it on the "Tail of theDragon", the autocross course or the race track. Having honed his skills to a fine edge Carl is a formidable foe. Yet a more affablefellow or a better friend was never found. Taking subtle refinements to an exact science, Carl's understated mount has surpassed thebest of the best under his experienced hand.
Secretary/TreasurerSteve DeGroat: An individualist of the highest order, Steve's approach can be seen to take unexpected turns that yield unusuallysatisfying results. With his wife beside him and matching trailer in tow, Steve's air conditioned, V-6 powered GT can be expected toturn up almost anywhere. Contributor of the MGB-GT that the car is based on, Steve has proven a stalwart supporter of the project.
Contributors
Our contributors are too numerous to give detailed accounts of their involvement. Those listed below are the Founders of the BritishAmerican Deviant Automotive Sports-car Society (BADASS, NLC), parent organization of the MGB Roadmaster project and aNon-Profit Limited Liability Company.
John Ayers Michael B. (Woodie) Dan Blackwood Jim Blackwood
Steve Carrick Brad Carson Kelly Combes Tom Craddock
Graham Creswick Steve DeGroat Michael Domanowski Eric Enneking
Rob Ficalora Carl Floyd Bill Guzman(Classic Conversions)
Rick Ingram(Pieces of Eight)
Curtis Jacobson(BritishV8)
Dan Jones Ted Lathrop(Fast Cars Inc.)
Jimmy Litterell
Allen Mandeen Pete Mantell(Mantell Motorsport)
Dan Masters(Advance Auto Wire)
Dennis McIntyre
Peter Melborne Ted Nagel Dale Spooner(Motion Machine)
Spring GroveSheet Metal Co.
Dave Tetlow Edd Weninger Denny Williams Bill Young(Service Garage)
Disclaimer: This page was researched and written by Jim Blackwood. Views expressed are those of the author, and areprovided without warrantee or guarantee. Apply at your own risk.
British V8: Newsletter Photo Gallery Web Forum Meetings Contact Info Web-Rings Site Map

Mantell Motorsports is a proud sponsor of the British V8 newsletter :
© 2008 British V8 Newsletter. All Rights Reserved. Designed by Curtis Jacobson at www.Boulder-Web-Design.com
Mantell Motorsport Ford V8 Powered MGB
Hi-Performance Ford V8 Engine
Read notes from Pete's British V8 2006 tech session:"MGB Ford 302 Engine Conversions"
Read notes from Pete's British V8 2007 tech session:"Powder Coating 101"
Mantell Motorsport
At Mantell Motorsport, we harness the latest technologies togive you the performance, look and feel you deserve.
When it comes to MGB V8 conversions, it's about "The Power".Whether you need more power for competition or justappreciate professionally-engineered, high-performance in an MG, Mantell Motorsport can give you what you deserve. We'llhelp you specify, build, and and tune the modern small-block Ford "5.0 liter" (302cid) engine to your very specificrequirements.
Please take a moment and have a look at several recentexamples of our work: Pete Mantell's Ford 5.0L V8 powered MGB Dave Kirkman's Ford 5.0L V8 powered MGB Jack Pease's Ford 5.0L V8 powered MGB
Be honest. It's about "The Look" too. At Mantell Motorsportwe're also expert in Media Blasting and Powder Coating.
Media Blasting involves the stripping and preparation of varioussurfaces for paint without damaging underlying material. Theprocess is similar to sand-blasting, except we carefully selectfrom a range of abrasives to assure the best results.
Powder Coating is a superior alternative to painting or platingfor many metallic automotive parts and for other items thatrequire an especially tough, attractive protective coating. Powder Coating is essentially a baked-on plastic finish. It'savailable in an almost unlimited range of colors. The applicationprocess is considered very environmental because no solvents are released into the air. The process also yields a moreconsistent coating thickness - free from drips, runs, or sags. Butfrom our experience, the biggest selling point of PowderCoating is the superior durability of the finish in terms ofchip-and-scratch resistance, solvent and fuel resistance, and color stability.
Whether your MGB needs refinishing, the snowblower islooking a little worn, or even if your kitchen appliances don'tmatch your new ceramic tile, Mantell Motorsport can help.
Mantell MotorsportPete Mantell, proprietor2147 County Road, 1100 NorthSidney, IL 61877
telephone: (217) 649-7717e-mail: [email protected]
British V8 Conversions Newsletter Meetings Photo Gallery Contact Info Web-Rings Site Map
A Visit to the MG Owners' Club in Cambridge
as published in British V8 Newsletter, Volume XV Issue 3, December 2007
by: Rob Ficalora
In the last issue of the Newsletter, Curtis wrote about visiting Abingdon and also the British Motor Heritage facility at Witney. In lateOctober I was planning a business trip of my own to England, and Curtis suggested I might enjoy visiting the MG Owners' Club(MGOC) headquarters in Cambridge.
I contacted Richard Ladds, who is Editor of the MGOC magazine. He was more than happy to have a visitor from the British V8community. When he realized he'd be away on holiday during my visit, Richard arranged for MGOC General Manager Richard Monkto be my host. With my business schedule, I only had about a half day free. Nonetheless, I had a great visit! I only wish there hadbeen more time to visit and explore.
I arrived in the UK at Gatwick airport, which is one of the two major London airports and is due south of the city. (The other airport isHeathrow, which is to the west.) Cambridge, on the other hand, is due north.
The drive to Cambridge was both easy and scenic. It took about two hours, starting with the beltway around London and continuingup the M11 motorway north through countryside, woodlands and farms, and past some charming small towns. I arrived a bit early, soI drove around the famous University of Cambridge and enjoyed its awesome architecture. There are also great museums and plentyof other points of interest. If my wife had been with me we'd certainly have enjoyed spending a few days in Cambridge, and dining insome of the many quaint restaurants on quiet side streets.
MGOC Headquarters, Cambridge England

MGOC General Manager - Richard Monk
The MGOC Headquarters is a relatively small facility, but the unassuming structure masks a tremendous range of operations. Fromthe headquarters, they run essentially four businesses:
the MG Owners' Club magazine - "Enjoying MG",1.a complete repair and restoration facility,2.a parts business,3.an insurance company.4.
The MGOC - and their magazine "Enjoying MG" - now embrace V8 conversions.
Enjoying MG is a full color magazine. It's roughly a 90 page publication and it's packed with information. There are articles to suiteany MG enthusiast. The October issue, for example, had a great article about a recent track day event; another article celebratingthe 50th anniversary of EX181 (a special MG that set a Bonneville salt-flats speed record in 1957); a detailed historical piece aboutthe MG Midget production line; and another covering the restoration of a '73 MGB (in Portugal). But for me the most interestingarticle in the October issue was about a V8 swap project, complete with pictures of the motor mounts being welded in and the"bulkhead" (firewall) being modified around the steering u-joint. In other words, their own version of a "How It Was Done" article!

MGOC Repair and Restoration Facility
The Paint & Body Room at MGOC
The MGOC repair and restoration facility, like the headquarters building, is relatively small: there were three lifts and room for about5 cars to be worked on at any given point. The paint and body room could handle one or two cars at a time. I didn't get to chat withany of the mechanics, but I was impressed by the expertise they have in diagnosing and repairing anything MG. Few places in theworld have that sort of singular focus and such depth of experience.
The MGOC parts business shouldn't be overlooked by North American MG enthusiasts. MGOC bought up much of the original MGtooling, and therefore they have the service parts that fit right. They have also updated parts where that made sense. Many of theseparts are directly applicable to our hobby: performance modifications!
The MGOC retail sales desk serves walk-in customers.
Wood & leather steering wheels, and hubs to make them fit!
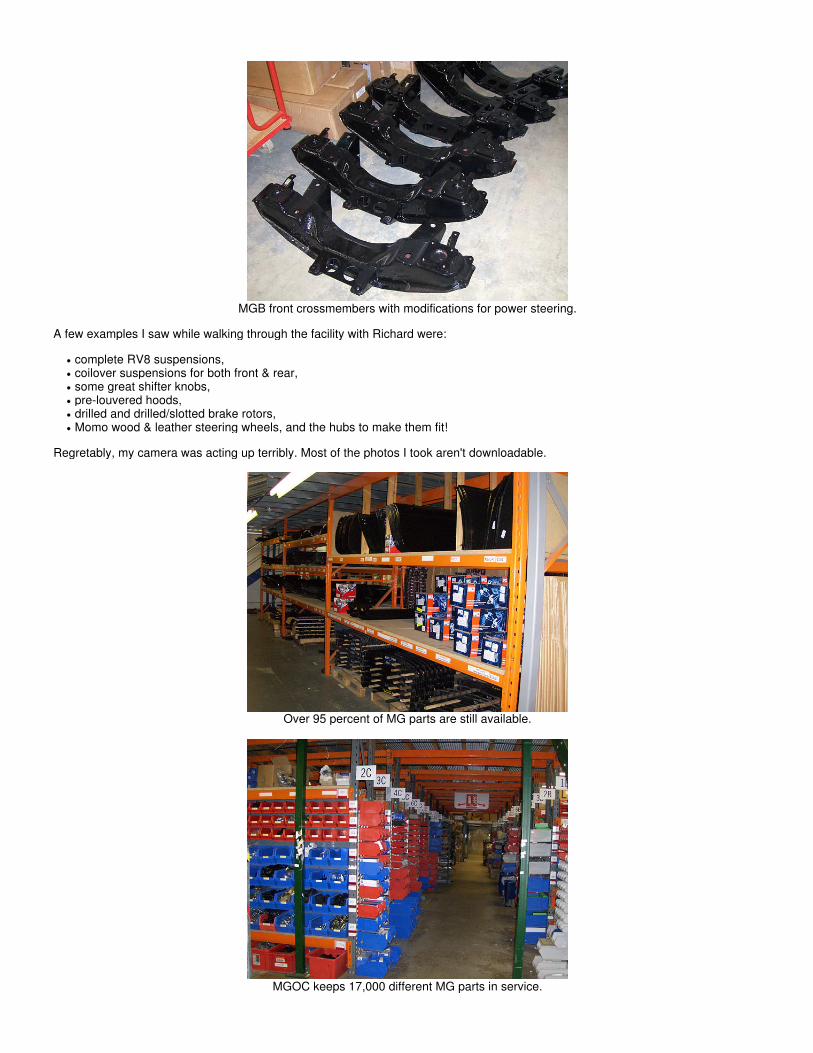
MGB front crossmembers with modifications for power steering.
A few examples I saw while walking through the facility with Richard were:
complete RV8 suspensions,coilover suspensions for both front & rear,some great shifter knobs,pre-louvered hoods,drilled and drilled/slotted brake rotors,Momo wood & leather steering wheels, and the hubs to make them fit!
Regretably, my camera was acting up terribly. Most of the photos I took aren't downloadable.
Over 95 percent of MG parts are still available.
MGOC keeps 17,000 different MG parts in service.

There were a ton of other parts to drool over too. Talking with Richard, I learned that MGOC provides about 95 percent of the partsan MG owner could want - and about 17,000 different part numbers! Very few MGB parts are on their "No Longer Available" list. With2.5 million pounds sterling in-inventory (i.e. about $5.0 million $US), they most likely have the parts you're after in stock.
North American MG enthusiasts are a steadily growing segment of MGOC's customer base, apparently because more and morecustomers are now comfortable with purchasing restoration and repair parts online.
MGOC's insurance company isn't licensed to do business in the US or Canada, but while talking about it, Richard did share that theMGOC has about 40k members worldwide. The vast majority, about 37k, are in the UK. About 900 are in the USA, and theremainder is spread around the rest of Europe along with a few members in other countries.
In 2001 this "MG ZT XPower 500" show car was built with a 500hp Ford 4.6L V8.
"MG Rover Group" was bought by state-owned Chinese automaker "Nanjing Automobile Corporation" in 2005.
We also chatted about Nanjing Automobile Corporation. The MGOC has a very pragmatic view of Nanjing's purchase of The MGRover Group (and reintroduction of the MG ZT and TF models, etc.), believing it will breath new life into the marque. They hope thatreintroduction of the MG brand will renew interest in restoring and enjoying classic MG's, both by generations that grew up with themand also by people who are too young to know about our cars. Nanjing recognizes that the MGOC can be a tremendous asset tothem as well; they've met with MGOC employees on several occasions and have had members of the MGOC headquartersparticipate in reestablishing the marque in Britain.
I'd like to thank Richard Monk for spending several extremely informative hours educating me about the MGOC. I'd also like to thankRichard Ladds for arranging my visit. If you get the chance to go to the UK, the MGOC Headquarters should definitely be one of yourstops.

This is the old threshold all visitors crossed to enter the "Morris Garages Ltd." show roomson Queen's Street in Oxford. (Note the image of an ox crossing a ford... hence "Oxford".)MGOC acquired this from a rubbish pile after the building was demolished in the 1970s.
British V8: Newsletter Photo Gallery Web Forum Meetings Contact Info Web-Rings Site Map

Rob Ficalora's MGB V8 Project - Progress Report
The British V8 Newsletter, Volume XV Issue 3, December 2007
by: Rob Ficalora
I've been working on this project for about 18 months now, and I thought I'd share where I am. You might think I'd be further along,but a typical work pattern is a few hours work one day, then none or maybe an hour here or there for a few weeks due to work andfamily focus.
The basics - my project is a Ford 302 (5.0L) / T5 swap into a rubber bumper ('76) MGB.
Additional features include:
Fast Cars IFS (by Ted Lathrop)1.Todd Budde IRS2.A/C (with evaporator hidden behind the dash)3.Early style metal dash conversion4.Chrome bumper conversion on the front5.Sebring valance and early style tail lights on the rear6.Dodge Omni fender flares, front and rear7.
Engine - Ford Racing 302 Crate motor (M-6007-XB3) purchased via eBay but from a local Houston body shop (so I was able to golook at it before bidding on it). The motor was purchased for a T-Bird project they had, but the customer ran out of money so theywere selling off all the stuff they'd not used already.
Getting the engine set up was the most difficult part of the project so far - not because there wasn't a proven solution, but because Iscrewed up when placing the motor. A "normal" 302 installation requires modifying the front suspension crossmember but no firewallmodifications. Doing it that way, which I did initially, didn't leave enough room for the alternator and A/C brackets I wanted to use,and I couldn't find any suitable alternative brackets (suitable to me meant chrome or polished with the accessories positioned wherethey'd fit). So, I moved the motor back and modified the firewall as follows:

I got the clearance I needed for the accessories at the front, but I mis-measured and the net result was that the harmonic balancerlanded in interference with the steering rack, rather than slightly behind the rack where I wanted it. I didn't want to move the motorany further back (didn't want to eat up driver side pedal space in particular). I researched modifying the cross member to move thesteering rack, but wasn't confident enough that I wouldn't introduce bump steer or other problems, so I punted and bought Ted's frontend. I'll admit it is very nice, but was also way more money than I wanted to spend.
Transmission - T5 from a SN95 ('94/95) V8 Mustang. This tranny is about an inch longer than the normal Mustang T5 which helpsalign the shifter right at the stock MG hole. The shift fork is also rotated lower so there's more room to mount and get at the slavecylinder. Gears are as follows:
1st 2nd 3rd 4th 5th
3.35 1.99 1.33 1.00 0.68
The first picture above is from Leonard Marshall's car (with a regular T5), but it shows how the slave mounts. Once verified to beworking, the fork is cut off and a simple plate is mounted over the access hole as a dirt shield. (Note: Leonard didn't mention anyproblem bleeding his clutch, but I think I'll try to mount mine with the bleeder valve pointed more upwards).
As shown in the second picture, I'll have to modify the transmission crossmember that I got from Ted with the 302 mount option onhis IFS. Because my tranny is a bit longer than what he uses, I'll need to weld some metal on at the edge and lengthen the holes. Ihaven't done it yet, but it should be an easy fix, although looking at the picture I think I'll cut off the flanges that mount to the rails andreplace them with longer ones rather than modifying the area where the transmission mount is.
Rear end - Once again, I opted for the hard way. Spending time on this slowed my project, but it will add "cool factor" if nothing else.Rear end is a custom developed unit designed and built by Todd Budde of Custom Rod Works. I have what Todd calls his"Generation II" unit, and Todd worked with me to modify his basic design to support the wider track and 5 x 4.75" lug pattern I

preferred. (Custom Rod Works is now offering a Gen-III design. Custom work is their specialty, so special versions of their IRS areno problem.)
Here are some of the specifics:
JDM (Japanese Domestic Market) 1996 Nissan Skyline limited slip differential (3.31:1 gears, although I may swap this for adifferential with 3.54 gears; we'll see.) Note that this solution uses the same CV joints as a 1994 Infinity J30, and that it's alsocompatible with any Nissan R200S differential.
1.
Halfshafts are from the Nissan Skyline, re-splined at outer end to match '88-97 S-10 4x4.2.Outer CV yokes and hubs are '88-97 S-10 4x4 (non-ABS version).3.Rotors are from an '88 Corvette.4.Calipers/outer brake parts are '94 Camaro Z28.5.Bushings are "Pete & Jakes" heavy-duty black urethane.6.Hub-to-hub width is 54 1/4", which is quite wide (probably an inch or two wider than I should've had them make it.)7.
The picture above is from one of the test fittings. The unit bolts into the stock MGB shock mount points at the top and the front MGBspring perches at the front. Todd modified the upper shock mount and added a battery holder after this photo was taken. The secondpicture shows those changes. Final product was powder coated and is ready for installation.
Front End - I started with Bill Guzman's coil over and Wilwood "big brake" kit, which I really liked. Here are some pictures showingthat kit installed on my 302 modified cross member. The first picture shows the cross member modification to clear the Ford 302 oilpan.
Essentially, the section shown above is cut out; about 1 1/2" has been cut off the bottom of the removed piece, then it's welded backin with 1/4" plate on the sides. My brother-in-law is a professional welder and he did this welding for me since it is an importantstructural piece.
Second picture shows Bill's kit installed on the cross member;
As noted above, after getting this suspension completed (even cleaned and painted it), I moved the motor further back and ran intoclearance problems with the steering rack. I got great advice for how to modify the rack mounting location down, flip the tie rodmounts over, etc., but frankly, that intimidated me, so I punted at that point and bought Ted's front end. I've since sold Bill's coil overand brake kits, but I'd recommend them to anyone. They were very well thought out and had excellent fit and finish. I do still have themodified cross member if anyone is interested.

Here's what Ted's IFS looks like. I decided to bite the bullet and get the optional Ford motor mount option. At the time I was thinkingthat I'd have time to finish the car pretty quickly.
Body Mods - I've done a bunch of body mods - none of them required for the engine swap but driven by my choices around thefollowing:
where to place the motor and radiator to make room for polished front engine accessories (alternator, A/C compressor, etc.)1.swapping the front bumper for a chrome one. (There's plenty published on that, so I haven't included it here, plus I apparentlydon't have any pictures of what I did there.)
2.
swapping the dash for an early metal one, and putting the A/C evaporator behind it.3.
Before starting the extensive body mods though... I built a rotisserie. It's a really simple one, but it works just fine, and it was a projectmy 11 year old could help with which really excited him. He did about half of the welds on it! I used the rotisserie to flip the car overto weld up the under side of things I'd not been able to easily do with the car on stands.
The changes to the engine bay were the most extensive. I modified the firewall as noted above. I also modified the panel that the oilcooler normally goes on and made a new support for the slam panel so the radiator could go right up against the slam panel with theA/C condensor in front of it.
This shows the firewall modifications while "in progress". The changes on the left/right are to provide clearance for the cylinder headswith the motor moved back. The heater shelf mod is not required for the motor to fit. I did it simply to provide a bit of an air gap at theback of the motor to help get hot air out of the engine bay. I also did a mod to the frame rails that gives a little room on each side ofthe motor block. Again, this is only needed if you push the motor back and down a little compared to where it goes with early Cometmotor mounts.

And, here are the oil cooler shelf and slam panel support changes for the radiator. I used 16 gauge for this to help ensure rigidity.
At the rear suspension, I made two modifications. First, I cut out the extra inch or so where the bump stops are. MG added that piecewhen the rubber bumper cars were raised up. Since my car will be at CB height, removing that piece gives the rear suspension thefull travel. I'm going to weld up the seams to keep moisture out and still have to put the bump stops back on but the picture aboveshows the current status.
The 2nd change is to make changing the shocks on the IRS possible. Todd used his GT as the development mule, and he didn'trealize that the shelf behind the seats on the roadster is lower than the shelf on a GT. The upper shock mounts are too close to thebottom of that shelf for the bolt to come out unless they're installed with the head down and even then, there's precious little room toget a wrench on the nut. To accommodate this, I'm making access holes (and covers) for access from above.
Dash swap and A/C evaporator - I started trying to figure out how to fit an A/C evaporator behind the dash. I did a bunch ofresearch on the various aftermarket evaporator boxes and on boxes from some small cars too. A couple of production cars probablyhave boxes that would fit, but I couldn't find dimensions published anywhere and I didn't have the time to search salvage yards.VintageAir, SouthernAir, and HotrodAir all publish dimensions of their products so I focused on them. I ultimately selected VintageAirbecause everyone I talked with that used them was happy. Their Gen-II Mini looked like it'd fit a hair better than either of the othertwo company's equivalent sizes. (It's longer, but a hair narrower). It still wouldn't fit completely!

Here's a picture of a box I made to do initial mock-up using a rusted out body shell I have.
The cowl is proud of the firewall by about an inch, but the evaporator box is still about 3/4" to 1" too wide. Plus, the '76 dash curvesso that area isn't as deep as it could be. About that time I came across an early metal dashboard. I used to have a '67 roadster andI've always liked the metal dash look. I also noticed that the metal dash is straighter across than the padded ones, so it gives aboutan extra 2" of clearance behind it. I decided to swap the dash over killing two birds with one stone (albeit a heavy "stone" as far asmods go).
If you look close, I have a new panel in the firewall behind the evaporator box. I initially cut that piece out, intending to install theevaporator box like Ted Lathrop does. Later I changed my mind for two reasons. One reason was that I decided I prefer to have theevaporator box better insulated from engine compartment heat. Secondly, I may decide to use the cowl vent for cowl induction at alater point.
I still have some fabrication work to do on the body shell:
Finish grafting in the metal dash cowl (I didn't weld it in before taking the car to the media blaster)1.Install some reinforcing pieces like the typical one that runs from the forward rear spring hanger to the "frame" structure andsome pieces that will help reduce any twist, plus probably a piece or two to make jacking the side of the car easier (I never likedthe MG style jack).
2.
Install the Omni flares. I was able to find a few Omni's around me and got all the flares I could from them. This will be a big job -especially the rears which need to be tied into the tubs.
3.

Wheels and Tires
Front - 15x7, 3 1/2" backspace American Racing 427P wheels; 205/55/15 tires. I probably could have fit 215's and they'd line upa bit better I think, but decided to go narrower because I know they'll work (they're what Ted used on the red car on his web site).
1.
Rear - 15x8, 4 1/2" backspace American Racing 427P wheels; 225/50/15 tires. I would really have liked 245/50/15's, but I hadTodd make the IRS too wide. As it is, I'm probably going to have to modify the Omni flares to make them about 3/4" wider thanthey are - Doh! - (this is a reason to start with a tube axle that's way easier to modify until you're sure how things are going to lineup.)
2.
Then I loaded the shell on a trailer and took it to a media blaster (sand for the bottom; soda for the rest).
That's it for now. Lots to do still, but I'm making progress. My goal is to have it done in time for British V8 2008 in Wisconsin!
Disclaimer: This page was researched and written by Rob Ficalora. Views expressed are those of the author, and areprovided without warrantee or guarantee. Apply at your own risk.
Photos by Rob Ficalora for the British V8 Newsletter. All rights reserved.
British V8: Newsletter Photo Gallery Web Forum Meetings Contact Info Web-Rings Site Map

Like a Phoenix: the Story of Steven Ward's MGB V8 Project
as published in British V8 Newsletter, Volume XV Issue 3, December 2007
by: Steven Ward
The difference between the sexes could be defined when my wife and I spotted this MGB on a used car lot in Montreal. She saw acute little car that we could buzz around town in, and I saw the monster car it could be! That was the beginning.
For 19 years, the MG remained virtually original. However, lurking in the back of my garage was a 1962 215 cubic inch Buick V-8.(During my formidable years I owned both a '62 Olds Cutlass convertible and also a '62 Buick Special.)
I raced our 4-cylinder MGB at 13 British autocrosses, winning all but 1 of them and actually setting a lap record at one of them. Ithought I had a fast little "B". My wife referred to it as "The Little Engine that could."
I eventually took the "B" to Texas Motor Speedway in the exhibition class (translation: gentleman's class - no passing in the curves.)Not that I had to worry as I was racing against a Lotus Elan, Shelby GT 350s, a big block Corvette, and a 427 AC Cobra, just tomention a few. After being black-flagged "Give Way!" (Like I had a choice!) On the front straightaway the 427 Cobra and the bigblock Corvette flew by me on either side. They lapped me three times in a 20 minute period. I swore that it would never happenagain!
I got home from the races and dusted the cobwebs off that Buick V-8. I studied it for awhile. I measured the space I had to work with.I searched on the computer for conversion sites. Eureka! I found "The British V8 Newsletter" page - and the sacred chart of enginecomparisons (in an article by Dan Masters, which included Buick, Ford and Chevy V8 weights and dimensions.) That convinced methat a Chevy was the way to go. The Buick motor was pushed back into the dark corner of the garage.

Steve's Chevrolet 350 LT-1 engine, from a 1995 Corvette.
My choice of engines was a second generation 350 LT-1 from a '95 Corvette. For the next three years I worked just about every daydesigning and building the parts to make my dream come true. I completed the project April 24, 2004 at 2:30am. I showed the B atAll British Car Day in Dallas at 12:00pm that same day!
The following week I revisited Texas World Speedway, this time looking for vengeance. I was 13th on the grid of 26 cars - a few ofthem my old nemeses. In just a few laps, I moved through the pack to find an old friend - the big block 427 Corvette. I followed himthrough several left and right hand curves until we found ourselves on the back straight, where I drag raced him and left him behind.How sweet it is!
A few laps later, 2 more old friends were within my reach and I took my shot. There on the banked front straightaway, I passedbetween a pair of 65 Shelby GT 350s. This day was mine! I now lead the pack. However, the B being automatic, I did not have theluxury of downshifting going into the curves. Tried it once, not again! So I had to rely on my Wilwoods to slow me down. Eventually, itwas too much even for them, as my pedal got soft and went right to the floor. I slowed down for 3 laps and the brakes recovered andI finished 3rd overall.
107 days later, just 3 days before I was to leave to go to the 2004 British V8 convention in Grand Rapids, the B caught fire in mygarage. Brake fluid got spilled onto the headers! I had taken it for a couple shots in a secluded part of my neighborhood - drove intothe garage and closed the garage door behind me. Several months of dealing with insurance companies, I was ready to start again.However, this time I could build it bigger and better!
Enjoying this article? Our newsletter is funded through the generoussupport of readers like you!
To contribute to our operating budget, please click here and follow the instructions.
(Suggested contribution is twenty bucks per year. Feel free to givemore!)
I stripped the body to bare metal, removed all the chrome, trunk rack, welded up and removed the body seams, removed the air cowlin front of the windshields, removed the heater box, and closed up the hole, and installed a mini Generation II heat/AC/defrost unitbehind the firewall.
Next was a new paint scheme. First time around it was Arctic White, over-sprayed with Violet Pearl. Beautiful, but missing thepizzazz factor. Hence, several artist renderings, resulting in the obvious choice!

The entire car was initially sprayed Arctic White, then over sprayed with Silver Pearl, and then a base clear. Base clear was usedbetween each level of the paint process so that if something went wrong, it would not have to be stripped all the way down. The "OhSo Yellow" and the "Orange Glo" were shot, followed by base clear. The flames were laid out using the blue fine line tape. A clearmasking sheet was then laid over the flame design. The back end of the car was shot with "T-Rod Red". The masking sheet and fineline were removed to expose the fading flame design. The car was then sprayed with base clear. A hand-painted purple enamelpinstripe was used to outline the flames. It was then cleared with three coats of polyurethane. The pinstripe was sanded until it wasflat with clear. The entire car was shot with Amber Glo" and then cleared with two additional heavy wet coats of polyurethane clear.The "B" was then color-sanded using 1200, 1500, 2000, 2500, and 3500 grit wet sandpaper and then compounded and polished.
The final product, I showed at the 2007 British V8 meet. It was a painstaking three years (twice!) of restoration, but well worth thetime.
British V8 2007 participants Graham Creswick, Dave Burstyn and Bill Jacobson enjoying Steve's completed MGB V8.
For more detailed specifications and photographs please refer to Steve's "How It Was Done" article!
Disclaimer: This page was researched and written by Steven Ward. Views expressed are those of the author, and areprovided without warrantee or guarantee. Apply at your own risk.
British V8: Newsletter Photo Gallery Web Forum Meetings Contact Info Web-Rings Site Map
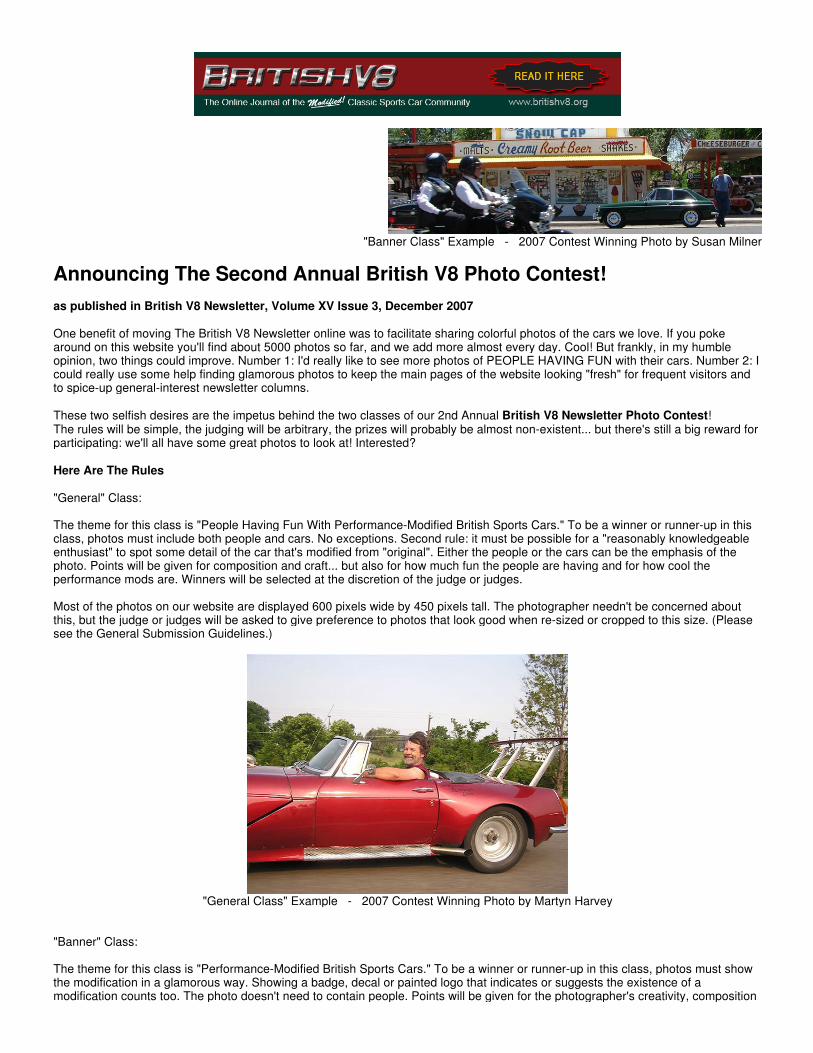
"Banner Class" Example - 2007 Contest Winning Photo by Susan Milner
Announcing The Second Annual British V8 Photo Contest!
as published in British V8 Newsletter, Volume XV Issue 3, December 2007
One benefit of moving The British V8 Newsletter online was to facilitate sharing colorful photos of the cars we love. If you pokearound on this website you'll find about 5000 photos so far, and we add more almost every day. Cool! But frankly, in my humbleopinion, two things could improve. Number 1: I'd really like to see more photos of PEOPLE HAVING FUN with their cars. Number 2: Icould really use some help finding glamorous photos to keep the main pages of the website looking "fresh" for frequent visitors andto spice-up general-interest newsletter columns.
These two selfish desires are the impetus behind the two classes of our 2nd Annual British V8 Newsletter Photo Contest!The rules will be simple, the judging will be arbitrary, the prizes will probably be almost non-existent... but there's still a big reward forparticipating: we'll all have some great photos to look at! Interested?
Here Are The Rules
"General" Class:
The theme for this class is "People Having Fun With Performance-Modified British Sports Cars." To be a winner or runner-up in thisclass, photos must include both people and cars. No exceptions. Second rule: it must be possible for a "reasonably knowledgeableenthusiast" to spot some detail of the car that's modified from "original". Either the people or the cars can be the emphasis of thephoto. Points will be given for composition and craft... but also for how much fun the people are having and for how cool theperformance mods are. Winners will be selected at the discretion of the judge or judges.
Most of the photos on our website are displayed 600 pixels wide by 450 pixels tall. The photographer needn't be concerned aboutthis, but the judge or judges will be asked to give preference to photos that look good when re-sized or cropped to this size. (Pleasesee the General Submission Guidelines.)
"General Class" Example - 2007 Contest Winning Photo by Martyn Harvey
"Banner" Class:
The theme for this class is "Performance-Modified British Sports Cars." To be a winner or runner-up in this class, photos must showthe modification in a glamorous way. Showing a badge, decal or painted logo that indicates or suggests the existence of amodification counts too. The photo doesn't need to contain people. Points will be given for the photographer's creativity, composition

and craftsmanship. Winners will be selected at the discretion of the judge or judges.
Photos submitted for the Banner Class should look great when cropped or resized to 700 pixels wide by about 200 pixels tall. (Seeabove for an example.) The photos may be cropped before submission, or the actual cropping may be left to the judge's imagination.(From my personal perspective, as editor and not as judge, the latter is actually preferable. Please see the General SubmissionGuidelines.)
General Submission Guidelines
You may submit your photos however is most convenient for you, including e-mail. Our contact information can always be foundhere: http://www.britishv8.org/British-V8-Contact-Info.htm If you're submitting the photos as digital files, then "the higher theresolution the better". If you submit the photos by physical mail, please indicate whether you want them returned. (It wouldn't hurt toinclude return postage.) You may submit however many photos you like. If you submit a photo that meets the criteria of both classes,it will be judged separately in both classes.
No matter how you submit your photos, we ask that you document them as follows:a) Please specify your full name, how we should credit you, and how we may contact you.(Include this with all submitted materials.)b) Please only submit photos that you took yourself.c) Please advise us the names of any people who appear in the photo, if you know their names.d) Please advise us the owners of the car/cars that appear in the photo, if you know their names.e) Please advise us the make, model, and year of the cars. (Generally, the more info the better!)
Some photographers like to develop their own film. Others like to alter their photos digitally. The contest rules neither restrict norprohibit this, but we don't particularly want to encourage it either. Generally, high resolution un-altered images are what we prefer toreceive. Please note, however, that we routinely modify photos before showing them on our website. For example, we use severaloptimization tools and techniques to reduce digital file size. We also frequently crop, re-size, and brighten photos. We have a weirdhabit of airbrushing out at least one or two digits from license plate numbers (unless they're vanity plates).
Participating in this contest implies that you're making the photos available to The British V8 Newsletter for use at our discretion. Wewill credit you as the photographer, but we will claim copyright rights on any and all photos that appear on our website or in ournewsletter. If you don't own a photo or if you're uncomfortable with our having the right to display it, please don't submit it.
Judging, Awards, and Deadlines
Judges have not yet been volunteered to judge this year's contest.
We're still working on identifying potential prizes. (Contact me if you'd like to sponsor the contest and provide awards!)The deadline for all entries is July 1, 2008. Winners will be judged and announced at the British V8 Meet, later in July!
DO NOT PUT THIS OFF! SEND IN YOUR PHOTOS NOW!
I wish everyone good luck and hope everyone who participates enjoys this informal competition!
Sincerely,Curtis Jacobson, editor
British V8: Newsletter Photo Gallery Web Forum Meetings Contact Info Web-Rings Site Map
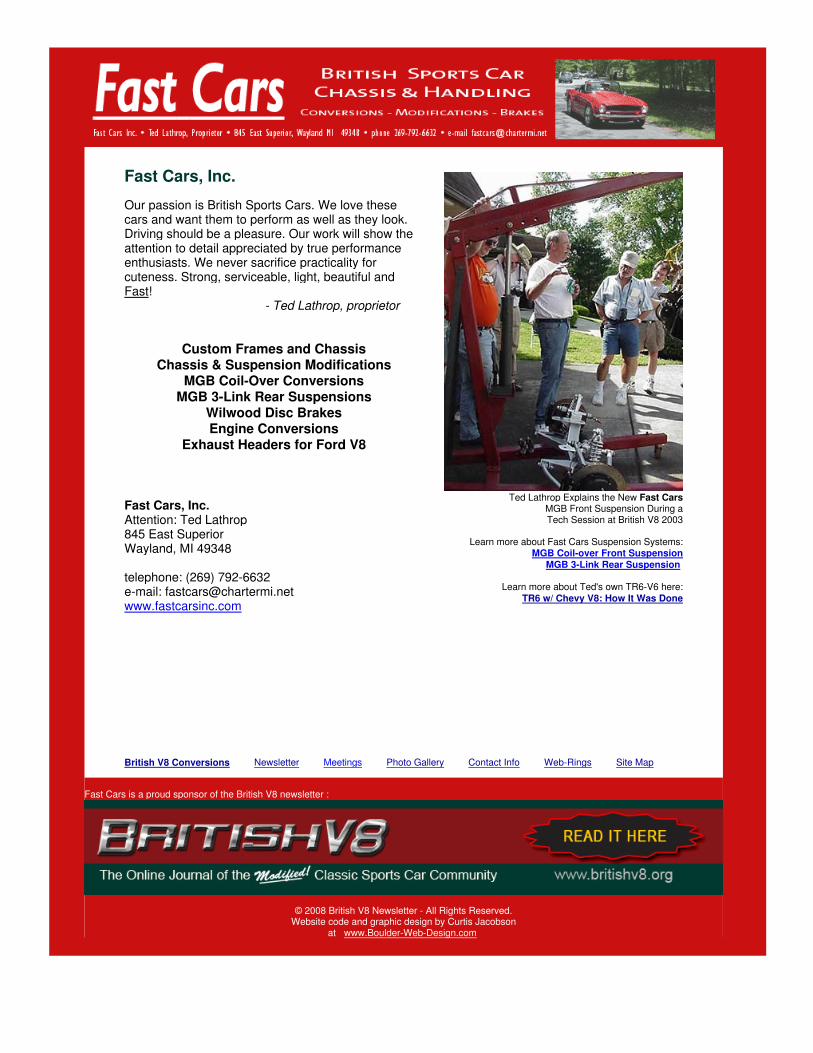
Fast Cars is a proud sponsor of the British V8 newsletter :
© 2008 British V8 Newsletter - All Rights Reserved.Website code and graphic design by Curtis Jacobson
at www.Boulder-Web-Design.com
Ted Lathrop Explains the New Fast CarsMGB Front Suspension During aTech Session at British V8 2003
Learn more about Fast Cars Suspension Systems:MGB Coil-over Front Suspension
MGB 3-Link Rear Suspension
Learn more about Ted's own TR6-V6 here:
TR6 w/ Chevy V8: How It Was Done
Fast Cars, Inc.
Our passion is British Sports Cars. We love thesecars and want them to perform as well as they look.Driving should be a pleasure. Our work will show theattention to detail appreciated by true performance enthusiasts. We never sacrifice practicality forcuteness. Strong, serviceable, light, beautiful andFast! - Ted Lathrop, proprietor
Custom Frames and ChassisChassis & Suspension Modifications
MGB Coil-Over ConversionsMGB 3-Link Rear Suspensions
Wilwood Disc BrakesEngine Conversions
Exhaust Headers for Ford V8
Fast Cars, Inc.Attention: Ted Lathrop845 East SuperiorWayland, MI 49348
telephone: (269) 792-6632e-mail: [email protected]
British V8 Conversions Newsletter Meetings Photo Gallery Contact Info Web-Rings Site Map

Vendor Directory
Please thank these companies for sponsoring our newsletter!
( click on the ads for additional information )
Advance Auto-Wire :
Advanced Distributors, LLC :
All British Car Repair :
BMC British Automobile LLC :
British Motor Heritage :
Brit-Tek Ltd. :
Brooklands Car Components :

Classic Conversions Engineering :
Custom Rod Works :
Executive Touch :
Fast Cars Inc. :
Glen Towery British Cars :
Mantell Motorsport :
Moss Motors Ltd. :
Motorcar Garage :

The Motorway Ltd. :
Pieces of Eight :
Roadtronics Automotive Technologies Company Inc. :
Reborn Company LLC :
Service Garage :
Sports Car Shop, Eugene OR :
Targett MotorSport :
Triple-C Motor Accessories :

The Wedge Shop :
Wire Wheel Classic Sports Cars Inc. :
Your company could be listed here too!
British V8 Newsletter Photo Gallery Web Forum Meetings Contact Info Web-Rings Site Map
© 2008 British V8 Newsletter, all rights reserved. Website code & graphic design by: www.Boulder-Web-Design.com
Google ������site �����web