
BRICON Electronic Clocking Device · 2020-02-10 · BRICON Electronic Clocking Device Belgian...
59
BRICON Electronic Clocking Device Belgian Racing pigeons Information and registration system Manual for basketing with BRICON on the loft BRICON 100/500/1000. BA-BSC/TW -ENG/08 Contacts: Ludo Wille: GSM +32 (0)475/ 25 30 21 BRICON nv Hoge Heerweg,49 9100 Sint-Niklaas België Tel: +32 (0)3/ 777 39 74 Fax: +32 (0)3/ 778 07 35 Website: www.bricon.be e-mail: [email protected]
Transcript of BRICON Electronic Clocking Device · 2020-02-10 · BRICON Electronic Clocking Device Belgian...

BRICON Electronic Clocking Device
Belgian Racing pigeons Information and registration system
Manual for basketing with BRICON on the loft BRICON 100/500/1000.
BA-BSC/TW -ENG/08
Contacts: Ludo Wille: GSM +32 (0)475/ 25 30 21
BRICON nv Hoge Heerweg,49 9100 Sint-Niklaas
België Tel: +32 (0)3/ 777 39 74 Fax: +32 (0)3/ 778 07 35 Website: www.bricon.be e-mail: [email protected]
2
The BRICON CLOCKING DEVICE.
manual: contents 1. Introduction 4 1.1. Electronic clocking systems, the basic principles. 4 1.2. What is RFID? 4 1.3. What are the advantages of RFID? 4 1.4. RFID and electronic clocking. 5 2. The BRICON range. 6 2.1. Advantages of the Bricon system. 6 2.2. The three types of electronic clocks In the BRICON range. 6 2.2.1. Little BRICON 100. 6 2.2.2. Little BRICON 500. 6 2.2.3. .Little BRICON 1000. 6 2.3. The three types of antennas in the BRICON range. 7 2.3.1. 2-field antenna. 7 2.3.2. 4-field antenna. 7 2.3.3. 6-field antenna. 7 3. Installing the system. 7 3.1. Programming the antennas. 8 3.2. Set up of the BRICON electronic clocking device. 9 3.2.1. Set up. 10 3.2.2. Which power supply to use?. 11 3.2.2.1. Two types of power supply. 11 3.2.2.2. Calculation of the electricity consumption. 11 3.2.2.3. Calculation of the number of adapter cables. 12 3.2.3. Placing the detecting antennas. 12 3.3. Testing the antennas. 13 3.4. Coupling the electronic chip ring to the national foot ring. 14 3.5. Clocking. 16 3.5.1. Clocking a race. 16 3.5.1.1. Extra functions during reading. 17 3.5.2. Clocking a training. 17 4. Race. 18 4.1. Basketing. 18 4.2. Read. 19 4.3. Placing bets. 20 4.4. Listing designated pigeons with the antenna. 21 4.5. Listing designated pigeons without antenna. 24 4.6. View the list of designations. 25 4.7. Delete the list of designations. 26 4.8. Print the list of designations. 27

3
5. Use data. 29 5.1. View data from the EC. 29 5.2. Delete data from the EC. 30 5.3. Printing data from the EC. 31 5.3.1. The overview list in detail. 33 5.3.2. Training clocking list in detail. 34 5.3.3. Race clocking list in detail. 35 5.3.4. The pigeon list in detail. 36 5.3.5. The race list in detail. 37 5.3.6. List of designations in detail. 38 5.3.7. The basketing list in detail. 39 5.3.8. The logbook in detail. 40 5.4. Viewing the pigeon list. 41 5.5. Viewing the races in the EC. 42 6. Options 43 6.1. Viewing the pigeon list. 43 6.2. Delete data from the pigeon list. 44 7. Set up of the EC. 45 7.1. Set number of print-outs. 45 7.2. Set number of lines of the print-out. 46 7.3. Set Auto print 48 7.4. Set the clock. 49 7.5. Set the clock type. 51 7.6. Set the basket number. 52 7.7. Set speed calculation. 53 7.8. Set your language. 55 7.9. Change password. 56 8. Technical data. 57
4
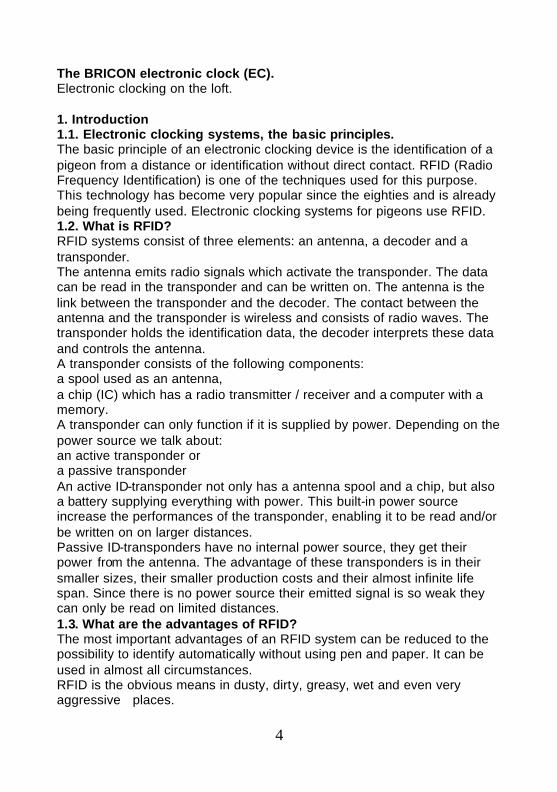
The BRICON electronic clock (EC). Electronic clocking on the loft. 1. Introduction 1.1. Electronic clocking systems, the basic principles. The basic principle of an electronic clocking device is the identification of a pigeon from a distance or identification without direct contact. RFID (Radio Frequency Identification) is one of the techniques used for this purpose. This technology has become very popular since the eighties and is already being frequently used. Electronic clocking systems for pigeons use RFID. 1.2. What is RFID? RFID systems consist of three elements: an antenna, a decoder and a transponder. The antenna emits radio signals which activate the transponder. The data can be read in the transponder and can be written on. The antenna is the link between the transponder and the decoder. The contact between the antenna and the transponder is wireless and consists of radio waves. The transponder holds the identification data, the decoder interprets these data and controls the antenna. A transponder consists of the following components: a spool used as an antenna, a chip (IC) which has a radio transmitter / receiver and a computer with a memory. A transponder can only function if it is supplied by power. Depending on the power source we talk about: an active transponder or a passive transponder An active ID-transponder not only has a antenna spool and a chip, but also a battery supplying everything with power. This built-in power source increase the performances of the transponder, enabling it to be read and/or be written on on larger distances. Passive ID-transponders have no internal power source, they get their power from the antenna. The advantage of these transponders is in their smaller sizes, their smaller production costs and their almost infinite life span. Since there is no power source their emitted signal is so weak they can only be read on limited distances. 1.3. What are the advantages of RFID? The most important advantages of an RFID system can be reduced to the possibility to identify automatically without using pen and paper. It can be used in almost all circumstances. RFID is the obvious means in dusty, dirty, greasy, wet and even very aggressive places.
5
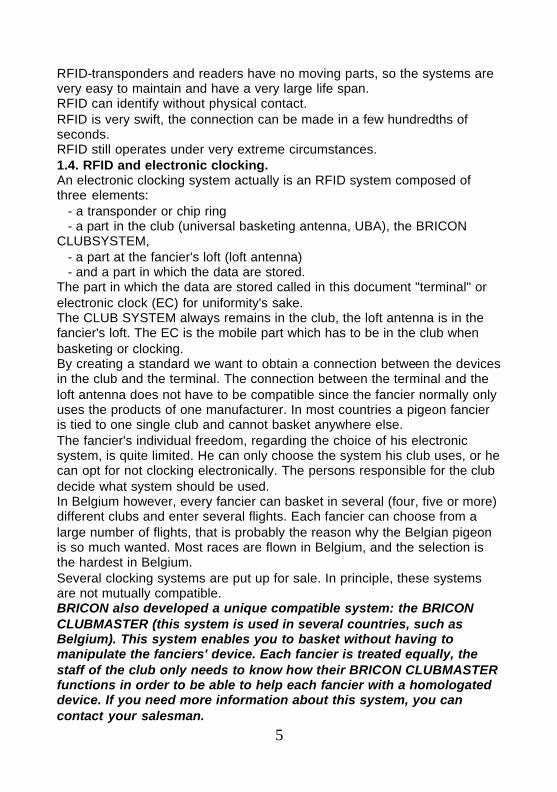
RFID-transponders and readers have no moving parts, so the systems are very easy to maintain and have a very large life span. RFID can identify without physical contact. RFID is very swift, the connection can be made in a few hundredths of seconds. RFID still operates under very extreme circumstances. 1.4. RFID and electronic clocking. An electronic clocking system actually is an RFID system composed of three elements: - a transponder or chip ring - a part in the club (universal basketing antenna, UBA), the BRICON CLUBSYSTEM, - a part at the fancier's loft (loft antenna) - and a part in which the data are stored. The part in which the data are stored called in this document "terminal" or electronic clock (EC) for uniformity's sake. The CLUB SYSTEM always remains in the club, the loft antenna is in the fancier's loft. The EC is the mobile part which has to be in the club when basketing or clocking. By creating a standard we want to obtain a connection between the devices in the club and the terminal. The connection between the terminal and the loft antenna does not have to be compatible since the fancier normally only uses the products of one manufacturer. In most countries a pigeon fancier is tied to one single club and cannot basket anywhere else. The fancier's individual freedom, regarding the choice of his electronic system, is quite limited. He can only choose the system his club uses, or he can opt for not clocking electronically. The persons responsible for the club decide what system should be used. In Belgium however, every fancier can basket in several (four, five or more) different clubs and enter several flights. Each fancier can choose from a large number of flights, that is probably the reason why the Belgian pigeon is so much wanted. Most races are flown in Belgium, and the selection is the hardest in Belgium. Several clocking systems are put up for sale. In principle, these systems are not mutually compatible. BRICON also developed a unique compatible system: the BRICON CLUBMASTER (this system is used in several countries, such as Belgium). This system enables you to basket without having to manipulate the fanciers' device. Each fancier is treated equally, the staff of the club only needs to know how their BRICON CLUBMASTER functions in order to be able to help each fancier with a homologated device. If you need more information about this system, you can contact your salesman.

6
2.The BRICON range. 2.1. Advantages of the BRICON system. - BRICON is completely Belgian: programming, assembling and high-tech knowledge from the centre of pigeon racing. - BRICON has quick and reliable antennas. - the BRICON antennas are fully waterproof and can resist temperatures from –10°C up to 80°C. - the BRICON antennas do not have any special entries (tunnels) for detection. - the BRICON antennas don’t need to be adjusted. - the BRICON antennas are easy to install (flat surface; 2cm high ) and can be placed under the arrival board. - BRICON gives a 2 year warranty on the antennas. - the BRICON antennas read all the registered electronic rings. - BRICON is easy to use, and gives complete info on display. Installation only takes a few minutes - the Bricon Electronic Clock has unlimited possibilities. The BRICON product range is complete. Each fancier can set up his own needs and choose the facilities he wants. - BRICON has the best prices. This manual gives an explanation of all the possibilities of the different clocks (EC) and of the assembling and set up of the equipment. It is important to read the manual before you start working with the system. 2.2. The three types of clocks (EC) in the BRICON range. Bricon has 3 types of clocks. These are fully automatic, you only need to connect them. All 3 clocks can also register training flights. The Bricon Clocks are easy to use; there are no mistakes possible during a race recording . 2.2.1. LittleLittle BRICON 100. Clocking device for 100 pigeons. Choice between 1 or 2 field antennas (not compatible). Maximum 4 antennas can be connected. 2.2.2..LittleLittle BRICON 500. Clocking device for 500 pigeons. Choice of 2, 4 or 6 field antennas (compatible). Maximum 8 antennas can be connected. 2.2.3. LittleLittle BRICON 1000. Clocking device for 1000 pigeons.
7
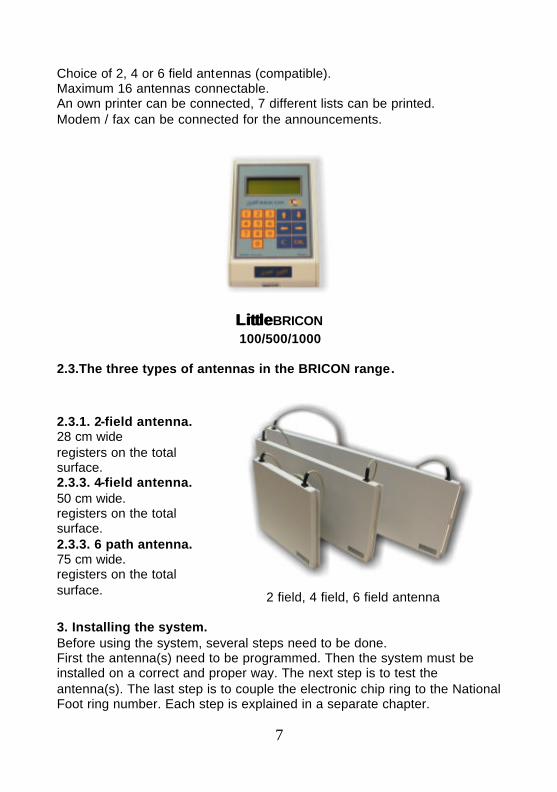
Choice of 2, 4 or 6 field antennas (compatible). Maximum 16 antennas connectable. An own printer can be connected, 7 different lists can be printed. Modem / fax can be connected for the announcements.
LittleLittle BRICON 100/500/1000
2.3.The three types of antennas in the BRICON range.
2.3.1. 2-field antenna. 28 cm wide registers on the total surface. 2.3.3. 4-field antenna. 50 cm wide. registers on the total surface. 2.3.3. 6 path antenna. 75 cm wide. registers on the total surface.
2 field, 4 field, 6 field antenna
3. Installing the system. Before using the system, several steps need to be done. First the antenna(s) need to be programmed. Then the system must be installed on a correct and proper way. The next step is to test the antenna(s). The last step is to couple the electronic chip ring to the National Foot ring number. Each step is explained in a separate chapter.
8
You can set up your language (see Set up your language .).
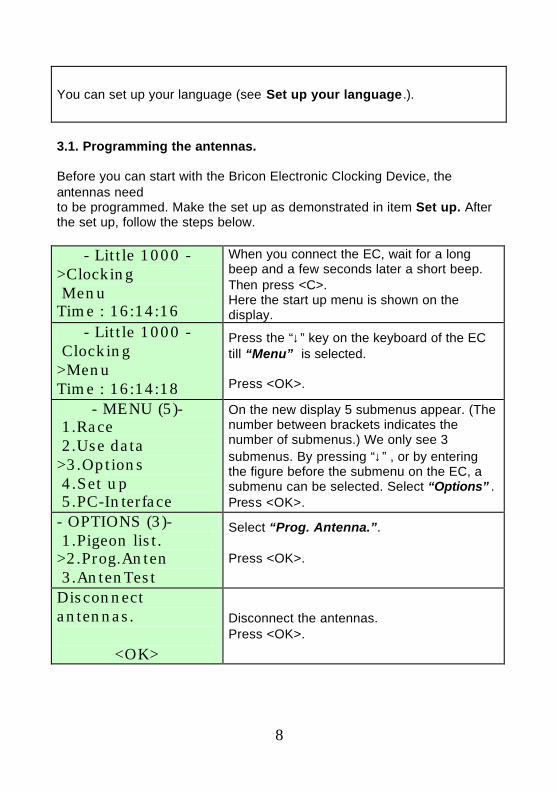
3.1. Programming the antennas. Before you can start with the Bricon Electronic Clocking Device, the antennas need to be programmed. Make the set up as demonstrated in item Set up. After the set up, follow the steps below.
- Little 1000 - >Clocking Menu Time : 16:14:16
When you connect the EC, wait for a long beep and a few seconds later a short beep. Then press <C>. Here the start up menu is shown on the display.
- Little 1000 - Clocking >Menu Time : 16:14:18
Press the “↓” key on the keyboard of the EC till “Menu” is selected. Press <OK>.
- MENU (5)- 1.Race 2.Use data >3.Options 4.Set up 5.PC-Interface
On the new display 5 submenus appear. (The number between brackets indicates the number of submenus.) We only see 3 submenus. By pressing “↓” , or by entering the figure before the submenu on the EC, a submenu can be selected. Select “Options” . Press <OK>.
- OPTIONS (3)- 1.Pigeon list. >2.Prog.Anten 3.AntenTest
Select “Prog. Antenna.”. Press <OK>.
Disconnect antennas.
<OK>
Disconnect the antennas. Press <OK>.
9
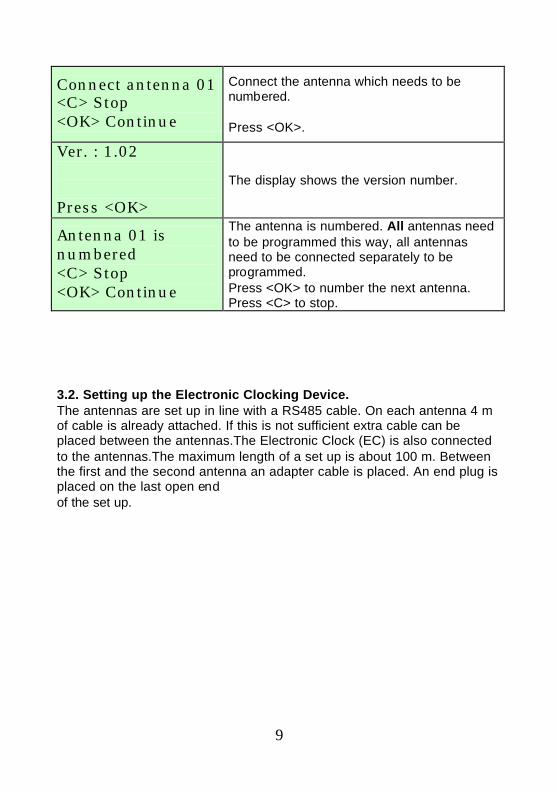
Connect antenna 01 <C> Stop <OK> Continue
Connect the antenna which needs to be numbered. Press <OK>.
Ver. : 1.02 Press <OK>
The display shows the version number.
Antenna 01 is numbered <C> Stop <OK> Continue
The antenna is numbered. All antennas need to be programmed this way, all antennas need to be connected separately to be programmed. Press <OK> to number the next antenna. Press <C> to stop.
3.2. Setting up the Electronic Clocking Device. The antennas are set up in line with a RS485 cable. On each antenna 4 m of cable is already attached. If this is not sufficient extra cable can be placed between the antennas.The Electronic Clock (EC) is also connected to the antennas.The maximum length of a set up is about 100 m. Between the first and the second antenna an adapter cable is placed. An end plug is placed on the last open end of the set up.
10
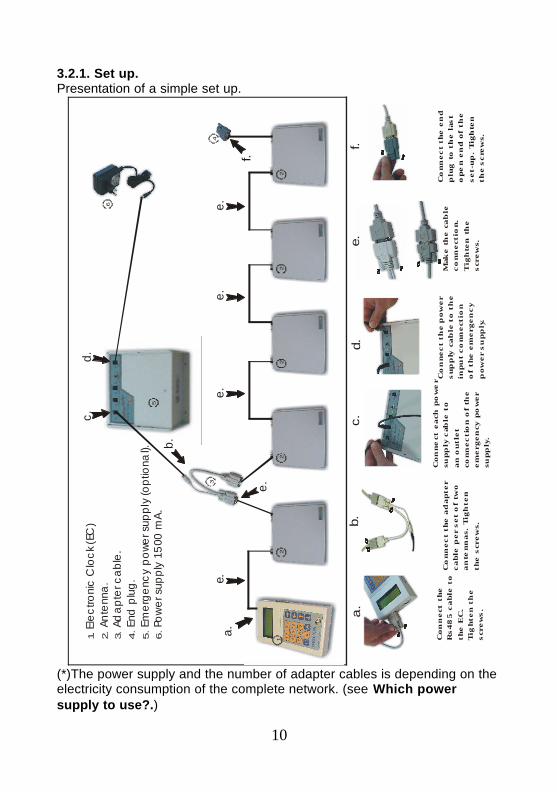
3.2.1. Set up. Presentation of a simple set up.
6
5
34
22
22
211.
2. 3.
4.
5.
6.El
ectro
nic
Clo
ck (E
C)
Ant
enna
.Ad
apte
r cab
le.
End
plu
g. E
mer
genc
y po
wer s
uppl
y (o
ptio
nal).
Pow
er s
uppl
y 15
00 m
A.
a.
b.
e.e.
e.
e.
e.
c.d.
a.
b.c.
d.f.
f.
Co
nn
ect
th
e
Rs
48
5 c
ab
le t
o
the
EC
.T
igh
ten
th
e
scr
ew
s.
Co
nn
ect
ea
ch p
ow
er
sup
ply
cab
le t
o
an
ou
tle
tco
nn
ec
tio
n o
f th
ee
me
rge
ncy
po
we
r su
pp
ly.
Co
nn
ec
t th
e p
ow
er
su
pp
ly c
ab
le t
o t
he
inp
ut
co
nn
ect
ion
of
the
em
erg
en
cy
po
we
r s
up
ply
.
Co
nn
ec
t th
e e
nd
plu
g t
o t
he
las
to
pe
n e
nd
of
the
se
t-u
p.
Tig
hte
n
the
sc
rew
s.
Co
nn
ec
t th
e a
da
pte
rc
ab
le p
er
se
t o
f tw
oa
nte
nn
as.
Tig
hte
n
the
scr
ew
s.
Mak
e t
he
ca
ble
co
nn
ect
ion
.
Tig
hte
n t
he
s
cre
ws.e.
(*)The power supply and the number of adapter cables is depending on the electricity consumption of the complete network. (see Which power supply to use?.)
11
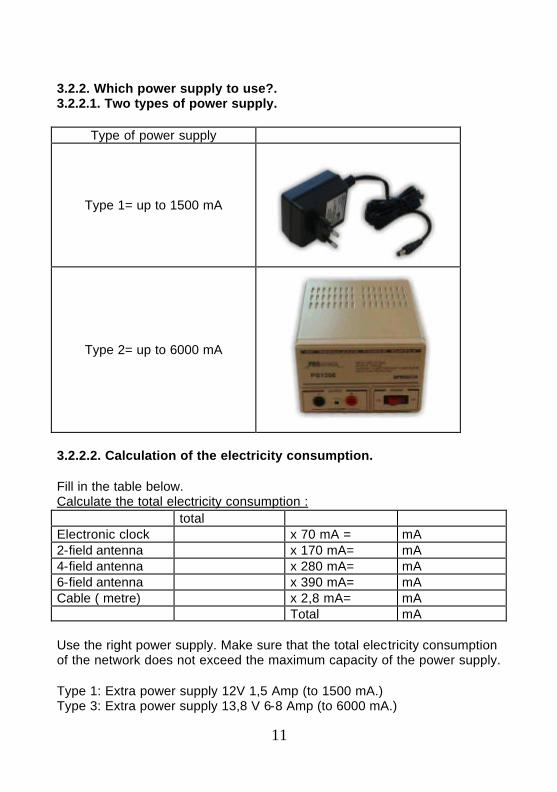
3.2.2. Which power supply to use?. 3.2.2.1. Two types of power supply.
Type of power supply
Type 1= up to 1500 mA
Type 2= up to 6000 mA
3.2.2.2. Calculation of the electricity consumption. Fill in the table below. Calculate the total electricity consumption : total Electronic clock x 70 mA = mA 2-field antenna x 170 mA= mA 4-field antenna x 280 mA= mA 6-field antenna x 390 mA= mA Cable ( metre) x 2,8 mA= mA Total mA Use the right power supply. Make sure that the total electricity consumption of the network does not exceed the maximum capacity of the power supply. Type 1: Extra power supply 12V 1,5 Amp (to 1500 mA.) Type 3: Extra power supply 13,8 V 6-8 Amp (to 6000 mA.)

12
3.2.2.3. Calculation of the number of adapter cables. Each component consumes a part of the energy, therefore we have to spread the adapter cables so that each component on its own has enough energy to function perfectly! For every 3 up to 5 components the use of 1 adapter cable is advised. The adapter cables need to be spread over the network.
For the calculation of the electricity consumption and the number of adapter cables in larger networks we recommend to ask the advice of your salesman.
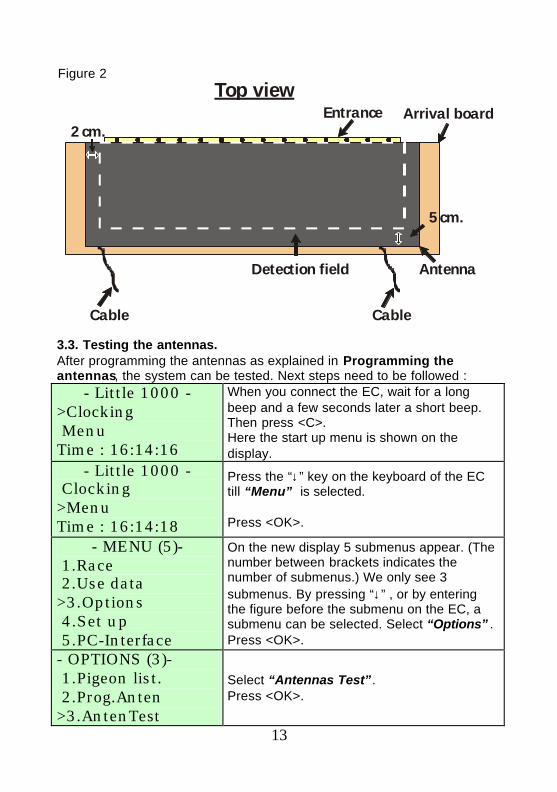
3.2.3. Placing the detecting antennas. All antennas can be placed on top or under the arrival board of the pigeon loft. The entrance to the inside of the loft must be smaller than the length of the antennas. A tunnel is not necessarry for BRICON antennas, the antenna registers over the whole surface ! It is recommended to slow down the pigeons the moment they enter the detection field .This to make sure the pigeon walks over the fields.The chip ring on the pigeon must be in a range of max. 7 cm hight to be properly detected. No metal items are allowed in the detection field of the antennas, because they can disturb the detection of the rings. It is adviced to keep metal items at about 10cm away from the antennas! The detection area of the paths is at the front of the antenna. It is recommended to place the front of the antennas to the inside of the loft (see figures 1 and 2). Figure 1
Entrance
Arrival board
Antenna
Detection field
Min 7 cm.
Cable Cable
Front view
13
Figure 2
Entrance Arrival board
AntennaDetection field
2 cm.
5 cm.
Cable Cable
Top view
3.3. Testing the antennas. After programming the antennas as explained in Programming the antennas, the system can be tested. Next steps need to be followed :
- Little 1000 - >Clocking Menu Time : 16:14:16
When you connect the EC, wait for a long beep and a few seconds later a short beep. Then press <C>. Here the start up menu is shown on the display.
- Little 1000 - Clocking >Menu Time : 16:14:18
Press the “↓” key on the keyboard of the EC till “Menu” is selected. Press <OK>.
- MENU (5)- 1.Race 2.Use data >3.Options 4.Set up 5.PC-Interface
On the new display 5 submenus appear. (The number between brackets indicates the number of submenus.) We only see 3 submenus. By pressing “↓” , or by entering the figure before the submenu on the EC, a submenu can be selected. Select “Options” . Press <OK>.
- OPTIONS (3)- 1.Pigeon list. 2.Prog.Anten >3.AntenTest
Select “Antennas Test”. Press <OK>.
14
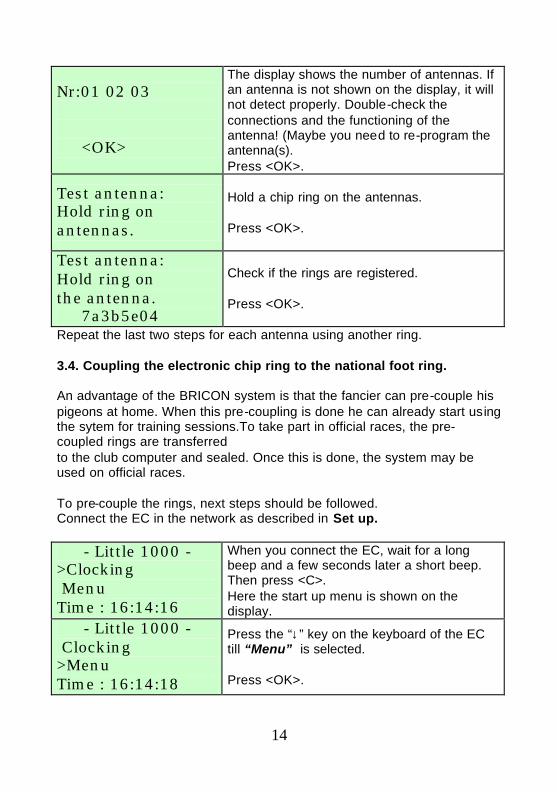
Nr:01 02 03 <OK>
The display shows the number of antennas. If an antenna is not shown on the display, it will not detect properly. Double-check the connections and the functioning of the antenna! (Maybe you need to re-program the antenna(s). Press <OK>.
Test antenna: Hold ring on antennas.
Hold a chip ring on the antennas. Press <OK>.
Test antenna: Hold ring on the antenna. 7a3b5e04
Check if the rings are registered. Press <OK>.
Repeat the last two steps for each antenna using another ring. 3.4. Coupling the electronic chip ring to the national foot ring. An advantage of the BRICON system is that the fancier can pre-couple his pigeons at home. When this pre-coupling is done he can already start using the sytem for training sessions.To take part in official races, the pre-coupled rings are transferred to the club computer and sealed. Once this is done, the system may be used on official races. To pre-couple the rings, next steps should be followed. Connect the EC in the network as described in Set up.
- Little 1000 - >Clocking Menu Time : 16:14:16
When you connect the EC, wait for a long beep and a few seconds later a short beep. Then press <C>. Here the start up menu is shown on the display.
- Little 1000 - Clocking >Menu Time : 16:14:18
Press the “↓” key on the keyboard of the EC till “Menu” is selected. Press <OK>.

15
- MENU (5)- 1.Race 2.Use data >3.Options 4.Set up 5.PC-Interface
On the new display 5 submenus appear. (The number between brackets indicates the number of submenus.) We only see 3 submenus. By pressing “↓” , or by entering the figure before the submenu on the EC, a submenu can be selected. Select “Options” . Press <OK>.
- OPTIONS (3)- >1.Pigeon list. 2.Prog.Anten 3.AntenTest
Select “Pigeon List”. Press <OK>.
- PIGEONS (3)- ->1. Insert 2. View 3. Delete
Select “Insert.”. Press<OK>.
Self-connection El/IDring Hold pigeon on antenna.<C> stop
Put the chip ring on the pigeon and hold the chip ring above the antenna.
Enter country : <OK> NL <1>BE <2> FR <3> DV <4> PT <0> Other
Make a selection. Press <OK> for the Netherlands, <1> for Belgium …
Enter year : <OK> ready <Arrows> Select BE-99
With the vertical arrows the year can be changed (e.g. 99) Press <OK>.
Enter ID number: <OK> ready <Arrows> Select BE-99-4210569
Give the ring number. 7 characters are entered. Overwrite the zeros e.g. (a ring of 7 characters) 4210569 With the horizontal arrows you can move from the left to the right.
Enter sex : Hen or Cock <C> <OK> BE-99-4210569
Select the sex. Press <C> for hen, press <OK> for cock. When the sex is still unknown choose cock. The sex can be changed anytime.
16
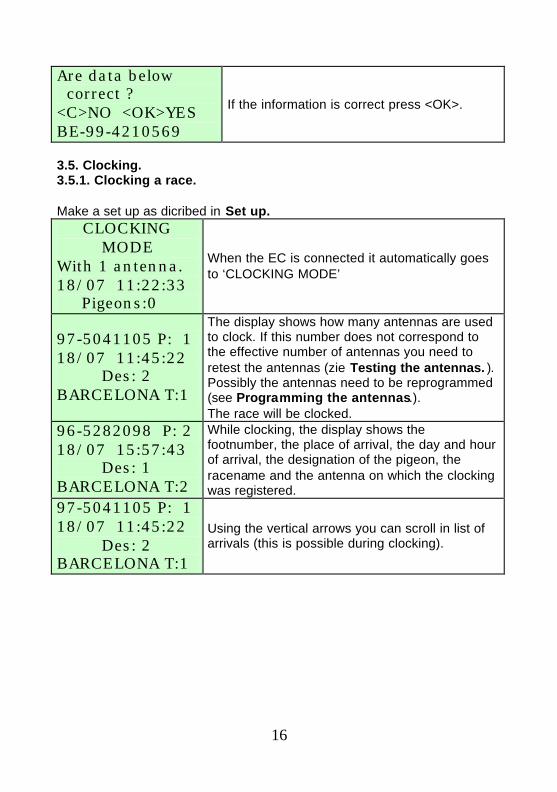
Are data below correct ? <C>NO <OK>YES BE-99-4210569
If the information is correct press <OK>.
3.5. Clocking. 3.5.1. Clocking a race. Make a set up as dicribed in Set up.
CLOCKING MODE
With 1 antenna. 18/07 11:22:33 Pigeons:0
When the EC is connected it automatically goes to ‘CLOCKING MODE’
97-5041105 P: 1 18/07 11:45:22 Des: 2 BARCELONA T:1
The display shows how many antennas are used to clock. If this number does not correspond to the effective number of antennas you need to retest the antennas (zie Testing the antennas. ). Possibly the antennas need to be reprogrammed (see Programming the antennas.). The race will be clocked.
96-5282098 P: 2 18/07 15:57:43 Des: 1 BARCELONA T:2
While clocking, the display shows the footnumber, the place of arrival, the day and hour of arrival, the designation of the pigeon, the racename and the antenna on which the clocking was registered.
97-5041105 P: 1 18/07 11:45:22 Des: 2 BARCELONA T:1
Using the vertical arrows you can scroll in list of arrivals (this is possible during clocking).

17
3.5.1.1.Extra functions during clocking. Nr:01 <C>
-Press“1”: the display shows al connected antennas. Press <C>.
ACTIVATE MODULE?
<C> NO <OK> YES
- Press“2”: Press <OK> to activate the storing module.
CLOCK TRAINING?
<C> NO <OK> YES
-Press “3”: Press <OK> for deactivating the clocking of training races (during the race).
3.5.2. Clocking a training. Function: This is the menu to clock a training flight.
TRAINING MODE With 1 antenna. 19/07 09:22:33 Pigeons:0
When the EC is connected the device automatically goes to ‘TRAINING MODE’
97-5041105 P: 1 19/07 09:25:22 Training Trap:2
The display shows how many antennas are used to clock. If this number does not correspond to the real number of antennas you need to retest the antennas (zie Testing the antennas. ). Possibly the antennas need to be reprogrammed (see Programming the antennas.).
96-5282098 P: 2 19/07 09:27:43 Training Trap:2
The training will be clocked. While clocking, the displays shows the foot number, the place of arrival, the day and hour of arrival, the type of race (Training) and the antenna on which the clocking was registered. Using the vertical arrows you can scroll (this is possible during clocking).
18
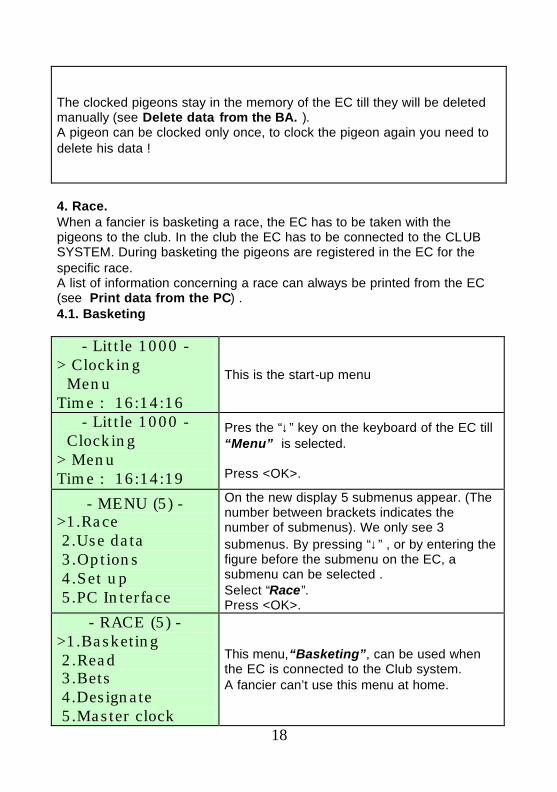
The clocked pigeons stay in the memory of the EC till they will be deleted manually (see Delete data from the BA. ). A pigeon can be clocked only once, to clock the pigeon again you need to delete his data !
4. Race. When a fancier is basketing a race, the EC has to be taken with the pigeons to the club. In the club the EC has to be connected to the CLUB SYSTEM. During basketing the pigeons are registered in the EC for the specific race. A list of information concerning a race can always be printed from the EC (see Print data from the PC) . 4.1. Basketing
- Little 1000 - > Clocking Menu Time : 16:14:16
This is the start-up menu
- Little 1000 - Clocking > Menu Time : 16:14:19
Pres the “↓” key on the keyboard of the EC till “Menu” is selected. Press <OK>.
- MENU (5) - >1.Race 2.Use data 3.Options 4.Set up 5.PC Interface
On the new display 5 submenus appear. (The number between brackets indicates the number of submenus). We only see 3 submenus. By pressing “↓” , or by entering the figure before the submenu on the EC, a submenu can be selected . Select “Race”. Press <OK>.
- RACE (5) - >1.Basketing 2.Read 3.Bets 4.Designate 5.Master clock
This menu,“Basketing”, can be used when the EC is connected to the Club system. A fancier can’t use this menu at home.

19
Attention: all released data need to be deleted before basketing can start ( see Delete data from the EC.)
4.2. Read. Function: This menu is used in the club to read the clock
- Little 1000 - > Clocking Menu Time : 16:14:16
This is the start-up menu.
- Little 1000 - Clocking > Menu Time : 16:14:19
Select with the arrow “↓” on the keyboard of the EC “Menu” . Press <OK>.
- MENU (5) - >1.Race 2.Use data 3.Options 4.Set up 5.PC Interface
On the new display 5 submenus appear (the number between brackets indicates the number of submenus). We only see 3 submenus. By pressing “↓” or by entering the figure before the submenu on the EC , a submenu can be selected . Select “Race”. Press <OK>.
- RACE (4) - 1.Basketing >2.Read 3.Bets 4.Designate 5.Master clock
This menu,“Read”, can be used when the EC is connected to the Club system. A fancier can’t use this menu at home.

20
4.3. Placing bets.
- Little 1000 - > Clocking Menu Time : 16:14:16
This is the start-up display.
- Little 1000 - Clocking > Menu Time : 16:14:19
With the arrow “↓” on the display of the EC the ‘Menu’ is selected. Press <OK>.
- MENU (5) - >1.Race 2.Use data 3.Options 4.Designate 5.Master clock
On the new display 5 submenus appear (the number between brackets indicates the number of submenus). We only see 3 submenus. By pressing “↓” or by entering the figure before the submenu on the EC , a submenu can be selected. Select “Race”. Press <OK>.
- RACE (4) - 1.Basketing 2.Read >3.Bets 4.Designate 5.Master clock
Although this menu can be entered it is not used for this country.
21
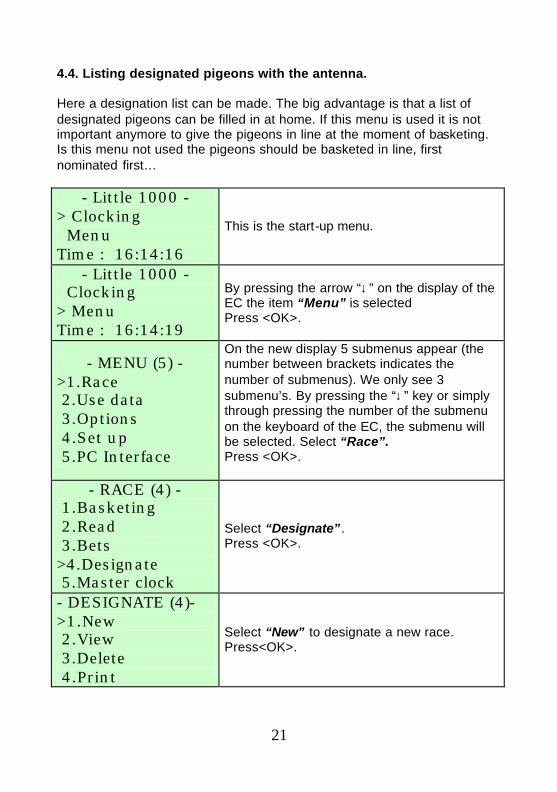
4.4. Listing designated pigeons with the antenna. Here a designation list can be made. The big advantage is that a list of designated pigeons can be filled in at home. If this menu is used it is not important anymore to give the pigeons in line at the moment of basketing. Is this menu not used the pigeons should be basketed in line, first nominated first…
- Little 1000 - > Clocking Menu Time : 16:14:16
This is the start-up menu.
- Little 1000 - Clocking > Menu Time : 16:14:19
By pressing the arrow “↓” on the display of the EC the item “Menu” is selected Press <OK>.
- MENU (5) - >1.Race 2.Use data 3.Options 4.Set up 5.PC Interface
On the new display 5 submenus appear (the number between brackets indicates the number of submenus). We only see 3 submenu’s. By pressing the “↓” key or simply through pressing the number of the submenu on the keyboard of the EC, the submenu will be selected. Select “Race”. Press <OK>.
- RACE (4) - 1.Basketing 2.Read 3.Bets >4.Designate 5.Master clock
Select “Designate”. Press <OK>.
- DESIGNATE (4)- >1.New 2.View 3.Delete 4.Print
Select “New” to designate a new race. Press<OK>.
22
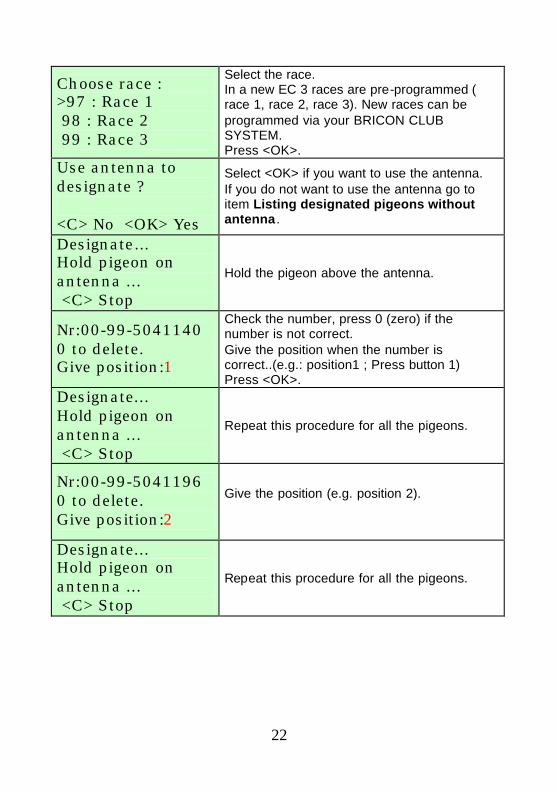
Choose race : >97 : Race 1 98 : Race 2 99 : Race 3
Select the race. In a new EC 3 races are pre-programmed ( race 1, race 2, race 3). New races can be programmed via your BRICON CLUB SYSTEM. Press <OK>.
Use antenna to designate ? <C> No <OK> Yes
Select <OK> if you want to use the antenna. If you do not want to use the antenna go to item Listing designated pigeons without antenna .
Designate... Hold pigeon on antenna ... <C> Stop
Hold the pigeon above the antenna.
Nr:00-99-5041140 0 to delete. Give position:1
Check the number, press 0 (zero) if the number is not correct. Give the position when the number is correct..(e.g.: position1 ; Press button 1) Press <OK>.
Designate... Hold pigeon on antenna ... <C> Stop
Repeat this procedure for all the pigeons.
Nr:00-99-5041196 0 to delete. Give position:2
Give the position (e.g. position 2).
Designate... Hold pigeon on antenna ... <C> Stop
Repeat this procedure for all the pigeons.
23
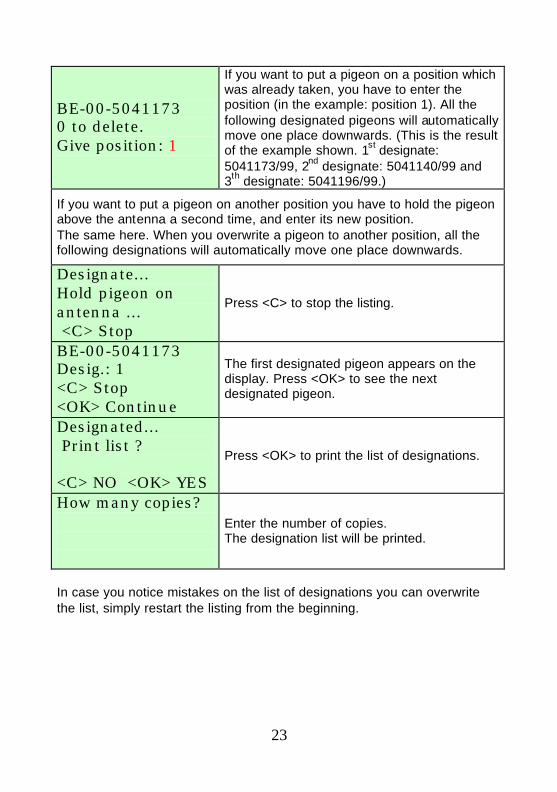
BE-00-5041173 0 to delete. Give position: 1
If you want to put a pigeon on a position which was already taken, you have to enter the position (in the example: position 1). All the following designated pigeons will automatically move one place downwards. (This is the result of the example shown. 1st designate: 5041173/99, 2nd designate: 5041140/99 and 3th designate: 5041196/99.)
If you want to put a pigeon on another position you have to hold the pigeon above the antenna a second time, and enter its new position. The same here. When you overwrite a pigeon to another position, all the following designations will automatically move one place downwards.
Designate... Hold pigeon on antenna ... <C> Stop
Press <C> to stop the listing.
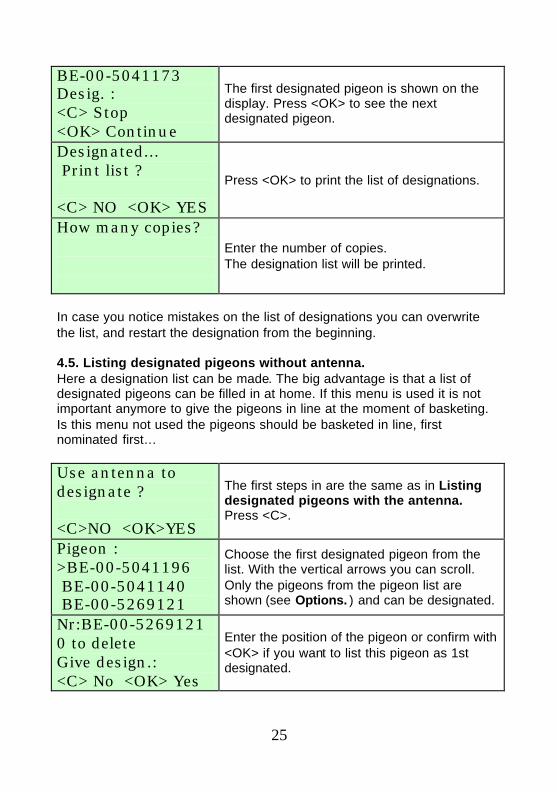
BE-00-5041173 Desig.: 1 <C> Stop <OK> Continue
The first designated pigeon appears on the display. Press <OK> to see the next designated pigeon.
Designated... Print list ? <C> NO <OK> YES
Press <OK> to print the list of designations.
How many copies?
Enter the number of copies. The designation list will be printed.
In case you notice mistakes on the list of designations you can overwrite the list, simply restart the listing from the beginning.
24
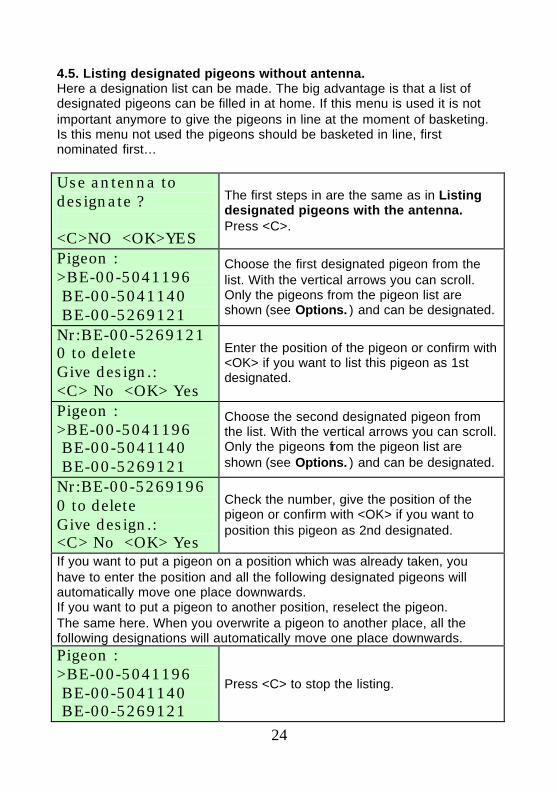
4.5. Listing designated pigeons without antenna. Here a designation list can be made. The big advantage is that a list of designated pigeons can be filled in at home. If this menu is used it is not important anymore to give the pigeons in line at the moment of basketing. Is this menu not used the pigeons should be basketed in line, first nominated first… Use antenna to designate ? <C>NO <OK>YES
The first steps in are the same as in Listing designated pigeons with the antenna. Press <C>.
Pigeon : >BE-00-5041196 BE-00-5041140 BE-00-5269121
Choose the first designated pigeon from the list. With the vertical arrows you can scroll. Only the pigeons from the pigeon list are shown (see Options. ) and can be designated.
Nr:BE-00-5269121 0 to delete Give design.: <C> No <OK> Yes
Enter the position of the pigeon or confirm with <OK> if you want to list this pigeon as 1st designated.
Pigeon : >BE-00-5041196 BE-00-5041140 BE-00-5269121
Choose the second designated pigeon from the list. With the vertical arrows you can scroll. Only the pigeons from the pigeon list are shown (see Options. ) and can be designated.
Nr:BE-00-5269196 0 to delete Give design.: <C> No <OK> Yes
Check the number, give the position of the pigeon or confirm with <OK> if you want to position this pigeon as 2nd designated.
If you want to put a pigeon on a position which was already taken, you have to enter the position and all the following designated pigeons will automatically move one place downwards. If you want to put a pigeon to another position, reselect the pigeon. The same here. When you overwrite a pigeon to another place, all the following designations will automatically move one place downwards. Pigeon : >BE-00-5041196 BE-00-5041140 BE-00-5269121
Press <C> to stop the listing.
25
BE-00-5041173 Desig. : <C> Stop <OK> Continue
The first designated pigeon is shown on the display. Press <OK> to see the next designated pigeon.
Designated... Print list ? <C> NO <OK> YES
Press <OK> to print the list of designations.
How many copies?
Enter the number of copies. The designation list will be printed.
In case you notice mistakes on the list of designations you can overwrite the list, and restart the designation from the beginning. 4.5. Listing designated pigeons without antenna. Here a designation list can be made. The big advantage is that a list of designated pigeons can be filled in at home. If this menu is used it is not important anymore to give the pigeons in line at the moment of basketing. Is this menu not used the pigeons should be basketed in line, first nominated first… Use antenna to designate ? <C>NO <OK>YES
The first steps in are the same as in Listing designated pigeons with the antenna. Press <C>.
Pigeon : >BE-00-5041196 BE-00-5041140 BE-00-5269121
Choose the first designated pigeon from the list. With the vertical arrows you can scroll. Only the pigeons from the pigeon list are shown (see Options. ) and can be designated.
Nr:BE-00-5269121 0 to delete Give design.: <C> No <OK> Yes
Enter the position of the pigeon or confirm with <OK> if you want to list this pigeon as 1st designated.

26
Pigeon : >BE-00-5041196 BE-00-5041140 BE-00-5269121
Choose the second designated pigeon from the list. With the vertical arrows you can scroll. Only the pigeons from the pigeon list are shown (see Options. ) and can be designated.
Nr:BE-00-5269196 0 to delete Give design.: <C> No <OK> Yes
Check the number, give the position of the pigeon or confirm with <OK> if you want to position this pigeon as 2nd designated.
If you want to put a pigeon on a position which was already taken, you have to enter the position and all the following designated pigeons will automatically move one place downwards. If you want to put a pigeon to another position, reselect the pigeon. The same here. When you overwrite a pigeon to another place, all the following designations will automatically move one place downwards. Pigeon : >BE-00-5041196 BE-00-5041140 BE-00-5269121
Press <C> to stop the listing.
BE-00-5041173 Desig. : <C> Stop <OK> Continue
The first designated pigeon is shown on the display. Press <OK> to see the next designated pigeon.
Designated... Print list ? <C> NO <OK> YES
Press <OK> to print the list of designations.
How many copies?
Enter the number of copies. The designation list will be printed.
In case you notice mistakes on the list of designations you can overwrite the list, and restart the designation from the beginning.
27
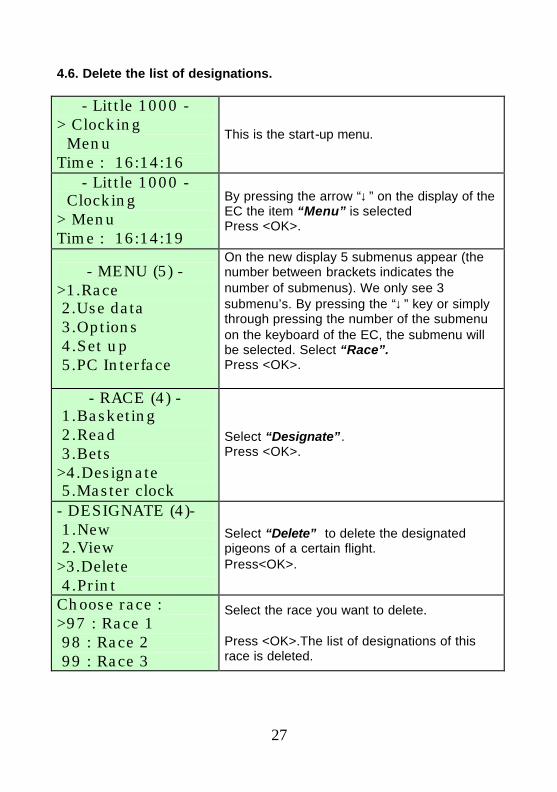
4.6. Delete the list of designations.
- Little 1000 - > Clocking Menu Time : 16:14:16
This is the start-up menu.
- Little 1000 - Clocking > Menu Time : 16:14:19
By pressing the arrow “↓” on the display of the EC the item “Menu” is selected Press <OK>.
- MENU (5) - >1.Race 2.Use data 3.Options 4.Set up 5.PC Interface
On the new display 5 submenus appear (the number between brackets indicates the number of submenus). We only see 3 submenu’s. By pressing the “↓” key or simply through pressing the number of the submenu on the keyboard of the EC, the submenu will be selected. Select “Race”. Press <OK>.
- RACE (4) - 1.Basketing 2.Read 3.Bets >4.Designate 5.Master clock
Select “Designate”. Press <OK>.
- DESIGNATE (4)- 1.New 2.View >3.Delete 4.Print
Select “Delete” to delete the designated pigeons of a certain flight. Press<OK>.
Choose race : >97 : Race 1 98 : Race 2 99 : Race 3
Select the race you want to delete. Press <OK>.The list of designations of this race is deleted.
28
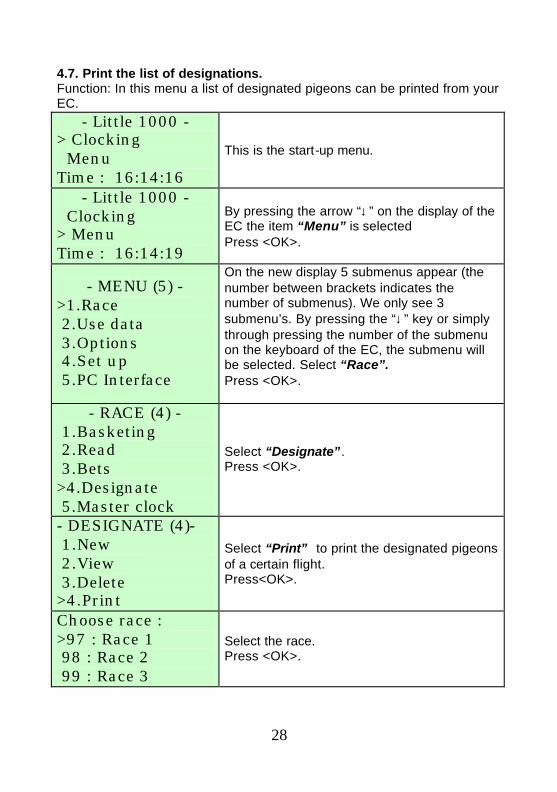
4.7. Print the list of designations. Function: In this menu a list of designated pigeons can be printed from your EC.
- Little 1000 - > Clocking Menu Time : 16:14:16
This is the start-up menu.
- Little 1000 - Clocking > Menu Time : 16:14:19
By pressing the arrow “↓” on the display of the EC the item “Menu” is selected Press <OK>.
- MENU (5) - >1.Race 2.Use data 3.Options 4.Set up 5.PC Interface
On the new display 5 submenus appear (the number between brackets indicates the number of submenus). We only see 3 submenu’s. By pressing the “↓” key or simply through pressing the number of the submenu on the keyboard of the EC, the submenu will be selected. Select “Race”. Press <OK>.
- RACE (4) - 1.Basketing 2.Read 3.Bets >4.Designate 5.Master clock
Select “Designate”. Press <OK>.
- DESIGNATE (4)- 1.New 2.View 3.Delete >4.Print
Select “Print” to print the designated pigeons of a certain flight. Press<OK>.
Choose race : >97 : Race 1 98 : Race 2 99 : Race 3
Select the race. Press <OK>.
29
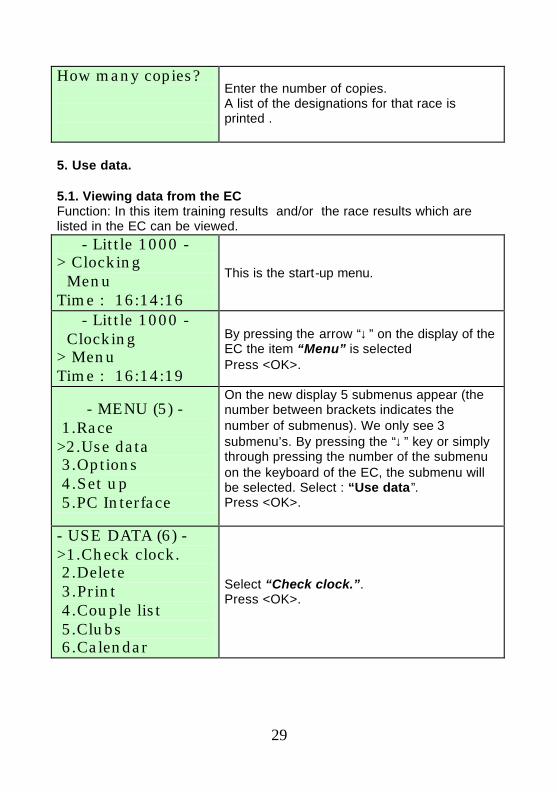
How many copies?
Enter the number of copies. A list of the designations for that race is printed .
5. Use data. 5.1. Viewing data from the EC Function: In this item training results and/or the race results which are listed in the EC can be viewed.
- Little 1000 - > Clocking Menu Time : 16:14:16
This is the start-up menu.
- Little 1000 - Clocking > Menu Time : 16:14:19
By pressing the arrow “↓” on the display of the EC the item “Menu” is selected Press <OK>.
- MENU (5) - 1.Race >2.Use data 3.Options 4.Set up 5.PC Interface
On the new display 5 submenus appear (the number between brackets indicates the number of submenus). We only see 3 submenu’s. By pressing the “↓” key or simply through pressing the number of the submenu on the keyboard of the EC, the submenu will be selected. Select : “Use data”. Press <OK>.
- USE DATA (6) - >1.Check clock. 2.Delete 3.Print 4.Couple list 5.Clubs 6.Calendar
Select “Check clock.”. Press <OK>.

30
00-5261478 P: 1 10/07 11:25:27 Training Trap: 1
When pigeons are clocked from a race/training we can see an overview. With the vertical arrows you can scroll. On the display the ring number is shown, the place of arrival, the date of arrival, the time of arrival, the (training) race and the antenna number the pigeon was clocked with. Press <C> to go back to the main menu.
31
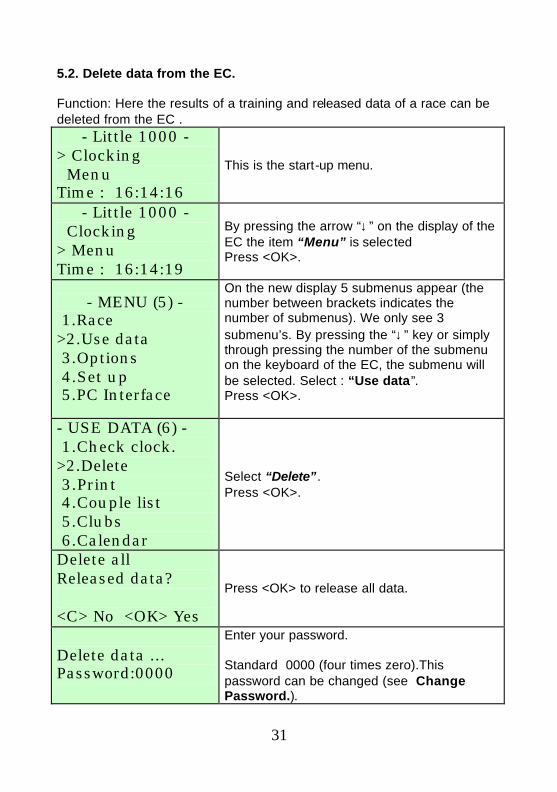
5.2. Delete data from the EC. Function: Here the results of a training and released data of a race can be deleted from the EC .
- Little 1000 - > Clocking Menu Time : 16:14:16
This is the start-up menu.
- Little 1000 - Clocking > Menu Time : 16:14:19
By pressing the arrow “↓” on the display of the EC the item “Menu” is selected Press <OK>.
- MENU (5) - 1.Race >2.Use data 3.Options 4.Set up 5.PC Interface
On the new display 5 submenus appear (the number between brackets indicates the number of submenus). We only see 3 submenu’s. By pressing the “↓” key or simply through pressing the number of the submenu on the keyboard of the EC, the submenu will be selected. Select : “Use data”. Press <OK>.
- USE DATA (6) - 1.Check clock. >2.Delete 3.Print 4.Couple list 5.Clubs 6.Calendar
Select “Delete”. Press <OK>.
Delete all Released data? <C> No <OK> Yes
Press <OK> to release all data.
Delete data ... Password:0000
Enter your password. Standard 0000 (four times zero).This password can be changed (see Change Password.).
32
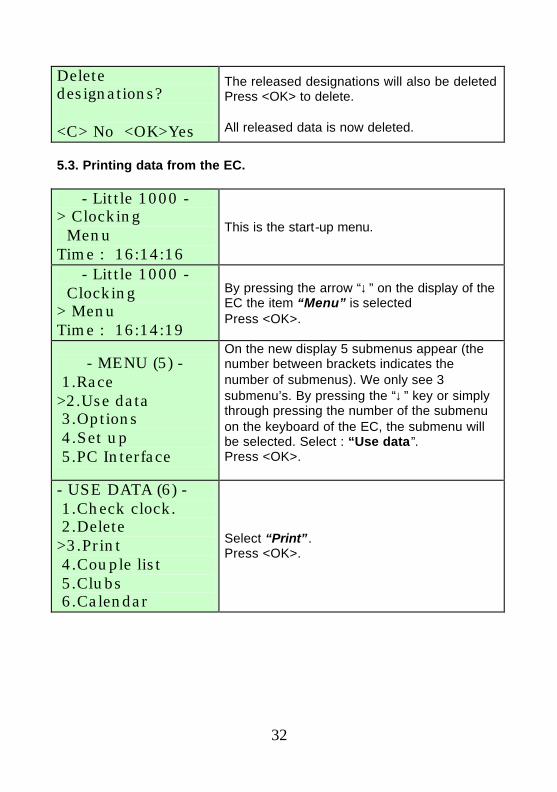
Delete designations? <C> No <OK>Yes
The released designations will also be deleted Press <OK> to delete. All released data is now deleted.
5.3. Printing data from the EC.
- Little 1000 - > Clocking Menu Time : 16:14:16
This is the start-up menu.
- Little 1000 - Clocking > Menu Time : 16:14:19
By pressing the arrow “↓” on the display of the EC the item “Menu” is selected Press <OK>.
- MENU (5) - 1.Race >2.Use data 3.Options 4.Set up 5.PC Interface
On the new display 5 submenus appear (the number between brackets indicates the number of submenus). We only see 3 submenu’s. By pressing the “↓” key or simply through pressing the number of the submenu on the keyboard of the EC, the submenu will be selected. Select : “Use data”. Press <OK>.
- USE DATA (6) - 1.Check clock. 2.Delete >3.Print 4.Couple list 5.Clubs 6.Calendar
Select “Print”. Press <OK>.

33
- PRINT (8)- >1.Overview 2.T.clock list 3.R.clock list 4.Bets 5.Pigeon list 6.Races 7.Designation 8.Basketing list 9.Clocking list
8 submenus will appear on the display. Choose what kind of data you want to print. 1.”Overview”: prints out a complete overview of what is in the EC.(see The overview list in detail) 2.”T.clock list” prints the training results from the EC (see Training clocking list in detail.) 3.”R.clock list” prints the race results from the EC, choose the race and press <OK>. (see Race clocking list in detail.) 4.”Bets” (not available for this country.) 5.”Pigeon list ” prints a list of all the coupled pigeons from the EC (see The pigeon list in detail.) 6.”Races” prints a list of all the races from the EC (see The race list in detail.) 7.”Designation” Prints the list of all the designations from a race; select the race. (see List of designations in detail.) 8.”Basketing list” Prints the basketing list of a race ; select the race.(see The basketing list in detail.) 9.”Clocking list” Prints an overview (logbook) of the last clockings. You can choose to print the clockings of 1 pigeon or of all pigeons. Give the number of constatations and press <OK>.(see The clocking list in detail.)
How many copies?
Give the number of printouts by each item.

34
5.3.1.The overview list in detail. ------------------------------------------------------------------------------------------------------------------------------------------------
Overview list ------------------------------------------------------------------------------------------------------------------------------------------------
Date : 24/07/00 (1) Member : XXXX XXXX (2) Name : XXXX XX (3) X-Coordinate : XXXXXX (4) Y-Coordinate : XXXXXX (4) Print date : XX XX XX XX:XX:XX (1) ------------------------------------------------------------------------------------------------------------------------------------------------ Check : Basketing (5) Sync. (6) Motherclock Timer Diff. Motherclock Timer Diff. Diff. Nr Race 230600 192639 192639 +000 000000 000000 000000 +000 +000 2 CREP 250600 162005 162005 +000 250600 140523 140524 +001 +000 3 MOMI 250600 204502 204503 +001 000000 000000 000000 +000 +000 ------------------------(5.1)-------(5.2)-------(5.3)-----(5.4)---------------(6.1)------(6.2)-------(6.3)---(6.4)-----(6.5)--------- List pigeons : (7) Nr. El.-ring IDring Sex Race Des Date Time *Eval 1 7A589624D BE-00-3141309 V BOUR 1 23/06/00 19:27:05 2 2 7A47C25E2 BE-00-3141312 BOUR 2 23/06/00 19:28:24 1 4 7A44F475E BE-00-3141345 CREP 1 25/06/00 16:23:05 1 5 7A12E12E1 BE-00-3141361 CREP 2 25/06/00 16:25:00 2 6 7A14FF154 BE-00-3141396 V MOMI 1 25/06/00 20:46:19 2 7 7A1A584D6 BE-00-3141401 MOMI 2 25/06/00 20:46:55 2 --------------(7.1)-------------------(7.2.) -----------(7.3) -----------------(7.4) -----(7.5) -----------(7.6) -------- (7.7)---------- *Legend (8) ! : Secret code not correct 0 : Reset. 1 : Clocked. 2 : Basketed 3 : Designated. 4 : Cl. w. Module 5 : Training -------------------------------------------------------------------------------------------------------------------- (1) date and time of print out. (2) member number. (3) name of the fancier. (4) coördinates of the loft of the fancier. (5) timer data by basketing. (5.1) date of basketing. (5.2) mother clock time by basketing. (5.3) time of the electronic clock (EC) by basketing (5.4) time difference between mother clock and EC (5.3)–(5.2) by basketing. (6) time data by read. (6.1) mate by read. (6.2) mother clock time by read. (6.3) time of the electronic clock (EC) by read. (6.4) time difference between mother clock and EC (6.3)–(6.2) by read.
(6.5) time difference of the EC (+ clock gains, - clock behind). (7) overview of what is in the memory of the EC. (7.1) code of the chip ring (electronic ring). (7.2) official ring of the federation. (7.3) sex of the pigeon. (F= female) (7.4) designation (7.5) date of basketing (7.6) hour of basketing (7.7) evaluation (see legend) (8) legend. (9) signature(s). (10) version of the software in the EC. (11) address of the fancier. (12) serial number of the EC.
------------------------------------------------------------------------------------------------------------------------------------------------ Signature (9) ………………….. ………………………….. ………………….. ------------------------------------------------------------------------------------------------------------------------------------------------
- Little 1000 - Ver : TW-08 (10) Serialn: BB129B Address : XXX XX XXXX XXXXXX (11) (12)
Page 1

35
5.3.2.Training clocking list in detail. ------------------------------------------------------------------------------------------------------------------------------------------------
List of the clocked pigeons. ------------------------------------------------------------------------------------------------------------------------------------------------ Race nr : _____ Date : XX/XX/XX (1) RACE: Training (10) Member : XXXX XXXX (2) Name : XXXXX XX (3) X-Coordinate : XXXXXX (4) Y-Coordinate : XXXXXX (4) Print date : XX/XX/XX XX:XX:XX (5) ------------------------------------------------------------------------------------------------------------------------------------------------ Nr. Pigeon Date Time 1 BE-00-3141312 25/06/00 13:36:14 2 BE-00-3141363 25/06/00 13:41:22 3 BE-00-3141315 25/06/00 13:49:25 4 BE-00-3141362 25/06/00 13:49:25 5 BE-00-3141304 25/06/00 13:49:00 6 BE-00-3141333 25/06/00 13:50:25 7 BE-00-3141309 25/06/00 13:50:45 8 BE-00-3141321 25/06/00 13:52:42 9 BE-00-3141354 25/06/00 13:53:55 10 BE-00-3141399 25/06/00 14:03:54 (6) (7) (8) (9) (1) date of print out. (2) member number. (3) name of the fancier. (4) coordinates of the loft of the fancier. (5) date and time of the print out. (6) number. (7) official ring of the federation. (8) date of clocking. (9) time of clocking. (10) sort of race = training. (11) signature(s). (12) software version of the electronic clock (EC). (13) address of the fancier. (14) serial number of the electronic clock (EC).
------------------------------------------------------------------------------------------------------------------------------------------------ Signature (11) ………………….. ………………………….. ………………….. ------------------------------------------------------------------------------------------------------------------------------------------------
- Little 1000 - Ver : TW-08 (12) Serialn: BB129B Address : XXX XX XXXX XXXXXX (13) (14)
Page 1

36
5.3.3.Race clocking list in detail. ------------------------------------------------------------------------------------------------------------------------------------------------
List of the clocked pigeons. ------------------------------------------------------------------------------------------------------------------------------------------------ Race nr : _____ Date : XX/XX/XX (1) RACE: XXXX (10) Member : XXXX XXXX (2) NAME : XXXX XX (3) X-Coordinate : XXXXXX (4) Y-Coordinate : XXXXXX (4) Print date : XX/XX/XX XX:XX:XX (5) ------------------------------------------------------------------------------------------------------------------------------------------------ Nr. Pigeon Date Time Race *Eval 1 BE-00-3141312 25/06/00 13:36:14 BOUR 1 2 BE-00-3141363 25/06/00 13:41:22 BOUR 1 3 BE-00-3141304 25/06/00 13:49:25 BOUR 1 (6) (7) (8) (9) (10) (11) (1) date of print out. (2) member number. (3) name of the fancier. (4) coordinates of the loft of the fancier. (5) date and time of the print out. (6) number. (7) official ring of the federation. (8) date of clocking. (9) time of clocking. (10) race. (11) evaluation. (12) signature(s). (13) software version of the electronic clock (EC). (14) address of the fancier. (15) serial number of the electronic clock (EC). ------------------------------------------------------------------------------------------------------------------------------------------------ Signature (12) ………………….. ………………………….. ………………….. ------------------------------------------------------------------------------------------------------------------------------------------------
- Little 1000 - Ver: TW-08 (13) Serialn: BB129B Address : XXX XX XXXX XXXXXX (14) (15)
Page 1

37
5.3.4.The pigeon list in detail. ------------------------------------------------------------------------------------------------------------------------------------------------
pigeon list ------------------------------------------------------------------------------------------------------------------------------------------------
Date : XX/XX/XX (1) Member : XXXX XXXX (2) Name : XXXX XX (3) X-Coordinate : XXXXXX (4) Y-Coordinate : XXXXXX (4) Print date : XX/XX/XX XX:XX:XX (5) ------------------------------------------------------------------------------------------------------------------------------------------------ Nr. El.-ring ID ring S Nr. El.-ring ID ring S 1 7A589624D BE-00-3141309 F 2 7A47C25E2 BE-00-0003141312 F 3 7A33FF126 BE-00-3141363 4 7A1F471D2 BE-00-0003141304 5 7A44F475E BE-00-3141345 6 7A12E12E1 BE-00-0003141361 7 7A14FF154 BE-00-3141396 8 7A1A584D6 BE-00-0003141401 9 7A24FD122 BE-00-3141405 10 711148DD5 BE-00-0003141433 F (6) (7) (8) (9) (6) (7) (8) (9) (1) date of print out . (2) member number. (3) name of the fancier. (4) coordinates of the loft of the fancier. (5) date and time of the print out. (6) number. (7) code of the chip ring (electronic ring). (8) official ring of the federation. (9) sex of the pigeon ( F = female ). (10) signature(s). (11) software version of the electronic clock (EC). (12) address of the fancier. (13) serial number of the electronic clock (EC).
------------------------------------------------------------------------------------------------------------------------------------------------ Signature (10) ………………….. ………………………….. ………………….. ------------------------------------------------------------------------------------------------------------------------------------------------
- Little 1000 - Ver: TW-08 (11) Serialn: BB129B Address : XXX XX XXXX XXXXXX (12) (13)
Page 1
38
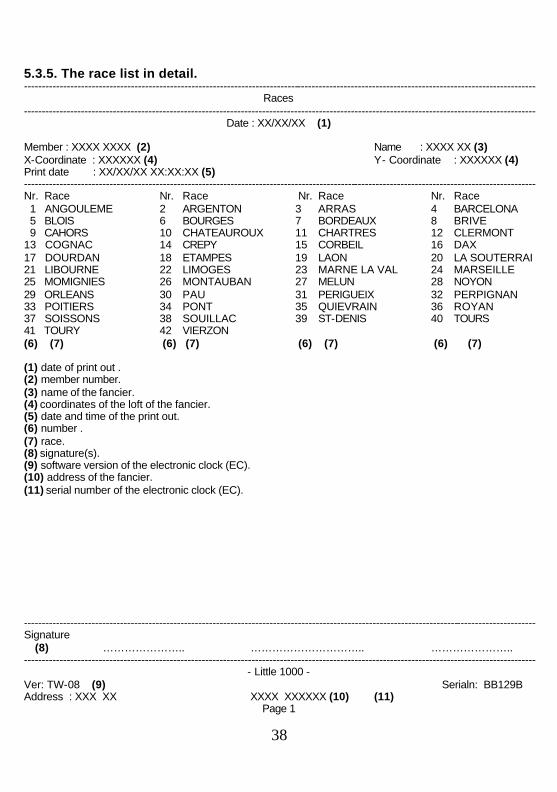
5.3.5. The race list in detail. ------------------------------------------------------------------------------------------------------------------------------------------------
Races ------------------------------------------------------------------------------------------------------------------------------------------------
Date : XX/XX/XX (1) Member : XXXX XXXX (2) Name : XXXX XX (3) X-Coordinate : XXXXXX (4) Y- Coordinate : XXXXXX (4) Print date : XX/XX/XX XX:XX:XX (5) ------------------------------------------------------------------------------------------------------------------------------------------------ Nr. Race Nr. Race Nr. Race Nr. Race 1 ANGOULEME 2 ARGENTON 3 ARRAS 4 BARCELONA 5 BLOIS 6 BOURGES 7 BORDEAUX 8 BRIVE 9 CAHORS 10 CHATEAUROUX 11 CHARTRES 12 CLERMONT 13 COGNAC 14 CREPY 15 CORBEIL 16 DAX 17 DOURDAN 18 ETAMPES 19 LAON 20 LA SOUTERRAI 21 LIBOURNE 22 LIMOGES 23 MARNE LA VAL 24 MARSEILLE 25 MOMIGNIES 26 MONTAUBAN 27 MELUN 28 NOYON 29 ORLEANS 30 PAU 31 PERIGUEIX 32 PERPIGNAN 33 POITIERS 34 PONT 35 QUIEVRAIN 36 ROYAN 37 SOISSONS 38 SOUILLAC 39 ST-DENIS 40 TOURS 41 TOURY 42 VIERZON (6) (7) (6) (7) (6) (7) (6) (7) (1) date of print out . (2) member number. (3) name of the fancier. (4) coordinates of the loft of the fancier. (5) date and time of the print out. (6) number . (7) race. (8) signature(s). (9) software version of the electronic clock (EC). (10) address of the fancier. (11) serial number of the electronic clock (EC).
------------------------------------------------------------------------------------------------------------------------------------------------ Signature (8) ………………….. ………………………….. ………………….. ------------------------------------------------------------------------------------------------------------------------------------------------
- Little 1000 - Ver: TW-08 (9) Serialn: BB129B Address : XXX XX XXXX XXXXXX (10) (11)
Page 1
39
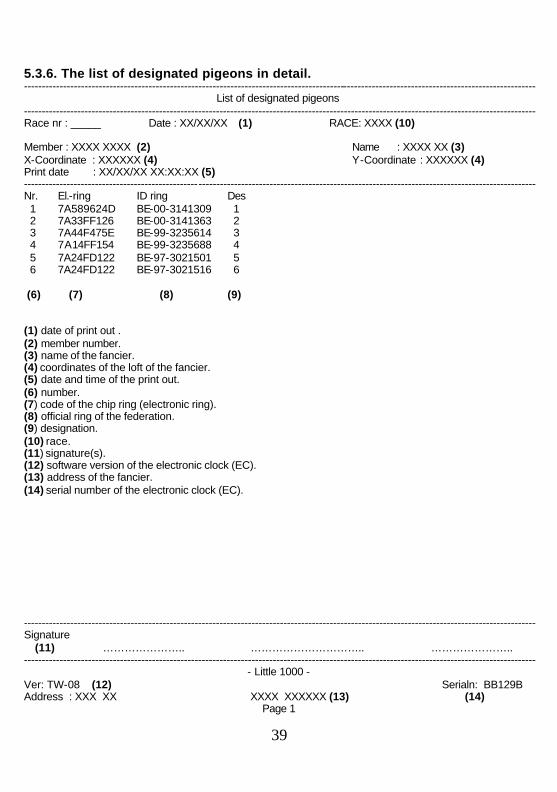
5.3.6. The list of designated pigeons in detail. ------------------------------------------------------------------------------------------------------------------------------------------------
List of designated pigeons ------------------------------------------------------------------------------------------------------------------------------------------------ Race nr : _____ Date : XX/XX/XX (1) RACE: XXXX (10) Member : XXXX XXXX (2) Name : XXXX XX (3) X-Coordinate : XXXXXX (4) Y-Coordinate : XXXXXX (4) Print date : XX/XX/XX XX:XX:XX (5) ------------------------------------------------------------------------------------------------------------------------------------------------ Nr. El.-ring ID ring Des 1 7A589624D BE-00-3141309 1 2 7A33FF126 BE-00-3141363 2 3 7A44F475E BE-99-3235614 3 4 7A14FF154 BE-99-3235688 4 5 7A24FD122 BE-97-3021501 5 6 7A24FD122 BE-97-3021516 6 (6) (7) (8) (9) (1) date of print out . (2) member number. (3) name of the fancier. (4) coordinates of the loft of the fancier. (5) date and time of the print out. (6) number. (7) code of the chip ring (electronic ring). (8) official ring of the federation. (9) designation. (10) race. (11) signature(s). (12) software version of the electronic clock (EC). (13) address of the fancier. (14) serial number of the electronic clock (EC).
------------------------------------------------------------------------------------------------------------------------------------------------ Signature (11) ………………….. ………………………….. ………………….. ------------------------------------------------------------------------------------------------------------------------------------------------
- Little 1000 - Ver: TW-08 (12) Serialn: BB129B Address : XXX XX XXXX XXXXXX (13) (14)
Page 1
40
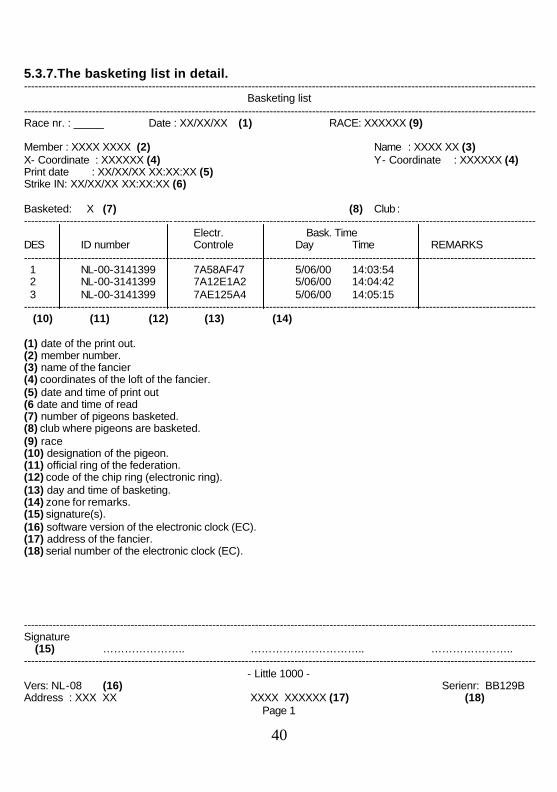
5.3.7.The basketing list in detail. ------------------------------------------------------------------------------------------------------------------------------------------------
Basketing list ------------------------------------------------------------------------------------------------------------------------------------------------ Race nr. : _____ Date : XX/XX/XX (1) RACE: XXXXXX (9) Member : XXXX XXXX (2) Name : XXXX XX (3) X- Coordinate : XXXXXX (4) Y- Coordinate : XXXXXX (4) Print date : XX/XX/XX XX:XX:XX (5) Strike IN: XX/XX/XX XX:XX:XX (6) Basketed : X (7) (8) Club : ------------------------------------------------------------------------------------------------------------------------------------------------ Electr. Bask. Time DES ID number Controle Day Time REMARKS ------------------------------------------------------------------------------------------------------------------------------------------------ 1 NL-00-3141399 7A58AF47 5/06/00 14:03:54 2 NL-00-3141399 7A12E1A2 5/06/00 14:04:42 3 NL-00-3141399 7AE125A4 5/06/00 14:05:15 ------------------------------------------------------------------------------------------------------------------------------------------------ (10) (11) (12) (13) (14) (1) date of the print out. (2) member number. (3) name of the fancier (4) coordinates of the loft of the fancier. (5) date and time of print out (6 date and time of read (7) number of pigeons basketed. (8) club where pigeons are basketed. (9) race (10) designation of the pigeon. (11) official ring of the federation. (12) code of the chip ring (electronic ring). (13) day and time of basketing. (14) zone for remarks. (15) signature(s). (16) software version of the electronic clock (EC). (17) address of the fancier. (18) serial number of the electronic clock (EC). ------------------------------------------------------------------------------------------------------------------------------------------------ Signature (15) ………………….. ………………………….. ………………….. ------------------------------------------------------------------------------------------------------------------------------------------------
- Little 1000 - Vers: NL-08 (16) Serienr: BB129B Address : XXX XX XXXX XXXXXX (17) (18)
Page 1
41
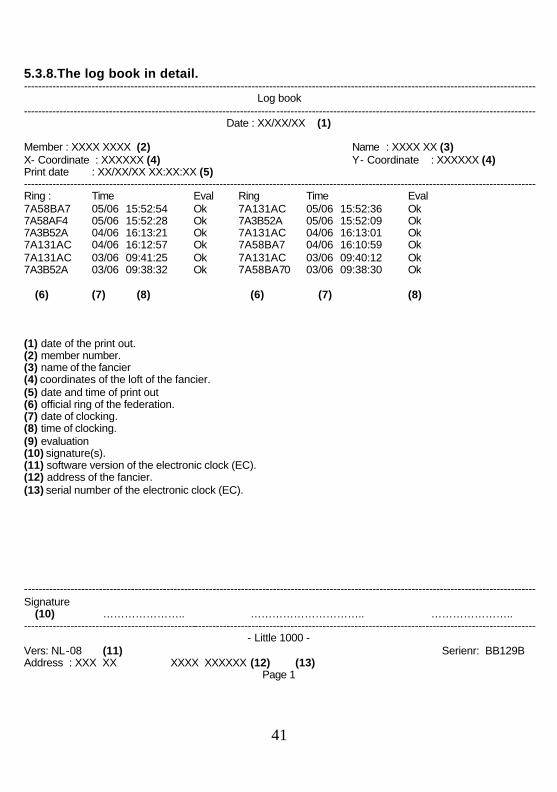
5.3.8.The log book in detail. ------------------------------------------------------------------------------------------------------------------------------------------------
Log book ------------------------------------------------------------------------------------------------------------------------------------------------
Date : XX/XX/XX (1) Member : XXXX XXXX (2) Name : XXXX XX (3) X- Coordinate : XXXXXX (4) Y- Coordinate : XXXXXX (4) Print date : XX/XX/XX XX:XX:XX (5) ------------------------------------------------------------------------------------------------------------------------------------------------ Ring : Time Eval Ring Time Eval 7A58BA7 05/06 15:52:54 Ok 7A131AC 05/06 15:52:36 Ok 7A58AF4 05/06 15:52:28 Ok 7A3B52A 05/06 15:52:09 Ok 7A3B52A 04/06 16:13:21 Ok 7A131AC 04/06 16:13:01 Ok 7A131AC 04/06 16:12:57 Ok 7A58BA7 04/06 16:10:59 Ok 7A131AC 03/06 09:41:25 Ok 7A131AC 03/06 09:40:12 Ok 7A3B52A 03/06 09:38:32 Ok 7A58BA7 0 03/06 09:38:30 Ok
(6) (7) (8) (6) (7) (8) (1) date of the print out. (2) member number. (3) name of the fancier (4) coordinates of the loft of the fancier. (5) date and time of print out (6) official ring of the federation. (7) date of clocking. (8) time of clocking. (9) evaluation (10) signature(s). (11) software version of the electronic clock (EC). (12) address of the fancier. (13) serial number of the electronic clock (EC). ------------------------------------------------------------------------------------------------------------------------------------------------ Signature (10) ………………….. ………………………….. ………………….. ------------------------------------------------------------------------------------------------------------------------------------------------
- Little 1000 - Vers: NL-08 (11) Serienr: BB129B Address : XXX XX XXXX XXXXXX (12) (13)
Page 1

42
5.4. Viewing the pigeonlist.
- Little 1000 - > Clocking Menu Time : 16:14:16
This is the start-up menu.
- Little 1000 - Clocking > Menu Time : 16:14:19
By pressing the arrow “↓” on the display of the EC the item “Menu” is selected Press <OK>.
- MENU (5) - 1.Race >2.Use data 3.Options 4.Set up 5.PC Interface
On the new display 5 submenus appear (the number between brackets indicates the number of submenus). We only see 3 submenu’s. By pressing the “↓” key or simply through pressing the number of the submenu on the keyboard of the EC, the submenu will be selected. Select : “Use data”. Press <OK>.
- USE DATA (6) - 1.Check clock. 2.Delete 3.Print >4.Couple list 5.Clubs 6.Calendar
Select “Couple list”. Press <OK>.
1:7a3b5e04 S:5 BE-00-0005264879 10/7 12:12:59 <C> Stop
The first coupled rings appear on the display. With the vertical arrows you can scroll. Press <C> to stop.
43
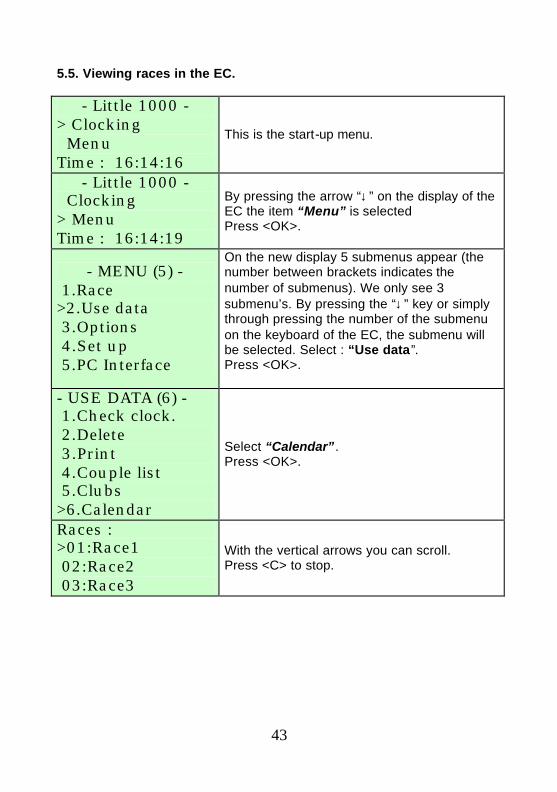
5.5. Viewing races in the EC.
- Little 1000 - > Clocking Menu Time : 16:14:16
This is the start-up menu.
- Little 1000 - Clocking > Menu Time : 16:14:19
By pressing the arrow “↓” on the display of the EC the item “Menu” is selected Press <OK>.
- MENU (5) - 1.Race >2.Use data 3.Options 4.Set up 5.PC Interface
On the new display 5 submenus appear (the number between brackets indicates the number of submenus). We only see 3 submenu’s. By pressing the “↓” key or simply through pressing the number of the submenu on the keyboard of the EC, the submenu will be selected. Select : “Use data”. Press <OK>.
- USE DATA (6) - 1.Check clock. 2.Delete 3.Print 4.Couple list 5.Clubs >6.Calendar
Select “Calendar”. Press <OK>.
Races : >01:Race1 02:Race2 03:Race3
With the vertical arrows you can scroll. Press <C> to stop.
44
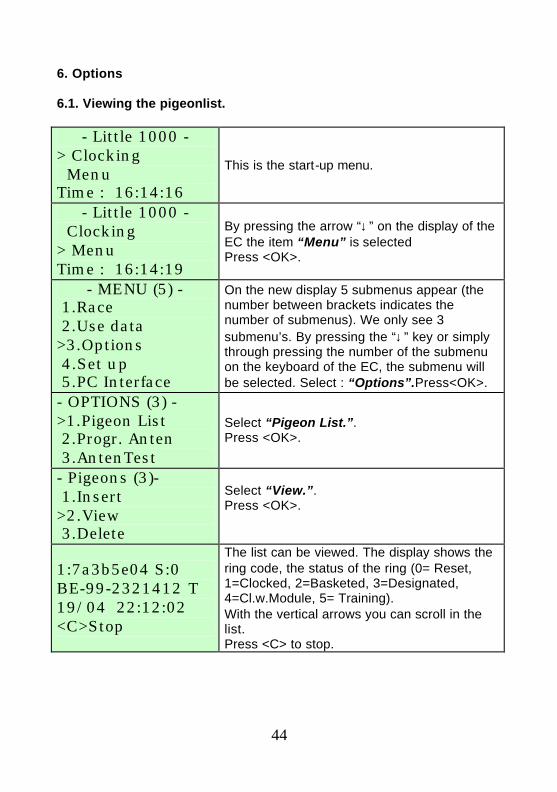
6. Options 6.1. Viewing the pigeonlist.
- Little 1000 - > Clocking Menu Time : 16:14:16
This is the start-up menu.
- Little 1000 - Clocking > Menu Time : 16:14:19
By pressing the arrow “↓” on the display of the EC the item “Menu” is selected Press <OK>.
- MENU (5) - 1.Race 2.Use data >3.Options 4.Set up 5.PC Interface
On the new display 5 submenus appear (the number between brackets indicates the number of submenus). We only see 3 submenu’s. By pressing the “↓” key or simply through pressing the number of the submenu on the keyboard of the EC, the submenu will be selected. Select : “Options”.Press<OK>.
- OPTIONS (3) - >1.Pigeon List 2.Progr. Anten 3.AntenTest
Select “Pigeon List.”. Press <OK>.
- Pigeons (3)- 1.Insert >2.View 3.Delete
Select “View.”. Press <OK>.
1:7a3b5e04 S:0 BE-99-2321412 T 19/04 22:12:02 <C>Stop
The list can be viewed. The display shows the ring code, the status of the ring (0= Reset, 1=Clocked, 2=Basketed, 3=Designated, 4=Cl.w.Module, 5= Training). With the vertical arrows you can scroll in the list. Press <C> to stop.
45
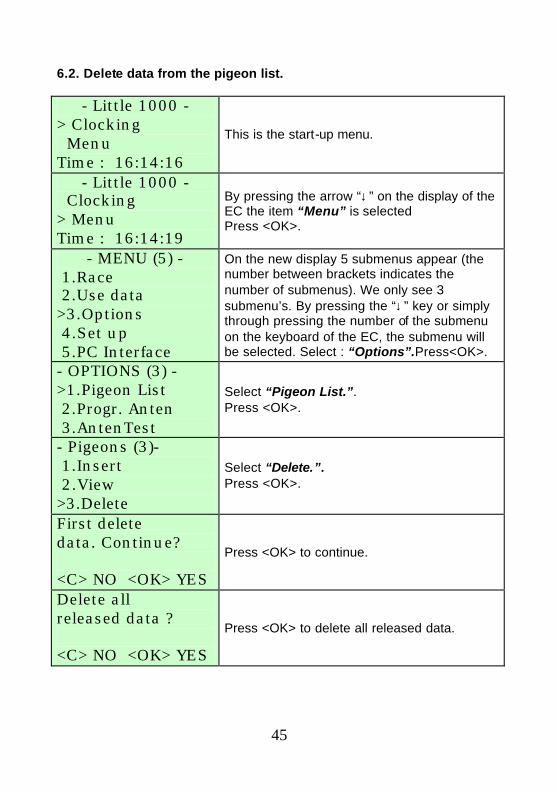
6.2. Delete data from the pigeon list.
- Little 1000 - > Clocking Menu Time : 16:14:16
This is the start-up menu.
- Little 1000 - Clocking > Menu Time : 16:14:19
By pressing the arrow “↓” on the display of the EC the item “Menu” is selected Press <OK>.
- MENU (5) - 1.Race 2.Use data >3.Options 4.Set up 5.PC Interface
On the new display 5 submenus appear (the number between brackets indicates the number of submenus). We only see 3 submenu’s. By pressing the “↓” key or simply through pressing the number of the submenu on the keyboard of the EC, the submenu will be selected. Select : “Options”.Press<OK>.
- OPTIONS (3) - >1.Pigeon List 2.Progr. Anten 3.AntenTest
Select “Pigeon List.”. Press <OK>.
- Pigeons (3)- 1.Insert 2.View >3.Delete
Select “Delete.”. Press <OK>.
First delete data. Continue? <C> NO <OK> YES
Press <OK> to continue.
Delete all released data ? <C> NO <OK> YES
Press <OK> to delete all released data.
46
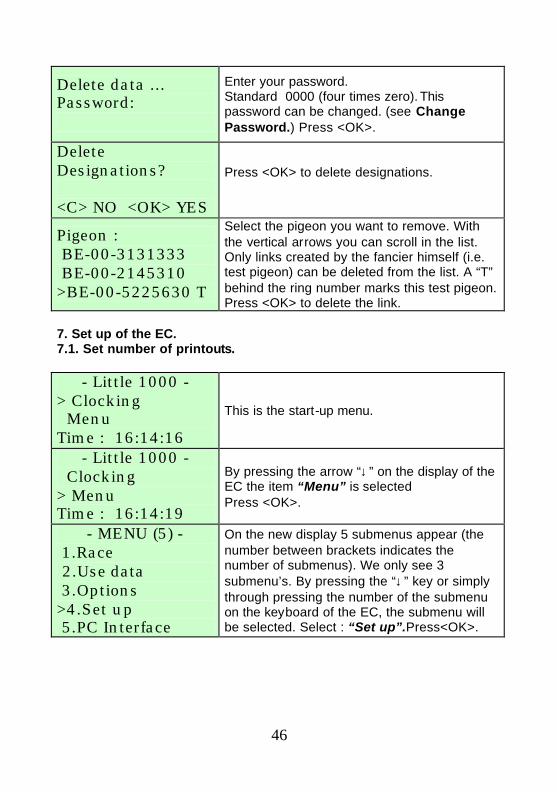
Delete data ... Password:
Enter your password. Standard 0000 (four times zero). This password can be changed. (see Change Password.) Press <OK>.
Delete Designations? <C> NO <OK> YES
Press <OK> to delete designations.
Pigeon : BE-00-3131333 BE-00-2145310 >BE-00-5225630 T
Select the pigeon you want to remove. With the vertical arrows you can scroll in the list. Only links created by the fancier himself (i.e. test pigeon) can be deleted from the list. A “T” behind the ring number marks this test pigeon. Press <OK> to delete the link.
7. Set up of the EC. 7.1. Set number of printouts.
- Little 1000 - > Clocking Menu Time : 16:14:16
This is the start-up menu.
- Little 1000 - Clocking > Menu Time : 16:14:19
By pressing the arrow “↓” on the display of the EC the item “Menu” is selected Press <OK>.
- MENU (5) - 1.Race 2.Use data 3.Options >4.Set up 5.PC Interface
On the new display 5 submenus appear (the number between brackets indicates the number of submenus). We only see 3 submenu’s. By pressing the “↓” key or simply through pressing the number of the submenu on the keyboard of the EC, the submenu will be selected. Select : “Set up”.Press<OK>.
47
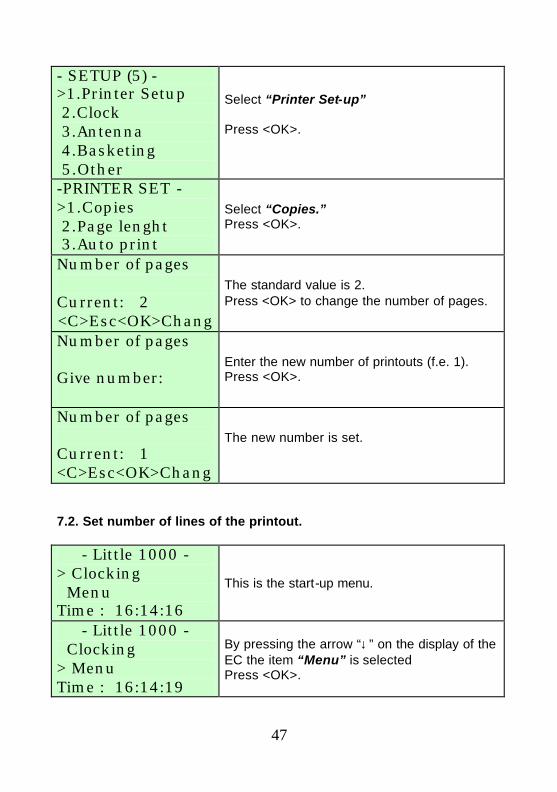
- SETUP (5) - >1.Printer Setup 2.Clock 3.Antenna 4.Basketing 5.Other
Select “Printer Set-up” Press <OK>.
-PRINTER SET - >1.Copies 2.Page lenght 3.Auto print
Select “Copies.” Press <OK>.
Number of pages Current: 2 <C>Esc<OK>Chang
The standard value is 2. Press <OK> to change the number of pages.
Number of pages Give number:
Enter the new number of printouts (f.e. 1). Press <OK>.
Number of pages Current: 1 <C>Esc<OK>Chang
The new number is set.
7.2. Set number of lines of the printout.
- Little 1000 - > Clocking Menu Time : 16:14:16
This is the start-up menu.
- Little 1000 - Clocking > Menu Time : 16:14:19
By pressing the arrow “↓” on the display of the EC the item “Menu” is selected Press <OK>.
48
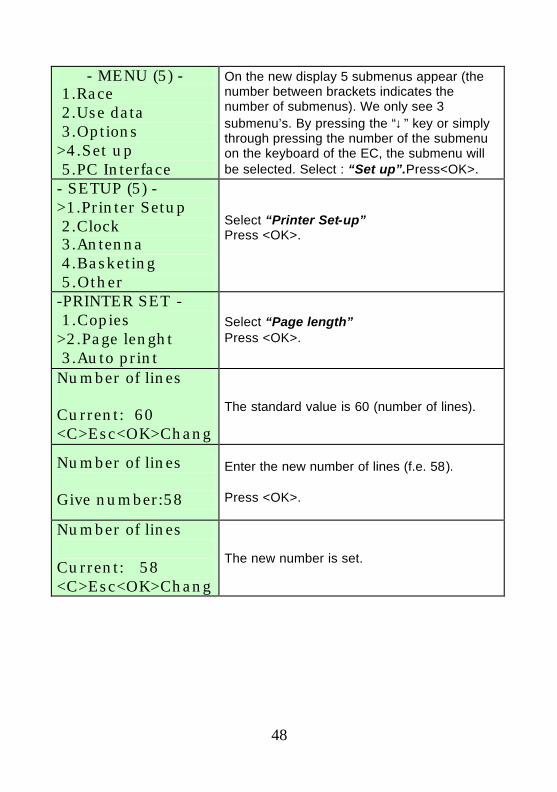
- MENU (5) - 1.Race 2.Use data 3.Options >4.Set up 5.PC Interface
On the new display 5 submenus appear (the number between brackets indicates the number of submenus). We only see 3 submenu’s. By pressing the “↓” key or simply through pressing the number of the submenu on the keyboard of the EC, the submenu will be selected. Select : “Set up”.Press<OK>.
- SETUP (5) - >1.Printer Setup 2.Clock 3.Antenna 4.Basketing 5.Other
Select “Printer Set-up” Press <OK>.
-PRINTER SET - 1.Copies >2.Page lenght 3.Auto print
Select “Page length” Press <OK>.
Number of lines Current: 60 <C>Esc<OK>Chang
The standard value is 60 (number of lines).
Number of lines Give number:58
Enter the new number of lines (f.e. 58). Press <OK>.
Number of lines Current: 58 <C>Esc<OK>Chang
The new number is set.

49
7.3. Set Auto print. Printing a basketing list is time-consuming (depending on the printer). In this menu you can set up ‘automatical printout’ of the basketinglist after basketing.
- Little 1000 - > Clocking Menu Time : 16:14:16
This is the start-up menu.
- Little 1000 - Clocking > Menu Time : 16:14:19
By pressing the arrow “↓” on the display of the EC the item “Menu” is selected Press <OK>.
- MENU (5) - 1.Race 2.Use data 3.Options >4.Set up 5.PC Interface
On the new display 5 submenus appear (the number between brackets indicates the number of submenus). We only see 3 submenu’s. By pressing the “↓” key or simply through pressing the number of the submenu on the keyboard of the EC, the submenu will be selected. Select : “Set up”.Press<OK>.
- SETUP (5) - >1.Printer Setup 2.Clock 3.Antenna 4.Basketing 5.Other
Select “Printer Set-up” Press <OK>.
-PRINTER SET - 1.Copies 2.Page lenght >3.Auto print
Select “Auto. print.” Press <OK>.
Automatic printing when basketing?C.:YES <C>Esc <OK>Chang
The default setting is ‘YES’, a basketinglist will be printed immediately after basketing. Press <OK> to change the setting.

50
Automatic printing when basketing? <C> NO <OK> Yes
When <C> is pressed no basketing list will be printed. The basketing list can be made afterwards and/or on another location (see Print data from the EC).
Automatic printing when basketing?C.:NO <C>Esc <OK>Chang
The ‘automatical printout’ is switched off.
7.4. Set the clock. The timer of the EC is synchronised while basketing. The timer can also be set manually. This may be useful after a long time of inactivity of the EC (e.g.winter period). Make sure all data is deleted. For security reasons there may be no basketed races in the EC, if there are it is impossible to change the time settings.
- Little 1000 - > Clocking Menu Time : 16:14:16
This is the start-up menu.
- Little 1000 - Clocking > Menu Time : 16:14:19
By pressing the arrow “↓” on the display of the EC the item “Menu” is selected Press <OK>.
- MENU (5) - 1.Race 2.Use data 3.Options >4.Set up 5.PC Interface
On the new display 5 submenus appear (the number between brackets indicates the number of submenus). We only see 3 submenu’s. By pressing the “↓” key or simply through pressing the number of the submenu on the keyboard of the EC, the submenu will be selected. Select : “Set up”.Press<OK>.
51
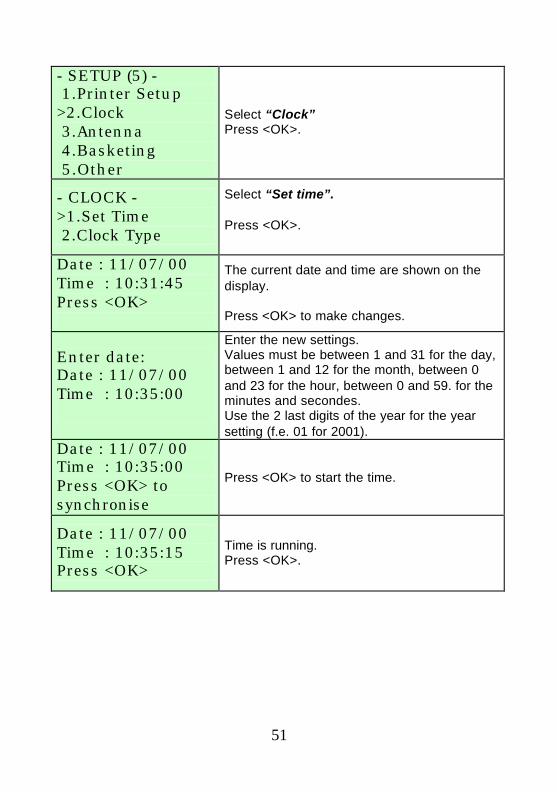
- SETUP (5) - 1.Printer Setup >2.Clock 3.Antenna 4.Basketing 5.Other
Select “Clock” Press <OK>.
- CLOCK - >1.Set Time 2.Clock Type
Select “Set time”. Press <OK>.
Date : 11/07/00 Time : 10:31:45 Press <OK>
The current date and time are shown on the display. Press <OK> to make changes.
Enter date: Date : 11/07/00 Time : 10:35:00
Enter the new settings. Values must be between 1 and 31 for the day, between 1 and 12 for the month, between 0 and 23 for the hour, between 0 and 59. for the minutes and secondes. Use the 2 last digits of the year for the year setting (f.e. 01 for 2001).
Date : 11/07/00 Time : 10:35:00 Press <OK> to synchronise
Press <OK> to start the time.
Date : 11/07/00 Time : 10:35:15 Press <OK>
Time is running. Press <OK>.

52
7.5. Set the clock type. This menu is used to select the clock type. There are three different methods of basketing: 1. Using the atomclock. 2. Using manual settings. 3. Using a masterclock.
- Little 1000 - > Clocking Menu Time : 16:14:16
This is the start-up menu.
- Little 1000 - Clocking > Menu Time : 16:14:19
By pressing the arrow “↓” on the display of the EC the item “Menu” is selected Press <OK>.
- MENU (5) - 1.Race 2.Use data 3.Options >4.Set up 5.PC Interface
On the new display 5 submenus appear (the number between brackets indicates the number of submenus). We only see 3 submenu’s. By pressing the “↓” key or simply through pressing the number of the submenu on the keyboard of the EC, the submenu will be selected. Select : “Set up”.Press<OK>.
- SETUP (5) - 1.Printer Setup >2.Clock 3.Antenna 4.Basketing 5.Other
Select “Clock” Press <OK>.
- CLOCK - 1.Set Time >2.Clock Type
Select “Clock type”. Press <OK>.

53
1. Atomclock 2. Manual 3. Masterclock Make your choice
Make a selection. Press 1 for ‘Atomclock’ (used by most of the European countries, the clubsystem is using a Motherclock witch get synchronised automatically ). Press 2 for ‘Manual’ (each clock time needs to be set manual, for basketing and for read as well). Press 3 for ‘Masterclock’ ( the time of one clock is set manual and is used as reference time for all the other clocks).
7.6. Set the basket number. Function: If in this menu the number of the basket can be set, the EC will ask for it during basketing when set.
- Little 1000 - > Clocking Menu Time : 16:14:16
This is the start-up menu.
- Little 1000 - Clocking > Menu Time : 16:14:19
By pressing the arrow “↓” on the display of the EC the item “Menu” is selected Press <OK>.
- MENU (5) - 1.Race 2.Use data 3.Options >4.Set up 5.PC Interface
On the new display 5 submenus appear (the number between brackets indicates the number of submenus). We only see 3 submenu’s. By pressing the “↓” key or simply through pressing the number of the submenu on the keyboard of the EC, the submenu will be selected. Select : “Set up”.Press<OK>.
- SETUP (5) - 1.Printer Setup 2.Clock 3.Antenna >4.Basketing 5.Other
Select “Basketing” Press <OK>.

54
- BASKETING - >1.Basket Nb. 2.Use M/min 3.Basketing:FOS
Select “Basket Nb” Press <OK>.
Enter basketnr.? Current: NO <C>Esc<OK>Chang
The default setting is ‘NO’, the basketingnumber will not be asked during basketing. Press <OK> to change the setting.
Enter basketnr.? <C> NO <OK> YES
Press <OK> to ask for the basket number during basketing.
Enter basketnr.? Current: YES <C>Esc<OK>Chang
The basket number will be asked during basketing
7.7. Set speed calculation.
- Little 1000 - > Clocking Menu Time : 16:14:16
This is the start-up menu.
- Little 1000 - Clocking > Menu Time : 16:14:19
By pressing the arrow “↓” on the display of the EC the item “Menu” is selected Press <OK>.
- MENU (5) - 1.Race 2.Use data 3.Options >4.Set up 5.PC Interface
On the new display 5 submenus appear (the number between brackets indicates the number of submenus). We only see 3 submenu’s. By pressing the “↓” key or simply through pressing the number of the submenu on the keyboard of the EC, the submenu will be selected. Select : “Set up”.Press<OK>.
55
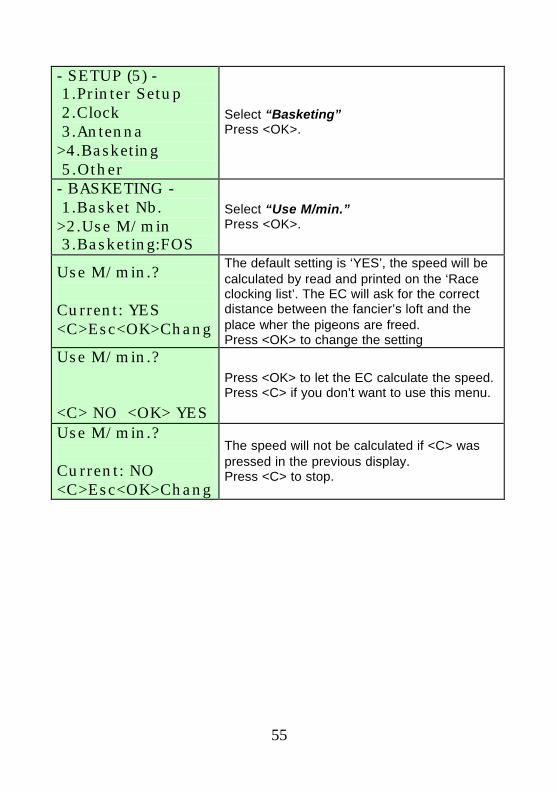
- SETUP (5) - 1.Printer Setup 2.Clock 3.Antenna >4.Basketing 5.Other
Select “Basketing” Press <OK>.
- BASKETING - 1.Basket Nb. >2.Use M/min 3.Basketing:FOS
Select “Use M/min.” Press <OK>.
Use M/min.? Current: YES <C>Esc<OK>Chang
The default setting is ‘YES’, the speed will be calculated by read and printed on the ‘Race clocking list’. The EC will ask for the correct distance between the fancier’s loft and the place wher the pigeons are freed. Press <OK> to change the setting
Use M/min.? <C> NO <OK> YES
Press <OK> to let the EC calculate the speed. Press <C> if you don’t want to use this menu.
Use M/min.? Current: NO <C>Esc<OK>Chang
The speed will not be calculated if <C> was pressed in the previous display. Press <C> to stop.
56
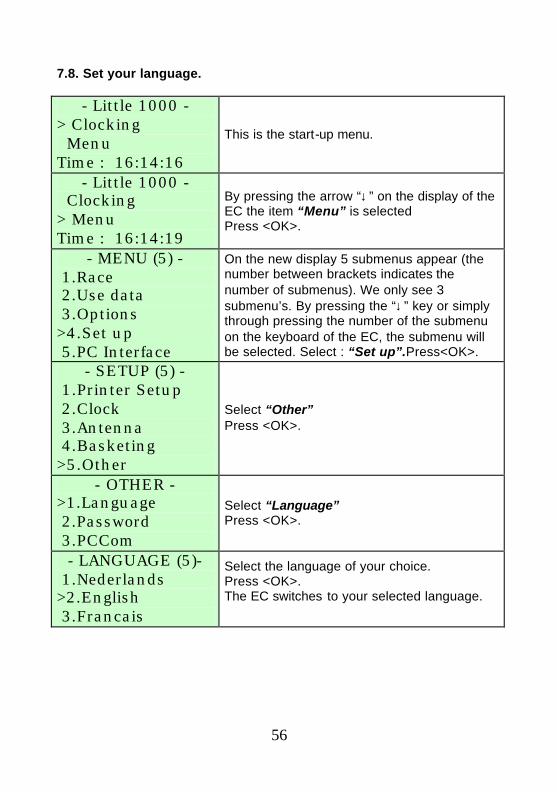
7.8. Set your language.
- Little 1000 - > Clocking Menu Time : 16:14:16
This is the start-up menu.
- Little 1000 - Clocking > Menu Time : 16:14:19
By pressing the arrow “↓” on the display of the EC the item “Menu” is selected Press <OK>.
- MENU (5) - 1.Race 2.Use data 3.Options >4.Set up 5.PC Interface
On the new display 5 submenus appear (the number between brackets indicates the number of submenus). We only see 3 submenu’s. By pressing the “↓” key or simply through pressing the number of the submenu on the keyboard of the EC, the submenu will be selected. Select : “Set up”.Press<OK>.
- SETUP (5) - 1.Printer Setup 2.Clock 3.Antenna 4.Basketing >5.Other
Select “Other” Press <OK>.
- OTHER - >1.Language 2.Password 3.PCCom
Select “Language” Press <OK>.
- LANGUAGE (5)- 1.Nederlands >2.English 3.Francais
Select the language of your choice. Press <OK>. The EC switches to your selected language.
57
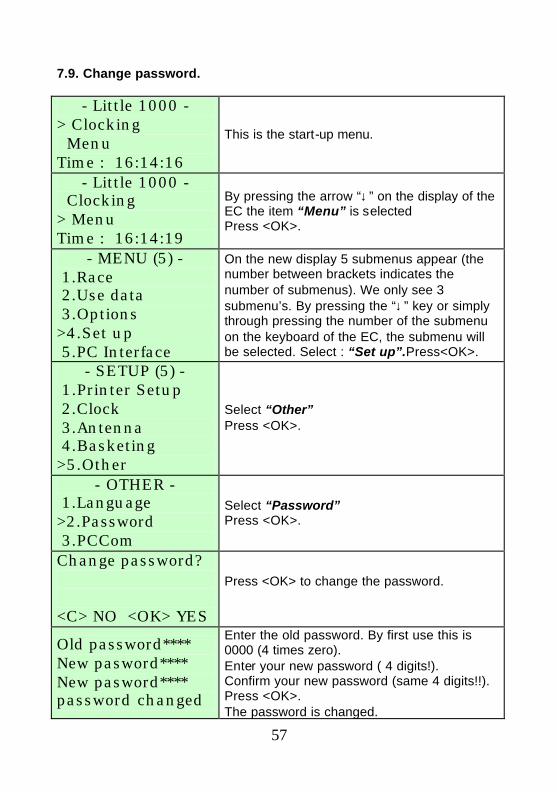
7.9. Change password.
- Little 1000 - > Clocking Menu Time : 16:14:16
This is the start-up menu.
- Little 1000 - Clocking > Menu Time : 16:14:19
By pressing the arrow “↓” on the display of the EC the item “Menu” is selected Press <OK>.
- MENU (5) - 1.Race 2.Use data 3.Options >4.Set up 5.PC Interface
On the new display 5 submenus appear (the number between brackets indicates the number of submenus). We only see 3 submenu’s. By pressing the “↓” key or simply through pressing the number of the submenu on the keyboard of the EC, the submenu will be selected. Select : “Set up”.Press<OK>.
- SETUP (5) - 1.Printer Setup 2.Clock 3.Antenna 4.Basketing >5.Other
Select “Other” Press <OK>.
- OTHER - 1.Language >2.Password 3.PCCom
Select “Password” Press <OK>.
Change password? <C> NO <OK> YES
Press <OK> to change the password.
Old password**** New pasword**** New pasword**** password changed
Enter the old password. By first use this is 0000 (4 times zero). Enter your new password ( 4 digits!). Confirm your new password (same 4 digits!!). Press <OK>. The password is changed.
58
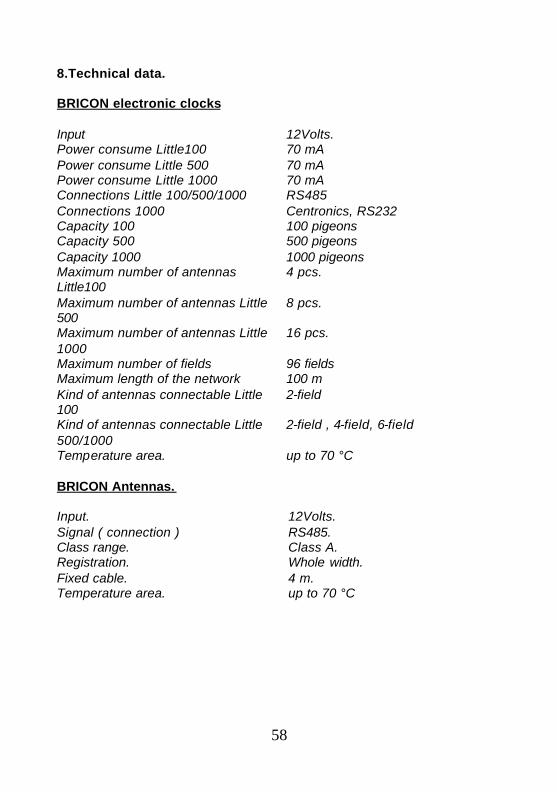
8.Technical data. BRICON electronic clocks Input 12Volts. Power consume Little100 70 mA Power consume Little 500 70 mA Power consume Little 1000 70 mA Connections Little 100/500/1000 RS485 Connections 1000 Centronics, RS232 Capacity 100 100 pigeons Capacity 500 500 pigeons Capacity 1000 1000 pigeons Maximum number of antennas Little100
4 pcs.
Maximum number of antennas Little 500
8 pcs.
Maximum number of antennas Little 1000
16 pcs.
Maximum number of fields 96 fields Maximum length of the network 100 m Kind of antennas connectable Little 100
2-field
Kind of antennas connectable Little 500/1000
2-field , 4-field, 6-field
Temperature area. up to 70 °C BRICON Antennas. Input. 12Volts. Signal ( connection ) RS485. Class range. Class A. Registration. Whole width. Fixed cable. 4 m. Temperature area. up to 70 °C

59
The BRICON CLUBSYSTEM is homologated by your federation. Abuse of this device or lending it to a third party, who is not part of the management or who is not working personnel, is an offence. For extra information or service contact your agent.
BRICON nv Hoge Heerweg,49 9100 Sint-Niklaas Belgium
Tel: +32 (0)3/ 777 39 74 Fax: +32 (0)3/ 778 07 35 website: www.bricon.be / e-mail: [email protected]
Countries where BRICON is homologated : Australia The Balkans Belgium Canada France Germany Gulf States Hungary
The Netherlands New Zealand Portugal Spain Taiwan United States South Africa