Braking Module / braking resistor - Siemens AG · · 2015-01-19Braking Module/braking resistor...
46
Operating Instructions · 03/2013 Braking Module/braking resistor SINAMICS G130 SINAMICS s
Transcript of Braking Module / braking resistor - Siemens AG · · 2015-01-19Braking Module/braking resistor...
Operating Instructions · 03/2013
Braking Module/braking resistor
SINAMICS G130
SINAMICS
s

� �Braking Module / braking resistor
___________________
___________________
___________________
___________________
___________________
___________________
SINAMICS
SINAMICS G130 Braking Module / braking resistor
Operating Instructions
Control version V4.6
03/2013 A5E00331454A
Safety information 1
General 2
Mechanical installation 3
Connection 4
Maintenance and servicing 5
Technical specifications 6
Siemens AG Industry Sector Postfach 48 48 90026 NÜRNBERG GERMANY
A5E00331454A Ⓟ 05/2013 Technical data subject to change
Copyright © Siemens AG 2004 - 2013.All rights reserved
Legal information Warning notice system
This manual contains notices you have to observe in order to ensure your personal safety, as well as to prevent damage to property. The notices referring to your personal safety are highlighted in the manual by a safety alert symbol, notices referring only to property damage have no safety alert symbol. These notices shown below are graded according to the degree of danger.
DANGER indicates that death or severe personal injury will result if proper precautions are not taken.
WARNING indicates that death or severe personal injury may result if proper precautions are not taken.
CAUTION indicates that minor personal injury can result if proper precautions are not taken.
NOTICE indicates that property damage can result if proper precautions are not taken.
If more than one degree of danger is present, the warning notice representing the highest degree of danger will be used. A notice warning of injury to persons with a safety alert symbol may also include a warning relating to property damage.
Qualified Personnel The product/system described in this documentation may be operated only by personnel qualified for the specific task in accordance with the relevant documentation, in particular its warning notices and safety instructions. Qualified personnel are those who, based on their training and experience, are capable of identifying risks and avoiding potential hazards when working with these products/systems.
Proper use of Siemens products Note the following:
WARNING Siemens products may only be used for the applications described in the catalog and in the relevant technical documentation. If products and components from other manufacturers are used, these must be recommended or approved by Siemens. Proper transport, storage, installation, assembly, commissioning, operation and maintenance are required to ensure that the products operate safely and without any problems. The permissible ambient conditions must be complied with. The information in the relevant documentation must be observed.
Trademarks All names identified by ® are registered trademarks of Siemens AG. The remaining trademarks in this publication may be trademarks whose use by third parties for their own purposes could violate the rights of the owner.
Disclaimer of Liability We have reviewed the contents of this publication to ensure consistency with the hardware and software described. Since variance cannot be precluded entirely, we cannot guarantee full consistency. However, the information in this publication is reviewed regularly and any necessary corrections are included in subsequent editions.
Braking Module / braking resistor Operating Instructions, 03/2013, A5E00331454A 3
Table of contents
1 Safety information...................................................................................................................................... 5
1.1 Warnings ........................................................................................................................................5
1.2 Safety and application instructions ................................................................................................6
1.3 Components that can be destroyed by electrostatic discharge (ESD) ..........................................7
2 General...................................................................................................................................................... 9
2.1 Braking Module ..............................................................................................................................9
2.2 Braking resistor ............................................................................................................................11
3 Mechanical installation............................................................................................................................. 13
3.1 General ........................................................................................................................................13
3.2 Braking Modules: overview..........................................................................................................14
3.3 Installing the Braking Module.......................................................................................................17 3.3.1 Installing the Braking Module in a Power Module, frame size FX ...............................................17 3.3.2 Installing the Braking Module in a Power Module frame size GX................................................20 3.3.3 Installing the Braking Module in a Power Module frame size HX................................................22 3.3.4 Installing the Braking Module in a Power Module frame size JX.................................................23
3.4 Installing the braking resistor .......................................................................................................24
4 Connection .............................................................................................................................................. 27
4.1 Cable lugs ....................................................................................................................................28
4.2 Connecting the Braking Module...................................................................................................29
4.3 Connecting the braking resistor ...................................................................................................32
4.4 Disabling the Vdc-max controller .................................................................................................33
5 Maintenance and servicing ...................................................................................................................... 35
6 Technical specifications........................................................................................................................... 37
Table of contents
Braking Module / braking resistor 4 Operating Instructions, 03/2013, A5E00331454A
Braking Module / braking resistor Operating Instructions, 03/2013, A5E00331454A 5
Safety information 11.1 Warnings
WARNING
Dangerous electrical voltage
Hazardous voltages are present when electrical equipment is in operation. Severe personal injury or substantial material damage may result if these warnings are not observed. Only qualified personnel are permitted to work on or around the equipment. These personnel must be thoroughly familiar with all the warnings and maintenance procedures described in these operating instructions. The successful and safe operation of this device is dependent on correct transport, proper storage and installation, as well as careful operation and maintenance. National safety guidelines must be observed.
DANGER
Five safety rules
When carrying out any kind of work on electrical devices, the "five safety rules" according to EN 50110 must always be observed: 1. Disconnect the system. 2. Protect against reconnection. 3. Make sure that the equipment is de-energized. 4. Ground and short-circuit. 5. Cover or enclose adjacent components that are still live.
Note Use of copper cables for a UL-approved system
For a UL-approved system use 60/75°C copper conductors only.
Safety information 1.2 Safety and application instructions
Braking Module / braking resistor 6 Operating Instructions, 03/2013, A5E00331454A
1.2 Safety and application instructions
DANGER
Dangerous electrical voltage
This equipment is used in industrial high-voltage installations. During operation, this equipment contains live, bare parts. For this reason, they could cause severe injury or significant material damage if the required covers are removed, if they are used or operated incorrectly, or have not been properly maintained. When the machines are used in non-industrial areas, the installation location must be protected against unauthorized access (protective fencing, appropriate signs).
Preconditions The persons responsible for the safety of the plant must ensure that the following conditions are met:
● Basic planning work for the system and all work relating to transportation, assembly, installation, commissioning, maintenance and repairs is carried out by qualified personnel and checked by responsible, suitably skilled personnel.
● The Operating Instructions and machine documentation are always available.
● The technical specifications regarding the applicable installation, connection, environmental, and operating conditions are always observed.
● The plant-specific assembly and safety guidelines are observed and personal protection equipment is used.
● Unqualified personnel are forbidden from using these machines and working near them.
These Operating Instructions are intended for qualified personnel and only contain information and notes relating to the intended purpose of the machines.
The Operating Instructions and machine documentation are written in different languages as specified in the delivery contracts.
Note Support by SIEMENS service centers
We recommend engaging the support and services of your local Siemens service center for all planning, installation, commissioning and maintenance work.

Safety information 1.3 Components that can be destroyed by electrostatic discharge (ESD)
Braking Module / braking resistor Operating Instructions, 03/2013, A5E00331454A 7
1.3 Components that can be destroyed by electrostatic discharge (ESD)
CAUTION Components sensitive to electrostatic charge
The board contains components that can be destroyed by electrostatic discharge. These components can be easily destroyed if not handled properly. If you do have to use electronic boards, however, please observe the following: You should only touch electronic boards if absolutely necessary. When you touch boards, however, your body must be electrically discharged
beforehand. Boards must not come into contact with highly insulating materials (such as plastic
parts, insulated desktops, articles of clothing manufactured from man-made fibers). Boards must only be placed on conductive surfaces. Boards and components should only be stored and transported in conductive packaging
(such as metalized plastic boxes or metal containers). If the packaging material is not conductive, the boards must be wrapped with a
conductive packaging material (such as conductive foam rubber or household aluminum foil).
The necessary ESD protective measures are clearly illustrated in the following diagram:
● a = conductive floor surface
● b = ESD table
● c = ESD shoes
● d = ESD overall
● e = ESD wristband
● f = cabinet ground connection
● g = contact with conductive flooring
g g a
b
e
d
c
d
a c
d b
c a
e
f f f f f
Figure 1-1 ESD protective measures
Safety information 1.3 Components that can be destroyed by electrostatic discharge (ESD)
Braking Module / braking resistor 8 Operating Instructions, 03/2013, A5E00331454A
Braking Module / braking resistor Operating Instructions, 03/2013, A5E00331454A 9
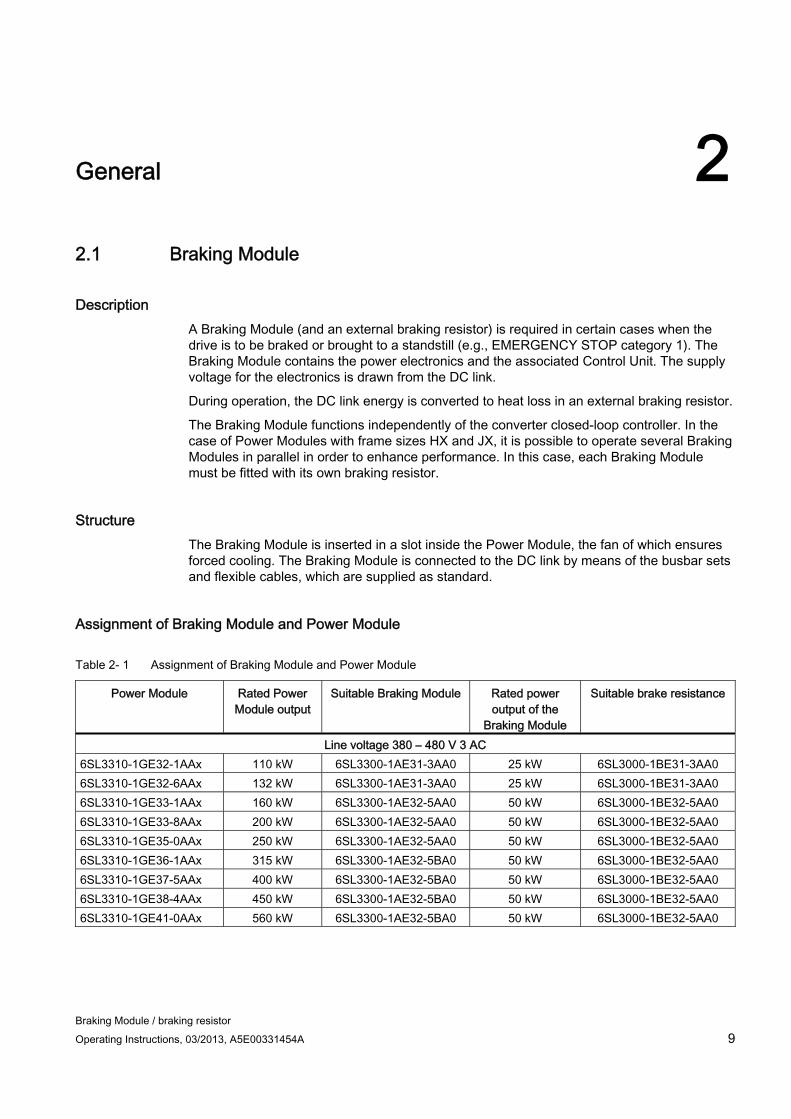
General 22.1 Braking Module
Description A Braking Module (and an external braking resistor) is required in certain cases when the drive is to be braked or brought to a standstill (e.g., EMERGENCY STOP category 1). The Braking Module contains the power electronics and the associated Control Unit. The supply voltage for the electronics is drawn from the DC link.
During operation, the DC link energy is converted to heat loss in an external braking resistor.
The Braking Module functions independently of the converter closed-loop controller. In the case of Power Modules with frame sizes HX and JX, it is possible to operate several Braking Modules in parallel in order to enhance performance. In this case, each Braking Module must be fitted with its own braking resistor.
Structure The Braking Module is inserted in a slot inside the Power Module, the fan of which ensures forced cooling. The Braking Module is connected to the DC link by means of the busbar sets and flexible cables, which are supplied as standard.
Assignment of Braking Module and Power Module
Table 2- 1 Assignment of Braking Module and Power Module
Power Module Rated Power Module output
Suitable Braking Module Rated power output of the
Braking Module
Suitable brake resistance
Line voltage 380 – 480 V 3 AC 6SL3310-1GE32-1AAx 110 kW 6SL3300-1AE31-3AA0 25 kW 6SL3000-1BE31-3AA0 6SL3310-1GE32-6AAx 132 kW 6SL3300-1AE31-3AA0 25 kW 6SL3000-1BE31-3AA0 6SL3310-1GE33-1AAx 160 kW 6SL3300-1AE32-5AA0 50 kW 6SL3000-1BE32-5AA0 6SL3310-1GE33-8AAx 200 kW 6SL3300-1AE32-5AA0 50 kW 6SL3000-1BE32-5AA0 6SL3310-1GE35-0AAx 250 kW 6SL3300-1AE32-5AA0 50 kW 6SL3000-1BE32-5AA0 6SL3310-1GE36-1AAx 315 kW 6SL3300-1AE32-5BA0 50 kW 6SL3000-1BE32-5AA0 6SL3310-1GE37-5AAx 400 kW 6SL3300-1AE32-5BA0 50 kW 6SL3000-1BE32-5AA0 6SL3310-1GE38-4AAx 450 kW 6SL3300-1AE32-5BA0 50 kW 6SL3000-1BE32-5AA0 6SL3310-1GE41-0AAx 560 kW 6SL3300-1AE32-5BA0 50 kW 6SL3000-1BE32-5AA0
General 2.1 Braking Module
Braking Module / braking resistor 10 Operating Instructions, 03/2013, A5E00331454A
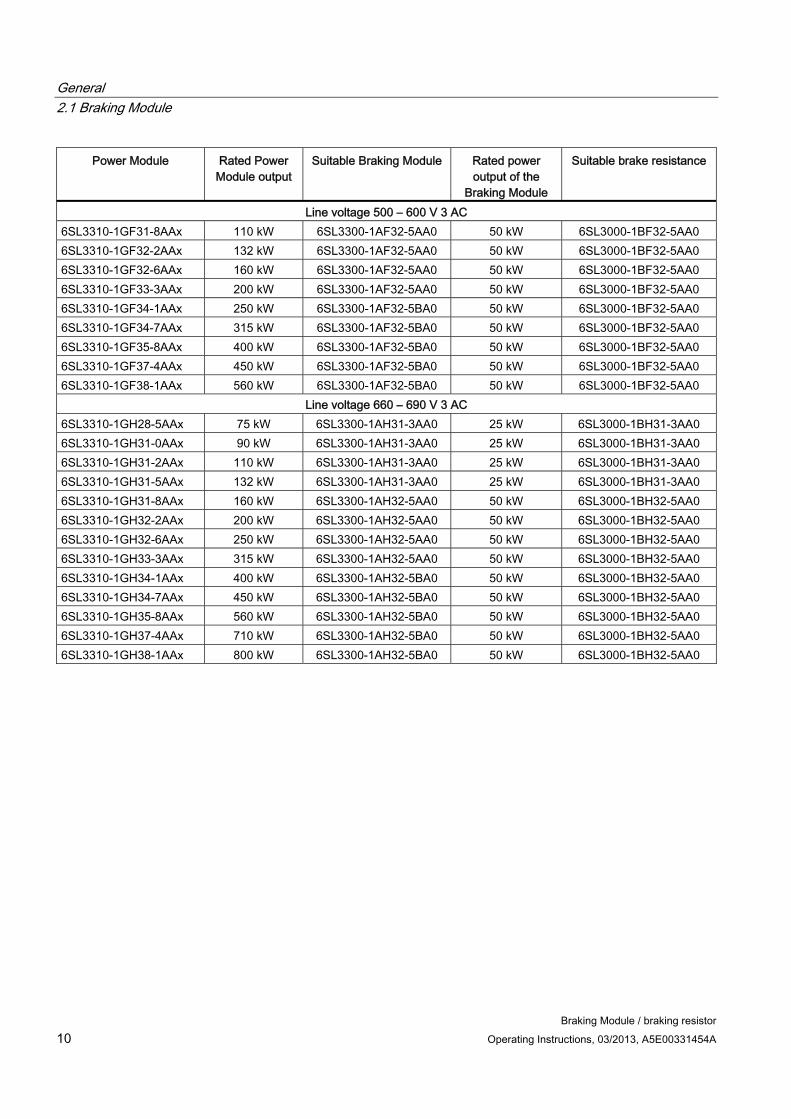
Power Module Rated Power Module output
Suitable Braking Module Rated power output of the
Braking Module
Suitable brake resistance
Line voltage 500 – 600 V 3 AC 6SL3310-1GF31-8AAx 110 kW 6SL3300-1AF32-5AA0 50 kW 6SL3000-1BF32-5AA0 6SL3310-1GF32-2AAx 132 kW 6SL3300-1AF32-5AA0 50 kW 6SL3000-1BF32-5AA0 6SL3310-1GF32-6AAx 160 kW 6SL3300-1AF32-5AA0 50 kW 6SL3000-1BF32-5AA0 6SL3310-1GF33-3AAx 200 kW 6SL3300-1AF32-5AA0 50 kW 6SL3000-1BF32-5AA0 6SL3310-1GF34-1AAx 250 kW 6SL3300-1AF32-5BA0 50 kW 6SL3000-1BF32-5AA0 6SL3310-1GF34-7AAx 315 kW 6SL3300-1AF32-5BA0 50 kW 6SL3000-1BF32-5AA0 6SL3310-1GF35-8AAx 400 kW 6SL3300-1AF32-5BA0 50 kW 6SL3000-1BF32-5AA0 6SL3310-1GF37-4AAx 450 kW 6SL3300-1AF32-5BA0 50 kW 6SL3000-1BF32-5AA0 6SL3310-1GF38-1AAx 560 kW 6SL3300-1AF32-5BA0 50 kW 6SL3000-1BF32-5AA0
Line voltage 660 – 690 V 3 AC 6SL3310-1GH28-5AAx 75 kW 6SL3300-1AH31-3AA0 25 kW 6SL3000-1BH31-3AA0 6SL3310-1GH31-0AAx 90 kW 6SL3300-1AH31-3AA0 25 kW 6SL3000-1BH31-3AA0 6SL3310-1GH31-2AAx 110 kW 6SL3300-1AH31-3AA0 25 kW 6SL3000-1BH31-3AA0 6SL3310-1GH31-5AAx 132 kW 6SL3300-1AH31-3AA0 25 kW 6SL3000-1BH31-3AA0 6SL3310-1GH31-8AAx 160 kW 6SL3300-1AH32-5AA0 50 kW 6SL3000-1BH32-5AA0 6SL3310-1GH32-2AAx 200 kW 6SL3300-1AH32-5AA0 50 kW 6SL3000-1BH32-5AA0 6SL3310-1GH32-6AAx 250 kW 6SL3300-1AH32-5AA0 50 kW 6SL3000-1BH32-5AA0 6SL3310-1GH33-3AAx 315 kW 6SL3300-1AH32-5AA0 50 kW 6SL3000-1BH32-5AA0 6SL3310-1GH34-1AAx 400 kW 6SL3300-1AH32-5BA0 50 kW 6SL3000-1BH32-5AA0 6SL3310-1GH34-7AAx 450 kW 6SL3300-1AH32-5BA0 50 kW 6SL3000-1BH32-5AA0 6SL3310-1GH35-8AAx 560 kW 6SL3300-1AH32-5BA0 50 kW 6SL3000-1BH32-5AA0 6SL3310-1GH37-4AAx 710 kW 6SL3300-1AH32-5BA0 50 kW 6SL3000-1BH32-5AA0 6SL3310-1GH38-1AAx 800 kW 6SL3300-1AH32-5BA0 50 kW 6SL3000-1BH32-5AA0
General 2.2 Braking resistor
Braking Module / braking resistor Operating Instructions, 03/2013, A5E00331454A 11
2.2 Braking resistor
Description In converters with no regenerative feedback capability, the energy that occurs in the drive train under regenerative conditions is fed back to the DC link where it is reduced via braking resistors.
The braking resistor is connected to the Braking Module. The distance between the Braking Module and braking resistor must not exceed 100 m. This enables the resulting heat loss to be dissipated outside the switchgear room.
Resistors with rated powers of 25 kW and 50 kW are available.
To boost performance, Braking Modules and braking resistors can be connected in parallel. In this case, the Braking Modules are installed in the discharged air ducts of the Power Module. Depending on the size of the Power Module, overall up to 3 slots are available:
● Frame size FX: 1
● Frame size GX: 1
● Frame size HX: 2
● Frame size JX: 3
Since the braking resistors can be used in converters with a wide voltage range, the voltage can be adjusted (for example, to reduce the voltage stress on the motor and converter) by setting the response thresholds on the Braking Module.
A thermostat monitors the braking resistor for excessively high temperatures and issues a signal on a floating contact if the limit value is exceeded.
General 2.2 Braking resistor
Braking Module / braking resistor 12 Operating Instructions, 03/2013, A5E00331454A
Braking Module / braking resistor Operating Instructions, 03/2013, A5E00331454A 13
Mechanical installation 33.1 General
WARNING Qualified personnel To ensure that the devices operate safely and reliably, they must be properly installed and commissioned by qualified personnel, taking into account the warnings provided in these operating instructions. In particular, the general and national installation and safety guidelines for high-voltage installations (e.g. VDE – the Union of German Technical Engineers) as well as the guidelines relating to the proper use of tools and personal protective equipment must be observed. Non-observance can result in death, severe personal injury or substantial material damage.
Tightening torques for screw connections The following tightening torques apply when tightening connections of operating current-conducting parts (DC link/motor connections, general busbars), non-operating current-conducting parts (ground connections, ground terminal connections), and general steel threaded connections.
Table 3- 1 Tightening torques for screw connections
Thread Ground connections, protective conductor connections, steel
threaded connections (fault current-conducting)
Plastic, busbars (operating current-conducting)
M3 1.3 Nm 0.8 Nm M4 3 Nm 1.8 Nm M5 6 Nm 3 Nm M6 10 Nm 6 Nm M8 25 Nm 13 Nm
M10 50 Nm 25 Nm M12 88 Nm 50 Nm M16 215 Nm 115 Nm
NOTICE Screw connections for protective covers The threaded connections for the protective covers made of Makrolon may only tightened with 2.5 Nm.
Mechanical installation 3.2 Braking Modules: overview
Braking Module / braking resistor 14 Operating Instructions, 03/2013, A5E00331454A
3.2 Braking Modules: overview
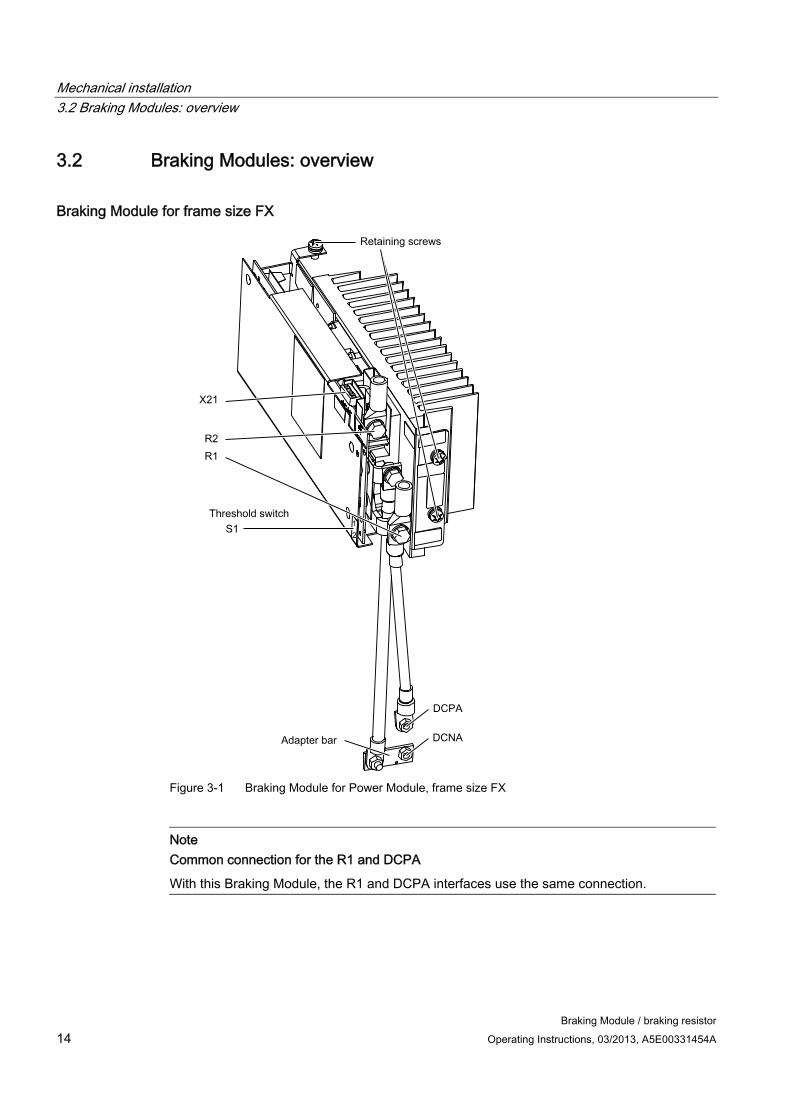
Braking Module for frame size FX
Figure 3-1 Braking Module for Power Module, frame size FX
Note Common connection for the R1 and DCPA
With this Braking Module, the R1 and DCPA interfaces use the same connection.
Mechanical installation 3.2 Braking Modules: overview
Braking Module / braking resistor Operating Instructions, 03/2013, A5E00331454A 15
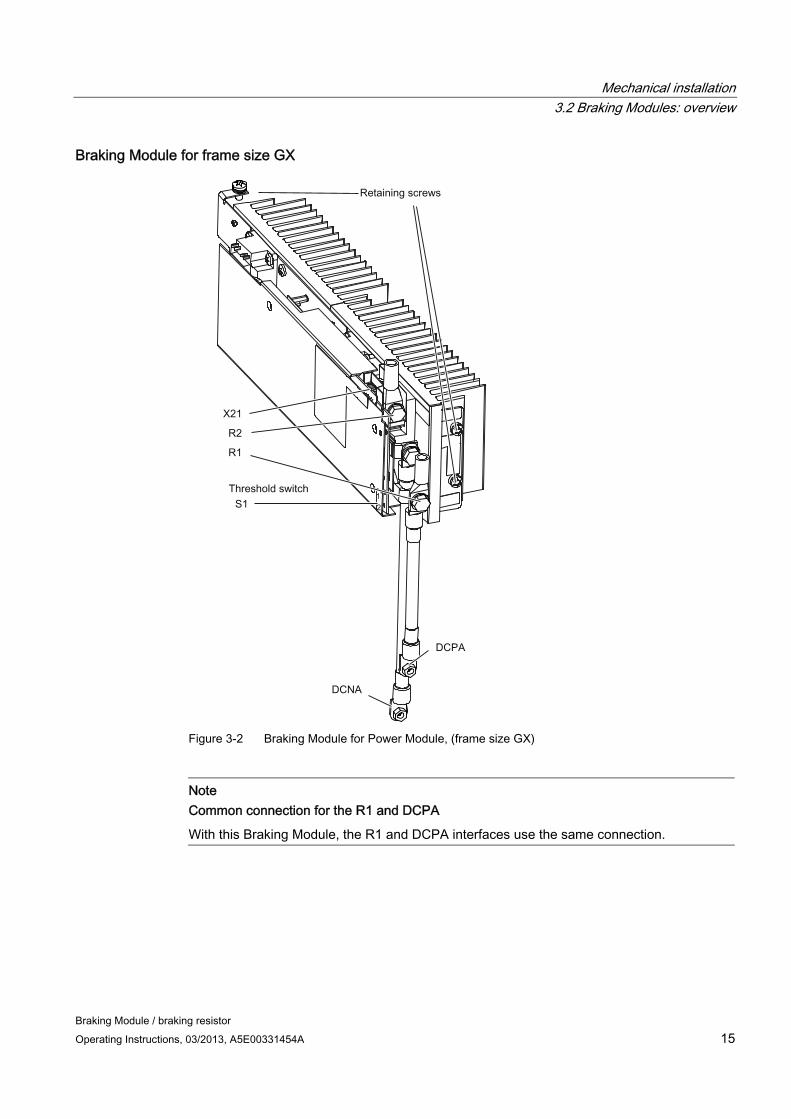
Braking Module for frame size GX
Figure 3-2 Braking Module for Power Module, (frame size GX)
Note Common connection for the R1 and DCPA
With this Braking Module, the R1 and DCPA interfaces use the same connection.
Mechanical installation 3.2 Braking Modules: overview
Braking Module / braking resistor 16 Operating Instructions, 03/2013, A5E00331454A
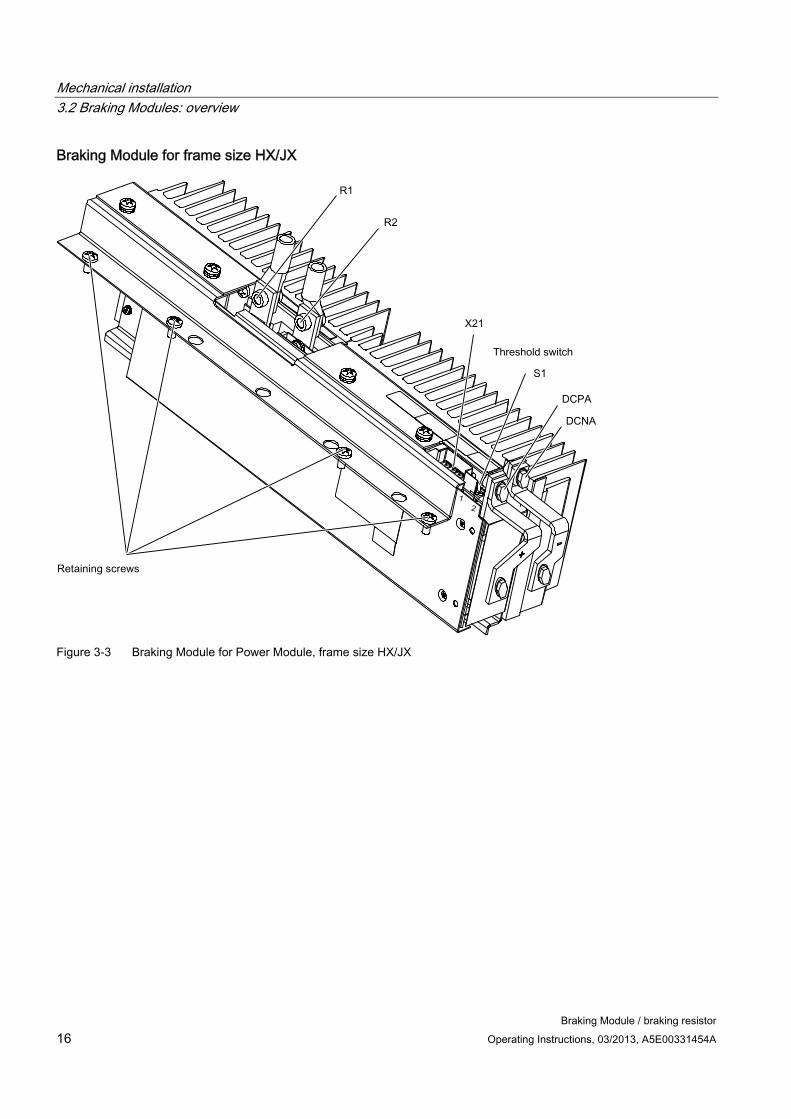
Braking Module for frame size HX/JX
Figure 3-3 Braking Module for Power Module, frame size HX/JX
Mechanical installation 3.3 Installing the Braking Module
Braking Module / braking resistor Operating Instructions, 03/2013, A5E00331454A 17
3.3 Installing the Braking Module
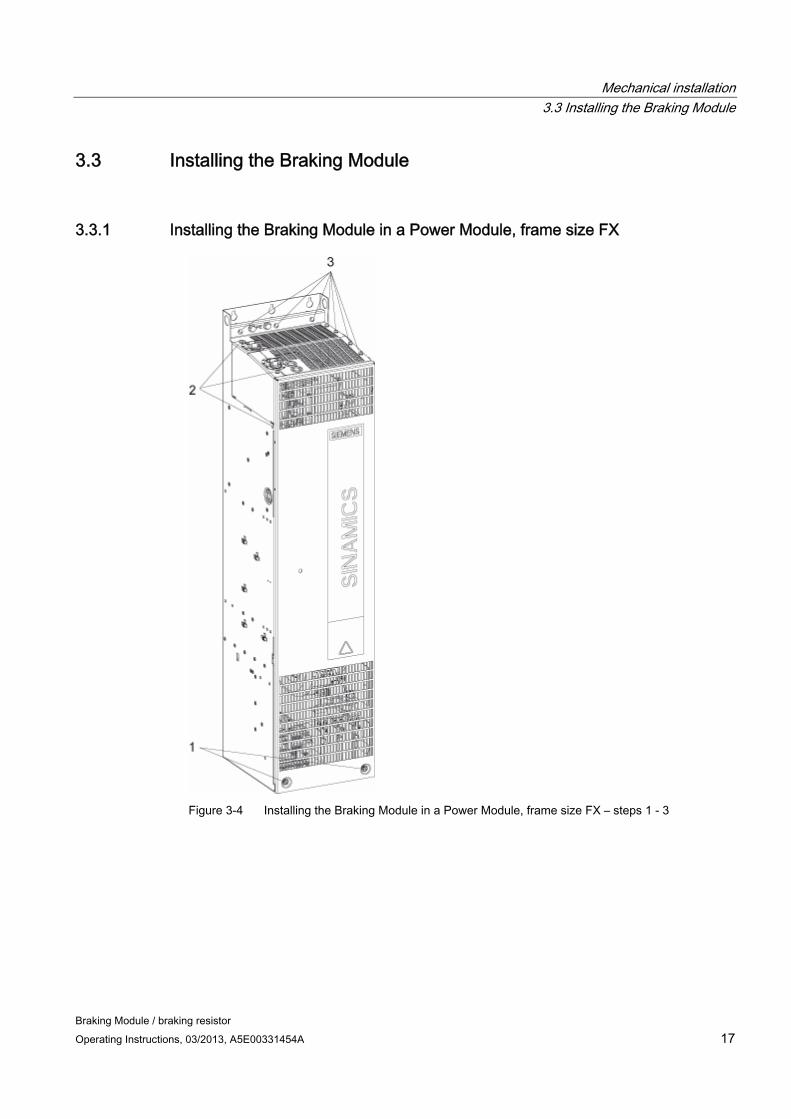
3.3.1 Installing the Braking Module in a Power Module, frame size FX
Figure 3-4 Installing the Braking Module in a Power Module, frame size FX – steps 1 - 3
Mechanical installation 3.3 Installing the Braking Module
Braking Module / braking resistor 18 Operating Instructions, 03/2013, A5E00331454A
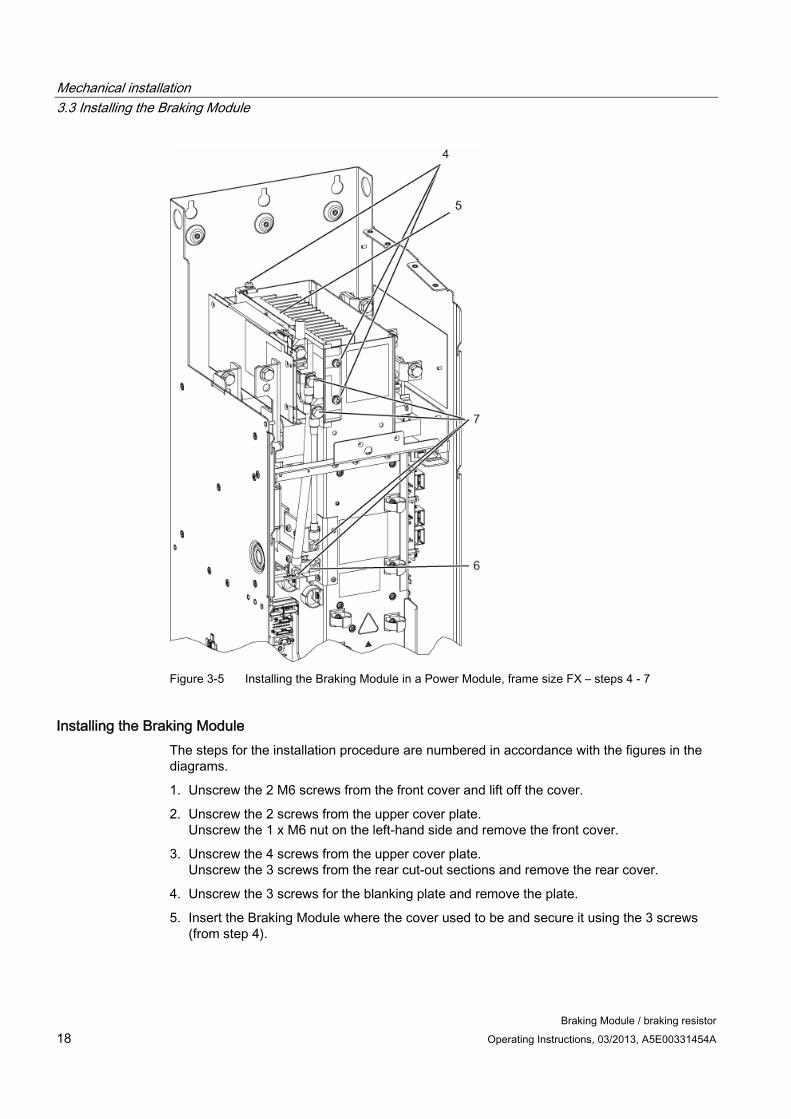
Figure 3-5 Installing the Braking Module in a Power Module, frame size FX – steps 4 - 7
Installing the Braking Module The steps for the installation procedure are numbered in accordance with the figures in the diagrams.
1. Unscrew the 2 M6 screws from the front cover and lift off the cover.
2. Unscrew the 2 screws from the upper cover plate. Unscrew the 1 x M6 nut on the left-hand side and remove the front cover.
3. Unscrew the 4 screws from the upper cover plate. Unscrew the 3 screws from the rear cut-out sections and remove the rear cover.
4. Unscrew the 3 screws for the blanking plate and remove the plate.
5. Insert the Braking Module where the cover used to be and secure it using the 3 screws (from step 4).
Mechanical installation 3.3 Installing the Braking Module
Braking Module / braking resistor Operating Instructions, 03/2013, A5E00331454A 19
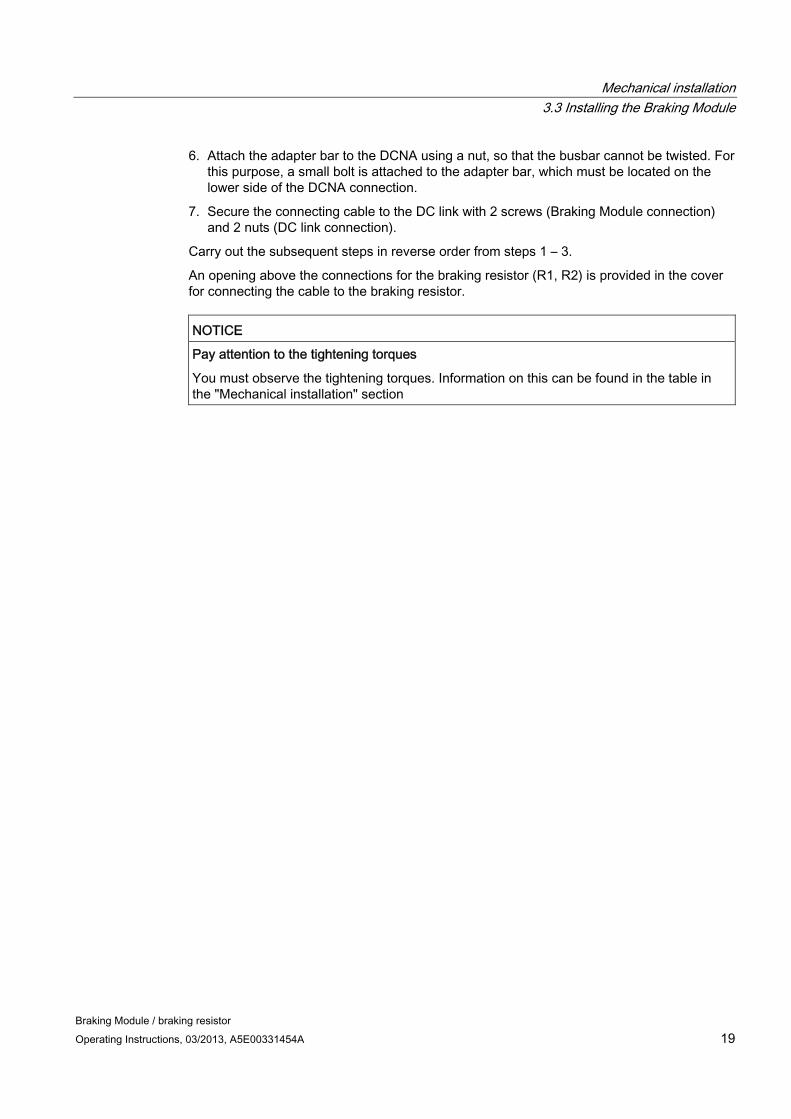
6. Attach the adapter bar to the DCNA using a nut, so that the busbar cannot be twisted. For this purpose, a small bolt is attached to the adapter bar, which must be located on the lower side of the DCNA connection.
7. Secure the connecting cable to the DC link with 2 screws (Braking Module connection) and 2 nuts (DC link connection).
Carry out the subsequent steps in reverse order from steps 1 – 3.
An opening above the connections for the braking resistor (R1, R2) is provided in the cover for connecting the cable to the braking resistor.
NOTICE Pay attention to the tightening torques
You must observe the tightening torques. Information on this can be found in the table in the "Mechanical installation" section
Mechanical installation 3.3 Installing the Braking Module
Braking Module / braking resistor 20 Operating Instructions, 03/2013, A5E00331454A
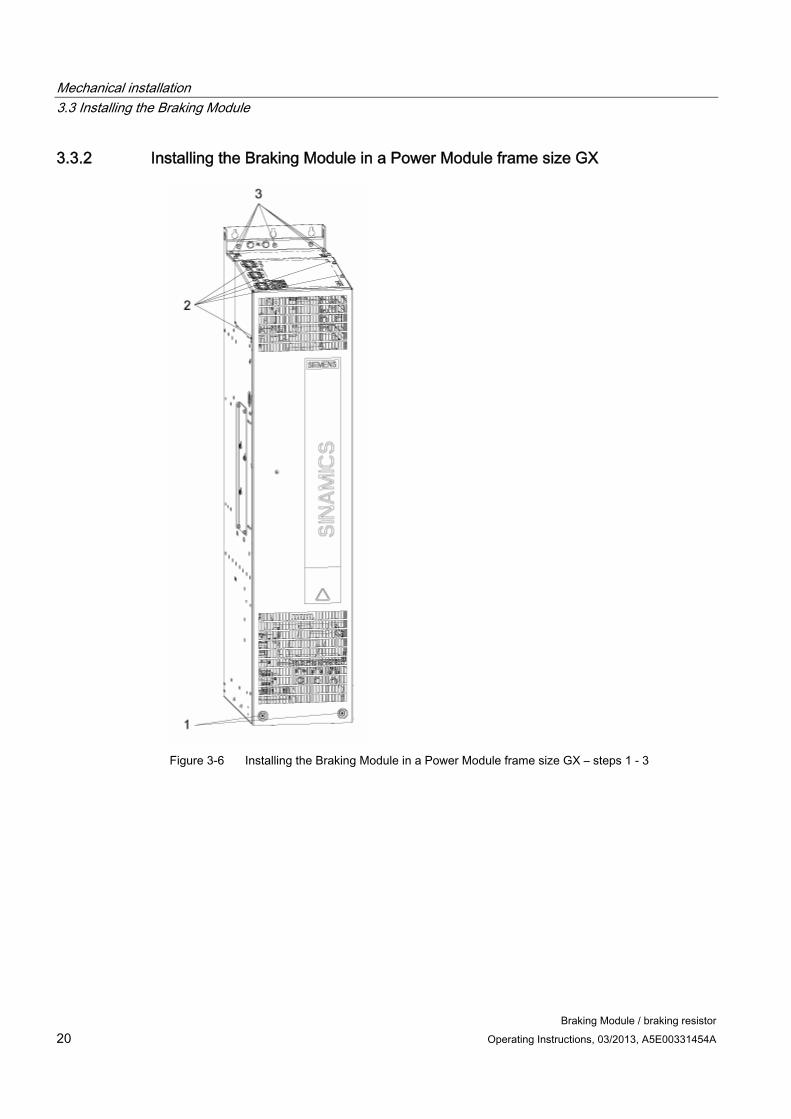
3.3.2 Installing the Braking Module in a Power Module frame size GX
Figure 3-6 Installing the Braking Module in a Power Module frame size GX – steps 1 - 3
Mechanical installation 3.3 Installing the Braking Module
Braking Module / braking resistor Operating Instructions, 03/2013, A5E00331454A 21
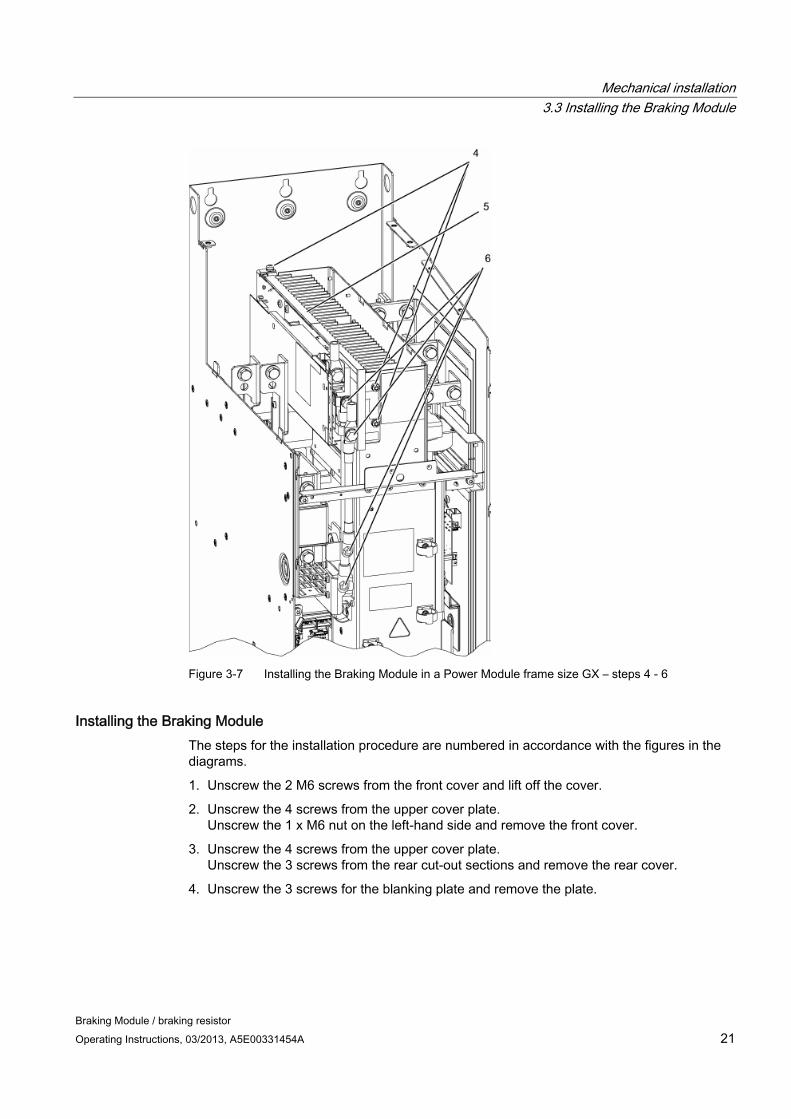
Figure 3-7 Installing the Braking Module in a Power Module frame size GX – steps 4 - 6
Installing the Braking Module The steps for the installation procedure are numbered in accordance with the figures in the diagrams.
1. Unscrew the 2 M6 screws from the front cover and lift off the cover.
2. Unscrew the 4 screws from the upper cover plate. Unscrew the 1 x M6 nut on the left-hand side and remove the front cover.
3. Unscrew the 4 screws from the upper cover plate. Unscrew the 3 screws from the rear cut-out sections and remove the rear cover.
4. Unscrew the 3 screws for the blanking plate and remove the plate.
Mechanical installation 3.3 Installing the Braking Module
Braking Module / braking resistor 22 Operating Instructions, 03/2013, A5E00331454A
5. Insert the Braking Module where the cover used to be and secure it using the 3 screws (from step 4).
6. Secure the connecting cable to the DC link with 2 screws (Braking Module connection) and 2 nuts (DC link connection).
Carry out the subsequent steps in reverse order from steps 1 – 3.
An opening above the connections for the braking resistor (R1, R2) is provided in the cover for connecting the cable to the braking resistor.
NOTICE Pay attention to the tightening torques
You must observe the tightening torques. Information on this can be found in the table in the "Mechanical installation" section
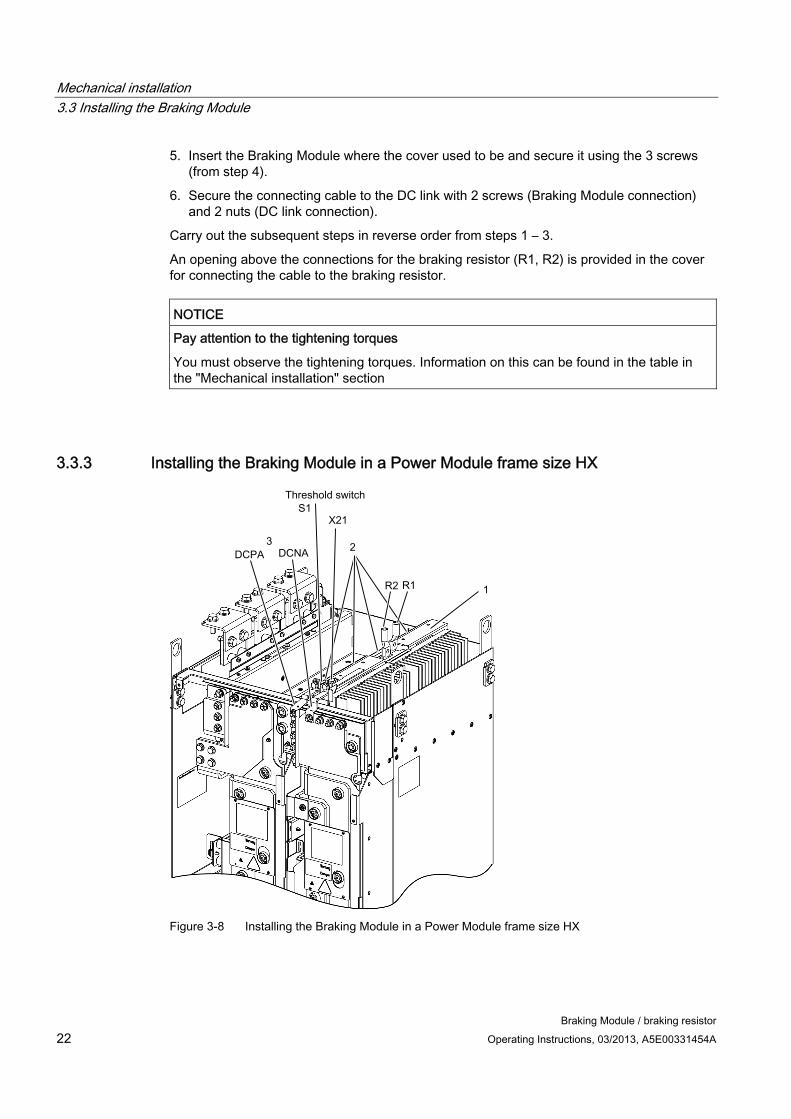
3.3.3 Installing the Braking Module in a Power Module frame size HX
Figure 3-8 Installing the Braking Module in a Power Module frame size HX
Mechanical installation 3.3 Installing the Braking Module
Braking Module / braking resistor Operating Instructions, 03/2013, A5E00331454A 23
Installing the Braking Module The steps for the installation procedure are numbered in accordance with the figures in the diagram.
1. Insert the Braking Module.
2. Screw in the 4 retaining screws for securing the Braking Module.
3. Secure the connection clip to the DC link (DCPA / DCNA) with 2 screws (Braking Module connection) and 2 nuts (DC link connection).
NOTICE Pay attention to the tightening torques
You must observe the tightening torques. Information on this can be found in the table in the "Mechanical installation" section
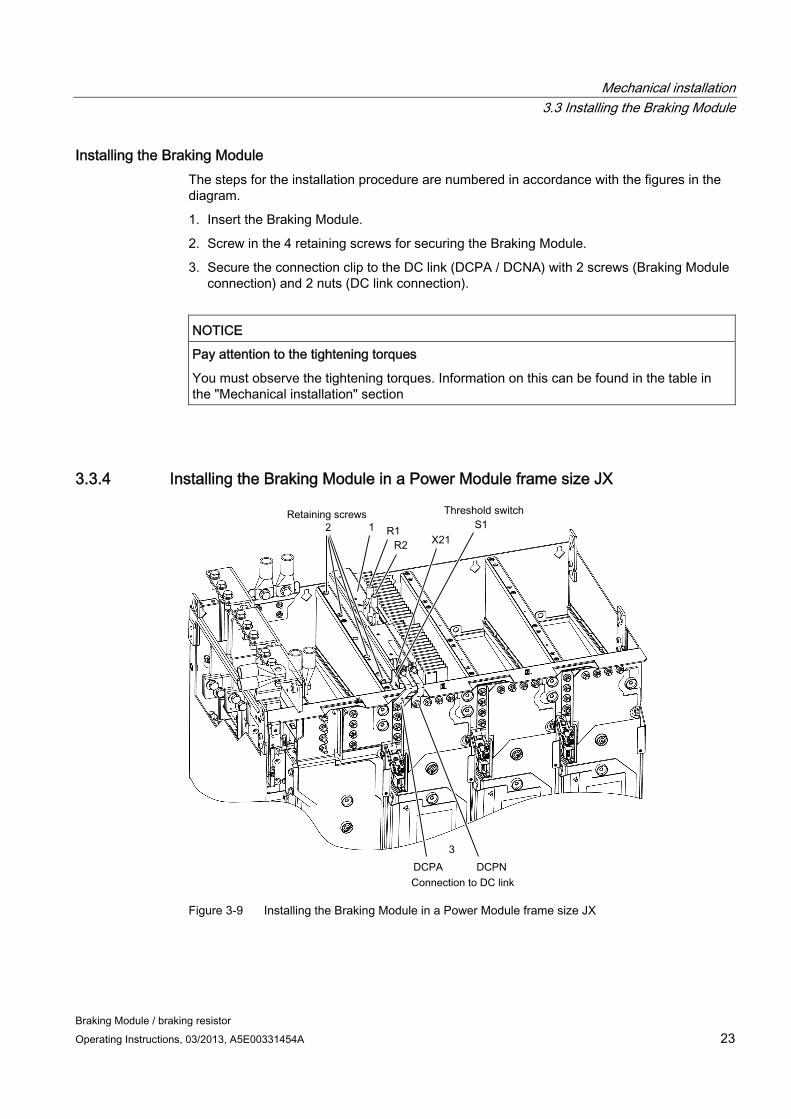
3.3.4 Installing the Braking Module in a Power Module frame size JX
Figure 3-9 Installing the Braking Module in a Power Module frame size JX
Mechanical installation 3.4 Installing the braking resistor
Braking Module / braking resistor 24 Operating Instructions, 03/2013, A5E00331454A
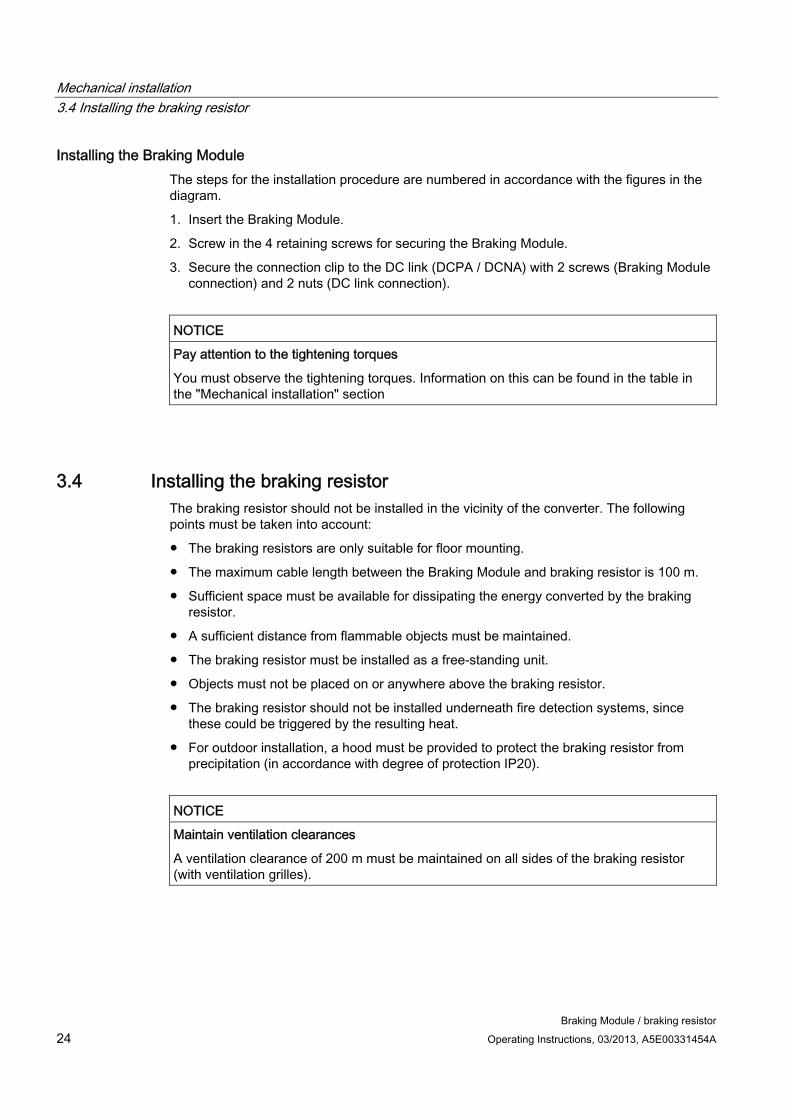
Installing the Braking Module The steps for the installation procedure are numbered in accordance with the figures in the diagram.
1. Insert the Braking Module.
2. Screw in the 4 retaining screws for securing the Braking Module.
3. Secure the connection clip to the DC link (DCPA / DCNA) with 2 screws (Braking Module connection) and 2 nuts (DC link connection).
NOTICE Pay attention to the tightening torques
You must observe the tightening torques. Information on this can be found in the table in the "Mechanical installation" section
3.4 Installing the braking resistor The braking resistor should not be installed in the vicinity of the converter. The following points must be taken into account:
● The braking resistors are only suitable for floor mounting.
● The maximum cable length between the Braking Module and braking resistor is 100 m.
● Sufficient space must be available for dissipating the energy converted by the braking resistor.
● A sufficient distance from flammable objects must be maintained.
● The braking resistor must be installed as a free-standing unit.
● Objects must not be placed on or anywhere above the braking resistor.
● The braking resistor should not be installed underneath fire detection systems, since these could be triggered by the resulting heat.
● For outdoor installation, a hood must be provided to protect the braking resistor from precipitation (in accordance with degree of protection IP20).
NOTICE Maintain ventilation clearances
A ventilation clearance of 200 m must be maintained on all sides of the braking resistor (with ventilation grilles).
Mechanical installation 3.4 Installing the braking resistor
Braking Module / braking resistor Operating Instructions, 03/2013, A5E00331454A 25
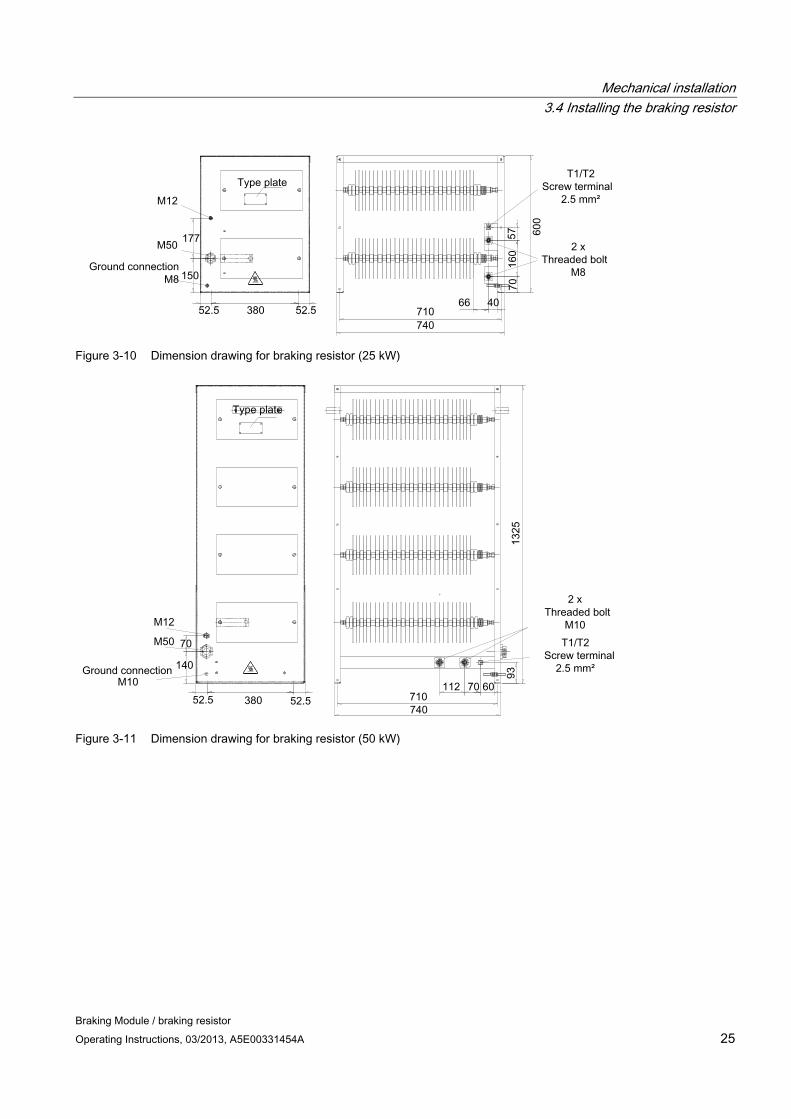
Figure 3-10 Dimension drawing for braking resistor (25 kW)
Figure 3-11 Dimension drawing for braking resistor (50 kW)
Mechanical installation 3.4 Installing the braking resistor
Braking Module / braking resistor 26 Operating Instructions, 03/2013, A5E00331454A
Braking Module / braking resistor Operating Instructions, 03/2013, A5E00331454A 27
Connection 4
WARNING
Dangerous electrical voltage
The built-in units are operated with high voltages. All connection work must be carried out when the cabinet is de-energized. All work on the device must be carried out by trained personnel only. Non-observance of these warnings can result in death, serious personal injury, or substantial property damage.
Work on an open device must be carried out with extreme caution because external supply voltages may be present. The power and control terminals may be live even when the motor is not running. Dangerously high voltage levels are still present in the device up to five minutes after it has been disconnected due to the DC link capacitors. For this reason, the cabinet should not be opened until a reasonable period of time has elapsed.
The operator is responsible for ensuring that the motor, converter, and other devices are installed and connected in accordance with the recognized technical rules in the country of installation and applicable regional guidelines. Special attention should be paid to cable dimensioning, fuses, grounding, shutdown, disconnection, and overcurrent protection.
If an item of protective gear trips in a branch circuit, a leakage current may have been disconnected. To reduce the risk of fire or an electric shock, the current-carrying parts and other components in the cabinet unit should be inspected and damaged parts replaced. When an item of protective gear trips, the cause of the trip must be identified and rectified.
Connection 4.1 Cable lugs
Braking Module / braking resistor 28 Operating Instructions, 03/2013, A5E00331454A
4.1 Cable lugs
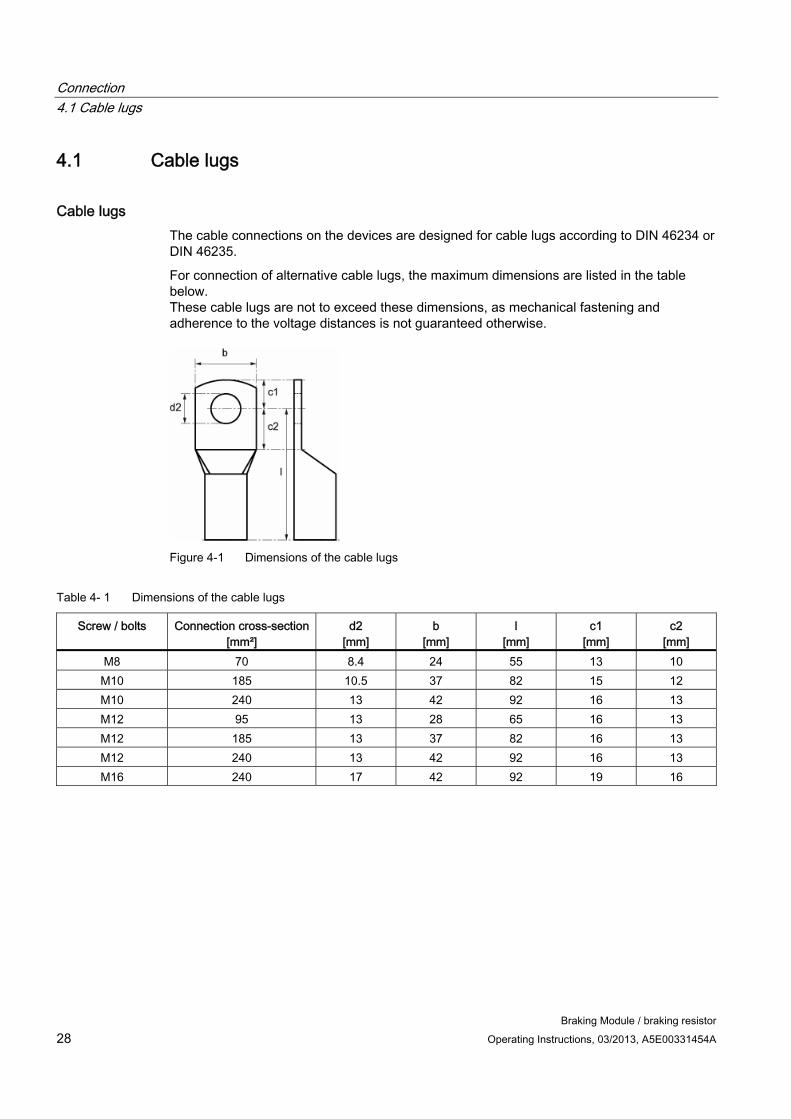
Cable lugs The cable connections on the devices are designed for cable lugs according to DIN 46234 or DIN 46235.
For connection of alternative cable lugs, the maximum dimensions are listed in the table below. These cable lugs are not to exceed these dimensions, as mechanical fastening and adherence to the voltage distances is not guaranteed otherwise.
Figure 4-1 Dimensions of the cable lugs
Table 4- 1 Dimensions of the cable lugs
Screw / bolts Connection cross-section [mm²]
d2 [mm]
b [mm]
l [mm]
c1 [mm]
c2 [mm]
M8 70 8.4 24 55 13 10 M10 185 10.5 37 82 15 12 M10 240 13 42 92 16 13 M12 95 13 28 65 16 13 M12 185 13 37 82 16 13 M12 240 13 42 92 16 13 M16 240 17 42 92 19 16
Connection 4.2 Connecting the Braking Module
Braking Module / braking resistor Operating Instructions, 03/2013, A5E00331454A 29
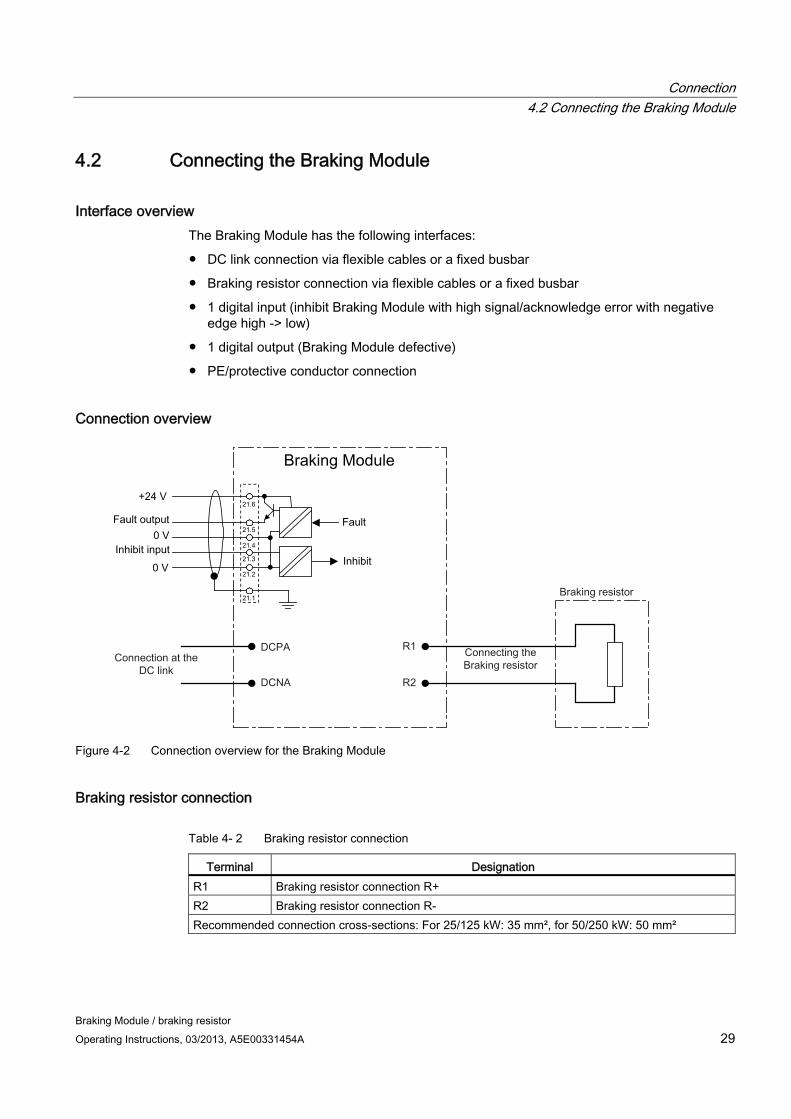
4.2 Connecting the Braking Module
Interface overview The Braking Module has the following interfaces:
● DC link connection via flexible cables or a fixed busbar
● Braking resistor connection via flexible cables or a fixed busbar
● 1 digital input (inhibit Braking Module with high signal/acknowledge error with negative edge high -> low)
● 1 digital output (Braking Module defective)
● PE/protective conductor connection
Connection overview
Figure 4-2 Connection overview for the Braking Module
Braking resistor connection
Table 4- 2 Braking resistor connection
Terminal Designation R1 Braking resistor connection R+ R2 Braking resistor connection R- Recommended connection cross-sections: For 25/125 kW: 35 mm², for 50/250 kW: 50 mm²
Connection 4.2 Connecting the Braking Module
Braking Module / braking resistor 30 Operating Instructions, 03/2013, A5E00331454A
Digital inputs/outputs X21
Table 4- 3 Terminal block X21
Terminal Designation 1) Technical data 1 Shield Shield connection for terminals 2 ... 6 2 0 V 3 DI inhibit input
High signal level: +15 V to 30 V Current consumption: 2 mA to 15 mA Low signal level: -3 V to 5 V
4 0 V 5 DO fault output
High signal: No fault Low signal: Fault present Voltage: 24 V DC Load current: 0.5 A to 0.6 A
6 +24 V Voltage: +18 V to +30 V Typical current consumption (induced current consumption): 10 mA at 24 V DC
Max. connectable cross-section 1.5 mm2
1) DI: digital input; DO: Digital output
Note Position of the terminals
When the Braking Module is installed, the individual terminals on its X21 terminal block are positioned as follows: terminal "1" is at the rear, terminal "6" at the front.
Note Signal characteristics of terminal X21.3
Applying a high signal to terminal X21.3 inhibits the Braking Module. With a falling edge, pending fault codes are acknowledged.
Threshold switch The response threshold at which the Braking Module is activated and the DC link voltage generated during braking are specified in the following table.
WARNING Actuate threshold switch only when device is turned off
The threshold switch must only be used when the Power Module is switched off and the DC link capacitors are discharged.
Connection 4.2 Connecting the Braking Module
Braking Module / braking resistor Operating Instructions, 03/2013, A5E00331454A 31
Table 4- 4 Response thresholds of the Braking Modules
Rated voltage Response threshold
Switch position
Comment
673 V 1 380 V – 480 V 3 AC 774 V 2
774 V is the delivery condition setting. With line voltages of between 380 V and 400 V, the response threshold can be set to 673 V to reduce the voltage stress on the motor and converter. This does, however, reduce the possible braking power with the square of the voltage (673/774)² = 0.75. The maximum possible braking power is, therefore, 75%.
841 V 1 500 V – 600 V 3 AC 967 V 2
967 V is the delivery condition setting. With a line voltage of 500 V, the response threshold can be set to 841 V to reduce the voltage stress on the motor and converter. This does, however, reduce the possible braking power with the square of the voltage (841/967)² = 0.75. The maximum possible braking power is, therefore, 75%.
1070 V 1 660 V – 690 V 3 AC 1158 V 2
1158 V is the delivery condition setting. With a line voltage of 660 V, the response threshold can be set to 1070 V to reduce the voltage stress on the motor and converter. This does, however, reduce the possible braking power with the square of the voltage (1070/1158)² = 0.85. The maximum possible braking power is, therefore, 85%.
Note Positions of the threshold switches
The threshold switches of the Braking Modules are positioned on the panel as follows: Braking Modules for frame sizes FX and GX: position "1" is up; position "2" is down Braking Modules for frame sizes HX and JX: position "1" is back; position "2" is front
NOTICE "Overvoltage" fault
Even when the response threshold is set to a low value, the DC link voltage can still reach the maximum voltage value (hardware shutdown threshold), thus triggering the "Overvoltage" fault. This can occur, for example, in cases where there is too much regenerative energy for the available braking power.
To prevent the DC link voltage from exceeding the threshold, the Vdc-max controller must be enabled (p1240) and the device supply voltage set accordingly (p0210).
Connection 4.3 Connecting the braking resistor
Braking Module / braking resistor 32 Operating Instructions, 03/2013, A5E00331454A
4.3 Connecting the braking resistor
WARNING Connect only when the device is switched off
The Braking Module must only be connected when the Power Module has been disconnected from the power supply and the DC link capacitors have been discharged.
WARNING Risk of fire and damage to equipment due to short-circuit/ground fault
The cables to the braking resistor must be routed so that a ground fault or short circuit can be ruled out. A ground fault can result in fire with the associated smoke. Protect the cables from mechanical damage. Comply with local installation regulations that enable this fault to be ruled out.
In addition, apply one of the following measures: Use cables with double insulation. Maintain adequate clearance, using spacers, for example. Route the cables in separate cable ducts or pipes.
NOTICE Maximum cable lengths
The length of the connecting cables between the Braking Module and external braking resistor must not exceed 100 m.
Recommended connection cross-sections:
● For 25/125 kW: 35 mm²
● For 50/250 kW: 50 mm²
Thermostatic switch A thermostatic switch is installed to protect the braking resistor against overload. Its floating contacts must be integrated in the fault chain on site.
Table 4- 5 Thermostatic switch connection
Terminal Description of function Technical data T1 Thermostatic switch connection T2 Thermostatic switch connection
Voltage: 250 V AC Load current: max. 1 A
Max. connectable cross-section: 2.5 mm²
Connection 4.4 Disabling the Vdc-max controller
Braking Module / braking resistor Operating Instructions, 03/2013, A5E00331454A 33
Integration of the thermostatic switch as release for switch-off via OFF2 The thermostatic switch must be connected to a free digital input of the SINAMICS G130 so that the converter is safely disconnected from the power supply if the braking resistor overheats. A digital input on the TM31 Terminal Module, on the TB30 Terminal Board or on the Control Unit can be used for this
Subsequently the digital input must be used as release for a switch-off with OFF2. External fault 2). The interconnection can be made with the STARTER or via the AOP30.
4.4 Disabling the Vdc-max controller The Vdc-max controller must be switched off (p1240 = 0) when a brake chopper is used.
Connection 4.4 Disabling the Vdc-max controller
Braking Module / braking resistor 34 Operating Instructions, 03/2013, A5E00331454A
Braking Module / braking resistor Operating Instructions, 03/2013, A5E00331454A 35
Maintenance and servicing 5
Maintenance and servicing are not carried out for the Braking Module and braking resistor. If a fault occurs, the Braking Module and/or braking resistor must be replaced.
Maintenance and servicing
Braking Module / braking resistor 36 Operating Instructions, 03/2013, A5E00331454A
Braking Module / braking resistor Operating Instructions, 03/2013, A5E00331454A 37
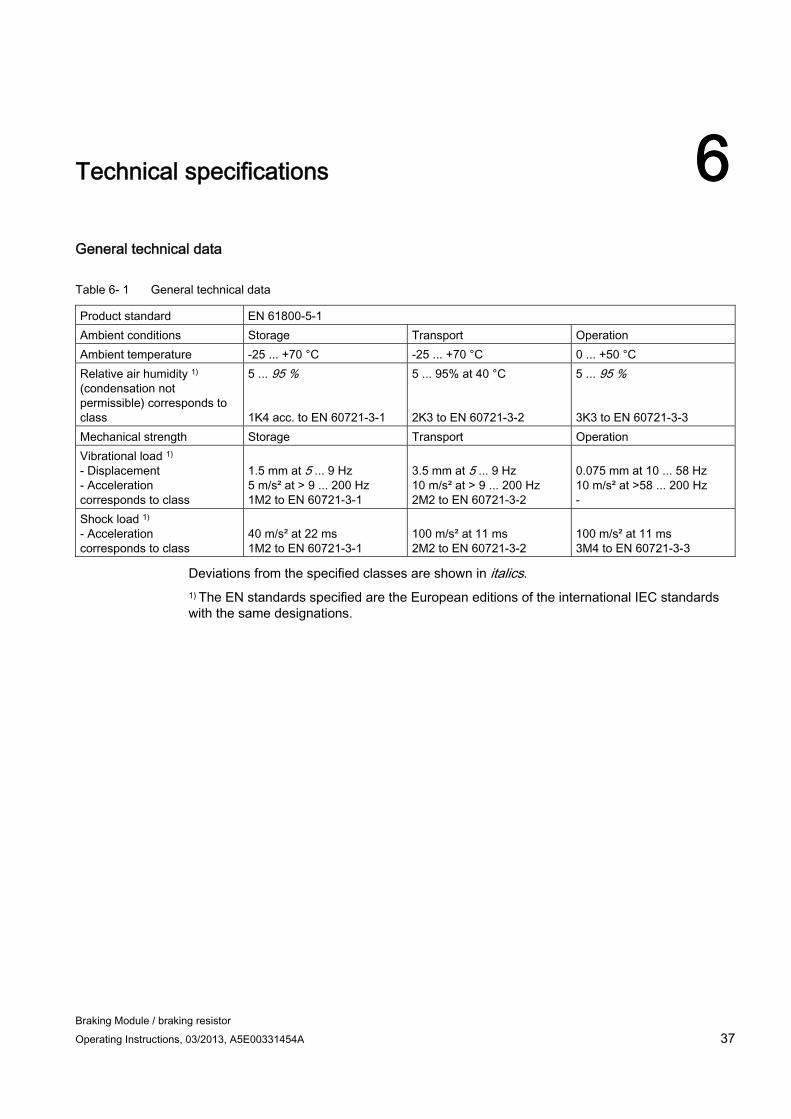
Technical specifications 6General technical data
Table 6- 1 General technical data
Product standard EN 61800-5-1 Ambient conditions Storage Transport Operation Ambient temperature -25 ... +70 °C -25 ... +70 °C 0 ... +50 °C Relative air humidity 1) (condensation not permissible) corresponds to class
5 ... 95 % 1K4 acc. to EN 60721-3-1
5 ... 95% at 40 °C 2K3 to EN 60721-3-2
5 ... 95 % 3K3 to EN 60721-3-3
Mechanical strength Storage Transport Operation Vibrational load 1) - Displacement - Acceleration corresponds to class
1.5 mm at 5 ... 9 Hz 5 m/s² at > 9 ... 200 Hz 1M2 to EN 60721-3-1
3.5 mm at 5 ... 9 Hz 10 m/s² at > 9 ... 200 Hz 2M2 to EN 60721-3-2
0.075 mm at 10 ... 58 Hz 10 m/s² at >58 ... 200 Hz -
Shock load 1) - Acceleration corresponds to class
40 m/s² at 22 ms 1M2 to EN 60721-3-1
100 m/s² at 11 ms 2M2 to EN 60721-3-2
100 m/s² at 11 ms 3M4 to EN 60721-3-3
Deviations from the specified classes are shown in italics. 1) The EN standards specified are the European editions of the international IEC standards with the same designations.
Technical specifications
Braking Module / braking resistor 38 Operating Instructions, 03/2013, A5E00331454A
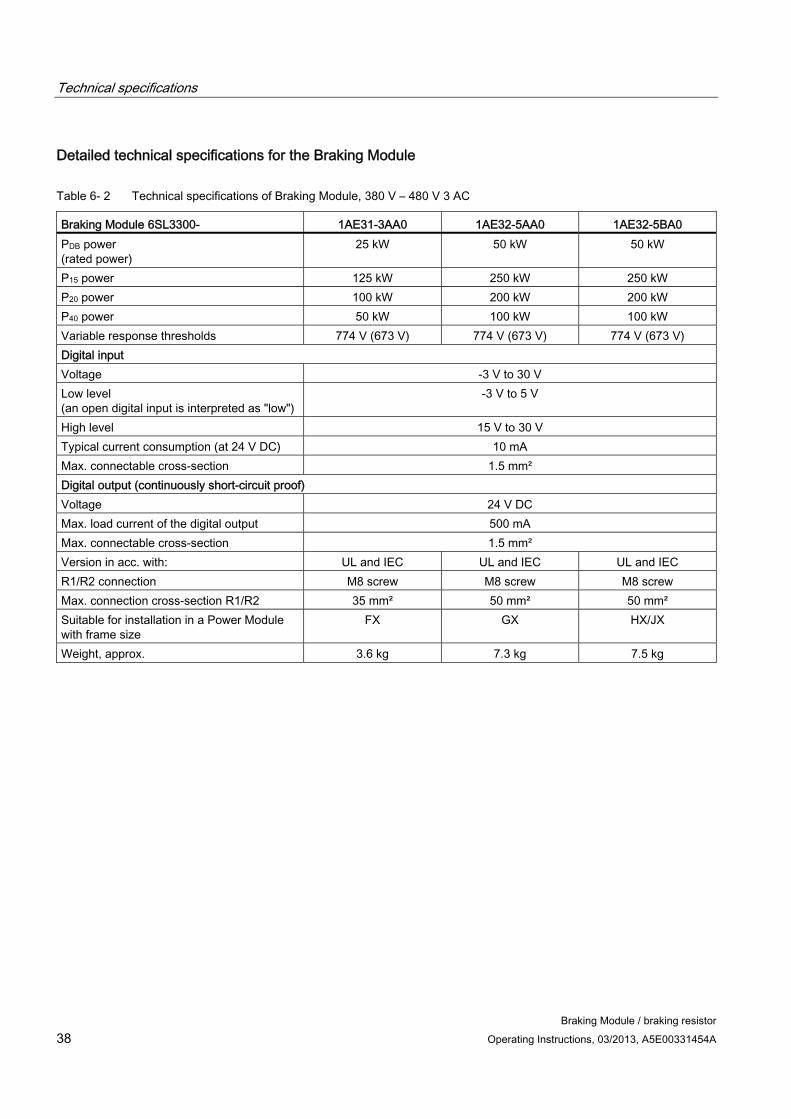
Detailed technical specifications for the Braking Module
Table 6- 2 Technical specifications of Braking Module, 380 V – 480 V 3 AC
Braking Module 6SL3300- 1AE31-3AA0 1AE32-5AA0 1AE32-5BA0 PDB power (rated power)
25 kW 50 kW 50 kW
P15 power 125 kW 250 kW 250 kW P20 power 100 kW 200 kW 200 kW P40 power 50 kW 100 kW 100 kW Variable response thresholds 774 V (673 V) 774 V (673 V) 774 V (673 V) Digital input Voltage -3 V to 30 V Low level (an open digital input is interpreted as "low")
-3 V to 5 V
High level 15 V to 30 V Typical current consumption (at 24 V DC) 10 mA Max. connectable cross-section 1.5 mm² Digital output (continuously short-circuit proof) Voltage 24 V DC Max. load current of the digital output 500 mA Max. connectable cross-section 1.5 mm² Version in acc. with: UL and IEC UL and IEC UL and IEC R1/R2 connection M8 screw M8 screw M8 screw Max. connection cross-section R1/R2 35 mm² 50 mm² 50 mm² Suitable for installation in a Power Module with frame size
FX GX HX/JX
Weight, approx. 3.6 kg 7.3 kg 7.5 kg
Technical specifications
Braking Module / braking resistor Operating Instructions, 03/2013, A5E00331454A 39
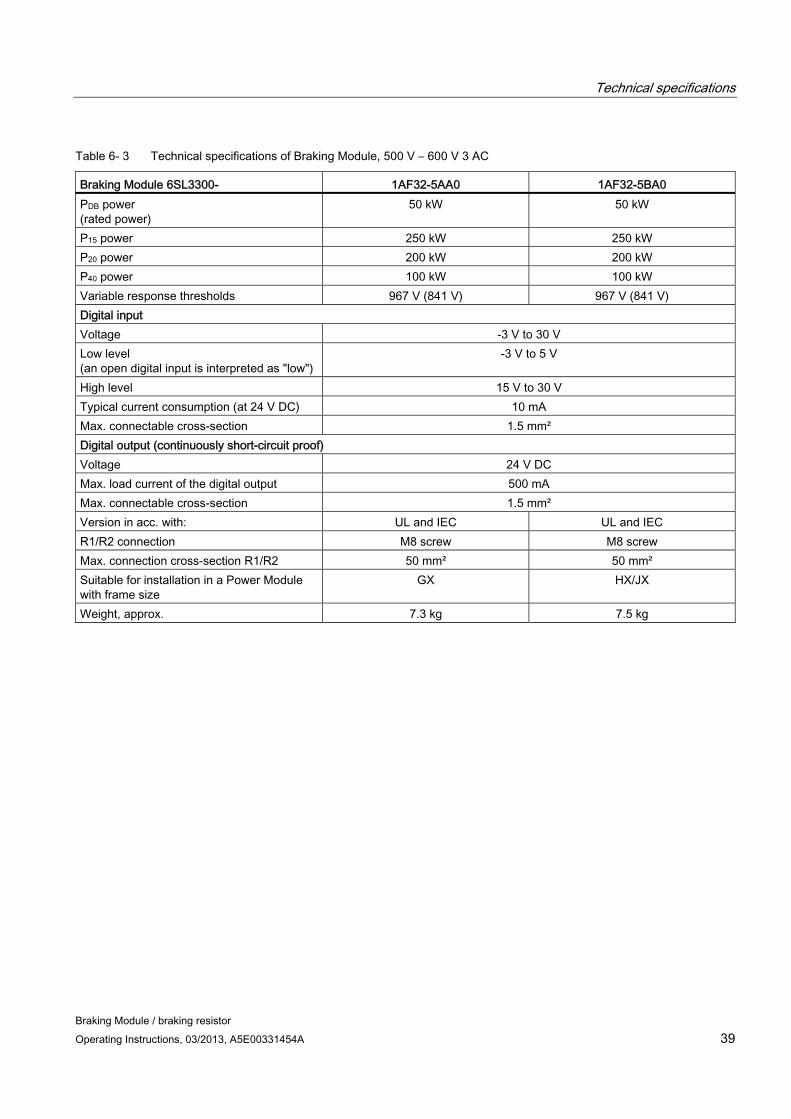
Table 6- 3 Technical specifications of Braking Module, 500 V – 600 V 3 AC
Braking Module 6SL3300- 1AF32-5AA0 1AF32-5BA0 PDB power (rated power)
50 kW 50 kW
P15 power 250 kW 250 kW P20 power 200 kW 200 kW P40 power 100 kW 100 kW Variable response thresholds 967 V (841 V) 967 V (841 V) Digital input Voltage -3 V to 30 V Low level (an open digital input is interpreted as "low")
-3 V to 5 V
High level 15 V to 30 V Typical current consumption (at 24 V DC) 10 mA Max. connectable cross-section 1.5 mm² Digital output (continuously short-circuit proof) Voltage 24 V DC Max. load current of the digital output 500 mA Max. connectable cross-section 1.5 mm² Version in acc. with: UL and IEC UL and IEC R1/R2 connection M8 screw M8 screw Max. connection cross-section R1/R2 50 mm² 50 mm² Suitable for installation in a Power Module with frame size
GX HX/JX
Weight, approx. 7.3 kg 7.5 kg
Technical specifications
Braking Module / braking resistor 40 Operating Instructions, 03/2013, A5E00331454A
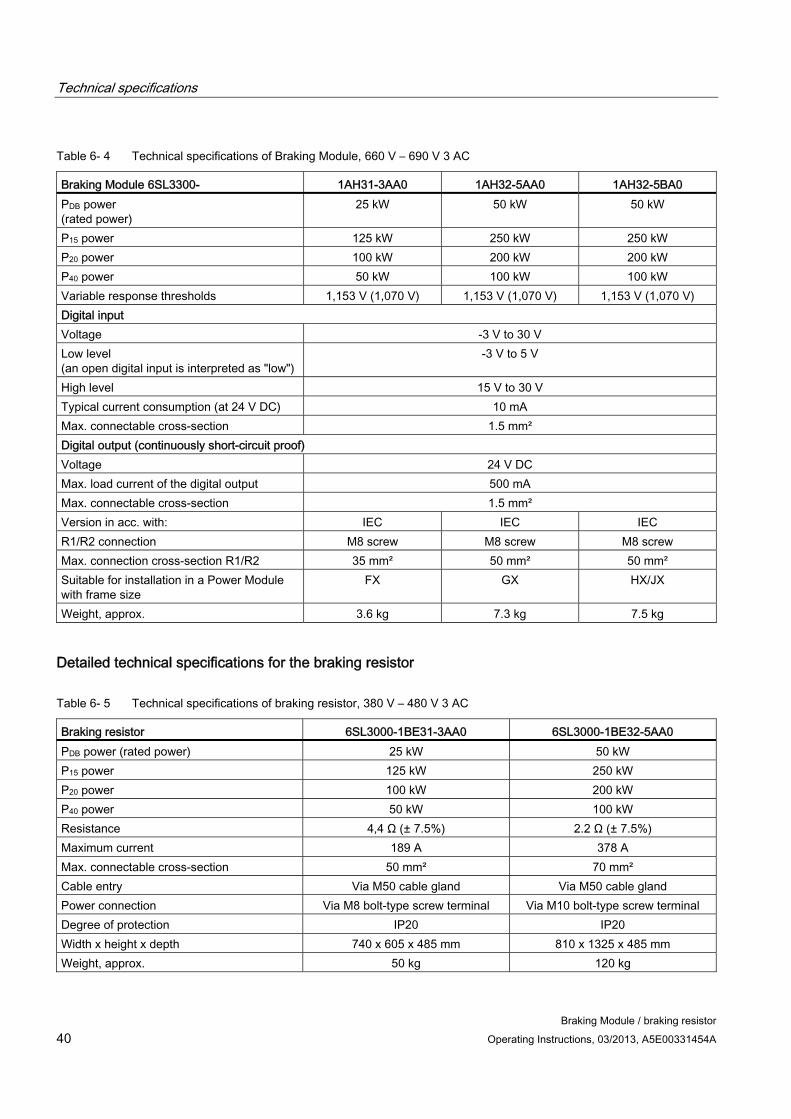
Table 6- 4 Technical specifications of Braking Module, 660 V – 690 V 3 AC
Braking Module 6SL3300- 1AH31-3AA0 1AH32-5AA0 1AH32-5BA0 PDB power (rated power)
25 kW 50 kW 50 kW
P15 power 125 kW 250 kW 250 kW P20 power 100 kW 200 kW 200 kW P40 power 50 kW 100 kW 100 kW Variable response thresholds 1,153 V (1,070 V) 1,153 V (1,070 V) 1,153 V (1,070 V) Digital input Voltage -3 V to 30 V Low level (an open digital input is interpreted as "low")
-3 V to 5 V
High level 15 V to 30 V Typical current consumption (at 24 V DC) 10 mA Max. connectable cross-section 1.5 mm² Digital output (continuously short-circuit proof) Voltage 24 V DC Max. load current of the digital output 500 mA Max. connectable cross-section 1.5 mm² Version in acc. with: IEC IEC IEC R1/R2 connection M8 screw M8 screw M8 screw Max. connection cross-section R1/R2 35 mm² 50 mm² 50 mm² Suitable for installation in a Power Module with frame size
FX GX HX/JX
Weight, approx. 3.6 kg 7.3 kg 7.5 kg
Detailed technical specifications for the braking resistor
Table 6- 5 Technical specifications of braking resistor, 380 V – 480 V 3 AC
Braking resistor 6SL3000-1BE31-3AA0 6SL3000-1BE32-5AA0 PDB power (rated power) 25 kW 50 kW P15 power 125 kW 250 kW P20 power 100 kW 200 kW P40 power 50 kW 100 kW Resistance 4,4 Ω (± 7.5%) 2.2 Ω (± 7.5%) Maximum current 189 A 378 A Max. connectable cross-section 50 mm² 70 mm² Cable entry Via M50 cable gland Via M50 cable gland Power connection Via M8 bolt-type screw terminal Via M10 bolt-type screw terminal Degree of protection IP20 IP20 Width x height x depth 740 x 605 x 485 mm 810 x 1325 x 485 mm Weight, approx. 50 kg 120 kg
Technical specifications
Braking Module / braking resistor Operating Instructions, 03/2013, A5E00331454A 41
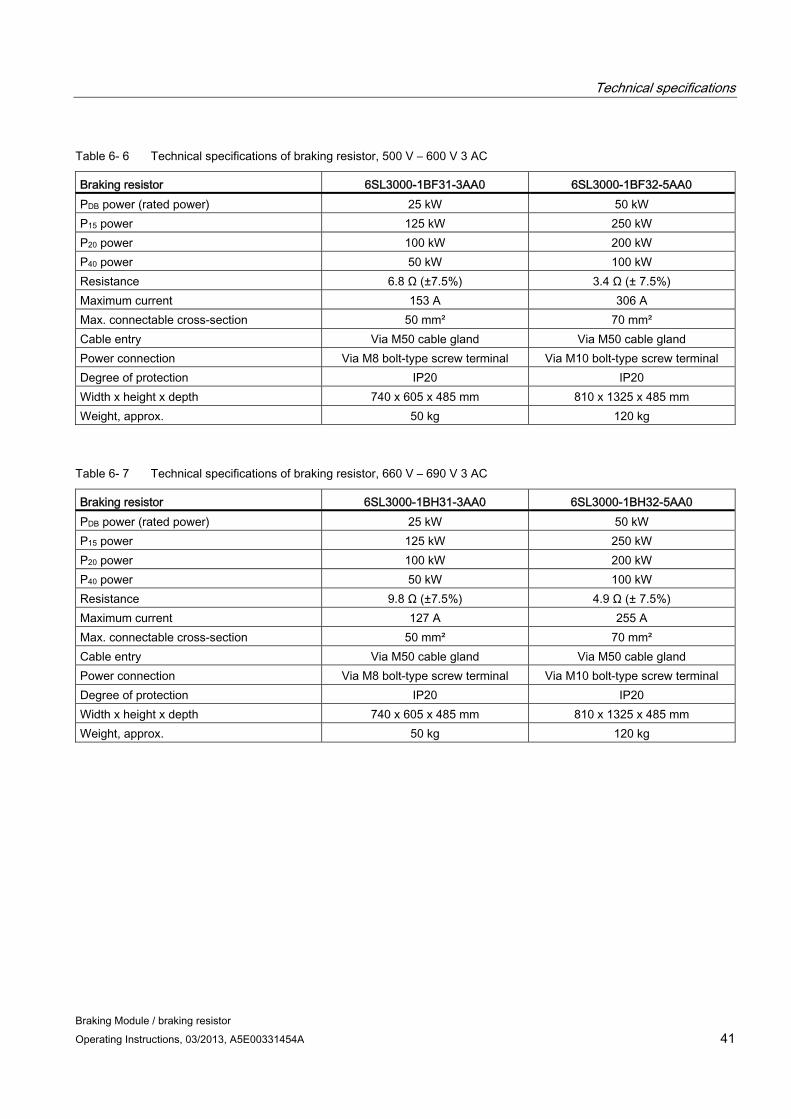
Table 6- 6 Technical specifications of braking resistor, 500 V – 600 V 3 AC
Braking resistor 6SL3000-1BF31-3AA0 6SL3000-1BF32-5AA0 PDB power (rated power) 25 kW 50 kW P15 power 125 kW 250 kW P20 power 100 kW 200 kW P40 power 50 kW 100 kW Resistance 6.8 Ω (±7.5%) 3.4 Ω (± 7.5%) Maximum current 153 A 306 A Max. connectable cross-section 50 mm² 70 mm² Cable entry Via M50 cable gland Via M50 cable gland Power connection Via M8 bolt-type screw terminal Via M10 bolt-type screw terminal Degree of protection IP20 IP20 Width x height x depth 740 x 605 x 485 mm 810 x 1325 x 485 mm Weight, approx. 50 kg 120 kg
Table 6- 7 Technical specifications of braking resistor, 660 V – 690 V 3 AC
Braking resistor 6SL3000-1BH31-3AA0 6SL3000-1BH32-5AA0 PDB power (rated power) 25 kW 50 kW P15 power 125 kW 250 kW P20 power 100 kW 200 kW P40 power 50 kW 100 kW Resistance 9.8 Ω (±7.5%) 4.9 Ω (± 7.5%) Maximum current 127 A 255 A Max. connectable cross-section 50 mm² 70 mm² Cable entry Via M50 cable gland Via M50 cable gland Power connection Via M8 bolt-type screw terminal Via M10 bolt-type screw terminal Degree of protection IP20 IP20 Width x height x depth 740 x 605 x 485 mm 810 x 1325 x 485 mm Weight, approx. 50 kg 120 kg
Technical specifications
Braking Module / braking resistor 42 Operating Instructions, 03/2013, A5E00331454A
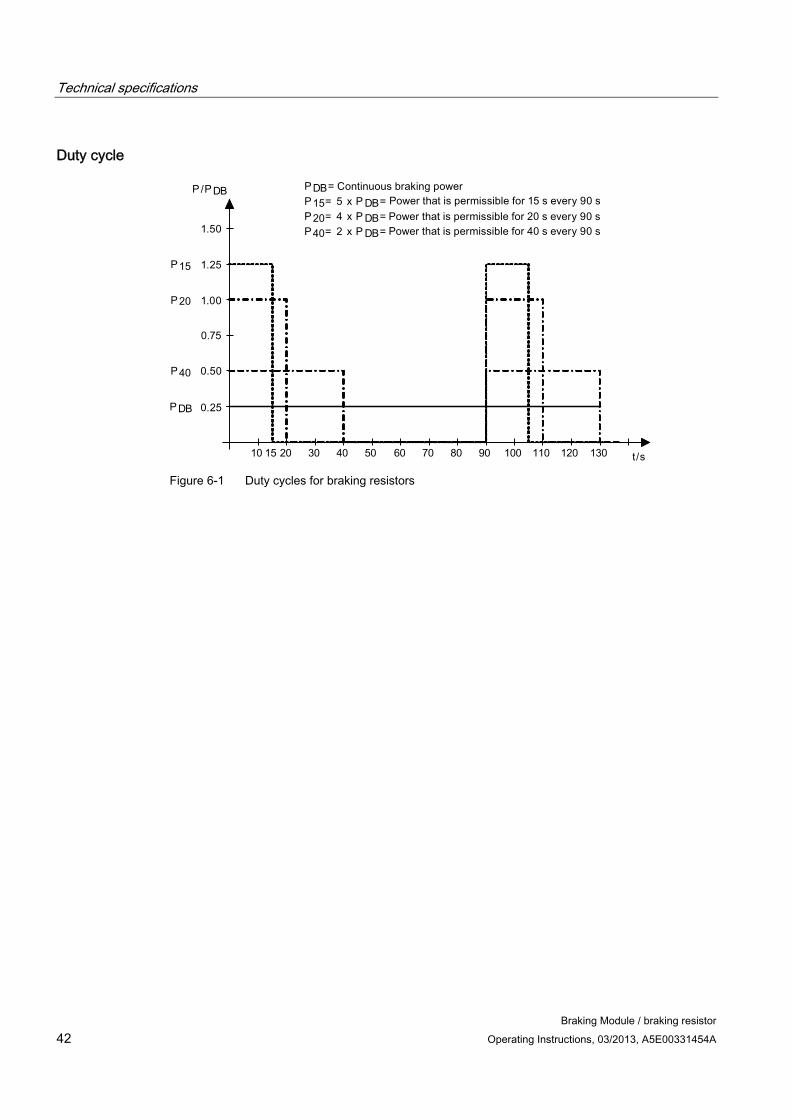
Duty cycle
Figure 6-1 Duty cycles for braking resistors


www.siemens.com/automation
Subject to change without prior notice© Siemens AG, 2004 - 2013
Siemens AGIndustry SectorDrive TechnologiesLarge DrivesP.O. Box 474390025 NUREMBERGGERMANY