BPS Course Guide Grade 7 World Geography 2009-2010 · The following concepts are at the heart of...
49
BPS Course Guide Grade 7 World Geography 2009-2010
Transcript of BPS Course Guide Grade 7 World Geography 2009-2010 · The following concepts are at the heart of...

BPS Course Guide Grade 7 World Geography
2009-2010

August 28, 2009 2
Table of Contents
Section Page # 1. Citywide History Outcomes 3 2. Course Description 4 3. World Geography Learning Standards 5 4. Pacing Guide/Assessment Dates 14 5. K-12 History Course Sequence 15 6. Workshop in the History Classroom 16 7. Preview Activities 17 8. Class Notes/Levels of Questioning 19 9. Processing Activities 33 10. Student Engagement/Accountable Talk 36 11. History Interactive Student Notebook 45 12. Rigor/Productivity/Assessment/Accountability 49 13. Unit & Lesson Planning Process 52 14. History Observation Guide (The H.O.G.) 55 15. Curriculum Implementation Reviews 80 16. Rubrics: Presentations, Debates, Persuasive Essay 83 17. Professional Development Calendar & Activities 89

August 28, 2009 3
Citywide History Outcomes (2009-2010): Background: During the 2005-06 school year, Curriculum Implementation Reviews were completed in thirty-one middle and high schools. Since then, full period classroom observations were conducted in over 300 history classrooms. The following outcomes emerged from the needs identified during these observations, as well as from the Accelerated Agenda goals for 2009-2010. Outcomes: 1. Students will successfully complete challenging processing activities every day1. The activities will
routinely push students beyond the recall/definition level, to higher levels of cognitive processing (e.g., application, inference, analysis, synthesis, evaluation).
2. Students will complete high-quality class notes every day, in response to readings or presentations.
They will effectively using the Cornell Note-Making methodology2. 3. Students will complete level 3-4 responses to the BPS Historical Thinking/Writing Tasks for their
grade level. 4. Students will routinely engage in high quality, accountable talk3, with their teacher and among
themselves, in the process of completing all activities and assignments. 5. Teachers will prepare high quality lesson plans each day, using the History Workshop Lesson Planner
as a guide4. 6. Teachers will communicate high expectations, continually project a “can-do” attitude, and engage
their students as valuable assets to one another’s learning. 7. Teacher will assign, and students will complete, challenging, concise homework assignments that
extend the day’s lesson and/or prepare students for the class to come. 8. Students, teachers and administrators will be conversant regarding all elements of the interactive
history notebook (e.g., personalized cover; table of contents; administrative notes; left-side/right-side format; preview, class notes, processing activities; Cornell Note-Making methodology)5.
9. Teachers will maintain pace with the scope, sequence and pacing guide for each course6.
1 See page 29 of this course guide. 2 See page 15 of this course guide. 3 See page 32 of this course guide. 4 See page 48 of this course guide. 5 See page 41 of this course guide. 6 See page 9 of this course guide.
August 28, 2009 4
HISTORY/SOCIAL SCIENCE
Title: World Geography, Grade 7, Required Course Number: 237 Description: Students will study the physical geography of the world outside of the United States and North America and its impact on the lives of people throughout the world. Students will acquire the skills and utilize the tools of geographers as they learn how to conduct geographic inquiry. In doing so, they will learn how to ask geographic questions, acquire geographic information, organize geographic information, analyze geographic information…and then answer the geographic questions they have posed, always supporting their answers with substantial geographic evidence. The following concepts are at the heart of each section of the World Geography course:
• The World in Spatial Terms • Places and Regions • Physical Systems • Human Systems • Environment and Society • The Uses of Geography
Instructional Time: minimum of 210 minutes per week Required Assessments/Products:
• Geography Notebook (daily work from preview activities, class notes, and processing activities)
• World Geography Mapping Labs • World Geography Writing for Understanding Exercises • BPS Mid and End-of-Course Assessments
Instructional Materials:
• Geography Alive!, Teachers Curriculum Institute (TCI) • Geography Alive! Teacher Resources , TCI

August 28, 2009 5
World Geography Students will study the world outside of the United States and North America. They will systematically learn geography around the world continent by continent, similar to the way in which atlases are organized. Students address standards that emphasize physical and political geography and embed five major concepts: location, place, human interaction with the environment, movement, and regions. Location refers both to absolute location indicated by longitude and latitude and to relative location, indicated by direction, distance, or travel time. The concept of place refers to the physical and man-made characteristics of a place such as a town or city. Human interaction with the environment encompasses the many ways in which people have adapted to their surroundings or altered them for economic reasons. The movement of people, goods, and ideas is the fourth concept. The fifth, region, refers to ways of categorizing areas of the earth, such as by climate or religion. Introduction: The Tools of Geography; Seeing the World Like a Geographer
Central and South America: Mexico, Argentina, Bolivia, Brazil, Chile, Colombia, Ecuador, Falkland Islands (U.K.), French Guiana (Fr.), Guyana, Paraguay, Peru, Suriname, Uruguay, Venezuela 7.1 On a map of the world, locate Central and South America and the Atlantic and Pacific Oceans. On a map of South America, locate the Amazon, the Andes Mountains, Cape Horn, and the southern, northern, eastern, and western regions of South America. (G) 7.2 Use a map key to locate the countries and major cities of Central and South America. (G, E) 7.3 Explain how the following five factors have influenced settlement and the economies of major South American countries. (G, E)
a. absolute and relative locations b. climate c. major physical characteristics d. major natural resources e. population size
7.4 Identify when South American countries became independent nations and explain how independence was achieved. (H, G).
Europe: Albania, Andorra, Austria, Belarus, Belgium, Bosnia-Herzegovina, Bulgaria, Channel Islands (U.K.), Croatia, Czech Republic, Denmark, Estonia, Finland, France, Germany, Gibraltar (U.K.), Greece, Hungary, Iceland, Ireland, Italy, Latvia, Liechtenstein, Lithuania, Luxembourg, Macedonia, Malta, Moldova, Monaco, Netherlands, Norway, Poland, Portugal, Romania, Russia, San Marino, Slovakia, Slovenia, Spain, Sweden, Switzerland, Ukraine, United Kingdom, Vatican City, Yugoslavia 7.5 On a map of the world, locate the continent of Europe. On a map of Europe, locate the Atlantic Ocean, Arctic Ocean, Norwegian Sea, and Barents Sea. Locate the Volga, Danube, Ural, Rhine, Elbe, Seine, Po, and Thames Rivers. Locate the Alps, Pyrenees, and Balkan Mountains. Locate the countries in the northern, southern, central, eastern, and western regions of Europe. 7.6 Use a map key to locate countries and major cities in Europe. (G) 7.7 Explain how the following five factors have influenced settlement and the economies of major European countries. (G, E)

August 28, 2009 6
a. absolute and relative locations b. climate c. major physical characteristics d. major natural resources e. population size
Optional Topics for Study: • Explain the sources and effects of the massive pollution of air, water, and land in the former
satellite nations of Eastern Europe, in the countries once part of the Soviet Union, and in Russia. (H, G)
Africa: Algeria, Angola, Benin, Botswana, Burkina Faso, Burundi, Cameroon, Cape Verde, Central African Republic, Chad, Comoros, Congo, Côte d’Ivoire, Democratic Republic of the Congo, Djibouti, Egypt, Equatorial Guinea, Eritrea, Ethiopia, Gabon, Gambia, Ghana, Guinea, Guinea-Bissau, Kenya, Lesotho, Liberia, Libya, Madagascar, Malawi, Mali, Mauritania, Mauritius, Mayotte (Fr.), Morocco, Mozambique, Namibia, Niger, Nigeria, Reunion (Fr.), Rwanda, Sao Tome and Principe, Senegal, Seychelles, Sierra Leone, Somalia, South Africa, Sudan, Swaziland, Tanzania, Togo, Tunisia, Uganda, Western Sahara, Zambia, Zimbabwe 7.8 On a map of the world, locate the continent of Africa, the Atlantic Ocean, the Indian Ocean, the Mediterranean Sea, and the Great Rift Valley. On a map of Africa, locate the northern, eastern, western, central, and southern regions of Africa, the Sahara Desert, the Nile River, Lake Victoria, Mount Kilimanjaro, and the Cape of Good Hope. (G) 7.9 Use a map key to locate countries and major cities in Africa. (G, E) 7.10 Explain how the following five factors have influenced settlement and the economies of major African regions and countries. (G, E)
a. absolute and relative locations b. climate c. major physical characteristics d. major natural resources e. population size
7.11 Identify when modern African countries became independent nations and explain how independence was achieved. (H, G) Western Asia/the Middle East: Armenia, Azerbaijan, Bahrain, Cyprus, Georgia, Iran, Iraq, Israel, Jordan, Kuwait, Lebanon, Oman, area governed by the Palestinian Authority, Qatar, Saudi Arabia, Syria, Turkey, United Arab Emirates, Yemen 7.12 On a map of the world, locate Western Asia, or the Middle East. On a map of the Middle East, locate the Black Sea, Mediterranean Sea, Caspian Sea, Red Sea, Indian Ocean, Arabian Peninsula, and the Persian Gulf. (G) 7.13 Use a map key to locate countries and major cities in the Middle East. (G, E) 7.14 Explain how the following five factors have influenced settlement and the economies of major Middle Eastern countries. (G, E)
a. absolute and relative locations
August 28, 2009 7
b. climate c. major physical characteristics d. major natural resources e. population size
7.15 Identify when the countries in the Middle East became independent nations and explain how independence was achieved. (H, G) Optional Topics for Study: • Discuss the reasons for and the effects of the United Nations’ attempt in 1947 to partition the
remainder of the Palestine Mandate, including the migration of tens of thousands of European Jews to Palestine; the flight of about 650,000 Arabs from Israel during its War of Independence in 1948; and the flight of more than 800,000 Jews in Arab countries to Israel after 1948. (H, G)
Central, South, North, and East Asia: Afghanistan, Bangladesh, Bhutan, India, Kazakhstan, Kyrgyzstan, Nepal, Pakistan, Tajikistan, Turkmenistan, Uzbekistan
7.16 On a map of the world, locate Central and South Asia. On a map of Central and South Asia, locate the Indian Ocean, the Arabian Sea, the Bay of Bengal, the Ganges River, the Indo-Gangetic Plain, the Northern Mountains, the Deccan Plateau, the Himalayan Mountains, and the Steppes. (G) 7.17 Use a map key to locate the countries and major cities in Central and South Asia. (G, E) 7.18 Explain how the following five factors have influenced settlement and the economies of major Central and South Asian countries. (G, E)
a. absolute and relative locations b. climate c. major physical characteristics d. major natural resource e. population size
7.19 Identify when India, Pakistan, Bhutan, Nepal, Bangladesh, Sri Lanka, and the Central Asian republics first became independent countries and explain how independence was achieved. Explain the relationship of the Central Asian republics to the former Soviet Union. (H, G) North and East Asia: China, Japan, Mongolia, North Korea, Russia, South Korea 7.20 On a map of the world, locate North and East Asia, the Pacific Ocean, and the Arctic Ocean. On a map of East Asia, locate the Sea of Japan, the Yellow Sea, the East China Sea, the Gobi Desert, the Himalayas, and the Huang He (Yellow) and Chang Jiang (Yantgtze) Rivers. On a map of North Asia, locate Siberia and the Yenisey, Lena, and Kolyma rivers. (G) 7.21 Use a map key to locate the countries and major cities in the various regions of East Asia. (G, E) 7.22 Explain how the following five factors have influenced settlement and the economies of major East Asian countries. (G, E)
a. absolute and relative locations b. climate c. major physical characteristics d. major natural resources e. population size
7.23 Identify when North Korea, South Korea, and Mongolia became independent countries and describe how independence was achieved. (G, H)
August 28, 2009 8
Optional Topics for Study: • Describe why the Chinese government seeks to control population growth and the methods it uses
to control population growth. (G, H) • Describe and explain the status of Taiwan. (H, G) • Identify the number of time zones the Asiatic part of Russia spans; identify the routes used by
Russian explorers, traders, and religious dissidents to cross into what is now Alaska. (H, G) Southeast Asia and Oceania: Australia, Brunei, Cambodia, Guam (U.S.), Indonesia, Laos, Malaysia, Maldives, Myanmar, Northern Mariana Islands (U.S.), Palau, Philippines, Singapore, Sri Lanka, Taiwan, Thailand, Vietnam 7.24 On a map of the world, locate Southeast Asia, the Indian Ocean, Australia, New Zealand, Antarctica, the major Pacific Islands, the Pacific Ocean, and the Coral Sea. On a map of Southeast Asia and Oceania, locate the Bay of Bengal, the South China Sea, the Great Victoria Desert, and the Great Barrier Reef. (G) 7.25 Use a map key to locate countries and major cities in the various regions of Southeast Asia, Australia, and the major Pacific Islands. (G, E) 7.26 Explain how the following five factors have influenced settlement and the economies of major countries of Southeast Asia and Oceania. (G, E)
a. absolute and relative locations b. climate c. major physical characteristics d. major natural resources e. population size
7.27 Identify when countries in Southeast Asia and Oceania became independent countries and describe how independence was achieved. (G, H)

August 28, 2009 9
Pacing Guide: World Geography, Full Year Course, 2009-2010
Dates Chap Lesson
Sept 10–15 Establishing Interactive Student Notebook*, norms, routines; 16–18 1 The Tools of Geography 21–25 2 Seeing the World Like a Geographer
28 –Oct 2 Mapping Lab: Latin America 5–15 9 Spatial Inequality in Mexico City *
16–23 11 Dealing with Extreme Weather: Hurricanes in the Caribbean 26-Nov 4 12 Land Use Conflict in the Amazon Rainforest
5–13 13 Life in the Andes: Adapting to a Mountainous Region 16–20 Mapping Lab: Europe and Russia
23–Dec 4 14 Supranational Cooperation in the European Union 7–14 16 Invisible Borders: Transboundary Pollution in Europe
15–23 18 New Nation-States from the Old Soviet Empire * Jan 4-8 Mapping Lab: Africa
11–15 19 The Nile River: A Journey from Source to Mouth 19–26 20 Life in the Sahara and the Sahel
27–Feb 3 21 Micro-entrepreneurs: Women’s Role in Development of Africa * 4–12 22 Nigeria: A Country of Many Cultures
22–26 Mapping Lab: Southwest and Central Asia Mar 1-5 24 Oil in Southwest Asia: How “Black Gold” Has Shaped a Region
8–16 26 The Aral Sea: Central Asia’s Shrinking Water Source 18–23 Mapping Lab: Monsoon Asia 24–31 27 Waiting for the Rains: Effects of Monsoons in South Asia
Apr 1-9 28 Tech Workers and Time Zones: India’s Comparative Advantage * 12–27 30 China: The World’s Most Populous Country
28–May 5 32 The Global Sneaker: from Asia to Everywhere 6–12 Mapping Lab: Oceania and Antarctica
13–26 35 Antarctica: Researching Global Warming at the Coldest Place on Earth *
29–June 18 Review • Mid-Course Assessments: January 26-30 (full-year courses). *Writing for Understanding (bolded) exercises are completed during these chapters.

August 28, 2009 10
Pacing Guide: World Geography, Half-Year Course, 2009-2010
1st Sem 2nd Sem Chap Title
Sept 10-15 Feb 1-4 Establish Interactive Student Notebook*, Norms, Routines 1 The Tools of Geography 16-22 5-11 2 Seeing the World Like a Geographer
23-30 12-25 Mapping Lab: Latin America Oct 1-7 26-Mar 2 9 Spatial Inequality in Mexico City*
11 Dealing with Extreme Weather: Hurricanes 8-16 3-9 12 Land Use Conflict in the Amazon Rainforest
19-21 10-12 13 Life in the Andes: Adapting to a Mountainous Region 22-28 15-16 Mapping Lab: Europe and Russia 29-30 18-22 14 Supranational Cooperation in the European Union
23-26 16 Invisible Borders: Transboundary Pollution in Europe Nov 2-6 29-30 18 New Nation-States from the Old Soviet Empire*
9-10 31-Apr 6 Mapping Lab: Africa 19 The Nile River: A Journey from Source to Mouth 12-18 7-14 20 Life in the Sahara and the Sahel 21 Micro-entrepreneurs: Women’s Role in Africa* 19-25 15-28 22 Nigeria: A Country of Many Cultures
Dec 1-2 29-May 3 Mapping Lab: Southwest and Central Asia 3-8 4-5 24 Oil in Southwest Asia: “Black Gold” 9-14 6-11 26 The Aral Sea: Central Asia’s Shrinking Water Source 15-16 12-17 Mapping Lab: Monsoon Asia
27 Waiting for the Rains: Effects of Monsoons in S. Asia 28 Tech Workers and Time Zones: India’s Advantage* 30 China: The World’s Most Populous Country
17-Jan 6 18-Jun 3
32 The Global Sneaker: from Asia to Everywhere 7-11 4-8 Mapping Lab: Oceania and Antarctica
12-14 9-11 35 Antarctica: Researching Global Warming* 15-22 14-18 Review
• Mid-Course Assessments: November 3-6 (half-year courses); Apr 2-3 (half-year courses). *Writing for Understanding (bolded) exercises are completed during these chapters.

August 28, 2009 11
History/Social Science Sequence: including major texts
Grade History/Social Studies
K Living, Learning, and Working Together
1 True Stories and Folktales from America and Around the World
2 E Pluribus Unum: From Many, One
3 Massachusetts and Its Cities and Towns: Geography and History
4 North American Geography + One Early Civilization (China)
5 United States History, Geography, Economics & Government: Early Exploration to Westward Movement
6 Ancient Civilizations of the Mediterranean: History Alive!: The Ancient World
7 World Geography: Geography Alive!: Regions & People
8 Civics In Action: Civics: Government and Economics in Action
HS U.S. History, 1763-1877: History Alive! The United States; The Americans; The American Nation
U.S. History, 1877-Present: History Alive! The United States; The Americans; The American Nation; The American Odyssey
World History 2, 1800-Present: World History: Connections to Today – The Modern Era; Modern World History: Patterns of Interaction; Modern World History
Note: History Alive! teacher resource materials are used to support all high school history courses.
August 28, 2009 12
Workshop in the History/Geography Classroom:
1. Instructional Objectives: Each class should be built around explicit, measurable, rigorous and achievable objective(s) that identify what students will know and be able to do as a result of the day’s lesson. A language objective that identifies the academic processes and language students will become familiar during the day’s lesson should also be identified. The teacher also needs to identify products students will complete that demonstrate the extent to which they met the day’s objective(s).
2. Preview: A “Do Now” activity should be posted that gets students started, activates and stretches their prior knowledge, makes connections to prior lessons, utilizes key concepts and vocabulary, creates some cognitive dissonance, and/or generates curiosity about the content to come.
3. Mini-Lesson/Class Notes: Initial instruction should focus on helping students access, organize, record and become familiar with the content embedded in the objectives, as well as the skills and processes embedded in the product they will complete to demonstrate mastery. The instruction should include a reading or presentation of new content and the explicit modeling of skills needed to complete the day’s product. Students should engage in accountable talk* with the teacher (through questioning) and among themselves (through brief, collaborative exercises) to build and check for understanding. Students organize and record what they have learned through class notes in their interactive notebooks.
4. Processing/Conferring/Assessment: Students should apply their new knowledge and skills through the planning and completion of some challenging product, to demonstrate progress toward the day’s objectives. A high degree of inquiry, engagement and accountable talk* should be evident in the classroom. Teachers use this time to confer with students to assess their progress, identify existing needs, and provide additional instruction as needed.
5. Sharing/Debriefing: The teacher should facilitate a structured closing activity that allows students to summarize and share what they’ve learned, relate what they’ve learned to the day’s objective(s), generate concrete evidence of accomplishments, ask and answer questions about content that is puzzling, and provide information to inform subsequent instruction (as well as the day’s homework assignment).
6. History Notebooks: Student notebook work should be integrated into every activity of every lesson. Student notebooks should serve as the essential artifacts that illustrate all that has gone on and has been learned in a class. Notebooks should be collected each month, helpful comments and recommendations should be written by the teacher, and the notebook should be graded using the BPS Interactive Notebook Rubric. Students’ notebooks grades should represent a substantial portion of their overall grades for each term.
* Accountable Talk: Talking with others about ideas and work is fundamental to learning, but not all
talk sustains learning. For classroom talk to promote learning it must be accountable—to the learning community, to accurate and appropriate knowledge, and to rigorous thinking. Accountable talk… • seriously responds to and further develops what others in the group have said • puts forth and demands knowledge that is accurate and relevant to the issue or work under
discussion • uses evidence appropriate to the discipline (e.g., documentary sources in history) and • follows established norms of good reasoning.
Teachers should intentionally create the norms and skills of accountable talk in their classrooms. - Institute for Learning, University of Pittsburgh
August 28, 2009 13
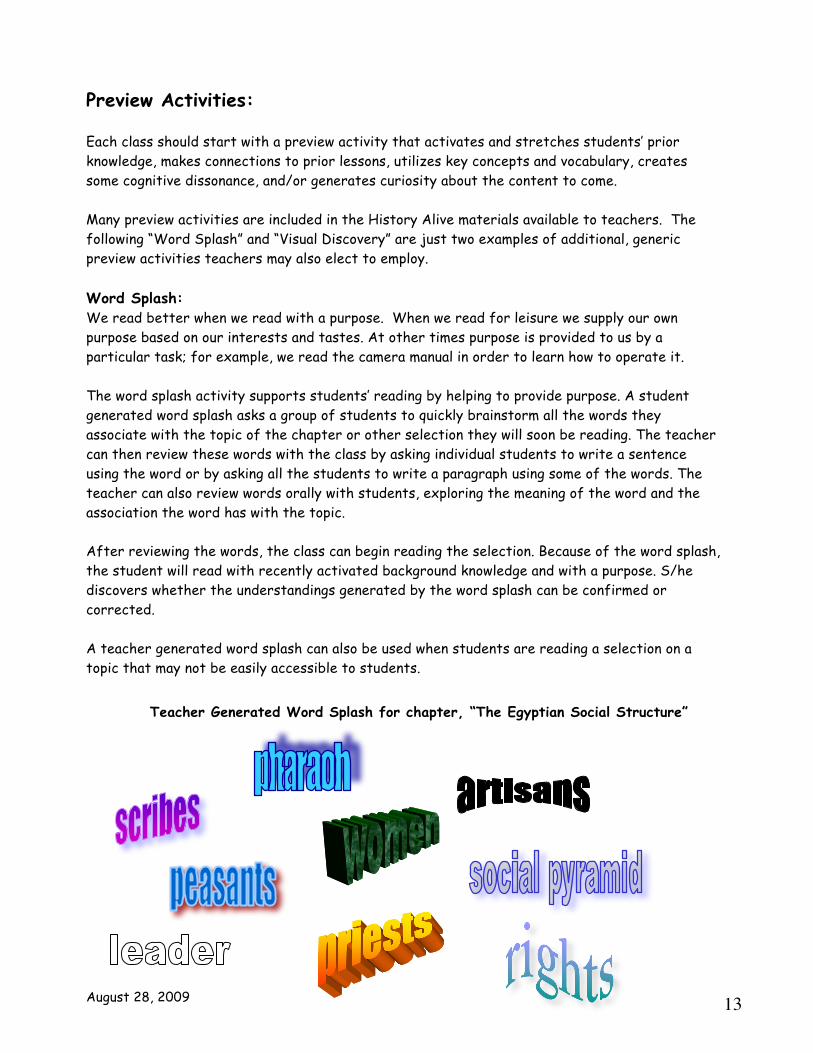
Preview Activities: Each class should start with a preview activity that activates and stretches students’ prior knowledge, makes connections to prior lessons, utilizes key concepts and vocabulary, creates some cognitive dissonance, and/or generates curiosity about the content to come. Many preview activities are included in the History Alive materials available to teachers. The following “Word Splash” and “Visual Discovery” are just two examples of additional, generic preview activities teachers may also elect to employ. Word Splash: We read better when we read with a purpose. When we read for leisure we supply our own purpose based on our interests and tastes. At other times purpose is provided to us by a particular task; for example, we read the camera manual in order to learn how to operate it. The word splash activity supports students’ reading by helping to provide purpose. A student generated word splash asks a group of students to quickly brainstorm all the words they associate with the topic of the chapter or other selection they will soon be reading. The teacher can then review these words with the class by asking individual students to write a sentence using the word or by asking all the students to write a paragraph using some of the words. The teacher can also review words orally with students, exploring the meaning of the word and the association the word has with the topic. After reviewing the words, the class can begin reading the selection. Because of the word splash, the student will read with recently activated background knowledge and with a purpose. S/he discovers whether the understandings generated by the word splash can be confirmed or corrected. A teacher generated word splash can also be used when students are reading a selection on a topic that may not be easily accessible to students.
Teacher Generated Word Splash for chapter, “The Egyptian Social Structure”

August 28, 2009 14
Visual Discovery: Working with Illustrations and Artifacts Goals: - To generate interest in a topic represented by an illustration or artifact.
- To build students’ background knowledge about a topic before reading about it. - To prepare students to read about the topic.
Steps: Visual Discovery 1. Identify and bring students’ attention to a thought-provoking illustration or
artifact related to a selection the students will read.
2. Ask the students to identify as many details as they can that might provide clues as to what the illustration’s or artifact’s all about. These details must be observable; they cannot be inferred.
3. Generate inferences about the details and their relationships to one another. Look carefully and consider some of the following questions: • What is this? • What role does it play in the larger picture? • Why did the artist put this in the picture? • What could it possibly represent or how might it be a symbol of the
people and the times? • How does it connect to the rest of the picture?
4. Generate predictions about what the passage to follow will be about, given the responses the students have generated.
5. Read the text that follows. Have the students confirm or refute their predictions.
Have them make note of where they found the evidence that confirmed or refuted their predictions. Make sure they note important terms and concepts (including ones associated with the illustration or artifact) and generate additional questions, ideas, and responses to the text.

August 28, 2009 15
Class Notes: Note-Making & Other Strategies - Thoughtful Reading, Viewing, Listening……Learning
Think about it. How many times have you read a chapter from a textbook but found that you retained very little of the content? How many times have you said, “I taught that just last week but the kids didn’t remember it.” There’s nothing unusual about either of these statements. We all read tough, dense text but tend to forget much of what we’ve read, unless we really work at it. Countless teachers are providing students with terrific readings, presentations and experiences only to find that the students retain and understand very little of the content a short while later. Our students’ scores on the district’s mid- and end-of-year assessments in history (and other subjects as well) attest to this lack of retention and understanding. So, what to do? Reading and thinking research of the last two decades has increasingly demonstrated that people retain very little content from text or presentations, and develop little understanding of key concepts, unless they are actively engaged with the content in some thoughtful way throughout the reading, viewing or listening process. While books, videos and teachers may present content in a thoughtful manner, students won’t learn that content unless they behave in equally thoughtful ways. Much of the district’s literacy work of the past decade has been devoted to teaching students some of the thoughtful ways they can interact with text. The same strategies students have learned (e.g., marking up and annotating text; using fix-up strategies while reading; applying thoughtful comprehension strategies before, during and after reading) can be used with many different sources of information. This document seeks to present some techniques for applying these same strategies (and others) before, during and after reading history text or viewing/listening to history presentations. The goal of each of these strategies is the development of thoughtful, independent learners who can collect, organize, understand and retain ideas and information from any source of knowledge. At the same time, none of these strategies will work well unless teachers continue to construct thoughtful and engaging lessons, utilizing accessible and engaging materials. For history teachers, this means using the array of materials now available (History Alive, et al.) in combination with the strategies and tools included in this document. In addition, every teacher must build strong assessment and accountability strategies into their lessons to ensure students are in fact learning, and to lend a greater sense of urgency to their daily work. As strong as the previewing, reading/presentation, note-making and processing strategies are that a teacher employs, many students won’t learn the content and skills they need to master unless they are held strictly accountable for results on a daily basis. Some ongoing assessment and accountability strategies are included at the end of this document. The bottom line is this…no matter how well we may teach new content and skills, our teaching is of little value unless the students learn this content and these skills. The strategies and tools included in this document should help to close the gap we now see between what we currently teach and what our students currently learn.
August 28, 2009 16
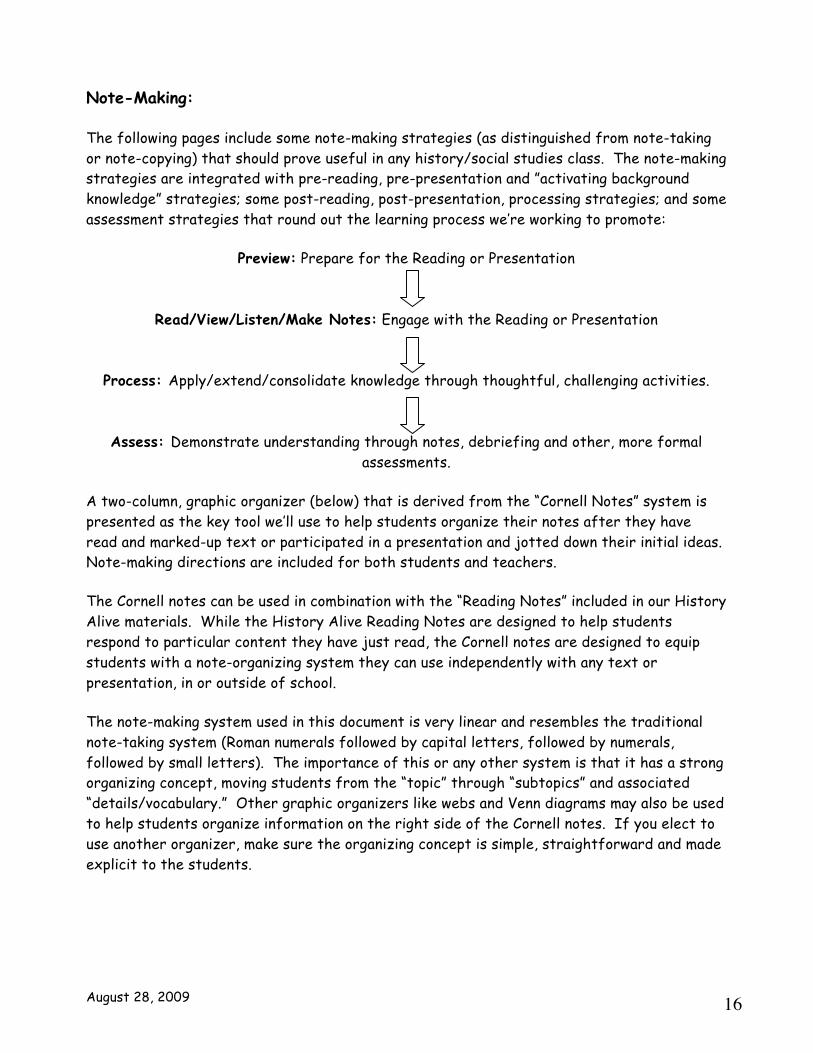
Note-Making: The following pages include some note-making strategies (as distinguished from note-taking or note-copying) that should prove useful in any history/social studies class. The note-making strategies are integrated with pre-reading, pre-presentation and ”activating background knowledge” strategies; some post-reading, post-presentation, processing strategies; and some assessment strategies that round out the learning process we’re working to promote:
Preview: Prepare for the Reading or Presentation
Read/View/Listen/Make Notes: Engage with the Reading or Presentation
Process: Apply/extend/consolidate knowledge through thoughtful, challenging activities.
Assess: Demonstrate understanding through notes, debriefing and other, more formal assessments.
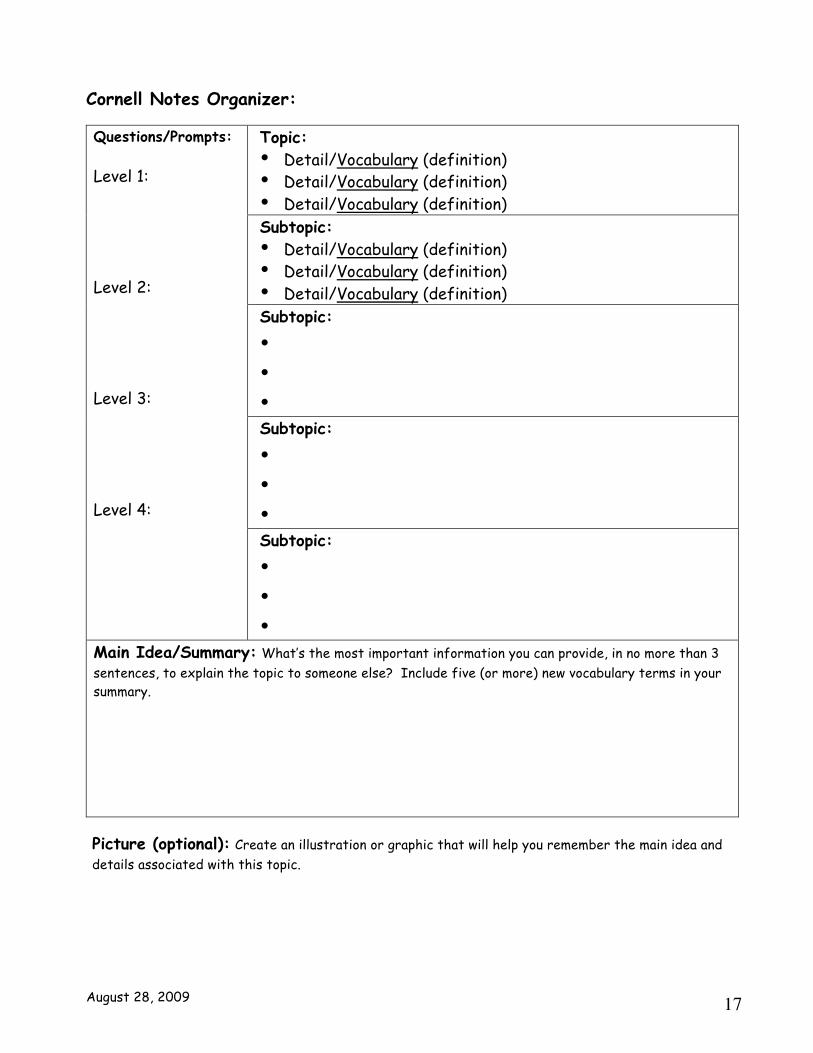
A two-column, graphic organizer (below) that is derived from the “Cornell Notes” system is presented as the key tool we’ll use to help students organize their notes after they have read and marked-up text or participated in a presentation and jotted down their initial ideas. Note-making directions are included for both students and teachers. The Cornell notes can be used in combination with the “Reading Notes” included in our History Alive materials. While the History Alive Reading Notes are designed to help students respond to particular content they have just read, the Cornell notes are designed to equip students with a note-organizing system they can use independently with any text or presentation, in or outside of school. The note-making system used in this document is very linear and resembles the traditional note-taking system (Roman numerals followed by capital letters, followed by numerals, followed by small letters). The importance of this or any other system is that it has a strong organizing concept, moving students from the “topic” through “subtopics” and associated “details/vocabulary.” Other graphic organizers like webs and Venn diagrams may also be used to help students organize information on the right side of the Cornell notes. If you elect to use another organizer, make sure the organizing concept is simple, straightforward and made explicit to the students.
August 28, 2009 17
Cornell Notes Organizer:
Topic: • Detail/Vocabulary (definition) • Detail/Vocabulary (definition) • Detail/Vocabulary (definition) Subtopic: • Detail/Vocabulary (definition) • Detail/Vocabulary (definition) • Detail/Vocabulary (definition) Subtopic:
• • • Subtopic:
• • •
Questions/Prompts: Level 1: Level 2: Level 3: Level 4:
Subtopic:
• • •
Main Idea/Summary: What’s the most important information you can provide, in no more than 3 sentences, to explain the topic to someone else? Include five (or more) new vocabulary terms in your summary.
Picture (optional): Create an illustration or graphic that will help you remember the main idea and details associated with this topic.

August 28, 2009 18
Cornell Notes Organizer (Sample): Topic: THE CIVIL WAR Subtopic: Causes (Details/Vocabulary) • Missouri Compromise/Compromise of 1850 re: slavery don’t end
disagreements b/w north and south: the balance of slave states and free states = power in Congress
• abolitionists (people who want to get rid of slavery) vs. slave owners and sympathizers (people who support slavery)
• Northerners refuse to honor Fugitive Slave Laws • Kansas/Nebraska Act scrapped Missouri Compromise: slavery okay in
both territories if approved by voters • John Brown: Kansas violence; Harper’s Ferry raid • Dred Scott case: slaves are property; property rights of
slaveholders is upheld • Lincoln elected with 40% of votes, all in the North; South fears the
end of slavery and the states’ rights to have slaves • Secession of southern states: Virginia, Arkansas, Tennessee, North
Carolina, South Carolina, Georgia, Alabama, Florida, Mississippi, Louisiana, Texas.
Subtopic: Major Events (Details/Vocabulary) • Bull Run: 1st major battle; North loses and has rude awakening. • Emancipation Proclamation: slaves in Confederate states declared
free to little effect. • Gettysburg: the war turns in Union’s favor; Lincoln gives Gettysburg
Address. • Grant takes charge/Sherman marches through South • Appomattox: the South surrendered. Subtopic: Key People (Details/Vocabulary) • Abraham Lincoln: president of U.S. • Jefferson Davis: president of Confederacy • Ulysses S. Grant: #1 Union general • Robert E. Lee: #1 Confederate general
Questions/Prompts: Level 1: 1. Who were the
abolitionists? 2. What were three
effects of the Civil War?
Level 2: 1. Describe the
impact of Sherman’s march on the South.
2. Summarize the events leading to the Missouri Compromise.
Level 3: 1. What would have
happened if Lincoln had supported the abolitionists in 1861?
2. What’s a lesson to be learned from the Civil War about states’ rights?
Level 4: 1. Was Robert E. Lee a
traitor or a loyalist? 2. Evaluate Lincoln’s
presidency from the perspective of a slave.
Subtopic: Effects (Details/Vocabulary) • The Union was saved. • Slavery was abolished (ended) • Billions of dollars spent. • 620,000 soldiers died. • Almost every family lost a loved one.
Main Idea/Summary: The Civil War was started largely because Northern free states and Southern slave states couldn’t reach a compromise on slavery that was reasonable to both sides. Northern abolitionists wanted slavery to end and Southerners wanted to make sure they could keep slaves and protect the property rights of slaveholders and the idea of states’ rights. So the southern states seceded and the war took place between the North (the Union) led by President Abraham Lincoln and General Ulysses S. Grant, and the South (the Confederacy) led by President Jefferson Davis and General Robert E. Lee. The North finally won, the Union was saved and slavery was abolished, but at a cost of billions of dollars and 620,000 dead soldiers.

August 28, 2009 19
Historical Thinking: Levels of Questioning* Level 1: Remember/Recall/Define • Identify people, places, events dates, and times. • Recall important information. • Define important terms. • List factual information.
Level 2: Understand • Explain in your own words. • Describe in your own words. • Illustrate based on what you know. • Summarize what you know or learned; identify important people and events; use historical terms.
Level 3: Dissect/Extend/Apply • Analyze: break into parts; identify elements; identify facts vs. interpretations; identify causes
and effects, issues and problems; distinguish between past, present and future, as well as historical antecedents
• Connect: compare, contrast, group, make connections between events or people from different places or times, construct timelines
• Infer: reach a conclusion/make an observation that isn’t stated in the text, based on what you already know and what you’ve learned; suggest the influence of the past on the present or more recent times
• Interpret: translate what was intended from what was stated or done; derive an important lesson from one or more events; derive information and ideas from data; derive an author’s perspective or affiliation from an historical narrative
• Speculate: imagine or predict what might have happened, what would have happened if…, or what may yet happen
• Get in the Shoes (perspective-taking #1): explain or describe in the words of one or more people who were there.
• Apply: apply a principle to an event or person, a lesson of the past to the present Level 4: Evaluate/Decide/Defend or Challenge • Evaluate/Assess/Critique: use facts, data and other evidence to determine advantages and
disadvantages, pros and cons, assets and deficits, strong and weak points, plusses and minuses of alternative courses of action…and to assess changes over time
• Recommend/Decide/Judge: identify alternative courses of action and make a recommendation, decision or judgment based on your evaluation/assessment of the facts, data, and other evidence
• Persuade/Convince/Defend: use facts, data and other evidence to make and support an opinion, assertion, position, decision or historical narrative
• Criticize/Challenge: use facts, data and other evidence to criticize or challenge an opinion, assertion, position, decision or historical narrative
• Get in the Shoes (perspective-taking #2): express and support an opinion or point of view in the words of someone who was there, using historical facts.
* Adapted from Bloom’s Taxonomy, Costa’s model of intellectual functioning, and the Historical Analysis and Thinking
Skills from the Center for History at UCLA

August 28, 2009 20
Note-Making: from Readings (Student & Teacher Directions) Step #1: Pre-Read/Activate Background Knowledge (Preview Activity) Students: Scan the headings, sub-headings, highlighted words, pictures, illustrations, graphics, and captions…and fill in the first column of the K/P-C-R organizer (below). Identify everything you already know about the content in this selection or predict what this selection will be about. You’ll return to the organizer later. Know/Predict Confirmed Revised
Teachers: Model this practice until students become proficient with it. While students work to complete the organizer, circulate and provide additional instruction as needed. Give students opportunities to share what they’ve recorded with one another.
Step #2: Identify Critical Information Students: Read the passage at least two times, each time with a different purpose. Highlight important information and respond to the text in thoughtful ways. If you don’t own the text, record the information and your responses on post-it notes or a separate sheet of paper. When you first do this work, chunk the text into small, manageable bits. Expand your “chunks” as you get better at managing longer passages. Reading #1: a. Look for the topic (the major subject) and sub-topics (smaller subjects). Underline history
vocabulary that appears to be important. If you want to, and it doesn’t break you’re momentum, jot down any questions or ideas that come to mind while you’re reading. Tip: Most of the time, the topic is contained in the main heading of the text. The sub-topics are often, but not always, contained in the sub-headings. Many, but not all, history terms are in bold letters.
b. Turn & Talk: Share and discuss your topic and the sub-topics with a partner. Reach consensus on what the topic and sub-topics should be and revise yours if you need to. Then share and discuss the important history vocabulary. Reach consensus on the vocabulary and revise or add additional terms if you need to. If there are any terms you’re not likely to remember, discuss them and come up with a brief definition in your own words.
c. Teacher (Clarifying Questions): Provide students with an opportunity to ask any questions they have that will help them clarify anything in the text that they don’t understand. This is not a time to accept additional questions (that comes later). It’s time to stick to the text and make sure the students understand it.
Reading #2: a. Go back and look for the really important details regarding the topic and sub-topics. Include
the important history vocabulary you’ve already identified. If you haven’t done so already, jot down any questions or ideas that come up while you’re reading. Also confirm or revise your pre-reading knowledge/predictions (the K/P-C-R organizer) if you completed step 1.
b. Turn & Talk: Discuss your selections with a partner. Reach consensus on the absolutely essential details. Revise or add to yours as necessary. Remember, you’re not trying to copy
August 28, 2009 21
everything in the reading. You’re looking for the absolutely essential information you need to record and remember.
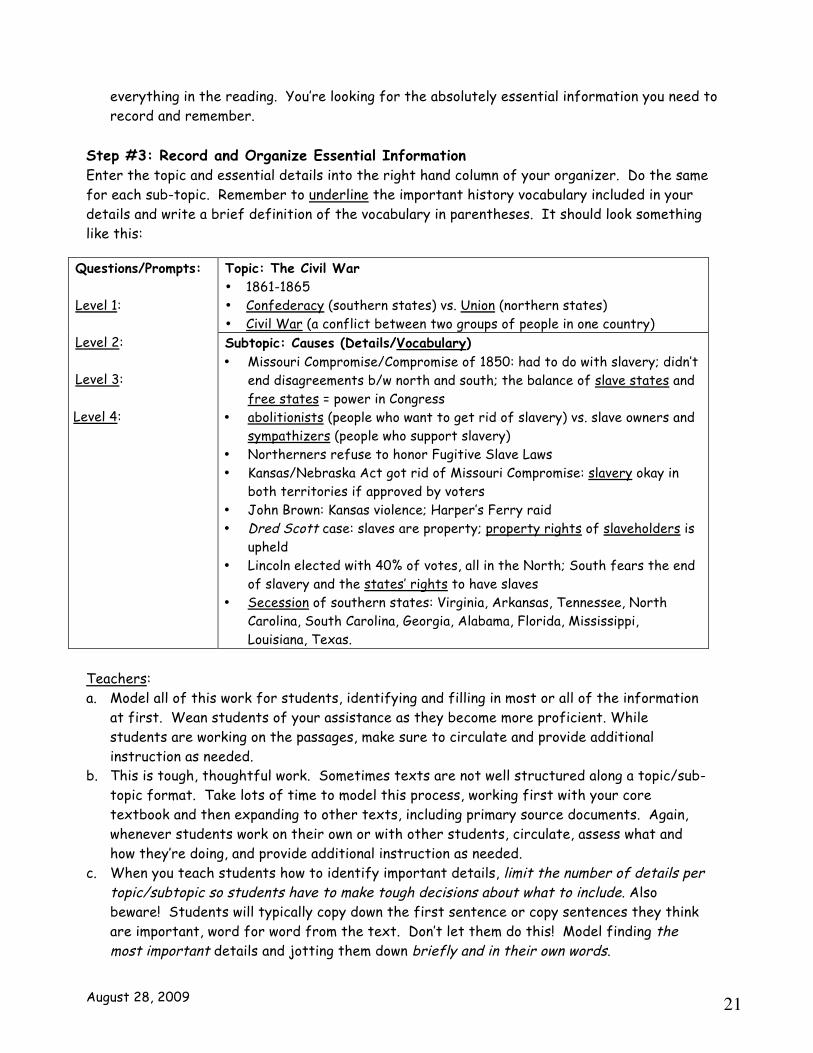
Step #3: Record and Organize Essential Information Enter the topic and essential details into the right hand column of your organizer. Do the same for each sub-topic. Remember to underline the important history vocabulary included in your details and write a brief definition of the vocabulary in parentheses. It should look something like this:
Topic: The Civil War • 1861-1865 • Confederacy (southern states) vs. Union (northern states) • Civil War (a conflict between two groups of people in one country)
Questions/Prompts: Level 1:
Level 2:
Level 3:
Level 4:
Subtopic: Causes (Details/Vocabulary) • Missouri Compromise/Compromise of 1850: had to do with slavery; didn’t
end disagreements b/w north and south; the balance of slave states and free states = power in Congress
• abolitionists (people who want to get rid of slavery) vs. slave owners and sympathizers (people who support slavery)
• Northerners refuse to honor Fugitive Slave Laws • Kansas/Nebraska Act got rid of Missouri Compromise: slavery okay in
both territories if approved by voters • John Brown: Kansas violence; Harper’s Ferry raid • Dred Scott case: slaves are property; property rights of slaveholders is
upheld • Lincoln elected with 40% of votes, all in the North; South fears the end
of slavery and the states’ rights to have slaves • Secession of southern states: Virginia, Arkansas, Tennessee, North
Carolina, South Carolina, Georgia, Alabama, Florida, Mississippi, Louisiana, Texas.
Teachers: a. Model all of this work for students, identifying and filling in most or all of the information
at first. Wean students of your assistance as they become more proficient. While students are working on the passages, make sure to circulate and provide additional instruction as needed.
b. This is tough, thoughtful work. Sometimes texts are not well structured along a topic/sub-topic format. Take lots of time to model this process, working first with your core textbook and then expanding to other texts, including primary source documents. Again, whenever students work on their own or with other students, circulate, assess what and how they’re doing, and provide additional instruction as needed.
c. When you teach students how to identify important details, limit the number of details per topic/subtopic so students have to make tough decisions about what to include. Also beware! Students will typically copy down the first sentence or copy sentences they think are important, word for word from the text. Don’t let them do this! Model finding the most important details and jotting them down briefly and in their own words.

August 28, 2009 22
Step #4: Share Students: Share your results with other members of the class. Discuss and defend your selections. Make any revisions/additions, if necessary. Teachers: As the students share, make sure to… a. call on particular students; don’t just wait for volunteers; get everyone involved b. include sufficient wait-time c. probe for elaborations, revisions or explanations when responses are unclear or
understanding isn’t apparent d. push for evidence or details from students to support their ideas As students become more proficient making notes with a partner, and eventually on their own, you can decrease the time devoted to large group sharing. If things go well, students will ultimately be able to complete their note-making work for homework.
Step #5: Main Idea/Summary Students: Include the most important information you can provide to explain the topic in 2-3 sentences. Use at least five new history vocabulary words in your explanation. - Step #5a (optional): Visualize: Draw a picture or other graphic representation that will
help you understand and remember the key ideas and information in the reading. Teachers: Summarizing is an essential processing activity students need to use to consider and organize content in a thoughtful manner. Make this particular processing activity a regular routine until you are confident students are proficient at summarizing. Circulate and provide students with additional instruction as needed. Students who benefit from visualizing content should be given the opportunity to do so, and their work should be acknowledged. At first, the summarizing/visualizing work can go on the left side of the students’ notebooks, as processing activities. Once students become proficient at this work, the summarizing and visualizing can also be completed as homework assignments. Step #6: Question/Explore (Part 1) Students: Ask all those other questions you had about the text and the content. Share and discuss any thoughts you may have, with a partner, the teacher, and as a whole class. Teachers: This is the point at which students can go beyond the text. Encourage them to consider, question, challenge and process the text in their own thoughtful ways before you assign a particular processing activity you want students to use to consolidate and apply what they’ve learned in a thoughtful manner.
Step #7: Question/Explore (Part 2) Students: Review the content included on the right side of your notes. Construct two level 1 questions on your own, working from your notes. Then share and discuss your questions with a partner until you’re both sure all of your questions qualify as level 1 questions. Complete a similar construct, share, and discuss process with level 2, level 3, and level four until you come up with two questions at each level. When you’re finished, generate responses to each question in collaboration with your partner, orally or in writing, working from your notes as a source document.
August 28, 2009 23
Teachers: Generating thoughtful questions, especially level 3-4 questions, is challenging work that raises the rigor of any class, and students’ level of understanding of the content and key concepts. It will take some time for your students to master this work. Here are some steps you can take to get them moving: 1. Inform the students about the different levels of historical thinking (see attachment). 2. Introduce one level at a time and work on it for a few days. As you move into higher levels,
select one type of question (e.g., “Summarize” at level 2, “Infer” at level 3, “Recommend/Decide/Judge” at level 4) that you’re comfortable with, to get the students generating, discussing and answering questions that require higher level thinking. After students have become comfortable with one type of question at each level, introduce them to additional types of questions, broadening their repertoire over time.
3. Define the verbs at each level, provide sample questions or prompts at each level, using content the students are very familiar with. Then have students try to develop a similar question on their own about the same content.
4. Provide sample questions about some content the students are familiar with, at each level, and have students classify the questions you’ve provided.
5. Have students read a simple passage or story and generate one question for each level. 6. Teach students how to rewrite questions you’ve given them at each level into less and more
sophisticated questions (at the other three levels). At all times, circulate to provide support as needed, and give students opportunities to share, discuss and assess their work in pairs, small groups and as an entire class. Once students have become reasonably proficient with this question-making work, have them construct questions at least once or twice per week, in class or for homework. Collect and review questions as a test-prep activity, focusing on levels 2-4. Use students’ questions in quizzes and tests and as discussion starters in class. As time goes on, build a collection of good questions that are made public to the students, letting them know that quiz and test questions will come (at least in part) from this collection. Finally, give students plenty of opportunities to pose questions they struggle to answer, to get assistance from other students. Step #8: Processing Teachers: As students learn the note-making process, the summarize and question portion of their work can serve as the processing activities for these particular classes. Once they become more proficient, students can complete more and more summary/questioning work as homework, with their products serving as “tickets to enter” their next class.
Step #9: Assessment Students: Regularly assess your note-making work using the “Interactive Notebook Did-I Sheet.” Answer the following questions and make improvements as needed. Did I…..
• Organize my notes so they can serve as good study guides? • Include only the most important information in my notes? • Underline important terms and vocabulary? • Include definitions of history vocabulary I didn’t understand?

August 28, 2009 24
• Include clear, helpful summaries, written in my own words? • Write summaries of no more than three sentences? • Include at least five new history vocabulary words in each of my summaries? • Include one or more solid questions at levels 1, 2, 3 and 4?
Teachers: As students become more proficient, hold them highly accountable for good work. Informally check their notes as you circulate (e.g., using a simple +/√/- tallies for good/acceptable/unacceptable work). Formally assess students’ notes at least once per month; grade them; add occasional, instructive comments; and use the tallies and grades to compute a note-making grade that counts a lot toward students’ final grades. All of the work above has been designed to help students think about, organize and record important information found in non-fiction text, for later retrieval and reflection. The work below is designed to provide students with an opportunity to begin to think between and beyond the lines.
Ultimately, students will be able to do all of this work on their own, outside of class, with longer and longer passages. Our goal in conducting all of this work is to develop
thoughtful, independent learners.

August 28, 2009 25
Note-Making: from Oral/Visual Presentations (Student & Teacher Directions) Step #1: Pre-Presentation/Background Knowledge Teachers: Give students the topic of the presentation and provide them with an opportunity to identify everything they already know (or think they know) about the content, using the first column of the K-C-R organizer (below). Model this practice until students become proficient with it. They’ll return to the organizer later. Know Confirmed Revised
Step #2: Jot Down Initial Notes Students: As you listen or watch, consider the following three sets of questions: People: Who’s important? Why? What did they do? Ideas/Terms: What are the important ideas or terms? What do they mean? Events/Decisions/Places: What are the important events/decisions? When, where and why did they happen? Why are they important? Use the following organizer to jot down your notes during the presentation. Another strategy is to divide the three sets of questions among two partners and yourself before you listen to/watch the presentation, with each of you taking responsibility for one set of questions. Topic: __________________
People Concepts/Terms Events/Decisions/Places
Teachers: This is tough, thoughtful work. Take lots of time to model this process with one, two and then three categories, using and dissecting a video or taped lecture as your point of departure. Take the time to make sure students understand what a “concept” is. Step #3: Clarify/Expand Your Notes (Right Away…) Students: a. Try to answer the questions to fill in your notes. b. Talk with two partners to get the answers to the three sets of questions. Hopefully one of
your partners jotted down the information you’ll need. If you already partnered before the presentation and divided responsibilities, fill in what you’re missing. Discuss the questions until you’re confident you’ve captured all you can. Add additional notes you think are important that didn’t fall into one of the three columns.
c. Use arrows to make connections between the people, concepts/terms, and events/places. d. Ask (and get answers to) any questions you have that will help you clarify anything that you
don’t understand. Don’t quit asking until you’re satisfied you have good answers.
August 28, 2009 26
Teachers: Model all of this (and particularly part “c.” ) for students. Circulate among the students and help them think through these processes; don’t give them the answers. Encourage (and teach) them to collaborate, takes turns, listen carefully and respectfully, respond thoughtfully, and push one another for clarity. Step #4: Organize Your Notes – Topic/Sub-Topics Students: a. Write the topic on the note-making organizer. b. Decide what your sub-topics are going to be. You can stick with the three question categories
(people, concepts/terms, events/decisions/places) and add any additional categories that came up during the presentation…or you can break down one of the categories into smaller subtopics. For example, if the topic was “The Causes of the Civil War”, your sub-topics might be “the Missouri Compromise”, “the Compromise of 1850”, “Fugitive Slave Laws”, et al., all of which would have fallen under “Events/Decisions/Places” in your initial notes. Any additional and important concepts, terms and people could be attached to each cause, in the “Details/ Vocabulary” section of the organizer. The arrows you drew (step #2) will identify some of the important concepts, terms and people As another example, if your topic was “Egypt’s Social Pyramid”, your sub-topics might be “Pharaoh”, “Government Officials”, “Priests”, et al., all of which would have fallen under “People” in your initial notes. Any additional and important concepts, terms, events, decisions, and places could be attached to each person or people, in the “Details/ Vocabulary” section of the organizer. Once again, the arrows you drew (step #2) will identify some of the important concepts, terms, events, decisions, and places.
c. In any case, do this work with your partners. Make some initial decisions about your sub-topics on your own. Then take the time to reconsider your options with your partners and revise your sub-topics if necessary. Write your final selections in the “sub-topics” sections of the graphic organizer.
Teachers: Again, this is tough, thoughtful work. Take lots of time to model this process, using and dissecting a video or taped lecture as your point of departure. Step #5: Organize Your Notes - Details/Vocabulary Students: Identify the most important details (usually no more than three) associated with the topic and each subtopic. Discuss your selections with a partner and revise them if necessary. Write your final selections in the “details/vocabulary” sections of the graphic organizer, in your own words. Underline important history vocabulary included in your details. Teachers: Again, model, model, model. When you teach students how to do this, always limit the number of details per topic/subtopic so students have to make tough decisions about what to include. Step #6: Share Students: a. Share your results (topics, sub-topics, details) with other members of the class. Discuss and
defend your selections. Make any revisions/additions, if necessary.
August 28, 2009 27
b. Return to the K-C-R organizer and complete it. Identify the bits of knowledge that were confirmed and revise those that were not accurate.
Teachers: As students become more proficient, hold them highly accountable for their responses, require them to provide evidence in support of their responses, and keep a record of their successful and off-target responses (e.g., through a simple +/- system for acceptable/off-target responses). Use these tallies as part of a note-making grade that counts a lot toward students’ final grades. As the students share, make sure to… a. call on particular students; don’t just wait for volunteers; get everyone involved b. include sufficient wait-time c. probe for elaborations, revisions or explanations when responses are unclear or understanding
isn’t apparent d. push for evidence or details from students to support their ideas Step #7: Main Idea/Summary Students: Include the most important information you can provide to explain the topic in 2-3 sentences. Use at least five new history vocabulary words in your explanation. - Step #7a (optional): Visualize: Draw a picture or other graphic representation that will help
you to understand the key ideas and information in the reading. Teachers: Summarizing is an essential processing activity students need to use to consider and organize content in a thoughtful manner. Make this particular processing activity a regular routine until you are confident students are proficient at summarizing. Students who benefit from visualizing content should be given the opportunity to do so, and their work should be acknowledged. Step #8: Question/Explore Students: Review the content included on the right side of your notes. Construct two level 1 questions on your own, working from your notes. Then share and discuss your questions with a partner until you’re both sure all of your questions qualify as level 1 questions. Complete a similar construct, share, and discuss process with level 2, level 3, and level four until you come up with two questions at each level. When you’re finished, generate responses to each question in collaboration with your partner, orally or in writing, working from your notes as a source document. Teachers: Generating thoughtful questions, especially level 3-4 questions, is challenging work that raises the rigor of any class, and students’ level of understanding of the content and key concepts. It will take some time for your students to master this work. Here are some steps you can take to get them moving: 1. Inform the students about the different levels of historical thinking (see attachment). 2. Introduce one level at a time and work on it for a few days. As you move into higher levels,
select one type of question (e.g., “Summarize” at level 2, “Infer” at level 3, “Recommend/Decide/Judge” at level 4) that you’re comfortable with, to get the students generating, discussing and answering questions that require higher level thinking. After students have become comfortable with one type of question at each level, introduce them to additional types of questions, broadening their repertoire over time.

August 28, 2009 28
3. Define the verbs at each level, provide sample questions or prompts at each level, using content the students are very familiar with. Then have students try to develop a similar question on their own about the same content.
4. Provide sample questions about some content the students are familiar with, at each level, and have students classify the questions you’ve provided.
5. Have students read a simple passage or story and generate one question for each level. 6. Teach students how to rewrite questions you’ve given them at each level into less and more
sophisticated questions (at the other three levels). At all times, circulate to provide support as needed, and give students opportunities to share, discuss and assess their work in pairs, small groups and as an entire class. Once students have become reasonably proficient with this question-making work, have them construct questions at least once or twice per week, in class or for homework. Collect and review questions as a test-prep activity, focusing on levels 2-4. Use students’ questions in quizzes and tests and as discussion starters in class. As time goes on, build a collection of good questions that are made public to the students, letting them know that quiz and test questions will come (at least in part) from this collection. Finally, give students plenty of opportunities to pose questions they struggle to answer, to get assistance from other students. Step #9: Processing Teachers: As students learn the note-making process, the summarize and question portion of their work can serve as the processing activities for these particular classes. Once they become more proficient, students can complete more and more summary/questioning work as homework, with their products serving as “tickets to enter” their next class. Step #10: Assessment Students: Regularly assess your note-making work using the “Interactive Notebook Did-I Sheet.” Answer the following questions and make improvements as needed. Did I…..
• Organize my notes so they can serve as good study guides? • Include only the most important information in my notes? • Underline important terms and vocabulary? • Include definitions of history vocabulary I didn’t understand? • Include clear, helpful summaries, written in my own words? • Write summaries of no more than three sentences? • Include at least five new history vocabulary words in each of my summaries? • Include one or more solid questions at levels 1, 2, 3 and 4?
Teachers: As students become more proficient, hold them highly accountable for good work. Informally check their notes as you circulate (e.g., using a simple +/√/- tallies for good/acceptable/unacceptable work). Formally assess students’ notes at least once per month; grade them; add occasional, instructive comments; and use the tallies and grades to compute a note-making grade that counts a lot toward students’ final grades. Ultimately, students should be able to do all of this work on their own. Our goal in conducting all of this work is to develop thoughtful, independent learners.

August 28, 2009 29
Processing Activities: Solid processing activities provide students with thoughtful, challenging opportunities to apply, extend, and consolidate the knowledge they’ve acquired through readings and presentations. The following processing activities complement the many processing activities that are included in the History/Geography Alive materials available to teachers. Teachers are encouraged to use these and the History/Geography Alive activities as interchangeable parts within the processing stage of the learning process.
• Note-Making Plus: Students are provided with time to share, revise, and quiz one another on their notes, to develop better note-making skills, to develop a better understanding of the content, and to prepare for quizzes or tests (Analysis, Synthesis)
• Graphic/Visual Representation: Students create an illustration, symbol, or cartoon to show
perspective or synthesize information on a topic, event, or character. They include a heading, caption, and thought/word bubbles as needed. (Analysis, Synthesis, Interpretation)
• Graphic/Visual Interpretation: Students examine a picture from a reading or presentation.
They explain the picture, including the importance of individual details. They then write a question they would like to ask a character in the picture or the creator of the picture. (Analysis, Interpretation)
• Dialectical Journal: Students create a dialogue with the text in a primary or secondary
source. They select an important or interesting phrase or quote and construct a reaction or opinion regarding the phrase or quote. (Analysis, Interpretation, Evaluation)
• Comment: Students write opinions, reactions, or assertions emerging from a reading or
presentation; they support their positions with evidence from the text, presentation or other sources. (Evaluation)
• APP-BAM: Students identify the Author/speaker, his/her Purpose, Perspective, Bias,
Audience, and Message…and support their ideas with evidence from the text. (Analysis, Interpretation)
• GRAPER: Students examine and comment on an event, decision, document, or idea from
multiple perspectives: Gender, Race, Age, Political affiliation, Economics/class, Religion. (Analysis, Interpretation, Evaluation)
• Connect: Students make a connection between new content and something else they’ve
studied or know about (e.g., historical events, ideas, eras, people, or places; something more contemporary, including their own lives and experiences). They discuss the similarities and/or differences. (Analysis, Synthesis)

August 28, 2009 30
• Lesson-Making: Students derive a lesson that can be learned from some event, era,
character or decision and apply it in some thoughtful way to a current event, person, decision, or their own lives and experiences. (Analysis, Interpretation, Synthesis, Application)
• Question: Students jot down questions that came to mind while reading or listening. They
share and answer the questions… and use them as a study guide. (Recall, Application, Analysis, Synthesis, Interpretation, Evaluation…depending on the questions)
• Question (Part 2): Students answer one tough essay question that would activate higher
order thinking. They support their answers with evidence from the text or their notes. Samples: Fill in the blanks with a person, era, culture, event or decision you’re studying. o What lesson can be learned from _____? o How is ___ similar to or different from ___? o Why did ___ happen? How could or should it have happened differently? o Why did ___ do this? How could or should s/he have acted differently? o Who (or which) was better (or the best)? Defend your position. o Who would you have supported and why? Defend your position. o Would you have made the same decision? Why or why not? o Was ___ effective? Defend your position. o What was the most important factor that shaped ___? Defend your position. o What would have happened if.…..? o How did time, place, or customs effect ___?
Almost every textbook has other good questions in its “Critical Thinking” sections.
• Summary: Students write a short summary of the main ideas or key points. They use their own words and five or more new terms to demonstrate their understanding of the topic. The summary can also take the form of a Rap or Poem (Recall, Analysis)
• Flow Chart/Timeline: Students make a chronological depiction of major events. They may also make a storyboard explaining the events. Add graphics. (Application)
• Compare/Contrast Chart: Students create a diagram (e.g., Venn, parallel capsules) comparing and contrasting the similarities and differences within or across topics, events, people, ideas. (Analysis, Interpretation)
• Cause/Effect Chart: Students design a cause and effect chart aligned with some issue from the reading or presentation. (Analysis)
• What If Statement: Students create a “What If Statement” that poses a hypothesis and they draw and defend some conclusion with evidence. (Analysis, Evaluation, Prediction)
• Problem/Solution Journal: Students identify a problem, brainstorm alternatives, and choose a probable or proposed solution. They divide their paper into three columns with the left column

August 28, 2009 31
labeled “Problem”, the middle column labeled “Ideas”, and the right column labeled “Solutions”. (Application, Evaluation)
• Poem/Rap/Acrostic: Students re-invent their notes, or examine an idea, concept, term or character through poetry, a rap or an acrostic. (Analysis, Synthesis)
• Concept-Making: Students identify a single word that characterizes a person, era or event. They defend their selection. (Analysis, Synthesis)
• Letter to the Editor: Students write a letter to the editor about a controversial issue on the content. They reference particular, historical details to lend authenticity to their letter.
• Map: Students design a map aligned with the setting of an event. (Recall, Interpretation) • Story/Narrative: Students write a story (fiction or nonfiction) that builds on historical
details. They can take the role of a character (first person) or write in the third person. Student Engagement/Accountable Talk: Talking with others about ideas and work is fundamental to learning, but not all talk sustains learning. For classroom talk to promote learning it must be accountable—to the learning community, to accurate and appropriate knowledge, and to rigorous thinking. Accountable talk…
• seriously responds to and further develops what others in the group have said • puts forth and demands knowledge that is accurate and relevant to the issue or
work under discussion • uses evidence appropriate to the discipline (e.g., documentary sources in
history) and • follows established norms of good reasoning.
Teachers should intentionally create the norms and skills of accountable talk in their classrooms.
- Institute for Learning, University of Pittsburgh
August 28, 2009 32
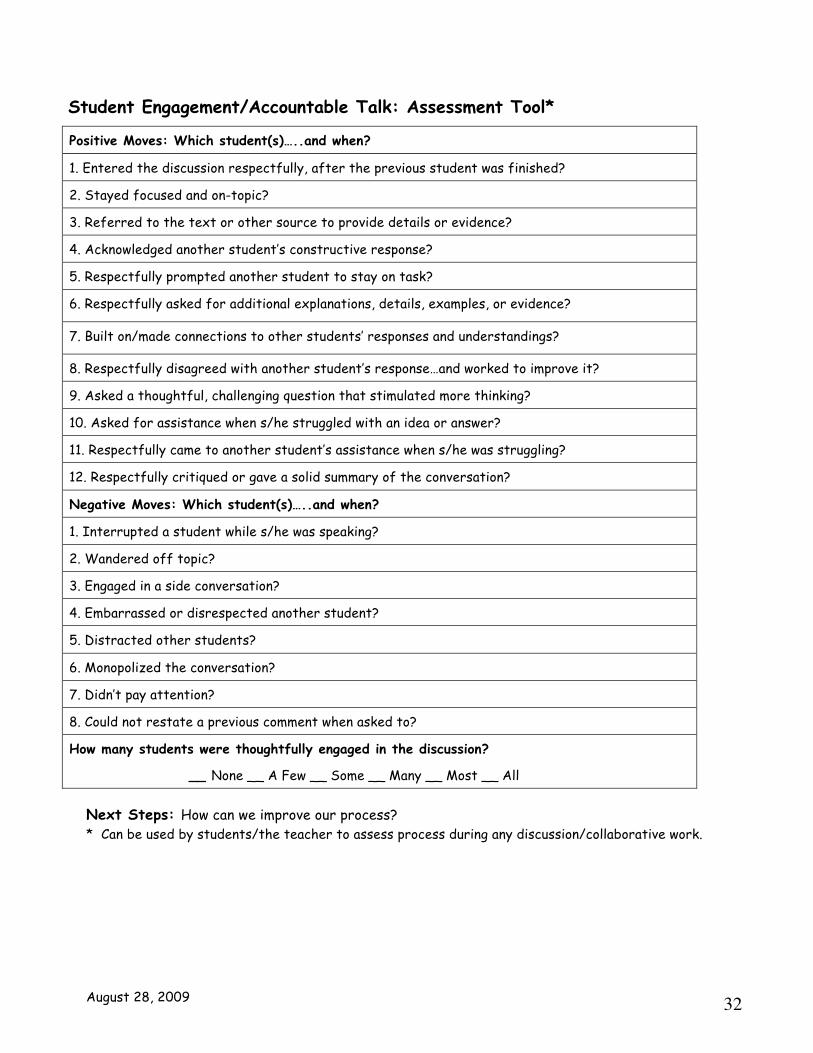
Student Engagement/Accountable Talk: Assessment Tool*
Positive Moves: Which student(s)…..and when?
1. Entered the discussion respectfully, after the previous student was finished?
2. Stayed focused and on-topic?
3. Referred to the text or other source to provide details or evidence?
4. Acknowledged another student’s constructive response?
5. Respectfully prompted another student to stay on task?
6. Respectfully asked for additional explanations, details, examples, or evidence?
7. Built on/made connections to other students’ responses and understandings?
8. Respectfully disagreed with another student’s response…and worked to improve it?
9. Asked a thoughtful, challenging question that stimulated more thinking?
10. Asked for assistance when s/he struggled with an idea or answer?
11. Respectfully came to another student’s assistance when s/he was struggling?
12. Respectfully critiqued or gave a solid summary of the conversation?
Negative Moves: Which student(s)…..and when?
1. Interrupted a student while s/he was speaking?
2. Wandered off topic?
3. Engaged in a side conversation?
4. Embarrassed or disrespected another student?
5. Distracted other students?
6. Monopolized the conversation?
7. Didn’t pay attention?
8. Could not restate a previous comment when asked to?
How many students were thoughtfully engaged in the discussion?
__ None __ A Few __ Some __ Many __ Most __ All
Next Steps: How can we improve our process? * Can be used by students/the teacher to assess process during any discussion/collaborative work.

August 28, 2009 33
Accountable Talk: Language Structures for Active Engagement To actively engage in discussions or collaborative activities, students must possess the language structures that enable them to participate. For example, students must know how to agree or disagree, express an opinion, or ask for clarification. What often prevents them from doing this successfully is the inability to express themselves effectively. These sentence stems will help. They need to be explicitly taught, modeled, and practiced.
Acknowledging Ideas Agreeing/Disagreeing: • I agree/don’t agree with _______ because… • I think/don’t think ________ is right because… • I got the same/different answer.
Affirming: • That’s an interesting way to think of it. • I see what you mean. • I hadn’t thought of that.
Relating: • My idea is similar to… • That reminds me of…
Rephrasing: • You’re saying that… • In other words… • What I’m hearing you say is…
Expressing Opinions • I think/believe/imagine that… • In my opinion…
Asking for Clarification • Could you say that again? • What did you mean? • I still have a question about… • Did you mean……?
Individual/Group Reporting • I/We learned/discovered/found out that…… • _____ showed me that…… • I/We agreed/didn’t agree that……
Holding the Floor • As I was saying…… • What I was trying to say…… • If I could finish…… • Let me finish.
- adapted from Teresa Walter, Teaching English Language Learners and Kate Kinsella,
Expository Writing Scaffolds for English Learners in Content Area Classrooms
August 28, 2009 34
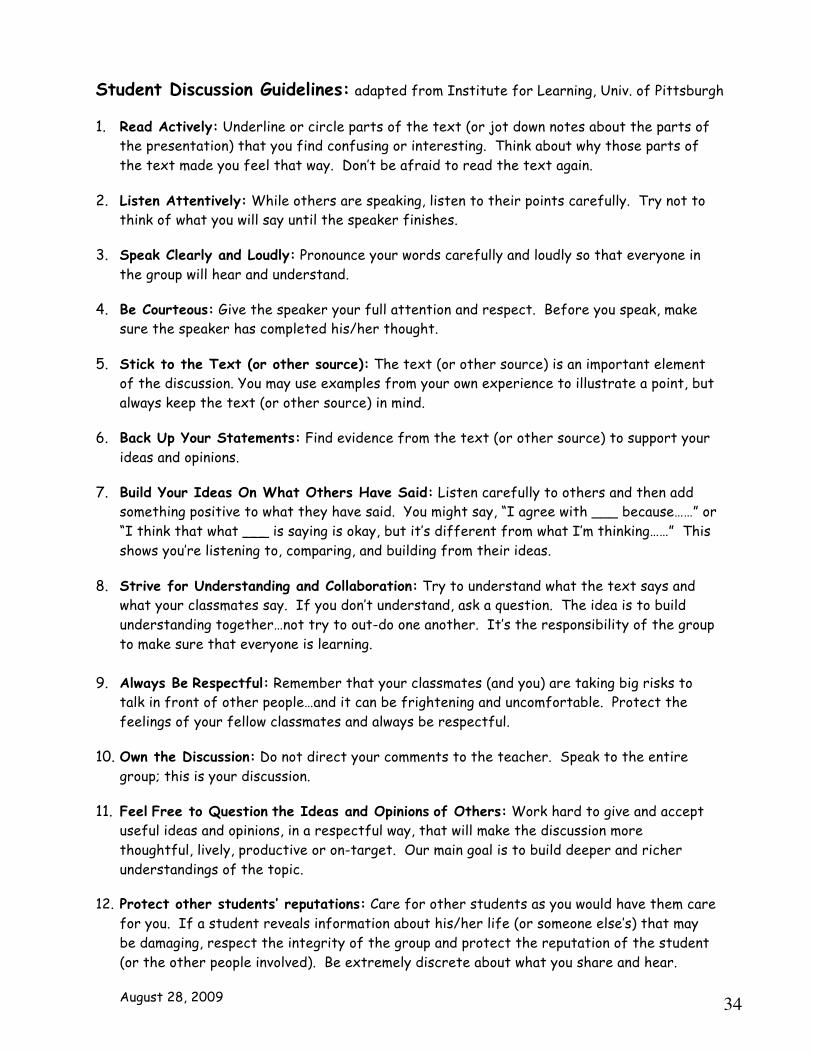
Student Discussion Guidelines: adapted from Institute for Learning, Univ. of Pittsburgh
1. Read Actively: Underline or circle parts of the text (or jot down notes about the parts of the presentation) that you find confusing or interesting. Think about why those parts of the text made you feel that way. Don’t be afraid to read the text again.
2. Listen Attentively: While others are speaking, listen to their points carefully. Try not to think of what you will say until the speaker finishes.
3. Speak Clearly and Loudly: Pronounce your words carefully and loudly so that everyone in the group will hear and understand.
4. Be Courteous: Give the speaker your full attention and respect. Before you speak, make sure the speaker has completed his/her thought.
5. Stick to the Text (or other source): The text (or other source) is an important element of the discussion. You may use examples from your own experience to illustrate a point, but always keep the text (or other source) in mind.
6. Back Up Your Statements: Find evidence from the text (or other source) to support your ideas and opinions.
7. Build Your Ideas On What Others Have Said: Listen carefully to others and then add something positive to what they have said. You might say, “I agree with ___ because……” or “I think that what ___ is saying is okay, but it’s different from what I’m thinking……” This shows you’re listening to, comparing, and building from their ideas.
8. Strive for Understanding and Collaboration: Try to understand what the text says and what your classmates say. If you don’t understand, ask a question. The idea is to build understanding together…not try to out-do one another. It’s the responsibility of the group to make sure that everyone is learning.
9. Always Be Respectful: Remember that your classmates (and you) are taking big risks to talk in front of other people…and it can be frightening and uncomfortable. Protect the feelings of your fellow classmates and always be respectful.
10. Own the Discussion: Do not direct your comments to the teacher. Speak to the entire group; this is your discussion.
11. Feel Free to Question the Ideas and Opinions of Others: Work hard to give and accept useful ideas and opinions, in a respectful way, that will make the discussion more thoughtful, lively, productive or on-target. Our main goal is to build deeper and richer understandings of the topic.
12. Protect other students’ reputations: Care for other students as you would have them care for you. If a student reveals information about his/her life (or someone else’s) that may be damaging, respect the integrity of the group and protect the reputation of the student (or the other people involved). Be extremely discrete about what you share and hear.
August 28, 2009 35
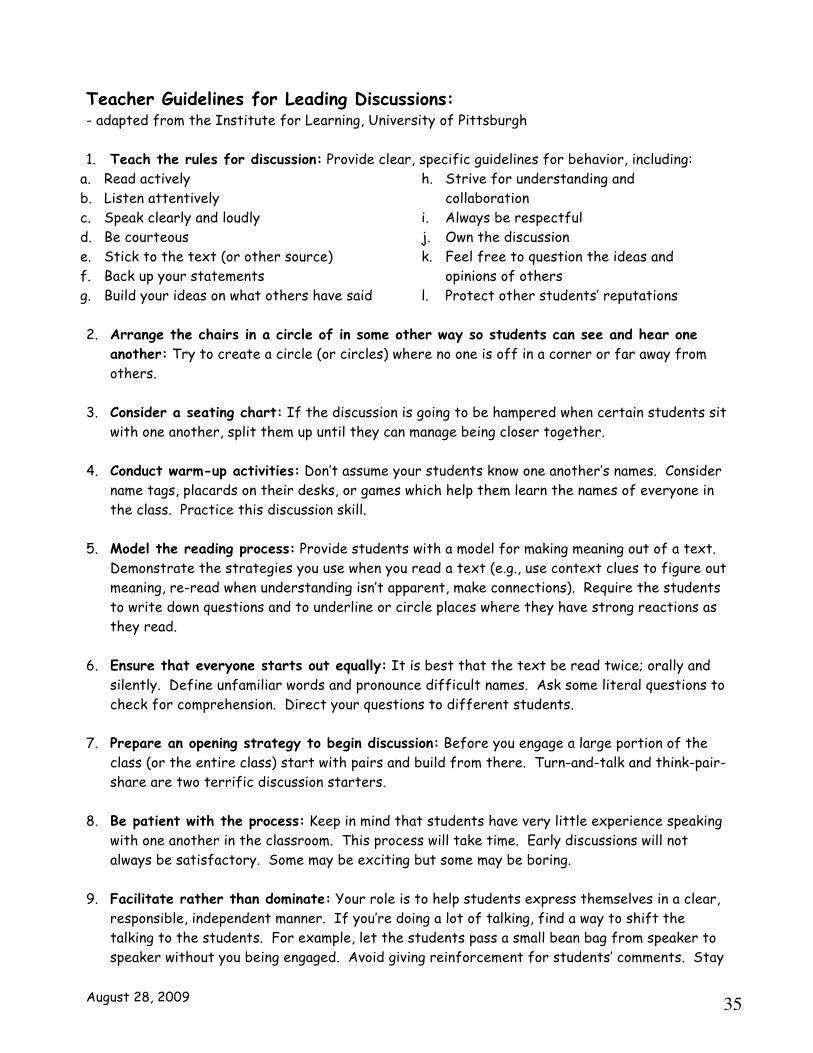
Teacher Guidelines for Leading Discussions: - adapted from the Institute for Learning, University of Pittsburgh 1. Teach the rules for discussion: Provide clear, specific guidelines for behavior, including:
a. Read actively b. Listen attentively c. Speak clearly and loudly d. Be courteous e. Stick to the text (or other source) f. Back up your statements g. Build your ideas on what others have said
h. Strive for understanding and collaboration
i. Always be respectful j. Own the discussion k. Feel free to question the ideas and
opinions of others l. Protect other students’ reputations
2. Arrange the chairs in a circle of in some other way so students can see and hear one
another: Try to create a circle (or circles) where no one is off in a corner or far away from others.
3. Consider a seating chart: If the discussion is going to be hampered when certain students sit
with one another, split them up until they can manage being closer together. 4. Conduct warm-up activities: Don’t assume your students know one another’s names. Consider
name tags, placards on their desks, or games which help them learn the names of everyone in the class. Practice this discussion skill.
5. Model the reading process: Provide students with a model for making meaning out of a text.
Demonstrate the strategies you use when you read a text (e.g., use context clues to figure out meaning, re-read when understanding isn’t apparent, make connections). Require the students to write down questions and to underline or circle places where they have strong reactions as they read.
6. Ensure that everyone starts out equally: It is best that the text be read twice; orally and
silently. Define unfamiliar words and pronounce difficult names. Ask some literal questions to check for comprehension. Direct your questions to different students.
7. Prepare an opening strategy to begin discussion: Before you engage a large portion of the
class (or the entire class) start with pairs and build from there. Turn-and-talk and think-pair-share are two terrific discussion starters.
8. Be patient with the process: Keep in mind that students have very little experience speaking
with one another in the classroom. This process will take time. Early discussions will not always be satisfactory. Some may be exciting but some may be boring.
9. Facilitate rather than dominate: Your role is to help students express themselves in a clear,
responsible, independent manner. If you’re doing a lot of talking, find a way to shift the talking to the students. For example, let the students pass a small bean bag from speaker to speaker without you being engaged. Avoid giving reinforcement for students’ comments. Stay
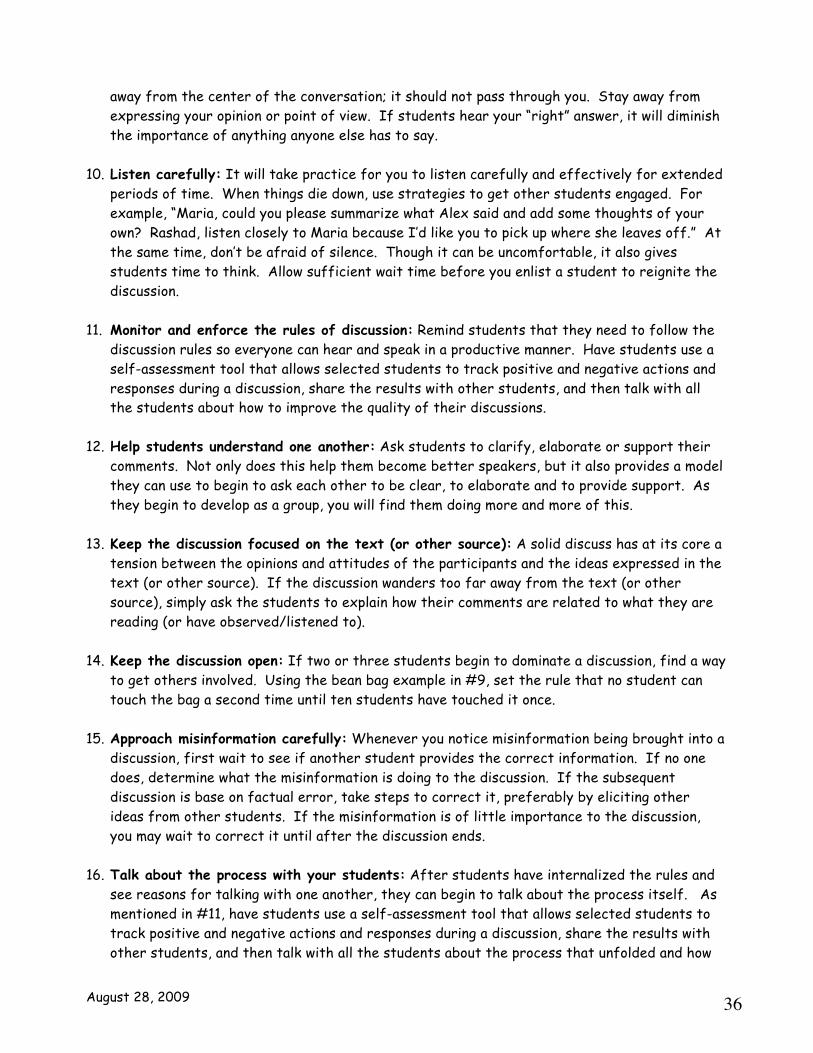
August 28, 2009 36
away from the center of the conversation; it should not pass through you. Stay away from expressing your opinion or point of view. If students hear your “right” answer, it will diminish the importance of anything anyone else has to say.
10. Listen carefully: It will take practice for you to listen carefully and effectively for extended
periods of time. When things die down, use strategies to get other students engaged. For example, “Maria, could you please summarize what Alex said and add some thoughts of your own? Rashad, listen closely to Maria because I’d like you to pick up where she leaves off.” At the same time, don’t be afraid of silence. Though it can be uncomfortable, it also gives students time to think. Allow sufficient wait time before you enlist a student to reignite the discussion.
11. Monitor and enforce the rules of discussion: Remind students that they need to follow the
discussion rules so everyone can hear and speak in a productive manner. Have students use a self-assessment tool that allows selected students to track positive and negative actions and responses during a discussion, share the results with other students, and then talk with all the students about how to improve the quality of their discussions.
12. Help students understand one another: Ask students to clarify, elaborate or support their
comments. Not only does this help them become better speakers, but it also provides a model they can use to begin to ask each other to be clear, to elaborate and to provide support. As they begin to develop as a group, you will find them doing more and more of this.
13. Keep the discussion focused on the text (or other source): A solid discuss has at its core a
tension between the opinions and attitudes of the participants and the ideas expressed in the text (or other source). If the discussion wanders too far away from the text (or other source), simply ask the students to explain how their comments are related to what they are reading (or have observed/listened to).
14. Keep the discussion open: If two or three students begin to dominate a discussion, find a way
to get others involved. Using the bean bag example in #9, set the rule that no student can touch the bag a second time until ten students have touched it once.
15. Approach misinformation carefully: Whenever you notice misinformation being brought into a
discussion, first wait to see if another student provides the correct information. If no one does, determine what the misinformation is doing to the discussion. If the subsequent discussion is base on factual error, take steps to correct it, preferably by eliciting other ideas from other students. If the misinformation is of little importance to the discussion, you may wait to correct it until after the discussion ends.
16. Talk about the process with your students: After students have internalized the rules and
see reasons for talking with one another, they can begin to talk about the process itself. As mentioned in #11, have students use a self-assessment tool that allows selected students to track positive and negative actions and responses during a discussion, share the results with other students, and then talk with all the students about the process that unfolded and how

August 28, 2009 37
to improve it. As students get more and more practice talking about the process, they will become more facile conducting quick debriefing sessions at the close of discussions, focused on process as well as content.
17. Protect other students’ reputations: At times, students may feel a need to reveal
information about their lives (or others’) that may be damaging. Make clear to the group that it is important to be extremely careful about sharing this kind of information. Even when a student has a compelling need to share information of this sort, and feels it is essential to building the discussion, it is probably best to share the information in private, with the teacher or some other adult the student respects. When a student does share this kind of information, all other students must respect the integrity of the group and protect the reputation of the student (or others).
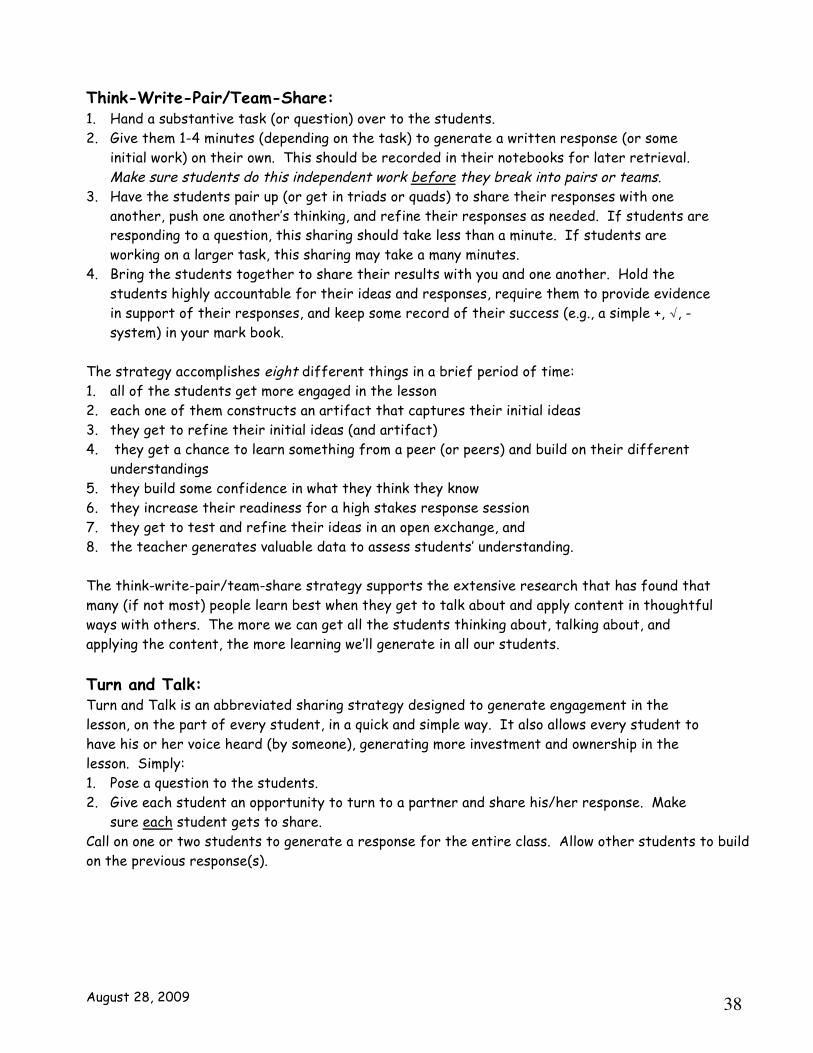
August 28, 2009 38
Think-Write-Pair/Team-Share: 1. Hand a substantive task (or question) over to the students. 2. Give them 1-4 minutes (depending on the task) to generate a written response (or some
initial work) on their own. This should be recorded in their notebooks for later retrieval. Make sure students do this independent work before they break into pairs or teams.
3. Have the students pair up (or get in triads or quads) to share their responses with one another, push one another’s thinking, and refine their responses as needed. If students are responding to a question, this sharing should take less than a minute. If students are working on a larger task, this sharing may take a many minutes.
4. Bring the students together to share their results with you and one another. Hold the students highly accountable for their ideas and responses, require them to provide evidence in support of their responses, and keep some record of their success (e.g., a simple +, √, - system) in your mark book.
The strategy accomplishes eight different things in a brief period of time: 1. all of the students get more engaged in the lesson 2. each one of them constructs an artifact that captures their initial ideas 3. they get to refine their initial ideas (and artifact) 4. they get a chance to learn something from a peer (or peers) and build on their different
understandings 5. they build some confidence in what they think they know 6. they increase their readiness for a high stakes response session 7. they get to test and refine their ideas in an open exchange, and 8. the teacher generates valuable data to assess students’ understanding. The think-write-pair/team-share strategy supports the extensive research that has found that many (if not most) people learn best when they get to talk about and apply content in thoughtful ways with others. The more we can get all the students thinking about, talking about, and applying the content, the more learning we’ll generate in all our students. Turn and Talk: Turn and Talk is an abbreviated sharing strategy designed to generate engagement in the lesson, on the part of every student, in a quick and simple way. It also allows every student to have his or her voice heard (by someone), generating more investment and ownership in the lesson. Simply: 1. Pose a question to the students. 2. Give each student an opportunity to turn to a partner and share his/her response. Make
sure each student gets to share. Call on one or two students to generate a response for the entire class. Allow other students to build on the previous response(s).
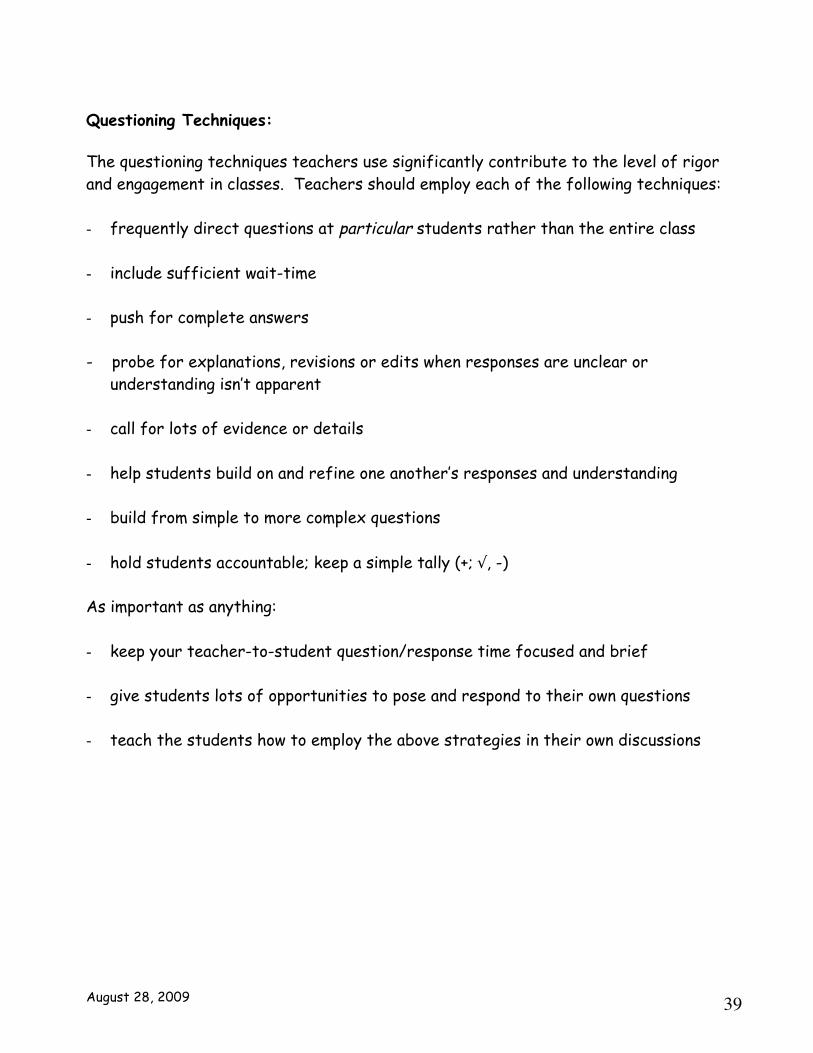
August 28, 2009 39
Questioning Techniques: The questioning techniques teachers use significantly contribute to the level of rigor and engagement in classes. Teachers should employ each of the following techniques: - frequently direct questions at particular students rather than the entire class
- include sufficient wait-time
- push for complete answers
- probe for explanations, revisions or edits when responses are unclear or
understanding isn’t apparent - call for lots of evidence or details
- help students build on and refine one another’s responses and understanding - build from simple to more complex questions - hold students accountable; keep a simple tally (+; √, -) As important as anything: - keep your teacher-to-student question/response time focused and brief - give students lots of opportunities to pose and respond to their own questions - teach the students how to employ the above strategies in their own discussions

August 28, 2009 40
History/Geography Interactive Student Notebook: 1. Student notebooks should serve as the essential artifacts that illustrate all that has
gone on in a class, including preview activities, class notes, processing activities, and sharing/debriefing sessions at the close of each class.
2. Student notebook work should be integrated into every activity of every lesson.
3. If students are going to become thoughtful, independent learners, they need to get in the daily habit of: • gathering, organizing, summarizing, processing, consolidating, studying and retaining
information, ideas, and new vocabulary from text, lectures, and other presentations…..on their own and through small group work.
• asking and answering their own and others’ simple and complex questions about content and key concepts, on their own and with others
Students need to receive explicit instruction in each of these cognitive exercises. Cornell notes, graphic organizers and other visual devices should be used on a routine basis as powerful, helpful tools.
4. Notebooks should be collected on a monthly basis; responded to through brief, focused comments and recommendations; graded for content, organization, and clarity; and included as a substantial portion of a student’s overall grade.
5. History/geography teachers need to use the interactive notebook format.*
6. Administrators should examine notebooks on a regular basis, as a key indicator of student and teacher work and progress.
* Workshops on the interactive notebook format will be offered during each school year. In
addition, the entire guide to the interactive notebook can be found on MyBPS on the History/Social Studies page.
Note: Samples of middle and high school students’ interactive notebook work can be found
on the History page on MyBPS.
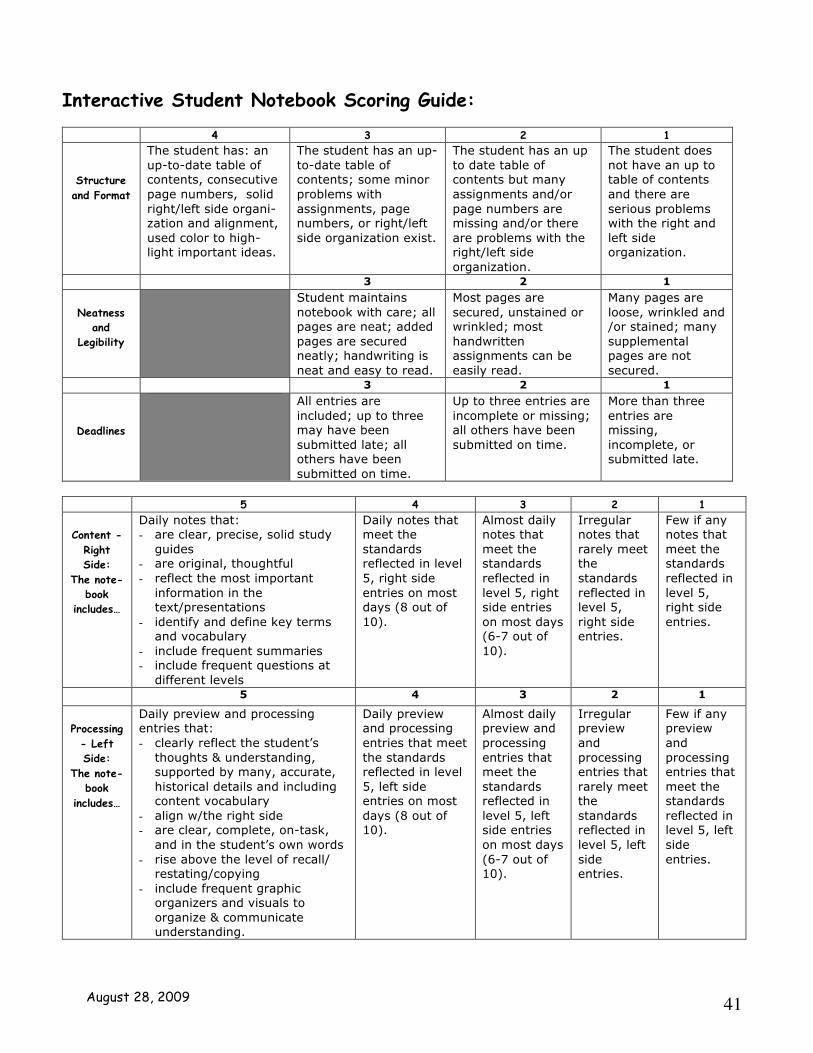
August 28, 2009 41
Interactive Student Notebook Scoring Guide:
4 3 2 1
Structure and Format
The student has: an up-to-date table of contents, consecutive page numbers, solid right/left side organi-zation and alignment, used color to high-light important ideas.
The student has an up-to-date table of contents; some minor problems with assignments, page numbers, or right/left side organization exist.
The student has an up to date table of contents but many assignments and/or page numbers are missing and/or there are problems with the right/left side organization.
The student does not have an up to table of contents and there are serious problems with the right and left side organization.
3 2 1 Neatness
and Legibility
Student maintains notebook with care; all pages are neat; added pages are secured neatly; handwriting is neat and easy to read.
Most pages are secured, unstained or wrinkled; most handwritten assignments can be easily read.
Many pages are loose, wrinkled and /or stained; many supplemental pages are not secured.
3 2 1
Deadlines
All entries are included; up to three may have been submitted late; all others have been submitted on time.
Up to three entries are incomplete or missing; all others have been submitted on time.
More than three entries are missing, incomplete, or submitted late.
5 4 3 2 1
Content - Right Side:
The note-book
includes…
Daily notes that: - are clear, precise, solid study
guides - are original, thoughtful - reflect the most important
information in the text/presentations
- identify and define key terms and vocabulary
- include frequent summaries - include frequent questions at
different levels
Daily notes that meet the standards reflected in level 5, right side entries on most days (8 out of 10).
Almost daily notes that meet the standards reflected in level 5, right side entries on most days (6-7 out of 10).
Irregular notes that rarely meet the standards reflected in level 5, right side entries.
Few if any notes that meet the standards reflected in level 5, right side entries.
5 4 3 2 1
Processing
- Left Side:
The note-book
includes…
Daily preview and processing entries that: - clearly reflect the student’s
thoughts & understanding, supported by many, accurate, historical details and including content vocabulary
- align w/the right side - are clear, complete, on-task,
and in the student’s own words - rise above the level of recall/
restating/copying - include frequent graphic
organizers and visuals to organize & communicate understanding.
Daily preview and processing entries that meet the standards reflected in level 5, left side entries on most days (8 out of 10).
Almost daily preview and processing entries that meet the standards reflected in level 5, left side entries on most days (6-7 out of 10).
Irregular preview and processing entries that rarely meet the standards reflected in level 5, left side entries.
Few if any preview and processing entries that meet the standards reflected in level 5, left side entries.

August 28, 2009 42
History/Geography Notebooks:
Left Side Right Side
Student Preview/Processing “Output”
• Students connect to previous lessons/prior knowledge and preview what they will be reading and learning.
• Students process new ideas derived from readings or presentations, through thoughtful, challenging, creative activities.
• Students explore opinions, clarify values, make connections, wonder “what if”, and ask questions about new ideas.
• Students express feelings and reactions.
• Students review what they have learned.
Teacher Selected Readings and
Presentations “Input”
• Students take notes during
lectures or class presentations.
• Students construct reading
notes from their textbook, literature, or primary sources.
• The information is organized
and structured so key ideas and concepts are clear.
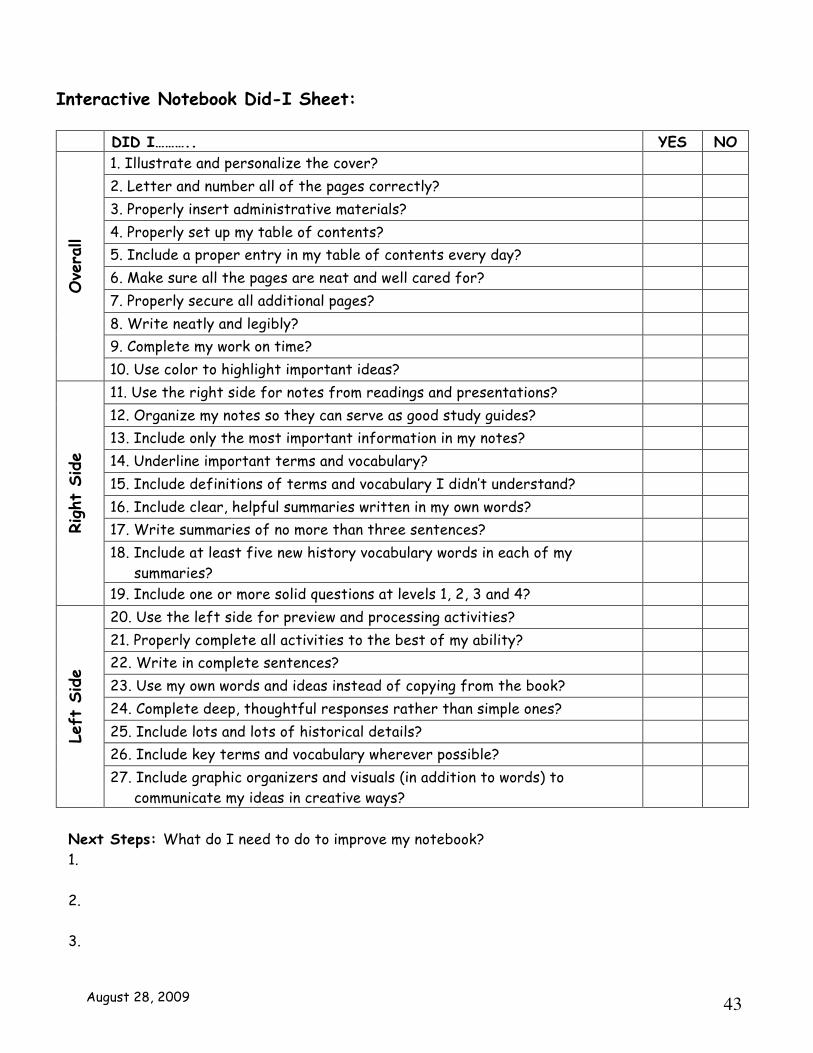
August 28, 2009 43
Interactive Notebook Did-I Sheet: DID I……….. YES NO
1. Illustrate and personalize the cover? 2. Letter and number all of the pages correctly? 3. Properly insert administrative materials? 4. Properly set up my table of contents? 5. Include a proper entry in my table of contents every day? 6. Make sure all the pages are neat and well cared for? 7. Properly secure all additional pages? 8. Write neatly and legibly? 9. Complete my work on time?
Ove
rall
10. Use color to highlight important ideas? 11. Use the right side for notes from readings and presentations? 12. Organize my notes so they can serve as good study guides? 13. Include only the most important information in my notes? 14. Underline important terms and vocabulary? 15. Include definitions of terms and vocabulary I didn’t understand? 16. Include clear, helpful summaries written in my own words? 17. Write summaries of no more than three sentences? 18. Include at least five new history vocabulary words in each of my
summaries?
Righ
t Si
de
19. Include one or more solid questions at levels 1, 2, 3 and 4? 20. Use the left side for preview and processing activities? 21. Properly complete all activities to the best of my ability? 22. Write in complete sentences? 23. Use my own words and ideas instead of copying from the book? 24. Complete deep, thoughtful responses rather than simple ones? 25. Include lots and lots of historical details? 26. Include key terms and vocabulary wherever possible?
Left
Side
27. Include graphic organizers and visuals (in addition to words) to communicate my ideas in creative ways?
Next Steps: What do I need to do to improve my notebook? 1. 2. 3.

August 28, 2009 44
Rigor/Productivity/Assessment/Accountability: Students need to produce a substantial amount of work on a daily basis for which they are held accountable. The work that is required needs to be rigorous and challenge the limits of students’ understanding. Students must feel a sense of urgency in regards to keeping on top of their work on a daily basis. At the same time, they need to know they will receive consistent support during initial instruction and collaborative work/conferring time. Teachers need to ask the following questions after each phase of their classes and after every activity has been completed. 1. What have students produced that:
a. provides conclusive evidence that they have met the day’s objective(s), and b. can serve as an artifact students can refer to in the future, to recall and study what has
been presented and worked on today? 2. Does the evidence indicate that students have been pushed (and have worked) to their limits? Student Work: Evidence of consistent, rigorous, accountable work needs to be generated, in increasing quantities, in the following ways: 1. Students need to complete as many as five products that show up in their notebooks, during and
after a typical class, for which they are held accountable: • one at the beginning of the class (the Preview/Do Now) that makes a connection to the
previous day’s lesson, activates prior knowledge and ignites interest in the content to come • class notes from readings or presentations • a third product through the day’s processing activity, completed independently or, more
typically, in collaboration with other students, • a fourth product completed during the sharing/debriefing time that helps students
summarize and reflect upon what they’d learned that day, in relation to the day’s objectives, and
• homework While the previewing and sharing/debriefing may occasionally be oral, and the homework may be a reading assignment, every student’s notebook should include class notes and a processing product every day.
2. Questioning: Teachers need to ask questions at use highly accountable questioning techniques to check for students’ understanding on an ongoing basis. Teachers should: • frequently direct questions at particular students; get everyone involved and accountable • include sufficient wait-time • push for complete answers; resist the temptation to step in • probe for revisions or edits when responses are unclear or understanding isn’t apparent • push students to explain, assess, build on, refine and respond to one another’s responses and
ideas • call for lots of evidence or details from the text or other sources to support students’
responses • hold students accountable for their responses by keeping a simple tally of kids’
good/acceptable/unacceptable responses (+/√/-) and factor these tallies into a class participation grade that counts a great deal

August 28, 2009 45
• have students generate, consider and respond to their own questions, at increasing levels of complexity
• teach students to use these same techniques in their own partner and small group discussions
3. Quizzes: Teachers need to administer frequent quizzes for which students are held accountable. Quizzes can often be administered as a Do Now or summary activity. Oral quizzes, with questions directed at particular students rather than the class as a whole are also valuable. Use a simple tally system to keep track of students’ good/acceptable/ unacceptable responses (e.g., +/√/-). Use the tallies students’ accumulate over a week, month or term as extra test grades.
4. Tests: Formal tests, every one or two weeks, are a good way to assess student progress and hold
students accountable for having paid close attention to the work of the previous week(s). Include a variety of questions to assess different levels of understanding. Get the results back to students quickly and use the results to assess their progress (and yours), and to inform subsequent instruction. When it’s clear some skill clearly hasn’t been mastered by a significant number of students, take the time to re-teach it until a significant level of mastery has been attained.
5. Grades: Teachers need to keep ongoing records of students’ grades and grade averages, which
students are always aware of. Remember when you always knew what your grade average was for any course you were taking? Give your students that experience.
6. Conferring: Gather data and assign credits (+/√/- again) while you confer during students’
independent/small group work time and during class-ending summary activities…for content, effort and process (e.g., accountable talk). Factor these marks into students’ overall grades as important class participation and productivity grades.
7. Assessing Notebooks: Assess students’ notebooks in a formal manner at least once per month.
Randomly collect some notebooks each night (enough to check every student’s notebook each month). Quickly check to see if each student has completed all of the work expected of him/her during the month and assign a grade. Then randomly select 6-8 pages you’ll review in greater depth. Write comments on sticky notes and attach them to the pages you’ve reviewed. Assign a second grade for these 6-8 pages, with the student receiving an overall grade that represents the average of the two grades.
Students’ notebooks need to be informally assessed as often as possible (e.g., through directed questioning after presentations, during collaborative work/conferring time, and during summary exercises at the close of a class). Students’ notebooks need to be formally assessed at least once per month. Teachers should respond to students’ notebook work with brief comments and suggestions written on “stickie notes” and inserted in students’ notebooks. Each notebook should also be assigned a grade using the BPS Interactive Notebook Rubric and the Notebook Did-I Sheet as guides. All of this work is essential to generating the work students are capable of.
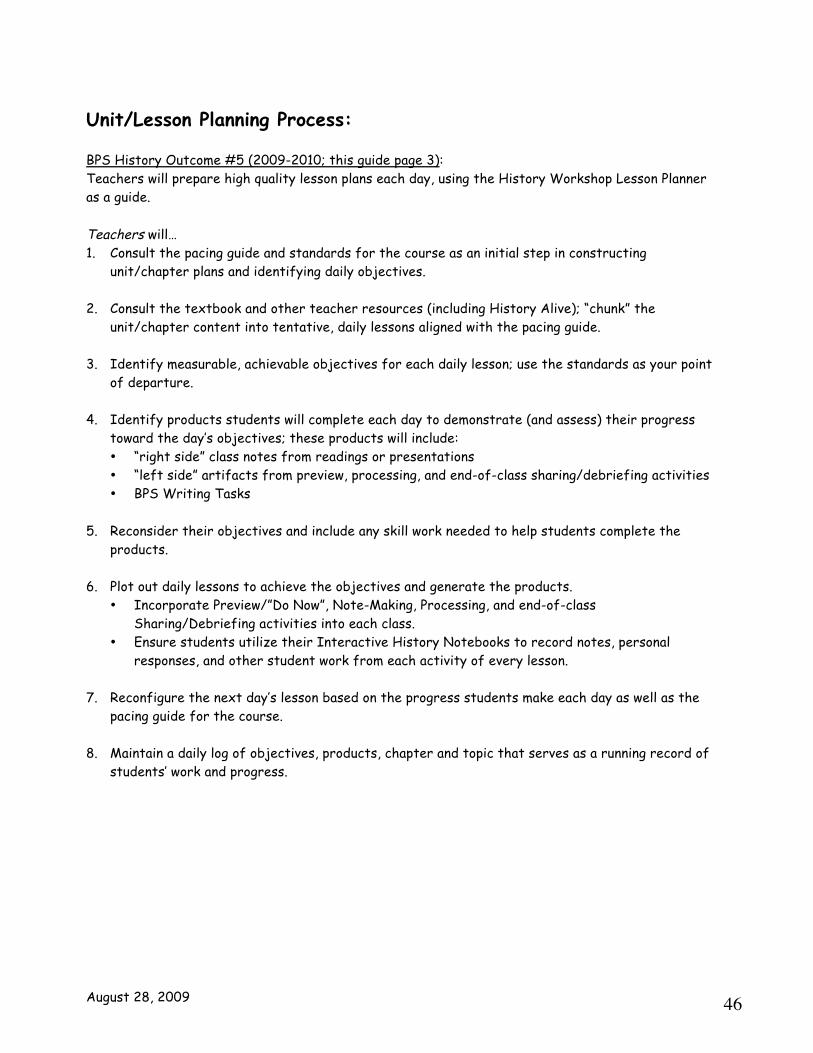
August 28, 2009 46
Unit/Lesson Planning Process: BPS History Outcome #5 (2009-2010; this guide page 3): Teachers will prepare high quality lesson plans each day, using the History Workshop Lesson Planner as a guide. Teachers will… 1. Consult the pacing guide and standards for the course as an initial step in constructing
unit/chapter plans and identifying daily objectives. 2. Consult the textbook and other teacher resources (including History Alive); “chunk” the
unit/chapter content into tentative, daily lessons aligned with the pacing guide. 3. Identify measurable, achievable objectives for each daily lesson; use the standards as your point
of departure. 4. Identify products students will complete each day to demonstrate (and assess) their progress
toward the day’s objectives; these products will include: • “right side” class notes from readings or presentations • “left side” artifacts from preview, processing, and end-of-class sharing/debriefing activities • BPS Writing Tasks
5. Reconsider their objectives and include any skill work needed to help students complete the
products. 6. Plot out daily lessons to achieve the objectives and generate the products.
• Incorporate Preview/”Do Now”, Note-Making, Processing, and end-of-class Sharing/Debriefing activities into each class.
• Ensure students utilize their Interactive History Notebooks to record notes, personal responses, and other student work from each activity of every lesson.
7. Reconfigure the next day’s lesson based on the progress students make each day as well as the pacing guide for the course.
8. Maintain a daily log of objectives, products, chapter and topic that serves as a running record of
students’ work and progress.

August 28, 2009 47
History/Geography Workshop Lesson Planner: Key Questions
Topic: In a few words, what’s the topic of today’s lesson?
Standards: What state/local standards apply to today’s lesson?
Objectives: What will students know and be able to do as a result of today’s lesson? What new, academic language related to the procedures and content of the day’s lesson will they acquire?
Note: These objectives need to be specific, measurable, rigorous and achievable.
Assessment: What product will students complete to demonstrate they’ve met the day’s objectives?
Activities: Consider each of the following… 1. Preview: What will you do at the beginning of the class to activate students’
background knowledge, connect with yesterday’s lesson, incite curiosity, and/or assess students’ preparation for the day’s lesson?
2. Mini-Lesson/Class Notes: - How will students receive, record and organize the new content, strategies, skills
and academic language included in the day’s objectives? - How will you promote a high level of accountable talk with and among the students
to build and check for initial understanding? - How will you make all of this work as interactive as possible?
3. Processing/Conferring/Assessment: - What challenging product will students complete, on their own and with others, to
apply and practice the content and skills you’re teaching…and to demonstrate understanding?
- How will you promote a high level of inquiry, engagement and accountable talk? - How will you differentiate the work given students’ varying levels of
understanding and proficiency? - What will you do to check students’ progress and help them make mid-course
corrections?
4. Sharing/Debriefing/Assessment: What will students do to share what they’ve completed and learned, to assess their progress toward the day’s objectives and to help you plan for tomorrow?
5. Homework: What additional work will students complete to practice and prepare for tomorrow’s lesson?
Materials: What materials will you and the students use during today’s lesson?

August 28, 2009 48
Lesson Planner: Name: Mr. Williams Subject: U.S. History 1 Section: 02 Date: May 23, 2004
Topic: Gettysburg Address/Reading for Meaning/Writing Cogent Summaries: Day 1 Standards: U.S. History 1 #15 (BPS) - Students will demonstrate familiarity with key ideas, people, events, policies, debates, decisions, documents and their relationships to one another. Objectives: • Students will derive the literal meaning of the Gettysburg Address and write a three-
sentence summary, in their own words, including a main idea and key vocabulary. • Students will write one level 1, level 2, level 3, and one level 4 question related to the
Address. Assessment: Students will mark up the text and staple it into their History Notebook; they will write their summary in their History Notebook. Activities: Preview: Students will complete a Media K-W-L: Matthew Brady photos of Gettysburg, including Lincoln giving the address; the Media K-W-L will be entered in their notebooks Mini-Lesson/Class Notes: • Situate the address in time and place, building from previous lessons on Civil War • Show Hal Holbrook video (re-enactment) • Ask for/discuss initial reactions/understandings • Shared Reading (pairs): mark up text; complete Cornell notes (leave summary and questions
for processing activity) • Review guidelines: level 1-4 questions Processing/Conferring: Independent/Small Group Work Buddy Write: • complete initial summary sentence with main idea • complete two additional sentences including at least five key words from the Address • complete one of each: level 1, 2, 3 and 4 questions Differentiate: make text-on-tape and video available (Marcus/Julia/others) Circulate/Confer: need to check in with Jamilla, Anthony, and Ricky to review notebooks Sharing/Debriefing/Assessment: Complete +/- T-Chart; review and resolve problems; generate examples of how students used the text to complete summaries and questions. Homework: Finalize summaries and questions; ticket-to-enter tomorrow; one level 3 or 4 question selected for “Do Now” quiz. Materials: Copies/transparency of the Address; Brady photos; Holbrook video; audio tape of Address
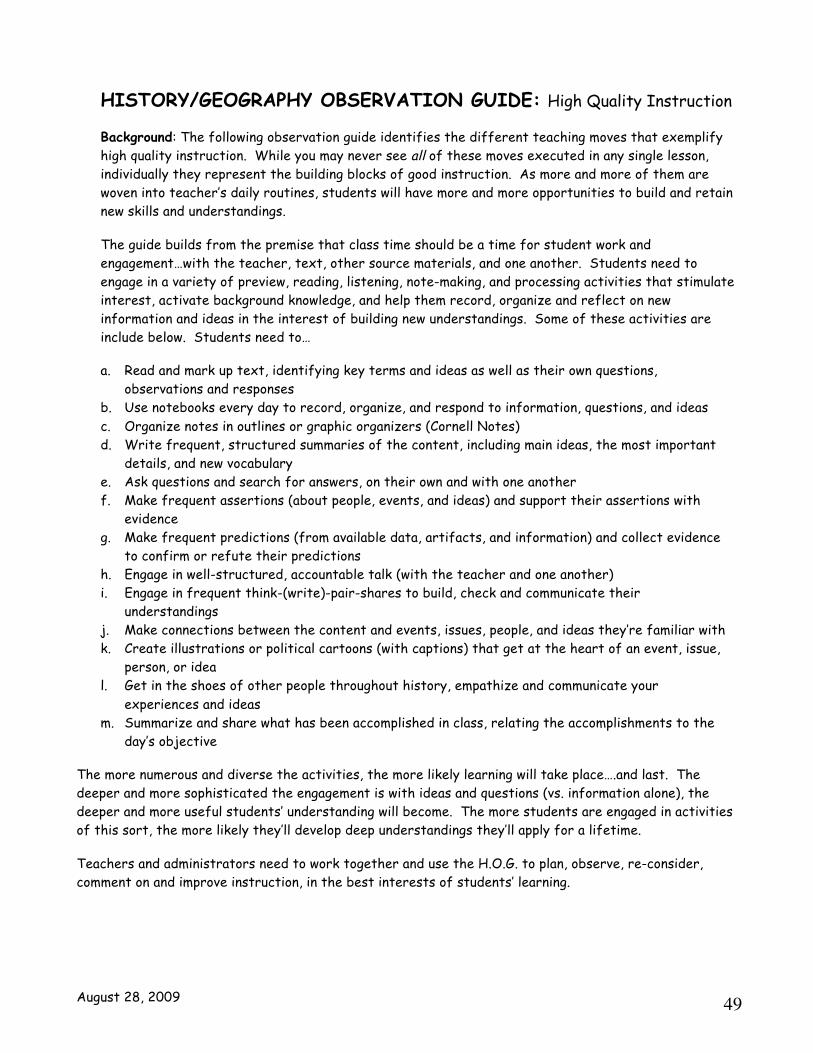
August 28, 2009 49
HISTORY/GEOGRAPHY OBSERVATION GUIDE: High Quality Instruction Background: The following observation guide identifies the different teaching moves that exemplify high quality instruction. While you may never see all of these moves executed in any single lesson, individually they represent the building blocks of good instruction. As more and more of them are woven into teacher’s daily routines, students will have more and more opportunities to build and retain new skills and understandings. The guide builds from the premise that class time should be a time for student work and engagement…with the teacher, text, other source materials, and one another. Students need to engage in a variety of preview, reading, listening, note-making, and processing activities that stimulate interest, activate background knowledge, and help them record, organize and reflect on new information and ideas in the interest of building new understandings. Some of these activities are include below. Students need to… a. Read and mark up text, identifying key terms and ideas as well as their own questions,
observations and responses b. Use notebooks every day to record, organize, and respond to information, questions, and ideas c. Organize notes in outlines or graphic organizers (Cornell Notes) d. Write frequent, structured summaries of the content, including main ideas, the most important
details, and new vocabulary e. Ask questions and search for answers, on their own and with one another f. Make frequent assertions (about people, events, and ideas) and support their assertions with
evidence g. Make frequent predictions (from available data, artifacts, and information) and collect evidence
to confirm or refute their predictions h. Engage in well-structured, accountable talk (with the teacher and one another) i. Engage in frequent think-(write)-pair-shares to build, check and communicate their
understandings j. Make connections between the content and events, issues, people, and ideas they’re familiar with k. Create illustrations or political cartoons (with captions) that get at the heart of an event, issue,
person, or idea l. Get in the shoes of other people throughout history, empathize and communicate your
experiences and ideas m. Summarize and share what has been accomplished in class, relating the accomplishments to the
day’s objective The more numerous and diverse the activities, the more likely learning will take place….and last. The deeper and more sophisticated the engagement is with ideas and questions (vs. information alone), the deeper and more useful students’ understanding will become. The more students are engaged in activities of this sort, the more likely they’ll develop deep understandings they’ll apply for a lifetime. Teachers and administrators need to work together and use the H.O.G. to plan, observe, re-consider, comment on and improve instruction, in the best interests of students’ learning.