Boiler Manual - Mechanical Equipment Sales Co
44
04/15 Copyright 2014 Mestek, Inc. FTIII-I0M-HN-6 82-0300 Boiler Manual Installation and Operation Instructions Also read and follow: HeatNet® Control Manual is manual is intended only for use by a qualified heating installer/technician. Read and follow this manual, all supplements and related instructional information provided with the boiler. Install, start and service the boiler only in the sequence and methods given in these instructions. Failure to do so can result in severe personal injury, death or substantial property damage. Do not use the boiler during construction. Construction dust and particulate, particularly drywall dust, will cause contamination of the burner, resulting in possible severe personal injury, death or substantial property damage. e boiler can only be operated with a dust-free air supply. Follow the instruction manual procedures to duct air to the boiler air intake. If the boiler has been contaminated by operation with contaminated air, follow the instruction manual guidelines to clean, repair or replace the boiler if necessary. Affix these instructions near to the boiler. Instruct the building owner to retain the instructions for future use by a qualified service technician, and to follow all guidelines in the User’s Information Manual. Finned Copper Tube Gas Boilers (MB) & Water Heaters (MW)
Transcript of Boiler Manual - Mechanical Equipment Sales Co

04/15 Copyright 2014 Mestek, Inc.
FTIII-I0M-HN-682-0300
Boiler ManualInstallation and Operation
Instructions
Also read and follow:
HeatNet® Control Manual
Th is manual is intended only for use by a qualifi ed heating installer/technician. Read and follow this manual, all supplements and related instructional information provided with the boiler. Install, start and service the boiler only in the sequence and methods given in these instructions. Failure to do so can result in severe personal injury, death or substantial property damage.
Do not use the boiler during construction. Construction dust and particulate, particularly drywall dust, will cause contamination of the burner, resulting in possible severe personal injury, death or substantial property damage. Th e boiler can only be operated with a dust-free air supply. Follow the instruction manual procedures to duct air to the boiler air intake. If the boiler has been contaminated by operation with contaminated air, follow the instruction manual guidelines to clean, repair or replace the boiler if necessary.
Affi x these instructions near to the boiler. Instruct the building owner to retain the instructions for future use by a qualifi ed service technician, and to follow all guidelines in the User’s Information Manual.
Finned Copper TubeGas Boilers (MB) &Water Heaters (MW)

Finned copper tube gas boilers & water heaters – Boiler Manual
2
F
If the information in this manual is not followed exactly, a fi re or explosion may result causing property, personal injury or loss of life.
Do not store or use gasoline or other fl ammable vapors and liquids in the vicinity of this or any other appliancWHAT TO DO IF YOU SMELL GAS:• Do not try to light any appliance.• Do not touch any electrical switch. Do not use any
phone in your building.• Immediately call your gas supplier from a neighbor’s
phone. Follow the gas supplier’s instructions.• If you cannot reach your gas supplier, call the fi re
department.Installation and service must be performed by a qualifi ed installer, service agency or the gas supplier.
Assurez-vous de bien suivre les instructions données dans cett e notice pour réduire au minimum le risque d’incendie ou d’explosion ou pour éviter tout dommoge matériel, toute blessure ou la mort
Ne pas entreposer ni utiliser d’essence ou ni d’autres vapeurs ou liquides infl ammables à proximité de cet appareil ou de tout autre appareil.QUE FAIRE SI VOUS SENTEZ UNE ODEUR DE GAZ:• Ne pas tenter d’allumer d’appareil. • Ne touchez à aucun interrupteur; ne pas vous servir
des téléphones se trouvant dans le bâtiment.• Appelez immédiatement votre fournisseur de gas depuis
un voisin. Suivez les intructions du fournisseur. • Si vous ne purvez rejoindre le fournisseur, appelez le
service des incendies.L’installation et l’entretien doivent être assurés par un installateur ou un service d’entretien qualifi é ou par le fournisseur de gaz.
Failure to properly vent this unit can cause excessive amounts of carbon monoxide resulting in severe personal injury or death!
DESIGNED AND TESTED ACCORDING TO A.S.M.E. BOILER AND PRESSURE VESSEL CODE, SECTION IV FOR A MAXIMUM ALLOWABLE WORKING PRES-SURE OF 160 PSI, 1103 kPa WATER.
BEFORE YOU START . . . . . . . . . . . . . . . . . . . . 2
RATINGS & CAPACITIES . . . . . . . . . . . . . . . . . . 3
BOILER/WATER HEATER LOCATION . . . . . . . . . . . . 3
COMBUSTION AIR & VENTILATION. . . . . . . . . . . . . 3
GENERAL VENTING GUIDELINES. . . . . . . . . . . . . . 5
OUTDOOR VENTING. . . . . . . . . . . . . . . . . . . . . 10
COMMON VENT SYSTEMS . . . . . . . . . . . . . . . . . 11
GENERAL PIPING REQUIREMENTS . . . . . . . . . . . . 12
HEATING SYSTEM PIPING . . . . . . . . . . . . . . . . . 13
DOMESTIC WATER SUPPLY PIPING . . . . . . . . . . . . 17
GAS SUPPLY PIPING . . . . . . . . . . . . . . . . . . . . 20
ELECTRICAL WIRING . . . . . . . . . . . . . . . . . . . . 21
GENERAL OPERATION . . . . . . . . . . . . . . . . . . . 21
OPERATING INSTRUCTIONS . . . . . . . . . . . . . . . . 22
SEQUENCE OF OPERATION . . . . . . . . . . . . . . . . 24
CHECKING & ADJUSTMENTS. . . . . . . . . . . . . . . . 25
HEATNET FIELD WIRING . . . . . . . . . . . . . . . . . . 26
CONTROL DESCRIPTION . . . . . . . . . . . . . . . . . . 28
DIAGNOSTIC . . . . . . . . . . . . . . . . . . . . . . . . . 28
MAINTENANCE . . . . . . . . . . . . . . . . . . . . . . . 31
TROUBLE-SHOOTING . . . . . . . . . . . . . . . . . . . . 33
REPAIR PARTS . . . . . . . . . . . . . . . . . . . . . . . . 34
START-UP SHEET . . . . . . . . . . . . . . . . . . . . . . 40
MASS CODE . . . . . . . . . . . . . . . . . . . . . . . . . 42
WARRANTY . . . . . . . . . . . . . . . . . . . . . . . . . 43
BEFORE YOU START
Th is manual covers the application, installation, operation and maintenance of a Futera III Series fi nned copper heating boiler/water heater/pool heater (Canada only). To obtain the safe, dependable, effi cient operation and long life for which this heating boiler/water heater was designed, these instructions must be read, understood and followed.
Th e Futera III Series fi nned copper heating boiler/water heaters have been design certifi ed by CSA for use with natural and propane gas under the latest revision of ANSI-Z21.10.3/CSA 4.3, Gas Water Heaters, ANSI-Z21.13/CSA 4.9, Gas-Fired Low Pressure Steam and Hot Water Boilers ANSI-Z21.56/CSA 4.7 Gas-Fired Pool Heaters (Canada only) and CAN1-3.1, Industrial and Commercial Gas Fired Packaged Boilers. Each unit has been constructed and hydrostatically tested for a maximum working pressure of 160 psi, 1103 kPa in accordance with Section IV of the A.S.M.E. Boiler and Pressure Vessel Code.

Finned copper tube gas boilers & water heaters – Boiler Manual
3
F
All aspects of the boiler/water heater installation must conform to the requirements of the authority having jurisdiction, or, in the absence of such requirements, to the National Fuel Gas Code, ANSI Z223.1/NFPA 54-latest revision. Where required by the authority having jurisdiction, the installation must conform to the Standard for Controls and Safety Devices for Automatically Fired Boilers, ANSI/ASME CSD-1.
In Canada, the installation must be in accordance with the require-ments of CSA B149.1 or .2, Installation Code for Gas Burning Appliances and Equipment.
If installed in the Commonwealth of Massachusett s, you MUST FOLLOW the additional instructions contained in RBI’s instruction sheet MACODE-3. Which is located in the back of this manual.
Th e owner should maintain a record of all service work performed with the date and a description of the work done. Include the name of the service organization for future reference.
Direct all questions to your RBI distributor or contact the RBI Customer Service Department at: 260 North Elm Street, Westfi eld, MA 01085 for US or 7555 Tranmere Drive, Mississauga ONT L5S 1L4 for Canada. Always include the model and serial numbers from the rating plate of the boiler/water heater in question.
RATINGS & CAPACITIES
Before undertaking the installation of the Futera III Series boiler/water heater check the rating plate to ensure that the unit has been sized properly for the job. Th e “Net I=B=R Ratings” specify the equivalent amount of direct copper radiation that the unit can supply under normal conditions. Also ensure that the unit has been set up for the type of gas available at the installation site. Other important considerations are the availability of an adequate electrical supply, fresh air for combustion and a suitable chimney or vent system.
BOILER/WATER HEATER LOCATION
1. Th is boiler/water heater is suitable for indoor and oudooor installations. Locate the boiler/water heater in an area that provides good access to the unit. Servicing may require the removal of jacket panels. Allow the minimum clearances between adjacent construction and the boiler/water heater as listed in Table 1.
Service clearances are not mandatory, but are recommended to ensure ease of service should it be required.
Table 1
Clearance to
Combustibles
Service
Clearance in mm in mm
Top 6 153 30 762Back 6 153 24 610Left Side 6 153 12 306Right Side 6 153 12 306Front 6 153 30 762
2. An optimum site will be level, central to the piping system, close to a chimney or outside wall and have adequate fresh air for combustion. Ensure that the boiler/water heater is level from front to back and from side to side. Use metal shims to level the boiler/water heater. Electrical and electronic components must also be protected from exposure to water during operation and maintenance. DO NOT install this boiler/water heater in a location that would subject any of the gas ignition components to direct contact with water or excessive moisture during operation or servicing.
3. Ensure that the fl oor is structurally sound and will support the weight of the boiler/water heater.
Th e Futera III may be installed directly on combustible fl ooring, but never on carpeting.
4. Locate the boiler/water heater in an area that will prevent water damage to adjacent construction should a leak occur or during routine maintenance. If such a location doesn’t exist, a suitable drain pan that’s adequately drained must be installed under the unit.
5. DO NOT place this boiler/water heater in a location that would restrict the introduction of combustion air into the unit or subject it to a negative pressure, see “GENERA L VENTING GUIDELINES”.
6. NEVER place this boiler/water heater in a location that would subject it to temperatures at or near freezing, see the “FREEZE PROTECTION” section on page 12.
Never store combustible materials, gasoline or any product containing fl ammable vapors or liquids in the vicinity of the boiler/water heater. Failure to comply with this warning can result in an explosion or fi re causing extensive property damage, severe personal injury or death!
COMBUSTION AIR & VENTILATION
Th is boiler/water heater must be supplied with combustion air in accordance with Section 5.3, Air for Combustion & Ventilation, of the latest revision of the National Fuel Gas Code, ANSI Z223.1/NFPA 54 and all applicable local building codes. Canadian installations must comply with CAN/ CGA B149.1 or .2 Installation Code for Gas Burning Appliances and Equipment, or applicable provisions of the local building codes. Failure to provide adequate combustion air for this boiler/water heater can result in excessive levels of carbon monoxide which can result in severe personal injury or death!
To operate properly and safely this boiler/water heater requires a continuous supply of air for combustion. NEVER store objects on or around the boiler/water heater!

Finned copper tube gas boilers & water heaters – Boiler Manual
4
F
Combustion air contaminated with fl uorocarbons or other halogenated compounds such as cleaning solvents and refrigerants will result in the formation of acids in the combustion chamber. Th ese acids will cause premature failure of the boiler/water heater voiding the warranty!
If the boiler/water heater is operated while the building is under construction it MUST be protected from wood, concrete, sheet rock and other types of dust. Failure to properly protect the unit from construction dust will damage the unit voiding the warranty!
Buildings will require the installation of a fresh air duct or other means of providing make-up air if the intake air option isn’t used. Any building utilizing other gas burning appliances, a fi replace, wood stove or any type of exhaust fan must be checked for adequate combustion air when all of these devices are in operation at one time. Sizing of an outside air duct must be done to meet the requirements of all such devices.
Never operate the Futera III in an environment subjected to a negative pressure unless it is Direct Vented. Failure to comply with this warning can result in excessive levels of carbon monoxide causing severe personal injury or death!
All Air From Inside The Building
If the Futera III is to be located in a confi ned space, the minimum clearances listed in Table 1 must be maintained between it and any combustible construction. When installed in a confi ned space without the intake air option, Figures 5, 6 and 7, two permanent openings communicating with an additional room(s) are required. Th e combined volume of these spaces must have suffi cient volume to meet the criteria for an unconfi ned space. Th e total air requirements of all gas utilization equipment, fi replaces, wood stoves or any type of exhaust fan must be considered when making this determination. Each opening must have a minimum free area of 1 in2/1000 Btu/hr, 2200 mm2/kW based on the total input rating of ALL gas utilization equipment in the confi ned area. Each opening must be no less than 100 in2, 64,516 mm2 in size. Th e upper opening must be within 12 in, 305 mm of, but not less than 3 in, 76 mm from, the top of the enclosure. Th e bott om opening must be within 12 in, 305 mm of, but not less than 3 in, 76 mm from, the bott om of the enclosure.
All Air From Outside The Building
When installed in a confi ned space without utilizing the intake air option two permanent openings communicating directly with, or by ducts to, the outdoors or spaces that freely communicate with the outdoors must be present. Th e upper opening must be within 12 in, 305 mm of, but not less than 3 in, 76 mm from, the top of the enclosure. Th e bott om opening must be within 12 in, 305 mm of, but not less than 3 in, 76 mm from, the bott om of the enclosure.
Where directly communicating with the outdoors or communi-cating with the outdoors through vertical ducts, each opening shall have a minimum free area of 1 in2/4000 Btu/hr, 550 mm2/kW of the total input rating of all of the equipment in the enclosure.
Where communicating with the outdoors through horizontal ducts, each opening shall have a minimum free area of 1 in2/2000 Btu/hr, 1100 mm2/kW of the total input rating of all of the equipment in the enclosure.
When ducts are used, they must have the same cross-sectional area as the free area of the opening to which they connect.
When calculating the free area necessary to meet the make-up air requirements of the enclosure, consideration must be given to the blockage eff ects of louvers, grills and screens. Screens must have a minimum mesh size of 1/4 in, 6.4 mm. If the free area through a louver or grill is not known, ducts should be sized per Table 2.
Canadian installations must comply with CSA B149.1 when air supply is provided by natural air fl ow from the outdoors for natural draft, partial fan-assisted, fan-assisted, or power draft -assisted burners, there shall be a permanent air supply opening(s) having a cross-sectional area of not less than 1 in2 per 7,000 Btuh (310 mm2 per kW) up to and including 1 million Btuh, plus 1 in2 per 14,000 Btuh (155 mm2 per kW) in excess of 1 million Btuh.
Table 2 Make-up Air Louver Sizing
Required Cross Sectional AreaInput(MBH)
1/4 in 6.4 mmWire Screen
75% Free AreaMetal Louvers
25% Free AreaWooden Louvers
in2 cm2 in2 cm2 in2 cm2
500 125 806 167 1077 500 3226 750 187 1206 250 1613 750 48391000 250 1613 333 2148 1000 64521250 313 2019 416 2684 1250 80651500 375 2419 500 3226 1500 96771750 437 2819 583 3761 1750 11,2901999 500 3226 667 4303 2000 12,900
Intake Air Option – General Guidelines
Th is confi guration provides combustion air directly to the boiler/water heater’s air intake adapter using a dedicated pipe when using the direct vent option. Combustion air can be drawn in horizontally through the same outside wall which terminates the exhaust gases or vertically through the roof, see Figures 1, 2, 3 & 4.
Common intake air systems may be used provided the common duct is sized properly. An intake combustion air damper should be installed if the common vent option is used in the intake air pipe of each heater. Improper installation can result in excessive levels of carbon monoxide which can cause severe personal injury or death!
Single wall galvanized smoke pipe, single wall aluminum pipe, fl exible aluminum pipe, PVC or CPVC pipe can be used for the intake air pipe. It must be sized per Table 3.

Finned copper tube gas boilers & water heaters – Boiler Manual
5
F
Table 3 Intake Air Pipe Sizing
Model For Vertical For HorizontalSize (Up to 60’) (Up to 60’)
in mm in mm 500 8 203 6 152 750 8 203 6 1521000 8 203 6 1521250 10 254 8 2031500 10 254 10 2541750 12 305 12 3052000 12 305 12 305
All joints in metal intake air systems must be secured using corro-sion resistant fasteners and sealed using a suitable Silicone caulk. If PVC or CPVC is used, the joints must be cleaned with a suitable solvent and connected using a solvent based PVC cement. Th e combustion air system MUST be supported by the building structure not the boiler/water heater.
A combustion air damper interlocked with the unit should be installed in the intake air pipe when the infi ltration of subfreezing air could occur, otherwise the unit could freeze up voiding the warranty!
Intake Air Option – Vertical Guidelines
Th e maximum equivalent length for the vertical intake air pipe is 60 ft , 18.3 m. Each 90° elbow and the intake air terminal are equal to 10 linear ft , 3.0 m of pipe, see Table 3.
An approved, nonrestrictive intake air terminal must be used. Th e intake air terminal must terminate as shown in Figure 3. Th e penetration point in the roof must be properly fl ashed and sealed.
Intake Air Option – Horizontal Guidelines
Th e maximum equivalent length for the horizontal intake air pipe is 60 ft , 18.3 m. Each 90° elbow and the intake air terminal are equal to 10 linear ft , 3.0 m of pipe. If horizontal runs exceed 5 ft , 1.5 m they must be supported at 3 ft , 0.9 m intervals with overhead hangers. Th e certifi ed intake air terminal from RBI must be used, see Figures 1, 2 and 4.
GENERAL VENTING GUIDELINES
Th e vent installation must be in accordance with Part 7, Venting of Equipment, of the National Fuel Gas Code, ANSI Z223.1/NFPA 54-latest revision or appli-cable provisions of the local building codes. Canadian installations must comply with CAN/CGA B149.1 or .2 Installation Code. Improper venting can result in excessive levels of carbon monoxide which can result in severe personal injury or death!
All vent systems must be fully supported by the building structure and not by the boiler/water heater. Appropriate thimbles and fi re-stops must be used where required.
Common vent systems must be properly engineered and sized to provide a negative draft of .03 in, 0.8 mm to .1 in, 2.5 mm W.C. at the fl ue outlet. Common positive pressure vent systems are not to be used. Improper installation can result in excessive levels of carbon monoxide which can cause severe personal injury or death!
VENT SYSTEM OPTIONS – (CATEGORY I, II, IV)
Correctly identify the type of vent system the appliance requires before proceeding. Category identifi cation is noted on the unit rating plate.
Th e fl ue products in the vent system may be cooled below their dew point and form condensate in the fl ue. Th e materials used for a Category II and IV vent must be resistant to any corrosive damage from fl ue gas condensate. Th e fl ue from a Category II and IV vent system must have a condensate drain with provisions to properly collect and dispose of any condensate that may occur in the venting system.
Th e Futera III may be vented the following ways:
1) Direct Vent, Positive Pressure, Category IV uses a vent system certifi ed to UL 1738 for installations in the United States, ULC S636 for installations in Canada. Combustion air is piped from the outdoors to the blower inlet.
2) Side Wall Vent, Positive Pressure, Category IV uses a vent system certifi ed to UL 1738 for installations in the United States, ULC S636 for installations in Canada. Combus-tion air is obtained from the space in which the unit is installed.
3) Vertical/Chimney Vent, Negative Pressure, Category II uses a metal chimney system approved for Category II.
4) Vertical Vent, Positive Pressure, Category IV uses a vent system certifi ed to UL 1738 for installations in the United States, ULC S636 for installations in Canada. Combustion air is obtained from the outdoors or the space in which the unit is installed.
5) Vertical Vent/Chimney Vent (750-2000), Negative Pres-sure Non-Condensing, Category I uses an approved metal chimney system or masonry chimney. Combustion air is ob-tained from the space in which the unit is installed.
All venting and combustion air material supplied by installer. All venting materials must be approved for the application. Consult the vent manufacturer’s product literature.
Th e maximum equivalent length for the fl ue outlet vent system for Category IV conditions is 60 ft , 18.3 m. Use Table 4 for the equivalent lengths per fi tt ing. Table 4 “Category Equivalent Length Per Fitt ing” chart is meant as a guideline for preliminary sizing. If vent length approaches 75% of maximum length listed an engineered vent system calculation must be performed, consult factory.

Finned copper tube gas boilers & water heaters – Boiler Manual
6
F
DIRECT VENT, POSITIVE PRESSURE,
CATEGORY IV
In this confi guration the boiler/water heater blower is used to push the fl ue products to the outdoors while drawing combustion air from the outdoors. Th e Intake Air Option instructions under the “COMBUSTION AIR & VENTILATION” section must be followed! Th e vent system must be sized per Table 4.
Table 4 Category IV
Horizontal Direct Vent Systems
Figures 1 & 2
Th e vent materials used in horizontal vent systems must be certifi ed to UL 1738 for installations in the United States, ULC S636 for installations in Canada. Th e certifi ed vent terminal from RBI must also be used.
If any part of a single wall metal vent system passes through an unheated space, it must be insulated with insulation rated for 400°F, 204°C. Structrual penetrations must be made using approved fi re-stops. For best results, horizontal vent systems should be as short and straight as possible.
Th e vent system must be both gas tight and watertight. All seams and joints in metal pipes must be joined and sealed in accordance with the vent system manufacturer’s instructions.
When horizontal vent runs exceed 5 ft , 1.5 m they must be supported at 3 ft , 0.9 m intervals with overhead hangers. Th e vent system must be pitched down, toward the vent terminal, 1/4 in/ft , 20 mm/m. If any part of a single wall metal vent system passes through an unheated space it must be insulated with insulation rated for 400°F, 204°C.
Horizontal vent systems shall terminate at least 4 ft , 1.2 m below, 4 ft , 1.2 m horizontally from or 1 ft , 0.30 m above any door, window or gravity air inlet into any building. It must not terminate less than 4 ft , 1.2 m horizontally from, and in no case above or below, unless a 4 ft , 1.2 m horizontal distance is maintained, from electric meters, gas meters, regulators and relief equipment and not less than 7 ft , 2.1 m above adjacent public walkway. Th e bott om of the vent terminal(s) shall be located at least 5 ft , 1.5 m above the air intake terminal(s) unless there is a minimum 5 ft , 1.5 m horizontal separation between them. Avoid terminal locations likely to be aff ected by winds, snowdrift s, people and pets. Protect building materials and vegetation from degradation caused by the fl ue gases.
Vertical Direct Vent Systems – Figure 3
If any part of a single wall metal vent system passes through an unheated space, it must be insulated with insulation rated for 400°F, 204°C. Structural penetrations must be made using approved fi re-stops.
An approved, nonrestrictive vent terminal must be used Th e top of a vertical vent system must extend at least 51/2 ft , 1.7 m above the roof surface and maximum snow line that it passes through, 4 ft , 1.2 m above the intake air terminal, see Figure 3.
In addition the vent system must conform to the dimensions shown in Figure 3. Th e penetration point in the roof must be properly fl ashed and sealed.
Th e vent system must be gas tight. All seams and joints in metal pipes must be joined and sealed in accordance with the vent system manufacturer’s instructions.
Combination Direct Vent Systems – Figure 4
Th e boiler/water heater can be vented vertically with the intake air piped horizontally through an outside wall. Follow the instruct-ions in the Intake Air Option – Horizontal Guidelines on page 5. Also follow the general instructions in the “COMBUSTION AIR & VENTILATION” and “GENERA L VENTING GUIDE-LINES” sections.
Model/Outlet Diameter
Equivalent Feet of Straight Pipe (ft)
K 500 750 1000
5" 5" 6"
Standard Tee 1.25 15 ft 20 ft 25 ftBoot Tee 0.65 10 ft 10 ft 15 ftCap - Low Res. (UL) 0.50 10 ft 10 ft 10 ft45° w/Bird Screen 0.40 7 ft 7 ft 10 ftElbow – 90° 0.38 10 ft 10 ft 10 ftElbow – 45° 0.15 5 ft 5 ft 5 ft
Model/Outlet Diameter
Equivalent Feet of Straight Pipe (ft)
K 1250 1500 1750 2000
6" 8" 10" 10"
Standard Tee 1.25 25 ft 35 ft 40 ft 40 ftBoot Tee 0.65 15 ft 15 ft 20 ft 20 ftCap - Low Res. (UL) 0.50 10 ft 10 ft 15 ft 15 ft45° w/Bird Screen 0.40 10 ft 10 ft 10 ft 10 ftElbow – 90° 0.38 10 ft 10 ft 15 ft 15 ftElbow – 45° 0.15 5 ft 5 ft 5 ft 5 ft

Finned copper tube gas boilers & water heaters – Boiler Manual
7
F
Figure 1 Hoizontal Air Intake an Venting for a Single Direct Vent System (Category IV)
Figure 2 Horizontal Air Intake and Venting for Multiple Direct Vent Systems (Category IV)
When running horizontal combustion air and venting for single or multiple units, exhaust and combustion air ter-minals must be installed on the same plane (outside wall) in order to prevent pressure diff erences due to prevailing winds. In cold climates, double-wall or insulated inlet pipe recommended to prevent condensation.
5 FT 1.5 m
1.5 FT 0.5 m
2 IN. 5.0 cm
4001 & LARGER
2001 TO 4000
1001 TO 2000
500 TO 1000
MBH FT m
15 4.620 6.1
5 1.510 3.1
kW146 TO 293293 TO 586586 TO 1172
1172 & LARGER
16 FT 4.9 m
1/4 IN. PER FOOT20 mm/m
1.5 FT 0.5 m
1000 BTU'S

Finned copper tube gas boilers & water heaters – Boiler Manual
8
F
Figure 3 Vertical Air Intake and Venting for a Direct Vent System (Category IV)
Figure 4 Combination Direct Vent Systems (Category IV)
10 FT 3.1 m
4 FT
1.2 m
5 FT
1.5 m
1.5 FT
0.5 m
5 1/2 FT
1.7 m
1.5 FT. .5 m
10 FT. 3.1 m
3 FT. 1 m

Finned copper tube gas boilers & water heaters – Boiler Manual
9
F
SIDE WALL VENT, POSITIVE PRESSURE,
CATEGORY IV – Figure 5
In this confi guration the boiler/water heater blower is used to push the fl ue products horizontally to the outdoors, see Figure 5. Th e air for combustion is taken from the space in which the unit is installed. Th e applicable instructions under the “COMBUSTION AIR & VENTILATION” section must be followed! Th e vent guidelines under the Horizontal Direct Vent Systems section must also be followed.
VERTICAL VENT, POSITIVE PRESSURE,
CATEGORY IV – Figures 7 & 9
(Vent pipe equivalent length up to 60 ft , 18.3 m maximum)
Masonry chimneys, when used, must be lined with a metal liner certifi ed for Category IV venting.
A thorough inspection of the masonry chimney must be performed to ensure that the chimney is clean, properly constructed lined, and sized. Exterior masonry chimneys should not be used unless properly lined to prevent condensation and draft problems.
Figure 5 Side Wall Venting (Category IV)
VERTICAL VENT, NEGATIVE PRESSURE –
CATEGORY I & II
Th e Futera III when listed as a Category II appliance and vent-ed vertically into a listed metal chimney system, Figures 7 & 9. Th e chimney must provide a negative pressure not greater than 0.10 in, 2.5 mm W.C. at the boiler/water heater fl ue collar with the unit running. Th e Futera III when listed as a Category I appliance and vented vertically into a listed metal chimney system, Figures 6 & 8. Th e chimney must provide a negative pressure not greater than 0.01 to 0.10 in, 0.25 to 2.0 mm W.C. at the boiler/water heater fl ue collar with the unit running. A barometric damper must be installed between the fl ue collar and the vent connector when nega-tive pressures exceed 0.10 in, 2.5 mm W.C.
When using a listed metal chimney system the chimney system manufacturer’s instructions must be followed.
Masonry chimneys, when used with Category II appliances, must be lined with a metal liner certifi ed to UL 1738 for installations in the United States and ULC S636 for installations in Canada.
When more than one appliance is connected to the same chimney fl ue, the fl ue must be large enough to safely vent the combined output of all of the appliances.
If an appliance using any type of a mechanical draft system operating under positive pressure is connected to a chimney fl ue, never connect any other appliances to this fl ue. Doing so can result in excessive levels of carbon monoxide which can cause severe personal injury or death!

Finned copper tube gas boilers & water heaters – Boiler Manual
10
F
Chimney Inspection & Sizing – Category I and II
A thorough inspection of the masonry chimney must be performed to ensure that the chimney is clean, properly constructed, lined and sized. Exterior masonry chimneys should not be used unless properly lined to prevent condensation and draft problems. Tables 5 & 6 list the equivalent breeching and fl ue sizes required for the boiler/water heater.
Correctly identify the type of vent system the appliance requires before proceeding. Category identifi cation is noted on the unit rating label.
Table 5 Equivalent Breeching & Chimney Size, Negative Pressure (Category I)
Model Size Pipe Diameter in mm
500 – – 750 8 2031000 10 2541250 10 2541500 10 2541750 12 3052000 12 305
Note: These sizes are based on a 20 ft, 6.1m chimney height.
Figure 6 Vertical Venting with a Metal Chimney System (Category I)
Figure 7 Vertical Venting with a Metal Chimney System (Category II)
Vent Connections
Locate the boiler/water heater as close to the chimney as possible. Use the shortest, straightest vent connector possible for the installation. If horizontal runs exceed 5 ft , 1.5 m they must be supported at 3 ft , 0.9 m intervals with overhead hangers. Use a single wall stainless steel vent pipe the same diameter as the fl ue collar to connect the boiler/water heater to a masonry chimney. When using a listed metal chimney system use the appropriate vent connector.
Th e vent connector should be sloped up toward the chimney at a minimum rate of 1/4 in/ft , 21 mm/m. On masonry chimneys the connector must terminate fl ush with the inside of the chimney fl ue, Figures 8 & 9. Fasten each single wall vent connection with at least 3 corrosion resistant sheet metal screws.
Always provide a minimum clearance of 6 in, 152 mm between single wall vent pipe and any combustible materials.
Failure to maintain minimum clearances between vent connectors and any combustible material can result in a fi re causing extensive property damage, severe personal injury or death!
Exit cones are favorable when used to increase the velocity of the fl ue gas exiting the stack and, may also help, in cold climates, to reduce ice build-up. Exit cone terminations must be supplied by others, installed per manufacturer’s instructions, and meet local and federal code.
generic exit cone Model Size Pipe Diameter
in mm 500 6 152 750 6 1521000 7 1781250 8 2031500 8 2031750 10 2542000 10 254
Note: These sizes are based on a 20 ft, 6.1m chimney height.
Table 6 Equivalent Breeching & Chimney Size, Negative Pressure (Category II)

Finned copper tube gas boilers & water heaters – Boiler Manual
11
F
Figure 9 Vertical Venting Using a Lined Masonry Chimney (Category II)
Figure 11 Multiple Outdoor Units
Figure 8 Vertical Venting Using a Lined Masonry Chimney (Category I)
Figure 10 Outdoor Venting (Category IV)
DISCHARGE VENT
AIR INLET LOUVERS
RIOM-60 REV. A
2 FT
(0.62 M)
3 FT
(1 M)

Finned copper tube gas boilers & water heaters – Boiler Manual
12
F
OUTDOOR VENTING
When installed outdoors the Futera III must be fi tt ed with the factory supplied outdoor hood, air intake adapter with fi lter and exhaust terminal, see Figure 10. Multiple units must be spaced per Figure 11.
Th e boiler/heater must be at least 2 ft , .62 m from any door, window or gravity air inlet into any building and at least 3 ft , 1 m from any overhang unless local codes dictate diff erently.
Avoid locations where wind defl ection off of adjacent walls, buildings or shrubbery might cause a downdraft . Th e unit(s) should be located at least 3 ft , 1 m from structures. Outdoor installations are not recommended in areas where the danger of snow blockage exists.
Do not place the boiler/water heater in a location that would subject it to runoff from adjacent buildings or damage may occur voiding the warranty!
COMMON VENT SYSTEMS
On multiple boiler common vent applications, the master boiler may be required to be fi rst on and installed closest to the verticle chimney (consult factory).
If an existing boiler/water heater is removed from a common venting system, the common venting system may then be too large for the proper venting of the remaining appliances connected to it. At the time of removal of an existing boiler/water heater, the following steps shall be followed with each appliance remaining connected to the common venting system placed in operation, while the other appliances remaining connected to the common venting system are not in operation.
Au moment du retrait d’une chaudière existante, les mesures suivantes doivent être prises pour chaque appareil toujours raccordé au système d’évacuation commun et qui fonctionne alors que d’autres appareils toujours raccordés au système d’évacuation ne fonction-nent pas: système d’évacuation
a) Seal any unused openings in the common venting system.
Sceller toutes les ouvertures non utilisées du système d’évacuation.
b) Visually inspect the venting system for proper size and horizontal pitch and determine there is no blockage or restriction, leakage, corrosion and other defi ciencies which could cause an unsafe condition.
Inspecter de façon visuelle le système d’évacuation pour déterminer la grosser et l’inclinaison horizontale qui conviennentet s’assurer que le système est exempt d’obstruction, d’étranglement de fruite, de corrosion et autres défaillances qui pourraient présenter des risques.
c) Insofar as is practical, close all building doors and windows and all doors between the space in which the appliances remaining connected to the common venting system are located and other spaces of the building. Turn on clothes dryers and any appliance not connected to the common venting system.Turn on any exhaust fans, such as range hoods and bathroom exhaust, so they will operate at maximum speed. Do not operate a summer exhaust fan for a boiler installation. Close fi replace dampers.
Dans la mesure du possible, fermer toutes les portes et les fenêtres du bâtiment et toutes les portes entre l’espace où les appareils toujours raccordés du système d’évacuation sont installés et les autres espaces du bâtiment. Mett re en marche les sécheuses, tous les appareils non raccordés au système d’évacuation commun et
tous les ventilateurs d’extraction comme les hott es de cuisinère et les ventilateurs des salles de bain.
S’assurer que ces ventilateurs fonctionnent à la vitesse maximale. Ne pas faire fonctionner les ventilateurs d’été. Fermer les registres des cheminées.
d) Place in operation the appliance being inspected. Follow the lighting instructions. Adjust thermostat so appliance will operate continuously.
Mett re l’appareil inspecté en marche. Suivre les instructions d’allumage. Régler le thermostat de façon que l’appareil fonc-tionne de façon continue.
e) Test for spillage at the draft hood relief opening aft er 5 minutes of main burner operation. Use the fl ame of a match or candle, or smoke from a cigarett e, cigar or pipe.
Faire fonctionner le brûleur principal pendant 5 min ensuite, déterminer si le coupe-tirage déborde à l’ouverture de décharge. Utiliser la fl amme d’une allunett e ou d’une chandelle ou la fumée d’une cigarett e, d’un cigare ou d’une pipe.
f ) Aft er it has been determined that each appliance remaining connected to the common venting system properly vents when tested as outlined above, return doors, windows, exhaust fans, fi replace dampers and any other gas-burning appliance to their previous condition of use.
Une fois qu’il a été d éterminé, selon la métode indiquée ci-dessus, que chaque appareil raccordé au système d’évacuation est mis à l’air libre de façor adéquate. Remett re les portes et les fenêtres, les ventilateurs, les registres de cheminées et les appareils au gaz à leur position originale.
g) Any improper operation of the common venting system should be corrected so the installation conforms with the National Fuel Gas Code, ANSI Z223.1/NFPA 54. When resizing any portion of the common venting system, the common venting system should be resized to approach the minimum size as determined using the appropriate tables in Appendix F in the National Fuel Gas Code, ANSI Z223.1/ NFPA 54 and or CAN/CGA B149 Installation Codes.
Tout mauvais fonctionnement du systéme d’évacu-tion commun devrait étré corrigé de façor que l’installation soit conforme au National Fue Gas Code, ANSI Z223.1/NFPA 54 et (ou) aux codes d’installation CAN/CGA-B149. Si la grosseur d’une section du système d’ évacuation doit étré modifi ée, le système devrait étré modifi é pour respecter les valeurs minimales des tableaux pertinents de l’appendice F du National Fuel Gas Code, ANSI Z223.1/ NFPA 54 et (ou) des codes d’installation CAN/CGA-B149.
GENERAL PIPING REQUIREMENTS
Improper piping of this boiler/water heater will void the manufacturer’s warranty and can cause boiler failure resulting in fl ooding and extensive property damage! Excessive water hardness causing scaling in the copper heat exchanger tubes is NOT covered under the manufacturer’s warranty, see Table 9. Excessive pitt ing and erosion of the internal surface of the copper heat exchanger tubes is NOT covered under the manufacturer’s warranty if the result of high water fl ow rates, see Table 8. Return water temperatures below 125°F, 52°C will result in heat exchanger damage from excessive condensation voiding the manufacturer’s warranty, see Primary/Secondary Piping, Figure 13.

Finned copper tube gas boilers & water heaters – Boiler Manual
13
F
Figure 12 Futera III Piping
Shut off valves and unions should be installed at the inlet and outlet connections of the boiler/hot water heater to provide for isolation of the unit should servicing be necessary.
Freeze Protection
Installations in areas where the danger of freezing exists are not recommended unless proper freeze protection is provided. Th e following precautions MUST be observed:1. A continuous fl ow of water through the unit MUST be main-
tained! Th e pump responsible for fl ow through the boiler/water heater must run continuously!
2. An ethylene glycol/water mixture suitable for the minimum temperature that the unit will be exposed to must be used. Th e pump must be capable of producing a minimum of 15% more fl ow and overcoming a 20% increase in head loss. Domestic water systems must be isolated from the water heater by the use of a heat exchanger or other approved method.
3. If the unit must be shut off for any reason the electric, gas and water supplies MUST be shut off and the unit and its pump completely drained.
Improper outdoor installation of this unit can cause boiler failure voiding the manufacturer’s warranty!
Valve
Pipe the discharge of the pressure relief valve as shown in Figure 12.
Never install any type of valve between the boiler/water heater and the relief valve or an explosion causing extensive property damage, severe personal injury or death may occur!
Flow Switch
Th e fl ow switch supplied with the boiler/water heater must be wired to the terminal strip in the control panel to prevent the boiler from fi ring unless there’s adequate water fl ow through the unit. Th e fl ow switch must be installed in the supply piping adjacent to the boiler outlet connection.
Failure to properly install the fl ow switch may result in damage to the boiler/water heater heat exchanger voiding the warranty!
HEATING SYSTEM PIPING
General Piping Requirements
All heating system piping must be installed by a qualifi ed technician in accordance with the latest revision of the ANSI/ASME Boiler and Pressure Vessel Code, Section IV, and ANSI/ASME CSD-1, Standard for Controls and Safety Devices for Automatically Fired Boilers. All applicable local codes and ordinances must also be followed. A minimum clearance of 1 in, 25 mm must be maintained between heating system pipes and all combustible construction. All heating system piping must be supported by suitable hangers not the boiler. Th e thermal expansion of the system must be considered when supporting the system. A minimum system pressure of 12 psig, 82.7 kPa must be maintained.
Heating Boiler Piping Connections
Th e supply and return connections should be sized to suit the system, see Table 7.
Table 7 Supply & Return Pipe Sizing (Flanged)
Model Size Supply Size Return Size
500 thru 1000 2” 2”1250 thru 2000 2 1/2” 2 1/2”

Finned copper tube gas boilers & water heaters – Boiler Manual
14
F
Pump Requirements
Th is low mass boiler requires a continuous minimum water fl ow for proper operation. Th e system pump must be sized to overcome the head loss of the boiler and the heating system in order to achieve the required temperature rise. Table 8 provides the heat exchanger pressure drop and temperature rise fi gures. Th e temperature rise across the boiler must never exceed 35°F, 19.4°C. Th e adjustable pump delay turns the pump on each time the burner fi res and runs the pump for 20 to 600 seconds aft er the call for heat is satisfi ed.
A temperature rise outside of the range listed in Table 8 indicates that the fl ow rate through the heat exchanger is incorrect which will damage the heat exchanger voiding the warranty! Th e maximum allowable temperature rise is 35°F, 19.4°C.
Th e maximum allowable fl ow rate through a Futera III boiler is 97 GPM, 6.1 L/s on 500 through 1000 models and 136 GPM, 8.6 L/s for 1250 through 2000 models. Th e Cupro-Nickel heat exchanger allows for 108 GPM, 6.8 L/s on 500 through 1000 models and 151 GPM, 9.5 L/s on 1250 through 2000 models.
Table 8 Temperature Rise Table
ΔT = 20°F ΔT = 11.1°CModel Flow Rate Pres. Drop Flow Rate Pres. Drop
Number GPM Ft L/s kPa500 43.5 0.55 2.7 1.6750 65.3 1.63 4.1 4.8
1000 87.0 3.59 5.5 10.61250 108.8 2.21 6.9 6.51500 130.5 3.73 8.2 11.0
ΔT = 25°F ΔT = 13.9°CModel Flow Rate Pres. Drop Flow Rate Pres. Drop
Number GPM Ft L/s kPa500 34.8 0.36 2.2 1.1750 52.2 1.08 3.3 3.2
1000 69.6 2.37 4.4 7.01250 87.0 1.46 5.5 4.31500 104.4 2.46 6.6 7.31750 121.8 3.84 7.7 11.32000 139.2 5.63 8.8 16.6
ΔT = 30°F ΔT = 16.7°CModel Flow Rate Pres. Drop Flow Rate Pres. Drop
Number GPM Ft L/s kPa750 43.5 0.77 2.7 2.3
1000 58.0 1.69 3.7 5.01250 72.5 1.04 4.6 3.11500 87.0 1.76 5.5 5.21750 101.5 2.74 6.4 8.12000 116.0 4.01 7.3 11.8
ΔT = 35°F ΔT = 19.4°CModel Flow Rate Pres. Drop Flow Rate Pres. Drop
Number GPM Ft L/s kPa750 37.3 0.58 2.4 1.7
1000 49.7 1.27 3.1 3.81250 62.1 0.78 3.9 2.31500 74.6 1.32 4.7 3.91750 87.0 2.06 5.5 6.12000 99.4 2.02 6.3 8.9
Low Water Cutoff
If a boiler is installed above any radiation elements it must be fi tt ed with a low water cutoff device.
Refer to the wiring diagram supplied with the boiler/water heater for proper wiring connections.
Expansion Tank & Air Separator
An expansion tank or other means to control thermal expansion must be installed in the heating system. An expansion tank must be installed close to the boiler on the suction side of the pump. An air scoop and automatic air vent must also be installed to eliminate air trapped in the system.
Primary/Secondary Piping
Boilers connected to heating systems using zone valves, zone pumps, or systems that have excessive flow rates or return water temperatures less than 125°F, 52°C must be isolated from these systems to protect the boiler.
Variable Water Flows
Figure 13 shows a typical primary/secondary piping system. A dedicated pump is used to maintain a constant water fl ow through the boiler. Th is secondary pump is sized to overcome the head loss of the boiler and secondary piping system while supplying the fl ow rate required to maintain the desired temperature rise across the boiler. Th e primary pump is sized to provide the required fl ow to the heating system. Th e secondary piping connections to the primary system piping must not be more than 12 in, 305 mm apart to ensure zero pressure drop in the primary system, see Figure 13.
Low Return Water Temperatures
To prevent the problems associated with condensation of the products of combustion due to low return water temperatures a primary/secondary piping system with a bypass confi guration must be installed, see Figure 14. Th e bypass system must be sized the same as the secondary piping. Th e primary and secondary pumps should be sized to provide the required fl ow through each system. Th e secondary piping connections to the primary system piping must not be more than 12 in, 305 mm apart to ensure zero pressure drop in the primary system, see Figure 14.
Multiple Boiler Systems
Systems using multiple boilers can also be installed using a primary/secondary manifold system, Figure 15.
Piping For Use With Cooling Units
The boiler, when used in connection with a refrigeration system, must be installed so the chilled medium is piped in parallel with the boiler. Appropriate valves must be used to prevent the chilled water from entering the boiler.
When a boiler is connected to a heating coil that may be exposed to refrigerated air from an air handling device, the piping system must be equipped with fl ow-control valves or some other automatic means of preventing gravity circulation of the boiler water during the cooling cycle.

Finned copper tube gas boilers & water heaters – Boiler Manual
15
F
Figure 13 Typical Primary/Secondary Piping System (See Notes)
Figure 14 Low Temperature Piping with Thermostatic Valve (See Notes and Adjustment Procedures)
Operated Valve
Air Vent
Pressure Switch
Aquastat Union
Gas PressureRegulator
Automatic
Thermometer
Flow Switch
PressureRelief Valve
Reducing Valve
Self-Operated
Check Valve
Pressure
Valve
Pump
Motorized Valve
Solenoid
Ball Valve
Bufferfly Valve
Angle Valve
Gate Valve
Globe Valve
Balance Valve
Backflow-Prevention
Device
3-Way Valve
Expansion
Tank
NOTES:
1. Boiler circuit piping must be sized large enough to handle maximum fl ow through unit.
2. Boiler pump sized to boiler design fl ow requirements.
3. All boilers furnished with factory mounted outlet water temperature gauge.
4. Boiler pump purging required. Use terminals supplied.
Notice: These drawings show suggested piping confi guration and valving.Check with local codes and ordinances for specifi c requirements.
NOTES:
1. For pump selection consult factory.2. Boiler pump sized to boiler and thermostatic 3-way valve design fl ow requirements.3. Boiler circuit piping must be sized large enough to handle maximum fl ow through unit.4. All boilers furnished with factory mounted outlet water temperature gauge.5. Boiler pump purging required. Use terminals supplied.6. Valve is precalibrated for 140°F return temperature and installed in a mixing confi guration.
Notice: These drawings show suggested piping confi guration and valving.Check with local codes and ordinances for specifi c requirements.

Finned copper tube gas boilers & water heaters – Boiler Manual
16
F
Figure 15 Multiple Boiler Piping (See Notes)
Operated Valve
Air Vent
Pressure Switch
Aquastat Union
Gas PressureRegulator
Automatic
Thermometer
Flow Switch
PressureRelief Valve
Reducing Valve
Self-Operated
Check Valve
Pressure
Valve
Pump
Motorized Valve
Solenoid
Ball Valve
Bufferfly Valve
Angle Valve
Gate Valve
Globe Valve
Balance Valve
Backflow-Prevention
Device
NOTES:
1. Boiler circuit piping must be large enough to handle maximum fl ow through unit.2. Boiler pump sized to boiler design fl ow requirements.3. All boilers furnished with factory mounted outlet water temperature gauge.4. Boiler pump purging required. Use terminals supplied.5. Secondary loop pipe diameter must be sized large enough to handle maximum fl ow through all units.
Notice: These drawings show suggested piping confi guration and valving.Check with local codes and ordinances for specifi c requirements.

Finned copper tube gas boilers & water heaters – Boiler Manual
17
F
DOMESTIC WATER SUPPLY PIPING
Proper controls must be used to prevent water sup-plied for domestic use from exceeding 130°F, 54°C or a scald injury will occur! When higher water tem-peratures are required for appliances such as a dish-washer, a mixing valve or some other tempering means must be installed. Households with small children may require water temperatures less than 120°F, 49°C. Local codes must be complied with!
General Piping Requirements
Ensure that the water heater is equipped with bronze headers. Piping and components connected to the water heater must be suitable for use with potable water. Th e water heater must not be connected to any heating system piping or components previously used with a non-potable water heating appliance. No toxic chemicals, such as those used for boiler treatment, are to be introduced into the potable water used for space heating. If a hot water storage tank is used in the system it must be equipped with a temperature and pressure relief valve that complies with ANSI Z21.22 or CAN-4.4 and CAN-4.6.
Th e storage tank must be located as close to the water heater as possible to prevent excessive head loss which will reduce fl ow.
Water Chemistry
Th e required temperature rise across the water heater is based on water having a hardness between 8 and 18 grains per gallon with a level of dissolved solids not exceeding 350 ppm. Water having a hardness less than 8 grains can cause excessive corrosion of the heat exchanger. Water that has a hardness greater than 18 grains per gallon and/or a level of dissolved solids exceeding 350 ppm will require a recalculation of the pump size and temperature rise.
A cupro-nickel heat exchanger may also be required. Th e manufac-turer should be consulted when these water conditions are encountered. See Table 9.
Th e maximum allowable fl ow rate through a Futera III water heater is 97 GPM, 6.1 L/s on 500 through 1000 models and 136 GPM, 8.9 L/s for 1250 through 2000 models. Th e cupro-nickel heat exchanger allows for 108 GPM, 6.8 L/s on 500 through 1000 models and 151 GPM, 9.5 L/s on 1250 through 2000 models, see Table 8B.
RBI water heaters are designed to run scale free. Due to the extreme variables of water conditions world wide it is necessary to consider pH values and water hardness in relationship to scaling. It is crucial to consider these two variables when making heat exchanger and pump selections. If local water conditions are extreme, follow the guidelines in the Heat Exchanger Selection (Table 9) and the Pumping Performance (Table 10). Scale free operation can be achieved by using water with a hardness between 8 and 18 and by maintaining the pH between 5 and 9. Follow the conditions listed under NORMAL in the table. In some areas of the country additional precautions must be observed due to unusual charac-teristics of the local water supply. Call the nearest RBI representa-tive for details.
To properly size the pump a grain hardness and pH test must be taken at the installation site before the order is placed. Proper pump sizing will improve heater performance and help ensure heater longevity.
Expansion Tank
An expansion tank or other means to control thermal expansion must be installed in the water heating system if back fl ow preven-tion devices are installed.
Pump Requirements
Th is low-mass water heater requires a continuous mini-mum water fl ow for proper operation. Th e low water fl ow switch provided for this unit will shut down the water heater if fl ow falls below the required minimum level. Table 10 provides the heat exchanger pres-sure drop chart and temperature rise table. Th e temperature rise across the water heater must never exceed 35°F, 19.4°C.
Cold Water Supply
Th e cold water supply must be piped to the water heater’s outlet piping between the water heater and the hot water storage tank. Th is will prevent untempered water from entering the water heater, see the Temperature Rise Control section below. Two typical water heating systems are shown in Figures 16 & 17.
Temperature Rise Control
Water returned to the water heater inlet must not be less than 125°F, 52°C or excessive condensation of the products of combustion will damage the water heater voiding the warranty. Th e method outlined below can be employed to prevent this condition from occurring.
A balancing valve should be installed on the outlet side of the water heater for purposes of adjusting the fl ow rate through the heat exchanger. Th ermometers are installed on both the inlet and outlet of the water heater for determining the temperature rise through the unit.
Th e proper velocity through the water heater must be maintained in accordance with Table 10 for effi cient operation and long life. If the temperature rise through the water heater is lower than recommended the water velocity is too high. Premature erosion of the heat exchanger will occur. Conversely, if the temperature rise is higher than recommended in Table 10 the fl ow rate is too low. Scaling and soft ening of the heat exchanger will occur.
Th ermostatic Mixing Valve – Water Above 140°F, 60°C Water can be stored at temperatures above 140°F, 60°C provided that a thermostatically controlled mixing valve is used to temper the hot water to an acceptable temperature before it’s supplied for domestic use.
Th e mixing valve MUST be set to prevent a scald injury from occurring, see the caution against scalding.
Storage of water for domestic use above 140°F, 60°C will provide an increased quantity of tempered water and help prevent the growth of water born bacteria.

Finned copper tube gas boilers & water heaters – Boiler Manual
18
F
Table 9 Futera III Heat Exchanger Selection Graph
Table 10 Futera III Pumping Performance Requirement

Finned copper tube gas boilers & water heaters – Boiler Manual
19
F
Figure 16 Typical Water Heating Piping (MW Models Only)
Figure 17 Multiple Water Heating Piping (MW Models Only) (See Notes)
NOTES:1. Optional cold water make up and recirculation line location.2. When using intermittent pump and pump delay, locate remote HeatNet sensor with well in lower 1/3 of tank. Install sensor with heat sensing compound. For multiple tanks, self balancing reverse-return systems, a single HeatNet sensor is applied.3. Th ermal expansion tank may be required, check local codes.4. When using optional factory mounted pump, max pipe length 30 ft total, 6-90° elbows, full pipe size.5. CAUTION: MEASURE WATER HARDNESS AND pH AT JOB SITE.6. Th e pH and water hardness must be measured before selecting heat exchanger and pump. Consult the Heat Exchanger Graph and Pumping Performance
Table before making selection.7. Common piping must be sized for maximum combined heater flow.8. Hot water tanks should be equipped with a combination temperature & pressure relief valve.9. MA Code requires an 1/8 in hole in check valve to compensate for thermal expansion.
Notice: Th ese drawings show suggested piping configuration and valving. Check with local codes and ordinances for specific requirements.
These drawings show sug-gested piping confi guration and valving. Check with local codes and ordinances for specifi c requirements.

Finned copper tube gas boilers & water heaters – Boiler Manual
20
F
GAS SUPPLY PIPING
Check the boiler/water heater rating plate to make sure that the boiler/water heater is for the type of gas that will be used. If it isn’t, do not connect the boiler/water heater to the gas supply. Gas supply piping must be in accordance with the National Fuel Code, ANSI Z223.1-latest revision or applicable provisions of the local building codes. Canadian installations must comply with CAN/CGA B149.1 or .2 Installation Code. Failure to comply with this warning can result in extensive property damage, severe personal injury or death!
Th e Futera III comes from the factory ready to be piped to the gas supply. If for any reason the boiler/water heater is not for the type of gas available at the installation site, call your RBI representative to resolve the problem.
A minimum gas supply pressure of 2 in, 51mm, W.C. natural or propane and maximum 14 in, 356 mm W.C. natural or propane, must be available at the safety shutoff valve inlet with the unit(s) operating.
Table 11 should be used to ensure that the gas supply piping is sized properly. If more than one appliance is supplied by the same supply pipe, the piping must be sized based on the maximum possible demand. Do not neglect the pressure drop due to pipe fi tt ings. Table 11 should be used in conjunction with Table 12 to ensure that the gas supply piping has the capacity to meet the demand.
Figure 18 depicts the proper way to connect the boiler/water heater to the gas supply piping. Th e manual shut-off valve MUST be installed in the supply piping. It should be installed 5 ft , 1.5 m above the fl oor where required by local codes. Provide a sediment trap at the bott om of the vertical section of the gas supply pipe upstream of the gas controls.
A ground joint union should be installed between the boiler gas controls and the supply piping. Each of these items are needed to ensure long life and ease of servicing. Always use a pipe sealant that is suitable for use with LP gas.
Table 11 Gas Pipe Capacity
Maximum pipe capacity in ft3/hr based on 0.60 specifi c gravity gasat a pressure of 0.5 psig or less and a 0.3" WC pressure drop. NominalIron Pipe
Size
Pipe length, (ft)10 20 30 40 50 60 80 100 150
Maximum gas volume of pipe, (ft3/hr)1" 520 350 285 245 215 195 170 150 120
1 1/4" 1050 730 590 500 440 400 350 305 2501 1/2" 1600 1100 890 760 670 610 530 460 380
2" 3050 2100 1650 1270 1270 1150 990 870 710
Note: Multiply the gas volume by 0.62 for propane fl ow capacity in ft3/hr.Multiply the propane fl ow capacity by 2500 Btu/ft3 to determinethe propane Btu/hr capacity for a given pipe size and length.
Table 12 Equivalent Pipe Length Chart
NominalIron Pipe
Size
Type of pipe fi tting90° Elbow Tee1 Gate Valve2 Gas Cock2
Equivalent pipe length, (ft)1" 2.6 5.2 0.6 1.5
1 1/4" 3.5 6.9 0.8 1.91 1/2" 4.0 8.0 0.9 2.3
2" 5.2 10.3 1.2 3.0
Notes: 1. For fl ow through branch. 2. For fl ow at full open.
Always use a wrench on the gas valve body when making gas connections to it. Never over-tighten the piping entering the gas valve body or gas valve failure may result!
When applicable, provisions for vent, bleed and gas relief lines must be made in accordance with the latest revision of ANSI Z223.1/NFPA 54. Th e main Dungs gas valve supplied with boiler/water heater does not require external venting.
Safe lighting and other performance criteria were met with the gas manifold and control assembly provided on the boiler. All gas connections MUST be leak tested before putt ing the boiler into operation.
Figure 18 Gas Supply Piping

Finned copper tube gas boilers & water heaters – Boiler Manual
21
F
Never use an open fl ame to test for gas leaks. Always use an approved leak detection method. Failure to comply with this warning can cause extensive property damage, severe personal injury or death!
Whenever the gas supply piping is pressure tested the boiler/water heater gas controls must be protected. If the test pressure is equal to, or less than 1/2 psig, 3.5 kPa isolate the boiler/water heater by closing it’s manual shut off valve, see Figure 18. If the test pressure is greater than, or equal to 1/2 psig, 3.5 kPa, disconnect the boiler/water heater and its individual shut-off valve.
ELECTRICAL WIRING
Electrical Power Connections
Label all wires prior to disconnection when servicing controls. Wiring errors can cause improper and dangerous operation! Verify proper operation aft er servicing.
Au moment de l’entretien des commandes, étiquetez tous les fi ls avant de les débrancher. Des erreurs de câblage peuvent entraîner un fonctionnement inadé-quat et dangereux. S’assurer que l’appareil fonctionne adéquatement une fois l’entretirn terminé.
Th e electrical connections to this boiler/water heater must be made in accordance with all applicable local codes and the latest revision of the National Electrical Code, ANSI /NFPA-70. Installation should also conform with CSA C22.1 Canadian Electrical Code Part I if installed in Canada.
Install a separate 120 volt 15 amp or 20 amp circuit breaker for the boiler/water heater and pump, see Table 13. A properly rated shut-off switch should be located at the boiler/water heater. Th e boiler/water heater must be grounded in accordance with the authority having jurisdiction, or if none, the latest revision of the National Electrical Code, ANSI/NFPA-70.
Table 13 Futera III Electrical Requirements
RecommendedFutera III Circuit Breaker *Running
Model (Amps) AmpsMB/MW 500 15 3.9
MB/MW 750 - 1000 15 6.0MB/MW 1250 - 2000 20 11.4
*Use separate circuit breaker that is properly sized for pump andpump contactor.
Line voltage fi eld wiring of any controls or other devices must conform to the temperature limitation of type TEW wire at 95°F, 35°C above room temperature. Use copper conductors with a minimum size of #14 awg. Use appropriate wiring materials for units installed oudoors. Th e wire size must be compatible with the total amp draw of the circuit.
Refer to the wiring diagram supplied with the boiler/water heater for proper wiring connections and boiler full load amperage (FLA).
GENERAL OPERATION
Before proceeding read and fully understand the instructions contained in this manual. Do not att empt to operate this boiler/water heater if it has not been installed in accordance with the guidelines set forth in this manual. Failure to comply with this warning can result in extensive property damage, severe per-sonal injury or death!
Should overheating occur or the gas supply fail to shut off , turn off the manual gas control valve to the appliance. Do not interrupt water fl ow through the boiler/water heater.
En cas de surchauff e ou si l’alimentation en gaz ne s’arrête pas, fermez manuellement le robinet d’arrêt de l’admission de gaz.
Hydronic Heating Boilers
Open the make-up water valve and slowly fi ll the boiler and all of the radiation with water. Ensure that all bleed and drain valves are closed.
Adjust the make-up water pressure regulator so a minimum12 psig, 82.7 kPa system pressure is maintained at the highest point in the system piping. If a make-up water pump is used adjust it to maintain a minimum 12 psig, 82.7 kPa system pressure.
Open the system bleed and drain valves, one at a time, to purge the air trapped in the heating system piping.
With the boiler off , run the system pump for at least 30 minutes and bleed the system piping using the bleed valves. If strainers are used in the system piping, the make- up water valve should be closed and the strainers checked and cleaned.
Th e system expansion tank should be checked to ensure that the correct water level in the tank is maintained. Th e tank should be less than half full of water with the system full and adjusted to the correct operating pressure.
Start the boiler as described in the “OPERA TING INSTRUCTIONS” section. Run the boiler for at least an hour. Th e system pump(s) and all radiation units must be operated during this time. Ensure that the make-up water valve is open.
Shut the boiler off and open the bleed valves to purge the air trapped in the heating system piping. Close the make-up water valve and check and clean the strainers and make-up water pressure reducing valve.
Open the make-up water valve and adjust the system pressure if necessary. Th e system should be checked and bled aft er three days of operation.

Finned copper tube gas boilers & water heaters – Boiler Manual
22
F
OPERATING INSTRUCTIONS
FOR YOUR SAFETY READ BEFORE OPERATING.
POUR VOTRE SÉCURITÉ LISEZ AVANT DE
METTRE EN MARCHE
A. Th is appliance is equipped with an ignition device which automatically lights the pilot. Do not try to light the pilot by hand.
Cet appareil est muni d’un dispositif d’allumage qui allume automatiquement la veilleuse. Ne tentez pas d’allumer la veilleuse manuellement.
B. BEFORE OPERA TING smell all around the appliance area for gas. Be sure to smell next to the fl oor because some gas is heavier than air and will sett le on the fl oor.
Propane gas may not always be detected by smell. Propane gas is heavier than air and can collect in low areas.
Propane gas can ignite or explode if an ignition source is present and result in death, serious injury and property damage!
FOR YOUR SAFETY
• Have only qualifi ed licensed professionals install, service and maintain this appliance and your gas system in accordance with all applicable codes.
• If you suspect a leak:1. Have everyone leave the building immediately.2. Do not att empt to light any appliance.3. Do not touch any electrical or electronic switches in the
building.4. Do not use any phone in the building.5. Call your gas supplier from a phone outside of the building.6. If you cannot reach your gas supplier call the fi re department.
AVANT DE FAIRE FONCTIONNER, renifl ez tout autour de l’appareil pour déceler une odeur de gaz. Renifl ez près du plancher, car certains gaz sont plus lourds que l’air et peuvent s’accumuler au niveau du sol.
QUE FAIRE SI VOUS SENTEZ UNE ODEUR DE GAZ: • Ne pas tenter d’allumer d’appareil. • Ne touchez à aucun interrupteur; ne pas vous servir des
téléphones se trouvant dans le bâtiment. • Appelez immédiatement votre fournisseur de gaz depuis un
voisin. Suives les instructions du fournisseur. • Si vous ne pouvez rejoindre le fournisseur, appelez le service
de incendies.
C. Do not use this appliance if any part has been under water. Immediately call a qualifi ed service technician to inspect the appliance and to replace any part of the control system and any gas control that has been under water.
N’utilisez pas cet appareil s’il a été plongé dans l’eau, même partiellement. Faites inspecter l’appareil par un tecnicien qualifi é et remplacez toute partie du système de contrôle et toute com-mande qui ont été plongés dans l’eau.
Operating Instructions
1. STOP! Read the safety information above. If, at any time, the appliance will not operate properly, follow the instructions “TO TURN OFF GAS TO APPLIANCE” and call your service technician or gas supplier.
2. Set the operating control to off and disable any outside (BMS) call for heat.
3. Turn off all electric power to the appliance. 4. Close main isolation gas valve (fi eld supplied), Figure 18. 5. Purge the gas piping up to the manual valve ahead of the main
gas control of air. When the bleeding is complete, check all gas joints up to the gas valve for leaks.
6. Wait fi ve (5) minutes to clear out any gas.7. Install a fi tt ing at the supply test port and connect a manometer
having a minimum range of 20 in, 508 mm WC to it, Figure 18.
8. Remove the 1/8" pipe plug from the pilot test port located on the CV100 pilot/reg combination gas valve and connect a manometer having a minimum range of 6 in, 154 mm WC to it, Figure 20.
9. Open the main isolation gas valve (fi eld supplied), Figure 18.10. Place the “Remote/Local” switch to Remote inside control
cabinet, Figure 19.11. Turn the power switch on the front of the boiler to “on”. It will
light up when the power is on. If all interlocks are properly closed, the display will say “Standby”, Figure 19.
12. Slide the Low Fire Hold Switch (on HeatNet control board) to Low Fire position.
13. Th e boiler will begin the start sequence.14. When the main display reads “PILOT RUNNING” and the
fl ame current is 5 VDC, switch the Honeywell 7800 to the “test” position, Figure 19. Th is will hold the Honeywell 7800 in its ignition state.
15. Adjust the pilot pressure per the CHECKING, ADJUSTMENT & OPERA TION section.
16. Remove the demand from the 7800 control by disabling the Low Fire switch allowing the boiler to stop.

Finned copper tube gas boilers & water heaters – Boiler Manual
23
F
Figure 19 HeatNet Control Panel
17. Close main isolation gas valve (fi eld supplied), Figure 18.18. Remove the manometer fi tt ing from the pilot test port and
replace the plug. Place monitor tube on to the test port tee located along the1/3" hose piped directly off of the manifold test port, Figure 20.
19. Switch the Honeywell 7800 back to “run”.20. Create a min input demand as before (enable Low Fire Hold
switch.) Th e boiler will begin the start sequence.21. Monitor the fl ame current on the 7800. No fl ame current should
be detected and the 7800 should lock out. If fl ame current is detected at any time up to the 7800 locking out, the 120V wiring on the ignition transformer must be reversed and the test run again to insure that no fl ame is detected.
Improper wiring of the ignition transformer can result in an explosion causing extensive property damage, severe personal injury or death!
22. Open main isolation gas valve (fi eld supplied).23. Reset the Honeywell 7800. Th e boiler will start and will run
at minimum input rate.
24. Sett ing the low fi re: Allow the low fi re to sett le out for a few minutes and observe the combustion reading. Refer to
“Combustion Reading” table for proper combustion readings and elbow pressure, Table 15.
Th e low fi re O2-CO2 can be adjusted in the fi eld by opening the low fi re adjustment door located on the forward facing side of the main gas valve, see Figure 20. Inserting an allen wrench and rotating the allen screw clock-wise will increase the CO2 and lower the O2, rotating counter clock-wise will decrease the CO2 and increase the O2. DO NOT LEAVE THE BURNER IN AN INFRA RED STATE. A few random speckles of red are fi ne, but large concentrations of spots or large areas of red are not. If large amounts of red concentrations are observed, verify combustion readings.
25. Jumper the “AA” terminals located on the HeatNet control board. Th e boiler input will rise to its maximum input, “Run 100%”, see Figure 22.
26. Allow the boiler to reach steady state and verify supply gas pressure and check input rates as explained in the “Gas Supply Piping” section. Also, refer to “Combustion Reading” table for proper combustion readings and elbow pressure, Table 15. Th e high fi ve trim is located on the outlet fl ange of the gas valve, see Figure 20. O2-CO2 can be adjusted by inserting a screw driver and rotating clockwise to increase the CO2 and lower the O2 . Rotating counterclockwise will decrease the CO2 and increase the O2.
27. Remove jumper “AA” and allow boiler to sett le into minimum input. Observe the combustion readings and make any fi nal adjustments. When fi nished disable the Low Fire Hold Switch and replace test ports to normal state.
28. Boiler allows for many modes of operation and control methods. Reference the “HeatNet Control Manual”.
Table 14 Combustion Readings (Category I)
Natural Fuel Propane Fuel
CO2 %7.6 - 7.8 (min.) 8.8 - 9.0 (min.)
7.8 - 8.0 (100%) 9.0 - 9.4 (100%)
O2 %7.5 - 7.0 (min.) 7.5 - 7.0 (min.)7.0 - 6.7 (100%) 7.0 - 6.7 (100%)
For factory set gas manifold (elbow) pressures see label oninner cabinet door.
Table 15 Combustion Readings (Category II and IV)
Natural Fuel Propane Fuel
CO2 %8.0 - 8.5 (min.) 9.4 - 9.9 (min.)
8.8 - 9.8 (100%) 10.3 - 11.5 (100%)
O2 %6.6 - 5.8 (min.) 6.6 - 5.8 (min.)5.2 - 3.5 (100%) 5.2 - 3.5 (100%)
For factory set gas manifold (elbow) pressures see label oninner cabinet door.

Finned copper tube gas boilers & water heaters – Boiler Manual
24
F
Figure 20
INSTRUCTIONS DE MISE EN MARCHE
1. ARRÊTEZ! Lisez les instructions de sécurité sur la portion supérieure de cett e étiquett e.
2. Réglez le thermostat à la température la plus basse.. 3. Coupez l’alimentation électrique de l’appareil.4. Cet appareil est muni d’un dispositif d’allumage qui allume au-
tomatiquement la veilleuse. Ne tentez pas d’allumer la veilleuse manuellement.
5. Fermer la vanne manuelle d’arrêt d’alimintation de gaz.6. Att endre cinq (5) minutes pour laisser échapper tout le gaz.
Renifl ez tout autour de l’appareil, y compris près du plancher, pour déceler une odeur de gaz. Si vous sentez une odeur de gaz, ARRÊTEZ! Passez à l’étape B des instructions de sécurité sur la portion supérieure de cett e étiquett e. S’il n’y a pas d’odeur de gaz, passez à l’étape suivante.
7. Ouver la vanne manuelle d’arrêt d’alimintation de gaz.8. Mett ez l’appareil sous tension. 9. Réglez le thermostat à la température désirée.10. Si l’appareil ne se met pas en marche, suivez les instructions
intitulées couper l’admission de gaz de l’appareil et appelez un technicien qualifi é ou le fournisseur de gaz.
TO TURN OFF GAS TO APPLIANCE
1. Set the operating control to its lowest sett ing.2. Turn off all electric power to the boiler if service is to be
performed. 3. Close the manual main and pilot gas shut-off valves.
COMMENT COUPER L’ADMISSION DE GAZ DE
L’APAREIL
1. Réglez le thermostat à la température la plus basse.2. Coupez l’alimentation électrique de l’appareil s’il faut procéder
à l’entretien.3. Fermer la vanne manuelle d’arrêt d’alimintation de gaz.
SEQUENCE OF OPERATION
NO DEMAND
Standby
1. Th e boiler is idle with no interlocks in the fault condition.
DEMAND
Pre-Purge
1. Th e blower operates at purge RPM. Th e water fl ow interlock must ‘make’ within 15 seconds aft er the demand signal is initiated.
2. Th e Honeywell 7800 starts a 10 second purge delay once the air prove switch contacts close.
Pilot Run - % Input
1. Th e blower operates at minimum ignition sett ing. See the calibration section in the “HeatNet Control-IOM” to enter the calibration menus.
2. Th e ignition transformer is energized. Th e pilot solenoid valve opens for the 10 second pilot ignition trial.
Main Run % Input
1. Th e main gas valve opens. 2. Th e ignition transformer is de-energized. 3. Th e pilot solenoid valve closes.4. Th e blower stays at the minimum input sett ing for 3 seconds
then operates at demand % input. See the calibration section in the “HeatNet Control-IOM” to enter the calibration menus.
NO DEMAND
Post-Purge
1. Th e main gas valve closes.2. Th e blower operates at purge RPM for 10 seconds. 3. Th e boiler is idle with no interlocks in the fault condition.

Finned copper tube gas boilers & water heaters – Boiler Manual
25
F
CHECKING & ADJUSTMENTS
Spark Gap
With the main and pilot gas manual valves in the closed position energize the unit. Observe the trial for ignition to confi rm that the spark is strong and continuous. If not check and adjust the spark gap as shown in Figure 21.
Figure 21 Spark Gap
Pilot Adjustment
Th e pilot pressure has been factory set at 3 in. W.C. for natural and LP gas and shouldn’t need adjustment. To check the pilot pressure close the manual main shut-off valve 2 and the pilot gas shut-off valve, Figure 18. Remove the 1/8" pipe plug from the pilot tee and connect a manometer having a minimum range of 6 in, 152 mm WC to it. Open the pilot gas shut-off valve. With the unit powered, generate a call for heat. When the prepurge is complete the ignition/pilot trial will begin. At this point put the Honeywell RM7800 test switch in the test position. Th e control will hold in the ignition/pilot sequence allowing you to check the pressure.
To adjust the pilot the following steps must be taken:1. Remove the pilot gas pressure regulator cap. 2. Turn the pressure regulator adjustment screw clock-wise to
increase the pressure and counterclockwise to decrease it.3. Replace the pressure regulator adjustment screw cap.
Never force the regulator adjustment screw beyond the stop limits or damage to the regulator will occur!
Required Gas Pressure
Provide gas supply pressure at inlet to boiler gas train as follows:
LP Nat Minimum (in. W.C.) 2 2 Maximum (in. W.C.) 14 14Measure pressure when the boiler is fi ring at full rate. Low gas pressure could indicate undersized gas line or insuffi cient gas supply.
“Static and operating gas pressure required at the gas valve inlet is between 2" W.C. and 14" W.C. for natural gas and 2" W.C. and 14" W.C. propane. If the gas pressure is above this limit, a lock-up style regulator suitable for dead end service such as an Equimeter or Fisher must be installed to prevent increase (creep) of gas pressure when the units are not operating. Th is pressure regulator (supplied by others) may be installed at the service entrance to each unit or a “master” regulator sized to handle multiple units may be utilized. Consult local gas utility or regulator manufacturer for recommendations to meet specifi c job site requirements.”
Input Rate, Natural Gas
Gas appliances are rated based on sea level operation with no adjust-ment required at elevations up to 2000 ft , 610 m. At elevations above 2000 ft , 610 m input ratings should be reduced by 4% for each 1000 ft , 305 m.
Check the input rate as follows: 1. Turn off all other gas appliances that use the same gas meter
as the boiler/water heater. 2. Call your gas supplier and ask for the heating value of the gas. 3. Start the boiler/water heater and let it run for 15 minutes. 4. Using the gas meter and a stopwatch, clock the time that it takes
to burn 10 ft 3, 0.28 m3 of gas and divide this time by 10. 5. Insert the heating value and the time, in seconds, into the formula
below. 6. Input = (heating value, Btu/hr)(3600)/(time, seconds) 7. If the computed rate deviates by more than 5% from the rated
input value of the unit, consult factory.
Never increase the input to the boiler/water heater above that for which it is rated. Doing so can cause premature failure of the boiler!
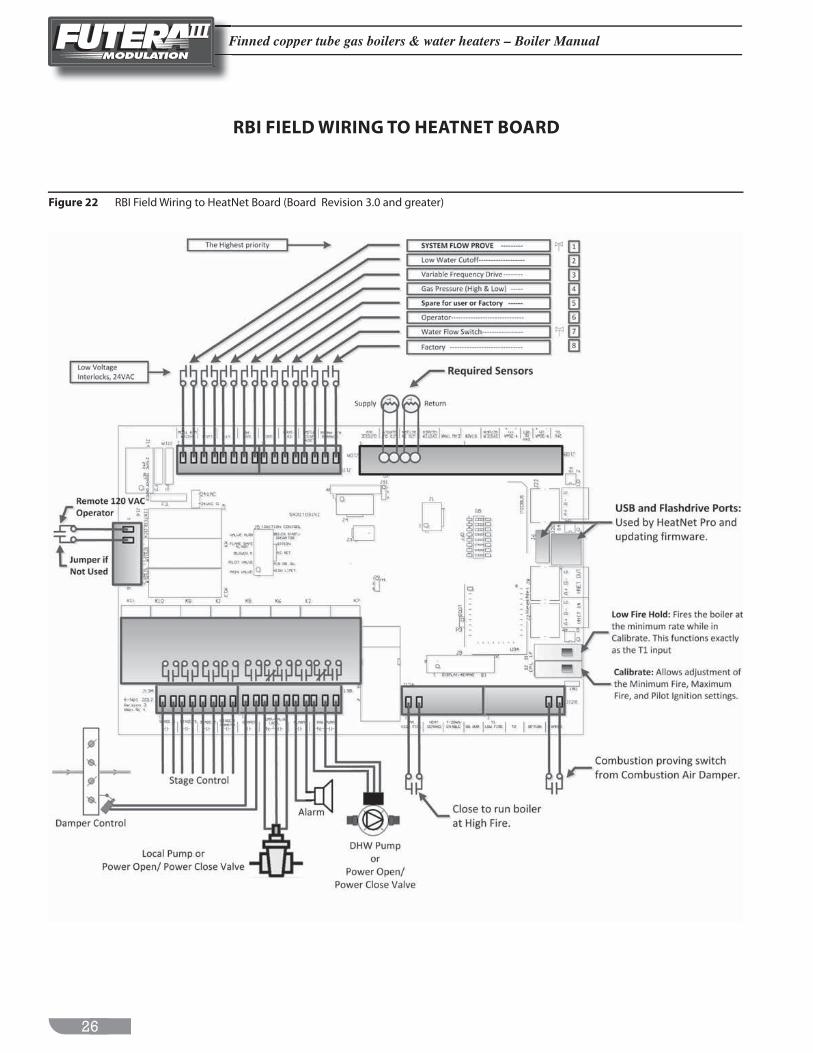
Finned copper tube gas boilers & water heaters – Boiler Manual
26
F
RBI FIELD WIRING TO HEATNET BOARD
Figure 22 RBI Field Wiring to HeatNet Board (Board Revision 3.0 and greater)

Finned copper tube gas boilers & water heaters – Boiler Manual
27
F
RBI HEATNET FIELD WIRING TO TERMINAL BLOCK
NOTES:1. Remove jumper “A” when using a low water
cutoff interlock.
2. For multiple boilers utilizing a system air damper when in a master/member confi guration consult factory or reference wiring diagram 42-0501 sheet 3 for wiring connections.
3. For single boilers or multiple boilers with individual dampers connect the end proving switch to main terminal block 15 and 16. Terminals 17 and 18 provide 120V power to the damper motor.
4. There are two methods in which a 4-20mA signal can be used to control HeatNet equipped boilers.
Method 1A 4-20mA signal can be used to directly modulate each boiler from a remote panel or building management system. On multiple boiler installations, there is no communication between boilers, no HeatNet system sensor; therefore no master/member relationship exists.(Use Menu: Setup: Setpoints: Setpoint Source: Auto)
Method 2A 4-20mA signal can be used to change the setpoint temperature the HeatNet is maintaining. This can be used on single or multiple boilers with a master/member relationship. (Use Menu: Setup: Setpoints: Setpoint Source: 4-20, then set the parameters for the temperature and boiler start point.)
5. The ‘local’ pump relay in the control panel is rated for 1 hp, 1Ø motors. For larger or 3Ø reference factory wiring diagram.
Figure 23

Finned copper tube gas boilers & water heaters – Boiler Manual
28
F
CONTROL DESCRIPTION
Low Water Cutoff
If the boiler is to be installed above radiation or if required by other codes or regulations, install a low water cutoff in appropriate piping. Wire the switch to the “Interlock” contacts as illustrated on “Field Wiring” schematic. Ensure that the low water cutoff device(s) will funtion properly.
Operating Control
Th e preferred control sett ing for potable hot water is 130°F, 54°C. Th e operating control should be set to the lowest sett ing that will satisfy the consumer’s needs.
Sett ing the thermostat or operation control too high can result in scalding resulting in severe personal injury!
High Limit (Aquastat)
Th e high limit is located in the top control area of the boiler/water heater. A remote capillary bulb is run to a well on the outlet side of the supply header. Th e high limit can be reset by depressing the red butt on.
Th e water heater high limit should be set a minimum of 20°F, 11°C higher than the operating control. Refer to the HOT WATER SUPPLY section for the proper supply water temperature.
Flow Switch
A fl ow switch is provided in the water outlet piping to prevent the boiler/water heater from fi ring without adequate water fl ow through the heat exchanger.
DIAGNOSTICS
Th e Futera III has a display that indicates the sequence of operation. Th e display will also list faults should the unit fail to operate. An explanation of each status message and fault can be located in HeatNet Control Manual under status screen fault display section.
STATUS SCREEN FAULT DISPLAY
Th ere are numerous interlock switches and soft ware limits that are detected. Each of these, when tripped will produce a display message, an audible beeping, and an alarm relay closure. Th e fault is displayed fi rst, then aft er a second, the time the fault occurred is displayed. Th is cycle will keep occurring until the fault is cleared. Th ese faults are:
HIGH LIMIT: When the high limit aquastat trips the following message is displayed:
FAULT SYSTEM SET
160˚FHIGH LIMIT
FAULT SYSTEM SET
160˚F10/27 9:16
Th e high limit interlock breaks power to the ignition control (shutt ing it off ) and eff ectively removes any chance of the gas valve receiving power. Th e FIII series control will remain powered to display the fault, latch the alarm relay/audible beeper, and to access the log. Th e interlock is located on J5, HIGH LIMIT.
INTERLOCK SPARE 3: Th is is a reserved interlock input that is normally jumpered at the factory, but can have a remote interlock connected as a fi eld install. Th e interlock is located on J11A, SPARE 3.
FAULT SYSTEM SET
160˚FINTERLOCK SPARE 3
LOW WATER CUTOFF: If there is a low water condition reported by the low water cutoff switch this fault is displayed. Check that there is water fl ow and water in the boiler. Th ere is a reset switch located on the LWCO box. Th e interlock connection is located on J11A, LWCO.
FAULT SYSTEM SET
160˚FLOW WATER CUTOFF

Finned copper tube gas boilers & water heaters – Boiler Manual
29
F
VAR FREQ DRIVE: Th e variable frequency drive, which controls the blower, reports this fault in the event of over current or other conditions that would cause it to shut down. If this is the case, check the fault indicators on the VFD. Th e interlock is located on J11A, VFD.
FAULT SYSTEM SET
160˚FVAR FREQ DRIVE
GAS PRESSURE: Th e optional gas pressure switches (high pressure and low pressure) are connected in series, so if either trip, a fault will be reported here. A reset switch is located on the gas pressure switches. Th e interlock is located on J11A, GAS PR.
FAULT SYSTEM SET
160˚FGAS PRESSURE
INTERLOCK SPARE 4: Th is is also a spare interlock (similar to INTERLOCK SPARE 3) for future expansion or use as a fi eld interlock. Th e interlock is located on J11B, SPARE 4.
FAULT SYSTEM SET
160˚FINTERLOCK SPARE 4
FLOW SWITCH ERROR: Once the FIII series boiler receives a call for heat, it closes the circulator pump relay. It then waits 10 seconds to prove fl ow. If there is no fl ow, the fl ow switch alarm will be set. Every 10 seconds the circulator pump relay will cycle ON for 10 seconds and then OFF for 10 seconds to try and establish fl ow. Th e interlock connection is located on J11B, WTR FLW.
FAULT SYSTEM SET
160˚FWATER FLOW SWITCH
IGNITION CTRL ALARM: Th e ignition control alarm is displayed if the ignition control detects a fault. Th is could be a fl ame failure, air proving switch, or other fault associated with the ignition con-trol. When this fault occurs, you will need to refer to the ignition control for the reason.
FAULT SYSTEM SET
160˚FIGNITION CTRL ALARM
IRI ALARM: Th e optional IRI alarm is the alarm from the gas valve. If this alarm is set check the gas valve.
FAULT SYSTEM SET
160˚FIRI ALARM

Finned copper tube gas boilers & water heaters – Boiler Manual
30
F
COMBUST AIR DAMPER: If the combustion air damper has been selected for use (MASTER BOILER, AUX FUNCTIONS), and the proof switch does not make, this fault will be displayed.
When the combustion air damper is used, the master’s BOILER3/DAMPER relay contacts at J13 are closed. Th ese should be wired to the combustion air damper or preferably an isolation relay. Th e prove switch on the combustion air damper must be wired to J10B, SPARE 1.
FAULT SYSTEM SET
160˚FCOMBUSTION AIR DAMPER
When the master boiler receives a call for heat and needs to start a boiler, the BOILER3/DAMPER relay K5 closes. At the same time, the boiler is started, fi res, and continues to fi re. If the combustion air damper does not prove within the proof time specifi ed in the combustion air damper menu, the boiler will shut down and display the fault. Th e fault on the Master boiler can be cleared by removing the call for heat on the master boiler and fi xing the combustion air damper problem. A combustion damper fault on a Member boiler can only be cleared by power cycling.
Th e Master boiler controls a system damper and Member boilers control their own respective dampers. When the call for heat is removed, the damper will remain open for 30 seconds before closing. Th is allows for post purge cycles to complete.
OPEN ***** SENSOR: If the open sensor fault is displayed, the sensor in the position reported was originally detected, but has since opened. Th e boiler will shut down on any OPEN sensor.
FAULT SYSTEM SET
160˚FOPEN OUTSIDE SENSOR
SHORTED ***** SENSOR: If the shorted sensor fault is displayed, the sensor in the position reported was originally detected, but has since shorted. Th e boiler will shut down on any SHORTED sensor.
FAULT SYSTEM SET
160˚FSHORTED OUTSIDE SENSOR
DELTA TEMP > 40°F: If the temperature across the heat exchanger rises above the maximum designated temperature for the FIII model boiler, a warning or fault will be displayed. Th is protection is required to prevent damage to the heat exchanger in the event high diff erential temperatures are encountered. Th e fault or warning condition may be changed in the AUX FUNCTIONS menu under ALARM TYPE. Th e default condition is WARNING with LIM->HALF RA TE = YES.
When this condition exists and the ALARM TYPE is set to WARNING and LIM-> HALF RA TE, the boiler is limited to 1/2 it’s input rate. So, if the boiler is trying to fi re at 80%, the rate is limited to 40% until the temperature across the heat exchanger falls at least 10°F below the maximum designated temperature for the FIII boiler model. In this case: 40°F - 10°F = 30°F.
If the ALARM TYPE is set to FAULT, the boiler will display the FAULT message and this condition will be treated as an interlock, thus shutt ing down the boiler until the Delta Temp drops 10°F below the maximum designated temperature.
1/2 INPUTDELTA TEMP > 40°F
LOCAL SET
41˚F
RETURN TEMP < 130°F: If the Return Inlet temperature is less than 130°F this warning will be displayed. Th is warning does not aff ect operation and does not set the alarm relay. A log entry is made to aide in diagnosing why this may be occuring. Condensing will occur with return temperatures below 130°F and a shortened heat exchanger life will occur.
PREPURGERETURN TEMP < 130°F
LOCAL SET
41˚F

Finned copper tube gas boilers & water heaters – Boiler Manual
31
F
MAINTENANCE
Disconnect electrical power and close the manual gas shut off valve before performing maintenance or severe personal injury may result!
Servicing, inspection and adjustment must be done by a trained technician in accordance with all appli-cable local and national codes. Improper servicing or adjustment can damage the boiler/water heater!
Th e boiler/water heater must be cleaned and inspected at least once a year and before each heating season. Make sure that the burner and ignition components are free from dust, soot, dirt, corrosion or other deposits that would impair the boiler/water heater’s performance. Refer to Figure 25 for component identifi cation.
Improper burner servicing can result in premature burner failure voiding the warranty!
Burner Removal
1. Close the manual shutoff valves in the gas supply line and turn off electrical power to the boiler/water heater.
2. Remove the jacket top panel. 3. Disconnect the wires to the fan and remove the four bolts that
secure the fan to the transition piece. 4. Remove wires from the spark rods and remove the UV sense
from the transition piece. 5. Disconnect the compression nut at the back of the transition
piece to remove pilot gas tubing.6. Remove the four nuts holding the transition piece to the heat
exchanger. 7. Lift and remove the transition piece and burner together from
the boiler/water heater, taking care not to damage the spark rods and or their alignment.
8. Disconnect the compression nut from the inside of the transition piece.
9. Remove the transition piece, taking care not to damage the spark rods and or their alignment.
Heat Exchanger Inspection
1. Close the manual shutoff valves in the gas supply lines and turn off electrical power to the boiler/water heater.
2. Remove burner following the instructions in the Burner Removal section.
3. Remove the front jacket panel and combustion chamber door. 4. Inspect the inside and outside of the heat exchanger for signs
of damage, sooting or corrosion. 5. Th e outside surfaces of the copper tubes should be free of any
soot deposits. A slight black smudge is normal with some types of gases. Black soot indicates poor combustion. Green deposits indicate condensation due to low return water temperatures. In either case the heat exchanger must be cleaned thoroughly and the problem resolved before the boiler/water heater is returned to service.
6. If there are no signs of damage, sooting or corrosion, reassemble the unit following the previous steps in reverse order.
7. A badly corroded or damaged heat exchanger must be replaced, see the Heat Exchanger Repair & Replacement section.
Heat Exchanger Cleaning
1. Close the shut off valves in the inlet and outlet piping. On heat-ing systems close the system fi ll valve and relieve the system pressure from the boiler by carefully lift ing the relief valve or opening the drain valve.
2. Disconnect the boiler/water heater from the system piping. 3. Remove the eight bolts on the rear pipe enclosure panel. 4. Remove the front jacket panel and combustion chamber door. 5. Slide the heat exchanger out of the unit. 6. Remove the “V” baffl e straps and “V” baffl es. 7. Th oroughly clean the heat exchanger with water from
a high-pressure hose. Use a soft bristle brush if necessary. 8. Replace the cleaned heat exchanger and other components in
the reverse order of their removal.
Heat Exchanger Repair & Replacement
1. A leaking or otherwise damaged tube(s) can be replaced as outlined in steps 2 through 8.
2. Remove the heat exchanger from the boiler/water heater as outlined in the Heat Exchanger Cleaning section.
3. Remove the pipe plugs from the inlet/outlet and return headers opposite from the ends of the tube(s) being replaced.
4. Carefully cut the damaged tube(s) in half, taking care not to damage the adjacent tubes and remove.
5. Install and swage/expand in place the new tube(s). 6. Replace the pipe plugs using a suitable thread sealant on each
one. 7. Sagging or distorted heat exchanger tubes are an indication of
low water fl ow through the system. A damaged heat exchanger must be replaced and the condition that caused the damage resolved before the boiler/water heater is returned to service.
8. Replace the heat exchanger and other components in the reverse order of their removal.
9. Th e recommended torque value for the heat exchanger plugs is approximately 45 ft . lbs, not to exceed 50 ft . lbs.
Air Intake & Vent System
Th oroughly inspect the air intake and vent systems for any signs of blockage, corrosion or leakage. Immediately replace any unsound vent system piping. Inspect the air fi lter and wash with warm water and soap if dirty.

Finned copper tube gas boilers & water heaters – Boiler Manual
32
F
Controls
Use the “GENERA L OPERA TION” and “CHECKING AND AD-JUSTMENTS” sections of this manual for reference.1. Check the operating controls for proper operation. 2. A fl oat type low water cutoff device must be fl ushed out per
the manufacturers’ instructions. Th e probe on a probe low water cut off must be removed, cleaned and inspected at least once a year. Ensure that the low water cutoff s operate properly. If not, replace them.
3. Th e fl ow switch contacts must be open when water fl ow is not present.
4. Th e relief valve should not weep or discharge water at normal system pressure. If it does, contact a qualifi ed service technician to have it inspected. NEVER try to clean or repair the relief valve! If the valve fails to operate properly, have it replaced!
5. Th e aquastat high limit controls the maximum water temperature in the boiler. If the water temperature reaches the set temperature before the demand for heat has been met, the aquastat high limit should shut the boiler off . Th e water temperature should never exceed the maximum set point of 250°F, 121°C, for boilers and 210°F, 99°C for water heaters. Th e aquastat high limit cannot be repaired. If it fails to function properly, replace it.
6. Visually check the pilot and main burner fl ames to ensure proper operation, see Figure 24.
A yellow, fl oating fl ame indicates a lack of combustion air. Do not operate the boiler/water heater until the problem is solved or severe personal injury or death may occur!
Figure 24 Main Burner Flame

Finned copper tube gas boilers & water heaters – Boiler Manual
33
F
Troubleshooting A Startup
ActionCheckIdentify SourceSymptom
An Interlock is tripped.
Proceed to HeatNetControl Manual formore details andproblem resolution.
1. 1. Is it a 24 VAC Interlock?
2. Is it a 120 VAC Interlock/Alarm?
3. Internal Alarms
1. All 24 VAC Interlocks arelocated on J11A and J11B.Examples of 24 VAC Interlocks:1.SPARE32. Variable Frequency Drive(VFD)3. Low Water Cutoff(LWCO),4. Gas Pressure5. Spare 46. Operator OPLIM7. Water Flow8. Air Pressure from UV Sensor.
2. All 120 VAC interlocks/Alarmsare located on J5. These include:1.FLAME SAFE ALARM (IgnitionCTRL ALARM)2. Valve Alarm (IRI ALARM)3. XS_FACTORY (Reserved4. HIGH LIMIT
1. OPEN SENSOR2. SHORTED SENSOR3. COMBUSTION AIR DAMPER
1.Use a multimeter and checkfor 24 VAC on J11A,J11B toidentify which interlock hastripped. Reset the Interlock orcheck for disconnected wiringor shorts.
The Air Pressure from UVSensor interlock if displayedwill allow the boiler tofunction, but it needs to befunctional while the boiler isrunning for it to clear.
1. Use a multimeter on J5 toto check for 120 VAC onthese interlocks (except theHIGH LIMIT). The High LimitInterlock is displayed whenthere is no 120 VAC, sincethe HIGH LIMIT breaks the120VAC to the IgnitionControl.
NOTE: Stray VoltagesGreater than 8 VAC and lessthan 18 VAC on theseinterlocks can causeintermittant operation. If thisis the case, check for backfed voltages from field wiring.
Check sensor voltages atJ10A and J10B. TheTemperature sensor inputsshould be between 0 VDCand 5 VDC measured acrossthe sensor. Example: At 77 °F,the voltage would read 2.5VDC.
The combustion air damperprove switch must be wiredacross SPARE 1 and must bea "DRY" contact. Do notapply a voltage to this input,the input supplies it's ownvoltage/current.
2.

Finned copper tube gas boilers & water heaters – Boiler Manual
34
F
Figure 25 Exploded View
REPAIR PARTS

Finned copper tube gas boilers & water heaters – Boiler Manual
35
F
REPAIR PARTS CONTINUED

Finned copper tube gas boilers & water heaters – Boiler Manual
36
F
REPAIR PARTS CONTINUED
Model Size with Item Quantities Below
Ref # Name of Part Part # 500 750 1000 1250 1500 1750 2000
15 Burner for Turbo Pilot 70-2529.1 1
70-2530.1 1
70-2531.1 1
70-2532.1 1
70-2533.1 1
70-2534.1 1
70-2535.1 1
15a Transition Gasket (must order as kit 21-2007)
(must order as kit 21-2008)
15b Burner Gasket (must order as kit 21-2007)
(must order as kit 21-2008)
16 Solenoid Valve w/Regulator, NG 11-0372 1 1 1 1 1 1 1
Solenoid Valve w/Regulator, LP 11-0374 1 1 1 1 1 1 1
17 Flange 1" (Inlet) 11-0231 1 1 1 1 1
Flange 1-1/2" (Inlet) 11-0214 2 2
18 Gas Valve 11-0230 1 1 1 1
11-0227 1 1 1
Test Port (CSD-1) 11-0354 1 1 1 1 1 1 1
19 Flange 1" (Outlet) 11-0228 1 1 1 1
Flange 1-1/2" (Outlet) 11-0229 1 1 1
NS Orifi ce Gasket 06-0022 1 1 1 1 1 1 1
NS Gas Injectors NG 10-1009 1 1 1 1
Gas Injectors NG 10-1002 1 1 1
Gas Injectors LP 10-1010 1 1 1 1 1 1 1
20 Ball Valve 11-0395 1 1 1 1 1 1 1
21 Firing Valve, 1" 11-0456 1 1
Firing Valve, 1-1/2" 11-0458 1 1 1
22 “A” Valve, 1" 11-0465 1 1
“A” Valve, 1-1/4" 11-0466 1 1 1
“A” Valve, 1-1/2" 11-0467 1 1
23 Blower, Fasco 7043 70-2348 1 1 1
Blower, Fasco 7035 12-0017 1 1 1 1
25 Flow Switch 14-0203 1 1 1 1 1 1 1
Flow Switch (Outdoor) 14-0205 1 1 1 1 1 1 1
Flow Switch (Potter) 14-0201 1 1 1 1 1 1 1
Flow Switch (Outdoor Potter) 14-0202 1 1 1 1 1 1 1
26 Frequency Drive 15-0231 1 1 1 1 1 1 1
27 Jacket Top Panel 70-2412 1 1 1
70-2413 1 1 1 1
36 Combustion Chamber Top Panel 70-2356 1 1 1
70-2357 1 1 1 1
Manning Glass Insulation (per square foot) 05-0104 4 4 4 5 5 5 5

Finned copper tube gas boilers & water heaters – Boiler Manual
37
F
REPAIR PARTS CONTINUED
Model Size with Item Quantities Below
Ref # Name of Part Part # 500 750 1000 1250 1500 1750 2000
NS 2" Blanket Insulation (per sq ft) 05-0200 20 22 24 26 26 30 30
Red Silicone Gasket (per ft / sold per roll 50’) 06-0146 50 50 50 50 50 50 50
39 Pressure Relief Valve 50# 30-0360 1 1 1
Pressure Relief Valve 50# 30-0374 1
Pressure Relief Valve 50# 30-0379 1 1 1
Pressure Relief Valve 125# 30-0364 1 1 1 1 1 1 1
40 Latch 20-0046 2 2 2 2 2 2 2
42 Air Filter Upgrade Kit 21-2005 1 1 1
21-2006 1 1 1 1
Air Filter 09-0483 1 1 1
09-0484 1 1 1 1
45 Tridicator 30 - 60 psi 13-0308 1 1 1 1 1 1 1
Tridicator 75 - 160 psi 13-0305 1 1 1 1 1 1 1
46 Heat Exchanger Assembly (Copper) 70-2515.1R 1
Cast Iron (prior to 0209 must replace 70-2516.1R 1
combustion chamber top panel #36) 70-2517.1R 1
70-2518.1R 1
70-2519.1R 1
70-2520.1R 1
70-2521.1R 1
Heat Exchanger Assembly (Copper) 70-2186.1R 1
Bronze 70-2187.1R 1
70-2188.1R 1
70-2189.1R 1
70-2190.1R 1
70-2191.1R 1
70-2192.1R 1
Individual copper/cupronickel tubes* available for fi eld repair *model and serial number required
Tube Expansion Tool 30-0761 1 1 1 1 1 1 1
Heat Exchanger Assembly (Cupronickel) 70-2522.1R 1
Cast Iron (prior to 0209 must replace 70-2523.1R 1
combustion chamber top panel #36) 70-2524.1R 1
70-2525.1R 1
70-2526.1R 1
70-2527.1R 1
70-2528.1R 1
Heat Exchanger Assembly (Cupronickel) 70-2193.1R 1
Bronze 70-2194.1R 1
70-2195.1R 1
70-2196.1R 1
70-2197.1R 1
70-2198.1R 1
70-2199.1R 1

Finned copper tube gas boilers & water heaters – Boiler Manual
38
F
REPAIR PARTS CONTINUED
Model Size with Item Quantities Below
Ref # Name of Part Part # 500 750 1000 1250 1500 1750 2000
NS Inlet Adapters (Flanged) 01-0044GL 1 1 1
01-0045GL 1 1 1 1
Outlet Adapters (Flanged) 01-0046GL 1 1 1
01-0047GL 1 1 1 1
Outlet Adapters (Threaded) 01-0042 1 1 1
01-0043 1 1 1 1
Inlet/Outlet Header Gasket (must order as kit 21-2007)
(must order as kit 21-2008)
NS Heat Exchanger “V” Baffl e 03-1612 20
03-1613 20
03-1614 20
03-1615 28
03-1616 28
03-1617 28
03-1618 28
Heat Exchanger “V” Baffl e Strap 03-1619 2 2 2
03-1620 2 2 2 2
48 High Limit, Jumo, (MB) 14-0013 1 1 1 1 1 1 1
High Limit, Jumo, (MW) 14-0014 1 1 1 1 1 1 1
NS Operator, T6031A (pool heater) 14-0003 1 1 1 1 1 1 1
NS High Limit Well, 3/8 x 3 13-0104 2 2 2 2 2 2 2
NS 10K Temperature Sensor 14-0325 3 3 3 3 3 3 3
50 Transformer, 50 VA 15-0007 1 1 1 1 1 1 1
51 Purge Timer, ST7800 16-0007 1 1 1 1 1 1 1
52 Spark Generator, Q652B 16-0036 1 1 1 1 1 1 1
53 Flame Safeguard, RM78957C 16-0024R 1 1 1 1 1 1 1
NS Keyboard Display Module, S7800A 16-0010 1 1 1 1 1 1 1
54 Main Board (HeatNet) 16-0047 1 1 1 1 1 1 1
55 Display Board (HeatNet) 40-0088 1 1 1 1 1 1 1
NS Ribbon Cable 40-0115 1 1 1 1 1 1 1
NS Power Switch 48-0013 1 1 1 1 1 1 1
NS Toggle Switch Remote / Local 48-0014 1 1 1 1 1 1 1
56 Air Pressure Switch 11-0416 1 1 1 1 1 1 1
NS Low Gas Pressure Switch (Manual Reset) 11-0422 1 1 1 1 1 1 1
NS High Gas Pressure Switch (Manual Reset) 11-0411 1 1 1 1 1 1 1
NS High Gas Pressure Switch Adapter 11-0423 1 1 1 1 1 1 1
NS UV Amplifi er, R7849A 16-0006 1 1 1 1 1 1 1
NS Ignition Cable 44-0063 1 1 1 1 1 1 1
60 Transition Assembly (prior to 020970-2305 1 1 1
must upgrade to turbo pilot by
replacing burner, spark rod and70-2306 1 1 1 1
transition assembly)

Finned copper tube gas boilers & water heaters – Boiler Manual
39
F
REPAIR PARTS CONTINUED
Model Size with Item Quantities Below
Ref # Name of Part Part # 500 750 1000 1250 1500 1750 2000
60a Gasket (must order as kit 21-2007)
(must order as kit 21-2008)
61 Pump Contactor Relay 15-0137 1 1 1 2 2 2 2
NS Rating Plate 82-0054 1 1 1 1 1 1 1
NS Futera III Overlay (HeatNet) 82-0200 1 1 1 1 1 1 1
77 Keypad Overlay 82-0189 1 1 1 1 1 1 1
78 Mini Fan 12-0021 1 1 1 1 1 1 1
79 Air Solenoid Valve 11-0376 1 1 1 1 1 1 1
80 3/8" Aluminum Tubing 62-0102 1 1 1 1 1 1 1
81 Pilot Orifi ce, .052 NG 10-0140 1 1 1 1 1 1 1
Pilot Orifi ce, .040 LP 10-0139 1 1 1 1 1 1 1
82 Mini Peeper, C7027A 16-0009 1 1 1 1 1 1 1
83 Spark Plate Gasket 06-0102 1 1 1
06-0037 1 1 1 1
NS Spark Rod Assembly 70-2566 1 1 1
70-2567 1 1 1 1
84 Electrode 16-0335 1 1 1 1 1 1 1
NS Spark Rod O’ring 06-0008 1 1 1 1 1 1 1
86 1/2" Aluminum Tubing 62-0103 1 1 1 1 1 1 1
NS Silicone 66-0151 1 1 1 1 1 1 1
NS Silicone Tubing 06-0051 2 2 2 2 2 2 2
NS Vent Termination Hood 5" 09-0117 1 1
Vent Termination Hood 6" 09-0112 1 1
Vent Termination Hood 8" 09-0113 1
Vent Termination Hood 10" 09-0115 1 1
NS Air Intake Hood 6" 09-0102 1 1 1
Air Intake Hood 8" 09-0103 1
Air Intake Hood 10" 09-0104 1
Air Intake Hood 12" 09-0105 1 1

Finned copper tube gas boilers & water heaters – Boiler Manual
40
F
START-UP REPORT
DATE : JOB NAME:
T E C HNI C IAN: L OCATION:
CO MPANY : MODEL CATEGORY::
PH O NE N U MBER : S ERIAL # :
PRE -STATT R T UP CHE CK LIST
NO VISIBLE DAMAGE TO UNI T INLET AIR FILTER IN S TALLED AND C LEA N
P IPING PROPERLY CONNECTE D PROPER SERVICE CLEARANCES PROVIDE D
B O ILER CIRC U LAT O R WIRE D P UMP RUNNING, HEAT EX C HANGER FUL L
V ENT / STACK C O NNECTE D GAS LINES PURGED, N O LEAKS, N O MISSING TEST
P L U G S
BOILE R STATT R T UP S E Q U E N C E
Note: Locate the AA terminals and minimum hold switch in the bottom-right of the electrical panel on the main
HeatNet board. Also locate the manometer test mani f old in the bottom o f the electrical panel .
Disable an y external call f or heat and toggle the remote/local switch to REMOTE .1 .
T oggle the LOW FIRE switch to c y cle the boiler then hold at trial f or pilot ignition .2 .
S et pressure to 3–3.5" w.c. (flame signal should read 5.0 VDC).3.
Release boiler to main flame trial for ignition.4 .
C heck for stable flame.5 .
Record combustion and manifold pressure at minimum firing rate.6.
J um p er the AA terminals to force 100% input .7.
Record combustion and manifold pressure.8.
R emove the AA j umper to place the boiler at minimum rate .9 .
Make any final adjustments on low fire.1 0.
C heck all combustion results using a calibrated flue gas anal y zer .11 .
R e l ease t h e LOW FIRE switc h to p l ace b oi l er in stan dby.12 .
In addition to completing the Fusion/Futera III start-up report, complete the control set-up information in the rear of the HeatNet manual.
Finned copper tube gas boilers & water heaters – Boiler Manual
41
F
CO M BUSTI O N ANALYSISLL MINIMUM FIR I NG RATEAA 1 00% FIR IN G RATEAA
GAS PRESSURE AT SUPPLY TEST PORT INCHES W.C . I NCHES W.C .
C O2 % %
O2 % %
CO ( PPM ) PP M PPM
NET S TA C K TEMPERAT U R E oF oF
MANIFOLD PRESSURE (W.C.) IN C HE S W. C. I N C HE S W. C.
SAFE TY T E S T CHE CK LI STF L O W SWITCHE S A IR S WIT CH FLAME SAFEGUAR DL OW WATER CUT-OFF H IGH LIMIT S
C O MMISSIONIN G THE BO I LER/WAT E RAA HEATERAA
U NIT CYCLED MINIMUM O F 15 TIME S THE DELTA T BETWEEN THE HEATERINLET AND OUTLET IS CRITICAL TOPROPER FLOW. BEFORE YOU LEAVE THE JOBSITE, YOU MUST RECORD THEDELTA T. THIS READING SHOULD NOTEXCEED 35°F, 19.4°C, NOR BE LOWERTHAN 20°F, 11.2°C.
D ELTA T =
CUSTOMER INSTRUCTE D
ALL COVERS REPLACE D
C UST O MER GIVEN MANUA L
T ARGET TEMPERAT U RE SET PER C U ST O ME R
COMMISSIONED BY: ______________________________________(SIGNATURE )
DATE: ___________________________ _
ADDI TI ONAL N O TE S AND C O MMENTS
Verify that the piping and controls ensure the boiler return water temperature does NOT drop below 140°F, 60°C. Operating at lower return temperatures is likely to cause condensation in the primary heat exchanger, resulting in corrosion and possible failure of the heat exchanger.

Finned copper tube gas boilers & water heaters – Boiler Manual
42
F
NOTICE! Commonwealth of Massachusetts
Installation Requirements MACODE-3
In the Commonwealth of Massachusetts, the installa-tion must be performed by a licensed plumber or gas fi tter.
1. For all side wall horizontally vented gas fueled equipment installed in every dwelling, building or structure used in whole or in part for residential purposes, including those owned or operated by the commonwealth and where the side wall exhaust vent termination is less than seven (7) feet above fi nished grade, in the area of the venting, including but not limited to decks and porches, the following requirements shall be satisfi ed:
d. INSTALLATION OF CARBON MONOXIDE DETECTORS. At the time of installation of the side wall horizontal vented gas fueled equipment, the installing plumber or gasfi tter shall observe that a hard wired carbon monoxide detector with an alarm and battery back-up is installed on the fl oor level where the gas equipment is to be installed. In addition, the installing plumber or gasfi tter shall observe that a battery operated or hard wired carbon monoxide detector with an alarm is installed on each additional level of the dwelling, building or structure served by the side wall horizontal vented gas fueled equipment. It shall be the responsibility of the property owner to secure the services of qualifi ed licensed professionals for the installation of hard wired carbon monoxide detectors.
i. In the event that the side wall horizontally vented gas fueled equipment is installed in a crawl space or an attic, the hard wired carbon monoxide detector with alarm and battery back-up may be installed on the next adjacent fl oor level.
ii. In the event that the requirements of this subdivision can not be met at the time of completion of installation, the owner shall have a period of thirty (30) days to comply with the above requirements; provided, however, that during said thirty (30) day period, a battery operated carbon monoxide detector with an alarm shall be installed.
e. APPROVED CARBON MONOXIDE DETECTORS. Each carbon monoxide detector as required in accordance with the above provisions shall comply with NFPA 720 and be ANSI/UL 2034 listed and IAS certifi ed.
f. SIGNAGE. A metal or plastic identification plate shall be permanently mounted to the exterior of the building at a minimum height of eight (8) feet above grade directly in line with the exhaust vent terminal for the horizontally vented gas fueled heating appliance or equipment. The sign shall read, in print size no less than one-half (1/2) inch in size, “GAS VENT DIRECTLY BELOW. KEEP CLEAR OF ALL OBSTRUCTIONS”.
g. INSPECTION. The state or local gas inspector of the side wall horizontally vented gas fueled equipment shall not approve the installation unless, upon inspection, the inspector observes carbon monoxide detectors and signage installed in accordance with the provisions of 248 CMR 5.08(2)(a)1 through 4.
Improper venting can result in excessive levels of carbon monoxide which can cause severe personal injury or death!
2. Exemptions — The following equipment is exempt from 248 CMR 5.08(2)(a) 1 through 4:
a. The equipment listed in Chapter 10 entitled “Equipment Not Required To Be Vented” in the most current edition of NFPA 54 as adopted by the Board; and
b. Product Approved side wall horizontally vented gas fueled equipment installed in a room or structure separate from the dwelling, building or structure used in whole or in part for residential purposes.
3. MANUFACTURER REQUIREMENTS - GAS EQUIPMENT VENTING SYSTEM PROVIDED.
a. When the manufacturer of Product Approved side wall horizontally vented gas equipment provides a venting system design or venting system components with the equipment, the instructions provided by the manufacturer for installation of the equipment and the venting system shall include:
i. Detailed instructions for the installation of the venting system design or the venting system components; and
ii. A complete parts list for the venting system design or venting system.
4. MANUFACTURER REQUIREMENTS – GAS EQUIPMENT VENTING SYSTEM NOT PROVIDED.
a. When the manufacturer of a Product Approved side wall horizontally vented gas fueled equipment does not provide the parts for venting the fl ue gases, but identifi es “special venting systems”, the following requirements shall be satisfi ed by the manufacturer:
i. The referenced “special venting system” instructions shall be included with the appliance or equipment installation instructions; and
ii. The “special venting systems” shall be Product Approved by the Board, and the instructions for that system shall include a parts list and detailed installation instructions.
5. A copy of all installation instructions for all Product Approved side wall horizontally vented gas fueled equipment, all venting instructions, all parts lists for venting instructions, and/or all venting design instructions shall remain with the appliance or equipment at the completion of the installation.
Improper venting can result in excessive levels of carbon monoxide which can cause severe personal injury or death!

43
LIMITED WARRANTY
Boilers/Water HeatersIndustrial, Commercial and Other Non-Residential Use
Th e “Manufacturer” warrants to the original owner at the original installation site that the heat exchanger of the Industrial, Commercial, and other Non-Residential Use Boiler (the “Product”) will be free from defects in material or workmanship for ten (10) years from the date of installation. Additional twenty one (21) year thermal shock warranty on heat exchanger. If upon examination by the Manufacturer the Product is shown to have a defect in material or workmanship during the warranty period, the Manufacturer will repair or replace, at its option, that part of the Product which is shown to be defective. All other RBI supplied Boiler/Water Heater parts are warranted against defects in material and workmanship for one (1) year from date of installation or 18 months from date of shipment from RBI.
Th e “Manufacturer” warrants to the original owner at the original installation site that the heat exchanger of the Industrial, Commercial, and other Non-Residential Use Water Heater (the “Product”) will be free from defects in material or workmanship for five (5) years from the date of installation. Additional twenty one (21) year thermal warranty on heat exchanger. If upon examination by the Manufacturer the Product is shown to have a defect in material or workmanship during the warranty period, the Manufacturer will repair or replace, at its option, that part of the Product which is shown to be defective. All other RBI supplied Boiler/Water Heater parts are warranted against defects in material and workmanship for one (1) year from date of installation or 18 months from date of shipment from RBI.
Th is limited warranty does not apply:(a) if the Product has been subjected to misuse or neglect, has been accidentally or intentionally damaged, has not been installed,
maintained or operated in accordance with the furnished writt en instructions, or has been altered or modifi ed in any way. Th ese include but not limited to:
• Excessive water hardness causing a lime build-up in the heat exchanger tubes is not a fault of the equipment and is not covered under the manufacturer’s warranty.
• Excessive pitt ing and erosion on the inside of the heat exchanger tubes caused by high water velocity through the tubes and is not covered by the manufacturer’s warranty. (See Installation Instructions for proper pump performance.)
• Chemical corrosion, no corrosive chemical (freon, dry cleaning chemicals, degreasing liquids, chlorine or any chemicals that produce hydrochloric acid) can be present in the boiler room as it rapidly destroys the heating equipment and voids the warranty.
• All copper fi n boilers should not operate with a return water temperature less than 110°F, 43°C atmospheric combustion, 125°F, 52°C fan assist combustion. If a lower temperature is required, an external bypass should be installed to prevent condensation. Th e manufacturer’s warranty does not cover damage done by condensation.
(b) to any expenses, including labor or material, incurred during removal or reinstallation of the Product or parts thereof.(c) to damage as a result of sett lement, distortion, collapse, or cracking of any foundation area, beams or pipes surrounding the Product.(d) to any workmanship of any installer of the Product; or to Products installed outside the continental United States or Canada.
Th is limited warranty is conditional upon:(a) shipment, to the Manufacturer, of that part of the Product thought to be defective. Goods can only be returned with prior writt en
approval from the Manufacturer. All returns must be freight prepaid.(b) determination in the reasonable opinion of the Manufacturer that there exists a defect in material or workmanship.
Repair or replacement of any part under this Limited Warranty shall not extend the duration of the warranty with respect to such repaired or replaced part beyond the stated warranty period.
THIS LIMITED WARRANTY IS IN LIEU OF ALL OTHER WARRANTIES, EITHER EXPRESS OR IMPLIED, AND
ALL SUCH OTHER WARRANTIES, INCLUDING WITHOUT LIMITATION IMPLIED WARRANTIES OF
MERCHANTABILITY OR FITNESS FOR A PARTICULAR PURPOSE, ARE HEREBY DISCLAIMED AND EXCLUDED
FROM THIS LIMITED WARRANTY. IN NO EVENT SHALL THE MANUFACTURER BE LIABLE IN ANY WAY FOR
ANY CONSEQUENTIAL, SPECIAL, OR INCIDENTAL DAMAGES OF ANY NATURE WHATSOEVER, OR FOR ANY
AMOUNTS IN EXCESS OF THE SELLING PRICE OF THE PRODUCT OR ANY PARTS THEREOF FOUND TO BE
DEFECTIVE. THIS LIMITED WARRANTY GIVES THE ORIGINAL OWNER OF THE PRODUCT SPECIFIC LEGAL
RIGHTS. YOU MAY ALSO HAVE OTHER RIGHTS WHICH MAY VARY BY EACH JURISDICTION.

44 05/14 Copyright 2014 Mestek, Inc.
260 North Elm Street 7555 Tranmere DriveWestfi eld, MA 01085 Mississauga, Ontario L5S 1L4 Canada Phone: (413) 568-9571 Phone: (905) 670-5888Fax: (413) 568-9613 Fax: (905) 670-5782
www.rbiwaterheaters.com