Body Mechanics Lifting/Transfers Staff Handbook
33
Body Mechanics & Lifting/Transfers Staff Handbook
Transcript of Body Mechanics Lifting/Transfers Staff Handbook

Body Mechanics
&
Lifting/Transfers
Staff Handbook

Table of Contents
• Terminology
• Basics of Body Mechanics
• Lifts and Transfers
o Bed Mobility
o Two Person
o Three Person
o Pivot
o Aquatics Area Transfers
o Mechanical Lifts
o Bathroom Transfers
• Positioning Considerations
o Wheelchair Positioning
o Pressure Sores
o Repositioning in Wheelchair

Terminology
Some of the terminology used in this handbook is listed below for reference:
Body Mechanics – Maintaining a proper position during movement
Contracture – Permanent shortening of muscle that limits motion at the joint involved
Spasticity - Extreme or abnormal tension of the muscles which increases with quick passive movements
Flaccidity – Lack of tension in muscles that results in “floppiness”
Supine – Lying on the back, face up.
Prone – Lying face down.
Basics of Body Mechanics
Today, four out of five individuals will suffer some type of back pain during their lives. Nearly 90% of all
back pain falls into the musculoskeletal category including sprains and strains of the muscles or
ligaments due to lifting. Much of this pain can be lessened and even prevented through the use of
proper body mechanics. Body mechanics can be defined as maintaining a proper position during
movement. Proper use of body mechanics will conserve energy, reduce stress and strain on body
structures and reduce the possibility of personal injury.1
Body mechanics are very important when working at a job that requires a lot of lifting. Body mechanics
are equally as important in every day life situations from taking out the trash to playing with your
children or grandchildren. The more aware you are of moving your body in ways that help to prevent
injury, the less prone you will be to injury. Once you have a back injury, you are more prone to injuring
yourself again, so any steps you can take to protect yourself now from injury will be helpful in the long
run.
Some essentials to body mechanics that need to be addressed include2:
• Plan out all activities before performing them
• Survey the area and clear any objects that could pose a tripping hazard
• Keep the distance to move an object/individual as short as possible
• Position yourself as close as possible to the object/individual to be moved
• Raise/Lower surface which you are lifting to or from if possible to prevent unnecessary forward
bending
• Use a wide base of support, one foot slightly ahead of the other
• Bend at your knees and hips while keeping your back as straight as possible
• Look ahead, not at the ground
• Push up with your legs to perform the lift. Continue to keep back straight during the lift
• Do not twist back, move your feet instead
• Do not hold your breath
The following photographs illustrate poor use of body mechanics.
a. Lifting with your back and not your legs

b. Twisting your body instead of moving your feet
c. Twisting while reaching an object on a high shelf
d. Not removing obstacles in the way, creating poor body mechanics
a. b. c. d.
The essentials that are listed above are a general list of steps that should be taken every time you lift,
whether it is at home or while transferring individuals at work. It may not always be possible to keep an
object close to your body to decrease strain on your back because of its size or shape. In this situation,
planning how you are going to lift the object ahead of time will help to ensure you are using the most
appropriate strategy.
The following photographs illustrate good use of body mechanics. a. Using legs to perform a lift b. Holding an object close to the body while carrying it c. Pivoting while moving your feet instead of twisting your body d. Standing square to a shelf when reaching for an object without twisting body
a. b. c. d.

Lifts and Transfers
No individual over 50 pounds should ever be lifted by only one person. A minimum of two staff persons
is required for all transfers. Please be sure to follow the lifting guidelines for each individual you are
working with as recommended by the Physical Therapist. The identified lift or transfer can be found in
each Unit Chart under the Assessment Tab, titled PT evaluation and/or on the Positioning/Mobility List.
There are many different ways to complete the lifts and transfers contained in this training. Different
employers may have expected a different approach to these transfers. This training is tailored to our
clientele and is what should be used when transferring the individuals.
The top staff injuries within the IDD division continue to be strains of the lower back. The other top
injuries included strains of the shoulder and strains of the upper back. The most common ways that
staff have been injured included: the client jerking unexpectedly, attempting to catch client during fall
or drop, staff assisting with transfer was lifting improperly, twisting back while lifting and poor hand
placement during lift. Staff should always be prepared for unexpected movements of client, using the
‘Things to Remember’ listed below will help to ensure the safety of the individual as well as the staff.
Things to Remember:
• USE TEAMWORK: Coordinate efforts – timing is essential for a successful lift.
• One person, the person at the top of a two-person lift is in command of the lift and should count
1-2-3-lift
• All persons involved in a lift should communicate that they are ready, avoid distractions during
lift (no irrelevant conversation)
• It is important to position the individual properly after transferring them (See Positioning
Considerations Section)
• Let the individual see the destination during the move
• The lift should be performed at a controlled speed, not fast and jerky
• Control the lowering of the individual (many clients are at risk for osteoporosis, be aware that
being repeatedly dropped into their wheelchair may increase their risk of fracture)
• Get to know the individual, some clients may be insecure about being transferred, some may
have very spastic muscle tone and some may have very flaccid muscle tone. It is very important
to speak and move in a calming manner before and during a lift to keep an individual that may
be apprehensive at ease during a transfer. Understanding that an individual may hold on very
tightly during a transfer because of their spastic tone or may slide through your fingers because
of their flaccidity will help to adapt your handling of the individual.1
• For individuals who are aggressive or excessively spastic when a transfer is attempted - wait
until the person calms down, and becomes attentive to participate as much as possible. Use
calming techniques first before attempting the lift. Get additional help if needed.

Before Every Lift:
• Explain to the individual what you are going to do
• Place the wheelchair as close as possible to the surface you are moving the individual to
• Have the area to which the individual will be transferred in place prior to beginning the transfer
(tub bench in appropriate position, toilet seat in place, etc.)
• Lock the brakes
• Remove the tray, footrests, armrests, headrest, and laterals to get as close to the person as
possible
• Avoid pulling the individual forward in the wheelchair by their arms (Be aware of the risk for
osteoporosis)
• Make sure there are no obstacles in the way of your lift
• Assure a firm grip (avoid pulling/lifting at the shoulders)1
NOTE: Remember Merakey Policy on Dress Code: Wear shoes with closed toes, closed heels, and non-slip
soles.

Bed Mobility
When moving an individual in bed, the following should be considered:
• If possible, adjust the height of the bed to reduce strain on your back
• Move individual body segments (head/shoulders, hips, then legs) to reduce the effort required
and to provide greater control
• Position your body as close to the side of the individual as possible, trying not to reach with your
arms2
Side-to Side Movement 2
1. Position one forearm under the individual’s upper back and one forearm under the middle of
the back * It may be necessary to support the individual’s head with your upper arm as you
move them
2. Gently slide the upper body toward you
3. Do not lift, slide on your forearms
4. Next, position your forearms under the individual’s lower trunk and just below the hips
5. Gently slide that body segment toward you
6. Finally, position your forearms under the thighs and legs and gently slide them toward you
7. When pulling the individual towards you, be sure that you are pulling straight toward your body.
This will decrease the amount of force needed to move the individual.
** For both the side-to-side and upward movements in bed, if the individual has a history of skin
breakdown, a draw sheet should be used.
• A sheet should be placed under the individual
• Two staff members will complete the transfer with one staff on either side of the individual
• Staff members will grasp sheet and roll until close to the side of the individual
• Assure a firm grasp on the sheet and lift individual slightly off of bed and move in the direction
necessary to reposition

The following photographs illustrate side-to-side bed mobility.
a. Proper technique for sliding an individual to the edge of the bed.
b. Proper use of a draw sheet.
a. b.
The following photograph shows poor technique for side-to-side bed mobility.
A. NEVER pull an individual by their arm or leg while moving them, always support at the trunk.
This could cause injury or a fracture, especially in individuals with osteoporosis.
A.
Upward Movement 2
1. Before attempting to move the individual upward, bring them close to the edge of the bed using
the above technique
2. Bend the individual’s hips and knees so the feet rest flat on the bed
3. You should face toward the individual’s head and stand at the individual’s mid-chest level with
one foot slightly in front of the other
4. Support the individual’s head and upper trunk with your arms and lift until the shoulder blades
clear the bed *If you are unable to lift the person’s trunk or if the lift creates excessive strain in
your back, it may be necessary to ask for assistance
5. Your chest should be close to the individual’s chest to reduce strain on the back
6. Slide the lower trunk and pelvis upward approx 6-10 inches *Do not attempt to move the
individual over a long distance unless they are able to assist
The following photographs illustrate upward bed mobility.

a. Proper technique for upward movement in bed, assisting the individual to lift the head and
shoulders during the transfer.
b. Use of a draw sheet.
a. b.
The following photograph illustrates poor technique for upward bed mobility.
A. Improper technique: NEVER pull an individual by their arms.
A.
Supine to Sidelying Transfer 2
1. Stand facing the individual on the side you are rolling the person toward.
2. If you are rolling the person onto their right side, cross the left leg over the right leg and position
the right arm straight and at shoulder height
3. Roll the person by gently pulling from behind the left shoulder and the left hip
4. Once the person is sidelying, position them for comfort with pillows under the head, and
between the knees and ankles.

The following photographs illustrate the Supine to Sidelying Transfer.
a. Support the individual at the hip and shoulders standing square to the person’s chest.
b. Slowly pull the individual toward your chest until they are lying on their side.
a. b.
Supine to Sit Transfer 2
1. Move the individual close to one side of the bed or mat and roll to a sidelying position
2. Make sure the person’s hips and knees are bent
3. Keeping a wide base of support, reach under the person’s shoulder with one hand and a hand at
the knee
4. Moving in one fluid motion by putting body weight on one foot and then the other, move the
person into a sitting position ** It may be necessary to complete this step segmentally. While
the individual is sidelying, move the legs over the edge of the surface, then lift the
shoulders/upper body to a sit position.
5. Once the individual is up in the sitting position, they can then be transferred to their wheelchair
using the techniques listed below.

The following photographs illustrate the Supine to Sit Transfer.
a. First perform the supine to sidelying transfer.
b. Position one arm under the shoulder of the individual and one arm cradling the legs under the
knees.
c. Shift your weight from one leg to the other while assisting the individual to a sitting position.
a. b.
c.

Prone to Sit Transfer 2
1. Move the individual close to one side of the bed or mat
2. If you are going to roll toward the right side, cross the left leg over the right and position the
right arm close to the person’s side with the elbow straight and hand tucked under their hip
3. Grasp the individual at the hip and shoulder regions on their left side and roll toward you into a
sidelying position (make sure the individual’s arm is not stuck underneath them)
4. Ensure there is enough space to roll the individual onto their back before completing the
transfer, if there is not enough space, move the person forward while sidelying
5. Guide the individual from sidelying to supine by gently lowering them to a supine position
6. Once the individual is supine, follow the steps for the supine to sit transfer and then transfer the
person into their wheelchair

The following photographs illustrate the prone to sit transfer.
a. Prepare the person to roll onto their side by tucking their arm at their side and crossing one leg
over the other
b. Roll the individual into a sidelying position by grasping the person’s hip and shoulder region
c. Continue to roll the person into supine and then follow the steps for a supine to sit transfer
d. Move the person to a sitting position from sidelying
a. b.
c. d.

Wheelchair Transfers
Two Person – Top and Bottom Lift 1,2
1. When possible, the taller, stronger person should stand behind the chair (TOP)
2. The top person should stand behind the wheelchair and reach through the individual’s armpits
and grasp the person’s opposite forearm with the hands and fold the individual’s forearms over
chest/stomach 2
3. The person at the bottom should bend their hips and knees, keep their back straight and lower
themselves to the same level as the individual
4. The person at the bottom should support the individual’s hips and knees by placing hands under
thighs, just above the knees
5. The person at the bottom will remove the pelvic positioning belt, chest harness, foot strap, etc.
*Double check to be sure the individual is released from all strapping and positioning
equipment. **Do not move away from the individual when positioning equipment is removed.
6. On the count of three, lift slowly and in unison
7. Lift only as high as needed
8. Shift or step to the side and place the client gently on the designated surface. DO NOT TWIST
9. Position individual appropriately in the designated area (Refer to Positioning Considerations
Section)
10. When Lifting from a surface to the wheelchair, place the individual in a sitting position first and
reverse the procedure. If the individual is prone, they need to be assisted into supine, then
sitting first.
11. Be sure to attach the pelvic positioning belt before the top person releases their grasp

The following photographs illustrate the top and bottom transfer.
a. Appropriate arm grasp
b. Alternative arm grasp if crossing arms is not possible (PT will determine and provide instruction
as to which technique should be used)
c. Start position
d. Lift
e. End position
a. b.
c. d.
e.

The following photographs illustrate improper technique for a two-person top and bottom transfer
A. Improper technique: should grasp behind knees
B. Improper technique: chair should be placed as close to the surface you are moving the
individual to as possible to decrease the amount of time needed to lift the individual
C. Improper technique: Avoid distractions and extraneous conversation
A.
B. C.
Three Person Transfer 1
May be used when:
• The individual is being fed by tube – THE SOLE PURPOSE OF THE THIRD PERSON IS TO ATTEND
TO THE FEEDING EQUIPMENT
• The individual is overweight. The third person will assist by taking some of the individual’s
weight at the buttocks and helping to guide them during transfer
• The individual has positioning restrictions due to surgery or a medical condition. The third
person will assist by taking some of the individual’s weight at the buttocks and helping to guide
them during transfer.
1. Will be performed as the two-person lift shown above with the assistance of a third person
2. After lifting, if the individual needs to be repositioned or needs a seat cushion, ask another staff
member to assist you with a two person lift. DO NOT LIFT ALONE
Pivot Transfer (The individual is an active participant in the transfer)
It is helpful to understand the basics of sit-to-stand before performing this transfer. Before standing the
individual, ensure the following:
o The individual’s bottom is scooted out to the end of the chair
o Their feet are placed slightly behind their knees
o They are bending forward at the waist, bring their ‘nose over their toes’
Completing these three steps before standing will make it much easier on both the staff and the
individual to complete the transfer.
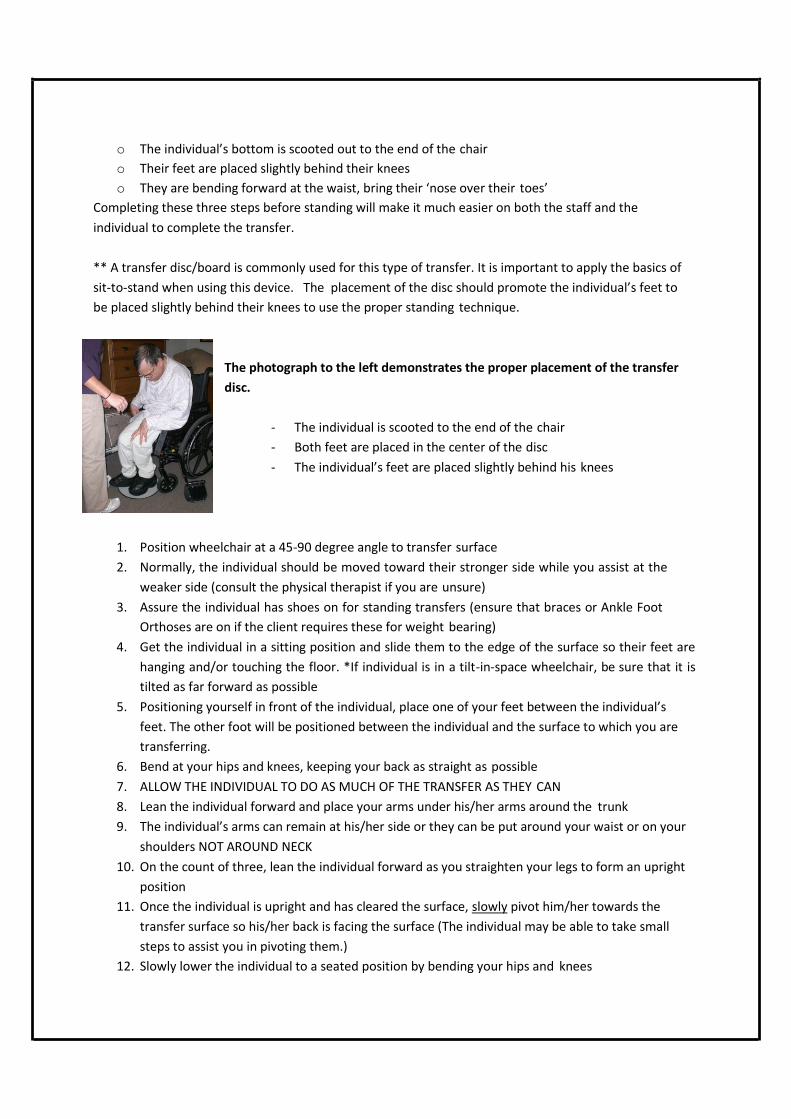
** A transfer disc/board is commonly used for this type of transfer. It is important to apply the basics of
sit-to-stand when using this device. The placement of the disc should promote the individual’s feet to
be placed slightly behind their knees to use the proper standing technique.
The photograph to the left demonstrates the proper placement of the transfer
disc.
- The individual is scooted to the end of the chair
- Both feet are placed in the center of the disc
- The individual’s feet are placed slightly behind his knees
1. Position wheelchair at a 45-90 degree angle to transfer surface
2. Normally, the individual should be moved toward their stronger side while you assist at the
weaker side (consult the physical therapist if you are unsure)
3. Assure the individual has shoes on for standing transfers (ensure that braces or Ankle Foot
Orthoses are on if the client requires these for weight bearing)
4. Get the individual in a sitting position and slide them to the edge of the surface so their feet are
hanging and/or touching the floor. *If individual is in a tilt-in-space wheelchair, be sure that it is
tilted as far forward as possible
5. Positioning yourself in front of the individual, place one of your feet between the individual’s
feet. The other foot will be positioned between the individual and the surface to which you are
transferring.
6. Bend at your hips and knees, keeping your back as straight as possible
7. ALLOW THE INDIVIDUAL TO DO AS MUCH OF THE TRANSFER AS THEY CAN
8. Lean the individual forward and place your arms under his/her arms around the trunk
9. The individual’s arms can remain at his/her side or they can be put around your waist or on your
shoulders NOT AROUND NECK
10. On the count of three, lean the individual forward as you straighten your legs to form an upright
position
11. Once the individual is upright and has cleared the surface, slowly pivot him/her towards the
transfer surface so his/her back is facing the surface (The individual may be able to take small
steps to assist you in pivoting them.)
12. Slowly lower the individual to a seated position by bending your hips and knees

13. Stabilize the individual in the appropriate position on the transferred surface (according to
his/her PT evaluation and/or positioning/mobility list)
The following photographs illustrate the pivot transfer.
a. Starting position
b. Assisting the individual to pivot
c. End position
a. b.
c.

The following photographs demonstrate improper technique of a pivot transfer.
A. Improper technique: Individual’s feet are not placed under their knees, individual is sitting back
in the chair, they should be scooted forward and leaning their trunk forward.
B. Improper technique: NEVER allow individual to grab around your neck.
A. B.

Lifts in the Aquatics Area
Three Person Lift
1. Position the wheelchair at the edge of the pool with individual facing the pool
2. Apply the Personal Flotation Device (PFD) to the individual
3. Two people will need to stand on either side of the wheelchair and a third person will need to
step into the pool, to lift the individual’s legs
4. If you are lifting at the right side of the individual, you will place your left arm under the
individual’s right arm and bend their arm at the elbow
5. With your left hand, grasp the individual’s right forearm by the elbow
6. Gently push their arm in towards their body and hold it gently, but firmly, against their torso
7. Your right hand will support under the persons leg above the knee
8. If you are approaching from the left, do the same as above but your right arm will hold the
person’s left arm and left hand will support under their left leg
9. Next, bend at your knees, with your feet spread and keep your back straight
10. The person lifting at the bottom should be in the water and standing directly in front of the
individual
11. One of the people at the top of the lift should unfasten the pelvic positioning belt
12. One of the people at the top of the lift should be in command, and on a count of three, the top
staff should lift up and step forward to the lip of the pool – THIS SHOULD BE COMPLETED IN
UNISON
13. Now bending their knees, the staff should slowly lower the individual to the lip of the pool
14. In this position, the individual will be sitting with his/her legs in the water and his/her buttocks
on the edge of the pool
15. On another count of three, ease the individual into the water. Lifting is minimal here. You need
only to clear the edge of the pool, to ensure that the individual does not scrape their back or hit
their head
16. At this point, the staff person in the water is in control of the lift, lowering the individual into a
supine position in the water
17. To transfer from the pool to the wheelchair, reverse the procedures outlined above
18. Replace the pelvic positioning belt

The following photographs illustrate a three-person lift in the aquatic area, wheelchair to pool.
a. Start position, the third person involved in the lift will be in the water supporting the feet and
legs.
b. Positioning while individual is seated on lip of pool.
c. End position, individual is slowly lowered into pool and bottom staff takes control of lift.
a. b.
c.

The following photographs illustrate a three person lift in the aquatic setting, pool to wheelchair.
a. Start position, bringing individual from pool to their wheelchair/shower chair, one top person
gets into pool to lift individual from pool to sitting on lip of pool.
b. Position while individual is seated on lip of pool, top person is back on pool deck to assist other
staff member.
c. End position, individual is seated in their wheelchair or shower chair, safety belt is replaced.
a. b.
c.
Alternative Three-Person Lift
This type of lift is used when the individual has difficulty maintaining an upright seated position
in order to successfully perform the above transfer.
1. A two-person top and bottom transfer as discussed previously in this training is used to transfer
the individual from their wheelchair to a mat on the side of the pool.
2. While the individual is on the mat, their Personal Flotation Device is applied.
3. One of the staff members on the pool deck will move into the pool to assist the bottom person
once the PFD is secured.
4. The staff in the water will stand beside each other and place their forearms under the individual
at their head/upper trunk and their lower trunk/hips.
5. From this position, the individual is lifted enough to clear the edge of the pool and is lowered
slowly into the water.

The following photographs demonstrate the alternative three-person aquatic transfer, wheelchair to
pool.
a. Two staff persons on the pool deck perform a two-person top and bottom transfer to move
individual from wheelchair to a mat on the pool deck.
b. All staff members are assisting in placing the personal flotation device to the individual.
c. One person from the pool deck moves into the water to assist the individual into the pool from
the mat.
d. End position, individual is slowly lowered into the water.
a. b.
c. d.

The following photographs illustrate the alternative three-person aquatic transfer, pool to wheelchair.
a. Start position, two staff members are in the water to move the individual from the pool to the
mat using a two-person top and bottom transfer.
b. Once the individual is on the mat, the PFD is removed.
c. One staff member from the water comes back up on to the pool deck to perform a two-person
top and bottom transfer into the individual’s wheelchair.
a. b.
c.

Use of Mechanical Lifts
(Hoyer Lifts)
Use of a mechanical lift is necessary in situations where a manual lift would pose a safety risk to either
staff or the Individual being transferred. The PT will determine which individuals must be transferred by
use of the mechanical lift. This determination is made based on the physical characteristics and medical
history of the individual.
The mechanical lift MAY be recommended for:
• Individuals whose size or weight prevents a safe manual transfer
• Individuals who have severe osteoporosis and are at risk of fracture
• Individuals who have a history of multiple fractures
• Individuals whose contractures or muscle tone prevent a safe and secure grasp by staff
• Individuals who have low muscle tone and are excessively floppy during a manual transfer
• Individuals whose tone fluctuates quickly, making transfers unpredictable
Using a mechanical lift provides several benefits. The potential for patient injury (such as falls and skin
tears) that may occur during a manual lift is reduced by using mechanical lifts. Mechanical lifts provide a
more secure process for lifting and transferring which may increase patient comfort and lessen their
anxiety.
Proper placement of the sling is essential to prevent slippage of the sling during the transfer and also to
prevent injury to the individual’s legs. The PT will determine whether the straps of the sling should be
crossed under both legs or if the sling straps can be brought up between the legs. For individuals with
severe spasticity or severe osteoporosis, bringing the sling straps between the legs may produce
excessive stress to the legs and hips.

Before transporting an individual in a mechanical lift, ensure the base is open to increase the base of
support.
a. Closed Position
b. Open Position
a. b.
Basics for Using Mechanical Lifts
• Position the wheelchair as close as possible to where the individual is being transferred.
• For maximum safety, two staff persons must always be used when transferring an individual via
mechanical lift. The second staff person should help control the individual’s position by using
the handles on the sling and checking the sling placement and arm and leg position as the lift is
being moved.
• If repositioning of the individual is needed for a secure lift, lower the individual to the surface
and readjust sling as needed.
• Use caution to keep the lift boom away from the individual’s face throughout entire lift.
• Do not lock brakes or block wheels when lifting an individual. The wheels must be free to roll to
allow the lifter to center itself beneath the person.
• When lifting, always keep the individual centered over the base. The individual should face the
staff that is operating the lift.
• For some individuals, the leg sections of the sling will be brought forward and up between the
thighs. For others, the leg sections will be brought under both legs together and brought up
along the outer thighs.
• If the individual has a tube used for feeding, a third staff person must be present to attend to
the feeding equipment
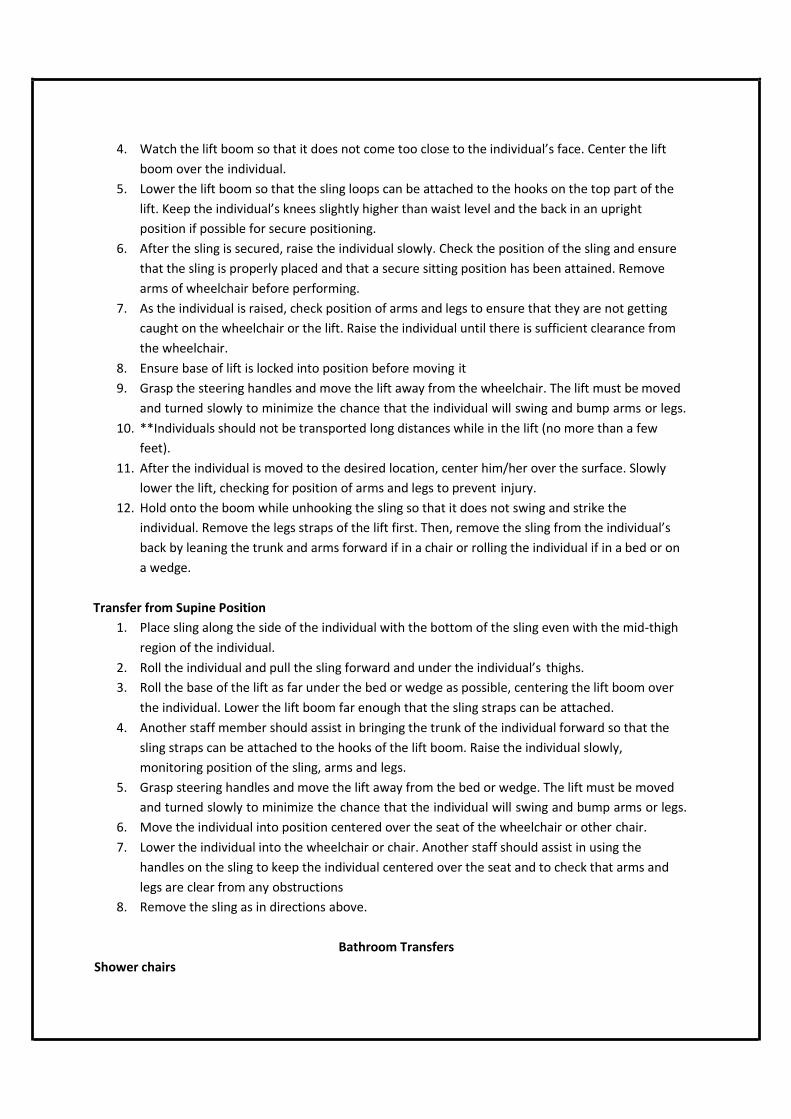
Transfer from Wheelchair
1. Lean the individual forward with arms forward. Place the sling behind the individual’s back and
move it down until it reaches the seat of the WC
2. Pull the leg sections of the sling forward and under the individual’s thighs.
3. Widen the base of the mechanical lift so that is can go around the wheelchair. To increase
stability of the lift, the base of the lift must be spread to the widest possible position before
beginning the lift.
4. Watch the lift boom so that it does not come too close to the individual’s face. Center the lift
boom over the individual.
5. Lower the lift boom so that the sling loops can be attached to the hooks on the top part of the
lift. Keep the individual’s knees slightly higher than waist level and the back in an upright
position if possible for secure positioning.
6. After the sling is secured, raise the individual slowly. Check the position of the sling and ensure
that the sling is properly placed and that a secure sitting position has been attained. Remove
arms of wheelchair before performing.
7. As the individual is raised, check position of arms and legs to ensure that they are not getting
caught on the wheelchair or the lift. Raise the individual until there is sufficient clearance from
the wheelchair.
8. Ensure base of lift is locked into position before moving it
9. Grasp the steering handles and move the lift away from the wheelchair. The lift must be moved
and turned slowly to minimize the chance that the individual will swing and bump arms or legs.
10. **Individuals should not be transported long distances while in the lift (no more than a few
feet).
11. After the individual is moved to the desired location, center him/her over the surface. Slowly
lower the lift, checking for position of arms and legs to prevent injury.
12. Hold onto the boom while unhooking the sling so that it does not swing and strike the
individual. Remove the legs straps of the lift first. Then, remove the sling from the individual’s
back by leaning the trunk and arms forward if in a chair or rolling the individual if in a bed or on
a wedge.
Transfer from Supine Position
1. Place sling along the side of the individual with the bottom of the sling even with the mid-thigh
region of the individual.
2. Roll the individual and pull the sling forward and under the individual’s thighs.
3. Roll the base of the lift as far under the bed or wedge as possible, centering the lift boom over
the individual. Lower the lift boom far enough that the sling straps can be attached.
4. Another staff member should assist in bringing the trunk of the individual forward so that the
sling straps can be attached to the hooks of the lift boom. Raise the individual slowly,
monitoring position of the sling, arms and legs.
5. Grasp steering handles and move the lift away from the bed or wedge. The lift must be moved
and turned slowly to minimize the chance that the individual will swing and bump arms or legs.
6. Move the individual into position centered over the seat of the wheelchair or other chair.
7. Lower the individual into the wheelchair or chair. Another staff should assist in using the
handles on the sling to keep the individual centered over the seat and to check that arms and
legs are clear from any obstructions
8. Remove the sling as in directions above.
Bathroom Transfers
Shower chairs

o Before transferring individual onto shower chair, ensure the brakes on wheelchair and shower
chair are locked.
o When a pivot transfer is used, if possible, position the shower chair at a 90 degree angle to the
wheelchair
o Use the appropriate transfer technique for the individual using the steps listed in the lifts and
transfers section.
o Be sure that all necessary positioning straps are snugly fastened, the configuration and types of
straps to be used will be determined by the PT for each individual.
o Shower chairs are not designed to transport individuals and should be used only within
immediate bathroom areas
Tub Bench
o Make sure the legs are at equal height and are squarely on the surface to prevent slipping
Changing Tables
o Individuals should be transferred using a two-person transfer or mechanical lift
o Never leave an individual unattended when on a changing table, stay within arm’s length of the
individual
Tub Transfers
o Follow specific PT instruction as to which type of transfer and use of grab bars or other assistive
devices
** Non-skid slippers or shoes should be used during pivot transfers at all times to minimize risk of falls
** There will be many instances in which there will be less than ideal situations while performing a lift or
transfer. One major issue encountered is not having enough room to complete the lift. When
completing a transfer in a small space, removing the footrests and other equipment that add bulk to the
wheelchair before wheeling it into the small space will help with maneuverability. Ensure that the
wheelchair is placed as close as possible to the surface to which you are moving the individual.
Positioning Considerations
Proper positioning in WC
It is extremely important that people are positioned properly in their wheelchair for the following
reasons:
1. For their comfort
2. To prevent skin breakdown (pressure sores)
3. Prevent and/or maintain deformities
4. To decrease muscle tone (For very spastic individual) and to facilitate good head and eye
alignment
Pressure sores
A pressure sore (decubitus ulcer or bed sore) is an injury usually caused by unrelieved pressure that
damages the skin and underlying tissue. These sores can range in severity from mild (minor skin
reddening) to severe (deep, down to the muscle and bone). Individuals who must stay in bed, chair or
wheelchair are at risk to develop pressure sores. Fortunately, most pressure sores can be prevented
and when they do form, they do not have to get worse.
Signs and Symptoms
- A danger sign is any color that is different from a normal skin color
- The first indication of a developing ulcer is the appearance of reddened skin over the bony
prominence. This reddened area may feel hard. At this stage, the spread of the pressure sore is
reversible. The redness will disappear if pressure on the area is relieved. You must remove all pressure
from this area until the skin returns to its normal color.
- *IF YOU NOTICE ANY REDDENED AREAS, PLEASE NOTIFY THE NURSE IMMEDIATELY. EARLY
ASSESSMENT AND TREATMENT IS ESSENTIAL.
Skin Assessment
- ALL STAFF IS TO CONTINUOUSLY MONITOR ALL OF THE SKIN SURFACES OF EVERY INDIVIDUAL,
ESPECIALLY OVER BONY PROMINENCES (HEELS, ANKLES, HIPS, SACRUM, EARS, SHOULDERS, ELBOWS,
ETC.), for signs of redness or irritation during care and with each assessment. Non-medical staff should
immediately notify the nurse any time irritation is present.
- Daily skin inspections are essential to the prevention and treatment of pressure sores. Be sure to
provide privacy when doing skin inspections. Take care to examine the entire skin surface, scalp, inside
the mouth, nails, palms of hands, soles of feet, and all skin folds.
Protecting the skin from injury
- Reduce friction by avoiding brushing, bumping, scraping, or dragging the skin when transferring or
positioning the person.
- Ensure the bed or wheelchair is free of objects such as wrinkles, crumbs, pins, catheter plugs and
tubing, hair curlers, and small toys that he/she can lay or sit on, so they do not cause undue pressure on
the individual’s skin.
- Ensure the individual’s clothing is free of wrinkles, shirts pulled down, socks pulled up, tongue of shoes
is not bunched up, etc.
Recommendations for Prevention of Pressure Sores 4,5
- Individuals in bed should be repositioned at least every two hours
- In a wheelchair, individuals should be repositioned or shifted in chair to relieve pressure at least every
hour. Individuals who are able to weight shift on their own should do so every 15 minutes.
- Pressure relief can be completed by leaning the individual’s trunk forward, leaning them to right or left
sides, reclining the wheelchair or if applicable, tilting the wheelchair. (Tilt-in-space is a special feature of
a wheelchair that keeps the position of the chair the same and tips the whole seat back)
- Leaning to the left or right has been shown to be the most effective way of relieving pressure on the
buttocks

- Full body tilt of the wheelchair to 25 degrees (scale is located on the wheelchair) has been shown to
reduce shear (skin sliding against wheelchair) to approximately zero.
- Tilt-in-space wheelchairs should be tilted back at least once every hour for about 15 minutes.
- *The wheelchair must be upright during meals to prevent choking.
- **Individuals with GI problems, do not tilt back more than 30 degrees. Consult your PT department.

Repositioning in WC
Due to the amount of time an individual spends seated, either in a wheelchair or supported seating
system, it is imperative that how they sit be evaluated. The goal of proper seating/positioning is to
provide enough support for postural stability using a minimum of external supports.
Listed below are several key areas that must be stressed to ensure that the individuals are positioned
properly in their wheelchairs:
1. REMEMBER: WHEN CONSIDERING A POSITION: Always keep the individual’s head supported in
a neutral (midline) position. Their head, neck and trunk should form a straight line
2. Ensure the individuals feet are in the proper foot position, on the footrests (foot straps securely
fastened, as recommended by PT – most clients only require these for transport)
3. The individual’s buttocks (hips) must be against the back of the wheelchair
4. Trays, table tops, lap boards, etc. must be adequately spaced from the individual’s body
5. If a head rest is on the wheelchair, make sure the individual’s head is on the head rest
6. Be sure that all positioning straps (pelvic positioning belt, ACS) are fastened snugly to help
maintain position
7. Be sure that all adaptive seating is in place such as abductors, foot straps, etc.
8. Ensure seat cushions are in the correct position. We see many cushions on backwards or upside
down. This can cause skin problems and discomfort. They should be labeled with “front” and
“back”.
When necessary to reposition an individual in their wheelchair, a side-by-side two person lift should
be used.
1. Lock the brakes of the wheelchair and ensure all positioning devices and strapping are removed
from the individual before repositioning
2. The two people who are lifting should stand on either side of the wheelchair
3. If you are lifting at the right side of the individual, you will place your left arm under the
individual’s right arm and bend their arm at the elbow
4. With your left hand, grasp the individual’s right forearm by the elbow
5. Gently push their arm in towards their body and hold it gently, but firmly, against their torso
6. Your right hand will support under the persons leg above the knee
7. If you are approaching from the left, do the same as above but your right arm will hold the
person’s left arm and left hand will support under their left leg
8. Next, bend at your knees, with your feet spread and keep your back straight
9. Lift the individual enough to clear the seat of their wheelchair and move them in the direction
necessary to reposition
10. Slowly lower the person into their seat in the new position

**This type of lift should ONLY be performed to reposition individual in their wheelchair or as the
initial lift in the aquatic setting to move the individual from the shower chair to the pool deck.
The information in this handbook provides basic training on lifting procedures
that are used with individuals with intellectual and developmental disabilities.
Decisions as to which type of equipment and techniques that are to be used for
specific individuals and in specific physical locations are made based on many
factors. These include: the individual’s upper and lower extremity strength,
ability to assist with the transfer, medical status, the ability to bear weight,
presence of contractures or other orthopedic limitations, and the configuration
of the physical space in which the transfer must be performed. Specific lifting
procedures to be used temporarily may need to be implemented following
surgeries or fractures.
Lifting techniques to be used for particular individuals will be determined by the
physical therapist. Procedures that are specific to an individual or unique to a
site should be reviewed and demonstrated.
Resources
1. Allegheny Valley School Staff Training Material.
2. Pierson, F. and Fairchild, S. (2002). Principles and Techniques of Patient Care. Third Edition.
Philadelphia, PA: Elsevier.
3. “Preventing Back Pain at Work and at Home.” American Academy of Orthopedic Surgeons. July
2007. http://orthoinfo.aaos.org/topic.cfm?topic=A00175
4. U.S. Department of Health and Human Services. Pressure Ulcers in Adults: Prediction and Prevention
– Clinical Practice Guidelines. 1992 (reviewed 2000).
http://www.ncbi.nlm.nih.gov/bookshelf/br.fcgi?book=hsahcpr&part=A9054
5. Hobson, Douglas A. Comparative effects of posture on pressure and shear at the body-seat interface.
Journal of Rehabilitation Research and Development. 1992; 29:4. p. 21-31.
Created by: Erin Dillaman
Slippery Rock University Doctor of Physical Therapy, Class of 2010
Revised to Merakey Format: 5/2020 CE