BMC Remedy Service Desk: Problem Management User...
160
BMC Remedy Service Desk: Problem Management User Guide Supporting Version 7.6.04 of BMC Remedy Problem Management January 2011 www.bmc.com
-
Upload
duongthuan -
Category
Documents
-
view
241 -
download
2
Transcript of BMC Remedy Service Desk: Problem Management User...

BMC Remedy Service Desk:Problem Management UserGuide
Supporting
Version 7.6.04 of BMC Remedy Problem Management
January 2011
www.bmc.com

Contacting BMC Software
You can access the BMC Software website at http://www.bmc.com. From this website, you can obtaininformation about the company, its products, corporate offices, special events, and career opportunities.
United States and Canada
Address BMC SOFTWARE INC2101 CITYWEST BLVDHOUSTON TX 77042-2827 USA
Telephone 1 713 918 8800or1 800 841 2031
Fax 1 713 918 8000
Outside United States and Canada
Telephone +01 713 918 8800 Fax +01 713 918 8000
© Copyright 1996, 1998-1999, 2002-2006, 2009, 2010-2011 BMC Software, Inc.BMC, BMC Software, and the BMC Software logo are the exclusive properties of BMC Software, Inc., areregistered with the U.S. Patent and Trademark Office, and may be registered or pending registration inother countries. All other BMC trademarks, service marks, and logos may be registered or pendingregistration in the U.S. or in other countries. All other trademarks or registered trademarks are theproperty of their respective owners.
Current and Notes are trademarks or registered trademarks of International Business MachinesCorporation in the United States, other countries, or both.
IT Infrastructure Library® is a registered trademark of the Office of Government Commerce and is usedhere by BMC Software, Inc., under license from and with the permission of OGC.
ITIL® is a registered trademark, and a registered community trademark of the Office of GovernmentCommerce, and is registered in the U.S. Patent and Trademark Office, and is used here by BMC Software,Inc., under license from and with the permission of OGC.
Crystal Reports is a trademark or registered trademark of SAP AG in Germany and in several other countries.
The information included in this documentation is the proprietary and confidential information of BMCSoftware, Inc., its affiliates, or licensors. Your use of this information is subject to the terms and conditionsof the applicable End User License agreement for the product and to the proprietary and restricted rightsnotices included in the product documentation.
Restricted rights legend
U.S. Government Restricted Rights to Computer Software. UNPUBLISHED—RIGHTS RESERVEDUNDER THE COPYRIGHT LAWS OF THE UNITED STATES. Use, duplication, or disclosure of any dataand computer software by the U.S. Government is subject to restrictions, as applicable, set forth in FARSection 52.227-14, DFARS 252.227-7013, DFARS 252.227-7014, DFARS 252.227-7015, and DFARS252.227-7025, as amended from time to time. Contractor/Manufacturer is BMC SOFTWARE INC, 2101CITYWEST BLVD, HOUSTON TX 77042-2827, USA. Any contract notices should be sent to this address.
Customer support
Support website
You can obtain technical support from BMC 24 hours a day, 7 days a week at http://www.bmc.com/support. From thiswebsite, you can
■ read overviews about support services and programs that BMC offers
■ find the most current information about BMC products
■ search a database for problems similar to yours and possible solutions
■ order or download product documentation
■ download products and maintenance
■ report a problem or ask a question
■ subscribe to receive proactive e-mail alerts
■ find worldwide BMC support center locations and contact information, including e-mail addresses, fax numbers, andtelephone numbers
Support by telephone or e-mail
In the United States and Canada, if you need technical support and do not have access to the web, call 800 537 1813 orsend an e-mail message to [email protected]. (In the subject line, enter SupID:yourSupportContractID, suchas SupID:12345). Outside the United States and Canada, contact your local support center for assistance.
Before contacting BMC
Have the following information available so that Customer Support can begin working on your issue immediately:
■ product information
― product name― product version (release number)― license number and password (trial or permanent)
■ operating system and environment information
― machine type― operating system type, version, and service pack or other maintenance level such as PUT or PTF― system hardware configuration― serial numbers― related software (database, application, and communication) including type, version, and service pack or
maintenance level
■ sequence of events leading to the problem
■ commands and options that you used
■ messages received (and the time and date that you received them)
― product error messages― messages from the operating system, such as file system full― messages from related software
3

License key and password information
If you have questions about your license key or password, use one of the following methods to get assistance:
■ Send an e-mail to [email protected].
■ Use the Customer Support website at http://www.bmc.com/support.
4 BMC Remedy Service Desk: Problem Management User Guide

Contents
About this Book 9Audience ............................................................................................................................9BMC Remedy IT Service Management documents ...................................................10Conventions .....................................................................................................................12Syntax statements ...........................................................................................................12
Chapter 1 Introducing BMC Remedy Problem Management 15BMC Remedy ITSM usability enhancements .............................................................15
Where to find features and fields that have moved .......................................19About the IT Home Page ...............................................................................................21
Configuring the IT Home Page ..........................................................................24Consoles overview ...............................................................................................25
Navigating consoles, forms, and modules .................................................................26Problem Investigation form views ...............................................................................29
Best Practice view ................................................................................................29Classic view ..........................................................................................................32User interface standards for field labels ...........................................................32
Calbro Services ................................................................................................................33Problem management user roles ..................................................................................34
Problem coordinator ............................................................................................34Specialist ................................................................................................................35Mapping permission groups to SMPM roles ...................................................35
Process flow and the lifecycle of a problem investigation ........................................36Problem management use cases ...................................................................................37
Problem investigation resolution—change request ........................................38Problem investigation resolution—no change request ..................................41Problem investigation resolution—change request roll back .......................44Problem investigation—at an impasse .............................................................47
Chapter 2 Working with the Overview console 51Functional areas ..............................................................................................................51Console list table .............................................................................................................54Selecting status values ....................................................................................................55
Chapter 3 Working with the Problem Management console 57Functional areas ..............................................................................................................57
Contents 5

Chapter 4 Performing the incident request review 63Incident request review process ...................................................................................63Generating an incident request review .......................................................................64Creating a problem investigation .................................................................................65
Viewing problem investigations ........................................................................66Recording additional investigation information .............................................66Indicating impacted areas ...................................................................................67
Relating incident requests and problem investigations ............................................68Defining relationships .........................................................................................69Copying relationships .........................................................................................71Modifying relationships ......................................................................................72Performing quick actions on a relationship .....................................................73Removing relationships ......................................................................................74
Assigning problem investigations ................................................................................74Viewing unassigned investigations ..................................................................74Specifying a problem coordinator for the problem investigation ................75Assigning an investigation to a specialist ........................................................76
Chapter 5 Performing the root cause analysis 79Root cause analysis .........................................................................................................79Reviewing and updating the problem investigation .................................................80
Receiving notification of assignments .............................................................81Viewing problem investigations assigned to you ...........................................81Accepting an assignment ....................................................................................82Searching for similar problem investigations ..................................................83Searching knowledge base entries ....................................................................84Authoring knowledge base entries ...................................................................84Documenting work with a vendor ....................................................................84
Proposing a temporary workaround ...........................................................................85Establishing the root cause ............................................................................................87Proposing a structural solution ....................................................................................88Notifying the problem coordinator ..............................................................................89Implementing the solution ............................................................................................89
Resolving a problem investigation ....................................................................90Creating a solution entry ....................................................................................91
Chapter 6 Performing the analysis review 93Analysis review ...............................................................................................................93Reviewing the problem investigation ..........................................................................94
When a structural change was implemented ..................................................95
6 BMC Remedy Service Desk: Problem Management User Guide

When Change Management is needed .............................................................95When no root cause was found ..........................................................................96
Reassigning the problem investigation .......................................................................96Creating a known error ..................................................................................................97Reviewing known error details ....................................................................................99Monitoring a problem’s status ....................................................................................100Canceling a problem investigation .............................................................................100
Chapter 7 Closing the problem investigation 103Closing the problem investigation .............................................................................103Verifying the structural solution ................................................................................104Closing the problem investigation and known errors ............................................105Indicating an impasse ..................................................................................................106Performing periodic checks .........................................................................................107
Chapter 8 Supplemental BMC Remedy Problem Management features 109Using the KPI flashboards ...........................................................................................109
BMC Remedy Problem Management KPIs ....................................................110KPI flashboard variables ...................................................................................110Opening the KPI flashboards ...........................................................................112Viewing and displaying data ...........................................................................112
Viewing your profile ....................................................................................................114Setting application preferences ...................................................................................114Searching for records ....................................................................................................117
Running Defined Searches ...............................................................................117Creating a custom search ..................................................................................118Editing or deleting the custom search ............................................................119Searching all records .........................................................................................119Using Global search ...........................................................................................120
Printing records .............................................................................................................121Modifying records ........................................................................................................122Tracking costs ................................................................................................................122
Recording the cost of working on an investigation ......................................123Recording the cost of CI unavailability ..........................................................124
Using work information notes ....................................................................................124Adding work information notes ......................................................................124Viewing work information notes .....................................................................126Modifying work information entries .............................................................127
Recording effort spent on an investigation ...............................................................128Creating reminders .......................................................................................................129Broadcasting messages ................................................................................................131
Contents 7

Creating broadcast messages ...........................................................................131Viewing broadcasts ...........................................................................................133Modifying a broadcast message ......................................................................134Limiting the number of messages ...................................................................134
Sending pages and email messages ...........................................................................135Paging a person or on-call group ....................................................................135Sending email .....................................................................................................136
Working with reports ...................................................................................................138Generating a report ............................................................................................139Using qualifications to generate a report .......................................................140Using advanced qualifications to generate a report .....................................142BMC Remedy Problem Management predefined reports ...........................143
Chapter 9 Managing configuration items 145Creating a CI ..................................................................................................................146Inventory management ................................................................................................151
Placing bulk CIs in inventory ...........................................................................151Placing non-bulk CIs in inventory .................................................................152Managing inventory ..........................................................................................153
8 BMC Remedy Service Desk: Problem Management User Guide

About this BookThis guide describes how to use the BMC Remedy Problem Management applicationof the BMC Remedy IT Service Management Suite.
The BMC Remedy IT Service Management Suite includes the following applications:
■ The BMC Remedy Service Desk solution , which includes theBMC Remedy Incident Management application and the BMC Remedy ProblemManagement application
■ The BMC Remedy Asset Management application
■ The BMC Remedy Change Management application, which also includes the BMCRemedy Release Management module
The applications run with the BMC Remedy Action Request System (BMC RemedyAR System) environment and share a common database. All these applicationsreceive data from the BMC Atrium Configuration Management Database (BMCAtrium CMDB).
AudienceThis guide is intended for the following IT professionals:
■ IT support staff
■ Problem coordinators
About this Book 9

BMC Remedy IT Service Managementdocuments
The following table lists the documentation available for BMC Remedy Service Desk:Problem Management. It also lists relevant documents for related solutions andproducts.
Unless otherwise noted, online documentation is available with the product and onthe Customer Support website at http://www.bmc.com/support .
Title Document provides Audience
BMC Remedy Service Desk: Problem Management
BMC Remedy IT ServiceManagement Release Notes
Information about known issues in each release ofBMC Remedy IT Service Management. Also providesa list of new features included with the applications.
Everyone
BMC Remedy Service Desk: ProblemManagement User Guide
Procedures for using the BMC Remedy ProblemManagement application; includes new features andan overview.
Everyone
BMC Remedy IT ServiceManagement Administration Guide
Procedures for configuring and administrating theBMC Remedy IT Service Management applications.
Administrators
BMC Remedy IT ServiceManagement Concepts Guide
Conceptual overview information about theapplications that make up the BMC Remedy ITSMSuite of applications.
Everyone
Help Help for using and configuring Problem Management,available by clicking Help in the product interface.Available from Help links after Help is installed.
Everyone
Additional BMC Remedy IT Service Management products
BMC Remedy Service Desk: IncidentManagement User Guide
Procedures for using the BMC Remedy Service Desk:Incident Management application; includes newfeatures and an overview.
Everyone
BMC Remedy Asset ManagementUser Guide
Procedures for using the BMC Remedy AssetManagement application; includes new features andan overview.
Everyone
BMC Remedy Change ManagementUser Guide
Procedures for using the BMC Remedy ChangeManagement application; includes new features andoverview.
Everyone
BMC Service Management ProcessModel, BMC Best Practice Flows
A white paper describing the best practice work flowfor the BMC Remedy IT Service Managementprocesses that are covered by the BMC ServiceManagement Process Model.
Everyone
Solutions
BMC Remedy IT Service Management documents
10 BMC Remedy Service Desk: Problem Management User Guide

Title Document provides Audience
BMC Service Impact Manager:Integration for BMC Remedy ServiceDesk User Guide
Detailed information about the Integration for theBMC Remedy Service Desk (IBRSD) component. Thisguide is intended for system administrators and userswith an understanding of the BMC Impact Managerand BMC Remedy Service Desk environments.
Administratorsand BMCImpactManager users
Service Management SolutionsRelease Notes
Information about new features, open issues, andresolved issues.
Everyone
BMC Atrium CMDB
BMC Atrium Core Release Notes Information about new features, open issues, andresolved issues.
Everyone
BMC Atrium CMDB User Guide Information about using BMC Atrium CMDB,including searching for and comparing CIs andrelationships, relating CIs, viewing history, runningimpact simulations, and viewing federated data.
Users
BMC Atrium Core TroubleshootingGuide
Information about resolving issues with BMC AtriumCore components, including API, filter and consoleerror messages and their solutions.
Administrators,programmers,and BMCSupportpersonnel
BMC Remedy Action Request System
BMC Remedy Approval ServerGuide
Information about installation and configuration of theBMC Remedy Approval Server, how to use the BMCRemedy Approval Server, and understanding theapproval workflow.
Everyone
BMC Service Level Management
BMC Service Level ManagementRelease Notes
Information about known issues in each release ofBMC Service Level Management. Also provides a listof new features included with the application.
Everyone
BMC Service Level ManagementUser Guide
Procedures for using the BMC Service LevelManagement application; includes new features andoverview.
Everyone
BMC Service Request Management
BMC Service Request ManagementRelease Notes
Information about new features and known issues. Everyone
BMC Remedy Knowledge Management
BMC Remedy KnowledgeManagement User Guide
Procedures for using the BMC Remedy KnowledgeManagement application; includes new features andoverview.
Everyone
BMC Service Management Process Model
BMC Remedy IT Service Management documents
About this Book 11

Title Document provides Audience
BMC Service Management ProcessModel Role Mapping to BMCRemedy ITSM Suite
List and description of BMC Service ManagementProcess Model roles.
Everyone
ConventionsThis document uses the following special conventions:
■ All syntax, operating system terms, and literal examples arepresented in this typeface.
■ Variable text in path names, system messages, or syntax is displayed in italic text:testsys/instance/fileName
■ This document uses a symbol to show menu sequences. For example, Actions => Create Test instructs you to choose the Create Test command from the Actionsmenu.
Syntax statementsThis topic explains conventions for showing syntax statements.
A sample statement follows:
COMMAND KEYWORD1 [KEYWORD2 | KEYWORD3] KEYWORD4={YES | NO} fileName…
Convention Example
Items in italic type represent variables that youmust replace with a name or value. If a variableis represented by two or more words, initialcapitals distinguish the second and subsequentwords.
alias
databaseDirectory
serverHostName
Brackets indicate a group of optional items. Donot type the brackets when you enter theoption. A comma means that you can chooseone or more of the listed options. You must usea comma to separate the options if you choosemore than one option.
[tableName, columnName, field]
[-full, -incremental, -level] (UNIX)
Conventions
12 BMC Remedy Service Desk: Problem Management User Guide

Convention Example
Braces indicate that at least one of the encloseditems is required. Do not type the braces whenyou enter the item.
{DBDName | tableName}
UNLOAD device={disk | tape, fileName |deviceName}
{-a | -c} (UNIX)
A vertical bar means that you can choose onlyone of the listed items. In the example, youwould choose either commit or cancel.
{commit | cancel}
{-commit | -cancel} (UNIX)
An ellipsis indicates that you can repeat theprevious item or items as many times asnecessary.
columnName…
Syntax statements
About this Book 13

Syntax statements
14 BMC Remedy Service Desk: Problem Management User Guide

Introducing BMC Remedy ProblemManagement
The BMC Remedy Problem Management application is used to manage probleminvestigations, known errors, and solution database entries. In the IT InfrastructureLibrary (ITIL) model, problem management focuses on reducing the number ofincidents; either reactively, by preventing them from recurring, or proactively bypreventing them from occurring.
An important ITIL objective is to minimize service disruptions. A probleminvestigation helps an IT organization get to the root cause of incidents. It initiatesactions that help to improve or correct the problem, preventing the incident fromrecurring. For example, if computers are running low on disk space and this isdiscovered during a problem investigation, the problem can be resolved before itbecomes an incident that causes a disruption to service.
After a problem investigation identifies the root cause of the incident, theinformation results in a known error. A known error is a problem that has beensuccessfully diagnosed and for which a temporary work-around or permanentsolution has been identified. Service desk analysts and specialists can use the work-around information in the known error to resolve similar incident requests if theyoccur before the proposed structural solution has been implemented.
Many of the processes described in this guide are developed from the BMC RemedyService Management Process Model (SMPM), which is a companion product to BMCRemedy Problem Management. The SMPM describes a set of predefined processesfor the delivery and support of information technology (IT) services. The processesdescribed by the SMPM are aligned with ITIL good practices.
BMC Remedy ITSM usability enhancementsThe BMC Remedy ITSM 7.6.04 release contains the following usabilityenhancements. These enhancements are available only when the applications areaccessed through a web browser.
1
Chapter 1 Introducing BMC Remedy Problem Management 15

Table 1: BMC Remedy ITSM usability enhancements
Description Affected applications and modules
To help you retrieve information faster, the type-ahead search functionality is available on morefields. When you start to type a query into a fieldthat has the type-ahead search functionality, one ormore possible matches are immediately presentedfor selection in a drop-down list. As you type morecharacters, the list changes to match what you type.
■ BMC Remedy Change Management
■ Release Management
■ BMC Remedy Incident Management
■ BMC Remedy Problem Management
■ BMC Remedy Knowledge Management
■ BMC Service Request Management
To improve application usability when using theBest Practice and Classic view, a system–generatedrecord ID is assigned to all new record typesimmediately when the application displays the formin New mode.
■ BMC Remedy Change Management
■ Release Management
■ BMC Remedy Incident Management
■ BMC Problem Management
■ BMC Service Request Management (work order)
To improve application performance, systemadministrators can configure system messages fromfilters and servers to appear in a message bar insteadof in pop-up windows. For information about thisconfiguration, see the BMC Remedy Action RequestSystem 7.6.04 Configuration Guide.
■ BMC Remedy Asset Management
■ BMC Remedy Change Management
■ Release Management
■ BMC Remedy Incident Management
■ BMC Remedy Problem Management
■ BMC Remedy Knowledge Management
■ BMC Service Request Management
■ BMC Service Level Management
BMC Remedy ITSM usability enhancements
16 BMC Remedy Service Desk: Problem Management User Guide

Description Affected applications and modules
Using the Application Preferences settings, you canconfigure the system to display a confirmationmessage when you submit a new record. Forinformation about these settings, see yourapplication's user guide.
■ BMC Remedy Change Management
■ Release Management
■ BMC Remedy Incident Management
■ BMC Remedy Problem Management
■ BMC Service Request Management (work order)
To provide easier access to the BMC ServiceManagement Process Model (SMPM) from theapplications, the Process Overview link is availablefrom the Quick Actions navigation area of the mainforms. The Process Overview link is also availableabove the main tables on the consoles.
■ BMC Remedy Asset Management
■ BMC Remedy Change Management
■ BMC Remedy Incident Management
■ BMC Remedy Problem Management
To improve overall system performance, mostconsoles and forms now open inside a single viewarea, instead of in individual windows.
■ BMC Remedy Asset Management
■ BMC Remedy Change Management
■ BMC Remedy Incident Management
■ BMC Remedy Problem Management
■ BMC Service Request Management (work order)
■ BMC Remedy Knowledge Management
To make navigation through the BMC Remedy ITSMsuite of applications easier, a more consistentnavigation model is used on the IT Home Page,consoles, and forms. For example, the applicationmenu that appeared on the IT Home page in earlierreleases of the BMC Remedy ITSM suite ofapplications is now used on all of the applicationconsoles and main forms.
■ BMC Remedy Asset Management
■ BMC Remedy Change Management
■ BMC Remedy Incident Management
■ BMC Remedy Problem Management
■ BMC Service Request Management (work order)
■ BMC Remedy Knowledge Management
BMC Remedy ITSM usability enhancements
Chapter 1 Introducing BMC Remedy Problem Management 17

Description Affected applications and modules
To make required fields more obvious, when yousave a record, a red box outlines required fields thatdo not contain valid information.
■ BMC Remedy Asset Management
■ BMC Remedy Change Management
■ BMC Remedy Incident Management
■ BMC Remedy Problem Management
■ BMC Service Request Management
To improve usability, the number of steps needed tocreate a work info entry has been reduced. See theapplicable application user guide for informationabout how to create work info entries.
■ BMC Remedy Change Management
■ BMC Remedy Incident Management
■ BMC Remedy Problem Management
■ BMC Service Request Management
To make searching for information acrossapplications easier and more intuitive, a globalsearch option is available. The search scans andretrieves information from the installed BMCRemedy ITSM applications and presents it in areadable, consumable format. See the applicableapplication user guide for information about how theglobal search function works.
■ BMC Remedy Asset Management
■ BMC Remedy Change Management
■ BMC Remedy Incident Management
■ BMC Remedy Problem Management
■ BMC Service Request Management(work order)
To make creating Relationships easier, a new linkcalled Create Relationship to is available. See theapplicable application user guide for informationabout how the link works.
■ BMC Remedy Change Management
■ BMC Remedy Incident Management
■ BMC Remedy Problem Management
BMC Remedy ITSM usability enhancements
18 BMC Remedy Service Desk: Problem Management User Guide
Description Affected applications and modules
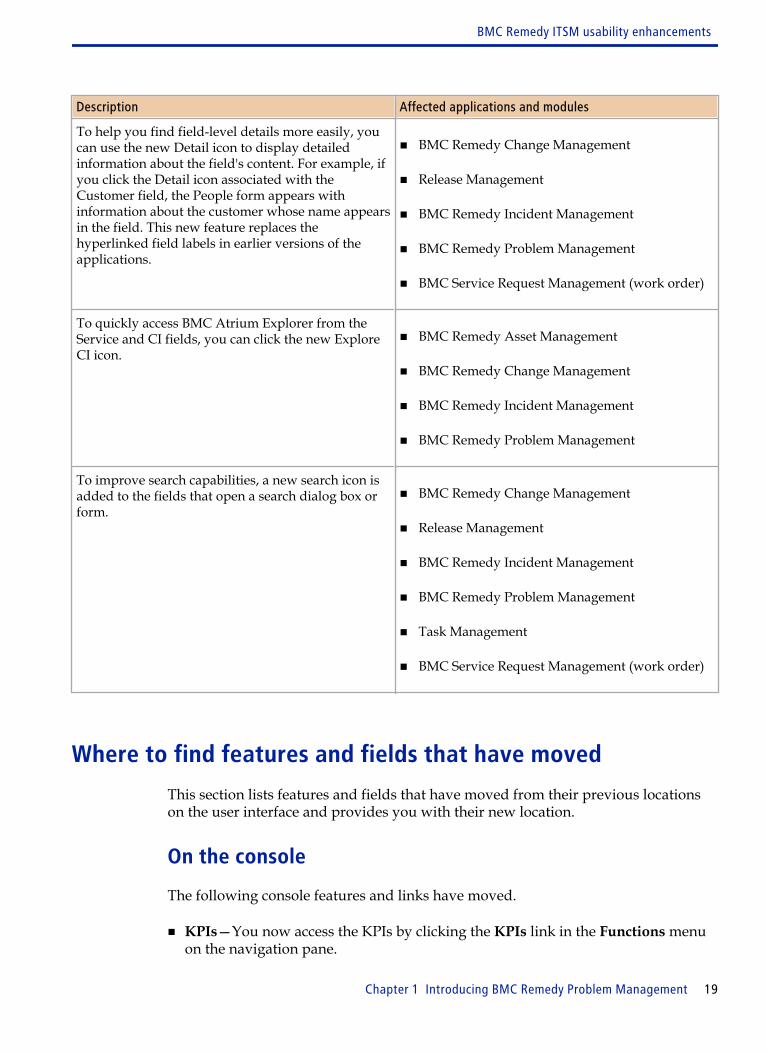
To help you find field-level details more easily, youcan use the new Detail icon to display detailedinformation about the field's content. For example, ifyou click the Detail icon associated with theCustomer field, the People form appears withinformation about the customer whose name appearsin the field. This new feature replaces thehyperlinked field labels in earlier versions of theapplications.
■ BMC Remedy Change Management
■ Release Management
■ BMC Remedy Incident Management
■ BMC Remedy Problem Management
■ BMC Service Request Management (work order)
To quickly access BMC Atrium Explorer from theService and CI fields, you can click the new ExploreCI icon.
■ BMC Remedy Asset Management
■ BMC Remedy Change Management
■ BMC Remedy Incident Management
■ BMC Remedy Problem Management
To improve search capabilities, a new search icon isadded to the fields that open a search dialog box orform.
■ BMC Remedy Change Management
■ Release Management
■ BMC Remedy Incident Management
■ BMC Remedy Problem Management
■ Task Management
■ BMC Service Request Management (work order)
Where to find features and fields that have moved
This section lists features and fields that have moved from their previous locationson the user interface and provides you with their new location.
On the console
The following console features and links have moved.
■ KPIs—You now access the KPIs by clicking the KPIs link in the Functions menuon the navigation pane.
BMC Remedy ITSM usability enhancements
Chapter 1 Introducing BMC Remedy Problem Management 19

■ Defined Searches— You now access Defined Searches from the Filter By dropdown menu at the top of the console.
■ Process Overview—You now access Process Overview from a link above theconsole table.
■ Tool bar—The Problem console tool bar is removed. The following tool barfunctions have been retained and are available from other locations on the interface:
— Close button—To close the application and return to the Home page, click theHome icon on the breadcrumb bar.
— New mode—To invoke New mode, in the Navigation pane click New Problem.
— Modify mode—To invoke Modify mode after you create a new probleminvestigation you must configure your application preferences appropriately.For information about how to do this, see “Setting application preferences” onpage 114
— Search mode—From the breadcrumb bar, return to the Problem console anduse the Search function.
On the form
The following application form features and fields have moved.
■ You now access these fields from the main body of the form:
— Assigned Group
— Assignee
— Vendor Group
— Vendor Ticket Number
— Status
— Status Reason
— Resolution
■ You now access the following links from the Quick Action section of theNavigation pane.
— Create Relationship to—for creating relationships between the current recordand other record types.
— Create Related Request—for creating other record types.
BMC Remedy ITSM usability enhancements
20 BMC Remedy Service Desk: Problem Management User Guide

— Process Overview—for opening a process flow diagram.
— Work information—Changes have been made to the work information entriesare created in Best Practice view. For informaiton about creating workinformation entries in this view, see “Adding work information notes” on page124.
— Realationships—Changes have been made to the way you create relationshipsin the Best Practice view. For information about how to create relationships inthis view, see “Defining relationships” on page 69
About the IT Home PageWhen you start the BMC Remedy IT Service Management Suite, the IT Home Pagedisplays the Overview console by default. However, you can set up what you wantto see on the IT Home Page. If you are a system administrator, you can configure thepage for all users. Otherwise, you can configure your own user ID to see your views.
The following figure illustrates the functional areas of the IT Home Page.
Figure 1: IT Home Page and its functional areas
The following table describes each of the functional areas of the IT Home Page.
About the IT Home Page
Chapter 1 Introducing BMC Remedy Problem Management 21

Functional area Purpose
Home Page header
Logout Click Logout to exit the application.
Breadcrumb bar The breadcrumb bar helps you keep track of the records you are viewing andhelps with navigation. For more information about breadcrumbs, refer to “Navigating consoles, forms, and modules ” on page 26.
Global search Type in a word or a phrase in the search area, and the application will searchacross multiple forms for records that match your input. For more informationabout global search, refer to “Using Global search” on page 120.
Navigation pane
About the IT Home Page
22 BMC Remedy Service Desk: Problem Management User Guide

Functional area Purpose
Applications Depending on your permissions and other installed applications, the followinglinks are displayed. Use them to open applications.
■ Quick Links
■ AR System Administration
■ Analytics
■ BMC Atrium Core
■ BMC Atrium Integration Engine
■ Administrator Console
■ Asset Management
■ Change Management
■ Change Management Dashboard
■ Contract Management
■ Product Catalog
■ Foundation Elements
■ Incident Management
■ Problem Management
■ Return On Investment
■ Release Management
■ Requestor Console
■ Task Management
Note: When you run your mouse over the applications, you see a second menu.You can select one of those options to go directly to a form. For example, rollover Change Management and select Change/Release Calendar. The Calendarscreen appears.
Configuration Buttons Use these buttons to configure your panel display.
Overview console
About the IT Home Page
Chapter 1 Introducing BMC Remedy Problem Management 23

Functional area Purpose
Company and View By These fields combine to provide a way to indicate the company name and theassigned-to categories filtering the records in the Console List table.
Refresh This button refreshes the data in the table.
Preferences This button allows you to set preferences for the console list table. You canremove columns, set refresh intervals, reset and save your preferences.
Console List table This table lists the different types of requests.
Configuring the IT Home Page
You can configure the IT Home Page to display information of your choice. Forexample, Bob Baxter is the Manager for payroll at Calbro Services. He likes to keeptrack of all potential problems, changes, and incidents pertaining to his department.He also tracks software license contracts so that he knows which ones are about toexpire. Bob configures his panels to display all the information he is looking for, asfollows:
■ Asset Management => Contracts About to Expire in 90 Days
■ Change Management => All Open Changes with Extensive Impact
■ Incident Management => All Open Incidents with Extensive Impact
■ Problem Management => All Open Problems by Status and Priority
To add or delete panels
You can specify how many panels to display on your IT Home Page up to amaximum of four panels.
1 In the IT Home Page, click the Add panels to layout button.
Four panels appear.
2 To delete a panel, click the Close button on the panel.
To configure panels
You can select what to display on your IT Home Page.
Note You can configure your panels only with options for which you have permissions.
About the IT Home Page
24 BMC Remedy Service Desk: Problem Management User Guide

1 In the panel, click the Show list and run your cursor over the list of options.
2 From the list of work areas for each option, select the one to display (for example,Asset Management => Software Certificates).
The panel displays your selection.
3 Repeat Step 1 to for your other panels.
To change display on a panel, click the Edit button to display the Show list,and make another selection.
4 Click the Save Current Layout button to save your IT Home Page.
A dialog box confirms that your customized layout has been saved.
5 Click OK.
When you next log in, you will see your saved IT Home Page.
To expand and collapse panels
1 In the panel, click the Collapse button. The panel will collapse. In the panelclick the Expand button. The panel will expand to its original size.
To restore a default IT Home Page view
1 In the IT Home Page, click the Restore Default Layout button. A dialog boxinforms you that the default layout for this page will be brought back. Click OKto proceed or Cancel to retain your current layout. If you click OK, the panels onthe IT Home Page disappear and the Overview Console is displayed.
To hide or show the navigation pane
1 In the IT Home Page, click the Applications button to hide or show thenavigation pane.
Consoles overview
The following consoles provide access to all or a part of BMC Remedy ProblemManagement:
■ Overview console
About the IT Home Page
Chapter 1 Introducing BMC Remedy Problem Management 25

■ Problem Management consoleUsing the Overview console, specialists can view problem investigations thatwere assigned to them through the BMC Remedy Problem Managementapplication. The specialist role is fulfilled by all IT employees and long termcontractors, other than Service Desk Analysts and IT Operators. Specialists canalso view work that was assigned to them through the other BMC Remedy ITService Management applications with which BMC Remedy ProblemManagement integrates:
■ BMC Remedy Incident Management
■ BMC Remedy Asset Management
■ BMC Remedy Change Management
The Problem Management console is the main console for the application. Itprovides problem coordinators and specialists with a single point from which theycan create problem investigations, known error entries, and solution databaseentries. It also provides a place from which they can monitor the progress ofproblem investigations as the investigation moves through its lifecycle, and recordwork that was performed during the investigation.
Navigating consoles, forms, and modulesThis section describes how to navigate around BMC Remedy ITSM consoles, forms,and modules.
In most cases, when you open consoles, forms, and modules from the IT Home page,they open inside the IT Home page view. Similarly, if you open a form from aconsole, the form replaces the console in the view.
If you open a related record from a form, the related record opens in the view thatwas occupied by the form. For example, if you are working with a probleminvestigation (the "parent" record) and from the parent record you open a relatedincident request, the incident request replaces the parent record in the view. If youthen open a change request from the incident request, the change request replacesthe incident request in the view, and so on. To help you keep track of the recordsyou are viewing and to help with navigation, there is a breadcrumb bar across thetop of the view field.
Note Not all of the consoles, forms, and modules open in the view area. For example, CIrecords open in a new window. When a console, module, or form opens in awindow, it is not added to the breadcrumb bar.
Navigating consoles, forms, and modules
26 BMC Remedy Service Desk: Problem Management User Guide

The breadcrumb bar contains links to the records that you opened from the parentrecord. When you open a record, the breadcrumb trail expands along thebreadcrumb bar to the right, with the new link. If there are more than six links in thebreadcrumb trail, arrows appear at one or both ends of the bar that let you scrollback and forward on the bar to see links not currently in the view.
The first link in the breadcrumb trail indicates the place from which you started. Itcan be a console or a form. For example, if you open a change request record directlyfrom the IT Home page, the first link in the breadcrumb trail takes you to the changerequest.
The last link corresponds to the record currently in the view. If you open a link to theleft of the record currently in view, the system truncates the breadcrumb trail to thatlink. The history is retained, however, so you can use the back and forward arrowsin the navigation controls to move through the bar one record at a time. There is alsoa history of your most recently viewed records, which you can use to move directlyto a record. Click the down arrow to open the history list.
Note The Forward button is only visible after you move back down the breadcrumb barby opening a link to a record that you previously viewed.
Figure 2: The breadcrumb navigation buttons and bar
If you are viewing a record from the middle of the breadcrumb trail and then branchoff to another parent-type record, the system removes the forward breadcrumb trailfrom the point where you branched off and starts a new history from there, using thenew parent-type record as the starting point. For example: You open a probleminvestigation, then open a related incident request, and from the incident requestyou open a related change request. If you go back to the incident request record andthen open a second problem investigation, the breadcrumb bar no longer contains alink to the change request. The breadcrumb trail now shows the original probleminvestigation, the incident request, and the second problem investigation. It thenshows any related records that you subsequently open from the second probleminvestigation.
When you close the parent record, the system removes the breadcrumb history.
What happens to data as I move back and forth on thebreadcrumb trail?
If you are entering information into a record and open another record from thebreadcrumb trail, the system prompts you to save the work, if you have not done so.If you do not save the information, the system does not preserve it on the record andyou must re-enter it later.
Navigating consoles, forms, and modules
Chapter 1 Introducing BMC Remedy Problem Management 27

If someone updates a record on your breadcrumb trail that is not currently in theview, those changes are visible to you when you open the record again.
How does the breadcrumb trail behave with forms inSearch mode?
If you run a search from a form that is in Search mode, the last entry in thebreadcrumb trail is the name of the form.
When you open a record from the search results table, that record does not appear inthe breadcrumb trail. However, if you drill down through that record to open otherrelated records, those related records will appear in the breadcrumb trail.
To return to the originating record, use the history list.
Note All of the records that you open from a form in Search mode are added to the historylist.
To return to the results table, click the name of the form in the breadcrumb trail.
Can I force a second window to open?
If you press the Shift key and then click a record entry in a console or in any searchresults table, the record opens in a second window. Also, if you hold the Shift keyand click a link, button, and so on, the form or dialog box associated with the link orbutton opens in another window.
Note If there is a record in the history list that you want to open in a second window,press the Shift key and then double-click the entry.
Which consoles, forms, and modules open in a new window?
Not all of the consoles, forms, and modules open in the IT Home page's view. Theconsoles, forms, and modules in the following list open in a new window. If youopen one of these from the IT Home page, any unsaved changes to the IT Homepage are lost.
Tip Before you open any of these consoles, forms, or modules, save the changes to the ITHome page that you want to keep.
■ BMC Remedy Asset Management, except for the Asset Management console.
Navigating consoles, forms, and modules
28 BMC Remedy Service Desk: Problem Management User Guide

■ BMC Action Request System Administrator
■ All BMC Atrium applications
■ Application Administration
■ BMC Service Level Management
■ All Service Request Management entry points, except for Work Order
■ Analytics
■ Service Management Process Model
Problem Investigation form viewsBMC Remedy Problem Management provides you with different ways to view theProblem Investigation and Known Error forms:
■ Best Practice view (the default view)
■ Classic view
Your view is configured for you by your system administrator. For informationabout configuring views, see the BMC Remedy IT Service Management AdministrationGuide for information about configuring views.
Note If a procedure differs depending on the view, both methods are described.Instructions for the Best Practice view are provided first.
Best Practice view
In the Best Practice view, the fields most commonly used for updating, resolving,and closing problem investigations and for working with known errors areimmediately visible. You can access additional, less frequently used functionalityfrom the tabbed sections of the form or from the links in the Navigation pane.
The following list outlines the Best Practice view features:
■ Coordinator Group—(Problem Investigation and Known Error forms) Use theCoordinator Group field to select a support group. The support groups thatappear in the menu each have at least one member with the functional role of a
Problem Investigation form views
Chapter 1 Introducing BMC Remedy Problem Management 29

Problem Coordinator. From the Coordinator Group menu, you select thecompany, the organization, and then the support group. Only the selectedsupport group name appears in the Coordinator Group field.
■ Problem Coordinator—(Problem Investigation and Known Error forms) Use theProblem Coordinator field to select a Problem Coordinator for the probleminvestigation. The names that appear on this menu belong to the support groupselected in the Coordinator Group field and have the functional role of ProblemCoordinator.
■ Problem Location—The Problem Location field specifies the location of the CIthat is the focus of the problem investigation. The Location record includes thename of the client company, the region, the site group, and the specific site.
■ Known Error Location—The Known Error location field specifies the location ofthe CI that is the focus of the knows error. The Location record is always the nameof the problem coordinator company.
■ Service field—(Problem Investigation and Known Error forms) The Service fieldrelates business service configuration items (CIs) to the problem investigation orknown error at the time it is created. All available business service CIs appear inthe Service field menu and are only limited by the access levels of the personcreating the problem investigation or the known error.
■ CI field—(Problem Investigation and Known Error forms) The CI field specifiesto which piece of infrastructure the problem investigation pertains. This field iscan be configured to be a required field when you resolve an incident; however,you can specify the CI at any time in the problem investigation lifecycle.
■ Investigation Driver—(Problem Investigation form) The Investigation Driverfield specifies the reason for the investigation: High Impact Incident, ReoccurringIncidents, Non-Routine Incident, or Other.
■ Product and Operational Categorization—(Problem Investigation and KnownError forms) If the problem investigation record is created from an incidentrequest, the operational categorization and the product categorization fields areautomatically filled, out based on the categorizations specified in the originatingincident request. Likewise, when you create a known error from a probleminvestigation, the product categorization fields are automatically filled, based onthe categorizations of the originating Problem Management record. If you arecreating a new problem investigation or known error from within the BMCRemedy Problem Management application, or if the originating record did notspecify a product categorization, the product categorization is filled automatically,based on the business service CI that you select in the Service field. You can alsoquickly select or change operational and product categorizations from the QuickActions area of the Navigation pane by using the Select Operational and SelectProduct links. This makes sure the correct categorization information is used tomanage the problem investigation.
Problem Investigation form views
30 BMC Remedy Service Desk: Problem Management User Guide

The Best Practice view is recommended for all BMC Remedy Problem Managementusers, regardless of their role. For information about BMC Remedy ProblemManagement roles.
Figure 3: Problem console - Best Practice view
Icons used in the interface
This table describes the icons used on the consoles and in the Best Practice view ofthe application interface.
Table 2: Icon descriptions
Icon Description
Detail—Displays detailed information about the field's content. For example, if youclick the Detail icon associated with the Customer field, the People form appears withinformation about the customer whose name appears in the field.
Problem Investigation form views
Chapter 1 Introducing BMC Remedy Problem Management 31

Icon Description
Search—Searches for field contents. This icon is associated with fields that have theability to open a search dialog box or form.
Explore CI—Opens the BMC Atrium Explorer for the CIs selected in the Service andCI fields.
Clear field contents—Clears the contents of the field and allows you to make anotherselection. It does not delete the record.
Classic view
The Classic view is the Problem Investigation form as it appeared in previousreleases of BMC Remedy Problem Management. This view is provided for customerswho are upgrading from earlier versions of BMC Remedy Problem Management andwho are not yet ready to adopt the Best Practice view. The following fields have beenadded to the Classic view:
■ Service field—(Problem Investigation and Known Error forms) The Service fieldrelates business service configuration items (CIs) to the problem investigation orknown error at the time it is created. All available business service CIs appear inthe Service field menu and are only limited by the access levels of the personcreating the problem investigation or the known error.
■ CI field—(Problem Investigation and Known Error forms) The CI field specifiesto which piece of infrastructure the problem investigation pertains. This field canbe configured to be a required field when you resolve an incident; however, youcan specify the CI at any time in the problem investigation lifecycle.
User interface standards for field labels
On BMC Remedy ITSM forms, field labels provide data entry hints.
Table 3 on page 32 lists the significance of field-label formats and special characters.
Table 3: Significance of field labels for data entry
Field-label format or special characters Significance for data entry
Bold label followed by an asterisk (*) Field is required to submit and update the form.Note: If you leave the field blank when you attemptto submit the form, the field is highlighted with a redborder.
Field label not bolded Field is optional.
Problem Investigation form views
32 BMC Remedy Service Desk: Problem Management User Guide

Field-label format or special characters Significance for data entry
Italicized label System-generated value for this field. Typically thisfield is read-only for the user.
Label followed by a plus sign (+) Additional functionality is associated with this field.Typically, you access this functionality by pressingEnter. For example, you might press Enter in a fieldto access a search dialog box or to perform a searchbased on the value typed into the field.If a field label followed by a plus sign is also bolded,the field is required. Otherwise, the field is optional.
Calbro ServicesIn the BMC Remedy ITSM documentation set, a fictional company named CalbroServices helps explain how BMC Remedy ITSM principles and procedures are usedin practice.
Although Calbro Services is a fictional company, it is based on research of actualBMC Software customers. Learning how Calbro Services manages common ITService Management scenarios should prove useful as you use the BMC RemedyITSM applications in your own environment.
Calbro Services, a large, global company, is headquartered in New York City andpublicly traded on the New York Stock Exchange. The company has 27,000employees in 240 offices located in 20 countries. Table 4 on page 33 describes keybusiness services in Calbro Services.
Table 4: Key business services
Service Description
Online banking 500 ATMs in major cities
WWW presence Corporate site and online brokerage services
Discount equity brokerage Online and storefront services
Sales force automation Automated sales activities such as leads, orders, reports,and so on
Customer support Support centers in the United States, Europe, and Asia
Mass marketing World-wide marketing campaigns aimed at makingCalbro Services a household name
Calbro Services
Chapter 1 Introducing BMC Remedy Problem Management 33

Problem management user rolesBMC Remedy Problem Management provides functionality for the following SMPMdefined problem management roles:
■ problem coordinator —The problem coordinator is a management role. For adetailed description of this role, see Problem coordinator on page 34.
■ specialist—The specialist is a support staff role. For a detailed description of thisrole, see Specialist on page 35.
Note The permissions model in BMC Remedy Problem Management has had severalupdates since version 6.0. To define permissions and functional roles, reviewthe permissions and functional roles sections in the BMC Remedy IT ServiceManagement Administration Guide.
The following figure illustrates the different SMPM problem management processroles. It also shows where each role fits into the lifecycle of a problem investigation.For general information about the problem investigation lifecycle, see Process flowand the lifecycle of a problem investigation on page 36.
The relationship between specific problem management roles and the individualstages in the lifecycle are explained in the following sections:
■ Performing the incident request review on page 63
■ Performing the root cause analysis on page 79
■ Performing the analysis review on page 93
Problem coordinator
Problem coordinators are responsible for the quality and integrity of the problemmanagement process. Problem coordinators have full access to probleminvestigations, known errors, and solution entries assigned to their support groups.
Note Problem coordinators require at least the permission of Problem User to access BMCRemedy Problem Management. In addition, they must have the functional role ofProblem Coordinator to perform the problem coordinator’s duties.
Their responsibilities include:
Problem management user roles
34 BMC Remedy Service Desk: Problem Management User Guide

■ reviewing the incident requests that have been related to the services for whichthey act as the problem coordinator, to help identify problems.
■ ensuring that the problems for which they are responsible, including the ones thathave been identified within the Availability and Capacity Management processes,progress through the problem management process in a timely and prioritizedfashion.
■ ensuring that the information entered in the problem investigations and knownerrors that they manage is accurate and complete.
■ reviewing periodically their problem investigations for which a practicalstructural solution can not be found.
■ verifying structural solutions and closing the known errors and probleminvestigations that they manage.
Specialist
Specialists work on problem investigations, known errors, and solution entries asassigned.
Their responsibilities include:
■ suggesting workarounds for problems.
■ establishing the root causes of identified problems.
■ proposing structural solutions (that is, permanent solutions) for problems.
■ implementing structural solutions for problems if the Change Managementprocess is not required.
■ updating the problem investigation with relevant information and status changes.To complete tasks described in the specialist sections of this guide, individualsfulfilling the role of a specialist require Problem User” permissions to access theBMC Remedy Problem Management application. Permissions are assigned toindividuals by the system administrator.
Mapping permission groups to SMPM roles
The following table lists the problem management roles that are defined in theSMPM and the equivalent permissions that each role needs in BMC RemedyProblem Management to complete the relevant procedural steps.
Problem management user roles
Chapter 1 Introducing BMC Remedy Problem Management 35

For more information about how SMPM roles map to BMC Remedy ITSM Suite, seethe BMC Service Management Process Model Role Mapping to BMC Remedy ITSM Suitewhite paper.
Note This section does not list all of the permission groups and functional roles defined inBMC Remedy Problem Management, only those that are mapped to SMPM roles.
Table 5: BMC Remedy Problem Management role mapping
SMPM role name Calbro user BMC Remedy Problem Management permission groups
Specialist Ian Plyment■ Incident User
■ Problem User
■ Task User
■ Infrastructure Change Viewer
■ Asset Viewer
Problem Coordinator Bob Baxter■ Problem User
■ Incident Viewer
■ Infrastructure Change Viewer
■ Asset Viewer
■ Functional Role: Problem Coordinator
Process flow and the lifecycle of a probleminvestigation
The Process Flow Status area displays the process flow of the problem investigationwithin the Problem Investigation form. A diagram shows the stages of a probleminvestigation in blue. The current stage of the investigation is highlighted in green.The status of the investigation is indicated both by color and text.
Process flow and the lifecycle of a problem investigation
36 BMC Remedy Service Desk: Problem Management User Guide

Figure 4: Process Flow Status area on the Problem Investigation form
The following figure provides an overview of the problem investigation lifecycle, asdescribed by SMPM. Each of the major steps in the diagram corresponds to a sectionin this guide, where the step and its associated tasks are explained in more detail.
Figure 5: Problem investigation lifecycle
Problem management use casesThis section describes common problem management use cases that you typicallyencounter as IT support staff. The Calbro Services user personas help to illustrate theuse cases and overall ITIL good practices workflow; however, the use cases do notnecessarily make reference to specific Calbro Service sample data.
Problem management use cases
Chapter 1 Introducing BMC Remedy Problem Management 37

Problem investigation resolution—change request
This user scenario describes how to resolve a problem investigation with a changerequest.
Bob Baxter, the Calbro problem coordinator, conducts an incident request review onthe Calbro Order Processing System (OPS). In the course of the review, Bobdiscovers that several similar incidents related to the OPS occurred over the past sixmonths. The resulting problem investigation determines that a change to the ITinfrastructure is required. A known error is created making a request for change(RFC), which is assigned to Mary Mann, the change coordinator.
The change is approved by Mary, executed and verified by Ian Plyment, thespecialist. The status of the Known Error is automatically marked as corrected.
Bob is notified that the change request has been completed. He notes the permanentcorrective action in the problem investigation and changes its status to closed.
Note BMC Remedy Incident Management, BMC Remedy Problem Management, andBMC Remedy Change Management must be installed to follow this user scenario.Detailed information about the individual actions mentioned in this user scenarioare described in the BMC Remedy Services Desk: Incident Management User Guide, theBMC Remedy Service Desk: Problem Management User Guide, and the BMC RemedyChange Management User Guide.
Table 6 on page 39 describes the typical steps involved in this user scenario.
Problem management use cases
38 BMC Remedy Service Desk: Problem Management User Guide

Table 6: Resolving a problem investigation with a change request
Role Actions Explanation
Problem coordinator The problem coordinator performs anincident request review:From the Incident console, the problemcoordinator creates a custom search thathas the following characteristics:
■ Service = OPS
■ Impact => 2-Significant/Large OR 1-Extensive/Widespread
■ Last Resolved Date >=07/19/2009
Note: For the purpose of thisexample, assume today’s date is01/19/2010. The Last Resolved Dateused in this example, therefore, is sixmonths ago.
After running the search, the problemcoordinator looks for incident requestrecords that have not yet been linked to aproblem investigation.
The problem coordinator, Bob Baxter,performs an incident request review onthe OPS by querying the IncidentManagement system for incidents orrecent changes related to the OPS. Bobdiscovers that over the past six monthsthere were several similar incidentsrelated to the OPS.
Problem coordinator From one of the incident request recordsthat is related to the OPS server issue, theproblem coordinator creates a probleminvestigation.The incident record’s details are copiedfrom the incident request record to theProblem form, and a relationship iscreated between the probleminvestigation record and the incidentrequest records.The problem coordinator completes theProblem form.
Bob wants to determine the root cause ofthese incidents, so he creates a probleminvestigation from one of the incidentrequest records. Creating the probleminvestigation from an incident requestrecord ensures that all of the relevantdetails are copied over from the incidentrequest to the problem investigation.
Problem coordinator From the Problem form, the problemcoordinator creates relationshipsbetween the problem investigation andall related incident requests.The problem coordinator creates arelationship between the probleminvestigation and the OPS server.
Bob then relates the remaining OPSincidents and the OPS CI to the probleminvestigation.
Problem management use cases
Chapter 1 Introducing BMC Remedy Problem Management 39

Role Actions Explanation
Problem coordinator The problem coordinator assigns theproblem investigation to the specialist.
Bob assigns the problem investigation tothe specialist, Ian Plyment, to conduct aroot cause analysis.
Specialist The specialist accepts the assignmentand performs the root cause analysis.
Ian accepts the problem investigationassignment and begins a root causeanalysis. During the root cause analysis,he determines the physical server onwhich the OPS runs needs a memoryupgrade and sends his root causeanalysis to Bob.
Problem coordinator The problem coordinator performs theanalysis review:The problem coordinator opens theproblem investigation andindependently verifies that thespecialist’s assessment of the root causeis correct.
Bob reviews and verifies Ian’s analysis.Bob then creates a Known Error, whichserves two purposes: to identify the bestworkaround (temporarily routing theusers to a redundant server) and torequest a change for the memoryupgrade on the primary OPS server.
Problem coordinator The problem coordinator creates aknown error:On the problem investigation form, theproblem coordinator sets the Status fieldto Completed and the Status Reasonfield to Known Error.This opens the Known Error form andcreates a relationship between theknown error and the probleminvestigation.The problem coordinator completes theform. The problem coordinator assignshimself as the problem coordinator. Theproblem coordinator assigns the changecoordinator for the known errorassignment.
Bob creates the known error directlyfrom the problem investigation, whichtransfers all pertinent information to theknown error. Bob assigns the knownerror to Mary Mann, the changecoordinator.
Change coordinator From the Known Error form, the changecoordinator creates a change request.This opens the Change Request form andcreates a relationship between theknown error and the change request. Italso copies information from the knownerror record to the change request record.The change coordinator saves the changerequest and moves the request throughthe change request lifecycle until thechange request is approved and has adate.
Mary receives the known error andreviews it. She agrees that the change isrequired and creates a change requestfrom the known error.Mary moves the record through thechange request lifecycle.
Problem management use cases
40 BMC Remedy Service Desk: Problem Management User Guide

Role Actions Explanation
Change coordinator The change coordinator assigns thechange request to a specialist.The change coordinator adds a task tothe change request and relates the CIs tothe change request.The change coordinator moves thechange request to the Implement stage.
On the change request record, Marycreates a task to implement the change,and assigns the change request to IanPlyment, the specialist who will performthe work. The coordinator also relatesthe CI to the change request.
Specialist The specialist performs the tasks andcloses them:On the Change Management Supportconsole, the specialist searches forassigned tasks.The specialist opens the task record andperforms the task. Then the specialistrecords information about performingthe task and changes the status of thetask to Closed.
Ian implements the change. When hefinishes the last task, the system notifiesMary that the tasks are closed.
Change coordinator The change coordinator completes thechange request:From the Change form, the changecoordinator moves the change request tothe Close stage.The change coordinator enters theperformance rating and the actual startand end dates.
After Mary coordinates the changeimplementation, she reassigns theknown error to Bob for verification.
Problem coordinator The problem coordinator confirms thatthe change has solved the problem.Then, the problem coordinator sets thestatus of both the problem investigationand the known error to Closed.
Bob is notified that the change wascompleted and verifies that it fixed theproblem. He then changes the status ofthe problem investigation and knownerror to Closed.
Problem investigation resolution—no change request
This user scenario describes how to resolve a problem investigation without achange request.
Bob Baxter, the problem coordinator for the Calbro Services Payroll service, conductsa incident request review on this service. In the course of the review, Bob discoversthat multiple incidents related to performance have occurred over the past sixmonths. Bob assigns the problem investigation to a specialist, Ian Plyment. Ian’sproblem investigation determines that the anti-virus software on the Payroll serviceserver runs a complete scan of the server every ten minutes. Ian reconfigures the anti-virus software to run only once an hour. Ian then notifies Bob that he has
Problem management use cases
Chapter 1 Introducing BMC Remedy Problem Management 41

implemented a corrective action to solve the root cause. Bob verifies the correctiveaction and closes the problem investigation.
Note BMC Remedy Incident Management and BMC Remedy Problem Management mustbe installed to follow this user scenario.Detailed information about the individual actions mentioned in this user scenarioare described in the BMC Remedy Service Desk: Incident Management User Guide andthe BMC Remedy Service Desk: Problem Management User Guide.
Table 7 on page 42 describes the typical steps involved in this user scenario.
Table 7: Resolving a problem investigation without a change request
Role Actions Explanation
Problem coordinator The problem coordinator performs anincident request review. From theIncident console, the problemcoordinator creates a custom search withthe following characteristics:
■ Service = Payroll
■ Impact => 2-Significant/Large OR 1-Extensive/Widespread
■ Last Resolved Date >=07/19/2008
Note: For the purpose of thisexample, assume today’s date is11/19/2008. The Last Resolved Dateused in this example, therefore, is sixmonths ago.
Bob performs an incident request reviewby searching incident requests registeredagainst the services for which:
■ He is the problem coordinator.
■ That have not yet been linked to aproblem investigation.
■ That have been resolved with aworkaround.
Problem coordinator The problem coordinator opens one ofthe incident request records related tothe Payroll service performance issue,and creates a problem investigation. Theincident record’s details are copied fromthe incident request record to theProblem form, and a relationship iscreated between the probleminvestigation record and the incidentrequest records.The problem coordinator completes theProblem form.
Bob spots a trend—numerousperformance-related incidents have beenreported against the Payroll service. Bobcreates a problem investigation recorddirectly from one of the incident requestrecords. Creating a probleminvestigation directly from an incidentrequest record transfers all relevantinformation from the incident requestand automatically establishes therelationship between the incidentrequest and the problem investigation.
Problem management use cases
42 BMC Remedy Service Desk: Problem Management User Guide

Role Actions Explanation
Problem coordinator The problem coordinator relates all therelated incident requests to the probleminvestigation.
Bob then relates the other incidentrequests to the problem investigation.
Problem coordinator The problem coordinator assigns theproblem investigation to a specialist.
After creating the problem investigation,Bob assigns it to the specialist, IanPlyment.
Specialist The specialist accepts the assignmentand performs the root cause analysis.
Ian accepts the problem investigationassignment and begins a root causeanalysis. During the root cause analysis,he determines the anti-virus software onthe server runs every ten minutes, whichis causing the performance issues. Iandetermines the more appropriatefrequency for the anti-virus software torun is once an hour.
Specialist The specialist implements the solution.The specialist changes the probleminvestigation status to Completed,change the status reason to EnhancementRequest, and records details about theinvestigation.
Because the changes to the anti-virussoftware configuration do not meet thecriteria for the change managementprocess, Ian makes the necessarychanges himself and then changes thestatus of the problem investigation toCompleted. To complete the probleminvestigation, Ian must select a statusreason.
Specialist The specialist notifies the problemcoordinator.The specialist confirms that the problemcoordinator is set as the assignedproblem coordinator. Then the specialistchanges the status of the probleminvestigation to Assigned.
Ian notifies Bob about the results of theproblem investigation and the correctiveaction he performed.
Problem coordinator The problem coordinator performs theanalysis review:On the problem investigation form, theproblem coordinator reviews the workinformation and independently verifiesthat the changes have corrected theproblem.
Bob performs an analysis review anddouble-checks that the problem has beencorrected.
Problem coordinator The problem coordinator closes theproblem investigation:The problem coordinator reviews theproblem investigation form to verify thatthe details are complete. When theproblem coordinator is satisfied that theproblem investigation form is completeand correct, the problem coordinatorchanges the status to Closed.
Bob closes the problem investigation.
Problem management use cases
Chapter 1 Introducing BMC Remedy Problem Management 43

Problem investigation resolution—change request roll back
This user scenario describes how to resolve a problem investigation by rolling back achange request.
Bob Baxter, the problem coordinator at the Calbro Service Desk, performs anincident request review by searching incident requests registered against the payrollservice. He reviews the history of the associated CIs and recognizes a trend inproblems that are related to common changes to a specific CI. He creates a changerequest to roll back changes that affect that CI.
A Request for Change (RFC) is submitted to Mary Mann, the change manager inFront Office Support, for approval.
The change is approved and successfully implemented by Ian Plyment, theSpecialist. The change manager creates a Broadcast to alert users. Future incidentsare successfully averted.
Note BMC Remedy Incident Management, BMC Remedy Problem Management, andBMC Remedy Change Management must be installed to follow this user scenario.Detailed information about the individual actions mentioned in this user scenarioare described in the BMC Remedy Service Desk: Incident Management User Guide, theBMC Remedy Service Desk: Problem Management User Guide, and the BMC RemedyChange Management User Guide.
Table 8 on page 45 describes the typical steps involved in this user scenario.
Problem management use cases
44 BMC Remedy Service Desk: Problem Management User Guide

Table 8: Rolling back a change
Role Actions Explanation
Problem coordinator The problem coordinator performs anincident request review:From the Incident console, the problemcoordinator creates a custom searchwith the following characteristics:
■ Service = Payroll
■ Impact => 2-Significant/Large OR 1-Extensive/Widespread
■ Last Resolved Date >=07/19/2009
Note: For the purpose of thisexample, assume today’s date is11/19/2009. The Last ResolvedDate used in this example,therefore, is four months ago.
The problem coordinator looks forincident request records that have notyet been linked to a probleminvestigation.
Bob performs an incident request review bysearching incident requests registeredagainst the payroll service, for which he isthe problem coordinator.
Problem coordinator The problem coordinator opens anincident request that is related to thepayroll service and creates a probleminvestigation.The incident record’s details are copiedfrom the incident request record to theProblem form, and a relationship iscreated between the probleminvestigation record and the incidentrequest records.The problem coordinator completes theProblem form.
Bob spots a trend—numerous incidentshave been reported against the payrollserver CI, which is critical to making thatservice available. He also discovers that theserver recently was the subject of a change.Bob reviews the change related to the serverand determines that the recent change to theCI was the root cause of those incidentrequests. Bob creates a probleminvestigation record directly from one of theincident request records, which transfers allrelevant information from the incidentrequest and automatically establishes therelationship between the incident requestand the problem investigation.
Problem management use cases
Chapter 1 Introducing BMC Remedy Problem Management 45
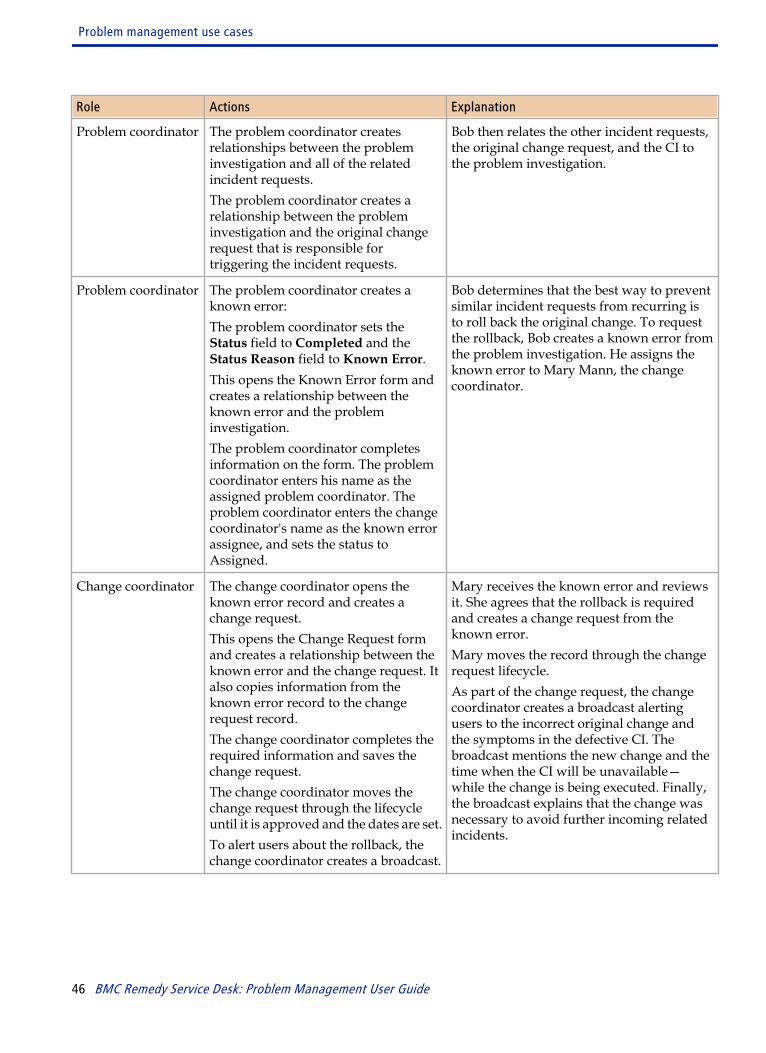
Role Actions Explanation
Problem coordinator The problem coordinator createsrelationships between the probleminvestigation and all of the relatedincident requests.The problem coordinator creates arelationship between the probleminvestigation and the original changerequest that is responsible fortriggering the incident requests.
Bob then relates the other incident requests,the original change request, and the CI tothe problem investigation.
Problem coordinator The problem coordinator creates aknown error:The problem coordinator sets theStatus field to Completed and theStatus Reason field to Known Error.This opens the Known Error form andcreates a relationship between theknown error and the probleminvestigation.The problem coordinator completesinformation on the form. The problemcoordinator enters his name as theassigned problem coordinator. Theproblem coordinator enters the changecoordinator's name as the known errorassignee, and sets the status toAssigned.
Bob determines that the best way to preventsimilar incident requests from recurring isto roll back the original change. To requestthe rollback, Bob creates a known error fromthe problem investigation. He assigns theknown error to Mary Mann, the changecoordinator.
Change coordinator The change coordinator opens theknown error record and creates achange request.This opens the Change Request formand creates a relationship between theknown error and the change request. Italso copies information from theknown error record to the changerequest record.The change coordinator completes therequired information and saves thechange request.The change coordinator moves thechange request through the lifecycleuntil it is approved and the dates are set.To alert users about the rollback, thechange coordinator creates a broadcast.
Mary receives the known error and reviewsit. She agrees that the rollback is requiredand creates a change request from theknown error.Mary moves the record through the changerequest lifecycle.As part of the change request, the changecoordinator creates a broadcast alertingusers to the incorrect original change andthe symptoms in the defective CI. Thebroadcast mentions the new change and thetime when the CI will be unavailable—while the change is being executed. Finally,the broadcast explains that the change wasnecessary to avoid further incoming relatedincidents.
Problem management use cases
46 BMC Remedy Service Desk: Problem Management User Guide

Role Actions Explanation
Change coordinator The change coordinator assigns thechange request to a specialist.The change coordinator adds a task tothe change request.The change coordinator relates the CIsto the change request.The change coordinator moves thechange request to the Implement stage.
On the change request record, Mary createsa task to roll back the CI and assigns thechange request to Ian Plyment, the specialistwho will perform the work. The coordinatoralso relates the CI to the change request.
Specialist The specialist closes the tasks afterperforming them:From the Change ManagementSupport console, the specialist searchesfor assigned tasks.After performing the task, thespecialist records information aboutperforming the task and changes thestatus to Closed.
Ian rolls back the change to the CI. When hefinishes the last task, the system notifiesMary that the tasks are Closed.
Change coordinator The change coordinator completes thechange request:The change coordinator moves thechange request to the Closed stage.The change coordinator enters theperformance rating and the actualdates of the change.
Mary completes the change request recordand removes the broadcast, because it is nolonger relevant.
Problem coordinator The problem coordinator closes theproblem investigation and known error:The problem coordinator confirms thatthe rollback has solved the problemwith the payroll server.The problem coordinator opens theproblem investigation record andchecks that the details are all correct,and then sets the status to Closed.The problem coordinator opens theknown error and sets the status toclosed. The problem coordinatorrecords a summary of how the knownerror was resolved.
Bob is notified that the rollback wascompleted. Bob verifies that the rollbackfixed the problem, and then changes thestatus of the problem investigation andknown error to closed.
Problem investigation—at an impasse
This user scenario describes how to indicate a problem investigation at an impasse.
Problem management use cases
Chapter 1 Introducing BMC Remedy Problem Management 47
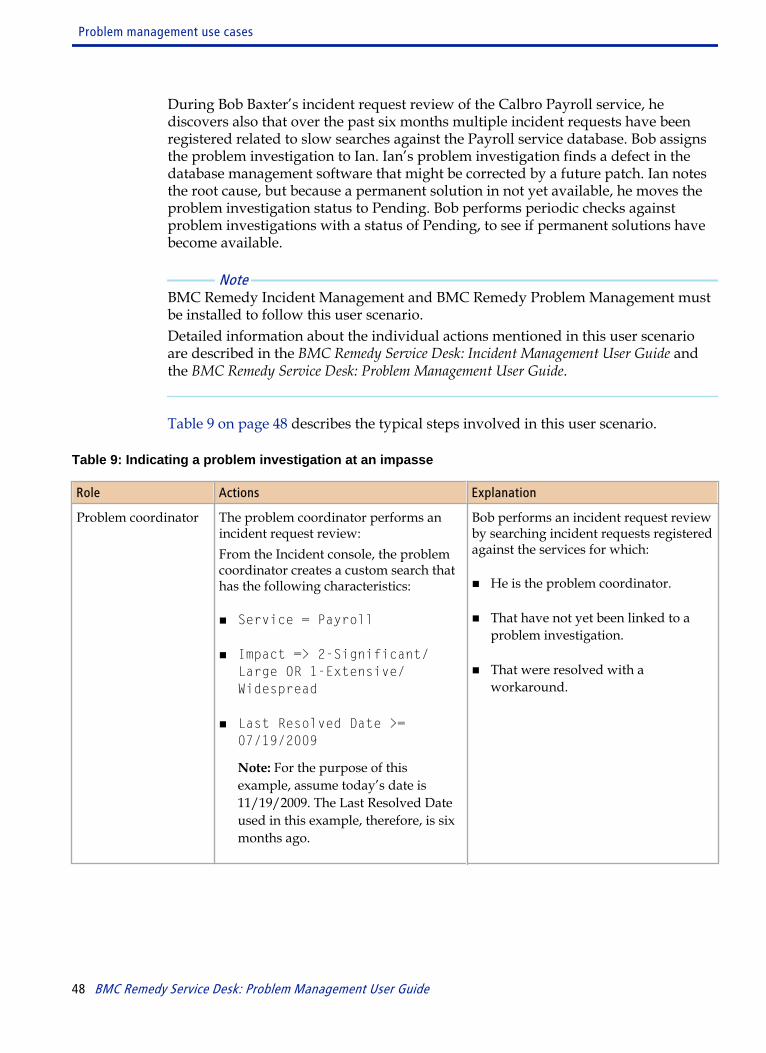
During Bob Baxter’s incident request review of the Calbro Payroll service, hediscovers also that over the past six months multiple incident requests have beenregistered related to slow searches against the Payroll service database. Bob assignsthe problem investigation to Ian. Ian’s problem investigation finds a defect in thedatabase management software that might be corrected by a future patch. Ian notesthe root cause, but because a permanent solution in not yet available, he moves theproblem investigation status to Pending. Bob performs periodic checks againstproblem investigations with a status of Pending, to see if permanent solutions havebecome available.
Note BMC Remedy Incident Management and BMC Remedy Problem Management mustbe installed to follow this user scenario.Detailed information about the individual actions mentioned in this user scenarioare described in the BMC Remedy Service Desk: Incident Management User Guide andthe BMC Remedy Service Desk: Problem Management User Guide.
Table 9 on page 48 describes the typical steps involved in this user scenario.
Table 9: Indicating a problem investigation at an impasse
Role Actions Explanation
Problem coordinator The problem coordinator performs anincident request review:From the Incident console, the problemcoordinator creates a custom search thathas the following characteristics:
■ Service = Payroll
■ Impact => 2-Significant/Large OR 1-Extensive/Widespread
■ Last Resolved Date >=07/19/2009
Note: For the purpose of thisexample, assume today’s date is11/19/2009. The Last Resolved Dateused in this example, therefore, is sixmonths ago.
Bob performs an incident request reviewby searching incident requests registeredagainst the services for which:
■ He is the problem coordinator.
■ That have not yet been linked to aproblem investigation.
■ That were resolved with aworkaround.
Problem management use cases
48 BMC Remedy Service Desk: Problem Management User Guide

Role Actions Explanation
Problem coordinator The problem coordinator opens anincident request record that is related tothe Payroll service search issue andcreates a problem investigation.The incident record’s details are copiedfrom the incident request record to theProblem form, and a relationship iscreated between the probleminvestigation record and the incidentrequest records.The problem coordinator completes theProblem form.
Bob spots another trend—numerousincidents have been reported against thePayroll service related to the length oftime it takes to run a search against thedatabase. Bob creates a probleminvestigation record directly from one ofthe incident request records. Creating aproblem investigation directly from anincident request record transfers allrelevant information from the incidentrequest and automatically establishesthe relationship between the incidentrequest and the problem investigation.
Problem coordinator The problem coordinator relates all therelated incident requests to the probleminvestigation.
Bob then relates the other incidentrequests to the problem investigation.
Problem coordinator The problem coordinator assigns theproblem investigation to a specialist.
After creating the problem investigation,Bob assigns it to Ian.
Specialist The specialist accepts the assignmentand performs the root cause analysis.
Ian accepts the problem investigationassignment and begins a root causeanalysis. During the root cause analysis,he determines that the problem is with adefect in the database managementsoftware. Ian also determines that noneof the database management softwarepatches fixes this problem. The problemmight be fixed in a future release.
Specialist The specialist notifies the problemcoordinator.The specialist verifies that the problemcoordinator is assigned as problemcoordinator.The specialist changes the probleminvestigation status to Assigned.
Ian notifies Bob that he has completedthe root cause analysis and determinedthe problem is with the databasemanagement software. He also tells Bobthat, currently, no patch from thedatabase software vendor fixes theproblem.
Problem coordinator The problem coordinator performs theanalysis review:The problem coordinator reviews thework information recorded on theproblem investigation. The problemcoordinator independently verifies thatthe specialist’s assessment of the impasseis correct.
Bob performs an analysis review anddouble-checks that Ian’s assessment ofthe situation is correct.
Problem management use cases
Chapter 1 Introducing BMC Remedy Problem Management 49

Role Actions Explanation
Problem coordinator The problem coordinator indicates thatthe problem investigation is at an impasse.The problem coordinator indicates whyno further action can be taken against theinvestigation and changes the probleminvestigation status to Pending.
Because no current fix for the root causeis available, Bob determines that theproblem investigation is at an impasse.
Problem coordinator Periodically, the problem coordinatorchecks the problem investigations with astatus of Pending.If a solution is now available, theproblem coordinator reassigns theproblem investigation to a specialist forfollow-up and implementation.If a solution is still unavailable, theproblem coordinator records informationabout the periodic check.
Bob performs periodic checks of allproblem investigations with a status ofPending to determine if a solution hasbecome recently available.
Problem management use cases
50 BMC Remedy Service Desk: Problem Management User Guide
Working with the Overviewconsole
The information in this section is for people who fulfill one or more of the followingsupport roles:
■ problem coordinators
■ specialists
Use the Overview console if you must respond to, manage, or track individual orgroup work assignments from a variety of sources. For example, if your companyruns the full BMC Remedy ITSM Suite, either you or the group you manage mightreceive work assignments from BMC Remedy Incident Management, BMC RemedyProblem Management, and BMC Remedy Change Management. From the Overviewconsole, you can quickly get information about all your work assignments andperform the procedures that you use most often.
Functional areasThis section describes the functional areas of the Overview console.
Table 10: Overview console functional areas
Functional area Purpose
Overview console header
2
Chapter 2 Working with the Overview console 51

Functional area Purpose
Show This field provides a filte by which you can manage the contents of theConsole List table. The choices are:
■ All—Shows all records
Submitted by Me—Shows all records submitted by you.
Assigned to Me—Shows all records assigned to you.
Assigned to My Selected Groups—Asks you to select one of thegroups to which you belong, and then displays the records assigned tothat group.
Assigned to all My Groups—Displays the records assigned to all ofthe support groups to which you belong.
Refresh Refreshes the data in the tables.
Navigation pane
View Broadcast, or NewBroadcast
Opens the broadcast dialog box, from where you can view, create,modify, and delete broadcasts.When there are unread broadcast messages, this area displays a message:New Broadcasts, followed by the number of new messages. Whenthere are new broadcast messages, the area also turns red.
Note: If you open the Overview console with no new broadcast messages,but the View Broadcast link is red, open the Application Preferencesdialog box and make sure that a Console View preference has beenselected.
Functions Use the links in this area to do the following actions:
■ Select Status Values—Use this link to open a diaglog box from whichyou can fitler the console to show only records that match theconditions that you specify. This filter works in conjunction with theShow field.
■ My Profile—Allows you to change the information associated withyour login profile. For example, if your title changes or if you move toa new office location, use this link to open the People form and updateyour title or location, and so on.
■ Application Preferences—Set your program preferences and options.
IT Home Page Use this link to open the IT Home Page.
ROI Console Use this link to open the Retrun on Investment (ROI) console.
CMDB Use this link to open the BMC Atrium CMDB.
Console list panel
Functional areas
52 BMC Remedy Service Desk: Problem Management User Guide

Functional area Purpose
Create Creates a new record.
View Displays a form containing detailed information about the selected recordin the Console list table.
Print Prints the selected record.
Search for Ticket Opens a dialog box from which you can select the type of ticket you aresearching for. After you select the type of record from the menu, click theSelect button to open a search form specific to the type of ticket you aresearching for.
Note: To see activity records and CI unavailability records, you mustsearch for those tickets, because these records are not displayed in theConsole List table.
Preferences Using Preferences, you can control the appearance of the Console Listtable. For example, you can add or remove a column.
Functional areas
Chapter 2 Working with the Overview console 53

Functional area Purpose
Console list table Lists the different types of requests.
Figure 6: Overview console
Console list tableThe Console list table lists different types of requests. The types of requests that youcan choose from depend on the applications that are installed.
A specific prefix identifies each type of request:
■ CRQ—Identifies change requests. To view and define change requests, BMCRemedy Change Management must be installed.
Console list table
54 BMC Remedy Service Desk: Problem Management User Guide

■ RLM—Identifies release requests. To view and define release requests, BMCRemedy Change Management must be installed.
■ TAS—Identifies tasks.
■ SDB—Identifies solution database entries. To view and define solution entries,BMC Remedy Service Desk must be installed.
■ INC—Identifies incidents. To view and define incidents, BMC Remedy ServiceDesk must be installed.
■ PBI—Identifies problems. To view and define problems, BMC Remedy ServiceDesk must be installed.
■ PKE—Identifies known errors. To view and define known errors, BMC RemedyService Desk must be installed.
■ PR—Identifies purchase requisitions. To view and define purchase requisitions,BMC Remedy Asset Management must be installed.
You can also change the table’s contents by using the Company and View By filtersat the top of the console.
Selecting status valuesYou can use the Select Status Values dialog box to filter the requests that appear inthe Overview console based on their status.
To select status values
1 From the Navigation pane , choose Functions => Select Status Values.
2 In the Select Status Values dialog box, select the status values for each categoryfrom the lists, then click OK to close the dialog box.
3 If the Assigned Work table does not refresh with the filtered records, click Refreshto reload the table’s contents.
Selecting status values
Chapter 2 Working with the Overview console 55

Selecting status values
56 BMC Remedy Service Desk: Problem Management User Guide

Working with the ProblemManagement console
The information in this section is for people who fulfill one or more of the followingsupport roles:
■ problem coordinators
■ specialistsUsing the Problem Management console, you can create, track, and close probleminvestigations, solutions, and known errors.
Functional areasThis section describes the functional areas of the Problem Management console
Table 11: Problem Management console functional areas
Functional area Purpose
Console tab
If the KPIs tab is open, click the Console tab to return to the console.
KPIs tab
Click the KPIs link to select and to view the problem management flashboards. The flashboards that appearrepresent, in graphical format:
■ Process KPI—See Using the KPI flashboards later in this guide for information about using theseflashboards.
■ Total Open Problems—Click either All Open or By Status and Priority.
Problem Management console header
3
Chapter 3 Working with the Problem Management console 57

Functional area Purpose
Breadcrumb bar A navigation aid that contains links to related records that you opened fromthe current problem investigation.
Breadcrumb navigationcontrols
Back button-Takes you back one link in the breadcrumb trail.Forward button-Takes you forward one link in the breadcrumb trail. TheForward button is only visible if you have returned to a record on thebreadcrumb trail that you previously viewed.Drop down menu-Contains links to all the records that you viewed from thecurrent problem investigation, including records that are not currently visiblein breadcrumb trail.Home icon-Takes you to the IT Home page.
Search If you have BMC Remedy Knowledge Management installed, the Global searchfeature lets you search across multiple forms for records that match a key term.For more information about this feature, see “Using Global search” on page120.
ShowFilter ByMagnifying glass iconMore filters
This area contains the following fields: Show, Filter By and Search. These fieldscombine to provide a way that you can filter the problem investigation recordsin the Problem table.The Show field has a menu from which you select the basic criteria by whichyou want to filter the contents of the Problem table, the menu choices include:Submitted by me-all problem investigations created by you.All-all problem investigations, regardless of who created them.Assigned to me-all problem investigations assigned to you.Assigned to my group-all problem investigations assigned to a specific supportgroup of which you are a member. If you select this, you are prompted to selectthe support group.Assigned to all my groups-all problem investigations assigned to all of thesupport groups of which you are a member.The Filter By field places conditions on the basic criteria that you choose in theShow field. This helps you manage the number of records returned by theShow field. If you select Assigned to me in the Show field and All Open > AllPriorities from the Filter By field, then the Problems table contains all openproblem investigations, regardless of their priority, that are assigned to you.The maginfying glass icon opens the Manage My Searches dialog box fromwhich you can edit, save, and delete custom searches. Saved custom searchesappear in the My Searches node of the Defined Searches list. For moreinformation about Manage My Searches, see "Creating a custom search," laterin this guide.More filters provides a way for you to further filter the contents of theIncidents table. If you still have a large number of records after using the FilterBy field, click Advanced to open a dialog box that contains fields in which youcan indicate even more precise information, such as product or operationalcategories. For example, using the advanced field you can add the productcategory Hardware to the filter. When added to the Show and Filter by fields,the Incidents table now contains all open hardware incidents, regardless oftheir priority, that are assigned to you. An active funnel icon appears besideMore filters to show when a filter from this area is active.
Functional areas
58 BMC Remedy Service Desk: Problem Management User Guide

Functional area Purpose
Refresh Click Refresh to update the console with the latest information.
Navigation pane
View Broadcast, or NewBroadcast
Click this link to open the broadcast dialog box, from where you can view,create, modify, and delete broadcasts.When there are unread broadcast messages, this area displays a message: NewBroadcast, along with the number of new messages. When there are newbroadcast messages, the area also turns red.For more information about broadcasting messages, see Broadcasting messages.
Note: If you open the Problem Management console with no new broadcastmessages, but the View Broadcast link is red, open the Application Preferencesdialog box and make sure that a Console View preference has been selected.For information about how to view and select Console View preferences, seeSetting application preferences.
Counts This area shows the number of open, unassigned, and unacknowledgedproblem investigations and the number of open known errors according to theselection in the Show field.
Functional areas
Chapter 3 Working with the Problem Management console 59

Functional area Purpose
Functions Use the links in this area to do the following actions:
■ New Problem—Create a new problem investigation record.
■ Search Problem—Search the database for problem investigation records.
■ New Solution—Create new solution database entries.
■ Search Solution—Search the database for solution database entries.
■ New Known Error—Create new known errors.
■ Search Known Error—Search the database for known errors.
■ My Profile—Set your profile.
■ Application Preferences—Set your application preferences and applicationoptions.
■ Reminders—View and create reminders.
■ Reports—Create and run custom reports.
■ Manage CIs—Search for information about specific CI types and gives youaccess to the CI records.
■ Manage Inventory—Access the Manage Inventory form of BMC RemedyAsset Management.
■ KPIs—Click the KPIs link to select and to view the problem managementKPI flashboards. The flashboards that appear represent, in graphical format:
Process KPI—See Using the KPI flashboards later in this guide forinformation about using these flashboards.
Total Open Problems—Click either All Open or By Status and Priority.
Applications This area contains links to other BMC applications, consoles, and modules. Thecontents of this area depend on what other applications and so on are installed.Click the double greater-than sign to open or close this panel.
Problems table
Create Opens a dialog box from which you can select to create either a Known Error,Problem Investigation, or Solution Database record.
View Opens the Known Error, Problem Investigation, or Solution Database recordselected in the Problems table.
Functional areas
60 BMC Remedy Service Desk: Problem Management User Guide

Functional area Purpose
Process overview If the full SMPM application is installed, opens the detailed SMPM ProblemManagement process. Otherwise, it opens a high-level diagram of the problemmanagement process.
Print Prints the details of the Known Error, Problem Investigation, or SolutionDatabase record selected in the Problems table.
the table Displays high-level details about the records that match the criteria specified inthe Company and Assigned To fields, or that were found by the most recentlycompleted search.
Details and Tasks
Details—When selected, contains detailed information about the record selected in the Problems table. Tosee Details when the Tasks table is showing, click Show Details. The Create, View, and Report icons relate towork information notes. For information about working with work information notes, see Creating WorkInformation entries, later in this guide.Tasks—When selected, lets you view tasks associated with the record that is selected in the Problems table.To see Tasks when Details is showing, click Show Tasks.
Functional areas
Chapter 3 Working with the Problem Management console 61

Functional areas
62 BMC Remedy Service Desk: Problem Management User Guide
Performing the incident requestreview
The information in this section is for people who fulfill the role of problem coordinator.
The tasks described by this section are organized according to the stages of theproblem management lifecycle as described by the BMC Service ManagementProcess Model (SMPM).
Incident request review processThe incident request review is the first process in the problem management lifecycle.You perform incident request reviews periodically, according to your organization’sschedule. When performing an incident request review, you analyze incident requestinformation to identify potential problems in the services you are responsible for.This information is most often obtained from the BMC Remedy IncidentManagement application. However, incident information can also come fromspecialists who have resolved incident requests with a workaround and who thinkthe incident might recur if the root cause is not removed quickly.
After you identify a problem, create a new problem investigation. You link theproblem investigation to the incident requests that were caused by the problem. Youcan also create a problem investigation from an incident request in the IncidentManagement application (see the BMC Remedy Service Desk: Incident ManagementUser Guide for information about how to do this).
Tip Creating a problem investigation from an incident request automatically creates arelationship between the incident request and the newly created problem.
You then assign the new problem investigation to a specialist for analysis. Whenassigning the problem investigation, choose a specialist whose skills, availability,and access rights make them the most appropriate person to perform the analysis.
4
Chapter 4 Performing the incident request review 63

If you find an incident request during the incident request review for which aproblem investigation has already been registered, you should link the incidentrequest to the problem investigation.
Figure 7: Incident request review
Generating an incident request reviewThe first step in the incident request review process is to generate an incident reviewoverview. The overview helps you to identify problems that need to be investigated.
When generating the incident request overview, consider selecting all incidentrequests that have:
■ been linked to the service infrastructures, or business service records, for whichyou are the problem coordinator.
■ their Impact field set to 2-Significant/Large” or higher.
■ been resolved in the past four months.
■ not yet been linked to a problem investigation and were resolved with aworkaround.
Generating an incident request review
64 BMC Remedy Service Desk: Problem Management User Guide

If a specialist notifies you of a new problem, create an overview that includes theincident requests referred to by the specialist, and any similar incident requests.
After you generate an overview of unreviewed incident requests using the searchcriteria outlined in the preceding list, review the individual incident requests. Whenreviewing the incident requests, consider the following points when decidingwhether the incident request should be linked to a problem investigation:
■ Was the root cause of the incident request removed when the incident request wascompleted?
■ Was the incident request significant? Consider an incident request significant when:
— the service outage involved more than one person.
— there were multiple occurrences.
— you believe the incident might recur.
■ Has the underlying problem already been identified? If it has, link the incidentrequest to the problem.
In addition, consider whether analysis of your organization’s capacity managementor availability management systems indicates the potential for problems.
If the incident request requires a new problem investigation, generate the probleminvestigation and link the incident request to it as described earlier in this section.After you create the problem investigation, assign it to a specialist. For informationabout how to do this, see Assigning problem investigations on page 74.
Creating a problem investigationAfter you identify an incident request that indicates a problem, create a probleminvestigation.
Problem investigations should be created from the BMC Remedy IncidentManagement application to ensure the information is copied from the incidentrequest record to the problem investigation. See the BMC Remedy Service Desk:Incident Management User Guide for information about creating probleminvestigations from the BMC Remedy Incident Management application.
Creating a problem investigation
Chapter 4 Performing the incident request review 65

Viewing problem investigations
This section describes how to open a problem investigation after it is created. Youopen problem investigations anytime you need to update.
To view problem investigations
1 On the Problem Management console, from the Company list, select the companyfor which you want to view problem investigations.
2 From the View By list, select one of the following filters:
■ Personal—Displays records assigned to you.
■ Selected Groups—Prompts you to select any support groups to which youbelong. You can select to display all records assigned to your group, or recordsassigned to your group that are not yet assigned to an individual.
■ All My Groups—Displays records assigned to all your support groups. Youcan choose to display all records, or records that are not yet assigned to anindividual.
3 From the Defined Searches area, select Problem Investigation => All OpenProblems.
4 To view additional details about an investigation, select the problem investigationrecord in the Problems table and then click View.
The Problem Investigation form appears. You can modify the form and performother actions, as appropriate.
Recording additional investigation information
You can use BMC Remedy Problem Management to record additional informationabout the problem investigation after you create it.
For example, when using the Best Practice view, you might add or change the TargetDate to indicate the estimated date for the problem investigation’s resolution.
When using the Classic view, you might use additional classification information todetermine whether to proceed with the investigation.
To record additional information by using the Best Practice view
1 Open the relevant problem investigation as described in Viewing probleminvestigations on page 66.
Creating a problem investigation
66 BMC Remedy Service Desk: Problem Management User Guide

2 Click the calendar icon beside the Target Date field.
Note The Target Date field is a required field when the problem investigation’s status isnot Draft.
3 Select the target resolution date and time.
4 Click OK, then click Save.
To record additional information by using the Classic view
1 Open the relevant problem investigation as described in Viewing probleminvestigations on page 66.
2 Click the Classification tab.
3 Select an investigation driver.
4 In the Investigation Justification field, type the reason that you are requesting theproblem investigation.
5 Enter the target resolution date.
6 Click Save.
Indicating impacted areas
When you indicate which areas of the organization are impacted by a problem, youcan determine priorities based on business needs. Areas of the organization can beindicated by location or organizational structure.
To indicate impacted areas
1 With the relevant Problem Investigation form open, from the Navigation pane,choose Advanced Functions => Impacted Areas.
2 In the Impacted Areas Update dialog box, select the area, and click Add.
You can add as many impacted areas affected by the problem as necessary. Youcan also remove areas that you have previously chosen in this form.
3 When you finish adding areas, click Close.
Creating a problem investigation
Chapter 4 Performing the incident request review 67

Relating incident requests and probleminvestigations
By defining and maintaining relationships among records, you can create a moresophisticated overview of the connections and interdependencies among the currentproblem investigation and additional service issues being tracked by your system.
A problem investigation can be related to any of the following record types:
■ Configuration item (CI)
■ Incident request
■ Solution database
■ Known error
■ Another problem investigationAdditionally, if your environment runs BMC Remedy Asset Management andBMC Remedy Change Management, a problem investigation can also be relatedto the following record types:
■ Configuration item (CI) unavailability
■ Infrastructure changeA known error can be related to any of the following record types:
■ Configuration item
■ Incident request
■ Solution database
■ Another known error
■ Problem investigation
If you have Change Management, a known error can also be related to infrastructurechange or a release record.
Relating incident requests and problem investigations
68 BMC Remedy Service Desk: Problem Management User Guide

Note You cannot define a relationship from a solution database record to another recordtype. You can only define a relationship to a solution database record from anotherrecord type. For example, from an open incident request, you can create arelationships to a solution database record. You cannot, however, create arelationship from an open solution database record to an incident request.
Defining relationships
Use the following procedure to define a relationship. The following example uses aproblem investigation, but the procedure is similar for defining a relationship from aknown error.
To define a relationship-Classic view
1 Open the relevant problem investigation as described in Viewing probleminvestigations on page 66.
2 Click the Relationships tab.
3 From the Request Type list at the bottom of the Relationships tab, select the typeof record to which you want to relate the current record.
For example, to relate your problem investigations to a configuration item, selectConfiguration Item from the Request Type list.
4 Click Search.
5 Complete the search criteria tabs with the relevant information, then click Search.
Note Try to supply as much information as possible in the search dialog box to reducethe overall number of records returned by the search.
6 From the search results table, select the item with which you want to create therelationship.
7 From the Relationship Type list at the bottom of the search dialog box, select thetype of relationship you want to create. For example, if you are relating a probleminvestigation to a CI that is impacted by the problem, you might select Impacts.
Note The contents of the Relationship Type list depends on the type of record you aretrying to create the relationship with.
Relating incident requests and problem investigations
Chapter 4 Performing the incident request review 69

8 Click Relate.
An information message appears confirming the relationship.
9 Click OK to dismiss the dialog box and then click Close to close the search dialogbox.
To define a relationship-Best Practice view
1 Open the relevant problem investigation as described in Viewing probleminvestigations on page 66.
2 From the Quick Action area, click the arrow beside Create Relationship to.
3 From the menu, select the type of record to which you want to relate the currentrecord.
For example, to relate your problem investigations to an incident request, selectIncident.
Note If your system has BMC Remedy Knowledge Management Installed, continuewith this procedure. Otherwise, complete the procedure described in “To define arelationship-Classic view” on page 69 starting at Step 5.
4 In the Search field of the dialog box that opens, type a search string. For example,if you are creating a relationship to an incident request about a printer thatregularly goes off-line, you might type printer off line.
The search scans multiple fields in each record looking for a match, and returns alist of records that contain the phrase "printer off line" in one of the scanned fields.
Note The type of search dialog box that appears depends on the type of record youchose from the menu.
Tip Try to supply as much information as possible in each type of search to reduce theoverall number of records returned by the search. If, after using a more specificsearch string, the search returns too many records, consider using the advancedsearch. To do this, click Use Advanced Search, which opens a form in searchmode that is relevant to the type of relationship you are making. This searchbehaves the same way as the search described in To define a relationship-Classicview, above.
Relating incident requests and problem investigations
70 BMC Remedy Service Desk: Problem Management User Guide

5 From the search results table, select the item with which you want to create therelationship.
6 From the Relationship Type menu at the bottom of the search dialog box, selectthe type of relationship you want to create. For example, if you are relating aproblem investigation to a CI that is impacted by the problem, you might selectImpacts.
Note The contents of the Relationship Type list depends on the type of record you aretrying to create the relationship with.
7 Click Relate.
An information message appears confirming the relationship.
8 Click OK to dismiss the dialog box and then click Close to close the search dialogbox.
Copying relationships
When you define a relationship between the current record and another record, theother record might also have one or more records related to it. Using the CopyRelated Relationships form, which you open from the Relationships tab, you canlook at the related record’s additional relationships. If you determine that any ofthese additional relationships should be related to the current record, you can definethe relationship from this form.
By doing this, you can more thoroughly document all the record relationships.
Note You cannot use this procedure to copy related CIs.
To copy relationships
1 Open the relevant problem investigation as described in Viewing probleminvestigations on page 66.
2 Click the Relationships tab.
3 In the Relationships table, select a record related to the current probleminvestigation.
Relating incident requests and problem investigations
Chapter 4 Performing the incident request review 71

4 From the Quick Actions list at the botton of the Relationships tab, select GetRelated Relationships, then click Execute.
5 From the table of related records on the Copy Related Relationships form, selectthe other record that you want to relate to the current record.
Note To see a detailed description of the other record, select it, then click View. A formappears with detailed information about the selected record. Use this feature tohelp you determine whether you want to relate the other record to the currentrecord.
6 Click inside the Relationship Type field.
Note The contents of the Relationship Type list depends on the type of record you aretrying to create the relationship with.
7 From the list of relationship types, select the type of relationship you want tocreate, then click Select.
Click OK to dismiss the note confirming the relationship creation.
8 Close the Copy Related Relationships form.
Modifying relationships
After you define a relationship, you can change the relationship type and update therelationship description.
Use the following procedure to modify the relationship.
To modify a relationship
1 Open the relevant problem investigation as described in Viewing probleminvestigations on page 66.
2 Click the Relationships tab.
3 In the Relationships table, select the relationship you want to modify.
4 From the Quick Actions list at the bottom of the Relationships tab, select ModifyRelationship Type, then click Execute.
Relating incident requests and problem investigations
72 BMC Remedy Service Desk: Problem Management User Guide
5 On the Modify Relationships Type form, enter the new relationship detailsaccording to the on-screen instructions.
6 Click Save to save your changes.
Performing quick actions on a relationship
You can perform many additional actions on a relationship. For a list of theseactions, see the following tables.
To perform a quick action
1 Open the relevant problem investigation as described in Viewing probleminvestigations on page 66.
2 Click the Relationships tab.
3 In the relationships table, select the relationship entry on which you want toperform the action.
4 From the Quick Actions list at the bottom of the Relationships tab, select theaction you want to perform, such as Get Impacted Areas.
The following table lists available quick actions for any related item.
Table 12: Effects of general relationship actions
Relationship action Effect
Get Related Relationships Copies the relationships of the selected record to the currentproblem investigation’s relationships.
Modify Relationship Type Prompts you to modify the relationship type, as described in Modifying relationships on page 72.
Additional quick actions are available when you select a related configurationitem, as indicated in the following table.
Table 13: Effects of relationship actions for related CIs
Relationship action Effect
Explore CI Opens a graphical relationship viewer that shows a selectedCI’s relationship with other records.
Get CI Impact/Urgency Copies the impact and urgency of the selected CI.
Relating incident requests and problem investigations
Chapter 4 Performing the incident request review 73

Relationship action Effect
Get CI Product Categorization Copies the product categorization from the selected CI to theclassification of the current problem investigation.
Get Impacted Areas Prompts you to select impacted areas, as defined in the selectedCI, into the current investigation’s impacted areas.
5 Click Execute.
Removing relationships
Use the following procedure to remove a relationship.
To remove a relationship
1 Open the relevant problem investigation as described in Viewing probleminvestigations on page 66.
2 Click the Relationships tab.
3 In the Relationships table, select the relationship you want to remove.
4 Click Remove. Click Yes when the system prompts you to confirm the removal.
Assigning problem investigationsAn investigation can be assigned to an individual or a group.
Note Known errors and solution entries can also be assigned by the same process.
Viewing unassigned investigations
A problem investigation might be assigned to your support group without beingassigned to an individual.
View the unassigned problem investigations, then assign them as described in Specifying a problem coordinator for the problem investigation on page 75.
Assigning problem investigations
74 BMC Remedy Service Desk: Problem Management User Guide

To view unassigned problem investigations
1 From the Defined Searches list on the Problem Management console, run DefinedSearches => Problem Investigation => All Open Problems.
For more information about running predefined searches, see Running DefinedSearches on page 117.
2 View the unassigned problem investigations in the Problems table.
Specifying a problem coordinator for the probleminvestigation
Problem coordinators are individuals who have the functional role of ProblemCoordinator within the support group to which they belong. For details aboutfunctional roles, see the BMC Remedy IT Service Management Administration Guide .
To specify a problem coordinator using the Best Practice view
1 Open the relevant problem investigation as described in Viewing probleminvestigations on page 66.
2 From the Coordinator Group menu, select the client company, organization, andsupport group that will coordinate the problem investigation.
After you specify the client company, organization, and support group, only thesupport group name appears in the Coordinator Group field.
3 From the Problem Coordinator menu, select the name of the person you want toassign as the problem coordinator.
4 Click Save.
To specify a problem coordinator using the Classic view
1 Open the relevant problem investigation as described in Viewing probleminvestigations on page 66.
2 Click the Assignment tab.
3 In the Problem Coordinator Assignment area, select the problem coordinatorfrom the Assignee field.
■ If you look at the Set Assignment Using menu and see that problemcoordinator groups have been defined there, select the Pblm Mgr Default
Assigning problem investigations
Chapter 4 Performing the incident request review 75

Group from the Set Assignment Using list, then click Set. Then, select theproblem coordinator from the Assignee field.
■ To assign yourself as the problem coordinator, click My Default Group.
4 Click Save.
Assigning an investigation to a specialist
You can assign the investigation to any specialist belonging to a support group.
For information about how to reassign the investigation to another support group orto an assignee in another support group, see Reassigning the problem investigationon page 96.
To assign an investigation to a specialist
1 Open the relevant problem investigation as described in Viewing probleminvestigations on page 66.
2 Indicate the appropriate assignee, as follows.
■ To assign the investigation to yourself.
When using the Best Practice view When using the Classic view
— In the Navigation pane, choose QuickActions => Assign to Me.
— In the Navigation pane, choose Quick Links => Assign to Me.
■ To assign the investigation based on predefined routing.
When using the Best Practice view When using the Classic view
— In the Navigation pane, choose QuickActions => Auto Assign.
— In the Navigation pane, choose Functions => Auto Assign.
■ To assign the investigation to a specific person.
Assigning problem investigations
76 BMC Remedy Service Desk: Problem Management User Guide

When using the Best Practice view When using the Classic view
1 Click the Work Detail tab.
2 From the Assigned Group menu, select thesupport group.
3 From the Assignee menu, select the name of theperson you want to assign as the assignee.
1 Click the Assignment tab.
2 In the Problem Assignment area, select theappropriate assignee.
3 Click Save.
Assigning problem investigations
Chapter 4 Performing the incident request review 77

Assigning problem investigations
78 BMC Remedy Service Desk: Problem Management User Guide

Performing the root cause analysisThe information in this section is for people who fulfill the support role of specialist.
The tasks described by this section are organized according to the stages of theproblem management lifecycle as described by the BMC Service ManagementProcess Model (SMPM).
Root cause analysisAfter a problem investigation is assigned to you for investigation, you perform aroot cause analysis to determine the problem’s cause.
If the problem has caused one or more incidents, you first try to find a temporaryworkaround to restore normal service operation as quickly as possible. If atemporary workaround is available, update the problem investigation record withdetails about the workaround, including how to implement it. This information canbe used later to resolve other incidents caused by the same or similar problems untila structural solution is found and implemented.
After assessing temporary workarounds, begin to investigate the root cause of theproblem. After finding the root cause, you update the problem investigation with adescription of the root cause.
After determining what is causing the problem, you investigate possible structuralsolutions. Ensure you add a description of each option to the problem investigationalong with a recommendation for the preferred solution.
If you can perform a structural solution, implement the solution and then update theproblem investigation with the solution. If the change management process isneeded to permanently work around or solve the root cause, ensure you inform theproblem coordinator that change management must be involved with the analysis.
If you cannot determine the problem’s root cause or cannot propose a structuralsolution, then record this in the problem investigation along with an explanation.
5
Chapter 5 Performing the root cause analysis 79
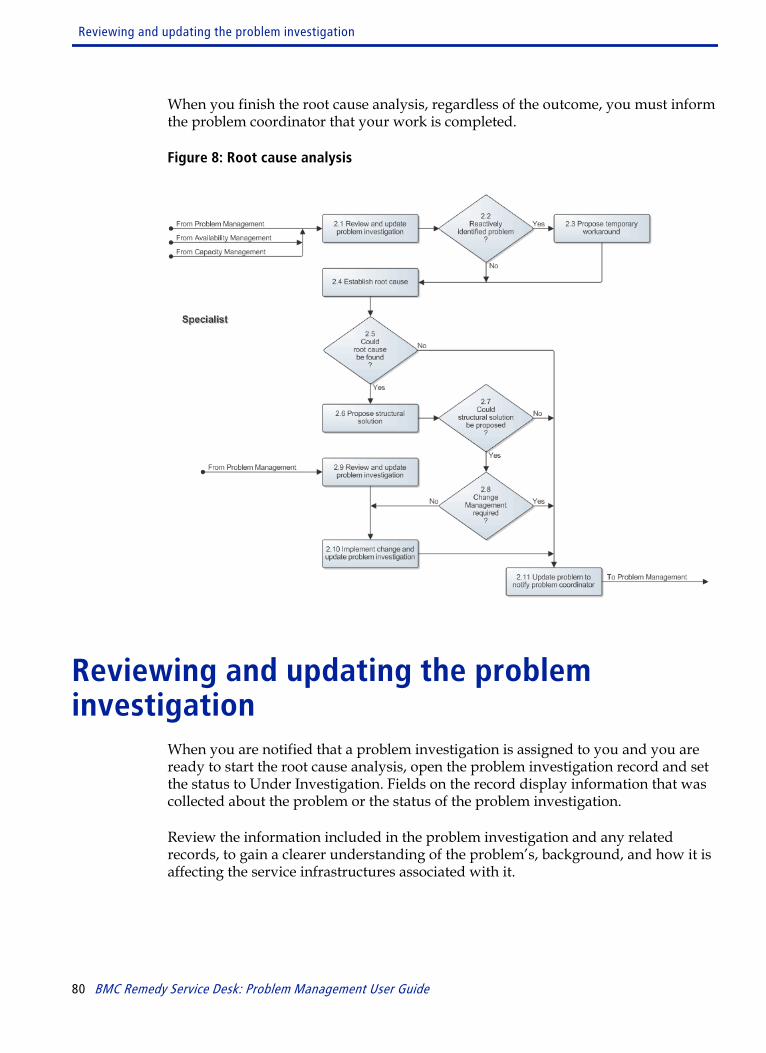
When you finish the root cause analysis, regardless of the outcome, you must informthe problem coordinator that your work is completed.
Figure 8: Root cause analysis
Reviewing and updating the probleminvestigation
When you are notified that a problem investigation is assigned to you and you areready to start the root cause analysis, open the problem investigation record and setthe status to Under Investigation. Fields on the record display information that wascollected about the problem or the status of the problem investigation.
Review the information included in the problem investigation and any relatedrecords, to gain a clearer understanding of the problem’s, background, and how it isaffecting the service infrastructures associated with it.
Reviewing and updating the problem investigation
80 BMC Remedy Service Desk: Problem Management User Guide

Note If you receive an investigation that you think someone else is better suited to review,you can reassign it to that person. For information about how to do this, see Relatingincident requests and problem investigations on page 68.
The tasks described by the following procedures are related to reviewing andupdating the problem investigation.
Receiving notification of assignments
When a problem investigation is assigned to you, you can receive notification through:
■ BMC Remedy Alert
The BMC Remedy Problem Management console displays all probleminvestigations, known errors, and solution entries assigned to you.
Viewing problem investigations assigned to you
You can view the summary and detail of problem investigations assigned to you.
As a problem assignee, you assume responsibility for the problem investigation. Youbecome the focal point for communication about the problem. You are responsiblefor coordinating activity to investigate the problem.
You can record the effort that you have spent working on an investigation. If you arenot assigned to an investigation, you can record that you have assisted with theinvestigation.
Note If you do not accept the assignment, reassign the investigation, as described in Reassigning the problem investigation on page 96.
To view problem investigations assigned to you
1 On the Problem Management console, from the View By list, select Personal.
Reviewing and updating the problem investigation
Chapter 5 Performing the root cause analysis 81

Note You can also view problem investigations assigned to other people in the supportgroups you belong to by selecting either Selected Groups , which enables you toselect a subset of your groups, or All My Groups , which displays probleminvestigations for all the support groups you belong to.
2 From the Defined Searches area, select Problem Investigation => All OpenProblems.
3 To view additional details about an investigation, select the problem investigationrecord in the Problems table and then click View.
The Problem Investigation form appears. You can modify the form and performother actions, as appropriate.
Accepting an assignment
You can accept any investigation assigned to your support group.
To accept an assignment
1 Open the relevant problem investigation by selecting it from the Problems tableand clicking View.
2 In the Navigation pane:
When using the Best Practice view When using the Classic view
■ Choose Quick Actions => Assign to Me.. ■ Quick Links => Assign to Me.
If you belong to more than one support group, you are prompted to select thegroup you want the problem investigation assigned to.
3 Select the support group.
4 From the Status field, select Under Investigation.
5 Click Save.
Reviewing and updating the problem investigation
82 BMC Remedy Service Desk: Problem Management User Guide

Searching for similar problem investigations
After accepting a problem investigation assignment, if you remember havingworked on a similar problem investigation, you can use the Advanced Search featureto find it. Viewing similar problem investigations might help you find the root causeof your current problem investigation.
Tip If you have access to BMC Remedy Knowledge Management, you can also use thatapplication to help you find information to help with the problem investigation. Forinformation about using BMC Remedy Knowledge Management, see Searchingknowledge base entries on page 84.
To search for similar problem investigations
1 With the problem investigation record open, from the Navigation pane, chooseAdvanced Functions => Advanced Search.
2 In the Advanced Search Selection dialog box, select the type of search you want toperform, then click Select:
■ Search Problem Investigation by Work Info—Searches for probleminvestigation using fields from the Work Detail tab (Work Info tab when usingthe Classic view).
■ Search Problem Investigation by Relationships—Searches for probleminvestigations using fields from the Relationship form.
3 On the search form, provide as much information about the previous probleminvestigation as possible, and then click Search.
4 View the matching problem investigations in the table that appears.
Tip If you are running BMC Remedy Problem Management from the BMC RemedyUser client, you can use the advanced search bar to define a more complex set ofcriteria than you can specify by using only fields in a form. For example, you cansearch for all problem investigations with two different values in the same field.Thus, you can search for all problem investigations that have a status ofCompleted or Closed. For more information about using the advanced search bar,see the BMC Remedy User online help system. To access the help system from theBMC Remedy User tool bar, select Help => Contents and Index.
Reviewing and updating the problem investigation
Chapter 5 Performing the root cause analysis 83

Searching knowledge base entries
If you have access to the BMC Remedy Knowledge Management application, youcan author and search for solutions in a knowledge base. You can use theinformation in these knowledge base entries to help perform the root cause analysis.
To search the knowledge base
1 With the problem investigation record open, from the Navigation pane, chooseQuick Actions (Quick Links in the Classic view) => Search Knowledge Base.
2 Complete the Knowledge Management search form that appears. For detailedinformation about how to use this application, see the BMC Remedy KnowledgeManagement User Guide.
Authoring knowledge base entries
When you finish the problem investigation, if you think that publishing the solutionin the knowledge base can help future root cause analyses, you can do this from theproblem investigation record.
To author a knowledge base entry
1 With the problem investigation record open, from the Navigation pane, chooseQuick Actions (Quick Links in the Classic view) => Create Knowledge.
2 Complete the Knowledge Management authoring form that appears. For detailedinformation about how to use this application, see the BMC Remedy KnowledgeManagement User Guide.
Documenting work with a vendor
Use this procedure to track investigations that require vendor support, and toindicate when you assign an investigation to a vendor.
Note If you assign an investigation to a vendor, you must communicate with the vendoras appropriate. BMC Remedy Problem Management does not notify the vendor.
To document work with a vendor when using the Best Practice view
1 Open the relevant problem investigation as described in Viewing probleminvestigations on page 66.
Reviewing and updating the problem investigation
84 BMC Remedy Service Desk: Problem Management User Guide

2 In the Vendor field, indicate the vendor’s name.
■ If the vendor is already defined, select the vendor.
■ If the vendor is not listed on the menu, type the vendor’s name.
3 If available, enter the Vendor Ticket Number.
The Vendor Ticket Number is a tracking number issued by the vendor’s trackingsystem for the problem investigation that you are assigning to that vendor.
4 Click Save.
To document work with a vendor when using the Classic view
1 Open the relevant problem investigation as described in Viewing probleminvestigations on page 66.
2 Click the Assignment tab.
3 For Assign to Vendor, select Yes.
4 Click the Vendor tab.
5 Complete the Vendor Information tab, as appropriate.
■ If the vendor is already defined, you can select the vendor.
■ If the vendor is not listed on the menus, you can type the vendor contactinformation.
Note The Internet Email field is only informational. From this field, you can see who iscurrently working on the problem investigation and how to contact the vendorfor an update.
6 Indicate the date that you assigned the investigation to the vendor.
7 Click Save.
Proposing a temporary workaroundProblem investigations can be created proactively or reactively. A proactive probleminvestigation comes from your capacity management system and is created to avoid
Proposing a temporary workaround
Chapter 5 Performing the root cause analysis 85

incidents caused by capacity shortages. Reactive problem investigations are relatedto one or more incident requests.
If the problem investigation was created by the capacity management system, youcan skip this step and go to Establishing the root cause on page 87.
If the problem investigation is related to one or more incident requests, try to find aworkaround to resolve the incidents. You might find useful information about theResolution tab of the related incident request record. See the BMC Remedy ServiceDesk: Incident Management User Guide for information about viewing incident requestrecords.
If you identify a workaround, carefully describe it in the Workaround field of theproblem investigation record. Until a permanent solution is found, this informationcan be useful to service desk analysts and other specialists working on similar cases.
Note It is possible that a workaround from a previous analysis is already described in theWorkaround field. If this is the case, review the workaround and update thedescription if necessary.
If you cannot find a practical workaround for the problem, make sure that yourecord this in a work information note on the Work Detail tab (Work Info tab whenusing the Classic view). For information about how to do this, see Adding workinformation notes on page 124.
To record a workaround
1 Open the relevant problem investigation as described in Viewing probleminvestigations on page 66.
2 Enter the workaround information:
When using the Best Practice view When using the Classic view
1 In the Workaround field, type a description of theworkaround.
1 In the Process Flow Status area, click theInvestigation and Diagnosis box, chooseGenerate Work Around/Root Cause.
2 In the Problem Investigation Workaround dialogbox, type information in the Workaround field.
3 Click Save.
Proposing a temporary workaround
86 BMC Remedy Service Desk: Problem Management User Guide

Establishing the root causeIn this step, you try to establish the problem’s root cause. Even if the probleminvestigation was triggered proactively by your organization’s capacity managementsystem, you must determine why the service infrastructure is running out of capacity.
After you determine the root cause, take the following steps:
■ Describe the root cause on the problem investigation form.
■ If the root cause resides within a CI, relate the CI to the problem investigation. Forinformation about how to do this, see Relating incident requests and probleminvestigations on page 68.
■ Look at the Workaround field to review any previously proposed workarounds.With the root cause now known, if necessary, propose a better workaround anddescribe how to implement it. For information about how to do this, see Proposing a temporary workaround on page 85.
If you cannot determine the root cause, you must record this also in a workinformation note on the Work Detail tab (Work Info tab when using the Classicview). See Adding work information notes on page 124 for information about howto do this. Make sure that you record why a root cause cannot be found, and be sureto record the activities that you performed to determine that a root cause cannot bedetermined.
Note If the root cause analysis is temporarily unable to progress (for example, if you arewaiting for information from a supplier), make sure you set the probleminvestigation’s Status field to Pending, and then specify why in a work informationnote on the Work Detail tab (Work Info tab when using the Classic view). See Adding work information notes on page 124 for information about how to do this.
When you determine the root cause of the problem, you can record it.
After you record the root cause, the problem investigation can be completed as asolution entry or a known error, as described in Creating a solution entry on page91 and Creating a known error on page 97.
To record the root cause
1 Open the relevant problem investigation as described in Viewing probleminvestigations on page 66.
2 Record the root cause:
Establishing the root cause
Chapter 5 Performing the root cause analysis 87

When using the Best Practice view When using the Classic view
Add a Work Detail note describing the root cause.
Note: For information about how to do this, see Adding work information notes on page 124
1 In the Process Flow Status area, in theInvestigation and Diagnosis box, choose GenerateWork Around/Root Cause.
2 In the Problem Investigation Workaround dialogbox, select the root cause.
Note: The Root Cause options available for theselection depend on the product and operationalcategorizations that are associated with the rootcause. Root cause selections are configured byyour administrator, as described in the BMCRemedy IT Service Management AdministrationGuide.
3 Click Save.
3 If a recent change is the root cause, and if BMC Remedy Change Management isinstalled on your system, relate the investigation to the change request with aRequest Type of Infrastructure Change. For information about how to relaterecords, see Relating incident requests and problem investigations on page 68.
4 If a known error is the root cause, relate the investigation to the known error witha Request Type of Known Error. For information about how to relate records, see Relating incident requests and problem investigations on page 68.
Proposing a structural solutionAfter you determine the problem’s root cause, if possible, determine the best way topermanently fix it. For example, if the problem is related to a CI that is still underwarranty, contact the supplier for a replacement CI.
In a work information note on the Work Detail tab (Work Info tab when using theClassic view), describe the proposed structural solution. If there are multiplepossible solutions, make sure you record all them. For information about how to dothis, see Adding work information notes on page 124.
After determining the best solution, based on technical, financial, and availabilityconsiderations, use a work information note to record the preferred solution,providing details about how to implement it.
Proposing a structural solution
88 BMC Remedy Service Desk: Problem Management User Guide

If a service infrastructure change is required to resolve the problem, recommend thatthe problem coordinator create a known error to coordinate the change through theChange Management process. The Change Management process is required when:
■ Services become unavailable or is degraded during service hours.
■ The functionality of a service changes.
■ The BMC Atrium CMDB requires an update.
If you cannot find or implement a practical solution, make sure that you use a workinformation note to record the reasons why a solution is not currently available.
Notifying the problem coordinatorIf you have have a recommended structural solution after completing the root causeanalysis, but before you implement the structural solution, use the ProblemInvestigation form to notify the problem coordinator that the problem has been solved.
To notify the problem coordinator
1 Open the relevant problem investigation as described in Viewing probleminvestigations on page 66.
2 Set the Assignee field to the name of the Problem Coordinator:
When using the Best Practice view When using the Classic view
■ Make sure the Assignee field is set to the name ofthe problem coordinator.
■ On the Assignment tab, make sure the ProblemCoordinator Assignment— Assignee field is set tothe name of the problem coordinator.
3 From the Status field menu, select Assigned.
Implementing the solutionIf you determine that a structural solution to the problem is available, or if you havefound a permanent workaround, implement it. After you implement the solution orpermanent workaround, record how the solution or permanent workaround wasimplemented using a work information note on the Work Detail tab (Work Info tabwhen using the Classic view).
Notifying the problem coordinator
Chapter 5 Performing the root cause analysis 89
For information about how to do this, see Adding work information notes on page124.
Resolving a problem investigation
After you implement the solution, resolve the problem investigation. The end resultof the investigation might be a known error record or solution record.
To resolve a problem investigation
1 Open the relevant problem investigation as described in Viewing probleminvestigations on page 66.
2 Change the Status to Completed.
Note If and infrastructure change is required to permanently resolve the problem, thenselect Known Error from the Status Reason list in the next step.
3 Select the appropriate status reason.
If you select Known Error or Solution Database, the details of the probleminvestigation are copied to a new known error or solution database entry whenyou save your changes.
4 Select the appropriate product categorization:
When using the Best Practice view When using the Classic view
■ In the Quick Actions area of the Navigation pane,click Select Product.
■ On the Classification tab, select the appropriateproduct categorization.
Note To complete the problem investigation, you must select at least Tier 1 from theProduct Categorization list.
5 Select the product categorizations from the drop down menus in the ProductSelection dialog box.
6 Click Save to save your changes.
Implementing the solution
90 BMC Remedy Service Desk: Problem Management User Guide

The status of the investigation is set to Completed. If the status reason for theinvestigation is:
■ Known Error, the Known Error form appears, and details from the probleminvestigation are copied into the form. Complete the form and save it, asdescribed in Creating a known error on page 97.
Note if an infrastructure change is required to permanently resolve the problem,then in the Known Error form, assign the known error to the ChangeCoordinator to have the change implemented.
■ Solution Database, the Solution Database form appears, and details from theproblem investigation are copied into the form. Complete the form and save it,as described in Creating a solution entry on page 91.
Note If the problem investigation is related to an incident that is not yet closed orcanceled, the incident assignee is notified that the investigation is complete.
Creating a solution entry
After you determine the root cause of a problem, you can create a solution entry.Typically, you might create a solution entry if you determine that the issue againstthe investigated CI is not a defect (that is, the CI is functioning as designed). In thisscenario, a change request does not have to be issued for correcting the CI in question.
Note Solution entries require that solution managers are defined. For details, see the BMCRemedy IT Service Management Administration Guide.
To create a solution entry
1 With the Solution Database form open, as described in Resolving a probleminvestigation on page 90 complete the Solution Database entry as appropriate. Adescription of the various required fields is provided in the following table.
Table 14: Creating a solution entry
Field Explanation
Summary A brief summary of the solution.
Implementing the solution
Chapter 5 Performing the root cause analysis 91

Field Explanation
View Access Select one of the following choices:
■ Internal—Users within your organization can see the entry.
■ Public—Everyone with access to BMC Remedy Problem Managementcan see the entry, including users of the Requester console.
Details tab
Abstract A brief description of the root cause and the solution.
Solution A detailed description of the solution.
Assignment tab
Support Company The support company to which the problem investigation was assigned.
Support Organization The support organization to which the problem investigation was assigned.
Assigned Group The support group to which the problem investigation was assigned.
Mappings tab
Organization—Company Select the client company from the menu. If the solution applies to allclient companies, then select -Global-.
Location—Company Select the client company from the menu. If the solution applies to allclient companies, then select -Global-.
Date/System tab
Submitter Record the name of the person creating the Solution Database entry.
2 Click Save.
Implementing the solution
92 BMC Remedy Service Desk: Problem Management User Guide

Performing the analysis reviewThe information in this section is for people who fulfill the management role ofproblem coordinator.
The tasks described by this section are organized according to the stages of theproblem management lifecycle as described by the BMC Service ManagementProcess Model (SMPM).
Analysis reviewAfter the specialist completes a root cause analysis of the assigned probleminvestigation, you review the analysis.
If during the analysis review you determine that the specialist implemented asolution to the problem, you can start to close the problem investigation. Forinformation about how to do this, see Closing the problem investigation on page103.
You can close the investigation without a solution if you determine that the specialistthoroughly analyzed the problem, but was unable to find a root cause. If youdetermine the analysis was not adequate, then assign the problem investigation backthe specialist for further analysis, or reassign it to another specialist. For informationabout how to do this, see Reassigning the problem investigation on page 96.
If the specialist proposes a structural solution that requires change management,review the proposal to determine if this is an appropriate course of action. If youagree that a change is required to solve the problem, generate a known error andpasses it to the Change Coordinator of the affected service. If you do not agree that a
6
Chapter 6 Performing the analysis review 93

change is required, assign the problem investigation back the specialist for furtheranalysis, or reassign it to another specialist.
Figure 9: Analysis review
Reviewing the problem investigationWhen specialists complete their root cause analysis, they assign the probleminvestigation to a problem coordinator to perform an analysis review.
As the assigned problem coordinator, you open the problem investigation andreview the Work Detail tab entries (Work Info tab when using the Classic view). Forinformation about how to do this, see Viewing work information notes on page 126.
During the review, determine whether the specialist:
■ implemented a structural change.
■ is recommending a service infrastructure change—which requires the ChangeManagement process.
■ was unable to find a root cause.
Reviewing the problem investigation
94 BMC Remedy Service Desk: Problem Management User Guide

The following list of topics are covered in this section:
When a structural change was implemented
If the specialist implemented a change and if your review determines the root causeanalysis was satisfactory, close the problem investigation.
For information about how to start this process, see Closing the probleminvestigation on page 103.
If you determine the root cause analysis was not satisfactory, reassign the probleminvestigation back to the specialist, or to another specialist for further investigation.For information about how to do this, see Reassigning the problem investigation onpage 96.
When Change Management is needed
If the specialist recommends an infrastructure change that requires the involvementof Change Management, determine independently whether the proposed change isjustified. This can save time in resolving the problem if Change Management is notreally needed.
Change Management must be involved whenever:
■ Services becomes unavailable or are degraded during service hours.
■ Functionality of a service changes.
■ BMC Atrium Configuration Management Database (BMC Atrium CMDB)requires an update.
If you agree that Change Management is needed, create a known error and assign itto the Change Coordinator. For information about how to do this, see Creating aknown error on page 97.
Otherwise, reassign the problem investigation back to the specialist, or to anotherspecialist for further investigation. For information about how to do this, see Reassigning the problem investigation on page 96.
Reviewing the problem investigation
Chapter 6 Performing the analysis review 95

When no root cause was found
If the specialist cannot find a root cause, make sure that the reason is recorded in awork information note on the Work Detail tab (Work Info tab when using the Classicview). Make sure, too, that the status of the problem investigation is set to Pending.
For information about adding work information notes, see Adding work informationnotes on page 124.
If you determine that the analysis was not adequate, reassign the probleminvestigation back to the specialist, or to another specialist for further investigation.For information about how to do this, see Reassigning the problem investigation onpage 96 which follows.
Reassigning the problem investigationIf you determine the problem investigation was not adequate, disagree with the needfor Change Management, or if Change Management rejects the known error, youreassign the problem investigation for further analysis.
You begin the reassignment process by explaining, using a work information note onthe Work Detail tab (Work Info tab when using the Classic view), why theinvestigation is being reassigned. You then decide which specialist can perform abetter analysis based on skill level, availability, and access rights.
After determining the most appropriate specialist, reassign the probleminvestigation. You can assign the investigation to either the original specialist or toanother specialist.
You can reassign an investigation to either an individual or a support group. Use thequick actions in the Navigation pane to reassign an investigation to yourself (Assignto Me) or to reassign an investigation based on automatic routing (Auto Assign).
To reassign an investigation
1 Open the relevant problem investigation as described in Viewing probleminvestigations on page 66.
2 To assign the investigation to yourself, in the Navigation pane, choose one of thefollowing actions:
■ Quick Actions (Quick Links in the Classic view) => Assign to Me
■ Quick Actions (Quick Links in the Classic view) => Auto Assign
Reassigning the problem investigation
96 BMC Remedy Service Desk: Problem Management User Guide

Auto Assign uses the automatic routing to assign the investigation based onpredefined system mapping. Automated assignment can be based on the problemlocation, operational categorization, or product categorization.
3 Otherwise, follow these steps to reassign the investigation:
When using the Best Practice view When using the Classic view
To change the AssigneeSelect a new assignee from the Assignee list.To change the Assigned Group
1 Select a new assigned group from the AssignedGroup list
2 Select a new assignee from the Assignee list.
1 Click the Assignment tab.
2 Reassign the investigation with one of thefollowing options:
■ Select the assigned group.
■ After selecting an assigned group, select theassignee.
■ Select from Set Assignment.
Note: Table 15 on page 97 describes the SetAssignment selections for the ProblemAssignee area of the Assignment tab.
Table 15: Set Assignment selections for the Problem Assignee
Set assignment using Description
My Default Group Assigns the investigation to you and your default support group.
My Group List Opens a list of all groups to which you belong. Select the appropriate groupfrom this list.
Favorite Groups Lists the typical groups to which your support group assigns investigations.
Auto Assign The same as the Auto Assign link in the Navigation pane, this assigns theinvestigation based on predefined system mapping.
4 Click Save.
Creating a known errorIf you agree with the specialist’s recommendation that a change is the best way toremove the root cause of the problem, initiate the change by creating a known errorand assigning it to the change coordinator of the affected service.
Creating a known error
Chapter 6 Performing the analysis review 97

To create a known error
1 Open the relevant problem investigation as described in Viewing probleminvestigations on page 66.
2 Set the Status field to Completed and the Status Reason field to Known Error.
3 Click Save.
4 Click Yes, when prompted by the system.
This opens the Known Error form and creates a relationship between the knownerror and the problem investigation.
5 In the Notes field, enter a brief description of the known error and a detaileddescription of the change requirements.
6 Select the impact and urgency. The priority and weight are calculated based onthe impact and urgency. If required, you can adjust the weight.
7 Select whether view access is internal or public.
This field is for informational purposes to indicate whether the known error is forinternal or public consumption.
8 Select the client company:
When using the Best Practice view When using the Classic view
From the Known Error Location list, select the clientcompany.
In the Known Error Details area of the Classificationtab, select the company.
9 Select the appropriate operational categorization.
Operational categorization is based on a three-tier hierarchy that is defined in theOperational Catalog:
When using the Best Practice view When using the Classic view
In the Quick Actions area of the Navigation pane,click Select Operational. 1 Click the Classification tab.
2 From the Operational Categorization fields of theClassification tab, select the operationalcategorizations by tier.
10 Select the appropriate product categorization.
Creating a known error
98 BMC Remedy Service Desk: Problem Management User Guide

Product categorization is based on a multi-tier hierarchy that is defined in yourProduct Catalog:
When using the Best Practice view When using the Classic view
In the Quick Actions area of the Navigation pane,click Select Product.
From the Product Categorization fields of theClassification tab, select the product categorizationsby tier.
11 Make sure the assignments are correct.
When using the Best Practice view When using the Classic view
1 Make sure your support group appears in theCoordinator Group field.
2 Make sure your name appears in the ProblemCoordinator field.
3 Make sure the Change Coordinator’s supportgroup name appears in the Assigned Group field.
4 Make sure the Change Coordinator’s nameappears in the Assignee field.
1 Click the Assignment tab.
2 Make sure that your name appears in theAssignee field in the Problem CoordinatorAssignment area.
Note: Your name appears in this field, becauseyou are the problem coordinator.
3 Make sure that the Change Coordinator’s nameappears in the Assignee field in the Known ErrorAssignment area.
12 Click the Relationship tab.
13 Ensure the known error is related to all the affected service infrastructure and tothe CI in which the problem resides. For information about how to do this, see Defining relationships on page 69.
14 Ensure the Status is set to Assigned.
15 Click Save.
Reviewing known error detailsIf you submit a known error to change management, the Change Coordinator hasthe option to reassign the known error back to you if the Change Coordinatordetermines that the solution can be implemented within the problem managementprocess.
Reviewing known error details
Chapter 6 Performing the analysis review 99

If this happens, review the known error to determine why the Change Coordinatorreassigned it, and then assign the problem investigation to the appropriate specialist.For information about how to do this, see Reassigning the problem investigation onpage 96.
To review a known error
1 From the Defined Searches area of the Navigation pane on the ProblemManagement console, choose Known Error => All Open Known Errors.
2 Click Refresh.
The Known Errors list refreshes with all open known errors for the selectedCompany and View By fields.
3 Select the known error and click View.
4 On the Known Error form, review the details as necessary.
Monitoring a problem’s statusThe Process Flow Status area on the Problem Investigation form indicates the currentstage and state of an investigation. When using the Classic view, the effort trackingfeature records the history of assigned work that has been performed on theinvestigation.
The Process Flow Status area provides a quick visual indicator of the current stageand state of an investigation. When you open an investigation, the Process FlowStatus area appears toward the top of the form.
For additional information about the process flow lifecycle, see Process flow and thelifecycle of a problem investigation on page 36.
In the Classic view, the investigation effort log attached to the Problem Investigationform lists all individuals who have worked on the problem during its lifecycle. Thisinformation is not system-generated; staff record this manually, as described in Recording effort spent on an investigation on page 128.
Canceling a problem investigationIf an investigation is not justified or is a duplicate of a current investigation, youmight want to cancel it.
Monitoring a problem’s status
100 BMC Remedy Service Desk: Problem Management User Guide

To cancel a problem investigation
1 Open the problem investigation.
2 Update the form, as appropriate.
3 Select Canceled in the Status field.
4 Select a status reason from the Status Reason list.
5 Click Save.
Canceling a problem investigation
Chapter 6 Performing the analysis review 101

Canceling a problem investigation
102 BMC Remedy Service Desk: Problem Management User Guide

Closing the problem investigationThe information in this section is for people who fulfill the role of problem coordinator.
The tasks described by this section are organized according to the stages of theproblem management lifecycle as described by the BMC Service ManagementProcess Model (SMPM).
Closing the problem investigationWhen you are notified by the specialist that the problem is solved, verify that theproblem is solved. After you verify that the problem is solved, close the probleminvestigation and any associated known errors.
If the change was proposed but not implemented, or if the change did not fix theproblem, determine if a different solution for the problem is available. If it is, thenyou can assign the problem investigation back to the specialist for further analysis,or reassign it to another specialist.
If thorough investigation and analysis reveals that currently there are no practicalmeans to permanently work around or to solve the problem's root cause, update theproblem investigation to indicate an impasse. After that, you must periodically
7
Chapter 7 Closing the problem investigation 103

reassign the problem investigation to determine if new technology or if a differentapproach to the problem's root cause can provide a structural solution.
Figure 10: Problem closure
Verifying the structural solutionWhen you are notified that a problem is resolved, open the problem investigationand any related known errors to review the information about the respective WorkDetail tabs (Work Info tabs when using the Classic View).
You do this to determine which structural solution was implemented to resolve theproblem. For information about how to do this, see Viewing work information noteson page 126.
After determining the nature of the structural solution, you must verify that thesolution has solved the problem. One way to do this is to review the production testresults. In cases where incidents caused by the problem under investigationexhibited only intermittent symptoms, the only way to verify the solution might beto monitor incident requests against the affected service, to see if any new incidentsare being reported.
Verifying the structural solution
104 BMC Remedy Service Desk: Problem Management User Guide

Closing the problem investigation and knownerrors
After verifying that the structural solution resolved the problem (a process that cantake days or even weeks of monitoring), close the problem investigation and anyrelated known errors.
Note After you close a problem investigation, you can no longer modify it. Therefore,ensure that the root cause has been resolved and review all information about theproblem investigation on the Problem Investigation form before you change theinvestigation's status to Closed.
Note If you do not close the problem investigation or the known error within a specifiedperiod of time, BMC Remedy Problem Management automatically moves the statusof the problem investigation or known error to Closed. The length of this period isconfigurable. Check with your system administrator to determine how much timeyour organization specifies. The default setting is 15 days.
To close a problem investigation
1 Open the relevant problem investigation as described in Viewing probleminvestigations on page 66.
2 Review the Problem Investigation form to verify that the details are complete.
3 From the Status list, select Closed.
4 Click Save.
The status is changed to Closed.
To close a known error
1 From the Company and View By lists on the Problem Management console, selectthe appropriate Company and View By criteria.
2 From the Defined Searches area of the Navigation pane on the ProblemManagement console, choose Known Error => All Open Known Errors.
3 Click Refresh.
The Problems table refreshes with all open known errors for the selectedCompany and View By fields.
Closing the problem investigation and known errors
Chapter 7 Closing the problem investigation 105

4 Select the known error and click View.
5 On the Known Error form, set the Status field to Closed.
6 Record a summary of how the known error was resolved:
When using the Best Practice view When using the Classic view
Type the summary in the Resolution field.1 Click the Resolution tab.
2 Type the summary in the Resolution field.
7 Complete any other fields that will help someone else viewing the record tounderstand how the known error was resolved.
8 Click Save.
Indicating an impasseIf the specialist cannot find a root cause, or if the Change Management processrejected the known error, then the problem investigation is at an impasse and cannot be resolved. If this occurs, update the known error and the problem investigationrecords to indicate this is the case.
To indicate a problem investigation impasse
1 Open the relevant problem investigation as described in Viewing probleminvestigations on page 66.
2 In a work information note on the Work Detail tab (Work Info tab when using theClassic view), record why no further action currently is required. See Addingwork information notes on page 124 for information about how to do this.
3 Set the Status field to Pending.
Note If the problem investigation previously came to an impasse and the Status isalready set to Pending, create a work information note indicating that a resolutionis still not available. You must perform periodic checks of problem investigationsat an impasse to see whether they can be resolved. For information about how todo this, see Performing periodic checks on page 107.
4 Click Save.
Indicating an impasse
106 BMC Remedy Service Desk: Problem Management User Guide

To indicate a known error impasse
1 To indicate a known error impasse, from the Defined Searches area of theNavigation pane on the Problem Management console, choose Known Error => All Open Known Errors.
2 Click Refresh.
The Known Errors list refreshes with all open known errors for the selectedCompany and View By fields.
3 Select the known error and click View.
4 On the Work Detail tab of the Known Error form (Work Info tab when using theClassic view), create a work information note to explain why the problem was notfixed. See Adding work information notes on page 124 for information abouthow to do this.
5 Set the Status field to Canceled.
6 Set the Status Reason field to No Longer Applicable.
7 Click Save.
Performing periodic checksIf a problem investigation results in an impasse, you must periodically check theproblem investigation, to see if newer technology or another approach mightprovide a solution.
You can, for example, contact the supplier of the CI in which the root cause residesto see if the supplier has been able to determine a structural solution. You might alsocheck websites that provide solutions for recognized, common errors or problemswith specific versions of software or specific models of hardware.
If you determine that a structural solution or permanent workaround might now bepossible, record this information in a work information note on the Work Detail taband reassign it to a specialist for implementation (Work Info tab when using theClassic view); or if Change Management is required, create a known error. Forinformation about how to do this, see Reassigning the problem investigation on page96 or Creating a known error on page 97.
If, after conducting the periodic check, it is apparent that a resolution is still notavailable, record this information in a work information note on the Work Detail tab
Performing periodic checks
Chapter 7 Closing the problem investigation 107

(Work Info tab when using the Classic view). For information about how to do this,see Indicating an impasse on page 106.
Performing periodic checks
108 BMC Remedy Service Desk: Problem Management User Guide

Supplemental BMC RemedyProblem Management features
This section contains basic procedures that are common to most forms and consoles.Most of the information in this section is similar throughout the BMC Remedy ITService Management suite.
Using the KPI flashboardsThe KPI flashboards graph problem management business processes against theproblem management key performance indicators (KPIs).
The KPIs are described in BMC Remedy Problem Management KPIs on page 110. Ifyou have BMC Service Management Process Model installed, you can also view theproblem management KPI definitions there.
Tip The BMC Service Management Process Model (SMPM) defines a key performanceindicator as, A vital and measurable result to track the efficiency, effectiveness, andpredictability of a process.”
The KPI flashboard component collects the data according to the selected customercompany. Each KPI flashboard contains graphs that present the following types ofinformation:
■ Relevant historical data—Use this graph for trending purposes. The most recenthistorical data displayed in the graph is collected from the previous month.Historical data goes back to a maximum of one year.
Note Historical data only appears in a graph when that historical data exists in thedatabase. Typically, new or recent installations, or upgrades, of BMC RemedyProblem Management might not have historical data available.
8
Chapter 8 Supplemental BMC Remedy Problem Management features 109
■ Current, or real time data—Use this graph to see what is happening with thebusiness process now. In most cases, the displayed real time data is collected fromthe first day of the current month to today’s date.
You can also view the individual problem investigation records that are reported bythe real time flashboard graph. For example, you can view all of the probleminvestigation records that are reported by the Problem Backlog KPI flashboard. Forinformation about how to do this, see Viewing and displaying data on page 112.
Note KPI flashboards are available only for version 7.6.00 (and later) of the BMC RemedyITSM applications. If you are running a mixed environment, that is, if you arerunning some BMC Remedy ITSM applications at version level 7.5.01 (or earlier),you see flashboards with only the version 7.6.00 (or later) applications.
BMC Remedy Problem Management KPIs
The following table lists and describes the problem management key performanceindicators.
Table 16: BMC Remedy Problem Management KPIs
KPI name Description of graph content
Incidents Reported The number of registered incident requests with the Service Type set to User ServiceRestoration or Infrastructure Restoration.
Problem Backlog The total number of problem investigations that do not have their Status field set toClosed.
ProblemManagementActivity
The number of new problems identified.The number of solved problems. That is, the number of problem investigations withtheir Status field set to Closed.
KPI flashboard variables
KPI flashboards use variables to fetch the data that is used to create the flashboardgraphs for the selected company. In most cases, you can control what data appearsin the graph.
The following table lists the KPI graph types and the active variable names, anddescribes the information they provide. This helps you to understand the effects ofhiding or displaying a specific variable.
Using the KPI flashboards
110 BMC Remedy Service Desk: Problem Management User Guide
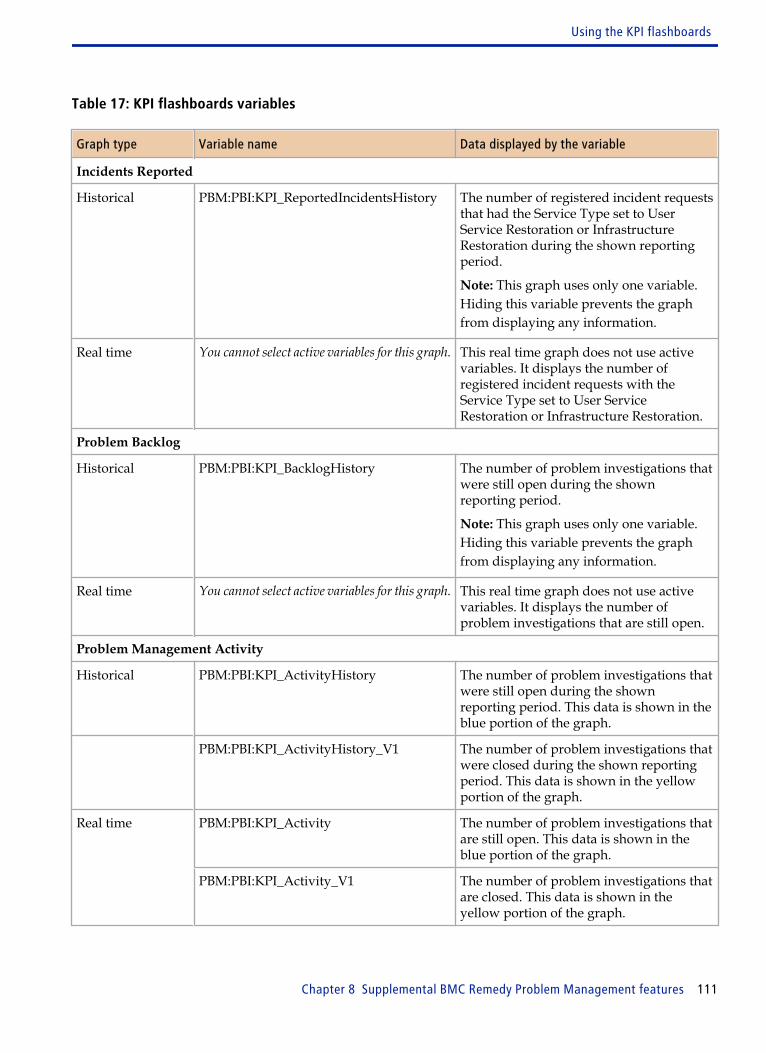
Table 17: KPI flashboards variables
Graph type Variable name Data displayed by the variable
Incidents Reported
Historical PBM:PBI:KPI_ReportedIncidentsHistory The number of registered incident requeststhat had the Service Type set to UserService Restoration or InfrastructureRestoration during the shown reportingperiod.
Note: This graph uses only one variable.Hiding this variable prevents the graphfrom displaying any information.
Real time You cannot select active variables for this graph. This real time graph does not use activevariables. It displays the number ofregistered incident requests with theService Type set to User ServiceRestoration or Infrastructure Restoration.
Problem Backlog
Historical PBM:PBI:KPI_BacklogHistory The number of problem investigations thatwere still open during the shownreporting period.
Note: This graph uses only one variable.Hiding this variable prevents the graphfrom displaying any information.
Real time You cannot select active variables for this graph. This real time graph does not use activevariables. It displays the number ofproblem investigations that are still open.
Problem Management Activity
Historical PBM:PBI:KPI_ActivityHistory The number of problem investigations thatwere still open during the shownreporting period. This data is shown in theblue portion of the graph.
PBM:PBI:KPI_ActivityHistory_V1 The number of problem investigations thatwere closed during the shown reportingperiod. This data is shown in the yellowportion of the graph.
Real time PBM:PBI:KPI_Activity The number of problem investigations thatare still open. This data is shown in theblue portion of the graph.
PBM:PBI:KPI_Activity_V1 The number of problem investigations thatare closed. This data is shown in theyellow portion of the graph.
Using the KPI flashboards
Chapter 8 Supplemental BMC Remedy Problem Management features 111

Opening the KPI flashboards
Use this procedure to open the KPI flashboards.
To open the KPI flashboards
1 From the Functions area of the Navigation pane, click the KPI link.
2 From the Company list at the top, select the customer company for which youwant to view KPI flashboards.
Note Your access level determines the companies that you see in the Company list.
3 From the Navigation pane, choose Process KPIs => KPIflashBoardLink
KPIflashboardLink is the link to the specific KPI flashboard that you want to see.
Tip Click the triangle beside the Process KPI text to open and close this area of theNavigation pane.
Viewing and displaying data
Controls on the open flashboard help you view and display the data. The actionsthat you can perform and the procedures that you use to perform them are describedin The following table.
Note Not all of the KPI flashboards support all of these procedures.
Table 18: KPI flashboard actions and procedures
Action Procedure
View specific records used to create the real time KPI flashboarddataUse this procedure, for example, to view all of the probleminvestigation records that are reported by the Problem Backlog KPIflashboard. That is, you can see all of the records that do not yethave their Status field set to Closed for the reporting period. Thisfeature is not available on the historical data graph.
1 Click anywhere inside the real-time graph.
2 In the search results list, select therecord you want to view.
Using the KPI flashboards
112 BMC Remedy Service Desk: Problem Management User Guide

Action Procedure
Zoom a graphUse the zoom feature to enlarge a section of the graph. You can alsouse full-screen mode to enlarge the entire graph as described laterin this table.
1 Click the arrow in the lower leftcorner of the graph to expand thebottom control panel.
2 Click the magnifying glass iconand then follow the onscreeninstructions.
Hide or display the graph legendThe default setting is to show the graph legend. The legendprovides information about how to interpret the graph. Not allgraphs have a legend.
1 Click the arrow in the lower leftcorner of the graph to expand thebottom control panel.
2 Clear or select the Show Legendcheck box to either hide or displaythe legend.
Change the graph styleThere are many different graph styles from which you can choose.For example, you can select to display the KPI data in a line graph,a bar graph, a stacked bar graph, an area chart, and so on.However, be aware that some data is best represented in aparticular format and that changing the format might affect the wayin which the data is interpreted. Not all graphs support all graph styles.
1 Click the arrow in the lower leftcorner of the graph to expand thebottom control panel.
2 Click the double-arrow button andthen select the graph style you want.
Change the graph titlesYou can customize the title text that appears on the graphs to suityour organization’s needs. For example, you can change the titles ofthe X and Y axis.
1 In the upper right corner of thegraph, click the Open OptionsPanel icon.
2 Change the label text appropriatelyto your organization’s needs.
3 Click Apply when you finishupdating the text.
Hide or display active variablesSee KPI flashboard variables on page 110 for descriptions of theactive variables. Not all graphs have active variables that you can turnon or off.
1 In the upper right corner of thegraph, click the Open OptionsPanel icon.
2 Select or clear the active variablesthat you want to display or hide.
Using the KPI flashboards
Chapter 8 Supplemental BMC Remedy Problem Management features 113

Action Procedure
View a graph in full-screen modeYou can display the selected graph across the entire screen forbetter visibility. Not all graphs display in full-screen mode.
1 In the upper right corner of thegraph, click the Full Screen icon.
2 When you finish viewing thegraph in full-screen mode, pressESC to restore regular displaymode.
Viewing your profileYou can view and modify your personal profile. When you click My Profile, thePeople (Search) form appears. In this form, you can:
■ Update company information such as organization, business, and home address,and so on.
■ View permissions.
For detailed information about the People form, see the BMC Remedy IT ServiceManagement Administration Guide.
To modify your profile
1 From the Navigation pane of the Problem Management console, chooseFunctions => My Profile.
2 On the People form, update the information at the top of the form, or click the tabcorresponding to the area in which you want to change the profile information.
Make your changes by selecting from the various lists that are available.
3 When you finish making the changes, click Save.
Setting application preferencesYou can set preferences to:
■ Set defaults for the consoles.
■ Determine the action that occurs after you save a Problem investigation form.
Viewing your profile
114 BMC Remedy Service Desk: Problem Management User Guide

■ Determine which console appears by default when you open BMC RemedyProblem Management .
To set your preferences
1 From the Navigation pane of the Problem Management console, chooseFunctions => Application Preferences.
2 Update the form as appropriate.
The following table describes the settings available on the form.
Table 19: Application preference settings
Setting Description
Preferences for This is a read-only field that identifies the user.
Default Home Page Select the console that you want to appear as your home page when you log into theBMC Remedy Action Request System (BMC Remedy AR System) server. For example,if you want the Problem Management console to appear, select Problem ManagementConsole.
Company Select the company that you want to appear by default in the Company field, which isfound under the More Filters feature on the application's console.
Console View The default console view, with the search criteria, controls which probleminvestigations appear in the Assigned Work area. You can temporarily change thissetting from the Navigation pane of the console. The following list shows you theavailable selections:
■ All—Lists all work being tracked by the BMC Remedy Problem Managementapplication.
■ Submitted by Me—Lists all work submitted by you.
■ Assigned to Me—Displays work assigned to you.
■ Assigned to My Selected Groups—Prompts you to first select a support group towhich you belong and then displays the work assigned to that group.
■ Assigned to All My Groups—Displays work assigned to all your support groups.You can choose to display all work, or work that is not yet assigned to an individual.
Confirm on Submit Choose whether to display a confirmation message when you submit a new probleminvestigation record.
Setting application preferences
Chapter 8 Supplemental BMC Remedy Problem Management features 115

Setting Description
Console Page On Form Open
■ Data Set Name—When multiple data sets exist, such as production and trainingdata sets, select the appropriate data set.
Form■ After New Save—This setting controls the action after you click Save on the
Problem investigation form. The following list shows the available selections:
— New request after submit— Closes the newly created problem investigation,then opens a blank problem investigation form in New mode, ready for you tocreate a new problem investigation.
— Modify request after submit— Saves the new problem investigation, but leavesthe record open so that you can continue to work with it and add or changeinformation.
■ Tab Views—(Classic View only) You can choose whether to show the followingpanels:
— Vendor
— Financials
— Date System
Overview console You can choose whether to show problems, known errors, and solutions —and bywhich status, on the Overview console.RoleYou can also filter the entries by Role using one of the following selections (this filterworks in conjunction with the other Overview console preferences you selected above):
■ Assignee—Shows only problem investigations for which you are the assignee.
■ Problem Coordinator—Shows only problem investigations for which you are theProblem Coordinator.
3 Click Save.
Setting application preferences
116 BMC Remedy Service Desk: Problem Management User Guide

Searching for recordsFrom the Problem Management console, you can search for problem investigationrecords, known error records, and solution database entries.
To do this, you can run a series of predefined searches, search all of the records usingthe Problem Investigation Search form, or create and save your own custom searchesusing advanced qualifications.
Running Defined Searches
The Defined Searches are predefined searches that you can use to look for probleminvestigations, known errors, and solution database entries. For example, you canuse a predefined search to search the database for all problem investigations thathave a status of open.
You run this search from the Filter by menu at the top of the view area.
Note You can view the support groups you belong to by clicking the My Profile link in theNavigation pane, then opening the Support Groups tab. For more information aboutthis link, see Viewing your profile on page 114.
To run a defined search
1 Make sure the Show field at the top of the view area contains the correct entry forthe search you need to run.
2 From the Filter By menu, select Defined Searches.
3 Open the search category that corresponds to the search you want to run and thenselect a specific search.
For example, to see all open problem investigations, select ProblemInvestigation => All Open Problems.
4 Click the search name to run the search. In the previous example, you would clickAll Open Problems.
Tip If the contents of the Problems table does not update after you run the search,click the Refresh button.
Searching for records
Chapter 8 Supplemental BMC Remedy Problem Management features 117

Creating a custom search
When you create custom searches using advanced qualifications, you can createsearches with very specific search criteria, which you can save for reuse.
Tip If you want the power of a custom search with advanced qualifications, but do notwant to save the search, you can delete it.
To create a custom search
1 At the top of the console, click the magnifying glass beside the Filter by field.
2 In the Type field, select the type of record you want to search for.
3 In the Search Name field, type a name for the search.
4 Click Build Search Qualification to open the Advanced Qualification Builderdialog box, and then define the search qualification.
5 From the Keywords or Fields selection boxes, select the keywords or record fieldson which you want to search.
To insert operators (+, =, >,<, and so on), click the appropriate operator button.Do not forget to place literal values between double quotation marks.
For example, if you are performing an incident request review and you aresearching for incident requests that meet the following criteria:
■ Impact => 2-Significant/Large or 1-Extensive/Widespread
■ Service = Payroll Service
■ the Last Resolved Date >= 07/19/2009
then the query would look like this:
(‘Impact’ = 2-Significant/Large” OR ‘Impact’ = ”1-Extensive/Widespread”) AND ‘Service’ = Payroll Service” AND ‘Last Resolved Date’ >= 07/19/2009”
Note Date formats can vary, depending on how your system is configured. The dateshown here is only an example.
6 Click Select to close the Advanced Qualification Builder, and then click Save.
7 Close the Manage My Searches dialog box.
Searching for records
118 BMC Remedy Service Desk: Problem Management User Guide

The search appears in the Defined Searches list, under the My Searches node.
Note The My Searches node appears only when a custom search is defined.
Editing or deleting the custom search
After you create a custome search, you can edit the search parameters or you candelete the search entirely. Use the following procedure if you want to edit or deletethe custom search.
To edit or delete the custom search
1 Open the Manage My Searches dialog box as described in the precedingprocedure.
2 From the list of searches, select the search you are modifying or deleting.
3 Perform one of the actions described in the following table.
To modify the search To delete the search
1 Edit the search as required.
2 Click Save.
3 Click Close.
1 Click Delete.
2 Click Close.
Searching all records
An all records search looks through all the records that meet your search criteria,regardless of their associations to people or groups. You run this type of search byusing the Search Problem link in the Navigation pane.
Use this type of search when you are looking for a record not associated with yourID or your group’s ID, or any time you must search all records.
To search all records
1 From the Navigation pane, choose Functions => Search Problem.
Searching for records
Chapter 8 Supplemental BMC Remedy Problem Management features 119

A form appears that enables you to perform the search. The form is laid out in asimilar way to the Problem Investigation form, but contains some additional tabsand fields. You can use any of the tabs and fields in the form to specify yoursearch criteria.
2 Using the tabs and fields, build your search condition.
To reduce the number of records found by the search, enter as much informationinto the form as you can.
Note The search criteria are persistent. This means that if you run a search and thenclose the BMC Remedy Problem Management application, the next time that youopen the application and perform this procedure, the search criteria that youentered in this step are still present in the search form. They remain until youchange or delete them.
3 When you finish entering your search criteria, click Search.
When the search finishes, the search results list contains all the records that matchthe search criteria.
4 Scroll through the results list to find the specific records that you want.
Note When you open a record from the search results table, it is added to the historylist, but not to the breadcrumb bar. However, any related records that you openfrom the record do appear in the breadcrumb bar and get added to the history list
Using Global search
If you have BMC Remedy Knowledge Management installed, you can use the Globalsearch feature. Global search searches across multiple forms for records that match aword or phrase that you type in the search area.
To use Global search
1 In the text field to the right of the breadcrumb bar, type your search string andthen click Search.Figure 11: Global search
Searching for records
120 BMC Remedy Service Desk: Problem Management User Guide

2 Locate the record you want in the search results table and double-click it.
The record opens in the viewing area and the system updates the breadcrumbtrail with an entry for the record you opened.
Note As you drill down through the record, each record you open is also added to thebreadcrumb trail.If you want to maintain the contents of the search results table to view later, donot change the text in the Search field. If you do, when you click the Search iconto return to the search results table, the search feature will execute a new searchbased on the changed content of the Search field.
3 To return to the search results table, click the Search icon again.
Printing recordsYou can print a copy of a record to keep for filing purposes or to share with someonewho does not have access to BMC Remedy Problem Management.
Use this procedure to print a record.
To print a record
1 From the Problem Management console, select the record you want to print.
Note If you already have the record open and want to print it, click Print at the bottomof the form to open the Business Objects Report Preview dialog box, then go to List item. on page 121.
2 Click Print.
The Business Objects Report Preview dialog box appears, enabling you to viewthe record before you print it.
3 Click the print icon on the menu bar at the top of the dialog box.
When the print confirmation dialog box appears, click Print to send the record toyour local printer.
4 Close the Business Objects dialog box.
Printing records
Chapter 8 Supplemental BMC Remedy Problem Management features 121

Modifying recordsAfter you generate a record, you can modify or update the information it contains.Use the following procedure to modify a record.
To modify a record
1 Open the relevant problem investigation as described in Viewing probleminvestigations on page 66.
2 Click the tab or field that contains the information that you want to update.
3 Make the appropriate changes.
4 Click Save.
Tracking costs Note
The Financials tab, from which you perform cost tracking, is available in the Classicview of the Problem Investigation form.
The Financials tab on the Classic view of the Problem Investigation form shows thefinancial effect of the problem on a company or site. Knowing how much anunresolved problem costs helps you determine whether and when to perform aformal problem investigation.
This tab displays Investigation Costs. If Asset Management is installed, this tab alsodisplays Cost of CI Unavailability.
You can record the cost involved in working on a problem investigation. If theproblem investigation is related to an incident with CI unavailability, you canupdate the costs of CI unavailability.
Note The CI unavailability feature is available when BMC Remedy Asset Management isinstalled and is used to track both scheduled and unscheduled outages against CIs.
Modifying records
122 BMC Remedy Service Desk: Problem Management User Guide

Recording the cost of working on an investigation
Note Recording the cost of working on an investigation is performed from the Classic view.
You can record the costs of working on the investigation by using the Financials tabon the Problem Investigation form.
To record the cost of working on an investigation
1 With the relevant Problem Investigation form open, click the Financials tab.
2 In the Investigation Cost area, click Create.
The Cost Category field is set to Problem Investigation. This indicates the formfrom which you entered the charge. You cannot change this value.
3 On the Cost form, select the appropriate cost center code from the list.
This is the code name for the business unit or organization within the company tobe charged for servicing the problem investigation. When you select the costcenter code, the Company and Cost Center Name fields display the valuesattached to the cost center code.
4 From the Cost Classification list, select either Actual or Budget.
5 In the Related Cost field, type the cost amount, and select the currency from thelist.
6 If appropriate, you can also:
■ Select the cost type. Cost types are defined by your organization for reportingpurposes.
■ Enter a description.
■ Select the unit type. The unit type indicates whether cost is measured as a flatrate, or in hours or minutes. If you select a unit type of hours or minutes, youmust type the number of hours or minutes in the Related Units field.
■ Enter the date the charge was incurred. To set it to the current date, you canleave this field blank.
7 Click Save.
The totals for budgeted and actual costs appear at the bottom of the table.
Tracking costs
Chapter 8 Supplemental BMC Remedy Problem Management features 123

8 Repeat steps List item. on page 123 through List item. on page 123 for each costassociated with the investigation.
Recording the cost of CI unavailability
Note Recording the cost of CI unavailability is performed from the Classic view.
If CI unavailability is recorded for a related incident request or change request, thecost of the CI unavailability appears on the Financials tab. You can record additionalcosts of CI unavailability.
To record the cost of CI unavailability
1 Open the relevant problem investigation as described in Viewing probleminvestigations on page 66.
2 Click the Financials tab.
3 In the Manually Entered CI Unavailability area, click Create.
4 Complete the Cost Update form.
5 Click Save.
Using work information notesWork information notes provide a place for you to record activities performed on thecurrent record. You can add attachments to the notes to provide additionalinformation. This section describes how to add work information notes and how toview them after they are created.
Adding work information notes
Use this feature to add work information notes about activities performed on thecurrent record. For example, you might want to add a note that a particular CI wasdeployed, and include the date.
Using work information notes
124 BMC Remedy Service Desk: Problem Management User Guide

To add work information notes—Classic view
1 Open the problem investigation, known error, or solution.
2 Click the Work Detail tab (Work Info tab when using the Classic view).
3 Type a summary of the note in the Summary field.
4 Type the details of the note in the Details field.
Note If you are creating a work information note in a Known Error, you must alsosupply the target date.
5 To add an attachment to the record, right-click in the attachment table and selectAdd from the menu that appears.
6 From the Locked list, select Yes or No to lock the log.
Note If you select Yes, you cannot modify the work log after you save it.
7 From the View Access list, select Internal or Public.
■ Internal—Users within your organization can see the entry.
■ Public—Everyone with access to BMC Remedy Problem Management can seethe entry, including users from the Requester console.
8 Click Save.
Note To see a report of selected work information entries, select one or more entries,and click Report. In the Best Practice view, you see an overview of the WorkDetail entries by clicking History.
To add work information entries—Best Practice view
Use these procedures if you are using the Best Practice view.
Note If you use Best Practice view and are adding work details to a solution record, usethe procedure described for Classic View.
1 Open the problem investigation or Known Error record.
Using work information notes
Chapter 8 Supplemental BMC Remedy Problem Management features 125
2 On the Work Details tab, click the Create icon.
3 Type the information in the Notes field at the bottom of the tab.
Note If you want to add an attachment to the work information note, peform step 4 tostep 6.
4 Click the button to the right of the Attachment filed.
The Add Attachment dialog box opens.
5 Click Browse and then navigate to the file you want to attach.
6 Select the file, click Open, and then click OK.
The file name appears in the Attachment field.
Note You can attach a maximum of three files to a work info record. If you want to addmore files, see the following Note. To view the attachment, click the spectaclesicon. To remove the attachment, click the eraser icon.
Note By default, the Work Info Type is General Information (the Work Info Type let'syou categorize the type or source of the work info entry); the Locked status is Yes(the work note cannot be edited after you save it); the View Access is Internal(your customers cannot view the entry). If you want to change these settings, clickthe arrow beside More Details to reveal these fields and then update themappropriately. You can also make additional attachments in this area. Clicking thearrow again hides the fields.
7 Click Add.
The note text appears in the Work Details table.
Viewing work information notes
Use the information in this section any time that you must view a work informationnote that you or someone else created previously. For example, if you areperforming an analysis review, you must view the notes left by the assignedspecialist to determine if the work performed was adequate.
Using work information notes
126 BMC Remedy Service Desk: Problem Management User Guide

To view work information notes
1 Open the relevant problem investigation as described in Viewing probleminvestigations on page 66.
2 Click the Work Detail tab (Work Info tab, when using the Classic view).
3 View the information note.
When using the Best Practice view When using the Classic view
Click the History icon.The system displays a pop-up window with theNotes field entries arranged with the most recententry at the top (a date and time stamp is also visiblewith each entry)
Select the note from the Work Info History table.Click View.To view another work information note, click thenote that you want to view in the table at the bottomof the Investigation Work Info dialog box.
Modifying work information entries
You can also modify a work information entry.
To modify a work information entry—Classic view
1 With the problem investigation, known error, or solution record open, click theWork Info tab.
2 Select the work information entry that you want to update.
3 Edit the fields as required.
To modify a work information entry—Best Practice view
1 Open the problem investigation or known error record.
Note If you want to modify a work detail entry for a solution record, use the proceduredescribed for Classic view.
2 On the Work Details tab, select the work information entry that you want toupdate.
The Notes field updates to contain the work info text and the More Details areaexpands to reveal the hidden fields.
3 Make the required changes.
Using work information notes
Chapter 8 Supplemental BMC Remedy Problem Management features 127

Note If you need to remove an attachment, click the Eraser icon beside the associatedAttachment field.
4 Click Save.
Recording effort spent on an investigation Note
Recording effort spent on an investigation is performed in the Classic view.
You can record time spent working on the investigation. The Effort Time Spent fieldis an informational field that tracks the time spent on the investigation per session.
To record effort spent on an investigation
1 Open the relevant problem investigation as described in Viewing probleminvestigations on page 66.
2 In the Navigation pane, choose Advanced Functions > Track Effort.
3 Complete the Investigation Effort Log dialog box as appropriate.
You can change the assignee effort duration for your own effort logs, but notthose of another support group or individual.
Note The time values in the Effort Duration Hours and Minutes fields are not filled inby the system. You must type these values manually. Also, if you are updatingthe Effort Duration, you must make the calculations manually and then type thenew values in the Hours and Minutes fields. For example, if you previouslylogged 10 minutes on a problem investigation and then spent an additional 90minutes on the investigation (for a new total of 1 hour and 40 minutes), you type1 in the Hours field and 40 in the Minutes field.
4 Click Add to save your total effort time in the effort log.
5 Click Close to close the dialog box.
Recording effort spent on an investigation
128 BMC Remedy Service Desk: Problem Management User Guide

Creating remindersUse reminders to create notes for yourself and others. You can send the remindersby email or by BMC Remedy Alert, and can specify when they are sent. You cancreate generic reminders, or you can create reminders that are associated with aspecific request.
For example, you can send yourself a note about a specific investigation to remindyourself to follow up on it.
You can create and view reminders from either the BMC Remedy ProblemManagement console or from within a specific investigation, known error, orSolution Database entry. The location from which you create or view a reminderdetermines which reminders you see:
■ BMC Remedy Problem Management console—You can view all reminders thatyou created.
■ Problem Investigation form—You can view all reminders associated with thatinvestigation. This includes reminders created by other users of BMC RemedyProblem Management.
■ Known Error form—You can view all reminders associated with that knownerror. This includes reminders created by other users of BMC Remedy ProblemManagement.
■ Solution Database form—You can view all reminders associated with thatSolution Database entry. This includes reminders created by other users of BMCRemedy Problem Management.
To create a reminder
1 From the Navigation pane in either the Problem Management console or theProblem Investigation form, choose Functions => Reminders.
Note If you create a reminder from the main BMC Remedy Problem Managementconsole, the reminder is general in nature. If you open a record and create areminder, the reminder is specific to the open record.
2 Click the Create Reminder tab.
Note If you are creating the reminder from the main console, skip the next step.
3 To remove the link between the reminder you are creating and the open record,select, and then delete the contents of the Link to Request-ID field. The Request-
Creating reminders
Chapter 8 Supplemental BMC Remedy Problem Management features 129
ID and Form fields are filled in automatically by the system. The Request-ID fieldlinks the reminder to the open record.
4 From the Notify list, select either Individual or Group, depending on whether youare sending the reminder to a single person, or a group of people.
5 In the Recipient field, type the name of the person or group to whom you want tosend the reminder.
If you need more space to type the entry, click the Browse button next to the field.A larger text entry box appears.
If you type a person’s name and press ENTER, the system automatically fills inthe AR Login field. If the system discovers multiple matches with the name youentered, another dialog box appears that enables you to specify which of thematching names you want to receive the reminder.
6 In the Time field, enter the date and time you want the system to send thereminder.
You can type the information directly into the field, or you can click the buttonnext to the field and select the date and time from the calendar that appears. Bydefault, the Time field contains the current date. The default time is one hourahead of the current time.
7 In the Subject field, enter information about the reminder.
If you need more space to type the entry, click the Browse button next to the field.A larger text entry box appears.
The information in this field appears in the subject line if the reminder is sent byemail.
8 In the Message field, type the reminder message text.
If you need more space to type the entry, click the Browse button next to the field.A larger text entry box appears.
Note Do not type text in the Log field. This field records the subject line and message ofthe reminder when it is sent.
9 Click Save.
A confirmation message appears.
10 Click Close to close the Reminders dialog box.
Creating reminders
130 BMC Remedy Service Desk: Problem Management User Guide

The reminder is sent at the time you specified.
Broadcasting messagesThis feature lets you send messages to your entire organization, selected groupswithin the organization, and to external customers as well. You can use this featureto send messages about work in progress, system status, planned work, and so on.You can also use this feature to view messages that were broadcast to you from othergroups in your organization.
Creating broadcast messages
To create a broadcast, you must have the functional role of Broadcast Submitter. Seethe BMC Remedy IT Service Management Administration Guide for details.
You can create either a general broadcast message to distribute general information,or you can create a broadcast message about a specific problem investigation.
To create a broadcast message
1 From the Problem Management console, open the New/Modify Broadcastsdialog box.
To send a general broadcast To send a broadcast about a specific probleminvestigation
1 At the top of the Navigation page, click eitherNew Broadcasts or View Broadcasts.
2 Click Create.
1 Open the relevant problem investigation.
2 Do one of the following actions:
■ Best Practice view, in the Quick Actions areaof the Navigation pane, click BroadcastProblem.
■ Classic view, in the Functions area of theNavigation pane, click Broadcast Problem.
2 Enter information in the required fields.
Broadcasting messages
Chapter 8 Supplemental BMC Remedy Problem Management features 131

Table 20: Required fields
Field Explanation
Company Select the company to which this broadcast pertains. Only users with access tothis company can see the broadcast. If you select Global from the Company list,the broadcast is sent to everyone.
Note: Of the various Location fields, only Company is mandatory. The otherLocation fields: Region, Site Group, Site, Organization, and Department, areinformational fields that allow you to specify the physical location, and so on, towhich the broadcast applies. These fields otherwise do not restrict who can seethe broadcast. All people assigned to the specified company can see thebroadcast.
Subject A short description of what the broadcast is about.
Broadcast Message The text of your message.
Broadcast Type Select a broadcast type from the list.
Broadcast Start Date andBroadcast End Date
To start the broadcast now, click inside the Broadcast Start Date field, and pressENTER. To select a date from the calendar, click the Browse button next to thefield, then use the calendar that appears to select the date on which the broadcastis to start and the date on which you want it to end. You can also specify times ofthe day using the Time feature at the bottom of the calendar.
Broadcast OriginatedFrom
This field is completed by the system. The contents depend on where you arecreating the broadcast. If you broadcast from an problem investigation, this is setto Problem Investigation.
Broadcast OriginatedFrom ID
This field is filled in by the system, but only when you create a broadcast fromwithin a record. If you create a broadcast from the main console, the fieldappears dimmed.
View Access Select Internal if you want the broadcast enabled only for members of yourorganization. If you also want the broadcast enabled from the Requester console,select Public.
Notify To automatically send a broadcast notification to an individual or group, selectYes.If you select Yes, the Manual Email button and the Notify Support areaappear.Use the Manual Email button to manually send an email about thebroadcast to a person or group. When the Email System form appears, enter therecipient’s email address in the Internet email field, and then click Send EmailNow.Use the Notify Support area to indicate the group you want to notify of thebroadcast. You must complete all of the fields: Support Company, SupportOrganization, and Support Group. The notification is sent at the time and on thedate specified in the Broadcast Start Date field.
Priority Select a priority level for the broadcast. The choices are Low, Medium, and High.
Broadcasting messages
132 BMC Remedy Service Desk: Problem Management User Guide

3 To add an attachment to the Broadcast, right-click inside the table and select Addfrom the menu.
The Add Attachment dialog box appears. Use this to indicate the file you want toattach. Click Open to attach the indicated file. You are limited to one attachmentfor each broadcast.
4 To allow members of another group to modify the message, follow these steps:
a Click the Authoring Groups tab, and then click Manage Authoring Groups.
The Authoring Group dialog box appears.
b Indicate the group that you want to have authoring rights by selecting fromthe menus. Click Add when you are finished.
Note The support group you belong to appears in the table by default.
You can indicate another group, or click Close to dismiss the dialog box.
5 Click Save to save the broadcast message and close the dialog box.
Viewing broadcasts
This section describes how to view broadcast messages. While viewing broadcasts,you can modify the message (if you belong to an authorized authoring group), createa new broadcast message, and under some circumstances (when viewing themessage from the current record) relate the broadcast message to the current record.
To view broadcasts
1 At the top of the Navigation pane, click either New Broadcasts or ViewBroadcasts.
2 From the Broadcast table, select the broadcast that you want to view and clickView.
Note When viewing broadcast messages from the current record, you are looking at allthe broadcast messages, not just the ones related to the current record. If thebroadcast table contains a large number of messages, use the Broadcast SearchCriteria tab to limit the number of messages. For information about how to dothis, see Limiting the number of messages on page 134.
Broadcasting messages
Chapter 8 Supplemental BMC Remedy Problem Management features 133

3 To view another message, click Close to close the broadcast.
4 From the Broadcast table, select the next broadcast and click View.
Modifying a broadcast message
You can edit the fields in a broadcast message.
To modify a broadcast message
1 Open the View Broadcast window, as described in Viewing broadcasts on page133, click Modify.
2 Edit the fields according to the changes you want to make.
3 Click Close, to save the change and close the View Broadcast window.
Limiting the number of messages
Note Limiting the number of messages is available when using the Classic view.
When viewing broadcast messages from the current record, you can limit thenumber of messages that appear in the Broadcast table by opening the BroadcastSearch Criteria tab and defining a set of criteria that filters out messages that do notmatch.
To limit the number of messages
1 With a problem investigation record open, go to the Navigation pane and selectQuick Actions => View Broadcasts.
2 Click the Broadcast Search Criteria tab.
This tab contains search fields where you can specify criteria to reduce thenumber of broadcast messages displayed in the table.
3 Complete the fields in the tab.
4 Click Search.
Broadcasting messages
134 BMC Remedy Service Desk: Problem Management User Guide

The broadcast messages that meet the criteria appear in the table at the top of theView Broadcasts window.
Sending pages and email messagesBMC Remedy Problem Management provides the following methods of sendingmessages to either individuals or organizations:
■ Pages (when using the Classic view)
This section describes how to send both types of messages manually.
Note Notification messages to individuals, based on ticket assignments and other events,can be sent by BMC Remedy Problem Management as pages or emails. Forinformation about configuring notification to be sent as pager or email messages, seethe BMC Remedy IT Service Management Administration Guide.
Paging a person or on-call group
Note You can access the Paging System feature from the Classic view.
You can use the BMC Remedy Problem Management Paging System feature toindividuals or the on-call member of a group about the current record.
To page a person or an on-call group
1 With the problem investigation from which you want to send the page open, goto the Navigation pane and select Functions => Paging System.
2 In the Paging System dialog box, select either:
■ Page By Person—To page an individual.
■ Page By On-Call Group—To page the on-call member of a specified group.
3 Select the recipient.
Sending pages and email messages
Chapter 8 Supplemental BMC Remedy Problem Management features 135
To do this, complete the fields in the Search Criteria area, then click Search. Whenthe search finishes, click the recipient’s name in the search results table, then clickSelect.
If you are sending a page to a person (instead of an on-call group) and need helpdetermining the correct person, you can see more information about anindividual by selecting their name from the list, then clicking View. This opensthe People form, which contains detailed information about the recipient.
4 Complete the fields in the Paging Information area, as follows, then click SendPage Now.
■ Pager Service Provider—Select the recipient’s pager service provider from thelist.If you are sending a page to a person, you can find this information by selectingthe person’s name from the search results list, then clicking View (as describedin step 4). When the People form appears, click the Notifications tab and lookfor the Pager Service Provider field.
Note To learn more about the service provider, click the button with the globe iconbeside the field to open a link that takes you to the service provider’s website.
■ Pager Type—The system fills in this field automatically, using informationabout the recipient already in the system.
■ Pager Number—The system automatically completes this field with the pager’stelephone number, when possible. If the pager number is unavailable to thesystem, you must enter the pager number manually. For information aboutentering the pager number manually, see Manual Pager Number, which isdescribed in this list.
■ Pager Email—If the pager has an email address, type it here. If you are sendingthe page to a person, this information is available on the Notifications tab, asdescribed previously.
■ Manual Pager Number—If the pager’s telephone number is not availableautomatically from the paging system, type the pager’s telephone number here.
■ Alphanumeric Pager Message or Numeric Pager Message—Type yourmessage in this field. Be aware that only one of these fields is enabled,depending on the type of pager the recipient carries.
Sending email
You can send messages about the current record using the Email System.
Sending pages and email messages
136 BMC Remedy Service Desk: Problem Management User Guide

You can use this function to send email to any valid email address. This mightinclude an SMS recipient or wireless PDA user, if you can send email to the device.
To send an email message
1 With the problem investigation from which you want to send the email open, goto the Navigation pane and select Functions => Email System.
2 In the Email System dialog box, indicate the recipient by selecting one of thefollowing options:
■ Current Contact—When you open the Email System form, if there is a currentcontact assigned to the record, the contact’s name with contact informationappears in the table and is the default recipient.
■ Current Assignee—To select the current assignee, click Select CurrentAssignee. The current assignee’s name with contact information appears in thetable.
3 To select another recipient, follow these steps:
a Complete the fields in the People Search Criteria area.
b Click Search.
c When the search finishes, select the recipient’s name in the search results table.
If you need help determining the correct name in the list, you can see moreinformation about an individual by selecting their name from the list, thenclicking View. This opens the People form, which contains detailedinformation about the recipient.
4 Complete the email information fields. See the list that follows for a description ofthe fields.
■ Internet Email—This displays the recipient’s email address.
When you select the email recipient, as described in steps List item. on page 137and List item. on page 137, the internet email address updates from the peoplerecord.
■ Email Subject Line—By default, the subject line contains the investigation IDnumber, to which you can append text or over-type.
■ Email Message Body—You type the message text here. A series of buttons, tothe right of the Email Message Body field, lets you automatically insert textfrom the problem investigation into the message text; these buttons enable youinsert the following values:
Sending pages and email messages
Chapter 8 Supplemental BMC Remedy Problem Management features 137

—Status
—Summary
—Details
—Resolution
Note If one or more of these buttons appear disabled, it means the correspondingfield in the record contains no information.
■ Email Attachment—You can attach a file to the email message (you are limitedto just one attachment). To do this, right-click inside the Email Attachmenttable, then click Add. The Add Attachment dialog box appears. Go to, thenselect the file you want to attach. Click Open. Details of the attached file appearin the table.
5 Click Send Email Now.
6 Click Close to close the Email System window.
Working with reportsBMC Remedy ITSM provides a variety of predefined reports to give you quick andeasy access to information about your system. Use the Report console to generatethese reports. If the predefined reports return more information than you need, youcan manage the scope of the report using qualifications.
This release of BMC Remedy ITSM integrates the Crystal reports from version 7.6.00and Web reports from version 7.6.01. On the web interface, a number of reports areavailable in the Web format. Additional Crystal reports are available only if usershave a valid Crystal license and have chosen to install them for the web at the timeof installation.
Note If you modify the prepared reports supplied Customer Support can only providelimited assistance if you should have a reporting problem. In addition, there is noguarantee that BMC Customer Support can solve problems that result from thesemodifications. The standard reports included with the BMC Remedy ITSMapplication are designed to be used without modification.
Working with reports
138 BMC Remedy Service Desk: Problem Management User Guide

WARNING If your database does not support the Not Equal To argument in this format: "!=",format the content of your reports can be affected. Reports that have additionalqualifications that filter out Group By fields (for example, ‘Department’ !="Engineering") also filter out the specified conditions and records that have GroupBy fields set to Unspecified or Null. Check with your system administrator todetermine whether your database supports this form of the Not Equal To argument.
Generating a report
Use this procedure to generate a standard report without qualifications by using theBMC Remedy web console.
For information about generating reports with qualifications, see Usingqualifications to generate a report on page 140 or Using qualifications to generate areport on page 140.
To generate a report by using the Remedy web console
1 In the navigation pane on the application console, choose Functions => Reports.
2 On the Reporting console, select one of the options under Show:
All Reports Displays all available reports
Created by me Displays reports that you created
3 Under Category, select applicationName => reportCategory => reportName.
A list of available reports is displayed. Reports are organized by category, someof which contain subcategories. The reports that you see vary according to whichapplications are installed.
4 Select the report that you want to run.
5 Click Run.
If you select a report that requires additional parameters, you are prompted toenter the required parameters. For example, if the selected report requires a daterange, the date range field appears.
6 Enter the required parameters, and click OK.
Working with reports
Chapter 8 Supplemental BMC Remedy Problem Management features 139

7 If the report displayed is a web report, you can specify the following additionaloptions:
ToggleTable ofContents
Display the table of contents for the current report
ExportReport
Export the report to a file of the specified format
To export the report, select one of the following formats fromthe Export Format list:
■ Excel
■ PostScript
■ Word
■ PowerPoint
Select the appropriate page options, and click OK.
Print Report Print the report to HTML or PDF format
Using qualifications to generate a report
You can manage the scope of a report by adding qualifications to the criteria that thereport engine uses to generate the report content. You can tell the report to searchonly certain specified fields for particular values, or you can build advancedqualifications by using field names, keywords, and operators.
This procedure describes how to generate basic qualifications by using the ShowAdditional Filter option. To generate a report by using advanced qualifications, see Using advanced qualifications to generate a report on page 142.
To use qualifications to generate a report
1 From the navigation pane in the application console, choose Functions => Reports.
2 On the Reporting console, select one of the options under Show:
Working with reports
140 BMC Remedy Service Desk: Problem Management User Guide

All Reports Displays all available reports
Created by me Displays reports that you created
3 Under Category, select applicationName => reportCategory => reportName.
A list of available reports is displayed. Reports are organized by category, someof which contain subcategories. The reports that you see vary according to whichapplications are installed.
4 Select the Show Additional Filter option.
Along with a list of available fields, two sections are displayed—the simple querybuilder and the advanced query builder. You use the simple query builder toquickly construct a simple query. Alternatively, advanced users can use theadvanced query builder to build the query by using BMC Remedy AR Systemquery syntax.
For additional information about the BMC Remedy AR System Reporting console,see the BMC Remedy Mid Tier Guide.
5 Select a field name from the Available Fields list, and click Add next to thesimple query builder.
Note Click to remove a qualification.
6 Click the down arrow next to the field name listed in the qualification box, andselect the appropriate operator.
7 Enter or select a value for the field in the right column.
Example If you want to enter the qualification Cost Center = 001, select the Cost Centerfield, click the down arrow next to the field and select =, and then enter 001 in theright column.
8 Repeat steps 5 through 7 for each field that you want to include in the report.
9 When you finish defining your additional qualifications, click Run.
10 If the report displayed is a web report, you can specify the following additionaloptions:
Working with reports
Chapter 8 Supplemental BMC Remedy Problem Management features 141

Toggle Tableof Contents
Display the table of contents
Export Report Export the report to a file of the specified format
To export the report, select one of the following formats fromthe Export Format list:
■ Excel
■ PostScript
■ Word
■ PowerPoint
Select the appropriate page options, and click OK.
Print Report Print the file to HTML or PDF format
Using advanced qualifications to generate a report
You can manage the scope of a report by adding qualifications to the criteria that thereport engine uses to generate the report content. You can tell the report to searchonly specified fields for particular values, or you can build advanced qualificationsby using field names, keywords, and operators.
To generate a report by using advanced qualifications
1 From the Navigation pane in the application console, choose Functions => Reports.
2 On the Reporting Console, select one of the options under Show:
All Reports Displays all available reports
Created by me Displays reports that you created
3 Under Category, select applicationName => reportCategory => reportName.
Working with reports
142 BMC Remedy Service Desk: Problem Management User Guide

A list of available reports is displayed. Reports are organized by category, someof which contain subcategories. The reports that you see vary according to whichapplications are installed.
4 Select the Show Additional Filter option.
Along with a list of available fields, two sections are displayed—the simple querybuilder and the advanced query builder. You use the simple query builder toquickly construct a simple query. Alternatively, advanced users can use theadvanced query builder to build the query by using BMC Remedy AR Systemquery syntax.
For additional information about the BMC Remedy AR System Reporting console,see the BMC Remedy Mid Tier Guide.
5 Select a field name from the Available Fields list, and click Add next to theadvanced query builder. Use the BMC Remedy AR System query syntax to buildyour qualification.
6 Construct your qualification by using the various operators provided by thequalification builder.
7 Repeat steps 5 and 6 for each field that you want to include in the report.
Note Select the qualification and press Delete to remove a qualification.
8 When you finish defining your advanced qualification, click Run to view theupdated report.
BMC Remedy Problem Management predefined reports
This section lists the predefined Web reports and Crystal Reports available for BMCRemedy Problem Management. It provides a brief description of each report andshows you where to find it.
You first select the type of report that you want to run. The report type pullsinformation from the appropriate BMC Remedy ITSM application form. After youselect a report type, you select the individual report that you want to run.
Table 21 on page 144 describes the predefined Web reports and Table 22 on page144 describes the predefined Crystal Reports included, organized by the type of report.
Working with reports
Chapter 8 Supplemental BMC Remedy Problem Management features 143

Table 21: Web reports—names and descriptions
Report name Description
Problem Investigation => All
All Problem Investigations by Coordinator Group Lists all problem investigations, based on theproblem coordinator’s group
Problem Investigation => Open by Service
Open Problem Investigations by Service Lists open problem investigation records grouped byservice
Problem Investigation => Resolved by Product Categorization
Resolved Problem volume by Product Categorization Lists resolved and closed problem investigationrecords grouped by product category
Known Error => All by Coordinator Group
All Known Errors by Coordinator Group Lists all known errors, based on the problemcoordinator’s group
Table 22: Crystal reports—names and descriptions
Report name Description
Known Error => Resolved => Resolved Known Errors by Coordinator Group
Resolved Known Errors by Coordinator Group Lists resolved known errors, which includes knownerrors with a status of canceled, closed, andcorrected. The listing is grouped by status andproblem coordinator group
Known Error => Open => Open Known Errors by Coordinator Group
Open Known Errors by Coordinator Group Lists open known errors records grouped by statusand problem coordinator group
Problem Investigation => Open
Open Problem Investigations by Coordinator Group Lists open problem investigation records grouped bystatus and problem coordinator group
Problem Investigation => Resolved
Resolved Problem Investigations by CoordinatorGroup
Lists resolved and closed problem investigationrecords grouped by status and problem coordinatorgroup
Problem Investigation => Root Cause
Problem Investigations by Root Cause Lists problem investigations grouped by root cause
Resolved Problem Investigations by Root Cause Lists all resolved problem investigations, grouped bythe root cause of the problem
Working with reports
144 BMC Remedy Service Desk: Problem Management User Guide

Managing configuration itemsA configuration item (CI) is a physical, logical, or conceptual entity that is part of yourIT environment and has configurable attributes.
Some CI types are virtual, while others are physical. The Service CI type is anexample of a virtual CI. In this context, a service can be provided from one businessor organization within a business to another. Service CIs can include customersupport, employee provisioning, web farms, storage, and so on.
Other CI types are physical and include hardware and software.
You can use the information in CIs to diagnose user problems and to determine if achange to a CI or the IT infrastructure must be made. For example, if a user calls inwith a printing problem, you can check the printer’s CI to see whether the printer isdown.
To record information against CIs, such as CI unavailability, or to relate an probleminvestigation to a CI, the CI must be recorded in the BMC Atrium ConfigurationManagement Database (BMC Atrium CMDB). If you do not have BMC RemedyAsset Management, then BMC Remedy Problem Management provides limitedability to manage CIs and inventory.
Note You can manage configuration items even if your environment does not run BMCRemedy Asset Management. To manage configuration items, including creating andmodifying CIs and managing inventory for bulk and non bulk CI's, you do not needa BMC Remedy Asset management license. However, if you are running BMCRemedy Asset Management, then you have access to additional functionality, asdescribed in the BMC Remedy Asset Management User Guide. To make use of thisadditional functionality, you will need either Asset Admin or User permissions andan AR System fixed or floating license.
9
Chapter 9 Managing configuration items 145

Creating a CITo create a CI, you must have Asset Admin permission. If you have Asset Userpermission and you are modifying a CI, your administrator must open theappropriate CI, and then relate your support group to the CI.
There are many different types of CIs that you can create. While the generalprocedure for creating each CI type is similar, only the specific fields on the CI formchange depending on the CI type.
This section provides several examples of how to create CIs.
To create a Service CI
Note Step List item. on page 146 to List item. on page 82 creates the service CI. Step Listitem. on page 97 to List item. on page 67 relates the service CI to a company. This isnecessary to make sure the service CI appears in the Service field menu on theClassification tab, when relating the problem investigation to a company.
1 From the Navigation pane of the console, choose Functions > Manage CIs.
2 From the CI Type list , select Logical Entity > Business Service and then clickCreate.
3 On the Business Service form, type the CI name in the CI Name field.
When creating a CI name, BMC recommends that you follow a consistent namingconvention. According to ITIL guidelines, identifiers should be short butmeaningful. For example, Payroll” or Network.” The name can be followed by anumeric code, such as NETWORK100.
4 Complete the optional fields that appear on the form in a way that is appropriatefor the service you are creating.
Table 23: Optional fields when creating a Service CI
Field name Description
CI ID A customer specified identifier. You can use this to augmentthe CI Name.
Company The company that owns the service.
Impact, Urgency, and Priority Used to determine service levels when assigning support.
Supported Indicates whether the service currently is supported.
Creating a CI
146 BMC Remedy Service Desk: Problem Management User Guide

Field name Description
System Role A description of the role the service fulfills in the organization.
Additional Information A place to record any additional information about the service.
Users Affected The number of users who use this service.
Product Categorization Use this file to categorize the business service through multipletiers. This hierarchy is used to drive assignment routing.
Location The location of the support group that supports the service.
Lifecycle The date on which the service became active.
5 Click Save.
Note Depending on how your application is configured, after you click Save to create aService CI, the Service CI form might be redisplayed in a Modify window.
Note The People tab referred to in the following procedure does not appear on theBusiness Service form until you create and save the CI. The Relationships tab,Outage tab, and Impact tab also appear after you save the new CI. If the Peopletab does not appear after you click Save, then search for and open the CI record asdescribed in To search for CIs from the console on page 153, and then continuewith List item. on page 97.
6 Open the People tab and click Add.
7 From the Type list in the CI Person Type, select People Organization and thenclick OK.
8 From the Company list in the Organization Search window, select the company towhich you are relating the service and then click Search.
Note If you are relating the service to the entire company, then skip List item. on page67.
9 If you must relate the service either to an organization within the company or to adepartment within the organization, select the organization and, if necessary, thedepartment from the Organization and Department lists.
■ Organization—If you choose Organization, the service is related to thespecified organization within the specified company.
Creating a CI
Chapter 9 Managing configuration items 147

■ Department—If you choose Department, the service is related to the specifieddepartment within the specified organization.
10 From the Choose a Relationship Level list, select how much of the company willbe related to this service.
For example, if you are relating the service to the entire company, then selectCompany. If you specified department in the preceding step, then selectDepartment, and so on.
11 Click Select.
12 From the Role list in the Asset Person Role window, select Used By and click OK.
13 Click OK to dismiss the confirmation note.
14 Click Save and then click Close.
To create a computer system CI
1 From the Navigation pane of the console, choose Functions > Manage CIs.
2 From the CI Type list of the CI Type dialog box, select System > ComputerSystem.
3 Click Create.
4 In the CI Name field of the Computer System form, type a name for the CI.
When creating a CI name, BMC recommends that you follow a consistent namingconvention. According to ITIL guidelines, identifiers should be short butmeaningful, and for hardware they should not based on supplier device names.For example, the name can include an indicator of the CI’s function (such asWorkstation” or Monitor”) followed by a numeric code, such as MONITOR100.
5 In the CI ID field, type a unique alphanumeric value for the CI.
6 Select the company to which this CI belongs.
7 From the Primary Capability and Capability lists, select the roles this CI performsin your company’s topology.
8 Select a status from the Status list.
The default value is Deployed. You can select one of the following options.
Creating a CI
148 BMC Remedy Service Desk: Problem Management User Guide

Table 24: Computer system CI status options
Status Description
Ordered The CI was ordered from the supplier.
Received The CI was received in shipping.
Being Assembled The CI is being assembled.
Deployed The CI was installed.
In Repair The CI is down for maintenance.
Down The CI is down, but not yet in maintenance.
End of Life The CI is no longer being deployed.
Transferred The CI was transferred to another place.
Delete The CI is marked for deletion. You must be a member of the APP-Management or APP-Administrator group to mark a CI for deletion.
In Inventory The CI is in inventory but not yet deployed. When you select this status, you areprompted to select the inventory place.
On Loan The CI is on loan to another location.
Disposed The CI is no longer available and was disposed of.
Reserved The CI was reserved and taken out of inventory.
Return to Vendor The CI must be returned to the vendor as damaged or unwanted.
9 Specify whether the CI is supported by selecting Yes or No from the Supportedlist.
10 Select what impact or urgency this CI will have if it goes down.
11 In the Users Affected field, specify the number of people who use this CI or willbe affected if it goes down.
12 Complete the other fields in this area.
Field name Description
Tag Number The CI tag number. This is the number usually placed on theproduct by a member of your IT department to track the CI.
Serial Number The CI serial number.
Part Number The CI part number.
System Role The role this CI plays in your company.
Status Reason The reason this CI has the status it does.
Creating a CI
Chapter 9 Managing configuration items 149

13 Click the General tab.
14 Categorize your CI using the lists and fields in the Product Categorization area.
15 Specify the place of the CI using the lists and fields in the Location area.
16 Enter the dates of the CI in the lifecycle area.
17 Click the Specifications tab.
18 Add more information about the CI.
19 Click Save.
To create a bulk inventory CI
Note Bulk inventory items are not tracked by an separate record for each item. Instead,bulk items are tracked by quantities of an item type. For example, cables used toconnect desktop computers to the network do not require individual records butrather, one record for a bulk quantity of the specific cable type.
1 From the Navigation pane of the console, choose Functions > Manage CIs.
2 From the CI Type list of the Manage CI Information dialog box, select BulkInventory > Bulk Inventory, and click Create.
3 In the Bulk Inventory form, complete the following required fields.
Field name Description
CI Name Enter the name of the bulk inventory item, for example,Microsoft Windows XP.
Tier 1, Tier 2, and Tier 3 Categorize the item.
Received Quantity Enter the number of items received.
4 Click Save.
To create an inventory location CI
Note You can use inventory location CIs to indicate where bulk inventory and other CIsare located.
1 From the Navigation pane of the console, choose Functions > Manage CIs.
Creating a CI
150 BMC Remedy Service Desk: Problem Management User Guide

2 From the Type list of the Manage CI Information dialog box, select System >Inventory Location, and click Create.
3 In the CI Name field of the Inventory Location form, enter the location name.
4 Complete the optional fields.
5 Click Save.
Inventory managementYou can use the Manage Inventory function to track bulk inventory items and otherCIs that are available for deployment.
Before you can track inventory, you must:
■ Create bulk inventory CIs, or other CIs to be tracked as inventory. For informationabout how to do this, see To modify your profile on page 114 or To create acomputer system CI on page 148.
■ Create inventory location CIs. For information about how to do this, see To createan inventory location CI on page 150.
■ For bulk inventory, specify the received quantity and the inventory locations. Forinformation about how to do this, see To place bulk CIs in inventory on page 151.
■ For non-bulk inventory CIs, set the inventory status to In Inventory, and select alocation. For information about how to do this, see To place non-bulk CIs ininventory on page 152.
Placing bulk CIs in inventory
To place bulk CIs in inventory, you must specify the location or locations for them.
Tip If you do not see a location, make sure that the CI has a CI type of inventory location,and not physical location. For information about creating inventory locations, see Tocreate an inventory location CI on page 150.
To place bulk CIs in inventory
1 Open a bulk CI, as described in To search for CIs from the console on page 153.
Inventory management
Chapter 9 Managing configuration items 151

2 On the Inventory Location tab, click Add.
3 In the Search Inventory Locations dialog box, specify the search criteria and clickSearch.
4 Select a location, and click Relate.
5 In the message about the relationship, click OK.
6 If the inventory is stored in multiple locations, for each location, repeat List item.on page 74 and List item. on page 74.
7 Click Close.
On the Bulk Inventory form, the Inventory Location tab lists each of the relatedlocations.
8 Click in the Quantity Per Location field for a location, and type the quantity inthat location.
9 Continue to enter the quantity for each location, until all the quantity in stock forthe bulk CI is accounted for.
10 Click Save.
After items are in inventory, you can use the Manage Inventory function to:
■ view
■ relocate
■ reserve and use CIs and bulk inventory items
Placing non-bulk CIs in inventory
You can place non-bulk CIs that you want to manage in inventory by changing thestatus of the CI to In Inventory, and then designating a location for that CI.
To place non-bulk CIs in inventory
1 Open a CI, as described in To search for CIs from the console on page 153.
2 From the Status list, select In Inventory.
3 Click OK in the confirmation message that appears.
Inventory management
152 BMC Remedy Service Desk: Problem Management User Guide

4 In the Search Inventory Locations dialog box , from the Location list, select alocation, make sure other values are correct, and click Search.
5 Select a location and click Return.
Managing inventory
This section describes how to perform inventory management tasks that you mostcommonly use.
To search for CIs from the console
1 From the Functions area of the console Navigation pane, click the Manage CIslink.
2 From the CI Type list on the Manage CI Information window, select the type of CIyou are looking for and click Search.
3 On the form that appears, provide as much information about the CI you aresearching for as possible and click Search.
4 From the search results list at the top of the window, select the CI.
The details appear in the CI form below the search results.
To view inventory locations
1 From the Navigation pane of console, choose Functions > Manage Inventory.
2 Enter your search criteria in the Manage Inventory dialog box, and click Search.
Results matching your search criteria appear in the table.
3 Select a CI or bulk inventory item from the table, and click View Location.
4 View the CIs in the inventory listed in the Inventory Location form.
5 Click Close.
To relocate CIs
1 From the Navigation pane of the console, choose Functions > Manage Inventory.
2 Search for inventory in the current location using the Manage Inventory dialogbox.
Inventory management
Chapter 9 Managing configuration items 153

3 Select the CI or bulk inventory item you want to relocate, and click Relocate CIs.
4 For the location where you want to relocate the CI, specify search criteria, andclick Search in the Search Inventory Locations dialog box.
5 Select the location where you want to relocate your CI.
6 In the Quantity field, enter the number of CIs you want to relocate.
7 Click Relocate.
To reserve and use inventory
1 From the Navigation pane of console, choose Functions > Manage Inventory.
2 From the CI Type menu in the Manage Inventory dialog box, select the CI or bulkinventory item you want to reserve and use.
3 Click Search.
4 Click in the Transaction Qty column and enter the number of assets or bulkinventory items you want to use.
5 Click Reserve/Use Inventory.
The number of CIs or bulk inventory items in the Qty in Stock column is reducedby the number reserved and used.
Inventory management
154 BMC Remedy Service Desk: Problem Management User Guide

Index
Aactive variables
for KPIs, described 110hiding and displaying 113
adding work information 124Advanced Qualification dialog box, generating
reports 142advanced qualifications, using to generate reports
142advanced search bar, using 83Assigned Work area, viewing problem
investigations 81Assigned Work table, about 54assignments
accepting 82receiving notification of 81recording effort spent 128viewing problem investigations assigned to
you 81audience 9
Bbest practices
CI naming conventions 146, 148indicating organization areas impacted by
problems 67using CIs to diagnose user problems 145
BMC Remedy Knowledge Managementknowledge entries, authoring 84knowledge entries, searching for 84
breadcrumb bar 26broadcasts
creating 131limiting 134viewing 133
CCalbro Services 33canceling problem investigations 100categorization, specifying operational and product
30change requests
from problem investigation 38rolling back 44
CI Field, behavior described 30, 32CIs
naming conventions, best practice 146, 148non-bulk 152problem diagnosis and, best practice 145recording cost of unavailability 124relocating 153status 148unavailability 124
closingknown errors 105problem investigations 105
conventions, documentation 12Coordinator Group field, behavior described 29copying relationships 71costs
CI unavailability 124creating
broadcasts 131custom searches 118reminders 129solution entries from problem investigations 91
crystal reportslicense 138
custom searches 118creating 118described 118editing 119
Ddate, indicating estimated in Best Practice view 66
A B C D E F G H I J K L M N O P Q R S T U V W X Y Z
Index 155
defined searchesdescribed 117running 117using 117
defining relationships 69
Eediting custom searches 119effort spent, recording 128email, sending about problem investigations 136estimated date, indicating in Best Practice view 66
Ffields
standards for labels 32forms
Advanced Qualification 142Simple Qualification 141
Ggenerating
reports with advanced qualifications 142reports with qualifications 140reports without qualifications 139standard reports 139
Global search 120
Iicons, recognizing 31impacted areas, indicating 67impasse
indicating in known error 106indicating in problem investigation 106
impasse, problem investigations 47Index Term 19, 21infrastructure changes
problem investigations and 91inventory
non-bulk CIs 152viewing locations 153
Investigation Driver field, behavior described 30
KKey Performance Indicator,. See KPI flashboardsknowledge base, 84
knowledge management, 84Known Error Location field, behavior described 30known errors
closing 105indicating impasse 106
KPI flashboardsactive variables 110changing the appearance of 113described 109enlarging 113, 114opening the Flashboard console 112view and display controls 112viewing underlying records 112
Llimiting number of broadcast messages 134
Mmodifying
profile 114records 122relationships 72
monitoring status of problems 100
Nnon-bulk CIs, placing in inventory 152notifications, assignments 81
Ooperational categorization, how to specify 30Overview console
Assigned Work table 54Overview console, about 51
Ppaging people and on-call groups 135pending status, when to use 87predefined reports
Crystal Reports 143Web reports 143
printing records 121Problem Coordinator field, behavior described 30Problem Investigation form views, described 29
A B C D E F G H I J K L M N O P Q R S T U V W X Y Z
156 BMC Remedy Service Desk: Problem Management User Guide

problem investigations 73accepting assignments 82at an impasse 47canceling 100closing 105creating solution entries from 91identifying impacted areas, best practice 67indicating impasse 106infrastructure changes 91monitoring problem status 100recording effort spent 128searching for similar 83unassigned 74working with vendors 84See also records
Problem Location field, behavior described 30process flows
about 37product categorization, how to specify 30profile, viewing and modifying 114proposing solution entries 91
Qqualifications, generating reports with 140quick actions for relationships 73
Rrecent records, viewing 26recording
cost of CI unavailability 124recording effort spent 128records 73
modifying 122printing 121searching 117See also problem investigations
refreshing data 52relationships
copying 71defining 69modifying 72quick actions 73removing 74
relocating CIs 153reminders, creating 129removing relationships 74
reportsabout 138generating 139generating with advanced qualifications 142generating with qualifications 140generating without qualifications 139predefined 143
Requester consolefunctions 51
resolvingknown errors 105problem investigations 105
roles, support staff 35
Ssearching
all problem investigation records 119BMC Remedy Knowledge Management entries
84for inventory locations 153similar problem investigations 83using defined searches 117using the search bar 83
Service field, behavior described 30, 32Simple Qualification dialog box, generating reports
141solution entries
proposing from problem investigations 91status values, selecting 55structural solution, defined 35support staff
assigning to problem investigation 76role 35
syntax statement conventions 12
Uunassigned problem investigations, viewing 74usability improvements 15use scenarios
change request from a problem investigation 38change request roll back 44problem investigation at an impasse 47problem investigation without a change
request 41user interfaces
standards for field labels 32using inventory 153
A B C D E F G H I J K L M N O P Q R S T U V W X Y Z
Index 157

Vvendors
communicating assigned incidents to 84documenting work with 84
viewingbroadcasts 133problem investigations 74, 81profile 114
views.. See Problem Investigation form views
Wweb reports 138work info
attachment, adding 126attachment, removing 126attachment, viewing 126
work information, adding 124
A B C D E F G H I J K L M N O P Q R S T U V W X Y Z
158 BMC Remedy Service Desk: Problem Management User Guide


49532*174272*


![[BMC Remedy AR System] the Pulse_ FTS Fortific..](https://static.fdocuments.us/doc/165x107/563dba15550346aa9aa287b9/bmc-remedy-ar-system-the-pulse-fts-fortific.jpg)