BMC Impact Solutions Event Management Guideatmgmicrosoft.free.fr/depot/at/BMC doc/BMC Impact...
390
www.bmc.com BMC Impact Solutions Event Management Guide Supporting BMC Impact Manager 7.3 BMC Impact Explorer 7.3 BMC Impact Portal 7.3 BMC Impact Event Adapters 7.3 February 2009
-
Upload
truongtram -
Category
Documents
-
view
241 -
download
0
Transcript of BMC Impact Solutions Event Management Guideatmgmicrosoft.free.fr/depot/at/BMC doc/BMC Impact...

www.bmc.com
BMC Impact Solutions Event
Management Guide
Supporting
BMC Impact Manager 7.3BMC Impact Explorer 7.3BMC Impact Portal 7.3BMC Impact Event Adapters 7.3
February 2009

Contacting BMC Software
You can access the BMC Software website at http://www.bmc.com. From this website, you can obtain information about the company, its products, corporate offices, special events, and career opportunities.
United States and Canada
Address BMC SOFTWARE INC2101 CITYWEST BLVDHOUSTON TX 77042-2827 USA
Telephone 713 918 8800 or800 841 2031
Fax 713 918 8000
Outside United States and Canada
Telephone (01) 713 918 8800 Fax (01) 713 918 8000
© Copyright 2007-2009 BMC Software, Inc.
BMC, BMC Software, and the BMC Software logo are the exclusive properties of BMC Software, Inc., are registered with the U.S. Patent and Trademark Office, and may be registered or pending registration in other countries. All other BMC trademarks, service marks, and logos may be registered or pending registration in the U.S. or in other countries. All other trademarks or registered trademarks are the property of their respective owners.
AIX is a trademark or registered trademark of International Business Machines Corporation in the United States, other countries, or both.
Linux is the registered trademark of Linus Torvalds.
Oracle is a registered trademark of Oracle Corporation.
Java and Solaris are trademarks or registered trademarks of Sun Microsystems, Inc., in the U.S. and other countries.
UNIX is the registered trademark of The Open Group in the US and other countries.
BMC Software considers information included in this documentation to be proprietary and confidential. Your use of this information is subject to the terms and conditions of the applicable End User License Agreement for the product and the proprietary and restricted rights notices included in this documentation.
Restricted rights legendU.S. Government Restricted Rights to Computer Software. UNPUBLISHED -- RIGHTS RESERVED UNDER THE COPYRIGHT LAWS OF THE UNITED STATES. Use, duplication, or disclosure of any data and computer software by the U.S. Government is subject to restrictions, as applicable, set forth in FAR Section 52.227-14, DFARS 252.227-7013, DFARS 252.227-7014, DFARS 252.227-7015, and DFARS 252.227-7025, as amended from time to time. Contractor/Manufacturer is BMC SOFTWARE INC, 2101 CITYWEST BLVD, HOUSTON TX 77042-2827, USA. Any contract notices should be sent to this address.

Customer support
You can obtain technical support by using the BMC Software Customer Support website or by contacting Customer Support by telephone or e-mail. To expedite your inquiry, see “Before contacting BMC.”
Support website
You can obtain technical support from BMC 24 hours a day, 7 days a week at http://www.bmc.com/support_home. From this website, you can
■ read overviews about support services and programs that BMC offers■ find the most current information about BMC products■ search a database for issues similar to yours and possible solutions■ order or download product documentation■ download products and maintenance■ report an issue or ask a question■ subscribe to receive proactive e-mail alerts when new product notices are released■ find worldwide BMC support center locations and contact information, including e-mail addresses, fax numbers, and
telephone numbers
Support by telephone or e-mail
In the United States and Canada, if you need technical support and do not have access to the web, call 800 537 1813 or send an e-mail message to [email protected]. (In the subject line, enter SupID:<yourSupportContractID>, such as SupID:12345). Outside the United States and Canada, contact your local support center for assistance.
Before contacting BMC
Have the following information available so that Customer Support can begin working on your issue immediately:
■ product information
— product name— product version (release number)— license number and password (trial or permanent)
■ operating system and environment information
— machine type— operating system type, version, and service pack or other maintenance level such as PUT or PTF— system hardware configuration— serial numbers— related software (database, application, and communication) including type, version, and service pack or
maintenance level
■ sequence of events leading to the issue
■ commands and options that you used
■ messages received (and the time and date that you received them)
— product error messages— messages from the operating system, such as file system full— messages from related software
3

License key and password information
If you have questions about your license key or password, contact BMC as follows:
■ (USA or Canada) Contact the Order Services Password Team at 800 841 2031, or send an e-mail message to [email protected].
■ (Europe, the Middle East, and Africa) Fax your questions to EMEA Contracts Administration at +31 20 354 8702, or send an e-mail message to [email protected].
■ (Asia-Pacific) Contact your BMC sales representative or your local BMC office.
4 BMC Impact Solutions Event Management Guide

ContentsChapter 1 Introduction to event management 19
Event management process . . . . . . . . . . . . . . . . . . . . . . . . . . . . . . . . . . . . . . . . . . . . . . . . 19Related documentation . . . . . . . . . . . . . . . . . . . . . . . . . . . . . . . . . . . . . . . . . . . . . . . . . . . . 20Using this guide . . . . . . . . . . . . . . . . . . . . . . . . . . . . . . . . . . . . . . . . . . . . . . . . . . . . . . . . . . 20Elements of the Events View . . . . . . . . . . . . . . . . . . . . . . . . . . . . . . . . . . . . . . . . . . . . . . . 21
Accessing the Events View. . . . . . . . . . . . . . . . . . . . . . . . . . . . . . . . . . . . . . . . . . . . . . 21Dashboard View. . . . . . . . . . . . . . . . . . . . . . . . . . . . . . . . . . . . . . . . . . . . . . . . . . . . . . . . . . 25Cell data view . . . . . . . . . . . . . . . . . . . . . . . . . . . . . . . . . . . . . . . . . . . . . . . . . . . . . . . . . . . . 27Online help . . . . . . . . . . . . . . . . . . . . . . . . . . . . . . . . . . . . . . . . . . . . . . . . . . . . . . . . . . . . . . 29
Customizing access to Help for events. . . . . . . . . . . . . . . . . . . . . . . . . . . . . . . . . . . . 29Guidelines for setting login timeout value. . . . . . . . . . . . . . . . . . . . . . . . . . . . . . . . . . . . 30
Chapter 2 Working with event adapters (walk-through) 33
Purpose . . . . . . . . . . . . . . . . . . . . . . . . . . . . . . . . . . . . . . . . . . . . . . . . . . . . . . . . . . . . . . . . . 33Prerequisite. . . . . . . . . . . . . . . . . . . . . . . . . . . . . . . . . . . . . . . . . . . . . . . . . . . . . . . . . . . 34
LogFile Adapter . . . . . . . . . . . . . . . . . . . . . . . . . . . . . . . . . . . . . . . . . . . . . . . . . . . . . . . . . . 34Gathering event information from the third-party event source . . . . . . . . . . . . . . 34Task summary . . . . . . . . . . . . . . . . . . . . . . . . . . . . . . . . . . . . . . . . . . . . . . . . . . . . . . . . 35Sample log file . . . . . . . . . . . . . . . . . . . . . . . . . . . . . . . . . . . . . . . . . . . . . . . . . . . . . . . . 35Updating the mcxa.conf file . . . . . . . . . . . . . . . . . . . . . . . . . . . . . . . . . . . . . . . . . . . . . 36Defining the MAP file . . . . . . . . . . . . . . . . . . . . . . . . . . . . . . . . . . . . . . . . . . . . . . . . . . 37Defining the .baroc file . . . . . . . . . . . . . . . . . . . . . . . . . . . . . . . . . . . . . . . . . . . . . . . . . 38Defining the rule . . . . . . . . . . . . . . . . . . . . . . . . . . . . . . . . . . . . . . . . . . . . . . . . . . . . . . 40Creating a policy . . . . . . . . . . . . . . . . . . . . . . . . . . . . . . . . . . . . . . . . . . . . . . . . . . . . . . 40Generating test events. . . . . . . . . . . . . . . . . . . . . . . . . . . . . . . . . . . . . . . . . . . . . . . . . . 45
SNMP Adapter . . . . . . . . . . . . . . . . . . . . . . . . . . . . . . . . . . . . . . . . . . . . . . . . . . . . . . . . . . . 47Gathering event information from the third-party event source . . . . . . . . . . . . . . 47Installing the SNMP Configuration Manager . . . . . . . . . . . . . . . . . . . . . . . . . . . . . . 48Configuring the adapter . . . . . . . . . . . . . . . . . . . . . . . . . . . . . . . . . . . . . . . . . . . . . . . . 48Publishing the MIB files . . . . . . . . . . . . . . . . . . . . . . . . . . . . . . . . . . . . . . . . . . . . . . . . 49Viewing/Editing the MAP file . . . . . . . . . . . . . . . . . . . . . . . . . . . . . . . . . . . . . . . . . . 51Installing the generated .baroc files in the cell’s KB. . . . . . . . . . . . . . . . . . . . . . . . . 52Unpublishing MIBs . . . . . . . . . . . . . . . . . . . . . . . . . . . . . . . . . . . . . . . . . . . . . . . . . . . . 53Generating test events. . . . . . . . . . . . . . . . . . . . . . . . . . . . . . . . . . . . . . . . . . . . . . . . . . 53
Chapter 3 Event rules 55
Rules and event management . . . . . . . . . . . . . . . . . . . . . . . . . . . . . . . . . . . . . . . . . . . . . . 56Rule structure and syntax . . . . . . . . . . . . . . . . . . . . . . . . . . . . . . . . . . . . . . . . . . . . . . . . . . 56
Contents 5

MRL files . . . . . . . . . . . . . . . . . . . . . . . . . . . . . . . . . . . . . . . . . . . . . . . . . . . . . . . . . . . . . 56MRL conventions . . . . . . . . . . . . . . . . . . . . . . . . . . . . . . . . . . . . . . . . . . . . . . . . . . . . . . 56General rule syntax . . . . . . . . . . . . . . . . . . . . . . . . . . . . . . . . . . . . . . . . . . . . . . . . . . . . 57
MRL event selection clauses . . . . . . . . . . . . . . . . . . . . . . . . . . . . . . . . . . . . . . . . . . . . . . . . 60Where clauses . . . . . . . . . . . . . . . . . . . . . . . . . . . . . . . . . . . . . . . . . . . . . . . . . . . . . . . . . 60Using clause . . . . . . . . . . . . . . . . . . . . . . . . . . . . . . . . . . . . . . . . . . . . . . . . . . . . . . . . . . 63Using_policy clause . . . . . . . . . . . . . . . . . . . . . . . . . . . . . . . . . . . . . . . . . . . . . . . . . . . . 65Unless clause. . . . . . . . . . . . . . . . . . . . . . . . . . . . . . . . . . . . . . . . . . . . . . . . . . . . . . . . . . 66When clause . . . . . . . . . . . . . . . . . . . . . . . . . . . . . . . . . . . . . . . . . . . . . . . . . . . . . . . . . . 67Body clause . . . . . . . . . . . . . . . . . . . . . . . . . . . . . . . . . . . . . . . . . . . . . . . . . . . . . . . . . . . 69
Variables in rules . . . . . . . . . . . . . . . . . . . . . . . . . . . . . . . . . . . . . . . . . . . . . . . . . . . . . . . . . 71Dynamic data in rules . . . . . . . . . . . . . . . . . . . . . . . . . . . . . . . . . . . . . . . . . . . . . . . . . . . . . 72Global records in rules . . . . . . . . . . . . . . . . . . . . . . . . . . . . . . . . . . . . . . . . . . . . . . . . . . . . . 74Interfaces in rules . . . . . . . . . . . . . . . . . . . . . . . . . . . . . . . . . . . . . . . . . . . . . . . . . . . . . . . . . 75
Interface instances . . . . . . . . . . . . . . . . . . . . . . . . . . . . . . . . . . . . . . . . . . . . . . . . . . . . . 75Indexes in rules . . . . . . . . . . . . . . . . . . . . . . . . . . . . . . . . . . . . . . . . . . . . . . . . . . . . . . . . . . . 76
Using indexes . . . . . . . . . . . . . . . . . . . . . . . . . . . . . . . . . . . . . . . . . . . . . . . . . . . . . . . . . 77Compiling rules . . . . . . . . . . . . . . . . . . . . . . . . . . . . . . . . . . . . . . . . . . . . . . . . . . . . . . . . . . 79Testing a rule . . . . . . . . . . . . . . . . . . . . . . . . . . . . . . . . . . . . . . . . . . . . . . . . . . . . . . . . . . . . . 79Tracing a rule. . . . . . . . . . . . . . . . . . . . . . . . . . . . . . . . . . . . . . . . . . . . . . . . . . . . . . . . . . . . . 79
Configuring rule tracing . . . . . . . . . . . . . . . . . . . . . . . . . . . . . . . . . . . . . . . . . . . . . . . . 80Customizing rule trace message headers . . . . . . . . . . . . . . . . . . . . . . . . . . . . . . . . . . 83
Undefined events, processing errors, and deprecated slots. . . . . . . . . . . . . . . . . . . . . . 84Undefined events . . . . . . . . . . . . . . . . . . . . . . . . . . . . . . . . . . . . . . . . . . . . . . . . . . . . . . 84Event processing errors. . . . . . . . . . . . . . . . . . . . . . . . . . . . . . . . . . . . . . . . . . . . . . . . . 85Using deprecated slots . . . . . . . . . . . . . . . . . . . . . . . . . . . . . . . . . . . . . . . . . . . . . . . . . 86
Chapter 4 Working with collectors 87
Creating or modifying a collector . . . . . . . . . . . . . . . . . . . . . . . . . . . . . . . . . . . . . . . . . . . 88Collector syntax . . . . . . . . . . . . . . . . . . . . . . . . . . . . . . . . . . . . . . . . . . . . . . . . . . . . . . . 88Best practices for defining collectors . . . . . . . . . . . . . . . . . . . . . . . . . . . . . . . . . . . . . . 90Collector security . . . . . . . . . . . . . . . . . . . . . . . . . . . . . . . . . . . . . . . . . . . . . . . . . . . . . . 91Defining static collectors . . . . . . . . . . . . . . . . . . . . . . . . . . . . . . . . . . . . . . . . . . . . . . . . 93Defining dynamic collectors. . . . . . . . . . . . . . . . . . . . . . . . . . . . . . . . . . . . . . . . . . . . . 94
Default event management collectors . . . . . . . . . . . . . . . . . . . . . . . . . . . . . . . . . . . . . . . . 96self_collector.mrl . . . . . . . . . . . . . . . . . . . . . . . . . . . . . . . . . . . . . . . . . . . . . . . . . . . . . . 96catchall_collector.mrl. . . . . . . . . . . . . . . . . . . . . . . . . . . . . . . . . . . . . . . . . . . . . . . . . . . 96mc_bystatus_collectors.mrl . . . . . . . . . . . . . . . . . . . . . . . . . . . . . . . . . . . . . . . . . . . . . 97mc_bylocation_collectors.mrl. . . . . . . . . . . . . . . . . . . . . . . . . . . . . . . . . . . . . . . . . . . . 97MCxP collector set . . . . . . . . . . . . . . . . . . . . . . . . . . . . . . . . . . . . . . . . . . . . . . . . . . . . . 98bii4p_collectors.mrl . . . . . . . . . . . . . . . . . . . . . . . . . . . . . . . . . . . . . . . . . . . . . . . . . . . . 98mc_evr_collectors.mrl . . . . . . . . . . . . . . . . . . . . . . . . . . . . . . . . . . . . . . . . . . . . . . . . . . 99
Default service impact management event collector. . . . . . . . . . . . . . . . . . . . . . . . . . . . 99
Chapter 5 Event lists 101
Event list details . . . . . . . . . . . . . . . . . . . . . . . . . . . . . . . . . . . . . . . . . . . . . . . . . . . . . . . . . 102Events View details pane . . . . . . . . . . . . . . . . . . . . . . . . . . . . . . . . . . . . . . . . . . . . . . 104New Common Event Model slots . . . . . . . . . . . . . . . . . . . . . . . . . . . . . . . . . . . . . . . 105
6 BMC Impact Solutions Event Management Guide

How to determine event states. . . . . . . . . . . . . . . . . . . . . . . . . . . . . . . . . . . . . . . . . . . . . 106Understanding event status . . . . . . . . . . . . . . . . . . . . . . . . . . . . . . . . . . . . . . . . . . . . 108Understanding event severity . . . . . . . . . . . . . . . . . . . . . . . . . . . . . . . . . . . . . . . . . . 108Understanding event priority . . . . . . . . . . . . . . . . . . . . . . . . . . . . . . . . . . . . . . . . . . 109
Customizing display settings . . . . . . . . . . . . . . . . . . . . . . . . . . . . . . . . . . . . . . . . . . . . . 110Understanding the effect of event status and severity on collectors’ color . . . . 112Understanding the effect of event status on event count for collectors . . . . . . . 113
Working with event lists . . . . . . . . . . . . . . . . . . . . . . . . . . . . . . . . . . . . . . . . . . . . . . . . . . 114Viewing event lists . . . . . . . . . . . . . . . . . . . . . . . . . . . . . . . . . . . . . . . . . . . . . . . . . . . 114Selecting the type of event list to view . . . . . . . . . . . . . . . . . . . . . . . . . . . . . . . . . . . 115Viewing event details . . . . . . . . . . . . . . . . . . . . . . . . . . . . . . . . . . . . . . . . . . . . . . . . . 116Viewing related events . . . . . . . . . . . . . . . . . . . . . . . . . . . . . . . . . . . . . . . . . . . . . . . . 116Refreshing and freezing the event list . . . . . . . . . . . . . . . . . . . . . . . . . . . . . . . . . . . 117Viewing floating windows in full screen . . . . . . . . . . . . . . . . . . . . . . . . . . . . . . . . . 119
Organizing events in the event list . . . . . . . . . . . . . . . . . . . . . . . . . . . . . . . . . . . . . . . . . 120Using MetaCollectors . . . . . . . . . . . . . . . . . . . . . . . . . . . . . . . . . . . . . . . . . . . . . . . . . 120Filtering events. . . . . . . . . . . . . . . . . . . . . . . . . . . . . . . . . . . . . . . . . . . . . . . . . . . . . . . 121Sorting events. . . . . . . . . . . . . . . . . . . . . . . . . . . . . . . . . . . . . . . . . . . . . . . . . . . . . . . . 129
Assigning events to users . . . . . . . . . . . . . . . . . . . . . . . . . . . . . . . . . . . . . . . . . . . . . . . . . 133
Chapter 6 Event groups and image views 137
Event groups. . . . . . . . . . . . . . . . . . . . . . . . . . . . . . . . . . . . . . . . . . . . . . . . . . . . . . . . . . . . 138Types of event groupings . . . . . . . . . . . . . . . . . . . . . . . . . . . . . . . . . . . . . . . . . . . . . . 138Event group configuration files. . . . . . . . . . . . . . . . . . . . . . . . . . . . . . . . . . . . . . . . . 139Event tree hierarchy . . . . . . . . . . . . . . . . . . . . . . . . . . . . . . . . . . . . . . . . . . . . . . . . . . 140Event tree objects . . . . . . . . . . . . . . . . . . . . . . . . . . . . . . . . . . . . . . . . . . . . . . . . . . . . . 140
Image views . . . . . . . . . . . . . . . . . . . . . . . . . . . . . . . . . . . . . . . . . . . . . . . . . . . . . . . . . . . . 141Planning event groups and image views . . . . . . . . . . . . . . . . . . . . . . . . . . . . . . . . . . . . 143Working with event groups and image views. . . . . . . . . . . . . . . . . . . . . . . . . . . . . . . . 144
Creating an event group (event tree top-level) node . . . . . . . . . . . . . . . . . . . . . . . 144Creating an event group subnode (event tree node) . . . . . . . . . . . . . . . . . . . . . . . 145Deleting an event group subnode (event tree top-level node) . . . . . . . . . . . . . . . 146Hiding a collector in an event group . . . . . . . . . . . . . . . . . . . . . . . . . . . . . . . . . . . . 146Showing a hidden collector in an event group . . . . . . . . . . . . . . . . . . . . . . . . . . . . 147Putting an event group into production or development . . . . . . . . . . . . . . . . . . . 147Adding a custom image view to an event group . . . . . . . . . . . . . . . . . . . . . . . . . . 148Guidelines for viewing custom slots in an event view . . . . . . . . . . . . . . . . . . . . . 150
Granting user access to event groups . . . . . . . . . . . . . . . . . . . . . . . . . . . . . . . . . . . . . . . 151
Chapter 7 Event operations 153
Performing event operations . . . . . . . . . . . . . . . . . . . . . . . . . . . . . . . . . . . . . . . . . . . . . . 154Executing remote or local actions . . . . . . . . . . . . . . . . . . . . . . . . . . . . . . . . . . . . . . . . . . 156Manually setting component status or maintenance mode with a remote action . . 159Viewing event operations history . . . . . . . . . . . . . . . . . . . . . . . . . . . . . . . . . . . . . . . . . . 160Analyzing event relationships for abstracted, correlated, or propagated events. . . 160Copying and printing event information . . . . . . . . . . . . . . . . . . . . . . . . . . . . . . . . . . . . 161Connecting to event sources through hyperlinks . . . . . . . . . . . . . . . . . . . . . . . . . . . . . 162Alias formulas. . . . . . . . . . . . . . . . . . . . . . . . . . . . . . . . . . . . . . . . . . . . . . . . . . . . . . . . . . . 163
Contents 7

Working with Event Alias Formulas. . . . . . . . . . . . . . . . . . . . . . . . . . . . . . . . . . . . . 163Working with the CIEM Dashboard View . . . . . . . . . . . . . . . . . . . . . . . . . . . . . . . . . . . 168
Creating the CIEM Dashboard View . . . . . . . . . . . . . . . . . . . . . . . . . . . . . . . . . . . . 168Specifying a web browser for your component’s home page . . . . . . . . . . . . . . . . 173Launching the web browser from your dashboard homepage. . . . . . . . . . . . . . . 174Editing the CIEM dashboard . . . . . . . . . . . . . . . . . . . . . . . . . . . . . . . . . . . . . . . . . . . 174Copying the CIEM dashboard . . . . . . . . . . . . . . . . . . . . . . . . . . . . . . . . . . . . . . . . . . 175Deleting the CIEM dashboard . . . . . . . . . . . . . . . . . . . . . . . . . . . . . . . . . . . . . . . . . . 176
Guidelines for managing high availability . . . . . . . . . . . . . . . . . . . . . . . . . . . . . . . . . . . 177Relating events . . . . . . . . . . . . . . . . . . . . . . . . . . . . . . . . . . . . . . . . . . . . . . . . . . . . . . . . . . 179
Event relation definition example . . . . . . . . . . . . . . . . . . . . . . . . . . . . . . . . . . . . . . . 184Guidelines for implementing an event relation. . . . . . . . . . . . . . . . . . . . . . . . . . . . 186
Chapter 8 Creating local and remote actions 189
Defining and executing local actions . . . . . . . . . . . . . . . . . . . . . . . . . . . . . . . . . . . . . . . . 190Local action definitions . . . . . . . . . . . . . . . . . . . . . . . . . . . . . . . . . . . . . . . . . . . . . . . . 190File naming guidelines for action executables . . . . . . . . . . . . . . . . . . . . . . . . . . . . . 190Defining a local action . . . . . . . . . . . . . . . . . . . . . . . . . . . . . . . . . . . . . . . . . . . . . . . . . 190Creating a user-defined local action for multiple events . . . . . . . . . . . . . . . . . . . . 194Configuring BMC Impact Explorer to run a local action . . . . . . . . . . . . . . . . . . . . 197Version control of local actions . . . . . . . . . . . . . . . . . . . . . . . . . . . . . . . . . . . . . . . . . 197Adding buttons for actions to the toolbar . . . . . . . . . . . . . . . . . . . . . . . . . . . . . . . . 198
Defining and executing remote actions. . . . . . . . . . . . . . . . . . . . . . . . . . . . . . . . . . . . . . 200Remote action result events . . . . . . . . . . . . . . . . . . . . . . . . . . . . . . . . . . . . . . . . . . . . 201Location of remote actions and executables. . . . . . . . . . . . . . . . . . . . . . . . . . . . . . . 201Requirements for action executable files . . . . . . . . . . . . . . . . . . . . . . . . . . . . . . . . . 202Defining a remote action. . . . . . . . . . . . . . . . . . . . . . . . . . . . . . . . . . . . . . . . . . . . . . . 202Remote action definitions . . . . . . . . . . . . . . . . . . . . . . . . . . . . . . . . . . . . . . . . . . . . . . 202Remote action execution results. . . . . . . . . . . . . . . . . . . . . . . . . . . . . . . . . . . . . . . . . 208Action execution variables . . . . . . . . . . . . . . . . . . . . . . . . . . . . . . . . . . . . . . . . . . . . . 209Defining a remote action in a BMC Impact Manager cell . . . . . . . . . . . . . . . . . . . 209
Chapter 9 Remote execution 211
Background . . . . . . . . . . . . . . . . . . . . . . . . . . . . . . . . . . . . . . . . . . . . . . . . . . . . . . . . . . . . . 212Audience . . . . . . . . . . . . . . . . . . . . . . . . . . . . . . . . . . . . . . . . . . . . . . . . . . . . . . . . . . . . 212
Component descriptions . . . . . . . . . . . . . . . . . . . . . . . . . . . . . . . . . . . . . . . . . . . . . . . . . . 213Admin record . . . . . . . . . . . . . . . . . . . . . . . . . . . . . . . . . . . . . . . . . . . . . . . . . . . . . . . . 213Action rule. . . . . . . . . . . . . . . . . . . . . . . . . . . . . . . . . . . . . . . . . . . . . . . . . . . . . . . . . . . 214Action task. . . . . . . . . . . . . . . . . . . . . . . . . . . . . . . . . . . . . . . . . . . . . . . . . . . . . . . . . . . 215Credential record . . . . . . . . . . . . . . . . . . . . . . . . . . . . . . . . . . . . . . . . . . . . . . . . . . . . . 215
Process summary . . . . . . . . . . . . . . . . . . . . . . . . . . . . . . . . . . . . . . . . . . . . . . . . . . . . . . . . 218Working with credential records . . . . . . . . . . . . . . . . . . . . . . . . . . . . . . . . . . . . . . . . . . . 220
Guidelines . . . . . . . . . . . . . . . . . . . . . . . . . . . . . . . . . . . . . . . . . . . . . . . . . . . . . . . . . . . 220How IAS searches for credentials . . . . . . . . . . . . . . . . . . . . . . . . . . . . . . . . . . . . . . . 223
Interactive remote execution. . . . . . . . . . . . . . . . . . . . . . . . . . . . . . . . . . . . . . . . . . . . . . . 224GUI walkthrough: interactive remote execution. . . . . . . . . . . . . . . . . . . . . . . . . . . 225Defining the remote action rule and task . . . . . . . . . . . . . . . . . . . . . . . . . . . . . . . . . 226
Automatic remote execution. . . . . . . . . . . . . . . . . . . . . . . . . . . . . . . . . . . . . . . . . . . . . . . 236
8 BMC Impact Solutions Event Management Guide

Work flow . . . . . . . . . . . . . . . . . . . . . . . . . . . . . . . . . . . . . . . . . . . . . . . . . . . . . . . . . . . 236Authentication guidelines for automatic remote execution . . . . . . . . . . . . . . . . . 237GUI walkthrough: automatic remote execution . . . . . . . . . . . . . . . . . . . . . . . . . . . 237Defining the remote execution policy. . . . . . . . . . . . . . . . . . . . . . . . . . . . . . . . . . . . 237
Supplemental manual procedures. . . . . . . . . . . . . . . . . . . . . . . . . . . . . . . . . . . . . . . . . . 240Manual configuration of interactive remote execution . . . . . . . . . . . . . . . . . . . . . 240Manual configuration of automatic remote execution. . . . . . . . . . . . . . . . . . . . . . 251
Properties files . . . . . . . . . . . . . . . . . . . . . . . . . . . . . . . . . . . . . . . . . . . . . . . . . . . . . . . . . . 252ias.properties . . . . . . . . . . . . . . . . . . . . . . . . . . . . . . . . . . . . . . . . . . . . . . . . . . . . . . . . 252centraladmin-strings.properties . . . . . . . . . . . . . . . . . . . . . . . . . . . . . . . . . . . . . . . . 253remoteexecution.properties . . . . . . . . . . . . . . . . . . . . . . . . . . . . . . . . . . . . . . . . . . . . 253
Troubleshooting tips . . . . . . . . . . . . . . . . . . . . . . . . . . . . . . . . . . . . . . . . . . . . . . . . . . . . . 254Executing reboot command via remote action results in timeout messages . . . 254A script is deployed on a remote UNIX system but does not execute . . . . . . . . 255PsExec is not supported on 64-bit Windows 2008 Server systems. . . . . . . . . . . . 255Issues in high availability environments . . . . . . . . . . . . . . . . . . . . . . . . . . . . . . . . . 256Excluded character in action group name . . . . . . . . . . . . . . . . . . . . . . . . . . . . . . . . 256
Chapter 10 Event management policies 257
Event management policy types . . . . . . . . . . . . . . . . . . . . . . . . . . . . . . . . . . . . . . . . . . . 258Out-of-the-box event management policies . . . . . . . . . . . . . . . . . . . . . . . . . . . . . . . . . . 260How event management policies work . . . . . . . . . . . . . . . . . . . . . . . . . . . . . . . . . . . . . 262
Event management policy workflow overview . . . . . . . . . . . . . . . . . . . . . . . . . . . 262Event selectors . . . . . . . . . . . . . . . . . . . . . . . . . . . . . . . . . . . . . . . . . . . . . . . . . . . . . . . 263Event selector groups . . . . . . . . . . . . . . . . . . . . . . . . . . . . . . . . . . . . . . . . . . . . . . . . . 263Event selection criteria . . . . . . . . . . . . . . . . . . . . . . . . . . . . . . . . . . . . . . . . . . . . . . . . 264Timeframes . . . . . . . . . . . . . . . . . . . . . . . . . . . . . . . . . . . . . . . . . . . . . . . . . . . . . . . . . . 265Evaluation order of event policy types . . . . . . . . . . . . . . . . . . . . . . . . . . . . . . . . . . 266
How dynamic data enrichment event management policies work . . . . . . . . . . . . . . 267External enrichment data sources . . . . . . . . . . . . . . . . . . . . . . . . . . . . . . . . . . . . . . . 267
How to create a new local timeframe . . . . . . . . . . . . . . . . . . . . . . . . . . . . . . . . . . . . . . . 270How to add a notification service (notification policies only). . . . . . . . . . . . . . . . . . . 272How to create and edit a dynamic data enrichment source file . . . . . . . . . . . . . . . . . 274
Using the sample PATROL messaging text translation dynamic data enrichment source file . . . . . . . . . . . . . . . . . . . . . . . . . . . . . . . . . . . . . . . . . . . . . . . . . . . . . . . . . 276
How to create an event selector and specify event selection criteria . . . . . . . . . . . . . 278Creating new standard event management policies. . . . . . . . . . . . . . . . . . . . . . . . . . . 282
Creating a new standard blackout policy . . . . . . . . . . . . . . . . . . . . . . . . . . . . . . . . 283Creating a new component based enrichment policy . . . . . . . . . . . . . . . . . . . . . . 285Creating a new closure policy . . . . . . . . . . . . . . . . . . . . . . . . . . . . . . . . . . . . . . . . . . 290Creating a new correlation policy . . . . . . . . . . . . . . . . . . . . . . . . . . . . . . . . . . . . . . . 292Creating a new enrichment policy . . . . . . . . . . . . . . . . . . . . . . . . . . . . . . . . . . . . . . 296Creating a new escalation policy. . . . . . . . . . . . . . . . . . . . . . . . . . . . . . . . . . . . . . . . 299Creating a new notification policy . . . . . . . . . . . . . . . . . . . . . . . . . . . . . . . . . . . . . . 304Creating a new propagation policy . . . . . . . . . . . . . . . . . . . . . . . . . . . . . . . . . . . . . 308Creating a new recurrence policy . . . . . . . . . . . . . . . . . . . . . . . . . . . . . . . . . . . . . . . 310Creating a new remote action policy . . . . . . . . . . . . . . . . . . . . . . . . . . . . . . . . . . . . 313Creating a new suppression policy. . . . . . . . . . . . . . . . . . . . . . . . . . . . . . . . . . . . . . 313Creating a new threshold policy . . . . . . . . . . . . . . . . . . . . . . . . . . . . . . . . . . . . . . . . 316
Contents 9

Creating a new timeout policy . . . . . . . . . . . . . . . . . . . . . . . . . . . . . . . . . . . . . . . . . . 319Enabling and disabling out-of-the-box standard event management policies . . . . . 322Creating a new dynamic data enrichment event management policy . . . . . . . . . . . . 324Enabling out-of-the-box dynamic data enrichment event management policies . . . 334
Enabling a dynamic data enrichment blackout policy . . . . . . . . . . . . . . . . . . . . . . 335Enabling a dynamic data enrichment location policy . . . . . . . . . . . . . . . . . . . . . . 338Enabling a dynamic data enrichment service contact policy . . . . . . . . . . . . . . . . 342Enabling a dynamic enrichment PATROL message text translation policy . . . . 346
Importing dynamic data enrichment source . . . . . . . . . . . . . . . . . . . . . . . . . . . . . . . . . 350Verifying that the policy is running. . . . . . . . . . . . . . . . . . . . . . . . . . . . . . . . . . . . . . . . . 351Editing event selection criteria . . . . . . . . . . . . . . . . . . . . . . . . . . . . . . . . . . . . . . . . . . . . . 351Deleting an event selector . . . . . . . . . . . . . . . . . . . . . . . . . . . . . . . . . . . . . . . . . . . . . . . . . 352Trouble-shooting event management policies . . . . . . . . . . . . . . . . . . . . . . . . . . . . . . . . 352
Problem: The policy is not running . . . . . . . . . . . . . . . . . . . . . . . . . . . . . . . . . . . . . . 352Problem: The notification policy is configured to generate a notification email,
but no email is being sent. . . . . . . . . . . . . . . . . . . . . . . . . . . . . . . . . . . . . . . . . . . . 353Problem: I receive an invalid data error when running a dynamic data
enrichment policy . . . . . . . . . . . . . . . . . . . . . . . . . . . . . . . . . . . . . . . . . . . . . . . . . . 353Problem: I receive an error message when running a dynamic data enrichment
blackout policy. . . . . . . . . . . . . . . . . . . . . . . . . . . . . . . . . . . . . . . . . . . . . . . . . . . . . 354Problem: I have several thousand data records displayed in the Dynamic Data
Editor tab . . . . . . . . . . . . . . . . . . . . . . . . . . . . . . . . . . . . . . . . . . . . . . . . . . . . . . . . . 355Trouble-shooting tools for dynamic data enrichment policies . . . . . . . . . . . . . . . 355
Chapter 11 Dynamic data editor 357
Dynamic data definition using the Dynamic Data Editor . . . . . . . . . . . . . . . . . . . . . . 358Navigating the Dynamic Data Editor . . . . . . . . . . . . . . . . . . . . . . . . . . . . . . . . . . . . . . . 358
Navigation pane . . . . . . . . . . . . . . . . . . . . . . . . . . . . . . . . . . . . . . . . . . . . . . . . . . . . . . 358Toolbar functions . . . . . . . . . . . . . . . . . . . . . . . . . . . . . . . . . . . . . . . . . . . . . . . . . . . . . 360
Filtering and sorting the Data List . . . . . . . . . . . . . . . . . . . . . . . . . . . . . . . . . . . . . . . . . . 360Filtering slots. . . . . . . . . . . . . . . . . . . . . . . . . . . . . . . . . . . . . . . . . . . . . . . . . . . . . . . . . 360Sorting data fields . . . . . . . . . . . . . . . . . . . . . . . . . . . . . . . . . . . . . . . . . . . . . . . . . . . . 363
Working with data instances . . . . . . . . . . . . . . . . . . . . . . . . . . . . . . . . . . . . . . . . . . . . . . 364Extended Details tab . . . . . . . . . . . . . . . . . . . . . . . . . . . . . . . . . . . . . . . . . . . . . . . . . . 365Internals tab . . . . . . . . . . . . . . . . . . . . . . . . . . . . . . . . . . . . . . . . . . . . . . . . . . . . . . . . . 365Data instance context menu . . . . . . . . . . . . . . . . . . . . . . . . . . . . . . . . . . . . . . . . . . . . 365Adding a new data instance . . . . . . . . . . . . . . . . . . . . . . . . . . . . . . . . . . . . . . . . . . . . 365Editing slots. . . . . . . . . . . . . . . . . . . . . . . . . . . . . . . . . . . . . . . . . . . . . . . . . . . . . . . . . . 367Exporting data . . . . . . . . . . . . . . . . . . . . . . . . . . . . . . . . . . . . . . . . . . . . . . . . . . . . . . . 368
Chapter 12 User-defined policies 371
Understanding user-defined event policy types . . . . . . . . . . . . . . . . . . . . . . . . . . . . . . 372Understanding event processing rules (MRL) for policy types. . . . . . . . . . . . . . . . . . 372
Format of event processing rules for policy types . . . . . . . . . . . . . . . . . . . . . . . . . 372How a rule for a policy type is processed . . . . . . . . . . . . . . . . . . . . . . . . . . . . . . . . 373Sources of information about rules . . . . . . . . . . . . . . . . . . . . . . . . . . . . . . . . . . . . . . 373
User-defined event policy type creation . . . . . . . . . . . . . . . . . . . . . . . . . . . . . . . . . . . . . 374Creating user-defined policy types . . . . . . . . . . . . . . . . . . . . . . . . . . . . . . . . . . . . . . 374
10 BMC Impact Solutions Event Management Guide

Defining the policy data class for a new policy type . . . . . . . . . . . . . . . . . . . . . . . 374Defining presentation names for a new policy type . . . . . . . . . . . . . . . . . . . . . . . 376Creating the event processing rule(s) for a new policy type. . . . . . . . . . . . . . . . . 377
Index 379
Contents 11

12 BMC Impact Solutions Event Management Guide

FiguresLocation of elements in the Events View . . . . . . . . . . . . . . . . . . . . . . . . . . . . . . . . . . . . . 22Events View navigation pane . . . . . . . . . . . . . . . . . . . . . . . . . . . . . . . . . . . . . . . . . . . . . . 24A CIEM Dashboard . . . . . . . . . . . . . . . . . . . . . . . . . . . . . . . . . . . . . . . . . . . . . . . . . . . . . . . 26Impact Manager Information dialog box General tab . . . . . . . . . . . . . . . . . . . . . . . . . . 27Impact Manager Information dialog box Workload tab . . . . . . . . . . . . . . . . . . . . . . . . 28Impact Manager Information dialog box Components tab . . . . . . . . . . . . . . . . . . . . . 28Selector Details: Logfile Adapter example . . . . . . . . . . . . . . . . . . . . . . . . . . . . . . . . . . . 41Add Event Criteria: LogFile Adapter example . . . . . . . . . . . . . . . . . . . . . . . . . . . . . . . . 41Selector Details complete: LogFile Adapter example . . . . . . . . . . . . . . . . . . . . . . . . . . 42By Policy Type selection: LogFile Adapter example . . . . . . . . . . . . . . . . . . . . . . . . . . . 43Selector Chooser: LogFile Adapter example . . . . . . . . . . . . . . . . . . . . . . . . . . . . . . . . . . 43Notification Policy Details: Logfile Adapter example . . . . . . . . . . . . . . . . . . . . . . . . . . 44Event message: LOGFILE_BASE event . . . . . . . . . . . . . . . . . . . . . . . . . . . . . . . . . . . . . . 46Event message: BACKUP_MONITOR event . . . . . . . . . . . . . . . . . . . . . . . . . . . . . . . . . 47Rule syntax . . . . . . . . . . . . . . . . . . . . . . . . . . . . . . . . . . . . . . . . . . . . . . . . . . . . . . . . . . . . . . 58Event selection criteria example . . . . . . . . . . . . . . . . . . . . . . . . . . . . . . . . . . . . . . . . . . . . 60when condition triggered by any change to a specified slot . . . . . . . . . . . . . . . . . . . . 67when condition triggered by a specific change to a specified slot . . . . . . . . . . . . . . . . 68when condition triggered by a specific change to a specified slot . . . . . . . . . . . . . . . . 68Rule containing a when clause . . . . . . . . . . . . . . . . . . . . . . . . . . . . . . . . . . . . . . . . . . . . . 69Sample data . . . . . . . . . . . . . . . . . . . . . . . . . . . . . . . . . . . . . . . . . . . . . . . . . . . . . . . . . . . . . 69Execute rule using dynamic data . . . . . . . . . . . . . . . . . . . . . . . . . . . . . . . . . . . . . . . . . . . 73Interface instance example . . . . . . . . . . . . . . . . . . . . . . . . . . . . . . . . . . . . . . . . . . . . . . . . . 76Collector definition syntax . . . . . . . . . . . . . . . . . . . . . . . . . . . . . . . . . . . . . . . . . . . . . . . . . 88Collector tree definition example . . . . . . . . . . . . . . . . . . . . . . . . . . . . . . . . . . . . . . . . . . . 92Static collector example 1 . . . . . . . . . . . . . . . . . . . . . . . . . . . . . . . . . . . . . . . . . . . . . . . . . . 93Static collector example 2 . . . . . . . . . . . . . . . . . . . . . . . . . . . . . . . . . . . . . . . . . . . . . . . . . . 94Self collector definition . . . . . . . . . . . . . . . . . . . . . . . . . . . . . . . . . . . . . . . . . . . . . . . . . . . . 96Catchall collector definition . . . . . . . . . . . . . . . . . . . . . . . . . . . . . . . . . . . . . . . . . . . . . . . . 96MC_SMC_EVENTS collector definition . . . . . . . . . . . . . . . . . . . . . . . . . . . . . . . . . . . . . 99How event operations affect event state . . . . . . . . . . . . . . . . . . . . . . . . . . . . . . . . . . . . 107Events View subtab of Edit Configuration dialog box . . . . . . . . . . . . . . . . . . . . . . . . 111Severity section of Events View subtab of Edit Configuration dialog box . . . . . . . . 113Event count section of Events View subtab of Edit Configuration dialog box . . . . 114Event Sources selection . . . . . . . . . . . . . . . . . . . . . . . . . . . . . . . . . . . . . . . . . . . . . . . . . . 116Float command . . . . . . . . . . . . . . . . . . . . . . . . . . . . . . . . . . . . . . . . . . . . . . . . . . . . . . . . . 119MetaCollector addition . . . . . . . . . . . . . . . . . . . . . . . . . . . . . . . . . . . . . . . . . . . . . . . . . . 121Slot quick filter and severity quick filter . . . . . . . . . . . . . . . . . . . . . . . . . . . . . . . . . . . . 123Edit Event View dialog box . . . . . . . . . . . . . . . . . . . . . . . . . . . . . . . . . . . . . . . . . . . . . . . 125Slot order creation . . . . . . . . . . . . . . . . . . . . . . . . . . . . . . . . . . . . . . . . . . . . . . . . . . . . . . . 129
Figures 13

Single-click sorting indicators . . . . . . . . . . . . . . . . . . . . . . . . . . . . . . . . . . . . . . . . . . . . . 132Multiple column sorting indicators . . . . . . . . . . . . . . . . . . . . . . . . . . . . . . . . . . . . . . . . 132Edit Configuration dialog . . . . . . . . . . . . . . . . . . . . . . . . . . . . . . . . . . . . . . . . . . . . . . . . . 134Event tree hierarchy . . . . . . . . . . . . . . . . . . . . . . . . . . . . . . . . . . . . . . . . . . . . . . . . . . . . . 140Image view widgets . . . . . . . . . . . . . . . . . . . . . . . . . . . . . . . . . . . . . . . . . . . . . . . . . . . . . 141Custom image view . . . . . . . . . . . . . . . . . . . . . . . . . . . . . . . . . . . . . . . . . . . . . . . . . . . . . . 142Image view with float option . . . . . . . . . . . . . . . . . . . . . . . . . . . . . . . . . . . . . . . . . . . . . . 143Event Group editor . . . . . . . . . . . . . . . . . . . . . . . . . . . . . . . . . . . . . . . . . . . . . . . . . . . . . . 144Event tree node addition . . . . . . . . . . . . . . . . . . . . . . . . . . . . . . . . . . . . . . . . . . . . . . . . . 145Event annotation . . . . . . . . . . . . . . . . . . . . . . . . . . . . . . . . . . . . . . . . . . . . . . . . . . . . . . . . 156Remote action selection . . . . . . . . . . . . . . . . . . . . . . . . . . . . . . . . . . . . . . . . . . . . . . . . . . 157Local action selection . . . . . . . . . . . . . . . . . . . . . . . . . . . . . . . . . . . . . . . . . . . . . . . . . . . . 158Active Explore Event Relationships icon . . . . . . . . . . . . . . . . . . . . . . . . . . . . . . . . . . . . 160Alias Formulas Editor . . . . . . . . . . . . . . . . . . . . . . . . . . . . . . . . . . . . . . . . . . . . . . . . . . . . 164Add Alias Formula dialog . . . . . . . . . . . . . . . . . . . . . . . . . . . . . . . . . . . . . . . . . . . . . . . . 165Example of match attributes . . . . . . . . . . . . . . . . . . . . . . . . . . . . . . . . . . . . . . . . . . . . . . 166Home Page URI slot . . . . . . . . . . . . . . . . . . . . . . . . . . . . . . . . . . . . . . . . . . . . . . . . . . . . . 173Dashboard with CI homepage link . . . . . . . . . . . . . . . . . . . . . . . . . . . . . . . . . . . . . . . . . 174Related events command . . . . . . . . . . . . . . . . . . . . . . . . . . . . . . . . . . . . . . . . . . . . . . . . . 181Event relations . . . . . . . . . . . . . . . . . . . . . . . . . . . . . . . . . . . . . . . . . . . . . . . . . . . . . . . . . . 182Local action general syntax . . . . . . . . . . . . . . . . . . . . . . . . . . . . . . . . . . . . . . . . . . . . . . . 192Syntax to limit local actions available by user role . . . . . . . . . . . . . . . . . . . . . . . . . . . . 192Syntax to limit local actions by event class . . . . . . . . . . . . . . . . . . . . . . . . . . . . . . . . . . 193Syntax to execute a local actions against multiple events of the same type . . . . . . . 195Example of an action definition that uses the batchmode parameter . . . . . . . . . . . . 195Example celleventdata.xml file . . . . . . . . . . . . . . . . . . . . . . . . . . . . . . . . . . . . . . . . . . . . 195Edit Toolbar Actions dialog box . . . . . . . . . . . . . . . . . . . . . . . . . . . . . . . . . . . . . . . . . . . 198Local toolbar action selection . . . . . . . . . . . . . . . . . . . . . . . . . . . . . . . . . . . . . . . . . . . . . . 199Local action toolbar button order . . . . . . . . . . . . . . . . . . . . . . . . . . . . . . . . . . . . . . . . . . 200Action rule syntax . . . . . . . . . . . . . . . . . . . . . . . . . . . . . . . . . . . . . . . . . . . . . . . . . . . . . . . 203Example of a specified role . . . . . . . . . . . . . . . . . . . . . . . . . . . . . . . . . . . . . . . . . . . . . . . 204Action argument syntax . . . . . . . . . . . . . . . . . . . . . . . . . . . . . . . . . . . . . . . . . . . . . . . . . . 205Primitive to perform an action from a rule . . . . . . . . . . . . . . . . . . . . . . . . . . . . . . . . . . 207Example of exit code that returns an argument . . . . . . . . . . . . . . . . . . . . . . . . . . . . . . 208Example of exit code that returns a specified value . . . . . . . . . . . . . . . . . . . . . . . . . . . 208Process overview: remote execution . . . . . . . . . . . . . . . . . . . . . . . . . . . . . . . . . . . . . . . . 218Add Event Criteria . . . . . . . . . . . . . . . . . . . . . . . . . . . . . . . . . . . . . . . . . . . . . . . . . . . . . . 228Remote action result icon . . . . . . . . . . . . . . . . . . . . . . . . . . . . . . . . . . . . . . . . . . . . . . . . . 235Automatic remote execution . . . . . . . . . . . . . . . . . . . . . . . . . . . . . . . . . . . . . . . . . . . . . . 236Remote Action Policy definition window . . . . . . . . . . . . . . . . . . . . . . . . . . . . . . . . . . . 239Interactive remote execution . . . . . . . . . . . . . . . . . . . . . . . . . . . . . . . . . . . . . . . . . . . . . . 241Event management policy definition workflow . . . . . . . . . . . . . . . . . . . . . . . . . . . . . . 262Event selector group name . . . . . . . . . . . . . . . . . . . . . . . . . . . . . . . . . . . . . . . . . . . . . . . . 264Flow of data required to implement a dynamic data enrichment policy . . . . . . . . . 267Default PMEP event classes and slots . . . . . . . . . . . . . . . . . . . . . . . . . . . . . . . . . . . . . . 270Timeframes . . . . . . . . . . . . . . . . . . . . . . . . . . . . . . . . . . . . . . . . . . . . . . . . . . . . . . . . . . . . 271Example edited location.csv file . . . . . . . . . . . . . . . . . . . . . . . . . . . . . . . . . . . . . . . . . . . 275Sample rows in the TextTranslation.csv file . . . . . . . . . . . . . . . . . . . . . . . . . . . . . . . . . 277Variable syntax example . . . . . . . . . . . . . . . . . . . . . . . . . . . . . . . . . . . . . . . . . . . . . . . . . . 278
14 BMC Impact Solutions Event Management Guide
Selector Details tab . . . . . . . . . . . . . . . . . . . . . . . . . . . . . . . . . . . . . . . . . . . . . . . . . . . . . . 279Class Chooser dialog box . . . . . . . . . . . . . . . . . . . . . . . . . . . . . . . . . . . . . . . . . . . . . . . . . 280Selection Definition section of the Add Event Criteria editor . . . . . . . . . . . . . . . . . . 281Example event selection criteria expression . . . . . . . . . . . . . . . . . . . . . . . . . . . . . . . . . 281Completed event selection criteria in Selector Details tab . . . . . . . . . . . . . . . . . . . . . 281Blackout Policy Details tab . . . . . . . . . . . . . . . . . . . . . . . . . . . . . . . . . . . . . . . . . . . . . . . 284Component Based Enrichment Policy Details tab . . . . . . . . . . . . . . . . . . . . . . . . . . . . 287Closure Policy Details tab . . . . . . . . . . . . . . . . . . . . . . . . . . . . . . . . . . . . . . . . . . . . . . . . 291Correlation Policy Details tab . . . . . . . . . . . . . . . . . . . . . . . . . . . . . . . . . . . . . . . . . . . . . 294Enrichment Policy Details tab . . . . . . . . . . . . . . . . . . . . . . . . . . . . . . . . . . . . . . . . . . . . . 297Escalation Policy Details tab . . . . . . . . . . . . . . . . . . . . . . . . . . . . . . . . . . . . . . . . . . . . . . 301Time Escalation Controls . . . . . . . . . . . . . . . . . . . . . . . . . . . . . . . . . . . . . . . . . . . . . . . . . 303Rate of Event Arrival Controls . . . . . . . . . . . . . . . . . . . . . . . . . . . . . . . . . . . . . . . . . . . . 304Notification Policy Details tab . . . . . . . . . . . . . . . . . . . . . . . . . . . . . . . . . . . . . . . . . . . . . . 306Propagation Policy Details tab . . . . . . . . . . . . . . . . . . . . . . . . . . . . . . . . . . . . . . . . . . . . . . 309Propagation cell list . . . . . . . . . . . . . . . . . . . . . . . . . . . . . . . . . . . . . . . . . . . . . . . . . . . . . 310Recurrence Policy Details tab . . . . . . . . . . . . . . . . . . . . . . . . . . . . . . . . . . . . . . . . . . . . . . 312Suppression Policy Details tab . . . . . . . . . . . . . . . . . . . . . . . . . . . . . . . . . . . . . . . . . . . . 314Threshold Policy Details tab . . . . . . . . . . . . . . . . . . . . . . . . . . . . . . . . . . . . . . . . . . . . . . 317Hold Events options . . . . . . . . . . . . . . . . . . . . . . . . . . . . . . . . . . . . . . . . . . . . . . . . . . . . . 318Pass Events Through options . . . . . . . . . . . . . . . . . . . . . . . . . . . . . . . . . . . . . . . . . . . . . 319Timeout Policy Details tab . . . . . . . . . . . . . . . . . . . . . . . . . . . . . . . . . . . . . . . . . . . . . . . . 321List of event management policies . . . . . . . . . . . . . . . . . . . . . . . . . . . . . . . . . . . . . . . . . 323Dynamic Enrichment Policy Details tab . . . . . . . . . . . . . . . . . . . . . . . . . . . . . . . . . . . . 325Import confirmation . . . . . . . . . . . . . . . . . . . . . . . . . . . . . . . . . . . . . . . . . . . . . . . . . . . . . 328Dynamic Blackout Policy Details tab . . . . . . . . . . . . . . . . . . . . . . . . . . . . . . . . . . . . . . . 330Import confirmation . . . . . . . . . . . . . . . . . . . . . . . . . . . . . . . . . . . . . . . . . . . . . . . . . . . . . 333Dynamic Blackout Policy Details tab . . . . . . . . . . . . . . . . . . . . . . . . . . . . . . . . . . . . . . . 336Import Data Confirmation dialog box . . . . . . . . . . . . . . . . . . . . . . . . . . . . . . . . . . . . . . 338List of out-of-the-box dynamic data enrichment policies . . . . . . . . . . . . . . . . . . . . . . 339Dynamic Enrichment Policy Details tab . . . . . . . . . . . . . . . . . . . . . . . . . . . . . . . . . . . . 340Import confirmation . . . . . . . . . . . . . . . . . . . . . . . . . . . . . . . . . . . . . . . . . . . . . . . . . . . . . 342List of out-of-the-box dynamic data enrichment policies . . . . . . . . . . . . . . . . . . . . . . 343Dynamic Enrichment Policy Details tab . . . . . . . . . . . . . . . . . . . . . . . . . . . . . . . . . . . . 344Import confirmation . . . . . . . . . . . . . . . . . . . . . . . . . . . . . . . . . . . . . . . . . . . . . . . . . . . . . 346List of out-of-the-box dynamic data enrichment policies . . . . . . . . . . . . . . . . . . . . . . 347Dynamic Enrichment Policy Details tab . . . . . . . . . . . . . . . . . . . . . . . . . . . . . . . . . . . . 348Import confirmation . . . . . . . . . . . . . . . . . . . . . . . . . . . . . . . . . . . . . . . . . . . . . . . . . . . . . 349Import tab . . . . . . . . . . . . . . . . . . . . . . . . . . . . . . . . . . . . . . . . . . . . . . . . . . . . . . . . . . . . . . 350History tab showing executed dynamic data enrichment policy . . . . . . . . . . . . . . . 351Invalid data error: dynamic enrichment policy . . . . . . . . . . . . . . . . . . . . . . . . . . . . . . 354Invalid timeframe error: dynamic blackout policy . . . . . . . . . . . . . . . . . . . . . . . . . . . 354Dynamic Data Editor Navigation Pane . . . . . . . . . . . . . . . . . . . . . . . . . . . . . . . . . . . . . 359Dynamic Data Editor toolbar . . . . . . . . . . . . . . . . . . . . . . . . . . . . . . . . . . . . . . . . . . . . . 360Slot Quick Filter dialog box . . . . . . . . . . . . . . . . . . . . . . . . . . . . . . . . . . . . . . . . . . . . . . . 361Unfiltered data list . . . . . . . . . . . . . . . . . . . . . . . . . . . . . . . . . . . . . . . . . . . . . . . . . . . . . . 362Type field list . . . . . . . . . . . . . . . . . . . . . . . . . . . . . . . . . . . . . . . . . . . . . . . . . . . . . . . . . . . 366Message bar . . . . . . . . . . . . . . . . . . . . . . . . . . . . . . . . . . . . . . . . . . . . . . . . . . . . . . . . . . . . 366New data instance created with the New Copy option . . . . . . . . . . . . . . . . . . . . . . . 367
Figures 15

Type field List . . . . . . . . . . . . . . . . . . . . . . . . . . . . . . . . . . . . . . . . . . . . . . . . . . . . . . . . . . . 367Export Data dialog box . . . . . . . . . . . . . . . . . . . . . . . . . . . . . . . . . . . . . . . . . . . . . . . . . . . 368Export Data dialog box—Selecting the data format . . . . . . . . . . . . . . . . . . . . . . . . . . . 368Contents of mcdata.csv . . . . . . . . . . . . . . . . . . . . . . . . . . . . . . . . . . . . . . . . . . . . . . . . . . . 369Export file containing four data instances . . . . . . . . . . . . . . . . . . . . . . . . . . . . . . . . . . . 369
16 BMC Impact Solutions Event Management Guide
TablesEvent management processes implemented through BMC IX Console . . . . . . . . . . . 20Chapter overviews . . . . . . . . . . . . . . . . . . . . . . . . . . . . . . . . . . . . . . . . . . . . . . . . . . . . . . . 21Description of elements in the Events View . . . . . . . . . . . . . . . . . . . . . . . . . . . . . . . . . . 22Description of elements in the Events View navigation pane . . . . . . . . . . . . . . . . . . . 25Help Info subtab display settings . . . . . . . . . . . . . . . . . . . . . . . . . . . . . . . . . . . . . . . . . . . 30mcxa.conf parameters: Logfile adapter . . . . . . . . . . . . . . . . . . . . . . . . . . . . . . . . . . . . . . 36mcxa.conf parameters: SNMP Adapter . . . . . . . . . . . . . . . . . . . . . . . . . . . . . . . . . . . . . . 49Syntax object description . . . . . . . . . . . . . . . . . . . . . . . . . . . . . . . . . . . . . . . . . . . . . . . . . . 58Conditions for the using clause . . . . . . . . . . . . . . . . . . . . . . . . . . . . . . . . . . . . . . . . . . . . 64MC_CELL_PARSE_ERROR slots . . . . . . . . . . . . . . . . . . . . . . . . . . . . . . . . . . . . . . . . . . 84MC_CELL_UNDEFINED_CLASS slots . . . . . . . . . . . . . . . . . . . . . . . . . . . . . . . . . . . . . . 85MC_CELL_PROCESS_ERROR slots . . . . . . . . . . . . . . . . . . . . . . . . . . . . . . . . . . . . . . . . 85BMC Impact Manager standard roles . . . . . . . . . . . . . . . . . . . . . . . . . . . . . . . . . . . . . . . 91By Status collector set . . . . . . . . . . . . . . . . . . . . . . . . . . . . . . . . . . . . . . . . . . . . . . . . . . . . . 97By Location collector set . . . . . . . . . . . . . . . . . . . . . . . . . . . . . . . . . . . . . . . . . . . . . . . . . . . 97Collectors included in the MCxP collector set . . . . . . . . . . . . . . . . . . . . . . . . . . . . . . . . 98Event relations icons . . . . . . . . . . . . . . . . . . . . . . . . . . . . . . . . . . . . . . . . . . . . . . . . . . . . 103Events View Details pane . . . . . . . . . . . . . . . . . . . . . . . . . . . . . . . . . . . . . . . . . . . . . . . . 104New CEM-related slots in BMC IX . . . . . . . . . . . . . . . . . . . . . . . . . . . . . . . . . . . . . . . . . 105Event states resulting from event operations . . . . . . . . . . . . . . . . . . . . . . . . . . . . . . . . 106Current operator information in event list . . . . . . . . . . . . . . . . . . . . . . . . . . . . . . . . . . 107Event status icons . . . . . . . . . . . . . . . . . . . . . . . . . . . . . . . . . . . . . . . . . . . . . . . . . . . . . . . 108Event severity levels . . . . . . . . . . . . . . . . . . . . . . . . . . . . . . . . . . . . . . . . . . . . . . . . . . . . 109Event priority icons . . . . . . . . . . . . . . . . . . . . . . . . . . . . . . . . . . . . . . . . . . . . . . . . . . . . . 109Events View subtab display settings . . . . . . . . . . . . . . . . . . . . . . . . . . . . . . . . . . . . . . . 111Default filters and filter options . . . . . . . . . . . . . . . . . . . . . . . . . . . . . . . . . . . . . . . . . . . 122Event group configuration files . . . . . . . . . . . . . . . . . . . . . . . . . . . . . . . . . . . . . . . . . . . 139Event tree objects and definitions . . . . . . . . . . . . . . . . . . . . . . . . . . . . . . . . . . . . . . . . . . 141Description of conditional operators . . . . . . . . . . . . . . . . . . . . . . . . . . . . . . . . . . . . . . . 166Related event and source event slots . . . . . . . . . . . . . . . . . . . . . . . . . . . . . . . . . . . . . . . 182Example event relation definitions . . . . . . . . . . . . . . . . . . . . . . . . . . . . . . . . . . . . . . . . . 186Tags for the local action general syntax . . . . . . . . . . . . . . . . . . . . . . . . . . . . . . . . . . . . . 192Tags for defining multiple actions in one file . . . . . . . . . . . . . . . . . . . . . . . . . . . . . . . . 193Standard locations for action executables . . . . . . . . . . . . . . . . . . . . . . . . . . . . . . . . . . . 201Action rule syntax variable descriptions . . . . . . . . . . . . . . . . . . . . . . . . . . . . . . . . . . . . 203Action execution variables . . . . . . . . . . . . . . . . . . . . . . . . . . . . . . . . . . . . . . . . . . . . . . . . 209Elements of credential_repository.xml . . . . . . . . . . . . . . . . . . . . . . . . . . . . . . . . . . . . . 216Process description: remote execution . . . . . . . . . . . . . . . . . . . . . . . . . . . . . . . . . . . . . . 218iadmin options for remote execution . . . . . . . . . . . . . . . . . . . . . . . . . . . . . . . . . . . . . . . 220Required fields: adding a credential record . . . . . . . . . . . . . . . . . . . . . . . . . . . . . . . . . 221
Tables 17

Required fields: modifying a credential record . . . . . . . . . . . . . . . . . . . . . . . . . . . . . . 222Required fields: deleting a record . . . . . . . . . . . . . . . . . . . . . . . . . . . . . . . . . . . . . . . . . . 223Create Remote Actions dialog . . . . . . . . . . . . . . . . . . . . . . . . . . . . . . . . . . . . . . . . . . . . . 226Data fields (part 1): Create Remote Actions dialog . . . . . . . . . . . . . . . . . . . . . . . . . . . 226Add Event Criteria descriptions . . . . . . . . . . . . . . . . . . . . . . . . . . . . . . . . . . . . . . . . . . . 229Data fields (part 2): Create Remote Actions dialog . . . . . . . . . . . . . . . . . . . . . . . . . . . 230Rule and task correspondence . . . . . . . . . . . . . . . . . . . . . . . . . . . . . . . . . . . . . . . . . . . . . 240Input arguments: admin_execute . . . . . . . . . . . . . . . . . . . . . . . . . . . . . . . . . . . . . . . . . . 244Parameters: action task . . . . . . . . . . . . . . . . . . . . . . . . . . . . . . . . . . . . . . . . . . . . . . . . . . . 247Remote execution properties in ias.properties . . . . . . . . . . . . . . . . . . . . . . . . . . . . . . . 252Remote execution port and timeout properties . . . . . . . . . . . . . . . . . . . . . . . . . . . . . . 253Standard event management policy types . . . . . . . . . . . . . . . . . . . . . . . . . . . . . . . . . . . 258Out-of-the-box policies . . . . . . . . . . . . . . . . . . . . . . . . . . . . . . . . . . . . . . . . . . . . . . . . . . . 260Out-of-the-box event selectors . . . . . . . . . . . . . . . . . . . . . . . . . . . . . . . . . . . . . . . . . . . . . 263Timeframe types and descriptions . . . . . . . . . . . . . . . . . . . . . . . . . . . . . . . . . . . . . . . . . 265Evaluation order of event policy types . . . . . . . . . . . . . . . . . . . . . . . . . . . . . . . . . . . . . . 266Dynamic data enrichment source files . . . . . . . . . . . . . . . . . . . . . . . . . . . . . . . . . . . . . . 268Enrichment configuration files . . . . . . . . . . . . . . . . . . . . . . . . . . . . . . . . . . . . . . . . . . . . 269Timeframe Edit dialog options . . . . . . . . . . . . . . . . . . . . . . . . . . . . . . . . . . . . . . . . . . . . 271Standard event management policy types and procedures . . . . . . . . . . . . . . . . . . . . 282Cause Event tab controls . . . . . . . . . . . . . . . . . . . . . . . . . . . . . . . . . . . . . . . . . . . . . . . . . 295Out-of-the-box dynamic data enrichment event policy types and procedures . . . . 334Import tab uneditable fields . . . . . . . . . . . . . . . . . . . . . . . . . . . . . . . . . . . . . . . . . . . . . . . 350Administration tab navigation pane . . . . . . . . . . . . . . . . . . . . . . . . . . . . . . . . . . . . . . . . 359Policy Type Creation process . . . . . . . . . . . . . . . . . . . . . . . . . . . . . . . . . . . . . . . . . . . . . . 374
18 BMC Impact Solutions Event Management Guide

C h a p t e r 1
1 Introduction to event managementThe BMC Impact Explorer (BMC IX) component provides a cross-platform operator and administrator interface for defining and managing events and for viewing service models that have event associations.
Event management process . . . . . . . . . . . . . . . . . . . . . . . . . . . . . . . . . . . . . . . . . . . . . . . . 19Related documentation . . . . . . . . . . . . . . . . . . . . . . . . . . . . . . . . . . . . . . . . . . . . . . . . . . . . 20Using this guide . . . . . . . . . . . . . . . . . . . . . . . . . . . . . . . . . . . . . . . . . . . . . . . . . . . . . . . . . . 20Elements of the Events View . . . . . . . . . . . . . . . . . . . . . . . . . . . . . . . . . . . . . . . . . . . . . . . 21
Accessing the Events View. . . . . . . . . . . . . . . . . . . . . . . . . . . . . . . . . . . . . . . . . . . . . . 21Dashboard View. . . . . . . . . . . . . . . . . . . . . . . . . . . . . . . . . . . . . . . . . . . . . . . . . . . . . . . . . . 25Cell data view . . . . . . . . . . . . . . . . . . . . . . . . . . . . . . . . . . . . . . . . . . . . . . . . . . . . . . . . . . . . 27Online help . . . . . . . . . . . . . . . . . . . . . . . . . . . . . . . . . . . . . . . . . . . . . . . . . . . . . . . . . . . . . . 29
Customizing access to Help for events. . . . . . . . . . . . . . . . . . . . . . . . . . . . . . . . . . . . 29Guidelines for setting login timeout value. . . . . . . . . . . . . . . . . . . . . . . . . . . . . . . . . . . . 30
Event management processThe BMC Impact Explorer Console provides a means for monitoring, managing, and taking actions on events. Event monitoring can be as simple as an operator taking note of the severity levels of events originating from different components and then reporting the information to an administrator. Event managing can run the gamut from initiating simple management actions such as acknowledging the event to launching remote actions on the impacted component. Event managing also includes the creation of Master Rule Language (MRL) rules and of policies, both of which are designed to process incoming events that match specified criteria. You create MRL rules manually, but you can define the policies through the BMC IX Console.
Table 1 on page 20 lists the different ways that BMC Event Manager can implement the different aspects of event management. Some implementations apply to more than one process.
Chapter 1 Introduction to event management 19

Related documentation
Related documentationThis guide is part of the BMC Impact Solutions documentation set. You should review it together with the following complementary guides:
■ BMC Impact Solutions Concept Guide■ BMC Impact Solutions Getting Started Guide■ BMC Impact Event Adapters User Guide■ BMC Impact Solutions Knowledge Base Development Reference Guide■ BMC Impact Solutions Infrastructure Administration Guide
Using this guideTable 2 on page 21 provides an overview of each chapter in the guide.
Table 1 Event management processes implemented through BMC IX Console
Event management process BMC IX implementation
Normalization and enrichment ■ MAP files at the event adapter source■ Enrichment policy■ Dynamic enrichment policy■ Component based enrichment policy
Filtering ■ Selectors■ MAP files at the event adapter source■ Suppression policy■ Threshold policy
Prioritization ■ Enrichment policy■ Escalation policy
Suppression ■ Suppression policy■ Closure policy
Deduplication Recurrence policy
Abstraction Not implemented in BMC IX. You must apply the MRL rules instead.
Correlation Correlation policy
Escalation ■ Escalation policy■ Propagation policy■ Set Manual Status menu option
Notification ■ Notification policy■ Send Event as SMTP Email menu option
Automation ■ Remote Action Policy■ Run Book Automation integration module
20 BMC Impact Solutions Event Management Guide

Elements of the Events View
Elements of the Events View This section describes some of the main GUI elements and navigation features of the Events View in the BMC Impact Explorer (BMC IX) Console.
Accessing the Events View
To access the Events View in the BMC IX Console, click the Events tab. The Events View contains a toolbar, a navigation pane, the event list, and subtabs containing various types of details about the events that are displayed in the events list. You can view events for a cell, a collector, a MetaCollector, or an event group
Event instances are displayed in an event list. From the event list, you can perform event operations (such as closing or escalating an event), view event relationships (such as correlation), perform actions on an event, or view business services related to an event.
Table 2 Chapter overviews
Chapter Title Summary
2 Working with event adapters (walk-through)
shows how to set up the LogFile and SNMP Adapters and their MAP files to normalize events at the event source
3 Event rules explains how to write rules in the Master Rule Language to process events. It assumes an understanding of MRL and the BMC Impact Solutions Knowledge Base Development Reference Guide.
4 Working with collectors describes the default event collects and tells how to write custom collectors
5 Event lists describes how to use the GUI to handle events
6 Event groups and image views shows how to manage the GUI through event groups and image views
7 Creating local and remote actions provides the procedure for defining local and remote actions that you perform from the GUI
8 Event operations tells how to initiate different actions on events in the GUI
9 Remote execution explains how to implement and use the remote execution feature
10 Event management policies shows how to create the different types of event management policies to handle event processing
11 Dynamic data editor tells how to use the Dynamic Data Editor to create data instances that supplement rules and policies
12 User-defined policies describes how to create and implement user-defined policies to handle specialized event processing
Chapter 1 Introduction to event management 21

Accessing the Events View
Figure 1 shows an example of the BMC IX Events View.
Figure 1 Location of elements in the Events View
Table 1 lists and describes the main elements of the Events View.
Table 3 Description of elements in the Events View (part 1 of 2)
# Name Description
1 Information Display Selection tabs
provide access to the available categories of event information such as cells, cell groups, collectors, MetaCollectors, and event groups
2 navigation pane displays cells, cell groups, collectors, MetaCollectors, and event groups in a hierarchical relationship tree
3 View Selection tabs provide access to the Events, Services, Administration, and Dashboard Views
2
1
3
45
6
8
7
22 BMC Impact Solutions Event Management Guide

Accessing the Events View
Figure 2 on page 24 shows the navigation panel and tree in detail.
4 Event Sources list provides access to the default filters, which provide variations of the event list:
■ list all events
■ limit the event list to active, new, closed, or blackout events in the following categories:
— Basic Information: displays the default slots of the class EVENT
— Supervisor Information: displays the same slots as Basic Information, except that action count is replaced by current owner
— SMC Information: displays information from the collector MC_SMC_EVENT that collects all events in which the mc_smc_id slot contains information
■ list service model component events in the following categories:
— impact events— status history events
For more information, see “Using the default filters” on page 122.
5 Slots columns that display the status, priority, severity, action count (Occurrences), event relation, receipt date (Occurred), and message for events
6 event list displays the contents of a cell or collector as a list of events with slot information and filters.
Each line of the list represents one event.
7 Pending Events indicator
displays the number of events in the current list and the number of events pending
In Figure 1 on page 22, Pending Events shows that 98 events are in the current event list and no events are pending.
8 details pane displays details about the currently selected event in each subtab
For descriptions of each subtab, see Table 18 on page 104.
Table 3 Description of elements in the Events View (part 2 of 2)
# Name Description
Chapter 1 Introduction to event management 23

Accessing the Events View
Figure 2 Events View navigation pane
Table 4 on page 25 lists and describes the main features of the navigation panel.
1
2
3
4
6
7
8
9
10
5
24 BMC Impact Solutions Event Management Guide

Dashboard View
Dashboard ViewWhen the Impact Manager cell that your important components reside on is a BMC EM cell, clicking the Dashboard tab on BMC IX displays a CI-centric Event Management (CIEM) Dashboard View. This view displays the important components that you want to monitor, but does not display relationships between those components or how an impacted component can affect a service.
Table 4 Description of elements in the Events View navigation pane
# Name Icon Description
1 Collectors subtab
displays the cells, cell groups, and collectors available for viewing
2 MetaCollectors subtab
displays the MetaCollectors available for viewing
3 Event Groups subtab
displays the event groups available for viewing
4 cell group icon identifies a cell group
5 cell icon identifies a cell
6 hierarchy indicator
indicates existence of a hierarchy below the monitored cell, cell group, or collector
7 collector icon identifies a collector
8 severity level indicator
varies identifies by color the highest severity level of the events contained in the collector (for the configured statuses).
For more information about the severity levels for events, see Table 23 on page 109.
For more information, see “Understanding the effect of event status and severity on collectors’ color” on page 112.
9 event count none displays the number of events contained in the collector and the number of events that you selected to count.
For more information, see “Understanding the effect of event status on event count for collectors” on page 113.
10 View Selection tabs
none access the Events, Services, Administration, or Dashboard Views
Chapter 1 Introduction to event management 25
Dashboard View
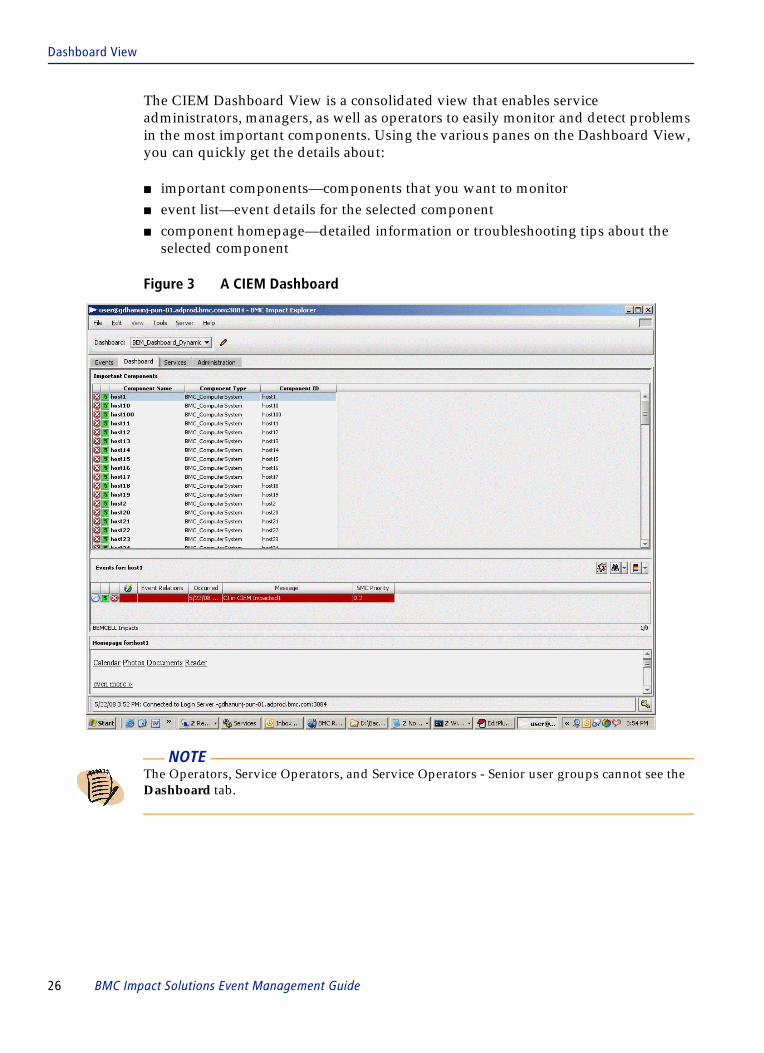
The CIEM Dashboard View is a consolidated view that enables service administrators, managers, as well as operators to easily monitor and detect problems in the most important components. Using the various panes on the Dashboard View, you can quickly get the details about:
■ important components—components that you want to monitor■ event list—event details for the selected component■ component homepage—detailed information or troubleshooting tips about the
selected component
Figure 3 A CIEM Dashboard
NOTE The Operators, Service Operators, and Service Operators - Senior user groups cannot see the Dashboard tab.
26 BMC Impact Solutions Event Management Guide

Cell data view
Cell data view Property and performance information for a cell is maintained in the Impact Manager Info dialog box. You can access this information by right-clicking a cell in the navigation pane and choosing View Manager Info from the menu. Cell property data is presented on the General subtab, including the cell name, description, IP address and port number for the primary cell server, IP address and port number for the secondary cell server (if applicable), release and build versions, service address, port number, and platform information.
The Workload subtab presents performance statistics for the cell, including how much data the cell has received, the number of errors, and how much data has been stored, removed, and propagated. The service performance data presented on the Components tab pertains specifically to the number of service model components associated with the cell, such as the type of components and the relationships.
Figure 4 on page 27, Figure 5 on page 28, and Figure 6 on page 28 show examples of property and performance data presented on the tabs of the dialog box.
Figure 4 Impact Manager Information dialog box General tab
Chapter 1 Introduction to event management 27

Cell data view
Figure 5 Impact Manager Information dialog box Workload tab
Figure 6 Impact Manager Information dialog box Components tab
NOTE To refresh the contents of the Impact Manager Information dialog box, click Refresh .
28 BMC Impact Solutions Event Management Guide

Online help
Online helpProvided that your administrator has set up online event Help, you can use the Help Info subtab in the Edit Configuration dialog box to select options for displaying that additional event information. See your administrator for details about using static or dynamic Help.
Customizing access to Help for events
Static Help is based on classes and is created by the console with a combination of the Help Info URL, the class name of the event, and the HTML suffix. An .html or .htm file must already exist for each class used in your enterprise environment. These files must be available to your browser.
Dynamic Help is based on slot information for the selected event. When you access dynamic Help, a script creates a web page from a combination of the Help Info URL, the slot names, and the slot values of the selected event.
Before you begin
Before you enable either static or dynamic Help, you must obtain the following information:
■ whether you have static or dynamic Help■ the URL of the backup web server you will use■ the local path to the directory location of the Help HTML files■ the location of the directory for dynamic Help
To customize access to event Help
1 From the menu bar, choose Edit => Configuration.
2 In the Edit Configuration dialog box, click the Help Info subtab.
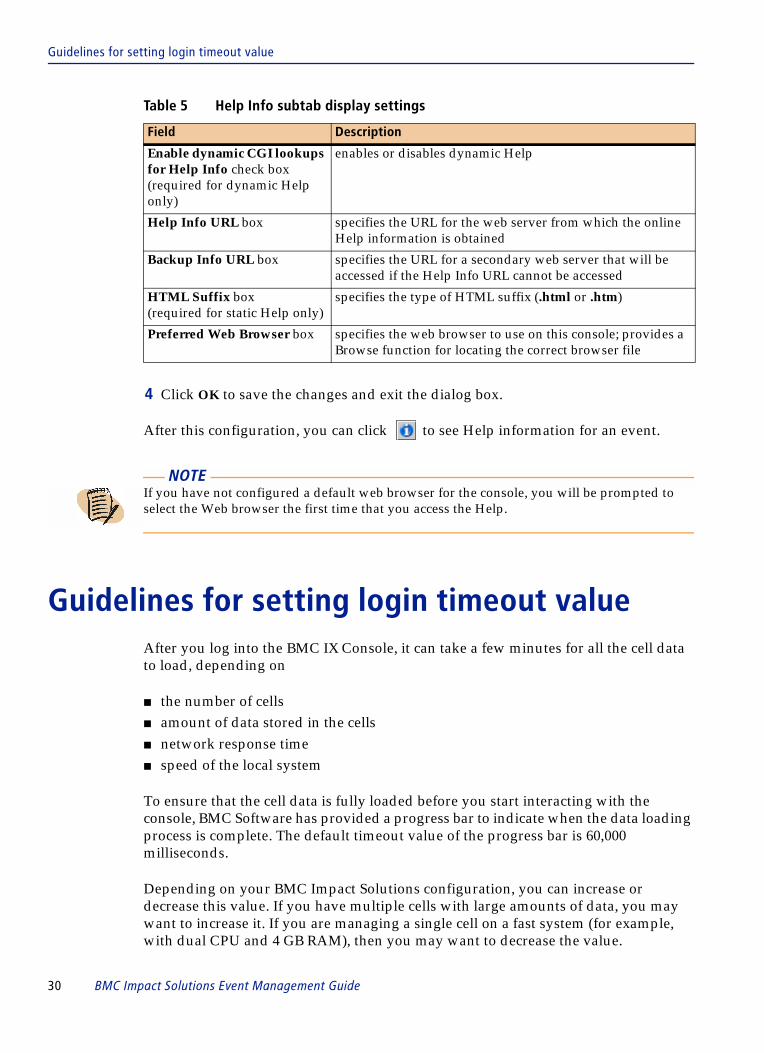
3 Use the information in Table 5 to determine the appropriate settings.
Chapter 1 Introduction to event management 29
Guidelines for setting login timeout value
4 Click OK to save the changes and exit the dialog box.
After this configuration, you can click to see Help information for an event.
Guidelines for setting login timeout valueAfter you log into the BMC IX Console, it can take a few minutes for all the cell data to load, depending on
■ the number of cells■ amount of data stored in the cells■ network response time■ speed of the local system
To ensure that the cell data is fully loaded before you start interacting with the console, BMC Software has provided a progress bar to indicate when the data loading process is complete. The default timeout value of the progress bar is 60,000 milliseconds.
Depending on your BMC Impact Solutions configuration, you can increase or decrease this value. If you have multiple cells with large amounts of data, you may want to increase it. If you are managing a single cell on a fast system (for example, with dual CPU and 4 GB RAM), then you may want to decrease the value.
Table 5 Help Info subtab display settings
Field Description
Enable dynamic CGI lookups for Help Info check box(required for dynamic Help only)
enables or disables dynamic Help
Help Info URL box specifies the URL for the web server from which the online Help information is obtained
Backup Info URL box specifies the URL for a secondary web server that will be accessed if the Help Info URL cannot be accessed
HTML Suffix box(required for static Help only)
specifies the type of HTML suffix (.html or .htm)
Preferred Web Browser box specifies the web browser to use on this console; provides a Browse function for locating the correct browser file
NOTE If you have not configured a default web browser for the console, you will be prompted to select the Web browser the first time that you access the Help.
30 BMC Impact Solutions Event Management Guide
Guidelines for setting login timeout value
You can modify this value in the IMPACT_SOLUTIONS_HOME\console\etc\ix.properties file by assigning a different value to the init_time parameter. Remember to restart the BMC IX Console after modifying the ix.properties file.
TIP Do not try to interact with the BMC IX Console, such as clicking objects in the navigation tree, until the data is fully loaded. Otherwise, the BMC IX Console will experience performance delays.
Chapter 1 Introduction to event management 31

Guidelines for setting login timeout value
32 BMC Impact Solutions Event Management Guide

C h a p t e r 2
2 Working with event adapters (walk-through)Purpose . . . . . . . . . . . . . . . . . . . . . . . . . . . . . . . . . . . . . . . . . . . . . . . . . . . . . . . . . . . . . . . . . 33Prerequisite. . . . . . . . . . . . . . . . . . . . . . . . . . . . . . . . . . . . . . . . . . . . . . . . . . . . . . . . . . . 34
LogFile Adapter . . . . . . . . . . . . . . . . . . . . . . . . . . . . . . . . . . . . . . . . . . . . . . . . . . . . . . . . . . 34Gathering event information from the third-party event source . . . . . . . . . . . . . . 34Task summary . . . . . . . . . . . . . . . . . . . . . . . . . . . . . . . . . . . . . . . . . . . . . . . . . . . . . . . . 35Sample log file . . . . . . . . . . . . . . . . . . . . . . . . . . . . . . . . . . . . . . . . . . . . . . . . . . . . . . . . 35Updating the mcxa.conf file . . . . . . . . . . . . . . . . . . . . . . . . . . . . . . . . . . . . . . . . . . . . . 36Defining the MAP file . . . . . . . . . . . . . . . . . . . . . . . . . . . . . . . . . . . . . . . . . . . . . . . . . . 37Defining the .baroc file . . . . . . . . . . . . . . . . . . . . . . . . . . . . . . . . . . . . . . . . . . . . . . . . . 38Defining the rule . . . . . . . . . . . . . . . . . . . . . . . . . . . . . . . . . . . . . . . . . . . . . . . . . . . . . . 40Creating a policy . . . . . . . . . . . . . . . . . . . . . . . . . . . . . . . . . . . . . . . . . . . . . . . . . . . . . . 40Generating test events. . . . . . . . . . . . . . . . . . . . . . . . . . . . . . . . . . . . . . . . . . . . . . . . . . 45
SNMP Adapter . . . . . . . . . . . . . . . . . . . . . . . . . . . . . . . . . . . . . . . . . . . . . . . . . . . . . . . . . . . 47Gathering event information from the third-party event source . . . . . . . . . . . . . . 47Installing the SNMP Configuration Manager . . . . . . . . . . . . . . . . . . . . . . . . . . . . . . 48Configuring the adapter . . . . . . . . . . . . . . . . . . . . . . . . . . . . . . . . . . . . . . . . . . . . . . . . 48Publishing the MIB files . . . . . . . . . . . . . . . . . . . . . . . . . . . . . . . . . . . . . . . . . . . . . . . . 49Viewing/Editing the MAP file . . . . . . . . . . . . . . . . . . . . . . . . . . . . . . . . . . . . . . . . . . 51Unpublishing MIBs . . . . . . . . . . . . . . . . . . . . . . . . . . . . . . . . . . . . . . . . . . . . . . . . . . . . 53Generating test events. . . . . . . . . . . . . . . . . . . . . . . . . . . . . . . . . . . . . . . . . . . . . . . . . . 53
PurposeThis walk-through summarizes the major steps in implementing two of the BMC Impact Event Adapters: the LogFile Adapter and the SNMP Adapter. The main purpose is to show you how to normalize events at the adapter level before the events are received by the BMC Impact Manager. For optimal event processing, BMC recommends that you reformat the event messages at the adapter level.
Chapter 2 Working with event adapters (walk-through) 33

Prerequisite
Prerequisite
You should be familiar with the MAP files, directory structure, and the configuration parameters and procedure of the LogFile Adapter and SNMP Adapter. Refer to the BMC Impact Event Adapters User Guide.
LogFile AdapterThe Logfile Adapter reads text-based logfiles that contain records which can be interpreted by Perl regular expressions.
Some log files that the Logfile Adapter monitors are:
■ Syslog messages on UNIX-based systems through the mcsyslogd.map file■ Apache log files through the mcapache.map file■ other text-based log files through the mclogfile.map file
This walk-through provides guidelines on editing the mclogfile.map file.
Gathering event information from the third-party event source
You can install the BMC Impact Event Adapters on the event source or on a system that points to the event source.
When installing the BMC Impact Event Adapters separately from the other BMC Impact Solution components, you are prompted to specify the
■ host name of the BMC Impact Administration Server ■ name of the cell to which to send the BAROC events
The installer creates an mcell.dir file for the event adapter with an entry for the cell. The installer also populates the ServerName parameter of the mcxa.conf file with the cell name.
When installing the BMC Impact Event Adapters with the BMC Impact Manager cell, you specify the host name of the BMC Impact Administration Server. The installer automatically updates the mcell.dir file of the event adapter with the cell entry and populates the ServerName parameter of the mxca.conf file with the cell name.
34 BMC Impact Solutions Event Management Guide

Task summary
When installing the BMC Impact Event Adapters with the BMC Impact Manager cell and the BMC Impact Administration Server, the installer automatically updates the mcell.dir file with the cell record and populates the ServerName parameter in the mcxa.conf file with the cell name.
Task summary
To prepare the Logfile Adapter, obtain a sample log file from the event source, and determine the relevant event messages that you want to translate into BAROC format. You specify the log file that you are monitoring in the mcxa.conf file by entering the full path to the log file as the Logfile parameter value.
You then can modify the MAP file to add new class definitions that translate messages to BAROC format. If you have customized class definitions in the MAP file, you must modify the classes in the mcxa.baroc file to accommodate the specified classes and slots. You can define rules and policies that implement actions based on the class definitions, and you can send test events to verify event processing.
Sample log file
The following sample log file, drive:\temp\backupMonitor.log, contains event messages that you can prepare the Logfile Adapter to monitor:
The event messages indicate the number of successful backups.
TIP Make sure that the Adapter has permission to access the log file by checking the permissions on the log file.
Feb 10 9:01:01 EnterpriseNightlyBackups Accounting Backups Pass: 10 Fail: 0Feb 10 9:01:05 EnterpriseNightlyBackups Marketing Backups Pass: 7 Fail: 3Feb 10 9:01:20 EnterpriseNightlyBackups Finance Backups Pass: 11 Fail: 1Feb 10 9:01:23 EnterpriseNightlyBackups Sales Backups Pass: 9 Fail: 0Feb 10 9:01:23 EnterpriseNightlyBackups HR Backups Pass: 20 Fail: 0
Chapter 2 Working with event adapters (walk-through) 35

Updating the mcxa.conf file
How the LogFile Adapter processes log file data
The LogFile Adapter converts log file data into records containing fields. The LogRecordSeparator parameter delimits log file records, and the LogFieldSeparator parameter delimits log file record fields. The default LogRecordSeparator parameter is the Perl regular expression for newline: \n. The default LogFieldSeparator parameter is the Perl regular expression for one or more white space characters: \s+.
This log file example contains 5 log file records having 10 fields each.
Updating the mcxa.conf file
In the MCELL_HOME\etc\mcxa.conf file, you can identify the full path to the backupMonitor.log file in the LogFile parameter:
You can define a LogFile Adapter instance, such as in the following extract:
When monitoring multiple log files, you must configure a LogFile Adapter instance for each log file. Each LogFile Adapter instance must be able to access the log file that it monitors. Otherwise, it cannot generate events.
Generally, you can use the default specific parameter values to indicate to the LogFile Adapter how to process the log files. However, you can customize how the Adapter processes the log files by completing the specific parameters in its mcxa.conf file. Table 6 describes these parameters and provides brief annotations of each. For more detailed descriptions, see the BMC Impact Event Adapters User Guide.
LogFile =c:\temp\backupMonitor.log
[backupMonitor adapter] #provides the name of the adapter instanceEngine = MA::ELogfile #required for LogFile AdaptersLogFile =c:\temp\backupMonitor.log #pointer to the log file
Table 6 mcxa.conf parameters: Logfile adapter (part 1 of 2)
Parameter Annotation
Logfile the complete file path to the log file name. The parameter accepts only one log file.
LogFieldSeparator a regular expression that delimits event attributes. Used only when the LogRegExpr parameter is empty
LogFlushPosPeriod number of events after which the log position is saved to disk
LogKeepEmpty Boolean value that indicates whether to drop or save empty events
LogMaxCount maximum number of log files to keep when log file rotation is enabled. Enter 0 if you do not want to keep log files. Enter -1 to keep all log files.
36 BMC Impact Solutions Event Management Guide

Defining the MAP file
If you modify the mcxa.conf during run-time, the Adapter’s engine manager detects the change and restarts the Adapter. Otherwise, you will need to start the Adapter to initialize the changes.
Defining the MAP file
MAP files are located in the MCELL_HOME\etc directory. The MAP file defines how an event is converted from its internal representation into BAROC format.
For the LogFile Adapter, BMC recommends that you use the default MAP file, mclogfile.map, as the basis for creating mapping customizations. The default MAP file is already mapped to the BAROC classes in the cell’s KB. To add any customizations, you must manually edit the MAP file. If you customize the MAP file, you must ensure that you update the BAROC classes accordingly.
LogMaxSize maximum log file size in bytes before the log file is rotated
LogProcessName name of daemon process name that receives the kill HUP command (UNIX)
LogReadAll Boolean value that indicates whether the log file is read upon Adapter startup
LogReadAllReopen Boolean value that indicates the Adapter opens a new log file [from the beginning or the end] when it detects that a log file has changed
LogRecordSeparator regular expression that delimits two events
LogRegExpr Perl 5 regular expression that is used to match an event
LogRegExprGlobal Boolean value that indicates whether the LogRegExpr event matching is performed globally
LogRememberPos Boolean value that indicates whether the Adapter stores the position of the last log entry
LogRotate Boolean value that indicates whether a new logfile is created when the logfile size exceeds the maximum specified by the LogMaxSize parameter
LogSmartOpen Boolean value that indicates whether the part of the current log file that has not been read is appended to the beginning of a new log file, when the current log file is replaced
LogStatPeriod the interval at which the Adapter performs the stat command
LogSupportKillHUP Boolean value that indicates whether the kill-HUP command is launched at each rotation of the log file (UNIX)
LogVarPrefix input variable prefix defined in the INPUT_VARIABLES stanza of the MAP file
TIP Make a backup copy of the default MAP file before beginning any customizations. Rename the backup copy or save it to a different directory location.
Table 6 mcxa.conf parameters: Logfile adapter (part 2 of 2)
Parameter Annotation
Chapter 2 Working with event adapters (walk-through) 37

Defining the .baroc file
The following extract of the default MAP file mclogfile.map is customized to capture specific event messages from the event source’s log file backupMonitor.log.
In this extract, we specify the input variables that we want to use for populating event slots. In this example, these input variables are assigned to the event slots defined under the CLASS:LOGFILE_BASE section. For example, $logname is assigned to the mc_tool slot and $complete is assigned to the msg slot.
Our custom class, BACKUP_MONITOR, is embedded within the LOGFILE_BASE class, meaning that the BACKUP_MONITOR event class is a subclass of the LOGFILE_BASE and inherits all the LOGFILE_BASE slot definitions. The BACKUP_MONITOR event class has a condition: the Perl regular expression that is defined on the line below "CLASS BACKUP_MONITOR". Only log records that satisfy this condition are processed as BACKUP_MONITOR events. Otherwise, the log record is processed as a LOGFILE_BASE event.
In addition, the BACKUP_MONITOR event class has a custom slot called app_fail_count. It is assigned the tenth field of the log record. In our example, this is the number of backup failures.
After modifying the MAP file, restart the Logfile Adapter.
Defining the .baroc file
BAROC classes for Adapters are defined in the mcxa.baroc file, installed under MCELL_HOME\etc\cell_name\kb\classes directory. The classes defined in the MAP file correspond to the names of the BAROC classes of the cell’s KB. You must manually customize the .baroc file if you customize classes in the MAP file.
INPUT_VARIABLES $LOGFILE $complete $logname $varlog 0-iEND
CLASS LOGFILE_BASE
logfile = $lognamemsg = $completemc_tool = $lognameCLASS BACKUP_MONITOR
$complete equals /^(...\s+\d+\s+\d+:..:..)\s+(\w+)\s+(\w+)\s+(\w+)\s+(\w+\:)\s+(\d+)\s+(\w+\:)\s+(\d+)\s*$/app_fail_count=$varlog9
ENDEND
38 BMC Impact Solutions Event Management Guide

Defining the .baroc file
In the following extract, we define the subclass BACKUP_MONITOR of the LOGFILE_BASE class, and we specify the data type of the slot app_fail_count (INTEGER).
A BAROC event is created when the log record from the event source matches the defined class in the Adapter’s MAP file and thereby enables the slot assignments to be made. A BAROC event is then sent to the designated cell.
After you update the BAROC classes, you define an MRL rule to process the event of class BACKUP_MONITOR.
TIP Make a backup copy of the default .baroc file before beginning any customizations. Rename the backup copy or save it to a different directory location.
# Logfile classes
MC_EV_CLASS : LOGFILE_BASE ISA MC_ADAPTER_BASE DEFINES { logfile : STRING; mc_tool_class : default = "Logfile"; };END
MC_EV_CLASS :BACKUP_MONITOR ISA LOGFILE_BASEDEFINES
{app_fail_count : INTEGER;
};END
WARNING Add the class definition—in this example, BACKUP_MONITOR—after the LOGFILE_BASE definition in the MAP file. Otherwise, you will encounter a compilation error.
Chapter 2 Working with event adapters (walk-through) 39

Defining the rule
Defining the rule
First, access the MCELL_HOME\etc\cellName\kb\rules\.load file, and add the line backupMonitorRule. Then specify the rule definition in the MCELL_HOME\etc\cellName\kb\rules\backupMonitorRule.mrl file, as shown in the following extract of a refine rule:
In this example, we have added a custom rule named BACKUP_MONITOR_FAILED. This rule is triggered if our custom event, BACKUP_MONITOR, contains a value greater than zero in its custom slot, app_fail_count. If the rule is triggered, the event severity is changed to MAJOR because the app_fail_count slot contains the tenth field of the log file record ($varlog9), which is the number of backup failures.
If the tenth field is greater than zero, meaning that there are backup failures, the BACKUP_MONITOR event will have a severity of MAJOR.
Recompile the cell’s KB and restart the cell.
Creating a policy
Here we create a sample notification policy that uses the specified event condition formula to process the incoming event forwarded by the Adapter.
Refer to Chapter 10, “Event management policies,”for details on policy creation. In this section we provide a series of snapshots with short explanations of how to build a notification policy that references the previously defined custom event class, BACKUP_MONITOR and its custom slot, app_fail_count.
In the BMC IX Console, under the Administration View, select the cell in the navigation tree and click the Add Event Selector icon to specify the selector BACKUP_MONITOR_FAILED _Events for this notification policy. See Figure 7 on page 41.
refine BACKUP_MONITOR_FAILED: BACKUP_MONITOR ($EV) where [$EV.app_fail_count > 0]
{$EV.severity = MAJOR ;}END
40 BMC Impact Solutions Event Management Guide

Creating a policy
Figure 7 Selector Details: Logfile Adapter example
Enter a description for this selector, such as EnterpriseNightlyBackup Failures in the example. You then click on the ellipses next to the Base Event Class field to open the Class Chooser dialog from which you select a subclass that contains the selection criteria. In this example, it would be the subclass you assigned to the Logfile Adapter: BACKUP_MONITOR.
You next add the event selection criteria in the Add Event Criteria dialog. Access the the Add Event Criteria dialog by clicking Add.
Figure 8 Add Event Criteria: LogFile Adapter example
Chapter 2 Working with event adapters (walk-through) 41
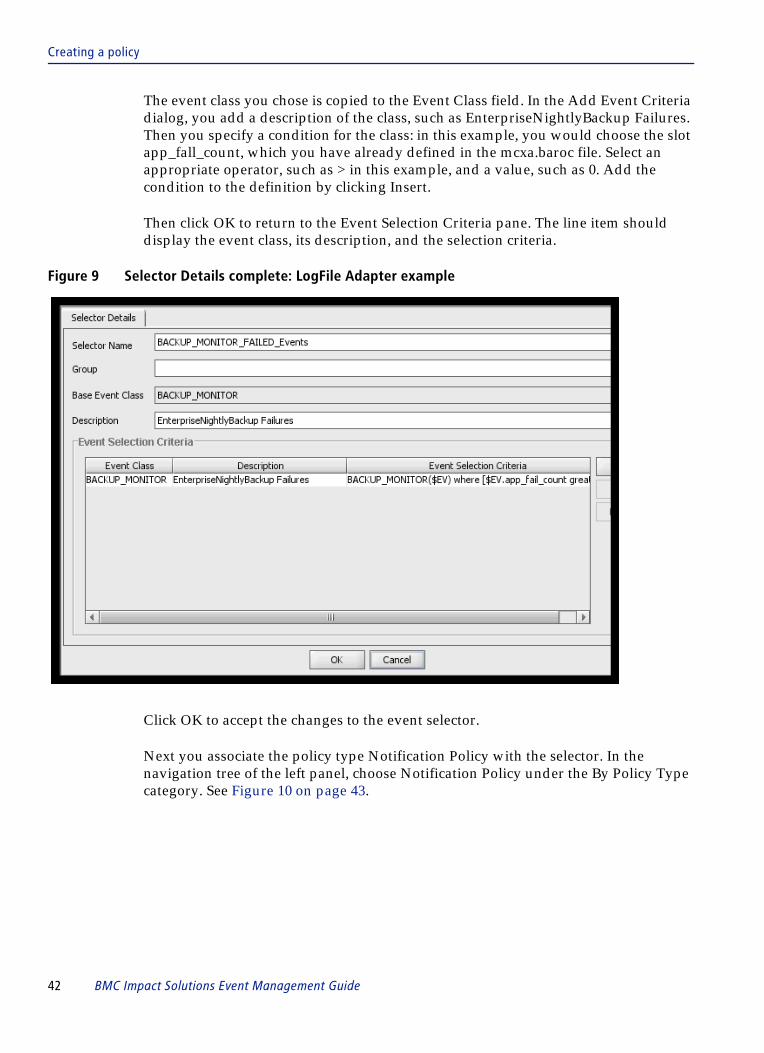
Creating a policy
The event class you chose is copied to the Event Class field. In the Add Event Criteria dialog, you add a description of the class, such as EnterpriseNightlyBackup Failures. Then you specify a condition for the class: in this example, you would choose the slot app_fall_count, which you have already defined in the mcxa.baroc file. Select an appropriate operator, such as > in this example, and a value, such as 0. Add the condition to the definition by clicking Insert.
Then click OK to return to the Event Selection Criteria pane. The line item should display the event class, its description, and the selection criteria.
Figure 9 Selector Details complete: LogFile Adapter example
Click OK to accept the changes to the event selector.
Next you associate the policy type Notification Policy with the selector. In the navigation tree of the left panel, choose Notification Policy under the By Policy Type category. See Figure 10 on page 43.
42 BMC Impact Solutions Event Management Guide

Creating a policy
Figure 10 By Policy Type selection: LogFile Adapter example
Now click the Add Event Policy icon to open the Selector Chooser dialog from which you select the already defined BACKUP_MONITOR_FAILED_Events selector.
Figure 11 Selector Chooser: LogFile Adapter example
Click OK to add the details of the notification policy. Under the Notification Policy Details tab, add the following information:
Field Description
Policy Name EnterpriseNightlyBackup Failure
Description Send Notification when EnterpriseNightlyBackupFailue detected
Users to Notify valid email address
Chapter 2 Working with event adapters (walk-through) 43

Creating a policy
Compare with the following example screen:
Figure 12 Notification Policy Details: Logfile Adapter example
Click Add. Here you enter the notification text, adding the event slot to include with the log message, as shown in the following example screen:
44 BMC Impact Solutions Event Management Guide

Generating test events
Then click Insert to complete the notification policy details:
Click OK to make the policy available to the cell.
Generating test events
To test that the Logfile Adapter is reading the log file and sending BAROC events, you add a message to the bottom of the log file that it monitors. First, however, ensure that BMC Impact Manager cell and the BMC Impact Event Adapters are running. Then launch the BMC IX Console and connect to the target cell. Open the Events View, and click the All Events collector. Verify that the Events list displays startup events for the BMC Impact Event Adapters and for the LogFile Adapter.
The example log file, drive:\temp\backupMonitor.log, is shown below:
In the first test, append the following line to the bottom of the log file:
This message does not satisfy the condition of the BACKUP_MONITOR event, so it is processed as a LOGFILE_BASE event. In the BMC IX Console, verify that a LOGFILE_BASE event is displayed, as shown in Figure 13 on page 46.
Feb 10 9:01:01 EnterpriseNightlyBackups Accounting Backups Pass: 10 Fail: 0Feb 10 9:01:05 EnterpriseNightlyBackups Marketing Backups Pass: 7 Fail: 3Feb 10 9:01:20 EnterpriseNightlyBackups Finance Backups Pass: 11 Fail: 1Feb 10 9:01:23 EnterpriseNightlyBackups Sales Backups Pass: 9 Fail: 0Feb 10 9:01:23 EnterpriseNightlyBackups HR Backups Pass: 20 Fail: 0
This line should result in a LOGFILE_BASE event!
Chapter 2 Working with event adapters (walk-through) 45

Generating test events
Figure 13 Event message: LOGFILE_BASE event
In the next test, add the following line to the bottom of the log file:
This message satisfies the condition of the BACKUP_MONITOR event, but its app_fail_count slot is not greater than 0. This event will have a severity of OK.
In the BMC IX Console, verify that a BACKUP_MONITOR event message with a severity of OK is displayed.
In the last test, append the following line to the bottom of the log file:
This message satisfies the condition of the BACKUP_MONITOR event, and its app_fail_count slot is greater than 0. This event will have a severity of MAJOR, as defined in the rule.
In the BMC IX Console, verify that the BACKUP_MONITOR event message with a severity of MAJOR is displayed, as shown Figure 14 on page 47. Also verify that expected email notification has been sent by the previously configured notification policy. Check that the email notification contains the same message slot text as recorded in the event.
Feb 10 9:01:01 EnterpriseNightlyBackups Accounting Backups Pass: 10 Fail: 0
Feb 10 9:01:05 EnterpriseNightlyBackups Marketing Backups Pass: 7 Fail: 3
46 BMC Impact Solutions Event Management Guide

SNMP Adapter
Figure 14 Event message: BACKUP_MONITOR event
SNMP AdapterThe SNMP Adapter is a User Datagram Protocol (UDP) SNMP server that listens for SNMP traps. It uses an internal utility to convert Management Information Base (MIB) files into BAROC classes and other data, both of which are used to format traps into BMC Impact Manager events.
The SNMP Adapter relies on the SNMP Configuration Manager, a web-based utility that automates the MIB conversion task and makes the MAP file editing task easier.
Gathering event information from the third-party event source
Install the BMC Impact Manager and the BMC Impact Event Adapters on the system on which you want to receive the SNMP traps. See the earlier discussion on page 34 for installation guidelines.
Chapter 2 Working with event adapters (walk-through) 47
Installing the SNMP Configuration Manager
Installing the SNMP Configuration Manager
Install the SNMP Configuration Manager utility on a system where the SNMP adapter, the MAP file, and the MIB files reside. Create a directory to which you copy or move the MIB files you wish to convert.
Launch the SNMP Configuration Manager to access its web-based interface. The usual URL link is http://hostName:port/snmpadapter; for example: http://mycomputer:8080/snmpadapter.
Configuring the adapter
To create an SNMP adapter instance, add the following entry to the MCELL_HOME\etc\mcxa.conf file:
The SNMP Adapter requires specific parameters in its mcxa.conf file. Table 7 on page 49 describes these parameters and provides brief annotations of each. Generally you update the default values of these specific parameters in only when required. For example, you would modify the SnmpLocalAddr parameter when the SNMP adapter resides on a system that has multiple Network Interface Cards. You would enter the IP address to which the SNMP adapter listens.
For more detailed descriptions, see the BMC Impact Event Adapters User Guide.
[Snmp]Engine = MA::ESnmpTrap
48 BMC Impact Solutions Event Management Guide

Publishing the MIB files
Publishing the MIB files
Your first step is to import the MIB files to the MAP file, which stores the classes of each SNMP trap.
Table 7 mcxa.conf parameters: SNMP Adapter
Parameter Description
SnmpDatFile File name of the .dat file that contains information used to translate incoming traps
If the parameter value is a relative path, the file must be located in the MCELL_HOME\etc directory. The .dat file is an enhanced version of the old .oid file. It can contain additional information to map enumerations and to extract indexes.
This file contains the results of the output of the BMC Impact Manager mib2map tool. Do not attempt to create this file manually.
Default: mcsnmptrapd.dat
SnmpGetIndexes Boolean indicator (0,1) that indicates whether to start or stop index extraction.
Valid values:
■ 0 – starts■ 1 – stops
SnmpLocalAddr IP address that specifies which interface to use on a computer with two or more interface cards
SnmpOIDFile Name of the file containing translations from SNMP OIDs to strings
Default: mcsnmptrapd.oid
SnmpPort port number of the UDP SNMP server
Default: 162
SnmpTrapLength initial size of the buffer that receives SNMP traps
Default: 8192
Use the SnmpTrapLength parameter default setting. If you must modify it, be aware that an MC_ADAPTER_ERROR occurs if the SnmpTrapLength value is smaller than the actual size of the trap.
Chapter 2 Working with event adapters (walk-through) 49
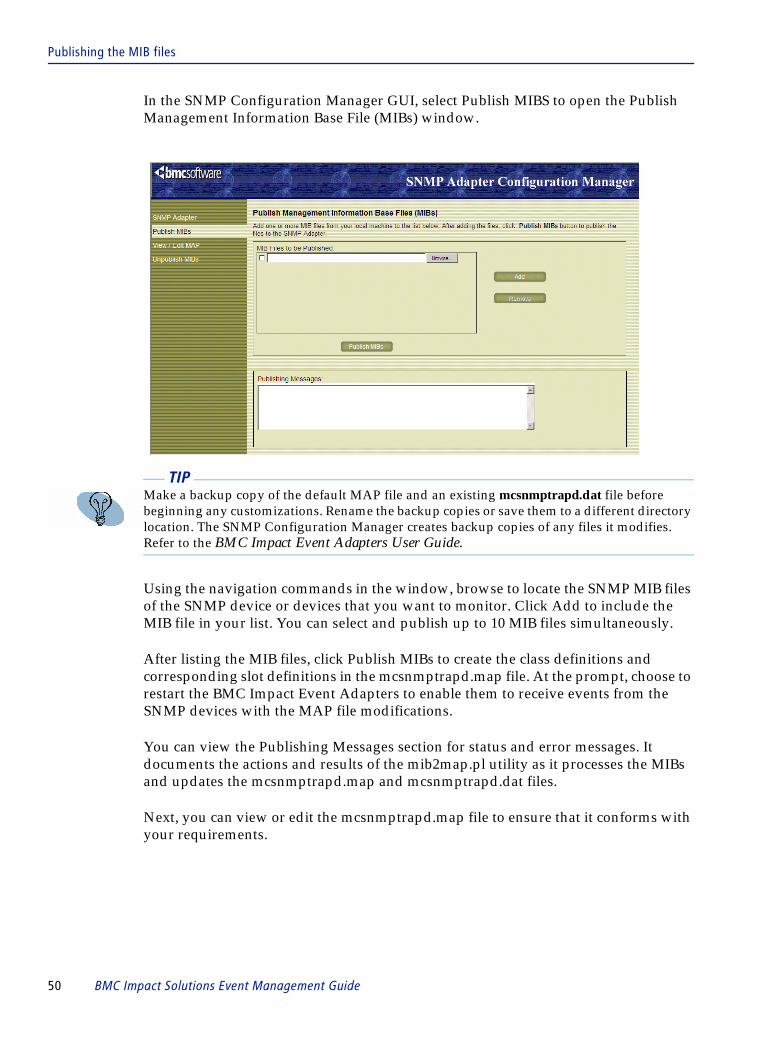
Publishing the MIB files
In the SNMP Configuration Manager GUI, select Publish MIBS to open the Publish Management Information Base File (MIBs) window.
Using the navigation commands in the window, browse to locate the SNMP MIB files of the SNMP device or devices that you want to monitor. Click Add to include the MIB file in your list. You can select and publish up to 10 MIB files simultaneously.
After listing the MIB files, click Publish MIBs to create the class definitions and corresponding slot definitions in the mcsnmptrapd.map file. At the prompt, choose to restart the BMC Impact Event Adapters to enable them to receive events from the SNMP devices with the MAP file modifications.
You can view the Publishing Messages section for status and error messages. It documents the actions and results of the mib2map.pl utility as it processes the MIBs and updates the mcsnmptrapd.map and mcsnmptrapd.dat files.
Next, you can view or edit the mcsnmptrapd.map file to ensure that it conforms with your requirements.
TIP Make a backup copy of the default MAP file and an existing mcsnmptrapd.dat file before beginning any customizations. Rename the backup copies or save them to a different directory location. The SNMP Configuration Manager creates backup copies of any files it modifies. Refer to the BMC Impact Event Adapters User Guide.
50 BMC Impact Solutions Event Management Guide

Viewing/Editing the MAP file
Viewing/Editing the MAP file
You can select the View/Edit MAP command to access the View/Edit MAP File window where you can customize the mcsnmptrapd.map file for the SNMP Adapter.
The SNMP class hierarchy is displayed in a tree view.
You can choose from among the list of published classes to add or edit the following variables:
■ msg■ mc_tool_class■ mc_tool■ mc_host_address■ mc_location■ severity■ mc_priority■ mc_notes
For example, to add the value “Cold start first” to the msg slot of the COLD_START class, select the COLD_START class entry in the tree view. Then click Add New in the edit pane. In the Add New Variable - Web Page Dialog, select msg from the Variable drop-down box. Enter text “Cold start first” in the Value text box, and click Save.
An asterisk appears next to the class name in the displayed list when its slots have been modified.
Chapter 2 Working with event adapters (walk-through) 51
Installing the generated .baroc files in the cell’s KB
Click Update Map File, and then at the prompt dialog, click Yes to restart the BMC Impact Event Adapters to enable them to receive events from the SNMP devices with the map file modifications.
After verifying or editing the classes in the MAP file, you must add the new class definitions to the cell’s Knowledge Base.
Installing the generated .baroc files in the cell’s KB
When you publish the MIB files of the SNMP devices you wish to monitor, the mib2map.pl utility, which operates behind the scenes, automatically generates two .baroc files: mcsnmptrapdmib.baroc and mcsnmptrapdmibe.baroc. To enable the cell to receive events from the SNMP devices, you must copy the mcsnmptrapdmib.baroc and mcsnmptrapdmibe.baroc files to the cell’s MCELL_HOME\etc\cellName\kb\classes directory.
Then you append the mcsnmptrapdmib.baroc and mcsnmptrapdmibe.baroc files to the .load file. When appending these files to the .load file, do not include the .baroc extension; just enter the file name. Make sure that mcsnmptrapdmibe is listed before mcsnmptrapdmib in the .load file:
Compile the KB and then restart the cell.
You must repeat this procedure for all cells that receive the events.
mcsnmptrapdmibemcsnmptrapdmib
52 BMC Impact Solutions Event Management Guide

Unpublishing MIBs
Unpublishing MIBs
When a device is removed from a system, you can unpublish its associated MIBs to remove entries from the mcsnmptrapd.map file. Choose the Unpublish MIBs option in the navigation bar to open the Unpublish Management Information Base files window.
You can select one or more MIB files to “unpublish.” After you click Unpublish, the unpublished MIB file entries are removed from the mcsnmptrapd.map file. When you restart the BMC Impact Event Adapters to initialize the change, the SNMP Adapter no longer uses the associated class definitions to process incoming events.
The class definitions of the unpublished MIB file entries are removed from the mcsnmptrapd.map file, and the BMC Impact Event Adapters no longer apply them to incoming traps.
Generating test events
Before generating test events, ensure that you have started or restarted the BMC Impact Event Adapters to initialize any changes. Also ensure that the cell has been restarted after you have added the mcsnmptrapdmibe.baroc and mcsnmptrapdmib.baroc files to the cell’s KB and compiled it.
Chapter 2 Working with event adapters (walk-through) 53

Generating test events
Using the device or application that generates the traps or a trap generator, generate the SNMP traps that satisfy the event class conditions that have been published to the mcsnmptrapd.map file and added to the .baroc files. To locate the parameters that a trap generate requires, such as the OID, trapType, and Specific Type number, you can view the class definitions of the mcsnmptrapd.map file.
In the BMC IX Console, you can view whether the traps result in the expected BMC Impact Manager events, with the corresponding event class and slot values.
54 BMC Impact Solutions Event Management Guide

C h a p t e r 3
3 Event rulesRules and event management . . . . . . . . . . . . . . . . . . . . . . . . . . . . . . . . . . . . . . . . . . . . . . 56Rule structure and syntax . . . . . . . . . . . . . . . . . . . . . . . . . . . . . . . . . . . . . . . . . . . . . . . . . . 56
MRL files . . . . . . . . . . . . . . . . . . . . . . . . . . . . . . . . . . . . . . . . . . . . . . . . . . . . . . . . . . . . . 56MRL conventions. . . . . . . . . . . . . . . . . . . . . . . . . . . . . . . . . . . . . . . . . . . . . . . . . . . . . . 56General rule syntax . . . . . . . . . . . . . . . . . . . . . . . . . . . . . . . . . . . . . . . . . . . . . . . . . . . . 57
MRL event selection clauses. . . . . . . . . . . . . . . . . . . . . . . . . . . . . . . . . . . . . . . . . . . . . . . . 60Where clauses. . . . . . . . . . . . . . . . . . . . . . . . . . . . . . . . . . . . . . . . . . . . . . . . . . . . . . . . . 60Using clause . . . . . . . . . . . . . . . . . . . . . . . . . . . . . . . . . . . . . . . . . . . . . . . . . . . . . . . . . . 63Using_policy clause. . . . . . . . . . . . . . . . . . . . . . . . . . . . . . . . . . . . . . . . . . . . . . . . . . . . 65Unless clause . . . . . . . . . . . . . . . . . . . . . . . . . . . . . . . . . . . . . . . . . . . . . . . . . . . . . . . . . 66When clause . . . . . . . . . . . . . . . . . . . . . . . . . . . . . . . . . . . . . . . . . . . . . . . . . . . . . . . . . . 67Body clause. . . . . . . . . . . . . . . . . . . . . . . . . . . . . . . . . . . . . . . . . . . . . . . . . . . . . . . . . . . 69
Variables in rules . . . . . . . . . . . . . . . . . . . . . . . . . . . . . . . . . . . . . . . . . . . . . . . . . . . . . . . . . 71Dynamic data in rules . . . . . . . . . . . . . . . . . . . . . . . . . . . . . . . . . . . . . . . . . . . . . . . . . . . . . 72Global records in rules . . . . . . . . . . . . . . . . . . . . . . . . . . . . . . . . . . . . . . . . . . . . . . . . . . . . 74Interfaces in rules . . . . . . . . . . . . . . . . . . . . . . . . . . . . . . . . . . . . . . . . . . . . . . . . . . . . . . . . . 75
Interface instances . . . . . . . . . . . . . . . . . . . . . . . . . . . . . . . . . . . . . . . . . . . . . . . . . . . . . 75Indexes in rules. . . . . . . . . . . . . . . . . . . . . . . . . . . . . . . . . . . . . . . . . . . . . . . . . . . . . . . . . . . 76
Using indexes . . . . . . . . . . . . . . . . . . . . . . . . . . . . . . . . . . . . . . . . . . . . . . . . . . . . . . . . . 77Compiling rules . . . . . . . . . . . . . . . . . . . . . . . . . . . . . . . . . . . . . . . . . . . . . . . . . . . . . . . . . . 79Testing a rule . . . . . . . . . . . . . . . . . . . . . . . . . . . . . . . . . . . . . . . . . . . . . . . . . . . . . . . . . . . . 79Tracing a rule . . . . . . . . . . . . . . . . . . . . . . . . . . . . . . . . . . . . . . . . . . . . . . . . . . . . . . . . . . . . 79
Configuring rule tracing. . . . . . . . . . . . . . . . . . . . . . . . . . . . . . . . . . . . . . . . . . . . . . . . 80Customizing rule trace message headers. . . . . . . . . . . . . . . . . . . . . . . . . . . . . . . . . . 83
Undefined events, processing errors, and deprecated slots . . . . . . . . . . . . . . . . . . . . . 84Undefined events. . . . . . . . . . . . . . . . . . . . . . . . . . . . . . . . . . . . . . . . . . . . . . . . . . . . . . 84Event processing errors . . . . . . . . . . . . . . . . . . . . . . . . . . . . . . . . . . . . . . . . . . . . . . . . 85Using deprecated slots . . . . . . . . . . . . . . . . . . . . . . . . . . . . . . . . . . . . . . . . . . . . . . . . . 86
Chapter 3 Event rules 55
Rules and event management
Rules and event managementRules specify which events are selected for processing and then determine how they are processed. Rules differ from policies (see Chapter 10, “Event management policies”) insofar as they are manually edited, require more effort to implement, but provide more flexibility.
Rule structure and syntaxYou write rules using MRL and then compile and store them in the cell’s KB. For detailed information about MRL, see the BMC Impact Solutions Knowledge Base Development Reference Guide.
MRL files
Rule files have an .mrl extension and are located in the rules subdirectory of a Knowledge Base. Rules must be compiled before they can be used by the cell. The compiled files have a .wic or .pkg extension and are also located in the rules subdirectory.
The order of loading into the cell at startup, which determines the order of evaluation, is specified in the .load and .loadwic files (files with the compiler extensions).
MRL conventions
BMC Impact Solutions Knowledge Base Development Reference Guide addresses the purpose of each rule phase with programming examples. This section focuses on the general syntax of rules and the roles of the different objects and syntactic constructs. When writing rules, use the following conventions:
■ Use single quotation marks for all literal strings. This convention is not mandatory for text without internal spaces but is required for text that does contain spaces.
■ When a cell name contains a hyphen, the cell name must be enclosed in single quotation marks (‘).
56 BMC Impact Solutions Event Management Guide

General rule syntax
■ When a primitive contains an argument that is a list arg, such as the first argument of a concatenation string, the argument must be enclosed with square brackets.
The compiler validates syntax on primitive arguments. For example, use of a SIMPLE type instead of a LIST will result in a compilation error.
■ Literal strings can be no more than 65535 characters in length. If you attempt to compile a rule file containing a slot assignment of a string greater than 65535 characters, the compiler replaces it with the empty string.
■ If the newline character, \n, is received as input for a slot value, it is stored as part of the slot value. Neither the cell nor the operators interpret slot values. Therefore, if the newline character is part of the slot value, any search for a match must contain the newline character. Otherwise, the match search is unsuccessful.
■ MRL is case sensitive. References to classes and slots must respect case.
■ An event is referenced with a variable name within the rules. Variable names begin with $ and must contain only alphabetic characters. Slots belonging to a particular event are accessed using the $eventVariable.slotName notation.
■ Many rules contain an action block. The action block contains one or more actions that are executed by the rule. Braces ({}) delimit action blocks, and semicolons (;) separate actions within an action block.
■ Rules end with the END keyword.
General rule syntax
All rules, in general, have the same structure which includes the rule introduction, the event selection criteria, and the rule body.
The generic rule syntax presented in Figure 15 on page 58 shows the syntax objects that can appear in a rule, and Table 8 on page 58 describes those objects.
concat([this,is,a,quick,example],$CONCAT_STR);
Chapter 3 Event rules 57
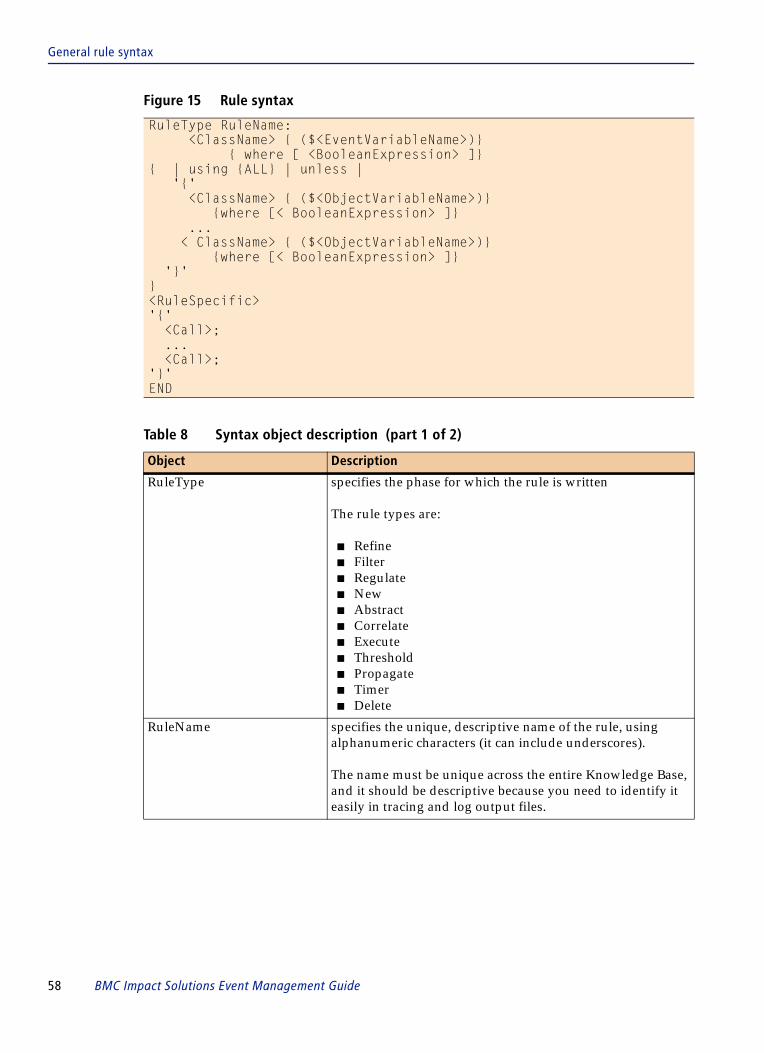
General rule syntax
Figure 15 Rule syntax
RuleType RuleName: <ClassName> { ($<EventVariableName>)} { where [ <BooleanExpression> ]}{ | using {ALL} | unless | '{' <ClassName> { ($<ObjectVariableName>)} {where [< BooleanExpression> ]} ... < ClassName> { ($<ObjectVariableName>)} {where [< BooleanExpression> ]} '}' }<RuleSpecific>'{' <Call>; ... <Call>;'}'END
Table 8 Syntax object description (part 1 of 2)
Object Description
RuleType specifies the phase for which the rule is written
The rule types are:
■ Refine■ Filter■ Regulate■ New ■ Abstract■ Correlate■ Execute■ Threshold■ Propagate■ Timer■ Delete
RuleName specifies the unique, descriptive name of the rule, using alphanumeric characters (it can include underscores).
The name must be unique across the entire Knowledge Base, and it should be descriptive because you need to identify it easily in tracing and log output files.
58 BMC Impact Solutions Event Management Guide

General rule syntax
Event condition formula event condition formula (ECF) begins with <ClassName>
The ECF specifies the conditions that the event currently being processed must match for the rule to be evaluated. ClassName specifies the event class that the event must match. The class of the event instance can be a subclass of ClassName.
Note: To apply the rule to all incoming event instances, specify ClassName as EVENT
optional clause The optional clause is enclosed within the curly braces. It begins with { | using and ends before <RuleSpecific>.
This portion of the syntax contains a query clause that directs the rule engine to retrieve data or events from the dynamic data repository to be used in the remainder of the rule.
This example includes the Using clause qualified by an Unless clause.
The object that matches the specified conditions is retrieved by the Using query clause and can be used in the body of the rule.
If the query has no matches, then the Unless clause is applied.
The body of the rule (see below) is executed for every match to these queries when the optional keyword "ALL" is specified after the “using” keyword.
For more information about the use of clauses, see “MRL event selection clauses” on page 60.
{ } optional clause indicators (curly braces)
‘{‘ the actual character ‘{‘
| using {ALL} | unless> | using either {ALL} or unless
<EventVariableName> name of a variable representing an event
<ObjectVariableName> name of a variable representing an event or data< BooleanExpression> an expression whose value is a boolean<Call> an assignment or a primitive call<RuleSpecific> the body of the rule, specifying actions to be performed on
events, slots to be modified, and primitives to be used.
The syntax of the rule body and meaning of the primitives depend on the rule type to which the rule belongs.
Table 8 Syntax object description (part 2 of 2)
Object Description
Chapter 3 Event rules 59

MRL event selection clauses
MRL event selection clausesWhether the event being processed triggers the execution of the rule depends on the events’s conformance with the selection criteria specified in the rule.
For example, suppose that an event class is defined as follows:
And the engine receives the following event:
The following rule will accept the instance and will be evaluated.
Where clauses
where clauses are an optional part of the ECF and establish restrictive selection criteria. A where clause consists of the keyword where followed by the criteria within square brackets:
Figure 16 Event selection criteria example
MC_EV_CLASS :APPLICATION_UP ISA APPLICATION_EVENT DEFINES{
severity: default = INFO;};
END
APPLICATION_UP;mc_host=babble;...status=OPEN;
END
filter application_events : PASSAPPLICATION_EVENT ($APEV)
where [....]
...
where [criteria]
60 BMC Impact Solutions Event Management Guide
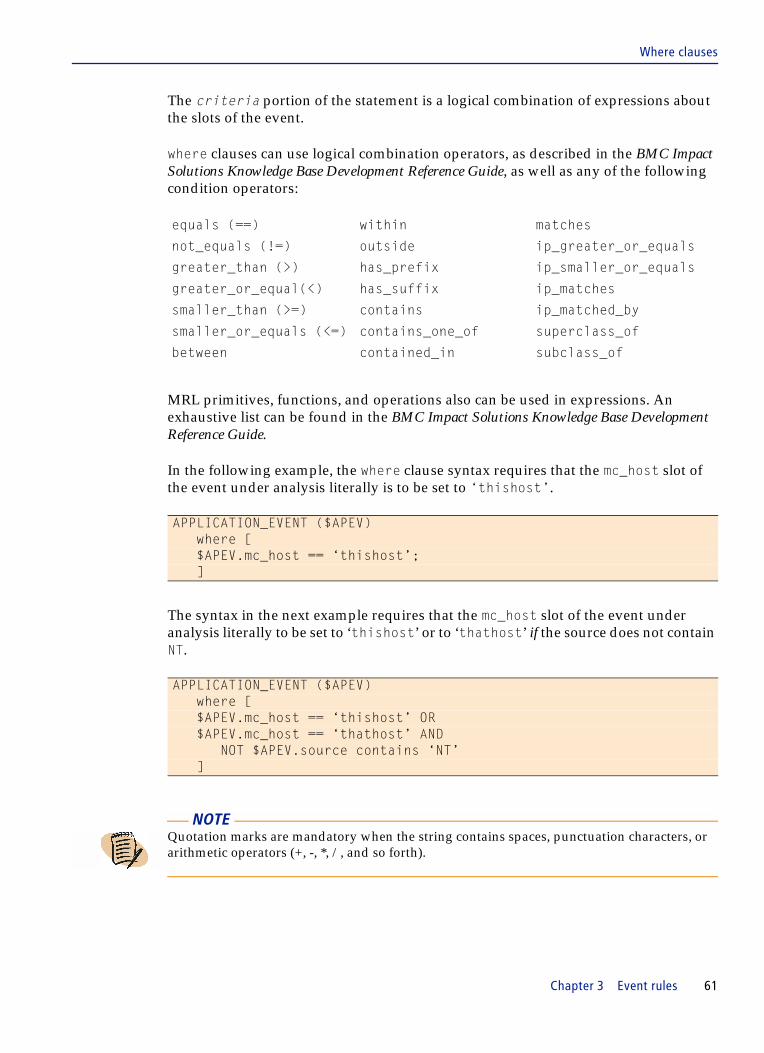
Where clauses
The criteria portion of the statement is a logical combination of expressions about the slots of the event.
where clauses can use logical combination operators, as described in the BMC Impact Solutions Knowledge Base Development Reference Guide, as well as any of the following condition operators:
MRL primitives, functions, and operations also can be used in expressions. An exhaustive list can be found in the BMC Impact Solutions Knowledge Base Development Reference Guide.
In the following example, the where clause syntax requires that the mc_host slot of the event under analysis literally is to be set to ‘thishost’.
The syntax in the next example requires that the mc_host slot of the event under analysis literally to be set to ‘thishost’ or to ‘thathost’ if the source does not contain NT.
equals (==) within matches
not_equals (!=) outside ip_greater_or_equals
greater_than (>) has_prefix ip_smaller_or_equals
greater_or_equal(<) has_suffix ip_matches
smaller_than (>=) contains ip_matched_by
smaller_or_equals (<=) contains_one_of superclass_of
between contained_in subclass_of
APPLICATION_EVENT ($APEV)where [$APEV.mc_host == ‘thishost’;]
APPLICATION_EVENT ($APEV)where [$APEV.mc_host == ‘thishost’ OR $APEV.mc_host == ‘thathost’ AND
NOT $APEV.source contains ‘NT’]
NOTE Quotation marks are mandatory when the string contains spaces, punctuation characters, or arithmetic operators (+, -, *, /, and so forth).
Chapter 3 Event rules 61
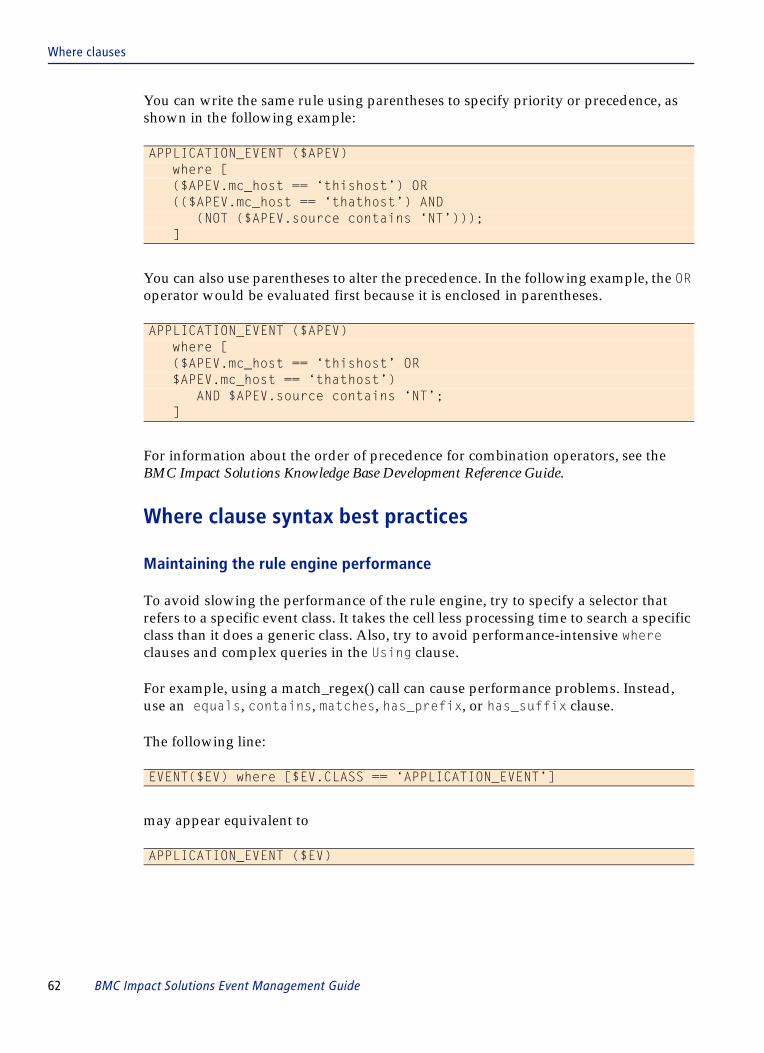
Where clauses
You can write the same rule using parentheses to specify priority or precedence, as shown in the following example:
You can also use parentheses to alter the precedence. In the following example, the OR operator would be evaluated first because it is enclosed in parentheses.
For information about the order of precedence for combination operators, see the BMC Impact Solutions Knowledge Base Development Reference Guide.
Where clause syntax best practices
Maintaining the rule engine performance
To avoid slowing the performance of the rule engine, try to specify a selector that refers to a specific event class. It takes the cell less processing time to search a specific class than it does a generic class. Also, try to avoid performance-intensive where clauses and complex queries in the Using clause.
For example, using a match_regex() call can cause performance problems. Instead, use an equals, contains, matches, has_prefix, or has_suffix clause.
The following line:
may appear equivalent to
APPLICATION_EVENT ($APEV)where [($APEV.mc_host == ‘thishost’) OR (($APEV.mc_host == ‘thathost’) AND
(NOT ($APEV.source contains ‘NT’)));]
APPLICATION_EVENT ($APEV)where [($APEV.mc_host == ‘thishost’ OR $APEV.mc_host == ‘thathost’)
AND $APEV.source contains ‘NT’;]
EVENT($EV) where [$EV.CLASS == ‘APPLICATION_EVENT’]
APPLICATION_EVENT ($EV)
62 BMC Impact Solutions Event Management Guide

Using clause
However, they are not equivalent. The rule engine maintains an inheritance table that enables it to be extremely efficient at manipulating classes. In the first syntax example, the rule engine literally must check to see if the class name is the string ‘APPLICATION_EVENT’. This literal comparison does not take advantage of the inheritance mechanism, and places a much heavier demand on the performance of the rule engine than the syntax in the second example. Using class comparisons in a where clause does not use the inheritance table optimization and results in performance degradation of the rule engine.
Equivalent syntax and backward compatibility
The following line:
can also be written as
However,
is permitted only for backward compatibility with the first initial releases of the MRL.
Syntax shortcut
In a where clause slot: is a shortcut for $EV.slot.
$EV.slot: is syntactically incorrect.
Using clause
The using clause retrieves information from the event repository of the rule engine to be used in the context of a rule. You can use the using clause to retrieve data instances for a dynamic rule, or to retrieve instances of past events. The syntax for the using clause is as follows:
$APEV.mc_host equals ‘thathost’
mc_host:equals thathost
$EV.mc_host:equals ‘thathost’
EventClassName (Variable)where [Expression CondOperator Expression, ...]
using [ALL] {DataClassName (Variable)where [Expression CondOperator Expression,
Expression CondOperator Expression,...];
Chapter 3 Event rules 63

Using clause
To search for event instances, you must write a valid criteria block with a valid event class name instead of a data class name.
You can define indexes on events and data. Querying instances can be computationally intensive and might dramatically reduce cell performance. When there are only conjunctions (ANDs but no ORs) in the using clause, the compiler performs the following optimizations:
■ Equality constraints against mc_ueid and mc_udid (like $D.mc_udid == <value>) are compiled to use the internal hash table associated with these special slots.
■ Equality and order constraints (==, <, >, <=, >=, between, has_prefix) against key slots (a slot with facet key=yes) are compiled to use the internal key index.
If you need to query potentially large tables but the above optimizations are not possible, consider declaring an index on the table and query the table using the index. For further information, see “Indexes in rules” on page 76.
You can use conditions in the using clause to set controls on event processing. For example, you can indicate that the remainder of a rule is to be skipped if no relevant data is located. Table 9 on page 64 lists additional conditions that affect rule processing.
DataClassName (Variable)where [Expression CondOperator Expression,
Expression CondOperator Expression,...];
... ;}
Table 9 Conditions for the using clause (part 1 of 2)
Condition Result
Only a single instance of the data is found in the repository.
The rule is evaluated only for the single instance.
No data that matches the specified criteria is found in the repository.
The remainder of the rule is skipped.
More than one instance of the data exists in the repository.
Only the first data instance is retrieved.
Note: You can alter this behavior by using the ALL keyword. If you use the ALL keyword and more than one instance of data is found, the rule is evaluated for each instance. The ALL keyword contains a hidden recursive mechanism that produces this result.
64 BMC Impact Solutions Event Management Guide

Using_policy clause
Using_policy clause
Policy instances can be referenced before the selection part of a rule as shown in this example:
Each instance of EVENT_CLOSURE_POLICY is instantiated at runtime. The closing_event and closed_event criteria are linked dynamically at runtime.
ECF slots can be used in place of the class name in the main selection of a static rule. Where clauses specified in the rule are logically ANDed with the where clause in the ECF instance.
The using clause in a rule contains several queries.
The rule engine searches for an instance corresponding to the criteria in the first using query, then an instance for the criteria in the second query, until all queries are exhausted. At least one instance of each query must exist for the rule to evaluate.
For a using clause to succeed, each of its queries must find a solution.
If the ALL keyword is present in the using clause, the body of the rule is executed for all the possible combinations of the different query solutions.
A condition in a query can refer to the slot values of the main event of the rule, data, or event, each of which is retrieved by preceding queries in the using clause.
The ALL keyword is used in the using clause.
The rule is evaluated for all combinations of the instances found.
For example, if a using clause contains two blocks, the first block retrieving three instances and the second block five, the rule is evaluated a total of fifteen times.
new bmc_im_internal_closure:using_policy { EVENT_CLOSURE_POLICY($POL)
where [ calendars_active($POL.active_calendars) ] }$POL.closing_event($CLOSING)
where [ $CLOSING.status != CLOSED ] updates ALL $POL.closed_event($CLOSED) within $POL.time_window
{ $CLOSED.status = CLOSED; if ($POL.suppress_restoring_event == 1) then { drop_new; }
}
Table 9 Conditions for the using clause (part 2 of 2)
Condition Result
Chapter 3 Event rules 65
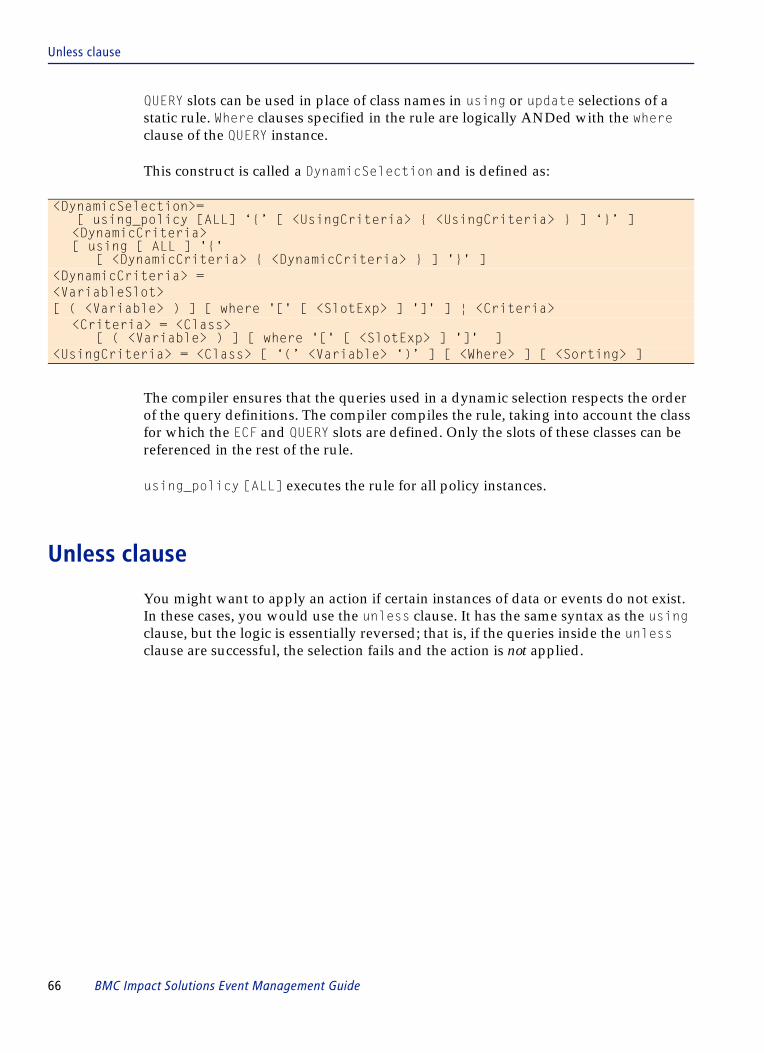
Unless clause
QUERY slots can be used in place of class names in using or update selections of a static rule. Where clauses specified in the rule are logically ANDed with the where clause of the QUERY instance.
This construct is called a DynamicSelection and is defined as:
The compiler ensures that the queries used in a dynamic selection respects the order of the query definitions. The compiler compiles the rule, taking into account the class for which the ECF and QUERY slots are defined. Only the slots of these classes can be referenced in the rest of the rule.
using_policy [ALL] executes the rule for all policy instances.
Unless clause
You might want to apply an action if certain instances of data or events do not exist. In these cases, you would use the unless clause. It has the same syntax as the using clause, but the logic is essentially reversed; that is, if the queries inside the unless clause are successful, the selection fails and the action is not applied.
<DynamicSelection>= [ using_policy [ALL] ‘{’ [ <UsingCriteria> { <UsingCriteria> } ] ‘}’ ]
<DynamicCriteria>[ using [ ALL ] '{'
[ <DynamicCriteria> { <DynamicCriteria> } ] '}' ]<DynamicCriteria> = <VariableSlot> [ ( <Variable> ) ] [ where '[' [ <SlotExp> ] ']' ] ¦ <Criteria>
<Criteria> = <Class> [ ( <Variable> ) ] [ where '[' [ <SlotExp> ] ']' ]
<UsingCriteria> = <Class> [ ‘(’ <Variable> ‘)’ ] [ <Where> ] [ <Sorting> ]
66 BMC Impact Solutions Event Management Guide

When clause
The syntax of the unless clause is as follows:
When clause
Use a when clause to trigger part of a rule each time a specified slot of a previously processed event is modified or is assigned a specific value.
The when clause can be used in the Execute, Abstract, Correlate, and Propagate rule phases. Rules containing a when clause are evaluated completely when a new event is processed that matches the where condition of the rule. The when clauses in these rules are re-evaluated each time the processed event is modified so that it matches the when condition.
The general syntax of the when clause is:
CallList is the part of the rule that is re-evaluated when the event is modified. The syntax for WhenCondition depends on whether you want the slots and conditions to be static or dynamic.
To trigger the when clause when a specified slot changes, use the syntax in Figure 17.
In Figure 17, the name of an existing variable must be specified, as well as the name of the slot to be monitored for changes. The when clause is triggered each time the specified slot changes.
EventClassName (Variable)where [Expression CondOperator Expression, ...]
unless {DataClassName (Variable)where [Expression CondOperator Expression,
Expression CondOperator Expression,...];
DataClassName (Variable)where [Expression CondOperator Expression,
Expression CondOperator Expression,...];
... ;}
when = WhenCondition CallList
Figure 17 when condition triggered by any change to a specified slot
WhenCond = when $VarName.SlotName
Chapter 3 Event rules 67

When clause
To trigger the when clause when a specified slot changes to a specified value, use the syntax in Figure 18.
In Figure 18, the name of an existing variable must be specified, as well as the name of the slot to be monitored for changes. The when clause is triggered only when the slot value changes to match the operator and condition expression specified by Op Condition.
When the slot name and/or the condition are not known in advance, use the syntax in Figure 19.
In Figure 19, $VarName is the name of an existing variable. If $VarName is not specified, the variable used in the where clause of the rule is used. The slot name is determined dynamically by evaluating the expression SlotExpr, which must result in a valid slot name.
The condition that the slot must meet also is specified dynamically. The operator is determined by evaluating the expression OpExpr, which must result in a valid operator name. The conditional expression is derived by evaluating the expression CondExpr. CondExpr is evaluated twice—once to determine a conditional expression and a second time to evaluate if the slot matches that conditional expression.
When an event is modified by a rule containing a when clause so that it becomes a candidate for evaluation by another rule, that evaluation does not take place immediately. Instead, the request is queued for the rule engine to process after all other pending requests or events are processed.
Figure 18 when condition triggered by a specific change to a specified slot
WhenCond = when $VarName.SlotName [:] Op Condition
Figure 19 when condition triggered by a specific change to a specified slot
WhenCond = when ([$VarName,]SlotExpr,OpExpr,CondExpr)
68 BMC Impact Solutions Event Management Guide

Body clause
when clause example
The sample data determines in which cases an incoming event will trigger the when clause in the Execute rule, depending on the mc_object_class of the event:
■ For object class CLS1, the when clause is triggered when the event's severity is MAJOR or higher.
■ For object class CLS2, the when clause is triggered when the event's status is within ACK, ASSIGNED.
Note for object class CLS2, the list value of trigger_expr must be within single quotation marks to form a STRING type value, instead of a LIST. The arguments used in the when clause must be type STRING.
Body clause
Use a body clause in a rule to call slot assignments, primitives, or functions. In a body clause, functions return an expression and primitives return a Boolean value expressing the success or failure of the primitive. For more information about primitives and functions, see the BMC Impact Solutions Knowledge Base Development Reference Guide.
Figure 20 Rule containing a when clause
execute Exec1: EVENT($E) where ...using { NOTIFY_RULE($N) where [$N.object_class == $E.mc_object_class] }when($N.trigger_slot,$N.trigger_op,$N.trigger_expr){...}
Figure 21 Sample data
NOTIFY_RULE; object_class=CLS1; trigger_slot=severity; trigger_op='>='; trigger_expr=MAJOR; ENDNOTIFY_RULE; object_class=CLS2; trigger_slot=status; trigger_op=within; trigger_expr='[ACK,ASSIGNED]'; END
NOTE When a primitive fails, that is, returns the value FALSE, the remainder of the block is not executed.
Chapter 3 Event rules 69

Body clause
The syntax of the body clause is as follows:
The syntax to call a slot assignment in a body clause is as follows:
if-then-else construct
The if-then-else construct is a special call used in a body clause that specifies a conditional execution. The syntax for the if-then-else construct is:
The else body clause is optional. If the Expression is evaluated as true, the statements in the then block are executed. However, if an else block is included in the body clause and the statement is evaluated as false, the statements in the else block are executed.
{Variable.SlotName = Value;Call ;
}
NOTE Except for the last statement, all statements in a body clause must be separated using a semicolon (;).
$EV.SlotName = expression
if Expression then
{ Variable.SlotName = Value; Call ;
}[ else
{ Variable.SlotName = Value; Call ;
}]
70 BMC Impact Solutions Event Management Guide

Variables in rules
You can refer to a local variable declared in the then and else block after the if-then-else call if the variable is declared in both the then and else block with the same data type, as shown in the following example:
Variables in rulesUse variables in rules to point to MRL objects, such as events, data, global records, or interfaces, and to reference results returned by a primitive.
In a rule, you must declare variables at their first occurrence in the text. The scope of the variable is from its declaration to the end of the rule. The value for a variable cannot change during the life of the variable. For example, you cannot assign another value to a variable after the first occurrence in a rule.
The syntax for a declaring a variable is as follows:
The name of the variable must be composed of alphanumeric characters; it also can contain underscore characters.
if Boolean expression then{
...$TEMP = ' yes' ;...
}else
{...$TEMP = ' no';...
};$EV.msg = $TEMP;
NOTE It is unnecessary to use an if-then-else construct to create a conditional affectation. A simpler solution is to use a conditional expression. For information about conditional constructs, see the BMC Impact Solutions Knowledge Base Development Reference Guide.
$VariableName
NOTE BMC Impact Manager uses a naming convention of variables with short uppercase names.
Chapter 3 Event rules 71

Dynamic data in rules
In the following example, the variable $EV points to the event being evaluated so that $EV.SlotName refers to the slot of the specified name for that event. The slot must exist in the BAROC definition of that object class. You then can use the $EV variable in expressions in the rule or in assignment statements.
Global record instances are predefined in the Knowledge Base; therefore, the scope of global record variables is the entire Knowledge Base. A variable $UNDER_MAINTENANCE refers to the unique instance of the UNDER_MAINTENANCE global record. You can use variables in primitives to obtain the values they return, as shown in the following example:
The concat primitive concatenates a list of strings into another string. The $MSG variable obtains the result, so that the concatenated string can be used in subsequent clauses. The result is used as an assignment.
Dynamic data in rulesDynamic data objects are BAROC objects that are used as parameters within rules and as structured objects in the Service Information Management model. Like events, they are stored in the persistent repository of the cell. The cell uses dynamic data objects to process rules.
Using dynamic data enables you to avoid writing several similar rules that differ only by values that can be stored within the data instances. When the cell evaluates a generic rule that references dynamic data, it queries a dynamic data table to access the relevant data.
ClassName ($EV) where [expression op expression, . . . , expression op expression ]
NOTE The same principles that apply to events also apply to interface objects: a variable points to the interface instance returned by an external program. Additionally, it allows the use of the individual slot values in subsequent expressions.
concat( [‘from top’, ‘to bottom’ ], $MSG0; $EV.msg = $MSG ;
72 BMC Impact Solutions Event Management Guide

Dynamic data in rules
In the following example, the business impact of an unavailable application determines the severity level of the associated APP_DOWN event. Upon receiving an APP_DOWN event, an Execute rule retrieves the first instance of SEVERITY_BY_APP_DOWN that matches the application name set in the APP_DOWN event. The instance contains the appropriate severity to associate with the application, so the rule makes the assignment as shown:
Figure 22 Execute rule using dynamic data
The rule searches the data instances to find the instance of the application in the APP_DOWN event. When a match is found, the rule stops searching the data instances and continues processing with the matching instance, as follows:
The data must be populated beforehand; otherwise, the rule engine does not find an instance and the remainder of the rule is skipped. In other words, when the using clause is present in a rule, it must return data or the selection fails, and the remainder of the rule is skipped. You can also define dynamic data instances by using the Dynamic Data Editor in BMC Impact Explorer. For instructions, see Chapter 11, “Dynamic data editor.”
execute Set_App_Down_Severity :APP_DOWN ($AD)
using SEVERITY_BY_APP_DOWN ($SBAD)where [$SBAD.application == $AD.application]
when $AD.status == OPEN{
$AD.severity = $SBAD.severity;}
END
SEVERITY_BY_APP_DOWN ;application = mail ;severity = CRITICAL ;
END
NOTE Using an index dramatically improves the performance of a query in the data repository. If key slots are present in the Event Condition Formula (ECF), optimization is performed on the data query. For information about indexes, see “Indexes in rules” on page 76.
Chapter 3 Event rules 73

Global records in rules
Global records in rulesGlobal records maintain specified values across rule phases. You can use global records for sharing data between events. For example, you can use a global record to maintain a list of systems under maintenance. You can ignore the new events for one of these systems using a Filter rule until the system is no longer part of the global record list.
You can query or modify the contents of a global record either from the rule engine or through the mgetrec or msetrec commands. For more information about the mgetrec and msetrec commands, see BMC Impact Solutions Infrastructure Administration Guide.
Global records are created using .baroc files. The global record files are located in the Records directory of the cell’s Knowledge Base.
The syntax for global records is as follows:
Global records are addressed by name, so you must know the name of the global record to use it. You can use global records in an expression, an assignment, or a primitive. Use the following syntax in a rule to refer to a slot listed in a global record:
The following is a simple example of a global record:
NOTE Global records maintain their information when the cell is stopped and restarted.
RECORD RecordNameDEFINES {
SlotName : SlotType ; SlotName : SlotType ;
}END
$RecordName.SlotName
RECORDUNDER_MAINTENANCE DEFINES {
hosts: LIST_OF STRING ; }
END
74 BMC Impact Solutions Event Management Guide

Interfaces in rules
Interfaces in rulesRefine rules use interfaces to import external data to the rule engine. For example, you can create an interface and use it as an interface instance to return data to the Refine rule.
Interfaces are maintained in .baroc file in MCELL_HOME\etc\CellName\kb\classes on Windows platforms and in MCELL_HOME/etc/CellName/kb/classes on UNIX platforms.
Slots defined in an interface follow the same syntax as used in a class definition, as shown:
In the following example, the interface is designed to retrieve additional data about a system that is potentially down.
Interface instances
The pieces of data collected by the external program or script are assigned to the slots of the interface, creating an interface instance. The life of an interface instance is limited, since only the calling Refine rule can use it. To access the data in the future, the slot values must be stored in a global record or an event.
The syntax for an interface instance is as shown:
MC_INTERFACE: InterfaceNameDEFINES {
SlotName: DataType, Facet, Facet; SlotName: DataType; ...
};END
MC_INTERFACE: LOCATIONDEFINES {
site: STRING; phone: STRING;
}; END
InterfaceName ; SlotName = Value ; SlotName = Value ;
END
Chapter 3 Event rules 75

Indexes in rules
After the external information exists in an interface instance, a Refine rule assigns it to slots or uses it another manner, such as normalizing an event message.
In conjunction with the interface instance defined above, the interface instance in Figure 23 provides values for the system location and phone number for the responsible party.
During rule processing, you can use the following functions or primitives to execute an external script or program: execute, get_external, or confirm_external. The external script or program that you reference in a rule must be located in the correct bin subdirectory or it will not execute. The platform for the host computer that you use determines where the script or program resides. For further information about the bin directory, see the BMC Impact Solutions Knowledge Base Development Reference Guide.
Indexes in rulesUse indexes to improve rule performance. Indexes enable the rule engine to find event or data instances more rapidly. When only a limited selection of instances is required, an index avoids iteration over all instances. You can also use an index to determine the order of iteration over a set of event or data instances.
A sorted index implements an order on the instances. If the goal is to determine the search order, use a sorted index. When the goal is mainly performance improvement, a hashed index (an index based on a hash table) will produce the best results.
You should define key slots when there is a need to enforce uniqueness on a combination of slots. Hashed indexes do not enforce uniqueness. Several instances can have the same value for all of their indexed slots, but with key slots, only one instance can have a certain combination of slot values. When there is no need to enforce a uniqueness, use hashed indexes rather than key slots for optimization.
Indexes are defined with in the MRL with a rule-like syntax. An index rule will not do any processing on an incoming event. The syntax for an index definition within a rule is
Figure 23 Interface instance example
LOCATION ; site = B3R123 ‘ phone = 555-555-5555 ;
END
index IndexName : CLASS ( sorted|hashed )Slot | '[' Slot { , Slot } ']'
END
76 BMC Impact Solutions Event Management Guide
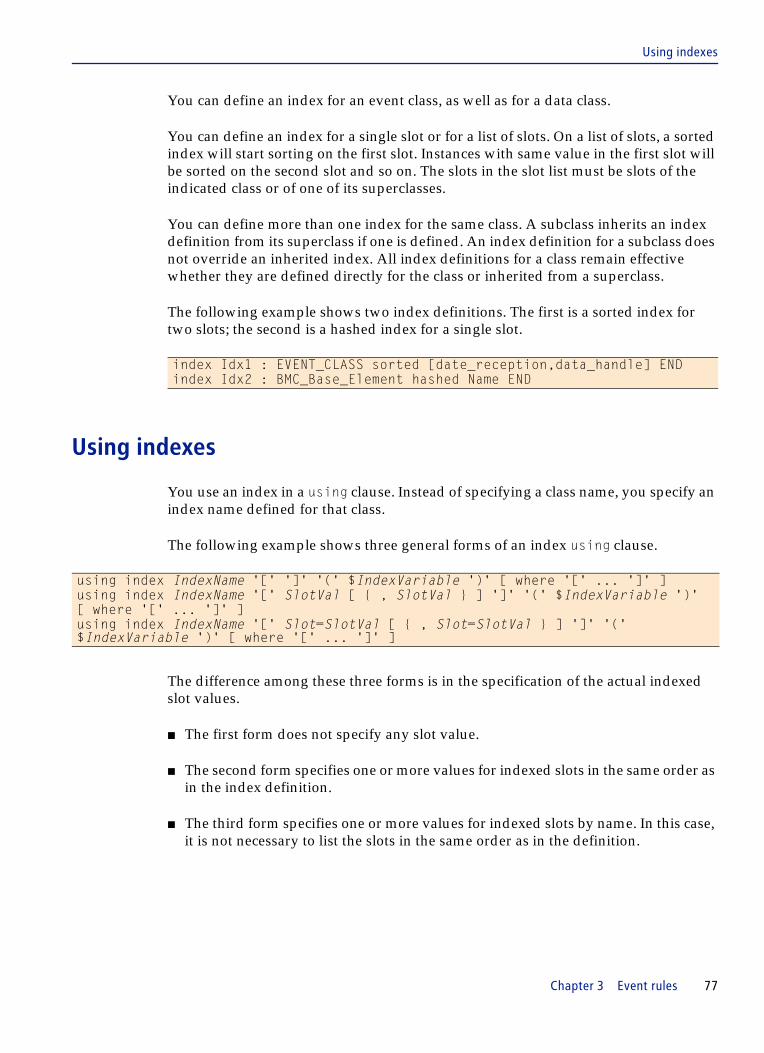
Using indexes
You can define an index for an event class, as well as for a data class.
You can define an index for a single slot or for a list of slots. On a list of slots, a sorted index will start sorting on the first slot. Instances with same value in the first slot will be sorted on the second slot and so on. The slots in the slot list must be slots of the indicated class or of one of its superclasses.
You can define more than one index for the same class. A subclass inherits an index definition from its superclass if one is defined. An index definition for a subclass does not override an inherited index. All index definitions for a class remain effective whether they are defined directly for the class or inherited from a superclass.
The following example shows two index definitions. The first is a sorted index for two slots; the second is a hashed index for a single slot.
Using indexes
You use an index in a using clause. Instead of specifying a class name, you specify an index name defined for that class.
The following example shows three general forms of an index using clause.
The difference among these three forms is in the specification of the actual indexed slot values.
■ The first form does not specify any slot value.
■ The second form specifies one or more values for indexed slots in the same order as in the index definition.
■ The third form specifies one or more values for indexed slots by name. In this case, it is not necessary to list the slots in the same order as in the definition.
index Idx1 : EVENT_CLASS sorted [date_reception,data_handle] ENDindex Idx2 : BMC_Base_Element hashed Name END
using index IndexName '[' ']' '(' $IndexVariable ')' [ where '[' ... ']' ]using index IndexName '[' SlotVal [ { , SlotVal } ] ']' '(' $IndexVariable ')' [ where '[' ... ']' ]using index IndexName '[' Slot=SlotVal [ { , Slot=SlotVal } ] ']' '(' $IndexVariable ')' [ where '[' ... ']' ]
Chapter 3 Event rules 77

Using indexes
A sorted index does not require you to provide an actual value for each of the indexed slots. However, all slots for which an actual value is specified must be at the beginning of the slot list in the definition. For example, if an index is defined for the slot list [slot1, slot2, slot3, slot4], it is valid to have an actual value for slot1 and slot2 and no values for slot3 and slot4. It is not valid to provide an actual value for slot2 and slot3 only, because the first slot, slot1, is left unspecified. It also valid to specify none of the indexed slots for a sorted index.
To use a hashed index, you must specify all indexed slots with an actual value.
The rule compiler will report invalid use of an index in error messages.
For these indexes:
the following example illustrates their use in New rules:
The rules use $E to refer to the EVENT_CLASS instances and $D to refer to the BMC_BaseElement instances that are retrieved through the indexes.
The first rule, Rule1 uses the sorted index Idx1 without specifying any of the indexed slots. As a result, it will iterate over all EVENT instances in the order of the index (which can impact performance if there is a large number of instances). The additional where condition will select the desired data instances.
The second rule, Rule2 uses a hashed index. It provides the mandatory actual value for the indexed slot Name, assuming that the MY_EVENT instance has a slot ci_name that contains the Name of the relevant BMC_BaseElement instance.
index Idx1 : EVENT_CLASS sorted [date_reception,data_handle] ENDindex Idx2 : BMC_Base_Element hashed Name END
new Rule1 : EVENT($EV) where [...] using ALL { index Idx1[]($E) where [...] } ... END new Rule2 : MY_EVENT($EV) where [...] using { index Idx2[$EV.ci_name]($D) } ... END
78 BMC Impact Solutions Event Management Guide

Compiling rules
Compiling rulesRules do not immediately start processing events after they are created. The Knowledge Base (KB) for the cell must be compiled so the rules are read into it. You can use the mccomp command to compile the KB. For more information about using the mccomp command, see the BMC Impact Solutions Knowledge Base Development Reference Guide.
Testing a ruleYou can test a rule to verify that it processes events correctly. The process for testing a rule is to send an event to a cell and then review how the event is processing through the rules.
To send an event to a cell
Use the msend command to send an event to a specific cell from any source. For more information about the msend command, see the BMC Impact Solutions Infrastructure Administration Guide.
To review event processing
Use rule tracing as described in “Tracing a rule.”
Tracing a ruleTracing enables you to follow the flow of events through each rule phase. Tracing the execution of a rule also helps Knowledge Base developers to find logical errors or enhance performance.
NOTE To monitor rule behavior you can compile the KB with a tracing option. For more information, see the BMC Impact Solutions Knowledge Base Development Reference Guide.
Chapter 3 Event rules 79

Configuring rule tracing
The MRL compiler (mccomp) generates rule trace code that contains the following fields:
■ message id (identifying the type of statement being executed) ■ source file name ■ source line number ■ name of the rule ■ reference to the main event being processed ■ class name of the main event being processed
This code is generated each time the compiler is run. Impact on performance is minimal when rule trace is not enabled.
Configuring rule tracing
You can configure rule tracing both statically and dynamically.
Configuring static rule tracing
Rule tracing can be statically configured in mcell.conf. Each time the cell starts, it reverts to this rule trace configuration. While the cell is running, the rule trace configuration can be adapted dynamically.
The following mcell.conf parameters determine which rules are traced and the level of tracing:
■ TraceRuleLevel■ TraceRulePhases■ TraceRuleNames■ TraceRulePorts
The TraceRuleLevel parameter controls rule tracing globally. It can have the following values:
■ 0 — completely disables rule tracing as well as run time error reporting. It is not recommended.
■ 1 — enables run time error reporting, and disables rule tracing. This is the recommended setting for normal production environments.
■ 2 — enables rule tracing. This should only be used in development, for analysis or when debugging the Knowledge Base.
80 BMC Impact Solutions Event Management Guide

Configuring rule tracing
If rule tracing is enabled, the TraceRulePhases and TraceRuleNames parameters control which rules are traced. A rule is only traced if both the phase to which it belongs and the rule itself are configured for tracing.
The TraceRuleNames parameter contains a comma-separated sequence of module:rule combinations or the keyword ALL to indicate all modules and/or rules. Each rule name optionally can be prefixed with a + or - sign to indicate addition or removal from the list. To trace rules from the global module, enter the rule name by itself without an accompanying module name. The list is interpreted in sequential order.
The TraceRulePorts parameter determines the category of tracing messages that are reported. This parameter is a comma-separated list of any of the following trace message categories:
■ entry—a message is displayed when an event satisfies the main selector of a rule. If the rules refer to a policy, the messages are displayed for every policy instance that matches the event. For example,
■ using—a message is displayed when an object instance is retrieved by a query in a using block. For example,
■ using_policy—a message is displayed when a policy is retrieved by a query in a using_policy block. For example,
■ using_failure—a message is displayed when there are no instances that statisfy a query in a using block. For example,
■ using_policy_failure—a message is displayed when there are no instances that statisfy a query in a using_policy block. For example,
im_internal.mrl, 60: refine im_internal_lowercase_hostname: EVENT #5: Rule execution starting with $EV = 0xd926d0 (class: EVENT, event_handle: 5, mc_ueid: mc.ruleTrc9612.7de944e.0)
ruleTrc9612.mrl, 31: refine idx_data_s: IDX_EVENT #5: solution 1 to data query:$X = 0x13c5468 (class: IDX_DATA, data_handle: 374, mc_udid: mc.ruleTrc9612.7f100f7.327)
im_internal.mrl, 207: refine im_internal_timeout: EVENT #5: solution 1 to policy query:$POL = 0x109e4b8 (class: IM_TIMEOUT_POLICY, data_handle: 32, mc_udid: mc.ruleTrc9612.7de9405.19)
ruleTrc9612.mrl, 13: refine idx_event_h: IDX_EVENT #5: no solution for $X in context$E = 0x146ca80 (class: IDX_EVENT, event_handle: 5, mc_ueid: mc.ruleTrc9612.7f100f7.349)
im_internal.mrl, 18: refine im_internal_blackout: EVENT #5: no solution for $POL in context$EV = 0xd926d0 (class: EVENT, event_handle: 5, mc_ueid: mc.ruleTrc9612.7de940c.0)
Chapter 3 Event rules 81

Configuring rule tracing
■ assign—a message is displayed for each assignment instruction. For example,
Static rule tracing configuration example
These settings enable tracing of the following rules:
■ All rules from module TroubleTicketing that are not refine or regulate, except rule1
■ Rules rule1 and rule2 from module SendMail, if they are not refine or regulate
■ All entry to the specified rules is traced, as well as assignments within those rules.
Configuring dynamic rule tracing
While the cell is running, rule tracing configuration can be changed using the mcontrol CLI. Controls that influence rule tracing are:
■ tracerule on|off — globally enables (on) or disables (off) rule tracing
■ tracerule phases Phases — modifies the configuration of which rule phases are enabled for tracing. The Phases value has the same format as the TraceRulePhases parameter. For example,
mcontrol -n CellName tracerule phases -new,-abstract
This command disables tracing of all new and abstract rules.
■ tracerule names Names — modifies the configuration of which rules are enabled for tracing. The Names value has the same format as the TraceRuleNames parameter. For example,
mcontrol -n CellName tracerule names problem_rule
This command enables tracing of the rule named problem_rule (assuming that problem_rule is of a phase that has rule tracing enabled).
im_internal.mrl, 167: refine im_internal_default_location: EVENT #5: $EV.mc_location = 'bmc.com'
TraceRuleLevel=2TraceRulePhases=ALL,-refine,-regulateTraceRuleNames=TroubleTicketing:ALL,-TroubleTicketing:rule1,SendMail:rule1,SendMail:rule2TraceRulePorts=entry,assign
82 BMC Impact Solutions Event Management Guide

Customizing rule trace message headers
■ tracerule ports Ports — determines which tracing ports are enabled. Ports is a string with the same format as the TraceRulePorts parameter, described on page 81.
Each time the cell starts, it reverts to the static rule tracing configuration defined in mcell.conf.
Customizing rule trace message headers
Each rule trace message is a standard cell trace message. The first part of this message is the standard cell trace message header. This header can be customized using the TraceRuleHeader parameter in mcell.conf.
The header is specified as text and can contain references to parameters, using the following designations to represent the associated parameters:
■ %I — message id ■ %F — source file name ■ %L — source line number ■ %M — KB module name ■ %R — rule name ■ %P — rule phase ■ %H — handle of the main event being processed (event_handle slot) ■ %C — class name of the main event being processed
For example, the following default TraceRuleHeader parameter value:
results in messages like:
The text of the message is retrieved from the message catalog through the message identifier and can be localized.
TraceRuleHeader= %F, %L: %P %R: %C #%H:
mc_intevt.mrl, 42: new StbldStop: MC_CELL_STATBLD_STOP #118: Rule execution starting
Chapter 3 Event rules 83

Undefined events, processing errors, and deprecated slots
Undefined events, processing errors, and deprecated slots
This section briefly describes how the rule engine handles undefined events and errors in event processing. It also tells you how to process deprecated slots that you wish to continue to use.
Undefined events
Events with errors, or undefined events, are treated so that as much correct data as possible is retained and incorrect data is made available for use in rules. The rule engine determines incorrect data through parsing errors and incompatibilities with the BAROC class definitions.
The following incorrect events are handled by the cell as specified:
■ The event message cannot be parsed as an event.
An internal event of class MC_CELL_PARSE_ERROR is created. It contains slots with the complete message text, as well as the line number and column number in the message text that locates the error message. Specific slots for this internal event are listed in Table 10.
■ The event is of an undefined class.
An internal event of class MC_CELL_UNDEFINED_CLASS is generated. Its class definition is shown below:
Table 10 MC_CELL_PARSE_ERROR slots
Slot Data
error_column column number in text where error occurs
error_line line number on text where error occurs
error_message error message
event_text complete event message text
MC_EV_CLASS: MC_CELL_UNDEFINED_CLASS ISA MC_CELL_EVENT DEFINES { severity : default = MINOR; class_name: STRING; };END
84 BMC Impact Solutions Event Management Guide

Event processing errors
It contains slots with the undefined class name, a list of slot names, and a list of slot values. The specific slot used is described in Table 11.
■ The event is of a defined class, but contains undefined slots.
The event is generated as one of the specified class, and the undefined slots are stored in the bad slot list slots, in corresponding order, as shown below:
■ The event has slot values that do not match the data type of the slot, such as a non-numeric value for a numeric type.
The event is generated as specified, except the bad slots. Because a valid value is not assigned for the bad slots, the default value applies to those slots. All bad slot values are stored in the two slot lists, as for the event of a defined class with undefined slots.
Event processing errors
When an error occurs during the processing of an event, the cell’s trace displays an error message. It also generates an internal event of class MC_CELL_PROCESS_ERROR, with the slots listed in Table 12.
Table 11 MC_CELL_UNDEFINED_CLASS slots
Slot Data
class_name name of class as specified in the message
mc_bad_slot_names : LIST_OF STRING;mc_bad_slot_values: LIST_OF STRING;
Table 12 MC_CELL_PROCESS_ERROR slots
Slot Data
error_code the error number
error_goal the part of the processing command that has the error
error_message an error description message
error_source the position in the rule source where the error occurred
event the mc_ueid of the event that was being processed
Chapter 3 Event rules 85

Using deprecated slots
Using deprecated slots
Deprecated slots are obsolete in the product and may not be available in a future release. They were retained for a limited time for backward compatibility with earlier releases. If you are using slots that have been deprecated and want to continue to use them, define them and enable them. The definitions for deprecated slots are located in mc_root_redef.baroc. You can enable this file in the .load file, or you can define the individual slots that you need.
If you enable deprecated slots, their values are displayed in the Deprecated subtab of the details pane in the Events View. Administrators can access the Deprecated subtab, and they can grant access to other user roles.
86 BMC Impact Solutions Event Management Guide

C h a p t e r 4
4 Working with collectorsThis chapter describes the procedures for defining and working with collectors. It depicts the default event collectors that are included with the installation. This chapter presents the following topics:
Creating or modifying a collector . . . . . . . . . . . . . . . . . . . . . . . . . . . . . . . . . . . . . . . . . . . 88Collector syntax . . . . . . . . . . . . . . . . . . . . . . . . . . . . . . . . . . . . . . . . . . . . . . . . . . . . . . . 88Best practices for defining collectors . . . . . . . . . . . . . . . . . . . . . . . . . . . . . . . . . . . . . 90Collector security. . . . . . . . . . . . . . . . . . . . . . . . . . . . . . . . . . . . . . . . . . . . . . . . . . . . . . 91Defining static collectors. . . . . . . . . . . . . . . . . . . . . . . . . . . . . . . . . . . . . . . . . . . . . . . . 93Defining dynamic collectors . . . . . . . . . . . . . . . . . . . . . . . . . . . . . . . . . . . . . . . . . . . . 94
Default event management collectors. . . . . . . . . . . . . . . . . . . . . . . . . . . . . . . . . . . . . . . . 96self_collector.mrl . . . . . . . . . . . . . . . . . . . . . . . . . . . . . . . . . . . . . . . . . . . . . . . . . . . . . . 96catchall_collector.mrl . . . . . . . . . . . . . . . . . . . . . . . . . . . . . . . . . . . . . . . . . . . . . . . . . . 96mc_bystatus_collectors.mrl . . . . . . . . . . . . . . . . . . . . . . . . . . . . . . . . . . . . . . . . . . . . . 97mc_bylocation_collectors.mrl . . . . . . . . . . . . . . . . . . . . . . . . . . . . . . . . . . . . . . . . . . . 97MCxP collector set . . . . . . . . . . . . . . . . . . . . . . . . . . . . . . . . . . . . . . . . . . . . . . . . . . . . . 98bii4p_collectors.mrl . . . . . . . . . . . . . . . . . . . . . . . . . . . . . . . . . . . . . . . . . . . . . . . . . . . . 98mc_evr_collectors.mrl . . . . . . . . . . . . . . . . . . . . . . . . . . . . . . . . . . . . . . . . . . . . . . . . . . 99
Default service impact management event collector . . . . . . . . . . . . . . . . . . . . . . . . . . . 99
Chapter 4 Working with collectors 87
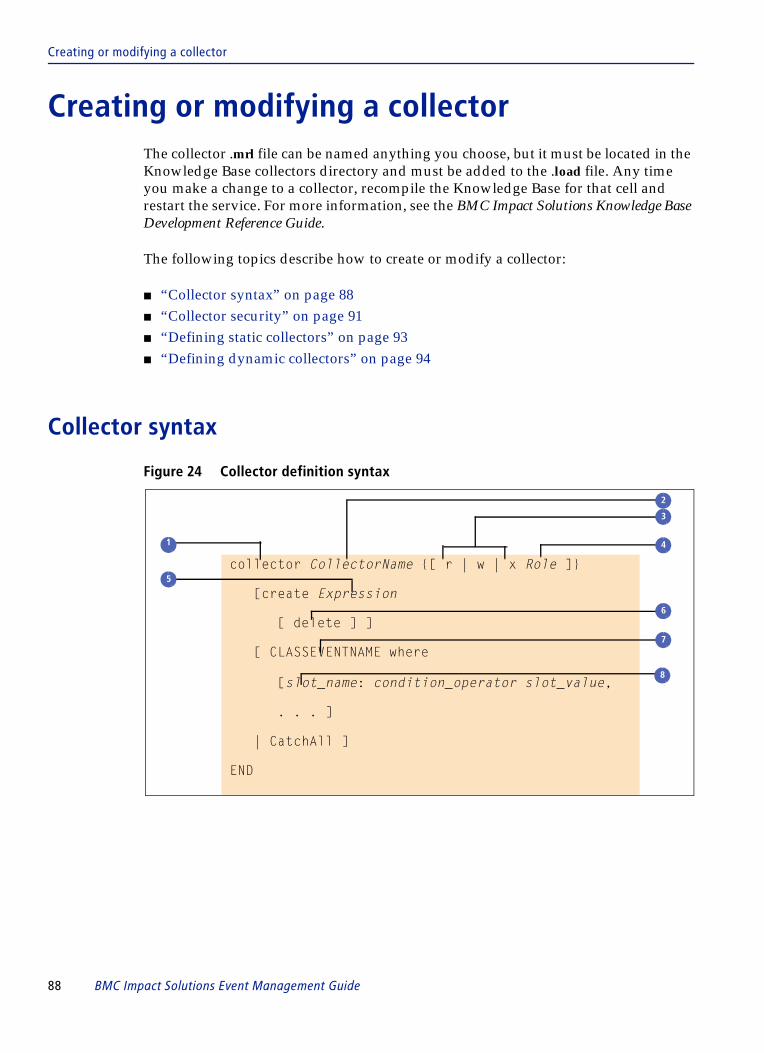
Creating or modifying a collector
Creating or modifying a collectorThe collector .mrl file can be named anything you choose, but it must be located in the Knowledge Base collectors directory and must be added to the .load file. Any time you make a change to a collector, recompile the Knowledge Base for that cell and restart the service. For more information, see the BMC Impact Solutions Knowledge Base Development Reference Guide.
The following topics describe how to create or modify a collector:
■ “Collector syntax” on page 88■ “Collector security” on page 91■ “Defining static collectors” on page 93■ “Defining dynamic collectors” on page 94
Collector syntax
Figure 24 Collector definition syntax
collector CollectorName {[ r | w | x Role ]}
[create Expression
[ delete ] ]
[ CLASSEVENTNAME where
[slot_name: condition_operator slot_value,
. . . ]
| CatchAll ]
END
2
4
3
6
7
8
5
1
88 BMC Impact Solutions Event Management Guide
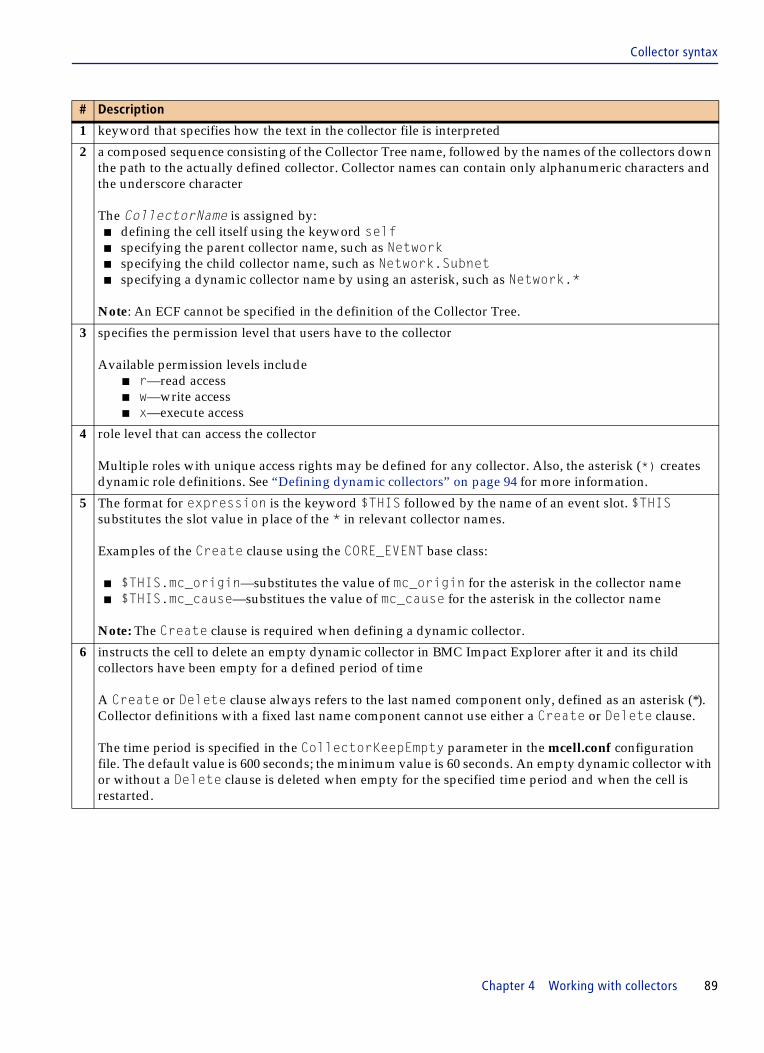
Collector syntax
# Description
1 keyword that specifies how the text in the collector file is interpreted
2 a composed sequence consisting of the Collector Tree name, followed by the names of the collectors down the path to the actually defined collector. Collector names can contain only alphanumeric characters and the underscore character
The CollectorName is assigned by:■ defining the cell itself using the keyword self■ specifying the parent collector name, such as Network■ specifying the child collector name, such as Network.Subnet■ specifying a dynamic collector name by using an asterisk, such as Network.*
Note: An ECF cannot be specified in the definition of the Collector Tree.
3 specifies the permission level that users have to the collector
Available permission levels include■ r—read access■ w—write access■ x—execute access
4 role level that can access the collector
Multiple roles with unique access rights may be defined for any collector. Also, the asterisk (*) creates dynamic role definitions. See “Defining dynamic collectors” on page 94 for more information.
5 The format for expression is the keyword $THIS followed by the name of an event slot. $THIS substitutes the slot value in place of the * in relevant collector names.
Examples of the Create clause using the CORE_EVENT base class:
■ $THIS.mc_origin—substitutes the value of mc_origin for the asterisk in the collector name■ $THIS.mc_cause—substitues the value of mc_cause for the asterisk in the collector name
Note: The Create clause is required when defining a dynamic collector.
6 instructs the cell to delete an empty dynamic collector in BMC Impact Explorer after it and its child collectors have been empty for a defined period of time
A Create or Delete clause always refers to the last named component only, defined as an asterisk (*). Collector definitions with a fixed last name component cannot use either a Create or Delete clause.
The time period is specified in the CollectorKeepEmpty parameter in the mcell.conf configuration file. The default value is 600 seconds; the minimum value is 60 seconds. An empty dynamic collector with or without a Delete clause is deleted when empty for the specified time period and when the cell is restarted.
Chapter 4 Working with collectors 89

Best practices for defining collectors
Best practices for defining collectors
To preserve the optimum cell performance, observe the following guidelines. Any new event or any slot change forces the cell to reconfigure collector conditions.
■ Define Where clauses in event condition formulas (ECFs) as simply as possible. Use narrowly defined classes rather than complex Where clauses. For example:
is more efficient than
■ Avoid complex pattern-matching conditions on slot contents.
■ Design collectors to take full advantage of the class hierarchy and its specialization properties. For example, write a collector condition on a class that catches all events belonging to any of its subclasses. In the following example, the collector catches all instances of any HOST_DOWN or HOST_UP events, assuming HOST_EVENT is a superclass of HOST_UP and HOST_DOWN.
7 identifies which events require further processing by the collector
This section is referred to as an Event Condition Formula (ECF). The ECF includes the name of the event class and all the slot conditions for that class.
Note: The ECF portion of a collector can contain references to the dynamic data by using a Using clause. Use this type of reference with extreme care because it can result in the performance degradation of the cell, particularly when large tables are searched on unindexed slots.
8 collects all events, including any events not picked up by the collectors you define
collector HostsDown : HOST_DOWNEND
collector HostsDown : EVENTwhere (CLASS: equals ‘HOST_DOWN’)
END
collector AllHostsEvents : HOST_EVENTEND
# Description
90 BMC Impact Solutions Event Management Guide

Collector security
The following collector does not catch all instances of HOST_UP or HOST_DOWN events because the comparison is done literally on the string.
■ If you want to use dynamic data in the Using clause of an ECF, keep tables short and always search on indexed slots.
Collector security
The administrator for BMC Impact Manager specifies which collectors in each Knowledge Base users can view and act upon in the BMC Impact Explorer Console. For example, a user might be able to connect to a cell but not view all the collectors.
Table 13 lists the standard BMC Impact Manager roles that can be defined within the collectors.
In addition, the read-only role restricts you to viewing events and services.
For more information about user roles in BMC Impact Manager, see BMC Impact Solutions Infrastructure Administration Guide.
collector HostsEvents : EVENTwhere (CLASS: equals ‘HOST_EVENT’)
END
Table 13 BMC Impact Manager standard roles
Role Description
Administrator roles
Full Access manages everything in the environment
Service Administrator manages the BMC Impact Manager infrastructure events, events, and services
Service Manager roles
Service Managers- Senior manages services and events with full customization capabilities
Service Managers manages services and events with limited customization capabilities
Operator roles
Service Operators- Senior manages events and services with full customization capabilities
Service Operators manages events and services with limited customization capabilities
Chapter 4 Working with collectors 91

Collector security
How collector permissions work
Child collectors inherit the permissions and role assignments specified for the parent collector. You cannot override a role assignment at a child collector level once the role has been assigned at a parent level. Therefore, roles and related permissions should be assigned at the highest level collector.
A self collector must be defined in each collector tree. If more than one .mrl file containing collector definitions exists for any Knowledge Base, you need only one self collector defined. Figure 25 illustrates the main collector, self, followed by the c1 collector and its child collectors, c1.one and c1.two. The collector tree also contains the c2 collector and its child collectors, c2.one and c2.two.
The following points describe the user roles and associated permissions for the collectors defined in Figure 25:
■ Users with a Full Access role have read, write, and execute permissions for all collectors and subcollectors defined in this example.
■ Users with Service Administrator and Service Operators roles have read, write, and execute permissions on collector c1 and subcollectors c1.one and c1.two.
Figure 25 Collector tree definition example
collector self:{r[Full Access]; w[Full Access]; x[Full Access]}
ENDcollector c1:
{r[Service Administrator,Service Operators]; w[Service Administrator,Service Operators]; x[Service Administrator,Service Operators]}ENDcollector c1.one:
{r[Service Managers-Senior]}ENDcollector c1.two:
{r[Service Managers-Senior], w[Service Managers-Senior]}ENDcollector c2:
{r[Service Managers-Senior,Service Administrator]; w[Service Managers-Senior,Service Administrator]; x[Service Managers-Senior,Service Administrator]}ENDcollector c2.one:
{r[Service Operators], w[Service Operators]}ENDcollector c2.two:
{r[Service Operators]}END
92 BMC Impact Solutions Event Management Guide

Defining static collectors
■ Users with a Service Managers-Senior role have read permissions at collector c1, subcollector c1.one, and read and write permissions on subcollector c1.two.
■ Users with Service Managers-Senior and Service Administrator roles have read, write, and execute permissions on collector c2, and subcollectors c2.one and c2.two.
■ Users with a Service Operators role have read permissions at collector c2, subcollector c2.two, and read and write permissions at subcollector c2.one.
Defining static collectors
Static collectors remain visible for a cell regardless of whether that collector contains any events. A static collector requires that event criteria are fully defined.
In Figure 26, the self collector has no roles or access rights defined. The Networks parent collector does not have an ECF but it does define read access rights for a user with the Service Administrator role.
The Local and Remote child collectors in Figure 26 accept only events that originate from a computer within the specified IP address range. The Local collector inherits the rights and roles defined for the Networks collector and defines additional access rights for Service Operators and Service Administrator users. The Remote child collector inherits the Networks collector rights and roles and defines additional access rights for Service Administrator users.
Figure 26 Static collector example 1
collector self :ENDcollector Networks :
{ r [Service Administrator] }ENDcollector Networks.Local :
{ r [Service Operators]w [Service Operators, Service Administrator]
} :EVENT where
[source: ip_matches 172.16.23.<128]END collector Networks.Remote :
{ w [Service Administrator] } :EVENT where
[source: ip_matches 172.16.23.>128]END
Chapter 4 Working with collectors 93

Defining dynamic collectors
When multiple ECFs exist for a single collector, the cell interprets the ECFs by using the OR operator. If multiple slot conditions exist in the same ECF for a collector, the cell uses the AND operator. In Figure 27, the static collectors are defined with single and multiple ECFs.
When a collector uses multiple ECFs, you must ensure that the ECFs match outcomes. For example, in Figure 27 the AllEvents.Ack collector accepts events with an ACK status. The first ECF complies with that request and adds another stipulation to accept only events with an ACK status and a FATAL severity. However, the second ECF states that the collector accepts an event with any status as long as its severity is not UNKNOWN.
The access rights and permissions set in the AllEvents parent collector are inherited by all of its children collectors. The only modification to the inherited permissions is in the AllEvents.Ack collector, which adds execute access rights for a Service Operators user.
Defining dynamic collectors
Dynamic collectors are created automatically when specified events are received. When specified events are deleted or changed and the associated collector becomes empty, the collector is removed. Dynamic collectors reflect the dynamic nature of event sources.
Figure 27 Static collector example 2
collector AllEvents : {r [Service Operators, Service Administrator, Full Access ] w [Service Operators, Service Administrator, Full Access ]x [Service Administrator, Full Access]
} ENDcollector AllEvents.Open :
EVENT where [status: equals OPEN]END collector AllEvents.Ack :
{x [Service Operators]}:EVENT where [status: equals ACK,
severity: equals FATAL]EVENT where [severity: not_equals UNKNOWN]
ENDcollector AllEvents.NotOpen :
EVENT where [status: not_equals OPEN]END
94 BMC Impact Solutions Event Management Guide

Defining dynamic collectors
The following is the definition of class NET, for which events are generated for network-related issues:
In the following example, NET events are generated for network-related issues. When the issue is specific to a subsystem, the kind of subsystem is specified in the mc_object_class slot. The collector definitions shown create a collector structure for each subsystem that produces events. The name of the collector is determined by the mc_object_class slot. Events that are not related to a specific subsystem are collected in the Global subcollector.
Within the subsystem collector, a distinction is made between events coming from servers and events coming from clients. When the mc_origin_class slot has the value SERVER, the event is assumed to come from a server. In that case, a subcollector is created for each server that produces events. The name of the subcollector is taken from the mc_origin slot.
Dynamic roles in dynamic collectors
In a dynamic collector, dynamic role assignments depend on characteristics of the incoming event. The dynamic roles are created with the dynamic collector. The $THIS variable in the following example refers to the incoming event and is used in the role name definition.
This example assigns a read permission to a role having the same name as the value of the mc_origin slot. For example, if the name of a server is host12 in an event, the dynamic collector creates a new collector host12. The role host12 must be listed in the list of roles if it is to see what is contained in the collector.
MC_EV_CLASS: NET ISA EVENT ; END
collector Net ENDcollector Net.* : NET where [$THIS.mc_object_class != '']create $THIS.mc_object_class deleteENDcollector Net.*.Server : NET where [$THIS.mc_origin_class == SERVER]ENDcollector Net.*.Server.* : NETcreate $THIS.mc_originENDcollector Net.*.Client : NETENDcollector Net.Global : NETEND
collector Net.*.Server.* : { r[$THIS.mc_origin] } : NETcreate $THIS.mc_origin
END
Chapter 4 Working with collectors 95
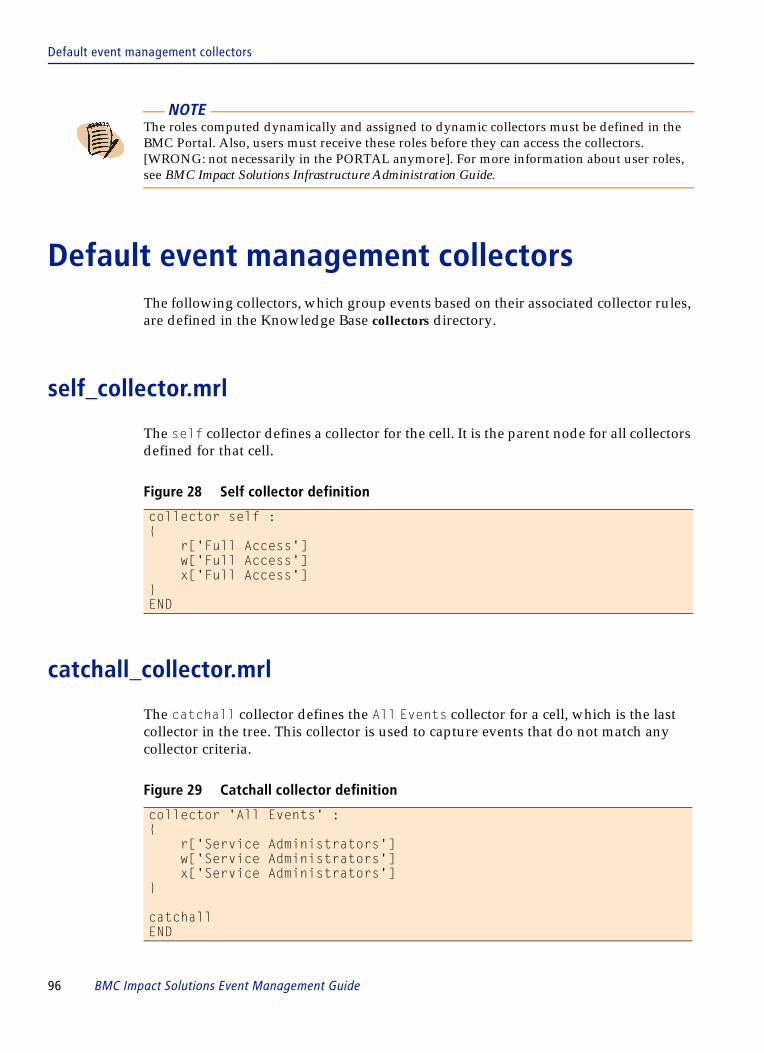
Default event management collectors
Default event management collectorsThe following collectors, which group events based on their associated collector rules, are defined in the Knowledge Base collectors directory.
self_collector.mrl
The self collector defines a collector for the cell. It is the parent node for all collectors defined for that cell.
catchall_collector.mrl
The catchall collector defines the All Events collector for a cell, which is the last collector in the tree. This collector is used to capture events that do not match any collector criteria.
NOTE The roles computed dynamically and assigned to dynamic collectors must be defined in the BMC Portal. Also, users must receive these roles before they can access the collectors. [WRONG: not necessarily in the PORTAL anymore]. For more information about user roles, see BMC Impact Solutions Infrastructure Administration Guide.
Figure 28 Self collector definition
collector self :{ r['Full Access'] w['Full Access'] x['Full Access']}END
Figure 29 Catchall collector definition
collector 'All Events' :{ r['Service Administrators'] w['Service Administrators'] x['Service Administrators']}
catchallEND
96 BMC Impact Solutions Event Management Guide

mc_bystatus_collectors.mrl
mc_bystatus_collectors.mrl
This file defines the By status collector set. Table 14 lists the collectors included in the mc_bystatus_collectors.mrl file.
mc_bylocation_collectors.mrl
This file defines the By location collector set. This collector set collects either system events or standard events. System events are directed to the static collector named ByLocation.Syste; other events go to the ‘By Location’.* dynamic subcollector branch. Table 15 lists the collectors included in the mc_bylocation_collectors.mrl file.
Table 14 By Status collector set
Subcollector branch Description
‘ByStatus’.Open shows all events in OPEN status
‘ByStatus’.Acknowledged shows all events in ACK status
‘ByStatus’.Assigned shows all events in ASSIGNED status
‘ByStatus’.Closed shows all events in CLOSED status
‘ByStatus’.Blackout shows all events in BLACKOUT status
Table 15 By Location collector set (part 1 of 2)
Subcollector branch Description
ByLocation.System This collector stores events belonging to the following classes:
■ MC_CELL_CONTROL■ MC_CLIENT_BASE■ MC_ADAPTER_CONTROL■ MC_MCCS■ 'By Location'.System.'Event Processor' that collects
MC_CELL_CONTROL events— 'By Location'.System.'Event
Processor'.'Heartbeat Log' that collects MC_CELL_HEARTBEAT_EVT events
— 'By Location'.System.'Event Processor'.'Connection Log' that collects MC_CELL_CLIENT and MC_CELL_CONNECT events
— 'By Location'.System.'Event Processor'.'Action Log' that collects MC_CELL_ACTION_RESULT events
■ 'By Location'.System.'Adapters' that collects MC_CLIENT_BASE and MC_ADAPTER_CONTROL events
■ 'By Location'.System.'Configuration Server' that collects MC_MCCS events
Chapter 4 Working with collectors 97

MCxP collector set
MCxP collector set
The MCxP collector set contains a hierarchy of dynamic collectors that collect PATROL_EV events.
bii4p_collectors.mrl
The bii4p_collectors.mrl file contains collector rules used by BMC Impact Integration for PATROL Enterprise Manager. For more information, see the BMC Impact Integration for PATROL User Guide.
‘By Location’.* This collector collects all event types except SMC_STATE_CHANGE events. Events are stored in a dynamic collector named by their domain name, which is stored in their mc_location slot. If this slot is empty, the event goes into the Unknown collector.
collector ‘By Location’.*.* At this second level, events are stored in a dynamic collector named by host name, which is extracted from their mc_host slot. If this slot is empty, the mc_host_address slot is used. If this slot is also empty, the event goes into the Unknown collector.
‘By Location’.*.*.* The name of the third level is based directly on slot mc_tool_class. Events with an empty mc_tool_class slot are not accepted at this subcollector level.
‘By Location’.*.*.*.* The name of the fourth level is based directly on the mc_tool slot. Events with an empty mc_tool slot are not accepted at this subcollector level.
Table 16 Collectors included in the MCxP collector set
Collector Description
MCxP.* The first level of the hierarchy is created based on mc_host slot.MCxP.*.* The second level of the hierarchy is created based on the
p_application slot, provided this slot is not empty. MCxP.*.*.* The third level of the hierarchy is created based on p_instance slot,
provided this slot is not empty. MCxP.*.*.*.* The fourth level of the hierarchy is created based on mc_parameter slot,
provided this slot is not empty.
Table 15 By Location collector set (part 2 of 2)
Subcollector branch Description
98 BMC Impact Solutions Event Management Guide

mc_evr_collectors.mrl
mc_evr_collectors.mrl
The mc_evr_collectors.mrl file contains collector rules for event relations. The event relations collector tree is not visible in the Events View in BMC Impact Explorer. This collector tree is used internally.
Default service impact management event collector
The service model requires only the MC_SMC_Events collector node. This collector tree is used by the Services View to retrieve the events of a specific component, based on its type and its logical ID, stored in the mc_udid slot. Figure 30 shows the MC_SMC_EVENTS collector definition.
Figure 30 MC_SMC_EVENTS collector definition
An example query issued by the collector is shown in the following example:
collector MC_SMC_Events:{r['Full Access', 'Service Administrators']w['Full Access', 'Service Administrators']x['Full Access', 'Service Administrators']}END
collector MC_SMC_Events.*:EVENT where [$THIS.mc_smc_id != ""]create cond($THIS.mc_smc_type == '', "Unknown", $THIS.mc_smc_type)END
collector MC_SMC_Events.*.Impacts:EVENT where [$THIS.mc_smc_impact == 1]END
collector MC_SMC_Events.*.History: SMC_STATE_CHANGE END
select open events from collector MC_SMC_EVENTS.component_typewhere [$THIS.mc_smc_id equals component_mc_udid]
Chapter 4 Working with collectors 99

Default service impact management event collector
This query varies depending on the menu command selected in the Services View:
Menu command Query type
All Events any open or acknowledged event associated to the component
Impact Events any open or acknowledged event associated to the component and elected
History Events any open or closed event of class SMC_STATE_CHANGE for that component
100 BMC Impact Solutions Event Management Guide

C h a p t e r 5
5 Event listsThis chapter describes how to work with event lists. It contains the following topics:
Event list details . . . . . . . . . . . . . . . . . . . . . . . . . . . . . . . . . . . . . . . . . . . . . . . . . . . . . . . . . 102Events View details pane . . . . . . . . . . . . . . . . . . . . . . . . . . . . . . . . . . . . . . . . . . . . . . 104New Common Event Model slots . . . . . . . . . . . . . . . . . . . . . . . . . . . . . . . . . . . . . . . 105
How to determine event states. . . . . . . . . . . . . . . . . . . . . . . . . . . . . . . . . . . . . . . . . . . . . 106Understanding event status . . . . . . . . . . . . . . . . . . . . . . . . . . . . . . . . . . . . . . . . . . . . 108Understanding event severity . . . . . . . . . . . . . . . . . . . . . . . . . . . . . . . . . . . . . . . . . . 108Understanding event priority . . . . . . . . . . . . . . . . . . . . . . . . . . . . . . . . . . . . . . . . . . 109
Customizing display settings . . . . . . . . . . . . . . . . . . . . . . . . . . . . . . . . . . . . . . . . . . . . . . 110Understanding the effect of event status and severity on collectors’ color . . . . 112Understanding the effect of event status on event count for collectors . . . . . . . 113
Working with event lists . . . . . . . . . . . . . . . . . . . . . . . . . . . . . . . . . . . . . . . . . . . . . . . . . . 114Viewing event lists . . . . . . . . . . . . . . . . . . . . . . . . . . . . . . . . . . . . . . . . . . . . . . . . . . . 114Selecting the type of event list to view . . . . . . . . . . . . . . . . . . . . . . . . . . . . . . . . . . . 115Viewing event details . . . . . . . . . . . . . . . . . . . . . . . . . . . . . . . . . . . . . . . . . . . . . . . . . 116Viewing related events . . . . . . . . . . . . . . . . . . . . . . . . . . . . . . . . . . . . . . . . . . . . . . . . 116Refreshing and freezing the event list . . . . . . . . . . . . . . . . . . . . . . . . . . . . . . . . . . . 117Viewing floating windows in full screen . . . . . . . . . . . . . . . . . . . . . . . . . . . . . . . . . 119
Organizing events in the event list . . . . . . . . . . . . . . . . . . . . . . . . . . . . . . . . . . . . . . . . . 120Using MetaCollectors . . . . . . . . . . . . . . . . . . . . . . . . . . . . . . . . . . . . . . . . . . . . . . . . . 120Filtering events. . . . . . . . . . . . . . . . . . . . . . . . . . . . . . . . . . . . . . . . . . . . . . . . . . . . . . . 121Sorting events. . . . . . . . . . . . . . . . . . . . . . . . . . . . . . . . . . . . . . . . . . . . . . . . . . . . . . . . 129
Assigning events to users . . . . . . . . . . . . . . . . . . . . . . . . . . . . . . . . . . . . . . . . . . . . . . . . . 133
Chapter 5 Event lists 101

Event list details
Event list detailsFrom the event list, you can access the event data collected for the cells contained in your BMC Impact Manager (BMC IM) environment. Also, you can
■ select a different view for the event list of a cell or collector■ access the specific details collected for an event■ perform operations on an event, such as take or decline ownership or reopen■ annotate individual or multiple events ■ explore event relationships■ sort column data by clicking on the column heading■ copy and print event data
The event list displays selected event details, including operational status. Each row in the table shows information for one event. The columns are determined by the type of information that you select in Event Sources and the slots (event attributes) selected for display. For example, if you select All Events and Basic Information from the Event Sources list, the default event list displays the following columns:
■ status■ priority■ severity■ action count (number of remote actions applied to the event)■ event relations■ receipt date of the event■ message associated with the event■ SMC priority
The set of slots (columns) presented in the event list is called the slot order. Depending on your role and access privileges, you can select different slots to see other event information (and therefore other columns in the event list). When you change the slots presented, either by adding or removing slots or by rearranging them, you are changing the slot order. To use a new slot order, you must associate it with a filter. For instructions, see “Sorting events” on page 129.
NOTE The SMC priority slot contains a numerical value that indicates the priority of the event in its impact on the SIM model. Events that are the root cause of an impact on an important component have a priority value greater than zero. See the description of the mc_smc_priority slot of the CORE_EVENT base class in the BMC Impact Solutions Knowledge Base Development Reference Guide.
102 BMC Impact Solutions Event Management Guide

Event list details
You can click a column heading in the event list to switch between ascending and descending sort order according to that column. For example, you could display the events sorted by date, either earliest to latest (ascending order) or newest to oldest (descending order). You could also display the events sorted by their messages, which would display them in alphabetical order (ascending order) or reverse alphabetical order (descending order).
If the event has related events, one of the icons shown in Table 17 on page 103 is displayed in the event relations column.
You can also customize the display of the event list, as described in “Customizing access to Help for events” on page 29.
Table 17 Event relations icons
Icon Event relation
Generic
Notification
Incident
iBRSD-related incident errors
Chapter 5 Event lists 103

Events View details pane
Events View details pane
The event details pane provides all of the recorded information about an event. The subtabs of the details pane organize the information, as shown in Table 18 on page 104.
Table 18 Events View Details pane (part 1 of 2)
Subtab name Sections in subtab Description of contents
Summary Workflow Status status, priority, and owner of the event
Event Information basic information about the event, such as date and time of occurrence, severity, any associated message, and the event class
Actions a list of actions against the event and the number of occurrences of actions
Object Monitored information about the host of the monitored object, such as its name and location and the object class
Service Model the component type and ID and any impact the event has on the component
Notes none a text box in which users can view and submit annotations about the event
History Time Stamps time and date for event occurrence, arrival, receipt, and modifications
Original Settings severity and priority of the event when it originated
Operations Log time and date of each event operation performed on the event, logon ID of user who performed the operation, and type of operation
Notification Log logon ID of the user to whom notification is sent if an event operation is a notification
Source Adapter/Gateway information about the adapter or gateway from which the event came, including name, class, and IP address
Origin information about the origin of the event, including class and encryption key
Details classes and subclasses
104 BMC Impact Solutions Event Management Guide

New Common Event Model slots
New Common Event Model slots
The use of the BMC Atrium Common Event Model (CEM) results in the addition of nine new slots that you can view in the BMC IX Events View details pane. All of these slots belong to the default class EVENT.
Table 19 describes these slots.
Internals Tracking tracking information, such as the tracking ID, event handle, collectors, and propagations
Relationships information about events abstracted from this one, abstractions, causes and effects, and associations
Undefined Attributes a list of undefined attributes and values
Deprecated none a list of slots that are no longer used; for more information, see “Customizing access to Help for events” on page 29
Table 19 New CEM-related slots in BMC IX (part 1 of 2)
Slot label in IX GUI CEM name BAROC name
Data type Description
Reported from Source
ReportTime mc_incident_report_time
integer indicates the date and time when the event was reported. Displayed in the format mm/dd/yyyy hh:mm
Tool Address ComponentHostAddress mc_tool_address string specifies the network address of the reporter
Tool Time EventTime mc_tool_time integer indicates when the reporter received the event. It translates reporter time into epoch time.
Tool Suggestion EventSuggestion mc_tool_suggestion
string suggests a solution for the situation defined by the reporter
Object Owner ComponentOwner mc_object_owner string string data type that identifies the owner of the source component
Parameter Unit MetricValueUnit mc_parameter_unit
string specifies the unit of measure of the metric
Parameter Threshold
MetricThreshold mc_parameter_threshold
string defines the threshold value that, when exceeded, results in the generation of an event
Table 18 Events View Details pane (part 2 of 2)
Subtab name Sections in subtab Description of contents
Chapter 5 Event lists 105

How to determine event states
How to determine event statesThe event list displays sufficient information for you to recognize an event’s current state quickly. Each event’s state depends on multiple factors:
■ severity, reflected in the severity icon and color of the event line■ priority, reflected in the priority icon■ the last event operation performed on the event, reflected in the status icon
When you perform an event operation on an event, the state of the event changes according to Table 20.
Figure 31 on page 107 shows how an event in any state is affected by the operations that are valid for that current state. The circles represent the event states. Each arrow represents an action, with the direction of the arrow indicating the flow of the action. For example, if the event is currently in the Acknowledged Event state, you can perform a Reopen Event, Close Event, Take Ownership, or Assign To action. Conversely, for that event to be in the Acknowledged Event state, an Acknowledge Event or Decline Ownership action must have been taken against it.
Account Account mc_account string identifies the account associated with the event
CEM version EventModelVersion mc_event_model_version
string specifies the version number of the data model
Table 20 Event states resulting from event operations
Event operation performed Resulting state
Acknowledge Event Acknowledged
Take Ownership Assigned
Decline Ownership Acknowledged
Assign To Assigned
Close Event Closed
Reopen Event Open
Black Out Blacked Out
Table 19 New CEM-related slots in BMC IX (part 2 of 2)
Slot label in IX GUI CEM name BAROC name
Data type Description
106 BMC Impact Solutions Event Management Guide

How to determine event states
Figure 31 How event operations affect event state
A user with a supervisory role (Full Access is the only default supervisory role) can select Supervisor Information from the secondary menu of the Event Sources list to see current operator information based on the last event operation applied. This information is displayed in the mc_owner column in the event list, according to Table 21.
Other factors can also affect the information displayed, such as whether an event has been propagated, abstracted, correlated, or recycled.
Table 21 Current operator information in event list
Last event operation action Current operator information displayed in mc_owner
Take Ownership logon user ID of the user who took ownership
Assign To logon user ID of the user to whom the event is assigned
Decline Ownership none
Close none
Acknowledge none
Reopen none; this operation clears previous information from the event list
Set Priority no change to displayed information
Chapter 5 Event lists 107

Understanding event status
Understanding event status
The status of an event provides basic information about the event’s response activity. The cell assigns a status value to each event, and then you can change the status by performing event operations or other actions on the event. Also, the status of the event can be changed automatically by a rule.
Table 22 lists the icons that are displayed in the event list to represent event status.
The color of the status icon is always the same. However, if you have configured the Events View to use the severity color for the event line, the color of the icon’s background varies with the severity of the event.
Understanding event severity
Each event has a severity level associated with it that indicates the seriousness of the event. In combination with status and priority, the severity level indicates the urgency of the need to take action. For example, a high severity level for an event in the Closed status is no cause for alarm, but a high severity level for an event in the Open status and with a priority of 1 indicates an urgent need for action.
The color of each line (row) in the event list table is determined by settings in the Events View subtab in the Edit Configuration dialog box and by the severity of the event depicted in the line, as follows:
■ If you selected Line Color Severity in the configuration, the line shows the color associated with the severity level of the event.
For events that have no severity (statuses Closed and Blackout have no severity level associated with them), the line has no color (is displayed as white).
■ If you did not select Line Color Severity, the line has no color (is displayed as white).
Table 22 Event status icons
Icon Event status
Open
Closed
Acknowledged (ACK)
Assigned
Blackout
108 BMC Impact Solutions Event Management Guide

Understanding event priority
Table 23 lists the default severity levels and colors for the events that appear in the navigation pane and event list and shows the icons used in the event list.
The event with the highest severity level in an event group on the Event Group tab determines the severity indicator that you see for the event group in the navigation tree. For example, if one event has a severity of Critical, the event group is displayed in the navigation tree with a Critical (red) severity indicator.
Understanding event priority
In addition to a severity level, each event has a priority level. Distinguishing between severity and priority helps you to understand which event requires action first. Table 24 lists the icons that are displayed in the event list to represent event priority.
Table 23 Event severity levels
Color Icon in Event List Severity level
red CRITICAL
dark orange MAJOR
light orange MINOR
yellow WARNING
blue INFO
green OK
gray UNKNOWN
Table 24 Event priority icons
Icon Event Priority
Priority 1 (highest)
Priority 2
Priority 3
Priority 4
Priority 5 (lowest)
Chapter 5 Event lists 109

Customizing display settings
Customizing display settings In the Events View, you can define the following attributes to help you monitor and manage events:
■ color■ confirmation dialog boxes■ icons■ counters
To customize display settings for the events tab
1 From the menu bar, choose Edit => Configuration.
2 In the Edit Configuration dialog box, click the Events View subtab, if necessary.
The Events View subtab is displayed, as shown in Figure 32 on page 111.
110 BMC Impact Solutions Event Management Guide
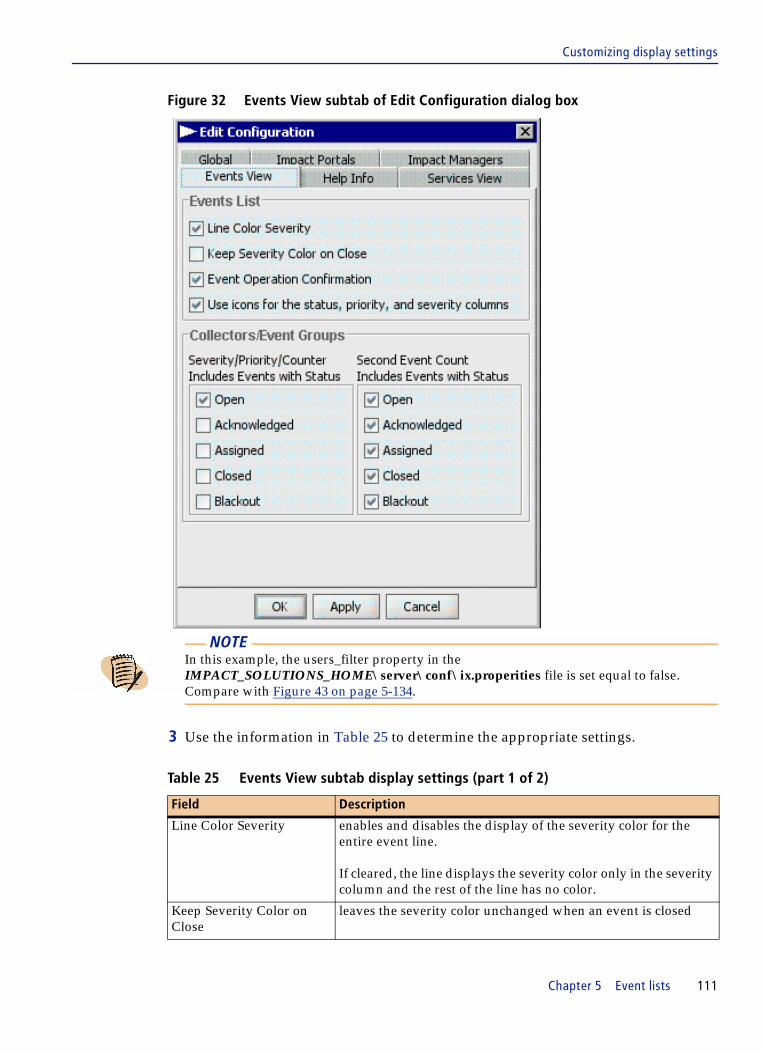
Customizing display settings
Figure 32 Events View subtab of Edit Configuration dialog box
3 Use the information in Table 25 to determine the appropriate settings.
NOTE In this example, the users_filter property in the IMPACT_SOLUTIONS_HOME\server\conf\ix.properities file is set equal to false. Compare with Figure 43 on page 5-134.
Table 25 Events View subtab display settings (part 1 of 2)
Field Description
Line Color Severity enables and disables the display of the severity color for the entire event line.
If cleared, the line displays the severity color only in the severity column and the rest of the line has no color.
Keep Severity Color on Close
leaves the severity color unchanged when an event is closed
Chapter 5 Event lists 111

Understanding the effect of event status and severity on collectors’ color
4 Click OK to save the changes and exit the dialog box.
Understanding the effect of event status and severity on collectors’ color
You can affect the color of a collector by your selection of event statuses in the Events View subtab of the Edit Configuration dialog box. The collector color that you see in the tree is determined by the severity color of the highest severity event that also has a status selected from the list under Severity/Priority/Counter, as shown in Figure 33 on page 113.
Event Operation Confirmation
enables a notification when a user takes ownership of an event
Use icons for the status, priority, and severity columns
enables and disables the display of icons instead of text for the status, priority, and severity columns
Severity/Priority/Counter determines the color displayed for the collector in the tree:
■ OPEN: selects events with status Open■ ACKNOWLEDGED: selects events with status
Acknowledged■ ASSIGNED: selects events with status Assigned■ CLOSED: selects events with status Closed■ BLACKOUT: selects events with status Blackout
For more information, see “Understanding the effect of event status and severity on collectors’ color” on page 112
Second Event Count determines which statuses contribute to the event count:
■ OPEN: selects events with status Open■ ACKNOWLEDGED: selects events with status
Acknowledged■ ASSIGNED: selects events with status Assigned■ CLOSED: selects events with status Closed■ BLACKOUT: selects events with status Blackout
For more information, see “Understanding the effect of event status on event count for collectors” on page 113.
Table 25 Events View subtab display settings (part 2 of 2)
Field Description
112 BMC Impact Solutions Event Management Guide

Understanding the effect of event status on event count for collectors
Figure 33 Severity section of Events View subtab of Edit Configuration dialog box
For example, if you select all of the statuses and one of the closed events has a severity of Critical, the relevant collector will be displayed in red, even though no open event has a Critical severity. That severity color will be propagated up through the hierarchy of collectors in that branch of the tree, so you will see a red severity indicator for each hierarchical level.
Understanding the effect of event status on event count for collectors
In the navigation pane of the Events View, two counters are displayed beside each node in the tree. The first counter is enclosed in parentheses and represents the number of unacknowledged (Open) events. This counter decreases whenever the status changes from open to some other state. Also, this counter is always present for all nodes except the top-level node.
The second counter represents the number of events that match the statuses that you selected to count. You can affect the event count of a collector by your selection of event statuses in the Second Event Count section of the Events View subtab of the Edit Configuration dialog box (see Figure 34 on page 114).
NOTE No status is available for the top-level node in an event tree.
Chapter 5 Event lists 113

Working with event lists
Figure 34 Event count section of Events View subtab of Edit Configuration dialog box
In the Second Event Count section of the Events View subtab, all status types are selected by default, but you may select one status or any combination of statuses.
For example, if you select only the Open status, the event count will not include events of other statuses. Not even the event count for the All Events collector will include events of any status other than Open.
To customize the second counter
1 From the menu bar, choose Edit => Configuration.
2 In the Edit Configuration dialog box, click the Events View subtab, if necessary.
3 In the Events View subtab, under Second Event Count, activate the status that you want to count for the event.
4 Click Apply to save the changes, or click OK to save and exit the dialog box.
Working with event listsThis section describes some of the interactions that you can perform with the event lists.
Viewing event lists
The procedures for viewing events for a cell, a collector, a MetaCollector, and an event group are similar. They differ in the tab or the tree icon that you select. BMC Impact Explorer (BMC IX) displays the events for the selected object in the event list pane.
114 BMC Impact Solutions Event Management Guide

Selecting the type of event list to view
To view the event list for a cell
1 At the top of the Events navigation pane, click the Collectors tab .
2 Expand the hierarchy to locate the cell whose events you want to display.
3 Click the cell.
To view the event list for a collector
1 At the top of the Events navigation pane, click the Collectors tab .
2 Expand the hierarchy to locate the collector whose events you want to display.
3 Click the collector.
To view the event list for a MetaCollector
1 At the top of the Events navigation pane, click the MetaCollectors tab .
2 Expand the hierarchy to locate the MetaCollector whose events you want to display.
3 Click the MetaCollector.
To view the event list for an event group
1 At the top of the Events navigation pane, click the Event Groups tab .
2 Expand the hierarchy to locate the event group whose events you want to display.
3 Click the event group.
Selecting the type of event list to view
From the Event Sources list box, you can select different views of the event list, including events that match specific criteria or the results from a filter, as shown in Figure 35.
Chapter 5 Event lists 115

Viewing event details
Figure 35 Event Sources selection
For more information about filtering, see “Filtering events” on page 121.
Viewing event details
From the Events View, you can access various kinds of data for an event. The details pane provides tabs that categorize the data, as described in Table 18 on page 104. If you hide the details pane, you can access the same information by double-clicking the event in the event list or by selecting the event and choosing View => Event Details from the menu bar.
Viewing related events
An event in the event list displays one or more icons when that event has another event associated with it. The icon that is displayed depends on the type of event to which it is associated. For example, if the related event is about trouble ticket information, an icon that represents a trouble ticket is displayed.
You can view related events in the following ways:
■ from the events list■ from the main menu
To view related events from the events list
1 From the events list, right-click a row.
2 From the menu, choose Views => Related Events.
A list of related events is displayed.
Available event list viewsEvent Sources list box
116 BMC Impact Solutions Event Management Guide

Refreshing and freezing the event list
3 Perform one of the following actions:
■ To view one type of related event, select a type.
An event list of the selected type, as denoted by its title, is displayed.
■ To view all related events, select Show all related events.
All related events are displayed.
To view related events from the main menu
1 From the main menu, choose View => Related events.
2 Perform one of the following actions:
■ To view one type of related event, select a type.
An event list of the selected event, as denoted by its title, is displayed.
■ To view all related events, select Show all related events.
All related events are displayed.
Refreshing and freezing the event list
All of the event sources in the BMC Impact Manager system can generate thousands of events. You can choose whether to view all of those events as they occur. You can configure refresh of the event list to occur automatically or manually, and even if you use the automatic refresh, you can manually refresh at any time to be sure that you have the most recent data. When you manually refresh the event list, the cell is queried for any changes in events. The console updates the event list if changes are present.
Using manual refresh gives you the ability to freeze the event list at an instant. Freezing the event list can be useful for troubleshooting, in that it prevents the events of interest from being displaced in the view by new events at each refresh interval. Instead of being displayed in the event list, new events increment the Pending Events indicator at the lower right of the event list pane.
NOTE If you move the cursor over an event relations icon, a summary of the number of related events by category is displayed briefly.
Chapter 5 Event lists 117

Refreshing and freezing the event list
To automatically refresh the event list
1 In the Events View, choose Edit => Configuration.
2 In the Edit Configuration dialog box, configure the function and the refresh interval, as follows:
A On the Global subtab, select Auto Refresh active by default.
B On the Impact Managers subtab, in the advanced option, specify a value in Refresh Freq (in seconds).
3 On the event list, ensure that Auto Refresh is active.
If Auto Refresh is not enabled and active when an event is modified externally from the console, the event is not updated until you manually refresh the event list.
To manually refresh the event list
Use any of the following methods:
■ From the menu bar, choose View => Refresh.■ On the toolbar, click Refresh .■ Press F5.
To freeze the event list
In the upper-left corner of the event list, click Auto Refresh .
The auto refresh activity stops. The list updates only when you click Auto Refresh or Refresh again.
NOTE If the cell is extremely busy, the event list may not be refreshed until the cell completes the current event processing load.
118 BMC Impact Solutions Event Management Guide
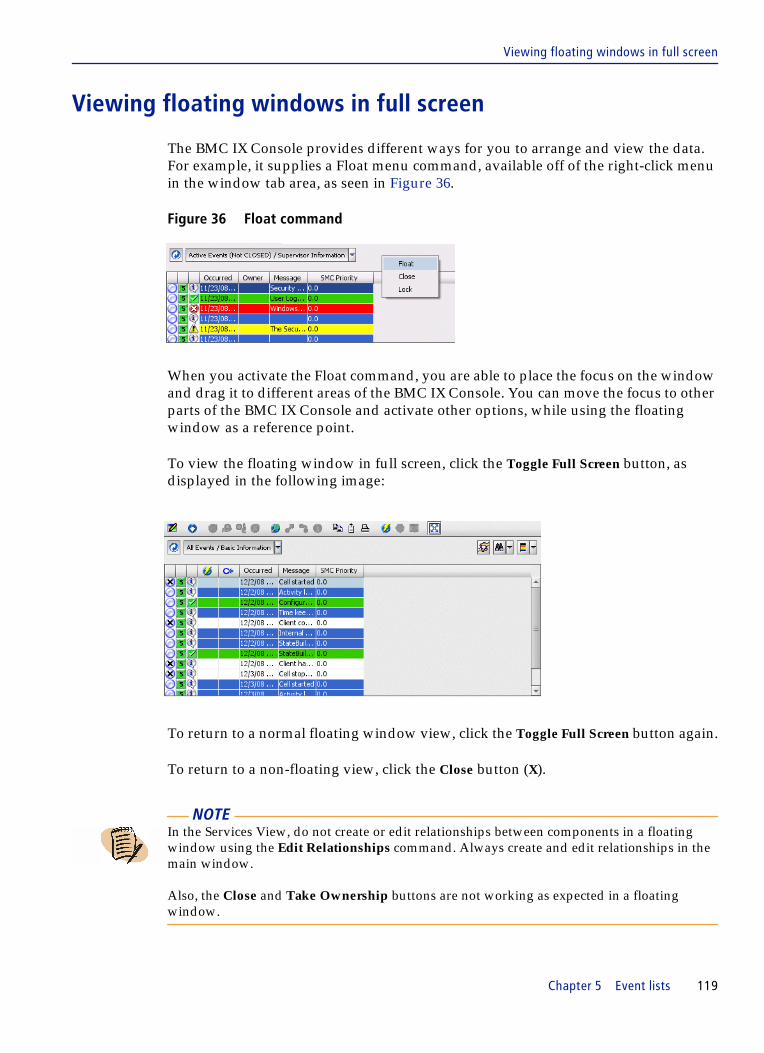
Viewing floating windows in full screen
Viewing floating windows in full screen
The BMC IX Console provides different ways for you to arrange and view the data. For example, it supplies a Float menu command, available off of the right-click menu in the window tab area, as seen in Figure 36.
Figure 36 Float command
When you activate the Float command, you are able to place the focus on the window and drag it to different areas of the BMC IX Console. You can move the focus to other parts of the BMC IX Console and activate other options, while using the floating window as a reference point.
To view the floating window in full screen, click the Toggle Full Screen button, as displayed in the following image:
To return to a normal floating window view, click the Toggle Full Screen button again.
To return to a non-floating view, click the Close button (X).
NOTE In the Services View, do not create or edit relationships between components in a floating window using the Edit Relationships command. Always create and edit relationships in the main window.
Also, the Close and Take Ownership buttons are not working as expected in a floating window.
Chapter 5 Event lists 119

Organizing events in the event list
Organizing events in the event listYou can use various techniques to organize events and view information about them:
■ Use MetaCollectors to arrange events from different sources.■ Filter events to see only the ones of interest.■ Change the sorting of the event list.■ Change the columns displayed in the event list.
Using MetaCollectors
BMC IX has an organizational tool, called a MetaCollector, that both operators and administrators can use to view and manage numerous events from different sources in meaningful ways. With MetaCollectors, you can display events from multiple, connected cells in a single tree node in the navigation pane, grouping events in your own customized ways. MetaCollectors are displayed in the navigation pane in their own tab.
To create a MetaCollector
1 At the top of the navigation pane of the Events View, select the MetaCollectors tab .
2 From the menu bar, choose Edit => MetaCollectors.
The Edit MetaCollector dialog box is displayed.
3 On the dialog box toolbar, click the New button .
The MetaCollector Naming dialog box is displayed.
4 Enter a name for the MetaCollector and click OK.
The new MetaCollector is displayed in the right pane of the dialog box.
5 Select the new MetaCollector.
6 Select a cell or collector from the left pane that you want to include in the new MetaCollector.
120 BMC Impact Solutions Event Management Guide

Filtering events
7 Click the right arrow button to move the cell or collector to the MetaCollector, as shown in Figure 37.
Figure 37 MetaCollector addition
8 When you have finished adding collectors to the MetaCollector, click OK.
9 Click the MetaCollectors tab in the navigation pane to view the new MetaCollector.
Filtering events
Using filters, you can narrow the scope and number of events displayed. BMC IX offers the following filtering methods:
■ default filters, provided in the Event Sources list, which filter events based on status, time, or affiliation with the service model and provide global event views
■ quick filters, provided in the Slot Quick Filter and Severity Quick Filter lists, which show events based on a specific slot value or severity level
■ local filters, which you create and which are unique to your logon user name
■ global filters, which an administrator creates and which are available to any user logged on to the server where the global filter was created
TIP You can also drag the cell or collector to the right pane to add it to the MetaCollector.
The cell is added to the MetaCollector
Chapter 5 Event lists 121

Filtering events
Using the default filters
The default filters provide an easy way to see only the events that are active, new, closed, or those that are related to the service model. To use a default filter, click the down arrow next to Event Sources and choose the default filter that you want to use.
Table 26 summarizes the default filters and their options.
All of the default filters have the following options to differentiate the event information that is displayed:
■ Basic Information displays
■ Supervisor Information displays
■ SMC Information displays
Table 26 Default filters and filter options
Filter name Primary options Secondary options
All Events ■ Basic Information■ Supervisor Information■ SMC Information
none
Active Events
New Events
Closed Events
Blackout Alerts
SMC Events ■ SMC Impact Events■ SMC Status History Events
■ Basic Information■ Supervisor Information■ SMC Information
Incident Events ■ CI Incidents ■ CI Incident Information
■ Event Incidents ■ Event Incident Information
— status— severity— priority
— number of operation actions performed on the event— date and time the event was received— message produced by the event
— status— severity— priority
— date and time the event was received— owner of the event— message produced by the event
— status— severity— priority— receipt date and time— class
— impact — type of service model component— component ID— causes— effects
122 BMC Impact Solutions Event Management Guide
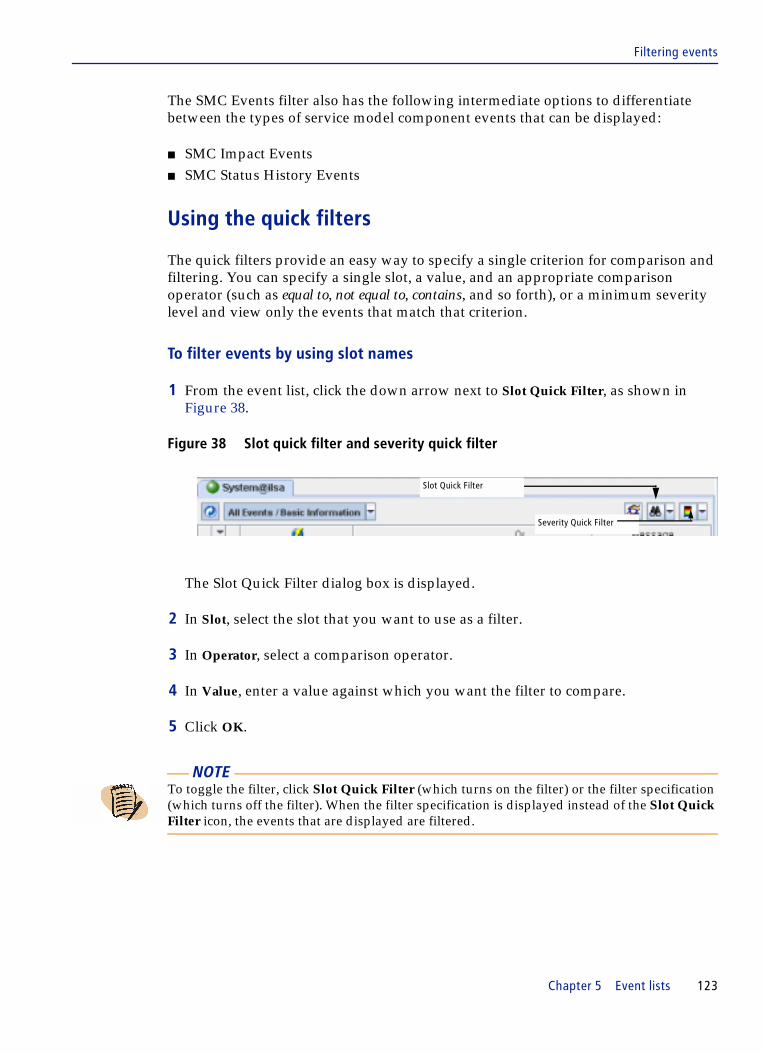
Filtering events
The SMC Events filter also has the following intermediate options to differentiate between the types of service model component events that can be displayed:
■ SMC Impact Events■ SMC Status History Events
Using the quick filters
The quick filters provide an easy way to specify a single criterion for comparison and filtering. You can specify a single slot, a value, and an appropriate comparison operator (such as equal to, not equal to, contains, and so forth), or a minimum severity level and view only the events that match that criterion.
To filter events by using slot names
1 From the event list, click the down arrow next to Slot Quick Filter, as shown in Figure 38.
Figure 38 Slot quick filter and severity quick filter
The Slot Quick Filter dialog box is displayed.
2 In Slot, select the slot that you want to use as a filter.
3 In Operator, select a comparison operator.
4 In Value, enter a value against which you want the filter to compare.
5 Click OK.
NOTE To toggle the filter, click Slot Quick Filter (which turns on the filter) or the filter specification (which turns off the filter). When the filter specification is displayed instead of the Slot Quick Filter icon, the events that are displayed are filtered.
Slot Quick Filter
Severity Quick Filter
Chapter 5 Event lists 123

Filtering events
To filter events using severity
1 From the event list, click the down arrow next to Severity Quick Filter as displayed in Figure 38 on page 123.
A list of severity levels is displayed.
2 Select the minimum severity level that you want to use to filter the event list.
The Severity Quick Filter filters out any events that have a severity level below the severity level that you selected. For example, if you select a severity status of Minor, only events of status Minor, Major and Critical would be displayed, and all events with a severity level below Minor would be filtered out.
Using global and local filters
Administrators can create filters and make them accessible to all users who are logged on to the server where the filters were created; these filters are global filters. Any user can create filters that are unique to the logon user name and only that user can access; these filters are local filters. You can use the filters that are available to you to adjust the view of the events list just as you use the quick filters or default filters.
To create a filter
1 From the menu bar, choose Edit => Event Views.
The Edit Event View dialog box is displayed.
2 On the toolbar, click Edit Filters , as indicated in Figure 39 on page 125.
NOTE To toggle the filter on and off, click Severity Quick Filter (which turns on the filter) or the filter specification (which turns off the filter). When the filter specification is displayed instead of the Severity Quick Filter icon, the events that are displayed are filtered.
124 BMC Impact Solutions Event Management Guide
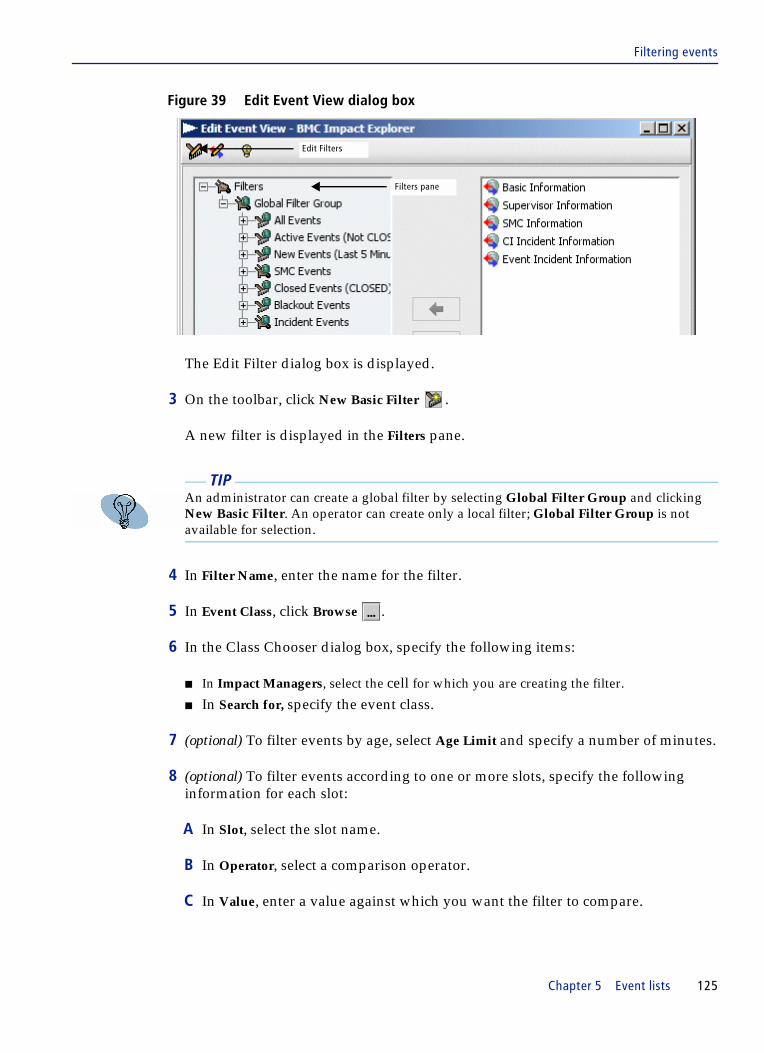
Filtering events
Figure 39 Edit Event View dialog box
The Edit Filter dialog box is displayed.
3 On the toolbar, click New Basic Filter .
A new filter is displayed in the Filters pane.
4 In Filter Name, enter the name for the filter.
5 In Event Class, click Browse .
6 In the Class Chooser dialog box, specify the following items:
■ In Impact Managers, select the cell for which you are creating the filter.
■ In Search for, specify the event class.
7 (optional) To filter events by age, select Age Limit and specify a number of minutes.
8 (optional) To filter events according to one or more slots, specify the following information for each slot:
A In Slot, select the slot name.
B In Operator, select a comparison operator.
C In Value, enter a value against which you want the filter to compare.
TIP An administrator can create a global filter by selecting Global Filter Group and clicking New Basic Filter. An operator can create only a local filter; Global Filter Group is not available for selection.
Edit Filters
Filters pane
Chapter 5 Event lists 125

Filtering events
D If you want to add another filter condition (slot), select a logical operator of And or Or and then click Add.
9 Click OK.
The Edit Filter dialog box closes and the new filter is displayed in the Filters pane of the Edit Event View dialog box.
10 In the Edit Event View dialog box, select the new filter in the left pane.
11 In the right pane, select the options that you want to use for displaying the results of the new filter (referred to as slot orders), and then click the left arrow between the panes.
The slot orders are added to the filter hierarchy in the left pane.
12 Click OK to return to the main console window.
Your new filter is ready for use. You can access it in Event Sources.
To edit a filter
1 From the menu bar, choose Edit => Event Views.
The Edit Event View dialog box is displayed.
2 On the toolbar, click Edit Filters .
The Edit Filter dialog box is displayed.
3 From the Filters pane, select the filter that you want to modify.
4 Edit the settings for the filter (see steps 4 through 8 on page 125 for guidance).
5 Click OK.
6 Click OK to return to the console.
TIP To remove a filter condition, select the condition you want to delete and click Remove.
NOTE If you want to create or edit a filter using more complex logic, you can click Promote to Advanced and use the editing tool to add and remove logic, change operators, and so forth.
126 BMC Impact Solutions Event Management Guide

Filtering events
To delete a filter
1 From the menu bar, choose Edit => Event Views.
The Edit Event View dialog box is displayed.
2 On the toolbar, click Edit Filters .
The Edit Filters dialog box is displayed.
3 From the Filters pane, select the filter that you want to delete, and click Delete on the toolbar.
4 Click OK.
5 Click OK to return to the console.
Organizing local filters into groups
You may have enough local filters to warrant organizing them into groups. Using local filter groups can make finding a particular filter easier.
To create a filter group
1 From the menu bar, choose Edit => Event Views.
The Edit Event View dialog box is displayed.
2 On the toolbar, click Edit Filters.
The Edit Filter dialog box is displayed.
3 On the toolbar, click New Filter Group.
In the Filters pane, a new filter group is displayed.
4 In Filter Group Name, enter a name for the filter group.
NOTE A filter group labeled Global Filter Group is created during the installation process and is displayed in the Filters hierarchy in the Edit Event Views dialog box. An administrator can add filters to this group to make them available to other users. Otherwise, access is restricted to the user who created the filter.
Chapter 5 Event lists 127

Filtering events
5 Click OK.
6 Click OK to return to the console.
To rename a filter group
1 From the menu bar, choose Edit => Event Views.
The Edit Event Views dialog box is displayed.
2 On the toolbar, click Edit Filters.
The Edit Filter dialog box is displayed.
3 From the Filters pane, select the filter group whose name you want to change.
4 In Filter Group Name, enter a new name for the filter group.
5 Click OK.
6 Click OK to return to the console.
To delete a filter group
1 From the menu bar, choose Edit => Event Views.
The Edit Event View dialog box is displayed.
2 On the toolbar, click Edit Filters.
The Edit Filters dialog box is displayed.
3 From the Filters pane, select the filter group you want to delete and click Delete on the toolbar.
4 Click OK.
5 Click OK to return to the console.
128 BMC Impact Solutions Event Management Guide

Sorting events
Sorting events
Slots identify information within an event class. Each event class has defined slots. Some slots are common to all event classes, while others are unique to one event class. The default slots in the event list provide basic information about an event. By changing the slots presented in the event list, you can view additional pertinent information or change the order in which event data is presented.
The set of slots presented in the event list is called the slot order. When you change the slots presented, either by adding or removing slots or by rearranging them, you are changing the slot order. To use a new slot order, you must associate it with a filter.
To create a new slot order
1 From the menu bar, choose Edit => Event Views.
The Edit Event View dialog box is displayed.
2 On the toolbar, click Edit Slot Orders, as indicated in Figure 40.
Figure 40 Slot order creation
The Edit Slot Order dialog box is displayed.
3 On the toolbar, click New Slot Order .
TIP You can also access the Edit Slot Order dialog box by double-clicking a slot listed in the Slot orders pane.
Slot orders paneEdit Slot Orders
Chapter 5 Event lists 129
Sorting events
4 In Slot Order Name, enter the name for the new slot order.
5 In Event Class, click Browse .
6 In the Class Chooser dialog box, specify the following items:
■ In Impact Manager, select the cell for which you are creating the slot order.■ In Search for, specify the event class.
7 Use the left and right arrow buttons to move slots between Available Slots and Selected Slots.
The slots listed in Available Slots depend on the level within the event class hierarchy of the specified class. The higher the class is in the hierarchy, the more slots are available.
8 (optional) Use the up and down arrow buttons to move a slot up or down in the Selected Slots list.
9 Click OK.
The Edit Event View dialog box is displayed, listing the new slot order in the Slots pane.
10 Click OK to return to the console.
To modify an existing slot order
1 From the menu bar, choose Edit => Event Views.
The Edit Event View dialog box is displayed.
2 Click the Edit Slot Orders button on the toolbar.
The Edit Slot Order dialog box is displayed.
TIP An administrator can create a global slot order (available to all consoles connected to the BMC IX) by selecting Global SlotOrder.
NOTE You must associate the new slot order with a filter before you can use it. For more information, see “To associate a slot order with a filter” on page 131.
130 BMC Impact Solutions Event Management Guide

Sorting events
3 From the Slot orders pane, select the slot order to edit.
4 Edit the settings.
5 Click OK.
6 Click OK to return to the console.
To associate a slot order with a filter
1 From the menu bar, choose Edit => Event Views.
The Edit Event View dialog box is displayed.
2 From the Slots orders pane, select a slot order.
3 From the Filters pane, select a filter or filter group.
4 Click the left arrow button, located between the Slots orders and Filters panes.
5 Expand the filter’s hierarchy indicator to display the new relationship with the slot order.
6 Click OK.
Single-click sorting
You can use single-click sorting by clicking the header of the column that you want to use as the basis of your event list sort, as shown in Figure 41 on page 132. Even if a multiple sort order has been established, you can click any column heading that is not part of the designated multiple sort order to reset sorting. This action establishes single-column sorting, and the column on which you clicked is designated as the first, and only, column in the new sort order.
NOTE You can associate only a global slot order with a global filter.
Chapter 5 Event lists 131

Sorting events
Figure 41 Single-click sorting indicators
Multiple column sorting
Designating multiple columns for a sorting order is useful in resolving sort order conflicts in the event list. You can set a multiple column sort order for a maximum of three columns, as shown in Figure 42.
Figure 42 Multiple column sorting indicators
In the following procedures, you can select or deselect the column headings that you want to use to sort the contents of the event list.
Before you begin
Following are multiple column sorting considerations:
■ Sorting is resolved by the second sort column only if the first sort column has a sorting conflict.
■ Sorting extends to the third sort column only if the second sort column has a sorting conflict.
Indicates that the event list is being sorted in an ascending order.
Indicates that the message subject listed in the message column is being used to sort the event list.
The event list is first sorted using the priority column in descending order.
The status column is being selected to use as the second criteria for sorting the event list.
The Message column is used as the third criteria to sort the event list.
132 BMC Impact Solutions Event Management Guide

Assigning events to users
To add a column to the sort order
Use one of the following methods:
■ Right-click a column heading and choose a position order from the Slot Order Indicator menu. Repeat this step to add a second or third column to the sort order for the event list.
■ Press the Ctrl key and click a column heading. Repeat this step to add a second or third column to the sort order for the event list.
To remove a column from the sort order
Use one of the following methods:
■ Right-click a column heading and choose None from the Slot Order Indicator menu. ■ Press the Ctrl key and click a column heading contained in the sort order.
Assigning events to users
Using the Flexibility for Event Assignment feature, you can assign events to different sets of user groups:
■ BMC EM users (local, file-based user authentication definitions contained in the user_definitions.xml file)
■ LDAP users as defined in the ldap_configuration.xml file■ a combination of BMC EM users and LDAP users
Before you begin
You must be logged into the BMC IX Console as a user with supervisory permission.
NOTE If you have established a multiple sort order in the event list, clicking one of the sort order columns toggles that column’s display between ascending and descending order.
NOTE See the discussion of the BMC Impact Administration server in the BMC Impact Solutions Infraststructure Administration Guide for a description of file-based and LDAP user groups.
Chapter 5 Event lists 133

Assigning events to users
Ensure that the users_filter property in the IMPACT_SOLUTIONS_HOME\server\conf\ix.properities file is set equal to true. The default value is false.
To assign events to users
1 Choose Edit => Configuration from the main menu bar in the BMC IX Console to open the Edit Configuration dialog box.
2 In the Edit Configuration dialog box, click the Events View tab.
Figure 43 Edit Configuration dialog
134 BMC Impact Solutions Event Management Guide

Assigning events to users
3 In the Users List for Assigning Events section, choose one of the group options:
4 In the AssignTo drop-down list dialog box, choose the user that you wish to assign to the event.
NOTE If the users_filter property is set equal to false (the default value), the different groups under Users List for Assigning Events do not display in the Events View tab.
User Description
All Users in BMC Event Manager user file
all local users defined in the IMPACT_SOLUTIONS_HOME\server\conf\user_definitions.xml file
All LDAP Users LDAP users from all LDAP configurations specified in the IMPACT_SOLUTIONS_HOME\server\conf\ldap_configuration.xml file
Your LDAP Users LDAP users from the LDAP configuration(s) to which the login user belongs
Your Group - both LDAP and BMC EM user file members
all local and LDAP users who belong to the user group of the login user
Chapter 5 Event lists 135

Assigning events to users
136 BMC Impact Solutions Event Management Guide
C h a p t e r 6
6 Event groups and image viewsThis chapter describes event groups and image views and explains how to create them. This chapter presents the following topics:
Event groups. . . . . . . . . . . . . . . . . . . . . . . . . . . . . . . . . . . . . . . . . . . . . . . . . . . . . . . . . . . . 138Types of event groupings . . . . . . . . . . . . . . . . . . . . . . . . . . . . . . . . . . . . . . . . . . . . . . 138Event group configuration files. . . . . . . . . . . . . . . . . . . . . . . . . . . . . . . . . . . . . . . . . 139Event tree hierarchy . . . . . . . . . . . . . . . . . . . . . . . . . . . . . . . . . . . . . . . . . . . . . . . . . . 140Event tree objects . . . . . . . . . . . . . . . . . . . . . . . . . . . . . . . . . . . . . . . . . . . . . . . . . . . . . 140
Image views . . . . . . . . . . . . . . . . . . . . . . . . . . . . . . . . . . . . . . . . . . . . . . . . . . . . . . . . . . . . 141Planning event groups and image views . . . . . . . . . . . . . . . . . . . . . . . . . . . . . . . . . . . . 143Working with event groups and image views. . . . . . . . . . . . . . . . . . . . . . . . . . . . . . . . 144
Creating an event group (event tree top-level) node . . . . . . . . . . . . . . . . . . . . . . . 144Creating an event group subnode (event tree node) . . . . . . . . . . . . . . . . . . . . . . . 145Deleting an event group subnode (event tree top-level node) . . . . . . . . . . . . . . . 146Hiding a collector in an event group . . . . . . . . . . . . . . . . . . . . . . . . . . . . . . . . . . . . 146Showing a hidden collector in an event group . . . . . . . . . . . . . . . . . . . . . . . . . . . . 147Putting an event group into production or development . . . . . . . . . . . . . . . . . . . 147Adding a custom image view to an event group . . . . . . . . . . . . . . . . . . . . . . . . . . 148Guidelines for viewing custom slots in an event view . . . . . . . . . . . . . . . . . . . . . 150
Granting user access to event groups . . . . . . . . . . . . . . . . . . . . . . . . . . . . . . . . . . . . . . . 151
Chapter 6 Event groups and image views 137

Event groups
Event groupsThe Event Groups tab on the Events View of BMC Impact Explorer allows you to create and control access to the event groups and their image views that IT operators use to monitor and manage events.
Event groups allow the organization of cells and collectors to make event displays meaningful for operators. For example, you might create an event group for collectors that gather database warning events and allow only operators that are database administrators access to that event group. Event groups are displayed in a hierarchical navigation tree. Although some of the objects displayed in the tree are unique to event groups, other objects are common across all three event management tabs on the Events tab of the BMC Impact Explorer. The remainder of this section provides more detail about the navigation tree and its objects.
Types of event groupings
In BMC Impact Explorer, events can be grouped or organized in these ways:
■ event collectors--an event list, a meaningful grouping of events or events grouped by their relationships
■ MetaCollectors--a grouping of events from several different event lists (collectors), showing their combined status
■ event groups--a hierarchy of event lists
■ image views--a graphical representation of the collectors in an event group
Event collectors
Event collectors group events for display in an event list to provide operators with meaningful groups of events and to show relationship through the hierarchy of the nodes in the tree. To access the event list for a collector, operators click the collector node in the navigation tree.
NOTE Unlike metacollectors, which operators can define themselves in BMC Impact Explorer, only administrators create event groups and image views.
138 BMC Impact Solutions Event Management Guide

Event group configuration files
Event collectors are dynamic or static. Nodes for dynamic collectors appear or disappear from the navigation tree based on whether or not events are present that meet the collectors’ criteria. Nodes for static collectors remain in the navigation tree whether events are present or not.
MetaCollectors
A MetaCollector is a grouping of collectors. Operators create MetaCollectors to view events from several event lists. Each event list is shown as a tab in the event list pane. The MetaCollector node represents the state of the combined events. MetaCollectors are often used to view collectors from multiple cells in the network.
Event groups
An event group is another way for showing the relationship of events through the hierarchy of the navigation tree. Service administrators and managers define event groups and associate them with one or more collectors. Each level of the collector is shown as a node under the event group. An event list is associated with the lowest level nodes of an event group. The parent level of an event group represents all of the events associated with the collectors and it is associated with an image view.
Image views
An image view is a graphical representation of the collectors in an event group. The collectors are represented by objects that can be placed on a background image. The objects can be graphics, such as icons; statistical information, such as the number of events by priority or by severity; or text, such as a label.
Event group configuration files
The event group configuration file structure is listed in Table 27:
Table 27 Event group configuration files (part 1 of 2)
Folder Contains
\Images Backgrounds and Icons directories
\Images\Backgrounds background image files that are shared by all Map definitions
\Images\Icons image files which are shared by all Map definitions
\Map event group tree node template MapObjectTemplate.xml
\Map event group default image view configuration DefaultMapPage.xsl
\Map Map tree definition Maps.xml
Chapter 6 Event groups and image views 139

Event tree hierarchy
Event tree hierarchy
Event groups are displayed in a hierarchical tree, the event tree, in the navigation pane of the Event Groups tab, as shown in Figure 44. Although administrators see all the event groups they create in the event tree, operators viewing the event tree see only those event groups to which they are granted access.
Figure 44 Event tree hierarchy
Event groups appear as event tree top-level nodes. Beneath event tree top-level nodes you can add event tree nodes (child nodes of event groups) to further organize event tree display. To event tree top-level nodes and event tree nodes you can add collectors and subcollectors which represent, cells, collectors, and subcollectors. Use the Event Group Editor to create and modify the event group hierarchy to organize the display of these objects.
Event tree objects
Table 28 on page 141 shows the icons and descriptions of the objects represented in the event tree.
\Map\Map_xxx Map.xml for Map_xxx as well as its MapPages directory
\Map\Map_xxx\MapPages all map page definitions for Map Map_xxx
Table 27 Event group configuration files (part 2 of 2)
Folder Contains
140 BMC Impact Solutions Event Management Guide

Image views
Additionally, each object icon in the event tree has an associated status, shown as an icon to the right of the object icon. For information about the statuses represented by each icon, see the BMC Impact Solutions: Event Monitoring.
Image viewsImage views provide operators with a graphical representation of the aggregated state of the event groups they represent. Administrators create image views by dragging and dropping an image view object, called a widget (shown in Figure 45 on page 141), onto a background image. Each widget represents a group node, collector, or child collector from the event tree.
Figure 45 Image view widgets
Table 28 Event tree objects and definitions
Objecticon Name and definition
event tree top-level node in production status; the top-level node of an event group that is in production status, making the Event Group Editor and Image View Editor unavailable for the event group
event tree top-level node in development status; the top-level node of an event group that is in development status, making the Event Group Editor available for the event group
event group node; an event group subnode of an event tree top-level node or another event group node
child collector node; displays information from a collector or subcollector of a cell or collector added as a collector node
subcollector node; child node of a collector node
image view widgets
Chapter 6 Event groups and image views 141

Image views
All event tree nodes with children (event tree top-level nodes, event group nodes, and collector nodes with child collectors) have either a default image view or a custom image view. All such nodes initially display a default image view that contains a blank background and a widget for each child node, as shown in Figure 45. Administrators create custom image views by adding an imported image (for example, a map of a geographical region or a diagram of the IT system of an enterprise) to replace the blank background of a default image view and by arranging widgets representing some or all of the child odes on the background, as shown in Figure 46.
Figure 46 Custom image view
You can right click on image view tab to open a pop-up menu that displays Float, Close, and Lock options as shown in Figure 47 on page 143. When you choose Float, you can separate the image view into a separate window and move about it the GUI. You can click the Close (X) button of the floating window to dock it. The image view while in a floating window shows map updates whenever related events change.
142 BMC Impact Solutions Event Management Guide

Planning event groups and image views
Figure 47 Image view with float option
The floating image view does not respond to mouse clicks. You can only float the image view, not the related events list or associated events toolbar.
Planning event groups and image viewsPlanning is essential to creating event groups and image views that logically and efficiently depict IT assets of your enterprise. Before creating event groups and image views, consider these guidelines:
■ Event groups and image views organize and represent the contents of collectors Consequently, you should carefully plan and create the collectors for your enterprise. Event groups and image views can provide no more information than that gathered by collectors. (Collectors must be created before the event groups that use them. For more information about collectors, see the BMC Impact Solutions: Knowledge Base Development Reference Guide.)
■ Creating event groups by using static collectors allows you to create the event groups before you run the event management system in a test or production environment. However, this practice can require a significant amount of manual work depending on the number of event groups you create.
Chapter 6 Event groups and image views 143

Working with event groups and image views
■ Creating event groups by using dynamic collectors requires less manual work than using static collectors, but the event groups do not exist until cells receive events to populate the dynamic collectors.
Working with event groups and image viewsThis section provides instructions for creating event groups and adding associated nodes that make up an event tree. This section also provides instructions for defining custom image views for event groups.
Creating an event group (event tree top-level) node
Use the Event Groups tab to create an event group.
To create an event group (event tree top-level node)
1 On the menu bar of the Event Groups tab of the Events tab view, choose Edit => Add Event Group.
The Event Group Editor, shown in Figure 48, is displayed.
Figure 48 Event Group editor
NOTE Event groups are a prerequisite for image views. You must first create an event group to which you then add an image view.
144 BMC Impact Solutions Event Management Guide

Creating an event group subnode (event tree node)
2 On the Available Collectors pane, select a cell, collector, or subcollector to add to the new event group.
3 On the Event Group pane, select NewEventsGroup.
4 To add the selected collector in the Available Collectors pane to the new event group in the Event Group pane, click the right arrow.
The selected collector appears beneath the new event group in the Event Group pane.
5 To add another collector (or cell or subcollector) to the new event group, select the additional collector from the Available Collectors pane and click the right arrow.
Repeat this step as necessary to add more cells, collectors, or subcollectors to the new event group.
6 To save the event group, click OK.
Creating an event group subnode (event tree node)
Use the Event Groups tab to create an event group subnode.
To create an event group subnode (event tree node)
1 On the menu bar of the Event Groups tab of the Events tab view, choose Edit => Add Event Group.
The Event Group Editor is displayed.
2 On the Event Group pane, select NewEventsGroup and click Insert Group.
An event group subnode, NewGroup, is inserted beneath the NewEventsGroup node, as shown in Figure 49.
Figure 49 Event tree node addition
3 On the Available Collectors pane, select a cell, collector, or subcollector to add to the new event group subnode.
Chapter 6 Event groups and image views 145

Deleting an event group subnode (event tree top-level node)
4 To add the selected collector in the Available Collectors pane to the new event group subnode in the Event Group pane, click the right arrow.
5 To add another collector (or cell or subcollector) to the new event group subnode, select the additional collector from the Available Collectors pane and click the right arrow.
Repeat this step as necessary to add more cells, collectors, or subcollectors to the new event group subnode.
6 To save the event group subnode, click OK.
Deleting an event group subnode (event tree top-level node)
Use the Event Groups tab to delete an event group subnode.
To delete an event group (Event tree top-level node)
1 On the event tree of the Event Groups tab, select an event group or any of its descendant nodes.
2 From the menu bar, choose Edit => Delete Event Group.
An action confirmation dialog box appears.
3 To delete the event group and its descendants, click OK.
Hiding a collector in an event group
Use the Event Group pane to hide a collector in an event group.
NOTE To delete an event group, it must be in development status. If the event group is in production status you must change the status before deleting it.
WARNING Deleting an event group deletes the entire event group and all its descendants, regardless of what node you select in the event group.
146 BMC Impact Solutions Event Management Guide

Showing a hidden collector in an event group
To hide a collector in an event group
1 In the Event Group pane, select a collector node.
2 Click Hide.
A lock icon is displayed with the node to show that the collector will not appear in the production event group. Event information from the collector and any subcollectors are still aggregated by the event group it appears in.
Showing a hidden collector in an event group
Use the Event Group pane to show a hidden event group.
To show a hidden collector in an event group
1 In the Event Group pane, select a hidden collector node.
2 Click Show.
The collector now appears in the production event group.
Putting an event group into production or development
Use the Image Group Editor to put an event group into production or development.
To put an event group into production or development
1 On the menu bar of the Event Groups tab of the Events tab view, choose Edit => Add Event Group.
The Event Group Editor is displayed.
2 In the Event Group navigation pane, select an event group.
3 Click the appropriate Status radio button.
4 Click OK to save your change.
Chapter 6 Event groups and image views 147

Adding a custom image view to an event group
Adding a custom image view to an event group
Under the path IMPACT_SOLUTIONS_HOME\data\Image\Background, you find a series of default *.gif files that you can use as background images for different event groups. For example, they include
■ Korea.gif■ North_America.gif■ Europe.gif
From the Events Group tab off of the Events View, you can launch the Image View Editor to add a custom image view to the selected event group.
Before you begin
Custom image views require files in .jpg or .gif format for use as background and icon images.
To make these images available to the Image View Editor, perform the following steps on the system where the BMC Impact Administration server is installed and running:
1 Copy the designated .jpg or .fig file or files to the Background or Icon subdirectory in the path IMPACT_SOLUTIONS_HOME\data\Image\.
2 Open the IMPACT_SOLUTIONS_HOME\data\Image\Icon\component_icon.properties file in a text editor.
NOTE If two administrators have the same event group open and one administrator changes the status of the event group from development to production, the properties of the event group will not be protected and the other administrator will be able to edit the properties of the event group.
Image view objects become disabled after editing the event group.
TIP For performance considerations, do not load more than 100 icons in the Image View Editor.
148 BMC Impact Solutions Event Management Guide

Adding a custom image view to an event group
A Add an entry that specifies the custom icon or icons. Use a format as shown in the following example:
B Save and close the IMPACT_SOLUTIONS_HOME\data\Image\Icon\component_icon.properties file.
3 Restart the BMC Impact Explorer Console.
To add a custom image view to an event group
1 From the event tree of the Event Groups tab, select the event group (an event tree top-level node).
2 Choose from the following selection options:
■ From the menu bar, choose Edit => Edit Image View... .■ Right-click to display the pop-up menu, and choose Edit Image View... .
The Image View Editor is displayed. The Image View Editor opens with a descriptive text of the default image view.
3 To add a custom image view background, click Use Custom in the right-hand pane.
The View tab is enabled.
4 In the list of fields, under the heading Background Image click the Filename drop-down list to display the names of the available .gif and .jpg files, including the ones you have added.
The selected image file appears in the left-hand image pane of the Image View Editor.
If you have any widgets representing collectors for the event group, their object labels display in the top part pane above the selected image. Go to step 5.
If you do not have any widgets to add, go to step 6.
sms.component.icon.BMC_Collection=BMC_Collection
NOTE An event group must be in development status to add a custom image view. If the event group is in production status you must change the status before adding the image view.
Chapter 6 Event groups and image views 149

Guidelines for viewing custom slots in an event view
5 To place the widgets representing collectors for the event group, drag and drop their icon objects onto the selected background image in the view pane below them.
When you drag and drop a widget, the Selected Object tab on the right-hand pane is enabled for the widget. You can use the controls on this tab to modify the appearance of the widget on the image view background.
6 To save the custom image view and close the Image View Editor, click Save Custom Image & Close.
The saved image view is displayed in the Event Groups tab above the display of the event list for the selected event group.
Guidelines for viewing custom slots in an event view
Define the custom slots in the mc_root_redef.baroc file of the cell’s KB. Refer to the BMC Impact Solutions Knowledge Base Development Reference Guide for more information.
To view the custom slots of a particular cell, ensure that only that one cell is connected in the Collector Tree view. In this way, you load the custom slots defined in its mc_root_redef.baroc file. Ensure that any other cells are disconnected.
You can choose Edit => Event Views... from the main menu bar to open the Edit Event View window. In the Edit Event View window, you can view the custom slots from the Edit Slot Order dialog, and you can create custom filters with the custom slots through the Edit Filter dialog.
NOTE You should choose contrasting widget fill colors and custom image canvas colors. Some color combinations can result in text that cannot be seen. For example, if the widget fill color is set to transparent and the custom image canvas color is set to white, white letters that appear on the widget cannot be seen against the white canvas.
TIP To modify the appearance of widgets that appear on a default image view, edit the object appearance attributes in the XML-based defaultmappage.xsl located under IMPACT_SOLUTIONS_HOME\server\data\Map and under IMPACT_SOLUTIONS_HOME\server\data\iwcMaps. You can modify attributes such as width and height, font, and icon name. The file also contains helpful comments that identify the appearance attributes. Restart the BMC IX Console after making your changes and saving the file.
150 BMC Impact Solutions Event Management Guide

Granting user access to event groups
After you load the custom slots of the target cell and have finished with viewing custom slots and updating custom filters, you can reconnect the other cells.
Granting user access to event groupsAdministrators grant operators access privileges for event groups using the Event Group Properties editor. The Event Group Properties editor controls access to and the status of each event tree top-level node.
To grant user access to event groups
1 From the event tree of the Event Groups tab, select an event group (an event tree top-level node).
2 From the menu bar, choose Edit => Edit Event Group Properties.
The Event Group Properties editor, shown is displayed.
3 (optional) Add a text description of the event group.
4 Modify the Read and Write permissions to grant or deny access for each group as necessary. When complete, click OK.
BMC Impact Explorer saves the access settings for the selected event group
Chapter 6 Event groups and image views 151

Granting user access to event groups
152 BMC Impact Solutions Event Management Guide

C h a p t e r 7
7 Event operationsThis chapter describes typical event management operations that you perform in the BMC IX Console, including the Dashboard View, and by editing text files. This chapter presents the following topics:
Performing event operations . . . . . . . . . . . . . . . . . . . . . . . . . . . . . . . . . . . . . . . . . . . . . . 154Executing remote or local actions . . . . . . . . . . . . . . . . . . . . . . . . . . . . . . . . . . . . . . . . . . 156Manually setting component status or maintenance mode with a remote action . . 159Viewing event operations history . . . . . . . . . . . . . . . . . . . . . . . . . . . . . . . . . . . . . . . . . . 160Analyzing event relationships for abstracted, correlated, or propagated events. . . 160Copying and printing event information . . . . . . . . . . . . . . . . . . . . . . . . . . . . . . . . . . . . 161Connecting to event sources through hyperlinks . . . . . . . . . . . . . . . . . . . . . . . . . . . . . 162Alias formulas. . . . . . . . . . . . . . . . . . . . . . . . . . . . . . . . . . . . . . . . . . . . . . . . . . . . . . . . . . . 163
Working with Event Alias Formulas . . . . . . . . . . . . . . . . . . . . . . . . . . . . . . . . . . . . 163Working with the CIEM Dashboard View . . . . . . . . . . . . . . . . . . . . . . . . . . . . . . . . . . . 168
Specifying a web browser for your component’s home page. . . . . . . . . . . . . . . . 173Launching the web browser from your dashboard homepage . . . . . . . . . . . . . . 174Creating the CIEM Dashboard View . . . . . . . . . . . . . . . . . . . . . . . . . . . . . . . . . . . . 168Editing the CIEM dashboard . . . . . . . . . . . . . . . . . . . . . . . . . . . . . . . . . . . . . . . . . . . 174Copying the CIEM dashboard. . . . . . . . . . . . . . . . . . . . . . . . . . . . . . . . . . . . . . . . . . 175Deleting the CIEM dashboard . . . . . . . . . . . . . . . . . . . . . . . . . . . . . . . . . . . . . . . . . . 176
Guidelines for managing high availability. . . . . . . . . . . . . . . . . . . . . . . . . . . . . . . . . . . 177Relating events . . . . . . . . . . . . . . . . . . . . . . . . . . . . . . . . . . . . . . . . . . . . . . . . . . . . . . . . . . 179
Event relation definition example. . . . . . . . . . . . . . . . . . . . . . . . . . . . . . . . . . . . . . . 184Guidelines for implementing an event relation . . . . . . . . . . . . . . . . . . . . . . . . . . . 186
Chapter 7 Event operations 153

Performing event operations
Performing event operations You can perform basic management actions on events, such as acknowledge, close, assign, and so forth. You can also annotate an event, providing it with additional information. The following sections provide instructions for performing the event operations and annotating events.
To acknowledge an event
1 From the event list, select one or more open events designated with .
2 From the menu bar, choose Edit => Event Operations => Acknowledge Event.
A confirmation dialog box is displayed.
3 Click Yes.
To take ownership of an event
1 From the event list, select one or more events of which to take ownership.
2 From the menu bar, choose Edit => Event Operations => Take Ownership.
A confirmation dialog box is displayed.
3 Click Yes.
To assign an event to an individual
1 From the event list, select one or more events to assign.
2 From the menu bar, choose Edit => Event Operations => Assign to.
3 In the Assign To dialog box, select the person to whom you want to assign the event, and then click OK.
NOTE Although all the event operations that are available to your user role are available when you have selected two or more events in the event list, an operation is performed only on the selected events whose status makes the operation valid. If the operation is not valid for some selected events, a message box reports the mc_ueid slot values for those events, and the events are not changed.
154 BMC Impact Solutions Event Management Guide

Performing event operations
To decline ownership of an event
1 From the event list, select one or more events that have been assigned to you.
2 From the menu bar, choose Edit => Event Operations => Decline Ownership.
A confirmation dialog box is displayed.
3 Click Yes.
To close an event
1 From the event list, select one or more events to close.
2 From the menu bar, choose Edit => Event Operations => Close Event.
A confirmation dialog box is displayed.
3 Click Yes.
To reopen an event
To reopen a closed event, you must have either an MC_SuperAdmins or MC_Admins role ID established.
1 From the event list, select an event that has a status of Closed.
2 From the menu bar, choose Edit => Event Operations => Reopen Event.
A confirmation dialog box is displayed.
3 Click Yes.
To set the priority for an event
1 From the event list, select an event.
2 From the menu bar, choose Edit => Event Operations => Set Priority.
NOTE The list of users in the Assign To dialog box contains only users who are in the same account as the logged-on user. BMC Software recommends that all BMC Impact Explorer users be in the same account.
Chapter 7 Event operations 155
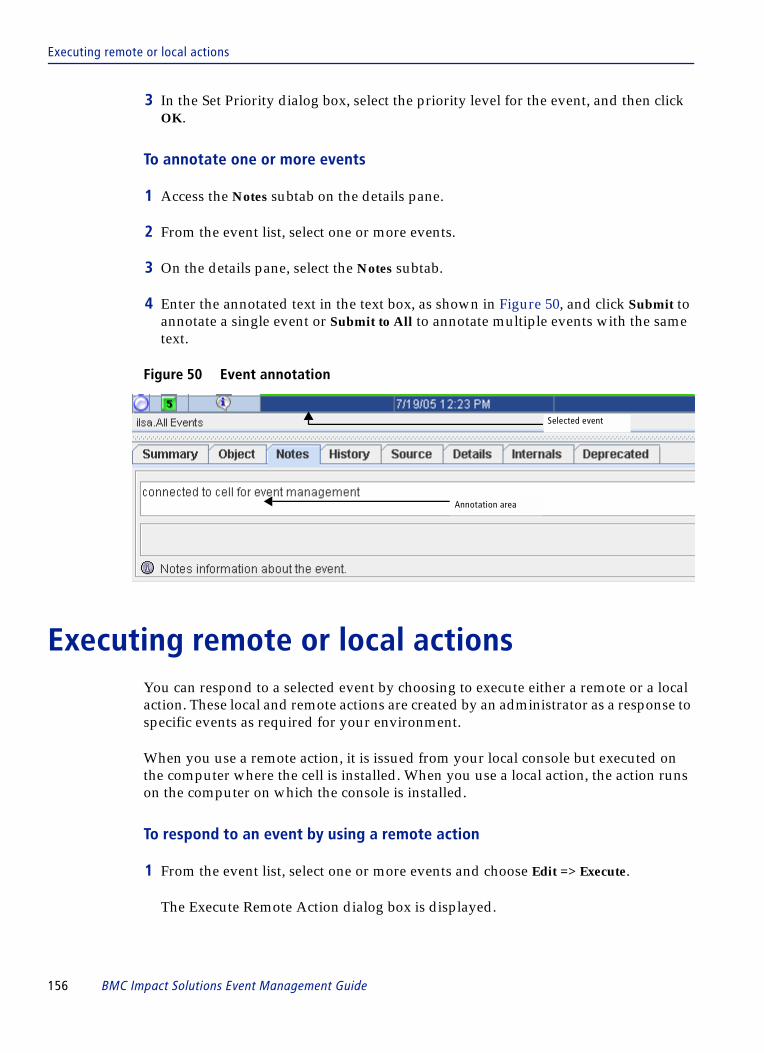
Executing remote or local actions
3 In the Set Priority dialog box, select the priority level for the event, and then click OK.
To annotate one or more events
1 Access the Notes subtab on the details pane.
2 From the event list, select one or more events.
3 On the details pane, select the Notes subtab.
4 Enter the annotated text in the text box, as shown in Figure 50, and click Submit to annotate a single event or Submit to All to annotate multiple events with the same text.
Figure 50 Event annotation
Executing remote or local actions You can respond to a selected event by choosing to execute either a remote or a local action. These local and remote actions are created by an administrator as a response to specific events as required for your environment.
When you use a remote action, it is issued from your local console but executed on the computer where the cell is installed. When you use a local action, the action runs on the computer on which the console is installed.
To respond to an event by using a remote action
1 From the event list, select one or more events and choose Edit => Execute.
The Execute Remote Action dialog box is displayed.
Selected event
Annotation area
156 BMC Impact Solutions Event Management Guide

Executing remote or local actions
2 Expand the Remote Actions folder and select a remote action, as shown in Figure 51 on page 157.
Figure 51 Remote action selection
3 Enter the appropriate settings required to run the selected remote action.
4 Click Execute.
5 To access the results of the remote action, right-click the individual event you ran the remote action for and choose Actions => Remote Action Results from the menu.
To respond to an event by using a local action
1 From the event list, select one or more events and Edit => Actions => Execute.
The Actions dialog box is displayed.
NOTE If you select Set Status as the remote action, you must enter a comment that explains the reason for changing the status.
TIP You can export the information about the remote action to a file by highlighting the action information in the Remote Action Results dialog box and clicking Export.
Chapter 7 Event operations 157

Executing remote or local actions
2 Expand the Local Actions folder and select a local action, as shown in Figure 52.
Figure 52 Local action selection
3 Direct the results of the local action to the results dialog box or to a file:
■ To view the results in a dialog box, clear both the Suppress Feedback and Log output to file check boxes.
■ To disable the display of results and send the output to an external file, clear the Suppress Feedback check box, and select the Log output to file check box. Enter the location for the output file in Log output to file or click the Browse button to specify the directory in which to place the output file.
4 Enter the appropriate settings to run the selected local action.
5 Click Execute.
Either the Local Action Results dialog box is displayed, containing the results of the local action, or those results are sent to the specified file.
NOTE The Batch Mode check box in the Local Action dialog box will not be editable unless the batchmode=true parameter is enabled. For more information about the batchmode parameter, see “To create a user-defined local action to respond to multiple events” on page 194.
158 BMC Impact Solutions Event Management Guide

Manually setting component status or maintenance mode with a remote action
To suppress local action results for all events
You can choose to suppress local action results for all events by manually editing the IMPACT_SOLUTIONS_HOME\console\etc\event_op\mc_actions.xml file. You can add the attribute suppress_feedback=”true” to the ActionDef element, as shown in the following extract:
When you add the attribute suppress_feedback=”true”, you receive status messages but you do not receive the local action results in the Local Actions Results popup window.
Manually setting component status or maintenance mode with a remote action
Similar to responding to an event with a remote action, you can set the status of a service component manually by using a remote action. You can also put a component in maintenance mode by using this feature. When you use the manual status feature, you must enter a comment that explains why the status was changed. To remove the manually set status or to return a component to operation, you must use another remote action to clear the manually set status. For instructions, see “To respond to an event by using a remote action” on page 156.
<?xml version="1.0" encoding="UTF-8"?>
<!--DOCTYPE Actions SYSTEM "Actions.dtd"-->
<Actions xmlns:xsi="http://www.w3.org/2001/XMLSchema-instance" xsi:noNamespaceSchemaLocation="Actions.xsd">
<ActionDef id="mc_ping" label="Ping EVENT origin"type="executable"target="mc_ping" suppress_feedback="true">Ping the system from which the event originated.
</ActionDef>
NOTE After modifying the mc_actions.xml file, restart the BMC Impact Administration Server.
Chapter 7 Event operations 159
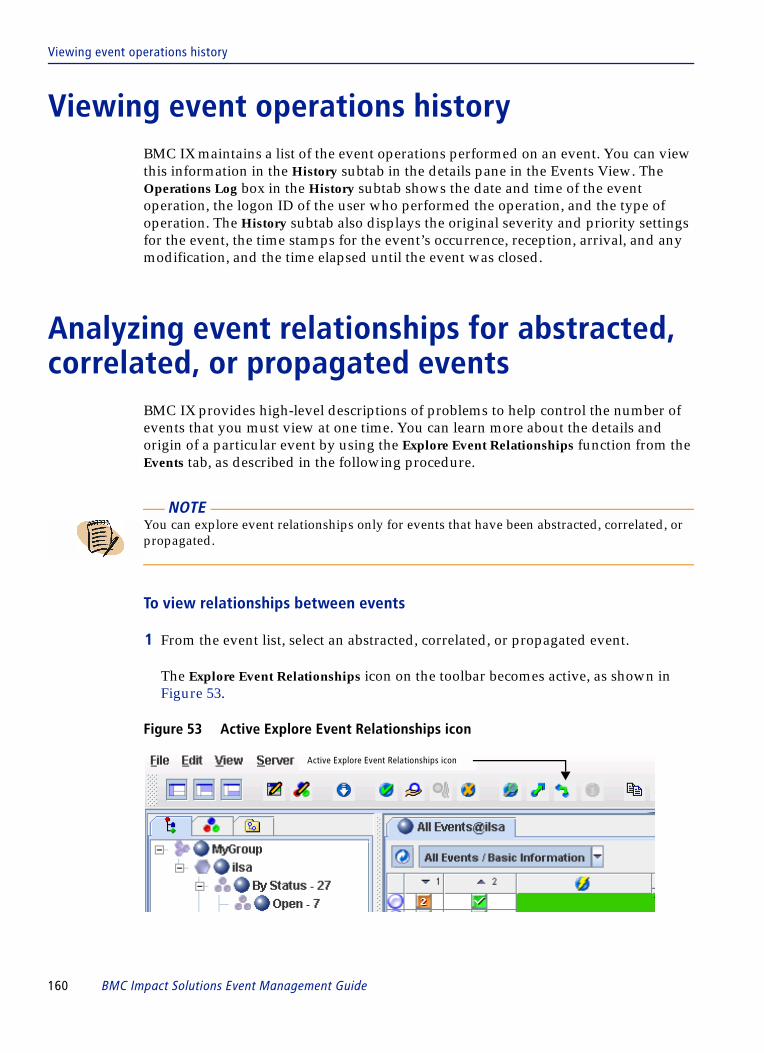
Viewing event operations history
Viewing event operations historyBMC IX maintains a list of the event operations performed on an event. You can view this information in the History subtab in the details pane in the Events View. The Operations Log box in the History subtab shows the date and time of the event operation, the logon ID of the user who performed the operation, and the type of operation. The History subtab also displays the original severity and priority settings for the event, the time stamps for the event’s occurrence, reception, arrival, and any modification, and the time elapsed until the event was closed.
Analyzing event relationships for abstracted, correlated, or propagated events
BMC IX provides high-level descriptions of problems to help control the number of events that you must view at one time. You can learn more about the details and origin of a particular event by using the Explore Event Relationships function from the Events tab, as described in the following procedure.
To view relationships between events
1 From the event list, select an abstracted, correlated, or propagated event.
The Explore Event Relationships icon on the toolbar becomes active, as shown in Figure 53.
Figure 53 Active Explore Event Relationships icon
NOTE You can explore event relationships only for events that have been abstracted, correlated, or propagated.
Active Explore Event Relationships icon
160 BMC Impact Solutions Event Management Guide

Copying and printing event information
2 Click the Explore Event Relationships icon.
The relationships pane is displayed, in which you can explore the hierarchy of additional events that contributed to the original event’s correlation, abstraction, or propagation.
The following actions and more are available from the relationships window:
■ reopen an event■ execute actions against an event■ open a service impact view for an event■ display event details
Copying and printing event information You can copy the detailed data collected for an event to the clipboard and then paste that data into another program, such as a spreadsheet or a text editor.
To copy event information
1 From the event list, select one or more events and choose Edit => Copy Events.
2 Paste the copied information into Notepad, Microsoft Word, or another program.
You can print the detailed data collected for an event to your local printer.
To print event information
1 From the event list, select one or more events and choose File => Print.
2 In the Print dialog box, change the settings for the printer, print range, and number of copies, if necessary, and click OK.
Chapter 7 Event operations 161

Connecting to event sources through hyperlinks
Connecting to event sources through hyperlinks
Application developers can define events in the appropriate files of their application so that BMC IX users connect with the event source via a hyperlinked URI. The specified URI is defined in the mcevent.baroc file under the Event class. The mc_tool_uri parameter contains the URI value. This parameter is linked with the mc_tool parameter, which identifies the event source. The event source can be any integration application, such as a console or a server.
The Monitoring Tool field of the Events View - Summary tab captures and displays the mc_tool and mc_tool_uri parameter values. It displays the information in the format nameOfEventSource-launch in browser where launch in browser is a hyperlink of the event source. The event source is displayed as it is defined in the mc_tool parameter definition. The URI value is not displayed, but is hidden behind the hyperlink label launch in browser.
When you click the hyperlink launch in browser, the object identified by the URI is opened in a separate browser window with the focus already on it. The object can be the event source or a gateway though which you can navigate to the event source.
Before you begin
Check your default browser settings. Under MS Windows, the hyperlink will open in the default browser. Under Solaris and other UNIX operating systems, the default browser should be specified in the PATH variable.
To connect to an event source
1 In the Events View, select the event.
2 Open the Summary tab.
3 Locate the Monitoring Tool field that identifies the event source.
4 Click the launch in browser hyperlink.
The URI object is opened in a separate browser window, or in the current one if you are using MS Internet Explorer v. 6.x.
NOTE In MS Internet Explorer v. 6.x, the object is launched in the current browser window. If you are using MS Internet Explorer v.7 or later or any tabbed browser, then it is launched in a separate window.
162 BMC Impact Solutions Event Management Guide
Alias formulas
5 Enter authentication credentials if you are prompted.
Alias formulasYou can add and edit alias formulas across all views (Dashboard, Events, Services, and Administration) of the BMC IX Console provided you
■ belong to the Full Access or Service Administrators group■ have at least one cell connection to the BMC IX Console
The procedure for adding and editing alias formulas in the BMC IX Console is very similar to the procedure used in the BMC Impact Service Model Editor.
Several default alias formulas are provided out-of-the-box. For example, default aliases for the BMC Patrol product are offered for PATROL events of class PATROL_EV. These aliases can be used by the BMC Impact Integration for PATROL product.
For background information about defining component aliases and event alias associations, see the BMC Impact Solutions Service Modeling and Publishing Guide.
Working with Event Alias Formulas
1 From the menu bar, choose Tools =>Event Alias Formulas.
The Alias Formulas Editor window is displayed. It lists the connected cells in the Cell drop-down list. It displays all current alias formulas for the selected cell in the drop-down list, as shown in Figure 54 on page 164.
Chapter 7 Event operations 163

Working with Event Alias Formulas
Figure 54 Alias Formulas Editor
The menu bar at the top of the window contains the following icons:
2 In the Cell drop-down list, select the cell you want to work on.
Icon Purpose
to edit a selected alias formula
to create a new alias formula
to copy an existing alias formula to use as a template for creating a new alias formula
to delete a selected alias formula
to copy an existing alias formula
to paste an alias formula
164 BMC Impact Solutions Event Management Guide
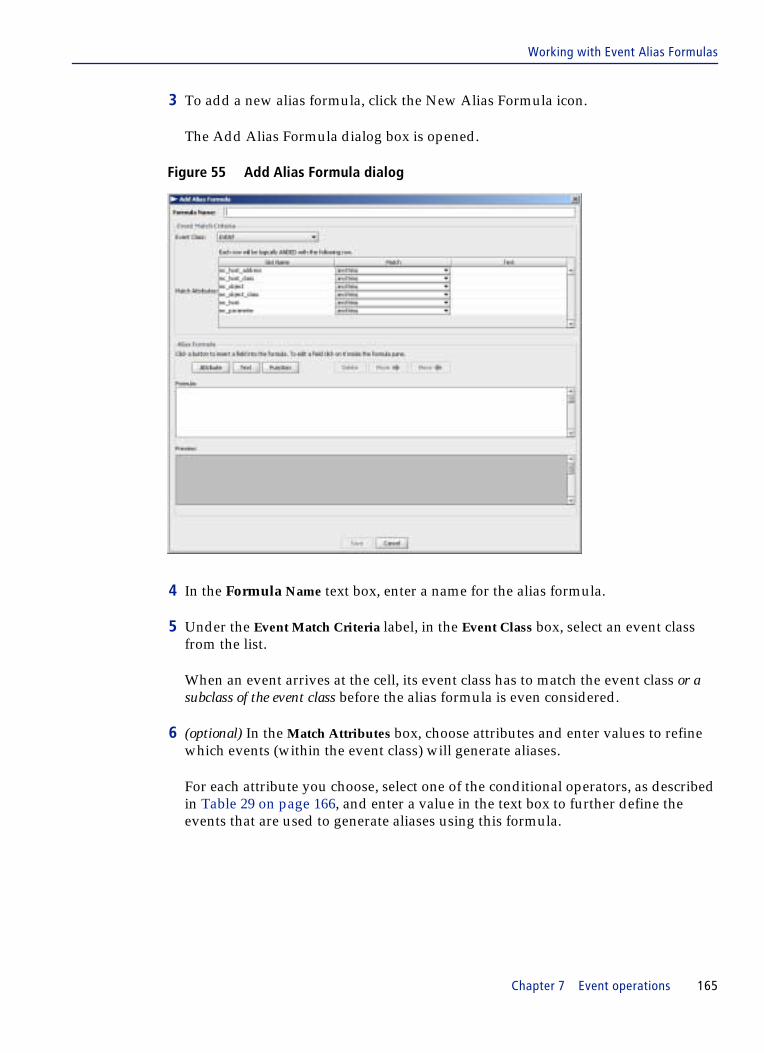
Working with Event Alias Formulas
3 To add a new alias formula, click the New Alias Formula icon.
The Add Alias Formula dialog box is opened.
Figure 55 Add Alias Formula dialog
4 In the Formula Name text box, enter a name for the alias formula.
5 Under the Event Match Criteria label, in the Event Class box, select an event class from the list.
When an event arrives at the cell, its event class has to match the event class or a subclass of the event class before the alias formula is even considered.
6 (optional) In the Match Attributes box, choose attributes and enter values to refine which events (within the event class) will generate aliases.
For each attribute you choose, select one of the conditional operators, as described in Table 29 on page 166, and enter a value in the text box to further define the events that are used to generate aliases using this formula.
Chapter 7 Event operations 165

Working with Event Alias Formulas
If you use more than one attribute, each condition must test true (the Boolean operator between the selection criteria phrases is AND) before the alias formula process is performed. For example, in Figure 56 on page 166, the search phrase would read: Hostname contains SALLOG and IP address equals 555.22.19.105. Both conditions must be true for the event to be selected for alias processing.
Figure 56 Example of match attributes
7 In the Alias Formula area, use the Attribute, Text, and Function buttons in any order and as many times as needed to build the formula:
A To insert an attribute in the formula, click the Attribute button. The attributes shown are those that belong to the event class you selected in the Event Definition area.
When an attribute is selected, the control shows the attribute name, and the preview area is updated to show the syntax of the formula as it currently exists.
Table 29 Description of conditional operators
Conditional operators Description
anything the attribute can contain any value and is not used as a selection criteria
If every attribute listed has anything that means that every incoming event that belongs to the event class will pass through alias formula processing
contains the characters you enter in the text box occur someplace in the value
has prefix the value starts with the characters you enter in the text box
has suffix the value ends with the characters you enter in the text box
equals the value exactly matches the characters you enter in the text box
166 BMC Impact Solutions Event Management Guide

Working with Event Alias Formulas
B To insert literal text (for example, a period, semi-colon, the word Oracle), click on the Text button. In the text box, type the literal text that you want in the alias formula.
Literal text appears in the first part of the alias formula with data type definitions.
C To insert a function that defines the data type and an expression in the formula, click on the Function button. Type the function and choose the data type.
For a list of functions you can use, see BMC Impact Solutions Knowledge Base Development Reference Guide.
D (optional) To change the order of the elements in the alias formula, select the part of the formula you want to move and click the Move arrow button as appropriate.
E (optional) To delete one of the elements in the alias formula, select the part of the formula you want to delete and click the Delete button.
8 When the alias formula is complete, click Save.
To edit an event alias formula
1 Choose Tools => Event Alias Formulas.
2 In the Alias Formulas Editor window, select an existing alias computing formula.
3 Click the Edit Alias Formula icon.
4 In the Edit Alias Formula dialog box, make changes as needed.
5 When your changes are complete, click OK.
TIP If your formula for a component instance (CI) contains the mc_host slot with a host name value, then the mc_host slot of the matching event definition should also contain the host name value, not the IP address, of the CI. For example, if you assign the mc_host slot in your formula the value mycomputer.abc.com, then the mc_host slot of the incoming event should contain the same host name value, not the IP address.
You can check with your system administrator for the correct Domain Name System (DNS) resolution if the object represented by the component instance experiences host name resolution errors.
Chapter 7 Event operations 167

Working with the CIEM Dashboard View
To delete an event alias formula
1 Choose Tools =>Event Alias Formulas.
2 In the Alias Formulas Editor window, select an existing alias computing formula.
3 Click the Delete Alias Formula icon.
To add/edit an alias formula associated with a component instance
1 Open a service model in a View window of the Services tab.
2 Select a component instance, right-click to display the pop-up, and choose Event Alias Formulas to open the Alias Formulas Editor window.
3 Refer to the procedures described in this topic, “Working with Event Alias Formulas” on page 163.
Working with the CIEM Dashboard ViewThe Configuration Item Event Management (CIEM) dashboard allows you to define different component views for BEM cells and for different user groups.
Creating the CIEM Dashboard View
The Full Access and Service Administrator user roles can create a new CIEM dashboard for that BEM cell in BMC IX. For default user roles and the operations that they can carry out in the Dashboard view, see the BMC Impact Solutions Infrastructure Administration Guide.
To create an CIEM dashboard
1 Click the (Edit Dashboards) icon from the toolbar.
The Dashboard Views dialog box opens.
2 Click the (New Dashboard) icon.
The New Dashboard dialog box opens.
3 Type a name for the dashboard in the Name of Dashboard View field.
168 BMC Impact Solutions Event Management Guide

Creating the CIEM Dashboard View
4 Type a relevant description for the Dashboard View that you want to create.
5 To make the dashboard immediately available to the selected user roles after saving, select the Public check box.
If you do not select the check box, the dashboard is saved in your Dashboard Views till you make it available to all relevant user roles by selecting Public.
6 Select the user groups that the dashboard should be available to from the list of user groups. You must select at least one user group to proceed. The available user groups are:
— Admins— Full Access— Operators— Read Only— Service Administrators— Service Managers— Service Managers - Senior— Service Operators— Service Operators - Senior— Supervisors
7 Click Next.
8 From the Impact Manager (cell) list, select the BMC EM cell that contains the components that you want to monitor using the new dashboard.
NOTE ■ The default user groups are defined in the <MCELL_HOME>\conf\group_roles.xml file.
■ One user group can contain multiple user roles. Each role, in turn, can have different permissions.
■ The default permissions for each role are defined in the <MCELL_HOME>\conf\default_role_permissions.xml file. BMC strongly recommends that you do not modify this file, but add or modify the required permissions in the <MCELL_HOME>\conf\role_permissions.xml file.
■ Users that belong to each user role are defined in the <MCELL_HOME>\conf\user_definitions.xml file. The user ID, user role, and encrypted password for that user are stored in this file. Full Access users and Service Administrators (Admins) can add, delete, or modify user credentials such as user ID and user group using this file.
Chapter 7 Event operations 169

Creating the CIEM Dashboard View
9 By default, the Important Components Status pane is selected.
NOTE In the BMC IX Dashboard View, when the Full Access users log on for the first time, all the cells in the cell_info.list file are auto-connected. If you add any cells to this file while you have BMC IX running on your computer, you must manually add the cell name to the Selected Impact Managers list using the Edit Configuration dialog box.
This list contains only those BMC IM cells that you can select for the user groups that you specified earlier. To add permission for a user group to access a BMC IM cell that is not in the list, edit the <MCELL_HOME>\conf\cell_info.list file.
A typical entry in the cell_info.list file has the following format:
<cellname> <celltype> <encryption key> <hostname:port> <environment> “user role1, user role2,....”
■ All fields are tab-separated.■ The first field must start with the word “cell”. Cell type can be appended after “cell”.
The available cell types are: SIM, EM and Admin.■ The second field is the cell name. This name must match the definition in the mcell.dir
file.■ The third field is the encryption key.■ The fourth field is the location of the cell, that is, the host name.■ If this cell has a failover cell, then it must be defined as the fifth field. Otherwise, the
fifth field can be omitted.■ The environment can be either “Production” or “Test”.■ If the cell can be accessed by all users, use “*” to indicate all the user groups, otherwise,
type the user group names separated by commas. If the user group contains space, this field must be surrounded by double quotes.
For example:
cell.IAC Admincell mc compname.company.com:1828 production “Full Access, Admins”
Where:
■ cell type—IAC (Impact Administration Cell)■ cell name—Admincell■ encryption key—mc■ host name—compname.company.com■ port number—1828■ environment—production■ user groups that can see this cell—Full Access and Admins
NOTE In the CIEM dashboard, because no service impact relationships can be created, edited, or deleted, the CIEM dashboard does not display causal components for a selected important component.
170 BMC Impact Solutions Event Management Guide

Creating the CIEM Dashboard View
10 Click Next.
11 Select a Components Selection Method.
Static list of components—Search components based on the criteria that you require and then add the required components that you want displayed in the important components pane to the Components to show in Top Pane list.
A To see the component names that contain a specified string, type a name or part of a name in the Name contains field.
B To see the components owned by a particular user, type the user name in the Owner name contains field.
C To see the components of a certain type, select a type from the Type of component list.
D To see the components with an impact cost above a certain limit, specify the cost limit per second in the Cost greater than/equal to field.
E To see the components belonging to a particular location, select the location type and then type the location name in the Location field.
F Click Find. The Results list displays all the components that match the specified criteria.
G Select required components and click Add. You can add multiple components using the Ctrl and Shift keys.
H Optionally, to remove a component, select it and click Delete.
Dynamic Filter—Specify components using a dynamic filter which BMC IX will use at runtime. Because the dynamic filter is used at runtime, if component properties change, the selection of components will change too.
Chapter 7 Event operations 171

Creating the CIEM Dashboard View
A Under Available Filters, select the filter name, filter condition, and type or select a value to match.
B To preview the components that this filter will select, click Test Filters.
C Check the components in the Test of Filters window and click Close.
D Optionally, to remove a selected filter from the list, select it and click Delete.
12 Specify the content to be optionally displayed as follows:
— Events Pane—select this check box to display the events pane on the dashboard.
— Component Homepage—select this check box to display the component homepage on the dashboard.
13 To make this a default dashboard for the selected user roles, select the Default Dashboard check box.
14 Click Save to save the new dashboard.
If you are a Full Access or Service Administrator (Admin) user, and if you have created the dashboard yourself, you can see the dashboard once you refresh the BMC IX window. If a dashboard is created for your user role by the Admin users and is made public, you must log out of BMC IX and log on again to see the dashboard.
NOTE BMC IX inserts an AND condition for different filter names that you select. For the same filter name, if you want to specify different values, it inserts an OR condition.
For example:
NAME contains EMORNAME equates SIMANDStatus equals ImpactedORStatus equals Warning
172 BMC Impact Solutions Event Management Guide

Specifying a web browser for your component’s home page
Specifying a web browser for your component’s home page
You can specify a web browser in which to launch the home page for a selected dashboard component, provided you have defined the component’s Home Page URI slot with a valid URL value.
To define a Home Page URI value
1 In the Edit Service Component or Create Service Component dialog of the Services View for the selected component, locate the Home Page URI slot, as shown in Figure 57.
Figure 57 Home Page URI slot
2 Enter a valid URI value, and click OK.
The value will populate the Homepage for: componentName slot on the dashboard’s home page screen.
To specify a web browser
1 In the BMC IX Console, choose Edit => Configuration to open the Edit Configuration dialog.
2 In the Edit Configuration dialog, choose the HelpInfo tab.
3 In the Preferred Web Browser field of the HelpInfo tab, click the Choose Browser icon to select the full path to the web browser executable.
4 Click OK to close the Edit Configuration dialog.
Chapter 7 Event operations 173
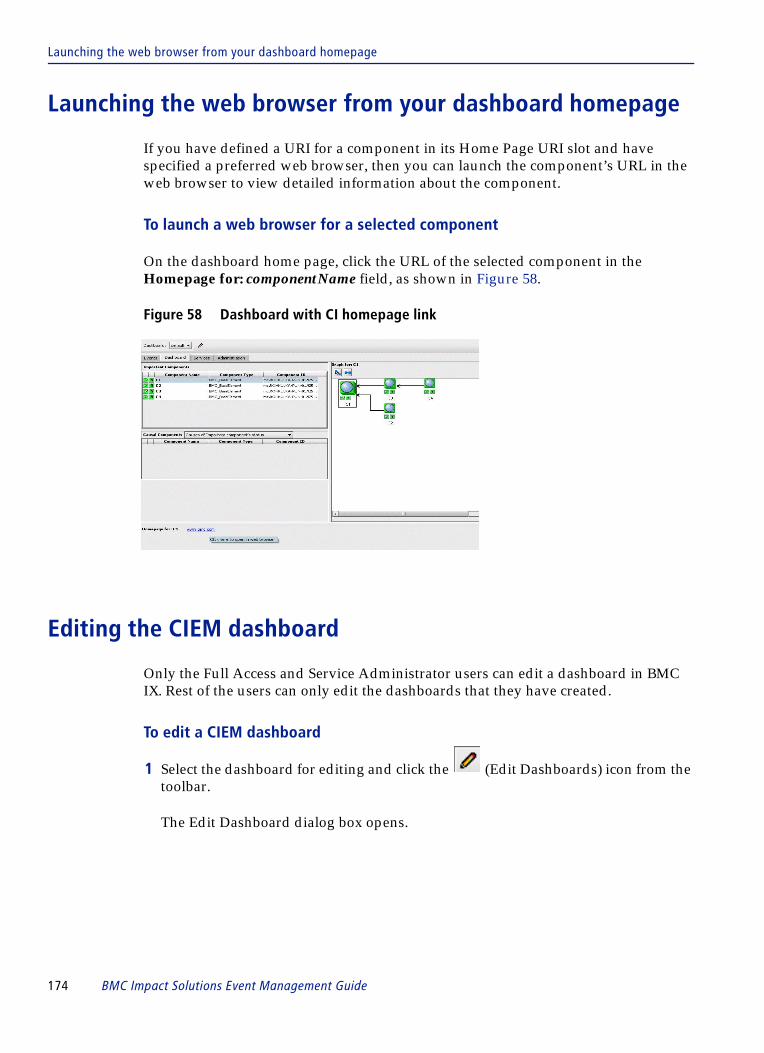
Launching the web browser from your dashboard homepage
Launching the web browser from your dashboard homepage
If you have defined a URI for a component in its Home Page URI slot and have specified a preferred web browser, then you can launch the component’s URL in the web browser to view detailed information about the component.
To launch a web browser for a selected component
On the dashboard home page, click the URL of the selected component in the Homepage for: componentName field, as shown in Figure 58.
Figure 58 Dashboard with CI homepage link
Editing the CIEM dashboard
Only the Full Access and Service Administrator users can edit a dashboard in BMC IX. Rest of the users can only edit the dashboards that they have created.
To edit a CIEM dashboard
1 Select the dashboard for editing and click the (Edit Dashboards) icon from the toolbar.
The Edit Dashboard dialog box opens.
174 BMC Impact Solutions Event Management Guide

Copying the CIEM dashboard
2 Edit the following if required:
— Name of the dashboard
— Description of the dashboard
— Public—whether the dashboard should be inserted in the users’ dashboard list once edited or not.
3 Change the Components Selection Method if required. For more information, see step 11 on page 171.
4 Click Save to save the changed dashboard settings.
Copying the CIEM dashboard
Only the Full Access and Service Administrator users can copy and/or edit a dashboard for all user groups in BMC IX. Rest of the users can only copy and edit the dashboards that they have created.
To copy a CIEM dashboard
1 Click the (Edit Dashboards) icon from the toolbar.
The Dashboard Views dialog box opens.
2 Select the dashboard for copying and click the (Copy Dashboard) icon from the Dashboard Views toolbar.
3 The dashboard details open in a new window titled Copy of <dashboard name>.
You can rename the dashboard as is, or edit it.
NOTE You cannot edit the following settings:
■ Groups that see the dashboard
■ Impact Manager (Cell)
■ Type of the dashboard (Important components)
Chapter 7 Event operations 175

Deleting the CIEM dashboard
4 Edit the following if required:
— Name of the dashboard
— Description of the dashboard
— Public—whether the dashboard should be inserted in the users’ dashboard list once edited or not.
5 Change the Components Selection Method if required. For more information, see step 11 on page 171.
6 Click Save to save the changed dashboard settings.
Deleting the CIEM dashboard
Only the Full Access and Service Administrator users can edit a dashboard for all user groups in BMC IX. Rest of the users can only delete the dashboards that they have created.
To delete a CIEM dashboard
1 Click the (Edit Dashboards) icon from the toolbar.
The Dashboard Views dialog box opens.
2 Select the dashboard for deletion and click the (Delete Dashboard) icon from the Dashboard Views toolbar.
BMC IX displays the following message:
Are you sure you want to delete the selected Dashboard(s)?
3 Click Delete.
NOTE You cannot edit the following settings:
■ Groups that see the dashboard
■ Impact Manager (Cell)
■ Type of the dashboard (Important components)
176 BMC Impact Solutions Event Management Guide

Guidelines for managing high availability
The dashboard is no longer displayed in the list of dashboards in the Dashboard Views dialog box.
Guidelines for managing high availabilityA high availability configuration of a primary cell and a secondary cell provides redundant access to the event repository should the primary cell become unavailable. This section describes the interaction of primary and secondary cells and their impact on the Events View. It tells how to activate and change the status of the cells. It explains how events related to high availability interactions are generated.
The primary cell copies event data to the secondary cell. When the primary cell is in active mode, the secondary cell is in standby mode. By default, if the primary cell becomes unavailable, the BMC IX automatically connects to the designated secondary cell server. The secondary cell then changes to active mode and performs the same functions as the primary cell. When the primary cell becomes available again, the secondary cell changes back to standby mode.
During the time in which the active cell is down and the secondary cell is still in standby mode, the cell continues to collect events; however, you cannot perform any actions on those events. You will see the following changes in the Events View of BMC IX:
■ In the Events list, the following message is displayed:Event List frozen xx:yy:zz time – primary server for cell is down
■ Tabs associated with the cell are highlighted in yellow ■ In the navigation pane, cells, cell groups, collectors, MetaCollectors, and
subcollectors are highlighted in yellow ■ Local and remote actions are disabled■ The following Edit menu commands are disabled:
— Event Operations — Execute — MetaCollectors — Edit Event Group
By default, the cells are configured for automatic failover. If your administrator changes this configuration, you can manually change the status of the primary or secondary cells by performing the following procedures.
Chapter 7 Event operations 177

Guidelines for managing high availability
To manually activate a primary or secondary cell
1 Open a command prompt.
2 Enter the following command:
mcontrol -n cellName#number start
The variable cellName is the name of either the primary or secondary cell and the variable number is either 1, for the primary cell, or 2 for the secondary cell.
To manually change the status of the secondary cell from active to standby
1 Open a command prompt.
2 Enter the following command:
mcontrol -n cellName#2 pause
The variable cellName is the name of the secondary cell.
For details about high availability, see the BMC Impact Solutions Infrastructure Administration Guide guide.
High availability related events
A high availability cell operates the same way that a standard cell operates.
To keep the primary and secondary cell servers synchronized, the primary cell server transmits all its transactions to the secondary server. This happens transparently. For instance, it is not visible in BMC Impact Explorer. Also, the Knowledge Base rules do not have to be modified for synchronization and there are no specific events generated for it.
When the primary server loses contact with the secondary server and cannot transmit its transactions, it generates an internal event of class MC_CELL_DUPLICATE_FAILURE with severity=MAJOR. All transactions are buffered for transmission to the secondary server. As soon as the primary server has re-established a connection with the secondary, it generates an internal event of class MC_CELL_DUPLICATE_ON with severity=OK and with the down_time slot indicating (in seconds) how long the connection between primary and secondary servers was down.
178 BMC Impact Solutions Event Management Guide

Relating events
Each time a cell changes its operation mode, it generates an MC_CELL_ACTIVITY_CHANGED class event.
The active_server slot indicates which of the cell's servers became the active one. A value of 1 indicates the primary server is active and a value of 2 indicates the secondary server is active. If the cell is not a high availability cell, this slot is 0.
When the primary server is active for the high availability cell, the duplicate_connected slot indicates whether or not the secondary server is connected. If the primary server is not active and/or the secondary server is not connected, the value of the duplicate_connected slot is NO.
If the value of the paused slot is YES, the cell is paused (or has limited activity). If the value is NO, the cell is fully active.
This event is generated by a failover or switchback. It is also generated when the active server switches between limited activity and full activity. On a high availability cell, the event is generated only by the active server. In case of a switch between primary and secondary servers, the event is generated just after the switch.
Relating events Certain operations on an event can generate another event. You can associate that generated event to the source event. Several types of event relations can occur, such as the following examples:
■ an action result event related to the event on which an action was performed ■ a trouble ticket event related to the event that automatically created the trouble
ticket
One event can have multiple related events, but a related event can be related to only one source event. From the source event, you can retrieve all its related events.
MC_EV_CLASS: MC_CELL_ACTIVITY_CHANGED ISA MC_CELL_CONTROLDEFINES {
active_server : INTEGER; -- 0 = Regular cell / 1 = Primary node / 2 = Secondary
node of HA cellduplicate_connected : MC_YESNO; paused : MC_YESNO; };
END
Chapter 7 Event operations 179

Relating events
The following definitions will help you to better understand this section:
Generic event relations mechanism
By using the generic event relations mechanism, you can define relationships between events. The generic event relations mechanism consists of the following KB elements:
■ slots in the CORE_EVENT class that identify source events and related events
■ the MC_EVENT_RELATION data class for defining relations
■ the relate and unrelate primitives to establish and remove a relation between two events
Term Definition
source event an event that generates a related event
related event an event that is generated by a source event
A related event can also be the source of other related events.
relation a logical association that expresses the relevance of one event to another
relation definition a data instance that defines a relation
relation type a string in the relation definition for an event class that indicates its type
180 BMC Impact Solutions Event Management Guide

Relating events
■ a console command mechanism that creates a Related Events command so users can view event relations in the BMC Impact Explorer Console, as shown in Figure 59:
Figure 59 Related events command
Event relation slots
Table 30 lists the CORE_EVENT slots used to identify source events and related events and the presentation names for those slots that are displayed in the BMC Impact Explorer and BMC Impact Portal consoles. For more information about the CORE_EVENT class, see the BMC Impact Solutions Knowledge Base Development Reference Guide.
Chapter 7 Event operations 181

Relating events
Figure 60 illustrates how the slots are populated.
Figure 60 Event relations
Event relation data class
The MC_EVENT_RELATION data class defines the types of relations between events. Its class definition is shown below:
Table 30 Related event and source event slots
Slot name and definition Presentation name Contains
mc_relation_source Relation Source the mc_ueid of the source event to which this event is related
This slot links a related event to its source event.
mc_event_relations Event Relations a list of tuples
■ The first element of the tuple contains the relation type. ■ The second element is the mc_ueid of the related event.
This slot links a source event to one or more related events.
MC_DATA_CLASS: MC_EVENT_RELATION ISA MC_CELL_DATADEFINES { class : STRING, read_only=yes, key=yes; # Related event class type : STRING; # Relation type}; END
1
In a source event, the mc_event_relations slot contains the relation type and the mc_ueid of one ore more related event.
related eventrelated event and source
event
source event
related event
related event related event
In a related event, the mc_relation_source slot contains the mc_ueid of the source event. A related event can be associated with only one source event.
182 BMC Impact Solutions Event Management Guide
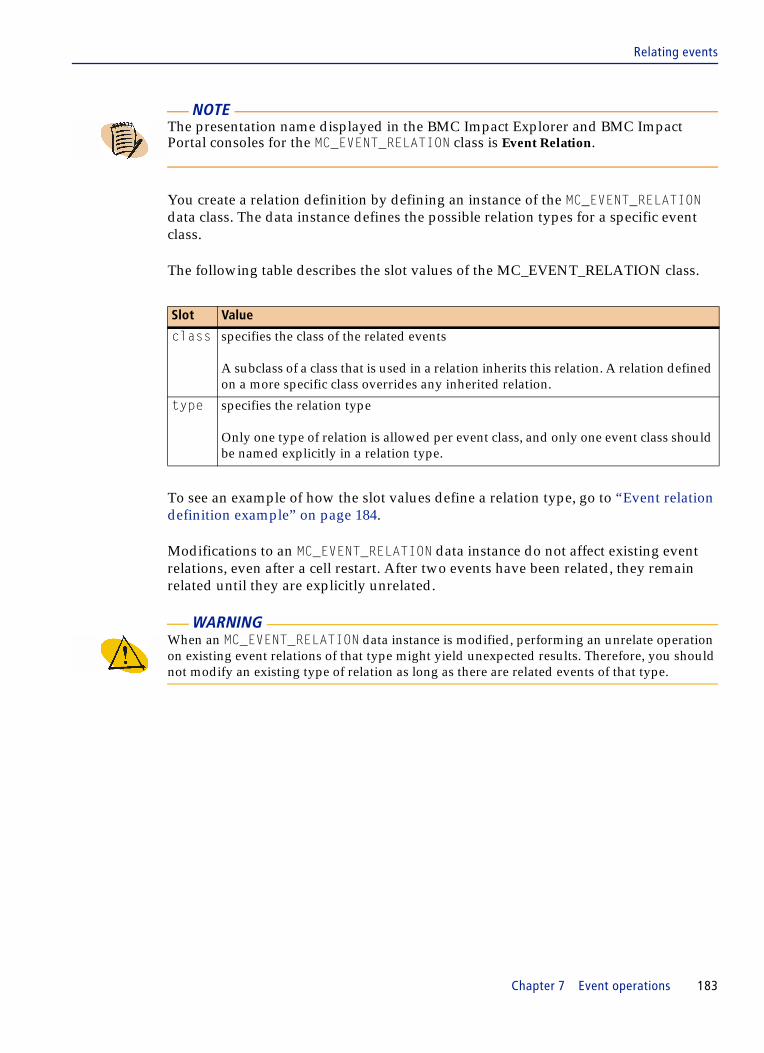
Relating events
You create a relation definition by defining an instance of the MC_EVENT_RELATION data class. The data instance defines the possible relation types for a specific event class.
The following table describes the slot values of the MC_EVENT_RELATION class.
To see an example of how the slot values define a relation type, go to “Event relation definition example” on page 184.
Modifications to an MC_EVENT_RELATION data instance do not affect existing event relations, even after a cell restart. After two events have been related, they remain related until they are explicitly unrelated.
NOTE The presentation name displayed in the BMC Impact Explorer and BMC Impact Portal consoles for the MC_EVENT_RELATION class is Event Relation.
Slot Value
class specifies the class of the related events
A subclass of a class that is used in a relation inherits this relation. A relation defined on a more specific class overrides any inherited relation.
type specifies the relation type
Only one type of relation is allowed per event class, and only one event class should be named explicitly in a relation type.
WARNING When an MC_EVENT_RELATION data instance is modified, performing an unrelate operation on existing event relations of that type might yield unexpected results. Therefore, you should not modify an existing type of relation as long as there are related events of that type.
Chapter 7 Event operations 183

Event relation definition example
Event relation primitives
The following table lists the primitives used to establish and remove event relations.
Event relation definition example
Suppose that one relation is evaluated for action results and one is evaluated for trouble tickets. Whenever an action is performed on an event, a corresponding action result event is generated. The generated event is related to the source event with a relation type of action. If an event triggers a trouble ticket to be created in BMC Remedy Service Desk, it generates a corresponding trouble ticket event that is related to the source event with relation type of tt_ars.
Instances of the MC_EVENT_RELATION data class define the event relations, as shown:
Primitive Description
relate(Object) establishes a relation between a generated event and a source event
The relation primitive associates the related event’s object handle (Object) to the source event as set in the mc_relation_source slot of the source event. The relation type is determined by the class of this event or its most specific superclass that has a relation type defined.
The result of this operation is that the relation type and the mc_ueid of this event are added to the mc_event_relations slot of the source event.
For the relation to occur, the mc_relation_source slot of the related event must be set correctly. The slot should be set by the agent that generates the related event. However, the fact that this slot has a non-empty value does not imply that this event is correctly related to the event indicated in the mc_relation_source slot.
unrelate(Object) removes an existing relation between two events
The unrelate primitive uses the related event’s object handle (Object) to remove the related event’s mc_ueid from the mc_event_relations slot of the source event.
The related event contains the mc_ueid of the source event in the mc_relation_source slot. The mc_relation_source slot is not modified.
The rule that performs the unrelate could also clear the mc_relation_source slot to ensure that the event is no longer related.
MC_EVENT_RELATION; type=action; class=MC_CELL_ACTION_RESULT; ENDMC_EVENT_RELATION; type=tt_ars; class=ARS_TROUBLE_TICKET; END
184 BMC Impact Solutions Event Management Guide

Event relation definition example
Now, event E001 generates the related action result event A001.
The generated action event has a slot named event that contains the same value as the mc_relation_source slot. This duplication ensures backward compatibility with existing action events originating from pre-7.0 BMC Impact Manager cells.
Now, event E002 generates the associated trouble ticket event T001 and two action result events, A002 and A003.
EVENT; mc_ueid=E001; ... mc_event_relations=[action,A001];ENDMC_CELL_ACTION_RESULT mc_ueid=A001; ... event=E001; mc_relation_source=E001;END
EVENT; mc_ueid=E002; ... mc_event_relations=[action,A003,tt_ars,T001,action,A002];ENDMC_CELL_ACTION_RESULT mc_ueid=A002; ... event=E002; mc_relation_source=E002;ENDMC_CELL_ACTION_RESULT mc_ueid=A003; ... event=E002; mc_relation_source=E002;ENDARS_TROUBLE_TICKET mc_ueid=T001; ... mc_relation_source=E002;END
Chapter 7 Event operations 185

Guidelines for implementing an event relation
Guidelines for implementing an event relation
The following guidelines, presented in a sequential order, describe one scenario in which you can implement an event relation.
1 In the cell’s \EM or \SM KB directory, which is MCELL_HOME\etc\CellName\kb on Windows platforms and in MCELL_HOME/etc/CellName/kb on UNIX platforms, create the files and entries shown in Table 31.
In this example, you are adding an instance of the Action Request System (ARS) trouble ticket class.
2 Add test_tt to the .load file in the \classes, \data, \rules, and \bin directories.
3 Stop the cell, compile the KB, and restart the cell.
(See the BMC Impact Solutions Knowledge Base Development Reference Guide for the procedures.)
In BMC Impact Explorer, connect to the cell.
4 In the Events list, right-click an event and choose Actions => Remote Actions=> ARS.
The following events are generated:
MC_CELL_ACTION_RESULT ARS_TROUBLE_TICKET
Table 31 Example event relation definitions
File to create Entry to include in file
classes/test_tt.baroc MC_EV_CLASS: ARS_TROUBLE_TICKET ISA EVENT; END
data/test_tt.baroc MC_EVENT_RELATION; class=ARS_TROUBLE_TICKET; type=tt_ars; END
rules/test_tt.mrl refine ars_trouble_ticket_relate : ARS_TROUBLE_TICKET($E){ relate($E); }
ENDexecute ars_trouble_ticket_unrelate : ARS_TROUBLE_TICKET($E)
when $E.status != OPEN { unrelate($E); }END
bin/test_tt.mrl action ARS test_tt [] END
bin/A/test_tt mposter -n $CELL_NAME -a ARS_TROUBLE_TICKET -b "mc_relation_source=$mc_ueid;"
bin/w4/test_tt.cmd @echo offmposter -n %CELL_NAME% -a ARS_TROUBLE_TICKET -b mc_relation_source=%mc_ueid%;
186 BMC Impact Solutions Event Management Guide
Guidelines for implementing an event relation
5 To view the event relations, choose View => Related Events and then select the relation type.
6 To unrelate the event, select the ARS_TROUBLE_TICKET event and close it.
The ARS_TROUBLE_TICKET event is unrelated.
Chapter 7 Event operations 187

Guidelines for implementing an event relation
188 BMC Impact Solutions Event Management Guide

C h a p t e r 8
8 Creating local and remote actionsDefining and executing local actions . . . . . . . . . . . . . . . . . . . . . . . . . . . . . . . . . . . . . . . 190Local action definitions. . . . . . . . . . . . . . . . . . . . . . . . . . . . . . . . . . . . . . . . . . . . . . . . 190File naming guidelines for action executables . . . . . . . . . . . . . . . . . . . . . . . . . . . . 190Defining a local action . . . . . . . . . . . . . . . . . . . . . . . . . . . . . . . . . . . . . . . . . . . . . . . . 190Creating a user-defined local action for multiple events. . . . . . . . . . . . . . . . . . . . 194Configuring BMC Impact Explorer to run a local action. . . . . . . . . . . . . . . . . . . . 197Version control of local actions . . . . . . . . . . . . . . . . . . . . . . . . . . . . . . . . . . . . . . . . . 197Adding buttons for actions to the toolbar . . . . . . . . . . . . . . . . . . . . . . . . . . . . . . . . 198
Defining and executing remote actions . . . . . . . . . . . . . . . . . . . . . . . . . . . . . . . . . . . . . 200Location of remote actions and executables . . . . . . . . . . . . . . . . . . . . . . . . . . . . . . 201Requirements for action executable files . . . . . . . . . . . . . . . . . . . . . . . . . . . . . . . . . 202Defining a remote action . . . . . . . . . . . . . . . . . . . . . . . . . . . . . . . . . . . . . . . . . . . . . . 202Remote action definitions. . . . . . . . . . . . . . . . . . . . . . . . . . . . . . . . . . . . . . . . . . . . . . 202Remote action execution results . . . . . . . . . . . . . . . . . . . . . . . . . . . . . . . . . . . . . . . . 208Action execution variables . . . . . . . . . . . . . . . . . . . . . . . . . . . . . . . . . . . . . . . . . . . . . 209Defining a remote action in a BMC Impact Manager cell . . . . . . . . . . . . . . . . . . . 209
Chapter 8 Creating local and remote actions 189

Defining and executing local actions
Defining and executing local actions Local actions are defined in local BMC Impact Explorer configuration files and can be launched by a user from an event in the console only. Local actions always run locally in the console's environment.
The action definition can prompt the user performing the action for arguments. An executable associated with an action can be a script or binary. The executable is run on the OS platform on which the cell is running.
You execute local actions are executed in the BMC Impact Explorer Console. The action name and arguments are displayed in the console.
Local action definitions
Local actions are created as .xml files and saved in the BMC Impact Explorer Console directory, and are defined in the BMC Impact Explorer Console directory under etc\event_op. The action definition includes the action name as it appears in BMC Impact Explorer and the path to the associated executable.
The action definition also can indicate permission roles that are required in order to perform the action. An optional selection condition indicates the events to which the action is restricted. The definition also lists the requested arguments by name or description.
File naming guidelines for action executables
Files are executable under different conditions, depending on the operating system. On UNIX systems, the execute permission for the file must be set, and the file must have an UNIX executable file format. Also on UNIX, a text file is considered executable if it begins with the characters #! followed by a path used to interpret the script. On Windows platforms a file is executable if it has a suffix that corresponds to an executable system. These suffixes are listed in the PATHEXT environment variable.
Defining a local action
This section describes how to define a local action in BMC Impact Explorer configuration files.
190 BMC Impact Solutions Event Management Guide

Defining a local action
Local action definitions
Local actions definition files determine how the actions appear in the BMC Impact Explorer Console interface. The BMC Impact Explorer Console directories contain local action definitions. The BMC Impact Explorer Console is configured through files created with XML. The local actions definition files are LocalActions.dtd and LocalActions.xsd. Actions.dtd and Actions.xsd define the action files. The .dtd files are DTD definitions for the format of the files. DTD and XSD accomplish the same thing insofar as they define the acceptable format for an XML file. XSD allows definition of an elements type as well as the structure of the document. DTD defines only the document structure, not element type, such as Integer, String, or Float. In an .xsd file, therefore, you can specify element <x> is of type Integer. In a .dtd file there is no such distinction.
Either of the XML files, .dtd or .xsd, can be used to create well formed XML or to validate existing .dtd files. You may be able to utilize these files in conjunction with a third party XML editing tool to develop new local action files. The following local actions and actions definition files are shipped with the BMC Impact Explorer Console and installed in the IMPACT_SOLUTIONS_HOME\console\event_op\spec directory:
■ LocalActions.dtd■ LocalActions.xsd■ Actions.dtd■ Actions.xsd
Configure the BMC Impact Explorer Console to run local actions using the LocalActions.xml file. To locate this file, the BMC Impact Explorer Console first looks in the home directory. The home directory location is C:\Documents and Settings\<user_name>, represented here as %HOME%:
%HOME%\.econsole\etc\event_op
If the LocalActions.xml file is not found in that location, the BMC Impact Explorer Console looks in the BMC Impact Solutions home directory:
MCELL_HOME\console\etc\event_op
NOTE The first directory in which the BMC Impact Explorer Console looks to locate the LocalActions.xml file, %HOME%\.econsole\etc\event_op, contains a dot prefix, .econsole, as part of the path. Because of this dot notation the directory is hidden on UNIX platforms.
Chapter 8 Creating local and remote actions 191

Defining a local action
Figure 61 shows the general syntax for a local action.
Table 32 lists the tags for the local action general syntax.
Limiting local actions by role
The definition of local actions allows the actions to be displayed and available, based on the roles the current user has been granted by the BMC Impact Explorer and the specific event that is selected in the BMC Impact Explorer Console.
Figure 62 lists the syntax that uses roles to limit the local actions available. The Dev Tools group is displayed only when the current user has either the Full Access or the Service Administrator role.
Figure 61 Local action general syntax
LocalActionsActionGroup name=""tip=""
ActionGroup name=""tip=""Action location=""id=""
Action location=""id=""/Action location=""id=""/
/ActionGroup>Action name=""/Action name=""
/ActionGroup/LocalActions
Table 32 Tags for the local action general syntax
Tags Attributes
ActionGroup “name” shows as the name for a group node
ActionGroup “tip” shows as the tooltip for the node
Action “location” location to find the action
Action “id” ID of the action to be loaded and added to the action tree
Figure 62 Syntax to limit local actions available by user role
<ActionGroup name="Dev Tools" tip="Actions that help with development"><Action location="mc_actions.xml" id="mc_showenv"/><Action location="mc_actions.xml" id="mc_export"/><Action location="mc_actions.xml" id="mc_crtfilter"/><Action location="mc_actions.xml" id="mc_crtregulate"/><Role>Full Access</Role><Role>Service Administrator</Role><EventClass>*</EventClass>
</ActionGroup>
192 BMC Impact Solutions Event Management Guide

Defining a local action
Limiting local actions by event class
The file LocalActions.xml in the console\etc\event_op directory, defines actions for other events. These actions are available only if an event that inherits from this class is selected in the BMC Impact Explorer Console event display. In the syntax shown in Figure 63, the Launch Manager Action group displays only if an event class in the CA_EVENT event class hierarchy or in the PATROL_EVENT class hierarchy is selected, as specified in Figure 63.
Defining multiple actions in one file
Multiple actions can be defined in a single <Actions>.mrl file, as shown.
Table 33 lists the tags for the syntax.
Figure 63 Syntax to limit local actions by event class
<ActionGroup name="Launch Manager" tip="Actions that launch an element manager"><Action location="uniactions.xml" id="UniConsole">
<EventClass>CA_EVENT</EventClass></Action><Action location="mc_actions.xml" id="mc_patrol">
<EventClass>PATROL_EVENT</EventClass></Action><EventClass>CA_EVENT</EventClass><EventClass>PATROL_EVENT</EventClass>
</ActionGroup>
<Actions><ActionDef id="" type="executable" target="">
<Argument label="" tip=""required="Y|N|T|F|yes|no|true|false" defaultvalue=""
type="" fieldsize="" rows=""columns=""/><Argument label="" tip""required=required"" defaultvalue=""
type="" fieldsize="" rows="" columns=""/><Argument label=""tip""required=required""defaultvalue=
""type=""fieldsize=""rows="" columns=””/></ActionDef>
<ActionDef id=""label=""type"executable"target=""/></Actions>
Table 33 Tags for defining multiple actions in one file (part 1 of 2)
Tags Attributes
ActionDef “label” shows as the name of the action in the action tree; if not specified, label = “”
ActionDef “target” for
type = “executable”
fully qualified path to an executable to be run when executing action; if not specified, target = “”
Chapter 8 Creating local and remote actions 193

Creating a user-defined local action for multiple events
Creating a user-defined local action for multiple events
The mc_actions.xml file allows you to define your own local actions. By default, each action is taken only on the first event that matches the criteria in the action definition. If you want the action to be taken on all events that match the action definition criteria, you must enable batch mode. When you enable batch mode, the celleventdata.xml file is created in the same directory where the mc_actions.xml file is located. You could use this file to execute a script that could parse all of the slots that are in the file and possibly change or take whatever action you want. For instance you could add a comment, change a slot value, or update a table using SQL.
To create a user-defined local action to respond to multiple events
1 Using a text editor, open the mc_actions.xml file.
The file is located in one of the following directories, depending on your operating system:
■ Windows: C:\Program Files\BMC Software\console\etc\event_op
■ UNIX: opt/bmc/Impact/console/etc/event_op
ActionDef “id” identifies the action; if not specified, id = “”
Argument “label” name of the argument; if not specified, default value = “”
Argument “tip” tooltip to be shown when hovering over the argument label; if not specified, default value = “”
Argument “required” determines if this argument is required; if not specified,
required = “false”
Argument “defaultvalue” default value to be displayed for the argument; if not specified, default value = “”
Argument “fieldsize” size of the argument field; if not specified, field size = 50
Argument “type” type of argument, either: ‘textfield’ or ‘textarea’; if not specified, type = textfield
Argument “rows” number of rows to make the displayed size of the text area
Only use if type = ‘textarea’; if not specified, rows = 5
Argument “columns” number of columns to make the displayed size of the text area
Only use if type = ‘textarea’; if not specified, columns = 25
Table 33 Tags for defining multiple actions in one file (part 2 of 2)
Tags Attributes
194 BMC Impact Solutions Event Management Guide

Creating a user-defined local action for multiple events
2 In the mc_actions.xml file, add the batchmode=true parameter to the action that you want to execute against multiple events, as shown in Figure 64:
For example, Figure 65 illustrates how you can enable the batchmode parameter to ping each system from which a specified event originates:
The resulting celleventdata.xml file might look similar to Figure 66:
Figure 64 Syntax to execute a local actions against multiple events of the same type
<Actions><ActionDef id="" type="executable" target="" batchmode=true>
</Actions>
Figure 65 Example of an action definition that uses the batchmode parameter
<ActionDef id="mc_ping" label="Ping EVENT origin" type="executable" target="mc_ping" batchmode="true">
Figure 66 Example celleventdata.xml file (part 1 of 2)
<?xml version="1.0" encoding="UTF-8" ?> - <BMC_Impact_Manager version="1.0">- <IMPACT_EVENT>- <TST_EV> <event_handle>315</event_handle> <mc_ueid>mc.ci-70.4198e3d.1</mc_ueid> <mc_client_address>192.168.2.2</mc_client_address> <adapter_host /> <mc_location>adprod.bmc.com</mc_location> <mc_service /> <mc_host_class /> <mc_host>HostNameWouldBeHere</mc_host> <mc_host_address>IPWouldBeHere</mc_host_address> <mc_object_class /> <mc_object /> <mc_tool_class /> <mc_tool /> <mc_tool_rule /> <mc_tool_key /> <mc_tool_sev /> <mc_origin_class /> <mc_origin>IPWouldBeHere</mc_origin> <mc_origin_key /> <mc_origin_sev /> <mc_parameter /> <mc_parameter_value /> <mc_event_category>OPERATIONAL</mc_event_category> <mc_incident_time>0</mc_incident_time> <mc_arrival_time>1142525501</mc_arrival_time> <mc_local_reception_time>1142525501</mc_local_reception_time> <date_reception>1142525501</date_reception>
Chapter 8 Creating local and remote actions 195

Creating a user-defined local action for multiple events
You can parse the resulting celleventdata.xml file.
<date>20060316081141.000000-480</date> <status>OPEN</status> <severity>WARNING</severity> <mc_original_severity>WARNING</mc_original_severity> <mc_priority>PRIORITY_5</mc_priority> <mc_original_priority>PRIORITY_5</mc_original_priority> <mc_owner /> <msg>test modify for administrator</msg> <duration>0</duration> <mc_timeout>0</mc_timeout> <repeat_count>0</repeat_count> <mc_action_count>0</mc_action_count> <administrator><unknown>@hostnameWouldBeHere</administrator> <mc_acl /> <mc_date_modification>1142525501</mc_date_modification> <mc_notes /> <mc_operations /> <mc_notification_history /> <mc_bad_slot_names /> <mc_bad_slot_values /> <mc_history /> - <mc_modhist> <LI>ci-70</LI> </mc_modhist> <mc_propagations /> - <mc_collectors> <LI>1.1</LI> <LI>2.2.1</LI> <LI>6</LI> </mc_collectors> <mc_abstraction /> <mc_abstracted /> <mc_associations /> <mc_cause>0</mc_cause> <mc_effects /> <mc_event_relations /> <mc_relation_source /> <mc_smc_id /> <mc_smc_alias /> <mc_smc_impact>0</mc_smc_impact> <mc_smc_type /> <mc_smc_causes /> <mc_smc_effects /> <in_state>one</in_state> <out_state>unknown</out_state> <restrict>not_two</restrict> </TST_EV>
Figure 66 Example celleventdata.xml file (part 2 of 2)
196 BMC Impact Solutions Event Management Guide

Configuring BMC Impact Explorer to run a local action
Configuring BMC Impact Explorer to run a local action
1 Place the action in the etc\event_op directory under the BMC Impact Explorer Console home directory.
2 Create an .xml file to refer to the executable.
3 Update the LocalActions.xml file to reflect the new action name to be viewed in the BMC Impact Explorer Console.
4 Restart the BMC Impact Explorer Console.
Version control of local actions
If you install BMC Impact Explorer to run as a Java Web Start application, software updates are downloaded automatically. Each time a user launches a BMC Impact Explorer as a Web Start application, Webstart Application Manager checks whether a new version of BMC Impact Explorer is deployed on the BMC Impact Portal. If there is a new version, the update is downloaded into the client cache as needed. To enable users to customize local actions and maintain their customizations through these automatic software updates, BMC Impact Explorer provides version control of local actions.
During the initial download of BMC Impact Explorer to run as a Web Start application, the local action scripts are downloaded to a local directory so they can be executed when needed and you can customize them. On Windows platforms, the local directory is C:\Documents and Settings\userName\.econsole\webconsole\BIP_hostname_BIP_port#\etc\event_op. You can modify the local scripts in this directory as needed.
During software updates, the local action scripts are maintained in this way:
■ If the local copy of the script is newer than the one on the BMC Impact Portal, the script is kept as it is.
■ If the local copy is older than the one on the BMC Impact Portal,
— the local copy is saved in this local directory: C:\Documents and Settings\ userName\.econsole\webconsole\BIP_hostname_BIP_port#\etc\event_op_bak \current_system_time.
— the original local copy is replaced by the new version from the BMC Impact Portal.
Chapter 8 Creating local and remote actions 197

Adding buttons for actions to the toolbar
Adding buttons for actions to the toolbar
You can modify your toolbar to provide appropriate buttons for local actions that you need. You can add up to 16 custom toolbar buttons for local actions. Also, you can change the order in which the buttons are displayed, and you can remove buttons. Each button is associated with only one action, which is platform independent.
You can specify a GIF image to be used as the icon for the additional toolbar buttons. The images must be available on the local computer where the console is installed, but they are not stored by the console. You must maintain the availability of these images. When the specified image is not available, the console displays a generic image.
To add a local action button to the toolbar
1 From the menu bar, choose Edit => Toolbar Actions.
The Edit Toolbar Actions dialog box is displayed, but it is empty except for a toolbar, as shown in Figure 67 on page 198.
Figure 67 Edit Toolbar Actions dialog box
2 Click Create a new toolbar action.
The Edit Toolbar Actions dialog box is updated to display the Action Parameters box.
3 Provide information about your new button in the Action Parameters box:
A In the Name box, enter the name of the new toolbar button.
B In Local Action, select an action from the list, as shown in Figure 68.
NOTE You can create custom toolbar buttons for local actions only on the Events tab. This functionality is not available on either the Services or Administration tab.
Delete a toolbar action
Create a new toolbar action
198 BMC Impact Solutions Event Management Guide
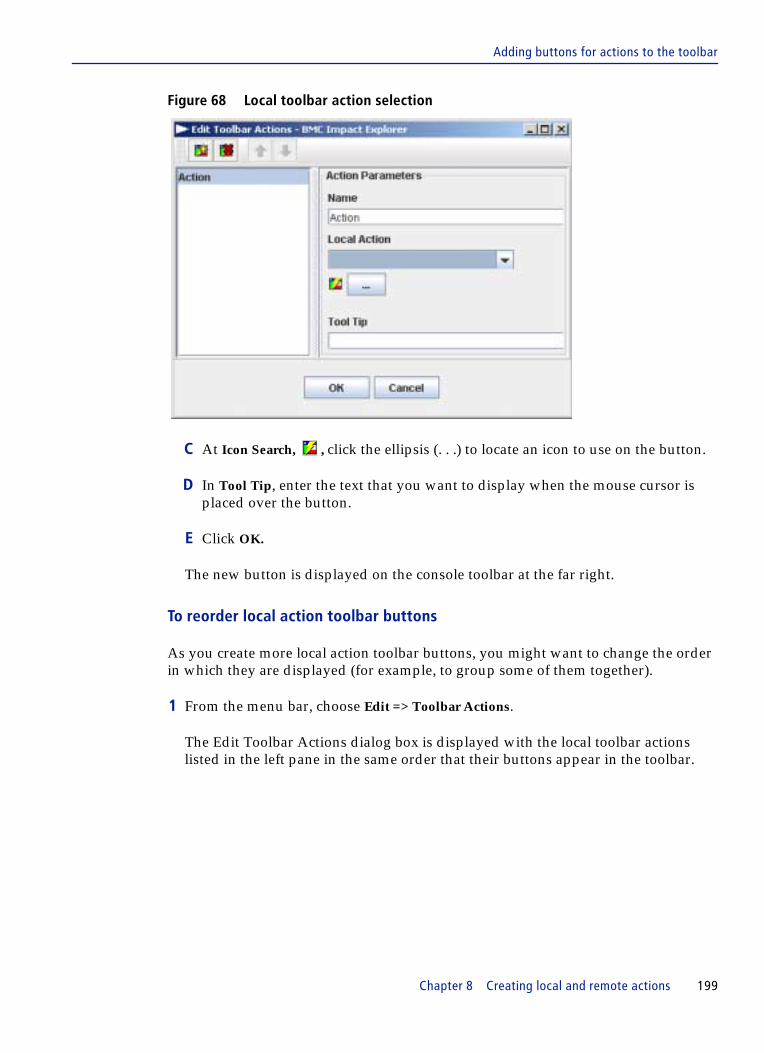
Adding buttons for actions to the toolbar
Figure 68 Local toolbar action selection
C At Icon Search, , click the ellipsis (. . .) to locate an icon to use on the button.
D In Tool Tip, enter the text that you want to display when the mouse cursor is placed over the button.
E Click OK.
The new button is displayed on the console toolbar at the far right.
To reorder local action toolbar buttons
As you create more local action toolbar buttons, you might want to change the order in which they are displayed (for example, to group some of them together).
1 From the menu bar, choose Edit => Toolbar Actions.
The Edit Toolbar Actions dialog box is displayed with the local toolbar actions listed in the left pane in the same order that their buttons appear in the toolbar.
Chapter 8 Creating local and remote actions 199

Defining and executing remote actions
2 Click an action in the list, and then click a directional arrow on the toolbar to move that action up or down one position in the list box, as shown in Figure 69.
Figure 69 Local action toolbar button order
3 Click OK to save the changes.
To delete a local action button from the toolbar
1 From the menu bar, choose Edit => Toolbar Actions.
The Edit Toolbar Actions dialog box is displayed.
2 Select the action that you want to delete from the list of actions.
3 On the dialog box toolbar, click Delete a toolbar action.
The action is deleted from the list of actions, and its corresponding button is deleted from the toolbar.
4 Click OK.
Defining and executing remote actionsRemote actions are defined in the BMC Impact Manager Knowledge Base and are executed by the BMC Impact Manager.
You can define remote actions through the BMC IX Console. The action name and arguments are displayed in the console. You are asked to provide values for the arguments when performing an action on an event. Actions performed from the BMC Impact Explorer Console always generate a result event in the form of MC_CELL_ACTION_RESULT.
You can also define a remote action through a rule. If an action is executed in a rule, an action result event is not automatically generated, nor is the result available in the BMC Impact Explorer Console. If you want to generate an action result event, you must code the action definition to generate it.
Directional Arrows
Toolbar Actions
200 BMC Impact Solutions Event Management Guide

Remote action result events
External program actions are executed asynchronously; therefore, an asynchronous result notification mechanism is provided.
Remote action result events
An external action that is performed on an event from the console will result in another event. An event that occurs as the result of an action is designated as an internal event of class MC_CELL_ACTION_RESULT.
This MC_CELL_ACTION_RESULT instance consists of the return code and the standard output and error streams produced by the external program. If the size of those streams is not too large, they are included literally in the action result event. Otherwise, they are stored in a file whose reference name is stored in the action result. The size limit is set with configuration parameter ActionResultInlineLimit, which has a default value of 4096, or 4KB.
If an action cannot be started, the action result event indicates the reason in the failure slot contained in the MC_CELL_ACTION_RESULT class.
For information about this parameter, see BMC Impact Solutions Infrastructure Administration Guide.
Location of remote actions and executables
Actions and relevant executables are placed in the cell’s kb\bin directory. The subdirectory location within the bin directory depends on the platform type on which the cell is running, as defined in Table 34:
Table 34 Standard locations for action executables
Directory Platform
A independent
h1 HP-UX 11+
l2 Linux
p4 AIX
s5 Solaris
w4 Windows
Chapter 8 Creating local and remote actions 201
Requirements for action executable files
Executables that can run on multiple platforms, such as all UNIX, can be located in the A subdirectory. A cell first looks for executables in the platform-specific directory, and then in the independent directory (A). An executable also can be located anywhere on a file system. In that case, the cell requires the path to the executable in order to locate it.
Requirements for action executable files
Files are executable under different conditions, depending on the operating system. On UNIX systems, the file's execute permission must be set, and the file must have an UNIX executable file format. Also on UNIX, a text file is considered executable if it begins with the characters #! followed by a path used to interpret the script. On Windows platforms a file is executable if it has a suffix that corresponds to an executable system. These suffixes are listed in the PATHEXT environment variable.
Defining a remote action
This section describes how to define a remote action in the KB of a cell.
For additional information on defining a remote action in the BMC IX Console, you can refer to Chapter 9, “Remote execution.”
Remote action definitions
The following sections describe how to define a remote action, as well as how to specify roles and arguments. This section also provides examples of remote actions.
202 BMC Impact Solutions Event Management Guide

Remote action definitions
Common action rule syntax
Both internal and external remote actions are defined through an action rule. The basic syntax of an action rule is shown in Figure 70.
Table 35 describes the variables of the action rule syntax.
Figure 70 Action rule syntax
action ActionName : { [ Role , Role , ... ] } [ Argument , Argument , ... ]ActionCodeInternal
ENDaction ActionName [ Argument , Argument , ... ]
ActionCodeInternalENDaction ActionName : { [ Role , Role , ... ] }
ActionCodeInternalOrExternalENDaction ActionName
ActionCodeInternalOrExternalEND
Table 35 Action rule syntax variable descriptions (part 1 of 2)
Variable Description
ActionName ActionName is the name that is used to represent the action in a console and to refer to the action when performing it from a rule. For example, an ActionName could be SendMail or ModifyEvent.
For more information, see “Specifying an action name” on page 204.
Role [Optional.] Role specifies the permissions required to perform the action. The use of roles only applies when you are performing the action from a console. An example of a role is Service Administrators.
For more information, see “Specifying roles” on page 204.
Chapter 8 Creating local and remote actions 203
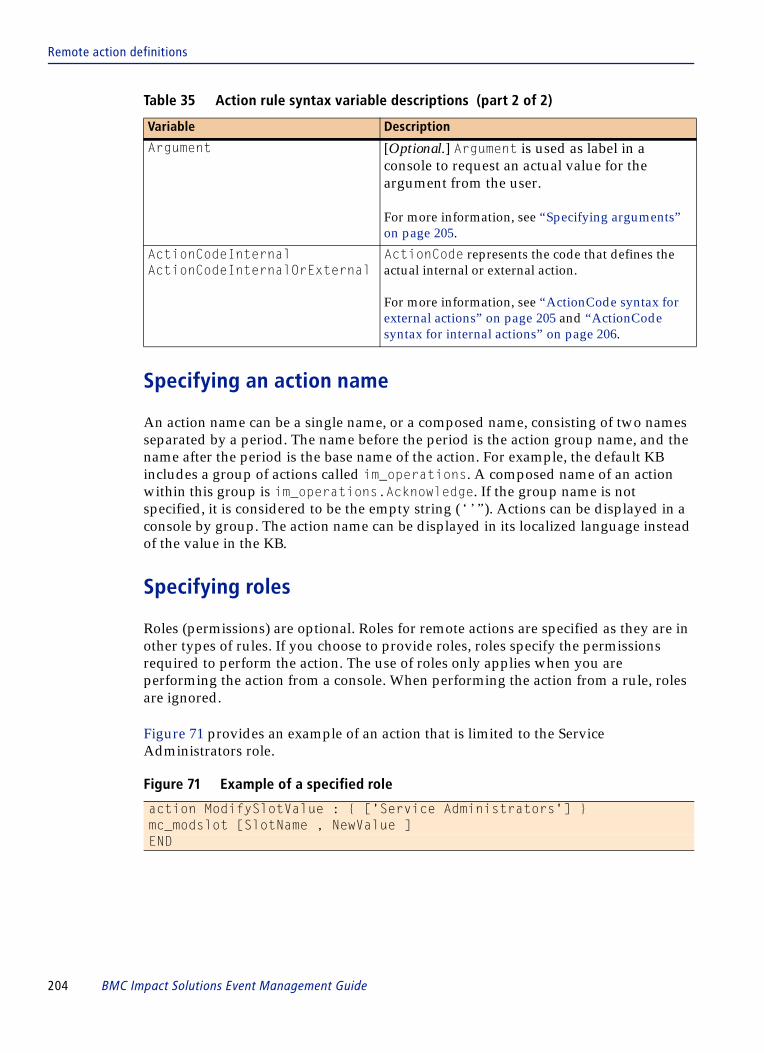
Remote action definitions
Specifying an action name
An action name can be a single name, or a composed name, consisting of two names separated by a period. The name before the period is the action group name, and the name after the period is the base name of the action. For example, the default KB includes a group of actions called im_operations. A composed name of an action within this group is im_operations.Acknowledge. If the group name is not specified, it is considered to be the empty string (‘’”). Actions can be displayed in a console by group. The action name can be displayed in its localized language instead of the value in the KB.
Specifying roles
Roles (permissions) are optional. Roles for remote actions are specified as they are in other types of rules. If you choose to provide roles, roles specify the permissions required to perform the action. The use of roles only applies when you are performing the action from a console. When performing the action from a rule, roles are ignored.
Figure 71 provides an example of an action that is limited to the Service Administrators role.
Argument [Optional.] Argument is used as label in a console to request an actual value for the argument from the user.
For more information, see “Specifying arguments” on page 205.
ActionCodeInternalActionCodeInternalOrExternal
ActionCode represents the code that defines the actual internal or external action.
For more information, see “ActionCode syntax for external actions” on page 205 and “ActionCode syntax for internal actions” on page 206.
Figure 71 Example of a specified role
action ModifySlotValue : { ['Service Administrators'] }mc_modslot [SlotName , NewValue ]END
Table 35 Action rule syntax variable descriptions (part 2 of 2)
Variable Description
204 BMC Impact Solutions Event Management Guide

Remote action definitions
Specifying arguments
Arguments are optional. If you choose to include action arguments, specify them as a list, using the following format for each argument as shown in Figure 72.
A standard slot type declaration is used to specify the type of the value that is expected for the argument. This can be a single value or a list of single values (LIST_OF). If no type declaration is provided, it defaults to STRING.
If a Variable is specified, the actual value of the argument is available in the action code through that variable.
For an external action, the optional arguments are specified inside the ActionCode. For more information, see “ActionCode syntax for external actions.”
ActionCode syntax for external actions
For external actions, the action code is one of four types:
■ an action with arguments that will be performed on an event that matches the specified selection conditions
■ an action without arguments that will be performed on an event that matches the specified selection conditions
■ an action with arguments that is performed on any event
■ an action without arguments that is performed on any event
Figure 72 Action argument syntax
ArgumentName : SlotType ( $Variable )ArgumentName : SlotTypeArgumentName ( $Variable )ArgumentName ( $Variable )
: Selection ActionProgram [ Argument , Argument , ... ]
: Selection ActionProgram
ActionProgram [ Argument , Argument , ... ]
ActionProgram
Chapter 8 Creating local and remote actions 205
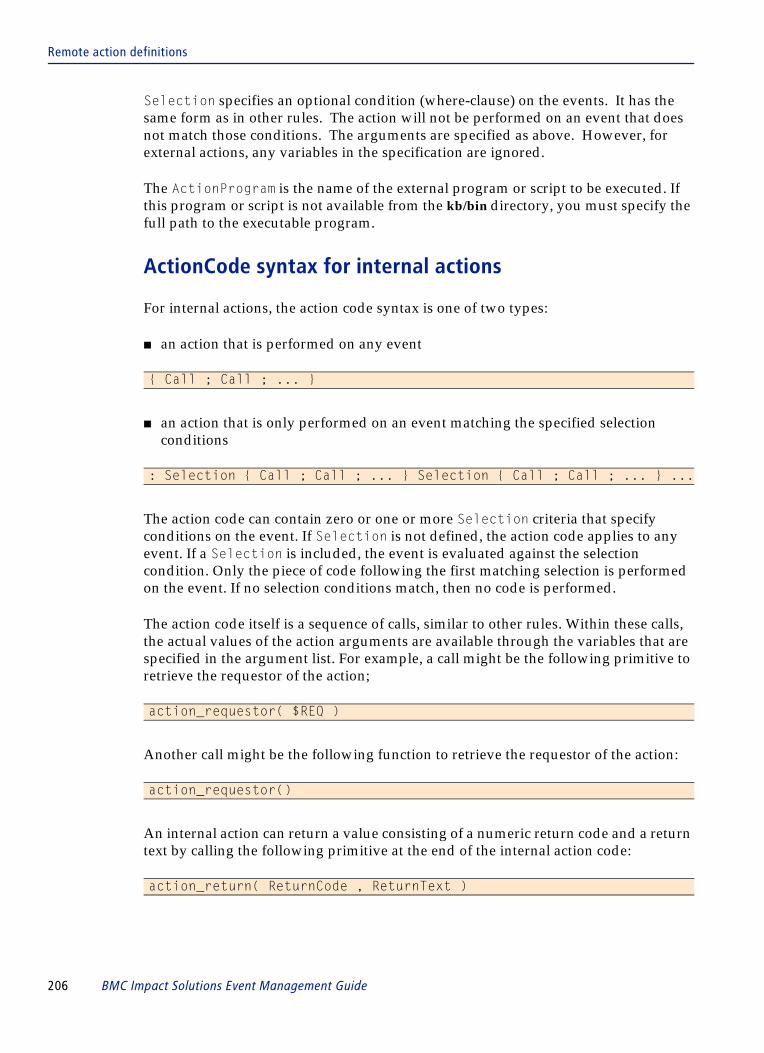
Remote action definitions
Selection specifies an optional condition (where-clause) on the events. It has the same form as in other rules. The action will not be performed on an event that does not match those conditions. The arguments are specified as above. However, for external actions, any variables in the specification are ignored.
The ActionProgram is the name of the external program or script to be executed. If this program or script is not available from the kb/bin directory, you must specify the full path to the executable program.
ActionCode syntax for internal actions
For internal actions, the action code syntax is one of two types:
■ an action that is performed on any event
■ an action that is only performed on an event matching the specified selection conditions
The action code can contain zero or one or more Selection criteria that specify conditions on the event. If Selection is not defined, the action code applies to any event. If a Selection is included, the event is evaluated against the selection condition. Only the piece of code following the first matching selection is performed on the event. If no selection conditions match, then no code is performed.
The action code itself is a sequence of calls, similar to other rules. Within these calls, the actual values of the action arguments are available through the variables that are specified in the argument list. For example, a call might be the following primitive to retrieve the requestor of the action;
Another call might be the following function to retrieve the requestor of the action:
An internal action can return a value consisting of a numeric return code and a return text by calling the following primitive at the end of the internal action code:
{ Call ; Call ; ... }
: Selection { Call ; Call ; ... } Selection { Call ; Call ; ... } ...
action_requestor( $REQ )
action_requestor()
action_return( ReturnCode , ReturnText )
206 BMC Impact Solutions Event Management Guide
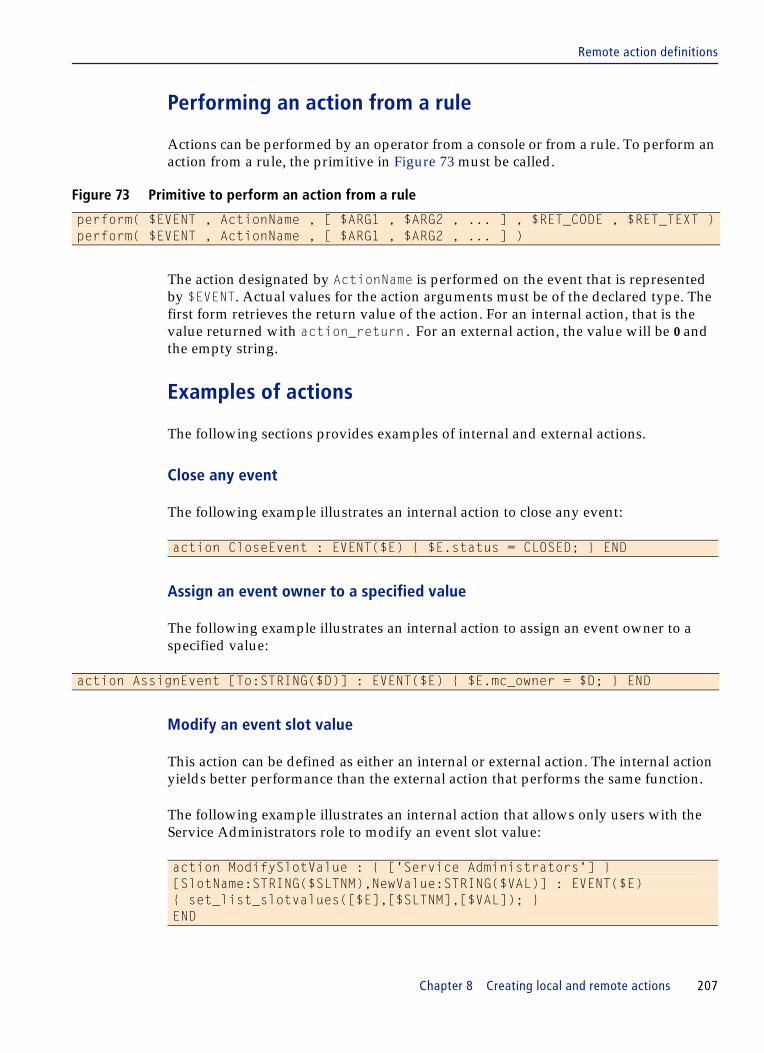
Remote action definitions
Performing an action from a rule
Actions can be performed by an operator from a console or from a rule. To perform an action from a rule, the primitive in Figure 73 must be called.
The action designated by ActionName is performed on the event that is represented by $EVENT. Actual values for the action arguments must be of the declared type. The first form retrieves the return value of the action. For an internal action, that is the value returned with action_return. For an external action, the value will be 0 and the empty string.
Examples of actions
The following sections provides examples of internal and external actions.
Close any event
The following example illustrates an internal action to close any event:
Assign an event owner to a specified value
The following example illustrates an internal action to assign an event owner to a specified value:
Modify an event slot value
This action can be defined as either an internal or external action. The internal action yields better performance than the external action that performs the same function.
The following example illustrates an internal action that allows only users with the Service Administrators role to modify an event slot value:
Figure 73 Primitive to perform an action from a rule
perform( $EVENT , ActionName , [ $ARG1 , $ARG2 , ... ] , $RET_CODE , $RET_TEXT )perform( $EVENT , ActionName , [ $ARG1 , $ARG2 , ... ] )
action CloseEvent : EVENT($E) { $E.status = CLOSED; } END
action AssignEvent [To:STRING($D)] : EVENT($E) { $E.mc_owner = $D; } END
action ModifySlotValue : { ['Service Administrators'] }[SlotName:STRING($SLTNM),NewValue:STRING($VAL)] : EVENT($E){ set_list_slotvalues([$E],[$SLTNM],[$VAL]); }END
Chapter 8 Creating local and remote actions 207

Remote action execution results
The following example illustrates an external action that allows only users with the Service Administrators role to modify an event slot value:
Remote action execution results
The standard cell action mechanism provides for results consisting only of the standard output and error stream; you must implement other mechanisms. If the result must be in a file, the external program can write the file and return the file path in the standard output stream. The external program also can use a CLI to modify a cell event or to send a new event to the cell containing the desired result.
To return 123 as the exit code, call the special program at the end of the script as:
action ModifySlotValue : { ['Service Administrators'] }mc_modslot [SlotName , NewValue ]END
NOTE It is impossible to return an exit code from a .bat script on Windows operating systems versions prior to Windows 2000. This is a Windows/DOS limitation. However, you can circumvent this limitation. By definition, the exit code of the script is the exit code of the last executed external program. You can write a small C program whose only function is to return the argument it receives as the exit code, as shown in Figure 74. Call that program from the script with an argument that specifies the desired exit code. This program should be placed in the kb\bin\w4 directory.
Figure 74 Example of exit code that returns an argument
exitcode.c int main( int argc , char *argv[] )
{return( ( argc <= 1 ) ? 0 : atoi(argv[1]) );
}
Figure 75 Example of exit code that returns a specified value
exitcode 123
208 BMC Impact Solutions Event Management Guide
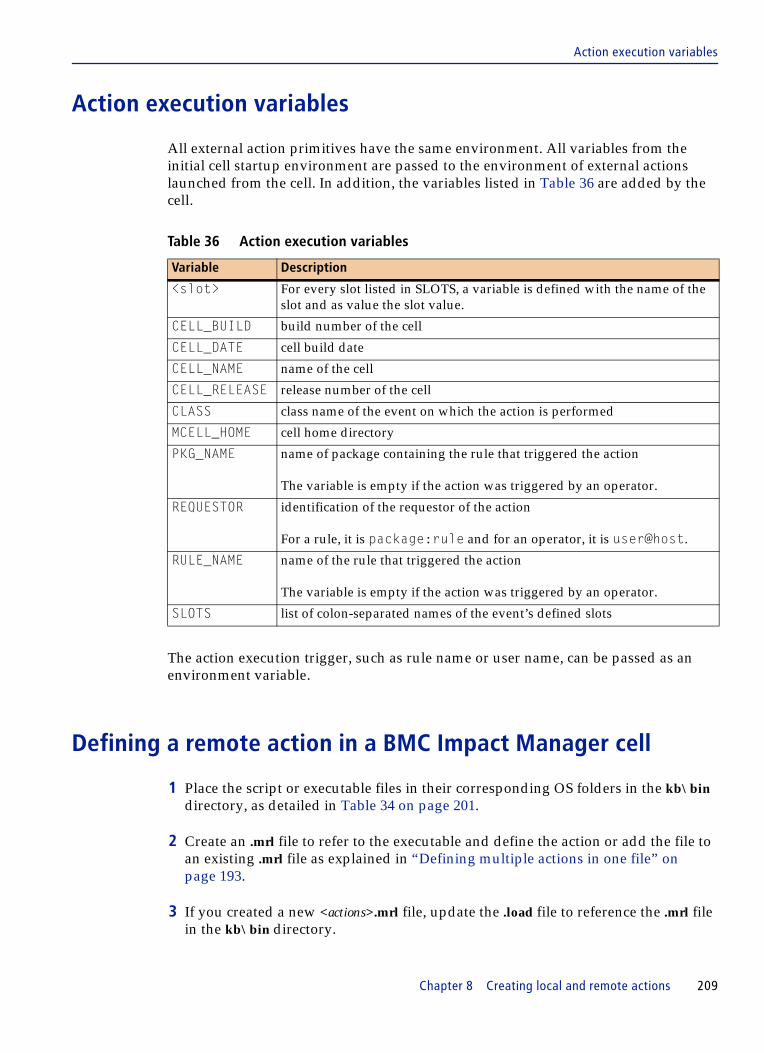
Action execution variables
Action execution variables
All external action primitives have the same environment. All variables from the initial cell startup environment are passed to the environment of external actions launched from the cell. In addition, the variables listed in Table 36 are added by the cell.
The action execution trigger, such as rule name or user name, can be passed as an environment variable.
Defining a remote action in a BMC Impact Manager cell
1 Place the script or executable files in their corresponding OS folders in the kb\bin directory, as detailed in Table 34 on page 201.
2 Create an .mrl file to refer to the executable and define the action or add the file to an existing .mrl file as explained in “Defining multiple actions in one file” on page 193.
3 If you created a new <actions>.mrl file, update the .load file to reference the .mrl file in the kb\bin directory.
Table 36 Action execution variables
Variable Description
<slot> For every slot listed in SLOTS, a variable is defined with the name of the slot and as value the slot value.
CELL_BUILD build number of the cell
CELL_DATE cell build date
CELL_NAME name of the cell
CELL_RELEASE release number of the cell
CLASS class name of the event on which the action is performed
MCELL_HOME cell home directory
PKG_NAME name of package containing the rule that triggered the action
The variable is empty if the action was triggered by an operator.
REQUESTOR identification of the requestor of the action
For a rule, it is package:rule and for an operator, it is user@host.
RULE_NAME name of the rule that triggered the action
The variable is empty if the action was triggered by an operator.
SLOTS list of colon-separated names of the event’s defined slots
Chapter 8 Creating local and remote actions 209

Defining a remote action in a BMC Impact Manager cell
4 Compile the Knowledge Base, using the mccomp command.
5 Restart the cell and test the remote action from the rules or from the BMC Impact Explorer Console.
210 BMC Impact Solutions Event Management Guide

C h a p t e r 9
9 Remote executionBackground . . . . . . . . . . . . . . . . . . . . . . . . . . . . . . . . . . . . . . . . . . . . . . . . . . . . . . . . . . . . . 212Audience . . . . . . . . . . . . . . . . . . . . . . . . . . . . . . . . . . . . . . . . . . . . . . . . . . . . . . . . . . . . 212
Component descriptions . . . . . . . . . . . . . . . . . . . . . . . . . . . . . . . . . . . . . . . . . . . . . . . . . . 213Admin record . . . . . . . . . . . . . . . . . . . . . . . . . . . . . . . . . . . . . . . . . . . . . . . . . . . . . . . . 213Action rule . . . . . . . . . . . . . . . . . . . . . . . . . . . . . . . . . . . . . . . . . . . . . . . . . . . . . . . . . . 214Action task . . . . . . . . . . . . . . . . . . . . . . . . . . . . . . . . . . . . . . . . . . . . . . . . . . . . . . . . . . 215Credential record . . . . . . . . . . . . . . . . . . . . . . . . . . . . . . . . . . . . . . . . . . . . . . . . . . . . . 215
Process summary . . . . . . . . . . . . . . . . . . . . . . . . . . . . . . . . . . . . . . . . . . . . . . . . . . . . . . . . 218Working with credential records . . . . . . . . . . . . . . . . . . . . . . . . . . . . . . . . . . . . . . . . . . . 220
Guidelines. . . . . . . . . . . . . . . . . . . . . . . . . . . . . . . . . . . . . . . . . . . . . . . . . . . . . . . . . . . 220How IAS searches for credentials . . . . . . . . . . . . . . . . . . . . . . . . . . . . . . . . . . . . . . . 223
Interactive remote execution . . . . . . . . . . . . . . . . . . . . . . . . . . . . . . . . . . . . . . . . . . . . . . 224GUI walkthrough: interactive remote execution . . . . . . . . . . . . . . . . . . . . . . . . . . 225Defining the remote action rule and task. . . . . . . . . . . . . . . . . . . . . . . . . . . . . . . . . 226
Automatic remote execution . . . . . . . . . . . . . . . . . . . . . . . . . . . . . . . . . . . . . . . . . . . . . . 236Work flow . . . . . . . . . . . . . . . . . . . . . . . . . . . . . . . . . . . . . . . . . . . . . . . . . . . . . . . . . . . 236Authentication guidelines for automatic remote execution . . . . . . . . . . . . . . . . . 237GUI walkthrough: automatic remote execution . . . . . . . . . . . . . . . . . . . . . . . . . . . 237Defining the remote execution policy. . . . . . . . . . . . . . . . . . . . . . . . . . . . . . . . . . . . 237
Supplemental manual procedures. . . . . . . . . . . . . . . . . . . . . . . . . . . . . . . . . . . . . . . . . . 240Manual configuration of interactive remote execution . . . . . . . . . . . . . . . . . . . . . 240Manual configuration of automatic remote execution. . . . . . . . . . . . . . . . . . . . . . 251
Properties files . . . . . . . . . . . . . . . . . . . . . . . . . . . . . . . . . . . . . . . . . . . . . . . . . . . . . . . . . . 252ias.properties . . . . . . . . . . . . . . . . . . . . . . . . . . . . . . . . . . . . . . . . . . . . . . . . . . . . . . . . 252centraladmin-strings.properties . . . . . . . . . . . . . . . . . . . . . . . . . . . . . . . . . . . . . . . . 253remoteexecution.properties . . . . . . . . . . . . . . . . . . . . . . . . . . . . . . . . . . . . . . . . . . . . 253
Troubleshooting tips . . . . . . . . . . . . . . . . . . . . . . . . . . . . . . . . . . . . . . . . . . . . . . . . . . . . . 254Executing reboot command via remote action results in timeout messages . . . 254A script is deployed on a remote UNIX system but does not execute . . . . . . . . 255PsExec is not supported on 64-bit Windows 2008 Server systems. . . . . . . . . . . . 255Issues in high availability environments . . . . . . . . . . . . . . . . . . . . . . . . . . . . . . . . . 256
Chapter 9 Remote execution 211

Background
BackgroundRemote execution refers to the process by which an action rule, which is defined on a cell, invokes an action task, which is defined on the Impact Administration Server (IAS). The action rule is written in MRL, and the action task is written in XML.
The action task initiates a command. This command is executed on the system where IAS resides or on a specified remote system. If the command is executed on the IAS system, then the BMC IAS user account executes the command. If it is executed on a remote system, then a user account that impersonates the remote login credentials executes the command.
Remote execution can be exercised in two ways: interactive remote execution and automatic remote execution. You can configure remote execution manually by editing files or through the GUI.
The walk-throughs starting on page 225 show how to configure an interactive remote execution and an automatic remote execution by using the GUIs. A description of the manual procedures follows the GUI walk-throughs.
If you are an advanced user and you want to start working immediately in the GUI, without reviewing the background information, go to “GUI walkthrough: interactive remote execution” on page 225 or “GUI walkthrough: automatic remote execution” on page 237.
Audience
This section is addressed to experienced BMC IX administrators and to developers who are familiar with Knowledge Base rules and policy definitions. Some experience in XML development is helpful.
Developers can define MRL-based rules and XML-based tasks, both of which enable users who belong to the appropriate user groups to launch remote executions manually. In addition, developers can define remote execution policies that reference rules which, when triggered by events, automatically perform remote executions.
The target application can be any application that resides on a UNIX or MS Windows remote host. You can define the action to be taken in a batch file, shell script, or Perl script, any of which is launched on the remote host. This batch file or script cannot accept manual inputs when it is launched. Apart from batch files and scripts, users can execute any executable file on a remote host.
The set of remote actions that are available for events is different from the set of remote actions that are available for infrastructure management components.
212 BMC Impact Solutions Event Management Guide

Component descriptions
Component descriptionsThe current implementation is built on the following components.
Admin record
The Admin record is a special Type entry in the mcell.dir file of the cell from which the remote execution is launched. It identifies the IAS instance name, authentication credentials, and the host name and port of the server.
The Admin record entry is automatically inserted in the mcell.dir at installation. It is referenced by the action rules in the cell’s KB. A sample default Admin record entry is shown below:
The action rule references the information in the Admin record through its Name value (ias_Admin in this example).
The Admin record consists of the following parameters:
■ Type with the label admin
■ Name with the IAS instance name. The default is ias_Admin. The instance name is an arbitrary string that the admin_execute primitive, a required code component of the action rule, uses to refer to the Admin record in the mcell.dir.
■ Encryption Key with the default value 0 or a specified user name and password.
Interactive or manual remote execution
The default value 0 is used by the interactive or manual remote execution process. The 0 indicates that a specified user name and password are not required to launch the remote action interactively. Instead the manual remote execution process retrieves the user name and password of the login account of the current BMC IX session. So the default BMC IX login user account user/user, which belongs to the Full Access group, can manually execute remote actions provided the
■ action rule associates the Full Access group to the event and action■ ias_user userid attribute in the credential record is set equal to “user”
<Type> <Name> <EncryptionKey> IpAddress:Port>admin ias_Admin 0 localhost.domain:3084
Chapter 9 Remote execution 213
Action rule
Automatic remote execution
To enable automatic remote execution, you must specify an IAS user and password as the Encryption Key value. The automatic remote execution process uses the specified IAS user and password to authenticate the automatic execution. The specified IAS user must also be specified in the ias_user userid attribute value of the credential record.
■ IpAddress/Port that identifies the name of the host where IAS resides and the port connection. The default port number is 3084.
To change the Admin record
1 Open the mcell.dir file in a text editor.
2 Enter the changes in the appropriate Admin fields, and save the file.
3 Restart the cell to initialize the changes.
Action rule
You define the MRL-based action rule in the MCELL_HOME/etc/cellName/kb/bin/basicsolution_actions.mrl file on the cell. The basicsolution_actions.mrl file is designed to hold action rules for both interactive and automatic remote executions. In addition to referencing the information in the Admin record of the mcell.dir file, the action rule can specify
■ user group or groups■ the action task■ the event type ■ the remote application or host
For interactive remote executions, the action rule calls the IAS with the user name and password of the account that is logged into the BMC IX session. This is the account that manually executes the action. For automatic remote executions, the action rule retrieves the IAS credentials from the Admin record of the mcell.dir file. The action rule calls the action task.
Remote execution policy
To set up automatic remote executions that are triggered by events, you must first define a remote execution policy using the new remote execution policy feature of the BMC IX Console. This policy refers to the action rule.
214 BMC Impact Solutions Event Management Guide

Action task
The policy contains the definition of the event that triggers it. When the specified event is received, it triggers the rule, which invokes the action rule that calls the action task.
Action task
You define the action task in the IMPACT_SOLUTIONS_HOME/server/data/admin/actions/UserDefinedActions.xml file on the IAS. It is an XML-based file that contains the command which is executed on the remote host. The action task obtains the action definition from the action rule.
When the action task is run, the IAS uses a search algorithm to determine which user credentials to use to log into the remote system.
Credential record
Using the iadmin CLI, you define the XML-based credential record in the IMPACT_SOLUTIONS_HOME/server/conf/credential_repository.xml file on the IAS. It identifies the IAS user or role that can impersonate the login credentials of the remote host user.
The credential repository (credential_repository.xml) consists of credential records. A credential record identifies the Impact Administration Server user (IAS user). The IAS user can be an individual user account or a group ID such as Full Access. In effect, the credential record enables impersonalization. It allows the IAS user to impersonate the login credentials of the remote host user. The IAS user has the permission to execute actions on remote systems.
Aside from identifying the IAS user, the credential record must specify what the IAS user can access. The record must contain values for the application, the application instance, the remote host name or the domain, and the login user account of the remote system. The application and application instance can be designated by a wildcard (*), meaning that IAS user can initiate remote actions against any application or application instance on the specified remote system.
In addition, the credential record can contain other details. It can specify a login_password on the remote system if one is required. For example, in public key-based authentication for your client/server communication, such as the Open SSH protocol, an IAS credential entry is not required. However, if you rely on non-key-based authentication, you must supply a password in the credential repository.
Chapter 9 Remote execution 215

Credential record
The credential record can define an execution account (user name and password) for the remote application. If the login user account is on an MS Windows system, then the credential record provides for a login_user_domain that you must supply.
The credential_repository.xml file is located under IMPACT_SOLUTIONS_HOME/server/conf. A sample credential_repository.xml file is shown below:
BMC recommends that you update the credential_repository.xml file using the iadmin options discussed under “Working with credential records” on page 220.
Each credential record consists of the following elements:
<?xml version="1.0" encoding="UTF-8"?> <ias_user_list xmlns="urn:bmc:schemas:impact"xmlns:xsi="http://www.w3.org/2001/XMLSchema-instance"xsi:schemaLocation="urn:bmc:schemas:impact credential_repository.xsd">
<!-- Do not delete lines above this line --> <ias_user userid="user">
<application>dummyApplication</application><applicationinstance>dummyApplicationInstance</applicationinstance><hostname_or_domain>dummyHostname</hostname_or_domain><login_user>dummyLogin</login_user><login_password encrypted="true">Wn1zFHPbbQ==</login_password><execute_user>dummyExeUser</execute_user><execute_password encrypted="true">MTsZdM8brZawoQ==</execute_password><login_user_domain>dummyDomain</login_user_domain>
</ias_user>
<ias_user groupid="Full Access"><application>testApplication</application><applicationinstance>testApplicationInstance</applicationinstance><hostname_or_domain>pun-pcm-sun02</hostname_or_domain><login_user>abc</login_user><login_password encrypted="true">GB4VAhR0k2InIw5Q==</login_password><execute_user>xyz</execute_user> <execute_password encrypted="true">GB4VAhR0kQ==</execute_password><login_user_domain>ADPROD</login_user_domain>
</ias_user></ias_user_list>
Table 37 Elements of credential_repository.xml (part 1 of 2)
Element name Description
ias_user_list contains the two categories of IAS user: the individual IAS user ID (userid) or the IAS group ID (groupid)
ias_user specifies the account name of the user ID or the value of the group ID, either of which can exercise the available remote actions. You can assign an individual or group value to the ias_user.
userid the name of the individual IAS user account that can exercise the remote action. The userid is specified by the credentialId string in the iadmin syntax.
216 BMC Impact Solutions Event Management Guide

Credential record
Each credential record contains a unique combination of primary key values for userid or groupid, hostname_or_domain, and login_user fields. Records with duplicate primary key values are not permitted.
groupid the name of the IAS user group that can exercise the remote action. The default group ID values are defined in the group_roles.xml file under IMPACT_SOLUTIONS_HOME/server/conf. The groupid is also specified by the corresponding credentialId string in the iadmin syntax if you specify the group option.
If the user or users who belong to the group have rights to exercise the remote action, then they can launch the remote actions even though their specific user accounts have not been defined by the IAS_user element.
applicationname name of the application on the remote system. It can be any alphanumeric value or the asterisk wildcard.
applicationinstancename name of the application instance. It can be any alphanumeric value or the asterisk wildcard.
hostname_or_domain host name of the remote system or domain in which the remote action will be executed. If you enter the domain name, then all systems within the domain that connect to the local BMC IX Console are eligible for remote execution.
login_user user account that can log into the remote system
login_password password associated with the user account. By default the password is encrypted.
execute_user user account that can execute the specified application on the remote system. If the login_user account has execute privilege, then leave the execute_user element blank.
execute_password password associated with the user account that can access the application on the remote system. By default the password is encrypted.
login_user_domain required for MS Windows accounts. Domain where the remote login user account resides
Table 37 Elements of credential_repository.xml (part 2 of 2)
Element name Description
Chapter 9 Remote execution 217

Process summary
Process summaryFigure 76 on page 218 depicts an overview of the remote execution process:
Figure 76 Process overview: remote execution
Table 38 summaries the different stages in the process.
Table 38 Process description: remote execution (part 1 of 2)
Stage Description
1 remote execution policy. Automatic remote execution only. The developer defines a remote execution policy that calls the action rule and specifies the event type which triggers it.
218 BMC Impact Solutions Event Management Guide

Process summary
2 Action rule. Interactive and automatic remote execution. The developer writes an action rule that defines the remote action to be performed. The action is called through the input arguments of an admin_execute primitive.
Interactive remote execution requires an action_requestor primitive to retrieve the IAS user account and password from the login IAS account. Automatic remote execution accesses the IAS user name and password as defined in the Admin record under the Encryption Key value.
Interactive remote execution can include role definitions for the user. Roles are omitted in automatic remote execution.
3 Admin record. Interactive and automatic remote execution. The Encryption Key value of the Admin record supplies the defined IAS login credentials for automatic remote execution. The interactive remote execution process, however, retrieves the login credentials from the user account of the BMC IX session. It ignores the Encryption Key value defined in the Admin record.
The specific IAS user defined in the Admin record must also be defined in the credential record to enable remote login.
4 action task. Interactive and automatic remote execution. The action task is linked to the action rule by a task Id. The action task contains the command that executes the task.
5 credential repository. Interactive and automatic remote execution. The credential repository contains the impersonalized IAS user with the valid credentials for accessing the remote host.
During a remote execution, after the action task is executed, IAS searches the credential repository for matching credentials of the remote host. These matching credentials are used to access the remote host. If IAS cannot locate matching credentials, it sends an error message to the cell.
6 remote execution. Interactive and automatic remote execution. In interactive remote execution, the user chooses the action from a dynamically populated menu. The available actions depend on whether the user’s assigned group matches the group definition of the action for the selected event.
In automatic remote execution, the specified event triggers the rule without user intervention. The rule uses the IAS credentials in the Admin record to authenticate the action.
Table 38 Process description: remote execution (part 2 of 2)
Stage Description
Chapter 9 Remote execution 219

Working with credential records
Working with credential recordsYou define a credential record for each application on a remote system for which you want a specific user to execute actions. You can use the iadmin command line interface to with the following options to update credential records in the credential_repository.xml file and to initialize any changes to the action task definitions in the .xml files under the IMPACT_SOLUTIONS_HOME\server\data\admin\actions\ folder.
Table 39 on page 220 lists the iadmin options for the credential record.
Guidelines
The asterisk (*) functions as a wildcard. It is a valid entry only for the applicationname and applicationinstancename fields. It indicates that any value of the applicationname or applicationinstancename field is acceptable.
The search algorithm does not support pattern matching. Your entry must match exactly the underlying value.
Any alphanumeric value is valid for the applicationname and applicationinstancename fields.
Enclose any password values in double quotation marks to ensure proper processing. On UNIX systems, run the iadmin command without the bash shell to reinforce the proper processing of the password value.
Table 39 iadmin options for remote execution
Option Description
-acr adds a credential record to the credential_repository.xml
-mcr modifies an existing credential record
-dcr deletes a credential record
-lcr lists the credential
-reinit actions loads the action files after any additions or changes to the action tasks defined in the .xml files under IMPACT_SOLUTIONS_HOME\server\data\admin\actions\
220 BMC Impact Solutions Event Management Guide

Guidelines
The required fields in which you must enter a value are
■ credential Id■ hostname_or_domain■ applicationname (wildcard is permitted)■ applicationinstancename (wildcard is permitted)■ loginuser
To add a credential record
From the /bin subdirectory of your IMPACT_SOLUTIONS_HOME/server directory, execute the iadmin command using the -acr option, and follow the syntax in the example.
Table 40 on page 221 lists the required fields for the -acr option. You must include values for the required fields; otherwise the credentials record is not created.
The userorgroup field is optional. If you leave the userorgroup field blank, the -acr argument assumes that user is the selection, and the value you enter in the credentialId field (required) is the user account. To specify a group Id value, set the userorgroup field equal to group, and then specify the group value in the credentialId field.
Using the iadmin command syntax, you enter password values in clear text. However, the passwords are encrypted when they are added to the credential_repository.xml file.
iadmin -acr userorgroup=<user/group>:credentialId=<string>:hostname_or_domain=<string>:applicationname=<string>:applicationinstancename=<string>:login_user_domain=<string>:loginuser=<string>:loginpassword=<string>:executeuser=<string>:executepassword=<string>
Table 40 Required fields: adding a credential record
-acr field name Description
credentialId the user account (default) or the group Id value
hostname_or_domain the host name of the remote system, as in myremotecomputer123, or the domain name where it resides
applicationname name of the application. You can enter an asterisk “*” to bypass a specific application value.
applicationinstancename name of the application instance. You can enter an asterisk “*” to bypass a specific instance value.
login_user_domain required when the login account belongs to an MS Windows system
Chapter 9 Remote execution 221
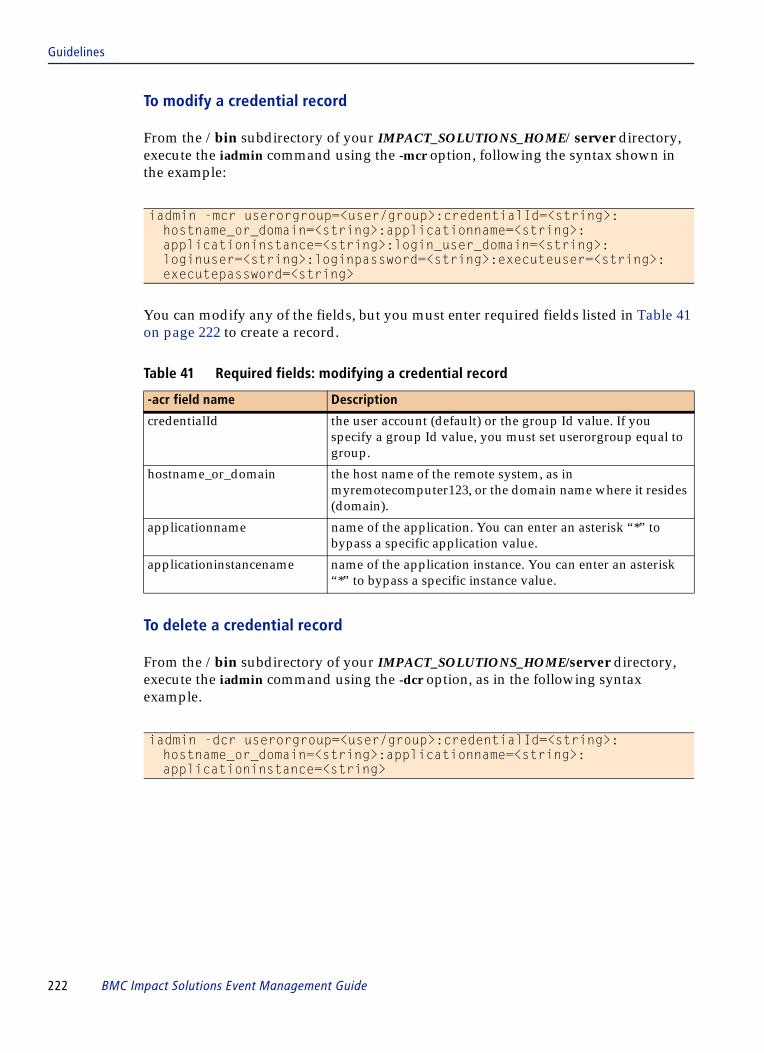
Guidelines
To modify a credential record
From the /bin subdirectory of your IMPACT_SOLUTIONS_HOME/server directory, execute the iadmin command using the -mcr option, following the syntax shown in the example:
You can modify any of the fields, but you must enter required fields listed in Table 41 on page 222 to create a record.
To delete a credential record
From the /bin subdirectory of your IMPACT_SOLUTIONS_HOME/server directory, execute the iadmin command using the -dcr option, as in the following syntax example.
iadmin -mcr userorgroup=<user/group>:credentialId=<string>:hostname_or_domain=<string>:applicationname=<string>:applicationinstance=<string>:login_user_domain=<string>:loginuser=<string>:loginpassword=<string>:executeuser=<string>:executepassword=<string>
Table 41 Required fields: modifying a credential record
-acr field name Description
credentialId the user account (default) or the group Id value. If you specify a group Id value, you must set userorgroup equal to group.
hostname_or_domain the host name of the remote system, as in myremotecomputer123, or the domain name where it resides (domain).
applicationname name of the application. You can enter an asterisk “*” to bypass a specific application value.
applicationinstancename name of the application instance. You can enter an asterisk “*” to bypass a specific instance value.
iadmin -dcr userorgroup=<user/group>:credentialId=<string>:hostname_or_domain=<string>:applicationname=<string>:applicationinstance=<string>
222 BMC Impact Solutions Event Management Guide
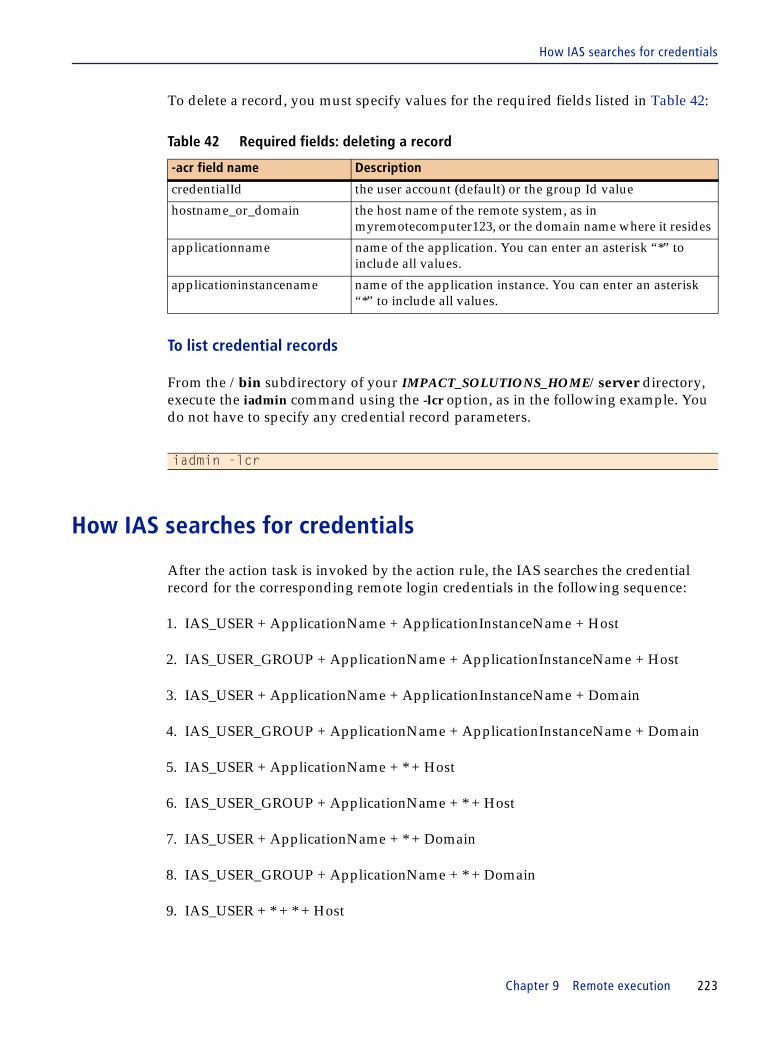
How IAS searches for credentials
To delete a record, you must specify values for the required fields listed in Table 42:
To list credential records
From the /bin subdirectory of your IMPACT_SOLUTIONS_HOME/server directory, execute the iadmin command using the -lcr option, as in the following example. You do not have to specify any credential record parameters.
How IAS searches for credentials
After the action task is invoked by the action rule, the IAS searches the credential record for the corresponding remote login credentials in the following sequence:
1. IAS_USER + ApplicationName + ApplicationInstanceName + Host
2. IAS_USER_GROUP + ApplicationName + ApplicationInstanceName + Host
3. IAS_USER + ApplicationName + ApplicationInstanceName + Domain
4. IAS_USER_GROUP + ApplicationName + ApplicationInstanceName + Domain
5. IAS_USER + ApplicationName + * + Host
6. IAS_USER_GROUP + ApplicationName + * + Host
7. IAS_USER + ApplicationName + * + Domain
8. IAS_USER_GROUP + ApplicationName + * + Domain
9. IAS_USER + * + * + Host
Table 42 Required fields: deleting a record
-acr field name Description
credentialId the user account (default) or the group Id value
hostname_or_domain the host name of the remote system, as in myremotecomputer123, or the domain name where it resides
applicationname name of the application. You can enter an asterisk “*” to include all values.
applicationinstancename name of the application instance. You can enter an asterisk “*” to include all values.
iadmin -lcr
Chapter 9 Remote execution 223

Interactive remote execution
10. IAS_USER_GROUP + * + * + Host
11. IAS_USER + * + * + Domain
12. IAS_USER_GROUP + * + * + Domain
13. IAS_USER + * + ApplicationInstanceName + Host
14. IAS_USER_GROUP + * + ApplicationInstanceName + Host
15. IAS_USER + * + ApplicationInstanceName + Domain
16. IAS_USER_GROUP + * + ApplicationInstanceName + Domain
The wildcard * in the ApplicationName and ApplicationInstanceName fields indicates any value.
If you are implementing automatic remote execution, the IAS searches the credential records for an IAS_USER with the same value as the IAS user name defined under the Encryption Key parameter of the Admin record. Therefore, to use the default Admin record, you must modify the default Encryption Key value of 0 by changing it to a specific IAS user name and password (see “To change the Admin record” on page 214). Then you define in the credential record the IAS User with the credential Id set equal to the value you specified in the Encryption Key value of the Admin record.
Interactive remote executionThis is remote execution that a user with the appropriate group/role assignment can launch manually from a selected event in the Events View of the BMC IX Console. In the BMC IX Events View, the user selects an event, right-clicks to open the pop-up menu, and chooses Actions => Remote Actions to display a dynamically populated list of available actions. Users can also execute interactive remote actions on multiple events. To do so, the user selects multiple events (a maximum of 25) in the BMC IX Events View, right clicks on those events, selects Actions => Remote Actions, and executes an action from the list of displayed actions.
These actions may be collected into groups and listed under the group name
The action is available to the user if the
■ user shares a role that has been assigned to the action
■ event on which the user has right -clicked matches the WHERE condition set for that action in the MRL-based rule
224 BMC Impact Solutions Event Management Guide
GUI walkthrough: interactive remote execution
If the action is unavailable to a specific user group/role, then the menu option is not displayed to the user with that specific user group/role.
As a developer, to implement interactive remote execution, you create an MRL-based action rule on the cell and a corresponding XML-based action task on the Impact Administration Server.
GUI walkthrough: interactive remote execution
You can add an action rule and action task simultaneously by using the Create Remote Actions dialog box.
To modify an existing action rule or task, you must do so by manually editing the files. To delete an action rule or task, you must manually remove the files from the target directory. Then recompile the cell’s KB and restart the cell, and next reload the Impact Administration Server by running the iadmin -reinit actions command. Refer to the manual procedures described under “Defining the action rule for the IAS or remote system” on page 242 and “Defining the action task for the IAS or remote system” on page 246.
Before you begin
Ensure that
■ the cell on which you are defining the action rules is registered with the Impact Administration Cell and is visible in the Infrastructure Management tab
■ you can ping the system on which the cell resides from the BMC IX system
■ if the cell resides on a UNIX system, the SSH server is running
This interactive procedure is divided into three parts:
■ defining the rule and the action■ adding event criteria■ specifying timeout intervals, login credentials, and deployment options
Chapter 9 Remote execution 225
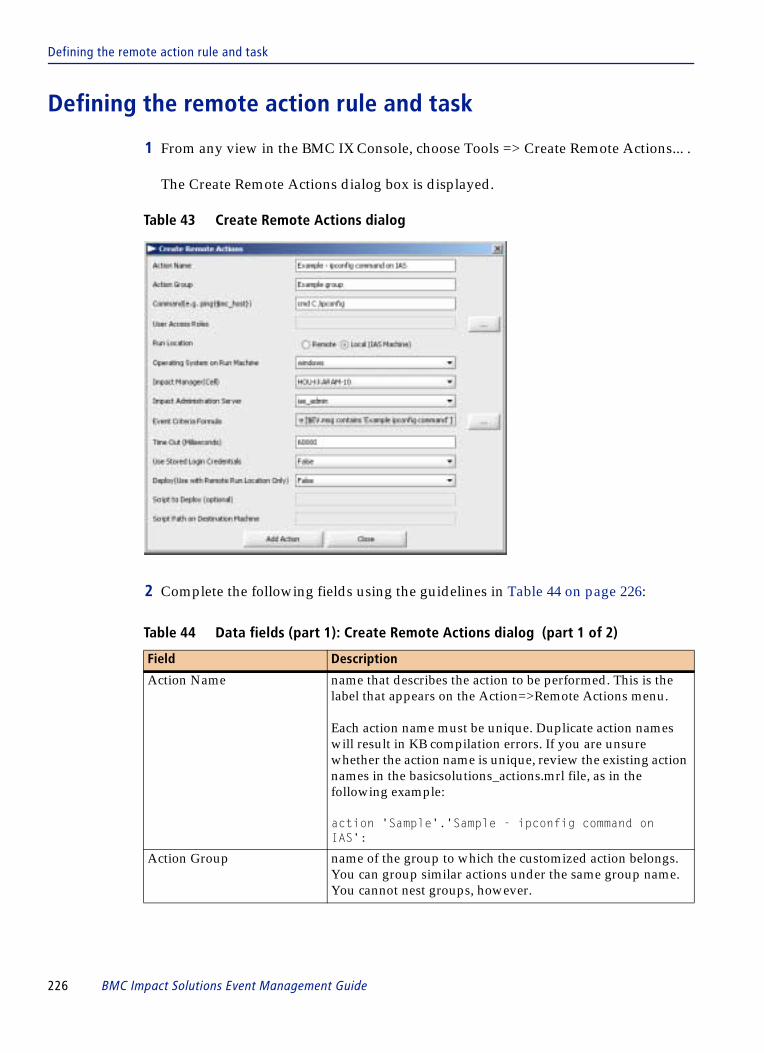
Defining the remote action rule and task
Defining the remote action rule and task
1 From any view in the BMC IX Console, choose Tools => Create Remote Actions... .
The Create Remote Actions dialog box is displayed.
Table 43 Create Remote Actions dialog
2 Complete the following fields using the guidelines in Table 44 on page 226:
Table 44 Data fields (part 1): Create Remote Actions dialog (part 1 of 2)
Field Description
Action Name name that describes the action to be performed. This is the label that appears on the Action=>Remote Actions menu.
Each action name must be unique. Duplicate action names will result in KB compilation errors. If you are unsure whether the action name is unique, review the existing action names in the basicsolutions_actions.mrl file, as in the following example:
action 'Sample'.'Sample - ipconfig command on IAS':
Action Group name of the group to which the customized action belongs. You can group similar actions under the same group name. You cannot nest groups, however.
226 BMC Impact Solutions Event Management Guide

Defining the remote action rule and task
Command string that contains the command to be run on the IAS or remote system
If the command string includes double quotation marks, as in the ping command ping “{$mc_host}”, then the forward slash is added to the command in the action_name.xml file under the IMPACT_SOLUTIONS_HOME/server/data/admin/actions directory: ping \”{$mc_host}\”.
You must manually edit the action_name.xml file to remove the slash characters from the command string. After saving the action_name.xml file, return to the Infrastructure Management tab, select the IAS instance object, right-click to open the pop-up menu, and choose Action => Reload.
If the command string includes a hard-coded path, then always specify the path name using the UNIX style forward slash /, as in “c:/Program Files/BMC Software/Test1.exe”, even if the target systems is Windows.
User Access Roles roles—Full Access, Service Administrators, Read Only, and so forth—that have permission to execute this action. You can choose one or more roles.
Note: The roles that are listed are the ones available on the Impact Administration Server to which your BMC IX Console is currently connected.
Run Location system on which the action is run. It can be any remote system that can be pinged from the Impact Administration Server, or the local system where the Impact Administration Server resides.
If you select Remote, you are able to deploy scripts to the remote system.
Operating System on Run Machine
specifies the operating system where the action is to be executed. This can be the operating system of the remote machine or the operation system of the machine where the Impact Administrator Server resides.
Impact Manager (Cell) name of the cell that receives the event associated with the action. The action rule is defined on this cell.
Impact Administrator Server the name of the Impact Administrator Server instance where the action task is defined
Table 44 Data fields (part 1): Create Remote Actions dialog (part 2 of 2)
Field Description
Chapter 9 Remote execution 227

Defining the remote action rule and task
Adding event criteria
Through the Event Criteria Formula field of the Create Remote Actions dialog box, you enter event criteria in a separate dialog box called Add Event Criteria, shown below:
Figure 77 Add Event Criteria
When you define the event criteria, you are building a selector that acts as a filter for the incoming event, which is associated with the action rule and action task. You can define the selector, and consequently the event, broadly or narrowly. If the event does not satisfy the criteria, then the action rule and action task are not available.
You should be familiar with Master Rule Language and Baroc class definitions before developing elaborate event selectors. See the BMC Impact Solutions Knowledge Base Development Reference Guide.
The event criteria are essentially the Master Rule Language (MRL) event definition. You specify the event class, slot values, and operators of the event definition.
For interactive remote execution, this is the definition that the incoming event must satisfy before the action rule invokes the remote action.
228 BMC Impact Solutions Event Management Guide

Defining the remote action rule and task
Completing the fields in the Add Event Criteria dialog is self-explanatory. However, you can refer to Table 45 on page 229 for general guidelines.
NOTE Automatic remote execution requires a two-step validation. First, an event policy automatically calls a specified action rule provided it satisfies the event criteria of the policy. Second, the action rule, which you define in the Create Remote Actions dialog, invokes the remote action provided it meets the event criteria that you have defined in the Add Event Criteria dialog box.
Table 45 Add Event Criteria descriptions
Field/Control button Description
Description optional. Free-form text field in which you can provide a description of the event. The Description field can be used to classify the selectors.
Event Class drop-down list of event classes and subclasses, which you can select in the Class Chooser dialog
Slot drop-down list of available slots which you can specify
Operator drop-down list of available operators that link the slots to the value strings
Value text field in which you specify a value for the slot
Insert control button. Places the slot-operator-value string in the display area, where you can review and edit. When placing multiple slot-value combinations, the default connector is AND. You can specify others from the drop-down list.
Edit control button. Displays the selected slot-value combination in the editable fields above the display area
Delete control button. Removes the selected object from the display area
Group control button. Adds parentheses around the selected object to indicate the order and the logic of the operation. You can create nested objects using the Group button
Move control button. Moves the placement of the selected object to the left or right
Chapter 9 Remote execution 229

Defining the remote action rule and task
Specifying timeout intervals, login credentials, and deployment options
1 Complete the remaining fields using the guidelines in Table 46 on page 230.
Table 46 Data fields (part 2): Create Remote Actions dialog
Field Description
Time Out (Milliseconds) interval in milliseconds before the action is canceled. The action can be canceled if the Impact Administration Server did not receive a response before the customized or default timeout interval.
Use Stored Login Credentials Boolean indicator (True or False) that tells whether you execute the action using either of the following:
■ the user credentials of the remote host system (the login user and login password of the credential record) = True
■ public key authentication = False (default)
If you choose False (default), then your public key account on the system should be sufficient to launch the action. The routine does not search the credential_repository.xml file for login credentials.
If you choose True, then the routine uses the remote system’s account information as defined in the credential_repository.xml file (login_user and login_password).
Reminder: For interactive remote execution, you do not need to modify the default Encryption Value of 0 in the Admin record of the mcell.dir file. For automatic remote execution, you must specify an IAS user name and password in the Admin record.
Deploy Boolean indicator (True or False) that tells whether you are going to deploy a script from the IAS system to the remote system and then execute the script through a RunRemoteTask command.
The default is False, indicating that no script is deployed.
You can only deploy a script when the selected Run Location option is Remote. You cannot deploy a script on a remote system when the Run Location option is Local (IAS System).
Script To Deploy (optional) name of script or .bat file
Script Path on Destination Machine
file path of the script on the system where it will be executed
230 BMC Impact Solutions Event Management Guide

Defining the remote action rule and task
2 Click Add Actions.
A dialog box opens informing you of the next steps. To enable the action rule, recompile the cell’s KB and restart the cell. To enable the action task, reload the XML action task files of the Impact Administration Server.
You can perform both actions in the Infrastructure Management tab of the Administrator view.
Before you begin, open the Infrastructure Management model, and drill down to the cell server instance and, if necessary, the IAS instance.
Recompiling the cell’s KB
1 Right-click on the cell server icon to open the pop-up menu, and choose Actions.
2 Choose Recompile Knowledge Base.
TIP You cannot enter parameterized actions through the Create Remote Actions dialog. (Parameterized actions refer to the values of the Args input parameter from the admin_execute() primitive.) To enter values, such as “true” or “all”, for the Args parameter, you must manually edit the basicsolution_actions.mrl file. You must then reference the Args values (with variables such as $[2], $[3], and so forth) by manually editing the corresponding action_name.xml file. Refer to the manual procedures under “Defining the action rule for the IAS or remote system” on page 242 and “Defining the action task for the IAS or remote system” on page 246 for more information.
NOTE The available actions may be slow to display. If they do not display at first, repeat the right-click action.
Chapter 9 Remote execution 231

Defining the remote action rule and task
3 Click Recompile in the acknowledgment dialog.
4 In the User Credentials dialog, enter the user credentials for the local or remote system, and click OK.
A logging window opens and the recompilation process starts. When it is complete, scroll down to the end of the log to see if it is successful.
5 Optional. To view the action rule, open the MCELL_HOME/etc/cellName/kb/bin/basicsolution_actions.mrl file in a text editor.
Scroll to the bottom of the file and you see the action rule that you have just created, as in the following example:
6 To restart the cell server process, right-click the selected cell object to open the pop-up menu, and choose Actions=>Restart Cell Server Process.
Reloading the Impact Administration Server
1 Right-click on the IAS instance icon to open the pop-up menu, and choose Actions.
2 Choose Reload.
The Reload Actions dialog opens.
3 Click Reload Actions.
action 'Example group'.'Example - ipconfig command on IAS': { [Full Access] } :EVENT($EV) where [$EV.msg contains 'Example ipconfig command' ] { action_requestor($UID,$PWD); admin_execute(ias_admin,$UID,$PWD,$EV,Example_-_ipconfig_command_on_IAS,["false", "Example_-_ipconfig_command_on_IAS"],YES); } END
232 BMC Impact Solutions Event Management Guide

Defining the remote action rule and task
4 In the User Credentials dialog, enter the user credentials for the local or remote system, and click OK.
A logging window opens and the reloading process starts. When it is complete, scroll down to the end of the log to see if it is successful. If it is successful, you should see an exit code of 0.
5 To view the action task, go to the IMPACT_SOLUTIONS_HOME/server/data/admin/actions directory. Locate the XML file with the action name. In this example, it is Example_ipconfig_command_on_IAS.xml. Open your XML file in a text editor, as in the following example:
Adding credentials required to run the remote execution
Here you specify a credential record to run the remote execution. See “Credential record” on page 215 and “Working with credential records” on page 220 for general information on credential records.
<?xml version="1.0" encoding="ISO-8859-1" ?> <!DOCTYPE root SYSTEM "DiagnosticUtil.dtd"> <root name="Example_-_ipconfig_command_on_IAS"> <phases>
<phase name="phase.PhaseImpl" > <operations>
<operation name="operation.OperationImpl" > <tasks>
<task name="task.RunTask" id="Example_-_ipconfig_command_on_IAS" timeout="60000" deploy="false"> <input>
<param name="os">windows</param > <param name="cmd"><![CDATA[cmd /C ipconfig]]></param>
</input> </task>
</tasks> </operation>
</operations> </phase>
</phases> <reporters>
<reporter name="report.CasTaskReporter"></reporter> </reporters>
</root>
NOTE Alternatively, to reload the BMC Impact Administration Server, you can open a command prompt or terminal window, and enter the iadmin -reinit actions command. See also “Reinitializing the .xml files” on page 249.
Chapter 9 Remote execution 233

Defining the remote action rule and task
From the /bin subdirectory of your IMPACT_SOLUTIONS_HOME/server directory, execute the iadmin command using the -acr option, and follow the syntax in the example.
See “To add a credential record” on page 221 for the procedure.
Viewing action results in the Action Results window
You can view the results of the execution attempts in the Action Results window.
After you have recompiled the cell’s KB, restarted the cell, and reloaded the Impact Administration Server, the cell receives an event with the message Remote action creation through GUI tool.
1 From the Events View, select an event, such as Remote Action Created through GUI Tool, and right-click to open the pop-up menu.
2 Choose Actions=>Remote Action Results... .
The corresponding Remote Action Results window opens. It lists one event with a results message similar to the following:
3 View the data in the Output, Errors, and Details tabs.
4 Optional. Export the Output, Error, or Detail data to a separate file by choosing Export.
Sending and viewing a test event
You can use the mposter command to send a test event that determines whether the actions are available.
iadmin -acr userorgroup=<user/group>:credentialId=<string>:hostname_or_domain=<string>:applicationname=<string>:applicationinstancename=<string>:login_user_domain=<string>:loginuser=<string>:loginpassword=<string>:executeuser=<string>:executepassword=<string>
Your request for creating an action xml file C:\PROGRA~1\BMCSOF~1\Impact\server\data\admin\actions\aaa.xml went through successfully.
234 BMC Impact Solutions Event Management Guide

Defining the remote action rule and task
From the MCELL_HOME path, enter an mposter command syntax such as in the following example:
To view the test event
1 In the Events View, select the test event with the specified event message.
2 Right-click to open the pop-up menu, and choose Actions => Remote Actions.
You should see a folder with the specified Action Group name.
3 Choose the Action Group name folder, and select the command.
When you execute a remote action on an event, the event is updated with a green-colored remote action result icon, as shown in Figure 78:
Figure 78 Remote action result icon
mposter -n cellName -a EVENT -r MAJOR -m “Example ipconfig command on IAS” -b “mc_host=IAS host name”
Chapter 9 Remote execution 235

Automatic remote execution
Automatic remote executionAutomatic remote execution occurs without user intervention. When an event that matches specified criteria is received, it triggers a specially defined policy that calls the action rule which invokes the action task that runs on the remote system. Roles are omitted when you implement automatic remote execution.
As a developer tasked with implementing automatic remote execution, you define a remote execution policy that will be triggered by an event. You always define the policy through the Remote Action Policy GUI. You must also define the MRL-based action rule that the policy calls and the XML-based action task that the action rule invokes.
Work flow
Figure 79 outlines the major steps in implementing automatic remote execution.
Figure 79 Automatic remote execution
236 BMC Impact Solutions Event Management Guide

Authentication guidelines for automatic remote execution
Authentication guidelines for automatic remote execution
Specify an IAS user and password as the Encryption Key value in the Admin record of the cell’s mcell.dir file, and restart the cell. (See “To change the Admin record” on page 214.) The routine uses the specified IAS user and password to authenticate the automatic execution.
Using the iadmin command, enter this specified IAS user as the ias_user userid attribute value in the credential_repository.xml file. (See “To add a credential record” on page 221.)
GUI walkthrough: automatic remote execution
In this procedure you are defining an action rule and concomitant task to be invoked automatically by a remote execution policy.
1 From any view in the BMC IX Console, choose Tools => Create Remote Actions... .
The Create Remote Actions dialog box is displayed.
2 Following the guidelines described in Table 44 on page 226, Table 45 on page 229, and Table 46 on page 230, complete the Create Remote Actions fields.
3 Recompile the cell’s KB and reload the configuration files under the Impact Administration Server.
The remote action rule that you define is available to be invoked by the remote execution policy, along with the default remote actions such as ping mc_host_address, traceroute to mc_host_address, and others.
4 Optional. Send a test event that satisfies the selector criteria to ensure that the associated action is available on the dynamic menu.
Defining the remote execution policy
NOTE Refer to Chapter 10, “Event management policies,”for descriptions and procedures related to the event management policy mechanism.
Chapter 9 Remote execution 237

Defining the remote execution policy
In this procedure you are defining a policy that will automatically call a specified action rule provided the incoming event satisfies the remote execution policy’s event criteria. The associated action rule, in turn, invokes the remote action provided the same event satisfies its event criteria.
Before you begin
If an appropriate selector definition does not already exist, use the Edit => Selectors => New Selector... menu option to define the event criteria for the incoming event. Be sure that the selector’s event criteria correlate with the event criteria of the selector you defined for the action rule in the Create Remote Actions dialog.
Follow these steps to define a policy:
1 In the BMC IX Console, go to the Administration tab, and select the Event Management Policies view.
2 Choose the Remote Action Policy type under the By Policy Type folder.
The Remote Action Policy definition window is opened, as shown in Figure 80 on page 239:
TIP The event criteria that you define for the remote execution policy and the event criteria defined for the action rule in the Create Remote Actions dialog must be highly correlated. Otherwise the action rule is not invoked.
238 BMC Impact Solutions Event Management Guide
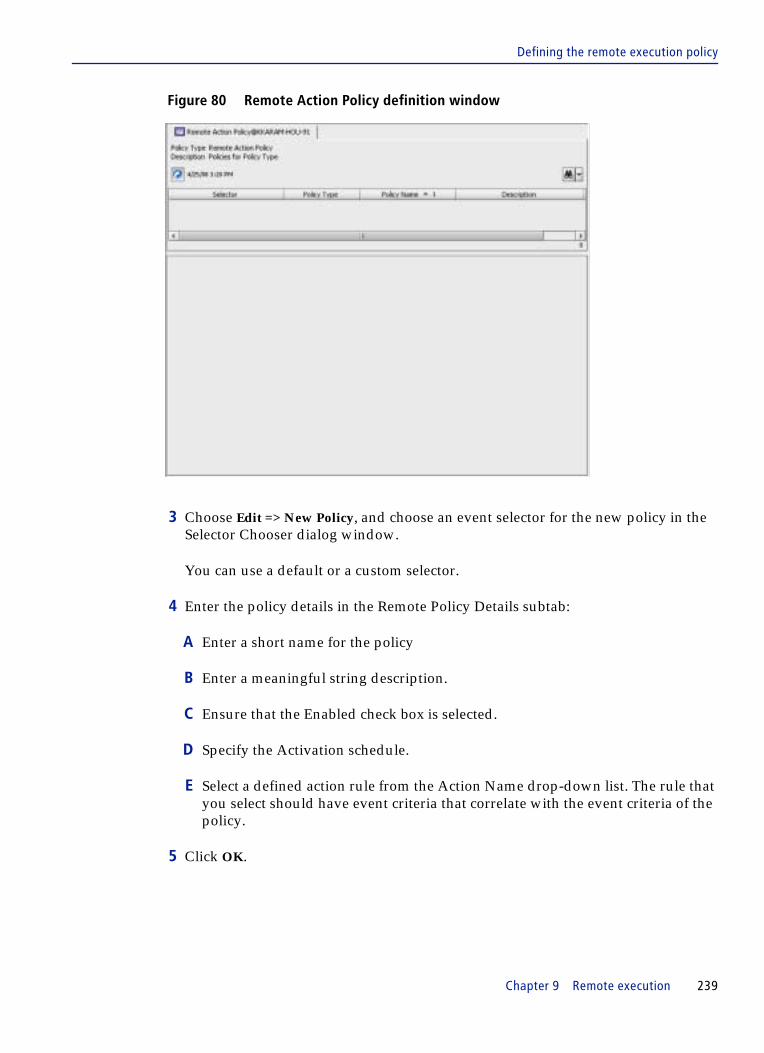
Defining the remote execution policy
Figure 80 Remote Action Policy definition window
3 Choose Edit => New Policy, and choose an event selector for the new policy in the Selector Chooser dialog window.
You can use a default or a custom selector.
4 Enter the policy details in the Remote Policy Details subtab:
A Enter a short name for the policy
B Enter a meaningful string description.
C Ensure that the Enabled check box is selected.
D Specify the Activation schedule.
E Select a defined action rule from the Action Name drop-down list. The rule that you select should have event criteria that correlate with the event criteria of the policy.
5 Click OK.
Chapter 9 Remote execution 239

Supplemental manual procedures
Supplemental manual proceduresThese procedures tell you how to manually define and configure remote execution action rules and action tasks.
Manual configuration of interactive remote execution
The manual configuration process requires that you edit the action rules and action tasks in their respective files.
Action rules and action tasks
You write the action rule in the MCELL_HOME/etc/cellName/kb/bin/basicsolution_actions.mrl file, and you define the corresponding action task on the IAS in the IMPACT_SOLUTIONS_HOME/server/data/admin/actions/UserDefinedActions.xml file.
The action task file is created under the action name at IMPACT_SOLUTIONS_HOME/server/data/admin/actions/.
The action rule and the action task are cross-referenced. The admin_execute primitive of the action rule includes in its arguments the task Id value of the action task. The task Id value links the action rule on the cell with the action task on IAS.
The action rule defines the roles, the action, and the target of the action task.
When defining interactive action rules, you can specify whether they call tasks that are run on the system where IAS resides or a remote system(s). The action task called RunTask is executed on the IAS system. The action task called RunRemoteTask is executed on the remote system(s). Table 47 shows the correspondence between the target system of the rule and the task name.
Work flow: manually configuring interactive remote execution
Figure 81 on page 241 outlines the major steps in implementing interactive remote execution.
Table 47 Rule and task correspondence
Rule for ... Task name
IAS system RunTask (local)
remote system RunRemoteTask (remote)
240 BMC Impact Solutions Event Management Guide

Manual configuration of interactive remote execution
Figure 81 Interactive remote execution
Specifying the IAS user account and group
In interactive remote execution, the IAS user who is logged into the session can execute the remote action provided the user belongs to the group specified in the action rule. Therefore, when setting up your IAS user for interactive remote execute, ensure that the group ID in the user definition corresponds to the group definition in the action rule.
When adding a user entry, enter a plain-text password with the <password encrypted> element set equal to false. When the file is initialized, the password becomes encrypted and the <password encrypted> element is changed to true.
From the /bin subdirectory of your IMPACT_SOLUTIONS_HOME/server directory, execute the iadmin command using the -aru option, as in the following example:
NOTE You can use the default BMC IX login account of user/user provided the rule that you define is associated with the Full Access group and the ias_user userid attribute in the credential record is set equal to “user”.
iadmin -aru loginId=IAS_user:password=IAS_user:usergroups=”Full Access”:description:”Full Access User Group”
Chapter 9 Remote execution 241
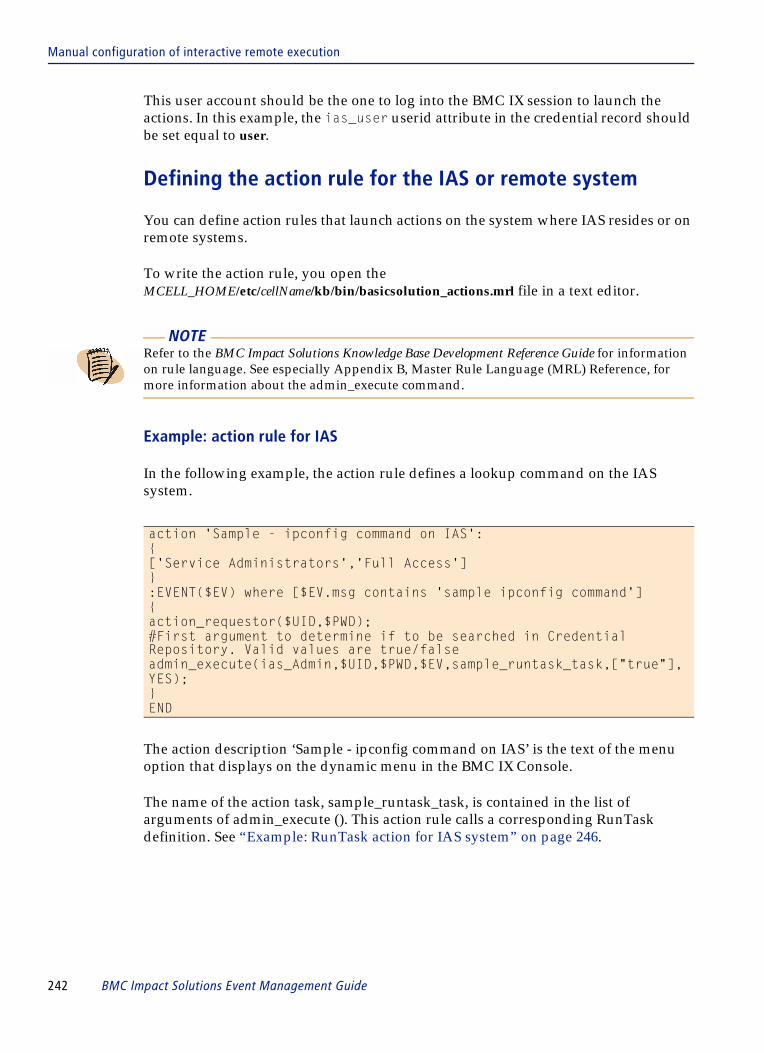
Manual configuration of interactive remote execution
This user account should be the one to log into the BMC IX session to launch the actions. In this example, the ias_user userid attribute in the credential record should be set equal to user.
Defining the action rule for the IAS or remote system
You can define action rules that launch actions on the system where IAS resides or on remote systems.
To write the action rule, you open the MCELL_HOME/etc/cellName/kb/bin/basicsolution_actions.mrl file in a text editor.
Example: action rule for IAS
In the following example, the action rule defines a lookup command on the IAS system.
The action description ‘Sample - ipconfig command on IAS’ is the text of the menu option that displays on the dynamic menu in the BMC IX Console.
The name of the action task, sample_runtask_task, is contained in the list of arguments of admin_execute (). This action rule calls a corresponding RunTask definition. See “Example: RunTask action for IAS system” on page 246.
NOTE Refer to the BMC Impact Solutions Knowledge Base Development Reference Guide for information on rule language. See especially Appendix B, Master Rule Language (MRL) Reference, for more information about the admin_execute command.
action 'Sample - ipconfig command on IAS':{['Service Administrators','Full Access']}:EVENT($EV) where [$EV.msg contains 'sample ipconfig command']{action_requestor($UID,$PWD);#First argument to determine if to be searched in Credential Repository. Valid values are true/falseadmin_execute(ias_Admin,$UID,$PWD,$EV,sample_runtask_task,["true"],YES);}END
242 BMC Impact Solutions Event Management Guide

Manual configuration of interactive remote execution
Example: action rule for remote system
The next example shows the same action rule, but it is to be executed on a remote system, not on the IAS system.
The action description ‘Sample - ipconfig command on remote host’ is the text of the menu option that displays on the dynamic menu in the BMC IX Console. The name of the action task, sample_runremotetask_task, is contained in the list of arguments of admin_execute (). This action rule calls a corresponding RunRemoteTask definition. See “Example: RunRemoteTask action for remote system” on page 248.
Associating actions with groups
When defining the action rule, you have the option of associating the action names with a specified group name. Both the group name and the associated action names will display on the dynamic menu.
To define a group and associate it with an action, simply define the group name before the action description as in the following example:
In the dynamic menu, you would choose the group (Sample) and then select the corresponding action (Sample – ipconfig command on remote host).
Differences in rules between IAS system and remote system execution
The chief differences between the rules for running the action on the IAS system and on a remote system are
■ the names of the menu options and the action tasks■ the associated event messages■ the additional argument for the underlying ipconfig command (“all”) of the
sample_runremotetask_task action
action 'Sample - ipconfig command on remote host':{['Service Administrators','Full Access']}:EVENT($EV) where [$EV.msg contains 'sample remote ipconfig command']{action_requestor($UID,$PWD);admin_execute(ias_Admin,$UID,$PWD,$EV,sample_runremotetask_task,["true","all"],YES);}END
action ‘Sample’.’Sample - ipconfig command on remote host’:
Chapter 9 Remote execution 243

Manual configuration of interactive remote execution
Similarities in rules for IAS system and remote system execution
Both action rule examples specify the groups Full Access and Service Administrator, indicating that only users assigned to these specified groups can execute this action. If you do not specify a group, then members of any group can perform the action. Your IAS user account should be assigned to the groups specified in the action rule.
In both action rule examples, the admin_execute primitive is calling the default Admin record in the mcell.dir file:
In its input arguments, the admin_execute primitive is calling the Name argument ias_Admin to link the record with the rule. Because this is an interactive execution, it ignores the Encryption Key value. Instead, the action rule uses the action_requestor primitive to retrieve the login credentials of the user account for the BMC IX session:
In interactive execution, any IAS user account that is logged into the BMC IX session and that belongs to the designated group and role can exercise the action.
The admin_execute command for the interactive action contains seven input arguments that tell IAS how to process the action. The arguments are listed below in Table 48 on page 244:
<Type> <Name> <EncryptionKey> IpAddress:Port>admin ias_Admin 0 localhost.domain:3084
action_requestor($UID,$PWD);
Table 48 Input arguments: admin_execute (part 1 of 2)
Argument Description
Name the name of the IAS instance as specified in the Admin record of the cell’s mcell.dir
Example: ias_Admin
User IAS user account
Example: $UID (a pointer to the user ID)
Passwd IAS user account password
Example: $PWD (a pointer to the password)
Object object handle of the target event or data object
Example: $EV
Action name of the action task
Example: sample_runtask_task
244 BMC Impact Solutions Event Management Guide
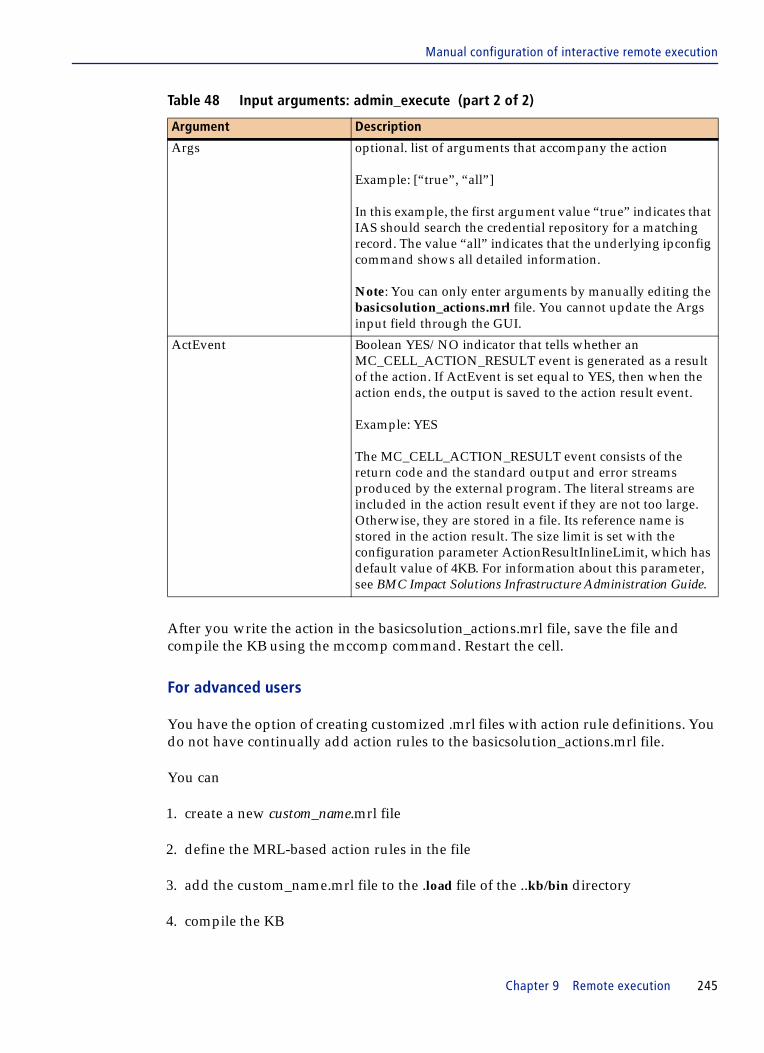
Manual configuration of interactive remote execution
After you write the action in the basicsolution_actions.mrl file, save the file and compile the KB using the mccomp command. Restart the cell.
For advanced users
You have the option of creating customized .mrl files with action rule definitions. You do not have continually add action rules to the basicsolution_actions.mrl file.
You can
1. create a new custom_name.mrl file
2. define the MRL-based action rules in the file
3. add the custom_name.mrl file to the .load file of the ..kb/bin directory
4. compile the KB
Args optional. list of arguments that accompany the action
Example: [“true”, “all”]
In this example, the first argument value “true” indicates that IAS should search the credential repository for a matching record. The value “all” indicates that the underlying ipconfig command shows all detailed information.
Note: You can only enter arguments by manually editing the basicsolution_actions.mrl file. You cannot update the Args input field through the GUI.
ActEvent Boolean YES/NO indicator that tells whether an MC_CELL_ACTION_RESULT event is generated as a result of the action. If ActEvent is set equal to YES, then when the action ends, the output is saved to the action result event.
Example: YES
The MC_CELL_ACTION_RESULT event consists of the return code and the standard output and error streams produced by the external program. The literal streams are included in the action result event if they are not too large. Otherwise, they are stored in a file. Its reference name is stored in the action result. The size limit is set with the configuration parameter ActionResultInlineLimit, which has default value of 4KB. For information about this parameter, see BMC Impact Solutions Infrastructure Administration Guide.
Table 48 Input arguments: admin_execute (part 2 of 2)
Argument Description
Chapter 9 Remote execution 245

Manual configuration of interactive remote execution
5. restart the cell
Defining the action task for the IAS or remote system
Similar to writing action rules, you can define action tasks that launch actions on the system where IAS resides or on remote systems.
To write the corresponding action task, open the IMPACT_SOLUTIONS_HOME/server/data/admin/actions/UserDefinedActions.xml file in a text editor.
Example: RunTask action for IAS system
A sample RunTask action for the action rule sample_runtask_task to be executed on the IAS system is shown below:
The task id “sample_runtask_task” is the same value that the corresponding action rule’s admin_execute primitive calls in its Action parameter:
TIP Keep in mind that there are different variants of the admin_execute command. They are distinguished by the number of input arguments they take.
For interactive remote execution, we use a version of admin_execute that holds seven input arguments.
For automatic remote execution, we use a version admin_execute that holds five input arguments, omitting the IAS user account and password, because it retrieves it from the Admin record, not the login session.
WARNING The Impact Administration Server reads all the XML files from the IMPACT_SOLUTIONS_HOME/server/data/admin/actions directory. To prevent data conflicts, do not keep a backup action task XML file or any unwanted XML file in this directory.
<!--RunTask sample--><task name="task.RunTask" id="sample_runtask_task"><input><param name="os">windows</param><param name="cmd"><![CDATA[cmd /C ipconfig]]></param></input></task>
admin_execute(ias_Admin,$UID,$PWD,$EV,sample_runtask_task,["true"],YES);
246 BMC Impact Solutions Event Management Guide

Manual configuration of interactive remote execution
Refer back to “Example: action rule for IAS” on page 242 for the action rule definition that is linked to this action task.
The RunTask uses the following command string to execute the action on the IAS system:
The parameters describing the action task are listed below in Table 49:
<param name="cmd"><![CDATA[cmd /C ipconfig]]></param>
Table 49 Parameters: action task
Parameter Description
name required. Identifies the type of task. Valid values are RunRemoteTask and RunTask.
A RunRemoteTask is executed on a remote system, not the IAS system. For example, the tasks defined in the IMPACT_SOLUTIONS_HOME/server/data/admin/actions/ImpactManager.xml file are the default RunRemoteTasks.
A RunTask is executed on the IAS system.
The authentication protocols of each task type may be different.
id required. The name of the task as defined in the admin_execute action rule. The id value links the task with the rule.
os required. Specifies the operating system of the remote host where the designated action task (the id value) is to be executed. Valid values are windows, SOLARIS, LINUX, AIX, HPUX, and all.
If you specify all, you indicate that the same action is to be executed on different operating systems. The all selection uses the SSH protocol by default.
To change communication protocol, edit the all.execute.command parameter of the ../conf/resources/centraladmin-strings.properties file.
cmd specifies the command that executes the action. You can include parameters within curly brace { } delimiters.
Note: You can only add references to arguments (entries in the Args input field of the corresponding basicsolution_actions.mrl file) by manually editing the UserDefinedActions.xml file. You cannot add variables such as $[2], $[3], and so forth through the GUI.
Chapter 9 Remote execution 247
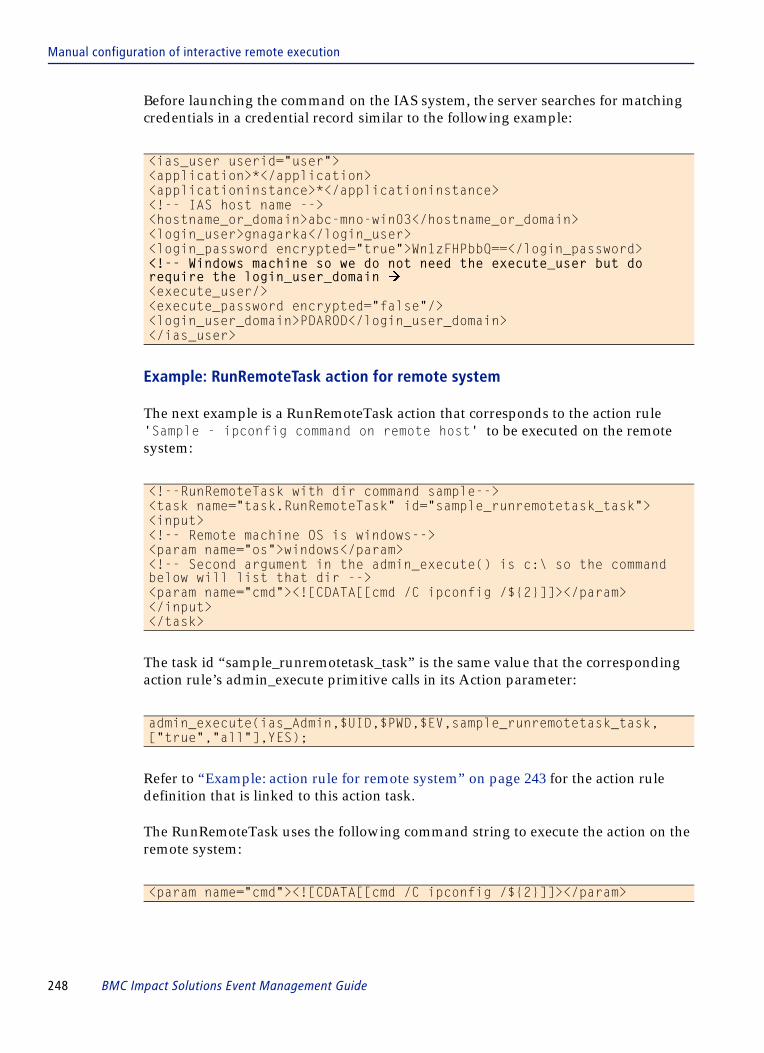
Manual configuration of interactive remote execution
Before launching the command on the IAS system, the server searches for matching credentials in a credential record similar to the following example:
Example: RunRemoteTask action for remote system
The next example is a RunRemoteTask action that corresponds to the action rule 'Sample - ipconfig command on remote host' to be executed on the remote system:
The task id “sample_runremotetask_task” is the same value that the corresponding action rule’s admin_execute primitive calls in its Action parameter:
Refer to “Example: action rule for remote system” on page 243 for the action rule definition that is linked to this action task.
The RunRemoteTask uses the following command string to execute the action on the remote system:
<ias_user userid="user"><application>*</application><applicationinstance>*</applicationinstance><!-- IAS host name --><hostname_or_domain>abc-mno-win03</hostname_or_domain><login_user>gnagarka</login_user><login_password encrypted="true">Wn1zFHPbbQ==</login_password><!-- Windows machine so we do not need the execute_user but do require the login_user_domain �<execute_user/><execute_password encrypted="false"/><login_user_domain>PDAROD</login_user_domain></ias_user>
<!--RunRemoteTask with dir command sample--><task name="task.RunRemoteTask" id="sample_runremotetask_task"><input><!-- Remote machine OS is windows--><param name="os">windows</param><!-- Second argument in the admin_execute() is c:\ so the command below will list that dir --><param name="cmd"><![CDATA[[cmd /C ipconfig /${2}]]></param></input></task>
admin_execute(ias_Admin,$UID,$PWD,$EV,sample_runremotetask_task,["true","all"],YES);
<param name="cmd"><![CDATA[[cmd /C ipconfig /${2}]]></param>
248 BMC Impact Solutions Event Management Guide
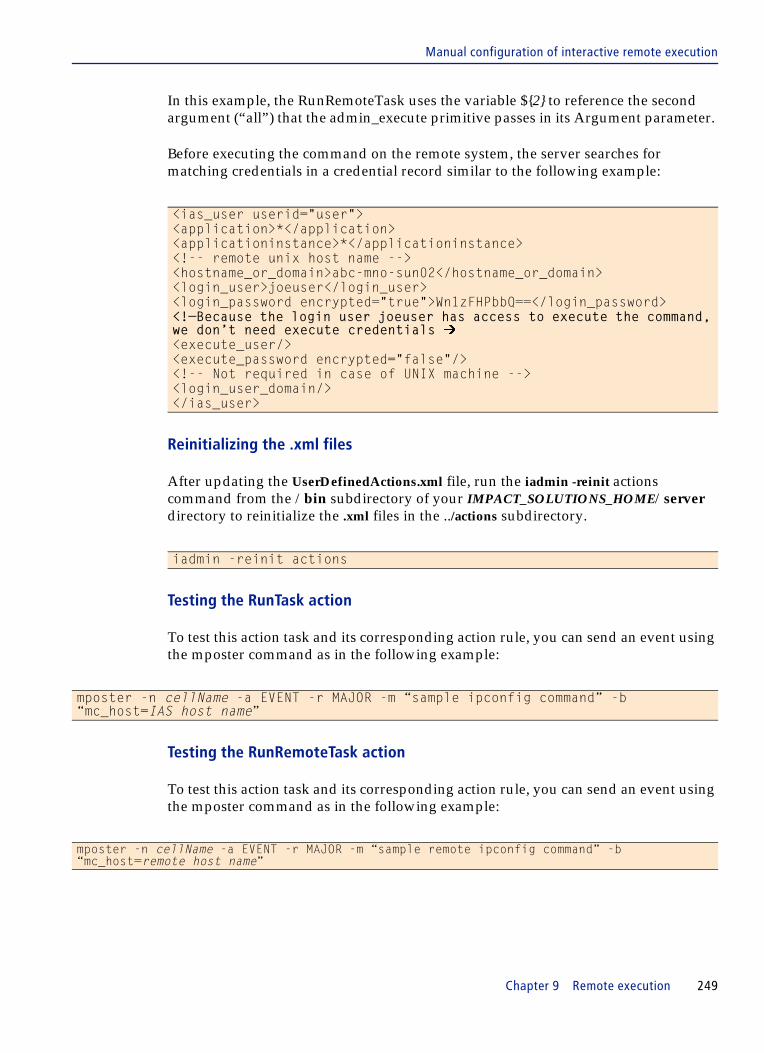
Manual configuration of interactive remote execution
In this example, the RunRemoteTask uses the variable ${2} to reference the second argument (“all”) that the admin_execute primitive passes in its Argument parameter.
Before executing the command on the remote system, the server searches for matching credentials in a credential record similar to the following example:
Reinitializing the .xml files
After updating the UserDefinedActions.xml file, run the iadmin -reinit actions command from the /bin subdirectory of your IMPACT_SOLUTIONS_HOME/server directory to reinitialize the .xml files in the ../actions subdirectory.
Testing the RunTask action
To test this action task and its corresponding action rule, you can send an event using the mposter command as in the following example:
Testing the RunRemoteTask action
To test this action task and its corresponding action rule, you can send an event using the mposter command as in the following example:
<ias_user userid="user"><application>*</application><applicationinstance>*</applicationinstance><!-- remote unix host name --><hostname_or_domain>abc-mno-sun02</hostname_or_domain><login_user>joeuser</login_user><login_password encrypted="true">Wn1zFHPbbQ==</login_password><!—Because the login user joeuser has access to execute the command, we don’t need execute credentials �<execute_user/><execute_password encrypted="false"/><!-- Not required in case of UNIX machine --><login_user_domain/></ias_user>
iadmin -reinit actions
mposter -n cellName -a EVENT -r MAJOR -m “sample ipconfig command” -b “mc_host=IAS host name”
mposter -n cellName -a EVENT -r MAJOR -m “sample remote ipconfig command” -b “mc_host=remote host name”
Chapter 9 Remote execution 249

Manual configuration of interactive remote execution
For advanced users
You can create a unique XML file to define your action tasks. You do not have to continually add action tasks to the UserDefinedActions.xml. In the IMPACT_SOLUTIONS_HOME/server/data/admin/actions subdirectory, create an XML file with a unique node (root element).
Each unique XML file must have its unique value for the root name attribute. For example, the UserDefinedActions.xml file contains this root name definition:
When you create a unique XML file for your action tasks, specify a unique value for its root name:
After you define the root name value and add the action tasks, run the iadmin -reinit actions command to load the custom file to IAS.
Launching the action
1 In the BMC IX Console Events View, select an event in the event list, right-click to open the pop-up menu, and choose Actions=>Remote Actions to display a list of available actions.
If the user’s role corresponds to the role assigned to the action rule, then the remote action item should be displayed.
2 Click the remote action item in the menu.
Result
The action rule, using the action_requestor primitive, obtains the credentials of the logged-in IAS user. The action rule triggers the action task, which causes the IAS server to search the credential record for a match with the login information to connect to the remote host. The action task initiates the command on the remote system.
You can choose Actions => Get Remote Results to view results and logging information. If successful, the MC_CELL_ACTION_RESULT event contains an Exit code of 0 and the command output in its output_val slot. If unsuccessful, the MC_CELL_ACTION_RESULT event contains a specific Exit code and error output in the error_val slot.
<root name="UserDefinedActions">
<root name="myCustomDefinedActions">
250 BMC Impact Solutions Event Management Guide

Manual configuration of automatic remote execution
Manual configuration of automatic remote execution
When you manually configure automatic remote execution, you edit the action rule and action task in the respective files. You define the remote execution policy through the Remote Action Policy definition window (see “Remote execution policy” on page 214).
Defining the action rule (manual)
In automatic remote execution, the action on the event is performed upon receipt of the event without user intervention. To enable automatic execution, the action rule must supply a standard set of IAS user name and password credentials. The action rule gathers the IAS user name and password from the Encryption Key value of the Admin record:
For an automatic remote execution, the action rule’s admin_execute primitive calls the IAS user name and password through its Name argument, which specifies the IAS instance name of the Admin record—ias_Admin in this example:
For automatic remote execution, the admin_execute has only five input arguments. It does not call the user name and password arguments because it uses the credentials supplied by the Admin record. Also, the action rule does not need to call IX login credentials, so the action_requestor primitive is omitted:
In this example, the event slot $E.mc_origin_key holds the name of the MS Windows cell to be terminated.
<Type> <Name> <EncryptionKey> IpAddress:Port>
admin ias_Admin ixs_internal_admin/IAS$Admin$ localhost.domain:3084
admin_execute(Admin,$EV,Task_stopWinCell,[$E.mc_origin_key],YES)
action 'stop_cell_on_windows' : EVENT($E){admin_execute(Admin,$EV,Task_stopWinCell,[$E.mc_origin_key],YES);
}END
Chapter 9 Remote execution 251

Properties files
Defining the action task (manual)
The action task is defined the same for both interactive and automatic execution:
The action task uses the variable ${1} to reference the first argument that the admin_execute primitive passes in its Argument parameter. In this example, the admin_execute primitive passes the value of the $E.mc_origin_key slot. This value is the target cell for the mkill command to stop in the command string of the action task.
Properties filesWhen defining remote execution tasks, you may need to configure values in the following properties files that reside on IAS:
■ ..\conf\ias.properties
■ ..\conf\resources\centraladmin-strings.properties
■ ..\conf\resources\remoteexecution.properties
After editing any of the .properties file, restart the IAS.
ias.properties
The ias.properties file specifies the event slot names, key name values, and other configuration items of remote execution under the stanza Properties for remote execution.
<task name="task.RunRemoteTask" id="Task_stopWinCell" ><input>
<param name="os">windows</param><param name="cmd"><![CDATA["D:\Progra~1\BMCSOF~1\Impact\server\
bin\mkill" -v -n ${1}]]></param></input>
</task>
Table 50 Remote execution properties in ias.properties (part 1 of 2)
Property name Description
com.bmc.sms.ixs.remoteexecution.hostname_slot
specifies the event slot name that contains the host name value. The default is mc_host.
com.bmc.sms.ixs.remoteexecution.instance_slot
specifies the event slot name that contains the instance. The default is mc_object.
252 BMC Impact Solutions Event Management Guide

centraladmin-strings.properties
centraladmin-strings.properties
The centraladmin-strings.properties file defines the default communication protocols for the different operating systems. Use caution when editing this file to change the default protocols. Refer to the file comments for editing guidelines.
remoteexecution.properties
The remoteexecution.properties file defines the timeout values and default ports for the SSH, FTP, SCP, and Telnet protocols. Refer to Table 51 on page 253.
com.bmc.sms.ixs.remoteexecution.application_slot
specifies the event slot name that contains the application. The default is mc_object_class.
com.bmc.sms.ixs.remoteexecution.domain_slot
specifies the event slot name that contains the domain value. The default value is mc_location.
com.bmc.sms.ixs.remoteexecution.ias_user_key
specifies the key name that contains the name of the user. The default value is ias_user. Not yet implemented
com.bmc.sms.ixs.remoteexecution.ias_user_password_key
specifies the key name that contains the password. The default value is ias_user_password. Not yet implemented
com.bmc.sms.ixs.remoteexecution.action_context_key
specifies the root element in the action.xml file. You enter the root element in the Action Name field of the Create Remote Actions dialog box. The default value is 2.
com.bmc.sms.ixs.remoteexecution.search_credential_repository_key
indicates the argument number (1, 2, 3, and so forth) or slot name
com.bmc.sms.ixs.remoteexecution.search_in_credentialrepository
If the client does not send the key, then this parameter determines whether to search in the credential repository. Valid values are true and false.
com.bmc.sms.ixs.dataparser.allowHostVerification
Boolean true/false indicator that tells whether host verification is done when you add a record to the credential_repository.xml file. The default value is set equal to true, meaning that host verification is required.
Table 51 Remote execution port and timeout properties (part 1 of 2)
Parameter Description
ssh_port port number for SSH network protocol. The default port number is 22.
telnet_port port number for Telnet network protocol. The default port number is 23.
Table 50 Remote execution properties in ias.properties (part 2 of 2)
Property name Description
Chapter 9 Remote execution 253
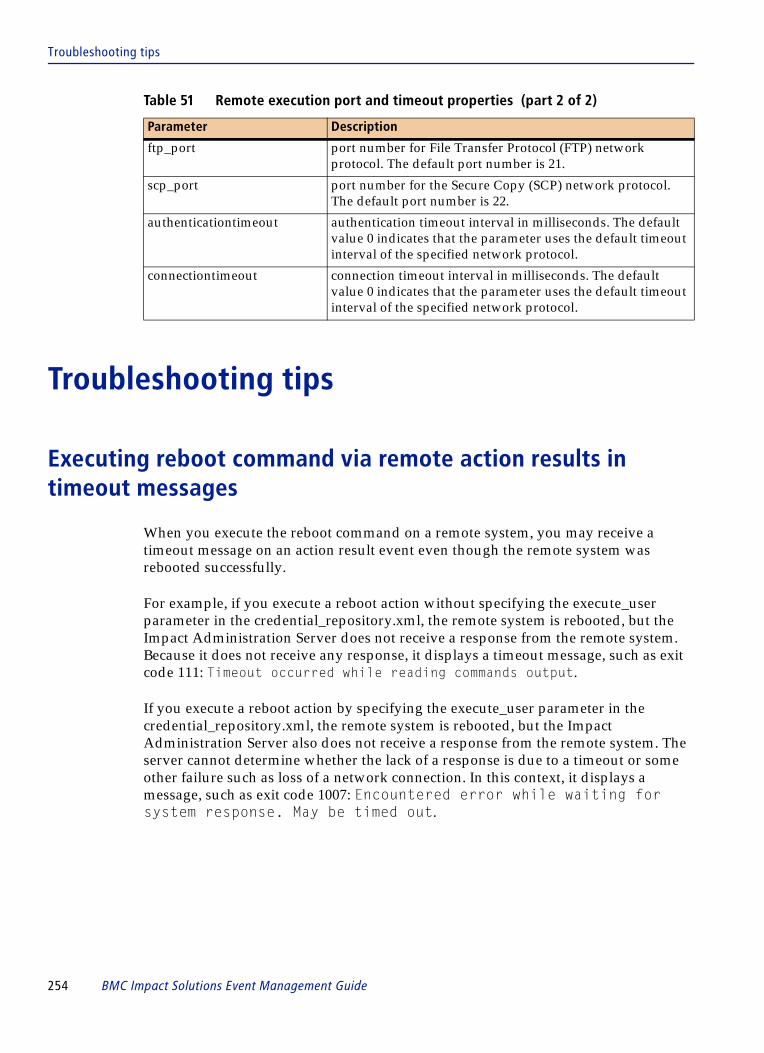
Troubleshooting tips
Troubleshooting tips
Executing reboot command via remote action results in timeout messages
When you execute the reboot command on a remote system, you may receive a timeout message on an action result event even though the remote system was rebooted successfully.
For example, if you execute a reboot action without specifying the execute_user parameter in the credential_repository.xml, the remote system is rebooted, but the Impact Administration Server does not receive a response from the remote system. Because it does not receive any response, it displays a timeout message, such as exit code 111: Timeout occurred while reading commands output.
If you execute a reboot action by specifying the execute_user parameter in the credential_repository.xml, the remote system is rebooted, but the Impact Administration Server also does not receive a response from the remote system. The server cannot determine whether the lack of a response is due to a timeout or some other failure such as loss of a network connection. In this context, it displays a message, such as exit code 1007: Encountered error while waiting for system response. May be timed out.
ftp_port port number for File Transfer Protocol (FTP) network protocol. The default port number is 21.
scp_port port number for the Secure Copy (SCP) network protocol. The default port number is 22.
authenticationtimeout authentication timeout interval in milliseconds. The default value 0 indicates that the parameter uses the default timeout interval of the specified network protocol.
connectiontimeout connection timeout interval in milliseconds. The default value 0 indicates that the parameter uses the default timeout interval of the specified network protocol.
Table 51 Remote execution port and timeout properties (part 2 of 2)
Parameter Description
254 BMC Impact Solutions Event Management Guide

A script is deployed on a remote UNIX system but does not execute
A script is deployed on a remote UNIX system but does not execute
When the BMC Impact Administration Server resides on a Windows system and you want to deploy and execute a script on a remote UNIX system, you will encounter permission problems.
After you select one of the UNIX scripts from IMPACT_SOLUTIONS_HOME/server/data/admin/scripts directory, you can deploy it on the specified remote UNIX system. However, the RunRemoteTask action fails when it tries to execute the script if the script does not have the execute permission.
To successfully execute the script, you must add the execute permissions to the command string using the chmod command.
The resultant XML action file under IMPACT_SOLUTIONS_HOME/server/data/admin/actions would have a command string similar to the following example:
PsExec is not supported on 64-bit Windows 2008 Server systems
To implement remote execution on 64-bit Windows 2008 Server systems, use the Open SSH protocol.
<param name="cmd"><![CDATA["chmod 755 /opt/unix.sh; /opt/unix.sh"]]></param>
Chapter 9 Remote execution 255

Issues in high availability environments
Issues in high availability environments
When remote execution is implemented in high availability environments where there are primary and secondary cell servers, you can encounter issues under these two scenarios:
1. A remote action is defined and executed on the target cell server during a failover from one cell server to another when the switch from one server to the other occurs before the BMC Impact Administration Server completely executes the action. In this case, the result of the remote action execution is not available on the corresponding primary or secondary server to which the switch is made.
2. The action that you define in the Create Remote Actions dialog applies only to the cell server specified in the dialog. The action definition is not automatically duplicated on the corresponding primary or secondary server of the high availability pair. You must manually add the action definition parameters to the kb of the other cell server.
To duplicate the action definition in a high availability environment
1 In a text editor, open the MCELL_HOME/etc/cellName/kb/bin/basicsolution_actions.mrl file of the cell server specified in the Create Remote Actions dialog.
2 Copy the action definition parameters that you created through the Create Remote Actions from the basicsolution_actions.mrl file.
3 Open the MCELL_HOME/etc/cellName/kb/bin/basicsolution_actions.mrl file of the other cell server in the high availability pair, and paste the action definition at the bottom of the file.
4 Close and save the file.
5 Recompile the cell’s KB using the mccomp -n cellName command.
6 Restart the cell.
Excluded character in action group name
When creating an action group name (refer to “Associating actions with groups” on page 243 or Table 43 on page 226), do not use the dot (.) character as part of the name. The reason why is that the dot (.) character acts as the separator between the group name and the action name.
256 BMC Impact Solutions Event Management Guide

C h a p t e r 10
10 Event management policiesThis chapter describes the components of event management policies and explains how to implement them. It contains the following topics:
Event management policy types . . . . . . . . . . . . . . . . . . . . . . . . . . . . . . . . . . . . . . . . . . . 258Out-of-the-box event management policies . . . . . . . . . . . . . . . . . . . . . . . . . . . . . . . . . . 260How event management policies work . . . . . . . . . . . . . . . . . . . . . . . . . . . . . . . . . . . . . 262
Event management policy workflow overview . . . . . . . . . . . . . . . . . . . . . . . . . . . 262Event selectors . . . . . . . . . . . . . . . . . . . . . . . . . . . . . . . . . . . . . . . . . . . . . . . . . . . . . . . 263Event selector groups . . . . . . . . . . . . . . . . . . . . . . . . . . . . . . . . . . . . . . . . . . . . . . . . . 263Event selection criteria . . . . . . . . . . . . . . . . . . . . . . . . . . . . . . . . . . . . . . . . . . . . . . . . 264Timeframes . . . . . . . . . . . . . . . . . . . . . . . . . . . . . . . . . . . . . . . . . . . . . . . . . . . . . . . . . . 265Evaluation order of event policy types . . . . . . . . . . . . . . . . . . . . . . . . . . . . . . . . . . 266External enrichment data sources . . . . . . . . . . . . . . . . . . . . . . . . . . . . . . . . . . . . . . . 267
How dynamic data enrichment event management policies work . . . . . . . . . . . . . . 267How to create a new local timeframe . . . . . . . . . . . . . . . . . . . . . . . . . . . . . . . . . . . . . . . 270How to add a notification service (notification policies only). . . . . . . . . . . . . . . . . . . 272How to create and edit a dynamic data enrichment source file . . . . . . . . . . . . . . . . . 274
Using the sample PATROL messaging text translation dynamic data enrichment source file . . . . . . . . . . . . . . . . . . . . . . . . . . . . . . . . . . . . . . . . . . . . . . . . . . . . . . . . . 276
How to create an event selector and specify event selection criteria . . . . . . . . . . . . . 278Creating new standard event management policies. . . . . . . . . . . . . . . . . . . . . . . . . . . 282
Creating a new standard blackout policy . . . . . . . . . . . . . . . . . . . . . . . . . . . . . . . . 283Creating a new component based enrichment policy . . . . . . . . . . . . . . . . . . . . . . 285Creating a new closure policy . . . . . . . . . . . . . . . . . . . . . . . . . . . . . . . . . . . . . . . . . . 290Creating a new correlation policy . . . . . . . . . . . . . . . . . . . . . . . . . . . . . . . . . . . . . . . 292Creating a new enrichment policy . . . . . . . . . . . . . . . . . . . . . . . . . . . . . . . . . . . . . . 296Creating a new escalation policy. . . . . . . . . . . . . . . . . . . . . . . . . . . . . . . . . . . . . . . . 299Creating a new notification policy . . . . . . . . . . . . . . . . . . . . . . . . . . . . . . . . . . . . . . 304Creating a new propagation policy . . . . . . . . . . . . . . . . . . . . . . . . . . . . . . . . . . . . . 308Creating a new recurrence policy . . . . . . . . . . . . . . . . . . . . . . . . . . . . . . . . . . . . . . . 310Creating a new remote action policy . . . . . . . . . . . . . . . . . . . . . . . . . . . . . . . . . . . . 313Creating a new suppression policy. . . . . . . . . . . . . . . . . . . . . . . . . . . . . . . . . . . . . . 313Creating a new threshold policy . . . . . . . . . . . . . . . . . . . . . . . . . . . . . . . . . . . . . . . . 316Creating a new timeout policy . . . . . . . . . . . . . . . . . . . . . . . . . . . . . . . . . . . . . . . . . 319
Enabling and disabling out-of-the-box standard event management policies . . . . . 322Creating a new dynamic data enrichment event management policy. . . . . . . . . . . . 324
Chapter 10 Event management policies 257

Event management policy types
Enabling out-of-the-box dynamic data enrichment event management policies . . . 334Enabling a dynamic data enrichment blackout policy . . . . . . . . . . . . . . . . . . . . . . 335Enabling a dynamic data enrichment location policy . . . . . . . . . . . . . . . . . . . . . . 338Enabling a dynamic data enrichment service contact policy . . . . . . . . . . . . . . . . 342Enabling a dynamic enrichment PATROL message text translation policy . . . . 346
Importing dynamic data enrichment source . . . . . . . . . . . . . . . . . . . . . . . . . . . . . . . . . 350Verifying that the policy is running. . . . . . . . . . . . . . . . . . . . . . . . . . . . . . . . . . . . . . . . . 351Editing event selection criteria . . . . . . . . . . . . . . . . . . . . . . . . . . . . . . . . . . . . . . . . . . . . . 351Deleting an event selector . . . . . . . . . . . . . . . . . . . . . . . . . . . . . . . . . . . . . . . . . . . . . . . . . 352Trouble-shooting event management policies . . . . . . . . . . . . . . . . . . . . . . . . . . . . . . . . 352
Problem: The policy is not running . . . . . . . . . . . . . . . . . . . . . . . . . . . . . . . . . . . . . . 352Problem: The notification policy is configured to generate a notification email,
but no email is being sent. . . . . . . . . . . . . . . . . . . . . . . . . . . . . . . . . . . . . . . . . . . . 353Problem: I receive an invalid data error when running a dynamic data
enrichment policy . . . . . . . . . . . . . . . . . . . . . . . . . . . . . . . . . . . . . . . . . . . . . . . . . . 353Problem: I receive an error message when running a dynamic data enrichment
blackout policy. . . . . . . . . . . . . . . . . . . . . . . . . . . . . . . . . . . . . . . . . . . . . . . . . . . . . 354Problem: I have several thousand data records displayed in the Dynamic Data
Editor tab . . . . . . . . . . . . . . . . . . . . . . . . . . . . . . . . . . . . . . . . . . . . . . . . . . . . . . . . . 355Trouble-shooting tools for dynamic data enrichment policies . . . . . . . . . . . . . . . 355
Event management policy typesEvent management policy types provide a base policy definition that allows you to quickly create certain types of policies. Policy types allow you to quickly set up routine event management processes.
Table 52 on page 258 describes the standard event management policy types.
Table 52 Standard event management policy types (part 1 of 2)
Policy name Definition
Blackout specifies which events the receiving cell should classify as unimportant and process no further but log for reporting purposes
A blackout event management policy might specify that the cell ignore events generated from a successful logon to an internal system.
Closure closes a specified event in response to receipt of a separate event
Component Based Enrichment
enriches the definition of an event associated with a component by assigning selected component slot definitions to the event slots
Correlation relates one or more cause events to an effect event, and can close the effect event
The cell maintains the association between these cause-and-effect events.
258 BMC Impact Solutions Event Management Guide

Event management policy types
It is also possible to define custom policy types that allow you to do specialized event processing not supported by the out-of-the-box policy types.
Enrichment adds values for specific event slots if those slots are empty as received from the event source
An enrichment event management policy can also reformat slots or normalize slot values.
Escalation raises or lowers the priority level of an event after a specified period of time
A specified number of event recurrences can also trigger escalation of an event. For example, if the abnormally high temperature of a storage device goes unchecked for 10 minutes or if a cell receives more than five high-temperature warning events in 25 minutes, an escalation event management policy might increase the priority level of the event to critical.
Notification sends a request to an external service to notify a user or group of users of the event
A notification event management policy might notify a system administrator by means of a pager about the imminent unavailability of mission-critical piece of storage hardware.
Propagation forwards events to other cells or to integrations to other products
Recurrence combines duplicate events into one event that maintains a counter of the number of duplicates
Remote action automatically calls a specified action rule provided the incoming event satisfies the remote execution policy’s event criteria
See also Chapter 9, “Remote execution,” for more information.
Suppression specifies which events that the receiving cell should delete
Unlike a blackout event management policy, the suppression event management policy maintains no record of the deleted event.
Threshold specifies a minimum number of duplicate events that must occur within a specific period of time before the cell accepts the event
For events allowed to pass through to the cell, the event severity can be escalated or de-escalated a relative number of levels or set to a specific level. If the event occurrence rate falls below a specified level, the cell can take action against the event, such as changing the event to closed or acknowledged status.
Timeout changes an event status to closed after a specified period of time elapses
Table 52 Standard event management policy types (part 2 of 2)
Policy name Definition
Chapter 10 Event management policies 259

Out-of-the-box event management policies
For more information about creating user-defined policy types, see Chapter 12, “User-defined policies”.
Out-of-the-box event management policiesSeveral event management policies are included with the product that enable you to interactively set up routine event processing quickly. Standard event management policies that are provided out-of-the-box include:
■ PATROL_Portal_Closure■ Apache_Login_Failed_Repeats■ Blackout_Suppression■ Adapter_Start_Stop_Closure■ Client_Stop_Closes_Start■ Sample_Component_Based_Enrichment_Policy■ Sample_Intelligent_Incident_Service_Policy■ Event_Reporting_Propagation■ Event_Propagation_To_Remedy_Help_Desk
Dynamic data enrichment policies that are provided out-of-the-box include:
■ Location_Enrichment■ Service_Contact_Enrichment■ PATROL_Message_Translation■ Dynamic_Blackout
To use these out-of-the-box dynamic data enrichment policies, you must enable the policy, import useful data into the sample .csv files and then import the data into the cell using the policy mechanism. For instructions on creating dynamic data enrichment policies, see “Creating a new dynamic data enrichment event management policy” on page 324.
Table 53 lists the out-of-the-box policies and indicates whether or not each out-of-the-box policy is enabled by default.
Table 53 Out-of-the-box policies (part 1 of 2)
Policy type Policy name Description Enabled?
Closure PATROL_Portal_Closure closes previous Portal events for the same managed object
Yes
Adapter_Start_Stop_Closure closes previous events for the same adapter instance
Yes
Client_Stop_Closes_Start Client Stop events close Client Start events and then close themselves
Yes
260 BMC Impact Solutions Event Management Guide

Out-of-the-box event management policies
For instructions on using these out-of-the-box policies, see “Creating new standard event management policies” on page 282 and “Creating a new dynamic data enrichment event management policy” on page 324.
Component Based Enrichment
Sample_Component_Based_Enrichment_Policy
enriches events by filling selected event slots with the slot values of the component type
No
Dynamic Blackout Dynamic_Blackout suppresses events that meet a specified criteria during a specified time period
No
Dynamic Enrichment Location_Enrichment appends the location of a server to an event
No
Service_Contact_Enrichment appends contact information for a server administrator to an event. For example, contact information may include the name of the administrator for that server and his or her telephone number.
No
PATROL_Message_Translation replaces the text of existing PATROL event messages with messages that can be more easily understood by operators in your enterprise.
No
Intelligent Incident Service
Sample_Intelligent_Incident_Service_Policy
sample policy for creating Intelligent Incidents for Remedy Helpdesk
No
Propagation Event_Propagation_To_Remedy_Help_Desk
propagates events to Remedy Helpdesk No
Recurrence Apache_Login_Failed_Repeats handles repeating Apache Login Failed events
No
Patrol_Portal_DeDup_Policy handles repeating Portal events for the same managed object
Yes
Suppression Blackout_Suppression suppresses Blackout events No
Timeout PATROL_Portal_Timeout times out OK Portal events Yes
NOTE The BMC Impact Integration for PATROL product can detect duplicate events and can correlate events that come from the same origin. The rules for detecting duplicated events are located in the MCELL_HOME/server/etc/cellName/kb/rules/bii4p.mrl file. See the patrol_duplicates and the correlate alarm_and_ra definitions. You can use the new patrol_duplicates rule to delete duplicate events and the correlate alarm_and_ra rule to close a current event after a subsequent event arrives from the same origin.
BMC Impact Integration for PATROL does not provide a policy for these events.
Table 53 Out-of-the-box policies (part 2 of 2)
Policy type Policy name Description Enabled?
Chapter 10 Event management policies 261
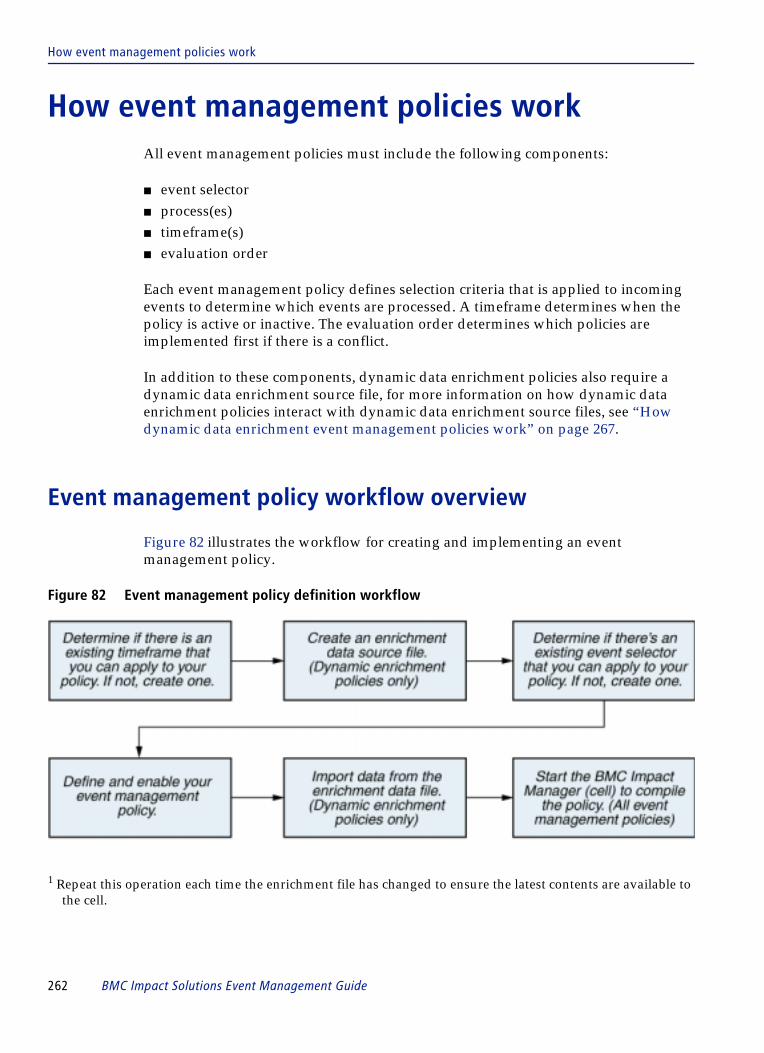
How event management policies work
How event management policies workAll event management policies must include the following components:
■ event selector■ process(es)■ timeframe(s)■ evaluation order
Each event management policy defines selection criteria that is applied to incoming events to determine which events are processed. A timeframe determines when the policy is active or inactive. The evaluation order determines which policies are implemented first if there is a conflict.
In addition to these components, dynamic data enrichment policies also require a dynamic data enrichment source file, for more information on how dynamic data enrichment policies interact with dynamic data enrichment source files, see “How dynamic data enrichment event management policies work” on page 267.
Event management policy workflow overview
Figure 82 illustrates the workflow for creating and implementing an event management policy.
Figure 82 Event management policy definition workflow
1 Repeat this operation each time the enrichment file has changed to ensure the latest contents are available to the cell.
262 BMC Impact Solutions Event Management Guide

Event selectors
Event selectors
An event selector is the component of an event management policy that selects one or more events to which an event management policy applies. Rather than specifying a particular event to process, as a rule does, a selector specifies a list of event selection criteria (also called an Event Condition Formula (ECF)). When an incoming event meets any of the specified event selection criteria, the cell applies the associated event management policy to the event. See “Event selection criteria” on page 264 for more information.
Table 54 lists the out-of-the-box event selectors.
You can create custom event selectors. For information about creating event selectors, see “How to create an event selector and specify event selection criteria” on page 278.
Event selector groups
An event selector group, created when an event selector is defined, allows you to organize event selectors. For example, you could create event selector groups that classify event selectors by the severity of events. You could create one event selector group for major severity events and one for minor severity events.
Table 54 Out-of-the-box event selectors
Event selector Group Event selector Events selected
Default Adapter_Start_Stop Adapter starting and stopping events
Default Apache_Login_Failed Apache web server login failed events
Default Client Stop client stop events
Default PATROL_Portal_OK_Events OK severity events coming from PATROL Portal
Default PATROL_Portal_Events events coming from PATROL Portal
None All_Events all events
None Blackout_Events all blacked-out events
None PATROL_Events events coming from PATROL agents
NOTE The maximum number of selectors that can display in the BMC IX Administrator view is 2500. The BMC IX Administrator view will display 1024 selectors if you set the query_size parameter in the IMPACT_SOLUTIONS_HOME\server\conf\ix.properties file to less than 100 (< 100) or greater than 2500 (> 2500).
Chapter 10 Event management policies 263

Event selection criteria
Event selector groups appear as folders in the By Selector subtree in the Event Management Policies navigation pane. The names of event selectors which belong to a group are displayed as group.event_selector_name in the selectors lists in the list pane and in the By Event Class subtree. The name also is displayed in a separate field in the Selector Details tab.
Figure 83 shows an event selector group called Default that has the Adapter Start Stop event selector highlighted. Notice that details about the highlighted event selector appear in the Selector list in the right pane of the Administration View.
Figure 83 Event selector group name
Event selectors do not have to belong to a group. Event selectors that do not belong to a group are displayed directly under the By Selector subtree.
Event selection criteria
Event selection criteria tells a cell to which incoming events to apply the associated event policies. By using selection criteria to choose events rather than creating a single event management policy for each event type, event selection criteria perform the event management policy equivalent of dynamic data for rules. One event management policy using event selection criteria that spans a range of event types can be easier to maintain than a separate rule for each of many event types.
The BMC Impact Explorer interface allows you to interactively create syntactically accurate event selection criteria expressions without the need for specific syntax knowledge because the editor verifies that the expression has the correct syntax.
For more information see, “How to create an event selector and specify event selection criteria” on page 278.
event selector group name
264 BMC Impact Solutions Event Management Guide

Timeframes
Timeframes
Timeframes allow you to specify when the event management policy is active. For example, during scheduled database maintenance periods, you might want to activate an event suppression policy for maintenance-related events to reduce unnecessary event accumulation.
For events to be impacted by a timeframe setting, the timeframe must be active for the entire time that is specified in the policy.
Table 55 describes the types of timeframes you can use in an event management policy.
The following timeframe definitions are provided out-of-the-box:
■ Weekdays■ Weekend
EXAMPLE An escalation policy is defined to escalate an event to priority level 1 (escalated one level) after 10 minutes. Events are generated. No event will be escalated for at least 10 minutes. Five minutes after the policy is enabled, the policy is disabled. Even though the policy was active at the beginning of the 10 minute period, no event is impacted by the policy because it is not active at the end of the 10 minutes.
An escalation policy is defined to escalate an event priority after 30 minutes with an active timeframe from 4:00 P.M. to 5:00 P.M. At 4:45 P.M. Events are generated. The active time period expires at 5:00 P.M. Events generated at 4:45 P.M. are not impacted by the policy because the timeframe is not active at 5:15 P.M.
Table 55 Timeframe types and descriptions
Type Icon Description
local timeframe Local timeframes are used for event policies only. They are maintained in the cell and are only visible to a single cell.
You create local timeframes from the Administration View of the BMC Impact Explorer, as described in “How to create a new local timeframe” on page 270.
global timeframe Global timeframes are used for event policies and service model components. They are maintained in the CMDB and are visible to all cells in an environment.
You create global timeframes in the Service Model Editor. For instructions, see the BMC Impact Solutions Service Modeling and Publishing Guide.
Chapter 10 Event management policies 265

Evaluation order of event policy types
Evaluation order of event policy types
BMC Impact Managers evaluate event policies of different types based on the order of the rule phase in which the event management policy executes. The standard rule phases and their associated event policy types are shown in Table 56.
1Unlike other event policies, cells evaluate threshold event policies in two distinct phases—the first phase for the hold threshold and the second phase for the pass through threshold.
Table 56 Evaluation order of event policy types
Evaluation order Rule phase Event policy type
1 refine blackoutenrichmentdynamic blackoutdynamic enrichmenttimeout (initialization)
2 filter NOPASS suppression
3 regulate threshold1
4 threshold threshold1
escalation
5 new closurerecurrence
6 abstract no related event management policy
7 correlate correlation
8 execute timeout (arm)notification
9 propagate propagation
10 delete no related event management policy
11 timer timeout (execute)escalation
WARNING Although event policies of different types are evaluated according to their associated rule phase, event policies of the same type do not have an evaluation order. For example, if event selectors for two event policies of the same type select the same event, the cell evaluates the event according to one event management policy and ignores the other event management policy.
To prevent omission of event management policy evaluation, you must create mutually exclusive event selection criteria for two event policies of the same type. With the exception of dynamic blackout, dynamic enrichment, notification and propagation event policies, two or more policies of the same type should not execute against the same event. In the case of exceptional event policies, the cell evaluates all event policies of those four types, even if their selectors reference the same event.
266 BMC Impact Solutions Event Management Guide
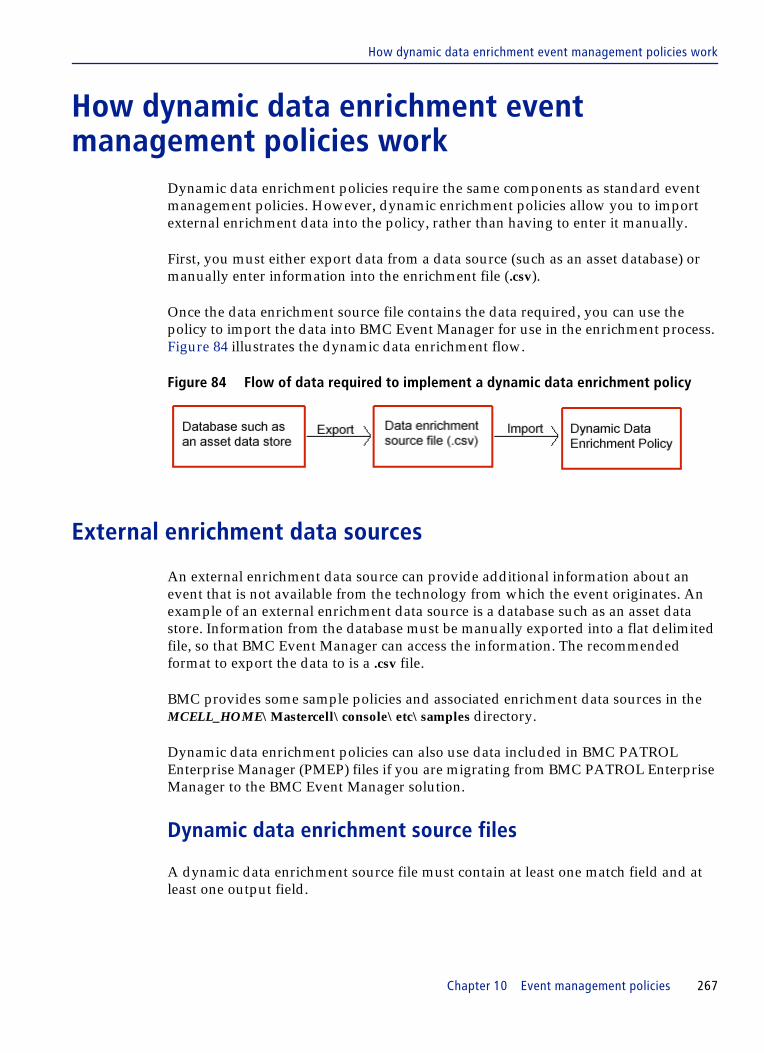
How dynamic data enrichment event management policies work
How dynamic data enrichment event management policies work
Dynamic data enrichment policies require the same components as standard event management policies. However, dynamic enrichment policies allow you to import external enrichment data into the policy, rather than having to enter it manually.
First, you must either export data from a data source (such as an asset database) or manually enter information into the enrichment file (.csv).
Once the data enrichment source file contains the data required, you can use the policy to import the data into BMC Event Manager for use in the enrichment process. Figure 84 illustrates the dynamic data enrichment flow.
Figure 84 Flow of data required to implement a dynamic data enrichment policy
External enrichment data sources
An external enrichment data source can provide additional information about an event that is not available from the technology from which the event originates. An example of an external enrichment data source is a database such as an asset data store. Information from the database must be manually exported into a flat delimited file, so that BMC Event Manager can access the information. The recommended format to export the data to is a .csv file.
BMC provides some sample policies and associated enrichment data sources in the MCELL_HOME\Mastercell\console\etc\samples directory.
Dynamic data enrichment policies can also use data included in BMC PATROL Enterprise Manager (PMEP) files if you are migrating from BMC PATROL Enterprise Manager to the BMC Event Manager solution.
Dynamic data enrichment source files
A dynamic data enrichment source file must contain at least one match field and at least one output field.
Chapter 10 Event management policies 267

External enrichment data sources
A match field is the lookup or key field which the dynamic data enrichment policy uses to identify the incoming event. You may use multiple match fields to identify an incoming event.
An output field identifies the type of enrichment information that is to be added to the event.
Once the policy has matched the event data of the match field(s) with the data in the enrichment file, it will add the associated enrichment data from the enrichment file into the output field identified in the policy.
Wildcards are supported for pattern matching which allows for more generic policy rules to be written.
Sample dynamic data enrichment source files
Table 57 lists the product-supplied dynamic data enrichment source files that are located in the MCELL_HOME\Mastercell\console\etc\samples directory. These sample files provide commonly needed enrichment information.
You can use these files as a guide to create your own dynamic data enrichment source files or you can modify and use these sample files.
WARNING It is critical that the policy definition and the data enrichment source file contain the exact same number of match fields and output fields in the same order. If the match fields and output fields in the enrichment file and the policy do not match, the policy will not run.
For example, if you are using the contact.csv file that is included with the product, you must select the Host Class, Host, Object Class, and Object slots as the Match Fields and the Service and Owner slots as the Output Fields to correspond to the slots in the contact.csv file.
Table 57 Dynamic data enrichment source files (part 1 of 2)
Data source file Policy name Description
location.csv Location_Enrichment appends the location of a server to an event
contact.csv Service_Contact_Enrichment appends contact information for a server administrator to an event. For example, contact information may include the name of the administrator for that server and his or her telephone number.
268 BMC Impact Solutions Event Management Guide

External enrichment data sources
For information on creating and using dynamic data enrichment source files, see “How to create and edit a dynamic data enrichment source file” on page 274.
PMEP files
PMEP files are BMC PATROL Enterprise Manager (PATROL Message Enhancement Processor) enrichment configuration files. In BMC PATROL Enterprise Manager, PMEP provided a similar dynamic data enrichment capability. If you are migrating from BMC PATROL Enterprise Manager to BMC Event Manager (BEM), you can continue to use the PMEP files in the BEM environment.
Depending on your requirements, you can use one or more of the following configuration files shown in Table 58.
TextTranslation.csv PATROL_Message_Translation replaces the text of existing PATROL event messages with messages that can be more easily understood by operators in your enterprise. This file includes predefined message translations that will be immediately useful in your enterprise. For more information, see “Using the sample PATROL messaging text translation dynamic data enrichment source file” on page 276.
blackout.csv Dynamic_Blackout suppresses events that meet a specified criteria during a specified time period.
Table 58 Enrichment configuration files
File Description
Blackout.cfg Provides event suppression for specified time periods when matching criteria are met
Location.cfg Provides a name that identifies the location (or server) from which the PATROL Agent events are being sent to Agent Connection. The name is added to the ObjectLocation field when matching criteria is met
ServiceContact.cfg Provides the Business Service Views or Application Groups to which the events belong. The support staff that are responsible for correcting the problem are identified by an event and any trouble ticket information will be included in an event when matching criteria is met. Service information is added to the Service field; contact information is added to the ObjectStaff field and concatenated into the ObjectLocation field and trouble ticket information is concatenated into the ObjectLocation field
TextTranslation.cfg Provides modifications to text in the FreeText field when matching criteria is met
Table 57 Dynamic data enrichment source files (part 2 of 2)
Data source file Policy name Description
Chapter 10 Event management policies 269

How to create a new local timeframe
In data event policies, your PMEP file selection will populate the event class and match fields with predefined values.
Figure 85 lists the default PMEP event classes and slot values.
Figure 85 Default PMEP event classes and slots
How to create a new local timeframe
Local timeframes allow you to specify periods of time that determine when an event management policy will or will not run. You can set up a single timeframe that can apply to multiple policies.
For example, if you have several policies that you do not want to run on weekends, you can set up a timeframe from 12:00AM to 12:00 AM on both Saturday and Sunday and call that timeframe Weekend. You can then apply the timeframe Weekend to all policies that you do not want to run on weekends.
If you do not specify a timeframe for a policy, the policy will run continuously. For a list of timeframes that are included out-of-the-box, see “Timeframes” on page 265.
# PMEP Text Transaclationpmep.text.eventclass=PATROL_EVpmep.text.match_fields=mc_object_class,mc_parameter,p_classpmep.text.output_fields=msg
# PMEP Service Contactpmep.service.eventclass=EVENTpmep.service.match_fields=mc_host_class,mc_host,mc_object_class,mc_objectpmep.service.output_fields=mc_service,administrator,mc_notes
# PMEP Locationpmep.location.eventclass=EVENTpmep.location.match_fields=mc_hostpmep.location.output_fields=mc_location
# PMEP Blackoutpmep.blackout.eventclass=EVENTpmep.blackout.match_fields=mc_host_class,mc_host,mc_object_class,mc_object,mc_paramemter
NOTE Global timeframes are created in the Service Model Editor. For instructions, see the BMC Impact Solutions Service Modeling and Publishing Guide.
NOTE Timeframes are required for blackout policies.
270 BMC Impact Solutions Event Management Guide

How to create a new local timeframe
To define an event management policy timeframe
1 From the toolbar of the Administration View, click the View/Update Timeframes button .
The Timeframes window is displayed, as shown in Figure 86.
Figure 86 Timeframes
2 From the Timeframes toolbar, click the New Timeframe button.
The Timeframe Edit dialog is displayed.
3 Enter or modify the appropriate information in the fields available in the Timeframe Edit dialog as described in Table 59.
Table 59 Timeframe Edit dialog options (part 1 of 2)
Field Description
Name Name of the timeframe
Description Description of the timeframe
Start, End, and Duration
Period when the timeframe begins and ends, and the duration of the timeframe. Changing the duration will change the value in the End field, and vice-versa.
The individual time zone of cell will be used in timeframe calculations.
Chapter 10 Event management policies 271

How to add a notification service (notification policies only)
4 To create additional timeframes, click Save and repeat this procedure starting with step 2.
5 To close the editor, click Close.
How to add a notification service (notification policies only)
Before you can create or enable a standard notification event management policy (as described in “Creating a new notification policy” on page 304), you must add a notification service. A BASIC_EMAIL notification service that sends an email notification to a specified user or group of users when selected events occur is provided by default.
To add a notification service
1 On the Administration View, choose the Dynamic Data Editor tab.
2 In the Dynamic Data Editor tree, expand the server for which you want to add notification.
3 Expand the Data section, and then expand the Cell Data section.
4 Select Notification Service.
The available notification services are listed in the Notification Service tab in the right pane of the Administration View.
Recurrence pattern Schedules how often the timeframe will recur. Changing the selection in the left side list will change the options available on the right side.
Besides the Daily, Weekly, Monthly, and Yearly timeframe options, you can select individual dates that are part of the timeframe by selecting Date List and choosing dates from the displayed calendar.
Range of recurrence When you have selected a Daily, Weekly, Monthly, or Yearly timeframe option, you can choose the starting and ending date range for the recurrence.
Optionally, instead of choosing an end date, you can enter the number of recurrences for the timeframe.
Table 59 Timeframe Edit dialog options (part 2 of 2)
Field Description
272 BMC Impact Solutions Event Management Guide

How to add a notification service (notification policies only)
5 Click the Add data instance icon .
A New notification service tab is displayed.
6 On the New tab, in the Name field, enter a unique name for the service.
7 In the Type field, choose one of the following notification service types:
■ Command—the notification service is implemented using a command or script■ Gateway—a gateway to an external notification service will be used
8 In the Service field, enter the appropriate information based on the notification service type:
■ Command—enter the command or script used to initiate notification. For example, the script for the default BASIC_EMAIL notification service is mc_sendmail.
■ Gateway—enter the name of the destination gateway. This gateway must be referenced in the directory file of your cell (mcell.dir).
9 [Optional.] In the available_targets field, within the square brackets enter a comma-separated list of predefined users that you want to receive the notification. The list must be known to the notification service. If no predefined list exists, any target string may be entered (such as an email address).
10 Click OK.
NOTE If the notification service will be executed using a script, the script must be located in the kb/bin/platform directory of the cell Knowledge Base.
Chapter 10 Event management policies 273

How to create and edit a dynamic data enrichment source file
How to create and edit a dynamic data enrichment source file
Before you enable a dynamic enrichment policy, you must import or enter the data that you want to use for enrichment into a data file. You can import the enrichment data into any delimited flat file; however, BMC Software recommends importing the data into a .csv file and using Microsoft Excel to view and manipulate the contents of the file. The spreadsheet format of Microsoft Excel makes it easier to view and manipulate the information in the file.
You can use the sample data enrichment files provided with the product as a guide to set up your own data enrichment source files. The sample files are located in the %HOME%\Mastercell\console\etc\samples directory. For a list of sample files provided with the product, see “Sample dynamic data enrichment source files” on page 268.
Before you begin
If you will be referencing a timeframe in your dynamic data enrichment source file, you must ensure that the timeframe that you will be referencing already exists. If the timeframe you want to reference does not exist, you must define it as described in “How to create a new local timeframe” on page 270.
NOTE Dynamic data enrichment source files are not required for standard event management policies. You only need a dynamic data enrichment source file if you are creating a dynamic data enrichment policy.
274 BMC Impact Solutions Event Management Guide
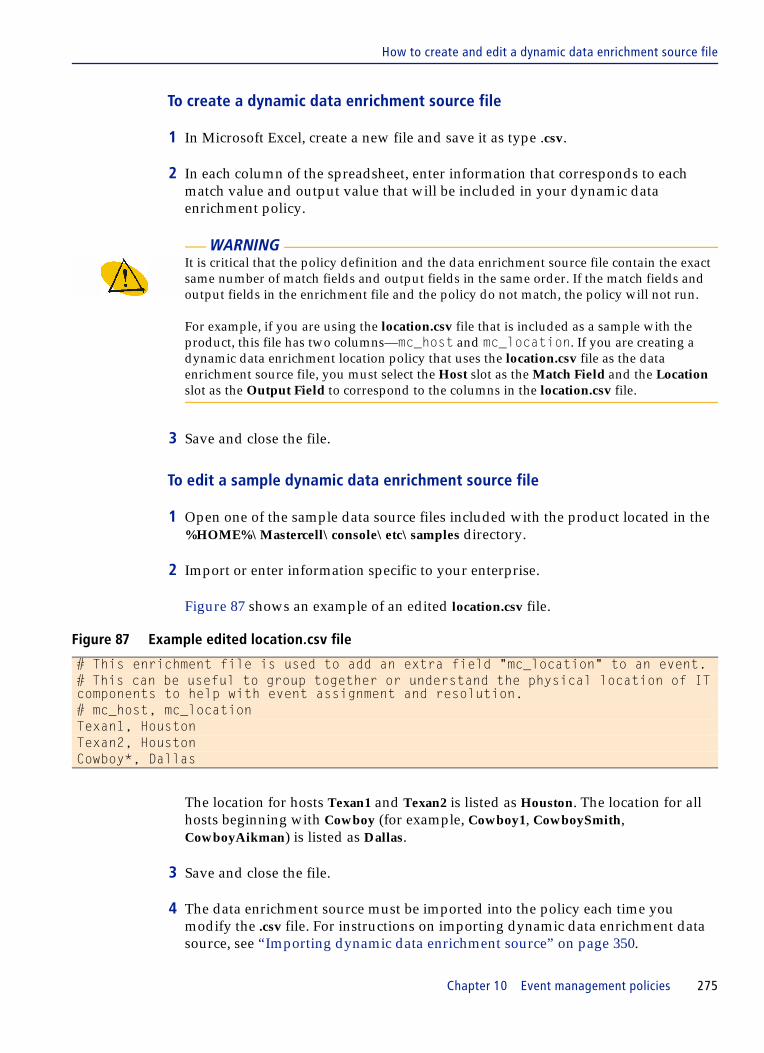
How to create and edit a dynamic data enrichment source file
To create a dynamic data enrichment source file
1 In Microsoft Excel, create a new file and save it as type .csv.
2 In each column of the spreadsheet, enter information that corresponds to each match value and output value that will be included in your dynamic data enrichment policy.
3 Save and close the file.
To edit a sample dynamic data enrichment source file
1 Open one of the sample data source files included with the product located in the %HOME%\Mastercell\console\etc\samples directory.
2 Import or enter information specific to your enterprise.
Figure 87 shows an example of an edited location.csv file.
The location for hosts Texan1 and Texan2 is listed as Houston. The location for all hosts beginning with Cowboy (for example, Cowboy1, CowboySmith, CowboyAikman) is listed as Dallas.
3 Save and close the file.
4 The data enrichment source must be imported into the policy each time you modify the .csv file. For instructions on importing dynamic data enrichment data source, see “Importing dynamic data enrichment source” on page 350.
WARNING It is critical that the policy definition and the data enrichment source file contain the exact same number of match fields and output fields in the same order. If the match fields and output fields in the enrichment file and the policy do not match, the policy will not run.
For example, if you are using the location.csv file that is included as a sample with the product, this file has two columns—mc_host and mc_location. If you are creating a dynamic data enrichment location policy that uses the location.csv file as the data enrichment source file, you must select the Host slot as the Match Field and the Location slot as the Output Field to correspond to the columns in the location.csv file.
Figure 87 Example edited location.csv file
# This enrichment file is used to add an extra field "mc_location" to an event.# This can be useful to group together or understand the physical location of IT components to help with event assignment and resolution.# mc_host, mc_locationTexan1, HoustonTexan2, HoustonCowboy*, Dallas
Chapter 10 Event management policies 275

Using the sample PATROL messaging text translation dynamic data enrichment source file
Using the sample PATROL messaging text translation dynamic data enrichment source file
The sample PATROL messaging text translation data enrichment source file, TextTranslation.csv, provided in the %HOME%\Mastercell\console\etc\samples directory is prepopulated with over two hundred translations for messages from the following Knowledge Modules:
■ BMC SQL-BackTrack NetWorker OBSI Module■ PATROL KM for CONTROL-M■ PATROL KM for UNIX and Linux■ PATROL KM for Microsoft Windows Servers■ PATROL KM for Netware■ PATROL KM for Sybase■ PATROL KM for Internet Server Manager■ PATROL KM for Oracle■ BMC Performance Manager for Microsoft Windows Terminal Services
If you are integrated with PATROL, you can gain instant value by enabling this policy and importing the data from TextTranslation.csv into the cell as described in “Enabling a dynamic enrichment PATROL message text translation policy” on page 346. This policy allows you to reword ambiguous event messages into messages more easily understood by the IT operators handling the events in Impact Explorer.
The sample policy, TextTranslation.csv, will translate PATROL event messages coming from either BMC Impact Integration for PATROL 3.0 or BMC Impact Integration for PATROL 7.0.
Overview of the PATROL messaging text translation dynamic data enrichment source file
Figure 88 on page 277 shows some sample rows included in the TextTranslation.csv file.
276 BMC Impact Solutions Event Management Guide

Using the sample PATROL messaging text translation dynamic data enrichment source file
Figure 88 Sample rows in the TextTranslation.csv file
The first three columns are match fields for incoming events. The first column contains the object class or application class of the KM. The second column contains the parameter. The third column contains the origin class.
The last column is the output field or the message that should be displayed when an event matching the criteria in the first three columns is received.
For example, in the first row, the cell will look for an event coming from the CPUCpuUtil parameter of the CPU application class. When the cell receives that event, it will display the message:
CPU Utilisation is at 97%
or whatever number the CPU utilization percentage is at that time.
Many of the messages in the sample file contain slots that will be populated with values from the parameter. For information on the syntax for using slots in a text message see, “Editing the PATROL messaging text translation dynamic data enrichment source file.”
Editing the PATROL messaging text translation dynamic data enrichment source file
You can also add to and edit the TextTranslation.csv file, if required. For example, you might want to translate the messages included in the file into your native language. Or, you might want to include messages related to a KM that is not already included in the file.
One of the most powerful features of the text translation file is the ability to include CORE_EVENT base event class slots that will allow you to dynamically populate the message with information from parameters or other BMC Impact Manager components. This feature allows you to create messages that are very meaningful.
Chapter 10 Event management policies 277

How to create an event selector and specify event selection criteria
Figure 88 on page 277 shows some actual messages in the TranslationText.csv file that include variables. For example,
This message includes the %mc_object% and %mc_parameter_value% variables. This syntax in the enrichment source file allows you to substitute the value of the slot you have referenced into the event message.
To insert a slot value into a message, use the following syntax:
Message text %<slot_name>% message text
If you need to include a % sign in the actual message text, you must precede the % character with a back slash (\). For example, in Figure 89 the desired text message includes a % character. The syntax for the message is %mc_parameter_value%\% full.
If the value of mc_object is D: and the value of mc_parameter is 97 the reworded message would be:
Filesystem D: is 97% full.
For a list of CORE_EVENT base event class slots that you can use in text messages, see BMC Impact Solutions: Knowledge Base Development.
How to create an event selector and specify event selection criteria
An event selector is the component of an event management policy that selects one or more events to which an event management policy applies using specified event selection criteria. When an incoming event matches any of the specified event selection criteria, the cell applies the associated event management policy to the event.
Before you begin
■ Unless you want the event management policy to run continuously, you must define a timeframe as described in “How to create a new local timeframe” on page 270.
Figure 89 Variable syntax example
FILESYSTEM FSCapacity Filesystem %mc_object% is %mc_parameter_value%\% full
278 BMC Impact Solutions Event Management Guide

How to create an event selector and specify event selection criteria
■ [For dynamic data enrichment policies only.] Create a data enrichment source file as described in “How to create and edit a dynamic data enrichment source file” on page 274.
To create an event selector and specify event selection criteria
1 From the Administration View, select the Event Management Polices tab.
2 Select a valid node (non-cell group) from the navigation pane.
Valid nodes for event selector creation are all visible nodes except the top-level cell group node. When the Add Event Selector button in the toolbar becomes active, this is an indication that valid node is selected.
3 On the Administration View toolbar, click the Add Event Selector button .
The Selector Details tab, shown in Figure 90, is displayed.
Figure 90 Selector Details tab
4 In the Selector Name field, type the event selector name.
5 In the Group field, type an event selector group name.
The event selector that you create in the next step will belong to the event selector group that you enter. If you enter a name of an event selector group that does not exist, that group will be created.
6 To the right of the Base Event Class field, click the button to display an event class chooser dialog box (shown in Figure 91) from which to choose the event class.
Chapter 10 Event management policies 279

How to create an event selector and specify event selection criteria
Figure 91 Class Chooser dialog box
7 Select an event class from the tree and click OK to accept the class.
For more information about event classes, see the BMC Impact Solutions Knowledge Base Development Reference Guide.
8 In the Description field, type an optional description for the event selector.
9 Click Add to add event selection criteria to this event selector.
The Add Event Criteria editor is displayed.
10 From the Add Event Criteria editor, type a description for the event selection criteria in the Description slot.
11 In the Event Class field, use one of the following methods to select an event class on which to base the event selection criteria:
■ Accept the default event class in the Event Class field.
■ Change the class by clicking the browse button. The Class Chooser dialog box is displayed, select a class and click OK.
NOTE You cannot change the event class specified in an ECF to any class that is not at the same level or below the event class already specified in the ECF. If the ECF contains slots in the current class that are not in the new class, you cannot change to the new class, even when it occurs in the hierarchy rooted in the base event class.
280 BMC Impact Solutions Event Management Guide

How to create an event selector and specify event selection criteria
12 In the Selection Definition section, shown in Figure 92, create an expression that is used to determine whether an event of the selected class is processed by the policy by choosing a Slot, Operation, and Value.
Figure 92 Selection Definition section of the Add Event Criteria editor
The example expression in Figure 93 tests events for Windows security messages containing logon and logoff messages. You might use this expression as part of an event selector for implementation in an event blackout policy that hides these security events from display but maintains their history.
Figure 93 Example event selection criteria expression
For a list and definitions of EVENT slots available for selection, see the event and data classes appendix of the BMC Impact Solutions Knowledge Base Development Reference Guide. For a list and definitions of the operators available for each slot, see the section on operators in the Master Rule Language (MRL) appendix of the BMC Impact Solutions Knowledge Base Development Reference Guide.
13 Click OK to save the expression and close the Add Event Criteria editor.
The event selection criteria is displayed in the Event Selection Criteria section of the Selector Details tab, as shown in Figure 94.
Figure 94 Completed event selection criteria in Selector Details tab
14 To add more event selection criteria, click Add and repeat step 10 through step 13.
15 Click OK to save the event selector and its event selector group.
Chapter 10 Event management policies 281
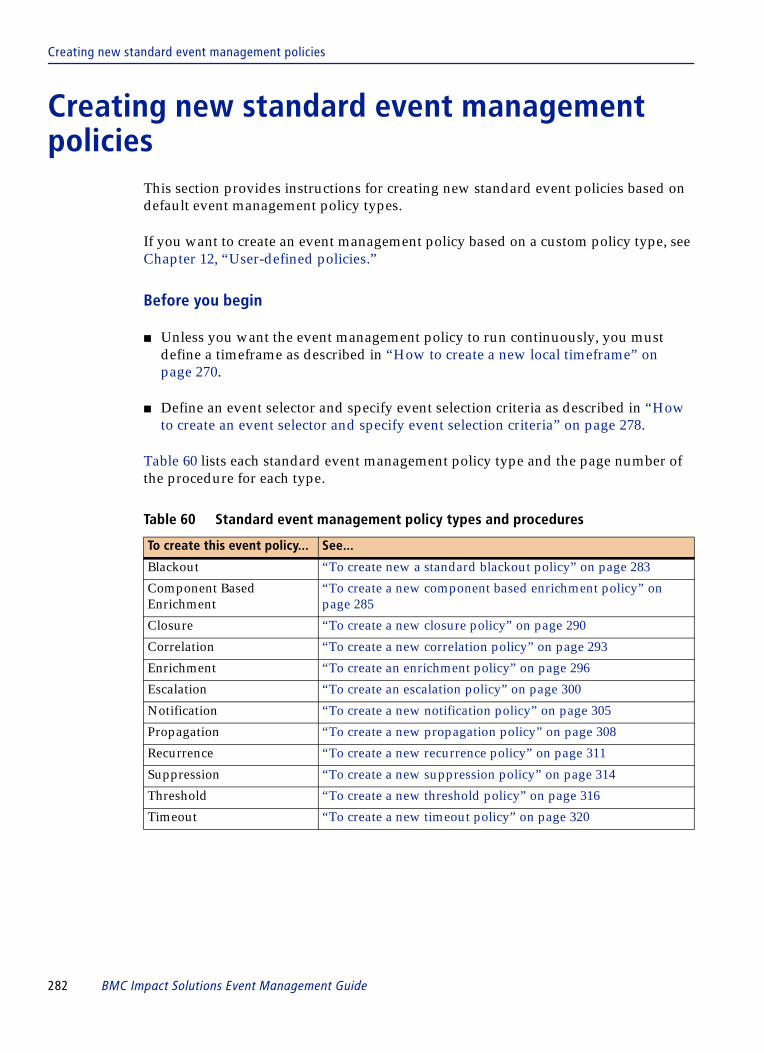
Creating new standard event management policies
Creating new standard event management policies
This section provides instructions for creating new standard event policies based on default event management policy types.
If you want to create an event management policy based on a custom policy type, see Chapter 12, “User-defined policies.”
Before you begin
■ Unless you want the event management policy to run continuously, you must define a timeframe as described in “How to create a new local timeframe” on page 270.
■ Define an event selector and specify event selection criteria as described in “How to create an event selector and specify event selection criteria” on page 278.
Table 60 lists each standard event management policy type and the page number of the procedure for each type.
Table 60 Standard event management policy types and procedures
To create this event policy... See...
Blackout “To create new a standard blackout policy” on page 283
Component Based Enrichment
“To create a new component based enrichment policy” on page 285
Closure “To create a new closure policy” on page 290
Correlation “To create a new correlation policy” on page 293
Enrichment “To create an enrichment policy” on page 296
Escalation “To create an escalation policy” on page 300
Notification “To create a new notification policy” on page 305
Propagation “To create a new propagation policy” on page 308
Recurrence “To create a new recurrence policy” on page 311
Suppression “To create a new suppression policy” on page 314
Threshold “To create a new threshold policy” on page 316
Timeout “To create a new timeout policy” on page 320
282 BMC Impact Solutions Event Management Guide
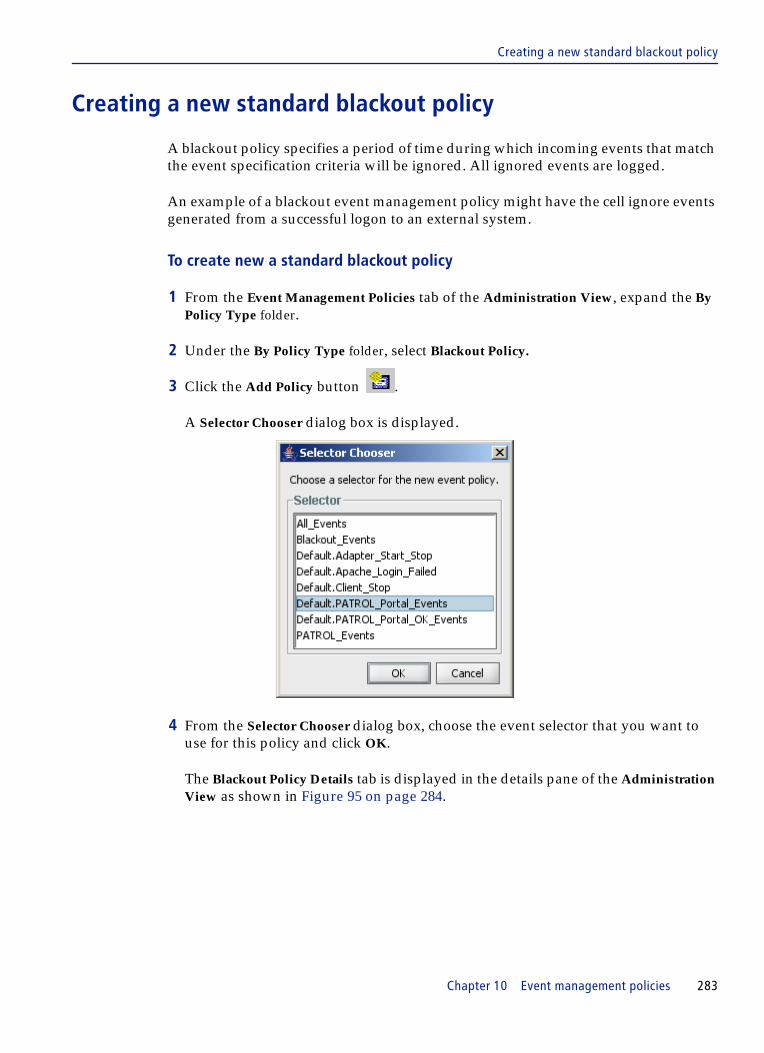
Creating a new standard blackout policy
Creating a new standard blackout policy
A blackout policy specifies a period of time during which incoming events that match the event specification criteria will be ignored. All ignored events are logged.
An example of a blackout event management policy might have the cell ignore events generated from a successful logon to an external system.
To create new a standard blackout policy
1 From the Event Management Policies tab of the Administration View, expand the By Policy Type folder.
2 Under the By Policy Type folder, select Blackout Policy.
3 Click the Add Policy button .
A Selector Chooser dialog box is displayed.
4 From the Selector Chooser dialog box, choose the event selector that you want to use for this policy and click OK.
The Blackout Policy Details tab is displayed in the details pane of the Administration View as shown in Figure 95 on page 284.
Chapter 10 Event management policies 283
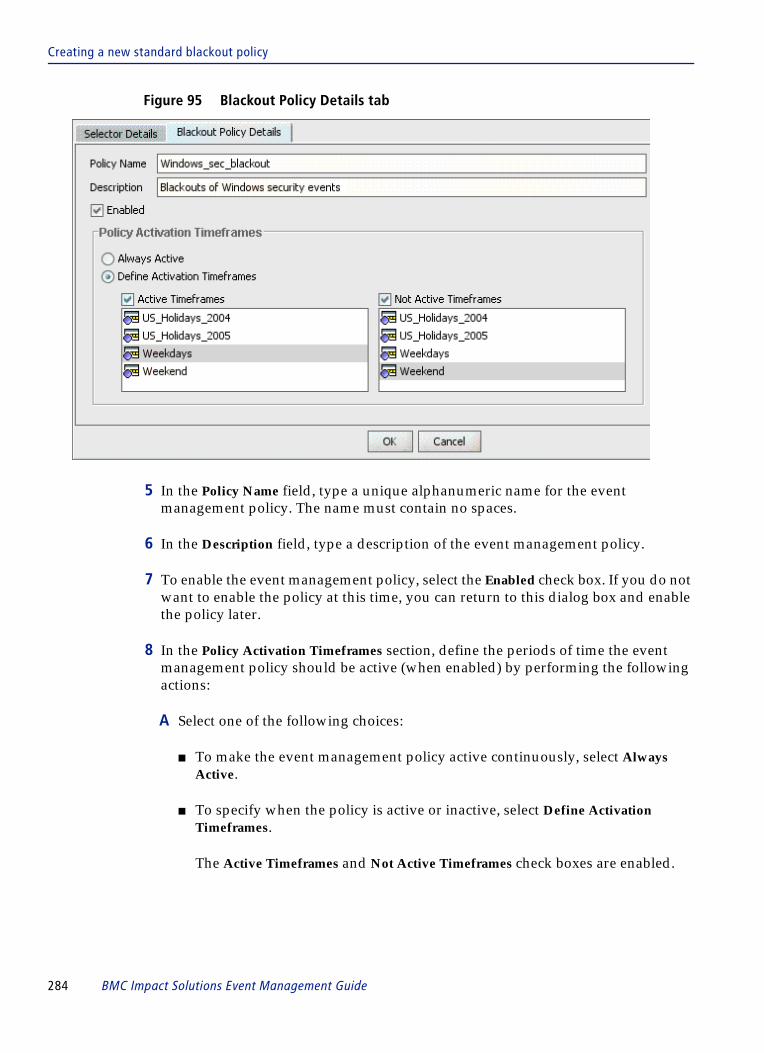
Creating a new standard blackout policy
Figure 95 Blackout Policy Details tab
5 In the Policy Name field, type a unique alphanumeric name for the event management policy. The name must contain no spaces.
6 In the Description field, type a description of the event management policy.
7 To enable the event management policy, select the Enabled check box. If you do not want to enable the policy at this time, you can return to this dialog box and enable the policy later.
8 In the Policy Activation Timeframes section, define the periods of time the event management policy should be active (when enabled) by performing the following actions:
A Select one of the following choices:
■ To make the event management policy active continuously, select Always Active.
■ To specify when the policy is active or inactive, select Define Activation Timeframes.
The Active Timeframes and Not Active Timeframes check boxes are enabled.
284 BMC Impact Solutions Event Management Guide

Creating a new component based enrichment policy
B If you selected Define Activation Timeframes, depending on how you want to define the timeframe for your policy do one or both of the following:
■ To specify the periods of time when the policy should be active, select the Active Timeframes check box and one or more timeframes from its scrollable list.
■ To specify the periods of time when the policy should be inactive, select the Not Active Timeframes check box and one or more timeframes from its scrollable list.
9 Click OK.
BMC Impact Explorer saves the defined event management policy, and it is displayed in the list of event policies for the selected event selector.
Creating a new component based enrichment policy
A component based enrichment policy enables you to enhance the event definition of an incoming event that is already associated with a component through an mc_smc_id or mc_smc_alias match. When you define the component based policy, you assign specified slot values from a standard list of component slots (BMC_BaseElement class) to matching slots in the associated event definition. Whenever an event that matches the selection criteria is received, its definition is automatically enriched by the specified component slot values.
To create a new component based enrichment policy
1 From the Event Management Policies tab of the Administration View, expand the By Policy Type folder.
2 Under the By Policy Type folder, select Component Based Enrichment Policy.
3 Click the Add Event Policy button .
NOTE You can select both check boxes to create active and inactive time periods. However, the inactive time period takes precedence over the active time period.
Chapter 10 Event management policies 285

Creating a new component based enrichment policy
A Selector Chooser dialog box is displayed.
4 From the Selector Chooser dialog box, choose the event selector that you want to use for this policy and click OK.
The event selector controls which events are processed by the policy and, consequently, which event slots are displayed in the Event fields list.
The Component Based Enrichment Policy Details tab is displayed in the details pane of the Administration View as shown in Figure 96 on page 287.
286 BMC Impact Solutions Event Management Guide

Creating a new component based enrichment policy
Figure 96 Component Based Enrichment Policy Details tab
5 In the Policy Name field, type a unique alphanumeric name for the event management policy. The name must contain no spaces.
6 In the Description field, type a description of the event management policy.
7 To enable the event management policy, select the Enabled check box. If you do not want to enable the policy at this time, you can return to this dialog box and enable the policy later.
8 Assign a numerical value to the policy in the Execution Order combo box.
The numerical value indicates the order in which policies are automatically executed. Policies are executed in ascending chronological order. A policy with the lowest numerical value is executed first while the policy with the highest numerical value is executed last. During the execution phase, policies with higher numerical values always overwrite the preceding policies with lower numerical values.
Chapter 10 Event management policies 287

Creating a new component based enrichment policy
You should assign higher numerical values to policies that you want to execute last and lower values to policies that you want to execute first.
9 In the Policy Activation Timeframes section, define the periods of time the event management policy should be active (when enabled) by performing the following actions:
A Select one of the following choices:
■ To make the event management policy active continuously, select Always Active.
■ To specify when the policy is active or inactive, select Define Activation Timeframes.
The Active Timeframes and Not Active Timeframes check boxes are enabled.
B If you selected Define Activation Timeframes, depending on how you want to define the timeframe for your policy do one or both of the following:
■ To specify the periods of time when the policy should be active, select the Active Timeframes check box and one or more timeframes from its scrollable list.
■ To specify the periods of time when the policy should be inactive, select the Not Active Timeframes check box and one or more timeframes from its scrollable list.
10 In the Component Based Event Enrichment Details tab, assign the component slots to the matching event slots in the Match the Component and Event Slots section.
EXAMPLE You have defined four component based enrichment policies and have assigned each a unique numerical value (1, 2, 3, or 4) in the Execution Order combo box. The policy assigned the value 1 is executed first, followed in ascending numerical order by policies assigned the values 2, 3, and 4. During the execution sequence, the policy with the value 2 overwrites the policy with the value 1; the policy with value 3 overwrites the policy with value 2; and the policy with value 4 overwrites the policy with value 3.
NOTE You can select both check boxes to create active and inactive time periods. However, the inactive time period takes precedence over the active time period.
288 BMC Impact Solutions Event Management Guide
Creating a new component based enrichment policy
Consider these guidelines before you make the assignments:
■ The list of event slots is dynamic insofar as it depends on the base event class you chose in the selector. The list that you see always contains a subset of the CORE_EVENT class. It also contains any additional slot or slots derived from the subclass you specified as the base event class.
■ The list of component slots is static. The component slots are derived from the BMC_BaseElement class.
■ You can view and edit a list of excluded event and component slots in the MCELL_HOME\data\ix\configurationItemPolicies\configurationItemEnrichment.slotFiltering.properties file. You can specify event and component slots to be excluded in the appropriate field: excluded.event.slots and excluded component.slots. Add or update the slots using a comma-separated list.
■ The component slot value overwrites any current value in the matching event slot.
■ You must match slots of similar types: STRING with STRING, INTEGER with INTEGER, BOOLEAN with BOOLEAN, and so forth.
To make the assignment, select a slot name in the Event fields column and, using the arrow button, move it to the Assignment Table, where you match it with a slot in the Component fields column.
11 Click OK.
BMC Impact Explorer saves the defined component based enrichment policy, and it is displayed in the list of event policies for the selected event selector.
NOTE After updating and saving the configurationItemEnrichment.slotFiltering.properties file, restart the BMC Impact Administration Server to initialize the changes.
NOTE The table does not support the assignment of LIST or LIST OF slots.
Chapter 10 Event management policies 289

Creating a new closure policy
Creating a new closure policy
An closure policy closes a specified event when a separate specified event is received.
To create a new closure policy
1 From the Event Management Policies tab of the Administration View, expand the By Policy Type folder.
2 Under the By Policy Type folder, select Closure Policy.
3 Click the Add Policy button .
A Selector Chooser dialog box is displayed.
4 From the Selector Chooser dialog box, choose the event selector that you want to use for this policy and click OK.
The Closure Policy Details tab is displayed in the details pane of the Administration View as shown in Figure 97 on page 291.
290 BMC Impact Solutions Event Management Guide

Creating a new closure policy
Figure 97 Closure Policy Details tab
5 In the Policy Name field, type a unique alphanumeric name for the event management policy. The name must contain no spaces.
6 In the Description field, type a description of the event management policy.
7 To enable the event management policy, select the Enabled check box. If you do not want to enable the policy at this time, you can return to this dialog box and enable the policy later.
8 In the Policy Activation Timeframes section, define the periods of time the event management policy should be active (when enabled) by performing the following actions:
A Select one of the following choices:
■ To make the event management policy active continuously, select Always Active.
■ To specify when the policy is active or inactive, select Define Activation Timeframes.
The Active Timeframes and Not Active Timeframes check boxes are enabled.
Chapter 10 Event management policies 291

Creating a new correlation policy
B If you selected Define Activation Timeframes, depending on how you want to define the timeframe for your policy do one or both of the following:
■ To specify the periods of time when the policy should be active, select the Active Timeframes check box and one or more timeframes from its scrollable list.
■ To specify the periods of time when the policy should be inactive, select the Not Active Timeframes check box and one or more timeframes from its scrollable list.
9 Click Edit Event Criteria.
The Add Event Criteria window is displayed.
10 In the Add Event Criteria window, specify event selection criteria for the event type that you want to close and click OK.
11 To close only matching events that occur within a certain timeframe, check the Close Events with Age Less Than check box and specify an amount of time. If the Close Events with Age Less Than check box is not checked, there is no limit on the time between the closed event and the closing event.
12 To suppress the closing event, check the Suppress the Closing Event check box.
13 To save the completed event closure policy, click OK.
BMC Impact Explorer saves the defined event management policy, and it is displayed in the list of event policies for the specified event selector.
Creating a new correlation policy
A correlation policy relates one or more cause events to an effect event. If desired, this policy can close the effect event. The cell maintains the association between these cause-and-effect events.
NOTE You can select both check boxes to create active and inactive time periods. However, the inactive time period takes precedence over the active time period.
292 BMC Impact Solutions Event Management Guide

Creating a new correlation policy
To create a new correlation policy
1 From the Event Management Policies tab of the Administration View, expand the By Policy Type folder.
2 Under the By Policy Type folder, select Correlation Policy.
3 Click the Add Policy button .
A Selector Chooser dialog box is displayed.
4 From the Selector Chooser dialog box, choose the event selector that you want to use for this policy and click OK.
The Correlation Policy Details tab is displayed in the details pane of the Administration View, as shown in Figure 98 on page 294.
Chapter 10 Event management policies 293

Creating a new correlation policy
Figure 98 Correlation Policy Details tab
5 In the Policy Name field, type a unique alphanumeric name for the event management policy. The name must contain no spaces.
6 To enable the event management policy immediately, select the Enabled check box. If you do not want to enable the policy at this time, you can return to this dialog box and enable the policy later.
7 In the Description field, type a description of the event management policy.
294 BMC Impact Solutions Event Management Guide

Creating a new correlation policy
8 In the Policy Activation Timeframes section, define the periods of time the event management policy should be active (when enabled) by performing the following actions:
A Select one of the following choices:
■ To make the event management policy active continuously, select Always Active.
■ To specify when the policy is active or inactive, select Define Activation Timeframes.
The Active Timeframes and Not Active Timeframes lists are enabled.
B If you selected Define Activation Timeframes, depending on how you want to define the timeframe for your policy do one or both of the following:
■ To specify the periods of time when the policy should be active, select the Active Timeframes check box and one or more timeframes from its scrollable list.
■ To specify the periods of time when the policy should be inactive, select the Not Active Timeframes check box and one or more timeframes from its scrollable list.
9 Complete a separate Cause Event tab as appropriate for each cause event that you want to define.
Table 61 describes each of the controls in the Cause Event tabs.
NOTE You can select both check boxes to create active and inactive time periods. However, the inactive time period takes precedence over the active time period.
Table 61 Cause Event tab controls (part 1 of 2)
Field name Description
Enable check box Select this check box to relate the cause events to the effect events; this information is stored in the cell.
Edit Event Criteria button Click this button to specify the selection criteria for the cause event.
Correlation Timespan check box
Select this check box and enter a time limit within which the cause event must occur to produce the effect event.
Chapter 10 Event management policies 295

Creating a new enrichment policy
10 To save the completed event correlation policy, click OK.
BMC Impact Explorer saves the defined event management policy, and it is displayed in the list of event policies for the selected event selector.
Creating a new enrichment policy
An enrichment policy adds values for specific event slots if those slots are empty when the event is received from the event source. An enrichment policy can also reformat slots or normalize slot values.
To create an enrichment policy
1 From the Event Management Policies tab of the Administration View, expand the By Policy Type folder.
2 Under the By Policy Type folder, select Enrichment Policy.
3 Click the Add Policy button .
A Selector Chooser dialog box is displayed.
4 From the Selector Chooser dialog box, choose the event selector that you want to use for this policy and click OK.
Close Effect Event radio buttons
Choose one of the following radio buttons to specify the circumstances under which the effect event will be closed:
■ Upon Correlation—as soon as events are associated (cause and effect), the effect event is closed
■ On Cause Event Closure—when the cause event closes, the effect event is closed also
■ On Its Own—closing the cause event has no consequence to the effect event
Escalate Cause Event check box
select this check box to escalate the cause event to the specified priority level
De-escalate Effect Event check box
select this check box to de-escalate the effect event
Table 61 Cause Event tab controls (part 2 of 2)
Field name Description
296 BMC Impact Solutions Event Management Guide
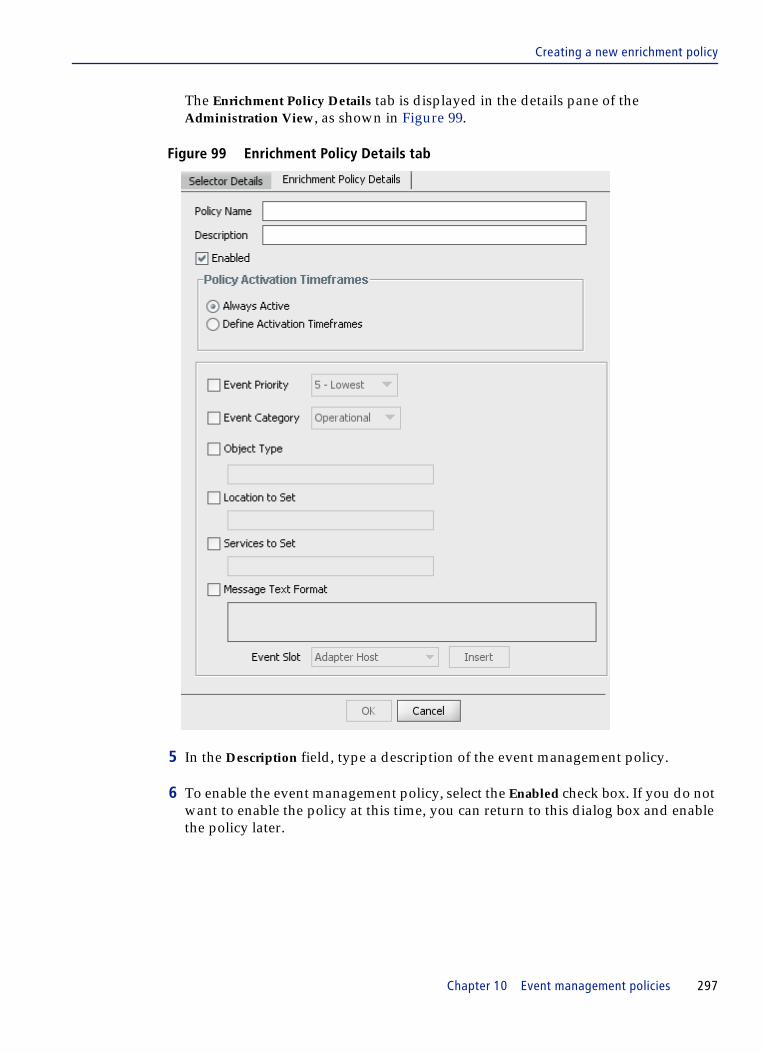
Creating a new enrichment policy
The Enrichment Policy Details tab is displayed in the details pane of the Administration View, as shown in Figure 99.
Figure 99 Enrichment Policy Details tab
5 In the Description field, type a description of the event management policy.
6 To enable the event management policy, select the Enabled check box. If you do not want to enable the policy at this time, you can return to this dialog box and enable the policy later.
Chapter 10 Event management policies 297
Creating a new enrichment policy
7 In the Policy Activation Timeframes section, define the periods of time that the event management policy should be active (when enabled) by performing the following actions:
A Select one of the following choices:
■ To make the event management policy active continuously, select Always Active.
■ To specify when the policy is active or inactive, select Define Activation Timeframes.
The Active Timeframes and Not Active Timeframes lists are enabled.
B If you selected Define Activation Timeframes, depending on how you want to define the timeframe for your policy do one or both of the following:
■ To specify the periods of time when the policy should be active, select the Active Timeframes check box and one or more timeframes from its scrollable list.
■ To specify the periods of time when the policy should be inactive, select the Not Active Timeframes check box and one or more timeframes from its scrollable list.
8 Enable the following check boxes as necessary to assign appropriate settings:
■ Event Priority—the relative priority to assign to the event (1 is a high priority)■ Event Category—the classification to assign to the event; categories include
— availability— capacity— configuration— operational— performance— recovery— security— SLM (service level management)— message text format
■ Object Type—the object type against which the event applies, such as a server■ Location to Set—the physical location of the object, such as a city■ Services to Set—the service that the event is associated with
NOTE You can select both check boxes to create active and inactive time periods. However, the inactive time period takes precedence over the active time period.
298 BMC Impact Solutions Event Management Guide

Creating a new escalation policy
9 In the Message Text Format box, define the message slot enrichment for the event:
A From the list of available event slots in the Event Slot box, select an event slot to which to add enrichment information and click Insert.
B To insert a a slot value into the message, either type the slot name surrounded by % characters or select the slot name from the Event Slot list and click Insert.
The box is a standard text box. You can position the cursor and type or insert text and slot references in any order. The Event Slot list and Insert button are provided as a convenience so you do not have to remember the valid slot names. The resulting string of characters in the Message Text Format box, %<slot name>%, whether typed or inserted, is used as a template to create the message (msg slot) for the event.
Repeat steps A and B to add more enrichment information to the event slot, if necessary.
10 To save the completed event enrichment policy, click OK.
BMC Impact Explorer saves the defined event management policy, and it is displayed in the list of event policies for the selected event selector.
Creating a new escalation policy
An escalation policy raises or lowers the priority level of an event after a specified period of time. A specified number of event recurrences can also trigger escalation of an event.
For example, if the abnormally high temperature of a storage device goes unchecked for 10 minutes or if a cell receives more than five high-temperature warning events in 25 minutes, an escalation event management policy could increase the priority level of the event to critical.
NOTE The hidden and list of slots are not available for message enrichment.
To avoid unpredictable results when adding a text message, use no more than one set of quotation marks.
Chapter 10 Event management policies 299

Creating a new escalation policy
To create an escalation policy
1 From the Event Management Policies tab of the Administration View, expand the By Policy Type folder.
2 Under the By Policy Type folder, select Escalation Policy and click OK.
3 Click the Add Policy button .
A Selector Chooser dialog box is displayed.
4 From the Selector Chooser dialog box, choose the event selector that you want to use for this policy and click OK.
The Escalation Policy Details tab is displayed in the details pane of the Administration View, as shown in Figure 100 on page 301.
300 BMC Impact Solutions Event Management Guide

Creating a new escalation policy
Figure 100 Escalation Policy Details tab
5 In the Policy Name field, type a unique alphanumeric name for the event management policy. The name must contain no spaces.
6 In the Description field, type a description of the event management policy.
7 To enable the event management policy, select the Enabled check box. If you do not want to enable the policy at this time, you can return to this dialog box and enable the policy later.
Chapter 10 Event management policies 301

Creating a new escalation policy
8 In the Policy Activation Timeframes section, define the periods of time the event management policy should be active (when enabled) by performing the following actions:
A Select one of the following choices:
■ To make the event management policy active continuously, select Always Active.
■ To specify when the policy is active or inactive, select Define Activation Timeframes.
The Active Timeframes and Not Active Timeframes lists are enabled.
B If you selected Define Activation Timeframes, depending on how you want to define the timeframe for your policy do one or both of the following:
■ To specify the periods of time when the policy should be active, select the Active Timeframes check box and one or more timeframes from its scrollable list.
■ To specify the periods of time when the policy should be inactive, select the Not Active Timeframes check box and one or more timeframes from its scrollable list.
9 In the Time Escalation section, shown in Figure 101 on page 303, use the Timespan Before Priority is Escalated selectors to enter the number of a specified period of time that must elapse before an event is escalated. The default time period is seconds, but this time period can be changed to minutes, hours, or days by selecting one of these time periods from the drop list.
NOTE You can select both check boxes to create active and inactive time periods. However, the inactive time period takes precedence over the active time period.
NOTE You can set Time Escalation or Rate of Event Arrival (step 13 through step 15 on page 304), or both. To set only one, leave the fields of the other set to zero.
302 BMC Impact Solutions Event Management Guide
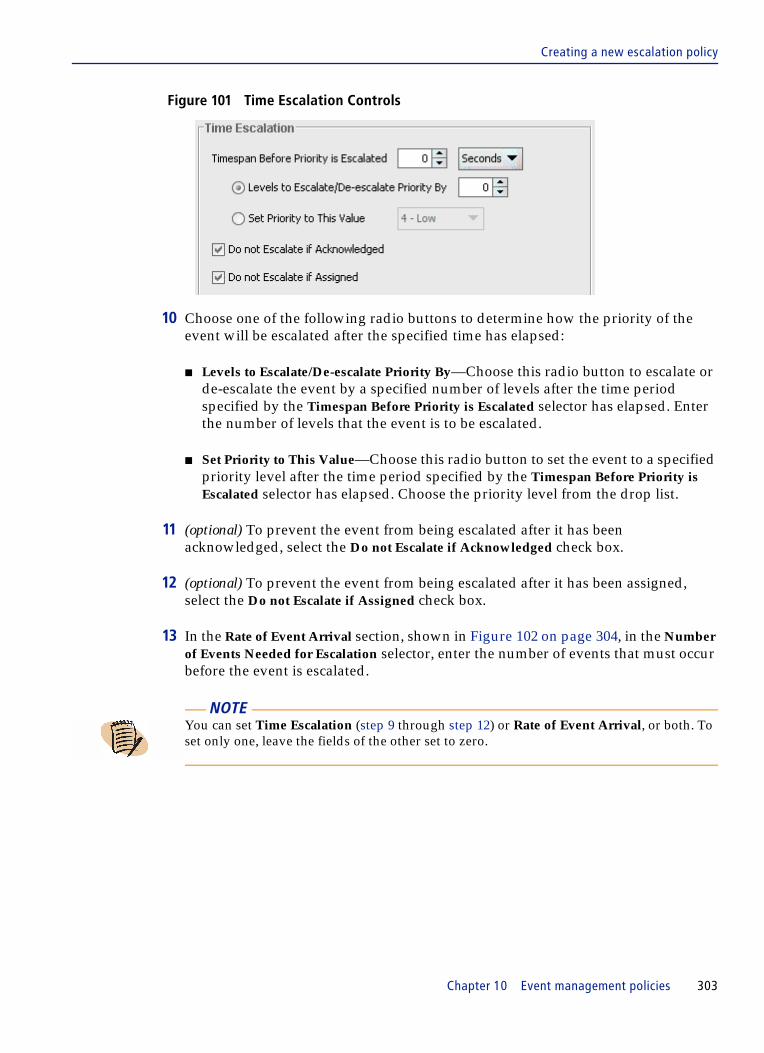
Creating a new escalation policy
Figure 101 Time Escalation Controls
10 Choose one of the following radio buttons to determine how the priority of the event will be escalated after the specified time has elapsed:
■ Levels to Escalate/De-escalate Priority By—Choose this radio button to escalate or de-escalate the event by a specified number of levels after the time period specified by the Timespan Before Priority is Escalated selector has elapsed. Enter the number of levels that the event is to be escalated.
■ Set Priority to This Value—Choose this radio button to set the event to a specified priority level after the time period specified by the Timespan Before Priority is Escalated selector has elapsed. Choose the priority level from the drop list.
11 (optional) To prevent the event from being escalated after it has been acknowledged, select the Do not Escalate if Acknowledged check box.
12 (optional) To prevent the event from being escalated after it has been assigned, select the Do not Escalate if Assigned check box.
13 In the Rate of Event Arrival section, shown in Figure 102 on page 304, in the Number of Events Needed for Escalation selector, enter the number of events that must occur before the event is escalated.
NOTE You can set Time Escalation (step 9 through step 12) or Rate of Event Arrival, or both. To set only one, leave the fields of the other set to zero.
Chapter 10 Event management policies 303

Creating a new notification policy
Figure 102 Rate of Event Arrival Controls
14 In the Timespan in which Events Must Arrive selector, enter the time in which the events must arrive before the event is escalated or the event priority is changed.
15 Choose one of the following radio buttons to determine how the priority of the event will be escalated after the number of events have arrived within the specified timespan:
■ Levels to Escalate Causal Event Priority—Choose this radio button to escalate the causal event by a specified number of levels after the number of events specified Number of Events Needed for Escalation selector have occurred within the time period specified by the Timespan in which Events Must Arrive selector. Enter the number of levels that the event is to be escalated.
■ Set Priority to This Value—Choose this radio button to set the event to a specified priority level after the number of events specified Number of Events Needed for Escalation selector have occurred within the time period specified by the Timespan in which Events Must Arrive selector. Choose the priority level from the drop list.
16 To save the completed event escalation policy, click OK.
BMC Impact Explorer saves the defined event management policy, and it is displayed in the list of event policies for the selected event selector.
Creating a new notification policy
A notification policy sends a request to an external service to notify a user or group of users that the event has occurred.
For example, a notification event management policy might notify a system administrator about the imminent unavailability of a mission-critical piece of storage hardware.
304 BMC Impact Solutions Event Management Guide

Creating a new notification policy
Before you begin
You must add a notification service as described in “How to add a notification service (notification policies only)” on page 272.
To create a new notification policy
1 From the Event Management Policies tab of the Administration View, expand the By Policy Type folder.
2 Under the By Policy Type folder, select Notification Policy and click OK.
3 Click the Add Policy button .
A Selector Chooser dialog box is displayed.
4 From the Selector Chooser dialog box, choose the event selector that you want to use for this policy and click OK.
The Notification Policy Details tab is displayed in the details pane of the Administration View, as show in Figure 103 on page 306.
Chapter 10 Event management policies 305

Creating a new notification policy
Figure 103 Notification Policy Details tab
5 In the Policy Name field, type a unique alphanumeric name for the event management policy. The name must contain no spaces.
6 In the Description field, type a description of the event management policy.
7 To enable the event management policy, select the Enabled check box. If you do not want to enable the policy at this time, you can return to this dialog box and enable the policy later.
306 BMC Impact Solutions Event Management Guide
Creating a new notification policy
8 In the Policy Activation Timeframes section, define the periods of time the event management policy should be active (when enabled) by performing the following actions:
A Select one of the following choices:
■ To make the event management policy active continuously, select Always Active.
■ To specify when the policy is active or inactive, select Define Activation Timeframes.
The Active Timeframes and Not Active Timeframes check boxes are enabled.
B If you selected Define Activation Timeframes, depending on how you want to define the timeframe for your policy do one or both of the following:
■ To specify the periods of time when the policy should be active, select the Active Timeframes check box and one or more timeframes from its scrollable list.
■ To specify the periods of time when the policy should be inactive, select the Not Active Timeframes check box and one or more timeframes from its scrollable list.
9 From the Notification Service drop list, select the service to use as the notification mechanism. The default service is email.
10 In the Add field, type the name of a person or group to notify. Click Add to add the name to the Notify slot. Add more names or groups if necessary.
11 From the Event Status that will Notify Users list, choose the event status that you want to trigger the notification.
12 In the Notification Text field, enter the notification message. If desired, you can use the Event Slot drop list to choose event slots to add to the notification message. Click the Insert button to insert the slots into the message. Enter a space before and after each slot that you add.
13 (optional) Select the Auto Acknowledge check box to automatically acknowledge the event.
NOTE You can select both check boxes to create active and inactive time periods. However, the inactive time period takes precedence over the active time period.
Chapter 10 Event management policies 307

Creating a new propagation policy
14 (optional) Select the Auto Assign check box to automatically assign the event to the user you select from the list.
15 To save the completed event notification policy, click OK.
BMC Impact Explorer saves the defined event management policy, and it is displayed in the list of event policies for the selected event selector.
Creating a new propagation policy
A propagation policy forwards events to other cells or to integrations to other products.
To create a new propagation policy
1 From the Event Management Policies tab of the Administration View, expand the By Policy Type folder.
2 Under the By Policy Type folder, select Propagation Policy and click OK.
3 Click the Add Policy button .
A Selector Chooser dialog box is displayed.
4 From the Selector Chooser dialog box, choose the event selector that you want to use for this policy and click OK.
The Propagation Policy Details tab is displayed in the details pane of the Administration View, as shown in Figure 104 on page 309.
308 BMC Impact Solutions Event Management Guide

Creating a new propagation policy
Figure 104 Propagation Policy Details tab
5 In the Policy Name field, type a unique alphanumeric name for the event management policy. The name must contain no spaces.
6 In the Description box, type a description of the event management policy.
7 To enable the event management policy, select the Enabled check box. If you do not want to enable the policy at this time, you can return to this dialog box and enable the policy later.
8 In the Policy Activation Timeframes section, define the periods of time the event management policy should be active (when enabled) by performing the following actions:
A Select one of the following choices:
■ To make the event management policy active continuously, select Always Active.
■ To specify when the policy is active or inactive, select Define Activation Timeframes.
The Active Timeframes and Not Active Timeframes check boxes are enabled.
B If you selected Define Activation Timeframes, depending on how you want to define the timeframe for your policy do one or both of the following:
Chapter 10 Event management policies 309
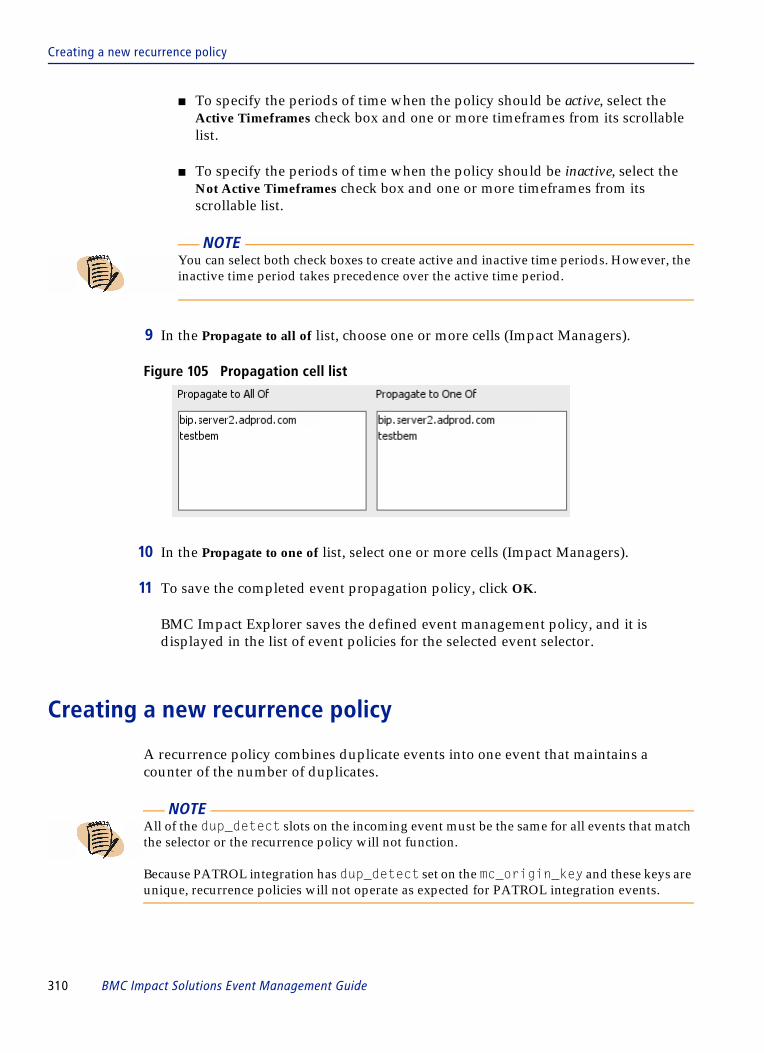
Creating a new recurrence policy
■ To specify the periods of time when the policy should be active, select the Active Timeframes check box and one or more timeframes from its scrollable list.
■ To specify the periods of time when the policy should be inactive, select the Not Active Timeframes check box and one or more timeframes from its scrollable list.
9 In the Propagate to all of list, choose one or more cells (Impact Managers).
Figure 105 Propagation cell list
10 In the Propagate to one of list, select one or more cells (Impact Managers).
11 To save the completed event propagation policy, click OK.
BMC Impact Explorer saves the defined event management policy, and it is displayed in the list of event policies for the selected event selector.
Creating a new recurrence policy
A recurrence policy combines duplicate events into one event that maintains a counter of the number of duplicates.
NOTE You can select both check boxes to create active and inactive time periods. However, the inactive time period takes precedence over the active time period.
NOTE All of the dup_detect slots on the incoming event must be the same for all events that match the selector or the recurrence policy will not function.
Because PATROL integration has dup_detect set on the mc_origin_key and these keys are unique, recurrence policies will not operate as expected for PATROL integration events.
310 BMC Impact Solutions Event Management Guide

Creating a new recurrence policy
To create a new recurrence policy
1 From the Event Management Policies tab of the Administration View, expand the By Policy Type folder.
2 Under the By Policy Type folder, select Recurrence Policy and click OK.
3 Click the Add Policy button .
A Selector Chooser dialog box is displayed.
4 From the Selector Chooser dialog box, choose the event selector that you want to use for this policy and click OK.
The Recurrence Policy Details tab is displayed in the details pane of the Administration View, as shown in Figure 106 on page 312.
Chapter 10 Event management policies 311

Creating a new recurrence policy
Figure 106 Recurrence Policy Details tab
5 In the Policy Name box, type a unique alphanumeric name (with no spaces) for the event management policy.
6 In the Description box, type a description of the event management policy.
7 To enable the event management policy, select the Enabled check box. If you do not want to enable the policy at this time, you can return to this dialog box and enable the policy later.
8 In the Policy Activation Timeframes section, define the periods of time the event management policy should be active (when enabled) by performing the following actions:
A Select one of the following choices:
■ To make the event management policy active continuously, select Always Active.
■ To specify when the policy is active or inactive, select Define Activation Timeframes.
The Active Timeframes and Not Active Timeframes check boxes are enabled.
312 BMC Impact Solutions Event Management Guide

Creating a new remote action policy
B If you selected Define Activation Timeframes, depending on how you want to define the timeframe for your policy do one or both of the following:
■ To specify the periods of time when the policy should be active, select the Active Timeframes check box and one or more timeframes from its scrollable list.
■ To specify the periods of time when the policy should be inactive, select the Not Active Timeframes check box and one or more timeframes from its scrollable list.
9 If you want to define a time window for events that are considered to be recurring, check the Recurring Events Must Arrive Within this Timespan check box and set the maximum time after the initial event within which an event must arrive to count toward recurrence. If the box is not checked, there is no limit on the time between duplicate events that are counted as recurring.
10 In the Slot Updates section, select any original event values that you want updated by the latest recurrent event values.
11 To save the completed event recurrence policy, click OK.
BMC Impact Explorer saves the defined event management policy, and it is displayed in the list of event policies for the selected event selector.
Creating a new remote action policy
See Chapter 9, “Remote execution,” for the procedure.
Creating a new suppression policy
A suppression policy specifies the events that the receiving cell should delete. Unlike a blackout event management policy, the suppression event management policy maintains no record of the deleted event.
NOTE You can select both check boxes to create active and inactive time periods. However, the inactive time period takes precedence over the active time period.
Chapter 10 Event management policies 313

Creating a new suppression policy
To create a new suppression policy
1 From the Event Management Policies tab of the Administration View, expand the By Policy Type folder.
2 Under the By Policy Type folder, select Suppression Policy.
3 Click the Add Policy button .
The Selector Chooser dialog box is displayed.
4 From the Selector Chooser dialog box, choose the event selector that you want to use for this policy and click OK.
The Suppression Policy Details tab is displayed in the details pane of the Administration View, as shown in Figure 107.
Figure 107 Suppression Policy Details tab
5 In the Policy Name field, type a unique alphanumeric name for the event management policy. The name must contain no spaces.
314 BMC Impact Solutions Event Management Guide

Creating a new suppression policy
6 In the Description box, type a description of the event management policy.
7 To enable the event management policy, select the Enabled check box. If you do not want to enable the policy at this time, you can return to this dialog box and enable the policy later.
8 In the Policy Activation Timeframes section, define the periods of time the event management policy should be active (when enabled) by performing the following actions:
A Select one of the following choices:
■ To make the event management policy active continuously, select Always Active.
■ To specify when the policy is active or inactive, select Define Activation Timeframes.
The Active Timeframes and Not Active Timeframes check boxes are enabled.
B If you selected Define Activation Timeframes, depending on how you want to define the timeframe for your policy do one or both of the following:
■ To specify the periods of time when the policy should be active, select the Active Timeframes check box and one or more timeframes from its scrollable list.
■ To specify the periods of time when the policy should be inactive, select the Not Active Timeframes check box and one or more timeframes from its scrollable list.
9 Click OK.
BMC Impact Explorer saves the defined event management policy, and it is displayed in the list of event policies for the selected event selector.
NOTE You can select both check boxes to create active and inactive time periods. However, the inactive time period takes precedence over the active time period.
Chapter 10 Event management policies 315

Creating a new threshold policy
Creating a new threshold policy
A threshold policy specifies a minimum number of duplicate events that must occur within a specific period of time before the cell accepts the event. For events allowed to pass through to the cell, the event severity can be escalated or de-escalated a relative number of levels or set to a specified level. If the event occurrence rate falls below a specified level, the cell can take action against the event, such as changing the event to closed or acknowledged status.
To create a new threshold policy
1 From the Event Management Policies tab of the Administration View, expand the By Policy Type folder.
2 Under the By Policy Type folder, select Threshold Policy.
3 Click the Add Policy button .
A Selector Chooser dialog box is displayed.
4 From the Selector Chooser dialog box, choose the event selector that you want to use for this policy and click OK.
The Threshold Policy Details tab is displayed in the details pane of the Administration View as shown in Figure 108 on page 317.
316 BMC Impact Solutions Event Management Guide

Creating a new threshold policy
Figure 108 Threshold Policy Details tab
5 In the Policy Name field, type a unique alphanumeric name for the event management policy. The name must contain no spaces.
6 In the Description field, type a description of the event management policy.
7 To enable the event management policy, select the Enabled check box. If you do not want to enable the policy at this time, you can return to this dialog box and enable the policy later.
8 In the Policy Activation Timeframes section, define the periods of time the event management policy should be active (when enabled) by performing the following actions:
A Select one of the following choices:
■ To make the event management policy active continuously, select Always Active.
■ To specify when the policy is active or inactive, select Define Activation Timeframes.
The Active Timeframes and Not Active Timeframes check boxes are enabled.
Chapter 10 Event management policies 317

Creating a new threshold policy
B If you selected Define Activation Timeframes, depending on how you want to define the timeframe for your policy do one or both of the following:
■ To specify the periods of time when the policy should be active, select the Active Timeframes check box and one or more timeframes from its scrollable list.
■ To specify the periods of time when the policy should be inactive, select the Not Active Timeframes check box and one or more timeframes from its scrollable list.
9 For the Number of Duplicate Events Received slot, supply a numeric value and an associated time measurement to specify the threshold above which an event is accepted.
10 Select one of the following radio buttons (The threshold-specific options displayed on the tab change depending on which button you select.):
■ Hold Events Until Threshold is Met—Select this option to prevent creation of any specified event until the number of events exceeds the threshold within the specified time period.
If you select Hold Events Until Threshold is Met, the options shown in Figure 109 are displayed. Specify whether to include allowing the last, first, highest, or lowest severity event to pass and whether to acknowledge or close the passed event when incoming (new) events fall below a specified low threshold rate.
Figure 109 Hold Events options
■ Pass Events through—select this option to create all events when they meet the required threshold rate.
NOTE You can select both check boxes to create active and inactive time periods. However, the inactive time period takes precedence over the active time period.
318 BMC Impact Solutions Event Management Guide

Creating a new timeout policy
If you select Pass Events through, the options shown in Figure 110 are displayed.
Figure 110 Pass Events Through options
Choose one of the following radio buttons to determine how the severity of the event will be escalated or de-escalated:
■ Levels to Escalate/De-Escalate Event Severity By—Choose this radio button to escalate or de-escalate the severity of the event by a specified number of levels after the number of events specified Number of Duplicated Events Received selector have occurred within the time period specified by the Timespan in which Events the Must Arrive selector. Enter the number of severity levels that the event is to be escalated.
■ Set Severity to This Value—Choose this radio button to set the event to a specified severity level after the number of events specified Number of Duplicated Events Received selector have occurred within the time period specified by the Timespan in which Events the Must Arrive selector. Choose the severity level from the drop list.
11 To save the completed event threshold policy, click OK.
BMC Impact Explorer saves the defined event management policy, and it is displayed in the list of event policies for the selected event selector.
Creating a new timeout policy
A timeout policy changes an event status to closed after a specified period of time elapses.
NOTE From the Set Severity to This Value drop list, choose Critical, Non-critical, Minor, Warning, or OK. Do not choose Unknown, as it is considered a status rather than a severity.
Chapter 10 Event management policies 319
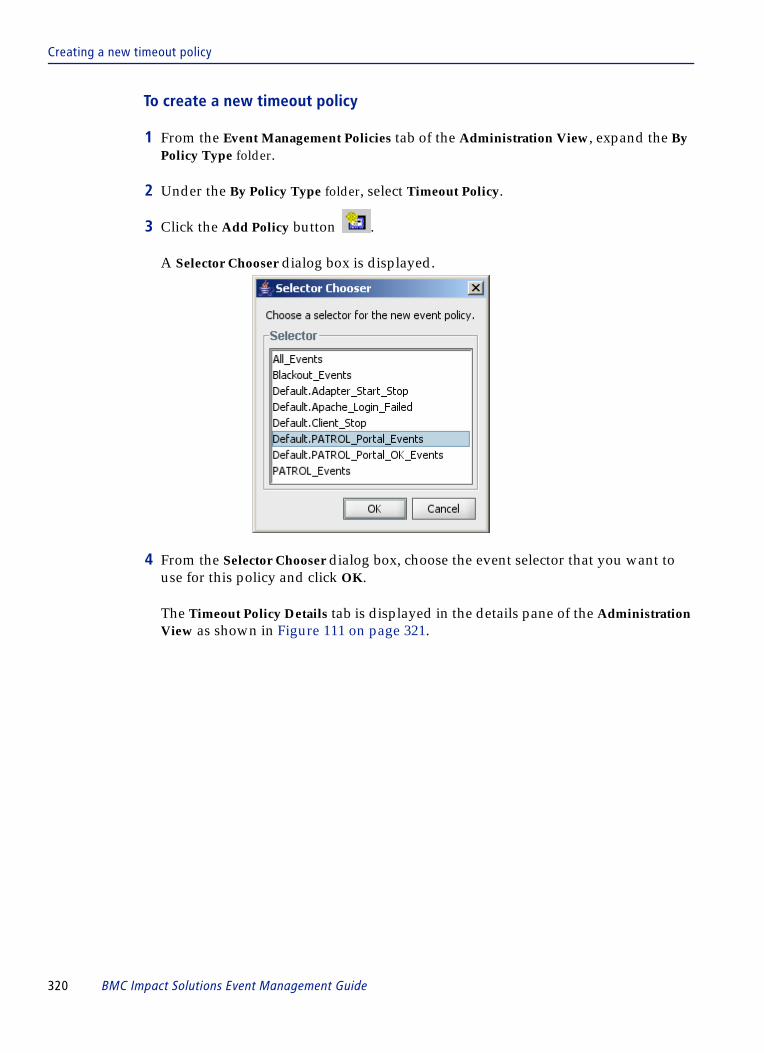
Creating a new timeout policy
To create a new timeout policy
1 From the Event Management Policies tab of the Administration View, expand the By Policy Type folder.
2 Under the By Policy Type folder, select Timeout Policy.
3 Click the Add Policy button .
A Selector Chooser dialog box is displayed.
4 From the Selector Chooser dialog box, choose the event selector that you want to use for this policy and click OK.
The Timeout Policy Details tab is displayed in the details pane of the Administration View as shown in Figure 111 on page 321.
320 BMC Impact Solutions Event Management Guide

Creating a new timeout policy
Figure 111 Timeout Policy Details tab
5 In the Policy Name field, type a unique alphanumeric name for the event management policy. The name must contain no spaces.
6 In the Description field, type a description of the event management policy.
7 To enable the event management policy, select the Enabled check box. If you do not want to enable the policy at this time, you can return to this dialog box and enable the policy later.
8 In the Policy Activation Timeframes section, define the periods of time the event management policy should be active (when enabled) by performing the following actions:
A Select one of the following choices:
■ To make the event management policy active continuously, select Always Active.
■ To specify when the policy is active or inactive, select Define Activation Timeframes.
The Active Timeframes and Not Active Timeframes check boxes are enabled.
B If you selected Define Activation Timeframes, depending on how you want to define the timeframe for your policy do one or both of the following:
■ To specify the periods of time when the policy should be active, select the Active Timeframes check box and one or more timeframes from its scrollable list.
Chapter 10 Event management policies 321

Enabling and disabling out-of-the-box standard event management policies
■ To specify the periods of time when the policy should be inactive, select the Not Active Timeframes check box and one or more timeframes from its scrollable list.
9 In the Timeout Event After field, enter a number of time periods that must elapse before an event will time out. The default time period is seconds, but this time period can be changed to minutes, hours, or days by selecting one of these time periods from the drop list.
10 To save the completed event timeout policy, click OK.
BMC Impact Explorer saves the defined event management policy, and it is displayed in the list of event policies for the selected event selector.
Enabling and disabling out-of-the-box standard event management policies
This section provides instructions for enabling and disabling out-of-the-box standard event management policies.
For a list of out-of-the-box event management policies, see “Out-of-the-box event management policies” on page 260.
For instructions on enabling out-of-the-box dynamic data enrichment policies, see “Enabling out-of-the-box dynamic data enrichment event management policies” on page 334.
To enable or disable a standard event management policy
1 From the Event Management Policies tab of the Administration View, expand the By Policy Type folder.
2 Under the By Policy Type folder, select the policy type for the out-of-the-box standard event policy that you want to enable.
NOTE You can select both check boxes to create active and inactive time periods. However, the inactive time period takes precedence over the active time period.
322 BMC Impact Solutions Event Management Guide

Enabling and disabling out-of-the-box standard event management policies
Out-of-the-box standard event policies are included under the following policy types:
■ Closure Policy■ Recurrence Policy■ Suppression Policy■ Timeout Policy
A list of out-of-the-box standard event management policies of that policy type are displayed in the right pane of the Administration View as shown in Figure 119.
Figure 112 List of event management policies
3 From the list of event management policies, select the policy that you want to enable.
The Details tab for that policy is displayed in the details pane of the Administration View.
4 On the BMC Impact Manager toolbar, click the Update Policy button to enable the Details tab to be edited.
5 Enable or disable the policy by selecting or deselecting the Enabled check box.
6 Click OK.
BMC Impact Explorer saves the defined event management policy, and it is displayed in the list of event policies for the selected event selector.
Chapter 10 Event management policies 323

Creating a new dynamic data enrichment event management policy
Creating a new dynamic data enrichment event management policy
This section provides instructions for creating a new dynamic data enrichment event management policy (page 324) and for creating a new dynamic enrichment blackout policy (page 329).
Before you begin
■ Ensure that the timeframe referenced in your dynamic data enrichment source file exists. If it does not exist, you must define the timeframe as described in “How to create a new local timeframe” on page 270.
■ Determine which event selector you want to apply to your dynamic data enrichment policy. If none of the out-of-the-box event selectors are appropriate for your policy, define an event selector and specify event selection criteria as described in “How to create an event selector and specify event selection criteria” on page 278.
■ Create a data enrichment source file as described in “How to create and edit a dynamic data enrichment source file” on page 274.
To create a new dynamic data enrichment policy
1 From the Event Management Policies tab of the Administration View, expand the By Policy Type folder.
2 Under the By Policy Type folder, select Dynamic Enrichment Policy.
3 Click the Add Policy button .
A Selector Chooser dialog box is displayed.
324 BMC Impact Solutions Event Management Guide

Creating a new dynamic data enrichment event management policy
4 From the Selector Chooser dialog box, choose the event selector that you want to use for this policy and click OK.
The Dynamic Enrichment Policy Details tab, shown in Figure 113 on page 325, is displayed in the details pane of the Administration View.
Figure 113 Dynamic Enrichment Policy Details tab
5 In the Policy Name field, type a unique alphanumeric name for the event management policy. The name must contain no spaces.
Chapter 10 Event management policies 325

Creating a new dynamic data enrichment event management policy
6 In the Description field, type a description of the event management policy.
7 To enable the policy immediately, select the Enabled check box. If you do not want to enable the policy at this time, you can return to this dialog box and enable the policy later.
8 In the Execution Order field, if more than one policy exists, specify the order of execution.
9 In the Policy Activation Timeframes section, define the periods of time the event management policy should be active (when enabled) by performing the following actions:
A Select one of the following choices:
■ To make the event management policy active continuously, select Always Active.
■ To specify when the policy is active or inactive, select Define Activation Timeframes.
The Active Timeframes and Not Active Timeframes lists are displayed.
B If you selected Define Activation Timeframes, depending on how you want to define the timeframe for your policy do one or both of the following:
■ To specify the periods of time when the policy should be active, select the Active Timeframes check box and one or more timeframes from its scrollable list.
■ To specify the periods of time when the policy should be inactive, select the Not Active Timeframes check box and one or more timeframes from its scrollable list.
NOTE When a new policy is created, the number shown in the Execution Order field should be one greater the largest current execution order.
If two policies have the same execution order, they will run in indeterminate order.
NOTE You can select both check boxes to create active and inactive time periods. However, the inactive time period takes precedence over the active time period.
326 BMC Impact Solutions Event Management Guide
Creating a new dynamic data enrichment event management policy
10 If you do not want to accept the default event class, you can select an event class by clicking in the Event Class field of the Match Fields section, selecting a new event class, and clicking OK.
The Event Class determines what slots are available in the Available Event Fields column.
11 In the Class Chooser dialog box, select an event class and click OK.
12 In Available Event Fields column, select the slots that correspond to the match fields in your dynamic data enrichment source file. Use the left arrow button to move those slots into the Match Fields column. You may select and move multiple slots at the same time.
13 In Available Event Fields column, select the slots that correspond to the output fields in your dynamic data enrichment source file. Use the right arrow button to move those slots into the Output Fields column. You may select and move multiple slots at the same time.
14 (optional) In the Match Fields section, activate the Match Tracing check box to add diagnostic notes to the event, if necessary.
15 In the Match Table section, in the Type field, accept the default.
16 In the Match Table section, in the Tag field, accept the default.
WARNING It is critical that the policy definition and the data enrichment source file contain the exact same number of match fields and output fields in the same order. If the match fields and output fields in the enrichment file and the policy do not match, the policy will not run.
For example, if you were creating a file similar to the location.csv file that is included with the product, you must select the Host slot as the Match Field and the Location slot as the Output Field to correspond to the slots in the location.csv file.
NOTE Typically, you do not need to the change the value of the Type field. You can override the default; however, you must use a unique tag within the given match table.
NOTE The Tag field uniquely identifies the match table that will be used by the policy instance.
You do not need to the change the value of this field. You can override the default; however, you must use a unique tag within the given match table.
Chapter 10 Event management policies 327

Creating a new dynamic data enrichment event management policy
17 In the Match Table section, in the Data File field, do one of the following actions:
■ Type the path to the enrichment data source.■ To browse for the enrichment data source, click .
1. In the File Chooser dialog box, select the dynamic data enrichment source file appropriate for your policy. For more information, see “External enrichment data sources” on page 267.
2. Click OK.
18 In the Match Table section, in the File Format field, select one of the following radio buttons to specify the type of data enrichment file to import:
■ Data file with this separator—Choose this radio button to import a flat, delimited file, such as a .csv file. Enter a separator to delimit the data column in the file.
For example, if you are using a .csv file, enter a comma (,) as the separator.
■ PMEP file—Choose this radio button to import a PMEP table and select the appropriate PMEP format for your policy from the drop list:
— Blackout— Blackout CSV— Location— Location CSV— Service— Service CSV— Text— Text CSV
19 Click OK.
If this is the first time a policy is saved, the following confirmation dialog box is displayed:
Figure 114 Import confirmation
NOTE If you select the PMEP file button, the Event Class, Match Fields, and Output Fields are autopopulated with predefined values and become read-only.
328 BMC Impact Solutions Event Management Guide

Creating a new dynamic data enrichment event management policy
20 Click Yes.
A green check mark should be displayed in the Enable column next to the policy in the event management policies list. (You may need to scroll the window to the right to see the Enable column.) The policy also should show up in the tree in the left pane of the BMC Impact Explorer window.
21 Import the data from the dynamic data enrichment source enrichment file as described in “Importing dynamic data enrichment source” on page 350.
To create a new dynamic data enrichment blackout policy
1 From the Event Management Policies tab of the Administration View, expand the By Policy Type folder.
2 Under the By Policy Type folder, select Dynamic Blackout Policy.
3 Click the Add Policy button .
A Selector Chooser dialog box is displayed.
4 From the Selector Chooser dialog box, choose the event selector that you want to use for this policy and click OK.
The Dynamic Blackout Policy Details tab is displayed in the details pane of the Administration View, as shown in Figure 115 on page 330.
Chapter 10 Event management policies 329

Creating a new dynamic data enrichment event management policy
Figure 115 Dynamic Blackout Policy Details tab
5 In the Policy Name field, type a unique alphanumeric name for the event management policy. The name must contain no spaces.
6 In the Description field, type a description of the event management policy.
330 BMC Impact Solutions Event Management Guide

Creating a new dynamic data enrichment event management policy
7 To enable the policy immediately, select the Enabled check box. If you do not want to enable the policy at this time, you can return to this dialog box and enable the policy later.
8 In the Execution Order field, if more than one policy exists, specify the order of execution.
9 In the Policy Activation Timeframes section, define the periods of time the event management policy should be active (when enabled) by performing the following actions:
A Select one of the following choices:
■ To make the event management policy active continuously, select Always Active.
■ To specify when the policy is active or inactive, select Define Activation Timeframes.
The Active Timeframes and Not Active Timeframes lists are displayed.
B If you selected Define Activation Timeframes, depending on how you want to define the timeframe for your policy do one or both of the following:
■ To specify the periods of time when the policy should be active, select the Active Timeframes check box and one or more timeframes from its scrollable list.
■ To specify the periods of time when the policy should be inactive, select the Not Active Timeframes check box and one or more timeframes from its scrollable list.
NOTE When a new policy is created, the number shown in the Execution Order field should be one greater the largest current execution order.
If two policies have the same execution order, they will run in indeterminate order.
NOTE You can select both check boxes to create active and inactive time periods. However, the inactive time period takes precedence over the active time period.
Chapter 10 Event management policies 331
Creating a new dynamic data enrichment event management policy
10 If you do not want to accept the default event class, you can select an event class by clicking in the Event Class field of the Match Fields section, selecting a new event class, and clicking OK.
The event class determines what slots are available in the Available Event Fields column.
11 In the Class Chooser dialog box, select an event class and click OK.
12 In Available Event Fields column, select the slots that correspond to the match fields in your dynamic data enrichment source file. Use the left arrow button to move those slots into the Match Fields column. You may select and move multiple slots at the same time.
13 In Available Event Fields column, select the slots that correspond to the output fields in your dynamic data enrichment source file. Use the right arrow button to move those slots into the Output Fields column. You may select and move multiple slots at the same time.
14 (optional) In the Match Fields section, activate the Match Tracing check box to add diagnostic notes to the event, if necessary.
15 In the Match Table section, in the Type field, accept the default.
16 In the Match Table section, in the Tag field, accept the default.
WARNING It is critical that the policy definition and the data enrichment source file contain the exact same number of match fields and output fields in the same order. If the match fields and output fields in the enrichment file and the policy do not match, the policy will not run.
For example, if you were creating a file similar to the location.csv file that is included with the product, you must select the Host slot as the Match Field and the Location slot as the Output Field to correspond to the slots in the location.csv file.
NOTE Typically, you do not need to the change the value of the Type field. You can override the default; however, you must use a unique tag within the given match table.
NOTE The Tag field uniquely identifies the match table that will be used by the policy instance.
You do not need to the change the value of this field. You can override the default; however, you must use a unique tag within the given match table.
332 BMC Impact Solutions Event Management Guide
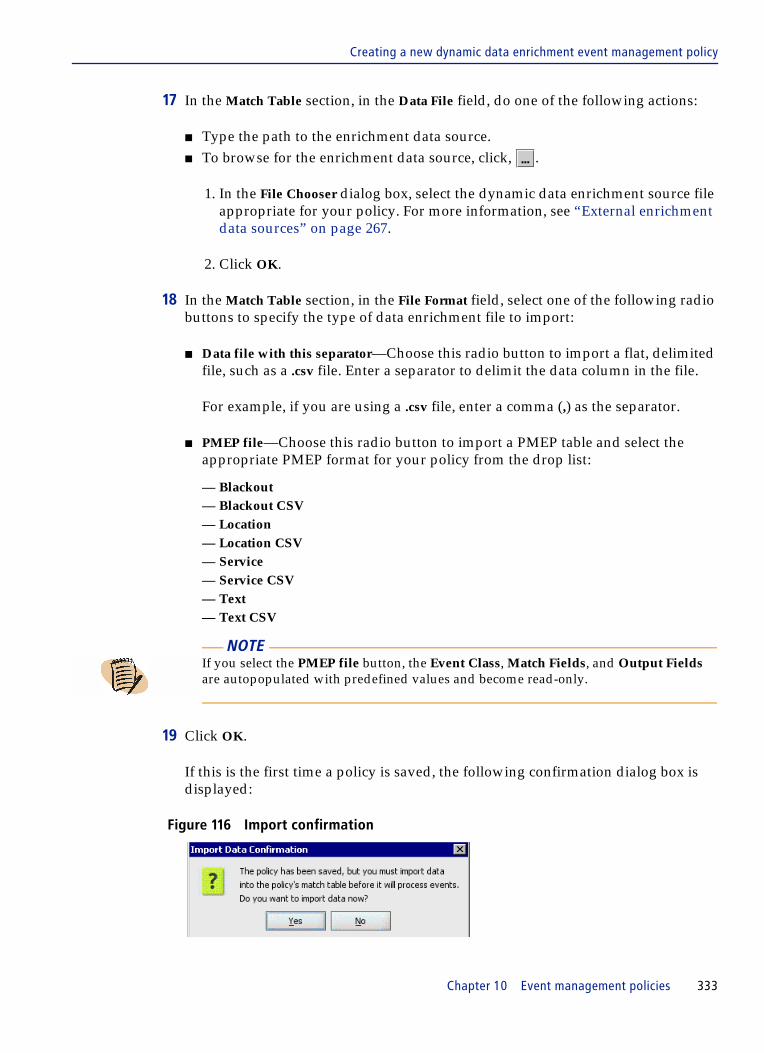
Creating a new dynamic data enrichment event management policy
17 In the Match Table section, in the Data File field, do one of the following actions:
■ Type the path to the enrichment data source.■ To browse for the enrichment data source, click, .
1. In the File Chooser dialog box, select the dynamic data enrichment source file appropriate for your policy. For more information, see “External enrichment data sources” on page 267.
2. Click OK.
18 In the Match Table section, in the File Format field, select one of the following radio buttons to specify the type of data enrichment file to import:
■ Data file with this separator—Choose this radio button to import a flat, delimited file, such as a .csv file. Enter a separator to delimit the data column in the file.
For example, if you are using a .csv file, enter a comma (,) as the separator.
■ PMEP file—Choose this radio button to import a PMEP table and select the appropriate PMEP format for your policy from the drop list:
— Blackout— Blackout CSV— Location— Location CSV— Service— Service CSV— Text— Text CSV
19 Click OK.
If this is the first time a policy is saved, the following confirmation dialog box is displayed:
Figure 116 Import confirmation
NOTE If you select the PMEP file button, the Event Class, Match Fields, and Output Fields are autopopulated with predefined values and become read-only.
Chapter 10 Event management policies 333

Enabling out-of-the-box dynamic data enrichment event management policies
20 Click Yes.
A green check mark should be displayed in the Enable column next to the policy in the event management policies list. (You may need to scroll the window to the right to see the Enable column.) The policy also should show up in the tree in the left pane of the BMC Impact Explorer window.
21 Import the data from the dynamic data enrichment source enrichment file as described in “Importing dynamic data enrichment source” on page 350.
Enabling out-of-the-box dynamic data enrichment event management policies
This section provides instructions for enabling out-of-the-box dynamic data enrichment event management policies.
Before you begin
You must export data from an external enrichment data source into the dynamic data enrichment source files provided with the product before you can enable any of the out-of-the-box dynamic data enrichment policies. For more information see, “How to create and edit a dynamic data enrichment source file” on page 274.
The dynamic data enrichment source file for the PATROL Message Text Translation policy (TextTrans.csv) is the only out-of-the-box dynamic data enrichment source file that includes valid data. You can enable PATROL Message Text Translation policy without exporting data into TextTrans.csv. For more information about TextTrans.csv, see “Using the sample PATROL messaging text translation dynamic data enrichment source file” on page 276.
Table 62 lists each out-of-the-box dynamic data enrichment event management policy type and the page number of the procedure for each type.
Table 62 Out-of-the-box dynamic data enrichment event policy types and procedures
To enable this event policy... See...
Dynamic blackout “Enabling a dynamic data enrichment blackout policy” on page 335
Dynamic location enrichment “Enabling a dynamic data enrichment location policy” on page 338
Dynamic service contact enrichment “Enabling a dynamic data enrichment service contact policy” on page 342
Dynamic PATROL message translation
“Enabling a dynamic enrichment PATROL message text translation policy” on page 346
334 BMC Impact Solutions Event Management Guide

Enabling a dynamic data enrichment blackout policy
Enabling a dynamic data enrichment blackout policy
A dynamic data enrichment blackout policy specifies external schedules that initiate event blackout.
Before you begin
For the dynamic blackout policy to work, you must define the timeframes referenced in the enrichment source file (blackout.csv). If any of the timeframes referenced in the enrichment source file have not been created in BEM, then the policy will not run.
For instructions on defining timeframes, see “How to create a new local timeframe” on page 270.
To enable a dynamic data enrichment blackout policy
1 From the Event Management Policies tab of the Administration View, expand the By Policy Type folder.
2 Under the By Policy Type folder, select Dynamic Blackout Policy.
The Dynamic Blackout Policy Details tab is displayed in the details pane of the Administration View, as shown in Figure 117 on page 336.
Chapter 10 Event management policies 335

Enabling a dynamic data enrichment blackout policy
Figure 117 Dynamic Blackout Policy Details tab
3 On the BMC Impact Explorer toolbar, click the Update Policy button to make the Dynamic Blackout Policy Details tab editable.
4 On the Dynamic Blackout Policy Details tab, select the Enabled check box.
336 BMC Impact Solutions Event Management Guide

Enabling a dynamic data enrichment blackout policy
5 In the Execution Order field, if more than one policy of this type exists, specify the order of execution.
6 In the Policy Activation Timeframes section, define the periods of time the event management policy should be active and/or inactive (when enabled) by performing the following actions:
A Select one of the following choices:
■ To make the event management policy active continuously, select Always Active.
■ To specify when the policy is active or inactive, select Define Activation Timeframes.
The Active Timeframes and Not Active Timeframes timeframe lists are displayed.
B If you selected Define Activation Timeframes, depending on how you want to define the timeframe for your policy do one or both of the following:
■ To specify the periods of time when the policy should be active, select the Active Timeframes check box and one or more timeframes from its scrollable list.
■ To specify the periods of time when the policy should be inactive, select the Not Active Timeframes check box and one or more timeframes from its scrollable list.
7 (optional) In the Match Fields section, activate the Match Tracing check box to add diagnostic notes to the event to assist with trouble-shooting an event.
8 Click OK.
A confirmation dialog box is displayed, asking if you want to import data now, as shown in Figure 118 on page 338.
NOTE When a new policy is created, the number shown in the Execution Order field should be one greater the largest current execution order.
If two policies have the same execution order, they will run in indeterminate order.
NOTE You can select both check boxes to create active and inactive time periods. However, the inactive time period takes precedence over the active time period.
Chapter 10 Event management policies 337

Enabling a dynamic data enrichment location policy
Figure 118 Import Data Confirmation dialog box
9 Click Yes.
A green check mark should be displayed in the Enable column next to the policy in the event management policies list. (You may need to scroll the window to the right to see the Enable column.) The policy also should show up in the tree in the left pane of the BMC Impact Explorer window.
10 Import the data from the dynamic data enrichment source enrichment file as described in “Importing dynamic data enrichment source” on page 350.
Enabling a dynamic data enrichment location policy
The dynamic enrichment location policy adds location information to an event.
Some examples of uses for a dynamic enrichment location policy include:
■ Provides information to IT Operations so that they know which area/datacenter the problematic technology is located in and can direct engineers more quickly to the problem.
■ Allows IT Operations to build views in Impact Explorer of specific areas/data centers and understand at a glance where the problems are.
■ Allows IT Operations to view reports in BMC Impact Reporting based on location. For example, they can identify which locations which are generating the most events.
■ If you are integrating with a service desk the location identifier can be passed along with the rest of event, providing more useful information to the engineer that will be assigned to handle the incident.
To enable a dynamic data enrichment location policy
1 From the Event Management Policies tab of the Administration View, expand the By Policy Type folder.
2 Under the By Policy Type folder, select Dynamic Enrichment Policy.
338 BMC Impact Solutions Event Management Guide

Enabling a dynamic data enrichment location policy
A list of out-of-the-box dynamic data enrichment policies are displayed in the right pane of the Administration View as shown in Figure 119.
Figure 119 List of out-of-the-box dynamic data enrichment policies
3 From the list of out-of-the-box dynamic enrichment policies, select Location_Enrichment.
The Dynamic Enrichment Policy Details tab, shown in Figure 120 on page 340, is displayed in the details pane of the Administration View.
Chapter 10 Event management policies 339

Enabling a dynamic data enrichment location policy
Figure 120 Dynamic Enrichment Policy Details tab
4 On the BMC Impact Explorer toolbar, click the Update Policy button to make the Dynamic Enrichment Policy Details tab editable.
5 To enable the policy, select the Enabled check box.
340 BMC Impact Solutions Event Management Guide

Enabling a dynamic data enrichment location policy
6 In the Execution Order field, if more than one of this type of policy exists, specify the order of execution.
7 In the Policy Activation Timeframes section, define the periods of time the event management policy should be active (when enabled) by performing the following actions:
A Select one of the following choices:
■ To make the event management policy active continuously, select Always Active.
■ To specify when the policy is active or inactive, select Define Activation Timeframes.
The Active Timeframes and Not Active Timeframes lists are displayed.
B If you selected Define Activation Timeframes, depending on how you want to define the timeframe for your policy do one or both of the following:
■ To specify the periods of time when the policy should be active, select the Active Timeframes check box and one or more timeframes from its scrollable list.
■ To specify the periods of time when the policy should be inactive, select the Not Active Timeframes check box and one or more timeframes from its scrollable list.
8 (optional) In the Match Fields section, activate the Match Tracing check box to add diagnostic notes to the event, if necessary.
NOTE When a new policy is created, the number shown in the Execution Order field should be one greater the largest current execution order.
If two policies have the same execution order, they will run in indeterminate order.
NOTE You can select both check boxes to create active and inactive time periods. However, the inactive time period takes precedence over the active time period.
Chapter 10 Event management policies 341

Enabling a dynamic data enrichment service contact policy
9 Click OK.
If this is the first time a policy is saved, the following confirmation dialog box is displayed:
Figure 121 Import confirmation
10 Click Yes.
A green check mark should be displayed in the Enable column next to the policy in the event management policies list. (You may need to scroll the window to the right to see the Enable column.) The policy also should show up in the tree in the left pane of the BMC Impact Explorer window.
11 Import the data from the dynamic data enrichment source enrichment file as described in “Importing dynamic data enrichment source” on page 350.
Enabling a dynamic data enrichment service contact policy
The dynamic enrichment location policy adds contact information related to the originating technology to an event.
For example, you can add a server administrator’s name and telephone number to all events originating from a particular server
To enable a dynamic data enrichment service contact policy
1 From the Event Management Policies tab of the Administration View, expand the By Policy Type folder.
2 Under the By Policy Type folder, select Dynamic Enrichment Policy.
A list of out-of-the-box dynamic data enrichment policies are displayed in the right pane of the Administration View as shown in Figure 122 on page 343.
342 BMC Impact Solutions Event Management Guide
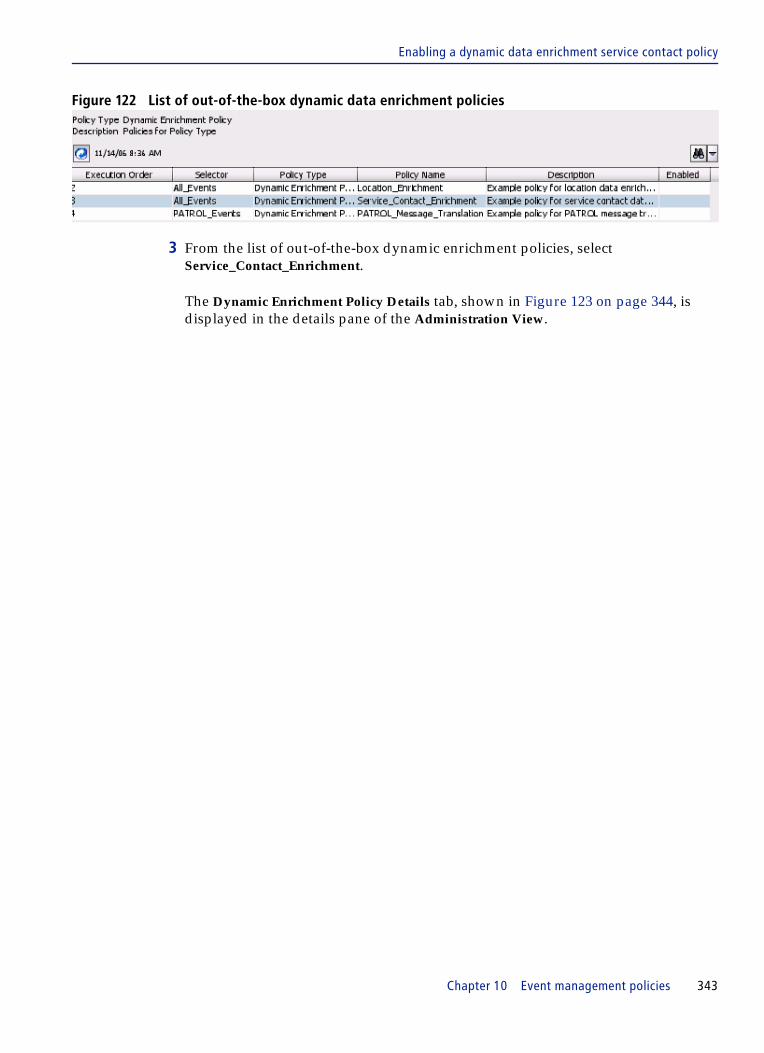
Enabling a dynamic data enrichment service contact policy
Figure 122 List of out-of-the-box dynamic data enrichment policies
3 From the list of out-of-the-box dynamic enrichment policies, select Service_Contact_Enrichment.
The Dynamic Enrichment Policy Details tab, shown in Figure 123 on page 344, is displayed in the details pane of the Administration View.
Chapter 10 Event management policies 343
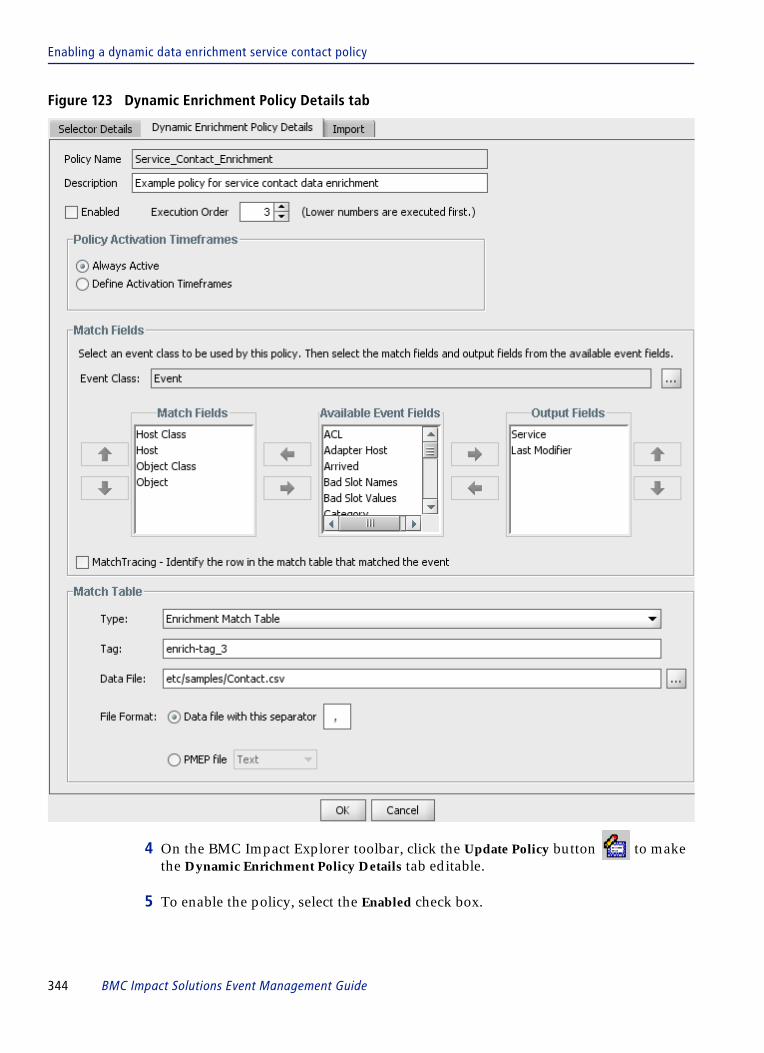
Enabling a dynamic data enrichment service contact policy
Figure 123 Dynamic Enrichment Policy Details tab
4 On the BMC Impact Explorer toolbar, click the Update Policy button to make the Dynamic Enrichment Policy Details tab editable.
5 To enable the policy, select the Enabled check box.
344 BMC Impact Solutions Event Management Guide

Enabling a dynamic data enrichment service contact policy
6 In the Execution Order field, if more than one type of this policy exists, specify the order of execution.
7 In the Policy Activation Timeframes section, define the periods of time the event management policy should be active (when enabled) by performing the following actions:
A Select one of the following choices:
■ To make the event management policy active continuously, select Always Active.
■ To specify when the policy is active or inactive, select Define Activation Timeframes.
The Active Timeframes and Not Active Timeframes lists are displayed.
B If you selected Define Activation Timeframes, depending on how you want to define the timeframe for your policy do one or both of the following:
■ To specify the periods of time when the policy should be active, select the Active Timeframes check box and one or more timeframes from its scrollable list.
■ To specify the periods of time when the policy should be inactive, select the Not Active Timeframes check box and one or more timeframes from its scrollable list.
8 (optional) In the Match Fields section, activate the Match Tracing check box to add diagnostic notes to the event, if necessary.
9 Click OK.
NOTE When a new policy is created, the number shown in the Execution Order field should be one greater the largest current execution order.
If two policies have the same execution order, they will run in indeterminate order.
NOTE You can select both check boxes to create active and inactive time periods. However, the inactive time period takes precedence over the active time period.
Chapter 10 Event management policies 345

Enabling a dynamic enrichment PATROL message text translation policy
If this is the first time a policy is saved, the following confirmation dialog box is displayed:
Figure 124 Import confirmation
10 Click Yes.
A green check mark should be displayed in the Enable column next to the policy in the event management policies list. (You may need to scroll the window to the right to see the Enable column.) The policy also should show up in the tree in the left pane of the BMC Impact Explorer window.
11 Import the data from the dynamic data enrichment source enrichment file as described in “Importing dynamic data enrichment source” on page 350.
Enabling a dynamic enrichment PATROL message text translation policy
If you are integrated with PATROL, the dynamic data enrichment PATROL message translation policy allows you to substitute existing PATROL messages with messages that are meaningful to your enterprise.
For example, you can use the PATROL message translation policy to change this message:
NT_CPU.CPU_0.CPUprcrUserTimePercent parameter CPUCputil triggered on 90 <= 97 <= 100
to the following, more comprehensible message:
CPU Utilization is at 97%
NOTE A sample dynamic data enrichment service contact policy data source file, TextTranslation.csv, is provided in the %HOME%\Mastercell\console\etc\samples directory. The TextTranslation.csv file includes translations for many common messages that will be useful in your enterprise. If you are integrated with PATROL, BMC Software recommends that you take advantage of the data that is already included in this sample file. For information about using the TextTranslation.csv file, see “Using the sample PATROL messaging text translation dynamic data enrichment source file” on page 276.
346 BMC Impact Solutions Event Management Guide
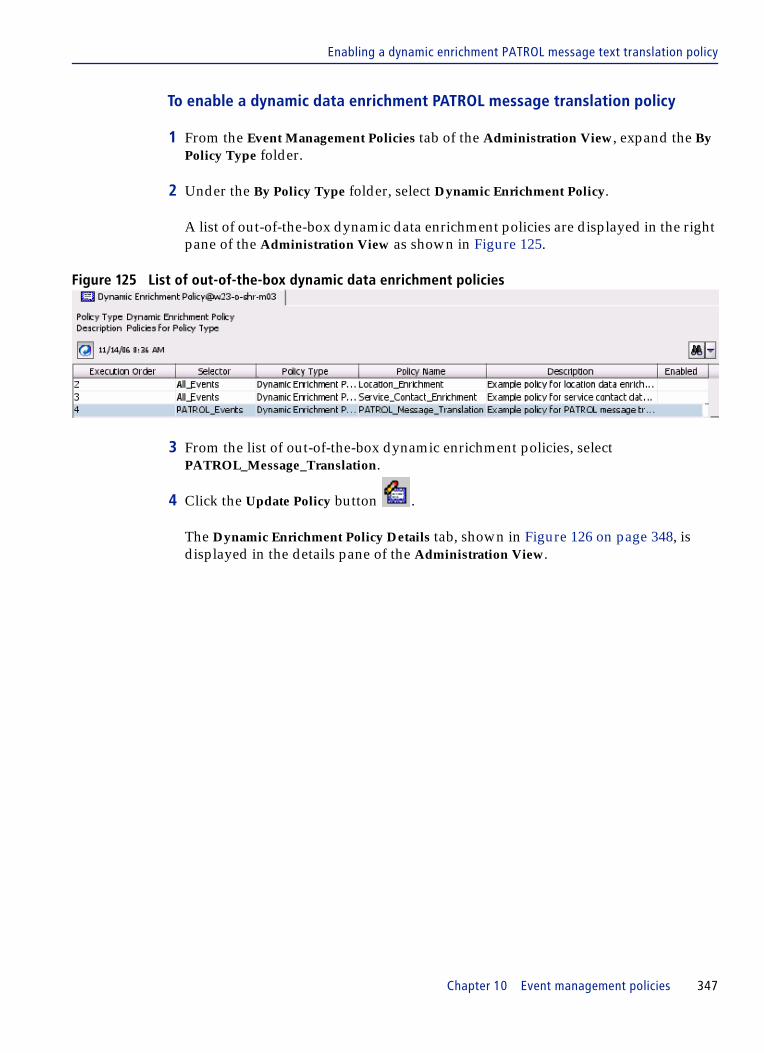
Enabling a dynamic enrichment PATROL message text translation policy
To enable a dynamic data enrichment PATROL message translation policy
1 From the Event Management Policies tab of the Administration View, expand the By Policy Type folder.
2 Under the By Policy Type folder, select Dynamic Enrichment Policy.
A list of out-of-the-box dynamic data enrichment policies are displayed in the right pane of the Administration View as shown in Figure 125.
Figure 125 List of out-of-the-box dynamic data enrichment policies
3 From the list of out-of-the-box dynamic enrichment policies, select PATROL_Message_Translation.
4 Click the Update Policy button .
The Dynamic Enrichment Policy Details tab, shown in Figure 126 on page 348, is displayed in the details pane of the Administration View.
Chapter 10 Event management policies 347

Enabling a dynamic enrichment PATROL message text translation policy
Figure 126 Dynamic Enrichment Policy Details tab
5 To enable the event management policy, select the Enabled check box. If you do not want to enable the event management policy at this time, it can be enabled later.
6 In the Execution Order field, if more than one policy exists, specify the order of execution.
7 In the Policy Activation Timeframes section, define the periods of time the event management policy should be active (when enabled) by performing the following actions:
A Select one of the following choices:
■ To make the event management policy active continuously, select Always Active.
■ To specify when the policy is active or inactive, select Define Activation Timeframes.
NOTE When a new policy is created, the number shown in the Execution Order field should be one greater the largest current execution order.
If two policies have the same execution order, they will run in indeterminate order.
348 BMC Impact Solutions Event Management Guide
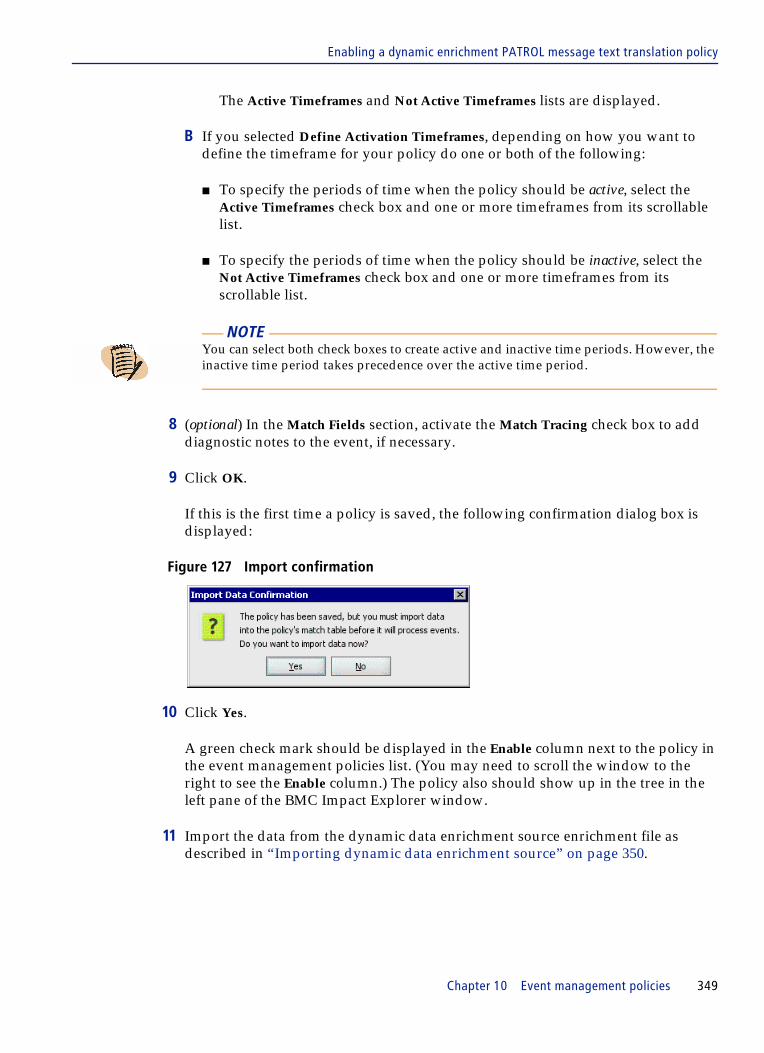
Enabling a dynamic enrichment PATROL message text translation policy
The Active Timeframes and Not Active Timeframes lists are displayed.
B If you selected Define Activation Timeframes, depending on how you want to define the timeframe for your policy do one or both of the following:
■ To specify the periods of time when the policy should be active, select the Active Timeframes check box and one or more timeframes from its scrollable list.
■ To specify the periods of time when the policy should be inactive, select the Not Active Timeframes check box and one or more timeframes from its scrollable list.
8 (optional) In the Match Fields section, activate the Match Tracing check box to add diagnostic notes to the event, if necessary.
9 Click OK.
If this is the first time a policy is saved, the following confirmation dialog box is displayed:
Figure 127 Import confirmation
10 Click Yes.
A green check mark should be displayed in the Enable column next to the policy in the event management policies list. (You may need to scroll the window to the right to see the Enable column.) The policy also should show up in the tree in the left pane of the BMC Impact Explorer window.
11 Import the data from the dynamic data enrichment source enrichment file as described in “Importing dynamic data enrichment source” on page 350.
NOTE You can select both check boxes to create active and inactive time periods. However, the inactive time period takes precedence over the active time period.
Chapter 10 Event management policies 349

Importing dynamic data enrichment source
Importing dynamic data enrichment sourceBefore a dynamic data enrichment policy can take effect, the data in the dynamic data enrichment source file must be imported.
1 Ensure that the policy is enabled.
2 Select Import tab.
The Import tab is displayed as shown in Figure 128.
Figure 128 Import tab
Table 63 describes the uneditable fields of the Import tab. These fields are for your information only.
3 In the field opposite the Import button, select whether you want to Replace the existing data in the cell or Merge new data with existing data in the cell.
4 Click Import.
The data is imported from the file into the cell.
5 Verify that the information has been uploaded by ensuring that the Last Action information in the Import tab shows a completed upload message.
Table 63 Import tab uneditable fields
Field Description
Data File Path to the enrichment data source
File Format Type of file used by the policy
Last Action Last time an import (replace or merge) was completed.
350 BMC Impact Solutions Event Management Guide
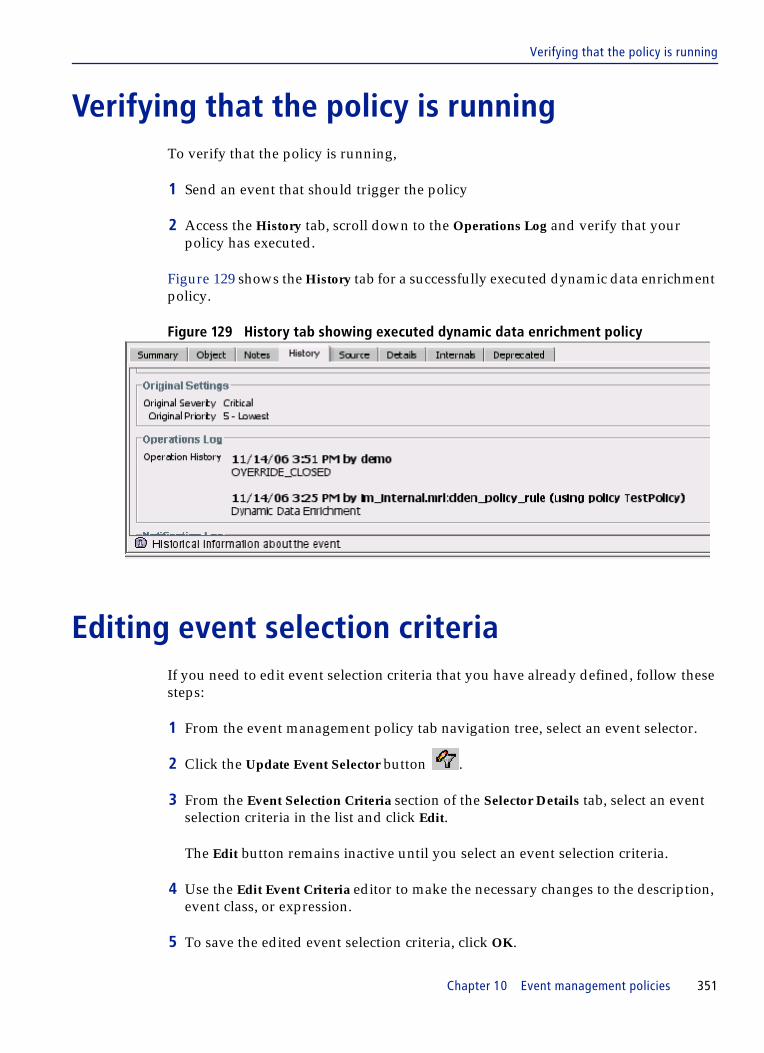
Verifying that the policy is running
Verifying that the policy is runningTo verify that the policy is running,
1 Send an event that should trigger the policy
2 Access the History tab, scroll down to the Operations Log and verify that your policy has executed.
Figure 129 shows the History tab for a successfully executed dynamic data enrichment policy.
Figure 129 History tab showing executed dynamic data enrichment policy
Editing event selection criteriaIf you need to edit event selection criteria that you have already defined, follow these steps:
1 From the event management policy tab navigation tree, select an event selector.
2 Click the Update Event Selector button .
3 From the Event Selection Criteria section of the Selector Details tab, select an event selection criteria in the list and click Edit.
The Edit button remains inactive until you select an event selection criteria.
4 Use the Edit Event Criteria editor to make the necessary changes to the description, event class, or expression.
5 To save the edited event selection criteria, click OK.
Chapter 10 Event management policies 351

Deleting an event selector
6 From the Selector Details tab, click OK to save the edited event selection criteria and the event selector.
Deleting an event selectorIf you need to delete an event selector that you have defined, follow these steps:
1 From the event management policy navigation tree, select the appropriate event selector.
2 Click the Delete Event Selector button .
The Delete Confirmation dialog box is displayed.
3 Click Yes.
The event selector is deleted.
Trouble-shooting event management policiesThis section lists some common problems encountered with event management policies and some tools to assist you trouble-shoot problems not listed here.
Problem: The policy is not running
If the policy is not running, try the following:
■ Access the Policy Details tab for the policy and ensure that the Enabled check box is selected.
■ (Dynamic data enrichment policies only) Access the Policy Details tab for the policy and ensure that the Match Fields and Output Fields contain the exact same number of match fields in the same order as the associated data enrichment source file.
■ (Dynamic data enrichment policies only) Ensure that you have imported the data from the data enrichment source file into the cell using the Import tab.
■ For policies that use a schedule, check to see if CellEventEnable=No is set in mcell.conf. If it is then change it to CellEventEnable=Yes.
352 BMC Impact Solutions Event Management Guide
Problem: The notification policy is configured to generate a notification email, but no email is being sent
Problem: The notification policy is configured to generate a notification email, but no email is being sent
When the product is installed, part of the installation process locates the SMTP server. If an SMTP server is not installed before the product installed, the email notification will not be able to send an email. If you installed an SMTP server after the product was installed, from the product installation directory C:\Program Files\BMC Software\Impact\server\etc\<cell-name>\kb\bin\w4, run the smail.exe utility:
smail.exe -install server_address -f sender_name
where server_address is the name of your mail server and sender_name is the name that you want to appear in the From line of the notification email.
For example,
smail.exe -install mail.bmc.com -f BMC Technical Support
Problem: I receive an invalid data error when running a dynamic data enrichment policy
Access the Policy Details tab for the policy and ensure that the Match Fields and Output Fields contain the exact same number of match fields in the same order as the associated data enrichment source file.
Figure 130 on page 354 shows an example error message generated by dynamic data enrichment policy that has a mismatch between the match and output fields defined in the policy and the number of columns included in the enrichment data source file.
Chapter 10 Event management policies 353

Problem: I receive an error message when running a dynamic data enrichment blackout policy
Figure 130 Invalid data error: dynamic enrichment policy
Problem: I receive an error message when running a dynamic data enrichment blackout policy
Ensure that the timeframe defined in the data source enrichment file actually exists. For information on creating valid timeframes, see “How to create a new local timeframe” on page 270.
Figure 131 shows an example error message generated by dynamic blackout policy that has an invalid timeframes.
Figure 131 Invalid timeframe error: dynamic blackout policy
354 BMC Impact Solutions Event Management Guide

Problem: I have several thousand data records displayed in the Dynamic Data Editor tab
Problem: I have several thousand data records displayed in the Dynamic Data Editor tab
If your Match Table contains several thousand data records (testing has noted 7500), then when you try to execute a copy, paste, export, or print action, you can encounter poor response times from the BMC IX Console and find message buffer full exceptions in the trace files.
To overcome this limitation, you can uncomment out the five sizing properties in the IMPACT_SOLUTIONS_HOME\console\etc\ix.properties file.
After modifying the ix.properties file, you must restart the BMC IX Console.
Trouble-shooting tools for dynamic data enrichment policies
You can use the following methods to trouble-shoot the dynamic data enrichment policies that you have defined:
■ Enable the Match Tracing check box in the Dynamic Enrichment Policy Details tab to to add diagnostic notes to the event.
■ Access the History tab and check the Operations Log to determine which dynamic data enrichment policy added the information into the event.
#data_handle_method_new=true
#IX will handle below specified chunk size data at a time. Default data chunk size is 100#data_handle_chunk_size=100
#sleep interval (in milliseconds) between the specified chunk size data handling. Default Sleep interval is 500 milliseconds#data_handle_sleep_interval=500
#IX will handle specified chunk size data at a time while paste action. Default data chunk size is 25#data_paste_chunk_size=25
#sleep interval (in Milliseconds) between the specified paste chunk size data handling. Default Sleep interval is 1000 milliseconds#data_paste_sleep_interval=1000
Chapter 10 Event management policies 355

Trouble-shooting tools for dynamic data enrichment policies
356 BMC Impact Solutions Event Management Guide

C h a p t e r 11
11 Dynamic data editorThis chapter describes the Dynamic Data Editor. It contains the following topics:
Dynamic data definition using the Dynamic Data Editor . . . . . . . . . . . . . . . . . . . . . . 358Navigating the Dynamic Data Editor . . . . . . . . . . . . . . . . . . . . . . . . . . . . . . . . . . . . . . . 358
Navigation pane . . . . . . . . . . . . . . . . . . . . . . . . . . . . . . . . . . . . . . . . . . . . . . . . . . . . . 358Toolbar functions. . . . . . . . . . . . . . . . . . . . . . . . . . . . . . . . . . . . . . . . . . . . . . . . . . . . . 360
Filtering and sorting the Data List. . . . . . . . . . . . . . . . . . . . . . . . . . . . . . . . . . . . . . . . . . 360Filtering slots . . . . . . . . . . . . . . . . . . . . . . . . . . . . . . . . . . . . . . . . . . . . . . . . . . . . . . . . 360Sorting data fields . . . . . . . . . . . . . . . . . . . . . . . . . . . . . . . . . . . . . . . . . . . . . . . . . . . . 363
Working with data instances . . . . . . . . . . . . . . . . . . . . . . . . . . . . . . . . . . . . . . . . . . . . . . 364Extended Details tab . . . . . . . . . . . . . . . . . . . . . . . . . . . . . . . . . . . . . . . . . . . . . . . . . . 365Internals tab . . . . . . . . . . . . . . . . . . . . . . . . . . . . . . . . . . . . . . . . . . . . . . . . . . . . . . . . . 365Data instance context menu . . . . . . . . . . . . . . . . . . . . . . . . . . . . . . . . . . . . . . . . . . . . 365Adding a new data instance. . . . . . . . . . . . . . . . . . . . . . . . . . . . . . . . . . . . . . . . . . . . 365Editing slots . . . . . . . . . . . . . . . . . . . . . . . . . . . . . . . . . . . . . . . . . . . . . . . . . . . . . . . . . 367Exporting data . . . . . . . . . . . . . . . . . . . . . . . . . . . . . . . . . . . . . . . . . . . . . . . . . . . . . . . 368
Chapter 11 Dynamic data editor 357

Dynamic data definition using the Dynamic Data Editor
Dynamic data definition using the Dynamic Data Editor
Dynamic data is contextual reference data that is stored in the event repository and updated whenever the context changes while the cell is running. Its function is similar to a global variable. You use the Dynamic Data Editor to define data class instances for use in event management rules or service models. To define the data instances, you must first define a data class. See BMC Impact Solutions Knowledge Base Development Reference Guide for additional information about dynamic data.
Navigating the Dynamic Data EditorYou can use the Dynamic Data Editor to add a dynamic data instance to use as a contextual variable in MRL rules and policies (“Adding a new data instance” on page 365).
This section discusses the basics of how to navigate the Dynamic Data Editor.
Navigation pane
In the Dynamic Data Editor tab on the Administration View you can view the data classes for a cell in a hierarchical tree, as illustrated in Figure 132 on page 359.
358 BMC Impact Solutions Event Management Guide
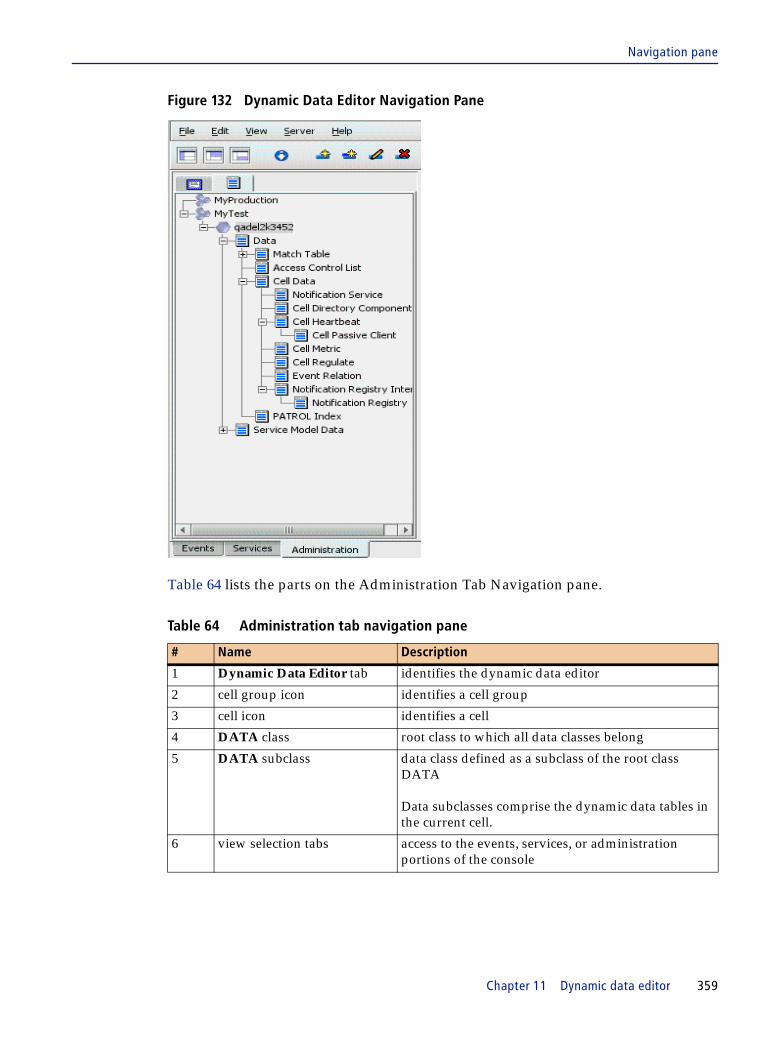
Navigation pane
Figure 132 Dynamic Data Editor Navigation Pane
Table 64 lists the parts on the Administration Tab Navigation pane.
Table 64 Administration tab navigation pane
# Name Description
1 Dynamic Data Editor tab identifies the dynamic data editor
2 cell group icon identifies a cell group
3 cell icon identifies a cell
4 DATA class root class to which all data classes belong
5 DATA subclass data class defined as a subclass of the root class DATA
Data subclasses comprise the dynamic data tables in the current cell.
6 view selection tabs access to the events, services, or administration portions of the console
Chapter 11 Dynamic data editor 359

Toolbar functions
Toolbar functions
Figure 133 describes the toolbar buttons available in the Dynamic Data Editor.
Figure 133 Dynamic Data Editor toolbar
Filtering and sorting the Data ListThe Data List of the Administration View in BMC Impact Explorer provides an interface to assist you in working with a cell’s dynamic data. From the Data List, you can
■ filter slots■ sort data
Filtering slots
The Slot Quick Filter allows you to filter the displayed data list according to specified slot criteria.
Hide Navigation
Hide Data List
Hide Details
Refresh Current Data
List
Add data instances
Copy and add data instances
Update data instance
Delete data instances
Copy data instances
Paste data instances
Export data instances
Print data instances
360 BMC Impact Solutions Event Management Guide

Filtering slots
1 Click on the Slot Quick Filter button or the down arrow to its right to display the Slot Quick Filter dialog box, shown in Figure 134, in which you set the filter criteria.
Figure 134 Slot Quick Filter dialog box
2 From the Slot list, select the slot name.
3 From the Operator list, select the specific operator with which the filter acts.
4 In the Value box, enter the value with which you want to filter the Data List.
5 Click OK.
The filter you specified appears in place of the Slot Quick Filter button and the data instances that meet the criteria are displayed in the Data List, as shown in Figure 135 on page 362.
For illustration purposes, the Data List is filtered by Slot name equals Brussels.
Chapter 11 Dynamic data editor 361

Filtering slots
Figure 135 Unfiltered data list
To toggle the quick filter on and off, click on the Slot Quick Filter button or on the filter specifications currently displayed in place of the icon.
Unfiltered Data List:
362 BMC Impact Solutions Event Management Guide

Sorting data fields
Sorting data fields
You can sort fields in the Data List using two methods: a multiple column sort order or single-click on a column to sort immediately by that column.
To sort using multiple column sorting
Designating multiple columns for a sorting order is useful in resolving sort order conflicts in the data list. Multiple column sorting functions as the following illustrates. Set a multiple column sort order for a maximum of three columns with these steps.
1 Right-click on a column head to display the Slot Order Indicator.
2 Select the order position desired for that column.
The Slot Order Indicator permits you to select a column as having no influence on the sort order, or as first, second or third in the order.
3 Right-click next on the column you want to include in the sort order.
4 Select the order position desired for that column.
5 Repeat if you want to establish a third column in the sort order.
An alternative method of multiple-column sorting is to press the Ctrl key and single-click on a header to add that column as the next column in the sort order. That is, pressing Ctrl and single-clicking on a column sets it as the first in the sort order, pressing Ctrl and single-clicking on the next column sets it as the second in the sort order, and the third column is set as the third in the sort order by again pressing the Ctrl key and single-clicking on the column header.
NOTE When you select the first column to include in your sort order the only options available in the Slot Order Indicator are None and First. After you designate a column as first in the sort order, the option Second is available in the Slot Order Indicator when you right-click on the second column. The Third option is available when you have designated a column as Second in the sort order.
Chapter 11 Dynamic data editor 363

Working with data instances
Currently only three columns can be included in the sort order. Pressing the Ctrl key and single-clicking on a fourth column will designate it as third in the sort order in place of the column previously designated as third. Also, pressing the Ctrl key and single-clicking on a column that is part of a sort order will remove it from the sort order.
The remaining columns in the designated sort order will reposition in the sort order to replace the one that has been removed. For example, if you press the Ctrl key and single-click on the column previously designated as first in the sort order, it will be removed from the order and the two remaining will move from second to first and from third to second in the new sort order.
Remember the following facts about sorting:
■ Only if there is a sorting conflict in the First sort column will the sorting be resolved by use of the Second sort column.
■ The sorting will extend to the Third sort column only if there is a sorting conflict in the Second sort column.
■ Establishing a multiple column sort simply ensures that any sorting conflicts that may arise can be resolved to the third column level.
If you have established a multiple sort order in the Data List, clicking on one of the sort order columns toggles that column’s display between ascending and descending order, as indicated by the small arrow next to the sort order number in the column head.
To sort using single-click sorting
Sorting also can be done by single-clicking on the column you want to use as the basis of your Data List sort. Even if a multiple sort order has been established, as in the preceding section, you can click on any column that is not part of the designated multiple sort order to reset sorting. This action establishes single column sorting and the column on which you clicked is designated as the First, and only, column in the new sort order.
Working with data instancesFrom the Administration View, you can edit and manipulate a cell’s dynamic data instances. All classes that are visible in the Administration View are subclasses of the base data class DATA and MC_SM_DATA. Subclasses of MC_SM_DATA are shown in the navigation pane, but data instances are not shown for these classes. Each cell’s data class definitions reside in its Knowledge Base.
364 BMC Impact Solutions Event Management Guide
Extended Details tab
To define data instances in the Administration View for a custom data class, you must first define that data class in the KB of the cell. For further information, see the BMC Impact Solutions Knowledge Base Development Reference Guide.
Extended Details tab
The Extended Details tab displays extended details of a selected data instance.
Internals tab
The Internals tab displays the internal data as defined on the base DATA class.
Data instance context menu
The Data List of the Administration View in BMC Impact Explorer provides an interface to assist you in working with a cell’s dynamic data. Right-click on a data instance in this pane to display the pop-up context menu. Discussion here focuses on the New, New Copy, Edit, and Delete pop-up context menu options.
Adding a new data instance
This section describes how to create a new data instance.
To create a new data instance
1 Right-click on a data instance.
2 Select the New pop-up menu option to display the New tab in the Details pane of the Administration View.
The fields on the New tab are the slots for which data information can be entered for this new data instance. The fields with a white background can be edited; fields with an asterisk are required.
The unique data identifier slot (mc_udid) has a white background and is empty.
Chapter 11 Dynamic data editor 365

Adding a new data instance
The cell assigns a valid value for this slot. The slot fields that are dimmed will be completed automatically by the cell. The only exception to this is the list associated with the Type field that permits you to select from specified options, as shown in Figure 136.
Figure 136 Type field list
3 Click OK to complete the new data instance and close the New tab.
The success or failure of your attempt to create a new data instance will be reflected in the message bar at the bottom of BMC Impact Explorer window. Figure 137 illustrates a notification of a failed attempt to create a new data instance.
Figure 137 Message bar
To create a new data instance with the New Copy option
Unlike the New menu option, the New Copy option requires you to right-click on a selected data instance in the Data List of the Administration View to display a New tab in the Details pane of the Administration View in BMC Impact Explorer window, as shown in Figure 138 on page 367. Note that certain of the editable fields contain slot information that is copied from the selected data instance in the Data List.
NOTE The mc_udid slot information is assigned by the cell and BMC Software recommends that you allow the cell to assign this value rather than entering one of your own.
366 BMC Impact Solutions Event Management Guide

Editing slots
Figure 138 New data instance created with the New Copy option
The New Copy menu option provides the same selection in the type field list as the New menu option, as shown in Figure 139.
Figure 139 Type field List
When you have entered or edited the appropriate slot information, click OK to create the new data instance and close the New tab. The success or failure of your attempt to create a new data instance is reflected in the message bar of BMC Impact Explorer window.
Editing slots
A class definition consists of one or more slots. Each slot has a data type and can have specific attributes called facets that can control the values that the slot can have or control aspects of a class instance’s processing. A class that is a subclass to another class inherits all the slots of the parent class.
The Edit pop-up menu option allows you to update the selected data instance of the current data list in the Data List display pane.
Chapter 11 Dynamic data editor 367
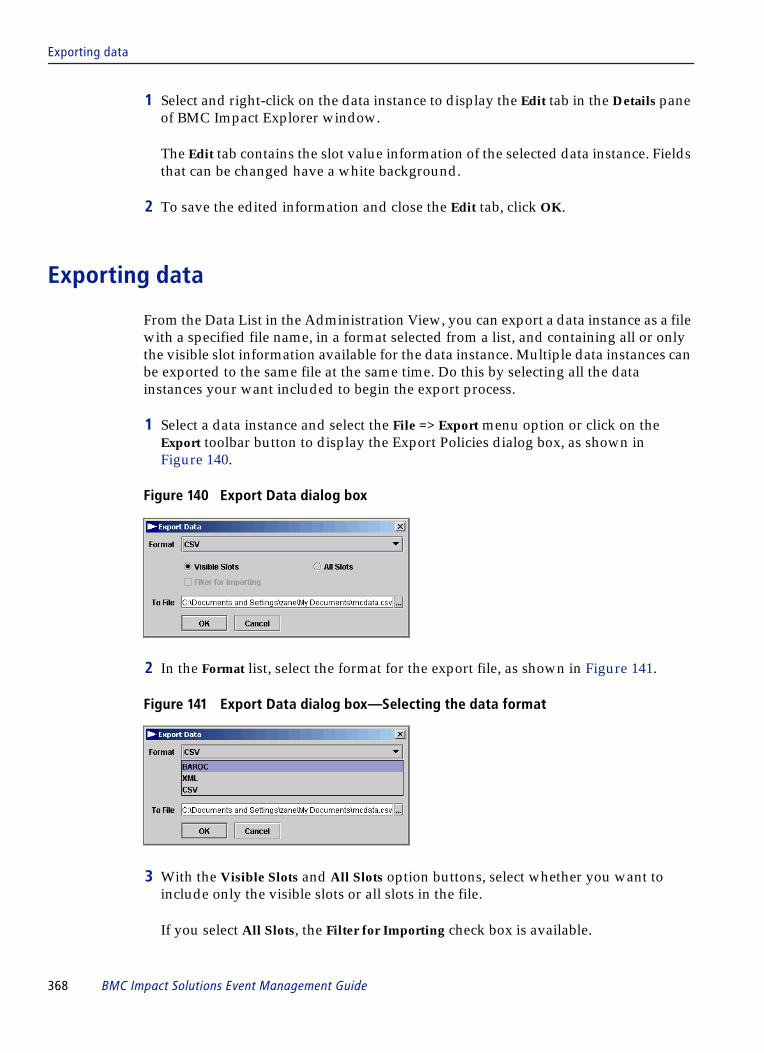
Exporting data
1 Select and right-click on the data instance to display the Edit tab in the Details pane of BMC Impact Explorer window.
The Edit tab contains the slot value information of the selected data instance. Fields that can be changed have a white background.
2 To save the edited information and close the Edit tab, click OK.
Exporting data
From the Data List in the Administration View, you can export a data instance as a file with a specified file name, in a format selected from a list, and containing all or only the visible slot information available for the data instance. Multiple data instances can be exported to the same file at the same time. Do this by selecting all the data instances your want included to begin the export process.
1 Select a data instance and select the File => Export menu option or click on the Export toolbar button to display the Export Policies dialog box, as shown in Figure 140.
Figure 140 Export Data dialog box
2 In the Format list, select the format for the export file, as shown in Figure 141.
Figure 141 Export Data dialog box—Selecting the data format
3 With the Visible Slots and All Slots option buttons, select whether you want to include only the visible slots or all slots in the file.
If you select All Slots, the Filter for Importing check box is available.
368 BMC Impact Solutions Event Management Guide

Exporting data
4 In the To File box, accept the default or specify the file name and location for the export file.
5 Click OK to create the export file and close the Export Data dialog box.
For illustration purposes, in Figure 142, the export file mcdata.csv containing information on all the slots for the selected data instance is created in C:\Documents and Settings\zane\My Documents.
Figure 142 Contents of mcdata.csv
Figure 143 illustrates an export file containing four data instances.
Figure 143 Export file containing four data instances
Chapter 11 Dynamic data editor 369

Exporting data
370 BMC Impact Solutions Event Management Guide
C h a p t e r 12
12 User-defined policiesThis chapter describes how to create and how to implement user-defined policy types. This chapter presents the following topics:
Understanding user-defined event policy types . . . . . . . . . . . . . . . . . . . . . . . . . . . . . . 372Understanding event processing rules (MRL) for policy types . . . . . . . . . . . . . . . . . 372
Format of event processing rules for policy types . . . . . . . . . . . . . . . . . . . . . . . . . 372How a rule for a policy type is processed . . . . . . . . . . . . . . . . . . . . . . . . . . . . . . . . 373Sources of information about rules . . . . . . . . . . . . . . . . . . . . . . . . . . . . . . . . . . . . . . 373
User-defined event policy type creation. . . . . . . . . . . . . . . . . . . . . . . . . . . . . . . . . . . . . 374Creating user-defined policy types. . . . . . . . . . . . . . . . . . . . . . . . . . . . . . . . . . . . . . 374Defining the policy data class for a new policy type . . . . . . . . . . . . . . . . . . . . . . . 374Defining presentation names for a new policy type . . . . . . . . . . . . . . . . . . . . . . . 376Creating the event processing rule(s) for a new policy type. . . . . . . . . . . . . . . . . 377
Chapter 12 User-defined policies 371

Understanding user-defined event policy types
Understanding user-defined event policy types
Predefined policy types cannot cover all requirements of different BMC Impact Solution implementations. To support specialized event processing, you can also define and implement custom event policy types to do specialized event processing not supported by the predefined policy types. For instructions on creating event policy types, see “User-defined event policy type creation” on page 374.
Understanding event processing rules (MRL) for policy types
This section describes the form of policy type rules and discusses how they work.
Format of event processing rules for policy types
A typical event processing rule for a user-defined policy type has this form:
<rule-phase> rule-name: using_policy { <POLICY_TYPE> ($POL) where [ ($POL.enabled == 1) AND (($POL.active_timeframes == [] ORtf_active($POL.active_timeframes)) AND NOT tf_active($POL.except_timeframes)) ] } $POL.selector_ecf ($EV) where [ <other conditions> ]{ <actions>; opadd($EV, $POL.name, "action name", ""); } END
372 BMC Impact Solutions Event Management Guide

How a rule for a policy type is processed
How a rule for a policy type is processed
The processing of a rule for a policy type is a follows:
1. The using_policy clause finds the applicable policy, that is, the instance of the user-defined policy class (derived from IM_POLICY).
These class definitions describe the slots available in a policy class:
2. The tf_active calls evaluates timeframes for the policy.
3. The selector ECF selects the event to process.
4. The actions implement the policy and the opadd call adds an entry to the operations log of the event.
Sources of information about rules
You can get more information about rules for policy types and how to create them from these sources
MC_DATA_CLASS : POLICY ISA CORE_DATA DEFINES { name : STRING, key = yes, read_only = yes; description : STRING; enabled : INTEGER, default = 1; }; ENDMC_DATA_CLASS: IM_POLICY ISA POLICY DEFINES { active_timeframes : LIST_OF STRING; except_timeframes : LIST_OF STRING; selector_name : STRING; selector_class : STRING; selector_ecf : ECF EVENT; ordinal : INTEGER, default=0; }; END
For... See...
examples of rules for policy types the pre-defined policies in .../kb/rules/im_internal.mrl.
definitions of the MRL constructs and primitives for policy rules
BMC Impact Solutions Knowledge Base Development Reference Guide
Chapter 12 User-defined policies 373

User-defined event policy type creation
User-defined event policy type creationIf you want to create a new user-defined event policy to perform specialized event processing, first, you must define a new event policy type. An event policy type is a data class, derived from that defines the distinct type of event processing to be performed.
Creating user-defined policy types
To define a new user-defined policy type, you must do the following things.
Defining the policy data class for a new policy type
To create a new policy type, first you must define a data class derived directly from the IM_BASE_CUSTOM_POLICY base class. This policy data class describes the policy type’s data. It also provides the template of data fields (slots) used by BMC IM to generate the BMC IX Custom Policy Details panel in which users specify the processing details for a policy of that type.
To define a new policy data class
1 Using a text editor, open the appropriate BAROC language file in the Knowledge Base.
Because the IM_BASE_CUSTOM_POLICY base class is defined in .../kb/class/im_policies.baroc file, you must define the new policy type in a separate file that is loaded for compilation after .../kb/class/im_policies.baroc file (it is listed after the im_policies.baroc in the .../kb/class/.load file list).
Table 65 Policy Type Creation process
Step Task Topic
1 Define a new policy data class that describes the policy type and copy it to the Knowledge Base of each BMC IM instance to use the user-defined policy.
“Defining the policy data class for a new policy type” on page 374
2 Define the presentation names that you want to appear in user interfaces for the policy type in a BMCIX.properties configuration file.
“Defining presentation names for a new policy type” on page 376
3 Create a new rule that defines the event processing done by the policy type and copy it to the Knowledge Base of each BMC IM instance to use the policy.
“Creating the event processing rule(s) for a new policy type” on page 377
374 BMC Impact Solutions Event Management Guide

Defining the policy data class for a new policy type
2 Define the new policy data class derived directly from the IM_BASE_CUSTOM_POLICY base class.
A Create the new class slots. You can create slots of these types:
■ ENUMERATION■ INTEGER■ STRING■ LIST OF
No other slot types are supported in custom event policies.
B Define the class slots in the order that you want them to appear in the BMC IX Custom Policy Type panel.
The BMC IX Custom Policy Details panel created from the policy type will have a field for each slot added to the IM_BASE_CUSTOM_POLICY class. The interface fields appear in the same order as the slots are defined in the class definition.
See the BMC Impact Solutions Knowledge Base Development Reference Guide for detailed information on creating new classes.
3 Save the edited file after defining the new policy type (data class).
4 Add and entry for the new file that you created to the compiler load list in the .../kb/class/.load file after the entry for the ../kb/class/im_policies.baroc file, which contains the base policy data class that the new policy type references.
5 Recompile the BMC Impact Manager instance’s Knowledge Base (KB) after defining the new policy data class.
For more information on compiling a KB, see “Compiling a Knowledge Base” in the BMC Impact Solutions Knowledge Base Development Reference Guide.
6 Finally, you must copy the changed KB to every BMC Impact Manager instance (cell) that will use the new policy.
Verifying that you created the class successfully
If you created the class successfully, you should be able to see it in the “By Policy” list and the “Custom Policy Details” panel.
Where to go from here
Next, define user-friendly presentation names to appear in the user interface for the policy type and its slots.
Chapter 12 User-defined policies 375

Defining presentation names for a new policy type
Defining presentation names for a new policy type
If you want user-friendly presentation names to appear in the user interface for the policy type and its slots instead of the internal names, you must:
■ define presentation names for the policy type in a resource file■ list the resource file for the policy type in the BMC IX.properties file
To define presentation names for a policy type
1 Create a resource file for the policy type to list the policy type and each slot with its assigned presentation name. The resource file name must have the .properties file extension.
2 Edit the resource file to add an entry for each presentation name assignment.
A To define the presentation name (label) for the policy type, add a line with the following format to the resource file:
B To define the presentation name (label) used for a slot, add a line with the following format to the resource file.:
3 Place the resource file in the .../console/lib/lang/kbinfo directory.
A Add the base name of the resource file to the value of kb_info_resources parameter in the BMC Impact Explorer .../console/etc/ix.properties file using this format:
The defined presentation names will display in the BMC Impact Manager Event Management Policies tree, the Policy Type picker window, and in the Policy List panel. Any slot or policy type for which a presentation name is not defined displays its internal name.
The event policy details tab for all user-defined policy types is Custom Policy Details.
CLASS.<policy type name>=<policy type presentation name> Policy
SLOT.<policy type name>.<slot name>=<slot presentation name>
kb_info_resources=<resource file name>,kb_core_resource, kb_deprecated_resource
376 BMC Impact Solutions Event Management Guide

Creating the event processing rule(s) for a new policy type
Creating the event processing rule(s) for a new policy type
Before you can define an event policy based on the user-defined policy type that you created, you must:
■ create a new Knowledge Base rule or rules to define the event processing done by the policy type
■ copy the rule or rules to the Knowledge Base of each BMC IM instance on which the user-defined policy will run
Event processing rule requirements
The event processing rule or rules that you define for the new user-defined policy type must:
■ do dynamic selection (use the using_policy clause)■ reference the policy data class that describes the new policy type
To create the event processing rule for a new policy type
1 , Add a new file in the .../kb/rules directory, for example, my_policies.mrl, for the new event processing rule or rules for the new policy type.
2 Edit the policy MRL file and write the event processing rule for the appropriate rule phase.
For more information, see
■ “Evaluation order of event policy types” on page 266 ■ “Understanding event processing rules (MRL) for policy types” on page 372■ See the MRL for the pre-defined policy types in ...\kb\rules\im_internal.mrl file.
3 Add the file name for the new rule or rules to the compiler load list in the .../kb/rules/.load file.
4 Compile the BMC Impact Manager instance’s Knowledge Base (KB) after defining the rule for the policy type.
For more information on compiling a KB, see BMC Impact Solutions Knowledge Base Development Reference Guide.
5 Copy this KB change to every BMC Impact Manager instance (cell) that will use a policy based on the new policy type.
Chapter 12 User-defined policies 377

Creating the event processing rule(s) for a new policy type
The definition of the policy type is complete and users can now create policies based on it in the Custom Policy Type panel.
378 BMC Impact Solutions Event Management Guide

A B C D E F G H I J K L M N O P Q R S T U V W X Y Z
Index
Symbols$, in variable name 57.dtd files 191.load files 56.loadwic files 56.mrl files 56.pkg files 56.wic files 56.xact files 79.xml files 190
AA directory 201Abstract rules
When clause 67Acknowledge
event icon 154event operation 154
Acknowledged (ACK) event status icon 108action blocks 57action definitions
local 191remote 202
Action tag 192ActionGroup tag 192ActionResultInlineLimit parameter 201actions
adding buttons to toolbar 198defining in a cell 209definitions 190deleting 200described 190directory 201execution results 208execution variables 209file naming guidelines 190, 202for AIX 201for HP-UX 201for Linux 201local, defining 190MRL syntax 202remote, defining 202reorder action buttons in toolbar 199responding to an event 156
result events 201return code limitation for Windows 208roles 202Solaris executables 201Windows executables 201
Actions.dtd file 191Actions.xsd file 191adding
buttons to local action toolbar 198cell to MetaCollector 121
Admin record 213Administration View
creating new data instance 365edit menu 367exporting data 368menu, context 365Slot Quick Filter 360sort multiple columns 363sort, single-click 364
alias formulasconditional operators 165functions in 167
ALL keywordUsing clause 65
annotating events 156Argument tag 194Assign To (event operation) 154Assigned event status icon 108
BBasic Information option of default filters 122bii4p_collectors.mrl file 98bin directory 201Blackout
event status icon 108blackout policy (standard), creating 283blackout policy, creating 283, 285, 322Blackout.cfg 269BMC Impact Administration server
configuration files 255BMC Impact Explorer
action definitions 190configuring local actions 197Event Groups, described 139
Index 379

A B C D E F G H I J K L M N O P Q R S T U V W X Y Z
BMC Impact Managerroles 91
BMC Portaldefining roles for collectors 96
BMC Software, contacting 2Body clause
in rules 69syntax 70
bracesto delimit action blocks 57
bracketsrequired for primitive arguments 57
Ccatchall_collector.mrl file 96cell groups
icon 25cell names
spaces in 56CELL_BUILD variable 209CELL_DATE variable 209CELL_NAME variable 209CELL_RELEASE variable 209cells
defining actions 209icon 25importing data into 269sending events to 79viewing event list 115
character casefor MRL 57
Class Chooser dialog box 125, 130class slot 183CLASS variable 209class_name slot 85clauses
Body 69conditions for Using 64Unless 66Using 63When 67Where 60
Close eventicon 155operation 155
Closed event status icon 108closure policy, creating 290collector keyword 89collectors
bii4p_collectors.mrl 98catchall_collector.mrl 96color affected by status and severity 112creating 88defaults for event management 96defaults for service impact management 99
380 BMC Impact Solutions Event Management Guide
directory 88dynamic 144event count affected by status 113expression 90icon 25mc_bylocation_collectors.mrl 97mc_bystatus_collectors.mrl 97mc_evr_collectors.mrl 99MCxP 98MCxP collector set 98naming 89permissions 89, 92roles 89, 91security 91self_collector.mrl 96setting color in navigation tree 112static 93, 143syntax 88, 90viewing event list 115
Collectors tab (Events View navigation) 25color
affected by event severity 108affected by status and severity 112event status icon 108
commandsmccomp 79msend 79
compilingrules 79
complex logic in creating filters 126component based enrichment policy 285component based enrichment policy, excluding slots 289component service
setting maintenance model manually 159setting status manually with remote action 159
Componentssubtab (Impact Manager Info dialog box) 27
condition operatorsfor Where clauses 61, 62
conditional operators in alias formulas 165conditions
for Using clause 64configuring
event Help 29Events tab display settings 110local actions 197
connecting to event sources 162console
adding action buttons to toolbar 198dynamic data 364exporting data 368Help, viewing 30settings, default configuration 27Slot Quick Filter 360sort data fields 363sort, single-click 364toolbar
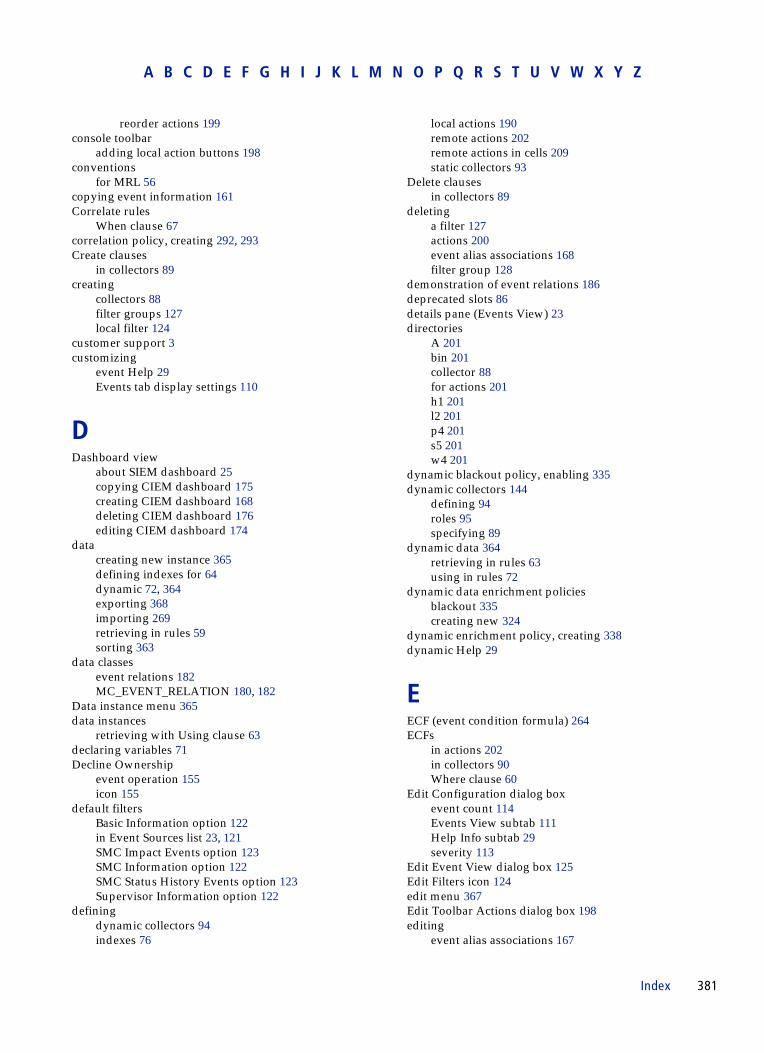
A B C D E F G H I J K L M N O P Q R S T U V W X Y Z
reorder actions 199console toolbar
adding local action buttons 198conventions
for MRL 56copying event information 161Correlate rules
When clause 67correlation policy, creating 292, 293Create clauses
in collectors 89creating
collectors 88filter groups 127local filter 124
customer support 3customizing
event Help 29Events tab display settings 110
DDashboard view
about SIEM dashboard 25copying CIEM dashboard 175creating CIEM dashboard 168deleting CIEM dashboard 176editing CIEM dashboard 174
datacreating new instance 365defining indexes for 64dynamic 72, 364exporting 368importing 269retrieving in rules 59sorting 363
data classesevent relations 182MC_EVENT_RELATION 180, 182
Data instance menu 365data instances
retrieving with Using clause 63declaring variables 71Decline Ownership
event operation 155icon 155
default filtersBasic Information option 122in Event Sources list 23, 121SMC Impact Events option 123SMC Information option 122SMC Status History Events option 123Supervisor Information option 122
definingdynamic collectors 94indexes 76
local actions 190remote actions 202remote actions in cells 209static collectors 93
Delete clausesin collectors 89
deletinga filter 127actions 200event alias associations 168filter group 128
demonstration of event relations 186deprecated slots 86details pane (Events View) 23directories
A 201bin 201collector 88for actions 201h1 201l2 201p4 201s5 201w4 201
dynamic blackout policy, enabling 335dynamic collectors 144
defining 94roles 95specifying 89
dynamic data 364retrieving in rules 63using in rules 72
dynamic data enrichment policiesblackout 335creating new 324
dynamic enrichment policy, creating 338dynamic Help 29
EECF (event condition formula) 264ECFs
in actions 202in collectors 90Where clause 60
Edit Configuration dialog boxevent count 114Events View subtab 111Help Info subtab 29severity 113
Edit Event View dialog box 125Edit Filters icon 124edit menu 367Edit Toolbar Actions dialog box 198editing
event alias associations 167
Index 381

A B C D E F G H I J K L M N O P Q R S T U V W X Y Z
local filter 126slot orders 130
END keyword 57enrichment policy, creating 296error_code slot 85error_column slot 84error_goal slot 85error_line slot 84error_message slot 84, 85error_source slot 85errors
in event processing 85escalation policy, creating 299, 300evaluation order of policies 266event alias associations
deleting 168editing 167
event collectorsdescribed 138
event condition formula 264Event Condition Formulas, See ECFsevent count
affected by status 113in Events View navigation 25
Event Count field 112Event Details window 116event groups
described 138granting access 151viewing event list 115
Event Groups tab 25event management
collectors 96event management policies
closure 290component based enrichment 285correlation 292enabling and disabling 322escalation 299execution order 287notification 304propagation 308recurrence 310remote action policy 259, 313standard blackout 283suppression 313threshold 316timeout 319
Event Operation Confirmation check box 112event policy
evaluation order 266types of 258
event priorityicons 109setting 155understanding 109
event processing
382 BMC Impact Solutions Event Management Guide
errors 85event relations
data class 182definition example 184demonstration 186icons 103illustrated 182mechanism 180primitives 184slots 181
event relationships, exploring 160event selection clauses
described 60event selectors
defined 263, 278groups 263maximum number 263
event severityicons 109levels 109
event slot 85Event Sources list
effect on event list 102location in Events View 23using 115
event statusicons 108understanding 108
event_text slot 84events
acknowledging 154annotating 156, 160assigning to an individual 154closing 155copying event data 161copying event information 161declining ownership 155defining indexes for 64event details 116for action results 201MC_CELL_ACTION_RESULT 201MC_CELL_PARSE_ERROR 84MC_CELL_PROCESS_ERROR 85MC_CELL_UNDEFINED_CLASS 85referencing a particular slot in rules 57relating 179reopening 155reopening in event list 155responding with an action 156retrieving with Using clause 63selecting in rules 60sending to a cell 79setting the priority 155sorting 129sorting fields 131taking ownership 154undefined 84

A B C D E F G H I J K L M N O P Q R S T U V W X Y Z
viewing details 116events list
current operator information 107default columns 102elements 102location in Events View 23organizing 120refreshing 117, 118selecting the type to view 115slot orders, editing 130viewing 114
Events Viewconfiguring display settings 110customizing display settings 110illustrated 22location of elements 22navigation pane 24overview 21subtab (Edit Configuration dialog box) 111
events, sorting 363Execute rules
When clause 67Explore Event Relationships icon 160exploring relationships 160exporting data 368expressions
in collectors 90external data sources 267
Ffiles
.dtd 191
.load 56
.loadwic 56
.mrl 56
.pkg 56
.wic 56
.xact 79
.xml 190Actions.dtd 191Actions.xsd 191bii4p_collectors.mrl 98catchall_collector.mrl 96LocalActions.dtd 191LocalActions.xsd 191mc_bylocation_collectors.mrl 97mc_bystatus_collectors.mrl 97mc_evr_collectors.mrl 99MRL 56naming guidelines for actions 190, 202self_collector.mrl 96
filter groupscreating 127deleting 128renaming 128
filteringevents, by severity 124events, by slot name 123events, overview 121
filtersassociating a slot order 131creating global 125, 130creating local 124default 23, 122deleting 127editing 126filter groups 127global 121local 124organizing 127severity quick filter 124slot quick filter 123using complex logic 126
flexibility for event assignmentldap_configuration.xml 135procedure 133user groups 133user_definitions.xml 135
functionsin alias formulas 167in Body clause 69
GGeneral subtab (Impact Manager Info dialog box) 27generic event relations mechanism 180global filters 125, 130global records
syntax 74using in rules 74
Hh1 directory 201hashed indexes
described 76Help
for events, configuration 29for events, customizing 29icon for event Help 30viewing 30
Help Info subtab 29HP-UX
actions executables 201hyperlinked URI 162
Iicons
Acknowledge Event 154
Index 383

A B C D E F G H I J K L M N O P Q R S T U V W X Y Z
cell 25cell group 25Close event 155collector 25Collectors tab 25Decline Ownership 155Edit Filters 124Event Groups tab 25event Help 30event priority 109event relations 103event severity 109event status 108Explore Event Relationships 160Icon Search for locating file for new action button 199MetaCollectors tab 25New Basic Filter 125New Slot Order 129Refresh 28Reopen Event 155Set Priority 155severity level indicator 25severity quick filter 121slot quick filter 121Take Ownership 154
icons versus text for columns in event list 112if-then-else construct 70image views, defined 141Impact Manager Info dialog box
Components subtab 27General subtab 27Workload subtab 27
importing data 269indexes
defining 76defining on events and data 64in Using clause 77using in rules 76
Information Display Selection tabs (Events View) 22instances
of interface classes 75querying 64
interactive configurationaction task 240
interfacesinstances 75syntax in rule 75using in rules 75
KKeep Severity Color on Close check box 111
384 BMC Impact Solutions Event Management Guide
Ll2 directory 201limit for literal strings 57Line Color Severity check box 108, 111Linux platform
action executables 201literal strings
character length limit 57single quotes 56
local actionsaccessing results of 158adding toolbar buttons for 198configuring 197defining 190described 190responding to an event 157, 194roles 192syntax 192tags 193XML tags 192
local filters 121, 124LocalActions.dtd file 191LocalActions.xsd file 191Location.cfg 269Logfile Adapter
.baroc file 39MAP file 37mcxa.conf file 36sample log file 34sample policy 40sample rule 40test events 45walk-through procedure 34
Mmc_bylocation_collectors.mrl file 97mc_bystatus_collectors.mrl file 97MC_CELL_ACTION_RESULT event 201MC_CELL_PARSE_ERROR
event 84slots 84
MC_CELL_PROCESS_ERRORevent 85slots 85
MC_CELL_UNDEFINED_CLASSevent 85slots 85
MC_EVENT_RELATION data class 180, 182mc_event_relations slot 182mc_evr_collectors.mrl file 99mc_relation_source slot 182mc_tool_uri parameter 162mccomp command 79MCELL_HOME action execution variable 209
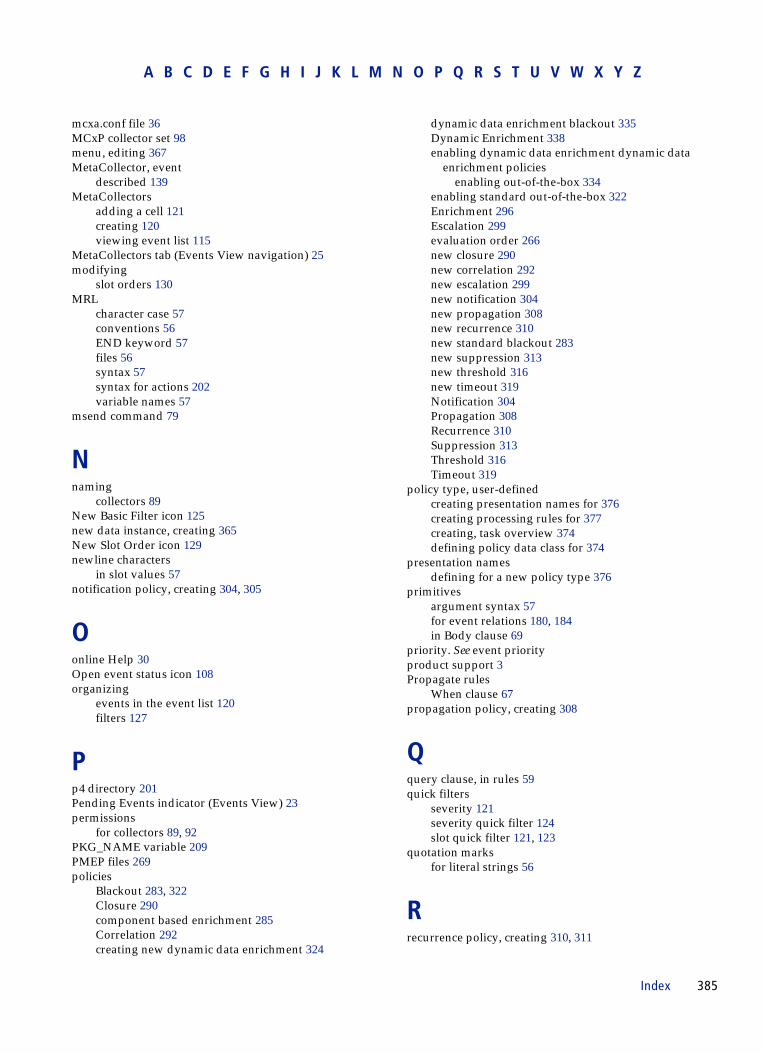
A B C D E F G H I J K L M N O P Q R S T U V W X Y Z
mcxa.conf file 36MCxP collector set 98menu, editing 367MetaCollector, event
described 139MetaCollectors
adding a cell 121creating 120viewing event list 115
MetaCollectors tab (Events View navigation) 25modifying
slot orders 130MRL
character case 57conventions 56END keyword 57files 56syntax 57syntax for actions 202variable names 57
msend command 79
Nnaming
collectors 89New Basic Filter icon 125new data instance, creating 365New Slot Order icon 129newline characters
in slot values 57notification policy, creating 304, 305
Oonline Help 30Open event status icon 108organizing
events in the event list 120filters 127
Pp4 directory 201Pending Events indicator (Events View) 23permissions
for collectors 89, 92PKG_NAME variable 209PMEP files 269policies
Blackout 283, 322Closure 290component based enrichment 285Correlation 292creating new dynamic data enrichment 324
dynamic data enrichment blackout 335Dynamic Enrichment 338enabling dynamic data enrichment dynamic data
enrichment policiesenabling out-of-the-box 334
enabling standard out-of-the-box 322Enrichment 296Escalation 299evaluation order 266new closure 290new correlation 292new escalation 299new notification 304new propagation 308new recurrence 310new standard blackout 283new suppression 313new threshold 316new timeout 319Notification 304Propagation 308Recurrence 310Suppression 313Threshold 316Timeout 319
policy type, user-definedcreating presentation names for 376creating processing rules for 377creating, task overview 374defining policy data class for 374
presentation namesdefining for a new policy type 376
primitivesargument syntax 57for event relations 180, 184in Body clause 69
priority. See event priorityproduct support 3Propagate rules
When clause 67propagation policy, creating 308
Qquery clause, in rules 59quick filters
severity 121severity quick filter 124slot quick filter 121, 123
quotation marksfor literal strings 56
Rrecurrence policy, creating 310, 311
Index 385

A B C D E F G H I J K L M N O P Q R S T U V W X Y Z
Refine rulesusing interfaces in 75
Refresh icon 28refreshing the event list
automatically 117manually 118
related eventsdescribed 179, 180
relation definitiondescribed 180
relation typedescribed 180
relations, eventicons 103
remote actionsaccessing results of 157defining 202, 209described 190responding to event 156
remote executionaction group 226action name 226action rule 214, 219, 240, 242, 251action task 215, 219, 246, 252Add Event Criteria dialog 228Admin record 213, 219automatic 212, 214, 236, 237, 251Create Remote Actions dialog 226credential records 215
working with 221credential_repository.xml 215definition 212Event Criteria Formula 228iadmin commands 220interactive 212, 213, 224, 240policy 214, 238process summary 218properties files 252Remote Action Policy window 238RunRemoteTask 240, 249RunTask 240, 249script deployment 230test event 234troubleshooting 254user access roles 227
removingactions 200filter group 128
renaming a filter group 128Reopen Event
icon 155operation 155
reopening events 155REQUESTOR variable 209results
from actions 201, 208of a local action 158
386 BMC Impact Solutions Event Management Guide
of a remote action 157return codes
from action results 201roles
collector access 89in actions 202in BMC Impact Manager 91in collectors 91in dynamic collectors 95in local actions 192
rule phases 266RULE_NAME variable 209rules
body 59Body clause 69compiling 79ending 57global records 74if-then-else construct 70query clause 59querying instances 64retrieving data 59selecting events 60syntax 57testing 79tracing 79Unless clause 66Using clause 63using dynamic data 72using indexes 76using interfaces 75using variables in 71When clause 67Where clause 60writing 56
Ss5 directory 201security
for collectors 91selection criteria
in rules 60self collectors
file 96self keyword 89self_collector.mrl file 96sending
events to a cell 79service component
maintenance mode, setting manually with a remote action 159
status, setting manually with a remote action 159service impact management
collectors 99ServiceContact.cfg 269

A B C D E F G H I J K L M N O P Q R S T U V W X Y Z
Set Priorityevent operation 155icon 155
severityeffect on color of collector 112effect on event status icon 108keeping color on close 111level indicator (Events View navigation) 25, 109quick filter 121setting color in collector tree 112setting color in event list 111
single quotesfor cell names 56for literal strings 56
slot assignmentsin Body clause 69
slot ordersassociating with a filter 131creating 129described 102editing 130
Slot Quick Filter 360slot quick filter 121, 123slot values
newline character 57slots
class 183for event relations 181MC_CELL_PARSE_ERROR 84MC_CELL_PROCESS_ERROR 85MC_CELL_UNDEFINED_CLASS 85mc_event_relations 182mc_relation_source 182referencing in rules 57type 183
SLOTS variable 209SMC
Impact Events option of SMC Events filter 123Information option of default filters 122Status History Events option of SMC Events filter 123
SNMP Adapter.baroc file 52configuring 48MAP file 51publishing MIB files 49test events 53
Solaris platformaction executables 201
sorted indexesdescribed 76
sorting 363, 364sorting events
creating new slot order 129multiple columns 132single column 131
source eventdescribed 180
spacesin cell name 56
static collectors 143defining 93
static Help 29status
affects color of collector 112affects event count for collector 113contribution to event count 112event icons 108service component, setting manually with remote
action 159string length 57strings
character limit 57subcollector node 141Supervisor Information option of default filters 122support, customer 3suppression policy, creating 313, 314syntax
for Body clause 70for collectors 88, 90for global records 74for interface rule 75for local actions 192for rules 57for variables 71
TTake Ownership
event operation 154icon 154
technical support 3testing
rules 79TextTranslation.cfg 269threshold policy, creating 316timeframes
creating 271Timeframes window 271timeout policy, creating 319, 320toolbar
adding action buttons to 198deleting an action 200in dynamic data editor 360reordering actions 199
tracingrules 79
transaction logsviewing 79
type slot 183
Index 387

A B C D E F G H I J K L M N O P Q R S T U V W X Y Z
Uundefined events 84Unless clauses
in rules 66Using clauses
ALL keyword 65conditions 64in rules 59, 63indexes in 77
Vvariables
action execution 209CELL_BUILD 209CELL_DATE 209CELL_NAME 209CELL_RELEASE 209CLASS 209declaring 71MCELL_HOME 209naming 57PKG_NAME 209REQUESTOR 209RULE_NAME 209SLOTS 209syntax 71using in rules 71
View Manager Info menu command 27View Selection tabs
Events View 22Events View navigation 25
viewingcell performance data 27cell properties 27event details 116event list 115Help for a console window or dialog box 30Help in console 30transaction logs 79types of event lists 115
Ww4 directory 201When clauses
in rules 67Where clauses
condition operators 61, 62in collectors 90in rules 60
widgets, defined 141Windows
action executables 201
388 BMC Impact Solutions Event Management Guide
return code execution limitation 208Workload subtab (Impact Manager Info dialog box) 27writing rules 56
XXML
tags 193tags for local actions 192

Notes

*97714**97714**97714**97714*
*97714*