
blenderart_mag-13_eng
73
Making a ‘Realistic’ Underwater Rift Issue 12 | Nov 2007 Blender learning made easy Creating a ‘Tree Character’ Using ‘Auto Masonry’ Script Video Editing in Blender Making of - Andy Tear Liquid Tubes Making of - Glass Girl Meet the Blenderart Team
-
Upload
sergey-demchishin -
Category
Documents
-
view
212 -
download
0
description
Making of - Glass Girl Using ‘Auto Masonry’ Script Creating a ‘Tree Character’ Making a ‘Realistic’ Underwater Rift Issue 12 | Nov 2007 Blender learning made easy
Transcript of blenderart_mag-13_eng
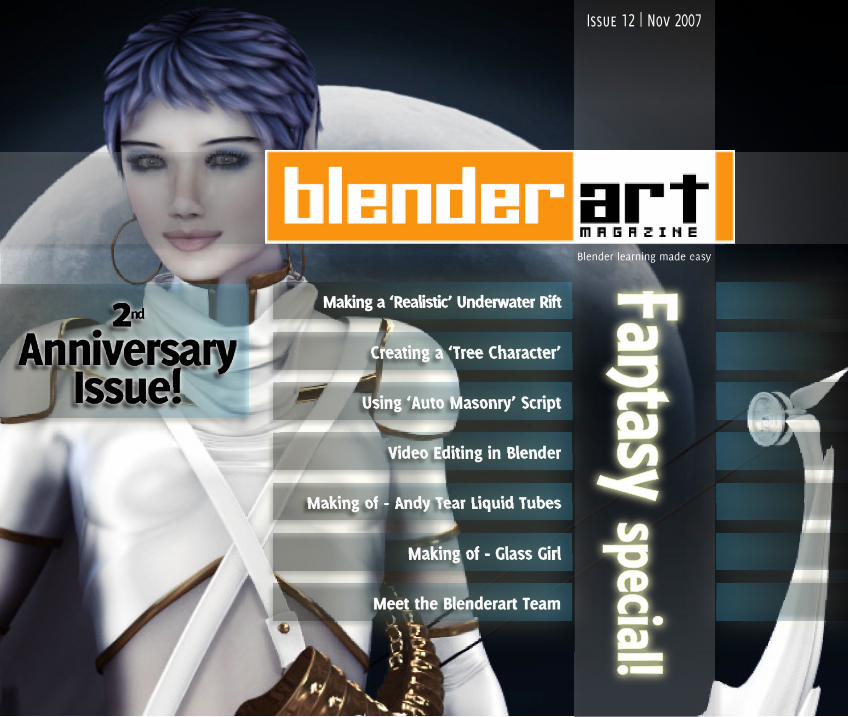
Making a ‘Realistic’ Underwater Rift
Issue 12 | Nov 2007
Blender learning made easy
Creating a ‘Tree Character’
Using ‘Auto Masonry’ Script
Video Editing in Blender
Making of - Andy Tear Liquid Tubes
Making of - Glass Girl
Meet the Blenderart Team

EDITORGaurav Nawani [email protected]
MANAGING EDITORSandra Gilbert [email protected]
WEBSITENam Pham [email protected]
DESIGNERGaurav, Sandra, Alex
PROOFERKevin BraunPhillip RyalsBruce WestfallDerek MarshJoshua LeungLynda SchemanskyEric PranauskNoah SummersJoshua ScottonMark WarrenWade BickPatrick O'DonnellBrian C. TreacyScott HillHenriel Veldtmann
WRITERSAbhihsek GuptaDan TabonetDenisJuan Pablo BouzaMigeroMark (dwarf)Nick (Rusty246)Paul Spooner (dudecon)Sandra GilbertYann Caron (CyaNn)
COVER ARTZoltan Miklosi ‘Guard of the Golden Horn’
CONTENTS
Making a Realistic Underwater Rift
Deep Dream’s Caustics
Creating a ‘Tree Character’
Using Auto Masonry Script
Video Editing in Blender
Making of - Andy Tear Liquid Tubes
Making of - Glass Girl
Making of - Tripeace Animated
Making of - The Dance of the Bashful Dwarf
www.blenderart.org Issue 13 | Nov 2007 - Fantasy
2
7
10
14
19
23
27
31
36
38
Meet the Blenderart Team 51

Welcome to our second anniversary issue ofBlenderart! Looking back, it is hard to believethat two years have actually passed since wereleased our first issue. Time sure flies, andboth Blender and Blenderart magazine havegrown considerably in that time. We have cov-ered a variety of topics and showcased anumber of wonderful Blender projects by someof the most talented artists in our community.
And just like Blender itself, we will continue togrow and showcase all the best and brightestof our community to inspire and teach thoseof us still learning our way around the wonder-ful world of Blender.
I would like to take this opportunity to thankall of our volunteers, past and present, thathave made Blenderart what it is today. I wouldalso like to welcome all of our new proofread-ers to our little staff of dedicated volunteers.They are a welcome addition. You can checkout their biographies in our "Meet the Staff"article.
Now let's talk ''Fantasy". Fantasy art is some ofthe most beautiful, as well as inspiring, artthat you can view. From the traditional fairy,goblin and dragon to the fantastic dreamylooks into an artist's mind, there is a style thatappeals to just about everyone. And whilethere are some loose rules about how some
characters are supposed to look, for the mostpart anything goes. This gives the artist a greatdeal of freedom when creating, and createthey do!
For this issue we have rounded up some fasci-nating looks into how a number of artists goabout creating their fantasies. We also showyou how to create a tree character using Mul-tires and Sculpt mode, and even take a look ata couple of games created in Blender's gameengine.
So sit back and soak it all in. Then go modelyour own fantasy!
Happy [email protected]
Sandra GilbertManaging Editor
EDITORIAL 3
www.blenderart.org Issue 13 | Nov 2007 - Fantasy
Fantasy creatures/characters come in a wide array ofstyles and types. So many in fact, that it can be hardto decide what you want to model/create. It oftenhelps to have a reference object or image to jumpstart the process. Even if your final model onlyslightly resembles the reference object, it can atleast get you started and your imagination can takeover at any time.
One of the best places to get inspired is the toy aisleof your favorite department store. In fact, that is myall-time favorite place to wander around. Being sur-rounded by toys puts me in the proper frame ofmind and takes me back to a time when everythingwas magical.
Of course, the process is helped by the fact that fan-tasy genre toys are very popular right now. You canfind dragons, fairies, and castles in a variety of detaillevels. Depending on the manufacturer/brand, youcan find everything from a simple toony look to hy-per realism.
While I am not promoting any one toy manufacturerover another, I thought I would share some toys thatI think are inspiring or at the very least make a greatreference object to model from.
Megabloks Dragons series: The sets, of course,feature nicely detailed dragons, with some setsalso containing castles and a variety of medievalbattle machines.
Barbie Fairytopia: Yeah, I know - Barbie???Nevertheless,there are some nice fairy dolls in avariety of styles and sizes.
Bratz Fairies: Yeah, another fashion doll,thoughnot your typical fairy look, which is what ap-pealed to me when I saw them.
Schleich Dragons and Knights: Highly detailedfigures of dragons, knights, and horses, as wellas castles, and medieval battle machines.
Fisher-Price Imaginext Adventures: These are forthe younger child and as such are more whimsi-cal and colorful, yet still contain a lot of detail.
Magna Morph Dragon Magnetic Building System:Nicely detailed dragon parts that you can mixand match to create your own unique dragonlook.
Also, don't forget to look down the action figureaisle. That is where you most often find toys thathave been marketed from major movies, so the se-lection changes as often as hit movies come out.Thus, constantly giving you a changing selection ofnicely detailed figures to choose from.
Okay, so now you have the actual reference object(read that as the toy you bought not only to modelbut also to play with when no one is looking'). Hav-ing it in your hand is the ideal scenario, but it canalso become an expensive one as you continue todiscover inspirational objects in the toy department.Not to worry, most toy manufacturers post imagesfrom different angles on their websites that generallyare useful and detailed enough for modeling purpos-es. You could also take a camera to the store withyou and take your own photos, or you can raid yourchild's (or niece/ nephew/ younger sibling/ next doorneighbours kid's) toy box to see what inspiration itcontains.
The important thing to remember is to always be onthe lookout for objects that will inspire your creativeprocess. You never know where you will find them.
One of the best placesto get inspired is the toy
aisle of your favouritedepartment store!
IZZY SPEAKS : Inspire Me! 4
www.blenderart.org Issue 13 | Nov 2007 - Fantasy

Project PeachProject Peach is off to a greatstart. They have produced andposted their first animaticfrom their story board as wellas a video showing Nathanrigging Rinky the squirrel. Tosee the latest progress on
Project Peach, check out their project site.
Project Peach is looking for some extra coders tohelp out in creating volumetric clouds. If you areinterested, you can check out their requirementshere.
The ManCandy FAQThe first in an Open Movie Workshop series is availa-ble for pre-order.
The ManCandy FAQ is a collection of animations andvideo tutorials for rigging and animating with Man-Candy. The animations are in question and answerformat (hence the title) and are intended to be a funway of documenting the rig.
The DVD includes an HTML interface that containssome written tutorial/reference material, a collectionof videos (Animations in 640x480 resolution, Tutorialsin 1024x768 resolution), the ManCandy 2.0 blend file,the mystery character blend file, all the blend filesfor the animations on the DVDs, and of course somehelper blend files for the tutorials.
Material Node CookbookBlenderart Magazine is launching a special project, aMaterial Node Cookbook.
As Blender users become more familiar with the Ma-terial Node system, a lot of very cool Material Nodesetups are being created. Unfortunately, the majorityof these setups are spread all over the net on vari-ous forums, threads and websites. BAM thinks itwould be beneficial to the community to gather upas many of these wonderful setups (with the artists’permission of course) as we can find, add a short‘how to/description’ of how and why it works andbundle it all in a pdf format ‘Cookbook’.
It would allow node users to quickly get the lookthey need without re-inventing the wheel, so tospeak. It would also provide a valuable learning toolfor users that are still struggling with the wholeNode system.
After giving it some thought, I am considering someof the following format options:
1. PDF chapters separated in logical categoriesfor a smaller download size .
• each category could be updatedquickly and or a new pdf with addi-tional nodes could be created.
BLENDER NEWS
Proj
ect
Peac
h, M
ater
ial N
ode
Cook
Boo
k
5
www.blenderart.org Issue 13 | Nov 2007 - Fantasy

Material Node Cookbook ...
1. A flash card based system (or more appro-priately recipes cards) with the node set-upimage on one side of the card and thedescription/how to on the reverse side
2. Recipe cards could be added as need with1st sets bundled according to category andfuture releases in one download that couldbe added to your previous sets.
Preliminary categories (to be adjusted later as set-ups are submitted)
1. Organics
2. Inorganics
3. Special Effects4. Compositing
We welcome any and all submissions, in fact themore that are submitted the better our cookbook willbe.
To submit a Node set-up please follow these guide-lines
1. Node set-up must be an original creation bythe person submitting it. Please do not sub-mit someone else's Node set-up, as then Iwill have to track down the original artist toobtain permission
2. Please send a blend file containing yourNode set-up. I will be taking all the screenshots to maintain a consistent look/size forthe cookbook
3. If you want to write the description/how-tofor your Node set-up, feel free to do so,otherwise I will be happy to take care ofthat myself.
So dust off that amazing setup you created and sendit in. The community will love you for it.
Send all submissions to [email protected] put Node set-up in the subject line area.
BLENDER NEWS
Proj
ect
Peac
h, M
ater
ial N
ode
Cook
Boo
k
6
www.blenderart.org Issue 13 | Nov 2007 - Fantasy

IntroductionThis tutorial is based on the works done for the 3d
Deep dreamsTabonet.
Step1: First, in Blender, lets create a horizontal plane(go to top view [Numpad 7] and clickAdd>Mesh>Plane). Press the S-key to scale it to nearlyfill the view and then left click. In edit mode, pressthe F9-key to subdivide it, say 5 times, then deselectall by pressing the A-key. Press the B-key twice toobtain the Brush Selection tool. Use the mouse wheelto adjust the size of the brush until it's about thesize of a face, like in Figure1.
Step2: Using the left mouse button, draw lines randomly on themesh, selecting what will be the hollow parts of the rift. Don't makethem too large. You should obtain something like in Figure2 (Topview). Finish by right clicking -once only!
Step3: Pressing the numpad 1 or 3-keys (front and side view, re-spectively) will allow you to see your plane in a lateral view. Then,turning proportional editing off, move the newly selected vertices alittle above the others, for instance at a distance of 5 to 10 timesthe size of an edge, like inFigure3.
Step4: Exit the Edit mode bypressing the Tab-key. In theMultires Panel,press Add Levelonce, then Apply Multires.(tutor001.blend), Figure4.
3D WORKSHOP: Making a ‘Realistic’ Underwater Rift
by D
an T
abon
et
Fig:1
Fig:2
Fig:3
Fig:4
7
www.blenderart.org Issue 13 | Nov 2007 - Fantasy

Step5: Return to Edit mode. To reduce the number of selected points to
You can now push these more deeply above the others again like inFigure5.
Step6: Now in object mode (Tab-key), in the Modifier panel add a Deci-mate modifier of a ratio like 0.3 and Apply. Do not go too low and alter theshape too much. (tutor002.blend) and Figure6.
now. In the Sculpt Panels set Brush to Inflate, Shape to Add, Size to 50,and Strength to 25 with Symmetry off.
Step7: You can now use the middle mouse button place the perspectiveview (orthogonal for instance by pressing the numpad 5-key) to allow youto draw in the regions of the rift which are in the rounded borders tomake these look more like Figure7. (tutor003.blend)
You can now Apply Multires when sculpting is done in different points ofview, until you are satisfied. An Auto Smooth of less than 30 degrees inthe Mesh panel applied with a Set Smooth in the Link and Materials Panelwill make the rocks look more realistic.
In Vertex paint Mode, you can set a greeny-blue colour for vertex points,and the excellent Self shadow VCols script, faking ambient occlusion canbe applied twice, to make the deeper sides be darker. If you try to paint invertex mode, use it VERY sparingly to keep realism on your scene.Last notes on the materials:
The material used for the rift must then be set with the VCol Paint buttonON to see the different vertex colour modifications made before. You alsoneed to set the material Specularity very low: 0 would be good enough.
3D WORKSHOP: Making a ‘Realistic’ Underwater Rift
by D
an T
abon
et
Fig:5
Fig:6
Fig:7
8
www.blenderart.org Issue 13 | Nov 2007 - Fantasy

Here it is: the final render in Figure9.
If the lighting in your scene is like in the previoustutorial about caustics, you will get something thatblend-fishes will be glad to swim in!
3D WORKSHOP: Making a ‘Realistic’ Underwater Rift
by D
an T
abon
et
Fig:8
Fig:9 The Rift Rendered
9
www.blenderart.org Issue 13 | Nov 2007 - Fantasy

IntroductionWhen I was an 8 year old kid, someof my young friends used to collectmysterious things in water pondsnear my home. I'll always rememberthe day when, for the first time, Icould see what was so exciting tothem: thousands of very little, veryshiny thunderbolt creatures in a solittle flask of water they showed tomy wide open eyes! It was so amaz-ing that I saw myself at the size ofone of them, swimming amongthem... and that was the dream! So,
since that day I have asked myself how to sharethis.
Many years passed before I saw one of the first 3Dsoftware packages in early 1993; it was SculptAnimate4d on the Amiga platform. That was a kindof revelation - and a challenge: making others seemy dream! But at this time modeling a single chesspiece and making it turn on itself was a "piece" ofwork, since rendering one frame at 640X480 resolu-tion could take half an hour!
However, when more sophisticated software camefor my needs of modelling insects, I trained a lotwith my dream still in mind. And believe me, thatkind of modeling was much more complicated thanmaking space vessels. Just have a look, for in-stance, at the images in the 12 volumes of the La-rousse Encyclopedia of Insects and you will beconvinced that imagination is nothing compared to
the real world, because it is in a real brain: yours!That was an artistic but very technical challenge aswell. So if I had a word to future animators whohesitate to show their work, my motto to you is:
Observe from nature
Learn from nature
Modestly imitate, and you will go where noone has gone before where dreams get real(appearance)...
Technical DetailsTalking about all the "making of" the movie wouldtake too long to explain in detail. Some examples ofamount of work, for now: 14 months of perfectingthe model more or less 250 times for a finally -com-pressed- .blend file of 73 Mb including 555 meshes,906 595 polygons, 107 Mb of textures... you begin tosee the challenge and the drastic choices I had tomake for the final render, and that taught me pre-cious things:
For instance, I now get a better flow of productionbecause I lost a lot of time scaling and positioningthe new meshes in the scene instead of creatingthem by the means of temporary reference boxes(simple cubes created where I projected to makenew objects later)in the scene, exporting theseboxes out of the scene and modelling into them thenew objects separately,finally introducing the realnew objects after wards into the scene.
Another precious hint I learned when I made mymovie is that all objects that came out off the came
3D WORKSHOP: Deep Dream’s Caustics
by D
an T
abon
et
Deep Dreams
10
www.blenderart.org Issue 13 | Nov 2007 - Fantasy

out off the camera field had to be hidden in layers by the meansof layer keys, to make the render be possible on one machine ina "reasonable" time. For the same reason I had to turn raytracingoff and use only shadow map lights. That increased the renderspeed a lot, but there was a serious problem to keep realism: forreflections of underwater scenes I had to find something to pro-duce caustics. These are animated, random wavelets of lightmade by refraction on the water surface that you can see underit. This phenomenon is hard to produce in 3d, but very commonin nature. If I wanted to recreate underwater ambiance, I couldn'tdo without it. So when I discovered the excellent free software,Caustics Generator, that convinced me to fake caustics.
Now let's see how it works to make a relatively realistic underwater sceneenvironment. In this little tutorial we assume basic knowledge of theBlender interface.
First the scene lighting.You need 3 lamps:
"Projector lamp": First of all, add a spotlight in a clear 3d window inBlender, and turn it more or less downwards. Set the spot as a Buff-ered-shadow, then in a classic-halfway toggle, then the spotbias an-gle more than 0.5, to soften the border, and make it halo.
"Soft lamp": Add another lamp (Hemi type) pointing behind the cam-era, and parented to it. Set its power to a high level, more or less 2.You'll see why we use this lamp later
"Darkening lamp": Add Area lamp(s) set to negative power 0.5 orless, positioned upon the details to hide from view. This kind of lampwill darken unnecessary parts of the scene, hiding them from view.
To make the ground,add a plane in the top view and scale it until its bor-ders are out the camera's field of view. Set the world colors to black.You should see something like this (figure1). (saustics001.blend)
3D WORKSHOP: Deep Dream’s Caustics
by D
an T
abon
et
Fig:1
11
www.blenderart.org Issue 13 | Nov 2007 - Fantasy
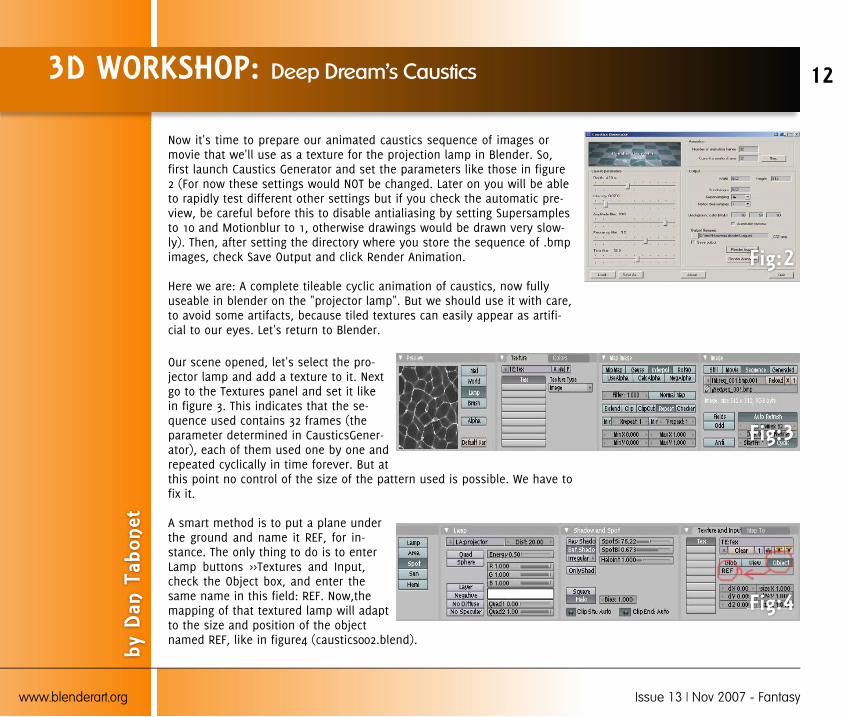
Now it's time to prepare our animated caustics sequence of images ormovie that we'll use as a texture for the projection lamp in Blender. So,first launch Caustics Generator and set the parameters like those in figure2 (For now these settings would NOT be changed. Later on you will be ableto rapidly test different other settings but if you check the automatic pre-view, be careful before this to disable antialiasing by setting Supersamplesto 10 and Motionblur to 1, otherwise drawings would be drawn very slow-ly). Then, after setting the directory where you store the sequence of .bmpimages, check Save Output and click Render Animation.
Here we are: A complete tileable cyclic animation of caustics, now fullyuseable in blender on the "projector lamp". But we should use it with care,to avoid some artifacts, because tiled textures can easily appear as artifi-cial to our eyes. Let's return to Blender.
Our scene opened, let's select the pro-jector lamp and add a texture to it. Nextgo to the Textures panel and set it likein figure 3. This indicates that the se-quence used contains 32 frames (theparameter determined in CausticsGener-ator), each of them used one by one andrepeated cyclically in time forever. But atthis point no control of the size of the pattern used is possible. We have tofix it.
A smart method is to put a plane underthe ground and name it REF, for in-stance. The only thing to do is to enterLamp buttons >>Textures and Input,check the Object box, and enter thesame name in this field: REF. Now,themapping of that textured lamp will adaptto the size and position of the objectnamed REF, like in figure4 (caustics002.blend).
3D WORKSHOP: Deep Dream’s Caustics
by D
an T
abon
et
Fig:3
Fig:2
Fig:4
12
www.blenderart.org Issue 13 | Nov 2007 - Fantasy
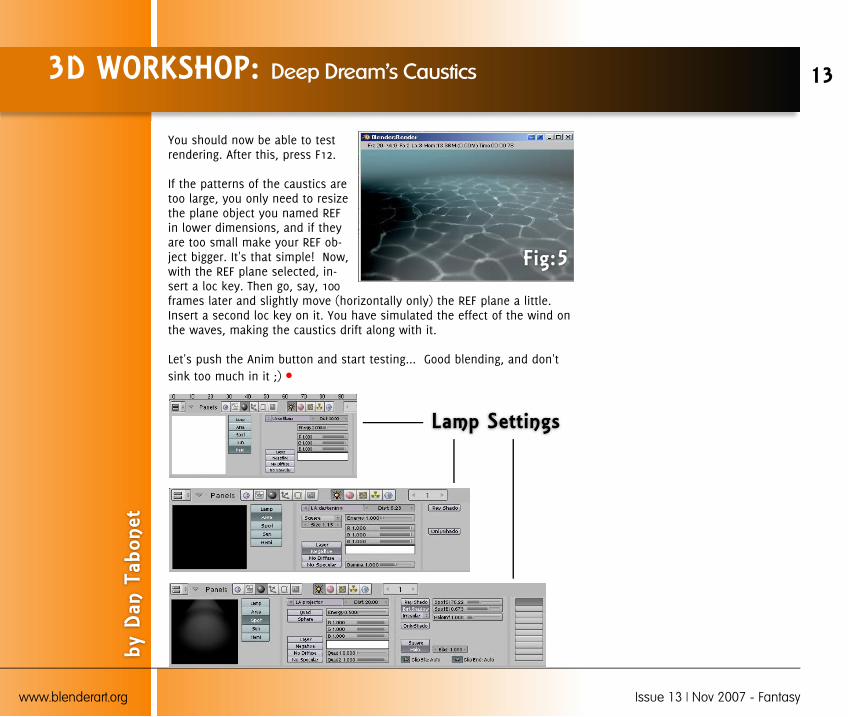
You should now be able to testrendering. After this, press F12.
If the patterns of the caustics aretoo large, you only need to resizethe plane object you named REFin lower dimensions, and if theyare too small make your REF ob-ject bigger. It's that simple! Now,with the REF plane selected, in-sert a loc key. Then go, say, 100frames later and slightly move (horizontally only) the REF plane a little.Insert a second loc key on it. You have simulated the effect of the wind onthe waves, making the caustics drift along with it.
Let's push the Anim button and start testing... Good blending, and don'tsink too much in it ;)
3D WORKSHOP: Deep Dream’s Caustics
by D
an T
abon
et
Fig:5
Lamp Settings
13
www.blenderart.org Issue 13 | Nov 2007 - Fantasy

IntroductionOne of the things I love most aboutfantasy modeling is that anything ispossible, up to and including treecharacters. I love the idea of a treecharacter with features flowing natu-rally into the tree trunk and haveoften tried to model one. I haveended up with some rather interest-ing experiments, but none as inter-esting or as much fun to make aswhen I started using the Sculpt modeto create the face on the tree andgive it some character. Although Hal-
loween is already over, there is no harm in getting ahead start on a spooky old tree for next year.
Sculpt mode allows for a great deal ofnatural/organic detailing that would be tedious andtime consuming to model using traditional methods.It is also a lot of fun. The only real drawback is thatthe vertex count can quickly climb and bog downyour machine if you are not careful.
NOTE: Do not be alarmed if your tree does not endup looking exactly like mine. Due to the nature ofSculpt mode which makes every model unique, Iwill be giving you a general road map to making asimilar model, not an exact replica.
Before we launch into the wonders of Sculpt mode,we are going to model a very basic low-poly treeshape. This will be the base model for our higher
resolution model. So let's fire up Blender and getstarted.
3D WORKSHOP: Creating a ‘Tree Character’
by S
andr
a G
ilber
t
Tree Character
Draw creates a smooth curve on the modelfollowing the brush; vertices are displaced inthe direction of the average normal of the ver-tices contained within the brush. (hotkey: D)
Smooth As the name suggests, Smooth elimi-nates irregularities in the area of the meshwithin the brush's influence. (hotkey: S)
Pinch pulls vertices towards the center of thebrush. If Sub is active instead of Add, verticesare pushed away from the center of the brush.(hotkey: P)
Inflate is similar to Draw, except that verticesin Inflate mode are displaced in the directionof their own normals. (hotkey: I)
Grab is used to drag a group of verticesaround. Unlike the other brushes, Grab doesnot modify different points as the brush isdragged across the model. Instead, Grab se-lects a group of vertices upon pressing andholding the mouse button, and pulls them tofollow the mouse movement. The effect is sim-ilar to moving a group of vertices in Edit modewith proportional-editing enabled, except thatGrab can make use of other Sculpt mode op-tions (like textures and symmetry.)(hotkey: G) (continued on next page...)
SCULPT TOOLS
14
www.blenderart.org Issue 13 | Nov 2007 - Fantasy

Trunk We will be creating a very basic trunk.
Select the top row of vertices and extrude (E key > Region) up4 times. It might help to be in Wireframe mode while selectingtop row of vertices (fig. 1). This will be the trunk of our tree.
Main Branches Next we will be creating a few main branches. For thescope of this tutorial, we are only going to make a few branches tokeep the vertex count down, but feel free to add as many as you want.
key) 4-5 times, scaling (S key) each extrusion a little smallerthan the last one. Go ahead and move (G key) and rotate (Rkey) the sections of the branch to create a pleasing profile(fig. 3).
using the same techniques as in the last step. You can makesmaller branches by selecting faces on each branch and ex-truding, moving and scaling just as you did for the mainbranches (fig. 4).
Tree Roots Next we will create the roots. I experimented with variousmethods and this seemed to give the best results.
5).only
Edges, leaving the four corner vertices in place (fig. 6).
and subdivide them (W key > Subdivide).
select any of the corner vertices (fig. 8).
the bottom row, and fill in the missing faces by selecting threevertices at a time and pressing the F key (fig. 9).
3D WORKSHOP: Creating a ‘Tree Character’
Fig:1
Fig:2
Fig:3
Fig:4
Layer The Layer brush issimilar to Draw, exceptthat the height of thedisplacement layer iscapped. This creates theappearance of a solidlayer being drawn. Thisbrush does not draw ontop of itself; a singlebrush stroke intersectsitself. Releasing themouse button and start-ing a new stroke will resetthe depth and paint ontop of the previousstroke. (hotkey: L)
Add and Sub: Add causesthe brush to pull an areaof the model in the posi-tive direction, Sub in thenegative direction. (Withthe Pinch brush, Addpulls vertices inward andSub pushes vertices out-ward.) Interactive tog-gling of brush direction isdone by holding downShift. Alternatively,pressing the "V" key canbe used to toggle it untilit is toggled again.
SCULPT TOOLS
15
www.blenderart.org Issue 13 | Nov 2007 - Fantasy
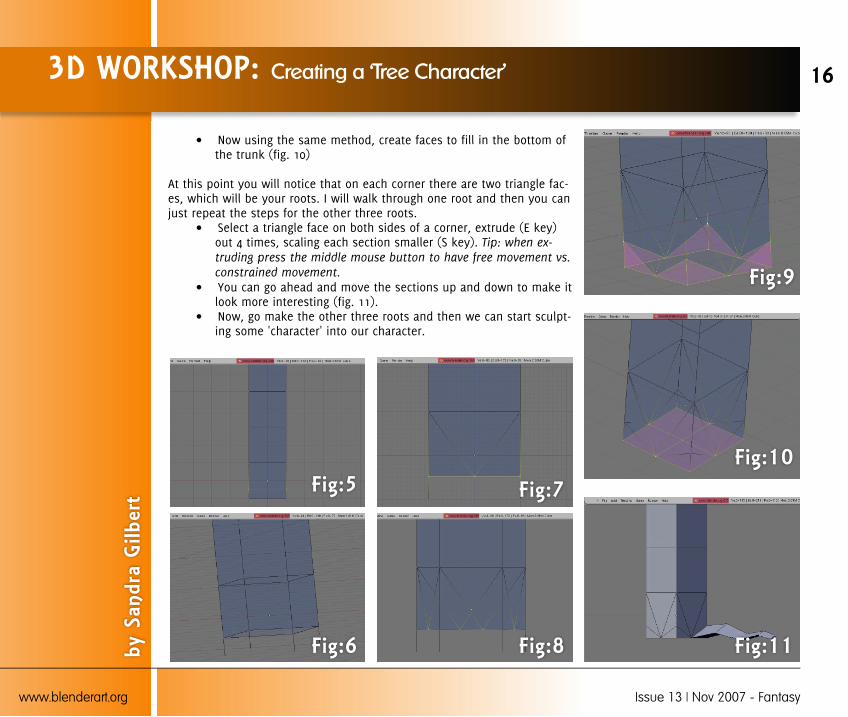
the trunk (fig. 10)
At this point you will notice that on each corner there are two triangle fac-es, which will be your roots. I will walk through one root and then you canjust repeat the steps for the other three roots.
out 4 times, scaling each section smaller (S key). Tip: when ex-truding press the middle mouse button to have free movement vs.constrained movement.
look more interesting (fig. 11).
ing some 'character' into our character.
3D WORKSHOP: Creating a ‘Tree Character’
by S
andr
a G
ilber
t Fig:5
Fig:6
Fig:9
Fig:10Fig:7
Fig:8 Fig:11
16
www.blenderart.org Issue 13 | Nov 2007 - Fantasy

SculptingSo now we have our base model ready to sculpt. Granted it doesn't looklike much yet, but it will give us a nice place to start doing some reallycool things.
Multires levels. I'm going to start at level 4 (fig. 12).
whorls that form as a tree grows? So with the Draw brush (D key)set to a size of 20 (F key) and strength of 100 (Shift + F key), startdragging the brush up and down the tree. Remember to rotateyour view and draw over all of the tree, overlapping strokes if youwant to. You can also hold the Shift key down while dragging thebrush to create cracks/indents in the truck surface (fig. 13).
the Brush panel press the "X" toggle button under Symmetry tocreate mirrored features along the X axis. With the Draw brush setfairly small (15-20) draw a half circle on one side of your tree. Ifyou've enabled symmetry, you should see the half circle appearon the other side as well (depending on the results of the previ-ous step, your features might not be an exact mirror copy) (fig.14).
tween the eye ridges; this will form the nose. Draw the nostrilpart of the nose to the side (small circle motion should do it) (fig.15).
key and draw under the ridges to create an eye socket. You canuse the same settings from the previous step (fig. 16).
and trace around the socket you just formed (fig. 17).
small brush size of about 10-15 (fig. 18).
3D WORKSHOP: Creating a ‘Tree Character’
by S
andr
a G
ilber
t
Fig:12
Fig:13
Fig:14
Fig:15
17
www.blenderart.org Issue 13 | Nov 2007 - Fantasy
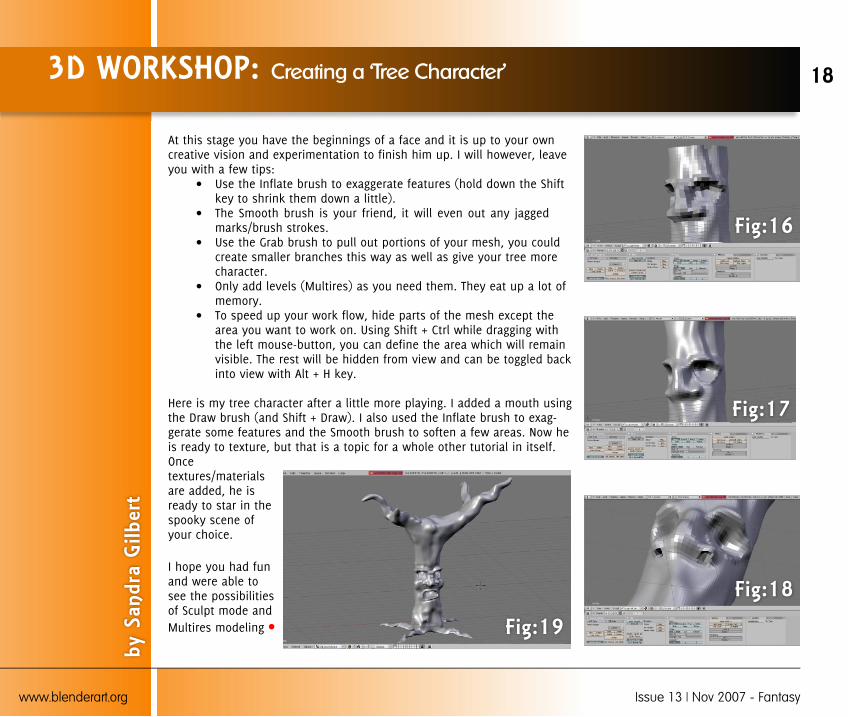
At this stage you have the beginnings of a face and it is up to your owncreative vision and experimentation to finish him up. I will however, leaveyou with a few tips:
key to shrink them down a little).
marks/brush strokes.
create smaller branches this way as well as give your tree morecharacter.
memory.
area you want to work on. Using Shift + Ctrl while dragging withthe left mouse-button, you can define the area which will remainvisible. The rest will be hidden from view and can be toggled backinto view with Alt + H key.
Here is my tree character after a little more playing. I added a mouth usingthe Draw brush (and Shift + Draw). I also used the Inflate brush to exag-gerate some features and the Smooth brush to soften a few areas. Now heis ready to texture, but that is a topic for a whole other tutorial in itself.Oncetextures/materialsare added, he isready to star in thespooky scene ofyour choice.
I hope you had funand were able tosee the possibilitiesof Sculpt mode andMultires modeling
3D WORKSHOP: Creating a ‘Tree Character’
by S
andr
a G
ilber
t
Fig:16
Fig:17
Fig:18
Fig:19
18
www.blenderart.org Issue 13 | Nov 2007 - Fantasy

IntroductionI've always liked castles. When Istarted doing 3D modeling I used atool called "Ray Dream Designer" andthe first tutorial I did was making acastle. It was a wimpy castle withflat, poorly textured walls, no win-dows, etc. One thing that has alwaysbugged me is that castle wall modelstend to be textured planes, perhapswhitewashed with cornerstones mod-eled. Real castles have every stoneshowing, uneven rows and stonesizes, etc. The pure texture version
looks good from a distance, but you can't get closeto them without the sham appearing. It's also hardto knock out a few blocks, or add siege damage.I've always dreamed of building a castle that wouldstand up to scrutiny, but the tools at hand wereinsufficient. I wasn't going to build it block by block!
Anyway, I gave up on the dream for a while, movedon to newer software versions, and eventuallyswitched to Blender. With the presence of the Py-thon extension language my dream resurfaced. Ifthe computer could do the grunt work, then all I'dhave to do is the overall design and touch up work.Score! I looked around to see if anyone else haddone this already, but I couldn't find anything simi-lar to what I wanted. This confused me, it seemedlike a simple problem to solve. More than six hun-dred lines of code later I discovered why it may nothave been as simple as I expected.
What follows is my first major foray into python
scripting and the results. A section on how to usethe script comes first, followed by a short history ofthe coding, and some things I learned in the proc-ess. I'm not fully satisfied with the script yet, but itis very usable and I hope will be useful to many ofyou.
Using Auto MasonryLet's jump straight into the fun stuff shall we? If youdon't have it, download the current version of thescript and place it in your scripts path folder(Normally "...Blender/.blender/scripts"). To start thescript, open a "Scripts" window and select"Scripts>>Wizards>>Auto Masonry". You should seesomething like this.
3D WORKSHOP: Using ‘Auto Masonry’ Script
by Paul SpoonerAKA: Dudecon or ZiggyLocation: CA, USAInterests: The varied formsof craftsmanship, design,music, imagination, andgeneral Excellence.Education: BA in Engineering:Mechanical concentrationE-mail: [email protected]
Using AutoMasonry Script
19
www.blenderart.org Issue 13 | Nov 2007 - Fantasy

It's the default GUI. If you press "Make this wall!" you should end up withsomething like in figure2
If you don't, you may need to install Python. If that doesn't work, I mayneed to fix the script. The current incarnation allows you to make wallswith or without rectangular windows, doors, and crenellations. The scriptgenerates two mesh objects, a "wall" and a "grout".
All of the buttons and options have explanatory pop-up text, so feel free totry it without reading this whole tedious section.
If you're not feeling quite that bold, here is an explanation of all the op-tions in the GUI.
"Make this wall!": This button generates the wall which conforms tothe options you have selected. If there is a curve selected, the walllength will be set to the curve length, the wall will deform to followthe curve, and have the curve as a parent. This means that all of thepos/rot/size of the curve will be applied to the wall as well. If thecurve is closed the script will assume that it is a perfect circle. If thecurve is not a circle, the wall probably won't be the right length."WALL": These settings govern the overall size of the wall in blenderunits. The "Wall Height" does not include crenels (see "CRENELS",below)."Straight Edges/Offset Edges": Basically, if you want to make a closedloop wall set it to "Offset Edges", otherwise "Straight Edges"."STONES": these settings govern the range of the size of the stones."Depth" will also set the thickness of the wall. The stones may ex-ceed these limits at the edges, to make everything fit, or due to the"Row Weight" setting. These settings are for the centerline of thegrout, so a larger "Grout W" will reduce the actual size of the stones."Bevel": The size of the bevel. If set to zero the stones will havesquare corners, useful for reducing poly-count.
"Grout W": The width of the grout, pretty straight forward.
3D WORKSHOP: Using ‘Auto Masonry’ Script
by P
aul S
poon
er
Fig:2
Script GUI
20
www.blenderart.org Issue 13 | Nov 2007 - Fantasy

"Grout D": How far the grout is offset from the face of the stones.This references the value "Min Depth" so if there is a large range indepth the grout will be quite far back on the thicker stones."Row Weight": This setting governs how much the height of the rowaffects the width of the stones in that row. Positive values are nor-mal (taller stones, wider stones), but negative values are valid aswell (taller stones, narrower stones). I usually set it between 0.0 and1, depending on the application."DOOR" and "WINDOW": These settings behave very much the same.Turn on and off a door or windows by pushing the big button labeled"DOOR" or "WINDOWS" respectively. Door "Position" is from the originto the centre of the door. Height and Width behave as you wouldexpect. Window spacing will be centred between the edges, and theedges of the door (if one is present). The top of the windows will beat the door "Height" setting, even if doors are turned off. This meansthat door and window lintels have the same height (generally true inarchitecture). The "Angled" button toggles an angle along the sides ofthe door/window, such as would be present in a castle arrow slit.Generally, doors do not have angles like this, but I left it as an op-tion, just in case you want it."CRENELS": The crowning part of the wall, crenels are often seen oncastle walls. Height, width and spacing work the reverse of windows,setting the size of the stone portions, not the openings. Crenels arealways angled, though I'll add an option to control this in the future.
"Exit": This button fires the masons and lets you do the work your-self. Very useful if you are done creating stone structures just atpresent.
The script is rather fast, so you can make very large walls if you want. Ithink the wall in figure 3 took thirty seconds to generate.
3D WORKSHOP: Using ‘Auto Masonry’ Script
by P
aul S
poon
er
Fig:3
21
www.blenderart.org Issue 13 | Nov 2007 - Fantasy

A Few TechniquesHere are a few tricks I've come up with. I suspect ingenioususers will come up with many more.
Paths: Make a narrow, tall, wall with no windows, doors,or crenels and set it to follow a curve on the Z axis. It's apath, street, or cobblestone highway! See figure 4Support Beams: Crenels can also be made to hold supportbeams for multi-story castle towers, siege defense struc-tures, etc. See figure 5.Multi wall: You can build a wall in multiple segments. Thisallows several different styles of windows and doorsstacked or strung together. The example for the SupportBeams was actually created by stacking two walls on topof each other.Sub Surf: The script automatically sets all edge crease val-ues to 0.5 which results in a pretty good Subsurf results.
Texture bake: Render the Z value of the wall on an isomet-ric view and save it to a texture. Now you can use this asa bump channel or texture mask for a low-poly wall. Using"Offset Edges" and correct clipping allows seamless tiling!Multiple Curve Deformers: Often walls are tapered orcurved. By applying a Z-axis curve deformer above theX-axis one, many wall effects can be achieved. This canalso be used to make more realistic streets (see thecurved profile of the path example), or cartoonish towers.
I hope this script allows many of you to realize your dreams ofrealistic castles, brick walls, roads, textures, towers, and any-thing else you can do with it. I'd be thrilled if you'd drop me aline and let me know what you're using it for. Let me know ifyou run across any bugs, and I'll try to fix them right away.
3D WORKSHOP: Using ‘Auto Masonry’ Script
by P
aul S
poon
er
Fig:4
Fig:5
22
www.blenderart.org Issue 13 | Nov 2007 - Fantasy
Writing the ScriptIf you are still reading this, you may be interested inhow the script was programed. The code is decentlywell documented, so feel free to jump right in and fid-dle around with it. Here's a little background on how Iwrote it as well as a few lessons I learned. Some of thisis just good programming practice, some is specific toBlender.
Before I could program anything I had to learn Python.In college I took a computer programming course, andI've done a bit of programming in my spare time, sothere was some background to build on. Essentially, allprogramming languages are expressions of a logicalprogression, and Python is no different. I workedthrough the built in "Getting Started" tutorial in Python,wrote a few small applications to play with features,and got comfortable with the syntax. At this point Istarted to ease into Blender python extensions. My firstBlender script took a mesh object and created everypossible polygon with the existing vertices. Not too use-ful, but rather fun. I also discovered that you can crashBlender by trying to make a mesh object with too manypolygons.
At this stage I was also examining a lot of the scriptsincluded in Blender. Here are the first two things Ilearned about programming Python extensions:
Lesson 1: Do your homework. This is true in every as-pect of life, and applies here, too. All the basic pythontutorials I did were invaluable in seeing how to struc-ture an efficient script. Looking in the Blenderartist.orgforums helped a lot too. If you put the effort into dis-covering the right way to do things, it will make your
job a whole lot easier later on. Learning Python beforelearning Blender Python really helped to keep thingsstraight.
Lesson 2: Document your code. This is one of the bigstress points in computer science, and it is so helpful! Ifsomeone else wants to use parts of your script, theyshouldn't have to reconstruct what every line of codedoes. If you put the script down for a month or two, youwon't remember what anything does, trust me. I knowit's a drag. I know it feels pointless. Please, oh, please,document your code. When looking for examples, docu-mentation helped me out immensely.
Once I had done a few mini-scripts in Blender I startedon the wall maker. As the script progressed from mak-ing plain squares of wall to complex walls with doors,windows, and edge features, I noticed a few otherthings:
Lesson 3: Programming Python extensions is not as hardas it sounds. The extension framework in Blender in-cludes some very advanced tools which makes program-ing extensions rather elementary. If you have an ideafor a script, and have any confidence at all in your pro-gramming skills, give it a shot!
Lesson 3 Corollary: But it's harder than you think. Beprepared for frustrations. Even though it's nice, the py-thon-blender integration is far from perfect. The logicalway of doing things is often (but discouragingly, notalways) how it will work. Be prepared to perseverethrough the tough spots. While working on the script Ihad three other windows open.
3D WORKSHOP: Using ‘Auto Masonry’ Script
by P
aul S
poon
er
23
www.blenderart.org Issue 13 | Nov 2007 - Fantasy

The Python Scripting reference (accessible from insideBlender in the Help menu), the Python package helpmenu, and the Blenderartist.org scripting forum. Thesethree, with lots of persistence, should guide youthrough your seasons of scripting woes.As the Script progressed from simple to complex, Ifound myself discovering that my original architecturewas insufficient or highly inefficient for what I was try-ing to do. I think I re-wrote every function at least oncefrom the ground up. Initially I was using the "BevelCenter" script to do the beveling, but I had to re-codeparts of it to make it work from an outside call (whichwould require downloading an altered version of BevelCenter along with Auto Masonry) and it was very slow.In the end I bit the bullet and re-coded my basic blockfunction to include beveling. At the beginning of theproject I had a free form approach, which I abandonedafter working a few days on it. Here's the Fourth lesson:
Lesson 4: Be willing to re-think your approach. Even if itmeans starting over. Every so often step back and sayto yourself, "Does it make sense to do it this way, or isthere a better way?" If you want a good script, alwaysopt for the better way. Sometimes it won't do quitewhat you had in mind, but that's better than it not do-ing anything at all.
I still have lots of features in mind for future develop-ment. I'm also thinking that I will have to re-write a lotof the structure when I get back to the project (in linewith lesson 4). However, once the script was mostlyfinished, it was time for:
The GUI! Writing the GUI can be the most fun or mostheartbreaking part of the process, depending on how
well you have managed your variables. If you havenicely written functions and variable management, theGUI should be pretty straightforward. Writing a GUI inBlender is pretty easy, and really finishes off the script.On the other hand, don't feel compelled to include everyfeature in the GUI if it isn't well supported, or reliable.There are several features in Auto Masonry which arealmost functional in the code, but not in the GUI. If yourcode is well documented then code-heads will be ableto use these features anyhow, and not including themin the GUI helps reduce headaches for entry-level users.
Future ImprovementsI'd like to improve this script in several directions. Un-fortunately, my time is absorbed with other projectsright now. Here are a few of the things I'd like to add. Ifyou have ideas for other features please let me know:
Arches: Right now windows and doors are flat topped.I'd like to add both round and pointed arches. This willrequire significant re-coding of the basic architecture ofthe script, but I think it will be worth it.
Flaws: Not all stones are perfect. Some stones shouldhave missing corners, or even cracks. An early version(while using Bevel Center) was able to knock off cor-ners, but I haven't added that feature since convertingto an internal beveling scheme. Adding cracks would beeven more difficult, but I'm sure it is possible.
Grout: Right now the grout is simply a second set ofblocks behind the stones. On curved surfaces this cre-ates problems with the grout, which Subsurfing helps,but doesn't fix.
3D WORKSHOP: Using ‘Auto Masonry’ Script
by P
aul S
poon
er
24
www.blenderart.org Issue 13 | Nov 2007 - Fantasy
A true stone grouting algorithm would also require a major overhaul ofthe code, but would also create a much better finished product, andwould allow beveled grout.
More robust window and door placement: Right now the GUI for thewindow and door placement is rather limited. The script itself can ac-cept any configuration of window and door placement, but I couldn'tfigure out how to simply implement the user interface. If there is agood way of doing this, will someone let me know?
Persistent settings: the ability to save settings to a file would make iteasier to tweak settings. It would also allow the creation of multiplewalls with "offset edges" that will mesh with one-another, or angledcorners with interlocking edges. Unfortunately, this would also require asimilar code overhaul.
So basically, when I am feeling up to another few weeks of program-ming, I'll rewrite the script to be better than ever. When I do, I will tryto include any feature requests I receive in the meantime. Alternatively,if someone else is feeling bold, I encourage you to make changes to thescript yourself. I'd be happy to learn of all the improvements that canbe made, and I'm sure there are many.
I hope this script allows many of you to realize your dreams of realisticcastles, brick walls, roads, textures, towers, and anything else you cando with it. I'd be thrilled if you'd drop me a line and let me know whatyou're using it for. Let me know if you run across any bugs, and I'll tryto fix them right away.
3D WORKSHOP: Using ‘Auto Masonry’ Script
by P
aul S
poon
er
25
www.blenderart.org Issue 13 | Nov 2007 - Fantasy
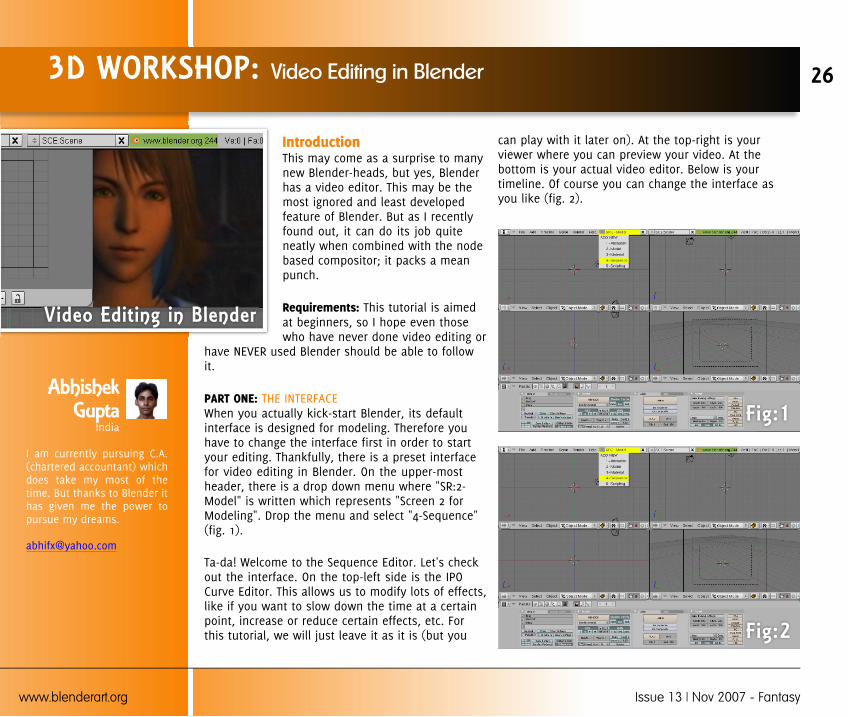
IntroductionThis may come as a surprise to manynew Blender-heads, but yes, Blenderhas a video editor. This may be themost ignored and least developedfeature of Blender. But as I recentlyfound out, it can do its job quiteneatly when combined with the nodebased compositor; it packs a meanpunch.
Requirements: This tutorial is aimedat beginners, so I hope even thosewho have never done video editing or
have NEVER used Blender should be able to followit.
PART ONE: THE INTERFACEWhen you actually kick-start Blender, its defaultinterface is designed for modeling. Therefore youhave to change the interface first in order to startyour editing. Thankfully, there is a preset interfacefor video editing in Blender. On the upper-mostheader, there is a drop down menu where "SR:2-Model" is written which represents "Screen 2 forModeling". Drop the menu and select "4-Sequence"(fig. 1).
Ta-da! Welcome to the Sequence Editor. Let's checkout the interface. On the top-left side is the IPOCurve Editor. This allows us to modify lots of effects,like if you want to slow down the time at a certainpoint, increase or reduce certain effects, etc. Forthis tutorial, we will just leave it as it is (but you
can play with it later on). At the top-right is yourviewer where you can preview your video. At thebottom is your actual video editor. Below is yourtimeline. Of course you can change the interface asyou like (fig. 2).
3D WORKSHOP: Video Editing in Blender
Video Editing in Blender
Fig:1
Fig:2
AbhishekGupta
India
I am currently pursuing C.A.(chartered accountant) whichdoes take my most of thetime. But thanks to Blender ithas given me the power topursue my dreams.
26
www.blenderart.org Issue 13 | Nov 2007 - Fantasy

PART TWO: IMPORTINGIn the editor panel press "Add" and select "Movie". If you want to add au-dio and video together then press "Movie + Audio (HD)" (fig. 3). Browse toand select the video file you want to edit. As this issue is about fantasy,I've selected a final fantasy video. He he! Once you have opened the file ablue colored strip will appear. As you move it left or right with yourmouse, you will notice some numbers changing at the left-most side;these are frame numbers. Drag the strip toward the left until you reach thezero frame and left-click.
PART THREE: THE CONTROLSNow if you press "Alt+A" on your keyboard you will be able to play backand view the movie in your viewer. As the movie plays you will see agreen line moving forward and your cursor changes to show which frameis playing. Press "Esc" to stop. If you press your left or right arrow keysyou will scroll through the frames. You can jump directly to the desiredframe by clicking in the sequence editor. Check out the last frame numberand note it. Then, move ahead some frames and hit "F12" to see your final
told Blender's renderer that we wanted to output a sequence. Press "F10"to go to the Scene buttons in the bottom-most button window and press"Do Sequence" in the Anim tab. Now change the end frame number to thesame as the last frame number of the video which you want to edit. Nowpress "F12" and you should be able to see your video in your render out-put.
PART FOUR: EDITING TIMEThat's right... time to do the dirty work. Here is what we want to do:
1. Delete some scenes.2. Add transitions.3. Increase the video resolution.4. Add a diffuse glow effect.
3D WORKSHOP: Video Editing in Blender
by A
bhish
ek G
upta
Fig:3
Fig:4
27
www.blenderart.org Issue 13 | Nov 2007 - Fantasy
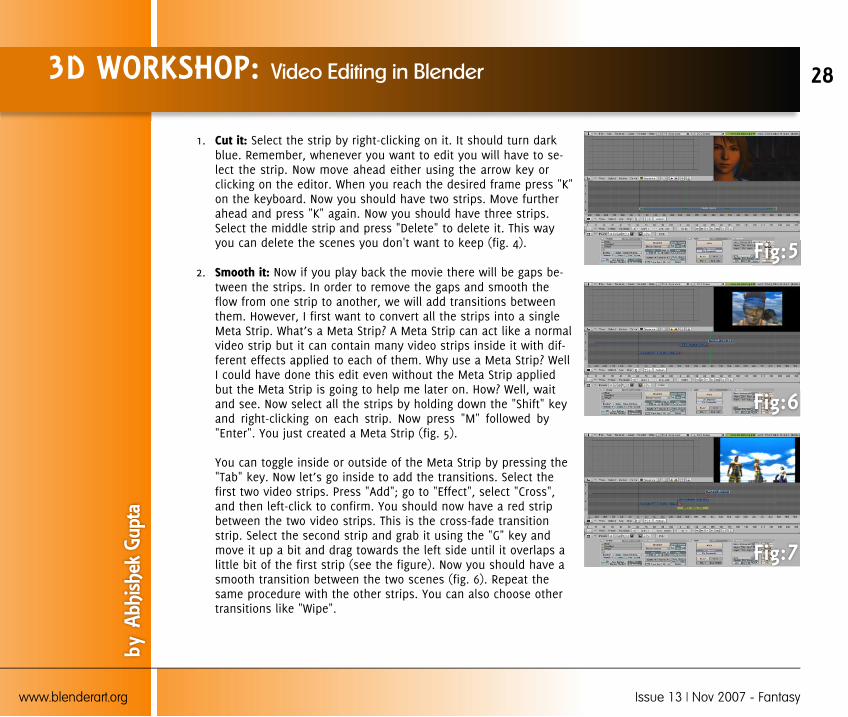
1. Cut it: Select the strip by right-clicking on it. It should turn darkblue. Remember, whenever you want to edit you will have to se-lect the strip. Now move ahead either using the arrow key orclicking on the editor. When you reach the desired frame press "K"on the keyboard. Now you should have two strips. Move furtherahead and press "K" again. Now you should have three strips.Select the middle strip and press "Delete" to delete it. This wayyou can delete the scenes you don't want to keep (fig. 4).
2. Smooth it: Now if you play back the movie there will be gaps be-tween the strips. In order to remove the gaps and smooth theflow from one strip to another, we will add transitions betweenthem. However, I first want to convert all the strips into a single
video strip but it can contain many video strips inside it with dif-ferent effects applied to each of them. Why use a Meta Strip? WellI could have done this edit even without the Meta Strip appliedbut the Meta Strip is going to help me later on. How? Well, waitand see. Now select all the strips by holding down the "Shift" keyand right-clicking on each strip. Now press "M" followed by"Enter". You just created a Meta Strip (fig. 5).
You can toggle inside or outside of the Meta Strip by pressing the
first two video strips. Press "Add"; go to "Effect", select "Cross",and then left-click to confirm. You should now have a red stripbetween the two video strips. This is the cross-fade transitionstrip. Select the second strip and grab it using the "G" key andmove it up a bit and drag towards the left side until it overlaps alittle bit of the first strip (see the figure). Now you should have asmooth transition between the two scenes (fig. 6). Repeat thesame procedure with the other strips. You can also choose othertransitions like "Wipe".
3D WORKSHOP: Video Editing in Blender
by A
bhish
ek G
upta
Fig:5
Fig:6
Fig:7
28
www.blenderart.org Issue 13 | Nov 2007 - Fantasy

3. The effect: I wanted to add a diffuse glow ef-fect in a particular scene which I have alreadycut. So select the middle strip, press "Add", goto "Effect" and select "Glow". Move the stripjust above the video strip and left-click toconfirm. You can use the "G" key to move it.Now if you play the frames of that video stripyou should have a nice glow effect at thehighlight areas. If want to change some pa-rameters regarding the glow effect, select theglow strip and press "N" (fig. 7). Change it asyou like and toggle out of the Meta Strip bypressing the "Tab" key.
4. The secret of Meta Strip: Here is the reasonwhy I wanted to use a Meta Strip in the firstplace. The video I have is of VCD quality and Iwanted to render it out in DVD quality. Tocompensate for the loss of quality, I wantedto add a box blur filter. If had not used a MetaStrip, I would have to apply box filter to eachvideo strip. This could have turned out to be avery time consuming process if I had to editmany individual strips. Now that I have a sin-gle Meta Strip which contains all the editedvideo strips, all I have to do is apply the effectto one Meta Strip only. Therefore, select theMeta Strip and press "Add", "Effects", "Plugin"(you may need to download this filter which iseasily available; Windows users will need todownload the ".dll" files while Linux users willdownload the ".so" files). Now browse to thedirectory where you saved your plug-in andselect box blur filter. You can also change theparameters of this filter by pressing the "N"
key. I reduced the size slider from 5 (the de-fault) to 1.
5. Render it: In the buttons window at the bot-tom-most screen, press "F10" to switch to theScene buttons. In the Format panel, select thedesired format you want to render your videoout to. I selected AVI Codec and chose XviDcodec. Linux users can use "FFMpeg" to renderin a compressed format. In the "Size X" and"Size Y" buttons, click and enter the desiredresolution you want to render to (note: youmust enter a resolution of at least the same,or greater than, the original video's resolu-tion). Press the "ANIM" button to render yourvideo file.
There you have it. Your final video output done entirelywithin Blender, and yet we have not even touched theadvanced features. Blender is capable of much morethan this.
Note: I have not yet managed to get audio from Blend-er's Sequencer Editor. I have used Jahshaka for thatpurpose. Jahshaka is a video editing and effects sys-
impressive. The latest release is version 2.0 RC4, checkit out as well!
3D WORKSHOP: Video Editing in Blender
by A
bhish
ek G
upta
29
www.blenderart.org Issue 13 | Nov 2007 - Fantasy

IntroductionHi there. Many people have askedme about how I created the tubeeffect on my "Andy tear" illustration.As I always work step-by-step, I willtalk about the different steps I used.First I always finish modeling beforesomething else. I think it's not goodto mix different steps like modelingand material, or lighting and materialetc. I think it's important to cut thework into different parts. For an illus-tration, here is my work flow: mode-ling, bone setup, skinning, material
colors (only color), environment and lighting (renderoptions, like AO, AA etc.), materials (with nodes ifnecessary), rendering effect (I always make thispart with different layers and importing them intoPhotoshop, but you can translate them into aBlender compositing node setup). So here are thesteps for the tubes :
ModelingFirst, in Top view [NumPad 7],[Space] / Add / Curve / Bezier Circle and name it"CurveBevC1" (for future use). Always remember toname your objects in Blender. It makes it easier tofind them in the Outliner window. In Edit mode[Tab] duplicate the circle in place [Shift + D] / [Ctrl],and scale [S] it into the first one. Make it again toform your circle curve like fig1:
Now, in Left view, [NumPad 3], create a secondcurve like an "S". This curve will be the path of
"CurveBevC1". Name it "CurvePath1". Don't forget toenable the 3D property of the curve using the "3D"button on the "Curve and Surface" panel. It allowsthe curve to have 3D coordinates for it's controlpoints. You will obtain something like in fig2:
MAKING OF: ‘Andy Tear’ liquid tubes
Andy Tear Liquid tubes
Fig:1
Fig:2
by C
yaN
n
30
www.blenderart.org Issue 13 | Nov 2007 - Fantasy

Add the "CurveBev1" name into "BevOb" text box (see Fig 3).
The question is : Why have I made a tube with another tube not joined tothe first? Because we will add 2 transparent materials, one for the tubeand one for the liquid. Refraction can cause artifacts with two joinedmeshes. Now to finish, convert it into a mesh [Alt + C]. You can also closethe liquid (extrude an edge-loop and merge the vertices [Alt + M]) andtube hole (select an edge-loop and make a face [F]).
Lighting & EnvironmentWe will create reflect/refract materials, so tocreate a reflecting environment I like to use anHDRI map mapped onto the scene environment.To do this, go to the Texture buttons [F6], andcreate a new World image texture. Select"carwash.hdri" (or another) like in fig 4.
After that, go to the Shading / World buttons[F8] and set to "Sphere" mapping on the"Texture and Input" panel. On the "Map To"panel press "Hori" and set the blending modeto "Add". Set the World color dark, and withthe "Col" slider you can tweak the HDRI mapintensity. See fig 5.
You may tweak the lighting as you wish. I always work with a lot of quadattenuated lights to create a smoother atmosphere. Add some indirectorange lights, and blue lights for the back lighting. For main lights choosea high-level white lamp. In my lighting work I always work each sort oflight step-by-step. Example: if I am working on the back light of a 3-pointlighting set-up, I isolate the back lights and inactivate the direct ones. Imake a lot of tweaks on the back lights, do a lot of renders, and when I'msatisfied I work around the indirect orange lights, and inactivate the oth-ers. I think it the best way to have the most control over lightning.
MAKING OF: ‘Andy Tear’ liquid tubes
by C
yaNn
Fig:3
Fig:4
Fig:5
31
www.blenderart.org Issue 13 | Nov 2007 - Fantasy

MaterialsBefore creating materials, I've assigned 3 material IDs to the mesh. Theoutside of the tube, the inside, and the liquid. Se fig 6.
So select the different parts of the tube and assign the 3 new sub-materialIDs. Outside is a transparent material with thin bump and a refract coeffi-cient greater than 1. See fig 7. And the thin bump setup as in Fig 8.
Inside, I've duplicated the first material andremoved the bump. Try a different refractionfactor, and see what happens.
For the liquid I've create one purple materialwith "Ray Transp", and a high amount of "Filt"(transmissivity). It permits you to filter light bythe material color, and make the liquid appearpurple. For all these ray-traced materials, don'tforget to increase the ray level up to 6, becauseone ray must pass through 6 mesh surfacesbefore reaching the camera. See fig 9.
I've played with the "Ramp" color ("Input" set to"Normal" and "Method" to "Add") to simulatethe lighting that passes through the material.Translucency and color emission are really im-portant too, to tweak this effect. See fig 10.
Post ProcessingFor post processing, I will not go into all the details because the glowmethod I've used does not involve Blender. I've just exported color layersto select the purple colors rendered. After making my selection, I've dupli-cated the image selection in another layer in lighten mode and blurred it.I've already simulated a little reflection and refraction in objects. Toachieve the final effect, I've duplicated the layer several times.
MAKING OF: ‘Andy Tear’ liquid tubes
by C
yaNn
Fig:6
Fig:7
Fig:8
Fig:9
Fig:10
32
www.blenderart.org Issue 13 | Nov 2007 - Fantasy

But you can also use the "Video Sequence Editor" or "CompositeNode Editor" to add glow. So this is the end result as seen in fig11.
It's the same technique I've used for the head in my illustration,except for the bump on the outside container.
MAKING OF: ‘Andy Tear’ liquid tubes
by C
yaNn
Fig:11
33
www.blenderart.org Issue 13 | Nov 2007 - Fantasy

Introduction
simple. As time went by I thought,"It's starting to look good, why justleave it like this if I can model higherpolygon meshes and test out mybaking skills?"
Because I had already made a bodyin pose (not in a standard T pose), itwas hard to make her very symmetricand keep good proportions ofbody/head parts. Before you start a
new project it's helpful to think about what youactually will do to avoid problems later.
learning to model like a pro. ;) There's not much totell about modeling her, as she started from a boxand ended up as a ~1000 polygon mesh, which was
inflate, and pinch to fine tune my modeling.
Wings
how to start modeling them. First, I made a basewing and used dupliverts with feathers. Next, Imade a base wing and just extruded edges to mimicfeathers. Unfortunately, both methods gave poorresults.
I found a reference from Wikipedia about birdwings, and I started modeling to make them mani-fold, or sufficiently varied, and give the featherssome thickness. I knew it would be a pain to UVmap it, but in the end I used plain unwrap andhelped by adding seam edges around feathers andat their joining with the wing bone. To model somany feathers, extrude the faces individually (inedit mode, select all faces and use E key - individ-ual faces option) (see fig 1) Start at the top of themesh and select enough faces to extrude 2-3 rowsof feathers. Adding some random size, length, androtation adjustments is a good idea.
MAKING OF: ‘Glass Girl’
Glass Girl
Fig:1
Kamil LatochaPoland
(aka migero)I started using Blendersince version 2.25 wasborn, while it evolved Ialso learned 3dsmax andsome Maya, but Blenderbeats them all.
34
www.blenderart.org Issue 13 | Nov 2007 - Fantasy

Detailing feathersThe next step is to detail the feathers. Select all their side edges and sub-divide them 3 or more times, depending on their length, until they startlooking like in fig 2 If you want extra details on some of the feathers youcan edit them this way, see fig 3
UV for wingsRemember that UV maps for the wings are only needed if we want to bakethem. Before you do this on such a complex model you need to be 1000%sure that the mesh is correct. I made 3 UV maps for my wings, and the
First, (in edit mode) hold the shift key and start selecting side, tip andbase edges of feathers. When you are done selecting, hit alt+E and select"make seams". Now create a new UV map for it. The more the complexthe wing is, the bigger the size of map should be. ;) In UV face selectmode, selecting all faces, pressing U, and picking unwrap will do the trick.
If you are not happy with the results (if some islands of feathers are toosmall, they are very chaotic and use less than 50% of the map space) thenI suggest you use pack charts in UV/Image editor. If it still is not good, youcan always rotate/scale/move UV islands by hand. Alternatively, if youhave the python script for smart unwrap, use it (script found in blender
own) and play with the settings. Incidentally, in such a complex mesh Ido not suggest using lightmap Uvpack, but if you change the map size to4056X4056 then I think it will be ok.
The ClothThis is where the fun began! I started modeling it from the leg (the onelike a stiff rubber, because it had no folds. I started to think of ways toadd them. One method was using plain modeling, splitting edges/faces,and slowly adding details.
MAKING OF: ‘Glass Girl’
by K
amil
Lato
cha
Fig:2
Fig:3
35
www.blenderart.org Issue 13 | Nov 2007 - Fantasy
his was fine in the beginning, but in the end it looked very random and Icouldn't really see where the folds went - it just looked unreal. Next Itried using a subdivided mesh with sculpted folds, but it became evenworse. It's hard to mimic cloth and how it will react this way, where willthe folds be, and in what direction they should go.
But I got lucky - while searching over at blenderartists, I ran across a newcloth simulation currently in SVN and some test builds. My only complaint
so that it doesn't just fall down from that tree, it needed some goals. Inedit mode I selected only the main faces and added them to a vertexgroup. See fig 4. Only 40 frames were needed to make the folds comedown and give a really nice effect. After that, I just applied the deforma-tion, and in edit mode adjusted the faces of the cloth that had jumped
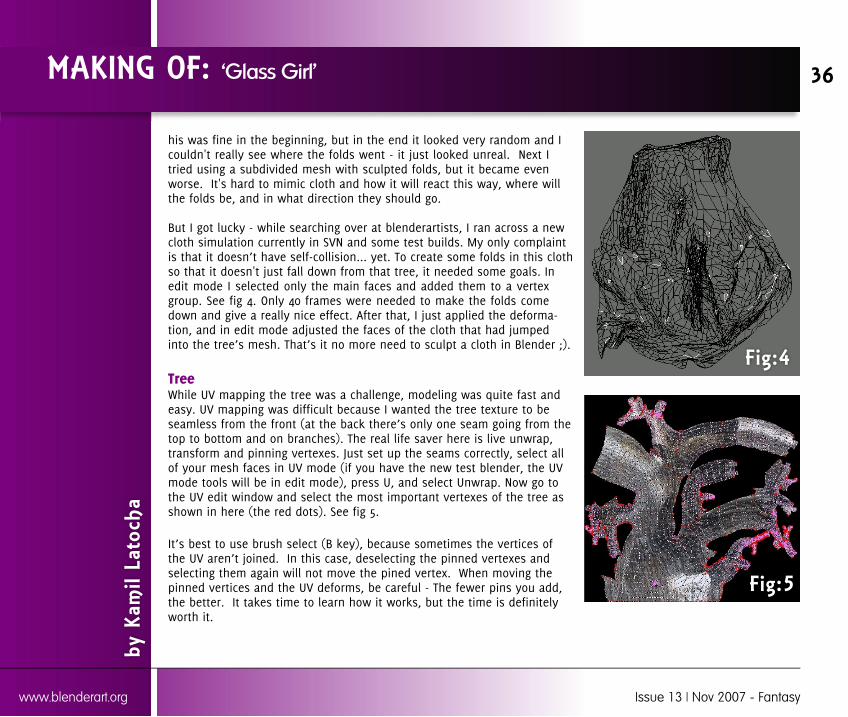
TreeWhile UV mapping the tree was a challenge, modeling was quite fast andeasy. UV mapping was difficult because I wanted the tree texture to be
top to bottom and on branches). The real life saver here is live unwrap,transform and pinning vertexes. Just set up the seams correctly, select allof your mesh faces in UV mode (if you have the new test blender, the UVmode tools will be in edit mode), press U, and select Unwrap. Now go tothe UV edit window and select the most important vertexes of the tree asshown in here (the red dots). See fig 5.
selecting them again will not move the pined vertex. When moving thepinned vertices and the UV deforms, be careful - The fewer pins you add,the better. It takes time to learn how it works, but the time is definitelyworth it.
MAKING OF: ‘Glass Girl’
by K
amil
Lato
cha
Fig:4
Fig:5
36
www.blenderart.org Issue 13 | Nov 2007 - Fantasy

The advantage of this method is that you can goback to edit mode and change your edge seams onthe mesh, but unwrapping again won't delete yourpinned vertexes. That way you don't need to startall over again if you found a missing edge seam.
On the tree I used 2 UV maps. The first UV map isfor baking, which can't overlap itself and must beinside the map border. The second map seen herein fig6 is for texture. It doesn't need to be inbounds of the map area as the texture of the treeis seamless.
The BakePart 1: Creating AO bakeTo start off, go to left/front orthographic view and Add>>Mesh>>Icosphere inthe center of your scene. Now depending on the subdivision level, you willget more lights (thus, slower baking), so go for a setting of 1 or 2. Higheris not required.
If you want a 2 color AO, then go to edit mode and select the bottom partof the iconosphere ball. Split it (P key), and if you want 1 light just leaveit in once piece. In the same place as the sphere, create a spot light, setthe light to raytrace and set samples to 1 or 2. Next, parent the light tothe sphere. If you split the sphere, you'll need to duplicate the light, leaveit in same place, and then parent it to second sphere part.
Setting colors of the lights can be as you want. I used blue and red, but ifyou use 1 light then white is what you want (as you can always changethe color in gimp when compositing). If the lights are parented, select thesphere or their parts and turn on dupliFaces (they seem better than du-pliVerts). If the lights on your sphere are facing inside, you're fine. If not,
See fig 7.
MAKING OF: ‘Glass Girl’
by K
amil
Lato
cha
Fig:6
Fig:7
37
www.blenderart.org Issue 13 | Nov 2007 - Fantasy
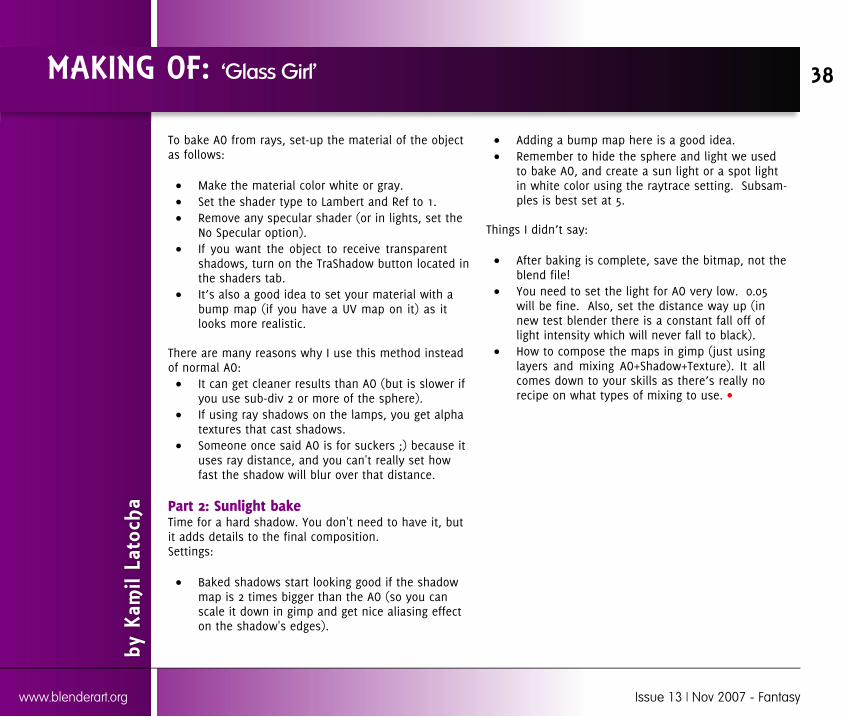
To bake AO from rays, set-up the material of the objectas follows:
Make the material color white or gray.Set the shader type to Lambert and Ref to 1.Remove any specular shader (or in lights, set theNo Specular option).If you want the object to receive transparentshadows, turn on the TraShadow button located inthe shaders tab.
bump map (if you have a UV map on it) as itlooks more realistic.
There are many reasons why I use this method insteadof normal AO:
It can get cleaner results than AO (but is slower ifyou use sub-div 2 or more of the sphere).If using ray shadows on the lamps, you get alphatextures that cast shadows.Someone once said AO is for suckers ;) because ituses ray distance, and you can't really set howfast the shadow will blur over that distance.
Part 2: Sunlight bakeTime for a hard shadow. You don't need to have it, butit adds details to the final composition.Settings:
Baked shadows start looking good if the shadowmap is 2 times bigger than the AO (so you canscale it down in gimp and get nice aliasing effecton the shadow's edges).
Adding a bump map here is a good idea.Remember to hide the sphere and light we usedto bake AO, and create a sun light or a spot lightin white color using the raytrace setting. Subsam-ples is best set at 5.
After baking is complete, save the bitmap, not theblend file!You need to set the light for AO very low. 0.05will be fine. Also, set the distance way up (innew test blender there is a constant fall off oflight intensity which will never fall to black).How to compose the maps in gimp (just usinglayers and mixing AO+Shadow+Texture). It all
recipe on what types of mixing to use.
MAKING OF: ‘Glass Girl’
by K
amil
Lato
cha
38
www.blenderart.org Issue 13 | Nov 2007 - Fantasy
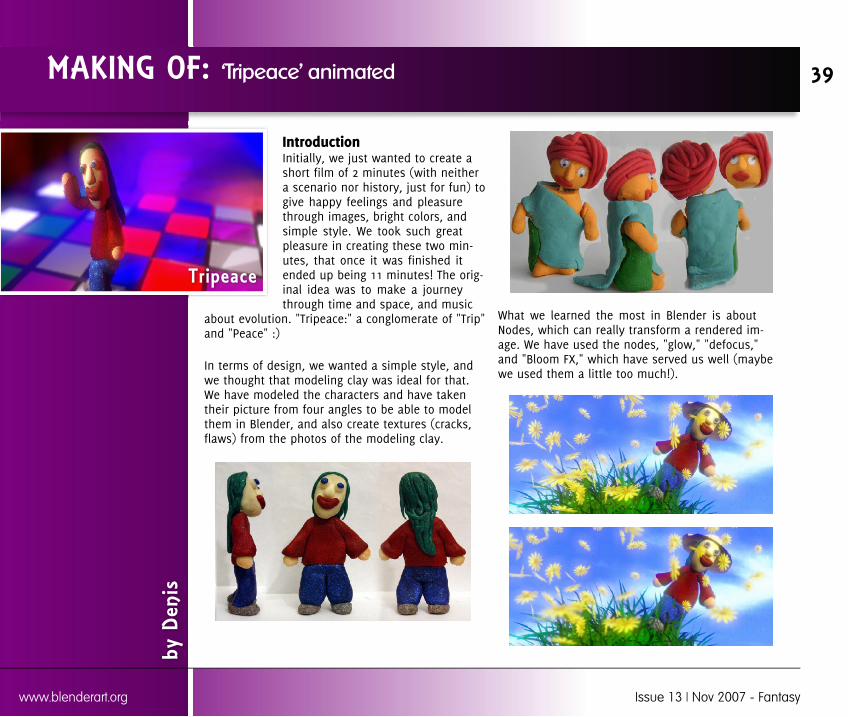
IntroductionInitially, we just wanted to create ashort film of 2 minutes (with neithera scenario nor history, just for fun) togive happy feelings and pleasurethrough images, bright colors, andsimple style. We took such greatpleasure in creating these two min-utes, that once it was finished itended up being 11 minutes! The orig-inal idea was to make a journeythrough time and space, and music
about evolution. "Tripeace:" a conglomerate of "Trip"and "Peace" :)
In terms of design, we wanted a simple style, andwe thought that modeling clay was ideal for that.We have modeled the characters and have takentheir picture from four angles to be able to modelthem in Blender, and also create textures (cracks,flaws) from the photos of the modeling clay.
What we learned the most in Blender is aboutNodes, which can really transform a rendered im-age. We have used the nodes, "glow," "defocus,"and "Bloom FX," which have served us well (maybewe used them a little too much!).
MAKING OF: ‘Tripeace’ animated
Tripeace
by D
enis
39
www.blenderart.org Issue 13 | Nov 2007 - Fantasy
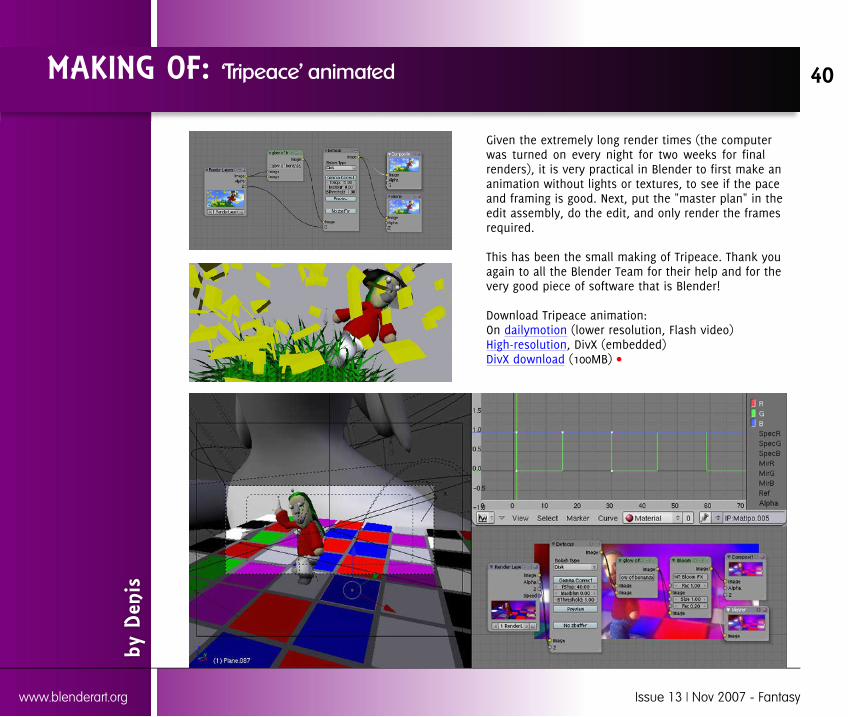
Given the extremely long render times (the computerwas turned on every night for two weeks for finalrenders), it is very practical in Blender to first make ananimation without lights or textures, to see if the paceand framing is good. Next, put the "master plan" in theedit assembly, do the edit, and only render the framesrequired.
This has been the small making of Tripeace. Thank youagain to all the Blender Team for their help and for thevery good piece of software that is Blender!
Download Tripeace animation:On dailymotion (lower resolution, Flash video)High-resolution, DivX (embedded)DivX download (100MB)
MAKING OF: ‘Tripeace’ animated
by D
enis
40
www.blenderart.org Issue 13 | Nov 2007 - Fantasy

IntroductionWhat I like about Fantasy Dwarfs,Gnomes and Leprechauns is that theycan be actually funny characters aswell as very evil ones. You can nevertell what they´ll come up with.
Some time ago, when the BlenderSculpting tools came into my hands, Idecided that I wanted to build a re-ally nice humanoid character. Istarted thinking about the different
options, and finally I realized that the best I coulddo was to make a character whose main character-istics resided in the proportions of its body.
I didn't want to make a standard ´´Muscle Man´´, sothen, a drawing that I had done when I was a kidcame to my mind, and I knew that I had to model ashrinky, old fatty dwarf!!
I took a standard humanoid model I had made afew years ago, and I started sculpting it. Some to-pology refinement had to be done too. Finally, aftera couple of days, my Dwarf sculpture was finished.
The next step was to UV Unwrap the model. Thatwas quite easy with Blender tools (Unwrap and Pro-portional Editing). Then, I carefully started arrangingthe UV Layout. As I knew I was going to use bit-maps for the main diffuse textures, I planned a UVlayout that would allow me to have really fine detailin the face without compromising the details of therest of the body.
As you may know, it is almost impossible to workwith a 10K texture, so I strategically divided the UVlayout in different sections. This way I could texturethe body using separated smaller bitmaps. I fin-ished up having seven different layouts.
MAKING OF: The dance of the ‘Bashful Dwarf’
Bashful Dwarf
by J
uan
Pabl
o Bo
uza
Face
Body Ears
Head
Legs Arms
41
www.blenderart.org Issue 13 | Nov 2007 - Fantasy
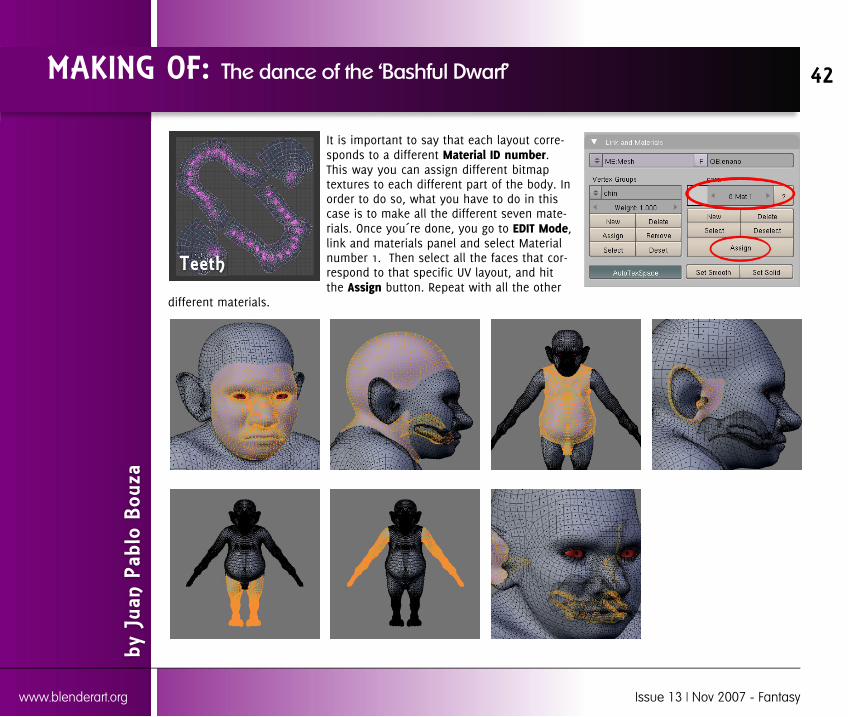
It is important to say that each layout corre-sponds to a different Material ID number.This way you can assign different bitmaptextures to each different part of the body. Inorder to do so, what you have to do in thiscase is to make all the different seven mate-rials. Once you´re done, you go to EDIT Mode,link and materials panel and select Materialnumber 1. Then select all the faces that cor-respond to that specific UV layout, and hitthe Assign button. Repeat with all the other
different materials.
MAKING OF: The dance of the ‘Bashful Dwarf’
by J
uan
Pabl
o Bo
uza
Teeth
42
www.blenderart.org Issue 13 | Nov 2007 - Fantasy
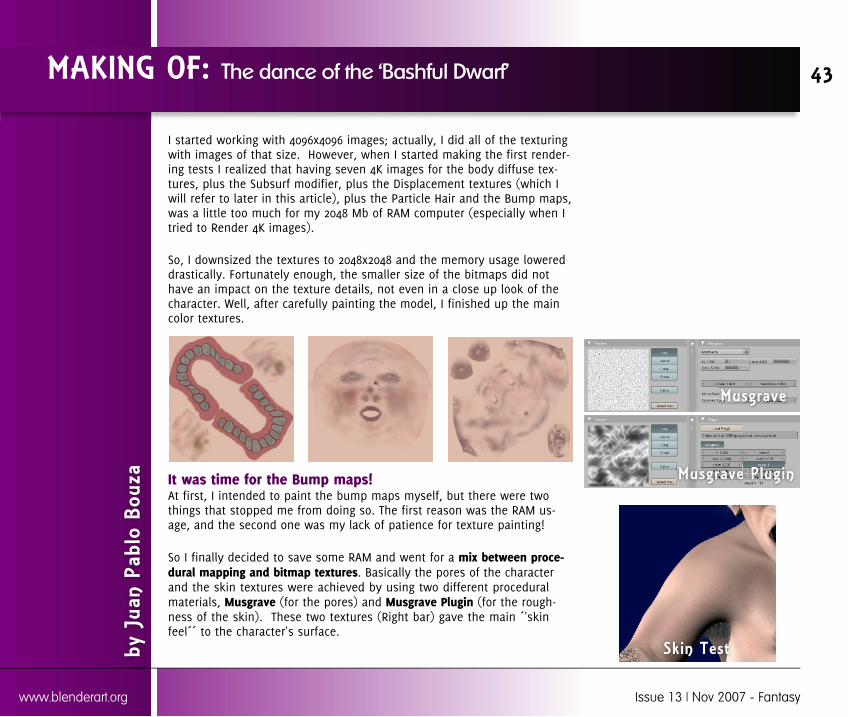
I started working with 4096x4096 images; actually, I did all of the texturingwith images of that size. However, when I started making the first render-ing tests I realized that having seven 4K images for the body diffuse tex-tures, plus the Subsurf modifier, plus the Displacement textures (which Iwill refer to later in this article), plus the Particle Hair and the Bump maps,was a little too much for my 2048 Mb of RAM computer (especially when Itried to Render 4K images).
So, I downsized the textures to 2048x2048 and the memory usage lowereddrastically. Fortunately enough, the smaller size of the bitmaps did nothave an impact on the texture details, not even in a close up look of thecharacter. Well, after carefully painting the model, I finished up the maincolor textures.
It was time for the Bump maps!At first, I intended to paint the bump maps myself, but there were twothings that stopped me from doing so. The first reason was the RAM us-age, and the second one was my lack of patience for texture painting!
So I finally decided to save some RAM and went for a mix between proce-dural mapping and bitmap textures. Basically the pores of the characterand the skin textures were achieved by using two different proceduralmaterials, Musgrave (for the pores) and Musgrave Plugin (for the rough-ness of the skin). These two textures (Right bar) gave the main ´'skinfeel´´ to the character's surface.
MAKING OF: The dance of the ‘Bashful Dwarf’
by J
uan
Pabl
o Bo
uza
43
www.blenderart.org Issue 13 | Nov 2007 - Fantasy
Musgrave
Musgrave Plugin
Skin Test

But there were some details that I could not possibly achieve with simpleprocedural mapping; the Wrinkles.
For the wrinkles details, I used a very simple 50% gray bitmap, and Ipainted the wrinkle lines over it. The darker the lines, the deeper the wrin-kles. Then I added this map to the material as a Bump map.
This is the Final layout for the Face material:
MAKING OF: The dance of the ‘Bashful Dwarf’
by J
uan
Pabl
o Bo
uza
44
www.blenderart.org Issue 13 | Nov 2007 - Fantasy
Facebump Wrinkles More wrinkles

Finally, for the hair(see image on right), I made two new Vertex Groups:one for the hair density, and another for the hair length. I enabled Parti-cles on the model and set up this layout (which I took from the BlenderWiki tutorials. You should read all of it before you start fooling around withBlender!).
I assigned the two new Vertex Groups to the density and length values ofthe Particle System, and then I started Weight painting these VertexGroups. The great thing is that the results show up in the viewport in real-
time while you paint.The combing of the hairwas fairly simplistic andeasy to do. I used lots ofCurve Guides and a fewEmpties with SphericalDeflection, and that wasit. (see left)
This is the Materiallayout(Images on right
pane) I used for the hair (also from the Wiki tutorials):
MAKING OF: The dance of the ‘Bashful Dwarf’
by J
uan
Pabl
o Bo
uza
45
www.blenderart.org Issue 13 | Nov 2007 - Fantasy
Hair Ammount Hair Length

I was so happy with the final result of the character,that I decided to create a rigging system that wouldenable me to animate the dwarf in any pose I wanted,so I started the BlenRig project, but that's another sto-ry...
There is a non-Blender section of this work that I thinkis worth mentioning:
The Displacement MapsAs you may know, Blender has a superb set of sculptingtools that can be greatly combined with the impressiveMultiRes feature. The thing is that we are not yet ableto properly animate MultiRes meshes, as the MultiResinformation gets awkwardly corrupted when you movethe mesh out of its rest position. Therefore, deformableobjects cannot be animated with MultiRes enabled. Thegood thing is that this issue is already known in theBlender Projects site. Hopefully, MultiRes Animation willbe possible some time soon.
For now, though, theonly thing we can do issomehow generate theDisplacement maps forthe model and applythem to the mesh withthe Displacement Mod-ifier, or with the Dis-placement mappingbutton in the 'Map To' layout of the Materials rollout(´´Disp´´ button).
As I said before, I had tosave all the RAM I could,and as the DisplacementMaps did not need to beso detailed, I created twonew UV layers just for thedisplacement maps.
If you work with multipleUV Layers , you must al-ways remember to assignthe correct UV Layer nameto the map in the ´´Mapinput´´ layout.
As you can see, I scaled down and joined the UV Lay-outs that I had made for the Diffuse textures. This way,there was no need to have seven displacement mapsbut just two.
MAKING OF: The dance of the ‘Bashful Dwarf’
by J
uan
Pabl
o Bo
uza
46
www.blenderart.org Issue 13 | Nov 2007 - Fantasy

But how did I manage to generate these Dis-placement maps?Well, there are three (working) free programs I know ofthat do the displacement calculation job for you. Theseare: ORB, Xnormal and DnormGen (which has a Blenderplugin).
In case you don't know what a Displacement map is, itis Grayscale based map that Blender can use to trans-form the faces of a mesh along its normals (Go to theWiki and find out more about it). Therefore, you canadd very small details to a subdivided LowRes mesh.This means that you can animate the lower resolutionmesh, and it will render with all the details of the highresolution one.
After a lot of research, I finally used ORB for the Dwarf'sdisplacement maps. It's a little bit old console- basedprogram, but it worked for me.
ORB needs the mesh to be triangulated, so you´ll haveto turn the triangulate option on when you export your.OBJ models.In order to get the best results you have to play aroundwith the raydistance value. In my case I used a value of
2, which did not deliver the best results with the nor-mal maps, but it did for the displacement maps.
As you may know, ZBrush and Mudbox subdivide thelower res model in order to generate smooth displace-ment maps. Therefore, the idea is to:
Model in MultiRes mode and export the HighResmodel.
Afterwards, apply a subsurf modifier to the lowerres model before you export it.
That way, ORB will be able to draw a more detailed dis-placement map when it traces the rays from the HighResolution mesh to the Low Resolution one.
In the case of my Dwarf character, I had to export theLow Res model twice. One time with the first UV Layoutand another one with the Second Layout.
Then, I imported the first .Obj Low Resolution mesh andthe High Resolution mesh into ORB and generated thefirst map. I repeated the procedure with the second LowResolution Mesh in order to generate the other map.
After the maps are generated, you will probably have tocorrect the gray values of the seams areas with Gimp,as no matter how little the difference may be, it willshow up when you render the model.
As I said before, one of the drawbacks of ORB is that itis based on console commands, another one is that thewindow must be fully displayed in your desktop, so ifyou want to render 1024x1024 textures, your monitor
MAKING OF: The dance of the ‘Bashful Dwarf’
by J
uan
Pabl
o Bo
uza
47
www.blenderart.org Issue 13 | Nov 2007 - Fantasy
1 Lowres. 2Multires level3. 3Lowres + SubSurf + Disp Map
must be set to at least at a 1280x1024 resolution (Iwould recommend you set it to 1600x1200).Some time ago I gave a little try to the latest version ofXnormal, and I must say that it is working really wellnow for displacement maps. You could give it a try.
Well, these are the resulting maps. Let's hope Blendercan generate Displacement maps from MultiRes meshessome time soon!
The DanceEver since I finished BlenRig, I wanted to make somekind of demonstration of its capabilities, so I imaginedthis funny scene of this little Dwarf dancing naked inthe dark. The idea was to make a simpler project beforeI went on working on the original short film that theDwarf was made for, which happens in the woods...
I wanted the movie to have music that had nothing todo with dwarfs, really. At first I thought about somekind of Disco ´´Bee Gees´´ style music, but then I cameacross this nice little piece called ´´Jazz Freestyle Instru-mental´´ (www.archive.org) and knew that it was ex-actly what I needed.
To tell you the truth, the animation was done in quite ahurry. I wanted to make it for the 2007 Siggraph con-vention and I had only three days left...well, I didn'tmake it on time, as the final render took about a week.That's the reason why there were some aspects thathad to be left behind, but I was quite happy with thefinal result anyway. Besides, I took it as an exercisemore than anything, and I learned a lot from it.
The Animation ProcessWell, once I had the music set, I started synchronizingthe movements. I must confess that many of his danc-ing moves were inspired by my own dancing experi-ence... sadly enough for him.
So, I started the synchronization process. I would startdancing myself in order to make the choreography se-quence; I really hope no one saw me.
The idea was not to make him a great dancer. In fact, Iwanted him to be more like clumsy and ridiculous ontop of everything. You know, with that ´'sexy, sexy´´thing he is mumbling, and the movement of his pelvis...
I think that the end result was some kind of mix be-tween great dancing and clumsiness. You have to admitthat he has some great coordination in those hands. Tryto do it yourself and you´ll see that it is almost impos-sible to do that!
MAKING OF: The dance of the ‘Bashful Dwarf’
by J
uan
Pabl
o Bo
uza
48
www.blenderart.org Issue 13 | Nov 2007 - Fantasy
So, the first part of the animation had to be really wellsynchronized with the sound, and I knew that the sec-ond part, the jumping one, was more like a freestyletotally out of rhythm dancing.
For the Technical aspects, my main tool was the NLAEditor. I did some looping animations, especially for thehip side to side and up and down movements, and Irepeated them all over the song.
I had some trouble making the spine move realistically,as I was combining the IK of the hips and the legs withthe FK of the spine. You know, I had to do a lot of com-pensation movements in order to avoid the spine frommoving like crazy when the hip rotated. This was one ofthe reasons why I developed the new double IK systemfor the spine in BlenRig 1.2.
In general, all the animation was done using InverseKinematics. That's why the jumping sequence was notdifficult at all to animate. I think that the most chal-lenging phase of the animation was the turning aroundmoment.
Full body turning around movements seem to be ratherdifficult to achieve if you want them to be "realistic."The first thing I did was establishing the upper body'srotation. Once I did that, I started posing the feet andlegs to follow the rotation of the body. It was tough tomake it not look "mechanical like."
You can always add realism to the movements by ani-mating secondary motion. You know, the subtle move-ment of the toes when the foot hits the ground,delaying the movements of the arms and head due toinertia, producing the feel of the weight of the body bylowering the torso a little bit with each step, etc.
That is what I did in general, tracing the basic roughmovements, and then adding realism with secondarymotion.
The last thing I animated was the facial expression. Idid it rather in a hurry, and I made some planning mis-takes. To tell you the truth, there was absolutely noplanning with this animation, and that was not so verygood for the workflow.
Well, the thing was that I had just one hour left before Istarted rendering, and I didn't have the voice audioedited. Therefore, I had to completely improvise hisexpressions. Fortunately for me, I did quite a good job
MAKING OF: The dance of the ‘Bashful Dwarf’
by J
uan
Pabl
o Bo
uza
49
www.blenderart.org Issue 13 | Nov 2007 - Fantasy
BlendRig 1 BlenRig 1.2
with the timings, so it was not so difficult to add thevoice of the Dwarf over the rendered video. But it wouldhave been much easier and tidier, if I had had the au-dio track already edited before I animated the charac-ter.
This is just a thought though. Luckily enough this moviewas rather simple, but if you are going to do a morecomplex film, it is definitely advisable to have a roughof the soundtrack already edited before you start ani-mating.
Scene SetupWhen I first thought about the dancing dwarf scene, Iwanted it to have a simplistic background, but simplyblack was not enough. So, I tried to give some atmos-phere to it, and with the use of a Halo light I was ableto create a rather abstract place that could easily be thedwarf's cave or dungeon. Nothing too specific.
So, this was when the problems began, and I startedthis technically tricky scene setup... First of all, I usedBlender 2.43/44 for this project, so there were somerendering and lightings features that were not availableyet, not even through SVN.
Basically, the scene had two objects: the Dwarf and asimple plane for the ground. What I first did was to adda Spot Light with Halo enabled. My main concern wasthe quality of the light and especially of the shadows.Therefore I could not simply use the Spot Light, as spotlights didn't have soft shadows. Besides, I wanted theVolumetric Halo to have Volumetric Shadows, and the
only way of doing that was to disable Raytraced Shad-ows and enable Buffer Shadows to the Spot Light.
I was not satisfied with the quality of the shadows thatthe Spot Light was giving to the scene, so I decided todo a little experiment on mixing the Spot Light with anArea Light (which has soft raytraced shadows).
To make the concept clear, here's how I set it up:
Dwarf lighting:Spot Dwarf is the main Halo light, and produces thevolumetric shadows inside of the Halo.
Area Dwarf is aligned to Spot Dwarf, and it lit’s theDwarf Mesh and generates raytraced soft shadowsover his body.
The Dwarf Mesh is exclusively lighted by the lightgroup called Area, to which Area Dwarf belongs.Spot Dwarf is not part of this group, thus, it doesnot lit the Dwarf, it just produces the volumetricshadows in the Halo.
Floor Lighting:The floor mesh is exclusively illuminated by thelamps that belong to the group called Floor.
Spot Floor is aligned to Spot Dwarf, it has no shad-ows enabled. Its purpose is to generate the lightcircle on the floor.
Area Floor is also aligned to Spot Dwarf, and it hasthe ´´Only Shadows´´ option enabled, thus, it doesnot lit anything, but it generates the projection ofthe raytraced soft shadows of the Dwarf on thefloor.
MAKING OF: The dance of the ‘Bashful Dwarf’
by J
uan
Pabl
o Bo
uza
50
www.blenderart.org Issue 13 | Nov 2007 - Fantasy

That was the basic lighting setup. But a BIG problemarose... The hair, which had ZTransp option enabled,rendered over the Halo light... too bad.
After trying to solve the problem using the Compositorwithout being able to achieve the desired results, Ifound out that if you specifically tell the material thathas ZTransp enabled to be lightened exclusively by acertain group of lights, the ZTransp is rendered behindthe Halo lights that belong to that group.
So, I had to clone the Dwarf mesh lighting setup andassign those new lights exclusively to the hair. The onlyproblem was that now I had two Halo lights that weresumming their Halo values. I solved the problem bylowering each Halo to half of the original value, andthat did the trick.
Lastly, there was some strange issue concerning HaloLight rendering against Void and Ztransp faces. Somestrange white glitches appeared. Fortunately, I was ableto solve the problem by adding a simple plane mesh tothe back of the scene. Therefore, Ztransp and Haloceased to be rendered against the background black
color, and were rendered against actual black geometry.Well, don't ask me why, but it worked.
It's amazing how you can solve things by coming upwith strange tricky solutions when you are in a hurry...As I said before, I did this animation mainly withBlender 2.43, so many of the technical problems I en-countered were fortunately solved in later revisions ofBlender.
Well, that's it. I hope this little article is useful for youand encourages you to keep on working on yourprojects! You can Check out "The Dance of the BashfulDwarf" animation at www.blender.org, or atwww.jpbouza.com.ar. Don't forget to check out my newBlenRig and Cartoon BlenRig 1.2 if you enter my site, orat BlenderArtists.
I´ve made the .blend file of the scene with the lightingsetup and the BlenRig Armature available to BlenderArtMagazine, so check it out if you want!!
Note: the animation is not compatible with Blender SVN,as it is based on BlenRig 1.0. Try to open it with Blender2.45 or prior.
Cheers!Juan Pablo Bouza
MAKING OF: The dance of the ‘Bashful Dwarf’
by J
uan
Pabl
o Bo
uza
51
www.blenderart.org Issue 13 | Nov 2007 - Fantasy
White Ar t i fac ts Geometry Background

IntroductionI first discovered Blender about 6months ago while I was searching theInternet for animation programmes. Itwas almost by luck that I foundBlender.
I wanted to create some sort of ani-mation and Blender seemed like itcould be the right sort of programmeto practice on. After searching theWiki I found out that Blender had agame engine. I then followed a tuto-
rial and created my first Blender game. It was asimple maze and ball game. This taught me aboutlogic bricks and physics.
I then went on trying to create a more complexgame. This game was a prison escape game. Ilearned about bones, alpha textures and fadingscenes. My next game was an FPS (first personshooter). I learned how to create a first persongame with mouse-camera control. Once I hadlearned what I wanted, I started the project I amcurrently working on.
Up until now, all of my learning has come from trialand error and fabulous feedback fromwww.Blenderartists.org. When I first started my cur-rent project, I intended it as a learning experienceabout Blender and its game engine. As peoplelearned about my game and commented, it becamemore involved.
During this project I have learned about shadowbaking, properties and more about modeling. I in-tend to continue on with this game for some timewhile I continue to learn more about the power ofBlender.
Here are some screen shots of my game. It will besomething like the Elder Scrolls series.
Cheers,Rusty246 (12 year old student)
Video of walkthrough of part of the game area:Forum thread on www.blenderartists.org showingprogress of his game.
MAKING OF: Rusty’s RPG
Rusty’s RPG
by R
usty
246
52
www.blenderart.org Issue 13 | Nov 2007 - Fantasy
IntroductionThe idea was to create somethingplayful and interactive for my 8-year-old daughter, apart from all thatgloomy animation stuff I usually workon. It ought to be simple and funny. Ihad a look at Blender's game engineand was amazed by its physics en-gine, "Bullet."
So my daughter and Ithought about a characterthat could be shot and
would then blow up into a big balloonthat keeps rolling around. First I beganwith Blender's "Suzanne" that turned intoa donut when it was hit. We discoveredthat the fun increased with every newbouncing donut.
After a few weeks, when the logic of thegame was nearly finished, we came uponthe idea of changing the character to adwarf. So the character, environment, andlook of the game were the last things inthe game's small production line.
While all of the computer work wasdone by me, my daughter helped me withthe textures, nearly all of which werehand-drawn on paper. Some friendsof mine are working on noises andsounds that will be added whenthey are finished.
I have tried to keep everything assimple as possible, from the in-staller to playing the game touninstalling it.
The installer/uninstaller wasmade with NSIS, a GPL installingsystem. The game has a splash screenwith all necessary instructions. Dwarf Hunt is a finegame for a coffee break, especially if you are angrywith somebody. You will only need one hand and athree-button mouse.
Note that the middle mouse-button is the "bosscomes around the corner (quit game)" button.Dwarf Hunt can be downloaded atwww.marc-brink.com.
Marc
MAKING OF: Coffee Break Game ‘Dwarf Hunt’
Dwarf Hunt
by M
arc
53
www.blenderart.org Issue 13 | Nov 2007 - Fantasy

Joshua Scotton
Hi my name isJoshua Scottonand I'm fromEngland. I'm21 years oldand have juststarted my fourth year doingan honours degree in Mathe-matical and Computer Studies.
In my spare time I like to dopaint balling, rock-climbing,programming and blender(which I run on a laptop run-ning Ubuntu).
I also run the newly startedBlender Week Day Challengeover on blenderartists.org. Youcan find me there under thealias blackcougar.
www.joshuascotton.com
Blen
derA
rt S
taff
-N
o P
art
icu
lar
Ord
er
54
www.blenderart.org Issue 13 | Nov 2007 - Fantasy
Kevin Braun
Kevin Braun (HumanForum) isa multimedia professionalspecializing in all forms ofinteractive development. Hereceived his BFA from the Uni-versity of Massachusetts atDartmouth in 1995 and sincethen has served world-classclients such as Harvard Univer-sity, MIT and Cisco Systems.
When he and his wife Chris-tine take a moment from rais-ing their 3 boys they conspireon how to save the world us-ing their combined artisticskills.
To learn more or see examplesof his work visit:
www.brauninteractive.com
Ronan Posnic
After a few years studyingphilosophy and then commu-nication, in France and Ire-land, I finally find myselfworking in Paris for a smallproduction company.
I gradually improve my skillsin Blender so as to integrate itmore and more into my ownwork flow.
Contributing as a proofer is away for me to give back alittle and to follow moreclosely BlenderArt Magazineissues...
MEET THE STAFF
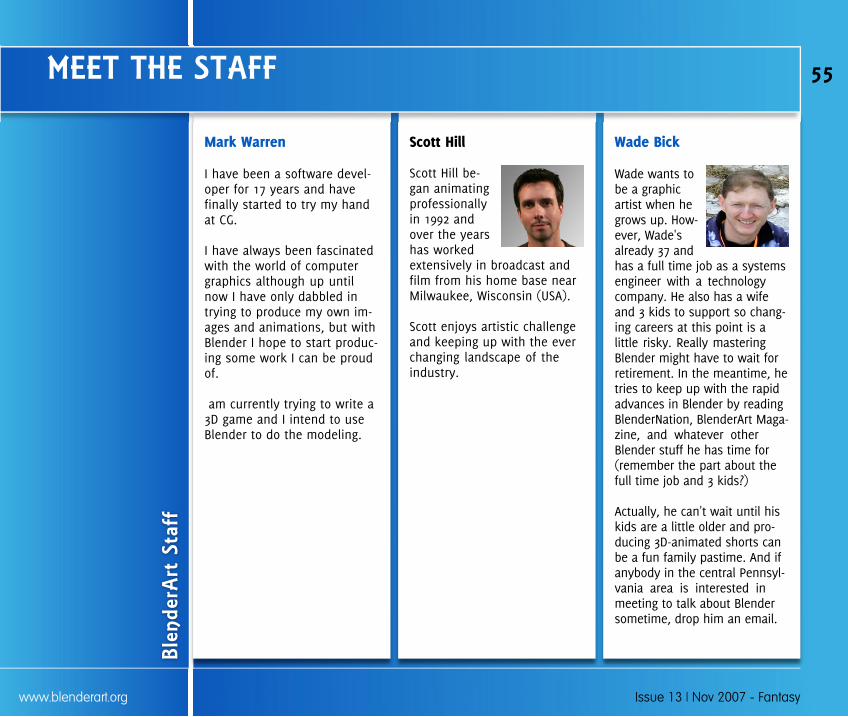
Mark Warren
I have been a software devel-oper for 17 years and havefinally started to try my handat CG.
I have always been fascinatedwith the world of computergraphics although up untilnow I have only dabbled intrying to produce my own im-ages and animations, but withBlender I hope to start produc-ing some work I can be proudof.
am currently trying to write a3D game and I intend to useBlender to do the modeling.
Blen
derA
rt S
taff
55
www.blenderart.org Issue 13 | Nov 2007 - Fantasy
Scott Hill
Scott Hill be-gan animatingprofessionallyin 1992 andover the yearshas workedextensively in broadcast andfilm from his home base nearMilwaukee, Wisconsin (USA).
Scott enjoys artistic challengeand keeping up with the everchanging landscape of theindustry.
Wade Bick
Wade wants tobe a graphicartist when hegrows up. How-ever, Wade'salready 37 andhas a full time job as a systemsengineer with a technologycompany. He also has a wifeand 3 kids to support so chang-ing careers at this point is alittle risky. Really masteringBlender might have to wait forretirement. In the meantime, hetries to keep up with the rapidadvances in Blender by readingBlenderNation, BlenderArt Maga-zine, and whatever otherBlender stuff he has time for(remember the part about thefull time job and 3 kids?)
Actually, he can't wait until hiskids are a little older and pro-ducing 3D-animated shorts canbe a fun family pastime. And ifanybody in the central Pennsyl-vania area is interested inmeeting to talk about Blendersometime, drop him an email.
MEET THE STAFF

Brian Treacy
Aged 29,Chesapeake,VaOccupation:Senior CADDDesigner - PB Americas, Inc. inNorfolk, VaFamily Life: Married VallariJanuary 30, 2002; Lydia bornNovember 23, 2006Religion: I enjoy teaching aSunday School class to a groupof 4th, 5th and 6th graders atFreedom Baptist Church.Hobbies: Reading, art, 3D, pro-gramming, writing, teaching,camping Blender Experience:Blender user since April 2002as a hobby; first professionalproject in Blender in 2005.Writing Experience: Authoredmany CADD related articlespublished within company'sinternal magazines; externallypublished two articles (one ofwhich includes Blender con-tent) and one ad; currentlyworking on a short book: acommentary on the first epis-tle of John
Blen
derA
rt S
taff
56
www.blenderart.org Issue 13 | Nov 2007 - Fantasy
Eric Pranausk
I have been drawing andsculpting for as long as I canremember, with only minimalacademic training. I found thatmy creative skills easily car-ried over to digital media,which I found to be the mostfreeing way to express ideas.Discovering open-source soft-ware and Blender in particularhas further helped me to bringmy imagination to life, not tomention put food on the table!
After years of personal experi-mentation, guidance frommembers of various onlinecommunities and employmentas a graphic designer, I hopeto help others enjoy a similarexperience.
Phillip Ryals
PhillipRyals(paryl)has beenaroundtheBlender community since1999. He eats and drinks 3D,but he finds most of his timetaken up by the 'real world'.
Until hobbies start payingbills, he's more than happy tosit in the shadows, quietlyproofing articles for the bestBlender magazine out there.
MEET THE STAFF
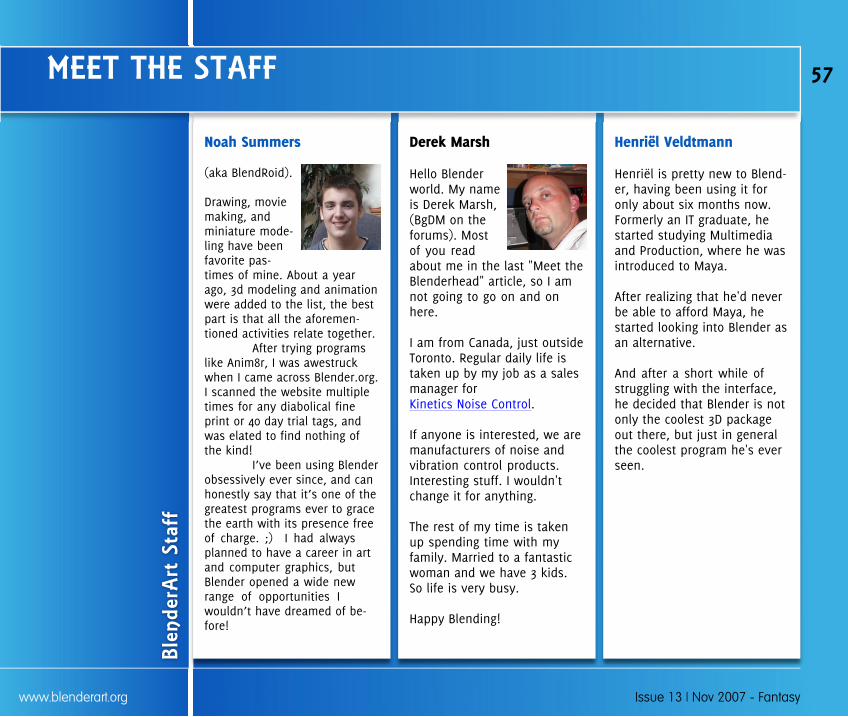
Noah Summers
(aka BlendRoid).
Drawing, moviemaking, andminiature mode-ling have beenfavorite pas-times of mine. About a yearago, 3d modeling and animationwere added to the list, the bestpart is that all the aforemen-tioned activities relate together. After trying programslike Anim8r, I was awestruckwhen I came across Blender.org.I scanned the website multipletimes for any diabolical fineprint or 40 day trial tags, andwas elated to find nothing ofthe kind!
obsessively ever since, and can
greatest programs ever to gracethe earth with its presence freeof charge. ;) I had alwaysplanned to have a career in artand computer graphics, butBlender opened a wide newrange of opportunities I
fore!
Blen
derA
rt S
taff
57
www.blenderart.org Issue 13 | Nov 2007 - Fantasy
Derek Marsh
Hello Blenderworld. My nameis Derek Marsh,(BgDM on theforums). Mostof you readabout me in the last "Meet theBlenderhead" article, so I amnot going to go on and onhere.
I am from Canada, just outsideToronto. Regular daily life istaken up by my job as a salesmanager forKinetics Noise Control.
If anyone is interested, we aremanufacturers of noise andvibration control products.Interesting stuff. I wouldn'tchange it for anything.
The rest of my time is takenup spending time with myfamily. Married to a fantasticwoman and we have 3 kids.So life is very busy.
Happy Blending!
Henriël Veldtmann
er, having been using it foronly about six months now.Formerly an IT graduate, hestarted studying Multimediaand Production, where he wasintroduced to Maya.
After realizing that he'd neverbe able to afford Maya, hestarted looking into Blender asan alternative.
And after a short while ofstruggling with the interface,he decided that Blender is notonly the coolest 3D packageout there, but just in generalthe coolest program he's everseen.
MEET THE STAFF
Joshua Leung
Joshua Leung is an active de-veloper of Blender, with a pri-mary focus on the AnimationTools (in particular the ActionEditor, Armatures, and Con-straints).
He started using Blendershortly after the release of2.33a, having previouslyplayed around with otherfreely available 3D-softwaresincluding Anim8or and POV-RAY.
Currently he is busy workingon improving the AnimationSystem to satisfy the require-ments of the Peach OpenMovie Project.
Blen
derA
rt S
taff
58
www.blenderart.org Issue 13 | Nov 2007 - Fantasy
Also on our staff:
Bruce WestfallLyndaPatrick O'DonnellGaurav NawaniSandra GilbertNam Pham
MEET THE STAFF
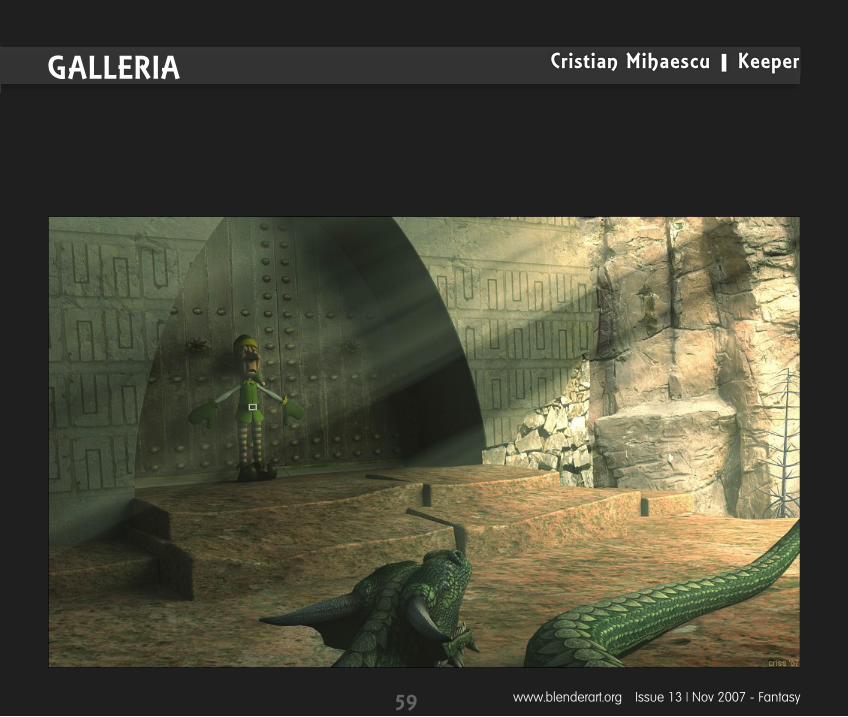
www.blenderart.org Issue 13 | Nov 2007 - Fantasy
Cristian Mihaescu | KeeperGALLERIA
59
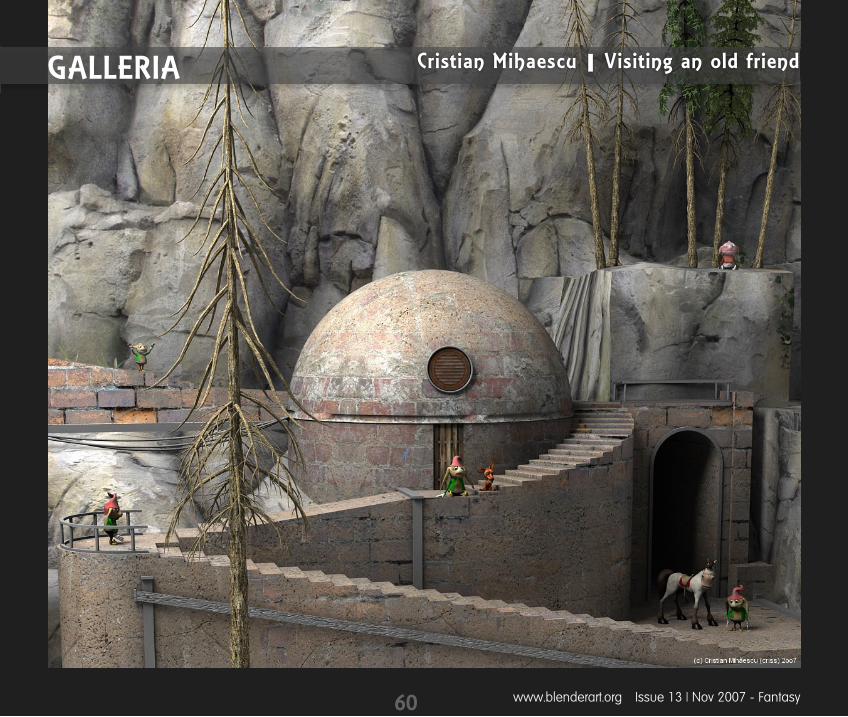
www.blenderart.org Issue 13 | Nov 2007 - Fantasy
Cristian Mihaescu | Visiting an old friendGALLERIA
60
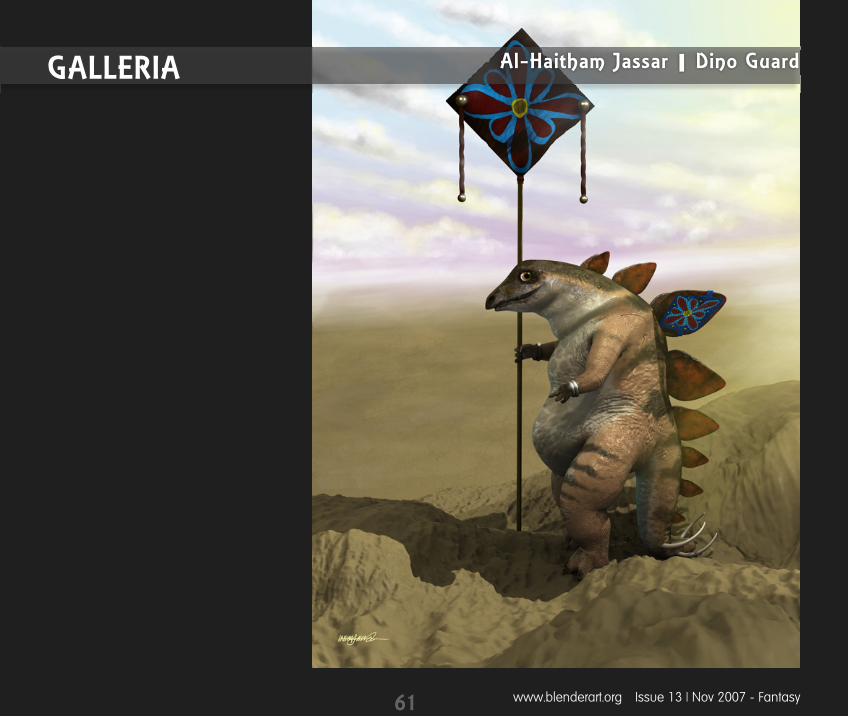
www.blenderart.org Issue 13 | Nov 2007 - Fantasy
Al-Haitham Jassar | Dino GuardGALLERIA
61
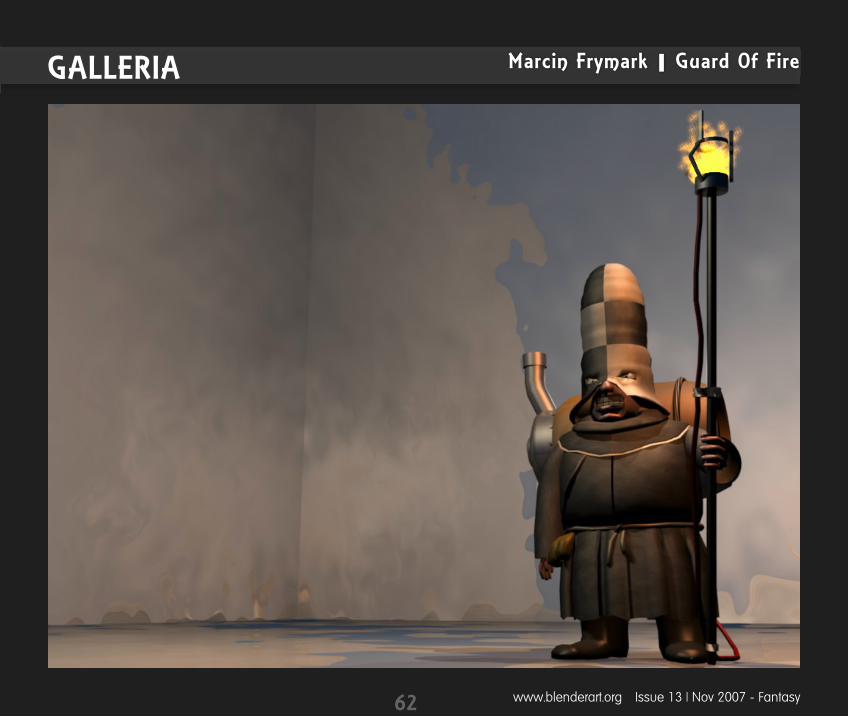
www.blenderart.org Issue 13 | Nov 2007 - Fantasy
Marcin Frymark | Guard Of FireGALLERIA
62
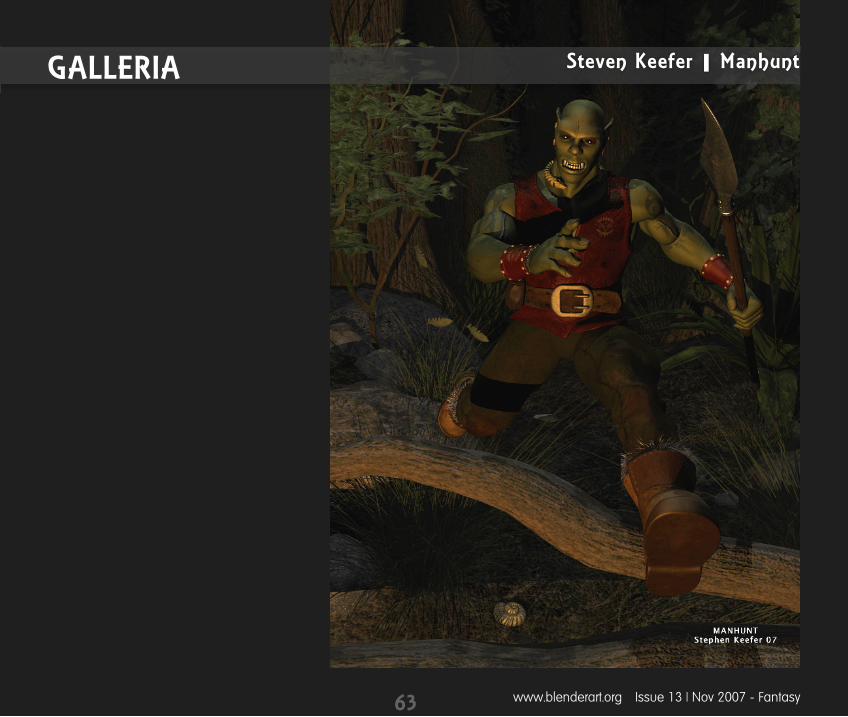
www.blenderart.org Issue 13 | Nov 2007 - Fantasy
Steven Keefer | ManhuntGALLERIA
63

www.blenderart.org Issue 13 | Nov 2007 - Fantasy
Zoltan Miklosi | Female FighterGALLERIA
64
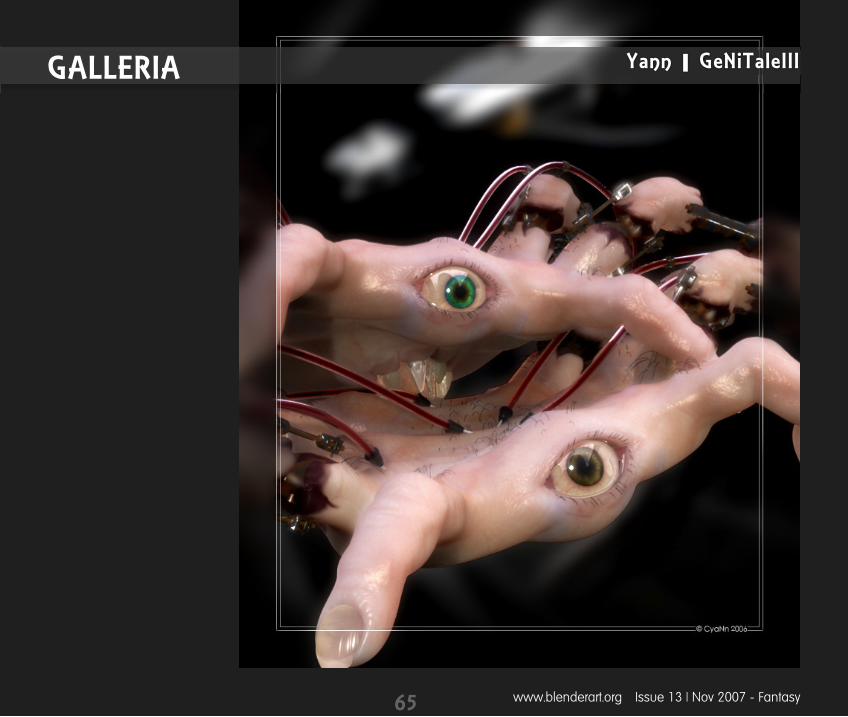
www.blenderart.org Issue 13 | Nov 2007 - Fantasy
Yann | GeNiTaleIIIGALLERIA
65
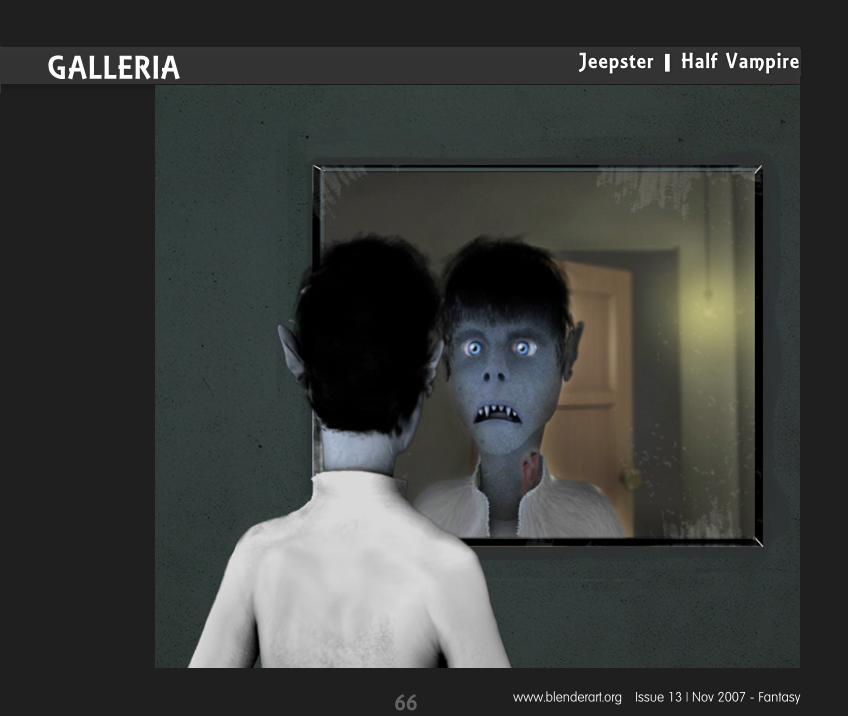
www.blenderart.org Issue 13 | Nov 2007 - Fantasy
Jeepster | Half VampireGALLERIA
66

www.blenderart.org Issue 13 | Nov 2007 - Fantasy
Mohamed Taia | OrcGALLERIA
67

www.blenderart.org Issue 13 | Nov 2007 - Fantasy
Paolo Acampora | Warrior CatGALLERIA
68

www.blenderart.org Issue 13 | Nov 2007 - Fantasy
Anirudh Gupta | Flower & WitchGALLERIA
69
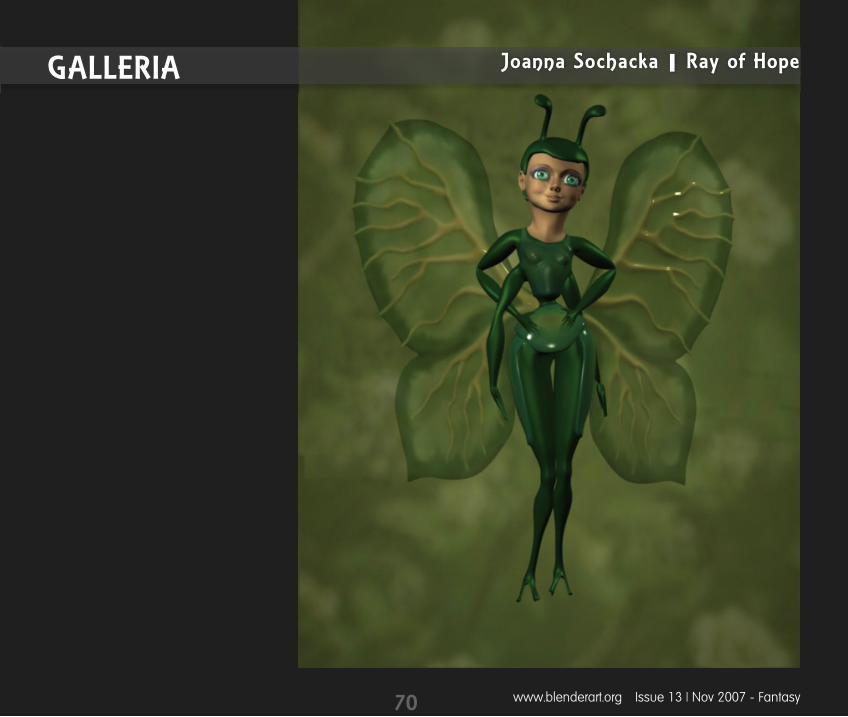
www.blenderart.org Issue 13 | Nov 2007 - Fantasy
Joanna Sochacka | Ray of HopeGALLERIA
70
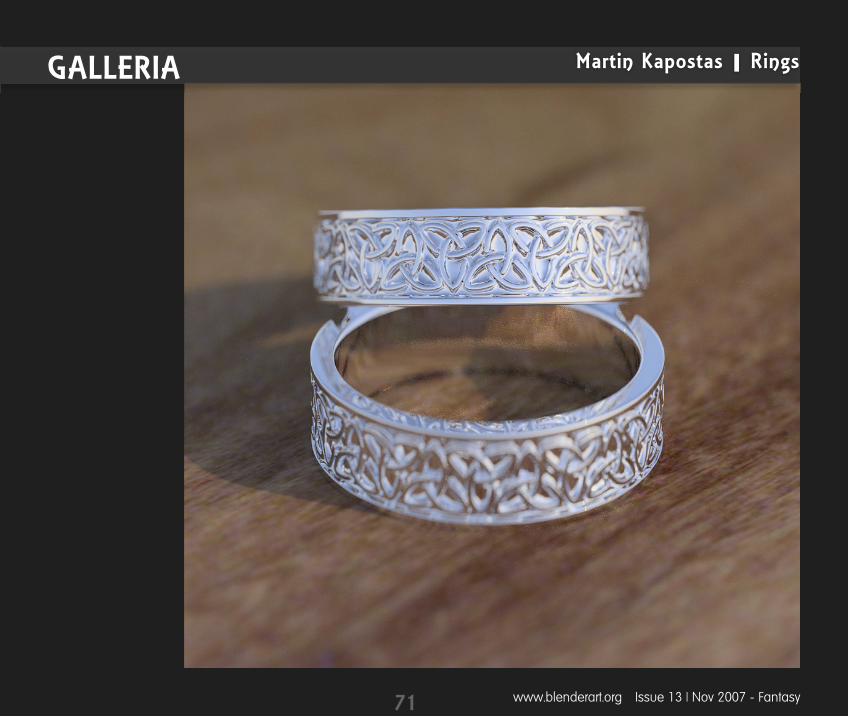
www.blenderart.org Issue 13 | Nov 2007 - Fantasy
Martin Kapostas | RingsGALLERIA
71
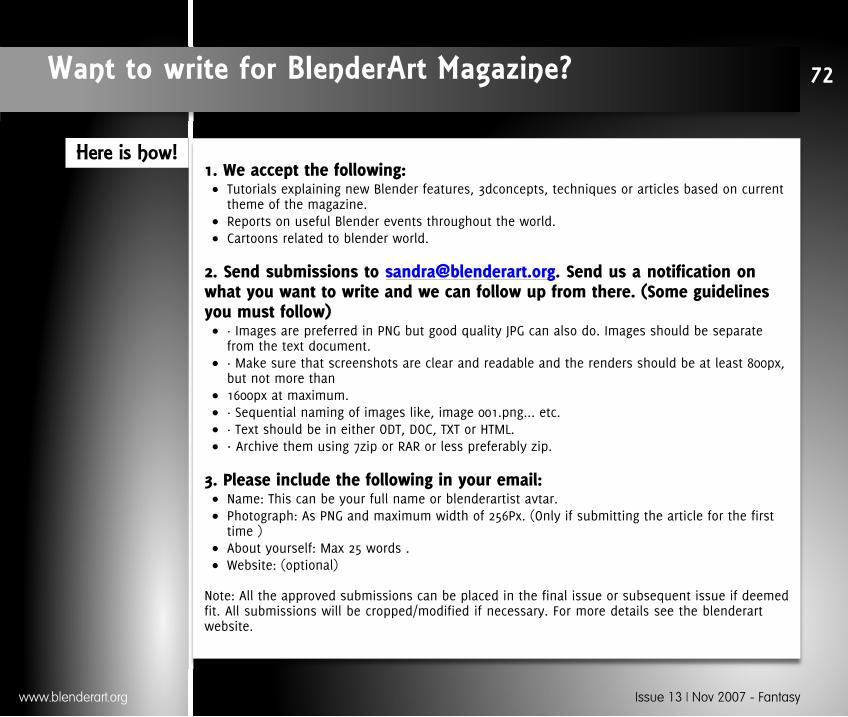
1. We accept the following: Tutorials explaining new Blender features, 3dconcepts, techniques or articles based on currenttheme of the magazine.
Reports on useful Blender events throughout the world. Cartoons related to blender world.
2. Send submissions to [email protected]. Send us a notification onwhat you want to write and we can follow up from there. (Some guidelinesyou must follow)
· Images are preferred in PNG but good quality JPG can also do. Images should be separatefrom the text document.
· Make sure that screenshots are clear and readable and the renders should be at least 800px,but not more than
1600px at maximum. · Sequential naming of images like, image 001.png... etc. · Text should be in either ODT, DOC, TXT or HTML.· Archive them using 7zip or RAR or less preferably zip.
3. Please include the following in your email: Name: This can be your full name or blenderartist avtar. Photograph: As PNG and maximum width of 256Px. (Only if submitting the article for the firsttime )
About yourself: Max 25 words . Website: (optional)
Note: All the approved submissions can be placed in the final issue or subsequent issue if deemedfit. All submissions will be cropped/modified if necessary. For more details see the blenderartwebsite.
72
www.blenderart.org Issue 13 | Nov 2007 - Fantasy
Want to write for BlenderArt Magazine?
Here is how!

blenderart.org does not takes any responsibility both expressed or implied for the material and itsnature or accuracy of the information which is published in this PDF magazine. All the materialspresented in this PDF magazine have been produced with the expressed permission of theirrespective authors/owners. blenderart.org and the contributors disclaim all warranties, expressedor implied, including, but not limited to implied warranties of merchantability or fitness for aparticular purpose. All images and materials present in this document are printed/re-printed withexpressed permission from the authors/owners.This PDF magazine is archived and available from the blenderart.org website. The blenderart maga-zine is made available under Creative Commons‘ Attribution-NoDerivs 2.5’ license.
COPYRIGHT© 2007‘BlenderArt Magazine’, ‘blenderart’ and BlenderArt logo are copyright of Gaurav Nawani. ‘Izzy’ and ‘Izzylogo’ are copyright Sandra Gilbert. All products and company names featured in the publication aretrademark or registered trade marks of their respective owners.
73
www.blenderart.org Issue 13 | Nov 2007 - Fantasy
Upcomming Issue ‘Theme’
Issue 14
Disclaimer
Cartoon Modeling/Game Engine
Adorable/odd characters. Scenes in realistic or Toon shading. Any game you are working on creating? Low poly models. Levels.
How to's on game AI/game play.


