Blackboard Collaborate Launcher for Windows (Staff) - n P · PDF fileBlackboard Collaborate...
9
Page 1 of 9 Updated on Apr 2017 NGEE ANN POLYTECHNIC Blackboard Collaborate Launcher for Windows (Staff) DOCUMENT CHANGE HISTORY Version Date Summary of Change Updated By Reviewed By Approved By 1.0 27-Oct-14 Revised Guide for the new Blackboard Collaborate Launcher for Windows (Staff) Johnny Ng Lim Peng Heng Lim Peng Heng 2.0 11-Apr-17 Updated with Windows 10 screenshots Johnny Ng Lim Peng Heng Lim Peng Heng
Transcript of Blackboard Collaborate Launcher for Windows (Staff) - n P · PDF fileBlackboard Collaborate...

Page 1 of 9 Updated on Apr 2017
NGEE ANN POLYTECHNIC
Blackboard Collaborate Launcher for Windows (Staff)
DOCUMENT CHANGE HISTORY
Version Date Summary of Change Updated By Reviewed By Approved By
1.0 27-Oct-14 Revised Guide for the new
Blackboard Collaborate
Launcher for Windows
(Staff)
Johnny Ng Lim Peng Heng Lim Peng Heng
2.0 11-Apr-17 Updated with Windows 10
screenshots
Johnny Ng Lim Peng Heng Lim Peng Heng

Page 2 of 9 Updated on Apr 2017
Blackboard Collaborate Launcher for Windows (Staff) Last Modified, 11 Apr 2017
For Windows 7 users, please see Appendix I below BEFORE
proceeding to Step 2.
For Windows 8 or 10 users, you may proceed to Step 2.
Download and install the Blackboard Collaborate Launcher.
CLICK HERE or go to http://goo.gl/o9ii8g
(Use either Firefox or Chrome browser)
Step-by-step Guide for Step 2
a. Select the Operating System and click the [Download] button.
Figure 1: Select Operating System
NOTE: If you see the following page instead, you can click on [download the Blackboard Collaborate
Launcher.] to go to “Get the Launcher” page to download the launcher.
Figure 2: Download Blackboard Collaborate Launcher

Page 3 of 9 Updated on Apr 2017
b. You will be prompt to save the “BlackboardCollaborateLauncher-Win.msi”. Different browsers handle this
scenario differently and the behavior of each browser may vary depending on how you configured your
browser settings.
- Firefox prompts you to save the Windows installer “BlackboardCollaborateLauncher-Win.msi”. Save the
file. The default save location is your browser's Downloads library. Open the Downloads library and,
when the download is complete, open the file to start the Blackboard Collaborate setup wizard.
NOTE: DO NOT close the Firefox browser, it will be continued for Step 4 later.
Figure 3: Firefox Download Prompt
- Chrome prompts you to save the Windows installer “BlackboardCollaborateLauncher-Win.msi”. Save
the file. The default save location is your Downloads folder. In the bottom-left corner of your browser
window, Chrome shows you the progress of the download. When the download is complete, click the
downloaded file to start the Blackboard Collaborate setup wizard.
NOTE: DO NOT close the chrome browser, it will be continued for Step 4 later.
Figure 4: Chrome Download Indicator
c. Windows may prompt you with a Security Warning dialog, asking if you want to run this file. If so,
click [Run] to continue the Blackboard Collaborate setup wizard. Click [Next >] to start the setup wizard
and [Finish] when complete.
Figure 5: Blackboard Collaborate Launcher Setup

Page 4 of 9 Updated on Apr 2017
The setup wizard installs the Windows Blackboard Collaborate Launcher and adds it to the Start menu’s
All apps list. Windows 8 users can find the Blackboard Collaborate Launcher shortcut in Metro view.
Figure 6: Windows 10 (Start menu > All apps)
Figure 7: Windows 8 (Metro view)
If you are joining the Blackboard Collaborate session using NPNet
network, including NPWireless and NPWirelessx WiFi, please see
see Appendix II below BEFORE proceeding to Step 4.
Enter the Blackboard Collaborate Configuration Room.
Step-by-step Guide for Step 4
a. Continuing from the webpage in Step 2, go back to the browser (Firefox/Chrome) and click on [Join] to
enter the Blackboard Collaborate Configuration room.
Figure 8: Join Blackboard Collaborate Configuration Room
Page 5 of 9 Updated on Apr 2017
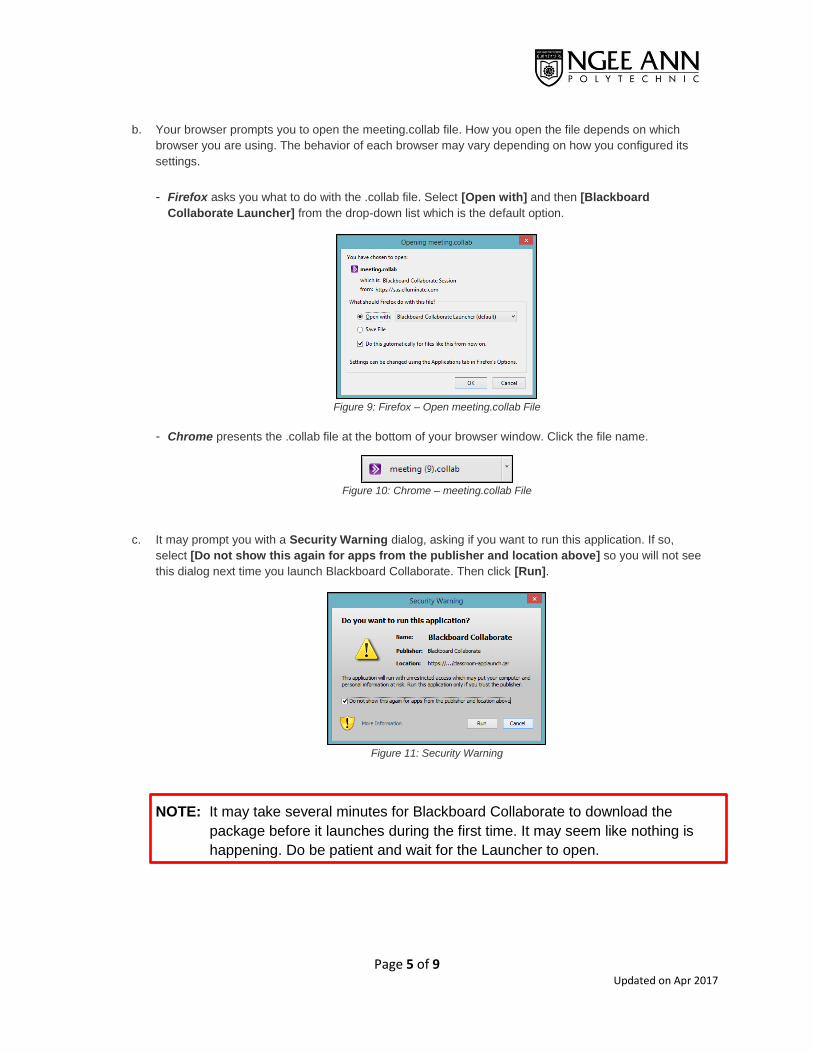
b. Your browser prompts you to open the meeting.collab file. How you open the file depends on which
browser you are using. The behavior of each browser may vary depending on how you configured its
settings.
- Firefox asks you what to do with the .collab file. Select [Open with] and then [Blackboard
Collaborate Launcher] from the drop-down list which is the default option.
Figure 9: Firefox – Open meeting.collab File
- Chrome presents the .collab file at the bottom of your browser window. Click the file name.
Figure 10: Chrome – meeting.collab File
c. It may prompt you with a Security Warning dialog, asking if you want to run this application. If so,
select [Do not show this again for apps from the publisher and location above] so you will not see
this dialog next time you launch Blackboard Collaborate. Then click [Run].
Figure 11: Security Warning
NOTE: It may take several minutes for Blackboard Collaborate to download the
package before it launches during the first time. It may seem like nothing is
happening. Do be patient and wait for the Launcher to open.

Page 6 of 9 Updated on Apr 2017
d. Before your Blackboard Collaborate session opens, it may prompt you to select the connection speed.
Select [Wireless (300 Kbps)] from the drop-down list. Check on [Don’t show this dialog again] so you
will not see this dialog next time. Then click [OK] and your Blackboard Collaborate launches.
Figure 12: Blackboard Collaborate – Wireless (300kpbs)
e. When Blackboard Collaborate is launched, you will see the following. In this configuration room, follow the
instruction under “1. Configure your audio” to setup the speaker and microphone. After you have setup
the audio, you may close the Blackboard Collaborate Configuration Room. You can now attend your
module’s Blackboard Collaborate session or view the recordings.
Figure 13: Blackboard Collaborate

Page 7 of 9 Updated on Apr 2017
Appendix I
If you are a staff with a NP issued notebook using Microsoft Windows 7 or older and having the "NPNet” and “SCH &
DEPT Menus" on your Windows "Start" Menu -> All Programs", it may cause a conflict and would have to be
removed before you proceed with the launcher installation :
Figure 14: Windows Start Menu
a. Plug in a staff LAN network connection into your notebook computer.
b. Login to NPNet.
c. Save this batch file [Remove Start_menu.bat]: CLICK HERE or go to http://goo.gl/EqdbZp
d. Double-Click on the [Remove Start_menu.bat] file. A command-prompt window will open. Press any key to close
the command-prompt when done.
Figure 15: Batch File – Remove Roaming Profile’s Start Menu
e. Logout of NPNet.
f. Login to NPNet.
g. Check your Windows "Start" Menu -> All Programs" and verify that the "NPNet” and “SCH & DEPT Menus"
have been removed.
h. If so, proceed to Step 2 on page 2.
i. If not, please restart your computer and re-verify if the "NPNet” and “SCH & DEPT Menus" have been
successfully removed.
If the "NPNet Menu" and “SCH & DEPT Menus" is removed, proceed to Step 2 on page 2.
If not, please bring your notebook computer to the CC IT Helpdesk on the ground floor of Block 27 during
office hours for assistance.

Page 8 of 9 Updated on Apr 2017
Appendix II
If users are accessing Blackboard Collaborate session through NPNet network, including NPWireless and
NPWirelessx WiFi, you may encounter the following “Error” window keeps popping-up when the Blackboard
Collaborate session is launching. The following network settings will have to be set to prevent this error box from
popping-up when launching Blackboard Collaborate session.
Figure 16: Network Connection Pop-up Error
a. Open the Blackboard Collaborate Launcher Application.
Windows 10: via Start Menu -> All apps
Figure 17: Windows 10 (Start menu > All apps)
Windows 8: via Start page in Metro view.
Figure 18: Windows 8 (Metro view)

Page 9 of 9 Updated on Apr 2017
b. Select the “Advanced” tab and click [Network Settings].
Figure 19: Advanced – Network Settings
c. Select [Direct connection] and click [OK].
Figure 19: Direct Connection
d. Close the Blackboard Collaborate Launcher application.
e. Proceed to Step 4 on page 4.