bizhub 226 USER’S GUIDE - ATEC Global Systems SRL · bizhub 226 Copy USER’S GUIDE. bizhub 226...
160
bizhub 226 Copy USER’S GUIDE
-
Upload
duongnguyet -
Category
Documents
-
view
243 -
download
0
Transcript of bizhub 226 USER’S GUIDE - ATEC Global Systems SRL · bizhub 226 Copy USER’S GUIDE. bizhub 226...

bizhub 226
Copy
USER’S GUIDE

.

bizhub 226 Contents-1
Table of contents
1 Introduction
1.1 Welcome .......................................................................................................................................... 1-3
1.1.1 User's guides ..................................................................................................................................... 1-3
1.1.2 User's Guide ...................................................................................................................................... 1-3
1.2 Conventions used in this manual .................................................................................................. 1-4
1.2.1 Symbols used in this manual ............................................................................................................. 1-4To use this machine safely................................................................................................................. 1-4
Procedural instruction........................................................................................................................ 1-4
Key symbols....................................................................................................................................... 1-5
1.2.2 Original and paper indications ........................................................................................................... 1-5Original and paper sizes .................................................................................................................... 1-5
Original and paper indications ........................................................................................................... 1-5
2 Before Using This Machine
2.1 Part names and their functions ..................................................................................................... 2-3
2.2 Main Body ........................................................................................................................................ 2-5
2.2.1 Exterior of the main unit ..................................................................................................................... 2-5
2.2.2 Interior of the main unit ...................................................................................................................... 2-7
2.2.3 Reverse Automatic Document Feeder (Option)/Automatic Duplex Unit (Option) ..............................................................................................................................................2-8Reverse Automatic Document Feeder............................................................................................... 2-8
Automatic Duplex Unit ....................................................................................................................... 2-8
2.2.4 Paper Feeder Unit (Option) ................................................................................................................ 2-9
2.3 Control Panel................................................................................................................................. 2-10
2.3.1 Name and function of each part on the control panel ..................................................................... 2-10
2.3.2 Extended Operation Panel MK-749 (Option) ................................................................................... 2-12
2.3.3 Display message.............................................................................................................................. 2-13
2.4 Power ............................................................................................................................................. 2-18
2.4.1 Turning on the power....................................................................................................................... 2-18
2.4.2 Turning off the power....................................................................................................................... 2-18
2.4.3 Initial mode....................................................................................................................................... 2-18
2.4.4 Auto Panel Reset ............................................................................................................................. 2-18
2.4.5 Sleep mode...................................................................................................................................... 2-19
2.4.6 Auto shut time.................................................................................................................................. 2-19
2.4.7 Next Copy Job ................................................................................................................................. 2-19
2.5 Saving electricity........................................................................................................................... 2-20
2.5.1 Setting sleep mode .......................................................................................................................... 2-20
2.5.2 Specifying the auto shut time .......................................................................................................... 2-21
3 Before Making Copies
3.1 Paper ................................................................................................................................................ 3-3
3.1.1 Paper type.......................................................................................................................................... 3-3
3.1.2 Paper size .......................................................................................................................................... 3-4
3.1.3 Loadable number of sheets ............................................................................................................... 3-5
3.1.4 Precautions for using paper............................................................................................................... 3-5
3.2 Image copy/printing area ............................................................................................................... 3-6
3.3 Storing paper................................................................................................................................... 3-7
3.4 Loading paper ................................................................................................................................. 3-8
3.4.1 Loading paper into Tray1................................................................................................................... 3-8
3.4.2 Loading paper to Tray2/Tray3/Tray4/Tray5 ....................................................................................... 3-9
Contents-2 bizhub 226
3.5 Original........................................................................................................................................... 3-10
3.5.1 Using ADF ....................................................................................................................................... 3-10
3.5.2 Original type..................................................................................................................................... 3-10
3.5.3 Precautions on originals................................................................................................................... 3-11
3.6 Loading the original ...................................................................................................................... 3-12
3.6.1 Loading the original into the ADF .................................................................................................... 3-12
3.6.2 Setting the original on the Original Glass......................................................................................... 3-13
3.6.3 Loading the highly translucent or transparent original .................................................................... 3-14
3.6.4 Setting the book original .................................................................................................................. 3-15
3.6.5 Setting originals of different sizes (Mixed Original) .......................................................................... 3-16
4 Making Copies
4.1 Copy ................................................................................................................................................. 4-3
4.1.1 Basic copying method ....................................................................................................................... 4-3
4.1.2 Reducing or enlarging a standard size original to a different standard size...................................... 4-4
4.1.3 Specifying the image quality to fit the original ................................................................................... 4-4
4.1.4 Specifying the density........................................................................................................................ 4-5
4.1.5 Setting the original direction .............................................................................................................. 4-6
4.2 Stopping, restarting, or erasing the copy job............................................................................... 4-7
4.3 Selecting the tray ............................................................................................................................ 4-8
4.3.1 Auto tray change function.................................................................................................................. 4-8
4.3.2 Tray selection order by tray change function .................................................................................... 4-9
4.4 Manually making copies............................................................................................................... 4-10
4.4.1 Paper type and number of sheets of paper available for the Bypass Tray...................................... 4-10
4.4.2 Adjusting the Bypass Tray ............................................................................................................... 4-10
4.4.3 Loading plain paper into the Bypass Tray ....................................................................................... 4-11
4.4.4 Loading OHP transparencies into Bypass Tray............................................................................... 4-12
4.4.5 Loading envelopes into the Bypass Tray......................................................................................... 4-13
4.4.6 Manually making copies (Bypass Tray)............................................................................................ 4-15
4.5 Making copies on various types of paper................................................................................... 4-16
4.5.1 Making copies on OHP transparencies ........................................................................................... 4-16
4.5.2 Making copies on custom size paper .............................................................................................. 4-17
4.5.3 Making copies on envelopes ........................................................................................................... 4-19
4.6 Specifying the zoom ratio to copy the original .......................................................................... 4-20
4.6.1 Zoom ratio setting type.................................................................................................................... 4-20
4.6.2 Setting the auto zoom function........................................................................................................ 4-20
4.6.3 Setting the fixed zoom ratio............................................................................................................. 4-21
4.6.4 Setting the zoom ratio manually ...................................................................................................... 4-21
4.6.5 Setting the X/Y variable zoom ratio ................................................................................................. 4-22
4.7 Changing copy density to copy the original ............................................................................... 4-23
4.7.1 Setting the copy density .................................................................................................................. 4-23
4.8 Confirming the machine counter................................................................................................. 4-24
4.8.1 Items you can confirm using the machine counter.......................................................................... 4-24
4.8.2 Viewing the total counter ................................................................................................................. 4-24
4.9 Printing reports ............................................................................................................................. 4-25
4.9.1 Printing reports ................................................................................................................................ 4-25
5 Making Copies in Advanced Manner
5.1 Finishing setting (sorting, grouping) ............................................................................................. 5-3
5.1.1 Finishing type..................................................................................................................................... 5-3
5.1.2 Setting finishing ................................................................................................................................. 5-5
5.2 Making 1-sided or 2-sided copy .................................................................................................... 5-6
5.3 Configuring 2in1 or 4in1 copy settings ......................................................................................... 5-8
5.4 Using the ID Copy ......................................................................................................................... 5-10

bizhub 226 Contents-3
5.5 Making copies by entering the ID (Account) number ................................................................ 5-11
5.6 Setting book separation copy...................................................................................................... 5-12
5.6.1 Frame/Center erase type ................................................................................................................. 5-13
5.7 Erasing a part of the original and making copies (Erase) ......................................................... 5-14
5.7.1 Precautions when making copies in the erase mode ...................................................................... 5-14
5.7.2 Setting the erase.............................................................................................................................. 5-15
5.8 Making copies with black and white reversed (Neg./Pos. Reverse) ........................................ 5-16
5.9 Making copies with a binding margin ......................................................................................... 5-17
5.9.1 Precautions when making copies with a binding margin ................................................................ 5-17
5.9.2 Setting a binding margin.................................................................................................................. 5-18
5.10 Making copies with a date and page number ............................................................................ 5-19
5.11 Registering or recalling the copy settings.................................................................................. 5-20
5.11.1 Registering the copy setting ............................................................................................................ 5-20
5.11.2 Recalling the copy setting and making copies ................................................................................ 5-21
6 Utility and Copy Settings
6.1 Utility ................................................................................................................................................ 6-3
6.2 Machine Setting .............................................................................................................................. 6-4
6.2.1 Select Machine Setting ...................................................................................................................... 6-5
6.2.2 Changing the auto panel reset setting............................................................................................... 6-5
6.2.3 Changing the sleep mode setting ...................................................................................................... 6-6
6.2.4 Changing the auto shut time.............................................................................................................. 6-6
6.2.5 Changing the image quality when using the ADF.............................................................................. 6-7
6.2.6 Changing the image quality when using the Original Glass .............................................................. 6-7
6.2.7 Changing the density ......................................................................................................................... 6-8
6.2.8 Changing the LCD contrast ............................................................................................................... 6-8
6.2.9 Changing key speed setting .............................................................................................................. 6-9
6.2.10 Changing the language to be displayed on the Display .................................................................. 6-10
6.3 Tray Settings.................................................................................................................................. 6-11
6.3.1 Selecting tray settings...................................................................................................................... 6-11
6.3.2 Setting the unit of the paper size ..................................................................................................... 6-12
6.3.3 Configuring paper settings for Tray1 ............................................................................................... 6-12
6.3.4 Configuring settings for Tray2 to Tray5 ........................................................................................... 6-13
6.4 Registering a custom size............................................................................................................ 6-14
6.4.1 Registering a custom size................................................................................................................ 6-14
6.5 Drum Dray (Dew condensation removal) .................................................................................... 6-16
6.6 Administrator Settings.................................................................................................................. 6-17
6.6.1 Selecting the administrator setting .................................................................................................. 6-18
6.6.2 Changing the administrator number ................................................................................................ 6-18
6.6.3 Enabling a change of the auto shut time ......................................................................................... 6-19
6.6.4 Configuring setting so that sleep mode is not used ........................................................................ 6-19
6.6.5 Specifying ACCOUNT TRACK MODE ............................................................................................. 6-19
6.6.6 Registering ID (account)................................................................................................................... 6-20
6.6.7 Changing or deleting the ID (account) ............................................................................................. 6-21
6.6.8 Displaying or erasing the total counter by ID (account) ................................................................... 6-22
6.6.9 Erasing all total counters by ID (account) ........................................................................................ 6-22
6.7 COPY SETTING 1 .......................................................................................................................... 6-23
6.7.1 Selecting COPY SETTING 1 ............................................................................................................ 6-23
6.7.2 Setting the tray priority..................................................................................................................... 6-24
6.7.3 Specifying the quality priority........................................................................................................... 6-24
6.7.4 Specifying the density priority.......................................................................................................... 6-25
6.7.5 Specifying the density level priority (Auto) ....................................................................................... 6-25
6.7.6 Specifying the density level priority (Manual)................................................................................... 6-26
6.7.7 Setting 2-sided printing ................................................................................................................... 6-26
6.7.8 Setting the copy page margin.......................................................................................................... 6-27

Contents-4 bizhub 226
6.7.9 Setting the original page margin position ........................................................................................ 6-27
6.7.10 Setting the book binding position.................................................................................................... 6-28
6.7.11 Adjusting the page margin width ..................................................................................................... 6-28
6.7.12 Setting the erase width .................................................................................................................... 6-29
6.7.13 Setting a small size original.............................................................................................................. 6-29
6.8 COPY SETTING 2 .......................................................................................................................... 6-30
6.8.1 Selecting COPY SETTING 2 ............................................................................................................ 6-30
6.8.2 Setting the copy mode priority ........................................................................................................ 6-31
6.8.3 Specifying the finishing priority........................................................................................................ 6-31
6.8.4 Specifying the alternate output........................................................................................................ 6-32
6.8.5 Setting 4in1 page copy order .......................................................................................................... 6-32
6.8.6 Specifying the mixed original priority............................................................................................... 6-33
6.8.7 Configure ORIG. DIRECTION setting............................................................................................... 6-33
6.8.8 Configuring BOOK SEPARATION setting ........................................................................................ 6-34
6.8.9 Setting stamp printing...................................................................................................................... 6-34
6.8.10 Setting the page number print format.............................................................................................. 6-35
6.8.11 Setting the date/time print format.................................................................................................... 6-35
7 If you suspect a failure then do the following
7.1 If this copy is output ....................................................................................................................... 7-3
7.2 Major messages and troubleshooting .......................................................................................... 7-5
7.3 The copier does not function......................................................................................................... 7-7
8 Others
8.1 Major specifications ....................................................................................................................... 8-3
8.1.1 bizhub 226 ......................................................................................................................................... 8-3
8.1.2 Reverse Automatic Document Feeder DF-625.................................................................................. 8-4
8.1.3 Paper Feeder Unit PF-507 ................................................................................................................. 8-4
8.1.4 Automatic Duplex Unit AD-509.......................................................................................................... 8-5
8.2 Daily maintenance........................................................................................................................... 8-6
8.2.1 Housing.............................................................................................................................................. 8-6
8.2.2 Original Glass..................................................................................................................................... 8-6
8.2.3 Slit Scan Glass................................................................................................................................... 8-6
8.2.4 Original Pad ....................................................................................................................................... 8-7
8.2.5 Control Panel ..................................................................................................................................... 8-7
9 Index
9.1 Index by item ................................................................................................................................... 9-3
9.2 Index by button................................................................................................................................ 9-6

1 Introduction


bizhub 226 1-3
1.1 Welcome 1
1 Introduction
1.1 Welcome
Thank you for purchasing this machine.
This User's Guide describes the functions, operating instructions, precautions for correct operation, and sim-
ple troubleshooting guidelines of this machine. In order to obtain maximum performance from this product
and use it effectively, please read this User's Guide as necessary.
1.1.1 User's guides
1.1.2 User's Guide
This User's Guide is intended for users ranging from those using this machine for the first time to administra-
tors.
It describes basic operations, functions that enable more convenient operations, maintenance procedures,
simple troubleshooting operations, and various setting methods of this machine.
Note that basic technical knowledge about the product is required to enable users to perform maintenance
work or troubleshooting operations. Limit your maintenance and troubleshooting operations to the areas ex-
plained in this manual.
Should you experience any problems, please contact our service representative.
User's guide DVD manuals Overview
[Quick Guide] This manual describes operating procedures and the most frequently used functions to enable you to begin using this machine immediately.This manual describes details on trademarks and copyrights.• Trademarks and copyrights
[User's Guide Copy] This manual describes details on copy mode opera-tions and the settings of this machine.• Specifications of originals and copy paper• Copy function• Maintaining this machine• Troubleshooting
[User's Guide Fax] This manual describes fax mode operations and set-tings.• G3 fax function• Internet Fax• PC-FAX
[User's Guide Print] This manual describes details on printer functions.• Printer function• Setting the printer driver
[User's Guide Scan] This manual describes details on scan functions.• Scan Function• Setting the TWAIN/WIA scan driver• Network scan (E-mail TX, FTP TX, and SMB TX)• Scan to USB
[User's Guide Network Administrator] This manual describes details on setting methods for each function using the network connection.• Network settings• Settings using PageScope Web Connection

Conventions used in this manual1
1-4 bizhub 226
1.2
1.2 Conventions used in this manual
1.2.1 Symbols used in this manual
Symbols are used in this manual to express various types of information.
The following describes each symbol related to correct and safe usage of this machine.
To use this machine safely
7 WARNING
- This symbol indicates that a failure to heed the instructions may lead to death or serious injury.
7 CAUTION
- This symbol indicates that negligence of the instructions may lead to mishandling that may cause injury
or property damage.
NOTICEThis symbol indicates a risk that may result in damage to this machine or documents. Follow the instructions to avoid property damage.
Tips
- This symbol indicates supplemental information of a topic as well as options required to use a function.
d Reference
This symbol indicates reference functions related to a topic.
Procedural instruction
0 This check mark indicates an option that is required in order to use conditions or functions that are pre-
requisite for a procedure.
1 This format number "1" represents the first step.
2 This format number represents the order of serial steps.
% This symbol indicates a supplementary explanation of a pro-
cedural instruction.
% This symbol indicates transition of the Display to access a desired menu item.
This symbol indicates a desired page.
The operation
procedures are
described using
illustrations.
UTILITY MODE
PAPER SOURCE SETUP
CUSTOM SIZE MENORYDRUM DEHUMIDIFY
MACHINE SETTING

bizhub 226 1-5
1.2 Conventions used in this manual 1
d Reference
This symbol indicates a reference.
View the reference as required.
Key symbols
[ ]
Brackets are used to indicate items on Display, key names on the computer screen, or a name of a user
guide.
Bold text
Bold text is used to indicate names of keys, parts, products and options on the Control Panel.
1.2.2 Original and paper indications
Original and paper sizes
The following explains the indication for originals and paper described
in this manual.
When indicating the original or paper size, the Y side represents the
width and the X side the length.
Original and paper indications
w indicates the paper size with the length (X) being longer than the
width (Y).
v indicates the paper size with the length (X) being shorter than the
width (Y).

Conventions used in this manual1
1-6 bizhub 226
1.2
2 Before Using This Machine


bizhub 226 2-3
2.1 Part names and their functions 2
2 Before Using This Machine
2.1 Part names and their functions
No. Name Description
1 Main unit The original is scanned by the scanner section, and the scanned image is printed by the printer section.The main unit is hereinafter referred to as "this machine", "main unit", or bizhub 226 through this manual.
2 Original Cover OC-512 Fixes the loaded originals.This unit is hereinafter referred to as the Original Cover through this manual.
3 Reverse Automatic Document Feeder DF-625
Automatically feeds and scans originals by page.This unit automatically reverses and scans 2-sided originals.This unit is hereinafter referred to as the ADF through this manual.
4 Automatic Duplex Unit AD-509 This unit allows 1- or 2-sided printing from a 2-sided original.
5 Paper Feeder Unit PF-507 Up to 250 sheets can be loaded onto this paper feeder unit.Up to four trays can be added on this machine.The unit is hereinafter referred to as Tray 2/Tray 3/Tray 4/Tray 5 through this manual.
6 Desk DK-706 This machine can be installed on this desk.By using the desk, you can install this machine on the floor.One tray can be added on this desk.This desk is hereinafter referred to as the Desk through this manual.

Part names and their functions2
2-4 bizhub 226
2.1
* Indicates a built-in option that is not shown in the figure above.
7 Desk DK-707 This machine can be installed on this desk.By using the desk, you can install this machine on the floor.Up to three trays can be added on this desk.This desk is hereinafter referred to as the Desk through this manual.
8 Desk DK-708 This machine can be installed on this desk.By using the desk, you can install this machine on the floor.Up to four trays can be added on this desk.This desk is hereinafter referred to as the Desk through this manual.
9 Extended Operation Panel MK-749
An address book registration number and address can be registered or recalled while using fax and scanning functions.
10 Image Controller IC-209* This is a built-in printer controller that enables you to;• Use this machine as PC printer (PCL).• Scan an original to send its data to a computer or attach
it to an E-mail.For details, refer to [User's Guide Print].
11 Network Card NC-504* This is a built-in network card that enables you to; • Scan an original to send its data to a computer or attach
it to an E-mail.For details, refer to the [User's Guide Network Administrator].
12 FAX Kit FK-510* Allows this machine to function as a fax machine. Alternative-ly, it allows more telephone lines to be connected.
No. Name Description

bizhub 226 2-5
2.2 Main Body 2
2.2 Main Body
2.2.1 Exterior of the main unit

Main Body2
2-6 bizhub 226
2.2
No. Name
1 Output Tray
2 Front Cover
3 Tray1
4 1st Side Cover Release Button
5 Bypass Tray Extension
6 Bypass Tray
7 Auto Duplex Unit
8 1st Side Cover
9 USB Port (Host:Scan to USB)
10 Jack for connecting a telephone (TEL PORT)
11 Telephone Jack (LINE PORT)
12 USB Port (Type B) USB 2.0/1.1
13 Network Connector (10 Base-T/100 Base-TX)
14 Total Counter
15 Main Power Switch
16 Control Panel

bizhub 226 2-7
2.2 Main Body 2
2.2.2 Interior of the main unit
No. Name
1 Original Pad
2 Original Scale
3 Slit Scan Glass
4 Toner Bottle
5 Drum Unit
6 Fusing Unit Release Lever
7 Original Glass

Main Body2
2-8 bizhub 226
2.2
2.2.3 Reverse Automatic Document Feeder (Option)/Automatic Duplex Unit
(Option)
Reverse Automatic Document Feeder
Automatic Duplex Unit
No. Name
1 Lateral Guide
2 Document Feeder Cover
3 Original Tray
4 Original Output Tray
5 Stopper
No. Name
6 Duplex Cover

bizhub 226 2-9
2.2 Main Body 2
2.2.4 Paper Feeder Unit (Option)
No. Name
1 to 4 Tray 2/3/4/5
5 2nd/3rd/4th/5th Side Cover

Control Panel2
2-10 bizhub 226
2.3
2.3 Control Panel
2.3.1 Name and function of each part on the control panel
No. Name Functions Page
1 Mixed Original Press this key to select the mixed original mode. p. 3-16
2 Utility In the Utility screen, you can configure the following settings:Machine setting, tray setting, custom size registra-tion, user maintenance, administrator setting, copy setting 1, and copy setting 2
p. 6-3
3 Display This area displays the number of copies, zoom ratio, Utility screen, icons, and error messages.
-
4 +, ,, *, )OK
Use +, ,, *, and ) to move an option item on the Display or change settings.Press OK to determine settings.
-
5 Back Press this key to return to the previous page. -
6 Error This lamp lights up or flashes when an error occurs. p. 7-5
7 Function Press this key to configure the advanced copy set-tings such as copying with a binding position.
p. 5-18
8 Density Press this key to select the density with which to scan a copy original.
p. 4-23
9 Quality Press this key to select the image quality of the orig-inal from [TEXT], [PHOTO], and [TEXT/PHOTO].
p. 4-4
10 Zoom Press this key to enlarge or reduce an image in copy mode.
p. 4-20
11 Paper Press this key to select a paper tray to be used. p. 4-8
12 Mode Memory Press this key to register or recall the configured copy function.
p. 5-20
13 Confirm Press this key to confirm the counter or communica-tion result, or print out a report.
p. 4-24
14 ID Copy Press this key to copy the contents of the front and back sides of a card-size original such as a driver's license, on one sheet.
p. 5-10
15 Combine Original Press this key to copy a multi-page original on one sheet.
p. 5-8
16 Finishing Press this key to select the copy finishing mode. p. 5-5
17 Simplex/Duplex Press this key to use the 1-Sided or 2-Sided printing function.
p. 5-6

bizhub 226 2-11
2.3 Control Panel 2
No. Name Functions Page
18 Printer Indicator Lights up green when the machine is in the printer mode.
-
19 Printer Press this key to use the printer mode.For details, refer to [User's Guide Print].
-
20 Access Press this key to use account track. p. 5-11
21 Power Save Press this key to switch to sleep mode. p. 2-20
22 A.../1... Press this key to switch between numerals and let-ters you enter from the Keypad.
-
23 Reset • Press this key to reset all settings you entered on the Control Panel. (Excluding the registered set-tings )
• Erases the jobs you are currently configuring.
-
24 Clear/Stop • Press this key to clear the digit your are currently entering.
• Stops continuous copy operations.• Stops PC printing.
p. 4-7
25 Start • Starts a copy operation.• Pressing this key in the warm-up state starts the
Next Copy Job function.• Lights up blue when the machine is ready to ac-
cept a copy job, and lights up orange when the machine is not ready to start a copy operation.
p. 4-3p. 2-19
26 Keypad • Specify the number of copies.• Enter various settings.
-
Control Panel2
2-12 bizhub 226
2.3
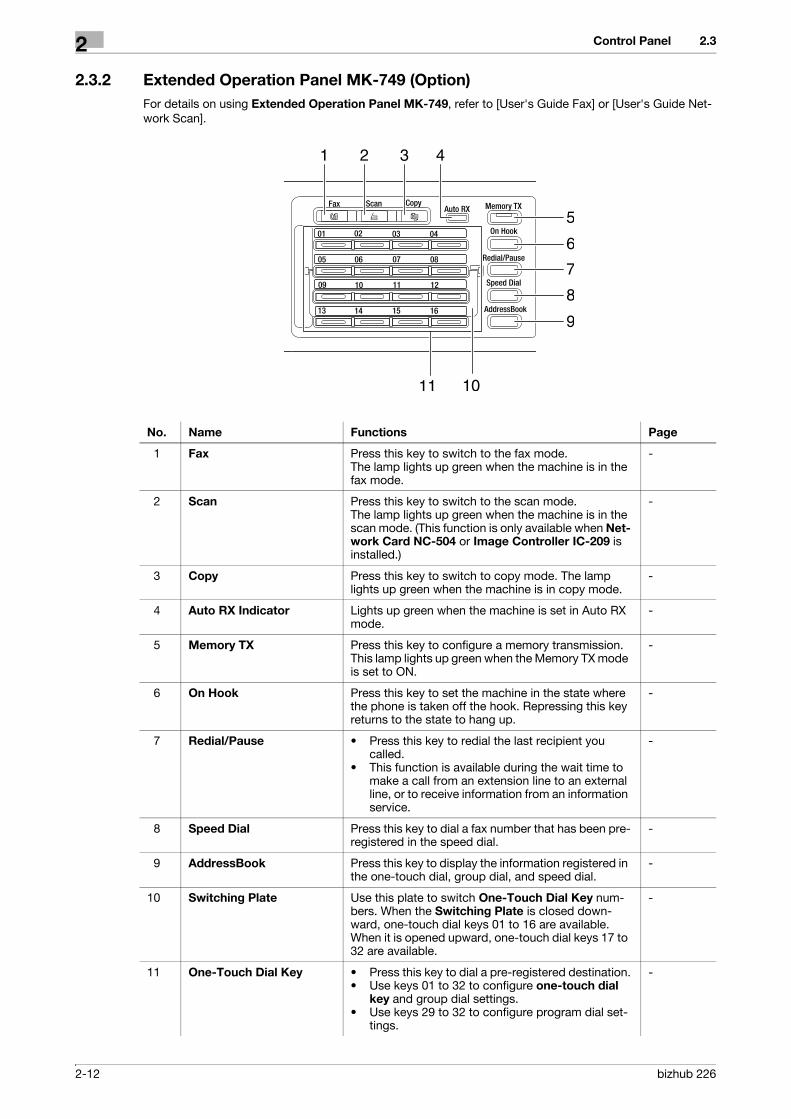
2.3.2 Extended Operation Panel MK-749 (Option)
For details on using Extended Operation Panel MK-749, refer to [User's Guide Fax] or [User's Guide Net-
work Scan].
No. Name Functions Page
1 Fax Press this key to switch to the fax mode.The lamp lights up green when the machine is in the fax mode.
-
2 Scan Press this key to switch to the scan mode.The lamp lights up green when the machine is in the scan mode. (This function is only available when Net-work Card NC-504 or Image Controller IC-209 is installed.)
-
3 Copy Press this key to switch to copy mode. The lamp lights up green when the machine is in copy mode.
-
4 Auto RX Indicator Lights up green when the machine is set in Auto RX mode.
-
5 Memory TX Press this key to configure a memory transmission. This lamp lights up green when the Memory TX mode is set to ON.
-
6 On Hook Press this key to set the machine in the state where the phone is taken off the hook. Repressing this key returns to the state to hang up.
-
7 Redial/Pause • Press this key to redial the last recipient you called.
• This function is available during the wait time to make a call from an extension line to an external line, or to receive information from an information service.
-
8 Speed Dial Press this key to dial a fax number that has been pre-registered in the speed dial.
-
9 AddressBook Press this key to display the information registered in the one-touch dial, group dial, and speed dial.
-
10 Switching Plate Use this plate to switch One-Touch Dial Key num-bers. When the Switching Plate is closed down-ward, one-touch dial keys 01 to 16 are available. When it is opened upward, one-touch dial keys 17 to 32 are available.
-
11 One-Touch Dial Key • Press this key to dial a pre-registered destination.• Use keys 01 to 32 to configure one-touch dial
key and group dial settings.• Use keys 29 to 32 to configure program dial set-
tings.
-

bizhub 226 2-13
2.3 Control Panel 2
2.3.3 Display message
Copy mode screen
Utility screen
No. Display message Description
1 Paper Tray Displays the selected paper tray.
1 Indicates that Tray1 is selected.
2 Indicates that Tray2 is selected.
3 Indicates that Tray3 is selected.
4 Indicates that Tray4 is selected.
5 Indicates that Tray5 is selected.
Indicates that Bypass Tray is selected.
2 Paper size Displays the selected paper size.
[X/Y] Indicates that custom size paper is set.
UTILITY MODE
SPEED DIAL
GROUP DIALPROGRAM DIAL
ONE-TOUCH DIALUTILITY MODE
PAPER SOURCE SETUP
CUSTOM SIZE MENORYDRUM DEHUMIDIFY
MACHINE SETTING
Control Panel2
2-14 bizhub 226
2.3
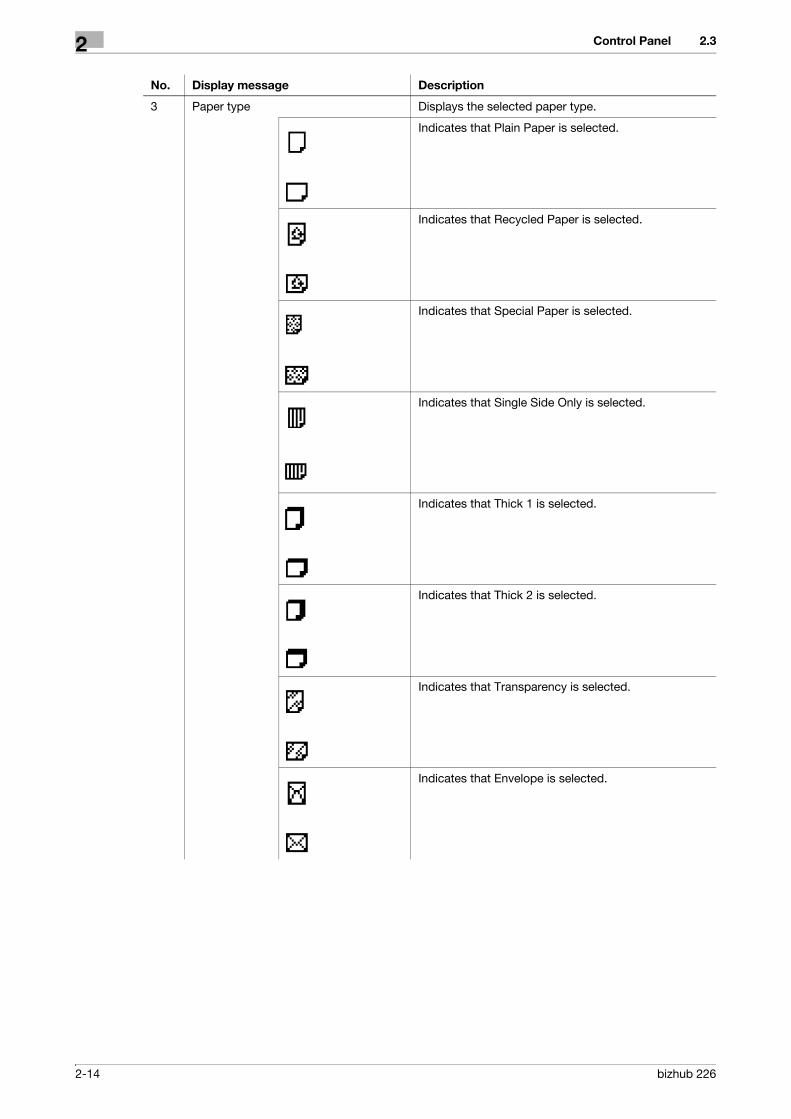
3 Paper type Displays the selected paper type.
Indicates that Plain Paper is selected.
Indicates that Recycled Paper is selected.
Indicates that Special Paper is selected.
Indicates that Single Side Only is selected.
Indicates that Thick 1 is selected.
Indicates that Thick 2 is selected.
Indicates that Transparency is selected.
Indicates that Envelope is selected.
No. Display message Description
bizhub 226 2-15
2.3 Control Panel 2
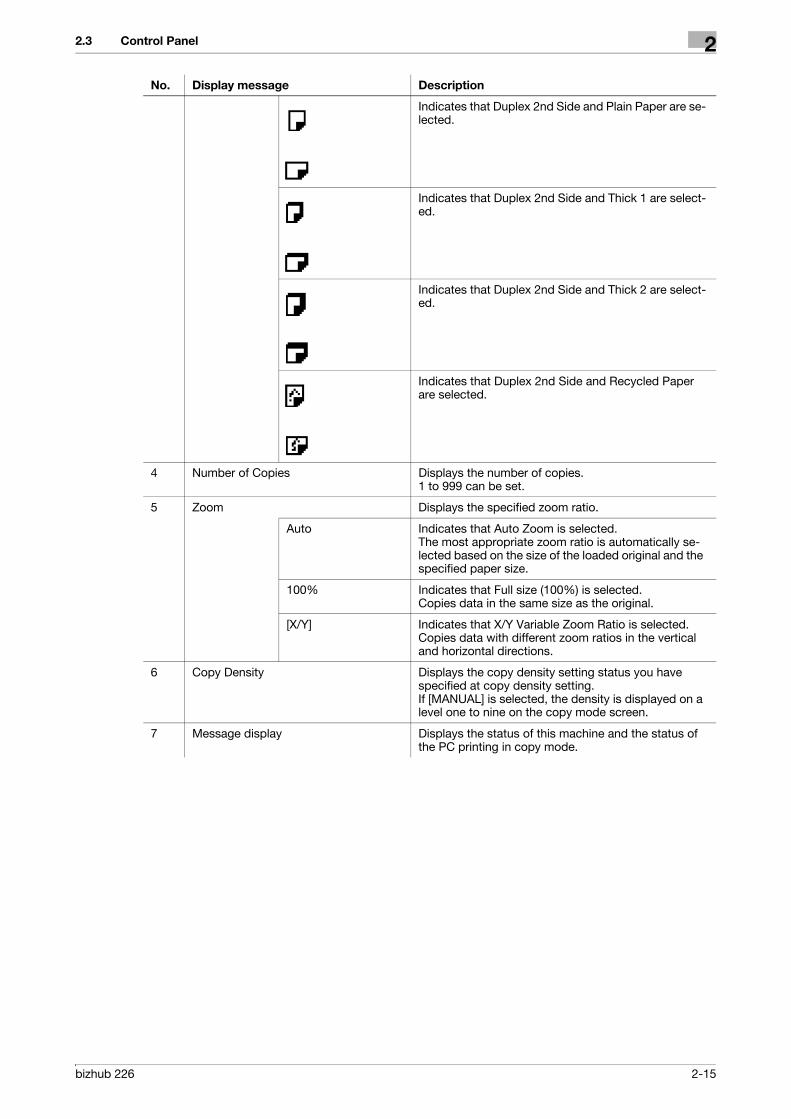
Indicates that Duplex 2nd Side and Plain Paper are se-lected.
Indicates that Duplex 2nd Side and Thick 1 are select-ed.
Indicates that Duplex 2nd Side and Thick 2 are select-ed.
Indicates that Duplex 2nd Side and Recycled Paper are selected.
4 Number of Copies Displays the number of copies.1 to 999 can be set.
5 Zoom Displays the specified zoom ratio.
Auto Indicates that Auto Zoom is selected.The most appropriate zoom ratio is automatically se-lected based on the size of the loaded original and the specified paper size.
100% Indicates that Full size (100%) is selected.Copies data in the same size as the original.
[X/Y] Indicates that X/Y Variable Zoom Ratio is selected.Copies data with different zoom ratios in the vertical and horizontal directions.
6 Copy Density Displays the copy density setting status you have specified at copy density setting.If [MANUAL] is selected, the density is displayed on a level one to nine on the copy mode screen.
7 Message display Displays the status of this machine and the status of the PC printing in copy mode.
No. Display message Description

Control Panel2
2-16 bizhub 226
2.3
8 Icons representing functions The specified status is displayed with an icon.
The uppermost and lowermost icons indicate that 2in1 is selected and the middle icon indicates that 4in1 is selected.
Indicates that Book Separation is selected.
Indicates that Erase is selected.
The upper icon indicates that Sort is selected. The low-er icon indicates that Group is selected.
Indicates that ID Copy is selected.
Indicates that Page Margin is selected.
Indicates that Neg./Pos. Reverse is selected.
Indicates that Stamp is selected.
Simplex/Duplex is selected.
No. Display message Description

bizhub 226 2-17
2.3 Control Panel 2
9 Original Type Displays the image quality setting of the original.
Text/Photo Indicates that the Text/Photo Quality is selected.Select this mode to copy printed originals containing both text and images, such as newspapers and mag-azines.You can select this setting in combination with the Auto Density mode.
Photo Indicates that Photo Quality is selected.Select this mode to copy printed originals, such as pamphlets and catalogs. Select this setting to produce better reproductions of halftone original images (pho-tographs, etc.) that cannot be reproduced with Text Quality.
Text Indicates that Text Quality is selected.Select this mode when copying documents containing only text. The edges of copied text are reproduced with sharpness, providing an image that is easy to read.You can select this setting in combination with the Auto Density mode.
10 Mode or function Displays setting menus or options.
No. Display message Description

Power2
2-18 bizhub 226
2.4
2.4 Power
2.4.1 Turning on the power
Tips
- The warm up time is 15 seconds at room temperature of 23°C.
- You can program the next copy job even during warm up. For details, refer to page 2-19.
Press the | side of Main Power Switch.
The indicator on Start lights up in orange and [PLEASE WAIT!] is displayed on the Display.
After that, the indicator on Start lights up in blue and [Warming Up] is displayed on the Display.
2.4.2 Turning off the power
1 Confirm that all jobs have finished.
2 Press the o side of Main Power Switch.
2.4.3 Initial mode
The setting when this machine is turned on or reset is referred to as "initial mode". The initial mode is used
as a basic mode to perform all operations.
Copy mode
- Number of copies: 1
- Copy density: Auto
- Zoom ratio: Full size (100%)
- Paper: Auto Paper
- Finishing: Non-sort
d Reference
The initial mode can be changed in the Utility screen. For details, refer to page 6-3.
2.4.4 Auto Panel Reset
This function returns you to the initial mode when the specified time has elapsed after copying is finished or
the user paused operations of this machine. (The factory default is [1min].)
d Reference
The time period until the auto panel reset function is enabled can be set to 30 seconds or between one and
five minutes. The auto panel reset function can be disabled. For details, refer to page 6-5.

bizhub 226 2-19
2.4 Power 2
2.4.5 Sleep mode
Sleep mode causes this machine to enter power-saving mode instead of turning off the power.
In sleep mode, Power Save lights up in green and the Display on the Control Panel turns off.
Conditions to cause this machine to enter sleep mode
- When Power Save is pressed
- When the specified time has elapsed after the user paused operations of this machine (The factory de-
fault is [15min])
Tips
- If the auto shut time function is enabled even in the sleep mode, the power of this machine turns off.
d Reference
The time period until sleep mode is enabled can be set between 1 and 60 minutes. For details, refer to
page 6-6.
2.4.6 Auto shut time
This function turns off the power to save power when the specified period of time has elapsed after the user
stopped using this machine. (The factory default is [180min].)
d Reference
The time until the auto shut time function is turned off automatically can be set between 15 and 240 minutes.
For details, refer to page 6-6.
2.4.7 Next Copy Job
This function reserves the next copy job by loading the original when [Warming Up] is displayed on the
Display and Start is pressed.
When Warming Up disappears, scanning of the loaded original starts to perform copy operation.

Saving electricity2
2-20 bizhub 226
2.5
2.5 Saving electricity
When you want to save electricity for power saving, it is convenient to use the sleep mode or the auto shut
time function.
2.5.1 Setting sleep mode
1 Press the Utility key.
The Utility screen appears.
2 Use +, to select [MACHINE SETTING], then press OK.
The machine setting screen appears.
3 Use +,, to select [SLEEP MODE], then press OK.
4 Enter time until the function is enabled using the Keypad, then press OK.
Tips
- Timer setting can be configured between one and 60 minutes.
- To correct the value, press Clear/Stop.
SLEEP MODE15min(1-240min)

bizhub 226 2-21
2.5 Saving electricity 2
2.5.2 Specifying the auto shut time
Tips
- To specify the auto shut time, the display auto shut setting must be enabled in Administrator Settings.
For details, refer to page 6-6 and page 6-19.
1 Press Utility.
The Utility screen appears.
2 Use +, to select [MACHINE SETTING], then press OK.
The machine setting screen appears.
3 Use +, to select [AUTO SHUT TIME], then press OK.
4 Use +, to select [ON], then enter the time required to enable the function using the Keypad.
If the auto shut time is already specified, the currently specified time is displayed.
5 Press OK.
Tips
- The timer can be specified to be between 15 and 240 minutes.
- To correct the numeric value, press Clear/Stop.
AUTO SHUT TIME
OFF
ON180min(15-240min)

Saving electricity2
2-22 bizhub 226
2.5

3 Before Making Copies


bizhub 226 3-3
3.1 Paper 3
3 Before Making Copies
3.1 Paper
Use paper that meets the conditions shown in the table below.
3.1.1 Paper type
o: Loadable
-: Not loadable
Tips
- Tray2/Tray3/Tray4/Tray5 are optional.
Paper type Plain paper Thick 1 Thick 2 Recycled paper
Basic weight (g/m2) 17 lb to 23-15/16 lb (64 to 90 g/m2)
24-3/16 lb to 31-15/16 lb (91 to 120 g/m2)
32-3/16 lb to 41-3/4 lb (121 to 157 g/m2)
17 lb to 23-15/16 lb (64 to 90 g/m2)Paper source/
Others
Bypass Tray o o o o
Tray1 o o o o
Tray2 o - - o
Tray3 o - - o
Tray4 o - - o
Tray5 o - - o
Paper type Special paper
Transparency Envelope
Paper source/Others
Bypass Tray o o
Tray1 o o
Tray2 - -
Tray3 - -
Tray4 - -
Tray5 - -

Paper3
3-4 bizhub 226
3.1
3.1.2 Paper size
Custom size paper
Standard paper
o: Loadable
-: Not loadable
Tips
- Tray2/Tray3/Tray4/Tray5 are optional.
Paper source Paper width Paper length
Bypass Tray 3-9/16 to 11-11/16 inches (90 mm to 297 mm)
5-1/2 inches to 17 inches(140 mm to 432 mm)
Tray1 3-9/16 to 11-11/16 inches (90 mm to 297 mm)
5-1/2 inches to 17 inches(140 mm to 432 mm)
Tray2 7-3/16 to 11-11/16 inches (182 mm to 297 mm)
7-3/16 inches to 17 inches(182 mm to 432 mm)
Tray3 7-3/16 to 11-11/16 inches (182 mm to 297 mm)
7-3/16 inches to 17 inches(182 mm to 432 mm)
Tray4 7-3/16 to 11-11/16 inches (182 mm to 297 mm)
7-3/16 inches to 17 inches(182 mm to 432 mm)
Tray5 7-3/16 to 11-11/16 inches (182 mm to 297 mm)
7-3/16 inches to 17 inches(182 mm to 432 mm)
Paper size
11e17wA3w
8-1/2e14wB4 wLGL w
8-1/2e11wA4 wLTR w
8-1/2e11vA4 vLTR v
B5 w B5 v 5-1/2e8-1/2wA5 wINV w
5-1/2e8-1/2vA5 vINV v
A6 Cardw
Paper source/Others
Bypass Tray
o o o o o o o o o
Tray1 o o o o o o o o o
Tray2 o o o o o o - - -
Tray3 o o o o o o - - -
Tray4 o o o o o o - - -
Tray5 o o o o o o - - -

bizhub 226 3-5
3.1 Paper 3
3.1.3 Loadable number of sheets
-: Not loadable
Tips
- Tray2/Tray3/Tray4/Tray5 are optional.
3.1.4 Precautions for using paper
Do not use the following types of paper. Not observing these precautions may lead to reduced print quality,
a paper jam or a damage to the machine.
- OHP transparencies that have already been fed through the machine (even if they are still blank)
- Paper that has been printed on with a heat-transfer printer or an inkjet printer
- Folded, curled, wrinkled, or torn paper
- Paper that has been left unwrapped for a long period of time
- Damp paper, perforated paper, or paper with punched holes
- Extremely smooth or extremely rough paper, or paper with an uneven surface
- Treated paper such as carbon-backed paper, thermal paper, pressure-sensitive paper, or iron-on
transfer paper
- Paper that has been decorated with foil or embossing
- Paper of a non-standard shape (paper that is not rectangular)
- Paper that is bound with glue, staples or paper clips
- Paper with labels attached
- Paper with ribbons, hooks, buttons, etc., attached
Paper type Plain paper Thick 1 Thick 2 Recycled paper
Basic weight (g/m2) 17 lb to 23-15/16 lb (64 to 90 g/m2)
24-3/16 lb to 31-15/16 lb (91 to 120 g/m2)
32-3/16 lb to 41-3/4 lb (121 to 157 g/m2)
17 lb to 23-15/16 lb (64 to 90 g/m2)Paper source/Others
Bypass Tray 100 sheets 20 sheets 20 sheets 100 sheets
Tray1 250 sheets 20 sheets 20 sheets 250 sheets
Tray2 250 sheets - - 250 sheets
Tray3 250 sheets - - 250 sheets
Tray4 250 sheets - - 250 sheets
Tray5 250 sheets - - 250 sheets
Paper type Special paper
Transparency Envelope
Paper source/Others
Bypass Tray 10 sheets 10 sheets
Tray1 10 sheets 10 sheets
Tray2 - -
Tray3 - -
Tray4 - -
Tray5 - -

Image copy/printing area3
3-6 bizhub 226
3.2
3.2 Image copy/printing area
Note that images within the following areas cannot be copied or printed.
- Area between the bottom edge of the paper and 3/16 inches (4 mm) away from the bottom edge of the
paper (full size) (A)
- Area between the top edge of the paper and 3/16 inches (4 mm) away from the top edge of the paper
(full size) (B)
- Area between the edge of the paper and 3/16 inches (4 mm) away from the edge of the paper
(full size) (C)
d Reference
If documents are printed from the computer or if an optional Image Controller IC-209 is installed, refer to
[User's Guide Print].
Paper output direction
A, B, C: 3/16 inch (4 mm) (at full size)

bizhub 226 3-7
3.3 Storing paper 3
3.3 Storing paper
Handle paper by following the precautions below.
- Do not store paper in the following locations.
– Location subject to direct sunlight
– Location near open flames
– Humid locations
– Dusty locations
- Once paper is taken out of a packet, put it in a plastic bag and be sure to store it in a cool and dark
location.
- Do not place paper within reach of infants or children.

Loading paper3
3-8 bizhub 226
3.4
3.4 Loading paper
This section describes how to load paper into each paper tray.
For the types of paper to be used, refer to page 8-3.
3.4.1 Loading paper into Tray1
1 Pull out Tray1.
1. Paper take-up roller
NOTICEBe careful not to touch the surface of the paper take-up roller with your hand.
2 Press down the lifter plate until it "clicks" into position.
2. Lifter plate
3 Load paper.
% Be sure to load the paper below the tab, so that the
stack height does not exceed the , mark.
4 Adjust the lateral guide to the size of the paper.
% Push the lateral guide firmly up against the edges of the
paper.
5 Reset the tray.
bizhub 226 3-9
3.4 Loading paper 3
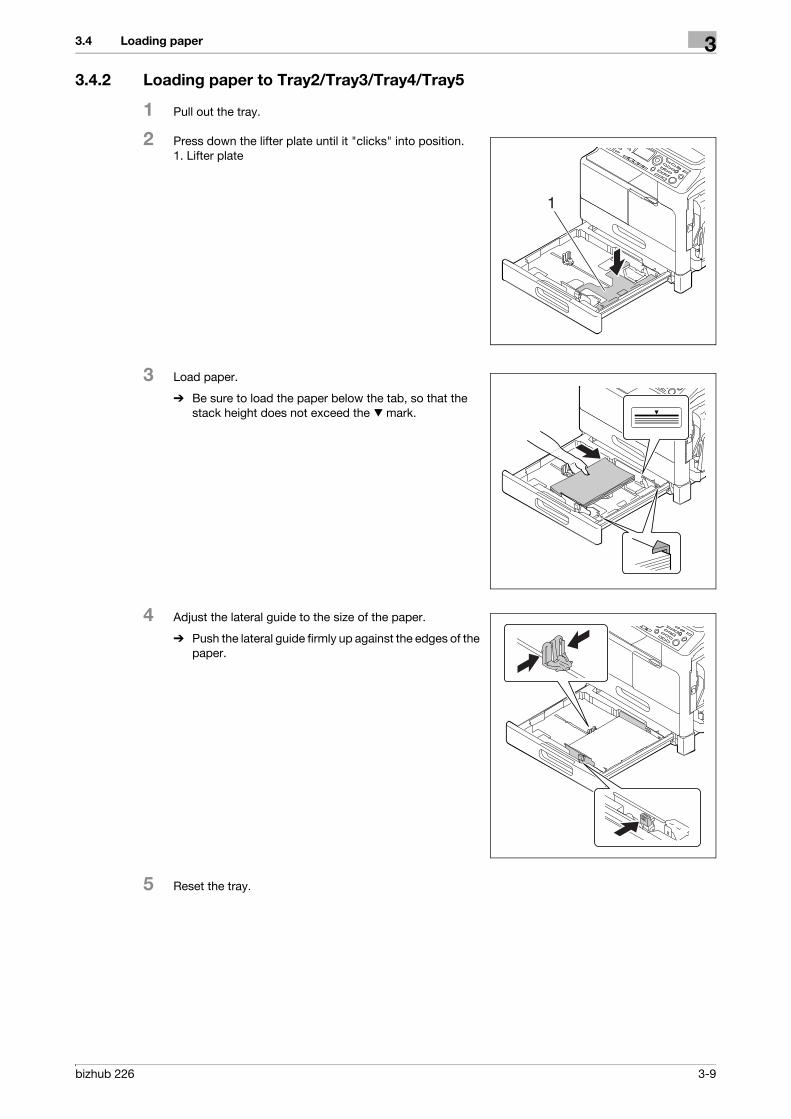
3.4.2 Loading paper to Tray2/Tray3/Tray4/Tray5
1 Pull out the tray.
2 Press down the lifter plate until it "clicks" into position.
1. Lifter plate
3 Load paper.
% Be sure to load the paper below the tab, so that the
stack height does not exceed the , mark.
4 Adjust the lateral guide to the size of the paper.
% Push the lateral guide firmly up against the edges of the
paper.
5 Reset the tray.

Original3
3-10 bizhub 226
3.5
3.5 Original
3.5.1 Using ADF
The ADF is a device that scans multiple original pages while feeding out them one by one, and automatically
outputs scanned pages. To benefit from the more efficient functions of this machine, use the appropriate
original.
Using an inappropriate original will likely cause jamming and/or spoiling of the original or machine failure.
3.5.2 Original type
1. 1-sided original
2. 2-sided original
3. Mixed original
Original loading method Original type Original Size
When using the ADF: 1. 1-sided original (9-5/16 lb to 34-1/16 lb (35 g/m2 to 128 g/m2))2. 2-sided original (13-5/16 lb to 34-1/16 lb (50 g/m2 to 128 g/m2))3. Mixed original (13-5/16 lb to 34-1/16 lb (50 g/m2 to 128 g/m2))
11 e 17w to 5-1/2 e 8-1/2w/v (A3w to A5w/v)Original width: 3-9/16 inches to 11-11/16 inches (90 mm to 297 mm)Original length: 8-1/2 inches to 17 inches (215.9 mm to 431.8 mm)In the mixed original mode, the following combinations are avail-able.11 e 17w (A3w) and 8-1/2 e 11v (A4v)8-1/2 e 11w (A4w) and 5-1/2 e 8-1/2v (A5v)8-1/2 e 14w (B4w) and 5-1/2 e 8-1/2v (B5v)
When using the Original Glass: Highly translucent or transparent original, book original, three-di-mensional objectsMax. weight: 4-7/16 lb (2 kg)
11 e 17w to 5-1/2 e 8-1/2w/v (A3w to A5w/v)Original width: Max. 11-11/16 inches (297 mm)Original length: Max. 17 inches (431.8 mm)
1 2 3

bizhub 226 3-11
3.5 Original 3
3.5.3 Precautions on originals
The following types of originals should not be loaded into the ADF. If loaded, paper may be jammed or the
original may be damaged.
- Wrinkled, folded, curled, or torn originals
- Highly translucent or transparent originals, such as OHP transparencies or diazo photosensitive paper
- Coated originals such as carbon-backed paper
- Original of which the basic weight is less than 35 g/m2 or greater than 128 g/m2.
- Originals that are bound, for example, with staples or paper clips
- Originals that are bound in a book or booklet form
- Originals with pages bound together with glue
- Originals with pages that have had cutouts removed or are cutouts
- Label sheets
- Offset printing masters
- Originals with binder holes
- Originals that have just been printed with this machine
- Photographic paper
- Glossy original such as gloss-coated paper
Tips
- When you set the original of custom size on the Original Glass, you cannot use the Auto Paper and
Auto Zoom functions. If you set the original of custom size, press Paper to select paper used for cop-
ying or press Zoom to select the zoom ratio. For details, refer to page 4-20.
Loading the original3
3-12 bizhub 226
3.6
3.6 Loading the original
The original loading methods are classified into two types: loading the original into the ADF and setting the
original on the Original Glass. Load the original using the method appropriate for the type of original being
used.
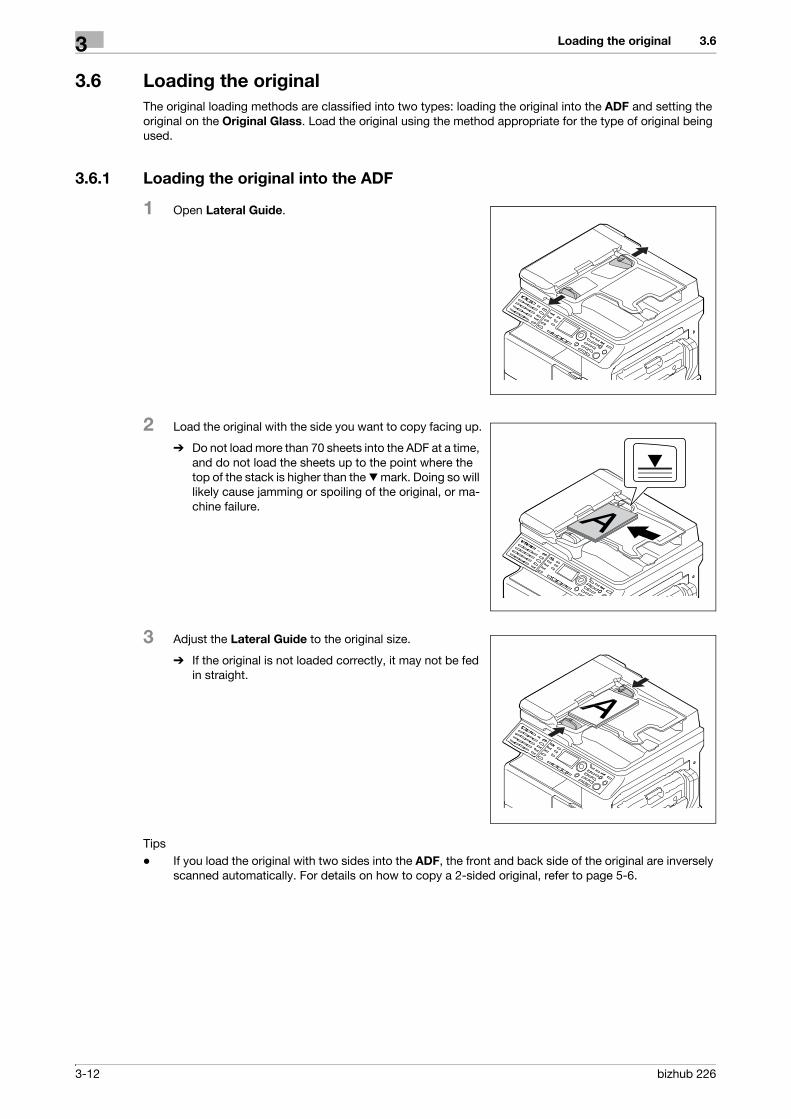
3.6.1 Loading the original into the ADF
1 Open Lateral Guide.
2 Load the original with the side you want to copy facing up.
% Do not load more than 70 sheets into the ADF at a time,
and do not load the sheets up to the point where the
top of the stack is higher than the , mark. Doing so will
likely cause jamming or spoiling of the original, or ma-
chine failure.
3 Adjust the Lateral Guide to the original size.
% If the original is not loaded correctly, it may not be fed
in straight.
Tips
- If you load the original with two sides into the ADF, the front and back side of the original are inversely
scanned automatically. For details on how to copy a 2-sided original, refer to page 5-6.

bizhub 226 3-13
3.6 Loading the original 3
3.6.2 Setting the original on the Original Glass
When loading plain paper or paper that is not appropriate for the ADF, follow the below procedure.
1 Open the ADF.
2 Set the original with the side you want to copy facing
down.
% Set the original along the Original Scale on the left and
at the top of the Original Glass.
3 Gently close the ADF.
Tips
- You can copy the 2-sided original by setting it on the Original Glass. For details on how to copy a 2-
sided original, refer to page 5-6.

Loading the original3
3-14 bizhub 226
3.6
3.6.3 Loading the highly translucent or transparent original
When you set the highly translucent or transparent original, such as OHP transparencies, tracing paper, and
diazo photosensitive paper, follow the below procedure.
1 Open the ADF.
2 Set the original with the side you want to copy facing down.
% Set the original along the Original Scale on the left and at the top of the Original Glass.
3 Place a blank sheet of paper that is the same size as
the original over the original.
4 Gently close the ADF.

bizhub 226 3-15
3.6 Loading the original 3
3.6.4 Setting the book original
When setting the bound two-page spread original, follow the below procedure.
For details on the book separation copy, refer to page 5-12.
NOTICEDo not place an original weighing more than 4-7/16 lb (2 kg) on the Original Glass. Furthermore, do not exert strong pressure to press down on a book or any other form of original that has to be spread out on the original glass. Otherwise, the machine may be damaged or a failure may occur.
1 Open the ADF.
2 Set the book original onto the Original Glass.
% For the original spread over two facing pages, align it
with the (arrow) mark on the back-left corner of the
Original Scale.
% For book separation copy, place the top part (upper
part) of the original at the back side, and align the cent-
er of the book original with — mark of the Original
Scale at the back.
3 Gently close the ADF.

Loading the original3
3-16 bizhub 226
3.6
3.6.5 Setting originals of different sizes (Mixed Original)
Mixed Original is a function to set originals of different sizes (1 shown in the illustration below) into the ADF
and make copies (2 shown in the figure below) at a time.
1. Originals
2. Copies
Tips
- The Mixed Original function is only available for originals of the same width. The following shows com-
binations of originals.
– 11 e 17w (A3w) and 8-1/2 e 11v (A4v)
– 8-1/2 e 11w (A4w) and 5-1/2 e 8-1/2v (A5v)
– 8-1/2 e 14w (B4w) and 5-1/2 e 8-1/2v (B5v)
1 Open Lateral Guide.
2 Load the original with the side you want to copy facing up.
% Do not load more than 70 sheets into the ADF at a time,
and do not load the sheets up to the point where the
top of the stack is higher than the , mark. Doing so will
likely cause jamming or spoiling of the original, or ma-
chine failure.
3 Adjust the Lateral Guide to the original size.
% If the original is not loaded correctly, it may not be fed
in straight.
4 Press Mixed Original.
Mixed Original lights up.
5 Press Paper.
Auto Paper

bizhub 226 3-17
3.6 Loading the original 3
6 Use +, to select [AUTO], then press OK.
The screen returns to the basic screen.
% Confirm that [AUTO] appears in the first line of the Display of this machine.
7 Press the Start key.
Tips
- The mixed original setting, the auto zoom setting, 1side % 2side copy setting, the book separation copy
setting, ID copy setting, 2 in 1/4 in 1 copy setting cannot be set at the same time.
PAPER SELECTPAPER SELECT
TRAY1:INV
TRAY2:LTR
AAUTO

Loading the original3
3-18 bizhub 226
3.6
4 Making Copies


bizhub 226 4-3
4.1 Copy 4
4 Making Copies
4.1 Copy
This section describes basic procedures for loading and copying an original.
4.1.1 Basic copying method
1 Load the original.
% For details on how to load the original, refer to page 3-12.
2 Configure required settings on the Control Panel.
% For details on the basic functions, refer to page 4-3.
% For details on the Application, refer to page 5-3.
3 Set the number of copies on the Keypad,
% Set the number of copies in the range from 1 to 999.
% Press Clear/Stop to clear the number of copies you have set.
4 Press the Start key.
Copying begins.
% To stop the copy operation being performed, press Clear/Stop.
% For details on stopping copying, refer to page 4-7.

Copy4
4-4 bizhub 226
4.1
4.1.2 Reducing or enlarging a standard size original to a different standard size
As an example, this section describes procedures for making copies by enlarging a LTR size original to fit
11e 17 size paper.
1 Load the original.
% For details on how to load the original, refer to page 3-12.
2 Press Zoom.
3 Use +, to select [FIXED], then press OK.
4 Use +, to select [129% LTR % 11 e 17], then press OK.
The screen returns to the basic screen.
5 Confirm the size of paper for copying.
% If [AUTO] appears, confirm that sheets of 11 e 17 size are loaded in the tray.
% If [AUTO] does not appear, press Paper to select the tray in which sheets of 11 e 17 size are loaded.
% For details on how to select the tray, refer to page 4-8.
6 Configure other desired settings.
% For details on the basic functions, refer to page 4-3.
% For details on the Application, refer to page 5-3.
7 Press the Start key.
4.1.3 Specifying the image quality to fit the original
If you specify [TEXT/PHOTO], [TEXT], or [PHOTO] to fit the original to be copied, you can copy the original
with clarity.
1 Load the original.
% For details on how to load the original, refer to page 3-12.
2 Press the Quality key.
3 Use +,to select [TEXT/PHOTO], [TEXT], or [PHOTO], then press OK.
The screen returns to the basic screen.
4 Configure other desired settings.
% For details on the basic functions, refer to page 4-3.
% For details on the Application, refer to page 5-3.
5 Press the Start key.
FIXED ZOOM RATIO
121% LGL%11x17129% LTR%11x17200%
100%

bizhub 226 4-5
4.1 Copy 4
4.1.4 Specifying the density
1 Load the original.
% For details on how to load the original, refer to page 3-12.
2 Press the Density key.
3 Use +, to select [AUTO] or [MANUAL].
% If you select [AUTO], press OK.
% If you select [MANUAL], use *) to select a density from nine levels, then press OK.
The screen returns to the basic screen.
4 Configure other desired settings.
% For details on the basic functions, refer to page 4-3.
% For details on the Application, refer to page 5-3.
5 Press the Start key.
Tips
- You cannot specify the automatic density control and the [PHOTO] image quality setting at the same
time.
DENSITY(TEXT/PHOTO)
MANUALAUTO

Copy4
4-6 bizhub 226
4.1
4.1.5 Setting the original direction
Set the orientation of the original loaded into the ADF or placed on the Original Glass. Otherwise, part of the
images on the original may not be printed.
1 Load the original.
% For details on how to load the original, refer to page 3-12.
2 Press Simplex/Duplex.
A screen for specifying the 2-sided copy appears.
3 Use +, to select [ORIG. DIRECT].
4 Press ). The screen for specifying the original direction is displayed.
5 Use +, to select [TOP], [LEFT], [RIGHT], or [BOTTOM], then press OK.
The screen returns to the basic screen.
6 Configure other desired settings.
% For details on the basic functions, refer to page 4-3.
% For details on the Application, refer to page 5-3.
7 Use the Keypad to specify the number of copies, then press Start.
ORIG. DIRECTION
LEFT
RIGHTBOTTOM
TOP

bizhub 226 4-7
4.2 Stopping, restarting, or erasing the copy job 4
4.2 Stopping, restarting, or erasing the copy job
To interrupt the copy operation being performed, follow the below procedure.
1 Configure the copy settings and press Start.
Copying begins.
2 Press Clear/Stop when copying operations were being carried out.
The [Please wait] message appears and the job stops.
% To restart the stopped job, select [NO], then press OK.
% To erase the stopped job, select [YES], then press OK.

Selecting the tray4
4-8 bizhub 226
4.3
4.3 Selecting the tray
1 Load the original.
% For details on how to load the original, refer to page 3-12.
2 Select Paper.
3 Use +, to select [AUTO] or one of the trays, then press OK.
The screen returns to the basic screen.
% By selecting [TRAY1] and pressing ), you can specify the size, unit, and type of paper.
% By selecting one of the trays from [TRAY2] to [TRAY5] and pressing ), you can specify the unit of
the paper size and paper type.
4 Configure other desired settings.
% For details on the basic functions, refer to page 4-3.
% For details on the Application, refer to page 5-3.
5 Press the Start key.
Tips
- If [NO SUITABLE PAPER] appears on the Display after you select [AUTO] and press Start, appropriate
paper is not loaded in the tray. Load paper of the appropriate size or select one of the trays, then press
Start again.
- The auto zoom setting and the auto paper setting, the manual zoom setting, the book separation copy
setting, or the ID copy setting cannot be selected at the same time.
4.3.1 Auto tray change function
If the currently selected tray has run out of paper during copying or printing, this function automatically
switches to another tray to continue copying or printing.
The auto tray change function operates when a tray other than the currently selected tray meets the following
conditions.
- When paper of the same size as that of the paper in the currently selected tray is loaded
- When paper of the same type as that of the paper in the currently selected tray is loaded
- When paper is loaded in the same orientation as that of the paper in the currently selected tray
- The type of paper loaded in each tray is [PLAIN], [RECYCLE], or [1-SIDE]
- By using the Bypass Tray and Tray2/Tray3/Tray4/Tray5, you can continuously copy or print a large
number of documents. To continuously copy or print a large number of documents, set the same con-
ditions above for all trays and load paper into them.
- If all trays have run out of paper, replenish paper according to the on-screen instructions. Even if you
load paper to a tray other than the tray displayed on the screen, copy or print operations may not re-
start.
PAPER SELECT
TRAY1:INV
TRAY2:LTR
PAPER SETTING
AUTO

bizhub 226 4-9
4.3 Selecting the tray 4
4.3.2 Tray selection order by tray change function
When the auto tray change function operates, the trays are selected in the following priority sequence.
- Tray1 ö Tray2 ö Tray3 ö Tray4 ö Tray5 ö Bypass Tray
Tips
- If Tray1 or the Bypass Tray is set to Special Paper (Transparency), the auto tray change function does
not apply to the tray. For details on how to set special paper, refer to page 4-15 or page 6-12.
- When a priority tray is set in the Utility menu, that tray is given priority. For details on the setting proce-
dure, refer to page 6-24.

Manually making copies4
4-10 bizhub 226
4.4
4.4 Manually making copies
When making copies on paper of a size not loaded in the tray or making copies on special paper such as
OHP transparencies, envelopes, and thick paper, use the Bypass Tray.
4.4.1 Paper type and number of sheets of paper available for the Bypass Tray
Type:
- Plain paper, recycled paper (thick paper: 17 lb to 23-15/16 lb (64 g/m2 to 90 g/m2)): 100
- Special paper
– Thick paper 1 (Thick paper: 24-3/16 lb to 31-15/16 lb (91 g/m2 to 120 g/m2)): 20 or less
– Thick paper 2 (Thick paper: 32-3/16 lb to 41-3/4 lb (121 g/m2 to 157 g/m2)): 20 or less
– OHP transparency: 10 or less
– Envelope: 10 or less
Size:
- Width: 3-9/16 inches to 11-11/16 inches (90 mm to 297 mm)
- Length: 5-1/2 inches to 17 inches (140 mm to 432 mm)
4.4.2 Adjusting the Bypass Tray
You can adjust the Bypass Tray Extension to fit the paper size as shown below.

bizhub 226 4-11
4.4 Manually making copies 4
4.4.3 Loading plain paper into the Bypass Tray
Up to 100 sheets of plain paper can be loaded into the Bypass Tray.
Tips
- If you load paper other than plain paper, you need to specify the paper type on the Control Panel.
NOTICELoad the paper so that the side to be copied is facing down.
Be sure to uncurl the paper before loading it.
1 Load paper into the Bypass Tray.
% Do not load the sheets up to the point where the top of
the stack is higher than the+ mark.
2 Adjust the guide and the Bypass Tray Extension to fit the
paper size.
d Reference
For details on how to set the size and type of paper, refer to Steps 4 to 7 in page 4-15.
% The relation between the orientation of the original image and that of the copy image to be printed
on paper is as shown below.

Manually making copies4
4-12 bizhub 226
4.4
4.4.4 Loading OHP transparencies into Bypass Tray
Up to 10 OHP transparencies can be loaded into the Bypass Tray.
NOTICEIf you load OHP transparencies, set the size and type of paper on the Control Panel.
1 Load OHP transparencies in the w or v direction to fit the original.
% Do not load the OHP transparencies up to the point where the top of the stack is higher than the +
mark.
d Reference
For details on how to set the size and type of paper, refer to Steps 4 to 7 in page 4-15.
% The relation between the orientation of the original image and that of the copy image to be printed
on OHP transparencies is as shown below.

bizhub 226 4-13
4.4 Manually making copies 4
4.4.5 Loading envelopes into the Bypass Tray
Up to 10 envelopes can be loaded into the Bypass Tray.
NOTICEWhen loading envelopes, expel air from the envelopes, then hold the folds of the envelopes.
If air is left or the folds are not held firmly, they get wrinkled or a paper jam may occur.
If you load envelopes, set the size and type of paper on the Control Panel.
1 Load them with the flap side up, as shown in the illustration.
% Do not load the envelopes up to the point where the top of the stack is higher than the + mark.
d Reference
For details on how to set the size and type of paper, refer to Steps 4 to 7 in page 4-15.
NOTICEDo not load envelopes in the v direction.
Do not load envelopes with the flap side down.
Do not load envelopes with the flap side placed as the trailing edge.

Manually making copies4
4-14 bizhub 226
4.4
The relation between the orientation of the original image and that of the copy image to be printed on enve-
lopes is as shown below.

bizhub 226 4-15
4.4 Manually making copies 4
4.4.6 Manually making copies (Bypass Tray)
NOTICEBe sure to uncurl thick paper before loading it.
1 Load the original.
% For details on how to load the original, refer to page 3-12.
2 Load the paper with the side you want to copy facing down, and slightly insert it until it stops.
A screen for paper setup appears.
3 Adjust the guide and the Bypass Tray Extension to fit the paper size.
4 Use +, to select [SIZE], then press ).
5 Use +, to select the appropriate paper size, then press OK.
The screen returns to the one for paper setup.
6 Use +, to select [TYPE], then press ).
7 Use +, to select the appropriate paper type, then press OK.
% Paper type can be selected from [PLAIN], [RECYCLE], [1-SIDE], [SPECIAL], [TRANSPARENCY],
[CARD1], [CARD2], [ENVELOPE], [PLAIN 2-SIDE], [CARD1 2-SIDE], [CARD2 2-SIDE], and [RECY. 2-
SIDE].
The screen returns to the one for paper setup.
8 Press Back.
% When you want to change the size or type settings, take out the set paper and repeat Step 2 to 8.
9 Configure other desired settings.
% For details on the basic functions, refer to page 4-3.
% For details on the Application, refer to page 5-3.
10 Press the Start key.
BYPASS PAPER SIZE
LGL
LTRLTR
11x17
TYPE SETTING
RECYCLE
1-SIDESPECIAL
PLAIN

Making copies on various types of paper4
4-16 bizhub 226
4.5
4.5 Making copies on various types of paper
4.5.1 Making copies on OHP transparencies
As an example, this section describes procedures for loading OHP transparencies into Tray1 and copying
the original on them.
1 Load the original of 8-1/2 e 11 (A4) size.
% For details on how to load the original, refer to page 3-12.
2 Adjust the guide of Tray1, and load OHP transparencies.
% When loading OHP transparencies in the w or v direc-
tion to fit the original.
% Up to 10 OHP transparencies can be loaded.
% Be sure to load the OHP transparencies below the tab,
so that the stack height does not exceed the , mark.
3 Press the Utility key.
The Utility screen appears.
4 Use +, to select [PAPER SOURCE SETUP], then press OK.
5 Use +, to select [TRAY1], then press OK.
6 Use +, to select [PAPER SIZE], then press OK.
7 Use +, to select [AUTO], then press OK.
8 Use +, to select [TRAY1], then press OK.
9 Use +, to select [PAPER TYPE], then press OK.
10 Use +, to select [TRANSPARENCY], then press OK.
TRAY1 PAPER TYPE
INVINVEXE
AUTO
TRAY1 PAPER TYPE
CARD1
CARD2ENVELOPE
TRANSPARENCY
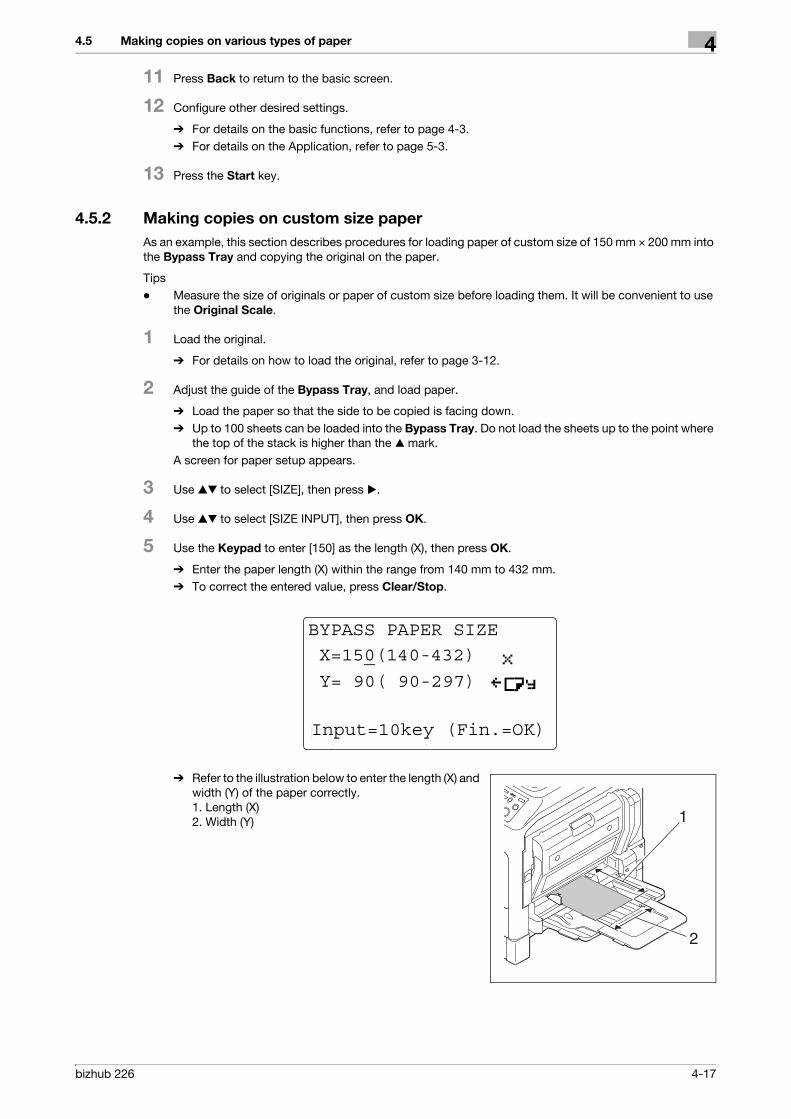
bizhub 226 4-17
4.5 Making copies on various types of paper 4
11 Press Back to return to the basic screen.
12 Configure other desired settings.
% For details on the basic functions, refer to page 4-3.
% For details on the Application, refer to page 5-3.
13 Press the Start key.
4.5.2 Making copies on custom size paper
As an example, this section describes procedures for loading paper of custom size of 150 mm e 200 mm into
the Bypass Tray and copying the original on the paper.
Tips
- Measure the size of originals or paper of custom size before loading them. It will be convenient to use
the Original Scale.
1 Load the original.
% For details on how to load the original, refer to page 3-12.
2 Adjust the guide of the Bypass Tray, and load paper.
% Load the paper so that the side to be copied is facing down.
% Up to 100 sheets can be loaded into the Bypass Tray. Do not load the sheets up to the point where
the top of the stack is higher than the + mark.
A screen for paper setup appears.
3 Use +, to select [SIZE], then press ).
4 Use +, to select [SIZE INPUT], then press OK.
5 Use the Keypad to enter [150] as the length (X), then press OK.
% Enter the paper length (X) within the range from 140 mm to 432 mm.
% To correct the entered value, press Clear/Stop.
% Refer to the illustration below to enter the length (X) and
width (Y) of the paper correctly.
1. Length (X)
2. Width (Y)
BYPASS PAPER SIZE
X=150(140-432)
Y= 90( 90-297)
Input=10key (Fin.=OK)

Making copies on various types of paper4
4-18 bizhub 226
4.5
6 Use the Keypad to enter "200" as the width (Y), then press OK.
% Enter the paper width (Y) within the range from 90 mm to 297 mm.
% To correct the entered value, press Clear/Stop.
The screen returns to the one for paper setup.
7 Confirm that [TYPE:PLAIN] is displayed.
% If paper type other than plain paper is set, select [TYPE], then [PLAIN].
8 Press Back to return to the basic screen.
9 Configure other desired settings.
% For details on the basic functions, refer to page 4-3.
% For details on the Application, refer to page 5-3.
10 Press the Start key.
BYPASS PAPER SIZE
X=150(140-432)
Y=200( 90-297)
Input=10key (Fin.=OK)

bizhub 226 4-19
4.5 Making copies on various types of paper 4
4.5.3 Making copies on envelopes
As an example, this section describes procedures for loading envelopes into the Bypass Tray and copying
the original on them.
Tips
- Measure the size of originals or paper of custom size before loading them. It will be convenient to use
the Original Scale.
1 Load the original.
% For details on how to load the original, refer to page 3-12.
2 Adjust the guide of the Bypass Tray, and load envelopes.
% Load the envelopes with the flap side up as shown in the illustration, so that the side on which you
want to copy the original is facing down.
% When loading envelopes, expel air from the envelopes, then hold the folds of the envelopes.
% Up to 10 envelopes can be loaded into the Bypass Tray. Do not load the envelopes up to the point
where the top of the stack is higher than the + mark.
% For details on how to enter the size, refer to page 4-17.
A screen for paper setup appears.
3 Use +, to select [TYPE], then press ).
4 Use +, to select [ENVELOPE], then press OK.
5 Press Back to return to the basic screen.
6 Configure other desired settings.
% For details on the basic functions, refer to page 4-3.
% For details on the Application, refer to page 5-3.
7 Press the Start key.
TYPE SETTING
CARD1
CARD2
ENVELOPE
TRANSPARENCY

Specifying the zoom ratio to copy the original4
4-20 bizhub 226
4.6
4.6 Specifying the zoom ratio to copy the original
By specifying the zoom ratio, you can copy data larger or smaller than the original size.
4.6.1 Zoom ratio setting type
4.6.2 Setting the auto zoom function
1 Load the original.
% For details on how to load the original, refer to page 3-12.
2 Press Zoom.
3 Use +, to select [AUTO], then press OK.
4 Configure other desired settings.
% For details on the basic functions, refer to page 4-3.
% For details on the Application, refer to page 5-3.
5 Press the Start key.
Tips
- The auto zoom setting and the auto paper setting, the mixed original setting, the book separation copy
setting, the ID copy setting, or the 2 in 1/4 in 1 copy setting cannot be set at the same time.
Zoom ratio type Description
[AUTO] The most appropriate zoom ratio is automatically selected based on the size of the loaded original and the selected paper.
[FIXED] The most appropriate frequently used zoom ratio when copying a standard size original onto paper of a different standard size is set.<Inch area>25%50%64% (11 e 17 % LTR (8-1/2 e 11))78% (LGL (8-1/2 e 14) % LTR (8-1/2 e 11))100% (same size as the original) 121% (LGL (8-1/2 e 14) % 11 e 17)129% (LTR (8-1/2 e 11) % 11 e 17)200%400%<Metric area>25%50%70% (A3 % A4, B4 % B5)81% (B4 % A4)100% (Same size as the original)115% (B4 % A3)141% (B5 % B4, A4 % A3)200%400%
[MANUAL] Specify the zoom ratio between 25% and 400%.Directly enter the zoom ratio on the Keypad, Pressing +, increases or de-creases the zoom ratio in steps of 1%.
[X/Y ZOOM] Copies data with different zoom ratios in width and length directions of the original.Width direction: Specify the zoom ratio between 50% and 200%.Length direction: Specify the zoom ratio between 50% and 100%.Directly enter the zoom ratio on the Keypad,

bizhub 226 4-21
4.6 Specifying the zoom ratio to copy the original 4
4.6.3 Setting the fixed zoom ratio
1 Load the original.
% For details on how to load the original, refer to page 3-12.
2 Press Zoom.
3 Use +, to select [FIXED], then press OK.
4 Use +, to select the zoom ratio, then press OK.
5 Configure other desired settings.
% For details on the basic functions, refer to page 4-3.
% For details on the Application, refer to page 5-3.
6 Press the Start key.
Tips
- The fixed zoom setting and the ID copy setting or the 2 in 1/4 in 1 copy setting cannot be set at the
same time.
4.6.4 Setting the zoom ratio manually
1 Load the original.
% For details on how to load the original, refer to page 3-12.
2 Press Zoom.
3 Use +, to select [MANUAL], then press OK.
4 Use +, or the Keypad to set the zoom ratio, then press OK.
% If you use +, to set the zoom ratio, you can set it in steps of 1%.
5 Configure other desired settings.
% For details on the basic functions, refer to page 4-3.
% For details on the Application, refer to page 5-3.
6 Press the Start key.
Tips
- The manual zoom setting and the mixed original setting, the ID copy setting, or the 2 in 1/4 in 1 copy
setting cannot be set at the same time.
FIXED ZOOM RATIO
121% LGL%11x17
129% LTR%11x17
200%
100%
MANUAL ZOOM RATIO150% (25%-400%)
+,or 10key input

Specifying the zoom ratio to copy the original4
4-22 bizhub 226
4.6
4.6.5 Setting the X/Y variable zoom ratio
1 Load the original.
% For details on how to load the original, refer to page 3-12.
2 Press Function.
The copy function screen appears.
3 Use +, to select [X/Y ZOOM], then press OK.
4 Use +, to select [ON], then press ).
5 Use the Keypad to specify the zoom ratio in the length direction (X), then press OK.
To correct the entered zoom ratio, press Clear/Stop, and configure the setting again.
6 Use the Keypad to specify the zoom ratio in the width direction (Y), then press OK.
To correct the entered zoom ratio, press Clear/Stop, and configure the setting again.
7 Press Back to return to the basic screen.
8 Configure other desired settings.
% For details on the basic functions, refer to page 3-3.
% For details on the Application, refer to page 5-3.
9 Press the Start key.
Tips
- The X/Y variable zoom ratio setting and the auto paper setting, the mixed original setting, the ID copy
setting, or the 2 in 1/4 in 1 copy setting cannot be set at the same time.
X/Y ZOOM SETTING
X= 70(50-100)
Y=100(50-200)
Input=10key (Fin.=OK)
X/Y ZOOM SETTING
X= 70(50-100)
Y=120(50-200)
Input=10key (Fin.=OK)

bizhub 226 4-23
4.7 Changing copy density to copy the original 4
4.7 Changing copy density to copy the original
Setting the original type and copy density
- Text mode:
Select this mode to copy text originals. The text shape is enhanced to provide the sharp text with clarity.
Automatic density adjustment (AUTO) and manual 9-level density adjustment (MANUAL) are available.
– AUTO: Automatically adjusts the density to fit the original to be copied.
– MANUAL: Adjust the density by using * (lighter) or ) (darker) to fit the original to be copied.
- Photo mode:
Select this mode when copying the original with many halftones such as photos. The auto density ad-
justment is not available in the photo mode.
- Text/Photo mode:
Select this mode for the original with texts and photos. Automatic density adjustment (AUTO) and man-
ual 9-level density adjustment (MANUAL) are available.
– AUTO: Automatically adjusts the density to fit the original to be copied.
– MANUAL: Adjust the density by using * (lighter) to prevent background prints when copying newspa-
pers or magazines. When you want reproduce subtle colors in the light part of the image, adjust the
density by using ).
Tips
- If you set the density to the "darker" side in the manual density adjustment mode, the background color
may be also copied, and if you set it to the "lighter" side, the copy itself may become lighter. Set an
appropriate density level for the original.
4.7.1 Setting the copy density
Tips
- If you set [PHOTO] for image quality, automatic setting is not available.
1 Load the original.
% For details on how to load the original, refer to page 3-12.
2 Press the Density key.
A screen that specifies the density appears.
3 Use +, to select [AUTO] or [MANUAL].
% If you select [AUTO], press OK.
% If you select [MANUAL], use *) to select a density from nine levels, then press OK.
The screen returns to the basic screen.
4 Configure other desired settings.
% For details on the basic functions, refer to page 4-3.
% For details on the Application, refer to page 5-3.
5 Press the Start key.
DENSITY(TEXT/PHOTO)
MANUALAUTO

Confirming the machine counter4
4-24 bizhub 226
4.8
4.8 Confirming the machine counter
You can confirm the cumulative number of printed pages and the number of scans from when this machine
was installed using Confirm.
4.8.1 Items you can confirm using the machine counter
4.8.2 Viewing the total counter
1 Press the Confirm key.
This displays a screen that confirms the number of printed pages.
2 Use +, to select [TOTAL PAGE], then press OK.
3 Use +, to confirm each count value.
4 Press OK.
The screen returns to the basic screen.
Machine counter Contents
[TOTAL COUNT] The total number of printed pages is displayed.
[SIZE COUNT] Displays the total number of copies/printed pages of the specified paper size as size count. (Your service representative will specify the size of the paper to be counted.)
[TOTAL SCAN] Displays the total number of scans. (The number of scans for copying is not included.)
[COLOR SCAN] Displays the total number of color scans. (The number of scans for copying is not included.)
[TX PAGES] Displays the total number of fax TX.
[RX PAGES] Displays the total number of fax RX.
TOTAL PAGE
SIZE COUNT :000000
TOTAL SCAN :000000COLOR SCAN :000000
TOTAL COUNT:000000

bizhub 226 4-25
4.9 Printing reports 4
4.9 Printing reports
You can print each information registered in this machine as report.
The printable items vary depending on the options being used.
4.9.1 Printing reports
1 Press the Confirm key.
This displays a screen that confirms the number of printed pages.
2 Use +, to select [PRINT REPORT], then press OK.
3 Use +, to select the list to be printed, then press OK.
The report is printed and the screen returns to the basic screen.
Item Without FAX Kit FK-510, Net-work Card NC-504, Im-age Control-ler IC-209
With FAX Kit FK-510
With Net-work Card NC-504
With Image Controller IC-209
[TX RESULT REPORT] e o o o
[RX RESULT REPORT] e o e e
[ACTIVITY REPORT] e o o o
[MEMORY DATA LIST] e o o o
[MEMORY IMAGE PRINT] e o o o
[ONE-TOUCH LIST] e o o o
[SPEED DIAL LIST] e o o o
[KEY SETTING LIST] e o o o
[RELAY BOX LIST] e o e e
[MACHINE STATUS] o o o o
[CONFIGRATION PAGE (GDI)] o o o e
[CONFIGRATION PAGE (PCL)] e e e o
[PCL FONT LIST] e e e o
PRINT REPORT
ACTIVITY REPORTMEMORY DATA LIST
MEMORY IMAGE PRINT
TX RESULT REPORT

Printing reports4
4-26 bizhub 226
4.9

5 Making Copies in Advanced
Manner


bizhub 226 5-3
5.1 Finishing setting (sorting, grouping) 5
5 Making Copies in Advanced Manner
5.1 Finishing setting (sorting, grouping)
When copying or printing two or more sets, you can copy each set in order of page (Sort) or make copies by
page (Group).
5.1.1 Finishing type
Non-sort:
Copies the original without sorting them.
Sort:
Automatically sorts and copies a multi-page original per set.
Group:
Sorts and copies a multi-page original per page.

Finishing setting (sorting, grouping)5
5-4 bizhub 226
5.1
Alternate Sort:
Sorts an original by outputting paper of w and v alternately per set.
Alternate Group:
Sorts an original by outputting paper of w and v alternately per page.
Tips
- To output paper alternately, the following conditions are required.
– 8-1/2 e 11 (A4) or B5 size paper is used.
– Paper of the same size and type is loaded with the w orientation in one paper tray and with the v ori-
entation in another tray.
– Auto Paper is set.
– Mixed Original is not set.
– Book Separation is not set.
– In the Utility menu, [CRISSCROSS MODE] is set to [ON]. (For details, refer to page 6-32.)

bizhub 226 5-5
5.1 Finishing setting (sorting, grouping) 5
5.1.2 Setting finishing
1 Load the original.
% For details on how to load the original, refer to page 3-12.
2 Press Finishing.
A screen that specifies the finishing appears.
3 Use +, to select [NON-SORT], [SORT], or [GROUP], then press OK.
The following icons are displayed in the basic screen.
% : [SORT]
% : [GROUP]
4 Configure other desired settings.
% For details on the basic functions, refer to page 4-3.
% For details on the Application, refer to page 5-3.
5 Use the Keypad to specify the number of copies, then press Start.
% If you set the original on the Original Glass, the number of scans is displayed under [NEXT PAGE?]
and the number of copies. Set the next original and press OK. Repeat this operation the same
number of times as there are originals. When all pages have been scanned, press Start.
Tips
- If the optional Reverse Automatic Document Feeder DF-625 is not installed, [GROUP] will not be dis-
played.
COPY FINISHING
SORT
GROUP
NON-SORT

Making 1-sided or 2-sided copy5
5-6 bizhub 226
5.2
5.2 Making 1-sided or 2-sided copy
The Simplex/Duplex function is available in the following four settings: 1-sided to 1-sided setting, 1-sided to
2-sided setting, 2-sided to 1-sided setting, or 2-sided to 2-sided setting.
The 2-sided copy function is only available when the optional Automatic Duplex Unit AD-509 is installed.
1 Load the original.
% For details on how to load the original, refer to page 3-12.
2 Press Simplex/Duplex.
A screen for specifying the 2-sided/1-sided copy appears.
3 Use +, to select [1-SIDE % 1-SIDE], [1-SIDE % 2-SIDE], [2-SIDE % 1-SIDE], or [2-SIDE % 2-SIDE],
then press OK.
The following icons are displayed in the basic screen.
% : [1-SIDE % 1-SIDE]
% : [1-SIDE % 2-SIDE]
% : [2-SIDE % 1-SIDE]
% : [2-SIDE % 2-SIDE]
% When you select [1-SIDE % 2-SIDE] and press ), you can specify the binding position for the print-
ed sheets. Select [LEFT], [RIGHT], or [TOP], then press OK.
% When you select [2-SIDE % 1-SIDE] and press ), you can specify the binding position for the orig-
inal. Select [LEFT], [RIGHT], or [TOP], then press OK.
% When you select [2-SIDE % 2-SIDE] and press ), you can specify the binding position for the orig-
inal. When you press ) next, you can specify the binding position for the printed sheets. Press OK.
Name Functions
[1-SIDE % 1-SIDE] Prints a 1-sided original on one side of paper.
[1-SIDE % 2-SIDE] Prints a 1-sided original on two sides of paper.
[2-SIDE % 1-SIDE] Prints a 2-sided original on one side of paper.
[2-SIDE % 2-SIDE] Prints a 2-sided original on two sides of paper.
SIMPLEX/DUPLEX
1-SIDE%2-SIDE
2-SIDE%1-SIDE
OUTPUT BINDING POS.
1-SIDE%1-SIDE

bizhub 226 5-7
5.2 Making 1-sided or 2-sided copy 5
4 Configure other desired settings.
% For details on the basic functions, refer to page 4-3.
% For details on the Application, refer to page 5-3.
5 Use the Keypad to specify the number of copies, then press Start.
% If you set the original on the Original Glass, the number of scans is displayed under [NEXT PAGE?]
and the number of copies. Set the next original and press OK. Repeat this operation the same
number of times as there are originals. When all pages have been scanned, press Start.
Tips
- If the optional Reverse Automatic Document Feeder DF-625 is not installed, [2-SIDE % 1-SIDE]
[2-SIDE % 2-SIDE] will not be displayed.
- If the optional Automatic Duplex Unit AD-509 is not installed, [1-SIDE % 2-SIDE] [2-SIDE % 2-SIDE]
will not be displayed.
- The 1side % 1side setting and ID copy setting cannot be set at the same time.
- The 1side % 2side setting and the mixed original setting or ID copy setting cannot be set at the same
time.
- The 2side % 1side setting or the 2side % 2side setting and the book separation setting or ID copy set-
ting cannot be set at the same time.

Configuring 2in1 or 4in1 copy settings5
5-8 bizhub 226
5.3
5.3 Configuring 2in1 or 4in1 copy settings
1 Load the original.
% For details on how to load the original, refer to page 3-12.
2 Press Combine Original.
The screen for setting up the 2in1 and 4in1 appears.
Name Functions
[2 in 1] Copies images on two original pages on one sheet of paper.Portrait original pages
Landscape original pages
[4 in 1] Copies images of four original pages on one sheet of paper.Horizontal
Vertical

bizhub 226 5-9
5.3 Configuring 2in1 or 4in1 copy settings 5
3 Use +, to select [2in1] or [4in1], then press OK.
% When you select [2in1] and press ), you can specify the original direction. For details on the original
direction, refer to page 4-6.
% When you select [4in1] and press ), you can specify the page order. Select [PATTERN1] or
[PATTERN2], then press OK. When you press ) next, you can specify the original direction.
4 Configure other desired settings.
% For details on the basic functions, refer to page 4-3.
% For details on the Application, refer to page 5-3.
% If you set multiple sets, press Finishing and select [SORT].
5 Use the Keypad to specify the number of copies, then press Start.
% If you set the original on the Original Glass, the number of scans is displayed under [NEXT PAGE?]
and the number of copies. Set the next original and press OK. Repeat this operation the same
number of times as there are originals. When all pages have been scanned, press Start.
Tips
- The 2 in 1/4 in 1 copy setting and the manual zoom setting, the X/Y variable zoom ratio setting, the
mixed original setting, the book separation copy setting, the ID copy setting, the page margin setting,
or the erase setting cannot be set at the same time.
Pattern 1 Pattern 2

Using the ID Copy5
5-10 bizhub 226
5.4
5.4 Using the ID Copy
Separately scans the contents of the front and back sides of a card, for example, insurance card, driver's
license, or business card, and copies them together on one sheet.
Using the ID copy function, you can save the number of sheets to be used.
% Set the original at a distance 3/16 inches (4 mm) away from the Original Scale on the left and at the
top of the Original Glass.
A: 3/16 inches (4 mm)
1 Open the ADF, and set the original on the Original Glass with the front side of the card facing down.
2 Press ID Copy.
is displayed in the basic screen.
3 Use the Keypad to specify the number of copies, then press Start.
The number of scanned pages is displayed under [NEXT PAGE?] and the number of copies.
% When copying only the front side of the card, press Start.
4 Open the ADF, and set the original on the Original Glass with the back side of the card facing down,
then press OK.
Tips
- If you press ID Copy, [TEXT/PHOTO] is automatically selected as copy quality.
- To change the copy quality, press Quality before pressing Start.
The ID copy setting and the auto paper setting, the zoom setting, the mixed original setting, the book sepa-
ration copy setting, the 2-sided copy setting, the 2 in 1/4 in 1 copy setting, the page margin setting, or the
erase setting cannot be set at the same time.

bizhub 226 5-11
5.5 Making copies by entering the ID (Account) number 5
5.5 Making copies by entering the ID (Account) number
If you register the ID (Account) number, you can configure settings so that only specific users can use this
machine or you can manage the number of copies by account.
This section describes procedure for entering the ID (Account) number and making copies.
0 If you have registered the ID (Account) number, you cannot use this machine unless you enter it before
using this machine.
0 To use this function, select [ADMIN. MANAGEMENT] and [ACCOUNT TRACK] in the Utility menu, and
configure setting. For details, refer to page 6-20.
1 Enter the 3-digit ID (Account) number using the Keypad.
% To correct the ID (Account) number, press Clear/Stop.
2 Press Access.
The screen switches from the screen for inputting the ID to the basic screen, and you can make copies.
3 Load an original and configure copy settings.
% For details on the basic functions, refer to page 4-3.
% For details on the Application, refer to page 5-3.
4 Press the Start key.
5 When the copy operation completes, press Access again.
The screen for entering the ID (Account) appears.
Tips
- If the auto panel reset time has elapsed, the screen for entering the ID (Account) appears.
ACCOUNT NO.:---
Input=10Key

Setting book separation copy5
5-12 bizhub 226
5.6
5.6 Setting book separation copy
Divides or does not divide page spreads (such as a book or catalog) into left and right pages to copy data.
If you combine this function with the erase function, you can erase the area outside the original and the folds
when making copies.
Confirm the size and orientation of the paper in the paper tray in advance.
A: Separation
B: Book spread
1 Set the original onto the Original Glass.
% Set the original along the mark at the center of the Original Glass.
2 Press Function.
The copy function screen appears.
3 Use +, to select [BOOK SEP.], then press OK.
4 Use +, to select [SEPARATION] or [SPREAD], then press OK.
% When specifying the erase function, go to the next step. When not specifying the erase function,
skip to Step 8.
% If you separate data when making copies, the data on the left page is copied first when the set orig-
inal is left bound, and the data on the right page is copied first when it is right bound. The binding
position can be changed at [BINDING POSITION] in the Utility menu. For details, refer to page 6-28.
5 Use +, to select [ERASE], then press OK.
A
B
BOOK SEPARATION
SEPARATION
SPREAD
ALIGN BOOK TO CENTER
OFF

bizhub 226 5-13
5.6 Setting book separation copy 5
6 Use +, to select [FRAME], [CENTER], or [CENTER+FRAME], then press OK.
% If you select [FRAME], [CENTER], or [CENTER+FRAME] and press ), you can specify the erase
width. You can set the erase width for CENTER within the range from 2 mm to 30 mm, and the erase
width for FRAME within the range from 4 mm to 20 mm in steps of 1 mm. Press OK.
7 Press Back to return to the basic screen.
is displayed in the basic screen.
8 Configure other desired settings.
% For details on the basic functions, refer to page 4-3.
% For details on the Application, refer to page 5-3.
9 Use the Keypad to specify the number of copies, then press Start.
Tips
- The book separation copy and the auto zoom setting, the auto paper setting, 2side % 1side/2side %
2side copy setting, the mixed original setting, ID copy setting, 2 in 1/4 in 1 copy setting cannot be set
at the same time.
5.6.1 Frame/Center erase type
ERASE
FRAMECENTER
ERASE SETTING
OFF
Erase type Description Finishing
[FRAME] Erases the area outside the orig-inal and copy data.
Original Copy
[CENTER] Erases the center area of the original and copy data.
Original Copy
[CENTER + FRAME] Erases the area to the outside and center of the original and copy data.
Original Copy

Erasing a part of the original and making copies (Erase)5
5-14 bizhub 226
5.7
5.7 Erasing a part of the original and making copies (Erase)
Erases any contamination on the edges of the original and makes copies.
5.7.1 Precautions when making copies in the erase mode
When you make copies in the erase mode, exercise care regarding the direction in which the original is load-
ed.
Finishing Original Glass ADF
Left erase
Upper erase
Frame erase

bizhub 226 5-15
5.7 Erasing a part of the original and making copies (Erase) 5
5.7.2 Setting the erase
1 Load the original.
% For details on how to load the original, refer to page 3-12.
2 Press Function.
The copy function screen appears.
3 Use +, to select [ERASE], then press OK.
4 Use +, to select [LEFT], [UPPER], or [FRAME], then press OK.
% If you select [LEFT], [UPPER], or [FRAME] and press ), you can specify the erase width. You can
set the erase width within the range from 4 mm to 20 mm in steps of 1 mm. Press OK.
5 Press Back to return to the basic screen.
is displayed in the basic screen.
6 Configure other desired settings.
% For details on the basic functions, refer to page 4-3.
% For details on the Application, refer to page 5-3.
7 Use the Keypad to specify the number of copies, then press Start.
Tips
- [LEFT] or [UPPER] for [ERASE] and the book separation copy setting, the ID copy setting, or 2 in 1/4 in
1 copy setting cannot be set at the same time.
- [FRAME] for [ERASE] and the ID copy setting or 2 in 1/4 in 1 copy setting cannot be set at the same time.
ERASE
LEFT
UPPER
ERASE SETTING
OFF

Making copies with black and white reversed (Neg./Pos. Reverse)5
5-16 bizhub 226
5.8
5.8 Making copies with black and white reversed (Neg./Pos. Reverse)
You can make copies by reversing the white part (background) and the black part (text) of the original.
1 Load the original.
% For details on how to load the original, refer to page 3-12.
2 Press Function.
The copy function screen appears.
3 Use +, to select [NEG.¨ % POS.], then press OK.
4 Use +, to select [ON], then press OK.
5 Press Back to return to the basic screen.
is displayed in the basic screen.
6 Configure other desired settings.
% For details on the basic functions, refer to page 4-3.
% For details on the Application, refer to page 5-3.
7 Use the Keypad to specify the number of copies, then press Start.
OFFON
NEG.<->POS.

bizhub 226 5-17
5.9 Making copies with a binding margin 5
5.9 Making copies with a binding margin
You can displace the original image to the right and make copies by setting a binding margin on the left of
the paper.
If you set a binding margin for the paper on which you want to copy data, you will be able to easily file the
pages.
5.9.1 Precautions when making copies with a binding margin
When you make copies with a binding margin, exercise care regarding the direction in which the original is
loaded.
Original Glass ADF

Making copies with a binding margin5
5-18 bizhub 226
5.9
5.9.2 Setting a binding margin
1 Load the original.
% For details on how to load the original, refer to page 3-12.
2 Press Function.
The copy function screen appears.
3 Use +, to select [PAGE MARGIN], then press OK.
4 Use +, to select [ON], then press OK.
% When you select [ON] and press ), you can specify the binding margin width. You can set the bind-
ing margin width within the range from 0 mm to 20 mm in steps of 1 mm. Press OK.
5 Press Back to return to the basic screen.
is displayed in the basic screen.
6 Configure other desired settings.
% For details on the basic functions, refer to page 4-3.
% For details on the Application, refer to page 5-3.
7 Use the Keypad to specify the number of copies, then press Start.
Tips
- The binding margin setting and the ID copy setting or the 2 in 1/4 in 1 copy setting cannot be set at the
same time.
PAGE MARGIN
ON
MARGIN SETTING
OFF

bizhub 226 5-19
5.10 Making copies with a date and page number 5
5.10 Making copies with a date and page number
You can print the date/time or page number.
1 Press Function.
The copy function screen appears.
2 Use +, to select [STAMP], then press OK.
3 Use +, to select [PAGE NUMBER], [DATE&TIME], or [PAGE+D&T], then press OK.
% When you select [PAGE NUMBER] and press ), you can select the page number type. Select [P001,
P002,] or [1, 2, 3,], then press OK.
% When you select [DATE&TIME] and press ), you can select the date/time type. Select [MM/DD/YY],
[DD/MM/YY], or [YY/MM/DD], then press OK.
% When you select [PAGE+D&T] and press ), you can select the date/time type. If you press ) next,
you can select the page number type. Press OK.
4 Press Back to display the basic screen.
is displayed in the basic screen.
5 Configure other desired settings.
% For details on the basic functions, refer to page 4-3.
% For details on the Application, refer to page 5-3.
6 Use the Keypad to specify the number of copies, then press Start.
STAMP
PAGE NUMBER
DATE&TIME
PAGE FORMAT SETTING
OFF

Registering or recalling the copy settings5
5-20 bizhub 226
5.11
5.11 Registering or recalling the copy settings
By registering the frequently used copy mode, you can recall it as required. You can register up to two copy
settings.
The available setting items are as follows.
- Number of Copies
- Tray Select (Including [AUTO])
- Image quality
- Density (Including [AUTO])
- Each item of the function (Frame Erase, Page Margin, X/Y Variable Zoom Ratio, Neg./Pos. Reverse,
Book Separation)
- Mixed Original
- Combine Originals
- Zoom
- Finishing
- ID Copy
- Stamp
If the paper loaded in the tray is in custom size, it is not registered. For details on registering the custom size,
refer to page 6-14.
5.11.1 Registering the copy setting
Tips
- You cannot register setting while this machine is warming up.
1 Set various items you want to register.
% For details on the basic functions, refer to page 4-3.
% For details on the Application, refer to page 5-3.
2 Press Mode Memory.
The program screen appears.
3 Use +, to select [REGISTER], then press OK.
4 Use +, to select the program number to be registered, then press OK.
The current copy setting is registered.
% If you register a new copy setting to a program number for which a program has been already reg-
istered, the previous copy setting is erased.
MODE MEMORY REGIST.PROGRAM1
PROGRAM2

bizhub 226 5-21
5.11 Registering or recalling the copy settings 5
5.11.2 Recalling the copy setting and making copies
1 Load the original.
% For details on how to load the original, refer to page 3-12.
2 Press Mode Memory.
The program screen appears.
3 Use +, to select [RECALL], then press OK.
4 Use +, to select the program number to be recalled, then press OK.
The selected program is recalled.
5 Press the Start key.
MODE MEMORY RECALLPROGRAM1
PROGRAM2

Registering or recalling the copy settings5
5-22 bizhub 226
5.11
6 Utility and Copy Settings


bizhub 226 6-3
6.1 Utility 6
6 Utility and Copy Settings
6.1 Utility
The Utility screen provides 13 setting items.
Tips
- Some items cannot be configured depending on which optional device is installed in this machine. If an
unavailable item is selected, an error message appears.
No. Name Description Page
1 [MACHINE SETTING] Configure the settings for the operating environment of this machine.
p. 6-5
2 [PAPER SOURCE SET-UP]
Specify the size and type of the paper loaded in Tray 1. You can also specify the unit of paper size and pa-per type loaded in Tray2-Tray5.
p. 6-11
3 [CUSTOM SIZE MEMO-RY]
Register up to two custom sizes. p. 6-14
4 [DRUM DEHUMIDIFY] Perform maintenance operations to prevent a function reduction.
p. 6-16
5 [ADMIN. MANAGE-MENT]
Configure the remote monitor settings or settings for the administrator to manage each account.
p. 6-18
6 [COPY SETTING 1] Configure the default settings for each copy function. p. 6-23
7 [COPY SETTING 2] p. 6-30
8 [DIAL REGISTRATION] This item is available if the optional Fax Kit FK-510, Image Controller IC-209, or Network Card NC-504 is installed. For details, refer to [User's Guide Fax] [Us-er's Guide Network Scan].
-
9 [FAX REGISTRATION] This item is available if the optional Fax Kit FK-510 is installed. For details, refer to [User's Guide Fax].
-
10 [FAX TX OPERATION] This item is available if the optional Fax Kit FK-510 is installed. For details, refer to [User's Guide Fax].
-
11 [FAX RX OPERATION] This item is available if the optional Fax Kit FK-510 is installed. For details, refer to [User's Guide Fax].
-
12 [REPORTING] This item is available if the optional Fax Kit FK-510 is installed. For details, refer to [User's Guide Fax].
-
13 [SCAN SETTING] This item is available if an optional Image Controller IC-209 or Network Card NC-504 is installed in this machine. For details, refer to [User's Guide Network Scan].
-

Machine Setting6
6-4 bizhub 226
6.2
6.2 Machine Setting
In the Machine Setting screen, change the settings for the following items.
<Items for Machine Setting>
No. Settings Description
1 [AUTO PANEL RESET] After completing copy operations or the last key operation, set the time period until the auto panel reset function starts from [OFF], [30 sec], [1 min], [2 min], [3 min], [4 min], or [5 min]. The auto panel reset function automatically returns the screen to the initial mode, and the basic screen appears.• The factory default is [1 min].
2 [SLEEP MODE] Set the time period until this machine enters sleep mode after the user paused operations within the range from [1 min] to [240 min].• The factory default is [15 min].
3 [AUTO SHUT TIME] Specify whether to automatically turn the power off [ON] or not [OFF] when the specified time elapsed after this machine became inactive.If [ON] is selected, specify the time [15min] to [240min] required to turn the power off.• The factory default is [ON].
4 [DENSITY(ADF)] Set the image quality level when using the optional ADF.[MODE1]: Select this to make copies with the density same as that of the original.[MODE2]: Select this to set the lighter copy density and prevent con-tamination due to copying.• The factory default is [MODE1].
5 [DENSITY(BOOK)] Set the image quality level when you copy the original by setting it on the Original Glass.[MODE1]: Select this to make copies with the density same as that of the original.[MODE2]: Select this to set the lighter copy density and prevent con-tamination due to copying.• The factory default is [MODE1].
6 [PRINT DENSITY] Adjust copy density.• The factory default is ( ).
7 [LCD CONTRAST] Use this dial to adjust the brightness of the LCD Display.• The factory default is ( ).
8 [KEY SPEED SETTING] Set the time period until repeating input starts by holding down the key and the interval for repetition to [0.1 sec], [0.3 sec], [0.5sec], [1.0 sec], [1.5 sec], [2.0 sec], [2.5 sec], or [3.0sec].• The factory default is Start Time: [1.0 sec] and Interval: [0.1sec].
9 [LANGUAGE] Set a display screen language.• The factory default is [ENGLISH].
10 [BUZZOR VOLUME] This item is available if the optional FAX Kit FK-510 is installed. You can adjust buzzer volume.• The factory default is [LOW].For details, refer to [User's Guide Fax].
11 [INITIAL MODE] This item is available if the optional FAX Kit FK-510 is installed. You can specify the initial mode.• The factory default is [COPY].For details, refer to [User's Guide Fax].
12 [SCAN THRESHOLD] This item is available if the optional FAX Kit FK-510, Image Control-ler IC-209, or Network Card NC-504 is installed. You can set re-maining amount of memory when you interrupt to scan the original because the memory becomes full.• The factory default is [512Kbyte].For details, refer to [User's Guide Fax].

bizhub 226 6-5
6.2 Machine Setting 6
6.2.1 Select Machine Setting
1 Press the Utility key.
The Utility screen appears.
2 Use +, to select [MACHINE SETTING], then press OK.
6.2.2 Changing the auto panel reset setting
1 Select [MACHINE SETTING].
% For details on selecting [MACHINE SETTING], refer to page 6-5.
2 Use +, to select [AUTO PANEL RESET], then press OK.
3 Use +, to select [OFF], [30 sec], [1 min], [2 min], [3 min], [4 min], or [5 min], then press OK.
This returns to the Machine Setting screen.
UTILITY MODE
PAPER SOURCE SETUPCUSTOM SIZE MEMORYDRUM DEHUMIDIFY
MACHINE SETTING
AUTO PANEL RESET
30sec1min
2min
OFF

Machine Setting6
6-6 bizhub 226
6.2
6.2.3 Changing the sleep mode setting
1 Select [MACHINE SETTING].
% For details on selecting [MACHINE SETTING], refer to page 6-5.
2 Use +,, to select [SLEEP MODE], then press OK.
3 Enter time until the sleep function is enabled using the Keypad, then press OK.
% Configure timer setting between one and 240 minutes.
% To correct the value, press Clear/Stop.
This returns to the Machine Setting screen.
6.2.4 Changing the auto shut time
Specify whether to automatically turn the power off when the specified time elapsed after this machine be-
came inactive. If it is set to be turned off, specify the time required for the power to turn off.
Tips
- This machine is not available if the power is turned off by the auto shut time function. Turn on the power
when using this machine.
d Reference
If [ADMIN. MANAGEMENT] - [DISPLAY AUTO SHUT] is set to [DISABLE], the auto shut time cannot be
changed. For details, refer to page 6-19.
1 Select [MACHINE SETTING].
% For details on selecting [MACHINE SETTING], refer to page 6-5.
2 Use +, to select [AUTO SHUT TIME], then press OK.
3 Use +, to select [OFF] or [ON].
% If you select [OFF], press OK.
% If you select [ON], enter the time required to automatically turn the power off using the Keypad, then
press OK.
% The timer can be specified between 15 and 240 minutes.
% To correct the numeric value, press Clear/Stop.
This returns to the machine setting screen.
SLEEP MODE
15min(1-240min)
AUTO SHUT TIME
ON
180min(15-240min)
OFF

bizhub 226 6-7
6.2 Machine Setting 6
6.2.5 Changing the image quality when using the ADF
1 Select [MACHINE SETTING].
% For details on selecting [MACHINE SETTING], refer to page 6-5.
2 Use +, to select [DENSITY(ADF)], then press OK.
3 Use +, to select [MODE1] or [MODE2], then press OK.
This returns to the Machine Setting screen.
6.2.6 Changing the image quality when using the Original Glass
1 Select [MACHINE SETTING].
% For details on selecting [MACHINE SETTING], refer to page 6-5.
2 Use +, to select [DENSITY(BOOK)], then press OK.
3 Use +, to select [MODE1] or [MODE2], then press OK.
This returns to the Machine Setting screen.
DENSITY(ADF)
MODE1
MODE2
DENSITY(BOOK)
MODE1
MODE2

Machine Setting6
6-8 bizhub 226
6.2
6.2.7 Changing the density
1 Select [MACHINE SETTING].
% For details on selecting [MACHINE SETTING], refer to page 6-5.
2 Use +, to select [PRINT DENSITY], then press OK
3 Use *) to select the density level, then press OK.
This returns to the Machine Setting screen.
6.2.8 Changing the LCD contrast
1 Select [MACHINE SETTING].
% For details on selecting [MACHINE SETTING], refer to page 6-5.
2 Use +, to select [LCD CONTRAST], then press OK.
3 Use *) to select the contrast level, then press OK.
This returns to the Machine Setting screen.
PRINT DENSITY
LCD CONTRAST

bizhub 226 6-9
6.2 Machine Setting 6
6.2.9 Changing key speed setting
1 Select [MACHINE SETTING].
% For details on selecting [MACHINE SETTING], refer to page 6-5.
2 Use +, to select [KEY SPEED SETTING], then press OK.
% To set a value at [INTERVAL], go to Step 5.
3 Use +, to select [TIME TO START], then press OK.
4 Use +, to select the time period until the function starts, then press OK.
The screen returns to the one for setting key speed.
% Press Back to return to the Machine Setting screen.
% To set a value at [INTERVAL], go to the next step.
5 Use +, to select [INTERVAL], then press OK.
6 Use +, to select the key speed changing interval, then press OK.
The screen returns to the one for setting key speed.
% Press Back to return to the Machine Setting screen.
TIME TO START
0.3sec0.5sec1.0sec
0.1sec
INTERVAL
0.3sec
0.5sec1.0sec
0.1sec

Machine Setting6
6-10 bizhub 226
6.2
6.2.10 Changing the language to be displayed on the Display
1 Select [MACHINE SETTING].
% For details on selecting [MACHINE SETTING], refer to page 6-5.
2 Use +, to select [LANGUAGE], then press OK.
3 Use +, to select the language, then press OK.
This returns to the Machine Setting screen.
LANGUAGE
GERMANFRENCH
ITALIAN
ENGLISH

bizhub 226 6-11
6.3 Tray Settings 6
6.3 Tray Settings
Using Tray Settings, you can change the settings for each tray.
<Items for Tray Settings>
6.3.1 Selecting tray settings
1 Press the Utility key.
The Utility screen appears.
2 Use +, to select [PAPER SOURCE SETUP], then press OK.
The Tray Settings screen appears.
No. Settings Description
1 [TRAY1] Specify the size, unit, and type of the paper to be loaded in Tray 1. Select the paper size from [AUTO], [A6w(A6 CARD)], [A6w], [B4w], [B5v], [B5w], [B6w], [INVw], [INVv], [EXEv], [EXEw], [INCH/METRIC], [SIZE INPUT], [MEMORY1], and [MEMORY2]. If you have selected [SIZE INPUT], enter the page size (X: 140 mm to 432 mm, Y: 90 mm to 297 mm). Set the paper unit at [INCH/METRIC]. Select the paper type from [PLAIN], [RECYCLE], [1-SIDE], [SPECIAL], [TRANSPARENCY], [CARD1], [CARD2], [ENVELOPE], [PLAIN 2-SIDE], [CARD1 2-SIDE], [CARD2 2-SIDE], and [RECY. 2-SIDE].• The factory default is [AUTO], [PLAIN], and
[METRIC].
2 [TRAY2] Specify the unit of the paper size and paper type. Select in what unit of paper size is used, inches such as Letter or centimeters (metric size) such as A4 and B5. If the setting is not ap-propriate, the paper size is not automatically de-tected.Select the paper type from [PLAIN], [RECYCLE], [1-SIDE], and [SPECIAL].• The factory default is [PLAIN] and [METRIC].
3 [TRAY3] Same as TRAY2.
4 [TRAY4] Same as TRAY2.
5 [TRAY5] Same as TRAY2.

Tray Settings6
6-12 bizhub 226
6.3
6.3.2 Setting the unit of the paper size
1 Select [PAPER SOURCE SETUP].
% For details on selecting [PAPER SOURCE SETUP], refer to page 6-11.
2 Use +, to select [TRAY1], then press OK.
3 Use +, to select [PAPER SIZE], then press OK.
4 Use +, to select [INCH/METRIC], then press OK.
5 Use +, to select [METRIC] or [INCH], then press OK.
This returns to the Tray Settings screen.
6.3.3 Configuring paper settings for Tray1
1 Select [PAPER SOURCE SETUP].
% For details on selecting [PAPER SOURCE SETUP], refer to page 6-11.
2 Use +, to select [TRAY1], then press OK.
% To set the paper type, go to Step 5.
3 Use +, to select [PAPER SIZE], then press OK.
4 Use +, to select the paper size, then press OK.
% For [MEMORY1] or [MEMORY2], you can select the paper size registered in [CUSTOM SIZE MEM-
ORY]. For details on registering the custom size, refer to page 6-14.
% If you have selected [SIZE INPUT], use the Keypad to enter the lengths of X and Y on the next
screen, then press OK.
This returns to the Tray Settings screen.
% To continuously set the paper type, go to Step 5.
5 Use +, to select [PAPER TYPE], then press OK.
TRAY1
INCHMETRIC
TRAY1 PAPER SIZE
Y=297( 90-297)
Input=10key (Fin.=OK)
X=210(140-432)

bizhub 226 6-13
6.3 Tray Settings 6
6 Use +, to select the paper type, then press OK.
This returns to the Tray Settings screen.
6.3.4 Configuring settings for Tray2 to Tray5
1 Select [PAPER SOURCE SETUP].
% For details on selecting [PAPER SOURCE SETUP], refer to page 6-11.
2 Use +, to select a target tray, then press OK.
3 Use +, to select [INCH/METRIC], then press OK.
% For details on setting the unit of the paper size, refer to page 6-12.
4 Use +, to select [PAPER TYPE], then press OK.
5 Use +, to select the paper type, then press OK.
This returns to the Tray Settings screen.
TRAY1 PAPER TYPE
RECYCLE1-SIDESPECIAL
PLAIN
TRAY2
PAPER TYPEINCH/METRIC

Registering a custom size6
6-14 bizhub 226
6.4
6.4 Registering a custom size
For Save Custom Size, you can register up to two frequently used custom sizes. The custom size registered
here can be selected when you set the paper size for Tray1 by selecting [PAPER SOURCE SETUP] - [TRAY1]
- [PAPER SIZE].
<Items for Save Custom Size>
6.4.1 Registering a custom size
1 Press the Utility key.
The Utility screen appears.
2 Use +, to select [CUSTOM SIZE MEMORY], then press OK.
The screen for registering a custom size appears.
3 Use +, to select the number to be registered, then press OK.
4 Enter a value for the length (X) using the Keypad, then press OK.
% Refer to the illustration below to enter the length (X) and
width (Y) of the paper correctly.
% Enter the paper length (X) within the range from
140 mm to 432 mm.
% To correct the entered value, press Clear/Stop.
1. Length (X)
2. Width (Y)
No. Settings Description
1 [MEMORY1] Register a frequently used paper size and recall it when you set the paper size. The following size can be registered: Length direction: 140 mm to 432 mmwidth direction: 90 mm to 297 mm.
2 [MEMORY2]
CUSTOM SIZE MEMORY1
Y= 90( 90-297)
Input=10key (Fin.=OK)
X=140(140-432)
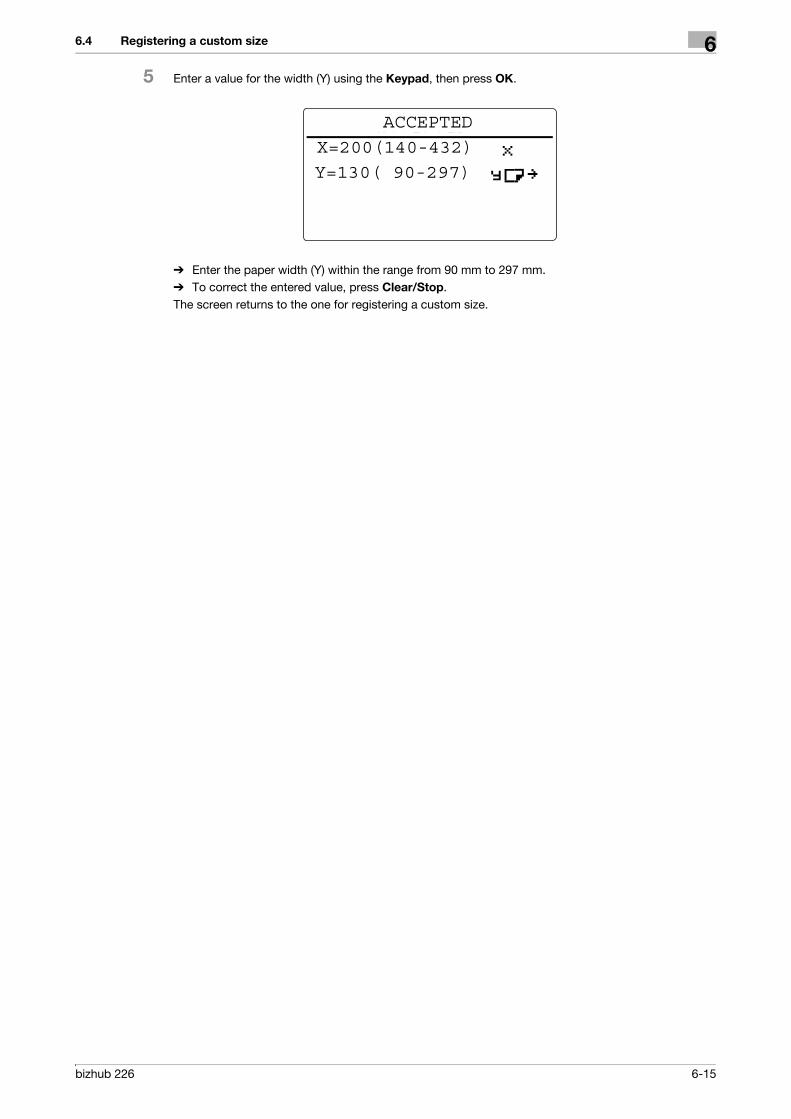
bizhub 226 6-15
6.4 Registering a custom size 6
5 Enter a value for the width (Y) using the Keypad, then press OK.
% Enter the paper width (Y) within the range from 90 mm to 297 mm.
% To correct the entered value, press Clear/Stop.
The screen returns to the one for registering a custom size.
Y=130( 90-297)
ACCEPTED
X=200(140-432)

Drum Dray (Dew condensation removal)6
6-16 bizhub 226
6.5
6.5 Drum Dray (Dew condensation removal)
If the room temperature changes rapidly (particularly when a heater is used during winter) or the humidity is
high, condensation may form on the surface of the photo conductor in this machine, causing a smudgy image
to be generated. In this case, use the drum dry (dew condensation removal) function to remove dew conden-
sation. It will take approximately three minutes until the drum dry operation finishes.
1 Press the Utility key.
The Utility screen appears.
2 Use +, to select [DRUM DEHUMIDIFY], then press OK.
The Drum Dry screen appears.
3 Use ,+ to select [DRUM DEHUMIDIFY], then press OK.
This starts the drum dry operation, and returns to the Drum Dry screen.
RETURN
ACCEPTED
DRUM DEHUMIDIFY

bizhub 226 6-17
6.6 Administrator Settings 6
6.6 Administrator Settings
Administrator Setting is the mode the administrator of this machine uses. If you select Administrator Setting,
you need to enter the administrator number.
<Items for Administrator Settings>
Tips
- The administrator of this machine must not forget the administrator number.
No. Settings Description
1 [ADMINISTRATOR NO.] Change the currently set administrator number to another number.
2 [DISPLAY AUTO SHUT] Specify whether to enable or disable a change of the auto shut time.To enable a change, select [ENABLE]. To disable a change, select [DISABLE].• The factory default is [ENABLE].
3 [SLEEP SHIFT] Select whether to enable you to select [OFF] for the sleep mode set-ting in [MACHINE SETTING] ([ENABLE]) or not ([DISABLE]).• The factory default is [ENABLE].
4 [ACCOUNT TRACK] Configure settings for performing management by account. Up to 50 accounts can be managed.• Whether to manage account or not• Registering the account number• Changing/deleting the account number• Displaying/erasing the total counters by account• Erasing all total counters by account
5 [REMOTE MONITOR] This item appears if the optional Fax Kit FK-510 and Image Control-ler IC-209, or FAX Kit FK-510 and Network Card NC-504 are in-stalled.You can configure remote monitor settings.For details, refer to [User's Guide Fax].• The factory default is [ENABLE].
6 [NETWORK SETTING] This item appears if Image Controller IC-209 or Network Card NC-504 is installed.Configure settings required for connecting to the network.For details, refer to the [User's Guide Network Administrator].
7 [E-MAIL SETTING 1] This item appears if Image Controller IC-209 or Network Card NC-504 is installed.Configure settings required for Scan To E-mail.For details, refer to the [User's Guide Network Administrator].
8 [E-MAIL SETTING 2] This item appears if Image Controller IC-209 or Network Card NC-504 is installed.This item is required when you use POP BEFORE SMTP authentica-tion.For details, refer to the [User's Guide Network Administrator].
9 [LDAP SETTING] This item appears if Image Controller IC-209 or Network Card NC-504 is installed.Configure settings to search for the destination registered in the LDAP server.For details, refer to the [User's Guide Network Administrator].
10 [COMM. SETITNG] This item appears if the optional Fax Kit FK-510 and Image Control-ler IC-209, or FAX Kit FK-510 and Network Card NC-504 are in-stalled.Configure settings for the FAX function.For details, refer to [User's Guide Fax].
11 [USER SETTING] This item appears if the optional FAX Kit FK-510, Image Controller IC-209, or Network Card NC-504 is installed.Configure the NTP server and time zone settings.For details, refer to [User's Guide Fax].
12 [SCAN TO USB] This item appears if Image Controller IC-209 or Network Card NC-504 is installed. Select whether to save scanned data in USB memory.The factory default is [ENABLE].For details, refer to [User's Guide Network Scan].

Administrator Settings6
6-18 bizhub 226
6.6
6.6.1 Selecting the administrator setting
1 Press the Utility key.
The Utility screen appears.
2 Use +, to select [ADMIN. MANAGEMENT], then press OK.
3 Enter the administrator number using the Keypad, then press OK.
% The factory default is [000000].
% To correct a value, press Clear/Stop.
The Administrator Settings screen appears.
6.6.2 Changing the administrator number
1 Select [ADMIN. MANAGEMENT].
% For details on selecting [ADMIN. MANAGEMENT], refer to page 6-18.
2 Use +, to select [ADMINISTRATOR NO.], then press OK.
3 Enter the current administrator number using the Keypad, then press OK.
% To correct a value, press Clear/Stop.
4 Enter a new administrator number using the Keypad, then press OK.
5 For confirmation, enter the new administrator number, then press OK.
This returns to the Administrator Settings screen.
ADMIN. NO.:------ADMIN. MANAGEMENT
CURRENT NO.:------ADMINISTRATOR NUMBER

bizhub 226 6-19
6.6 Administrator Settings 6
6.6.3 Enabling a change of the auto shut time
1 Select [ADMIN. MANAGEMENT].
% For details on selecting [ADMIN. MANAGEMENT], refer to page 6-18.
2 Use +, to select [DISPLAY AUTO SHUT], then press OK.
3 Use +, to select [ENABLE] , then press OK.
% If you select [DISABLE], you cannot change the auto shut time.
This returns to the Administrator Settings screen.
6.6.4 Configuring setting so that sleep mode is not used
1 Select [ADMIN. MANAGEMENT].
% For details on selecting [ADMIN. MANAGEMENT], refer to page 6-18.
2 Use +, to select [SLEEP SHIFT], then press OK.
3 Use +, to select [DISABLE], then press OK.
This returns to the Administrator Settings screen.
6.6.5 Specifying ACCOUNT TRACK MODE
1 Select [ADMIN. MANAGEMENT].
% For details on selecting [ADMIN. MANAGEMENT], refer to page 6-18.
2 Use +, to select [ACCOUNT TRACK], then press OK.
3 Use +, to select [ACCOUNT TRACK MODE], then press OK.
4 Use +, to select [COPY] or [PC-PRINT], then press OK.
5 Select [ON] or [OFF], then press OK.
This returns to the Account Track Settings screen.

Administrator Settings6
6-20 bizhub 226
6.6
6.6.6 Registering ID (account)
Register an account number. Up to 50 account numbers can be registered.
1 Select [ADMIN. MANAGEMENT].
% For details on selecting [ADMIN. MANAGEMENT], refer to page 6-18.
2 Use +, to select [ACCOUNT TRACK], then press OK.
3 Use +, to select [ACCOUNT NO. REG.], then press OK.
4 Enter the account number using the Keypad, then press OK.
% Specify the 3-digit ID (account) number.
% To correct the value, press Clear/Stop.
5 Press Back.
% If you select [ADD], you can continuously register another ID (account) number.
% If the number of registered ID (account) numbers exceeds 50, the [UP TO 50 ACCOUNT] message
appears.
This returns to the Account Track Settings screen.
ACCOUNT NO. REG.ACCOUNT NO.:111

bizhub 226 6-21
6.6 Administrator Settings 6
6.6.7 Changing or deleting the ID (account)
1 Select [ADMIN. MANAGEMENT].
% For details on selecting [ADMIN. MANAGEMENT], refer to page 6-18.
2 Use +, to select [ACCOUNT TRACK], then press OK.
3 Use +, to select [ACCOUNT NO. REG.], then press OK.
4 Enter a target number using the Keypad, then press OK.
% Specify the 3-digit ID (account) number.
% To correct the value, press Clear/Stop.
5 Use +, to select [CHECK/EDIT], then press OK.
6 Use +, to select the target number.
% To change the number, press OK, and go to the next step.
% To delete the number, press Clear/Stop, and select [YES].
7 Enter a new number using the Keypad, then press OK.
% If the entered ID (account) number has been already registered, [REGISTERED!] is displayed.
% To continuously change or delete the next number, repeat Steps 6 to 7.
8 When all changing or deleting operations have been completed, press Back.
This returns to the Administrator Settings screen.
ACCOUNT NO. REG.ACCOUNT NO.:111
ACCOUNT NO. EDITACCOUNT NO.:112

Administrator Settings6
6-22 bizhub 226
6.6
6.6.8 Displaying or erasing the total counter by ID (account)
1 Select [ADMIN. MANAGEMENT].
% For details on selecting [ADMIN. MANAGEMENT], refer to page 6-18.
2 Use +, to select [ACCOUNT TRACK], then press OK.
3 Use +, to select [ACCOUNT TRACK DATA], then press OK.
4 Use +, to select [DISPLAY], then press OK.
5 Use +, or the Keypad to enter the account number to be displayed, then press OK.
The total counters of the selected ID (account) is displayed.
6 To erase the displayed counter, press Clear/Stop.
The total counters of the selected ID (account) is erased.
6.6.9 Erasing all total counters by ID (account)
1 Select [ADMIN. MANAGEMENT].
% For details on selecting [ADMIN. MANAGEMENT], refer to page 6-18.
2 Use +, to select [ACCOUNT TRACK], then press OK.
3 Use +, to select [ACCOUNT TRACK DATA], then press OK.
4 Use +, to select [ALL COUNTER CLEAR], then press OK.
This returns to the screen for the counter by account.
BOOK SCANAUTO DETECTION
MANUAL: LTRv
TRACK DATA DISPLAY
ACCOUNT NO.:111
TOTAL PRINT:222222

bizhub 226 6-23
6.7 COPY SETTING 1 6
6.7 COPY SETTING 1
The mode when you turn on the power or press Reset is called the initial mode. COPY SETTING 1 or COPY
SETTING 2 enables you to change the initial mode settings for each copy function.
Items of COPY SETTING 1
6.7.1 Selecting COPY SETTING 1
1 Press the Utility key.
The Utility screen appears.
2 Use +, to select [COPY SETTING 1], then press OK.
The COPY SETTING 1 screen appears.
No. Settings Description
1 [PAPER PRIORITY] Select a tray to be given priority when Auto Zoom is selected from [TRAY1], [TRAY2], [TRAY3], [TRAY4], [TRAY5], and [MULTI BYPASS].• The factory default is [TRAY1].
2 [QUALITY PRIORITY] Select the image quality when you turn on the power or reset the set-tings from [TEXT], [PHOTO], and [TEXT/PHOTO].• The factory default is [TEXT].
3 [DENSITY PRIORITY] Select the density when you turn on the power or reset the settings from [AUTO] and [MANUAL].• The factory default is [AUTO].
4 [DENSITY LEVEL] - [DENSITY LEVEL(A)]
Specify a density level in Auto mode from three levels.• The factory default is .
5 [DENSITY LEVEL] - [DENSITY LEVEL(M)]
Specify a density level in Manual mode from nine levels.• The factory default is .
6 [DUPLEX PRIORITY] This item is available if the optional Reverse Automatic Document Feeder DF-625 or Automatic Duplex Unit AD-509 is installed.Select an original and proof copy mode when you use the automatic 2-sided printing function from [1-SIDE % 1-SIDE], [1-SIDE % 2-SIDE], [2-SIDE % 1-SIDE], and [2-SIDE % 2-SIDE].• The factory default is [1-SIDE % 1-SIDE].
7 [OUTPUT BIND POS.] Select the page margin position when you use the automatic 2-sided printing function from [LEFT], [RIGHT], and [TOP].• The factory default is [LEFT].
8 [ORIG. BINDING POS.] Select the page margin position of the original when you use the au-tomatic 2-sided printing function from [LEFT], [RIGHT], and [TOP].• The factory default is [LEFT].
9 [BINDING POSITION] Specify the left page (Left Bind) or right page (Right Bind) to be scanned first when a book original is scanned.• The factory default is [LEFT].
10 [MARGIN SETTING] Specify the page margin width within the range from 0 mm to 20 mm in steps of 1 mm when giving margin to paper.• The factory default is 10 mm.
11 [ERASE SETTING] Specify the erase width on the left, upper, and around the paper when you use the frame/center erase function within the range from 4 mm to 20 mm in steps of 1 mm.• The factory default is [LEFT]. The erase width is 10 mm.
12 [SMALL ORIGINAL] Specify whether to [DISABLE] or [ENABLE] copying of a small size original for which the size cannot be automatically detected.• The factory default is [ENABLE].

COPY SETTING 16
6-24 bizhub 226
6.7
6.7.2 Setting the tray priority
1 Select [COPY SETTING 1].
% For details on selecting [COPY SETTING 1], refer to page 6-23.
2 Use +, to select [PAPER PRIORITY], then press OK.
3 Use +, to select a target tray, then press OK.
% If Bypass Tray is installed, the following screen appears.
This returns to the COPY SETTING 1 screen.
Tips
- If the same size and type of paper as that in the priority tray is loaded into multiple trays and they have
run out of paper, a message may appear to notify you to replenish the trays other than the priority tray
with paper. If the message appears, replenish paper according to the on-screen instructions.
6.7.3 Specifying the quality priority
1 Select [COPY SETTING 1].
% For details on selecting [COPY SETTING 1], refer to page 6-23.
2 Use +, to select [QUALITY PRIORITY], then press OK.
3 Use +, to select a target quality, then press OK.
This returns to the COPY SETTING 1 screen.
PAPER PRIORITY
TRAY1
TRAY3TRAY4
TRAY2
PAPER PRIORITY
MULTI BYPASS
RETURN
TRAY5
QUALITY PRIORITY
TEXT/PHOTO
PHOTOTEXT

bizhub 226 6-25
6.7 COPY SETTING 1 6
6.7.4 Specifying the density priority
1 Select [COPY SETTING 1].
% For details on selecting [COPY SETTING 1], refer to page 6-23.
2 Use +, to select [DENSITY PRIORITY], then press OK.
3 Use +, to select [AUTO] or [MANUAL], then press OK.
This returns to the COPY SETTING 1 screen.
6.7.5 Specifying the density level priority (Auto)
1 Select [COPY SETTING 1].
% For details on selecting [COPY SETTING 1], refer to page 6-23.
2 Use +, to select [DENSITY LEVEL], then press OK.
3 Use +, to select [AUTO], then press OK.
4 Use *) to select the density level, then press OK.
This returns to the COPY SETTING 1 screen.
DENSITY PRIORITY
MANUALAUTO
DENSITY LEVEL(A)

COPY SETTING 16
6-26 bizhub 226
6.7
6.7.6 Specifying the density level priority (Manual)
1 Select [COPY SETTING 1].
% For details on selecting [COPY SETTING 1], refer to page 6-23.
2 Use +, to select [DENSITY LEVEL], then press OK.
3 Use +, to select [MANUAL], then press OK.
4 Use *) to select the density level, then press OK.
This returns to the COPY SETTING 1 screen.
6.7.7 Setting 2-sided printing
1 Select [COPY SETTING 1].
% For details on selecting [COPY SETTING 1], refer to page 6-23.
2 Use +, to select [DUPLEX PRIORITY], then press OK.
3 Use +, to select [1-SIDE % 1-SIDE], [1-SIDE % 2-SIDE], [2-SIDE % 1-SIDE], or [2-SIDE % 2-SIDE],
then press OK.
This returns to the COPY SETTING 1 screen.
Tips
- If the optional Reverse Automatic Document Feeder DF-625 is not installed, [1-SIDE % 2-SIDE] and
[2-SIDE % 2-SIDE] will not be displayed.
- If the optional Automatic Duplex Unit AD-509 is not installed, [2-SIDE % 1-SIDE] and
[2-SIDE % 2-SIDE] will not be displayed.
DENSITY LEVEL(M)
DUPLEX PRIORITY
1-SIDE%2-SIDE
2-SIDE%1-SIDE
1-SIDE%1-SIDE
2-SIDE%2-SIDE

bizhub 226 6-27
6.7 COPY SETTING 1 6
6.7.8 Setting the copy page margin
1 Select [COPY SETTING 1].
% For details on selecting [COPY SETTING 1], refer to page 6-23.
2 Use +, to select [OUTPUT BIND POS.], then press OK.
3 Use +, to select [LEFT], [RIGHT], or [TOP], then press OK.
This returns to the COPY SETTING 1 screen.
6.7.9 Setting the original page margin position
1 Select [COPY SETTING 1].
% For details on selecting [COPY SETTING 1], refer to page 6-23.
2 Use +, to select [ORIG. BINDING POS.], then press OK.
3 Use +, to select [LEFT], [RIGHT], or [TOP], then press OK.
This returns to the COPY SETTING 1 screen.
OUTPUT BIND POS.
LEFT
TOPRIGHT
ORIG. BINDING POS.LEFT
TOPRIGHT

COPY SETTING 16
6-28 bizhub 226
6.7
6.7.10 Setting the book binding position
1 Select [COPY SETTING 1].
% For details on selecting [COPY SETTING 1], refer to page 6-23.
2 Use +, to select [BINDING POSITION], then press OK.
3 Use +, to select [LEFT] or [RIGHT], then press OK.
This returns to the COPY SETTING 1 screen.
6.7.11 Adjusting the page margin width
1 Select [COPY SETTING 1].
% For details on selecting [COPY SETTING 1], refer to page 6-23.
2 Use +, to select [MARGIN SETTING], then press OK.
3 Enter the page margin width using the Keypad, then press OK.
% You can set the binding margin width within the range from 0 mm to 20 mm.
% To correct the value, press Clear/Stop, and enter a new value using the Keypad.
This returns to the COPY SETTING 1 screen.
BINDING POSITION
LEFT
RIGHT
MARGIN SETTING
10mm(0-20mm)

bizhub 226 6-29
6.7 COPY SETTING 1 6
6.7.12 Setting the erase width
1 Select [COPY SETTING 1].
% For details on selecting [COPY SETTING 1], refer to page 6-23.
2 Use +, to select [ERASE SETTING], then press OK.
3 Use +, to select [LEFT], [UPPER], or [FRAME], then press OK.
4 Enter the erase width using the Keypad, then press OK.
% You can set the erase width within the range from 4 mm to 20 mm.
% To correct the value, press Clear/Stop, and enter a new value using the Keypad.
This returns to the COPY SETTING 1 screen.
6.7.13 Setting a small size original
1 Select [COPY SETTING 1].
% For details on selecting [COPY SETTING 1], refer to page 6-23.
2 Use +, to select [SMALL ORIGINAL], then press OK.
3 Use +, to select [DISABLE] or [ENABLE], then press OK.
This returns to the COPY SETTING 1 screen.
ERASE SETTING(LEFT)
10mm(4-20mm)
SMALL ORIGINAL
ENABLE
DISABLE

COPY SETTING 26
6-30 bizhub 226
6.8
6.8 COPY SETTING 2
<Items of COPY SETTING 2>
6.8.1 Selecting COPY SETTING 2
1 Press the Utility key.
The Utility screen appears.
2 Use +, to select [COPY SETTING 2], then press OK.
The COPY SETTING 2 screen appears.
No. Settings Settings
1 [COPY PRIORITY] Select how to select copy mode when you turn on the power or reset the settings from [AUTO PAPER SELECT], [AUTO ZOOM], and [MANUAL].• The factory default is [AUTO PAPER SELECT].
2 [OUTPUT PRIORITY] Select finishing mode priority when you turn on the power or reset the settings from [NON-SORT], [SORT], and [GROUP].• The factory default is [NON-SORT].
3 [CRISSCROSS MODE] Specify [ON] or [OFF] for alternate output if the conditions for alter-nately outputting paper are satisfied.• The factory default is [ON].
4 [4IN1 COPY ORDER] Select the copy order in 4in1 mode from the two options shown be-low.
[PATTERN1] [PATTERN2]
• The factory default is [PATTERN1].
5 [MIXED ORIGINAL] Specify whether to select the mixed original mode when you turn on the power or reset the settings.This item is available if the optional ADF is installed.• The factory default is [OFF].
6 [ORIG. DIRECTION] Select the origin direction from [TOP], [LEFT], [RIGHT], and [BOTTOM].• The factory default is [TOP].
7 [BOOK SEPARATION] Select the print finishing mode in the book separation copy mode from [OFF], [SEPARATION], and [SPREAD].• The factory default is [OFF].
8 [STAMP] Select the stamp printing mode from [OFF], [PAGE NUMBER], [DATE&TIME], and [PAGE+D&T].• The factory default is [OFF].
9 [PAGE FORMAT] Select the [PAGE NUMBER] format to be printed in the stamp print-ing mode from [P001,P002] and [1,2,3].• The factory default is [P001,P002].
10 [DATE&TIME FORMAT] This item is available if the optional Image Controller IC-209, Net-work Card NC-504, or FAX Kit FK-510 is installed.Select the [DATE&TIME] format to be printed in the stamp printing mode from [MM/DD/YY], [DD/MM/YY], and [YY/MM/DD].• The factory default is [MM/DD/YY].

bizhub 226 6-31
6.8 COPY SETTING 2 6
6.8.2 Setting the copy mode priority
1 Select [COPY SETTING 2].
% For details on selecting [COPY SETTING 2], refer to page 6-30.
2 Use +, to select [COPY PRIORITY], then press OK.
3 Use +, to select [AUTO PAPER SELECT], [AUTO ZOOM], or [MANUAL], then press OK.
This returns to the COPY SETTING 2 screen.
6.8.3 Specifying the finishing priority
1 Select [COPY SETTING 2].
% For details on selecting [COPY SETTING 2], refer to page 6-30.
2 Use +, to select [OUTPUT PRIORITY], then press OK.
3 Use +, to select [NON-SORT], [SORT], or [GROUP], then press OK.
This returns to the COPY SETTING 2 screen.
COPY PRIORITY
AUTO PAPER SELECT
AUTO ZOOM
MANUAL
OUTPUT PRIORITYNON-SORT
SORT
GROUP

COPY SETTING 26
6-32 bizhub 226
6.8
6.8.4 Specifying the alternate output
1 Select [COPY SETTING 2].
% For details on selecting [COPY SETTING 2], refer to page 6-30.
2 Use +, to select [CRISSCROSS MODE], then press OK.
3 Use +, to select [OFF] or [ON], then press OK.
This returns to the COPY SETTING 2 screen.
6.8.5 Setting 4in1 page copy order
1 Select [COPY SETTING 2].
% For details on selecting [COPY SETTING 2], refer to page 6-30.
2 Use +, to select [4IN1 COPY ORDER], then press OK.
3 Use +, to select [PATTERN1] or [PATTERN2], then press OK.
% Page arrangements of PATTERN 1 and PATTERN 2 are as shown below.
This returns to the COPY SETTING 2 screen.
CRISSCROSS MODEOFFON
4IN1 COPY ORDERPATTERN1
PATTERN2
PATTERN 1 PATTERN 2

bizhub 226 6-33
6.8 COPY SETTING 2 6
6.8.6 Specifying the mixed original priority
0 This item is available if the optional ADF is installed.
1 Select [COPY SETTING 2].
% For details on selecting [COPY SETTING 2], refer to page 6-30.
2 Use +, to select [MIXED ORIGINAL], then press OK.
3 Use +, to select [OFF] or [ON], then press OK.
This returns to the COPY SETTING 2 screen.
6.8.7 Configure ORIG. DIRECTION setting
1 Select [COPY SETTING 2].
% For details on selecting [COPY SETTING 2], refer to page 6-30.
2 Use +, to select [ORIG. DIRECTION], then press OK.
3 Use +, to select [TOP], [LEFT], [RIGHT], or [BOTTOM], then press OK.
This returns to the COPY SETTING 2 screen.
MIXED ORIGINAL
OFFON
ORIG. DIRECTION
LEFT
BOTTOMRIGHT
TOP

COPY SETTING 26
6-34 bizhub 226
6.8
6.8.8 Configuring BOOK SEPARATION setting
1 Select [COPY SETTING 2].
% For details on selecting [COPY SETTING 2], refer to page 6-30.
2 Press +, to select [BOOK SEPARATION], then press OK.
3 Use +, to select [OFF], [SEPARATION], or [SPREAD], then press OK.
This returns to the COPY SETTING 2 screen.
6.8.9 Setting stamp printing
1 Select [COPY SETTING 2].
% For details on selecting [COPY SETTING 2], refer to page 6-30.
2 Use +, to select [STAMP], then press OK.
3 Use +, to select [OFF], [PAGE NUMBER], [DATE&TIME], or [PAGE+D&T], then press OK.
This returns to the COPY SETTING 2 screen.
BOOK SEPARATIONOFF
SEPARATION
SPREAD
STAMPOFF
PAGE NUMBER
DATE&TIMEDATE+D&T

bizhub 226 6-35
6.8 COPY SETTING 2 6
6.8.10 Setting the page number print format
1 Select [COPY SETTING 2].
% For details on selecting [COPY SETTING 2], refer to page 6-30.
2 Use +, to select [PAGE FORMAT], then press OK.
3 Use +, to select [P001, P002] or [1, 2, 3], then press OK.
This returns to the COPY SETTING 2 screen.
6.8.11 Setting the date/time print format
1 Select [COPY SETTING 2].
% For details on selecting [COPY SETTING 2], refer to page 6-30.
2 Use +, to select [DATE&TIME FORMAT], then press OK.
3 Use +, to select [MM/DD/YY], [DD/MM/YY], or [YY/MM/DD], then press OK.
This returns to the COPY SETTING 2 screen.
PAGE FORMAT
P001,P002,1,2,3,
DATE&TIME FORMAT
MM/DD/YY
DD/MM/YYYY/MM/DD

COPY SETTING 26
6-36 bizhub 226
6.8

7 If you suspect a failure then
do the following


bizhub 226 7-3
7.1 If this copy is output 7
7 If you suspect a failure then do the following
7.1 If this copy is output
Copy status Major cause Correction action
Copy density/color is light. Is the copy density set to "Light"?
Press Density to set the desired copy density. (p. 4-5)
Is the paper damp? Replace with new paper. (p. 3-8)
Copy density/color is dark. Is the copy density set to "Dark"?
Press Density to set the desired copy density. (p. 4-5)
Was the original pressed firmly enough against the Original Glass?
Position the original so that it is pressed closely against the Orig-inal Glass. (p. 3-13)
The ink runs or a copied image is blurred.
Is the paper damp? Replace with new paper. (p. 3-8)
Was the original pressed firmly enough against the Original Glass?
Position the original so that it is pressed closely against the Orig-inal Glass. (p. 3-13)
There are streaks on the copy.
There are dark specks or spots throughout the copy.
Is the Original Glass dirty? Wipe the Original Glass using a soft, dry cloth. (p. 8-6)
Is the Original Pad dirty? Clean the Original Pad using a soft cloth dampened with a mild detergent. (p. 8-7)
Was the original printed on high-ly translucent material, such as diazo photosensitive paper or OHP transparencies?
Place a blank sheet of paper on top of the original. (p. 3-14)
Is a 2-sided original being cop-ied?
If a thin 2-sided original is being copied, the print on the back side may be reproduced on the front side of the copy. Press Density to select a lighter background den-sity. (p. 4-5)
The end of the service life of Drum Unit.
Contact your service representa-tive.

If this copy is output7
7-4 bizhub 226
7.1
The edge of the copied image is dirty
Is the Original Pad dirty? Clean the Original Pad using a soft cloth dampened with a mild detergent. (p. 8-7)
Was the selected paper size larger than the original?(With a Zoom setting of Full Size)
Select a paper size that is the same size as the original. (p. 4-8)Otherwise, select Auto Setting for Zoom to enlarge the copy to the selected paper size. (p. 4-20)
Is the size or orientation of the original different from that of the paper?(With a Zoom setting of Full Size)
Select a paper size that is the same size as the original. Other-wise, select a paper orientation that is the same as that of the original.
Was the copy reduced to a size smaller than the paper?(With a reduced zoom specified manually)
Select a copy zoom ratio that ad-justs the original size to the se-lected paper size. (p. 4-20)Otherwise, select Auto Setting for Zoom to reduce the copy to the selected paper size. (p. 4-20)
The image is copied at an angle. Is the original positioned cor-rectly?
Position the original along the Original Scale correctly. (p. 3-13)Load the original into the ADF, and slide the adjustable Lateral Guide to fit the size of the origi-nal. (p. 3-12)
Is the original incorrectly posi-tioned in the ADF?
Open the ADF, and position the original along the Original Scale correctly. (p. 3-12)
Are the adjustable Lateral Guide correctly positioned against the edges of the paper?
Slide the adjustable Lateral Guide against the edges of the paper.
Was curled paper loaded into the paper tray?
Flatten the paper before loading it.
Copy status Major cause Correction action

bizhub 226 7-5
7.2 Major messages and troubleshooting 7
7.2 Major messages and troubleshooting
Message Cause Correction action
[PAPER JAM Open #th side cover]
A paper jam has occurred in this machine. "#" indicates a tray.
Open the cover at the displayed position, and remove the jammed paper. For details, refer to [Quick Guide].
Jammed paper is left in this ma-chine. "#" indicates a tray.
Open the cover at the displayed position, and remove the jammed paper again. For details, refer to [Quick Guide].
[Original doc. jam Open doc.feed cover]
Paper jam inside the ADF.Jammed paper is left in the ADF.
Open the cover at the displayed position, and remove the jammed paper. For details, refer to [Quick Guide].
[FRONT COVER OPEN CLOSE FRONT COVER]
The Front Cover of this machine is opened, or not set securely.
Securely close the Front Cover of this machine.
[DOCUMENT COVER OPEN CLOSE DOCUMENT COVER]
An original is loaded into the ADF while the ADF is opened.
Securely close the ADF.
[DOC.FEED COVER OPEN CLOSE DOC.FEED COVER]
The Document Feeder Cover of the ADF is opened.
Securely close the Document Feeder Cover.
[TONER EMPTY SUPPLY TON-ER]
Toner is depleted.Cannot copy or print data.
Install a new Toner Bottle. For details, refer to [Quick Guide].
[PAPER EMPTY LOAD PA-PER(#XXX)]
Paper-out occurs in the selected tray."#" indicates a tray, and "XXX" indicates the paper size.
Load paper of the displayed size into the displayed tray.
[SET ORIGINAL TO ADF] When the copy function is start-ed using the ADF (such as mixed original copy), the original is not loaded into the ADF. Or the ADF is opened.
Set the original into the ADF.Securely close the ADF.
[REMOVE ORIGINAL IN ADF] When the copy function is start-ed using the Original Glass (such as ID COPY), the original is left in the ADF.
Remove the original from the ADF.
[Paper Empty] (Copy settings being configured)The selected tray has run out of paper.
Load paper of the displayed size into the displayed tray or press Paper to select another paper size.
[NO SUITABLE PAPER LOAD PAPER(#XXX)]
• The paper size of the select-ed tray was changed when copying operations were be-ing carried out.
• There is no suitable-size pa-per when mixed originals are copied in the Auto Paper Se-lect mode. "#" indicates a tray, and "XXX" indicates the paper size.
Load paper of the displayed size or press Paper to select another paper size.
[APS SIZE ERROR(XXX)] There is no suitable-size paper when the original is copied in the auto paper select mode. "XXX" indicates the paper size.
Load paper of the suitable-size paper or press Paper to select another paper size.
[AMS SIZE ERROR] The zoom ratio based on the combination of the original size and paper size is outside the range from 25% to 400% when the original is copied in the auto zoom select mode.
Load paper of the suitable-size paper or press Zoom to select a zoom ratio.
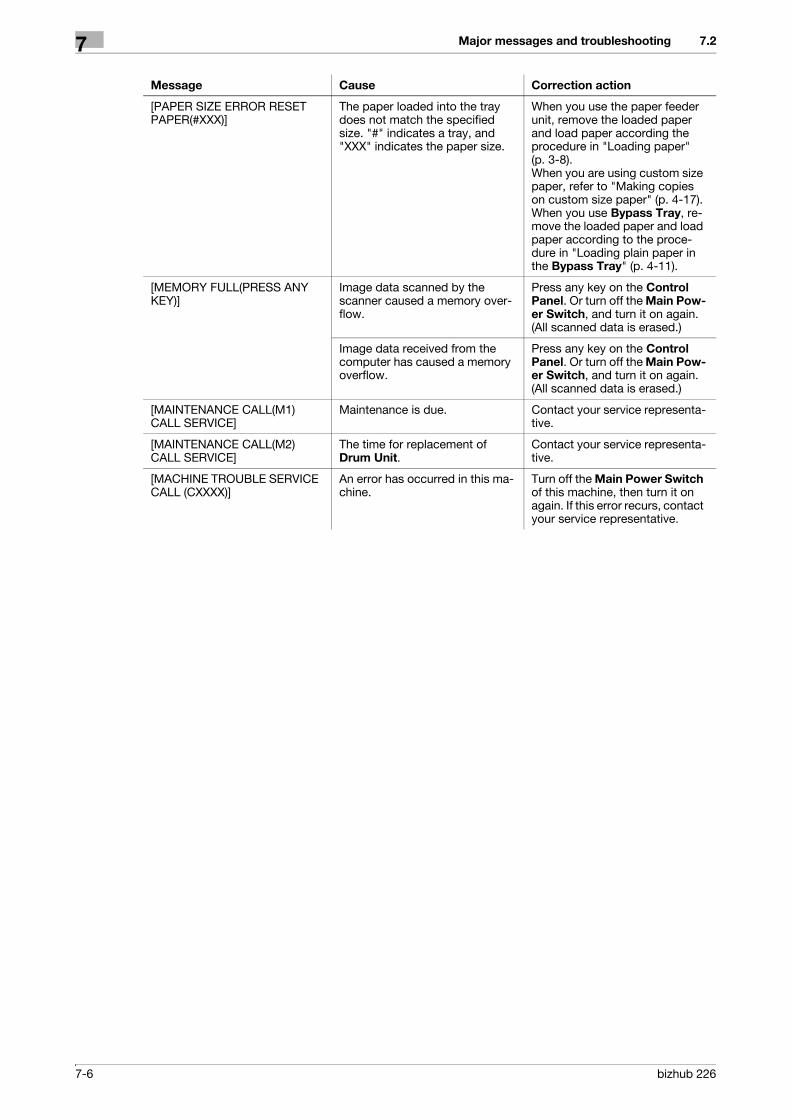
Major messages and troubleshooting7
7-6 bizhub 226
7.2
[PAPER SIZE ERROR RESET PAPER(#XXX)]
The paper loaded into the tray does not match the specified size. "#" indicates a tray, and "XXX" indicates the paper size.
When you use the paper feeder unit, remove the loaded paper and load paper according the procedure in "Loading paper" (p. 3-8).When you are using custom size paper, refer to "Making copies on custom size paper" (p. 4-17).When you use Bypass Tray, re-move the loaded paper and load paper according to the proce-dure in "Loading plain paper in the Bypass Tray" (p. 4-11).
[MEMORY FULL(PRESS ANY KEY)]
Image data scanned by the scanner caused a memory over-flow.
Press any key on the Control Panel. Or turn off the Main Pow-er Switch, and turn it on again. (All scanned data is erased.)
Image data received from the computer has caused a memory overflow.
Press any key on the Control Panel. Or turn off the Main Pow-er Switch, and turn it on again. (All scanned data is erased.)
[MAINTENANCE CALL(M1) CALL SERVICE]
Maintenance is due. Contact your service representa-tive.
[MAINTENANCE CALL(M2) CALL SERVICE]
The time for replacement of Drum Unit.
Contact your service representa-tive.
[MACHINE TROUBLE SERVICE CALL (CXXXX)]
An error has occurred in this ma-chine.
Turn off the Main Power Switch of this machine, then turn it on again. If this error recurs, contact your service representative.
Message Cause Correction action

bizhub 226 7-7
7.3 The copier does not function. 7
7.3 The copier does not function.
Copier status Major cause Correction action
Nothing is displayed on the Control Panel.
Is only Start lit in blue? The low power (sleep) mode is set.Press any key on the Control Panel to cancel the low power mode. (p. 2-19)
Was the auto shut-off operation performed?
Turn on the Main Power Switch.
Start does not light in blue. Have you entered the ID (ac-count) number?
Enter the number according to the procedure in "Entering the ID (account) number". (p. 5-11)
Even if you press Start, you cannot make copies.
Is Error on the Control Panel lit?
While viewing the Display to take a corrective action according to the troubleshooting by display.
The Main Power Switch has just been turned on, and the copier is in preparation mode.
It will take approximately 15 sec-onds after you turn on the Main Power Switch.Please wait.
Power does not appear to have been supplied to this machine.
Has the power cord been re-moved from the outlet?
Plug in the power cord.
Has the breaker for the location where this machine is installed been turned OFF?
Turn on the breaker.
ACCOUNT NO.:---
Input=10Key

The copier does not function.7
7-8 bizhub 226
7.3

8 Others


bizhub 226 8-3
8.1 Major specifications 8
8 Others
8.1 Major specifications
8.1.1 bizhub 226
Specifications
Type Scanner, printer, or desktop
Document holder Fixed mount type
Photo conductor OPC
Copy system Laser electrostatic copying
Developing system HMT system
Fusing system Heat roller fusing system
Resolution 600 dpi e 600 dpi
Originals Type: Sheets, books, three-dimensional objectsSize: Max. 11 e 17 w (A3 w), Weight: 4-7/16 lb (2 kg)
Copying paper type Plain paper (17 lb to 23-15/16 lb (64 g/m2 to 90 g/m2)), Recycled paper (17 lb to 23-15/16 lb (64 g/m2 to 90 g/m2))Special paper: Thick 1 (24-3/16 lb to 31-15/16 lb (91 g/m2 to 120 g/m2), Thick 2 (32-3/16 lb to 41-3/4 lb (121 g/m2 to 157 g/m2), Transparency, Envelope* Special paper is only available in Tray 1, Bypass Tray.
Copy paper size <Tray1>11 e 17w to 5-1/2 e 8-1/2w/v, A3w to B6w, A6w, 8 e 13w*1
Width: 3-9/16 to 11-11/16 inches (90 mm to 297 mm), Length: 5-1/2 to 17 inches (139.7 mm to 431.8 mm)<Bypass Tray>11 e 17w to 5-1/2 e 8-1/2w/v, A3w to B6w, A6w, 8 e 13w*1, 16Kw/v, 8KwWidth: 3-9/16 to 11-11/16 inches (90 mm to 297 mm)Length: 5-1/2 to 17 inches (139.7 mm to 431.8 mm)*1 Foolscap is provided with the following six types of paper sizes: 8-1/2 e 13-1/2, 220 mm e 330 mm, 8-1/2 e 13, 8-1/4 e 13, 8-1/8 e 13-1/4, and 8 e 13. Any one of these sizes is selectable. For details, contact your service representative.
Paper loading capacity <Tray1>Plain paper, Recycled paper: 250 sheetsSpecial paper (Thick paper): 20 sheets, (Transparency): 10 sheets, (Envelope): 10 sheets<Bypass Tray>Plain paper, Recycled paper: 100 sheetsSpecial paper (Thick paper): 20 sheets, (Transparency): 10 sheets, (Envelope): 10 sheets
Warm-up time 15 sec. or less (Room temperature: 73.4°F (23°C))
First copy(8-1/2 e 11 v (A4 v) at printing)
6.5 sec. or less
Copy speed (per minute) Copy speed (When print-ing 8-1/2 e 11v (A4v)
1-Sided Plain paper: 22 sheets/min. (Thick paper: 7 sheets/min.)
2-Sided Plain paper: 15.8 sheets/min.

Major specifications8
8-4 bizhub 226
8.1
8.1.2 Reverse Automatic Document Feeder DF-625
8.1.3 Paper Feeder Unit PF-507
Copy magnification Full Size: 100%Enlarge<Inch area>: 121%, 129%, 200%, 400%<Metric area>: 115%, 141%, 200%, 400%Reduce<Inch area>: 78%, 64%, 50%, 25%<Metric area>: 81%, 70%, 50%, 25%Zoom: 25% to 400% (in steps of 1%)
Number of continuous copies
1 to 999 sheets
Density adjustment Auto and manual adjustment of nine levels
Image missing Leading edge: 4 mm, trailing edge: 4 mm, back side: 4 mm, front side: 4 mm
Power supply AC 120 V to 127 V, 11 A, 60 Hz (AC 220 V to 240 V, 6.0 A, 50/60 Hz)
Max. power consumption 1300 W or less
Size Width: 23-7/8 inches (607 mm) e Depth: 22-7/16 inches (570 mm) e Height: 18-1/16 inches (458 mm) (to the surface of the Original Glass)
Weight 62-3/16 lb (28.2 kg)
Standard memory Copy side: 128 MB
Specifications
Specifications
Original feed mode 1-sided original, 2-sided original, mixed original
Original type 1-Sided: Plain paper (9-5/16 lb to 34-1/16 lb (35 g/m2 to 128 g/m2))2-Sided/Mixed: (13-5/16 lb to 34-1/16 lb (50 g/m2 to 128 g/m2))
Original Size 1-Sided/2-Sided: 11 e 17w to 5-1/2 e 8-1/2w/v, A3w to A5w/vFor details on handling mixed originals, refer to page 3-16.
Original loading capacity Max. 70 sheets (21-1/4 lb (80 g/m2))
Max. power consumption 14.4 W or less
Size Width: 21-1/2 inches (546 mm) e Depth: 19-1/8 inches (486 mm) e Height: 3-1/8 inches (80 mm)
Weight 11-11/16 lb (5.3 kg)
Specifications
Paper type Plain paper, Recycled paper (15-15/16 lb to 23-15/16 lb (64 g/m2 to 90 g/m2))
Paper size 11 e 17w to 5-1/2 e 8-1/2 v, A3w to B5v
Number of loadable sheets 250 sheets
Max. power consumption 9 W or less
Size Width: 22-7/16 inches (570 mm) e Depth: 20-7/8 inches (530 mm) e Height: 4-1/4 inches (108 mm)
Weight 11-7/8 lb (5.4 kg)

bizhub 226 8-5
8.1 Major specifications 8
8.1.4 Automatic Duplex Unit AD-509
Specifications
Paper type Plain paper (17 lb to 23-15/16 lb (64 g/m2 to 90 g/m2))
Paper size 11 e 17w to 5-1/2 e 8-1/2w/v, A3w to A5w/v, 8 e 13 w*1, 16Kw/v, 8KwWidth: 5-1/2 to 11-11/16 inches (139.7 mm to 297 mm), Length: 5-1/2 to 17 inches (139.7 mm to 431.8 mm)*1 Foolscap is provided with the following six types of paper sizes: 8-1/2 e 13-1/2, 220 mm e 330 mm, 8-1/2 e 13, 8-1/4 e 13, 8-1/8 e 13-1/4, and 8 e 13. Any one of these sizes is selectable. For details, contact your service representative.
Power supply Supply from machine
Max. power consumption 6 W or less
Size Width: 15-3/16 inches (386 mm) e Depth: 4-3/16 inches (107 mm) e Height: 8-7/8 inches (225 mm)
Weight 3-5/16 lb (1.5 kg)
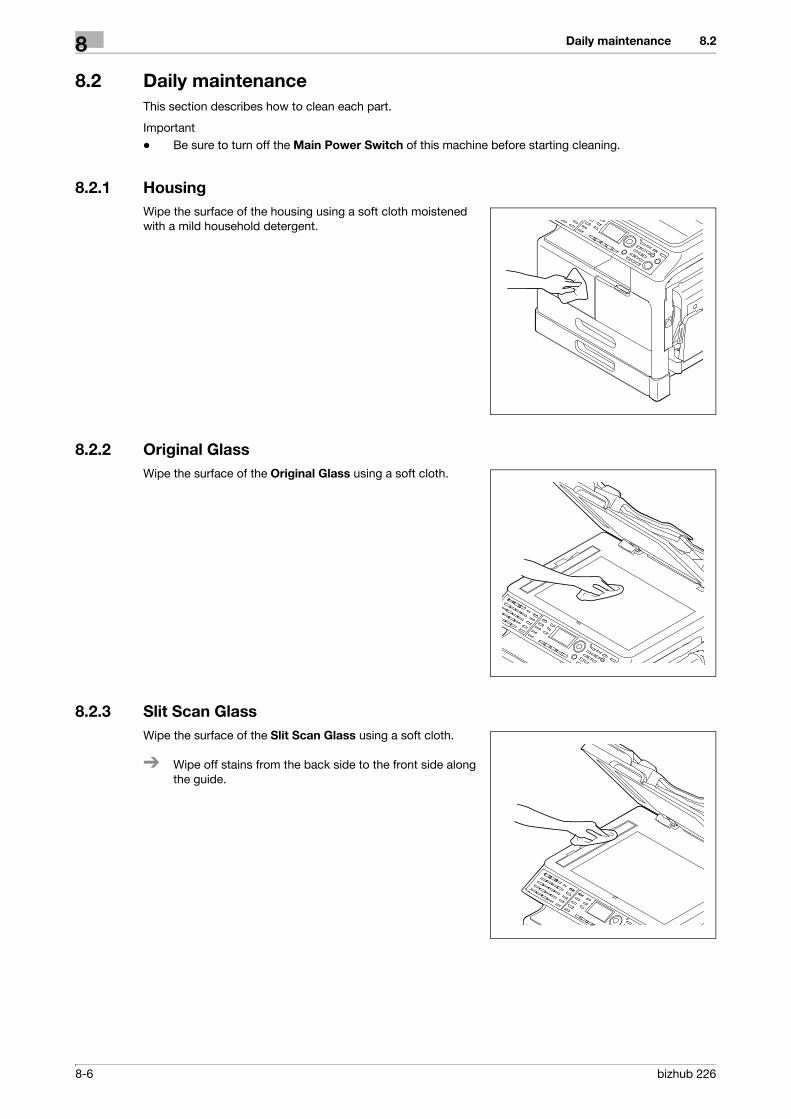
Daily maintenance8
8-6 bizhub 226
8.2
8.2 Daily maintenance
This section describes how to clean each part.
Important
- Be sure to turn off the Main Power Switch of this machine before starting cleaning.
8.2.1 Housing
Wipe the surface of the housing using a soft cloth moistened
with a mild household detergent.
8.2.2 Original Glass
Wipe the surface of the Original Glass using a soft cloth.
8.2.3 Slit Scan Glass
Wipe the surface of the Slit Scan Glass using a soft cloth.
% Wipe off stains from the back side to the front side along
the guide.

bizhub 226 8-7
8.2 Daily maintenance 8
8.2.4 Original Pad
Wipe the surface of the Original Pad using a soft cloth mois-
tened with alcohol.
8.2.5 Control Panel
Wipe the surface of the Control Panel using a soft cloth.
Important
- Do not use a mild household detergent or glass cleaner,
otherwise the keys may be damaged.

Daily maintenance8
8-8 bizhub 226
8.2

9 Index


bizhub 226 9-3
9.1 Index by item 9
9 Index
9.1 Index by item
Numerics
2in1 copy 5-8
4in1 copy 5-8
A
Access 2-10
AddressBook 2-12
Administrator Settings 6-17
Alternate Group 5-3
Alternate Sort 5-3
Auto panel reset 2-18
Auto Panel Reset Setting 6-5
Auto paper setting 3-16
Auto RX Indicator 2-12
Auto shut time 2-19
Auto tray change 4-8
Auto zoom 4-20
Automatic Duplex Unit 2-8
B
Binding margin setting 5-18
Book original 3-15
Book separation copy 5-12
Bypass copy 4-10
Bypass Tray 2-5, 4-10
Bypass Tray Extension 2-5, 4-10
C
Changing ID (account number) 6-21
Changing the administrator number 6-18
Changing the auto shut time 6-6
Clear/Stop 2-10
Combine Original 2-10
Confirm 2-10
Control Panel 2-10
Copy 2-12, 4-3
Copy density setting 4-5, 4-23
Copy mode screen 2-13
COPY SETTING 1 6-23
COPY SETTING 2 6-30
Copy setting registration 5-20
Copying area 3-6
Custom size paper 3-4, 4-17
D
Date/time printing 5-19
Deleting ID (account number) 6-21
Density 2-10
Display 2-10, 2-13
Display auto shut 2-21, 6-6, 6-19
Displaying total counter 6-22
Drum Dry 6-16
E
Enabling a change of the auto shut time 6-19
Enter custom size paper 4-17
Envelope 3-3, 4-13, 4-19
Erase 5-14, 5-15
Erase print job 4-7
Erasing total counter 6-22
Error Indicator 2-10
Extended Operation Panel MK-749 2-12
Exterior of the main unit 2-5
F
Fax 2-12
Finishing 2-10, 5-3
Finishing setting 5-5
Fixed zoom 4-20
Fixed zoom setting 4-21
Frame/Center erase 5-13
Full size 4-20
Function 2-10
G
Grouping 5-3
I
Icon 2-13
ID (Account) number 5-11
ID Copy 2-10, 5-10
Image quality setting 4-4, 6-7
Initial mode 2-18
Interior of the main unit 2-7
K
Key speed setting 6-9
Keypad 2-10

9-4 bizhub 226
Index by item9 9.1
L
Language setting 6-10
Lateral Guide 3-12
LCD contrast 6-8
Loadable number of sheets 3-5
Loading paper 3-8, 4-11
M
Machine counter 4-24
Machine Setting 6-4
Main Power Switch 2-18
Main unit configuration 2-3
Manual zoom 4-21
Memory TX 2-12
Message display 2-13
Messages 7-5
Mixed Original 2-10
Mixed original 3-16
Mode Memory 2-10
N
Negative-positive reversal 5-16
Next Copy Job 2-19
Non-sort 5-3
Number of copies 4-3
O
OHP 3-14, 4-12, 4-16
On Hook 2-12
One-Touch Dial Key 2-12
Option configuration 2-3
Original direction 4-6
Original Glass 3-13
Original Scale 3-13
Original set 3-10
Original size 3-10
Original type 3-10
P
Page margin 5-17
Page number printing 5-19
Paper 2-10
Paper Feeder Unit 2-9
Paper selection 4-8
Paper size 3-4
Paper take-up roller 3-8
Paper that cannot be used for copying 3-5
Paper tray 4-8
Paper type 3-3, 4-16
Photo mode 4-23
Plain paper 3-3
Power Save 2-10
Power saving 2-20
Precautions on originals 3-11
Print density setting 6-8
Printer 2-10
Printer Indicator 2-10
Printing area 3-6
Q
Quality 2-10
R
Recycled paper 3-3
Redial/Pause 2-12
Reduce/enlarge setting 4-4
Registering ID (account) 6-20
Report printing 4-25
Reset 2-10
Restart copy job 4-7
Reverse Automatic Document Feeder 2-8
S
Save Custom Size 6-14
Scan 2-12
Setting 2-sided printing 6-26
Setting 4in1 page copy order 6-32
Setting a small size original 6-29
Setting original direction 6-33
Setting sleep mode 2-20, 6-19
Setting the book binding position 6-28
Setting the book separation copy 6-34
Setting the copy mode priority 6-31
Setting the copy page margin 6-27
Setting the date/time print format 6-35
Setting the erase width 6-29
Setting the original page margin position 6-27
Setting the page margin width 6-28
Setting the page number printing 6-35
Setting the stamp printing 6-34
Setting the tray priority 6-24
Simplex/Duplex 2-10, 5-6
Sleep mode 2-19
Sleep Mode Settings 6-6
Sorting 5-3
Special paper 3-3
Specifying the administrator mode 6-19
Specifying the alternate output 6-32
Specifying the density level priority (Auto) 6-25
Specifying the density level priority (Manual) 6-26
Specifying the density priority 6-25
Specifying the finishing priority 6-31
Specifying the mixed original priority 6-33
Specifying the quality priority 6-24
Speed Dial 2-12
Standard paper 3-4
Standard size printing 4-4
Start 2-10, 4-3
Stop 4-3
Stop copy job 4-7
Storing paper 3-7
Switching Plate 2-12

bizhub 226 9-5
9.1 Index by item 9
T
Text mode 4-23
Text/Photo mode 4-23
Thick 1 3-3
Thick 2 3-3
Total counter 4-24
Tracing paper 3-14
Transparency 3-3, 3-14
Tray change 4-8
Tray Settings 6-11
Tray1 3-8, 6-12
Tray2 3-9, 6-13
Tray3 3-9, 6-13
Tray4 3-9, 6-13
Tray5 3-9, 6-13
Troubleshooting 7-5, 7-7
Turning ON/OFF the power 2-18
U
Unit of paper size 6-12
Utility 2-10, 6-3
X
X/Y variable zoom ratio 4-20, 4-22
Z
Zoom 2-10, 4-20

9-6 bizhub 226
Index by button9 9.2
9.2 Index by button
Numerics
1-SIDE 4-15
1-SIDE ∅ 1-SIDE 5-6
1-SIDE ∅ 2-SIDE 5-6
2in1 5-9
2-SIDE ∅ 1-SIDE 5-6
2-SIDE ∅ 2-SIDE 5-6
4in1 5-9
4IN1 COPY ORDER 6-30, 6-32
A
ACCOUNT NO. REG. 6-20, 6-21
ACCOUNT TRACK 6-17
ACCOUNT TRACK DATA 6-22
ACCOUNT TRACK MODE 6-19
ADMIN. MANAGEMENT 6-3, 6-18
ADMINISTRATOR NO. 6-17, 6-18
ALL COUNTER CLEAR 6-22
AUTO 4-20
AUTO PANEL RESET 6-4, 6-5
AUTO SHUT TIME 2-21, 6-4
B
BINDING POSITION 6-23, 6-28
BOOK SEP. 5-12
BOOK SEPARATION 6-30, 6-34
Buzzer Volume 6-4
C
CARD1 4-15
CARD1 2-SIDE 4-15
CARD2 4-15
CARD2 2-SIDE 4-15
COMM. SETITNG 6-17
COPY PRIORITY 6-30, 6-31
COPY SETTING 1 6-3, 6-23
COPY SETTING 2 6-3, 6-30
CRISSCROSS MODE 6-30, 6-32
CUSTOM SIZE MEMORY 6-3, 6-14
D
DATE&TIME FORMAT 6-30, 6-35
DENSITY LEVEL 6-25, 6-26
DENSITY LEVEL(A) 6-23
DENSITY LEVEL(M) 6-23
DENSITY PRIORITY 6-23, 6-25
DENSITY(ADF) 6-4, 6-7
DENSITY(BOOK) 6-4, 6-7
DIAL REGISTRATION 6-3
DISPLAY AUTO SHUT 6-6, 6-17, 6-19
DRUM DEHUMIDIFY 6-3, 6-16
DUPLEX PRIORITY 6-23, 6-26
E
E-MAIL SETTING 1 6-17
E-MAIL SETTING 2 6-17
ENVELOPE 4-15, 4-19
ERASE 5-15
ERASE SETTING 6-23, 6-29
F
FIXED 4-21
G
GROUP 5-5
I
INCH/METRIC 6-12
Initial mode 6-4
K
KEY SPEED SETTING 6-4, 6-9
L
LANGUAGE 6-4, 6-10
LCD CONTRAST 6-4, 6-8
LDAP SETTING 6-17
M
MACHINE SETTING 6-3, 6-5
MANUAL 4-21
MARGIN SETTING 6-23, 6-28
MIXED ORIGINAL 6-30, 6-33
N
NEG. POS. 5-16
NETWORK SETTING 6-17
NON-SORT 5-5
O
ORIG. BINDING POS. 6-23, 6-27
ORIG. DIRECT 4-6
ORIG. DIRECTION 6-30
OUTPUT BIND POS. 6-23, 6-27
OUTPUT PRIORITY 6-30, 6-31
P
PAGE FORMAT 6-30, 6-35
PAGE MARGIN 5-18
PAGE NUMBER 5-19
PAPER PRIORITY 6-23, 6-24
PAPER SIZE 6-12
PAPER SOURCE SETUP 6-3
PLAIN 4-15
PLAIN 2-SIDE 4-15
PRINT DENSITY 6-4, 6-8
PRINT REPORT 4-25

bizhub 226 9-7
9.2 Index by button 9
Q
QUALITY PRIORITY 6-23, 6-24
R
RECALL 5-21
RECY. 2-SIDE 4-15
RECYCLE 4-15
REGISTER 5-20
REMOTE MONITOR 6-17
S
SCAN SETTING 6-3
SCAN THRESHOLD 6-4
SCAN TO USB 6-17
SIZE 4-15
SIZE INPUT 4-17
SLEEP MODE 2-20, 6-4, 6-6
SLEEP SHIFT 6-17, 6-19
SMALL ORIGINAL 6-23, 6-29
SORT 5-5
SPECIAL 4-15
STAMP 6-30, 6-34
T
TOTAL PAGE 4-24
TRANSPARENCY 4-15, 4-16
TRAY1 6-11, 6-12
TRAY2 6-11
TRAY3 6-11
TRAY4 6-11
TRAY5 6-11
TYPE 4-15
U
USER SETTING 6-17
X
X/Y ZOOM 4-22

Index by button9
9-8 bizhub 226
9.2


![User’s Guide [Network Administrator] - NovaCopyops.novacopy.com/ftb/Product Guides/bizhub 751_601/bizhub751... · This User’s Guide describes setting methods for each function](https://static.fdocuments.us/doc/165x107/5a78d4c67f8b9a70648d8b15/users-guide-network-administrator-guidesbizhub-751601bizhub751this.jpg)