Bionic Needle Organizer Wallet - Amazon Web...
71
1 Bionic Needle Organizer Wallet By RipStitcher www.bionicgearbag.com All rights reserved. © 2014 Sally Thompson Join me on: Instagram: RipStitcher Facebook: facebook.com/sally.ripstitcher Personal blog: www.RipStitcher.com PO Box 824 , Castle Rock, CO 80104 720 628-0542
Transcript of Bionic Needle Organizer Wallet - Amazon Web...

1
Bionic Needle Organizer Wallet
By RipStitcher www.bionicgearbag.com
All rights reserved. © 2014 Sally ThompsonJoin me on:
Instagram: RipStitcher Facebook: facebook.com/sally.ripstitcher
Personal blog: www.RipStitcher.com PO Box 824 , Castle Rock, CO 80104
720 628-0542
Bionic Needle Organizer Wallet
2
A few things before starting …
First, a big thank you for buying this pattern. I appreciate you.
If you haven't done so already, be sure and join the mailing list on bionicgearbag.com . This will keep you in the loop for future revisions or freebies that may be offered.
Next, if you bought your pattern on Craftsy, that's *great*! Craftsy is awesome because they give such great customer service to you. If you didn't buy your pattern from Craftsy and wish you had, please pop me an email and I'll give you a solution to get this pattern moved into your library in your Craftsy account.
This pattern has been tested for accuracy, but please know that if you find a typo in this pattern or something that could be clarified, I *love* hearing from you.
Suggestion: If you have an iPad, tablet or a laptop that can be in your sewing space, pleae consider reading your PDFs from a device instead of printing. I put quite a few pictures in this
pattern to make this easier for novice sewers - but it's a real killer on ink.
The next picture should help you as we go along….
Bionic Needle Organizer Wallet
3
About the Bionic Needle Organizer Wallet
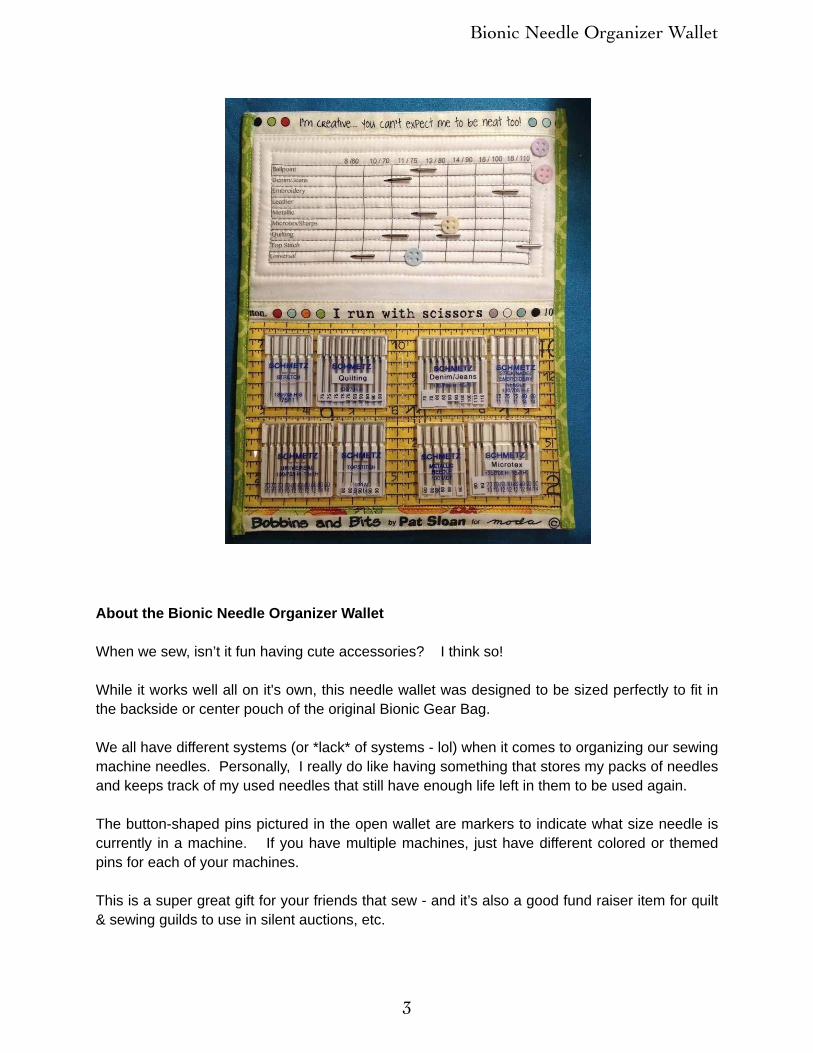
When we sew, isn’t it fun having cute accessories? I think so!
While it works well all on it's own, this needle wallet was designed to be sized perfectly to fit in the backside or center pouch of the original Bionic Gear Bag.
We all have different systems (or *lack* of systems - lol) when it comes to organizing our sewing machine needles. Personally, I really do like having something that stores my packs of needles and keeps track of my used needles that still have enough life left in them to be used again.
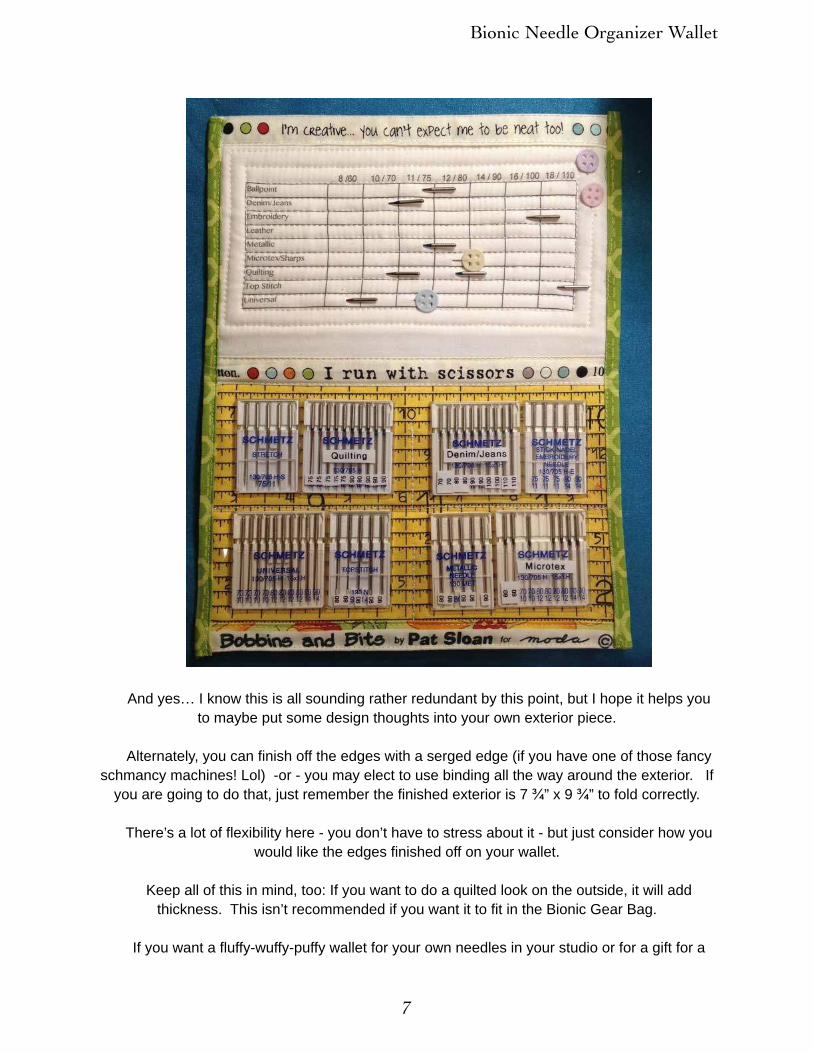
The button-shaped pins pictured in the open wallet are markers to indicate what size needle is currently in a machine. If you have multiple machines, just have different colored or themed pins for each of your machines.
This is a super great gift for your friends that sew - and it’s also a good fund raiser item for quilt & sewing guilds to use in silent auctions, etc.

Bionic Needle Organizer Wallet
4
I have one of these in my Bionic Gear Bag that is packed and ready to go to classes, retreats, or my RV. I have a second one of these that is machine-side in my home sewing room. I keep all of my "back stock" of needles in a drawer that is out of the way of my "cute space".
I want you to be just over-the-moon thrilled with your accomplishment when you finish your wallet. :) So to that end, I also put up a website to help out:
http://www.bionicgearbag.com ( referred to in this pattern as "the site")
The site is a source for additional tutorials for the “Bionic” projects - which currently include the Bionic Gear Bag Notions Tote, Bionic Needle Organizer Wallet, and the Bionic Dumpling Dish.
If you’re comfortable with measuring & simple sewing techniques, I think this PDF will get you through making the wallet just fine. The site is meant to be overkill in a way - but it is meant to help take up the learning curve slack for newbies, By doing so, hopefully, anyone that has a healthy relationship with their sewing machine can accomplish this project. :)
Happy Stitching!
- Sally aka RipStitcher
Materials List
• 1 fat quarter (18” x 22”) or an assortment of scraps for exterior & the inside area that holds the new needle packages
• Interior “needle parking lot” - 1 - 8 ½ x 11” piece of white or other light colored quilting weight cotton - you may want a little extra for trial and error.
• Batting for “needle parking lot” area - 2 pieces 8” x 5” • Pellon Peltex double fusible interfacing - 2 pieces 8” x 5” • Needle Pockets - 2 strips of 8” x 1 ½” Clear vinyl• Reynold’s Freezer Paper - 8 ½” x 11” • Thread • Iron • Sewing Machine Needles - I have good luck with Microtex size 80/12 & 90/14’s • Sewing Machine• Sewing Machine Feet: walking foot is recommended for the “needle parking lot”,
and please see more under “considerations” below. • Inkjet printer that is not front fed (in other words, the paper doesn’t have to make
a “U-turn” in the machine when being printed)

Bionic Needle Organizer Wallet
5
Considerations & Notes:
Colors of fabrics: A light color is needed to print the “needle parking lot” grid. I got lucky - given this was my first time trying this - and I only needed one 8 ½” by 11” piece.
The first time I ran it through the printer, the fabric munged up a little and got smudged on one end - basically it cleaned out the inside of my old printer a little. :)
I flipped it around and ran it through again, and it worked. Your mileage may vary. :)
Likewise, think of what color you want behind your needle packages.
Freezer Paper - I used Reynolds. If you have something else, hey, try it. :) Let me know how it goes - because I haven’t tried any other brands at this point.
About batting - Personally, I like Warm & Natural cotton batting.
Peltex by Pellon - This stuff is *amazing* for this project. If you have something else you like, feel free to try it, but this project really needs the structure that the Peltex gives. Plus, the double fusible is kinda important if you don’t want to quilt your exterior to the batting.
Serger Owners: omigosh! This project is the *first* thing I’ve ever made that I truly wished I owned a serger! Making these is going to push me to buying one someday!!! Instead of binding the edges, this is the perfect project for a well-done, serged, satin stitched or waved edge!
Sewing Machine Feet: For me, I like working with:• a ¼” foot• an edge joining (or may be called “sttch in the ditch” foot)• an open toe clear view foot• as well as an overcasting foot.
The project can be completed with just a plain-ol’ foot… but I like the ease of control by using the ones above.
Bionic Needle Organizer Wallet
6
Let’s get started…. Be Creative! Now the fun starts… it’s time to be creative - if you so desire!
If you want to just have a solid color exterior and have that color show on the inside edge of your top and bottom interior… just ignore what I’m going to put you through here. Lol
The finished exterior dimensions of this wallet (when open, after binding is applied) will be approx. 7 ¾” wide x 9 ¾” long.
The instructions are going to show how to finish the top and bottom edges by folding over the exterior piece “A” to the inside on the top (above the needle parking lot when open) and the bottom (under the needle package pockets). By doing it this way, you don’t have to bind all the
way around all four edges - you’ll only have to bind the sides.
You need to create an exterior piece that is 7 ½” x 11 ¼”
If you prefer to bind the entire perimeter of the exterior, that’s OK, too. Just notice the difference in size of the exterior piece “A” in the cutting directions for whatever way you’d like to
do your edges.
Likewise, if you’re a lucky dog that has a serger that lays down an amazing edge, you might want to do that instead of binding.
So back to the way I did it: If you want to finish your wallet to show some of the exterior fabric, or edges of selvedges, etc… The exterior piece will need to be cut to allow a ¼” fold in the raw edge as well as allow for about ½” of edge that you want to show inside the wallet. In
the example of the Bobbins & Bits fabric that I used, the top edge (that says “I’m creative…” was about ½” wide that I wanted to show) plus, remember, I added another ¼” to turn under to finish
that edge.)
Likewise, I did the same on the bottom. So the overall dimensions of the exterior piece “A” (before sewing) should be 11 ¼” long - allowing for ¼” on each end to be folded under as
well as ½” showing on the interior.
As you can see by the next picture, I pieced the different fabrics together to get the words and the selvedge edge themed fabric to land where I wanted it to.
Bionic Needle Organizer Wallet
7
And yes… I know this is all sounding rather redundant by this point, but I hope it helps you to maybe put some design thoughts into your own exterior piece.
Alternately, you can finish off the edges with a serged edge (if you have one of those fancy schmancy machines! Lol) -or - you may elect to use binding all the way around the exterior. If
you are going to do that, just remember the finished exterior is 7 ¾” x 9 ¾” to fold correctly.
There’s a lot of flexibility here - you don’t have to stress about it - but just consider how you would like the edges finished off on your wallet.
Keep all of this in mind, too: If you want to do a quilted look on the outside, it will add thickness. This isn’t recommended if you want it to fit in the Bionic Gear Bag.
If you want a fluffy-wuffy-puffy wallet for your own needles in your studio or for a gift for a
Bionic Needle Organizer Wallet
8
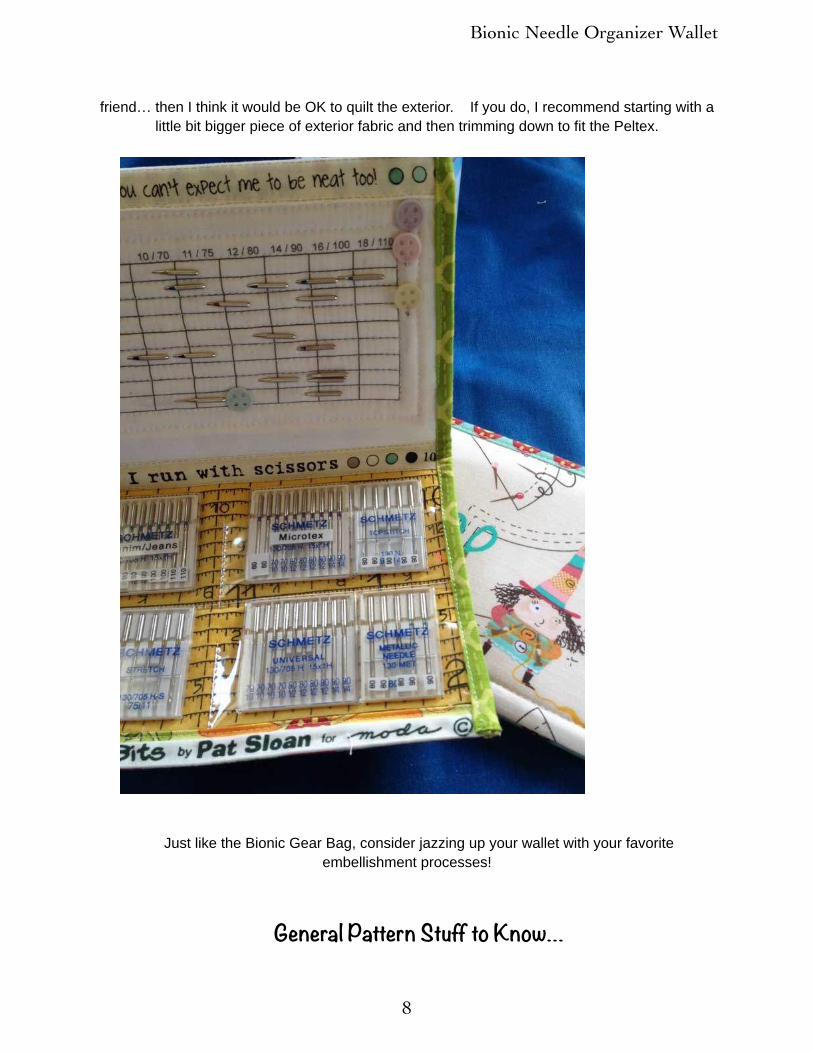
friend… then I think it would be OK to quilt the exterior. If you do, I recommend starting with a little bit bigger piece of exterior fabric and then trimming down to fit the Peltex.
Just like the Bionic Gear Bag, consider jazzing up your wallet with your favorite embellishment processes!
General Pattern Stuff to Know…
Bionic Needle Organizer Wallet
9
Note: You’re getting this pattern from me (and not some big pattern company!) So…. I’m writing this as if we were having fun and doing this project together. :) I hope this approach helps to make this more understandable. I want to enjoy my time making this for you, and in turn, I hope this makes this project more enjoyable for you, too.
If you're an expert sewer, you might think this is overkill. That’s OK - skip all of this if you’d like. :) But, I'm truly hoping it's a good thing for people just startin' out. I especially love getting feedback from the new sewers out there. Let me know how you do! Let’s do this thing!
*** It’s a good idea to read each section in it’s entirety before starting that section. ***
Grab your beverage of choice and let’s get started….
• Note: Dimensions. It is universal nomenclature to have the last dimension given be that of the “height”. This is true for *everything* - appliances, boxes, etc. (Irks me to see patterns that don’t do this!) Unless stated otherwise, the first dimension is width (as you would be looking at the finished wallet) and the second is the height from top to bottom.
• Seam allowances are ¼”, unless specified differently for a certain part.• If you’re working with a seam with lots of layers, I find it better to make a first stabilizing
seam with a longer stitch (about 3.0-3.5 mm) very close to the edge (no more than about ⅛”) with the first two layers, then do the same adding additional layers. *Then* I go back and make my pretty ¼” seam without having to deal with pins distorting the seams. This is especially useful if you’re working with directional prints that you want to have line up perfectly parallel with your seam. Just sayin’. :)
• Because we want the durability… use a short stitch on your machine for constructing your seams - 2mm or so.
• Microtex Needles: I like these and have had great results with them. They’re sharp and seem very well suited for going through lots of layers. Only because I’m fanatical about enjoying the right tools for the job, I use 80/12 and then switch to the 90/14 when going through the final stages of an item if it has lots of layers. For this project, you should be fine with an 80/12 from start to finish.
• Stitch Quality: If you find, especially when quilting, that your machine skips stitches, try moving your needle to a different position (usually left) and try it from there. Depending on how many thicknesses you’re going through, some machines seem happier when the needle is picking up the bobbin thread from either left or center position. Do a test with scraps before doing your “needle parking lot” piece.
• I use a lot of Clover Wonder Clips as I do my projects like this. So to avoid any possible confusion as to what a “clip” is (as in being confused with clipping/cutting with a scissor) I’ll be referring the Wonder Clips as WC’s. Hope this helps.
• Right side (RS) & Wrong Side (WS) of fabrics is self explanatory, I hope. :)
Bionic Needle Organizer Wallet
10
Cutting Instructions
From Cotton:Tip: If you’re cutting your bindings from the same fabrics you will be using for other parts of
the bag, it’s a good idea to cut those first to make sure you have adequate length available.
“A” - Exterior as shown in my examples - 7 ½” x 11 ¼” (if you are going to fold in the top & bottom edges like I did)
Note: So consider how you might want to piece your exterior to take directional prints into consideration. See notes in “Be Creative” section about how you might want to go about designing the exterior piece.
“A” - Exterior if you desire to bind all the way around or serge your edges - 7 ½” x 9 ¾”
“B” - “Needle Parking Lot” (or NPL from here on out!) 9” x 12” for ease in using printer. Note: Will be trimmed down to 8 ½” x 11” before printing AND
After printing, this will be trimmed down to 7 ½” x 4 ¾” “C” - Interior Bottom (where the packs of needles go!) : 7 ½” x 4 ¾” “D” - Interior Crease Fold Lining Trim Strip : 1” x 7 ½” “E” - Side Bindings - (cut two) 1 1/4" x 12"
-OR-“F” - Bias binding for all the way around - 40"
From Peltex: “G” - (cut two) - 7 ½” x 4 ¾”
From Batting: “H” - (cut two) - 7 ½” x 4 ¾”
From Vinyl: “I” - (cut two) - 7 ½” x 1 ½”
Tip: Cut as close to being on the square of the weave of the fabric as possible. Sometimes, if your fabric is really wonky off the bolt, you should “square up” the fabric by pressing before cutting. If the fabric is off-grain by too much, depending on the print, it could be quite noticeable on an item like this and possibly a little more difficult to handle.
Tip: Prewashing. Personally, I never do it. (Oh, did I say that out loud?!?!) For an item like this that will probably never go through the washer, I just don’t see a reason for it.
Bionic Needle Organizer Wallet
11
Note: As you’re working, if you baste stitch pieces together for this project, you shouldn’t have to do any trimming.
Important Note: About the Peltex: Keep in mind that the Peltex is fusible on both sides. As we’re constructing this, we’re going to be fusing down the insides but we don’t want to fuse the project down to your ironing surface! Be careful when applying heat - just enough so the interior pieces (B & C) look nice - but not so much that you melt the beads on the backside of the Peltex until you get to putting the exterior on.
Prep: Printing the Fabric
A. Pressing light colored cotton to the freezer paper:
1. Cut the fabric for the Needle Parking Lot (NPL) to be usable through your inkjet printer. Some printers may need an 8.5" x 11" piece of paper to feed properly.
2. I suggest you cut your freezer paper slighly larger than 8.5" x 11' - so that you can square up the piece after you press the two layers together.
3. Then, I suggest you cut your fabric slightly lartger than your freezer paper (so you don't gunk up your iron from I hitting the edges of the freezer paper!
4. Placing the shiny side of the freezer paper against the WS of the fabric, press well enough to create a firm fused material.
5. Don't worry.. These layers peel apart easily later!
6. Trim to 8.5" x 11"
7. Be sure to know what side of paper gets printed on with your particular printer.
You're ready to print!
TIP: First, print a test page. To check for accuracy, the grid of the NPL should measure 6 1/16" across from left to right. If your piece measures differently, then check to make sure you don't have any printer settings that are altering the PDF printed size - such as "scaling" or "fit to page" or any other setting that reduces or enlarges the PDF.
8. Place your fused material into your printer… making sure the fabric side is going to receive the ink!
9. Cross your fingers and push the button! Print!
Bionic Needle Organizer Wallet
12
There are videos that show this process that will be included in sew alongs. Check for them to be uploaded to bionicgearbag.com by 10/15/14.
Section 1 - Quilting the Needle Parking Lot
Let’s start with the fun part… making the Needle Parking Lot (NPL) piece. :)
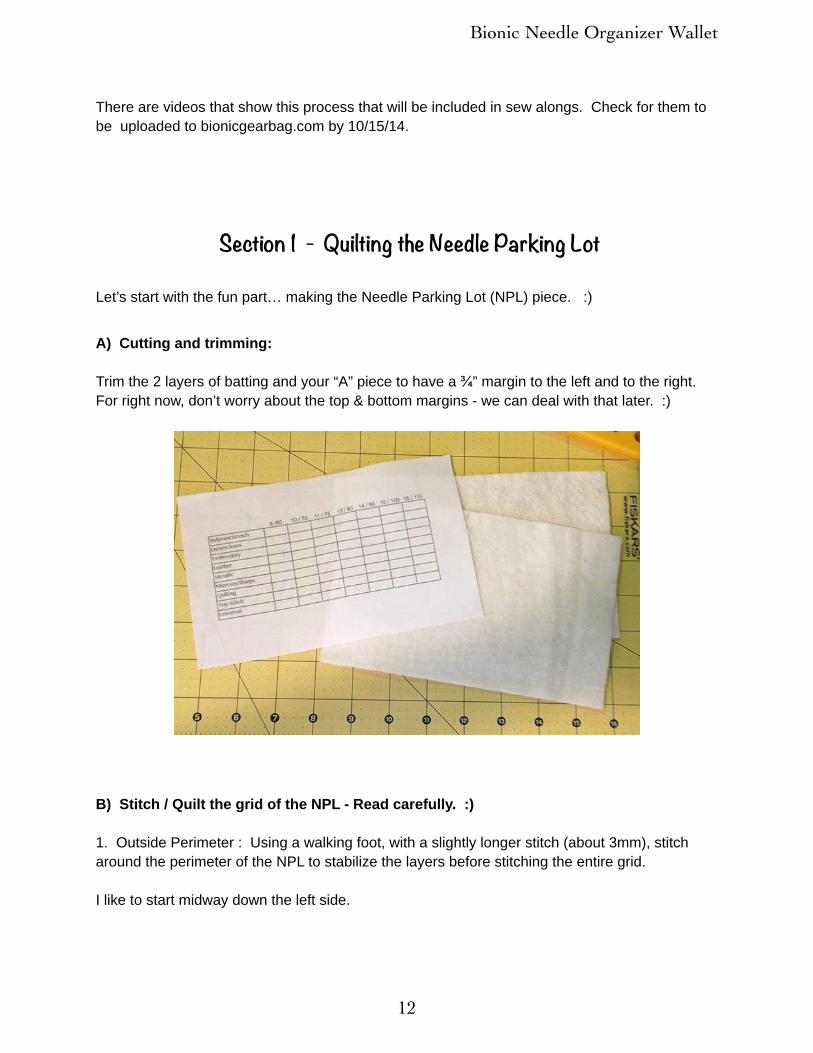
A) Cutting and trimming:
Trim the 2 layers of batting and your “A” piece to have a ¾” margin to the left and to the right. For right now, don’t worry about the top & bottom margins - we can deal with that later. :)
B) Stitch / Quilt the grid of the NPL - Read carefully. :)
1. Outside Perimeter : Using a walking foot, with a slightly longer stitch (about 3mm), stitch around the perimeter of the NPL to stabilize the layers before stitching the entire grid.
I like to start midway down the left side.

Bionic Needle Organizer Wallet
13
Important: As shown above, when you get to the top of the grid, extend your stitching another generous ¼” above the corner of the grid before turning. This will create one row of stitching
*above* the print of the needle sizes.
Tip: I like to be extra picky when turning corners. When making that last stitch of a line, if it looks like the machine is going to make a stitch that is a little too long, I stop the machine and use the hand wheel (that knob on the side of your machine - lol) to lower the needle down into the fabric to make that last stitch of the line end where I want it to. That way, I can move the fabric just a bit to make sure the needle drops into the corner - making a perfect pivot point.
2. Now… it’s Meditate Time. :) Continue to quilt the horizontal lines of the NPL. Take your time… make it pretty!
Tip: I restrained myself from stitching the vertical lines of the grid… and in the end, I’m very glad I didn’t stitch the verticals. You’ll find when you use the finished item that it’s nice being able to slide the sewing machine needle in without it having to pierce through stitching lines.
Bionic Needle Organizer Wallet
14
3. If any distortion of this piece has happened, try to square it up and trim it to be 7 ½” wide by 4 ¾” high.
4. Overcast the edges - securing the batting to the NPL cotton.
Tip for overcasting: Use a skinny width, but relatively long stitch, zig zag is fine.
If you don’t have an overcasting foot, no big deal. But be sure to make a skinny zig zag over the edge - no wider than ⅛”. Later, you’ll appreciate these three layers playing nice. :)
5. I decided to make one more lap of quilting around the perimeter of the NPL - at about ¼” away from the previous grid stitching.
6. Next, I find it easier to make one more trip of overcasting around this piece - securing it to the Peltex. This stabilizes the pieces together nicely.
The next picture is a good reference to illustrate this section as well as a few of the next steps.

Bionic Needle Organizer Wallet
15
Section 2 - Prep Your Bottom Interior Piece
1. Press “C” to make it pretty before fusing - you don’t want to fuse in any wrinkles. :)
Bionic Needle Organizer Wallet
16
2. Fuse the wrong side of bottom piece “C” to one of the pieces of Peltex.
Important: When fusing this step, don’t overheat it to the point that you’re melting the dots on the backside of the Peltex. It’s better to use dry heat (no steam!) so that you don’t accidentally overheat the back. And… remember: press, don’t “iron” .
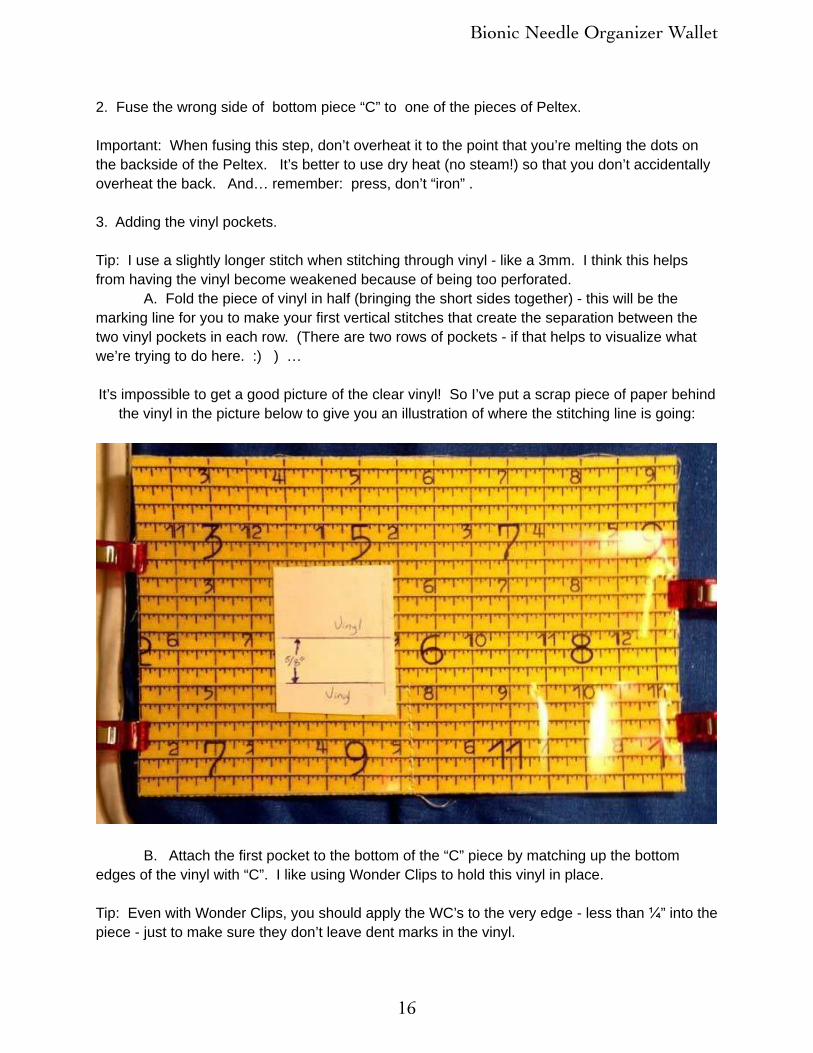
3. Adding the vinyl pockets.
Tip: I use a slightly longer stitch when stitching through vinyl - like a 3mm. I think this helps from having the vinyl become weakened because of being too perforated.
A. Fold the piece of vinyl in half (bringing the short sides together) - this will be the marking line for you to make your first vertical stitches that create the separation between the two vinyl pockets in each row. (There are two rows of pockets - if that helps to visualize what we’re trying to do here. :) ) …
It’s impossible to get a good picture of the clear vinyl! So I’ve put a scrap piece of paper behind the vinyl in the picture below to give you an illustration of where the stitching line is going:
B. Attach the first pocket to the bottom of the “C” piece by matching up the bottom edges of the vinyl with “C”. I like using Wonder Clips to hold this vinyl in place.
Tip: Even with Wonder Clips, you should apply the WC’s to the very edge - less than ¼” into the piece - just to make sure they don’t leave dent marks in the vinyl.
Bionic Needle Organizer Wallet
17
Tip: If you’re going to use pins, it’s important to keep your pin holes within about ⅛” from the edge - or you’ll see pin holes later in your finished work.
Tip: If you are having a hard time seeing the fold in the vinyl to make a good stitching line, just measure your work. The stitching line is half way - so 3 ¾” from the outside edge. Put a pin into the Peltex (don’t pierce the vinyl!) to mark where to start your stitching.
C. Stitch a vertical line as you see in the illustration above. I like to start at the bottom, stitch up to the top of the vinyl, and then reverse back down to the bottom edge. This will bring your tails from this line of stitching to the edge where they will be concealed with the fold over of exterior or binding (depending on how you choose to finish yours).
D. Repeat this with the upper piece of vinyl. Place this piece of vinyl parallel - with a ⅝” gap between the rows of vinyl. You need this gap in order to easily remove your packages of needles. DO NOT place these rows of vinyl any closer together.
I put a scrap of paper behind the vinyl to hopefully illustrate how the vinyl strips should be placed parallel to each other with a ⅝” gap between them….
E. Stitch the center of the top strip carefully (again, use a longish - 3mm or so - stitch. Neatness counts here - so pull the thread tails to the backside of the work.
Using the same 3mm stitch, stitch across the bottom of the top strip of vinyl to form the bottom of the top two pockets. Stitch close to the edge of the vinyl… ⅛” or less.
At this point, I don’t have any stitching holding down the sides of either vinyl strip, nor do I have any stitching across the bottom one. In my opinion, the vinyl “behaves itself”, and it will lay nicely when I’m applying the exterior “fold over” bottom as well as binding on the sides. I personally think that overworking the vinyl by putting too many stitches into it could cause it to be too perforated and weaken it.
Are you getting excited yet? :)
Admire your first two pieces. :)
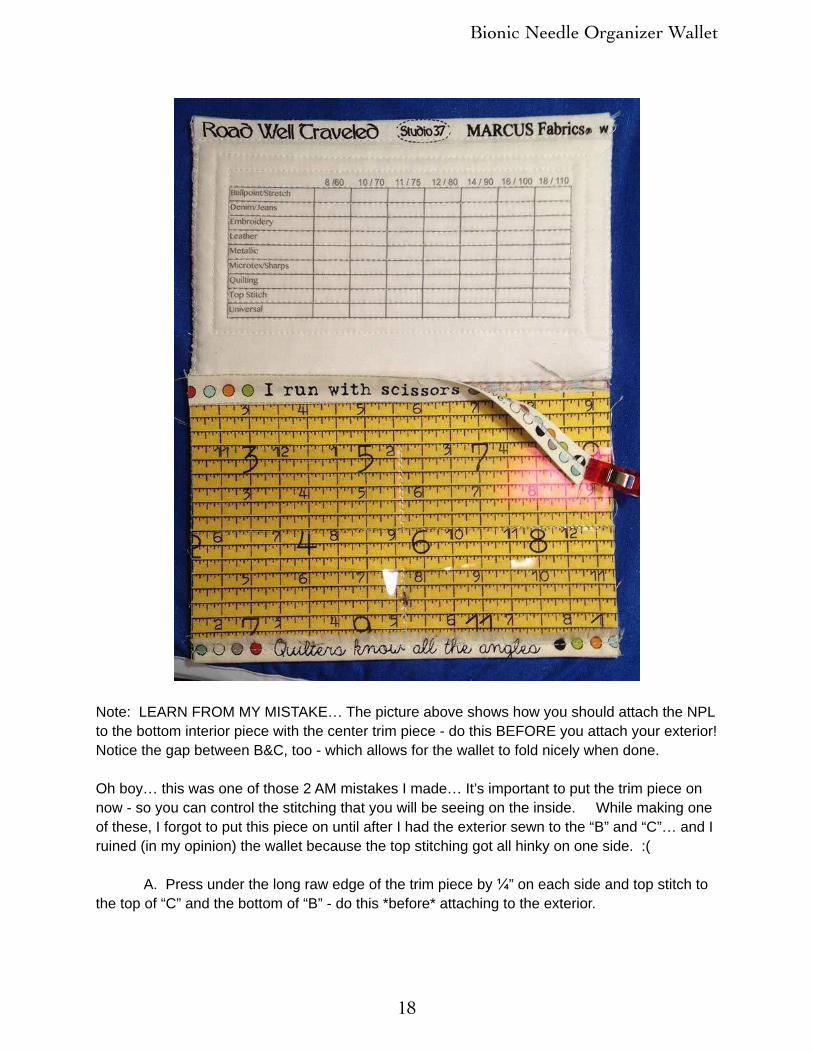
4. Attach “B” & “C” together with the center trim piece
Note: You want to wind up with about a ¼” gap between the heavy Peltex’d pieces “B” & “C”. By using the trim piece to put these two pieces together, you will be forming a “hinge” of sorts.
Bionic Needle Organizer Wallet
18
Note: LEARN FROM MY MISTAKE… The picture above shows how you should attach the NPL to the bottom interior piece with the center trim piece - do this BEFORE you attach your exterior! Notice the gap between B&C, too - which allows for the wallet to fold nicely when done.
Oh boy… this was one of those 2 AM mistakes I made… It’s important to put the trim piece on now - so you can control the stitching that you will be seeing on the inside. While making one of these, I forgot to put this piece on until after I had the exterior sewn to the “B” and “C”… and I ruined (in my opinion) the wallet because the top stitching got all hinky on one side. :(
A. Press under the long raw edge of the trim piece by ¼” on each side and top stitch to the top of “C” and the bottom of “B” - do this *before* attaching to the exterior.

Bionic Needle Organizer Wallet
19
Section 3 - Create Your Exterior1. You have choices at this point. :)
• Use one 7 ½” x 11 ¼” piece for your exterior.Or• Create an exterior by piecing your exterior to achieve a 7 ½” x 11 ¼” pieceOr• If you’re intending on running binding or serging all four edges, then create a piece
that is 7 ½” wide x 9 ¾” long.
2. I created a piece using 5 pieces of cotton… including two selvedge edges. I made a rather dorky video about it. :) You can find it in the tutorial section at bionicgearbag.com by 10/15/14
The top and bottom of my exterior are made from selvedge edges - so they don’t need to be turned in ¼” to hide a raw edge. BUT… if you are using fabric that needs to be turned under ¼” to created a finished edge, do that now. Press well.
Section 4 - Attach Exterior to the Innards :)1. Fold your exterior piece “A” in half horizontally - mark this fold line. (Use a fabric marker or chalk of some sort on the wrong side… we’ll be covering this up in a bit - so don’t be concerned about seeing the mark. Just don’t use anything that might bleed through and be seen on the right side of the “A” piece later!) 2. Place your exterior right side down.
3. Place your Needle Parking Lot, wrong sides together, with the top of your exterior - matching up the side raw edges but having the bottom of the NPL about ⅛” away from the center horizontal marking you made on the “A” (Exterior) piece .
Bionic Needle Organizer Wallet
20
4. Place the bottom “C” piece wrong sides together with the bottom of your exterior - matching up the side raw edges but having the top of the “C” piece about ⅛” away from the horizontal marking you made on the Exterior Piece “A”.
Note: Notice there should be about a ¼” gap between “B” (the needle parking lot) and “C” (the pockets for the needle packages piece). This gap needs to be there in order to create a “hinge” of sorts for the wallet to close nicely.
Note: Do a quick check to make sure your exterior piece is going to fit properly to your “B” and “C” . Make sure the edges you are folding over (if you’re finishing your piece this way) are going to work.
5. Before flipping the work over to fuse the exterior to the Peltex on “B” and “C”, I like to use wonder clips to make sure the pieces don’t shift.
6. Fuse these pieces into place. Remember, be careful to not go overboard with the heat! You’ve got vinyl on the one back side…. And soft, cute pillows of quilting on the other. :) I like to press lightly, working from the centers outward. I use just enough pressure to bond the pieces, but no steam! You don't want that heat going through to the back side. :)
7. Turn your top and bottom edges of the exterior to the inside, use WC’s to hold in place - sew these folded edges down with a ¼” or less seam.
If needed, refer back to previous pictures that show the detail.
Section 5 - Side BindingsYou have some choices as we're finishing up. :)
I've found that I prefer to finish off the sides as follows:
1. Measure the sides of your wallet carefully. Add 1/2" to the length (to accomodate turning in the ends by 1/4" on each end) … 2. Trim excess.3. Press well. Your piece should look like in the pictue below.

Bionic Needle Organizer Wallet
21
At this point, you may elect to do a typical bound edge: sewing one side seam down, folding over and then stitching in the ditch.
OR…. Just fold lengthwise again, and press really well:
Now that you have this skinny little binding made, you just need o place it over the raw edge, pin or use Wonder Clips to hold in place, and make one line of stitching down the side.
See the previous pictures as reference. :)
Tip: I have found that if you don't want to sew that tiny binding down, the use of E6000 brand Fabric Fusion adhesive is a really clean, neat looking application! Just glue the bindings down!

Bionic Needle Organizer Wallet
22
There! You should now be the proud owner of your own special Bionic Needle Organizer Wallet!
Congratulations!
…. And thanks again!
Thanks so much for purchasing this pattern. Lots of work and love went into it…And I’m still not done. I truly want to make this into an awesome teaching project by utilizing bionicgearbag.com .
I truly hope you enjoyed your time with me. While my life has been a little chaotic (that’s an understatement!) since launching the Bionic Gear Bag pattern, I’ve been truly enjoying the

Bionic Needle Organizer Wallet
23
emails & phone calls I’ve had with other sewers all over the globe. It’s truly been a joyful thing!
A word about selling finished items while I have you here …. :) ….
There is so much mis-information out there about this topic. While I’m not a lawyer, everything I’ve read sure seems to point the fact that when you make an item, it’s *yours*.
So for my items, there is no question that you are allowed to personally sew this item and sell the finished products… after all, once you make it, it is on the planet only because of you … and it is your property to do with whatever you’d like, isn’t it? I personally don’t see a difference between giving one away as a gift or selling one to someone.
I’m looking into having some of my items made up for sale by a group of women in Cambodia. There, it’s common for sewers to earn about $2 a day. It’s shameful. So I’m investigating the possibility of my items being made there - but the people, working through a certain church group that is sourcing work for them, would earn more like $10-15 a day. Stay tuned on that. :)
Please respect the work that went into this. Redistributing/sharing the pattern and mass commercial production of the finished product in some third world country is still a no-no.
Lastly, please check out bionicgearbag.com for any special offers, and join me on Instagram - RipStitcher and the #sewmobile. :)
Thanks again,
Sally
BONUSAt the time of launching this pattern, I have created another pattern to
enhance the fun of owning and using the Bionic Gear Bag!
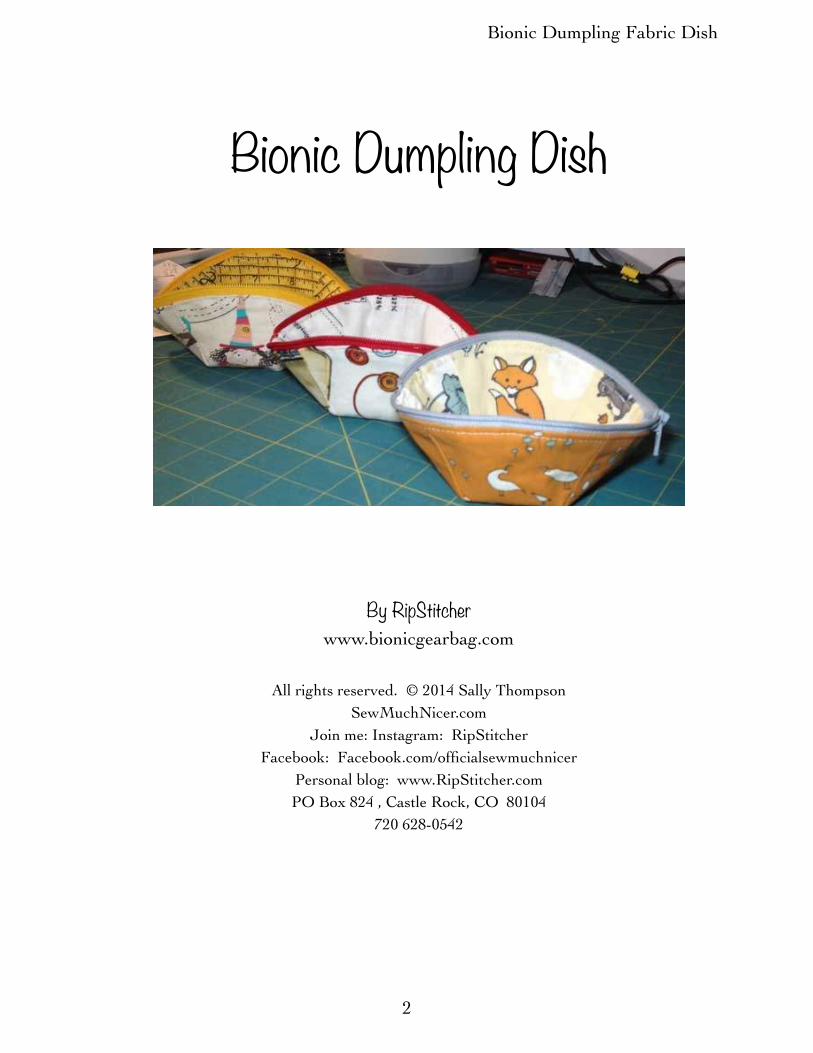
This little item is the "Bionic Dumpling Dish" as shown below.
This pattern is being offered free to you. In order to get your copy of the pattern, just do two things:
1. subscribe to the email newsletter on bionicgearbag.com .

Bionic Needle Organizer Wallet
24
2. Then, please pop me an email at [email protected] to request the free pattern. Please use the same email address that you did when you joined my email list.
You will get your free pattern via email within 24 hours. :)
Happy Sewing!!!
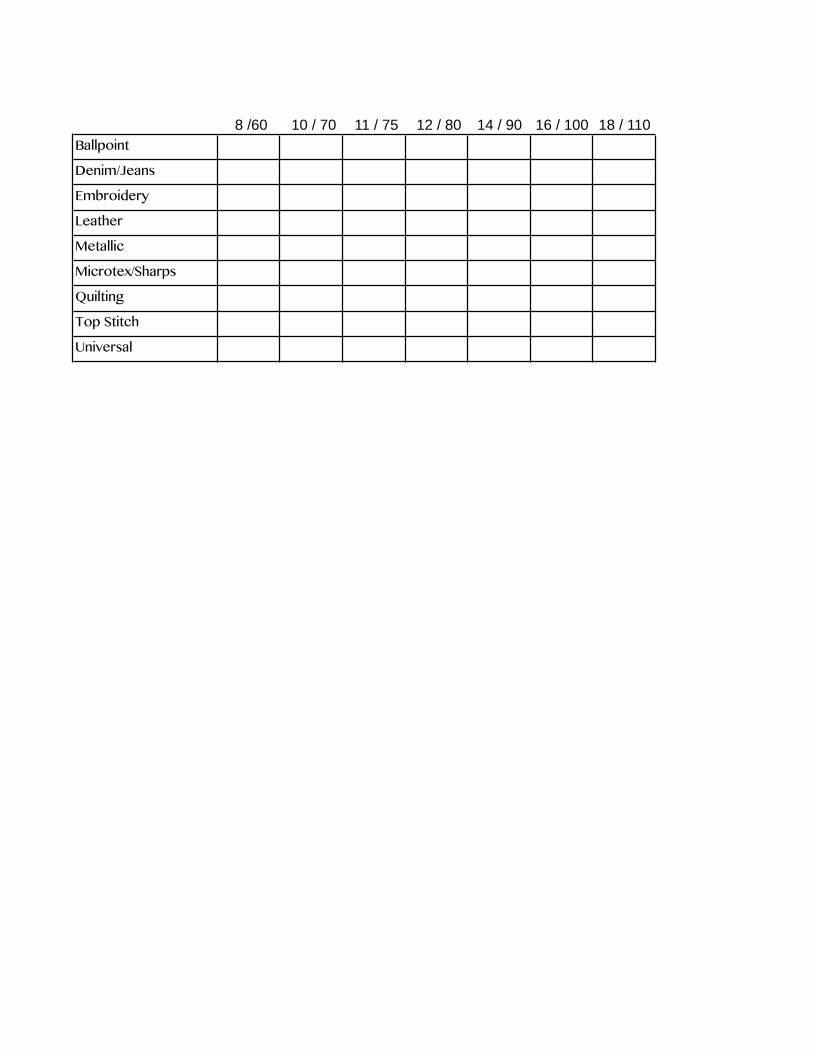
8 /60 10 / 70 11 / 75 12 / 80 14 / 90 16 / 100 18 / 110 Ballpoint
Denim/Jeans
Embroidery
Leather
Metallic
Microtex/Sharps
Quilting
Top Stitch
Universal

Bionic Dumpling Fabric Dish
1
BEFORE PRINTING…..
Just a thought… depending on how you feel about the price of ink, "saving a tree", or making use of a mobile device or your laptop…..
I suggest you read over this pattern and decide if it's worth printing this whole document out.
Personally, I think if you have a device to read this on, you can just print out the last page - the pattern piece itself - and avoid printing anything else.
:)
Bionic Dumpling Fabric Dish
2
Bionic Dumpling Dish
By RipStitcher www.bionicgearbag.com
All rights reserved. © 2014 Sally ThompsonSewMuchNicer.com
Join me: Instagram: RipStitcher Facebook: Facebook.com/officialsewmuchnicer
Personal blog: www.RipStitcher.com PO Box 824 , Castle Rock, CO 80104
720 628-0542

Bionic Dumpling Fabric Dish
3
A few things before starting …
Thank you!
First, please know that I'm very grateful for all of you that have chosen to spend a little time with me on my projects. I can't tell you how cool it is to know that (In a weird sort of way) that people all over the world have chosen to enjoy a little time at their sewing machines with me. :)
Stay tuned in!
If you're coming to this pattern before seeing the Bionic Gear Bag (also known as BGB to most of us!), you might want to go on over to www.bionicgearbag.com and see the video there of the bag and how it works.
Also, If you haven't done so already, be sure and join the mailing list on bionicgearbag.com . This will keep you in the loop for future revisions, freebies , and early bird specials that are offered in the future.
My Goal:
These days, my granddaughter is my main inspiration when I write instructions. At the time of this writing, she's 9 years old. I bought her a nice sewing machine 2 years ago for her 7th birthday. It's my greatest desire for her, maybe 40 years from now, to remember us sewing together - and to remember me - with great love - at quirky times for the rest of her life.
I learned so many things from my mom (even though I lost her when I was 14) that have stuck with me for all of these decades. Even now, there are times when I see myself turning out a corner on something (she made a lot of stuffed dolls) or even doing a reverse stitch on the machine (I remember the magical silver reverse button on her White sewing machine) or even something as stupid as winding a bobbin (remember pressing that rubber wheel up against the hand wheel to wind a bobbin back in the day? Lol) ….. Well… Memories kick in… I see her hands doing the work instead of mine… and I think of her and smile.
I probably wouldn't be so appreciative of sewing if it weren't for Mom… and we probably wouldn't be having this time together if it weren't for her. (Thanks, Mom.)
I hope you have similar memories of someone you love… and that you're creating memories for someone else - ether by gifting the projects you sew or teaching another - and that you make happy memories that will last for decades, too.
And in the meantime, I hope you're feeling joy as you create.
Anyway… Just know that the "success" I'm striving for is to have anyone - like my
Bionic Dumpling Fabric Dish
4
granddaughter - (with no fear of their own sewing machine lol) - be able to make my projects and be ***thrilled*** with their finished item. And more than that, on the way to that feeling of pride, it's my hope that sewing these instructions with me is a fun, enjoyable experience for you.
Let me hear from you!
This pattern has been tested for accuracy, but please know that if you find a typo in this pattern or something that you think could be clarified, I *love* hearing from you. Especially if you're a newbie/novice sewer.
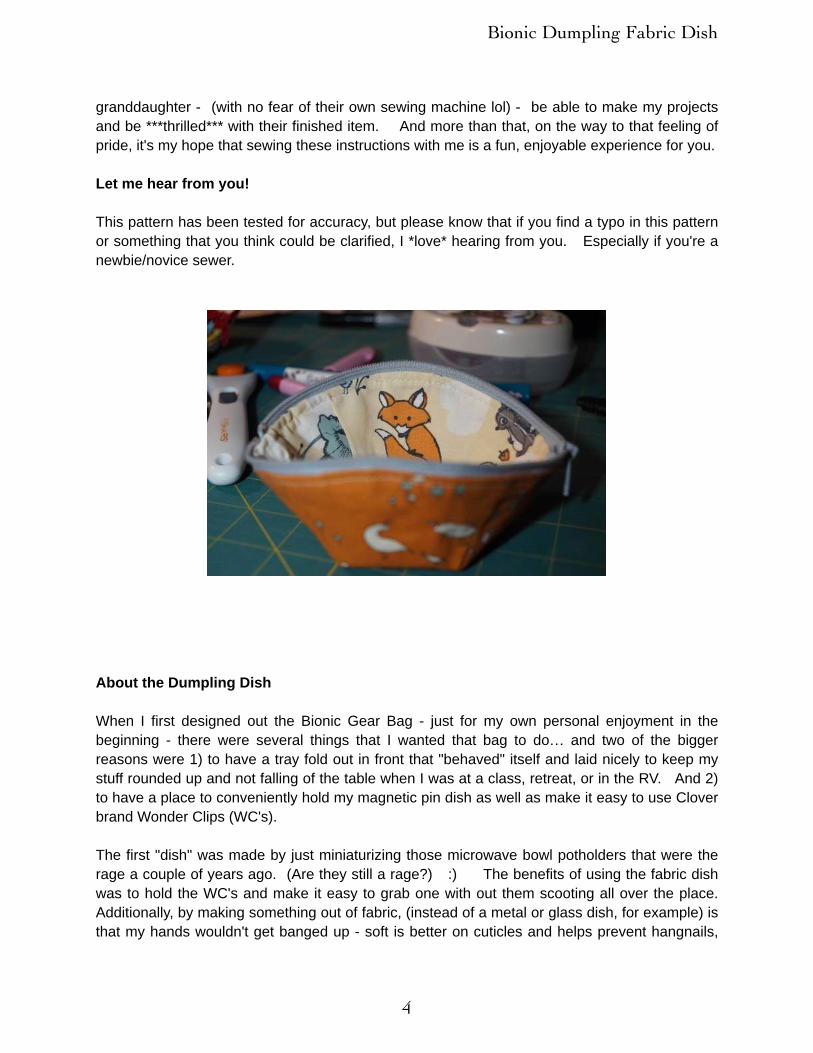
About the Dumpling Dish
When I first designed out the Bionic Gear Bag - just for my own personal enjoyment in the beginning - there were several things that I wanted that bag to do… and two of the bigger reasons were 1) to have a tray fold out in front that "behaved" itself and laid nicely to keep my stuff rounded up and not falling of the table when I was at a class, retreat, or in the RV. And 2) to have a place to conveniently hold my magnetic pin dish as well as make it easy to use Clover brand Wonder Clips (WC's).
The first "dish" was made by just miniaturizing those microwave bowl potholders that were the rage a couple of years ago. (Are they still a rage?) :) The benefits of using the fabric dish was to hold the WC's and make it easy to grab one with out them scooting all over the place. Additionally, by making something out of fabric, (instead of a metal or glass dish, for example) is that my hands wouldn't get banged up - soft is better on cuticles and helps prevent hangnails,
Bionic Dumpling Fabric Dish
5
etc - as well as I personally prefer not having hard things bang around in/on other hard things in my sewing area. :) I like treating all of my tools softly - and that includes my hands. :)
So after the first little square dish worked out so well - for what it was - a simple, quick solution - I started working on creating a knitting bag that will work as well as the BGB does. We knitters have all sorts of tiny things to keep rounded up. (Needle markers, itty bitty safety pins, etc. ) So I wanted something that woud close up securely but still open up and make a wide open bowl to make it easy to access the notions.
So there ya have it. A zippered "bowl" that would work for knitting… and be a Sew Much Nicer solution for the Bionic Gear Bag . :)
Then came naming the thing that looked like an Asian Potsticker. LOL Obviously, Dumpling is a perfect word - but there are other patterns out there that use the name. So when I went to Google it, there are probably hundreds of references to "Dumpling" as it relates to cosmetic bags, etc. So I might as well go with the flow on this description for this one, too.
But mine is a "Dish". So Dumpling Dish. :)
Besides, I think my dumpling looks more like a dumpling than anybody else's does. Lol
I'm here to tell you, though, I've *never* done so much seam ripping as I have when making the tests of this thing. My first one - that you may have seen on bionicgearbag.com or on Instagram - was rather dorky in the way I finished off one end of the zipper. But in the end, it still seems that was one of the better solutions that we tried because it helps to make the bowl open up nicely when unzipped. I'm going to give you a way to opt-out of finishing yours that way - but I like the way I've been using a patch to hide that end of the zipper.
The two things that make this little pouch different from anything else out there is the square bottom on the base - which gives it that nice "bowl" effect when open - and the zipper installation that helps to round out the bowl when open.
This pattern will be in two forms - the first is a free add-on to the Bionic Gear Bag pattern and then later, it is also going to be offered as a separate pattern in two or three sizes down the road. I think this has a basis for something kind of cool - stay tuned. :)
I still like using a couple of the original square fabric dishes around my work areas at home. But for anything that travels, obviously, this zippered version is Sew Much Nicer. Depending on what you put in your own BGB, you probably could fit 3 or 4 of these in the biggest compartment of your Bionic Gear Bag …

Bionic Dumpling Fabric Dish
6
If you’re comfortable with measuring & simple sewing techniques, I think this PDF will get you through making your dumplings just fine.
However, I'm doing sew alongs that will have videos that will stay on the bionicgearbag.com site for the future. That site is meant to be overkill in a way - but hopefully, it will take up the slack for newbies.
Thanks for buying the Bionic patterns… I hope you enjoy them as much as I enjoy mine!
Got questions? Please feel free to reach me: Email: [email protected] Phone: 720 628-0542 (Mountain Time, USA)
Happy Stitching!
- Sally aka: RipStitcher

Bionic Dumpling Fabric Dish
7
Materials List
• 2 pieces of 7" x 9" fabrics (one color for exterior, one for lining) • 1 small piece fabric (1 1/2" x 1 1/2" or possibly less) to make a patch to cover
the tail of one end of the zipper - I'm only listing it here in case you want to use something contrasting or cute. :)
• 14" x 9" piece of Pellon SF101 Shapeflex Fusible Interfacing• Polyester or Nylon zipper - 8" or longer (you're going to trim one end back )• Thread - there will be topstitching showing on the exterior and lining• Optional - 2 sets of magnetic snaps, if you haven't gotten them already - only if
you're using this for the Bionic Gear Bag • Pressing gear - iron, ironing mat /etc• Sewing Machine Needles - I have good luck with Microtex size 80/12• Sewing Machine Feet: You'll need a regular foot and a zipper foot.
⁃ Optionally, a 1/4" foot is nice, and I found an open toe embroidery foot came in handy at the end.
Considerations & Notes:
Pellon SF101 is a fusible, woven, quite thin interfacing. I know some people in other countries can't find the stuff… so just use something very thin and fusible to add a little structure to the exterior. This is important if you are going to be attaching snaps to use your dumpling with the Bionic Gear Bag.
The use of batting and quilting this project is not advised - it would create a host of issues in construction as well as probably make the dumpling too puffy and it wouldn't hold as much.
The zipper is going to be trimmed back on one end - so nylon or polyester is desirable. If you're going to try a metal-toothed one or one with large teeth … you're on your own. :)
Bionic Dumpling Fabric Dish
8
Let’s get started…. Be Original!
Now the fun starts… it’s time to be creative - if you desire!
If you're making this for your Bionic Gear Bag (BGB) , it doesn't take much of a scrap or two to create your Dumpling Dish (DD) so it can coordinate with your bag. And just like the BGB -
you can let your creativity and imagination cut loose… or not. :)
I decided to take a shot at paper piecing a fox for my next BGB - which, at the time of writing this, I haven't done yet! Cross your fingers for me - I haven't done any paper piecing before. :)
Anyway, the fabrics I've hoarded for the fox have been stashed in my space for the last few months - so I dug them out to do more photos to help support this pattern. So the fabrics I
chose have cute little foxes on them - and I'll probably use some in the lining of the next BGB.
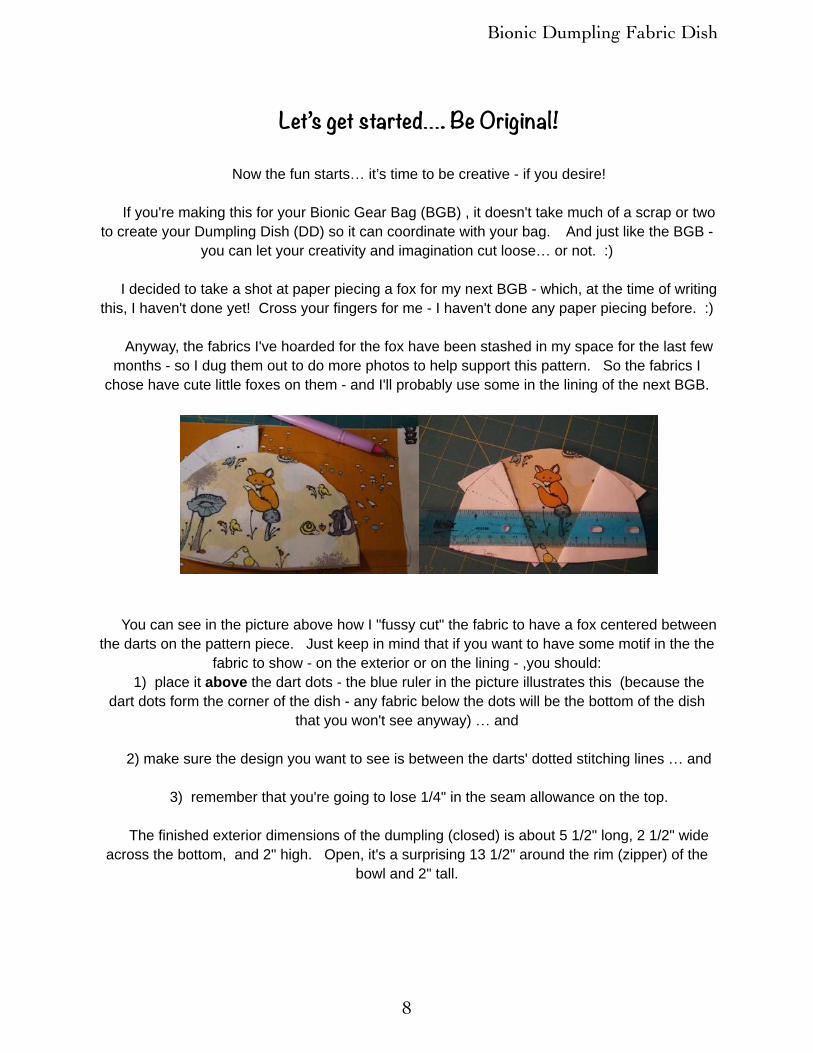
You can see in the picture above how I "fussy cut" the fabric to have a fox centered between the darts on the pattern piece. Just keep in mind that if you want to have some motif in the the
fabric to show - on the exterior or on the lining - ,you should: 1) place it above the dart dots - the blue ruler in the picture illustrates this (because the
dart dots form the corner of the dish - any fabric below the dots will be the bottom of the dish that you won't see anyway) … and
2) make sure the design you want to see is between the darts' dotted stitching lines … and
3) remember that you're going to lose 1/4" in the seam allowance on the top.
The finished exterior dimensions of the dumpling (closed) is about 5 1/2" long, 2 1/2" wide across the bottom, and 2" high. Open, it's a surprising 13 1/2" around the rim (zipper) of the
bowl and 2" tall.
Bionic Dumpling Fabric Dish
9
General Pattern Stuff to Know…
Note: You’re getting this pattern from me (and not some big pattern company!) So…. I try to write this as if we were having fun and doing this project together. :) I hope this approach helps to make this more understandable. I want to enjoy my time making this for you, and in turn, I hope this makes this project more enjoyable for you, too.
If you're an expert sewer, you might think this is overkill. That’s OK - skip all of this if you’d like. :) But, I'm truly hoping it's a good thing for people just startin' out. I especially love getting feedback from the new sewers out there. Let me know how you do! Let’s do this thing!
*** It’s a good idea to read each section in it’s entirety and take a peek at the pictures before starting that section. ***
Grab your beverage of choice and let’s get started….
• When manipulating a goofy little project like this with several layers (like you're going to go through putting the zipper in), I find it better to make a first stabilizing seam with a longer stitch (about 3.0-3.5 mm) very close to the edge (no more than about ⅛”) with the first two layers, then do the same adding additional layers. *Then* I go back and make my pretty ¼” seam without having to deal with pins distorting the seams. Just sayin’. :)
• Because we want the durability… use a short stitch on your machine for constructing your seams - 2mm or so.
• Microtex Needles: I like these and have had great results with them. They’re sharp and seem very well suited for going through lots of layers. Only because I’m fanatical about enjoying the right tools for the job, I use 80/12 on this one. On my machine, I found no reason to go up to a 90/14 on this one.
• Stitch Quality: If you find that your machine skips stitches, try moving your needle to a different position (usually left) and try it from there - maybe on a scrap before digging into the project. Depending on how many thicknesses you’re going through, some machines seem happier when the needle is picking up the bobbin thread from either left or center position.
• I use a lot of Clover Wonder Clips as I do my projects. So to avoid any possible confusion as to what a “clip” is (as in being confused with clipping/cutting with a scissor) I’ll be referring the Wonder Clips as WC’s. Hope this helps.
• I *hate* hand stitching. I mean, I really hate it. LOL … so I do this whole thing on the machine. After all, that's why I bought the darn thing - so I could *avoid* hand sewing! :) You might rather finish off the lining or the last little zipper patch by hand. If you do, that's cool. :) The most important thing is that you have fun in putting this together.
• Right side (RS) & Wrong Side (WS) of fabrics is self explanatory, I hope. :)

Bionic Dumpling Fabric Dish
10
Cutting Instructions
Important Note: Before you make the first cut, do an accuracy test of your printed pattern piece. The "fold" edge of the pattern piece should measure 3 7/8" long. If it doesn't measure that, look at the settings in your printer software and uncheck any boxes that reference "scaling" or "fit to page" or any other settings that would alter this printing at 100%.
I think it's more accurate and easier, when working with little pieces like this, to just use a marking pen and mark the fabric around the pattern piece and then cut.
From Cotton:
Cut two pieces for your exteriorCut two pieces for your lining
Interfacing: Cut two pieces from Pellon SF101 or other lightweight fusible. Cut them slightly smaller than your fabric pieces (maybe 1/8" from the edges) so you
don't goober up your iron when fusing. :)

Bionic Dumpling Fabric Dish
11
Section 1 - Prep
A) Interfacing
Fuse interfacing to the WS of your exterior pieces
Be sure to fuse to the exterior pieces, and not the lining. This helps the structure of the dish as well as creates a better surface to attach magnetic snaps if you are using this for a Bionic Gear Bag. Lastly, the very last seam of the lining is easier to accomplish if there is NOT interfacing on it. :)
B) Mark Darts
Tip: For the darts, I just mark the two dots on the raw edge and the dot at the point.Tip: If you make a mark directly on the edge of the raw edge of the fabric on the WS, you will be able to use that mark as your needle drop position when you go to sew the seam. Tip: To mark the dart point dot: Stick a pin through the paper pattern to your fabric piece. Then, while holding the pin, lift the paper piece and mark where the pin is poking on your fabric. (I know… this is overkill… but maybe it will help someone! No griping! Lol)
Mark the darts on both the exterior pieces and lining pieces.
Bionic Dumpling Fabric Dish
12
C) Clip Zipper Edges
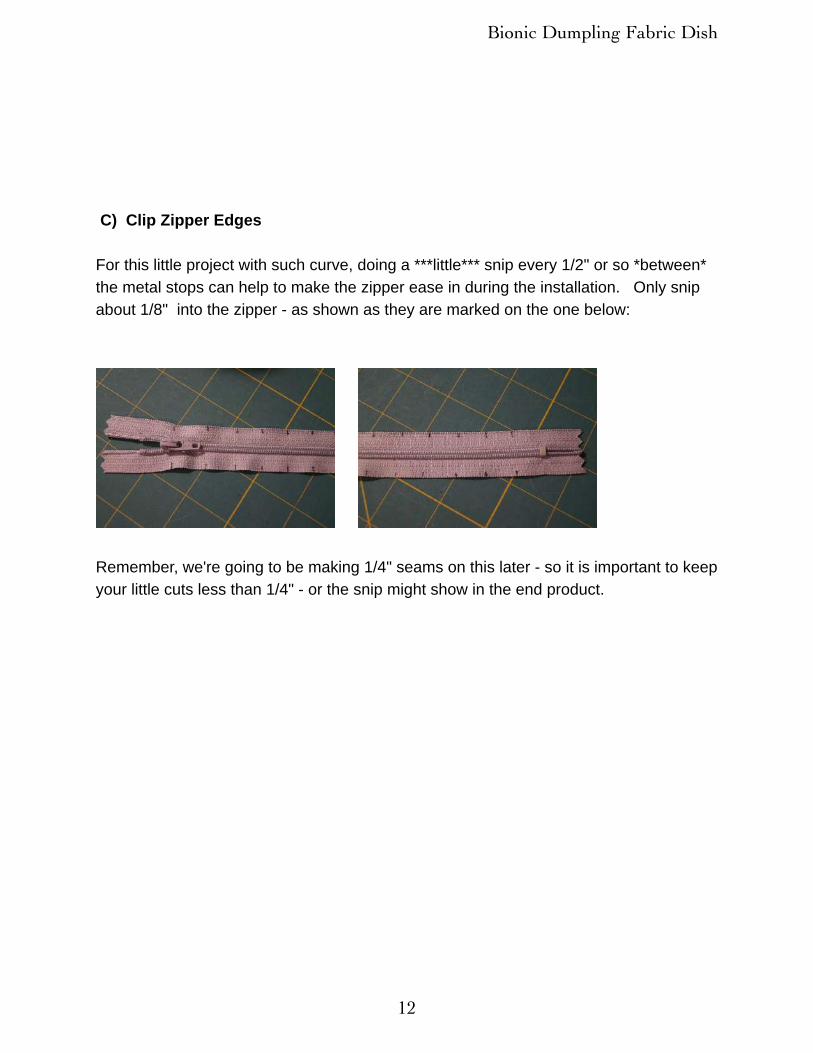
For this little project with such curve, doing a ***little*** snip every 1/2" or so *between* the metal stops can help to make the zipper ease in during the installation. Only snip about 1/8" into the zipper - as shown as they are marked on the one below:
Remember, we're going to be making 1/4" seams on this later - so it is important to keep your little cuts less than 1/4" - or the snip might show in the end product.
Bionic Dumpling Fabric Dish
13
Section 2 - A few tips & reminders for this pattern… All final seams are 1/4" using about a 2mm stitch lengthTop stitching is done with a 3mm stitch length
The fabrics used in my example photos in these instructions show an orange fabric for the exterior and a light "fox" themed fabric for the interior.
If you have a "needle down" feature on your machine, you'll probably appreciate it for this project. :) For those of you that don't know what that is, it means that there is a setting on the machine that makes sure the machine always stops with the needle down - which makes moving your hands, pivoting, removing pins, etc a little easier to do without losing your place. If you don't have the feature, you're going to find that stopping with needle down while you're putting in the zipper a very handy advantage - so just use your handwheel to accomplish "needle down" when you feel the need.
Tip: When sewing several tricky layers together, I like to make a temporary seam (which is easy to rip out if need be) with a 3 mm stitch length at about 1/8" from the raw edge. If it all looks good (no puckers, everything is where it needs to be… lol) then I make my final pretty 1/4" seam with a 2mm stitch.
If you're good at manipulating goofy little stuff like this, you might be able to put the whole works down with one pass… but not me! So the directions from here on out will show my temporary stitching, too. :)
Tip: Sewing machine foot selection - I prefer to sew with a foot that allows me to see what is approaching the needle. Below are the two most common type feet used for all purpose sewing. The one on the right is a standard foot, the one on the left is a 1/4" foot. I prefer the 1/4" foot because it is slimmer (easier to go around curves, etc) as well as I like the opening leading up to the needle. If you have only sewn with the typical foot (like the one on the left) you might enjoy the differences after using a foot with a view. :)
Bionic Dumpling Fabric Dish
14
Section 3 - Darts A) Sew Darts
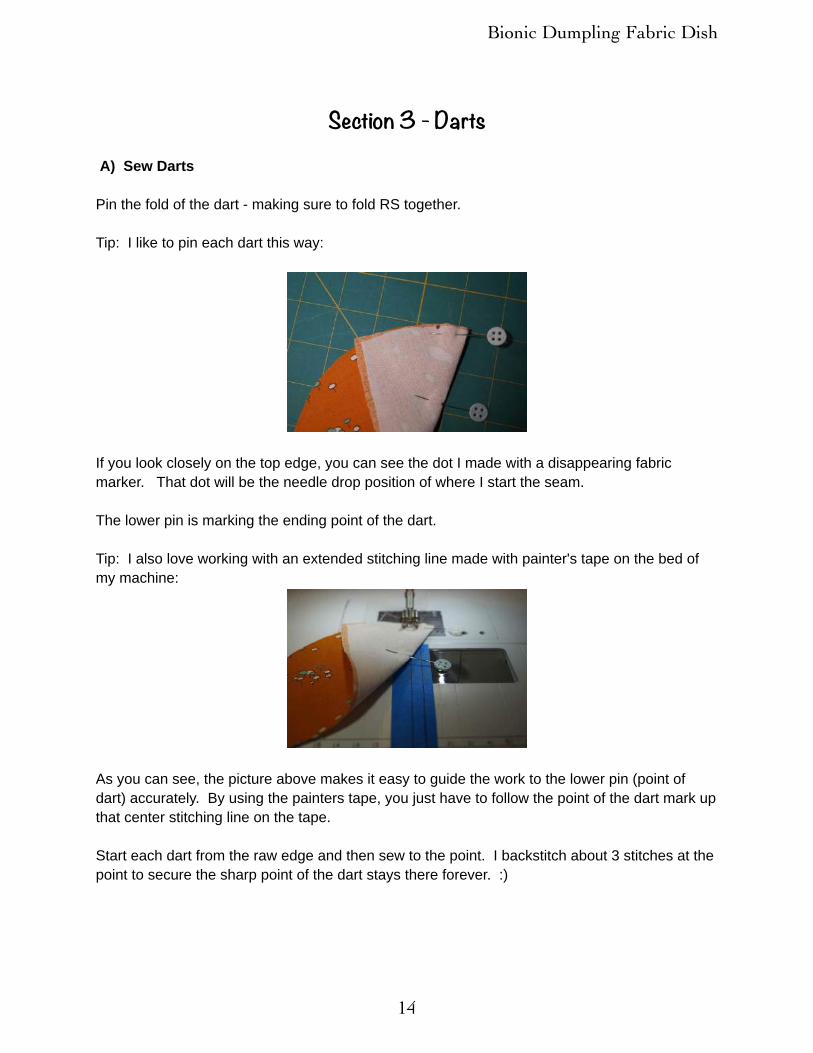
Pin the fold of the dart - making sure to fold RS together.
Tip: I like to pin each dart this way:
If you look closely on the top edge, you can see the dot I made with a disappearing fabric marker. That dot will be the needle drop position of where I start the seam.
The lower pin is marking the ending point of the dart.
Tip: I also love working with an extended stitching line made with painter's tape on the bed of my machine:
As you can see, the picture above makes it easy to guide the work to the lower pin (point of dart) accurately. By using the painters tape, you just have to follow the point of the dart mark up that center stitching line on the tape.
Start each dart from the raw edge and then sew to the point. I backstitch about 3 stitches at the point to secure the sharp point of the dart stays there forever. :)

Bionic Dumpling Fabric Dish
15
Remove pins - don't sew over them!
Remember… If you placed your dart markings right on the edge of the WS during the prep part, you can use that mark as your needle drop position to start your dart seams.
Tip: I like to use "starters and enders" (small scrap of fabric) to start and end seams like darts. The benefits are 1) better feeding of fabric, 2) less thread waste, and 3) less thread mess.
I used one starter piece, then I chain pieced all 8 dart seams… avoiding thread messes. :) Sew all 8 darts.

Bionic Dumpling Fabric Dish
16
Clip each dart open
Press open. The raw edges of the darts are going to be sewn into the zipper seam - so be sure to press open instead of to one side to avoid lumpy bumpies. :)
B) Decide What is Front & What is Back :)
If it matters in your choice of fabrics, now is the time to decide what you want to have show on the outside of the dumpling and what is going to show on the inside back lining of the dumpling when it is open and you're enjoying it when it's in use. :)
On my fox example below, I lined things up (somewhat) so I could have one cute fox showing inside the dish, and one of the exterior pieces with the quail birds showing on the outside.

Bionic Dumpling Fabric Dish
17
Section 4 - Zipper Install A) Considerations and notes…
Again, if it matters, you need to decide what end you want your zipper tab to be on when the dumpling is open. In my example, I want the zipper pull to be on the front of the dumpling when open and in my BGB. In other words, the zipper pull, when looking at the front of the dumpling when it's open, will be on the right.
A note about zipper installs: Have you ever noticed someone's work and the stitching seems so uneven along the zipper? There are several reasons for that… and I think the main issue is that the sewist didn't have a good reference point as she was making the seams that comprise the zipper install.
And think about this… if the stitching is "off" by 1/16th of an inch… do you notice it in the bag itself? Or just the zipper? Of course, it's just the zipper. So to help accuracy, we're going to use temporary seams and also pay close attention to the edge of the zipper tape for all sewing that has to do with the zipper install.
Oh… and before starting… I have to mention this… if you're like me and you can't wait to top stitch everything as you go along (just for that instant gratification thing!) … *Don't* do it until you get to that part of this pattern - I promise I didn't forget it - and it's almost last on this project. If you do it too soon, you'll regret it. :)
B) First temporary seam …
1. Start with your exterior piece that you want to show - RS up. Make sure the raw edges that have the stitching of the darts is UP. Don't put the zipper on the exterior bottom by accident! (Been there, done that)

Bionic Dumpling Fabric Dish
18
2. Place zipper, open, teeth side down, matching raw edges of top of the exterior piece and arranging it so the outside edge of the metal zipper stop (on the open end of zipper) is 3/8" away from the outside side of the exterior piece:
In the picture above, the top of the exterior piece is at the bottom of the photo. Notice the zipper teeth are away from the inside edge. The photo is meant to illustrate where you need to measure 3/8" away from the outside edge of the exterior.
Tip: When pinning a zipper down like this, I find it helps tremendously to pin the zipper so that the tiniest possible little bit of edge of the zipper extends past the raw edge of the fabric:
The picture above is meant to illustrate the open end of the darts need to be facing up and will be sewn into the zipper seam. If you look closely, you can see the grey zipper edge *barely* peeking out from under this layer of exterior piece.
The reasoning: When you're sewing the zipper down, the one thing that is a constant to use as a reference point (to get the best possible look when done) *is* the edge of the zipper. So don't hide it behind layers of fabric. :)
Bionic Dumpling Fabric Dish
19
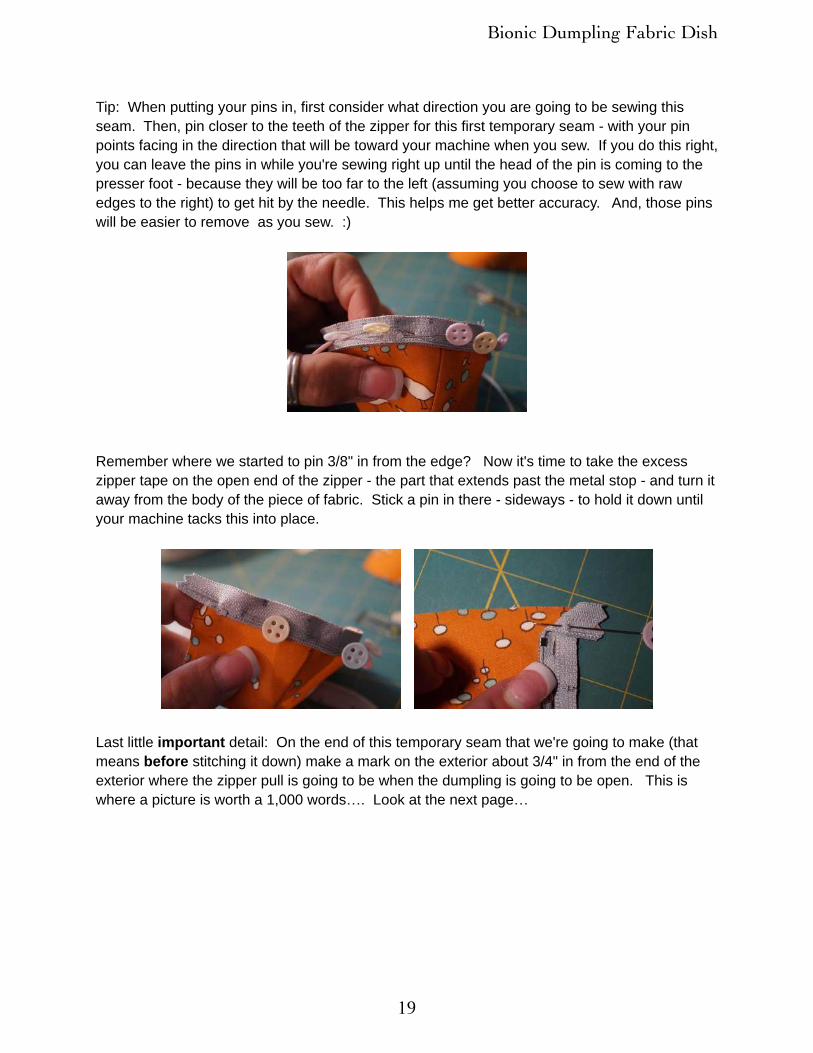
Tip: When putting your pins in, first consider what direction you are going to be sewing this seam. Then, pin closer to the teeth of the zipper for this first temporary seam - with your pin points facing in the direction that will be toward your machine when you sew. If you do this right, you can leave the pins in while you're sewing right up until the head of the pin is coming to the presser foot - because they will be too far to the left (assuming you choose to sew with raw edges to the right) to get hit by the needle. This helps me get better accuracy. And, those pins will be easier to remove as you sew. :)
Remember where we started to pin 3/8" in from the edge? Now it's time to take the excess zipper tape on the open end of the zipper - the part that extends past the metal stop - and turn it away from the body of the piece of fabric. Stick a pin in there - sideways - to hold it down until your machine tacks this into place.
Last little important detail: On the end of this temporary seam that we're going to make (that means before stitching it down) make a mark on the exterior about 3/4" in from the end of the exterior where the zipper pull is going to be when the dumpling is going to be open. This is where a picture is worth a 1,000 words…. Look at the next page…

Bionic Dumpling Fabric Dish
20
Move the zipper down and away from the raw edge starting at this 3/4" mark - as shown above. Notice the zipper is face down - and the exterior is RS up. Sew your temporary seams 1/8" away from the raw edges of the fabric - keeping that zipper tucked down on this end. (This will make sense later. Promise)
Tip: I don't have good luck putting pins in crosswise to the zipper. Pinning lengthwise - with needle points facing the machine - makes producing the seam easier.
Before you sew… make sure that your raw edges with the dart stitching are UP. Don't sew the bottom by mistake. (Yeah, I did that once during testing! Lol)
Using a zipper foot and a 3mm stitch, we're going to make the temporary seam to hold these two layers together before adding the next piece.
Make sure your needle position is correct for your machine so you don't slam into the foot and break a needle. :) (Ask me how I know this, too! Lol)
Bionic Dumpling Fabric Dish
21
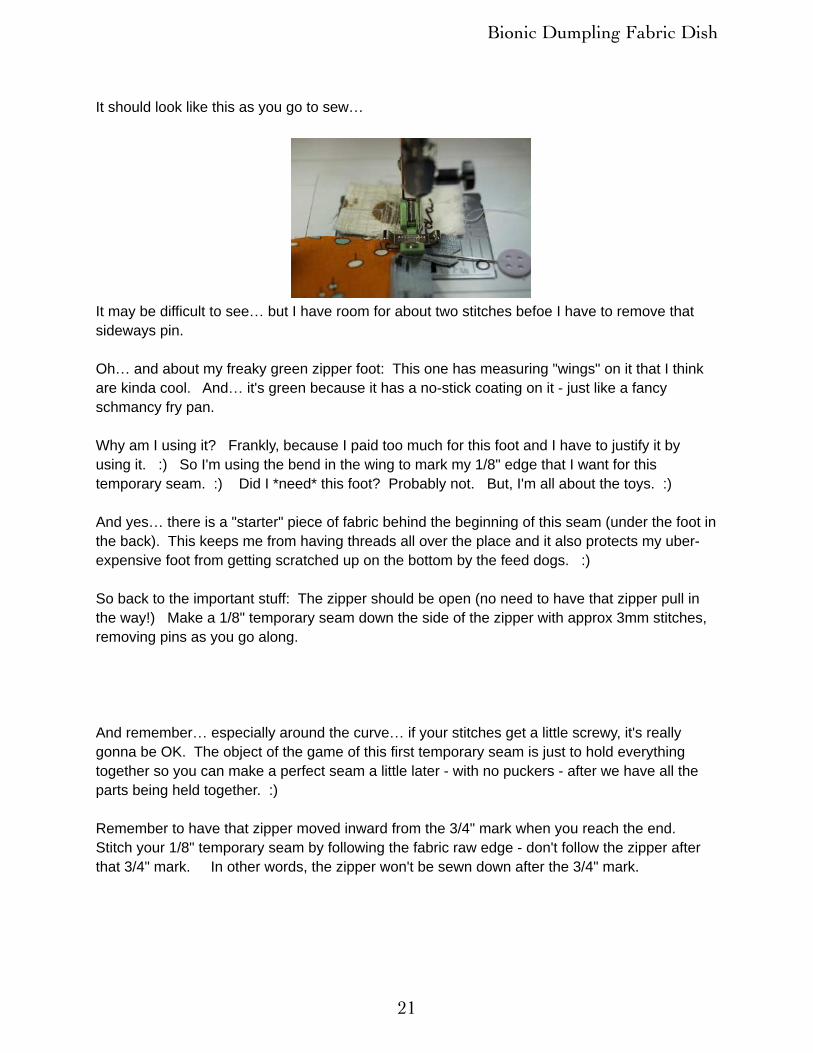
It should look like this as you go to sew…
It may be difficult to see… but I have room for about two stitches befoe I have to remove that sideways pin.
Oh… and about my freaky green zipper foot: This one has measuring "wings" on it that I think are kinda cool. And… it's green because it has a no-stick coating on it - just like a fancy schmancy fry pan.
Why am I using it? Frankly, because I paid too much for this foot and I have to justify it by using it. :) So I'm using the bend in the wing to mark my 1/8" edge that I want for this temporary seam. :) Did I *need* this foot? Probably not. But, I'm all about the toys. :)
And yes… there is a "starter" piece of fabric behind the beginning of this seam (under the foot in the back). This keeps me from having threads all over the place and it also protects my uber-expensive foot from getting scratched up on the bottom by the feed dogs. :)
So back to the important stuff: The zipper should be open (no need to have that zipper pull in the way!) Make a 1/8" temporary seam down the side of the zipper with approx 3mm stitches, removing pins as you go along.
And remember… especially around the curve… if your stitches get a little screwy, it's really gonna be OK. The object of the game of this first temporary seam is just to hold everything together so you can make a perfect seam a little later - with no puckers - after we have all the parts being held together. :)
Remember to have that zipper moved inward from the 3/4" mark when you reach the end.Stitch your 1/8" temporary seam by following the fabric raw edge - don't follow the zipper after that 3/4" mark. In other words, the zipper won't be sewn down after the 3/4" mark.

Bionic Dumpling Fabric Dish
22
See? My temp seam is even a little wonky…..
.
But isn't it cool that this is NOT your final seam all botched up like that??!? :) Seriously, it's just the pins that make everything get warped out.
Snip off the "flag" at the open end of the zipper.

Bionic Dumpling Fabric Dish
23
Now, place the desired lining piece RS together with the exterior piece.(this is the one that won't be as visible when the dumpling is open in your BGB - if that matters to you)
So the layers should look like this - if you're following my lead:
Zipper is openExterior piece (with zipper that we just temporarily sewed in) is fabric RS up Zipper is temporarily stitched down to Exterior piece - with zipper pull to your rightThe zipper pull is facing down. Teeth of zipper are facing downLining piece is RS down - facing the RS of Exterior pieceLike this:
Now repeat the pinning process like we did for the first side… or now you can just use WCs because that unruly zipper has been stitched down and will now behave itself. :) Match up the dart seams of the exterior and the lining and pin/WC those first.. And then get rest of the seam secured to ease in properly.
Remember - pull that zipper inward at the 3/4" mark.. You don't want to catch the zipper after
Bionic Dumpling Fabric Dish
24
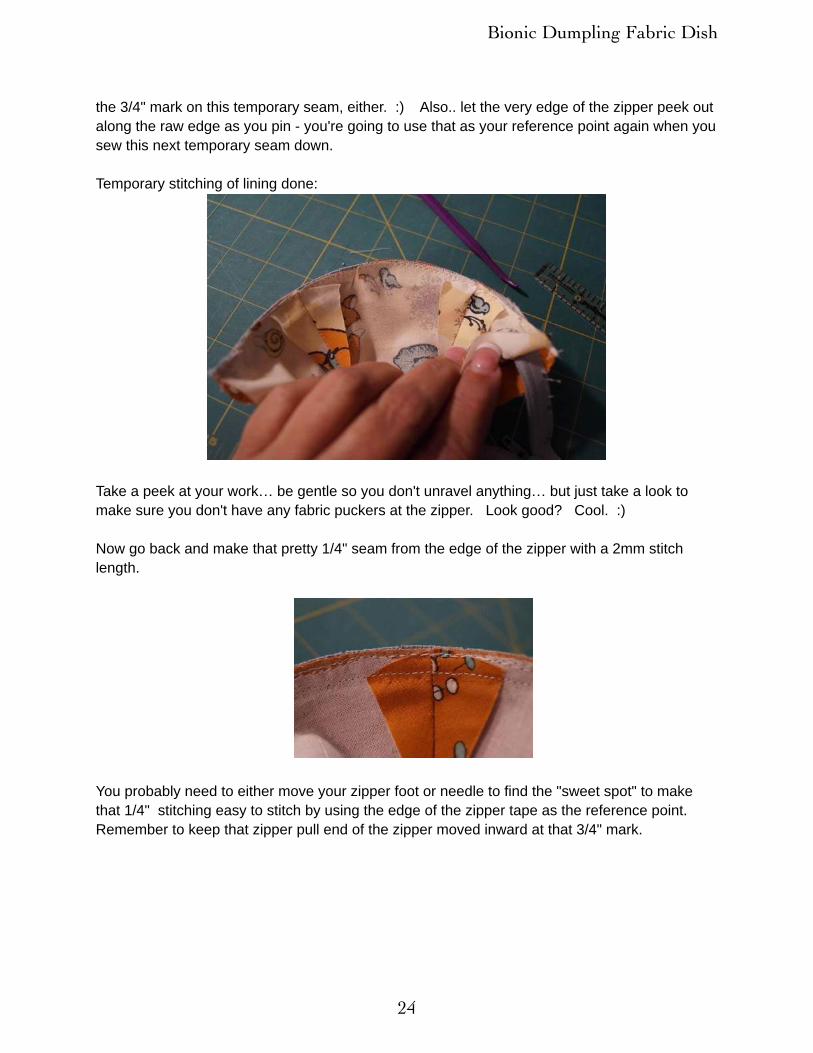
the 3/4" mark on this temporary seam, either. :) Also.. let the very edge of the zipper peek out along the raw edge as you pin - you're going to use that as your reference point again when you sew this next temporary seam down.
Temporary stitching of lining done:
Take a peek at your work… be gentle so you don't unravel anything… but just take a look to make sure you don't have any fabric puckers at the zipper. Look good? Cool. :)
Now go back and make that pretty 1/4" seam from the edge of the zipper with a 2mm stitch length.
You probably need to either move your zipper foot or needle to find the "sweet spot" to make that 1/4" stitching easy to stitch by using the edge of the zipper tape as the reference point. Remember to keep that zipper pull end of the zipper moved inward at that 3/4" mark.

Bionic Dumpling Fabric Dish
25
Turn RS out and press.
If it doesn't want to lay right, you might want to go in and clip the curve of the seam inside the most drastic curve of the top of the "arc" if you want it to behave better. Be careful not to cut that pretty 1/4" seam - but know that you can get close to it because we're going to top stitch that later - there won't be any stress on those seams on the zipper.
If you clipped - turn carefully and give one more quick press. Admire. :)
Yours should look something like this at this point:
Remember, the orange fabric is my EXTERIOR. The lighter fabric is the INTERIOR.
Bionic Dumpling Fabric Dish
26
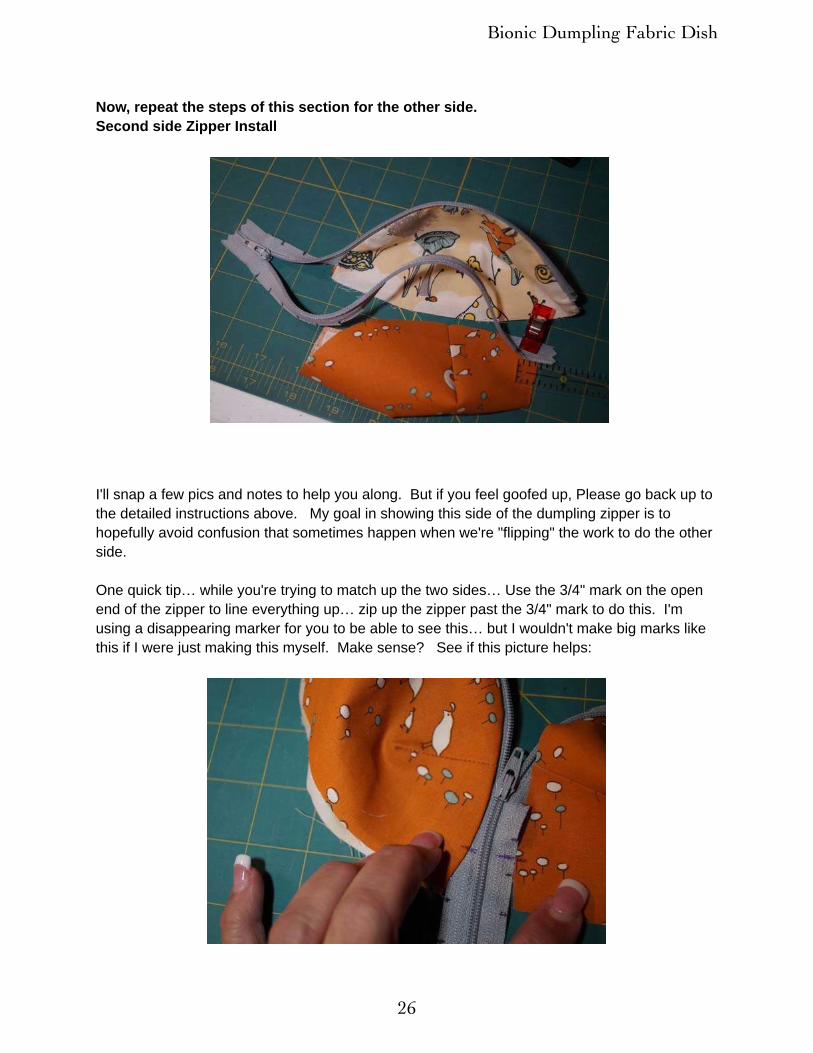
Now, repeat the steps of this section for the other side.Second side Zipper Install
I'll snap a few pics and notes to help you along. But if you feel goofed up, Please go back up to the detailed instructions above. My goal in showing this side of the dumpling zipper is to hopefully avoid confusion that sometimes happen when we're "flipping" the work to do the other side.
One quick tip… while you're trying to match up the two sides… Use the 3/4" mark on the open end of the zipper to line everything up… zip up the zipper past the 3/4" mark to do this. I'm using a disappearing marker for you to be able to see this… but I wouldn't make big marks like this if I were just making this myself. Make sense? See if this picture helps:
Bionic Dumpling Fabric Dish
27
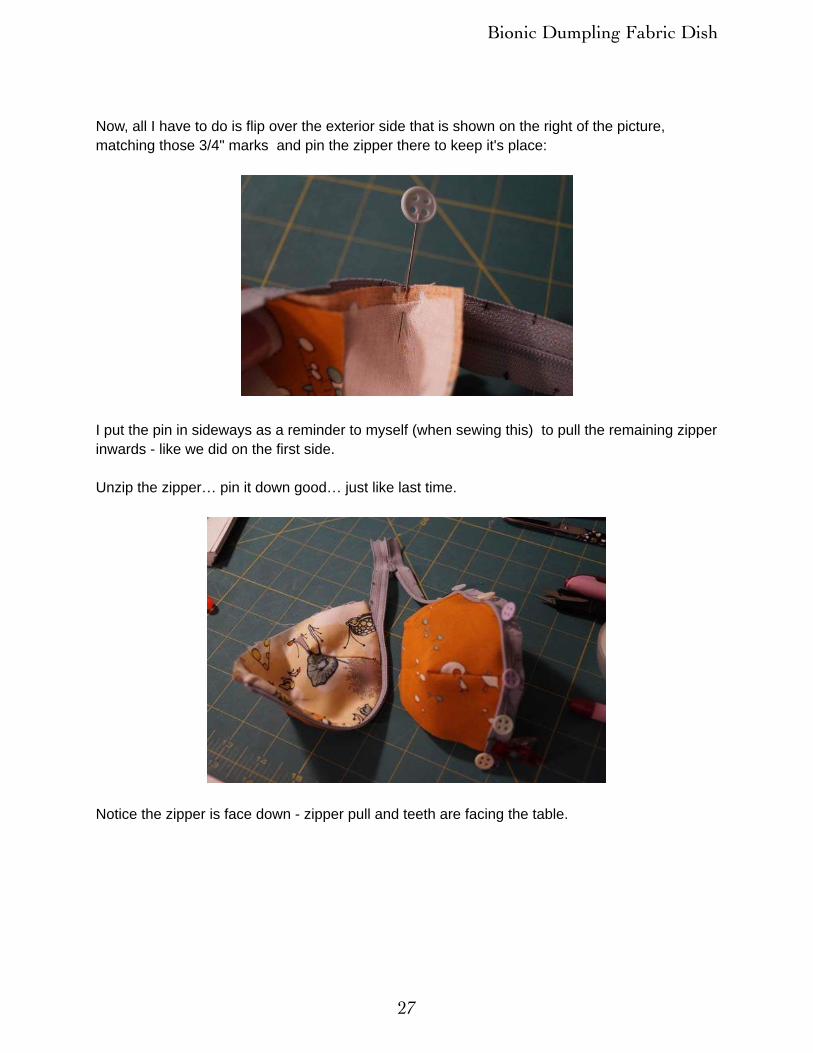
Now, all I have to do is flip over the exterior side that is shown on the right of the picture, matching those 3/4" marks and pin the zipper there to keep it's place:
I put the pin in sideways as a reminder to myself (when sewing this) to pull the remaining zipper inwards - like we did on the first side.
Unzip the zipper… pin it down good… just like last time.
Notice the zipper is face down - zipper pull and teeth are facing the table.

Bionic Dumpling Fabric Dish
28
Now last pinning step for this side: Fold out that end -extending it out the raw edge side …
I'm going to sew this side starting at the end where the 3/4" mark is… making sure to push the zipper inward and then start catching the zipper into the temporary 1/8" seam at the 3/4" mark :
Notice the zipper is pulled to the left… so my first stitches are 3/4" in from the edge behind my needle when I’m first starting this seam. Remember - use longer (3mm or so) stitches for the temp seams - just in case of boo-boo's.

Bionic Dumpling Fabric Dish
29
And here it is, done with first temp seam on second side. Note the zipper is face down - teeth & zipper pull are face down in this pic:
Just like we did on the other side: Trim flag off open end of zipper.
Put lining piece on top of zipper - RS of lining down - remember to match up dart seams to get proper placement:
Bionic Dumpling Fabric Dish
30
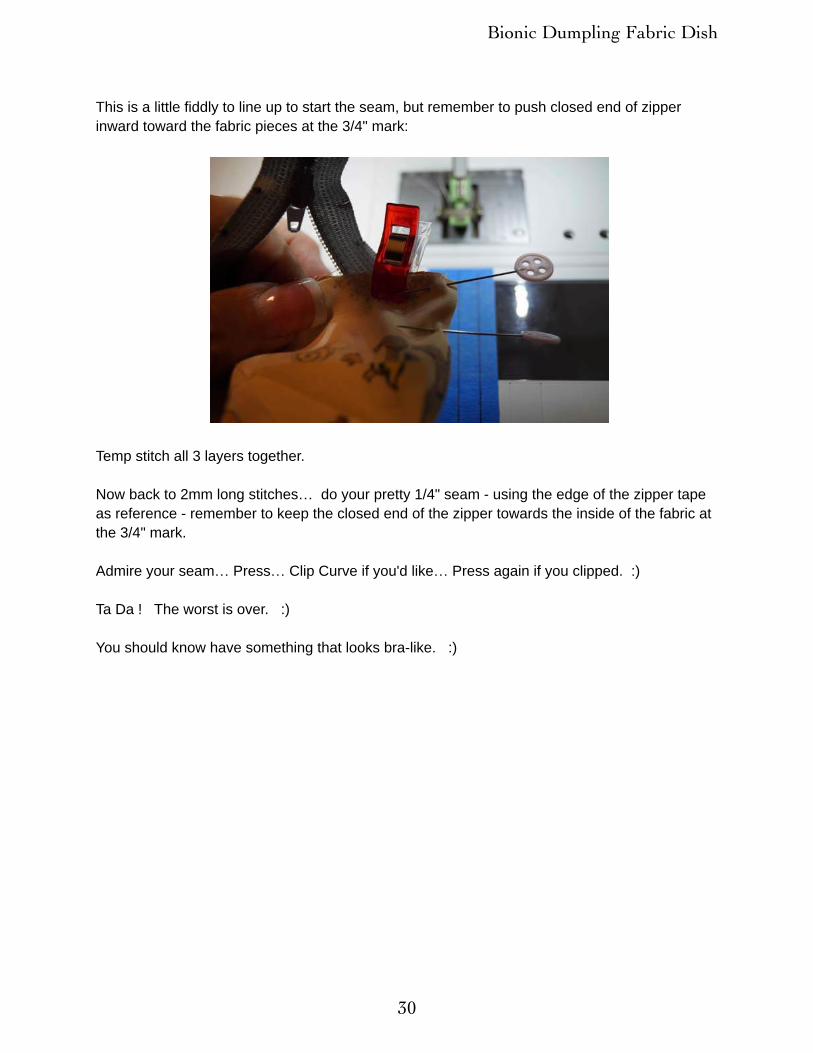
This is a little fiddly to line up to start the seam, but remember to push closed end of zipper inward toward the fabric pieces at the 3/4" mark:
Temp stitch all 3 layers together.
Now back to 2mm long stitches… do your pretty 1/4" seam - using the edge of the zipper tape as reference - remember to keep the closed end of the zipper towards the inside of the fabric at the 3/4" mark.
Admire your seam… Press… Clip Curve if you'd like… Press again if you clipped. :)
Ta Da ! The worst is over. :)
You should know have something that looks bra-like. :)
Bionic Dumpling Fabric Dish
31
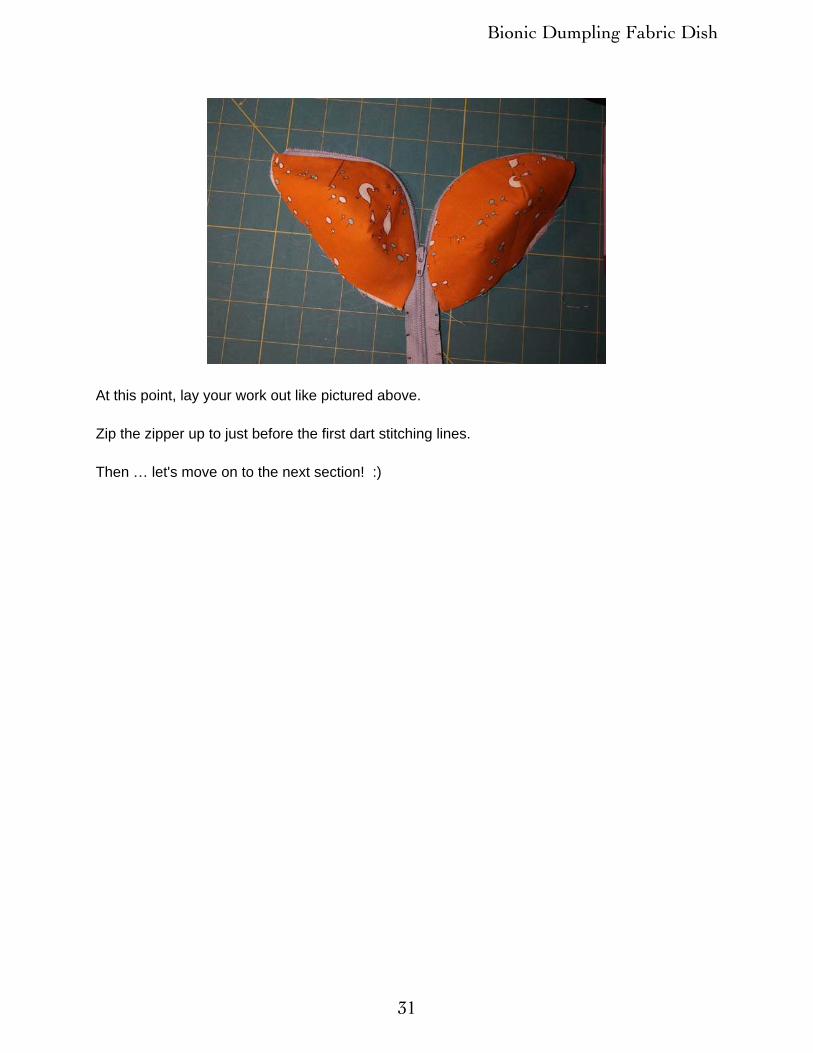
At this point, lay your work out like pictured above.
Zip the zipper up to just before the first dart stitching lines.
Then … let's move on to the next section! :)
Bionic Dumpling Fabric Dish
32
Section 5 - Bottom & Lining A) Sewing the bottom
Before you start… super important… make sure the zipper pull is now zipped in between the fabric pieces - BUT only far enough to clear the bottom edge enough so you can sew past the zipper pull as we sew up the bottoms. We're going to be doing some turning… and you need the zipper open, but still zipped up into the work a little ways, in order to do that.
See the last picture in the previous section if I've got you confused at this point. :)
1. Turn your piece so the RS of the exterior pieces are raw edges together. Pin the exterior raw edges together.
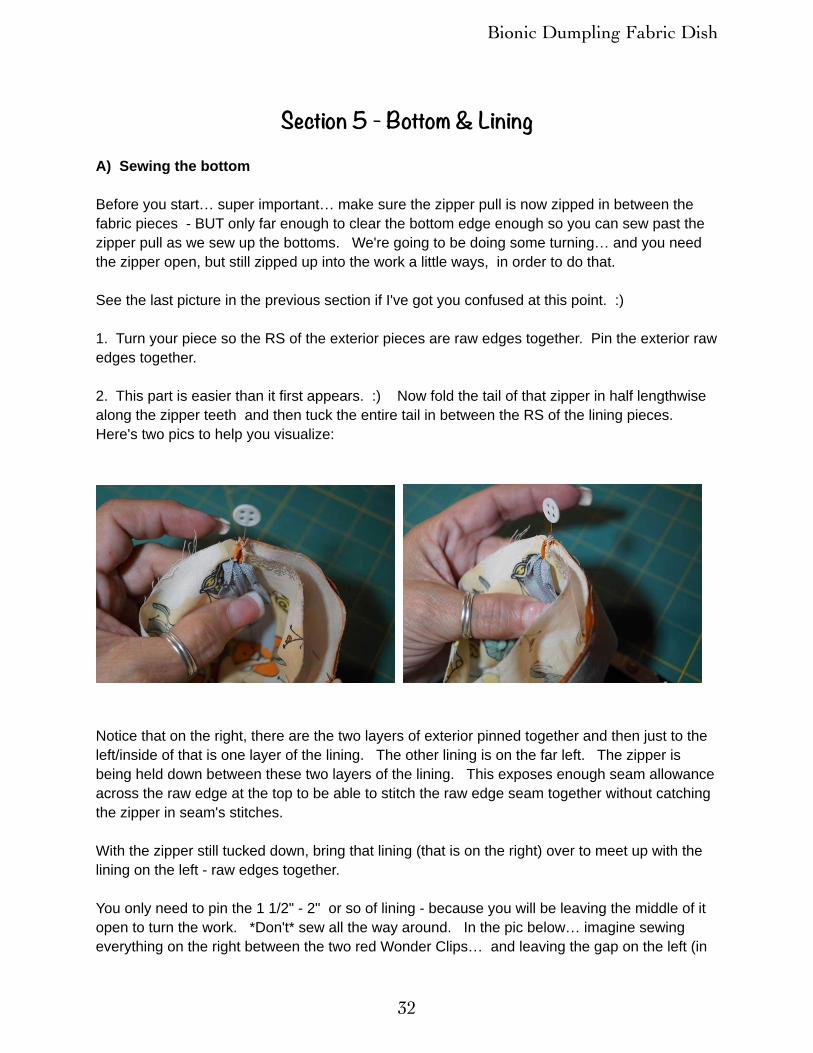
2. This part is easier than it first appears. :) Now fold the tail of that zipper in half lengthwise along the zipper teeth and then tuck the entire tail in between the RS of the lining pieces. Here's two pics to help you visualize:
Notice that on the right, there are the two layers of exterior pinned together and then just to the left/inside of that is one layer of the lining. The other lining is on the far left. The zipper is being held down between these two layers of the lining. This exposes enough seam allowance across the raw edge at the top to be able to stitch the raw edge seam together without catching the zipper in seam's stitches.
With the zipper still tucked down, bring that lining (that is on the right) over to meet up with the lining on the left - raw edges together.
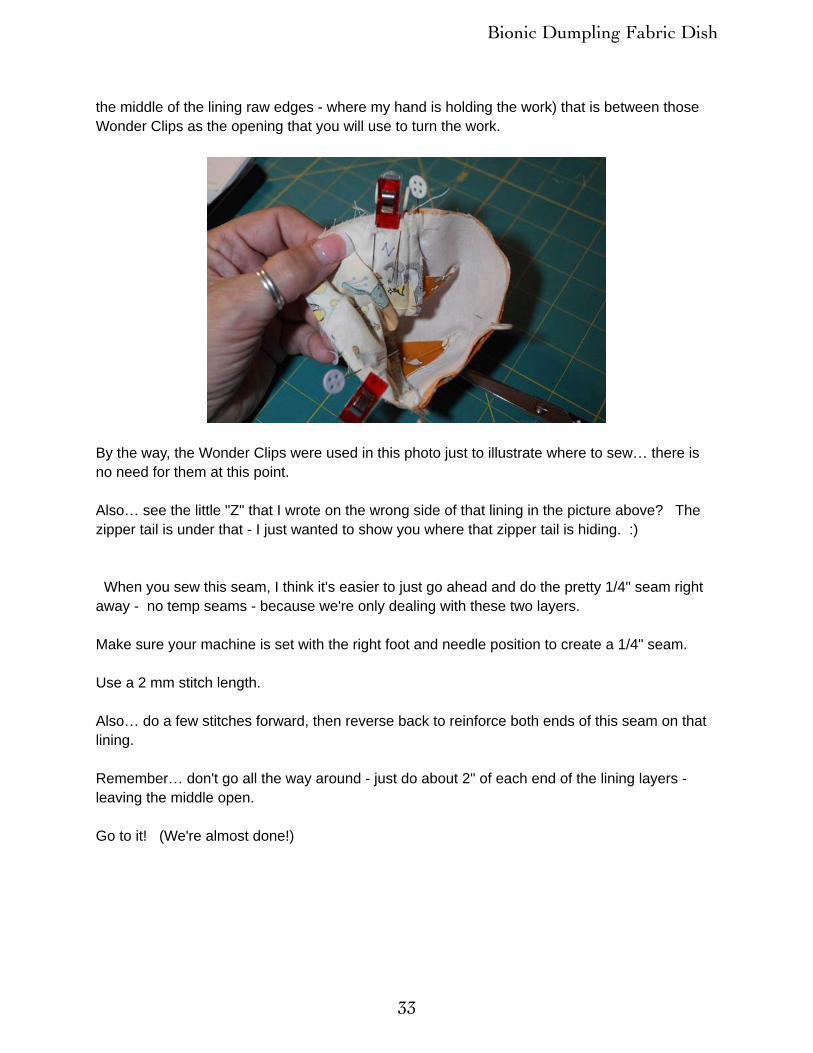
You only need to pin the 1 1/2" - 2" or so of lining - because you will be leaving the middle of it open to turn the work. *Don't* sew all the way around. In the pic below… imagine sewing everything on the right between the two red Wonder Clips… and leaving the gap on the left (in
Bionic Dumpling Fabric Dish
33
the middle of the lining raw edges - where my hand is holding the work) that is between those Wonder Clips as the opening that you will use to turn the work.
By the way, the Wonder Clips were used in this photo just to illustrate where to sew… there is no need for them at this point.
Also… see the little "Z" that I wrote on the wrong side of that lining in the picture above? The zipper tail is under that - I just wanted to show you where that zipper tail is hiding. :)
When you sew this seam, I think it's easier to just go ahead and do the pretty 1/4" seam right away - no temp seams - because we're only dealing with these two layers.
Make sure your machine is set with the right foot and needle position to create a 1/4" seam.
Use a 2 mm stitch length.
Also… do a few stitches forward, then reverse back to reinforce both ends of this seam on that lining.
Remember… don't go all the way around - just do about 2" of each end of the lining layers - leaving the middle open.
Go to it! (We're almost done!)
Bionic Dumpling Fabric Dish
34
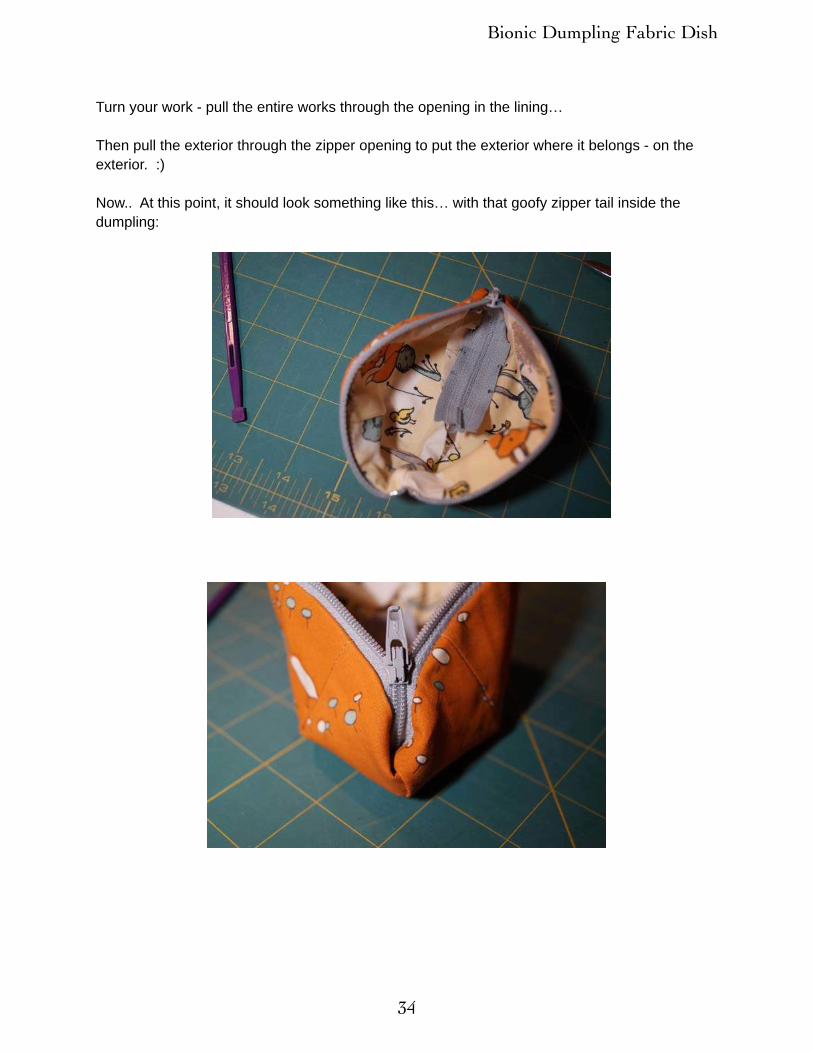
Turn your work - pull the entire works through the opening in the lining…
Then pull the exterior through the zipper opening to put the exterior where it belongs - on the exterior. :)
Now.. At this point, it should look something like this… with that goofy zipper tail inside the dumpling:
Bionic Dumpling Fabric Dish
35
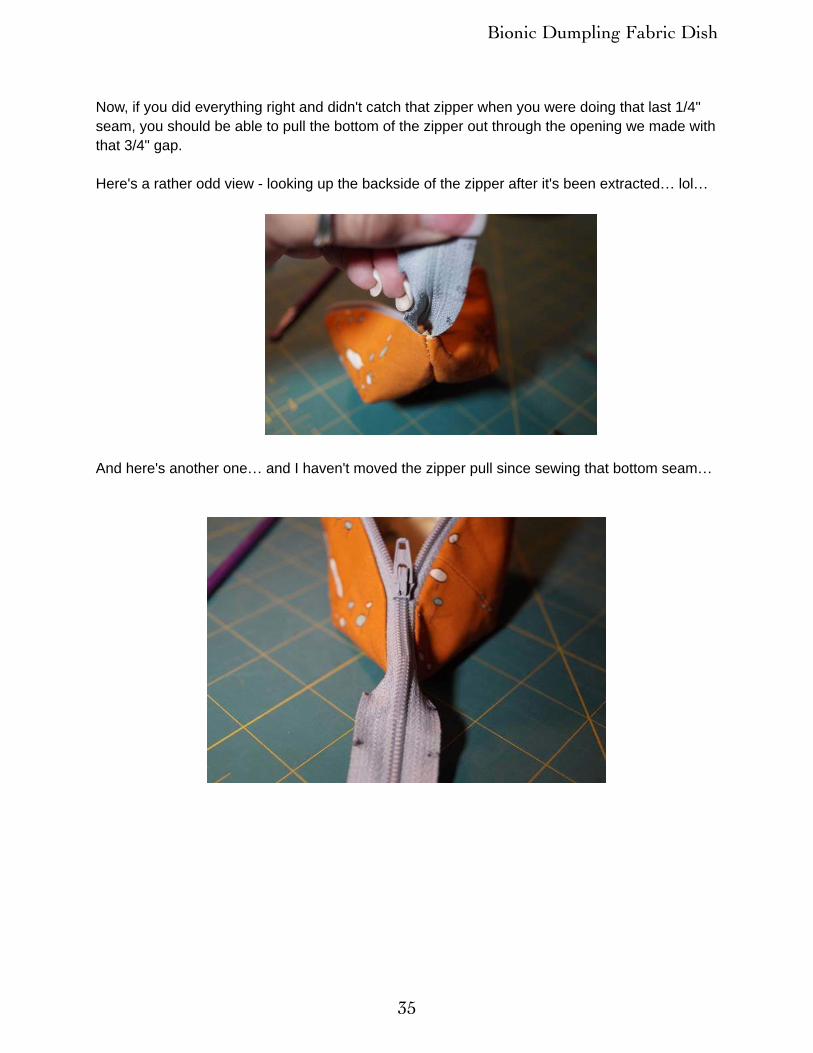
Now, if you did everything right and didn't catch that zipper when you were doing that last 1/4" seam, you should be able to pull the bottom of the zipper out through the opening we made with that 3/4" gap.
Here's a rather odd view - looking up the backside of the zipper after it's been extracted… lol…
And here's another one… and I haven't moved the zipper pull since sewing that bottom seam…

Bionic Dumpling Fabric Dish
36
To pretty up this end of the zipper…
First, move the zipper pull back just far enough to reach the point that you will be able to see your dish turn into a nice bowl shape…. Like this:
PS… see?!?!? I told you that fox would show up to be super cute inside this dumpling! :)
And this next picture shows how the zipper pull needs to be pulled back - over the “rim” of the bowl so it will lay down on the exterior of the dish when the zipper is open:
Bionic Dumpling Fabric Dish
37
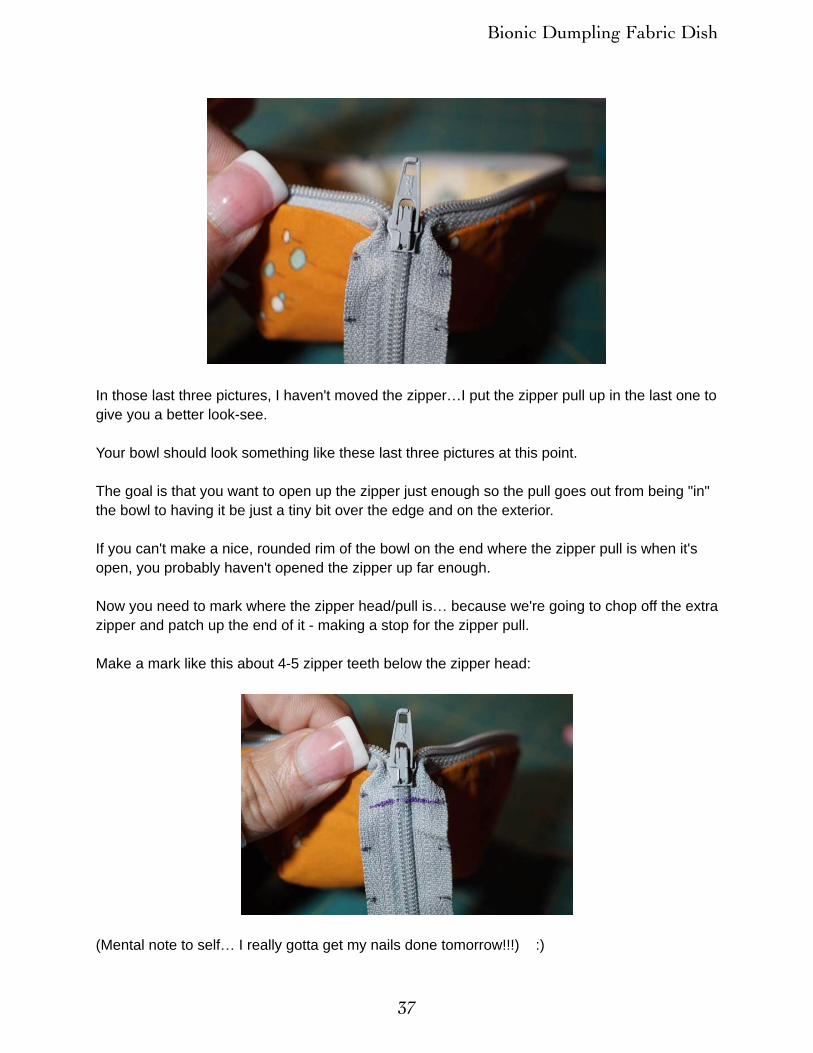
In those last three pictures, I haven't moved the zipper…I put the zipper pull up in the last one to give you a better look-see.
Your bowl should look something like these last three pictures at this point.
The goal is that you want to open up the zipper just enough so the pull goes out from being "in" the bowl to having it be just a tiny bit over the edge and on the exterior.
If you can't make a nice, rounded rim of the bowl on the end where the zipper pull is when it's open, you probably haven't opened the zipper up far enough.
Now you need to mark where the zipper head/pull is… because we're going to chop off the extra zipper and patch up the end of it - making a stop for the zipper pull.
Make a mark like this about 4-5 zipper teeth below the zipper head:
(Mental note to self… I really gotta get my nails done tomorrow!!!) :)
Bionic Dumpling Fabric Dish
38
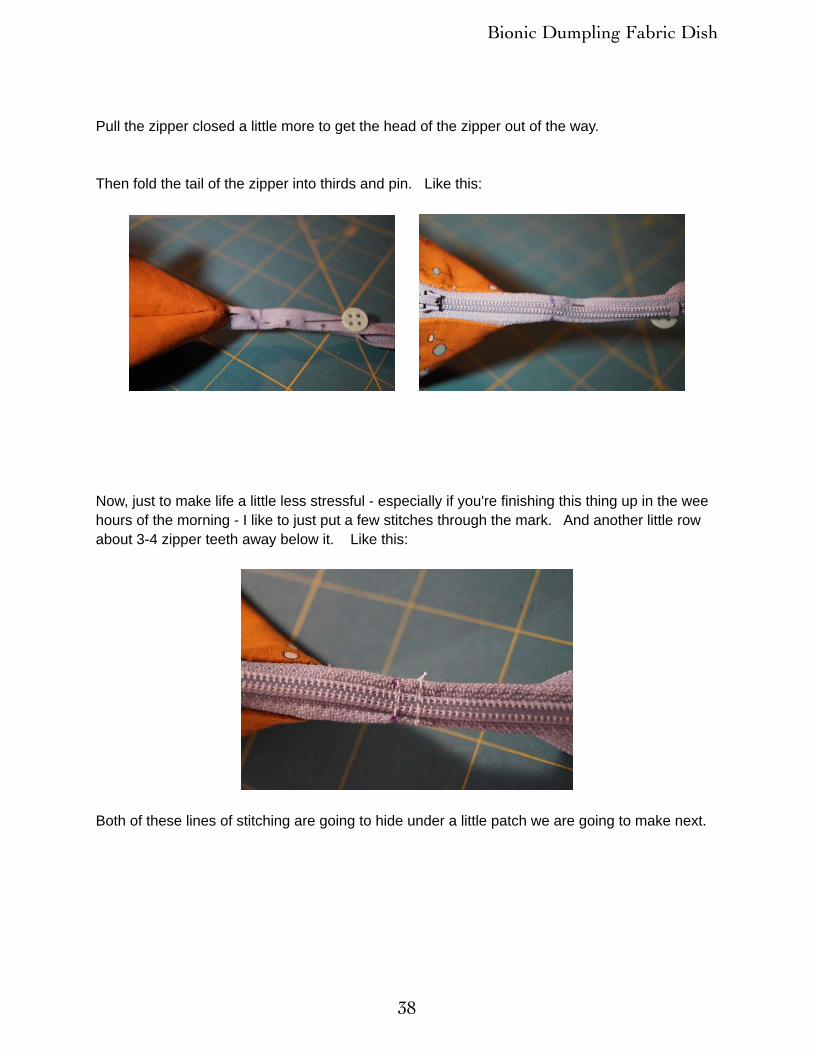
Pull the zipper closed a little more to get the head of the zipper out of the way.
Then fold the tail of the zipper into thirds and pin. Like this:
Now, just to make life a little less stressful - especially if you're finishing this thing up in the wee hours of the morning - I like to just put a few stitches through the mark. And another little row about 3-4 zipper teeth away below it. Like this:
Both of these lines of stitching are going to hide under a little patch we are going to make next.
Bionic Dumpling Fabric Dish
39
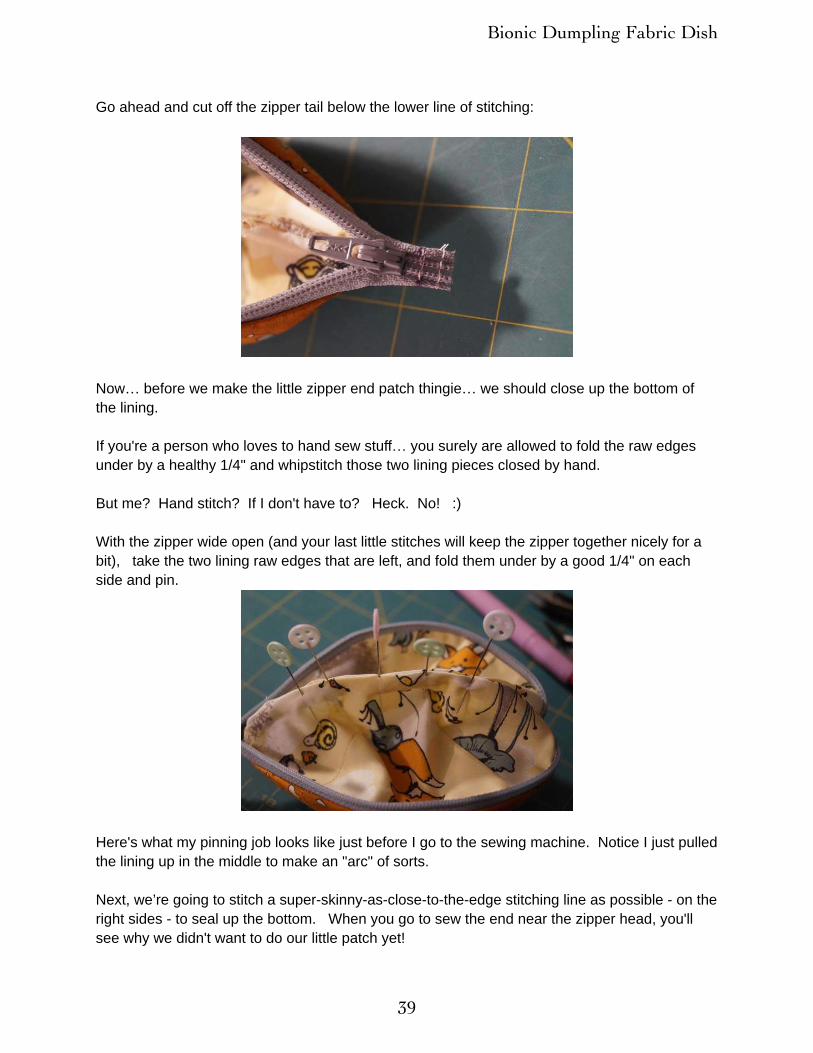
Go ahead and cut off the zipper tail below the lower line of stitching:
Now… before we make the little zipper end patch thingie… we should close up the bottom of the lining.
If you're a person who loves to hand sew stuff… you surely are allowed to fold the raw edges under by a healthy 1/4" and whipstitch those two lining pieces closed by hand.
But me? Hand stitch? If I don't have to? Heck. No! :)
With the zipper wide open (and your last little stitches will keep the zipper together nicely for a bit), take the two lining raw edges that are left, and fold them under by a good 1/4" on each side and pin.
Here's what my pinning job looks like just before I go to the sewing machine. Notice I just pulled the lining up in the middle to make an "arc" of sorts.
Next, we’re going to stitch a super-skinny-as-close-to-the-edge stitching line as possible - on the right sides - to seal up the bottom. When you go to sew the end near the zipper head, you'll see why we didn't want to do our little patch yet!

Bionic Dumpling Fabric Dish
40
After stitching, it should look something like this:
And this….
Are you in awe of yourself, yet? If not, you should be. :)
Now let's go do the final step in the next section!

Bionic Dumpling Fabric Dish
41
Section 6 - Zipper Patch
Let me take a minute to tell you what a hassle this was! LOL
I tried so hard to find a way to install this zipper without doing this step!
But here's what I wanted:
1. The finished bowl had to be able to take the shape of truly being *round* and look like a cute little bowl… and *not* look like a fish that got opened up like my first attempt wound up being! (I've got pics of that somewhere - it worked, but omigosh, it looked terrible! Lol)
2. When closed, there couldn't be any gaps between the zipper ends and the fabric of the dish. The primary idea when I was first messing with doing one of these was for knitting notions. Some of the stuff knitters carry is *really* small - especially stitch markers and those itty bitty baby safety pins that some knitters use. So that ruled out some of the other zipper installs you see on pouches or bags that are able to open up wide. All that I've seen have a hole on at least one end. So back to the drawing board.
So after trying a few different things, it wound up that the best result to get the desired shape came from attaching the end of the zipper to the exterior of the bowl so the zipper head could move slightly over the "rim" of the bowl. The patch to cover the zipper tail stub wound up creating more roundness.
So that’s the story. :)
A) Making the zipper patch.
The object of the game here is to try to stay cute while performing the function of covering that ugly zipper tail stub. :)
Bionic Dumpling Fabric Dish
42
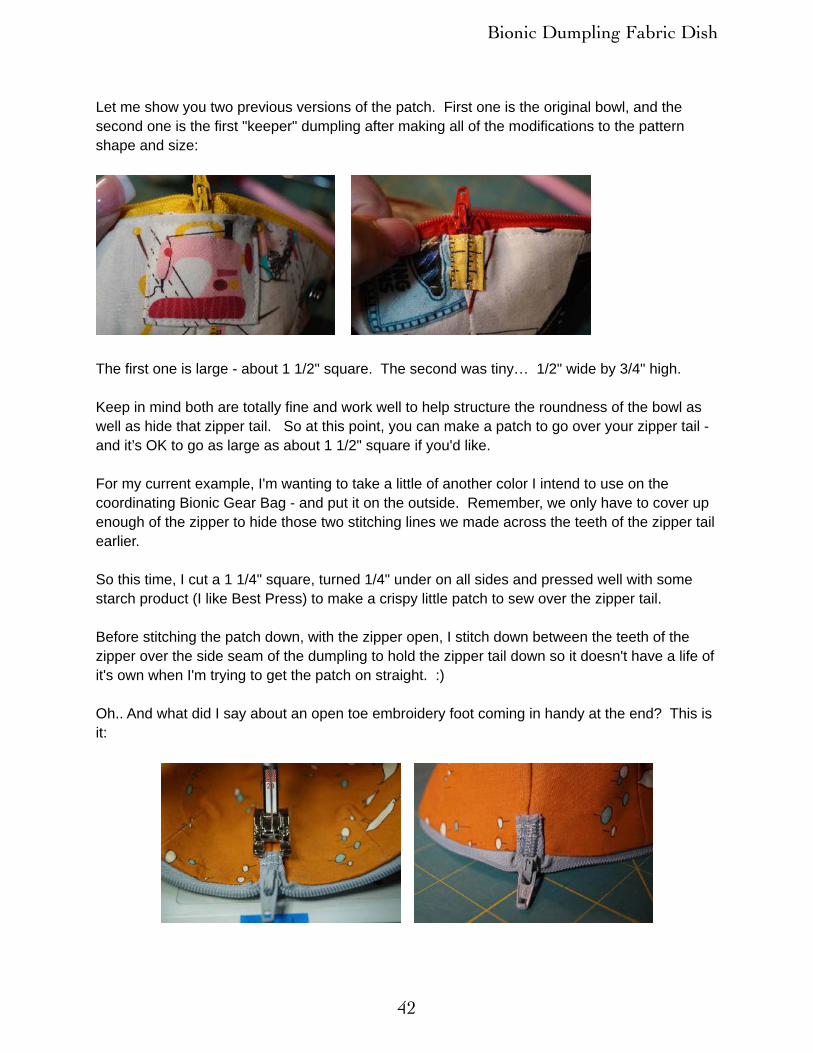
Let me show you two previous versions of the patch. First one is the original bowl, and the second one is the first "keeper" dumpling after making all of the modifications to the pattern shape and size:
The first one is large - about 1 1/2" square. The second was tiny… 1/2" wide by 3/4" high.
Keep in mind both are totally fine and work well to help structure the roundness of the bowl as well as hide that zipper tail. So at this point, you can make a patch to go over your zipper tail - and it’s OK to go as large as about 1 1/2" square if you'd like.
For my current example, I'm wanting to take a little of another color I intend to use on the coordinating Bionic Gear Bag - and put it on the outside. Remember, we only have to cover up enough of the zipper to hide those two stitching lines we made across the teeth of the zipper tail earlier.
So this time, I cut a 1 1/4" square, turned 1/4" under on all sides and pressed well with some starch product (I like Best Press) to make a crispy little patch to sew over the zipper tail.
Before stitching the patch down, with the zipper open, I stitch down between the teeth of the zipper over the side seam of the dumpling to hold the zipper tail down so it doesn't have a life of it's own when I'm trying to get the patch on straight. :)
Oh.. And what did I say about an open toe embroidery foot coming in handy at the end? This is it:
Bionic Dumpling Fabric Dish
43
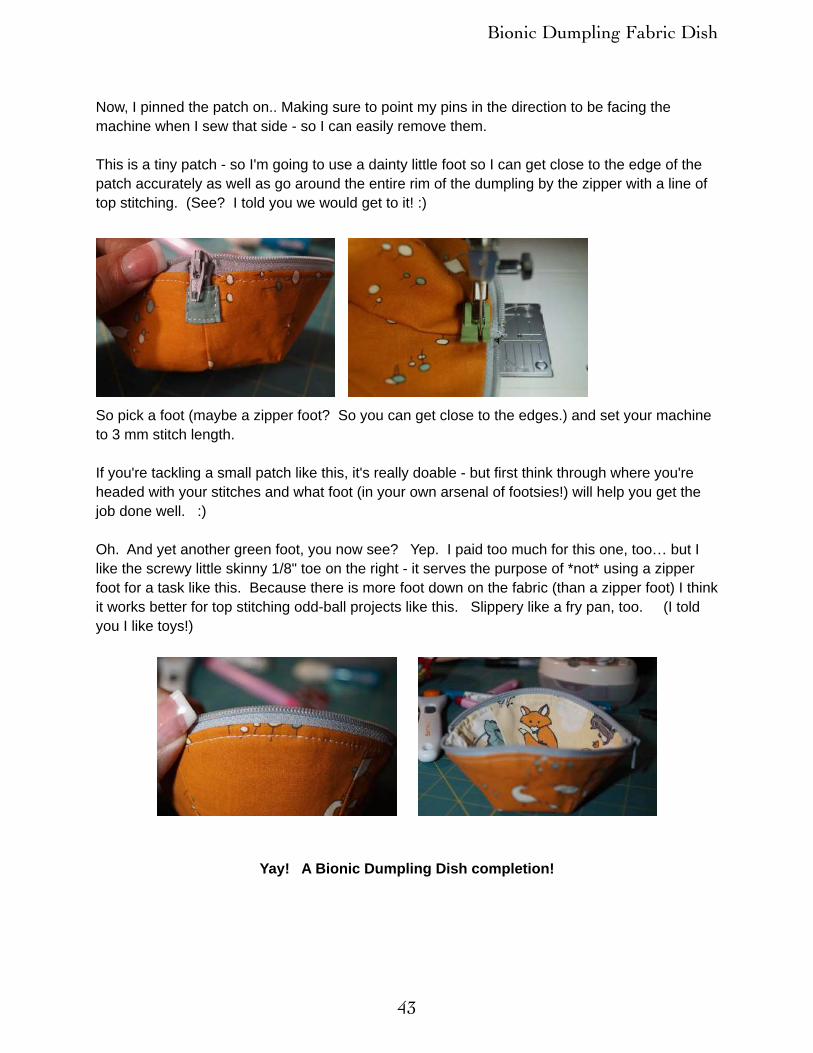
Now, I pinned the patch on.. Making sure to point my pins in the direction to be facing the machine when I sew that side - so I can easily remove them.
This is a tiny patch - so I'm going to use a dainty little foot so I can get close to the edge of the patch accurately as well as go around the entire rim of the dumpling by the zipper with a line of top stitching. (See? I told you we would get to it! :)
So pick a foot (maybe a zipper foot? So you can get close to the edges.) and set your machine to 3 mm stitch length.
If you're tackling a small patch like this, it's really doable - but first think through where you're headed with your stitches and what foot (in your own arsenal of footsies!) will help you get the job done well. :)
Oh. And yet another green foot, you now see? Yep. I paid too much for this one, too… but I like the screwy little skinny 1/8" toe on the right - it serves the purpose of *not* using a zipper foot for a task like this. Because there is more foot down on the fabric (than a zipper foot) I think it works better for top stitching odd-ball projects like this. Slippery like a fry pan, too. (I told you I like toys!)
Yay! A Bionic Dumpling Dish completion!

Bionic Dumpling Fabric Dish
44
Bionic Dumpling Fabric Dish
45
Congratulations!
…. And thanks again!
Thanks so much for purchasing this pattern. Lots of work and love went into it…And I’m still not done. I truly want to make this into an awesome teaching project by utilizing bionicgearbag.com .
I truly hope you enjoyed your time with me. While my life has been a little chaotic (that’s an understatement!) since launching the Bionic Gear Bag pattern, I’ve been truly enjoying the emails & phone calls I’ve had with other sewers all over the globe. It’s truly been a joyful thing!
A word about selling finished items while I have you here …. :) ….
There is so much mis-information out there about this topic. While I’m not a lawyer, everything I’ve read sure seems to point the fact that when you make an item, it’s *yours*.
So for my items, there is no question that you are allowed to personally sew this item and sell the finished products… after all, once you make it, it is on the planet only because of you … and it is your property to do with whatever you’d like, isn’t it? I personally don’t see a difference between giving one away as a gift or selling one to someone.
I’m looking into having some of my items made up for sale by a group of women in Cambodia. There, it’s common for sewers to earn about $2 a day. It’s shameful. So I’m investigating the possibility of my items being made there - but the people, working through a certain church group that is sourcing work for them, would earn more like $10-15 a day. Stay tuned on that. :)
Please respect the work that went into this. Redistributing/sharing the pattern and mass commercial production of the finished product in some third world country is still a no-no.
Please check out bionicgearbag.com for any special offers & to sign up on my email list.
And the new site, SewMuchNicer.com , is in the works. Stay tuned. :)
Thanks again,
Sally
Aka: RipStitcher www.bionicgearbag.com Instagram (join me there!): RipStitcherFacebook: facebook.com/officialsewmuchnicer Email: [email protected]

Bionic Dumpling Dish© 2014 Sally Thompsonwww.bionicgearbag.com
Cut o
n Fo
ld o
f Fab
ric
Top
Bottom
Cut 2 Exterior FabricCut 2 Lining FabricCut 2 Interfacing
Dart