Biology Lab Practical Review Biology 1110 Instructor: Kate ...

1
Biology Practical
BIOLOGY
Notes
Biology Practical
Introduction
As in any other science subject, practicals have an important role in Biology too. Thepurpose of teaching biology is not only to acquaint the learner with biological terms, facts,concepts and principles but also to prepare him/her to understand these concepts by doingexercises relating to them. Self experience not only eliminates doubts and misbeliefs inone’s mind but also generates an interest in the subject. The present practical course thusconsiders practical work as an integral part of the biology curriculum at Senior Secondarystage.
1. THE OBJECTIVES OF BIOLOGY PRACTICALS
The objectives of biology practicals are to :
� develop practical skill for better understanding through first hand experience;
� demonstrate the principles covered in the theory;
� develop observational skill in the form of identifying and locating desired parts inspecimen;
� develop manipulative skills in arranging and handling the apparatus and instrumentsand taking readings on them;
� collect material and to mount it and to develop skill in preserving biological materialand specimens;
� draw, label and record experimental results and interpret them;
Through practical work, not only the theoretical concepts are tested but also it trainsyou in the scientific method.
2. THE FORMAT OF THIS MANUAL
The exercises presented in this manual are in the form of self-instructional material. Eachexercise in the manual has the following format:
1. Aim : It defines the scope of the exercise.
2. Introduction : It describes the purpose of the experiment.
3. Objectives : The objective of an experiment gives you an idea about the skills andknowledge to be developed after performing that experiment.

BIOLOGY
Biology Practical
2
Notes
Biology Practical
4. What you should know : It highlights the concepts and background knowledgerelating to the experiment, which should be known to you in order to perform theexperiment in a meaningful manner.
5. Materials required: Listed various materials, apparatus etc. required to carry outthe exercise.
6. How to proceed : It includes the steps to perform an experiment in a sequentialmanner.
7. Precautions : The precautions to be taken in carrying out the exercise are listedhere. Any specific precaution wherever necessary is listed at the relevant step of theexercise.
8. Observation and Documentation : A detailed format of observations, step by stepand their recording is given in observation and documentation. An effort has beenmade to adopt a self-interactive method of recording these observations.
9. Diagrams, wherever necessary, are given in each exercise and it is advisable that thestudents should compare the diagrams with the actual one as seen in the slide/specimen etc.
10. For the teacher : The teacher will help you to perform an experiment.
3. HOW TO USE THIS MANUAL
This manual consists of the following parts :
– Illustrative step-by-step instructions for doing the practical.
– Worksheets for recording observations and answering related questions.
Use the manual in the following way for performing the practicals.
1. Read the aim of the experiment carefully. Try to understand what is required to bedone.
2. Get ready by collecting all materials required for the.exercise.
3. Read the instructions given in the procedure step by step and keep following theinstructions.
4. Wherever “observe” comes, carry out the observation and fill up the observationsin the space provided for observations and documentation or in your notebook. Thesequence of different observations is indicated by numbers 1,2,3 etc. Recordobservations in the correct sequence. Try noting down the observations then and thereinstead of doing it later. Draw the diagrams as you actually see them. Only the partof the specimen should be drawn which is asked for.
5. Apart from the general precautions to be taken while working in a laboratory alsofollow the precautions given either at the end or in between the instruction steps foreach practical within box. Do not avoid these precautions if you want better resultsas they are very specific for the particular experiment.

3
Biology Practical
BIOLOGY
Notes
Biology Practical
6. Complete the worksheet for each experiment. You will find that the worksheet isbased on your observations and also on the theoretical knowledge which you havestudied in the study material.
7. Reference of the books has been given wherever necessary. After doing the practicalsyou may go back and study the book once again for better understanding.
8. Keep your record book neat and clean as it is an important material for practicalexamination. Three marks are allocated for keeping proper records of practicals.
9. Do not forget to carry your manual with you when you go for the practical work.
Once again the steps involved in performing a practical are listed below in the chartto help you do the practicals.
Read instructions → Follow each → Makecarefully step observations
Get it evaluated ← Complete ← Note down allworksheet observations
|↓
Prepare a Record Book
4. SAFETY IN THE LABORATORY (DO’S AND DON‘TS)
The following precautions and care should be taken while working in the biologylaboratory :
(i) The students should be well aware of the exercise they are going to perform inthe laboratory.
(ii) The instruments, glassware and any other equipment should be kept clean at itsproper place before and after its use.
(iii) The microscope and other delicate instruments should be handled gently andproperly and should be atleast 5 inches from the edge of the table to avoid itsknocking off accidently.
(iv) Do not throw any broken glassware in the sink. It should be thrown in the dustbin.
(v) Whenever working with the sharp instrument as blade/scalpel etc, be careful notto cut or puncture your skin.
(vi) Do not inhale, never taste or apply stain or any chemical as it may harm.
(vii) Never eat in the laboratory to avoid infection.

BIOLOGY
Biology Practical
4
Notes
Biology Practical
5. MAINTENANCE OF RECORD BOOK
We hope you will follow the instructions listed in each experiment while performing itand record your observations in your notebook. You may use following style for writingthe exercise in your record book.
� Aim of the exercise.
� Materials and method used for performing the exercise.
� Procedure followed.
� Observations which you made during performing the exercise and diagram whereverasked.
� Precautions taken during experimentation.
6. SCHEME OF PRACTICAL EXAMINATION
There will be a practical examination of three hours duration carrying 20 marks. Thedistribution of marks is as follows:
(i) Performing an experiment 4 marks
(ii) Submitting a project report 3 marks
(iii) Identification of given samples 4 marks(4 samples)
(iv) Preparing mounts 3 marks
(v) Maintenance of Record Book 3 marks
(vi) Viva Voce 3 marks
Total 20 marks

5
Biology Practical
BIOLOGY
Notes
Biology Practical
Exercise 1
SOME COMMON INSTRUMENTS
There are some instruments,which you will use frequently while working in the laboratory.One of these is the compound microscope.
(i) Compound Microscope
Know your microscope
It is an indispensable instrument in a Biology laboratory. Study the diagram of themicroscope and compare it with an actual one in the laboratory.
Eye-Piece : Contains lenses to increasemagnification.
Body Tube : Holds lenses of eyepiece andobjectives at proper working distance from eachother.
Arm : Supports body tube and coarse adjustment.
Nose-Piece : Permits interchange of low and highpowered objectives.
Coarse Adjustment : Moves body tube up anddown to the correct distance from the specimenfor focussing the object.
Objective : Contains lenses of differentmagnification as 10X, 40X etc.
Stage : Supports slide over hole that admits lightfrom mirror below.
Diaphragm : Regulates amount of light passingthrough the specimen.
Stage Clips : Hold slide firmly in place.
Base : Firm support bearing weight of microscope.
Mirror : Reflects light upward through diaphragmand hole in stage.
Fine Adjustment : Permits exact focussing bymoving stage or body tube up or down veryslightly.
Inclination Joint : Permits tilting to adjust the eyelevel.

BIOLOGY
Biology Practical
6
Notes
Biology Practical
Using the microscope
� Always use both hands when carrying the microscope, one hand beneath the baseand the other holding the arm of the microscope in an upright position to be check.Walk, holding the microscope close to your body.
� Set the microscope at least 5 inches from the edge of the table to avoid its knockingoff accidently.
� Always clean the lenses and mirror of the microscope with the lens paper/ cloth.Otherwise there might be scratches on them.
� Adjust the mirror by slightly tilting it and by seeing through the eye piece so thatsufficient light enters the microscope when you view under low magnificationobjectives.
� Place the prepared slide directly over the hole in the stage.
� Secure the slide on the stage with the stage clips to prevent accidental movementof the slide.
� Look through the eye piece and slowly bring the low magnification objective towardsthe material by using the coarse adjustment until the specimen comes into view.
� To change to high power, rotate the nose-piece to bring the high power objectivein position (taking precaution that the body tube does not move up or down).
� Look through the eye piece, if the light is insufficient, open out the diaphragm slightly.
� Gently raise the objective by using fine adjustment. If the image worsens withoutimproving, start lowering the objective by the same fine adjustment. (Do not usecoarse adjustment while viewing under high power). By gently moving up anddown you will be able to get a clear focus.
� While removing the slide from the stage release the spring clips. Do not allow thestage clips to extend out of the stage.
� When work gets over, rotate nose piece such that the objective lens is not over thehole in the stage.
� When not in use keep it covered by a polythene cover and/or lock it in its box.
(ii) A simple hand lens
� Contains a single double convexlens mounted on a handle.
� Can magnify things four to fivetimes.
� Used for smaller magnification.
7
Biology Practical
BIOLOGY
Notes
Biology Practical
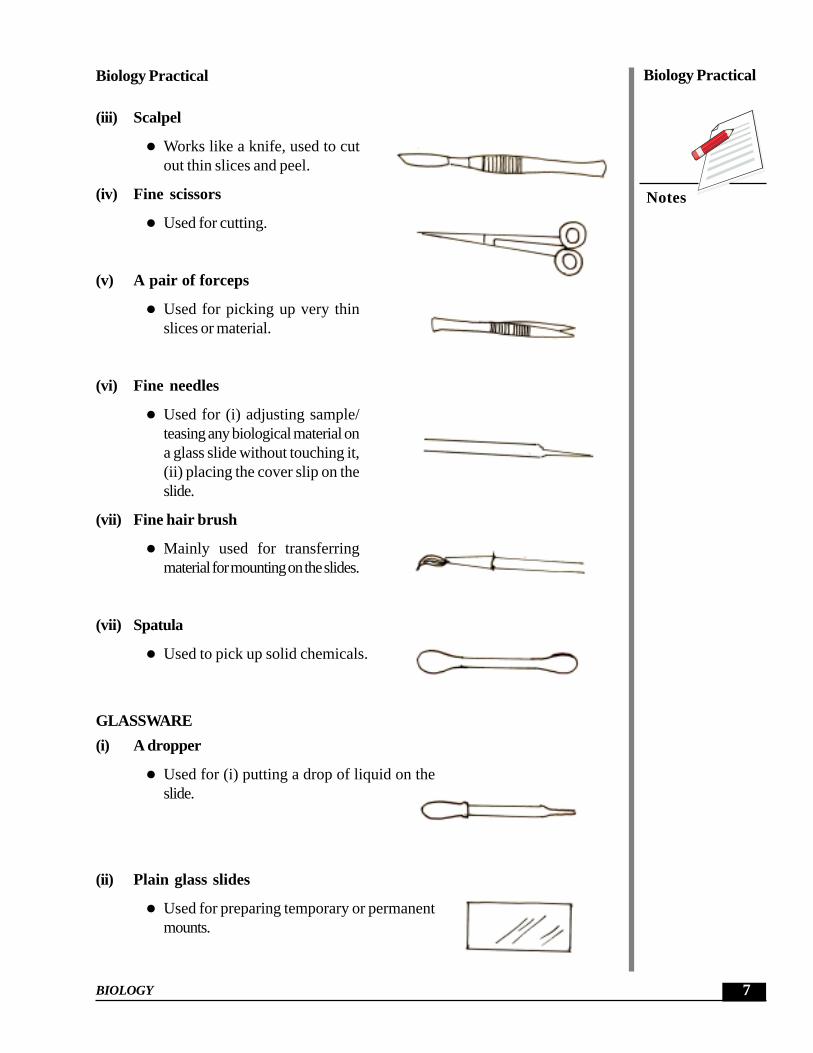
(iii) Scalpel
� Works like a knife, used to cutout thin slices and peel.
(iv) Fine scissors
� Used for cutting.
(v) A pair of forceps
� Used for picking up very thinslices or material.
(vi) Fine needles
� Used for (i) adjusting sample/teasing any biological material ona glass slide without touching it,(ii) placing the cover slip on theslide.
(vii) Fine hair brush
� Mainly used for transferringmaterial for mounting on the slides.
(vii) Spatula
� Used to pick up solid chemicals.
GLASSWARE
(i) A dropper
� Used for (i) putting a drop of liquid on theslide.
(ii) Plain glass slides
� Used for preparing temporary or permanentmounts.

BIOLOGY
Biology Practical
8
Notes
Biology Practical
(iii) Cover slips (Very thin glass cover)
� Used for covering the material placed on glassslide to be observed under the microscope.This protects the objective lens.
(iv) Petridish
� Is a shallow dish often with a cover.
� Used for soaking specimen for thepurpose of preservation, staining etc.Also used to keep a medium on whichbacteria or small organisms may becultured.
(v) Beaker
� Available in various sizes like 100 ml and 250ml etc.
� Used for preparing and storing chemicals andperforming experiments.
(vi) Flask
� A bottle with a narrow neck used in the laboratoryfor performing experiments (keeping solution, forheating solution etc).
(vii) Funnel
� Available in various sizes i.e. in differentdiameter of the mouth of the funnel.
� Used during filtration of solutions.

9
Biology Practical
BIOLOGY
Notes
Biology Practical
(viii) Pipette
� A slender graduated glass tube for measuringand transferring known volume of liquid.
(ix) Spirit lamp or Bunsen burner
� Used for heating. It should be extinguishedimmediately after use.

Exercise 2
Preparing Stained Glycerine Mounts
2.1 Epidermal peel of onion
2.2 Squamous epithelium from human cheek cells.
2.3 Epidermal peel of leaf to observe stomata
2.4 Xylem and phloem from cucurbita stem
2.5 Striated muscle fibres (cockroach)

11
Biology Practical
BIOLOGY
Notes
Biology Practical
Exercise 2
2.1 PREPARATION OF TEMPORARY MOUNT OF ONION PEEL TOOBSERVE AND STUDY EPIDERMAL CELLS
An onion peel is a very suitable material for observing a cell and its parts. The componentssuch as cell wall, cytoplasm, nucleus and vacuoles can be easily observed through thisexercise.
OBJECTIVES
After performing this exercise, you should be able to:
� acquire the skill of removing thin outer layers from plant material;
� prepare a temporary stained mount without trapping air bubbles;
� learn to handle and use the microscope such that its light is adjusted and materialfocussed to clarity;
� observe a typical plant cell and tally with your theoretical knowledge about the celland its components;
� distinguish between some components of a plant cell such as the cell wall, cytoplasm,nucleus and vacuole.
2.1.1 WHAT YOU SHOULD KNOW
1. A tissue such as that of the peel is made of many cells.
2. A cell has many components, some of which can be seen under the compoundmicroscope.
Materials Required
(i) Onion bulbs (ii) Paper towelling/ Blotting paper
(iii) Dropper (iv) Glycerine.
(v) Saffranine solution (for staining)
2.1.2 HOW TO PROCEED
(i) Select an onion bulb, discard the brown dry outer scales.

BIOLOGY
Biology Practical
12
Notes
Biology Practical
(ii) Cut the onion into four pieces (quarters) vertically.(See Fig. 2.1.1). Remove one fleshy scale.
(iii) Bend the outer (convex) surface of the fleshyscale towards you with your right hand to breakit. (Fig. 2.1.2)
(iv) It forms a neat break yet it remains attached tothe other end of the scale that you are holdingwith your left hand (See Fig. 2.1.3).
(v) Gently pull the broken end. You will find thatfrom other half of the scale held in your lefthand, a thin transparent layer of epidermis ispeeling off easily (See Fig. 2.1.4).
(vi) If the peel is large, use a fine pair of scissor ora blade to cut a small piece of about 2 mm. Todo this place the peel in a drop of water on aclean slide and trim it.
(vii) If there are any wrinkles in the peel, stretch itwith the help of dissecting needle.
(viii) Place this neatly cut peel in the centre of a cleanslide in a fresh drop of water (Fig. 2.1.5) andblot out the excess water.
(ix) Examine the slide under low power of themicroscope (fill up observation 1).
Fig. 2.1.1
Fig. 2.1.2
Fig. 2.1.3
Fig. 2.1.4
Fig. 2.1.5

13
Biology Practical
BIOLOGY
Notes
Biology Practical
Staining
(i) When you are able to see the epidermal cells clearly in your peel, remove the slidefrom the microscope.
(ii) Drain off water and then add a very small drop of Saffranine to the peel on theslide and leave the material in the stain for about two minutes.
(iii) See the stained material under the microscope to check staining. It should neitherbe too dark nor to light. If it is light, leave in the stain for some more time.
(iv) Pick up the stained material from the slide, wash it and place it in a drop of glycerineon a fresh slide.
(v) Hold the coverslip with your left hand at 45° (as shown in the diagram) on the slidein such a way that the lower edge of the coverslip touches the glycerine. Now usingthe needle, gradually lower the coverslip so that no air bubble gets trapped in thematerial. Excess glycerine should be removed with the help of a blotting paper.
Fig. 2.1.6 Putting coverslip Fig. 2.1.7 Epidermal cells in onion
The slide is now ready for further observation (fill up observation 2).
(vi) Observe under the microscope and compare the diagram provided (Fig. 2.1.7)with the slide as seen under the microscope.
2.1.3 PRECAUTIONS
1. Do not leave the peel too long in air, otherwise it will dry and show air bubbles init.
2. The peel should be mounted in the centre of the slide.
3. Always use a brush (not a needle) to transfer the peel from petridish to the slideor from one slide to another. Otherwise, the peel will tear off.
4. Avoid the entry of any air-bubbles in the mount.
5. Use clean slides and cover slips for mounting.

BIOLOGY
Biology Practical
14
Notes
Biology Practical
2.1.4 RECORDING OF OBSERVATION
Observation 1
Under low power of the microscope
(i) What can you see ? (long rows of rectangular cells in the unstained onion peel)
.........................................................................................................................
(ii) Which structures of the cell can you see ? Do you see the cell wall, the nucleusand a large vacuole contained in the cytoplasm?
.........................................................................................................................
Observation 2
After staining the onion peel
(i) Do you see large number of cells in the peel or only one? What is the generalshape of these cells (rectangular, circular, triangular, polygonal etc)?
.........................................................................................................................
(ii) What is the darkly stained body in each cell?
.........................................................................................................................
(iii) Can you see any vacuole in the cell cytoplasm?
.........................................................................................................................
(iv) Does the nucleus become more conspicuous after staining?
.........................................................................................................................
(v) What is the position of the cytoplasm in the cell? (central or peripheral)
.........................................................................................................................
(vi) What is the shape of the nucleus? (spherical, oval, irregular etc.)
.........................................................................................................................
(vii) Sketch the onion peel cell as seen under the microscope. Label the parts such asthe cell wall, cytoplasm, vacuole and the nucleus.
.........................................................................................................................
(viii) Record all the observations in your record book.
.........................................................................................................................

15
Biology Practical
BIOLOGY
Notes
Biology Practical
2.1.5 FOR THE TEACHER
Please ensure that
1. slides and coverslips are cleaned before use.
2. microscope is handled properly.
3. staining is properly done as staining helps to highlight certain cell components.
4. the students are told that cell has other components also but they can not be seenunder compound microscope.
5. and that staining is important.

BIOLOGY
Biology Practical
16
Notes
Biology Practical
Exercise 2
2.2 PREPARATION OF TEMPORARY STAINED MOUNT OF HUMANCHEEK CELLS
The slide of human cheek cells is easy to prepare and gives a view of an animal celland also how the cells of squamous epithelium are arranged.
OBJECTIVES
After performing this exercise, you should be able to:
� acquire the skill of taking out human cheek cells;
� learn to prepare a uniform smear;
� observe the special features of squamous epithelium.
2.2.1 WHAT YOU SHOULD KNOW
1. Animal cell lacks the cell wall and large vacuoles.
2. Epithelial tissue forms covering of organs and is of various types.
3. Inner lining of the cheek is made of squamous epithelium where cells are(a) flat (b) closely packed and (c) have central nucleus.
Materials Required
(i) Slides (ii) Coverslips (iii) Filter-papers
(iv) Needles (v) Methylene blue (vi) Brush
(vii) Tooth pick.
2.2.2 HOW TO PROCEED
(i) Take a washed tooth pick and gently slide its tip over the inner lining of your cheek.Its tip would collect some viscous transparent substance. Smear this substance ona slide. (Instead of tooth pick, you can use the uncoated end of a matchstick).
(ii) Add a drop of water to the smear and also a drop of Methylene blue stain.
(iii) Leave for about one minute.

17
Biology Practical
BIOLOGY
Notes
Biology Practical
(iv) Tilt the slide to let the extra stain drain off. wash gently with water.
(v) Put a coverslip gently over the material with the help of a needle avoiding entryof any air bubbles.
(vi) Press it gently with a needle to make the cellsunder the coverslip uniform.
(vii) Soak away extra stain by placing the slidewithin a folded filter paper, taking care not tomove the coverslip.
(viii) Observe under a microscope and find out thestructural details of cheek cells and answerthe questions given in observation 1.
2.2.3 PRECAUTIONS
1. Scrape the inner surface of the cheek gently to avoid any damage or bleeding.
2. See that you, do not break the coverslip.
3. While removing the extra stain, make sure you do not move the coverslip and thematerial under it.
2.2.4 RECORDING OF OBSERVATION
Observation 1
Cheek cells under the microscope :
(i) Draw a few cells in your record book as you see them..........................................................................................................................
(ii) What is the shape of cheek cells?.........................................................................................................................
(iii) What is the location of nucleus in a cheek cell?.........................................................................................................................
(iv) List the differences between the cells you see in this exercise (cheek cells) andthe cells you saw in onion peel with respect to the following :(a) Presence or absence of cell wall :
.................................................................................................................(b) Presence or absence of large vacuole:
.................................................................................................................(c) Difference in shape :
.................................................................................................................(v) Is there any cell wall in the cheek cells?
.........................................................................................................................
Fig. 2.2.1 Cheek cells

BIOLOGY
Biology Practical
18
Notes
Biology Practical
(vi) Cheek cells are epithelial cells. What is the name of this kind of epithelium?.........................................................................................................................
2.2.5 FOR THE TEACHER
Please ensure that the student
1. does not get hurt while removing the cheek cells.
2. is able to identify the differences between a plant cell (onion peel) and an animal cell(human cheek cells).

19
Biology Practical
BIOLOGY
Notes
Biology Practical
Exercise 2
2.3 PREPARATION OF TEMPORARY MOUNT OF LEAF EPIDERMIS TOSTUDY THE STRUCTURE OF STOMATA
The slide gives a view of (i) leaf epidermal cells and (ii) stomata made of two guard cells.The guard cells contain prominent nucleus and chloroplasts. In contrast, the epidermalcells lack chloroplasts.
OBJECTIVES
After performing this exercise, you should be able to :
� acquire the skill of taking out the epidermal peel from a leaf;
� prepare a stained mount of leaf peel without trapping air bubbles;
� observe the special features of the leaf epidermis and compare it with that of onionpeel.
2.3.1 WHAT YOU SHOULD KNOW
(i) Leaf epidermis is made up of tightly fitted cells. These cells show cell wall nucleusand cytoplasm.
(ii) In between the epidermal cells are present small pores called stomata (singular -stoma). Each of these pores is enclosed by two large bean shaped cells calledguard cells. The guard cells are responsible for opening and closing of stomata.They contain chloroplasts in addition to cell wall, nucleus and cytoplasm.
(iii) The inner walls of guard cells are thicker than the outer walls.
Materials Required
(i) Slide (ii) Filter paper (iii) Brush
(iv) Coverslip (v) Needles (vi) Water
(vii) Lily leaf/any other leaf from which a peel can be obtained easily
2.3.2 HOW TO PROCEED
(i) Take a lily leaf. Cut it into smaller pieces of about 6 cm2.

BIOLOGY
Biology Practical
20
Notes
Biology Practical
(ii) Wash it with water
(iii) Fold the leaf on its upper surface to break it such that it still remains attached.
(iv) Gently pull the broken end apart.
(v) You will find the lower epidermis separating from the rest of the leaf.
(vi) Take a fine pair of scissors and cut a small regular piece of the peel and transferit in water into a petridish.
(vii) Take a clean slide. Put a drop of water in its centre and transfer the peel fromthe petridish to the slide with the help of a brush. Place the coverslip.
(viii) Remove the extra water by placing the slide within a folded filter paper.
(ix) Examine the slide first under low power and then under high power.
(x) Record your observations.
Fig. 2.5.1 Structure of stomata
2.3.3 PRECAUTIONS
1. Do not let the peel dry up.
2. Mount the peel in the centre of the slide.
3. Use a brush to transfer the peel.
4. There should be no air bubbles.
5. Slides and coverslips should be very clean.

21
Biology Practical
BIOLOGY
Notes
Biology Practical
2.3.4 RECORDING OF OBSERVATIONS
Observe under low power of the microscope:
(i) How many different types of cells can you see in the leaf epidermis?
.........................................................................................................................
(ii) How do the guard cells differ from the other epidermal cells. Mention threedifferences.
(a) .................................................................................................................
(b) .................................................................................................................
(c) .................................................................................................................
(iii) Is the cell wall of guard cells uniformly thick? If not describe the cell wall.
.........................................................................................................................
(iv) How will you differentiate between the epidermal cells and guard cells on the basisof their shape.
(v) Draw a labelled diagram of the leaf peel showing stomata.
2.3.5 FOR THE TEACHER
Please emphasize that
1. the lower surface has more stomata than the upper surface in most types of leaves.
2. the same technique is applicable for viewing stomata in the leaf of any other plant.
3. the guard cells are epidermal cells specialised for a particular function.

BIOLOGY
Biology Practical
22
Notes
Biology Practical
Exercise 2
2.4 PREPARATION AND STUDY OF XYLEM AND PHLOEM FROMCUCURBITA STEM
Xylem and phloem are complex tissues present in plants. They constitute the vascularbundles in leaf, stem and root. Xylem consists of vessels, tracheids, parenchyma andfibres. Phloem consists of phloem tubes (sieve-tubes), companion cells, parenchyma andfibres.
OBJECTIVES
After completing this exercise, you should be able to:
� identify xylem and phloem under a microscope;
� locate and differentiate between xylem and phloem.
2.4.1 WHAT YOU SHOULD KNOW
1. Xylem and Phloem are the constituents of a vascular bundle.
2. These are present in roots, stem and leaves.
Fig. 2.4.1 Xylem and Phloem

23
Biology Practical
BIOLOGY
Notes
Biology Practical
Materials Required
(i) Cucurbita stem (ii) Sharp blade/razor
(iii) Slides (iv) Thin brush
(v) Water (vi) Cover slip
(vii) Glycerine (viii) Saffranine stain
(ix) Compound microscope
2.4.2 HOW TO PROCEED
(i) Cut a T.S. of cucurbita stem.
(ii) Select a thin section and stain in Saffranin.
(iii) Wash the section with fresh water to remove the extra stain.
(iv) Put the stained section in a drop of glycerine on the centre of a slide.
(v) Put a cover slip over it and see the vascular bundle under the microscope.
2.4.3 PRECAUTIONS
1. Thin uniform section should be cut.
2. A good section is cut in a straight, transverse or longitudinal plane and should notbe oblique.
3. Observe under the microscope before it dries up.
2.4.4 RECORDING OF OBSERVATIONS
(i) Do you see thick walled more or less circular cells stained red?
If yes ................... These cells constitute xylem.
(ii) Do all the vessels appear of same diameter in cross section?
Yes/No .............................................................................................................
(iii) Do you find some thin walled cells unstained, just above the xylem.
Yes/No ..................................................................... If yes, These are phloem.
(iv) Draw a few cells of xylem and phloem in your record book.
2.4.5 FOR THE TEACHER
1. The teacher to help the students to :
(i) locate vascular bundl in the section and
(ii) identify xylem and phloem.

BIOLOGY
Biology Practical
24
Notes
Biology Practical
Exercise 2
2.5 TEMPORARY STAINED PREPARATION AND STUDY OF STRIATEDMUSCLE FIBRES IN COCKROACH
Muscle fibres are cells which are responsible for motility of an animal or that of the partsof its body. Limb muscles have muscle cells which are called striped or striated musclesand these are under voluntary control. You will study their structure by making a slidefrom the leg of a cockroach. Unstriated muscle cells are involuntary and found in musclesof various internal organs such as those of the digestive system.
OBJECTIVES
After performing this exercise, you should be able to:
� acquire the skill to handle live cockroach and remove its legs;
� acquire the skill of making a stained preparation of striated muscle fibres;
� identify, draw and label striated muscle fibres;
2.5.1 WHAT YOU SHOULD KNOW
1. Muscle fibre is a muscle cell.
2. Contractility is its special property.
3. Muscle fibres form the muscle tissue.
4. Muscles are of three types - striated, unstriated and cardiac, which differ from eachother in their structural details and mode of functioning. Revise these differences fromthe theory text book.
Materials Required
(i) Cockroach (live) (Try to collect one yourself).
(ii) Glass slides (iii) Cover slips (iv) Forceps
(v) Needles (vi) Brush (vii) Watch glass
(viii) Methylene blue (ix) Glycerine (x) Compound Microscope

25
Biology Practical
BIOLOGY
Notes
Biology Practical
2.5.2 HOW TO PROCEED
(i) Remove one of the legs of acockroach.
(ii) Locate its coxa (the broadest firstsegment of the leg). See Fig. 2.5.1
(iii) Slit open the leg (longitudinally) withthe help of fine scissors.
(iv) Whitish fibrous tissue is the striatedmuscle.
(v) Add 2-3 drops of methylene blue tostain it.
(vi) Place the muscle in a watch glass inwater.
(vii) Using a forceps pull a few fibres from the stained muscle and place these fibresin another watch glass.
(viii) Put the stained muscle fibres on a clean slide.
(ix) Blot out excess stain surrounding the tissue with the help of a filter paper.
(x) Tease the muscle with a needle.
(xi) Add a drop of glycerine on the slide and gently put the coverslip. Avoid air bubbles.Mount the material in the centre of the slide.
(xii) After putting the coverslip press it gently with the back of a needle or pencil tospread out the glycerine and the muscle fibrs under the coverslip.
(xiii) Examine the slide under the microscope and note the following points. (Fill upobservation 1)
– The plasma membrane of a muscle fibre is called Sarcolemma.
– The muscle fibres (muscle cells) show alternate light and dark bands orstriations and hence the name striated muscles.
– Each muscle fibre is long and cylindrical.
– Many nuclei can be seen in the muscle fibre at the periphery.
Sometimes in your slide you may come across striated (striped) silvery shiningcylindrical structure. They are not striated muscle fibres. They are tracheal tubesand can be distinguished from muscle fibres by (a) their broader diameter and (b)absence of nucleus.
Fig. 2.5.1 Leg of a Cockroach

BIOLOGY
Biology Practical
26
Notes
Biology Practical
Fig. 2.5.2 Striated muscle fibres.
2.5.3 PRECAUTIONS
1. Use clean slides and coverslips.
2. Use adequate amount of stain.
3. Do not let the slide dry.
4. Manipulate such that the material is neither too darkly stained nor very lightly stained.
2.5.4 RECORDING OF OBSERVATIONS
Observation
(i) In which kind of muscle fibre do you see light and dark bands? Striated orunstriated.
.........................................................................................................................
(ii) Are these fibres uninucleate or multinucleate?
.........................................................................................................................
(iii) What is the shape of the muscle fibres?
.........................................................................................................................
2.5.5 FOR THE TEACHER
Please ensure that :
1. the microscope is adjusted and the slide properly focussed.
2. the student identifies the striated muscle fibre and observes its muclei and does notmistake the trachea for striated muscle fibre as trachea also shows striations.

27
Biology Practical
BIOLOGY
Notes
Biology Practical
Exercise 3
STUDY OF MORPHOLOGICAL MODIFICATIONS OF PLANT PARTS LIKEROOT, STEM AND LEAF
The practical exercise has been planned to give an idea that plant parts like root, stemand leaf in certain plants can get modified structurally to perform functions which are verydifferent from their normal functions.
OBJECTIVES
After performing this exercise, you should be able to :
� identify the root, stem and leaf in their modified form in plants other than what youwill be observing in this exercise.
� differentiate or identify these modified structures on the basis of their primarycharacters.
3.1 WHAT YOU SHOULD KNOW
1. Recapitulate what you have learnt about modification of various plant parts like root,stem and leaf.
2. The modified structure or parts may look very different from the normal structure,that is a stem may look like a root or a leaf and the leaf may take the shape of athorn or a tendril.
3. In their modified form, they perform very different functions from what they normallydo. The modified roots do the job of storage and support, the stem may take upthe job of photosynthesis and multiplication; the leaf may do the function of protectionand support.
Material Required
(i) Fresh or museum specimens
(ii) Models of specimens
(iii) Photographs or pictures of specimens of carrot, radish, beet, ginger, potato,zamikand, onion, grass, Eichhoria, strawberry, lemon and grape twigs, pea leaf,Opuntia, pitcher plant, Australian acacia

BIOLOGY
Biology Practical
28
Notes
Biology Practical
3.2 HOW TO PROCEED
(i) Observe the specimens from different sides.
(ii) In most cases, you will know what you are looking at, in your first glance only.
(iii) You can use a hand lens, if need be.
(iv) Draw labelled diagram of the specimens provided, write their salient features ofidentification.
(v) A short guideline of diagram with points of identification has been given for eachspecimen. You observe the specimens carefully and record your observation onthe basis of what you actually observe.
A. Modifications of Roots
a. Radish
1. The tap root is swollen in the middle and taperstowards apex and base
2. It is known as fusiform root and it stores excessfood.
b. Beet
1. It is swollen at the upper part almost becomingspherical and abruptly tapering at the lower point.
2. It is known as napiform root.
3. It is a storage root and a source of sugar.
c. Carrot
1. It is broad at the base and tapers gradually towardsthe apex.
2. This is known as conical root.
3. Function is storage of food.

29
Biology Practical
BIOLOGY
Notes
Biology Practical
d. Banyan Tree
1. Roots are produced from main stembranches for mechanical support.
2. These roots grow downwards andpenetrate the soil and act as supportingpillars.
3. These roots are known as prop root.
e. Sugarcane
1. From the lower portions of the main stem largenumber of strong roots are produced to providesupport.
2. These roots are known as stilt roots.
f. Rhizophora
1. These plants grow in marshy places.
2. Large number of conical structures, which are roots,grow vertically upwards.
3. These roots being aerial perform the function ofrespiration and are known as pneumatophores orbreathing roots.
3.3(a) RECORDING OF OBSERVATION
1. Do you find hair like structures coming out from carrot and radish? What are these?
............................................................................................................................
2. What kind of function these roots perform?
............................................................................................................................

BIOLOGY
Biology Practical
30
Notes
Biology Practical
3. Have you been able to locate the stem in these plants?
............................................................................................................................
4. Where do you find the leaves in these plants?
............................................................................................................................
B. Modification of Stems :
� Stems get modified in various ways
� These modified sturctures help the plant to survive during unfavourable seasons bystoring food, help in vegetative multiplication of the plant and provide mechanicalsupport and protection.
� They can be studied by grouping them into underground, subaerial and aerial.
(i) Underground modifications
a. Ginger
1. It has an irregularly branchedprostrate structure.
2. There are nodes, internodes, budsand scale leaves.
3. It is known as rhizome.
b. Zamikand
1. It is a condensed form of rhizome growingmore or less in vertical direction and known ascorm.
2. Axillary buds and scale leaves are present.

31
Biology Practical
BIOLOGY
Notes
Biology Practical
c. Potato
1. The smooth brown, swollen structure is known astuber.
2. There are a number of axillary buds known as eyeslocated on one side of the tuber.
3. The axillary buds give rise to new plants.
Onion
1. The bases of the bulb as it is termed has aconvex, compressed stem which producescluster of firbrous roots at its base.
2. There are many scale leaves which are fleshyand store food.
3. Buds are present in the axil of scale leaves.
4. The complete shoot is modified.
(ii) Subaerial modifications
In some plants the stem is partly aerial and partly underground. The underground partis not very deep and lies horizontally underground. It has nodes and internodes. The nodesgive out leaves which grow above the soil surface and roots below :
� The delicate branch arising from an axillary bud grows horizontally below the surfaceof the soil.
� It creeps on the ground with roots at the nodes and is called a runner.
� It may break off from the mother plant and can grow independently.
a. Strawberry
1. Branches originates from the base of the stemwhich grows obliquely known as stolon.
2. You have studied potato which is actually astolon.

BIOLOGY
Biology Practical
32
Notes
Biology Practical
b. Eichhornia and Pistia
1. Short, thick, horizontal branch originates in the axilof a leaf.
2. It elongates to produce a tuft of leaves above andclusters of small roots below.
3. This is known as offset.
(iii) Aerial modifications
a. Grape-vine
1. From the axil of leaves arise tendrils which arewiry, coiled structures.
2. Tendrils help the climber in clinging to support.
b. Lemon and Karonda
1. The axillary or terminal buds of the stem aremodified into thorns, which are hard pointedstructures.
2. Thorns provide protection to the plant.
c. Opuntia
1. Green, flat, thick branches have unlimitedgrowth.
2. Leaves are modified into spines.
3. The modified structure is known as phylloclade.

33
Biology Practical
BIOLOGY
Notes
Biology Practical
d. Asparagus
1. There are branches of limited growthwhich become green and that like aleaf.
2. These are called cladodes.
3.3(b) RECORDING OF OBSERVATION
1. Can you name the three structures you observe on the rhizome of ginger?
............................................................................................................................
2. Which sturcture of the potato tuber can give to new plants?
............................................................................................................................
3. Can you locate the axillary bud on the runner of grass?
............................................................................................................................
4. Can you see the stem of grass in your lawns?
............................................................................................................................
5. What causes fast rate of growth in Eichhomia?
............................................................................................................................
6. Why are the tendrils in grape-wine stem and thorns of karonda or lemon calledmodified stems?
............................................................................................................................
7. Give reason why phylloclade and cladode are modified xerophytes.
............................................................................................................................
C. Modification of Leaf
Although the main function of leaf is to synthesize food for the plant, in some plants theyget modified to perform functions of support and protection for the plant.
a. Pea
1. Leaves (a portion) are modified into slender,wiry, closely coiled structures called tendrils.
2. These are climbing organs for the plant.

BIOLOGY
Biology Practical
34
Notes
Biology Practical
b. Opuntia
1. Leaves are modified into sharp, pointed, spinesfor defensive purpose.
2. These spines also help for reducing trans-piration.
c. Australian acacia
1. The petiole becomes flat, green leaf like calledphyllode.
1. It helps in photosynthesis.
d. Pitcher plant
1. Leaf is modified into a pitcher and the leaf tipinto a lid to trap insects.
2. It is an insectivorous plant.
3.3(c) RECORDING OF OBSERVATIONS
1. Observe the tendril of pea carefully. Why do you call them modified leaves?
............................................................................................................................
2. Which portion of the leaf is modified in pea?
............................................................................................................................
Pitcher

35
Biology Practical
BIOLOGY
Notes
Biology Practical
3. Which part of opuntia plant prepares food?
............................................................................................................................
4. Can you observe the modified leaves, where are they located?
............................................................................................................................
3.4 FOR THE TEACHER
Teacher may help the students to identify or locate the modified structures like axillarybunds, scale leaves, root hairs, spines and thorns on various specimens.

BIOLOGY
Biology Practical
36
Notes
Biology Practical
Exercise 4
TO STUDY THE T.S. OF DICOT AND MONOCOT STEMS AND ROOTSFROM PERMANENT SLIDES
Stem and root are made up of different types of tissues. These tissues form different layersin the composition of stem and root. This exercise is intended to study the structural details(anatomical details) of these tissues.
OBJECTIVES
After performing this exercise, you should be able to:
� identify the sections of dicot and monocot stem;
� identify the sections of dicot and monocot root;
� identify location of various layers in the above, formed by different tissues;
� differentiate anatomically between the various sections of stem and root.
4.1 WHAT YOU SHOULD KNOW
1. Different layers are made up of different types of tissues.
2. The layers are present in a definite sequence.
3. Anatomically the monocot and dicot stems differ significantly in the arrangement ofvarious tissues.
4. Anatomical differences between monocot and dicot roots exist in the vascular zone.
Materials Required
(i) Compound microscope (iii) Dissecting microscope
(ii) Permanent slides of dicot and monocot stems
(iv) Permanent slides of dicot and monocot roots.
4.2 HOW TO PROCEED
(i) Take permanent slides of T.S. of the dicot and monocot stem and root.
(ii) Adjust the slides under the microscope.
(iii) Note the outline of the sections, and the main structures and their arrangementinside.

37
Biology Practical
BIOLOGY
Notes
Biology Practical
(iv) Select a part of the slide as viewed under the microscope and draw a labelleddiagram.
1. Stem
(A) T.S. of Dicot Stem
Observation
From the permanent slide of the T.S. of dicot stem (sunflower plant), try to locate thefollowing tissues (Fig. 4.1)
Fig. 4.1 T.S. of Dicot stem
� Outermost layer of single row of cells–epidermis.
It bears some multicellular hairs.
� Immediately below the epidermis is two–three layers of collenchymatous hypodermis.� Inner to the hypodermis are few layers of thin walled cells–cortex.
� Innermost layer of cortex forms a distinct layer–endodermis
� Inner to endodermis lies a layer of cells–pericycle� The pericycle encloses vascular bundle and pith in the centre
� Each vascular bundle consists of phloem towards outside and xylem toward inside.Thus the vascular bundles are conjoint and collateral.
� Xylem and phloem are separated by cambium thus these vascular bundles are open.Thus the vascular bundles are conjoint, collateral and open.

BIOLOGY
Biology Practical
38
Notes
Biology Practical
� Parenchyma tissue separating the vascular bundles is termed medullary rays.
Main points of identificaiton of T.S. dicot stem are :
1. Cortex is differentiated into hypodermis (collenchymatous), parenchymatous cortexand innermost layer of endodermis.
2. Note the conjoint, collateral, open, endarch vascular bundles.
(B) T.S. of Monocot Stem
(i) Keep the slide containing T.S. of monocot stem (Maize stem) under a dissectingmicroscope (Fig. 4.2). Do you observe scattered vascular bundles?
(ii) Now place the slide under low power of the microscope and focus only a portionof the section in a view for greater details.
(iii) Start observing from the periphery.
(a)
(b)
Fig. 4.2 T.S. of monocot stem

39
Biology Practical
BIOLOGY
Notes
Biology Practical
Observations
Do you notice a large difference between the section of maize (monocot) stem and thatof dicot stem?
Note these differences.
Important distinguishing characters of monocot stem are:
1. Single layer of epidermis covered with thick cuticle.
2. Narrow zone of sclerenchymatous hypodermis.
3. A mass of thin walled parenchyma tissue known as ground tissue below thehypodermis.
4. Scattered vascular bundles.
5. Have you observed four distinct vessels stained red and arranged in the form of letter‘Y’. Two large ones are metaxylem and two smaller inner ones are protoxylem.
6. Observe the thin walled small cells towards outside which form the phloem.
4.3 RECORDING OF OBSERVATIONS
Observation 1
T.S. of dicot stem
(i) How many layers are there in the epidermis? Draw few cells of epidermis as seenunder the microscope.
.........................................................................................................................
(ii) Is there any outgrowth or structure visible on the epidermis. If yes what are thesecalled?
.........................................................................................................................
(iii) What is pericycle? See in your slide and draw it.
.........................................................................................................................
(iv) Can you locate the vascular bundle. Draw a few xylem and phloem cells as yousee them in a vascular bundle.
.........................................................................................................................
Observation 2
T.S. of Monocot stem
(i) Observe the outermost epidermis. Can you see some ‘holes’ scattered all aroundin the cortex?

BIOLOGY
Biology Practical
40
Notes
Biology Practical
(ii) Can you make out any difference in the position of vascular bundle in monocotand dicot stem?
(iii) Are the vascular bundles separated from one another by the intervening groundtissue? Yes/No .......................
(iv) What is the differece between the hypodermis that you have seen in sunflower stem(dicot stem) and the hypodermis that you are seeing here in the maize stem(monocot stem)?
Sunflower (dicot) Maize (monocot)
................................. .................................
................................. .................................
................................. .................................
Observation 3
Differences between Dicot and Monocot Stem
Structures Dicot stem Monocot stem
1. Epidermis ................................. .................................
2. Hypodermis ................................. .................................
3. Cortex ................................. .................................
4. Endodermis ................................. .................................
5. Pericycle ................................. .................................
6. General cortex ................................. .................................
7. Medullary rays ................................. .................................
8. Vascular bundles ................................. .................................
9. Pith ................................. .................................
2. Root
(A) T.S. of Dicot Root
(i) Place the slide under the dissecting microscope and observe its structure.
(ii) Observe the single outermost layer–epiblema which gives out single celled hairs.Inner to this, there is a compact mass of rounded cells with intercellular spacesforming cortex.
(iii) The central cylinder constitutes, the vascular bundle.

41
Biology Practical
BIOLOGY
Notes
Biology Practical
(iv) Do you find that inner cylinder is also surrounded by two definite layers of cells?Name the two layers from the diagram.
(v) Semi-circular patch of thin walled cells with blue stain constitute phloem.
Fig. 4.3 T.S. of Dicot root
(vi) This alternates with group of thick walled cells which have taken up red stain.
(vii) Both these structures constitute vascular bundle.
Note : In Root, the xylem and phloem are in separate bundles and are atdifferent radii.
(viii) Do you observe that protoxylem is placed towards pericycle and the metaxylemtowards centre. It is one of the characteristic points to identify root. It is knownas exarch condition.
(ix) Do you find any projections coming out from the epiblema? These are called roothairs.
(xi) Count the number of vascular bundles present. You will note that they are in thenumbers of 2 to 6.

BIOLOGY
Biology Practical
42
Notes
Biology Practical
(B) T.S. Of Monocot Root
(i) Place the permanent slide of T.S. of monocot root under low power of themicroscope.
The outline of monocot root is much bigger in T.S., so you will not be able tosee it as an entire section under the microscopic field as in case of dicot root. Soto find out the general outline view the slide under dissecting microscope (Fill upobservation) (Fig. 4.4)
Fig. 4.4 T.S. of Monocot Root
(ii) Do you observe the difference in the number of vascular bundles? If yes, whatis their approximate number?
(iii) Do you see the large pith? Yes/No

43
Biology Practical
BIOLOGY
Notes
Biology Practical
(iv) Tabulate the difference between dicot root and monocot root.
Dicot Root Monocot Root
1. .............................. ...............................
2 .............................. ...............................
4.4 RECORDING OF OBSERVATIONS
Observation 1
T.S. of Dicot Root
(i) Is it circular in outline? Can you view the entire section in the microscopic field?
.........................................................................................................................
(ii) Can you distinguish two distinct zones in the section?
.........................................................................................................................
(iii) Is the peripheral outermost layer epiblema, single layered or multilayered?
.........................................................................................................................
(iv) Is there any outgrowth or projections or any structures on this epiblema? If so,what are they?
.........................................................................................................................
(v) Look at the epiblema.
Can you see multilayered loosely packed thin walled parenchymatous cells withintercellular spaces?
Yes/No .............................................................................................................
Is this ground tissue or cortex?
.........................................................................................................................
(vi) Can you differentiate the central cylinder from the cortex by any complete layerof cells? Yes/No ...............................................................................................
If yes, how many layers of cells are there.
.........................................................................................................................
(vii) Look at between xylem and phloem bundles. Can you see thin walled parenchymacells? Yes/No ....................................................................................................
What are these called? .....................................................................................
(viii) Draw a simple sketch of T.S. of dicot root in your record book.

BIOLOGY
Biology Practical
44
Notes
Biology Practical
Observation 2
T.S. of Monocot Root
(i) Is it circular in outline? Yes/No ........................................................................
(ii) Are there root hairs? Yes/No ...........................................................................
(iii) Does the endodermis have its radial walls thickened? Yes/No .........................
(iv) Is the pericycle thin walled or thick walled?
.........................................................................................................................
(v) Are xylem and phloem in separate bundles? Yes/No .......................................
(vi) How many bundles are there?
.........................................................................................................................
(vii) Is there a pith? Is it large and well developed or small in size?
.........................................................................................................................
(viii) Write the difference between a dicot and monocot root?
Dicot root Monocot root
............................ ............................
............................ ............................
............................ ............................
............................ ............................
(ix) Draw a simple sketch of T.S. of monocot root in your record book.
4.5 FOR THE TEACHER
Please enusure that
1. the microscope in adjusted and the slide properly focused.
2. the student identifies the various tissues in both dicot and monocot roots and stems.
3. the students get a clear concept regarding the structure and conditions of the vascularbundles.
The teacher may kindly inform the students that the red and blue colours of cellsmaintained inside are not their natural colours, but colours taken up during stainingof the slide.

45
Biology Practical
BIOLOGY
Notes
Biology Practical
Exercise 5
STUDY OF THE MICROSCOPIC ANATOMY (HISTOLOGY) OFMAMMALIAN TISSUES AND ORGANS
Every tissue has a special structure suited to its function. In this exercise you will studythe histological features of some of the major tissues and organs of mammals.
OBJECTIVES
After performing this exercise, you should be able to :
� identify and differentiate between various kinds of mammalian tissues and organsbased on their shape, size and structural details;
� differentiate between different types of blood cells.
5.1 WHAT YOU SHOULD KNOW
1. Animals have different types of tissues and organs which perform specific functions.
2. Each organ is different histologically.
� Cartilage and bone represent supportive connective tissue where matrix is solid.
3. Blood is another type of connective tissue composed of plasma and cells. Matrixis fluid.
4. Testis and ovary produce male and female gametes respectively. They also secretesex hormones.
Aim : To study the histology of mammalian tissues and organs from permanentslides. (cartilage, bone, blood, testis and ovary)
Material required
(i) Compound microscope
(ii) Dissection microscope
(iii) Permanent slides of tissue or organ namely
(a) Cartilage (b) Bone (c) Blood
(d) Mammalian testis and (e) Ovary

BIOLOGY
Biology Practical
46
Notes
Biology Practical
5.2 HOW TO PROCEED
(i) Gently wipe the prepared slide with a soft tissue paper in order to clean the dustparticles if any on the slide.
(ii) First examine the slide under low power of the microscope.
(iii) Move the slide to get a general view of the entire section.
(iv) Select a region where individual cells are seen.
(v) Change to high power if required, by using fine adjustment only.
(vi) Record your observations and repeat the same procedure for all the slides.
1 To study the microscopic structure of cartilage
– Examine the T.S. of cartilage under lowpower of microscope (refer to Fig. 5.l).
– It will show the ground substance or matrixand cartilage cells termed chondriocytesscattered in it.
– Chondrocytes are present in spaces calledlacunae.
– Now change to high power and by using thefine adjustment only focus a few cells.(Record observation 1)
– Given below is a sketch showing T.S. ofcartilage. Compare your slide with it andlabel the parts - matrix, lacunae andchondrocytes or cartilage cells.
2. To study the microscopic structure of bone
T.S. of Bone (long bone such as femur)
– Examine the slide under the lowpower of microscope.
– Observe some areas showingconcentric rings or lamellae, andeach such area having a narrowcentral canal. The lamellae withtheir lacunae and central canalfrom the Haversian system.
– Compare the section in the slidewith the figure (Fig. 5.2) provided.
Fig. 5.1 T.S: of Cartilage
Fig. 5.2 T.S: of bone

47
Biology Practical
BIOLOGY
Notes
Biology Practical
– Try to locate the central canal, bone lamellae and lacunae (spaces that conained bonecells) arranged in concentric rings.
– Lying in the bone lamellae are empty lacunae (spaces) which in natural conditioncontain bone cells (osteocytes). Some fine canals (canaliculi) radiate out from theselacunae. (Fill up observation 2)
You may not see the osteocytes within the lacunae as they get removed whileprocessing the bone for slide preparation.
– (If the section passes obliquely or longitudinally, you will not find the Haversiansystems so perfectly and the central canals may become oblong or even longitudinal).
3. To study the microscopic structure of mammalian testis (T.S.)
Place the slide under the microscope under low magnification and observe. (Fig. 5.3)
Fig. 5.3 T.S: of Testis
– Do you find any circular, oval compartments? These are seminiferous tubules.
– Can you see some material filling the space between the tubules? This is connectivetissue matrix.
– Record the shape of the semini-ferous tubule.
– Locate the germinal epithelium which is first layer of cells lining each seminiferoustubule. It is interrupted in between by vertical row of cells which proceed from thesurface towards the interior of the tubule.
– Inner to the germinal epithelium lie, spermatogonia, spermatocytes, spermatids andspermatozoa.
– Can you also see in the centre of the tubules the cluster of spermatozoa in seminiferousfluid. Observe their tail ends which are clustered together towards the centre.

BIOLOGY
Biology Practical
48
Notes
Biology Practical
– Between the seminiferous tubules are interlobular spaces containing Leydig cells. Canyou locate them?
– Draw a labelled diagram of T.S. of testis.
4. To study the microscopic structure of mammalian ovary
Examine the slide under low magnification moving it in all directions. First of all, observethe general outline of the ovary. Is it plain or uneven with slight bulges here and there?
Then study part by part all the structures contained in it. Compare the slide with thediagram provided (Fig. 5.4).
(i) Observe cells contained in the outermost lining of the ovary. They constitute thegerminal epithelium.
(ii) Observe the developing primary follicles.
(iii) Observe the multilayered (graffian follicle) and the ruptured follicle which formscorpus luteum. (Fill up observation 4).
Fig. 5.4 T.S. of Mammalian Ovary
5. To study human blood smear and identify the different types of blood cells.
Examine the slide of human bloodsmear under the microscope, first underlow power and then under high power.Look for various types of blood cells.Record your observations and drawRBCs and WBCs.
You will see a large number of circularconcave disc like structure, which haveno nuclei. These are red blood cells(RBCs).
Fig. 5.5 Different type of human blood cells.

49
Biology Practical
BIOLOGY
Notes
Biology Practical
You should be able to see a fewer number of stained larger cells (larger than RBC)irregular in shape, with a nucleus of various shapes. (Fig. 5.5). These are white bloodcells (WBCs).
(Fill up observation 5)
How many WBCs are you able to see in a single focal field?
5.4 RECORDING OF OBSERVATIONS
Observation 1
Cartilage under high power of the microscope :
(i) What is the shape of the cartilage cells?
(square, hexagonal, spherical, or hemispherical)
.........................................................................................................................
(ii) Does each cell lie in a cavity? If so, what is the name of this cavity?
.........................................................................................................................
(iii) Is the nucleus of the cells oblong, oval or round?
.........................................................................................................................
(iv) Note that most cells are in groups. Are they mostly in groups of two’s, three’sor four’s?
.........................................................................................................................
(v) What is the term for the ground substance in which the cell clusters lie?
.........................................................................................................................
(vi) Draw a labelled diagram of T.S. of cartilage.
Observation 2
Bone under high power of the microscope :
(i)) Draw at least three adjacent Haversian systems as you see them and label the parts.
.........................................................................................................................
(ii) Mention any two differences between bone and cartilage.
(a) Arrangement of cells : in lamellae or single or in clusters?
.................................................................................................................
(b) Central canal : present or absent
.................................................................................................................
(iii) Draw a labelled diagram of T.S. of bone.

BIOLOGY
Biology Practical
50
Notes
Biology Practical
Observation 3
Mammalian testis under low power of microscope :
(i) Are there prominently large tubules of uniform size and shape?
.........................................................................................................................
(ii) What are these tubules called?
.........................................................................................................................
(iii) Is there any space between tubules or are they tightly arranged? What is this spacecalled? What can you see in the space?
.........................................................................................................................
(iv) Name the structures present in the interior of each seminiferous tubule?
.........................................................................................................................
(v) How does a spermatozoon look, as you see it in the slide? Draw it as you seeit.
.........................................................................................................................
(vi) Draw a labelled diagram of T.S. of testis.
Observation 4
Mammalian ovary under low power of microscope :
(i) Can you see several follicles? Are they similar with respect to size and structure?
.........................................................................................................................
(ii) Count the number of follicle.
.........................................................................................................................
(iii) Draw a diagram of a portion of your slide showing a primary follicle and theGraafian follicte.
.........................................................................................................................
(iv) Can you see the corpus luteum? Label it in the diagram.
.........................................................................................................................
(v) Draw a labelled diagram of section of ovary.

51
Biology Practical
BIOLOGY
Notes
Biology Practical
Observation 5
Human blood cells under low power of Microscope
(i) (a) Draw ten RBCs as you see them in the slide.
.................................................................................................................
(b) Draw two or three different types of white blood cells and label them.
.................................................................................................................
(ii) What are the different types of WBCs present in human blood? Name them.
.........................................................................................................................
(iii) List any two differences between RBC and WBC.
.........................................................................................................................
5.6 FOR THE TEACHER
Please ensure that the student
1. handles the permanent slides with much care while focussing it, especially under highpower.
2. can identify the various types of cells (eg. chondrocytes, WBC, RBC etc) in thedifferent tissues and
3. also identify the various parts seen in the sections of mammalian testis and ovary whichthey need to label in their drawings.

BIOLOGY
Biology Practical
52
Notes
Biology Practical
Exercise 6
TO STUDY THE STRUCTURE AND FUNCTION OF DIFFERENT PARTS OFFLOWERS (PETUNIA AND CHINA ROSE)
Flowering plants are classified on the basis of the structure and arrangement of floral partson and around the receptacle or thalamus (the swollen end part of the flower stalk) inconcentric whorls.
OBJECTIVES
After performing this exercise, you should be able to:
� identify different parts of the flower;
� recognise main features of the flowers of petunia and china rose;
� explain the structure of any type of flower.
6.1 WHAT YOU SHOULD KNOW
1. The flowering plants are classified on the basis of the structure of flowers andarrangement of floral parts around the receptacle or thalamus.
2. This arrangement is specific for a specific family.
3. Flowers have parts such as sepals, petals, androecium, gynoecium etc.
Materials Required
(i) Flowers of china rose/hollyhock and petunia
(ii) Dissecting microscope
A. Floral Parts
Main points to be noted in these two (or in any other) flowers as follows :
(a) The size and nature of flower whether the flowers are large and showy orinconspicuous.
(b) The origin of flower whether they are borne on the flowering twig singly/in clustersor serially along the twig etc. (i.e. the kind of inflorescence).

53
Biology Practical
BIOLOGY
Notes
Biology Practical
Inflorscence
(i) Main axis does not terminate in a flower-Recemose
(ii) Main axis terminates in a flower-cymose
Size of the stalk whether the flowers have a long stalk (pedicellate) or they haveno stalk (sessile).
Floral parts
Each flower has to be observed starting from outermost whorl (calyx/sepals) orepicalyx and to proceed to the inward whorls (corolla, stamens, pistils, etc.)
(a) Calyx (Sepals)
Observe and record the number of sepals, their colour and whether they are free or united.Consult your Biology text book-1 lesson 7 and find out the function of the calyx.
(b) Corolla (Petals)
– The number of petals, their colour and shape, whether they are free or fused, theirrelation with each other (overlapping, twisted, or free etc.)
– Whether the flower has both male (Androecium) and female (Gynoecium) partsor only one of them. Thus whether the flower is bisexual or unisexual.
– Find out the function of the corolla from your text book.
(c) Androecium:
– The number of stamens, whether fused or free.
– Each stamen has an anther attaches to a long filament.
– Whether the filaments are free or attached to the corolla.
– It is the male part of the flower and has pollen grains in the anther.
(d) Gynoecium (Carpels)
The gynoecium consists of carpels and each carpel has three parts-ovary, style and stigma.
– The position of the ovary on the thalamus with respect to the position of other parts—above, at the same level or below i.e. inferior ovary or superior ovary.
– Number of Carpels.
– Whether the style is short or protruding out.
– The stigma, whether simple or divided into lobes or branches.
In order to find out the number of ovary chambers (locules) and the number of ovulesin each chamber cut T.S. of ovary. In such sections you can also observe theattachment of ovules to the ovary wall (i.e. placentation).

BIOLOGY
Biology Practical
54
Notes
Biology Practical
Fig. 6.1 Flowering twig, parts of flower of Hibiscus rosa-sinensis (China rose)
B. Symmetry
Actinomorphicsymmetrical, can be cut along more than one plane into two similar halves.
Zygomorphic
Bilaterally symmetrical can be cut into two similar halves along one plane.
C. Aestivation
The arrangement of sepals and petals in a floral bud with respect to the members of thesame whorl.
6.2 HOW TO PROCEED
(i) Take the flower and observe the different floral parts by using hand lens/ dissectingmicroscope, needles and forceps.
(ii) Note down the main features as described.
(iii) Remove the sepals one by one. Draw one of them, or the entire calyx if fused,in your notebook.
(iv) Remove the petals. If all are similar, draw one of them otherwise each one of themseparately.

55
Biology Practical
BIOLOGY
Notes
Biology Practical
(v) Observe the stamens and ovary. Locate their position/attachment/inter-relationshipamong themselves and with other floral members.
(vi) Cut transverse sections of ovary to observe placentation and draw it in your recordbook.
(i) China rose
Observe the different parts of the flower carefully (Fill up observation 1)
(ii) Petunia
Observe the different parts of flower carefully (Fill up observation 2)
6.3 OBSERVATION AND DOCUMENTATION
Observation 1
(A) China-rose (Hibiscus rosasinensis)
1. Inflorescence ........................................................................................................
Draw the inflorescence
2. Pedicellate/sessile .................................................................................................
3. Sepals (Calyx)
(i) Shape ........................................................................................................
(ii) Number .....................................................................................................
(iii) Free/fused .................................................................................................
(iv) Colour .......................................................................................................
(v) Do the sepal-lobes face each other (valvate) or do they overlap (twisted)?
.................................................................................................................
(vi) Draw one sepal as you see it in your flower.
4. Petals (Corolla)
(i) Size ...........................................................................................................
(ii) Colour .......................................................................................................
(iii) Number .....................................................................................................
(iv) Free/fused .................................................................................................
(v) Do the petals face each other (valvate) or do they overlap (twisted) one abovethe other by their edges?
.................................................................................................................
(vi) Draw a figure to show aestivation in corolla.

BIOLOGY
Biology Practical
56
Notes
Biology Practical
5. Stamens (Androecium)
(i) Position (whether attached to corolla or not)
.................................................................................................................
(ii) Number .....................................................................................................
(iii) Free/Fused ................................................................................................
(iv) Are the anthers free/united ........................................................................
(v) Does the staminal tube protrude out of the flower?
.................................................................................................................
(vi) Is the anther one-lobed or four lobed?
.................................................................................................................
6. Carpels (Gynoecium)
(i) Position of ovary on the thalamus (superior/Inferior)
.................................................................................................................
(ii) Style : Is it exposed or enclosd in a tube?
.................................................................................................................
(iii) Stigma : Is it branched?
.................................................................................................................
(iv) If so, how many branches?
.................................................................................................................
(v) Take T.S. of ovary and examine and draw the diagram as you see in thesection under a dissecting microscope.
.................................................................................................................
(vi) How many chambers are there in the ovary?
.................................................................................................................
(vii) How many ovules are there inside each chamber?
.................................................................................................................
(B) Petunia
1. Draw the flower of Petunia.
2. Pedicellate/sessile
............................................................................................................................

57
Biology Practical
BIOLOGY
Notes
Biology Practical
3. Sepal (Calyx)
(i) Number : ..................................................................................................
(ii) Free/Fused : ..............................................................................................
(iii) Colour : ....................................................................................................
(iv) Do the sepals face each other (valvate) or do they overlap (twisted)?
.................................................................................................................
(v) Draw one sepal.
4. Petals (Corolla)
(i) Number .....................................................................................................
(ii) Colour .......................................................................................................
(iii) Free/fused .................................................................................................
(iv) Valvate or twisted? ...................................................................................
(v) Draw one corolla.
5. Stamens (Androecium)
(i) Number .....................................................................................................
(ii) Position (whether attached to corolla or not) ............................................
(iii) Free/united ................................................................................................
(iv) How many lobes in each anther : .............................................................
(v) Draw a stamen indicating the filament, connective and anther lobe.
7. Carpels (Gynoecium)
(i) Position of ovary on the thalamus (Superior/inferior)
.................................................................................................................
(ii) Is the style protruding out?
.................................................................................................................
(iii) Is the style longer than the stamens?
.................................................................................................................
(iv) What is the type of placentation?
...................... (Observe T.S. of ovary under a dissection microscope)
(v) How many chambers are there in the ovary?
.................................................................................................................

BIOLOGY
Biology Practical
58
Notes
Biology Practical
(vi) How many ovules are there in each chamber?
.................................................................................................................
(vii) Draw T.S. of ovary.
6.4 PRECAUTIONS
1. Use the neddle carefully so that the floral parts are not damaged.
2. The flowers must be kept fresh by dipping the stalks in water.
6.5 FOR THE TEACHER
1. Teacher may help the students to separate out various floral parts
2. The function of flowers may be emphasised as a reproductive organ of a plant.

59
Biology Practical
BIOLOGY
Notes
Biology Practical
Study of Animal Specimens andtheir Classification
Invertebrates Vertebrates
Sponge Dogfish
Earthworm Rohu
Butterfly Toad
Apple Snail Wall lizard
Starfish Pigeon
Bat

BIOLOGY
Biology Practical
60
Notes
Biology Practical
Exercise 7
STUDY OF ANIMAL SPECIMENS CLASSIFICATION
To identify the Characteristic features of Sponge, Earthworm, Butterfly, Applesnail, Starfish, Cartilegenous fish (Dogfish, Scoliodon), Bony fish (Rohu), Toad,House lizard, Pigeon and Bat.
The animal world is a group of large variety of animals which can be subgrouped onthe basis of differences in their specific body forms and morphological features. The studyof the animal specimen helps us in understanding relationship with other animals belongingto its own subgroup and to the others.
OBJECTIVES
After performing this exercise, you should be able to:
� identify the given animal specimens;
� identify even those animals which are closely similar to the ones prescribed;
� point out the important features of the specimens, especially those that form the basisof their classification;
� assign the organisms to their systematic position, i.e. Phylum, Sub-phylum (if any),and Class;
� list the general distinguishing features of the specimens;
� mention any specific feature/s (if present) of the specimen as different from othersof the same class.
7.1 WHAT YOU SHOULD KNOW
1. The name of all the Phyla, Subphyla (if any), and the Classes under each phylum.
2. The distinctive features of the above mentioned categories.
3. The common names of the specimens recommended.
4. One or more special features (if any) of the given specimens.

61
Biology Practical
BIOLOGY
Notes
Biology Practical
5. The manner in which scientific names are written, i.e. genus name to start with capital,species name to start with small letter, and the entire name to be underlined whenwritten or to be in italics when printed.
6. Revise the lesson on classification of animals in Biology text book-1.
Materials Required
(i) Museum specimens mentained for study.
(ii) Dry or stuffed specimens for study.
If specimens are not available then the study may be conducted with.
(iii) Models of specimens, photographs/pictures.
7.2 HOW TO PROCEED
A. Specimens in Museum jars/stuffed specimens
(i) Observe the specimens from different sides.
(ii) In most cases you will know what you are looking at in your first glance.
(iii) You can use handlens in some cases, if need be.
B. Dry and stuffed specimens and models of specimens-proceed in the same wayas in A (Museum jars).
C. Models and pictures of specimens provide only limited scope of observation, andcan be used only when actual specimens are either not available or are somewhatbroken.
7.3 OBSERVATIONS
(i) Observe the specimens. Locate the characteristics required for classifying them,for example, the kind of body covering (hairs, feathers, scales, etc), the appendages- their number, arrangement and other structural characteristics.
(ii) Note down these observations in your record book.
(iii) Make labelled diagrams of the specimens provided.
7.4 PRECAUTIONS
1. Do not take out the specimens from the jars. Do not tilt the jars.
2. Handle the stuffed specimens and the models carefully.
3. Do not write or move-your pen/pencil on the specimens or on their labels.

BIOLOGY
Biology Practical
62
Notes
Biology Practical
7.5 HOW TO PROCEED
You have read in Biology text book No. 1 about the general classification of animals.The set of observation exercises in this practical are intended to see with your own eyes.The main points in the body features of some representative examples of the vast varietyof animals. Some of the animals included are microscopic (mounted on slides), othersare large wet-preserved or dry preserved. Here we have included only the commonrepresentative examples of the different phyla and some classes. These are someinvertebrates (1-5) and some vertebrates (6-12).
Almost all these animals should be available in your laboratory centre. In case you donot find any one as a specimen, look up its diagram or photograph in any book on animals.
Listed below are the specimens (invertebrates and vertebrates) which you are supposedto study in the practicals. Short guide lines have been given wherever desirable. Havingread about each specimen, turn to the exercise sheets entitled OBSERVATION. Performthe observation sequentially as listed under each exercise and write the responsesaccording to what you actually observe (and not from your theoretical knowledge). Inyour notebook, draw the diagram/s of the specimens, label their parts and write theclassification (Phylum, Subphylum (if any) and Class at the bottom of the sheet, as wellas write a few very significant features of the specimen. A sample format is given below,which may be suitably modified according to the different specimens.
Title
Name of the specimen
CLASSIFICATION
PHYLUM
CLASS
Main characterstics
1. ..............................................
2. ..............................................
3. ..............................................
We shall broadly group the specimens under invertebrates (1-5) and vertebrates (6-11)

63
Biology Practical
BIOLOGY
Notes
Biology Practical
1. Sponge
Find out the type of sponges you have in yourlaboratory.
(a) Is it a Bath sponge or
(b) Colony of Leucosolenia or
(c) Dried sponge of Scypha or any othersponge.
Take help of your teacher and find out thename of the sponge you have been givenfor observation and study.
Observe the specimen for the following details:
(Fill up observation 1)
– Porous body.
– No mouth, but numerous pores (ostia) all over the body.
– One large opening (osculum) at the top.
– Spongy body strengthened by a skeleton of elastic spongin fibres.
2. Earthworm
A terrestrial animal commonly found in moist soil. Observethe specimen for the following details : (Fill up observation2)
– Cylindrical body with tapering ends.
– Body is segmented.
– Head is not distinct, mouth is terminal.
– A thick band called clitellum present towards theanterior half of the body.
– Few setae present on the ventral side of eachsegment. They help in locomotion.
– Sexes not separate.
– Use a hand lens to observe the setae. Also try toobserve if any pores are present on the body.
3. Butterfly
The specimens provided are usually dried ones and mounted on pins. A butterfly has:
– Two pairs of wings.
Fig. 7.1 Sponge
Fig. 7.2 Earthwarm

BIOLOGY
Biology Practical
64
Notes
Biology Practical
– Club shaped antennae.
– Powdery scales on wings.
– Observe the butterfly carefully and answerthe questions given in observation 3.
4. Apple snail (pila)
Observe the specimen (fill up observation 4).
It is a mollusc.
Observe the “mouth” of the shell. In preserved specimensit is firmly closed by a “door” - the lid.
If ever you get a spare specimen break open the shell andlook for the animal contained inside. (You may sometimesfind only the empty shells)
– unsegmented body.
– Body is soft and encosed a calcareous shell.
– Head bears eyes and tentacles.
Observe carefully and fill up observatin 4.
5. Starfish
Starfish is an Echinoderm. It is an unsegmented marineanimal, showing radial symmetry. It has a spiny body surface.It moves by tube feet. Head is absent.
Observe the animal carefully and fill up observation 5.
7.6 RECORDING OF OBSERVATION
Observation 1
A. Outward appearance of sponge
(i) Looking at it what do you think-is it unicellular or multicellular?
.................................................................................................................
Fig. 7.4 Apple snail
Fig. 7.5 Starfish
Fig. 7.3 Butterfly

65
Biology Practical
BIOLOGY
Notes
Biology Practical
(ii) Is it a single lump or branched?
.................................................................................................................
(iii) What is its shape?
Vase-shaped/cup-shaped/bottle-shaped or irregular mass.
.................................................................................................................
B. Finer structure
Look at the surface of the main body.
(v) Do you find pores? ...................................................................................
(These pores are called ostia, and serve as the entrances for water into thebody).
You may also find a large hole osculum. It is for exit of water from the body.
If the specimen is a dried one, you may not see the pores. The dried materialis the skeleton made of spongin fibres.
C. Classification
Why are sponges placed in phylum Porifera? Give one reason.
............................................................................................................................
Can you assign the particular specimen given to you to its class - Calcarea,Hexactinellida, or Demospongiae?
............................................................................................................................
Observation 2
Earthworm (Pheretima)
A. External features
(i) Is the animal (a) long and dorso-ventrally flattened or (b) cylindrical andcontracted?
.........................................................................................................................
(ii) What is the colour of the animal?
.........................................................................................................................
(iii) What is the shape of the animal?
.........................................................................................................................
(iv) Is the body even or segmented?
.........................................................................................................................

BIOLOGY
Biology Practical
66
Notes
Biology Practical
(v) How does the clitellum differ from the skin over the rest of the body?
.........................................................................................................................
(vi) What is the shape of the part of organ present at the upper (anterior) end?
.........................................................................................................................
(vii) Where is the mouth present?
.........................................................................................................................
(viii) Look for the anal aperture. Where is it present?
.........................................................................................................................
(ix) Do you observe any setae? On which surface are they present, dorsal or ventralor on both?
B. Classification
(i) Why does the earthworm belong to the phylum Annelida? Give one reason?
.........................................................................................................................
(ii) In which class will you place Pheretima in Polychaeta, Oligochaeta or Hirudinea?
.........................................................................................................................
Observation 3
Butterfly (Danaus)
A. External Features
(i) Is the animal bilaterally symmetrical or radially symmetrical?
.........................................................................................................................
(ii) Into how many parts or regions is the body divisible?
.........................................................................................................................
Name the regions .............................................................................................
(iii) How many pairs of eyes do you see? (Use a hand lens)
.........................................................................................................................
(iv) Are these simple eyes or compound eyes?
.........................................................................................................................
(v) How many pairs of antennae do you see?
.........................................................................................................................

67
Biology Practical
BIOLOGY
Notes
Biology Practical
(vi) What is the shape of the antennae?
.........................................................................................................................
(vii) Are they long and swollen at tip?
.........................................................................................................................
The scientific term for this type of antennae is clavate (club-shaped).
(viii) Mention the type of mouth parts. (sucking/piercing/biting).
.........................................................................................................................
(ix) Do you see a coiled (spring-like) part located on the lower side of the head?........................... It is the proboscis.
(x) What does the butterfly feed upon?
.........................................................................................................................
(xi) How many pairs of wings are there?
.........................................................................................................................
(xii) Describe the pattern of colouration the body?
.........................................................................................................................
In case you ever catch a butterfly then only try the following:
� Gently move your finger on the wings. Do you find something powdery comingon to your finger?
� Spread this powdery material on a clean slide and examine under microscope.(These are the scales).
(xiii) How many pairs of legs do you see?
.........................................................................................................................
(xv) Are the legs jointed?
.........................................................................................................................
(xv) From which region of body do they originate?
.........................................................................................................................
(xvi) How many joints are there in each leg?
.........................................................................................................................
(xvii) Are the legs hairy or smooth?
.........................................................................................................................
(xviii) What are the legs used for (resting/walking)?
.........................................................................................................................

BIOLOGY
Biology Practical
68
Notes
Biology Practical
B. Classification
(i) Why is butterfly classified as an Arthropod? Give one character.
.........................................................................................................................
(ii) Give two characters that justify that butterfly is an insect.
(1) .................................................................................................................
(2) .................................................................................................................
Observation 4
4. Apple snail (Pila)
A. External Features
(i) Is the body of the animal enclosed in a shell?
.........................................................................................................................
(ii) Is the shell made up of one piece (univalve) or of two pieces (bivalve)?
.........................................................................................................................
(iii) Is the shell plain or spirally coiled?
.........................................................................................................................
(iv) Locate the position of the opening of the shell. Is it open or closed?
.........................................................................................................................
B. Classification
Let us try to classify pila:
(i) Why is Pila placed in phylum Mollusca?
Give one suitable reason
.........................................................................................................................
(ii) Mention the class of Pila. Give one reason.
.........................................................................................................................
(Bivalvia, Gastropoda or Cephalopoda)
Observation 5
Starfish
A. External features
(i) Is the animal radially symmetrical or bilaterally symmetrical?
.........................................................................................................................

69
Biology Practical
BIOLOGY
Notes
Biology Practical
(ii) How many arms does it have?
.........................................................................................................................
(iii) Can you make out any central region i.e. the central disc?(Yes/No)
.........................................................................................................................
(iv) Locate the mouth on the lower (lighter coloured) side of the body. Is it locatedin the centre?
.........................................................................................................................
(v) Do you observe any plates and spines on the surface of the body?
.........................................................................................................................
Examine the lower surface of the arm
(vi) Do you find a groove running through the middle?
.........................................................................................................................
(vii) Do you observe any fleshy structures along the sides of the groove?
These are tube feet. .........................................................................................
(viii) What is the natural habitat of starfish?
.........................................................................................................................
(ix) Why is it called starfish?
.........................................................................................................................
Classification
(Echinodermata : echinos = spiny, derma = skin).
(i) Why is the starfish placed in the phylum Echinodermata? Give one reason?
.........................................................................................................................
(ii) In which class will you place starfish - Asteroidea, Ophiuroidea, EchinoideaHolothuroidea or Crinoidea? Give reason.
.........................................................................................................................
B. Vertebrata
Animals observed and studied upto this point were all invertebrates (without backbone).We will now take up Vertebrates.
6. Dogfish
– Scales embedded in skin.
– Paired pectoral and pelvic fins.

BIOLOGY
Biology Practical
70
Notes
Biology Practical
– Unpaired dorsal, caudal and ventral fins.
– Five Gill slits.
Dog fish has a cartilagenous skeleton. Refresh your memory about cartilage. Observethe animal carefully and fill up observation 6.
Fig. 7.6 Dogfish
7. Rohu
– Large scales cover the body.
– Gills covered by operculum.
– Rohu is a bony fish. i.e. it has abony skeleton.
Observe the animal carefully and fill upobservation 7.
8. Toad (Bufo)
– Dry skin.
– Parotid glands.
– Toad has much in commonwith frog, but it has some ofits own characteristics.
– Count the number of toes infore and hind limbs.
Observe the specimen carefully andfill up observation 8.
Fig. 7.7 Rohu
Fig. 7.8 Toad
Five pairs gill slits
Parotid glands
Ear drum

71
Biology Practical
BIOLOGY
Notes
Biology Practical
9. Wall-lizard (Hamidactyles)
– Dry scaly skin,
– Hands and feet with flat expanded digits forclasping.
– Wall lizard is the most familiar repitle.
Observe the specimen carefully and fill upthe observation 9.
10. Pigeon (Columba)
– Has feather.
– Wings (modified forelimbs).
– Beak but no teeth.
Pigeon or any other bird have the same general features of class Aves.
Observe the specimen carefully. Fill up observation 10.
Fig. 7.10 Pigeon
11. Bat (Pterapus)
– Hair on the body.
– Projecting external ears.
– Forelimbs modified as wings.
Observe the animal carefully and fill upobservation 11.
Bat flies like a bird but it is not a bird. What is itthen? Exercise under the observation no. 11 to findout.
Fig. 7.9 Wall lizard
Fig. 7.11 Bat

BIOLOGY
Biology Practical
72
Notes
Biology Practical
7.7 RECORDING OF OBSERVATIONS
Observation 6
Dogfish
A. External features
(i) What is the shape of the body? boat shaped/spindle shaped or any other shape.
.........................................................................................................................
(ii) How many distinct regions are there in the body?
.........................................................................................................................
(iii) Is the surface of the body smooth or covered by any distinct scales?
.........................................................................................................................
(iv) How many fins do you find in the trunk?
.........................................................................................................................
(v) Tick (√) mark those fins which you observe in the specimen.
(1) Paired pectoral fins ( ) (2) Dorsal fins ( )
(3) Paired pelvic fins ( ) (4) Ventral fins ( )
(5) Anal fin ( )
(vi) Where is the mouth located- on the front tip or on the dorsal or on the ventralside of the head?
.........................................................................................................................
(vii) Does the head bear a pair of nostrils?
.........................................................................................................................
(viii) What are the nostrils used for in a fish?
.........................................................................................................................
(ix) Where are the eyes located?
.........................................................................................................................
Observe the gill-slits behind and slightly below the eyes.
(x) How many gill-slits do you find on each side?
.........................................................................................................................
(xi) Are the gill slits covered by any flap?
.........................................................................................................................

73
Biology Practical
BIOLOGY
Notes
Biology Practical
(xii) Do you see a “line” extending all along from head to tail on each side?
.........................................................................................................................
(xiii) What is this line called?
.........................................................................................................................
(xiv) Does the fish posses an internal skeleton or an external skeleton?
.........................................................................................................................
B. Classification
(i) Why the dogfish has been placed in Phylum Chordata? Give one suitable reasonfor it.
.........................................................................................................................
(ii) Why is dogfish also a vertebrate?
.........................................................................................................................
(iii) Mention three features in this animal which shows that it lives in water?
(1) .................................................................................................................
(2) .................................................................................................................
(3) .................................................................................................................
Observation 7
Rohu (Bony fish)
A. External features
(i) Find out the shape of the body-fusiform/spindle shaped/boat shaped (mark √ onthe right answer)
(ii) How many distinct regions are there in the animal?
.........................................................................................................................
(iii) Does the head possess any scales? Yes-or No.
.........................................................................................................................
(iv) Where is the mouth located? (Terminal/sub-terminal/dorsal/ventral)
.........................................................................................................................
(v) What other parts do you observe on the head?
.........................................................................................................................

BIOLOGY
Biology Practical
74
Notes
Biology Practical
(vi) Are the gill-slits naked or covered by a flap?
.........................................................................................................................
The flap is called operculum.
(vii) Does the dogfish possess Operculum?
.........................................................................................................................
(viii) Is the trunk of Rohu covered by hair or by scales?
.........................................................................................................................
(ix) Observe the fins and fill in the blanks below :
Name the unpaired fins Name the paired fins.
1 .................................... 1 .......................................
2 .................................... 2 .......................................
3 ....................................
(x) Is the lateral line distinct or indistinct?
.........................................................................................................................
(xi) List any two features by which you can differentiate a cartilaginous fish from bonyfish.
(i) .................................. (ii) .....................................
B. Classification
(i) Why is Rohu placed in the Sub phylum Vertebrata?
Give one reason
.........................................................................................................................
(ii) Mention three features of this animal which show that it lives in water.
1. .................................................................................................................
2. .................................................................................................................
3. .................................................................................................................
Observation 8
Toad (Bufo)
A. External features
(i) Name the regions into which the body is divided.
(Head, neck and trunk/head and trunk) (mark √)

75
Biology Practical
BIOLOGY
Notes
Biology Practical
(ii) Is there a neck?
.........................................................................................................................
(iii) What type of skin do you observe? Tick (√) mark the appropriate one.
Smooth/dry/warty/rough/scaly.
(iv) Is the snout pointed or semicircular?
.........................................................................................................................
(v) Name the structures present on the head.
.........................................................................................................................
(vi) Are the eyes large and bulging? Yes/No
.........................................................................................................................
(vii) Is there a dark patch seen behind the eye?
Yes/No .............................................................................................................
Behind each tympanum, you observe an oval shaped area which is different fromthe rest of the skin. It is the parotid gland.
(viii) What is its function?
.........................................................................................................................
(ix) How many appendages (limbs) do you observe?
.........................................................................................................................
(x) Which limb is longer? (fore limb/hind limb)
.........................................................................................................................
(xi) How many digits do you observe in the fore-limb?
.........................................................................................................................
(xii) How many digits do you observe in the hind-limb?
.........................................................................................................................
(xiii) How do these differ from the digits of the fore limbs? Give two differences.
1. ......................................................................................................................
2. ......................................................................................................................
(xiv) Does the skin of the toad serve as an organ for respiration or for protection orfor both?
.........................................................................................................................
(xv) From the external features that you have observed, point out whether this animalis (a) aquatic (b) terrestrial or (c) both. Tick (√) mark.

BIOLOGY
Biology Practical
76
Notes
Biology Practical
B. Classification
(i) Why has toad been included in the phylum Chordata?
Give one reason ...............................................................................................
(ii) Why is it grouped in the class Amphibia?
Mention a suitable explanation. (Amphi=both; bios=life).
Observation 9
Wall lizard
A. External features
(i) In how many regions can you divide the body of a lizard. Name them.
.........................................................................................................................
(ii) Is the surface of the body covered by hairs/warts/horny scales?
.........................................................................................................................
(iii) What is the shape of the head?
.........................................................................................................................
(iv) How does the tympanum (ear-drum) of lizard differ from that of a toad?
.........................................................................................................................
(v) How many limbs are there?
.........................................................................................................................
(vi) How many digits does each limb have?
.........................................................................................................................
These limbs are called pentadactyl limbs.
(vii) Do the digits have claws? Yes or No ..............................................................
(viii) What do you observe on the ventral side of the digit?
.........................................................................................................................
(ix) Why does the wall lizard not fall when it creeps on the ceiling or the wall? (Co-relate it with the structure of the digit).
(x) Why is it known as wall-lizard?
.........................................................................................................................

77
Biology Practical
BIOLOGY
Notes
Biology Practical
(xi) Does this animal walk/creep/run?
.........................................................................................................................
Reptiles are creeping animals.
B. Classification
(i) Why is it placed in phylum Chordata?
Give one reason ...............................................................................................
(ii) Why is it grouped in class Reptelia?
Give one reason ...............................................................................................
(iii) Give the scientific name of the wall lizard.
Observation 10
Pigeon
A. External features
(i) What is the shape of the body?
.........................................................................................................................
(ii) What is the body covered with?
.........................................................................................................................
(iii) Do you find the same type of structures covering on the head?
Yes/No .............................................................................................................
(iv) If they are different, in what way do they?
.........................................................................................................................
(v) How is its beak ? (Short and pointed, short and curved).
.........................................................................................................................
(vi) From the shape of the beak, suggest the-type of food it feeds on.
.........................................................................................................................
(vii) Can you locate the nostrils? Yes/No.
.........................................................................................................................
(viii) Are the nostrils slit-like or oval?
.........................................................................................................................

BIOLOGY
Biology Practical
78
Notes
Biology Practical
(ix) How many eyes are there?
.........................................................................................................................
(x) How many wings does it have?
.........................................................................................................................
Fore-limbs are modified into wings.
(xi) Do you see the digits at the tip of the wings?
Yes/No .............................................................................................................
Pigeon has a pair of hind limbs.
(xii) Are they covered with hairs/scales or are smooth?
.........................................................................................................................
(xiii) How many digits do you observe in “each hind limb?
.........................................................................................................................
(xiv) Are they clawed?
.........................................................................................................................
(xv) How do they make use of their feet?
.........................................................................................................................
(xvi) What is the tail made up of?
.........................................................................................................................
(xvii) How is it useful?
.........................................................................................................................
B. Classification
(i) Enumerate any three external features of pigeon that suggests aerial mode of life.
(1) .................................................................................................................
(2) .................................................................................................................
(3) .................................................................................................................
(ii) Why is the pigeon placed in phylum chordata? .
Give one reason ...............................................................................................
Birds are grouped under the class Aves. List any two characteristic features.
.........................................................................................................................

79
Biology Practical
BIOLOGY
Notes
Biology Practical
Observation 11
Bat
A. External features
(i) Body is divisible into ................., .............. and tail. (Mention the regions)
1. ..................................................... 2. ..........................................................
(ii) What structures are located on the head? Tick (J) mark the ones you observe.eyes/nostrils/tympanum/external ear (pinna).
(iii) Is the snout long or short?
.........................................................................................................................
(iv) How many limbs do you observe?
.........................................................................................................................
(v) Fore-limbs are in the form of wings.
Does the fore limb possess the skin/feathers?
Examine the folds of skin
The wing skin called patagium begins from shoulder, extends along theupper margin of the arm to the base of the thumb, between the finger (digits)and along the sides of the body to the hind legs. It helps in flying.
(vi) Which digits support the wings? (Second to fifth/first to fifth)
.........................................................................................................................
(vii) Which digits are clawed?
.........................................................................................................................
(viii) Which digit is free?
.........................................................................................................................
(ix) Are the hind limbs small/large?
.........................................................................................................................
(x) How many digits are there in each hind limb?
.........................................................................................................................
(xi) Are the digits clawed?
.........................................................................................................................
B. Classification
(i) Why is bat included in chordata?
Give one reason ...............................................................................................
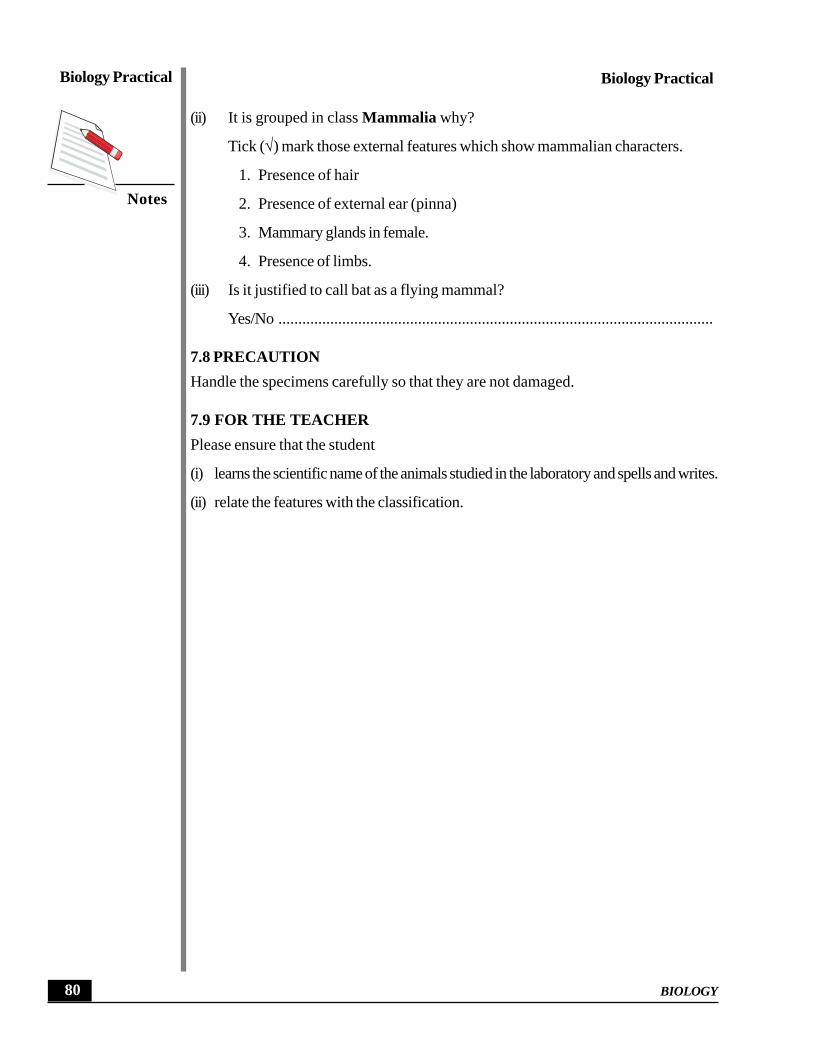
BIOLOGY
Biology Practical
80
Notes
Biology Practical
(ii) It is grouped in class Mammalia why?
Tick (√) mark those external features which show mammalian characters.
1. Presence of hair
2. Presence of external ear (pinna)
3. Mammary glands in female.
4. Presence of limbs.
(iii) Is it justified to call bat as a flying mammal?
Yes/No .............................................................................................................
7.8 PRECAUTION
Handle the specimens carefully so that they are not damaged.
7.9 FOR THE TEACHER
Please ensure that the student
(i) learns the scientific name of the animals studied in the laboratory and spells and writes.
(ii) relate the features with the classification.

81
Biology Practical
BIOLOGY
Notes
Biology Practical
Exercise 8
PREPARATION OF A SLIDE OF ONION ROOT TIP FOR OBSERVATIONOF STAGES OF MITOSIS
Growth and repair of any part of an organism takes place through mitotic division ofcells of that part. The growing tip of onion roots form an excellent material to study variousstages of mitosis.
OBJECTIVES
After performing this exercise, you should be able to:
� acquire the skill of making a root tip squash preparation;
� distinguish between dividing and non-dividing cells;
� identify different stages of mitotic cell division;
� differentiate between different stages of mitosis.
8.1 WHAT YOU SHOULD KNOW
1. Cells follow a cell cycle in which there is a phase termed interphase in which cellsdo not divide and another phase termed mitosis in which one cell divides to give twoidentical cells.
2. In non-dividing cells, nucleus is seen to contain a chromatin network.
3. Mitosis can be divided into four phases (stages) Prophase, Metaphase, Anaphaseand Telophase (Fig. 8.1)
4. At Prophase
(a) Nuclear membrane remains intact.
(b) Chromatin is resolved into thread like chromosomes.
At Metaphase
(a) Nuclear membrane disappears.
(b) Spindle forms (may not be seen in the slides).
(c) Chromosomes arrange at the equator.
(d) Each chromosome has two chromatids joined by a centromere.

BIOLOGY
Biology Practical
82
Notes
Biology Practical
At Anaphase
(a) Centromere splits.
(b) Each chromatid now has its own centromere and so becomes a chromosome.
(c) Equal number of chromosomes move to opposite poles.
Fig. 8.1 Different stages of cell division.

83
Biology Practical
BIOLOGY
Notes
Biology Practical
At Telophase
(a) Two groups of chromosomes lie at two poles and nuclear membranes formaround them.
(b) Chromosomes clump together and lose their identity and once again formchromatin network.
(c) Thus two nuclei are formed in the cell containing the same number and typesof chromosome.
(d) A partition wall (cell plate) begins to form in the centre of the cell.
4. Cytokinesis
(a) Cell plate formed in the middle extends and divides the cell into two daughtercells.
(b) Each daughter cell now contains a single nucleus.
Materials Required
(i) Onion bulb (vi) Microscope (xi) Match-stick
(ii) Needles (vii) Acetocarmine (xii) Scalpel
(iii) Brush (viii) Dilute HCl (xiii) Scissors
(iv) Slides (ix) Wide-mouthed bottle/ (xiv) 70% Alcohol.container/vial
(v) Coverslips (x) Beaker (xv) Blotting paper.
8.1 HOW TO PROCEED
This exercise has to be done in three phases:
1. Growing an onion for 3 to 5 days till roots emerge.
2. Fixing the root-tips.
3. Preparing a microscopic slide.
Phase 1. Growing onion for root-tips
(i) Take a wide-mouthed bottle 3-4 days prior to the day you have fixed for thisexperiment and fill it with water very close upto the mouth.
(ii) Take one medium sized onion bulb and remove its dry roots if any.
(iii) Place the onion at the mouth of the bottle so that only the base (disc) of the oniontouches the water (Fig. 8.2a).

BIOLOGY
Biology Practical
84
Notes
Biology Practical
Fig. 8.2(a) Placing onion at the mouth of bottle Fig. 8.2(b) Growing root tips
(iv) In 3-4 days new roots will appear (Keep watching everyday).
(v) When the roots are about 2-3 cms long (Fig. 8.2b) you can start with the nextphase (2) of the exercise.
Phase 2. Fixing the root-tips
(i) Remember you have to cut the root-tips only in early morning (around 9 A.M.)(Generally mitotic activity occurs at this time).
(ii) Remove the onion bulb from water. Using scissors, cut only the root tips (about0.5 cm long from their ends from the cluster of white slender thread-like roots).
(iii) Put them in 1 : 3 Acetic Alcohol for 10 minutes. Remove from fixative and putthe cut root tips in 70% Alcohol. (This is permanent preservation for any lengthof time).
(iv) The root-tips are ready for use after 24 hours.
Phase 3. Preparing a microscopic slide
(i) Take one root tip on a clean slide.
(ii) Add a few drops of dilute HCl just for 1 or 2 seconds. (This will soften the roottips).
(iii) Immediately add a few drops of ordinary water to this material to wash off theacid,
(iv) Decant the water by holding the slide tilted over a watch glass with one hand andholding the material on the slide with a brush by the other hand,

85
Biology Practical
BIOLOGY
Notes
Biology Practical
(v) Shift the material to a cavity block/watch glass. Add a few drops of acetocarninestain, cover it with a lid. Wait for 5-8 minutes. The root tips become deep red.
(vi) Now take a clean slide. Place 3-4 drops of acetocarmine stain on the slide andtransfer the material from the watch glass to the stain on the slide.
(vii) Gently warm the slide and then place on a square piece of paper towel / blottingpaper. Take care that the slide is not overheated.
(viii) Squash the stained root tip and then place a coverslip over the material.
(ix) Place the slide between folded filter paper or blotting paper and blot gently withoutmoving the coverslip, to remove excess stain.
(x) Take a pencil and using its blunt end gently tap over the cover-slip (cells of theroot tip will spread out.
(This will crush the root-tips and the cells lying deepest which may not have pickedup the stain earlier would now do so, as they are again submerged in the stain).
(xi) If the material is soft, a few tappings will be enough for the material to be squashed(squash means crushing to release contents).
Note : Do not crush the coverslip while tapping the material below it.
Always use glass-rod, brush, or needles, forceps etc.for handling the material in this exercise.
Metallic contact with the stained material causes adark-brown precipitate in the material.
(xii) Observe the slide under the microscope first under the low power.
(xiii) Locate a specific good area on the slide and then observed under the high power.
(xiv) Move your slide gradually to observe different areas for various stages of mitosis.
8.3 YOU WILL OBSERVE
(i) Cells in onion are rectangular. Do you see any circular or oval cells? Check.
(ii) Acetocarmine stains the chromosomes, that is why you do not observe spindlefibres.
(iii) Look for a cell with distinct nucleus (no separate chromosomes). Such cells arein Interphase stage.
(iv) Look for cells where the chromosomes are thick, deeply stained and easily visible.They are arranged in the middle (equator) of the cell, arranged in a circle or ina row etc. These cells are in Metaphase stage.
(v) Look for some cells in your slide in which the chromosomes are away from themiddle and in two groups, each such group lying at the opposite ends. These cellsare in the Anaphase stage.

BIOLOGY
Biology Practical
86
Notes
Biology Practical
(vi) You may also see cells where the chromosomes form a cluster at extreme oppositeends. These cells are in the Telophase stage. You may also see beginning of cellplate formation.
(vii) You may see cells where cell plate formation is completed and cell is divided intotwo daughter cells. These cells are in the Cytokinesis stage.
(viii) In case you are unable to see all the stages of mitosis in your slide try to see them,in the preparation of other students.
Why should you cut only the tips for this exercise andnot any other region of the root?
8.4 RECORDING OF OBSERVATIONS
Observation 1
(i) Name the stage at which a cell is in the non-dividing phase. Interphase/ Telophase/or Amitosis.
.........................................................................................................................
(ii) (a) Look for a stage where the chromosomes are arranged in the middle of acell. What is this stage known as?
.................................................................................................................
(b) Is there a nuclear membrane at this stage?
.................................................................................................................
(iii) Can you count the number of chromosomes in the above mentioned stage?
.........................................................................................................................
(iv) Can you see two chromatids of each chromosome?
.........................................................................................................................
(v) Look for a stage where you see the chromosomes in two groups moving towardsthe two opposite ends.
.........................................................................................................................
(a) Are they slightly away from the middle? At this stage the cell is said to beat early Anaphase.
.................................................................................................................
(b) Have they reached the opposite ends of a cell? Then it would be lateAnaphase.
.................................................................................................................

87
Biology Practical
BIOLOGY
Notes
Biology Practical
(vii) Look for a cell with two nuclei which have a partition between them.
.........................................................................................................................
(viii) What is this stage of cell division called?
.........................................................................................................................
(ix) In some cells the partition will be incomplete, what is this partition called?
.........................................................................................................................
(x) Draw the following in your record book.
1. An interphase cell
2. A cell at prophase
3. A cell at metaphase
4. A cell at anaphase
5. A cell at telophase
6. A cell showing cell plate formation (cytokinesis)
8.5 PRECAUTIONS
1. Use clean slides and coverslips.
2. While fixing the tissues do not leave it in acid for more than the required time.
3. Do not heat the slide. It is only to be warmed.
4. After putting coverslip over stained material, blot off excess stain.
5. Do not allow the slide to dry up.
8.6 FOR THE TEACHER
1. This is a comparatively difficult exercise as students have to be trained to locateparticular stages of cell division in the microscopic field under observation.
2. It will be of immense help if a squash preparation is first demonstrated by the teacher.
3. An interphase cell may then be shown under the microscope. The student may thenbe asked to focus an interphase cell in the slide prepared by the student. Dividingcells can then be distinguished from the non dividing cells lying in the same field.
4. In this way, demonstration of a particular mitotic stage followed by its identification,in the students own slide, may be carried out for each of the different stages of mitosis.

BIOLOGY
Biology Practical
88
Notes
Biology Practical
Exercise 9
TO STUDY THE SPECIAL ADAPTIVE FEATURES IN SOME PLANTSAND ANIMALS
Animals and plants have evolved special features in order to live successfully in a particularhabitat. These features known as adaptive features, help the organisms to adjust to theirhabitats.
You will study the adaptive features in a hydrophyte (Water hyacinth), xerophyte(Opuntia) and a parasitic animal (Tapeworm).
OBJECTIVES
After completeing this exercise, you should be able to :
� identify the specimen and know its habitat;
� list the general features as well as the special adaptive features of these organisms;
� mention the role played by the adaptive features;
� identify and relate the habitat of other organisms showing similar adaptive features.
9.1 WHAT YOU SHOULD KNOW
1. Diverse habitats in which plants and animals live are (i) terrestrial (ii) aquatic (iii) aerial.
2. Depending upon the availability of water, the habitat can be xeric, mesic or aquatic.
3. Name some plants and animals belonging to the above categories.
4. The term adaption can be defined as the modifications of characteristics which haveevolved over a period of time in the living organisms. These modifications help theorganisms to adjust in a particular environment.
5. Some of the adaptive features in aquatic plants are presence of air cavities in stemor leaf for buoyancy; presence of waxy coating on leaves to protect them fromdamage due to continuous flow of water on them; roots are partly developed as wateris present in abundance.
6. Some of the xeric plants show adaptation which help them to conserve water.

89
Biology Practical
BIOLOGY
Notes
Biology Practical
7. Some parasitic worms have thick cuticle which protects them from the action ofdigestive enzymes of the host.
Material Required
1. Fresh or preserved specimens of (a) water Hyacinth (b) Opuntia (c) preservedspecimen of tapeworm and a slide of head of tapeworm (scolex)
2. Hand lens
How to proceed
1. Water Hyacinth Free floating aquatic plant :
Take a fresh or preserved specimen andobserve its parts carefully. Take specialnote of the following :
(a) Roots - Its type, growth patternand any special feature that comesto your notice.
(b) Stem - Its nature, length etc.
(c) Leaves - Observe the petiole, theprotective coating on the leavesand the texture of the leaves.
Note down the special features thathelp it to survive in aquatic habitat.Record your observations.
2. Opuntia are xeric plants so observe a fresh orpreserved specimen with special attention to
(a) Root - Its type, length etc.
(b) Stem - If it is modified then the type ofmodifications it shows. Observe itscolour. Does it suggest any specialfunction that it perform?
(c) Leaves - are present ? If not, then whatare they modified into. What is thesignificance of this modification?
Fill up observation
3. Tapeworm (Taenia) = A human intestinal parasite
(a) Observe the entire specimen from the head up to the last segment or the widest endand identify the following parts :
Fig. 9.1
Fig. 9.2

BIOLOGY
Biology Practical
90
Notes
Biology Practical
(i) Scolex or the head
(ii) Neck
(iii) Proglottides forming the strobila
(b) Observe the slide of the scolex under a dissection microscope or the low power ofa compound microscope and identify
(i) the hooks in the form of acirclet on the top of the head.
(ii) Four suckers present on fourdifferent sides of the scolex.
The parasite attaches itself to thewall of the human instestine with thehelp of its scolex.
(c) Observe that there is no mouth andanus in the parasite because it absorbsdigested food surrounding it
(d) How do you think it respires insidethe human intestine?
RECORDING OF OBSERVATIONS
Observation 1
(i) Are the plants rooted or freely floating?
.........................................................................................................................
(ii) Is the roots system poorly developed or well developed?
.........................................................................................................................
(iii) Are root hairs present or absent?
.........................................................................................................................
(iv) Is the fibrous root system or tap root system?
.........................................................................................................................
(v) What is the significance of these types of roots?
.........................................................................................................................
(vi) What is the nature of the petiole of the leaf?
.........................................................................................................................
Fig. 9.3

91
Biology Practical
BIOLOGY
Notes
Biology Practical
(vii) What role do the air cavities in the stem or petiole play in life of plant in aquatichabitat?
.........................................................................................................................
(viii) What is the nature of special coating on the leaves? How is it useful?
.........................................................................................................................
(ix) List the special adaptive features in water hyacinth for aquatic life
(i) ........................... (ii) ........................... (iii) ...........................
(x) Draw a labelled diagram of the specimen.
Observation 2
(i) What is the nature of the stem? Is it fleshy or dry?
.........................................................................................................................
(ii) Are there any leaves present? What are they reduced to ? What is the significance?
.........................................................................................................................
(iii) What is the term used to describe such a stem?
.........................................................................................................................
(iv) How have such plants reduced the loss of water?
.........................................................................................................................
(v) Draw a labelled diagram of specimen.
Observation 3
(i) Draw a labelled diagram showing
(a) Scolex with hooks and suckers
(b) Neck
(c) Proglottides
(ii) What is the use of the hooks and suckers in the scolex?
(a) .................................................................................................................
(b) .................................................................................................................
(iii) Comment upon the digestive system of Taenia.
(a) Does it have a well developed digestive system?
.................................................................................................................
(b) How does its obtain food?
.................................................................................................................

BIOLOGY
Biology Practical
92
Notes
Biology Practical
(iv) List at least three parasitic adaptations in Taenia.
(a) .................................................................................................................
(b) .................................................................................................................
(c) .................................................................................................................
(v) How does it protect itself from the action of the digestive enzymes present in theintestine?
PRECAUTIONS
1. Carefully handle the opuntia plant with fine spines, it is fresh specimen.
FOR THE TEACHER
Please ensure that student is able to
1. correlate special adaptive features with the habitat
2. identify the spines and suckers on the scolex of Taenia.

93
Biology Practical
BIOLOGY
Notes
Biology Practical
Exercise 10(a)
TO STUDY THE PHYSICAL PROPERTIES OF DIFFERENT SOIL SAMPLES
Soil is the uppermost layer of the earth. It is formed by disintegration and decompositionof rocks. Soil is a mixture of mineral particles of varying sizes and decaying organic mattercalled humus. Numerous organisms live in soil and soil sustains plant life. On the natureof soil depends the type of plants or crops that can be grown on it.
OBJECTIVES
After performing the exercise, you should be able to :
� acquire the skill of setting up the experiment;
� identify different layers or components of the soil;
� compare the physical properties of different soil samples.
10.1(a) WHAT YOU SHOULD KNOW
Soil is a mixture of mineral particles of different sizes and decaying organic matter. Thedifferent sized soil particles are classified as follows :
S.No Diameter of particles Name of the soil particles
1. more than 2.00 mm gravel
2. 2.00 mm to 0.2 mm Coarse sand
3. 0.2 mm to 0.02 mm Fine sand
4. 0.02 mm to 0.002 mm Silt
5. below 0.002 mm Clay
The varying percentage of different particles in the soil are responsible for the differencein soil texture. According to the texture, characteristics of soil it may be named as :
1. Sandy soil - When soil consists of 60% of sand, 10% clay and 10% silt.
2. Loamy soil - When soil has 30-50% silt, 5-20% clay and rest sand.
3. Clay soil - When soil contains 50% of clay particles or more, rest as silt and sand.
Fig. 10.1 Soil sample

BIOLOGY
Biology Practical
94
Notes
Biology Practical
Material Required
(i) Paper bags for collecting soil samples (ii) Hand lens
(iii) Measuring cylinder (iv) Water
(v) Glass rod
10.2(a) HOW TO PROCEED
1. Collect soil samples from different places in different paper bags and label the placeand date of collection. Bring them to the laboratory.
2. Examine the soil samples by a hand lens and feel its texture and note down in theobservation table given below.
3. Take about 50 gm of soil from a sample in a 250 ml measuring cylinder.
4. Add 150 ml of water and stir it well with a glass rod.
5. Allow it to settle down.
6. Record the thickness of the layers formed by different types of particles Calculatetheir relative percentage and note down your observations in the table given below.
7. Similarly record the relative percentage of different types of particles in different soilsamples.
Fig. 10(a) Different layers formed by different types of soil particles in water.
10.3(a) RECORDING OF OBSERVATIONS
1. Name the layer that settles at the bottom and the layer that floats on water.
(a) ................................... (b) ...................................

95
Biology Practical
BIOLOGY
Notes
Biology Practical
2. How many layers are formed by the soil samples
(a) ........................................................................................................................
(b) ........................................................................................................................
(c) ........................................................................................................................
3. What is the colour and texture of the soil sample A, B and C in the table given below
S.No. Soil sample Colour Texture Relative percentage
Sand Silt Clay
1. Soil from a crop land
2. Soil from road side
3. Soil from river orany other source
10.4(a) PRECAUTIONS
1. Soil samples should be collected in separate bag labelled and brought to thelaboratory.
2. The thickness of the layers formed in water should be carefully measured.
10.5(a) FOR THE TEACHER
The teacher may help the students to
1. identify the different layers formed by the soil in water.
2. identify the sample/type of soil smaple A, B and C.

BIOLOGY
Biology Practical
96
Notes
Biology Practical
Exercise 10(b)
TO STUDY THE WATER HOLDING CAPACITY OF DIFFERENT SOILSAMPLE
Soil water is one of the most important ecological factors. Soil water is derived eitherfrom rain or from irrigation. All the water falling on soil in an area is not retaind by it.Most of it is lost as gravitational water, the rest of it is retained as capillary waterand hygroscopic water. The amount of water retained by the soil depends upon itsparticle size.
OBJECTIVES
After performing the exercise, you should be able to :
� acquire the skill of weighing soil samples by using physical balance;
� develop the skill to set up an apparatus to perform this exercise;
� explain that water rises up in soil by capillarily;
� explain why different soil samples have different water holding capacities.
10.1(b) WHAT YOU SHOULD KNOW
1. The maximum amount of water retained by a unit mass of dry soil after the loss dueto gravitational flow is called its water holding capacity.
2. It varies in different types of soils.
3. Soil is a complex mixture of mineral particles, humus, water and air.
4. The texture of the soil depends upon its particle size.
5. The soil particles may be classified into (a) coarse sand (b) fine sand (c) silt and(d) clay depending upon the particle size (0.2 mm-0.002 mm)
Material Required
(i) Garden soil sample (ii) Small tin cans with perforated bottom(iii) Road side soil sample (iv) Petridish(v) Filter papers (vi) Water(vii) Weighing balance

97
Biology Practical
BIOLOGY
Notes
Biology Practical
10.2(b) HOW TO PROCEED
1. Take the soil samples, one from garden and the other from the road side. Allow themto dry. Crush the lumps if any.
2. Take two tin boxes of the same dimensions (empty cans of softdrink or preservedfood. The tins should be narrow and long). Make 15 holes uniform sizes at the bottomof these two boxes.
3. Place filter paper at the bottom of each tin and weigh them separately say x1 andx2.
4. Now fill 50 gms of garden soil in one box and 50 gms of roadside soil in the otherbox and gently tap to ensure uniform filling.
Fig. 10(b) Figure showing water holding capacity of soil.
5. What is the weight of the soil filled boxes? (x1 + 50 gms).
6. Place the soil filled tins in petridishes containing water and allow them to take upwater till the upper surfaces of the soils become wet. Note down the time taken.
7. Now take out the tins from the petridishes and hold them slightly tilted so that theextra water drips down. Can you explain why this is important?
8. Now weigh the tins again say it weighs y1 and y2 gms respectively.
9. Now complete the following table and record it in your recod book.

BIOLOGY
Biology Practical
98
Notes
Biology Practical
1 2 3 4 5
Soil sample Wt of the Wt of the can Wt of the can Wt of water
empty can (x) after filling after removing retained by
soil it from petridish soil
x + 50 gm y gm y – (x + 50) = z
Garden soil ................... ................... ................... ...................
Road side soil ................... ................... ................... ...................
Water holding capacity of soil Z/50 × 100
10.3(b) RECORDING OF OBSERVATION
1. In which of the soil samples did the water reach the top layer earlier?
............................................................................................................................
2. How much time did the water take to rise to the top in the two samples?
............................................................................................................................
3. What was the final weight of the soils after the completion of the experiment?
Sample A ................. gm
Sample B .................. gm
4. How much of water was gained by
Sample A .................. gm
Sample B .................. gm
5. Which of the two samples has a higher water holding capacity, sample A or sampleB?
............................................................................................................................
6. What is the nature of soil in the samples? Coarse/fine?
Sample A ..................
Sample B ..................
7. How do you corelate the water holding capacity with the texture of the soil?
Did the sample with finer texture of soil show higher water holding capacity?

99
Biology Practical
BIOLOGY
Notes
Biology Practical
10.4(b) PRECAUTIONS
1. The tins should be weighed accurately.
2. Weighing of the cans after taking out of the petridishes should be done only afterdripning of water has stopped.
10.5(b) FOR THE TEACHER
1. Collection of soil sample be done under the guidance of the teacher.
2. Significance of water holding capacity may be emphasized by the teacher.

BIOLOGY
Biology Practical
100
Notes
Biology Practical
Exercise 11
DEMONSTRATION OF OSMOSIS BY POTATO OSMOMETER
Materials move in and out of the cells by different cell processes. Water moves in andout of the cells by osmosis through the cell membrane. This exercise aims at studyingthe osmosis in detail.
OBJECTIVES
After performing this exercise, you should be able to:
� develop a skill to make an osmometer with some plant material such as carrot, potato;
� reason out that cell membrane of the potato cells acts as semipermeable membrane.
11.1 WHAT YOU SHOULD KNOW
An osmometer is used to see the movement of water molecules from the region of higherwater concentration to the region of lower water concentration through the semipermeablemembrane of the cells.
Materials Required
(i) Potato (ii) Sugar Solution (iii) Stand
(iv) Petridish (v) Water (vi) Scalpel
11.2 HOW TO PROCEED
(i) Select a medium-sized potato.
(ii) Peel a potato and cut one end of the potato so that it can stand on its base.
Make a cavity (2 cm broad × 3 cm long) with the help of a scalpel on the upperportion of the potato.
(iv) A measured amount of 10% sugar solution is placed in the cavity of the tuber.
(v) Make the initial level of solution in the cavity with the help of a common pin.
(vi) Place the potato tuber containing sugar solution in a petridish containing water.
(vii) You can keep the set up for 2-3 hours or even over night.
(viii) Observe the set up after 2 hours and measure and record the level of solution.

101
Biology Practical
BIOLOGY
Notes
Biology Practical
(ix) Measure the volume of solution after the experiment is over.
Fig. 11.1 Potato osmometer.
11.3 RECORDING OF OBSERVATIONS
(i) Has the level in the potato cavity (a) remained same, (b) risen, or (c) fallen?
.........................................................................................................................
(ii) Explain the reason for your observation made in observation no.(i)
.........................................................................................................................
(iii) Name the processes involved in this experiment. (diffusion, osmosis, imbibition,absorption)
.........................................................................................................................
(iv) Define or explain the phenomenon concerned with the change of the level of sugarsolution in the cavity of potato stated above.
.........................................................................................................................
(v) What will happen if sugar solution is kept in the petridish and water in the potatocavity?
.........................................................................................................................
11.4 PRECAUTIONS
1. Make a cavity carefully in the potato so that it should deep enough.
2. Initial level of water should be carefully marked.
11.5 FOR THE TEACHER
1. The teacher may demonstrate to students, how to make cavity in the potato tuber.
2. Make sure that the sugar is properly dissolved while preparing its solution beforepouring it in the potato cavity.
3. Mark the initial level of solution in the cavity.
Pin Petridish
10% Sugar solution
Potato
Water

BIOLOGY
Biology Practical
102
Notes
Biology Practical
Exercise 12
DETERMINING THE RATE OF PHOTOSYNTHESIS IN AN AQUATICPLANT (HYDRILLA OR ELODEA)
Plants take CO2 and water to produce food in the presence of sunlight. The processis referred to as photosynthesis. O2 is one of the end products during photosynthesis.
In the present exercise you will study the rate of photosynthesis in an aquatic plantHydrilla. Rate of photosynthesis will be measured by counting the number of bubblesevolved per minute from the cut end of the plant.
OBJECTIVES
After performing this exercise, you should be able to:
� explain that different wave lengths of light affect the rate of photosynthesis;
� explain that release of O2 during the day indicates that photosynthesis is taking place,
� argue that it is therefore one of the reasons to suggest that during night one shouldnot sleep under the trees because at night there is photosynthesis and therefore, noO2 is evolved but only CO2 is released in respiration;
� explain giving one reason why during the day, one feels fresh under the tree; (thatis because of oxygen given out by the trees)
� give reason why aquatic plants are best suited for such experiments.
12.1 WHAT YOU SHOULD
1. In the presence of light, green plants take in CO2 and water and synthesize sugarand liberate O2 in the process of photosynthesis.
2. Light and carbon dioxide are two important factors which control the rate ofphotosynthesis.
Materials Required
(i) Water (ii) Sodium bicarbonate (iii) Glass rod (v) Hydrilla plants
(vi) Glass jar (12’’ by 5’’) or xuide-mouth bottle
(vii) Stop watch with seconds hand

103
Biology Practical
BIOLOGY
Notes
Biology Practical
12.3 HOW TO PROCEED
(i) Collect some Hydrilla plants from a nearby pond. May be your school centre hasan aquarium containing Hydrilla. It is a free floating green plant with several leavesarising in whorls at the nodes..
(ii) Take a big bucket full of water and leave the Hydrilla plants in it.
(iii) Select a healthy twig and tie it to a glass rod in such a way that the cut end ofthe stem is facing upwards as shown in the Fig. 12.1. It must remain inside thewater to prevent any air getting into the xylem at the cut ends of the twig.
Fig. 12.1 Experimental set up for rate of photosynthesis.
(v) Now introduce the Hydrilla plant which is tied to a rod, inside the jar filled withwater.
IMPORTANT
The Hydrilla plant must always remain submerged in water.
(vii) Add a pinch of sodium bicarbonate (NaHCO3) to the water which will provideCO2 to the plant.
(viii) What do you observe at the cut end of stem of Hydrilla twig? You will find thatair bubbles are coming out.
(ix) Keep the set up in full sunlight and take five readings by counting the number ofbubbles per minute using a stop watch.
(x) Remove the set up in the shade and count the number of bubbles per minute usinga stop watch.

BIOLOGY
Biology Practical
104
Notes
Biology Practical
12.4 OBSERVATION AND DOCUMENTATION
Observation
No. of observation No of bubbles given out/minute
Full Under the shade Meansunlight of a tree
1
2
3
4
5
(i) In which light the number of bubbles evolved is more?
.........................................................................................................................
(ii) Why is it that under the tree shade there is less number of bubbles per minute?
.........................................................................................................................
(iii) Name the gas which is evolved in the form of bubbles.
.........................................................................................................................
(iv) What is the source of the gas mentioned in item no. (iii) above
.........................................................................................................................
(v) Name the process involved in this experiment.
.........................................................................................................................
(vi) What does the rate of bubbles given out indicate?
.........................................................................................................................
(vii) Can we replace Hydrilla by any grass or any common plant like balsam or rose?Yes/No ............................... and why?
12.5 PRECAUTIONS
1. Set up the apparatus very carefully.
2. Never permit air bubbles to enter the xylem vessels of Hydrilla. Therefore alwayskeep the twigs submerged in water.
3. Do not damage the plant while tying to the grass rod.
12.6 FOR THE TEACHER
1. Teacher may help the student to select a healthy twig of Hydrilla.
2. Student be helped in recording the observation and counting of bubbles.

105
Biology Practical
BIOLOGY
Notes
Biology Practical
Exercise l3
STUDY THE STRUCTURE AND GERMINATION IN GRAM AND BEANSEEDS
13(A) STRUCTURE
All seeds have the same function i.e. to produce a new plant. For this they have anembryo, but they also have some other parts. This exercise is intended to make you studyby yourself the detailed structure of the two common seeds gram and bean. In the drycondition they are available throughout the year.
OBJECTIVES
After performing this exercise you should be able to :
� identify the different parts of the seed;
� highlight the characteristics of each component of the seed;
� justify the classification of the two prescribed seeds as dicotyledonous;
� make a temporary mount of the embryonal axis;
� identify the embryonal axis and its parts such as epicotyl and hypocotyl regions;
� identify two basic patterns of germination like epigeal and hypogeal.
13.1 WHAT YOU SHOULD KNOW
1. Seed is a reproductive part.
2. Seed contains an embryo consisting of plumule and radicle.
3. Cotyledons usually store food, and are the first leaves in same seeds.
4. Seeds are classified as monocotyledonous (single cotyledon) and dicotyledonous(two cotyledons).
Material Required
(i) Seeds of gram/bean/castor (iii) Watch glass/Petridish
(ii) Dissecting microscope/hand lens (iv) Needles
(v) Ice cream cups (vi) Soil

BIOLOGY
Biology Practical
106
Notes
Biology Practical
13.2 HOW TO PROCEED
Place the seeds in water in a petridish and leave them as such for about 24 hours. Youwill find that the seeds are somewhat swollen and that their coverings have become soft.
A. Gram and Bean
(i) Pick up one large sized soakad seed and place it in a watch glass or on a slide(Fill up observation No. 1)
(ii) Keep another watch glass ready with some water in it to keep the embryonal axis.
(iii) Remove the outermost covering of the seed, i.e the seed coat, with the help offine needles taking care that the underlying parts are not damaged, and thecotyledons are intact (Fill up Observation No. 2).
(iv) Gently open out the two cotyledons from their most convex side taking care. thatthey do not separate totally (Fill up Observation No. 3).
(v) Observe the point of attachment of the two cotyledons with the embryonal axis.
(vi) With the help of fine needles separate the embryonal axis by breaking the pointof attachment with the cotyledons.
(vii) Place the embryonal axis in the other watch glass containing some water (Fill upObservation No. 4).
Fig. 13.1 Structure of gram and bean seeds

107
Biology Practical
BIOLOGY
Notes
Biology Practical
13.3 RECORDING OF OBSERVATION
Observation No. 1
(i) What is the shape of the seed (somewhat conical, rounded or kidney shaped)
.........................................................................................................................
(ii) Do you find any markings on the surface? Yes/No .......................................... :
(iii) If yes, describe the markings.
.........................................................................................................................
(iv) Can you make out the point by which the seed was attached to the parent fruit?Yes/No....: ........................................................................................................
If yes, what is its name
.........................................................................................................................
Observation No. 2
(i) How many cotyledons are there?
.........................................................................................................................
(ii) What is the colour of the cotyledons?
.........................................................................................................................
Observation No. 3
(i) What is nature of the outer surface of the cotyledons? (Convex, concave or flat)
.........................................................................................................................
(ii) What is the shape of the inner surface of the cotyledons? (Convex, concave orflat)
.........................................................................................................................
Observation No. 4
(i) How many distinct parts do you see in the embryonal axis? (One, two, three or more)
(ii) Which parts of the embryonal axis will form
(a) Shoot .............................................................................................................
(b) Root ...............................................................................................................
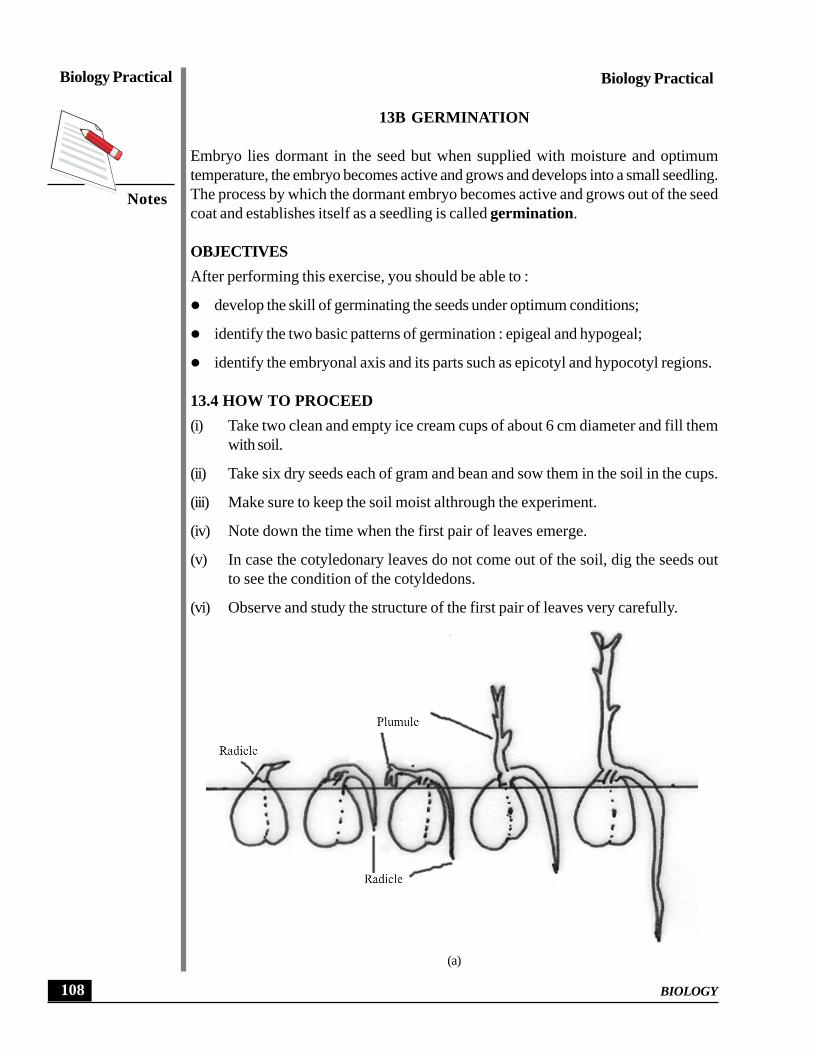
BIOLOGY
Biology Practical
108
Notes
Biology Practical
13B GERMINATION
Embryo lies dormant in the seed but when supplied with moisture and optimumtemperature, the embryo becomes active and grows and develops into a small seedling.The process by which the dormant embryo becomes active and grows out of the seedcoat and establishes itself as a seedling is called germination.
OBJECTIVES
After performing this exercise, you should be able to :
� develop the skill of germinating the seeds under optimum conditions;
� identify the two basic patterns of germination : epigeal and hypogeal;
� identify the embryonal axis and its parts such as epicotyl and hypocotyl regions.
13.4 HOW TO PROCEED
(i) Take two clean and empty ice cream cups of about 6 cm diameter and fill themwith soil.
(ii) Take six dry seeds each of gram and bean and sow them in the soil in the cups.
(iii) Make sure to keep the soil moist althrough the experiment.
(iv) Note down the time when the first pair of leaves emerge.
(v) In case the cotyledonary leaves do not come out of the soil, dig the seeds outto see the condition of the cotyldedons.
(vi) Observe and study the structure of the first pair of leaves very carefully.
(a)

109
Biology Practical
BIOLOGY
Notes
Biology Practical
(b)
Fig. 13.2 Seed germination of bean and gram seeds
13.5 RECORDING OF OBSERVATIONS
1 Bean as well as in gram seeds which part emerged first from the soil, radical/plumule/cotyledons?
............................................................................................................................
2. What was the nature of the first leaf formed in (a) gram and (b) bean?
............................................................................................................................
3. What happen to the cotyledons in the (a) gram seeds and (b) bean seeds. You maydig out the germinating seeds to see the condition of the cotyledons.
............................................................................................................................
4. Which portion of the embryonal axis grow faster epicotyl/hypocotyl in (a) and (b)?
............................................................................................................................
5. What type of germination is found in (a) and in (b)?
............................................................................................................................
6. What is the major difference you find in the first pair of leave in the two types ofseedlings and why?
............................................................................................................................

BIOLOGY
Biology Practical
110
Notes
Biology Practical
13.6 PRECAUTION
1. Make sure to keep the soil wet through the experiment.
2. While digging the soil to examine the condition of the cotyledons, do not damagethe seeds.
13.7 FOR THE TEACHER
1. Student should take help of the teacher to identify different parts of a seed.
2. Students may take help from the teacher to select out right kind of seeds to studyepigeal and hypogeal germination.
3. Teacher may kindly emphasize the significance of seed as a reproductive unit or apropagative body.

111
Biology Practical
BIOLOGY
Notes
Biology Practical
Exercise 14
TO DEMONSTRATE THE RELEASE OF CO2 DURING GERMINATION OFSEEDS
All living beings respire whether a developing baby plant (germinating seeds) or adeveloping human foetus, or a single cell. During respiration oxygen is taken in whilecarbon dioxide is liberated which can be demonstrated by the present exercise.
OBJECTIVES
After performing this exercise you should be able to:
� develop a skill to set up an apparatus to perform this exercise;
� reason out why germinating seeds and not dry seeds are selected;
� explain that the rate of respiration is higher in germinating seeds than in non-germinating ones, as the rate of growth is faster.
14.1 WHAT YOU SHOULD KNOW
1. All living beings respire take in of O2, from the inspired air and give out CO2 in theexpired air.
2. Inspiration and expiration together constitute breathing.
3. O2 taken in is used for oxidation of food to release energy-Cellular respiration.
Materials Required
(i) Conical flask-250 ml, capacity (v) Small bottle (4 cm × 3/4 cm)
(ii) One holed rubber cork (vi) Thread
(iii) Glass-tube bent twice at right angles
(vii) KOH-pellets (caustic or potassium hydroxide)
(iv) Beaker
(viii) Gram seeds/Moong seeds/Wheat grains

BIOLOGY
Biology Practical
112
Notes
Biology Practical
14.2 HOW TO PROCEED
(i) Take about 25 gms of gram seeds and soak them overnight in 1/2 a beaker ofwater.
(ii) Next day decant the water and wrap the seeds in a wet cloth.
(iii) After one or two days, open the cloth and look at the seeds.
(iv) The seeds have sprouted or germinated (The radicle and plumule have appeared)
(v) You may use the same method to germinate moong seeds and wheat grains anduse them in place of gram seeds.
Material is now ready to proceed further
(vi) Take a dry conical flask and put sufficient number of germinated seeds into it, soas to cover the base of the flask. (Two to three layers of germinated seeds).
(vii) Insert a one-holed rubber cork in the mouth of the conical flask.
(viii) Take a small test-tube and put 5 to 6 pellets of KOH (Potassium hydroxide).
(ix) Tie the test-tube with a piece of thread and hang it as shown in the diagram.
Fig. 14.1 Experimental set-up
(x) Introduce one end of the bent glass tube into the conical flask through the cork.
(xi) The end of the tube must be slightly away from the seeds.
(xii) Dip the other end into a beaker of water coloured with a drop of saffranin.
(xiii) Mark the initial level of water inside the tube.
Your experimental set-up is now ready for observation
(xiv) Leave your set-up and observe the level of the water after every half an hour. Nowturn to your work-sheet and fill up observation 1.

113
Biology Practical
BIOLOGY
Notes
Biology Practical
14.3 RECORDING OF OBSERVATION
Observation 1
(i) Why do we take germinating seeds for this experiment and not the dry seeds?
.........................................................................................................................
(ii) Can we take young floral buds instead of germinating seeds? Yes/No
.........................................................................................................................
(iii) If your answer is ‘Yes’ what precaution to be taken?
.........................................................................................................................
(iv) Why do we take KOH pellets inside the conical flask?
.........................................................................................................................
(v) Why is the other end of the tube dipped in beaker of water?
.........................................................................................................................
(vi) Does the level of water in the tube (a) remain same, (b) rise or (c) fall?
.........................................................................................................................
(vii) State a suitable reason for your answer in Q. No. (vi)
.........................................................................................................................
(viii) Name the process that your experiment has demonstrated.
.........................................................................................................................
(ix) Define or explain the process, mentioned in answer no. (viii)
.........................................................................................................................
(x) Can you perfom the experiment with boiled seeds? If not why not?
.........................................................................................................................
14.4 PRECAUTIONS
(i) The cork of the flask should remain air tight.
(ii) The KOH pellets should not come in contact with the germinating seeds.
14.5 FOR THE TEACHER
1. Students may be explained the significance of the process of respiration.
2. Students should be explained the metabolites the seeds and grains have
3. Teacher may explain the significance of oxygen in the process of respiration.

BIOLOGY
Biology Practical
114
Notes
Biology Practical
Exercise 15
TO STUDY ABOUT THE ACTION OF SALIVARY AMYLASE ON STARCH
Enzymes are involved in major physiological processes and biochemical reactions in theliving body systems such as digestion, cellular respiration, biosynthesis etc. Salivaryamylase is present in our saliva and is an important enzyme for digestion in the mouth.
OBJECTIVES
After performing this exercise, you should be able to:
� reason out that
(i) enzymes are specific for specific biochemical reactions;
(ii) act best at optimum temperature and pH;
� develop skill to prepare different solutions of specific concentration;
� show that salivary amylase acts best on cooked starch.
15.1 WHAT YOU SHOULD KNOW
1. Saliva is the secretion of three pairs of salivary glands opening into the buccal cavityof humans.
2. Saliva is a mixture of salivary amylase, mucin, minerals and water.
3. Salivary amylase is the first digestive enzyme acting on starch.
Materials Required
(i) Test-tubes (vii) Starch powder
(ii) Test-tube stand (viii) Iodine
(iii) Beakers (ix) Benedicts reagent
(iv) Burner (x) Pipette
(v) Measuring cylinder. (xi) Water bath
(vi) Physical balance (xii) Thermometer
Note : Starch solution and iodine solution to be prepared one day before the experiment.

115
Biology Practical
BIOLOGY
Notes
Biology Practical
15.2 HOW TO PROCEED
A. Preparation of Starch Solution
Note : Starch is soluble only in hot water.
(i) Weigh one gram of starch and dissolve it in 10 ml hot (boiling) distilled water.
(ii) Keep it aside.
(iii) Heat 90 ml of distilled water in a conical flask (85°C-95°C).
(iv) When the air bubbles form, remove the flask from the source of heat.
(v) Gradually transfer the prepared starch to this hot water.
(vi) Shake it thoroughly and leave it overnight.
(vii) Cork the conical flask containing starch solution.
This is 1% starch solution
B. Preparation of Iodine solution
(i) Dissolve 1 gm. of iodine and 2 gms. of potassium iodide in 100 ml of water ina beaker.
(ii) Pour it in a bottle and cork it.
Action of salivary amylase on starch
(i) Rinse your mouth with warm water. Make sure that no particle is sticking in yourteeth.
(ii) Chew a piece of paraffix wax, to get saliva collected in your mouth. Chewingenhances secretion of saliva.
(iii) Collect your saliva in a test-tube (spit it into a test-tube).
(iv) Filter the saliva through a thin layer of moistened cotton to collect frothless, clearsaliva in another test-tube (Fig. 15.1)
(v) Take two test-tubes A and B. Pour 1 ml. of 1% starch solution in both A and B.Add a drop of iodine in A.
(vi) Pour 1 ml of saliva in B and add one drop of iodine solution to it.
(vii) Observe any colour change in both A and B
Iodine gives blue-black colour only with starch.
(viii) Get a water-bath. If you do not have one, make one as given below (Fig. 15.2).

BIOLOGY
Biology Practical
116
Notes
Biology Practical
Fig. 15.1 Filtering saliva Fig. 15.2 Water bath
A beaker containing water heated to a temperature of 38°C serves as a water-bath.
(x) Prepare a series of three test-tubes (D,E,F) each containing 2 ml. of iodine solution.
(xi) Pipette out 5 ml. of 1% starch solution into another test-tube ‘C’.
(xii) Add 1 ml of saliva to the above starch solution in C. Mix the contents well andrecord the exact time of addition of saliva.
(xiii) The mixture of 1% starch solution with saliva is called digestion mixture.
(xiv) Keep the test-tube containing digestion mixture into the water-bath. Temperatureof water bath must be 38°C-39°C.
Suppose, the temperature of the water in the water bath falls below 34°C, addhot water to it. Stir it and take the temperature reading.
Do you know your normal body, temperature. It is 38°C.Salivary amylase acts best at 38°C.
Why do we maintain the temperature of 38°C? Salivaryamylase becomes inactive at lower temperature and
gets destroyed at higher temperature.
(xv) Immediately take out 2 drops of digestion mixture and add it into the test-tubeD containing iodine. (Fig.19.3a)
Note the change in colour of the iodine and record in work-sheet.
(xvi) After 5 minutes repeat the previous step. This time use test-tube-E. (Fig. 19.3b)Note the change in colour if any and record it in work-sheet.
(xvii) After 5 minutes again repeat the earlier step. This time use test-tube (F). (Fig.15.3c)
Note the change in colour if any and record it in work-sheet.

117
Biology Practical
BIOLOGY
Notes
Biology Practical
(a) (b) (c)Addition of digestion mixture Addition of digestion mixture Addition of digestion mixtureimmediately after keeping in after 5 minutes after 10 minutes.
water bath
Fig. 15.3
Clue : Some chemical reaction must have taken place during this time.
(xviii) Keep all the three test-tubes (D,E and F) and compare the colours and fill upObservation 1.
15.3 CONCLUSION
Salivary amylase of saliva acts on starch and converts it into sugar. During this chemicalaction some intermediate substances like dextrins are formed. Dextrins give reddishbrown colour with iodine.
15.4 RECORDING OF OBSERVATION
Observation 1
(i) Why do you rinse your mouth before collecting saliva in a test tube?
.........................................................................................................................
(ii) Did you find any change in colour in test-tube A?
If yes, what was the colour?
.........................................................................................................................
(iii) Did you find any change in colour in test- Tube B? Yes/No
.........................................................................................................................
(iv) What was the significance of keeping the digestion mixture in water-bath at atemperature of 38°C.
.........................................................................................................................

BIOLOGY
Biology Practical
118
Notes
Biology Practical
(v) Mention the change in colour of the contents in test-tubes - D,E,F,
.........................................................................................................................
Change in colour
(i) Test-tube D ...................... Why/ ......................
(ii) Test-tube E ...................... Why/ ......................
(iii) Test-tube F ...................... Why/ ......................
(Hint :- Starch may be undigested, partially digested, completely digested)
(vi) How much time has your saliva taken to convert starch into sugar?
.........................................................................................................................
15.5 PRECAUTIONS
1. Rinse your mouth before collecting saliva.
2. Prepare the solutions carefully.
3. Make sure the required temperature is maintained in the water bath.
15.6 FOR THE TEACHER
Please ensure that the student observes closely and times changtes inthe various test tubes.

119
Biology Practical
BIOLOGY
Notes
Biology Practical
Execise 16(Optional Module)
TO STUDY THE DEVELOPMENTAL STAGES IN THE LIFE CYCLE OFDROSOPHILA BY PREPARING A CULTURE
The progress in genetics has been largely due to experiments with common red-eyedfruit fly (Drosophilla) hovering over fruits. It is easily available and easily cultured. Thegeneration time (time to complete development is also short). It has conspicuous stagescarvae and pupa observing the eggs hatch into larvae of then into adults through pupalstage is a delight to watch.
OBJECTIVES
After preparing a culture of Drosophila, you should be able to :
� prepare the culture medium;
� crop this from the fruit shop;
� transfer flies from one bottle to another;
� identify the various stages of life history.
Materials Required
(i) Empty jam bottle or milk bottle (ii) agar (iii) yeast
(iv) sugar, (v) corn flour, (vi) propionic acid,
(vii) banana (viii) water (ix) brush
16.1 WHAT YOU SHOULD KNOW
� Culturing of an organism in laboratory is required to study the behaviour, geneticscytology and evolution purpose.
� Growing large population of organisms in the laboratory by providing space andnutrition is termed culturing.
� For research work, few organism are collected from nature or brought from dealerand maintained and grown and multiplied on a large scale.

BIOLOGY
Biology Practical
120
Notes
Biology Practical
� In school laboratories. Drosophila is cultured on a small scale for laboratory use bythe student.
16.2 HOW TO PROCEED
Drosophila, the fruit fly can be cultured by the following method :
1. Clean the empty jam bottle or milk bottle and keep in boiling water for 4-5 minutes.
2. Dissolve one gram of agar in water.
Fig. 16.1a Drosophila culture
3. Add one gram of yeast, 5 grams of sugar and 7.5 grams of conflour to the abovesolution.
4. Heat the mixture till it is semi solid.
5. Transfer it into the empty and clean jam bottle.
6. Add a drop of propionic acid to it. The culture bottle is ready.
7. Put on overripe banana in an empty and clean bottle. Place it at a fruit shop. Soonred eyed fruit flies will come into the bottle.
8. Bring the bottle containing fruit flies to your place and transfer the fruit flies into theculture bottle. Note the date and time.
9. Observe the tiny, red eyed fruit flies daily and record your observations.
10. Note the changes they undergo from egg to larva, larva to pupa and pupa to adult.
11. Draw diagrams of each stage.
12. Do not forget to write the date and time of each observation.
16.3 RECORDING OBSERVATIONS
Write the procedure of making the culture and obtaining this to lay eggs.
Draw labelled diagrams of the stages of life history that is adult male and femaleDrosophila, eggs, larvae of any in bottle or pupa.
Note : Drosophila flies move up into the empty bottle if you place it upside down abovethe culture bottle

121
Biology Practical
BIOLOGY
Notes
Biology Practical
16.4 PRECAUTIONS
1. The nutrient medium should not become hard
2. Care should be taken while transferring flies
3. Close observation is needed to see the various larval stages or larval instars as theygrow in size.
16.5 FOR THE TEACHER
The students might need help in transferring the flies. If an inverted jam bottle of samesize is kept over culture bottle. This easily fly into the upper bottle.

BIOLOGY
Biology Practical
122
Notes
Biology Practical
Execise 16(b)
A PROJECT TO STUDY THE GROWTH PATTERN OF MONEY PLANT
Growth is a essential character of life or living organisms. Growth may be defined asa permanent change in size. When growth occurs in plants, it organs increase in numberand size. Thus growth plants, its organs increase in number and size. Thus growth is avital process which brings about a permanent change in any plant or its part in respectto size, form, weight and volume.
OBJECTIVES
After completing this project, you should be able to
� know and differentiate between temporary increase due to water absorption andpermanent increase in size and number of plant organs.
� develop the skill of using methods to measure length and size of roots, stems andleaves.
� learn the technique of measuring number and size of leaves.
� learn to draw a graph to show the growth pattern of various organs of the plant.
Material Required
(i) Discarded bulb or jam bottle (ii) money plant (iii) water
(iv) thread (v) scale (vi) graph paper, pencil
16.1 WHAT YOU SHOULD KNOW
1. Growth is a permanent change in size and weight of any organism.
2. In growth of a whole organism or a part of an organism, like the twig of a moneyplant can be measured by vaious methods.
3. Measurement of length of the internodes and the size and number leaves can berecorded every day at the same time to determine the growth pattern of money plant.

123
Biology Practical
BIOLOGY
Notes
Biology Practical
16.2 PROCEDURE
1. Take a neat and clean empty bulb or jam bottle.
2. Fill three-fourth of it with fresh water.
3. Collect a piece of money plant with one or two leaves and grow in the bulb/bottleat a place with sufficient light.
4. Change the water twice a day.
5. Observe and record the growthpattern of the money plant.
6. continue collecting the data for 15days.
7. Draw conclusions about
(i) Time taken by roots to appear
(ii) Time taken by new leaves toappear
(iii) Growth rate of roots
(iv) Growth rate of stem
(v) Growth rate of leaves
(vi) Draw the diagram of eachstage.
8. Plot a graph to represent growth patterns of roots, stem and leaves. In such growthcurves, take time along x-axis and length about y-axis.
9. Present your record in the form of a project report.
16.3 RECORDING OF OBSERVATION
Suggested observation variables are
Date Time Length of Length of Number ofroot stem leaves
16.4 PRECAUTIONS
1. Observation be recorded for the same set of organs during the experiment
2. Mark the roots, leaves and stem portion with the help of tages
16.5 FOR THE TEACHER
1. Teacher may explain to the students that temporary increase in size or volume ofcertain organ due absorption of water should not be confused with real growth.
2. Students should be helped while recording the length with the help of thread.
Fig. 16.2 Growth pattern of money plant
BIOLOGY
Biology Practical
124
Notes
Biology Practical
Execise 16(c)
TO MAKE A HERBARIUM
The books are kept in the libraries in a classified manner, so that it becomes easier forus to find a specific book when we need it. The same idea applies to systems guidingus about living world. Plants are kept in dry conditions mounted on hard sheets fo paper,in a classified manner in a herbarium. Preparation of a plant to be kept in a herbariumis an important technique.
OBJECTIVES
After performing the exercise, you should be able to :
� develop the skill of collecting plants for their study;
� prepare a plant for mounting on herbarium sheets;
� learn the technique of classifying plants.
Material Required
(i) A gardener’s knife (ii) a plant press blotting papers or news papers
(iii) trowel (iv) herbarium sheets
(v) tape (vi) pen
(vii) plastic bags (viii) water
(ix) tags (x) labels.
16.1 WHAT YOU SHOULD KNOW
1. A herbarium is defined as a collection of plants that have been dried pressed andpreserved on sheets.
2. Dried plants are classified and arranged for future reference in taxonomic studies.
3. Plants should be collected from various localities for preparation of herbarium.

125
Biology Practical
BIOLOGY
Notes
Biology Practical
16.2 PROCEDURE
1. Collect 10 to 15 plants of different types from various localities with the help of knifeand trowel.
2. The plants should be from at least five different groups.
3. The plants should be moistened with water and kept in the plastic bags duringcollection.
4. At the time of collection, the plant specimen should have all the parts such as stem,root and leaf.
5. Name of location, from where the specimen has been collected, should be taggdwith it.
6. The collected plant should be spread evenly between the sheets of blotting paperor newspapers.
7. Then the plant should be pressed with the help of a plant press. If the plant pressis not available, then some other heavy objects having plane surface can be usedfor the purpose.
8. While pressing, care must be taken that the parts of the plant do not overlap andthe pressure is applied uniformly on the entire plant
9. The plant should be kept under some heavy weight for about three days.
10. The plant is taken out of the sheets, that is the sheets should be blotting paper ornewspapers changed for about three days. The same procedure is followed with otherplant specimens simultaneously.
11. Now, the dried specimens are mounted on the herbarium sheets/big drawing sheetswith the help of tape.
12. Only one specimen should be mounted on one herbarium sheet.
13. On each sheet the following detail should be given on the lower right hand corner.
(i) The site of collection
(ii) Date of collection
(iii) Name of the plant
(iv) Family
(v) Ecological and morphological note
(vi) Habitat
(vii) Name of the collector
14. Herbarium sheets should be preserved safely with moth balls/naphthalene balls etc.
15. These sheets should be presented in the form of a file.

BIOLOGY
Biology Practical
126
Notes
Biology Practical
1. The site of collection ...............................
2. Date of collection .....................................
3. Name of the plant .....................................
4. Family ........................................................
5. Ecological and morphological note ..........
6. Habitat .......................................................
7. Name of the collector ...............................
16.3 PRECAUTIONS
1. If a plant is too large then a 12 inch long flowering twig can be collected and identified
2. The leaves must be pressed in a manner that they do not overlap and get crinkled.
3. make sure that the plants contain flowers
16.4 FOR THE TEACHER
1. Learners should be helped in identifying plants
2. Significance of taxonomic classification be explained.