Biology 397NP: Neurobiology and Physiology Lab Metabolism ...
12
Biology 397NP: Neurobiology and Physiology Lab Metabolism Regulation in Zebrafish Background The energy that most animals need to perform all the every day activities is obtained from the food ingested. The most common way of extracting the chemical energy from food is to break down organic materials in the presence of oxygen, to ultimately produce carbon dioxide, water and heat. Thanks to these tight relationships between oxygen consumption, carbon dioxide production, and heat release, it is possible to make precise and noninvasive measurements of energy metabolism in a living animal simply by measuring its respiratory gas exchanges. The oxygen consumed is directly proportional to the energy produced (which in turn is proportional to the energy consumed) by the organism. Therefore, measurement of oxygen consumption is a viable indicator of the total energy usage by organisms under most circumstances. The devices required for such measurements are usually less complicated and less costly than those required for measuring the heat released by combustion of fuels. In most animals glucose is the most important metabolic fuel distributed by the blood to the tissues of the body. Maintenance of an adequate energy supply in the body is so critical that several control systems regulate blood glucose levels within a narrow range. The most important homeostatic mechanism to control levels of blood glucose is regulated by two mutually antagonistic hormones: the anabolic insulin and the catabolic glucagon. The energy-producing, storing, and transferring reactions of life are highly conserved pathways, and a common inheritance of all organisms. In this lab cycle you will study metabolism and metabolic fuel regulation in zebrafish. Zebrafish is an important model organism in many areas of scientific research. A fundamental advantage in using zebrafish is that they share a considerable amount of genetic identity with humans, and several zebrafish organ systems are remarkably similar to those in humans. Zebrafish is also an excellent tool for teaching, and it has been chosen for these laboratory exercises because it is easy to maintain, and experiments on zebrafish are easy to perform. Moreover, zebrafish is an interesting model organism for the study of energy balance because its metabolic regulation through the production of insulin is similar to mammalian models. That being said, as ectotherms zebrafish tend to have a lower O2 consumption, and lower heat production than mammals (and endotherms in general). Endotherms have a constant body temperature and maintain their elevated temperature by endogenous heat production. They tend to have a high VO2, high heat production, low thermal conductivity (good insulation) and a high metabolism - up to 5 times the metabolism of ectotherms. Ectotherms base their internal body temperature on the thermal condition outside their bodies. Their body temperatures are high in warm environments, but low in cool environments. They adjust body temperature by means other than heat production and heat loss - thus having a lower overall metabolism than endotherms. Lab Overview Objectives: - You will learn about zebrafish as an aquatic ectotherm organism, and as a model organism. - You will learn basic techniques for measuring the rate of oxygen consumption, and the level of blood glucose in adult zebrafish. - You will work in groups to design an experiment, conduct the experiment, collect data, analyze data, and present results. - You will learn how to present and discuss the results obtained from your experiments. Lab Overview: Week 1: Form groups of three, learn the basic techniques, and explore hypotheses about how environment can affect metabolism/02 consumption and/or blood glucose levels in adult zebrafish. Week 2: Pre-run some of the 12 experimental manipulations listed at the end of this manual. Come up with hypotheses, predictions, and experimental procedures that could test these predictions. Design and turn in your
Transcript of Biology 397NP: Neurobiology and Physiology Lab Metabolism ...

Biology 397NP: Neurobiology and Physiology Lab Metabolism Regulation in Zebrafish
Background The energy that most animals need to perform all the every day activities is obtained from the food ingested. The most common way of extracting the chemical energy from food is to break down organic materials in the presence of oxygen, to ultimately produce carbon dioxide, water and heat. Thanks to these tight relationships between oxygen consumption, carbon dioxide production, and heat release, it is possible to make precise and noninvasive measurements of energy metabolism in a living animal simply by measuring its respiratory gas exchanges. The oxygen consumed is directly proportional to the energy produced (which in turn is proportional to the energy consumed) by the organism. Therefore, measurement of oxygen consumption is a viable indicator of the total energy usage by organisms under most circumstances. The devices required for such measurements are usually less complicated and less costly than those required for measuring the heat released by combustion of fuels. In most animals glucose is the most important metabolic fuel distributed by the blood to the tissues of the body. Maintenance of an adequate energy supply in the body is so critical that several control systems regulate blood glucose levels within a narrow range. The most important homeostatic mechanism to control levels of blood glucose is regulated by two mutually antagonistic hormones: the anabolic insulin and the catabolic glucagon. The energy-producing, storing, and transferring reactions of life are highly conserved pathways, and a common inheritance of all organisms. In this lab cycle you will study metabolism and metabolic fuel regulation in zebrafish. Zebrafish is an important model organism in many areas of scientific research. A fundamental advantage in using zebrafish is that they share a considerable amount of genetic identity with humans, and several zebrafish organ systems are remarkably similar to those in humans. Zebrafish is also an excellent tool for teaching, and it has been chosen for these laboratory exercises because it is easy to maintain, and experiments on zebrafish are easy to perform. Moreover, zebrafish is an interesting model organism for the study of energy balance because its metabolic regulation through the production of insulin is similar to mammalian models. That being said, as ectotherms zebrafish tend to have a lower O2 consumption, and lower heat production than mammals (and endotherms in general). Endotherms have a constant body temperature and maintain their elevated temperature by endogenous heat production. They tend to have a high VO2, high heat production, low thermal conductivity (good insulation) and a high metabolism - up to 5 times the metabolism of ectotherms. Ectotherms base their internal body temperature on the thermal condition outside their bodies. Their body temperatures are high in warm environments, but low in cool environments. They adjust body temperature by means other than heat production and heat loss - thus having a lower overall metabolism than endotherms. Lab Overview Objectives: - You will learn about zebrafish as an aquatic ectotherm organism, and as a model organism. - You will learn basic techniques for measuring the rate of oxygen consumption, and the level of blood glucose in adult zebrafish. - You will work in groups to design an experiment, conduct the experiment, collect data, analyze data, and present results. - You will learn how to present and discuss the results obtained from your experiments. Lab Overview: Week 1: Form groups of three, learn the basic techniques, and explore hypotheses about how environment can affect metabolism/02 consumption and/or blood glucose levels in adult zebrafish. Week 2: Pre-run some of the 12 experimental manipulations listed at the end of this manual. Come up with hypotheses, predictions, and experimental procedures that could test these predictions. Design and turn in your
proposed experiments for next week, choosing from the list of 12. Week 3: Perform your experiments, with controls and replicates! Week 4: Finish glucose measurements, analyze and interpret your data, present your results to the class.
You will learn two different techniques to study metabolism and metabolic fuel regulation in zebrafish. You will generate a hypothesis about how environment affects metabolism/metabolic fuel regulation in zebrafish; then design an experiment to test your hypothesis. You will work in a group to design an independent research question and then to write a research proposal for approval by the instructor. Your instructors will help you to refine your question and ensure that the experimental procedures can be carried out using methods and materials supported by the laboratory and approved by the UMass Institutional Animal Care and Use Committee (IACUC). At the end of the lab cycle groups will present their results to the class using data slides, and each student will write up an explanation of their findings. The explanation must be in agreement with the data collected and analyzed, and you should include a section stating how the results were consistent (or not) with the hypothesis suggested in your proposal. You can go to the primary literature to see how your results mesh with published data.
Technique 1: To Measure the Rate of Oxygen Consumption in Zebrafish Objectives: - You will apply your knowledge on the process of aerobic cellular respiration in animals, and how nutrients are broken down to fuel ATP synthesis. - You will understand how to measure metabolic rates in organisms using respiratory gas sensors. - You will learn the basic techniques to measure oxygen consumption using the iWorx oxygen electrode.
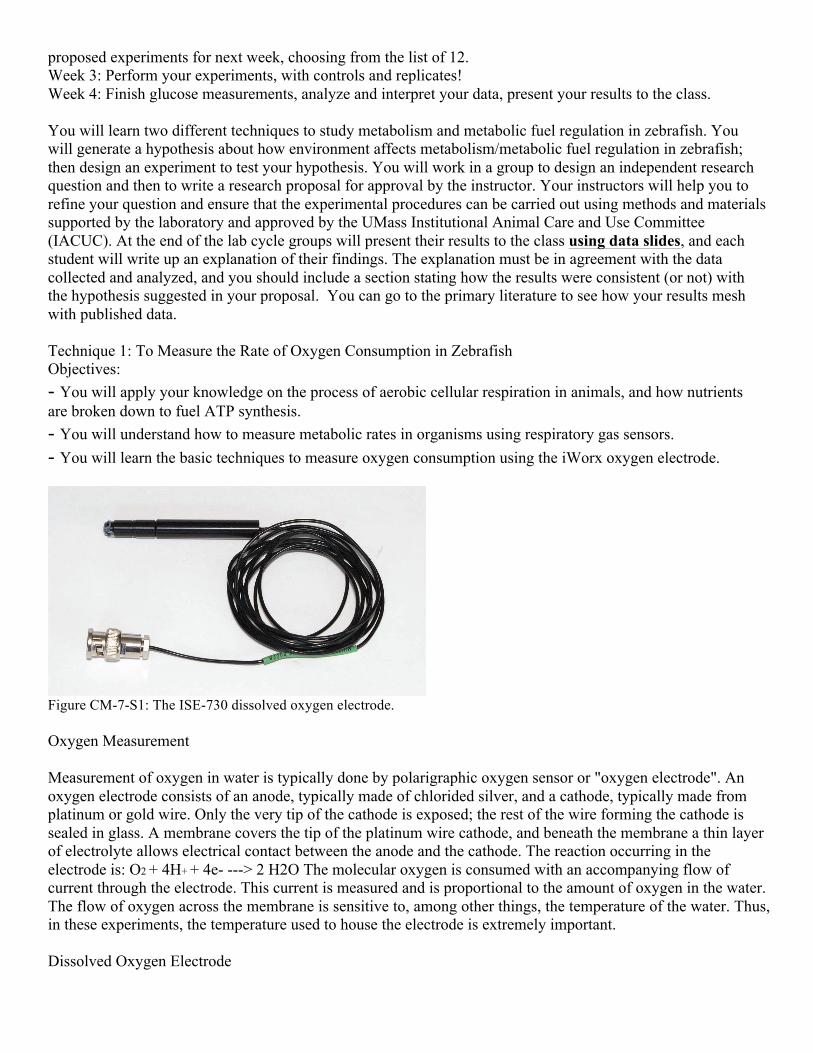
Figure CM-7-S1: The ISE-730 dissolved oxygen electrode.
Oxygen Measurement
Measurement of oxygen in water is typically done by polarigraphic oxygen sensor or "oxygen electrode". An oxygen electrode consists of an anode, typically made of chlorided silver, and a cathode, typically made from platinum or gold wire. Only the very tip of the cathode is exposed; the rest of the wire forming the cathode is sealed in glass. A membrane covers the tip of the platinum wire cathode, and beneath the membrane a thin layer of electrolyte allows electrical contact between the anode and the cathode. The reaction occurring in the electrode is: O2 + 4H+ + 4e- ---> 2 H2O The molecular oxygen is consumed with an accompanying flow of current through the electrode. This current is measured and is proportional to the amount of oxygen in the water. The flow of oxygen across the membrane is sensitive to, among other things, the temperature of the water. Thus, in these experiments, the temperature used to house the electrode is extremely important.
Dissolved Oxygen Electrode
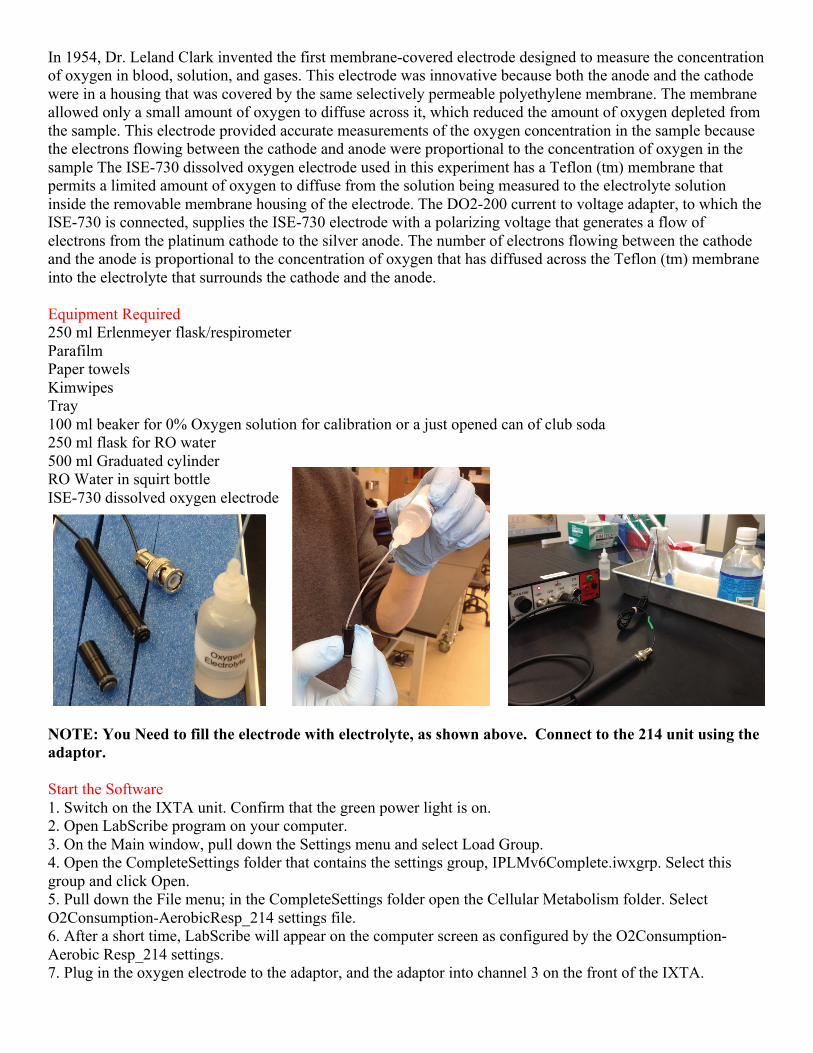
In 1954, Dr. Leland Clark invented the first membrane-covered electrode designed to measure the concentration of oxygen in blood, solution, and gases. This electrode was innovative because both the anode and the cathode were in a housing that was covered by the same selectively permeable polyethylene membrane. The membrane allowed only a small amount of oxygen to diffuse across it, which reduced the amount of oxygen depleted from the sample. This electrode provided accurate measurements of the oxygen concentration in the sample because the electrons flowing between the cathode and anode were proportional to the concentration of oxygen in the sample The ISE-730 dissolved oxygen electrode used in this experiment has a Teflon (tm) membrane that permits a limited amount of oxygen to diffuse from the solution being measured to the electrolyte solution inside the removable membrane housing of the electrode. The DO2-200 current to voltage adapter, to which the ISE-730 is connected, supplies the ISE-730 electrode with a polarizing voltage that generates a flow of electrons from the platinum cathode to the silver anode. The number of electrons flowing between the cathode and the anode is proportional to the concentration of oxygen that has diffused across the Teflon (tm) membrane into the electrolyte that surrounds the cathode and the anode.
Equipment Required 250 ml Erlenmeyer flask/respirometer Parafilm Paper towels Kimwipes Tray 100 ml beaker for 0% Oxygen solution for calibration or a just opened can of club soda 250 ml flask for RO water 500 ml Graduated cylinder RO Water in squirt bottle ISE-730 dissolved oxygen electrode
NOTE: You Need to fill the electrode with electrolyte, as shown above. Connect to the 214 unit using the adaptor. Start the Software 1. Switch on the IXTA unit. Confirm that the green power light is on. 2. Open LabScribe program on your computer. 3. On the Main window, pull down the Settings menu and select Load Group. 4. Open the CompleteSettings folder that contains the settings group, IPLMv6Complete.iwxgrp. Select this group and click Open. 5. Pull down the File menu; in the CompleteSettings folder open the Cellular Metabolism folder. Select O2Consumption-AerobicResp_214 settings file. 6. After a short time, LabScribe will appear on the computer screen as configured by the O2Consumption-Aerobic Resp_214 settings. 7. Plug in the oxygen electrode to the adaptor, and the adaptor into channel 3 on the front of the IXTA.
Warnings: 1) Handle electrode carefully. The tip of the electrode is covered by a delicate Teflon membrane, which can tear easily. 2) Do not tighten or loosen the plastic housing holding the Teflon membrane. Tightening the housing will stretch or tear the membrane; loosening the housing will cause the electrolyte to leak out of the electrode and affect its responsiveness. 3) When not in use, keep the electrode in the flask with RO water, or in its apposite container. Experimental Protocol: Calibration of Dissolved Oxygen Electrode The standards used for calibrating the dissolved oxygen electrode are the known concentrations of oxygen in an air-saturated water, and in a 0% oxygen solution. The amount of oxygen that is dissolved in water is known as its solubility and it is dependent upon the temperature, oxygen pressure in the air, and the concentrations of dissolved solutes in the water. If in your experimental setting you change any of these parameters you need to recalibrate the electrode. This is an important step, only if you do a correct and accurate calibration curve you will have a precise O2 measurement. Procedure: 1. Air Saturation: Half-fill a 200 ml flask with RO water at room temperature. Shake the flask vigorously for about 2 minutes. This is your air-saturated water. 2. Place the oxygen electrode in the flask. Completely submerge the tip of the oxygen electrode, but avoid touching the bottom of the flask. 3. Type VA (for O2-Saturated Water) in the Mark box to the right of the Mark button. 4. Click Record on the Main window. The recording will eventually reach a stable level near the top of the recording channel. Press the Enter key on the keyboard to mark the recording when the output of the electrode is constant. At this point in the recording, the output of the oxygen electrode is equal to the saturation concentration of oxygen in RO water at room temperature. 5. This is your Saturated oxygen value. 6. Keep recording. 7. Zero Oxygen: Use a just opened can of club soda as 0% oxygen calibration solution. Submerge the tip of the oxygen electrode without touching the bottom of the soda can. Seal the soda can with parafilm. It is important that you work quickly to open the can, insert the electrode, and cover the can opening with parafilm. 8. Type VZ (for No Oxygen) in the Mark box to the right of the Mark button. 9. The recording will eventually reach a stable level near the bottom of the recording channel. Press the Enter key on the keyboard to mark the recording when the output of the electrode is constant. At this point in the recording, the output of the oxygen electrode is equal to no oxygen at room temperature. 10.Click Stop to halt the recording. 11.Select Save As in the File menu, type a name for the file. Choose the 329L folder on the desktop, open your lab section folder, and create a new folder with your names. Designate the file type as *.iwxdata. Click on the Save button to save the data file. 12.Rinse the electrode with RO water from the squirt bottle. Blot any drops of solution from the electrode and place it in the flask of RO air-saturated water. Unit Conversion 1. Measure the temperature (in oC) in the lab room. Assume the barometric pressure in the lab room is one atmosphere (760mmHg) and the concentration of oxygen in the air is 21%. From Table CM-1-S2 (page 6 of the manual), find the dissolved oxygen concentration ([O2]) in deionized water at room temperature. This concentration will be used to calibrate the dissolved oxygen electrode. 2. Scroll to the beginning of the calibration data for the dissolved oxygen electrode. 3. Use the Display Time icons on the LabScribe toolbar to adjust the Display Time of the Main window to show the data collected at both the 100% (saturated) and 0% (unplugged) levels of oxygen in water on the Main window at the same time (Figure CM-7-S5). The required data can also be selected by:

• placing the cursors on either side of data required. • clicking the Zoom between Cursors button on the LabScribe toolbar to expand the segment with both the 100% and 0% saturation levels of oxygen in water to the width of the Main window.
Figure CM-7-S5: Recording of oxygen concentrations in air saturated and oxygen depleted waters used to convert the units of the Y-axis from voltage to O2 concentration (µMolar).
4. Click the Double Cursor icon so that two red cursors appear on the Main window. Place one cursor on the flat section of data collected when the saturation of dissolved oxygen in water was 100% and the second cursor on the flat section of data collected when the saturation of oxygen was 0%. 5. To convert the output of the dissolved oxygen electrode from a voltage to the molarity of dissolved oxygen in a sample: • Click on the arrow next to the title of the [Oxygen] channel to open the channel menu. • Select Units from the channel menu and Simple from the Units submenu. 6. The Simple Units Calibration window will appear (Figure CM-7-S6). On this window: • Select 2 point calibration from the pull-down menu in the upper-left corner of the window. • Put a check mark in the box next to Apply units to all blocks. • Notice that the voltages from the positions of the cursors are automatically entered into the value equations. • From Table CM-1-S2, find the concentration of dissolved oxygen in water at the room temperature that is 100% saturated. Enter this concentration in the corresponding box to the right of the voltage at 100% oxygen saturation. Enter zero in the corresponding box to the right of the voltage for 0% oxygen saturation. • Enter the name of the units, µMolar, in the box below the concentration. Click on the OK button in the lower right corner of the window to activate the unit conversion.
Figure CM-7-S6: The Simple Units Conversion dialogue window with the voltages at the cursors set to equal the dissolved oxygen concentrations used in calibration.

Table CM-1-S2: Concentration of Oxygen [O2] in Air-Saturated Water at 1 Atmosphere.
Note: If you wish to measure dissolved oxygen concentration of water at parameters that would change O2 solubility, you need to repeat the Calibration of the Oxygen Electrode. For example, if you wish to measure O2 consumption at different temperatures you need to recalibrate the electrode at each temperature. Use RO-Water, 0% oxygen solution, and electrode at the same new temperature you want to use.
STOP HERE WEEK 1

Biology397NP:NeurobiologyandPhysiologyLabMetabolismRegulationinZebrafish–Week1
Post-LabAssignmentNames:________________________________________________________________________
1) WhataretheCalibrationVoltagelevelsfor:
a. 100%O2?
b. 0%O2?
2) Whatwastheoxygenforthezebrafishtankwater?
3) Whatwastheoxygenconcentrationinthefollowingsolutions:
a. Hydrogenperoxide?
b. Sodiumbicarbonate?
c. Sodiumsulfite?

WEEK 2: Measure the rate of oxygen consumption for a zebrafish: Procedure: 1. Take a new 250 ml flask. 2. Half-fill the flask with fresh, aerated zebrafish water from the 5G carboy. 3. Weigh the flask and its contents on the top-loading balance. 4. Catch a fish from the tank and place it in the same flask. Record the tank number from which you took the fish. 5. Weigh the flask again. 6. Subtract the two weights of the flask. The difference is the weight of the fish.
Weight of flask_________________ Weight of flask with fish___________
7. Cover the sides of the flask with paper towels to minimize disturbance from outside. 8. Let the fish equilibrate to the flask for about 10-15 minutes. 9. Fill the flask to the brim with aerated fish water from the 5G carboy. 10. Tightly seal the top of the flask and around the cable of the oxygen electrode with parafilm. Make sure to do this step with the flask on the tray to collect all the water pouring off the flask. Note: It is important that there are no air bubbles on the side of the flask. 11. Type VB in the Mark box as your starting point. 12. Click Record and press the Enter key on the keyboard to mark the recording. Record the output of the oxygen electrode for 30 minutes, or until the concentration of oxygen falls below 65% of the initial concentration at the beginning of the exercise. Mark the end of the measurement VE. 12. Click Stop to halt the recording. 13. Select Save in the File menu. 14. Open the flask. Remove the dissolved oxygen electrode from the flask. Rinse the electrode with deionized water from the squirt bottle. Place the electrode in deionized water (you can use the flask with the water used for the calibration. 15. At the sink carefully pour all the water from the flask containing the fish into a graduated cylinder. While you are pouring the water hold a net to catch the fish. Return the fish to the correct aquarium. Measure and record the volume of all the water in the flask. 16. Discard the water in the sink. ml of water in the flask:_______________________ Note: Data analysis will occur after all data is collected. Data Analysis 1. Scroll through the data file and locate a section near the beginning of the. You should be very near the VB-room mark made during the recording. 2. Click the single cursor icon and measure and record the value shown in the right hand margin of the dissolved O2 channel for VB-room. • Click the down arrow to the right of the Mark button and select VE-room. This will adjust your recording to the time at when you made this mark. • Click the single cursor icon and measure and record the Value shown in the right hand margin of the Dissolved O2 channel for the fish at room temperature. Record in Journal the following information: Conditions used during the measurements: VA - Air Saturated Value:

VZ - Zero % Value: VB – Beginning: VE – End: Body Weight of fish: ml of water in the flask: Calculate the metabolic rate and express the rate in ml O2/sec per liter of water and in ml O2/sec per mass. Clean up: Disconnect the ISE-730 dissolved oxygen electrode from the iworx IX-TA unit. Rinse well the electrode with distilled water from the squirt bottle. Dry the electrode gently with kimwipes. Store the electrode in the apposite container. Rinse the flasks, beaker, and graduated cylinder, and place them in the “dirty glassware container”. List of 12 approved manipulations to choose from when designing your experiments. Measure O2 for 15 minutes (or until the concentration of oxygen falls below 65%, recording the time it takes to fall to that level) in fish under the following conditions:
1) in fish adapted to different temperatures (between 20°C to 34°C), comparing adaptation times between 15 and 60 minutes
2) after acute temperature changes, from room temperature (~25°C) to 20°C, 30°C, or 34°C 3) comparing normally fed fish to those that have fasted from 1 to 5 days, and after re-feeding. (The
instructor will be in charge of preventing feeding of designated fish by placing tape over the feeding hole in the tank)
4) in male and female fish of different sizes and ages (from 2 months to 2 years) 5) in individual fish vs. mating pairs (male and female) vs. same sex pairs, vs. "schools" of 3, 4, and 5 fish. 6) in fish experiencing current/water movement, as created with a stir bar in the flask (to be kept below the
point where swimming behavior becomes abnormal) 7) in fish experiencing minor additional stressors beyond the O2 test itself. These will be limited to
tapping the beaker gently, using smaller beaker sizes (down to 25 ml), playing music/noises, and creating visual stressors outside the beaker (such as flashing lights, moving backgrounds and pictures of stationary and moving predators).
8) in lightly anesthetized/unstressed fish, using and comparing the 2 safest anesthetics described in Collymore et al, 2014 "Efficacy and Safety of 5 anesthetics in adult zebrafish". Students can choose various doses at or below the 50% safe doses reported in the manuscript. We will use lidocaine hydrochloride at 150 mg/L and below and MS222 at 150 mg/L and below.
9) comparing fish in the light vs. in a dark chamber vs. in a lit isolation chamber (reduced stress) for different amounts of time (1-3 hours)
10) before and after the addition of live food (brine shrimp) vs. pellet food (GM300). 11) in water of pH from 6-8 (the recommended safe range in our fish facility), after either acute change or
adaptation 12) in water of different salt concentrations, in a conductivity range between 200 and 800 µSiemens (the
recommended safe range in our fish facility), after either acute change or adaptation

397 NP Animal Neurobiology and Physiology Lab, Spring 2017
Laboratory on The Regulation of Metabolism in Zebrafish Week 2 Post-lab Assignment (turn in one per group) Student Names: _____________________________________________________ 1. Calculate the metabolic rate expressed in ml O2/sec per liter of water. 2. Calculate the specific metabolic rate expressed in ml O2/sec per mass. 3. Draw a graph to represent the change in glucose levels in the blood of a zebrafish over a 24 hour period. Our zebrafish eat around noon.

WEEK 3: Real Experiments, including Measurong Blood Glucose in Adult Zebrafish (and fix fish heads for brain dissection) Objectives: - You will apply your knowledge on how hormones exert their regulatory effects throughout the body, and how their plasma concentration can be regulated. - You will learn 2 basic techniques for measuring glucose levels in adult zebrafish. - You will learn how glucose is homeostatically regulated by insulin to control fuel metabolism. - You will collect blood for glucose measuremnts and put the head of your experimental fish into fixative for later dissection.
Equipment Required Gloves 2 Glass plates Razor blade Bucket with ice Plastic spoon Glucose meter and strip (take out one strip at the time, they are light sensitive) 200!l pippeter with tip attached Labeled 1.5 ml eppendorf tubes. For each experimental fish, 1 tube will be empty for the blood, and one will contain 4% Paraformaldehyde fixative for the head/brain dissection.
Figure 1: Glucose meter with the strip.
Procedure: Euthanasia with ice-cold water: Place a 10 cm glass dish containing fish water in a bucket of ice. Allow the water in the dish to reach 2-4°C. Place a strip in the monitor (Fig.1) and get your pipette and labeled eppendorf tubes ready.
Place your experimental fish in the dish containing the cold water (cover the plate). Within 1 minute in the cold water the fish should stop swimming and gill (operculum) will stop. As soon as the gill movement (operculum movement) stops transfer the fish to a paper towel and dry one time Place fish on dry glass plate. Use a razor blade to cut the euthanized zebrafish just caudal to the operculum (gill cover). This should sever the heart (Fig.2).
Place the head in the fixative tube, cap and store on ice.Use a 200!l pipette to collect as much blood as possible and place in the empty labeled tube for later, keep on ice. Place the blood entry port of the strip directly into the remaining blood around/in the heart. Wait for the result on the monitor display. The glucose monitor reads to a maximum of 600 mg/dL. If the monitor displays “HI” the glucose level is above
Figure 2. Adult zebrafish, blade positioning for decapitation. !

600 mg/dL. Clean up: Dispose the fish in the biohazard bag on the table, and place the razor blade in the apposite sharp container. Rinse the plates and place them in the “dirty glassware”container. Blood Glucose Measurements using the Plate Reader. Plate reader glucose protocol goes here.