BigInsights: IBM Open Platform with Apache Hadoop and ...€¦ · v Phoenix 4.6.1 v T itan 1.0.0 (T...
136
BigInsights IBM Open Platform with Apache Hadoop and BigInsights 4.2 Technical Preview Version 4 Release 2 IBM
Transcript of BigInsights: IBM Open Platform with Apache Hadoop and ...€¦ · v Phoenix 4.6.1 v T itan 1.0.0 (T...

BigInsights
IBM Open Platform with Apache Hadoopand BigInsights 4.2 Technical PreviewVersion 4 Release 2
IBM


BigInsights
IBM Open Platform with Apache Hadoopand BigInsights 4.2 Technical PreviewVersion 4 Release 2
IBM

Edition notice - early release documentation
This document contains proprietary information. All information contained herein shall be kept in confidence. Noneof this information shall be divulged to persons other than (a) IBM employees authorized by the nature of theirduties to receive such information, or (b) individuals with a need to know in organizations authorized by IBM toreceive this document in accordance with the terms (including confidentiality) of an agreement under which it isprovided. This information might include technical inaccuracies or typographical errors. Changes are periodicallymade to the information herein; these changes will be incorporated in new editions of the publication. IBM maymake improvements or changes in the product or the programs described in this publication at any time withoutnotice.
© Copyright IBM Corporation 2013, 2016.US Government Users Restricted Rights – Use, duplication or disclosure restricted by GSA ADP Schedule Contractwith IBM Corp.

Contents
Chapter 1. Introduction to 4.2 . . . . . 1Introduction . . . . . . . . . . . . . . 1
Chapter 2. What's New in 4.2. . . . . . 3What's new for Version 4.2 . . . . . . . . . 3Open source technologies . . . . . . . . . . 9
Chapter 3. Installing IBM Open Platformwith Apache Hadoop . . . . . . . . . 11Get ready to install . . . . . . . . . . . . 11Preparing your environment. . . . . . . . . 16
Configuring LDAP server authentication on RedHat Enterprise Linux 6.7 and 7.2 . . . . . . 25
Creating a mirror repository for the IBM OpenPlatform with Apache Hadoop software . . . . . 27Running the installation package . . . . . . . 28Upgrading the Java (JDK) version . . . . . . . 36Installing and configuring Ranger in the Ambariweb interface . . . . . . . . . . . . . . 37
Configuring MySQL for Ranger . . . . . . 41Installing Ranger plugins . . . . . . . . . 42Set up user sync from LDAP/AD/Unix toRanger . . . . . . . . . . . . . . . 45Installing Ranger authentication . . . . . . 48
Ranger KMS set up and usage . . . . . . . . 53Cleaning up nodes before reinstalling software . . 55
HostCleanup.ini file . . . . . . . . . . 57HostCleanup_Custom_Actions.ini file. . . . . 59
Chapter 4. Installing the IBMBigInsights value-added services onIBM Open Platform with ApacheHadoop . . . . . . . . . . . . . . 61Users, groups, and ports for BigInsights value-addservices. . . . . . . . . . . . . . . . 61
Preparing to install the BigInsights value-addservices. . . . . . . . . . . . . . . . 63Obtaining the BigInsights value-add services . . . 68Installing the BigInsights value-add packages . . . 69
Installing BigInsights Home . . . . . . . . 72Installing the BigInsights - Big SQL service . . . 74Installing the Text Analytics service . . . . . 84Enabling Knox for value-add services . . . . 88Removing BigInsights value-add services . . . 90
Chapter 5. Some new or enhancedfeatures for 4.2 . . . . . . . . . . . 95Impersonation in Big SQL . . . . . . . . . 95ANALYZE command . . . . . . . . . . . 99
Auto-analyze . . . . . . . . . . . . 108HCAT_SYNC_OBJECTS stored procedure . . . . 112Big SQL integration with Apache Spark . . . . 119
EXECSPARK table function. . . . . . . . 122
Chapter 6. Known problems . . . . . 125
Index . . . . . . . . . . . . . . . 127
© Copyright IBM Corp. 2013, 2016 iii

iv BigInsights: IBM Open Platform with Apache Hadoop and BigInsights 4.2 Technical Preview
Chapter 1. Introduction to 4.2
IntroductionWelcome to the Technical Preview of the IBM® Open Platform with ApacheHadoop and IBM BigInsights 4.2. This README contains information to ensurethe successful installation and operation of the IOP and the BigInsights Value addservices.
The information contained in this Technical Preview documentation might notdescribe completely the functionality that is available in the 4.2 release. Theinformation represents a snapshot of the full 4.2 release. It describes how to installthe product and some of the highlights of the 4.2 release. Because the productdocumentation is still being refined, you might find links that are not valid.Contact your IBM representative for help in those cases.
Description
IBM Open Platform with Apache Hadoop and IBM BigInsights Version 4.2 deliverenterprise Hadoop capabilities with easy-to-use analytic tools and visualization forbusiness analysts and data scientists, rich developer tools, powerful analyticfunctions, complete administration and management capabilities, and the latestversions of Apache Hadoop and associated projects. This 4.2 release provides fullfunction SQL query capability, with security and performance benefits, to data thatis stored in Hadoop.
Obtaining the Technical Preview for 4.2
TECHNICAL PREVIEW DOWNLOAD ONLYAccept the IBM BigInsights Early Release license agreement:http://www14.software.ibm.com/cgi-bin/weblap/lap.pl?
popup=Y&li_formnum=L-MLOY-9YB5S9&accepted_url=http://ibm-open-platform.ibm.com/repos/beta/4.2.0.0/&title=IBM+BigInsights+Beta+License&declined_url=http://www-01.ibm.com/software/data/infosphere/hadoop/trials.html
Then select the appropriate repository file for your environment:
RHEL6https://ibm-open-platform.ibm.com/repos/beta/4.2.0.0/rhel6/
Use the following TAR files:BIPremium-4.2.0.0-beta1.el6.x86_64.tar.gzambari-2.2.0.0-beta1.el6.x86_64.tar.gziop-4.2.0.0-beta1-el6.x86_64.tar.gziop-utils-4.2.0.0-beta1.el6.x86_64.tar.gz
RHEL7https://ibm-open-platform.ibm.com/repos/beta/4.2.0.0/rhel7/
Use the following TAR files:BIPremium-4.2.0.0-beta1.el7.x86_64.tar.gzambari-2.2.0.0-beta1.el7.x86_64.tar.gziop-4.2.0.0-beta1-el7.x86_64.tar.gziop-utils-4.2.0.0-beta1.el7.x86_64.tar.gz
© Copyright IBM Corp. 2013, 2016 1

2 BigInsights: IBM Open Platform with Apache Hadoop and BigInsights 4.2 Technical Preview

Chapter 2. What's New in 4.2
What's new for Version 4.2New features for Version 4.2
Note: There is no UPGRADE path to or from the IBM Open Platform with ApacheHadoop and BigInsights Version 4.2 technical preview.
Major milestones
v ODPi compliant.v Express upgrade is available. You can quickly upgrade the entire cluster
while it is shut down.v Apache Spark ecosystem.v Apache Hadoop ecosystem.
Operating Systems
Refer to the System Requirements for the most up-to-date information onoperating system support:v RHEL 6.7+v RHEL 7.2
Open SourceThe following open source technologies are now supported:v Ranger 0.5.2v Phoenix 4.6.1v Titan 1.0.0 (Titan server and OLAP are not integrated in IBM Open
Platform with Apache Hadoop 4.2)
The following open source technologies are updated:v Ambari 2.2.0v Flume 1.6.0v Hadoop 2.7.2v HBase 1.2.0v Kafka 0.9.0.1v Knox 0.7.0v Slider 0.90.2v Solr 5.5v Spark 1.6.1
BigInsights Big SQL updates
1. BigInsights - Big SQL is now packaged as part of the IBM BigInsightsPremium package.
2. Big SQL and Spark Integration is now available as a technical preview.You can invoke Spark jobs from Big SQL by using a table UDFabstraction. The following example calls theSYSHADOOP.EXECSPARK user-defined function to kick off a Sparkjob that reads a JSON file stored on HDFS:
© Copyright IBM Corp. 2013, 2016 3

SELECT * FROM TABLE(SYSHADOOP.EXECSPARK(language => ’scala’,class => ’com.ibm.biginsights.bigsql.examples.ReadJsonFile’,uri => ’hdfs://host.port.com:8020/user/bigsql/demo.json’,card => 100000))
AS doc,products WHERE doc.country IS NOT NULL ANDdoc.language = products.language;
3. Support for update and delete on Big SQL HBase tables.4. Impersonation feature, which allows a service user to securely access
data in Hadoop on behalf of another user.5. An auto-analyze feature that runs the ANALYZE command
automatically under certain conditions. In addition, ANALYZEcommand now has a FOR ALL COLUMNS clause.
6. ANALYZE command improvements, some of which are listed in thefollowing table:
Table 1. Big SQL ANALYZE improvements
Enhancement Description
Analyze v2 There are major performance and memoryimprovements due to the removal of alldependencies from Hive and Map/Reduce.The ANALYZE command with noMap/Reduce dependency is called Analyzev2, which is the default for BigInsights 4.2.You can use Analyze v1 by setting thebiginsights.stats.use.v2 property tofalse. However, Analyze v1 is deprecatedand will be removed in future releases ofBig SQL.
Cumulative statistics When you run the ANALYZE commandagainst a table on a set of columns, and thenlater run ANALYZE on a second set ofcolumns, the statistics that are gathered fromthe first ANALYZE command are mergedwith the statistics that are gathered from thesecond ANALYZE command.
SYSTEM sampling Instead of scanning an entire table, you canspecify a percentage of the splits thatANALYZE can run against. Big SQLextrapolates the statistics for the whole tablebased on the sample of the table that itgathered statistics on. The SYSTEM optioncan reduce the time to run the ANALYZEcommand with minor impact on queryperformance.
FOR ALL COLUMNS By using this option, you can collectstatistics on all of the columns of the table.
7. Some maintenance improvements:
4 BigInsights: IBM Open Platform with Apache Hadoop and BigInsights 4.2 Technical Preview

Table 2. Big SQL maintenance enhancements
Enhancement Description
Automatic analyze By default, ANALYZE is run automaticallyafter a successful LOAD orHCAT_SYNC_OBJECTS call, whichautomatically gathers statistics on the tableto improve query performance. Also, BigSQL determines whether a table haschanged significantly and automaticallyschedules an ANALYZE, if necessary.
Automatic HCAT_SYNC_OBJECTS By default, Big SQL automaticallysynchronizes the Big SQL and Hive catalogsso that when data is added to Hive it can beassessed automatically by Big SQL. Inaddition, table metadata is preservedthrough the support of ALTER column. Youcan customize Big SQL metadatasynchronization with Hive withconfiguration options.
8. Some performance improvements:
Table 3. Big SQL performance improvements
Enhancement Description
Concurrency improvements Improved performance for high concurrency Hadoop,HBase, and Hybrid workloads which allows for greaterthroughput and improved CPU utilization by defaulton Big SQL clusters.
Join range predicate runtimefiltering
For joins on partitioned and non-partitioned tables,runtime filters are automatically injected to reduceunnecessary I/O during join processing.
Deferred partition pruning An improvement to the partition pruning feature thatallows Big SQL to eliminate more partitions duringquery execution. You can now consider partitioning ona join column to improve performance even further.
More flexible partitioning options In the CREATE HADOOP TABLE statement, you cannow partition a table on an expression of a previouslydefined column. You can apply an expression on acolumn with a lot of distinct values and the evaluationof that expression is used as the partitioning key. Forexample,
...PARTITIONED BY (MONTH(order_date)AS order_month)..
Additional partition pruning datatypes
The following data types in the CREATE HADOOPTABLE statement, now yield better performance whenused in the PARTITIONED BY clause of the CREATETABLE statement:
v DECIMAL
v DATE stored as DATE
Partitioned tables Improved performance for queries against Hadooptables with tens of thousands of partitions.
LOAD improvements Significant performance improvements when loadingtables with tens of thousands of partitions.
Chapter 2. What's New in 4.2 5

Table 3. Big SQL performance improvements (continued)
Enhancement Description
HBase query improvements Significant performance improvements for small HBasequeries.
9. Some of the installation improvements:v Relaxed passwordless SSH requirements for the root user ID.v An enhanced installation pre-checker and an automated
post-checker advisor.v Upgrade and patch management (4.1 fp2+ to 4.2, Ambari express
upgrade).v Enhanced storage configuration (automatic discovery of multi-disk
configuration for database storage and smarter defaults).v A new Big SQL high availability Ambari interface, with multiple
head node support, and an automatic enablement by adding newhead nodes.
10. Some administration improvements:v Simplified cluster topology changes, such as decommissioning dead
nodes.v Parallel (and online) cluster topology changes, such as adding and
dropping nodes.v Simplified service configuration management (global configuration
updates).v The ability to install and decommission Big SQL high availability
head nodes online.v Automatic failover and failback.v Some manual administration options for Big SQL high availability
management, that are automatic through the Ambari dashboard.v Automatic database engine diagnostics log management.v Runtime diagnostics collection tool for problem determination.v Performance monitoring tool with data collection for serviceability.
11. Some native C++ and Java I/O engine memory managementenhancements:v More optimal distribution of resources for high demand (enterprise)
environments.v Improvements to utilize configured memory more efficiently.v Optimized internal configuration for large result sets transfer.v Serviceability enhancements for memory management .v Optimizations for high concurrency large data volume query
workloads.12. Big SQL disaster recovery improvements:
v Online backup of the Big SQL metastore data (local tables), and anoffline restore from a remote site.
v Ability to do regular backups and restores that are configured tomeet your recovery window requirements.
13. Deeper warehouse-style storage integration:v BLU acceleration is integrated within Big SQL 4.2 as a technical
preview: in-memory processing of columnar data for analytic
6 BigInsights: IBM Open Platform with Apache Hadoop and BigInsights 4.2 Technical Preview

workloads. BLU acceleration is a revolutionary query processingtechnology built by IBM. BLU introduces a set of advanced queryprocessing technologies.
v Ability to create BLU tables on the head node.v Support for update and delete and transactional workloads.v By using BLU tables, you can join Hadoop (HDFS) data, with local
(row-stored) tables.v The Big SQL high availability feature makes data automatically
highly available.14. When you work with relational database products other than Big SQL,
the following Big SQL enhancements help reduce the time andcomplexity of enabling applications that were written for those otherrelational database products.
Note: The links in the following table will be "live" at the time of theproduct's General Availability.
Table 4. SQL compatibility enhancements
Enhancement Description
New built-in aggregate and scalar functions The following new built-in functionsincrease functionality and compatibility withother relational database managementsystems:v DATE_PARTv EXTRACT (Additional parameters such as
EPOCH)v HASHv HASH4v HASH8v NEXT_YEARv OVERLAPSv POWv THIS_QUARTERv THIS_WEEKv TIMEZONE
Syntax alternatives The following SQL syntax alternatives cannow be used:
v LIMIT ... OFFSET is a syntax alternativefor a FETCH FIRST ... OFFSET clause.
v ISNULL and NOTNULL are syntaxalternatives for the IS NULL and IS NOTNULL predicates.
Chapter 2. What's New in 4.2 7

Table 4. SQL compatibility enhancements (continued)
Enhancement Description
Extensions that enhance SQL compatibility Big SQL has added several additional SQLextensions to improve SQL compatibilitywith other vendors:
v OFFSET clause now available withFETCH FIRST n ROWS ONLY. LIMIT /OFFSET syntax may also be used in BigSQL.
v ORDER BY now supports ASC NULLSFIRST and DECS NULLS FIRST -Enhanced NULL ordering support.
v Oracle style join syntax (using +).
v CONNECT BY support for hierarchicalqueries.
v Support for ROWNUM.
v DUAL table support (such as SELECT *FROM dual).
v ISNULL can be used as a synonym for ISNULL.
v NOTNULL can be used as a synonym forIS NOT NULL
v NOW special register can be used as asynonym for CURRENT TIMESTAMP.
v Netezza style CREATE TEMPORARYTABLE.
v Netezza join syntax (USING clause).
v Netezza style casting.
v Extensions to NULLS FIRST / NULLSLAST.
v You can now use the global variable,SQL_COMPAT to activate the followingNetezza Performance Server (NPS)compatibility features(SQL_COMPAT=‘NPS’):
– Double-dot notation (for databaseobject), such that
<NPS_DatabaseName>..<NPS_ObjectName>
is interpreted as
<SchemaName>.<ObjectName>
– TRANSLATE parameter syntax.
– Operators: The operators ^ and ** areboth interpreted as the exponentialoperator. The operator # is interpretedas bitwise XOR.
– Use of ordinal and column aliases inGROUP BY clause. You can specify theordinal position or exposed name of aSELECT clause column when groupingthe results of a query.
– Netezza style procedural language(NZPLSQL) can be used in addition toSQL PL language.
8 BigInsights: IBM Open Platform with Apache Hadoop and BigInsights 4.2 Technical Preview

Table 4. SQL compatibility enhancements (continued)
Enhancement Description
New CREATE FUNCTION statement foruser-defined aggregate functions.
The new CREATE FUNCTION (aggregateinterface) statement allows you to createyour own aggregate functions, by usingyour choice of programming language. Tosee examples about migrating to this latestBig SQL feature, see Migrate your SQL codeto use the user-defined aggregate function.
User defined aggregate functions Big SQL now provides functionality to allthe creation user defined aggregate functionsfor use anywhere in SQL that a built-inaggregate can be used, including OLAPspecifications. The functions can be writtenin either JAVA or C. By using user definedaggregate functions, you can now run someof the following SQL code:
v Create a SUM function that returns 0instead of null when no rows are in agroup.
v Create a MUL function to generate theproduct of a group of numbers bymultiplying them all.
v Create a function to approximate thenumber of distinct values in a multiset(hyperloglog)
Expression operators v power (**)
v modulo (%)
v bit operators (&, | , and ^ (xor))
BigInsights - Text Analytics and Web tooling enhancements
v BigInsights - Text Analytics is now packaged as part of the IBMBigInsights Premium package.
v Spark support - Run on Cluster feature will also support Spark jobs,v Embedded light weight AQL editor.v Import / Export of projects.v Min/max of concepts in a sequence.v Input / Output spec separation.
BigInsights - BigSheetsNo new features for version 4.2.
BigInsights - Big RNo new features for version 4.2.
Open source technologiesThe following open source technologies are included with IBM Open Platform withApache Hadoop version 4.1.
Table 5. Open source technology versions by IBM BigInsights value-add services release
Open sourcetechnology 4.1.0.0 4.1.0.1 4.1.0.2 4.2
Ambari 2.1.0 2.1.0 2.1.0 2.2
Chapter 2. What's New in 4.2 9

Table 5. Open source technology versions by IBM BigInsights value-add servicesrelease (continued)
Open sourcetechnology 4.1.0.0 4.1.0.1 4.1.0.2 4.2
Flume 1.5.2 1.5.2 1.5.2 1.6.0
Hadoop (HDFS,YARNMapReduce)
2.7.1 2.7.1 2.7.1 2.7.2
HBase 1.1.1 1.1.1 1.1.1 1.2.0
Hive 1.2.1 1.2.1 1.2.1 1.2.1
Kafka 0.8.2.1 0.8.2.1 0.8.2.1 0.9.0.1
Knox 0.6.0 0.6.0 0.6.0 0.7.0
Oozie 4.2.0 4.2.0 4.2.0 4.2.0
Phoenix N/A N/A N/A 4.6.1
Pig 0.15.0 0.15.0 0.15.0 0.15.0
Ranger N/A N/A N/A 0.5.2
Slider 0.80.0 0.80.0 0.80.0 0.90.2
Solr 5.1.0 5.1.0 5.1.0 5.5
Spark 1.4.1 1.4.1 1.5.1 1.6.1
Sqoop 1.4.6 1.4.6 1.4.6 1.4.6
Titan N/A N/A N/A 1.0.0
Zookeeper 3.4.6 3.4.6 3.4.6 3.4.6
10 BigInsights: IBM Open Platform with Apache Hadoop and BigInsights 4.2 Technical Preview

Chapter 3. Installing IBM Open Platform with Apache Hadoop
The IBM Open Platform is comprised of entirely Apache Hadoop open sourcecomponents, such as Apache Ambari, HDFS, Flume, Hive, and ZooKeeper. Afteryou install the IBM Open Platform, you can add additional IBM value-add servicemodules. These value-add service modules are installed separately, and they areincluded in the IBM BigInsights® Premium package.
What is Apache Ambari?
Ambari is a system for provisioning, managing, and monitoring Apache Hadoopclusters. With Ambari, system administrators can perform the following taskswithin a centralized web interface:
Provision a clusterAmbari provides a wizard to install and configure Hadoop services acrossany number of hosts in a cluster.
Manage a clusterYou use Ambari to start, stop, and reconfigure Hadoop services across anentire cluster.
Monitor a clusterAmbari has a dashboard to monitor the health and status of a cluster.Ambari uses Ambari Metric Services for metrics and system alerts.
The Ambari architecture includes a server, agents, and web interface. The Ambariserver collects data from your cluster. An Ambari agent is installed on each host sothat the Ambari server can control the host. Each host also has a copy of theAmbari Metrics system to collect metric information.
Get ready to installPrepare your environment before you begin the installation of IBM Open Platformwith Apache Hadoop.
Meet the minimum system requirements
Make sure that your system meets the minimum requirements by reviewing thefollowing documentation.v The detailed system requirements: https://www.ibm.com/support/
docview.wss?uid=swg27027565.v The release notes in the IBM Open Platform with Apache Hadoop Knowledge
Center.
Host name information that you should have
FQDNYou must know the fully qualified domain name (FQDN) of each host ornode that is going to be part of your IBM Open Platform with ApacheHadoop cluster. The Ambari installation wizard does not support IPaddresses, so you must use the FQDN. You can determine the FQDN byrunning the following command from the Linux command line of eachnode in the cluster:
© Copyright IBM Corp. 2013, 2016 11

hostname -f
Preexisting database instancesIf you plan to install Hive/HCatalog (typical), and you want to use apreexisting instance of MYSQL/Maria (less typical), then you must knowthe host name, the database name, and the password for that instance.
Components on each hostIdentify the components that you might want to set up on each host.
Think about what directories on each host to use for dataBegin thinking about the base directories to use for storing the followingdata:v NameNode datav DataNodes datav MapReduce datav ZooKeeper data (if you install ZooKeeper)v Various log files, PID files, and database files (depending on your
installation type)
You do not need the answers yet, but it might be useful to plan yourinstallation strategy.
Base operating system repositories
The Ambari installer pulls some packages from the base operating systemrepositories. If you do not have these base operating system repositories availableto all your machines at the time of installation, you might see some issues. Forexample, if your operating system is RHEL, make sure that you have the Red HatLinux and Red Hat Optional repository channels configured and set up prior toinstallation.
Users and groups for IBM Open Platform with Apache Hadoop
Each service in Hadoop is run under the ownership of a corresponding UNIXaccount. These accounts are known as service users. The following informationlists the users and groups that are created at the time you install IBM OpenPlatform with Apache Hadoop. In some cases, you will want to create users andgroups prior to the installation of IBM Open Platform with Apache Hadoop toensure consistency across the nodes in your cluster.
UIDs and GIDs must be consistent across all nodes. If you use local service IDs forthe IBM Open Platform with Apache Hadoop services, ensure that the UIDs andGIDs are consistent across the cluster by creating them manually.
The following table lists the users and groups that are used by various services ofthe IBM Open Platform with Apache Hadoop.
If these users are not pre-created, they are created as part of the installation. If youare using LDAP, you can pre-create these IDs in LDAP before installing.
Important: For LDAP users, ensure that group memberships for each service IDare as indicated in the table.
If you are pre-creating the service IDs, create the IDs in all nodes of your cluster,and ensure consistent UIDs and GIDs across all of the nodes to make sure theservices function properly.
12 BigInsights: IBM Open Platform with Apache Hadoop and BigInsights 4.2 Technical Preview

Tip: If you are not using LDAP for your service users and groups, and you aredepending on the users and groups that are created by Ambari, you might seesome user ID and group ID inconsistencies across the different nodes in yourcluster. With IBM Open Platform with Apache Hadoop, the Ambari installationwizard creates new service user accounts and preserves any existing service useraccounts. These are the accounts that are used to configure Hadoop services. Toavoid the possibility of UID and GID inconsistencies, create the service users andgroups before you install IBM Open Platform with Apache Hadoop
Table 6. Users and groups for IBM Open Platform with Apache Hadoop
User Group Service
apache (the user account isoptional)
apache
ams hadoop Ambari metric service
postgres postgres
hive hadoop Hive
oozie hadoop Oozie
ambari-qa hadoop
flume hadoop
hdfs hadoop HDFS
solr hadoop
knox hadoop Knox
spark hadoop Spark
mapred hadoop MapReduce
hbase hadoop HBase
zookeeper hadoop ZooKeeper
sqoop hadoop Sqoop
yarn hadoop YARN
hcat hadoop HCat,WebHCat
rrdcached rrdcached
mysql mysql
hadoop (the user account isoptional)
hadoop Hadoop
kafka hadoop Kafka
Default Ports created by a typical installation
Before you install IBM Open Platform with Apache Hadoop software, use thevalues in this table to plan for any conflicts that might exist in your system.
Table 7. Default ports
Component Default port
Ambari server (HTTP) port 8080
Ambari server (HTTPS) port 8440
Ambari server (HTTPS) port 8441
dfs.datanode.address 50010
Chapter 3. Installing IBM Open Platform with Apache Hadoop 13

Table 7. Default ports (continued)
Component Default port
dfs.datanode.http.address 50075
dfs.datanode.https.address 50475
dfs.datanode.ipc.address 8010
dfs.https.port 50470
dfs.journalnode.http-address 8480
dfs.namenode.http-address 50070
dfs.namenode.https-address 50470
dfs.namenode.secondary.http-address 50090
hbase.master.info.port 60100
hbase.regionserver.info.port 60030
HBase Master Port 60000
Hbase root 8020
HiveServer2 Port 10000
hive.metastore.uri 9083
hive.server2.thrift.http.port 10001
knox gateway.port 8443
Kafka Port 6667
mapreduce.shuffle.port 13562
Oozie Server base 11000
Oozie Server Admin Port 11001
Solr 8983
spark_history_ui_port 18080
spark_thriftserver_port 10002
templeton.port 50111
yarn.nodemanager.address 45454
yarn.resourcemanager.admin.address 8188
yarn.resourcemanager.address 8050
yarn.resourcemanager.admin.address 8141
yarn.resourcemanager.resource-tracker.address
8025
yarn.resourcemanager.scheduler.address 8030
yarn.resourcemanager.webapp.address 8088
yarn.timeline-service.webapp.https.address 8190
yarn.timeline-service.address 10200
Zookeeper Server Port 2181
Setting up port forwarding from private to edge nodes
This is an optional task that depends on the network setup and specificcommunication requirements of your environment.
14 BigInsights: IBM Open Platform with Apache Hadoop and BigInsights 4.2 Technical Preview

If the data nodes are on a private network, by default, there is no direct networkpath between the data nodes and the external (corporate or internet) network. Thisdesign forces communications to be routed through a management or edge nodefor security reasons. There are scenarios where nodes on the internal Hadoopnetwork should be permitted to initiate network communications directly to theoutside network, such as the following examples:v When you install IBM Open Platform with Apache Hadoop or the BigInsights
value-add services, software is downloaded from a network location whichmight be external to the Hadoop network. In this case, the Ambari clients on thedata nodes are not able to get the files they need to perform an install.
v As part of general operating system maintenance, such as updating RPMs, thedata nodes on the internal network need to reach an RPM repository on thecorporate network or the internet.
v Sqoop is a Map/Reduce job where each data node initiates its own JDBCconnection to a data source that exists outside of the Hadoop only network.
Run the following commands as root on a management node to enable portforwarding between data nodes and management nodes. Data nodes can theninitiate communication to servers outside of the private network and receive data,but external servers remain unable to directly address Hadoop nodes on theinternal network.echo 1 > /proc/sys/net/ipv4/ip_foward/sbin/iptables -t nat -A POSTROUTING -o eth0 -j MASQUERADE/sbin/iptables -A FORWARD -i eth0 -o eth1 -m state --state RELATED,ESTABLISHED -j ACCEPT/sbin/iptables -A FORWARD -i eth1 -o eth0 -j ACCEPT
These commands assume eth0 is the external network interface. The eth1 traffic isrouted to outside of the network as if it were coming from the management node.Adjust the interface names (eth0, eth1) to match your environment.
Test the configuration by logging into a data node which is part of the internalnetwork only. Then ping or download a file from an external server or web site.The operation should succeed.
Configure your browser
To run the installation program successfully, make sure that your browser issupported. For details, see the system requirements.
Make sure that JavaScript is enabled in your browser.
Configure authentication
You configure LDAP authentication for IBM® Open Platform with Apache Hadoopin three steps.1. Decide on the directory service you plan to use. IBM Open Platform with
Apache Hadoop supports any directory service that complies with the LDAPv3 protocol (for example, OpenLDAP, Microsoft Active Directory).
2. During the installation of the IBM Open Platform with Apache Hadoop, youwill install and enable the Knox service in your cluster. This Gateway servicemust be configured to communicate with the directory service you chose instep 1.
3. If you do not have a directory service configured, you can use the OpenLDAPservice bundled with your Linux distribution (for example, see ConfiguringLDAP server authentication on Red Hat Enterprise Linux 6.5 and above. It is
Chapter 3. Installing IBM Open Platform with Apache Hadoop 15

advised that you run this service on a separate node outside of the cluster. Youwill use this directory service to authenticate all users that need access to thecluster.
Preparing your environmentIn addition to product prerequisites, there are tasks common to all IBM OpenPlatform with Apache Hadoop installation paths. You must complete thesecommon tasks before you start an installation.
Before you begin
The Ambari installer pulls some packages from the base operating systemrepositories. If you do not have these base operating system repositories availableto all your machines at the time of installation, you might see some issues. Forexample, if your operating system is RHEL, make sure that you have the Red HatLinux and Red Hat Optional repository channels configured and set up prior toinstallation.
Use the root user account to perform the following steps. To make sure that youare the root user account, run the following command from the Linux terminal:whoami
Procedure1. Ensure that adequate disk space exists for the root partition.
Issue the command to return a list of available disks in your cluster. You usethe disk partition names when specifying the cache and data directories foryour distributed file system.df -h
Here is an example of the output from the command:
Table 8. Example of dfcommand output
Filesystem Size Used Avail Use% Mounted on
/dev/sda3 95G 5.4G 85G 7% /
tmpfs 5.9G 0 5.9G 0% /dev/shm
/dev/sda1 190M 73M 108M 41% /boot
Table 9. Estimated space needed
Directory Minimum disk space
Recommended disk spacefor a productionenvironment
root partition 40 GB 100 GB
Many directories are installed in the root partition during the IBM OpenPlatform with Apache Hadoop installation, so you need enough space forthese directories and users.
2. Resolve host names and configure your network.a. Make sure that all characters in host names are lower case.b. If you want to change the host names in your cluster, and ensure they
persist between system reboots, do these steps:
RHEL 6.x
16 BigInsights: IBM Open Platform with Apache Hadoop and BigInsights 4.2 Technical Preview

1) Change the current host name by editing the followingconfiguration file:/etc/sysconfig/network
2) Save the file and then restart the network service./etc/init.d/network restart
RHEL 7.x
1) Change the current host name by running the followingcommand:hostnamect1 set-hostname <myNewhostname>
2) Verify the host name:hostnamectl status
3) Restart the host name service.systemctl restart systemd-hostnamed
Restart the Linux machine to complete the changes.c. Edit the /etc/hosts file.
Ensure that the host names for all cluster nodes are resolved. The hostnames must be configured to the same IP addresses as the actual servers,because IBM Open Platform with Apache Hadoop does not supportdynamic IP addresses. All hosts in your system must be configured forDNS and reverse DNS.You can resolve host names by using DNS servers, or by ensuring that thehost names are mapped correctly in the /etc/hosts file across all nodes inthe cluster.
Note: If you are unable to configure DNS and Reverse DNS, contact yourLinux administrator.In the /etc/hosts file, ensure that localhost is mapped to the loopbackaddress 127.0.0.1, as shown in the following example.# Do not remove the following line, or various programs# that require network functionality will fail.127.0.0.1 localhost.localdomain localhost::1 localhost6.localdomain6 localhost6192.0.2.* server_name.com server_name
d. Edit the /etc/hosts file to include the IP address, fully qualified domainname, and short name of each host in your cluster, separated by spaces.You can edit this file on each node in your cluster, or edit the file on thefirst node in your cluster and copy it to every other node by using SCP.The format is IP_address domain_name short_name. In the followingexample, assume that node1 is the host that is used for the Ambari setupand the Ambari server:127.0.0.1 localhost.localdomain localhost123.123.123.123 node1.abc.com node1123.123.123.124 node2.abc.com node2123.123.123.125 node3.abc.com node3
e. If your cluster includes nodes that use private networks only, then youmust configure a default gateway to a host that can access themanagement node, which must reside on a public network. Otherwise,skip this step and continue with the next step.
Important: You must always use a public host name for the managementnode.
Chapter 3. Installing IBM Open Platform with Apache Hadoop 17

1) On all private nodes in your cluster, edit the /etc/sysconfig/network-scripts/ifcfg-eth0 file and add the private IP address of themanagement node. This file contains the private network configurationfor the Network Interface Controller (NIC).GATEWAY=management_node_IP
management_node_IP is the private IP of your management node, suchas 192.0.2.21.
2) Save your changes and then restart your network.
RHEL 6.xservice network restart
RHEL 7.xsystemctl restart network.service
3) Check the routing tables to ensure that your gateway is enabled.route -n
You should see the gateway that you added as the last line in thekernel IP routing table. You install BigInsights by using the public hostname for the management node, and then use private or public hostnames for other nodes in your cluster.Kernel IP routing tableDestination Gateway Genmask Flags Metric Ref Use Iface...0.0.0.0 192.0.2.21 0.0.0.0 UG 0 0 0 eth0)
3. You must set up passwordless SSH connections between the Ambari serverhost and all other cluster hosts so that the Ambari server can install theAmbari agent automatically on each host.a. If your are not already logged into the master node, which is the node that
you designate as the Ambari server host, log in to your Linux master nodeas root.
b. On this Ambari server host, generate the public and private SSH keys withthe following command:ssh-keygen
When you are asked to enter a passphrase, click the Enter key to makesure the passphrase is empty. Otherwise, the host registration at Ambarifails with the following error: Permission denied (publickey,gssapi-keyex,gssapi-with-mic,password).
c. From the master node (assume that node1.abc.com is the master node),which is designated to contain the Ambari server host, copy the SSHpublic key (id_rsa.pub) to the root account on your target hosts, using thefollowing command:ssh-copy-id -i ~/.ssh/id_rsa.pub [email protected] -i ~/.ssh/id_rsa.pub [email protected] -i ~/.ssh/id_rsa.pub [email protected]...
Ensure that permissions on your .ssh directory are set to 700 (directoryowner can read,write, and execute) and the permissions on theauthorized_keys file in that directory are set to either 600 (file owner canread and write) or 640 (file owner can read and write and users in thegroup can read). You can determine the permission levels by issuing thefollowing command from the /root/ directory and from the /root/.sshdirectory:
18 BigInsights: IBM Open Platform with Apache Hadoop and BigInsights 4.2 Technical Preview

ls -l
If you need to change the permissions, run the following code:chmod 700 /root/.sshchmod 600 /root/.ssh/authorized_keys
d. From the Ambari server host, connect to each host in the cluster usingSSH. For example, enter the following command:ssh [email protected]
You may see this warning on your first connection.Are you sure you want to continue connecting (yes/no)?
Enter yes.Repeat the connection attempt from the master node to each child node tomake sure the master node can connect to each child node in the clusterwithout a password:ssh [email protected] [email protected]
e. Save a copy of the SSH private key (id_rsa) on the machine where youwill run the Ambari installation wizard. The file is in $HOME/.ssh/, bydefault. You have the option to use the contents of this file during theinstallation, and saving the contents to a convenient temporary file mightsave you some steps.
4. Disable firewalls and IPv6.a. Run the following commands in succession to disable the firewall
(iptables) on all nodes in your cluster.
Important: Ensure that you reenable the firewall on all nodes in yourcluster after installation.
RHEL 6.xchkconfig iptables off
/etc/init.d/iptables stop
RHEL 7.xsystemctl stop firewalld.service
systemctl disable firewalld.service
b. For Linux x86_64 systems only, for each client node in your cluster,disable the Transparent Huge Pages. To do this, run the followingcommand on each Ambari client node:echo never > /sys/kernel/mm/transparent_hugepage/enabled
Since this change is temporary, add the following command to your/etc/rc.local file to run the command automatically when you reboot.if test -f /sys/kernel/mm/transparent_hugepage/enabled; then
echo never > /sys/kernel/mm/transparent_hugepage/enabledfi
c. On all servers in your cluster, disable IPv6.1) From the command line, enter ifconfig to check whether IPv6 is
running. In the output, an entry for inet6 indicates that IPv6 isrunning.
2) Run the command to disable IPv6, based on your operating system:
Chapter 3. Installing IBM Open Platform with Apache Hadoop 19

Operating system Command
Red Hat Enterprise Linux 6.x 1. Write the changes to the /etc/sysctl.conf file withthe following statements, if the lines do not alreadyexist:
Open the file to edit it:
vi /etc/sysctl.conf
Add these lines if they do not already exist:
net.ipv6.conf.all.disable_ipv6 = 1net.ipv6.conf.default.disable_ipv6 = 1net.ipv6.conf.lo.disable_ipv6 = 1
Make sure the change takes effect:
sysctl -p
If the line exists with a different value, change thevalue according to the example.
2. Verify that IPv6 is disabled. From the command line,enter ifconfig to check whether IPv6 is running.IPv6 is disabled if no line containing inet6 is listedin the output.
For example, the shell command ifconfig | grep"inet6 addr:" | wc -l returns a value of "0".
Red Hat Enterprise Linux 7.x The default settings are in this path:
/usr/lib/sysctl.d/00-system.conf
To override the default settings, update the00-system.conf file, or create a file such as the followingexample:
/etc/sysctl.d/<new_file_name>.conf
Run sysctl --system to commit the changes.
5. Check that all devices have a Universally Unique Identifier (UUID) and thatthe devices are mapped to the mount point.a. Display currently assigned UUIDs for all devices in your cluster.
blkid
The output lists all devices and their UUID. In the following example,three disks are listed: /dev/sda3, /dev/sda1, and /dev/sda2./dev/sda3: UUID="1632fdf8-2283-4771-9fdd-664964ee7fcf" TYPE="ext3"/dev/sda1: UUID="8ed83d7a-4e5f-44a1-8448-533da7109312" TYPE="ext3"/dev/sda2: UUID="59f180e3-931f-4b50-aa94-4b3cb0ab2c0a" TYPE="swap"
b. Hard code the mapping references for devices to the mount point byupdating the following file:/etc/fstab
These references ensure that device mapping does not change if a devicebecomes unavailable or stops functioning. The mount point must existbefore you create mapping references.
Important: Before you edit /etc/fstab, save a copy of the original file.#UUID=<device-UID> </path/to/mount/point> <file-system-type> <options> <dump> <pass>
#/dev/sda3UUID=1632fdf8-2283-4771-9fdd-664964ee7fcf / ext3 defaults 1 1#/dev/sda1
20 BigInsights: IBM Open Platform with Apache Hadoop and BigInsights 4.2 Technical Preview

UUID=8ed83d7a-4e5f-44a1-8448-533da7109312 /boot ext3 defaults 1 2#/dev/sda2UUID=59f180e3-931f-4b50-aa94-4b3cb0ab2c0a swap swap defaults 0 0
In the previous example, both /dev/sda3, which is the root file system, and/dev/sda1 are included in the backup dump, as indicated by the firstinteger listed (1). The second integer determines the order in which filesystems are checked. In the previous example, /dev/sda3 is checked first,/dev/sda1 is checked second, and /dev/sda2 is not checked.
6. Before installing the Ambari server, confirm that your environment does notinclude any existing Ambari installation files, by running a search for thestring ambari. The following code returns nothing if no Ambari installationfiles exist:yum list installed | grep -i ambari
If files exist, follow the procedure in “Cleaning up nodes before reinstallingsoftware” on page 55.
7. Ensure that the ulimit properties for your operating system are configured.a. Edit the /etc/security/limits.conf file.b. Ensure that the nofile and nproc properties contain the following values
or greater. The nofile parameter sets the maximum number of files thatcan be open, and the nproc property sets the maximum number ofprocesses that can run. The following values are the minimum values thatare required.
nofile 65536nproc 65536
8. Synchronize the clocks of all servers in the cluster by using an internal orexternal Network Time Protocol (NTP/NTPD) source. The IBM Open Platformwith Apache Hadoop installation program synchronizes the other serverclocks with the master server during installation. You must enable theNTP/NTPD service on the management node and allow the clients tosynchronize with the master node.
Chapter 3. Installing IBM Open Platform with Apache Hadoop 21

Operating system Command
Red Hat Enterprise Linux6.x
1. Ensure that NTP is installed by running the followingcommand:
rpm -qa | grep ntp
If it is not installed (which means the grep commandreturned no output), run this install command to install it:yum install ntp.
2. From the /etc directory, open the ntp.conf script.
vi /etc/ntp.conf
3. In the ntp.conf script, search for the line that begins with# Please consider joining the pool(http://www.pool.ntp.org/join.html. After this line,insert one or more of the following time servers.
server1.rhel.pool.ntp.orgserver2.rhel.pool.ntp.orgserver3.rhel.pool.ntp.org
Where serverN represents time servers that yourorganization can access. The rhel.pool.ntp.org is adomain address where the servers are hosted, if theoperating system you are using is Red Hat EnterpriseLinux. This can change for other Linux distributions. Referto your Linux distribution documentation for details.Note: Ensure that you can ping the time servers listed. Ifthey are unreachable, specify a time server that can bereached, perhaps one within your organization's network.
4. After the configuration, synchronize the servers manuallywith the following command:
/usr/sbin/ntpdate pool.ntp.org
5. Update the NTPD service with the time servers that youspecified.
chkconfig --add ntpd
6. Stop and then start the NTPD service.
service ntpd stopservice ntpd start
7. Enable NTPD service to start automatically on reboot byrunning chkconfig ntpd on.
8. Verify that the clocks are synchronized with a time serverby running ntpstat.
Running ntpstat fails if the clocks are not synchronized. Ifthe clocks remain unsynchronized, try restarting theservice.
22 BigInsights: IBM Open Platform with Apache Hadoop and BigInsights 4.2 Technical Preview

Operating system Command
Red Hat Enterprise Linux7.x
1. Ensure that NTP is installed by running the followingcommand:
rpm -qa | grep ntp
If it is not installed (which means the grep commandreturned no output), run the yum install ntp commandto install it.
2. From the /etc directory, open the ntp.conf script.
vi /etc/ntp.conf
3. In the ntp.conf script, search for the line that begins with# Please consider joining the pool(http://www.pool.ntp.org/join.html. After this line,insert one or more of the following time servers.
server1.rhel.pool.ntp.orgserver2.rhel.pool.ntp.orgserver3.rhel.pool.ntp.org
Where serverN represent time servers that yourorganization can access. The rhel.pool.ntp.org is adomain address where these servers are hosted, if theoperating system you are using is Red Hat EnterpriseLinux. This can change for other Linux distributions. Referto your Linux distribution documentation for details.Note: Ensure that you can reach ping the time serverslisted. If they are unreachable, specify a time server thatcan be reached, perhaps one within your organization'snetwork.
4. After the configuration, synchronize the servers manuallywith the following command:
/usr/sbin/ntpdate pool.ntp.org
5. Stop and then start the NTPD service.
systemctl stop ntpd.servicesystemctl start ntpd.service
6. Enable NTPD service to start automatically on reboot:
systemctl enable ntpd.service
7. Verify that the clocks are synchronized with a time serverby runnng ntpstat.
Running ntpstat fails if the clocks are not synchronized. Ifthe clocks remain unsynchronized, try restarting theservice.
9. You must disable SELinux before installing IBM Open Platform with ApacheHadoop and it must remain disabled for IBM Open Platform with ApacheHadoop to function. To disable SELinux temporarily, run the followingcommand on each host in your cluster:setenforce 0
Then, disable SELinux permanently by editing the SELinux config and set theSELINUX parameter to disabled on each host. This ensures SELinux remainsdisabled if the system is rebooted.vi /etc/selinux/config# This file controls the state of SELinux on the system.# SELINUX= can take one of these three values:# enforcing - SELinux security policy is enforced.# permissive - SELinux prints warnings instead of enforcing.# disabled - SELinux is fully disabled.
Chapter 3. Installing IBM Open Platform with Apache Hadoop 23

SELINUX=disabled# SELINUXTYPE= type of policy in use. Possible values are:# targeted - Only targeted network daemons are protected.# strict - Full SELinux protection.SELINUXTYPE=targeted
10. When you install on a Red Hat Enterprise Linux operating system, for allnodes in your cluster, ensure that the ZONE parameter value is valid, whichmeans that it must match an actual file name in /usr/share/zoneinfo. If theZONE parameter value is set to a file that does not exist, modify the value torefer to the correct time zone. As an example, sometimes spaces exist in thetime zone name. Replace the space with an underscore (_) to match the correcttime zone file. If this value is not correct, the Open JDK software picks thewrong time zone information, which results in invalid time stamp values.
RHEL 6.xThe ZONE parameter value is in /etc/sysconfig/clock, and it mustrefer to a valid file under /usr/share/zoneinfo.
For example, view the contents of the /etc/sysconfig/clock file.# The time zone of the system is defined by the contents of /etc/localtime.# This file is only for evaluation by system-config-date, do not rely on its# contents elsewhere.ZONE="America/Los Angeles"
You see that the value of ZONE is America/Los Angeles, which does notmatch the /usr/share/zoneinfo/America/Los_Angeles file name.
Change the value in /etc/sysconfig/clock file to the value of theactual file name:a. Edit the /etc/sysconfig/clock file:
vi /etc/sysconfig/clock
b. Set the value of ZONE to match the file name:ZONE="America/Los_Angeles"
RHEL 7.xUse the following command to set the Zone:timedatectl set-timezone [timezone]
where timezone is the zone. This command updates the symbolic linkfor /etc/localtime.
For example if the file name is actually /usr/share/zoneinfo/America/New_York, then issue the following command:timedatectl set-timezone America/New_York
The result is the following output:/etc/localtime-> ../usr/share/zoneinfo/America/New_York
11. Optional: Use these optional steps to explicitly create a non-root user andgroup with sudo privileges. Otherwise, default IDs will be used.a. On every node in your cluster, as the root user, create the somegroup group
and then add the userx user to it.1) Add the somegroup group.
groupadd -g 123 somegroup
2) Add the userx user to the somegroup group.useradd -g somegroup -u 123 userx
3) Set the password for the userx user.
24 BigInsights: IBM Open Platform with Apache Hadoop and BigInsights 4.2 Technical Preview

passwd userx
b. On the intended master node, add the userx user to the sudoers group.(Repeat this step for all nodes.)1) Edit the sudoers file.
sudo visudo -f /etc/sudoers
2) Comment out the following line.Defaults requiretty
3) Locate the following line.# %wheel ALL=(ALL) NOPASSWD: ALL
Replace that line with the following lines, depending on what type ofaccess is required.##Permits users in the somegroup group to run all commands without##supplying a passwordsomegroup ALL=(ALL) NOPASSWD:ALL
Configuring LDAP server authentication on Red Hat EnterpriseLinux 6.7 and 7.2
If you want to use LDAP authentication on RHEL 6.7 or 7.2 for your users andgroups, you must configure your LDAP server before installing IBM OpenPlatform with Apache Hadoop. You must complete this procedure on every nodein your cluster.
Before you begin
You need the following information to complete this procedure. You can find thisinformation in the ldap.conf file in the /etc/openldap directory.v LDAP server URI, such as ldap://10.0.0.1.v LDAP server search base, such as dc=example,dc=com.
Add users and user groups to your LDAP configuration. All users of Oozieservices, zookeeper services, or monitoring services must belong to the Hadoopgroup. For more information about potential groups, see “Get ready to install” onpage 11.
To disable LDAP authentication, use the following command:sudo /usr/bin/authconfig
--disableldap --disableldapauth--ldapserver=ldap://your-ldap-server-name:port--ldapbasedn="dc=your-ldap-dc,dc=your-ldap-dc"--update
Procedure1. Install the following required packages.
yum install authconfig
yum install pam_ldap
yum install openldap openldap-clients openldap-servers sssd
2. Configure your OpenLDAP server.a. Change the directory to /etc/openldap/slapd.d/cn\=config. Then, update
the olcDatabase\=\{2\}bdb.ldif parameter to point to the LDAP serverconfig file. In the LDAP server config file modify the olcSuffix entry to
Chapter 3. Installing IBM Open Platform with Apache Hadoop 25

identify your domain. For example, if your domain is example.com, thenyour suffix looks like the following example.olcSuffix "dc=example,dc=com"
b. Modify the olcRootDN entry to reflect the name of the privileged user whohas unrestricted access to your OpenLDAP directory. For example, if theprivileged user is ldapadmin and the domain is example.com, then yourolcRootDN looks like the following example.olcRootDN "cn=ldapadmin,dc=example,dc=com"
c. Enter a password for your OpenLDAP server by using the olcRootPWparameter. Using a password provides the capability to configure, test, andcorrect your OpenLDAP system over your local network.olcRootPW password
Alternatively, you can use the slappasswd command to generate anencrypted password that you can copy and paste into the slapd.conf file.The command prompts you to enter a password and then generates anencrypted password.
d. From the /etc/init.d directory, run the ldap script to start yourOpenLDAP server./etc/init.d/slapd start
3. Configure the LDAP user stores and enable your machine to authenticate toyour remote LDAP server. You must use the full LDAP URL for your LDAPserver./usr/sbin/authconfig --enableldapauth --ldapserver=ldap://ldap.example.com /
--ldapbasedn="dc=ibm,dc=com" --update
4. Configure the LDAP client by using sssd.The sssd configuration is located at /etc/sssd/sssd.conf. Examples ofsssd.conf:[sssd]config_file_version = 2services = nss, pamdomains = default
[nss]filter_users = root,ldap,named,avahi,haldaemon,dbus,radiusd,news,nscd
[pam]
[domain/default]auth_provider = ldapid_provider = ldapldap_schema = rfc2307ldap_search_base = ou=im,dc=example,dc=comldap_group_member = memberuidldap_tls_reqcert = neverldap_id_use_start_tls = Falsechpass_provider = ldapldap_uri = ldap://ldap.example.com:389/ldap_tls_cacertdir = /etc/openldap/cacertsentry_cache_timeout = 600ldap_network_timeout = 3#ldap_access_filter = (&(object)(object))ldap_default_bind_dn = cn=Manager,ou=im,dc=example,dc=comldap_default_authtok_type = passwordldap_default_authtok = YOUR_PASSWORDcache_credentials = Trueenumerate=true
Note:
26 BigInsights: IBM Open Platform with Apache Hadoop and BigInsights 4.2 Technical Preview

v There are a very large number of LDAP calls made by a Hadoop cluster.v ALL IBM Open Platform with Apache Hadoop and IBM BigInsights
value-add service users can be local. Adding them to the filter users clauseprevents any call to LDAP. For more information, see http://www-01.ibm.com/support/docview.wss?uid=swg21962541.
5. Edit /etc/nsswitch.conf to make sure the account resolution is using sss.passwd: files sssshadow: files sssgroup: files sss
6. From the /etc/init.d/sssd, run the sssd script to start your LDAP client./etc/init.d/sssd start
Creating a mirror repository for the IBM Open Platform with ApacheHadoop software
You can create a mirror of the IBM hosted repository on a machine within yourenterprise network and instruct Ambari to use that local repository. You can usethis approach when internet access is restricted.
Before you begin
Ensure you have met all the prerequisites described in Preparing to install IBMOpen Platform with Apache Hadoop
Procedure1. On a server that is accessible to your cluster, enable network access from all
hosts in your cluster to a mirror server. This mirror server can be defined inDNS or you can add an entry for the mirror server in /etc/hosts on each nodeof your cluster.
2. Create an HTTP server on the mirror server, such as Apache httpd. Apachehttpd might already be installed on your mirror server. If it is not alreadyinstalled, install it with the yum install httpd command. Start this mirror webserver. For Apache httpd, you can start it using the following command:apachectl start
3. Ensure that any firewall settings allow inbound HTTP access from your clusternodes to your mirror web server.
4. On the mirror web server, create a directory for your IOP repos, such as<document root>/repos. For Apache httpd with document root /var/www/html,type the following command:mkdir -p /var/www/html/repos
5. Obtain the following tarballs for the IBM Open Platform repository, using eitherwget or curl -O:
TECHNICAL PREVIEW DOWNLOAD ONLYAccept the IBM BigInsights Early Release license agreement:http://www14.software.ibm.com/cgi-bin/weblap/lap.pl?popup=Y&li_formnum=L-MLOY-9YB5S9&accepted_url=http://ibm-open-platform.ibm.com/repos/beta/4.2.0.0/&title=IBM+BigInsights+Beta+License&declined_url=http://www-01.ibm.com/software/data/infosphere/hadoop/trials.html
Then select the appropriate repository file for your environment:
RHEL6https://ibm-open-platform.ibm.com/repos/beta/4.2.0.0/rhel6/
Chapter 3. Installing IBM Open Platform with Apache Hadoop 27

Use the following TAR files:BIPremium-4.2.0.0-beta1.el6.x86_64.tar.gzambari-2.2.0.0-beta1.el6.x86_64.tar.gziop-4.2.0.0-beta1-el6.x86_64.tar.gziop-utils-4.2.0.0-beta1.el6.x86_64.tar.gz
RHEL7https://ibm-open-platform.ibm.com/repos/beta/4.2.0.0/rhel7/
Use the following TAR files:BIPremium-4.2.0.0-beta1.el7.x86_64.tar.gzambari-2.2.0.0-beta1.el7.x86_64.tar.gziop-4.2.0.0-beta1-el7.x86_64.tar.gziop-utils-4.2.0.0-beta1.el7.x86_64.tar.gz
Note: If you use a Windows system to download the files, you can also cutand paste the URLs into a web browser and proceed to download the files. Youcan then transfer the files to the system that will host your mirror/repositoryfiles.
6. Extract the IOP repository tarballs in the repos directory under document root.For Apache httpd, issue the following commands:cd /var/www/html/repostar xzvf <path to downloaded tarballs>
7. Test your local repository by browsing to the web directory:http://<your.mirror.web.server>/repos
Running the installation packageTo install the IBM Open Platform with Apache Hadoop software, run theinstallation commands, start the Ambari server, and complete the installationwizard steps.
Before you begin
TECHNICAL PREVIEW DOWNLOAD ONLY
See the download information for the technical preview.
If you need overview information about the Ambari server, see Chapter 3,“Installing IBM Open Platform with Apache Hadoop,” on page 11.
UIDs and GIDs must be consistent across all nodes. If you use local service IDs forIBM Open Platform with Apache Hadoop services, ensure that the UIDs and GIDsare consistent across the cluster by creating them manually. For more informationabout what users and groups to create, see Table 6 on page 13. .
Procedure1. Log in to your Linux cluster on the master node as root. You can log in as a
user with root privileges, but this is not typical.a. Verify that you are the root user on the management node by running the
following commands:
hostname -fThis command returns the current hostname (such asnode1.abc.com) of the node that will contain the Ambari server.
28 BigInsights: IBM Open Platform with Apache Hadoop and BigInsights 4.2 Technical Preview

whoamiThis command returns the user account, root.
b. Log into the system as the root user:ssh [email protected]
2. Ensure that the nc package is installed on all nodes. If you installed the BasicServer option, you might not already have the nc package, which can result indata node failures.
RHELyum install -y nc
Your output will show that the nc package is installed, or is is alreadyinstalled and there is nothing for your to do.
...Nothing to do
...Updated: nc.x86_64 0:1.84-24.el6 Complete!
3. If you are using a mirror repository, complete the following steps.a. Create the ambari.repo file. You can use the following command to copy it
from where the Ambari tarball is extracted:cp /var/www/html/repos/ambari.repo /etc/yum.repos.d/
a. Edit the file /etc/yum.repos.d/ambari.repo. Replace the value for baseURLwith your mirror URL. The original baseURL might look like one of thefollowing:
xRHEL6
v Ambari: https://ibm-open-platform.ibm.com/repos/Ambari/rhel/6/x86_64/2.2.x/Updates/2.2.0_Spark-1.x.x/BI-AMBARI-2.2.0-Spark-1.x.x-20160105_1211.el6.x86_64.tar.gz
v IOP: https://ibm-open-platform.ibm.com/repos/IOP/rhel/6/x86_64/4.x.x/IOP-4.x-Spark-1.x.x-20151210_1028.el6.x86_64.tar.gz
v IOP-Utils: https://ibm-open-platform.ibm.com/repos/IOP-UTILS/rhel/6/x86_64/1.1/
xRHEL7
v Ambari: https://ibm-open-platform.ibm.com/repos/Ambari/rhel/7/x86_64/2.2.x/Updates/2.2.0_Spark-1.x.x/BI-AMBARI-2.2.0-Spark-1.x.x-20160105_1212.el7.x86_64.tar.gz
v IOP: https://ibm-open-platform.ibm.com/repos/IOP/rhel/7/x86_64/4.x.x/Updates/4.x.0.0_Spark-1.x.x/IOP-4.x-Spark-1.x.x-20151209_2001.el7.x86_64.tar.gz
v IOP-UTILS: https://ibm-open-platform.ibm.com/repos/IOP-UTILS/rhel/7/x86_64/1.1/
For example: baseurl= http://web_server/repos/Ambari/rhel/6/x86_64/2.2.x/Updates/2.2.0_Spark-1.x.x/...
Remember, the Linux version number and the platform might be different.b. Perform one of the following two actions:v Disable gpgcheck in the ambari.repo file. To disable signature
validation, change gpgcheck=1 to gpgcheck=0.
Chapter 3. Installing IBM Open Platform with Apache Hadoop 29

v Keep gpgcheck enabled and change the public key file location to themirror Ambari repository. Replace gpgkey=http://ibm-open-platform.ibm.com/repos/Ambari/rhel/6/x86_64/2.2.x/Updates/2.2.0_Spark-1.x.x/.../BI-GPG-KEY.public with the mirror Ambarirepository location.For example: gpgkey=http://web_server/repos/Ambari/rhel/6/x86_64/2.2.x/Updates/2.2.0_Spark-1.x.x/.../BI-GPG-KEY.public.Remember, the Linux version number and the platform might bedifferent.
Note:
v The IBM hosted repository uses HTTPS. If your local mirror is notconfigured for HTTPS, use http:// instead of https://.
v If you are installing on an operating system other than RHEL6, thepaths will be slightly different. Modify as appropriate.
4. Clean the yum cache on each node so that the right packages from the remoterepository are seen by your local yum.yum clean all
The output might look like the following text:
Loaded plugins: product-id, refresh-packagekit, rhnplugin, security,: subscription-manager
Cleaning repos: BI_AMBARI-2.2.xxxx rhel-x86_64-server-6Cleaning up Everything
5. Install the Ambari server on the intended management node, using thefollowing command:yum install ambari-server
Accept the install defaults.6. Update the following file with the mirror repository URLs.
For Mirror Repository:/var/lib/ambari-server/resources/stacks/BigInsights/4.x/repos/repoinfo.xml
In the file, change the information from the Original content to the Modifiedcontent. Modify according to your level of Linux and platform:
Example original content Modified content
<os type="redhat6"> <repo> <baseurl>https://ibm-open-platform.ibm.com/repos/Ambari/rhel/6/x86_64/2.2.x/Updates/2.2.0_Spark-1.5.1/.../</baseurl><repoid>IOP-4.x</repoid><reponame>IOP</reponame> </repo><repo> <baseurl> http://ibm-open-platform.ibm.com/repos/IOP-UTILS/rhel/6/x86_64/1.0</baseurl><repoid>IOP-UTILS-1.0</repoid><reponame>IOP-UTILS</reponame></repo> </os>
<os type="redhat6"> <repo> <baseurl>http://<web.server>/repos/IOP/rhel/6/x86_64/4.x</baseurl> <repoid>IOP-4.x</repoid> <reponame>IOP</reponame></repo> <repo> <baseurl>http://<web.server>/repos/IOP-UTILS/rhel/6/x86_64/1.0</baseurl><repoid>IOP-UTILS-1.0</repoid><reponame>IOP-UTILS</reponame></repo> </os>
Tip:
30 BigInsights: IBM Open Platform with Apache Hadoop and BigInsights 4.2 Technical Preview

If you use a local repository URL, and you must modify the repo URL, thereare three ways to change the repo URL:a. Change the repo.xml file manually.b. During the cluster installation, change repos on the Ambari web interface
at the Select Stack step.c. After you complete an installation, use the Ambari web tool:
1) From the Ambari web dashboard, in the menu bar, click admin >Manage Ambari.
2) From the Clusters panel, click Versions > <stack name>.3) Change the URL as needed, and click Save.4) Restart the Ambari server.
There is no need to restart the Ambari server for the second or third option.Edit the /etc/ambari-server/conf/ambari.properties file. Change theinformation from the Original content to the Modified content
Original content Modified content
openjdk1.8.url=http://ibm-open-platform.ibm.com/repos/IOP-UTILS/rhel/6/x86_64/1.1/openjdk/jdk-1.8.0.tar.gz
openjdk1.8.url=http://<web.server>/repos/IOP-UTILS/rhel/6/x86_64/1.1/openjdk/jdk-1.8.0.tar.gz
7. Set up the Ambari server:a. Run the following command and accept the default settings:
ambari-server setup
The IBM Open Platform with Apache Hadoop installation includes OpenJDK1.8 and is the default. The Ambari server setup allows you to reuse anexisting JDK. The command is:ambari-server setup -j /full/path/to/JDK
The JDK path set by the -j parameter must be identical and valid on everynode in the cluster.For a list of the currently supported JDK versions, see “Upgrading the Java(JDK) version” on page 36.
Chapter 3. Installing IBM Open Platform with Apache Hadoop 31

Tip: You might need to reboot your nodes if you see a message that SELinuxis still enabled.
8. Start the Ambari server, using the following command:ambari-server start
9. If the Ambari server had been installed on your node previously, the nodemay contain old cluster information. Reset the Ambari server to clean up itscluster information in the database, using the following commands:ambari-server stop
ambari-server reset
ambari-server start
10. Access the Ambari web user interface from a web browser by using the servername (the fully qualified domain name) on which you installed the software,and port 8080. For example, enter the following string in your browser:HTTP://node1.abc.com:8080
Note: In some networks, port 8080 is already in use. To use another port, dothe following:a. Edit the ambari.properties file:
vi /etc/ambari-server/conf/ambari.properties
b. Add a line in the file to select another port:client.api.port=8081
c. Save the file and restart the Ambari server:ambari-server restart
11. Log in to the Ambari server (http://<server-name>:8080) with the defaultusername and password: admin/admin.The port 8080 is the default. If you changed the default port in the previousstep, use the modified port number.
12. On the Welcome page, click Launch Install Wizard.13. On the Get Started page, enter a name for the cluster you want to create. The
name cannot contain blank spaces or special characters. Click Next.14. On the Select Stack page, click the Stack version you want to install:
Option Description
IBM Open Platform with Apache Hadoop The administrator selects BigInsights 4.2 asthe stack.
Click Next.15. On the Install Options page, complete the following two steps:
a. In Target Hosts, list all of the nodes that will be used in the IBM OpenPlatform with Apache Hadoop cluster. Specify one node per line, as in thefollowing example:node1.abc.comnode2.abc.comnode3.abc.comnode4.abc.com
The host name must be the fully qualified domain name (FQDN).b. In Host Registration Information, select one of the two options:v Provide your SSH Private Key to automatically register hosts
32 BigInsights: IBM Open Platform with Apache Hadoop and BigInsights 4.2 Technical Preview

Click SSH Private Key. The private key file is /root/.ssh/id_rsa, if theroot user installed the Ambari server. If you installed as a non-root user,then the default private key is in the .ssh directory in the non-rootuser's home directory.You have the option of browsing to the .ssh/id_rsa file and letting theAmbari web interface upload the contents of the key file, or you canopen the file and copy and paste the contents into the SSH key field. Formore information about the key file, see “Preparing your environment”on page 16.Click the Register and Confirm button.
v Perform manual registration on hosts and do not use SSH
You can choose this option when the ambari-agents are manuallyinstalled on all nodes, and they are running. In this case, nopassword-less SSH setup is required. For more information, seehttps://ambari.apache.org/1.2.0/installing-hadoop-using-ambari/content/ambari-chap6-1.html.
16. On the Confirm Hosts page, check that the correct hosts for your cluster havebeen located:If hosts were selected in error, remove the hosts one-by-one by following thesesteps:a. Click the box next to the server to be removed.b. Click Remove in the Action column.If warnings are found during the check process, you can click Click here tosee the warnings to see what caused the warnings. The Host Checks pageidentifies any issues with the hosts. For example, a host may have TransparentHuge Pages or Firewall issues. For information on how to address theseissues, see “Preparing your environment” on page 16.After you resolve the issues, click Rerun Checks on the Host Checks page.When you have confirmed the hosts, click Next.
17. On the Choose Services page, select the services you want to install.You must select to install HDFS.Ambari shows a confirmation message to install the required servicedependencies. For example,when selecting Oozie only, the Ambari webinterface shows messages for accepting YARN/MR2, HDFS and Zookeeperinstallations.Click Next.
18. On the Assign Masters page, assign the master nodes to hosts in your clusterfor the services you selected. Refer to the right column for the default serviceassignments by host. You can accept the current default assignments. Toassign a new host to run services, click the dropdown list next to the masternode in the left column and select a new host. Click Next.To see a suggested layout of services, see Suggested services layout for IBMOpen Platform with Apache Hadoop
19. On the Assign Slaves and Clients page, assign the slave and clientcomponents to hosts in your cluster. You can accept the default assignments.
Tip: If you anticipate adding the Big SQL service, you must include all clientson all the anticipated Big SQL worker nodes. Big SQL specifically needs theHDFS, Hive, HBase, Sqoop, HCat, and Oozie clients.
Chapter 3. Installing IBM Open Platform with Apache Hadoop 33

Click all or none to decide the host assignments. Or, you can select one ormore components next to a selected host (that is, DataNode, NodeManager,RegionServer, Flume, Client).Click Next.
20. On the Customize Services page, select configuration settings for the servicesselected. Default values are filled in automatically when available and they arethe recommended values. The installation wizard prompts you for requiredfields (such as password entries) by displaying a number in a circle next to aninstalled service. Click the number and enter the requested information in thefield outlined in red. Make sure that the service port that is set is not alreadyused by another component.
Important: For example, the Knox gateway port is, by default, set as 8443.But, when the Ambari server is set up with HTTPs, and the SSL port is set upusing 8443, then you must change the Knox gateway port to some othervalue.
Note: If you are working in an LDAP environment where users are set upcentrally by the LDAP administrator and therefore, already exist, selecting thedefaults can cause the installation to fail. Open the Misc tab, and check thebox to ignore user modification errors.
21. When you have completed the configuration of the services, click Next.22. On the Review page, verify that your settings are correct. Click Deploy.23. The Install, Start, and Test page shows the progress of the installation. The
progress bar at the top of the page gives the overall status while the mainsection of the page gives the status for each host. Logs for a specific task canbe displayed by clicking on the task. Click the link in the Message column tofind out what tasks have been completed for a specific host or to see thewarnings that have been encountered. When the Ambari web interfacedisplays messages about the install status and displays the Next button, clickit to proceed to the next page.
24. On the Summary page, review the accomplished tasks. Click Complete to goto the IBM Open Platform with Apache Hadoop dashboard.
What to do next
MySQL/MariaDBIf you plan to use MySQL/MariaDB for the Hive Metastore, ensure thatthe mysqld service starts on reboot. Run the following command on thenode that will host the Hive Metastore and the MySQL/MariaDB:
Note: Install MySQL in the RHEL 6.x operating system. Install MariaDB inthe RHEL 7.x operating system.
RHEL 6.xchkconfig mysqld onservice mysqld start
RHEL 7.xsystemctl start mariadb.servicesystemctl enable mariadb.service
postgresqlEnsure that the postgresql service, which is used by Ambari, startsautomatically on reboot. Run the following command on the node that willhost the Ambari database and the postgres:
34 BigInsights: IBM Open Platform with Apache Hadoop and BigInsights 4.2 Technical Preview

RHEL 6.xchkconfig postgresql onservice postgresql start
RHEL 7.xsystemctl start postgresql.servicesystemctl enable postgresql.service
HDFS caching
HDFS caching is supported in the IBM Open Platform with ApacheHadoop. To make sure that it can be started successfully, you must changetwo configuration settings:1. From the Linux command line where the Ambari server is running, edit
the /etc/security/limits.conf file:hdfs - memlock 200000
This value must be set to equal or greater than the value that you setfor the dfs.datanode.max.locked.memory property. Also, consider thememory available on the server when you set the memlock value. Formore information about the values, see HDFS caching
2. Open the Ambari web interface, and select the HDFS service.3. Stop the HDFS service.4. Click the Configs tab.5. Expand the Advanced hdfs-site section and locate the following
property to add the value:dfs.datanode.max.locked.memory 200000
Restriction: To make sure data is cached, the lowest value for thisproperty must be bigger than the virtual memory page size (the defaultvalue is 4096 bytes = getconf PAGE_SIZE).
6. Restart the HDFS service.
Ambari dashboard user name and password
You can change default username and password and can configure usersand groups after the first login to the Ambari web interface.
TroubleshootingBe sure to check the available troubleshooting information if you haveproblems.
Non-root user
Tip:
If you install IBM Open Platform with Apache Hadoop as the non-rootuser, which is not typical, preface the instructions with sudo, where theinstruction would normally require the root user.
Related information:Information on installing with Ambari BlueprintsInformation on using Ambari Blueprints
Chapter 3. Installing IBM Open Platform with Apache Hadoop 35

Upgrading the Java (JDK) versionWhen you installed IBM Open Platform with Apache Hadoop, you selected theJava Development Kit (JDK) to use or you provided a path to a custom JDK thatwas already installed on your hosts. You can change the JDK version after youcomplete the initial installation of IBM Open Platform with Apache Hadoop.
About this task
The JDK version that you use is dependent on which IBM Open Platform withApache Hadoop stack that you plan to install in your cluster. Use the followingtable as a guide for the JDK that will work with which version of IBM OpenPlatform with Apache Hadoop.
Table 10. Acceptable JDK versions
IBM Open Platform with Apache HadoopRelease JDK version
4.2 Open JDK v1.8
4.1.0.2 Open JDK v1.8, v1.7
4.1.0.1 Open JDK v1.8, v1.7
4.1.0.0 Open JDK v1.8, v1.7
4.0.0.1 Open JDK v1.7
4.0.0.0 Open JDK v1.7
Important: If you upgrade from a previous version of IBM Open Platform withApache Hadoop to a later version, such as from IBM Open Platform with ApacheHadoop 4.1 to IBM Open Platform with Apache Hadoop 4.2, do not change theJDK version until your IOP upgrade is successfully completed, and the cluster isrunning.
Procedure1. Re-run the Ambari server set up.
ambari-server setup
2. When you are prompted to change the JDK, enter y.Do you want to change Open JDK [y/n] (n)? y
3. At the prompt to select a JDK, enter 1 to change the JDK to v1.8.Do you want to change the current JDK [y/n] (n)?[1] OpenJDK 1.8.0[2] Custom JDK=====================================================================Enter choice (1):
a. If you select OpenJDK 1.8, the JDK is automatically downloaded andinstalled on the Ambari server host. You must have an internet connectionto download the JDK. Install this JDK on all the hosts in the cluster to thissame path.
b. If you select Custom JDK, verify or add the custom JDK path on all thehosts in the cluster. Select this option if you want to use a different JDK oryou do not have an internet connection (and have pre-installed the JDK onall hosts).
4. When the Ambari set up completes, from the Ambari dashboard restart allservices so that the new JDK is used by the Hadoop services.
36 BigInsights: IBM Open Platform with Apache Hadoop and BigInsights 4.2 Technical Preview

Installing and configuring Ranger in the Ambari web interfaceAfter you reinstall IBM Open Platform with Apache Hadoop, you can add theRanger open source.
Before you begin1. Make sure you have installed at least one of the Hadoop services, such as
Hadoop, HBase or Hive.2. Install and configure one of the databases that Ranger can use, such as MySQL,
PostgreSQLm or Oracle. See Configuring MySQL for Ranger for the steps toconfigure MySQL for Ranger.
3. Install a JDBC connector for a database server on the node where the Ambariserver is installed.
Procedure1. Log into your Ambari cluster with your designated user credentials.2. On the main ambari dash board, in left navigation menu, click Actions, then
select Add Service.3. On the Add Service Wizard, select Ranger, then click Next.4. The Ranger Requirements page appears. Ensure that you have met all of the
installation requirements, then select the "I have met all the requirementsabove" check box and click Proceed.
5. You are then prompted to select the host where Ranger Admin and RangerUserSync will be installed. This host should have DB admin access to theRanger DB host. Make a note of the Ranger Admin host for use in subsequentinstallation steps. Click Next when finished to continue with the installation toopen the Customize services page.
Note:
The Ranger Admin and Ranger Usersync services must be installed on thesame cluster node.
6. Specify the Ranger settings on the Customize Services page. You must specifyall of the Range, Ranger Admin, and Ranger Audit settings on the CustomizeServices page before clicking Next at the bottom of the page to continue withthe installation.The page shows that there are some configurations that have to be set(highlighted in red). The other configuration properties have default values.Refer to the tables below for the configuration details under each tab.
Table 11. Ranger admin settings
ConfigurationProperty Name Description Default Value
ExampleValue/comment
DB FLAVOR Select the "DBFlavor" (installeddatabase type) thatyou are using withRanger.
MYSQL
Chapter 3. Installing IBM Open Platform with Apache Hadoop 37

Table 11. Ranger admin settings (continued)
ConfigurationProperty Name Description Default Value
ExampleValue/comment
Ranger DB host The server/hostwhere the installeddatabase is present.Based on the DBFLAVOR andversion, this valuemight need toinclude the port aswell.
iopserver.ambari.ibm.com
(For MYSQL)
Ranger DB name The name of theRanger Policydatabase. For Oraclethe tablespace nameshould be given here.
ranger The DB isautomatically createdby the Rangerinstallation
Driver class name JDBC driver classname to connect toRanger database
com.mysql.jdbc.Driver
Ranger DB username The username tocreate the Policydatabase
rangeradmin Automaticallycreated by theRanger installation
Ranger DB Password The password for theRanger Policydatabase user
N/A Admin-password
JDBC connect string Ranger database jdbcconnect string for theRanger DB user.
Auto filled based onthe other values.
Setup Database andDatabase User
Enabling this optionwill automaticallycreate the rangerdatabases and theusers.
Yes
DatabaseAdministrator (DBA)username
The Ranger databaseuser that hasadministrativeprivileges to createdatabase schemasand users.
root If you have set up anon- root user duringthe pre-requisite setup, then update thisfield, such asrangerdba
DatabaseAdministrator (DBA)password
The root passwordfor the Rangerdatabase user.
N/A rangerdba
JDBC connect stringfor root user
Ranger database jdbcconnect string for theroot user.
Auto filled based onthe other values.
7. After completing the database configuration click Test Connection. Thisshould result in connection successful. If not, then re-check your databaseconfiguration values.
8. Update the Ranger User information.
38 BigInsights: IBM Open Platform with Apache Hadoop and BigInsights 4.2 Technical Preview

Table 12. Ranger User settings
ConfigurationProperty Name Description Default Value
ExampleValue/comment
Enable User Sync Enables Rangerusersync to sync upthe users based onthe Sync Source
Yes
Sync Source The users to besynced based on theauthenticationmethod.
UNIX
9. Make sure the configurations in the Ranger Plugin tab are disabled until youcomlete the installation.The configurations under this tab enable the Ranger plugins for the differentHadoop services. These configurations are disabled by default.
10. In the Ranger Audit tab, make sure that the Audit to Solr option is disabledand the ranger.audit.source.type property is set to db.Ranger can store the audit records to Solr for temporary use and to HDFSand/or to Database for long-term. Currently, IBM Open Platform with ApacheHadoop version 4.2 supports storing the audit records to HDFS or Databaseonly.In the Advanced tab of the Ranger Configuration, in the Advancedranger-admin-site section, set the value of ranger.audit.source.type to db.
Table 13. Ranger audit settings
ConfigurationProperty Name Description Default Value
ExampleValue/comment
Audit to HDFS Allows the auditrecords to be storedto HDFS.
ON This property isoverridable at servicelevel.
Destination HDFSDirectory
The HDFS directoryto write audit to.
hdfs://iopserver.ambari.ibm.com:8020/ranger/audit
Make sure all serviceusers have requiredpermissions. Thisproperty isoverridable at servicelevel.
Audit to DB Enable audit to DBfor all Rangersupported services.
OFF This property isoverridable at servicelevel.
Ranger Audit DBname
Audit database name ranger_audit Automaticallycreated by theRanger installation.
Ranger Audit DBusername
The username forstoring the audit loginformation.
rangerlogger Automaticallycreated by theRanger installation
Ranger Audit DBPassword
The password for theRanger audit user
N/A Audit-password
11. Update the property values in the Advanced tab.
Chapter 3. Installing IBM Open Platform with Apache Hadoop 39
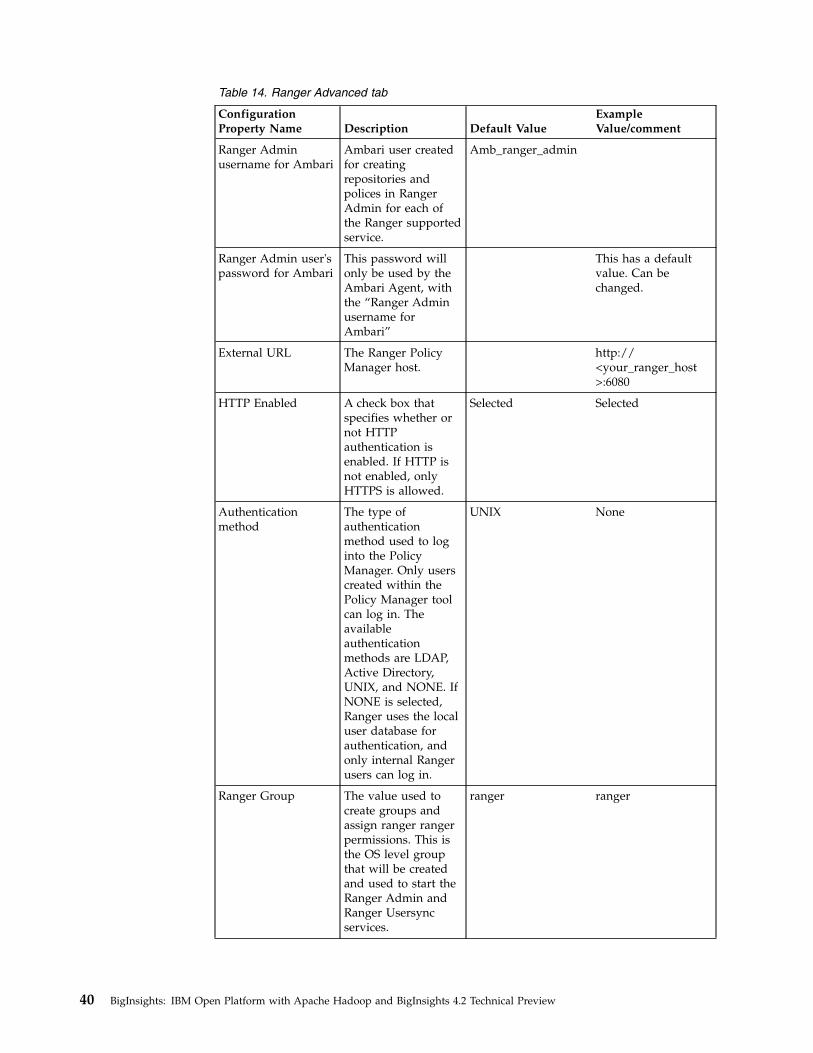
Table 14. Ranger Advanced tab
ConfigurationProperty Name Description Default Value
ExampleValue/comment
Ranger Adminusername for Ambari
Ambari user createdfor creatingrepositories andpolices in RangerAdmin for each ofthe Ranger supportedservice.
Amb_ranger_admin
Ranger Admin user'spassword for Ambari
This password willonly be used by theAmbari Agent, withthe “Ranger Adminusername forAmbari”
This has a defaultvalue. Can bechanged.
External URL The Ranger PolicyManager host.
http://<your_ranger_host>:6080
HTTP Enabled A check box thatspecifies whether ornot HTTPauthentication isenabled. If HTTP isnot enabled, onlyHTTPS is allowed.
Selected Selected
Authenticationmethod
The type ofauthenticationmethod used to loginto the PolicyManager. Only userscreated within thePolicy Manager toolcan log in. Theavailableauthenticationmethods are LDAP,Active Directory,UNIX, and NONE. IfNONE is selected,Ranger uses the localuser database forauthentication, andonly internal Rangerusers can log in.
UNIX None
Ranger Group The value used tocreate groups andassign ranger rangerpermissions. This isthe OS level groupthat will be createdand used to start theRanger Admin andRanger Usersyncservices.
ranger ranger
40 BigInsights: IBM Open Platform with Apache Hadoop and BigInsights 4.2 Technical Preview

Table 14. Ranger Advanced tab (continued)
ConfigurationProperty Name Description Default Value
ExampleValue/comment
Ranger User The value used tocreate users andassign permissions.This is the OS leveluser that will becreated and used tostart the RangerAdmin and RangerUsersync services.
ranger ranger
After you have finished specifying all of the settings on the CustomizeServices page, click Next at the bottom of the page to continue with theinstallation.
12. Complete the Ranger installation.a. On the Review page, carefully review all of your settings and
configurations. If everything looks good, click Deploy to install Ranger onthe Ambari server.
b. When you click Deploy, Ranger is installed on the specified host on yourAmbari server. A progress bar displays the installation progress.
c. When the installation is complete, a Summary page displays theinstallation details.
What to do next
The Ranger installation triggers a restart of the other services that have the Rangerplugins. This is done to load the necessary Ranger plugin configurations for theRanger supported services. Restart the necessary services.
If you would like to set up Ranger User sync with LDAP/AD, then seeAutomatic user sync from LDAP/AD/Unix to Ranger.. For setting up theRanger authentication with LDAP or AD other than the default UNIX, then seeRanger Authentication setup using LDAP/AD or Unix.
After the Ranger installation is complete and the necessary services are restarted,you can enable the individual component plugins. For more information see,Ranger Hadoop Plugin Usage for HDFS, Hive, HBase and Knox and Yarn RangerPlugin Usage.
Configuring MySQL for RangerProcedure1. Download and install the MySQL server. If you have installed and configured
Hive with MySQL server, you can use the same MySQL Server instance forRanger.
2. You can use the MySQL root user or create a non-root user to use to create theRanger databases. For example, use the following series of commands to createthe rangerdba user with password rangerdba.a. Log in as the root user, then use the following commands to create the
rangerdba user and grant it adequate privileges.
Chapter 3. Installing IBM Open Platform with Apache Hadoop 41

CREATE USER ’rangerdba’@’localhost’ IDENTIFIED BY ’rangerdba’;GRANT ALL PRIVILEGES ON *.* TO ’rangerdba’@’localhost’ WITH GRANT OPTION;CREATE USER ’rangerdba’@’%’ IDENTIFIED BY ’rangerdba’;GRANT ALL PRIVILEGES ON *.* TO ’rangerdba’@’%’ WITH GRANT OPTION;FLUSH PRIVILEGES;
b. Use the exit command to exit MySQL.c. Test that rangerdba is able to connect to the database using the following
command:mysql -u rangerdba -prangerdba
After testing the rangerdba login, use the exit command to exit MySQL.3. Use the following command to confirm that the mysql-connector-java.jar file is
in the Java share directory. This command must be run on the server whereAmbari server is installed.ls /usr/share/java/mysql-connector-java.jar
If the file is not in the Java share directory, use the following command toinstall the MySQL connector .jar file.yum install mysql-connector-java*
4. Use the following command format to set the jdbc/driver/path based on thelocation of the MySQL JDBC driver .jar file.This command must be run on theserver where Ambari server is installed.ambari-server setup
--jdbc-db={database-type}--jdbc- driver={/jdbc/driver/path}
For example:ambari-server setup
--jdbc-db=mysql --jdbc-driver=/usr/share/java/mysql-connector-java.jar
Installing Ranger pluginsThe Ranger plugins can be set up and configured from the individual service orfrom ranger service. The examples here show you how to enable plugins from theRanger service.
Ranger Hadoop plugin usage for HDFS, Hive, HBase, Knox, andYarnAbout this task
This topic shows you how to configure and enable five of the Ranger plugins:HDFS, Hive, Hbase, Knox, and Yarn. You can select the services that you wouldlike Ranger to control.
Procedure1. Set up and configure HDFS plugins for Ranger:
a. From the Ambari web interface, select the Ranger servcie and then open theConfigs tab. Select the Ranger Plugin tab.
b. In the Ranger Plugin section, enable the HDFS Ranger Plugin, and thenclick Save.
c. The Dependent Configurations window opens to confirm the configurationsthat are updated. Click OK.
d. Before you restart HDFS, open the HDFS configuration tab and verify thefollowing changes: in the Advanced ranger-hdfs-plugin-properties:v Enable Ranger for HDFS: Check
42 BigInsights: IBM Open Platform with Apache Hadoop and BigInsights 4.2 Technical Preview

v Policy user for HDFS: ambari-qa
v Ranger repository config user: hadoop
v common.name.for.certificate: a single space without the quotes: " "
v REPOSITORY_CONFIG_PASSWORD: the password you set for the aboveuser, such as hadoop-password
e. Restart the HDFS service. The Ranger plugin for HDFS is now enabled. Youcan verify this by logging into the Ranger web interface, and you will seethat the HDFS repository appears in the access manager list with a defaultpolicy.
f. Verify that the policy is synched by navigating to Ranger > Audit > Pluginswith 200 Response code.
2. Set up and configure Hive plugins for Ranger:You should not use the Hive CLI after enabling the Ranger Hive plugin. Usingthe Hive CLI can break the install or lead to other unpredictable behavior.Instead, use the HiveServer2 Beeline CLI after you enable the Ranger Hiveplugin. Ranger communicates through HiveServer2.a. From the Ambari web interface, select the Ranger servcie and then open the
Configs tab. Select the Ranger Plugin tab.b. In the Ranger Plugin section, enable the Hive Ranger Plugin, and then click
Save.c. The Dependent Configurations window opens to confirm the configurations
that are updated. Click OK.d. Before you restart Hive, open the Hive configuration tab and verify the
following changes: in the Hive > Configs > Settings tab:v In the Security section, in the Choose Authorization selection, Ranger is
showing.e. In the Hive > Configs > Advanced tab, validate there is a default
policy_user and repository config user in the Advancedranger-hive-plugin-properties.
f. Restart the Hive service. The Ranger plugin for Hive is enabled.g. To verify, login to the Ranger web interface and notice that the Hive
repository appears in the access manager list with a default policy.h. Verify that the policy is synced up by going to Ranger > Audit > Plugins
with 200 Response code.3. Set up and configure HBase plugin for Ranger:
a. From the Ambari web interface, select the Ranger servcie and then open theConfigs tab. Select the Ranger Plugin tab.
b. In the Ranger Plugin section, enable the HBase Ranger Plugin, and thenclick Save.
c. The Dependent Configurations window opens to confirm the configurationsthat are updated. Click OK.
d. Before you restart HBase, open the HBase configuration tab and verify thefollowing changes: in the HBase > Configs > Settings > Security tab:v In the Security section, in the Enable Authorization selection, HBase is
showing.e. In the HBase > Configs > Advanced tab, validate there is a default
policy_user and repository config user in the Advancedranger-hbase-plugin-properties.
f. Restart the HBase service. The Ranger plugin for HBase is enabled.
Chapter 3. Installing IBM Open Platform with Apache Hadoop 43

g. To verify, login to the Ranger web interface and notice that the HBaserepository appears in the access manager list with a default policy.
h. Verify that the policy is synced up by going to Ranger > Audit > Pluginswith 200 Response code.
4. Set up and configure Knox plugin for Ranger:a. From the Ambari web interface, select the Ranger servcie and then open the
Configs tab. Select the Ranger Plugin tab.b. In the Ranger Plugin section, enable the Knox Ranger Plugin, and then
click Save.c. The Dependent Configurations window opens to confirm the configurations
that are updated. Verify that the topology has been updated with theauthorization of XASecurePDPKnox.
d. Click OK.e. Before you restart Knox, open the Knox configuration tab and add ambari-qa
(or, the default ranger policy user) to ldif file. In the Knox > Configs >Settings tab, open the Advanced users-ldif text box. Scroll to the bottom ofthe text box and add the following lines of code:# entry for sample user ambari-qadn: uid=ambari-qa,ou=people,dc=hadoop,dc=apache,dc=orgobjectclass:topobjectclass:personobjectclass:organizationalPersonobjectclass:inetOrgPersoncn: ambari-qasn: ambari-qauid: ambari-qauserPassword:ambari-password
f. Save the configuration.g. Restart the Knox service. The Ranger plugin for Knox is enabled.h. To verify, login to the Ranger web interface and notice that the Knox
repository appears in the access manager list with a default policy.i. Verify that the policy is synced up by going to Ranger > Audit > Plugins
with 200 Response code.5. Set up and configure Yarn plugin for Ranger:
a. Select the Yarn service in the Ambari dashboard and open the Config tab.b. In the Advanced tab, look for the ranger-yarn-plugin-properties and
select Enable ranger for yarn.c. Click Save. You will see other suggestions on properties to change. Select
OK save.d. If you see a warning about Ranger enable property needs to be set to
Yes, ignore it.e. Restart the Yarn service.f. Open the Ranger web interface and notice that the Yarn agent appears in the
list of agents with a 200 Response code.g. Configure Yarn to use only Ranger ACLs and ignore YARN ACLs by adding
a Custom ranger-yarn-security property:ranger.add-yarn-authorization = false
h. Save and restart the Yarn service.i. Create a test user, such as test_user and then login:
su test_user
j. Run a test Spark job:
44 BigInsights: IBM Open Platform with Apache Hadoop and BigInsights 4.2 Technical Preview

cd /usr/iop/current/spark-clientbin/spark-submit
--class org.apache.spark.examples.SparkPi--master yarn-client --num-executors 3--driver-memory 512m--executor-memory 512m--executor-cores 1 lib/spark-examples*.jar 10
k. It should fail with a message like Denied: test_user cannot submit sparkapplication.
l. Try to login as hdfs (su hdfs) or as an accepted user. Then, you can submitthe Yarn job.
Set up user sync from LDAP/AD/Unix to RangerRanger User Sync pulls in users from UNIX, LDAP, AD or a file, and populatesRanger's local user tables with these users.
About this task
You can use these users later with the Ranger policies creation for granting accessto the different services such as HDFS or Hive. After you have the usersync set up,the users are automatically pulled from the specified source into Ranger,periodically.
Note: The Ranger User Sync can be configured with LDAP/AD after the Rangerinstallation also.
The following information describes how to configure the Ranger User Sync foreither UNIX or LDAP/AD.
Procedure1. Configure Ranger user sync for UNIX:
a. On the Ranger Customize Services page, select the Ranger User Info tab.b. Click Yes under Enable User Sync.c. Use the Sync Source drop-down to select UNIX, then set the following
properties:
Table 15. UNIX user sync properties
Property Description Default value
Minimum user ID Only sync users above thisuser ID.
500
Password file The location of the passwordfile on the Linux server.
/etc/passwd
Group file The location of the groupsfile on the Linux server.
/etc/group
2. Configure Ranger user sync for LDAP/AD:
Note:
To ensure that LDAP/AD group level authorization is enforced in Hadoop, setup Hadoop group mapping for LDAP/AD.
Chapter 3. Installing IBM Open Platform with Apache Hadoop 45

The configurations shown are examples only. Modify to fit your own LDAPconfiguration. There are more options that are available but they generally donot need to change.a. On the Customize Services page, select the Ranger User Info tab.b. Click Yes under Enable User Sync.c. Use the Sync Source drop-down to select LDAP/AD.d. Set the following properties on the Common Configs tab.
Table 16. LDAP/AD common configurations
Property Description Default value Sample values
LDAP/AD URL Add URL dependingupon LDAP/ADsync source
ldap://{host}:{port} ldap://ldap.example.com:389
or
ldaps://ldap.example.com:636
Bind Anonymous If Yes is selected, theBind User and BindUser Password arenot required.
NO
Bind User
The LDAP/AD binduser is used toconnect to LDAP andquery for users andgroups. So this usershould haveprivileges to searchfor users. This usercould be read-onlyLDAP user.
The fulldistinguished name(DN), includingcommon name (CN),of an LDAP/AD useraccount
cn=admin,dc=example,dc=com [email protected]
Bind User Password The password of theBind User.
e. Set the following properties on the User Configs tab.
Table 17. LDAP/AD user configs
Property Description Default value Sample values
Username Attribute The LDAP user nameattribute.
sAMAccountNamefor AD, uid or cn forOpenLDAP
User Object Class Object class toidentify user entries.
person top, person,organizationalPerson,user, or posixAccount
User Search Base Search base for users. cn=users,dc=example,dc=com
46 BigInsights: IBM Open Platform with Apache Hadoop and BigInsights 4.2 Technical Preview

Table 17. LDAP/AD user configs (continued)
Property Description Default value Sample values
User Search Filter Optional additionalfilter constraining theusers selected forsyncing.
Sample filter toretrieve all the users:cn=*
Sample filter toretrieve all the userswho are members ofgroupA or groupB:(|(memberof=CN=GroupA,OU=groups,DC=example,DC=com)(memberof=CN=GroupB,OU=groups,DC=example,DC=com))
User Search Scope This value is used tolimit user search tothe depth fromsearch base.
sub base, one, or sub
User Group NameAttribute
Attribute from userentry whose valueswould be treated asgroup values to bepushed into thePolicy Managerdatabase. You canprovide multipleattribute namesseparated bycommas.
You can providemultiple attributenames separated bycommas.memberof,ismemberof
memberof,ismemberof, orgidNumber
Group User MapSync
Sync specific groupsfor users.
No Yes
f. Set up the following properties on the Group Configs tab.
Table 18. LDAP/AD group configs
Property Description Default value Sample values
Enable Group Sync If Enable Group Syncis set to No, thegroup names theusers belong to arederived from “UserGroup NameAttribute”. In thiscase no additionalgroup filters areapplied.
If Enable Group Syncis set to Yes, thegroups the usersbelong to areretrieved fromLDAP/AD using thefollowinggroup-relatedattributes.
No Yes
Chapter 3. Installing IBM Open Platform with Apache Hadoop 47

Table 18. LDAP/AD group configs (continued)
Property Description Default value Sample values
Group MemberAttribute
The LDAP groupmember attributename.
member
Group NameAttribute
The LDAP groupname attribute.
distinguishedNamefor AD, cn forOpenLdap
Group Object Class LDAP Group objectclass.
group,groupOfNames, orposixGroup
Group Search Base Search base forgroups.
ou=groups,DC=example,DC=com
Group Search Filter Optional additionalfilter constraining thegroups selected forsyncing.
Sample filter toretrieve all groups:cn=*
Sample filter toretrieve only thegroups whose cn isEngineering or Sales:(|(cn=Engineering)(cn=Sales))
If you perform the Ranger User Sync set up after Ranger installation, savethe above settings. Then restart Ranger. Verify the user sync by clickingSettings > Users/Groups > Users in the Ranger user interface.
Installing Ranger authenticationThe authentication method determines who is allowed to login to the Ranger Webinterface, such as local unix, AD, or LDAP.
About this task
To login to Ranger as admin/admin, leave the default value (such as UNIX) forauthentication. You can skip the extra configurations that are listed here. However,if you use other users, then follow the steps described here to set up the Rangerauthentication using Unix, LDAP or AD.
Note: The default authentication is set up as the UNIX authentication. The methodof authentication can be configured during or after the Ranger installation. It canalso be changed later.In the configurations listed, some of the Properties contain the value {{xyz}} that aremacro variables that are derived from other specified values in order to streamlinethe configuration process. Macro variables can be edited if required. If you need torestore the original value, click the Set Recommended symbol at the right of theproperty box.
Procedure1. Configure Ranger UNIX authentication.
a. Select the Advanced tab on the Ranger Customize Services page.b. Specify the following settings, under Ranger Settings:
48 BigInsights: IBM Open Platform with Apache Hadoop and BigInsights 4.2 Technical Preview

Table 19. Ranger UNIX authentication
Property Description Default value Sample values
External URL Ranger PolicyManager hostaddress.
http://<your_ranger_host>:6080
authenticationmethod
The authenticationmethod to be usedfor Ranger.
UNIX UNIX
HTTP enabled This allows to selectHTTP/HTTPScommunication forRanger adminconsole. If youdisable HTTP, onlyHTTPS is allowed
HTTP is enabled bydefault
Keep the default
c. After you select the UNIX authentication, set the following properties in theUNIX Authentication Settings:
Table 20. UNIX authentication settngs
Property Description Default value Sample values
Allow remote login Flag toenable/disableremote login. Onlyapplies to UNIXauthentication.
true true
ranger.unixauth.service.hostname
The address of thehost where the UNIXauthentication serviceis running.
{{ugsync_host}} {{ugsync_host}}
ranger.unixauth.service.port
The port number onwhich the UNIXauthentication serviceis running.
5151 5151
2. Configure Ranger LDAP authentication.a. Select the Advanced tab on the Ranger Customize Services page.b. Under Ranger Settings, specify the Ranger Policy Manager host address in
the External URL box in the format http://<your_ranger_host>:6080.c. Under Ranger Settings, authentication method, select LDAP.d. Under LDAP Settings, set the following properties:
Table 21. LDAP authentication settings
Property Description Default value Sample values
ranger.ldap. base.dn The DistinguishedName (DN) of thestarting point fordirectory serversearches.
dc=example,dc=com dc=example,dc=com
Chapter 3. Installing IBM Open Platform with Apache Hadoop 49

Table 21. LDAP authentication settings (continued)
Property Description Default value Sample values
Bind User The fullDistinguished Name(DN), includingCommon Name (CN)of an LDAP useraccount that hasprivileges to searchfor users. This is amacro variable valuethat is derived fromthe Bind User valuefrom Ranger UserInfo > CommonConfigs.
{{ranger_ug_ldap_bind_dn}}
{{ranger_ug_ldap_bind_dn}}
Bind User Password Password for theBind User. This is amacro variable valuethat is derived fromthe Bind UserPassword value fromRanger User Info >Common Configs.
ranger.ldap. group.roleattribute
The LDAP group roleattribute.
cn cn
ranger.ldap. referral See descriptionbelow.
ignore follow | ignore |throw
LDAP URL The LDAP serverURL. This is a macrovariable value that isderived from theLDAP/AD URLvalue from RangerUser Info > CommonConfigs.
{{ranger_ug_ldap_url}}
{{ranger_ug_ldap_url}}
ranger.ldap. user.dnpattern
The user DN patternis expanded when auser is being loggedin. For example, ifthe user "ldapadmin"attempted to log in,the LDAP Serverwould attempt tobind against the DN"uid=ldapadmin,ou=users,dc=example,dc=com" usingthe password theuser provided>
uid={0},ou=users,dc=xasecure,dc=net
cn=ldapadmin,ou=Users,dc=example,dc=com
50 BigInsights: IBM Open Platform with Apache Hadoop and BigInsights 4.2 Technical Preview

Table 21. LDAP authentication settings (continued)
Property Description Default value Sample values
User Search Filter The search filter usedfor BindAuthentication. Thisis a macro variablevalue that is derivedfrom the User SearchFilter value fromRanger User Info >User Configs.
{{ranger_ug_ldap_user_searchfilter}}
{{ranger_ug_ldap_user_searchfilter}}
There are three possible values for ranger.ldap.referral: follow, throw, andignore.When searching a directory, the server might return several search results,along with a few continuation references that show where to obtain furtherresults. These results and references might be interleaved at the protocollevel.Recommended settings for ranger.ldap.referral
follow When this property is set to follow, the LDAP service providerprocesses all of the normal entries first, and then follows thecontinuation references.
throw When this property is set to throw, all of the normal entries arereturned in the enumeration first, before the ReferralException isthrown. By contrast, a "referral" error response is processedimmediately when this property is set to follow or throw.
ignore When this property is set to ignore, it indicates that the servershould return referral entries as ordinary entries (or plain text). Thismight return partial results for the search.
3. Configure Ranger Active Directory authenticationa. Select the Advanced tab on the Ranger Customize Services page.b. Under Ranger Settings, specify the Ranger Policy Manager host address in
the External URL box in the format http://<your_ranger_host>:6080.c. Under Ranger Settings for Authentication method, select
ACTIVE_DIRECTORY.d. Under AD Settings, set the following properties:
Table 22. AD settings
Property Description Default value Sample values
ranger.ldap.ad.base.dn
The DistinguishedName (DN) of thestarting point fordirectory serversearches.
dc=example,dc=com dc=example,dc=com
Chapter 3. Installing IBM Open Platform with Apache Hadoop 51

Table 22. AD settings (continued)
Property Description Default value Sample values
ranger.ldap.ad.bind.dn
The fullDistinguished Name(DN), includingCommon Name (CN)of an LDAP useraccount that hasprivileges to searchfor users. This is amacro variable valuethat is derived fromthe Bind User valuefrom Ranger UserInfo > CommonConfigs.
{{ranger_ug_ldap_bind_dn}}
{{ranger_ug_ldap_bind_dn}}
ranger.ldap.ad.bind.password
Password for thebind.dn. This is amacro variable valuethat is derived fromthe Bind UserPassword value fromRanger User Info >Common Configs.
Domain Name (Onlyfor AD)
The domain name ofthe ADAuthenticationservice.
dc=example,dc=com
ranger.ldap.ad.referral See descriptionbelow.
ignore follow | ignore |throw
ranger.ldap.ad.url The AD server URL.This is a macrovariable value that isderived from theLDAP/AD URLvalue from RangerUser Info > CommonConfigs.
{{ranger_ug_ldap_url}}
{{ranger_ug_ldap_url}}
ranger.ldap.ad.user.searchfilter
The search filter usedfor BindAuthentication. Thisis a macro variablevalue that is derivedfrom the User SearchFilter value fromRanger User Info >User Configs.
{{ranger_ug_ldap_user_searchfilter}}
{{ranger_ug_ldap_user_searchfilter}}
There are three possible values for ranger.ldap.ad.referral : follow, throw,and ignore.Recommended settings for ranger.ldap.ad.referral
follow When this property is set to follow, the LDAP service providerprocesses all of the normal entries first, and then follows thecontinuation references.
throw When this property is set to throw, all of the normal entries are
52 BigInsights: IBM Open Platform with Apache Hadoop and BigInsights 4.2 Technical Preview

returned in the enumeration first, before the ReferralException isthrown. By contrast, a "referral" error response is processedimmediately when this property is set to follow or throw.
ignore When this property is set to ignore, it indicates that the servershould return referral entries as ordinary entries (or plain text). Thismight return partial results for the search.
Note: When you save the authentication method as Active Directory, duringthe Ranger install, a Dependent Configurations pop-up might appear thatrecommends that you set the authentication method as LDAP. Thisrecommended configuration should not be applied for AD, so clear (orun-check) the ranger.authentication.method check box, then click OK.
Ranger KMS set up and usageRanger Key Management Server (KMS) is based on the Hadoop KMS developedby the Apache community. It extends the native Hadoop KMS functions by lettingyou store keys in a secure database.
There are three main functions within the Ranger KMS:
Key managementRanger admin provides the ability to create, update, or delete keys byusing the Ambari dashboard, or REST APIs.
Access control policiesRanger admin provides the ability to manage access control policies withinRanger KMS. The access policies control permissions to generate ormanage keys, adding another layer of security for data encrypted inHadoop.
Audit Ranger provides a full audit trace of all actions that are done by theRanger KMS.
Configuring
Before you can use Ranger, you must first install Ranger on a Kerberized cluster.
After you complete the initial configuration, specify theREPOSITORY_CONFIG_USERNAME in the Ranger > Congifs > Advanced tabs,in the Advanced kms-properties section. Ranger uses this to connect to the RangerKMS server and to look up keys for creating access policies. The default value iskeyadmin.
The user in REPOSITORY_CONFIG_USERNAME will be set to proxy into KMS ina Kerberos mode.
The properties in the Custom kms-site section allow specified system users, suchas Hive or Oozie, to proxy on behalf of others when they communicate withRanger KMS. Add the following properties:v hadoop.kms.proxyuser.hive.usersv hadoop.kms.proxyuser.oozie.usersv hadoop.kms.proxyuser.HTTP.usersv hadoop.kms.proxyuser.ambari.usersv hadoop.kms.proxyuser.yarn.users
Chapter 3. Installing IBM Open Platform with Apache Hadoop 53

v hadoop.kms.proxyuser.hive.hostsv hadoop.kms.proxyuser.oozie.hostsv hadoop.kms.proxyuser.HTTP.hostsv hadoop.kms.proxyuser.ambari.hostsv hadoop.kms.proxyuser.yarn.hosts
Add the following properties to the kms-site section, and replace the correct valuefor keyadmin:v hadoop.kms.proxyuser.keyadmin.groups=*v hadoop.kms.proxyuser.keyadmin.hosts=*v hadoop.kms.proxyuser.keyadmin.users=*
Confirm the settings of the advanced kms-site group:v hadoop.kms.authentication.type=kerberosv hadoop.kms.authentication.kerberos.keytab=/etc/security/ keytabs/
spnego.service.keytabv hadoop.kms.authentication.kerberos.principal=*
Then configure HDFS encryption to use Ranger KMS access.v To use Ranger KMS for HDFS data at rest encryption:
1. Create a link to /etc/hadoop/conf/core-site.xml under /etc/ranger/kms/configuration:sudo ln -s /etc/hadoop/conf/core-site.xml
/etc/ranger/kms/conf/ core-site.xml
2. In HDFS Advanced core-site, specify the value forhadoop.security.key.provider.path.
3. In the Advanced hdfs-site, specify a value fordfs.encryption.key.provider.uri.
4. Set the Ranger KMS host name in the following format:kms://http@<kmshost>:9292/kms
5. Restart the Ranger KMS service and the HDFS service.
Ambari automatically creates a repository in Ranger for the Ranger KMS service tomanage Ranger KMS access policies. This repository configuration user also needsto be a principal in Kerberos with a password.
Using
Open your browser with http://<server_name>:6080. Log in as the Ranger KMSuser (remember, the default is keyadmin:keyadmin).
The browser window that opens is meant to separate encryption work (keys andpolicies) from Hadoop cluster management and access policy management work.
List and create keys
1. Click the Encription tab.2. In the Select service drop-down menu, select a service.
54 BigInsights: IBM Open Platform with Apache Hadoop and BigInsights 4.2 Technical Preview

Cleaning up nodes before reinstalling softwareBefore you reinstall IBM Open Platform with Apache Hadoop to manage yourcluster, prepare the environment, including uninstalling and removing all installedcomponents and artifacts.
Before you begin
Run all of the following clean-up scripts, or commands from the/usr/lib/python<versionNumber>/site-packages/ambari_agent directory. Theexample commands assume a Red Hat Linux environment.
Make sure that you installed the Ambari agent on the same host that runs theAmbari server. The clean-up scripts are part of the Ambari agent. You will need torun the scripts on each Ambari agent node in the cluster.
About this task
During the installation process, you might have already installed one or more ofthe following components:v Ambari serverv IBM Open Platform with Apache Hadoop components, including services like
YARN, HDFS, Hive, and Zookeeperv Ambari agents
You should clean your system before proceeding with reinstalling IBM OpenPlatform with Apache Hadoop. Do these steps on each node in your cluster.
Procedure1. Uninstall the Ambari and the IBM Open Platform with Apache Hadoop
components by running the HostCleanup.py against the HostCleanup.ini andthe HostCleanup_Custom_Actions.ini that are part of the IBM Open Platform.a. Stop all BigInsights services and IBM Open Platform with Apache Hadoop
services, by either using the Ambari administration interface or commandsthat invoke Ambari REST APIs.In the Ambari web interface, click Actions > Stop all from the Ambari webinterface. Then, wait for all of the services to stop.Or, use the following steps to stop various services in MyCluster on theMaster node server_name, port 8080:#!/bin/bash#Replace the following variables with values#specific to your cluster
ambari_server=localhostambari_port=8080ambari_user=adminambari_password=adminambari_cluster=MyCluster
#MAKE SURE CODE APPEARS ON ONE LINE
services=$(curl --silent -u ${ambari_user}:${ambari_password}-X GET http://${ambari_server}:${ambari_port}/api/v1/clusters/${ambari_cluster}/services | grepservice_name | sed -e ’s,.*:.*"\(.*\)".*,\1,g’)
Chapter 3. Installing IBM Open Platform with Apache Hadoop 55

for serv in $servicesdocurl -u ${ambari_user}:${ambari_password} -H ’X-Requested-By: ambari’ -X PUT -d
’{"RequestInfo": {"context" :"Stop service"},"Body": {"ServiceInfo": {"state":"INSTALLED"}}}’ http://${ambari_server}:${ambari_port}/api/v1/clusters/${ambari_cluster}/services/$serv
done
b. From a terminal window on the Ambari server node, stop the Ambariserver:ambari-server stop
c. On each Ambari agent node, stop the agent:ambari-agent stop
d. Run the HostCleanup.py script on all nodes of your cluster with thefollowing command:sudo python /usr/lib/python<versionNumber>/site-packages/ambari_agent/HostCleanup.py \ --silent --skip=users \-f /etc/ambari-agent/conf/HostCleanup.ini,/etc/ambari-agent/conf/HostCleanup_Custom_Actions.ini \
-o <full_path_to_cleanup_log>/cleanup.log
Note:
v Be sure to determine the exact Python version to replace theversionNumber.
v Remove --silent if you want to run the command with command-lineprompts.
v Remove --skip=users if you want to delete the service users. If all of theusers are managed with an LDAP server, run the command with the--skip=users parameter.
The script is installed as part of the ambari_agent python module in/usr/lib/python-version/site-packages/ambari_agent. It is available onlyon each Ambari agent node. To use the script on the Ambari server, youmust first install the Ambari agent on the server node.To have the HostCleanup.py do a more thorough job of removing binaries,and users, and other artifact from a node, IBM Open Platform with ApacheHadoop provides a cleanup configuration file. The -f parameter points tothis cleanup configuration input file of users, processes, or packages toclean up. The cleanup configuration file is packaged and installedas/etc/ambari-agent/conf/HostCleanup.ini. The -o parameter specifies anoutput log file.The HostCleanup.py performs the following functions:v Stops the Ambari server and the Ambari agent, if they are still running.v Stops the Linux processes started by a list of service users. The users are
defined in the HostCleanup.ini file. You can also specify a list of Linuxprocesses to be stopped.
v Removes the PRM packages that are listed in the HostCleanup.ini file.v Removes the service users that are listed in the HostCleanup.ini file.v Deletes directories, symbolic links, and files that are listed in the
HostCleanup.ini file.v Deletes repositories that are defined in the HostCleanup.ini file.
e. Remove the Ambari RPMs, directories and symbolic links:1) On each Ambari node, run the following command:
56 BigInsights: IBM Open Platform with Apache Hadoop and BigInsights 4.2 Technical Preview

yum erase -y ambari-*
2) On the Ambari server node, run the following command:rm -rf /usr/lib/ambari-server
3) On each Ambari agent node, run the following command:rm -rf /usr/lib/python2.6/site-packages/ambari_agent
4) If you have not already removed links by using RPM uninstall, unlinkall of the broken links in /usr/lib/python2.6/site-packages/ that pointto the Ambari directories. The following is an example:COMMON_DIR="/usr/lib/python2.6/site-packages/ambari-commons"RESOURCE_MANAGEMENT_DIR="/usr/lib/python2.6/site-packages/resource-management"JINJA_DIR="/usr/lib/python2.6/site-packages/ambari_jinja2"SIMPLEJSON_DIR="/usr/lib/python2.6/site-packages/ambari_simplejson"
You can remove the broken links with the following code:rm -rf /usr/lib/python2.6/site-packages/ambari*
/usr/lib/python2.6/site-packages/resource-management
f. Optional: Optionally remove postgresql.yum erase -y postgresql-*
After you remove postgresql, on the Ambari server node, clean up thepostgresql database by running the following command:rm -rf /var/lib/pgsql*
If you want to keep the postgresql RPM installed, make sure to runambari-server reset before you deploy the cluster.
g. Optional: Remove MySQL:yum erase -y mysql mysql-devel mysql-serverrm -rf /var/lib/mysql/*
Note: This can be an optional step. It is possible to reuse MySQL bydropping the database.
h. Clean the yum cache and remove the old ambari-repo file:yum clean allrm -f /etc/yum.repos.d/ambari.repo
2. Optional: Clean the artifacts by using the following code to remove folders thatwere created during the installation process, if they still exist:
Tip: These folders should already have been removed in Step 1d on page 56sudo rm -rf /usr/iop/sudo rm -rf /hadoopsudo rm -rf /etc/hadoop/ /etc/hive /etc/hbase/ /etc/oozie/ /etc/zookeeper/ /tmp/spark
HostCleanup.ini fileThe default HostCleanup.ini file is populated with the necessary elements to cleanby using the HostCleanup.py script. You can modify the HostCleanup.ini file toinclude additional artifacts to clean.
The HostCleanup.ini file is a static file that is included with the IBM OpenPlatform with Apache Hadoop. It includes a full list of RPMs, users, anddirectories to be removed. You can use the file as it is, or modify it to the specificconfiguration of your node.
The HostCleanup.py script reads cluster configuration information from theHostCleanup.ini file that lists the artifacts to remove. You pass this configuration
Chapter 3. Installing IBM Open Platform with Apache Hadoop 57
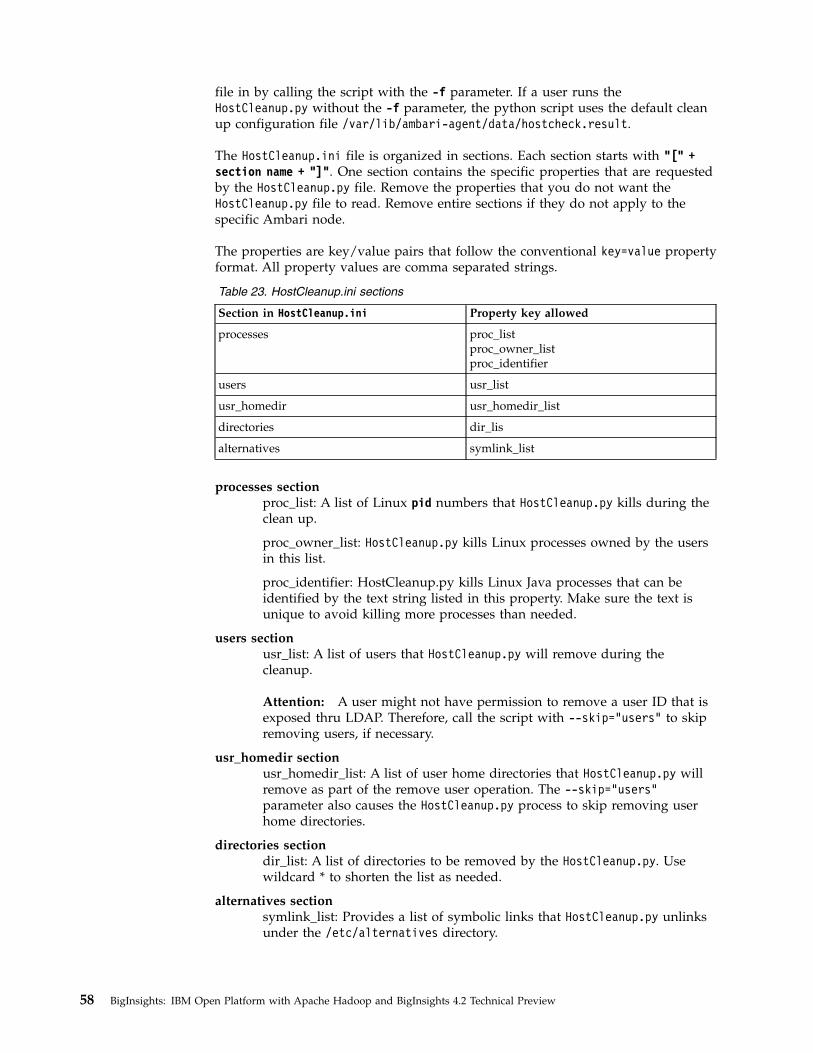
file in by calling the script with the -f parameter. If a user runs theHostCleanup.py without the -f parameter, the python script uses the default cleanup configuration file /var/lib/ambari-agent/data/hostcheck.result.
The HostCleanup.ini file is organized in sections. Each section starts with "[" +section name + "]". One section contains the specific properties that are requestedby the HostCleanup.py file. Remove the properties that you do not want theHostCleanup.py file to read. Remove entire sections if they do not apply to thespecific Ambari node.
The properties are key/value pairs that follow the conventional key=value propertyformat. All property values are comma separated strings.
Table 23. HostCleanup.ini sections
Section in HostCleanup.ini Property key allowed
processes proc_listproc_owner_listproc_identifier
users usr_list
usr_homedir usr_homedir_list
directories dir_lis
alternatives symlink_list
processes section proc_list: A list of Linux pid numbers that HostCleanup.py kills during theclean up.
proc_owner_list: HostCleanup.py kills Linux processes owned by the usersin this list.
proc_identifier: HostCleanup.py kills Linux Java processes that can beidentified by the text string listed in this property. Make sure the text isunique to avoid killing more processes than needed.
users sectionusr_list: A list of users that HostCleanup.py will remove during thecleanup.
Attention: A user might not have permission to remove a user ID that isexposed thru LDAP. Therefore, call the script with --skip="users" to skipremoving users, if necessary.
usr_homedir sectionusr_homedir_list: A list of user home directories that HostCleanup.py willremove as part of the remove user operation. The --skip="users"parameter also causes the HostCleanup.py process to skip removing userhome directories.
directories sectiondir_list: A list of directories to be removed by the HostCleanup.py. Usewildcard * to shorten the list as needed.
alternatives sectionsymlink_list: Provides a list of symbolic links that HostCleanup.py unlinksunder the /etc/alternatives directory.
58 BigInsights: IBM Open Platform with Apache Hadoop and BigInsights 4.2 Technical Preview

HostCleanup_Custom_Actions.ini fileThe default HostCleanup_Custom_Actions.ini file contains additional clean-upsections and works along with the HostCleanup.ini file.
Table 24. HostCleanup_Custom Actions.ini sections
Section in HostCleanup_Custom_Actions.ini Property key allowed
packages pkg_list
repositories repo_list
packages sectionpkg_list: A list of RPMs that HostCleanup.py will remove during the cleanup. You can use wildcard * to shorten the list.
repositories sectionrepo_list: A list of repository files to be removed by the HostCleanup.py.Specify the file name only, no extension names are required since thePython script takes care of repo files based on the OS type.
Chapter 3. Installing IBM Open Platform with Apache Hadoop 59

60 BigInsights: IBM Open Platform with Apache Hadoop and BigInsights 4.2 Technical Preview
Chapter 4. Installing the IBM BigInsights value-added serviceson IBM Open Platform with Apache Hadoop
After you install the IBM Open Platform with Apache Hadoop, you can addadditional service modules to your cluster.
The set of value-add services that you can install depends on the service modulethat you add.
Users, groups, and ports for BigInsights value-add servicesWhen you install any of the IBM BigInsights value-added services, the installationadds user accounts and their related directories that you should be aware of.
Prerequisite
If you create these user IDs before the installation as LDAP users or local IDs,make sure of the following prerequisites for all users:v The default shell is bash.
Do not set to /sbin/nolongin.v Either ensure that passwords do not expire, or, ensure that you have a process
for managing password changes so that they are always changed before theyexpire.
UIDs and GIDs must be consistent across all nodes. If you use local service IDs forthe BigInsights value-add services, ensure that the UIDs and GIDs are consistentacross the cluster by creating them manually before you install the service, ordecide to have Ambari manage the UID for the service users by selecting optionsin the Customize Services page in the installation wizard.
Users, groups, and ports
The following table lists the users, groups, and ports that are created by theinstallation of the value-added services.
© Copyright IBM Corp. 2013, 2016 61

Table 25. Users, groups, and ports created by the installation of the value-added modules
Service Service user Default UIDGroups [DefaultGID]
Default portsand protocol
BigSheets bigsheets 1200 hadoop [500],bigsheets [1200]
v 31000 http
Big SheetsWeb appaddress
v 31001
BigSheetsPigLocalServer
v 31005 https
Big SheetsWeb app stopaddress
v 31050 jdbc
Stored BigSheetsMetadata
Text Analytics tauser 2826 hadoop [500] v 32000 http
Text AnalyticsWeb appaddress
v 32005 https
Text AnalyticsWeb app stopaddress
Big SQL bigsql 2824 hadoop [500] v 33000 http
Big SQLMonitoring
v 32051jdbc
Big SQL JDBC
v 28051
Fastcommunicationstart port
v 7053 http
Schedulerservice port
v 7054 http
Scheduleradministrativeport
v 7056 http
Log4J serverport forScheduler
v 7055 jmx
JavaManagementExtensions(JMX) port forScheduler
62 BigInsights: IBM Open Platform with Apache Hadoop and BigInsights 4.2 Technical Preview

Table 25. Users, groups, and ports created by the installation of the value-addedmodules (continued)
Service Service user Default UIDGroups [DefaultGID]
Default portsand protocol
BigInsightsHome
uiuser 1004 hadoop [500] v 30000 http
Landing pageWeb appaddress
v 30005
Jetty Stop Port
Big R bigr 1217 hadoop [500],bigr[1202]
v 7052 jdbc
v 8152 jmx
Data Servermanager
dsmadmin 2827 The webapplicationservice for BigSQL.
Preparing to install the BigInsights value-add servicesBefore you install any of the value-add services, you must prepare yourenvironment by installing IBM Open Platform with Apache Hadoop, setting thedefault Java version, and following a list of prerequisite steps for each value-addservice that you plan to install,
To prepare your environment:1. You must have already downloaded, installed, and deployed the IBM Open
Platform with Apache Hadoop (IOP). You must be an administrator of the IOPand have root access to the cluster, or be a non-root user with root (sudo)privileges. The Ambari server must be running.
2. The IOP installation includes OpenJDK 1.8. For all nodes in your cluster, makesure that the default Java is set to the same JDK version that was selectedduring the IOP install. Run the following command on all nodes to verify theversion:java -version
Tip: During the Ambari setup, you will have the opportunity to use Open JDK1.8, or a Custom JDK. The default is OpenJDK 1.8.
Note: If the Java command is not found, the JDK might be installed but thePATH environment variable might not be set. For OpenJDK 1.8, the location is/usr/jdk64/java-1.8.0-openjdk-1.8.0.45-28.b13.el6_6.x86_64. The Javacommands are located in the /bin/ subdirecory.For each node where the version is not correct, run the following commands tocreate a symbolic link to the proper version:v For OpenJDK 1.8:
cd /etc/alternativesunlink java
ln -s /usr/jdk64/java-1.8.0-openjdk-<version>.x86_64/bin/java
Then, run the following command on all nodes after the change to verify theJDK version:java -version
Chapter 4. Installing the IBM BigInsights value-added services on IBM Open Platform with Apache Hadoop 63
3. Make sure that all host names are listed as lower case in either the /etc/hostsfile or the DNS configuration.
4. Add umask 022 in the .bashrc file of the root user on all nodes. This actionmakes the file permission executable by all users.
Note: After you complete the installation, you can revert to the default umasksetting for a secure environment.
5. Do the following prerequisites for the services that you will be installing:
Important:
v When you install any of these value-added services as the non-root user,preface the instructions with sudo where the instruction would normallyrequire the root user.
v UIDs and GIDs must be consistent across all nodes. If you use local serviceIDs for the BigInsights value-add services, ensure that the UIDs and GIDs areconsistent across the cluster by creating them manually. For moreinformation about what users and groups to create, see “Users, groups, andports for BigInsights value-add services” on page 61.
BigInsights - BigSheets:
a. You must be an IBM Open Platform administrator to add services.b. If you are also going to work with the BigInsights - Big SQL
service, consider installing that service prior to installing theBigInsights - BigSheets service.
c. Ensure that the bigsheets user has already been created and thatthe UID for BigSheets is uniform across the cluster or else that theuser does not exist on any node. If the user does not exist, theBigSheets installation code creates the user on all nodes with adefault UID of 1200. If the user already exists at the time ofinstallation, take note of the existing UID value and provide that tothe bigsheets.userid property during installation.
Important: The UID must be consistent across all nodes.d. Set up password-less SSH for the root user between the BigSheets
master node and all nodes in the cluster.e. Set up password-less SSH between the BigSheets master node and
itself.f. As part of the BigSheets service install changes are made to the
Hadoop configuration files core-site.xml and yarn-site.xml. Incore-site.xml, the following 2 properties are added:hadoop.proxyuser.bigsheets.groups
hadoop.proxyuser.bigsheets.hosts
The BigSheets service user must be able to proxy as other users inthe Hadoop system. The propertyhadoop.proxyuser.bigsheets.groups is added with value *, and theproperty hadoop.proxyuser.bigsheets.hosts is set to the hostnameof the BigSheets master node.In yarn-site.xml, the BigSheets service user is also added toyarn.admin.acl.
g. Make sure that in the configuration file hdfs-site.xml the propertydfs.namenode.acls.enabled is set to true. This is the default valueset when IBM Open Platform with Apache Hadoop is installed.
64 BigInsights: IBM Open Platform with Apache Hadoop and BigInsights 4.2 Technical Preview

h. Make sure that the Java development package is installed on allnodes. If it is not there, run the following command on all nodes:yum install java-<version-no>-openjdk-devel
i. Make sure that the ports listed in “Users, groups, and ports forBigInsights value-add services” on page 61 are not in use by otherprograms or components.
BigInsights - Big SQL
Note: The user names and home directory locations used here mightvary depending on your user environment. Adapt these instructions tomatch your local user environment.
Restriction: Ambari must run as root, either from root directly or fromsudo, in BigInsights - Big SQL.a. You must install the Big SQL service with at least two nodes in the
cluster to see the best performance with at least one nodedesignated as the Big SQL master.
b. It is recommended that you run the Big SQL pre-installation checkerutility.
c. Confirm that you have Hive metastore connectivity from the nodewhere Big SQL will be installed, even if Big SQL will be on thesame node as Hive. You can test this connectivity by opening theHive shell from the command line and running a simple command.Do the following steps:1) Authenticate to hive:
su hive
2) Open the HIVE shell by typing the following from the commandline:hive
3) Run a command such as the following that displays tables:hive> show tables;
d. Ensure that /home is not mounted with the nosuid option. You canrun the mount command in the Linux command line with no optionsto display information about all known mount points.
e. Install the package ksh on all nodes:yum install ksh
f. Set passwordless SSH for the root user from all Big SQL head nodesto all Big SQL worker nodes in the cluster. Every Big SQL workernode must be able to passwordless SSH (as root) to the Big SQLhead node.
Note: If you are a non-root user, make sure that user account canalso perform passwordless SSH from Big SQL head node to all of theother nodes.
g. On all nodes, modify the /etc/sudoers file with the followingchange:1) Find the line Defaults requiretty and comment it out by using
a # prefix:#Defaults requiretty
h. If the bigsql user ID does not yet exist, the installer will create it. Ifyou have pre-created the Big SQL service ID (locally, as bigsql, or a
Chapter 4. Installing the IBM BigInsights value-added services on IBM Open Platform with Apache Hadoop 65

non-default user ID), ensure that the bigsql UID or the non-defaultUID is the same across all of the nodes. You can determine the UIDfor each node with the following command:cat /etc/passwd | grep bigsql
or possiblycat /etc/passwd | grep <not_bigsql>
orid bigsql
Also, if you pre-create the bigsql user ID, make sure that you setup passwordless ssh for the bigsql user ID from every node toevery node, and every node to itself. If you pre-create the bigsqluser ID, make sure that the home directory path for Big SQL (suchas /home/bigsql) is the same on all nodes.If you pre-create a user ID other than bigsql, make sure that youset up the passwordless ssh for that user ID from every node toevery node, and every node to itself. Also, if you pre-create a userID other than bigsql, make sure that the home directory path forBig SQL (such as /home/notbigsql) is the same on all nodes.For information about Users and Groups for the Big SQL service,see “Users, groups, and ports for BigInsights value-add services” onpage 61.
i. Make sure that you added the HDFS, Hive, HBase, Sqoop, HCat,and Oozie clients to all nodes where you intend to install Big SQLcomponents during the installation of IBM Open Platform withApache Hadoop. If not, you can add them using Ambari.v For example, to confirm where Hive clients are installed, click on
the Hive service in the Ambari interface, and click the HiveClients link in the summary panel to see which nodes have clientsinstalled.
v To see what components are installed for all nodes, click on theHosts tab of the Ambari interface. Then, click the components linkfor each node to see what has been installed.
j. Make sure these IBM Open Platform with Apache Hadoop servicesare running:v Hivev HDFSv HBasev Ooziev Sqoopv Knox, and the LDAP server is started if you use LDAP. If you are
not using LDAP server, start the Knox Demo LDAP service. Formore information about the Knox Demo LDAP service, see Step 6on page 67.
BigInsights - Text Analytics
a. Ensure that the YARN, HDFS, and MapReduce2 services arerunning.
66 BigInsights: IBM Open Platform with Apache Hadoop and BigInsights 4.2 Technical Preview

b. Ensure that the jar command is available to the Ambari agentrunning on the Text Analytics Master node. To verify that the jarcommand is available, do the following:1) Determine which user performed the Ambari install (i.e. the user
who owns the Ambari service process). This should be root forIOP 4.2.
2) Determine which node in your cluster you would like to use asthe Text Analytics Master node.
3) Log into the node you identified in step "ii" as the useridentified in step "i.'
4) Type which jar in the command line.v If you see a valid path to the jar command, no further steps
are needed for this prerequisite.v If you see a message indicating that the jar command cannot
be found, you will need to include the jar executable in thedefault PATH for the user identified in step "i". For example,you can append any Java bin directory which contains jar toyour PATH in the .bashrc file of the relevant user: exportPATH=/usr/jdk64/java-1.8.0-openjdk-1.8.0.45-28.b13.el6_6.x86_64/bin/:$PATH. You should then see a validpath to the jar command when logging on as this user.
5) If you applied any changes to your node in order to make thejar command available, you must ensure that your currentlogged in session picks up the changes, then restart the Ambariagent from that session. For example, if you modified the user's.bashrc file, you should run source ⌂/.bashrc to apply thechanges. To restart the Ambari agent, run the ambari-agentrestart command.
BigInsights - Big R:
a. Ensure that yum-config-manager is installed. It is included with theyum-utensils package.yum install -y yum-utils
6. Knox requires that LDAP is running, even if your cluster is not configured forLDAP. The Knox service that is part of IBM Open Platform with ApacheHadoop provides a Demo LDAP server by default. Make sure that the Knoxservice is started, and that the LDAP server is started if you are using LDAP.v Click the Knox service.v In the Summary page, click Service Actions, and find the Start LDAP server
in the drop down menu.
Chapter 4. Installing the IBM BigInsights value-added services on IBM Open Platform with Apache Hadoop 67

Note: If Kerberos is enabled, the users referenced in the Demo LDAPconfiguration must also exist as operating system users on all nodes of thecluster in order for all value add operations to succeed. If creating the DemoLDAP users on the operating system, such as the guest user, make sure thatthe UID assigned to the user is the same on all nodes. Ensure that the userUID is greater than the value set in the Yarn configuration for Minimum userID for submitting job. By default the value is set to 1000.
Obtaining the BigInsights value-add servicesIf you have acquired software licenses for the BigInsights value-add services, youcan download the software from Passport Advantage.
BigInsights value-add modules
The following value-add modules can be deployed on IBM Open Platform withApache Hadoop:
TECHNICAL PREVIEW DOWNLOAD ONLYAccept the IBM BigInsights Early Release license agreement:http://www14.software.ibm.com/cgi-bin/weblap/lap.pl?
popup=Y&li_formnum=L-MLOY-9YB5S9&accepted_url=http://ibm-open-platform.ibm.com/repos/beta/4.2.0.0/&title=IBM+BigInsights+Beta+License&declined_url=http://www-01.ibm.com/software/data/infosphere/hadoop/trials.html
Then select the appropriate repository file for your environment:
RHEL6https://ibm-open-platform.ibm.com/repos/beta/4.2.0.0/rhel6/
Use the following TAR files:BIPremium-4.2.0.0-beta1.el6.x86_64.tar.gzambari-2.2.0.0-beta1.el6.x86_64.tar.gziop-4.2.0.0-beta1-el6.x86_64.tar.gziop-utils-4.2.0.0-beta1.el6.x86_64.tar.gz
RHEL7https://ibm-open-platform.ibm.com/repos/beta/4.2.0.0/rhel7/
Use the following TAR files:
68 BigInsights: IBM Open Platform with Apache Hadoop and BigInsights 4.2 Technical Preview
BIPremium-4.2.0.0-beta1.el7.x86_64.tar.gzambari-2.2.0.0-beta1.el7.x86_64.tar.gziop-4.2.0.0-beta1-el7.x86_64.tar.gziop-utils-4.2.0.0-beta1.el7.x86_64.tar.gz
IBM BigInsights Premium module This module provides Big SQL, Text Analytics, BigSheets, Big R, and theBigInsights Home services.
The license for this module also provides limited-use licenses for othersoftware so that you can get even more value out of Hadoop. Theseadditional software packages are optional and can also be downloadedfrom Passport Advantage. These packages are installed according to theirown documentation. This additional software includes:v InfoSphere Data Clickv InfoSphere Information Server
For more information in this additional software, see Additional relatedsoftware.
Installing the BigInsights value-add packagesAfter you have prepared the environment and acquired the software, follow thesesteps to install value added services.
Before you beginv Ensure that you installed a Apache Hadoop platform, such as IBM Open
Platform with Apache Hadoop.v Ensure that you followed the steps in “Preparing to install the BigInsights
value-add services” on page 63.v When you install any of the BigInsights value-added services as the non-root
user, preface the instructions with sudo, where the instruction would normallyrequire the root user.
About this task
Where you perform the following steps depends on whether the Hadoop clusterhas direct internet access.v If the Hadoop cluster does not have direct internet access, perform the steps
from a Linux host with direct internet access. Then, transfer the files, asrequired, to a local repository mirror.
TECHNICAL PREVIEW DOWNLOAD ONLYAccept the IBM BigInsights Early Release license agreement:http://www14.software.ibm.com/cgi-bin/weblap/lap.pl?
popup=Y&li_formnum=L-MLOY-9YB5S9&accepted_url=http://ibm-open-platform.ibm.com/repos/beta/4.2.0.0/&title=IBM+BigInsights+Beta+License&declined_url=http://www-01.ibm.com/software/data/infosphere/hadoop/trials.html
Then select the appropriate repository file for your environment:
RHEL6https://ibm-open-platform.ibm.com/repos/beta/4.2.0.0/rhel6/
Use the following TAR files:
Chapter 4. Installing the IBM BigInsights value-added services on IBM Open Platform with Apache Hadoop 69

BIPremium-4.2.0.0-beta1.el6.x86_64.tar.gzambari-2.2.0.0-beta1.el6.x86_64.tar.gziop-4.2.0.0-beta1-el6.x86_64.tar.gziop-utils-4.2.0.0-beta1.el6.x86_64.tar.gz
RHEL7https://ibm-open-platform.ibm.com/repos/beta/4.2.0.0/rhel7/
Use the following TAR files:BIPremium-4.2.0.0-beta1.el7.x86_64.tar.gzambari-2.2.0.0-beta1.el7.x86_64.tar.gziop-4.2.0.0-beta1-el7.x86_64.tar.gziop-utils-4.2.0.0-beta1.el7.x86_64.tar.gz
Procedure1. Set up a local repository.
A local repository is required if the Hadoop cluster cannot connect directly tothe internet, or if you wish to avoid multiple downloads of the same softwarewhen installing services across multiple nodes. In the following steps, the hostthat performs the repository mirror function is called the repository server. If youdo not have an additional Linux host, you can use one of the Hadoopmanagement nodes. The repository server must be accessible over the networkby the Hadoop cluster. The repository server requires an HTTP web server. Thefollowing instructions describe how to set up a repository server by using aLinux host with an Apache HTTP server.a. On the repository server, if the Apache HTTP server is not installed, install
it:yum install httpd
b. On the repository server, ensure that the createrepo package is installed.yum install createrepo
c. Make sure there is network access from all nodes in your cluster to therepository server. If data nodes are on a private network and the repositoryserver is external to the Hadoop cluster, you might need to configureiptables for “Get ready to install” on page 11.
d. On the repository server, create a directory for your value-add repository,such as <mirror web server document root>/repos/valueadds. For example, forApache httpd, the default is /var/www/html/repos.mkdir /var/www/html/repos/valueadds
e. Extract the TAR files that you downloaded from the Technical Preview site.f. Start the web server. If you use Apache httpd, start it by using either of the
following commands:apachectl start
orservice httpd start
Ensure that any firewall settings allow inbound HTTP access from yourcluster nodes to the mirror web server.
g. Test your local repository by browsing to the web directory:http://<your.mirror.web.server>/repos/valueadds
You should see all of the files that you copied to the repository server.h. On the repository server, run the createrepo command to initialize the
repository:createrepo /var/www/html/repos/valueadds
70 BigInsights: IBM Open Platform with Apache Hadoop and BigInsights 4.2 Technical Preview
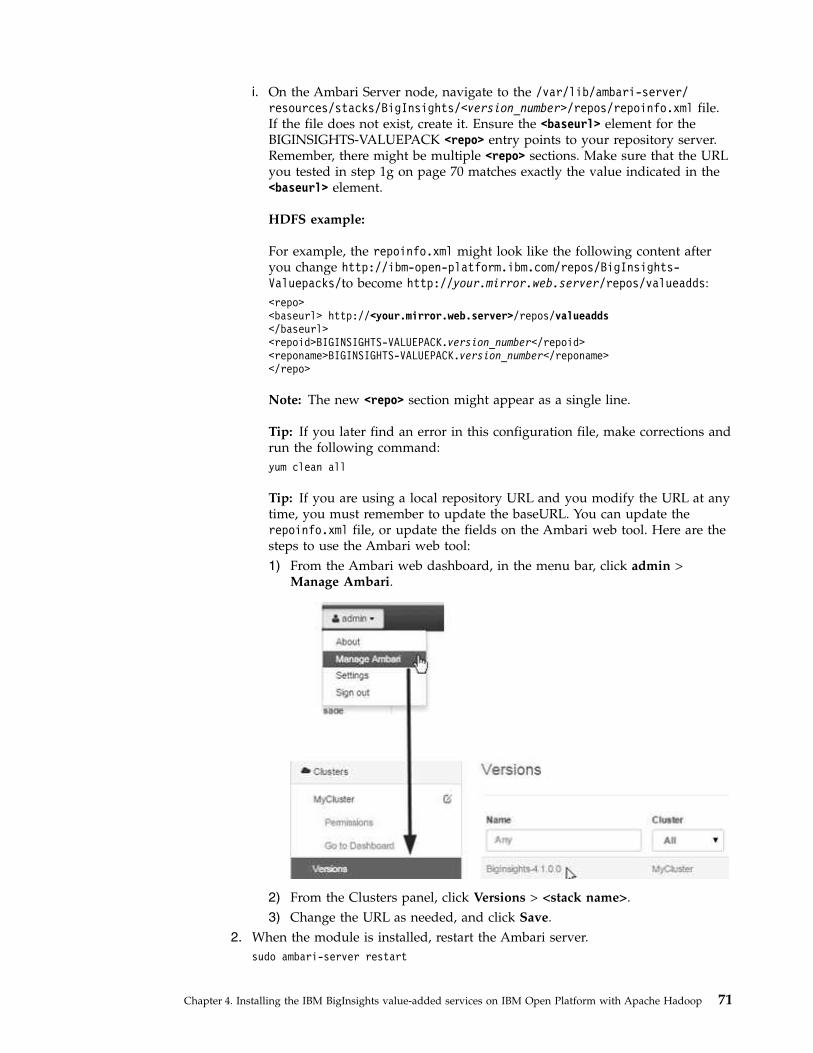
i. On the Ambari Server node, navigate to the /var/lib/ambari-server/resources/stacks/BigInsights/<version_number>/repos/repoinfo.xml file.If the file does not exist, create it. Ensure the <baseurl> element for theBIGINSIGHTS-VALUEPACK <repo> entry points to your repository server.Remember, there might be multiple <repo> sections. Make sure that the URLyou tested in step 1g on page 70 matches exactly the value indicated in the<baseurl> element.
HDFS example:
For example, the repoinfo.xml might look like the following content afteryou change http://ibm-open-platform.ibm.com/repos/BigInsights-Valuepacks/to become http://your.mirror.web.server/repos/valueadds:<repo><baseurl> http://<your.mirror.web.server>/repos/valueadds</baseurl><repoid>BIGINSIGHTS-VALUEPACK.version_number</repoid><reponame>BIGINSIGHTS-VALUEPACK.version_number</reponame></repo>
Note: The new <repo> section might appear as a single line.
Tip: If you later find an error in this configuration file, make corrections andrun the following command:yum clean all
Tip: If you are using a local repository URL and you modify the URL at anytime, you must remember to update the baseURL. You can update therepoinfo.xml file, or update the fields on the Ambari web tool. Here are thesteps to use the Ambari web tool:1) From the Ambari web dashboard, in the menu bar, click admin >
Manage Ambari.
2) From the Clusters panel, click Versions > <stack name>.3) Change the URL as needed, and click Save.
2. When the module is installed, restart the Ambari server.sudo ambari-server restart
Chapter 4. Installing the IBM BigInsights value-added services on IBM Open Platform with Apache Hadoop 71

3. Open the Ambari web interface and log in. The default address is the followingURL:http://<server-name>:8080
The default login name is admin and the default password is admin.4. Click Actions > Add service. In the list of services you will see the services
that you previously added as well as the BigInsights services you can now add.
What to do next
Select the service that you want to install and deploy. Even though your modulemight contain multiple services, install the specific service that you want and theBigInsights Home service. Installing one value-add service at a time isrecommended. Follow the service specific installation instructions for moreinformation.
To see a suggested layout of services, see Suggested services layout for IBM OpenPlatform with Apache Hadoop
Installing BigInsights HomeThe BigInsights Home service is the main interface to launch BigInsights -BigSheets, BigInsights - Text Analytics, and BigInsights - Big SQL.
Before you begin
The BigInsights Home service requires Knox to be installed, configured andstarted.
Procedure1. Open a browser and access the Ambari server dashboard. The following is the
default URL:http://<server-name>:8080
The default user name is admin, and the default password is admin.2. In the Ambari dashboard, click Actions > Add Service.3. In the Add Service Wizard > Choose Services, select the BigInsights –
BigInsights Home service. Click Next.If you do not see the option for BigInsights – BigInsights Home, follow theinstructions described in “Installing the BigInsights value-add packages” onpage 69.
4. In the Assign Masters page, select a Management node (edge node) that yourusers can communicate with. BigInsights Home is a web application that yourusers must be able to open with a web browser.
5. In the Assign Slaves and Clients page, make selections to assign slaves andclients.The nodes that you select will have JSQSH (an open source, command lineinterface to SQL for Big SQL and other database engines).
6. Click Next to review any options that you might want to customize.If you want to change the default UID for this BigInsights - Home serviceaccount, select the Misc tab in the Customize Services page. You can managethe UID for this service account so that Ambari will create the user with theappropriate UID.
7. Click Deploy.
72 BigInsights: IBM Open Platform with Apache Hadoop and BigInsights 4.2 Technical Preview

If the BigInsights – BigInsights Home service fails to install, run theremove_value_add_services.sh cleanup script. The following code is anexample command:cd /usr/ibmpacks/bin/<version>remove_value_add_services.sh
-u admin -p admin-x 8080 -s WEBUIFRAMEWORK -r
For more information about cleaning the value-add service environment, see“Removing BigInsights value-add services” on page 90.
8. After installation is complete, click Next > Complete .
What to do next1. Click the Knox service from the Ambari web interface to see the summary
page.2. Select Host Actions > Restart All to restart it and all of its components.3. If you are using LDAP, you must also start LDAP if it is not already started.4. Click the BigInsights Home service in the Ambari User Interface.5. Select Host Actions > Restart All to restart it and all of its components.6. Make sure that the Knox service is enabled.7. Open the BigInsights Home page from a web.
The URL for BigInsights Home is https://<knox_host>:<knox_port>/<knox_gateway_path>/default/BigInsightsWeb/index.htmlwhere:
knox_host The host where Knox is installed and running
knox_portThe port where Knox is listening (by default this is 8443)
knox_gateway_pathThe value entered in the gateway.path field in the Knox configuration(by default this is 'gateway')
For example, the URL might look like the following address:https://myhost.company.com:8443/gateway/default/BigInsightsWeb/index.html
If you are using the Knox Demo LDAP, a default user ID and password iscreated for you. When you access the web page, use the following presetcredentials:User Name = guestPassword = guest-password
Chapter 4. Installing the IBM BigInsights value-added services on IBM Open Platform with Apache Hadoop 73

8. To invalidate your session, click the Menu icon on the BigInsights Home pageand select Sign Out. You will need to re-authenticate before being able todisplay the BigInsights Home page again.
Installing the BigInsights - Big SQL serviceTo extend the power of the Open Platform for Apache Hadoop, install and deploythe BigInsights - Big SQL service, which is the IBM SQL interface to theHadoop-based platform, IBM Open Platform with Apache Hadoop.
Before you begin
Make sure that you do the prerequisite steps listed in Step 5 on page 64, Preparingto install the BigInsights value-add services.
Remember, you must install the Big SQL service with at least two nodes in thecluster.
Restriction:
v Non-root Ambari installations are not supported.v You must install the Big SQL service with at least two nodes in the cluster.v When installing the Big SQL service, ensure that the NodeManager component is
not installed on either the head node or the secondary head node as this is not asupported configuration.
Procedure1. Open a browser and access the Ambari server dashboard. The following is the
default URL.
74 BigInsights: IBM Open Platform with Apache Hadoop and BigInsights 4.2 Technical Preview

http://<server-name>:8080
The default user name is admin, and the default password is admin .2. In the Ambari web interface, click Actions > Add Service.3. In the Add Service Wizard, Choose Services, select the BigInsights - Big SQL
service, and the BigInsights Home service. Click Next.If you do not see the option to select the BigInsights - Big SQL service,complete the steps in “Installing the BigInsights value-add packages” on page69.
4. In the Assign Masters page, decide which nodes of your cluster you want torun the specified components, or accept the default nodes. Follow theseguidelines:v For the Big SQL monitoring and editing tool, you can assign the Data
Server Manager (DSM) to a different node from the Hive metastore.
Tip: If you install Big SQL before you install the DSM service, you will notsee DSM in any selections.
5. Click Next.6. In the Assign Slaves and Clients page, accept the defaults, or make specific
assignments for your nodes. Follow these guidelines:v Select the non-head nodes for the Big SQL Worker components. You must
select at least one node as the worker node.7. In the Customize Services page, accept the recommended configurations for
the Big SQL service, or customize the configuration by expanding theconfiguration files and modifying the values. Make sure that you have a validbigsql_user and bigsql_user_password in the appropriate fields in theAdvanced bigsql-users-env section.If you want to change the default UID for this BigInsights- Big SQL serviceaccount, select the Misc tab in the Customize Services page. You can managethe UID for this service account so that Ambari will create the user with theappropriate UID.
8. You can review your selections in the Review page before accepting them. Ifyou want to modify any values, click the Back button. If you are satisfiedwith your setup, click Deploy.
9. In the Install, Start and Test page, the Big SQL service is installed andverified. If you have multiple nodes, you can see the progress on each node.When the installation is complete, either view the errors or warnings byclicking the link, or click Next to see a summary and then the new serviceadded to the list of services.If the BigInsights – Big SQL service fails to install, review the errors, correctthe problems, and click Retry in Ambari. If the install still fails, and Big SQLneeds to be uninstalled, run the remove_value_add_services.sh cleanup script.The following code is an example of the command:cd /usr/ibmpacks/bin/<version>./remove_value_add_services.sh -u admin -p admin -x 8080 -s BIGSQL -r
When the remove_value_add_services.sh completes, if the Big SQL servicestill appears in the Ambari list of services, you can remove the Big SQLservice from Ambari by running the following REST API:curl -u admin:admin -H "X-Requested-By: ambari" -X DELETE
http://ambari_server_host_name:8080/api/v1/clusters/cluster_name/services/BIGSQL
Then, restart the Ambari server.
Chapter 4. Installing the IBM BigInsights value-added services on IBM Open Platform with Apache Hadoop 75

For more information about cleaning the value-add service environment, see“Removing BigInsights value-add services” on page 90.
10. The following properties in the hdfs-site.xml, core-site.xml, andyarn-site.xml sections of the configuration. are updated for you by theinstallation of Big SQL. You can verify that these properties are configured.a. In the Ambari web interface, click the HDFS service.b. Click the Configs tab and then the Advanced tab/
1) Expand the Custom core site section to see the following properties:
Key: hadoop.proxyuser.bigsql.groups Value: *
Key: hadoop.proxyuser.bigsql.hosts Value: Substitute with the fully qualified host name where Big SQLmaster is installed
2) Expand the Custom hdfs-site to see the following property:
Key: dfs.namenode.acls.enabled Value: true
c. In the Ambari web interface, click the YARN service.d. Click the Configs tab and then the Advanced tab. Expand the Resource
Manager section.e. Find the yarn.admin.acl property.
1) In the Value text field for the yarn.admin.acl property, find the bigsqluser.It might look like the following value: yarn,bigsql.
11. Restart the HDFS, YARN, MapReduce2, and Big SQL services, if needed.a. For each service that requires restart, select the service.b. Click Service Actions.c. Click Restart All.
12. A web application interface for Big SQL monitoring and editing is available toyour end-users to work with Big SQL. You access this monitoring utility fromthe IBM BigInsights Home service. If you have not added the BigInsightsHome service yet, do that now.
13. Restart the Knox Service. Also start the Knox Demo LDAP service if you havenot configured your own LDAP.
14. Restart the BigInsights Home services.15. To run SQL statements from the Big SQL monitoring and editing tool, type the
following address in your browser to open the BigInsights Home service:https://<knox_host>:<knox_port>/<knox_gateway_path>/default/BigInsightsWeb/index.html
Where:
knox_host The host where Knox is installed and running
knox_portThe port where Knox is listening (by default this is 8443)
knox_gateway_pathThe value entered in the gateway.path field in the Knox configuration(by default this is 'gateway')
For example, the URL might look like the following address:
76 BigInsights: IBM Open Platform with Apache Hadoop and BigInsights 4.2 Technical Preview

https://myhost.company.com:8443/gateway/default/BigInsightsWeb/index.html
If you use the Knox Demo LDAP service, the default credential is:userid = guestpassword = guest-password
To invalidate your session, click the Menu icon on the BigInsights Homepage and select Sign Out. You will need to re-authenticate before being ableto display the BigInsights Home page again.Your end users can also use the JSqsh client, which is a component of theBigInsights - Big SQL service.
16. If the BigInsights - Big SQL service shows as unavailable, there might havebeen a problem with post-installation configuration. Run the followingcommands as root (or sudo) where the Big SQL monitoring utility (DSM)server is installed:a. Run the dsmKnoxSetup script:
cd /usr/ibmpacks/IBM-DSM/<version-number>/ibm-datasrvrmgr/bin/dsmKnoxSetup.sh
where <knox-host> is the node where the Knox gateway service is running.b. Make sure that you do not stop and restart the Knox gateway service
within Ambari. If you do, then run the dsmKnoxSetup script again.c. Restart the BigInsights Home service so that the Big SQL monitoring
utility (DSM) can be accessed from the BigInsights Home interface.17. For HBase, do the following post-installation steps:
a. For all nodes where HBase is installed, check that the symlinks tohive-serde.jar and hive-common.jar in the hbase/lib directory are valid.v To verify the symlinks are created and valid:
– namei /usr/iop/<version-number>/hbase/lib/hive-serde.jar– namei /usr/iop/<version-number>/hbase/lib/hive-common.jar
v If they are not valid, do the following steps:cd /usr/iop/<version-number>/hbase/librm -rf hive-serde.jarrm -rf hive-common.jarln -s /usr/iop/<version-number>/hive/lib/hive-serde.jar hive-serde.jarln -s /usr/iop/<version-number>/hive/lib/hive-common.jar hive-common.jar
b. After installing the Big SQL service, and fixing the symlinks, restart theHBase service from the Ambari web interface.
18. If you are planning to use the HA feature with Big SQL, ensure that the localuser "bigsql" exists in /etc/passwd on all nodes in the cluster, otherwise youwill not be able to use the HA feature with Big SQL.
19. If you want to create and access catalog tables in BigSheets to work with BigSQL, do the following one-time step after Big SQL and BigSheets are bothinstalled, in the exact order listed:a. Restart BigSheets.b. Restart Hive.c. Restart Big SQL.
20. If you want to load data by using the LOAD command into Hadoop tablesfrom files that are compressed by using the lzo codec, do the following steps:a. Update the HDFS configuration.
1) Click the HDFS service and open the Config > Advanced tabs.2) Expand the Advanced core-site section.
Chapter 4. Installing the IBM BigInsights value-added services on IBM Open Platform with Apache Hadoop 77

3) Edit the io.compression.codecs field and append the following value toit:com.hadoop.compression.lzo.LzoCodec,com.hadoop.compression.lzo.LzopCodec
4) Restart the HDFS and Big SQL services.b. Make sure the following packages are installed on all nodes in the cluster:v lzov lzopv hadoop-lzov hadoop-lzo-native
What to do next
After you add Big SQL worker nodes, make sure that you stop and then restart theHive service.
For information about using BigInsights - Big SQL, see Analyzing andmanipulating big data with Big SQL.
Preinstallation checker utility for Big SQLBefore you install the BigInsights - Big SQL service, run the preinstallation checkerutility on all nodes that will be a part of the Big SQL service to verify that yourLinux environment is ready to install Big SQL.
The preinstallation checker utility is invoked automatically as part of theinstallation. It checks each worker node before running the installation on thathost. You can also invoke the checker utility manually on each node, which canvalidate the machine before the service is installed.
The preinstallation checker exists only for the Ambari server node before anyinstallation attempt. It is located in /var/lib/ambari-server/resources/stacks/BigInsights/<version>/services/BIGSQL/package/scripts/.
After the first installation attempt, the Big SQL preinstallation checker utility islocated at /var/lib/ambari-agent/cache/stacks/BigInsights/<version>/services/BIGSQL/package/scripts/.
The resulting log file is stored in /tmp/bigsql/logs/bigsql-precheck-<timestamp>.log. Read the log file to get more details about any issues that arefound. If one or more checks fails, determine the problem by reading the log andthen re-run the utility. If you run the utility before the Big SQL service is installed,some checks are skipped.
The following syntax and examples describe how you can use the Big SQLpreinstallation checker utility.
Syntaxbigsql-precheck.sh [options]
The following [options] can be included:
-A
Run the preinstallation checker utility on all hosts
-b hbase userThe user name for the HBase service. The default value is hbase.
78 BigInsights: IBM Open Platform with Apache Hadoop and BigInsights 4.2 Technical Preview

-f bigsql port
The port number used by Big SQL.
-F
Force all utility warnings to be logged as errors.
-h
Display the Help screen.
-H bigsqlhomeThe path to BIGSQL_DIST_HOME. The default value is /usr/ibmpacks/current/bigsql/bigsql.
-i hive userThe user name for the Hive service. The default value is hive.
-l hostlist
The path and filename listing all of the Big SQL hosts.
-L logdirThe name of the log directory that you want to use. The default is/tmp/bigsql/logs
-M modeThe phase of the check. The default is PRE_ADD_HOST.
-N namenodeThe NameNode host name.
-p DB2 portThe DB2 fast communication manager (FCM) port number.
-P
Parallel mode. Use for a large cluster. If used with Verbose mode printing isasynchronous.
-R hdfs principalThe principal name for the HDFS user when you use Kerberos.
-t timestampThe timestamp format to append to the log file name (to ensure consistency inoutput file names). The default format is YYYY-MM-DD_hh.mm.ss.[fraction].
-T hdfs keytabThe keytab for the HDFS user when you use Kerberos.
-u bigsql userThe user name for the Big SQL user. The default value is bigsql.
-v vardirThe path to the /var/ directory. The default value is /var/ibm/bigsql
-V Verbose mode. Specifies to display test results on the shell stdout. This optionis required to see the output.
-x hdfs userThe user name for the HDFS user. The default value is hdfs.
-z uid checkThe Big SQL User ID test string (for IBM internal use).
Chapter 4. Installing the IBM BigInsights value-added services on IBM Open Platform with Apache Hadoop 79

Usage notes
The Big SQL preinstallation checker utility will perform data collection on all hostsspecified by the -h parameter. The tests can be run in parallel.
On each host, the utility checks for the following issues:v A Korn shell, /bin/ksh exists on all nodes.v The db2set DB2RSHCMD is set, and that the userprofile is not empty and larger
than X bytes.v If you are using LDAP, the local bigsql user ID and group ID match exactly, or
do not exist yet in the LDAP definition.v There is enough disk space.v The /etc/hosts file contains host names in both long and short format. The file
should also contain an entry for db2nodes.cfg on each node.v The timediff between nodes is less than MAX_TIME_DIFF. Otherwise, a CREATE
DATABASE might not work.v The bigsql user ID and group id are the same across all of the nodes, or that it
is possible to have them the same across all nodes.v The /tmp/bigsql/ directory is writable for the bigsql user ID.v The line with requiretty is commented out with # in the /etc/sudoers file.v Big SQL /home/ resolves to the same path across all nodes.v HDFS is available to the bigsql user ID.v The proper privileges have been granted to the installation directories.v SQLLIB already exists in the Big SQL user /home/.v There are no DB2 entries in etc/services.v Determine potential errors with db2ckgpfs.v Validate the existence of passwordless ssh.v Validate that all of the client requirements are met.v Check that the Big SQL user name is within the required length.v Check that there are sufficient resources for Tivoli System Automation (TSA).v Check if the fast communication manager (FCM) port is in use.v Check if the DB2 communication manager (DB2COMM) port is in use.v Check that the HBase user has a valid login shell.v Check the Hive primary group.v Check umask.v Check for upper case in the host name.v Ensure that the Big SQL home directory is not mounted with the nosuid option
set.
Examples1. Run the pre-checker utility with the minimum required parameters and use the
default log file:./bigsql-precheck.sh -V
2. Run the pre-checker utility on list of Big SQL hosts, with HDFS, HBase andHive user names set, Big SQL and DB2 FCM ports specified, in Verbose mode,and with warnings logged as errors:
80 BigInsights: IBM Open Platform with Apache Hadoop and BigInsights 4.2 Technical Preview

./bigsql-precheck.sh -u bigsql-l mick_nodes_list.cfg-z bigsql,2824,hadoop,515-x hdfs -b hbase -i hive -p 32051 -f 28051 -V -F
Installing the BigInsights - Data Server Manager serviceTo extend the power of the Open Platform for Apache Hadoop, install and deploythe BigInsights - Data Server Manager service, which is the IBM monitoringweb-based tool for BigInsights - Big SQL.
Before you begin
Make sure that you do the prerequisite steps listed in Step 5 on page 64, Preparingto install the BigInsights value-add services.
The BigInsights - Data Server Manager service requires Knox to be installed,configured, and started.
About this task
Follow these steps to install the BigInsights - Data Server Manager service, andmake it available on the BigInsights Home page. From there, you can launch theData Server Manager.
Chapter 4. Installing the IBM BigInsights value-added services on IBM Open Platform with Apache Hadoop 81

Procedure1. Open a browser and access the Ambari server dashboard. The following is the
default URL.http://<server-name>:8080
The default user name is admin, and the default password is admin .2. In the Ambari web interface, click Actions > Add Service.3. In the Add Service Wizard, Choose Services, select the BigInsights - Data
Server Manager service, and the BigInsights Home service if it is not alreadyinstalled. Click Next.If you do not see the option to select the BigInsights - Data Server Managerservice, install the appropriate module and restart Ambari, as described in“Installing the BigInsights value-add packages” on page 69.
4. In the Assign Masters page, decide which node of your cluster you want torun the specified Data Server Manager master.
5. Click Next.6. In the Assign Slaves and Clients page, all of the defaults are automatically
accepted and the next page appears automatically. Since the BigInsights - DataServer Manager service does not have any slaves or clients, the Assign Slavesand Clients page is immediately skipped during the installation.
7. In the Customize Services page, accept the recommended configurations forthe Data Server Manager service, or customize the configuration by expandingthe configuration files and modifying the values. Make sure that you enter thefollowing information in the :Advanced dsm-config section:
dsm_admin_user fieldType a Knox user name that will become the administrator for DataServer Manager.
If you want to change the default UID for this BigInsights - Data ServerManager service account, select the Misc tab in the Customize Services page.You can manage the UID for this service account so that Ambari will createthe user with the appropriate UID.
8. Click Next.9. You can review your selections in the Review page before accepting them. If
you want to modify any values, click the Back button. If you are satisfiedwith your setup, click Deploy.
10. In the Install, Start and Test page, the Data Server Manager service isinstalled and verified. If you have multiple nodes, you can see the progress oneach node. When the installation is complete, either view the errors orwarnings by clicking the link, or click Next to see a summary and then thenew service is added to the list of services.
11. Click Complete.If the BigInsights – Data Server Manager service fails to install, run theremove_value_add_services.sh cleanup script. The following code is anexample of the command:cd /usr/ibmpacks/bin/<version>./remove_value_add_services.sh -u admin -p admin -x 8080 -s DATASERVERMANAGER -r
For more information about cleaning the value-add service environment, see“Removing BigInsights value-add services” on page 90.
12. Make sure that the Knox service is enabled.
82 BigInsights: IBM Open Platform with Apache Hadoop and BigInsights 4.2 Technical Preview
13. Access the BigInsights – Data Server Manager service from the BigInsights– Home service. Before you can launch the BigInsights – Home service toaccess DSM, ensure that the following services are installed and started:v If the BigInsights – Home service is not installed, see “Installing BigInsights
Home” on page 72.v If the BigInsights – Big SQL service is not installed, “Installing the
BigInsights - Big SQL service” on page 74.v Make sure that you restart the BigInsights – Home service so that the
BigInsights – Big SQL service icon displays on the Home page.14. Launch the BigInsights – Home service by typing the following address in
your web browser:https://<knox_host>:<knox_port>/<knox_gateway_path>/default/BigInsightsWeb/index.html
Where:
knox_host The host where Knox is installed and running
knox_portThe port where Knox is listening (by default this is 8443)
knox_gateway_pathThe value entered in the gateway.path field in the Knox configuration(by default this is 'gateway')
For example, the URL might look like the following address:https://myhost.company.com:8443/gateway/default/BigInsightsWeb/index.html
15. Click the BigInsights Big SQL icon to launch the Data Server Manager.
Chapter 4. Installing the IBM BigInsights value-added services on IBM Open Platform with Apache Hadoop 83

What to do next
For information about using BigInsights - Data Server Manager, seehttp://www.ibm.com/support/knowledgecenter/SS5Q8A_1.1.0/com.ibm.datatools.dsweb.ots.over.doc/topics/welcome.html?lang=en.
Installing the Text Analytics serviceThe Text Analytics service provides powerful text extraction capabilities. You canextract structured information from unstructured and semi-structured text.
Before you begin
Make sure that you do the prerequisite steps listed in Step 5 on page 64, Preparingto install the BigInsights value-add services.
Follow the steps in Installing the value-add services in the IBM Open Platformwith Apache Hadoop before you begin the steps below.
84 BigInsights: IBM Open Platform with Apache Hadoop and BigInsights 4.2 Technical Preview

Procedure1. Open a browser and access the Ambari server dashboard. The following is the
default URL.http://<server-name>:8080
The default user name is admin, and the default password is admin.2. In the Ambari dashboard, click Actions > Add Service.3. In the Add Service Wizard, Choose Services, select the BigInsights - Text
Analytics service.If you do not see the option to select the BigInsights - Text Analytics service,complete the steps in “Installing the BigInsights value-add packages” on page69.
4. To assign master nodes, select the Text Analytics Master server Node.5. Click Next. The Assign Slaves and Clients page displays.6. Assign slave and client components to the hosts on which you want them to
run. An asterisk (*) after a host name indicates the host is assigned a mastercomponent.a. To assign slaves nodes and clients, click All on the Clients column.
The client package that is installed contains runtime binaries that areneeded to run Text Analytics.
Important: This client needs to be installed on all Datanodes thatbelong to your cluster. You can also optionally choose nodes that do nothave Datanode on them, as the Text Analytics service will deploy it foryou.
Client nodes will install only the Text Analytics Runtime artifacts.(/usr/ibmpacks/current/text-analytics-runtime). Choose one or moreclients. You do not have to choose the Master node as a client since italready installs Text Analytics Runtime.
7. Click Next and select BigInsights - Text Analytics.8. Expand Advanced ta-database-config and enter the password in the
database.password field. Recommended configurations for the service arecompleted automatically but you can edit these default settings as desired.The database server can either be MySQL or MariaDB. There are two options:v database.create.new = Yes (default)
a. The database server will be MySQL for the RHEL 6 platform andMariaDB for the RHEL 7 platform.
b. You must enter the password for the database.c. You must ensure that the default port, 32050 is free. You can change the
port to any free port.d. You can change the database.username, but any changes to the
database.hostname are ignored.v database.create.new = N
a. You must enter the database.hostname, database.port (where theexisting database server instance is running), database.user anddatabase.password. Ensure that the user and password have full accessto create a database in the existing database server instance you specify.Especially if it is a remote MySQL server instance, ensure that allpermissions are given to the user and password to access this remoteinstance. Ensure that the server instance is up and running so that theText Analytics service can be started successfully.
Chapter 4. Installing the IBM BigInsights value-added services on IBM Open Platform with Apache Hadoop 85

9. Expand Advanced ta-web-tooling-config and select the type of tokenizer youwould like to use to run and build the Text Analytics extractors. This can alsobe modified later. The Text Analytics service provides support for two types oftokenizers:a. standard (default): The standard tokenizer uses white space and
punctuation to split tokens. Since a white space tokenizer is efficient, youcan use this tokenizer for alphabetic languages like English and Spanish.The standard tokenizer will generally perform more efficiently than themultilingual tokenizer, but is not suitable to process text in languageswithout word boundary indicators, such as Chinese or Japanese. Thestandard tokenizer also does not support part-of-speech extraction ortagging, and none of the POS-based extractors are visible or usable whenthe standard tokenizer has been chosen.
b. multilingual: The multilingual tokenizer uses white space and punctuationto split tokens, but also has algorithms for processing ideographiclanguages, such as Chinese or Japanese. Refer to the Language Supporttable for the list of languages that the multilingual tokenizer supports.
Note: Whenever you modify the tokenizer type, be sure to restart the TextAnalytics service for the changes to take effect.
10. If you want to change the default UID for this BigInsights - Text Analyticsservice account, select the Misc tab in the Customize Services page. You canmanage the UID for this service account so that Ambari will create the userwith the appropriate UID.
11. Click Next and in the Review screen that opens, click Deploy.12. After installation is complete, click Next > Complete.13. After the installation is successful, click Next and Complete.
If the BigInsights - Text Analytics service fails to install, run theremove_value_add_services.sh cleanup script. The following code is anexample command:cd /usr/ibmpacks/bin/<version>
remove_value_add_services.sh-u admin -p admin-x 8080 -s TEXTANALYTICS -r
For more information about cleaning the value-add service environment, see“Removing BigInsights value-add services” on page 90.
14. Update the Ambari server to allow the Text Analytics Web Tooling serviceuser to impersonate other users. This step is required for two reasons:v To support the ability to browse the HDFS file system as the logged-in user
from within the Text Analytics Web Tooling user interface.v To support the execution of text extractors against data on HDFS by using
Hadoop MapReduce jobs, where the jobs are issued on behalf of thelogged-in user.
To give impersonation privileges to the Text Analytics Web Tooling serviceuser (which defaults to tauser), do the following steps:a. From the Ambari web interface, click the HDFS service.b. At the top of the screen, click the Configs tab.c. Scroll down and expand the Custom core-site section.d. Click Add property to add the following two properties:
86 BigInsights: IBM Open Platform with Apache Hadoop and BigInsights 4.2 Technical Preview

Table 26. Add property
Key Value
hadoop.proxyuser.<ta-service-user-name>.groups
*
hadoop.proxyuser.<ta-service-user-name>.hosts
<text-analytics-web-tooling-master-node>
<ta-service-user-name>The value of the textanalytics_user field from the Advancedta-service-config section of the Text Analytics Web Tooling installconfiguration (the default value for that field is tauser).
<text-analytics-web-tooling-master-node>The fully qualified host name of the node which you selected asyour master node in Step 4.
Remember: Click Save located at the top-right section of the Ambariinterface, and restart HDFS, YARN and MAPREDUCE2 services.
15. Make sure that the Knox service is enabled.16. Restart the Knox service. If you have not configured LDAP service, start the
Knox Demo LDAP service.
17. Open the BigInsights Home and launch Text Analytics at the followingaddress:https://<knox_host>:<knox_port>/<knox_gateway_path>/default/BigInsightsWeb/index.html
Where:
knox_host The host where Knox is installed and running
knox_portThe port where Knox is listening (by default this is 8443)
knox_gateway_pathThe value entered in the gateway.path field in the Knox configuration(by default this is 'gateway')
For example, the URL might look like the following address:https://myhost.company.com:8443/gateway/default/BigInsightsWeb/index.html
Chapter 4. Installing the IBM BigInsights value-added services on IBM Open Platform with Apache Hadoop 87

If you use the Knox Demo LDAP service and have not modified the defaultconfiguration, the default credential to log into the BigInsights - Home serviceis:userid = guestpassword = guest-password
To invalidate a session, click the Menu icon on the BigInsights Home pageand select Sign Out. You will need to re-authenticate before being able todisplay the BigInsights Home page again.
Note: If you do not see the Text Analytics service from BigInsights Home,restart the BigInsights Home service in the Ambari interface.
What to do next
For information about using BigInsights - Text Analytics, see Analyzing big datawith Text Analytics .
Enabling Knox for value-add servicesTo enable Knox after installing the BigInsights value-add service, a post installscript must be executed. Besides making sure that the Knox service is up andrunning, this script also sets up the URL path to BigSheets, Text Analytics andData Server Manager in Knox, which makes the URLs accessible.
About this task
After installing IBM Open Platform with Apache Knox and the BigInsightsvalue-add services BigInsights Home, BigSheets, Text Analytics, and/or DataServer Manager a post installation script needs to be executed to enable Knox forthe value-add services. The script updates the Ambari topology, Knoxconfigurations, restarts Ambari server and Knox server as part of the process toenable Knox for the value-add services. The script needs to be run after installingany of the following value-add services: BigInsights Home, BigSheets, TextAnalytics, and/or Data Server Manager. If the value-add services are installed atdifferent times, the script needs to be rerun anytime one of the value add-servicesis installed.
Note: The Ambari-server and Knox server are restarted as part of running thisscript.
Procedure1. The following directory contains the Knox setup scripts and clean up scripts:
/usr/ibmpacks/bin/<version>
2. The BigInsights value-add services include scripts to help you enable Knox forthe following value adds: BigInsights Home, BigSheets, Text Analytics, andData Server Manager.
Option Description
Knox enablement for value adds knox_setup.sh-u <AMBARI_ADMIN_USERNAME>-p <AMBARI_ADMIN_PASSWORD>-y
The knox_setup.sh script detects the appropriate http or https protocolautomatically. It first tries http and, if it fails, it switches to https. The script
88 BigInsights: IBM Open Platform with Apache Hadoop and BigInsights 4.2 Technical Preview

also gets the port information from the /etc/ambari-server/conf/ambari.properties file.Use the following parameter definitions:
-u The Ambari administrator user name.
-p The Ambari administrator password. This parameter is optional.
-y Assume yes as the answer to any question. This parameter is optional.If you install IBM Open Platform with Apache Hadoop as the non-root user,preface the knox_setup.sh command with sudo, where the instruction wouldnormally require the root user.
Example
Knox setup examples for value-add services:
Note: The examples use the default Ambari port number, 8080. If you modifiedthe port number, adjust for your environment.v Normal Knox enablement of value-add services:
sudo ./knox_setup.sh -u admin -p admin
This example includes the optional password parameter.v Knox enablement of value-add services with the assume yes option
sudo ./knox_setup.sh -u admin -y
This example includes the optional -y parameter, which means you want toassume yes to any system prompt.
The following is example output from running the Knox setup scripts:[[email protected] 2.0-SNAPSHOT]# ./knox_setup.sh -u admin -p adminProtocol : http***********************************************************************Is Ambari User Name admin correct? y***********************************************************************Is Ambari Cluster Name ambari.server.name correct? y***********************************************************************Is Ambari port 8080 correct? y***********************************************************************Is Knox gateway server knox.server.name correct? y***********************************************************************Is IBM BigInsights IOP installed? y**********************************************************************************************************************************************Updating KNOX jars:***********************************************************************gateway-service-bigsheets-5.3-SNAPSHOT.jar 100% 13KB 13.1KB/s 00:00gateway-service-dsm-1.2-SNAPSHOT.jar 100% 13KB 13.3KB/s 00:00gateway-service-text-analytics-web-tooling-3.0-SNAPSHOT.jar 100% 23KB 22.8KB/s 00:00gateway-service-web-ui-2.5-SNAPSHOT.jar 100% 17KB 16.7KB/s 00:00Completed***********************************************************************Update Topology:***********************************************************************
% Total % Received % Xferd Average Speed Time Time Time CurrentDload Upload Total Spent Left Speed
105 737 105 737 0 0 73832 0 --:--:-- --:--:-- --:--:-- 81888% Total % Received % Xferd Average Speed Time Time Time Current
Dload Upload Total Spent Left Speed100 5148 100 5148 0 0 699k 0 --:--:-- --:--:-- --:--:-- 1005kChecking for updates for conf/knox_conf.jsonroles== WEBUIFRAMEWORKUpdating URL for = WEBUIFRAMEWORK to http://{{ui_server_host}}:{{ui_server_port}}/biginsights
Chapter 4. Installing the IBM BigInsights value-added services on IBM Open Platform with Apache Hadoop 89

roles== BIGSHEETSUpdating URL for = BIGSHEETS to http://{{bigsheets_server_host}}:{{bigsheets_server_port}}/bigsheetsroles== TEXTANALYTICSUpdating URL for = TEXTANALYTICS to http://{{ta_server_host}}:{{ta_server_port}}/TextAnalyticsWebroles== DSMUpdating URL for = DSM to http://{{dsm_server_host}}:{{dsm_server_port}}/consoleProvider iop-util already exists, no updates needed for provider
% Total % Received % Xferd Average Speed Time Time Time CurrentDload Upload Total Spent Left Speed
100 4800 0 0 100 4800 0 243k --:--:-- --:--:-- --:--:-- 260k***********************************************************************Updating KNOX keystore file at Text Analytics master node: textanalytics.server.name.svl.ibm.com***********************************************************************gateway.jks 100% 1374 1.3KB/s 00:00gateway.jks 100% 1374 1.3KB/s 00:00Completed***********************************************************************Cleanup KNOX deployment files:***********************************************************************Completed***********************************************************************Updating KNOX params.py file:***********************************************************************Completed***********************************************************************Restarting AMBARI:***********************************************************************Using python /usr/bin/python2.6Restarting ambari-serverUsing python /usr/bin/python2.6Stopping ambari-serverAmbari Server stoppedUsing python /usr/bin/python2.6Starting ambari-serverAmbari Server running with administrator privileges.Organizing resource files at /var/lib/ambari-server/resources...Server PID at: /var/run/ambari-server/ambari-server.pidServer out at: /var/log/ambari-server/ambari-server.outServer log at: /var/log/ambari-server/ambari-server.logWaiting for server start....................Ambari Server ’start’ completed successfully.***********************************************************************Stop KNOX:***********************************************************************Stopping KNOXService KNOX stoppedStopping KNOX succeeded***********************************************************************Redeploy KNOX:***********************************************************************Completed***********************************************************************Start KNOX:***********************************************************************Starting KNOXService KNOX startedStarting KNOX succeeded[[email protected] 2.0-SNAPSHOT]#
Removing BigInsights value-add servicesWhen you remove a BigInsights value-add service, make sure that there are noremaining files that might cause problems for future installations.
90 BigInsights: IBM Open Platform with Apache Hadoop and BigInsights 4.2 Technical Preview
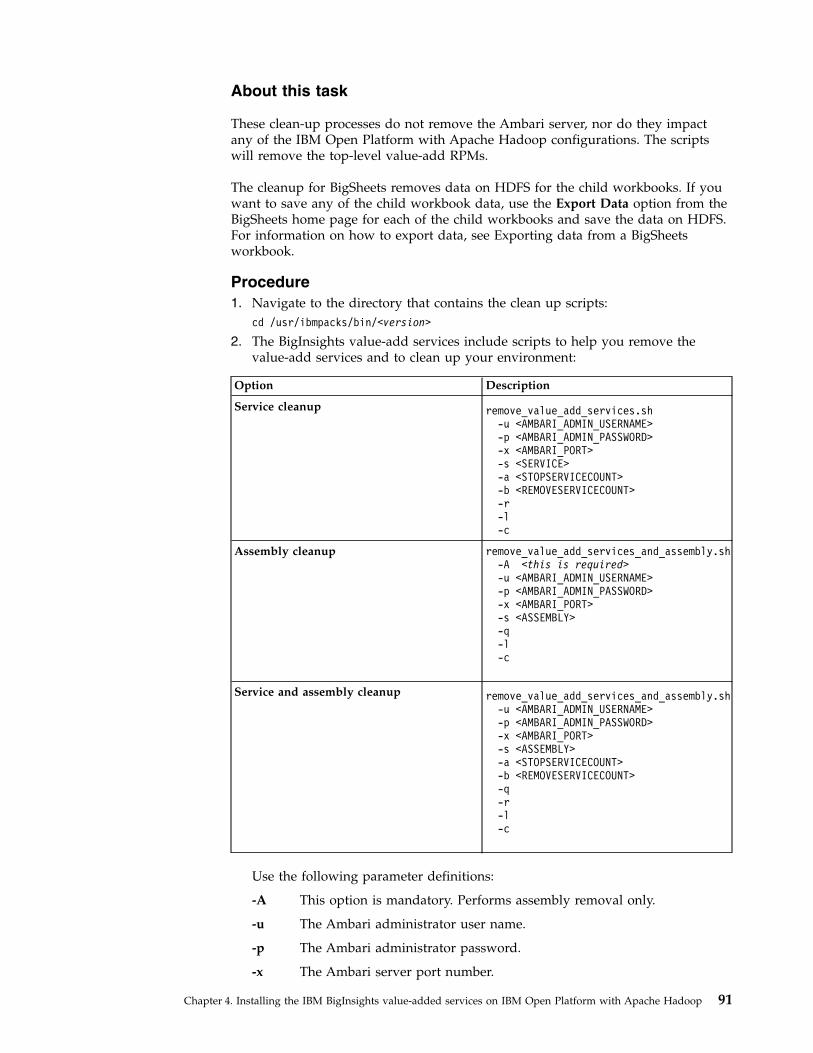
About this task
These clean-up processes do not remove the Ambari server, nor do they impactany of the IBM Open Platform with Apache Hadoop configurations. The scriptswill remove the top-level value-add RPMs.
The cleanup for BigSheets removes data on HDFS for the child workbooks. If youwant to save any of the child workbook data, use the Export Data option from theBigSheets home page for each of the child workbooks and save the data on HDFS.For information on how to export data, see Exporting data from a BigSheetsworkbook.
Procedure1. Navigate to the directory that contains the clean up scripts:
cd /usr/ibmpacks/bin/<version>
2. The BigInsights value-add services include scripts to help you remove thevalue-add services and to clean up your environment:
Option Description
Service cleanup remove_value_add_services.sh-u <AMBARI_ADMIN_USERNAME>-p <AMBARI_ADMIN_PASSWORD>-x <AMBARI_PORT>-s <SERVICE>-a <STOPSERVICECOUNT>-b <REMOVESERVICECOUNT>-r-l-c
Assembly cleanup remove_value_add_services_and_assembly.sh-A <this is required>-u <AMBARI_ADMIN_USERNAME>-p <AMBARI_ADMIN_PASSWORD>-x <AMBARI_PORT>-s <ASSEMBLY>-q-l-c
Service and assembly cleanup remove_value_add_services_and_assembly.sh-u <AMBARI_ADMIN_USERNAME>-p <AMBARI_ADMIN_PASSWORD>-x <AMBARI_PORT>-s <ASSEMBLY>-a <STOPSERVICECOUNT>-b <REMOVESERVICECOUNT>-q-r-l-c
Use the following parameter definitions:
-A This option is mandatory. Performs assembly removal only.
-u The Ambari administrator user name.
-p The Ambari administrator password.
-x The Ambari server port number.
Chapter 4. Installing the IBM BigInsights value-added services on IBM Open Platform with Apache Hadoop 91

-s Depending on the script that you run, the service to remove, or theservice assembly to remove. The following values are allowed:
Service
v TEXTANALYTICSv WEBUIFRAMEWORK
This is the BigInsights Home.v BIGSHEETSv BIGSQLv BIGRv DATASERVERMANAGER
Assembly
v DSThis is the Data Scientist module.
v AnalyticsThis is the Analyst module.
v ALL
-f This option is optional. The FORCE option allows you to continueremoving the service, even if intermittent steps fail.
Note: This might result in an Ambari unknown service state.
-q This option is optional. Depending on the script that you run, specifiesto remove stack files that are associated with the service, or removesthe yum repo and the cache.
Note: When running the remove service script, this option prevents areinstallation.
-a This option is optional. Specifies the number of attempts to stop theservice.
-b This option is optional. Specifies the number of attempts to remove theservice.
-r This option is optional. Removes service users.
Attention: Although this option is generally optional, be aware of thespecial considerations that are required for the bigsql user ID.
The bigsql user ID can be created on all nodes automatically as part ofthe Big SQL service installation. The Big SQL installation relies on theproper setup of root passwordless SSH. If the Big SQL serviceinstallation failed because of improper passwordless SSH setup forroot, you must use the -r option to ensure a full cleanup of Big SQLID
-l This option is optional. It enables secure https mode.
-c This option is optional. Run as user if non-root user is needed.3. Complete the removal process with the following steps:
a. Edit the file /var/lib/ambari-server/resources/stacks/BigInsights/<version_number>/repos/repoinfo.xml to remove the reference toBIGINSIGHTS-VALUEPACKS .
b. Restart the Ambari service to make sure that the cache is cleared:
92 BigInsights: IBM Open Platform with Apache Hadoop and BigInsights 4.2 Technical Preview

Note: Some previously launched services, such as Knox, may take severalminutes to refresh. Ambari may display these services in a warning stateand attempts to manually launch these services may fail during the refresh.sudo ambari-server restart
c. There are files that are left in /var/lib/ambari-server/resources/stacks/BigInsights/4.0/services/$SERVICE/package/archive.zip. These canremain and have no impact on future service additions.
Example
Service cleanup examples:
Normal removalRemove the Big SQL service:>sudo remove_value_add_services.sh-u admin -p admin -x 8081 -s BIGSQL
Remove the BigR service:>sudo remove_value_add_services.sh-u admin -p admin -x 8081 -s BIGR
Removal including usersRemove the Big SQL service including the users:>sudo remove_value_add_services.sh-u admin -p admin -x 8081 -s BIGSQL -r
Run as non-root userRemove the Big SQL service as non-root user (with sudo priviledge)biadmin:>sudo remove_value_add_services.sh-u admin -p admin -x 8081 -s BIGSQL-r -c biadmin
Assembly cleanup examples:
Normal removalRemove the Data Scientist assembly:>sudo remove_value_add_services_and_assembly.sh-u admin -p admin -x 8081 -s DS
Removal with repo clean:Remove the Data Scientist assembly:>sudo remove_value_add_services_and_assembly.sh-u admin -p admin -x 8081 -s DS -q
Run with repo clean and non root user:Remove the Data Scientist assembly and run as user biadmin:>sudo remove_value_add_services_and_assembly.sh-u admin -p admin -x 8081 -s DS -q -c biadmin
Service and assembly cleanup examples:
Normal removalRemoval all:>sudo remove_value_add_services_and_assembly.sh-u admin -p admin -x 8081 -s All
Removal the Analyst services and assembly:>sudo remove_value_add_services_and_assembly.sh-u admin -p admin -x 8081 -s Analyst
Chapter 4. Installing the IBM BigInsights value-added services on IBM Open Platform with Apache Hadoop 93

Removal including usersRemove all services and assemblies and users:>sudo remove_value_add_services_and_assembly.sh-u admin -p admin -x 8081 -s All -r
Run as non-root userRemove all and run as user biadmin:>sudo remove_value_add_services_and_assembly.sh-u admin -p admin -x 8081 -s All -r -c biadmin
Removal with repo clean and non-root user and removing serviceusers
Removing the Data Scientist service and assemblies and running asuser biadmin:>sudo remove_value_add_assembly.sh-u admin -p admin -x 8081 -s DS -r -q -c biadmin
94 BigInsights: IBM Open Platform with Apache Hadoop and BigInsights 4.2 Technical Preview

Chapter 5. Some new or enhanced features for 4.2
Impersonation in Big SQLImpersonation is the ability to allow a service user to securely access data inHadoop on behalf of another user. In Big SQL, you can enable impersonation atthe global level to enable impersonation of connected user for actions on hadooptables. So, while performing CREATE HADOOP TABLE or running a query or loadoperation, the user that connects to Big SQL will be the one that performs theaction in Hive or HDFS. Any DDL operation on Hadoop tables and all schemaDDL statements will be impersonated as the connected user when performed inHive. Big SQL performs native I/O on Hadoop tables by using its own I/Oengines. These I/O operations for a query or insert or load will be performed asthe connected user. So, all authorizations need to be setup in Hive and HDFS toallow the connected user to perform the operation.
Why use impersonation
By default, the bigsql user does all of the read or write operations on HDFS, Hive,and HBase, that is required for the Big SQL service. When the bigsql user is thesole owner and the user of the data, you do not need impersonation.
Without impersonation, you can set up the HDFS permissions and import theminto Big SQL by using the IMPORT HDFS AUTHORIZATIONS option in theHCAT_SYNC_OBJECTS stored procedure. But there is still some separation of thecontrol of access between HDFS and Big SQL.
You might need impersonation if the data that you want to analyze is producedoutside of the Big SQL service, or if there is sharing of data between multipleservices in your cluster.
Without impersonation, you can create a procedure to operate on tables that youown or control, or create a view to select only a few columns from the entire table.You, as the object creator, can then GRANT EXECUTE on the procedure or selecton the view to other users, while not giving any permissions on the underlyingtable to those other users.
With impersonation, those other users must have permissions on the tables inHDFS to perform the I/O operation. So, there is potential for loss of granularity inauthorization control with impersonation enabled. This is similar to Hiveimpersonation behavior.
Verify that Big SQL impersonation is possible
You must ensure that the bigsql user is listed in the HDFS configuration property:hadoop.proxyusers.*. This property allows the bigsql user to impersonate otherusers. It is added, by default, during the Big SQL installation.
You can verify that these properties are configured by doing the following steps:1. From the Ambari dashboard HDFS service, click the Configs > Advanced tab.2. Expand the Custom core site to view the following properties:
a.
© Copyright IBM Corp. 2013, 2016 95

hadoop.proxyuser.<bigsql>.groupsThe value is *, or set to allow the bigsql user to appropriatelyimpersonate the desired users.
hadoop.proxyuser.<bigsql>.hostsThe value should be the fully qualified host name where the BigSQL master is installed.
Big SQL creates the impersonated table as the connected user in Hive. It ispresumed that the connected user has the appropriate authority to create a table inthe specific schema, which is governed by either the Storage Based Authorizationmethod (the default) or the SQL Standard Based Authorization method. For moreinformation about these authorization methods, see https://cwiki.apache.org/confluence/display/Hive/LanguageManual+Authorization.
When impersonating another user, the bigsql user will use HDFS SecureImpersonation. So make sure that the bigsql user is listed in the HDFSconfiguration property.
How to enable Big SQL impersonation from the Installationwizard
When you install the Big SQL service from the Ambari installation wizard, you canenable Big SQL impersonation. In the wizard, select enable_impersonation, whichis described in “bigsql.alltables.io.doAs.” You can also select public_table_access,which issues GRANT statements as described in“bigsql.impersonation.create.table.grant.public.”
How to enable Big SQL impersonation or switch impersonationon or off
Follow these steps to enable or switch Big SQL impersonation:1. Modify the properties in bigsql-conf.XML to enable global impersonation for
Hadoop tables:
bigsql.alltables.io.doAsThe default value is false, which means that impersonation is notenabled on all table operations. If the value is true, impersonation isenabled for all table operations. This is recommended if Hiveimpersonation is enabled and you want to access data through Hiveand Big SQL for all users and tables, and include the security controlsin HDFS for all users.
bigsql.impersonation.create.table.grant.publicThe default value is false. If set to true, any new Hadoop table isgranted INSERT, SELECT, UPDATE, and DELETE to public. This isused in conjunction with global impersonation only to allow for all I/Oauthorization controls to happen only in HDFS and not in Big SQL. Bydefault, ADMIN authority is not granted to public so that security ofthe underlying data is maintained.
2. Update HDFS and Hive as appropriate to switch impersonation on or off:
Switching from non-impersonation to impersonation modeWhen you switch from non-impersonation mode to impersonationmode, make sure that you update the following components accordingto your needs:
HDFS With impersonation, all authorization is managed in HDFS, so
96 BigInsights: IBM Open Platform with Apache Hadoop and BigInsights 4.2 Technical Preview

set up the appropriate access controls in HDFS. The owner oftables in Big SQL could be set up as an owner in HDFS. Anyother users or groups that are granted access in Big SQL mustbe set up by using chmod at the group or public level or byusing HDFS ACLs as applicable.
Hive Tables that are created in Big SQL without impersonation arecreated and owned by the bigsql user in Hive. Make sure togrant the owner ADMIN privileges in Hive so that the ownercan administer the table with impersonation. Also, any otherusers that are granted ADMIN-like privileges in Big SQL mustbe granted ADMIN privileges in Hive.
Switching from impersonation to non-impersonation modeWhen you switch from impersonation mode to non-impersonationmode, make sure that you update the following components accordingto your needs:
HDFS With impersonation, all of the table directories in HDFS can beowned by the table creator, depending on the inheritPermssettings in Hive. Without impersonation, all access will happenas the bigsql user. So, set up the appropriate access controls inHDFS so that the bigsql user can read or write all the tables.
Hive Tables that are created in Big SQL with impersonation arecreated and owned by the creator of the table. Make sure togrant the bigsql user ADMIN privileges in Hive so that thebigsql user can administer the table in Hive withoutimpersonation in Big SQL.
Big SQLTables that are created with impersonation and thebigsql.impersonation.create.table.grant.public property isset have INSERT, SELECT, DELETE, and UPDATE operationsgranted to public. After switching to non-Impersonation, all theauthorization happens in Big SQL only, since HDFS and Hiveaccess would be as the bigsql user. Make sure to revoke thepublic grants and add any grants specific to usage based on theexisting sharing requirements.
Note: If you switch impersonation off after running statements on tables withimpersonation on, you must remember to update the HDFS and Hiveconfigurations as discussed before accessing those tables again.
3. Restart Big SQL.4. Run the HCAT_SYNC_OBJECTS procedure with the skip option at the table
level:CALL SYSHADOOP.HCAT_SYNC_OBJECTS(’USER2’,’T1’, ’T’, ’SKIP’);
The following HCAT_SYNC_OBJECTS example is for all tables in a schema:CALL SYSHADOOP.HCAT_SYNC_OBJECTS(’USER2’,’.*’, ’T’, ’SKIP’);
Authorization control with impersonation
By default, a result of the CREATE HADOOP TABLE statement is that GRANTstatements are applied for a connected user in Hive. This is true whenimpersonation is not enabled only. If impersonation is enabled, this GRANT is not
Chapter 5. Some new or enhanced features for 4.2 97

required since the connected user is the one that creates the table in Hive, so thatuser has all of the required privileges in Hive. Therefore, if impersonation isenabled, the GRANT is not applied.
Unlike Hive, Big SQL allows GRANT/REVOKE on impersonated tables. Anyaccess by using Big SQL is checked against authorization controls in Big SQL, aswell as by HDFS when the actual access happens as the connected user withimpersonation. If a GRANT is done in Big SQL to grant certain privileges to otherusers, groups, or roles, the privileges are not replicated to HDFS or Hive. You mustupdate these services manually to ensure proper operation with impersonation. Forexample, if user1 grants SELECT permission on its table T1 to user2, then user2must also be given read (r) permission in HDFS on the table location and files, aswell as execute (x) permission on the schema.db directory.
Usage Notes
If global impersonation is enabled, user username can run LOAD HADOOPsuccessfully only if the following are true:v The HDFS directory, /user/<username>/, must exist with READ, WRITE, and
EXECUTE permissions for the user.v <username> must exist on each node of the cluster.
You can set up permissions in HDFS and use HCAT_SYNC_OBJECTS to sync upGRANTs in Big SQL to create the same authorization controls in Big SQL. ForHCAT_SYNC_OBJECTS to be able to sync up any tables, they must be accessible tothe connected user. By default, the ability to run the HCAT_SYNC_OBJECTSprocedure is available only to the bigsql user. It should be granted only toappropriate users as required.
Restrictions and noticesv Any impersonation behavior is used for Hadoop tables only.v Any storage handlers or SERDEs that are used in a CREATE HADOOP TABLE
statement also see the impersonation behavior.v Impersonation is not used for tables that are created with the CREATE HBASE
TABLE statement, even if the bigsql.alltables.io.doAs property is set to true.For HBase tables, the bigsql user creates a logical Big SQL table over an HBasetable in Hive in the <schema>.db directory in the Hive warehouse. You musthave appropriate permissions set up in HDFS for the <schema>.db directory toallow for this. If the containing schema is created implicitly during a CREATEHBASE TABLE statement, it will be owned by the bigsql user. Any attempt todrop the schema explicitly will be tried as the connected user, so make surethere are appropriate permissions in HDFS for the connected user to perform thedrop operation.
Best practices
Enable impersonation in HiveIf impersonation is enabled in Big SQL, all Hive metadata operations andall HDFS I/O operations are performed as the connected user. In order toensure that the connected user has appropriate permissions on HDFS, it isrecommended to enable impersonation in Hive as well, to have properauthorizations setup in HDFS for access through Hive as well as Big SQL.
The best way to set up permissions in HDFSUse one of the following suggestions to set up HDFS permissions:
98 BigInsights: IBM Open Platform with Apache Hadoop and BigInsights 4.2 Technical Preview

v Create schemas before setting impersonation, and then set uppermissions according to the users that might be allowed to operate inthose schemas.
v Change the permissions level on the HDFS warehouse and disable theinheritPerms property in Hive.1. Let the umask setting of the current user account dictate the
permissions of directories and files that are created by them.You can verify or modify the fs.permissions.umask-mode from theAmbari web interface by selecting the HDFS service and clicking theConfigs > Advanced tabs. Then, expand the Advanced hdfs-sitesection.If the umask setting is updated, you must restart HDFS and possiblyMapReduce and Yarn.
Restriction: If you set the umask to 077, then when globalimpersonation is enabled, HADOOP tables and HBASE tables cannotbe created in the same schema. This restriction is because the schemadirectory for an HBASE table must currently be owned by the bigsqlservice user. The schema directory for a HADOOP table is owned bythe current user.
2. Disable the inheritPerms in the Hive service.a. Open the Hive service and click the Configs > Advanced > tabs.b. Expand the Advanced hive-site section.c. Locate the hive.warehouse.subdir.inherit.perms property and set
the value to false.d. Click Save and then restart the Hive service.
3. Set the HDFS /apps/hive/warehouse directory to 777.sudo -u hdfs hadoop fs -chmod 777 /apps/hive/warehouse
v HDFS files support the sticky bit setting. You can set the sticky bit ondirectories, which prevents anyone except the superuser, directoryowner, or file owner from deleting or moving the files within thedirectory. There is no effect on individual files.
ANALYZE commandUse the ANALYZE command to gather statistics for any Big SQL table. Thesestatistics are used by the Big SQL optimizer to determine the most optimal accessplans to efficiently process your queries. The more statistics that you collect onyour tables, the better decisions the optimizer can make to provide the bestpossible access plans. When you run ANALYZE on a table to collect thesestatistics, the query generally runs faster.
There are two levels of statistics that you can collect:
Table level:You can gather statistics about table level characteristics, such as thenumber of records.
Column level:You can gather statistics about your columns, such as the number ofdistinct values. You can also gather statistics for column groups which isuseful if columns have a relationship.
Chapter 5. Some new or enhanced features for 4.2 99

Authorizationv CONTROL privilege on the table.
The creator of the table automatically has this privilege. You can grant thisprivilege to users and roles, among others.
v DATAACCESS privilege on the database.The creator of the database and DBADM automatically have this privilege. Youcan grant DBADM access to others.
Syntax
►► ANALYZE TABLE table-name COMPUTE STATISTICSanalyze-col
NOSCANPARTIALSCANCOPYHIVE
►
►table-sampling
►◄
analyze-col:
INCREMENTAL
FULLFOR ALL COLUMNS
colgroupFOR COLUMNS colobj
colgroup:
▼
,
( cola , colb ... )
colobj:
▼
,
colncolgroup
table-sampling:
TABLESAMPLE SYSTEM ( numeric-literal )BERNOULLI
Description
table-nameThe name of the table that you want to analyze. You can specify any Big SQLtable (including DB2 regular tables) or views.
COMPUTE STATISTICS Gathers statistics. You can include the following options:
100 BigInsights: IBM Open Platform with Apache Hadoop and BigInsights 4.2 Technical Preview

analyze-col
INCREMENTALOnly partitions that do not have updated statistics are scanned.The option is ignored for HBase tables, or if the table is notpartitioned.
FULL For a partitioned table, this value results in a full scan of thetable to collect statistics. On a non-partitioned table, the scan isalways a FULL scan.
NOSCAN
When you specify the optional parameter NOSCAN, there is someperformance improvement in the ANALYZE command becauseANALYZE does not scan files. By using NOSCAN, ANALYZE gathersonly the following statistics:v Number of filesv Table size in bytesv Number of partitions
PARTIALSCANThe PARTIALSCAN option is valid for tables that use the RCFileformat only. This option is not valid for HBase tables. Only the blockheader information of the file is accessed to get the file size in bytes,and the number of files.
COPYHIVENo statistics are gathered on the table. The statistics that the Hivemetastore has on the table and its columns is copied to the Big SQLmetastore.
FOR COLUMNSTable statistics and column-level statistics are gathered for the columns thatyou specify. You must specify at least one column, or one column group as aparameter in FOR COLUMNS, or ANALYZE returns a syntax error.
colobj You can specify columns, column groups, or both. Separate eachcolumn group or column name with a comma. Enclose column groupswithin parentheses. For a column group, only the number of distinctvalues is gathered on the grouping of columns. You can intermix anindividual column and column groups. For example,...FOR COLUMNS (c1,c3),c2,(c4,c5),c7,c8...;
FOR ALL COLUMNSTable statistics and column-level statistics are gathered for all columns of thetable. This option is used when ANALYZE is automatically triggered by BigSQL.
colgroup
An optional list of column groups only can be included between theCOLUMNS and TABLESAMPLE (optional) clauses. Any individualcolumns that you specify trigger a syntax error.Enclose column groupswithin parentheses. For a column group, only the number of distinctvalues is gathered on the grouping of columns.
TABLESAMPLE SYSTEM | BERNOULLI (numeric-literal)
SYSTEM
Chapter 5. Some new or enhanced features for 4.2 101

This parameter is supported for ALL BIG SQL TABLE types, includingviews, and is supported in Analyze v2 only. You use this parameter tocollect statistics on a sample of HDFS splits. The term splits means thedivision of work that Big SQL generates to compute data in parallel,which can vary according to file type (such as text file or parquet),table type (HADOOP or HBASE), and configuration settings. Thesesample statistics are then used to extrapolate the statistics of the entiretable. The numeric-literal is the target percentage of splits to scan duringANALYZE. Therefore, if the value of the numeric-literal is 10, it mightmean that 10% of the splits are sampled. For example, if the table hasdata that resides on 10 splits, 1 split is used in the sample. However, ifthe table is small enough and resides on 2 splits, then TABLESAMPLESYSTEM (10) scans 1 split, which is about 50% of the table. ANALYZEmakes adjustments for small tables so that statistics are extrapolatedcorrectly. A default sample size of 10% is used when ANALYZE isautomatically triggered in Big SQL. This value speeds up theperformance of the ANALYZE statement with little impact on queryperformance.
BERNOULLI
This parameter is supported only for statistical views. You use thisparameter to collect statistics on a sample of the rows from thestatistical view rather than all of the rows. The numeric-literal is thetarget percentage of rows to analyze.
Statistical views can be very large because they can potentially describejoin operations between multiple large tables. When you use thisparameter, you can significantly reduce the time it takes to runANALYZE for a statistical view.
Bernoulli sampling considers each row individually, including the rowwith probability P/100 (where P is the value of the numeric-literal ) andexcluding it with probability 1-P/100. Therefore, if the value of thenumeric-literal is the value 10, which represents a 10% sample, each rowis included with a probability of 0.1, and is excluded with a probabilityof 0.9.
Usage notesv Results are written to the DB2 stats catalogs and to HDFS.v You must include at least one column name in the ANALYZE command if you
specify FOR COLUMNS.v There have been major performance and memory improvements to ANALYZE
by removing all dependencies from Hive and Map/Reduce. The ANALYZEstatement that does not use Map/Reduce is called Analyze v2. You can modify aproperty in Big SQL that disables or re-enables Analyze 2. The recommendationis to always to use Analyze 2 over Analyze 1.For instructions about turning Analyze v2 on or off, see “Enabling or disablingANALYZE v2” on page 104.
v When Analyze v2 is enabled by default, when you run the ANALYZE commandagainst a table on a set of columns, and then later run ANALYZE on a secondset of columns, the statistics that are gathered from the first ANALYZEcommand are merged with the statistics that are gathered from the secondANALYZE command. Therefore, if you decide that you need to run ANALYZEon additional columns after the first ANALYZE command is run, then runANALYZE on the second set of columns only. This practice speeds up the timethat it takes for ANALYZE to complete. Note the difference in usage for Analyze
102 BigInsights: IBM Open Platform with Apache Hadoop and BigInsights 4.2 Technical Preview

v2. If you use Analyze v1, then ANALYZE statements must always contain allcolumns that you need to collect statistics for at all times.You can modify a property in Big SQL that disables or re-enables cumulativestatistics. For instructions on turning cumulative statistics on or off, see“Enabling or disabling cumulative statistics” on page 105.
v Since gathering statistics is crucial for good query performance, Analyze v2 istriggered after a successful LOAD. The ANALYZE statement runs by default onall the columns in the table using a 10% table sample. The following is anexample of an ANALYZE statement that runs after a successful LOAD:ANALYZE TABLE schema.table COMPUTE STATISTICS FOR ALL COLUMNS TABLESAMPLE
SYSTEM(10);
You can modify a property in Big SQL that disables or enables an automaticanalyze after LOAD. For instructions on enabling or disabling ANALYZE afterLOAD, see Configuring for automatic analyze after LOAD.
v Since gathering statistics is crucial for good query performance, ANALYZE v2 isautomatically triggered after HCAT_SYNC_OBJECTS is called to ingest data intoBig SQL from Hive. The ANALYZE command runs on all the columns in thetable by default using a 10% table sample. The following is an example of anANALYZE statement that is run after a successful HCAT_SYNC_OBJECTS call:ANALYZE TABLE schema.table COMPUTE STATISTICS FOR ALL COLUMNS TABLESAMPLE
SYSTEM(10);
You can modify a property in Big SQL that disables or enables an automaticanalyze after HCAT_SYNC_OBJECTS. For instructions on enabling or disablingANALYZE after HCAT_SYNC_OBJECTS, see “Configuring automatic ANALYZEafter HCAT_SYNC_OBJECTS” on page 106.
v When a Big SQL table increases significantly, the statistics that were previouslygathered, either by a manual ANALYZE or automatic analyze after a successfulLOAD or a call to HCAT_SYNC_OBJECTS, will become out of date. As a result,ANALYZE must be run for optimal query performance. Big SQL automaticallychecks to see whether Hadoop or HBase tables changed significantly, and if so,ANALYZE v2 is also run automatically.
v Although the memory footprint of the ANALYZE command is considerablyreduced because of major revisions to ANALYZE v2, here are some ways toreduce the memory footprint of the ANALYZE command even further:– If you do not require distribution statistics for columns, turn them off by
setting the following properties to zero (0):
biginsights.stats.hist.numThe number of histogram buckets.set hadoop property biginsights.stats.hist.num=0;
biginsights.stats.mfv.numThe number of most frequent values.set hadoop property biginsights.stats.mfv.num=0;
By setting these properties to 0, the ANALYZE command can use lessmemory and less storage space. With the properties set to 0, histogram andMFV statistics are not collected. However, the basic statistics like min, max,cardinality, and number of distinct values (NDV) are still collected.
– Since automatic ANALYZE statements are executed against all of the columnsin the table, for cases where the table has a lot of columns, the storage andmemory requirements increase when distribution and MFV statistics arecollected. By default, if a table has over 50 columns then any ANALYZE
Chapter 5. Some new or enhanced features for 4.2 103
statement using the FOR ALL COLUMNS clause will not collect distributionand MFV statistics. If you want to increase or decrease this value, toggle it bysetting the following property:SET HADOOP PROPERTY biginsights.stats.wide.table.min.columns=50;
v The NOSCAN option allows ANALYZE to complete much faster. However, itcan potentially result in not having the best performance enhancements that canotherwise be achieved.
v It is a good idea to gather statistics on all Big SQL tables that are used in yourqueries. Collect column level statistics for all columns that your predicatesreference, including join predicates. Collect column grouping statistics for all setsof columns that your predicates reference that have an inter-relationship, such as(country, city).
v When you specify the ANALYZE command to gather statistics for HBase tables,statistics are also gathered for the rowkey. These statistics are stored in the BigSQL metastore.
v You can query SYSCAT.TABLES to determine the total number of partitions, thenumber of files, and the total size in kilobytes in an HADOOP table, if you haverun the ANALYZE command.
v Do not include ARRAY, ROW, or STRUCT data types in the FOR COLUMNSclause. You can ANALYZE a table that contains ARRAY, ROW, or STRUCT datatype, but no statistics are returned for those particular columns.
v Using the TABLESAMPLE clause in Analyze has no effect if the number ofblocks is small, which is tables with number of blocks smaller than 20.
Enabling or disabling ANALYZE v2
Big SQL defaults to using ANALYZE v2 instead of ANALYZE v1 starting with BigSQL 4.2 because ANALYZE v1 was very memory and CPU intensive due to theuse of Hive and Map/ Reduce. The recommended setting is to stay with Analyzev2, set the biginsights.stats.use.v2 property to true for ANALYZE v2 or falsefor ANALYZE v1, either as a session variable or as a system-wide property withinthe configurations:
Session variableRun the following command within the Big SQL shell or interface:SET HADOOP PROPERTY biginsights.stats.use.v2=true;
Setting the value to true to stay with ANALYZE v2, which is the default,is recommended.
System-wide propertyUpdate the configuration properties:1. Open the bigsql-conf.xml configuration file at $BIGSQL_HOME/conf/
bigsql-conf.xml on the head node only.2. Add the following property:
<property><name>biginsights.stats.use.v2</name><value>TRUE</value></property>
Setting the value to true to stay with ANALYZE v2, which is thedefault, is recommended.
3. Restart the Big SQL service.
104 BigInsights: IBM Open Platform with Apache Hadoop and BigInsights 4.2 Technical Preview

Enabling or disabling cumulative statistics
The default behavior in ANALYZE v2 is to keep the previously collected statistics.To change the behavior of ANALYZE so that you can keep or remove thepreviously collected statistics, set the biginsights.stats.cumulative property totrue or false, either as a session variable or as a system-wide property within theconfigurations:
Session variableRun the following command within the Big SQL shell or interface:SET HADOOP PROPERTY biginsights.stats.cumulative=true;
System-wide propertyUpdate the configuration properties:1. Open the bigsql-conf.xml configuration file at $BIGSQL_HOME/conf/
bigsql-conf.xml on the head node only.2. Add the following property:
<property><name>biginsights.stats.cumulative</name><value>true</value></property>
3. Restart the Big SQL service.
Configuring automatic ANALYZE after LOAD
To change the behavior of ANALYZE after a LOAD statement, modify theautomatic analyze process following a LOAD statement by setting thebiginsights.stats.auto.analyze.post.load property to ONCE, NEVER, orALWAYS. The default value is ONCE.
ONCE This is the default. This means that ANALZYE is run after LOADcompletes if an ANALYZE command has never been run for the specifiedtable.
NEVERThis means that ANALYZE is never run after the LOAD completes.
ALWAYSThis means that ANALYZE is always run after the LOAD completes.
You can set the value as a session variable or as a system-wide property within theconfigurations.
Session variableRun the following command within the Big SQL shell or interface:SET HADOOP PROPERTY biginsights.stats.auto.analyze.post.load=ALWAYS;
System-wide propertyUpdate the configuration properties:1. Open the bigsql-conf.xml configuration file at $BIGSQL_HOME/conf/
bigsql-conf.xml on the head node only.2. Add the following property:
<property><name>biginsights.stats.auto.analyze.post.load</name><value>ALWAYS</value></property>
3. Restart the Big SQL service.
Chapter 5. Some new or enhanced features for 4.2 105

Configuring automatic ANALYZE after HCAT_SYNC_OBJECTS
To change the behavior of ANALYZE after a HCAT_SYNC_OBJECTS statement isrun, modify the automatic analyze process following a HCAT_SYNC_OBJECTSstatement by setting the biginsights.stats.auto.analyze.post.syncobj propertyto ONCE, NEVER, or COPYHIVE. The default value is ONCE.
ONCE This is the default. This means that ANALYZE is run afterHCAT_SYNC_OBJECTS completes if an ANALYZE command has neverbeen run for the specified table.
NEVERThis means that ANALYZE is never run after the HCAT_SYNC_OBJECTScompletes.
COPYHIVEThis means that ANALYZE copies the statistics that are gathered fromHive after HCAT_SYNC_OBJECTS completes.
You can set the value as a session variable or as a system-wide property within theconfigurations.
Session variableRun the following command within the Big SQL shell or interface:SET HADOOP PROPERTY biginsights.stats.auto.analyze.post.syncobj=NEVER;
System-wide propertyUpdate the configuration properties:1. Open the bigsql-conf.xml configuration file at $BIGSQL_HOME/conf/
bigsql-conf.xml on the head node only.2. Add the following property:
<property><name>biginsights.stats.auto.analyze.post.syncobj</name><value>NEVER</value></property>
3. Restart the Big SQL service.
Examples
Example 1: Analyzing a non-partitioned table.ANALYZE TABLE myschema.Table2
COMPUTE STATISTICS FOR COLUMNS (c1,c2),c3,c4;
This statement gathers statistics for Table2, along with column statistics forc3 and c4 and column grouping statistics for (c1,c2). When you run a queryon Table2 after you use the ANALYZE command, the query generally runsfaster.
Example 2: Analyze a table and specific columns and then useSYSSTAT.COLUMNS to view the statistics.
Gather statistics on table MRK_PROD_SURVEY_TARG_FACT:ANALYZE TABLE gosalesdw.MRK_PROD_SURVEY_TARG_FACT
COMPUTE STATISTICSFOR COLUMNS month_key,product_key,product_survey_key,
product_topic_target;
Select from the SYSSTAT.COLUMNS table to display the statistics:
106 BigInsights: IBM Open Platform with Apache Hadoop and BigInsights 4.2 Technical Preview

SELECT cast(COLNAME as varchar(20)) AS "COL_NAME", COLCARD,cast(HIGH2KEY as varchar(100)) AS "HIGH2KEY",cast(LOW2KEY as varchar(100)) AS "LOW2KEY", NUMNULLS ,AVGCOLLENfrom SYSSTAT.COLUMNS WHERE TABNAME = ’MRK_PROD_SURVEY_TARG_FACT’and (COLNAME=’PRODUCT_KEY’ or COLNAME=’PRODUCT_TOPIC_TARGET’) order by COLNAME;
The output that shows the part of the statistics is shown in the followingexample:
+----------------------+---------+----------+---------+----------+-----------+| COL_NAME | COLCARD | HIGH2KEY | LOW2KEY | NUMNULLS | AVGCOLLEN |+----------------------+---------+----------+---------+----------+-----------+| PRODUCT_KEY | 90 | 30132 | 30001 | 0 | 4 || PRODUCT_TOPIC_TARGET | 8 | 1.0 | 0.495 | 0 | 8 |+----------------------+---------+----------+---------+----------+-----------+
Example 3: Analyzing an HBase table.CREATE HBASE TABLE HBTable (
c1 int,c2 int,c3 int,c4 varchar(20),c5 varchar(40),c6 varchar(90))COLUMN MAPPING (
KEY MAPPED BY (c1,c2,c3),cf1:cq1 MAPPED BY (c4,c5)
ENCODING DELIMITEDFIELDS TERMINATED BY ’\b’,cf1:cq2 MAPPED BY (c6) ENCODING BINARY)DEFAULT ENCODING BINARY;
ANALYZE TABLE HBTableCOMPUTE STATISTICS FOR COLUMNS (c1,c2,c3,c4,c5,c6);
This statement gathers statistics for the table HBTable, along with columnstatistics for all of the columns in the table. The key is c1,c2, and c3.Columns c4, c5 are part of column family cf1:cq1. Column c6 is part ofcolumn family cf1:cq2.
Example 4: Determining who has DATAACCESS on the database:Issue a query on the syscat.dbauth table.SELECT CHAR(GRANTOR, 12)GRANTOR,
CHAR(GRANTEE, 12)GRANTEE,DBADMAUTH, DATAACCESSAUTH
FROM syscat.dbauthORDER BY grantee, grantor;
GRANTOR GRANTEE DBADMAUTH DATAACCESSAUTH------------ ------------ --------- --------------SYSIBM DB2INST Y YSYSIBM PUBLIC N N
Example 5: Determining table level privileges:Issue a query on the syscat.tabauth.SELECT CHAR(GRANTOR, 12)GRANTOR,
CHAR(GRANTEE, 12)GRANTEE,CHAR(TABNAME, 15)tabname, CONTROLAUTH
FROM syscat.tabauth WHERE tabname=’T1’;
GRANTOR GRANTEE TABNAME CONTROLAUTH------------ ------------ --------------- -----------SYSIBM DB2INST T1 YSYSIBM JOESHMO T1 Y
Example 6: Find out the number of partitions, the number of files, and the sizeof the Hadoop table:
SELECT NPARTITIONS, NFILES, TABLESIZE FROM SYSCAT.TABLES WHERE TABNAME=’my_table’;
Chapter 5. Some new or enhanced features for 4.2 107

Example 7: Use the TABLESAMPLE BERNOULLI parameter to collect statisticson your view:
Create the view:CREATE VIEW SS_GVIEW AS(
SELECT t2.*, t3.*, t4.*, DATE(t2.D_DATE) AS D_D_DATEFROM STORE_SALES
AS t1, DATE_DIM as t2, TIME_DIM as t3, STORE as t4WHERE t1.SS_SOLD_DATE_SK=t2.D_DATE_SK
AND t1.SS_SOLD_TIME_SK=t3.T_TIME_SKAND t1.SS_STORE_SK=t4.S_STORE_SK
);
Make the view a statistical view by enabling query optimization:ALTER VIEW SS_GVIEW ENABLE QUERY OPTIMIZATION;
Run ANALYZE on the view with a 1% Bernoulli sampling:ANALYZE TABLE SS_GVIEW
COMPUTE STATISTICS TABLESAMPLE BERNOULLI (1);
Example 8: Use the TABLESAMPLE SYSTEM parameter to collect statistics on yourHadoop or HBase table:ANALYZE TABLE myschema.Table2 COMPUTE STATISTICS FOR COLUMNS (c1,c2),c3,c4
TABLESAMPLE SYSTEM (10);
Example 9: Use the cumulative statistics feature of Analyze v2 to collect statistics on anadditional set of columns:ANALYZE TABLE myschema.Table2 COMPUTE STATISTICS
FOR COLUMNS (c1,c2), c3, c4;ANALYE TABLE myschema.Table2 COMPUTE STATISTICS
FOR COLUMNS c5,c6;
Example 10:Collect table statistics with no columns specified.ANALYZE TABLE myTable COMPUTE STATISTICS TABLESAMPLE BERNOULLI (5);ANALYZE TABLE myTable COMPUTE STATISTICS TABLESAMPLE SYSTEM (10);
Example 11:Run ANALYZE on some column groups of the myTable table withTABLESAMPLE SYSTEM:ANALYZE TABLE myTable COMPUTE STATISTICS
FOR COLUMNS (I,J), (K,L,M)TABLESAMPLE SYSTEM (10);
Auto-analyzeYou can use the auto-analyze feature to automatically determine if a table shouldbe analyzed. If you add new data, or if you have never run ANALYZE on a table,then auto-analyze schedules to run an ANALYZE command.
Running auto-analyze
When more than 50% of the data is new, or the table has never been analyzed,then auto-analyze detects and runs an analyze. For Big SQL HBase tables, if amajor compaction has been done since the last analyze, then auto-analyze detectsand runs an analyze.
108 BigInsights: IBM Open Platform with Apache Hadoop and BigInsights 4.2 Technical Preview

Use the DB2 administrator task scheduler (ATS) to schedule and run tasks thatexecute an ANALYZE command. Analyze tasks are added to ATS whenauto-analyze detects that an ANALYZE command should be run. These analyzetasks are scheduled to run once only and immediately.
There is also one task that is scheduled to run every 10 minutes indefinitely tocheck if there are tables that need to be analyzed. This task is added during theinstallation of Big SQL. If you need a different schedule, modify the default cronschedule. Use use multiple schedules as shown in “Using multiple schedules forchecking analyze.”
Modifying the cron schedule for auto-analyze
The task that checks for tables to be analyzed has a default cron schedule of'0,10,20,30,40,50 * * * *'. This mean that the task runs every 10 minutesindefinitely. Change the cron schedule by using the ATS procedure,SYSPROC.ADMIN_TASK_UPDATE.
Example that will run once every day at midnight:
CALL SYSPROC.ADMIN_TASK_UPDATE(’BIGSQL_CHECK_ANALYZE’,NULL, NULL,NULL, ’0 0 * * *’,NULL,NULL);
Example that will disable the task so that it does not run:CALL SYSPROC.ADMIN_TASK_UPDATE(
’BIGSQL_CHECK_ANALYZE’,NULL, NULL,0, NULL,NULL,NULL);
For more information about setting a task cron schedule, see UNIX cron format.
Using multiple schedules for checking analyze
There can be multiple tasks with different schedules for calling theBIGSQL_CHECK_ANALYZE procedure and with different maximum concurrenttask settings. This task must be added as the bigsql administrator user only.
The following examples show how to add 2 BIGSQL_CHECK_ANALYZE taskswith different schedules and different maximum concurrent tasks. In theseexamples, one task is for daytime, and it runs from 7:00-18:59, every 15 minuteswith a maximum of 1 concurrent analyze task allowed. The other task is fornighttime, and it runs from 00:00-6:59 and 19:00-12:59, every half hour with amaximum of 5 concurrent analyze task allowed.
Daytime scheduleCALL SYSPROC.ADMIN_TASK_ADD(’
BIGSQL_CHECK_ANALYZE days max 1’,NULL, NULL, NULL,’0,15,30,45 7-18 * * *’,’SYSHADOOP’,
’BIGSQL_CHECK_ANALYZE’,’VALUES(1)’,NULL,NULL);
Nighttime scheduleCALL SYSPROC.ADMIN_TASK_ADD(
’BIGSQL_CHECK_ANALYZE nights max 5’,NULL, NULL, NULL,’0,30 0-6,19-23 * * *’,
’SYSHADOOP’,’BIGSQL_CHECK_ANALYZE’,’VALUES(5)’,NULL,NULL);
Chapter 5. Some new or enhanced features for 4.2 109

Big SQL procedures for auto-analyze
SYSHADOOP.BIGSQL_RUN_ANALYZEThis procedure is called by the analyze task to run an ANALYZEcommand. This procedure is an internal procedure that is intended to beused only by auto-analyze.
SYSHADOOP.BIGSQL_CHECK_ANALYZEThis procedure is called by a scheduled task that checks if there are tablesthat should be analyzed. This procedure is an internal procedure that isintended to be used only by auto-analyze.
This procedure has one parameter:SYSHADOOP.BIGSQL_CHECK_ANALYZE(maxConcurrentTasks)
maxConcurrentTasksThe value is an integer that is used to override the property settingof biginsights.stats.auto.analyze.concurrent.max. When thevalue is set to an integer larger then zero (0), it is used as themaximum number of concurrent tasks.
SYSHADOOP.BIGSQL_AUTO_ANALYZE_STATUSThis procedure is intended to be used by the Big SQL administrator tocheck the status of auto-analyze tasks. Successful analyze tasks show aSTATUS of COMPLETED and SQLCODE 0. Tasks that are waiting to runcontain NULL values for STATUS and END_TIME. A task that is runningshows a STATUS of RUNNING. If an error was encountered theSQLCODE and MESSAGE show the reason the task failed.
The procedure signature has 2 parameters:SYSHADOOP.BIGSQL_AUTO_ANALYZE_STATUS(schema, table)
schemaWhen not NULL the results are filtered to show tables in thisschema only. This parameter can be NULL to not filter the results.A wild card % can be used.
table When not NULL the results are filtered to show tables matchingthis name only. This parameter can be NULL to not filter theresults. A wild card % can be used.
An example that shows all:CALL SYSHADOOP.BIGSQL_AUTO_ANALYZE_STATUS(NULL, NULL);
Table 27. StatusTASKNAME TASKID ANALYZE_INPUT STATUS BEGIN_TIME END_TIME SQLCODE SQLSTATE MESSAGE
Analyze1458949355682BIGSQL.HCOUNTRY_FILE
102 VALUES('BIGSQL','HCOUNTRY_FILE',10,NULL)COMPLETE 2016-03-2516:50:34.112
2016-03-2516:50:46.831
0 SQL0000W Statement processing wassuccessful.
Analyze1458912345TEST.GENDATA_1YR
83 VALUES('TEST','GENDATA_1YR',10,NULL)COMPLETE 2016-03-2418:09:18.384
2016-03-2418:10:23.758
0 SQL0000W Statement processing wassuccessful.
Analyze1458912222UIUSER.T_UIUSER
42 VALUES('UIUSER','T_UIUSER',10,NULL)COMPLETE 2016-03-1711:17:39.281
2016-03-1711:18:37.945
0 SQL0000W Statement processing wassuccessful.
Analyze1458987654TEST.BAD
84 VALUES('TEST','BAD',10,NULL)COMPLETE 2016-03-2419:04:19.045
2016-03-2419:15:52.347
-4302 58040 SQL4302N Procedure or user-definedfunction "SYSHADOOOP.BIGSQL_RUN_A",specific name "BIGSQL_RUN_ANALYZE"aborted with an exception"[BSL-0-48470644e] Error run".
You can also see the status and history of the analyze tasks by querying the ATSviews SYSTOOLS.ADMIN_TASK_STATUS and SYSTOOLS.ADMIN_TASK_LIST.These views show all ATS tasks. The BIGSQL_AUTO_ANALYZE_STATUSprocedure shows auto-analyze tasks only.
110 BigInsights: IBM Open Platform with Apache Hadoop and BigInsights 4.2 Technical Preview

For more information about viewing tasks and status, see ADMIN_TASK_LIST andADMIN_TASK_STATUS.
Configuration properties for auto-analyze
Use these properties to set the behavior of auto-analyze.
biginsights.stats.auto.analyze.concurrent.maxThe default value is 1. This property limits the maximum number ofanalyze tasks that can be in the task queue at a time. When the scheduleris asked for tables to be analyzed it checks how many tasks are already inthe queue running or waiting and limits the amount returned so the totaldoes not exceed this maximum. Any remaining tables are returned onsubsequent requests to the scheduler to prevent too many ANALYZEcommand from being started concurrently.
biginsights.stats.auto.analyze.task.retention.time The default value is 1MONTH. This property controls the housekeepingpurge of old tasks that have completed. When old tasks are deleted, thehistory is also deleted. The available values are 1MONTH, 1WEEK,FOREVER, or NONE.When set to FOREVER, the completed analyze tasksand history are not deleted. When set to NONE, the completed analyzetasks are deleted. When set to 1MONTH or 1WEEK, tasks older then 1month or 1 week are deleted. Otherwise, the user can use theSYSPROC.ADMIN_TASK_REMOVE procedure to manually purge the oldtasks periodically.
biginsights.stats.auto.analyze.newdata.min The default is 50. It is the minimum percentage of new data that is addedto the table to cause auto-analyze to detect that the table needs to beanalyzed. If less then this amount of data has been added to the table, thenauto-analyze does not run an ANALYZE command. The value must be aninteger larger then 0.
Disable and enable auto-analyze
At the time of installation, auto-analyze is enabled by default with the default cronschedule. To disable auto-analyze, either modify the cron schedule of the task orremove the ATS task that checks for tables to be analyzed.
CLOUD environment: You might not be able to add or remove the tasks as abigsql user. In that case, always modify the cron schedule of the task with biadminuser and never remove the task. The task must run as bigsql user.
Examples
Example of how to disable – run as the bigsql administrator user only:CALL SYSPROC.ADMIN_TASK_REMOVE(
’BIGSQL_CHECK_ANALYZE’,NULL);
Example of how to enable – run as the bigsql administrator user only:To enable auto-analyze, add the ATS task that checks for tables to beanalyzed.CALL SYSPROC.ADMIN_TASK_ADD(
’BIGSQL_CHECK_ANALYZE’,NULL, NULL,NULL, ’0,10,20,30,40,50 * * * *’,’SYSHADOOP’,’BIGSQL_CHECK_ANALYZE’,’VALUES(0)’,NULL,NULL);
Chapter 5. Some new or enhanced features for 4.2 111

Example of how to manually remove old completed analyze tasks:SYSPROC.ADMIN_TASK_REMOVE(
’Analyze 1458912222 UIUSER.COUNTRY’, NULL)
Impersonation and auto-analyze
When you enable impersonation for Big SQL, then the ANALYZE command runsas the table owner. Otherwise, the ANALYZE command runs as the bigsqladministration user. The ATS tasks are always run as the bigsql administrationuser.
HCAT_SYNC_OBJECTS stored procedureThe HCAT_SYNC_OBJECTS stored procedure imports the definition of the Hiveobjects into the local database catalogs, and can also assign ownership to a user.This action makes the objects available for use within queries.
Syntax
►► HCAT_SYNC_OBJECTS ( schema , object-name, object-types
►
►, exists-action , error-action options
) ►◄
exists-action:
'SKIP''REPLACE''ERROR''MODIFY'
error-action:
'STOP''CONTINUE'
options:
▼
,
IMPORT HDFS AUTHORIZATIONSTRANSFER OWNERSHIP TO username
Authorization
Only the bigsql user or a user with Big SQL administrative privileges, can run thisHadoop procedure. However, the bigsql user can grant execute permission on theHCAT_SYNC_OBJECTS procedure to any user, group, or role.
Description
schemaThe name of the schema that contains objects to be imported. You can use
112 BigInsights: IBM Open Platform with Apache Hadoop and BigInsights 4.2 Technical Preview

regular expressions to match multiple schemas. For schemas that youpreviously defined in the Hive catalogs by using the CREATE TABLE(HADOOP) statement, the schema name is matched on the name as it wasoriginally specified when the schema was created. For schemas that youcreated outside of a CREATE TABLE (HADOOP) statement, the schema name ismatched on the actual name as defined in the Hive metastore.
object-nameThe name of object to be imported from within the schema. You can useregular expressions to match multiple objects. For objects that you previouslydefined in the Hive catalogs by using the CREATE TABLE (HADOOP)statement, the object name is matched on the name as it was originallyspecified when the object was created. For objects that you created outside of aCREATE TABLE (HADOOP) statement, the object name is matched on theactual name as defined in the Hive metastore.
object-typesA string of characters that indicate the types of objects to be imported. Thefollowing list contains the valid types:
t Indicates that table objects are to be imported without associatedconstraints.
T Indicates that table objects, and all the associated constraints are to beimported.
v Indicates that view objects are to be imported.
a Indicates that all supported objects are to be imported. This value isequivalent to specifying the string Tv. If the object-types argument isnot specified, a is the default.
exists-actionIndicates the action that the process takes if an object that is being importedexists within the Big SQL catalogs. The following actions are valid:
SKIP Indicates that objects that are already defined should be skipped. Thisvalue is the default action.
REPLACEIndicates that the existing objects should be removed from the Big SQLcatalogs and replaced with the definition that is stored in the Hivemetastore.
When an object is replaced, only the metadata that resides in the BigSQL catalogs is lost. This metadata includes permissions on the objectand referential constraints (if constraints are not being imported fromthe Hive catalogs).
The REPLACE process consists of dropping the original object andre-creating the object as defined by the Hive metastore.
Important: All objects that are created by this HCAT_SYNC_OBJECTSprocedure are owned by the user that runs the procedure.
ERRORIndicates that the presence of an existing object should be consideredan error. If error-action is CONTINUE, this action is the equivalent ofspecifying SKIP.
MODIFY
Chapter 5. Some new or enhanced features for 4.2 113

Indicates that the procedure will attempt to modify the existing objectswithout removing them from Big SQL catalog. There are two types ofactions that can be performed: changing a column type and droppingor appending columns. The actions are implemented as ALTERHADOOP TABLE statements.
If an object cannot be modified in terms of ALTER TABLE, theprocedure returns an ERROR, and the user is expected to update it in adifferent way, such as by using the REPLACE action.
When the MODIFY changes a column data type, there are somelimitations that can result in an ERROR:v Big SQL does not support the change from original type to new
type.v The type in Hive metastore is not a valid Big SQL type. For more
details about valid Big SQL types, see ALTER HADOOP TABLE,Data types that are supported by Big SQL, Data types migrated fromHive applications , and Understanding data types.
Note: Several Hive types are mapped into the same Big SQL type, andin these cases no alteration of the object is needed. Therefore, the resultis a SKIP.
Big SQL uses Hive comments to store information about the data type.As a consequence, modifying the Hive type of a column withcomments is unsafe and leads to undefined behavior. As a general rule,if the type of a column is changed in Hive, the existing commentshould be dropped.
For complex type columns it is not possible to change the column type,so an ERROR is returned and the user is expected to REPLACE thetable.
There are limitations about the way columns are removed or insertedin the existing table. Changing the column name is not supported forsafety reasons. A table can be safely modified if columns are eitherremoved or appended at the end of the object definition.
The following table summarizes the most common cases:
Columns in Big SQL catalog Columns in Hive metastore Notes
A B C D A C D Column B is removed byDROP COLUMN.
A B C D A B C D E Column E is appended byADD COLUMN.
A B C D A B C E The alteration is performedby dropping column D andappending column E. This isnot a renaming action, whichis not supported. It ispossible to drop the oldcolumn and add the new onebecause the column is at theend of the object definition,which makes it an append.
114 BigInsights: IBM Open Platform with Apache Hadoop and BigInsights 4.2 Technical Preview

Columns in Big SQL catalog Columns in Hive metastore Notes
A B C D A X B C D Column X is inserted insidethe object definition. As thisoperation is not supportedby MODIFY, the procedurereturns an ERROR. Thesolution is to use theREPLACE action.
A B C D A X C D Column B is apparentlyrenamed to X. Sincerenaming is not supported,and columns cannot beadded inside an objectdefinition, the procedurereturns an ERROR. Thesolution is to use theREPLACE action.
A B C D B A C D Columns A and B areswapped, so the procedurereturns an ERROR. Thesolution is to use theREPLACE action.
error-actionSpecifies the action that the process should take if there is an error during theimport. The value is a string that contains one of the following actions:
STOP Stops processing immediately and reports the nature of the error. Allimport activity is rolled back.
CONTINUEReports the error in the final results, but continues the import process.
'options'A string that contains a comma delimited list of options:
IMPORT HDFS AUTHORIZATIONSIf specified, the HDFS authorizations on the tables are importedautomatically. GRANT statements are issued to the same owner, group,and other roles based on the read/write permissions in the HDFSdirectory for the specified tables.
This option is only applicable for table objects. If you also specify theexists-action=SKIP, then tables that exist are not created again, butthe HDFS authorizations are imported. If you also specify theexists-action=REPLACE, then the tables are replaced and HDFSauthorizations are imported
For example, assume that permissions on the file location are-rwxr-xr-- hdfs biadmin. The following GRANT statements areautomatically issued when you specify the IMPORT HDFSAUTHORIZATIONS option:GRANT SELECT ON <schema.table> TO user hdfs;GRANT UPDATE ON <schema.table> TO user hdfs;GRANT DELETE ON <schema.table> TO user hdfs;GRANT INSERT ON <schema.table> TO user hdfs;GRANT SELECT ON <schema.table> TO group biadmin;GRANT SELECT ON <schema.table> TO public;
Chapter 5. Some new or enhanced features for 4.2 115

TRANSFER OWNERSHIP TO usernameIndicates that the ownership of the table is transferred to the value inusername. That value can be HIVEOWNER, which transfers ownership tothe original HIVE owner. If you omit the TRANSFER OWNERSHIP TOclause, no transfer action is taken.
Usage notes
The procedure returns the following results:
Table 28. Results of HCAT_SYNC_OBJECTS
Column Type Description
OBJSCHEMA VARCHAR(128) The name of the schema fromwhich an object is attemptedto be imported.
OBJNAME VARCHAR(128) The name of the object that isattempted to be imported.
OBJATTRIB VARCHAR(128) For constraints, this columnindicates the name of aconstraint that was imported.It is NULL for all other objecttypes.
TYPE VARCHAR(1) The type, which is designatedby one of the followingcharacters:
T table
V view
C constraint
116 BigInsights: IBM Open Platform with Apache Hadoop and BigInsights 4.2 Technical Preview
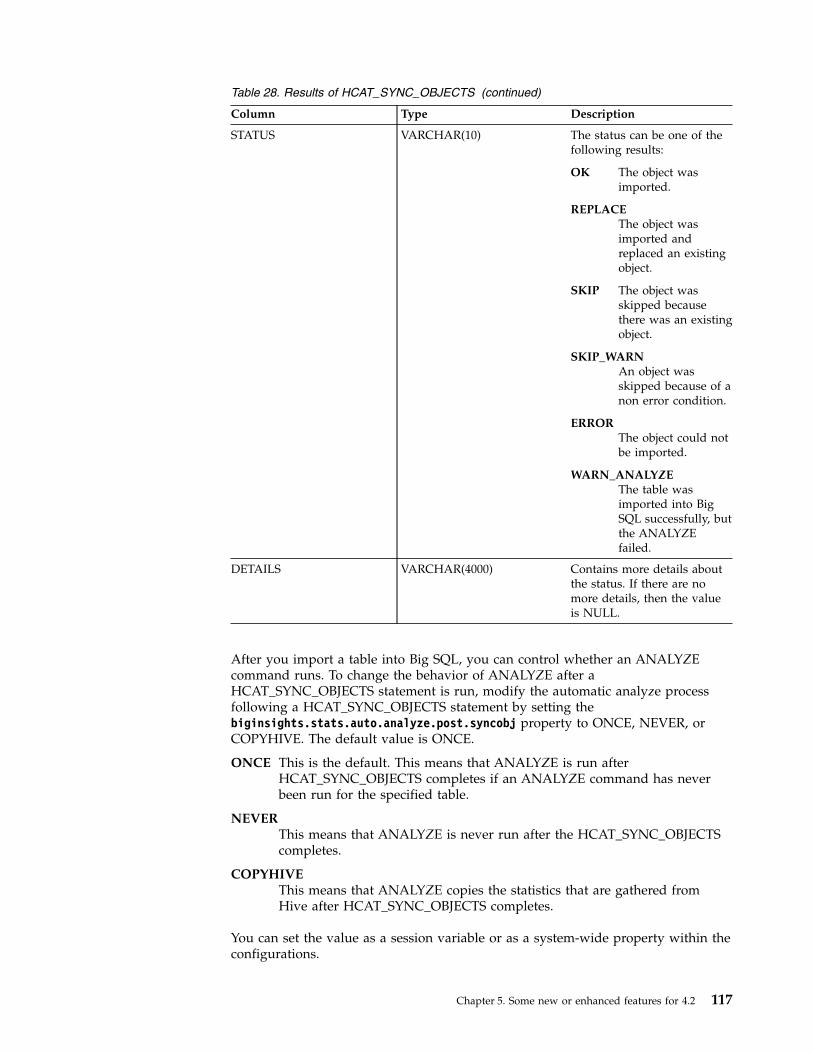
Table 28. Results of HCAT_SYNC_OBJECTS (continued)
Column Type Description
STATUS VARCHAR(10) The status can be one of thefollowing results:
OK The object wasimported.
REPLACEThe object wasimported andreplaced an existingobject.
SKIP The object wasskipped becausethere was an existingobject.
SKIP_WARN An object wasskipped because of anon error condition.
ERRORThe object could notbe imported.
WARN_ANALYZEThe table wasimported into BigSQL successfully, butthe ANALYZEfailed.
DETAILS VARCHAR(4000) Contains more details aboutthe status. If there are nomore details, then the valueis NULL.
After you import a table into Big SQL, you can control whether an ANALYZEcommand runs. To change the behavior of ANALYZE after aHCAT_SYNC_OBJECTS statement is run, modify the automatic analyze processfollowing a HCAT_SYNC_OBJECTS statement by setting thebiginsights.stats.auto.analyze.post.syncobj property to ONCE, NEVER, orCOPYHIVE. The default value is ONCE.
ONCE This is the default. This means that ANALYZE is run afterHCAT_SYNC_OBJECTS completes if an ANALYZE command has neverbeen run for the specified table.
NEVERThis means that ANALYZE is never run after the HCAT_SYNC_OBJECTScompletes.
COPYHIVEThis means that ANALYZE copies the statistics that are gathered fromHive after HCAT_SYNC_OBJECTS completes.
You can set the value as a session variable or as a system-wide property within theconfigurations.
Chapter 5. Some new or enhanced features for 4.2 117
Session variableRun the following command within the Big SQL shell or interface:SET HADOOP PROPERTY biginsights.stats.auto.analyze.post.syncobj=NEVER;
System-wide propertyUpdate the configuration properties:1. Open the bigsql-conf.xml configuration file at $BIGSQL_HOME/conf/
bigsql-conf.xml on the head node only.2. Add the following property:
<property><name>biginsights.stats.auto.analyze.post.syncobj</name><value>NEVER</value></property>
3. Restart the Big SQL service.
The HCAT_SYNC_OBJECTS routine uses the maximum default STRING lengththat is defined in the bigsql.string.size property when it is set. To ensure thatyou do not exceed any row limits defined by your database manager, set thebigsql.string.size property to a value smaller than the current default ofVARCHAR(32672) before you run the HCAT_SYNC_OBJECTS routine. TheHCAT_SYNC_OBJECTS routine can estimate the string size to best fit all thecolumns within the row limit. The following statement is an example of setting thebigsql.string.size property before you run the routine:SET HADOOP PROPERTY bigsql.string.size=4096;CALL SYSHADOOP.HCAT_SYNC_OBJECTS ...
For more information about the STRING data type, see Data types that aresupported by Big SQL
When you import tables with their constraints by using the T or a object-types, thematching tables are first imported, then a second pass attempts to import allconstraints that are associated with those tables. A constraint that cannot beimported because of a missing reference, produces a SKIP_WARN message toindicate that it was skipped. A constraint that cannot be imported for any otherreason is considered an ERROR.
Views in the Hive catalogs are generally defined in HiveQL or by Big SQL 1.0.Views are imported if they meet the following criteria only:v The SQL in the view is fully supported by Big SQL.v All objects that the view references exist in Big SQL.
Any view that does not meet the criteria is an ERROR.
A successfully imported view might not have the same behavior as the originalview. For example, if the view contains a Hive function that also exists in Big SQLwith a different behavior, the view might not be usable.
Examples1. Import all objects within a schema:
In the following example, the schema name is EXAMPLES. The statementrequests to import all objects within that schema. If an object exists, thenreplace the current object with the definition in the Hive metastore. If there isan error, report the error and continue the import.CALL SYSHADOOP.HCAT_SYNC_OBJECTS(’EXAMPLES’, ’.*’, ’a’, ’REPLACE’, ’CONTINUE’);
118 BigInsights: IBM Open Platform with Apache Hadoop and BigInsights 4.2 Technical Preview

The following output shows that there were two objects in the schema that theimport tried to process:+-----------+------------+-----------+------+-----------+--------------------------+|OBJSCHEMA | OBJNAME | OBJATTRIB | TYPE | STATUS | DETAILS |+-----------+------------+-----------+------+-----------+--------------------------+| EXAMPLES | HIVE_TABLE | [NULL] | T | SKIP_WARN | Column "C1", type || | | | | |"decfloat" is not || | | | | | supported |+-----------+------------+-----------+------+-----------+--------------------------+| EXAMPLES | My Table | [NULL] | T | OK | [NULL] |+-----------+------------+-----------+------+-----------+--------------------------+
2. Import objects and assign ownership to a user called user1, which also grantsaccess on the table:CALL SYSHADOOP.HCAT_SYNC_OBJECTS(
’EXAMPLES’, ’.*’, ’a’, ’REPLACE’,’CONTINUE’, ’TRANSFERTO user1’);
Big SQL integration with Apache SparkAs of BigInsights 4.2, Big SQL is tightly integrated with Spark. This integrationenables the development of hybrid applications where Spark jobs can be executedfrom Big SQL SELECT statements and the results efficiently streamed in parallelfrom Spark to Big SQL.
Big SQL applications can treat Spark as a powerful analytic co-processor thatcomplements the rich SQL functionality that is available in Big SQL. Big SQL users,who already enjoy the best SQL performance, richest SQL language, and extensiveenterprise capabilities, can also leverage Spark for its non-relational distributedprocessing capabilities and rich analytic libraries. The capabilities of both enginesare seamlessly blended in a single SQL statement, with large volumes of dataflowing efficiently between them.
A built-in table function can make Spark functionality directly available at the SQLlanguage level, and a Big SQL SELECT statement can invoke Spark jobs directlyand process the results of those jobs as though they were tables. For example, youcan use the “EXECSPARK table function” on page 122 to invoke Spark jobs fromBig SQL.
Polymorphic table functions
When compiling a query, the SQL compiler needs to know the names and datatypes of columns in the tables that are specified in the FROM clause of the query.In some cases, the schema of the result that is generated bySYSHADOOP.EXECSPARK is not fixed, because it depends on the value of anoptional argument to the table function. But the SQL compiler needs to know theschema before that value is processed. Polymorphism is a convenient feature thatenables dynamic interaction with an external entity (in this case, Spark) to producedata whose schema is not known up front and that might depend on inputarguments.
When dealing with a polymorphic table function (PTF), the SQL engine invokesthe function twice: first to inquire about the output schema so that the query canbe compiled and an execution plan can be created, and then at run time. Apolymorphic table function is not a single piece of executable code. Eachinvocation can call a different method with the same input arguments and differentresults (for example, one invocation returns a schema, and the other returns the
Chapter 5. Some new or enhanced features for 4.2 119

data). Such methods can be referred to as describe methods and execute methods,depending on their purpose. Big SQL defines a Java interface called SparkPtf.Classes that are used to specify Spark jobs in EXECSPARK, such as ReadJsonFile,must implement this interface. The main methods of the SparkPtf interface are thedescribe and execute methods. The describe method returns a Spark StructTypethat specifies the schema of the result, and the execute method returns the actualresult, which is always a Spark data frame, and which is transparently mapped toa Big SQL result set.
When a Big SQL query contains an invocation to EXECSPARK, the Big SQL engineoffloads the PTF execution to a “slave” Spark application known as the Big SQLSpark gateway. This gateway is a long-running Spark application that is fullycontrolled by Big SQL. It can be started and stopped by bigsql (that is, the userwho normally starts and stops the Big SQL service on a cluster), by using the samescript that is used to manage other services.
Building a Spark PTF
Writing a polymorphic table function involves writing a Java or Scala class thatimplements the SparkPtf interface. For more information, see “EXECSPARK tablefunction” on page 122.
Compiling a PTF
The classpath that is used to compile the class for a PTF must include thespark-assembly.jar file (from Spark), which contains all of the Spark libraries, andthe bigsql-spark.jar file (from Big SQL), which includes the definition of theSparkPtf interface. For example, if the ReadJsonFile class is in a text file namedReadJsonFile.scala, you can compile it from the command line by using thefollowing commands:$ scalac -cp /usr/iop/current/spark-client/lib/spark-assembly.jar:\/usr/ibmpacks/current/bigsql/bigsql/lib/java/bigsql-spark.jar ReadJsonFile.scala$ jar cvf examples.jar com
It is assumed that the shell from which these commands are invoked is running ona cluster node that contains Big SQL and Spark. To compile on a different machine,the two JAR files must be copied over and the paths in the command must beupdated accordingly. The JAR file that contains the PTF must be copied to thesame location on all the nodes in the cluster. A convenient location might be/usr/ibmpacks/current/bigsql/bigsql/userlib.
JAR files that contain PTFs must be added to the classpath of the Spark gateway’sdriver and executors (properties spark.driver.extraClassPath andspark.executor.extraClassPath in $BIGSQL_HOME/conf/bigsql-spark.conf). You mustthen restart the Spark gateway so that changes to bigsql-spark.conf can be pickedup.
Reading Big SQL tables inside a PTF
A PTF can contain arbitrary Spark code, including Spark SQL statements. In aBigInsights cluster, Big SQL and Spark share the Hive metastore, and the Sparkgateway runs under user bigsql. This make is possible to use Spark SQLstatements inside PTFs to query Big SQL tables.
120 BigInsights: IBM Open Platform with Apache Hadoop and BigInsights 4.2 Technical Preview

Configuring the Big SQL Spark gateway
The Spark gateway must be configured before it is used for the first time.Configuration involves specifying the values of various Spark settings in the$BIGSQL_HOME/conf/bigsql-spark.conf file, which does not exist when Big SQL isinstalled. Instead, a template for this file exists under $BIGSQL_HOME/conf/templates/bigsql-spark.conf. You can copy this template to the$BIGSQL_HOME/conf directory and then update it.
The key configuration parameters to set are the number of executors, the amountof memory for the driver and executors, the number of cores for executors, and thelocation of the JAR files for PTFs and libraries that are used in the PTFs. Thetemplate contains default values for these properties, which are set to fairly lowvalues and should be tuned to match available resources and the kind of Sparkjobs that will be executed as PTFs. A reasonable value for thespark.executor.instances property is the number of Big SQL workers. The Sparkdocumentation contains guidelines for the configuration and tuning of otherproperties. The spark.driver.extraClassPath and spark.executor.extraClassPathproperties in the template contain a JAR file named ptf-examples.jar, whichcontains the ReadJsonFile class. The properties that are specified inbigsql-spark.conf must be appropriate for running a Spark application in YARNclient mode, because that is how the Big SQL Spark gateway runs. You cancustomize the log configuration, in particular the log level for the gateway, bymodifying $BIGSQL_HOME/conf/log4j-spark.properties.
Managing the Big SQL Spark gateway
After the Spark gateway has been configured, you can start it by using thefollowing command: $BIGSQL_HOME/bin/bigsql start -spark. The start commandlaunches the Spark gateway in YARN client mode and executes a very simple PTFto ensure that the gateway is working correctly.
To stop the Spark gateway, the bigsql user must run the following command:$BIGSQL_HOME/bin/bigsql stop -spark. The Spark gateway does not start when-all is specified in the bigsql start command, because (depending on theconfiguration) the gateway can consume a nontrivial amount of memory evenwhen it is idle.
In cases where the Spark gateway becomes unresponsive to the bigsql stopcommand, you can use the forcestop command: $BIGSQL_HOME/bin/bigsqlforcestop -spark. You can check the status of the Spark gateway by running thestatus command: $BIGSQL_HOME/bin/bigsql status -spark. If the gateway isrunning, this command also returns the status and location of the YARN containersfor the executors.
Security considerations
The Big SQL Spark gateway runs under the same user ID as other Big SQL engineprocesses: bigsql. One implication of this is that PTFs have unrestricted access toall Big SQL tables, and for this reason, only bigsql has EXECUTE privilege onSYSHADOP.EXECSPARK. This does not mean, however, that only the bigsql usercan use PTFs. User bigsql could, in principle, grant EXECUTE privilege onSYSHADOP.EXECSPARK to other users, but this is not a recommended practice onproduction systems, because it virtually disables all data access control.
Chapter 5. Some new or enhanced features for 4.2 121
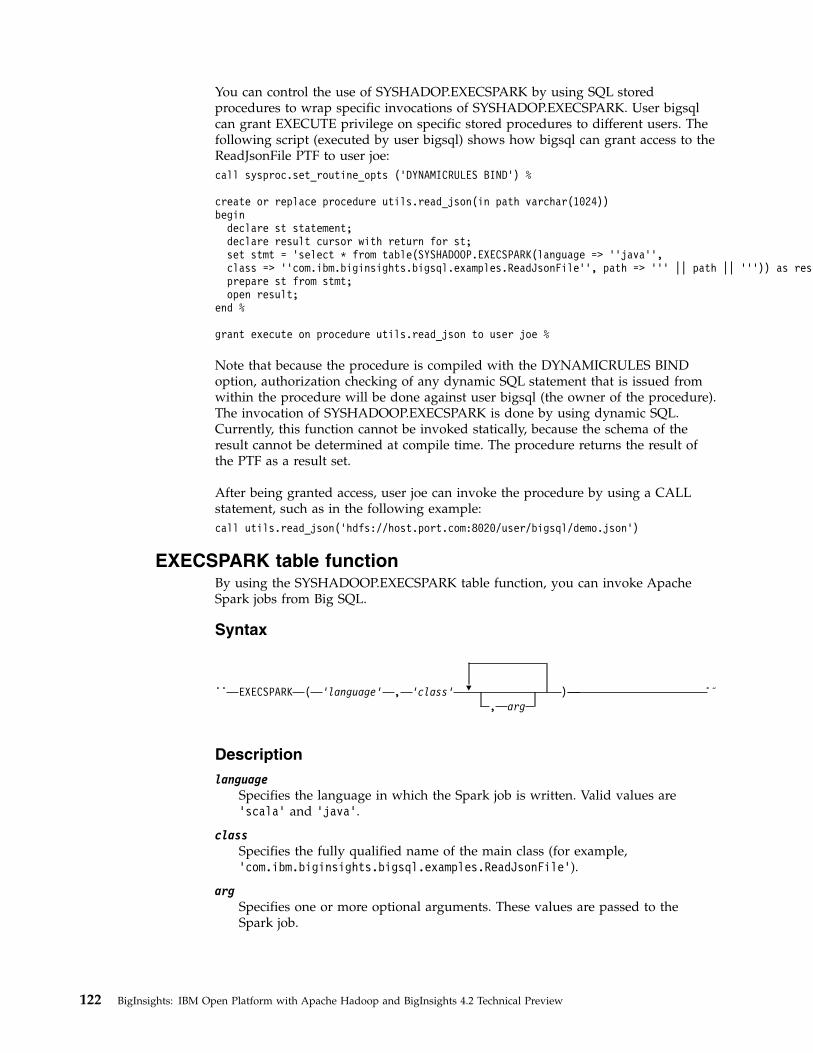
You can control the use of SYSHADOP.EXECSPARK by using SQL storedprocedures to wrap specific invocations of SYSHADOP.EXECSPARK. User bigsqlcan grant EXECUTE privilege on specific stored procedures to different users. Thefollowing script (executed by user bigsql) shows how bigsql can grant access to theReadJsonFile PTF to user joe:call sysproc.set_routine_opts (’DYNAMICRULES BIND’) %
create or replace procedure utils.read_json(in path varchar(1024))begin
declare st statement;declare result cursor with return for st;set stmt = ’select * from table(SYSHADOOP.EXECSPARK(language => ’’java’’,class => ’’com.ibm.biginsights.bigsql.examples.ReadJsonFile’’, path => ’’’ || path || ’’’)) as res’;prepare st from stmt;open result;
end %
grant execute on procedure utils.read_json to user joe %
Note that because the procedure is compiled with the DYNAMICRULES BINDoption, authorization checking of any dynamic SQL statement that is issued fromwithin the procedure will be done against user bigsql (the owner of the procedure).The invocation of SYSHADOOP.EXECSPARK is done by using dynamic SQL.Currently, this function cannot be invoked statically, because the schema of theresult cannot be determined at compile time. The procedure returns the result ofthe PTF as a result set.
After being granted access, user joe can invoke the procedure by using a CALLstatement, such as in the following example:call utils.read_json(’hdfs://host.port.com:8020/user/bigsql/demo.json’)
EXECSPARK table functionBy using the SYSHADOOP.EXECSPARK table function, you can invoke ApacheSpark jobs from Big SQL.
Syntax
►► EXECSPARK ( 'language' , 'class' ▼
, arg) ►◄
Description
languageSpecifies the language in which the Spark job is written. Valid values are'scala' and 'java'.
classSpecifies the fully qualified name of the main class (for example,'com.ibm.biginsights.bigsql.examples.ReadJsonFile').
argSpecifies one or more optional arguments. These values are passed to theSpark job.
122 BigInsights: IBM Open Platform with Apache Hadoop and BigInsights 4.2 Technical Preview

Usage
The class that is specified in the class argument must implement the interfacecom.ibm.biginsights.bigsql.spark.preview.SparkPtf:StructType describe(org.apache.spark.sql.SQLContext ctx, java.util.Map<String, Object> arguments);DataFrame execute(org.apache.spark.sql.SQLContext ctx, java.util.Map<String, Object> arguments);void destroy(org.apache.spark.sql.SQLContext ctx, java.util.Map<String, Object> arguments);long cardinality(org.apache.spark.sql.SQLContext ctx, java.util.Map<String, Object> arguments);
All the methods in the SparkPtf interface have the same two parameters: anSQLContext object and a map that contains the arguments provided in theinvocation. The SQLContext object that is passed to all the methods is an instance ofSpark’s HiveContext. It therefore can be used to query tables that are registeredwith the Hive metastore.
The arguments object is a map that contains all the arguments toSYSHADOOP.EXECSPARK, except language and class. If the arguments areexplicitly named by using the arrow syntax, the map key will be the specifiedname in uppercase characters; otherwise, the key will be the ordinal position (1, 2,and so on).
The PTF class is instantiated twice, once at query compilation time and once atquery execution time. The destroy method is called when the engine no longerneeds the PTF instance, and provides the user code an opportunity to performresource cleanup. The cardinality method is called at compilation time so that thePTF can provide an estimate of the number of rows to be returned by the executemethod. This information can help the Big SQL optimizer make better queryplanning decisions.
In the following example, the keys in the argument map are INTARG,DECIMALARG, STRINGARG, and 6.SELECT *
FROM TABLE(SYSHADOOP.EXECSPARK(language => ’java’,class => ’com.samples.MyPtf’,intarg => CAST(111 AS INT),decimalarg => 22.2,stringarg => ’hello’,CAST(33.3 AS DOUBLE))
) AS j
The last argument gets a key value of 6 because it is the sixth argument, and SQLindexing starts at 1. The values of the arguments to SYSHADOOP.EXECSPARKmust be constants. The SQL type of a constant is inferred by the compileraccording to standard SQL rules, and you can use the CAST expression to cast aliteral to a different type than the default. In this example, 33.3 would beinterpreted as a decimal value by default, but the CAST expression turns it into adouble value.
Example
Use SYSHADOOP.EXECSPARK to invoke a Spark job that reads a JSON file storedon the HDFS. For example:SELECT *
FROM TABLE(SYSHADOOP.EXECSPARK(language => ’scala’,class => ’com.ibm.biginsights.bigsql.examples.ReadJsonFile’,
Chapter 5. Some new or enhanced features for 4.2 123

uri => ’hdfs://host.port.com:8020/user/bigsql/demo.json’)
) AS docWHERE doc.country IS NOT NULLLIMIT 5
The following example shows a random record from this JSON file:{"Country":null, "Direction":"UP", "Languge":"English"}
The output might look like the following text:COUNTRY DIRECTION LANGUAGE-------------------- -------------------- --------------------DE UP GermanRU DOWN RussianUS UP EnglishAU - EnglishUS UP English
5 record(s) selected
In this example, each argument is explicitly named by using the arrow syntax toimprove readability.
The first two arguments, language and class, are mandatory because they specifythe executable code for the Spark job; language specifies that the job is a Scalaprogram, and class specifies the fully qualified name of the main class(com.ibm.biginsights.bigsql.examples.ReadJsonFile). Any other argument (in thiscase, only uri) is passed to the Spark job itself. In this example, when the Spark jobinstantiates class ReadJsonFile, the instance receives the specified URI as an inputargument.
124 BigInsights: IBM Open Platform with Apache Hadoop and BigInsights 4.2 Technical Preview

Chapter 6. Known problems
At the time of publication of this technical preview, the following issues areknown.
Known problems are documented in the form of individual technotes, techdocs, orAPARs in the Support knowledge base for BigInsights at https://www.ibm.com/support/entry/portal/Overview/Software/Information_Management/InfoSphere_BigInsights. As problems are discovered and resolved, the IBMSupport team updates the knowledge base. By searching the knowledge base, youcan quickly find workarounds or solutions to problems.
The following link starts customized queries of the live Support knowledge base:http://www.ibm.com/support/search.wss?tc=SSPT3X&rank=8&sort=desc&atrn1=SWVersion&atrv1=4.2.0 .
RangerRanger is not supported for the BigInsights value added services.
BigInsights - Big SQLYou might encounter an SQL5105N error when you drop a table that isdefined in the HDFS encryption zone (a secure directory). This error isbecause a trash interval property is by default enabled, and dropping atable moves the contents to a trash folder in your home directory, which isa non-encryption zone, which is not allowed. Currently you must droptables from Hive by using the PURGE clause
Ambari heat maps and metrics with SSL enabledThere are some issues wth HDFS and YARN metrics and heatmaps afteryou enable SSL for Hadoop and then restart services. No data will beavailable for several of the metric widgets in HDFS and YARN, or theheatmap for Yarn will not open and the HDFS heatmap appears gray formost of the metrics. This issue might be related to JIRA AMBARI-14680.
Titan and Solr integration does not work when you add Titan into aKerberos-enabled cluster
After you upgrade a Kerberos-enabled cluster from IBM Open Platformwith Apache Hadoop 4.1 to 4.2, and you add Titan into the cluster, it failswhen you build an index. You see an error from the server, Can not findthe specified config set: titan. Do the following work-around afteryou add Titan into a Kerberos-enabled cluster:1. Create and change the user permission, owner, and group for the Solr
configuration directory:$ mkdir /usr/iop/current/solr-server/server/solr/configsets/titan$ chmod 775 /usr/iop/current/solr-server/server/solr/configsets/titan$ chown solr:hadoop /usr/iop/current/solr-server/server/solr/configsets/titan
2. Use the user hdfs to get the configuration directory and jar.$ su hdfs
3. Get the Titan configuration files, and JAR from HDFS on each of theSolr server nodes:$ hadoop fs -get /apps/titan/conf
/usr/iop/current/solr-server/server/solr/configsets/titan$ hadoop fs -get /apps/titan/jts-1.13.jar
/usr/iop/current/solr-server/server/solr/configsets/titan
© Copyright IBM Corp. 2013, 2016 125
4. Revert back to the original admin user:$ exit
5. Move the JAR that you got from HDFS to the Solr server lib directoryon each of the Solr server nodes:$ mv /usr/iop/current/solr-server/server/solr/configsets/titan/jts-1.13.jar
/usr/iop/current/solr-server/server/solr-webapp/webapp/WEB-INF/lib
6. Restart Solr from the Amabari dashboard.7. Create a collection for Titan and Solr integration on either of the Solr
nodes:$ sudo su -c "SOLR_INCLUDE=/etc/solr/conf/solr.in.sh
/usr/iop/4.2.0.0/solr/bin/solr create -c titan-s 2 -rf 1 -d titan" - solr
Note: The Titan referenced here is the Titan configurationindex.search.solr.configset. The value titan is the default value for theconfiguration property in IBM Open Platform with Apache Hadoop. If youchange that value, also modify the commands referenced here.
YARN does not start when using RHEL when Cgroups is enabled (DefaultMode) If YARN does not start with RHEL, make the following changes:
1. Disable CPU Scheduling and CPU Isolation by selecting the YARNservice, and clicking the Configs tab. Then open the Settings page. Youwill find both the CPU Scheduling toggle switch and the CPUIsolation toggle switch in Node.
2. Change the scheduler class by opening the Configs tab and thenopening the Advanced page. Expand the Isolation section. Modify theyarn.nodemanager.container-executor.class toorg.apache.hadoop.yarn.server.nodemanager.util.DefaultLCEResourcesHandler.
126 BigInsights: IBM Open Platform with Apache Hadoop and BigInsights 4.2 Technical Preview

Index
AADMIN_TASK_UPDATE 108alerts 11Ambari 3, 9ANALYZE 2.0 99authentication
configuring LDAPRHEL 6 25
auto-analyze 108
BBETA known issues 125Big SQL
Apache Sparkintegration 119
Big SQL administrator 16Big SQL monitoring 74, 81Big SQL service 74, 78BigInsights Business Analyst module 61,
68BigInsights Data Scientist module 61, 68BigInsights Enterprise Management
module 68BigInsights for Apache Hadoop
module 61, 68BigInsights value-add services 61, 68biginsights.stats.auto.analyze.concurrent.max 108biginsights.stats.auto.analyze.task.retention.time 108BIGSQL_AUTO_ANALYZE_STATUS 108BIGSQL_CHECK_ANALYZE 108BIGSQL_RUN_ANALYZE 108bigsql-precheck.sh 78bigsql.alltables.io.doAs 95bigsql.analyze.java.opts 99bigsql.external.table.io.doAs 95bigsql.table.io.doAs 95bigsql.table.load.user.firstbigsql.table.load.user.first 95
Ccommands
ANALYZE 99cumulative statistics 99
DData Server Manager 81DB2
group name 16preinstallation requirements 16unmask 0022 16
deletions 3deprecations 3downloading repos 1DSM 74DSM service 81
EEXECSPARK table function 122
Ffunctions
tableEXECSPARK 122
Ggroups 61
HHadoop
open source technologies 9Hadoop functions
tableEXECSPARK 122
HCAT_DESCRIBETAB 99HDFS authorizations 112
Iimpersonation 95, 108importing objects 112install 11installing Big SQL 78IOP 28
JJDK 36
LLDAP
configuring authenticationRHEL 6 25
LOAD 74lzo compression 74
MMariaDB 28metrics 11monitoring 74, 81MySQL 28
Nnew features
overview 3non-root user 28non-root user installation 69
OOpen Platform 28
Pperformance 99planning for installation
preparing to run the installationprogram 16
ports 61postgresql 28preinstallation requirements 16
Rremoving value-add services 91repositories 74runstats 99
SSpark
Big SQLintegration 119
statistics 99synching Hadoop objects 112
Ttransferring ownership 112
Uusers 61
Vvalue-add services 61, 68
groups 61ports 61users 61
Wwhat's new 3
© Copyright IBM Corp. 2013, 2016 127

128 BigInsights: IBM Open Platform with Apache Hadoop and BigInsights 4.2 Technical Preview


IBM®
Printed in USA