BIG-IQ 7.0 Setup Guide Documentation
47
BIG-IQ 7.0 Setup Guide Documentation F5 Networks, Inc. Dec 07, 2019
Transcript of BIG-IQ 7.0 Setup Guide Documentation

BIG-IQ 7.0 Setup Guide Documentation
F5 Networks, Inc.
Dec 07, 2019


Agility 2019 Hands-on Lab Guide
F5 BIG-IQ Quick Setup
F5 Networks, Inc.

2

Contents:
1 BIG-IQ 7.0 Centralized Management Quick Setup Guide 51.1 Overview . . . . . . . . . . . . . . . . . . . . . . . . . . . . . . . . . . . . . . . . . . . . . . . 51.2 Module 1: BIG-IQ Instance Provisioning . . . . . . . . . . . . . . . . . . . . . . . . . . . . . . 71.3 Module 2: Setup Wizard . . . . . . . . . . . . . . . . . . . . . . . . . . . . . . . . . . . . . . 131.4 Module 3: High Availability . . . . . . . . . . . . . . . . . . . . . . . . . . . . . . . . . . . . . 231.5 Module 4: BIG-IP Template Creation for VMware (DHCP and IP Pools/Static) . . . . . . . . . 26
3

BIG-IQ 7.0 Setup Guide Documentation
4
1BIG-IQ 7.0 Centralized Management Quick Setup Guide
Description: This guide will focus on the basic setup steps for BIG-IQ CM.
Note: This is a supplement guide to official documentation on AskF5.
Prerequisites: None, this is entry level for a person not familiar with BIG-IQ Centralized Management.
1.1 Overview
This unofficial document details the technical steps needed to set up BIG-IQ v7.0 for testing in a testenvironment. This guide assumes a small environment that requires high availability.
1.1.1 Infrastructure
F5 BIG-IQ Centralized Management is a platform that you use as a tool to help you manage BIG-IP devicesand all of their services (such as LTM, AFM, ASM, and so forth), from one location. BIG-IQ can manage upto 600 (physical, virtual, or vCMP) BIG-IP devices and handle licensing for up to 5,000 unmanaged devices.
Using BIG-IQ helps you more efficiently manage your BIG-IP devices. That means you and your co-workersdon’t have to log in to individual BIG-IP systems to get your job done. Instead, you can discover, upgrade,deploy policy changes, manage licenses, and more, from just one place.
From BIG-IQ, you can manage a variety of tasks from software updates to health monitoring, and trafficto security. And because permissions for users are role-based, you can limit access to just a few trustedadministrators to minimize downtime and potential security issues. You can also allow users to view or editonly those BIG-IP objects that they need to do their job.
An F5 BIG-IQ Centralized Management solution can involve a number of different elements. The topologyfor these elements depends on your needs, and on whether you include data collection devices (DCDs) inyour solution. A typical solution can include the following elements:
• BIG-IQ system(s)
• BIG-IP devices
• Data collection devices
• Remote storage devices
5
BIG-IQ 7.0 Setup Guide Documentation
Note: We recommend that all work for this lab be performed from your local Web browser or from thewindows jumphost. No installation with your local system is required.
BIG-IQ Centralized Management system
Using BIG-IQ Centralized Management, you can centrally manage your BIG-IP devices, performing opera-tions such as backups, licensing, monitoring, and configuration management. And because access to eacharea of BIG-IQ is role-based, you can limit access to users, thus maximizing work flows while minimizingerrors and potential security issues.
BIG-IP device
A BIG-IP device runs a number of licensed components that are designed around application availability,access control, and security solutions. These components run on top of F5 TMOS. This custom operatingsystem is an event-driven operating system designed specifically to inspect network and application traffic,and make real-time decisions based on the configurations you provide. The BIG-IP software runs on bothhardware and virtualized environments.
Data collection device
A data collection device (DCD) is a specially provisioned BIG-IQ system that you use to manage and storealerts, events, and statistical data from one or more BIG-IP systems.
Configuration tasks on the BIG-IP system determine when and how alerts or events are triggered on theclient. The alerts or events are sent to a data collection device in a BIG-IQ Centralized Managementdeployment, and the BIG-IQ system retrieves them for your analysis. When you opt to collect statisticaldata from the BIG-IP devices, the DCD periodically retrieves those statistics from your devices, and thenprocesses and stores that data.
The group of data collection devices and BIG-IQ systems that work together to store and manage your dataare referred to as the data collection cluster. The individual data collection devices are generally referred toas nodes.
Remote storage device
You need a remote storage device only when your deployment includes a data collection device (DCD) andyou plan to store backups of your events, alerts, and statistical data for disaster recovery requirements. Youalso need remote storage so that you can retain this data when you upgrade your software.
Network environment for simple device management and configuration
To deploy a simple device management and configuration environment, all you need is one or more BIG-IQ systems and the BIG-IP devices that you want to manage. The number of BIG-IQ systems you needdepends on how much redundancy your business requires. A second system provides high availabilityfailover capability.
The simple management and configuration solution uses a single management network. The BIG-IQ sys-tem uses traffic on the management network to do these things:
• Enable bidirectional traffic between the BIG-IQ systems and the BIG-IP devices.
• Enable traffic between the BIG-IQ systems. If you use a secondary high availability BIG-IQ system,this traffic keeps the state information synchronized.
• Provide access to the BIG-IQ user interface. You can also use the management network to accessthe BIG-IQ system using SSH if you need to run manual commands.
Note: The number of devices of each type that will best meet your company’s needs depends on a numberof factors. Refer to the F5 BIG-IQ Centralized Management: Data Collection Device Sizing Guide on sup-port.f5.com for details.
6 Chapter 1. BIG-IQ 7.0 Centralized Management Quick Setup Guide
BIG-IQ 7.0 Setup Guide Documentation
1.2 Module 1: BIG-IQ Instance Provisioning
Goal:
In this module, you will learn how to provision BIG-IQ Centralized Manager (CM) and Data Collection Device(DCD) in supported platforms.
Note: For the latest info on supported platforms refer to AskF5.
1.2.1 Provision BIG-IQ (VMware)
Description:
This lab will deploy both BIG-IQ CM and DCD in VMware ESXi. Refer to below AskF5 link if you needfurther details.
AskF5 Reference
Step 1: VMware ESXi Requirements
The vSphere virtual machine guest environment for the BIG-IQ Virtual Edition (VE), at minimum, mustinclude:
• 4 virtual CPUs
• 16 GB RAM
• Important: When you provision the amount of RAM allocated to the virtual machine, it must match theamount of reserve RAM.
• 1 VMXNET3 virtual network adapter
• 1 virtual network adapter
• At least 128GB disk
1.2.2 Provision BIG-IQ (AWS)
Description:
In this lab, we will deploy both BIG-IQ CM and DCD in AWS cloud. Refer to below AskF5 link if you needfurther details.
AskF5 Reference
Step 1: AWS VPC Requirements
Before you deploy BIG-IQ in AWS, ensure that you meet below requirements:
• An active AWS account
• Access to the AWS Marketplace
• Valid BIG-IQ CM and BIG-IQ DCD registration keys (Contact your F5 Sales representative for this)
..NOTE:: Single or Multi Region is supported
1.2. Module 1: BIG-IQ Instance Provisioning 7

BIG-IQ 7.0 Setup Guide Documentation
1. IAM user accounts (optional, not required)
2. Key pair (required): AWS Reference
Important: Per AWS best practice, this is required to get ssh access to the instance after boot. Afterlogin, you can change the admin password for access to the GUI
3. Management subnet (public) For BIG-IQ GUI access, data sync between Primary/Secondary
4. External subnet (public) - For Elasticsearch Cluster traffic between BIG-IQ CM and BIG-IQ DCD (log-ging node) - For BIG-IP device discovery, management, monitoring
5. Security group configuration. Configure your security group so that it meets below criteria: - Criteria1 = allow-only-ssh-https from the source IP of your location for management access - Criteria 2 =allow-all-traffic from the internal AWS subnet 10.0.0.0/16 for traffic between BIG-IQ devices
6. Internet gateway (for initial BIG-IQ activation) - If you cannot allow internet access, you will need to domanual activation for BIG-IQ and BIG-IP pool licenses
7. Route Table configuration (association) - To allow access to internet for management and externalsubnets
Step 2: Launch Instance
Recommended Instance Type: m4.xlarge (EBS)
Required Network Interfaces: 2
AWS Marketplace
Follow below steps to deploy 2 BIG-IQ CM devices. You can repeat these same steps to deploy your BIG-IQDCD device(s).
Important: DCD is required to use analytics, application dashboard, and other visualization features.
1. Search using keywords F5 BIG-IQ Note that F5 BIG-IQ Virtual Edition and F5 BIG-IP Cloud Edi-tion deploy the same instance of BIG-IQ Centralized Manager.
8 Chapter 1. BIG-IQ 7.0 Centralized Management Quick Setup Guide

BIG-IQ 7.0 Setup Guide Documentation
Note: Currently only BYOL is available in AWS
2. Click Continue
1.2. Module 1: BIG-IQ Instance Provisioning 9

BIG-IQ 7.0 Setup Guide Documentation
3. Select m4.xlarge, click Next: Configure Instance Details
4. Enter in 2 for number of instances to provision Primary and Secondary BIG-IQ CM devices. Selectyour VPC and then management subnet.
5. Launch with 2 network interfaces. Select the External subnet for the additional NIC. Click Review andLaunch
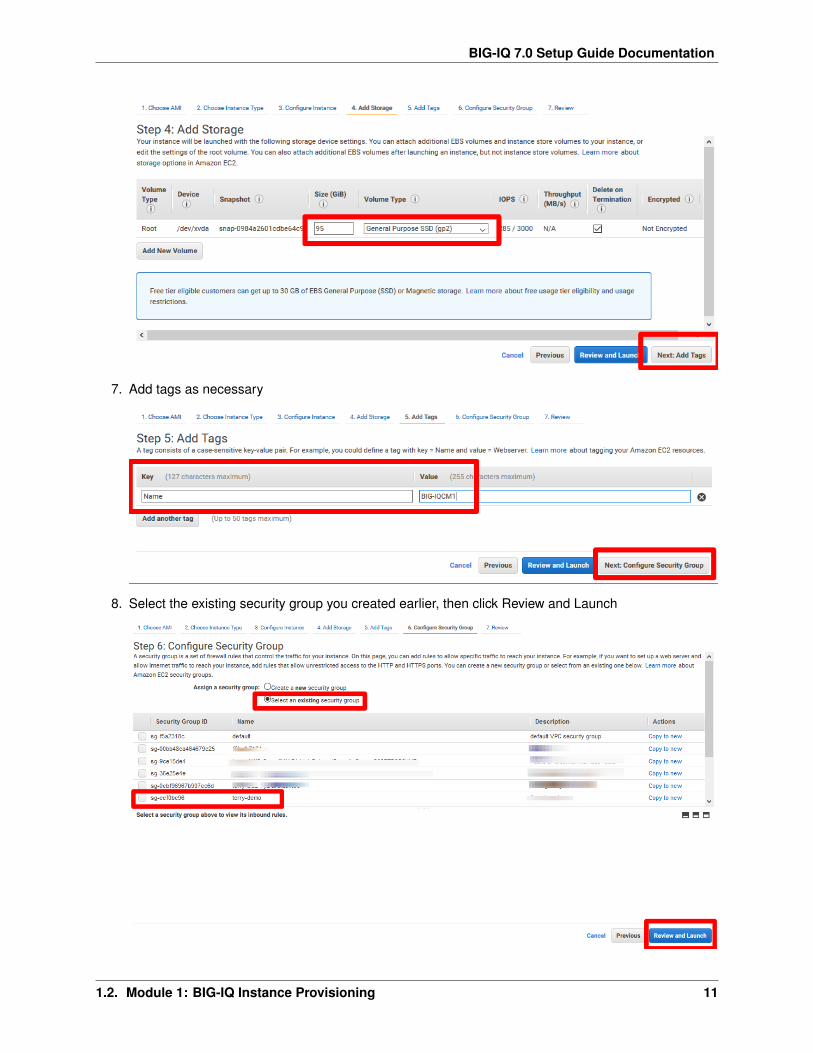
6. For storage size, you can set it to 500GB. Select General Purpose SSD and click Next: Add Tags
10 Chapter 1. BIG-IQ 7.0 Centralized Management Quick Setup Guide
BIG-IQ 7.0 Setup Guide Documentation
7. Add tags as necessary
8. Select the existing security group you created earlier, then click Review and Launch
1.2. Module 1: BIG-IQ Instance Provisioning 11

BIG-IQ 7.0 Setup Guide Documentation
9. Click Launch
10. Select the existing key pair you created earlier, then click Launch Instances
11. Associate EIP to primary IP of the management ENI
12. Log in via SSH to the EIP. Use public key authentication and your key that you specified when launch-ing the instances
13. Change admin password so you can log into GUI
• tmsh modify auth password admin
12 Chapter 1. BIG-IQ 7.0 Centralized Management Quick Setup Guide

BIG-IQ 7.0 Setup Guide Documentation
• tmsh save sys config
1.3 Module 2: Setup Wizard
Goal:
In this module, you will learn how to complete the setup wizard for BIG-IQ CM and DCD.
1.3.1 BIG-IQ Setup Wizard (VMware)
Description:
In this lab, we will complete the setup wizard for BIG-IQ CM and DCD in Vmware ESXi. You will thendiscover the DCD and activate service you want to monitor. Refer to below AskF5 link for official documen-tation.
AskF5 Reference
Step 1: Setup Wizard
Follow below steps to setup both BIG-IQ CM and DCD devices. The only difference will be step (2) below.
1. When you first log into the BIG-IQ, you must complete the setup wizard. The first step is licensing.Enter in the Base Registration Key for your BIG-IQ CM, click agree to accept EULA and activate. ClickNext to proceed to the next step
Note: If you cannot configure Internet access, use Manual activation
2. Select BIG-IQ Central Management for CM. Select BIG-IQ Data Collection Device when configuringyour logging node, click Next
1.3. Module 2: Setup Wizard 13

BIG-IQ 7.0 Setup Guide Documentation
3. Specify the first BIG-IQ Hostname, Management Port IP Address, Management Port Route. SelectSelf-IP for discovery address (recommended) and enter an IP address from the internal subnet con-figured for your second network adapter in ESXi, click Next
4. Configure your DNS, Time Server, and set your Time Zone, click Next
14 Chapter 1. BIG-IQ 7.0 Centralized Management Quick Setup Guide

BIG-IQ 7.0 Setup Guide Documentation
5. Set Master key: <Strong password>, click Next
Important: If this BIG-IQ is part of an HA or DCD configuration, make sure you keep track of thepass phrase, because it cannot be recovered if you lose it.
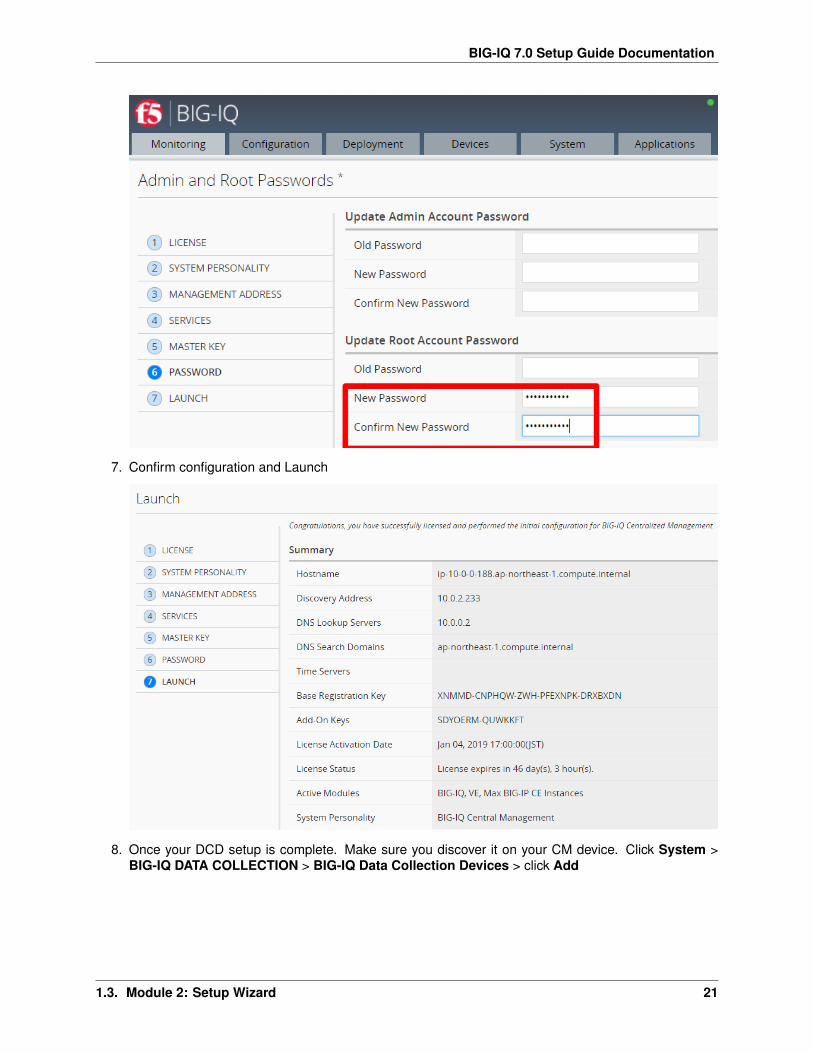
6. Enter in the default (admin/admin, root/default) and new passwords for admin and root, click Next
1.3. Module 2: Setup Wizard 15

BIG-IQ 7.0 Setup Guide Documentation
7. Confirm configuration and Launch
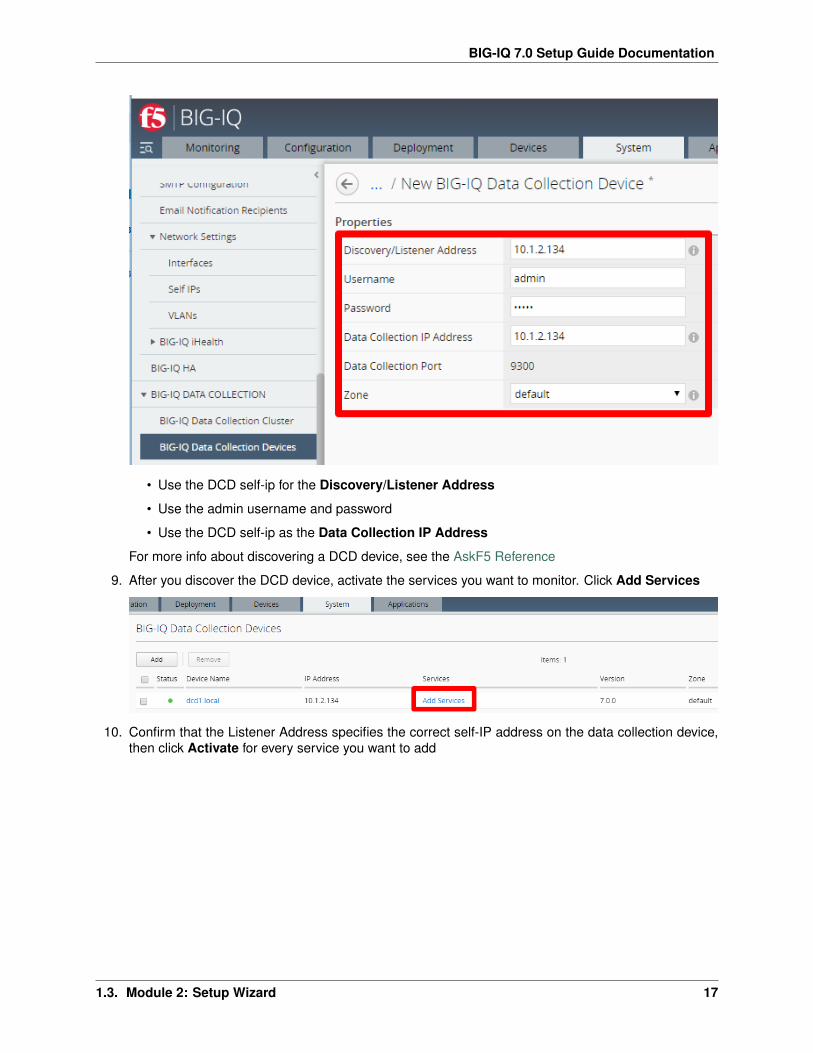
8. Once your DCD setup is complete. Make sure you discover it on your CM device. Click System >BIG-IQ DATA COLLECTION > BIG-IQ Data Collection Devices > click Add
16 Chapter 1. BIG-IQ 7.0 Centralized Management Quick Setup Guide
BIG-IQ 7.0 Setup Guide Documentation
• Use the DCD self-ip for the Discovery/Listener Address
• Use the admin username and password
• Use the DCD self-ip as the Data Collection IP Address
For more info about discovering a DCD device, see the AskF5 Reference
9. After you discover the DCD device, activate the services you want to monitor. Click Add Services
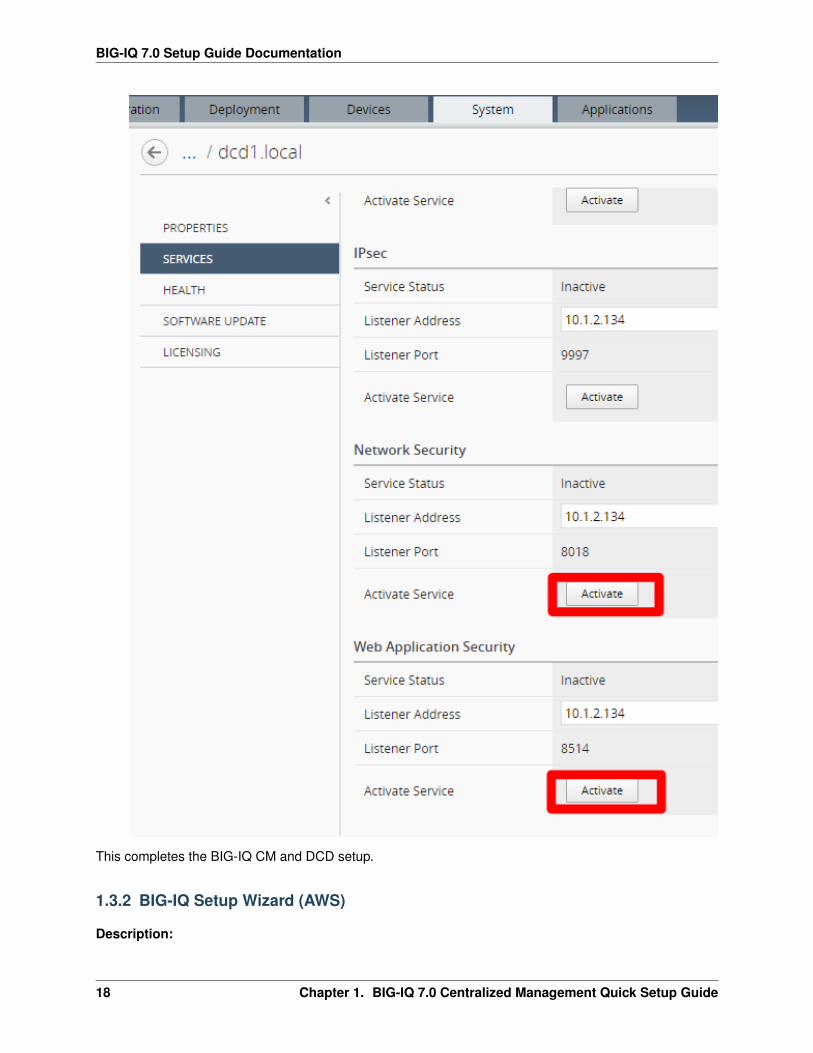
10. Confirm that the Listener Address specifies the correct self-IP address on the data collection device,then click Activate for every service you want to add
1.3. Module 2: Setup Wizard 17
BIG-IQ 7.0 Setup Guide Documentation
This completes the BIG-IQ CM and DCD setup.
1.3.2 BIG-IQ Setup Wizard (AWS)
Description:
18 Chapter 1. BIG-IQ 7.0 Centralized Management Quick Setup Guide

BIG-IQ 7.0 Setup Guide Documentation
In this lab, we will complete the setup wizard for BIG-IQ CM and DCD in AWS cloud. You will then discoverthe DCD and activate service you want to monitor. Refer to below AskF5 link for official documentation.
AskF5 Reference
Step 1: Setup Wizard
Follow below steps to setup your BIG-IQ CM and DCD devices. The only difference will be step (2) below.
1. When you first log into the BIG-IQ, you must complete the setup wizard. The first step is licensing.Enter in the Base Registration Key for your BIG-IQ CM, accept EULA and activate.
Note: If you cannot configure Internet access, use Manual activation
2. Select BIG-IQ Central Management for CM. Select BIG-IQ Data Collection Device when configuringyour logging node
1.3. Module 2: Setup Wizard 19

BIG-IQ 7.0 Setup Guide Documentation
3. In AWS, the Hostname, Management Port IP Address, Management Port Route are automatically setby DHCP. Select Self-IP for discovery address (recommended) and enter in the internal IP assignedto your second network interface using the appropriate netmask
4. Configure your Time Server using Amazon Time Sync Service and set your time zone
5. Set Master key: <Long password>
6. Skip changing the password for admin, just set root
20 Chapter 1. BIG-IQ 7.0 Centralized Management Quick Setup Guide
BIG-IQ 7.0 Setup Guide Documentation
7. Confirm configuration and Launch
8. Once your DCD setup is complete. Make sure you discover it on your CM device. Click System >BIG-IQ DATA COLLECTION > BIG-IQ Data Collection Devices > click Add
1.3. Module 2: Setup Wizard 21

BIG-IQ 7.0 Setup Guide Documentation
• Use the DCD self-ip for the Discovery/Listener Address
• Use the admin username and password
• Use the DCD self-ip as the Data Collection IP Address
For more info about discovering a DCD device, see the AskF5 Reference
9. After you discover the DCD device, activate the services you want to monitor. Click Services
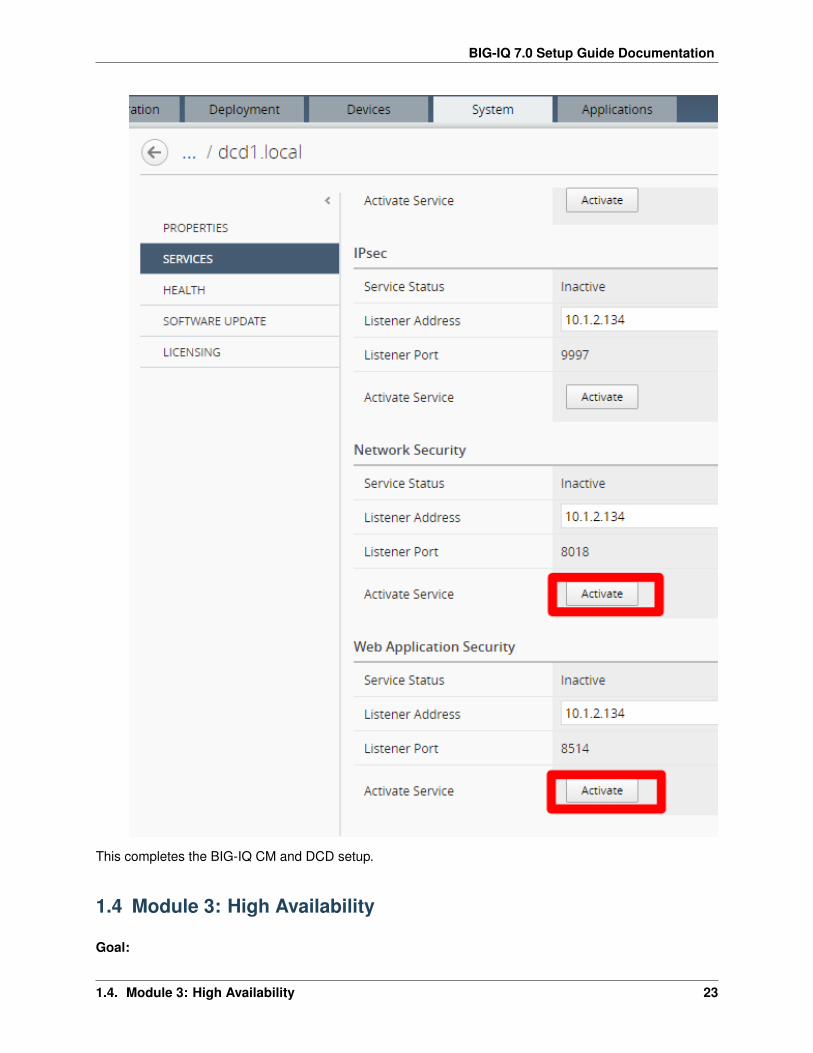
10. Confirm that the Listener Address specifies the correct self-IP address on the data collection device,then click Activate for every service you want to add
22 Chapter 1. BIG-IQ 7.0 Centralized Management Quick Setup Guide
BIG-IQ 7.0 Setup Guide Documentation
This completes the BIG-IQ CM and DCD setup.
1.4 Module 3: High Availability
Goal:
1.4. Module 3: High Availability 23
BIG-IQ 7.0 Setup Guide Documentation
In this module, you will learn how to complete High Availability setup for BIG-IQ CM. Starting in BIG-IQ v7.0,you have the option to chose Manual or Auto failover.
The steps are identical for AWS and VMware.
1.4.1 High Availability - Manual (VMware and AWS)
Description
In this lab, we will configure High Availability (Manual) for BIG-IQ CM. Refer to below AskF5 link if you needfurther details.
AskF5 Reference
Step 1: High Availability - Manual
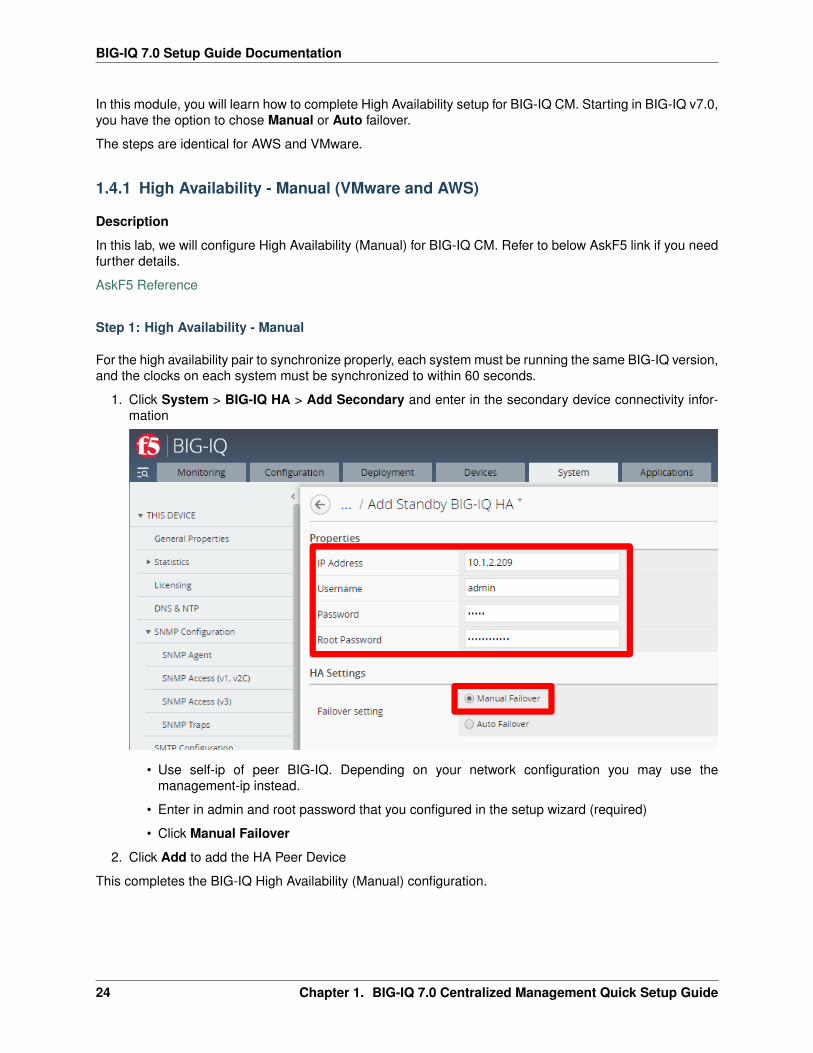
For the high availability pair to synchronize properly, each system must be running the same BIG-IQ version,and the clocks on each system must be synchronized to within 60 seconds.
1. Click System > BIG-IQ HA > Add Secondary and enter in the secondary device connectivity infor-mation
• Use self-ip of peer BIG-IQ. Depending on your network configuration you may use themanagement-ip instead.
• Enter in admin and root password that you configured in the setup wizard (required)
• Click Manual Failover
2. Click Add to add the HA Peer Device
This completes the BIG-IQ High Availability (Manual) configuration.
24 Chapter 1. BIG-IQ 7.0 Centralized Management Quick Setup Guide

BIG-IQ 7.0 Setup Guide Documentation
1.4.2 High Availability - Auto (VMware and AWS)
Description
In this lab, we will configure High Availability (Auto) for BIG-IQ CM. When configuring auto failover, you’llalso create or select an existing Data Collection Device (DCD) as a quorum device. A quorum DCD is usedas the deciding vote to determine which BIG-IQ becomes active if communication is disrupted between theactive and standby BIG-IQ in the HA pair.
Refer to below AskF5 link if you need further details.
AskF5 Reference
Step 1: High Availability - Auto
For the high availability pair to synchronize properly, each system must be running the same BIG-IQ version,and the clocks on each system must be synchronized to within 60 seconds.
1. Click System > BIG-IQ HA > Add Standby and enter in the standby device connectivity information
1.4. Module 3: High Availability 25
BIG-IQ 7.0 Setup Guide Documentation
• Use self-ip of peer BIG-IQ. Depending on your network configuration you may use themanagement-ip instead
• Enter in admin and root password that you configured in the setup wizard (required)
• Click Auto Failover
• Select the DCD device that you discovered in the setup lab and enter in its root password
• Click Enable Floating IP and enter in an IP in the management subnet. You cannot use theself-IP segment here
Note: Floating IP addresses are not support in public cloud due to limitations in those environ-ments
2. Click Add to add the HA Peer Device
This completes the BIG-IQ High Availability (Auto) configuration.
1.5 Module 4: BIG-IP Template Creation for VMware (DHCP and IPPools/Static)
Goal:
In this module, you will learn how to create BIG-IP templates in VMware for VE creation. Starting in BIG-IQv7.0, you can provision a new BIG-IP image from a template. This is tested on VMware vCenter v6.5, butshould also work on later versions.
AskF5 Reference
F5 Clouddocs Reference
1.5.1 BIG-IP Template Creation - DHCP (VMware)
Description
In this lab, we will create templates used for provisioning BIG-IP with DHCP issued IPs. Refer to belowAskF5 links if you need further details.
AskF5 Reference
F5 Clouddocs Reference
Step 1: Download BIG-IP ova image
1. Access https://downloads.f5.com/
2. Navigate to your desired BIG-IP version and from the Virtual-Edition list of images, select the BIGIP-<version>.ALL_1SLOT-vmware.ova. In test environments, this image will help to save on disk space.
26 Chapter 1. BIG-IQ 7.0 Centralized Management Quick Setup Guide

BIG-IQ 7.0 Setup Guide Documentation
Step 2: Deploy and Boot OVA file
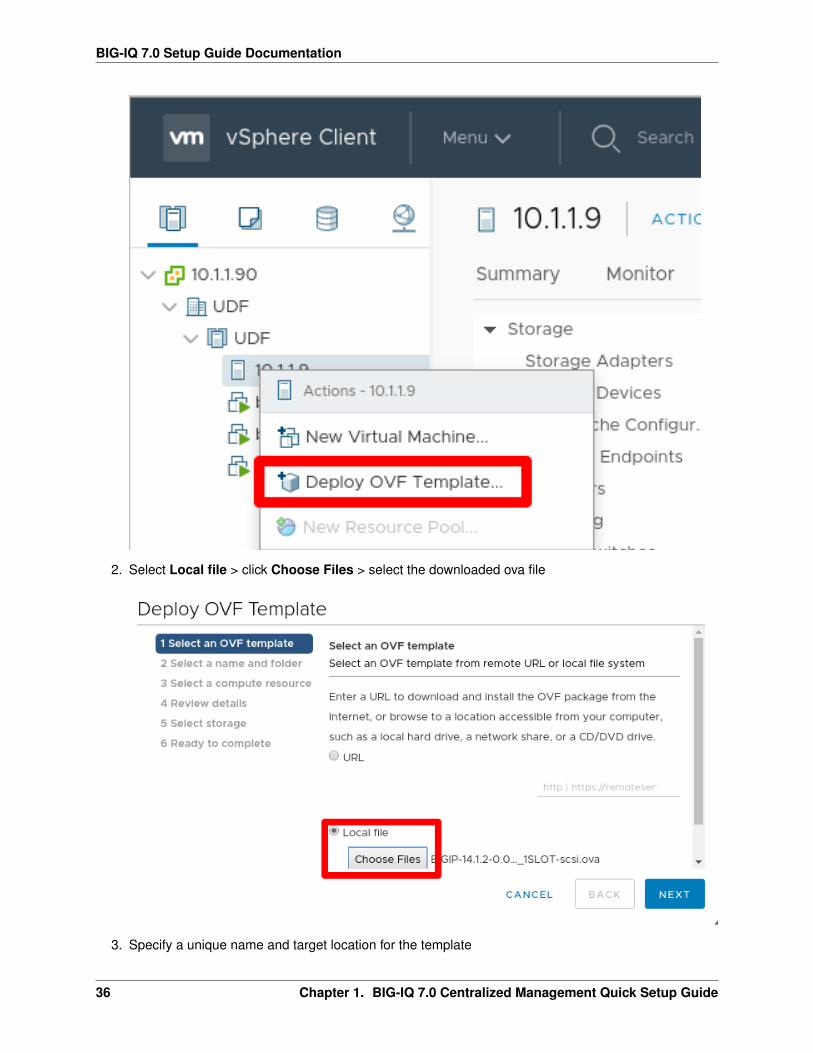
1. Right click the host or folder and select Deploy OVF Template. . .
2. Select Local file > click Choose Files > select the downloaded ova file
1.5. Module 4: BIG-IP Template Creation for VMware (DHCP and IP Pools/Static) 27

BIG-IQ 7.0 Setup Guide Documentation
3. Specify a unique name and target location for the template
4. Select the destination compute resource for the template
28 Chapter 1. BIG-IQ 7.0 Centralized Management Quick Setup Guide

BIG-IQ 7.0 Setup Guide Documentation
5. Review details
1.5. Module 4: BIG-IP Template Creation for VMware (DHCP and IP Pools/Static) 29

BIG-IQ 7.0 Setup Guide Documentation
6. Review EULA and check I accept all license agreements.
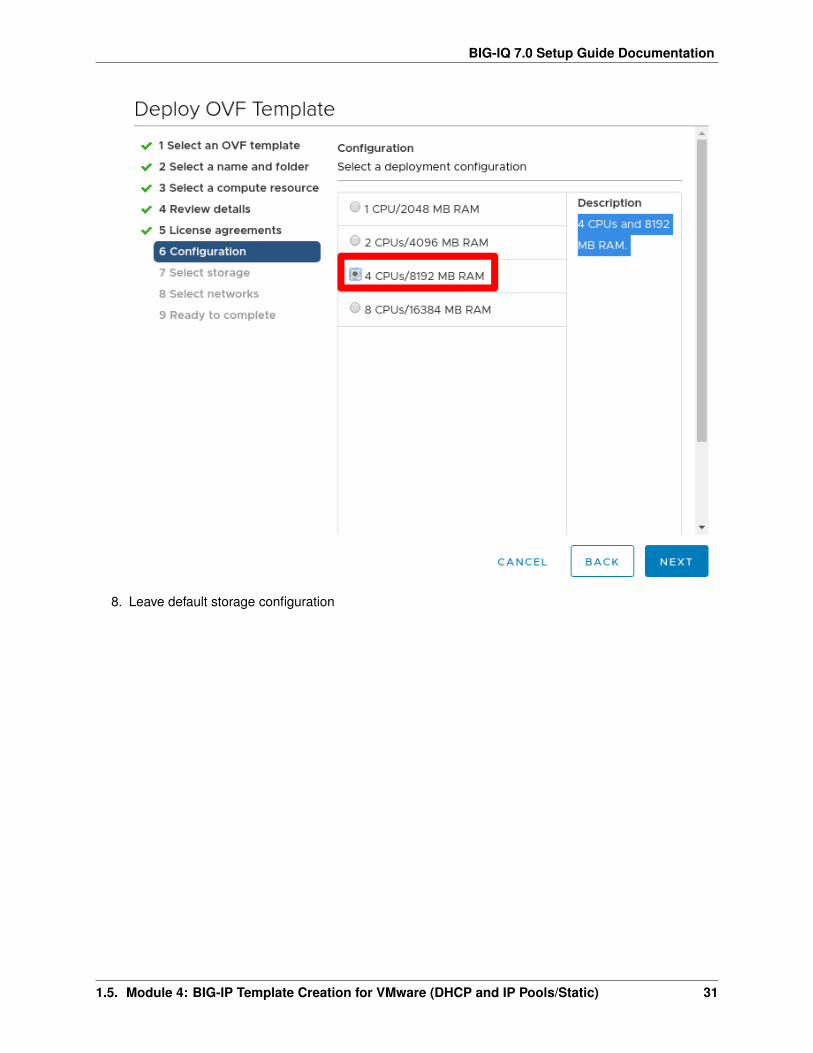
7. Select 4 CPUs/8192 MB RAM (this can be adjusted as needed depending on what you provision andconfigure on BIG-IP)
30 Chapter 1. BIG-IQ 7.0 Centralized Management Quick Setup Guide
BIG-IQ 7.0 Setup Guide Documentation
8. Leave default storage configuration
1.5. Module 4: BIG-IP Template Creation for VMware (DHCP and IP Pools/Static) 31

BIG-IQ 7.0 Setup Guide Documentation
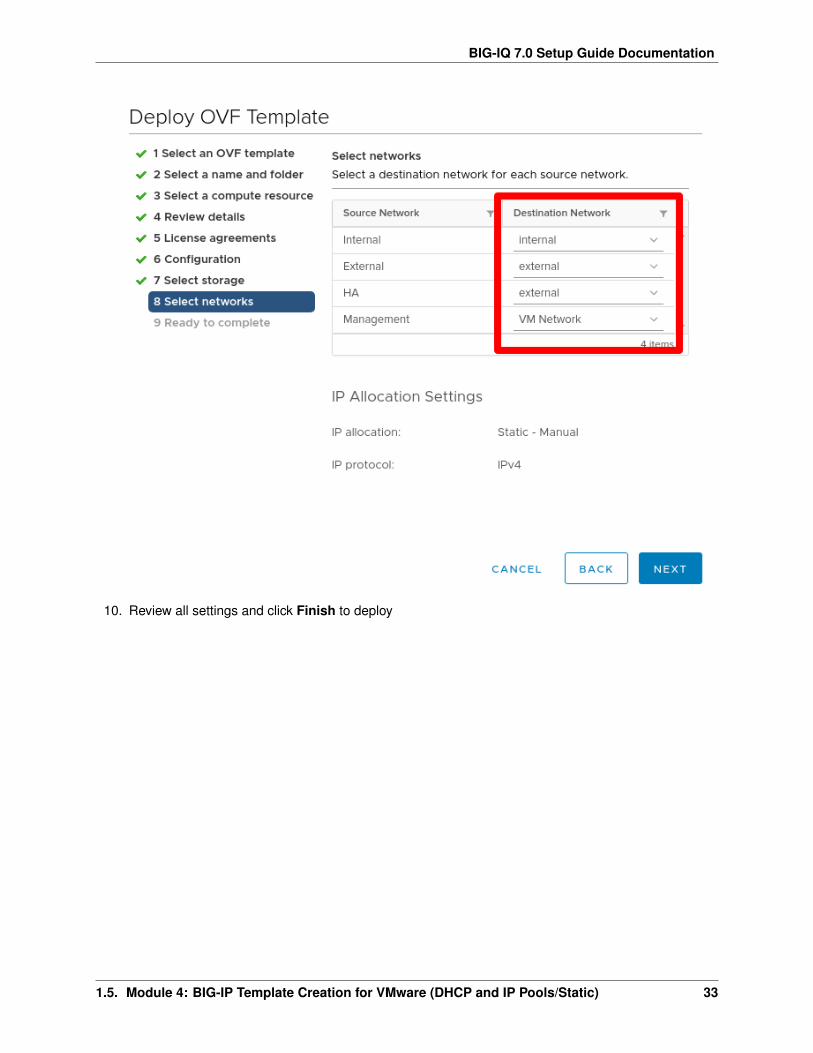
9. For networks, ensure that the Management NIC is associated with the network that has DHCP en-abled and confirm other NIC networks. You can ignore the IP allocation settings
32 Chapter 1. BIG-IQ 7.0 Centralized Management Quick Setup Guide
BIG-IQ 7.0 Setup Guide Documentation
10. Review all settings and click Finish to deploy
1.5. Module 4: BIG-IP Template Creation for VMware (DHCP and IP Pools/Static) 33

BIG-IQ 7.0 Setup Guide Documentation
11. Power on device
Step 2: Prepare BIG-IP to be a clone instance, and shutdown
AskF5 Reference
1. Open the web console and log into device using default credentials (root/default). Change passwordto a strong password as required from v14.1.0
2. Delete f5-rest-device-id directory file. This forces the REST device ID files to be uniquely generatedthe next time you start the clone
rm -f /config/f5-rest-device-id
3. Delete the BIG-IP VE clone instance-generated SSH keys
rm -f /config/ssh/ssh_host_*rm -f /shared/ssh/ssh_host_*
34 Chapter 1. BIG-IQ 7.0 Centralized Management Quick Setup Guide

BIG-IQ 7.0 Setup Guide Documentation
4. (BIG-IP 14.1.0 and later only) Reset the device administrative account passwords to their defaultvalues
echo "root:default" | chpasswd
echo "admin:admin" | chpasswd
5. Power off the BIG-IP VE clone template instance
shutdown -h now
This completes the BIG-IP Template Creation - DHCP.
1.5.2 BIG-IP Template Creation - IP Pools/Static (VMware)
Description
In this lab, we will create templates used for provisioning BIG-IP with Static IPs from BIG-IQ CM. Refer tobelow AskF5 links if you need further details.
AskF5 Reference
F5 Clouddocs Reference
Step 1: Download BIG-IP ova image
1. Access https://downloads.f5.com/
2. Navigate to your desired BIG-IP version and from the Virtual-Edition list of images, select the BIGIP-<version>.ALL_1SLOT-vmware.ova. In test environments, this image will help to save on disk space.
Step 2: Deploy and Boot OVA file
1. Right click the host or folder and select Deploy OVF Template. . .
1.5. Module 4: BIG-IP Template Creation for VMware (DHCP and IP Pools/Static) 35
BIG-IQ 7.0 Setup Guide Documentation
2. Select Local file > click Choose Files > select the downloaded ova file
3. Specify a unique name and target location for the template
36 Chapter 1. BIG-IQ 7.0 Centralized Management Quick Setup Guide

BIG-IQ 7.0 Setup Guide Documentation
4. Select the destination compute resource for the template
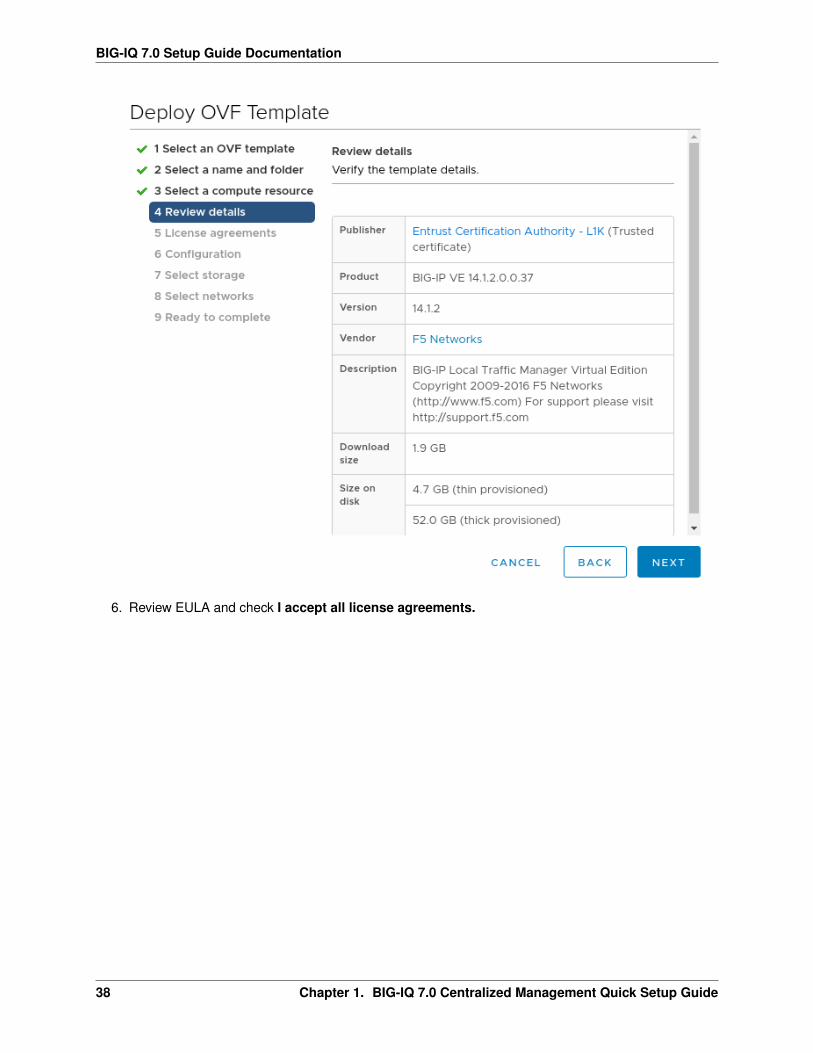
5. Review details
1.5. Module 4: BIG-IP Template Creation for VMware (DHCP and IP Pools/Static) 37
BIG-IQ 7.0 Setup Guide Documentation
6. Review EULA and check I accept all license agreements.
38 Chapter 1. BIG-IQ 7.0 Centralized Management Quick Setup Guide

BIG-IQ 7.0 Setup Guide Documentation
7. Select 4 CPUs/8192 MB RAM (this can be adjusted as needed depending on what you provision andconfigure on BIG-IP)
1.5. Module 4: BIG-IP Template Creation for VMware (DHCP and IP Pools/Static) 39

BIG-IQ 7.0 Setup Guide Documentation
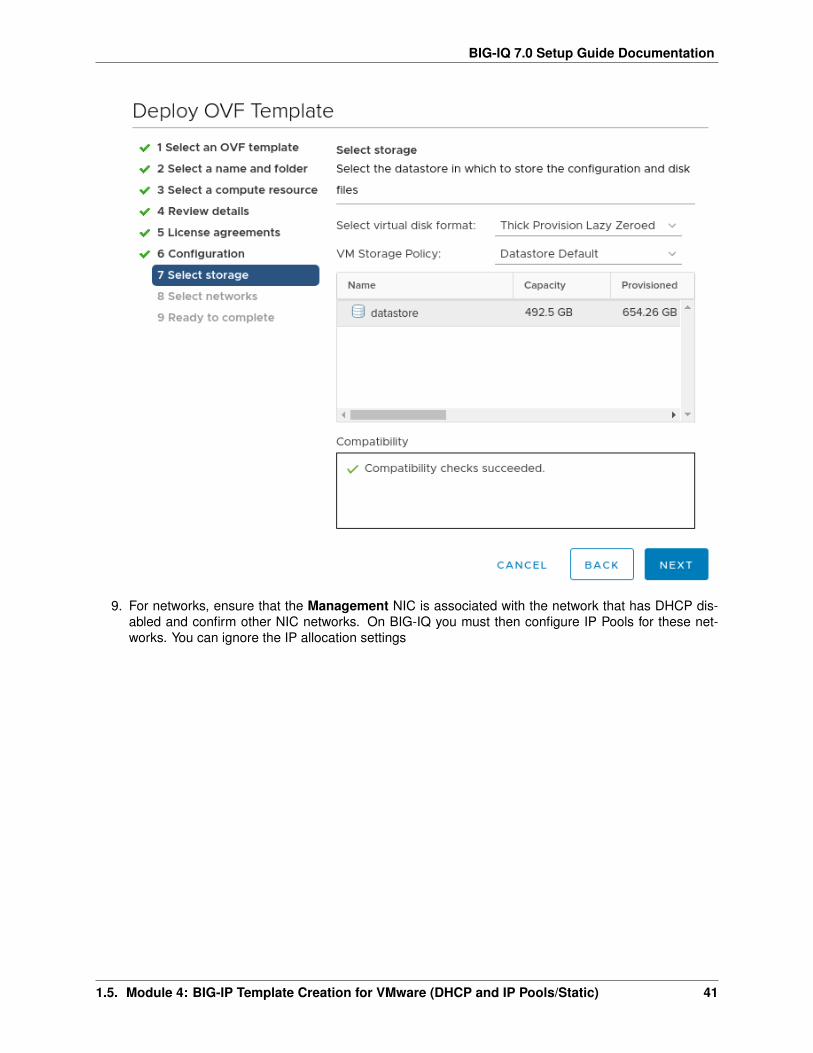
8. Leave default storage configuration
40 Chapter 1. BIG-IQ 7.0 Centralized Management Quick Setup Guide
BIG-IQ 7.0 Setup Guide Documentation
9. For networks, ensure that the Management NIC is associated with the network that has DHCP dis-abled and confirm other NIC networks. On BIG-IQ you must then configure IP Pools for these net-works. You can ignore the IP allocation settings
1.5. Module 4: BIG-IP Template Creation for VMware (DHCP and IP Pools/Static) 41

BIG-IQ 7.0 Setup Guide Documentation
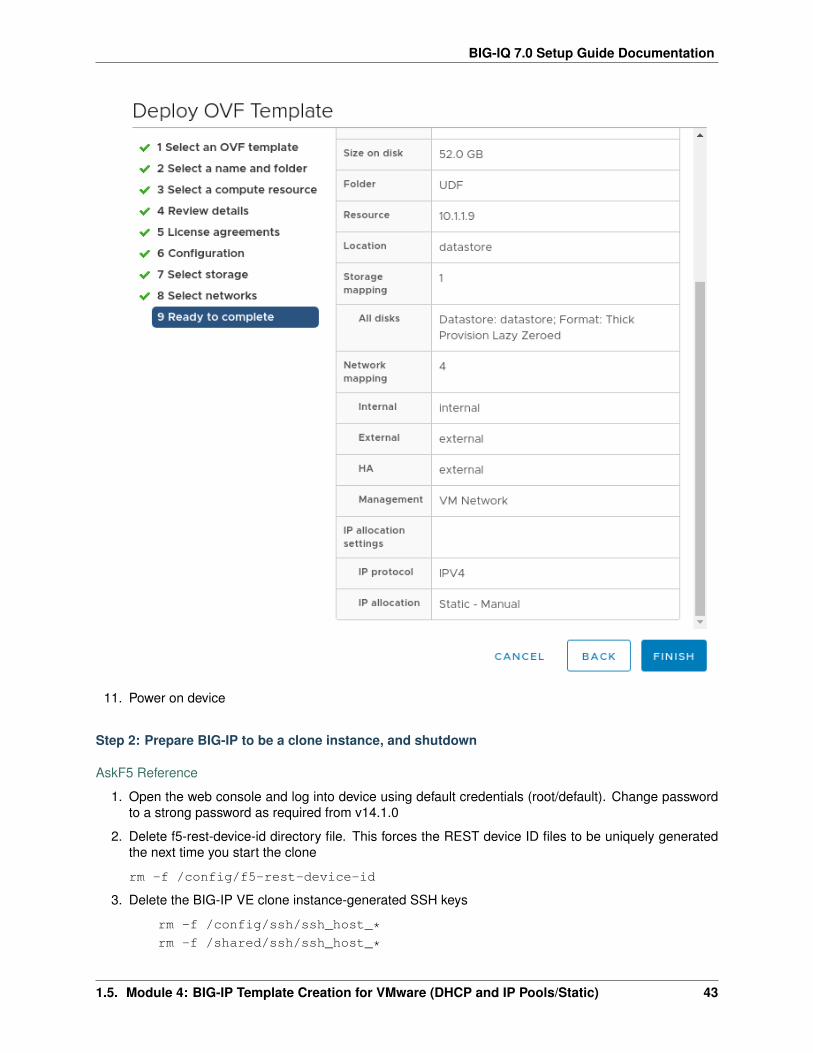
10. Review all settings and click Finish to deploy
42 Chapter 1. BIG-IQ 7.0 Centralized Management Quick Setup Guide
BIG-IQ 7.0 Setup Guide Documentation
11. Power on device
Step 2: Prepare BIG-IP to be a clone instance, and shutdown
AskF5 Reference
1. Open the web console and log into device using default credentials (root/default). Change passwordto a strong password as required from v14.1.0
2. Delete f5-rest-device-id directory file. This forces the REST device ID files to be uniquely generatedthe next time you start the clone
rm -f /config/f5-rest-device-id
3. Delete the BIG-IP VE clone instance-generated SSH keys
rm -f /config/ssh/ssh_host_*rm -f /shared/ssh/ssh_host_*
1.5. Module 4: BIG-IP Template Creation for VMware (DHCP and IP Pools/Static) 43

BIG-IQ 7.0 Setup Guide Documentation
4. (BIG-IP 14.1.0 and later only) Reset the device administrative account passwords to their defaultvalues
echo "root:default" | chpasswd
echo "admin:admin" | chpasswd
5. From tmsh prompt, disable DHCP for management IP and save configuration
modify sys global-settings mgmt-dhcp disable
save sys config
6. Power off the BIG-IP VE clone template instance
shutdown -h now
This completes the BIG-IP Template Creation - IP Pools/Static.
44 Chapter 1. BIG-IQ 7.0 Centralized Management Quick Setup Guide