Best Practices for VMware vSphere With … Practices for VMware vSphere With NexentaStor 4.0.x At a...
38
© 2015 Nexenta Systems. Page 1 Best Practices for VMware vSphere With NexentaStor 4.0.x At a Glance Overview Architectural Design Recommendations NFS Storage Configuration iSCSI Storage Configuration
Transcript of Best Practices for VMware vSphere With … Practices for VMware vSphere With NexentaStor 4.0.x At a...
© 2015 Nexenta Systems. Page 1
Best Practices for VMware
vSphere With NexentaStor 4.0.x
At a Glance Overview
Architectural Design Recommendations
NFS Storage Configuration
iSCSI Storage Configuration
© 2015 Nexenta Systems. Page 2
Table of Contents
Preface ................................................................................................................................... 3
About this document .....................................................................................................................3 Audience .......................................................................................................................................3 How to contact Nexenta .................................................................................................................3 External References .......................................................................................................................4 Document History ..........................................................................................................................4 Versions Tested .............................................................................................................................4
Overview ................................................................................................................................ 5
NexentaStor Advantages ................................................................................................................5 Document Highlights ......................................................................................................................5 Prerequisites..................................................................................................................................6 Additional Information...................................................................................................................6
Architectural Design Recommendations ................................................................................. 7
Storage Recommendations ............................................................................................................7 Network Recommendations ...........................................................................................................8
NFS Storage Configuration ...................................................................................................... 9 About NFS Storage Configuration ...................................................................................................9 NFS Configuration in NexentaStor ..................................................................................................9 Creating a Volume & NFS Share in NexentaStor ............................................................................ 10 NFS Protocol Settings within vSphere ........................................................................................... 14 Adding NFS Storage to the vSphere Server using traditional client ................................................. 17
iSCSI Storage Configuration ................................................................................................... 19 About iSCSI Configuration ............................................................................................................ 19 Adding Remote Initiators to NexentaStor ..................................................................................... 19 Create an Initiator Group ............................................................................................................. 20 Create a Target Group .................................................................................................................. 20 Creating a ZVOL ........................................................................................................................... 21 Configuring iSCSI in vSphere Traditional Client .............................................................................. 23 Adding iSCSI Servers to ESX Hosts ................................................................................................. 26 Adding iSCSI Storage to the vSphere Server using traditional client ............................................... 27 Using VAAI for Block Storage ........................................................................................................ 30 Validate VAAI is Enabled .............................................................................................................. 35
Conclusion ............................................................................................................................ 36

© 2015 Nexenta Systems. Page 3
PREFACE
About this document
This best practices guide describes how to integrate VMware vSphere 5.x or later with NexentaStor 4.0.x, utilizing NexentaStor as a backend storage for virtual machine storage.
Audience
This document is intended for system administrators that want to integrate NexentaStor with an existing VMware vSphere installation.
It is expected that the reader is experienced with VMware vSphere and has basic knowledge of NexentaStor.
How to contact Nexenta
For general questions or sales inquires please use [email protected], or the contact forms at http://nexenta.com/contact-us.
For support and services inquiries, please use [email protected].
© 2015 Nexenta Systems. Page 4
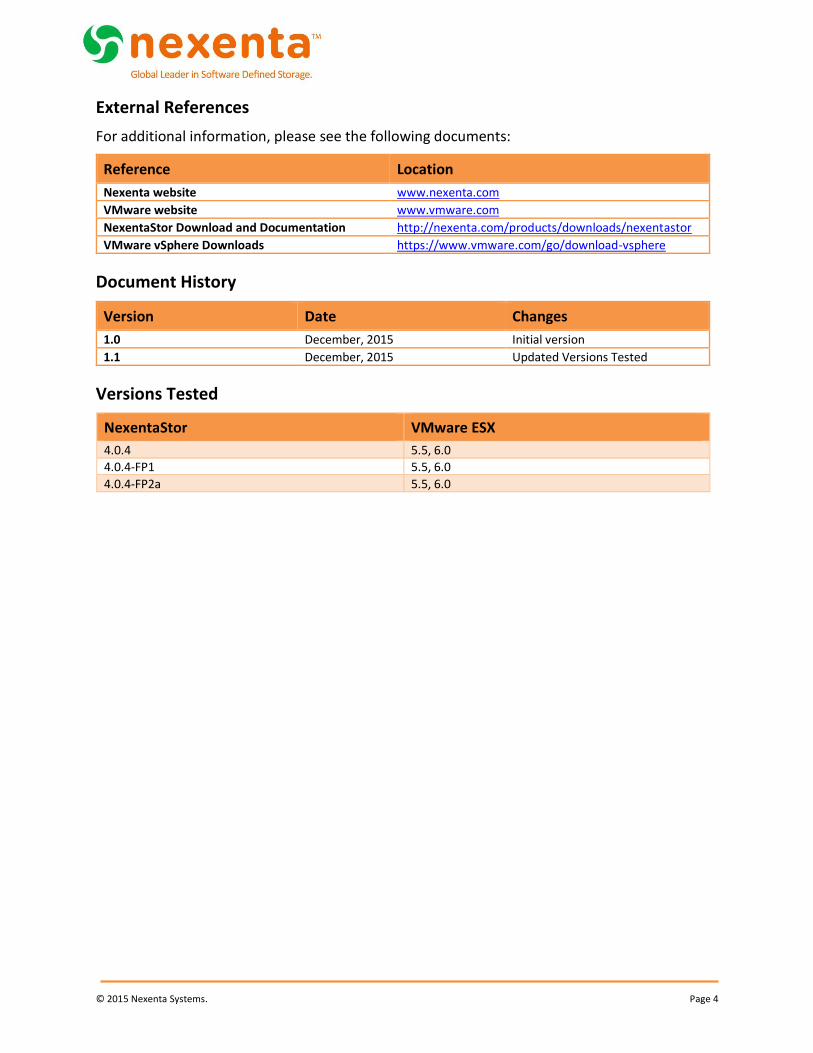
External References
For additional information, please see the following documents:
Reference Location
Nexenta website www.nexenta.com
VMware website www.vmware.com
NexentaStor Download and Documentation http://nexenta.com/products/downloads/nexentastor
VMware vSphere Downloads https://www.vmware.com/go/download-vsphere
Document History
Version Date Changes
1.0 December, 2015 Initial version
1.1 December, 2015 Updated Versions Tested
Versions Tested
NexentaStor VMware ESX
4.0.4 5.5, 6.0
4.0.4-FP1 5.5, 6.0
4.0.4-FP2a 5.5, 6.0
© 2015 Nexenta Systems. Page 5
OVERVIEW
This guide lists recommendations and guidelines for deploying and configuring NexentaStor storage in your high availability VMware vSphere environment.
Nexenta Systems provides enterprise class storage within the complexities of the enterprise environment. Business requirements constantly challenge IT management to provide a level of high availability, while simultaneously reducing costs. To this end, storage is a commodity, one where costs must decrease without negatively impacting availability.
Server virtualization is the de-facto standard for reducing server hardware costs. VMware is the leader in server virtualization with their vSphere product suite. As VMware is recognized as the leader in server virtualization, Nexenta is recognized as the leader in open software defined storage.
NexentaStor is a cost effective storage solution for VMware vSphere environments. It provides storage administrators with enhanced flexibility so they can meet their customer requirements. The basic NexentaStor product includes iSCSI, NFS and SMB support. You can enable Fibre Channel (FC) support through an optional licensed plug-in.
NexentaStor Advantages
NexentaStor improves the vSphere environment by providing:
Virtually Unlimited snapshots
Multiple levels of RAID support (Single (RAID5), Double (RAID6), Triple Parity, 2-way mirrors (RAID10))
Integrated replication
User-friendly Web GUI
Reporting
NexentaStor enhanced data protection features include:
Data integrity
Thin provisioning
Fault management
Optional NexentaStor plugins support:
High Availability
FC Target
Document Highlights
Best practices and recommendations for deploying VMware vSphere 5.x with a NexentaStor 4.x Array
Tuning options and deployment methods for NFS and iSCSI protocols in production environments
VMware cluster recommendations for high availability and load balancing

© 2015 Nexenta Systems. Page 6
Utilizing vSphere API Array Integration with NexentaStor
Prerequisites
This section lists the prerequisites that must be set up before you can implement the suggested solutions in this documentation.
VMware vSphere Infrastructure — Set up a VMware vSphere Hypervisor and configure all appropriate management software to include VMware vCenter Server as Windows or Linux Based Install.
NexentaStor Array — Set up a Highly Available NexentaStor Array with at least 2 available 10GbE interface per controller
Network – 10GbE Network Infrastructure capable of supporting Link Aggregation (LACP)
Additional Information
VMware Documentation
https://www.vmware.com/support/vsphere/
NexentaStor Installation Guide
https://nexenta.com/products/downloads/nexentastor
© 2015 Nexenta Systems. Page 7
ARCHITECTURAL DESIGN RECOMMENDATIONS
This chapter lists recommendations for using storage and network hardware with NexentaStor.
Storage Recommendations
Virtualized environments often mask the specific storage needs of an application, however this is not the case for some specific workloads. In light of this standardization Nexenta recommends the following minimum configurations for VMware environments. Nexenta maintains an extensive list of Reference Architectures that utilize industry standard x86 servers and JBODs. The current list can be found at:
http://info.nexenta.com/rs/059-GUR-914/images/NexentaStor-HCL.pdf
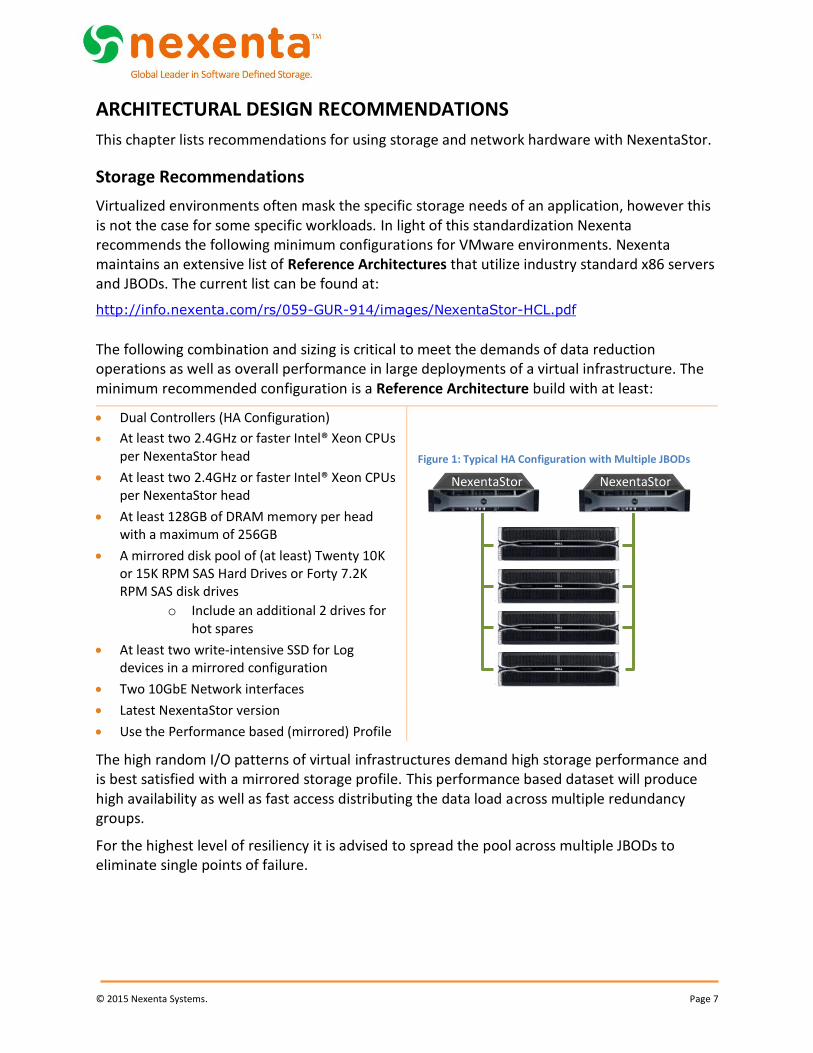
The following combination and sizing is critical to meet the demands of data reduction operations as well as overall performance in large deployments of a virtual infrastructure. The minimum recommended configuration is a Reference Architecture build with at least:
Dual Controllers (HA Configuration)
At least two 2.4GHz or faster Intel® Xeon CPUs per NexentaStor head
At least two 2.4GHz or faster Intel® Xeon CPUs per NexentaStor head
At least 128GB of DRAM memory per head with a maximum of 256GB
A mirrored disk pool of (at least) Twenty 10K or 15K RPM SAS Hard Drives or Forty 7.2K RPM SAS disk drives
o Include an additional 2 drives for hot spares
At least two write-intensive SSD for Log devices in a mirrored configuration
Two 10GbE Network interfaces
Latest NexentaStor version
Use the Performance based (mirrored) Profile
The high random I/O patterns of virtual infrastructures demand high storage performance and is best satisfied with a mirrored storage profile. This performance based dataset will produce high availability as well as fast access distributing the data load across multiple redundancy groups.
For the highest level of resiliency it is advised to spread the pool across multiple JBODs to eliminate single points of failure.
NexentaStor NexentaStor
Figure 1: Typical HA Configuration with Multiple JBODs
© 2015 Nexenta Systems. Page 8
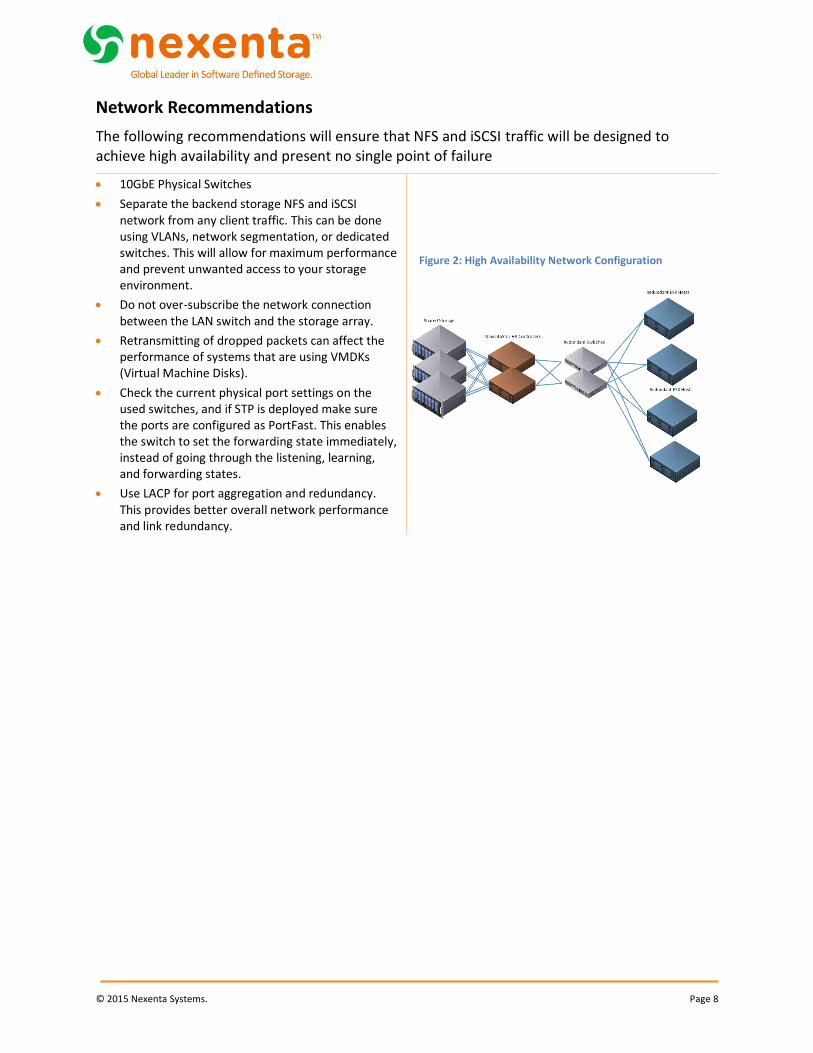
Network Recommendations
The following recommendations will ensure that NFS and iSCSI traffic will be designed to achieve high availability and present no single point of failure
10GbE Physical Switches
Separate the backend storage NFS and iSCSI network from any client traffic. This can be done using VLANs, network segmentation, or dedicated switches. This will allow for maximum performance and prevent unwanted access to your storage environment.
Do not over-subscribe the network connection between the LAN switch and the storage array.
Retransmitting of dropped packets can affect the performance of systems that are using VMDKs (Virtual Machine Disks).
Check the current physical port settings on the used switches, and if STP is deployed make sure the ports are configured as PortFast. This enables the switch to set the forwarding state immediately, instead of going through the listening, learning, and forwarding states.
Use LACP for port aggregation and redundancy. This provides better overall network performance and link redundancy.
Figure 2: High Availability Network Configuration
© 2015 Nexenta Systems. Page 9
NFS STORAGE CONFIGURATION
This chapter includes the following topics:
About NFS Storage Configuration NFS Configuration in NexentaStor Creating a Volume & NFS Share in NexentaStor NFS Protocol Settings within vSphere Adding NFS Storage to the vSphere Server using traditional client
About NFS Storage Configuration
This chapter describes adding NFS storage from a NexentaStor Array to the VMware vSphere environment. It also contains configuration settings for using NFS storage with NexentaStor.
NFS Configuration in NexentaStor
Configuring the NFS Server version
Up until version 6.0 VMware only supported NFS version 3. To ensure interoperability with all versions we recommend that you reduce the maximum Client and Server version
Click Data Management > Shares
In the NFS Server pane, click Configure
Select 3 for the Highest Server Version
Select 3 for the Highest Client Version
NexentaStor 4 NFSD Default Setting
We have determined that the default "Concurrent NFSD Servers" and "Concurrent LOCKD Servers" settings for NexentaStor versions 4.0.1 through 4.0.3-FP4 may be too small for typical NFS workloads. These settings limit the maximum number of NFS server and lock daemon threads that may be concurrently executing. The defaults for both of these settings have been increased to 256 in NexentaStor 4.0.4.
We strongly recommend that all NFS users still using the default Concurrent NFSD Servers and Concurrent LOCKD Servers settings in NexentaStor versions 4.0.1 through 4.0.3-FP4 increase the settings immediately. Increasing these settings does not require a reboot, but may result in a small delay or interruption to NFS clients. The interruption will be 5 seconds or the duration of the client timeout, whichever is greater. We recommend that any system configurations changes follow change control procedures and be performed in a maintenance window. To configure the settings, use NMV:
Click Data Management > Shares
In the NFS server panel, click Configure
Review the Concurrent NFSD Servers setting; if it is 16, change the value to 256.
Review the Concurrent LOCKD Servers setting; if it is 16, change the value to 256.
© 2015 Nexenta Systems. Page 10
Click Save, the changes will take effect immediately
Create Network Aggregate
By creating a network aggregate the NexentaStor array will be able to provide better overall network performance and link redundancy.
Click Settings > Network
In the Network pane, click Create
This will bring up the Create Network Interface
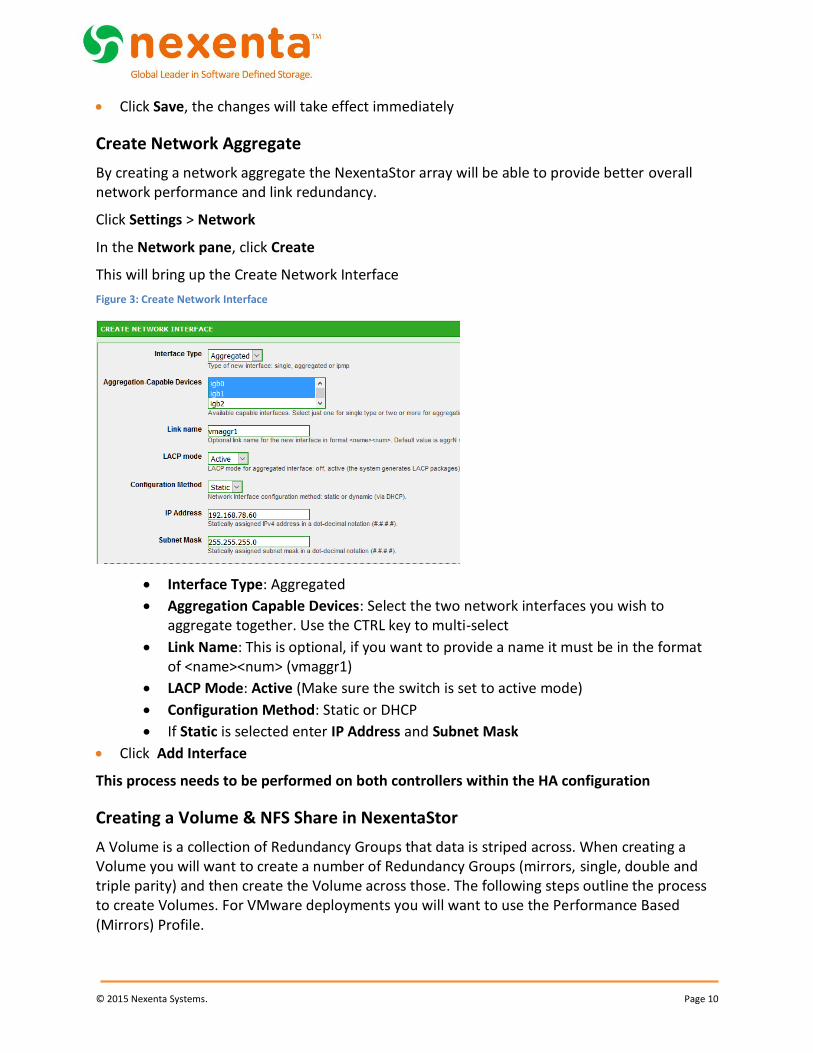
Figure 3: Create Network Interface
Interface Type: Aggregated
Aggregation Capable Devices: Select the two network interfaces you wish to aggregate together. Use the CTRL key to multi-select
Link Name: This is optional, if you want to provide a name it must be in the format of <name><num> (vmaggr1)
LACP Mode: Active (Make sure the switch is set to active mode)
Configuration Method: Static or DHCP
If Static is selected enter IP Address and Subnet Mask
Click Add Interface
This process needs to be performed on both controllers within the HA configuration
Creating a Volume & NFS Share in NexentaStor
A Volume is a collection of Redundancy Groups that data is striped across. When creating a Volume you will want to create a number of Redundancy Groups (mirrors, single, double and triple parity) and then create the Volume across those. The following steps outline the process to create Volumes. For VMware deployments you will want to use the Performance Based (Mirrors) Profile.
© 2015 Nexenta Systems. Page 11
Create an volume
Click Data Management > Datasets.
In the Volumes pane, click Create.
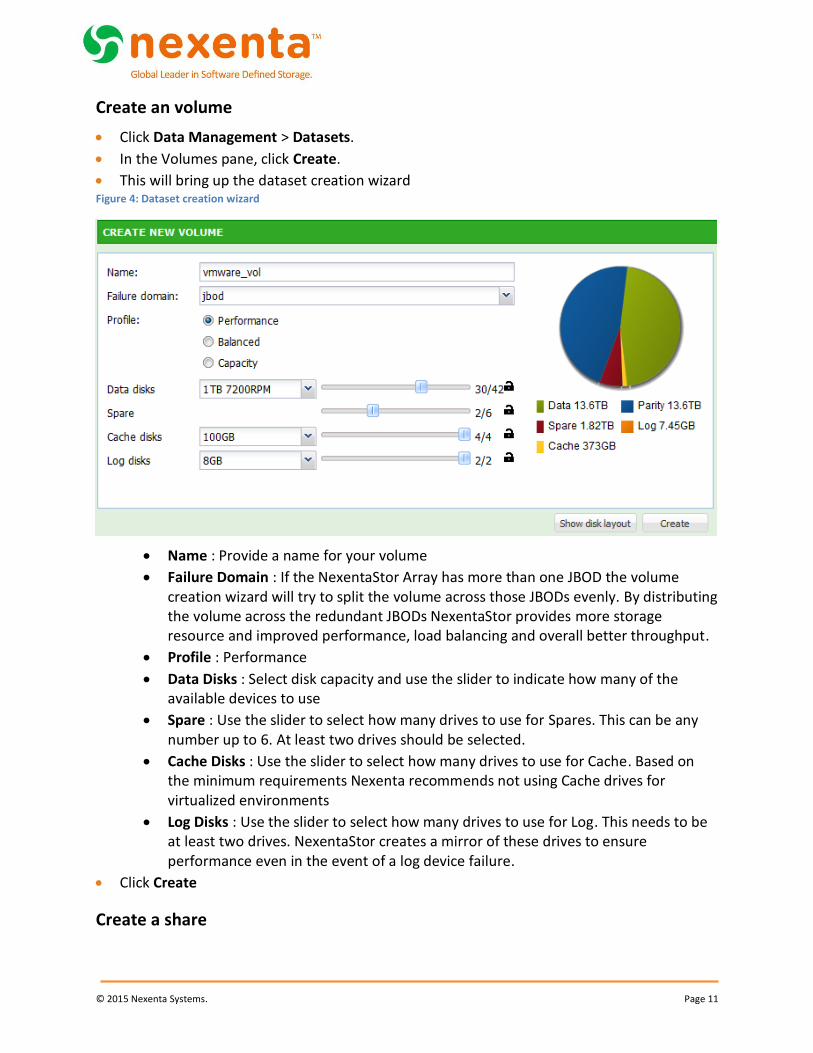
This will bring up the dataset creation wizard Figure 4: Dataset creation wizard
Name : Provide a name for your volume
Failure Domain : If the NexentaStor Array has more than one JBOD the volume creation wizard will try to split the volume across those JBODs evenly. By distributing the volume across the redundant JBODs NexentaStor provides more storage resource and improved performance, load balancing and overall better throughput.
Profile : Performance
Data Disks : Select disk capacity and use the slider to indicate how many of the available devices to use
Spare : Use the slider to select how many drives to use for Spares. This can be any number up to 6. At least two drives should be selected.
Cache Disks : Use the slider to select how many drives to use for Cache. Based on the minimum requirements Nexenta recommends not using Cache drives for virtualized environments
Log Disks : Use the slider to select how many drives to use for Log. This needs to be at least two drives. NexentaStor creates a mirror of these drives to ensure performance even in the event of a log device failure.
Click Create
Create a share
© 2015 Nexenta Systems. Page 12
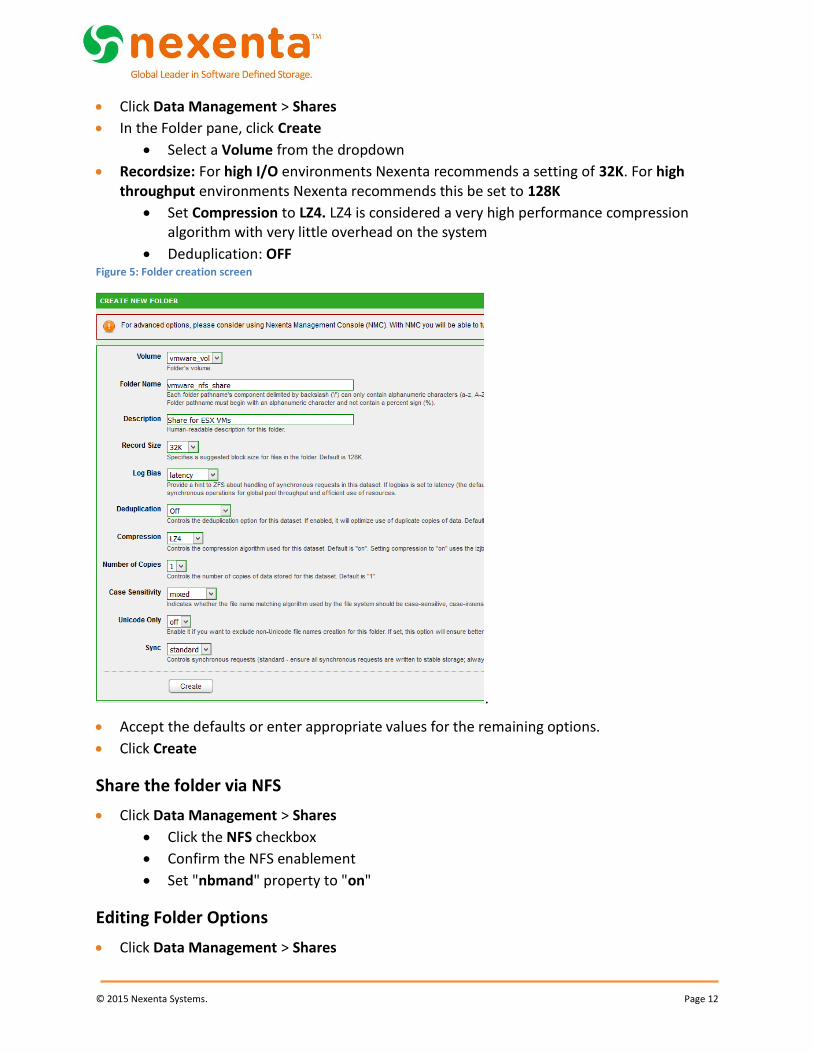
Click Data Management > Shares
In the Folder pane, click Create
Select a Volume from the dropdown
Recordsize: For high I/O environments Nexenta recommends a setting of 32K. For high throughput environments Nexenta recommends this be set to 128K
Set Compression to LZ4. LZ4 is considered a very high performance compression algorithm with very little overhead on the system
Deduplication: OFF Figure 5: Folder creation screen
.
Accept the defaults or enter appropriate values for the remaining options.
Click Create
Share the folder via NFS
Click Data Management > Shares
Click the NFS checkbox
Confirm the NFS enablement
Set "nbmand" property to "on"
Editing Folder Options
Click Data Management > Shares
© 2015 Nexenta Systems. Page 13
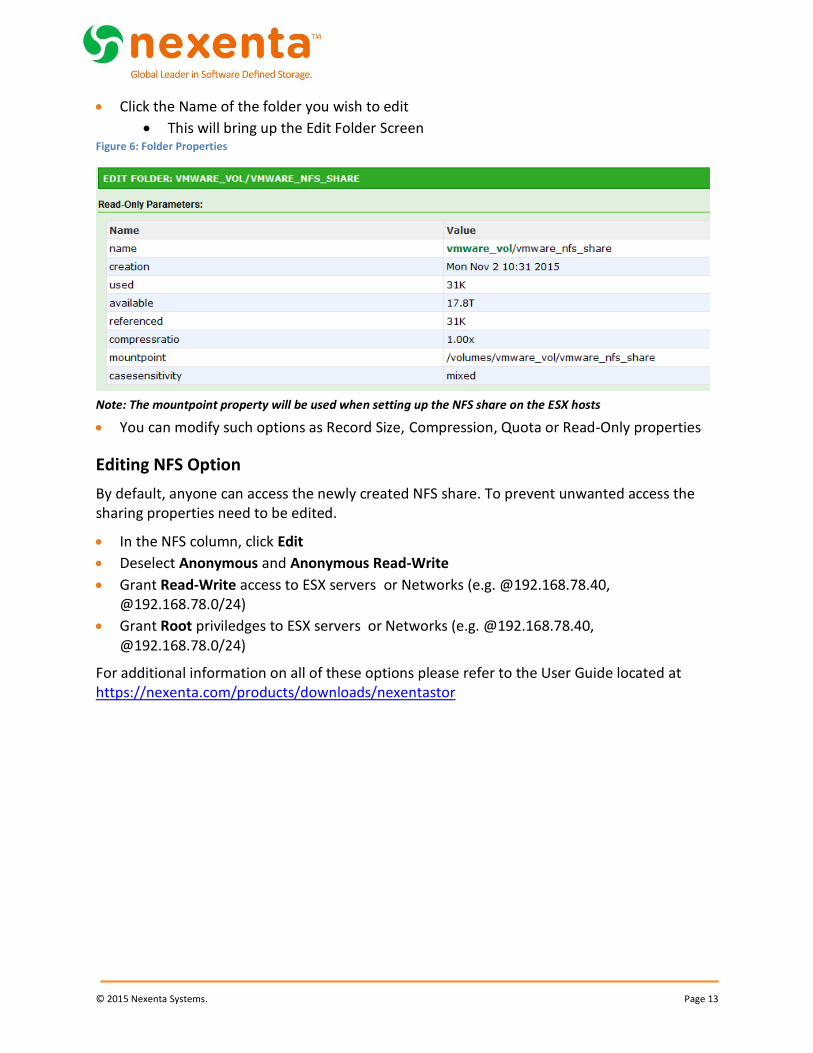
Click the Name of the folder you wish to edit
This will bring up the Edit Folder Screen Figure 6: Folder Properties
Note: The mountpoint property will be used when setting up the NFS share on the ESX hosts
You can modify such options as Record Size, Compression, Quota or Read-Only properties
Editing NFS Option
By default, anyone can access the newly created NFS share. To prevent unwanted access the sharing properties need to be edited.
In the NFS column, click Edit
Deselect Anonymous and Anonymous Read-Write
Grant Read-Write access to ESX servers or Networks (e.g. @192.168.78.40, @192.168.78.0/24)
Grant Root priviledges to ESX servers or Networks (e.g. @192.168.78.40, @192.168.78.0/24)
For additional information on all of these options please refer to the User Guide located at https://nexenta.com/products/downloads/nexentastor

© 2015 Nexenta Systems. Page 14
Figure 7: Editing NFS Access Rights
Figure 8: Disabling Anonymous Access
NFS Protocol Settings within vSphere
Configuring NFS protocol within vSphere is a critical component of a successful deployment with NexentaStor. To ensure high availability of your storage with a vSphere environment it is critical to follow the knowledge base articles and settings below.
VMware NFS connectivity issues on NexentaStor with ESXi 5.x and 6.0
ESXi default setting may result in NFS connectivity issues and "all path down" (APD) events.
http://kb.vmware.com/selfservice/microsites/search.do?cmd=displayKC&docType=kc&externalId=2133025
© 2015 Nexenta Systems. Page 15
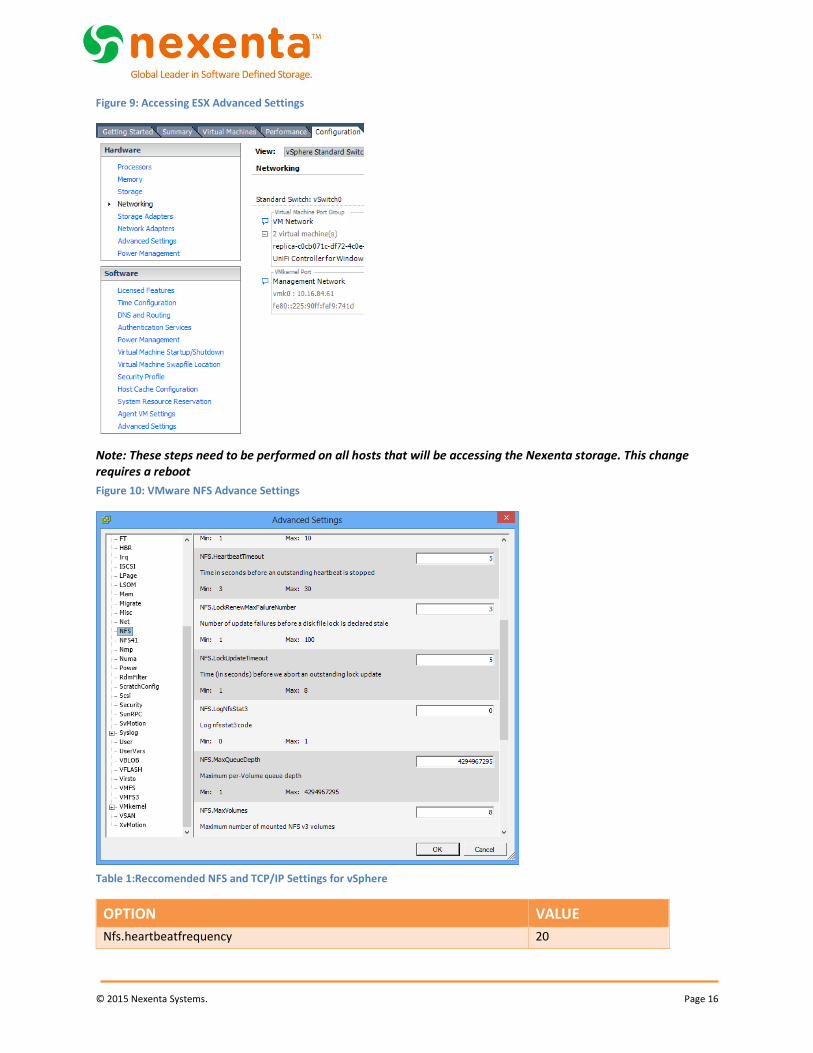
vSphere Advanced Settings
Table 1 below shows the Advanced Settings that should be modified prior to putting any production data on the array. To alter the parameters listed, go to the VMware vCenter 5.x server and select a VMware server. Select the Configuration tab and within the Software section click on Advanced Settings
© 2015 Nexenta Systems. Page 16
Figure 9: Accessing ESX Advanced Settings
Note: These steps need to be performed on all hosts that will be accessing the Nexenta storage. This change requires a reboot
Figure 10: VMware NFS Advance Settings
Table 1:Reccomended NFS and TCP/IP Settings for vSphere
OPTION VALUE
Nfs.heartbeatfrequency 20
© 2015 Nexenta Systems. Page 17
Nfs.heartbeatdelta 12
Nfs.heartbeatmaxfailures 10
NFS.HeartbeatTimeout 5
Nfs.Sendbuffersize 264
Nfs.Receivebuffersize 256
Nfs.MaxVolumes 256
Net.TcpipHeapMax 128
Net.TcpipHeapsize 32
Adding NFS Storage to the vSphere Server using traditional client
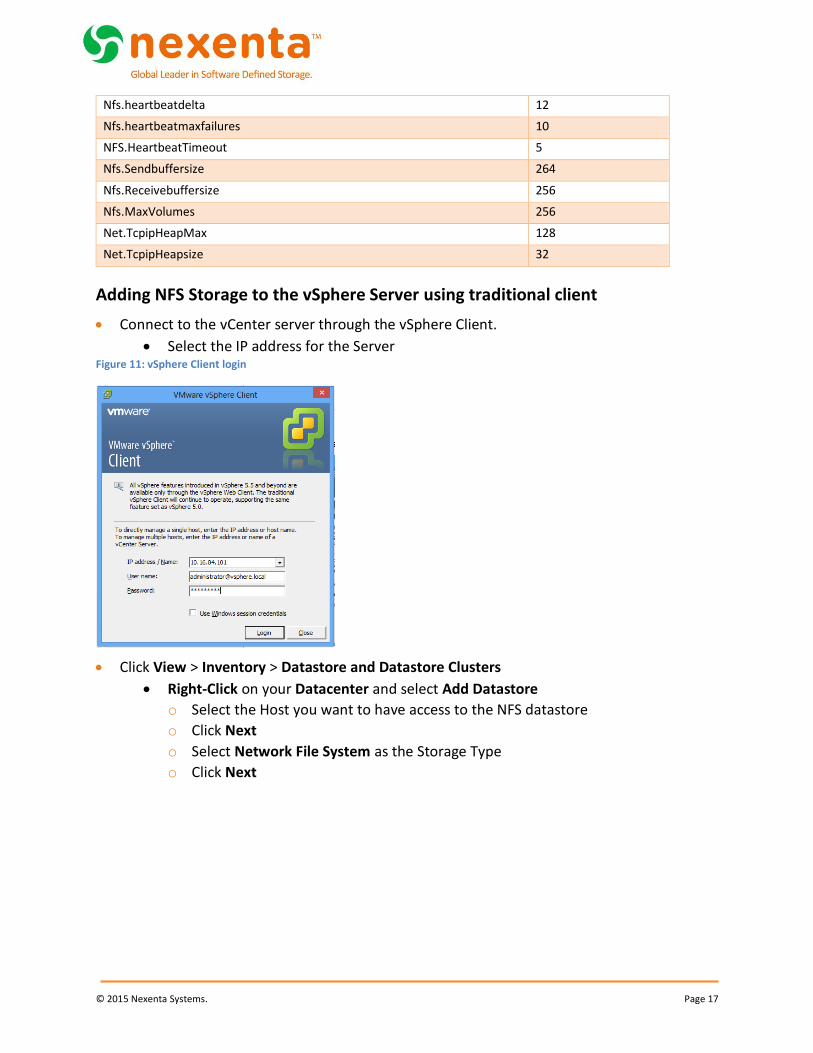
Connect to the vCenter server through the vSphere Client.
Select the IP address for the Server Figure 11: vSphere Client login
Click View > Inventory > Datastore and Datastore Clusters
Right-Click on your Datacenter and select Add Datastore
o Select the Host you want to have access to the NFS datastore
o Click Next
o Select Network File System as the Storage Type
o Click Next

© 2015 Nexenta Systems. Page 18
Figure 12: NFS Storage Type
Enter the following information
o Server : This is the IP or the DNS resolvable name of the NexentaStor Array
o Folder : This is the full path to the NFS share we created earlier. This path will be /volumes/<volume_name>/<share_name> (e.g. /volumes/vmware_vol/vmware_nfs_share). (See Editing Folder Options for this information)
o Datastore Name : This is a name used inside of vCenter to identify the storage Figure 13: NFS Connection Properties
o Click Finish
© 2015 Nexenta Systems. Page 19
ISCSI STORAGE CONFIGURATION
This chapter includes the following topics:
About iSCSI Configuration Adding Remote Initiators to NexentaStor Create an Initiator Group Create a Target Group Creating a ZVOL Configuring iSCSI in vSphere Traditional Client Adding iSCSI Servers to ESX Hosts Adding iSCSI Storage to the vSphere Server using traditional client Using VAAI for Block Storage Validate VAAI is Enabled
About iSCSI Configuration
The following items represent the best practices and recommendations when using iSCSI to access storage.
Ensure that each ESX host has at least one dual 10GbE NIC
Use at least two physical IP network switches.
On the NexentaStor Storage Array side make sure you have at a minimum of one LACP pair of 10GbE NICs, attached to physical switches and a working port-channel group
Ensure that your iSCSI network has enough throughput and low latency to handle iSCSI traffic
Isolate the iSCSI traffic through different VLANs and/or VMware vSwitches for iSCSI
Configure VMware iSCSI in port binding mode to achieve best performance. This also provides load balancing of the I/O traffic between paths and failover
Change the storage array type to VMW_SATP_ALUA
Change path selection policy VMW_PSP_MRU to VMW_PSP_RR, and verify that all NICs are balancing the I/O traffic
Adding Remote Initiators to NexentaStor
A remote initiator permits the vSphere server to access storage on the NexentaStor Array.
Click Data Management > SCSI Target
In the iSCSI pane, click Remote Initiators
Click Create to create a new remote initiator
Type a name for the remote initiator (This is the IQN of the iSCSI software adapter, iqn.1998-01.com.vmware:esx1-49850a8e)
Click Create
Repeat this process for all ESX HOSTS that will be accessing the iSCSI storage

© 2015 Nexenta Systems. Page 20
Create an Initiator Group
An Initiator Group controls who can see iSCSI devices (ZVOLs) on the network. By using Initiator Groups the administrator can control access to iSCSI presented luns.
Click Data Management > SCSI Target
In the SCSI Target pane, click Initiator Groups
Type a name for the group
Select the Remote Initiators for the ESX hosts you want to add to this group Figure 14: Creating Initiator Groups
Click Create
Create a Target Group
A Target Group allows you to specify which IQN an iSCSI device is presented from. This provides another layer of segregation on the storage array. We are going to create a single Target Group that includes the default IQN of the NexentaStor Array
Click Data Management > SCSI Target
In the SCSI Target pane, click Target Groups
Type a name for the group
Select the Target
Click Create
© 2015 Nexenta Systems. Page 21
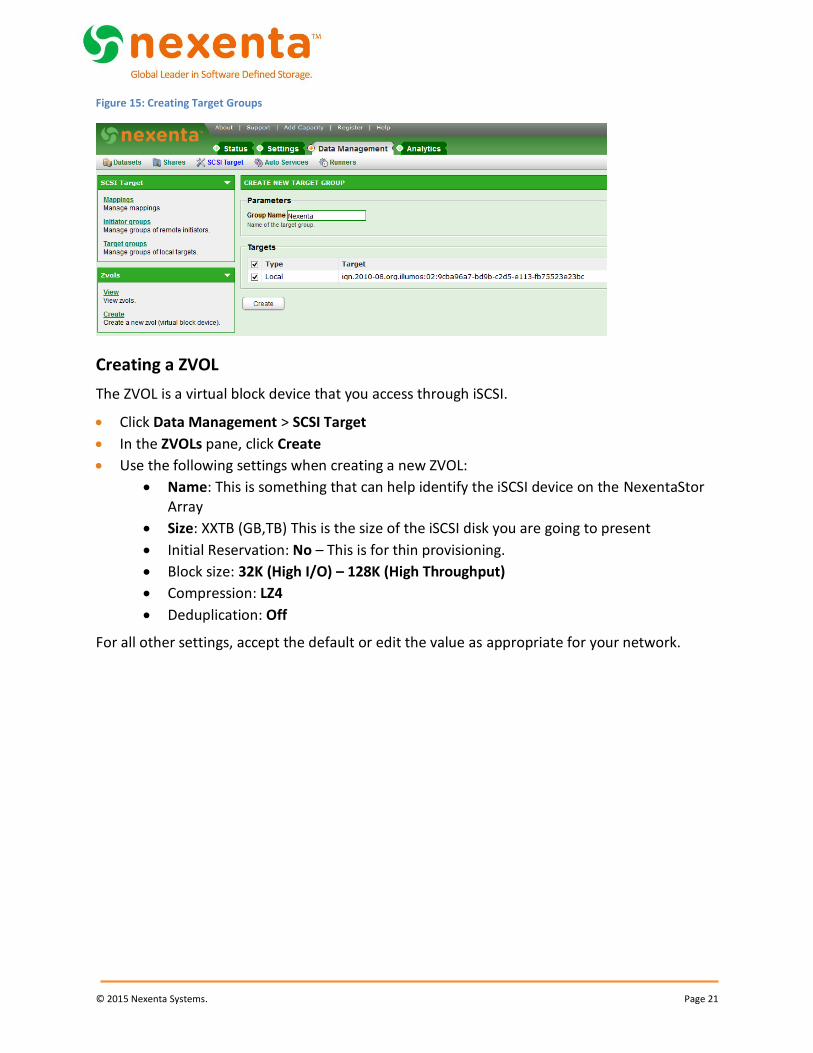
Figure 15: Creating Target Groups
Creating a ZVOL
The ZVOL is a virtual block device that you access through iSCSI.
Click Data Management > SCSI Target
In the ZVOLs pane, click Create
Use the following settings when creating a new ZVOL:
Name: This is something that can help identify the iSCSI device on the NexentaStor Array
Size: XXTB (GB,TB) This is the size of the iSCSI disk you are going to present
Initial Reservation: No – This is for thin provisioning.
Block size: 32K (High I/O) – 128K (High Throughput)
Compression: LZ4
Deduplication: Off
For all other settings, accept the default or edit the value as appropriate for your network.

© 2015 Nexenta Systems. Page 22
Figure 16: ZVOL Creation Options
Click Create.
Mapping an iSCSI Target
Click Data Management > SCSI Target
In the SCSI Target pane, click Mappings
If no mappings currently exist click the HERE link to create a new one
Select the Zvol you want to share from the drop down menu
Select the Initiator Group you want to have access to the Zvol
Select the Target Group you wish to present from
Leave Lun# and Serial Num to Auto
Click Create
Repeat this process for all iSCSI devices you wish to share

© 2015 Nexenta Systems. Page 23
Figure 17: How to map a ZVOL
Configuring iSCSI in vSphere Traditional Client
To configure iSCSI in vSphere:
Log in to the vSphere server
Select the vSphere server, (not a VM)
Click Configuration > Storage Adapters
Click Add
Click OK to add the software iSCSI Adapter, if it is not already present.
Write down the IQN associated with the newly created iSCSI adapter Figure 18: Adding the iSCSI Software Adapter
Figure 19: Finding the IQN of the iSCSI Software Adapter
© 2015 Nexenta Systems. Page 24
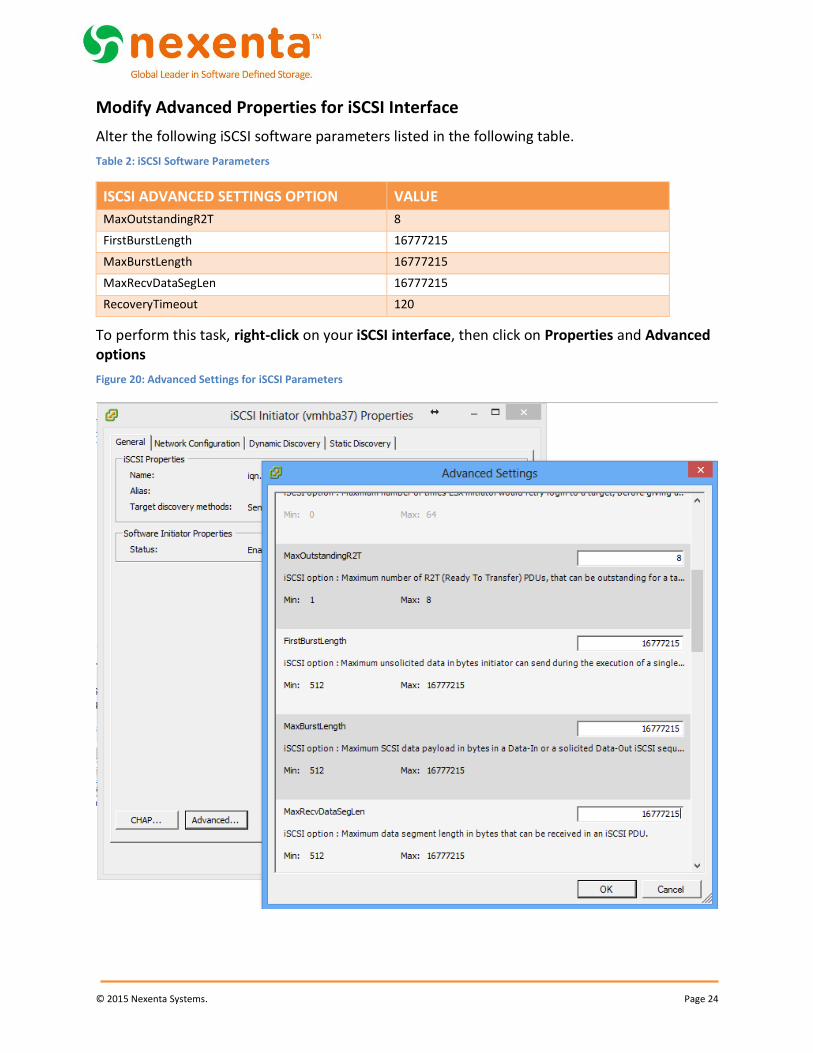
Modify Advanced Properties for iSCSI Interface
Alter the following iSCSI software parameters listed in the following table.
Table 2: iSCSI Software Parameters
ISCSI ADVANCED SETTINGS OPTION VALUE
MaxOutstandingR2T 8
FirstBurstLength 16777215
MaxBurstLength 16777215
MaxRecvDataSegLen 16777215
RecoveryTimeout 120
To perform this task, right-click on your iSCSI interface, then click on Properties and Advanced options
Figure 20: Advanced Settings for iSCSI Parameters
© 2015 Nexenta Systems. Page 25
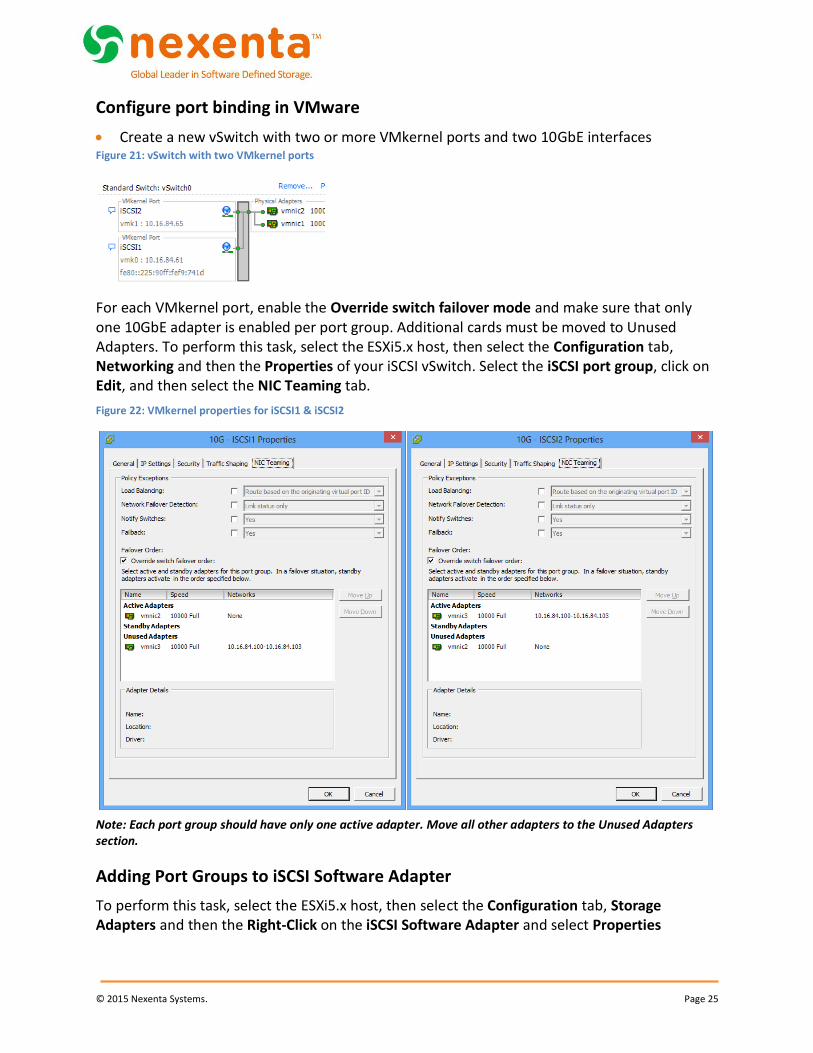
Configure port binding in VMware
Create a new vSwitch with two or more VMkernel ports and two 10GbE interfaces Figure 21: vSwitch with two VMkernel ports
For each VMkernel port, enable the Override switch failover mode and make sure that only one 10GbE adapter is enabled per port group. Additional cards must be moved to Unused Adapters. To perform this task, select the ESXi5.x host, then select the Configuration tab, Networking and then the Properties of your iSCSI vSwitch. Select the iSCSI port group, click on Edit, and then select the NIC Teaming tab.
Figure 22: VMkernel properties for iSCSI1 & iSCSI2
Note: Each port group should have only one active adapter. Move all other adapters to the Unused Adapters section.
Adding Port Groups to iSCSI Software Adapter
To perform this task, select the ESXi5.x host, then select the Configuration tab, Storage Adapters and then the Right-Click on the iSCSI Software Adapter and select Properties
© 2015 Nexenta Systems. Page 26
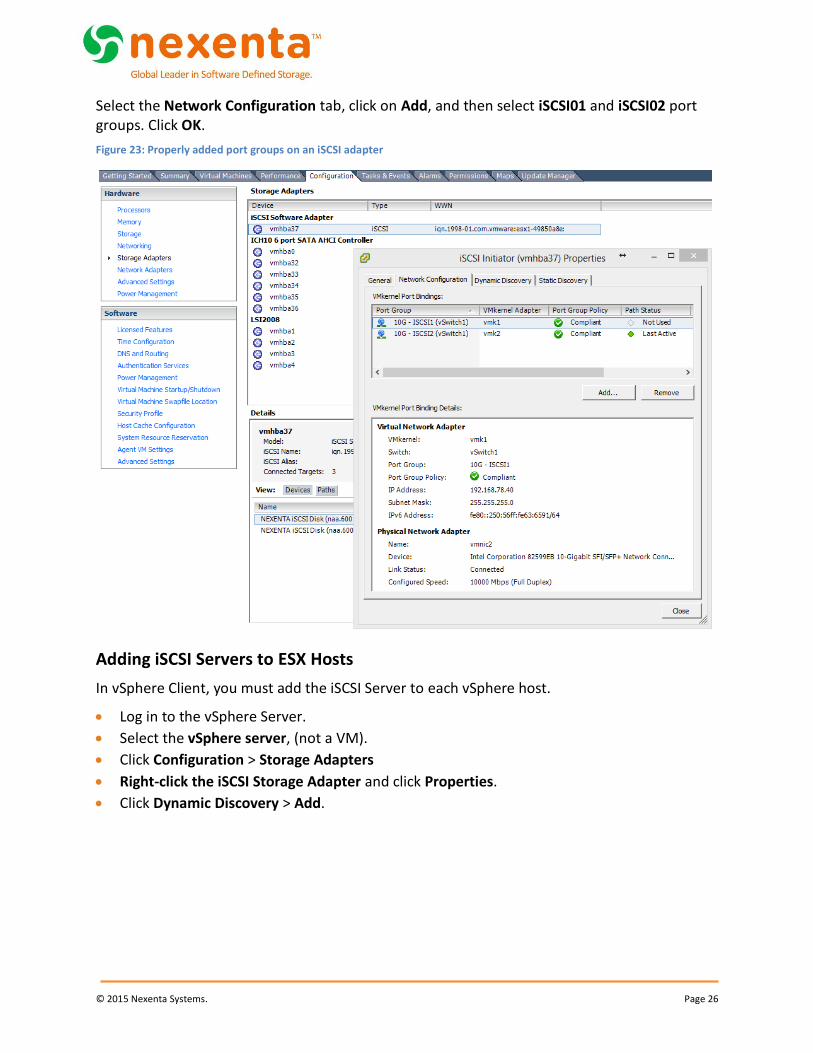
Select the Network Configuration tab, click on Add, and then select iSCSI01 and iSCSI02 port groups. Click OK.
Figure 23: Properly added port groups on an iSCSI adapter
Adding iSCSI Servers to ESX Hosts
In vSphere Client, you must add the iSCSI Server to each vSphere host.
Log in to the vSphere Server.
Select the vSphere server, (not a VM).
Click Configuration > Storage Adapters
Right-click the iSCSI Storage Adapter and click Properties.
Click Dynamic Discovery > Add.
© 2015 Nexenta Systems. Page 27
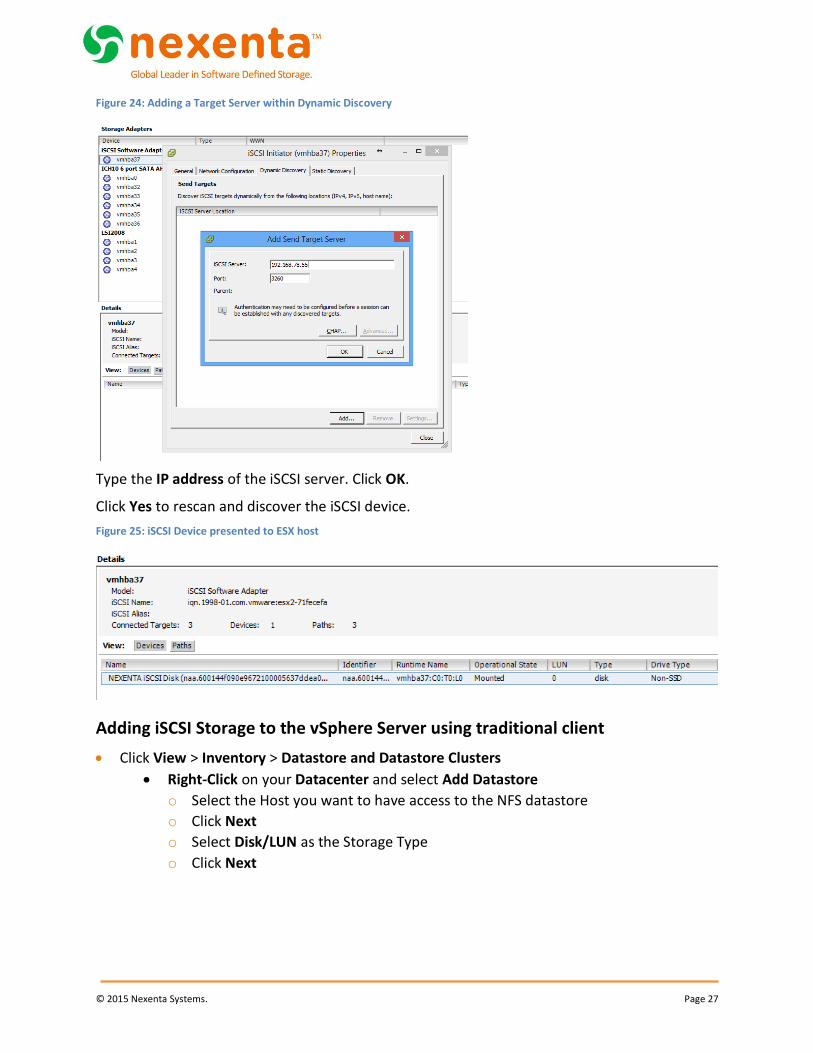
Figure 24: Adding a Target Server within Dynamic Discovery
Type the IP address of the iSCSI server. Click OK.
Click Yes to rescan and discover the iSCSI device.
Figure 25: iSCSI Device presented to ESX host
Adding iSCSI Storage to the vSphere Server using traditional client
Click View > Inventory > Datastore and Datastore Clusters
Right-Click on your Datacenter and select Add Datastore
o Select the Host you want to have access to the NFS datastore
o Click Next
o Select Disk/LUN as the Storage Type
o Click Next
© 2015 Nexenta Systems. Page 28
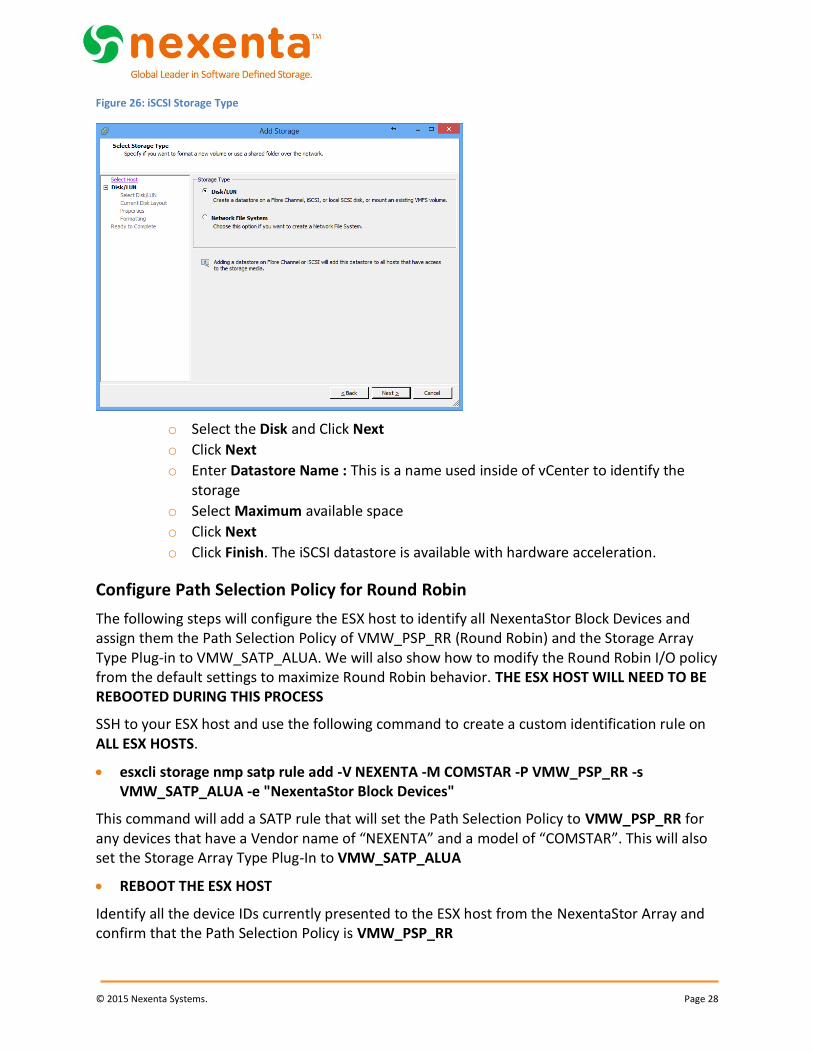
Figure 26: iSCSI Storage Type
o Select the Disk and Click Next
o Click Next
o Enter Datastore Name : This is a name used inside of vCenter to identify the storage
o Select Maximum available space
o Click Next
o Click Finish. The iSCSI datastore is available with hardware acceleration.
Configure Path Selection Policy for Round Robin
The following steps will configure the ESX host to identify all NexentaStor Block Devices and assign them the Path Selection Policy of VMW_PSP_RR (Round Robin) and the Storage Array Type Plug-in to VMW_SATP_ALUA. We will also show how to modify the Round Robin I/O policy from the default settings to maximize Round Robin behavior. THE ESX HOST WILL NEED TO BE REBOOTED DURING THIS PROCESS
SSH to your ESX host and use the following command to create a custom identification rule on ALL ESX HOSTS.
esxcli storage nmp satp rule add -V NEXENTA -M COMSTAR -P VMW_PSP_RR -s VMW_SATP_ALUA -e "NexentaStor Block Devices"
This command will add a SATP rule that will set the Path Selection Policy to VMW_PSP_RR for any devices that have a Vendor name of “NEXENTA” and a model of “COMSTAR”. This will also set the Storage Array Type Plug-In to VMW_SATP_ALUA
REBOOT THE ESX HOST
Identify all the device IDs currently presented to the ESX host from the NexentaStor Array and confirm that the Path Selection Policy is VMW_PSP_RR

© 2015 Nexenta Systems. Page 29
esxcli storage nmp device list | grep -i ‘NEXENTA iSCSI Disk’
This will return a list of devices with an output similar to this:
Device Display Name: NEXENTA iSCSI Disk (naa.600144f090e9672100005637ddea0001)
esxcli storage nmp device list -d naa. 600144f090e9672100005637ddea0001| egrep -i "Nexenta|Policy:"
o Device Display Name: NEXENTA iSCSI Disk (naa.600144f090e9672100005637ddea0001)
o Path Selection Policy: VMW_PSP_RR
Modify default Round Robin I/O Limits
To change the Round Robin I/O operation limit, use the steps shown in the following ESXi command lines.
To view the current Round Robin policy for a given device use the following commands
esxcli storage nmp device list | grep -i ‘NEXENTA iSCSI Disk’
This will return a list of devices with an output similar to this:
Device Display Name: NEXENTA iSCSI Disk (naa.600144f090e9672100005637ddea0001)
esxcli storage nmp psp roundrobin deviceconfig get -d naa.600144f090e9672100005637ddea0001
Byte Limit: 10485760
Device: naa. 600144f090e9672100005637ddea0001
IOOperation Limit: 1000
Limit Type: Default
Use Active Unoptimized Paths: false
As you can see the default policy has the paths being used every 1,000 IOPS. If we want to have a truly equally balanced Round Robin we need to modify this to every 1 IOP. These changes get applied directly to the device so if you add additional iSCSI disks to the ESX environment you will need to rerun the following command.
An easy way to loop through all the NexentaStor iSCSI devices that are currently presented to this ESX host and modify the I/O Limit and type of policy would be the following script:
for disk in `esxcli storage nmp device list | awk '/NEXENTA iSCSI Disk/i {print $7}' | cut -c 2-37`
do
esxcli storage nmp psp roundrobin deviceconfig set -d $disk -I 1 -t iops
done
Use the following script to check that the changes were applied

© 2015 Nexenta Systems. Page 30
for disk in `esxcli storage nmp device list | awk '/NEXENTA iSCSI Disk/i {print $7}' | cut -c 2-37`
do
esxcli storage nmp psp roundrobin deviceconfig get -d $disk done
Using VAAI for Block Storage
While NexentaStor 4.0.4 is fully VAAI Block certified, it also ships with VAAI support disabled by default. In order to use VAAI Block on a fresh NexentaStor 4.0.4 system, the user will have to first enable the functionality on NexentaStor.
The process follows the steps below:
Enable ATS on NexentaStor1
Upgrade NexentaStor
Re-enable ATS on existing ESXi servers
The procedures and background information provided here summarize information provided in VMware knowledge base articles. You are recommended to consult the original documents. The following KB articles were reviewed by Nexenta in consultation with VMware:
1033665
2037144
2006858
2030416
2094604
In case of any issues with these procedures, you should first open support cases with VMware and then, as needed, with Nexenta as joint support.
Warning about upgrading without preparation
VMware and Nexenta both recommend against an upgrade that changes defaults without first configuring ATS locking for affected datastores to be consistent with the new defaults. As per VMware KB 2037144, datastores configured to use ATS-only locking fail to mount after an upgrade that changes defaults to disable and do not show up in the vSphere client datastore view. In this situation Nexenta recommends that you revert to the previously running snapshot, thereby reverting the change in defaults, performing the preparatory steps outlined below, then returning to the upgrade checkpoint.
1 To change ATS settings on NexentaStor requires a reboot. You can minimize reboots by applying configuration changes before upgrading your
system, as they will take effect if the settings are on the system at upgrade. A vaaictl script, provided by Nexenta, may be used to enable VAAI features. Download the vaaictl script from https:// nexenta.com/products/downloads/nexentastor in the NexentaStor Utilities section. See section Enabling ATS on NexentaStor for more details.

© 2015 Nexenta Systems. Page 31
If you are running ESXi 6.0 with multi-extent datastores mounted by multiple hosts, you should consult KB 2094604and open a support case with VMware as necessary, given the following notice in that KB:
The combination of one host using ATS-only and another host using SCSI Reserve/Release might result in file system corruption.
This can result from other procedures to disable ATS documented by VMware but not recommended by Nexenta for this situation, including others from the listed KBs.
Planning for upgrade
You should schedule a maintenance window to prepare for upgrades on ESXi hosts and complete NexentaStor upgrades. As per KB 2030416, the datastore must be inactive (guests must either be migrated off the datastore or powered off) before disabling ATS:
All virtual machines must be migrated off the affected datastore, or powered off, prior to running the below steps.
Enabling ATS on NexentaStor
To identify VMFS datastores using NexentaStor storage and check their ATS status, see the section Identifying VMFS datastore extents and checking ATS status.
To change ATS settings on NexentaStor requires a reboot. You can minimize reboots by applying configuration changes before upgrading your system, as they will take effect if the settings are on the system at upgrade.
The vaaictl script may be used to enable VAAI features. Download the vaaictl script from https:/ /nexenta.com/products/downloads/nexentastor in the NexentaStor Utilities section. Copy the script to admin’s home directory, and make sure that it is executable by setting the execution mode of the file:
# -bash-4.2$ chmod 555 ./vaaictl
To apply changes, ssh into the device as admin and run the following script:
# -bash-4.2$ sudo ./vaaictl --enable
If you need to disable VAAI thereafter, you can follow the previous steps, changing the vaaictl invocation either to restore defaults, allowing the system to follow product defaults again:
# -bash-4.2$ sudo ./vaaictl --default
or to disable explicitly:
# -bash-4.2$ sudo ./vaaictl --disable
All settings changes require reboot. You can check current settings using this invocation, which will warn you if the config file has been changed without a system reboot, which means that settings on the running system are uncertain:
# -bash-4.2$ ./vaaictl --status
© 2015 Nexenta Systems. Page 32
Identifying VMFS datastore extents and checking ATS status
VMFS datastores use one or more extents. All procedures assume that a datastore uses extents backed exclusively by NexentaStor LUNs. In case of datastores using extents backed by storage from more than one vendor, you should open a support case with VMware to confirm appropriate procedures and identify possible further sources of risk, opening joint support cases with Nexenta and other storage vendors as appropriate.
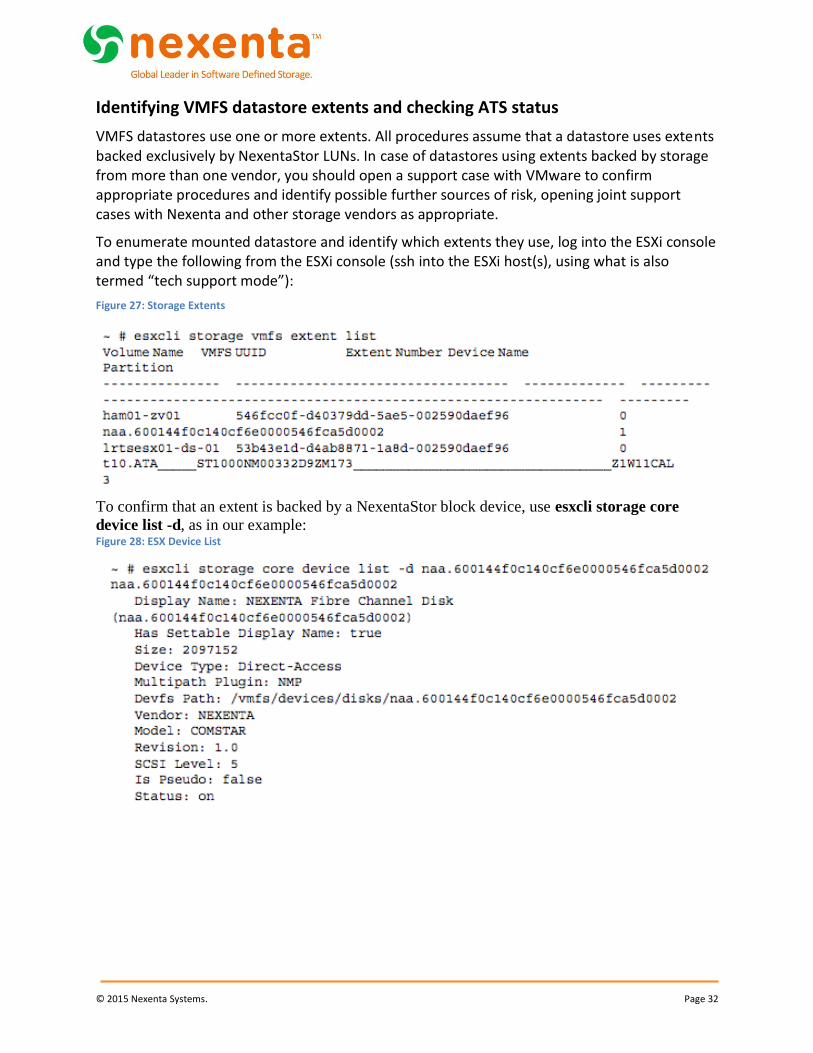
To enumerate mounted datastore and identify which extents they use, log into the ESXi console and type the following from the ESXi console (ssh into the ESXi host(s), using what is also termed “tech support mode”):
Figure 27: Storage Extents
To confirm that an extent is backed by a NexentaStor block device, use esxcli storage core
device list -d, as in our example: Figure 28: ESX Device List

© 2015 Nexenta Systems. Page 33
Devices exported from NexentaStor are evident because the Vendor field is set to NEXENTA. For each mounted datastore using NextaStor-exported extents, use vmkfstools -Phv1 / vmfs/volumes/ to confirm that ATS is enabled, as in our example:
Figure 29: ATS Mode Validation
The "ATS-only" output in the mode line indicates that the datastore is configured to use ATS. If that element is not present in the mode line, the datastore is not configured to use ATS.
Disabling ATS on Existing Datastores
© 2015 Nexenta Systems. Page 34
If you need to disable VAAI, Nexenta recommends disabling ATS on a per-device basis, consistent with VMware’s recommendation in KB 2006858:
Disabling VAAI entirely on the ESXi host may introduce issues in the environment. Instead of disabling VAAI for all devices, you can be disable it only for the affected LUN without impacting other LUNs.
To identify VMFS datastores using NexentaStor storage and check their ATS status, see the section “Identifying VMFS datastore extents and checking ATS status”.
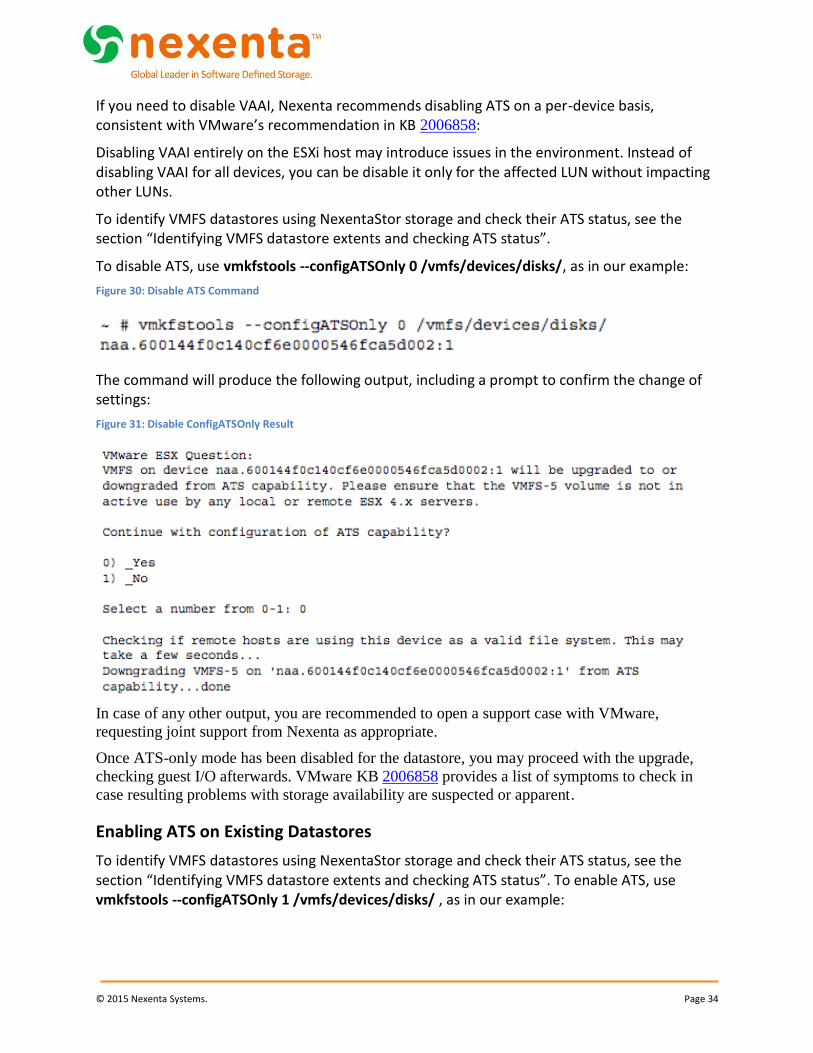
To disable ATS, use vmkfstools --configATSOnly 0 /vmfs/devices/disks/, as in our example:
Figure 30: Disable ATS Command
The command will produce the following output, including a prompt to confirm the change of settings:
Figure 31: Disable ConfigATSOnly Result
In case of any other output, you are recommended to open a support case with VMware,
requesting joint support from Nexenta as appropriate.
Once ATS-only mode has been disabled for the datastore, you may proceed with the upgrade,
checking guest I/O afterwards. VMware KB 2006858 provides a list of symptoms to check in
case resulting problems with storage availability are suspected or apparent.
Enabling ATS on Existing Datastores
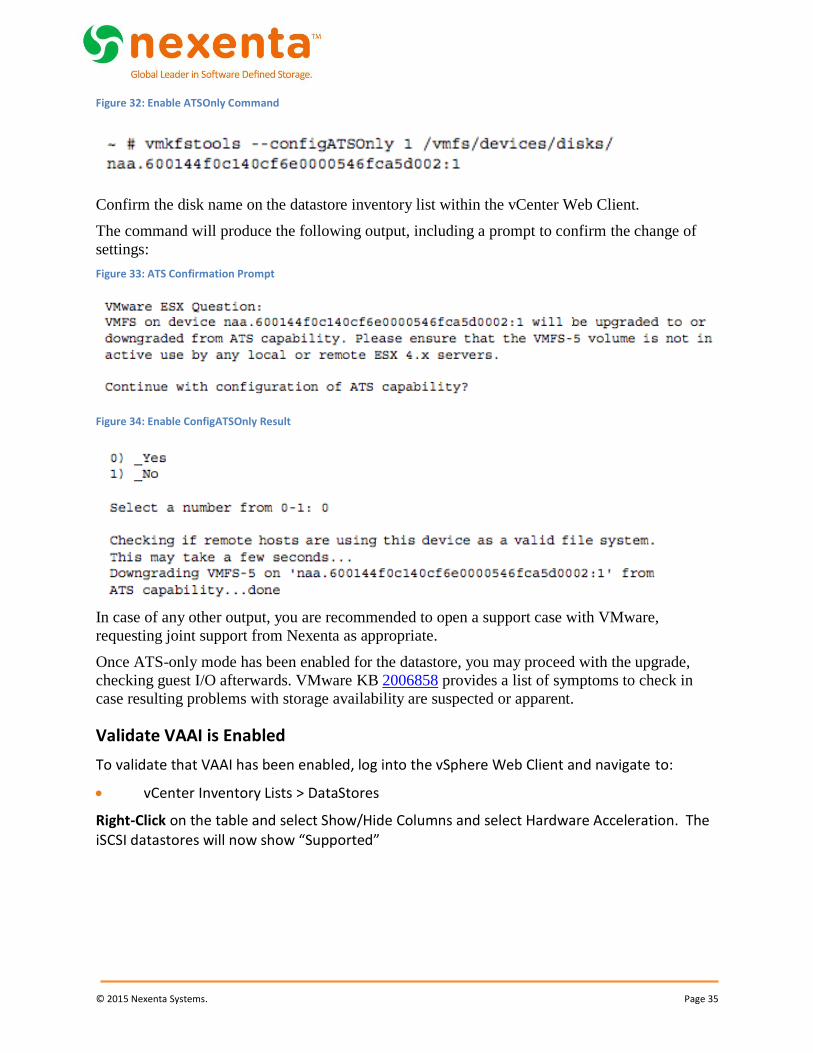
To identify VMFS datastores using NexentaStor storage and check their ATS status, see the section “Identifying VMFS datastore extents and checking ATS status”. To enable ATS, use vmkfstools --configATSOnly 1 /vmfs/devices/disks/ , as in our example:
© 2015 Nexenta Systems. Page 35
Figure 32: Enable ATSOnly Command
Confirm the disk name on the datastore inventory list within the vCenter Web Client.
The command will produce the following output, including a prompt to confirm the change of
settings:
Figure 33: ATS Confirmation Prompt
Figure 34: Enable ConfigATSOnly Result
In case of any other output, you are recommended to open a support case with VMware,
requesting joint support from Nexenta as appropriate.
Once ATS-only mode has been enabled for the datastore, you may proceed with the upgrade,
checking guest I/O afterwards. VMware KB 2006858 provides a list of symptoms to check in
case resulting problems with storage availability are suspected or apparent.
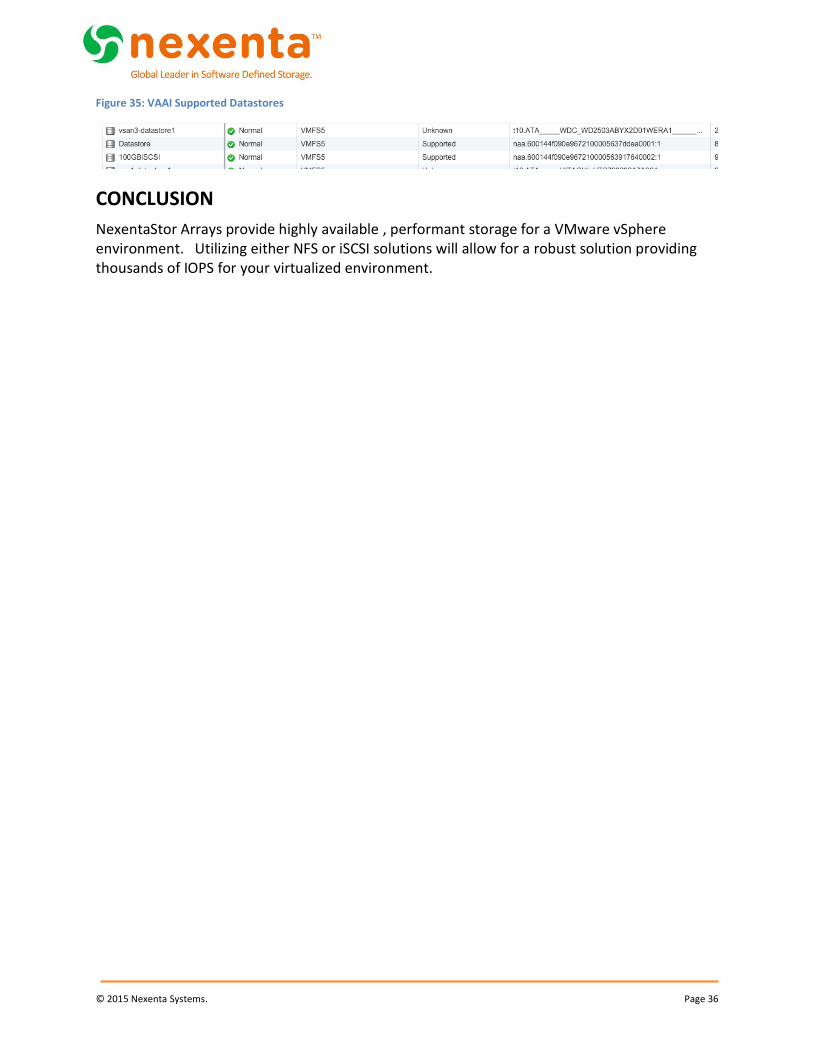
Validate VAAI is Enabled
To validate that VAAI has been enabled, log into the vSphere Web Client and navigate to:
vCenter Inventory Lists > DataStores
Right-Click on the table and select Show/Hide Columns and select Hardware Acceleration. The iSCSI datastores will now show “Supported”
© 2015 Nexenta Systems. Page 36
Figure 35: VAAI Supported Datastores
CONCLUSION
NexentaStor Arrays provide highly available , performant storage for a VMware vSphere environment. Utilizing either NFS or iSCSI solutions will allow for a robust solution providing thousands of IOPS for your virtualized environment.

© 2015 Nexenta Systems. Page 37
Figure List Figure 1: Typical HA Configuration with Multiple JBODs................................................................ 7
Figure 2: High Availability Network Configuration ......................................................................... 8
Figure 3: Create Network Interface .............................................................................................. 10
Figure 4: Dataset creation wizard ................................................................................................. 11
Figure 5: Folder creation screen ................................................................................................... 12
Figure 6: Folder Properties ........................................................................................................... 13
Figure 7: Editing NFS Access Rights............................................................................................... 14
Figure 8: Disabling Anonymous Access ......................................................................................... 14
Figure 9: Accessing ESX Advanced Settings .................................................................................. 16
Figure 10: VMware NFS Advance Settings .................................................................................... 16
Figure 11: vSphere Client login ..................................................................................................... 17
Figure 12: NFS Storage Type ......................................................................................................... 18
Figure 13: NFS Connection Properties .......................................................................................... 18
Figure 14: Creating Initiator Groups ............................................................................................. 20
Figure 15: Creating Target Groups ................................................................................................ 21
Figure 16: ZVOL Creation Options................................................................................................. 22
Figure 17: How to map a ZVOL ..................................................................................................... 23
Figure 18: Adding the iSCSI Software Adapter ............................................................................. 23
Figure 19: Finding the IQN of the iSCSI Software Adapter ........................................................... 23
Figure 20: Advanced Settings for iSCSI Parameters ...................................................................... 24
Figure 21: vSwitch with two VMkernel ports ............................................................................... 25
Figure 22: VMkernel properties for iSCSI1 & iSCSI2 ..................................................................... 25
Figure 23: Properly added port groups on an iSCSI adapter ........................................................ 26
Figure 24: Adding a Target Server within Dynamic Discovery ...................................................... 27
Figure 25: iSCSI Device presented to ESX host ............................................................................. 27
Figure 26: iSCSI Storage Type ........................................................................................................ 28
Figure 27: Storage Extents ............................................................................................................ 32
Figure 28: ESX Device List ............................................................................................................. 32
Figure 29: ATS Mode Validation ................................................................................................... 33
Figure 30: Disable ATS Command ................................................................................................. 34
Figure 31: Disable ConfigATSOnly Result ...................................................................................... 34
Figure 32: Enable ATSOnly Command .......................................................................................... 35
Figure 33: ATS Confirmation Prompt ............................................................................................ 35
Figure 34: Enable ConfigATSOnly Result ....................................................................................... 35
Figure 35: VAAI Supported Datastores ......................................................................................... 36

© 2015 Nexenta Systems. Page 38
Abbreviations
Abbreviation Definition
ATS Atomic Test & Set - an instruction used to write to a memory location and return its old value as a single atomic (i.e., non-interruptible) operation
LACP Link Aggregation Control Protocol (LACP)
NFSD Service that answers NFS requests from client machines.
PSP Path Selection Plugins
SATP Storage Array Type Plug-in
VAAI vStorage API for Array Integration (VAAI) is an application program interface (API) framework from VMware that enables certain storage tasks, such as thin provisioning, to be offloaded from the VMware server virtualization hardware to the storage array.
ZVOL Block based, iSCSI presented device