BERMAD Irrigation · DC IRRIGATION CONTROL BERMAD Irrigation The information herein is subject to...
12
DC IRRIGATION CONTROL BERMAD Irrigation The information herein is subject to change without notice. BERMAD shall not be held liable for any errors. All rights reserved. © Copyright by BERMAD. [email protected] • www.bermad.com User Manual
Transcript of BERMAD Irrigation · DC IRRIGATION CONTROL BERMAD Irrigation The information herein is subject to...
DC IRRIGATION CONTROL
BERMAD Irrigation
The information herein is subject to change without notice. BERMAD shall not be held liable for any errors. All rights reserved. © Copyright by BERMAD.
[email protected] • www.bermad.com
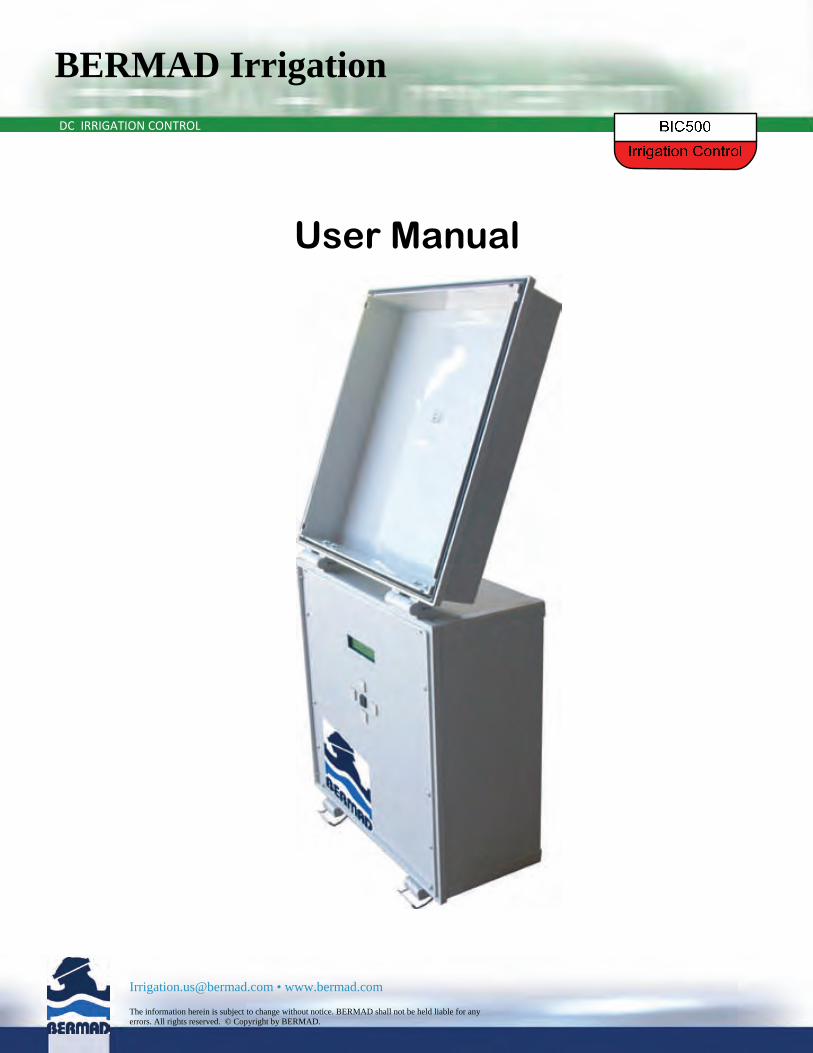
User Manual
DC IRRIGATION CONTROL
BERMAD Irrigation
The information herein is subject to change without notice. BERMAD shall not be held liable for any errors. All rights reserved. © Copyright by BERMAD.
[email protected] • www.bermad.com
GENERAL FEATURES
Modular structure – existing in 2, 4, 8, 12 or 16 outputs and 4 dry contact inputs
Outputs may be configured as: 0 or 1 main valve 0 or 1 fertilizer injector 1 up to 16 irrigation valves 0 or 9 filter station
Inputs can be allocated for 1 water meter, 1 fertilizer meter, 1 pressure sensor, 1 differential pressure sensor. In place of one of these sensors a start by tensiometer contact can be allocated
Activating 2 wired pulse latching solenoids Energized by standard alkaline batteries Detecting low battery condition Optional communication for remote programming
through a PC (for 2, 4, 8 outputs models only) Optionally utilizing the SMS system for sending
alarm messages (for 2, 4, 8 outputs models only)
IRRIGATION AND FERTIGATION
Water dosing by time units or volumetric units, specified per each valve individually
The days of irrigation can be set either as a constant cycle or as a RUN-LIST
Cycles within the irrigation day (pulse irrigation) Fertilizer dosage by time or by volume Injecting fertilizer continuously or proportionally
Fert/water proportion can be specified as: time/time; volume/volume; time/volume; volume/time Three stage fertigation: pre- watering, injection, post watering Main valve operation: delayed, advanced, or simultaneous with the irrigation valves Filter flushing , by time and/ or pressure differential Detecting endless looping problem in the flushing process and converting to flushing by time only High/ low flow control and leakage detection Low pressure wait Optional STOP-TIME definition Manual activation of programs and individual valves

DC IRRIGATION CONTROL
BERMAD Irrigation
The information herein is subject to change without notice. BERMAD shall not be held liable for any errors. All rights reserved. © Copyright by BERMAD.
[email protected] • www.bermad.com
TABLE OF CONTENTS
How to use the keyboard ? ............................................................................................... .4 The menu .......................................................................................................................... .4 The system configuration ................................................................................................. ..4 The system constants ........................................................................................................ 5 Communication ................................................................................................................. .5 Irrigation ............................................................................................................................ .6
Preparing irrigation programs ................................................................................. ….6 Setting the water dosage ........................................................................................... .6 Setting the fertilizer dosage ...................................................................................... ..7 Setting water before and after fertilization ............................................................ …..7 Setting cycles per day .................................................................................................8 Setting the starting mode ........................................................................................... 8 Setting the irrigation days .......................................................................................... 8 Combining valves for working together .................................................................... ..9 Manually starting stopping programs ....................................................................... ..9 Freezing system activities .............................................................................. ........... 9 Clearing error statuses ............................................................................................. 10
Manual activation of outputs .......................................................................................... .10 Problems detectable by the system................................................................................ .10 Accumulators ................................................................................................................... 11 Filters backflushing ......................................................................................................... 11 Technical information ...................................................................................................... 11

DC IRRIGATION CONTROL
BERMAD Irrigation
The information herein is subject to change without notice. BERMAD shall not be held liable for any errors. All rights reserved. © Copyright by BERMAD.
[email protected] • www.bermad.com
HOW TO USE THE KEYBOARD ?
The BIC500 is equipped with a keyboard of 5 buttons serving both the data insertion and the movement between screens. The black key in the middle, known as the ENTER key, is used for changing the function of the other 4 keys known as the arrow keys. The data insertion mode is indicated by a blinking black rectangle appearing on the screen in one of the editable fields, this is the cursor. During data insertion the vertical arrows are used for changing the value underneath the cursor, and the horizontal arrows enable the move-ment of the cursor between the digits. The ENTER key serves also for confirmation of the inserted value, and for movement to the next editable field on the screen. After passing the last editable field, the cursor disappears from the screen indicating the end of the data insertion mode. At this stage the 4 arrow keys can be used for movement between screens.
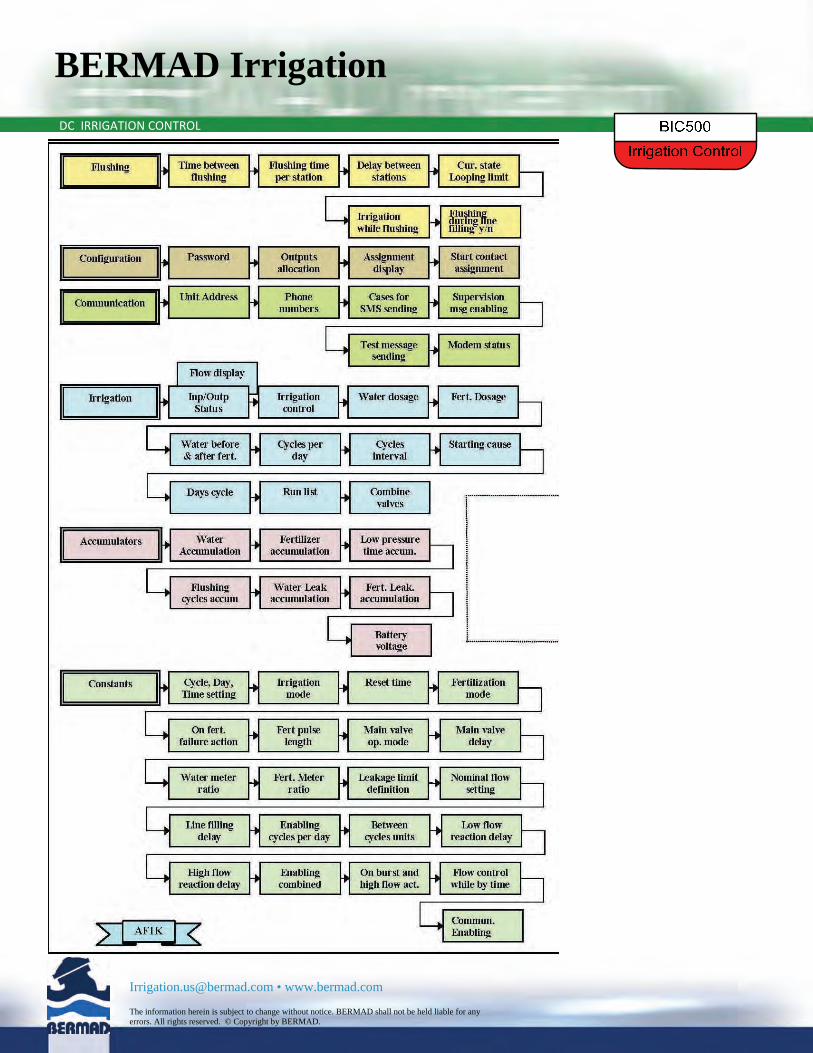
THE MENU
The list of subjects included in the controller is displayed in a series of vertical screens constituting a menu from which the desired subject can be selected. While being in the data display mode (outside of data insertion mode) the menu can be reached from any screen by moving repeatedly to the left (using the left arrow key) until arriving to the screen of the menu called IRRIGATION. From this point all other subjects of the menu can be reached using the vertical arrows. When the desired subject is reached, use the right arrow key to move into the list of screens belonging to the selected subject.
The subjects included in the menu are as follows: • CONFIGURATION • COMMUNICATION (available only when enabled in the constants) • IRRIGATION • ACCUMULATORS • CONSTANTS • FLUSHING (available only when the configuration contains a filter)
THE SYSTEM CONFIGURATION
The system is protected against unintentional changes of the configuration by a password which is 139. The existing configuration can be inspected any time, but changes will not be permitted while irrigation is in progress.
The number of available outputs depends on the model, the options are 2, 4 or 8 outputs. One can be allocated for main-valve/pump, one for fertilizer injector, and the number of stations allocated for filters back-flushing depends on the software version. Up to version 3.07 there could be only 1 filter station, but from version 4.00 and above there can be up to 7. Any remaining outputs can be used for irrigation valves. To make room for main-valve/fertilizer/filter definition, the number of irrigation valves need sometimes to be reduced.
While setting the configuration the following items are defined:
• The number of irrigation valves to be controlled (abbreviated as IRG) • The existence of a main-valve/pump to be controlled (abbreviated as MV) • The existence of a fertilizer injector to be controlled (abbreviated as FRT) • (in version 3.07) The existence of a filter to be back-flushed (abbreviated as FLT) • (in version 4.00) The number of filter stations for back-flushing (abbreviated as FLT)

DC IRRIGATION CONTROL
BERMAD Irrigation
The information herein is subject to change without notice. BERMAD shall not be held liable for any errors. All rights reserved. © Copyright by BERMAD.
[email protected] • www.bermad.com
At the end of the outputs configuration, the screen to the right shows the outputs assignment map, indicating the position allo-cated for each of the defined outputs. The meaning of the abbreviations can be found in a screen above the map.
When connecting the devices to the output terminals it is important to pay attention to the fact that the common terminals marked by "c" on the main board and on the extension boards are not the same. For solenoids connected to the main board the commons of the main board must be used, for solenoids connected to the extension boards, the common of the specific exten-sion board must be used.
Regarding the inputs, the BIC500 can handle 4 input devices:
• water meter - input 1 • fertilizer meter - input 2 • pressure sensor - input 3 • differential pressure sensor - input 4 Starting from version 4.00 one of the four inputs can be replaced by a "start contact", the selected input will no longer serve it's original function but instead will start the program of valve 1 each time the contact is closed. When irrigated due to the "start contact" valve 1 will not irrigate again by time during the following 24 hours. This feature can be used for irrigating by tensiome-ter.
THE SYSTEM CONSTANTS
The system constant parameters include the followings:
• Time settings – including current time, machine cycle and current day • Irrigation mode – by time ‘t’, or by volume ‘v’ • Irrigation time units – ‘hour:min’ or ‘min:sec’ • Reset time – the time at which all programs are forced to stop • Fertilization mode – dosing fert. by time or volume, injecting continuously or proportionally • Reaction on fertilizer failure – continue without fert., or stop irrigating the problematic valve • Fertilizer pulse length – used for time based proportional fertigation • Main valve’s operation – delayed, advanced or simultaneously with the irrigation valves • Main valve’s delay – when delayed or advanced operation specified • Water meter’s ratio – the volume represented by each pulse of the water meter • Fert. meter’s ratio – the volume represented by each pulse of the fert. meter • Burst limit – the number of illegal pulses defining a water or fertilizer leakage problem • Flow control parameters – nominal flow, minimal flow and maximal flow per valve • Line filling delay – expressed in minutes, defined per each valve individually • Cycles per day – enabling or disabling • Cycles interval units – ‘hour:min’ or ‘min:sec’ to be used when cycles per day are enabled • Reaction delay for low flow – specifies the delay in minutes from detection to reaction of low flow • Reaction delay for high flow – specifies the delay in minutes from detection to reaction of high flow • Combined mode – enabling or disabling combining valves for working together • Stop if burst or high flow – Yes/No • Flow control during time based irrigation – enabling or disabling • Communication – enabling or disabling communication to cellular phone or remote PC

DC IRRIGATION CONTROL
BERMAD Irrigation
The information herein is subject to change without notice. BERMAD shall not be held liable for any errors. All rights reserved. © Copyright by BERMAD.
[email protected] • www.bermad.com
COMMUNICATION
Setting up the communication system consists of the following steps:
• Defining the unit’s identification number (1-2 digits) • Defining 3 phone numbers to which the SMS messages will be directed • Defining the events for which SMS messages will be sent • Enabling/disabling supervision messages • Setting the time for sending the supervision messages • Setting the days cycle for sending the supervision messages • Sending an immediate SMS for testing • Showing the status of the cellular modem
IRRIGATION
Included under the title of IRRIGATION there are all the screens that enable defining, activating and inspecting the operation of irriga-tion/fertigation programs.
In the BIC500, irrigation programs are defined per each valve individually. In case of need the individual programs can be chained to work sequentially one after the other.
When the “combined” mode is enabled, valves can be combined in order to work together under the same program, and this is the only way that more than one irrigation valve can be opened at the same time. In any other case if a program tries to start while an-other program is already running, the new program will wait until the other program will finish. In the “combined” mode the accumula-tion will be on the leading valve only.
The screens of IRRIGATION include the following ones:
• The status of outputs, and inputs screen • The water and fertilizer flow display (appears above the outputs/inputs status screen)
• The Irrigation control screen • The water dosage screen • The fertilizer dosage screen (appears only when there is a fertilizer included in the configuration)
• Water before and water after fertilization (appears only when there is a fertilizer included in the configuration)
• Cycles per day definition screen (appears only when cycles per day were enabled)
• Interval between cycles definition screen (appears only when cycles per day were enabled)
• The starting mode definition screen. • The “Days Cycle” definition screen • The “Run-List” definition screen • A screen for combining valves to the program (appears only when combined mode was enabled)
PREPARING IRRIGATION PROGRAMS
An irrigation program definition starts with defining the water dosage in the third screen of the IRRIGATION row.
SETTING THE WATER DOSAGE
The water dosage can be specified volumetrically or by time units, depending on the selection made for the specific valve in the CON-STANTS, in the “irrigation mode” screen. A valve marked by “V” will irrigate by volume and if marked by “t” will irrigate by time.

DC IRRIGATION CONTROL
BERMAD Irrigation
The information herein is subject to change without notice. BERMAD shall not be held liable for any errors. All rights reserved. © Copyright by BERMAD.
[email protected] • www.bermad.com
Select the desired valve by using the vertical arrows,. Valves are also known as stations and they are marked as S1,S2, etc… Push the ENTER key to start edit mode (indicated by the blinking cursor). Set the desired water dosage next to the word ‘Water’ and push the ENTER key to confirm. The cursor moves next to the word ‘Left’. During irrigation this field shows the quantity left to be irrigated and it can be changed when needed. Inserting a nonzero value in this field before irrigation starts, will cause the next irrigation to sup-ply the left quantity instead of the programmed quantity, this therefore is the way to make a single time change.
SETTING THE FERTILIZER DOSAGE
The fertilizer dosage mode and the injection mode are set in the “Fertilization mode” screen in the CONSTANTS.
The “Fertilization mode” screen is shown to the right. The injection mode can be proportional or bulk, the dosage mode can be volu-metric or time based, all combinations are allowed. In the proportional injection, the specified fertilizer quantity will be injected in pulses proportional to the water, divided in such a way that the specified amount of fertilizer will be fully supplied when reaching the “water after” stage or, when completing the water dosage. Bulk injection means continuously injecting all the specified amount of fertil-izer.
The following drawing shows the difference between bulk and proportional injection modes: water before water during fertilization
DC IRRIGATION CONTROL
BERMAD Irrigation
The information herein is subject to change without notice. BERMAD shall not be held liable for any errors. All rights reserved. © Copyright by BERMAD.
[email protected] • www.bermad.com
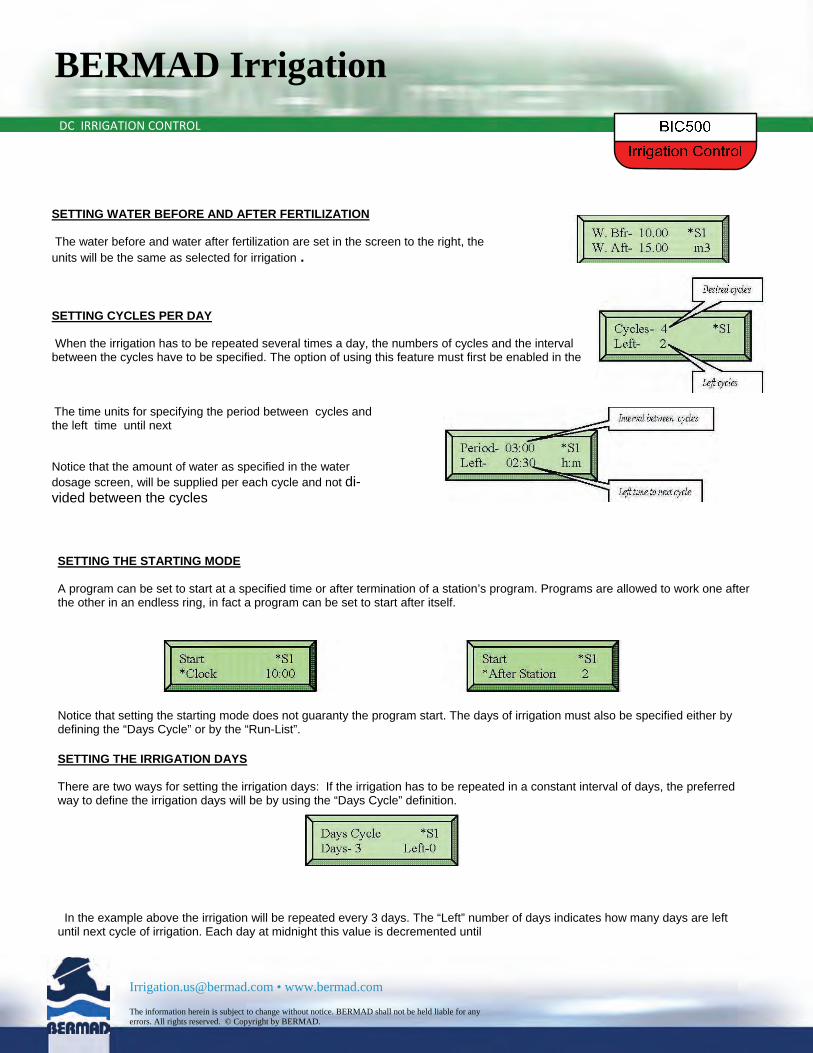
SETTING WATER BEFORE AND AFTER FERTILIZATION The water before and water after fertilization are set in the screen to the right, the units will be the same as selected for irrigation .
SETTING CYCLES PER DAY When the irrigation has to be repeated several times a day, the numbers of cycles and the interval between the cycles have to be specified. The option of using this feature must first be enabled in the
The time units for specifying the period between cycles and the left time until next Notice that the amount of water as specified in the water dosage screen, will be supplied per each cycle and not di-vided between the cycles
SETTING THE STARTING MODE A program can be set to start at a specified time or after termination of a station’s program. Programs are allowed to work one after the other in an endless ring, in fact a program can be set to start after itself.
Notice that setting the starting mode does not guaranty the program start. The days of irrigation must also be specified either by defining the “Days Cycle” or by the “Run-List”. SETTING THE IRRIGATION DAYS There are two ways for setting the irrigation days: If the irrigation has to be repeated in a constant interval of days, the preferred way to define the irrigation days will be by using the “Days Cycle” definition.
In the example above the irrigation will be repeated every 3 days. The “Left” number of days indicates how many days are left until next cycle of irrigation. Each day at midnight this value is decremented until
DC IRRIGATION CONTROL
BERMAD Irrigation
The information herein is subject to change without notice. BERMAD shall not be held liable for any errors. All rights reserved. © Copyright by BERMAD.
[email protected] • www.bermad.com
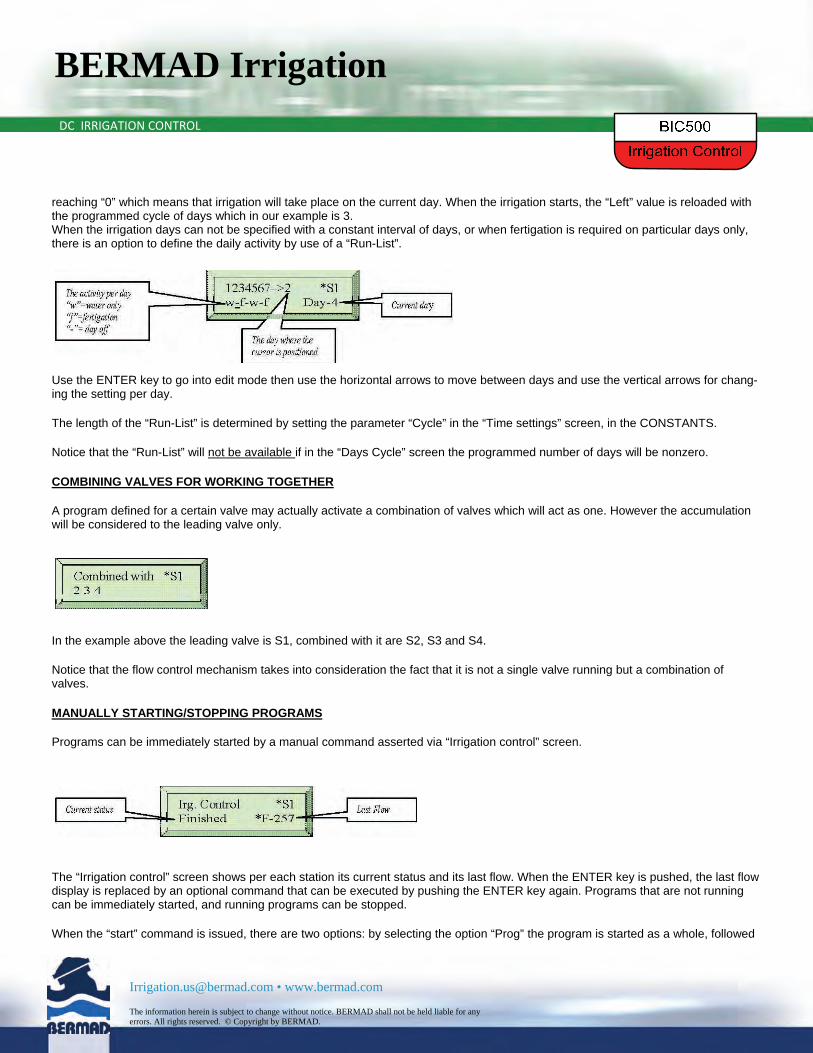
reaching “0” which means that irrigation will take place on the current day. When the irrigation starts, the “Left” value is reloaded with the programmed cycle of days which in our example is 3. When the irrigation days can not be specified with a constant interval of days, or when fertigation is required on particular days only, there is an option to define the daily activity by use of a “Run-List”.
Use the ENTER key to go into edit mode then use the horizontal arrows to move between days and use the vertical arrows for chang-ing the setting per day.
The length of the “Run-List” is determined by setting the parameter “Cycle” in the “Time settings” screen, in the CONSTANTS.
Notice that the “Run-List” will not be available if in the “Days Cycle” screen the programmed number of days will be nonzero.
COMBINING VALVES FOR WORKING TOGETHER
A program defined for a certain valve may actually activate a combination of valves which will act as one. However the accumulation will be considered to the leading valve only.
In the example above the leading valve is S1, combined with it are S2, S3 and S4.
Notice that the flow control mechanism takes into consideration the fact that it is not a single valve running but a combination of valves.
MANUALLY STARTING/STOPPING PROGRAMS
Programs can be immediately started by a manual command asserted via “Irrigation control” screen.
The “Irrigation control” screen shows per each station its current status and its last flow. When the ENTER key is pushed, the last flow display is replaced by an optional command that can be executed by pushing the ENTER key again. Programs that are not running can be immediately started, and running programs can be stopped.
When the “start” command is issued, there are two options: by selecting the option “Prog” the program is started as a whole, followed
DC IRRIGATION CONTROL
BERMAD Irrigation
The information herein is subject to change without notice. BERMAD shall not be held liable for any errors. All rights reserved. © Copyright by BERMAD.
[email protected] • www.bermad.com
only the selected valve's program will start, and if there are “Cycles per day” defined, only one cycle will be executed. When the “Stop” command is issued, not only the running program is stopped but also the chain of programs which are designed to follow it, will not be executed.
FREEZING SYSTEM ACTIVITIES
While being inside “Irrigation control” screen and instead of selecting the Start/Stop commands, the vertical arrows can be used in order to reach the “Freeze” command. When executed, the “Freeze” command causes a general system freeze, closing all outputs and halting all programs until receiving the “Resume” command in the same way.
CLEARING ERROR STATUSES
The “Irrigation control” screen is also used for clearing error statuses. While the error status is displayed pushing the ENTER key re-veals the “Clear” command. When executed, the “Clear” command removes the error status from the system. For example if fertiliza-tion has stopped because of a fertilizer failure, after executing the “Clear” command, fertilization will continue.
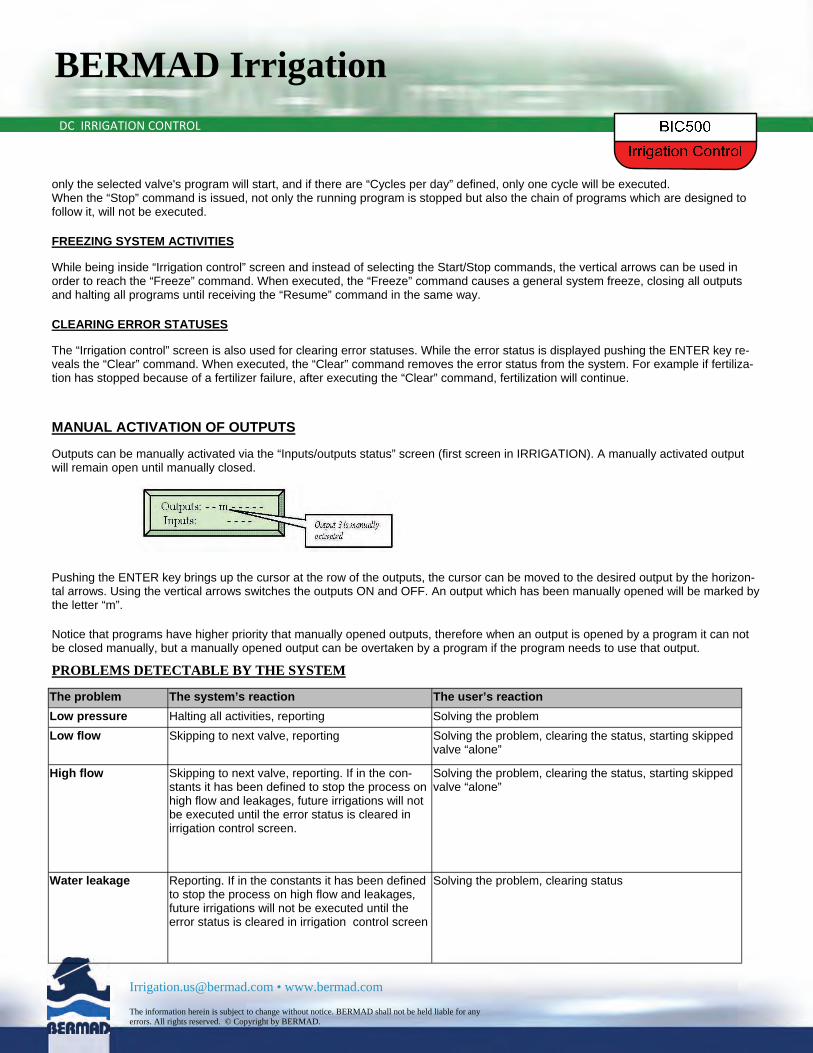
MANUAL ACTIVATION OF OUTPUTS
Outputs can be manually activated via the “Inputs/outputs status” screen (first screen in IRRIGATION). A manually activated output will remain open until manually closed.
Pushing the ENTER key brings up the cursor at the row of the outputs, the cursor can be moved to the desired output by the horizon-tal arrows. Using the vertical arrows switches the outputs ON and OFF. An output which has been manually opened will be marked by the letter “m”.
Notice that programs have higher priority that manually opened outputs, therefore when an output is opened by a program it can not be closed manually, but a manually opened output can be overtaken by a program if the program needs to use that output.
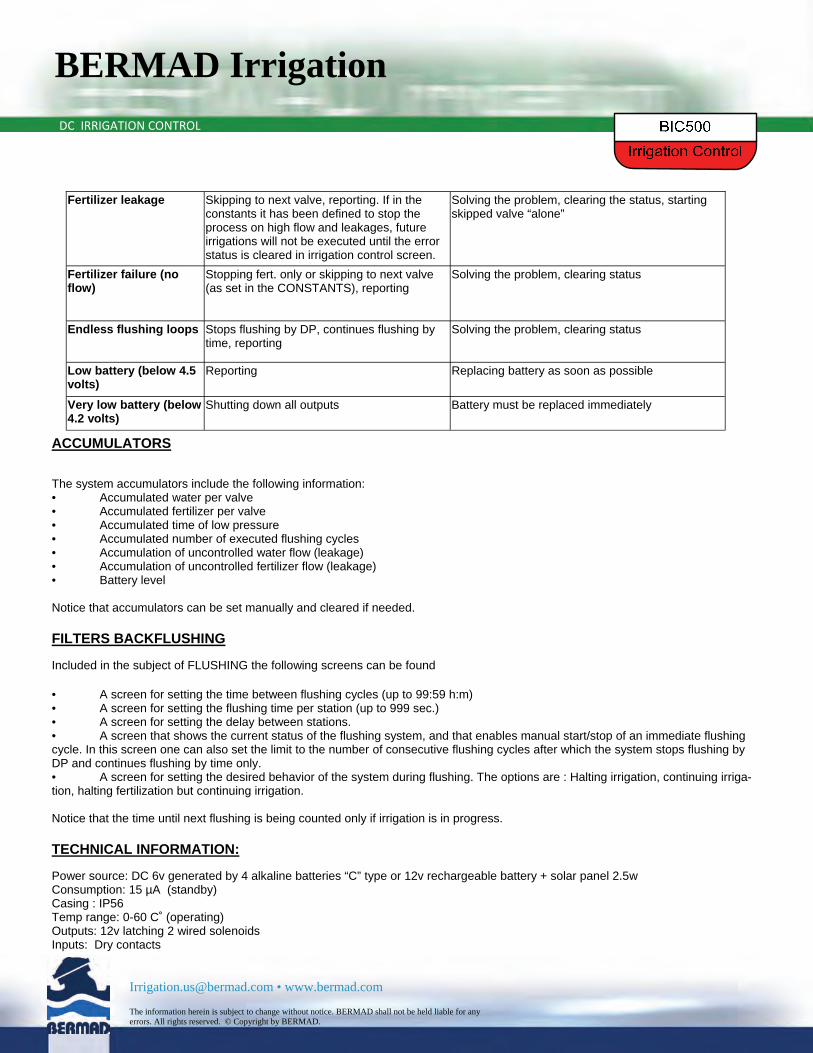
PROBLEMS DETECTABLE BY THE SYSTEM
The problem The system’s reaction The user’s reaction
Low pressure Halting all activities, reporting Solving the problem
Low flow Skipping to next valve, reporting Solving the problem, clearing the status, starting skipped valve “alone”
High flow Skipping to next valve, reporting. If in the con-stants it has been defined to stop the process on high flow and leakages, future irrigations will not be executed until the error status is cleared in irrigation control screen.
Solving the problem, clearing the status, starting skipped valve “alone”
Water leakage Reporting. If in the constants it has been defined to stop the process on high flow and leakages, future irrigations will not be executed until the error status is cleared in irrigation control screen
Solving the problem, clearing status
DC IRRIGATION CONTROL
BERMAD Irrigation
The information herein is subject to change without notice. BERMAD shall not be held liable for any errors. All rights reserved. © Copyright by BERMAD.
[email protected] • www.bermad.com
Fertilizer leakage Skipping to next valve, reporting. If in the constants it has been defined to stop the process on high flow and leakages, future irrigations will not be executed until the error status is cleared in irrigation control screen.
Solving the problem, clearing the status, starting skipped valve “alone”
Fertilizer failure (no flow)
Stopping fert. only or skipping to next valve (as set in the CONSTANTS), reporting
Solving the problem, clearing status
Endless flushing loops Stops flushing by DP, continues flushing by time, reporting
Solving the problem, clearing status
Low battery (below 4.5 volts)
Reporting Replacing battery as soon as possible
Very low battery (below 4.2 volts)
Shutting down all outputs Battery must be replaced immediately
ACCUMULATORS
The system accumulators include the following information: • Accumulated water per valve • Accumulated fertilizer per valve • Accumulated time of low pressure • Accumulated number of executed flushing cycles • Accumulation of uncontrolled water flow (leakage) • Accumulation of uncontrolled fertilizer flow (leakage) • Battery level Notice that accumulators can be set manually and cleared if needed.
FILTERS BACKFLUSHING
Included in the subject of FLUSHING the following screens can be found
• A screen for setting the time between flushing cycles (up to 99:59 h:m) • A screen for setting the flushing time per station (up to 999 sec.) • A screen for setting the delay between stations. • A screen that shows the current status of the flushing system, and that enables manual start/stop of an immediate flushing cycle. In this screen one can also set the limit to the number of consecutive flushing cycles after which the system stops flushing by DP and continues flushing by time only. • A screen for setting the desired behavior of the system during flushing. The options are : Halting irrigation, continuing irriga-tion, halting fertilization but continuing irrigation. Notice that the time until next flushing is being counted only if irrigation is in progress.
TECHNICAL INFORMATION:
Power source: DC 6v generated by 4 alkaline batteries “C” type or 12v rechargeable battery + solar panel 2.5w Consumption: 15 µA (standby) Casing : IP56 Temp range: 0-60 C˚ (operating) Outputs: 12v latching 2 wired solenoids Inputs: Dry contacts
DC IRRIGATION CONTROL
BERMAD Irrigation
The information herein is subject to change without notice. BERMAD shall not be held liable for any errors. All rights reserved. © Copyright by BERMAD.
[email protected] • www.bermad.com