Belltech Performance Suspension Parts Systems … · 4a) Raise the axle ... Take the vehicle to a...
7
1 INSTALLATION INSTRUCTIONS 6442 & 6443 5.5” REAR AXLE FLIP-KIT 2009-2012 FORD F-150 2WD SHORT BED Thank you for being selective enough to choose our high quality BELLTECH PRODUCT. We have spent many hours developing our line of products so that you will receive maximum performance with minimum difficulty during installation. Note: Confirm that all of the hardware listed in the parts list (page 7) is in the kit. DO NOT begin installation if any part is missing. Read the instructions thoroughly before beginning this installation. Warning: DO NOT work under a vehicle supported by only a jack. Place support stands securely under the vehicle in the manufacturer’s specified locations unless otherwise instructed. Warning: DO NOT drive vehicle until all work has been completed and checked. Torque all hardware to values specified. Reminder: Proper use of safety equipment and eye/face/hand protection is absolutely necessary when using these tools to perform procedures! Note: It is very helpful to have an assistant available during installation. RECOMMENDED TOOLS: Properly rated floor jack and six (6) support stands Wheel chocks Metric socket set up to 27mm Metric combination wrench set up to 27mm Impact wrench C-clamps Power Drill Drill bit set Abrasive cutter Grinder Safety Glasses JACKING, SUPPORTING AND PREPARING THE VEHICLE a) Block the front wheels of the vehicle with appropriate wheel chocks. Make sure the vehicle’s transmission is in “Park” (automatic) or 1 st gear (manual). Activate the parking brake. b) Loosen, but DO NOT REMOVE, the rear wheel lug nuts. c) Lift the rear of the vehicle off the ground using a properly rated floor jack. Lift the vehicle so that the rear tires are approximately 6-8 inches off the ground surface. d) Support the vehicle using four (4) support stands, rated for the vehicle’s weight. The stands should be positioned, two on each of the frame rails, just forward of the front leaf spring hangers and just below the
-
Upload
nguyenhuong -
Category
Documents
-
view
225 -
download
0
Transcript of Belltech Performance Suspension Parts Systems … · 4a) Raise the axle ... Take the vehicle to a...

1
INSTALLATION INSTRUCTIONS
6442 & 6443 5.5” REAR AXLE FLIP-KIT
2009-2012 FORD F-150 2WD SHORT BED
Thank you for being selective enough to choose our high quality BELLTECH PRODUCT. We have spent many hours developing our line of products so that you will receive maximum performance
with minimum difficulty during installation.
Note: Confirm that all of the hardware listed in the parts list (page 7) is in the kit. DO NOT begin installation if any part is missing. Read the instructions thoroughly before beginning this installation.
Warning: DO NOT work under a vehicle supported by only a jack. Place support stands securely under the vehicle in the manufacturer’s specified locations unless otherwise instructed.
Warning: DO NOT drive vehicle until all work has been completed and checked. Torque all hardware to values specified.
Reminder: Proper use of safety equipment and eye/face/hand protection is absolutely necessary when using these tools to perform procedures!
Note: It is very helpful to have an assistant available during installation.
RECOMMENDED TOOLS:
Properly rated floor jack and six (6) support stands
Wheel chocks
Metric socket set up to 27mm
Metric combination wrench set up to 27mm
Impact wrench
C-clamps
Power Drill
Drill bit set
Abrasive cutter
Grinder
Safety Glasses
JACKING, SUPPORTING AND PREPARING THE VEHICLE
a) Block the front wheels of the vehicle with appropriate wheel chocks. Make sure the vehicle’stransmission is in “Park” (automatic) or 1st gear (manual). Activate the parking brake.
b) Loosen, but DO NOT REMOVE, the rear wheel lug nuts.
c) Lift the rear of the vehicle off the ground using a properly rated floor jack. Lift the vehicle so that the reartires are approximately 6-8 inches off the ground surface.
d) Support the vehicle using four (4) support stands, rated for the vehicle’s weight. The stands should bepositioned, two on each of the frame rails, just forward of the front leaf spring hangers and just below the

2
rear leaf spring shackle hangers. Prior to lowering the vehicle onto stands, make sure the supports will securely contact the straight, flat portions of the frame rails. It is very important that the vehicle is properly supported during this installation to prevent frame damage and personal injury! Make sure that the support stands are properly placed prior to performing the following procedures.
e) Lower the vehicle slowly onto the stands and, before placing the vehicle’s weight on them, again checkthat they properly and securely contact the frame rails as described above. Check for possibleinterference with any lines, wires, or cables.
f) Remove the rear wheels from the vehicle.
SAFETY REMINDER: Check for safe vehicle stability before proceeding under the vehicle to begin thefollowing procedures. Never work under a vehiclesupported by only a jack. Always use properly ratedsupport stands to support the vehicle.
PRE-INSTALLATION / DIS-ASSEMBLY
The exhaust will need to be unbolted and lowered so the leaf spring hanger can be easily removed.
1. EXHAUST
1a) Remove the exhaust hanger brackets before and after the muffler as well as the exhaust hanger behind the rear axle. (photo 1)
2. LEAF SPRING REMOVALWarning: Leaf springs may be under tension. Springs under tension store a great amount of energy. Use caution during the following steps to avoid personal injury and/or damage to vehicle. Be careful not to damage the brake hoses and/or driveline while relocating rear axle assembly. 2a) Properly support the axle using a jack or lifting
device so that it can be raised and lowered. Also support the rear axle near the rear u-joint to keep the axle from rotating once unbolted.
2b) Remove both shocks using an 18mm and 15mm socket and or wrench.
2c) Remove the U-bolts using a 21mm socket (photo 2).
2d) Remove the lower shackle bolt that connects it to the rear hanger and leave the shackle connected to the spring at this time.
2e) Remove the passenger side front spring hanger bolt using a 24mm and 27mm socket and or wrench.
2f) Loosen the front spring hanger nut and bolt with 24mm and 27mm tools Back the bolt and nut off sufficiently to expose the bolt shank. Due to the fuel tank location, the driver side front spring hanger bolt needs to be cut off. Cut off the head of the bolt, being careful not to damage the fuel tank (photo 3).
1
3
2

3
2g) Mark the leaf springs “Left” and “Right”. Also mark each forward spring end with a forward pointing arrow so that the springs can be properly reinstalled into their original locations.
2h) Remove both leaf springs from under the vehicle. It might be necessary to lower the axle before they can be removed (photo 4).
3. LEAF SPRING PREPARATION
3a) Remove and reverse both center bolts on the leaf springs using a 19mm socket. DO NOT re-attach the U-bolt locating plate that’s bolted to the top of the spring: It is no longer needed. NOTE: It might be helpful to use a couple of C-clamps to hold the spring pack together while you reverse the center bolts, or loosen them and reverse one at a time. Tighten the center bolts using a vice grip and 19mm socket (photo 5).
3b) Remove the stock shackle using an 18mm and 21mm socket and or wrench.
3c) Install the new Belltech shackle onto the leaf spring. Do not tighten the shackle in place it will be tightened after the vehicle has been set down (photo 6).
3d) Repeat this process on the other leaf spring. 3e) Finally remove the bolt securing the brake hydraulic
line to the OEM leaf spring mount on each side of the axle using a 10mm socket (photo 7).
4. LEAF INSTALLATION
4a) Raise the axle upward into the vehicle so the springs may pass under the axle and bolt onto the chassis.
4b) Starting from the passenger side, place the leaf spring in the front spring hanger and insert the bolt, once in rotate the spring back and insert the lower shackle bolt in the rear hanger. Torque the front spring hanger bolt to 95 ft lb; leave the rear shackle bolt loose it will be tightened after the vehicle has been set down.
4
5
6 7

4
4c) Repeat this process on the driver side leaf spring. For the driver side front leaf spring bolt, used the supplied 18x2.5x140mm bolt, Nyloc and washers. The bolt will need to be inserted from outside in and torqued to 95 ft lb with 27mm tools.
4d) Install the two axle saddles onto the leaf springs with the two locating holes forward on the saddles.
4e) Lower the axle into the saddles ensuring the two tabs are positioned up inside the factory spring mount.
4f) Install the U-bolt Spring Pad Mount atop the axle, centering it atop the mount surface. (Photo 8) The U-Bolt Spring Pad Mount restricts slippage of the axle when torque is applied.
4g) Install the U-bolts and U-bolt plates onto the axle loosely threading the hardware in place.
4h) Tighten all the U-bolts using a 23mm socket. NOTE: The U-bolts are longer than necessary for ease of installation. After securely fastening the U-bolts, the excess ends can be trimmed (Photo 9).
4i) Install shorter length shock absorbers. THE OEM LENGTH SHOCKS WILL NO LONGER FIT. We recommend the Belltech Street Performance (2212EE) or Nitro Drop 2 lowering shocks (8523).
4j) Use the supplied Belltech12x1.25x75mm bolt and flange nut for the bottom shock mount. Torque to 60 ft lb using 19mm tools. Install and tighten the OEM nut and bolt for the upper shock mount to 60 ft lb using 10 and 18mm tools.
4k) Install the brake hydraulic line bracket and securing bolt using a 10mm socket tightened to 17 ft lb. It may be necessary to grind down the tip of the bolt for proper seating.
5. RE-ASSEMBLY
5a) Re-connect the three exhaust mounts to the chassis. 5b) Bend the parking brake cable support bracket attached to the passenger side of the rear axle so
that the parking brake cable has sufficient clearance from the hot exhaust tubing. 5c) Check to make sure that none of the hydraulic brake lines or ABS sensor lines running from the
frame to the driver side of the rear axle do not become pinched as the rear axle compresses. Zip tie or rearrange these lines if necessary.
6. DRIVELINE ADJUSTMENTS
For regular cab applications you will need to use the supplied Belltech transmission spacer to relocate the transmission in a higher position.
6a) Remove the two nuts located on the transmission mount, lifting the transmission high enough to install the supplied spacer. (photo 10).
6b) Lower the transmission onto the spacer and tighten the two nuts to 75 ft lb.
8
9
10

5
1-1/2
8”
2-3/8
Gas tank mount
Drill 9/16
Holes
Rear of vehicle
For models with two piece driveshafts you will need to re-locate the center carrier bearing mount.
6c) Move the driveline by unbolting the two center carrier-bearing bolts. Push the center carrier bearing towards the passenger side of the car and support it in place with a jack or stand. NOTE: Be very careful not to drop and dent or damage the two-piece driveline or it might have to be replaced.
6d) Remove the center-carrier bearing mount by cutting the weld that connects it to the cross member (photo 11). For best results use a thin abrasive cutting wheel.
6e) Use a grinder to clean up any excess material that was not cut off when removing the mount. You should have two smooth surfaces where the two welds were (photo 12).
6f) Drill two 9/16” holes in the cross member to re-attach the center-carrier bearing. Photo 13 shows the dimensions needed to layout the location of two holes for drilling. The dimensions will be referenced from welded gas tank mount and the front edge of the cross member (photo 14).
6g) Drill the two holes in the specified locations. The hole closest to the gas tank mount only needs to
be drilled threw the lower portion of the cross member because of the cutout directly above it. The second hole furthest away from the gas tank mount will need to pass threw the lower and upper section of the cross member (Photo 14).
6h) Connect the center-carrier bearing assembly onto the cross member using the supplied bolts, nuts, and washers (Photo 15). Tighten the bolts to 50 ft lb.
Rear of Vehicle
Gas Tank Mount
11
12
15
13 14
6
7. FINALIZING THE INSTALLATION
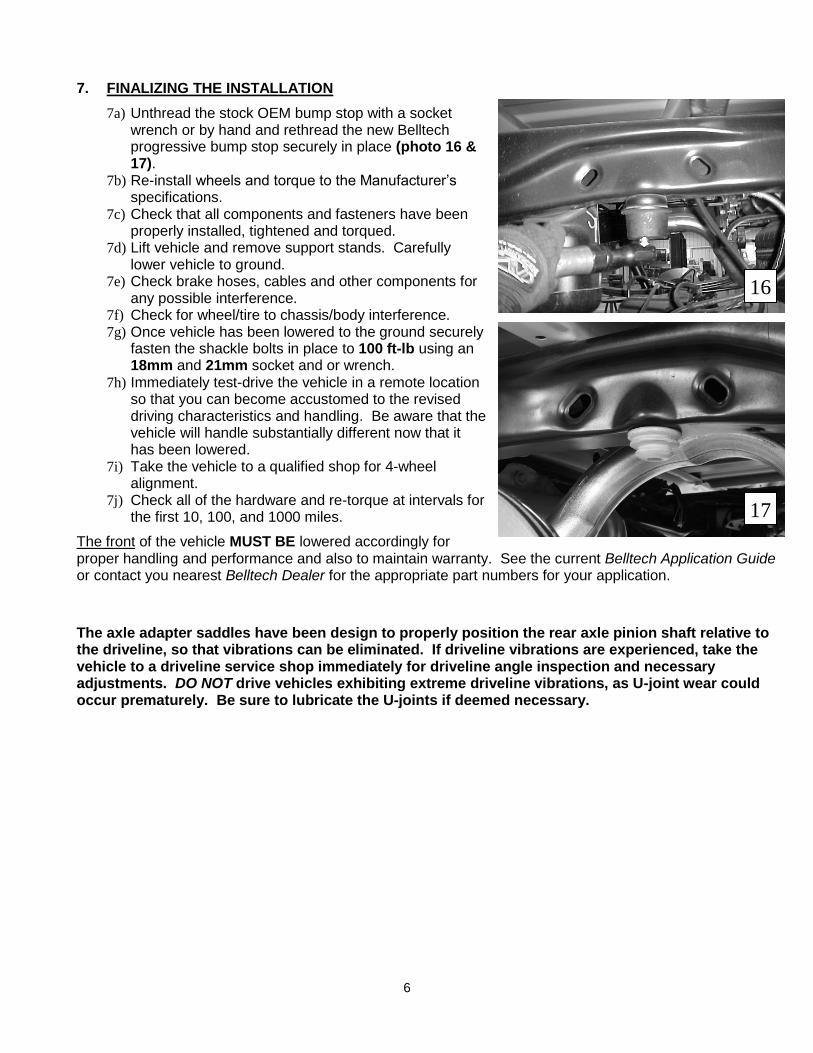
7a) Unthread the stock OEM bump stop with a socketwrench or by hand and rethread the new Belltech progressive bump stop securely in place (photo 16 & 17).
7b) Re-install wheels and torque to the Manufacturer’s specifications.
7c) Check that all components and fasteners have been properly installed, tightened and torqued.
7d) Lift vehicle and remove support stands. Carefully lower vehicle to ground.
7e) Check brake hoses, cables and other components for any possible interference.
7f) Check for wheel/tire to chassis/body interference. 7g) Once vehicle has been lowered to the ground securely
fasten the shackle bolts in place to 100 ft-lb using an 18mm and 21mm socket and or wrench.
7h) Immediately test-drive the vehicle in a remote location so that you can become accustomed to the revised driving characteristics and handling. Be aware that the vehicle will handle substantially different now that it has been lowered.
7i) Take the vehicle to a qualified shop for 4-wheel alignment.
7j) Check all of the hardware and re-torque at intervals for the first 10, 100, and 1000 miles.
The front of the vehicle MUST BE lowered accordingly for proper handling and performance and also to maintain warranty. See the current Belltech Application Guide or contact you nearest Belltech Dealer for the appropriate part numbers for your application.
The axle adapter saddles have been design to properly position the rear axle pinion shaft relative to the driveline, so that vibrations can be eliminated. If driveline vibrations are experienced, take the vehicle to a driveline service shop immediately for driveline angle inspection and necessary adjustments. DO NOT drive vehicles exhibiting extreme driveline vibrations, as U-joint wear could occur prematurely. Be sure to lubricate the U-joints if deemed necessary.
16
17

7
Parts List: 6442 & 6443
Part # Description Quantity
6442-025 Axle Adapter Saddle 2
6592-007 U-Bolt 9/16-18x31/8x9 4
110455 9/16-18 Locknut 8
110670 9/16” Washer 8
6440-020 U-Bolt Plate 2
5922-001 Bump Stop 2
6443-001 Transmission Spacer (6443 only) 1
110404 ½”-13 x 2 ¾” Flange Bolt (For CCB) 2
110401 Stover Lock Nut ½-13 (For CCB) 2
110660 ½” Washer (For CCB) 2
6702-100 Shackle 1/2” Lift 2
6440-002 U-Bolt Spring Pad Mount 2
112294 Stover Lock Nut 12-1.75 (for lower shock mount) 2
112053 M12 X 1.75 X 75mm Hex Bolt (for lower shock mount) 2
110264 M18-2.5 x 140mm Hex Bolt (for driver side front spring mount)
1
110265 M18-2.5 Nyloc nut (for driver side front spring mount) 1
We have the performance suspension parts that will help you achieve your performance goals, including lift and lowering kits, shocks, springs, sway bars, and more.