BELLMORE-MERRICK BROADCASTING...Communications II (BC II), a course designed for students enrolled...
115
BELLMORE-MERRICK BROADCASTING: BROADCAST COMMUNICATIONS II SUMMER 2016
Transcript of BELLMORE-MERRICK BROADCASTING...Communications II (BC II), a course designed for students enrolled...

BELLMORE-MERRICK
BROADCASTING:
BROADCAST COMMUNICATIONS II
SUMMER 2016

2
BELLMORE-MERRICK
CENTRAL HIGH SCHOOL DISTRICT
BOARD OF EDUCATION
2016-2017
Janet Goller, President
Nancy Kaplan, Ed.D., Vice President
Marion Blane Lisa Katz
JoAnn DeLauter Nina Lanci
Wendy Gargiulo Gina Piskin
CENTRAL ADMINISTRATION
John DeTommaso
Superintendent of Schools
Mara Bollettieri, Psy.D.
Deputy Superintendent
Kate Freeman
David Seinfeld
Assistant Superintendents

3
BELLMORE-MERRICK
BROADCASTING:
BROADCAST COMMUNICATIONS II
Written by:
Filiz Cooney (Mepham High School)
Project Administrator: Mary Donnelly
District Chairperson - English

4
TABLE OF CONTENTS
TOPICS PAGE(S) INTRODUCTION 5
CURRICULUM MAP 6-9
UNITS OF STUDY
ETHICS AND COPYRIGHT
10-26
REPORTING:
FACTS VS. OPINIONS
27 - 33
WRITING BROADCAST NEWS AND
SOURCE ATTRIBUTION
34-42
CONDUCTING INTERVIEWS
43-68
CREATING A NEWS PACKAGE
69-78
TV CREW POSITIONS AND
FUNCTIONS
79-83
CAMERA OPERATION 84-95
AUDIO FOR TV 96-102
CG/TELEPROMPTER BASICS 103-111
PRODUCING A NEWS SEGMENT 112-115

5
INTRODUCTION
This curriculum guide was created to provide a framework of skills to be taught in Broadcast
Communications II (BC II), a course designed for students enrolled in the Bellmore-Merrick
Broadcasting Program who have already taken Broadcast Communications I (BC I). The course
is designed to build upon the prerequisite skills introduced and practiced in BC I with a strong
focus on the development of skills in general organizational and planning, writing, and
professional communication. The lessons and activities contained herein provide students with
meaningful practice in various technical proficiencies needed for broadcast journalism, including
understanding and manipulating audio, camera angles, and the effective use of light.
The curriculum guide contains twenty lessons designed to be taught sequentially, beginning with
cultivating an understanding of journalistic ethics and copyright laws before moving into the
basics of reporting, interviewing and writing stories for broadcast news. Students will then apply
this knowledge to write and produce news packages using the technology available to them in
the Broadcast Journalism studio at Mepham High School.
Each of these lessons identify specific Common Core Learning Standards in English for grades
9-12 and the reading, writing, and speaking and listening strategies that are addressed.

6
Curriculum Map – Broadcast Communications II
TOPIC LESSONS Ethics and Copyright
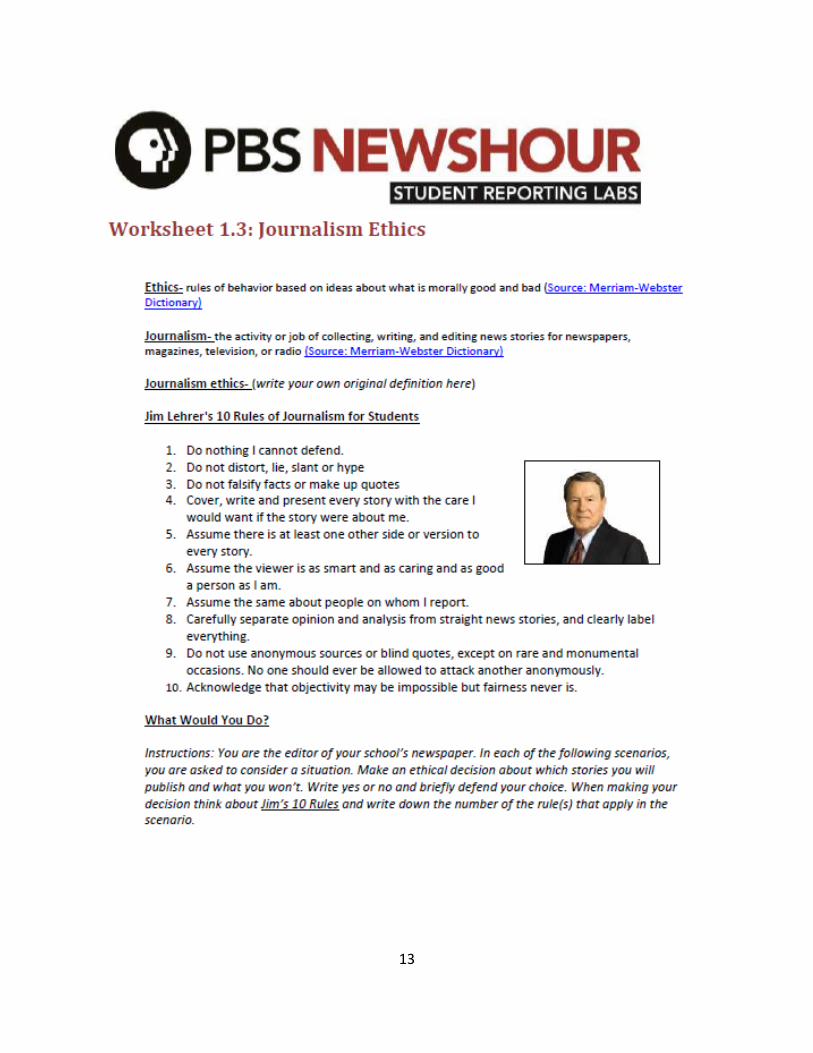
Lesson 1: Journalism Code of Ethics Aim: To understand the term “ethics” and how it applies to journalism/broadcasting Instructional Materials: Article/Video of Brian Williams flub Society of Professional Journalists “Code of Ethics” PBS Student Reporting Lab Worksheet 3 Summary: What does it mean to be unethical? Why is important to be ethical when reporting the news?
Lesson 2: Fair Use and Copyright Aim: Students will understand: 1. that copyright law is designed to promote creativity and the
growth of knowledge by considering both the rights of owners and the rights of users
2. how fair use ensures that copyright law does not limit First Amendment rights
3. the ways in which copyright law has expanded to protect owners over a period of time
4. that the flexibility of fair use enables it to be relevant and useful to many different kinds of creative communities
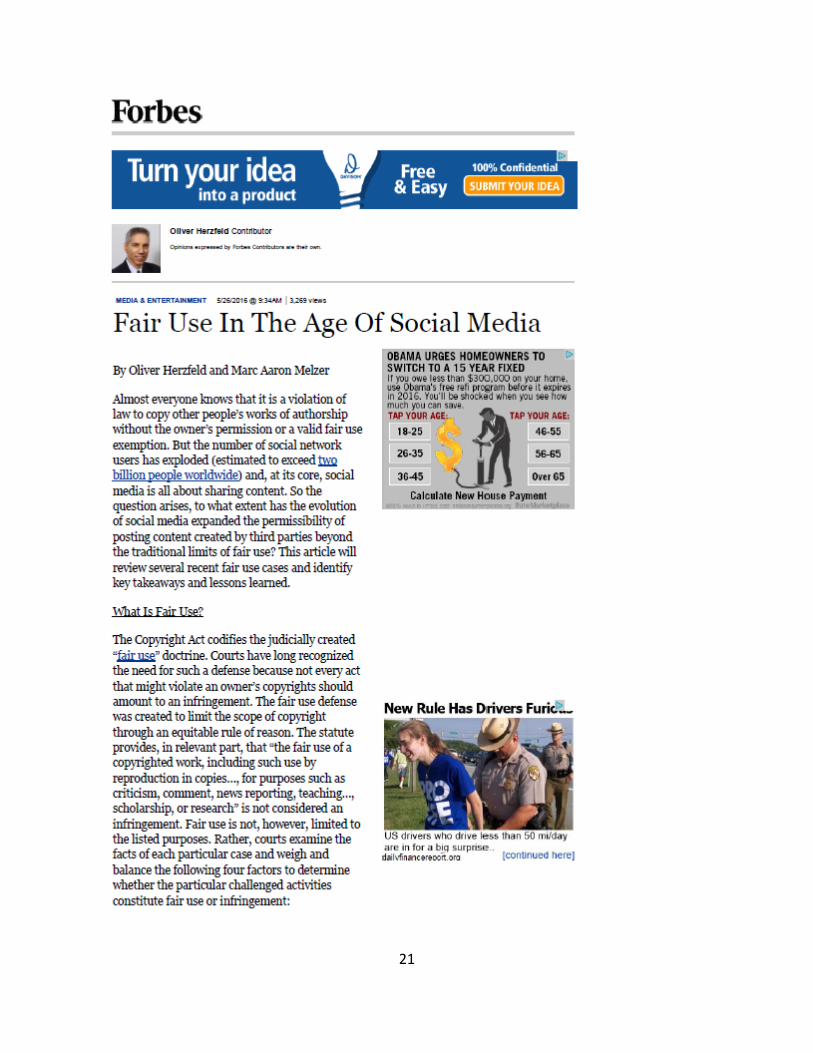
Instructional Materials: What’s Copyright? Song lyrics Handout: “Understanding Copyright” Handout: “Fair Use in the Age of Social Media” Summary: How would you define copyright and fair use? Think about/take a look at your Facebook page/Twitter or
Instagram feed. Do you see any copyright or fair use issues? How can you rectify them?
Reporting: Facts vs. Opinions
Lesson 3: Facts vs. Opinions vs. Informed Opinions and their Role in Journalism Aim: Why do many people like opinions more than facts? What are the negative and positive consequences of this tendency? How do facts encourage critical thinking? Instructional Materials: Video from BBC One Minute News Internet access to PBS NewsHour Rundown blog Handout: “Facts vs Opinion” Handout: “BBC Facts vs Opinion”
Summary: Answer the aim questions.
Lesson 4: Thinking Like a Reporter Aim: How can we enhance our critical thinking skills so we can think like reporters and writers? (Students will learn to brainstorm feature ideas and fresh angles for routine topics) Instructional Materials: THE CUBE: a six-sided cube labeled on each side with one of the following topics: History; People; Numbers (money/statistics); Comparisons; The Future; Trends Summary: How can we generate ideas for stories by thinking critically about

7
a topic? Writing Broadcast News and Source Attribution
Lesson 5: Writing a broadcast news story Aim: 1. What is the difference between a story topic and story idea? 2. How can we write an on-air news story using inverted
pyramid style? 3. How can we write an informative or attention-getting lead? Instructional Materials: Handout: Article: “How to Write Broadcast News Stories” Handout: “The Journalist’s Inverted Pyramid” Summary: How does the inverted pyramid help us structure our stories?
Lesson 6: On-Air Source Attribution Aim: What is attribution and how does one give it on air? How does the reporter avoid plagiarism? Instructional Materials: Access to the internet (for audio/video news clips) Copy of the newspaper Handout: “Who Said That?” Handout: “Keep it Honest Vocabulary” Summary: Why is source attribution so important?
Conducting Interviews
Lesson 7: Interviewing: The Art of Asking Questions via Phone Aim: How can we conduct an effective news interview via phone? Instructional Materials: Interview Case Studies Packet Handout: “How to Conduct a Journalistic Interview” Summary: Ask: What did you learn from working on this project? What
did you like best about it? What did you dislike and why? Ask: How might cold-calling be useful in your life right now?
In the future?
Lesson 8: Learning the Art of the “In-Person” Interview Aim: 1. How do interviewers craft and pose questions? 2. How can questions open doors to information, shed light on
important subjects and invite subjects to open up? Instructional Materials: Handout: “Practicing the Interview” Handout: “The Basics of Conducting an In-Person Interview” Summary: What are some of the critical parts of the interview process? Why are they critical?
Creating a News Package
Lesson 9: What Are the Elements of a News Package Aim: What are the elements of an informative and visually appealing news package? How can we constructively critique a news package? Instructional Materials: Handout: “What Makes a Good Video Report?” Handout: “How to Tell a Good News Story” Summary:
Lesson 10: How to Shoot a News Package Aim: What are the elements of an informative and visually appealing news package? How can we create one? Instructional Materials: Handout: “Checklist for Shooting a News Package” Summary: What are the basic elements of a news package? How will you be sure that all of those elements are present in

8
Answer Aim questions.
your news packages?
TV Crew Positions and Functions
Lesson 11: Production Crew Positions and Functions Aim: 1. What are the various TV crew positions and functions? 2. What skills are necessary to successfully perform each
position? Instructional Materials: Handout: “ TV Crew Descriptions and Functions” Summary: Based on what you have learned today, for which jobs do
you think you are best suited? With which jobs would you have the most difficulty? How
could you develop the skills necessary to serve in those positions?
Lesson 12: Producing a Show Open Aim: How can we shoot a show open? Instructional Materials: Video clip of any news show open Internet and studio access Summary: How much of your “job” have you completed? What did you learn today about the amount of effort needed
to complete pre-production tasks?
Camera Operation
Lesson 13: What is “White Balance”? Aim: What is “white balance” and why is it important? Instructional Materials: Handout: “Light Behavior and Characteristics” Handout: “Warm vs. Cool Tones” Handout: “White Balancing” Handout: “White Balance Icons” Summary: Answer the Aim question.
Lesson 14: Single vs. Multi-Camera Set Up Aim: What are the differences and advantages of using single vs. a multi-camera set up? Instructional Materials: Handout: “Basic 3 Camera Set Up” Summary: Answer the Aim question.
Audio for TV Lesson 15: Foley Sound Aim: What importance do ambient sound and sound effects play in the creation of video? Instructional Materials: Video clips of films with and without music Handout: “Sound Terms for Film and Video” Summary: Answer the Aim question.
Lesson 16: Microphones: The Basics Aim: How does using certain types of microphones in certain situations capture the sound accurately? Instructional Materials: Various microphones on display Headphones Handout: “Microphone Pickup Patterns”

9
Summary: Answer the Aim question.
CG/Teleprompter Basics
Lesson 17: Adding CG to Student Video Productions Aim: How and when do you add production/computer graphics to a live/pre-recorded broadcast? Instructional Materials: Internet connected computer capable of video and graphics
editing Graphics/Animation Software (Recommended: Adobe
Photoshop and/or Adobe After Effects) Handout: “Types of Broadcast Graphics” Summary: Answer the Aim question.
Lesson 18: Teleprompter Operation Aim: 1. Why is the teleprompter operator’s job so important?
2. How does one operate a teleprompter? Instructional Materials: Clip from Anchorman Handout: “Teleprompter Operation” Summary: Answer the Aim questions.
Producing a News Segment
Lesson 19: Producing a News Show (Day 1) Aim: How can we prepare to produce and record a 4-minute news show, which will include a show open and close and one pre-recorded news package (created in lesson 10)? Instructional Materials: Studio access Summary: Answer the Aim question.
Lesson 20: Producing a News Show (Day 2) Aim: How can we prepare to produce and record a 4-minute news show, which will include a show open and close and one pre-recorded news package (created in lesson 10)? Instructional Materials: Studio access Storyboard Templates Summary: What are some of the issues you have come across today? How can we best address them and prepare for things to run more smoothly tomorrow?

10
GRADE LEVEL: BCII
Lesson Topic: Journalism Code of Ethics
Lesson 1 One Class Period
Aim: To understand the term “ethics” and how it applies to journalism/broadcasting
Common Core Learning Standards:
Standard Grade Standard Number
RI BCII 1, 2, 4
W BCII 1C, 1E
SL BCII 1, 2, 5
Motivation:
Watch video/read article of Brian Williams lying about his experiences during Katrina:
http://www.nydailynews.com/news/national/brian-williams-hurricane-katrina-coverage-
questioned-article-1.2105423
Instructional Materials:
Article/Video of Brian Williams flub
Society of Professional Journalists “Code of Ethics”
PBS Student Reporting Lab Worksheet 3
Procedures and Pivotal Questions:
Ask students: Did Brian Williams lie? What may have prompted him to “misremember” the
details of his experiences?
Hand out Worksheet 1.3 and read through page one with the class. Give students time to
create their own definition for journalism ethics and examples. Then ask students to
volunteer their best answers and share them with the class.
Hand out Society of Professional Journalists “Code of Ethics” and review
Ask: Is Brian Williams an ethical journalist? Based on what you have read, how do you
know?
Next have students complete page two on their own and then put them in groups to compare
answers.

11
Summary:
What does it mean to be unethical? Why is important to be ethical when reporting the news?
Extension Activity:
Students will watch a nightly news show and note whether or not they see any unethical
behavior by journalists/broadcasters.
Adapted from: https://studentreportinglabs.org/resource/lesson-13-who-makes-news/

12
13

14

15
GRADE LEVEL: BCII
Lesson Topic: Fair Use and Copyright
Lesson 2 One Class Period
Aim: Students will understand:
• that copyright law is designed to promote creativity and the growth of knowledge by
considering both the rights of owners and the rights of users
• how fair use ensures that copyright law does not limit First Amendment rights
• the ways in which copyright law has expanded to protect owners over a period of time
• that the flexibility of fair use enables it to be relevant and useful to many different kinds of
creative communities
Common Core Learning Standards:
Standard Grade Standard Number
RI BCII 1, 2 4
W BCII 1C, 1E
SL BCII 1, 2, 5
Motivation:
Listen to the song, "What's Copyright?"
http://mediaeducationlab.com/1-whats-copyright-music-video
Instructional Materials:
What’s Copyright? Song lyrics
Handout: “Understanding Copyright”
Handout: “Fair Use in the Age of Social Media”
Procedures and Pivotal Questions:
Find out what students already know about copyright. Ask students to share with partners
their answers to the question, "What is the purpose of copyright?"
Listen to the song, "What's Copyright?". Ask students to share their thoughts about
copyright with their partners. Then replay the song. Ask students how their perception of
copyright has changed.
Handout: “Understanding Copyright” and “Fair Use in the Age of Social Media”. After
reading the selected article, invite students to: (1) explain the concept of fair use in their own
words; (2) explain why the article claims that without fair use, copyright law would limit
people's First Amendment rights.

16
In responding to the reading, encourage students to: (1) offer inferences about why copyright
law has expanded in recent years; and (2) explain why computer industry leaders believe that
a robust interpretation of fair use will create new business opportunities.
Summary:
How would you define copyright and fair use?
Think about/take a look at your Facebook page/Twitter or Instagram feed. Do you see any
copyright or fair use issues? How can you rectify them?
Extension Activity:
Encourage students to download the "What's Copyright?" song and insert their own examples of
their creative uses of copyrighted materials. Students can create short video clips to create a
version of the song with their own relevant visual examples.
Adapted from: http://mediaeducationlab.com/section-1-understanding-copyright

17

18

19

20
21

22

23

24

25

26
27
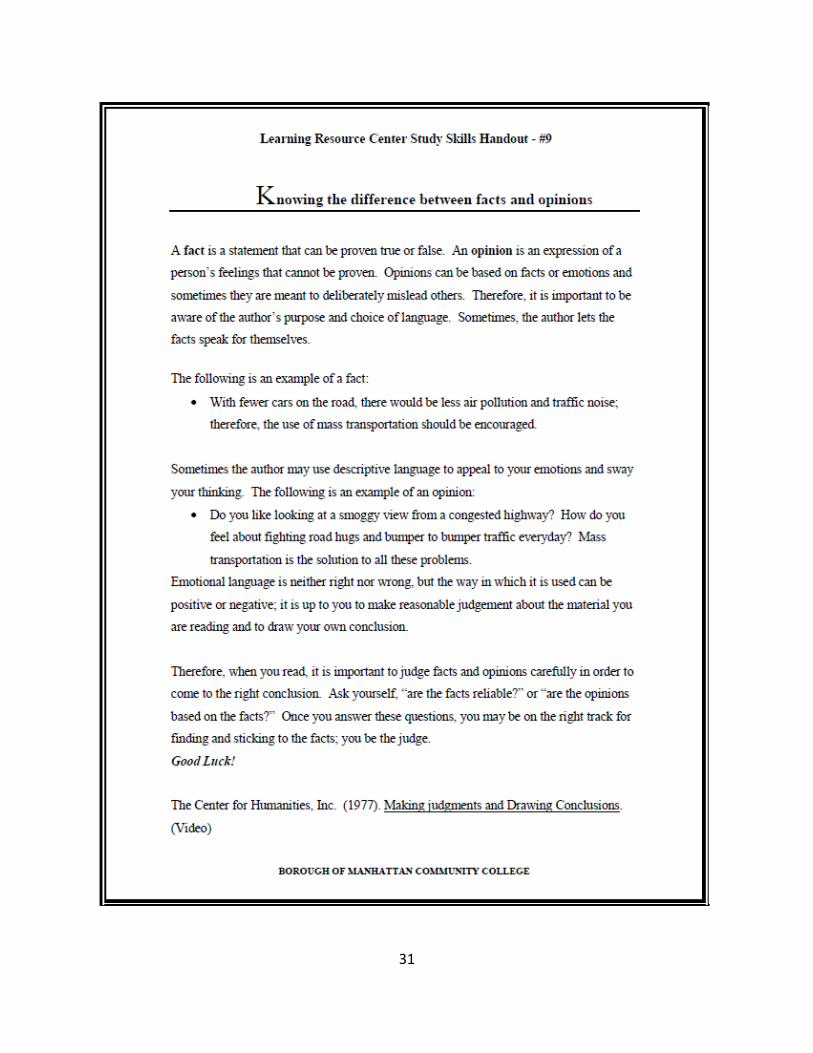
GRADE LEVEL: BCII
Lesson Topic: Facts vs. Opinions vs. Informed Opinions and their Role in
Journalism
Lesson 3 One Class Period
Aim: Why do many people like opinions more than facts? What are the negative and positive
consequences of this tendency? How do facts encourage critical thinking?
Common Core Learning Standards:
Standard Grade Standard Number
RI BCII 2
W BCII 1, 2, 11
SL BCII 1, 2
L BCII 1, 2
Motivation:
Ask: What’s the difference between “fact” and “opinion”? As a class create the best
definitions and give a few examples for each one. What does it mean to “think
critically”?
Instructional Materials:
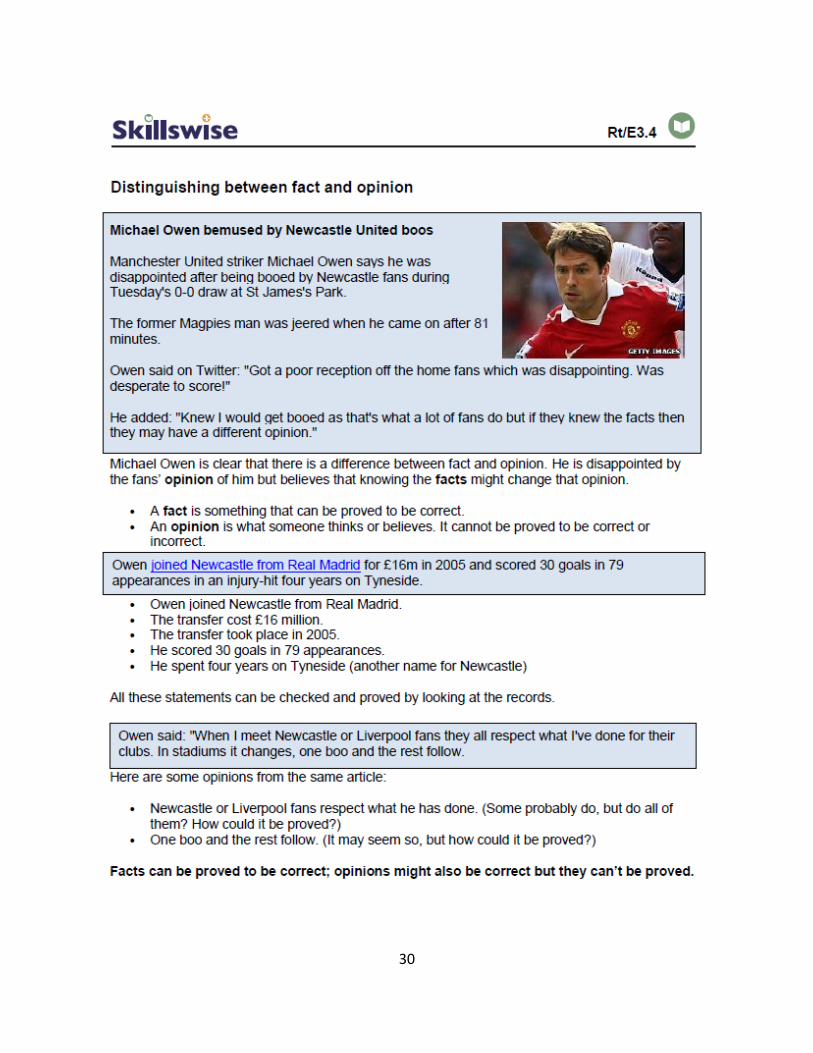
Video from BBC One Minute News
Internet access to PBS NewsHour Rundown blog
Handout: “Facts vs Opinion”
Handout: “BBC Facts vs Opinion”
Procedures and Pivotal Questions:
Ask: When and where do we see opinion pieces in the news? How do we know it is an
opinion piece?
Go to the BBC One Minute News and select one short news story to play for the students.
Then play three minutes of the PBS NewsHour analysis piece with Mark Shields and
Ramesh Ponnuru included in online materials.
Ask: Which was the opinion piece and how do they know?
Hand out “Facts vs Opinion” worksheet and “BBC Facts vs. Opinion” worksheet. Read
them as a class.
Ask: What is a blog? Do they have any favorites that they follow? Why do they like to
follow blogs?
As a class create a working definition of a “blog” and write it on the board. Ask: What
would a news blog look like?
Write adjectives and nouns on the board that students imagine would describe a news
blog.

28
Then pull up the PBS NewsHour Rundown blog for the class on the board and see if their
pre-conceptions about a news blog were right or wrong.
Explain to students that they must find the best news articles, opinion pieces and news
blogs and evaluate them. Some places to check out are (ex: The Washington Post, The
New York Times, The Richmond Times Dispatch, Huffington Post, BBC News, Slate, Al
Jazeera, etc.)
Here is a list of topics that might interest them:
Cuts to your school system’s budget for the current (or next) academic year.
Rising costs of college tuition in your state.
Recent decisions about players on one of your region’s sports teams.
The economy
A current political debate
Find one example of a news article and one example of an opinion article on the same
issue.
Examine popular online news blogs (ex: Fox News Blog, The Huffington Post, The Daily
Nightly, etc.) or another online opinion resource. Select one opinion piece from one of
these sources, and then conduct online research to locate another news article in another
news source about that particular topic. Print all articles so that you can read and mark
them.
Encourage students to discuss their findings of how fact coverage in news articles differs
from the presentation of an informed opinion, and how presentation of a point of view in
a news blog differs from a straight news article. Where do they see emotion shining
through? What kind of language or vocabulary differences do they see? How much
coverage of sides is there in each type? List students’ observations on the board.
o News items that present the facts will carefully avoid appealing to emotion.
Opinion pieces are trying to appeal to the emotion of the reader or viewer.
Opinion pieces will try to evoke some kind of reaction (agreement, disagreement,
move to action, etc.).
o An opinion piece often uses language that is much more demonstrative,
flamboyant, and sometimes inflammatory; that is how it often hooks the emotion
of the reader. News items that cover only the facts do not use this kind of
language.
o Opinion pieces will often present only one side of an issue, with a small
acknowledgement somewhere in the piece of the presence of another side of the
issue. A news item that covers the facts will strive to present all of the facts as
they are known.
Summary:
Answer the aim questions.
Extension Activity:

29
Students should choose a news article (print/online) and mark each statement with an “F” for fact
or an “O” for opinion and then determine whether or not the piece qualifies as news or an
editorial.
Adapted from: https://studentreportinglabs.org/resource/lesson-23-facts-and-opinions/
30
31

32
GRADE LEVEL: BCII
Lesson Topic: Thinking Like a Reporter
Lesson 4 One Class Period
Aim: How can we enhance our critical thinking skills so we can think like reporters and writers?
(Students will learn to brainstorm feature ideas and fresh angles for routine topics)
Common Core Learning Standards:
Standard Grade Standard Number
RI BCII 8, 9
W BCII 1, 2, 3, 4
SL BCII 1, 4
L BCII 1, 5
Motivation:
Hang a large poster of a bright red car in the front of the room. Ask various students to
describe what they see. Introduce THE CUBE. (See Generative Objects above). Generate
story angles about the red car from the topics on the cube. Hang a photo of a “suburban”
house in the front of the room. Then toss the cube at the students. The student must quickly
come up with a story idea about the house using an angle derived from the side on which the
cube lands.
Instructional Materials:
THE CUBE: a six-sided cube labeled on each side with one of the following topics: History;
People; Numbers (money/statistics); Comparisons; The Future; Trends
Procedures and Pivotal Questions:
Go over the motivational activity.
Ask students to consider a typical school year. They are to discuss routine stories covered
throughout the year, such as
o Back to School: What Changes Have Taken Place
o Homecoming
o Special Seasons
o Sports Coverage
o Special Events Celebrated by their school every year
o Annual Awards stories
o and others.
Make a list of the topics on the board. Using The Cube, students list two new angles for
each topic. Share the story ideas and how they would be developed with what range of
sources with the rest of the class.
33
Pair students to conduct research on one of the topics on which they will write copy for
on air presentation (as detailed in another lesson).
Summary:
How can we generate ideas for stories by thinking critically about a topic?
Extension Activity:
At lunch and after school, they are to listen to conversations and make a list of topics
from what people are saying about:
Life Issues
Relationships
Sports
Money
Hangouts/Hobbies
School/Work.
Adapted from: http://www.schooljournalism.org/thinking-like-a-reporter/

34
GRADE LEVEL: BCII
Lesson Topic: Writing a broadcast news story
Lesson 5 One Class Period
Aim:
What is the difference between a story topic and story idea?
How can we write an on-air news story using inverted pyramid style?
How can we write an informative or attention-getting lead?
Standard Grade Standard Number
RI BCII 2
W BCII 1, 2, 11
SL BCII 1, 2
L BCII 1, 2
Motivation:
Watch three or four news story clips
After each, have students take note on the specifics of each story. Compare notes to see if
they had most of the points correct. Ask: Why was it easy to retain the information? (It
was provided in a clear and concise manner). Read them the first two paragraphs of a
newspaper article and have them take notes on what they heard. Was it more difficult to
recall the details from the article? Why?
Instructional Materials:
Handout: Article: “How to Write Broadcast News Stories”
Handout: “The Journalist’s Inverted Pyramid”
Procedures and Pivotal Questions:
Go over motivation.
Be sure students understand the difference between story topics and story ideas (A story
topic is the general subject of a story, such as food in the cafeteria. A story idea is more
specific and helps the writer identify interesting hooks into the story for the reader).
Read article: “How to Write Broadcast News Stories”
Have students make a list of three story topics. Under each one, have them write a story
idea.
Have students choose one and write a broadcast news “story” using the inverted pyramid
structure.
Have students share their samples with the class.
Summary:
How does the inverted pyramid help us structure our stories?

35
How do print news and on air news differ in their presentation of information?
Extension Activity:
Locate an on-air news clip and its transcript. Print and label the transcript with the parts of the
inverted pyramid.

36
How to Write Broadcast News Stories
Jessica Weiss | May 15, 2013
Writing for television, radio or video requires a different set
of skills than writing text. Clear and condensed writing is
key. After all, a radio listener or TV viewer can't go back and
re-read a sentence. To improve your broadcast writing,
multimedia producer Jehangir Irani recommends that you
open a major newspaper, pick any news article, and try
reading the first paragraph aloud. You'll probably find that "it’s long and dry," he says, "and you’ll
run out of breath before finishing it." To help you hone your broadcast writing skills, IJNet recently
spoke to Irani and media trainer Estel Dillon. Here are their key tips:
• Write like you speak: Write in your own voice, in a conversational tone, as if you’re speaking to only one listener. Keep sentences short. If you have a long sentence, follow it up with a short one. When you go back and read your narration aloud, do you truly sound like yourself?
• Keep it simple: Allot a sentence to each idea. Be clear and concise, stick to the story and don't try too hard to be "clever." Too much detail can become irrelevant and make the story lose focus. Avoid most multiple-syllable words, words that are tough to pronounce and long, convoluted sentences. "Treasure small words," Dillon says.
• Provide specificity: Although the goal is to write clearly, you must also avoid being too general. Dillon says reporters should provide context for anything that may cause confusion or "raise eyebrows." When describing people, don't label them. Tell exactly what they do as opposed to using their official title.
• Tell stories in a logical order: Make sure that your content has a beginning, a middle and an ending. Don't bury the lead; state the news near the top, without too much buildup.
• Use the present tense and active voice: You're writing for flow and to express what is going on now. Broadcast strives for immediacy. To convey this to the listener, use the active voice whenever possible. In English, try to use a subject-verb-object sentence structure. For example: "Police (subject) have arrested (verb) 21 activists (object) for staging a protest at Merlion Park on Saturday afternoon."
• Write to the pictures: TV and video audiences will see why something happened. In television, the phrase “write to tape” is used to describe the way a story script is built around the visual images you have gathered. Don't write any longer than the story or pictures warrant.
• Use imagery: Radio audiences need to imagine the people, places and things in your story. With your words, create powerful and straightforward imagery. Use descriptive verbs instead of adjectives. For example, if you say “he struts or saunters” you’re giving a picture without using an adjective. But don't let vivid, imagery-rich writing turn verbose. Use words sparingly.
• Let the speaker speak: If you’re hosting a show or an interview, be the host. Don't overpower the subject of the story. When interviewing, "Don’t 'mm hmm' them and don't keep talking and talking about yourself," Irani says. "You’re just a conduit whose job it is to relay a story/experience/emotion from the guest to the audience."
Source: https://ijnet.org/en/blog/how-write-broadcast-news-stories

37

38
39
GRADE LEVEL: BCII
Lesson Topic: On-Air Source Attribution
Lesson 6 One Class Period
Aim: What is attribution and how does one give it on air? How does the reporter avoid
plagiarism?
Common Core Learning Standards:
Standard Grade Standard Number
RI BCII 2
W BCII 4, 9
SL BCII 3, 4
L BCII 5, 7
Motivation:
Read or play examples of actualities with the attribution missing. What is needed? If
students do not volunteer “the name of the speaker,” ask them to tell you who made the
statement. What is gained by knowing the name and credentials (experience, job and title,
background) of the person providing the information?
Instructional Materials:
Access to the internet (for audio/video news clips)
Copy of the newspaper
Handout: “Who Said That?”
Handout: “Keep it Honest Vocabulary”
Procedures and Pivotal Questions:
Go over the motivation
Define attribution and explain its necessity. Attribution is stating the source of the
actuality or information. In current strict practice, according to the Poynter Institute Web
discussion of attribution and sourcing, “anything the reporter does not know first-hand by
way of eyewitness experience or established knowledge must be attributed to a named
source.”
Handout: “Who Said That?” and review
Provide students with examples of giving attribution. Attribution is often given at the
beginning of a sentence in radio and television. Listeners are prepared to hear the
information provided by the source in active voice. “So and so said...,” “According to
White House Press Secretary ...,” “Jessica Simpson later recalled ....” If legal issues are
involved or the information has not been verified, use “according to” or “a statement
released by ... states.”
Using articles from newspapers, provide a variety of quotations and have students
practice writing attributions. Vary the material from actuality (direct quotation) to second
40
sources (according to) such at wire services, press releases and other news media.
Newspapers can be sources (According to The Washington Post today... ) of quotations
and material that is paraphrased.
Explain plagiarism. Plagiarism is claiming that someone else’s idea or work is yours.
Relate plagiarism to reporting using material written by other sources; therefore,
indirectly claiming material originates with your station’s reporters.
If a reporter cannot be on the scene to conduct interviews, what alternatives exist?
Definitely, do not lift an interview conducted by another reporter and edit it as if it were
done by you. Cover the use of phone interviews (phoners). When can you accept what
someone says as fact: “The transportation board says the plane crashed at 10 p.m.” When
do you attribute research and ideas to another media outlet?
Another area of concern related to attribution (identifying source of origin) and debated
by electronic journalists is the use of third-party audio and video news releases. Citizens
and the FCC questioned use of “news stories” packaged by interested parties. RTNDA’s
Code of Ethics is clear: If these audio and video releases are used, their sources must be
appropriately identified. “FCC regulations, journalism ethics and the reinvigorated
newsroom practices will adequately and properly ensure that the public is fully
informed,” stated RTNDA representatives before the FCC on June 22, 2005.
Additional Tips Regarding Quotations:
We must be careful about our use of the word “said.” Standing alone, it should be used
only when the reporter heard the source say the words quoted, either in person, on
television or radio. When we quote a written statement of any kind, we should explain
what we are doing accurately in our attribution [e.g. “...the White House said in a written
statement.”] (The Washington Post, “Policies on Sources, Quotations, Attribution, and
Datelines”)
When quoting people for whom English is not their first language, special care should be
taken. If such quotations make the speaker look stupid or foolish, we should consider
paraphrasing them (outside of quotation marks of course). When appropriate, a story
should note that a source was struggling with English. (The Washington Post, “Policies
on Sources, Quotations, Attribution, and Datelines”)
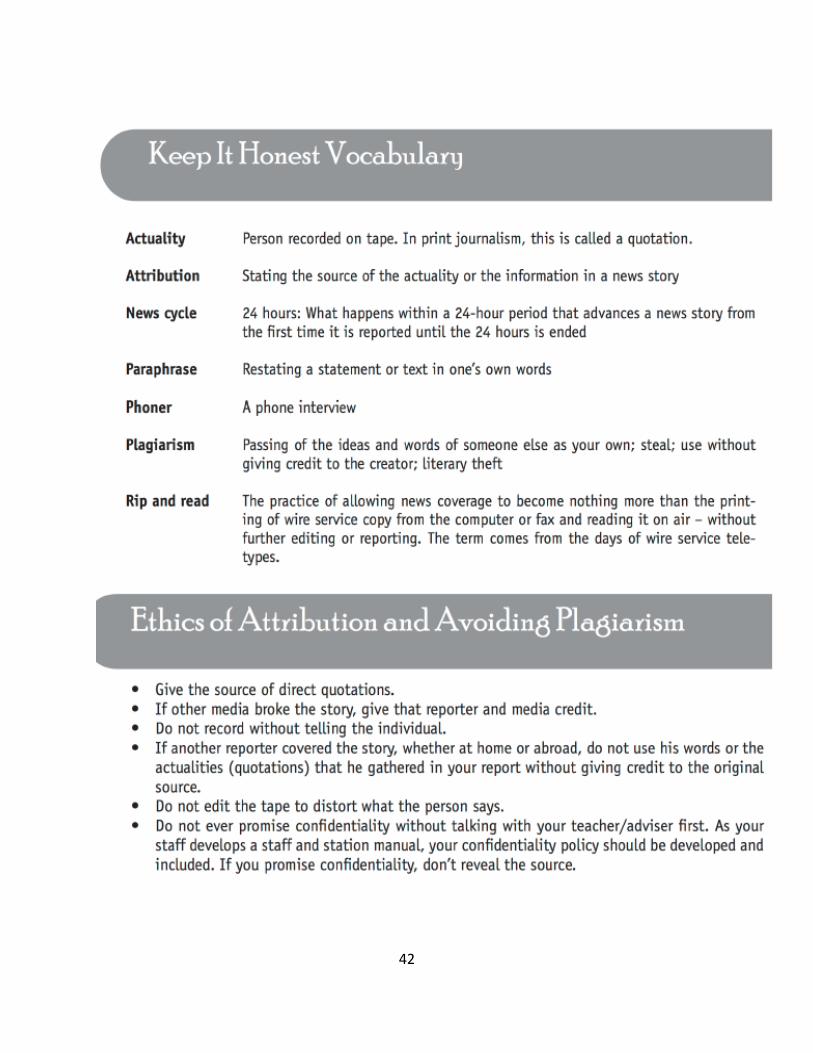
Handout: “Keep it Honest Vocabulary” and review as a class.
Summary:
Why is source attribution so important?
Extension Activity:
At the end of the first day, teachers will ask students to listen to news on the radio.
Record (in writing or on tape) a minimum of 10 examples of attribution.

41
WHO SAID THAT? The need for on-air attribution
Why is attribution needed?
Listeners want to know who is talking. The reporter wants to tell listeners where the information comes from. If the information is non-intuitive, reporters and editors have to make a judgment
call. Will most listeners understand the source? Some reporters always give attribution, even if it’s “clunky” or interrupts the storytelling. Others believe listeners can fill in the empty spots through context of the whole report.
If the reporter is not present at the scene of an event, reconstruction of a scene can be done if it is set up properly and clearly attributed.
After fabrication of quotations and deception by reporters — among the most well known are Janet Cooke, Jason Blair, and Stephen Glass — the industry is providing more transparency as to how reporters got the story (sourcing). If the reporter did not gather the information herself, the listener has a right to know who or what agency provided the information.
If the information is antagonistic or controversial, it is essential to identify the source. The listener can determine if the source is knowledgeable or someone with a reason (bias) to diminish an event, a project or person.
Reporters are not to give their personal opinions. The source of statements of opinion is needed.
Reporting of criminal involvement or potentially illegal activity should clearly be attributed.
Unnamed sources are a “last resort, if the information is of special public importance, if there is no other way to reveal it, if the source is reliable, and if the source’s biases are revealed,” according to the Poynter site.
Is there a business or financial reason to give attribution as well as a professional and ethical reason? If the listener cannot trust the reporter, has the information and the radio station lost credibility — and eventually listeners? Representatives of RTNDA before the FCC stated, “Determining the content of a newscast, including when and how to identify sources, is at the very heart of the responsibilities of electronic journalists, and these decisions must remain far removed from government involvement or supervision. The government must be cautious in considering any action that could interfere with journalistic judgments or otherwise influence or prescribe news decisions or content.”
42
43
GRADE LEVEL: BCII
Lesson Topic: Interviewing: The Art of Asking Questions via Phone
Lesson 7 One Class Period
Aim: How can we conduct an effective news interview via phone?
Common Core Learning Standards:
Standard Grade Standard Number
W BCII 1, 2, 11
SL BCII 10,11
Motivation:
Explain to students that the interview process can seem intimidating, but today’s lesson will give
them the tools they need to be successful.
Explain to students that part of a reporter’s job is to interview people they don’t know for stories.
Ask: Have you ever called someone you didn’t know? What did you like and dislike about it?
Students share stories of their experiences, if they have them.
Instructional Materials:
Handout: “How to Conduct a Journalistic Interview”
Interview Case Studies Packet
Procedures and Pivotal Questions:
Go over motivation. Discuss “cold calling”. Why might it be “scary”?
Tell students they will be role playing to learn more about how to conduct phone
interviews.
Go over the following instructions with students:
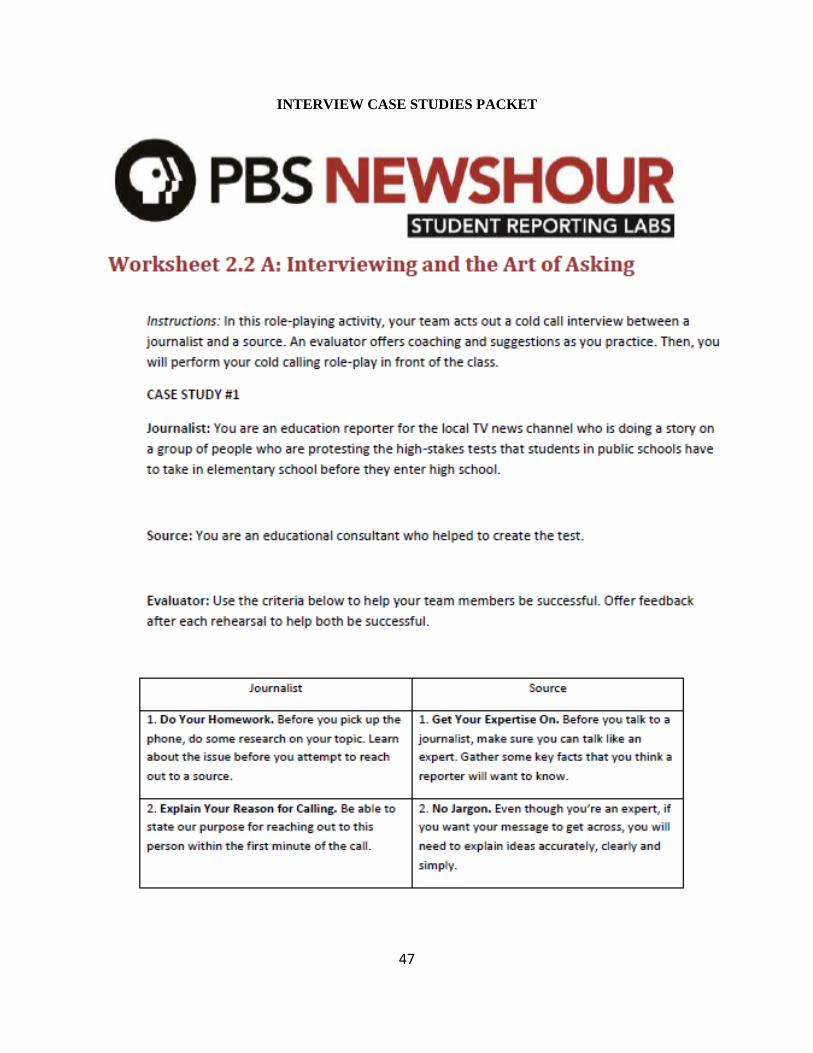
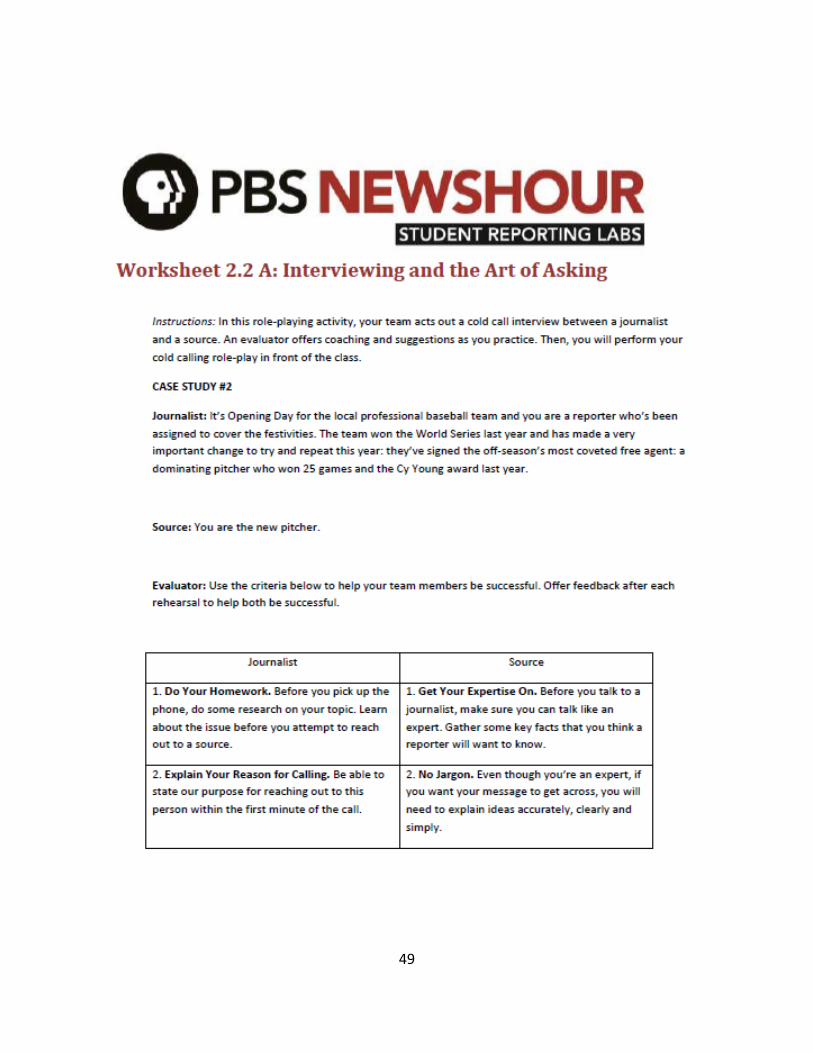
In this role-playing activity, students are divided the class into groups of three. They get a
worksheet that provides a scenario with a hypothetical reporter and source. Two team
members role-play an interview while the third team member, the evaluator, offers
coaching and suggestions as they practice.
Pass out copies of the worksheet so that each team receives one of the eight different
cases. One person will be the journalist, one will be the source, and the third person will
serve as an evaluator for both participants. Read aloud the directions and encourage
students to work together as a team to generate ideas and practice role-playing.
Because some students are pretending to be experts and others are pretending to be
journalists, give students the opportunity to use the Internet to gather information to make
their role-playing more credible. This will also help to make their performances less silly
and more realistic. Encourage them to use creativity and imagination along with good
research to create a strong cold-calling simulation.
Time to Practice o Before beginning, review the advice provided on the worksheet for both the

44
journalist and source. Make sure students can explain in their own words why this
advice makes sense and encourage them to make notes of their own that is
relevant to the topic they are interviewing about or are the interviewee.
Monitor students as they work and answer any questions they may have. Encourage them
to practice a couple of times so they’re comfortable. For advanced learners, you may
want to encourage the source to vary their answers at each rehearsal, so that the reporter
really has to think on their feet!
Time for Performance
o Each team performs their cold calls. Encourage evaluators from other teams to
offer “warm” and “cool” feedback. Warm feedback is positive and acknowledges
strengths. Cool feedback offers comments and suggestions to help the learner
reflect and improve.
Leaving a Message
o If you call a source and they are not available you might have to leave a message.
In this message you should identify yourself, your school or affiliation, your
reason for calling and a way for your source to contact you. See Worksheet B for
a script template.
Summary:
Ask: What did you learn from working on this project? What did you like best about it?
What did you dislike and why?
Ask: How might cold-calling be useful in your life right now? In the future?
Extension Activity:
Emailing, Tweeting and other forms of communication o Students might not be calling their sources; they might reach out via email or
Twitter. Have students practice composing an email to an expert. Give them the
following writing prompt:
o You are doing a story about water quality in your community. You would like to
interview the head of the water authority. You've gone to the website and found
the contact. What do you do next?
o Have the students look up their mayor's Twitter feed. Ask them how they would
send out a tweet to ask the mayor for an interview.
o Have them check their own Twitter feeds to see whether there is any
embarrassing content. This is also an opportunity to have the students reflect on
the language they use, the pictures they post and the image their social media
profiles project of them. These profiles will follow them into adulthood and their
future careers. This is a great "life lesson" about creating an online identity that
will help them rather than haunt them in the future.

45
How to Conduct a Journalistic Interview Proper research and preparation are essential to a successful interview.
One of the hardest skills for a young reporter to master is interviewing. It takes preparation and
persistence to conduct a good interview. Follow these steps and learn how to interview like a pro.
Step 1: Research, Research, Research
Then research some more. The only way to come up with good questions is to know everything
there is to know about your subject.
Step 2: Contact the Person You Wish to Interview
Ask when a good time would be to do the interview. Be polite. Say "please" and "thank you." Try to
set up the interview in person. If this isn't possible, then set up a phone interview.
Step 3: Read Over Your Research and Brainstorm a List of 15 Questions
The more specific your questions are, the better. And never ask questions that can be answered
with a simple yes or no. Make your interviewee talk.
Be sure to write all your questions down in a notebook, then practice asking them with a partner.
Become very familiar with your questions before you go into the interview.
Step 4: Come Prepared
You will want to bring:
• A pencil • A notebook • A list of good questions • A recording device (always ask permission before recording an interview) • Step 5: Be on Time
Arrive at your interview with plenty of time to spare. If you’ve never been to the place where your
interview is taking place, go early and scout it out. There is nothing more unprofessional than a
reporter who is late.
You can also use the time you are waiting to make notes about the surroundings. You won’t
remember details later, so write them down.
Step 6: Conduct Your Interview in an Organized, Timely Manner
During the interview:
• Be courteous to your subject. • Always take time to ask for an explanation about things you don't understand. • Don’t be afraid of uncomfortable silences and pauses. • Let the interview take its natural course. • Look the person in the eye when asking questions. • Always listen carefully to the answers. Each answer could lead to more questions or include an
answer to a question you haven’t asked yet. Don't ask a question that has already been answered. Your subject will know you weren't listening and be insulted.

46
• Don't read through your questions one right after another like you can't wait to be finished. Conduct your interview like a conversation. One question should lead naturally into another. If you are LISTENING to the answers this will come naturally.
• Also, take notes on what the person looked like, what the person was wearing, where he or she sat. If the interview is in an office, make notes of what is on the walls and on the desk. The objects people surround themselves with hold important clues to their personalities. Ask about any object that interests you. You’ll find some good stories.
Step 7: Even If You Are Recording an Interview, Take Notes
Don't try to write every word said. It will slow down the interview. Just take down the highlights.
After the interview, while the details are still fresh in your mind, write everything down you can
remember about the person you interviewed. Don’t forget to make note of the sounds in the
background. Take note of what was happening around you. Write it all down as soon as possible.
At home, expand your notes by following up on things you learned in your interview with more
research.
Step 8: Review Your Research and Your Interview Notes
Circle or highlight quotations that you think will be good for your article. Now you're ready to begin
writing.
Source: http://www.scholastic.com/teachers/article/how-conduct-journalistic-interview
47
INTERVIEW CASE STUDIES PACKET

48
49

50

51
52

53

54

55

56

57

58

59

60

61
62

63
GRADE LEVEL: BCII
Lesson Topic: Learning the Art of the “In-Person” Interview
Lesson 8 One Class Period
Aim:
How do interviewers craft and pose questions?
How can questions open doors to information, shed light on important subjects and invite
subjects to open up?
Common Core Learning Standards:
Standard Grade Standard Number
RI BCII 5
W BCII 6, 7, 11
SL BCII 1, 2, 3
L BCII 4, 5, 7
Motivation:
What does it mean to interview someone?
Instructional Materials:
Handout: “Practicing the Interview”
Handout: “The Basics of Conducting an In-Person Interview”
Procedures and Pivotal Questions:
Go over the motivation. Define interview:
o noun
o A formal meeting in which one or more persons question, consult, or evaluate
another person:
a job interview: a meeting or conversation in which a writer or reporter
asks questions of one or more persons from whom material is sought for a
newspaper story, television broadcast, etc.
o The report of a conversation or meeting.
Explain that students will be learning and practicing how to conduct in-person interviews
Ask students if they know who Arne Duncan is, and briefly explain his role as former
secretary of education. Then give students an excerpt of an article written just after Mr.
Duncan was confirmed as education secretary and have them conduct a reverse-interview
as detailed on the handout.
After the students complete the activity, have groups share the questions they generated.
Were their ideas similar or different? Then have students return to their groups to
brainstorm a list of questions they would ask Secretary Duncan if they had the

64
opportunity.
Summary:
What are some of the critical parts of the interview process?
Why are they critical?
Extension Activity:
Interview* a teacher in the building about the following:
The importance of technology in the classroom.
*Your interview must include at least four questions.
Adapted from: http://learning.blogs.nytimes.com/2010/09/20/beyond-question-learning-the-art-
of-the-interview/?_r=0
65
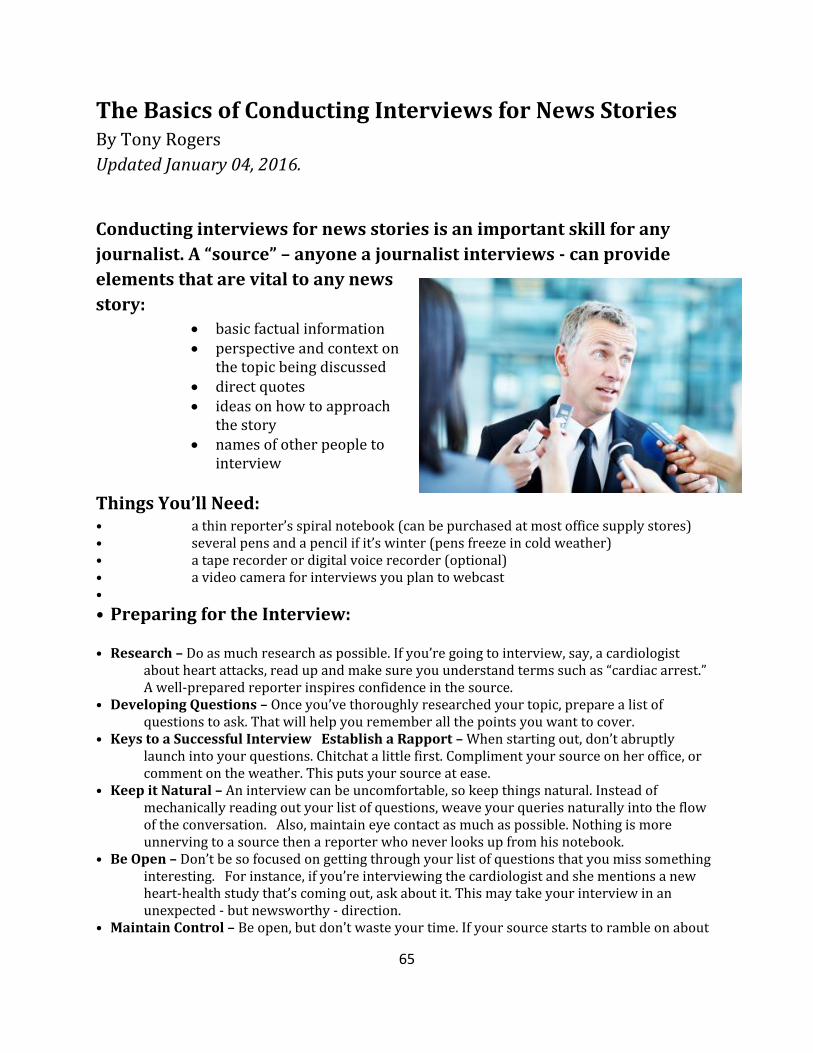
The Basics of Conducting Interviews for News Stories By Tony Rogers
Updated January 04, 2016.
Conducting interviews for news stories is an important skill for any
journalist. A “source” – anyone a journalist interviews - can provide
elements that are vital to any news
story:
basic factual information perspective and context on
the topic being discussed direct quotes ideas on how to approach
the story names of other people to
interview
Things You’ll Need: • a thin reporter’s spiral notebook (can be purchased at most office supply stores) • several pens and a pencil if it’s winter (pens freeze in cold weather) • a tape recorder or digital voice recorder (optional) • a video camera for interviews you plan to webcast •
• Preparing for the Interview:
• Research – Do as much research as possible. If you’re going to interview, say, a cardiologist about heart attacks, read up and make sure you understand terms such as “cardiac arrest.” A well-prepared reporter inspires confidence in the source.
• Developing Questions – Once you’ve thoroughly researched your topic, prepare a list of questions to ask. That will help you remember all the points you want to cover.
• Keys to a Successful InterviewEstablish a Rapport – When starting out, don’t abruptly launch into your questions. Chitchat a little first. Compliment your source on her office, or comment on the weather. This puts your source at ease.
• Keep it Natural – An interview can be uncomfortable, so keep things natural. Instead of mechanically reading out your list of questions, weave your queries naturally into the flow of the conversation.Also, maintain eye contact as much as possible. Nothing is more unnerving to a source then a reporter who never looks up from his notebook.
• Be Open – Don’t be so focused on getting through your list of questions that you miss something interesting. For instance, if you’re interviewing the cardiologist and she mentions a new heart-health study that’s coming out, ask about it. This may take your interview in an unexpected - but newsworthy - direction.
• Maintain Control – Be open, but don’t waste your time. If your source starts to ramble on about

66
things that are of no use to you, politely – but firmly – steer the conversation back to the topic at hand.
• Wrapping Up – At the end of the interview, ask your source if there’s anything important that you hadn’t asked about. Double-check the meanings of any terms they used that you’re unsure about. And always ask if there are other people they recommend that you speak with.
• A Note About Note-taking – Beginning reporters often freak out when they realize they can’t possibly write down everything the source is saying, word-for-word. Don’t sweat it. Experienced reporters learn to take down just the stuff they know they’ll use, and ignore the rest. This takes practice, but the more interviews you do, the easier it gets.
• Taping – Recording an interview is fine in certain circumstances, but always get permission to do so.The rules regarding taping a source can be tricky. According to Poynter.org, recording phone conversations is legal in all 50 states. Federal law allows you to record a phone conversation with the consent of only one person involved in the conversation - meaning that only the reporter is required to know that the conversation is being taped.However, at least 12 states require varying degrees of consent from those being recorded in phone interviews, so it's best to check the laws in your own state. Also, your newspaper or website may have its own rules about taping. Transcribing interviews involves listening to the taped interview and typing out virtually everything that's said. This is fine if you're doing an article with an extended deadline, such as a feature story. But it's too time-consuming for breaking news. So if you’re on a tight deadline, stick to note-taking.
Finally, ALWAYS take notes, even if you’re using a recorder. Every reporter has a story about
the time they thought they were recording an interview, only to get back to the newsroom to
discover that the machine’s batteries were dead!
Source: http://journalism.about.com/od/reporting/a/interviewing.htm

67
Practicing the Interview: Reverse Interviewing:
The following passage is excerpted from the New York Times article “For
Education Chief, Stimulus Means Power, Money and Risk,” written just after Mr.
Duncan was confirmed as education secretary. After reading it follow the
directions provided after the text:
The $100 billion in emergency aid for public schools and colleges in the economic stimulus bill
could transform Arne Duncan into an exceptional figure in the history of federal education policy: a
secretary of education loaded with money and the power to spend large chunks of it as he sees fit.
[…]
“There’s going to be this extraordinary influx of resources,” he said in an interview. “So people say,
‘You’re going to be the most powerful secretary ever,’ but I have no interest in that. Power has
never motivated me. What I love is opportunity, and this is a once-in-a-lifetime opportunity to do
something special, to drive change, to make our schools better.”
Mr. Duncan said he intended to reward school districts, charter schools and nonprofit organizations
that had demonstrated success at raising student achievement — “islands of excellence,” he called
them. Programs that tie teacher pay to classroom performance will most likely receive money, as
will other approaches intended to raise teacher quality, including training efforts that pair novice
instructors with veteran mentors, and after-school and weekend tutoring programs.
The positions of deputy secretary, under secretary and chief of staff and dozens of other senior
posts at the Education Department remain unfilled, so Mr. Duncan is relying on help from career
officers and consultants. He has appointed teams to develop procedures for distributing the
stimulus billions quickly, and many aides, he said, have been working evenings and weekends to
begin organizing the effort.
“I want all of us to work hard enough and smart enough to take full advantage of this, because it’ll
never happen again,” Mr. Duncan said last month in his first speech to hundreds of civil servants at
department headquarters, as the outlines of the huge stimulus package were taking shape in
Congress.
Urging department employees not to be deferential, he described the reception he got on his first
visit to his headquarters.
“It was like, ‘Hello, Mr. Secretary-designate-nominee,’ and it didn’t feel right,” Mr. Duncan said. “My
name is Arne. It’s not Mr. Secretary. Please just call me Arne.” That line drew a standing ovation.

68
Activity Instructions:
You will engage in a “reverse interview” exercise, using the
following prompts:
1. Identify/label the direct and indirect quotes, including partial quotes, from Mr. Duncan that appear in the passage.
2. Generate a list of questions (below) you imagine the reporter asked to get these quotes. How do you think the reporter, Sam Dillon, got Mr. Duncan talking? How did Mr. Dillon get Mr. Duncan to provide the information and quotations?
Source: http://learning.blogs.nytimes.com/2010/09/20/beyond-question-learning-the-art-of-the-interview/?_r=0

69
GRADE LEVEL: BCII
Lesson Topic: What Are the Elements of a News Package
Lesson 9 One Day
Aim:
What are the elements of an informative and visually appealing news package? How can we
constructively critique a news package?
Common Core Learning Standards:
Standard Grade Standard Number
RI BCII 7, 12
SL BCII 7, 8, 10, 11, 12
Motivation:
Students will watch a couple of news packages and review the essential elements of each.
While doing so they will complete the handout: “What Makes a Good Video Report?”
Instructional Materials:
Handout: “What Makes a Good Video Report?”
Handout: “How to Tell a Good News Story”
Procedures and Pivotal Questions:
Go over the motivation.
Discuss the elements of a solid news package (Ex: Varied types of video shots wide shot,
close up, mid shot, etc., B-roll, NAT sound, interviews, voice-overs, music etc.
Handout: “What Makes a Good Video Report?” and review
Handout: “How to Tell a Good News Story and review
Ask students to come up with ideas about how to give good feedback on a video report
without being too easy or too hard on the team that created it. Explain to students the
concept of providing “warm” (i.e. Positive and helpful) and “cool” (i.e. Critical, yet
constructive) feedback during critiques. What terms might they use for “warm” feedback,
what about for “cool”? Write them on the board and encourage students to write them
down on their own papers for future use.
Play another video report for the class and ask students to us the handout: “What Makes a
Good Video Report?” to guide their evaluation of the piece and to keep in mind that
helpful feedback is in terms of “warm” and “cool” rather than “good” or “bad”
Then as a class have students share their answers and get feedback from their classmates
about answers that are volunteered.
Summary:

70
Answer Aim questions.
Extension Activity:
Come up with three school-related news package story ideas.
Adapted from: https://studentreportinglabs.org/resource/lesson-12-journalism-ethics-news-
judgment-and-abcdefs-journalism/

71
72

73
74

75
GRADE LEVEL: BCII
Lesson Topic: How to Shoot a News Package
Lesson 10 One Week
Aim:
What are the elements of an informative and visually appealing news package? How can we
create one?
Common Core Learning Standards:
Standard Grade Standard Number
RI BCII 2, 4
W BCII 1, 2, 3, 5
SL BCII 2, 3, 6
L BCII 4, 5, 7
Motivation:
Students will watch a couple of news packages and review the essential elements of each.
Instructional Materials:
Handout: “Checklist for Shooting a News Package”
Procedures and Pivotal Questions:
Go over the motivation.
Discuss the elements of a solid news package (Ex: Varied types of video shots wide shot, close up, mid shot, etc., B-roll, NAT sound, interviews, voice-overs, music etc.
Students will be put into groups of three or four and create or be assigned a school-related
news story idea (Some examples are: “Get to Know Mepham’s Principal”, “Behind the
Cafeteria Counter: How Are Student Lunches Made?”, “A Day in the Life of a High
School Custodian”, etc.)
Handout: “Checklist for Shooting a News Package” and review
Students in each group will prepare a list of interviewees, a preliminary list of interview
questions for each interviewee and a shot list for the news package.
Students will create a shooting schedule and contact interviewees via email so that
interviews can be scheduled.
Summary:
What are the basic elements of a news package?
How will you be sure that all of those elements are present in your news packages?
Extension Activity:

76
Students will create a 2-minute long news package. Their work will be peer reviewed at
the end of the week. Outside class time is required for the completion of this project.
Adapted from: http://learning.blogs.nytimes.com/2010/09/20/beyond-question-learning-the-art-
of-the-interview/?_r=0

77
Checklist for Shooting a News Package
1. Start your video with NAT Sound and B-ROLL. Therefore, look for great NAT Sound and B-ROLL
opportunities on the shoot.
2. Get wide, medium and tight of every single shot, at least 10 seconds from each distance.
3. Make subjects stand at least one foot from the backdrop. It looks way more interesting.
4. Establishing shot. Get one. Don’t assume viewers know where you are or what you’re talking
about.
5. Make sure ANYONE you interview is also included in at least a few shots of your B-ROLL footage.
6. Light goes behind the camera; don’t leave your subjects in the dark. Refer to the 3-point lighting
handout you were given in BCI.
7. Look nice on camera. Dress Professionally.
8. Always shoot with editing in mind. Look for the action shots, the reaction shots, and interesting
activities/people.
• Motion = Emotion! • Don’t shoot inanimate objects to use as your B-Roll. BORING! • Action – Reaction
9. Test your equipment BEFORE you leave for the shoot.
• Camera • Battery (bring 2) • Tripod • Tape/SD card • Microphone • Headphones • 10. Check your AUDIO levels on the camera and the mic if needed.
11. Basic editing techniques
• Edit at LEAST 3 different shots of B-Roll together in a series • Don’t put 2 of the same CAM angles back to back (MS-MS or WS-WS or CU-CU) • 3-5 seconds long for each shot. • Show a sequence – WS-MS-CU, or MS-CU-WS, or CU-WS-MS • - WS = wide shot • - MS = medium shot • - CU = close up (tight shot)

78
12. Begin recording any interview with, “Say your name and spell it.” This is a great way to test your
audio levels, while recording the correct spelling of their name. And then spell their name correctly
on the lower thirds in post-production.
13. And remember, if there is a technical problem, it is probably YOU! The camera is not broken.
The microphone and tripod DO work. 99% of all technical problems are user related. Know how to
troubleshoot your equipment!
There are many more tricks, tips and suggestions, but with these ideas in mind, I believe you can
create a fun, polished news package video, while offering a tremendous learning experience for
your students. Good luck!
Adapted from: http://www.teachhub.com/13-steps-creating-student-news-package

79
GRADE LEVEL: BCII
Lesson Topic: Production Crew Positions and Functions
Lesson 11 One Class Period
Aim:
What are the various TV crew positions and functions?
What skills are necessary to successfully perform each position?
Common Core Learning Standards:
Standard Grade Standard Number
RI BCII 1
SL BCII 1
L BCII 1, 2
Motivation:
What are your top 3-5 strengths as a student? In what areas do you need to show improvement?
Instructional Materials:
Handout: “ TV Crew Descriptions and Functions”
Procedures and Pivotal Questions:
For the motivation have students list 3-5 personal characteristics which make them a
good student and five characteristics which make academic success a bit of a struggle.
Handout: “TV Crew Descriptions and Functions”
After reviewing, have students write down the three tops skills someone would need to
perform each job successfully. Based on their assessment, which jobs would most suit
them? Which ones would they most enjoy?
Give students a tour of the studio going over the placement of each crew member and
introducing the equipment one would have to master in order to perform that job.
Summary:
Based on what you have learned today, for which jobs do you think you are best suited?
With which jobs would you have the most difficulty? How could you develop the skills
necessary to serve in those positions?
Extension Activity:
Under the supervision of their instructor, students may use the remainder of the class to explore
the studio equipment associated with each position.

80
TV Crew
Positions
and
Functions
(THE LEADERS)
Producer - Organizes the crew, assigns jobs, over-sees entire production;
keeps everyone on task.
Skills Needed:
_______________________________________________________
Director - Calls the camera shots to the Technical Director, gives direction
to Floor Director.
Skills Needed:
_______________________________________________________
Stage Manager (Floor Director) - Maintains order in the studio, cues the
talent.
Skills Needed:
_______________________________________________________
(IN THE CONTROL ROOM)
Technical Director - Operates the video switcher. Listens to the Director.
Skills Needed:
_______________________________________________________
Audio Engineer - Operates the audio mixer. Balances all audio levels as
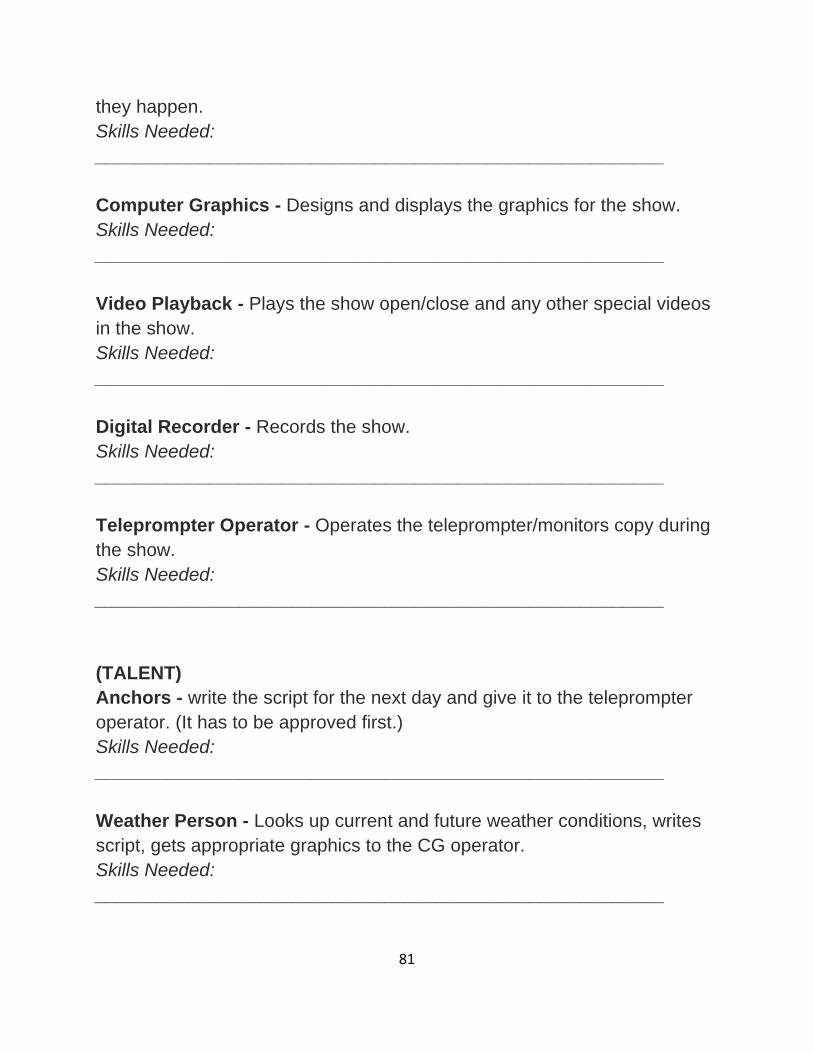
81
they happen.
Skills Needed:
_______________________________________________________
Computer Graphics - Designs and displays the graphics for the show.
Skills Needed:
_______________________________________________________
Video Playback - Plays the show open/close and any other special videos
in the show.
Skills Needed:
_______________________________________________________
Digital Recorder - Records the show.
Skills Needed:
_______________________________________________________
Teleprompter Operator - Operates the teleprompter/monitors copy during
the show.
Skills Needed:
_______________________________________________________
(TALENT)
Anchors - write the script for the next day and give it to the teleprompter
operator. (It has to be approved first.)
Skills Needed:
_______________________________________________________
Weather Person - Looks up current and future weather conditions, writes
script, gets appropriate graphics to the CG operator.
Skills Needed:
_______________________________________________________
82
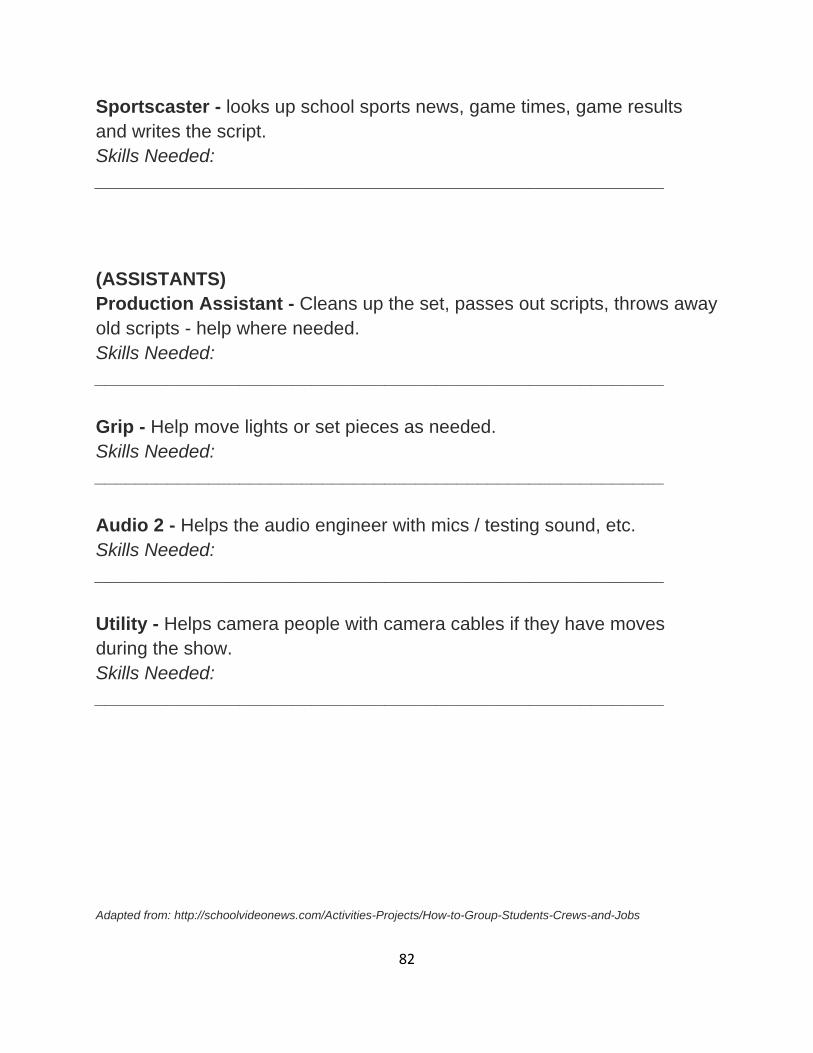
Sportscaster - looks up school sports news, game times, game results
and writes the script.
Skills Needed:
_______________________________________________________
(ASSISTANTS)
Production Assistant - Cleans up the set, passes out scripts, throws away
old scripts - help where needed.
Skills Needed:
_______________________________________________________
Grip - Help move lights or set pieces as needed.
Skills Needed:
_______________________________________________________
Audio 2 - Helps the audio engineer with mics / testing sound, etc.
Skills Needed:
_______________________________________________________
Utility - Helps camera people with camera cables if they have moves
during the show.
Skills Needed:
_______________________________________________________
Adapted from: http://schoolvideonews.com/Activities-Projects/How-to-Group-Students-Crews-and-Jobs
83
GRADE LEVEL: BCII
Lesson Topic: Producing a Show Open
Lesson 12 One Class Period
Aim:
How can we shoot a show open?
Common Core Learning Standards:
Standard Grade Standard Number
SL BCII 1b, 1c
L BCII 2
Motivation:
Have the students review their handouts on TV Crew Positions and Functions. Assign a
function to each student. Have the class watch the first two minutes of any news show,
taking note on what their assigned crew member position was responsible for in the
production of the clip.
Instructional Materials:
Video clip of any news show open
Internet and studio access
Procedures and Pivotal Questions:
Go over the motivation and discuss.
Explain that students will be producing an original news show open.
Have students choose positions and provide specific assignments for each one
Allow students class time to complete their assigned tasks
Summary:
How much of your “job” have you completed?
What did you learn today about the amount of effort needed to complete pre-production
tasks?
Extension Activity:
Students should complete their assigned tasks for homework.
During the next lesson, students will tape a run through of the news show open and critique their
work

84
GRADE LEVEL: BCII
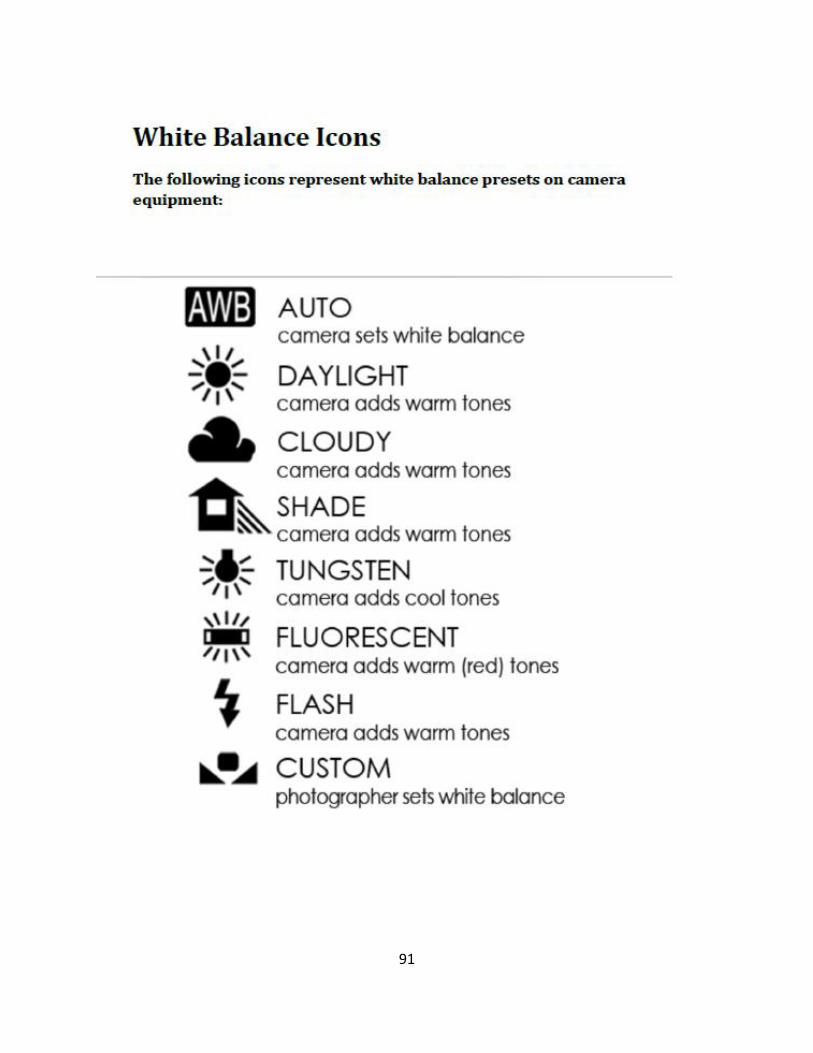
Lesson Topic: What is “White Balance”?
Lesson 13 One Class Period
Aim:
What is “white balance” and why is it important?
Common Core Learning Standards:
Standard Grade Standard Number
RI BCII 1
SL BCII 1, 2, 5
Motivation:
What is White?
Allow the students a couple minutes to gather their thoughts on the question. Then, have them
share their ideas with their partner.
Once the students have had a minute to share in pairs lead a class discussion about their answers.
NOTE* Typically, students will answer the 'What is White' question with two answers.
One common answers is that white is the absence of all colors. The other common answer is that
white is the combination of all colors.
Instructional Materials:
Handout: “Light Behavior and Characteristics”
Handout: “Warm vs. Cool Tones”
Handout: “White Balancing”
Handout: “White Balance Icons”
Procedures and Pivotal Questions:
Go over the motivation.
Pass out the handout titled, "Light Behavior and Characteristics".
Project the image of the visible light spectrum on smart board
Point out to the students that this chart shows the entire light spectrum.
Ask the students, do colors have moods, or can the tone of an image change the feel, or
temperature of the image?
Hand out “Warm vs. Cool Tones” to the students, and ask them what feelings the pictures
create. (Bluer tones create a cooler temperature look, and a more somber emotion, and
orange tones can create a happier, warmer feeling).
Define “white balance” and discuss its importance when filming. Hand out “White
Balancing” and “White Balance Icons” and review

85
Summary: Answer the aim question
Extension Activity: Have students white balance the studio cameras and then manipulate the
balance to create a warmer/cooler image.
Adapted from: http://learning.blogs.nytimes.com/2010/09/20/beyond-question-learning-the-art-
of-the-interview/?_r=0

86
LIGHT –Behavior and Characteristics
Before the topics of light and color can be explored, there must first be an understanding of waves.
Waves have high and low points, and the distance between one of those highs and lows and the next is
called a wavelength. Just how long that wave is will determine the amount of energy that it has. For
example, a long wave has a low amount of energy or low frequency, and a short wave has a high amount
of energy or high frequency. What we see in a rainbow, then, are the wavelengths of the visible colors.
Our sun emits its radiation in this visible range, which our eyes interpret as the colors of the rainbow.
These colors are identified as the visible spectrum and are often times remembered as ROY G. BIV: red,
orange, yellow, green, blue, indigo, and violet.
THE VISIBLE SPECTRUM OF LIGHT
Wave Travel It sounds logical so far, but how are these waves related to light and color? Light travels in the form of a
wave. It is basically photons (pieces of energy or particles), and mostly moves as waves. White light, or
the light from the sun, is made of colors, and colors are different types of light recognized by their own
wavelengths. Waves exist above and below the visible spectrum, too. Such waves called radio,
microwave, and infrared are below the red end of the spectrum, and ultraviolet (UV), x-rays, and gamma
rays are above the violet. These cannot be seen by the human eye, and therefore constitute the "invisible"
spectrum. Together, the visible and invisible spectrums make up the electromagnetic spectrum.

87
Light Transfer
Depending on the object that a light wave hits, it can do one of three things: be reflected, absorbed, or
transmitted. This determines the appearance of color. For an object to appear black all of the
wavelengths of light hitting that object must be absorbed; no light is reflected. Solid objects, for the most
part, will reflect light, and transparent objects will transmit light through them. To illustrate this last fact,
place a glass of red fruit juice on a table. Hold a piece of white paper on one side of the glass and chances
are, if the light in the room is right, you will see red on that piece of paper. The light transmitted the red
color of the juice onto the paper.
Adapted from: https://www.cteonline.org/curriculum/lessonplan/white-balancing-what-is-it-and-why-is-it-important-
copy/0oNDmu

88
WHITE BALANCE
Proper camera white balance has to take into account the "color temperature" of a light source,
which refers to the relative warmth or coolness of white light. Our eyes are very good at judging
what is white under different light sources, but digital cameras often have great difficulty with
auto white balance (AWB) — and can create unsightly blue, yellow, or even green color casts.
Understanding digital white balance can help you avoid these colorcasts, thereby improving
your video images under a wide range of lighting conditions.
White balance basically means color balance. It is a camera setting and function, which gives
the camera a reference to "true white" — it tells the camera what the color white looks like under
the current lighting conditions, so the camera will record color and white correctly. Since white
light is the sum of all other colors in the visual light spectrum, the camera will then display all
colors correctly.
Examples
Incorrect white balance shows up as pictures with orange or blue tints, as demonstrated by the
following examples:
Terminology
Most consumer-level video cameras have an "auto-white balance" feature, and this is how most
amateurs operate. The camera performs it's own white balance without any input from the
operator. In fact, very few home-video users are aware of the existence of a white balance
setting function. Unfortunately, the auto-white balance is not particularly reliable and therefore, it
is usually necessary to perform a manual white balance calibration.
The terminology commonly used in video productions is as follows:

89
"Auto-white" means the completely automatic function (no user input at all).
"Manual-white" means the operation described below.
"Color correction" means any other method of adjusting colors.
How to Perform a Manual White Balance
You should perform this procedure at the beginning of every shoot, and every time the lighting
conditions change. It is especially important to re-white balance when moving between indoors
and outdoors, and between rooms lit by different kinds of lights. During early morning and late
evening, the daylight color changes quickly and significantly (although your eyes don't notice,
your camera will). Do regular white balances during these periods.
You will need:
• A video camera with a manual white-balance function. There should be a "white balance"
button or switch on your camera.
1. Point your camera to a pure white subject, so that most of what you're seeing in the
viewfinder is white. Opinions vary on just how much white needs to be in the frame - About 50-
80% of the frame should be fine. The white balance calibration card or object subject should be
fairly matte, that is, non-reflective.
2. Set your exposure and focus.
3. Activate the white balance by pressing the button or throwing the switch. The camera may
take a few seconds to complete the operation, after which you should get a message (or icon) in
the viewfinder. Hopefully this will be telling you that the white balance has succeeded - in most
cases, the camera will retain it's current color balance until another white balance is performed.
Manually Setting the White Balance

90
Advanced White Balancing
Advanced camera operators occasionally trick the camera into reading an inaccurate white
balance to create a desired lighting effect.
Adapted from: https://www.cteonline.org/curriculum/lessonplan/white-balancing-what-is-it-and-why-is-it-
important/KFz6uU
91

92
Warm vs. Cool Tones
What feeling does each picture create?
If each image were part of a scene in a film, in which
genre of film would it appear?
Adapted from: https://www.cteonline.org/curriculum/lessonplan/white-balancing-what-is-it-and-why-is-it-
important/KFz6uU

93
GRADE LEVEL: BCII
Lesson Topic: Single vs. Multi-Camera Set Up
Lesson 14 One Class Period
Aim:
What are the differences and advantages of using single vs. a multi-camera set up?
Common Core Learning Standards:
Standard Grade Standard Number
SL BCII 1, 2
Motivation:
Watch a clip of I Love Lucy and ask students to determine if a single or multi-camera set
up was used (remind them that this was a live show-no editing!).
Instructional Materials:
Handout: “Basic 3 Camera Set Up”
Procedures and Pivotal Questions:
Go over the motivation. (It’s multi-camera)
Ask students: What are the advantages and disadvantages of Single Camera vs. Multi-
camera production. List on board. Fill in where needed and prompt for discussion.
(Answers can include but not limited to: various angles to cover same action, faster than
single camera, less expensive than single camera, more control over elements, cutting
while "live")
When list is complete or somewhat exhausted, ask students what method would they
choose if they had to demonstrate how to complete a something in 1 class period?
Hopefully they all choose multi-camera.
Handout “Basic 3 Camera Set Up”. Have students put the paper on their desks and
arrange so they are "behind" the cameras and facing the talent. Ask them to label the
camera on the left of the page, facing the male talent, Cam. #1, the middle camera is Cam
#2, and camera on right is Cam #3.
Describe how the camera opposite the talent shoots across the get their close up. (See the
arrows) The middle camera is used for a two shot.
Remind them that this is a basic setup and this is not written in stone.
Ask students to give a list of some of the shows they might have seen that are shot with
multiple cameras: Newscasts, American Idol and other "live" shows, talk shows, sports,
soap operas, sitcoms, etc. Mention that many films and television shows will run multiple
cameras at one time but this is not a true multi-camera production. Single camera
productions are shot in takes and various setups with components of the action repeated
several times and out of sequence; the action is not enacted chronologically so is
unsuitable for viewing by a live audience. When shooting stunts or other action with

94
multiple cameras it is then edited and manipulated in post-production for maximum
effect.
Show two clips – one of Giada DeLaurentiis and the other from Bourne Identity. Ask
students if they can identify which uses multiple cameras and which is single camera.
(Trick question: Bourne uses multiple cameras for some of the action and Giada is single
camera with insert shots completed after main action.)
Summary:
Answer the aim question.
Extension Activity:
You are shooting a segment on how to make a PB&J. You have one “chef” as talent.
Storyboard your segment using a 3-cam setup.
Adapted from: https://www.cteonline.org/curriculum/lessonplan/introduction-of-multi-camera-
production/YaGVRT
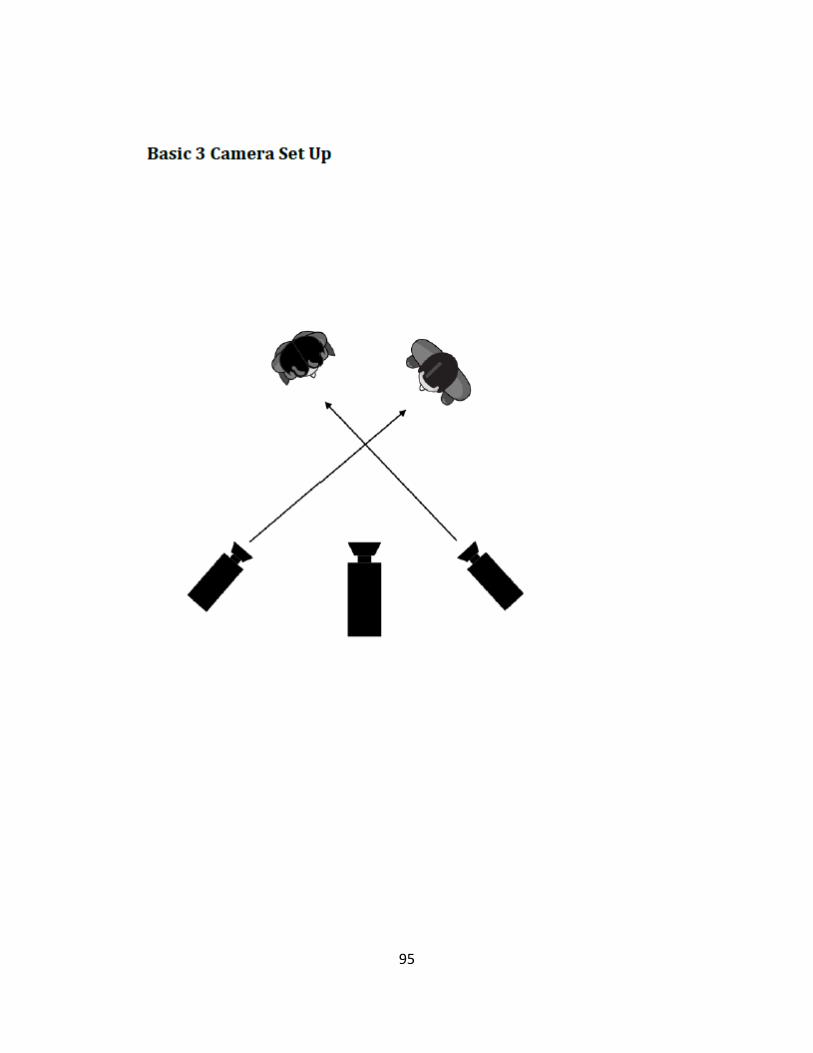
95

96
GRADE LEVEL: BCII
Lesson Topic: Foley Sound
Lesson 15 One Class Period
Aim:
What importance do ambient sound and sound effects play in the creation of video?
Common Core Learning Standards:
Standard Grade Standard Number
L BCII 4
Motivation:
Watch a clip of a film without ambient sound or sound effects (just dialogue). Play the
clip again with ambient sound. Ask students how the sound enhanced the clip.
JAWS with and without music:
https://www.youtube.com/watch?v=-fnq1s-babs
Psycho with and without music:
https://www.youtube.com/watch?v=81qweiWqyTU&list=PLq36i-
6lDP1yQ4vna9QElT7aSX4y9pYwr
Instructional Materials:
Video clips of films with and without music
Handout: “Sound Terms for Film and Video”
Procedures and Pivotal Questions:
Go over the motivation.
Handout “Sound Terms for Film and Video” and discuss
Provide students with a silent clip (https://www.youtube.com/watch?v=Bp3uGJu-kIE)
and assign genre types (comedy, horror, drama, romance). Have students edit the clip to
reflect that genre using a score they can find through iMovie or iTunes. They should also
include sound effects for any action.
Once completed, students will share their creations and critique one another’s work.
Summary:
Answer the aim question.
Extension Activity:
Choose a clip from your favorite movie and alter the sound to reflect a new genre.

97

98
99

100

101
GRADE LEVEL: BCII
Lesson Topic: Microphones: The Basics
Lesson 16 One Class Period
Aim:
How does using certain types of microphones in certain situations capture the sound accurately?
Common Core Learning Standards:
Standard Grade Standard Number
SL BCII 1, 4, 5
Motivation:
Ask students how many types of mics they have seen used on TV. Ask them what the
differences are of each.
Instructional Materials:
Various microphones on display
Headphones
Internet Handout: “Microphone Pickup Patterns”
Procedures and Pivotal Questions:
Go over motivation.
Cover the basics of microphones. Display various microphones and distribute “
Microphone Pickup Patterns” so that students understand how a basic omni-directional
microphone works compared with other more complicated microphones.
Using headphones, students can listen to each microphone when it is turned on to hear the
differences in the microphone patterns. Very briefly discuss how each microphone is
used.
Emphasize that holding the microphone in just the right spot is crucial. As part of the
classroom introduction to microphones make sure to discuss: levels, over and under
modulation, Aural signs of poor microphone placement, placement of the microphone
and how to hold it. Emphasize how placement of microphones is critical to good
recording. This includes where to place it in relation to the mouth and what to do when
students experience plosives and other signs that the microphone is not being used
properly.
Cover how to handle a microphone, including the following list of do’s and do not’s:
o Do not blow into a microphone
o Do not bang it or drop it
o Do not move your hand around on it or on the stem or cord when recording; it
will produce mic handling noise
o Do not position it directly in front of the mouth. You will get popped “p’s and
possibly distortion.

102
o Position the microphone about as far away from the mouth as between your
thumb and little finger on a spread out hand.
Have students wear headphones at all times that microphones are used to record. Briefly
touch on ambience including recognizing and collecting room and background ambience
to match interviews that are collected in the field. Talk about unnecessary noise:
computer hum, florescent lights, air conditioners, heaters, and what to do about them.
Stress that if at all possible they should turn off unnecessary noise makers before starting
to record or find another place that is quieter.
Summary:
Answer the aim question.
Extension Activity:
Have students use various mics to tape brief interviews of one another. They should upload the
audio clips and listen to them to hear the differences between recordings/mics.
Adapted from: http://www.schooljournalism.org/wp-
content/uploads/2015/09/C1L2__FocusonSound_How-to-use-Microphones-and-Minidiscs.pdf
103
GRADE LEVEL: BCII
Lesson Topic: Adding CG to Student Video Productions
Lesson 17 One Class Period
Aim: How and when do you add production/computer graphics to a live/pre-recorded broadcast?
Common Core Learning Standards:
Standard Grade Standard Number
SL BCII 1, 2, 3
Motivation:
Introduce the idea of broadcast graphics and animations and how they are used to convey
information to the viewer.
Show students examples of broadcast graphics in national news broadcasts on YouTube
or their official websites. Include a wide variety of broadcast graphics (lower thirds, intro
animation, transitions, sport graphics, etc…) and allow them to discuss graphics they
have seen used in broadcasts that interest them.
Instructional Materials:
Internet connected computer capable of video and graphics editing
Graphics/Animation Software (Recommended: Adobe Photoshop and/or Adobe After
Effects)
Handout: “Types of Broadcast Graphics”
Procedures and Pivotal Questions:
Complete motivation.
Tell students they must first decide what kind of graphics are needed for their video
productions
o There are a number of different types of graphics used in modern professional
video productions. Take some time to decide which graphics are needed for your
student production. You may find that you have a need for more than one type of
animated graphic. You can always add more production graphics through the
school year, so start with the easiest graphics and move your way up.
Determine Your Production Needs | Live production versus Post Production
o Live production is when you record and broadcast your show/segment live to tape
or on the air.
o Post production is when you record without broadcasting your show live and plan
to edit the video in your video editing software before airing the show/segment.
o You will need your graphics setup in different ways depending on if you are
creating a live show or one that is edited in post production.
Handout “Types of Broadcast Graphics” and discuss

104
Tell students: Once you have determined your show’s graphics needs (type of graphics
needed and if you are using them for post or live video production), you can start creating
and designing the graphics to be used.
Once you have created your broadcast animations and elements, it is time to add them to
your production workflow. You will need to output your animations in a format that is
compatible with the system you are using for live production or post production editing.
Common formats used are quicktime, png, avi and more. Check your system for
compatible file formats and render your animations from After Effects (or any other
animation editor) in the format that works best.
Allow students to choose one type of graphic and use either Adobe or iMovie to create
the graphic and add it to a pre-existing video clip they find on the internet.
Summary:
Answer the aim question.
Extension Activity:
Using Adobe After Effects, create one original graphic and save it.
Adapted from: http://schoolvideonews.com/Lesson-Plans-Curriculum/Adding-Graphics-and-
Broadcast-Animations-to-Student-Video-Productions
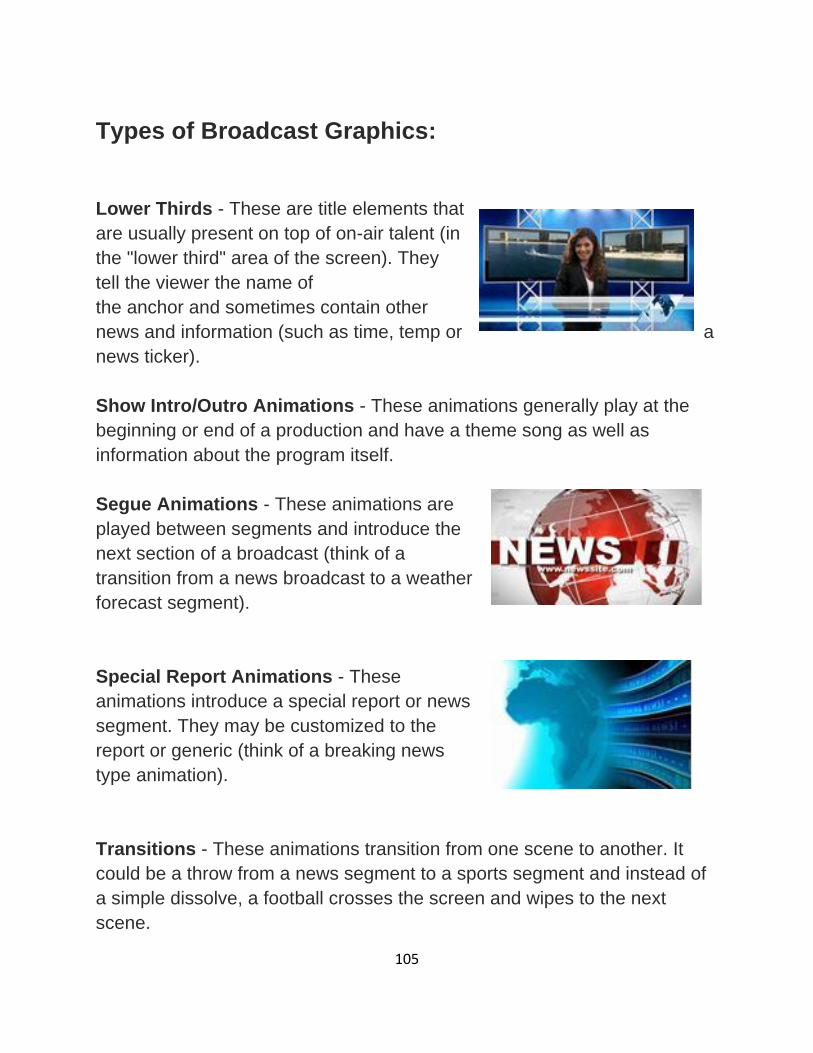
105
Types of Broadcast Graphics:
Lower Thirds - These are title elements that
are usually present on top of on-air talent (in
the "lower third" area of the screen). They
tell the viewer the name of
the anchor and sometimes contain other
news and information (such as time, temp or a
news ticker).
Show Intro/Outro Animations - These animations generally play at the
beginning or end of a production and have a theme song as well as
information about the program itself.
Segue Animations - These animations are
played between segments and introduce the
next section of a broadcast (think of a
transition from a news broadcast to a weather
forecast segment).
Special Report Animations - These
animations introduce a special report or news
segment. They may be customized to the
report or generic (think of a breaking news
type animation).
Transitions - These animations transition from one scene to another. It
could be a throw from a news segment to a sports segment and instead of
a simple dissolve, a football crosses the screen and wipes to the next
scene.

106
LIVE VS. POST-PRODUCTION GRAPHICS:
LIVE PRODUCTION GRAPHICS:
In live production, you will need graphics and animations that work within
your live production work flow that will allow you to cue and position
animated elements on the screen in real time. Animation file formats and
capabilities vary between live production systems, but you will want to
make sure that your graphics delivery system is reliable and easy to use so
there is less of a chance of an on-air mishap.
In addition to your normal live video production crew (camera people, on air
talent, etc.) you will want to assign the role of graphics switcher. This
person will que and execute the graphics live during the production at the
directors call. The graphics ques can also be performed by the main
switcher, but this can be stressful depending on the speed and number of
graphics in the production (especially if the wrong graphics shows up on
screen).Depending on your system capabilities, you may need to run on air
graphics in various animation or video formats.
In live productions, you will also need to plan ahead for graphics that will be
needed for each video production. Before the show, you will need to setup
lower thirds, transitions, bumpers, intros and more to be customized as
needed and ready to roll when the cameras
do.
POST PRODUCTION GRAPHICS:
For non-live productions, you will be editing
the program after recording the footage,
which gives you time and more control over
the final product. This also gives you the
107
ability to cut between multiple angles and layers of footage and allow a
quick way to piece together your footage and graphics. Most editing
software allow you to import a wide range of animation/video formats which
you can then place on top of your talent on the timeline.
Animation programs, such as Adobe After Effects and Apple Motion, can
be used to create and render animated elements for the main production.
Elements such as animated lower thirds and intro/segue graphics can be
customized, rendered and imported into your final video editing software
program. Also, if you have elements that are consistently used (such as
lower thirds and breaking news graphics), you can build a library of
animations that are used within your productions for easy access and
editing.
Source: http://schoolvideonews.com/Lesson-Plans-Curriculum/Adding-Graphics-and-Broadcast-Animations-to-
Student-Video-Productions

108
GRADE LEVEL: BCII
Lesson Topic: Teleprompter Operation
Lesson 18 One Class Period
Aim:
Why is the teleprompter operator’s job so important?
How does one operate a teleprompter?
Common Core Learning Standards:
Standard Grade Standard Number
SL BCII 1, 2
Motivation:
Show the students a clip from the movie, Anchorman, where Will Farrell’s character is
reading off a teleprompter script that has been tampered with by a colleague during a live
TV broadcast.
Instructional Materials:
Clip from Anchorman
Handout: “Teleprompter Operation”
Procedures and Pivotal Questions:
Show Anchorman clip. Ask the students why the teleprompter operator is essential to a
news broadcast.
Explain that they will be learning how to use the teleprompter software today using a pre-
loaded script.
Handout: “Teleprompter Operation” and review. Tell students they will answer the
worksheet questions/take notes as they go along, as these will serve as a reference guide
when they are operating the teleprompter.
Guide the students through teleprompter operation in the studio and allow them to take
turns being the operator and talent.
Summary:
Answer the aim question.
Extension Activity:
Create an original 30-second script and upload it for use on the teleprompter.

109
Teleprompter Operation
Basic teleprompter operation is a mission
critical part of your student newscast and
other video productions.
The teleprompter operator should thoroughly practice running the
teleprompter software, should communicate with on-camera talent and
thoroughly practice running the software with their on-camera talent
prior to the production.
Practice with the software
Thorough practice with the teleprompter software means that your
operator can answer or demonstrate the following:
1. How to properly load the script or load the entire show script?
2. How do you start the teleprompter scroll?
3. How do you scroll the teleprompter script forward?
4. How do you scroll the teleprompter script backward?
5. How do you pause the teleprompter scroll?
6. How do you control the speed of the forward scroll?
7. How do you control the speed of the backward scroll?

110
8. How do you skip ahead to the next story or script?
9. How do you skip back to the previous story or script?
10. How do you skip to the beginning of your story, script or
show?
11. How do you skip to the end of your story script or show?
Communicate with your talent
Each on-camera talent has a unique teleprompter reading speed and
preferences so teleprompter operators must communicate with their
talent with questions regarding the following topics:
Can you read this teleprompter font size? If not, make proper
adjustments.
From where (which line) on the teleprompter screen do you plan to
read the teleprompter script? (Top Line, 2nd Line, Middle of the screen
etc.)
Practicing with your talent
There is no substitute for practice!
For live production practice, scroll through the teleprompter script a
few times with your talent and be sure to practice or acknowledge
realistic pauses to read live voice-over copy, realistic pauses play
video elements such as your video Sound on Tape (SOT) segments
111
such as interviews, realistic pauses to play your video package stories
and be sure to properly emulate story-to-story transitions and
commercial/sponsor breaks.
Things do not always go as planned during live production.
What do you do if something goes wrong during live production and
you need to skip ahead to the next story? If you have time, be sure to
also practice this type of production scenarios.
Again, there is no substitute for practice!
Your school’s newscast production, including teleprompter operation, is
an exciting event that requires coordinated planning, preparation and
execution.
Adapted from: http://schoolvideonews.com/Pre-Production/Teleprompter-Operation-Techniques

112
GRADE LEVEL: BCII
Lesson Topic: Producing a News Show (Day 1)
Lesson 19 Two Class Periods of Instruction (a week or
more for project completion)
Aim: How can we prepare to produce and record a 4-minute news show, which will include a
show open and close and one pre-recorded news package (created in lesson 10)?
Common Core Learning Standards:
Standard Grade Standard Number
W BCII 1, 2, 3, 4, 5, 6
SL BCII 1, 2, 4, 5,
L BCII 1, 2
Motivation:
Show students a news show open/close and a news package. Review the content.
Instructional Materials:
Studio access
Procedures and Pivotal Questions:
Complete motivation.
Explain that students will be using all of the skills they have learned in BCI and BCII to
create an original 4-minute news show, incorporating the 2-minute news package they
created in lesson 10.
Assign the following roles to the class members (this may have to be adjusted depending
on class size. Teacher will serve as producer for this project):
o Director
o Stage Floor Manager
o TD (technical director)
o Camera Operators (at least 2)/Editors
o On-air Talent/Script Writer (at least 2)
o CG Creator/Teleprompter Operator
o Video Playback Operator/Digital Recorder
o (If additional students are available, wardrobe, make-up and set design positions
may also be assigned)
Allow students to choose one of the pre-recorded packages on which they will base their
news show.
Allow crew members to practice on the studio equipment
Have writers work on the script.

113
Summary:
Answer the aim question.
Extension Activity:
Students will continue working on this project for at least one week.

114
GRADE LEVEL: BCII
Lesson Topic: Producing a News Show (Day 2)
Lesson 20 Two Class Periods of Instruction (a week or
more for project completion)
Aim: How can we prepare to produce and record a 4-minute news show, which will include a
show open and close and one pre-recorded news package (created in lesson 10)?
Common Core Learning Standards:
Standard Grade Standard Number
W BCII 1, 2, 3, 4, 5, 6
SL BCII 1, 2, 4, 5,
L BCII 1, 2
Motivation:
Have a pre-production meeting with entire class addressing any issues from the previous
day’s lesson. Provide class with a simple run-down sheet for the day.
Instructional Materials:
Studio access
Storyboard Templates
Procedures and Pivotal Questions:
Complete motivation.
Meet with director and TD to storyboard news show
Provide teleprompter Op with script so it may be uploaded
Allow talent to practice the script
Instruct audio engineer to mic talent for the practice run and have digital recording op
record the read through.
If time permits, run through news open.
Summary:
What are some of the issues you have come across today? How can we best address them and
prepare for things to run more smoothly tomorrow?
Extension Activity:
Students will continue working on this project for at least one week.

115