Become A CO RE Member 2 - Howell Mayhew Engineering Home$avers -- Basement Insulat… ·...
24
CO 2 RE Home$avers CO 2 RE Carbon Dioxide Reduction Edmonton Take Action on Climate Change A Partner in Canada’s Basement Insulation
Transcript of Become A CO RE Member 2 - Howell Mayhew Engineering Home$avers -- Basement Insulat… ·...
Publications Currently Available in this Series
Attic Insulation
Basement Insulation
Caulking and Weather-stripping
Condensation Concerns
Conserving Electricity
Heating Systems
Ventilating Your Home
Water Conservation
Windows
Publications Available Spring 2005
Transportation
Crawlspace Insulation
Re-siding for Energy Conservation
Eco-efficient Landscaping
New Homes
Green Power
Storey-and-a-Half Insulation
Become A CO2RE Member We all contribute to the problem of Climate Change — and each of us can contribute to the solutions. Become a CO2RE Member.
Membership is free and you can sign-up on the CO2RE website at: www.co2re.ca
Printed on recycled paper containing 30% post-consumer fibre.
CO2RE Home$avers
CO2RECarbon Dioxide Reduction Edmonton
Take Action on Climate Change
CO2RECarbon Dioxide Reduction Edmonton
Office of the Environment2nd flr, Century Place
Edmonton, Alberta
Contact by phone:
944-CORE (2673)A Partner in Canada’s
Basement Insulation

The information contained in this publication is provided as a public service and represents current research results and information sources available to CO2RE and has been externally reviewed. CO2RE and the City of Edmonton however, assume no liability for any damage, injury or expense that may be incurred or suffered as the result of the use of this publication.
Supporting Sponsors
Technical Support
CO2RE Community Business Partners

CO2RE Home$aver SeriesBasement Insulation 1
About CO2RE
Created by Edmontonians for Edmontonians…
Carbon Dioxide Reduction Edmonton (CO2RE) is a developing organization formed to implement Edmonton’s Community-Wide Greenhouse Gas Emissions (GHG) Reduction and Energy Strategy. CO2RE is supported by the City of Edmonton and a group of local organizations dedicated to implementing the strategy and reducing greenhouse gas (GHG) emissions in our city.
The CO2RE mission is to work with Edmonton residents, businesses, institutions and industry providing services, programs and initiatives to assist in reducing energy use, thereby reducing the levels of the GHG emissions that are responsible for Climate Change.
CO2RE goals include:
up to a 6% reduction in GHG emissions (from 1990 levels) by the year 2010 and
a 20% reduction in GHG emissions (from 1990 levels) by the year 2020.
Do your part…
We can do many things to reduce our emissions – and that includes making our homes and lifestyles more energy efficient. The publications in this series are a first step, providing Edmonton with specific how-to guides on improving home energy efficiency, saving money and reducing GHG emissions.
For more ideas on how to become more energy efficient, log onto our website at www.co2re.ca!
Free MembershipWhy get a membership? Becoming a C02RE member is free and the more people who join us in taking action on climate change, the faster we will achieve our goals. CO2RE is working with local companies to offer incentives on energy-efficient products and programs to further assist homeowners. You’ll also receive a regular newsletter with new ideas and updates. Sign up today at www.co2re.ca.
Industrial and commercial/institutional companies can contact our manager at 944-CORE (2673) to find out how they can participate.
•
•

CO2RE Home$aver SeriesBasement Insulation 2
IntroductionAn un-insulated basement in a home can increase yearly heating costs by 10% to 30%. Basement walls should be properly insulated due to the fact that earth around the basement walls is not a good insulator and concrete walls easily conducts heat out. Cracks and holes in the foundation wall and the rim joist area also allow warm air to leak out and cold air in (Figure 1).
The table below shows the Low, High and Average yearly heating system gas usage and costs attributed to heat loss through basements.
*Averaged 2004/05 natural gas costs of $10 a GJ (Gigajoule).
Figure 1
Home Age Low Usage High Usage Average Usage
Average Cost *
1900-1919 13.21 GJ 108.79 GJ 44.04 GJ $4401920-1929 12.52 GJ 144.66 GJ 47.23 GJ $4721930-1939 25.67 GJ 111.56 GJ 50.86 GJ $5081940-1949 18.67 GJ 186.97 GJ 47.39 GJ $4741950-1959 11.13 GJ 141.81 GJ 49.38 GJ $4931960-1967 23.02 GJ 121.06 GJ 47.47 GJ $4741968-1979 13.04 GJ 147.54 GJ 44.56 GJ $4451980-1989 12.00 GJ 121.39 GJ 40.01 GJ $4001990-2003 15.34 GJ 92.60 GJ 38.31 GJ $383
CO2RE Home$aver SeriesBasement Insulation 3
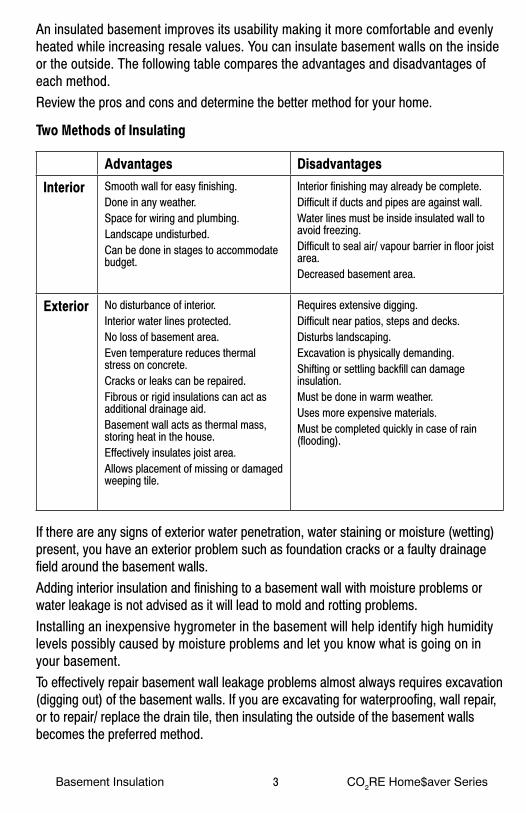
An insulated basement improves its usability making it more comfortable and evenly heated while increasing resale values. You can insulate basement walls on the inside or the outside. The following table compares the advantages and disadvantages of each method. Review the pros and cons and determine the better method for your home.
Two Methods of Insulating
If there are any signs of exterior water penetration, water staining or moisture (wetting) present, you have an exterior problem such as foundation cracks or a faulty drainage field around the basement walls. Adding interior insulation and finishing to a basement wall with moisture problems or water leakage is not advised as it will lead to mold and rotting problems.Installing an inexpensive hygrometer in the basement will help identify high humidity levels possibly caused by moisture problems and let you know what is going on in your basement.To effectively repair basement wall leakage problems almost always requires excavation (digging out) of the basement walls. If you are excavating for waterproofing, wall repair, or to repair/ replace the drain tile, then insulating the outside of the basement walls becomes the preferred method.
Advantages Disadvantages
Interior Smooth wall for easy finishing.Done in any weather.Space for wiring and plumbing.Landscape undisturbed.Can be done in stages to accommodate budget.
Interior finishing may already be complete.Difficult if ducts and pipes are against wall.Water lines must be inside insulated wall to avoid freezing.Difficult to seal air/ vapour barrier in floor joist area.Decreased basement area.
Exterior No disturbance of interior.Interior water lines protected.No loss of basement area.Even temperature reduces thermal stress on concrete.Cracks or leaks can be repaired.Fibrous or rigid insulations can act as additional drainage aid.Basement wall acts as thermal mass, storing heat in the house.Effectively insulates joist area.Allows placement of missing or damaged weeping tile.
Requires extensive digging.Difficult near patios, steps and decks.Disturbs landscaping.Excavation is physically demanding.Shifting or settling backfill can damage insulation.Must be done in warm weather.Uses more expensive materials.Must be completed quickly in case of rain (flooding).

CO2RE Home$aver SeriesBasement Insulation 4
Basement InsulationThe following five example tables show the average reductions in heating system gas usage, costs and greenhouse gas (GHG) emissions achievable by insulating basement walls to an RSI 2.1 (R12) insulation level (floor to ceiling). Gas usage savings and greenhouse gas (GHG) emission reduction figures were derived from the analysis of the results from 4,000 Edmonton area EnerGuide for Houses (EGH) home assessments. For homes built prior to 1981 the savings potentials are reasonable. Homes built after 1981 (Alberta Building Code) were required to have a minimum insulation level of RSI 1.4 (R8) for above grade portions of basement walls. Local building practice for 1990 and newer homes is usually RSI 2.1 (R12) insulation for above grade basement walls. The approximate cost of framing and insulating materials to insulate an unfinished basement on the inside of a 110 square metres (1200 square feet) bungalow is in the $950 to $1100 range. This price does not include the cost for interior finishes such as drywall or panelling or labour.The cost for materials to insulate the same sized bungalow on the exterior of the foundation would be in the $1300 to $1600 range not including the increased labour and excavation costs. Material cost for larger homes or those with more complex foundations are higher but the savings and GHG reductions achieved would be proportionately higher.
Example 1 – Homes 1900 to 1939
Cost savings of $175 and GHG emission reductions of 870 kilograms/ yearly.
Example 2 – Homes 1940 to 1967
Cost savings of $147 and GHG emission reductions of 730 kilograms/ yearly.
EnerGuide Results Gas (GJ) Yearly Costs Tonnes GHGAverage Gas Usage 47.38 $473.80 2.35Potential Gas Savings 17.52 Potential Cost Savings * $175.20GHG Savings ** (CO2) 0.87
EnerGuide Results Gas (GJ) Yearly Costs Tonnes GHGAverage Gas Usage 48.08 $480.80 2.38Potential Gas Savings 14.72Potential Cost Savings * $147.20GHG Savings ** (CO2) 0.73

CO2RE Home$aver SeriesBasement Insulation 5
Example 3 – Homes 1968 to 1979
Cost savings of $80 and a GHG emission reduction of 400 kilograms/ yearly.
Example 4 – Homes 1980 to 1989***
Cost savings of $34 and a GHG emission reduction of 170 kilograms/ yearly.
Example 5 – Homes 1990 to 2003***
Cost savings of $15 and a GHG emission reduction of 80 kilograms/ yearly.* Based on costs of $10/ GJ (2004/05 costs) ** Greenhouse Gas (GHG) Emission savings based on average gas usage savings.*** In 1981 Alberta Building Code for residential construction requires a minimum insulation level of RSI 1.4 (R8) for above grade portions of basement walls.
Getting StartedThe Alberta Building Code requires that new homes have a minimum RSI value (metric insulation value, the higher the better) of 1.4, which is equivalent to R8 (imperial insulation value) from the top of the basement wall to 600mm (24 inches) below ground level. A minimum recommended insulation value for basement walls to maximize energy efficiency is RSI 2.1 (R12).Familiarize yourself with the basic parts of a foundation wall (Figure 2). The drawing shows an older construction method where floor joists are embedded in the concrete foundation. The more common technique used today is platform framing, where floor joists rest on top of a wood plate, that is anchored to the concrete foundation.
EnerGuide Results Gas (GJ) Yearly Costs Tonnes GHGAverage Gas Usage 44.56 $445.60 2.21Potential Gas Savings 8.07Potential Cost Savings * $80.70GHG Savings ** (CO2) 0.40
EnerGuide Results Gas (GJ) Yearly Costs Tonnes GHGAverage Gas Usage 40.01 $400.10 1.98Potential Gas Savings 3.39Potential Cost Savings * $33.90GHG Savings ** (CO2) 0.17
EnerGuide Results Gas (GJ) Yearly Costs Tonnes GHGAverage Gas Usage 38.31 $383.10 1.90Potential Gas Savings 1.56Potential Cost Savings * $15.60GHG Savings ** (CO2) 0.08

CO2RE Home$aver SeriesBasement Insulation 6
Check for leaks before insulating, any serious water leakage usually require repairs to be completed on the outside of the basement walls.For most homes the most common method is insulating from the interior. Information is also included on exterior insulation. For additional installation details contact manufacturers or local distributors of exterior basement insulation products and systems. Additional how-to information is available in the attached “Additional Information Sources” on the last page of this booklet. For interior insulation increasing the RSI value to 2.1 or 3.5 (R12 to R20) down the
complete wall provides the greatest energy saving. Upgrading insulation and wall finishes are considered an “improvement”. Contact the City of Edmonton at www.edmonton.ca or call (780) 496 3100 to obtain any necessary building or development permits.
Interior Basement InsulationIf your basement has had no work done on it, starting the job is easy. Chances are some wall finishing has been done. If there is no proper air/ vapour barrier or a moisture barrier on the foundation wall and little or no insulation, it is best to remove these finishes. This allows you to check for moisture, apply a moisture barrier to the interior of the foundation wall (up to grade level) and to adequately seal and insulate the joist spaces.
Figure 2
CO2RE Home$aver SeriesBasement Insulation 7
Two Methods of Insulating the Interior 1. The most common method uses wall framing filled with glass fibre batts. This method is described here in detail. 2. The second involves fastening rigid board insulation to the wall. A number of fastening systems are available. Check with the local distributor or manufacturer of rigid insulation material for its recommended method of application. Note: The Alberta Building Code requires foamed plastic materials to be covered with a fireproof layer of drywall or plaster.
Tools NeededBasic carpentry tools (hammer, saw, level, etc.).Sharp knife.Caulking gun and stapler.Drill, masonry bit and concrete anchors.Safety and protection equipment: a hard hat, goggles, gloves and a breathing
mask should be used when working with power tools and installing some insulation materials.
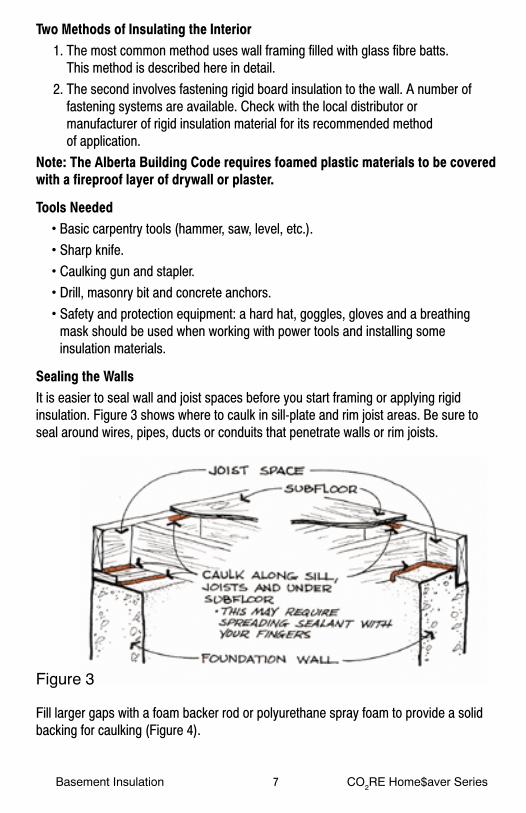
Sealing the WallsIt is easier to seal wall and joist spaces before you start framing or applying rigid insulation. Figure 3 shows where to caulk in sill-plate and rim joist areas. Be sure to seal around wires, pipes, ducts or conduits that penetrate walls or rim joists.
Fill larger gaps with a foam backer rod or polyurethane spray foam to provide a solid backing for caulking (Figure 4).
•••••
Figure 3

CO2RE Home$aver SeriesBasement Insulation 8
Canned polyurethane foam can be used as an alternative to caulking to both seal and insulate larger gaps. It must be covered with 12 mm (1/2 inch) drywall or equivalent for fire protection if exposed to the inside of the house.
Use a good quality, durable caulking material that is compatible with concrete. See the Home$avers – Caulking and Weatherstripping booklet for more information on caulking materials and methods of application.
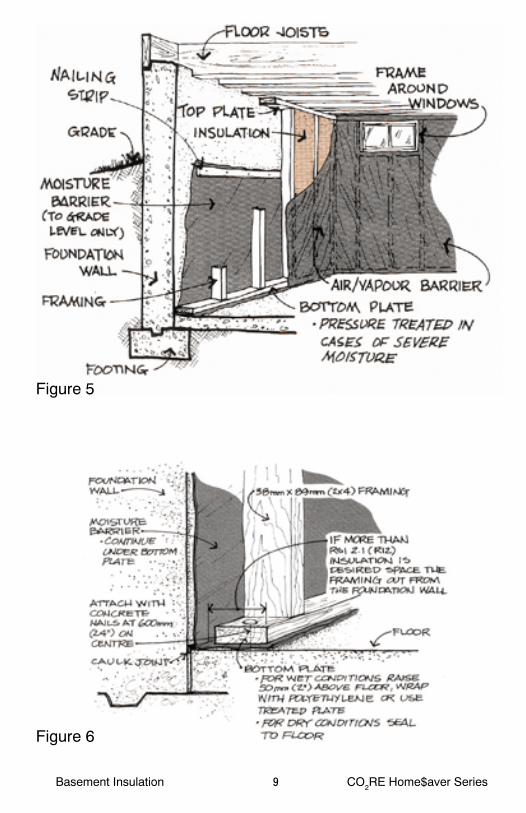
Moisture BarrierThe moisture barrier is generally placed on the inside of the foundation wall to protect the insulation and framing materials from water damage. In older basements the moisture barrier provides insurance against water damage in the wall. Whether it is really necessary depends on the type of drainage and soil type around the foundation. Clay soils tend to hold water so the moisture barrier is good insurance against future basement wall problems.In newly poured basements the large amount of moisture in the concrete can collect behind a polyethylene moisture barrier (if it is installed immediately), run down the barrier, and out of the bottom. To avoid this, either leave the basement walls open for one year to dry out or insulate from the exterior.The moisture barrier is usually polyethylene or a waterproof coating. It must extend from the ground or grade level down to the basement floor and under the bottom plate. It is important that this barrier extends only up to or slightly above the exterior grade level to prevent trapping moisture within the framed wall (Figure 5).
Figure 4
CO2RE Home$aver SeriesBasement Insulation 9
Figure 5
Figure 6
CO2RE Home$aver SeriesBasement Insulation 10
Polyethylene is attached to the wall with acoustical sealant and a plywood nailing-strip. Waterproof coatings must be applied prior to starting construction.In both cases, the bottom plate of the framing should be protected from the concrete with a strip of polyethylene (Figure 6).
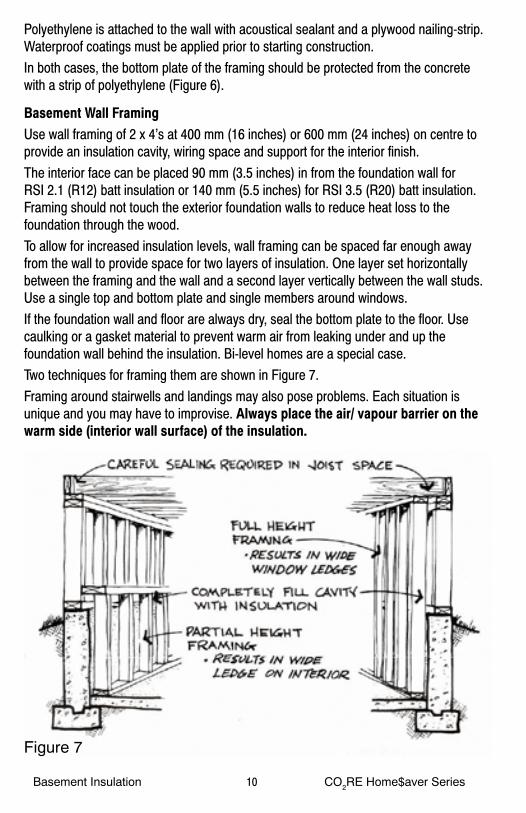
Basement Wall FramingUse wall framing of 2 x 4’s at 400 mm (16 inches) or 600 mm (24 inches) on centre to provide an insulation cavity, wiring space and support for the interior finish. The interior face can be placed 90 mm (3.5 inches) in from the foundation wall for RSI 2.1 (R12) batt insulation or 140 mm (5.5 inches) for RSI 3.5 (R20) batt insulation. Framing should not touch the exterior foundation walls to reduce heat loss to the foundation through the wood. To allow for increased insulation levels, wall framing can be spaced far enough away from the wall to provide space for two layers of insulation. One layer set horizontally between the framing and the wall and a second layer vertically between the wall studs. Use a single top and bottom plate and single members around windows. If the foundation wall and floor are always dry, seal the bottom plate to the floor. Use caulking or a gasket material to prevent warm air from leaking under and up the foundation wall behind the insulation. Bi-level homes are a special case. Two techniques for framing them are shown in Figure 7.Framing around stairwells and landings may also pose problems. Each situation is unique and you may have to improvise. Always place the air/ vapour barrier on the warm side (interior wall surface) of the insulation.
Figure 7
CO2RE Home$aver SeriesBasement Insulation 11
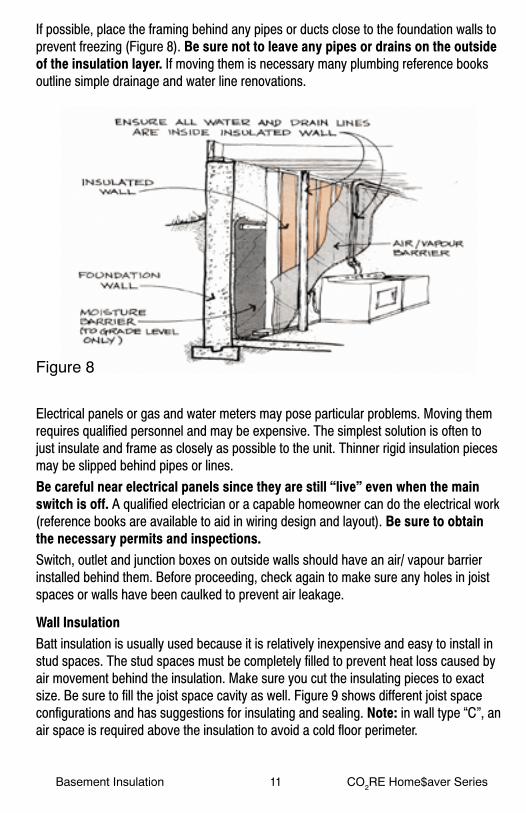
If possible, place the framing behind any pipes or ducts close to the foundation walls to prevent freezing (Figure 8). Be sure not to leave any pipes or drains on the outside of the insulation layer. If moving them is necessary many plumbing reference books outline simple drainage and water line renovations.
Electrical panels or gas and water meters may pose particular problems. Moving them requires qualified personnel and may be expensive. The simplest solution is often to just insulate and frame as closely as possible to the unit. Thinner rigid insulation pieces may be slipped behind pipes or lines.Be careful near electrical panels since they are still “live” even when the main switch is off. A qualified electrician or a capable homeowner can do the electrical work (reference books are available to aid in wiring design and layout). Be sure to obtain the necessary permits and inspections. Switch, outlet and junction boxes on outside walls should have an air/ vapour barrier installed behind them. Before proceeding, check again to make sure any holes in joist spaces or walls have been caulked to prevent air leakage.
Wall InsulationBatt insulation is usually used because it is relatively inexpensive and easy to install in stud spaces. The stud spaces must be completely filled to prevent heat loss caused by air movement behind the insulation. Make sure you cut the insulating pieces to exact size. Be sure to fill the joist space cavity as well. Figure 9 shows different joist space configurations and has suggestions for insulating and sealing. Note: in wall type “C”, an air space is required above the insulation to avoid a cold floor perimeter.
Figure 8

CO2RE Home$aver SeriesBasement Insulation 12
If there are floor overhangs, as in many bi-levels or under bay or bow windows, seal well and insulate as shown in Figure 10.
Before proceeding, survey the wall insulation to make sure all areas have been filled. Check that the joist space has been insulated properly. Make sure no pipes or ducts are on the cold side of the insulation.
Figure 9
Figure 10

CO2RE Home$aver SeriesBasement Insulation 13
The Air/ Vapour BarrierAn air/ vapour barrier is essential on the inner, or warm, surface of an exterior wall. This barrier can be provided by 0.15 mm (6 mil) polyethylene. Staple the polyethylene to the framing, using only enough staples to hold it in place. All joins (don’t pull it too tight) should overlap one joist or stud space (Figure 11). Caulk all edges and overlap with a non-skinning acoustical sealant. Overlaps, joins or edges can be reinforced with a strong tape before stapling.
Electrical outlets should be enclosed with polyethylene before installation. A commercial polyethylene box can be purchased or make one of polyethylene. Seal the edges of the box to the wall air/ vapour barrier. Also seal the barrier around window and exterior door openings (Figure 12).
The Airtight Drywall Approach (ADA.) is a method that uses properly installed and treated drywall as the air/ vapour barrier. To install a drywall air/ vapour barrier, a strip of gasket material is placed along the bottom and side of the bottom plate (Figure 13).
Figure 11
Figure 12

CO2RE Home$aver SeriesBasement Insulation 14
Recommended gasket materials include closed-cell neoprene and saturated urethane foams. Notch the drywall around the floor joists to provide a tight fit. With caulking, seal the drywall to the sub-floor and the floor joists. Finally, tape the drywall and finish it with approved vapour-barrier paint.No matter which method you use it is important to create as complete an air/ vapour barrier as possible. Make sure you do not accidentally puncture the poly air/ vapour barrier and repair any tears or holes in the polyethylene. If you are using the ADA method ensure that the drywall is sealed properly and that the vapour-barrier paint is applied evenly to all drywall surfaces.There are no limitations on wall or ceiling covering unless foamed plastic insulation materials are used. These products must be covered for fire protection with 12 mm (1/2 inch) drywall, which is securely anchored to the structure. Suspended ceiling systems in basements can provide convenient access if repair work is required on ducts or pipes.
Exterior Basement InsulationRetrofitting a basement from the outside is less common because of the extra work, the mess and the higher labour cost. However, for new homes or existing homes requiring major foundation repairs due to moisture penetration or water leakage problems exterior insulating may be practical.
Figure 13

CO2RE Home$aver SeriesBasement Insulation 15
Exterior insulating requires digging around the foundation. Mark the location and depth of utility services – underground electrical services, gas piping or telephone and cable TV hook-ups. Local utility companies provide this information.
Two Methods of Insulating the Exterior: 1. Partial depth method: place insulation against the wall down to 300 mm (12 inches) below ground. The place insulation 900 to 1200 mm (36 to 48 inches) horizontally to control lower-wall heat loss. Note: In new home construction, the Alberta Building Code requires vertical insulation down to 600 mm (24 inches) below ground level, either inside or outside the wall. 2. Full depth method: place insulation vertically down entire wall to the footings. This method is preferable as it is more effective in reducing heat loss but more difficult because a deeper trench is required.
Wall PreparationDepending on the method chosen you’ll need to dig a trench (either half depth or down to the footing around the foundations (Figure 14 shows ½ depth). If the black waterproofing is dried out, cracked or missing, repair the area. Building supply stores stock bituminous (tar) coatings for this purpose.
Figure 14

CO2RE Home$aver SeriesBasement Insulation 16
Allow new waterproof coatings to dry completely before applying insulation. Inspect all wall penetrations and surface-mounted fixtures such as exhaust vents, electrical outlets, hose bibs and gas lines. These should be sealed with grout or silicone sealant. If possible, extend fixtures out from the wall to accommodate the new thickness of insulation.
Use qualified trades people to move any gas or electrical fixtures.Carefully remove the lower portion of the siding or stucco. The top edge of the outside insulation should be a few centimetres above the line of the subfloor ensuring both the joist space and the wall below will be completely insulated. It also allows you to caulk around the rim joist where it meets the upper and lower floor.Leave the lower edge of the siding or stucco and building paper pulled away from the wall a few millimetres so that flashing (called drip cap or J-channel) can be installed beneath it. The flashing allows the insulation to extend beyond the line of the siding or stucco and protects the insulation from rain. The flashing should be wide enough to cover both insulation and protective coating.Slip the flashing into place under the existing siding or stucco and building paper before the wall insulation is installed. The bottom siding nails may have to be removed before slipping the flashing in place. After the insulation and protective covering are in place, lower the flashing slightly and attach with roofing nails. The secured flashing provides a waterproof cap for wall insulation and wall joint.It may not be possible to remove the stucco or siding above the level of the subfloor. Place the outside insulation as high as possible. The un-insulated portion, usually the rim joist area, can be insulated and sealed on the inside (see Figure 9).
Wall InsulationMaterials suitable for insulating outside foundation walls include extruded or expanded polystyrene and rigid glass fibre. Expanded polystyrene, also known as bead board, is available in different densities. Type 1 has the lowest density and is not recommended for below grade applications.Extruded and expanded (except Type 1) polystyrene can be used underground for both vertical and horizontal applications. Rigid glass fibre boards are also available that can be installed vertically to the foundation wall.The method for applying rigid insulation to basement walls depends on the type and thickness of the insulation and the soil conditions. Check with your local distributor or the manufacturer for installation recommendations. Considering the work and costs involved exterior insulation should have a minimum value of RSI 1.8 (R10).
CO2RE Home$aver SeriesBasement Insulation 17
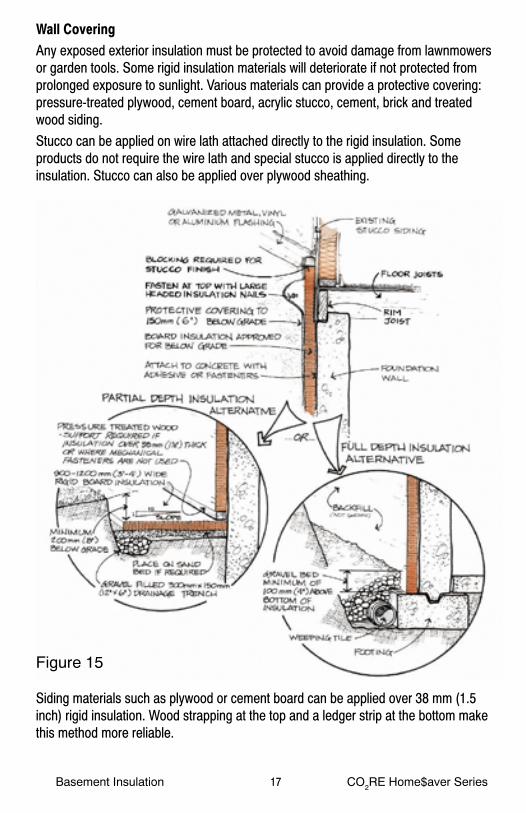
Wall CoveringAny exposed exterior insulation must be protected to avoid damage from lawnmowers or garden tools. Some rigid insulation materials will deteriorate if not protected from prolonged exposure to sunlight. Various materials can provide a protective covering: pressure-treated plywood, cement board, acrylic stucco, cement, brick and treated wood siding.Stucco can be applied on wire lath attached directly to the rigid insulation. Some products do not require the wire lath and special stucco is applied directly to the insulation. Stucco can also be applied over plywood sheathing.
Siding materials such as plywood or cement board can be applied over 38 mm (1.5 inch) rigid insulation. Wood strapping at the top and a ledger strip at the bottom make this method more reliable.
Figure 15

CO2RE Home$aver SeriesBasement Insulation 18
To attach over thicker insulation, support framing must be built to provide a nailing surface (Figure 15). You can also use siding or stucco over pressure-treated plywood. The treated plywood should extend below ground level to provide added protection for the insulation. Pressure-treated plywood can be painted to provide an inexpensive finish.
Floor InsulationAlthough basement floor insulation may be hard to justify from an energy saving point of view (unless you have radiant floor heating) it can increase the comfort level considerably. Carpet with thick underlay provides a minimum level of thermal comfort. A more effective but expensive method is to build an insulated subfloor, or sleeper floor.A word of caution: Ensure the basement is dry before insulating the floor. Check for moisture by placing a square of polyethylene at several locations on the floor. Seal the edges with masking tape. If a damp spot occurs within 24 hours, the floor is too moist. Place a polyethylene moisture barrier on the concrete to prevent the transfer of moisture to the subfloor (Figure 16).
Figure 16

CO2RE Home$aver SeriesBasement Insulation 19
Frame and insulate the subfloor with batts or rigid board insulation. Shim the sleepers as required to obtain a level surface. Apply an air/ vapour barrier, and then install plywood sheeting and floor covering.
SummaryChoose between exterior or interior basement insulation.Decide on materials, including existing materials that can be salvaged. Measure your requirements and obtain cost estimates. Obtain permits for changes to the building and electrical system.For interior insulating:
- Seal wall and joist space, apply moisture barrier (to grade level only). - Frame wall and make required electrical, plumbing and heating changes. - Install the insulation, apply air/ vapour barrier and finish.
For exterior insulating: - Excavate and clean wall of dirt and debris. - Remove siding or stucco to level required. - Insulate by selected method and apply wall insulation protection. - Backfill excavation carefully. - Install siding and flashing protection.
Consider insulating the floor to provide extra comfort.
Although the yearly heating cost savings from insulating basement walls and floors is usually not very large, the additional benefits include a much more comfortable and usable living space and additional small reductions in your share of Greenhouse Gas emissions.
•••••
•
•

CO2RE Home$aver SeriesBasement Insulation 20
Additional Information Sources
Natural Resources Canada – Office of Energy Efficiencywww.oee.nrcan.gc.ca – The Office of Energy Efficiency offers a wide range of free publications, programs and services to help Canadians save energy and reduce the greenhouse gas emissions that contribute to climate change.
EnerGuide for Houses (EGH) evaluations is a program from Natural Resources Canada. This detailed home assessment provides independent expert advice on the different systems of your home and what can be done to improve comfort, reduce energy bills, and cut down on greenhouse gas emissions that contribute to climate change. Consider having an EGH completed on your home.
Recommended Reading: Keeping the Heat In is a comprehensive source of energy efficiency how-to information for homeowners. This free publication is available from Natural Resources Canada. Call toll free at 1-800-387-2000.
Canada Mortgage and Housing Corp.www.cmhc.ca/publications – CMHC is a valuable resource for information. The CMHC Order Desk is a one-stop shop for all free and priced publications, fact sheets, reports, videos and other CMHC resources. You can order online, or through their call centre at 1-800-668-2642.
EPCORwww.epcor.ca – The website contains information on energy and water efficiency with calculators, tools and downloadable publications to assist you in reducing your energy and water consumption. Tools include a Home Energy Audit, a do-it-yourself home audit with a library of resources; EPCOR House, an animated tour of a typical home with efficiency information; and calculators for most major appliances, plus a simple electricity calculator and water audit tool. Tools are located in the EPCOR-Customer Service drop down menus.
Environment CanadaThe Green Lane in Environment Canada’s internet source for weather and environmental related to clean air, clean water and climate change. Visit them at www.ec.gc.ca

The information contained in this publication is provided as a public service and represents current research results and information sources available to CO2RE and has been externally reviewed. CO2RE and the City of Edmonton however, assume no liability for any damage, injury or expense that may be incurred or suffered as the result of the use of this publication.
Supporting Sponsors
Technical Support
CO2RE Community Business Partners

Publications Currently Available in this Series
Attic Insulation
Basement Insulation
Caulking and Weather-stripping
Condensation Concerns
Conserving Electricity
Heating Systems
Ventilating Your Home
Water Conservation
Windows
Publications Available Spring 2005
Transportation
Crawlspace Insulation
Re-siding for Energy Conservation
Eco-efficient Landscaping
New Homes
Green Power
Storey-and-a-Half Insulation
Become A CO2RE Member We all contribute to the problem of Climate Change — and each of us can contribute to the solutions. Become a CO2RE Member.
Membership is free and you can sign-up on the CO2RE website at: www.co2re.ca
Printed on recycled paper containing 30% post-consumer fibre.
CO2RE Home$avers
CO2RECarbon Dioxide Reduction Edmonton
Take Action on Climate Change
CO2RECarbon Dioxide Reduction Edmonton
Office of the Environment2nd flr, Century Place
Edmonton, Alberta
Contact by phone:
944-CORE (2673)A Partner in Canada’s
Basement Insulation