
BEACH COVER-UP - peppermint...
16
Our free Sewing School pattern is proudly supported by Oekaki Renaissance from Toyota Home Sewing - a revolutionary new sewing and free-motion embroidery machine designed to help you make beautiful things. ‘Draw’ your ideas directly onto fabric and create the designs of your dreams for quilting, textile arts, dressmaking, home furnishings and more. BEACH COVER-UP SIZES 1 - 5 (AU 6-24) | ADVANCED BEGINNER Pattern made exclusively for Peppermint Magazine by In the Folds
Transcript of BEACH COVER-UP - peppermint...

Our free Sewing School pattern is proudly supported by Oekaki Renaissance from Toyota Home Sewing - a revolutionary new sewing and free-motion embroidery machine designed to help you make beautiful things. ‘Draw’ your ideas directly onto fabric and create the designs of your dreams for quilting, textile arts, dressmaking, home furnishings and more.
BEACH COVER-UPSIZES 1 - 5 (AU 6-24) | ADVANCED BEGINNER
Pattern made exclusively for Peppermint Magazine by In the Folds

3 3
4
5
6
7
8 -14
15
contents
Garment overview (details + suggested fabrics)
Preparation
Sizing + garment measurements
Printing + assembling the pattern
Printing plan
Fabric requirements + cutting plan
Instructions
Glossary
2

FABRIC SUGGESTIONS
The Beach Cover-up is designed to be sewn with light-weight woven fabrics. Consider using: cotton, linen, silk georgette or crepe de chine, viscose/rayon, charmeuse, gauze or voile.
Extra fabric may be required for matching prints or stripes, or if you are using a directional print.
GARMENT DETAILS
The Beach Cover-up is a simple summer kaftan with a comfortable and relaxed fit, perfect for hot summer days on the beach.
It features a scooped neck, high-low hem and an optional waist tie. The neckline is finished with bias binding for a beautiful and professional finish. Tassels can be added to create a chic summer look.
Through the creation of this garment you will gain confidence in: - sewing with light-weight woven fabrics- sewing straight seams- sewing curved seams- attaching bias binding - attaching trims
garment overview
preparation
Print the pattern according to the instructions (on p. 5).
PRINT THE PATTERN
Gather all the supplies and tools you will need: scissors, tape measure and pins.
GATHER SUPPLIES
This pattern is available in sizes 1 - 5 (equivalent to AU sizes 6 - 24). Take your measurements and use the sizing information (on p. 4) to select your size. This pattern is layered so that you can print just the size/s you need (see p. 5 for more information about how layers work).
SIZE
Wash and dry your fabric. Use the method you intend to use when washing your garment so your top doesn’t shrink after its first wash. Give your fabric a good press before cutting.
PREPARE YOUR FABRIC
3
TIP
If you are using silk or similar, consider cutting your fabric sandwiched between two layers of fine paper (pinning and cutting through all three layers). This will help keep the fabric on grain, and ensure the fabric doesn’t move while you are cutting. Use silk pins, and a nice sharp fine needle on your sewing machine.

4
BODY MEASUREMENTS
FINISHED GARMENT MEASUREMENTS
Taking your measurements:
If your measurements fall between sizes, use the finished measurements below to help you select your size.
If your measurements range between several sizes, print the sizes your measurements lie between and grade between the sizes by drawing diagonal lines from one size to another.
The pattern is drafted for a B cup bust.
There is a lot of ease in this pattern as it is designed to be worn loosely over swimsuits etc.
SIZE BUST WAIST HIP
1 192cm (75½in) 188cm (74in) 188cm (74in)
2 202cm (79½in) 198cm (78in) 198cm (78in)
3 212cm (83½in) 208cm (82in) 208cm (82in)
4 222cm (87½in) 218cm (86in) 218cm (86in)
5 232cm (91¼in) 228cm (90in) 228cm (90in)
FINISHED LENGTH(shoulder to front hem)
86cm (34in)
87cm (34¼in)
88cm (34½in)
90cm (35¼in)
91cm (35¾in)
sizing + garment measurements
SIZE BUST WAIST HIP
1 76 - 86cm (30 - 34in) 61 - 71cm (24 - 28in) 84 - 94cm (33 - 37in)
2 86 - 96cm (34 - 38in) 71 - 81cm (28 - 32in) 94 - 104cm (37 - 41in)
3 96 - 106cm (38 - 42in) 81-91cm (32 - 36in) 104 - 114cm (41 - 45in)
4 106 - 116cm (42 - 46in) 91 - 101cm (36 - 40in) 114 -124cm (45 - 49in)
5 116 - 126cm (46-50in) 101 - 111cm (40 - 44in) 124 - 134cm (49 - 53in)

This pattern can be printed on either A4 or US letter sized paper.
PAPER SIZE
Before printing the file, you need to check the scaling settings on your printer. You will need to print the pattern at its true scale. To do this, go into your print settings and select ‘actual size’ or set page scaling to ‘none’ or ‘turn off page scaling.’
SCALING
When you have the scaling right, print the remainder of the pattern.
Cut around the border of each page - one long side and one short side (keep your choice of sides consistent between pages). Align the circles so that 1A matches up to 1A, 2A with 2A etc, and tape or glue in place. Use the printing plan on p. 6 as a reference, if required.
ASSEMBLE
Loosely cut around each pattern piece so that the pieces are easier to manage.
CUT
This pattern was designed with embedded layers. This means that you can select only the size/s you would like to print!
Layers make it much less confusing to cut out the pattern, and also saves on ink (and paper in some cases).
Open the pattern in Adobe Reader and click on the ‘layers’ option on the left hand side. There will be an eye next to each layer in the pattern. Turn off (by clicking) all the layers you do not need.
Remember to keep the ‘PATTERN INFO’ layer on for all sizes.
LAYERS
5
Print page 1 of the pattern only, and check that the large test square measures 5cm x 5cm, or the smaller one measures 1in x 1in. It really needs to be precise, so if it is not quite right, you will need to go back and check your printer settings again.
printing + assembling the pattern

PATTERN INVENTORY
BACK FRONT
WAIST TIENECK BINDING
SUPPLIES
- Length of main fabric (look to p. 7 for quantities - 9m (10 yards) of trimming (i.e tassels)- 1m (1 yard) x 25mm (1in) of single fold binding if you’d prefer to use store bought binding- Coordinating thread
printing plan
Front - cut 1 on foldBack - cut 1 on foldNeck binding - cut 1Waist tie (optional) - cut 1 pair or cut 2
6
BEACH COVER-UP
BACK
CUT 1 ON FOLD
Gra
inlin
e
Ce
ntr
e b
ack
(pla
ce o
n f
old
)
BEACH COVER-UP
FRONT
CUT 1 ON FOLD
Gra
inlin
e
Ce
ntre
fron
t (pla
ce o
n fo
ld)
BEA
CH
CO
VE
R-U
P
WA
IST
TIE
(O
PT
ION
AL)
CU
T 1
PA
IR
Grainline
BEA
CH
CO
VE
R-U
P
NEC
K B
IND
ING
CU
T 1
(O
N B
IAS
)
Gra
inlin
e(o
n b
ias)
5
5
5
5
5
5
BEA
CH
CO
VE
R-U
P
NEC
K B
IND
ING
CU
T 1
(O
N B
IAS
)
Gra
inlin
e(o
n b
ias)
BEA
CH
CO
VE
R-U
P
WA
IST
TIE
(O
PT
ION
AL)
CU
T 1
PA
IR
BEACH COVER-UP
FRONT
CUT 1 ON FOLD
BEACH COVER-UP
BACK
CUT 1 ON FOLD
4
4
4
4
4
4
BEA
CH
CO
VE
R-U
P
NEC
K B
IND
ING
CU
T 1
(O
N B
IAS
)
Gra
inlin
e(o
n b
ias)
BEA
CH
CO
VE
R-U
P
WA
IST
TIE
(O
PT
ION
AL)
CU
T 1
PA
IR
BEACH COVER-UP
FRONT
CUT 1 ON FOLD
BEACH COVER-UP
BACK
CUT 1 ON FOLD
3
3
3
3
3
3
BEA
CH
CO
VE
R-U
P
NEC
K B
IND
ING
CU
T 1
(O
N B
IAS
)
Gra
inlin
e(o
n b
ias)
BEA
CH
CO
VE
R-U
P
WA
IST
TIE
(O
PT
ION
AL)
CU
T 1
PA
IR
BEACH COVER-UP
FRONT
CUT 1 ON FOLD
BEACH COVER-UP
BACK
CUT 1 ON FOLD
2
2
2
2
2
2
BEA
CH
CO
VE
R-U
P
NEC
K B
IND
ING
CU
T 1
(O
N B
IAS
)
Gra
inlin
e(o
n b
ias)
BEA
CH
CO
VE
R-U
P
WA
IST
TIE
(O
PT
ION
AL)
CU
T 1
PA
IR
BEACH COVER-UP
FRONT
CUT 1 ON FOLD
BEACH COVER-UP
BACK
CUT 1 ON FOLD
1
1
1
1
1
1
1A
1A
1B
1B
1C
1C
3A
3A
5A
5A
3B
3B
3C
3C
2A
2A
4A
4A
4B
4B
4C
4C
4D
4D
2B
2B
2C
2C
2D
2D
5B
5B
5C
5C
7A
7A
7B
7B
7C
7C
9A
9A
9B
9B
9C
9C
11A
11A
11B
11B
11C
11C
13A 13
A 13B 13
B 13C 13
C
15A
15A
15B
15B
15C
15C
17A
17A
17B
17B
17C
17C
6B
6B
6C
6C
6D
6D
6A
6A
8A
8A
10A
10A
10B
10B
10C
10C
10C
10C
12A
12A
12B
12B
12C
12C
12D
12D
14A
14A
14B
14B
14C
14C
14D
14D
16A
16A
16B
16B
16C
16C
16D
16D
8B
8B
8C
8C
8D
8D
TEST SQUARE
1 inch x 1 inch
5cm x 5cm
PEPLUM TOPSEWING PATTERN
FEEL FREE TO HACK THIS PATTERN, ADD TO THIS PATTERN, LOVE THIS PATTERN
AND TO MAKE IT OVER & OVER BUT PLEASE REMEMBER THAT IT’S
FOR PERSONAL USE ONLY
HAPPY SEWING!
Emily HundtC
SHARE YOUR MAKES
#peppermintsewandtell
PATTERN SYMBOL KEY
notch
double notch (indicates the back of the pattern piece)
cutting line
stitch line
grainline
place pattern on fold
lengthen / shorten line
drill hole
Our free Sewing School pattern is proudly supported by Oekaki Renaissance from Toyota Home Sewing - a revolutionary new sewing and free-motion embroidery machine designed to help you make make beautiful things. ‘Draw’ your ideas directly onto fabric and create the designs of your dreams for quilting, textile arts, dressmaking, home furnishings and more.
Ce
ntre
ba
ck
CUT ALONG LINE TO MAKE PATTERN MORE MANAGEABLE TO ASSEMBLE
SIZE 1
SIZE 2
SIZE 3
SIZE 4
SIZE 5
PATTERN SIZE KEY1 2 3 4
5 6 7 8
9 11
13 14 15 16
17 18 19 20
21
25262728
10 12
22 2324
293031 32
33343536
Remember:The pattern has layers, which means you can just print the size/s you need. Be sure to keep the ‘PATTERN INFO’ layer on, as this layer includes all cutting information etc.

fabric requirements + suggested cutting plans
FO
LD
SELV
ED
GES
SELV
ED
GES
SELV
ED
GES
FO
LD
SELV
ED
GES
SELV
ED
GES
SELV
ED
GES
FRONT
BACK
2
WAIST TIE2
WAIST TIE
2
NECKBINDING
FRONT
BACK
WAIST TIEWAIST TIE
NECKBINDING
5
5
5
2.7m x 150cm wide(3 yards x 60in)+ 9m (10yards) of
2.6m x 115cm wide fabric* (3yards x 45in)+ 9m (10yards) of trimming (optional)
*NOTE: Only sizes 1- 4 can be made with 115cm (45in) wide fabric. For size 5 you must use 150cm (60in) fabric.
Cut these pieces on a single layer offabric.
Cut these pieces on a single layer offabric.
FABRIC REQUIREMENTS
Below you can find the cutting plans for 115cm (45in) and 150cm (60in) fabric. Due to the width of the front and back pieces, 115cm fabric is not suitable for Size 5.
If you are planning on matching prints, you may require more fabric than what is suggested.
7

STITCH THE SHOULDER SEAMS
These instructions guide you through making the Beach Cover-up with french seams (the most appropriate finish for lightweight and transparent fabrics). Seam allowances vary, to help you achieve a professional finish, and will be highlighted in each step.
Happy Sewing!
sewing time!
Step 1:Take the FRONT and BACK pieces and pin them together at the shoulder seams, with WRONG SIDES together. With a 6mm (¼in) seam allowance, stitch the seams.
Illustration Key:
Right side Wrong side
8
Step 2:Trim down the seam allowance on both shoulder seams by 2-3mm (⅛in), before pressing the seam allowance on both shoulder seams towards the back of the garment.

9
FINISH THE RAW EDGES
Step 3:Fold the shoulder seam, bringing right sides together (enclosing the raw edge inside the fold), press and pin.
Stitch the seam with a 6mm (¼in) seam allowance.
Press seam allowance towards the back of the garment.
Step 4:Lay the garment out flat with the right-side facing down.
Turn one edge up by 6mm (¼in) and stitch in place. You can press and pin it if you feel more comfortable, although with flimsy fabrics, it can be much easier to just turn with your finger while you are on the sewing machine.

10
Step 5:Work your way around the garment until all sides have been turned up and stitched once.
Step 6:Turn the edges in a second time - again by 6mm (¼in) and press in place. You will notice that the raw edge of the fabric is now enclosed inside the hem.
Use pins to mark the notch positions on the front and backs side seams (as you will lose the notches when you fold the edges in this time).

11
ADD TRIMMING
Step 8:Take the WAIST TIE pieces and with right sides together, fold the pieces in half lengthways and press. Stitch along the raw edge with a 1cm (⅜in) seam allowance.
Step 9:Trim down the seam allowances to 4 - 5mm (¼in) before using a safety pin (or bodkin) to turn the ties right side out. Press ties flat.
Step 10:Enclose the short ends of the ties by pushing the raw edges inside the tube, before stitching close to the edge. Alternatively you can stitch by hand (slip stitch) to finish the edges invisibly.
Step 7:If you are adding tassels (or a similar trim) carefully pin it in place around the edges on the wrong side of the garment. You will need to cut the trim when you reach the first pin on each side seam (closest to the shoulder seam) and restart pinning the trim from the second pin (pin closest to the hem). This will leave the side seams free of trim so that they can be joined together later on.
Carefully stitch the trim in place.
If you are not adding trim, simply stitch the edges in place, following the first row of stitching.
PREPARE WAIST TIES (OPTIONAL)

12
Step 11:Fold the garment at the shoulder seams, bringing the front and back pieces together with right sides together.
Try on the garment and decide where you would like to put the waist ties (it will probably feel most comfortable at your natural waist). Use a pin or chalk to mark position.
Insert waist tie between the front and back pieces at the side seam in desired position. Pin the side seams closed. The end of the ties should extend 1-2cm (⅜-⅝) beyond the side seam for stability.
SEW THE SIDE SEAMS
Step 12:Stitch close to the edge (or follow the hem stitching line) to secure waist ties and side seams.
Turn the garment right side out.
13
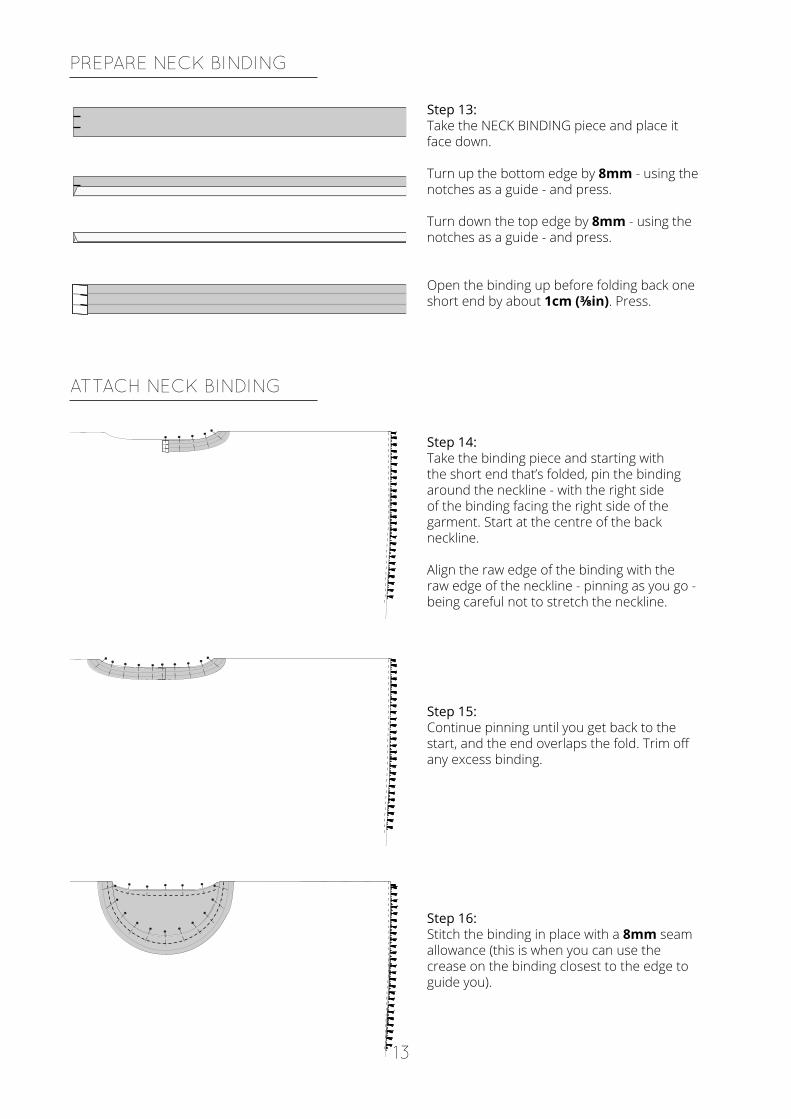
Step 14:Take the binding piece and starting with the short end that’s folded, pin the binding around the neckline - with the right side of the binding facing the right side of the garment. Start at the centre of the back neckline.
Align the raw edge of the binding with the raw edge of the neckline - pinning as you go - being careful not to stretch the neckline.
Step 13:Take the NECK BINDING piece and place it face down.
Turn up the bottom edge by 8mm - using the notches as a guide - and press.
Turn down the top edge by 8mm - using the notches as a guide - and press.
Open the binding up before folding back one short end by about 1cm (⅜in). Press.
PREPARE NECK BINDING
ATTACH NECK BINDING
Step 15:Continue pinning until you get back to the start, and the end overlaps the fold. Trim off any excess binding.
Step 16:Stitch the binding in place with a 8mm seam allowance (this is when you can use the crease on the binding closest to the edge to guide you).

14
Step 17:Turn the binding to the right side, pressing the seam allowances towards the binding with your fingers. Understitch the seam allowance to the binding.
Clip into the seam allowance, before trimming it down to 3 - 4mm (⅛in).Repeat for the other side.
Step 18:With the garment inside-out, turn the binding to the inside of the garment. Press in place, turning up the raw edge by 8mm - indicated by the second crease.
Pin the binding in place before stitching close to the edge of the binding, right next to the fold.
Go nice and slow as you will be able to see this line of stitching on the right side of thegarment.
Give your garment a good press and you’re

glossary
15
BASTE - Sew temporary stitches to hold pieces in place before sewing permanently. Basting can be done by hand or machine (on a long stitch length). Consider using a contrast thread when basting to make stitches easier to remove later.
CLIP - Snip into the seam allowance (perpendicular to the raw edge) getting close to the stitch line, to help open up curved seams or corners.
FINISH - Neaten the raw edges of your project using an overlocker, zigzag stitch or binding.
INTERFACING - A (normally) fusible fabric that is used to stiffen fabric, in certain parts of a garment. It is often used in collars, cuffs and button plackets.
NOTCH - A notch is a small cut in the fabric that helps guide you while you are sewing. Notches are used to indicate seam allowance, dart arms, the location of design details or indicate key points on the pattern (like the centre front or centre back). Notches are also used to indicate balance points (points on your pattern that help you sew the right pieces together, as well as help you when you are sewing long or curved seams).
PRESS - Use a hot iron to press seams flat, using steam (if appropriate for your fabric).
RIGHT SIDE / WRONG SIDE - The right side of the fabric is the side you would like to see on the outside of the finished garment, while the wrong side is the side that will be hidden inside the garment.
SEAM ALLOWANCE - The space between the stitching line and the raw edge of the fabric.
TRIM - Cut back a seam allowance to make it easier to manage or less bulky.
UNDERSTITCH - Stitch the seam allowance to a facing or binding, close to the seam edge. This helps the facing roll to the inside of the garment, preventing it from being seen on the outside of a garment.
CONTRAST - A secondary fabric that is used in conjunction with the main fabric of a garment.
SELF - The main fabric used in your garment.
DRILL HOLE - A single point marked on a pattern that cannot be marked with a notch. For example, dart point or pocket position markings.

Woohoo, you have finished your Beach Cover-up!
We’d love to see what you made! Find us on Instagram @peppermintmagazine and @inthefolds
and tag your new dress with #peppermintsewingschool
C Emily Hundt 2016 - made with love in Sydney, Australia for Peppermint Magazine
Pattern is for individual use onlyYou can make the garment for yourself or as a gift. It does not enti-
tle you to print, copy or distribute the pattern to others, whether you profit from it or not, nor to sell garments that
you have made from this sewing pattern.
Thank you for respecting the rights of the designer.
Love the pattern? Plenty more patterns can be found at
www.peppermintmag.com/other/sewing-school/+
www.inthefolds.com
Our free Sewing School pattern is proudly supported by Oekaki Renaissance from Toyota Home Sewing - a revolutionary new sewing and free-motion embroidery machine designed to help you make beautiful things. ‘Draw’ your ideas directly onto fabric and create the designs of your dreams for quilting, textile arts, dressmaking, home furnishings and more.