BC-3000 - scale service Lake/m_44299_bc3000.pdf · CAUTIONS FOR USE §Always operate the scale on a...
80
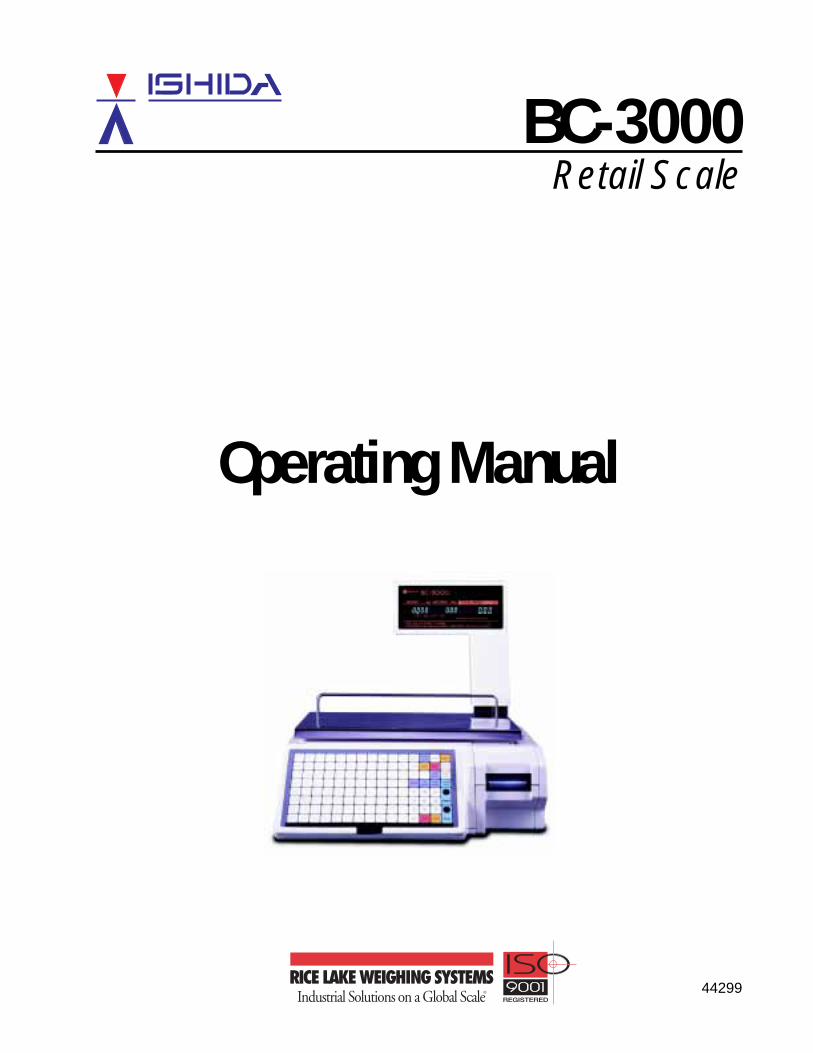
BC-3000 Retail Scale 44299 Operating Manual
Transcript of BC-3000 - scale service Lake/m_44299_bc3000.pdf · CAUTIONS FOR USE §Always operate the scale on a...
1
BC-3000Retail Scale
44299
Operating Manual

You can help improve this manual bycall ing attention to errors andby recommending improvements.Please convey your comments to thenearest Ishida Company regionalrepresentative. Thank you!
Copyright 1996 by Ishida Co., Ltd. All Rights Reserved.No part of this manual may be reproduced in any form, by mimeographor any other means, without written permission of the publisher.
§

CAUTIONS FOR USE
§Always operate the scale on a level surface.
§Do not disassemble the scale.
AC
§When cleaning the scale, only use a soft dry cloth or a cloth wetted with a neutral cleanser. Never use thinner or other volatile liquids.
§Do not drop or apply a strong shock to the scale.
§Do not expose the scale too long periods of direct sunlight.
§Do not allow any liquids to come into contact with the scale or terminal.
Always operate the scale withthe same rated AC power supplyshown on the specification plate.

SAFETY CONSIDERATIONS
To ensure safe operation, the general safety considerations below must befollowed.
GroundingThis instrument is a Class 1 device which requires protective grounding for safeoperation.To avoid potential shock hazards, a protective grounding conductor for theinstrument must be securely connected to the main grounding provision byqualified service personnel.
Do not remove covers or enclosuresTo avoid personal injury and shock, do not open or remove any covers orenclosures of the instrument unless specified in the manual.
Do not perform unspecified maintenanceFor your personal safety, do not perform any maintenance procedures whichare not specified in the manual.
Disconnect power supply before servicingTo ensure your personal safety, disconnect the power supply before servicing.

Contents
Chapter 1 Overview
1.1 Appearance .......................................................................................................................................2
1.2 Display ...............................................................................................................................................2
1.3 Operation Keys ..................................................................................................................................3
1.3.1 Operation Key Sheet .............................................................................................................31.3.2 Basic Function Keys ..............................................................................................................41.3.3 Additional Function Keys .......................................................................................................5
1.4 Program Keys ....................................................................................................................................6
1.4.1 Program Key Sheet ............................................................................................................... 61.4.2 Program Key Functions .........................................................................................................71.4.3 Speed Key Functions .............................................................................................................8
1.5 Loading Label/Paper Roll ................................................................................................................... 9
Chapter 2 Daily Operation
2.1 Pre-operation Inspection ..................................................................................................................12
2.2 Power On .........................................................................................................................................13
2.3 Sales by Weight ............................................................................................................................... 14
2.4 Fixed-price Sales .............................................................................................................................15
2.5 Prepack for Sales by Weight ............................................................................................................ 16
2.6 Prepack for Fixed-price Sales .......................................................................................................... 17
2.7 Label Batch Print .............................................................................................................................18
2.8 Pack Count Sub-total .......................................................................................................................19
2.9 Mark Down Functions ...................................................................................................................... 20
2.9.1 Amount Discount ................................................................................................................. 202.9.2 Percentage Discount ...........................................................................................................202.9.3 Special Price ........................................................................................................................ 20
2.10 Unit Price Override .......................................................................................................................... 21
2.11 Voiding the Last Label...................................................................................................................... 21
2.12 Switching from Sale by Weight to Fixed-price Sale .........................................................................21
2.13 Selecting Lower Preset Data ...........................................................................................................21
2.14 Pack Date Override .......................................................................................................................... 22
2.15 Save Function ..................................................................................................................................22
Chapter 3 Subtraction
3.1 Subtraction Mode .............................................................................................................................24
Chapter 4 Total Reports
4.1 Total Reports ....................................................................................................................................28
4.2 Total Mode .......................................................................................................................................28
4.3 Daily Total Report .............................................................................................................................29
4.3.1 Daily Report Categories ......................................................................................................294.3.2 Operation Procedure ...........................................................................................................30
4.4 Monthly Total Report ........................................................................................................................31
4.4.1 Monthly Report Categories ..................................................................................................314.4.2 Operation Procedure ...........................................................................................................32
4.5 Hourly Total Report ..........................................................................................................................33
4.6 Operator Total Report ......................................................................................................................34
4.7 Total Clear ........................................................................................................................................35
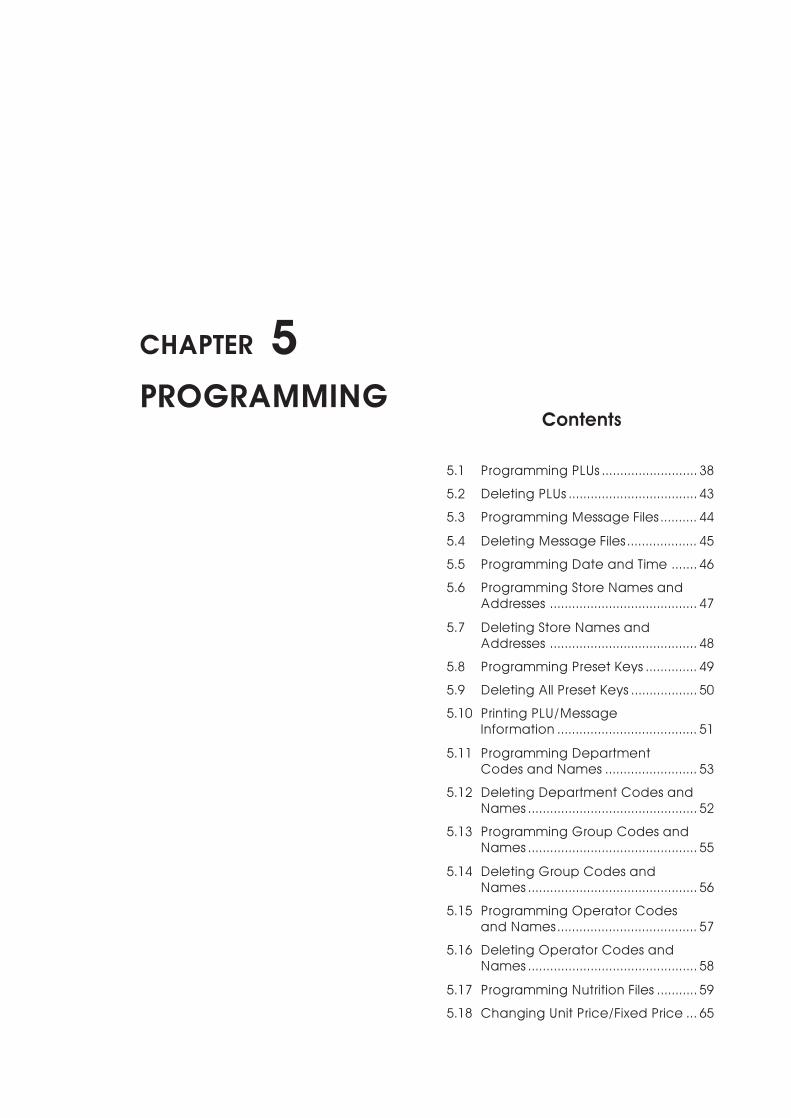
Chapter 5 Programming
5.1 Programming PLUs..........................................................................................................................38
5.2 Deleting PLUs ..................................................................................................................................43
5.3 Programming Message Files ...........................................................................................................44
5.4 Deleting Message Files ...................................................................................................................45
5.5 Programming Date and Time ...........................................................................................................46
5.6 Programming Store Names and Addresses ....................................................................................47
5.7 Deleting Store Names and Addresses .............................................................................................48
5.8 Programming Preset Keys ...............................................................................................................49
5.9 Deleting All Preset Keys ..................................................................................................................50
5.10 Printing PLU/Message Information ..................................................................................................51
5.11 Programming Department Codes and Names .................................................................................53
5.12 Deleting Department Codes and Names .........................................................................................54
5.13 Programming Group Codes and Names ..........................................................................................55
5.14 Deleting Group Codes and Names ..................................................................................................56
5.15 Programming Operator Codes and Names .....................................................................................57
5.16 Deleting Operator Codes and Names ..............................................................................................58
5.17 Programming Nutrition Files ............................................................................................................59
5.18 Changing Unit Price/Fixed Price ......................................................................................................65
Chapter 6 Text Editing
6.1 Text Entry Screen ............................................................................................................................68
6.1.1 Indicators .............................................................................................................................686.1.2 7-Segment Display Characters ............................................................................................68
6.2 Character Size .................................................................................................................................69
6.3 Text Editing Keys ..............................................................................................................................70
6.4 How to Create/Edit Text ...................................................................................................................71
6.5 How to Reverse Text ........................................................................................................................72
6.6 How to Insert Characters .................................................................................................................74
Chapter 7 Troubleshooting
7.1 Troubleshooting ................................................................................................................................76
7.2 Other Problems ................................................................................................................................75

Contents
1.1 Appearance ..................................... 2
1.2 Display................................................ 2
1.3 Operation Keys ................................. 3
1.4 Program Keys .................................... 6
1.5 Loading Label/Paper Roll ................ 9
Contents
1.1 Appearance ..................................... 2
1.2 Display................................................ 2
1.3 Operation Keys ................................. 3
1.4 Program Keys .................................... 6
1.5 Loading Label/Paper Roll ................ 9
CHAPTER 1OVERVIEW

page 8 BC-3000 • User’s Manual • Rev 0
1.2 Display
WEIGHT lb.
ZERO
Capacity 30 0.01 lb.
NET SAVE AUTO
$ $UNIT PRICE TOTAL PRICE
× PLU
IndicatorsZERONETSAVEAUTO
: Lights when weight value is true zero or temporary zero. : Lights when a tare is used. : Lights when the SAVE mode is used. : Lights when the AUTOMATIC PRINT mode is used.
1.1 Appearance
Operator Display
Weigh Platter
Key Sheet
Fuse
Power Switch
Customer Display
WEIGHT lb.
ZERO
Capacity 30 0.01 lb.
NET SAVE AUTO
$ $UNIT PRICE TOTAL PRICE
5 PLU
Height Adjustment
Side Cover
Printer

BC-3000 • User’s Manual • Rev 0 page 9
1.3 Operation Keys
1.3.1 Operation Key Sheet
VOID
DATE
7
4
1
0
8
5
2
CLR
9
6
3
TARE
PLU
ZERO
RESET
LABELBATCH
PREPACK
XMULTIPLY
PGMMODE
LOWERPRESET
PAPERFEED
PACKCOUNT
Preset key
Additional function key
The following functions can be programmed.• DATE/TIME display• EXTRA MESSAGE No.• STORE NAME No.• POP MESSAGE No.• FIXED PRICE function• SAVE function• DISCOUNT• AMOUNT DISCOUNT• PERCENTAGE DISCOUNT
Insert the Operation Key Sheetover the Program Key Sheet.
Program Key Sheet
OperationKey Sheet

page 10 BC-3000 • User’s Manual • Rev 0
1.3.2 Basic Function Keys
NUMERIC ENTRYKeys 0 through 9 are used to enternumeric data.
CLEARUsed to cancel incorrectly enterednumeric data.
LABEL BATCHUsed to issue batches of labels.
LOWER PRESET SELECTUsed to access the second level of dataprogrammed to the preset keys.
MULTIPLIERUsed to multiply the entered quantity offixed-price items.
PACK COUNT SUB-TOTALUsed to issue a label that shows thenumber of labels (packs), total weight andamount which have been printed sincethis key was last pressed.
PAPER FEEDUsed to advance labels to the correctprinting position.
PLU SELECTUsed to access PLU data.
0
to
PRE-PACKUsed to switch auto/manual label printing.
PRINTUsed to issue a label.
PROGRAM MODE SELECTUsed to access the Subtraction, TotalReports, and Programming menus.
RESETUsed to initialize the scale.
TAREUsed to subtract the tare weight from thetotal weight on the weigh platter.
TEMPORARY DATEUsed to change the current date of thescale temporarily. This allows labels to beproduced ahead of time for prepackingitems.
VOIDUsed to cancel the previous label issued.
ZERO ADJUSTMENTUsed to return the scale to zero.This key will only function if nothing is onthe weigh platter.
PREPACK
PAPERFEED
CLR
TARE
DATE
ZERO
VOID
9
LABELBATCH
XMULTIPLY
LOWERPRESET
PACKCOUNT
PLU
RESET
PGMMODE

BC-3000 • User’s Manual • Rev 0 page 11
1.3.3 Additional Function Keys
SAVEUsed to access the same stored PLU dataas a short cut operation.
DISCOUNTUsed to override a selling price and entera special price.
AMOUNT DISCOUNTUsed to subtract the entered amount.
PERCENTAGE DISCOUNTUsed to subtract the entered percentage.
STORENAME
POPMSSG
DATE/TIMEUsed to display the current date and time.
EXTRA MESSAGEUsed to access the extra messagecorresponding to the entered number.
STORE NAMEUsed to access the store namecorresponding to the entered number.
POP MESSAGEUsed to access the POP messagecorresponding to the entered number.
FIXED PRICEUsed to temporarily change from salesby weight to fixed-price sales.Also used to enter a new fixed price.
DATETIME
FIXEDPRICE
EXTRAMSSG
SAVE
DISCOUNT
–$
–%

page 12 BC-3000 • User’s Manual • Rev 0
1.4 Program Keys
The Program Key Sheet is accessed by removing the Operation Key Sheet. The keys will function as indicatedon the following page when one of the following modes has been accessed. This is done by using a passwordin conjunction with the MODE key.
• Total Report Mode (Chapter 4)• Programming Mode (Chapter 5)
1.4.1 Program Key SheetThe Program Key Sheet comes with a typewriter style keyboard layout.
Remove the Operation Key Sheet so thatthe Program Key Sheet under it can be used.
Program Key Sheet
OperationKey Sheet
EXTRATEXT
SPEEDKEYS
SHIFT
DATETIME
PLULIST
STORENAME
HELPZEROBS
MODERESETENDINSERTLINE
DELETE
CHARDELETE
COPY
PLU
PAPERFEED
EDITPLU
ENTERTARECLREDIT ∗ NEWLINE
GRANDTOTAL
PRICEOVRDE
SIZENORMAL
DEPT. GROUP OPERATOR
1
0
7
4@
?POIUYTREWQ
;LKJHGFDSA
(/&%$#’!
ßØÆA
Œ
N
.,MNBVCXZ 2
8
5
3
9
6
SPACESALES REPORTS
EDIT FUNCTIONSMESSAGE
REPORT NAMES EDIT FUNCTIONS
CHARACTER STYLE
REVERSE
E E
’’ ~ <)>
C+_=
:
➝
➝
➝
➝
~
U
°
E¨ I¨
O¨A¨
LOWERCASE
/
¨

BC-3000 • User’s Manual • Rev 0 page 13
1.4.2 Program Key Functions
Alphanumeric Keys
The alphanumeric keys are used to enter data intofields available on the BC-3000. The LOWER CASEkey is used to change to lower case letters upper andlower case characters. The SHIFT key is used toaccess the upper character of keys with two characters.
CLEARUsed to return numeric values that havebeen entered incorrectly to zero.
TARENot used in the program mode.
ENTERUsed to store numeric entries after thevalue has been correctly typed.Also used to move up the menu itemspresented in the program mode, totalmode and other menu screens.
PLUUsed to enter specific item numbers suchas PLU numbers and message numbers.
PRINTUsed to obtain a sample label to confirmthe entered text.
PAPER FEEDUsed to issue a blank label whenapplicable.
UP ARROWUsed to move up the lines of text.Also used to move up the menu itemspresented in the program mode, totalmode and other menu screens.
DOWN ARROWUsed to move down the lines of text.Also used to move up the menu itemspresented in the program mode, totalmode and other menu screens.
RIGHT ARROWUsed to move across the characters oftext.Also used to view options available onmenu lines of program menu items.
LEFT ARROWUsed to move across the characters oftext.Also used to view options available onmenu lines of program menu items.
ENDUsed to complete data entry in theprogram menu and return to the mainmenu.
CHARACTER DELETEUsed to delete the right most characteron the display from text field.
BACK SPACEUsed to delete the last entered character.
LINE DELETEUsed to delete an entire line from textfield.
INSERTUsed to change between inserting oroverriding characters in editing of any textfield.
CLR
TARE
ENTER
PLU
PAPERFEED
➝
END
➝
➝
➝
CHARDELETE
BS
LINEDELETE
INSERT

page 14 BC-3000 • User’s Manual • Rev 0
REVERSEAfter pressing this key, the followingentered text is changed to reverse type.Text is changed back to normal type whenthe NORMAL key is pressed or when theREVERSE key is pressed again.
SIZEUsed to select different character sizes.After pressing the SIZE key, use the UP,DOWN , LEFT and RIGHT arrow to scrollthrough the character sizes available forprinted text.
EDITUsed to enter the text entry mode for anytext field.
COPYUsed to copy the text.
NORMALUsed to switch from reverse type tonormal type.
EDIT
COPY
NORMAL
REVERSE
SIZE
1.4.3 Speed Key Functions
On the Program Key Sheet, there are various Speed Keys to jump directly to programming options.These Speed Keys reduce the dependence on the manual as they give direct access to menu items.
SPPED KEYSUsed to select the menu item forprogramming the preset keys.
EDIT PLUUsed to select the menu item for creating,editing or deleting the extra text (sales)messages.
EXTRA TEXTUsed to select the menu item for creating,editing or deleting the extra text (sales)messages.
DEPARTMENTUsed to select the menu item for creating,editing or deleting the department namefor use in the total report.
GROUPUsed to select the menu item for creating,editing or deleting the group name for usein the total report.
OPERATORUsed to select the menu item for creating,editing or deleting the operator name foruse in the total report.
SPEEDKEYS
EDITPLU
EXTRATEXT
DEPT.
DATE/TIMEUsed to select the menu item forprogramming the date and time.
PLU LISTUsed to select the menu item forgenerating a PLU and extra message filelist. The file can be printed on a continuousstrip (receipt) or on labels.
STORE NAMEUsed to select the menu item forprogramming the store name andaddress.
GRAND TOTALUsed immediately to print the dailydepartment total while in the total mode.
PRICE OVERRIDEUsed to print all items with changed unitprices while in the total mode.
OPERATOR
GROUP
DATETIME
PLULIST
STORENAME
PRICEOVRDE
GRANDTOTAL

OFF
1.5 Loading Label/Paper Roll
1. Make sure that the power is off.
2. Open the side cover.
3. Pull the release lever to raise the printer head.
4. Insert a new roll onto the label holding shaft.
5. When using the label roll, remove labels from the first 30 cm (12 inches) of backing paper.
6. Thread the label paper as shown below.
Check that the backing paper is:• threaded properly under the guide shaft.• threaded properly through the label sensor.• threaded properly over the peeling bar, making sure it passes through the groove.
7. When the label/paper needs to be wound up, wind the tip of the paper around the winding sleeveand fasten it with the U-pin.
8. Push the printer head down until it locks securely.
9. Close the side cover.
10. Turn on the power and press the PAPER FEED key to advance the label/paper to the correctprinting position.
ON
aPAPERFEED
Label Holding Shaft
Label Guide
U-pin
PrinterUnit
Release Lever Printer Head
Peeling Bar
Winding SleeveLabel Sensor
Guide Shaft
Label GuidePrinter
Unit
Release Lever Printer Head
Peeling BarLabel Sensor
Label Holding Shaft
Guide Shaft
30cm

CHAPTER 2DAILY OPERATION
Contents
2.1 Pre-operation Inspection ............... 12
2.2 Power On ......................................... 13
2.3 Sales by Weight ............................... 14
2.4 Fixed-price Sales ............................. 15
2.5 Prepack for Sales by Weight ......... 16
2.6 Prepack for Fixed-price Sales ........ 17
2.7 Label Batch Print ............................. 18
2.8 Pack Count Sub-total ..................... 19
2.9 Mark Down Functions..................... 20
2.10 Unit Price Override .......................... 21
2.11 Voiding the Last Label .................... 21
2.12 Switching from Sale by Weightto Fixed-price Sale .......................... 21
2.13 Selecting Lower Preset Data ......... 21
2.14 Pack Date Override ....................... 22
2.15 Save Function ................................. 22

BC-3000 • User’s Manual • Rev 0 page 17
2.1 Pre-operation Inspection
In order to maintain optimum scale performance, perform the following inspection before starting daily operations.
OFF
Thermal Head
Caution
Do not use metal tools to clean the thermal head as they may damagethe head surface.
Caution
Always turn off the power switch when performing this inspection.
1. Make sure that the power is off.
2. Check that the scale and the level device aperture are clean and free of foreign matter.If not, wipe any soiled areas with a dry cloth.
3. Clean the thermal head with a cotton swab at least once a week in order to maintain print quality.
Dip the end of the cotton swab into cleaning fluid and wipe the thermal head.
4. Remove any foreign matter, label adhesive, etc. to make the scale level.
5. Adjust the scale to level by using the height adjustment feet.
6. Make sure the label/paper amount is sufficient.
Level Indicator
Hight Adjustment
Correct Incorrect

page 18 BC-3000 • User’s Manual • Rev 0
2.2 Power On
1 Turn on the power.
2 Make sure that nothing is on the weigh platter.
3 Check that the ZERO indicator is lit.
4 If the ZERO indicator is not lit, press the ZEROkey.
ON
ZERO
ZERO

BC-3000 • User’s Manual • Rev 0 page 19
2.3 Sales by Weight
1 Check that nothing is on the weigh platter.
• Check that the ZERO indicator is lit.
• If not, press the ZERO key.
2 Subtract the tare.
■ Weighing tare
• Place the tare on the weigh platter. The tare weight will bedisplayed.
• Press the TARE key.The displayed value will return to zero, and the NETindicator will light.
■ Fixed tare weight
• Enter the tare weight and press the TARE key.
s Tare look-up key
• Press the tare look-up (preset) key.
3 Enter the PLU.
■ PLU number entry
• Enter the PLU number and press the PLU key.
■ PLU (preset) key
• Press the preset key in which the PLU item data is set.
4 Weigh the item.
• Place the item on the weigh platter.
5 Perform mark down operation if necessary.
• Refer to page 20.
6 Print the label.
■ When not using the operator system
• Press the PRINT key.
■ When using the operator system
• Press the operator key.
ZERO
8 TARE
NET
TARE
Ex. Weight = 0.08 lb.
Ex. Access Tare #1
➔
ZERO
PLU➔5 03
Ex. PLU No. = 350
TARE#1
Ex. Access PLU10
PLU10PLU90
Ex. Access PLU90
➔LOWERPRESET
PLU10PLU90
Ex. Operator = SusanSusan

page 20 BC-3000 • User’s Manual • Rev 0
Ex. PLU No. = 450
PLU➔5 04
Ex. Access PLU95
Ex. Access PLU15
PLU15PLU95
PLU15PLU95
LOWERPRESET
2.4 Fixed-price Sales
1 Enter the PLU.
■ PLU number entry
• Enter the PLU number and press the PLU key.
■ PLU (preset) key
• Press the preset key in which the PLU item data is set.
2 Perform mark down operation if necessary.
• Refer to page 20.
3 Multiply the quantity.
• When selling more than one of the same item, enter thequantity and press the MULTIPLY key.
• Otherwise, go to the next step.
4 Print the label.
■ When not using the operator system
• Enter the number of labels, and press the PRINT key.
Note: Press the CLEAR key once to temporarily stopprinting.To continue printing, press the PRINT key.To cancel printing, press the CLEAR key again.
• If the number of labels is one, simply press the PRINTkey.
■ When using the operator system
• Press the operator key.
➔
Ex. Three Items
Ex. Three Labels
Ex. Operator = Mike
Ex. One Label
➔ XMULTIPLY3
➔3 PRINT
Mike

BC-3000 • User’s Manual • Rev 0 page 21
Ex. Access PLU10
Ex. Access PLU90
PLU10PLU90
PLU10PLU90
LOWERPRESET ➔
PREPACK
5 03 PLU➔
Ex. PLU No. = 350
2.5 Prepack for Sales by Weight
1 Enter the prepack mode.
• Press the PREPACK key to enter the prepack mode.
• The AUTO indicator lights.
2 Check that the weight display reads zero.
• Make sure that nothing is on the weigh platter and checkthat the ZERO indicator is lit.
• If not, press the ZERO key.
3 Subtract the tare.
■ Weighing tare
• Place the tare on the weigh platter. The tare weight will bedisplayed.
• Press the TARE key.The displayed value will return to zero, and the NETindicator will light.
■ Fixed tare weight
• Enter the tare weight and press the TARE key.
■ Tare look-up key
• Press the tare look-up (preset) key.
4 Enter the PLU.
■ PLU number entry
• Enter the PLU number and press the PLU key.
■ PLU (preset) key
• Press the preset key in which the PLU item data is set.
Note: Refer to page 22 when using the Save Function.
5 Weigh the item.
• Place the item on the weigh platter.• The label is automatically printed.• Repeat this step until all the items are weighed.
6 Exit the prepack mode.
• Press the PREPACK key.• The AUTO indicator turns off.
PREPACK
ZERO
AUTO
ZERO
TARE
NETEx. Tare Weight= 0.08 lb.
TARE8 ➔
TARE#1
Ex. Access Tare #1

page 22 BC-3000 • User’s Manual • Rev 0
2.6 Prepack for Fixed-price Sales
1 Check that nothing is on the weigh platter.
• Check that the ZERO indicator is lit.
• If not, press the ZERO key.
2 Enter the prepack mode.
• Press the PREPACK key to enter the prepack mode.
• The AUTO indicator lights.
3 Enter the PLU.
■ PLU number entry
• Enter the PLU number and press the PLU key.
■ PLU (preset) key
• Press the preset key in which the PLU item data is set.
Note: Refer to page 22 when using the Save Function.
4 Print the label.
• Enter the number of labels, and press the PRINT key.
Note: Press the CLEAR key once to temporarily stopprinting.To continue printing, press the PRINT key.To cancel printing, press the CLEAR key again.
• If the number of labels is one, simply press the PRINTkey.
5 Exit the prepack mode.
• Press the PREPACK key.
• The AUTO indicator turns off.
ZEROZERO
PREPACK
PREPACK
Ex. PLU No. = 450
PLU➔5 04
Ex. Access PLU15PLU15PLU95
Ex. Access PLU95
➔ PLU15PLU95
LOWERPRESET
Ex. Three Labels
➔3 PRINT
Ex. One Label
AUTO

BC-3000 • User’s Manual • Rev 0 page 23
2.7 Label Batch Print
Used to set the number of fixed-price labels to be printed.
1 Check that nothing is on the weigh platter.
• Check that the ZERO indicator is lit.
• If not, press the ZERO key.
2 Enter the LABEL BATCH PRINT mode.
• Press the LABEL BATCH key to enter the label batch printmode.
3 Enter the PLU.
■ PLU number entry
• Enter the PLU number and press the PLU key.
■ PLU (preset) key
• Press the preset key in which the PLU item data is set.
4 Enter the desired number of labels.
• Enter the number of labels to be issued. (Max. 999)
• Press the LABEL BATCH key.
5 Enter any additional PLUs.
• Repeat steps 3 and 4 when labels for other PLUs areneeded. A maximum of 20 PLUs can be entered.
• Otherwise go to the next step.
6 Print the label.
• Press the PRINT key.
Note: Press the CLEAR key once to temporarily stopprinting.To continue printing, press the PRINT key.To cancel printing, press the CLEAR key again.
Ex. PLU No. = 450
PLU➔5 04
Ex. Access PLU15
Ex. Twenty Labels
➔ LABELBATCH2 0
Ex. Access PLU95
➔LOWERPRESET
PLU15PLU95
PLU15PLU95
ZEROZERO
LABELBATCH

page 24 BC-3000 • User’s Manual • Rev 0
PACKCOUNT
2.8 Pack Count Sub-total
Used to print the number of labels, total weight and amount whichhave been issued since the last time the PACK COUNT key waspressed.
1 Enter the PACK COUNT SUB-TOTAL mode.
• Press the PACK COUNT key.
Note: Press the CLEAR key to exit the pack count subtotalmode.
2 Print the pack count sub-total.
• Press the PRINT key.

BC-3000 • User’s Manual • Rev 0 page 25
2.9 Mark Down Functions
The following mark down options are available before the label isprinted.
(1) Amount discount(2) Percentage discount(3) Special price
Only one of these three options can be programmed for use.
2.9.1 Amount Discount
1 Enter the discount amount.
■ Discount amount entry
• Enter the amount to be discounted and press the AMOUNTDISCOUNT key.
■ AMOUNT DISCOUNT (preset) key
• Press the PRESET key in which the amount discount datais set.
2.9.2 Percentage Discount
1 Enter the discount percentage.
■ Discount percentage entry
• Enter the percentage to be discounted and press thePERCENT DISCOUNT key.
■ PERCENT DISCOUNT (preset) key
• Press the PRESET key in which the percentage discountdata is set.
2.9.3 Special Price
1 Enter the special price.
2 Press the DISCOUNT key.
Ex. Discount Amount = $0.50
Ex. Discount Percentage = 10%
Ex. Special Price = $4.50
054
–0.50$
–10%
DISCOUNT
–$➔05
01 ➔ –%

page 26 BC-3000 • User’s Manual • Rev 0
2.10 Unit Price Override
This feature only functions for the weighed PLUs which are program-med to allow unit price override.When attempting to override a PLU that is set not to allow an override,the error beep will sound.
1 Enter the desired unit price.
Note: If the entered unit price is not displayed at this point,the PLU is not programmed to allow price override,and its price cannot be changed.
2 Place the item on the scale.
2.11 Voiding the Last Label
1 Press the VOID key immediately after the label isissued.
2.12 Switching from Sale by Weightto Fixed-price Sale
1 Enter the fixed price.
Note: Skip this step if the fixed price is the same as thepreset unit price.
2 Press the FIXED PRICE key.
2.13 Selecting Lower Preset Data
A preset key can have two levels of preset data. Normally the upperpreset data is accessed. Follow the steps below to access the lowerpreset data.
1 Press the LOWER PRESET key.
2 Press an appropriate preset key.
Ex. $3.50
053
Ex. Fixed Price = $8.00
8 0 0
FIXEDPRICE
Ex. Access PLU90
LOWERPRESET
VOID
PLU10PLU90

BC-3000 • User’s Manual • Rev 0 page 27
2.14 Pack Date Override
This function is used to temporarily change the current date, allowinglabels to be produced ahead of time for prepacking items.
1 Enter the six-digit date (MMDDYY).
2 Press the DATE key.
2.15 Save Function
The SAVE key is one of the preset function options. When the SAVEindicator is lit, the selected PLU is retained (saved) after a label isissued.
1 Press the PREPACK key to enter the manual mode,if the scale is in auto mode.
2 Select the desired PLU if not already displayed.
3 Press the SAVE key. The SAVE indicator lights.
Note: To cancel the save mode, press the SAVE key again.
DATE
Ex. November 20, 1996
21 1 0 9 6
PREPACK
SAVE
Select PLU

CHAPTER 3SUBTRACTION
Contents
3.1 Subtraction Mode .......................... 24

BC-3000 • User’s Manual • Rev 0 page 29
3.1 Subtraction Mode
The subtraction mode is used to correct the running totals. The totals require correction if accurate reports areto be generated. Some examples of when correcting the totals is necessary are listed below.
a. product returned by customersb. incorrectly produced labels
The totals are subtracted from the running totals by a PLU number. The operator has to enter the productnumber, the number of items (labels) to be returned, the total weight and total price. The best way to managereturns is to keep all incorrectly produced labels in one place and subtract each label in turn.
Note: Confirm that the Operation Key Sheet, and not the Program Key Sheet, is being used for this operation.
Step Description Keys and Display1 • Access the Subtraction mode.
Ex. Password = 7000
• Press the ENTER key.
2 • Enter the PLU number to be correctedfollowed by the PLU key.
Ex. PLU No. 1
Note: If the PLU key is pressed again, theentered PLU number will be displayedfor one second.
3 • Enter the NUMBER of the item (label) to bereturned, followed by the VOID key.
Ex. Three (3) Labels
4 • Enter the WEIGHT of the item (label) to bereturned, followed by the VOID key.
Ex. Five (5) Pounds
5 • Enter the AMOUNT of the item (label) to bereturned, followed by the VOID key.
Ex. $3.75
6 • Press the PRINT key when not using theoperator system, or press the OPERATORkey when using the operator system.
Note: If a mistake is made during entry, pressthe VOID key to display the previousscreen with the mistake. Then re-enterthe correct data.
7 0 0 0 ➔ MODE
ENTER
1 PLU➔
VOID
5 VOID0 0 ➔
3 57 VOID➔
PRINT OR
3 ➔
Susan

page 30 BC-3000 • User’s Manual • Rev 0
Step Description Keys and Display7 • Repeat steps 2 through 6 for any other items
(labels) to be returned. When completeproceed to step 8.
8 • Press the MODE key to return to normaloperation. MODE

CHAPTER 4TOTAL REPORTS
Contents
4.1 Total Reports .................................... 28
4.2 Total Mode ...................................... 28
4.3 Daily Total Report ............................ 29
4.4 Monthly Total Report ...................... 31
4.5 Hourly Total Report ......................... 33
4.6 Operator Total Report .................... 34
4.7 Total Clear ....................................... 35

page 32 BC-3000 • User’s Manual • Rev 0
4.1 Total Reports
The BC-3000 has the ability to print a large number of reports for the number of labels printed. This informationcan be broken down into various categories including daily and monthly reports.
Note: Confirm that the Program Key Sheet, and not the Operation Key Sheet, is being used for these operations.
4.2 Total Mode
TOTALMODE
DAILYCLEAR
MONTHLYCLEAR
ALLCLEAR
MONTHLYSALES TOTAL
MONTHLYITEM
MONTHLYDEPT.
MONTHLYGROUP
MONTHLYDSN. TOTAL
MONTHLYPROFIT TOTAL
MONTHLYDEPT. TOTAL
MONTHLYGROUP TOTAL
DAILYSALES TOTAL
DAILY ITEM
DAILYDEPT.
DAILYGROUP
DAILYDSN. TOTAL
DAILYPROFIT TOTAL
DAILYDEPT. TOTAL
DAILYGROUP TOTAL
DAILYTOTAL
MONTHLYTOTAL
HOURLYTOTAL
OPERATORTOTAL
TOTALREPORT
TOTALCLEAR

BC-3000 • User’s Manual • Rev 0 page 33
4.3 Daily Total Report
The Daily Total Report can be considered as the accumulated total for one day. The only difference betweenthis set of total and the monthly total is the level at which the reports are cleared.
4.3.1 Daily Report CategoriesDaily Sales Total Report
The Daily Sales Total Report is the accumulated totals for all items printed since the last time the report wascleared.
Daily Item Report
The Daily Item Report is a list of all PLUs that have had labels printed since the last time the Daily Sales Totalwas cleared.
Daily Dept. Report
The Daily Dept. Report is a list of all departments that have had labels printed since the last time the DailySales Total was cleared.
Daily Group Report
The Daily Group Report is a list of all groups that have had labels printed since the last time the Daily SalesTotal was cleared.
Daily Designated PLU Total Report
The Daily Designated PLU Total Report allows the sales for a specified PLU to be printed. To specify a PLUenter the numeric value (1 ~ 999999) followed by the ENTER key. If the PLU number is correct press the PRINTkey.
Daily Profit Report
The Daily Profit Report produces a printout indicating how much profit has been made from selling items. Forthis report, the cost of each PLU must be programmed in the BC-3000. Otherwise the percentage report will notbe correct.
Daily Department Total Report
The Daily Department Total Report groups the PLUs together by the department number programmed for theitems. The report lists each department in numeric order.
Note: The report will only print if department numbers are programmed in the PLUs.
Daily Group Total Report
The Daily Group Total Report groups the PLUs together by the Group number programmed for the items.The report lists each group in numeric order.
Note: The report will only print if group numbers are programmed in the PLUs.

page 34 BC-3000 • User’s Manual • Rev 0
4.3.2 Operation Procedure
Step Description Keys and Display1 • Access the Total mode.
Ex. Password = 8000
2 • Press number “2” followed by the ENTER keyto access the Total Report menu.
3 • Press the ENTER key to access the ReportCategory.
4 • Press the UP or DOWN key to select thedesired Report Category.
F02-01-01 = Daily Sales TotalF02-01-03 = Daily ItemF02-01-04 = Daily Dept.F02-01-05 = Daily GroupF02-01-06 = Daily Designated PLU TotalF02-01-07 = Daily Profit TotalF02-01-08 = Daily Department TotalF02-01-09 = Daily Group Total
5 • Press the PRINT key.
6 • Repeat steps 4 and 5 for any other reports.
7 • Press the END key to return to the mainmenu.
8 • Press the MODE key to return to normaloperation.
8 0 0 ➔ MODE
➔ ENTER
0
ENTER
Select Report Category
END
MODE
Note: Particular reports can be obtained by using the following speed keys.
GRANDTOTAL
PRICEOVRDE
GRAND TOTALUsed to immediately print the Daily Department Total while in the Total mode.
PRICE OVERRIDEUsed to immediately print all items with changed unit prices while in the Total mode.
➝
➝2
OR

BC-3000 • User’s Manual • Rev 0 page 35
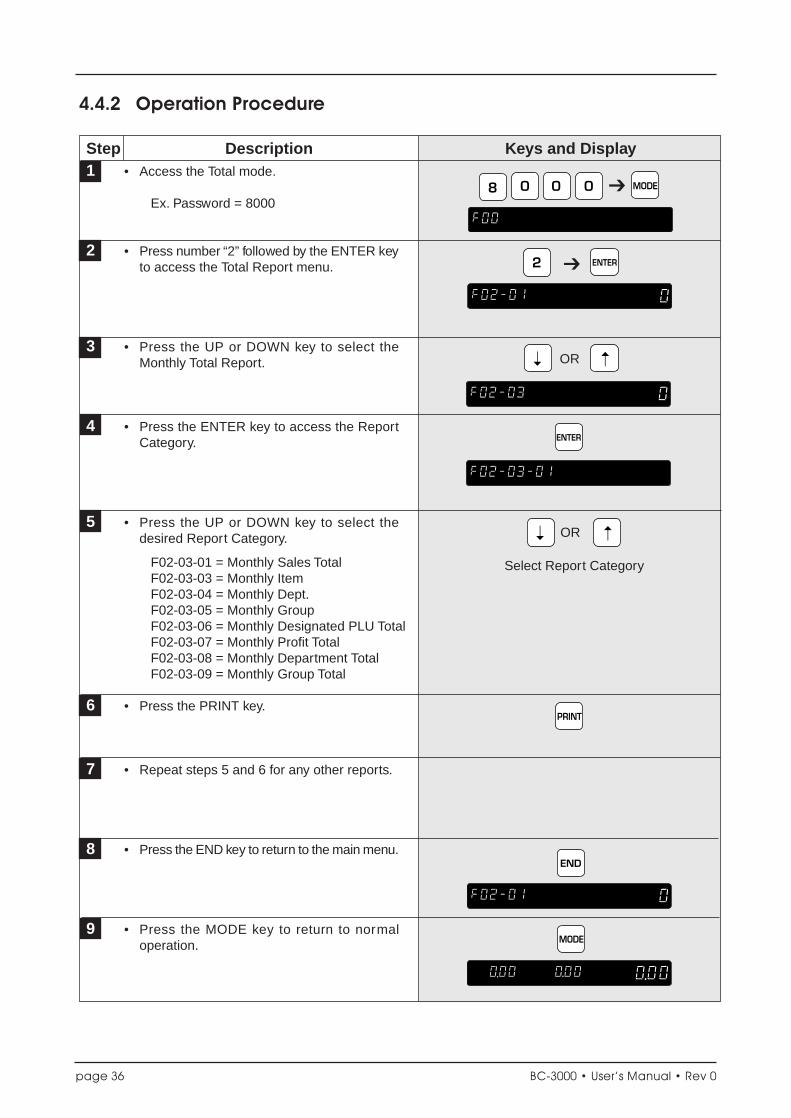
4.4 Monthly Total Report
The Monthly Total Report can be considered as the accumulated total for one month. The only differencebetween this set of total and the daily total is the level at which the reports are cleared.
4.4.1 Monthly Report CategoriesMonthly Sales Total Report
Monthly Sales Total Report is the accumulated totals for all items printed since the last time the report wascleared.
Monthly Item Report
The Monthly Item Report is a list of all PLUs that have had labels printed since the last time the Monthly SalesTotal was cleared.
Monthly Dept. Report
The Monthly Dept. Report is a list of all departments that have had labels printed since the last time the MonthlySales Total was cleared.
Monthly Group Report
The Monthly Group Report is a list of all groups that have had labels printed since the last time the MonthlySales Total was cleared.
Monthly Designated PLU Total Report
The Monthly Designated PLU Total Report allows the sales for a specified PLU to be printed. To specify a PLUenter the numeric value (1 ~ 999999) followed by the ENTER key. If the PLU number is correct press the PRINTkey.
Monthly Profit Report
The Monthly Profit Report produces a printout indicating how much profit has been made from selling items. Forthis report, the cost of each PLU must be programmed in the BC-3000. Otherwise the percentage report will notbe correct.
Monthly Department Total Report
The Monthly Department Total Report groups the PLUs together by the department number programmed to theitems. The report lists each department in numeric order.
Note: The report will only print if department numbers are programmed in the PLUs.
Monthly Group Total Report
The Monthly Group Total Report groups the PLUs together by the Group number programmed for the items.The report lists each group in numeric order.
Note: The report will only print if group numbers are programmed in the PLUs.
page 36 BC-3000 • User’s Manual • Rev 0
4.4.2 Operation Procedure
Step Description Keys and Display
8 0 0 ➔ MODE
➔ ENTER
0
2
OR
ENTER
Select Report Category
MODE
END
1 • Access the Total mode.
Ex. Password = 8000
2 • Press number “2” followed by the ENTER keyto access the Total Report menu.
3 • Press the UP or DOWN key to select theMonthly Total Report.
4 • Press the ENTER key to access the ReportCategory.
5 • Press the UP or DOWN key to select thedesired Report Category.
F02-03-01 = Monthly Sales TotalF02-03-03 = Monthly ItemF02-03-04 = Monthly Dept.F02-03-05 = Monthly GroupF02-03-06 = Monthly Designated PLU TotalF02-03-07 = Monthly Profit TotalF02-03-08 = Monthly Department TotalF02-03-09 = Monthly Group Total
6 • Press the PRINT key.
7 • Repeat steps 5 and 6 for any other reports.
8 • Press the END key to return to the main menu.
9 • Press the MODE key to return to normaloperation.
➝
➝
➝
➝
OR

BC-3000 • User’s Manual • Rev 0 page 37
4.5 Hourly Total Report
The Hourly Total Report allows the manager to obtain a report that shows sales by the hour. This report can beused to assist with scheduling of employees to meet the busy periods. The following steps indicate how toobtain the Hourly Total Report.
Step Description Keys and Display1 • Access the Total mode.
Ex. Password = 8000
2 • Press number “2” followed by the ENTER keyto access the Total Report menu.
3 • Press the UP or DOWN key to select theHourly Total report.
4 • Press the ENTER key to enter the print mode.
5 • Press the PRINT key to list the transactionsby hour.
6 • Press the END key to return to the mainmenu.
7 • Press the MODE key to return to normaloperation.
8 0 0 ➔ MODE
➔ ENTER
0
2
OR
ENTER
END
MODE
PRINT➝
➝
page 38 BC-3000 • User’s Manual • Rev 0
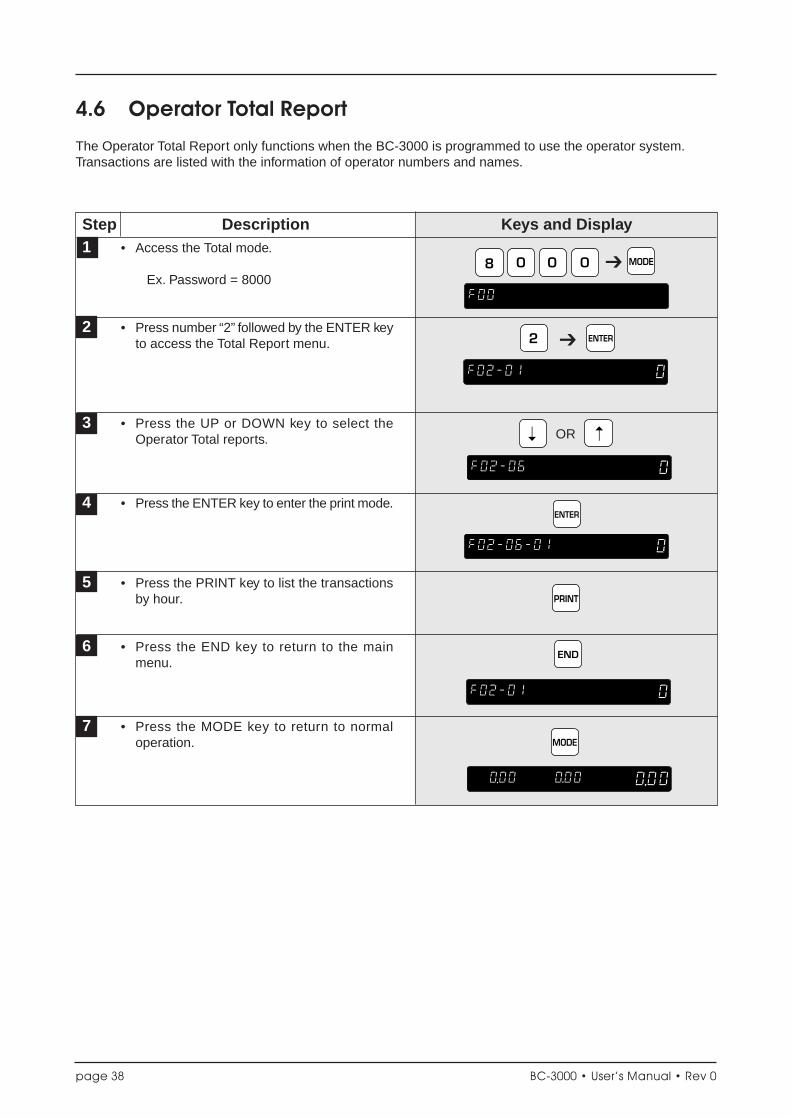
4.6 Operator Total Report
The Operator Total Report only functions when the BC-3000 is programmed to use the operator system.Transactions are listed with the information of operator numbers and names.
Step Description Keys and Display1 • Access the Total mode.
Ex. Password = 8000
2 • Press number “2” followed by the ENTER keyto access the Total Report menu.
3 • Press the UP or DOWN key to select theOperator Total reports.
4 • Press the ENTER key to enter the print mode.
5 • Press the PRINT key to list the transactionsby hour.
6 • Press the END key to return to the mainmenu.
7 • Press the MODE key to return to normaloperation.
8 0 0 ➔ MODE
➔ ENTER
0
2
OR
ENTER
END
MODE
PRINT➝
➝

BC-3000 • User’s Manual • Rev 0 page 39
4.7 Total Clear
After printing the necessary reports, all of the accumulated totals have to be cleared so that the accumulationcan begin from zero again.
Step Description Keys and Display1 • Access the Total mode.
Ex. Password = 8000
2 • Press number “3” followed by the ENTER keyto access the Total Clear mode.
3 • Press the UP or DOWN key to select the TotalReport to be cleared.
F03-01 = Daily Total ReportF03-03 = Monthly Total ReportF03-05 = All Total Reports
Note: When clearing one of the above Reports,the Hourly and Operator Total Reportswill also be cleared.
4 • Press the ZERO key twice to clear the totals.
5 • Press the END key to return to the mainmenu.
6 • Press the MODE key to return to normaloperation.
8 0 0 ➔ MODE
➔ ENTER
0
3
OR
ZERO ➔ ZERO
MODE
END
➝
➝
Select Report
CHAPTER 5PROGRAMMING
Contents
5.1 Programming PLUs .......................... 38
5.2 Deleting PLUs ................................... 43
5.3 Programming Message Files.......... 44
5.4 Deleting Message Files................... 45
5.5 Programming Date and Time ....... 46
5.6 Programming Store Names andAddresses ........................................ 47
5.7 Deleting Store Names andAddresses ........................................ 48
5.8 Programming Preset Keys .............. 49
5.9 Deleting All Preset Keys .................. 50
5.10 Printing PLU/MessageInformation ...................................... 51
5.11 Programming DepartmentCodes and Names ......................... 53
5.12 Deleting Department Codes andNames .............................................. 52
5.13 Programming Group Codes andNames .............................................. 55
5.14 Deleting Group Codes andNames .............................................. 56
5.15 Programming Operator Codesand Names...................................... 57
5.16 Deleting Operator Codes andNames .............................................. 58
5.17 Programming Nutrition Files ........... 59
5.18 Changing Unit Price/Fixed Price ... 65

BC-3000 • User’s Manual • Rev 0 page 41
5.1 Programming PLUs
This section explains how to program a product (PLU) in the BC-3000.Some steps listed below may not be available. At the time of installation the BC-3000 may be configured tobypass unused steps.
Note: Confirm that the Program Key Sheet, and not the Operation Key Sheet, is being used for this operation.
1 • Access the Programming mode.
Ex. Password = 9000
Note: To exit the Programming mode, press theMODE key again.
2 • Enter “1” followed by the ENTER key, or pressthe EDIT PLU key to select the PLUProgramming mode.
3 • Enter the PLU number (Max. 6 digits) to becreated or edited followed by the PLU key.
Ex. PLU No. = 123456
4 • To edit or create the PLU name at this point,press the EDIT key.
5 • Enter the desired PLU name using thekeyboard.
Note: For text editing, refer to Chapter 6.
• After entering the text, press the ENTER key.
6 • Press the ENTER key.
Note: If confirmation of the entered PLUnumber and name is necessary, press thePRINT key.
7 • Select the product type, then press theENTER key.
0 = Weighed item1 = Fixed-price item
Ex. Weighed Item
9 • Press the ENTER key.
Step Description Keys and Display
09 0 0 ➔ MODE
2 31 54 6 ➔ PLU
EDIT
PLU Name(See Chapter 6)
➔0
1 ➔EDITPLUORENTER
ENTER
ENTER
ENTER
ENTER

page 42 BC-3000 • User’s Manual • Rev 0
Step Description Keys and Display
OR
ENTER
0 0 ➔ ENTER5
ENTER0 0 ➔1
ENTER
0 0 ➔ ENTER8
ENTER
➔ ENTER3
ENTER
➝
➝
8 • Select the type of markdown by using theRIGHT and LEFT keys.
0 = No markdown1 = Special selling price2 = Amount discount from total price3 = Percentage discount from total price4 = Special unit price
• When other than “0” is selected, enter therespective price, amount or percentage,followed by the ENTER key.
Ex. Special Price = $5.00
• Press the ENTER key.
9 • Enter the unit price followed by the ENTERkey.
Ex. Unit Price = $1.00
• Press the ENTER key.
10 • Enter the fixed price followed by the ENTERkey.
Ex. Fixed Price = $8.00
• Press the ENTER key.
11 • Enter the fixed weight followed by the ENTERkey.
Ex. Fixed Weight = 3 oz.
• Press the ENTER key.
12 • Enter the registered code followed by theENTER key.
Ex. Registered Code = 2
• Press the ENTER key.
Note: If this programming step is not necessary,proceed to the next step.
➔ ENTER
ENTER
2

BC-3000 • User’s Manual • Rev 0 page 43
Step Description Keys and Display
13 • Enter the pack quantity followed by theENTER key.
Ex. Pack Quantity = 5
• Press the ENTER key.
14 • Enter the cost price followed by the ENTERkey.
Ex. Cost Price = $1.00
• Press the ENTER key.
15 • Enter the tare weight followed by the ENTERkey.
Ex. Tare Weight = 0.50 lb.
• Press the ENTER key.
16 • Select the desired date format.
0 = Machine default1 = No dates2 = Pack date only3 = Expiration date only4 = Both dates
Ex. Both Dates
• Press the ENTER key.
17 • Enter the shelf life (number of days) followedby the ENTER key.
Ex. Shelf Life (number of days) = 5
• Press the ENTER key.
18 • Enter sales by date (max. 3 digits).
Ex. To be sold within the next 5 days.
• Press the ENTER key.
Note: If this programming step is not necessaryproceed to the next step.
0 0 ➔ ENTER1
ENTER
0 ➔5 ENTER
ENTER
ENTER
4 ➔ ENTER
ENTER
5 ➔ ENTER
ENTER
5 ➔ ENTER
ENTER
ENTER5 ➔

page 44 BC-3000 • User’s Manual • Rev 0
Step Description Keys and Display19 • Enter the department code (used for tracking
totals) followed by the ENTER key.
Ex. Department Code = 3
• Press the ENTER key.
20 • Enter the group code (used for tracking totals)followed by the ENTER key.
Ex. Group Code = 5
• Press the ENTER key.
21 • Enter the item code followed by the ENTERkey.
Ex. Item Code = 101011
• Press the ENTER key.
22 • Select an optional POP message numberfollowed by the ENTER key.
Note: POP Message (1 ~ 6)Safe Handling Message (99)
Ex. POP Message No. 1
• Press the ENTER key.
23 • Select the optional extra message number(1 ~ 99) followed by the ENTER key.
Ex. Extra Message No. = 2
• Press the ENTER key.
24 • Select the barcode type followed by theENTER key.
0 = Machine default1 = UPC 132 = UPC 83 = 10 DIGIT 134 = 5 DIGIT 8
Ex. UPC 13
• Press the ENTER key.
ENTER
3 ➔ ENTER
5 ➔ ENTER
ENTER1 0 1 0 1 1 ➔
ENTER
ENTER
1 ➔ ENTER
ENTER
2 ➔ ENTER
ENTER
1 ➔ ENTER
ENTER
BC-3000 • User’s Manual • Rev 0 page 45
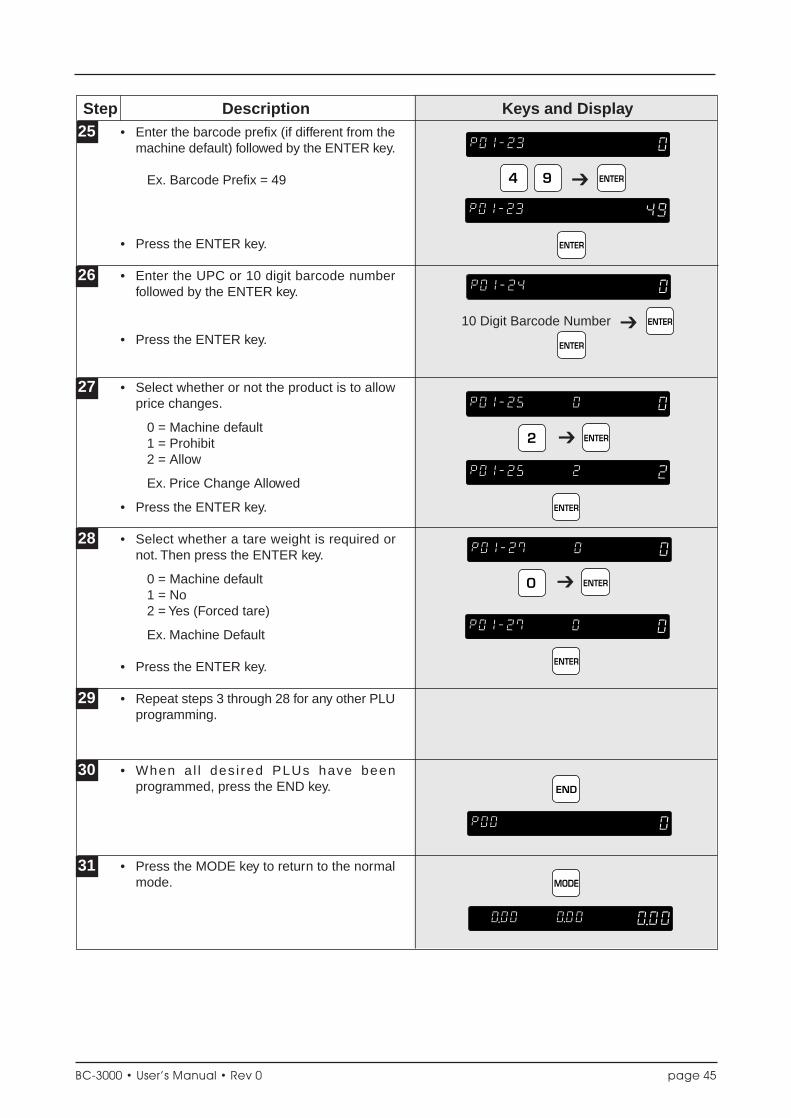
Step Description Keys and Display25 • Enter the barcode prefix (if different from the
machine default) followed by the ENTER key.
Ex. Barcode Prefix = 49
• Press the ENTER key.
26 • Enter the UPC or 10 digit barcode numberfollowed by the ENTER key.
• Press the ENTER key.
27 • Select whether or not the product is to allowprice changes.
0 = Machine default1 = Prohibit2 = Allow
Ex. Price Change Allowed
• Press the ENTER key.
28 • Select whether a tare weight is required ornot. Then press the ENTER key.
0 = Machine default1 = No2 = Yes (Forced tare)
Ex. Machine Default
• Press the ENTER key.
29 • Repeat steps 3 through 28 for any other PLUprogramming.
30 • When a l l des i red PLUs have beenprogrammed, press the END key.
31 • Press the MODE key to return to the normalmode.
➔ ENTER2
ENTER
➔4 9 ENTER
ENTER
➔ ENTER10 Digit Barcode Number
ENTER
ENTER
➔ ENTER0
END
MODE

page 46 BC-3000 • User’s Manual • Rev 0
5.2 Deleting PLUs
The following procedure is used to delete products (PLUs) from memory.
Step Description Keys and Display1 • Access the Programming mode.
Ex. Password = 9000
Note: To exit the Programming mode, press theMODE key again.
2 • Enter “1” followed by the ENTER key, or pressthe EDIT PLU key to select the PLUProgramming mode.
3 • Enter the PLU number to be deleted followedby the PLU key.
Ex. PLU No. = 123456
4 • To delete the complete PLU record, press theCHAR DELETE key.
5 • Press the CHAR DELETE key again toconfirm the deletion.
Note: Press the CLEAR key to cancel thedeletion.
6 • Repeat steps 3 through 5 for all PLUs to bedeleted.
7 • When all desired PLUs have been deleted,press the END key.
8 • Press the MODE key to return to the normalmode.
➔ PLU3 4 5 61 2
CHARDELETE
9 0 0 0 ➔ MODE
MODE
CHARDELETE
1 ➔EDITPLUORENTER
END

BC-3000 • User’s Manual • Rev 0 page 47
5.3 Programming Message Files
The following procedure is used to program a message file, that is used as an ingredient file linked to PLUs.
Step Description Keys and Display1 • Access the Programming mode.
Ex. Password = 9000
Note: To exit the Programming mode, press theMODE key again.
2 • Enter “4” followed by the ENTER key, or pressthe EXTRA TEXT key to select the MessageProgramming mode.
3 • Enter the message number (1 ~ 99) followedby the PLU key.
Ex. Message No. = 5
4 • Press the ENTER key to select the Edit mode.
5 • Enter the required message using thekeyboard.
Note: For text editing refer to Chapter 6.
• When complete, press the ENTER key.
6 • Repeat steps 3 through 5 for any othermessages to be created/edited.
7 • When all desired messages have beenprogrammed, press the END key.
8 • Press the MODE key to return to the normalmode.
9 ➔00 0 MODE
➔ PLU5
ENTER
MODE
ENTER
Text Editing(See Chapter 6)
END
4 ➔ OR EXTRATEXTENTER

page 48 BC-3000 • User’s Manual • Rev 0
5.4 Deleting Message Files
The following steps show how to delete messages.
Step Description Keys and Display
9 ➔00 0 MODE
➔ PLU6
CHARDELETE
CHARDELETE
1 • Access the Programming mode.
Ex. Password = 9000
Note: To exit the Programming mode, press theMODE key again.
2 • Enter “4” followed by the ENTER key, or pressthe EXTRA TEXT key to select the MessageProgramming mode.
3 • Enter the message number (1 ~ 99) to bedeleted followed by the PLU key.
Ex. Message No. = 6
4 • Press the CHAR DELETE key to delete themessage.
5 • Press the CHAR DELETE key again toconfirm the deletion.
Note: Press the CLEAR key to cancel thedeletion.
6 • Repeat steps 3 through 5 for any othermessages to be deleted.
7 • When all desired messages have beendeleted, press the END key.
8 • Press the MODE key to return to the normalmode. MODE
END
4 ➔ OR EXTRATEXTENTER

BC-3000 • User’s Manual • Rev 0 page 49
5.5 Programming Date and Time
Step Description Keys and Display
1 • Access the Programming mode.
Ex. Password = 9000
Note: To exit the Programming mode, press theMODE key again.
2 • Enter “6” followed by the ENTER key, or pressthe DATE TIME key to select the Date/TimeProgramming mode.
Ex. Current Date = November 25, 1996
3 • Enter new date (MMDDYYYY) followed by theENTER key.
Ex. New Date = November 26, 1996
• Press the ENTER key.
4 • Enter the time (hhmmss) followed by theENTER key (24-hour clock).
Ex. Current Time = 16:30:32New Time = 17:31:00
5 • After the new date and time have beenentered, press the END key.
6 • Press the MODE key to return to the normalmode.
0 0 0 ➔ MODE9
➔ ENTER6 OR DATETIME
7 31 1 0 0 ➔ ENTER
ENTER
2 6 1 9 9 6 ➔ ENTER11
MODE
END

page 50 BC-3000 • User’s Manual • Rev 0
5.6 Programming Store Names and Addresses
The BC-3000 can be programmed with store names and addresses, which allow the operator to select whichstore information is to be printed on labels. The following procedure shows how to program store name andaddress information.
Step Description Keys and Display1 • Access the Programming mode.
Ex. Password = 9000
Note: To exit the Programming mode, press theMODE key again.
2 • Enter “7” followed by the ENTER key, or pressthe STORE NAME key to select the StoreProgramming mode.
3 • Enter the store reference number (1 ~ 9)followed by the PLU key.
Ex. Store Reference Number = 1
4 • Press the ENTER key to program the storename.
5 • Enter the required store name using thekeyboard.
Note: For text editing, refer to Chapter 6.
5 • When text editing is complete, press theDOWN key.
• Press the ENTER key to program the storeaddress.
• Enter the required store address using thekeyboard (max. 47 characters).
Note: For text editing, refer to Chapter 6.
6 • Repeat steps 3 through 5 for any other storeinformation to be programmed.
7 • When all desired store names and addresseshave been entered, press the END key.
8 • Press the MODE key to return to the normalmode.
9 ➔0 00 MODE
➔ PLU1
7 ENTER➔ OR STORENAME
ENTER
Store Name(See Chapter 6)
➝
ENTER
Store Address(See Chapter 6)
END
MODE

BC-3000 • User’s Manual • Rev 0 page 51
5.7 Deleting Store Names and Addresses
The following steps show how to delete store names and addresses.
Step Description Keys and Display
1 • Access the Programming mode.
Ex. Password = 9000
Note: To exit the Programming mode, press theMODE key again.
2 • Enter “7” followed by the ENTER key, or pressthe STORE NAME key to select the StoreProgramming mode.
3 • Enter the store reference number (1 ~ 9)followed by the PLU key.
Ex. Store Reference Number = 1
4 • Enter “3” followed by the DOWN key to selectthe Delete mode.
• Press the ENTER key.
5 • Press the CHAR DELETE key to delete thestore information.
Note: Press the CLEAR key to cancel thedeletion.
6 • Repeat steps 3 through 5 for any other storeinformation to be deleted.
7 • When all desired store information has beendeleted, press the END key.
8 • Press the MODE key to return to the normalmode.
9 ➔0 00 MODE
PLU1
3 ➔
➔
➝
7 ➔ ENTER OR STORENAME
ENTER
MODE
END
CHARDELETE

page 52 BC-3000 • User’s Manual • Rev 0
5.8 Programming Preset Keys
The BC-3000 has 88 keys which can be programmed as preset keys. Each preset key has two levels of presetrecords (upper case and lower case).The following steps indicate how to program preset keys.
Step Description Keys and Display
9 ➔00 0 MODE1 • Access the Programming mode.
Ex. Password = 9000
Note: To exit the Programming mode, press theMODE key again.
2 • Enter “8” followed by the ENTER key, or pressthe SPEED keys to select the Preset KeyProgramming mode.
3 • Press the ENTER key to program preset keys.
4 • Select the type of preset key by pressing theRIGHT key.
0 = No key function1 = PLU3 = Amount discount from total price4 = Percentage discount from total price5 = Message text8 = Operator (Optional)
Ex. PLU
5 • Enter the numeric value to be programmed,then press the desired key location.
Ex. PLU No. = 1
Note: To confirm the value programmed in thepreset key, press the PRESET key andthe value will be displayed on the screen.
6 • Repeat step 5 only for the same type of presetkey.
• Repeat steps 4 through 5 for any other presetkeys to be programmed.
7 • When all preset keys have been programmed,press the END key.
8 • Press the END key again.
9 • Press the MODE key to return to the normalmode.
8 ➔ ORENTERSPEEDKEYS
(Any preset key)
(Any preset key)
Upper Case
Lower Case
➔ PLU11
OR
➝
➔ PLU11
END
MODE
END
➝
ENTER
BC-3000 • User’s Manual • Rev 0 page 53
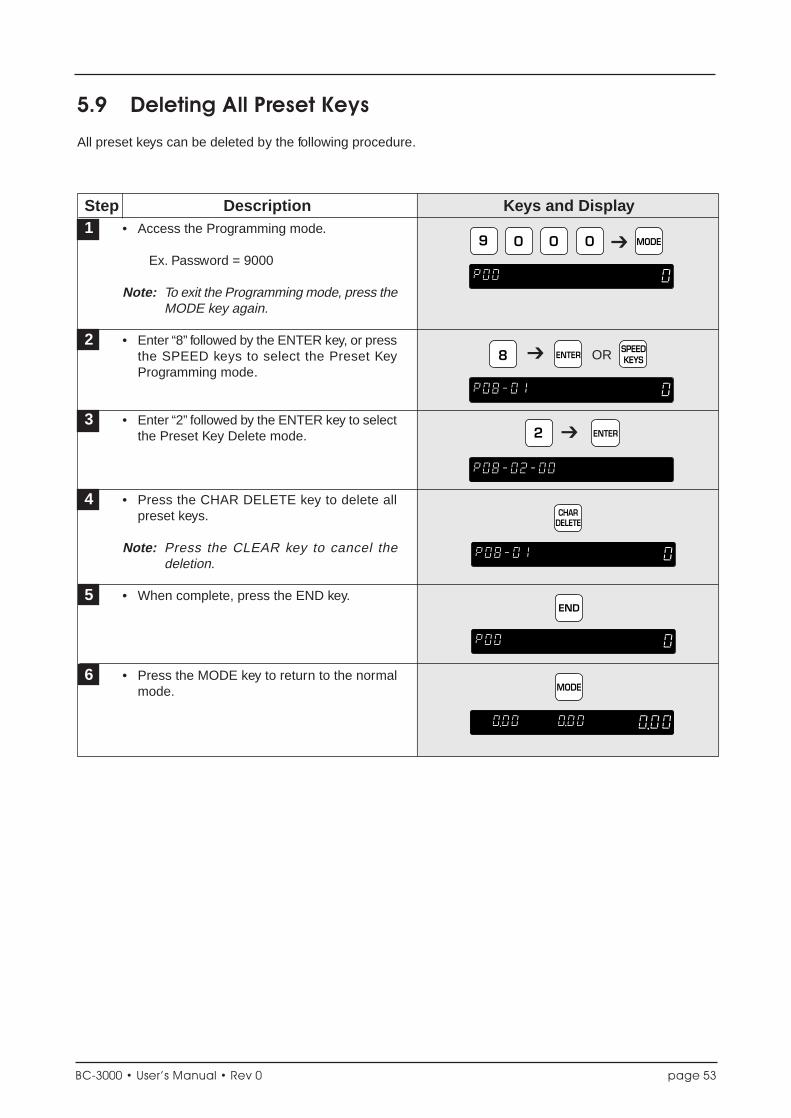
5.9 Deleting All Preset Keys
All preset keys can be deleted by the following procedure.
Step Description Keys and Display
9 ➔00 0 MODE
➔
CHARDELETE
2 ENTER
1 • Access the Programming mode.
Ex. Password = 9000
Note: To exit the Programming mode, press theMODE key again.
2 • Enter “8” followed by the ENTER key, or pressthe SPEED keys to select the Preset KeyProgramming mode.
3 • Enter “2” followed by the ENTER key to selectthe Preset Key Delete mode.
4 • Press the CHAR DELETE key to delete allpreset keys.
Note: Press the CLEAR key to cancel thedeletion.
5 • When complete, press the END key.
6 • Press the MODE key to return to the normalmode.
8 ENTER➔ OR SPEEDKEYS
MODE
END

page 54 BC-3000 • User’s Manual • Rev 0
5.10 Printing PLU/Message Information
Stored information can be printed on labels or receipt paper. The following steps indicate how this is done.
Step Description Keys and Display
9 ➔00 0 MODE1 • Access the Programming mode.
Ex. Password = 9000
Note: To exit the Programming mode, press theMODE key again.
2 • Enter “9” followed by the ENTER key, or pressthe PLU LIST key to select the Printing mode.
3 • To print all of the stored information, pressthe PRINT key. Otherwise skip this step.
•• labels for checking PLU barcodes will beissued when the label is set, or
•• programmed PLU information and extramessages will be printed when the receiptpaper is set.
Note: To stop printing, press the PRINT key.To continue printing, press the PRINTkey again.
• Proceed to step 9.
4 • Press the ENTER key, and select the type oflist using the RIGHT or LEFT key.
0 = PLUs1 = Messages (when receipt paper is set)
Ex. Messages
4 • Press the ENTER key.
5 • Enter the star t number of the range to belisted followed by the ENTER key.
Ex. Start No. = 5
4 • Press the ENTER key.
6 • Enter the end number of the range to belisted followed by the ENTER key.
Ex. End No. = 10
• Press the ENTER key.
9 ENTER PLULIST
OR➔
ENTER➔5
1 ➔ ENTER
ENTER
ENTER
0
ENTER
ENTER
OR
➝
➝

BC-3000 • User’s Manual • Rev 0 page 55
Step Description Keys and Display
7 • Press the PRINT key to bring the paper orlabel print out.
Note: To stop printing, press the PRINT key.To continue printing, press the PRINTkey again.
8 • After printing, press the PRINT key to returnto the previous mode.
9 • When all desired PLU/Message informationhas been printed, press the END key.
10 • Press the MODE key to return to the normalmode.
MODE
END

page 56 BC-3000 • User’s Manual • Rev 0
5.11 Programming Department Codes and Names
Departments are used to link similar products together into a category for report purposes. The following stepsshow how to program a name for the reference code entered when PLUs are programmed.
Step Description Keys and Display
9 ➔00 0 MODE
1 ➔5 PLU
ENTER
Dept. Name(See Chapter 6)
ENTER
END
1 • Access the Programming mode.
Ex. Password = 9000
Note: To exit the Programming mode, press theMODE key again.
2 • Enter “10” followed by the ENTER key, orpress the DEPT. key to select the DepartmentProgramming mode.
3 • Enter the department code followed by thePLU key.
Ex. Department Code = 15
4 • Press the ENTER key to create/edit thedepartment name.
5 • Enter the required department name usingthe keyboard (max. 12 characters).
• When complete press the ENTER key.
6 • Repeat steps 3 through 5 for any otherdepartments to be programmed.
7 • When all desired departments have beenprogrammed, press the END key.
8 • Press the MODE key to return to the normalmode.
01 ➔ ENTER DEPT.OR
MODE

BC-3000 • User’s Manual • Rev 0 page 57
5.12 Deleting Department Codes and Names
The following steps show how to delete department codes and names.
Step Description Keys and Display1 • Access the Programming mode.
Ex. Password = 9000
Note: To exit the Programming mode, press theMODE key again.
2 • Enter “10” followed by the ENTER key, orpress the DEPT. key to select the DepartmentProgramming mode.
3 • Enter the department code to be deletedfollowed by the PLU key.
Ex. Department Code = 16
4 • Press the CHAR DELETE key to delete thedepartment.
5 • Press the CHAR DELETE key again toconfirm the deletion.
Note: Press the CLEAR key to cancel thedeletion.
6 • Repeat steps 3 through 5 for any otherdepartments to be deleted.
7 • When all desired departments have beendeleted, press the END key.
8 • Press the MODE key to return to the normalmode.
9 ➔00 0 MODE
1 ➔6 PLU
CHARDELETE
CHARDELETE
1 ➔ OR0 ENTER DEPT.
MODE
END

page 58 BC-3000 • User’s Manual • Rev 0
5.13 Programming Group Codes and Names
Groups are used to link similar products together into a category for report purposes. The following steps showhow to program a name for the reference number entered when PLUs are programmed.
Step Description Keys and Display
9 ➔00 0 MODE
1 1 1 ➔1 PLU
ENTER
ENTER
Group Name(See Chapter 6)
END
MODE
1 • Access the programming mode.
Ex. Password = 9000
Note: To exit the Programming mode, press theMODE key again.
2 • Enter “11” followed by the ENTER key, orpress the GROUP key to select the GroupProgramming mode.
3 • Enter the group code followed by the PLUkey.
Ex. Group Code = 1111
4 • Press the ENTER key to create/edit the groupname.
5 • Enter the required group name as requiredusing the keyboard (max. 12 characters).
• When complete press the ENTER key.
6 • Repeat steps 3 through 5 for any other groupto be programmed.
7 • When al l desired groups have beenprogrammed, press the END key.
8 • Press the MODE key to return to the normalmode.
OR1 ➔ ENTER1 GROUP

BC-3000 • User’s Manual • Rev 0 page 59
5.14 Deleting Group Codes and Names
The following steps show how to delete group codes and names.
Step Description Keys and Display1 • Access the Programming mode.
Ex. Password = 9000
Note: To exit the Programming mode, press theMODE key again.
2 • Enter “11” followed by the ENTER key, orpress the GROUP key to select the GroupProgramming mode.
3 • Enter the group code to be deleted followedby the PLU key.
Ex. Group Code = 1112
4 • Press the CHAR DELETE key to delete thegroup.
5 • Press the CHAR DELETE key again toconfirm the deletion.
Note: Press the CLEAR key to cancel thedeletion.
6 • Repeat steps 3 through 5 for any other groupsto be deleted.
7 • When all desired groups have been deleted,press the END key.
8 • Press the MODE key to return to the normalmode.
CHARDELETE
CHARDELETE
1 1 1 ➔2 PLU
9 ➔00 0 MODE
1 ➔ ENTER1 OR GROUP
END
MODE

page 60 BC-3000 • User’s Manual • Rev 0
Step Description Keys and Display
5.15 Programming Operator Codes and Names
The following steps show how to program operator codes and names used in the operator system.
9 ➔00 0 MODE
1 ➔1 PLU
ENTER
ENTER
Operator Name(See Chapter 6)
MODE
END
1 • Access the Programming mode.
Ex. Password = 9000
Note: To exit the Programming mode, press theMODE key again.
2 • Enter “12” followed by the ENTER key, orpress the OPERATOR key to select theOperator Programming mode.
3 • Enter the operator code followed by the PLUkey.
Ex. Operator Code = 11
4 • Press the ENTER key to create/edit theoperator name.
5 • Enter the required operator name using thekeyboard (max. 12 characters).
• When complete press the ENTER key.
6 • Repeat steps 3 through 5 for any otheroperators to be programmed.
7 • When all desired operator information hasbeen programmed, press the END key.
8 • Press the MODE key to return to the normalmode.
1 ➔2 ENTER OR OPERATOR
BC-3000 • User’s Manual • Rev 0 page 61
Step Description Keys and Display1 • Access the programming mode.
Ex. Password = 9000
Note: To exit the Programming mode, press theMODE key again.
2 • Enter “12” followed by the ENTER key, orpress the OPERATOR key to select theOperator Programming mode.
3 • Enter the operator code to be deleted followedby the PLU key.
Ex. Operator Code = 12
4 • Press the CHAR DELETE key to delete theoperator.
5 • Press the CHAR DELETE key again toconfirm the deletion.
Note: To cancel the deletion, press the CLEARkey.
6 • Repeat steps 3 through 5 for any otheroperators to be deleted.
7 • When all desired operator information hasbeen deleted, press the END key.
8 • Press the MODE key to return to the normalmode.
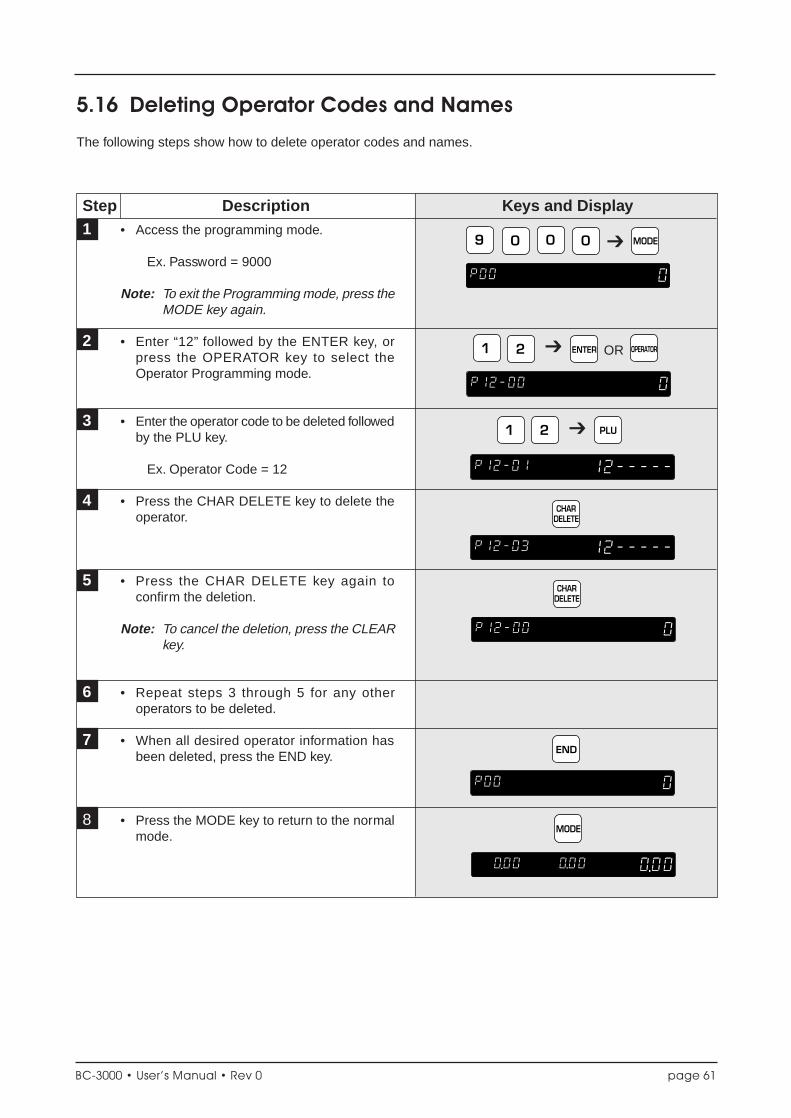
5.16 Deleting Operator Codes and Names
The following steps show how to delete operator codes and names.
9 ➔00 0 MODE
1 ➔ PLU2
CHARDELETE
CHARDELETE
MODE
END
1 ➔2 ENTER OR OPERATOR

page 62 BC-3000 • User’s Manual • Rev 0
5.17 Programming Nutrition Files
Nutrition Files can be included with each PLU. The following steps show how to program Nutrition Files.
Step Description Keys and Display
9 ➔00 0 MODE
➔ ENTER
Serving Size(Max. 10 characters)
2 1
Serving per Container(Max. 4 characters)
Total Calories(Max. 4 digits)
ENTER
ENTER
ENTER
1 • Enter the Programming mode.
Ex. Password = 9000
Note: To exit the Programming mode, press theMODE key again.
2 • Enter “21” followed by the ENTER key toselect the Nutrition File Programming mode.
3 • Enter the PLU number followed by the PLUkey.
Ex. PLU No.1
4 • To confirm the entered PLU number on thedisplay, press the PLU key. The entered PLUnumber will appear on the display for onesecond.
5 • Enter “Serving Size” followed by the ENTERkey.
6 • Press the ENTER key.
7
• Enter “Serving per Container” followed by theENTER key.
Note: The entered data will be printed whenissuing nutrition label for fixed price items.For the weighed items, “varies” willalways be printed.
7 • Press the ENTER key.
• Enter “Total Calories” followed by the ENTERkey.
ENTER
ENTER
PLU
➔ PLU1

BC-3000 • User’s Manual • Rev 0 page 63
Step Description Keys and Display8 • Press the ENTER key.
3
• Enter “Calories from Fat” followed by theENTER key.
9 • Press the ENTER key.
5
• Select the unit of weight (“mg” or “g”) by usingthe RIGHT or LEFT key.
0: mg1: g
• Enter “Total Fat” followed by the ENTER key.7
10 • Press the ENTER key.
• Enter “Total Fat Percentage” followed by theENTER key.
11 • Press the ENTER key.
• Select the unit of weight (“mg” or “g”) by usingthe RIGHT or LEFT key.
0: mg1: g
• Enter “Saturated Fat” followed by the ENTERkey.
12 • Press the ENTER key.
• Enter “Saturated Fat Percentage” followed bythe ENTER key.
ENTER
Calories from Fat(Max. 4 digits)
ENTER
➝
“mg” or “g”
ENTER
Select “mg” or “g”
Total Fat(Max. 3 digits)
OR
➝
➝
ENTER
ENTER
Total Fat %(Max. 3 digits)
ENTER
ENTER
Saturated Fat %(Max. 3 digits)
ENTER
➝
“mg” or “g”
➝
➝OR
Select “mg” or “g”
Saturated Fat(Max. 3 digits)
ENTER
ENTER
page 64 BC-3000 • User’s Manual • Rev 0
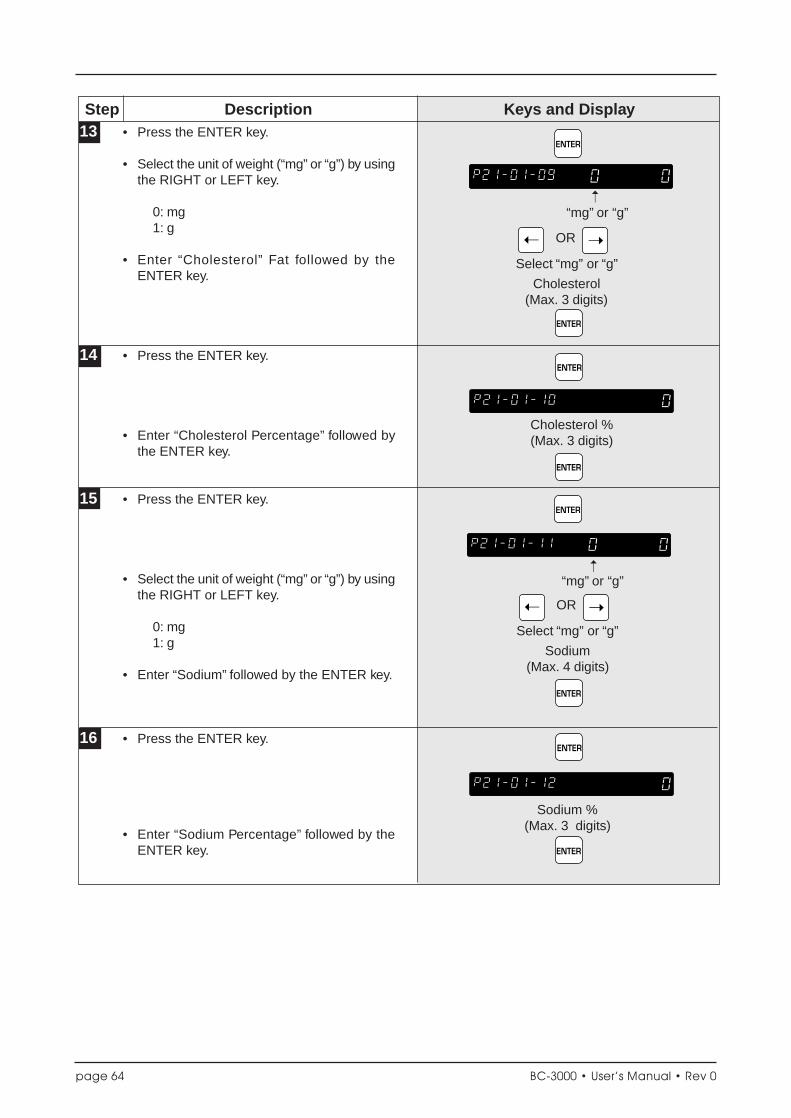
Step Description Keys and Display13 • Press the ENTER key.
• Select the unit of weight (“mg” or “g”) by usingthe RIGHT or LEFT key.
0: mg1: g
• Enter “Cholesterol” Fat followed by theENTER key.
14 • Press the ENTER key.
• Enter “Cholesterol Percentage” followed bythe ENTER key.
15 • Press the ENTER key.
• Select the unit of weight (“mg” or “g”) by usingthe RIGHT or LEFT key.
0: mg1: g
• Enter “Sodium” followed by the ENTER key.
16 • Press the ENTER key.
• Enter “Sodium Percentage” followed by theENTER key.
ENTER
➝
“mg” or “g”
Select “mg” or “g”
Cholesterol(Max. 3 digits)
OR➝
➝
ENTER
ENTER
Cholesterol %(Max. 3 digits)
ENTER
ENTER
➝“mg” or “g”
Select “mg” or “g”
Sodium(Max. 4 digits)
OR➝
➝
ENTER
ENTER
Sodium %(Max. 3 digits)
ENTER

BC-3000 • User’s Manual • Rev 0 page 65
Step Description Keys and Display17 • Press the ENTER key.
• Select the unit of weight (“mg” or “g”) by usingthe RIGHT or LEFT key.
0: mg1: g
• Enter “Total Carbohydrate” followed by theENTER key.
18 • Press the ENTER key.
• Enter “Total Carbohydrate Percentage”followed by the ENTER key.
19 • Press the ENTER key.
• Select the unit of weight (“mg” or “g”) by usingthe RIGHT or LEFT key.
0: mg1: g
• Enter “Dietary Fiber” followed by the ENTERkey.
20 • Press the ENTER key.
• Enter “Dietary Fiber Percentage” followed bythe ENTER key.
➝
“mg” or “g”
Select “mg” or “g”
Total Carbohydrate(Max. 4 digits)
OR➝
➝
Total Carbohydrate %(Max. 3 digits)
➝“mg” or “g”
➝
➝
Select “mg” or “g”
Dietary Fiber(Max. 3 digits)
ENTER
ENTER
Dietary Fiber %(Max. 3 digits)
ENTER
ENTER
ENTER
ENTER
ENTER
ENTER
OR

page 66 BC-3000 • User’s Manual • Rev 0
Step Description Keys and Display21 • Press the ENTER key.
• Select the unit of weight (“mg” or “g”) by usingthe RIGHT or LEFT key.
0: mg1: g
• Enter “Protein” followed by the ENTER key.
22 • Press the ENTER key.
• Enter “Protein Percentage” followed by theENTER key.
23 • Press the ENTER key.
• Select the unit of weight (“mg” or “g”) by usingthe RIGHT or LEFT key.
0: mg1: g
• Enter “Sugar” followed by the ENTER key.
24 • Press the ENTER key.
• Enter “Sugar Percentage” followed by theENTER key.
25 • Press the ENTER key.
• Enter “Vitamin A Percentage” followed by theENTER key.
ENTER
➝
“mg” or “g”Protein
(Max. 3 digits)
ENTER
ENTER
Protein %(Max. 3 digits)
ENTER
ENTER
➝
“mg” or “g”
OR
➝
➝
Select “mg” or “g”
Sugar(Max. 3 digits)
ENTER
ENTER
Sugar %(Max. 3 digits)
ENTER
ENTER
Vitamin A %(Max. 3 digits)
ENTER

BC-3000 • User’s Manual • Rev 0 page 67
Step Description Keys and Display
ENTER
Vitamin C %(Max. 3 digits)
ENTER
ENTER
Calcium %(Max. 3 digits)
ENTER
ENTER
Iron %(Max. 3 digits)
ENTER
END
MODE
26 • Press the ENTER key.
• Enter “Vitamin C Percentage” followed by theENTER key.
27 • Press the ENTER key.
• Enter “Calcium Percentage” followed by theENTER key.
2
28 • Press the ENTER key.
• Enter “Iron Percentage” followed by theENTER key.
29 • Repeat steps 3 through 28 for any otherNutrition Files to be programmed.
30 • When all desired Nutrition Files have beenprogrammed, press the END key.
31 • Press the MODE key to return to the normalmode.

page 68 BC-3000 • User’s Manual • Rev 0
Step Description Keys and Display
5.18 Changing Unit Price/Fixed Price
The following steps show how to change the price recorded in the PLU.
9 ➔00 0 MODE
➔2 ENTER2
➔ PLU1
Current price
➔2 02 ENTER
New price
1 • Access the Programming mode.
Ex. Password = 9000
Note: To exit the Programming mode, press theMODE key again.
2 • Enter “22” followed by the ENTER key toselect the Price Change mode.
3 • Enter the PLU No. followed by the PLU key.
Ex. PLU No. = 1
4 • Enter the new price.
Ex. $2.20
5 • Repeat steps 3 through 4 for any other pricesto be changed.
6 • When all desired prices have been changed,press the END key.
7 • Press the MODE key to return to the normalmode.
END
MODE

CHAPTER 6TEXT EDITING
Contents
6.1 Text Entry Screen ............................. 68
6.2 Character Size ................................ 69
6.3 Text Editing Keys .............................. 70
6.4 How to Create/Edit Text ................ 71
6.5 How to Reverse Text ....................... 72
6.6 How to Insert Characters ............... 74

page 70 BC-3000 • User’s Manual • Rev 0
6.1 Text Entry Screen
6.1.1 Indicators
Reverse
Line CounterCharacter Counter
Character Size
ShiftInsert
SizeLower Case
6.1.2 7-Segment Display Characters
0 1 2 3 4 5 6 7 8 9
A B C D E F G H I J
K L M N O P Q R S T
U V W X Y Z
! ” # $ % & ’ ( )
+ , – • / : ; < = >
? [ \ ] ^ __ @

BC-3000 • User’s Manual • Rev 0 page 71
6.2 Character Size
The following text can be entered while in the Editing mode.
Variable Character Size Fixed Character Size
• PLU name • Department name (max. 12 characters)• EXTRA message • Group name (max. 12 characters)• Store name • Operator name (max. 12 characters)
• Store address (max. 47 characters)
Character Size Print Examples
Size 1 7 × 14 mm (Upper/Lower case)Max. 48 characters/line
Size 2 10 × 20 mm (Upper case only)Max. 36 characters/line
Size 3 15 × 30 mm (Upper case only)Max. 25 characters/line
Size 4 20 × 40 mm (Upper case only)
Max. 18 characters/line
Size 5 30 × 60 mm (Upper case only)Max. 12 characters/line
Size 6 40 × 80 mm (Upper case only)Max. 9 characters/line
Size 7 60 × 120 mm (Upper case only)Max. 6 characters/line

page 72 BC-3000 • User’s Manual • Rev 0
6.3 Text Editing Keys
Note: Confirm that the Program Key Sheet, and not the Operation Key Sheet, is being used for this operation.
SIZEUsed to select different character sizesavailable for printed text.Also used to return to standard text.
RIGHT ARROWUsed to move across text characters.Also used to view options available onmenu lines of program menu items.
LEFT ARROWUsed to move across text characters.Also used to view options available onmenu lines of program menu items.
UP ARROWUsed to move up text lines.
DOWN ARROWUsed to move down text lines.
REVERSEUsed to reverse text type. Also used toreturn to standard text.
NORMALUsed to switch from reverse type tonormal type.
BACK SPACEUsed to delete the last entered character,or the character to the left of the right mostcharacter.
CHARACTER DELETEUsed to delete the right most characteron the display.
LINE DELETEUsed to delete complete words from textfield.
COPYUsed to copy the text and other settingsof a PLU to a new PLU.
INSERTUsed to change between inserting oroverriding characters in editing text.
NEW LINEUsed to move to the next line (carriagereturn) when in the Editing mode.
LOWER CASEUsed to change to lower case letters.
SHIFTUsed to access the upper character ofkeys with two characters.Also used to move to end of a text line incombination with the RIGHT ARROWkey, or used to move to the beginning ofa text line in combination with the LEFTARROW key.
SIZE
➝
➝➝
NORMAL
➝
BS
REVERSE
CHARDELETE
LINEDELETE
COPY
INSERT
LOWERCASE
SHIFT
NEWLINE

BC-3000 • User’s Manual • Rev 0 page 73
6.4 How to Create/Edit Text
Step Description Keys and Display1 • Make sure that the BC-3000 is in the Text
Editing mode.
2 • Select the desired character size.
•• Press the SIZE key, and the size indicatorwill light.
•• Press the UP or DOWN key to select thedesired character size.
Ex. Size 3
3 • Enter the desired text on the 1st line.
Ex. FILET MIGNON
4 • Press the NEW LINE Key.
• Select the desired character size by pressingthe UP or DOWN key.
Ex. Size 2
5 • Enter the desired text on the 2nd line.
Ex. ((BEEF))
• Press the ENTER key.
6 • Press the PRINT key to confirm the enteredtext.
➝
Character size
SIZE
➝
Size
➝
➝
➝➝
Size Character size
OR
F I L E T
M I G N O NSPACE
NEWLINE
SIZE
OR➝
➝
(<
(<
B E E F )>
)>
ENTER

page 74 BC-3000 • User’s Manual • Rev 0
Step Description Keys and Display
1 • Make sure that the BC-3000 is in the TextEditing mode.
2 • Select the desired character size.
•• Press the SIZE key, and the SIZE indicatorwill light.
•• Press the UP or DOWN key to select thedesired character size.
Ex. Size 3
3 • Press the REVERSE key to select TextReverse mode, and the REVERSE indicatorwill light.
• Enter the desired text on the 1st line.
Ex. FILET MIGNON
• Press the NORMAL key, or press theREVERSE key again to return to standardtext.
4 • Press the NEW LINE key.
• Select the desired character size.
•• Press the UP or DOWN key to select thedesired character size.
Ex. Size 2
➝
Character size
SIZE
➝
Size
➝
➝
➝
Big size
➝
Size
OR
➝
Reverse
REVERSE
F I L E T
M I G N O NSPACE
REVERSE NORMALOR
➝
➝
OR
NEWLINE
SIZE
6.5 How to Reverse Text

BC-3000 • User’s Manual • Rev 0 page 75
Step Description Keys and Display5 • Enter in the desired text on the 2nd line.
Ex. ((BEEF))
• Press the ENTER key.
6 • Press the PRINT key to confirm the enteredtext.
(<
(<
B E E F )>
)>
ENTER

page 76 BC-3000 • User’s Manual • Rev 0
Step Description Keys and Display
6.6 How to Insert Characters
1 • "FIET" instead of "FILET" was entered bymistake.
2 • Make sure that the INSERT indicator is lit.
Note: If this indicator is not lit, press the INSERTkey to turn on the INSERT indicator.
3 • To insert the character "L" between "I" and"E".
•• Press the LEFT key twice to move twocharacters back.
•• Type "L".
•• Press the ENTER key.
E TF I
➝
Insert
➝
L
ENTER
➝

CHAPTER 7TROUBLESHOOTING
Contents
7.1 Troubleshooting .............................. 76
7.2 Other Problems ............................... 77

page 78 BC-3000 • User’s Manual • Rev 0
7.1 Troubleshooting
When errors occur, try to recover normal operations by using the following troubleshooting chart.
Error No. Countermeasure
Label printing is not possible because the numberof entered characters is too great for the set label.Press the CLEAR key to return to the previousscreen and try to enter data again.
Replace with a new roll of labels. Press theCLEAR key to return to the previous screen.
The label size may be different from thepredetermined size. Press the CLEAR key toreturn to the previous screen. Confirm the labelsize and replace if necessary.
Press the CLEAR key to return to the previousscreen. Try to enter the special price again.
Contact the service engineer.
The scale reading was not stable when powerwas turned on, or some item was left on the weighplatter.Remove any items left on the weigh platter.
Description
Too many characters.
POP message is too long.
Extra message is too long.
Store name/address is too long.
Out of labels.
Label size error.
Entered special price is equal toor over the preset price.
Damaged memory.
Check the scale.
Remove items on the weighplatter.
WEIGHT lb
ZERO
Capacity 30 0.01 lb
NET SAVE AUTO
$ $UNIT PRICE TOTAL PRICE
× PLU

BC-3000 • User’s Manual • Rev 0 page 79
7.2 Other Problems
◆ Printing is too light.
The thermal head has become soiled. Use the attached cleaner set to clean the printer head.(Refer to page 12.)
◆ Labels are printed as soon as an item is placed on the weigh platter.
The scale is set in the AUTO mode. (AUTO indicator is lit.)
◆ Labels are not issued.
The printing position has slipped. Press the PAPER FEED key to align the paper with the correct printingposition.

IW512P1003
44 SANNO-CHO SHOGOIN SAKYO-KUKYOTO, 606 JAPANPHONE: (075) 771-4141FACSIMILE: (075) 751-1634TELEX: 05422065 SCALES JCABLE ADD: “SCALES”KYOTO