
Battlegames Magazine Issue 7
52
philip parisi (order #7077380)
-
Upload
filippo-longo -
Category
Documents
-
view
157 -
download
2
description
Wargame magazine
Transcript of Battlegames Magazine Issue 7

philip parisi (order #7077380)

2 Battlegames
philip parisi (order #7077380)

Battlegames 3
Battlegames magazine is a bi-monthly publication of Battlegames Ltd, 17 Granville Road, Hove BN3 1TG, East Sussex. Company No. 5616568.
All content © Battlegames and its contributors. Strictly no reproduction without prior written consent. All rights reserved. Opinions expressed in articles are those of the individual authors concerned.
Editor: Henry Hyde, email [email protected], tel. 01273 323320 Fantasy & Sci-Fi Editor: Guy Hancock, [email protected], 01273 845164
Web: www.battlegames.co.uk
Design, layout and typesetting by Henry Hyde in Adobe InDesign and Adobe Photoshop on Apple Mac G5 and G4.
Set in Adobe Warnock Pro and Helvetica Neue. Photography by Henry Hyde using Fuji S7000 except where otherwise credited. Copy editing and proofing by Henry Hyde and Steve Gill
Printed by Litho Direct, Brighton on environmentally-friendly paper. Special thanks to David Hayward and all the team.
Advertisers, contributors and businesses wishing to send samples for photography and review should contact the Editor.
TRADE PLEASE NOTE: Battlegames does NOT ask its reviewers to contact companies direct unless by previous arrangement authorised by the Editor in writing.
Subscription enquiries should be addressed to the Editor or you can subscribe online. Current rates (as at January 2007)
are £22.50 per annum post-free in the UK; EU Airmail £27.50; Rest of the World Economy Airmail £34.50.
All items relating to fantasy or sci-fi should be sent to our Fantasy & Sci-Fi Editor at 7 North Court, Hassocks, West Sussex BN6 8JS
All submissions and articles should initially be sent to the Editor and must be accompanied by an SAE if posted. We recommend submission of articles via email. Battlegames Ltd takes no responsibility for unsolicited articles. Please apply for submission guidelines. We like to discuss your proposal so that we can ensure your piece is suitable for inclusion. Submission guidelines and technical specifications are also given on our website.
Copy and advertising closing date for next edition: June 1st 2007
It’s four in the morning as I write this, putting the final touches to our
first anniversary issue of the magazine before the disk is whisked away by the printer at 9 a.m. Who would have thought that a magazine like this, focusing on quality writing above all else, could have survived in the 21st century? Well, I did, actually!
To celebrate this momentous occasion, I’ve added four extra pages to the magazine. Lord knows, I’ve got top-quality articles racked up for several issues to come, and I want to thank all our contributors for being so patient. Being bi-monthly means that I am conscious of keeping talented writers waiting who deserve to be seen in print, so every issue that I put together leaves me with a faint sense of guilt about what I had to leave out – but that goes with the territory.
Another slight change is the paper Battlegames is printed on. As a result of yet another recent round of Post Office price hikes, it became imperative that I could increase the page count without increasing the overall weight of the magazine. Fortunately, I discovered the same brand of paper is available in several weights, so I have been able to take down the inside pages a fraction without losing that ‘tactile’ aspect you’ve all raved about and, to compensate, I’ve increased the weight of the covers just a tad. By a small miracle, therefore, in spite of adding more pages, the magazine actually comes in at a few grams less than previously.
Meanwhile, plans are afoot at Battlegames HQ to push inland from the bridgehead we have established in the market. Deals with new distributors are in the offing, and I’m really excited about some that I hope will bear fruit in the near future. Meanwhile, those of our overseas readers who find the postage from the UK rather pricey can now talk to a clutch of reliable sources of the magazine in both the USA and Australia. In the US, we have On Military Matters, based in New Jersey, and Military Miniatures USA, who distribute to shops in various states. In Australia, we have Mainly Medieval in Sydenham, and Essex Miniatures Australia based in Hornsby Heights, both NSW.
Equally exciting are our contacts in Europe. A recent trip to the excellent Action! show in Rheindahlen allowed me to meet the irrepressible Jürgen from Quirxel
Editorial 3
A brush with musketeers 4Dave Robotham, UK
Forward Observer 7Mike Siggins, UK
Competition 8Win something!
The Wars of the Faltenian Succession 9Henry Hyde, UK
Battles for wargamers: Kassassin 1882 10Stuart Asquith, UK
The big push 13John Kersey, UK
Sans peur et sans reproche 19Adrian Hussey, UK
Larry Leadhead 32Eric Hotz and Douglas Hamm, Canada
Table top teaser 33C.S. Grant, UK
To boldly go 37Guy Hancock, UK
Recce 39Mike Siggins, Greg Horne, Alistair Birch with Andy Crofton, Guy Hancock, Richard Baber, Steve Gill, Dan Mersey, Stuart Asquith, Roger Smith & me!
Editorial Contents
Cover: a stunning WWI display game staged by the talented Aly Morrison and Dave Andrews at The Other Partizan in Newark, September 2006. The poor Tommies undergoing the bombardment are from Aly’s Great War Miniatures range. The incredible scenery was made by Dave. Photo by the Editor.
Games, but we also have contacts in Italy (Strategia e Tattica and Camelot Games) and Austria, with Der Buchfreund in Vienna. My thanks to all these companies for the efforts they are making on our behalf.
Back here in the Loftwaffe, I’ve decided to start a blog, which you can find at http://battlegames.wordpress.com. As you know, I’m a chatty type, so the blog gives me the opportunity to tell you about some of my personal wargaming projects as they progress, and the sort of stuff that doesn’t easily fit on the main Battlegames website. I’m following in the footsteps here of our very own Greg Horne, who told us back in issue 1 that a blog is a great way to keep you true to your word when it comes to wargaming output. I hope he’s right – I’ve recently acquired over 2,000 Baccus Greeks and Persians for a Warmaster Ancients project!
My thanks to all of you for your tremendous support and the kind sentiments so many of you have expressed.
philip parisi (order #7077380)

4 Battlegames
A brush with musketeersPainting infantry for the Great Northern War
by Dave Robotham
Over the last few months I have been looking into the new range of Great Northern War figures produced by Musketeer Miniatures. This is a
relatively new line, but is growing steadily. At the moment the range includes basic infantry for the Swedish and the Russians and command groups, as well as grenadiers and pikemen for the Swedish. For this guide, I am going to tackle a Russian and a Swedish infantryman. I will also detail a couple of different techniques and paint combinations to add variety and speed things up.
FACES AND HANDSI will always try to paint the skin on a figure first for a variety of reasons. I find that if you paint the miniature from the inside layer out (the skin, then the shirt, then the tunic etc.), you will not be painting over previous layers. In effect, you are minimising the chance that you will get paint on already finished areas of the model. But, for me, the biggest reason is that I enjoy painting flesh on a figure and I find it the most interesting part of most miniatures. Painting the face and hands (and other ‘fleshy’ bits) first really does give life to the figure, and can drive me on to complete the rest of it.
Both the Russian and Swedish infantry can be painted with the same style and colours: there is not a huge difference in skin tone between the two nations. But there are literally hundreds of methods of painting skin with an equal number of formulated paints to help you along the way, so you can add variety to your troops with ease. I painted the Russian and Swede in two different styles, both of which start with the same base colour, but build different colours on top of it.
COLOUR PALLETE 1 – THE SWEDEI started with a watered down basecoat of Pelikan Plaka’s Red Brown. This hobby paint dries totally matt and provides a great base colour for Caucasian skin tones.
For the next step, I painted a layer of Games Workshop’s (GW) Bronzed
Flesh over the red brown, making sure to leave the base colour in the deep recesses of the face. You don’t want to leave too much of the red brown showing, but areas to try to define with this highlight are the nose and nostrils, as well as the cheekbones and muscles. If you are feeling brave, you might also like to paint under the arches of the eyebrows and recesses under the eyes. In the next picture, you can see the extent to which I have covered the base colour with this layer. To add more definition, I added white to Bronzed Flesh for the second highlight. Areas to focus on here are
the same as before. Make sure you keep the definition of the nose and nostrils, as well the cheekbones and brow. You can see in third picture how subtle my highlight is, but you can increase the contrast by just adding a touch more white to the Bronzed Flesh.
At this point you could stop, paint the eyes and lips in, and be done. However a final highlight of pure white will make the face stand out on the tabletop, which is what we are looking for here. Even if it does look a little too harsh in the fourth picture, remember that on the tabletop, those sharp highlights will really work to make the features of the face stand out.
Finally, I painted in the eyes and the lower lip. The colour of the lower lip is really up to you. I know many painters prefer a much pinker colour instead of the dark red-brown colour I have used. Highlight the lips with either a single line or, as I have, you can add some more detail by splitting the highlight.
The eyes were painted is as a black stripe painted into the eye socket, then a white stripe painted over that, finished off with a dot of black or dark brown centrally on the white strip. To avoid that wide-eyed stare, make sure the black dot totally divides the white of the eyes, touching the top and the bottom of the eye.
COLOUR PALLETE 2 – THE RUSSIANThe Russian’s skin was painted using the same technique and template as with the Swede, a basecoat with layered colours over the top to define the features. (See photos at top of opposite page.) However, I used a different pallete of colours this time. I started with the same Plaka Red Brown, but this time I used paints from the Foundry and Privateer Press (P3) ranges.
After the basecoat of red-brown, I painted a layer of P3 Khardic Flesh followed by a second highlight of P3 Midland Flesh. Like the Foundry colour triads, these two colours were designed to be painted one after the other, and they form a wonderfully hardy looking reddish skin tone. To add that final definition to the face, I applied a final highlight of Foundry’s Flesh 5C although, as with the Swede, this is not really necessary if you want to save some time.
MUSKETSThere is a very simple and quick way to paint muskets and rifles if you need to get them finished and onto the table in a timely manner. Firstly, I start with a mid-brown colour and paint all the wooden parts of the weapon. Due to the varied manufacturers of muskets from different nations, you can choose almost any brown colour for this basecoat: just make sure it’s not too dark. All the metallic areas were also painted dark silver (such as GW’s Boltgun
philip parisi (order #7077380)

Battlegames 5
Metal), making sure the colour used was not bright or shiny. You can see the shades I used in this first picture.
The second, and final, stage is to water down some black ink or black paint and wash that over both the wooden areas and the metallic areas. It will shade and stain the colours at the same time, adding definition and that weathered look.
So that is the fast method, but there is also a far more detailed approach you can use to paint up muskets and rifles and other wooden-stocked weapons.
Starting off with a dark brown colour, I basecoated the wooden areas of the musket and used the same silver as I did in the first method detailed previously. GW’s Scorched Brown or Foundry’s Bay Brown 42A are fine for this.
To build up the colours of the wooden areas of the musket I used the Foundry’s Spear Shaft trio of colours. I painted horizontal stripes along the wooden surfaces using Spear Shaft 13A. As you can see in the picture, make sure the lines are quite wide, leaving only a sliver of the dark colour showing below.
Using Spear Shaft 13B I then painted thin lines over the top of the previous layer. This time, try to leave only a sliver of the Spear Shaft 13A showing as you retrace your design with this new colour. At this point, I also used a black ink to wash all the metal areas of the weapon and then used my original silver colour to neaten up the edges.
As a final highlight I used Spear Shaft 13C, again retracing my previous lines to build up the definition of the woodgrain. Using brighter silver (such as GW’s Mithril Silver or Chainmail), I also applied some highlights to the bayonet.
THE UNIFORMS On the next page, you will see a colour guide for a Russian and a Swedish infantryman’s uniform. I have provided a full run-down of the colours I used. I used Foundry colours for the most part, but fell back on the GW paint range for all the metallics, as well as the Russian soldier’s coat and cuffs.
When painting the different uniforms, I used a simple layering technique, starting with a dark basecoat and adding two or three layers of highlights – no blending or washes, just simple layering of paint.
You will notice that the Swedish Infantryman has not shaved for a few days. Adding a 5 o’clock shadow is really
not as hard as it might at first seem. To paint stubble, I use Foundry Granite 31C. This is a grey colour, but with
a hint of brown to it. You could easily mix the shade of colour by taking a mid-grey (just black mixed with white) and adding a touch of brown. Any brown will do, but don’t add too much, just a dot of colour to tint the grey.
I water the paint down until it is incredibly translucent. When you paint the first layer, you should only see a slight
change in colour. I then paint maybe six or seven layers, progressively building up the colour. The more layers you add, the more opaque the colour will become as more pigment is layered onto the surface. Using multiple layers, you
can make sure the pure granite colour is only along the jawbone and chin and fades out as it rises up the face.
The hair on these soldiers can be painted in hundreds of different ways, using a huge variety of colours. I started with a dark base colour and applied a single highlight, painting it on in small lines and dashes following the contours of the sculpted hair.
To finish off the bases, I used PVA to glue down some rough sand and then, when that was dry, I used a brown ink to stain the sand. It is far easier to paint
sand with a fluid ink than with acrylic paint. Then I drybrushed the bases with GW colours starting with Bestial Brown then Snakebite Leather followed up by Bubonic Brown and finally Bleached Bone. Then I added several tufts of static grass in various colours. I used different colours for the rims of the bases. On the
Swede, I used GW’s Bestial Brown and on the Russian, I used GW’s Scorched Brown, a much darker colour.
For protection, I first varnished the model with GW’s Ardcoat spray gloss varnish, and after that had been left to dry for a day, I varnished them again with Testors Dullcote for a wonderfully matt finish.
IN CONCLUSIONThere is a huge variety of different uniform colours you can use for the GNW. Like many armies in the 17th
and 18th centuries, uniforms were often brightly coloured and specific to different formations. I suggest you head over to www.musketeer-miniatures.com for plenty more ideas and information about the troops and battles of the Great Northern War.
philip parisi (order #7077380)

6 Battlegames
philip parisi (order #7077380)

Battlegames 7
As regular readers know, I like to watch the hobby for trends. Some years ago they
were easy to spot. Cowboys, Pirates, Darkest Africa, Dinosaurs... And then… nothing readily discernible. Perhaps a glimmer for Back of Beyond and Pulp games, a significant (but doomed?) rally for 28mm WWII and WWI, and a definite underground movement forming for 40mm. Nice to see the latter, considering my comments below.
This lack of one driving force is both good and bad. Good because we see a wide range of periods represented, and some innovative games and ranges looking to find something original. I have no problem with such diversity, even if that means 1/500th Napoleonics (due soon from 1st Virtual, and rather nice) or Action Man scale tanks. On the downside, it leaves some manufacturers wondering where to go next. They try new periods, new scales, they come back to a staple like Napoleonics, they go off again on some other venture.
Both manufacturers and traders are looking for next big thing, but the quicker the turnover of these ideas (fads, to be uncharitable) the less chance of a movement taking hold.
However, there are signs that one of the drivers for business and for games, demo and tournament, are the WAB supplements.
For the last few weeks, trader and web activity, and emails, have reflected the release of Age of Arthur. Friends, and I, are choosing our favourites from the armies on offer and mentally building armies. I almost certainly won’t play with them, but it is fun to speculate. All of a sudden, as well as the Gripping Beast stalwarts, there are other tempting Dark Age figures, and flags, competing for our dollar. In the same vein, it is not difficult to spot the approaching ranks of Samurai figures, jostling for position as Divine Wind nears publication. I think the same is probably true of
Flames of War, with flurries of activity when a new supplement appears.
MUSING ON MINIMALISMI have always strived for the maximum possible pleasure from my workbench. Assessing my recent output, this is clearly not measured only by projects completed. It is more a… tool thing. I have always figured that it is best to have all possible tools available at all times. It improves the experience of the hobby, it makes one, well, somehow a better person (!). Inevitably, duplicates appear. At the last count I had five scalpels. I long ago lost count of needle files. Brushes? Pots of ‘em.
I am happy with this approach until I encounter the minimalist. These people are very productive, and seem to turn out their own original sculpts and beautiful armies with little more than a knife and a file. One of my friends works on a small Davenport which has a surface area of about one square foot. I have fifteen square feet, plus storage, yet still manage to produce less, and be forced to work in a six inch square crater. Perhaps that is just untidiness.
More frustrating are the frugal painters. I am quite proud of my hundreds of paint pots. These draw admiring comments such as, “Can you possibly use all this in one lifetime?” and “Are you barmy?” Meanwhile, our under-equipped chums mix all the colours they ever need from six pots of Humbrol. How do they do that? I suspect they listened attentively in art class when primary and secondary colours came up.
40MMI still can’t tell you precisely why, but after a couple of years slowly deliberating, I am now very much a convert to 40mm. While it seems an arbitrary departure for some, and consistently draws negative comment from hardcore 28mm fans on web fora, the scale has probably now reached critical mass. When the likes of Front Rank join the fray, you know there is something to take notice of. And while I know it goes against all the logic of being a long-term 25/28/30mm
gamer, and it means my scenery might need revising (but then again it might not), the simple explanation is this: when I look at a 25mm figure these days, they appear tiny. Unpaintably tiny. This, as discussed before, is a function of declining eyesight, increasing detail and, I’m sure, the comparative presence of said 40mms. I also really like painting the larger figures, and they are obviously a step closer to merging two, or even three, of my interests: gaming, model soldiers and painting.
So, inspired by my mate Rob Santucci’s Vikings, I have been dabbling with Sash & Sabre’s 40mm Saxons. I am very pleased with the results. Twenty or so of these guys grouped in a small unit has a real presence, and the price (£30 for 20) is just about right. When the ranges fill out, show a bit less animation, and if sculpt and pose quality remains consistent, I can see these as a large part of my future plans.
In the background there are other candidates. The Perries are still up there at the top and it is just a matter of time and finances before I get hold of some. I have lost track of the excellent Trident medieval range, but I suspect the same sculptor has recently popped up in the States with an AWI range. Drabant remain highly appealing, but a bit too expensive. Ditto Doug Miller’s figures, but I must have some of these. I got very excited about Front Rank’s new AWI range for a day or two, but sadly they have misjudged the pricing level by a factor of two. Sash & Sabre, who have the pricing right, meanwhile have Landsknecht packs arriving any day, and are threatening Greek Hoplites this summer, which will see me handing over the credit card and throwing caution to the winds. I am trying hard not to look at Graven Image’s Feudals for fear of bankruptcy.
I suppose I could join the internet snipers who bemoan a figure’s scale when I see Fox’s beautiful 1/48th WWII range sculpted by Tom Meier, and the excellent wild west figures from Black Scorpion. These are smaller than 40mm but bigger than 28mm; significantly, in both cases. They don’t,
Forward observerTrends
by Mike Siggins
philip parisi (order #7077380)

8 Battlegames
like 40mms, ‘fit’ anywhere unless you have a Tamiya fetish (I do, since 1974…). For the manufacturer, it is all about doing whatever they feel will sell and if the Tamiya 1/48th output is a sign, then Fox are onto a winner. For me, I have to work out whether the Black Scorpions justify a stand-alone project that can somehow sit alongside my existing 28mm wild west. You can tell I am wavering.
For those purists who worry about me, never fear: the 20mm passion (WWII and plastics) is still very much there and the workbench has Egyptians and Sherden underway. Plus, I have more 28mm in reserve than I will ever get round to painting, with new temptation coming right along. I am adjusting the portfolio mix a bit, that is all.
28MM For a year or more I have bought very few 28mms. The odd Bolt Action pack, Anglian Miniatures, and Artizan – mainly cowboys, and those lovely
new pirates. I also bought quite a few eBobs, with which I am very pleased indeed. But at the turn of the year it became apparent that I might have a shot at being Lead Neutral in 2007 – for every figure bought, I would sell or paint one, or ideally two or three. That way I felt I could justify continued, relatively guilt-free purchases, because I have surely long since run out of plausible excuses. And then, all of a sudden, along came a whole load of tempting new ranges.
I mentioned a lot of Samurai. Three very nice ranges have caught my eye. Museum Miniatures have an unusual selection, of quite decent figures, if a bit smooth in look. They have a giant war drum, the proper name for which I cannot recall, but which always reminds me of the excellent Kodo drummer ensemble. I shall be adding a couple to the command stand.
Black Hat’s early Samurai releases, set for Salute, also look very tempting, and they are promising a large number of packs. I don’t think I need or want
any more ninjas, and I am doubtful about the unarmoured figures, but there are some tempting poses and I do like the period. More expense! Along with Kingsford’s new releases, which include a rather tasty mounted figure, and the Perries’ steady addition of new poses, I am somewhat spoilt. I will have to get a firm handle on which figures are compatible with which, and try to reconcile the 300 year spread of the figures… I also see more of the excellent John Jenkins buildings (available from TM Terrain in the UK) making an appearance on the credit card statement.
Hard to sniff at that lot, and nor would I, but my highlights this month have been the latest Pulp figures from Artizan, which have pretty much completed all my wants in the era (and continue to show anatomical improvement), and the excellent knights from eBob that land slap bang on my 1250 favourite era.
It is going to be an expensive Spring. I had better sell some more lead.
The judges’ decision is final. No correspondence will be entered into. This prize carries no cash alternative. One entry per household only. Battlegames Ltd takes no responsibility for the safe arrival of entries. Please ensure that your details are legible. The winner will be announced in the next issue of Battlegames.
Our lucky winners of the “Punic Wars” competition in issue 6 were subscribers Moira Rainford of Sleaford in Lincolnshire and Mr O Adamberry of Gibraltar. The answers were: 1) the Carthaginians; 2) Sicily; 3) Hamilcar Barca; 4) Iberia (modern Spain); 5) Lake Trasimene; 6) Cannae; 7) Scipio; 8) Zama; 9) the Numidians; 10) Tunisia.Honourable mentions in dispatches for the runners-up who also sent correct entries: Mr P J Day; Mr A Stephens; Mr J G Taylor; James Hall; and David Logan. Well done!
WIN A BUMPER OSPREY WWI BUNDLE!
Answers must be sent with your name and postal address clearly marked, to: WWI, Battlegames, 17 Granville Road, Hove BN3 1TG, East Sussex, UK. CLOSING DATE FRIDAY 1st JUNE 2007. A photocopy, printout or manual copy is fine – no need to destroy your copy of Battlegames!
How about this for a superb set of source material for wargamers wanting to have a go at Great War gaming? Not one, not two, not three, but four brilliant books to give away to our lucky winner! From the Essential Histories series, the 350+ page special “The First World War: the War to End All Wars” by Peter Simkins, Geoffrey Jukes and Michael Hickey, and three titles from their excellent Elite series: “World War I Trench Warfare (1) 1914-1916” and “World War I Trench Warfare (2) 1916-1918”, both by Dr Stephen Bull, illustrated by Adam Hook; and finally “The Kaiser’s Warlords, German Commanders of World War I” by Ronald Pawly, illustrated by Patrice Courcelle. Just answer the following questions correctly, and they could be yours!
1. What was the name of the German offensive designed to outflank the French and British defences at the outset of the war by sweeping through Belgium?
2. Who directed and produced the 1969 hit movie “Oh! What a Lovely War!”?
3. What was the name given to early British hand grenades?
4. What was the real name and final rank of Lawrence of Arabia?
6. Which type of aircraft was flown by The Red Baron?
7. Which German arms manufacturer was famous for its artillery pieces?
8. In which museum in Dorset, UK, can you find restored examples of WWI tanks?
9. What did Kaiser Wilhelm II, Czar Nicholas II of Russia and King George V of England have in common?
10. Which treaty formally ended hostilities between Great Britain, France and Germany?
philip parisi (order #7077380)
Battlegames 9
Back in issue 4, we looked at various ways in which you can individualise your campaign maps and make them reflect your own sense of adventure
and sense of humour. After all, it doesn’t do to take these things too seriously, and we’re here to have fun. And then, in issue 6, we discussed some of the ways of bringing these aspects into the creation of your fictitious armies, by designing entirely spurious uniforms and accoutrements for your tabletop forces. But now it’s time to wave the magic wand and breathe life into the key individuals who will hold sway in your little kingdoms.
One of the most exciting aspects of state creation is feeling as though the imagined men and women peopling it are, in some sense, ‘real’. And the easiest way to achieve that is to ensure that they won’t always – and in some cases, never will – behave as you would wish them to. This is, of course, true of the units we command on the tabletop to some degree, and a good set of morale rules will normally ensure that we treat our militia with more caution than our guard troops if we know what’s good for us.
But if our campaign is to be successful and enjoyable, and our fancied states are to come alive in a satisfactory manner, we must look beyond the simple manouevring of blocks of troops in battle and pick out those individuals whose fates are inextricably linked with the story we are telling.
Now, it’s entirely up to you how far up or down the social ladder you climb when addressing this subject. There are those who satisfy themselves with the highest echelons of the aristocracy, creating a sprinkling of princes, dukes, kings and queens to add colour to the scenario and, perhaps, a quarrelsome raison d’être for the inevitable clash of states (for without such a clash, there would be no campaign, would there?).
On the other hand – and why not? – you might wish to focus on a close-knit group of individuals at a much lower level. Who could argue with the creation of a group of comrades like the platoon that gamely followed the fictitious Richard Sharpe around the Peninsula and elsewhere? If skirmish-level gaming is your forte, then there is much mileage to be had from characters like Harper, Hagman, Harris and the rest.
My personal preference is to begin at the level of unit commanders and above: what in German would be called the Inhaber of regiments. In this way, a reasonably substantial number of characters are created at the outset, at a level that means they can directly influence not only the conduct of their units on the battlefield, but also at a political level too, as during the 18th century period I favour, such men would normally also be members of the aristocracy, own substantial tracts of land and have access to Court.
Going about this is simplicity itself. For every unit in your army, give its colonel or major a name. If nothing else, you will immediately feel a much
greater sense of ‘belonging’ to your forces, and their conduct on the field will be more keenly felt.
My own list resulted in 49 names, then I went a bit bonkers, and added Generals, Lieutenant Generals, staff ADCs, Quartermaster-Generals and so on – even the main civilian contractor of supplies! (Jakob Rosenberg GMBH, in case you’re interested.)
So, armed with about 100 names in all, I repeated this for Faltenland; this was, as it happens, in the days before Guy became involved as my opponent.
Precisely how you come up with the names is up to you. I’m reasonably fluent in German, so a certain number came just from everyday words and expressions and, as with the maps, some names I just liked the sound of. Some were quite rude, some were names of friends given a Germanic ‘twist’, and some, quite frankly, were just plain nonsense! If you’re stuck, buy a copy of a foreign-language newspaper or dictionary and just stick a pin in a page.
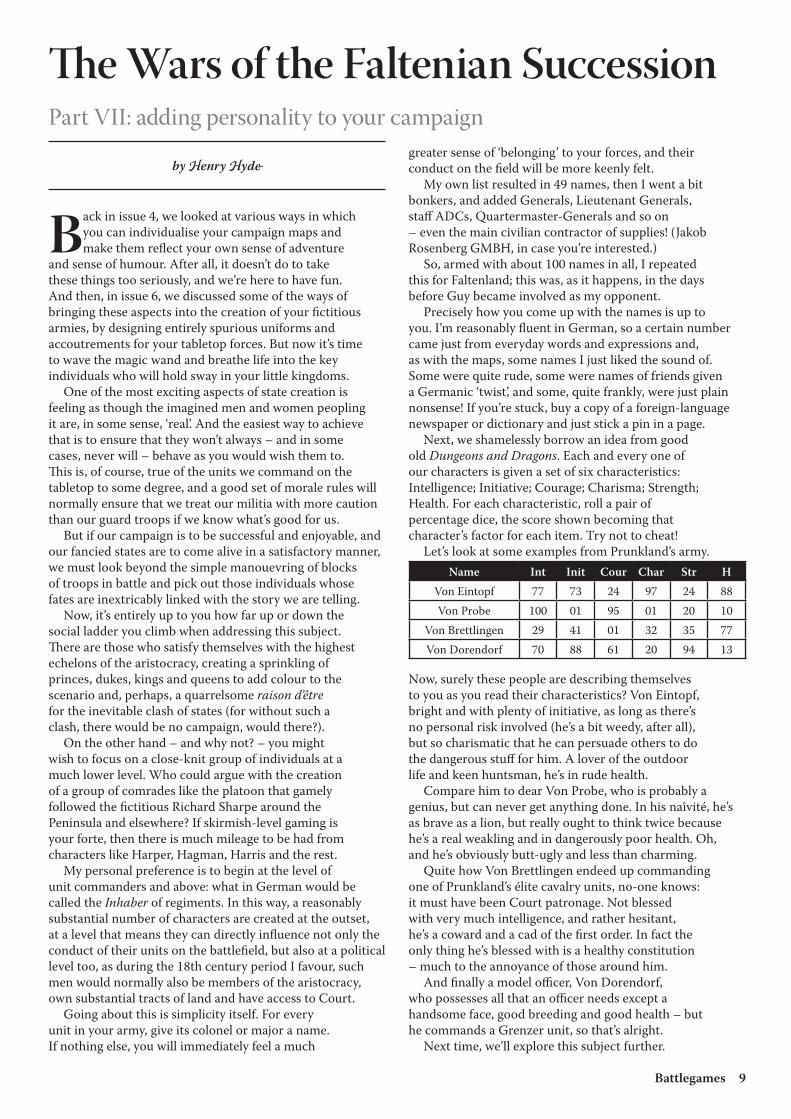
Next, we shamelessly borrow an idea from good old Dungeons and Dragons. Each and every one of our characters is given a set of six characteristics: Intelligence; Initiative; Courage; Charisma; Strength; Health. For each characteristic, roll a pair of percentage dice, the score shown becoming that character’s factor for each item. Try not to cheat!
Let’s look at some examples from Prunkland’s army.Name Int Init Cour Char Str H
Von Eintopf 77 73 24 97 24 88Von Probe 100 01 95 01 20 10
Von Brettlingen 29 41 01 32 35 77Von Dorendorf 70 88 61 20 94 13
Now, surely these people are describing themselves to you as you read their characteristics? Von Eintopf, bright and with plenty of initiative, as long as there’s no personal risk involved (he’s a bit weedy, after all), but so charismatic that he can persuade others to do the dangerous stuff for him. A lover of the outdoor life and keen huntsman, he’s in rude health.
Compare him to dear Von Probe, who is probably a genius, but can never get anything done. In his naîvité, he’s as brave as a lion, but really ought to think twice because he’s a real weakling and in dangerously poor health. Oh, and he’s obviously butt-ugly and less than charming.
Quite how Von Brettlingen endeed up commanding one of Prunkland’s élite cavalry units, no-one knows: it must have been Court patronage. Not blessed with very much intelligence, and rather hesitant, he’s a coward and a cad of the first order. In fact the only thing he’s blessed with is a healthy constitution – much to the annoyance of those around him.
And finally a model officer, Von Dorendorf, who possesses all that an officer needs except a handsome face, good breeding and good health – but he commands a Grenzer unit, so that’s alright.
Next time, we’ll explore this subject further.
The Wars of the Faltenian SuccessionPart VII: adding personality to your campaign
by Henry Hyde
philip parisi (order #7077380)

10 Battlegames
Battles for wargamersThe action at Kassassin, 28th August 1882
by Stuart Asquith, illustrated by John Parke
Egypt in the later 19th century was nominally under Turkish control. Khedive Ismail of Egypt attempted to modernise his country but failed, saddling the country
with huge debts as a result. The Sultan of Turkey deposed Ismail and appointed Tewfik, Ismail’s son, as his successor. In February 1881 there was a rebellion against Turkish and foreign rule in Egypt led by Ahmet Arabi, and this quickly turned into an anti-Christian conflict. In June 1882, some 50 Europeans were massacred in Alexandria by a native mob.
On 11th July, the Royal Navy bombarded Alexandria and 25,000 troops landed at Ismailia – at the entrance to the Suez Canal – under General Sir Garnet Wolseley.
The water level in the Sweetwater Canal at Ismailia was seen to be dropping, a fact that caused General Wolseley problems. The Canal itself – a small channel running from Ismailia to Cairo – provided fresh water for Ismailia and the railway that ran alongside the canal offered an alternative line of communication.
The reason for the drop in the water level was discovered to be a dam that the rebels had built at Magfar, about seven miles to the west of Ismailia.
On 24th August, General Wolseley determined to take
this dam and, with the Household Cavalry, part of the 19th Hussars, a detachment of mounted infantry and two guns from the main army, marched to Tel-el-Nefisha.
Major General Graham, VC, commanding 2nd Brigade, 1st Division, was ordered to follow and provide support with the 2nd Battalion, York and Lancaster Regiment and some Royal Marine artillerymen acting in an infantry rôle. The 2nd Battalion, Duke of Cornwall’s Light Infantry, divisional troops for the 1st Division, were summoned to garrison Tel-el-Nefisha, and the rest of General Wolseley’s force pressed on to Magfar, four miles away.
Cavalry picquets encountered rebel cavalry patrols and from prisoners taken in the resultant skirmishes, it was established that the rebels had constructed a dam some three miles farther on at Tel-el-Maskhuta, where they were present in some strength.
General Wolseley again decided to press on and, after summoning General Graham’s force, the Duke of Cornwall’s Light Infantry from Tel-el-Nefisha and urging reinforcements in the shape of the Guards Brigade and any available cavalry and artillery from his main army at Ismailia to follow as quickly as possible, his detachment was once again on the move.
General Wolseley scouted the rebel position at Tel-el-Maskhuta, but by the time he had massed sufficient forces to attack, the enemy, after some skirmishing, hastily retired,
philip parisi (order #7077380)

Battlegames 11
leaving behind artillery, arms and stores in the process.General Wolseley stopped at Tel-el-Maskhuts in order
to destroy the dam and to restore the railway, which had been damaged by the rebels. The general sent Graham with a largely infantry force to take and hold Kassassin Lock, some 10 miles away from Tel-el-Maskhuta and in the heart of the desert. The place was vital for the passage of boats and the security of the Sweetwater Canal, thereby maintaining a supply of fresh water in the Canal, while Wolseley himself oversaw events at Tel-el-Maskhuta to restore his supply system.
THE BATTLEGeneral Graham duly arrived at Kassassin, but his men were suffering from the heat and it was not until the relatively cooler evening arrived that patrols could be sent out to look for the rebels. These patrols brought back the news that a considerable number of the enemy was closing on General Graham’s position. The nearing presence of ever increasing numbers of enemy cavalry, supported by artillery, caused General Graham to send messengers asking for cavalry support.
The cavalry of the main British force was now at Mahsama and Major General Drury Lowe, the officer commanding the cavalry, responded to General Graham’s request at once. The British cavalry stood-to, but the Egyptians withdrew and General Lowe led his troopers back into their camp.
More rebels were reported as closing in on Graham’s position once again and in even greater numbers, possibly 10,000 with cavalry and infantry supported by artillery. The general deployed his force to meet them.
Large concentrations of rebel cavalry were spotted to the right of the British position and General Graham despatched an ADC to summon General Lowe’s cavalry once more to support his open right flank. It took this officer some time to reach the cavalry, and it was not until after nightfall that General Lowe’s men (three squadrons of the Household Cavalry and the 7th Dragoon Guards) neared General Graham’s position for a second time.
With his left flank and front secured and confident that his right was covered by the cavalry he had requested, as well as receiving reinforcements in the form of the Royal Marine Light Infantry and an artillery battery, General Graham had moved his men forward, firing volleys as they advanced. The troops covered perhaps two to three miles in this manner, with the enemy falling back in front of them. By this time it was dark, however, and the men were ordered back to camp.
A full moon cast a good
light over the area and General Lowe was able to see Graham’s outnumbered men from the flashes of their rifle fire. The heaped bodies of the rebels demonstrated that the defenders had given a good account of themselves. The British cavalry was seen by the rebels, who immediately turned their artillery on them.
The four remaining 13pdr guns of N Battery, A Brigade, RHA, which had advanced with the cavalry, deployed and with a few well aimed rounds put the enemy pieces out of action. The horse artillerymen then turned their attention to the rebel infantry, before ceasing their fire to allow the British cavalry to charge.
After a circuitous approach march the Household Cavalry and the 7th Dragoon Guards smashed into the flank of the rebel infantry, swiftly reducing them to a disorganised mob that fled the field.
Heavy casualties were inflicted on the rebels, with only minor losses to the British.
THE TERRAINThe ground over which the action took place consisted largely of deep sand, reportedly grey in colour. By far the simplest way of representing this is to place a suitably coloured cloth over the entire area playing area, perhaps adding a few rocks or the odd clump of lichen for effect.
philip parisi (order #7077380)

12 Battlegames
There was a sand ridge to British right which Drury Lowe’s cavalry used during their circuitous approach march to conceal themselves from the Egyptians. This can either be represented as a terrain feature, or the cavalry can appear at a suitable spot on the table edge, surprising the Egyptian commander.
The sand made the going heavy, causing the artillery ammunition wagons to be left behind as the teams had difficulty hauling them through the sand. The terrain also slowed the pace of General Graham’s message-bearing ADC who was seeking Drury Lowe.
Players might therefore wish to reduce the normal movement of the figures to reflect this.
THE FORCESThe British Major General G Graham VC CB RE commanding:a 4th (Royal Irish) Dragoon Guards (detachment) (15)b 7th (Princess Royal’s) Dragoon Guards (troop) (42)c 2/The Duke of Cornwall’s Light Infantry (611)d 2/The York and Lancaster Regiment (600 [estimated])e Royal Marine Light Infantry (600 [estimated])f Royal Marine Artillery (acting as infantry) (427)g Mounted Infantry (detachment) (70)h N Battery, A Brigade RHA (2 x 13pdrs)i There was also the captured enemy Krupp gun,
mounted on a railway track and served by a detachment of the Royal Marine Artillery.
Major General Drury Lowe commanding:j Household Cavalry (3 Squadrons) (375 [estimated])k 7th Dragoon Guards (less one troop) (611)l N Battery, A Brigade RHA (4 x 13pdrs)
The quoted historical strengths of the two sides have been converted into four different figure to man ratios – 1:20, 1:33, 1:50 and 1:100 – to assist the recreation of the combatant forces on the wargames table.
Unit 1:20 1:33 1:50 1:100a 1 – – –b 1 1 1 –c 30 19 12 6d 30 18 12 6e 30 18 12 6f 21 13 8 4g 3 2 1 –j 19 11 7 4k 30 19 12 6
Totals 165 101 65 32
Add a couple of artillery pieces, one to represent the 13pdrs that ran out of ammunition, and the other to either stand for the artillery reinforcement, or for the rest N Battery, A Brigade RHA that came up with Drury Lowe. To have all three represented on the tabletop could be considered as too overpowering. Alternatively, the wargamer could represent the Krupp gun mounted on a rail cart, which initially at least proved the most effective, maintaining accurate fire after the 13pdrs had run out of ammunition.
The EgyptiansThe overall strength of the Egyptian force at Kassassin is difficult to establish with any certainty; there were
possibly 8,000 infantry, 1,000 cavalry and 12 guns present, organised into 16 infantry battalions and two cavalry units.
Egyptian formations were roughly similar in size to those of the British, so if we assume 500 men in a unit for the sake of easy mathematics, we should not be too far away from reasonable figures.
Unit 1:20 1:33 1:50 1:100Infantry
(500) x 16 25 15 10 5
Cavalry (500) x 2 25 15 10 5
Totals 450 270 180 90
As artillery numbers were roughly on a par with those of the British, add in a couple of artillery pieces.
It might be worth noting here that the Egyptian infantry wore a small red fez with a black tassel, a coarse white cotton cloth tunic and loose trousers. All equipment was black leather. The officers wore a dark blue uniform consisting of a single-breasted thigh length tunic with voluminous skirts. The dark blue trousers were also full and tapered towards the ankles. The regular infantry were armed with the Remington repeating .433 inch rifle, capable of 17 rounds per minute, but the conscripts had muzzle-loaders. The cavalry and camel corps also wore white with black leather equipment. The irregular native – frequently Bedouin – cavalry wore traditional white robes and turbans. The Egyptian army had a number of Krupp guns of the pattern used in the 1870-1871 Franco-German War which were pretty much on a par with their English counterparts.
VICTORY CONDITIONSThe British need to hold on to their position around Kassassin and drive off the marauding Egyptian army in order to win. The Egyptians need to move swiftly against General Graham’s men and storm their position, pushing the British back along their lines of approach.
THOUGHTS FOR THE WARGAME RE-ENACTMENT OF KASSASSIN LOCKThe British 13pdrs ran out of ammunition. Due to the difficulty in moving ammunition wagons through the deep sand, they had been left behind. Each gun was therefore limited to the 36 rounds carried in the limber. Depending on the rules in use, this factor needs to be introduced into the wargame in some form to reflect the situation.
The Egyptian army suffered from a number of defects or hindrances. Although some old soldiers had returned to the colours to follow Arabi, many of the men were conscripts with little or no training in drill or weaponry – they were abysmal shots. The artillery was efficient and the gunners were regarded as being the army’s élite, but firing shells with percussion fuses into soft sand and incorrectly cutting the fuses on shrapnel rounds does not enhance the artillery’s effectiveness.
Readers may be interested to know that this scenario is taken from the forthcoming publication Warfare in Egypt and the Sudan (working title) which will feature wargame scenarios for the Nile Campaign 1882, the Gordon Relief Expedition 1884-1885 and the re-conquest of the Sudan 1895-1896. The book will be published by Partizan Press/Caliver Books in 2007.
philip parisi (order #7077380)

Battlegames 13
The big pushWWI gaming needn’t be dreary
by John Kersey
“It is my Royal and Imperial Command that you concentrate your energies… And all the valour of my soldiers to exterminate first the treacherous English; walk over General French’s insignificant (or contemptible) little army.”
Kaiser Wilhelm II to First Army Commander Alexander Von Kluck, August 1914.
OH WHAT A LOVELY WAR!It’s fair to state that the Great War (or the First World War) remains a minority interest and fairly barren territory for the avid gamer. A strong image of the conflict, which we can call the All’s Quiet on the Western Front Syndrome for convenience, still remains. It’s masses of soldiers rising from rat-infested trenches, going over the top and being mercilessly mown down by machine guns to little or no effect. In their turn, the opposition may counterattack and suffer the same fate, very few tactics and mindless slaughter being the order of the day. Although some aspects of the conflict did take on this form, the conflict really was much more varied than this. It was truly a global conflict (although whether it, or the Seven Years War, was the first one, is arguable). Fighting took part in:• France, Belgium and
the Western Front, using massed armies
• East Africa, using makeshift colonial forces
• The alpine heights and mountains of the Italian Front
• The Balkans, with a hodge-podge of minor nationalities involved, picking up where two minor Balkans Wars had left off
• The Middle East, with the western powers facing off against Turkey and its allies from the Central Powers
• Russia and the Eastern Front
• Naval actions off the coast of South America• Mainland China and Polynesia, where British and
Japanese forces subdued German coloniesWargamers have tended to avoid the period, as it seems
to lack the essentials of good gaming; colourful armies and terrain, a balance between fire and movement on the table
and a variety of different troop types. Certain periods and aspects of the conflict are cherry-picked, such as the war in the air involving ‘kites’ with colourful paint schemes or limited skirmish games such as Western Front trench raids. Don Featherstone, for example, in his timeless classic Skirmish Wargaming, featured a charming scenario involving a few trench raiders and their German prey. Naval gamers gaming the Great War tend to focus on the larger battleship fleet actions such as Jutland, using micro-scale ships.
ChorusOh, oh, oh it’s a lovely war. Who wouldn’t be a soldier, eh? Oh it’s a shame to take the pay. As soon as reveille has gone we feel just as heavy as lead, but we never get up till the sergeant brings our breakfast up to bed. Oh, oh, oh, it’s a lovely war.
Oh! It’s a Lovely WarMusic hall song written by J.P Long and M Scott 1917
Yet a more careful study will show lots of opportunities to explore this fascinating period. Although the immensity of the human losses can not be underestimated, a current rash of books present a different picture to the Western Front stereotype. The Imperial War Museum series of books by Malcolm Brown uses letters and diaries to show some of combatants did not fare as badly as was later thought. Another essential alternative view is provided in books such as Forgotten Victory by Gary Sheffield and Mud, Blood and Poppycock by Gordon Corrigan which challenge many of the Western Front myths using facts and much useful detail. In particular, Corrigan’s work outlines how many of the ideas we have about the Great War date from anti-establishment satire during the 1960s.
Perhaps an extreme view is shown in the so-called
‘bunglers and butchers’ rash of literature vilifying the Allied generals of the Great War. The Donkeys by Alan Clark used the Battle of Loos in 1915 to show the sheer waste of human life and ghastliness of the use of poison gas. This, however, was an extreme example of a Great War battle and in some ways an atypical one. This stereotype is still strongly
philip parisi (order #7077380)

14 Battlegames
cherished, as shown by the Blackadder Goes Forth TV series! The Great War had its fair share of battlefield gothic, which strangely inspired poets and painters. Indeed, a minor character in the Blackadder series is heard to declaim the horrors of the war as “...mud, blood and endless poetry!” Although the war poets and painters are much studied today, the true voices of the fighting man on all sides were the popular songs sung on the march; by turns patriotic, irreverent or often downright bawdy!
The Great War was an unparalleled period of military change in infantry, artillery and armoured tactics. Means of communication were sparse and relied on uncertain electronic means, such as vulnerable telephone links, or human or animal messengers such as dogs or pigeons. The character of the conflict changed; in the beginning, it was much like the earlier Franco-Prussian War and towards the end, operations on the Western Front were much like early WW2. During these four years, military leaders had to struggle with the innovations of chemical, armoured and even electronic warfare (the French utilising the Eiffel Tower as a massive radio-jamming station right at the start). These changes affected the British army in particular, as it had to adapt from being a small regular force at the start into a mass conscript army by the end. The continental armies already had this type of structure at mobilisation.
Another misconception is that the battles of the Great War were all mighty clashes of vast army groups. Its true that large scale operations like that of the Somme and Verdun are better known, however, even during periods of relative peace there were small-scale trench raids to keep the enemy on their toes or to gain intelligence from the enemy’s positions. The big battles themselves often broke down into smaller actions involving battalions or even companies struggling for vital heights, bridges or strong points. At the other end of the spectrum are the massive strategic actions such as the Schlieffen Plan in 1914, the Brusilov Offensive on the Russian Front in 1917 and the Michael Offensive of 1918 which so nearly brought victory to the Central Powers. These could be handled by a map game or a kriegspiel approach.
IMAGINARY WARSThose whose conscience is haunted by the bitter memories of Remembrance Sundays past or All’s Quiet on the Western Front may take an alternative approach. A conflict involving
suitably fictitious Central European countries, using Great War weapons, could be the way to go. This was the route that Captain W.E. Johns used in the novel Biggles Goes to War in which the peace-loving Maltovia is being troubled by the belligerent Lovitzna – a thinly disguised Central Power! Going further are the Great War trilogy written by the popular SF author, Harry Turtledove. In a series of novels, he envisages the American Civil War continuing into the 20th Century, with the Confederate States allying themselves with the Western Powers and the Union with Germany!
So, now let’s explore the gaming potential of the War to end all Wars.
“I have followed in campaigns six armies, but excepting not even our own, the Japanese, or the British, I have not seen one so thoroughly equipped. I am not speaking of the fighting qualities of any army, only of the equipment
and organization. The German army moved into this city as smoothly and as compactly as an Empire State Express. There were no halts, no open places, no stragglers.”
Richard Harding Davis, correspondent for the New York Tribune, describing the Imperial German army marching through Brussels, 21st August 1914.
TOOLS OF THE TRADECurrently, there are not that many rulesets dedicated to the First World War. Those that are on the market are often adapted from WW2 or other rules. We will briefly review what is available, starting with the redoubtable Chris Peers who has authored a set called Contemptible Little Armies, published by HLBS Publishing, with accompanying army lists. They are full of colour, and the interesting rules variations Chris is noted for. On the grand scale, Great War Spearhead designed by Shawn Taylor and Arty Conliffe is firmly set at the big picture. Officially, it is set at the divisional and corps level, so eminently useful for gaming the big battles like Tannenberg 1914, the Somme 1916 or the Kaiserschlacht offensive of 1918 that many many feel typifies the Great War conflict. Moving down a notch, there is a charming set of rules recently published by Partizan Press called Bloody Picnic by Dillon Browne. These can be either played at brigade or divisional level. The rulebook contains some very nice photos, sample army lists and scenarios. More elderly, and perhaps difficult to find now, was a set published by Games Design Workshop called Over The Top.
Elaborate Western Front trench systems under attack in a superb game staged at The Other Partizan in September 2006 by Aly Morrison and Dave
Andrews, featuring their lovingly-crafted range of Great War Miniatures. The ‘creeping barrage’ attracted many comments – the explosions are, apparently, made using Woodland Scenics foliage on sticks, liberally doused with black!
philip parisi (order #7077380)

Battlegames 15
This was a variation on the WW2 ruleset Command Decision, again set at the divisional level. Popular, but slightly more stylised, are the Square Bashing rules put out by Peter Pig. These use a square grid to regulate movement and, as with all Peter Pig rules, there is an element of pre-battle preparation to add variety.
As far as miniatures are concerned, most of the popular scales are represented, although it may take a bit of a search to find what you need. The ever-popular 25/28mm size has spawned a number of WW1 ranges from Foundry, Brigade, Renegade and a super new range called Great War Miniatures distributed by North Star. In 20mm, there are 1/72 plastic boxed figure sets (more anon!) and metal ranges from Tumbling Dice, Britannia Miniatures and Irregular Miniatures. Many plastic model vehicle kits in this scale are compatible with these ranges. In 15mm there is a Peter Pig range to support their rules, and an extensive range from Minifigs, covering the major combatants as well as vehicles etc. If you want to go even smaller, Pendraken carry an excellent and extensive range of 10mm WW1 figures and for micro-gamers, Navwar carry a range of 1/300 figures and equipment.
BACK TO PLASTIC SOLDIERSLike many gamers, I started with Airfix plastic boxed set figures and always felt I left them behind with my boyhood. Chipped and flaky paint work, crazily posed figures and hordes of useless dead ‘uns was my abiding memory of these symbols of my early roots! Believing I grew out of plastics long ago, it came as a shock to see how they have matured. The excellent WW1 ranges put out by HäT, Strelets and others tempted me to have a dabble. They have started with the ‘sideshow’ theatres, with ranges for Serbians, German Colonials, Russian Cossacks and Ottomans. Charmingly, the sets also include wonderful pieces such as snipers, field telephone operators and Austro-Hungarian dog carts, all screaming for special gaming attention. Temptation too powerful to resist! Nowadays, the plastic sprues contain figures ordered in loose squads, with figures in the right numbers and proportions. They are aimed at a mature gamer market, looking to use these for units supplemented with heavy weapons, vehicles and artillery that are all now represented. Also, careful painting and preliminary treatment can help avoid the Flaky Paint Syndrome!
Let’s run through the necessary stages to get them ready for the table:1) Firstly, you’ll need to buy
sufficient figures to make a respectable force. They are economically priced, so its worthwhile getting matching forces.
I decided to go for the company as my gaming level, which can be easily achieved with two or three boxes of infantry plus heavy weapons.2) Wash the figures in warm soapy water (not too hot, or they will distort) to remove moulding residue. I do this late at night and let them dry overnight.
3) Next I prepare some standard 2mm MDF bases by sanding and rounding the edges (wearing a mask, of course, as the dust is hazardous). The figures are then sorted and mounted on the bases using PVA or wood glue. The bases help protect the figures and allow them to stand up proudly.
4) The figures then have a dilute PVA mixture brushed over them, being careful to ensure it does not pool in the undercuts and recesses, obscuring the detail. This stiffens the plastic figure and provides a good key for the paint, preventing it from flaking off.
5) The figures are then sprayed with white undercoat.6) The base is terrained using a two-colour textured
paint scheme. A desert background is used for my force of Ottomans and ANZACs using a Dark Sand base with Light Sand drybrushed on top. Spots of Grass Green are used to add some colour and break up the sandy monotony.
7) The figures are then painted with acrylics, using speed-painting techniques and big brushes. The paint is used very dilute and almost as a stain, so as not to obscure the fine detail. A final ink wash is used in the recesses to bring out the shadow detail.I use a common basing system of 50 x 30mm bases
akin to the Flames of War system which I had a vague plan to adapt. Obviously, other rulesets could also be used with some minor adaptation. With Ottomans and ANZACs as my initial forces amounting to about a company apiece, a simple Gallipoli-style scenario seemed like a good place to start. They could also be used for actions in Palestine, Mesopotamia or the Balkans. I discovered a site under Yahoo Groups called FOW1918 with adapted lists for the Great War
DISASTER IN THE DARDANELLES“The moon shines bright On Charlie Chaplin But his shoes are cracking For want of blacking And his baggy khaki trousers Still need mending Before they send him To the Dardanelles.”
Soldiers’ tune sung to the popular music hall melody
Little Redwing
The Gallipoli campaign in 1915 was riddled with minor and major command
ANZAC troops from the author’s collection. These are HäT plastics.
Turkish troops from the same stable, hurriedly set up for the Editor to snap (badly)! The little howitzer is a very nice piece. All figures painted by John.
philip parisi (order #7077380)

16 Battlegames
problems, disruptions and downright cock-ups! Some would argue the whole concept of seizing the Dardanelles was misconceived from the very start, and bound not to succeed. Although the landings were often skilfully executed, the follow-up operations tended to break down, leading to missed opportunities. The Turkish opposition forces also had local difficulties in co-ordinating their defence and counter-attacks. Ironically, the best thought-out element by the Western powers was the eventual evacuation! Using deception and surprise, instead of the feared 50,000 casualties, there were only a handful – a remarkable achievement.
There are a number of useful resources on the Gallipoli campaign for the adventurous gamer, including:
Osprey Campaign Series No 8, Gallipoli 1915
Alan Moorehead, GallipoliPeter Chasseud, Grasping GallipoliTim Travers, Gallipoli 1915Gallipoli DVD, Director Peter Weir (1981)Anzacs TV series, DVD/Video (1985)All the Kings Men, BBC DVD
TWO-PART SCENARIO – STRONGPOINT ASSAULT AND COUNTERATTACKEven the large-scale battles and campaigns were often composed of small actions at a much lower level. Communications were evolving, but still primitive (pigeons were still being used for battlefield reports!) and so it proved difficult to coordinate the actions of forces much after the first clash. This leads to some interesting gaming ideas, simulating this loss of command and control, so that the forces do not act exactly as the player wishes.
The Strongpoint Assault represents that most typical of WW1 actions – the assault and occupation of a key piece of terrain. Taking the strongpoint against prepared firepower and a determined defence was only the first challenge. Inevitably, the defenders would fall back and use local reserves to organise a counterattack. The attackers thus became the defenders with the remnants of their force, and had to hold until relieved by follow-on forces. Often
even a successful assault would fail if the attackers had insufficient forces to hold what they had taken at such cost.
Although designed to be played using Flames of War 1918 rules, the scenarios can be easily adapted to other systems.
PART 1: STRONGPOINT ASSAULTThe scenario owes something to the assault on the Nek, depicted in the film Gallipoli directed by Peter Weir. There
is also a similar situation shown in the Stanley Kubrick movie Paths of Glory when French forces vainly attack the German-held Anthill. The scenario uses the Prepared Position, Over The Top, Nothing Up The Spout and Preliminary Bombardment special rules.
ANZAC attackersThe attacker has a three-platoon company comprising:• company command rifle team + command rifle team.• three infantry platoons each with command
rifle team and eight rifle teams.In addition they have a Preliminary Bombardment.ANZACS count as Confident Trained.
Turkish defendersThe defender has a reinforced platoon comprising:
• 2ic command rifle team.• one infantry platoons with command rifle team and nine rifle teams.• machine gun platoon with command rifle team and two HMGs.
They start set up in trenches.
Ottomans count as Conscript Fearless.
ORDERSANZAC attackersThe enemy occupies a key height which needs to be assaulted and held until relieved. This will distract the enemy from a major offensive occurring in another part of the line.
An opening bombardment by forces off the table will keep their heads down and help the assault.
Turkish defendersYou occupy a key strongpoint which must be held at
Map for part 1: the ANZAC assault on the hill position in desert and sparse scrub.
Map for part 2: the Turkish counterattack. The trenches must now serve the ANZACs.
Limit of heavy machine gun range (24”)
Limit of heavy machine gun range (24”)
Howitzer battery
Deployment zone
philip parisi (order #7077380)

Battlegames 17
all costs. You have been promised reserves in support, so you will hold onto the heights until help arrives.
THE GAME1) The defenders deploy their forces in trenches and
dugouts on the hill (counts as a Prepared Position). The trenches represent objectives in the game. The hill is located at extreme machine gun range from the parapets of the attacker’s trenches (24”).
2) The attackers deploy their forces in the trench line along their table edge. Only one platoon at a time may deploy along the frontline trenches. One platoon at a time may be brought on as reserves. All rifle teams start in Nothing Up The Spout status.
3) The defenders begin deployed in their prepared positions.4) The attackers then commence their
Opening Bombardment.5) The attacking player then has first turn and may
spend half a turn of movement to move his platoon Over The Top. Another platoon may then be brought on into the frontline trench from reserve but may not move any further that turn.
DECIDING WHO WONThe attacker wins if they hold the hill and have forced the enemy to fall back. They may then occupy the prepared positions and the game can continue into the follow-on scenario – Counter Attack – in which they become the defender with the surviving forces.
SPECIAL RULESPrepared PositionThe defenders have the advantage of ground and use the Concealed, Gone to Ground and Bulletproof Cover rules.
Over The TopUnits climbing out of trenches and may only move half their move after leaving the trench.
Nothing Up The SpoutAs depicted in the Gallipoli film, the attackers fix bayonets and may not shoot until after they Assault the defenders in the Prepared Position.
Opening BombardmentIn the early war period, artillery was still developing the art of spotting damage and adapting their fire to take into account the results of damage reports. In the Nek encounter, the opening bombardment lasted only 30 minutes and stopped a fatal 7 minutes before the infantry assault, giving time for the defenders to recover, re-man the trenches and go on to mow down the assault waves. Shockingly, this situation was to occur time and time again during the war and was known as the ‘Rush to the Parapet’. To simulate this roll a D6:
1, 2 No effect, defenders act normally3, 4 Defenders Pinned for one turn and use one 6” square template for damage5, 6 Defenders Pinned for two turns and use two 6” square templates for damage
PART 2: COUNTERATTACKEven if the defenders survive the assault and are fortunate
enough to gain the heights, their trials are not over yet. They must organise a defence of the heights against a hasty counterattack by the defender’s covering force.
Turkish attackersThe attacker has a company (minus) comprising:• company command rifle team• two infantry platoons with command
rifle team and nine rifle teams• howitzer battery with spotter and four howitzers
Ottomans count as Conscript Fearless.The howitzers have limited ammunition, roll D61, 2 No ammunition3, 4 Enough ammunition for one turn of firing5, 6 Enough ammunition for two turns of firing
ANZAC DefenderThe defender has the survivors of the company after the assault, including follow-on waves. They have the advantage of the trenches and may use the Prepared Position special rule.
Anzacs count as Confident Trained.
ORDERSTurkish attackerThe enemy needs to be driven off a key height that they have just assaulted. The height must be taken with forces to hand to avoid the enemy turning a vital flank.
ANZAC DefenderYou must hold onto a key height you have gained at much cost. Losing the height will mean another bloody assault to re-capture it.
THE GAME1) The defenders deploy their forces in trenches and dugouts
on the hill (counts as a Prepared Position). The trenches represent objectives in the game. The hill is located outside rifle range (24”) from the attacker’s positions.
2) The attackers deploy their forces outside rifle range (24”) from the hill. The howitzer battery is located at extreme range (48”) with the Spotter in a convenient position out of rifle range.
3) The defenders begin deployed in their prepared positions.4) The attackers then commence their turn.
DECIDING WHO WONWhoever holds the hill at the end is deemed to be the victor.
CONCLUSIONWWI holds many exciting challenges for the wargamer and tabletop tactician, and the forces involved aren’t nearly as drab as you might think. Uniforms in the early war period and on the wild fringes of the war were actually rather colourful. There is a surprisingly wide range of figures and models available, and you can fight over an extremely varied range of terrain, on land, on sea and in the air. Fancy yourself as Lawrence of Arabia? Haven’t you always dreamt of being Biggles taking on the Red Baron? Or do you want to see if you can do better than the real-life generals on the Western Front, break the deadlock and burst through into open country beyond, using the earliest tanks and trench-storming troops? Go on, have a go!
philip parisi (order #7077380)

18 Battlegames
This tiny pocket diary (shown actual size) belonged to
Harry Knott (seen pictured above, right, with one of his pals on leave). He was the Editor’s grandfather.
He served with the 1st battalion, 5th North Staff ordshire Regiment, a Territorial unit, and was sent to Flanders.
On 13th October 1915, his unit was tasked, along with others of the 46th (North Midland) Division, to attack the Hohenzollern Redoubt, a largely forgotten episode in the fi nal stages of the Battle of Loos but which, to its participants, became known as Hellfi re Corner. In the space of a few short hours, thousands of men lost their lives in a courageously-delivered, but poorly-planned assault.
Harry was a sergeant, a volunteer and, for his day, considering his working-class background, rather bright and well-schooled. Th e entries over these and the next few pages of his pocket diary reveal, with sparse phrases, the agonies of a man severely wounded in the groin by shrapnel: the build-up to, climax and aftermath of a real – and disastrous – ‘big push’.
Wednesday 13th OctoberIn trenches at Vermelles. Very nervous. Relieved Scotch Guards. Attacked at 2 p.m. Wounded soon after. Terrible sights. Saw Colonel Knight and Capt. Ridgway hit.
Th ursday 14th OctoberScrambled to trenches and lay there bleeding all night. Stretcher bearer got me to dressing station about 5 p.m. Did go through the mill1.
Friday 15th OctoberKept me at the Bethun 1st aid station all night, wounded coming in all the time. Moved in motor bus to 1st CCS2 at Chocques.
Saturday 16th OctoberIn marquee at Chocques. Two wounded Germans with us. Very cold.
Sunday 17th OctoberStill at Chocques. Having rotten time lying on stretcher. Very painful.
Monday 18th OctoberStill going through the mill at Chocques. Irish Guards man came in.
Tuesday 19th OctoberTh ey tell me that I am going on the barge tomorrow. Th is bucks me up a bit.
Wednesday 20th OctoberChocques. Yes, I am going. Th ey carry me out on a stretcher and put me on the fl oor to wait for motor bus.
Th ursday 21st OctoberHere we are on the barge. 30 of us. It was a rotten journey we had in the bus last night. We started at 5 o’clock in the morning.
Friday 22nd OctoberYes, it’s very comfortable on here. Total on board 30. I fi nd Castry of my platoon with us.
Saturday 23rd OctoberIn the British Lahore hospital at Calais on sea front. I fi nd out that it was a French gambling place in peace time!
Harry was eventually evacuated to England and underwent several painful operations, but survived and went on to run a bookshop in Luton, later becoming a local councillor in Caddington, Bedfordshire. He died in 1960, aged 70.
Henry Hyde
NOTES1 A euphemism for being in agony, as if
crushed by fl our mill machinery.2 Casualty Clearing Station.
One man’s experience of a real ‘big push’: Harry Knott at Hellfi re Corner
philip parisi (order #7077380)

Battlegames 19
Bayard, Knight of France, and the chevalier “without fear or reproach” of our title, is one of the most colourful and romantic figures of the wars in Italy
at the start of the 16th century. His death, by an arquebus shot at the Battle of the Sesia in 1524, aptly marks the transition from the old world of medieval chivalry to the new ‘pike and shot’ era of the 16th and 17th centuries. The birthplace of this transition was Italy in the last ten years of the 15th century and the first 30 or so of the 16th, as French, Spanish, Swiss, German and Italians battled each other in a melting pot of shifting objectives and alliances, technological and tactical developments, with colourful troops and colourful characters.
This article presents a set of rules intended, firstly, to give a flavour of the Italian Wars (rather than a detailed simulation), and secondly, to illustrate some of the advantages, disadvantages and considerations of using a hex-based system, as discussed in the last issue.
THE RULES – AIMS AND BACKGROUNDIf anybody is looking for the ‘definitive’ set of rules for the Italian Wars, I fear you may still be looking after reading these! The Italian Wars are, I think, a complex period to game for a number of reasons. For example, there is little in the way of hard, detailed evidence on the low-level mechanics of battle. Unit sizes varied enormously, from compact bodies of a few hundred gendarmes to the massive Swiss pike blocks of several thousand men.
For some years, I went round in circles trying to figure this stuff out and build it into a set of rules. How did a 5000-man pike block really operate? Did Spanish colonellas operate as tactical entities, or split their shot off into separate units? When you work out the relative frontages of gendarmes en haie and pike blocks 25+ ranks deep, how do you reconcile that with the battle descriptions? Exactly what were the “3000 Italians” mentioned in the account – and so on and so on... In the end, I concluded that the more I read, the more confused I became, so much so that I gave up on the period for a while.
So when I started work on these rules, I set out with the deliberate intention of abstracting the levels of detail that I couldn’t resolve to my satisfaction. This is why the rules treat the ‘unit’ (an ill-defined number of men) as the lowest level of currency, don’t deal with formations or sub-units (sword and buckler men, forlorn hopes, shot
Sans peur et sans reprocheWargaming the Italian Wars of the early 16th century using hexes
by Adrian Hussey
The Battle of Ravenna. Enraged by the relentless French artillery fire, the defender’s cavalry sally out from their entrenchments. On the French side, the Landsknechts launch their assault on the redoubt as the Spanish and Papal infantry move up to meet them. Figures and terrain part of the author’s motley
collection from a variety of sources and manufacturers. Photo by Richard Ellis.
Editor’s note: Adrian has provided us with the longest article we’ve ever had in Battlegames for our anniversary issue – a scenario AND a full set of rules! Happy gaming!
philip parisi (order #7077380)

20 Battlegames
(almost) unlimited granularity of the tape measure, so you are inherently less tempted to try and model everything, to capture every possible eventuality. (Perhaps this is more a fault with my rules writing abilities than a true advantage of hexes!)
Be that as it may, the Irregulars have now played a dozen or so games with these rules. They’ve also played – or in some cases, “been subjected to” – many other of my (non-hexed) attempts over the years. This is the first set about which we’ve all said, “that was fun, let’s play this again next week”. Positive observations have been:• There have been no altercations over ambiguity.• Games have moved noticeably faster
and been easier on the brain.• Each game has produced a decisive
result by the end of the evening.On the downside:
• Hex size imposes limits on the size of a unit and thus on the visual appeal of the game. This is most noticeable in the case of pike blocks. I use 15mm figures and, in earlier sets, deployed pike blocks of up to 128 figures, complete with attached shot, halberdiers and so on. With 10cm hexes, I’m restricted to units of 40 or so. Again, I rationalise this by assuming that huge units of pike (such as the supposed 10,000 Swiss at Marignano) are represented by multiple units. Obviously, another solution to this is to use 6mm or 10mm figures. The rules will work just the same and you won’t face the same problem.
• There are no formations (other than hedgehog) and no figure removal. Fatigue is tracked either with markers or by roster. So, although I didn’t write them with this in mind, you could argue that these rules are not ‘proper’ figure rules, but actually a boardgame. You certainly could play these rules as a pure boardgame, using cardboard counters and a paper map.
• I’ve opted for vertex facing even though units only occupy a single hex. (Again, in an earlier draft, I differentiated between gendarmes en haie and the deeper Imperial men-at-arms formations, so that the gendarmes occupied two hexes and the Imperial men-at-arms just one. But it caused unwanted complexities for the combat system and so I dropped it. Again, my excuse here is that the hex represents an unspecified area of ground. There are a number of tactical units of cavalry operating in this area, each in the formation they deem appropriate.
PUTTING THE RULES TO WORK: THE BATTLE OF RAVENNA, 1512The Battle of Ravenna, April 11th, 1512, was one of the major engagements of the Italian Wars. Space precludes a detailed description, but I will attempt to describe the essentials and then present it as a scenario.
Taylor and Oman both provide detailed descriptions and analyses of the battle, and on the Web you can find a reasonable summary at http://en.wikipedia.org/wiki/Battle_of_Ravenna_(1512).
The events leading up to the battle are complex, yet typical of the Machiavellian politics of the time. Briefly, Louis XII’s intrigues had led to the formation of the League of Cambray in 1508, in which Louis, Ferdinand of Spain, the Emperor Maximilian and the Pope joined forces to humble Venice, Louis’ only contender for mastership of northern Italy. Despite defeat at Agnadello in 1509,
sleeves and so on), and don’t define rigid time, ground or figure scales. “Cop out!” I hear the cry from the back. Well yes, in one sense “guilty as charged m’lud!”, but on the other hand, at least I’m now enjoying playing Italian Wars games instead of sitting over a computer with a headache!
The other prime directive I had in mind was to produce a set of rules that would provide an enjoyable game on the Irregulars’ regular weekly evening gaming session. This translated to the following design parameters:• Simplicity rather than complexity/simulation.• A traditional (or old school!) sequence of play, with
no abstract command rule mechanism such as PIPs etc. As one of the Irregulars remarks, he’s happy to be thrashed as a result of his own mistakes, but not as a result of his troops standing still all night because he keeps rolling a 1 on his PIP dice!
• Simultaneous movement, shooting and combat.• Games should be suitable for 2-3 players per side, playing
to a conclusion in an evening’s gaming (2-3 hrs).• A broad-brush feel for the period.
AH YES, ‘PERIOD FEEL’I think a stated objective of most wargames rules is ‘period feel’, but very rarely do they define what they actually mean by it! In my case it means that I want the game to reflect the sort of battle descriptions found in Oman and Taylor, at the unit level and above. Specifically, the sort of interactions that I’m trying to model are:• Pike blocks are big, solid units that can absorb
punishment and are largely invulnerable to gendarmes, unless they are disordered.
• Missile troops can irritate and even break close order troops if not driven off (as they did at the Sesia). They can also inflict significant damage from cover or behind ramparts (as they did at Pavia and Bicocca). But they cannot stand in the open, where they are easy prey for mounted troops.
• The gendarmerie are the continuation and legacy of the medieval knight – fierce, proud, and a shock force to be reckoned with. They can break anything except disciplined pike – and they still believe that they can break those too. To some extent, a gendarme unit is the Ford Capri of the period – you don’t steer it, you aim it!
SO WHY DID I USE HEXES?The rules started off as a tape-based set before I invested in my hex terrain. But, having settled on the design aims above I discovered that hexes lend themselves rather well to the levels of abstraction I had settled on. For example, frontages cease to be an issue, which removes all sorts of nasty issues for combat resolution (overlaps, how much of a unit fights if just the end contacts, and so on).
Similarly, in early drafts I had rules for sleeves of shot, forlorn hopes and such, all deploying in and out of the pike blocks and fighting their own minor parts of the action. I dropped all of this because firstly, it doesn’t figure in the accounts as a significant determinant of victory; and secondly, it slowed the game down and made it more cumbersome and difficult to resolve. My rationale is that these things are still happening, but they’re simply not represented on the table – or, more specifically, in the hex.
Somehow, the use of hexes seems to make this type of design decision easier. You do not have the
philip parisi (order #7077380)

Battlegames 21
Venice managed to protract the war into 1511, by which time the allies had fallen out. The French had been too successful, and suddenly Louis found that the Pope, the Spanish and the Swiss had joined with Venice in an attack on France, with the Emperor soon to join them!
The French army in northern Italy was commanded by the talented Gaston de Foix. Aware that time was not on his side, and with a field army superior in both quantity and quality, he had besieged Ravenna with the intention of drawing the Spanish-Papal army on to him and forcing a decisive battle. Unwilling to let Ravenna fall, the Spanish duly advanced to within a mile of the French army. Here they dug an entrenched camp, in a position from which they hoped to be able to disturb the siege without having to fight an open battle.
Gaston’s strategic situation and supplies were deteriorating rapidly, so he decided to move on the Spanish camp and force them to give battle.
Opposing plansPedro Navarro, in charge of the Spanish infantry, had chosen the position of the camp. Protected by the river Ronco to its rear and marsh to its right, with waterlogged ground bisected by ditches and drains to its front, he believed it offered an impregnable position. The French would have no option but to hurl themselves frontally at it (as they had done at Cerignola), and they would be repulsed by the Spanish arquebuses, artillery and pikes.
Gaston de Foix was, however, unwilling to simply oblige Navarro and resolved instead to use his superior artillery train (54 guns to the Spaniards’ 30) to draw the Spanish out from behind their positions.
The course of the battleThe battle can be split into four distinct phases:1 The artillery duel
Both sides began the fight with a violent artillery bombardment, with the intention of provoking the other side to attack. It lasted some two hours and inflicted heavy casualties on both sides. The Spanish guns played on the German and French infantry. The French guns concentrated on the Spanish cavalry, Pedro Navarro having withdrawn his infantry back from the earthworks and made them lie down. The French commanders had also moved two guns, a cannon and a long culverin, to the north bank of the Ronco, which enfiladed the Spanish cavalry to great effect.
2 The cavalry fight Eventually the Spanish cavalry could stand the bombardment no more. Their patience failed and they sallied out of the fortified camp from both sides, leading to a general engagement with the cavalry of the French vanguard and main battle. Navarro refused to join the advance and waited behind his entrenchments. The cavalry mêlée was a stubborn and close fight, but eventually the arrival of the French reserve under Alegre tipped the balance and the Spanish cavalry was routed, fleeing south-westwards down the road to Cesena. (The Viceroy, who had not taken part in the fight, fled with them.) Some of the French gendarmerie, Bayard included, and all the light cavalry pursued them, apparently for a distance of six miles.
3 The infantry fight
With the Spanish cavalry lured out, Gaston de Foix launched his infantry to the attack. Navarro’s infantry rose to meet them, and a further violent struggle broke out at the line of the Spanish entrenchments. The French forces were initially repulsed, but rallied and returned to the attack. Two companies of Spanish foot broke through the French and Italians and reached the French guns, before meeting further French reserves and turning back.
4 The rout Still the Spanish line held, when suddenly large numbers of the victorious French cavalry poured into the fortified camp through the gaps from which the Spanish cavalry had exited. Assailed from front, flank and rear, the Spanish infantry finally broke and fled. The two companies of Spanish foot who had earlier broken through were now also trying to escape along the river road. Spotted by Gaston de Foix, he rashly rode to intercept them with just his escort of a handful of gendarmes, and duly paid for his impetuosity with his life at the very moment of his victory.
AftermathTactically, the battle was a decisive French victory. Losses are difficult to ascertain, but were acknowledged by both sides as being extremely heavy. Strategically the battle achieved nothing for the French. Although Ravenna fell soon afterwards and was sacked, the death of Gaston de Foix robbed the army of its vitality, and as the situation deteriorated the French army had to evacuate northern Italy later that year. The Spanish army was virtually destroyed, but another one took the field in 1513, and the wars continued.
RAVENNA – THE SCENARIO
Orders of battleOrders of Battle are given for both armies in the following tables. I have calculated these on a very rough basis of one cavalry unit per 750 men (figuring a cavalry lance as three combatants), one infantry unit per 1500 men, and one artillery unit per 15 guns.
GeneralsAlthough the OOBs list the numerous different commands into which the armies at Ravenna were organised, a general for each would be overkill on the table. Command for the rules is therefore abstracted, as follows.
The two commanders-in-chief, Gaston de Foix and Ramon de Cardona should be represented as General figures. In addition:• The French army has two subordinate
Generals. Any French general may give a mêlée, morale or reform bonus to any unit.
• The Spanish army has one subordinate General: Pedro Navarro. Navarro may give a mêlée, morale or reform bonus only to infantry and artillery units. Cardona can similarly only give a bonus to any mounted unit. (This reflects the split of command that the Spanish army suffered from in the battle.)
TerrainThe map shows the area of the battlefield. It is 19 by 12 hexes which, if you are using a 4” hex system such as Hexon or TerrainMaker, fits nicely on a 6’ by 4’ table.
philip parisi (order #7077380)

22 Battlegames
philip parisi (order #7077380)

Battlegames 23
• The River Ronco is unfordable. Units forced into it as a result of combat immediately disperse.
• The Spanish camp is protected by a deep trench and earthen bank, which runs as indicated. This is treated as Earthwork hexsides.
• The marshes are treated as Difficult terrain hexes. Oman describes the land about Ravenna as “dead flat, water-logged, and cut into ditches and drains”, and this terrain certainly impeded the manoeuvrability and order of the troops still further. If you want to reflect this, mark further single hexes in the area between the two armies, at random, as marsh.
DeploymentThe map shows a (somewhat conjectural) historical deployment, which you may wish to use as is or slightly amended. Alternatively, deploy each side according to the following requirements:• All Spanish units must deploy within the limits of
the fortified camp (including the three exit hexes).• French units can deploy anywhere on the southern bank
of the Ronco, so long as they are not within four hexes of the Spanish camp or two hexes of the marsh to its northwest (i.e. deploy below the blue line on the map).Units deploy in the following sequence:
• The Spanish deploy their artillery, war carts and cavalry.• The French deploy all their troops. The French
commands must be deployed in ascending numerical order from right to left. (That is, de la Palisse’s units must be deployed furthest to the east.)
• The Spanish deploy their infantry units. These units are not visible to the French until they stand up, so may initially either be left off table, with their position marked on a map, or marked using counters. In this case, add three dummy counters to the six required for the units, so that the French player is not entirely sure where the Spanish infantry is deployed.
• The Spanish player must decide at the start of a turn whether the infantry will stand up. If they do, they are placed in the table and can charge, move and fire normally that turn. If not, they remain hidden in their current hexes. (If a French unit manages to reach a position where it can see a hidden unit, that unit must be placed on the table.)
Pedro Navarro’s war cartsThe Spanish army has two units of war carts. These were small, low, two-wheeled carts, with blades protruding from the front and upon which were mounted heavy arquebuses. They were intended to provide a movable obstacle that provided both protection and a firepower platform for the infantry. The accounts differ as to how many Navarro deployed – from around 30 to over 100, and it is not clear how many men or arquebuses they deployed. Interestingly, Ravenna is the only action of the Italian Wars in which they are mentioned.
For the purposes of the rules, war carts:• cannot be moved once deployed, but another
unit can occupy the same hex.• can shoot as if they were a unit of Poor
Missile Foot, unless another missile-armed unit is occupying the same hex!
• can mêlée as if they were a unit of Poor Missile
Foot, unless another unit is occupying the same hex! If they are mêléed through their frontal hexsides, they count as an obstacle.
• are removed as soon as an enemy unit enters their hex. If the unit enters through a frontal hexside it incurs 1FP. I represent them using a small wagon model with a couple of arquebusiers.
French reservesThe French reserve (one unit of gendarmes under Yves d’Alegre) was initially left further east to guard against a sally by the defenders of Ravenna, but was called into the fight when the French vanguard found itself hard pressed.
This unit may not enter the game until the move after one of Palisse’s gendarme units has been defeated in a round of mêlée. At the end of the normal movement phase of the next turn, Alegre’s gendarmes can appear on the eastern table edge in one of the four pale coloured hexes. The move after that they can operate as normal.
French flanking gunsThe enfilading guns on the north bank of the Ronco contributed greatly to making the position of the Spanish cavalry untenable.
This unit starts the game in the indicated hex on the north bank of the Ronco, either limbered or unlimbered.
Because the unit is on the north bank, it does not count for the purpose of spotting any hidden Spanish infantry, except for any unit that it actually shoots at.
ObjectivesFor both sides the objective is simple – decisively beat the opposing army. I have not assigned specific victory conditions in terms of number of units lost, geographical objectives or number of turns. I believe the fatigue and morale rules and the players’ own sense of reality should be enough to make it clear when the game is up for one side or the other!
Further readingIf you’re not already familiar with the Italian Wars and want to find out more, the following books are essential reading:• Frederick Taylor, The Art of War in Italy 1494 - 1529• Sir Charles Oman, The Art of War in the Sixteenth Century• Thomas Arnold, The Renaissance at War• George Gush, Renaissance Armies 1480 - 1650• Two Osprey Campaign Series, Fornovo 1495
(David Nicolle) and Pavia 1524 (Angus Konstam) rather neatly dovetail the beginning and end of the period (or more accurately, of this phase of it).
Should you get hooked and wish to delve deeper into the period there are a wealth of ever more detailed, obscure and academic tomes available. Among the more accessible are:• David Eltis, The Military Revolution
in Sixteenth-century Europe• Bert Hall, Weapons and Warfare in Renaissance EuropeThere are two societies whose activities and
membership encompass the period. They are:• The Pike and Shot Society (http://www.
pikeandshotsociety.org/)• Renaissance Wargames Society (http://www.
renaissancewargamesociety.com)
philip parisi (order #7077380)

24 Battlegames
FRENCH ARMY: 23,000 MEN UNDER GASTON DE FOIX, DUC DE NEMOURSCommand Units Type Class Notes Description
1 Seigneur de la Palisse 4 Gendarme Elite Heavy lance, fully armoured 910 French lances2 Unknown 1 Artillery Regular Siege 30 guns (French)
1 Artillery Poor Field3 Seigneur de Molart 2 Missile Foot Poor Crossbow 3,500 Gascons
4 Jacob Empser 1 Pike Elite 5,000 Landsknechts
3 Pike Regular
5 Thomas Bohier 1 Pike Poor 3,000 infantry, Picards and Gascons
1 Missile Foot Poor6 Odet de Lautrec 3 Gendarme Elite Heavy lance, fully armoured 780 French lances7 Federigo de Bozzolo 1 Pike Poor 3,900 Italians
1 Missile Foot Poor Crossbow8 Duke of Ferrara 1 Artillery Regular Field 24 guns (Ferrarese)
9 Gian Bernardo Caracciolo 2 Light Horse Poor Crossbow 2,000 light cavalry (Italians and Stradiots)
1 Light Horse Regular Light lance (Stradiots)
10 Yves d’Alegre 1 Gendarme Elite Heavy lance, fully armoured Reserve – see scenario notes400 French lances
11 1 Artillery Poor Field – see scenario notes 2 guns
SPANISH-PAPAL ARMY: 15,300 MEN UNDER RAMON DE CARDONA, VICEROY OF NAPLESCommand Units Type Class Notes Description
1 Fabrizio Colonna 1 Gendarme Elite Heavy lance, fully armoured 670 Papal lances2 Gendarme Regular Heavy lance, fully armoured
2 Marquis della Padula 2 Gendarme Regular Heavy lance, half armoured 565 Spanish lances3 Don Alfonso Carvajal 2 Gendarme Regular Heavy lance, half armoured 490 Spanish lances
4 Pedro Navarro 4 Pike Regular 12 Spanish colonellas, each of 5-600 men, in 4 divisions
1 Missile Foot Regular Arquebus
1 Pike Poor 2,000 Papal infantry
1 Artillery Regular Siege 30 Spanish guns1 Artillery Regular Field2 Special Regular See the scenario notes 30-100 war carts
5 Marquis of Pescara 2 Light Horse Regular Light lance 1,500 Spanish Ginetes
A fearsome formation of Swiss pikes. Dense formations like this were characteristic of the Renaissance, during which the longest weapons seen since the phalanxes of Alexander the Great and his Successors were revived. 28mm troops at №varra 1513, a game staged at Cavalier 2007 by George Moraitis.
philip parisi (order #7077380)

Battlegames 25
Sans Peur et Sans Reproche: e RulesSCALESThere are no defined figure, time or ground scales. A unit represents in the region of 500-1,000 cavalry, twice that many infantry, or 15-30 guns. A unit occupies a single hex, and can be represented by any number or scale of figures, according to your taste.
TURN SEQUENCEEach turn, both sides simultaneously perform each of the following steps:1 Compulsory moves. Move all units that are routing,
retreating, rallying back, pursuing or advancing out of control. Test morale for units seeing routers pass by.
2 Charges. Declare all charges, and charge responses. Test morale to charge or for being charged. Move units that are charging, countercharging or evading.
3 Normal movement. Move all units that wish to do so that haven’t already moved this turn. Use Priority to resolve any “if you do that, I do this” questions.
4 Shooting. Fire all units that wish to do so. Test morale of any unit reaching its Panic value as a result of being shot at. Test control of any Gendarme or Swiss Pike unit suffering hits.
5 Mêlée. Fight all mêlées. Move units that are recoiling, following up or breaking through. Test morale of any unit reaching its Panic value as a result of a mêlée.
6 Rally/Reform. Test morale to rally from rout. Test to remove Fatigue Points.
FATIGUE POINTS (FPS) AND UNIT STATEUnits accumulate Fatigue Points as the game progresses. Fatigue Points are an abstract representation of casualties, disorder and fatigue, all rolled into one for the sake of simplicity.
A unit’s status varies according to the number of FPs it has. Use suitable markers next to a unit to show its FPs.
A unit incurs FPs from the following causes:• moving through difficult terrain or crossing obstacles• interpenetration with another unit• compulsory moves such as rout, retreat, pursuit etc.• shooting and mêlée
A unit can remove some of its FPs by reforming. The relevant rules sections explain how many FPs a unit incurs in each case, and how to remove them.
Fatigue and unit stateFatigue Points State Notes
0-1 Formed
2-5 UnformedUnit incurs penalty
in shooting and mêlée
6+ Disordered Pike units count as ‘other foot’ in mêlée
See the Unit Characteristics
tableDispersed
Unit is immediately removed from the
table
FACING AND FORMATIONA unit occupies a single hex and is assumed to be in its typical fighting formation. For example, a pike unit is in some form of square or column, with its associated skirmishers milling around it. A French Gendarme unit is en haie (in line), with the gendarmes in the front rank and the more lightly armoured troops in subsequent ranks.
A unit must always face a hex vertex (rather than a hex side). Its facing defines its front, flank and rear hexes, and the arc through which it can shoot, move or charge.
UNIT CHARACTERISTICS TABLE
Troop type Order WeaponMovement Points
PriorityFPs to Panic/Disperse
Normal Rapid1 Poor Regular EliteGendarmes Close Heavy lance, mêlée 3 4 2 5/7 6/8 7/10
Pikes Close Pike, mêlée 2 (3)2 3 4 7/9 8/12 9/14Missile Foot Open Arquebus or crossbow 2 3 3 5/7 6/8 7/10Light Horse
(missile) Open Arquebus or crossbow 4 5 1 5/7 6/8 –
Light Horse (Stradiots or ginetes) Open Light lance, mêlée 4 5 1 5/7 6/8 –
Artillery (Field or Siege) Open – 1 – 5 5/7 6/8 –
Generals – – 4 4 1 – – –
1. Use this speed when charging, countercharging, evading, retreating, routing or pursuing2. Elite Swiss pike have a normal move of 3.
philip parisi (order #7077380)

26 Battlegames
MOVEMENTA unit has the number of Movement Points (MPs) shown in the Unit Characteristics table. It costs (a minimum of) 1 MP to move one hex, but a unit can only move into one of its two frontal hexes. It cannot move into a fl ank or rear hex – if it wants to change direction it must fi rst change facing.
PriorityBecause units move simultaneously, you can get the “if you do that, I’ll do this” syndrome. If this occurs, the unit with the highest priority chooses whether to move fi rst or second. If both units have the same priority, choice goes to the highest quality unit. If it’s still equal, roll a D6 to decide.
Changing formationTh e only formation changes that are specifi cally represented are:• Pike units can form ‘hedgehog’, a defensive formation with
the pikes protruding in all directions. When in hedgehog, the unit has no fl ank or rear hexes, but cannot move.It costs 1MP to form hedgehog, and 1MP to revert back to normal formation.A pike block that is already engaged in mêlée cannot form hedgehog.
• Artillery is either limbered or unlimbered. To limber or unlimber takes a full move.
Changing facingA unit changes facing by wheeling on the centre of the unit, within the hex it currently occupies, to face another hex vertex. (In traditional miniatures rules a unit normally pivots on one fl ank to wheel.)
Artillery changes facing as a Close Order unit.MPs to change
facing by:1 hex 2 hexes 3 hexes
(about face)
Close order 1 2 1
Open order 0 1 0
For example, if a close order unit wants to change facing (to its left or right) by 2 hexsides as in the photo above, it costs 2MPs.
Zone of control (ZOC)A unit exerts a ZOC into its two frontal hexes. ZOCs aff ect movement in the following way:
• A unit can move into an enemy unit’s ZOC, or out of an enemy unit’s ZOC, but it cannot do both unless it is charging the unit(s) in question. Th is applies to all forms of movement.
• However, a Pike or Gendarme unit can ignore the ZOC of a missile-armed (arquebus, crossbow or artillery) enemy unit.
TerrainHexes should be classifi ed as either:• Normal – fairly fl at, open ground or gentle slopes.• Diffi cult – e.g. open woods, marsh, steep slopes, streams.• Severe – e.g. dense woods or rocky slopes,
villages, prepared earthworks and ditches (e.g. as used at Ravenna or Bicocca).Linear obstacles should be similarly classifi ed,
and can either run along hexsides (e.g. streams or earthworks) or through hexes (e.g. wider rivers, like the Taro at the Battle of Fornovo).
Th e following table shows the MP cost to enter/cross a Diffi cult or Severe hex/side, and the FPs incurred for doing so, for each type of unit. (‘–’ indicates the hex is impassible to that type of unit.)
Terrain eff ects (MP/FP)Unit Diffi cult Severe Earthwork
Gendarmes +1/1 – –
Pike +1/1 – +1/2
Missile Foot +1/0 +1/1 +1/1
Light Horse +1/1 – –
Artillery – – –
For example, if a Pike unit enters a woods hex, it costs 2 MP and the unit incurs 1 FP. If it crosses an earthwork hexside, it costs 2 MP and the unit incurs 2 FPs, immediately making it unformed. (Note that the FPs are incurred after the unit has crossed the hexside. So if the earthwork is defended, the unit does not incur the FPs when mêléeing the defender.)
Movement example
philip parisi (order #7077380)

Battlegames 27
For example (see photo on previous page), a Light Horse unit moving in open terrain spends 3MP advancing through its frontal hexes, then changes facing (wheels) through one hexside in its last hex, for free.
InterpenetrationDuring normal movement:• Open order troops can move through open
order or close order troops without penalty.• Close order troops can move through open
order troops without penalty, but cannot move through other close order troops.
CHARGESA unit can declare a charge on a unit provided the target is within line of sight, charge arc and reach (counting the hex the target is in but not your own hex).
A unit must have enough MPs to enter the hex occupied by the target to declare a charge, but the charge physically stops in the hex adjacent to it. The charging unit only actually enters the hex if it wins the mêlée and pushes the target out of it.
A unit can declare a charge on two units at the same time if they are adjacent and both meet the above criteria.
Charge responsesA unit that is charged must either countercharge, stand (and shoot), or evade. It may also change facing/formation if necessary and if time permits.
An Open Order unit must evade if it is charged by a Close Order unit, unless it is in difficult terrain or behind an obstacle, in which case it can attempt to stand if it wants to.
Artillery automatically disperse if charged.
Advance to contact Pike cannot charge Gendarmes, but they can, however, declare an advance to contact on them – an exception to the normal charge rules. The Pike move at normal speed instead of rapid, and the Gendarmes must either charge them, or about face and move away at normal speed. If the Gendarmes charge, the Pike must halt. (This represents the Italian Wars version of the game of chicken...)
CounterchargingA countercharging unit advances to meet the charging unit halfway. If there is an odd number of hexes between the two units, the attacker moves the additional hex. Often there will be no physical movement at all, e.g. if a charge is delivered from an adjacent hex, but both sides are still deemed to be counter/charging.
EvadingLight horse and Missile Foot (only) can evade if charged. An evading unit turns 180 degrees and moves away from the charging unit in an attempt to avoid mêlée. It must move at least its normal move distance, and can move its rapid distance if necessary.
The charging unit follows in the evading unit’s path. It must move at least half of its normal move distance, but can stop at that point if you wish. However, Swiss pike or Gendarmes must move their full rapid move distance.
If the charging unit, as it follows the evader:1. finds another enemy unit in its ZOC, it can ignore
the evading unit and charge the new target instead.2. enters the ZOC of another enemy unit, that unit may
attempt to intercept the charging unit by declaring a charge on it. The originally charging unit must now react to this charge. The new charge is resolved in the same way as the original one (except that the charging unit has already used a portion of its movement).
Evading example
Gendarmes unit A charges Light Horse unit B, which evades through hexes 1 and 2. Unit A follows evading unit B and enters hex 1. At this point:• A can charge C if it wants to. • C can charge to intercept A, if it wants to.• If neither side wants to do this, A must halt. It cannot
enter hex 2, because it has entered C’s ZOC, and cannot also leave it in the same turn. Unit B must still evade at least a further two hexes (its full normal move).
Changing facing/formation and chargesA unit cannot change facing or formation if it charges.
If a unit is charged from its flank or rear, it can either turn to face or, if it is a pike block, form hedgehog, if it has the MP to do so before it is contacted.
If a unit does not have time to make a normal facing or formation change before it is contacted, it can make an emergency change if it wants to. This costs 0MPs, but the unit takes 2FPs for each MP that the change would normally take.
Facing change example
philip parisi (order #7077380)

28 Battlegames
Gendarmes A charges Gendarmes B from the flank. A contacts B after moving 1MP, which does not give B enough time to wheel to avoid the flank attack, as it costs 1MP for a Close Order unit to change facing by one hexside.
So Gendarmes B can either take the hit in the flank, or make a further emergency facing change to wheel the additional hex, but at a cost of 2FPs. Note that if unit A had started adjacent to unit B, it would have cost unit B 4FPs to turn to face.
SHOOTINGMovement and shooting• Mounted crossbows and all Missile Foot can
move their normal move distance and shoot.• Mounted arquebusiers can move half their normal
move distance and shoot (as they dismounted to fire).• Artillery cannot move (including
changing facing) and shoot.
Weapon ranges (in hexes)
Weapon Close Long
Arquebus or crossbow 1 2
Field artillery 2 6
Siege artillery 3 8
To fire, check that the target unit is in range and shooting arc. Count up the following Shooting Factors (starting from 0), then roll a D20 and read the number of hits inflicted from the Shooting Results table.
Shooting Factors
+1 for... -1 for...
Target is Pike block Target is in cover
Target is at close range Target is in open order
Target is Gendarmes at close range
Shooting unit is moving and shooting
Shooting unit is Elite Shooting unit is Unformed/Disordered (-1 for each)
– Shooting unit is Poor
Shooting Results
Shooting Factor
Hits inflicted
0 1 2 3
+3 – 1-4 5-10 11-20
+2 1-4 5-8 9-14 15-20
+1 1-6 7-12 13-18 19-20
0 1-10 11-18 19-20 –
-1 1-11 12-19 20 –
-2 1-12 13-20 – –
-3 or less 1-13 14-20 – –
For example, a unit of Poor arquebusiers fires at a unit of gendarmes that is one hex away. The total Shooting Factor is 0. +1 for gendarmes, +1 for gendarmes at close range, -1 for Poor shooting, for a total of +1. The unit rolls a 17. Find 17 in the +1 row and read up from 17. The gendarmes suffer two hits.
Control testGendarmes or Swiss pike who take FPs when shot at must pass a control test. Roll a D6 and score greater than the number of FPs inflicted to retain control. If you roll less than or equal to the FPs inflicted, the unit must advance on the nearest enemy in the next turn. If an enemy unit is in charge reach, they must charge it.
Did you know...?In the 50 years between 1494 and 1544, there were no less than six wars fought by the French against Italian and Hapsburg states in an attempt to gain control of Italy. The period is noted for the widespread use of mercenaries. Siege of Vienna 1520: defenders prepare to sally forth. An impressive 15mm
game staged by Mannheim Games Club at Action 2007 in Rheindahlen.
philip parisi (order #7077380)

Battlegames 29
MÊLÉEA unit can only fight in mêlée if it counter/charged, advanced to contact, reinforced, or is continuing a mêlée from last move. (A unit that simply advances adjacent to a mêlée during normal movement cannot fight in that mêlée.)
Each side counts up the Mêlée Factors above (starting from 0). Compare the difference. The side with the highest factor (or the attacker if the difference is 0) rolls a D20 and consults the Mêlée Results table to see who’s won and lost.
Mêlée results
DifferenceMêlée result for side X is...
Major defeat Defeat Draw Victory Major
victory+6 – – – 1-6 7-20
+5 – – – 1-8 9-20
+4 – – 1 2-10 11-20
+3 – 1 2 3-12 13-20
+2 – 1-3 4 5-14 15-20
+1 1 2-5 6,7 8-16 17-20
0 1,2 3-9 10,11 12-18 19,20
If the result is:• a Draw, the mêlée continues next round
and each unit suffers 1FP. • a Victory or Defeat – read the result for both sides
from the Mêlée Outcome: Victory/Defeat table.• a Major Victory or Major Defeat – read
the result for both sides from the Mêlée Outcome: Major Victory/Defeat table.
Reinforcing a mêléeIf a mêlée continues to a second round other units can join in, if they can charge the enemy unit.
“Bad war”If Landsknecht fight Swiss or other Landsknecht, no quarter is given: the loser in each round (or both sides if it is a draw) suffers an additional FP.
Multiple unit mêléesIf multiple units fight a single unit, or vice versa:
• Average out the mêlée factors for each side.• Each unit takes the worst outcome result that it suffers.
Interpenetration as a result of mêléeIf a unit is pushed back, retreats or routs from a mêlée, the first hex it moves into must be directly away from the victorious unit. If this hex is occupied by another unit:• Open order troops will pass through friendly
open order or close order troops without penalty, but are blocked by any enemy unit. The unit being passed through suffers 2FPs.
• Close order troops will push back open order troops, whether friendly or enemy (both units suffer 2FPs).
• Close order troops are blocked by other close order troops, whether friendly or enemy. Any retreating or routing unit that is blocked disperses immediately, otherwise suffers 2FPs. The blocking unit also suffers 2FPs.
Mêlée example
Two units of French gendarmes (A and B) charge a unit of Swiss pike (C) frontally. All three units are elite. Both French units are formed (A has 0FPs, B has 1) but the Swiss currently are unformed (2FPs) having been shot at earlier. Mêlée factors are:• French count superior impetus and state for a total of +2.• Swiss count superior weapon for a total of +1.
MÊLÉE FACTORSCount... For... Notes
+1 Superior ImpetusFully-armoured Gendarmes > 1/2 armoured Gendarmes > Light Horse > Pike > Other Foot. Mounted troops cannot claim impetus against a pike unit if it is stationary, facing them and not Disordered.
+1 or +2 Superior Quality Elite > Regular > Poor. Elite vs Poor count +2, Elite vs Regular or Regular vs Poor count +1.
+1 Superior Numbers Pike unit (2) > Any other unit (1). Count the total value of all units if multiple units are involved.
+1 Superior WeaponPike > Heavy Lance > Light Lance > Mêlée Weapons > Arquebus/Crossbow. Pike only counts if the unit is facing its opponent and is not Disordered. Lance only counts if the unit is charging or counter-charging.
+1 or +2 Superior State Formed > Unformed > Disordered. Formed vs Disordered count +2, Formed vs Unformed or Unformed vs Disordered count +1.
+1 General in hex with unit –+1 Contacting flank or rear hex Does not count against a pike unit that has formed hedgehog.
+1 or +2 Terrain advantage +1 for features such as woods, slopes, hastily thrown up earthworks (e.g. Ravenna). +2 for prepared defensive positions (e.g. the Spanish redoubt at Bicocca).
philip parisi (order #7077380)

30 Battlegames
Quality is the same (all elite) and numbers are the same (one size 2 unit vs two size 1 units).
The French have the advantage and so roll the D20 on the +1 line of the mêlée results table. They roll 17 which is a Major Victory. Looking on the Mêlée Outcome: Major Victory/Defeat table with gendarmes as the winner and Non-disordered Pike as the loser, the Swiss suffer 3FPs (taking them to a total of 5, still unformed), the French gendarmes 1FP each (which unforms unit B). The Swiss must rally and the gendarmes can choose either to break into them or through them. A decides to break through and B breaks in.
Next move, the mêlée continues between the Swiss and gendarmes B. Quality, weapon and state are all the same now, as the gendarmes are also unformed, and both sides are counting mêlée weapons rather than pike/lance because the gendarmes are in amongst the pike.
Mêlée factors are:• French count superior impetus for a total of +1.• Swiss count superior numbers (size
2 vs 1) for a total of +1.With +1 each it is an even fight. The gendarmes roll
the D20 as they initiated the combat but this time they roll 7 – a Defeat! Reading off the Mêlée Outcome: Major Victory/Defeat table the gendarmes suffer 2FPs and must Rally back. The Swiss must Rally and suffer 1FP – this takes them to 6FP, disordering them.
Did you know...?Landsknecht mercenaries who wielded the famous wavy-edged two-handed sword known as the flamberge were paid double the normal rates because of the dangerous work they did, and were called Doppelsöldner as a result.
Mêlée Outcome: Victory/Defeat
Winner (suffers 1FP)
Loser (suffers 2FPs)
Non-disordered Pike Other foot Gendarmes Light Horse
Pike or Missile FootWinner: Rally/Follow up1 Winner: Rally/Follow up1 Winner: Rally (and jeer!) Winner: Rally
Loser: Recoil Loser: Recoil Gendarmes: Rally back Mounted: Rally back
Gendarmes
Gendarmes: Break in/through Men at Arms: Pursue Winner: Rally/Follow up Men at Arms: Pursue
Pike: Rally Foot: Rout Loser: Recoil Loser: Rout
Light HorseMtd: Break in/through Mtd: Pursue Winner: Rally/Follow up Winner: Rally or
Rally back
Pike: Rally Foot: Rout Loser: Recoil Loser: Rally back
1. Swiss, or Landsknechts fighting ‘bad war’ opponents, must always follow up or pursue.
Mêlée Outcome: Major Victory/Defeat
Winner (suffers 1FP)
Loser (suffers 3FPs)
Non-disordered Pike Other foot Gendarmes Light Horse
Non-disordered PikeWinner: Rally/Follow up1 Pike: Rally/Pursue1 Pike: Rally (and jeer!) Pike: Rally
Loser: Recoil Foot: Rout Gendarmes: Rout Mounted: Rout
Disordered Pike or Missile Foot
Foot: Rally Winner: Pursue Foot: Rally Foot: Rally
Pike: Recoil Loser: Rout Gendarmes: Rout Mounted: Rout
Gendarmes orLight Horse
Mtd: Break in/through Mtd: Pursue Mtd: Pursue Winner: Pursue
Pike: Rally Foot: Rout Gendarmes: Rout Loser: Rout
philip parisi (order #7077380)

Battlegames 31
1. Advance (including Charge/Follow up/Pursue/Break in or through)
2. Hold (including Rally)3. Recoil (including Evade or Rally Back)4. Retreat5. Rout
The unit’s current level is defined by its current/last action.
For example, a unit of light horse (Regular) sees two friends rout past it during the Compulsory moves phase. It rolls two D6 and rolls 5 and 3, so failing one test. Last move it advanced, so it must now Hold this turn. In the Shooting phase, it receives 2FPs and reaches its Panic value, forcing it to test again. This time it rolls a 2, failing again, forcing it to recoil immediately.
REFORMINGIf a unit amasses its Panic Value in FPs it must take a morale test.
If a unit amasses its Dispersal Value in FPs it immediately disperses and is removed from play.
During the Rally/Reform phase, a unit can attempt to remove half of its current total FPs (rounded up), provided it did not charge, move, shoot or fight earlier in the turn.
A unit that is reforming can attempt to remove FPs that it has just received in the same move as a result of being fired on.
Roll a D6 for each FP, requiring a basic roll of 4+ to remove it, with the following modifiers:• +1 general with unit (in the same hex)• +1 unit is Elite• -1 unit is Poor
For example, an Elite Swiss pike block has 5FPs. It spends a turn reforming and in the Rally/Reform phase can roll to remove 3FPs, requiring a 3+. It throws 1, 4
MORALEWhen to Test MoraleA unit must test morale for each of the following causes that applies, at the indicated point in the move sequence: • End of the Compulsory moves phase – if a friendly
routing unit has moved within two hexes of it. Close Order units ignore routing Open Order units.
• In the Charge phase – to charge or to respond to a charge, unless the unit is Gendarmes, Pike, or if the unit is lance-armed light horse (stradiots or ginetes) testing to charge an Open Order or disordered unit.
• End of the Shooting phase – if a unit reaches its panic value in FPs.
• End of the Mêlée phase – if a unit reaches its panic value in FPs, or sees a friendly unit rout or disperse or a friendly general killed within two hexes. Close Order units ignore Open Order units.
• In the Rally/Reform phase – to rally from rout.
How to Test MoraleRoll 1 D6 per test, needing a basic roll of 3, 4 or 5 to pass if the unit is Elite, Regular or Poor, modified by the following:
Morale Factors+1 for...
Friendly general within one hex.
Unit is in cover (e.g. in woods, behind earthworks).
Unit is safe (i.e. there are no enemy units in a position to fire on or charge you).
If testing to evade – per hex between the unit and the unit charging it.
Each failed test drops the unit down one aggression level, where the levels are:
Mêlée and morale outcome definitions
Results FPs Definition
Recoil 0 Immediately fall back 1 hex, facing the enemy.
Follow up 0 Immediately follow up a recoiling opponent 1 hex, maintaining contact. The mêlée continues next move.
Break in 0 Immediately break into the opponent’s formation/hex. The mêlée continues next move. Both sides count mêlée weapons rather than Pike/Lance. (Physically, both units stay in the same hexes.)
Break through 0 Immediately break out of the opposite side of the opponent into an adjacent hex, facing in the same direction.
Hold 0 Next move, remain in the current hex, facing in the same direction. May not charge or move but may fire. May attempt to remove FPs in the Rally/Reform phase.
Rally 0 Next move, form up in the current hex, in any desired facing/formation. May not charge, move, or fire. May attempt to remove FPs in the Rally/Reform phase.
Rally back 0 Next move, form up a normal move to the rear, facing in the same direction. May not charge or fire. May attempt to remove FPs in the Rally/Reform phase.
Retreat 1 Next move, retreat a rapid move to the rear, facing away from the enemy. May not charge or fire. Rally the move after that.
Rout 1 In subsequent moves, rout a rapid move to the rear, facing away from the enemy. After the initial hex of movement the unit is treated as open order. Continue routing until the unit is safe (see below), when it may test to recover its morale. If it either fails this test, reaches its dispersal value, or routs off the table, it disperses and is removed from play. If it passes its morale test, it must rally in the following move.
Pursue 1 In subsequent moves, pursue the routing unit at rapid speed until the routers either break contact or disperse. The move after that, the pursuing unit must either rally or rally back.If a pursuing unit is still in contact when routers leave the table it follows them off and tests morale at the end of that move. If it fails this test, it disperses in pursuit and is removed from play. If it passes, it must rally (off table) in the following move, and can then re-enter the table in the same hex the following move.
philip parisi (order #7077380)

32 Battlegames
and 5 and removes 2FPs. It spends next turn reforming as well, and can then attempt to remove two of its remaining three FPs, again requiring 3+ to do so.
RISK TO GENERALSGenerals are mounted as single fi gures and can join or leave units at will, by moving to the same hex.
If a general is in the same hex as a unit that is either shot at or fi ghts in mêlée (whether it takes FPs or not), roll a D20 to see if the general is killed. A roll of 20 removes the general.
A FINAL WORDSans Peur et Sans Reproche is not the defi nitive set of rules for the Italian Wars. I hope, however, that it is a set that you can easily tinker with and adjust to produce a game that you enjoy and that fi ts your own interpretation of the Italian Wars.
EDITOR’S TIPS FOR BEGINNERSTh e Italian Wars can provide some of the most exciting and colourful wargaming available. Here are some of the companies that make 15mm fi gures suitable for the period:Venexia Miniatures: www.venexiaminiatures.com. Th eir site also has a lovely collection of fl ags that are free to download for you to print out and adorn your units.Mirliton: www.vexillia.ltd.uk/mirliton/index.html.Miniature Figurines: www.miniaturefi gurines.co.uk.Essex Miniatures: www.essexminiatures.co.ukBlack Hat Miniatures: www.coatdarms.com. (Confused? You will be – Black Hat actually manufacture the renaissance fi gures that used to be branded as Gladiator Games! Coat d’Arms is their excellent range of acrylic paints.)Falcon Figures: www.thequartermaster.comItal Model: www.italmodel.comOld Glory 15s: www.oldglory15s.com.
CardNo.
Expiry date /Start/valid from date* /Issuenumber* Card Security Code (last 3 digits on the back)
Name on card
Address
Please complete in BLOCK CAPITALS. Items marked * are not present on all cards, but please provide them if they are.
Type of card (please ✓. We can only accept Maestro from UK residents.)
Postcode/ZIP Country
Please debit the total amount of £ ................................ from my card account detailed above. I understand that my card will not be debited until goods are dispatched.Data Protection: Battlegames Ltd complies with the Data Protection Act. Th e information you give us will only be used for a single ‘Customer Not Present’ transaction and the delivery of your magazines.
FOR YOUR SECURITY, PLEASE DO NOT SIGN THIS FORM
Send postal subscriptions and purchases to:Subscriptions, Battlegames Ltd,17 Granville Road, Hove BN3 1TG, East Sussex, UK.Web: www.battlegames.co.uk Email: [email protected]
TIME TO (RE)SUBSCRIBE TO BATTLEGAMESIMPORTANT NOTICE FROM THE EDITORWe’ve reluctantly had to increase our cover price from £3.50 to £3.75 with eff ect from this issue. However, we’re sure you’ll agree this still represents terrifi c value for money when you consider the outstanding content you fi nd in every issue of Battlegames. We’ve also simplifi ed our postage catagories, since all Rest of the World subs are now sent via Economy Airmail by our distributor. No more long waits for surface mail!Subscribe securely via www.battlegames.co.uk using your PayPal account or your favourite debit or credit card. Or send us a cheque drawn on a UK bank, made payable to Battlegames Ltd. Or send your card details to us: go to our website’s subscription section for details, or use this form (a copy will do). Or call +44 (0)1273 323320 to use a card over the phone.Subscription for 6 issues: UK £22.50 POST FREE, EU £27.50 incl. p&p. Rest of the World Economy Airmail: £34.50 incl. p&p.Back issues are available of BG2, 3, 4, 5 and 6: see our website..
STOP PRESS! BATTLEGAMES BINDERS Would you like to keep your copies of the magazine neat, tidy and safe for posterity? We’re having some lovely binders made in black leather eff ect, with BATTLEGAMES embossed in gold on the front and spine (see visual, left. Final product may vary slightly from this impression). Th ey hold 12 issues each and are available for £7.50 plus postage. You can use this form to order them or use the shop on our website.UK £9.50 including p&pEurope £10.50 including p&p
Rest of the World £12.50 including p&pPlease allow up to 28 days for delivery as these
binders are ordered and delivered to us in batches.
Telephone incl. area code
I would like to order______ subscription(s) and/or______binders.
philip parisi (order #7077380)

Battlegames 33
Table top teaser
INTRODUCTIONAt the end of our second Rosetta Stone battle (issue 6), my son and I sat down to review our future wargame projects, as is our wont. The result is somewhat more complex than recent Table Top Teasers in terms of mechanics and rules, and indeed there is scope for further elaboration, but I hope you will find it worthwhile – we did.
PERIODThe scenario was played as a Napoleonic action, but it could easily cover any horse and musket period and, with a bit of adaptation, it can be set before that, for example with Romans and Gauls. The game mechanisms, move distances and so on, are designed for 25mm figures and would need to be altered to accommodate different scales.
BACKGROUNDThe problem concerns a river convoy and its escort negotiating a safe passage through potentially hostile territory to deliver its cargo to a riverside town.
GROUNDThe map shows a broad river flowing from east to west.
Shortly after entering the table, it divides. Each branch can take the convoy to its destination off the table to the west, but with varying hazards. These hazards are marked 1 to 6 and are described in the section on river hazards. Entry points for the escort and convoy are marked as A and points for the attacking forces are marked B, C, D and E. There are two bridges, several woods, a farmhouse and town as well as some hills and broken ground.
ORDERS FOR THE CONVOY (AUSTRIAN)SituationYou are the escort commander for a convoy of supplies that are destined to be delivered to a significant defended town to the west, off the table.
MissionTo move a river-borne convoy through hostile territory to safety.
ForcesThe convoy. The convoy contests of four barges loaded with supplies.• Four barges of supplies, each crewed by two figures:• Two Danube escort boats; each would have a crew
of 20 men of which 14 were at the bank of seven oars on each side. In the battle, I used two figures per boat and kept a paper record of losses from the 20.
River convoy, or “Messing about on the river”
by Brigadier (Ret’d) C.S. Grant OBE
philip parisi (order #7077380)

34 Battlegames
Forces• One regiment of hussars• One regiment of dragoons (dragoons may operate dismounted if the player desires)• Four regiments of infantry• One battery of two guns
Coordinating instructionsWhen the Austrian escort and lead boat enter at A on move 1, the dragoons at B will act as ordered and the hussars at C may move to alert the village at D. The garrison at D (two regiments of infantry and a half battery of artillery) may not deploy until alerted by the arrival of the squadron from C.
At the same time, the attackers draw one of three envelopes, which will determine the move on which his second force (the remainder of the dragoon regiment, two regiments of infantry and the other gun) appear at F marching back to the town D. The three envelopes each have a different move written on a slip of paper in them. More detail is given in the section on game mechanics.
GAME MECHANICSArrival of the remainder of the hussar regimentThe remaining squadrons of the hussar regiment at C are returning from patrol to the east and will arrive at E at some stage in the day. From move 3 onwards, the attacker throws a single d6. They will enter when a 6 is thrown.
The land escort. The river-borne convoy has a land-based element to support it. It consists of the following:• One regiment
of hussars• Two battalions
of infantry• One battery of
horse artillery
Coordinating instructionsPrior to the disclosure of any of the enemy (French) forces on the table, the convoy commander must determine the deployment of the land-based element. The dismounted escort enter at point A on move 1, distributed on either side of the river as the commander wishes.
ORDERS FOR THE ATTACKER (FRENCH)SituationThe attacker has a cavalry outpost, equivalent to one squadron of dragoons, at the inside of the fork in the river at the junction (B). At (C) is a hussar outpost, which can see the approach to the river fork. In the town (D) are two battalions of infantry and half a battery of artillery (one gun). A similar force, with a the remainder of the dragoons regiment, is off the table some way south of E. The remaining hussars are off the table to the west of F.
MissionTo destroy or capture the enemy river convoy before it sails into safer territory (i.e. off the table to the west).
A scene of calm and tranquillity. The Austrian land-based escort, an escort ship and convoy of barges on the river. All photos taken ‘live’ by the author of models and figures in his collection
A scene from the first game. The Austrian escort have been overrun by both infantry and dragoons and the gun is in peril. On the water, a barge has run aground on an island, harassedæ by fire from dismounted dragons on the far side, and the escort ship is making its way past.
philip parisi (order #7077380)

Battlegames 35
Entry of the attacking force from FAt the start of the game the attacker draws one of three sealed envelopes to determine the arrival of his force at F. The envelopes have slips showing moves 8, 10 and 12 respectively in them. The convoy player does not know the result of the draw. On the appropriate move, the force enters at F in column of march.
River movementRiver movement is divided as follows:Craft normal speed maximum speedEscort boats 7 ½” 9”Barges 6” 7 ½”Maximum speed can only be maintained for two moves, after which the craft is restricted to normal speed for four moves.
River hazardsThere are a number of hazards on the river to negotiate.
Number Hazard Action
1 Twin forks
As the lead escort ship enters the table, the player may opt to go left right or split his force. The escort ships will take the fork as ordered. However, as each barge approaches the fork in turn, throw a d6. A 1 means that it takes the opposite fork to the direction ordered.
2 Whirlpool
As each craft approaches the whirlpool, roll a d6. A throw of 1 means that it is caught in the whirlpool. Thereafter, roll a d6 on each move: 4, 5 or 6 allows it to escape, but a 1 will sink it.
3 Small islands
As each barge approaches the islands, roll a d6. A 2 or 3 and it goes left, 4,5 or 6 right. A throw of 1 will mean that it runs into the islands. Once aground, roll a d6 for it each move. 4, 5 or 6 and it floats free, but a 1 will sink it. Once clear, throw again: 2 or 3 and it goes left, 4,5 or 6 right. 1 means it runs aground again!
4 Bridges
As each barge (not escort boats, which are deemed to have better control) arrives at a bridge, roll a d6. A throw of 1 means that it hits the side of the bridge. Roll another d6: 1, the barge sinks, causing a blockage that will take two moves to clear; 2, the barge sinks causing a blockage that will take one move to clear; 3, the barge sinks causing no obstruction; 4, the barge takes one move to come unstuck – during this time nothing else can pass; 5, the barge takes one move to come unstuck but others can pass; 6, the barge moves as normal on the next move.
5 Island divide
As each craft approaches the island, roll a d6. A 1 means that it runs into the islands. A throw of 2 or 3 and it will go left, 4, 5 or 6 right. Once aground, roll a d6 each move. A throw of 4, 5 or 6 and it floats free, but a 1 will sink it.
6 Rocky fork
As each barge approaches the fork, roll 2d6. A double 1 means that it takes the left-hand fork away from home and is lost!
If an escort craft is down to half moves either through loss of crew or direct damage (see later
rules), then it has less control and will be treated as a barge when approaching a hazard.
Artillery fire on barges and boatsThere are two effects that artillery have on escort boats and one on barges. In the former case, successful artillery fire can cause both casualties and damage to the boat, but with the barges, it is simply a question of damage to the boat.
Depending on your own tactical rules the table below is applied to a direct hit by throwing a d6.
Dice throw
Short range
Medium range
Long range
1 no effect no effect no effect2 1 casualty no effect no effect
3 1 hit 1 casualty no effect no effect
4 2 hits 3 casualties
1 hit 2 casualties
no hit 1 casualty
5 3 hits 4 casualties
2 hits 3 casualties
1 hit 2 casualties
6 4 hits 4 casualties
3 hits 3 casualties
2 hits 2 casualties
Each time a 6 is thrown, roll another d6 – a further 6 will sink the boat or barge outright.
Musketry fire on bargesWhile the small number of crew mean that artillery fire effect is only considered in terms of damage to the barge, musketry fire will cause casualties. Assuming each barge is crewed by four figures, casualties from fire are calculated under the same conditions as normal musketry rules on an open order target.
Results of artillery and musketry fire on barges and boatsThe result of accumulated fire is as follows:• Escort boats will reduce speed by one quarter for
every five men lost or every five points lost.• Barges will reduce speed by one quarter for every
five points of damage or crewman lost.• A barge with no crew will run aground on the next move.
WINNING THE GAMENow let me consider the difficult business of determining the requirements for victory. The question from the Austrian viewpoint must be what level of successful re-supply will satisfy the military requirement. To that end, three barges will be a success, two a draw and any less defeat. The survival or otherwise of the escort ships must also play a part. The loss of an escort ship will raise the number of barges required by one to four for success and three for a draw.
POSTSCRIPTIn conclusion, I have several observations. The first is that the reader may have observed that the Austrian escort craft shown in the photos have been scratch built. I found an example of a halb tschaika riverboat in the Osprey Men-at-Arms Austrian Auxiliary Troops 1792 – 1816 and could not resist making a couple. Likewise, having found details of the tschaikisten boatmen, I converted some assorted Jäger figures, cutting off the muskets and replacing them with poles. Of course, none of this is really necessary, and a much simpler representation of
philip parisi (order #7077380)

36 Battlegames
escort boats and pontoons will suffice for the scenario.Turning to the game, after a playtest to make
sure the rules provided a degree of balance, we fought it twice, changing sides so we each had a go at commanding the convoy.
On both occasions, the battle went down to the wire, with a draw on the first occasion and a victory for the French (attackers) on the second. Memorable moments and less so abound, like the sight of the Austrian general,
having lost most of his escort force, escaping on a barge! Or the sight of the island junction covered with the debris of an escort boat, destroyed by French artillery, and a grounded barge. Or there is the tale of the French hussars that never got onto the table in 17 moves. Can you really throw a die 17 times and not get a 6? I can!
I could go on, but what I can say is that I am sure that this scenario will generate lots of different memorable moments for you – try it and see.
The second game, with chaos on the river. An escort ship is unmasted and sunk, a barge has been sunk and its crew and debris are stranded on the island, while a further barge and escort ship prepare to run the gauntlet, but Austrian infantry are closing in on the French gun.
In game two, the Austrians concentrated their escort on one side of the river, but sent barges up both rivers at the first junction. Foundry figures, CSG’s boats!
philip parisi (order #7077380)

Battlegames 37
To boldly go...
In the world of fantasy and sci-fi wargaming there are some big names: Games Workshop;
Rackham; and Wizards of the Coast (part of Hasbro since 1999). After these companies comes the next level of businesses working to meet the needs of gamers like me and, maybe, you. Th ough it is diffi cult to provide exact comparisons between these fi rms (do you measure them by the number of employees, revenue, number of gamers using their wares or their range of products?) the leaders in this pack are Mongoose Publishing and Privateer Press.
Mongoose, the UK’s second biggest fantasy and sci-fi wargames company, was formed six years ago by Matthew Sprange and Alex Fennell. Th eir initial focus was on d20-based products for roleplayers. Th is range includes complete campaign packs for games masters, the Quintessential range covering every class and race in fantasy d20 games, arcane and monster encyclopaedias, and much more. It’s easy to see why they are the country’s leading publisher of roleplaying games. Since 2004, they have entered the world of miniatures gaming with the Mighty Armies 15mm range and Babylon 5 – A Call to Arms spaceship combat. Since then, they have moved into plastic miniatures with Gangs of Mega City One, a skirmish game based on the world of Judge Dredd, and the mass battle game Starship Troopers. By 2006 this had won a “Best New Game” award from Origins and has a range of more than 50 metal and plastic releases. To round things off , as if they needed to with around 2,000 diff erent product codes in their range, Mongoose also have novels, a few card games and Th ud, the Discworld board game.
Th e company holds tournaments at their offi ces three times a year.
On a sunny day in February, I was fortunate enough to be able to make the trip down to Swindon and spend a very pleasant afternoon discussing all things wargaming with Matthew Sprange. Despite the fact that the majority of their revenue still comes from the roleplaying side of the business, my focus was on the miniatures rules and fi gures. And,
amongst his other duties, Matthew alsowrites the rules for their miniatures games!
Not being that professional, I didn’t tape the conversation, but made scribbled notes as we chatted. Th e following is my reconstruction of our talk, based on my scrawl, about designing games and the future for Mongoose.
When he wrote A Call to Arms, Matthew knew
that the movement system was the key to the game. Once that was fi nished, he realized that the solution he had come up with was the same as Battlefl eet Gothic. Further thought on the matter brought the conclusion that there is no point in trying to come up with something diff erent, just for the sake of being diff erent. It may be fair to say that other games companies have suff ered from exactly that problem.
He then started to look at and develop the core systems, or mechanics, of the games. Th is resulted in his thinking that you could use identical systems for a number of games, using only the unit cards to diff erentiate them. Th e validity
by Guy Hancock
Looking a Mongoose in the eyeof his idea is borne out by the success of Victory at Sea. Th is is a game of WWII naval warfare, but it uses the core game system from the spaceship combat game A Call to Arms.
From Matthew’s point of view, the rules should be fun and easy to grasp. It is important that players have something to do when it isn’t their turn. Th is type of interaction is what helps to keep the game interesting for all players. Th ere should also be something which isn’t apparent just from reading the rules; something which only comes out when you actually play the game. Matthew also eschews the use of optional rules for the simple reason that he believes they never get used, and I can see his point; I don’t think I can recall the last time I used any of the optional rules in the games I play.
Mongoose’s rules tend to use a priority system, instead of the common points system, for building forces. Th is came about after Matthew spent some time looking at naval games and noticed a trend where things grouped together into ‘points clumps’. Th ese clumps seemed to fall around the 100 or 200 point mark. For example, you would get ships at 195, 200 and 205 points, but they were all, essentially, the same. So he decided to put them
all into one category and, when you do that, why do you need points for them? He’s also noticed the same tendency with aerial combat, but more on that later.
In designing the dozen fl eets which make up the range for A Call to Arms, it was important to make sure that each fl eet had something unique and something very scary. At the same
time, they all had to be balanced and, in working towards that, it became clear that what you leave out is at least
you. Th ough it is diffi cult amongst his other duties, Matthew alsowrites the rules for their miniatures games!
Not being that professional, I didn’t tape the conversation, but made scribbled notes as we chatted. Th e following is my reconstruction of our talk, based on my scrawl, about designing games and the future for Mongoose.
Call to Arms
conclusion that there is no point in trying
something diff erent,
games. Th is resulted in his thinking
all into one category and, when you do that, why do you need points for them? He’s also noticed the same tendency with aerial combat, but more on that later.
In designing the dozen fl eets which make up the range for A Call to Armsit was important to make sure that each fl eet had something unique and something very scary. At the same
philip parisi (order #7077380)

38 Battlegames
as important was what you include.Despite all of the thinking
and hard work, Mongoose aren’t precious about their products. On their Web forum, the company has an open policy for feedback and questions about rules. And, if it is appropriate, they are willing to make changes in response to this.
And what does the future hold?Well, Mongoose have already
planned their release schedule for the next three years. This includes their Battlefield Evolution game, a series of pre-painted miniatures which will sell for £20 and £15 for the infantry and vehicles respectively. Whilst the company have sculptors for their metal figures, for the vehicles, they provide the manufacturer with technical drawings. For the plastic figures, Matthew and Alex provide the factory with drawings and information. The factory then uses their own sculptors to produce the figures. And Mongoose aren’t going to produce any army lists or books for this range. All of the information you need to play with these models is included on a double-sided A3 sheet in the box. This is supported with free downloads from their website.
In the coming months, we can also expect to see pre-painted miniatures for Starship Troopers and they may be producing something for the American Civil War with another company.
But there were two developments Matthew told me about which I think are really exciting. The first of these
is a World War II aerial combat game that the guys are working on. The rules are going through some rigorous playtesting and there is some work needed to finish off the models, but it looks really promising and I want to give it a try as soon as possible. After playing with those Airfix models all those years ago, I could finally get to complete a dogfight, rather than just pretending.I don’t want to say anything more about it at the moment as, unfortunately, I don’t think that would be appropriate.
Probably the most exciting development coming to Mongoose has nothing to do with new figures or games. No, the big move is going to be... in publishing! Now, I know you might think “So what?”, but listen to this. Mongoose, like many firms, currently has their printing produced in China and then shipped back
across the globe. However, this is all soon to change with the arrival in their Swindon offices of some pretty fancy digital printing equipment. In fact, the very spot where we sat and talked has been earmarked as the location for the new machines (though I don’t know where they plan to put the chairs, sofa and coffee table!). Anyway, this equipment will allow them to print any of their vast range of publications as and when it is needed. This means that they will no longer have to worry about keeping stock of rule sets and other publications. Instead, when someone orders one of these products, they will simply run off a copy – just for that customer. And that includes the hardback editions! Matthew is also quite aware, with an entrepreneurial eye, that their spare printing capacity will be very attractive to other firms, and not just in the wargames market. But this shouldn’t be any surprise; after all as Matthew said “We’re gamers at heart, but this is a business”.
With such a strong range of products, sound business thinking and a plan for the future, I think we can rest assured that Mongoose are going to be around for a while and that we can look forward to exciting developments in their product range.
№rth London Wargames Group toured this extremely popular Starship Troopers game around the shows last year. Here, they were drawing crowds all day at SELWG, Crystal Palace in October 2006..
Contraptioneering at its best. Seen at Action 2007 in Rheindahlen, this splendid piece was created by John Elbro, who staged his Starship Troopers game despite a mild heart attack earlier that week! An extraordinary effort.
philip parisi (order #7077380)

Battlegames 39
Battlegames strives to give fair, unbiased and truthful reviews of all products and services. The views expressed here are those of the reviewers concerned, who have been asked to express their honest opinions.
First of all, a correction. I received this email after issue 6 hit the streets:
Hi HenryThanks to Mike Siggins for a very
kind review of “The Age of Arthur” in the latest issue of the magazine.
I just feel I have to make one correction to Mike’s piece. The “Shieldwall” supplement for Warhammer Ancient Battles was written by neither James nor I, although James did contribute some figures that were photographed for the colour section. James did write the “El Cid” supplement.
The excellent “Shieldwall” was written by Stephen Patten, and without his earlier work our book would have been the poorer.
ThanksBest wishes to you and yoursSteve Jones
Our apologies for the error, Steve.
STRATEGIA E TATTICA 28mm medievals
This pack of four medieval footmen are of reasonable quality, retailing at a decent price of 5.00 Euro (roughly £3.50). Each figure is posed differently, and arrives with a separate head and weapon (this pack came with a two-handed axe, a falchion, and two studded clubs), allowing for plenty of variety in your units. Size wise, these figures fit in quite well alongside the other medieval footmen I’ve owned (Foundry, Black Tree, Qualticast). Sculpting detail on these figures is very good in my view – nice, clean sculpts without a lot of extra detail. This makes the figures easy to paint (great swathes of detail on a 28mm miniature look great when tackled by a competent painter, but I frequently flounder on it!).
On the down side, one of the heads appears to be much smaller than the
other three – I guess we can allow for human variation here – and I found the heads a little tricky to lop off of their sprue and fit correctly (that could be my lack of skill as a modeller); I also managed to break one of the weapons when testing its fit in a figure’s hands. Speaking of the hands, these are poorly cast on the review pack; they appear to be cut off at the base of the fingers, allowing weapons to be fitted without too much filing, but with the undesired effect of looking like your troops have suffered severe wounds before they’ve fought their first mêlée.
All in all, not the most stunning medieval figures I’ve seen (whatever happened to Qualiticast – does anybody know?), but they will add variety to your army and certainly aren’t shockers when painted up. The Strategia e Tattica website is useful, including photos of most of the figures, and even with my lack of linguistic skills, I found my way around the Italian language site easily enough.
Dan Mersey
STRATEGIA E TATTICA 15mm ancientsOh dear, I feel a bit bad about this review. I wasn’t frothing with enthusiasm about the Strategia e Tattica 28mm medievals, and I’m really not too keen on their 15mms. However, Henry asked me for an honest review, so here goes.
These figures (SAS2: Sassanid armoured cavalry and SAM1: Samnite command) remind me why I stopped painting 15mm figures and sold my collection off. The quality is as good as you’ll see in most other 15mm ranges – they could stand side-by-side with the ubiquitous Essex quite easily (apart from the horses) – and the poses of the figures are pretty standard (horsemen point their lances in the air, swordsmen waggle their weapons about a bit). The sculpting detail is very good, too. But the proportions of these figures don’t do it for me. The humans are a bit too cartoony (all heads, hands, and dumpy bodies and legs), and the horses, like most wargames horses, are just not quite right. The horses, in fact, are smaller than most others I’ve
seen in this scale – not a bad thing when you’re looking at ancient breeds – but I’d find them hard to mix in with other manufacturers’ mounts.
Price-wise these packs are 2.60 Euro (about £1.80), for four cavalry, eight infantry, or in the case of the Samnite command pack, four infantry and one cavalry. The Strategia e Tattica website illustrates the contents of the pack very nicely (www.StrategiaeTattica.it), and these figures are of equal quality to plenty of other 15mm figures... They’re just not good enough to tempt me back into ancients in this scale.
Dan Mersey
STRATEGIA E TATTICA 28mm Italian army figuresStrategia & Tattica are a company previously unknown to me, who produce figures in 25 and 28mm for the Italian armies for their colonial adventures in the late 19th Century through to WWI and WWII. The figures come in blister packs well secured against damage with foam inserts. Henry was nice enough to send me three random packs for review:
The first pack comes from the colonial wars range – B12 ‘Penne di Falco’. Now, I had no idea who Penne di Falco (the Hawk Feathers) were, but a quick Google search later revealed that they were an Italian Colonial Cavalry unit which served in Africa through the latter half of the 19th Century, through to the invasion of Abyssinia in the 1930s. The unit was made up of native troopers (Askari) and Italian officers/NCOs.
The pack contained four firing Askari (three standing, one kneeling). Each man wears the unit’s distinctive cloth hat with hawk feather. The figures are modelled in uniform with bare feet and gaiters (exactly like the illustrations I found on the internet). Each man has lots of pouches and an ammo bandolier and a pistol holster; there are also loose scabbarded sabres for you to fit (or not). I wasn’t happy with the casting of the carbines as these appeared crude and spoilt what otherwise are quite nice figures.
The second Pack – IT1 Mounted Cavalry Officers, was a pair of officers
RecceProducts and services scrutinised by our team
philip parisi (order #7077380)

40 Battlegames
and their mounts. Each figure is dressed in the WWII uniform of the Savoia Cavalleria Regiment which served on the Eastern Front as part of Italy’s ill-fated contribution to that disaster. The two horses are differently posed, one at the gallop the other caught frozen in the act of jumping. The galloping horse looks like a mule to me (I think it’s the odd pose), the jumping one seems fine. The riders, who come attached to their saddles, both wear standard Italian helmet and uniform. They have no visible kit except for a sword scabbard (obviously travelling light). Each figure has a separate sword arm which will allow you to produce a number of variants by altering the arm’s position. It was nice to see that the figure for the jumping horse was moulded leaning forward so as to sit right on his mount. Unusual and interesting figures, they got me thinking back to a scenario which featured in the Rapid Fire! rulebook of an Italian cavalry charge against the Russians at Chebotarevsky in August 1942: where did I put that rulebook?!
The last pack, and my personal favourite, was GG7 – Alpini attacking, from their WWI range. These are lovely figures, clearly Alpini with their distinctive hat and feather. There were four figures in three poses – advancing, running and a grenade thrower, each figure wearing ankle boots with puttees and armed with a carbine. The running figure has only a haversack, water bottle and bayonet; but the others have full pack and ammo pouches. The advancing figure has a pick or ice axe hanging from his pack too. All the figures are well detailed and animated – impressive.
Richard Baber
BACCUS 6MMAmerican Civil WarI’ll confess it now – Baccus have played their part in getting me back into 6mm wargaming. Gone (or going – I move quite slowly) are my storage issues, fretful painting sessions where I try to add extra shading to that 28mm fingernail, and attempts to clear enough space/buy a large enough house to play a decent sized game in.
Baccus’ American Civil War range offers up 8 packs of infantry in combinations of hat/kepi, sack coat/frock coat/shell jacket, and formed or skirmish order. Formed troops are lined up shoulder-to-
shoulder, advancing with shouldered weapons (on a 20mm frontage of 4 figures); skirmish order come as a strip of 4 figures to separate, with a mixture of firing and reloading troops. Two packets of fez-topped Zouaves complete the infantry range (formed and skirmishing just like the other infantry).
Cavalry come both mounted and dismounted, again with a choice of hat or kepi (a total of 4 packs). Dismounted cavalrymen come with horses for someone to hold onto behind the firing line.
Artillery is in the form of a 12-pdr and a Parrott, and there’s a separate limber pack. Being such fiddly little things, I was pleased to find that the artillery comes with a supporting ‘leg’ underneath, so the model doesn’t rely on just the two finely-cast wheels for support.
Finally, there’s a pack each of Confederate and Union generals, and a whole host of nicely printed flags to identify your units with.
I’ve had the chance to compare these recent castings with some older Baccus examples, and the overall quality has got better over the years. The bases are now less weighty (old style Baccus bases were a bit too chunky), and the crispness of castings seems to have improved (to my eyes, at least). The quality of Baccus figures is far greater than any other 6mm figures I’ve owned.
Skirmishing infantry are £2.30 for 12 stands of 4 figures each, and the same price for 1 artillery piece and crew; formed infantry cost £4.60 for 24 stands of 4 men; cavalry cost £5.40 for 15 stands of 3 horsemen, or £2.30 for 10 stands of dismounted horsey types.
The Baccus website at www.baccus6mm.com is a mine of information and photos and has a lively forum and, now, regular podcasts!
Dan Mersey
LOST BATTLEFIELDS OF BRITAINBy Martin Hackett, published by Sutton Publishing, £16.99The British Isles have witnessed many battles, both great and small, in their two thousand years of recorded history. Many of these battles are well-known, either due to their far-reaching consequences, their sheer scale, or the involvement of famous combatants.
Others, however, have rarely been properly investigated. In this book,
the author examines ten ‘forgotten’ British battles, covering the length and breadth of Great Britain and almost 900 years of warfare. The battles featured are Buttington 893, (First) St Albans 1455, Norwich 1549, Powick Bridge 1642, Lyme 1644, Montgomery 1644, Inverlochy 1645, Stow-on-the-Wold 1646, Killiekrankie 1689 and Goudhurst 1747.
Some of the actions, notably St Albans, Powick Bridge and Killiekrankie could perhaps be described as ‘not often featured’ rather than ‘forgotten’, and it will be seen that the author’s main focus is on the 17th century, but these observations should not be adjudged to detract from the book’s overall interest and usefulness.
The author provides a concise account for each of the battles and the narrative is supported by recent photographs of the area, a modern map of the battlefield, plus suggested tours and information on exploring the site today.
Well worth adding to the bookshelf or your car’s glove compartment.
Stuart Asquith
TOUCHING HISTORY: RECREATING HISTORY IN MINIATURE, ISSUE 3 – A WARGAMES SPECIAL COVERING THE SUDAN & WWIIPaul Darnell £13.99.This booklet is the third in the Touching History series by Paul Darnell; while the previous two issues have concentrated on one particular period – namely the Spanish Peninsula during the Napoleonic Wars (No1) and then the English Civil Wars (No2) – this issue features material on the Sudan, World War II and the American War of Independence.
The main text is preceded by a two page spread penned by Paul Darnell’s partner in praise of her Dad, then there is another two page section in which Paul sets out what he is trying to achieve with this series, followed by a page entitled “Paul’s Reminiscences Part 3”. To close this opening section, there are three pages pointing the reader towards reference books that cover the two main periods featured in the text.
The Sudan section opens on page 12 and features the battle at Hasheen (20th March 1885) and after a very sketchy historical introduction, looks at the action as a wargame at some length, 19 well-illustrated pages in
philip parisi (order #7077380)

Battlegames 41
fact. There then follows a section that suggests suitable items of terrain that can be purchased and some very generalised modelling tips.
The text now moves on to WW2 with a chapter covering a fictional action at Rhinel Bridge in 1945. Once again, the coverage is both extensive and colourful, running to some 24 pages. This is followed by a chapter offering modelling tips and recommendations.
There is then a double-page spread showing the work of painter Tom Weiss, and then three pages showing scenes from an American War of Independence scenario.
Some of the items that are included are clearly heartfelt and well-meant, but on reflection are possibly misplaced in this publication.
Purchasers looking for the same style of concentrated coverage that featured in the first two issues of Touching History may well be somewhat disappointed with the content of this one.
Contact details: Touching History, 2 Sumner Place, Lime Grove, Addlestone, Surrey KT15 1QD. Email touchbase@touching history.co.uk, website www.touchinghistory.co.uk. The books can be purchased at UK wargame shows from Dave Thomas and from Paul himself when he stages displays of his work.
Stuart Asquith
WARHAMMER 40K SPACE MARINE BOXESSpace Marine Devastator Squad, RRP £20.00, and Dark Angels Veteran Space Marines, RRP £12.00The Dark Angels are the latest (re)release for 40K as part of the wholesale makeover of these figures. Devastators have been a core part of Space Marine armies for years. Until now, if you wanted these figures, you had to use the metal miniatures. The difference here is that these boxed sets each offer you five plastic marines. This is part of the company’s policy of making more figures, especially the core elements of all their armies, available in plastic.
Both of these boxes are little goldmines of bits and pieces for your models. In the Devastator box, spread across three sprues, you have the choice of eight heavy weapons: two lascannon; one missile launcher; two plasma cannon; one multi-melta; and
two heavy bolters. On top of this, you have various weapon combinations for a Sergeant, should you want to have one in your squad. The Dark Angels have an even larger range with over a dozen right hand/weapon options, depending on what you want to create.
Great thought that is, it isn’t the best part of these boxes. What makes these sets stand out is the wealth of little extra items on the sprues: the Dark Angels have nine different heads and the Devastators a choice of seven. On top of the leg/torso/head/weapon combinations there are pouches, knives, holsters, scrolls, icons and various decorative items that allow you to make models which won’t just look the same as your opponents’. And whoever is designing this stuff at Games Workshop is getting the small details right. For example, the left and right arms are next to each other on the sprue, so you can easily pair up the bits you want.
The level of detail on all of the pieces is excellent. In fact, it is everything you would expect from one of the leading figure manufacturers. With their flowing robes, the Dark Angels could even be described as sumptuous. Just looking at the sprues, and you can study them for hours, is enough to tempt you into buying these figures.
What are they like to assemble? Each box comes with a little pamphlet of instructions; proof, if it were needed, that there are too many choices here to get by with a simple diagram on the back of the box. Some of the optional details are left totally up to you, with a picture to say “Yes, this can go on this figure”, but no other guidance.
I remember making my (old metal) Devastators and, due to the connections between the left arm, the right arm/gun, and a backpack, feeling the distinct need for a third hand. I also have the vivid memory of very nearly super-gluing myself to the figure when trying to hold all of these parts together as they set. The move to plastic has, thankfully, made life much easier. Yes, there are still the multitudinous parts to connect but, because you’re now working with plastic glue, you have the time to work a piece at a time. The result is a much less fraught process and a great-looking model.
Sadly, as with so much, there is a downside. In this case it is the mould
lines. Not only is it a pain having to spend time removing these lines from every little part, but the problem is actually made worse by the quality of the model. With many parts, there is a danger of damaging the fine detail when trying to remove a mould line. Considering that these must be (fairly) new moulds, I have to say that I am disappointed with the amount of cleaning required.
So, we have beautiful figures, a fantastic range of options and accessories, but lots of cleaning up required.
Guy Hancock
AIR ASSAULT TASK FORCEShrapnel Games, $45This is the latest game in the excellent AATF ‘simulation’ series from Shrapnel Games. As you might imagine, this time we are dealing with air assaults by helicopter. This covers such infamous theatres as Vietnam, Somalia and Afghanistan and, yes, you can if you wish listen to Wagner while playing this one. While I would normally not be interested in any of the periods offered, I am rather taken by the workings of helicopter insertion and evacuation operations. I just imagine they are Imperial Stormtroopers…
As per normal, I ignored the training missions and got straight into Blackhawk Down, a simple scenario set in Mogadishu. I liked the eponymous movie, and so had a feel for what was going on and what I should be doing. After that, all one has to do is convert a mental plan into game commands. AATF is actually pretty easy to operate, given the level of detail (wind speed calculations, for instance) it builds into the model. An easily-understood array of icons and commands gets us underway in very little time. I was soon able to deploy my helicopters, set routes and combat modes, and in time my Rangers and Special Forces secured the area after a hard fight. For anyone used to computer simulations, there is nothing too difficult here and apart from a slightly sluggish mouse cursor, learning went well.
The game really scores in the AI department. As I have said before, the AATF series AI is top notch, but this is a new, ‘even whiter whites’ system. I have to say it is hard to check that claim, but I can vouch for the fact that enemy units do seem to make logical moves, are fiendishly clever, and
philip parisi (order #7077380)

42 Battlegames
can get you into some really difficult situations. The good news, though I haven’t yet tried it, is that the new AI system is apparently backwards compatible with earlier ATF titles – just load a scenario and go.
The only real gripe I have is that the game can occasionally become ‘cluttered’. By that I mean when there are a lot of units in close proximity, the map zoom feature (even on maximum) doesn’t manage to separate the icons out. You can easily identify what is in the ‘clump’ by clicking, but it looks messy as it moves towards its target. I found this less of an issue when using top-down images rather than NATO symbols.
Apart from that, the game looks great. Shrapnel have pulled out some really impressive, atmospheric maps, which range in scale from rolling topology to individual street blocks in urban scenarios. These are overlaid with Blackhawks, tanks, planes, Apaches and Chinooks and various infantry (well, cavalry technically?) units. These go down to the fireteam level, with those scenarios I have played so far at around company level. The game also offers the promise of campaign settings, which sadly time did not permit me to check out fully.
As with many of Shrapnel’s titles, AATF is hardcore: in subject, implementation and gameplay. It is not to be taken lightly, and I suspect it will appeal pretty much exclusively to fans of modern, tactical situations. It fits in well with their growing range of ‘professional simulation’ games, and if this level and intensity is your weakness, I recommend AATF highly.
Mike Siggins
PAINTING SERVICE: GJM FIGURINESI don’t generally festoon the magazine with eye-candy, but when it comes to evaluating a painting service, there’s not really much option but to show you photos of the results! (Left)
I provided Gerrard (Ged) Cronin of GJM a clutch of my Newline 20mm Napoleonics, slated for my Salamanca project, and asked him to come up with a couple of command vignettes, one of Sir Arthur Wellesley with an
ADC from the Light Dragoons, the other of Marshal Marmont with an assistant in the form of a hussar. I left the rest to him – and the photos show what he came up with.
You can make your own minds up – but I’m a very happy bunny indeed!
Call GJM on 01689 828474, and he has a website at www.gjmfigurines.co.uk.
Henry Hyde
KHAZAD-DUM DRAGONThe Lord of the Rings Strategy Battle Game, Games Workshop, £30We have had a steady flow of remarkably high-quality figures for this range and the new Khazad-Dum supplement continues the fine work. I don’t personally collect dwarves, as I have enough problems with short grumpy blokes in real life to want to celebrate them in plastic or metal, but those who do now have an even greater choice of types, and how refreshing to see that the designer hasn’t followed the common path of taking comic-book Vikings and squashing them with a steam-hammer.
Showpiece of the new offer is
this splendid dragon. A stunning model, capturing the coiled menace and immense power of the monster, with just a hint of fear in the face of the cornered beast.
Some modelling skill is required; the wings would benefit from pinning and, as is customary with these larger metal kits, the imperfect joins need closing with putty.
Not cheap, and alternative options are available for the thrifty, even including plastic toys refreshed with a paint job, but for those gamers willing to pay for a piece of significant style and presence on the table, this is very much the Ferrari of wyrms.
Steve Gill
EUREKA MINIATURESEmpire of the Petal ThroneEmpire of the Petal Throne? Tekumel? What’s that? I’d never heard of the fantasy world created by a Professor Barker, so I did a little research and apparently Tekumel is a world that has been colonized by various humans and aliens and then (by mysterious means) dropped into another dimension where, as time has passed, their technology and origins have been forgotten. Naturally now, humans being humans, the stage is set for war.
The costume style brings the Romans to mind, albeit in plate armour, with South American flourishes in the form of long feather plumes and exotically-bladed weapons. These are heavy infantry indeed, armed with sword, spear and bow, the idea being that one could
represent “The First Legion of Ever-Present Glory”, the personal unit of one General Kéttukal who is himself represented here in miniature form.
This is the first release in a proposed much larger range that will include the various human and alien nations of Tekumel – one can only assume that initial sales will continue or curtail this range.The CrimeaSculpted by Mike BroadbentTurning now to the 1850s we come to a catholic collection of additions to the Eureka 15/18mm Crimean Range.
To begin we have a rather full selection of French infantry. These consist of both command and line
philip parisi (order #7077380)

Battlegames 43
in kepi or shako. The greatcoat-clad troops are in firing, advancing and marching poses. Gorgeous. If you’re not too fussy about firearm detail, the kepi-wearing troops might be willing to serve in the Franco-Prussian War.
There are nice foot and horse crews (three figures each) in fairly static poses for a lovely little six-pounder gun.
For the Russians there is a very attractive group of three mounted and three dismounted staff officers, all in the peaked cap.
Note that while billed at “15/18mm” these figures actually measure 18mm from foot-to-eye.Napoleonic Russian MilitiaSculpted by Tony BartonAs with their Crimean Range, this addition to the AB Napoleonic range is 15/18mm size which, in Eureka’s case, seems pretty much to mean 18mm foot-to-eye. As ever, they are very nicely proportioned with excellent anatomy and attention to detail.
Sets R19-20 are of the St Petersburg Militia, armed with pike and musket in static poses. R21 offers firing and loading infantry. Dressed in greatcoat and peaked cap – this latter I assume was the signifier of the St Petersburg men, as the Moscow Militia are differentiated only by their headgear. This is in the form of a tall, cylindrical, peakless shako.
Tony has also sculpted three generic staff officers as well as very nice representations of Generals Kutuzov, Platov and Bagration. All have a lovely sense of the age to them.Japanese SchoolgirlsSculpted by Mike BroadbentThey duck, they weave, they perform explosive high kicks that, in conjunction with their flippy little skirts, show you pretty much what they had for lunch.
These are the controversial Japanese schoolgirls. There are seven poses available; four are pulling various martial arts moves, three are waving large samurai swords about.
They are sculpted in something like the Manga style – short torsos, exaggeratedly long legs, prominently displayed underwear; I am sure that Tarantino fans would approve.
That being said, at a time when here in Australia at least, we are having a debate about the sexualisation of young children, I think these figures are in poor taste. At the very
least, I wonder what sort of image this presents of wargamers both within and without the hobby.
[Editor’s note: Battlegames will never show images of this kind of material. Eureka were asked not to feature these figures in their ad, and they have graciously complied.]Modern German InfantrySculpted by Kosta HeristanidisThis set of figures comprises three iterations of the same set of ten or so poses with differing levels of kit; i.e. in full kit with or without gas mask, or lightly-equipped without gasmask. These last are billed as a “zombie containment team”. The troopers are armed with G-36 assault rifles, MG5s with separate bipods and man-portable AT weapons. Additionally, in a supporting role, three HQ staff designed to go with Eureka’s’ recently released office furniture set.
These are as handsome a set of modern troops as you are likely to see. I expect to see them in any of a dozen peace-keeping operations from Bosnia to “somewhere in Africa” on the one hand, and fighting off hordes of zombies or resurgent neo-Sovs some time in the near future on the other.
Strange to say, I’m finding it hard to decide whether it’s their anatomy or just the general military clutter they are draped in that lends the figures a certain chunkiness.
Greg Horne
SPECIAL PLASTICS REPORTA whole slew of new plastic Napoleonic figures have arrived at the Battlegames bunker recently, so I enlisted the help of veteran wargamer, Andy Crofton, to give them an official inspection. Andy has been wargaming with 1/72 plastic figures for over 30 years and currently has a mind-boggling 8,000 in his collection (and yes, they’re all painted!). He’s a man who knows his hats from his HäT.
First up is an Italieri 1/32 Historics set, big brother of the little 1/72 chaps, and in the same series as the French General Staff set reviewed last issue. This is French Howitzer Gribeauval – named after the reforming French artillery general of the 18th century – and features a Guard horse artillery gun, limber, four horses and harness, a pair of gun team riders and a mounted officer. It appears to be from 1808 or before, as the two ‘soldats du train’ are wearing bicornes.
The proportions of the models are excellent – both men and horses – with lots of detail plus extras such as handspikes, rammers and ammo box, but the pail shown under the gun carriage on the box cover does not appear inside. Once again, the splendid box art by G. Rava appears more accurate than the contents. There’s the same disparity in busby size between the more correct illustration of the officer and the model itself that we recently saw in the Imperial staff set: the size is more British Hussar, Crimean War than French Chasseur.
Furthermore, other details are incorrect (puzzlingly inconsistent). The braiding at the top of the officer’s trousers is shown with one design on the cover, but as a trefoil on the model. We also found that the figures sat poorly on the horses, but this is nothing that a modelling knife or some hot water and a little intelligent bending couldn’t solve. This was particularly noticeable in that the natural position for their legs covers the locating holes for the harness traces.
From a wargamer’s perspective, there isn’t much to get excited about. Here we have an attractive diorama subject to grace your mantelpiece, but no wargamer wants a gun without gunners. However, handling this size figure is somehow inspiring – Andy and I began to work out what it would cost to field some 1/32 battalions and squadrons; not as much as you’d think. (N.B. If you got inspired by the medieval skirmish game in the last issue of Battlegames, Italeri also produce sets of 1/32 English and French knights and soldiers.)
Meanwhile, from the 1/72 side of the camp, a set of Italeri Prussian Light Cavalry has ridden forth – except they’re not, they’re actually dragoons! Andy got very excited about these, “At last! I used to have to convert these from a mixture of Scots Greys and other sets,” he proclaimed. So, full marks to Italeri for filling this particular gap in the market. While this will be a timesaver, and the uniforms were accurate, he did think the 17 models in the box looked a little dated. The figure and equine animation is good, albeit the horses have slightly short necks.
Next up were some Italeri French Cuirassiers. Box cover artist, Mr Rava, knows his stuff: just for fun,
philip parisi (order #7077380)

44 Battlegames
we dug out my Funckens and found the rose facings shown were for the 10th Regiment. Sure enough, we then spied a small “10” on one of the saddle blanket rolls on the illustration, but that’s understandably ‘a detail too far’ for a 20mm model! Proportions of the figures are good, albeit small compared to the light cavalry mentioned later. The horses (with separate bases) are rather narrow and each show two large dimples on the right hand side from the moulding process. In fact, they made our inspecting general wonder if in fact Italeri had bought the moulds from ESCI and re-released them. Uniform detail is subtle, but appears to be very accurate.
Wargamers will be annoyed to find that one of the 12 figures is not mounted, but standing by his horse, meaning you’ll have to buy two boxes to field a 12 figure unit if you like to play at a 1:33 figure scale or greater. Interestingly, this box bears an extra Italeri logo, “Let’s Glue it”. The links on the company website didn’t seem to work when I visited, but it appears that Italeri has devised a slightly different plastic which will take glue better than most.
The final Italeri set we reviewed were French Light Cavalry – Chasseurs à Cheval to be precise. These are really splendid figures and had us both exclaiming positively as we opened the box. There are 17 figures again, as with the last set, three sprues of five and a trumpeter and standard bearer. The detail is excellent, from uniforms, to the eagle atop the guidon, through to the half-crescent plates hung beneath the reins. As the son of a cavalry officer and having ridden for many years, it makes me cringe to see some of the creatures that pass as mounts in wargames, but these are different and really wonderful. There’s rich detail in the manes and tails, muscles and limb anatomy, animation and movement – and all in 20mm! These will look great on the wargaming table. The only downside we could see is that next to the older style cuirassiers just mentioned, this modern set makes it look as if the big men’s colonel had lost his regiment’s horses at cards to the leader of the light cavalry unit! The cuirassiers’ horses are too small in comparison (or maybe these are too large?). Disparity of scales is sadly a fact of life for the plastic figure gaming collector, even within
the ranges of the same manufacturer.We then inspected an unusual set
from Russian figure manufacterer, Zvezda (you may remember their starter wargaming set was reviewed in Battlegames issue 2). This French Elite Infantry. Voltigeurs box features a total of 40 figures from an élite company made up of three sprues of 12 figures plus a command sprue of four: officer, hornist, drummer and – a nice touch – a figure carrying a battalion marker flag on his musket. All the figures’ packs are separate, so a little gluing is necessary. Reviewing General A. Crofton thought these are the only such 1/72 figures in plastic with the required large shako plumes.
The set is also meant to be part of Zvezda’s Age of Battles wargaming system, which now supports Napoleonics: an included sheet gives various troop costs and wargame factors. Another help for gamers in a hurry is that whereas Italeri tend to feature an illustration of a figure or two on the reverse of the box as a painting guide, Zvezda show a photograph of a painted version of each type or pose of model included within: an excellent idea. One thing to note is that these figures are almost 25mm tall, albeit rather slim for that scale, so you’ll want to be careful who you mix them with.
Lastly, and the odd man out in this month’s review, is a set of 1/72 terrain pieces for WW2 from Italeri’s Alzo Zero wargaming range. There are two building ruin pieces showing wall intersections, several low sandbag sections, ruined brick wall sections and cast concrete walls. In addition, there are 40 loose sandbags, bricks and concrete blocks. As the items are modelled in hard plastic, the various components can easily be glued together in a wide variety of configurations for the wargamer. The only gripe is that the wall intersections are single-sided, so gamers conscious of looking their best on the battlefield will only want to attack or defend these from one direction!
Alistair Birch (with Andy Crofton)
NAPOLEONIC ARCHIVEThe Battle for Hougoumont 40pp + 4pp cover (£8.50); The Battle for La Haie Sainte 40pp + 4pp cover (£8.50); On Campaign with the 79th Cameron Highlanders through Portugal and Spain (memoirs of Robert Eadie) 48pp + 4pp cover (£7.50).
These three A5 (148mm x 210mm) booklets are an interesting addition to the literature available to wargamers and military historians.
The first two we were sent cover famous episodes from the Battle of Waterloo, and are sold as ‘Limited Editions’ of 250. The booklets are, by the look of things, laser-printed onto a standard stock paper inside, with a textured cream card cover, then stapled along the spine.
The content, however, is nicely done, making use of memoirs and eye-witness accounts of the actions, and with numerous colour illustrations and super photographs, including shots of suitably-posed 28mm wargame units and even re-enactment events. There are abundant period maps and, especially useful, photos of parts of the battlefield as it is today. Stephen Maughan, who produces the booklets, is a professional photographer, and it shows.
The bonus for wargamers is that the booklets include special rules and suggestions to enable you to stage a refight of these particular actions as self-contained games, rather than as just incidental parts of an overall Waterloo battle.
My only gripes are that the layout could be improved and a few basic typographic lessons learned (paragraphs are normally indented for a reason!) and the publications would benefit from some eagle-eyed copy proofing, especially at this kind of cover price. But if you’re a Waterloo nut, then these little works could deservedly fill some gaps in your library.
The final booklet of the trio turned out to be a memoir, though this is not announced on the cover. The work is primarily text-based, with just the cover illustration and a four-page centre section carrying a smattering of images of key figures in the regiment’s history and a recruiting poster.
Like many memoirs of the time, it is written in a highly engaging style and will be of general interest to both wargamers and military historians as a window onto the actions of this famous unit.
Again, my gripes are minor – the failure to make it clear where one paragraph ends and another begins is rather tiresome in this text-heavy pamphlet and would have required the work of mere minutes to correct.
philip parisi (order #7077380)

Battlegames 45
This one retails for £7.50, which seems steep-ish for such a slim volume, but again, those of us who gain inspiration from the Peninsular War will want to have it on our shelves: start practicing painting those kilts!
Overall, then, this little batch is recommended, and some aspects of them are very well done indeed.
You can order the books online at www.napoleonic-archive.com (though, irritatingly, the prices don’t appear next to the ‘add to basket’ buttons) where you will also find some very pretty photos of nicely-painted miniatures.
Henry Hyde
FANTASY GAMING – A GUIDE TO FANTASY ROLE PLAY AND TABLE-TOP BATTLESBy Martin Hackett. Published by Sutton Publishing, price £16.99.Firstly, I don’t like misleading titles because, at my age, I start to get confused easily. I expected this book to be about fantasy roleplay and tabletop battles in general. It is not. This book is actually concerned only with Martin Hackett’s own system, entitled Magic and Monsters (M&M).
Right, moan out of the way, down to business.
Anybody already familiar with roleplaying systems will be well aware that there are predominantly two types in general operation. These are either d20 or percentile dice-based and both have their ardent supporters – though there is some element of cross-over and some groups will use both systems over the course of campaigns.
The current book is the culmination of earlier rules, previously published privately by the author and in the first version of the book printed some years ago, and aims to provide a complete source under one cover, a bold and ambitious plan that, largely, works. We are all aware of the mass of material available to ‘bolt on’ to the Dungeons & Dragons system, greatly enhanced by the Open Gaming Licence status that the d20 system enjoys. Although this allows the roleplayer incredible flexibility, both for his character and the setting, it also means heavy purchases and a considerable amount of reading time needs to be devoted to the hobby to keep on top of it all.
The most serious rival to any percentile system has to be the revised Games Workshop’s Warhammer Fantasy Role Play (WFRP). This,
like M&M, has very simple base mechanics that can be picked up quickly and allows you to get started relatively fast. I do not intend to go into the mechanics here, because it would take far too long to do so, and be meaningless to anyone not involved in fantasy roleplay; suffice it to say that unlike WFRP, which has adopted an expansion package similar to that styled by Wizards of the Coast (Dungeons and Dragons), everything you need is here in one book. Once the basic character has been created, it is possible to modify it in an almost infinite amount of ways, making a truly unique ‘player’ for your game. However, it may be difficult to keep track of many of the modifiers accrued if too many are temporary in nature.
As well as characteristics, skills and occupations for the player characters, all the usual equipment is covered – armour, weapons (mundane and magical), adventuring, clothing etc.– as are magical abilities, spells and so on, nearly all of which can also be randomly generated (values are given against all lists). In fact, player characters – as well as non-player characters – can be generated with percentile dice alone (now there’s a scary thought!)
Despite the similarities, though, I would suggest this is not going to be a replacement system for anyone already engaged in a percentile game. Nor, by and large, is it going to satisfy the needs of a serious d20 addict (for a start, there is a lack of inherent background to feed such insatiable roleplayers) It is, however, a good a start as any for those who have little or no prior knowledge of the concept wishing to try their hand at fantasy roleplay.
The last third of the book is devoted to a massed battles version of the percentile system governing the M&M roleplay system. This employs the Warmaster/Ragnarok orders of battle code to determine the actions of the army and thence employs a ‘simultaneous’ play mechanic to control combinations of movement/shooting/magic/close combat by units involved in the orders.
The army composition rules are simple and enhanced by the numerous hero and unit types available. Whereas the very open nature of the M&M roleplay system gives me some cause for concern, as a serious fantasy battles
gamer I love the degree of freedom this gives me in the large-scale battles forum. Why? Because I can use it to customise any army, to ‘theme’ it to be far more in-character than with many other systems using published army lists or army books (such as Games Workshop’s Warhammer).
Lastly, there are suggestions for terrain, use of models and so forth, which are all practical and not aimed at pushing any one particular manufacturer or designer. I cannot stress how refreshing this is, and definitely raises the stature of the author in my eyes (funny how the little things matter the most).
To sum up, I think it fair to say (if I am to be brutally honest) I will probably never try to run a Monsters and Magic roleplay campaign. I believe that there are better systems out there and it doesn’t offer anything new, just combines elements of several for better or for worse. However, even though I am an avid disciple of the Warhammer fantasy battle system, I shall be trying Hackett’s fantasy battle rules as they appear in this book. I have a couple of armies which are no longer ‘legal’ in the system they were designed for, [hmm, I wonder which system you’re talking about... Ed.] that are too good to just sit on the shelf gathering dust. Having scanned the composition rules for this game, guess what? They would be usable! That means a thumbs-up from me.
Despite my reservations, I recommend you buy it for the massed battle rules. If nothing else, they alone are well worth the £16.99 cover price!
Roger Smith
LATE ARRIVALSMore sets of ancients rules than you can wave a stick at are hitting the marketplace, and Partizan Press have sent two: Phil Barker’s DBMM and the beautifully-designed Warlord by Trevor Halsall and Richard Harper. Meanwhile, I must claim an interest in my old friend Clifford Beal’s cracking book Quelch’s Gold: Piracy. Greed and Betrayal in Colonial New England – I did the maps for him. And finally, and perhaps most intriguingly, a superb sculpting kit for wargame figures from Prophet Miniatures, including tools, armatures, Green Stuff and an introductory booklet. You’ll be hearing more about this!
philip parisi (order #7077380)
46 Battlegames Please mention Battlegames when contacting advertisers
Please support our advertisers
philip parisi (order #7077380)

Battlegames 47Please mention Battlegames when contacting advertisers
Please support our advertisers
BATTLEGA MES SPECIAL OFFER: IDEAL GIFT!Limited edition prints of original commissioned art
“BREAKING THE SQUARE”, GARCIA HERNANDEZ 1812This magnifi cent painting was commissioned by Battlegames from John Parke. Every print is numbered, and comes with a signed Certifi cate of Authenticity.
To own a copy, choose one of the following:• Visit our website at www.battlegames.co.uk, follow the links and place your order there using your credit or debit card or your PayPal account.• Or send a cheque, made payable to Battlegames Ltd, together with your name and address, to GH Off er, Battlegames, 17 Granville Road, Hove BN3 1TG, East Sussex, UK with a note telling us which size you would like. Please note that we only accept cheques in pounds sterling drawn on a UK bank.• Or pay using your credit or debit card either by phone +44 (0)1273 323320, or by sending to the address above your name as it appears on your card, your full address with postcode/ZIP, the card number, type and issuing bank, expiry and start dates (if present), issue number (if present) and the three-digit security code on the back (the last three numbers appearing on the signature strip). Please include a contact telephone number. Oh, don’t forget to tell us who you’d like it sent to, if it’s a gift! • All prints are sold unframed and on a fi rst-come, fi rst served basis.
Prices (overseas post is via airmail) P&P UK P&P Europe P&P Rest of the WorldA4 (297mm x 210mm) £15 per print £1.50 £2.50 £3.00A3 (420mm x 297mm) £25 per print £2.00 £3.00 £3.50
WW2 Western DesertAll packs not priced are £1.05, and except where stated contain 10 foot.
BR88 8th Army riflemenBR89 8th Army Thompson smgBR90 8th Army BrenBR91 8th Army Vickers MG (2) x3BR92 8th Army CommandBR93 8th Army Field telephone (5)BR94 8th Army 3” mortar & crew (3)BR95 8th Army 2pdr A/T & crew (2) £1.65BR96 8th Army 6pdr A/T & crew (2) £1.65BR97 8th Army 25pdr FG & crew + ammo trailer (1) £1.65BR98 ‘Monty’ 30p
GR145 DAK riflemenGR146 DAK riflemen pose 2GR147 DAK MP40GR148 DAK MG34 (2) x5GR149 DAK MG42 (2) x3GR150 DAK 5cm mortar & crew x3GR151 DAK 8cm GWR34 mortar & crew x3GR152 DAK officersGR153 DAK radio operators (5)GR154 DAK 75mm IG & crew (2) £1.65GR155 DAK 8.8cm FLAK 36 - A.T./A.A. & crew (1)£1.65GR156 DAK FLE 105 field gun & crew (1) £1.65 GR157 DAK 150mm IG + crew (2) £1.65GR158 DAK 37mm A.T. gun + crew (2) £1.65GR159 DAK PAK38 50mm AT gun + crew (2) £1.65GR160 DAK PAK40 75mm AT gun + crew (2) £1.65GR161 DAK Russian 76.2mm FG + crew (2) £1.65GR162 DAK Rommel and Ramcke 60p
Postage and packingUK and BFPO 10%, Europe 20%, Rest of the World 30%
1 Easby Grove, Eston, Middlesbrough TS6 9DL Tel: 01642 460638Email: [email protected] Web: www.pendraken.co.uk
“BREAKING THE SQUARE”, GARCIA HERNANDEZ 1812
and start dates (if present), issue number (if present) and the three-digit security code on the back (the last three numbers appearing
philip parisi (order #7077380)

48 Battlegames Please mention Battlegames when contacting advertisers
Please support our advertisers
philip parisi (order #7077380)

Battlegames 49Please mention Battlegames when contacting advertisers
Please support our advertisers
philip parisi (order #7077380)

50 Battlegames Please mention Battlegames when contacting advertisers
Please support our advertisers
philip parisi (order #7077380)

Battlegames 51Please mention Battlegames when contacting advertisers
Please support our advertisers
philip parisi (order #7077380)

philip parisi (order #7077380)