Soviet IS-3 Heavy Tank- manual. Тяжелый танк ИС-3 - Руководство по материальной части.
1The JAWS of VICTORY — Rules of Play 1.0
Battle of the Korsun-Cherkassy Pocket: January/February 1944
An Operational Level Historical Simulation Game of World War II
RuLeS Of PLAy

2 The JAWS of VICTORY — Rules of Play 1.0
Table of Contents
1.0 IntroductIon . . . . . . . . . . . . . . . . . . . 3
2.0 Game components . . . . . . . . . . . . .32 .1 Inventory of Game Parts . . . . . . 32 .2 The Game Map . . . . . . . . . . . . . . 32 .3 Game Scale . . . . . . . . . . . . . . . . . 32 .4 Charts and Tables . . . . . . . . . . . 32 .5 The Playing Pieces . . . . . . . . . . . 32 .6 Unit and Marker Types . . . . . . . 42 .7 Rules Interpretation . . . . . . . . . . 52 .8 Glossary of Game Terms . . . . . . 5
3.0 sequence of play . . . . . . . . . . . . .63 .1 The Game-Turn . . . . . . . . . . . . . 63 .2 Game-Turn Sequence Summary 6
4.0 combat unIts and capabIlItIes . . . . . . . . . . . . . . . . . . . . 64 .1 Unit Attributes . . . . . . . . . . . . . . 64 .2 Unit Identification . . . . . . . . . . 64 .3 Unit Type and Size . . . . . . . . . . . 74 .4 Combat Strength and Steps . . . . 74 .5 Special Unit Attributes . . . . . . . . 84 .6 Unit Breakdown and
Recombination . . . . . . . . . . . . . 84 .7 Soviet Division Extension . . . . . 84 .8 German Alarm Units . . . . . . . . . 94 .9 Size Variation of German
Panzer Battalions . . . . . . . . . . . . 9
5.0 Weather . . . . . . . . . . . . . . . . . . . . . . . . 95 .1 Ground Condition
Determination . . . . . . . . . . . . . . . 95 .2 Visibility Determination . . . . . . . 9
6.0 combat aIr support mIssIons . . . . . . . . . . . . . . . . . . . . . . . 106 .1 Combat Air Support Availability 106 .2 Conducting Combat Air Support 10
7.0 reInforcements . . . . . . . . . . . . . 107 .1 Map Edge Entry . . . . . . . . . . . 107 .2 Reinforcement Schedules . . . . 10
8.0 replacements . . . . . . . . . . . . . . . . . 108 .1 Replacement Points . . . . . . . . . 108 .2 Eligible/Ineligible Units . . . . . . 118 .3 Turn Record Track RPs . . . . . . 118 .4 Applying RPs to Reduced Units 118 .5 Armor Type Replacements . . . . 118 .6 Special German Replacements . 12
9.0 movement . . . . . . . . . . . . . . . . . . . . 129 .1 Unit Movement Classes . . . . . . 129 .2 Terrain Effects on Movement . 129 .3 Ground Condition Effects
on Movement . . . . . . . . . . . . . . 13
9 .4 Types of Movement . . . . . . . . . 139 .5 German Rail Movement . . . . . . 139 .6 Reserve Declaration Segment . 139 .7 Reserve Movement . . . . . . . . . 139 .8 German Night Withdrawal
Segment . . . . . . . . . . . . . . . . . . 139 .9 Movement: General Cases . . . . 139 .10 Special Movement Restrictions 139 .11 Armor Interception . . . . . . . . . . 149 .12 Soviet Movement adjacent to
“Alarm Units” . . . . . . . . . . . . . 14
10.0 Zones-of-control/ Zones-of-Influence . . . . . . . . . . . 1410 .1 Units that project a ZOC or ZOI 1410 .2 Entering/Leaving an
Enemy ZOC/ZOI . . . . . . . . . . . 1410 .3 ZOC-to-ZOC Movement . . . . . 1410 .4 ZOI Movement . . . . . . . . . . . . . 1510 .5 General ZOC/ZOI cases . . . . . . 1510 .6 Effects of terrain on ZOC/ZOIs 15
11.0 stackInG . . . . . . . . . . . . . . . . . . . . . 1511 .1 Stacking Effects During
Movement . . . . . . . . . . . . . . . . 1511 .2 Retreat Stacking Conditions . . . 1511 .3 Stacking Convention . . . . . . . . 16
12.0 combat . . . . . . . . . . . . . . . . . . . . . . . . 1612 .1 Combat Phase . . . . . . . . . . . . . . 1612 .2 Units which may attack . . . . . . 1712 .3 Units which may be attacked . . 1712 .4 Supported/Unsupported Combat 1712 .5 Effects of Terrain on Combat . . 1812 .6 Effects of ZOCs/ZOIs on
Combat . . . . . . . . . . . . . . . . . . . 1812 .7 Combined Arms Combat Shift . 1812 .8 Armor Superiority . . . . . . . . . . 1812 .9 Special Unit Effects on Combat 1912 .10 Artillery Support . . . . . . . . . . . 1912 .11 High and Low Combat Ratios . 2012 .12 Combat Resolution . . . . . . . . . . 2012 .13 Retreats after Combat . . . . . . . . 2012 .14 “No Retreat “ . . . . . . . . . . . . . . 2112 .15 Advance after Combat . . . . . . . 2112 .16 Effects of Terrain on
Advance /Retreat . . . . . . . . . . . 2112 .17 Disorganization and Regroup . . 21
13.0 supply . . . . . . . . . . . . . . . . . . . . . . . . . 2213 .1 Supply Sources . . . . . . . . . . . . . 2213 .2 Supply Distribution
Markers (SDMs) . . . . . . . . . . . . 2213 .3 Tracing a Supply Path . . . . . . . 23
13 .4 Unit Supply State . . . . . . . . . . . 2313 .5 Effects of being Out-of-Supply 23
14.0 supply poInts . . . . . . . . . . . . . . . . . 2414 .1 Supply Point (SP) Markers . . . . 2414 .2 Receiving Supply Points . . . . . 2414 .3 Expending SPs . . . . . . . . . . . . . 2414 .4 Resupplying Artillery Units . . 2414 .5 Korsun Special Supply Source . 2414 .6 Air-Drop/Korsun Air Supply
Missions . . . . . . . . . . . . . . . . . . 2514 .7 Extended Supply Delivery
from an SDM . . . . . . . . . . . . . . 2514 .8 Soviet Air-Drop Supply
Missions . . . . . . . . . . . . . . . . . . 25
15.0 enGIneerInG . . . . . . . . . . . . . . . . . . . 2515 .1 German Improved
Positions (IPs) . . . . . . . . . . . . . 2515 .2 Bridges . . . . . . . . . . . . . . . . . . . 2615 .3 Soviet Minefields . . . . . . . . . . 27
16.0 German specIal rules . . . . . . . . 2716 .1 Hitler “No Retreat/Stand
Fast” Orders . . . . . . . . . . . . . . . 2716 .2 “Korps Isolation” . . . . . . . . . . 2716 .3 Operation Wanda . . . . . . . . . . . 2716 .4 “Breakout Declared” . . . . . . . . 2716 .5 “Every Man for Himself”
Rules . . . . . . . . . . . . . . . . . . . . 28
17.0 sovIet specIal rules . . . . . . . . . 2817 .1 Soviet Artillery Barrage . . . . . . 28
18.0 optIonal rules . . . . . . . . . . . . . . . 2918 .1 Soviet Partisans . . . . . . . . . . . . 2918 .2 German Armor
Reliability . . . . . . . . . . . . . . . . . 3018 .3 Heavy Tank Bridge Collapse . . 3018 .4 Effects of Rail Movement
on Supply . . . . . . . . . . . . . . . . 3018 .5 German Truck Movement: . . . . 3018 .6 Fords Across Rivers . . . . . . . . . 3018 .7 24th Pz Division (optional) . 3018 .8 Alternative Airfield
Construction . . . . . . . . . . . . . . . 3118 .9 Creating an Alternate
Supply Source . . . . . . . . . . . . . 3118 .10 Alternate German Strengths . . . 3118 .11 German 88 Anti-tank
Armor Intercept . . . . . . . . . . . . 3118 .12 Alternate Armor/Anti-armor
Combat . . . . . . . . . . . . . . . . . . . 3118 .13 Stalin Intervenes (multiple
Soviet players only) . . . . . . . . . 3118 .14 SDM Supply Range
Extension . . . . . . . . . . . . . . . . . 31

3The JAWS of VICTORY — Rules of Play 1.0
734
a5-580
1.0 IntroductionThe Jaws of Victory is an operational simulation of the encirclement of two German Korps in the Korsun-Cherkassy salient in January and February of 1944 . The German player manages parts of two German armees (the 8th and 1st Panzer) consisting of five korps . The Soviet player manages parts of two Fronts (the 1st and 2nd Ukrainian) consisting of eight armies . Players move and have combat with infantry, artillery and armored formations; choosing lines of attack, defensive lines, allocating supply and assigning combat air support missions . There are seven scenarios, each of which has a number of game turns . The Sequence of Play (Section 3 .0) regulates the order of the action in each game-turn, while providing a brief summary of how these actions are undertaken . The remainder of the rules are more detailed, explaining every aspect of each game function . A separate playbook contains game scenarios, historical notes, design notes and examples of play .
2.0 Game Components[2.1] Inventory of Game partsThe game consists of the following items:(2) 22 by 34 inch map sheets(5) Counter Sheets (1) Turn Record Track Card(1) Turn Sequence Player Aid Card(1) Combat Phase Player Aid Card(1) Terrain Effects Card(1) Soviet Player Card(1) German Player Card(8) German and Soviet Scenario Setup Cards(2) Six-Sided Dice (Red & Black)(1) Rule Book(1) Play Book
[2.2] the Game mapThe game map is composed of two separate 22 x 34-inch map sheets which, when joined together, form the Korsun battlefield area . A hexagonal (hex) grid is printed over the maps to regulate movement and placement of the playing pieces . The map topography is rotated counter clockwise
approximately 30 degrees from true north . See the compass on the map .
[2.3] Game scaleEach full Game-turn represents one day of ac-tual time . Each hexagon on the map represents approximately 2 miles . Combat units are at the division, regiment, brigade and battalion level .
[2.4] charts and tables A number of charts and tables are provided to facilitate play . They display many of the game functions and are printed on the map or on a sep-arate card . The use of these charts and displays is explained in the appropriate rules sections . turn record card• Turn Record Track• Ground Condition Table and Track• Visibility Table and Track• German and Soviet Reinforcement Scheduleturn sequence player aid card• Turn Sequenceterrain effects card• Terrain Effects Table• Bridge Collapse Table• Bridge Destruction Tablecombat results card• Combat Results Table (CRT)• German Artillery Support Table• Soviet Artillery Support Tablesoviet player card• Combat Air Support Track• Air Availability Table• 1Uk Replacement Point Track• 2Uk Replacement Point TrackGerman player card• Combat Air Support Track• Combat Air Support Availability Table• 8th Armee Replacement Point Track• 1st Panzer Armee Replacement Point Track • Korsun Air Supply Table• Air Drop Supply Table• Uman Airfield Track• Armor Replacement Roll Tableon-map boxes • Soviet and German Unit Breakdown Boxes
• Soviet and German Eliminated Unit Boxes• German Multi-step Armor Unit Holding Boxes• Soviet Artillery Division Holding Box
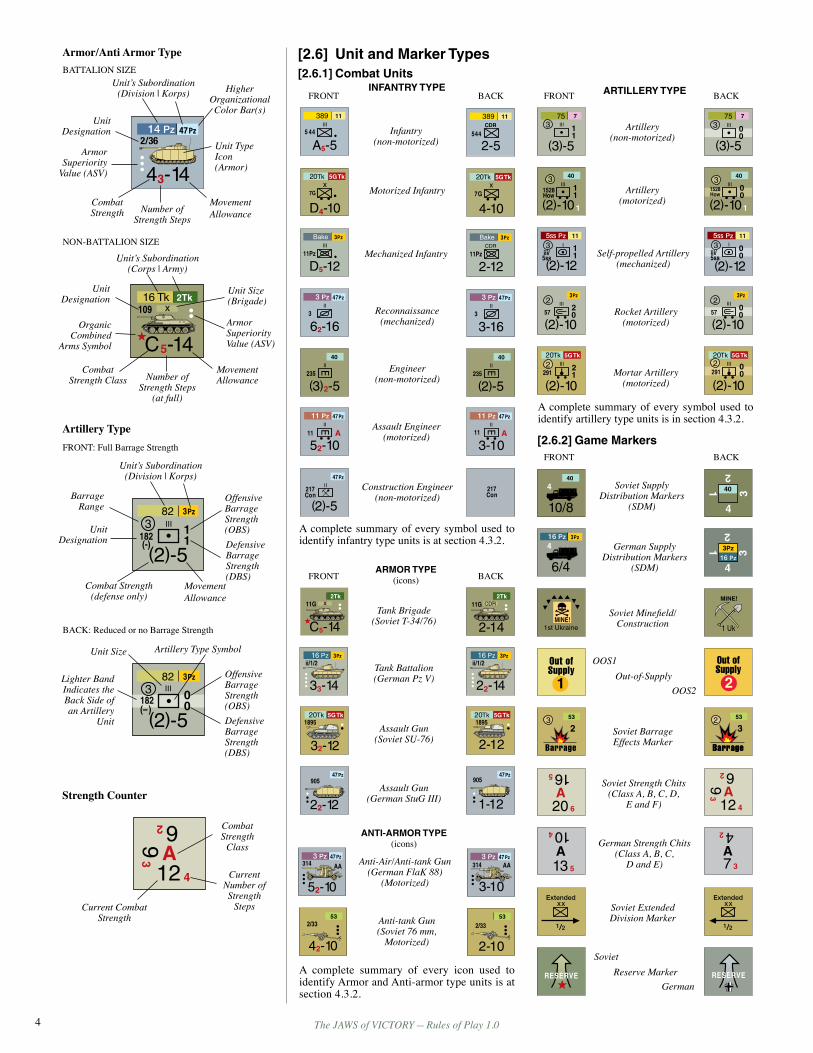
[2.5] the playing piecesThe 1170 1/2 inch cardboard playing pieces are provided in 5 die-cut sheets . These playing pieces are referred to as counters . Some rep-resent the actual combat units that participated in the campaign while others are simply markers used to facilitate specific game mechanics . [2.5.1] how to read the combat units The playing pieces representing the combat units are comprised of two nationalities; German and Soviet . Both German Armees and Soviet Fronts are depicted by a color unique to those forces . Although historically each had their own terms and symbols representing their combat units and functions, for the sake of brevity and consis-tency, both sides share a common set of terms and symbols used on the combat counters .
Higher Organizational Color Bar(s)
InfantryType
Unit Size(Division)
Unit Size(Regiment)
Unit SymbolUnit
Designation
Combat Strength Class
Combat Strength Class
Movement Allowance
Movement Allowance
Unit’s Subordination (Soviet Army)
Armor Superiority Value
Number of Strength Steps
Number of Strength Steps
basic terms for combat units
Battle of the Korsun-Cherkassy Pocket: January/February 1944
Rules of Play
Unit’s Division (number and color)
Unit’s Korps (number and color)
SOVIET
GERMAN
4 The JAWS of VICTORY — Rules of Play 1.0
A complete summary of every symbol used to identify infantry type units is at section 4 .3 .2 .
A complete summary of every symbol used to identify artillery type units is in section 4 .3 .2 .
A complete summary of every icon used to identify Armor and Anti-armor type units is at section 4 .3 .2 .
a 12 4
6 2
9 3
3Pz82
00
(2)-5
3182(–)
43-14
14 Pz 47Pz2/36
Reconnaissance(mechanized)
Motorized Infantry
Mechanized Infantry
Higher Organizational Color Bar(s)
Armor/AntiArmorType
ArtilleryType
StrengthCounter
Unit Size(Brigade)
Unit Designation
Unit Designation
Combat Strength
Movement Allowance
Unit’s Subordination (Division | Korps)
Number of Strength Steps
BATTALION SIZE
FRONT: Full Barrage Strength
BACK: Reduced or no Barrage Strength
NON-BATTALION SIZE
Unit’s Subordination (Corps | Army)
Unit Type Icon(Armor)
Combat Strength Class
Combat Strength
Class
Movement AllowanceNumber of
Strength Steps(at full)
Current Number of Strength
StepsCurrent Combat Strength
Armor Superiority Value (ASV)
Armor Superiority
Value (ASV)
Organic Combined
Arms Symbol
182(-)
3Pz82
11
(2)-5
3
Unit’s Subordination (Division | Korps)
Unit Designation
Lighter Band Indicates the Back Side of an Artillery
Unit
Barrage Range
Combat Strength(defense only)
Movement Allowance
Offensive Barrage Strength(OBS)
Offensive Barrage Strength(OBS)
Defensive Barrage Strength (DBS)
Defensive Barrage Strength (DBS)
Unit Size Artillery Type Symbol
[2.6] unit and marker types [2.6.1] combat units
Infantry type
Infantry (non-motorized)
FRONT
FRONT
BACK
BACK
Engineer (non-motorized)
Construction Engineer (non-motorized)
Assault Engineer (motorized)
235
(3)2-5
40
235
(2)-5
40
a
52-1011
11 Pz 47Pz
a
3-10
11 Pz 47Pz
11
217Con
(2)-5
47Pz
217Con
11
3
(2)-12
5ss Pz 11
iii/5ss
00
3
(2)-12
5ss Pz 11
iii/5ss
Artillery (non-motorized)
Artillery (motorized)
Self-propelled Artillery (mechanized)
775
11
(3)-5
3
Mortar Artillery (motorized)
Rocket Artillery (motorized)
257
20
(2)-10
3Pz
20tk
(2)-10291
21
5Gtk
2
1528How
(2)-101
11
3 40
artIllery type
armor type(icons)
antI-armor type(icons)
Soviet Supply Distribution Markers
(SDM)
Soviet Minefield/ Construction
Tank Brigade (Soviet T-34/76)
Tank Battalion (German Pz V)
Assault Gun (Soviet SU-76)
Assault Gun (German StuG III)
Anti-Air/Anti-tank Gun (German FlaK 88)
(Motorized)
Anti-tank Gun (Soviet 76 mm,
Motorized)
Soviet Extended Division Marker
Soviet Strength Chits (Class A, B, C, D,
E and F)
German Strength Chits (Class A, B, C,
D and E)
Soviet Barrage Effects Marker
Reserve Marker
Out-of-Supply
German Supply Distribution Markers
(SDM)
OOS1
OOS2
[2.6.2] Game markersFRONT
FRONT
BACK
BACK
Soviet
German
52-10
3 Pz 47Pz
AA314
3-10
AA3143 Pz 47Pz
00
(3)-5
3775
42-10
2/3353
2tk
C5-14
11G
20tk 5Gtk1895
32-12
20tk 5Gtk1895
2-12
2tk
2-14
11G
16 Pz 3Pz
33-14
ii/1/216 Pz 3Pz
22-14
ii/1/2
22-12
47Pz905
257
00
(2)-10
3Pz
00
1528How
(2)-101
340
20tk
(2)-10291
5Gtk2 0
0
1-12
90547Pz
2-10
53
2/33

5The JAWS of VICTORY — Rules of Play 1.0
[2.7] rules InterpretationIn case of conflict or ambiguity between the rules and the charts, tables, units and markers, the narrative of these rules shall take precedence . In all cases common sense should prevail .
[2.8] Glossary of Game terms Armor Unit: A combat unit whose primary equipment was armored and generally operated on tracks . When appearing in lower case, the term “armor” includes all armor and assault gun units .Anti-armor Unit: A combat unit whose primary equipment was a towed anti-tank or anti-air gun .Armor Superiority Value (ASV): A relative armor/anti-armor capability of a combat unit measured in dots . White dots allow for offensive and defensive armor capability . Black dots allow for only defen-sive anti-armor capability . The Armor Superiority Value is used to determine Armor Superiority Combat Bonus shifts during General Combat and loss results in Armor/Anti-armor Combat . Army / Armee: Terms that differentiate between Soviet and German army command levels . Soviet armies control subordinate divisions and
dedicated support units . German armees control German korps and dedicated support units . Artillery Unit: A combat unit that employs indi-rect fired as its main weapon component . These include motorized and non-motorized tube artil-lery, heavy caliber tube artillery, and mortar and rocket equipped units . When appearing in lower case, the term “artillery” includes all artillery types .Corps / Korps: Terms that differentiate between Soviet and German corps command levels . Soviet corps control subordinate infantry, armor, and artillery units . German Korps control sub-ordinate divisions and dedicated support units . Front: A term that distinguishes the highest Soviet command level . Fronts control subordi-nate Soviet armies and front support units .Gruppe Stemmerman: A related group of German units that are unable to trace supply to a supply source at the instant that the German player declares Korsun isolatedIcon: Some combat units contain depictions of the primary weapon system employed by the unit . These counters are referred to as “icon units” and indicate additional Armor/Anti-armor combat capabilities . Infantry Type Unit: A combat unit whose pri-mary combat component is dismounted infantry . These include non-motorized infantry, motor-ized infantry, mechanized infantry, motorized and non-motorized combat engineers, fusilier, cavalry and motorized and non-motorized/ mechanized reconnaissance units . When appear-ing in lower case, the term “infantry” includes all of the above types of units .Motorized Unit: When appearing in lower case, the term motorized unit includes all units whose primary method of movement is based on either armored vehicles (e.g. tanks) or motorized vehi-cles (e.g. trucks and halftracks) .Parent Unit: A term that refers to a higher echelon unit that can breakdown into separate smaller component units or a Soviet Division that can extend . Pocket: A term that describes a related group of German units that are unable to trace a supply path of any length to a map edge supply source .Stack: More than one friendly unit occupying a single hex .Step: A measure of the number of combat losses that a unit can incur before being eliminated from play .Supply Range: The distance, counted in hexes, from a combat unit to its Supply Distribution Marker (SDM) . Supply Distribution Marker (SDM): A map marker that denotes the central location of an organization’s supply distribution network . Support Unit: A German unit assigned to a Korps but not part of a division, kampfgruppe or korps gruppe . A Soviet unit assigned to a Front or Army that is not part of a division or tank/ mechanized/ cavalry corps .
German “Wanda”
(Start / End)
German Korsun SPs
Ground Condition
Visibility
Artillery No Fire Marker
CRT OddsGame Turn * (Soviet
player-turn)
Game Turn * (German
player-turn)
German Air Support
Soviet Air Support
1st UK
Soviet Air Support
2nd UK
German Air-Drop Supply
German Korsun Air
Supply
[2.6.3] track markers The following counters are a representative sample of most of the markers used on the var-ious game tracks and displays . Most are front side only .
Soviet Combat Air-Support Mission
Marker
German Combat Air-Support Mission
Marker
Combat Marker
German Disorganized/Regroup
Marker
Soviet Disorganized/Regroup
Marker
Breakthrough
German Truck
German Rail Capacity
German Rail Cut
German Panther/Tiger Bridge
OK Marker
German Alternate Airfield
Marker
German Improved Position
Artillery Out-of-Ammo
Armor Replacement
Points**
Infantry Replacement
Points**
New Bridge
Ford
Bridge Destroyed
FRONT BACK
Bridge Completed
German Discovered
Construction
Soviet Discovered
Bridge Repair
* Front and back of the same marker . ** These are samples of a number of Infantry and Armor Replacement Points markers specific to So-viet Fronts and German Korps .

6 The JAWS of VICTORY — Rules of Play 1.0
4.0 Combat units and Capabilities
Both the Soviet and German armies have combat units consisting of armor, anti-armor, various in-fantry types, engineers, anti-air, reconnaissance, and artillery . However, the organization, size, and capability of the units within those armies are quite different . Players should take note of these differences in order to effectively play the game .
[4.1] unit attributes Most combat units have a front and back side . The front side of the unit represents the unit at full strength (maximum capability) while the back side represents the unit at a reduced strength or capability . Each unit has the follow-ing attributes: unit subordination (Soviet army or German korps), unit identification (ID), unit type symbol, combat strength, and movement point allowance . Each unit also has an inherent unit size that is used to determine the number of combat losses (steps) that it can incur before being eliminated from play . Armor, artillery, anti-armor and engineer units have added attrib-utes as described in later sections .
[4.2] unit Identification Soviets: Each Soviet division consists of one combat unit and is labeled with its division number and its assigned army . Tank and mech-anized corps consist of 8 to 10 units . Each unit of a corps is labeled with either its regiment, bri-gade or battalion number and its corps number in addition to its assigned army . Army support units are labeled with their brigade, regiment or battalion number and their army number . German:Most German infantry divisions con-tain six combat units and most Panzer divisions contain nine . Each unit of a division is labeled with its division number and its assigned korps number . The infantry regiments within the divi-sions are also labeled with their regiment num-ber . Panzer division units are labeled with their regiment or battalion number . Korps support units are labeled with their regiment or battalion number and their assigned korps number .
3.0 Sequence of Play [3.1] the Game-turn Each scenario consists of a number of game-turns . A Game-Turn Marker is placed on the Turn Record Track (TRT) to indicate the current turn and is ad-vanced at the end of each turn . The Turn Record Track also contains turn-specific information for weather, reinforcements, replacements, and other special conditions . An abbreviated play sequence for each turn is outlined below . A separate, more detailed Turn Sequence Player Aid Card is pro-vided to help players navigate each turn . Reminder: the following Sequence of Play and the Sequence of Play Player Aid Card are only summaries . The text in the rule body has precedence .
[3.2] Game-turn sequence of play summary
a. Weather staGeDetermine the ground condition and visibility for the current turn (Section 5 .0) .
b. mutual aIr staGePlayers determine their number of combat air-support missions for the current turn (Section 6 .1) .
c. mutual supply staGe 1 . SupplyMarkerPhase: (Section 13 .2 .1)2. SupplyPointReceptionPhase: (Section 14 .2)3. SupplyDeterminationPhase: Players
determine the supply status of each of their units (Sections 13 .3 and 13 .4) .
4. ExtendedSupplyofOOSunitsPhase: (Section 14 .7)
5. ArtilleryResupplyPhase: Players may re-supply eligible artillery units (Section 14 .4) .
6. Soviet Air-Drop Supply Phase: Each Soviet Front may attempt Air-Drop Supply (Section 14 .8) .
d. German aIr supply staGe1. Air-DropSupplyPhase: The German player
may conduct Air-Drop Supply (Section 14 .6 .4) . 2. KorsunAirSupplyPhase: The German
player may conduct air supply to the Korsun Airfield (Section 14 .6 .3) .
3. Air-DropAllocationPhase: The German player may allocate supply points to Air-Drop missions (Section 14 .6 .1) .
4. KorsunAirSupplyAllocationPhase: The German player may allocate supply points to Korsun air supply missions (Section 14 .6 .2) .
e. sovIet player-turn 1. Soviet Event Phase(insequence):
A . Barrage Unit Deployment Segment: (Section 17 .1 .5)
B . Barrage Unit Creation Segment: (Section 17 .1 .1)
C . Artillery Barrage Segment: The Soviet Player may conduct a Special Barrage Attack (Section 17 .1 .3) .
2. Replacement/Reinforcement PhaseA . Replacement Segment: Receive Soviet re-
placements (Section 8 .0) .B . Reinforcement Segment:Receive any
Soviet reinforcements (Section 7 .0) .3. Movement Phase
A . Reserve Declaration Segment: The Soviet player may place eligible units in Reserve (Section 9 .6) .
B . Movement Segment: The Soviet player may move his units (Section 9 .0) The German player may attempt to destroy bridges and may conduct armor intercept (see 15 .2 .1) .
4. Combat PhaseA . Combat Declaration Segment:(Section
12 .1 .1)B . German Armor Reaction Segment:
(Section 12 .1 .2)C . Combat Resolution Segment:Each
declared combat is resolved individually and in any order (Section 12 .1 .3) .
D . Breakthrough Segment:(Section 12 .1 .4)E . Reserve Movement Segment: (Section 9 .7)F . Reserve Combat Segment: (Section 12 .1 .6)
5. Engineering Phase The Soviet player may destroy and repair
bridges, initiate new bridge construction, and construct minefields (Section 15 .0) .
6. Disorganization/Regroup Phase(both players)
The Soviet player removes all Regroup mark-ers from Soviet units . The German player flips all German Disorganized markers to their Regroup side (Section 12 .17 .4) .
Both players flip or remove artillery “No Fire” markers .
f. German player-turn1. Event Phase
A . Continuous Front Release Segment:The German player may roll for any “Contin-uous Front” release (Section 22 .1 .4) .
B . German Declaration Segment:The German player may declare:
•KorsunIsolation/AirfieldActivation (Section 13 .1 .3 and 14 .5 .1) .
•KorpsIsolation(Section16.2). •OperationWanda(Section16.3). •Breakout(Section16.4).C . Armor Reliability Roll(Optional Rule 18 .2)
2. Replacement/Reinforcement PhaseA . Replacement Segment:Receive German
replacements points (RPs) (Section 8 .0) . The German player may also receive RPs from certain eligible units (Section 8 .6) .
B . Reinforcement Segment: Receive any Ger-man scheduled reinforcements (Section 7 .0) .
3. Movement PhaseSame as in the Soviet Player-Turn except German units move . German reinforcements may enter and move by rail (Section 9 .0) . The Soviet player may attempt to destroy bridges and may conduct armor intercept .
4. Combat PhaseSame as in the Soviet Player-Turn except that the German units attack and the Soviets defend . There is no Soviet armor reaction (Section 12 .0) .A . Night Withdrawal Segment: German
Armor units may conduct withdrawal movement (Section 9 .8) .
5. Engineering PhaseSame as in the Soviet Player-turn except that
the German player does not construct mine-fields, but may construct improved positions (IPs) and type “J” and “K” bridges (Section 15) .
6. Disorganization/Regroup Phase(both players)
The German player removes all regroup markers from German units . The Soviet player flips all Soviet Disorganized markers to their regroup side (Section 12 .17 .4) .
7. Breakout Phase If Breakout declared see Section 16 .5 .
G. Game-turn staGeA .Victory Determination Segment: If it is
the last Game-turn of the scenario, then determine victory based on the scenario victory conditions .
B .Game-Turn Advance Segment:Advance the Game-Turn marker on the Turn Record Track .

7The JAWS of VICTORY — Rules of Play 1.0
B4-5 B4-5 B4-5 2-5
Motorized Infantry
[4.3] unit type and sizeAll units have a unit type symbol located at the cen-ter of their counter . Its unit size designator appears above the unit type symbol . Armor, assault gun, an-ti-air and anti-armor units are depicted with an icon representing the major type of weapon contained in the unit . Infantry, reconnaissance, cavalry, engineer, and artillery units are depicted using standard mili-tary symbols . [4.3.1] unit size xx Division DG Division Group x Brigade RG Regiment Group III Regiment KG Kampfgruppe II Battalion CDR Cadre I Company
NOTE: Armor and anti-armor units identified as an icon are assumed to be of regiment or battalion size unless otherwise noted .[4.3.2] unit type symbolsBelow is a summary of every symbol and icon used to identify a unit’s type . All units fall into one of three basic movement types; non-motor-ized, motorized/mechanized, or armor .
p
Sec
MEChanizED/MotoRizED
aRMoR
Mechanized Infantry Bridge Engineer
Reconnaissance
Soviet Reconnaissance
German Fusilier
[4.4] combat strength and steps Smaller size combat units (typically battalions) are represented by a single unit counter . Larger units are represented by a unit counter and a strength chit . Depending on its specific size, a unit may suffer from one to six combat step losses before elimination from play . Each combat strength reduction is referred to as a “step” loss . Each combat unit has an indicator on the counter that identifies the number of “steps” in the unit . The combat strength printed on a unit counter (or its strength chit) is used to determine the combat ratio during combat . A combat strength in paren-theses indicates that the unit may only contribute its combat strength to defense . As a unit incurs combat losses, its combat strength is reduced by either flipping it to its back side or rotating its strength chit to reflect the new reduced strength .
[4.4.1] artillery unitsArtillery units are one step units but have a front and a back side . The front side indicates that the unit is fully supplied with ammunition and is capable of either offensive or defensive combat support . The back side of the counter indicates that the unit has previously provided artillery support to combat (i .e . it has either reduced or no remaining artillery support capability) . If an artillery unit suffers a step loss while on either its front or back side, it is eliminated from play (see section 12 .10) .
[4.4.2] other one-step unitsSome armor, infantry, and engineer units have one step and are represented by a single counter with no back side . If they suffer a single combat step loss, they are eliminated from play .
[4.4.3] two-step units Anti-armor, engineer, anti-air, Soviet regiments and German infantry battalions are two-step units . They are represented by a single counter with a front and back side . When these units suf-fer a combat loss (a step reduction in strength) they are flipped to their back side . If they suffer an additional loss they are eliminated from play .
Motorized Engineer
Engineer
Construction Engineer
Partisans
Security
Mortar ArtilleryInfantry
Airborne Infantry
Mountain Infantry
Artillery
Super Heavy Artillery
Heavy Artillery
Motorized Artillery
Rocket Artillery
Mortar Artillery
88 mm Anti-air/Anti-tank
75 mm Anti-tank
45/50 mm Anti-tank
76 mm Anti-tank
German
Pz IIIT-34/76
M4 (Sherman)
SU-85
SU-122 Marder III
SU-152
SU-76
IS-1
Pz IV
Pz V (Panther)
Pz VI (Tiger)
StuG III
Soviet
[4.4.4] multi-step unitsUnits with more than two steps are represented by a unit counter and a strength chit . The strength chit is placed under the unit counter and may not be examined by the opposing player except dur-ing combat odds determination . On the combat counter, a subscript appears under the Combat Class to indicate the maximum number of steps available to the unit . The strength chit indicates the current combat strength and number of steps when the numbers are orientated to the base of the the counter (right reading and aligned with the base of the combat unit) .Soviet Multi-step units include Soviet divi-sions, cavalry divisions, armor brigades, motor-ized brigades, and FA battalions . GermanMulti-stepunits include German regi-ments, regiment groups, and division groups . As these units incur combat losses, their strength is reduced by rotating the strength chit to the next lowest value .
EXAMPLE: The above combat unit is a Soviet Infantry Division. It is represented by two counters: a combat unit and a strength chit. The strength chit is normally placed underneath the unit counter. Its combat class is an “A” indi-cating which class of strength counter is to be used to determine actual combat strength. The example shows a current combat strength of 12 at 4 steps. After losing a step in combat, the strength chit is rotated 90° and remains beneath the combat unit with a combat strength of 9 and with 3 steps remaining.
[4.4.5] cadre unitsA Multi-step unit that is reduced to its last step is flipped to its back side and its strength counter is removed from the map . The back side of the unit counter is a Cadre unit (CDR) that is specific to the unit .
non-MotoRizED
multi-step units
how Multi-step Units Reduce to Cadre
Cadre
Back
Back
Counter Front
Counter Front
Cadre
4 step unit
5 step unit
Marker Front
Marker Front
Marker Back
Marker BackFlip Marker
Rotate Marker
Flip Counter
Flip Counter
The same Strength Chit stays with the combart unit until removed.
Strength Chits are matched to the unit’s Combat Strength Class; A, B, C, etc . Note that some units may start a scenario at a reduced step level .
Flip Marker
a 12 4
6 2
9 3a6-5
133
40
a 1
2 4 6
2
9 3
Combat Strength
Class
Combat Strength
Class
Combat Unit Strength Marker

8 The JAWS of VICTORY — Rules of Play 1.0
same designation when the brigade is in play . These brigades do not receive combined arms but may use their armor unit’s white dot for ar-mor superiority .
[4.6] unit breakdown and recombination
Soviet divisions, German regiments, Soviet motorized brigades, and German motorized and mechanized regiments may breakdown into smaller component units . Component units may also recombine into their parent unit . A Breakdown unit is recognized by a different color in its unit type symbol .
Different Color Unit
Symbol
Further Examples: See below.The game contains both generic and unit-spe-cific breakdown counters . See section 22 .4 of the Playbook for details .CASES:1 . Breakdown or recombination occurs at either the beginning or end of a unit’s movement . Units must occupy the same hex at the instant of break-down or recombination . 2 . A unit that breaks down or recombines may not expend more than its allowed number of movement points during movement . 3 . The strength of a component unit or recom-bined unit is determined by its total number of steps at the instance of breakdown or recombi-nation . 4 . Upon breakdown, all components adopt the same supply and organizational status as the parent unit . 5 . Upon recombining, the parent unit adopts the worst supply or organizational status of the com-bining subordinate units . 6 . German regiments may breakdown during re-treat, however, Soviet units may not breakdown during retreat (see Section 12 .13) .PROCEDURE:1. Breakdown:When a full-strength parent unit
breaks down all component units replace it at full strength . If the parent unit has taken losses, then the player replaces the parent unit with breakdown units of an equal number of
steps . Place the parent unit in its on-map unit breakdown box .
2. Recombination: When one or more com-ponent units recombine into a parent unit, return the component units to their on-map holding box and replace them with the parent unit counter . Place the parent unit’s strength counter underneath the unit and set the com-bat strength to reflect the unit’s current num-ber of steps .
[4.7] soviet division extensionPLAyER NOTE: The inclusion of Soviet division extension markers allows the Soviet player to thin certain areas of a defensive line while still main-taining continuous occupied hexes in the line. They may be useful at the map edges or other ar-eas where there is little chance of German attack.
Parent UnitMarker
Soviet division extension allows a Soviet divi-sion to occupy two adjacent hexes using a sec-ond counter . A Soviet infantry or cavalry division may extend or recombine at any time during its movement or advance after combat . A Soviet division’s cadre may not extend .PROCEDURE:ExtendingaDivisionDuringMovement:Place an Extended marker in the divisions hex and then move either the marker, the division unit or both . The Extended marker must be on or adjacent to the unit at all times during movement and must obey all movement rules during movement . At the end of movement, point the arrow on the Extended marker toward the division unit counter . DuringAdvanceAfterCombat:If advancing, place an Extended marker in the advancing divi-sion’s hex and then advance the marker into the combat hex . Recombining During Movement: Move the Extended marker into the parent unit’s hex . Expend the number of movement points to enter the hex and then remove the marker .RecombiningDuringRetreat:Retreat the par-ent unit (or marker) into the Extended marker (or parent unit) and remove the Extended marker .[4.7.1] movement and stacking1 . Each hex of an extended division counts as one divisional unit for stacking purposes .2 . An Extended marker has the same number of movement points as its parent unit .3 . When a division is extending, expend the num-ber of movement points required to exit the parent unit’s hex and enter the adjacent extended hex . 4 . When a division is recombining, expend the number of movement points required to exit the hex the Extended marker is in to enter the hex that the parent unit occupies . 5 . When the component portion is extending or recombining, it must include all terrain move-ment costs and ZOC/ZOI costs during the act of extending/recombining . Note: A division cannot extend or combine into a hex in which two enemy hexes exert a ZOC.6 . An extended division may move as a single unit as long as both the parent unit and the Extended
6tk
2-14
5G tk22
53
3-525G
3Pz82
166
2-5
Regiment, Brigade, and Division Cadre sized units
Eliminated cadre units are not permanently re-moved from play when they incur the unit’s final step loss . They may return to play via replace-ments (Section 8 .2 .1)
[4.5] special unit attributes[4.5.1] armor/anti-armor combatArmor, assault gun, anti-air and anti-armor units are printed with an icon that depicts the primary weapon system of the unit . These units also con-tain a number of dots that indicate the relative ar-mor and anti-armor effectiveness of that weapon system (referred to as its Armor Superiority Value; see 2 .5 .1 and 12 .8) .
2-12
203 47Pz
Armor Superiority Value (ASV) Dots
White dots are used to determine armor superior-ity and are also used in attack or defensive Armor/Anti-armor combat . Black dots are only used in defensive anti-armor combat (see 12 .1) . Armor units with white dots are also capable of “armor intercept” during the enemy movement phase . [4.5.2] Infantry anti-armor capability Some infantry units have a black dot that reflects the unit’s inherent anti-armor effectiveness . The infantry unit’s ASV black dot is used for defen-sive anti-armor combat only (see 12 .12 .1) . [4.5.3] soviet armor brigade
combined arms Soviet armor brigades are unique in that they consist of both armor and infantry integrated into a single unit . They have one infantry step when on their front side and no infantry steps on their back side (Cadre) . When on their front side, they automat-ically receive combined arms as indicated by the star H on the counter .CASES:1 . During combat, Soviet armor brigades are considered as either: a) only an armor unit if in combat with only German armor or b) armor and infantry if in combat with German infantry .2 . They may participate in Armor Intercept (Section 9 .11) and ZoC to ZoC movement .
[4.5.4] soviet cavalry divisions5G Cav12G
1-14B4-712G
5G Cav The three divisions of the 5G Cavalry Corps were equipped with a small force of Sherman
M4 tanks as represented by a separate unit with one white dot . The Sherman armor unit must al-ways be stacked with the division bearing the same unit designation, unless the division is eliminated . [4.5.5] brigades of the soviet 5th
mechanized corps
C5-14
5M
9
D4- 5
6tk 5M 6tkThe three infantry bri-gades of the 5th Mech-anized Corps were equipped with a Sher-
man tank regiment as represented by a separate unit with one white dot . The Sherman unit must always be stacked with the brigade bearing the
CDR
A 20 6
16 5
A6-5
27
206
52-51
27
206
52-52
27
206
52-53
27
206+ +
10 4
D
8 3
+ +20Tk
70G
D4-10
5GTk
3/70G
3-10
5GTk20Tk
2/70G
3-10
5GTk20Tk
2-10
1/70G
5GTk20Tk
unit breakdown examples
Important: Only one German breakdown battalion retains a black dot.
See the back cover for more examples .
Breakdown/Recombination of a German Regiment
Breakdown/Recombination of a Soviet Division
9

9The JAWS of VICTORY — Rules of Play 1.0
marker move simultaneous and adjacent to each other . Neither a parent unit nor its marker may ex-ceed its individual movement allowance . Include all movement costs for terrain and ZOC/ZOIs .Note: As indicated above, divisions may not di-rectly extend or recombine into another enemy ZOC. However, they may indirectly do so (exit and reenter) if neither the parent unit nor its ex-tended counter violates the ZOC/ZOI movement rules. Example: An Extended marker extends from its parent occupied hex into a hex not in an enemy ZOC. The Extended marker may then move into a hex adjacent to the parent unit that is in an enemy ZOC.
[4.7.2] effects of combat on extended divisions
1 . For combat, each component of an Extended division is valued at ½ of the division’s current combat strength and number of steps, rounding up the value assigned to the parent unit . Any combat step losses are taken by rotating the unit’s single combat strength marker .2 . If an Extended division attacks, both the par-ent unit and its Extended marker act as two sep-arate units and may attack into any hex or hexes they are adjacent to . If both components of an Extended division attack into the same hex, the attack is executed as a single combat and their strengths must be combined . All rules for combat and ZOC/ZOI apply . 3 . An attacking Extended division does not ben-efit from the Soviet combat division bonus . 4 . If only one of its two hexes it occupies is at-tacked, then only the component in the attacked hex participates in the combat . 5 . If an Extended division is subjected to two separate attacks, the combat strength in each hex is determined prior to both combats . Both attacks must be resolved before any retreat is conducted .6 . If an Extended division is subject to an attack in only one of its hexes, then only the attacked component retreats . If either component suffers a breakthrough result, then both components of the division must retreat and must recombine .7 . An Extended division may not retreat into itself unless there are no other retreat options available .
[4.7.3] effects of disorganization and regroup on extended divisions
A Disorganized combat result on one component of the division does not affect the other com-ponent . A Regroup marker applied to one com-ponent of the division does not affect the other component of the division .[4.7.4] extended divisions and supplyIf either component of an extended division is In-Supply, then the entire division is in supply .
[4.8] German alarm unitsHISTORICAL NOTE: The German army had a large number of rear area support troops within an operational area. As the Soviets achieved their breakthrough, these rear area units were hastily formed into “Alarm” combat units for the purpose of defending key positions inside the battle area. The game is provided with a number of one-step “Alarm” units . The units are treated as infantry type units but have variable combat strengths and limited movement values .
[4.8.1] historical deploymentAlarm units are deployed in locations known to have historic significance such as logistic or rear area facilities . During scenario set-up they are randomly drawn from an opaque container and placed front-side-up (Alarm) in hexes indicated in the scenario . The German player (only) may observe the combat strength of alarm units once placed on the map . [4.8.2] alarm unit capabilities An Alarm unit has the following capabilities and limitations: • It has one step . • It has no ZOC or
ZOI .• It is always in supply .• It may not move when on its “Alarm” side .• It may be attacked per the normal combat
rules in either the Soviet Combat Phase or Movement Phase per (Section 9 .12) .
• An Alarm unit flips from its deployed side to its unit side when attacked .
• Its combat strength may only be used in defense, including adding it to other units de-fending in the same hex . It cannot contribute or receive combined arms .
• It receives no addition to its combat strength from terrain or improved positions .
• When flipped to its unit side, an Alarm unit may move normally per the movement rules .
• An Alarm unit may be incorporated into German combat units as a replacement point per (Section 8 .6 .3) .
• The German player may voluntarily flip an Alarm unit to its unit side any time that an attack-capable German unit occupies or moves through a hex occupied by an Alarm unit .
[4.9] size variation of German panzer battalions
HISTORICAL NOTE: By early 1944 most German Panzer (armor) Battalions were heavily depleted with many battalions reduced to less than 10 tanks. However, some Panzer battalions that arrived as reinforcements were nearly fully equipped. DESIGN NOTE: In order to replicate the above historical condition, some larger Panzer battal-ions are represented with two company counters instead of one battalion counter. In addition, some larger Panzer battalions are represented by mul-ti-counter units consisting of 4 or 3 step losses.
The number of steps in a German armor battalion is a function of the number of tanks in the bat-talion at the beginning of the battle and the abil-ity of the tank type to withstand Soviet Armor/Anti-armor direct fire . Accordingly, the number of steps in an armor unit can vary from one to four steps . Units with more than two steps are represented by multiple counters . After a second step loss, these unit counters are replaced by a second counter (identified by a band across the center of the counter) . See the example below.
In this example, upon the first loss Counter No. 1 is flipped to its back side. Upon the second step loss, Counter No. 1 is removed and replaced with Counter No. 2 with its front side up. Upon the third loss, Counter No. 2 is flipped to its back side. The unit is eliminated after the fourth step loss. In no instance should both of the unit’s counters be on the map at the same time.
size variation of a German panzer battalionThe i/1st battalion of the 2nd Pz Regiment of the 16 Pz Division is shown below .
Front Back BackFront
Bar denotes the second (replacement) counter for the same unit .
Unit starts with
4 steps .
Counter No. 1 Counter No. 2
(2)-35
alarmalarm
Front Unit Side5.0 Weather Historical Note: Weather played a significant part in the battle. During the initial break-through, the Soviets benefitted from frozen ground which allowed them to rapidly penetrate deep into the German rear. As the Germans be-gan their counter-attack to relieve the Pocket, an early warming period occurred creating vast fields of mud. Roads became impassable and movement and supply virtually came to a crawl. Players determine the ground condition and visibility conditions during the Weather Stage of each Game-turn .
[5.1] Ground condition determination
The ground condition is determined by a die roll cross referenced to the Ground Condition Table . The resulting ground condition will be either Frozen or Mud . PROCEDURE:1 . Either player rolls a single die .
2 . Apply the Ground Condition modifier from the Game-Turn Record Track to the die roll .
3 . Cross-reference the modified roll to the Ground Condition column of the table .
4 . Place the Ground Condition marker on the corresponding box of the Ground Condition Track (Frozen or Mud) .
Design Note: The die roll modifiers are designed to provide a bias toward the historical ground conditions of February 1944.
[5.2] visibility determinationVisibility is determined each turn by a die roll on the Visibility Table . The resulting visibility will be either Clear, Overcast or Storm . PROCEDURE:1 . Either player rolls a single die
2 . Cross reference the die roll to the Visibility Table .

10 The JAWS of VICTORY — Rules of Play 1.0
3 . If the result is 1–4, the visibility is Clear .4 . If the result is 5 or 6, roll a single die again .
If the result is a 1 through 5, the visibility is Overcast . If the result is 6 the visibility is Storm .
5 . Place the Visibility marker on the corre-sponding box of the Visibility Track (Clear, Overcast, Storm) .
6.0 Combat Air Support Missions
GENERAL RULEBoth players determine their number of combat air support (CAS) missions for the current turn during the Mutual Air Stage . Each CAS mission can provide either offensive or defensive air sup-port to individual combats during that turn .
[6.1] combat air support availability
[6.1.1] German air support availabilityThe Germans receive a single allocation of combat air support each turn . PROCEDURE:1 . Roll a single die during the Mutual Air Stage. 2 . Add the Visibility and Operation Wanda mod-
ifiers to the die roll (Sections 5 .2 and 16 .3) .3 . Cross reference the modified die roll to the
appropriate Frozen or Mud column of the German Combat Air Support Availability Table.
4 . The result is the number of combat air support missions available for the current turn . Place the German Combat Air Support marker on its Combat Air Support Missions Track on the number received .
EXAMPLE: The German player rolled a 2 un-der the Frozen Column. There are no modifiers for Visibility and it is not an Operation Wanda turn. The player receives 1 Air Support Point and places the Combat Air Support Marker in the 1 space on the Combat Air Support Missions Track.
[6.1.2] soviet air support availability The Soviets receive separate allocations for the 1st and 2nd Ukrainian Fronts each turn .
PROCEDURE:1 . Roll a single die for each Soviet Front during
the Mutual Air Stage . 2 . Add the Visibility modifier to the die roll .3 . Cross reference the modified die roll for each
front to its separate Frozen or Mud columns on the Soviet Combat Air Support Availability Table .
4 . The result is the number of combat air sup-port missions available each turn . Place the individual 1st and 2nd Ukrainian Front Air Support markers on the Soviet Combat Air Support Track on the number received .
EXAMPLE: The Soviet player rolls a die for each Front in the Frozen column on the Combat Air Support Availability Table . The Visibility is Overcast . The 1st Ukrainian Front’s modified
CASES: 1 . Stacking limits for reinforcements are re-
solved at the end of movement .2 . Reinforcements are considered to be In-
Supply with full movement value on the turn of entry unless specified otherwise in the scenario .
3 . Artillery units enter fully supplied (front side up) .
4 . If an entry area is occupied by an enemy unit or in an enemy ZOC then the owning player may enter reinforcements on the next map edge road hex adjacent to the designated entry hex .
5 . For German reinforcements entering by rail see Section 9 .5 .
6 . A German SDM marker that arrives as a rein-forcement by rail must end its movement in a rail-terminal hex .
7 . Reinforcements may be intentionally delayed by the owning player for as many turns as desired .
[7.2] reinforcement schedules (See the Soviet and German Reinforcement Schedules on the Turn Record Card) .
8.0 ReplacementsHistorical Note: Both the Soviet and German armies found it difficult to provide fresh re-placements for the 1944 Korsun pocket battles. The Soviets had several ongoing operations in the Western Ukraine that would draw most of the replacements. The Germans needed to give Italy along with other East Front areas the pri-ority. The major source for combat replacements would be “liberated” Ukrainians for the Soviets and returning sick, wounded and rear area troops for the Germans.
GENERAL RULEBoth players are eligible to receive replacements during their respective Replacement Segments . Replacements are used to replace lost steps in el-igible reduced units . Replacements are provided in the form of ReplacementPoints(RPs) such that one RP returns one combat step to a reduced unit . Players receive replacements from the fol-lowing sources:• The Turn Record Track (Soviet and German)• Artillery unit disbandment (German only,
see 8 .6 .2) • Alarm unit conversion (German only,
see 8 .6 .3)• Korsun Abandoned (German only, see 8 .6 .4)• SDM Abandoned (German only, see 8 .6 .5)
[8.1] replacement points[8.1.1] replacement point tracksReplacement Point Tracks are used to count the accumulation and expenditure of replacement points (RPs) . Soviets:The Soviets have separate Tracks for the 1st and 2nd Ukrainian Fronts . Each Front receives replacements separately .Germans:The Germans have separate Tracks for the 8th and 1st Pz Armees . Each korps within an armee receives and tracks its replacements separately .
die roll of zero results in zero combat air support missions. The 2nd Ukrainian Front’s modified die roll of 3 results in 2 combat air support missions.
[6.2] conducting combat air support
Both players have 10 Combat Air Support Mission counters that are used to support com-bat . These counters are placed in an opaque cup at the beginning of each scenario and are ran-domly drawn when using air support to combat . The back sides of the counters contain variable numbers that determine the number of shifts applied to the combat odds: Offensive Combat Air Support (OCAS) and Defensive Combat Air Support (DCAS) as shown below . When declar-ing combat air support during the Combat Phase, the player: a) Reduces the number of air support missions by one on the player’s “Combat Air Support Track” and b) Randomly draws one air counter from the cup and places it front side up next to the declared combat hex . Players may not examine the back side of air units prior to combat resolution.
Offensive Combat Air Support Value (OCAS)
Defensive Combat Air Support Value (DCAS)
Front Back
At the appropriate point in the combat sequence the player flips the counter to its back side to reveal the number of shifts (if any) that are pro-vided to the combat . The OCAS value shifts the CRT odds to the right and the DCAS value shifts the odds to the left . All expended air counters are returned to the cup at the end of each turn . CASES:1 . More CAS missions may not be conducted during a given Game-turn than are available on the Combat Air Support Missions Track . 2 . Unused air support missions may not be car-ried over to the next turn . 3 . Soviet air support missions may only be used to support combat for their own Front . German missions may support either Armee .4 . Only one air mission per player is allowed per combat .
7.0 Reinforcements GENERAL RULEThe Turn Record Track indicates whether each player receives reinforcements on a given turn . Separate Soviet and German Reinforcement Schedules on the card indicate which units enter that turn, the unit’s strength upon entry, the entry hex on the map and any restrictions placed on the unit’s entry . Reinforcements are placed on the map edge during the Reinforcement Segment .
[7.1] map edge entry Reinforcements may enter the map anywhere within 2 hexes of the hex designated on the Reinforcement Schedule . Once placed, reinforce-ments are free to move during the Movement Phase using tactical, strategic or rail movement (German only) .

11The JAWS of VICTORY — Rules of Play 1.0
[8.1.2] replacement point markersEach player has Replacement Point markers that are used to track RPs for their various commands . Infantry and armor RPs are tracked separately within each command . Soviets:The 1st and 2nd Ukrainian Fronts each have an armor and an infantry RP marker . Germans: The 7th, 11th, 47th Pz and 3rd Pz Korps each have an armor and an infantry RP marker . The 42nd Korps has an infantry RP marker only . CASES1 . Replacement Points are received and expended
during the phasing player’s Replacement Segment.
2 . A Replacement Point may only be used to replace a step of a unit bearing the same Front (Soviet) or Korps (German) designation as the RP marker .
3 . Received RPs may be either expended or ac-crued during the turn received .
4 . The number of Replacement Points for armor or infantry cannot exceed the maximum limit indicated on the track . Excess RPs are lost .
Example: The 47th Panzer Korps has 1 Armor RP and 3 Infantry RPs.
[8.2] eligible/Ineligible unitsOnly eligible units may receive replacements .[8.2.1] eligible soviet units Only Soviet infantry divisions and armor bri-gades may receive replacements (i .e . Cadre units) . Breakdown units of divisions or brigades (i .e . regiments) cannot receive replacements[8.2.2] eligible German units German infantry regiments (including mech-anized or motorized), regiment groups (RG), and division groups (DG) or their breakdown or cadre units may receive replacements . All German armor units (except Marder and Pz III units) may receive replacements . [8.2.3] Ineligible units Cavalry, reconnaissance, fusilier, anti-air, anti- armor, engineer, artillery and alarm units cannot receive replacements . [8.2.4] eliminated unitsOnly “eligible” eliminated units may return to play (reenter the map) via replacements . Place returning units on or adjacent to their SDM .
[8.3] turn record track rps Historical Note: The German divisions in the 11th and 42nd Corps had a substantial number of troops in the rear area at the time of the Soviet Korsun Offensive. These troops were either on leave or in hospitals recovering from wounds or illness. They were billeted in the Uman and Novogorod areas and thus outside the area pock-eted by the Soviet Offensive. In addition, many of the Ersatz (replacement) battalions for their divi-sions were located outside the pocket area. Once the scope of the Soviet Offensive was realized, these troops were organized into Kampfgruppens
and replacement pools. These troops are repre-sented by the replacements on the TRT and by the Haake reinforcements.During the Korsun operation, the Russians were short replacements from STAVKA due to other on-going operations. However, NKVD and political commissars actively compensated for the short-age by “recruiting” Ukrainian villagers that re-sided inside towns captured during the operation. These villagers were given minimal training and then used as replacements for infantry divisions. Their effectiveness was suspect. These “volun-teers” are built into the replacements on the TRT.Both players receive armor or infantry RPs as indicated on the Turn Record Track . If the Turn Record Track indicates receipt of an RP then advance the corresponding Replacement marker on its Replacement Point Track by the number received . Soviet RPs may only be added to the front indicated . German RPs may only be added to the korps indicated .
[8.4] applying replacement points to reduced units
During each player’s Replacement Segment, play-ers may add replacement steps to their reduced el-igible units . Subtract one RP from its command’s Replacement Point Track for each step added to a unit . Adjust the receiving unit’s strength chit to reflect the increased number of steps for mul-ti-counter units . For single counter units, flip the unit to reflect its increased number of steps .CASES1 . A unit must be in-supply and be within the supply range of its supply source or its SDM in order to receive replacements . 2 . There is no limit to the number of RPs that may be expended per turn as long as RPs are available .3 . Soviet divisions and German infantry regi-ments may never be returned to full strength via replacements (including the combined strength of their breakdown units) . Eligible Soviet and German armor units may be returned to full strength .4 . In addition to the requirements above, Soviet and German units receiving Replacement Points do so with the following differences:soviet rp application• Soviet units must be at least four hexes from
any German unit in order to receive replace-ments .
• Soviet infantry divisions or armor brigades must have two or fewer remaining steps in order to receive replacements .
• Eligible Soviet units may receive up to 2 steps of replacements (in one turn) using the corresponding number of RPs .
• Place a Disorganized marker on all Soviet units that receive replacements .
German rp application • Only one step increase may be applied to
an eligible unit in a given turn (including eliminated units) .
• German units may receive replacements even if adjacent to Soviet units .
• Place a Regroup marker on all German units that receive replacements .
Historical Note: The Soviet Army tended to keep its infantry divisions engaged in battle until the division was spent. It would then withdraw the division from the line for reinforcement. This process usually took several days at a minimum. On the other hand, the Germans reinforced their units while in the line using division Ersatz bat-talions and other rear area units as replacements.
[8.5] armor type replacementsThe procedure for armored unit replacement dif-fers for the Soviet and German players . [8.5.1] soviet armor replacement The Soviet player expends one Armor RP to replace any armor brigade step loss . The RP must be expended from the Soviet Front’s Replacement Point Track that corresponds to the unit receiving the replacement . CASES:1 . An on-map armor brigade may receive multi-ple replacement steps per turn . 2 . An eliminated armor brigade may return to play by expenditure of two RPs (one infantry and one armor) . Place the returning armor unit adja-cent to a SDM marker with the same Army or Front designation . [8.5.2] German armor replacementHistorical Note: The Germans operated main-tenance units close to the front that repaired damaged armored vehicles. A variety of tank types were being repaired by these units at the start of the battle.The German player expends one Armor RP to re-place an armor step loss . The unit receiving the armor replacement must be in the same Korps that expends the armor RP . PROCEDURE:The German player rolls two dice and cross-ref-erences the result to the German Armor Replace-ment Table (see German Player Card) . The table specifies the type of armor replacement received .
German armor Replacement tablearmor RP Dice Roll tank RP type
2, 6, 10, 12 StuG 4, 7, 8, Pz IV 5, 9 PzV 3, 11 PzVI
CASES:1 . The German player may add a step only to a reduced or eliminated armor unit that is of the same type designated in the table . If no unit of that type is eligible in that korps, the German player may either a) roll again until an eligible type is received, or b) save the armor RP for a later turn (the RP is not expended) . 2 . Once an eligible armor type replacement is received, it must be accepted (i.e. players may not continue rolling until a desired armor type is received.)3 . Only one armor RP may be applied per unit per turn .4 . An eliminated armor unit may be returned to play using an armor RP (return the unit to its last step side) . Place the returning armor unit on or adjacent to the SDM marker with the same divi-sion or Korps designation .

12 The JAWS of VICTORY — Rules of Play 1.0
PROCEDURE:1 . Declare Korsun abandoned .2 . Immediately provide three (3) replacement
steps to eligible infantry units that can trace a supply path of 6 hexes or less to Korsun .
3 . Remove all Korsun SPs from the Korsun SP Track and permanently transfer them to any SDM that that can trace a supply path of 8 hexes or less to Korsun . No SDM may receive more than 4 SPs . Once transferred, the SPs may be retained in the SDM until expended . Any excess SPs that cannot be transferred are permanently lost . Note: this is an exception to the standard rule that prohibits retention of SPs from turn to turn (Section 14 .2)
4 . The German player may not conduct air sup-ply to the Korsun airfield once Korsun is abandoned and may not reactivate the airfield .
[8.6.5] sdms abandonedThe German player may abandon SDM markers during the German Replacement Segment and receive infantry replacements according to the following procedure (Also see Section 13 .2)PROCEDURE:1 . Declare any SDM abandoned2 . Remove the SDM permanently from the
scenario .3 . Provide one (1) replacement step to any
eligible unit within its command and within its supply radius . The receiving unit must be able to trace a supply path to the abandoned SDM .
9.0 Movement GENERAL RULEDuring their Movement Phase, a player may move all, some, or none of his units in any se-quence . Each unit has a Movement Allowance expressed in Movement Points (MPs) . These points are expended as a unit moves by tracing a path of contiguous hexes across the map . The Terrain Effects Chart (TEC) defines the number of movement points required to enter a hex or traverse a hexside depending on terrain . Other factors affect movement such as the presence of enemy units, ground condition (frozen or mud), unit supply state, or strategic or tactical type of movement . A unit may be moved as many or as few hexes as desired as long as it does not expend more than its allowed movement points . Unused movement points may not be accumulated or transferred to another unit . If multiple units occupy a hex at the beginning of the movement phase, then the units may either move individu-ally or as a stack . Once a player begins moving a particular unit or stack, the player must complete his movement before any other unit is moved .
[9.1] unit movement classesIndividual units belong to one of three movement classes: Non-motorized, Motorized/Mechanized and Armor . Each movement class expends movement points to enter a hex and cross certain hexsides in accordance with its corresponding column on the TEC . Non-motorized: units that walk or move by horse drawn vehicles such as infantry, cavalry and some engineering or artillery .
Motorized/Mechanized: units that move by truck or mechanized vehicle such as some infan-try, reconnaissance, artillery, anti-armor, engi-neer and anti-aircraft units .Armor:units (depicted by icons) that move by tracked vehicles such as tanks and assault guns .Examples:
1528How
(2)-101
11
3 40
42-10
2/3353
16 Pz 3Pz
33-14
ii/1/2
B4-763
5G Cav734
a5-580
6tk5M1228
32-12
Motorized/Mechanized:
Non-Motorized:
Armor:
For a complete list of unit types by Movement Class see Section 4 .3 .2 .[9.1.1] special motorized/mechanized
movementMotorized and mechanized infantry and recon-naissance units may either: a) move using their motorized/mechanized movement points (e .g . 10) or b) move using the standard non-motorized (infantry) rate of 5 movement points . The mov-ing player must declare prior to movement which movement rate is being used . A Mechanized or motorized unit may not combine non-motorized movement and motorized/mechanized move-ment in the same movement phase .
[9.2] terrain effects on movement
Note that the expenditures for armor, mecha-nized/motorized and non-motorized class units may be different for the various types of terrain. Additionally, the expenditures vary depending on the current turn ground condition: frozen or mud.
[9.2.1] movement across rivers All unit types may move across a river hexside if that hexside contains a bridge . Certain types of units are either prohibited from or restricted when crossing non-bridged river hexsides .CASES:1 . An infantry type unit may cross a non-bridged river hexside if it expends all its movement al-lowance to do so, regardless of any ZOC/ZOI entry/exit costs . It must begin and end its move-ment in a hex adjacent to the river hexside that it crossed .2 . A mechanized or motorized infantry unit may cross a non-bridged river hexside as an in-fantry unit (above) but may not use its motorized or mechanized movement rate in subsequent turns after crossing a non-bridged river unless it can establish (trace) a supply path across that river that would allow its vehicles to provide transport . It must move using the movement rate of non-motorized infantry units until it can trace a line-of-supply via a bridge to a valid supply source .3 . An armor unit may not cross a non-bridged river hexside except at a ford (Section 18 .6) . 4 . An anti-armor, anti-air or artillery unit may not cross a non-bridged river hexside . NOTE: See Effects of Rivers and Ford Hexsides on ZOC (Section 10.6.2).
[8.6] special German replacements
The following special replacements may be ap-plied to eligible German units (see 8 .2) during the German player’s Replacement Segment and do not require expenditure or RPs . Reminder: German infantry regiments may never be re-stored to full strength through the use of the following special replacements.
[8.6.1] absorbing cadre units into regiments
Cadre units may serve as replacements for eligi-ble units . Simply remove the Cadre unit and add one step to the receiving unit .CASES:1 . The cadre unit must be within three hexes of the receiving unit and must be able to trace a path to that unit through vacant or friendly occupied hexes .2 . The order of replacement precedence is; 1) first to an eligible unit of its division, and 2) to an eligible unit of another division, korps gruppe or kampfgruppe . [8.6.2] German artillery conversion to
InfantryHistorical Note: During the battle, German ar-tillery units were routinely converted to infantry due to loss of artillery pieces, lack of artillery ammunition and poor road conditions.
PROCEDURE:During the German Replacement Segment, the German player may directly exchange an artillery unit for replacement steps . The player simply places the artillery unit in the Eliminated Box and immediately adds the following number of replacement steps directly to units eligible to receive replacements: Artillery regiments gener-ate 2 steps, artillery battalions generate 1 step .CASES:1 . The artillery units must be within three hexes of the receiving infantry unit and must be able to trace a path to that unit through vacant or friendly occupied hexes . 2 . Division artillery may only serve as replace-ments for their own division infantry regiments unless none are on the map .3 . Korps artillery may serve as replacements for any infantry regiment within their korps .[8.6.3] converting German alarm
units to replacementsAny time during the German Movement Phase that a German unit either enters or occupies a hex occupied by an “Alarm” unit then the German player has the following options:• If the alarm unit can trace a supply path to a
korps SDM, then immediately add one RP to that Korps’ Replacement Point Track and remove the alarm unit from play, or
• Retain the alarm unit in the hex with its “cur-rent” side face up .
[8.6.4] korsun airfield abandoned — replacements
If the Korsun Airfield is activated, (Section 14 .5) then the German player may declare Korsun abandoned during the German Replacement Segment and receive infantry replacements (only) according to the following procedure .

13The JAWS of VICTORY — Rules of Play 1.0
[9.2.2] road movement in any terrain Road movement is defined as moving in a chain of adjacent hexes whose hexsides are connected by a road or railroad line . A unit that enters a hex through a road or railroad hexside may ignore the normal movement point costs associated with the terrain for that hex . The unit pays only the movement point cost for that road or railroad per the TEC . Note: road movement is not allowed across destroyed bridge hexsides .[9.2.3] prohibited terrainLake hex sides may not be crossed at any time . In addition, certain terrain or hexside features may not be entered or crossed by specific unit types as indicated on the TEC .
[9.3] Ground condition effects on movement
The TEC contains two ground condition cate-gories: Frozen and Mud . Each unit movement class (Section 9 .1) must use the column that corresponds to the current turn ground condi-tion when determining terrain movement point expenditures . In addition, during mud turns, non-motorized type units subtract one movement point (1MP) from their movement allowance and motorized/mechanized and armor units subtract two movement points (2MP) .
[9.4] types of movementUnits may use either Tactical, Strategic or Rail Movement during their Friendly Movement Phase . Players determine which type of move-ment will be used at the beginning of each unit’s movement . Units may not combine tactical, strategic or rail movement . In addition, the fol-lowing types of special movement are allowed during specific segments of the Combat Phase: • Reserve Movement (Section 9 .7)• German (only) Night Withdrawal (Section
9 .8)• German (only) armor Reaction Movement
(Section 12 .1 .2) • Breakthrough Movement (Section 12 .1 .4) [9.4.1] tactical movementA unit using tactical movement expends move-ment points for each hexside crossed and each hex entered per the TEC . A unit that employs tactical movement may enter and exit hexes ad-jacent to an enemy unit and may perform combat during the ensuing Combat Phase . [9.4.2] strategic movementA unit using strategic movement expends move-ment points for each hex entered per the TEC but only expends the indicated fractional cost per hex for movement along a road . A unit may only employ Strategic Movement if it starts, ends and remains at least three hexes away from enemy units at all times during its Movement Phase (i .e . two intervening hexes between the units) . Example: a motorized unit using strategic move-ment along a secondary road during frozen ter-rain would only spend 1/3 of a movement point per hex entered.Restrictions:1 . Disorganized or Regroup units may not use
strategic movement (Section 12 .17 .2) .2 . Artillery units may not provide artillery
support to combat during turns that they use
Strategic Movement (Place a Regroup marker on artillery units that use strategic move-ment) . Also see special “No Fire” movement restriction for some Soviet and German artil-lery (Section 9 .10 .3)
3 . Engineeringunitsmay not perform engineer-ing actions during turns that they use Strategic Movement (Place a Regroup marker on engi-neering units that use strategic movement) .
[9.5] German rail movementRailroad (Rail) Movement is used only by German reinforcements; units already on the map may not employ Rail Movement. Some German reinforcements are designated to enter the map using Rail Movement as indicated in the Reinforcement Schedule . However, units so des-ignated need not move using Rail Movement but may instead use Tactical or Strategic Movement on the turn of entry . Unit(s) entering by railroad, move from the designated map entry hex along a continuous series of uninterrupted railroad line hexes . They must end their Rail Movement in any hex containing a Rail Terminal (See the map terrain key) .CASES:1 . A maximum of 5 units per turn may use rail movement . SDM reinforcements always enter by rail and do not count against the limit of 5 units per turn .2 . Movement distance along a rail line is un-limited .3 . Units may displace a maximum of one hex into an adjacent hex after reaching their desti-nation rail terminal . Displacement is subject to terrain restrictions and stacking rules . 4 . All restrictions pertaining to Strategic Move-ment apply to rail movement (Section 9 .4 .2)
[9.6] reserve declaration segment
RESERVE RESERVE
Individual units (or stacks) may be designated as Reserve during a player’s Reserve Declaration Segment . Place a Reserve marker on designated units . UnitsdesignatedasreservecannotmoveduringthatMovement Phase but may move and have combat during the player’s following Re-serve Movement and Reserve Combat Segments . Restrictions:1 . Units may not be placed in reserve if they be-
gin the Movement Phase adjacent to an enemy unit .
2 . Units must be in-supply in order to be placed in reserve .
3 . Units using reserve movement may only use Tactical movement .
[9.7] reserve movement During the Reserve Segment of a player’s Combat Phase, a unit (or stack) in Reserve may move its Movement Allowance less 1 MP for non-motorized units and less 2 MP for armor, mechanized or motorized units. All movement rules apply including stacking at the end of Reserve Movement . Retain the Reserve marker on units that move adjacent to enemy units .
[9.8] German night Withdrawal segment
German Armor units (only) may conduct a one hex night withdrawal movement during the German Night Withdrawal Movement Segment. The withdrawing armor unit may move only one hex regardless of terrain cost and from any Soviet ZOIs and ZOCs . In addition, the withdrawing ar-mor unit has the following restrictions:• It cannot enter a hex in a Soviet ZOC or ZOI• It cannot enter a hex prohibited by terrain
restrictions • It cannot violate stacking restrictions .• It cannot have participated in breakthrough
movement or breakthrough combat .
[9.9] movement: General cases[9.9.1] reciprocal movementA unit can only move from the terrain in hex A to hex B if it could also move from the terrain in hex B to hex A . [9.9.2] one hex movementUnits may always move one hex subject to pro-hibited terrain, ZOC and stacking rules .[9.9.3] movement through friendly
occupied hexesA friendly unit may freely move through hexes occupied by friendly units . There is no limit to the number of friendly units that may move through a given hex in the Movement Phase . Friendly zones-of-control or zones-of-influence do not affect movement of friendly units . There are, however, limits to the number of friendly units that may end the phase stacked together (see Section 11) .[9.9.4] units moving as a stackUnits that begin movement stacked in a hex may (but are not required to) move as a single entity . However, no unit in the stack may exceed the movement allowance of the unit with the lowest movement allowance . Units with a larger move-ment allowance may not continue movement once a unit with a lower movement allowance has stopped its movement . Units in a stack may always move individually .[9.9.5] movement and combatAdvances and retreats due to combat are not considered to be movement and do not cost movement points . Generally, combat does not occur during movement, with the exception of Armor Interception (Section 9 .11) and during the Breakout Phase.
[9.10] special movement restrictions
[9.10.1] entering and exiting enemy Zones-of-control
Units that enter and exit an enemy Zone-of-Control or Zone-of-Influence are required to expend additional Movement Points per the Terrain Effects Chart. See Section 10 for all movement rules related to Zones-of-Control and Zones-of-Influence .[9.10.2] non–attack-capable units
entering an enemy Zoc or ZoI Artillery and non–attack-capable engineer units (parenthesized combat value) may not move adjacent to an enemy unit unless the hex is
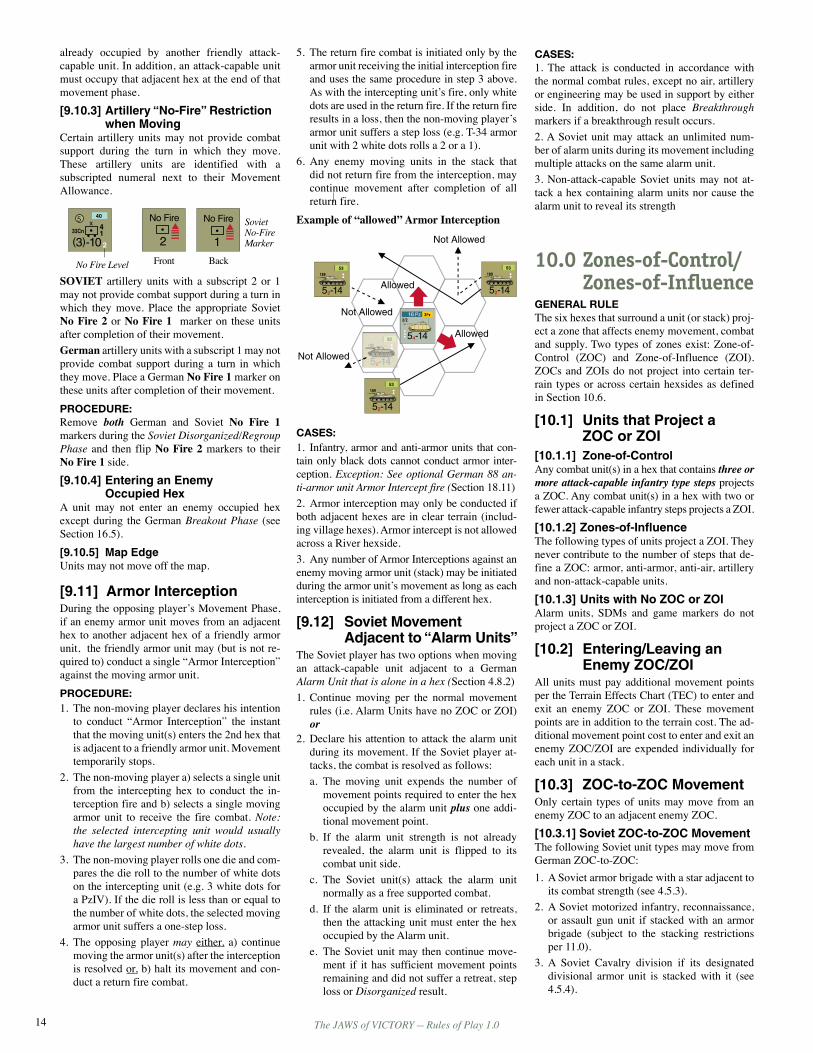
14 The JAWS of VICTORY — Rules of Play 1.0
already occupied by another friendly attack-capable unit . In addition, an attack-capable unit must occupy that adjacent hex at the end of that movement phase .[9.10.3] artillery “no-fire” restriction
when movingCertain artillery units may not provide combat support during the turn in which they move . These artillery units are identified with a subscripted numeral next to their Movement Allowance .
No Fire Level Front Back
Soviet No-Fire Marker
SOvIET artillery units with a subscript 2 or 1 may not provide combat support during a turn in which they move . Place the appropriate Soviet NoFire2or NoFire1 marker on these units after completion of their movement . German artillery units with a subscript 1 may not provide combat support during a turn in which they move . Place a German NoFire1marker on these units after completion of their movement . PROCEDURE:Remove both German and Soviet No Fire 1 markers during the Soviet Disorganized/Regroup Phase and then flip NoFire2 markers to their NoFire1 side . [9.10.4] entering an enemy
occupied hexA unit may not enter an enemy occupied hex except during the German Breakout Phase (see Section 16 .5) .[9.10.5] map edgeUnits may not move off the map .
[9.11] armor InterceptionDuring the opposing player’s Movement Phase, if an enemy armor unit moves from an adjacent hex to another adjacent hex of a friendly armor unit, the friendly armor unit may (but is not re-quired to) conduct a single “Armor Interception” against the moving armor unit .PROCEDURE:1 . The non-moving player declares his intention
to conduct “Armor Interception” the instant that the moving unit(s) enters the 2nd hex that is adjacent to a friendly armor unit . Movement temporarily stops .
2 . The non-moving player a) selects a single unit from the intercepting hex to conduct the in-terception fire and b) selects a single moving armor unit to receive the fire combat . Note: the selected intercepting unit would usually have the largest number of white dots.
3 . The non-moving player rolls one die and com-pares the die roll to the number of white dots on the intercepting unit (e .g . 3 white dots for a PzIV) . If the die roll is less than or equal to the number of white dots, the selected moving armor unit suffers a one-step loss .
4 . The opposing player may either, a) continue moving the armor unit(s) after the interception is resolved or, b) halt its movement and con-duct a return fire combat .
5 . The return fire combat is initiated only by the armor unit receiving the initial interception fire and uses the same procedure in step 3 above . As with the intercepting unit’s fire, only white dots are used in the return fire . If the return fire results in a loss, then the non-moving player’s armor unit suffers a step loss (e .g . T-34 armor unit with 2 white dots rolls a 2 or a 1) .
6 . Any enemy moving units in the stack that did not return fire from the interception, may continue movement after completion of all return fire .
Exampleof“allowed”ArmorInterception
CASES:1 . Infantry, armor and anti-armor units that con-tain only black dots cannot conduct armor inter-ception . Exception: See optional German 88 an-ti-armor unit Armor Intercept fire (Section 18 .11)2 . Armor interception may only be conducted if both adjacent hexes are in clear terrain (includ-ing village hexes) . Armor intercept is not allowed across a River hexside . 3 . Any number of Armor Interceptions against an enemy moving armor unit (stack) may be initiated during the armor unit’s movement as long as each interception is initiated from a different hex .
[9.12] soviet movement adjacent to “alarm units”
The Soviet player has two options when moving an attack-capable unit adjacent to a German Alarm Unit that is alone in a hex (Section 4 .8 .2)1 . Continue moving per the normal movement
rules (i .e . Alarm Units have no ZOC or ZOI) or
2 . Declare his attention to attack the alarm unit during its movement . If the Soviet player at-tacks, the combat is resolved as follows:a . The moving unit expends the number of
movement points required to enter the hex occupied by the alarm unit plus one addi-tional movement point .
b . If the alarm unit strength is not already revealed, the alarm unit is flipped to its combat unit side .
c . The Soviet unit(s) attack the alarm unit normally as a free supported combat .
d . If the alarm unit is eliminated or retreats, then the attacking unit must enter the hex occupied by the Alarm unit .
e . The Soviet unit may then continue move-ment if it has sufficient movement points remaining and did not suffer a retreat, step loss or Disorganized result .
CASES:1 . The attack is conducted in accordance with the normal combat rules, except no air, artillery or engineering may be used in support by either side . In addition, do not place Breakthrough markers if a breakthrough result occurs .2 . A Soviet unit may attack an unlimited num-ber of alarm units during its movement including multiple attacks on the same alarm unit .3 . Non-attack-capable Soviet units may not at-tack a hex containing alarm units nor cause the alarm unit to reveal its strength
10.0 Zones-of-Control/ Zones-of-Influence
GENERAL RULEThe six hexes that surround a unit (or stack) proj-ect a zone that affects enemy movement, combat and supply . Two types of zones exist: Zone-of-Control (ZOC) and Zone-of-Influence (ZOI) . ZOCs and ZOIs do not project into certain ter-rain types or across certain hexsides as defined in Section 10 .6 .
[10.1] units that project a Zoc or ZoI
[10.1.1] Zone-of-control Any combat unit(s) in a hex that contains three or more attack-capable infantry type steps projects a ZOC . Any combat unit(s) in a hex with two or fewer attack-capable infantry steps projects a ZOI . [10.1.2] Zones-of-InfluenceThe following types of units project a ZOI . They never contribute to the number of steps that de-fine a ZOC: armor, anti-armor, anti-air, artillery and non-attack-capable units .[10.1.3] units with no Zoc or ZoIAlarm units, SDMs and game markers do not project a ZOC or ZOI .
[10.2] entering/leaving an enemy Zoc/ZoI
All units must pay additional movement points per the Terrain Effects Chart (TEC) to enter and exit an enemy ZOC or ZOI . These movement points are in addition to the terrain cost . The ad-ditional movement point cost to enter and exit an enemy ZOC/ZOI are expended individually for each unit in a stack .
[10.3] Zoc-to-Zoc movementOnly certain types of units may move from an enemy ZOC to an adjacent enemy ZOC . [10.3.1] soviet Zoc-to-Zoc movementThe following Soviet unit types may move from German ZOC-to-ZOC:1 . A Soviet armor brigade with a star adjacent to
its combat strength (see 4 .5 .3) . 2 . A Soviet motorized infantry, reconnaissance,
or assault gun unit if stacked with an armor brigade (subject to the stacking restrictions per 11 .0) .
3 . A Soviet Cavalry division if its designated divisional armor unit is stacked with it (see 4 .5 .4) .

15The JAWS of VICTORY — Rules of Play 1.0
All other Soviet units may not move ZOC-to-ZOC . They must halt movement for the remain-der of their Movement Phase upon entering a German ZOC .EXAMPLE: Soviet units eligible for ZOC to ZOC movement.
Soviet units not eligible for ZOC to ZOC movement.
[10.3.2] German Zoc-to-Zoc movement
The following German unit types may move from Soviet ZOC-to-ZOC:1 . All armor units 2 . Panzer Division mechanized, motorized and
reconnaissance units if moving as a stack with an armor unit . If not stacked with an armor unit, then these units must have a Regroup marker placed on them immediately after completion of their ZOC-to-ZOC movement .
3 . All other infantry type units; however, these units must place a Regroup marker on their unit after completion of their movement . Units that were already Regroup or Disorganized remain so .
German artillery, anti-armor, anti-air and non-at-tack-capable units may not move ZOC-to-ZOC .Example: German units eligible for ZOC to ZOC movement.
German infantry units not stacked with an armor unit...
[10.4] ZoI movementOther than the additional movement point cost, all units may freely move from an enemy ZOC to a ZOI and from a ZOI to a ZOI .
[10.5] General Zoc/ZoI cases[10.5.1] multiple Zocs/ZoIs in a hexEnemy ZOC effects have precedence over enemy ZOI effects . There is no additional or cumulative effect when more than one unit exerts a ZOC or ZOI into a given hex . [10.5.2] mutual Zocs/ZoIs in a hexEnemy and friendly units can both exert ZOCs or ZOIs into the same hex . Such zones mutually exist in the hex and do not negate each other . All movement and combat effects of ZOC/ZOIs ap-ply to hexes with mutual ZOC/ZOIs .[10.5.3] retreat and ZocsSee Section 12 .13 .1 .[10.5.4] Zocs/ZoIs and supply traceSee Section 13 .3 .
[10.6] effects of terrain on Zoc/ZoIs
ZOCs and ZOIs extend into all terrain and across
all hexsides unless indicated below .[10.6.1] towns and forest ZOCs and ZOIs do not project into a town or forest hex . ZOCs and ZOIs do project out of a town or forest hex .[10.6.2] rivers and ford hexsidesZOCs and ZOIs do not extend across a river or ford hexside unless an opposing unit attempts to move or attack across that river . CASES: 1.Movement: If a friendly unit attempts to move across a river hexside, then any adjacent enemy unit on the opposite side that has either a ZOC or ZOI instantly projects a ZOC across the river hexside .2. Combat:If a friendly unit attempts to attack across a river hexside, any enemy unit(s) with a ZOC that is adjacent to the attacking unit in-stantly projects a ZOC across the adjacent river hexside into the hex making the attack . 3. Advance andRetreat:ZOCs and ZOIs do not extend across a river hexside for advance or retreat . 4. RiverBridgesandFordshave no effect on ZOC or ZOI rules but do allow eligible units to move, advance or retreat ZOC-to-ZOC across the bridge or ford .
EXAMPLE: Enemy ZOCs and ZOIs projecting across a river hexside during Movement and Combat.
[10.6.3] lakes and the dneprZOCs and ZOIs do not extend across these hex-sides . The Dnepr river hexsides are considered a map edge and are not playable .
11.0 Stacking GENERAL RULEA maximum of three units may stack in the same hex for all types of terrain except for forest hexes . A maximum of two units may stack in forest hexes . Stacking rules apply at the end of each segment of an owning player’s Movement Phase and Combat Phase . Units stacked in a hex may be any combination of various unit sizes and types subject to the following cases:• SDM markers may stack without regard to
stacking limits .• Cadre units count as a unit for stacking
purposes .SovietStackingRestrictions1 . Soviet units are restricted to stacking within
their own organizational level as follows: • Armyunitsmayonlystackwithunitsof
their own Army . • Tank, Mechanized, and Cavalry Corps
units may only stack with units of their own corps .
• Front units may stack with any unit oftheir front .
2 . Only one Soviet division (infantry or cav-alry) may be one of the maximum allowed units in a hex .
3 . Only two Soviet brigades (armor or motor-ized) may be two of the maximum allowed units in a hex .
4 . Soviet breakdown regiments or division ex-tension markers cannot occupy the same hex with units of another Soviet division . Soviet breakdown regiments and extension markers may recombine into their parent division to allow meeting the stacking requirements for a hex (Section 4 .6 and 4 .7)
5 . Armor units integral to Soviet cavalry divi-sions or to the 5th Mechanized corps must continually stack with the infantry/cavalry unit bearing the same division or corps des-ignation as long as its infantry/cavalry unit is in play (see 4 .5 .4 and 4 .5 .5) .
GermanStackingRestrictions1 . German units are restricted to stacking within
their own organizational level as follows: • Unitsfromseparatearmeesmaynotstack
together .• Units fromseparatekorpsmaynot stack
together .• Units from separate divisions may not
stack together .2 . A maximum of two infantry regiments are
allowed in a hex .3 . German Alarm units count as a unit for stack-
ing purposes . 4 . German cadre units may also stack with any
unit of their korps .
[11.1] stacking effects during movement
[11.1.1] stacking during the movement phase
Units may freely move through hexes without regard to stacking restrictions . There is no move-ment point cost to stack or unstack units . [11.1.2] stacking rule violationsStacking rule violations are resolved at the end of the owning player’s Movement Phase and Combat Phase . All units in a hex that exceed the stacking limit must immediately Disorganize . Place a Disorganized marker on all over-stacked units (Section 12 .17) . The player must then take a step-loss from the unit with the largest combat strength
[11.2] retreat stacking conditions
Retreating units may violate stacking limits when retreating through or into other friendly hexes . The stacking violation must be cor-rected during the owning player’s subsequent Movement Phase .
... add a Regroup marker after moving.

16 The JAWS of VICTORY — Rules of Play 1.0
2 . After all combats are declared, the Soviet player (only) declares which combat hexes will receive Soviet combat air support (in both attack and defense) . Randomly draw a Soviet air-support counter(s) from a cup and place it with its support value face down on each combat hex designated to receive Soviet combat air-support (Section 6 .2)
[12.1.2] German armor reaction segment
The German player may move any armor unit one hex as long as the unit does not begin move-ment in an enemy ZOC or ZOI . The hex entered can be any adjacent hex including a declared combat hex or a hex in an enemy ZOC or ZOI . The movement cannot violate terrain or stacking rules and cannot enter a hex containing a Soviet barrage marker .
[12.1.3] combat resolution segmentThe attacking player then identifies which units are attacking the defender’s units and resolves each declared combat, one-at-a-time, in any or-der . Each individual combat follows the below sequence . No further combats may be declared once combat resolution begins .A . Combat Support DeclarationB . Combat Odds DeterminationC . Apply Column Shifts to Combat OddsD . Resolve Combat
A . COMBATSUPPORTDEClARATIONPlayers declare their combat support, if any, in the following order, Declaration occurs before determining the combat strength of attacking and defending units .1 . The attacking player first declares which
attacking units will be supported or unsup-ported . Expend SPs for supported combats . (Section 12 .4)
Note: Declared air support to a Soviet attack (Section 12.1.1-2) above requires a sup-ported attack. If an attack is not supported with previously declared air support, then the air support is lost and not reusable during the current turn.
2 . The German player may declare combat air support for either attack or defensive combat . Note: When attacking, combat air support is only allowed if the combat is supported. Place a randomly drawn German Combat Air Support counter with its support value face down on the combat hex (Section 6 .2) .
3 . The attacking player may then declare any eligible artillery units to support the combat (supported combats only) . Flip supporting artillery units to their back side and total the number of OBS points supporting the combat .
Caution: Note the Soviet and German artil-lery difference per Section 12.10.
4 . The defending player may then declare any eligible artillery units in defensive support of the combat . Flip supporting artillery units to their back side and total the number of DBS points supporting the combat .
5 . The attacking player may declare an Assault Engineer bonus for the combat (Supported attacks only; see Section 12 .9 .1) .
6 . Lastly, the defender may declare “No Retreat” (Section 12 .14) .
B . COMBATODDSDETERMINATION1 . Both players separately examine and total
the combat strength of their units participat-ing in the combat, adjusting individual unit strengths by the following:a . Supported/unsupported combat (Section
12 .4)b . Terrain (Section 12 .5) c . ZOC rules (Section 12 .6)d. Disorganized/Regroup (Section 12 .17 .2)
2 . The total adjusted combat strength of the attacker is compared to the total adjusted combat strength of the defender and this com-parison is stated as a ratio; Attacker’s strength to Defender’s strength . This ratio is rounded down to match one of the ratio columns of the Combat Results Table (CRT) .
3 . Place the CRT Odds marker on the Combat Results Table over the column that equals the initial combat odds ratio . If the combat has Armor/Anti-armor combat, then flip the Odds marker to the back side as a reminder .
C . APPlyCOlUMNShIFTSTOCOMBATODDSONThECRT
Both Players apply the following column shifts to the above initial combat odds ratio on the CRT. Move the CRT Odds marker to the left for defender shifts and to the right for attacker shifts .1 . ARTILLERy: attacker and defender players
each roll a die and cross reference the result to the applicable column on their respective artillery tables to determine the number of shifts (Section 12 .10) . Apply the shifts to the CRT odds .
2 . COMBAT AIR SUPPORT: Players flip their air-support markers to reveal the number of shifts (Section 6 .2)
3 . SOVIET DIVISION: (attack only) (Section 12 .9 .2)
4 . COMBINED ARMS: (Section 12 .7)5 . ARMOR SUPERIORITy: (Section 12 .8)6 . HILLTOP: (Section 12 .5 .2)7 . DECLARED ASSAULT ENGINEER: (Section
12 .9 .1)8 . OOS2 EFFECTS: (Section 13 .5 .2)
D . RESOlvECOMBATThe attacking player rolls two different col-ored 6-sided dice (red for Soviet and black for German) and resolves the combat in two parts: Armor/Anti-armor Combat and General Combat .1 . Armor/Anti-armorCombat:The individual
die results of the combat die roll are compared to participating Soviet and German Armor and Anti-armor Superiority Values (ASVs) . Determine and apply Armor/Anti-armor (icon) losses (if any) per Section 12 .12 .1 .
2 . GeneralCombat:The sum of the two die is used to determine the general combat result . Cross-reference the die roll sum to the final combat odds-ratio on the Combat Results Table . The results can be a combination of the following and must be applied in the follow-ing order (Section 12 .12 .2):
Order of Precedence for Combat Resultsa . Step Loss (Section 12 .12 .3 & 4)b . Disorganization (Section 12 .17 .1)
COMBAT
3
12.0 CombatGENERAL RULE A player makes attacks during his Combat Phase and defends during the opposing player’s Combat Phase . Combat may occur in each of the three segments of the Combat Phase: Combat Segment, Breakthrough Segment, and Reserve Segment. In each segment, eligible units that are adjacent to enemy units may (but are notrequiredto)attack those adjacent units . An odds ratio of a given combat is determined by the rel-ative combat strength of attacking and defending units as modified by terrain, the attacker’s sup-ply status and various combat modifiers . Both players may increase the probability of combat success by employing combined arms, armor, artillery support, air support and engineering combat modifiers . As a result of combat, the units participating in combat may suffer reduced combat strength (step losses) and/or advances, retreats as well as unit disorganization .
[12.1] combat phaseThe Combat Phase is organized into the following segments and is conducted in sequential order:1. CombatDeclaration2. GermanArmor Reaction (Soviet Combat
Phase only)3. CombatResolution(each individual combat)4. Breakthrough(movement or combat)5. ReserveMovement6. ReserveCombat[12.1.1] combat declaration segment1 . At the beginning of the Combat Declaration
Segment, the attacking player must indicate all enemy occupied hexes that will be attacked . Place a combat marker on each attacked hex . The attacking player is not required to iden-tify which hexes will attack the defender .
Reminder: players may not examine opposing units prior to declaring.
[11.3] stacking convention The following end-of-movement stacking conventions are specified in order to facilitate speedy play:1 . If any of the units within a stack possess a
ZOC, then the top unit in the stack must have a ZOC (Facilitates movement)
2 . If no unit within a stack exerts a ZOC, but an armor unit is present, then an armor unit must be the top unit in the hex (Facilitates the armor intercept rule)
3 . If no unit within a stack meets the above re-quirements, then a player is free to stack units in any order .
4 . Disorganized or Regroup markers must be placed in the proper order within a stack so as to reflect the correct status of each unit within the stack .
5 . German Improved Position and Soviet Minefield markers are to be placed on top of all units within the hex . The opposing player may not examine units underneath these markers except to determine combat odds during combat resolution segments .

17The JAWS of VICTORY — Rules of Play 1.0
c . Unit Breakdown (Germans only; see 4 .6)d . Retreat: Units that received a retreat result
must retreat (Section 12 .13) Exception: “No Retreat” was declared.
e . Advance: Units may advance into vacated hexes (Section 12 .15)
3 . NoRetreatandBreakthrough:a . NoRetreat:If the defender declared “No
Retreat” and the defender combat result was a “retreat”, then the defender does not retreat his unit(s) . The defender remains in place but incurs additional step losses and then rolls a die to determine if the attacker incurs additional step losses (Section 12 .14 .2) . Reminder: A Disorganized result nullifies a no retreat declaration.
b . Breakthrough Result: An arrow E re-sult on the CRT indicates an attacker “Breakthrough” . If a breakthrough result occurred, then the attacker retreats the defender’s units two hexes in accordance with the retreat rules . The attacker may then advance his units up to two hexes in accordance with the advance rules . The attacker may then place a Breakthrough marker on any eligible unit that participated in the combat (see 12 .1 .4) . A Breakthrough result nullifies a No Retreat declaration . Note: Units that do not meet the above requirements may advance two hexes but do not receive a Breakthrough marker.
After resolving each combat, remove all Combat and Air markers but retain Disorganized and any Breakthrough markers . All losses, retreats, advances, and disorganized results must be taken before proceeding to the next combat . Exception: Combat against an extended Soviet division (Section 4 .7). All individual combats must be resolved during the Combat Segment before proceeding to the Breakthrough Segment .
[12.1.4] breakthrough segmentDuring the Breakthrough Segment units with Breakthrough markers may conduct either one hex movement or combat but not both . Breakthrough movement and combat actions may occur in any order . units eligible for breakthrough movement and combatWhen a Breakthrough result occurs, the attacker may place a Breakthrough marker on the fol-lowing types of units that can advance: 1) Ar-mor, and 2) Mechanized/Motorized infantry or Reconnaissance units that were stacked with an armor type unit during the combat .
A . BreakthroughMovementUnits with a Breakthrough marker may move one hex ignoring ZOC/ZOI and armor intercept rules . Units may not enter a hex prohibited by terrain restrictions or cross rivers and may not violate stacking restrictions . Breakthrough units within a hex may move individually or as a stack . Remove the Breakthrough marker from units that move .
B . BreakthroughCombatUnits with a Breakthrough marker that did not move may conduct one combat against any
adjacent enemy hex . All rules for combat apply except the following:1 . Units with a Breakthrough marker in the same
hex may either individually attack separate hexes or attack a single hex as a stack . Note: this is an exception to normal combat rules.
2 . Ignore all enemy ZOCs effects from adjacent units that were previously attacked during the current turn .
3 . Attacks are automatically supported if the original attack was supported .
4 . Attacking and defending units may not receive artillery, air support, or Assault Engineering support, but may receive combat odds shifts from combined arms, armor superiority, hill-top and OOS effects .
5 . Combat is resolved normally per Section 12 .1 .3-D except that a Breakthrough marker is not placed if a Breakthrough results occurs .
6 . Remove the Breakthrough marker after each combat .
All breakthrough actions must be completed before any Reserve movement or reserve combat occurs .
[12.1.5] reserve movement segmentUnits in reserve (designated with a Reserve marker) may move per the Reserve Movement rules (see Section 9 .7) .[12.1.6] reserve combat segmentAfter all units in Reserve have moved, reserve units that are adjacent to enemy units may then conduct Reserve Combat . Place a combat marker on enemy hexes that are to be attacked . Reminder: Units not in Reserve may not partici-pate in the Reserve Combat.All combat rules apply for Reserve Combat ex-cept the following:1 . If the combat is supported, an SP is expended
relative to the unit’s location prior to reserve movement.
2 . Ignore all ZOC effects from enemy units that were previously attacked during either the Combat or Breakthrough Segment .
3 . Attacking and defending units may not re-ceive air, artillery, or Assault Engineer sup-port, but may receive combat odds shifts from combined arms, armor superiority, Soviet division bonus, hilltop, and OOS effects .
4 . Combat is resolved per Section 12 .1 .3-D ex-cept that a Breakthrough marker is not placed if another Breakthrough results occurs .
5 . Remove all Reserve markers at the end of the segment .
[12.2] units Which may attackOnly units with a non-parenthesized combat strength may attack .
[12.3] units Which may be attacked
Friendly attack-capable units may attack enemy units in any, some or all adjacent hexes . Friendly units adjacent to enemy units are not obligated to attack . Enemy ZOC/ZOIs have no bearing on which units may be attacked . The attacking player chooses which friendly occupied hexes will attack adjacent enemy occupied hexes at the time of resolving each individual combat .
-BREAK-THROUGH-BREAK-
THROUGH
[12.3.1] unit participation within a hex during combat
1 . When attacking, all attack-capableunits at-tacking from the same hex must be included in a combat . However, Out-of-Supply units in an attacking stack may be withheld from the attack (Also, see exceptions during Breakthrough and Reserve combat).2 . When defending, all units in the attacked hex must be included in the combat . Exceptions: a . Artillery units occupying a defending hex
(See Artillery Support and Defense Restric-tions, Section 12 .10 .7) .
b . Units that previously retreated into a hex containing other units and are subsequently attacked in a later combat of that segment are not included in the defense .
3 . All attacking and defending units are subject to the combat results (including OOS withheld units per Case 1 above) . However, the following units cannot absorb step losses unless all other units in the hex are eliminated:• Defending units with a parenthesized combat
value .• Units that retreated into a hex and are sub-
sequently attacked in a later combat in that segment .
4 . Attacking stack limits are never affected by the stacking limits of the defending terrain hex . [12.3.2] multi-hex combatUnits in separate hexes may attack single or mul-tiple enemy hexes as a single declared combat as long as all attacking units are adjacent to all de-fending units . Combine all attacking and defending combat strengths and resolve as a single combat .[12.3.3] unit attack/defense limitsIndividual units may attack only once per turn in either their Combat or Reserve Segment . Breakthrough units (only) may attack again in their Breakthrough Segment. Units may be at-tacked in each of the Combat, Breakthrough and Reserve Segment but only once in each segment . There is no limit to the total number of attacks in a Combat Phase.
[12.4] supported/unsupported combat
Units that attack in a given combat may be ei-ther supported or unsupported . It is possible that some attacking units in a combat may be sup-ported and some units unsupported . Supported units attack at their printed combat strength (full value) and may also receive combat air support, artillery support and assault engineer support . Unsupported units attack at half their combat strength (rounded up) and cannot receive artil-lery support, combat air-support or assault engi-neer support . Attacking units become supported by the expenditure of Supply Point (SPs) as in each below case . CASES:SovietSupport:At least one unit of each Soviet army and tank/mechanized/cavalry korps that participates in an individual combat must be in-supply in order for units of that army or corps to be supported .GermanSupport:At least one unit from each German korps and panzer division that partici-pates in an individual combat must be in supply

18 The JAWS of VICTORY — Rules of Play 1.0
DEFENDING: Infantry type units receive an additional 2 combat strength points per hex (not per unit) . Reminder: Soviet armor brigades are considered to have one infantry type step .Townhex:ATTACKING: Each armor unit attacks into a town with one-half of its combat strength (rounded up) . DEFENDING: Defending attack-capable infantry units receive either a] one additional strength point for each attack-capable infantry step that occupies the hex or b] two additional strength points total per hex, whichever is greater . Armor, artillery, anti-armor, anti-air and non–attack-ca-pable infantry units do not receive or contribute to added strength points . Reminder: Soviet ar-mor brigades are considered to have one infantry type step .hilltophexATTACKING: If an attacker occupies a hilltop and the defender does not, then the attacker re-ceives a one-column shift to the right . DEFENDING: If a defender occupies a hilltop and the attacker does not then the defender receives a one column shift to the left . If a defending unit has a supporting artillery unit on a hilltop that is adjacent to a defending hex, the defending player receives a hilltop combat shift to the left . • Supporting artillery in a hilltop hex that is
being attacked (or has been attacked) may provide a hilltop combat shift only to itself .
• No individual combat can receive more than one hilltop shift .
• If both attacker and defender occupy adjacent or the same hilltops then neither attacker nor defender receives a combat shift .
RiverandStreamhexside:ATTACKING:Each unit attacking across a river or stream hexside has its combat strength halved (rounded up) .Bridgehexsides:A bridge across a hexside (with or without a road) has no effect on determining combat odds . Combat effects are determined by other terrain . Bridges do allow advance and retreat across a river .Fordhexsides(optionalrule):A ford across a river hexside negates the combat effects of the river . Combat effects are determined by other terrain . A ford allows units to advance and retreat across a ford only if they are able to move across a ford hexside .Swamp hexsides: An armor unit attacking across a swamp hexside has its combat strength halved (rounded up) . Armor units may not ad-vance or retreat across a swamp hexside except through a connected road hexside . Roads,Trails,andRailroads:Primary and sec-ondary roads, trails and railroads have no effect on combat odds determination . They do allow advance and retreat along the road (or railroad) in otherwise prohibited terrain .lakehexside:Units may never attack or retreat across a lake hexside .
[12.6] effects of Zocs/ZoIs on combat
The combat strength of an attacking unit is halved if it is in the ZOC of an enemy unit that is not be-ing attacked during the current Combat Segment.
During the Breakthrough and Reserve Segments, an attacker’s combat strength is not affected by the ZOC from units that were attacked in a pre-vious combat segment . Enemy zones-of-influence do not affect attacking combat strength .Note: a unit’s combat strength may never be halved more than twice due to terrain, ZOC ef-fects and unsupported combat. Always round up fractions for each halving.
[12.7] combined arms combat shift
DESIGN NOTE: Combined arms represent the ability of trained infantry and armor to mutually support one another in combat. Not all types of units were capable of such mutual support.The German player receives a combined arms combat shift to the CRT odds for each hex that contains both an armor unit and an attack-ca-pable infantry type unit . The Soviet player re-ceives a combined arms combat shift to the CRT odds for each hex that contains an armor brigade that has a red star H (see case 4 .5 .3) . No other Soviet units may receive combined arms . • For each attacking stack with Combined
Arms, the attacker receives one combined arms shift to the right on the CRT odds ratio (for a maximum of 2 shifts) .
• For each defending hex with a stack that has Combined Arms, the defender receives one combined arms shift to the left on the CRT odds ratio .
CASES:1 . A cadre unit cannot be used to provide a com-bined arms shift .2. Anti-armor or anti-air units do not contribute to or nullify Combined Arms shifts.3 . Attacker and defender are each allowed a maximum of two shifts per combat in clear, vil-lage and woods terrain . Note: The defender can only receive two shifts for combined Arms if the attacker is attacking 2 defending hexes, otherwise the most shifts for Combined Arms a defending hex can have is one . 4 . Attacker and defender are each allowed one shift per combat in towns .5 . Combined arms shifts are not allowed when attacking into a forest or across a river or swamp hexside unless the hexside is crossed by an intact bridge . Note: If using the optional bridge collapse rule then the bridge collapse roll should occur be-fore determining combined arms.6 . Combined arms shifts are not allowed when defending in a forest .
[12.8] armor superiorityBoth attacker and defender may receive Armor Superiority if a combat contains any armor units with white dots . Armor Superiority provides shifts to the CRT for the attacker or defender, and is determined by comparing the number of white dots of a single attacking armor unit against the number of white dots of a single defending ar-mor unit .
Example: Unit with both white and black ASV Dots
2tk3 tk1818
42-14
The players may choose any armor unit in their respective attacking and defending stacks
in order for units of that korps or division to be supported .SupportingMultipleSovietArmiesandCorps:when units from multiple armies or tank/mecha-nized/cavalry corps participate in a single combat, then one SP must be expended by each supporting army or corps participating in the combat . Supporting Multiple German Korps andPanzer Divisions: when units from multiple korps or panzer divisions participate in a single combat, then one SP must be expended by each supporting korps or panzer division participating in the combat . CombatSupportRange:The SDM supporting the combat unit must be the SDM that placed the unit in supply (even if the attacking unit is beyond the supply range) . Expend SPs only from that SDM .
[12.5] effects of terrain on combat
Unit combat strength is affected by certain map terrain features as indicated below and on the Terrain Effects Chart (TEC) .Units defend with their printed combat strength in all terrain . In addition, some terrain features add defensive strength points to a combat in that terrain . Attacking across certain terrain hexsides halves a unit’s combat strength . NOTE: A unit’s combat strength may never be halved more than twice due to terrain, ZOC effects and unsupported combat. Always round up fractions for each halving.Attack-capable units may attack into all hexes ex-cept across Lake hexsides . However, all of a unit’s combat attributes may not apply when attacking into certain terrain or across certain hexsides . [12.5.1] defending in multiple terrain
typesUse the terrain that most favors the defender when a combat occurs into a hex with multiple terrain types .
[12.5.2] effects of terrain on combatWoodshex:ATTACKING:Each armor unit attacks into woods with one-half its combat strength (rounded up) . DEFENDING: Infantry type units receive an additional 2 combat strength points per hex (not per unit) . Reminder: Soviet armor brigades are considered to have one infantry type step .Foresthex:ATTACKING: Each armor unit attacks into a forest hex with one-half of its combat strength (rounded up) . Armor units may not advance into or retreat out of a forest hex except through a connected road hexside . DEFENDING: Defending attack-capable infantry units receive either; a .) one additional strength point for each attack-capable infantry step that occupies the hex, or b .) two additional strength points total per hex, whichever is greater . Armor, artillery, anti-armor, anti-air and non–attack- capable infantry units do not receive or contrib-ute to added strength points . Reminder: Soviet armor brigades are considered to have one infan-try type step .villagehex:ATTACKING: All units attack into village hexes with their normal combat strength .

19The JAWS of VICTORY — Rules of Play 1.0
[12.10] artillery support GENERAL RULEAttacking and defending units within the Range of an artillery unit may receive artillery support to that combat . A maximum of three individual artillery units may provide offensive support in any given combat . Only one artillery unit may provide defensive support in any given combat . Exception: Soviet “Special Barrage” (see Section 17.1.3).
12.10.1 artillery unit barrage strength and range
Example: Front and back side on a Soviet artil-lery unit
BarrageStrength:Each artillery unit has two artillery support values printed on the counter: Offensive Barrage Strength (OBS) and Defensive Barrage Strength (DBS) . Only the OBS may be used to support friendly units in an attack . Only the DBS may be used in support of defending friendly units in a hex . These values are used to determine combat shifts in combats to which they are supporting . Range: An artillery unit‘s Barrage Range is counted from the artillery unit to the defending hex(s) . [12.10.2] artillery support during
combatArtillery support to each individual combat is determined following the below protocol: 1 . The attacking player and then the defending
player must announce which artillery units will provide support for that combat per the declarations in Section 12 .1 .3 .
2 . Each player totals the face-side-up Barrage Strengths from all their participating artillery units and cross reference that total to the cor-responding column on their separate Artillery Support Table .
3 . Both players flip their supporting artillery units to back side . Note: For German artillery regiments see Section 12.10.5.
4 . Each player rolls one die for offensive and defensive support on their respective Artillery Support Tables . Add the following modifier to their respective die rolls:+1 Storm (both player’s die)+1 German attacking a Minefield/ entrenchment (German die only)+1 If German is defending in a special barrage combat (German die only)
5 . Cross reference each modified die roll to the column on the Soviet and German Artillery Support Table that corresponds to the total OBS/DBS declared for the combat .
6 . The result of the roll determines the num-ber of shifts that are applied to the Combat Results Table (CRT) .
7 . OBS results shift the CRT odds to the right and DBS results shift the CRT odds to the left .
Example: The German player allocates three ar-tillery units to support a combat with OBS values
(presumably, players would select their best ar-mor unit to determine armor superiority) . Black dots are not used to determine Armor Superiority .
PROCEDURE:1 . The attacker determines which attacking
Armor unit has the largest number of white ASV dots .
2 . The defender determines which defending Armor unit has the largest number of white ASV dots .
3 . Compare the number of attacker’s white ASV dots to the defender’s white dots .
4 . If the attacking unit’s number is greater than the defending unit’s, the attacker receives a number of CRT shifts based on the following levels of difference:
1greater: shift the CRT odds 1 to the right . 2,3,or4greater: shift the CRT odds 2 to the right .
5greater: shift the CRT odds 3 to the right .
5 . If the defender’s number is greater than the at-tacker’s, then shift the CRT odds 1 column to the left . If the attacker’s and defender’s number are equal, then no shifts are applied to the CRT .
[12.8.1] terrain effects on armor superiority
Armor Superiority is not allowed for armor units:• attacking into or defending in a town or foresthex .
• attacking acrossariverorswamphexside, unless the hexside is crossed by an intact bridge . Note: If using the optional bridge collapse rule then the bridge collapse roll should occur before determining armor superiority.
[12.9] special unit effects on combat
[12.9.1] assault engineer combat bonus
Both the Soviets and Germans pos-sess engineering units with assault capability that provide a combat bonus when declared . They are designated with a red a on the counter . CASES:1 . An attacking player (only) must declare the use of an Assault Engineer prior to the combat odds determination . 2 . The AssaultEngineerCombatBonusshifts the combat ratio one column to the right . Only one shift is allowed regardless of the number of assault engineer units involved in the combat .3 . An Assault Engineer may only use its com-bat bonus if stacked with attack-capable units of their own division (German) or army (Soviet) .[12.9.2] soviet division combat bonusA Soviet division with 2 or more steps (not a cadre) has an intrinsic combat bonus that shifts the CRT odds one column to the right when attacking only . A combat bonus for an attacking division does not apply if the division is:• halved due to being in an enemy ZOC that is
not being attacked (see Section 12 .6) .• Out-of-Supply (OOS1 or OOS2) .• extended, or broken down into regiments .
42Ka-B
a
52-5Pio
1528How
(2)-101
11
3 40
00
1528How
(2)-101
340OBS
DBSBarrage
Range
of 1, 2, and 2 for a total of five OBS points. The German player rolls a single die with a result of 4 and receives two combat shifts to the right.Player’s note: Soviet and German artillery units function differently in order to reflect the differ-ences in systems, training and doctrine.
[12.10.3] soviet artillery fireSoviet artillery units may only provide artil-lery support once in a turn; either offensive or defensive support, but not both . The player automatically flips the unit to its back side (Out-of-Ammo) when declaring either offensive or defensive combat support .[12.10.4] soviet artillery support
restrictions 1 . Tank, Mechanized, and Cavalry corps ar-
tillery may only provide artillery support to units within their own corps .
2 . Army designated artillery units may provide artillery support to any unit within their own Army, including any corps units within that army .
3 . Soviet Front designated artillery units may provide artillery support to any unit within their own Front .
[12.10.5] German artillery fireGERMAN ARTIllERy BATTAlIONS may only provide artillery support once in a turn; using either its Offensive Barrage or Defensive Barrage Strength, but not both . The player au-tomatically flips the unit to its back side (Out-of-Ammo) when declaring either offensive or defensive artillery support . EXAMPLE: One offensive or defensive fire conducted by a battalion
GERMAN ARTILLERyREGIMENTSmay pro-vide artillery support using either its Offensive Barrage Strength once or its Defensive Barrage Strength twice, in a Combat Phase . When de-claring Offensive artillery support, the unit must be on its front side . The player flips the unit to its back side and places an Out-of-Ammo marker on the unit . EXAMPLE: One offensive fire conducted by a regiment
When declaring Defensive artillery support, the unit may be on either its front or back side (but not Out-of-Ammo) . If on its front side, the unit flips to its back side but does not receive an Out-of-Ammo marker . If on its back side, the unit then receives an Out-of-Ammo marker .Note: German divisional artillery regiments (only) have a DBS value on their back side al-lowing defensive fire when on their back side.
Flip Counter
Flip Counter
Out-of- Ammo Side
Add Out- of-Ammo Marker
Offensive or DefensiveFire
OffensiveFire

20 The JAWS of VICTORY — Rules of Play 1.0
EXAMPLE: Two defensive fires conducted by a regiment.
[12.10.6] German artillery support restrictions
1 . Division artillery regiments may only pro-vide artillery support to units within their own division . 2 . Korps artillery battalions may only provide support to units within their own korps including divisional units within the korps .[12.10.7] artillery defense and
support restrictions 1 . Artillery units that occupy a hex adjacent to an enemy unit may provide offensive or defen-sive artillery support to other combats if the hex is not the subject of a combat . However, artillery units that occupy a hex that is attacked may not provide artillery support to other combats during that combat phase .2 . If a single artillery unit is the only unit that oc-cupies a hex and is subject to an attack, it may only use its defensive combat strength and cannot pro-vide artillery support to itself or other combats .3 . If more that one artillery unit occupies a hex that is subject to an attack, then . . .•onlyoneartilleryunitmayprovidedefensive
artillery support to its defending hex (players choice)
• the remainingartilleryunits in thehexmustapply their defensive combat strength to the combat .
[12.11] high and low combat ratios
Attacks made at ratios lower or higher than those printed on the Combat Results Table use the lowest or highest ratio column indicated on the table . In addition, any combat that occurs at odds lower than 1:3 causes an automatic Disorganized result to the attacker . Any combat that occurs at odds greater than 10:1 causes an automatic Disorganized result to the defender .
[12.12] combat resolutionCombat results for each combat are determined by the roll of two six-sided dice . Armor/Anti-armor combat (for icon units) and General Combat occur simultaneously .a . Armor/Anti-armorCombat:Each individ-
ual die (black for German and red for Soviet) is used to separately determine the step loss to participating German and Soviet armor, anti-air or anti-armor units (Section 12 .12 .1) .
b . General Combat: The sum of the two die determines the general result of the combat for all participating units using the Combat Results Table (Section 12 .12 .2) .
The following table indicates the method of con-ducting combat for the various possible armor and infantry type combinations .Note: Attacking anti-armor/anti-air units never participate in Armor/Anti-armor combat.
Units Present in CombatCombat Result
Armor/Anti-armor Combat
ATTACKER DEFENDER
Infantry only Infantry only CRT NoInfantry only Armor/Anti-armor
onlyCRT No
Armor only Infantry only CRT yes*
Infantry & Armor
Infantry & Armor/Anti Armor
CRT yes
Armor Armor CRT** yes* If defending infantry has a black dot; ** use retreat & breakthrough results only
[12.12.1] armor/anti-armor combatArmor/Anti-armor Combat must be conducted for all combats in which attacking armor units are eligible to advance into the attacked hex . Armor/Anti-armor Combat is simultaneous for attacker and defender .AttackingPlayer:The Attacking player deter-mines the number of white dots on the attacking armor unit that has the greatest number of white ASV dots . If the number on the attacker’s die from the combat die roll is less than or equal to that number, a defending armor unit or anti-ar-mor unit with the greatest number of total ASV dots, must take a step loss .DefendingPlayer:The Defending player deter-mines the largest number of total ASV dots (white plus black) on a single defending armor or anti -armor unit. If the number on the defender’s die from the combat die roll is less than or equal to that number, an attacking armor unit with the greatest number of white dots must take a step loss . CASES:1 . Armor dots are determined prior to all combat resolution . 2 . If combat involves only friendly and enemy Armor/Anti-armor units, then only apply the re-treat and breakthrough results from the CRT .3 . Infantry unit black dots are used to determine armor loss only if an infantry unit is defending alone in a hex . 4 . Attacking anti-armor units are not subject to Armor/Anti-armor step loss (they only contrib-ute their combat strength) .
[12.12.2] General combat resolution using the crt
General combat is resolved using the Combat Results Table . Determine the final odds by applying all combat shifts to the initial combat odds ratio . Cross reference the die roll to the final odds column on the CRT . Each row of the odds column is divided into two parts: left for the attacker and right for the defender and separated by a forward slash (/) . Each part may contain possible combat results for the respective players consisting of the following:
• No result
1,2 Step Losses: The number of step losses applied to the owning player’s units .
d Disorganized: Some or all of the own-ing player’s units are Disorganized (see 12 .17) .
r Retreat: Retreat one hex
rE Breakthrough: The attacking player retreats the defending combat units two hexes . Advancing eligible units receive a breakthrough marker (see 12 .1 .4) .
NOTE: The attacker and defender each apply their combat results separately .
Example:
The above result is read as follows: The attacker must lose 1 step. The defender must lose 1 step, re-treat one hex and disorganize all defending units.
[12.12.3] how attacking units satisfy step losses
The attacking player must satisfy combat result step losses according to the following priority: a . If an Assault Engineer Combat Bonus was
declared then the first step loss mustbe taken from the declared Assault Engineer unit .
b . If “a” above does not apply, then the first step mustbetakenfromaparticipatinginfan-trytypeunitwiththehighest“unmodified”combatstrength.
c . If “b” above does not apply, then the first step loss maybeoftheowningplayer’schoice.
d . After the first step loss has been satisfied, the attacking player may take additional losses from any participating unit .
[12.12.4] how defending units satisfy step losses
The defender must take the first step loss, as a result of General Combat, from the unit with the highest unmodified combat strength . Any ad-ditional required losses may be taken from any defending unit . Note: Artillery units in the hex that provided artillery support and non–attack-capable units may not take step losses unless they are the last remaining unit(s) in the hex.
[12.13] retreat after combatAll units that receive a Retreat result in a given combat must retreat one or more hexes . EXCEPTION: See “No Retreat” (Section 12.14).
[12.13.1] how units retreat after combat
1 . The owning player retreats his own units except in a “Breakthrough” retreat result, wherein the attacking player retreats the de-fending units .
2 . Retreats indicated in the CRT are expressed in hexes, not movement points .
3 . Units must retreat the required number of hexes .4 . Units in a stack may retreat into separate
hexes . 5 . The path of retreat must meet the following
conditions:• Theretreatpathmustbeinthegeneraldi-
rection so as to keep the retreating unit in-supply (unless such a path is not available) .
• Thefinalretreathexmustbethemaximumdistance possible from the combat hex .
• Retreatingunitscannotreenterahexprevi-ously occupied during the retreat .
• Units cannot retreat into an enemy occu-pied hex .
• Units cannot retreat into hexes or acrosshexsides prohibited by movement on the Terrain Effects Chart (Section 12 .16) .
6 . Units may retreat into or through friendly oc-cupied hexes in violation of stacking limits .
7 . Units unable to retreat suffer a 1 step loss for each retreat result not satisfied .
Add Out- of-Ammo Marker
First DefensiveFire
Second DefensiveFire
Flip Counter
1/1dr

21The JAWS of VICTORY — Rules of Play 1.0
[12.13.2] “breakthrough” retreatsDuring a “Breakthrough” retreat result, the at-tacking player retreats the defending units . When retreating a defender’s units, the attacking player may not intentionally retreat the units such that it violates any of the above conditions .[12.13.3] how unit types affect retreatGerman Regiments: German Regiments may
breakdown into battalions prior to retreat but only after taking any received combat losses .
Soviet Divisions: Soviet Divisions may not breakdown or extend during a retreat .
Artillery: An artillery unit that retreats is imme-diately Disorganized .
Engineers: Any engineer unit with a parenthe-sized combat strength that retreats must take an automatic step loss in addition to the retreat result .
[12.13.4] retreats through Zocs and ZoIs
Soviet units that retreat into an enemy ZOC are Disorganized . German units that retreat into enemy ZOCs become Regroup . Units that are already Regroup or Disorganized suffer no additional effect when retreating through ZOCs . There is no effect for retreating into enemy ZOIs .
[12.14] “no retreat “[12.14.1] declaring no retreatA defender may declare “No Retreat” during the Combat Declaration Segment and prior to combat resolution . There must be at least one attack-capable infantry type unit in a defend-ing hex in order to declare “No Retreat” . Note: Soviet Armor Brigades are assumed to have one infantry step.“No Retreat” may be declared only in the fol-lowing terrain: • Woods, village, town, forest• Clear terrain if it contains an improved posi-
tion or minefield .• Clear terrain if all attackers are attacking
across a river or stream hex side .[12.14.2] resolving “no retreat” and
additional attacker lossA “No Retreat” declared combat that receives a defender retreat result must take step losses in-stead of retreating . These losses are in addition to any step losses indicated on the CRT . Also, the defender may cause the attacker to take an addi-tional step loss if the defender takes an additional step loss due to “no retreat” .PROCEDURE: 1 . The defender must take one additional
step loss if a retreat result is indicated on the CRT . The first loss must come from the defender’s largest infantry unit per 12 .12 .4 . Any additional loss may be taken from a unit of the defender’s choice .
2 . The defending player rolls 1 die . If the die roll is less than or equal to the remaining number of attack-capable infantry type steps in the defender’s hex, then the attacker’s largest strength unit (unmodified combat strength) must lose 1 step .
3 . All remaining defending units that partici-pated in the combat must remain in the hex in which the combat occurred .
[12.14.3] disorganized units and “no retreat”
A unit that declared “No Retreat” but becomes Disorganized during combat must retreat and may no longer take step losses in lieu of retreat . A Disorganized unit cannot cause additional at-tacker loss .
[12.15] advance after combat A retreating unit leaves a path of hexes which are called the path-of-retreat . Any attack-capable unit may only advance along this path-of-retreat . (Exception; see Special Armor/Mechanized Advance After Combat below) . [12.15.1] how units advance after
combat1 . Units are never required to advance after
combat . When units do advance, the owning player always conducts the advances .
2 . Units may advance individually or as a stack .3 . In any advance after combat, the first hex en-
tered must be the hex formerly occupied by the retreating or eliminated units . Advancing units may ignore enemy ZOCs and ZOIs dur-ing the entire advance .
4 . If all defending units in a hex are eliminated, then the attacking units may advance an ad-ditional hex in any direction after entering the combat hex up to a maximum advance of two hexes .
5 . If all defending units in the hex are eliminated and the attacker has a retreat result, then the at-tacking player has two options: a) ignore the at-tacker retreat result and stay in place or b) take an additional 1 step loss and advance one hex .
[12.15.2] restrictions on advance after combat
1 . Non-attack-capable units may never advance after combat .
2 . Units cannot advance into prohibited terrain or across prohibited hexsides (Section 12 .16)
3 . Defending units may advance only one hex if the attacker retreats or is eliminated (however, defending units that declared “No Retreat” may not advance after combat; see 12 .14 .2) .
4 . Units may not violate stacking limits at the completion of an advance after combat .
5 . If a unit can advance two hexes, then the sec-ond hex may not be entered if it crosses a non--bridge river hexside .
[12.15.3] special armor/mechanized advance after combat
All attacking armor, reconnaissance and mech-anized infantry (but not motorized) type units may advance the permissible number of hexes but may deviate from the path of retreat after the first hex entered. They may advance up to the allowable number of hexes .
[12.16] effects of terrain on advance/retreat
[12.16.1] the map edgeUnits may retreat off the map only if no other re-treat hex is available and they could trace a path to their supply source during the Supply Phase . Units that could not trace during the Supply Phase are eliminated from play . During the next turn units that could trace may reenter the map
on the next adjacent road hex (closer to a supply source) on the same map edge . [12.16.2] streams A unit advancing across a stream hexside must end its advance in the first hex entered . [12.16.3] riversRetreat:A unit that retreats across a river hex-side suffers Regroup . Advance:A unit advanc-ing across a river hexside must end its advance in the first hex entered . A unit may only advance across a river if it was adjacent to that river at the beginning of the combat . Note: Armor, anti-armor, anti-air and artillery units can only retreat or advance across a river hexside if the hexside is traversed by a bridge.
[12.16.4] Woods/forestUnits may advance only one hex when advanc-ing into a woods or forest hex . EXCEPTION: A road hex negates this restriction.
[12.16.5] swamp hexside Units may advance only one hex when ad-vancing across a swamp hexside.Armor and motorized type units may not retreat or advance across a swamp hexside unless connected by a road . Armor and motorized units retreating across a swamp hex via a road are Disorganized .[12.16.6] townsUnits may advance only one hex when advanc-ing into a town hex .
[12.17] disorganization and regroup
Disorganized: A unit becomes Disorganized due to any of the following:• Either the attacker or defender becomes
Disorganized due to a specific combat result indicated on the Combat Results Table.
• A unit that is in Regroup declares an attack .• A unit occupies a hex in violation of stacking
restrictions .• A Soviet unit retreats through an enemy ZoC .In each instance, place a Disorganized marker on all affected units .
Regroup: A unit assumes Regroup status in the following ways:• Whenever it recovers from
Disorganized (see 12.17.4) .• German units that retreat into an enemy ZOC .• Certain German units that move from enemy
ZOC-to-ZOC (see 10 .3 .2) . • Artillery units that move using strategic or
rail movement (see 9 .10) .• Whenever a non-Disorganized unit retreats
across a river or swamp hexside .In each instance, place a Regroup marker on all affected units .[12.17.1] disorganization during combatAll units in a combat hex that receive a “D” re-sult (including breakthrough result) are Disor-ganized . A Disorganized result from a combat is applied after any step losses are applied, but before any advances or retreats . 1 . The number of attacking stacks (from multi-
ple hexes) that become Disorganized depends on the status of the defending units before and
Disorgzd
Regroup

22 The JAWS of VICTORY — Rules of Play 1.0
after defender combat results are applied . 0 No stacks disorganize if all defending
units were Disorganized at the beginning of the combat
1 Onestackdisorganizesif a) all defending units were eliminated, b) the defending units retreat, or c) defending units remain-ing in the hex do not exert a ZOC .
2 Twostacksdisorganizeif units remaining in the defending hex exert a ZOC . No more than two attacking stacks are required to disorganize in any given combat .
Theattackingplayerchooseswhichofhisstackswilldisorganize.
2 . Disorganization only affects the units in-volved in the combat and does not affect units that had retreated into a combat hex prior to a given combat .
[12.17.2] effects of disorganizationDisorganization only affects units that have been designated as Disorganized . It has no effect on non-Disorganized units that subsequently oc-cupy the same hex due to movement, over stack-ing, advance, or retreat . Disorganized units suf-fer the following effects:1 . A unit’s movement and combat strength are
halved (rounded up) . Note: This is in addi-tion to any halving effects from terrain and supply/support.
2 . A unit cannot use strategic movement .3 . Engineer units cannot provide the Assault
Engineer Combat Bonus .4 . Units cannot provide combined arms .5 . Units cannot declare “No Retreat” . 6 . Units may advance only one hex after
combat .7 . Engineers cannot destroy, repair or construct
bridges, construct IPs, or minefields .8 . Units cannot receive replacements .9 . Armor units cannot conduct armor
interception .10 . Armor units cannot perform 1 hex reaction
or withdrawal movement .11 . Artillery units cannot provide offensive or
defensive artillery support12 . A unit with a Zone-of -Control has its ZOC
reduced to a Zone-of-Influence . Units with a ZOI retain their Zone-of-Influence .
13 . There are no additional effects to a Dis-organized unit that subsequently becomes Disorganized .
[12.17.3] effects of regroup A unit with a Regroup marker suffers the same effects as a disorganized unit . In addition, if a unit with a Regroup marker attacks, then it reverts to Disorganized prior to combat odds determination .
[12.17.4] recovery from disorganization and regroup
A unit’s recovery from Disorganized is a two-part process . 1 . During the enemy Disorganization/Regroup
Phase, any friendly unit that is Disorganized has its Disorganized marker flipped to the Regroup side .
2 . During the the friendly Disorganization/
Regroup Phase, remove the Regroup marker from all friendly units under Regroup.
NOTE: Terrain, supply status and ZOCs/ZOIs have no effect on the recovery process.
13.0 Supply GENERAL RULEBoth players establish “Supply Networks” dur-ing the Supply Determination Phase by placing Supply Distribution Markers (SDMs) on a road hex . A Supply Network consists of all of the following: 1 . A SupplySource (Section 13 .1)2 . A supply path from a Supply Source along
a road to a Supply Distribution Marker(SDM) (Section 13 .2)
3 . A supply path from an SDM to a CombatUnit (Section 13 .3)
Players then determine the supply status of each of their units within their respective network . Units are either In-Supply or Out-of-Supply . Players then distribute Supply Points (SPs) within each network to their In-Supply combat units for the purpose of:• Resupply of artillery (Supply Phase)• Combat “support” (Combat Phase)• Specific engineering actions (Engineering
Phase)
[13.1] supply sourcesThe Soviet and German players have dedicated supply sources printed on the map edge as de-picted by the following symbol . Each supply source may only supply formations indicated on the supply source symbol .
8 ar27 ar
Examples: Soviet 27th Army German 8th Army Supply Source Supply SourceSoviet:Each Soviet Army has a single map edge supply source . In addition, the 27th Army has three supply sources .German:The German 8th Army has three map edge supply sources and the 1st Panzer Army has two . In addition, the German player has rail terminals along rail lines that serve as a supply source .[13.1.1] German rail supply sourcesGerman Rail Terminals serve as a supply source for all German units . Rail Terminals: Any rail terminal along a rail-road line that traces a continuous, uninterrupted path to a German supply source also serves as a supply source (See the Terrain Key on the map for the Rail Terminal symbol .)Rail Lines: A rail line serves as a supply path of infinite length from its map edge supply symbol to any Rail Terminals along that rail line . Interrupted Rail Lines: A Rail Terminal may not serve as a supply source if any of the following conditions exist:a . A Soviet unit occupies a railroad hex or proj-
ects a ZOC or ZOI into a rail line hex and that hex is between its supply source and that rail terminal .
b . The path from the Rail Terminal to the supply source crosses a destroyed rail bridge .
[13.1.2] cutting a rail lineWhenever a Soviet unit with a ZOC occupies a railroad hex at the end of the Soviet Movement Phase, place a “Rail Cut” marker in the railroad hex . The rail line is consider cut and all Rail Terminals in and beyond that hex cease to be a supply source unless the rail line is repaired (See Sec-tion 15 .2 .5 for rail repair procedures) .
[13.1.3] special korsun supply sourceThe rail terminal in the town of Korsun serves as a normal German supply source as long as an un-interrupted rail line extends from Korsun to any German map edge supply source . If (during the German Event Phase) an uninterrupted rail path cannot be traced from Korsun to a map edge sup-ply source, then the German player may, but is not required to, declare “Korsun Isolated” . Once Korsun is declared isolated, the town of Korsun becomes a special supply source” (see Korsun Special Supply Source, Section 14.5) .
[13.2] supply distribution markers (sdms)
Design Note: Supply Distribution Markers (SDM) are a representation of each army’s distributed logistics systems. They reflect the ability of their general supply system to distribute supply to the various units within their army. These markers are not vehicles or depots but rather represent the central position of the distribution system.
46tk5G tk
10/8
Supply Capacity
Supply Range Increment
to its Supply Source during
Frozen
Supply Range Increment to its Supply Source during Mud
Unit Designation the SDM Supplies
Supply Distribution Markers (SDMs) that trace a supply path to their supply source may provide general supply to their component units and are eligible to receive and distribute “supply points” per the supply point rules of (Section 14 .2) .[13.2.1] how sdms are placedSDMs are placed on the map each Game-turn during the Supply Marker Phase . Once placed they cannot move for the remainder of the turn . However, players may relocate their SDMs each Game-turn . When placing SDMs the following requirements must be met:• They may only be paced in a road hex .• They must be able to trace a supply path
along a road to their designated supply source . That path may not pass through an enemy ZOC/ZOI (unless occupied by a friendly unit) or through a hex occupied by an enemy unit .
• They may not be placed more than one increment beyond the number of increments indicated by their supply capacity .
[13.2.2] soviet sdms The Soviet player has two SDMs for each army, one for each tank army, and one for each tank, mechanized and cavalry corps . Army SDMs can only supply units in their Army, including corps units within that army . Tank, mechanized, or cav-alry corps markers can only supply units within their corps . Units without an army designation
23The JAWS of VICTORY — Rules of Play 1.0
may trace supply to any Army SDM in their Front (see rules exception if Stalin Intervenes; 18 .3) .[13.2.3] German sdms The German player has two SDMs for each korps and one for each panzer/panzer grenadier division . In addition, the Germans have a Korsun and KG Haake SDM . Korps SDMs can only supply units within their korps including panzer/grenadier divisions . Panzer/Grenadier division SDMs can only supply units within their panzer/grenadier division . [13.2.4] how enemy units affect sdmsWhenever an enemy unit moves or advances adjacent to an opposing player’s Supply Distribution Marker (SDM) and the marker is not stacked with a friendly combat unit, the SDM must displace either one or two hexes along a road toward its supply source . The marker is displaced by the owning player . It may displace through an enemy ZOC or ZOI but may not dis-place through an enemy unit . If it cannot displace then it is removed from the map but is again available during the next turn . Note: Friendly SDMs have no effect on enemy units or SDMs.
[13.3] tracing a supply pathA supply path is a path of contiguous hexes from a unit to its designated SDM or a path of con-tiguous hexes, along a road, from a SDM to its designated supply source . The Supply Path must meet the following conditions:• None of the path hexes may be occupied by
an enemy unit or be in an enemy ZOC/ZOI (unless the path hex is occupied by a friendly unit) .
• The path may not cross a lake hexside .• The path may not cross a non-bridged river
hexside (unless the hexside is a ford) • The path may not cross a non-bridged swamp
hexside . Exception: If a unit is adjacent to a river hexside, it may trace a supply path across that adjacent river hexside to an SDM as long as all other sup-ply path conditions are met.
[13.4] unit supply stateA unit’s supply state is determined during each Supply Determination Phase . Additionally, a unit’s supply state may change during the friendly Movement Phase or any Combat Phase. At any time during the game a unit is in one of three possible supply states:In-Supply – no marker required to indicate the
unit is In-SupplyOut-of-Supply1 (OOS1 marker)Out-of-Supply2 (OOS2 marker)Once determined, units retain their supply state for the duration of the game-turn . However, units in OOS1 may change to OOS2 due to movement or combat during the current turn .[13.4.1] determining a unit’s supply
stateA unit’s supply state depends on the distance in hexes from the unit (its supply range) to either its supply source or to its SDM . During “frozen” ground the supply range is 10 hexes for the
Soviets and 6 for the Germans . During “mud” conditions the supply range is 8 hexes for the Soviets and 4 for the Germans . In-Supply:A unit is considered In-Supply if . . .a . it can trace a supply path to its designated
supply source and the length of that path is less than or equal to the “supply range” for the current ground condition, or
b . it can trace a supply path to its SDM, and the length of that path is less than or equal to the “supply range” for the current ground condition, or
c . it is on the shortest road (path) between its SDM and its designated supply source and can trace a supply path via that road to its supply source .
Out-of-Supply1:A unit is considered OOS1 if it is unable to meet any of the above “In-Supply” conditions . Place an OOS1 marker on any unit or stack determined to be in Out-of-Supply 1 .Out-of-Supply 2: A unit currently in OOS1 immediately converts to OOS2 after any of the following occurs: a . it engages in combat (attacking or defending) .b . it moves more than 1 hex using armor or
motorized/mechanized movement (infantry movement is unaffected) .
Place an OOS2 marker on any unit or stack re-quired to be in Out-of-Supply 2 (see Section 13 .5) .
PROCEDURE:During the Supply Determination Phase,1 . Remove any OOS1 or OOS2 marker from any
unit that is currently In-Supply .2 . Retain OOS1 and OOS2 markers on units that
remain Out-of-Supply . 3 . Place an OOS1 marker on any units that do not
meet the requirements for being In-Supply .Reminder: No markers are required to indicate that units are In-Supply.
[13.4.2] German air-drop to out-of-supply units.
Out-of-Supply units may be placed In-Supply by Air-Drop Supply during the Air-Drop Supply Phase (Section 14 .6 .4) .[13.4.3] transfer of units to another
army/korpsCombat units that cannot trace a supply path of any distance to their designated SDM, may be transferred to another Army (Soviet) or Korps (German) .1 . During the Supply Determination Phase
a player designates which unit(s) is to be transferred to another component command . Retain the unit’s current OOS marker .
2 . During the following Supply Determination Phase the unit may attempt to trace supply to a different Army (Soviet) or Korps (German) .
3 . Once transferred, the units may trace supply normally to the army or korps to which they were transferred .
4 . If at any time the unit(s) can trace to their original SDM of designated supply source, they revert to normal supply .
Exception: German Panzer V (Panther) and VI (Tiger) armor units may only be supplied by their parent division or corps .
[13.5] effects of being out-of-supply
[13.5.1] effects of out-of-supply 1 (oos1)
Units that are OOS1 are affected as follows:Supply:• OOS1 units may not receive SPs for combat
support, artillery resupply or engineering actions .
Combat:• If the unit is defending, its combat strength is
unaffected . It flips to OOS2 after combat .• If the unit is attacking, its combat strength is
unaffected (Note: Because the attack cannot be supported, the attacking units will be halved) . The unit flips to OOS2 after the attack .
NOTE 1: A unit’s Combat Strength may be halved due to other reductions, such as disor-ganization and terrain effects, but regardless of the amount of reductions, a unit’s Combat Strength cannot be less than one.
NOTE 2: Armor Superiority and Combined Arms are not affected.
• An Out-of-Supply Soviet division may not use its Soviet Division Combat Bonus during combat .
Movement:• If an OOS1 unit uses infantry movement,
then it retains its OOS1 marker .• If an OOS1 unit uses armor, motorized or
mechanized movement, then its movement allowance is halved (round fractions up) . In addition, if it moves more than one hex, then it flips to OOS2 at the end of its movement .
[13.5.2] effects of out-of-supply 2 (oos2)
Units that are OOS2 suffer the same effects as being in OOS1 In addition OOS2 units are af-fected as follows:Combat:• If the unit is defending alone or with only
other OOS2 units, its combat strength is unaffected, however, the combat incurs a two column CRT shift to the right .
• If the unit is attacking alone or with only other OOS2 units, its combat strength is unaffected, however, the combat incurs a two column CRT shift to the left .
NOTE: Because the attack cannot be sup-ported, the attacking units will be halved.
• If defending in conjunction with other In-Supply or OOS1 units, any participating OOS2 units may contribute their combat strength, however, the combat incurs a one column CRT shift to the right .
• If attacking in conjunction with other In-Supply or OOS1 units, then OOS2 units may contribute their combat strength, however, the combat incurs a one column CRT shift to the left .
• Armor, anti-armor and anti-air units subtract one dot (the top dot) from any combat (Com-bined Arms is not affected) .
• OOS2 units cannot declare “No Retreat” . Movement:• If the unit uses infantry movement, then its

24 The JAWS of VICTORY — Rules of Play 1.0
movement allowance remains the same .• If the unit uses armor, motorized or mech-
anized movement, its movement allowance is reduced to 1/4 its original value (round fractions up) .
• OOS2 units may not use strategic movement .Units retain their OOS2 marker after all move-ment and combat, but are eligible for In-Supply status during the next turn .
14.0 Supply Points Supply Points form the basis for all supply ac-tivities in the game . They represent the capacity of fuel, ammunition and other supply within the daily distribution systems . Supply Points (SPs) allow:• Resupply of artillery ammunition• Combat to be supported• Engineering units to repair and construct
river bridges• German engineers to build improved posi-
tions• Truck Movement (Optional Rule)• Soviet units to construct minefields• German engineers to construct optional
airfields and depots
[14.1] supply point (sp) markers
Supply Point (SP) markers are located on the back side of each Supply Distribution Marker (SDM) .
6/4
414 Pz 47Pz
47pz14 Pz
4
2
31
Supply Capacity
Supply Range
Increments Front Back
Designation of the Units the SDM Supplies
Available SPs (4 per Marker)
The rotated position of the marker on the map is used to indicate the number of SPs available for “expenditure” at specific instances of the Game-turn .
[14.2] receiving supply points During the Supply Point Reception Phase, each Supply Distribution Marker (SDM) may receive the maximum number of SPs as indicated by the Supply Capacity on its front side (Section 13 .2) . However, the actual number of SPs available for distribution may be reduced depending on the dis-tance from its placement hex to its supply source . PROCEDURE:1 . Place the SDM on a road hex on its front side . 2 . Select the Supply Range Increment indicated
on the front side of the SDM that matches the current ground condition (Frozen or Mud)
3 . Flip the SDM to its back side and determine the number of available SPs by subtract-ing one SP (-1 SP) for each “Supply Range Increment” (in hexes) beyond its supply source . Rotate the marker such that the final number of SPs available to the SDM is aligned right reading at the base of the counter .
Players note: The rotation of the SDM marker during supply point reception does not indicate actual expenditure of supply but rather indicates that less supply is available
for delivery due to the longer distance that the trucks and wagons in the supply system must travel.
4 . SDMs may not be placed more than one in-crement beyond the number of increments indicated by their supply capacity .
5 . If the SDM is one increment beyond the max-imum number of its Supply Range Increments to the supply source, then flip the marker to its truck (front) side . i.e. the SDM may not expend SPs, but may place units “In-Supply”.
CASES:1 . SPs may not be transferred from one SDM to
another .2 . SPs may not be saved from turn to turn .
[14.4] artillery unit resupply During the Artillery Resupply Phase, both play-ers may resupply any artillery unit that is on its back side or has an Out-of-Ammo marker on it . An artillery unit on its front side need not be resupplied .CASES:1 . Artillery units must be within the supply range of the SDM that placed the artillery unit in general supply . The size or type of the artillery unit determines the number of SPs required to resupply it as follows: All SovietArtillery: 1 SP to flip a unit to its
front side .GermanArtilleryBattalion: 1 SP to flip unit to
its front side .GermanArtilleryRegiment (with an Out-of-
Ammo marker): 2 SPs to remove Out-of-Ammo marker and
flip the unit to its front side 1 SP to remove only the Out-of-Ammo marker . GermanArtilleryRegiment (without an Out-
of-Ammo marker): 1 SP to flip the unit from its back side to its front side .
2 . Once an SP is supplied to an artillery unit the SP may not be returned to its SP marker . It may only be expended by artillery fire .3 . Artillery units may not transfer SPs to another artillery unit .
[14.5] korsun special supply source
HISTORICAL NOTE: In anticipation of events to come, General Stemmermann of the 11th Korps had ordered the collection of reserve supplies in a depot near the Korsun airfield. These reserves were sufficient to sustain the two isolated korps for a significant number of days.
[14.5.1] activating the special korsun supply source
The town of Korsun immediately becomes a supply source when the German player declares “Korsun Isolated” . Units of the 42nd and 11th Korps that subsequently trace supply to Korsun are immediately considered to be part of “Gruppe Stemmermann” and are used to determine vic-tory conditions for the campaign scenarios .PROCEDURE:1 . Korsun immediately receives 15 SPs upon
declaring Korsun isolated . Place the Korsun SPs marker on the corresponding box of the Korsun Supply Track .
2 . Beginning with the next turn after declara-tion, the German player may use the Korsun Supply Track as a supply source in accordance with the supply procedures of Section 13 and 14 . Reduce the number of SPs on the track by one for each SP expended by SDMs that trace supply to Korsun .Note: It is not required to expend SPs from the Korsun Airfield Track. They need only be expended when used for artillery resupply, combat support or engineering actions.
3 . Beginning with the second turn after declara-tion, the German player may begin allocating SPs to Korsun air supply on the Uman Airfield Track (see 14 .6 .2) .
47pz
14 Pz
4 2
3
1
6 Hexes
(in Frozen)
EXAMPLE: The 14 Pz SDM marker is tracing supply to the Rail Terminal at Tal’noye, but it is two hexes beyond the 6 hex “Supply Range Increment” for frozen ground. The “supply ca-pacity” of 4 SPs for the 14th Pz is reduced by one for being one “range increment” beyond the first 6 hex increment. The marker is rotated from 4 to 3 and aligned with the south map edge.
[14.3] expending spsSupply Points may be expended during various phases of a Game-turn . Combat units receiving SPs may only receive them from their own SDM bearing the same army, corps or division designation . Rotate the SP marker on the map to the next lowest number to reflect each expended SP . After the expenditure of the last SP flip the marker to its front side . SPs are expended for the specific activities during the following Phases: Artillery Resupply Phase: One (or two) SPs may
be expended to resupply individual artillery units (Section 14 .4)
Combat Phase: One SP may be expended to sup-port an attack (see 12 .4) . The SDM providing support to attacking combat units must be the SDM that placed the units in supply .
Engineering Phase: One SP may be expended to allow engineering units to repair and con-struct river bridges, build improved positions (German), and to construct minefields (So-viet) (Section 15) .
Also see optional Korsun airfield and depot con-struction (see Section 18 .8 and Section 18 .9) .Note: SDMs are not required to expend SPs.

25The JAWS of VICTORY — Rules of Play 1.0
4 . Beginning with the third turn after declaration, the German player may begin conducting Air Supply missions from the Uman airfield to Korsun (see14 .6 .3) .
5 . In addition, during the Mutual Supply Stage the German player may add two (2) SPs to the Korsun Supply track if a Supply Path (by road of any length) can be traced from Korsun to any In-Supply rail terminal .Historical note: The Germans were able to trickle supplies to Korsun via roads during the battle as long as a road path existed from Korsun to a supply source.
EXAMPLE: The Korsun supply source has 15 SPs for expenditure by SDMs that trace to Korsun.
[14.5.2] soviet capture of the korsun/korsun airfield
If the Soviets capture the Korsun airfield (i .e . occupy the hex at the end of any turn), the fol-lowing take effect:1 . No further air supply may be conducted to the
Korsun airfield . Note: Air-Drops may still be conducted.
If the airfield is recaptured by the Germans, the German player must repeat Section 14 .5 .1 to reactivate the airfield (except for step 1) .
2 . If the Soviets capture the town of Korsun (oc-cupy at the end of any turn), the Korsun SPs marker is immediately set to zero on the Kor-sun Supply Track .
If the town and the airfield are recaptured by the Germans, then normal air supply may continue .
[14.5.3] korsun airfield abandonedSee rule in Section 8 .6 .4 .[14.5.4] alternate airfield and supply
sourceSee optional rules in Sections 18 .8 and 18 .9 .
[14.6] air-drop supply and korsun air supply missions
During any turn of the game Out-of-Supply Ger-man units may be supplied utilizing the follow-ing types of supply missions: • Air-Drop Supply to an SDM .• Air-Drop Supply to an individual hex contain-
ing at least one Out-of-Supply combat unit .In addition, once Korsun has been declared iso-lated the German player may also begin conduct-ing air supply missions from the Uman airfield to Korsun . See the German Air Supply Stage in the turn sequence . 1 . A maximum of five total supply missions are available each turn between air drop and Korsun air supply but no more than two air drop missions may ever be allocated or conducted
each turn (e .g . 2 missions for air drop and 3 for Korsun or 1 air drop and 4 for Korsun etc .)Historical Note: When the Soviets encircled the 11th and 42nd Korps, the Luftwaffe began a determined effort to airlift essential fuel and ammunition to the Korsun Airfield. The Uman airfield served as the principal location for this supply effort. The delivered supply, coupled with reserves already stored in the pocket, was suffi-cient to sustain the encircled units for a signifi-cant number of days.
[14.6.1] allocating sps to air-drop missions
The German player may allocate a maximum of two SPs per turn to Air-Drop missions . Allocation occurs during the Air-Drop Allocation Phase . Place the Air-Drop Supply marker on the Uman Airfield Track to indicate the number of Air-Drop missions to be conducted next turn . Each air drop mission is a separate mission . Each mission may attempt to supply either an individual hex or to deliver SPs to an SDM . Once placed, the mark-ers may not be reallocated until the next turn . [14.6.2] allocating sps to korsun air
supply missionsThe German player may allocate a maximum of five SPs per turn to Korsun Air Supply . Allocation occurs during the Korsun Supply Allocation Phase . Place the Korsun Air Supply marker on the Uman Airfield Track to indicate the number of SPs allocated to Korsun air sup-ply; however, no more than 5 total SPs may be allocated to Air-Drop and Korsun air supply missions . Once placed, the markers may not be reallocated until the next turn .Example: One SP has been allocated to an Air-Drop Supply and 4 SPs to Korsun Air Supply.
[14.6.3] air supply to the korsun airfield
During the Korsun Air Supply Phase, the German player may attempt delivery of all the “allocated” Korsun Air Supply SPs to the Korsun Airfield . A die roll on the Korsun Air Supply Loss Table determines the number of SPs that must be subtracted from the number of Korsun Air Supply SPs allocated to be delivered .PROCEDURE:1 . The German player rolls a six sided die .2 . Add the die roll modifiers from the Table:
+1 Each German AA unit within 1 hex of the Korsun Airfield
–1 Mud ground condition–1 1 or 2 Soviet artillery units within artil-
lery range of the Korsun Airfield–2: 3 or more Soviet artillery units within
artillery range of the Korsun airfield3 . Cross reference the modified die roll to the
Korsun Air Supply Loss column .4 . Reduce the number of Korsun Air Supply SPs
“available” on the Uman Airfield Track by the amount shown on the table .
5 . Add the remaining SPs (if any) to the Korsun Supply Track . Any excess SPs greater than
the track maximum are lost .6 . Set the Korsun Air Supply marker to zero on
the Uman Airfield Track .[14.6.4] air-drop mission to sdms
and unitsDuring the Air-Drop Supply Phase, the German player may conduct Air-Drops to deliver avail-able Air-Drop SPs to either an SDM and/or a hex(s) . If a hex, the hex must contain at least one combat unit . Using the Air-Drop Supply Table, the German player determines the result of the Air-Drop with the following procedure:1 . Select the SDM or individual hex to be
supplied .2 . Roll a six-sided die (no modifiers) .3 . Cross reference the die roll to the either the
SDM or the individual hex column .4 . Apply the result as follows:
a . SDM:The SDM receives the number of SPs indicated by the die roll .
b . Individualhex:The result indicates the number of units that may be placed in supply . The units must be in or adjacent to the designated Air-Drop hex . If artillery, they are flipped to their front side (and any Out-of-Ammo markers are removed) .
5 . If the result is “zero” then no SPs are added to the SDM or no combat units may be supplied .
6 . Set the Air-Drop Supply marker to zero on the Uman Airfield Track .
[14.7] extended supply delivery from an sdm
At the beginning of the Supply of OOS Units Phase, each player may extend supply to units that are marked OOS1 or OOS2 . Expend SPs as follows and remove the OOS markers from supplied units .• 1 SP delivers In-Supply status from a SDM to
a designated hex that is up to twice its normal frozen (or mud) supply range .
• Up to 3 units may be supplied that are in the designated hex .
• Extended range supply may not be used a) to supply (flip) artillery, b) to support combat or c) for engineering activity .
[14.8] soviet air-drop supply missions
During the Soviet Air-Drop Phase, the Soviet player may attempt one Air-Drop Supply mis-sion per front into a hex containing OOS units for that front . The Soviet player rolls one die . On a result of 1 through 2 all units in the hex are placed In-Supply. Remove the OOS marker for each successfully resupplied hex . On a result of 3 through 6 the units remain Out-of-Supply .
15.0 engineering[15.1] German Improved
positions (Ips)DESIGN NOTE: Improved Positions represent enhanced fieldworks or hedgehogs etc. that in-crease the defensive capability of an occupying combat unit.

26 The JAWS of VICTORY — Rules of Play 1.0
GENERAL RULEGerman engineers are eligible to construct Improved Positions (IPs) . Constructing an IP is a one-turn process and occurs during the German player’s Engineering Phase . [15.1.1] constructing an IpDuring the Engineering Phase, any engineer unit that has not attacked during that turn may construct an IP . Place an IP marker in its hex and expend one Support Point from its Korps (or Division) SDM .CASES AND RESTRICTIONS:• The hex receiving the IP must be occupied
by an In-Supply engineer unit and must be a clear hex . The hex may be adjacent to an enemy unit .
• No more than one IP may occupy a hex .• Once constructed, the IP remains in place
and need not be occupied. [15.1.2] effects of Improved positionsAttack-capable units that occupy a friendly IP have two (2) strength points added to the defen-sive combat strength . They are also eligible to declare “No Retreat .” (Section 12 .14) . [15.1.3] elimination of Improved
positionsAn IP is removed the instant a Soviet unit enters that hex . The German player may freely remove any IP from the map .
[15.2] bridgesMAP DESIGN NOTE: Not all bridges on the map are depicted with a bridge symbol. Whenever a road crosses a stream or river hexside, that hex-side contains an “implied” bridge.
GENERAL RULE Both players may attempt to destroy bridges, repair existing destroyed bridges and build new bridges during the course of the game . A bridge is considered controlled by the player whose unit last crossed a hexside containing that bridge . Each bridge must be treated independently in hexes with multiple bridges .[15.2.1] destroying bridges1 . A player may attempt to destroy a friendly controlled bridge only dur-ing the following phases: Enemy Movement Phase: at the instant an enemy
unit first moves into to a hex containing a bridge hexside .
Enemy Combat Phase: at the instant an enemy unit advances during combat into a hex con-taining a bridge hexside .
Friendly Engineering Phase: any bridge that is friendly control .
2 . There is a limit of one attempt per bridge per phase . However, there is no limit to the number of bridges that may be destroyed per turn . eligibility for destroying a bridgeThe following conditions must exist whenever a player attempts to destroy a friendly controlled bridge:1 . The attempt may be made only if a friendly
engineer unit is within three hexes of the hex containing the bridge hexside .
2 . The 3-hex path from the engineer unit to the hex containing the bridge hexside may not be
occupied by an enemy unit and may not cross a river hexside (except via another bridge) .
PROCEDURE:1 . The controlling player announces which indi-
vidual bridge he wishes to destroy, rolls one die and adds the below modifiers . Modifiers:+ 2 if a railroad bridge across a river+ 2 if an enemy unit occupies the hex con-
taining the bridge during the Engineer-ing Phase
2 . An adjusted die roll of 1–5 destroys thebridgeon that hexside; an adjusted die roll of 6 is no-effect .
3 . Place a Bridge Destroyed marker next to the destroyed bridge with the arrow pointing to-ward the bridge .
[15.2.2] repairing bridgesBridge repair takes place during a player’s Engineering Phase . A player must control both hexes of the bridge hexside in order to begin and/or complete repair . If either hex is in an enemy ZOC/ZOI, then a friendly unit must occupy that hex .Bridge repair procedures are different depending on the following bridge types . 1 . RailroadBridgesmay not be repaired .2 . Stream Bridges:Destroyed stream bridges
are automatically repaired during a player’s Engineering Phase as long as: Soviet: any division unit is adjacent to the
bridge hexside or an engineer unit is within three hexes of the destroyed bridge.
German: an engineer unit is within three hexes of the destroyed bridge.
3 . River Bridges: An In-Supply engineer unit must be adjacent to the bridge hexside . Use the following procedure to repair river bridges:a . Expend one SP from the engineering
unit’s SDM .b . Place a Bridge Repair marker next to the
bridge hexside with the arrow pointing toward the repair hexside .
c . During the following Engineering Phase, the player rolls a die . A result of 1–5 repairs the bridge . Remove the Bridge Repair marker . A result of 6 is no-effect (bridge repair is incomplete — retain the Bridge Repair marker .
d . Only one roll per bridge may be made per turn . The player may roll again the fol-lowing turn .
[15.2.3] constructing new bridgesThe procedure for new bridge construction is identical to the procedure of Section 15 .2 .2, except that the Bridge Construction/Completed markers are used (shown below) . The markers have a bridge construction symbol on the front side and a completed symbol on the back side .
Under Construction Bridge Completed
• Only Soviet Army and German Korps level engineers may construct new bridges across streams or rivers .
• German Panther (Pz V) and Tiger (Pz VI) armor units are subject to optional rule 18 .3 when attempting to cross these bridges .
[15.2.4] German class “k” and “J” brücke engineers
German Brücke (bridge) engineers function as other engineer units . In addition, they may con-struct special “K” and “J” bridges across rivers and streams using the below procedure . Once in place, a “K” bridge is usable by all units except by Pz V and Pz VI units . A “J” bridge is usable by all armor units including Pz V and Pz VI units . Ignore the requirement of the bridge col-lapse rule (see 18 .3) . K and J bridge construction is normally a one turn process and takes place during a German player’s Engineering Phase . A German K or J engineer unit must occupy the hex adjacent to the river hexside in order to con-struct the bridge . If the opposite river hex is in an enemy ZOC/ZOI, then a German unit must occupy that hex .
(3)2-10843 J
3Pz
J J
Bridge Engineer Construction Under Unit Completed Construction
PROCEDURE1 . The K or J bridge marker is placed in the hex
with the completed side up and with the arrow pointing toward the river hexside . Once placed the marker orientation cannot be moved .
2 . The German player then rolls a single die . If the result is a 1 thru 5 then the bridge is completed . If the result is a 6 then the J-bridge marker is flipped to its construction side and the bridge is automatically completed during the Engineering Phase of the following turn .
3 . Either player may attempt to destroy “K” or “J” bridges using the same procedure for Destroying Bridges (see 15 .2 .1) . If destroyed, remove the bridge marker from the game .
4 . Soviet units may use a “K” or “J” Bridge if in place during Soviet movement .
[15.2.5] rail line repairThe German player may repair “cut rail lines” during the German Engineering Phase . In order to do so, a korps construction engineer must oc-cupy the cut railroad hex .
217Con
(2)-5
47Pz
Construction Back of Engineer Rail Cut Marker
PROCEDURE1 . The German player expends one SP from the
corresponding korps SDM and flips the “Rail Cut” marker to its “Rail Repair” side (back) .
2 . During the subsequent Engineering phase(s) (if a construction engineer is in the hex) the German player may expend an additional SP to complete the repair . Remove the Rail Repair/Rail Cut marker .
Note: Rail terminals beyond the repaired hex re-vert to supply sources unless blocked by a Soviet unit or another rail cut .
2

27The JAWS of VICTORY — Rules of Play 1.0
[15.3] soviet minefields GENERAL RULESoviet Minefields may be constructed in certain scenarios . Minefields provide defensive com-bat benefits and slow German movement . The number of Minefields that can be constructed is defined in each scenario . See the scenarios for ad-ditional rules and Minefield marker availability .
2 Uk
mIne!
2nd UkraineMINE!
Construction Side Completed Side
• Minefield markers are directional and only affect units moving across any of its three designated minefield hexsides . Once placed, the designation of the three Minefield hexsides remains for the duration of the scenario or until the Minefield marker is removed or eliminated .
[15.3.1] soviet minefield construction Minefields may be constructed only by Soviet divisions and army engineers and may be con-structed only in clear terrain (including villages) . The constructing unit must occupy the hex for two turns in order to complete construction . PROCEDURE:1 . During the Soviet Engineering Phase, the
Soviet player designates which units begin the construction of Minefields .
2 . Expend one SP from that army’s SDM for each Minefield construction . For each desig-nated hex, place a Minefield marker with its construction side up .
3 . During the Engineering Phase of the next Soviet player-turn, flip the each marker from its construction side to its completed (front) side . Align the direction of each Minefield marker to designate which three hexsides the Minefield marker affects .
[15.3.2] effects of minefieldsSoviet units are never affected by minefields . German units are affected only by completed minefields and at the instant they attempt to move or attack across a designated minefield hexside .Movement:1 . At the instant that German armor units move
across a designated Minefield hexside each armor unit is subject to a possible step loss . Roll a single die . If the result is a 1, 2 or 3, then the armor unit suffers a one-step loss . The armor unit may continue movement af-ter the die roll after expending 3 additional movement points .
2 . At the instant that a German infantry type unit moves across a designated Minefield hexside into a Minefield hex not occupied by an enemy unit, the unit must halt movement . Remove the Minefield marker during the German Engineering Phase of the current turn .
3 . At the instant that a German engineer unit moves across a designated Minefield hexside into a Minefield hex unoccupied by an enemy unit, the engineer unit must halt its movement . The Minefield marker is removed from the map . The German player rolls a die . On a re-sult of 1, 2, or 3, the engineering unit takes a one-step loss .
4 . Artillery, anti-air and anti-armor units may not move across a minefield hexside .
Combat:1 . At the instant that a German unit attacks a
Soviet unit across a designated minefield hex-side, the defending Soviet unit receives a one column shift on the CRT .
2 . A German Assault Engineer neutralizes the above one column shift but must roll prior to combat resolution . On a result of 1, 2, or 3, the engineering unit takes a one-step loss . If elim-inated, the engineer unit does not neutralize the minefield .
3 . A minefield hexside has no effect on advance after combat .
4 . If a German unit advances across a Minefield hexside after combat, immediately remove the Minefield marker .
Supply:1 . A German supply path cannot be traced
through a designated minefield hexside .[15.3.3] removed and eliminated
minefields1 . Any Soviet engineer unit occupying the hex may remove the minefield marker during its En-gineering Phase . Removed minefield markers may be reused in the scenario .2 . Eliminated minefield markers may not be re-used in the scenario .
16.0 German Special Rules
[16.1] hitler “stand fast” orders
Hitler insisted on holding onto a position along the Dnepr River near Cherkassy . This insistence is reflected in scenario specific rules contained in Playbook Section 22 .1 .
[16.2] “korps Isolation”GENERAL RULEThe German Player may declare “Korps Isolated” during his Event Phase if either or both of the SDMs of the 11th and/or 42nd Korps (as placed for the current turn) cannot trace a supply path to Korsun and to a supply source . If “Korps Isolation” is declared, the German Player may then conduct the following special withdrawal procedure during that Korps Isolation Segment .PROCEDURE:1 . Place the SDMs for the isolated korps in one of
the following hexes (individually or together): 11thKorps: 3821, 4223, 4114 42ndKorps: 2310, 1911, 2713
• IftheKorsunAirfieldhasnotbeenactivated,then set each SDM to a value of 3 SPs .
• If theKorsunAirfield has been activated,then the player may transfer SPs from the Korsun Airfield Track directly to the above relocated korps SDM . Reduce the number of SPs on the track by the number of SPs transferred to the SDMs . The number of SPs transferred to the SDMs cannot exceed the number of SPs available on the track .
2 . Once placed, the relocated SDMs cannot move . They serve as a supply source for the
korps until the korps can again trace supply to a valid supply source .
3 . SPs (SDMs) located in the designated hex may be expended per the normal supply rules . Reduce the value of the SDM SPs by one for each SP expended . If the SDM value is re-duced to zero, then the SDM may no longer issue SPs or provide general supply to units .
4 . Units of the affected korps (including units subject to the “continuous front” rule) may conduct a special one-time movement of two hexes in a direction toward the above hexes . This movement ignores ZOC and ZOI .
5 . Units of the korps are relieved of the require-ment to maintain a continuous front and may move and attack freely for the remainder of the scenario .
[16.3] operation WandaHISTORICAL NOTE: Operation Wanda was the German code name for the 3rd Panzer Korps’ re-lief effort of units trapped in the Korsun Pocket. The Luftwaffe allocated additional air units in support of this operation.Beginning with the Event Phase of turn 10 or any turn thereafter, the German player may declare Operation Wanda . On the turn that the German player declares “Wanda” then the Germans immediately receives additional Combat Air Support points . In addition, the German player adds +3 to future air availability rolls until the end of the operation .PROCEDURE:1 . Place the Start Operation Wanda marker on
the current turn of the Turn Record Track and immediately set the number of Combat Air Support Points to four on the Combat Air Support Track .
2 . The German player then determines the dura-tion of Operation Wanda as follows: a . Roll two dice and add three to the sum of
the two dice . b . Flip the Start Operation Wanda marker on
the Turn Record Track to its back side (End Operation Wanda) and place it on the turn that equals the current turn number plus the above modified die roll number .
3 . During turns that the Operation Wanda marker is on the Turn Record Track, the German player adds a +3 to the air availability die roll .
4 . Remove the End Operation Wanda marker during the German Event Phase of the turn in which the turn marker advances to the End Operation Wanda marker . Once the marker is removed, the German player no longer adds +3 to the die roll .
[16.4] “breakout declared”PLAyER NOTE: The breakout rule is only to be used in desperation in cases where the German pocket and relieving forces are in close prox-imity but the probability of relief is low; i.e., desperation.The German player may declare a “Breakout” during the German Event Phase of any turn in which the following conditions exist:1 . Korsun must have been declared isolated in a
previous Game-turn .2 . Some German units within the pocket (a unit
Minefield marker showing the 3 designated minefield hexsides
28 The JAWS of VICTORY — Rules of Play 1.0
of “Gruppe Stemmermann”) must be within 3 hexes of non-isolated units of the 7th Korps or the 3rd and 47th Panzer Korps .
The declaration of “Breakout” causes the follow-ing changes to the turn sequence:1 . The Breakout Phase is added to the German
turn sequence .2 . Special “Every Man for Himself” movement
and combat rules apply during the added Breakout Phase (see 16 .5) .
3 . The game automatically ends at the end of the Soviet player’s next turn .
4 . Victory is determined per the scenario vic-tory conditions .
PLAyER NOTE: German players should be mindful of the special German replacement rules during the Replacement Segment of the turn in which a breakout is declared (see 8.6).
[16.5] “every man for himself” rules
The following rules are to be used only if the above “Breakout” has been declared . Units of “Gruppe Stemmermann” have special stacking, unit recom-bination, movement and combat actions that occur only during the Breakout Phase . Conduct the Breakout Phase in the following sequence .1 . Unit Consolidation/Recombination (16 .5 .1)2 . One Hex movement (16 .5 .2)PLAyER’S NOTE: Players should conduct re-combination and one-hex movement in a manner that maximizes the possibility of subsequent “Breakout” movement and combat.3 . Staged Breakout (Simultaneous Movement
and Combat) (16 .5 .3) Wave 1 | Wave 2 | Wave 3 | Wave 44 . Soviet next Player-turn (16 .5 .4)[16.5.1] unit consolidation/
recombinationThe German player may incorporate and/or re-combine any units within a given division into any of its component infantry regiments . The proce-dure is similar to Section 4 .6 but is more inclusive .CASES:1 . Any individual divisional units within a hex (including engineer, anti-air, anti-armor and artil-lery and also SDM conversion and Korsun evac-uation actions) may either combine with an ex-isting infantry regiment or form a new regiment from an eliminated cadre unit . Units that com-bine or form new regiments add their equivalent number of steps to that regiment . Place the units that combine into or form new regiments into the Eliminated Units box (Retain the formed infantry regiments on the map .) The removed units do not count toward victory points . Reminder: German artillery regiments have 2 steps.2 . Combined/formed infantry regiments may have up to a maximum of 5 steps . The net num-ber of steps in the regiment must equal the total number of steps that were added/combined .3 . Units from separate regiments within a divi-sion may combine . 4 . Armor units may not combine or form new units .[16.5.2] one hex movementAfter all recombination has been completed, German units may move one hex . Ignore all ZOC/
ZOI effects . Normal stacking limits apply at the end of one-hex movement, except that units from a given division may stack with units of another division .[16.5.3] staged breakoutThe German player conducts breakout (move-ment/combat) from the pocket . Only units of “Gruppe Stemmermann” may conduct breakout . They may move into hexes occupied by Soviet units and have combat . Breakout occurs in four waves . Units may only move and have combat in their own wave . All movement/combat within each wave must be completed before the next wave can move .Wave1 units that are within 3 hexes (or less)
of non-pocketed German units . Wave2 units that are within 4 hexes of non-
-pocketed German units . Wave3 units that are within 5 hexes of non-
-pocketed German units . Wave4 all remaining “Gruppe Stemmermann”
units . procedure:1 . All units within a given hex must move as a
stack and each stack within a wave must com-plete its movement/combat before another unit (stack) in that wave may move .
2 . Units within each wave may move in any order .3 . Each unit (stack) may move up to four hexes
even if the hex is occupied by a Soviet unit . If an entered hex is occupied by a Soviet unit(s), then the Soviet unit(s) in the hex must be at-tacked before continuing movement .
4 . The following rules apply for movement and combat:a . Ignore ZOC/ZOI rules for movement and
combatb . All combats are considered supported and
a unit’s combat strength is only modified by Disorganized or Regroup .
c . No combat shifts are allowed for hilltop, air, artillery, assault engineer, combined arms or armor superiority . However, if the attacking stack contains any armor then a single combat shift to the right on the CRT may be applied .
d . The Soviet player may not declare a “No Retreat” .
e . The following additional shifts to the right on the CRT apply for first two attacking units during Wave 1 only:+2 for the first unit that attacks (surprise)+2 for the second unit that attacks
No shifts for additional combatsf . Only CRT step losses and Disorganized re-
sults are applied to both sides during com-bat (i .e . retreat and breakthrough results are ignored) . Note: Soviet units remain in the hex for the duration of all the breakout waves unless eliminated due to combat .
g . If either Soviet or German units are Dis-organized then those units remain Disor-ganized for the remainder of the Breakout Phase.
h . After all units within a wave complete their movement/ combat, then units in the next wave conduct their movement/combat .
5 . “Gruppe Stemmermann” units that enter a
hex occupied by a non-pocketed German unit are removed from play and are counted as victory points
6 . German units that occupy a hex containing a Soviet unit at the end of their wave remain in the hex during the Soviets next turn .
[16.5.4] soviet next turnThe Soviet player conducts his player turn ac-cording to the following modified turn sequence:1 . Conduct the Weather, Mutual Air and Mu-
tual Supply Stages, but do not place Soviet or “Gruppe Stemmermann” units Out-of-Supply .
2 . Ignore the German Air Supply Stage, the So-viet Event Phase and the Soviet Replacement/Reinforcement Stage .
3 . Conduct the normal Soviet Movement Phase; but with the following exceptions:a . Use normal movement except that units
may not enter a hex containing German units . Soviet units may (but are not required to) remain in hexes containing German units .
b . Do not place units in Reserve .c . German armor units may not react .
4 . Conduct the normal Soviet Combat Phase; but with the following exceptions:a . Soviet units stacked with German units may
only attack the German units in their hex .b . Artillery and air support may not be used in
hexes containing both Soviet and German units .
5 . The scenario ends after the Soviet Combat Phase is completed . Determine victory per the scenario rules . German units that occupy hexes containing Soviets units do not count for victory points .
17.0 Soviet Special Rules
[17.1] soviet artillery barrageHISTORICAL NOTE: The Soviets typically used heavy artillery barrages at the beginning of major offensive operations. During the Korsun battle, the 16th Artillery Division was assigned to the 53rd Army while additional independent artillery units were assigned to the 4th Guard Army. These artillery units delivered a dev-astating barrage at the beginning of the 2nd Ukrainian Front’s Operation on January 25th and on several other occasions in the battle.
GENERAL RULESpecific component artillery units of the 16th Artillery Division (53rd Army) and of the 4th Guard Army are eligible to create an artillery barrage unit . The Barrage unit is created by removing the component artillery units and re-placing them with a “special” Barrage unit . Once created, a Barrage unit is capable of performing a special “artillery barrage” (or Barrage) as de-scribed in Section 17 .1 .3 . The Barrage unit is es-sentially a marker and as such does not move and can only fire a Barrage . After firing a Barrage, the Barrage unit must be removed during the next turn and replaced with its component artil-lery units .

29The JAWS of VICTORY — Rules of Play 1.0
EXAMPLE: 16th Artillery Division Barrage Unit
(9)-0
b
016 Art
53
16 Art
53
(9)-0
b3
Front Back
[17.1.1] creating a barrage unit See the Play Book (Section 22 .3) for the specific component artillery units that form each of the barrage units . Some scenarios begin with the barrage unit(s) formed on the map . If not already formed, the Soviet player may wish to create the barrage unit during a desired turn in the scenario . Creation occurs during the Barrage Creation Segment of the Soviet Event Phase . PROCEDURE AND RESTRICTIONS:1 . A Barrage unit may only be created (placed)
in a clear hex and may not be in a German ZOC or ZOI .
2 . All component artillery units must occupy or be adjacent to the hex in which the Barrage unit is created .
3 . Each component artillery unit must be on its front side prior to formation (i .e ., supplied with ammunition) .
4 . Place the “special” Barrage unit counter in the designated hex .
5 . Remove the five component artillery units from the map and place them in their corresponding Artillery Holding Box on their front side .
[17.1.2] capability and restrictions Once placed on the map, a Barrage unit has the following capabilities and restrictions:• The Barrage unit may not move . • It may only conduct an Artillery Barrage (it
may not conduct regular artillery support fire) . • It defends with a maximum strength of 9 . • No other friendly units may occupy a hex
containing a Barrage artillery unit (at the end of the Soviet Movement Phase) .
• If a Barrage unit suffers a combat loss, then the first loss must come from a component with the highest “barrage” value .
• If forced to retreat, the Barrage unit is removed from the map and its component artillery units placed in its hex . All component units are au-tomatically Disorganized and may retreat into separate hexes per the normal retreat rules .
[17.1.3] executing a barrageThe Soviet player may execute a special artil-lery barrage during turns in which one or more Barrage units are present on the map . Each unit’s barrage is conducted separately and in any order .
5332
Barrage
5323
BarrageBarrage
Back Front
PROCEDURE:1 . During the Artillery Barrage Segment of the
Soviet Event Phase, place up to three Barrage Effects markers per Barrage unit on hexes oc-cupied by German units . The marked hexes must be within the 3-hex range of the Barrage unit conducting the barrage . Only one Bar-rage marker may be placed in a single hex .
2 . The Barrage Effects marker is placed with its front side up (3 shifts) on German units that are two hexes from the Barrage unit .
3 . The Barrage Effects marker is placed with its back side up (2 shifts) on German units that are three hexes from the Barrage unit .
4 . Flip the Barrage unit (and the five component artillery units that are in the Artillery Holding Box) to their back side (out-of-ammunition) .
5 . During the Soviet Combat Segment, declared combats will add the number of face-up shifts indicated on the Barrage Effects marker to the final combat odds ratio . • No other Soviet artillery can be used in
hexes that receive an artillery barrage .• Adda“+1”modifiertotheGermandefen-
sive artillery die roll for combats receiving a barrage .
• All defending units in a declared combatthat contains a Barrage Effects marker re-ceive an “automatic” Disorganized result in addition to any other CRT result .
6 . Remove the Barrage Effects marker after each individual combat is resolved .
7 . Units with a Barrage Effects marker that are attacked in subsequent Breakthrough or Re-serve Combat Segments do not receive the above shifts to the combat ratio . They do, however, receive an automatic Disorganized result after conducting a breakthrough com-bat or reserve combat . Remove the Barrage Effects marker after the combat and place a Disorganized marker on these attacked units .
8 . At the end of the Soviet Combat Phase, re-move any remaining Barrage Effects markers from units that were not attacked and place a Disorganized marker on all units in the hex .
9 . Units that retreat into a hex containing a Bar-rage Effects marker are not affected by the marker .
[17.1.4] resupplying the component artillery units
During the following Supply Phase, the Soviet player may resupply (flip to front side) all, some or none of the component artillery units while in the Artillery Holding Box . Standard artillery supply rules apply .
[17.1.5] barrage unit redeploymentAny barrage unit on the Turn Record Track, during the current Game-turn, are moved to their map Artillery Holding Box during the Barrage Unit Deployment Segment . Any barrage unit cur-rently on the map is then transferred to the Turn Record Track (current Game-turn space plus three turns) and all of its component artillery units are placed on the map in, or adjacent to, the hex formally occupied by their barrage counter . Three of the component units must occupy the former Barrage unit hexCASES:1 . Component units that are returned to the map must retain the front or back side of their counter (i .e ., their ammo supply state) at the instant of transfer . 2 . Units must obey stacking restrictions at the end of the Soviet Movement Phase .3 . Component units returned to the map may not
move during the subsequent Movement Phase . Also see (Section 9 .10 .2))4 . The Barrage marker returns to its holding box on the ame-turn that the Game-turn marker ad-vances to the turn containing the Barrage marker and is available for reuse that turn .
Barrage Effects Marker
18.0 Optional RulesThe following optional rules add historical nu-ance to game play . However, they also add time and complexity to the game . Each rule should be agreed upon by both players prior to start of a scenario . Also, be advised that they have not been extensively play tested in all combinations and variations .
[18.1] soviet partisans Historical Note: Ukrainian partisans operated in and around the forested areas in the northern portions of the Korsun battle area. They had lim-ited effect on the outcome of the battle but were effective in tying up and harassing the 5th SS and Wallonia units.
Ukrainian partisan units operate out of the forest areas in the northern portion of Map A (only) . Partisan units are two-step units that have a com-bat strength and movement value on both sides . They have special combat and reconstitution rules .[18.1.1] partisan home base and
supplyEach partisan unit has a home base hex as defined in the scenario . Partisans are never Out-of-Supply . [18.1.2] partisan stacking, movement
and Zoc/ZoIPartisans may not stack with Soviet units or other partisan units . Partisan units move per the TEC and may only move into woods or forest hexes . They cannot be placed in reserve . They only exert a ZOI . They ignore all German ZOC/ZOIs during movement . [18.1.3] special partisan combat
rules1 . Partisan units may only attack when on their
front side .2 . They may not attack a German unit that is
being attacked by a Soviet unit during the current Combat Phase .
3 . Their combat strength is not halved by German ZOC rules .
4 . All other combat rules apply .[18.1.4] special partisan combat
results1 . German units never suffer a step loss or retreat
as a result of combat, but may be Disorganized .2 . Partisans that suffer a step loss while on their
front side flip to their back side .3 . Partisans that are eliminated are placed on
the turn record track two turns later than the current turn .
3-61 pPaRtiSanS
1-61 pPaRtiSanS
Front Back
Barrage Range
Shifts Applied to Combat

30 The JAWS of VICTORY — Rules of Play 1.0
[18.1.5] reconstituting partisan units in their home base
Partisans reconstitute themselves by returning to their home base .1 . Partisans may always return directly to their
home base from their current map hex during the Soviet Movement Phase .
2 . Partisans return to their home base from the Turn Record Track during the Soviet Reinforcement Phase of the turn in which the Game-turn marker reaches the partisan unit .
3 . Partisans that return to their home base are placed on (flipped to) their front side during the Soviet Reinforcement Phase.
[18.2] German armor reliability
HISTORICAL NOTE: German Panther and Tiger tanks were historically prone to mechanical failure or engine fire (Panther only) during 1943/44. Consequently, many of these units suf-fered significant losses before they reached the battlefield and during combat operations.
Armor symbol on Game-turn Record Track
PRoCEDURE:During the German Event Phase of turns with an armor icon indicated on the Turn Record Track, roll two dice for each Pz V and Pz VI unit on the map . If the sum of the dice is equal to the below value, then the unit suffers a one-step loss . Reduce the unit by one step or eliminate the unit as appro-priate . Any other die result is a no effect .
armor type Die Roll
Pz V 5 or 6 Pz VI 7
Also see the Panther/Tiger Reliability Check on the Turn Record Track .
[18.3] heavy tank bridge collapse
HISTORICAL NOTE: Many bridges in the Ukraine were not capable of supporting the heavier German tanks such as the Panther and Tiger.
GENERAL RULEThe bridge collapse rule is applicable to all bridges except rail-road bridges, bridges along primary roads and the Bruko “J” bridges . Reminder: Panther and Tiger tanks are prohibited from crossing a “K” bridge. The German player must roll for bridge collapse the first time that a Panther or Tiger armor unit attempts to move, advance or retreat across an applicable bridge . PROCEDURE:1 . Roll a single die for the specific bridge . 2 . If the result is a 1 or 2, then the bridge does
not collapse . If the result is a 3, 4, 5 or 6, then the bridge collapses . See the Bridge Collapse Table .
3 . If the bridge collapses, place a Bridge Destroyed marker in the hex with the arrow pointing toward the bridge . The armor unit and all other units may not use the bridge .
4 . If the bridge does not collapse place a
Bridge OK marker in the hex with the arrow pointing toward the bridge to indicate that Panther and Tiger armor units may cross the bridge .
Bridge OK Marker ok
[18.4] effects of rail movement on supply
HISTORICAL NOTE: The German rail system had a finite capacity to deliver supply to the Korsun battle area. When reinforcements were trans-ported by rail to the battle area, it necessarily re-duced the amount of normal rail supply available to units tracing supply over that rail line.
PROCEDURE:After all reinforcements have arrived (during the Movement Phase) on a given rail line, place a Rail Capacity marker on the rail line in the hex indicated in the specific scenario rules:
Rail Capacity Marker Front Back
1 . Place the marker on its -2 SP side if reinforce-ments were railed to a hex that is farther along the rail line than the -2 SP hex indicated in the scenario .
2 . Place the marker on its -1 SP side if reinforce-ments were railed to a hex that is farther along the rail line than the -1 SP hex indicated in the scenario .
3 . Do not place the marker if no reinforcements enter by rail .
4 . During the Mutual Supply Stage of the next turn, the total number of initial supply points (SPs) available to SDMs that trace supply to a rail terminal that is beyond the marker is reduced by the value indicated on the face up side of the Rail Capacity marker (Either 1 or 2 SPs) . The German player is free to determine which SDMs have reduced initial SPs prior to SDM placement .
5 . During the following Movement Phase, either remove the marker if no replacements enter by rail or place the marker in accordance with steps 1-2 above .
[18.5] German truck movement
0-10
truck
[18.5.1] creating truck unitsThe German player may create truck units using the following procedure . Trucks allow non-mo-torized infantry to use motorized movement .PROCEDURE:1 . During the German Movement Phase, the
German player may expend 1SP from an In-Supply korps SDM and place a Truck marker on that SDM .
2 . The German Player may then place the Truck marker on any In-Supply non-motorized in-fantry type unit that is supplied by that SDM .
[18.5.2] moving non-motorized units by truck
A German non-motorized infantry type unit may move as a motorized unit if it begins and ends
Rail Capacity
-1Rail Capacity
-2
Pz V Panther
Pz VI Tiger
its movement stacked with a Truck marker . The unit moves using the motorized movement value of the Truck marker . At the end of the Movement Phase the infantry unit is assumed to be unloaded from the truck . Remove the Truck marker from the map after completing the unit movement . The Truck marker is available for use by another non-motorized unit during the current turn . CASES AND RESTRICTIONS1 . Units moving by truck may begin or end
movement in hexes adjacent to enemy units but must use tactical movement .
2 . Units moving by truck may use strategic movement in accordance with the strategic movement rules .
3 . Each korps SDM may support only one truck movement per German Player-turn .
[18.6] fords across rivers
Fo
RD
Fo
RD
HISTORICAL NOTE: Ukrainian rivers in the Korsun area had varying widths, depths and em-bankments. There were several instances in the battle where armor units were able to “ford” riv-ers due to shallow depth and low embankments. See the Terrain Key on the Map for the definition of fordable river hexsides.Whenever an armor, mechanized or reconnais-sance unit moves adjacent to a “Fordable River” hexside (on the Gniloy Tikich River), the moving player may attempt to discover a ford . PROCEDURE:1 . Pick a hexside and roll a die for each hexside
tested . On a roll of 5 or 6, a ford is discovered . Only one roll per hexside is allowed .
2 . If successful, place a Ford marker on the map pointing toward the discovered ford hexside . Use the front or back side of the maker to indicate whether the Soviets or Germans dis-covered the ford . The marker remains for the remainder of the scenario .
3 . The ford hexside costs additional movement points to cross . See the Terrain Effects Chart .
4 . Only non-motorized infantry, reconnaissance and armor units may move across a ford hexside .
CASES:1 . Both players are limited to four attempts at
discovering a ford per scenario and only one attempt per hexside .
2 . Players may not use fords that are discovered by the opposing player . Players must discover their own fords separately .
3 . Fords may not be discovered during advance after combat or retreats .
.[18.7] 24th pz division HISTORICAL NOTE: Von Manstein transferred the 24th Pz Division from the Southern Ukraine to the Korsun relief effort in anticipation of Hitler’s approval. The armor vanguard of the division arrived in the 47th Corps area after a 180 mile “mud” journey. The division initiated attacks be-ginning on the 7th. However, when Hitler learned of the 24th’s diversion he immediately ordered it

31The JAWS of VICTORY — Rules of Play 1.0
be returned. The situation makes for one of the great “what if” options to the game.Beginning on the scenario designated turn of arrival, use the following procedure .:1 . Select 5 units from the 24th Panzer Division .2 . Roll a single die for each unit .3 . On a roll of 1–4 the unit arrives at the
scenario designated entry hex . On a roll of 5–6 the unit does not arrive but may attempt arrival the next turn .
4 . Repeat the above process for the following turns until all units of the division have arrived .
NOTE: The division’s SDM may be placed on the map during the Supply Stage once a minimum of 4 division units have arrived on the map.
[18.8] alternative airfield construction
HISTORICAL NOTE: German engineers were able to construct an alternate airfield several kilometers from the Korsun airfield. The airfield provided additional logistics support to the iso-lated German units.
SPs
alternatealternate
airfield
GENERAL RULEGerman Korps engineers (only) may construct an alternate airfield to the Korsun Airfield .Construction may only occur on a road in clear terrain and must be within 6 hexes of Korsun . During the German Engineering Phase, the German player may construct an alternative air-field using the following procedure:1 . Expend 2 SPs from the Korsun Airfield Track .2 . Place the optional Alternate Airfield marker
on its construction side up in a hex occupied by a korps engineering unit .
3 . During the next Engineering Phase, flip the marker to its completed Alternate Airfield side . Place the Alternate Airfield SP marker in the zero space on the Korsun Supply Track .
4 . The Alternate Airfield may receive SPs dur-ing the Korsun Air-Supply Phase of the turn following its completion .
CASES:1 . The alternate airfield may receive a maximum
of 3 SPs per turn . SPs are tracked separately on the Korsun Supply Track starting with an initial zero number of SPs .
2 . Roll separately for the Korsun and Alternate Airfields on the Air Supply Loss Table .
3 . The Uman Airfield Track remains limited to a maximum of 5 SPs per turn which must be shared between Korsun and the Alternate Airfield .
4 . The Alternate Airfield acts as an identical air-field to Korsun except as noted above . It may serve as a supply source per Section 14 .3 .
[18.9] creating an alternate supply source
SPs
option option
alter nate Depot
German korps engineers (only) may create an al-ternate supply source (referred to as the Alternate
Depot) . During the German Engineering Phase, the Alternate Depot marker must be placed on a road within 10 hexes of either the Korsun hex or the hex containing the Alternate Airfield marker . Once created, the Alternate Depot may serve as a supply source for SDMs able to trace supply to it . Use the following procedure to create the Alternate Depot: PROCEDURE:1 . Expend 1 SP from the Korsun Supply Track
from either the Korsun SPs or Alternate Airfield markers .
2 . Place the Option Alternate Depot marker in a road hex occupied by a korps engineering unit and place the corresponding Option SPs marker in the zero space on the Korsun Supply Track .
3 . Beginning with the Mutual Supply Phase of the following Game-turn, the German player may transfer up to 4 SPs from either Korsun or the Alternate Airfield to the Alternate Supply Source . Subtract the transfered SPs from the Korsun SPs and/or Alternate SPs markers and add those SPs to the Option SPs marker total on the Korsun Supply Track .
4 . The Alternate Depot may also receive SPs during the Air-Drop Supply Phase on turns following its completion using the Isolated SDM column on the Air Supply Table .
[18.10] alternate German strengths
Note: The basic rule (Section 12.5.2) for add-ing strength to German units within Improved Positions and certain terrain is a compromise to simplify combat odds determination. Players may wish to use the following additions to com-bat strength to more accurately reflect the defen-sive benefits of terrain on unit size. Units add the following Combat Strength Point (CSP) values to German units defending in Improved Positions or terrain designated to re-ceive a +2 defensive strength benefit:• +3CSPsfortotalinfantrystrength≥13• +2 CSPs for total infantry strength 7 to 12 • +1CSPfortotalinfantrystrength≤6
[18.11] German 88 anti-tank armor Intercept
HISTORICAL NOTE: German 88 Anti-aircraft guns were capable of hitting tanks at a range of 3000 meters with a hit rate of about 25% per round. Players may wish to allow German 88 Anti-air/Anti-armor units to conduct “Armor Interception” per Section 9 .11, with the excep-tion that the intercept by the German 88 unit must be conducted using only two black dots instead of three .
[18.12] alternative armor/ anti-armor combat
DESIGN NOTE: If players wish to add an addi-tional degree of uncertainty and surprise to com-bat, then the following rule may be employed at the expense of added playing time.
During the Armor/Anti-armor Combat Segment, if the defending armor inflicts an armor step loss on the attacker, and the attacking armor inflicts no loss to the defender’s armor, the defender has achieved an “ambush” . Players must recalculate the combat odds (with any revised modifications due to the attacker’s armor loss), and resolve General Combat using the same die roll at the new odds per 12 .12 .2 . Note: there is no second Armor/Anti-armor Combat.
[18.13] stalin Intervenes (multiple Soviet players only)
HISTORICAL NOTE: During February 12–14 the pocketed troops of the two trapped corps initiated the initial stages of a breakout. They were able to penetrate the Soviet inner ring defenses and advance toward the 3rd Panzer Korps relief ef-fort. When word reached Stalin, he ordered that Vatutin be replaced by Zhukov and that Konev assume command of all forces in the inner ring defenses including Vatutin’s 27th Army.If either of the following conditions occur on or after Game-turn 17, then Stalin intervenes in the conduct of the Soviet battle: a .) Units of the 42nd or 11th Korps are within six hexes of the 47th Pz Korps, or b .) units of the 42nd or 11th Korps are within six hexes of either the 7th Korps or 3rd Pz Korps . If the above Stalin intervention occurs, then the following rules changes are in effect for the remainder of the scenario .• Thenominalboundaryconditionsforthetwo
Soviet Fronts are eliminated (see 22 .11) . • Individualunitsof the52nd,4thGuard,and
53rd Armies may be re-assigned to and re-ceive supply from either of these three armies .
• Individualunitsofthe27thand40thArmiesmay be re-assigned to and receive supply from either of these two armies .
[18.14] sdm supply range extension
HISTORICAL NOTE: Both the Soviets and Germans resorted to extraordinary measures to supply their forces during mud conditions including use of armor units, punji wagons and reallocation of transport units.Players may use the following procedure to ex-tend supply during the Mutual Supply Stage of mud turns .PROCEDURE:1 . One SDM from each Soviet Army (or
German Korps) may be placed front side up at one Supply Range increment from a supply source . Once placed the SDM serves as an additional supply source . However, it may not distribute SPs to units but may only place units in supply that are within its supply range .
2 . One, and only one, SDM from that Soviet Army (or German Korps), including Soviet tank corps (or German Panzer Divisions) may then use the placed SDM as a supply source .

The JAWS of VICTORy — Rules of Play
Copyright © 2019 New England Simulations, Nashua, NH 03062The Jaws of Victory is New England Simulations’ trademark for its
World War II East Front game of the Korsun-Cherkassy Pocket, 1944 .COVER IMAGE: Bundesarchive, Germany; Bild 101I-708-0299-06
www.carpatina.com/nes
B4-5 B4-5 B4-5 2-5
Multi-step unit examples [4.4.4]Soviet Multi-step Units
with Strength Chit German Multi-step
Units with Strength Chit
Multi-step Unit Step Reduction Examples
Cadre
Cadre
Back
Back
Back
Counter Front
Counter Front
Counter Front
Cadre
6 step unit
4 step unit
5 step unit
Marker Front
Marker Front
Marker Front
Marker Back
Marker Back
Marker Back
Flip Marker
Flip Counter
Flip Counter
Strength Chits are matched to the unit’s Combat Strength Class; A, B, C, etc. Note that some units may start a scenario at a reduced step level. Flip Marker
unit Breakdown and Recombination examples [6.4]
Important: Only one German breakdown battalion retains a black dot.
breakdown/recombination of a German regiment
breakdown/ recombination of a full strength soviet division
breakdown/ recombination of a reduced strength soviet motorized Infantry brigade
RULES: P05001-JV 11/2019 Printed in U .S .A .
Armor in CombatGuide to the Use of armor Superiority Value (aSV) Dots during Combat
armor superiority combat shifts [12.8 ]
armor/anti-armor combat [12.12.1]
attacker: White Dots OnlyDefender: White Dots Only• Subtractthenumberofdefender’swhite
ASV dots from the attacker’s white dots .• ShiftstheoddsratioontheCRTforattackeror
defender depending who’s number is greater
attacker: White Dots OnlyDefender: White & Black Dots• Comparethenumberofattacker’s
white dots to the attacker’s die .• Comparethenumberofdefender’s
white and black dots to the defender’s die .• Ifequaltoorlessthanthenumberonthedie,theopposing
Armor/Anti-Armor unit suffers a 1 step loss .
Check Each Die
If attacking unit’s number is greater, the attacker receives a number of shifts based on the following differences:
1greater: shift the CRT odds 1 to the right . 2,3,or4greater: shift the CRT odds 2 to the right .5greater: shift the CRT odds 3 to the right . If the defender’s number is greater, then shift the CRT odds 1 column to the left .
Shifts on CRt


![[Armor] - Histories of German and Soviet Tank Divisions](https://static.fdocuments.us/doc/165x107/546a866db4af9f82698b48e6/armor-histories-of-german-and-soviet-tank-divisions.jpg)