BATH PANEL FITTING INSTRUCTIONS PREMIUM BATHS · premium baths manufactured in the uk fitting...
6
PREMIUM BATHS MANUFACTURED IN THE UK FITTING INSTRUCTIONS FOR SHOWER BATHS PARTS SUPPLIED ATTENTION! REMOVE FILM PRIOR TO FITTING • Please note before fitting your bath, carefully remove all packaging and film from the bath and check the bath for damage and suitability of colour match • Check the panel fit and match prior to installation No claims for the above will be accepted once the bath is fitted BATH PANEL FITTING INSTRUCTIONS 1. The bath panel is supplied for floor to top of rim height of 520mm. Cutting is at the risk of the installer and great care will be needed. 2. Fit the panel(s) in position. Locate the top lip of the panel(s) between panel clip and the rim of the bath. 3. Ensure that both panels are set vertically and that the end panel is located behind the front panel at corner joint. 4. Small mirror screws can be used to secure the panel against the timber or alternatively, Velcro or Magnetic strips will secure in a neat fashion. All diagrams are for illustrative purposes only. AFTERCARE INSTRUCTIONS CLEANING We advise the use of warm soapy water or a non abrasive bathroom cleaner. The cleaner must be washed off after use and not left on the bath surface for more than 5 minutes. Do Not use cream cleaners or cleaners containing bleach Do Not scrub or scour Do Not use abrasive cleaning agents Do Not use solvent based cleaners Using any of the above cleaning products will cause the surface to deteriorate and invalidate the guarantee. SCRATCHES The bath should be free from any scratch or indents. If a scratch does occur during the life of the bath it may be possible to polish out fine scratches using a white t-cut automotive polish restorer. These can be purchased from any automotive store. Customer Services: 01535 613830 DESCRIPTION QUANTITY Wall brackets 2 Centre bracket 1 M10 x 152 feet come with 2 nuts attached 4 M8 x 118mm come with 2 nuts attached 1 Toggles with cross leg lock screw attached 4 Screws Pan Head No8 x 16mm pozi drive BZP screw 14 Transport Screws 32mm 4 Please read these instructions carefully. It is advised that a qualified plumber fit and install this bath. Failure to adhere to these instructions will invalidate the manufacturers guarantee and no responsibility will be accepted for any loss or damage. This does not affect your statutory rights Please inspect this product immediately for damage, size and colour. Do not install this product if you are not satisfied, as no claims for consequential damage will be accepted. bath rim panel clip 16mm screw
Transcript of BATH PANEL FITTING INSTRUCTIONS PREMIUM BATHS · premium baths manufactured in the uk fitting...

PREMIUM BATHSMANUFACTURED IN THE UK
FITTING INSTRUCTIONS FOR SHOWER BATHS
PARTS SUPPLIED
ATTENTION! REMOVE FILM PRIOR TO FITTING• Please note before fitting your bath, carefully remove all packaging and film from the bath and check the bath for damage and suitability of colour match
• Check the panel fit and match prior to installation
No claims for the above will be accepted once the bath is fitted
BATH PANEL FITTING INSTRUCTIONS
1. The bath panel is supplied for floor to top of rim height of 520mm. Cutting is at the risk of the installer and great care will be needed.
2. Fit the panel(s) in position. Locate the top lip of the panel(s) between panel clip and the rim of the bath.
3. Ensure that both panels are set vertically and that the end panel is located behind the front panel at corner joint.
4. Small mirror screws can be used to secure the panel against the timber or alternatively, Velcro or Magnetic strips will secure in a neat fashion.
All diagrams are for illustrative purposes only.
AFTERCARE INSTRUCTIONS
CLEANINGWe advise the use of warm soapy water or a non abrasive bathroom cleaner. The cleaner must be washed off after use and not left on the bath surface for more than 5 minutes.
Do Not use cream cleaners or cleaners containing bleachDo Not scrub or scourDo Not use abrasive cleaning agentsDo Not use solvent based cleanersUsing any of the above cleaning products will cause the surface to deteriorate and invalidate the guarantee.
SCRATCHESThe bath should be free from any scratch or indents. If a scratch does occur during the life of the bath it may be possible to polish out fine scratches using a white t-cut automotive polish restorer. These can be purchased from any automotive store.
Customer Services: 01535 613830
DESCRIPTION QUANTITY
Wall brackets 2 Centre bracket 1 M10 x 152 feet come with 2 nuts attached 4 M8 x 118mm come with 2 nuts attached 1 Toggles with cross leg lock screw attached 4
Screws Pan Head No8 x 16mm pozi drive BZP screw 14
Transport Screws 32mm 4
Please read these instructions carefully. It is advised that a qualified plumber fit and install this bath. Failure to adhere to these instructions will invalidate the manufacturers guarantee and no responsibility will be accepted for any loss or damage. This does not affect your statutory rights
Please inspect this product immediately for damage, size and colour. Do not install this product if you are not satisfied, as no claims for consequential damage will be accepted. bath rim
panel clip
16mm screw

INSTALLATION INSTRUCTIONS
Please Note: Bath should be set at supplied panel height.
1. Remove all packaging and film completely. Check that there is no damage on the bath that may have occurred during transit and that the colour match is acceptable. Place the bath upside down onto a drop cloth.
2. Remove the two tubular cradle legs from the bath frame. The widest leg fits at the waste end. Keep the transport screws for instruction 3.
3. Align the cradle and screw directly into the baseboard using the 32mm (11/4”) transport screws from instruction 2. YOU MUST CHECK THE SCREW LENGTH. If the cradle stands proud of the baseboard it can be shortened using a hacksaw.
4. Once the cradles have been secured to the baseboard of the bath, secure them into the leg toggles with the self tapping screws provided.
5. Secure the adjustable centre support using screws and nuts provided to the centre of the baseboard. Attach the centre foot with nuts provided.
6. Using the screws provided, secure the wall brackets to the bath frame at approximately 150mm from each end.
7. With the bath in the upright position, set top face level using threaded adjustment of feet and lock-nuts. When a panel is to be fitted, set bath height to height of panel.
8. Check that the bath rim is level.
9. Before the final fixing of the bath, fit tap and waste fittings using a suitable sealing compound. When complete, place the bath into position, re-check levels and make any final adjustments necessary. Finally, secure the feet to the floor and the wall brackets to the wall. Movement may occur if not fitted correctly.
bath rim
panel clip
16mm screw
16mm screws
16mm screws
leg lock screw
Transport Screws 32mm
Transport Screws 32mm
Wall Bracket

1
Tool Requried
PH23mm Drill bit
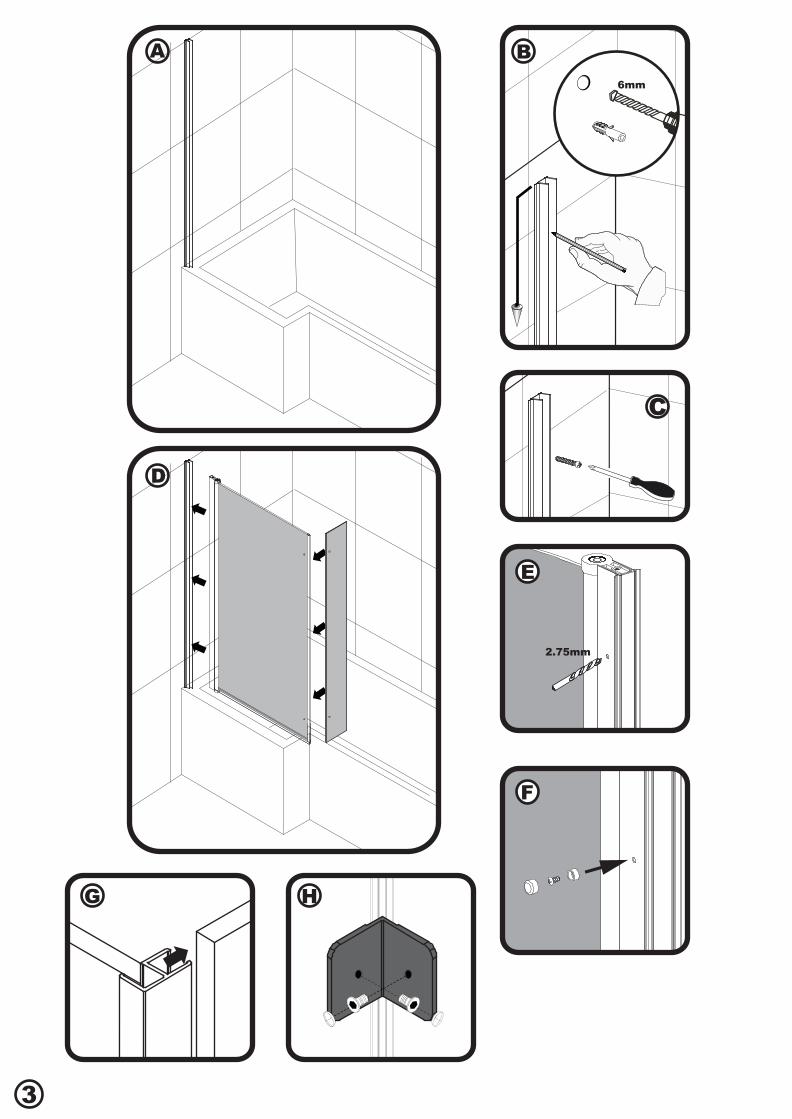
ASSEMBLY GUIDEBATH SCREEN

2
Item Description Image Qty
1 Wall Profile 1
2 Towel Rail 1
3 Bracket 2
4 Universal Screw Cup 3
5 Universal Screw Cap 3
6 Bath Screen Seal Stopper - LH 1
7 Bath Screen Seal Stopper - RH 1
8 Long Bottom Seal 1
9 Short Bottom Seal 1
10 Corner Seal 1
11 Wall Plug 3
12 Screw ST3.5×30 3
13 Screw ST4×12 3
3
2
111
45
13
10
6/7
12
89
3
A B
C
D
6mm
2.75mm
E
F
G H

4
I
Note:The cut of the hinge must beplaced inside of the bath.
Cut


![Untitled-2 [rei.wlimg.com] · Premium Ceramic Tiles on Floor in toilet Premium Quality C.P. fitting Premium Quality Sanitary Ware Kitchen Granite working counter Stainless Steel sinks](https://static.fdocuments.us/doc/165x107/6057cbf8e2209b272055c672/untitled-2-reiwlimgcom-premium-ceramic-tiles-on-floor-in-toilet-premium-quality.jpg)